
SDL Trados Studio 2011 SP2 Translating and Reviewing Documents Quick...
47
SDL Trados Studio 2011 Translating and Reviewing Documents Innovation Delivered. Quick Start Guide
-
Upload
truongkhanh -
Category
Documents
-
view
216 -
download
0
Transcript of SDL Trados Studio 2011 SP2 Translating and Reviewing Documents Quick...

SDL Trados Studio 2011Translating and Reviewing Documents
Innovation Delivered.
Quick Start Guide

Translating and Reviewing Documents Quick Start Guide Page 2
COPYRIGHT SDL Trados Studio Translating and Reviewing Documents Quick Start Guide Copyright ©2009-2012 SDL plc. All rights reserved. Unless explicitly stated otherwise, all intellectual property rights including those in copyright in the content of this website and documentation are owned by or controlled for these purposes by SDL PLC. Except as otherwise expressly permitted hereunder or in accordance with copyright legislation, the content of this site, and/or the documentation may not be copied, reproduced, republished, downloaded, posted, broadcast or transmitted in any way without the express written permission of SDL PLC. This product may include open source or similar software designated: Hunspell distributed under GNU Lesser General Public License version 3; Sharpziplib and Spring.net distributed under GNU General Public License version 3 with restrictions; ICU distributed under IBM ICU License; Log4Net, Xalan and Xerces distributed under Apache License version 2.0; Wix distributed under Common Public License version1.0; and SQLite which is public domain and requires no license for this distribution. Trados, MultiTerm, SDLX, Passolo and TranslationZone are registered trademarks of SDL plc. Translator's Workbench, Trados Studio, TagEditor, QuickPlace, AutoSuggest, BeGlobal and GlobalConnect are trademarks of SDL plc. All other trademarks are the property of their respective owners. The names of other companies and products mentioned herein may be the trademarks of their respective owners. Unless stated to the contrary, no association with any other company or product is intended or should be inferred. Although SDL takes all reasonable measures to provide accurate and comprehensive information about the product, this documentation is provided as-is and all warranties, conditions or other terms concerning the documentation whether express or implied by statute, common law or otherwise (including those relating to satisfactory quality and fitness for purposes) are excluded to the extent permitted by law. Information in this documentation, including any URL and other Internet Web site references, is subject to change without notice. Without limiting the rights under copyright, no part of this document may be reproduced, stored in or introduced into a retrieval system, or transmitted in any form or by any means (electronic, mechanical, photocopying, recording, or otherwise), or for any purpose, without the express written permission of SDL plc. This guide ships with SDL Trados Studio 2011 SP2. July 2012

Translating and Reviewing Documents Quick Start Guide Page 3
Table of Contents COPYRIGHT .................................................................................................... 2
Table of Contents ........................................................................................... 3
About this Quick Start Guide ......................................................................... 5
Who is This Guide For and What Does it Cover? ................................................................ 5
How to Use this Guide ....................................................................................................... 5
Other Information Sources ................................................................................................ 5
Introducing SDL Trados Studio ...................................................................... 6
Description ....................................................................................................................... 6
The Views .......................................................................................................................... 6
Workflows ...................................................................................................... 8
Single-File Translation Workflow ....................................................................................... 8
Project Package Translation Workflow ............................................................................... 9
Default Language Pair Settings ................................................................... 10
Options Dialog Box ......................................................................................................... 10
Language Pair Settings ................................................................................................... 10
Resources ........................................................................................................................ 11
How to Define your Default Language Pair Settings ........................................................ 12
Translating in SDL Trados Studio ................................................................. 15
How to Open a File for Translation .................................................................................. 15 How to Open a Single File for Translation ................................................................................................ 16 Changing your Project Settings ............................................................................................................... 18 How to Open a File for Translation from a Project or Project Package ...................................................... 20
A First Look at the Translation Environment in SDL Trados Studio .................................... 22 A Closer Look at the Editor Window ......................................................................................................... 23
How to Translate the Sample Document in SDL Trados Studio ........................................ 24 Context Matches ...................................................................................................................................... 24 Fuzzy Matches ......................................................................................................................................... 25 Termbases Matches ................................................................................................................................. 26 Editing your Translation ........................................................................................................................... 26 Spelling Errors ......................................................................................................................................... 27 Confirming your Translation .................................................................................................................... 27 Formatting Penalties ................................................................................................................................ 28 Applying Formatting ................................................................................................................................ 29 Performing Verification ............................................................................................................................ 30 Inserting Placeables ................................................................................................................................. 32 Using AutoSuggest .................................................................................................................................. 33 Previewing your Translation .................................................................................................................... 34
How to Translate the Sample Document with PerfectMatch Applied................................ 36 Translating with PerfectMatches .............................................................................................................. 36 Using the Display Filter to Find New Content........................................................................................... 37
Reviewing in SDL Trados Studio ................................................................... 38
How to Open and Review the Sample File ....................................................................... 38 Approving Translations ............................................................................................................................ 39 Rejecting Translations using Tracking Changes ........................................................................................ 40 Rejecting Translation using Comments .................................................................................................... 40 Rejecting Translations Manually .............................................................................................................. 42 Approving Remaining Segments.............................................................................................................. 42
How to Enter Corrections ................................................................................................ 43

Translating and Reviewing Documents Quick Start Guide Page 4
Segment Review Display Filters ................................................................................................................ 43 Using the Display Filters ........................................................................................................................... 44 Accepting Suggested Changes (Tracked Changes) .................................................................................. 44 Generating the Translated Document ...................................................................................................... 45
Return Work ................................................................................................ 46
How to Create a Return Package ..................................................................................... 46
End of Quick Start Guide .............................................................................. 46

Translating and Reviewing Documents Quick Start Guide Page 5
About this Quick Start Guide
Who is This Guide For and What Does it Cover?
This guide is for translators and reviewers. It focuses on how to translate and review files. These can be single files you have opened for translation or files that you have opened from a project or project package. NOTE For information about online workflows using Project Server, refer to the videos
and information in the SDL Trados Studio Help.
How to Use this Guide
You can use the sample files to complete the exercises. Each exercise builds on the last so if you are using the sample files you need to follow through the instructions step-by-step.
This symbol indicates there are sample files available to complete the exercise and their location. The paths specified are based on a Microsoft Windows 7 or Vista operating system. If you are using Windows XP, the same files can be found in the My Documents folder.
Tip
This symbol indicates that there is a tip providing additional information on the task you are performing.
NOTE This symbol indicates that there is an important piece of information you need to know for the task you are performing.
Keyboard Shortcuts
Any keys that you need to press on your keyboard are displayed in the following font: Ctrl+Enter.
Other Information Sources
Here are some other sources of information you can access:
SDL Trados Studio Help
SDL Trados Studio Migration Guide
Project Management Quick Start Guide
Translation Memory Management Quick Start Guide

Translating and Reviewing Documents Quick Start Guide Page 6
Introducing SDL Trados Studio
Description
SDL Trados Studio enables organizations to effectively manage all aspects of their translation projects. SDL Trados Studio incorporates project management and computer-aided translation (CAT) tools for use by project managers, translators, editors, proofreaders and other language professionals. These are presented in easy-to-use views which you can arrange in whatever way you prefer.
The Views
To display a view in SDL Trados Studio, click the button that bears the name of the view or the icon for that view. The view navigation buttons appear at the bottom of the navigation pane.

Translating and Reviewing Documents Quick Start Guide Page 7
View Description
Home
These are some of the commands you can access from this view:
Open a document for translation.
Open packages.
Define default global settings.
Selecting any of these commands will switch to the appropriate view in SDL Trados Studio or open another application where you can perform the action.
Projects
This is where you view and work with projects. You can select a project to view detailed project and file information and track project and file status.
Files
This is where you work with project files. From here you can:
Open files for translation.
Open files for review.
Perform batch processing on files.
You can also view word counts and translation progress for these files.
Reports
This is where you view project reports. The reports provide detailed translation analysis figures which feed directly into the project planning and budgeting process.
Editor This is where you translate and review documents.
Translation Memories
This is where you create and manage translation memories.

Translating and Reviewing Documents Quick Start Guide Page 8
Workflows There are several potential workflows in SDL Trados Studio. They are workflows that you control and can be changed to suit your needs. The following workflows are described in this guide:
Single-file Translation
Project Package Translation
NOTE For information about online workflows using Project Server, refer to the videos and information in the SDL Trados Studio Help.
Single-File Translation Workflow
The following diagram shows one potential way of translating in a single-file translation workflow:

Translating and Reviewing Documents Quick Start Guide Page 9
Project Package Translation Workflow
The following diagram shows one potential way of translating in a project package workflow:

Translating and Reviewing Documents Quick Start Guide Page 10
Default Language Pair Settings A language pair is used to store settings relating to translation from a specific source language into a specific target language. Resources and options are typically configured for use across all language pairs to which they apply. Multilingual resources, such as termbases and server-based translation memories, may apply to more than one language pair. Bilingual resources, such as file-based translation memories, only apply to a specific language pair. You may want to set up these default settings prior to translating documents. This allows you to use the same settings and resources for all your translations. For example, you may want to specify which translation memory, termbase and other resources to use to translate from English to German.
Options Dialog Box
You can define default settings in the Options dialog box. When you start a new translation, the default translation memories and termbases are automatically opened and the default settings applied.
Language Pair Settings
Typically you configure translation resources (even if they are bilingual) and edit settings at the All Language Pairs level. The settings then apply to all language pairs and the translation resources apply to the all language pairs to which they are relevant. For example:
If you select a multilingual server-based translation memory at the All Language
Pairs level that contains English to German and English to French language pairs, this translation memory is used for translation for both language pairs.
If you change the minimum match value to 65% at the All Language Pairs level, it will apply to all language pairs.
Tip
Individual exceptions to these settings can be defined for each language pair. For example, if you wanted the English to German language pair to have a different minimum match value, you could change it at the individual language pair level.
All Language Pairs
Individual Language
Pairs

Translating and Reviewing Documents Quick Start Guide Page 11
Resources
You can select the following resources:
Resource Description
Translation Memories
The SDL Trados Studio translation memory file-based format is .sdltm. You can use translation memories from any version of SDL Trados Studio 2009 and 2011. If you have a translation memory from a previous version of SDL Trados or SDLX, refer to the SDL Trados Studio 2011 SP2 Migration Guide for details of how to upgrade the translation memory to the current format. You can also connect to server-based translation memories from SDL TM Server 2009 SP3, SDL TM Server 2011 and SDL WorldServer 2011 SP1(Version 10.1 and 10.2).
Automated Translation Server
Automated translation is translation performed by computer software without human interaction. The application that provides the automated translation is installed on a server and is accessed in a similar way to a server-based translation memory. You can connect to the following automated translation servers:
SDL’s Default Automated Translation Server
SDL BeGlobal
Google Translate
You can also add your own custom automated translation server.
Termbases
SDL MultiTerm 2009 and 2011 SP2 (.sdltb) file-based termbases are used in SDL Trados Studio 2011 SP2. In addition, you can use the following legacy termbase formats.
SDL MultiTerm 2007 (version 7.5) and previous 7.x releases
SDL MultiTerm iX (version 6.x).
When you open legacy termbases, they are automatically upgraded to SDL MultiTerm 2011 SP2 (.sdltb) format. You can also connect to sever-based termbases from MultiTerm Server2009 SP3 and MultiTerm Server 2011.
AutoSuggest
Dictionaries
AutoSuggest editing is an important new feature which can be used to speed up manual translation. AutoSuggest monitors what you are typing and after you have typed the first few characters of a word presents you with a list of suggested words and phrases from the translation memory in the target language that start with the same characters. You can use the following as sources for AutoSuggest:
AutoSuggest dictionaries - create a new or select an existing AutoSuggest dictionary created by yourself or another user. This dictionary contains words and phrases extracted from translation memories (.sdltm) or .tmx files.
An SDL MultiTerm termbase selected in your project.
AutoText entries - create a list of words and phrases manually by typing them into SDL Trados Studio.

Translating and Reviewing Documents Quick Start Guide Page 12
How to Define your Default Language Pair
Settings
Follow these instructions to set up your default translation memories, termbases and AutoSuggest dictionaries for translating from English (United States) to German (Germany). NOTE These settings should be defined at the All Language Pairs
level where possible.
You can follow the same procedure for setting up default resources for other language pairs. In this example, you will use the sample project in SDL Trados Studio. Once you are familiar with these steps, you can then use them to specify your own default resources for all language pairs with which you are working.
1. Select Tools > Options from the menu bar. The Options dialog box is displayed.
2. Select Language Pairs > All Language Pairs > Translation Memory and
Automated Translation from the navigation tree.
3. On the Translation Memory and Automated Translation page, you can select file-based and server-based translation memories. Select the sample translation memory file, English-German.sdltm.
.
…Documents\Studio 2011\Projects\Samples\SampleProject\
TMs\English-German.sdltm
If your setup does not include any default options for the language pair the Add Supported Language Pairs
dialog box is displayed. Select the check box next to the language pair and click OK.

Translating and Reviewing Documents Quick Start Guide Page 13
4. Select Language Pairs > All Language Pairs > Termbases from the navigation tree.
5. On the Termbases page, you can select SDL MultiTerm termbases. Select the sample termbase file Printer.sdltb.
…Documents\Studio 2011\Projects\Samples\SampleProject\
Termbase\Printer.sdltb
6. Select Language Pairs > English (United States)->German (Germany) >
AutoSuggest Dictionaries from the navigation tree.
NOTE AutoSuggest dictionaries can only be defined at the individual language pair
level.
Translating and Reviewing Documents Quick Start Guide Page 14
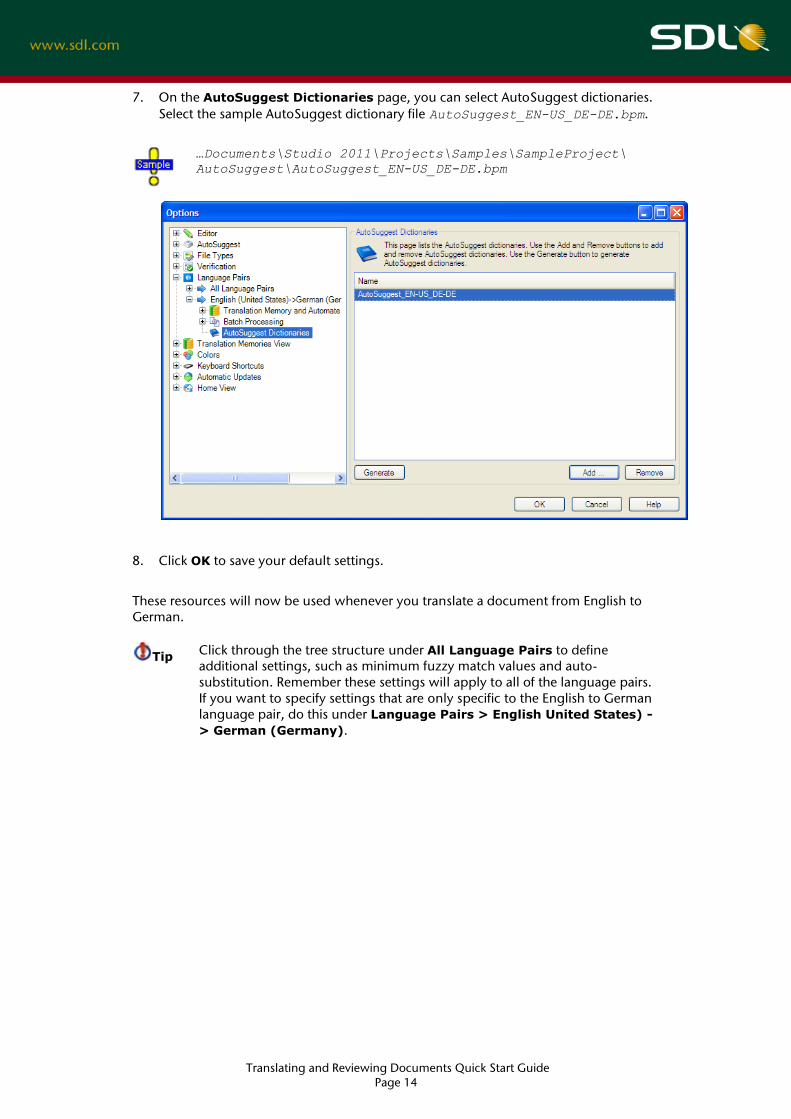
7. On the AutoSuggest Dictionaries page, you can select AutoSuggest dictionaries. Select the sample AutoSuggest dictionary file AutoSuggest_EN-US_DE-DE.bpm.
…Documents\Studio 2011\Projects\Samples\SampleProject\
AutoSuggest\AutoSuggest_EN-US_DE-DE.bpm
8. Click OK to save your default settings.
These resources will now be used whenever you translate a document from English to German.
Tip
Click through the tree structure under All Language Pairs to define additional settings, such as minimum fuzzy match values and auto-substitution. Remember these settings will apply to all of the language pairs. If you want to specify settings that are only specific to the English to German language pair, do this under Language Pairs > English United States) -
> German (Germany).

Translating and Reviewing Documents Quick Start Guide Page 15
Translating in SDL Trados Studio
How to Open a File for Translation
In SDL Trados Studio, you can open a file for translation using two different methods. One method is for single-file translation and the other method is for opening files from a project or project package.
Open Method Description
Open a Single File for Translation
Use the Open Document command in the Home view or from the File menu.
Open a File from a Project or Package for Translation
Right-click on the file name in the Files view and select Open for
Translation. Any translation memories, termbases, AutoSuggest dictionaries and settings associated with the package are opened automatically.

Translating and Reviewing Documents Quick Start Guide Page 16
How to Open a Single File for Translation
Assume you want to translate the SamplePhotoPrinter.doc from English (United States) to German (Germany). Follow these instructions to open the file and apply the settings you previously defined in the Options dialog box.
1. Click Open Document on the Standard toolbar in any view. The Open
Document dialog box is displayed.
2. Select the sample file and click Open. The Open Document dialog box is displayed.
…Documents\Studio 2011\Projects\Samples\SampleProject\
en-US\SamplePhotoPrinter.doc

Translating and Reviewing Documents Quick Start Guide Page 17
The translation memory you selected in the previous section is automatically displayed under Translation Memory and Automated Translation.
Tip
Click Advanced to specify advanced settings. This will also display the termbase and AutoSuggest dictionary that you selected in the Options dialog box as well as other settings related to the resources used during translation (such as, the minimum fuzzy match value, what metadata to use when updating the TM and concordance search settings).
3. Click OK:
The translatable content of the source language document is identified, segmented and placed in a bilingual SDLXLIFF file. The file is opened in the Editor window in the Editor view for translating.
Your default translation memories, termbases and AutoSuggest dictionaries that you previously defined are automatically opened. Any other settings that you specified in the Options dialog box are also automatically applied.
4. Click Save Document on the toolbar:
The Save As dialog box is displayed. You are prompted to save your document as SamplePhotoPrinter.doc_en-US_de-DE.sdlxliff. Click Save to save your document with this name.
A project is automatically created with the same name as the document: SamplePhotoPrinter.doc_en-US_de-DE.

Translating and Reviewing Documents Quick Start Guide Page 18
Changing your Project Settings
Use the Project Settings dialog box to change the settings that are applied to the file after you open it. When you change project settings, you typically change settings at the All Language Pairs level as you did when you set up your default settings in the Options dialog box. Assume you want to change your minimum match value for fuzzy matches to 65%. This is the degree of match that must exist between a source document segment and a translation memory segment in order for the segment translation to be offered as a match. The default is 70%. To change the minimum match value:
1. Click the Project Settings button in the Translation Results window.
The Project Settings dialog is displayed on the Translation and Automated
Translation page under All Language Pairs.
Project Settings button

Translating and Reviewing Documents Quick Start Guide Page 19
2. Select the Language Pairs > All Language Pairs > Search from the navigation tree.
3. Change the Minimum match value under Translation to 65.
4. Click OK to apply your search settings to the document that is currently open.
Tip
For instructions on how to translate the document, see A First Look at the Translation Environment in SDL Trados Studio.
Search page
Fuzzy minimum match value

Translating and Reviewing Documents Quick Start Guide Page 20
How to Open a File for Translation from a Project or
Project Package
Assume you have received a project package from your customer that contains files that need to be translated or reviewed. Follow these steps to open the package and start translating its contents.
Open a Project Package
1. Select Open Package from the Standard toolbar in any view. The Open Package dialog box is displayed.
2. Select the project package to be opened and click Open. The Open Package wizard opens on the Review Package Contents page.
3. Click Finish to import the package. The Importing Package page is displayed.
4. If this is the first package for this project that you have ever opened, the Browse
For Folder dialog box is displayed. Select a folder in which you would like to store the contents of the package and click OK. This defaults to a newly created project folder labeled with the name of the project to which the package is associated.
5. When the import is complete, click Close to close the Open Package wizard. A project corresponding to the project details in the package has been created and opened in SDL Trados Studio.
If you want to follow along with this part of the exercise, ask another user of SDL Trados Studio to create a project package that you can use to open in SDL Trados Studio.

Translating and Reviewing Documents Quick Start Guide Page 21
Open a Project File
The project associated with the project package you just opened becomes the active project. You can now open the project files for translation.
1. Click the Files button in the navigation pane to display the Files view. This displays all files from the project package you have just opened.
2. Double-click the SamplePhotoPrinter.doc.sdlxliff file. The file is automatically opened in the Editor view with the associated translation memories, termbases and AutoSuggest dictionaries that were included in the project or project package.
NOTE You can also right-click and select Open For Translation from the shortcut
menu to open the file, as shown in the screenshot above.
To follow along with this exercise in the application, use the Sample Project. If this project is not the active (currently selected) project, display the Projects view and double-click on Sample Project. …Documents\Studio 2011\Projects\Samples\SampleProject\
Sample Project.sdlproj
The active project name is displayed on the title bar: Sample Project

Translating and Reviewing Documents Quick Start Guide Page 22
A First Look at the Translation Environment in
SDL Trados Studio
In SDL Trados Studio, documents are reviewed and translated in the Editor view. This view contains the following components:
Navigation pane, where you can see the documents that are currently open and navigate between them.
Menus and toolbars containing editing tools.
Editor window where you perform translation or review.
Translation Results window - This window displays the results of translation memory lookups and creates draft automated translations. From here you can apply one of the results to the current segment if you are not happy with the result that is automatically applied.
Term Recognition window - This window displays the results of the termbase lookups.
Translation Results Window
Term Recognition Window
Editor Window

Translating and Reviewing Documents Quick Start Guide Page 23
A Closer Look at the Editor Window
The Editor window in the Editor view is where you translate documents. The bilingual SDL XLIFF document containing the text to be translated and the translation are displayed side by side in the window. The source language text appears on the left and the target language version on the right. The content of the document is broken down into segments (typically sentences). The target language segments can be edited.
The first column displays segment numbers. You can choose not to display segment numbers. The source and target segments can also be worked with as two separate lists.
Between the source and target segment columns is the segment status column. This column is very important as it indicates the current translation status of the segment and its translation origin. For example, if the translation is approved and if a 100% match was found in the translation memory for this segment.
To the right of the target language segments is the document structure column. It displays a code that tells you where the segment text appears in the original document. Hover over the code or click on the code in this column to display a description that tells you where the segment appears in the source document.
Document Window Name Tab
Source Language Segment
Target Language Segments
Segment Status Segment Numbers Document Structure

Translating and Reviewing Documents Quick Start Guide Page 24
How to Translate the Sample Document in SDL
Trados Studio
This section describes how to translate the SamplePhotoPrinter.doc in the Sample Project into German in SDL Trados Studio. First you open the sample file. See Open a Project File for details.
Context Matches
1. When you open the sample document, a lookup is automatically performed in the first segment. In the example below:
The results of the translation memory search are displayed in the Translation
Results window and the best result is placed in the target segment of the document.
A context match has been found in the translation memory and automatically confirmed. The match type is displayed in the segment status column
and the symbol indicates the segment is confirmed.
A context match is a 100% match that also has context, for example, it has the same preceding segment in the translation memory as it does in the document. Context match in this case means that this sentence has been translated at the beginning of a document before. The context in the translation memory is assumed to be the same as in our example where it is also the first sentence pair. No editing is required for a context match.
SamplePhotoPrinter.doc.sdlxliff in the Sample Project
…Documents\Studio 2011\Projects\Samples\SampleProject\ Sample Project.sdlproj
Translation Results Window
Segment Status Column

Translating and Reviewing Documents Quick Start Guide Page 25
Fuzzy Matches
2. Place your cursor in the target segment in segment 2.
Two fuzzy matches (91% and 88%) are found in the translation memory and are displayed in the Translation Results window.
The fuzzy match of 91% is the best match and is automatically inserted into the target segment of the document.
Tip
You can change the setting that automatically inserts the best fuzzy match into the document in the Options dialog box under Editor > Automation. Select Tools > Options to display this dialog box.
91% Match
88% Match
91% Match is Automatically Applied

Translating and Reviewing Documents Quick Start Guide Page 26
Termbases Matches
When you placed your cursor in segment 2, a termbase lookup was also performed. Photo printer was found in the termbase and is highlighted by a red bracket in the source segment.
The translation for the term, Fotodrucker, is displayed in the Term Recognition window. This translation is already in the target segment as it was found in the translation memory. NOTE To insert a term translation, press Ctrl+Shift+L, click Insert term
translation in the Term Recognition window or select Translation >
Show Translated Terms from the menu bar.
Editing your Translation
3. Edit the text in segment 2 to say Aufstellungsort für Ihren Fotodrucker finden. To do this, click inside the target segment. You can use standard windows text editing functionality to edit the segment and delete the word Geeigneten.
Highlighted Term
Term Recognition Window

Translating and Reviewing Documents Quick Start Guide Page 27
Spelling Errors
Spelling errors are displayed as a red wavy line underneath misspelled words. In segment 2, the word Fotodrucker has a red wavy line underneath.
4. Assume that Fotodrucker is the spelling that you want to use for this translation. Right-click and select Add to Dictionary from the shortcut menu. The term is now added to your custom dictionary and the wavy red line disappears.
Tip
You can view your custom dictionaries and the words they contain by clicking Custom Dictionaries in the Options dialog box under Editor >
Spelling. Select Tools > Options to display this dialog box.
Confirming your Translation
5. Now that your translation for segment 2 is complete, press Ctrl+Enter or click the
Confirm (Translated) button on the Translation and Review toolbar to confirm your translation. This indicates that the translation is completely finished. When you confirm a translation:
The segment status is changed to Translated and the following icon is
displayed in the segment status column:
The translation is automatically added to the translation memory. If you are using a project translation memory, the translation is added to the project translation memory and not the main translation memory.
NOTE For more information, see the About Updating a Translation Memory topic in the SDL Trados Studio Help.
Spelling Error

Translating and Reviewing Documents Quick Start Guide Page 28
Formatting Penalties
When you confirmed your translation in the last step, your cursor was automatically placed in the next unconfirmed segment. Segment 3 has a 98% match in the translation memory. The text found in the translation memory is the correct translation but because the new source segment in the document also has formatting applied, a 2% penalty was applied in the translation memory because it does not have the same formatting.
6. The symbol in the Translation Results window indicates that there is a formatting penalty. Hover over the symbol to see the details of the penalty.
NOTE By default, SDL Trados Studio settings specify that recognized formatting tags (such as bold and italics in this example) are hidden. The tags remain hidden when inserted and text is instead formatted in the style shown in the Editor window.
Formatting Penalty Symbol
Penalty Details

Translating and Reviewing Documents Quick Start Guide Page 29
Applying Formatting
7. Source segment 3 contains some text formatted in bold, in a dry location, and some text formatted in italics, direct sunlight. Use one of the following methods to apply formatting to the text in the translation:
Method 1
You can select the required formatting from the QuickPlace drop-down list. The QuickPlace list is so-called because it allows you to quickly place elements from the source segment into the target, for example formatting, numbers, dates and other types of placeables. For more information about placeables, see Inserting Placeables. To apply formatting from a QuickPlace drop-down list:
Select the text an einem trockenen Ort in the target segment and press Ctrl+,(comma). A QuickPlace drop-down list of formatting options is displayed below the target segment and the text with the formatting applied in the source segment is highlighted in gold.
Press Enter or Tab to select the first sample text on the list which is formatted in bold.
Repeat the same steps above to apply italics formatting to keinem direkten Sonnenlicht. This time select the sample text formatted in italics from the QuickPlace drop-down list.
Method 2
You can also select formatting from the QuickInsert toolbar. This allows you to apply formatting to the translation even if it does not exist in the source segment.
Select the text an einem trockenen Ort in the target segment and click on the QuickInsert toolbar or press Ctrl+B.
Select the text keinem direkten Sonnenlicht in the target segment and click on the QuickInsert toolbar or press Ctrl+I.
8. Press Ctrl+Enter to confirm the translation.
QuickPlace drop-down list
bold sample text

Translating and Reviewing Documents Quick Start Guide Page 30
Performing Verification
SDL Trados Studio includes verification tools that check translated text for errors and inconsistencies. Verification is automatically performed when you confirm the segment translation and errors are displayed in the Messages window. The following verification checks are includes in SDL Trados Studio:
Verification Description
Tag Verification
Tag verification compares the tag content of target text with the tag content of the original source text and identifies any changes that were made. Changes in the target text are acceptable provided that the syntax of tags remains intact and that the translated document can be converted back to its original format. Tag verification helps to ensure that only acceptable changes are made. The settings for this verifier are defined for each individual file type.
QA Check 3.0
QA Checker 3.0 incorporates a suite of quality assurance checks. The checks are broken down into the following areas: Segment Verification, Segments to Exclude, Punctuation, Numbers, Regular Expressions, Word List, Inconsistencies, Trademark Check and Advanced.
Terminology Verifier
Terminology Verifier checks your current document to ensure that the target terms contained in the SDL MultiTerm termbase have been used during translation or to verify whether forbidden terms have been used.
9. In segment 4 there is no match in the translation memory so the target segment remains blank. For the purpose of this example, enter the following incorrect translation with a wrong number, Lassen Sie 11 cm Abstand. and then press Ctrl+Enter to confirm the translation and perform verification.
An error has been found and the symbol is displayed in the segment status column. Hover over the symbol to for a quick explanation of the error.
The error indicates that a number (Inserting Placeables) from the source segment is missing in your translation. Your translation has the number 11 cm when it should be the same as the source segment 12 cm.
Error symbol in the Segment Status Column
Placeable

Translating and Reviewing Documents Quick Start Guide Page 31
10. To view detailed information about the error:
Click on the Messages tab to display the Messages window.
Right-click on the error message and select Show Message Details.
The Problem Description box provides additional detail and a suggestion of how to fix the problem by adapting the measurement.
Click Close to return to the Editor and fix the problem in the example on the next page.
Tip
Verification can also be performed on the whole document by pressing F8. You can then use the Verification Message Details dialog box to review and sometimes automatically fix those errors. For more details, see the online help in SDL Trados Studio.
Messages Window
Right-click and select

Translating and Reviewing Documents Quick Start Guide Page 32
Inserting Placeables
Placeables are source document content that has been recognized as content not requiring translation and/or content which can be automatically localized by applying a translation memory. Placeables are identified in the Editor window by a blue square-bracket underline.
11. Edit the translation in segment 4 and insert the correct placeable (12 cm):
Delete the text from the target segment.
Copy or type the following text into the target segment: Auf der Rückseite des Fotodruckers sollte für problemlosen Papiertransport ein Abstand von mindestens
Press Ctrl+,(comma). The QuickPlace drop-down list is displayed. In an earlier example, the QuickPlace drop-down list showed formatting; now it displays the number from the source segment for you to place it into the target segment.
Press Enter or Tab to select 12 cm from the list.
Copy or type the rest of the translation: gelassen werden.
Press Ctrl+Enter to confirm the translation. This time there are no verification errors.
QuickPlace drop-down list

Translating and Reviewing Documents Quick Start Guide Page 33
Using AutoSuggest
AutoSuggest editing monitors what you are typing and, after you have typed the first few characters of a word, presents you with a list of suggested words and phrases from the AutoSuggest sources in the target language that start with the same characters. AutoSuggest uses the following sources: termbases, AutoSuggest dictionaries (bilingual sentence fragments from translation memories) and AutoText entries. For more information, see Resources.
12. Use AutoSuggest to translate segment 9:
Place your cursor in segment 9. Type H. The AutoSuggest list is displayed
below the segment. It suggests using Hinweis. The symbol indicates that this suggestion comes from the translation memory. Press Enter to insert the suggestion.
Enter a colon : and press Ctrl+Enter to confirm the segment.
13. Your cursor is automatically placed in segment 10. Translate the segment using AutoSuggest:
Type the following translation using the suggested words that are displayed on the AutoSuggest list (bold letters indicate words or fragments that you can insert from the AutoSuggest list after typing the first letter): Verwenden Sie ausschließlich das Netzteil, das im Lieferumfang des Druckers enthalten ist.
Type the F for Fotodrucker. The following suggestions are displayed. This list includes a suggestion from a termbase and from a translation memory. The
symbol indicates that a suggestion comes from a termbase. In this case, you see Fotodrucker twice on the suggestions list as it has been found both in the termbase and in the translation memory. Finding a suggested translation in two sources can provide a more accurate translation for you to use.
Use your arrow keys to select either version of Fotodrucker and then press Enter to insert the suggestion.
Press Ctrl+Enter to confirm the segment.
AutoSuggest List

Translating and Reviewing Documents Quick Start Guide Page 34
Previewing your Translation
You can preview the translations as you work. Real-time preview reflects the changes as you type. The preview is updated every time you confirm a segment. This type of preview is available for frequently used file formats, such as Microsoft Word and HTML. NOTE You can also preview documents in the application in which they were
created or print preview them as a bilingual document in your browser. For more information, see the SDL Trados Studio Help.
14. Preview your translation:
Hover over the Preview tab on the right-hand side of the application.
The Preview window is displayed. Click the pin symbol to keep the window displayed. The preview window is docked on the bottom right-hand side.
In the Preview window, click the link Click here to generate initial
preview. The document is previewed in the Preview window.
Preview Tab
Click to pin window open.
Click to generate preview.

Translating and Reviewing Documents Quick Start Guide Page 35
The Preview window contains the content you have translated and confirmed. It also displays the English content that has not yet been translated and confirmed. The segment you currently have selected (Segment 11) is highlighted in gray. This shows the English source text since you have not yet translated the segment.
Copy or type the following translation into segment 11 in the target segment, using AutoSuggest as you go along (bold letters indicate words or fragments that you can insert from the AutoSuggest list after typing the first letter):
Andere Adapter können Ihre Kamera, Fotodrucker bzw. Computer beschädigen.
Press Ctrl+Enter to confirm the translation. The Preview window is updated with the new translation.
Selected segment

Translating and Reviewing Documents Quick Start Guide Page 36
How to Translate the Sample Document with
PerfectMatch Applied
A PerfectMatch is a form of context match that compares updated source files to a corresponding set of existing bilingual documents rather than to a translation memory. Segment matches, known as PerfectMatches, are checked for context, that is, the surrounding entries are checked to ensure that they are the same. They are then extracted from the existing bilingual documents and transferred to the updated source files. Because the PerfectMatch segment matching process includes a check for context, PerfectMatch units typically need no further translation or editing during translation.
Translating with PerfectMatches
Assume that the photo printer sample document that you translated in the previous example was fully translated and reviewed. Version 2 of the photo printer is being released and some additional text has been added to the document for this release. Since the new document is primarily the same as the previous document, the project manager applied PerfectMatch when pre-translating the file. This extracted the translations from the previously translated document and transferred them to the new version of the document as PerfectMatches.
1. Click the Files button in the navigation pane to display the Files view.
2. Right-click on the TryPerfectMatch.doc.sdlxliff file and select Open for
Translation from the shortcut menu. The file is automatically opened in the Editor view.
3. A PerfectMatch has been found for a majority of the segments in the document. PerfectMatch translations:
- Show a translation origin that indicates that the match type is PerfectMatch.
- Have a segment status of Signed off. This means that the translation needs no further translation or review.
- Are locked to avoid accidentally editing them since no further work is needed.
To follow along with this exercise in the application, use the Sample Project. If this project is not the active (currently selected) project, display the Projects view and double-click on Sample Project. …Documents\Studio 2011\Projects\ Samples\SampleProject\ en-US\TryPerfectMatch.doc
Locked and Signed Off PerfectMatch Translations

Translating and Reviewing Documents Quick Start Guide Page 37
Using the Display Filter to Find New Content
4. To find the new content in the document that has not been translated by PerfectMatch, you can use a display filter:
Display the Display Filter toolbar by selecting View > Toolbars > Display Filter from the menu bar.
Select Not Translated from the Display drop-down list.
5. Segment 8 is displayed. This is the only new content that needs to be translated in this document.
Enter the following translation Dies ist ein neuer Satz.
Press Ctrl+Enter to confirm the translation.
6. You have now finished translating this document. Click Save to keep your changes and then close the document.
The reviewer now only needs to review the new content in segment 8 since all of the PerfectMatches have already been through the review process.
New Content
Display drop-down List
Translating and Reviewing Documents Quick Start Guide Page 38
Reviewing in SDL Trados Studio After translating both documents, you or a dedicated reviewer may want to review the translations. If you still have the document open from the previous section, save and close the document now. NOTE If you have a reviewer that does not have Studio, for example a
subject matter expert, you can also export for external review in Word. For more information, see the SDL Trados Studio Help.
How to Open and Review the Sample File
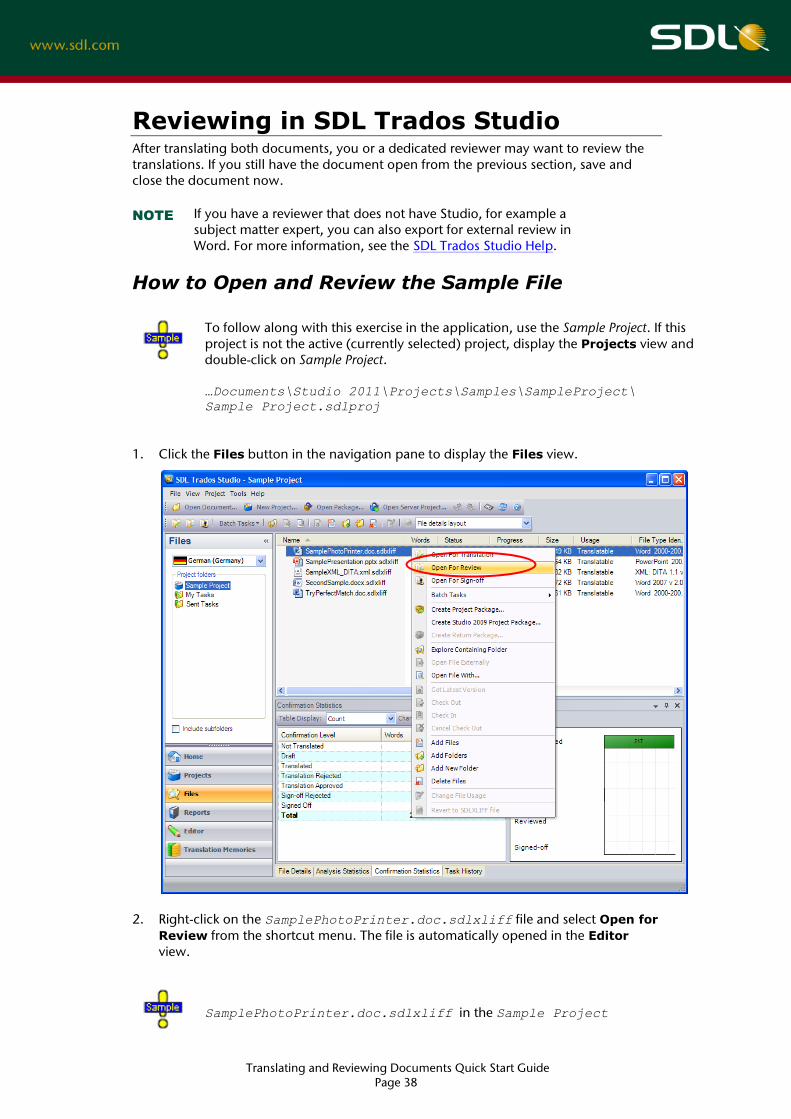
1. Click the Files button in the navigation pane to display the Files view.
2. Right-click on the SamplePhotoPrinter.doc.sdlxliff file and select Open for
Review from the shortcut menu. The file is automatically opened in the Editor view.
To follow along with this exercise in the application, use the Sample Project. If this project is not the active (currently selected) project, display the Projects view and double-click on Sample Project. …Documents\Studio 2011\Projects\Samples\SampleProject\
Sample Project.sdlproj
SamplePhotoPrinter.doc.sdlxliff in the Sample Project

Translating and Reviewing Documents Quick Start Guide Page 39
When you open a file for review, the screen layout in the Editor view changes to the review layout and the list of statuses available to apply to segments changes to show review statuses only.
Approving Translations
When you have finished reviewing a segment, you should confirm the segment to indicate that the translation is approved or reject the translation.
3. Place your cursor in the target translation in segment 1 and press Ctrl+Enter or click the Confirm (Translation Approved) button on the Translation and
Review toolbar to approve the translation. When you approve a translation:
The segment status is changed to Approved and the following icon is displayed in the segment status column:
Segment verification is also performed. Segment verification errors are displayed in the Messages window.
Approved Translation
Editor Window – displays at the top

Translating and Reviewing Documents Quick Start Guide Page 40
Rejecting Translations using Tracking Changes
The Track Changes feature allows you to see any changes that you make to the translated text alongside the original text. This allows your suggestions to be compared to the original text. This feature is automatically turned on when you choose the Open
for Review command. The current translation for photo printer in segment 2 is Fotodrucker. Assume the customer has asked you to change the translation to Drucker instead. Use the Track Changes feature to suggest the replacement word for Fotodrucker.
4. When you approved the translation in the last step, your cursor was automatically placed in the next unapproved segment which is segment 2. Delete the term Fotodrucker and then type the replacement term, Drucker. When you do this:
Fotodrucker is displayed in red with a line through it to indicate that you have deleted this word. Drucker is now displayed in purple with a line underneath to show that you inserted this word. When the document is sent back to the translator they can right-click on each suggestion and accept or reject your changes.
The segment status is changed to Rejected and the following icon is displayed in the segment status column: .
Rejecting Translation using Comments
Adding comments allows you to explain what is wrong with a translation. You can add a comment to the current segment, selected text or the whole document. Add a comment to explain why you replaced the term Fotodrucker with Drucker in segment 2.
5. In the translation in segment 2, select FotodruckerDrucker by highlighting it and then press Ctrl+Shift+N or right-click and select Add Comment from the shortcut menu.
Tracked Changes
Automatically Rejected Translation

Translating and Reviewing Documents Quick Start Guide Page 41
6. Complete the dialog box as shown below and click OK to add the comment:
The comment now appears in the Comments window. When you added this comment:
The text to which you attached the comment is highlighted in pale red, which indicates the severity level of the comment is an Error.
If the segment is not already rejected, the segment status is changed to Rejected and the following icon is displayed in the segment status column:
.
Tip Text with an attached comment can also be highlighted in pale yellow if it has a For your information severity level or pale orange if it has a warning severity level.
Highlighted in Red

Translating and Reviewing Documents Quick Start Guide Page 42
Rejecting Translations Manually
You can also choose to manually reject segments. Since you inserted a comment above to indicate that you want to use the term Drucker instead of Fotodrucker, reject any other translations that are using the term.
7. Place your cursor segment 3, press Ctrl+Shift+Enter or click the Reject
(Translation Rejected) button on the Translation and Review toolbar to reject the translation.
The segment status is changed to Rejected and the following icon is displayed in the segment status column: .
Approving Remaining Segments
Assume you have finished reviewing the entire document and that you have not rejected any of the other translations. You can approve all of the remaining segments at the same time.
8. To approve all translations that have not already been rejected or approved:
Click .
A prompt is displayed. Review the message and then click Yes.
Any translations that do not have a status of Translation Approved or Translation Rejected are now changed to Translation Approved and the document is saved and closed.
Manually Rejected

Translating and Reviewing Documents Quick Start Guide Page 43
How to Enter Corrections
When you are reviewing a document or entering corrections for a document that has been reviewed, you can use the display filters to filter out the translations that still need to be reviewed or to find translations that need corrections.
Segment Review Display Filters
SDL Trados Studio includes filters that allow you to only display the translations that you want to review and filter out the rest. When you are reviewing a document or entering corrections based on reviewer feedback, there are two key categories.
Review Filter Categories Description
Segment Review Statuses
Use this to view translations based on confirmation status. For example, you can choose to only display segments with a status of Translation rejected. This would allow you to review all segments with this status that have corrections that need to be made.
Segment Review
Use this to view translations that have:
Comments with feedback Tracked changes Messages with details of verification errors
You can apply these filters using the Display Filter toolbar. You can display the Display
Filter toolbar by selecting View > Toolbars > Display Filter from the menu bar.
Review Filters

Translating and Reviewing Documents Quick Start Guide Page 44
Using the Display Filters
Assume that you have received corrections back from the reviewer. Use display filters to find the translations that need corrections. If you still have the document open from the previous section, save and close the document now.
1. In the Files view, right-click on the SamplePhotoPrinter.doc.sdlxliff file and select Open for Translation from the shortcut menu. The file is automatically opened in the Editor view.
2. To display any content that needs corrections; filter to only show translations with a status of Translation Rejected.
Display the Display Filter toolbar by selecting View > Toolbars > Display Filter from the menu bar.
Select Translation Rejected from the Display drop-down list.
Segments 2 and 3 are displayed. These were both rejected by the reviewer in the last exercise because the customer wants to use the term Drucker instead of Fotodrucker.
Accepting Suggested Changes (Tracked Changes)
3. Accept the suggested changes:
Place your cursor in the middle of the term Fotodrucker and press Ctrl+Shift+F9 or right-click and select Accept Change. The word is removed from the translation.
Perform the same action with the other tracked change Drucker.
Press Ctrl+Enter to confirm the translation.
To follow along with this exercise in the application, use the Sample Project. If this project is not the active (currently selected) project, display the Projects view and double-click on Sample Project. …Documents\Studio 2011\Projects\Samples\SampleProject\
Sample Project.sdlproj
Display drop-down List
Filtered to show Translation Rejected Translation

Translating and Reviewing Documents Quick Start Guide Page 45
Generating the Translated Document Assume you have completed the translation of the sample document. Generate the final version of the translated document.
4. If you have closed the SamplePhotoPrinter.doc.sdlxliff file, open the file again in the Editor view.
5. Select File > Save Target As from the menu bar.
Save the final word document, for instance as SamplePhotoPrinter-Translated.doc

Translating and Reviewing Documents Quick Start Guide Page 46
Return Work Assume you have completed the translation of all files sent to you in a package and now want to return your work to your customer (typically your project manager). To do this, you return your work in a return package. Once the package is created, you can send it by email, post on an FTP site or use any other method that you prefer. NOTE This method of returning work is only used if you have received files
for translation in a project package.
How to Create a Return Package
1. Select Project > Create Return Package from the menu bar. The Create
Return Package wizard is displayed on the Select Files page. All files in the project are included in the list apart from reference files.
The option to create a return package is not available in the Sample Project because you have not originally received any files in a project package.
2. Click Next to go to the Return Package Options page.
3. Click Browse to open the Save Return Package dialog box. Browse to the location where you want to save the return package, enter SampleProjectReturn as the return package name for the return package in the File name box and click Save.
4. If you want to add a comment to the return package, enter it in the Comment box.
5. Click Finish to create the package and go to the Creating Return Package page.
6. Once the package creation is complete, the status next to the package name changes to Completed.
7. You can choose to send the return package by email to the appropriate team member by clicking Send Packages by Email.
8. Alternatively, to send the package by a different method such as placing it on a FTP site, click Open Target Folder to open the folder where your return package is saved.
9. Click the Close button to close the Create Return Package wizard.
End of Quick Start Guide Now you know how to translate and review documents in SDL Trados Studio. For additional information about translating and reviewing documents in SDL Trados Studio, see the SDL Trados Studio Help. You can access this help system by selecting Help >
Help Topics from the menu bar in the SDL Trados Studio application.

Copyright © 2012 SDL PLC. All Rights Reserved All company product or service names referenced herein are properties of their respective owners.
SDL is the leader in Global Information Management. Global Information Management enables companies to engage with their customers throughout the customer journey –
from brand awareness, to sales and after-sales support – and across languages, cultures and channels.
SDL’s best-of-breed Web Content Management, eCommerce, Structured Content and Language Technologies, combined with its Language Services drive down the cost
of content creation, management, translation and publishing. SDL solutions increase conversion ratios and customer satisfaction through targeted information
across all customer touch points.
Global industry leaders who rely on SDL include ABN-Amro, Bosch, Canon, CNH, FICO, GlaxoSmithKline, Hewlett-Packard, KLM, Microsoft, NetApp, Philips, SAP and Sony.
SDL has over 1,500 enterprise customers, has deployed over 170,000 software licenses and provides access to on-demand portals for 10 million customers per month.
It has a global infrastructure of more than 60 offices in 35 countries. For more information, visit
www.sdl.com.