
SD Digital Receiver - Luceco LED · PDF fileSD Digital Receiver User Manual ... •...
24
SD Digital Receiver User Manual DVB-S 5010 Please read carefully and retain for future reference
Transcript of SD Digital Receiver - Luceco LED · PDF fileSD Digital Receiver User Manual ... •...

SD Digital ReceiverUser Manual
DVB-S 5010
Please read carefully and retain for future reference
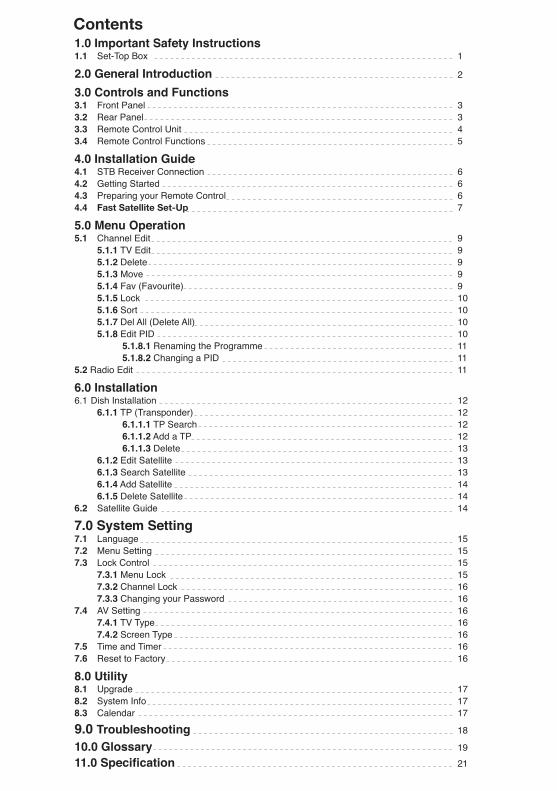
Contents1.0 Important Safety Instructions 1.1 Set-Top Box 1
2.0 General Introduction 2
3.0 Controls and Functions 3.1 Front Panel 33.2 Rear Panel 33.3 Remote Control Unit 43.4 Remote Control Functions 5
4.0 Installation Guide 4.1 STB Receiver Connection 64.2 Getting Started 64.3 Preparing your Remote Control 64.4 Fast Satellite Set-Up 7
5.0 Menu Operation 5.1 Channel Edit 9 5.1.1 TV Edit 9 5.1.2 Delete 9 5.1.3 Move 9 5.1.4 Fav (Favourite) 9 5.1.5 Lock 10 5.1.6 Sort 10 5.1.7 Del All (Delete All) 10 5.1.8 Edit PID 10 5.1.8.1 Renaming the Programme 11 5.1.8.2 Changing a PID 115.2 Radio Edit 11
6.0 Installation 6.1 Dish Installation 12 6.1.1 TP (Transponder) 12 6.1.1.1 TP Search 12 6.1.1.2 Add a TP 12 6.1.1.3 Delete 13 6.1.2 Edit Satellite 13 6.1.3 Search Satellite 13 6.1.4 Add Satellite 14 6.1.5 Delete Satellite 146.2 Satellite Guide 14
7.0 System Setting7.1 Language 157.2 Menu Setting 157.3 Lock Control 15 7.3.1 Menu Lock 15 7.3.2 Channel Lock 16 7.3.3 Changing your Password 167.4 AV Setting 16 7.4.1 TV Type 16 7.4.2 Screen Type 167.5 Time and Timer 167.6 Reset to Factory 16
8.0 Utility8.1 Upgrade 178.2 System Info 178.3 Calendar 17
9.0 Troubleshooting 18
10.0 Glossary 1911.0 Specification 21

1.0 Important Safety Instructions
1.1 Set-Top Box
This STB has been manufactured to satisfy all necessary International Safety Standards.Please read the following safety precautions carefully and retain for future reference.
• MAINS SUPPLY Use only 100-240V AC, 50/60Hz, (Consumption approx. 25W).• OVERLOADING Do not overload your wall outlet, extension cord or adaptor, failure to observe these precautionscanleadtoariskoffireorelectricalshock.Ensurethatthepowersource (socket) is easily accessible in case it needs to be disconnected.• LIQUIDS Neverallowliquids,sprayorotherfluidstoentertheReceiver(STB).Neverstandany containers (such as a vase) holding liquid on the STB.• CLEANING Always disconnects the STB power cord from the wall socket before cleaning. Use a slightly dampened cloth (no solvents) to clean the case.• VENTILATION TheslotsontopoftheSTBmustbeleftuncoveredtoallowproperairflowtotheunit. Ensureaminimumdistanceof5cmaroundtheapparatusforsufficientventilation.• POSITIONING DO NOT stand the STB on soft furnishings or carpets. DO NOT stack electronic equipment on top of the STB. DO NOT operate this STB where contact with or immersion in water is a possibility. DO NOT usenearaflowervase,washbowl,kitchensink,laundrytub,swimmingpool,etc. DO NOT put a candle or lamp stand on the STB. Failure to observe this may lead to a riskoffire. DO NOT allow the unit to be exposed to extreme heat, cold or conditions of high humidity. DO NOT cover the STB or place it on a device that emits heat.• ATTACHMENTS Never add any accessories or equipment that has not been approved by the manufacturer or isshownwithinthismanual.Failuretoobservethiscouldresultinariskoffire,electricshock or other personal injury.• CONNECTION TO THE SATELLITE DISH LNB Disconnect the STB from the mains supply before connecting or disconnecting the cable from the satellite dish. FAILURE TO DO SO CAN DAMAGE THE LNB.
1

• CONNECTION TO THE TV Disconnect the STB from the mains supply before connecting or disconnecting the cable the from TV. FAILURE TO DO SO CAN DAMAGE THE TV.
• EARTHING The LNB cable MUST BE EARTHED to the system earth for the satellite dish.• LOCATION Slots and openings in the cabinet are provided for ventilation to protect it from over heating. Do not block these openings or allow them to be blocked by placing the STB on a bed, sofa, or other similar surface, nor should it be placed over a radiator or other source of heat.• BATTERY HANDLING Batteries may contain toxic agents that are hazardous to the environment. Therefore, dispose of the batteries according to the prevailing statutory regulations. Waste electrical products should not be disposed of with household waste. Please recycle where facilities exist. Check with your local authority or retailer for recycling advice.
• INTRODUCTION This manual will help you understand the basic functions of your new Receiver such as installation, general operation and many of the other features this STB offers. Please make sure that you retain this manual and pass it on if you sell or give away your STB in the future. All functions can be operated by the remote control. You can easily install this Receiver by following the INSTALLATION instructions on PAGE 6.• WARNING The use of software versions other than that supplied by dealers or distributors will void themanufacturer’swarranty.Itisadvisedthatonlyofficialsoftwareprovidedtoyouby your dealer or distributor should be used.• UNPACKING Unpack the unit and check to make sure that all of the following items are included in the box:
2
Digital ReceiverUser’s Manual
User’s ManualDigital Satellite Receiver Remote Control AV Lead
2.0 General Introduction
1 2 3
4 5 6
7 8 9
0
OK
CH
CH
VOLVOL

3.0 Controls and Functions
3.1 Front Panel:
Power Standby Button
CH +/CH-: Changes the channels in viewing mode and moves the selection Up/Down in menu mode.
The 4-digit display shows the current channel number The Red LED is the Power Indicator Signal Strength indicator
4
3
1
2 3
3.2 Rear Panel
• Dish-In: Digital satellite signal input via F connector with Cable supplied• RS232C: Upgrade function. Connect to PC or another set top box• Video: Connect to the video interface of TV (Yellow) - supplied• Audio-L: Connect to the left audio-channel of TV (White) - supplied• Audio-R: Connect to the right audio-channel of TV (Red) - supplied N.B. If your TV does not have A/V phono socket Input (White, Red, Yellow), connect the leads to the Scart Adaptor supplied and use a Scart Socket for your TV connection.• Power Lead: To 13A Plug Socket N.B.Power on after all other connections are plugged in.
1 2 3 4
Power Lead
4
1 2 3
4 5 6
7 8 9
0
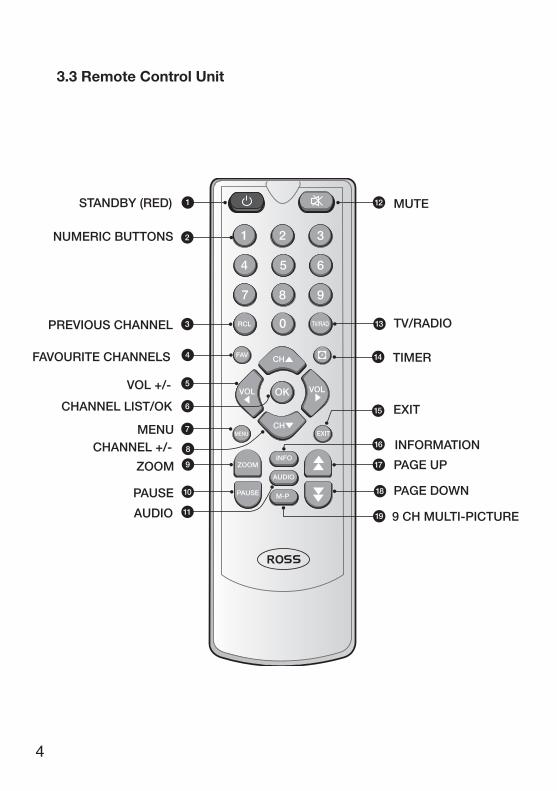
STANDBY (RED)
NUMERIC BUTTONS
FAVOURITE CHANNELS
VOL +/-
CHANNEL LIST/OK
MENUCHANNEL +/-
ZOOM
PAUSE
AUDIO
PREVIOUS CHANNEL
MUTE
TV/RADIO
TIMER
EXIT
INFORMATION
PAGE UP
PAGE DOWN
9 CH MULTI-PICTURE
FAV
RCL TV/RAD
OK
CH
CH
VOLVOL
MENU
INFO
AUDIO
M-P
EXIT
ZOOM
PAUSE
1
2
3
4
5
6
7
8
9
10
12
13
14
15
16
17
18
1911
3.3 Remote Control Unit

5
3.4 Remote Control Functions
Button Function Switches between Operation and Standby mode Changes channels or selects menu options Press to jump to previous channel Selects your favourite channel list in view mode. PLEASE NOTE: To return to your normal CHANNEL LIST press “1” Increases or decreases the volume. Changes the page of channel list Displays the channel list and selects the item on the menu To display the main menu, or return to a previous menu Changes channels or items from top to bottom on the Channel or Menu lists Press to enter or exit the Zoom mode Freezes the screen To select Audio Output (Left, Right or Stereo) Turns the sound off (Mute) or on Switches between TV and Radio modes Accesses the Time & Timer Menu directly To close the current menu and return to normal viewing To show information about the current programme Press to jump one page up (In Channel List) Press to jump one page down (In Channel List) Multi-picture function. 9 Channels per page displayed. Highlight a Channel and then press the M-P key again to view a live “PIP” image, press M-P again to exit Live View
1
2
3
4
5
6
7
8
9
10
11
12
13
14
15
16
17
18
19

4.1 STB Receiver Connection
A TV and Audio System can be connected to your STB. This manual will explaincommon ways to connect to the equipment. If you experience any problem, pleasecontact the Ross helpline on 0845 194 7584. Never connect or disconnect cables with the equipment switched on.
How to connect the STB to a TV set
a. Connect the colour coded (yellow, white, red composite cable supplied) to the A/V output sockets on the STB, and the other end of the cables to the A/V input sockets on your TV.
Or
b. If your TV has no (yellow, white, red) input sockets, use the Scart adaptor supplied to connect to the Scart socket in your TV.c. Connect the satellite cable from your dish to the LNB IN input connector of your STB.
4.2 Getting Started
Now you have studied the Safety Instructions and understand the Inputs / Outputs and controls of your STB you are ready to complete the Installation and start watching!
At this stage DO NOT connect your STB to the mains supply.
This procedure assumes that:(i) You will be tuning in your STB to the “ASTRA/EURO 1” Satellite which broadcasts most of the UK Programme content.
(ii) Your Satellite dish has been installed and aligned to the “ASTRA/EURO 1” Satellite. See separate instructions on how to do this.
Connect the STB to your TV and / or Audio System as described in “STB Receiver Connection”. Make sure you set the Input of your TV to match the Input you are using for your STB. ie. AV
4.3 Preparing your Remote Control Your Remote Control requires 2 x AAA (LR03) batteries to operate. Open the cover on the rear of the Remote Control and insert two batteries taking care to observe the polarity markings inside the compartment.
4.0 Installation Guide
6

Please observe the following when using your Remote Control –
• Change the batteries when operation becomes poor or erratic.• Always use two new batteries, DO NOT mix old and new.• Dispose of old batteries in an environmentally responsible way.• DO NOTplacespentbatteriesinafireorattempttorechargethem.• If you are not going to use the Remote Control for an extended period then remove the batteries to avoid the risk of leakage.
4.4 Fast Satellite Set-Up
You are now ready to switch on and adjust your dish to complete alignment (for this refer to the seperate instructions). Turn on your TV and plug in your Satellite Receiver. Proceed as follows:-
• Press the “Power” button on your Remote Control or the “Standby” Button on the front panel of the Receiver to turn the unit on. • Make sure your TV source is set to receive the signal from your Recevier.• Press the “Menu” key, then using the s/t keys scroll down to the “Installation” menu.• Press the and select “Dish Setting” then press “OK”.• Your Receiver has a large number of the available Satellites already programmed in to make setting up easier for you. You can see the Satellite names to the left of the OSD (On-Screen Display).• Using the s/t keys scroll to the “ASTRA / EURO1” Satellite No22 from the list on the left of the screen and press “OK”.• Now refer back to your “Satellite Dish Installation Guide”tofinetuneyoursignalreception.•Onceyouaresatisfiedwithyoursignallevelsas displayed in the two bars (Strength, Quality) towards the bottom of the Dish Setting Menu (try to obtain better than 50% for both) you are then ready to search for channels.• Now press numeric key “3” (Search) and from the drop down menu on the right of the screen, as shown select: “Scan Class” - Auto, “Scan Mode” - FTA, “Network” - OFF, using the t and keys scroll down to “Start Search” and the press “OK” button.
7
t
t
t
/
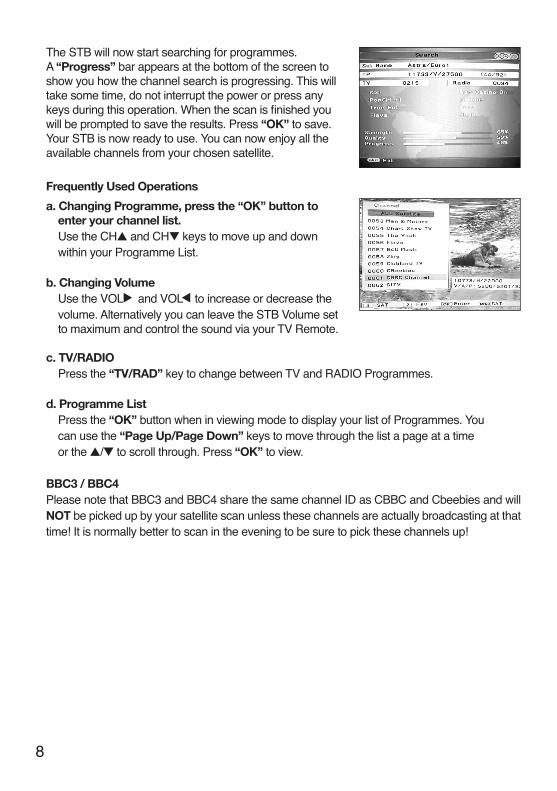
The STB will now start searching for programmes. A “Progress” bar appears at the bottom of the screen toshow you how the channel search is progressing. This willtake some time, do not interrupt the power or press anykeysduringthisoperation.Whenthescanisfinishedyouwill be prompted to save the results. Press “OK” to save.Your STB is now ready to use. You can now enjoy all theavailable channels from your chosen satellite.
Frequently Used Operations
a. Changing Programme, press the “OK” button to enter your channel list. Use the CHs and CHt keys to move up and down within your Programme List.
b. Changing Volume Use the VOL and VOL to increase or decrease the volume. Alternatively you can leave the STB Volume set to maximum and control the sound via your TV Remote.
c. TV/RADIO Press the “TV/RAD” key to change between TV and RADIO Programmes.
d. Programme List Press the “OK” button when in viewing mode to display your list of Programmes. You can use the “Page Up/Page Down” keys to move through the list a page at a time or the s/t to scroll through. Press “OK” to view.
BBC3 / BBC4 Please note that BBC3 and BBC4 share the same channel ID as CBBC and Cbeebies and will NOT be picked up by your satellite scan unless these channels are actually broadcasting at that time! It is normally better to scan in the evening to be sure to pick these channels up!
t
t
8
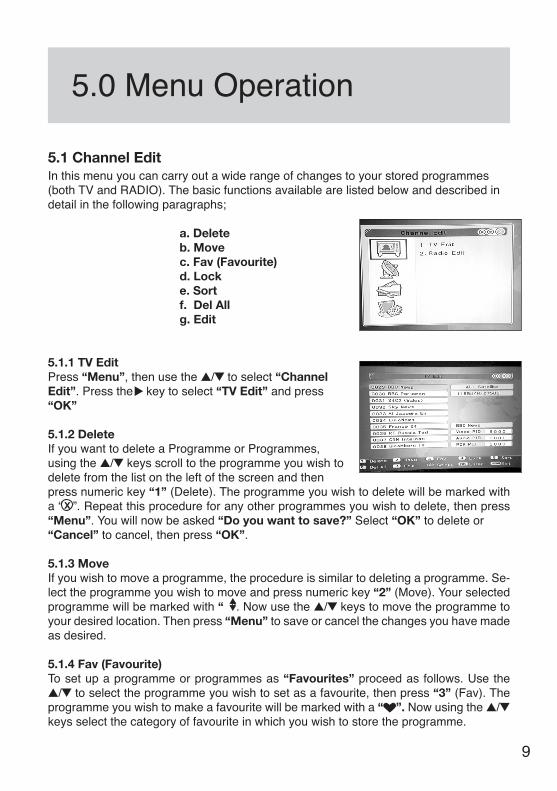
5.0 Menu Operation
5.1 Channel EditIn this menu you can carry out a wide range of changes to your stored programmes (both TV and RADIO). The basic functions available are listed below and described in detail in the following paragraphs;
a. Delete b. Move c. Fav (Favourite) d. Lock e. Sort f. Del All g. Edit
5.1.1 TV EditPress “Menu”, then use the s/t to select “Channel Edit”. Press the key to select “TV Edit” and press “OK”
5.1.2 Delete If you want to delete a Programme or Programmes,using the s/t keys scroll to the programme you wish todelete from the list on the left of the screen and then press numeric key “1” (Delete). The programme you wish to delete will be marked with a “ X ”. Repeat this procedure for any other programmes you wish to delete, then press “Menu”. You will now be asked “Do you want to save?” Select “OK” to delete or “Cancel” to cancel, then press “OK”.
5.1.3 MoveIf you wish to move a programme, the procedure is similar to deleting a programme. Se-lect the programme you wish to move and press numeric key “2” (Move). Your selected programme will be marked with “ ”. Now use the s/t keys to move the programme to your desired location. Then press “Menu” to save or cancel the changes you have made as desired.
5.1.4 Fav (Favourite)To set up a programme or programmes as “Favourites” proceed as follows. Use the s/t to select the programme you wish to set as a favourite, then press “3” (Fav). The programme you wish to make a favourite will be marked with a “ ”. Now using the s/t keys select the category of favourite in which you wish to store the programme.
t
t
t
9
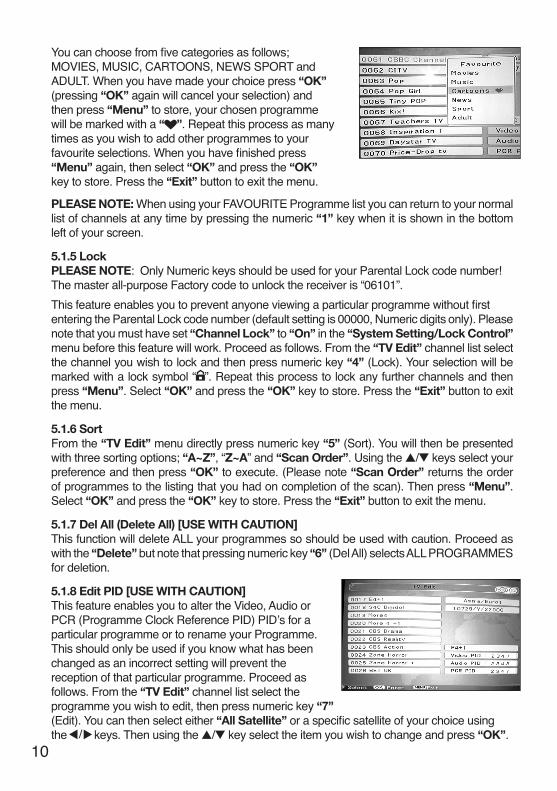
Youcanchoosefromfivecategoriesasfollows;MOVIES, MUSIC, CARTOONS, NEWS SPORT and ADULT. When you have made your choice press “OK” (pressing “OK” again will cancel your selection) and then press “Menu” to store, your chosen programmewill be marked with a “ ”. Repeat this process as manytimes as you wish to add other programmes to yourfavouriteselections.Whenyouhavefinishedpress“Menu” again, then select “OK” and press the “OK” key to store. Press the “Exit” button to exit the menu.
PLEASE NOTE: When using your FAVOURITE Programme list you can return to your normal list of channels at any time by pressing the numeric “1” key when it is shown in the bottom left of your screen.
5.1.5 LockPLEASE NOTE: Only Numeric keys should be used for your Parental Lock code number!The master all-purpose Factory code to unlock the receiver is “06101”.Thisfeatureenablesyoutopreventanyoneviewingaparticularprogrammewithoutfirstentering the Parental Lock code number (default setting is 00000, Numeric digits only). Please note that you must have set “Channel Lock” to “On” in the “System Setting/Lock Control” menu before this feature will work. Proceed as follows. From the “TV Edit” channel list select the channel you wish to lock and then press numeric key “4” (Lock). Your selection will be marked with a lock symbol “ ”. Repeat this process to lock any further channels and then press “Menu”. Select “OK” and press the “OK” key to store. Press the “Exit” button to exit the menu.
5.1.6 SortFrom the “TV Edit” menu directly press numeric key “5” (Sort). You will then be presented with three sorting options; “A~Z”, “Z~A” and “Scan Order”. Using the s/t keys select your preference and then press “OK” to execute. (Please note “Scan Order” returns the order of programmes to the listing that you had on completion of the scan). Then press “Menu”. Select “OK” and press the “OK” key to store. Press the “Exit” button to exit the menu.
5.1.7 Del All (Delete All) [USE WITH CAUTION]This function will delete ALL your programmes so should be used with caution. Proceed as with the “Delete” but note that pressing numeric key “6” (Del All) selects ALL PROGRAMMES for deletion.
5.1.8 Edit PID [USE WITH CAUTION]This feature enables you to alter the Video, Audio orPCR (Programme Clock Reference PID) PID’s for aparticular programme or to rename your Programme.This should only be used if you know what has beenchanged as an incorrect setting will prevent thereception of that particular programme. Proceed asfollows. From the “TV Edit” channel list select theprogramme you wish to edit, then press numeric key “7” (Edit). You can then select either “All Satellite”oraspecificsatelliteofyourchoiceusingthe keys. Then using the s/t key select the item you wish to change and press “OK”. 10
t
t
/

5.1.8.1 Renaming the ProgrammeTo rename a programme select the existing programme name from the dop down channel detail menu and press “OK”. From the characters displayed select the “ ” key and press “OK” to delete all or part of the old name. Then press the and s/t keys to select each character you require and “OK” toconfirmeachcharacter.FinallygotoOK atthebottomrightofthekeyboardmenutoconfirmandsavethenewname.
5.1.8.2 Changing a PIDIf you wish to edit a PID, use the s/t keys to select the PID to change and “OK” to con-firm.Youcannowusetheands/t keys to make the changes you require. Then press “Menu”. Select “OK” and press the “OK” key to store. Press the “Exit” button to exit the menu.
5.2 Radio EditThe procedure to edit a Radio as opposed to a TV Programme is identical. Therefore to edit a Radio Programme select the “Channel Edit” menu and then use the t key to choose “Radio Edit”. Proceed as in 5.1 above.
11
t
t
/
t
t
/
This menu enables you to tune to a particular satellite and also to modify various associ-ated settings. There is also a utility facilitating the calculations necessary to position your dishforaspecificsatellitegivenyourownlatitudeandlongitude.
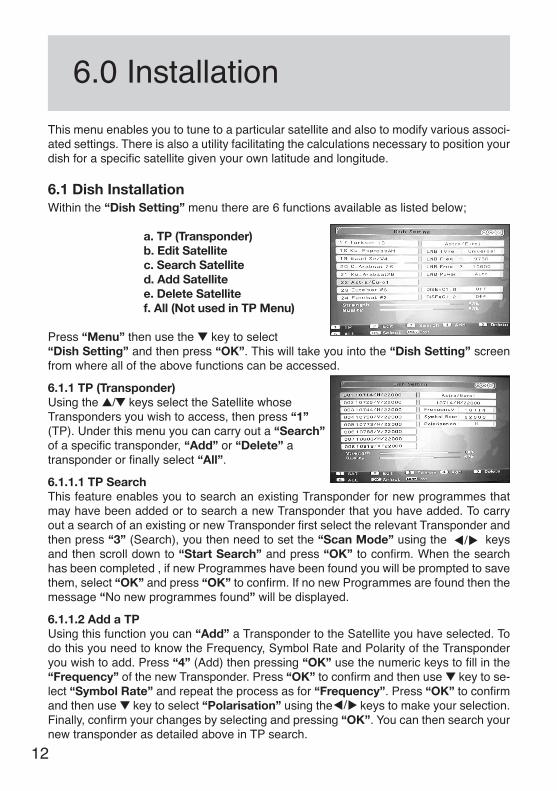
6.1 Dish InstallationWithin the “Dish Setting” menu there are 6 functions available as listed below;
a. TP (Transponder) b. Edit Satellite c. Search Satellite d. Add Satellite e. Delete Satellite f. All (Not used in TP Menu)
Press “Menu” then use the t key to select “Dish Setting” and then press “OK”. This will take you into the “Dish Setting” screen from where all of the above functions can be accessed.
6.1.1 TP (Transponder)Using the s/t keys select the Satellite whoseTransponders you wish to access, then press “1”(TP). Under this menu you can carry out a “Search”ofaspecifictransponder,“Add” or “Delete” a transponderorfinallyselect“All”.
6.1.1.1 TP SearchThis feature enables you to search an existing Transponder for new programmes that may have been added or to search a new Transponder that you have added. To carry outasearchofanexistingornewTransponderfirstselecttherelevantTransponderandthen press “3” (Search), you then need to set the “Scan Mode” using the keys and then scroll down to “Start Search” and press “OK”toconfirm.Whenthesearchhas been completed , if new Programmes have been found you will be prompted to save them, select “OK” and press “OK”toconfirm.IfnonewProgrammesarefoundthenthemessage “No new programmes found” will be displayed.
6.1.1.2 Add a TPUsing this function you can “Add” a Transponder to the Satellite you have selected. To do this you need to know the Frequency, Symbol Rate and Polarity of the Transponder you wish to add. Press “4” (Add) then pressing “OK”usethenumerickeystofillinthe“Frequency” of the new Transponder. Press “OK”toconfirmandthenuset key to se-lect “Symbol Rate” and repeat the process as for “Frequency”. Press “OK”toconfirmand then use t key to select “Polarisation” using the keys to make your selection. Finally,confirmyourchangesbyselectingandpressing“OK”. You can then search your new transponder as detailed above in TP search.
t
t
/
t
t
/
6.0 Installation
12
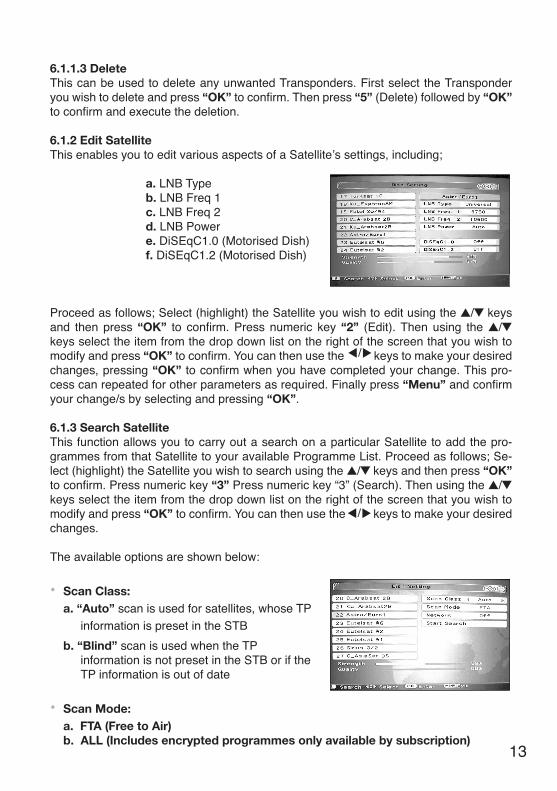
6.1.1.3 DeleteThis can be used to delete any unwanted Transponders. First select the Transponder you wish to delete and press “OK”toconfirm.Thenpress“5” (Delete) followed by “OK” toconfirmandexecutethedeletion.
6.1.2 Edit SatelliteThis enables you to edit various aspects of a Satellite’s settings, including;
a. LNB Type b. LNB Freq 1 c. LNB Freq 2 d. LNB Power e. DiSEqC1.0 (Motorised Dish) f. DiSEqC1.2 (Motorised Dish)
Proceed as follows; Select (highlight) the Satellite you wish to edit using the s/t keys and then press “OK” to confirm.Pressnumeric key “2” (Edit). Then using the s/t keys select the item from the drop down list on the right of the screen that you wish to modify and press “OK”toconfirm.Youcanthenusethekeystomakeyourdesiredchanges, pressing “OK”toconfirmwhenyouhavecompletedyourchange.Thispro-cess can repeated for other parameters as required. Finally press “Menu”andconfirmyour change/s by selecting and pressing “OK”.
6.1.3 Search SatelliteThis function allows you to carry out a search on a particular Satellite to add the pro-grammes from that Satellite to your available Programme List. Proceed as follows; Se-lect (highlight) the Satellite you wish to search using the s/t keys and then press “OK” toconfirm.Pressnumerickey“3” Press numeric key “3” (Search). Then using the s/t keys select the item from the drop down list on the right of the screen that you wish to modify and press “OK”toconfirm.Youcanthenusethekeystomakeyourdesiredchanges.
The available options are shown below:
• Scan Class: a. “Auto” scan is used for satellites, whose TP information is preset in the STB b. “Blind” scan is used when the TP information is not preset in the STB or if the TP information is out of date
• Scan Mode: a. FTA (Free to Air) b. ALL (Includes encrypted programmes only available by subscription)
13
t
t
/t
t
/

• Network (in Auto Scan): • Scan Type (in Blind Scan): a. OFF a. Quick b. ON b. Detail
NETWORK ON/OFF - When set to ON the Network Scans your selected SATEL-LITE for any additional NEW transponders. When set to OFF it scans only the preloaded factory list.
Having made your selections use the “OK” key to select “Start Search” and then press “OK” toconfirm.A“Progress” bar appears at the bottom of the screen. The search process may take some time, do not power off or press any keys whilst the search is taking place.
On completion you will be asked “Do you want to save”, press “OK” toconfirm.
6.1.4 Add SatelliteHere you can add a new satellite. Press “4” (Add). The default name of a new satellite is “New Sat”. Press OK to rename it.
Select the “ ” key at the bottom right of thekeyboard and press the “OK” button at the bottomright hand corner of the keyboard to delete“New Sat”. Then select each character you requireand “OK”toconfirmeachcharacter.Finallygoto“OK” at the bottom right hand corner of the keyboardtoconfirmandsavethenewname.Nowenter all the parameters listed on the right hand ofthe screen using the s/t/ and numeric keys as required. Finally, press “Menu” and then select “OK”pressingtoconfirmandsaveyour new Satellite. You can now Search for Programmes on your new Satellite following the procedure in 6.1.3.
6.1.5 Delete SatelliteThis can be used to delete any unwanted Satellites. Select the Satellite you wish to delete from the drop down list on the left of your screen and press “OK”toconfirm(aredflagwillappear).Nowpress“5” (Delete) and you will be asked “Do you want to save”. Select and press “OK”toconfirmandyourselectedSatellitewillbepermanentlydeleted.
6.2 Satellite GuideThis useful feature provides you with a calculationfor the Orientation and Elevation of a Satellitewhen you in put the following information:Local LongitudeLocal LatitudeSatellite Longitude
Using the s/t/ and numeric keys as required and the “OK”toselectandconfirmenter the data. Then select “Calculate” and press “OK”. The set up information for your Satellite will now be displayed. This can be used to set up your Satellite Dish exactly to the required settings.
14
t
t
/
t
t
/

7.0 System SettingThis Menu provides access to various settings relating to the general operation of the receiver. Press “Menu” and then using the s/t keys select “System Setting”. Press the key to enter the “System Setting” menu. There are six options as follows:
a. Language b. Menu Setting c. Lock Control d. AV Setting e. Time and Timer f. Reset to Factory
7.1 LanguagePress the s/t keys and select “Language”. Then press the key and then the s/t to select your chosen language (default is ENGLISH”). Press “Menu” and then select “OK” and press to save your choice.
7.2 Menu SettingHere you can adjust various aspects of your on screen display, such as;
a. Transparency b. Menu Style c. Brightness d. Warm (Red) e. Cold (Blue)
Press the s/t keys and select “Menu Setting”.Then press the key and then the s/t to selectthe parameter you wish to change. Then using the s/t / and numeric keys as required make the changes you wish pressing the ”OK”keytoconfirm.Whenyouhavefinishedpress “Menu” and then select “OK” and press to save your choice.
7.3 Lock ControlThis is used to prevent inadvertent changes to the setup of the Receiver or to restrict the ac-cess to certain programmes which may be unsuitable for younger members of your family.
7.3.1 Menu LockPress the s/t keys and select “Lock Control”.Press the key, you will then be prompted toenter your password (the default is 00000). Usingthe tkey, scroll down to “Menu Lock” and thenusing the set to “On”. Press “Menu” andthen select “OK” and press to save your choice.If you now wish to enter the “Menu” the passwordwill have to be inputted to gain access. 15
t
t
/
t
t
t
t
t
/
t
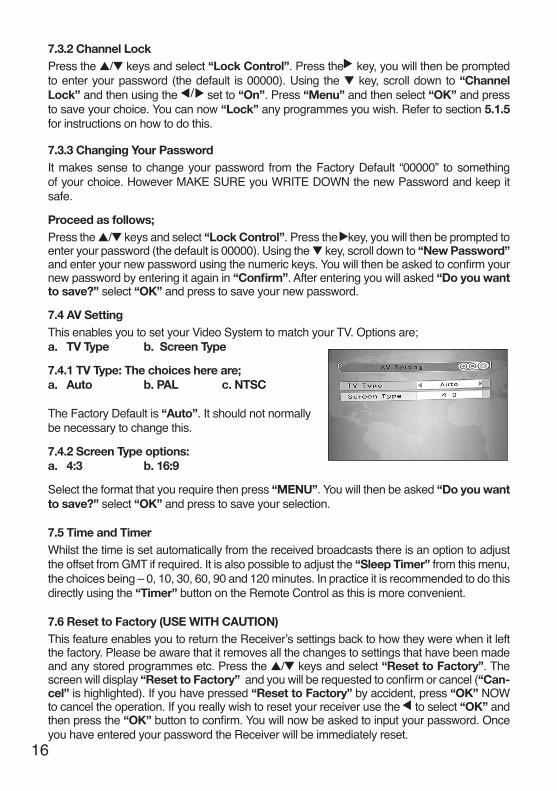
7.3.2 Channel LockPress the s/t keys and select “Lock Control”. Press the key, you will then be prompted to enter your password (the default is 00000). Using the t key, scroll down to “Channel Lock” and then using the set to “On”. Press “Menu” and then select “OK” and press to save your choice. You can now “Lock” any programmes you wish. Refer to section 5.1.5 for instructions on how to do this.
7.3.3 Changing Your PasswordIt makes sense to change your password from the Factory Default “00000” to something of your choice. However MAKE SURE you WRITE DOWN the new Password and keep it safe.
Proceed as follows;Press the s/t keys and select “Lock Control”. Press the key, you will then be prompted to enter your password (the default is 00000). Using the t key, scroll down to “New Password” andenteryournewpasswordusingthenumerickeys.Youwillthenbeaskedtoconfirmyournew password by entering it again in “Confirm”. After entering you will asked “Do you want to save?” select “OK” and press to save your new password.
7.4 AV SettingThis enables you to set your Video System to match your TV. Options are;a. TV Type b. Screen Type
7.4.1 TV Type: The choices here are;a. Auto b. PAL c. NTSC
The Factory Default is “Auto”. It should not normallybe necessary to change this.
7.4.2 Screen Type options:a. 4:3 b. 16:9
Select the format that you require then press “MENU”. You will then be asked “Do you want to save?” select “OK” and press to save your selection.
7.5 Time and TimerWhilst the time is set automatically from the received broadcasts there is an option to adjust the offset from GMT if required. It is also possible to adjust the “Sleep Timer” from this menu, the choices being – 0, 10, 30, 60, 90 and 120 minutes. In practice it is recommended to do this directly using the “Timer” button on the Remote Control as this is more convenient.
7.6 Reset to Factory (USE WITH CAUTION)This feature enables you to return the Receiver’s settings back to how they were when it left the factory. Please be aware that it removes all the changes to settings that have been made and any stored programmes etc. Press the s/t keys and select “Reset to Factory”. The screen will display “Reset to Factory”andyouwillberequestedtoconfirmorcancel(“Can-cel” is highlighted). If you have pressed “Reset to Factory” by accident, press “OK” NOW to cancel the operation. If you really wish to reset your receiver use the to select “OK” and then press the “OK”buttontoconfirm.Youwillnowbeaskedtoinputyourpassword.Onceyou have entered your password the Receiver will be immediately reset.
16
t
t
t
/
t
t
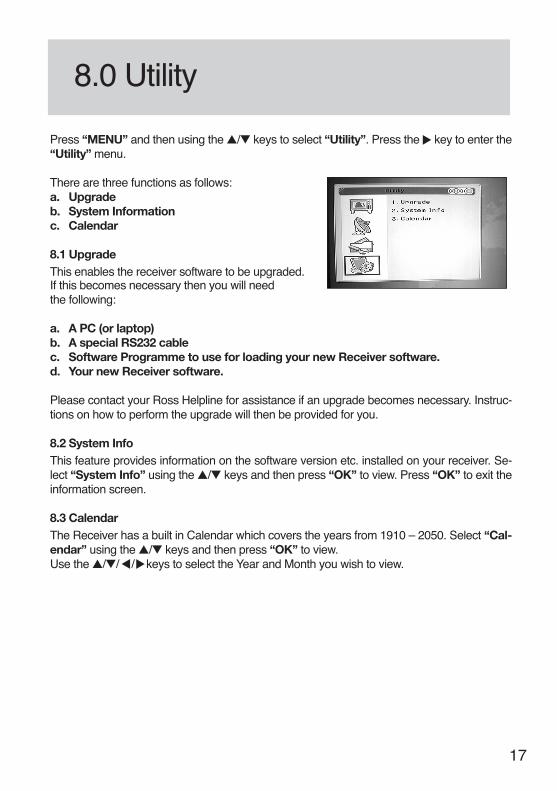
8.0 Utility
Press “MENU” and then using the s/t keys to select “Utility”. Press the key to enter the “Utility” menu.
There are three functions as follows:a. Upgradeb. System Informationc. Calendar
8.1 UpgradeThis enables the receiver software to be upgraded.If this becomes necessary then you will need the following:
a. A PC (or laptop)b. A special RS232 cablec. Software Programme to use for loading your new Receiver software.d. Your new Receiver software.
Please contact your Ross Helpline for assistance if an upgrade becomes necessary. Instruc-tions on how to perform the upgrade will then be provided for you.
8.2 System InfoThis feature provides information on the software version etc. installed on your receiver. Se-lect “System Info” using the s/t keys and then press “OK” to view. Press “OK” to exit the information screen. 8.3 CalendarThe Receiver has a built in Calendar which covers the years from 1910 – 2050. Select “Cal-endar” using the s/t keys and then press “OK” to view.Use the s/t/ keys to select the Year and Month you wish to view.
17
t
t
t
/

9.0 Troubleshooting
Should you encounter problems whilst using your Receiver please refer to the table below for helpful information before contacting your Service Company or Dealer for help as problems are often easily resolved.
18
Power on, but nodisplay on screen
Please carefully check thepower plug, to see if it isfirmly located in the wallsocket and switched on. Is the power interrupted?
Connect the power plug to thesocket on the wall.
Power on the STB,then the screendisplays ”No signal”
Is the dish installation correct? Carefully re-align the dish.
LNB input is not connected. Connect the LNB
The Satellite is not transmitting Try another Satellite
Weather conditions areaffecting reception, e.g. snow
Attempt again later
The program setup or systemsettings are incorrect
Set the correct parameters forthe received programme in thesystem settings menu
Audio is incorrect The received Programme isbeing transmitted in morethan one language.
User can use the “Audio” buttonon the Remote to select thecorrect audio track or audiolanguages
10.0 Glossary
(1) 22KHz switchA tone that can be sent via the LNB coax, this tone can control the LNB or switches on the coax cable. Do not interfere with the DC or 22KHz tone that the receiver sends to the dish.
(2) AntennaA device that collects electromagnetic waves includes a satellite dish and a broadband antenna.
(3) CVBSComposite Video Blanking and Sync, Standard single-wire video, mixing luminance and chrominance signals together.
(4) DiSEqCDigital Satellite Equipment Control, a protocol established by the EUTELSAT organiza-tion www.eutelsat.com, the most popular standard are DiSEqC 1.0 for Switching solu-tion, DiSEqC 1.2 for Dish actuator solution. Used for motorized dishes.
(5) Forward Error Correction (FEC)A system of error control for data transmission
(6) FrequencyThe number of cycles or events per one second, which is expressed in the unit of Hertz(Hz)
(7) Intermediate Frequency (IF)A frequency to which a carrier frequency is shifted as an intermediate step in transmis-sion or reception
(8) Low Noise Block (LNB) DownconverterAlownoisemicrowaveamplifierandconverterwhichdownconvertsarangeoffrequen-cies to IF range
(9) NTSCNational Television Standards Committee, a video standard established by the United States (RCA/NBC) and adopted by numerous other countries.
(10) PALPhase Alternate Line, a video standard used in Europe/UK and other parts of the world for composite colour encoding
19
(11) Packet Identifier (PID)Asetofnumbersthatidentifiestransportstreampacketscontainingdatafromasingledata stream
(12) PolarizationSatellite waves are polarized. They can be linear or circular. Linear polarity is Vertical or Horizontal, circular polarity is Right-hand and Left-hand circular polarity.
(13) Quadrature Phase Shift Keying (QPSK) ModulationPhase-shift keying in which four different phase angles are used.
(14) RFA frequency that is useful for radio transmission, usually between10KHz and 300,000Mhz.
(16) STBSet Top Box, another common name for a Digital Satellite Receiver, because it would usually be put on top of a TV. This acronym is common worldwide.
(17) Symbol RateThe amount of data transmitted every second.
(18) Transponder (TP)Equipment in a satellite which receives a single uplink channel from a satellite earth station,amplifiesit,convertsthefrequencyandchangesthepolarization,thenbroad-casts it back to earth.
(19) Transport StreamThe bit stream formed prior to transmission of signals by combining the video, audio anddatastreamsofoneservice.Itconsistsoffixedlengthpacketsof188bytesofdata.
20

21
11.0Specification
1.Tuner & Demodulator Input Frequency Range: 950MHz to 2150MHz RF Input Signal Level: -65dBm to-25dBm RF Impedance: 75W RF Impedance: 55MHz/8MHz(Under 5 Msps) LNB Power: 13/18DC, +/-5%, 0.5Amax, 1.8Apeak overloaded protect LNB Tone Switch: 22KHz +/- 2KHz, 0.65Vp-p+/-0.15V DiSEqC Control: V1.0, V1.2, Demodulation: QPSK Symbol Rate: 1 ~ 45Msps/SCPC, MCPC
2.MPEG Transport Stream: MPEG-2 ISO/IEC 13818 TransportStreamSpecification Input Rate: Video Max.15Mbit/s Video: MPEG-2 MP@ML Audio : MPEG-1/2 Audio Layer1 or layer2 Video Resolution: 720 x 576(PAL), 720 x 480(NTSC) Audio Mode: Stereo, Dual channel, Joint stereo, Mono Audio Sampling Frequency: 32/44.1/48KHz
3. Connector LNB IF input F type, IEC 169-24 Female Composite/RCA: AUDIO L, R, VIDEO (White, Yellow, Red). Serial Port Rs232 D-sub male type(max 57.6 Kbps)
4. Power Supply Input Voltage: 100-240V~, 50/60Hz. Power Consumption: Max.25W Weight: Appr. 1.8KG Operating Temperature: 00C – 400C StorageTemperature: -400C - 650C

UK Office: Stafford Park 1, Telford, Shropshire, England, TF3 3BDTel: +44 (0) 1952 238 100 • Fax: +44 (0) 1952 238 180
Helpline: (UK): 0845 194 7584/(IRL): 1800 930 185 For further product information please go to: www.ross.co.uk


![2016 Final Results Presentation 5[2] - Luceco · 2017. 4. 6. · 2016 Final Results Presentation 5[2] Created Date: 20170406105628Z ...](https://static.fdocuments.net/doc/165x107/5fef87419bb9041d1a391a03/2016-final-results-presentation-52-luceco-2017-4-6-2016-final-results-presentation.jpg)


