Screen Printing Steps “Rembrandt Tulips” Edition of 25 By Dorothy Markert, 2007 Creating an...
25
Screen Printing Steps “Rembrandt Tulips” Edition of 25 By Dorothy Markert, 2007 Creating an original print with one screen
-
Upload
joshua-stevenson -
Category
Documents
-
view
214 -
download
0
Transcript of Screen Printing Steps “Rembrandt Tulips” Edition of 25 By Dorothy Markert, 2007 Creating an...

Screen Printing Steps
“Rembrandt Tulips”Edition of 25
ByDorothy Markert, 2007
Creating an original print with one screen

I designed this print to go into a standard 14” x 11” frame. The image was to be 10” high x 7” wide. I drew the outline on a sheet of paper and composed the composition within the outline.
The “working drawing” (1) for this print was made up of an original pencil drawing of tulips(2), drawn from a photo in a garden catalog (3). I scanned the drawing and made it the size that I wanted
The vase and the border (4) were from this book and cd (5). I enlarged them both and printed them. Then I cut out the elements of the border and pasted them closer together onto some graph paper (6).
All of the elements of the design were cut out and pasted onto the sheet with the outline to make the “working drawing”. This, in turn was pasted onto a sheet of print paper cut to the appropriate size.
Looking at the “working drawing”, the vase and border are much heavier than the tulips – the opposite what I want. Color will take care of that.
I want the tulips, their leaves and to some degree the vase to stand out. The border will be subdued.
12
3
4 56

The “working drawing” is taped down onto the center of the screen bed.
Three small registration tabs have been glued and taped in place. The print paper should just butt up against the tabs.
Two are at the bottom right corner (1) and the third (2) near the top on the right side.
Be sure that the tabs are glued so that the print paper doesn’t slide under them.
1
2

The screen has been placed over the working drawing and the pins put into the hinges.
The transparent screen allows the artist to see the working drawing through the screen.

At this point, screen drawing fluid used to paint on the screen. Everything that is not to stay the color of the paper will be painted with the drawing fluid.
Watercolor brushes, and pens can be used. A ruling pen and ruler is helpful for straight edges. For larger areas, use larger brushes. Keep your original image in sight for reference.
The screen drawing fluid is water soluble and any mistakes can be easily cleaned off with water. Keep a small jar of water near by for rinsing brushes and pens and cleaning up mistakes. Have a paper towel handy
Strips of mat board are used to separate the screen from the working drawing. They can be moved around so that they are most effective. They can be stacked up on top of each other if the screen keeps touching the drawing.

Everything has been painted with the screen drawing fluid except the areas where just paper will show in the finished print. They consist of the edges of the tulips, the little diamond shapes in the border and the margin of paper around the print.The screen has been dried.
The white areas in the center of the photo are reflections from my camera’s flash.
The screen is set above the table top on four blocks in preparation for spreading the screen filler with a strip of mat board.

The dark red screen filler has been spread over the entire screen with onepull of a mat board strip. When spreading the filler the mat board is kept at a 45
degree angle for the right amount of coverage. Do not let it bow.
The blue drawing fluid is very water soluble and will smear if you go back over it while it is wet. The edges of the screen, where there is no drawing fluid may be
gone over as many times as necessary to fill in the whole screen.
When the screen filler is completely dry the drawing fluid Will be washed away with a cold water spray.

After wetting both sides of the screen with cold water, a cold spray
was used to remove all of the blue screen drawing fluid.Only the areas that are to remain without any color are blocked out
with the dark red screen filler.
They are the white edges of the tulips, the white diamonds in the border and the margin around
the print. These will all beblocked out whenever any color is
printed.
A stencil has been made on the screen, but I am not ready to print
just yet.

1. In preparation of printingthe red of the tulips and in the border, screen drawing fluid ispainted wherever the red is to be.It is painted right over the existingscreen filler. Two coats of Future floor wax have been spread over theentire screen.
2. When the wax is thoroughlydry, the screen drawing fluid was removed with cold water and the screen is ready to print with red.

Each piece of print paper has been printed with red ink.The red ink has been mademore luminous with the additionof transparent base. You can only do this only when there is plain paper under the translucent color.

All of the areas where there is to beany color besides the red and whiteare covered with screen drawing fluid
The screen has been covered with screen fillerand dried.

The screen is placed in the laundry tub and wet on both sides and sprayed with cold water to remove the screen drawing fluid
When the blue drawing fluid has all been removed the screen is dried. Again, I’m not ready to print another color just yet.
Everywhere I plan to have white or red has been blocked out with screen filler.

Screen drawing fluid has beenpainted onto the screen whereverI want to print green. The drawing fluid extends into the background and the edgeswill be covered by successive colors.
Two coats of Future floor wax are spread over all, the drawing Fluid is removed and the mediumgreen will be printed.

Medium green has been printed. It is shown alone and over the red which was printed previously.
The ink is cleaned from the screen, but not the Future floor wax.

Another stencil for a lighter green was made within the previous one.The light green is shown alone and on top of the other colors.
The ink has been cleaned off the screen as well as the floor wax.

Drawing fluid is painted onto the screen where I want to print dark green. Two coats of Future floor wax are spread over all, the drawing fluid is removed
and the dark green is printed on each print.

The prints are spread out over my counter to dry.
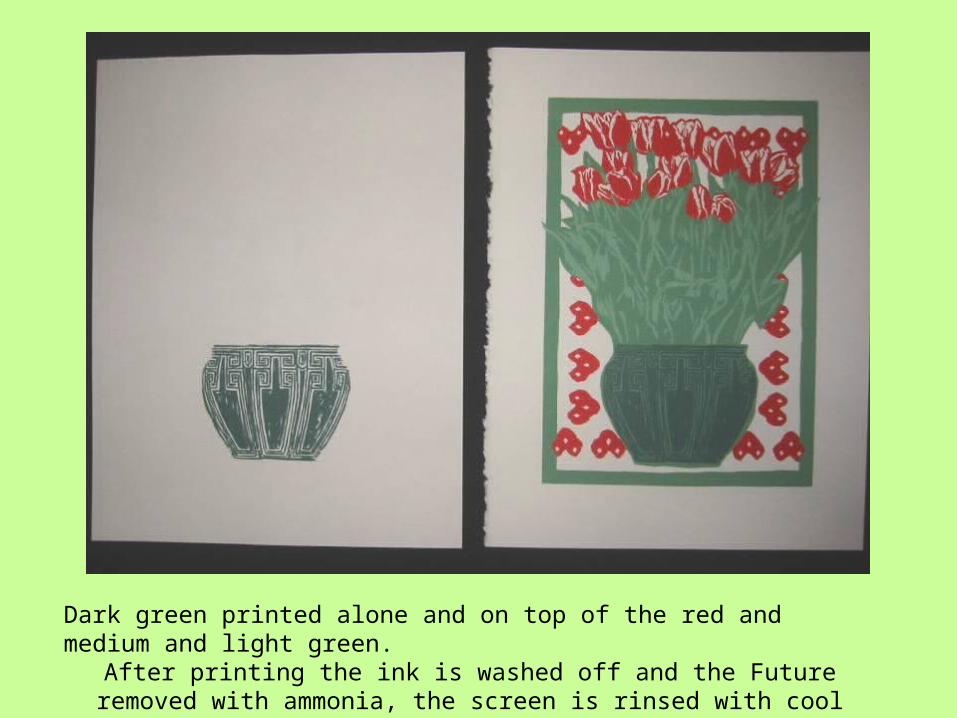
Dark green printed alone and on top of the red and medium and light green.After printing the ink is washed off and the Future removed with ammonia,
the screen is rinsed with cool water and dried.

The next color that I plan to print is a deep, dark brown. It will hold the print together.
I have painted everything that is to be that color with screen drawing fluid.It goes right over the screen filler that is still on the screen.
Another layer of filler is spread over all and the drawing fluid removed.

The dark brown ink has been printed on each print.

After the ink has been washed off and the screen dried the border design is painted with drawing fluid. I have changed the border design; I like the diamond shaped tiny
tulips, but not the rest of the original idea.
Using a little sketch of my new design that I moved from spot to spot I drew the design onto the screen with a soft pencil and then painted it in with drawing fluid.
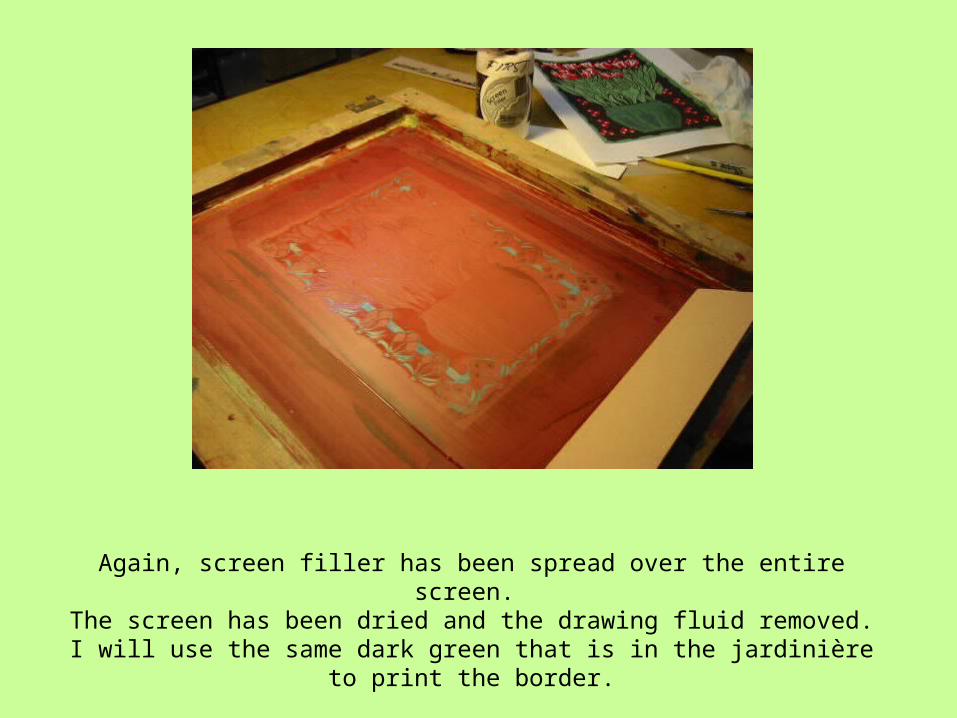
Again, screen filler has been spread over the entire screen. The screen has been dried and the drawing fluid removed.
I will use the same dark green that is in the jardinière to print the border.

The almost finished prints drying in my workroom.

The dark green of the border alone and on top of all of the other colors.
The only thing left to do is print the RR Mark and sign and number my prints.

The finished print, with the RR mark, signed and numbered on buff paper.
I also made some on white paper.