Scanning OFDR System Documentation - Electrical, …ecee.colorado.edu/~mcleod/pdfs/OFDRdoc.pdf ·...
121
McLeod Research Group University of Colorado Department of Electrical, Computer, and Energy Engineering Scanning Optical Frequency-Domain Reflectometer System Documentation Author: Eric D. Moore Document version 0.1 May 30, 2012 This material is based upon work supported by the National Science Foundation under Grant # IIP-1059286 to the American Society for Engineering Education.
Transcript of Scanning OFDR System Documentation - Electrical, …ecee.colorado.edu/~mcleod/pdfs/OFDRdoc.pdf ·...

McLeod Research GroupUniversity of Colorado
Department of Electrical, Computer,and Energy Engineering
Scanning Optical Frequency-Domain Reflectometer
System Documentation
Author: Eric D. Moore
Document version 0.1
May 30, 2012
This material is based upon work supported by the National Science Foundation underGrant # IIP-1059286 to the American Society for Engineering Education.

Contents
1 Introduction 5
2 Hardware 5
2.1 The Agilent 81680A Tunable Laser . . . . . . . . . . . . . . . . . . . . . . . . 5
2.2 The OFDR Fiber Optic Network . . . . . . . . . . . . . . . . . . . . . . . . . 7
2.3 Signal Detection and Acquisition . . . . . . . . . . . . . . . . . . . . . . . . . 10
2.4 The Seruga Seiki Stage System . . . . . . . . . . . . . . . . . . . . . . . . . . 12
2.5 The Control Computer . . . . . . . . . . . . . . . . . . . . . . . . . . . . . . . 12
3 Software 13
3.1 Usage . . . . . . . . . . . . . . . . . . . . . . . . . . . . . . . . . . . . . . . . 16
3.1.1 System Configuration . . . . . . . . . . . . . . . . . . . . . . . . . . . 16
3.1.2 Performing Swept-Wavelength Measurements . . . . . . . . . . . . . . 18
3.1.3 Displaying OFDR Data . . . . . . . . . . . . . . . . . . . . . . . . . . 19
3.1.4 Peak Selection and Measurements . . . . . . . . . . . . . . . . . . . . 20
3.1.5 Motion Control . . . . . . . . . . . . . . . . . . . . . . . . . . . . . . 23
3.1.6 Peak Optimization . . . . . . . . . . . . . . . . . . . . . . . . . . . . . 27
3.1.7 Sample Perpendicularization . . . . . . . . . . . . . . . . . . . . . . . 28
3.1.8 Scanning OFDR Measurements . . . . . . . . . . . . . . . . . . . . . . 29
3.1.9 Saving Data . . . . . . . . . . . . . . . . . . . . . . . . . . . . . . . . . 31
3.1.10 Saving and Loading System Configuration . . . . . . . . . . . . . . . . 33
3.2 SubVI Listing . . . . . . . . . . . . . . . . . . . . . . . . . . . . . . . . . . . . 34
Agilent Cycle Number.vi . . . . . . . . . . . . . . . . . . . . . . . . . . . . . . 35
Agilent Laser On-Off.vi . . . . . . . . . . . . . . . . . . . . . . . . . . . . . . 36
Agilent Power.vi . . . . . . . . . . . . . . . . . . . . . . . . . . . . . . . . . . 37
Agilent Query Sweep State.vi . . . . . . . . . . . . . . . . . . . . . . . . . . . 38
Agilent Start Wavelength.vi . . . . . . . . . . . . . . . . . . . . . . . . . . . . 39
Agilent Startup Sequence.vi . . . . . . . . . . . . . . . . . . . . . . . . . . . . 40
Agilent Stop Wavelength.vi . . . . . . . . . . . . . . . . . . . . . . . . . . . . 41
1

Agilent Sweep Actions.vi . . . . . . . . . . . . . . . . . . . . . . . . . . . . . . 42
Agilent Sweep Mode.vi . . . . . . . . . . . . . . . . . . . . . . . . . . . . . . . 43
Agilent Sweep Speed.vi . . . . . . . . . . . . . . . . . . . . . . . . . . . . . . . 44
baseband2.vi . . . . . . . . . . . . . . . . . . . . . . . . . . . . . . . . . . . . 45
Buffer Points.vi . . . . . . . . . . . . . . . . . . . . . . . . . . . . . . . . . . . 46
Calculate Tilt.vi . . . . . . . . . . . . . . . . . . . . . . . . . . . . . . . . . . 48
Check Instruments.vi . . . . . . . . . . . . . . . . . . . . . . . . . . . . . . . . 50
Confocal Plot Data.vi . . . . . . . . . . . . . . . . . . . . . . . . . . . . . . . 51
DAQ Config v3.vi . . . . . . . . . . . . . . . . . . . . . . . . . . . . . . . . . . 52
DAQ Read.vi . . . . . . . . . . . . . . . . . . . . . . . . . . . . . . . . . . . . 54
DriveOpticalSwitch.vi . . . . . . . . . . . . . . . . . . . . . . . . . . . . . . . 55
Edit Hardware Parameters.vi . . . . . . . . . . . . . . . . . . . . . . . . . . . 56
Edit Stage Limits.vi . . . . . . . . . . . . . . . . . . . . . . . . . . . . . . . . 57
Enqueue Config States.vi . . . . . . . . . . . . . . . . . . . . . . . . . . . . . 59
Enqueue Tilt Measurement.vi . . . . . . . . . . . . . . . . . . . . . . . . . . . 60
Fourier Interpolation.vi . . . . . . . . . . . . . . . . . . . . . . . . . . . . . . 61
Generate X-Axis.vi . . . . . . . . . . . . . . . . . . . . . . . . . . . . . . . . . 62
Get Channel Assignments.vi . . . . . . . . . . . . . . . . . . . . . . . . . . . . 63
Handle Peak Array.vi . . . . . . . . . . . . . . . . . . . . . . . . . . . . . . . . 64
Load Configuration.vi . . . . . . . . . . . . . . . . . . . . . . . . . . . . . . . 65
Load OFDR Config.vi . . . . . . . . . . . . . . . . . . . . . . . . . . . . . . . 66
Log Manager.vi . . . . . . . . . . . . . . . . . . . . . . . . . . . . . . . . . . . 67
Measurement Options Dialog.vi . . . . . . . . . . . . . . . . . . . . . . . . . . 68
Move SS Stage.vi . . . . . . . . . . . . . . . . . . . . . . . . . . . . . . . . . . 69
OFDR Global.vi . . . . . . . . . . . . . . . . . . . . . . . . . . . . . . . . . . 70
OFDR Plot Data.vi . . . . . . . . . . . . . . . . . . . . . . . . . . . . . . . . 72
Peak Amplitudes2.vi . . . . . . . . . . . . . . . . . . . . . . . . . . . . . . . . 73
Peak Optimizer.vi . . . . . . . . . . . . . . . . . . . . . . . . . . . . . . . . . 75
Precision Ranging2.vi . . . . . . . . . . . . . . . . . . . . . . . . . . . . . . . 76
Queue Manager (Comm).vi . . . . . . . . . . . . . . . . . . . . . . . . . . . . 78
2

Queue Manager (Proc).vi . . . . . . . . . . . . . . . . . . . . . . . . . . . . . 79
Register User.vi . . . . . . . . . . . . . . . . . . . . . . . . . . . . . . . . . . . 80
Resample.vi . . . . . . . . . . . . . . . . . . . . . . . . . . . . . . . . . . . . . 81
Save Configuration.vi . . . . . . . . . . . . . . . . . . . . . . . . . . . . . . . . 83
Save OFDR Config.vi . . . . . . . . . . . . . . . . . . . . . . . . . . . . . . . 84
Save Options Dialog.vi . . . . . . . . . . . . . . . . . . . . . . . . . . . . . . . 85
Save Scan Data Dialog.vi . . . . . . . . . . . . . . . . . . . . . . . . . . . . . 86
Scan Manager.vi . . . . . . . . . . . . . . . . . . . . . . . . . . . . . . . . . . 87
Set Postion Label.vi . . . . . . . . . . . . . . . . . . . . . . . . . . . . . . . . 88
Signal Levels.vi . . . . . . . . . . . . . . . . . . . . . . . . . . . . . . . . . . . 89
Smoothing Filter.vi . . . . . . . . . . . . . . . . . . . . . . . . . . . . . . . . . 90
SS Drive Axis.vi . . . . . . . . . . . . . . . . . . . . . . . . . . . . . . . . . . 91
SS Go To Position.vi . . . . . . . . . . . . . . . . . . . . . . . . . . . . . . . . 92
SS Monitor.vi . . . . . . . . . . . . . . . . . . . . . . . . . . . . . . . . . . . . 93
SS Query Acceleration.vi . . . . . . . . . . . . . . . . . . . . . . . . . . . . . 94
SS Query Distance.vi . . . . . . . . . . . . . . . . . . . . . . . . . . . . . . . . 95
SS Query Drive Speed.vi . . . . . . . . . . . . . . . . . . . . . . . . . . . . . . 96
SS Query Position.vi . . . . . . . . . . . . . . . . . . . . . . . . . . . . . . . . 97
SS Query Software Limit.vi . . . . . . . . . . . . . . . . . . . . . . . . . . . . 98
SS Query Start Up Speed.vi . . . . . . . . . . . . . . . . . . . . . . . . . . . . 99
SS Query Status.vi . . . . . . . . . . . . . . . . . . . . . . . . . . . . . . . . . 100
SS Select Axis.vi . . . . . . . . . . . . . . . . . . . . . . . . . . . . . . . . . . 101
SS Set Acceleration.vi . . . . . . . . . . . . . . . . . . . . . . . . . . . . . . . 102
SS Set Distance.vi . . . . . . . . . . . . . . . . . . . . . . . . . . . . . . . . . 103
SS Set Drive Speed.vi . . . . . . . . . . . . . . . . . . . . . . . . . . . . . . . 104
SS Set Position Value.vi . . . . . . . . . . . . . . . . . . . . . . . . . . . . . . 105
SS Set Remote Mode.vi . . . . . . . . . . . . . . . . . . . . . . . . . . . . . . 106
SS Set Software Limit.vi . . . . . . . . . . . . . . . . . . . . . . . . . . . . . . 107
SS Set Start Up Speed.vi . . . . . . . . . . . . . . . . . . . . . . . . . . . . . 108
SS Stop.vi . . . . . . . . . . . . . . . . . . . . . . . . . . . . . . . . . . . . . . 109
3

SS Toggle Motor Power.vi . . . . . . . . . . . . . . . . . . . . . . . . . . . . . 110
SS Toggle Software Limits.vi . . . . . . . . . . . . . . . . . . . . . . . . . . . 111
Stage Settings Dialog.vi . . . . . . . . . . . . . . . . . . . . . . . . . . . . . . 112
Sweep Agilent Laser 2.vi . . . . . . . . . . . . . . . . . . . . . . . . . . . . . . 114
Sweep Mgr Q Cleanup.vi . . . . . . . . . . . . . . . . . . . . . . . . . . . . . . 115
Update End WL.vi . . . . . . . . . . . . . . . . . . . . . . . . . . . . . . . . . 116
Update Scan Data.vi . . . . . . . . . . . . . . . . . . . . . . . . . . . . . . . . 117
Wavelength Range.vi . . . . . . . . . . . . . . . . . . . . . . . . . . . . . . . . 119
WL vs Time.vi . . . . . . . . . . . . . . . . . . . . . . . . . . . . . . . . . . . 120
4

1 Introduction
This document is intended to be a user’s guide for the Scanning Optical Frequency Do-main Reflectometer (OFDR) located in the McLeod Labs in the Department of Electrical,Computer, and Energy Engineering at the University of Colorado at Boulder. As such, notheoretical background on the physics underlying the OFDR is provided here, since that in-formation is available elsewhere1 Rather, this document provides an overview of the hardwareconfiguration and a guide to the use of the system control software.
2 Hardware
The hardware layout of the Scanning OFDR is illustrated in Fig. 1. The main componentsof the system are:
• A tunable laser source (specifically, an Agilent 81680A tunable laser source).
• A fiber optic network, the central feature of which is a fiber interferometer.
• Means for detecting and digitizing the optical signals output by the fiber optic network.
• A set of precision motion stages for positioning and positional scanning of test samples.
• A personal computer running the Scanning OFDR software application for controllingsystem hardware and performing data processing tasks.
This section will provide a series of “hardware notes,” roughly organized according to thisbulleted list of subsystems. These notes are meant to record as many “things you shouldknow” regarding the current hardware configuration for both users of the system and forsystem maintenance and modification in the future.
2.1 The Agilent 81680A Tunable Laser
• When the laser is rebooted, it starts in a locked state. The code to unlock the laser is1234.
• The laser has two optical outputs. Output 1 is a “low noise” output while Output 2 isthe “high power” output. Always use Output 2 for the OFDR.
• The optical outputs on the laser take FC-APC connectors. These connectors havean angle-polished ferrule and generally have a green boot. Do not plug FC-PC (flatpolished) connectors into the laser!
1see Eric D. Moore, “Advances in Swept-Wavelength Interferometry for Precision Measurements,” Ph.D.Dissertation, University of Colorado at Boulder, 2011 and the references therein. In particular, Ch. 2 providesan introduction to OFDR, Ch. 4 covers precision ranging measurements using OFDR, and Ch. 6 discussescalibrated reflectivity measurements using scanning OFDR.
5

HPPolarizationController
Agilent81680A
Tunable Laser
HPTower PC
“LabSnacks” Enclosure
Trigger
Interferometer
HCN Cell
Switch PBS
OFDR
Interferometer
OutBAIn Aux HCN
90
10
Frequency
Clock
HCN
Aux
S
P
StageStack 1
StageStack 2
DAQ
Seruga SeikiD120 Motion
Controller
Probe 1
Probe 2
Probe 3
Optical !ber
Harware commands
Clock signals
Digital trigger signal
PCI/MXI interface
Data signals
3dB Coupler (except as noted)
Manual polarization controller
Photodetector
AR coated FC/PC connector
Fiber delay line
PC1
PC2
PC0
Figure 1: A schematic diagram of the Scanning OFDR system hardware.
• There is a green LED labeled “Active” near each optical output. When this light isoff, an internal shutter is closed and no light is output. When disconnecting fiber fromthe laser, be sure to deactivate the output using the button directly above the LED.Reactivate the output once a fiber has been reconnected. The Scanning OFDR softwareshould generally remotely activate the output when needed, but it is possible to runinto errors because the laser output is off.
• Running the Scanning OFDR software puts the laser into Remote mode. Pressingbuttons on the laser will have no effect until it is returned to local mode, which isaccomplished by pressing the bottom softkey, which is labeled “Local” when the laseris in Remote mode.
• The polarization of the laser output varies when the wavelength is swept. To keepthe laser polarization constant over wavelength, the HP 8169A polarization controlleris being used as a broadband polarizer. This instrument includes a linear polarizerfollowed by a half waveplate and a quarter waveplate. Because the light output bythe laser is not guaranteed to be linearly polarized after traveling through a length of
6

55
50
45
40
35
30
25
Tun
ing
rate
(nm
/s)
24020016012080400
Time (ms)
55
50
45
40
35
30
25
Tun
ing
rate
(nm
/s)
225.0224.0223.0222.0221.0220.0
Time (ms)
Figure 2: Measured tuning rate for the Agilent 81680A tunable laser for a wavelength scanfrom 1520 nm to 1530 nm (left) and a 5 ms portion of the same scan showing the fine structureof the tuning rate variations (right). The nominal wavelength tuning rate setting was 40 nm/s.
single mode fiber, a manual polarization controller (PC0) is included inline between thelaser and the HP 8169A. This manual polarization controller and the orientation of thepolarizer in the HP 8169A should be adjusted to maximize the optical power outputthrough the HP 8169A.
• The laser has three possible tuning rate settings for wavelength sweeps: 0.5 nm/s, 5nm/s, and 40 nm/s. The Scanning OFDR software always uses the 40 nm/s settingbecause faster wavelength sweeps allow less environmental noise to couple into themeasurement. This tuning rate setting is a nominal value. The actual tuning ratevaries rapidly during a sweep. See Fig. 2 for plots of the measured tuning rate for arepresentative sweep.
2.2 The OFDR Fiber Optic Network
• The network is constructed using Corning SMF28 fiber. Use this or an equivalent fiberfor any modifications.
• Fiber networks consists of three branches that are broken out by the fiber subsystemhoused in the red Thorlabs box. One branch is the main OFDR interferometer. A sec-ond branch contain a H13CN gas cell, which is a NIST-traceable wavelength referenceover the range of 1525–1565 nm. The third branch is a fiber Mach-Zehnder interferom-eter, often called the trigger interferometer, which provides a frequency clock signal fortriggering data acquisition tasks.
• The gas cell is a dBm Optics model WA-1528- 1562 100 Torr H13CN wavelength ref-erence. Its absorption spectrum is shown in Fig. 3. Table 1 lists the wavelengths ofthe absorption lines. The primary function of the gas cell is for calibrating the rela-tive delay between paths in fiber interferometers. In particular, the OFDR relies onaccurate calibration of the trigger interferometer delay (often referred to as simply thetrigger delay). The gas cell may also be used for improving the wavelength accuracy of
7

1530 1535 1540 1545 1550 1555 1560Wavelength (nm)
Tra
nsm
issi
on (
a.u.
)
R Branch P Branch
8
0 1
7
2020
Figure 3: The absorption spectrum of the dBm Optics model WA-1528- 1562 100Torr H13CNwavelength reference showing the absorption line numbering scheme.
swept-wavelength measurements, though this feature has not yet been implemented inthe Scanning OFDR software.
• The connectors on the front of the Thorlabs box tend to spin. When connecting ordisconnecting them, reach inside the box and hold the connector on the back side whiletwisting to ensure a good connection.
• The ‘A’ and ‘B’ outputs of the Thorlabs box allow for different trigger interferometerdelays to be used by connecting different lengths of fiber. The internal fiber lengths areapproximately matched; that is, if the internal connectors at A and B are connectedto one another, the relative delay between the interferometer paths is approximatelyzero. There is a manual polarization controller (PC2) that is meant to be includedinline with the trigger interferometer delay line. Adjust the polarization controller tomaximize the fringe visibility of the frequency clock signal.
• To view the frequency clock signal, temporarily disconnect the frequency clock BNCcable from the clock input on the data acquisition (DAQ) board and connect it to one ofthe analog input channels (see Data Acquisition notes below. Then use the ScanningOFDR software to perform an internally clocked acquisition (see Sec. 3.1.2). Alterna-tively, look at the frequency clock signal using an oscilloscope. If using an oscilloscope,remember that the laser must be sweeping when the clock signal is acquired.
• The OFDR interferometer uses polarization diverse detection at the output. This de-tection method avoids reduction in signal levels due to polarization fading. To workproperly, this method requires that the light traveling through the reference arm of theinterferometer (the arm containing the switch in Fig. 1) be polarized such that it is splitevenly by the polarization beam splitter (PBS) at the output of the interferometer. Ad-just the manual polarization controller labeled PC1 to achieve an equal splitting ratio.
8

Table 1: Absorption line wavelengths for the dBm Optics model WA-1528-1562 100TorrH13CN wavelength reference. Accuracy is ±0.3 pm except for wavelengths marked with anasterisk (*), which are known to ±0.6 pm.
R Branch P BranchLine no. Wavelength (nm) Line no. Wavelength (nm)
25 1528.0541 1 1543.1148*24 1528.4862* 2 1543.809423 1528.9271 3 1544.514722 1529.3762 4 1545.2314*21 1529.8376* 5 1545.9563*20 1530.3061 6 1546.690219 1530.7856 7 1547.435418 1531.2764* 8 1548.190417 1531.7738 9 1548.9554*16 1532.2825 10 1549.7302*15 1532.8024* 11 1550.5149*14 1533.3291 12 1551.310613 1533.8671 13 1552.115712 1534.4159* 14 1552.930811 1534.9723 15 1553.756010 1535.5401* 16 1554.5892*9 1536.1170* 17 1555.4346*8 1536.7034* 18 1556.29197 1537.2997* 19 1557.15736 1537.9069 20 1558.03295 1538.5224* 21 1558.91854 1539.1494 22 1559.81433 1539.7855 23 1560.7185*2 1540.4314 24 1561.6344*1 1541.0872 25 1562.56250 1541.7529
9

Figure 4: Diagram and drive signal configuration for the E-Tek fiber optic switch.
This can be done by observing the S and P channel outputs directly using a scope, orby using the S Mean and P Mean indicators in the Scanning OFDR Software (seeSec. 3.1.2). Remove any strong reflectors from the test arm of the interferometer duringthis process.
• The E-Tek fiber optic switch in the reference arm allows the reference arm to be opened,partially mitigating coherent effects when performing confocal scans. The switch isdriven by a 5V pulse on the ctr0 and ctr1 outputs of the PCI-6115 DAQ board. Thepinout for the switch is shown in Fig. 4. The switch is not mounted in a PCB, so thephysical connection to the switch is made via test clips. The switch pins are fragileand the switch is expensive to replace, so the switch pins are run through a header(Digi-Key part number A100205-ND).
• The OFDR interferometer uses a three-coupler geometry with a transmissive referencearm and a reflective test arm. Currently the test arm has three probe paths, eachwith a different delay allowing their contributions to be separated from one anotherin the OFDR time domain data sets. Two probes have antireflection-coated FC-PCconnectors at their output. The third is a bare fiber that may be spliced to a deviceunder test.
2.3 Signal Detection and Acquisition
• The optical signals on the S, P, Aux, and Frequency Clock channels are currently de-tected using Thorlabs PDA10CS amplified photodetectors. The HCN signal is detectedusing an older, roughly equivalent model. These detectors have adjustable gain, andtheir bandwidth varies inversely with the gain setting. The gain settings and associatedbandwidths are summarized in Table 2
• Two different DAQ boards are available for use: a PCI-6115 and a PXIe-4492, bothmanufactured by National Instruments. The PCI-6115 resides inside the HP worksta-
10

Table 2: Gain settings and bandwidths for the Thorlabs PDA10CS Photodetectors.
Gain Setting (dB) Bandwidth (MHz)
0 1710 8.520 1.930 0.77540 0.32050 0.09060 0.03370 0.012
Table 3: Comparison of the PCI-6115 and PXIe-4492 DAQ boards.
Feature PCI-6115 PXIe-4492
ADC resolution 12 bits 24 bitsMaximum sampling rate 10 MS/s 204.8 kS/sInput voltage range ±42 V ±10 VNumber of analog inputs 4 8Number of gain settings 8 2Number of counters 2 0Number of digital I/O lines 8 0Supports external clock Yes NoSupports OFDR fiber optic switch control Yes NoSupports confocal scanning Yes No
tion and is accessed by the BNC-2110 connector block. The PXIe-4492 resides in thePXIe-1073 chassis. Only the PCI-6115 supports all of the features of the ScanningOFDR software, and this DAQ board must always remain connected and functional.The PXIe-4492 enables higher-precision ranging measurements because it uses a 24-bit analog-to-digital converter (ADC), whereas the PCI-6115 uses a 12-bit ADC. ThePXIe-4492 has other significant limitations, however, and does not support all of thesystem features of the Scanning OFDR software application. The most important lim-itations to note are that the PXIe-4492 does not support use of an external clock andits maximum sampling rate is a factor of 50 smaller than that of the PCI-6115. Table 3summarizes the relevant differences between the two DAQ boards.
• Both DAQ boards receive a start trigger signal from the laser (the “Trigger Out”connector on the back of the Agilent 81680A). The current hardware configuration hasthis trigger signal wired to pin PFI6 on the PCI-6115 DAQ board, though it can bewired to any available PFI pin2. The PXIe-4492 must receive the start trigger signal onpin PFI0 because it is the only pin on the board other than the analog input channels.The name of pin where the start trigger signal is applied is stored in the Scanning
2PFI0 on the PCI-6115 is the external analog clock pin, so it is not available for the start trigger signal.
11

OFDR software under the global variable Start Trig Pin.
2.4 The Seruga Seiki Stage System
• The minimum incremental linear motion for the Seruga Seiki stages is approximately40 nm. This unit is referred to as one “tick”. The settings and positions of the linearstages are all communicated through the Seruga Seiki D120 motion controller in unitsof ticks.
• The minimum incremental rotational motion for the Seruga Seiki stages is approxi-mately 1.6 millidegrees. This unit is also referred to as a tick in the context of rotationalmotion.
• Communication with the Seruga Seiki D120 motion controller takes place via GPIB,but the D120 does not respond to the standard *IDN? query. See the D120 SeriesStepping Motor Controller Instruction Manual for a complete listing of accepted GPIBcommands.
• For confocal scanning with the Scanning OFDR, data is acquired as a function of stageposition. This is accomplished using either the “CW pulse signal” or the “CCW pulsesignal” as an external clock for triggering data acquisition during motion. These signalsare accessed from the Monitor Output on the back of the D120 controller. The connectorfor the Monitor Output is apparently obsolete, and the closest Digi-Key part number isnot compatible3 As a result, there is a custom connector made from a modified DX40M-20P connector that interfaces to the Monitor Output. This connection isn’t as secureas it should be, so exercise care to make sure the connection is maintained.
• When the D120 applies power to the stage axes, the knobs on the stage stack becomelocked. Axis power must be turned off before the knobs can be turned. It is bestto avoid turning the knobs, and instead drive the stages using the Scanning OFDRsoftware (see Stage Software Limits in Sec. 3.1.5). Alternatively, use the “HandyTerminal” connected to the D120 controller to drive the stages.
• See the D120 Series Stepping Motor Controller Instruction Manual for instructions onhow to use the Handy Terminal and for further information about the Seruga Seikistages.
2.5 The Control Computer
This computer is currently an HP xw4600 workstation with an Intel Core2 Duo E8400 3.00GHz CPU and 6.0 GB of RAM. Presumably this computer will be replaced with an upgradedmodel at some point. A full-length PCI slot is required to accommodate the PCI-6115 DAQboard. The MXI interface to the PXIe-1073 chassis requires a PCI Express x1 slot. TheScanning OFDR software is written in the 64-bit version of LabVIEW 2011.
3The mating connector type is specified as DX40-20P in the D120 Series Stepping Motor Controller In-struction Manual, and Digi-Key carries a DX40M-20P, which doesn’t quite fit.
12

Figure 5: The graphical user interface for the Scanning OFDR system software.
3 Software
The Scanning OFDR system software is written in National Instruments LabVIEW 2011. Asof this writing, the most recent version of main user interface and source code framework isfound in the file Scanning OFDR 2.2.vi. This software application provides all user interface,hardware control, and data processing functions to perform a variety of measurement tasks.A screen capture of the main user interface is shown in Fig. 5. A listing of the controls foundon the front panel of the user interface appears in Table 4.
Table 4: Alphabetical list of user interface controls for the Scanning OFDR software, withdescriptions.
LVClass Name Description
Digital #Sweeps Specifies the number of wavelength sweeps to be per-formed when the Sweep button is pressed or at eachlocation of a scan.
Enum Active Axis Specifies the currently active Seruga Seiki stage axis.
Enum Active Stack Specifies the currently active Seruga Seiki stage stack.
13

Table 4: User interface control descriptions, continued.
LVClass Name Description
Boolean Autosave Raw
Data
Toggle saving of raw OFDR data during scanning. Whenturned on, a dialog window prompts the user to specify adata directory and file name prefix for saved data. Cau-tion: saving raw data can produce extremely largeamounts of data. Be aware of available disk space, andsave a single raw data file before beginning to determinewheter or not the available disk space will be adequate.
Digital Aux Mean Indicates the mean raw data value on the Aux channel.
Boolean Averaging Toggle averaging of wavelength sweep data on and off.*Not yet implemented.*
Enum Averaging Domain Specifies whether averaging of multiple wavelength sweepsshould be performed in the time domain or the frequencydomain. *Not yet implemented*
Digital Clock Freq (Hz) Specifies the clock frequency when the Internal optionis selected for Clock Source. For the PCI-6115 DAQboard, the maximum clock frequency is 10 MHz. For thePXIe-4492 DAQ board, the maximum clock frequency is204.8 kHz.
Enum Clock Source Specifies the clock source for data acquisition duringwavelength sweeps. Internal uses the internal clock onboard the data acquisition board. External uses the ana-log signal applied to PFI0 on the data acquisition board.Under normal usage, this signal should be signal outputby the trigger interferometer in the OFDR optical net-work. The PXIe-4492 DAQ board does not support ex-ternal clocking, so the Internal option must be used withthis board. The PCI-6115 DAQ board supports both in-ternal and external clocking.
Boolean Continuous Enables or disables continuous wavelength sweeping.
Digital Data Buffer Size This indicator displays the number of data points to beacquired for a wavelength sweep based on current sweepparameter settings.
Array Drive Speed OFDRConfig: This is an OFDR configuration parameterstored in configuration files.
Digital Endpoints The number of data points neglected at each end of thefiltered data set when performing curve fitting during pre-cision ranging data processing. Should be changed byselecting System→Measurement Options.
Digital EndWLnum Specifies the end wavelength for wavelength sweeps.
Ring EndWLring Specifies the end wavelength for wavelength sweeps.
Boolean EXIT Exit the Scaning OFDR software application
14

Table 4: User interface control descriptions, continued.
LVClass Name Description
String Filename Root Filename root for saving raw OFDR data during scanning
Digital Filter Size
(Pts)
The number of data points used for precision rang-ing data processing. Should be changed by selectingSystem→Measurement Options.
XYGraph Graph Main Main plot area for displaying measurement results.
Digital Laser Power (mW) Specifies the laser output power.
Digital P Mean Indicates the mean raw data value on the P channel.During ordinary operation, polarization controller PC1should be adjusted so that S Mean and P Mean areequal.
Digital Peak Area Pts The number of data points used for calculating peakamplitude values. Should be changed by selectingSystem→Measurement Options.
Array Peak Array the Peak Selection and Measurements array, this ar-ray is used to specify peaks used for measurements andto display measurements associated with those peaks.
Enum Plot Selection Specifies the quantity to be displayed in the main plotarea. Note this parameter is not stored in configurationfiles. The reason is because its allowable values depend onwhat type of measurement was most recently performed(wavelength sweep or confocal scan) and loading a con-figuration file does not affect the raw data in memory.
Array Position Indicates the current position for each axis of the SerugaSeiki stage stack specified by Active Stack. Positionsare in terms of “ticks” where 1 tick is approximately equalto 40 nm.
Boolean Recalculate Recalculate the amplitude and precision ranging measure-ment values in thePeak Selection and Measurementsarray. Perform this recalculation after modifying peak lo-cations within the array.
Digital S Mean Indicates the mean raw data value on the S channel.During ordinary operation, polarization controller PC1should be adjusted so that S Mean and P Mean areequal.
Boolean ShiftLimits Indicates whether or not the software limits of the ac-tive stage axis should be shifted when the zero locationis changed. This control is disabled; toggle this optionusing the menu option System→Shift Limits with Zero.
Digital Start Wavelength Specifies the starting wavelength for wavelength sweeps.
15

Table 4: User interface control descriptions, continued.
LVClass Name Description
Array Step Indicates and specifies the current step sizes for each axisof the Seruga Seiki stage stack specified byActive Stack.Units are ”ticks” where 1 tick is approximately equal to40 nm.
TabControl SupPlotsTab Supplemental Plots Tab. Allows the user to display thevarious supplemental plots or the Status Log. Add addi-tional pages to this tab control for custom data process-ing.
Boolean Sweep Initiates a laser wavelength sweep and data acquisition.
Digital Sweep Buffer
(nm)
Sweep buffer for HCN wavelength calibration (not yet im-plemented).
Boolean Update Cursor
List
Click to update the cursor lists in the Peak Selectionand Measurements array to match the cursor legendfor the main graph.
Boolean Use 2^n Indicates whether or not to contrain data set sizes to bea power of two. This control is disabled; toggle this fea-ture using the menu option System→Use 2ˆn Point ScanRange.
String User Displays the user logged in to the system. To change theuser, select File→Change User.
Enum Window Specifies the window function to be applied to raw fre-quency domain data prior to applying the Fourier trans-form when calculating OFDR time domain data.
3.1 Usage
3.1.1 System Configuration
Upon starting the Scanning OFDR system software, a dialog box will request registration ofyour user name. Users who have registered with the system previously will find their namesin the drop-down list. If your name is not in the list, type your name and click OK.
Before performing measurements, make sure that the current hardware state is accuratelyrepresented in the software settings. To edit hardware parameters, select System→SystemParameters. This brings up the Edit Hardware Parameters dialog window, shown in Fig. 6.For most general usage scenarios these parameters will not change. If values do not correctlyreflect the current harware configuration, however, the system will not function.
DAQ Board Two data acquisition boards are currently available: the PCI-6115, which
16

Figure 6: The Edit Hardware Parameters dialog window.
resides inside the HP workstation and is accessed by the BNC-2110 connector block,and the PXIe-4492, which resides in the PXIe-1073 chassis. Generally, the PCI-6115should be used. The PXIe-4492 does not support all system features.
Laser GPIB Address This value should be 19, unless changed on the Agilent 8164A main-frame.
Stage GPIB Address This value should be 7, unless changed on the Seruga Seiki D120motion controller.
Trigger Delay (ns) This value is the relative delay between the two arms of the triggerinterferometer in the OFDR optical network. If the current trigger interferometer delayis not known, measure the delay using Calibrate Interferometer v2.vi.
Trigger Hysteresis (V) This is the hysteresis value when using an external analog clocksignal for data acquisition. A rule of thumb is that the hysteresis level should be aboutone quarter to one half of the amplitude of the analog clock signal. See “Level Triggeringwith Hysteresis” on page 13-5 of the National Instruments DAQ S Series User Manualfor mor information.
Channel Assignment This lists the available analog input channels for the selected DAQBoard.
17

Signal Name Assigns device-independent signal names to the various analog input channels.Data processing functions in the Scanning OFDR software look for signals named S, P,HCN, and Aux. Signal names must be unique for each analog input channel.
Input Coupling Selects AC or DC coupling for each analog input channel. In general, allchannels should be DC coupled. The S and P channels may be AC coupled to increasethe signal-to-noise ratio for small amplitude reflectors, but this approach must be usedwith caution, especially with regard to balancing the polarization-diverse detectionchannels.
High Limit (V) Set the highest expected voltage to be measured on each analog inputchannel. Note this level is used to select an available gain setting on the selected DAQBoard and is not a firm fixed limit.
Low Limit (V) Set the lowest expected voltage to be measured on each analog input chan-nel. Note this level is used to select an available gain setting on the selected DAQBoard and is not a firm fixed limit.
Once all parameters have been set, click OK to accept the changes and close the dialogwindow, or click Cancel to discard all changes. Note if the PXIe-4492 DAQ board is selected,there are eight analog input channels, but only four are displayed at a time. Use the scrollbar to display the rest.
3.1.2 Performing Swept-Wavelength Measurements
A swept-wavelength measurement consists of sweeping the wavelength of the Agilent 81680Alaser source, digitizing and acquiring the output signals from OFDR system fiber optic net-work, and optionally performing data processing tasks on the resulting data. The controlsfor performing basic swept-wavelength measurements are located in the upper left corner ofthe user interface in the area labeled Swept Wavelength Acquisition. To perform a basicswept-wavelength measurement, use the following procedure:
1. Set the Start Wavelength and End Wavelength for the sweep. The available wave-length range for the Agilent 81680A tunable laser is 1460 to 1580 nm.
2. Set the Laser Power. Typical values for the laser power are 3 to 4 mW. Note thatwhen changing the laser power, be sure to ensure that the resulting raw data does notsaturate any of the analog input channels are the DAQ board. Changing the laserpower may also require a change in the Trigger Hysteresis.
3. Choose a Clock Source. Choices are External or Internal. Internal uses the clockinternal to the DAQ board. External uses the external clock signal supplied by theTrigger Interferometer on PFI0 of the PCI-6115 DAQ board. Use of the External clockoption with the PXIe-4492 DAQ board will result in an error because the PXIe-4492DAQ board does not support external clocking.
18

4. If Clock Source is set to Internal, then set the desired Clock Freq (Hz). Whenusing the PCI-6115 DAQ board, the maximum clock frequency is 10 MHz. When usingthe PXIe-4492, the maximum clock frequency is 204.8 kHz. If Clock Source is set toExternal, the value of Clock Freq (Hz) is ignored.
5. Select the desired Number of Sweeps. This is the number of consecutive wavelengthsweeps that will be performed when the Sweep button is clicked.
6. Click the Sweep button to perform the wavelength sweep and acquire data.
7. After sweeping, note the values of the S Mean and P Mean indicators. These valuesshould be approximately equal (within 5%). If this is not the case, adjust the polariza-tion controller PC1 while performing additional sweeps to equalize these values. Thisprocess ensures that the polarization-diverse detection channels are balanced.4
Continuous Sweeping To continuously sweep and acquire data, click the Continuouscheckbox. When the Continuous checkbox is checked, the Sweep button will remain de-pressed after clicking and the laser will continuously sweep and acquire data To stop contin-uous sweeping, click the the Sweep button again (it’s label changes to Sweeping while dataacquisition is in progress) or uncheck the Continuous checkbox.
3.1.3 Displaying OFDR Data
Once data has been acquired, it will be automatically displayed in the main graph area ofuser interface. The type of data displayed in graph depends on the value of Plot Selection,located directly above the graph. After data has been acquired, change Plot Selection toview the data processed in different ways. The options for Plot Selection are
Raw Data This option displays the raw, unprocessed data that is currently in memory. Therewill be one curve for each analog input channel (4 for the acquisitions made using thePCI-6115 DAQ board, and 8 for acquisitions with the PXIe-4492). The vertical axisis in units of volts, while the horizontal axis depends on the Clock Source used forthe acquisition. Internal clock acquisitions are displayed as a function of time, whileexternal clock acquisitions are displayed as a function of wavelength.
Fourier Transform (Raw) This option displays the discrete Fourier transform of the rawdata currently in memory. There will be one curve for each analog input channel.Internal clock acquisitions are displayed as a function of frequency, while external clockacquisitions are displayed as a function of time, or delay.
4Strictly speaking, only the reference arm contribution to the S and P signals should be balanced. Forweak reflectors (4% or less) it is acceptable to balance the signals in the presence of a test arm contribution.For strong reflectors, however, this is not the case. Therefore, if there is a strong reflector in the test arm,remove it (or pinch off the fiber if you know how to do this without breaking it) when balancing the S and Psignals.
19
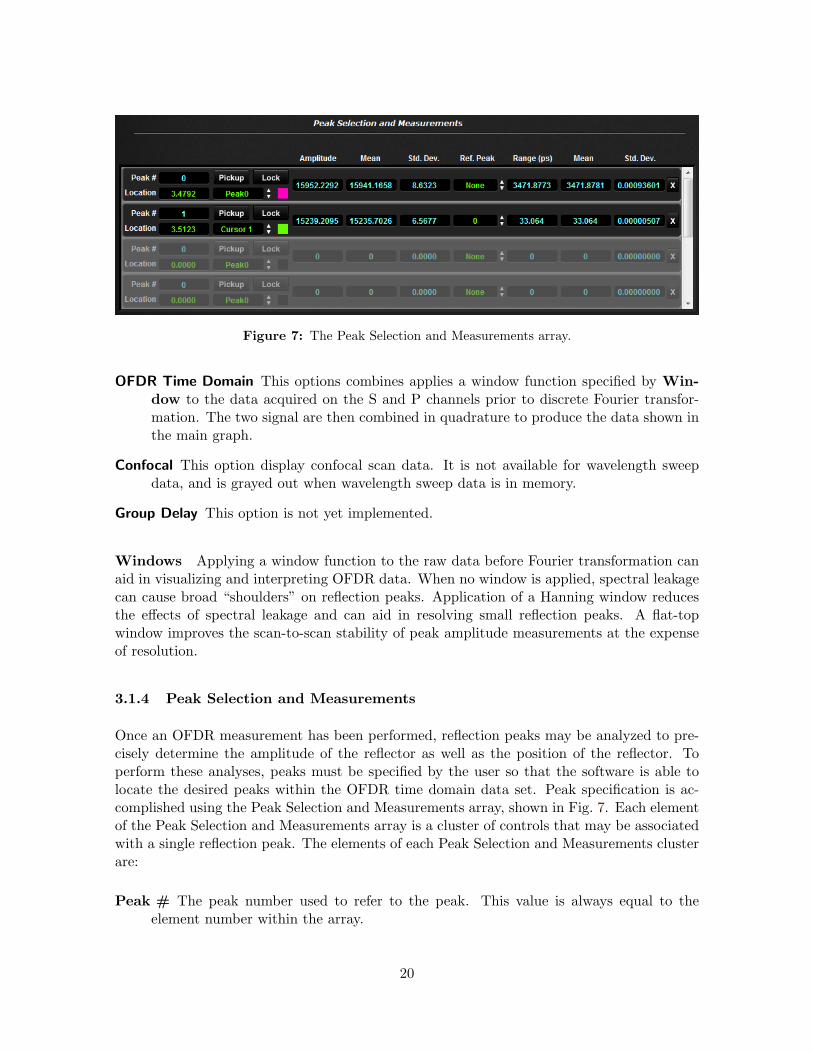
Figure 7: The Peak Selection and Measurements array.
OFDR Time Domain This options combines applies a window function specified by Win-dow to the data acquired on the S and P channels prior to discrete Fourier transfor-mation. The two signal are then combined in quadrature to produce the data shown inthe main graph.
Confocal This option display confocal scan data. It is not available for wavelength sweepdata, and is grayed out when wavelength sweep data is in memory.
Group Delay This option is not yet implemented.
Windows Applying a window function to the raw data before Fourier transformation canaid in visualizing and interpreting OFDR data. When no window is applied, spectral leakagecan cause broad “shoulders” on reflection peaks. Application of a Hanning window reducesthe effects of spectral leakage and can aid in resolving small reflection peaks. A flat-topwindow improves the scan-to-scan stability of peak amplitude measurements at the expenseof resolution.
3.1.4 Peak Selection and Measurements
Once an OFDR measurement has been performed, reflection peaks may be analyzed to pre-cisely determine the amplitude of the reflector as well as the position of the reflector. Toperform these analyses, peaks must be specified by the user so that the software is able tolocate the desired peaks within the OFDR time domain data set. Peak specification is ac-complished using the Peak Selection and Measurements array, shown in Fig. 7. Each elementof the Peak Selection and Measurements array is a cluster of controls that may be associatedwith a single reflection peak. The elements of each Peak Selection and Measurements clusterare:
Peak # The peak number used to refer to the peak. This value is always equal to theelement number within the array.
20
Location The location of the peak within the OFDR time domain data set in nanoseconds.
Cursor List A list of the available cursors in the Main Graph. When cursors are added,removed, or changed in the Main Graph, the Cursor List must be manually updatedby clicking Refresh Cursor List.
Colorbox The color of the cursor currently selected in Cursor List.
Pickup Sets Location to the time axis value of the Main Graph cursor currently selectedin Cursor List.
Lock Locks Location to the time axis value of the Main Graph cursor currently selectedin Cursor List. When Lock is on, Location will automatically update when theposition of the selected cursor is changed.
Amplitude Indicates the measured amplitude of the peak.
Amplitude Mean Indicates the mean of recent amplitude measurements of the peak. Therecent measurement values used to calculate the mean value are the values present inthe Amplitude Chart.
Amplitude Std. Dev. Indicates the standard deviation of the recent amplitude measure-ments of the peak stored in the Amplitude Chart.
Ref. Peak The reference peak used for the precision ranging calculation to precisely deter-mine the range to the peak. This control is a drop-down list containing all currentlyconfigured peaks in the Peak Selection and Measurements array. If “None” is selected,the range is calculated relative to the reference arm of the OFDR interferometer. If areference peak is selected, the range is calculated relative to the reference peak.
Range (ps) The range to the reflection peak calculated using the precision ranging algo-rithm. Strictly speaking, this is the optical path delay to the peak in picoseconds.
Range Mean Indicates the mean of recent range measurements for the peak. The recentmeasurement values used to calculate the mean value are the values present in theRange Chart.
Range Std. Dev. Indicates the standard deviation of the recent range measurements forthe peak stored in the Range Chart.
X Removes the peak from the Peak Selection and Measurements array.
Performing Measurements Each time an externally clocked OFDR measurement is per-formed, the range measurements in the Peak Selection and Measurements array are updatedbased on the newly acquired data. The amplitude measurements are also updated if PlotSelection is set to OFDR Time Domain. This is because the precision ranging calculationuses the raw measurement data as a starting point, while the amplitude calculation uses theOFDR time domain data, including application of the window function specified by Win-dow. This data is only produced when Plot Selection is set to OFDR Time Domain. If
21

wavelength sweep data is acquired with Clock Source set to Internal, then range data is notupdated since the precision ranging calculation relies on data sampled at equal incrementsof optical frequency. The amplitude measurement does not have this requirement, however,so amplitude measurement values will update for new internally clocked data.
If the Peak Selection and Measurements array has been modified since the last wavelengthsweep, the measurement values may be updated without acquiring new data by clicking theRecalculate button.
Measurement Charts and the Selected Peaks graph Additional information aboutthe peaks specified in the Peak Selection and Measurements array and the associated peakmeasurements can be found in the upper right of the main user interface in the Supplemen-tal Information Display area. Three of the options found in the Supplemental InformationDisplay selector are relevant to peak selection and measurements. The other options aredescribed elsewhere in this document. The options relevant here are:
Selected Peaks Both the amplitude and precision ranging calculations begin by selecting anumber of data points surrounding the specified peak locations. This plot shows the se-lected data points for each calculation. This plot is useful, for example, for ensuring theset of points used for amplitude measurements is centered on the peak, or to see whetheror not the precision ranging filter window includes neighboring peaks (which should beavoided). The Plot: selector provides the following choices: Amplitude Measurements,Precision Ranging, and Precision Ranging:Phase. The first two options show the timedomain data subsets used for the amplitude and precision ranging calculations, respec-tively. The third option displays the frequency domain phase of the precision rangingdata subset. Within the plot window, there will be one curve for each peak configuredin the Peak Selection and Measurements array. The visibility of each curve may betoggled using the checkbox next to the plot name in the plot legend.
Amplitude Chart Each time an amplitude measurement is performed, the resulting valuesare added to this chart. The horizontal axis is measurement number, and the verti-cal axis is amplitude measurement value. There will be one curve for for each peakconfigured in the Peak Selection and Measurements array. The visibility of each curvemay be toggled using the checkbox next to the plot name in the plot legend. Whethervisible or not, the data points stored in this chart are used to determine the amplitudemean and standard deviation values reported in the Peak Selection and Measurementsarray for each peak. Remove all stored data by clicking Clear Chart.
Range Chart Each time a precision ranging measurement is performed, the resulting valuesare added to this chart. The horizontal axis is measurement number, and the verticalaxis is range in picoseconds. There will be one curve for for each peak configuredin the Peak Selection and Measurements array. Toggle visibility of each curve as inthe Amplitude Chart using the checkbox next to the plot name in the plot legend.Whether visible or not, the data points stored in this chart are used to determinethe range mean and standard deviation values reported in the Peak Selection andMeasurements array for each peak. Remove all stored data by clicking Clear Chart.
22

The Use Cursor Colors checkbox is present when any of these three options is selected.It provides an easy way to color code peaks among the Main Graph, the Peak Selection andMeasurements array, and supplemental graphs and charts by setting the supplemental plotcolors to match the associated Colorbox value in the Peak Selection and Measurementsarray, which in turn matches the color of a cursor in the Main Graph, which may be used tospecify the peak location. Turning Use Cursor Colors off allows the user to freely set theplot colors in graphs and charts.
3.1.5 Motion Control
The Scanning OFDR software provides direct control over the Seruga Seiki stages via GPIBcommunication. The most commonly used stage settings are located to the right of the PeakSelection and Measurements array in the Seruga Seiki Stage Settings area. This area includesthe following controls and indicators:
Active Stack Selects the active Seruga Seiki stage stack. Each stack comprises six axes ofmotion. The physical stage stacks are labeled 1 and 2.
Active Axis Selects the active stage axis. Each stack has the following axes, which arelabeled on the hardware: X, Y, Z, θX , θY , and θZ .
Step This is an array of six step distances, with one entry for each axis of the active stagestack. Distances are in units of stage “ticks”, where one tick is approximately equal to40 nm. Valid step sizes are in the range 0–8,000,000.
Position This is an array of six current positions, with one entry for each axis of the activestage stack. Positions are also in units of ticks. This array is an indicator only, andcannot be used to set the axis positions (see Driving the Stages below).
Each axis has three other settings that determine how each motion request is executed.These settings are less commonly changed, and are modified by selecting the menu optionSystem→Stage Settings. This brings up the Seruga Seiki Stage Settings dialog window, shownin Fig. 8. This dialog window has the following controls:
Active Stack Has the same function as Active Stack in the Seruga Seiki Stage Settingsarea of the main user interface.
Startup Speed This is an array of six current startup speed values, with one entry for eachaxis of the active stage stack. The startup speed for an axis is the speed at whichmotion begins, in units of ticks/s. Valid startup speed values are in the range 10–9999.
Acceleration This is an array of six acceleration values, with one entry for each axis ofthe active stage stack. The acceleration setting for an axis is the rate at which motionaccelerates, beginning at Startup Speed and accelerating to Drive Speed, in unitsof ticks/s2. Valid acceleration values are in the range 0–9999.
23

Figure 8: The Seruga Seiki Stage Settings dialog window.
Drive Speed This is an array of six drive speed values, with one entry for each axis of theactive stage stack. the drive speed for an axis is the speed in units of ticks/s at whichmotion takes place following a period of acceleration. Valid drive speed values are inthe range 1–999,999.
Step A duplicate of the Step array in the Seruga Seiki Stage Settings area of the main userinterface.
Driving the Stages The title bar of the lower right region of the user interface is a drop-down menu where one of the options is Motion Control . Under this heading are the controlsto remotely drive the Seruga Seiki stages. This set of controls is shown in Fig. 9.
Drive Axis These three buttons provide manual control over stage motion. The left ar-row ( ) initiates counterclockwise, or negative direction motion. The right arrow( )likewise initiates clockwise, or positive direction motion. Clicking either arrowmoves the selected Active Axis on the Active Stack a distance specified by the cor-responding entry in the Step array. The change in axis position will be updated in realtime in the Position array. The Stop button ( ) halts any stage motion currently inprogress.
Zero These buttons provide two different ways to zero the position of the selected ActiveAxis. Clicking the Go button moves the Active Axis to the position 0. Clicking Setchanges the label of the current Active Axis position to 0. Note that Set does notmove the stage.
24

Figure 9: The Motion Control control group.
Confocal Scanning Stage motion may be optionally accompanied by data acquisition toenable confocal scanning. Generally confocal scanning is associated with motion along theZ axis, but the software allows for data acquisition during motion of any axis. Controlsassociated with confocal scanning are also located in the Motion Control area of the mainuser interface.
Confocal Toggles confocal data acquisition on and off. When off, no data acquisition occursduring stage motion. When on, data is acquired using the stage motion pulse signal asthe acquisition clock so that one data point is acquired on each analog input channelfor each tick that the stage axis moves.
Smoothing Toggles application of a digital smoothing filter to confocal scan data. Becausethe OFDR system is a coherent system, confocal scan data often displays oscillatorycharacter as a function of position due to interference effects. These oscillations canmake it difficult to locate confocal reflection peaks. The oscillations can often be re-moved in postprocessing through the application of a digital low-pass filter. The filteris a dual-sided amplitude-only filter with a flat passband and Gaussian roll-off.
Smoothing Filter Cutoff The width of the flat passband of the smoothing filter in unitsof ticks−1.
Smoothing Filter Rolloff The 1/e width of the Gaussian rolloff of the smoothing filter inunits of ticks−1.
Stage Software Limits Software limits may be applied to the Seruga Seiki stage axesso that axis motion does not go beyond user-configured positions. To configure the stagesoftware limits, select the menu option System→Stage Limits. This brings up the SS StageLimits dialog window, shown in Fig. 10. The upper left portion of this dialog window housesthe following controls:
Stack Selects the active stage stack.
25

Figure 10: The SS Stage Software Limits dialog window.
Axis Selects the active stage axis.
Software Limits Enabled Enables or disables software limits for the selected axis.
The upper right portion of the dialog window contains three indicators and a button control:
Current Position The current position of the active stage axis.
High Limit The current high software limit setting for the active stage axis.
Low Limit The current low software limit setting for the active stage axis.
Update Updates the above three indicators.
The central region of the dialog window contains the controls for setting new software limitvalues:
New Limit Position The position value to use for the new software limit.
Use Current Position When checked, New Limit Position is set to the current positionof the active axis. If New Limit Position is changed to a different value, UseCurrent Position becomes unchecked.
Set High Limit Sets the upper software limit for the active axis to the value of New LimitPosition.
Set Low Limit Sets the lower software limit for the active axis to the value of New LimitPosition.
Because software limits are specified in the stage axis coordinate system, changing the zerolocation of this coordinate system causes a shift in the physical location of the software limits.The Scanning OFDR software will optionally shift the software limit settings to preserve
26

the same physical location upon a change in the zero location for a stage axis. To enablethis option, select the menu option System→Shift Limits With Zero. When this option ischecked, limit settings are changed when the zero location for an axis changes, preservingthe same physical location for the limit. When unchecked, the software limit settings remainunchanged, so a change in zero location for a stage axis results in a change in the physicallocation of the software limit.
Manual Stage Motion Best practice when using the Scanning OFDR system is to use thesoftware interface to drive the stages and avoid manual stage motion by physically turning theknobs on the stage stacks. This is because the Seruga Seiki D120 motion controller does notregister manual motion and does not update the axis position in response to manual motion.This results in a shift of the axis coordinate system by an unknown amount each time an axisknob is turned. Because software limits are specified in the axis coordinate system, manualmotion causes a change in the physical location of the software limits, potentially leading todamage if the stage overruns an intended limit location causing a collision.
An alternative means of manual stage motion that does not cause a change in axis coor-dinate system is to use the “Handy Terminal” connected to the D120 motion controller. Seethe Seruga Seiki D120 user manual for more information on using the Handy Terminal.
If it is necessary to perform manual stage motion by turning the knobs on the stage axes,axis power must first be turned off through the Scanning OFDR software interface. This isaccomplished by selecting the menu option System→Allow Manual Motion. When this menuoption is checked, stage axis power is turned off and the axis knobs are unlocked. The DriveAxis controls also become disabled. This option should remain unchecked during normaloperation, which keeps power applied to the stage axes and locks the axis knobs.
3.1.6 Peak Optimization
When using a focused probe beam to perform reflectivity measurements using the ScanningOFDR, it is important to position the sample interface of interest precisely at the focus of theprobe beam. This is because reflected light must couple back into a single mode fiber core,which acts as a confocal filter and rejects reflections from outside the focal region. This meansthat the measured amplitude of reflection peaks will exhibit a maximum when the interfaceis positioned at the focus, and fall off as the interface moves axially in either direction. Forreflection peaks positioned near the focus, the Scanning OFDR software can automaticallyoptimize the measured reflection amplitude by moving the sample axially and monitoring thepeak amplitude as a function of position. This process is referred to as Peak Optimization,and is accomplished using the controls under the Peak Optimization heading selection in thelower right region of the Scanning OFDR user interface. This set of controls is shown inFig. 11.
Peak Set the peak to optimize. This value refers to the Peak # of a peak that has beenconfigured in the Peak Selection and Measurements array.
Optimize Peak Initiates the peak optimization process. The peak optimization process
27

Figure 11: The Peak Optimization control group.
incrementally moves Active Axis by the value of the corresponding element of Step.The amplitude of the peak specified by Peak is monitored, and motion continues aslong as the amplitude of the peak increases. If the amplitude decreases for motionin one direction, the other direction is tried. Once the peak amplitude decreased formotion in both directions, the axis position is returned to the location of the maximumpeak amplitude and the peak optimization routine terminates.
Abort Aborts the peak optimization process.
3.1.7 Sample Perpendicularization
A common measurement performed using the Scanning OFDR is a spatially resolved mea-surement of reflectivity for a planar sample under test as a function of transverse position.Because of the confocal filtering effect of the single mode fiber core discussed above, it isimportant that the planar interface remain at the focal position of the probe beam as itsposition is scanned transversely. This requires that the planar interface of the sample mustbe oriented so that it is parallel to the transverse stage axes and perpendicular to the axialstage axis. (This process assumes the optical axis of the probe beam has been previouslyaligned to the axial stage axis.) The Scanning OFDR software provides an automated sampleperpendicularization process. This process consists of the following steps:
1. Move transversely a known step size along one transverse axis.
2. Measure the axial location of the reflecting interface.
3. Move transversely a known step size in the opposite direction along the same transverseaxis.
4. Measure the axial location of the reflecting interface again.
5. Calculate the tilt angle of the interface as the inverse tangent of the difference in axiallocations of the interface over the difference in transverse measurement positions.
28

Figure 12: The Perpendicularization control group.
6. Rotate the sample an amount equal to the measured tilt angle.
7. Repeat this process for the other transverse axis.
To set parameter values and initiate the perpendicularization routine use the following con-trols found under the Perpendicularization heading selection, shown in Fig. 12:
Method Selects the method used for determining the axial position of the reflector. As ofthis writing, only the Precision Ranging method has been implemented. Future methodsmay include Confocal and Peak Optimization.
Transverse Axis Selects the transverse motion axis.
Confocal Axis Selects the confocal scanning axis for the Confocal method (not yet imple-mented).
Peak Specifies the reflection peak configured in the Peak Selection and Measurements arraythat corresponds to the planar reflecting interface being perpendicularized.
Transverse Step Sets the transverse distance to move.
Tilt Angle Displays the measured tilt angle.
Measure Tilt Initiates a tilt angle measurement.
Adjust Angle Rotates the sample to compensate for the measured tilt angle. This buttonis disabled until a tilt angle measurement has been performed.
3.1.8 Scanning OFDR Measurements
The Scanning OFDR software allows for measurements of reflection peak amplitude and rangeto be performed as a function of either one or two spatial coordinates by sequentially perform-ing OFDR measurements and moving the Seruga Seiki stage axes. Scanned measurements
29

Figure 13: The Scanning control group.
return an amplitude value and a range value for each peak specified in the Peak Selectionand Measurements array at each scan location. To perform scanned OFDR measurement,use the controls under the Scanning heading selection, shown in Fig. 13:
Scan Type Selects a 1D or 2D scan.
Axis 1 Settings Specifies the scan settings for a 1D scan, or for the first axis of a 2D scan.
Axis 2 Settings Specifies the scan settings for for the second axis of a 2D scan.
Scan Initiates a scanned OFDR measurement.
Abort Aborts any scanned measurement currently in progress.
Each Axis Settings cluster contains the following fields:
Axis Selects the stage axis to move.
Steps Sets the number of steps to move Axis during the scan.
Direction The direction to move Axis during the scan.
Current Step Displays the current step for the axis during the scan.
Outside of these controls, scanned measurements also make use of a few controls outside ofthe Scanning area. The Axis settings refer to axes on the stack specified by Active Stack.Each scan step moves Axis a distance set by the corresponding element in Step. At eachscan location, the number of wavelength sweeps that are performed are set by Number ofSweeps.
30

Figure 14: The 2D Scan Plot display.
Displaying Scan Data The Scanning OFDR software provides two ways to display scandata: a 2D intensity plot for visualizing 2D scan data, and a line graph for plotting 1Dscan data or slices through 2D scan data sets. These plot options are accessed from theSupplemental Information Display selector. Selecting 2D Scan Plot displays the intensityplot shown in Fig. 14. This plot has the following options:
Peak Selects a peak from the Peak Selection and Measurements array for which to plot scandata.
Quantity Selects Amplitude or Range data to plot.
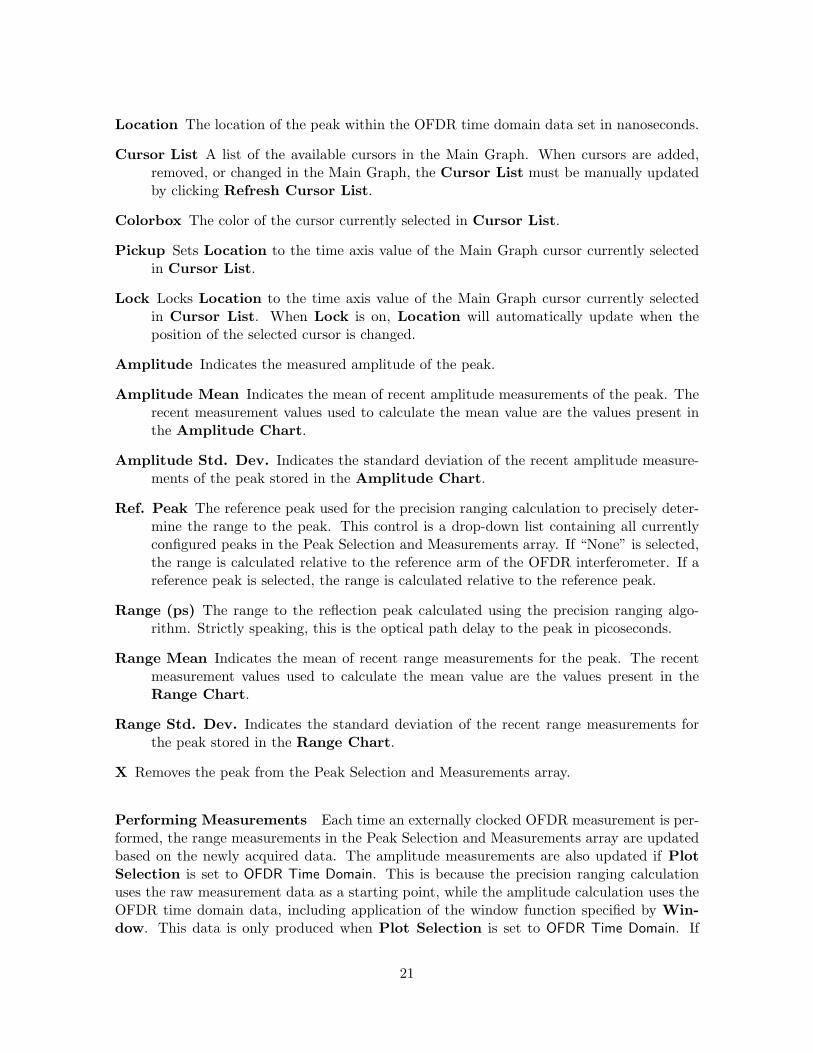
Selecting Scan Slice Plot from the Supplemental Information Display selector displays thegraph shown in Fig. 15. This graph has the same options for selecting Peak and Quantityas the 2D Scan Plot. Additionally, the following options are available:
Slice Direction When plotting a slice through a 2D scan data set, this selects whether touse a slice parallel to Axis 1 or Axis 2.
Slice Position Selects the array index of the slice within the 2D scan data set along theother axis which is not selected as the Slice Direction.
3.1.9 Saving Data
The Scanning OFDR software provides three options for saving data. These options arefound under the File menu.
31
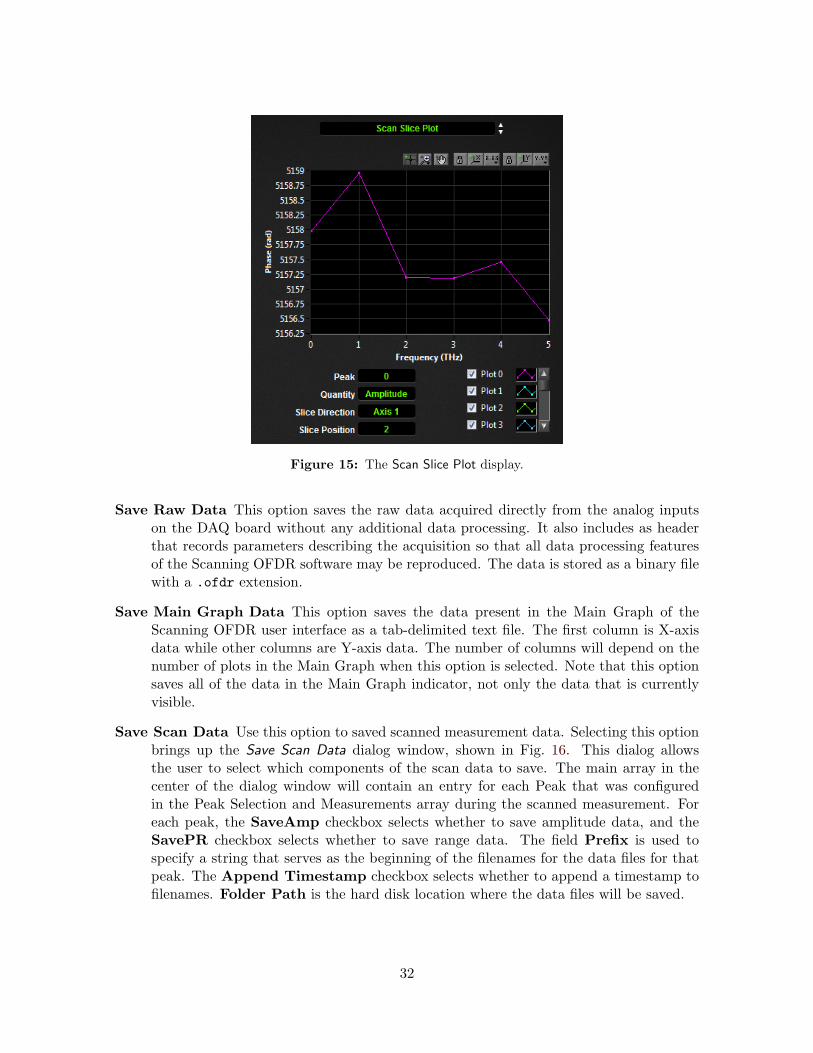
Figure 15: The Scan Slice Plot display.
Save Raw Data This option saves the raw data acquired directly from the analog inputson the DAQ board without any additional data processing. It also includes as headerthat records parameters describing the acquisition so that all data processing featuresof the Scanning OFDR software may be reproduced. The data is stored as a binary filewith a .ofdr extension.
Save Main Graph Data This option saves the data present in the Main Graph of theScanning OFDR user interface as a tab-delimited text file. The first column is X-axisdata while other columns are Y-axis data. The number of columns will depend on thenumber of plots in the Main Graph when this option is selected. Note that this optionsaves all of the data in the Main Graph indicator, not only the data that is currentlyvisible.
Save Scan Data Use this option to saved scanned measurement data. Selecting this optionbrings up the Save Scan Data dialog window, shown in Fig. 16. This dialog allowsthe user to select which components of the scan data to save. The main array in thecenter of the dialog window will contain an entry for each Peak that was configuredin the Peak Selection and Measurements array during the scanned measurement. Foreach peak, the SaveAmp checkbox selects whether to save amplitude data, and theSavePR checkbox selects whether to save range data. The field Prefix is used tospecify a string that serves as the beginning of the filenames for the data files for thatpeak. The Append Timestamp checkbox selects whether to append a timestamp tofilenames. Folder Path is the hard disk location where the data files will be saved.
32

Figure 16: The Save Scan Data dialog window.
Autosaving Raw Data The Scanning OFDR software provides an option to automaticallysave raw data each time a new acquisition is performed. Caution: autosaving raw data canproduce extremely large amounts of data. Before enabling autosaving for extensive measure-ment processes such as scanned OFDR measurements, make sure sufficient hard disk spaceexists to store all of the data. To configure autosaving of raw data, select File→ConfigureAutosave. This brings up the Configure Autosave Options dialog window, shown in Fig. 17.This window provides the following controls:
Autosave Raw Data Enable or disable autosaving using this checkbox.
Autosave Data Folder The hard disk location where autosaved data is stored.
Filename Root A string prefix used for filenames. Filenames also include a timestamp.
Loading Raw Data Raw data files with a .ofdr extension may be loaded back into theScanning OFDR software application for viewing or further data processing. To load a rawdata file, select File→Load Raw Data.
3.1.10 Saving and Loading System Configuration
The current state of the Scanning OFDR software application, including the values of frontpanel controls and hardware parameters, but excluding data currently in memory, may besaved to a configuration file by selecting the menu option File→Save Configuration File. Adialog window will appear with a prompt to select the filename and folder location to savethe file, and a default filename incorporating the registered user name and a timestamp isprovided. The file is saved with a .ini extension. The contents of the file is ascii text with
33

Figure 17: The Configure Autosave Options dialog window.
a key = value format for each parameter. While configuration files are human-readableand editable outside of the Scanning OFDR software application, manual editing is notrecommended to avoid invalid keys and values. Once a configuration file has been saved,the Scanning OFDR software application may be restored to the saved state by selecting themenu option File→Load Configuration File to load the configuration file.
3.2 SubVI Listing
The following is a listing of all custom subVIs called by the Scanning OFDR software applica-tion, Scanning OFDR v2.2.vi. These VIs also make use of VIs supplied by National Instrumentswith the LabVIEW 2011 installation, as well as VIs available through the OpenG project.See OpenG.org for more information on OpenG VIs.
34

Agilent Cycle Number.vi
Called by: Agilent Startup Sequence.vi
Custom VIs called: None
Labview VIs called: None
Inputs: 3
LVClass Name Description
Cluster error in Input error cluster.
Digital GPIB Address GPIB address of the Agilent 81680A tunable laser.
Digital Number of Sweep
Cycles
Requested number of sweeps. Allowable values are 1–100.
Outputs: 1
LVClass Name Description
Cluster error out Output error cluster.
VI description: This VI sets the number of consecutive wavelength sweeps the
Agilent 81680A tunable laser will perform.
35

Agilent Laser On-Off.vi
Called by: Sweep Agilent Laser 2.vi, Agilent Startup Sequence.vi
Custom VIs called: None
Labview VIs called: None
Inputs: 3
LVClass Name Description
Cluster Error In Input error cluster.
Digital GPIB Address GPIB address of the Agilent 81680A tunable laser.
Boolean Laser On/Off Requested optical output state. True=On, False=Off.
Outputs: 2
LVClass Name Description
Cluster Error Out Output error cluster.
Boolean Output Requested optical output state. True=On, False=Off.
VI description: This VI toggles the optical output of the Agilent 81680A tunable
laser on and off.
36
Agilent Power.vi
Called by: Scanning OFDR 2.2.vi, Agilent Startup Sequence.vi
Custom VIs called: None
Labview VIs called: None
Inputs: 3
LVClass Name Description
Cluster error in Input error cluster.
Digital GPIB Address
(Default=19)
GPIB address of the Agilent 81680A tunable laser.
Digital Power(mW) Requested power setting in mW.
Outputs: 2
LVClass Name Description
Cluster error out Output error cluster.
Digital Output Power
(mW)
Requested power setting in mW.
VI description: This VI sets the output power level of the Agilent 81680A tun-
able laser.
37

Agilent Query Sweep State.vi
Called by: Scanning OFDR 2.2.vi
Custom VIs called: OFDR Global.vi
Labview VIs called: None
Inputs: 1
LVClass Name Description
Cluster error in Input error cluster.
Outputs: 3
LVClass Name Description
String data
Cluster error out Output error cluster.
Boolean Sweeping? Indicates whether or not the Agilent 81680A tunable laseris currently sweeping.
VI description: This VI queries the state of the Agilent 81680A tunable laser to
determine if it is currently sweeping.
38

Agilent Start Wavelength.vi
Called by: Agilent Startup Sequence.vi
Custom VIs called: None
Labview VIs called: None
Inputs: 3
LVClass Name Description
Cluster error in Input error cluster.
Digital GPIB Address GPIB address of the Agilent 81680A tunable laser.
Digital Start Wavelength
(nm)
Requested sweep start wavelength.
Outputs: 1
LVClass Name Description
Cluster error out Output error cluster.
VI description: This VI sets the sweep start wavelength on the Agilent 81680A
tunable laser.
39

Agilent Startup Sequence.vi
Called by: Scanning OFDR 2.2.vi
Custom VIs called: OFDR Global.vi, Agilent Sweep Speed.vi, Agilent Sweep Mode.vi,Agilent Stop Wavelength.vi, Agilent Start Wavelength.vi, AgilentPower.vi, Agilent Laser On-Off.vi, Agilent Cycle Number.vi
Labview VIs called: None
Inputs: 6
LVClass Name Description
Digital End WL (nm) Requested sweep end wavelength.
Cluster error in Input error cluster.
Digital Number of Sweep
Cycle
Requested number of sweeps.
Digital Power (mW) Requested laser power setting.
Digital Start WL (nm) Requested sweep start wavelength.
ComboBox Sweep Speed
(nm/s)
Requested laser tuning rate. Allowable values are0.5NM/S, 5NM/S, and 40NM/S.
Outputs: 1
LVClass Name Description
Cluster error out Output error cluster.
VI description: This VI prepares the Agilent 81680A tunable laser for an OFDR
measurement by setting the sweep start and end wavelengths, laser power, sweep speed, and
number of sweep cycles, as well as turning on the optical output.
40

Agilent Stop Wavelength.vi
Called by: Agilent Startup Sequence.vi
Custom VIs called: None
Labview VIs called: None
Inputs: 3
LVClass Name Description
Cluster error in Input error cluster.
Digital GPIB Address GPIB address of the Agilent 81680A tunable laser.
Digital Stop Wavelength Requested sweep end wavelength.
Outputs: 1
LVClass Name Description
Cluster error out Output error cluster.
VI description: This VI sets the sweep end wavelength on the Agilent 81680A
tunable laser.
41

Agilent Sweep Actions.vi
Called by: Scanning OFDR 2.2.vi, Sweep Agilent Laser 2.vi
Custom VIs called: None
Labview VIs called: None
Inputs: 3
LVClass Name Description
ComboBox Action Requested action. Allowable values are STOP, START,PAUSE, and CONTINUE.
Cluster error in Input error cluster.
Digital GPIB Address GPIB address of the Agilent 81680A tunable laser.
Outputs: 1
LVClass Name Description
Cluster error out Output error cluster.
VI description: This VI stops, starts, pauses or continues a wavelength sweep
using the Agilent 81680A tunable laser.
42

Agilent Sweep Mode.vi
Called by: Agilent Startup Sequence.vi
Custom VIs called: None
Labview VIs called: None
Inputs: 3
LVClass Name Description
Cluster error in Input error cluster.
Digital GPIB Address GPIB address of the Agilent 81680A tunable laser.
ComboBox Sweep Mode Requested sweep mode. Allowable values are STEPPED,MANUAL, and CONTINUOUS.
Outputs: 1
LVClass Name Description
Cluster error out Output error cluster.
VI description: This VI sets the sweep mode for the Agilent 81680A tunable
laser. The OFDR system only uses the CONTINUOUS sweep mode.
43
Agilent Sweep Speed.vi
Called by: Agilent Startup Sequence.vi
Custom VIs called: None
Labview VIs called: None
Inputs: 3
LVClass Name Description
Cluster error in Input error cluster.
Digital GPIB Address GPIB address of the Agilent 81680A tunable laser.
ComboBox Sweep Speed Requested tuning rate. Allowable values are 0.5NM/S,5NM/S, and 40NM/S.
Outputs: 1
LVClass Name Description
Cluster error out Output error cluster.
VI description: This VI sets the sweep speed, or tuning rate, of the Agilent
81680A tunable laser.
44

baseband2.vi
Called by: Precision Ranging2.vi
Custom VIs called: None
Labview VIs called: None
Inputs: 1
LVClass Name Description
Array Data In Complex (midband) data set input.
Outputs: 1
LVClass Name Description
Array Baseband data
out
Complex data set shifted to baseband.
VI description: This VI shifts complex data to baseband by multiplying the
phase by a pi-per-sample phase ramp. Note that this VI also works in reverse. If a baseband
signal is input, then the output is a midband signal. Here “baseband” means a signal with a
peak near the first element of it’s discrete Fourier transformed data array, while “midband”
means a signal with a peak near the center of the discrete Fourier transformed data array.
45

Buffer Points.vi
Called by: Scanning OFDR 2.2.vi
Custom VIs called: OFDR Global.vi, Clock Source Enum.ctl
Labview VIs called: None
Inputs: 6
LVClass Name Description
Digital Clock Freq (Hz) Clock frequency for timed acquisitions.
Enum Clock Source Clock source for data acquisition (see VI description).
Digital End Wavelength
(nm)
Requested sweep end wavelenth in nanometers.
Cluster error in (no
error)
Input error cluster.
Digital Start Wavelength
(nm)
Requested sweep start wavelenth in nanometers.
Digital Sweep Buffer
(nm)
Additional sweep bandwidth for wavelength calibration.
Outputs: 3
LVClass Name Description
Digital #pts w/ buffer Number of data points in the data array prior to wave-length calibration.
Cluster error out Output error cluster.
Digital requested #pts Number of data points in the final data array not includ-ing the sweep buffer for wavelength calibration.
VI description: This VI determines the number of data points to acquire during
a laser wavelength sweep. This VI an additional sweep buffer for wavelength calibration, but
this calibration has not been implemented in the Scanning OFDR software.
The number of data points depends on both the sweep range (start and end wavelengths)
and the type of clock used for acquisition. For internal clock aquisitions, the number of data
points depends on the tuning rate of the laser and the clock frequency. For external clock
46

acquisitions, the external clock is assumed to be an interferometer with a fixed path length
difference. In this case, the number of points depends on the interferometer delay, which is
stored in the global variable TrigDelay.
47

Calculate Tilt.vi
Called by: Scanning OFDR 2.2.vi
Custom VIs called: Tilt cluster.ctl, Processing States.ctl, OFDR Global.vi
Labview VIs called: None
Inputs: 4
LVClass Name Description
LVVariant Data A Tilt Cluster typedef cast as a variant (see VI descrip-tion).
Cluster error in Input error cluster.
Digital Notifier Code Code to indicate if distance data is ready. A value of 2indicates new precision ranging data.
Digital Range The measured distance to the sample surface.
Outputs: 4
LVClass Name Description
Boolean Done? Indicates whether the tilt calculation is complete.
Cluster error out Output error cluster.
Array Queue States Queue state array. This is either empty or contains theCalcTilt state if more data is still required.
Digital Tilt angle The calculated tilt angle of the sample under test. If thecalculation is incomplete this returns a value of 360.
VI description: This VI performs data recording and calculation functions for
measuing the tilt of a sample under test. It is intended to be called in a data processing
loop during while the data for the tilt measurement is being acquired. This VI should be
called once per distance measurement. The tilt measurement requires two distance (range)
measurements at two different transverse locations of the sample under test. Because both
hardware communication and data processing states must execute before the correct data is
present in memory for the tilt measurement, the CalcTilt state in the main Scanning OFDR
program waits for a notifier before calling this VI. The notifier is used for other syncronization
tasks as well, this VI checks the notification code to determine whether it should proceed
48

with the tilt calculation, or if it should wait. If it should wait, it just enqueues the CalcTilt
state again. If the notifier indicates data is present, it stores the first range value in the
FirstPos element of the Tilt Cluster and increments the counter NumPos. When the second
distance value is ready, it calculates the tilt using the difference in ranges and the Transvere
Step value passed via the Tilt Cluster. The Method element of the Tilt Cluster specifies how
the range data was measured, which affects the calculation code should interpret this data.
Currently only the Precision Ranging method has been implemented.
49

Check Instruments.vi
Called by: Scanning OFDR 2.2.vi
Custom VIs called: OFDR Global.vi
Labview VIs called: None
Inputs: 2
LVClass Name Description
Cluster error in (no
error)
Input error cluster.
Boolean Show dialog? Indicates whether to display a dialog window to the userif hardware is not found.
Outputs: 2
LVClass Name Description
Cluster error out Output error cluster.
String Message Status message.
VI description: This VI checks for the presence of the Seruga Seiki stages and
the Agilent 81680A tunable laser at the GPIB addresses specified in the global variables
¡b¿Stage GPIB Address¡/b¿ and ¡b¿Laser GPIB Address¡/b¿.
50

Confocal Plot Data.vi
Called by: Scanning OFDR 2.2.vi
Custom VIs called: Smoothing Filter.vi, OFDR Global.vi
Labview VIs called: None
Inputs: 5
LVClass Name Description
Cluster error in (no
error)
Input error cluster.
Digital Filter Cutoff Smoothing filter bandwidth specification.
Digital Filter Roll-Off
Width
Smoothing filter roll-off specification.
Array Raw Data Data array containing raw confocal scanning data.
Boolean Smoothing Selects whether to apply a smoothing filter to the confocaldata.
Outputs: 2
LVClass Name Description
Array Confocal Data Processed confocal scan data.
Cluster error out Output error cluster.
VI description: This VI processes raw confocal scan data for display in the main
graph on the front panel of the Scanning OFDR software application. Specifically, it combines
data from the S and P channels and optionally applies a smoothing filter. See Smoothing
Filter.vi for a description of the filter.
51

DAQ Config v3.vi
Called by: Scanning OFDR 2.2.vi
Custom VIs called: OFDR Global.vi
Labview VIs called: DAQmx Timing.vi, DAQmx Timing (Sample Clock).vi, DAQmx StartTask.vi, DAQmx Create Virtual Channel.vi, DAQmx Create Task.vi,DAQmx Create Channel (AI-Voltage-Basic).vi, DAQmx Clear Task.vi,Clear Errors.vi
Inputs: 5
LVClass Name Description
Digital Clock Frequency
(Hz)
Clock speed for time-synchronous acquisitions. Maximumvalues are 10MHz for the PCI-6115 and 204.8kHz for thePXIe-4492.
Boolean CW? Direction specifier for confocal scanning acquisitions.
Cluster error in (no
error)
¡B¿error in¡/B¿ can accept error information wired fromVIs previously called. Use this information to decide ifany functionality should be bypassed in the event of errorsfrom other VIs.Right-click the ¡B¿error in¡/B¿ control on the front paneland select ¡B¿Explain Error¡/B¿ or ¡B¿Explain Warn-ing¡/B¿ from the shortcut menu for more informationabout the error.
Enum Mode Clock mode for data acquisition (see VI description.)
Digital Requested Sample
Points
The requested number of data points per channel to ac-quire.
Outputs: 2
LVClass Name Description
DAQmxName DAQmx Sweep
Capture Task
Data acquisition task name.
Cluster error out Output error cluster.
VI description: This VI configures the data acquisition hardware in the OFDR
system in preparation for acquiring measurement data. Depending on the data acquisition
52
board being used, different methods of triggering and clocking the data acquisition process
may be supported. The modes supported by this VI (specified by Mode) include: [format]
Sweep Ext Clock. In this mode, the acquisition looks for a start trigger on the pin specfied
by the global variable Start Trig Pin and is clocked by an externally applied analog signal on
pin PFI0.
Sweep Int Clock. In this mode, the acquisition looks for a start trigger on the pin spec-
fied by the global variable Start Trig Pin and is clocked by the internal clock on the data
acquisition board.
Confocal. In this mode, the start trigger and acquisition clock are both derived by an
externally applied digital signal applied to either of the pins specified by the global variables
Stage CW Pulse Pin and Stage CCW Pulse Pin, depending on the value of CW?.
No Sweep (SW trigger). In this mode, the acquisition does not look for an external start
trigger and instead begins immediately. The acquisition is clocked by the internal clock on
the data acquisition board.
The OFDR system hardware currently utilizes one of two data acquisition boards: a PCI-
6115 (physically located within the HP workstation and accessed via the BNC-2110 connector
block) and a PXIe-4492 (physically located in the PXIe-1073 chassis). The PCI-6115 supports
all of the above modes with a maximum clock rate of 10 MHz and 12-bit resolution. The
PXIe-4492 supports only the Sweep Int Clock and No Sweep (SW trigger) modes with a
maximum clock rate of 204.8 MHz and 24-bit resolution.
53

DAQ Read.vi
Called by: Scanning OFDR 2.2.vi
Custom VIs called: OFDR Global.vi
Labview VIs called: DAQmx Stop Task.vi, DAQmx Start Task.vi, DAQmx Read.vi,DAQmx Fill In Error Info.vi
Inputs: 4
LVClass Name Description
DAQmxName DAQmx Sweep
Capture Task
(Use Active)
Data acquisition task name. If empty, the task configuredby DAQ Config v3.vi is used, if it exists.
Cluster Error In Input error cluster.
Boolean Start Task? (F)
Digital Timeout (30 sec) Time to wait for data acquisition task to complete.
Outputs: 2
LVClass Name Description
Array Data Acquired data array.
Cluster Error Out Output error cluster.
VI description: This VI reads data from a data acquisition task initiated by
DAQ Config v3.vi.
54

DriveOpticalSwitch.vi
Called by: Scanning OFDR 2.2.vi
Custom VIs called: None
Labview VIs called: DAQmx Wait Until Done.vi, DAQmx Start Task.vi, DAQmx CreateVirtual Channel.vi, DAQmx Create Channel (CO-PulseGeneration-Time).vi, DAQmx Clear Task.vi
Inputs: 2
LVClass Name Description
Cluster error in Input error cluster.
Boolean State T=close Requested fiber optic switch state.
Outputs: 1
LVClass Name Description
Cluster error out Output error cluster.
VI description: This VI uses the counter outputs (ctr0 and ctr1) on the PCI-
6115 data acquisition board to drive the E-Tek fiber optic switch.
55

Edit Hardware Parameters.vi
Called by: Scanning OFDR 2.2.vi
Custom VIs called: OFDR Global.vi
Labview VIs called: None
Inputs: 9
LVClass Name Description
Boolean Cancel Discard changes an close the dialog window.
Array Channel
Assignments &
Coupling
Analog input channel configuration array.
Enum DAQ Board Data acquisition board selection.
Cluster error in (no
error)
Input error cluster.
Digital Laser GPIB
Address
GPIB address of the Agilent 81680A tunable laser.
Boolean OK Apply changes and close the dialog window.
Digital Stage GPIB
Address
GPIB address of the Seruga Seiki D120 motion controller.
Digital Trigger Delay
(ns)
Trigger interferometer delay in nanoseconds.
Digital Trigger
Hysteresis (V)
Trigger hysteresis level in volts.
Outputs: 1
LVClass Name Description
Cluster error out Output error cluster.
VI description: This VI presents a dialog interface allowing the user to modify
hardware parameters for the OFDR system. Parameter settings in this VI must accurately
correspond to the present hardware state in order for the Scanning OFDR system to operate
without error.
56

Edit Stage Limits.vi
Called by: Scanning OFDR 2.2.vi
Custom VIs called: SS Toggle Software Limits.vi, SS Set Software Limit.vi, SS SetRemote Mode.vi, SS Query Status.vi, SS Query Software Limit.vi, SSQuery Position.vi, OFDR Global.vi
Labview VIs called: None
Inputs: 12
LVClass Name Description
Enum Axis Stage axis selection.
Boolean Current->Hi
Limit
Set the high (clockwise) software limit to the current po-sition.
Boolean Current->Low
Limit
Set the low (counterclockwise) software limit to the cur-rent position.
Boolean Done
Cluster error in Input error cluster.
Boolean Limits Enabled Toggle software limits for the selected axis on and off.
Digital New Limit
Postion
Enter a value for a new software limit position setting.
Boolean Set High Limit Set the high (clockwise) software limit to the value of NewLimit Position.
Boolean Set Low Limit Set the low (counterclockwise) software limit to the valueof New Limit Position.
Enum Stack Stage stack selection.
Boolean Update Update displayed position and limit values for selectedstack and axis.
Boolean Use Current
Postion
Specify whether to use the current axis position for asoftware limit setting.
Outputs: 4
57
LVClass Name Description
Digital Current Position Current position of the selected axis.
Cluster error out Output error cluster.
Digital High Limit High (clockwise) software limit setting for the selectedaxis.
Digital Low Limit Low (counterclockwise) software limit setting for the se-lected axis.
VI description: This VI is a dialog user interface for setting the software limits
for the Seruga Seiki stages.
58

Enqueue Config States.vi
Called by: Scanning OFDR 2.2.vi
Custom VIs called: Stage Settings Cluster.ctl, Stage Setting Array.ctl, StageParameter.ctl, Processing States.ctl, Communication States.ctl,Active Stack Enum.ctl
Labview VIs called: None
Inputs: 4
LVClass Name Description
TypedRefNum Comm Queue Reference to the Hardware Communication Queue.
Cluster error in (no
error)
Input error cluster.
TypedRefNum Proc Queue Reference to the Data Processing Queue.
Cluster Value Cluster Cluster of configuration values (see VI description).
Outputs: 1
LVClass Name Description
Cluster error out Output error cluster.
VI description: This VI queues the states necessary to update the state of the
hardware and software after loading a configuration file. Value Cluster contains values read
from the configuration file that are required to be passed to the various states in the queues.
59
Enqueue Tilt Measurement.vi
Called by: Scanning OFDR 2.2.vi
Custom VIs called: Tilt cluster.ctl, Stage Parameter.ctl, Log Manager.vi, CommunicationStates.ctl, Axis Selector.ctl
Labview VIs called: None
Inputs: 4
LVClass Name Description
Cluster error in (no
error)
Input error cluster.
LVObjectRefNum Status Ref Reference to status log string control.
LVObjectRefNum Step Ref Reference to a stage axis step distance settings array inthe calling VI.
Cluster Tilt cluster Cluster of tilt measurement parameters (see VI descrip-tion).
Outputs: 2
LVClass Name Description
Cluster error out Output error cluster.
Array State array Array of queue states to perform a tilt measurement.
VI description: This VI enqueues the states necessary to perform a measurement
of the tilt angle of a sample under test. The steps in this process are as follows: [format]
1. Set active axis to Transverse Axis 2. Set Transverse Axis step size to Transverse Step
3. Move CW 4. Measure distance 5. Move CCW twice 6. Measure distance 7. Move CW 8.
Set Transverse Axis step size back to prior value
Tilt measurement parameters are passed to this VI via the Tilt Cluster, though not all
elements of the Tilt Cluster are used. The following elements are used: [format]
Transverse Axis : Stage axis for transverse motion. Transvese Step: Transverse distance
to move. Method: Tilt measurement method. Currently only the Precision Ranging method
is fully implemented. Confocal Axis: Confocal scan axis when using the Confocal method.
60

Fourier Interpolation.vi
Called by: Resample.vi, WL vs Time.vi
Custom VIs called: None
Labview VIs called: NI AALPro.lvlib:Real FFT.vi, NI AALPro.lvlib:Inverse Real FFT.vi,NI AALPro.lvlib:Inverse FFT.vi, NI AALPro.lvlib:FFT.vi
Inputs: 2
LVClass Name Description
Array Data Input data array to be interpolated.
Digital Interp Factor Factor by which to increase the number of data points inthe data array.
Outputs: 1
LVClass Name Description
Array Interpolated
Data
Output interpolated data array.
VI description: This VI interpolates a data array by zero padding in the Fourier
domain. The number of points in the data array is increased by a factor of Interp Factor.
61

Generate X-Axis.vi
Called by: Scanning OFDR 2.2.vi
Custom VIs called: Plot Selection.ctl, OFDR Global.vi, Acquisition Parameters.ctl
Labview VIs called: None
Inputs: 3
LVClass Name Description
Cluster Aquisition
Parameters
Acquisition parameters cluster describing the raw data inmemory.
Cluster error in (no
error)
Input error cluster.
Enum Plot Selection Selects the type of data to plot.
Outputs: 3
LVClass Name Description
Cluster error out Output error cluster.
Array X-Axis X-axis data for plot.
String X-Axis Label X-axis label for plot.
VI description: This VI generates scaled X-axis data for use in the main graph
plots on the front panel of the main Scanning OFDR software application. The content of
the X-axis data depends on the type of plot requested (specificed by Plot Selection) and the
parameters describing the data acqusition (specified by Acquisition Parameters).
62
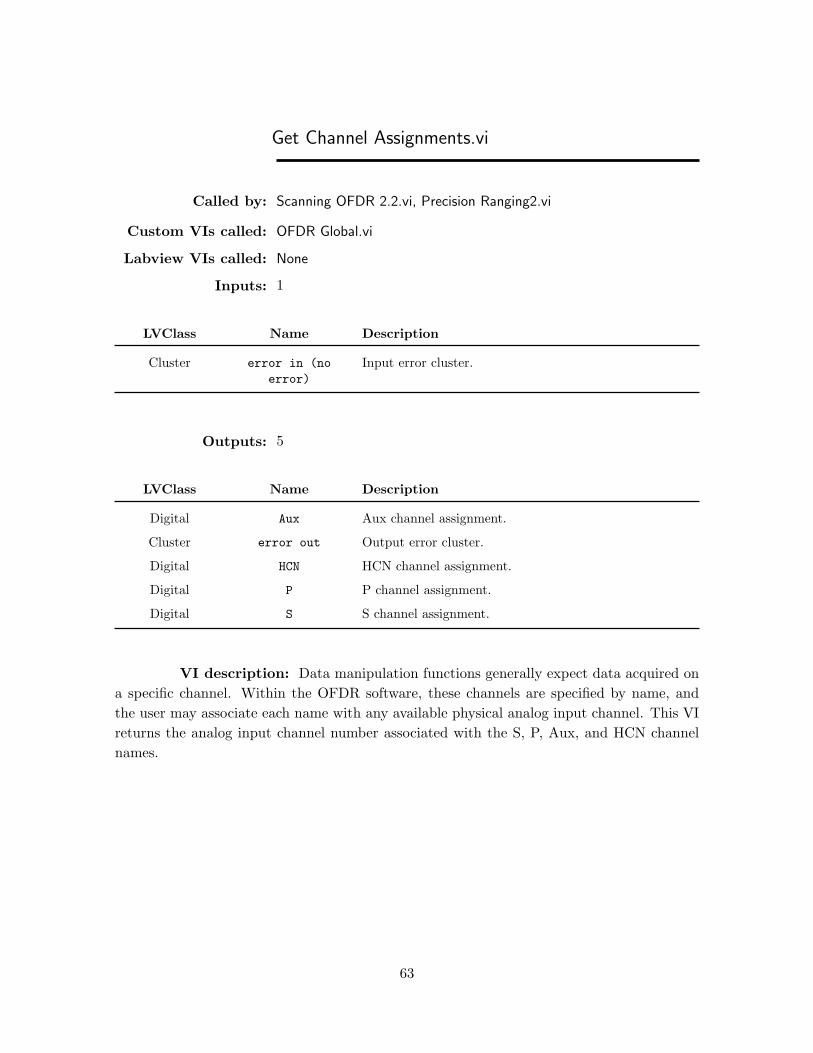
Get Channel Assignments.vi
Called by: Scanning OFDR 2.2.vi, Precision Ranging2.vi
Custom VIs called: OFDR Global.vi
Labview VIs called: None
Inputs: 1
LVClass Name Description
Cluster error in (no
error)
Input error cluster.
Outputs: 5
LVClass Name Description
Digital Aux Aux channel assignment.
Cluster error out Output error cluster.
Digital HCN HCN channel assignment.
Digital P P channel assignment.
Digital S S channel assignment.
VI description: Data manipulation functions generally expect data acquired on
a specific channel. Within the OFDR software, these channels are specified by name, and
the user may associate each name with any available physical analog input channel. This VI
returns the analog input channel number associated with the S, P, Aux, and HCN channel
names.
63

Handle Peak Array.vi
Called by: Scanning OFDR 2.2.vi
Custom VIs called: Peak Cluster3.ctl
Labview VIs called: None
Inputs: 6
LVClass Name Description
Array Chart Refs
Cluster error in (no
error)
Input error cluster.
LVObjectRefNum Main Graph Ref Reference to the Main Graph on the front panel of themain Scanning OFDR program.
Array Peaks (New) New peak array with changes.
Array Peaks (Old) Peak array prior to changes.
Array WFGraphs
Outputs: 5
LVClass Name Description
Cluster error out Output error cluster.
Array Peaks Out Updated peak array.
Boolean Recalc Amp?
Boolean Recalc PR?
Boolean SameSize?
VI description: This VI handles changes made to the Peak Selection and Mea-
surements array in the main Scanning OFDR program.
64

Load Configuration.vi
Called by: Load OFDR Config.vi
Custom VIs called: None
Labview VIs called: TRef Get All FP References.vi, NI LVConfig.lvlib:Config DataRefNum.ctl
OpenG VIs called: Read Key (Variant) ogtk.vi
Inputs: 4
LVClass Name Description
Cluster error in (no
error)
Input error cluster.
TypedRefNum INI refnum Configuration file reference.
String Tag Description tag. Only tagged controls are loaded.
VIRefNum VI reference Reference to the VI being configured.
Outputs: 3
LVClass Name Description
Cluster error out Output error cluster.
TypedRefNum INI refnum out Configuration file reference.
VIRefNum VI reference out Reference to the VI being configured.
VI description: This VI calls the OpenG function Read Key (Variant).vi to read
front panel control values of the VI specied by VI Path from a configuration file specified by
INI Path only if the beginning of the control description matches Tag. Read Key (Variant).vi
is recursive so that nested controls are handled. Only tags for top level controls are checked,
however, so for controls inside clusters or arrays all controls in the array are either written or
not depending on the description tag of the parent control. Controls inside tabs are parsed
before getting passed to Read Key (Variant).vi, so they are not subject to this limitation.
Configuration file keys must match control labels.
65

Load OFDR Config.vi
Called by: Scanning OFDR 2.2.vi
Custom VIs called: Load Configuration.vi
Labview VIs called: NI LVConfig.lvlib:Open Config Data.vi, NI LVConfig.lvlib:Close ConfigData.vi
OpenG VIs called: Read Key (Variant) ogtk.vi
Inputs: 5
LVClass Name Description
Path configuration
file path
The path to the platform-independent configuration file.
LVObjectRefNum Cursor Reference to the Cursor enum in the Peak Selection andMeasurements array on the front panel of the main OFDRprogram interface.
Cluster error in (no
error)
Input error cluster.
LVObjectRefNum Graph Main Ref Reference to the main graph on the front panel of themain OFDR program interface.
VIRefNum VI reference Reference to the VI being configured.
Outputs: 2
LVClass Name Description
Cluster error out Output error cluster.
VIRefNum VI reference out Reference to the VI being configured.
VI description: This VI loads control values for the main OFDR program in-
terface and OFDR Global.vi from a configuration (*.ini) file. Explicit references to the Main
Graph and Cursor list are passed because properties of these controls other than their values
are loaded from the configuration file.
66

Log Manager.vi
Called by: Scanning OFDR 2.2.vi, Enqueue Tilt Measurement.vi, Move SSStage.vi
Custom VIs called: None
Labview VIs called: Space Constant.vi
Inputs: 5
LVClass Name Description
Boolean Append
timestamp? (T)
Select whether to append timestamp to log entry.
Boolean Clear Select whether to clear the log.
Cluster error in (no
error)
Input error cluster.
LVObjectRefNum Log (Ref) Reference to status log string control.
String New line New line to add to the status log.
Outputs: 1
LVClass Name Description
Cluster error out Output error cluster.
VI description: This VI manages the Status Log in the main Scanning OFDR
program.
67

Measurement Options Dialog.vi
Called by: Scanning OFDR 2.2.vi
Custom VIs called: None
Labview VIs called: None
Inputs: 5
LVClass Name Description
Boolean Cancel Discard changes and close the dialog window.
Digital Endpoints to
Neglect
Number of endpoints to neglect during precision ranginglinear curve fit.
Digital Filter Size Number of points used for the precision ranging digitalfilter.
Boolean OK Accept changes and close the dialog window.
Digital Peak Area Points Number of points used for peak amplitude calculation.
Outputs: 4
LVClass Name Description
Boolean Canceled? Indicate whether or not the user canceled the operation.
Digital Endpoints to
Neglect
Number of endpoints to neglect during precision ranginglinear curve fit.
Digital Filter Size Number of points used for the precision ranging digitalfilter.
Digital Peak Area Points Number of points used for peak amplitude calculation.
VI description: This VI presents a dialog interface for the user to modify options
associated with peak amplitude and precision ranging measurements.
68

Move SS Stage.vi
Called by: Scanning OFDR 2.2.vi
Custom VIs called: SS Monitor.vi, SS Go To Position.vi, SS Drive Axis.vi, OFDRGlobal.vi, Log Manager.vi, Axis Selector.ctl, Active Stack Enum.ctl
Labview VIs called: None
Inputs: 8
LVClass Name Description
Enum Active Axis Stage axis selection.
Enum Active Stack Stage stack selection.
LVVariant Data Queue data message. See VI description.
Cluster error in Input error cluster.
Boolean Log? Indicate whether to make an entry in the OFDR statuslog.
LVObjectRefNum Position (Ref) Reference to stage axis position array on the main OFDRfront panel.
LVObjectRefNum Status Reference to status log string control.
LVObjectRefNum Stop (ref) Reference to Stop control on the main OFDR front panel.
Outputs: 3
LVClass Name Description
Boolean At Limit? Indicates whether selected axis is at a limit.
Boolean Axis powered? Indicates whether selected axis is powered.
Cluster error out Output error cluster.
VI description: This VI provides motion control of the Seruga Seiki stages. It
communicates with front panel controls in Scanning OFDR 2.2.vi via control references. Data
is a two-element boolean array cast as a variant in order to be passed by queue in the calling
VI. If the first element in the boolean array is true, the axis moves to position zero. If the
first element is false, the axis move it’s current step distance. The second element of the
boolean array indicates direction: True for clockwise, False for counterclockwise. Motion
may be aborted within the calling VI via the Stop (ref) boolean control reference.
69

OFDR Global.vi
Called by: Scanning OFDR 2.2.vi, Agilent Query Sweep State.vi, Sweep AgilentLaser 2.vi, Agilent Startup Sequence.vi, DAQ Read.vi, DAQ Configv3.vi, Set Postion Label.vi, SS Set Software Limit.vi, SS QuerySoftware Limit.vi, SS Query Position.vi, SS Set Position Value.vi,Move SS Stage.vi, SS Stop.vi, SS Query Status.vi, SS Go ToPosition.vi, SS Drive Axis.vi, SS Select Axis.vi, SS Query Distance.vi,SS Query Acceleration.vi, SS Query Start Up Speed.vi, SS QueryDrive Speed.vi, SS Toggle Motor Power.vi, SS Set Remote Mode.vi,SS Set Acceleration.vi, SS Set Distance.vi, SS Set Drive Speed.vi, SSSet Start Up Speed.vi, Check Instruments.vi, Resample.vi, WL vsTime.vi, Get Channel Assignments.vi, Calculate Tilt.vi, Confocal PlotData.vi, OFDR Plot Data.vi, Generate X-Axis.vi, Signal Levels.vi,Buffer Points.vi, Edit Hardware Parameters.vi, Stage SettingsDialog.vi, Edit Stage Limits.vi, SS Toggle Software Limits.vi
Custom VIs called: None
Labview VIs called: None
Inputs: 15
70

LVClass Name Description
Array Axis Labels
Digital c (m/s) OFDRConfig
Array Channel
Assignments &
Coupling
OFDRConfig
Enum DAQ Board OFDRConfig
Digital Ext. clock
level (V)
OFDRConfig
Digital Hysteresis (V) OFDRConfig
Digital Laser GPIB
Address
OFDRConfig
Digital Stage Angular
Tick (deg/tick)
OFDRConfig
DAQmxName Stage CCW Pulse
Pin
OFDRConfig
DAQmxName Stage CW Pulse
Pin
OFDRConfig
Digital Stage GPIB
Address
OFDRConfig
Digital Stage Linear
Tick (nm/tick)
OFDRConfig
DAQmxName Start Trig Pin OFDRConfig
Ring Sweep Rate
(nm/s)
OFDRConfig
Digital TrigDelay OFDRConfig
Outputs: 1
LVClass Name Description
DAQmxName DAQmx Sweep
Capture Task
OFDRConfig
VI description:
71

OFDR Plot Data.vi
Called by: Scanning OFDR 2.2.vi
Custom VIs called: OFDR Global.vi
Labview VIs called: NI AALPro.lvlib:Real FFT.vi, NI AALPro.lvlib:Hanning Window.vi,NI AALPro.lvlib:Hanning Window (DBL).vi, NI AALPro.lvlib:FlatTop Window.vi, NI AALPro.lvlib:Flat Top Window (DBL).vi,NI AALPro.lvlib:FFT.vi
Inputs: 3
LVClass Name Description
Cluster error in (no
error)
Input error cluster.
Array Raw Data Raw wavelength sweep data array.
Enum Window Window function applied to the raw data prior to theFourier transform.
Outputs: 2
LVClass Name Description
Cluster error out Output error cluster.
Array OFDR Data Processed OFDR data.
VI description: This VI processes raw wavelength sweep data to produce the
OFDR data plotted in the main graph of the Scanning OFDR software application. Process-
ing includes the optional application of a window function, Fourier transform, and combina-
tion of the S and P channel data.
72

Peak Amplitudes2.vi
Called by: Scanning OFDR 2.2.vi
Custom VIs called: Peak Cluster3.ctl
Labview VIs called: NI AALBase.lvlib:Std Deviation and Variance.vi
Inputs: 7
LVClass Name Description
LVObjectRefNum Chart AM A reference to the Amplitude chart on the front panel ofthe main Scanning OFDR software application.
Array Data OFDR plot data.
Digital Data Buffer Size The number of OFDR data points.
Cluster error in (no
error)
Input error cluster.
Digital Peak Area Pts The number of points to integrate in the peak amplitudecalculation.
Array Peak Array The Peak Selection and Measurements array passed fromthe main Scanning OFDR VI.
Digital TrigDelay Reciprocal of the frequency spacing of the OFDR dataset.
Outputs: 3
LVClass Name Description
Cluster error out Output error cluster.
Array Peak Array Out Output Peak Selection and Measurements with updatedamplitude measurement values.
Array Peak selections The data points used for each peak amplitude calculation.
VI description: This VI calculates reflection peak amplitudes from OFDR mea-
surement data for reflection peaks specified by the user in the Peak Selection and Measure-
ments array on the front panel of the main Scanning OFDR software application. The peak
amplitude calculation consists of numerical integration over a subset of the OFDR data ar-
ray centered at the peak locations specified by Location in the Peak Array and including a
73

number of points specified by Peak Area Pts. Note that TrigDelay is passed as a parameter
to this VI rather than reading OFDR Global.vi because the global variable is the hardware
value, while data loaded from a file may use a different value.
74

Peak Optimizer.vi
Called by: Scanning OFDR 2.2.vi
Custom VIs called: Communication States.ctl
Labview VIs called: None
Inputs: 6
LVClass Name Description
Boolean Abort (Op) Aborts peak optimization.
Digital Amplitude Current measured peak amplitude value.
Digital Ctr2 Counter to track number of direction changes.
Cluster Data Cluster Queue message data cluster. Two elements: boolean Init?to indicate first call, and numeric Peak (Opt.) to indicatewhich peak to optimize.
Cluster error in (no
error)
Input error cluster.
Digital Last Previous measured peak amplitude value.
Outputs: 5
LVClass Name Description
Digital Ctr2 Out Counter to track number of direction changes.
Boolean Done? Indicates whether peak optimization process is complete.
Cluster error out Output error cluster.
Digital Last Out Current measured peak amplitude value.
Array Q States Queue state array.
VI description: This VI manages peak optimization by moving the stage and
monitoring peak amplitude. Peak optimization is accomplished using a hill climb algorithm,
i.e., the stage continues to move in a particular direction as long as the peak amplitude
increases. The first time peak amplitude decreases the stage reverses direction; the second
time it decreases the algorithm terminates.
75

Precision Ranging2.vi
Called by: Scanning OFDR 2.2.vi
Custom VIs called: Peak Cluster3.ctl, Get Channel Assignments.vi, baseband2.vi
Labview VIs called: NI AALPro.lvlib:Unwrap Phase.vi, NI AALPro.lvlib:Real FFT.vi,NI AALPro.lvlib:Linear Fit.vi, NI AALPro.lvlib:Inverse FFT.vi,NI AALPro.lvlib:Inverse Complex FFT.vi, NI AALPro.lvlib:FFT.vi,NI AALBase.lvlib:Std Deviation and Variance.vi
Inputs: 7
LVClass Name Description
LVObjectRefNum Chart PR A reference to the Range Chart on the front panel of themain Scanning OFDR software application.
Cluster error in (no
error)
Input error cluster.
Digital Filter Size
(Pts)
The number of points to selected at each peak locationfor the precision ranging calculation.
Digital NumEndpoints The number of endpoints to neglect during precision rang-ing linear curve fit.
Array Peak Array The Peak Selection and Measurements array passed fromthe main Scanning OFDR VI.
Array Raw data The raw wavelength sweep data array.
Digital TrigDelay Reciprocal of the frequency spacing of the OFDR dataset.
Outputs: 4
LVClass Name Description
Cluster error out Output error cluster.
Array Peak Array Out Output Peak Selection and Measurements array with up-dated precision ranging measurement values.
Array Peak selections The data points used for each precision ranging calcula-tion.
Array Phases The frequency domain phases of each filtered data subset.
VI description: This VI performs data processing on raw OFDR scan data to
76

precisely locate reflection peaks to within a small fraction of the range resolution of the
system. Peak locations within the OFDR time domain data set are passed via the Peaks
Array, which is an array of clusters of the same type as the Peak Selection and Measurements
array on the front panel of the main Scanning OFDR software application. The precision
ranging calculation consists of selecting a number of points given by Filter Size (Pts) from
the OFDR time domain data array around the location of each peak. These data subsets
are inverse Fourer transformed, and the resulting frequency domain phases are shifted to
baseband and then fit to a line. The slope of the line determines the reflector location to
within a small fraction of the time domain sampling interval.
77

Queue Manager (Comm).vi
Called by: Scanning OFDR 2.2.vi
Custom VIs called: Communication States.ctl
Labview VIs called: Clear Errors.vi
Inputs: 4
LVClass Name Description
Cluster Error in Input error cluster.
Array Q States Array of states to add to the queue.
TypedRefNum Queue In Reference to the Communication Queue.
Enum Where? Indicates whether to add new states to the front or backof the queue, or to replace states currently in the queue.
Outputs: 2
LVClass Name Description
Cluster Error out Output error cluster.
TypedRefNum Queue Out Reference to the Communication Queue.
VI description: This VI manages the Communication Queue in the main Scan-
ning OFDR program.
78
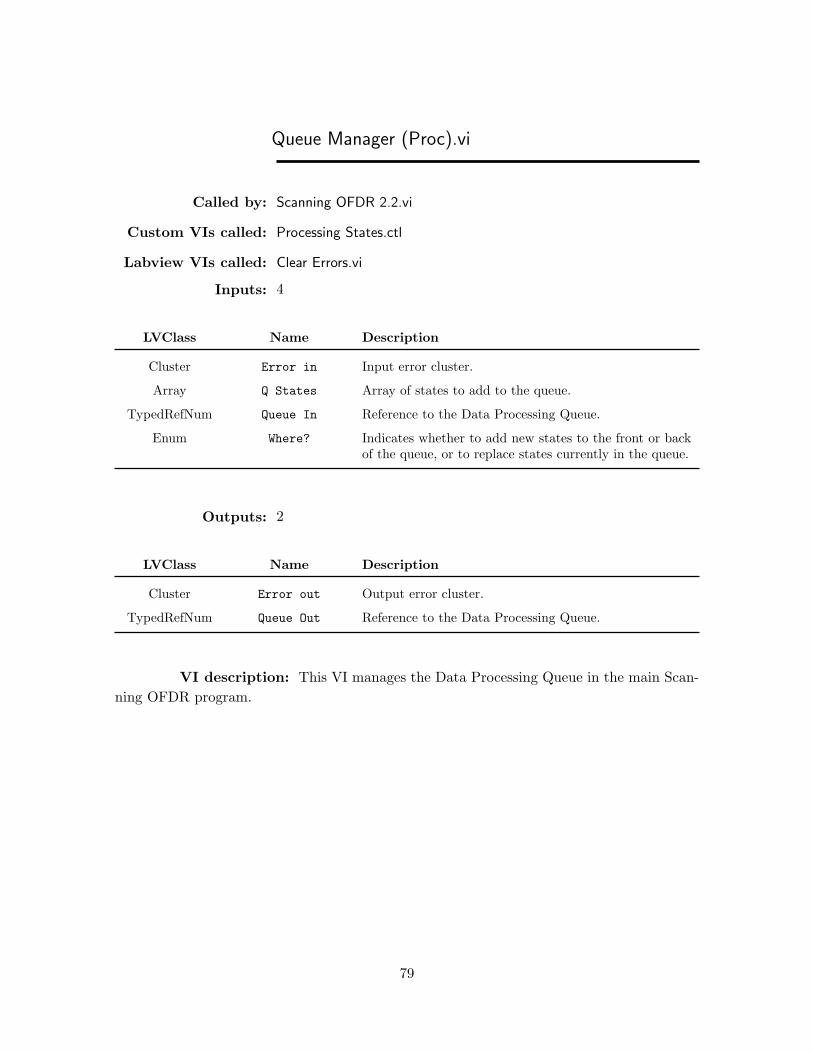
Queue Manager (Proc).vi
Called by: Scanning OFDR 2.2.vi
Custom VIs called: Processing States.ctl
Labview VIs called: Clear Errors.vi
Inputs: 4
LVClass Name Description
Cluster Error in Input error cluster.
Array Q States Array of states to add to the queue.
TypedRefNum Queue In Reference to the Data Processing Queue.
Enum Where? Indicates whether to add new states to the front or backof the queue, or to replace states currently in the queue.
Outputs: 2
LVClass Name Description
Cluster Error out Output error cluster.
TypedRefNum Queue Out Reference to the Data Processing Queue.
VI description: This VI manages the Data Processing Queue in the main Scan-
ning OFDR program.
79

Register User.vi
Called by: Scanning OFDR 2.2.vi
Custom VIs called: None
Labview VIs called: None
Inputs: 4
LVClass Name Description
Boolean Cancel Discard changes and close the dialog window.
Cluster error in (no
error)
Input error cluster.
Boolean Ok Accept changes and close the dialog window.
ComboBox User The name of the user. Previous users are stored in adrop-down list.
Outputs: 5
LVClass Name Description
Boolean Canceled? Indicate whether the user canceled the operation.
Cluster error out Output error cluster.
Boolean New User? Indicates whether registered user was present in the drop-down list.
String User out The name of the user.
VIRefNum vi reference Reference to this VI so changes to the drop-down list canbe saved after execution.
VI description: This VI presents a dialog interface to register the name of the
user.
80

Resample.vi
Called by: Scanning OFDR 2.2.vi
Custom VIs called: OFDR Global.vi, Fourier Interpolation.vi
Labview VIs called: NI Gmath.lvlib:Interpolate 1D.vi
Inputs: 4
LVClass Name Description
Array Data The time-sampled wavelength sweep data to be resampledonto a grid of equal optical frequency increments.
Array Frequency v.
time
Frequency evolution data during the wavelength sweep.
Digital Interp Factor Factor by which to increase the sampling density of theinput Data array via Fourier interpolation prior to resam-pling.
Ring method The interpolation method. See the LabVIEW documen-tation for Interpolate 1D.vi for descriptions of the avail-able methods.
Outputs: 4
LVClass Name Description
Digital Data buffer size The number of data points in the resampled output dataarray.
Digital Effective
trigger delay
The reciprocal of the frequency spacing of the resampleddata array.
Digital New start WL The start wavelength of the resampled data array. Thismay be slightly different that the start wavelength of theinput data array depending on the interpolation method.
Array Resampled Data The resampled ouput data array.
VI description: This VI interpolates time-synchronously sampled wavelength
sweep data onto a grid of equal frequency increments using a known frequency vs time
relationship for the wavelength sweep. This VI optionally performs a Fourier interpolation
on the time-sampled data prior to interpolation onto the frequency grid. The frequency vs
81

time data array is assumed to be decending in frequency, corresponding to wavelength sweeps
from low to high wavelengths. The time increment of the frequency vs time data array is not
needed; the data points only need to be separated by equal time intervals.
82

Save Configuration.vi
Called by: Save OFDR Config.vi
Custom VIs called: None
Labview VIs called: TRef Get All FP References.vi, NI LVConfig.lvlib:Config DataRefNum.ctl
OpenG VIs called: Write Key (Variant) ogtk.vi
Inputs: 4
LVClass Name Description
Cluster error in (no
error)
Input error cluster.
TypedRefNum INI refnum Configuration file reference.
String Tag Description tag. Only tagged controls are saved.
VIRefNum VI reference Reference to the VI whose configuration is being saved.
Outputs: 3
LVClass Name Description
Cluster error out Output error cluster.
TypedRefNum INI refnum out Configuration file reference.
VIRefNum VI reference out Reference to the VI whose configuration is being saved.
VI description: This VI calls the OpenG function Write Key (Variant) to write
front panel control values of the VI specied by VI Path to a configuration file specified by
INI Path only if the beginning of the control description matches Tag. Write Key (Variant)
is recursive so that nested controls are handled. Only tags for top level controls are checked,
however, so for controls inside clusters or arrays all controls in the array are either written or
not depending on the description tag of the parent control. Controls inside tabs are parsed
before getting passed to Write Key (Variant), so they are not subject to this limitation.
83

Save OFDR Config.vi
Called by: Scanning OFDR 2.2.vi
Custom VIs called: Save Configuration.vi
Labview VIs called: NI LVConfig.lvlib:Open Config Data.vi, NI LVConfig.lvlib:Close ConfigData.vi
OpenG VIs called: Write Key (Variant) ogtk.vi
Inputs: 4
LVClass Name Description
Path configuration
file path
The path to the platform-independent configuration file.
Cluster error in (no
error)
Input error cluster.
LVObjectRefNum Graph Main Ref Reference to the main graph on the front panel of themain OFDR program interface.
VIRefNum VI reference Reference to the VI whose configuration is being saved.
Outputs: 2
LVClass Name Description
Cluster error out Output error cluster.
VIRefNum VI reference out Reference to the VI whose configuration is being saved.
VI description: This VI accepts a reference to the main OFDR VI and saves
controls in both that VI and OFDR Global.vi tagged with ”OFDRConfig” in their descrip-
tions to a configuration (*.ini) file. Also takes a reference to the main graph in the main
OFDR VI so that cursor information can also be saved to the configuration file.
84

Save Options Dialog.vi
Called by: Scanning OFDR 2.2.vi
Custom VIs called: None
Labview VIs called: None
Inputs: 5
LVClass Name Description
Path Autosave Data
Folder
Specifies the folder where autosaved OFDR data is stored.
Boolean Autosave Raw
Data
Toggles autosaving of OFDR data on and off.
Boolean Cancel Discard changes and close the dialog window.
String Filename Root String used to begin filenames for autosaved OFDR data.
Boolean OK Accept changes and close the dialog window.
Outputs: 4
LVClass Name Description
Path Autosave Data
Folder out
The folder where autosaved OFDR data is stored.
Boolean Autosave Raw
Data out
Indicates whether autosaving of OFDR data is enabled ordisabled.
Boolean Canceled? Indicates whether the user canceled the operation.
String Filename Root
out
String used to begin filenames for autosaved OFDR data.
VI description: This VI presents a dialog interface to the user to configure op-
tions for automatically saving raw OFDR data whenever wavelength sweeps are performed.
When autosaving is enabled, data is saved using filenames that begin with Filename Root
followed by a timestamp.
85

Save Scan Data Dialog.vi
Called by: Scanning OFDR 2.2.vi
Custom VIs called: Save Scan Cluster.ctl
Labview VIs called: Write To Spreadsheet File.vi, Write To Spreadsheet File (DBL).vi
Inputs: 7
LVClass Name Description
Boolean Append Timestamp Select whether to append a timestamp to filenames.
Array Array Array of clusters of data save parameters (see VI descrip-tion).
Boolean Cancel Discard changes and close the dialog window.
Cluster error in (no
error)
Input error cluster.
Path Folder Path Select the destination folder for saved data.
Boolean OK Accept changes and close the dialog window.
DataValRefNum scan data value
reference
Data value reference to scanned OFDR data.
Outputs: 3
LVClass Name Description
Boolean Canceled? Indicates whether the user canceled the operation.
Cluster error out Output error cluster.
Path Folder Path Out The destination folder for saved data.
VI description: This VI presents a dialog interface to the user to configure op-
tions for saving scanned OFDR data. The Array of data save parameters will contain one
element for each peak that has been configured in the Peak Selection and Measurements array
in the main Scanning OFDR program. For each peak, the user may select the save amplitude
or precision ranging data, or both. For each peak the user may also enter a prefix used for
the data filenames. Amplitude data files will have ”Amp” appended to the prefix, and range
data files will have ”Range” appended to the prefix. A timestamp may also optionally be
appended to the filenames. Data are saved in a tab-delimited ASCII spreadsheet format.
86

Scan Manager.vi
Called by: Scanning OFDR 2.2.vi
Custom VIs called: Stage Parameter.ctl, Scan Type Enum.ctl, Scan Axis Settings.ctl,Communication States.ctl, Axis Selector.ctl
Labview VIs called: None
Inputs: 7
LVClass Name Description
Digital #Sweeps The number of wavelength sweeps to perform at each scanlocation.
Boolean Abort Scan Aborts current scan.
Cluster Axis 1 Settings Specifies the scan settings for a 1D scan, or for the firstaxis of a 2D scan.
Cluster Axis 2 Settings Specifies the scan settings for the second axis of a 2Dscan.
Cluster error in (no
error)
Input error cluster.
Enum Scan Type Selects a 1D or 2D scan.
LVObjectRefNum Step (Ref) Reference to stage axis step distance settings array on themain OFDR front panel.
Outputs: 4
LVClass Name Description
Cluster Axis 1 out Scan settings cluster output with updated Current Step.
Cluster Axis 2 out Scan settings cluster output with updated Current Step.
Cluster error out Output error cluster.
Array Queue States Queue state array.
VI description: This VI manages scanning OFDRmeasurement using the Seruga
Sekei stages. It enqueues states to be called in the main Scanning OFDR program that
perform swept wavelength measurements and stage motion. It is meant to be called in a
loop, where each call performs a single OFDR measurement and determines the next stage
movement, if any.
87

Set Postion Label.vi
Called by: Scanning OFDR 2.2.vi
Custom VIs called: Stage Setting Array.ctl, SS Set Software Limit.vi, SS Set PositionValue.vi, SS Query Software Limit.vi, SS Query Position.vi, OFDRGlobal.vi, Axis Selector.ctl, Active Stack Enum.ctl
Labview VIs called: None
Inputs: 6
LVClass Name Description
Enum Active Axis Stage axis selection.
Enum Active Stack Stage stack selection.
Cluster error in Input error cluster.
Digital New Position
Label
New position label setting.
Array Position Stage axis position array.
Boolean Shift limits? Indicates whether or not to shift axis software limits.
Outputs: 3
LVClass Name Description
Cluster error out Output error cluster.
String Message Message for status log.
Array Position out Stage axis position array.
VI description: This VI sets the position label for the selected Seruga Seiki stage
axis to a new value. Note that this VI does not move the stage, but only changes the label
value for the current position.
Because the axis software limits are set in terms of an axis position, changing the position
label results in a shift of the physical location of the sotware limits if the stage position
values of the sofware limits are not also shifted. This VI will optionally perform the required
software limit position shift in order to maintain the same physical location of the software
limits.
88

Signal Levels.vi
Called by: Scanning OFDR 2.2.vi
Custom VIs called: OFDR Global.vi
Labview VIs called: NI AALBase.lvlib:Mean.vi
Inputs: 2
LVClass Name Description
Cluster error in (no
error)
Input error cluster.
Array Raw Data Input raw data array.
Outputs: 4
LVClass Name Description
Digital Aux Mean The mean data value on the Aux channel.
Cluster error out Output error cluster.
Digital P Mean The mean data value on the P channel.
Digital S Mean The mean data value on the S channel.
VI description: This VI calculates the mean data values on the S, P, and Aux
channels.
89

Smoothing Filter.vi
Called by: Confocal Plot Data.vi
Custom VIs called: None
Labview VIs called: NI AALPro.lvlib:Real FFT.vi, NI AALPro.lvlib:Inverse FFT.vi,NI AALPro.lvlib:Inverse Complex FFT.vi, NI AALPro.lvlib:FFT.vi
Inputs: 4
LVClass Name Description
Digital Cutoff Width of the flat passband of the smoothing filter.
Array Data Input data array to be smoothed.
Cluster error in (no
error)
Input error cluster.
Digital Roll-Off Width 1/e width of the Gaussian roll-off of the smoothing filter.
Outputs: 4
LVClass Name Description
Cluster error out Output error cluster.
Array Filter Window The filter function that is multipled by the Fourier trans-form of the input Data array.
Array Filtered Data Output data array with the smoothing filter applied.
WaveformGraph Waveform Graph
VI description: This VI applies a digital low-pass filter applied to the supplied
data input data array. The filter is a dual-sided amplitude-only filter with a flat passband and
Gaussian roll-off. The width of the flat passband is given by ¡b¿Cutoff¡/b¿ and the 1/e width
of the Gaussian roll-off is given by ¡b¿Roll-Off Width¡/b¿. Frequency units are normalized
relative to the sampling frequency.
90

SS Drive Axis.vi
Called by: Move SS Stage.vi
Custom VIs called: OFDR Global.vi
Labview VIs called: None
Inputs: 3
LVClass Name Description
String Axis Axis selection. Allowable values are A1-A6 for stage stack1, or A7-A12 for stage stack 2.
Boolean Direction Direction to move axis. True moves clockwise, false movescounterclockwise.
Cluster error in Input error cluster
Outputs: 1
LVClass Name Description
Cluster error out Output error cluster
VI description: Moves the selected Seruga Seiki stage axis using the current
settings for Drive Speed, Start Up Speed, Acceleration, and Distance.
91
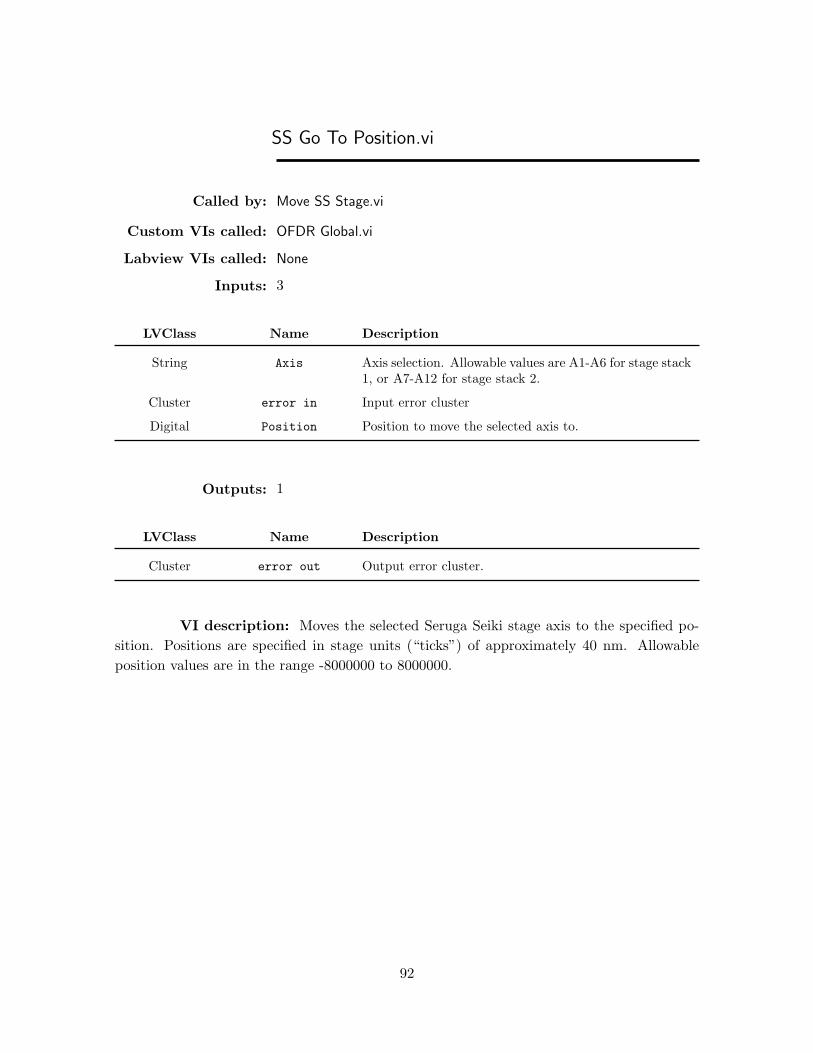
SS Go To Position.vi
Called by: Move SS Stage.vi
Custom VIs called: OFDR Global.vi
Labview VIs called: None
Inputs: 3
LVClass Name Description
String Axis Axis selection. Allowable values are A1-A6 for stage stack1, or A7-A12 for stage stack 2.
Cluster error in Input error cluster
Digital Position Position to move the selected axis to.
Outputs: 1
LVClass Name Description
Cluster error out Output error cluster.
VI description: Moves the selected Seruga Seiki stage axis to the specified po-
sition. Positions are specified in stage units (“ticks”) of approximately 40 nm. Allowable
position values are in the range -8000000 to 8000000.
92

SS Monitor.vi
Called by: Move SS Stage.vi
Custom VIs called: Stage Setting Array.ctl, SS Stop.vi, SS Query Status.vi, SS QueryPosition.vi, Axis Selector.ctl
Labview VIs called: None
Inputs: 5
LVClass Name Description
Enum Active Axis Stage axis selection for updating software controls.
String Axis Axis selection for hardware communication. Allowablevalues are A1-A6 for stage stack 1, or A7-A12 for stagestack 2.
Cluster error in Input error cluster.
Array Position Stage axis position array.
Boolean Stop Optionally stop current motion.
Outputs: 6
LVClass Name Description
Boolean At Limit? Indicate if axis is at a limit.
Boolean Axis powered? Indicates if axis is powered.
Cluster error out Output error cluster.
Boolean Interrupted? Indicate if prior axis motion was interrupted.
Boolean Moving? Indicate if axis is moving
Array Position out Stage axis position array.
VI description: This VI is intended to be called in a loop to monitor a Seruga
Seiki stage axis during motion. It reports the position and status of the axis and allows
motion to be interrupted.
93

SS Query Acceleration.vi
Called by: Scanning OFDR 2.2.vi, Stage Settings Dialog.vi
Custom VIs called: OFDR Global.vi
Labview VIs called: None
Inputs: 2
LVClass Name Description
String Axis Axis selection. Allowable values are A1-A6 for stage stack1, or A7-A12 for stage stack 2.
Cluster error in Input error cluster
Outputs: 2
LVClass Name Description
Digital Acceleration Current acceleration setting.
Cluster error out Output error cluster
VI description: Queries the acceleration setting for the specified Seruga Seiki
stage axis.
94

SS Query Distance.vi
Called by: Scanning OFDR 2.2.vi, Stage Settings Dialog.vi
Custom VIs called: OFDR Global.vi
Labview VIs called: None
Inputs: 2
LVClass Name Description
String Axis Axis selection. Allowable values are A1-A6 for stage stack1, or A7-A12 for stage stack 2.
Cluster error in Input error cluster.
Outputs: 2
LVClass Name Description
Digital Distance Current step distance.
Cluster error out Outpur error cluster.
VI description: Queries the step distance for the specified Seruga Seiki stage
axis.
95

SS Query Drive Speed.vi
Called by: Scanning OFDR 2.2.vi, Stage Settings Dialog.vi
Custom VIs called: OFDR Global.vi
Labview VIs called: None
Inputs: 2
LVClass Name Description
String Axis Axis selection. Allowable values are A1-A6 for stage stack1, or A7-A12 for stage stack 2.
Cluster error in Input error cluster.
Outputs: 2
LVClass Name Description
Digital Drive Speed Current drive speed setting.
Cluster error out Output error cluster.
VI description: Queries the drive speed setting for the specified Seruga Seiki
stage axis.
96

SS Query Position.vi
Called by: Scanning OFDR 2.2.vi, Set Postion Label.vi, SS Monitor.vi, EditStage Limits.vi
Custom VIs called: OFDR Global.vi
Labview VIs called: None
Inputs: 2
LVClass Name Description
String Axis Axis selection. Allowable values are A1-A6 for stage stack1, or A7-A12 for stage stack 2.
Cluster error in Input error cluster.
Outputs: 2
LVClass Name Description
Cluster error out Output error cluster.
Digital Position Value Current position.
VI description: Queries the position ofthe specified Seruga Seiki stage axis.
97

SS Query Software Limit.vi
Called by: Set Postion Label.vi, Edit Stage Limits.vi
Custom VIs called: OFDR Global.vi
Labview VIs called: None
Inputs: 3
LVClass Name Description
String Axis Axis selection. Allowable values are A1-A6 for stage stack1, or A7-A12 for stage stack 2.
Cluster error in Input error cluster.
Boolean Hi Limit? Specifies whether to query the clockwise limit (True) orthe counterclockwise limit (False).
Outputs: 2
LVClass Name Description
Cluster error out Output error cluster.
Digital Limit Value Out The position of the requested software limit.
VI description: Queries the position of the software limits for the specified
Seruga Seiki stage axis.
98

SS Query Start Up Speed.vi
Called by: Scanning OFDR 2.2.vi, Stage Settings Dialog.vi
Custom VIs called: OFDR Global.vi
Labview VIs called: None
Inputs: 2
LVClass Name Description
String Axis Axis selection. Allowable values are A1-A6 for stage stack1, or A7-A12 for stage stack 2.
Cluster error in Input error cluster.
Outputs: 2
LVClass Name Description
Cluster error out Output error cluster.
Digital Startup Speed Current startup speed setting.
VI description: Queries the start up speed setting for the specified Seruga Seiki
stage axis.
99

SS Query Status.vi
Called by: SS Monitor.vi, Edit Stage Limits.vi
Custom VIs called: OFDR Global.vi
Labview VIs called: None
Inputs: 2
LVClass Name Description
String Axis Axis selection. Allowable values are A1-A6 for stage stack1, or A7-A12 for stage stack 2.
Cluster error in Input error cluster.
Outputs: 2
LVClass Name Description
Cluster error out Output error cluster.
Cluster Status Cluster Axis status cluster.
VI description: Queries the status of the specified Seruga Seiki stage axis. The
Status Cluster output by this VI includes the following boolean indicators: [format]
Axis Powered?, At CCW Mechanical Limit?, At CW Mechanical Limit?, Moving?, At
CCW SW Limit?, At CW SW Limit?, Interrupted?, Axis Selected?, CCW SW Limit On?,
CW SW Limit On?
100

SS Select Axis.vi
Called by: Scanning OFDR 2.2.vi
Custom VIs called: OFDR Global.vi
Labview VIs called: None
Inputs: 2
LVClass Name Description
String Axis Axis selection. Allowable values are A1-A6 for stage stack1, or A7-A12 for stage stack 2.
Cluster error in Input error cluster.
Outputs: 1
LVClass Name Description
Cluster error out Output error cluster.
VI description: Specifies the active axis selection on the Seruga Seiki D120 mo-
tion controller.
101

SS Set Acceleration.vi
Called by: Scanning OFDR 2.2.vi, Stage Settings Dialog.vi
Custom VIs called: OFDR Global.vi
Labview VIs called: None
Inputs: 3
LVClass Name Description
Digital Acceleration Acceleration value. Allowable values are 0–9999.
String Axis Axis selection. Allowable values are A1–A6 for stage stack1, or A7–A12 for stage stack 2.
Cluster error in Input error cluster.
Outputs: 1
LVClass Name Description
Cluster error out Output error cluster.
VI description: Sets the acceleration value for the specified Seruga Seiki stage
axis.
102

SS Set Distance.vi
Called by: Scanning OFDR 2.2.vi, Stage Settings Dialog.vi
Custom VIs called: OFDR Global.vi
Labview VIs called: None
Inputs: 3
LVClass Name Description
String Axis Axis selection. Allowable values are A1–A6 for stage stack1, or A7–A12 for stage stack 2.
Digital Distance Step distance value. Allowable values are 0–8000000.
Cluster error in Input error cluster.
Outputs: 1
LVClass Name Description
Cluster error out Output error cluster.
VI description: Sets the step distance value for the specified Seruga Seiki stage
axis.
103
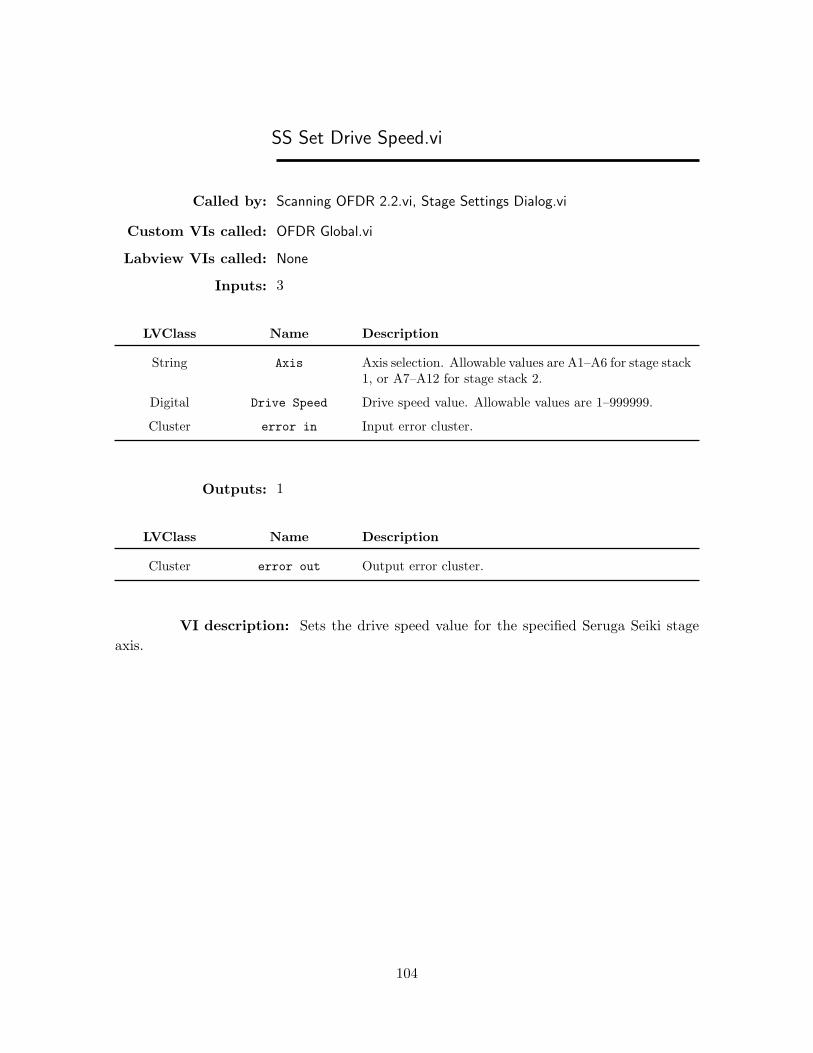
SS Set Drive Speed.vi
Called by: Scanning OFDR 2.2.vi, Stage Settings Dialog.vi
Custom VIs called: OFDR Global.vi
Labview VIs called: None
Inputs: 3
LVClass Name Description
String Axis Axis selection. Allowable values are A1–A6 for stage stack1, or A7–A12 for stage stack 2.
Digital Drive Speed Drive speed value. Allowable values are 1–999999.
Cluster error in Input error cluster.
Outputs: 1
LVClass Name Description
Cluster error out Output error cluster.
VI description: Sets the drive speed value for the specified Seruga Seiki stage
axis.
104

SS Set Position Value.vi
Called by: Set Postion Label.vi
Custom VIs called: OFDR Global.vi
Labview VIs called: None
Inputs: 3
LVClass Name Description
String Axis Axis selection. Allowable values are A1–A6 for stage stack1, or A7–A12 for stage stack 2.
Cluster error in Input error cluster.
Digital Position Value Position value. Allowable values are 1–999999.
Outputs: 1
LVClass Name Description
Cluster error out Output error cluster.
VI description: Sets the position value for the specified Seruga Seiki stage axis.
Note that this VI does not move the stage, but only changes the position label value for the
current position.
105

SS Set Remote Mode.vi
Called by: Scanning OFDR 2.2.vi, Stage Settings Dialog.vi, Edit Stage Limits.vi
Custom VIs called: OFDR Global.vi
Labview VIs called: None
Inputs: 1
LVClass Name Description
Cluster error in Input error cluster.
Outputs: 1
LVClass Name Description
Cluster error out Output error cluster.
VI description: Sets the Seruga Seiki D120 motion controller to remote mode.
This VI must be called before calling any other SS Stage VIs.
106

SS Set Software Limit.vi
Called by: Set Postion Label.vi, Edit Stage Limits.vi
Custom VIs called: OFDR Global.vi
Labview VIs called: None
Inputs: 4
LVClass Name Description
String Axis Axis selection. Allowable values are A1-A6 for stage stack1, or A7-A12 for stage stack 2.
Cluster error in Input error cluster.
Boolean Hi Limit? Specifies whether to set the clockwise limit (True) or thecounterclockwise limit (False).
Digital Position Value The requested position of the software limit.
Outputs: 2
LVClass Name Description
Cluster error out Output error cluster.
Digital Limit Value Out The actual value of the specified software limit.
VI description: Sets the position of the software limits for the specified Seruga
Seiki stage axis.
107

SS Set Start Up Speed.vi
Called by: Scanning OFDR 2.2.vi, Stage Settings Dialog.vi
Custom VIs called: OFDR Global.vi
Labview VIs called: None
Inputs: 3
LVClass Name Description
String Axis Axis selection. Allowable values are A1–A6 for stage stack1, or A7–A12 for stage stack 2.
Cluster error in Input error cluster.
Digital Start Up Speed Start up speed value. Allowable values are 10–9999.
Outputs: 1
LVClass Name Description
Cluster error out Output error cluster.
VI description: Sets the start up speed value for the specified Seruga Seiki stage
axis.
108
SS Stop.vi
Called by: SS Monitor.vi
Custom VIs called: OFDR Global.vi
Labview VIs called: None
Inputs: 1
LVClass Name Description
Cluster error in Input error cluster.
Outputs: 1
LVClass Name Description
Cluster error out Output error cluster.
VI description: Stops a Seruga Seiki stage axis currently in motion. Note that
the axis does not stop instantly, but rather decelerates smoothly to a stop.
109

SS Toggle Motor Power.vi
Called by: Scanning OFDR 2.2.vi
Custom VIs called: OFDR Global.vi
Labview VIs called: None
Inputs: 3
LVClass Name Description
String Axis Axis selection. Allowable values are A1-A6 for stage stack1, or A7-A12 for stage stack 2.
Cluster error in Input error cluster.
Boolean Motor On/Off Motor power setting. True=On, False=Off.
Outputs: 1
LVClass Name Description
Cluster error out Output error cluster.
VI description: Toggles the power to individual Seruga Seiki stage axes. Motor
power must be on before controlling axes remotely. When motor power is off, the manual
knobs on the stages may be turned. Motor power is indicated on the D120 motion controller
by the case of the axis label. Uppercase (ex: A1) indicates axis power is on, while lowercase
(ex: a1) indicates axis power is off.
110

SS Toggle Software Limits.vi
Called by: Edit Stage Limits.vi
Custom VIs called: OFDR Global.vi
Labview VIs called: None
Inputs: 3
LVClass Name Description
String Axis Axis selection. Allowable values are A1-A6 for stage stack1, or A7-A12 for stage stack 2.
Boolean Enable? Software limit setting. True=On, False=Off.
Cluster error in Input error cluster.
Outputs: 1
LVClass Name Description
Cluster error out Output error cluster.
VI description: Toggles software limits on and off for the specified Seruga Seiki
stage axis.
111
Stage Settings Dialog.vi
Called by: Scanning OFDR 2.2.vi
Custom VIs called: Stage Setting Array.ctl, SS Set Start Up Speed.vi, SS Set RemoteMode.vi, SS Set Drive Speed.vi, SS Set Distance.vi, SS SetAcceleration.vi, SS Query Start Up Speed.vi, SS Query DriveSpeed.vi, SS Query Distance.vi, SS Query Acceleration.vi, OFDRGlobal.vi, Active Stack Enum.ctl
Labview VIs called: None
Inputs: 9
LVClass Name Description
Array Acceleration Stage axis acceleration settings array.
Enum Active Stack Stage stack selection
Boolean Apply Apply changes to stage values.
Boolean Cancel Close dialog and discard changes.
Array Drive Speed Stage axis drive speed settings array.
Cluster error in (no
error)
Input error cluster.
Boolean OK Close dialog and apply changes to stage values.
Array Startup Speed Stage axis startup speed settings array.
Array Step Stage axis step distance settings array.
Outputs: 7
LVClass Name Description
Array Acceleration Out Stage axis acceleration settings array.
Enum Active Stack Out Stage stack selection
Boolean Canceled? Indicate if the user canceled the operation.
Array Drive Speed Out Stage axis drive speed settings array.
Cluster error out Output error cluster.
Array Startup Speed
Out
Stage axis startup speed settings array.
Array Step Out Stage axis step distance settings array.
112

VI description: This VI provides a dialog user interface to modify Seruga Seiki
stage settings.
113

Sweep Agilent Laser 2.vi
Called by: Scanning OFDR 2.2.vi
Custom VIs called: OFDR Global.vi, Agilent Sweep Actions.vi, Agilent Laser On-Off.vi
Labview VIs called: None
Inputs: 1
LVClass Name Description
Cluster Error In Input error cluster.
Outputs: 1
LVClass Name Description
Cluster Error Out Output error cluster.
VI description: This VI initiates a wavelength sweep with the Agilent 81680A
tunable laser.
114

Sweep Mgr Q Cleanup.vi
Called by: Scanning OFDR 2.2.vi
Custom VIs called: Communication States.ctl
Labview VIs called: None
Inputs: 2
LVClass Name Description
Cluster Error in Input error cluster.
TypedRefNum Queue In Queue reference.
Outputs: 2
LVClass Name Description
Cluster Error out Output error cluster.
TypedRefNum Queue Out Queue reference.
VI description: When continuous wavelength sweeping is halted by the user, or
when a fixed number of sweeps is requested and sweeping is aborted before all sweeps have
completed, states may be present in the Communication Queue that should not execute. This
VI removes such states from the queue.
115

Update End WL.vi
Called by: Scanning OFDR 2.2.vi
Custom VIs called: Wavelength Range.vi
Labview VIs called: LVStringsAndValuesArrayTypeDef.ctl
Inputs: 4
LVClass Name Description
Digital End Wavelength Modified sweep end wavelength setting so that data setsize is radix 2.
Cluster error in (no
error)
Input error cluster.
Digital Start Wavelength Sweep start wavelength.
Digital Trigger Delay
(ns)
Trigger interferometer delay.
Outputs: 3
LVClass Name Description
Digital End Wavelength Current sweep end wavelength setting.
Array End WL Strings
And Values []
Cluster of strings and values representing wavelengthsweep ranges for six radix-2 data set sizes.
Cluster error out Output error cluster.
VI description: The main Scanning OFDR software application allows the user
to toggle between restricting data set sizes to be a power of 2, or allowing arbitrary data set
sizes. Given a sweep start wavelength and the trigger interferometer delay, this VI determines
the sweep end wavelength for a radix 2 data set nearest to the previous sweep end wavelength
setting. It also provides a set of six wavelength ranges corresponding to data set sizes of 2
raised to the powers of 14 through 19. These ranges are not always appropriate, especially for
short trigger interferometer delays, so this VI should be updated with a more robust range
selection algorithm.
116

Update Scan Data.vi
Called by: Scanning OFDR 2.2.vi
Custom VIs called: None
Labview VIs called: NI AALBase.lvlib:Mean.vi
Inputs: 6
LVClass Name Description
Digital #Sweeps The number of wavelength sweeps to average at each scanlocation.
Array Chart Refs References the Amplitude Chart and Range Chart on thefront panel of the main Scanning OFDR software appli-cation organized in an array.
Digital Current Step 1 Current scan step along Axis 1.
Digital Current Step 2 Current scan step along Axis 2.
Cluster error in (no
error)
Input error cluster.
Array Scan Data Scan data array (see VI description)
Outputs: 2
LVClass Name Description
Cluster error out Output error cluster.
Array Updated Scan
Data
Updated scan data array.
VI description: This VI updates the Scan Data array each time an OFDR mea-
surement has completed during a scanned measurement. The Scan Data array contains
amplitude and range data at each scan position for each peak configured in the Peak Se-
lection and Measurements array on the front panel of the main Scanning OFDR software
application. The Scan Data array is a three dimensional array. Each selected peak is as-
sociated with two adjacent pages in the array in the order of peak number. The first of
these two pages is for amplitude data, and the second is for range data. Within each page,
rows and columns correspond to locations within a 2D scan. Rows correspond to steps along
Axis 1, and columns correspond to steps along Axis 2. For 1D scans, each page is still a 2D
117

data array structure, but with only one row. Each time an OFDR measurement completes
during a scan, this VI places the resulting amplitude and range values at the correct data
locations within the Scan Data array. If multiple wavelength sweeps are requested at each
scan location, data stored in the Amplitude Chart and Range Chart on the front panel of
the main Scanning OFDR software application is used for averaging.
This VI could be made more memory efficient by passing the Scan Data data value
reference rather than the Scan Data array.
118

Wavelength Range.vi
Called by: Update End WL.vi
Custom VIs called: None
Labview VIs called: None
Inputs: 3
LVClass Name Description
Digital # of Ranges The number of sweep ranges requested.
Digital Start Wavelength
(nm)
Wavelength sweep start wavelength.
Digital Trigger Delay
(ns)
Trigger interferometer delay; reciprocal of the frequencyspacing of wavelength sweep data.
Outputs: 2
LVClass Name Description
Array Data Set Sizes The number of data points in the data sets correspondingthe returned sweep ranges.
Array Sweep Ranges The wavelength sweep ranges corresponding to data setsizes equal to powers of 2.
VI description: This VI determines the wavelength sweep ranges corresponding
to data set sizes that are equal to powers of 2. The largest data set size is always 219, and a
number of ranges specified by # of Ranges is returned.
119

WL vs Time.vi
Called by: Scanning OFDR 2.2.vi
Custom VIs called: OFDR Global.vi, Fourier Interpolation.vi
Labview VIs called: NI AALPro.lvlib:Unwrap Phase.vi, NI AALPro.lvlib:Fast HilbertTransform.vi, NI AALBase.lvlib:Mean.vi
Inputs: 5
LVClass Name Description
Digital Clock rate (Hz) Data acquisition sampling rate.
Digital Interferometer
Delay (ns)
Relative delay between the interferometer paths.
Digital Interp Factor Factor by which to Fourier interpolate the Raw Data priorto the Hilbert transform.
Array Raw Data Time-sampled wavelength sweep data for a simple path-mismatched interferometer.
Digital Start WL (nm) Sweep start wavelength.
Outputs: 4
LVClass Name Description
Array Frequency (GHz) Measured frequency vs time data.
Digital Time step (ms) Time step size for wavelength and frequency output dataarrays.
WaveformGraph Waveform Graph
Array Wavlength (nm) Measured wavelength vs time data.
VI description: This VI calculates the laser wavelength versus time from time-
sampled wavelength sweep data for a simple interferometer on the Aux channel with a relative
delay equal given by Interferometer Delay (ns). This VI uses the Hilbert transform method
described in Ahn et. al., Applied Optics, 44, 35, 7630. The sampling density of the raw data
is optionally increased by a factor of Interp Factor prior to the Hilbert transform by Fourier
interpolation using zero padding.
120