Scan to Salesforce Attachments - Scan and Import … · Scanning to Salesforce® Attachments with...
18
Capture Components, LLC White Paper Page 1 of 18 Copyright © 2011-2013 by Capture Components, LLC. All rights reserved. Capture Components, LLC encourages the reader to freely share and distribute this White Paper. Scanning to Salesforce ® Attachments with ccScan ® Document Capture to the Cloud Overview This white paper shows how ccScan ® , a production-quality document capture application, can be used to capture documents as Salesforce ® Attachments in an automated, time-saving manner. Salesforce.com is the enterprise cloud computing company which is known primarily for three things: the Sales Cloud and the Service Cloud, their applications for sales and customer service (also known as customer relationship management or CRM); Force.com, their cloud platform for building and running business applications; and Chatter, their enterprise collaboration application. These and other Salesforce applications all run in the cloud and are sold in a subscription basis. Since there is more to Salesforce than this short introduction can cover please visit the Salesforce website at http://www.salesforce.com for in-depth information. Although Salesforce customers can easily upload their documents if they are already in digital format, paper documents must be scanned first and then manually uploaded. ccScan eliminates the time typically wasted with such a multi-step, manual operation that consists of scanning a document locally to the PC, naming this document, uploading the document as a Salesforce Attachment, and afterwards enter the description and sharing mode. Instead ccScan does all of the above in a single-step operation that is fully automated. Naming of documents can be manual or automated by using barcodes, OCR with Text Pattern Search, and running counters. In addition to scanning paper documents, ccScan has bulk import capabilities for already digitized documents that allow entire folders to be uploaded as Salesforce Attachments in a single step using wild card file specifications and recursion. This white paper describes ccScan for Salesforce Attachments. Capture Components also offers ccScan for Salesforce Documents (which scans and imports documents to Salesforce Documents) and ccScan for Salesforce Content (which scans and imports documents to Salesforce Content). To learn more about ccScan for Salesforce Attachments please visit the Capture Components website at http://www.capturecomponents.com. 32158 Camino Capistrano Suite A PMB 373 San Juan Capistrano, CA 92675 [email protected] www.CaptureComponents.com
Transcript of Scan to Salesforce Attachments - Scan and Import … · Scanning to Salesforce® Attachments with...
Capture Components, LLC White Paper Page 1 of 18
Copyright © 2011-2013 by Capture Components, LLC. All rights reserved. Capture Components, LLC encourages the
reader to freely share and distribute this White Paper.
Scanning to Salesforce® Attachments with ccScan
®
Document Capture to the Cloud
Overview
This white paper shows how ccScan®, a production-quality document capture application,
can be used to capture documents as Salesforce®
Attachments in an automated, time-saving
manner.
Salesforce.com is the enterprise cloud computing company which is known primarily for
three things: the Sales Cloud and the Service Cloud, their applications for sales and
customer service (also known as customer relationship management or CRM); Force.com,
their cloud platform for building and running business applications; and Chatter, their
enterprise collaboration application. These and other Salesforce applications all run in the
cloud and are sold in a subscription basis. Since there is more to Salesforce than this short
introduction can cover please visit the Salesforce website at http://www.salesforce.com for
in-depth information.
Although Salesforce customers can easily upload their documents if they are already in
digital format, paper documents must be scanned first and then manually uploaded. ccScan
eliminates the time typically wasted with such a multi-step, manual operation that consists
of scanning a document locally to the PC, naming this document, uploading the document
as a Salesforce Attachment, and afterwards enter the description and sharing mode.
Instead ccScan does all of the above in a single-step operation that is fully automated.
Naming of documents can be manual or automated by using barcodes, OCR with Text
Pattern Search, and running counters. In addition to scanning paper documents, ccScan
has bulk import capabilities for already digitized documents that allow entire folders to be
uploaded as Salesforce Attachments in a single step using wild card file specifications and
recursion.
This white paper describes ccScan for Salesforce Attachments. Capture Components also
offers ccScan for Salesforce Documents (which scans and imports documents to Salesforce
Documents) and ccScan for Salesforce Content (which scans and imports documents to
Salesforce Content). To learn more about ccScan for Salesforce Attachments please visit
the Capture Components website at http://www.capturecomponents.com.
32158 Camino Capistrano Suite A PMB 373 San Juan Capistrano, CA 92675 [email protected]
www.CaptureComponents.com

Capture Components, LLC White Paper Page 2 of 18
Copyright © 2011-2013 by Capture Components, LLC. All rights reserved. Capture Components, LLC encourages the
reader to freely share and distribute this White Paper.
ccScan for Salesforce® Attachments
Capture Components, LLC markets different versions of ccScan targeted for different
document repositories. The ccScan versions for “Internet Cloud” based storage support
Google Drive and Docs, Box, Salesforce, Dropbox, Microsoft SkyDrive, Amazon S3,
Windows Azure, etc, but other types of document repositories are supported as well. For
example, documents can be captured remotely and stored in Microsoft SharePoint and
SharePoint Online using SharePoint’s Internet-based web services interface. Additionally
ccScan works with the Microsoft Windows file system utilizing its local hard drive or
networked folders for storage.
Two Editions: ccScan Advanced and ccScan Standard
ccScan Advanced for Salesforce is best explained with some examples: create
Attachments from scanned paper documents or imported PDF documents and update fields
in the parent record with information extracted from the attached document in a single,
fully automated step. Run unattended jobs to import electronic faxes and attach them
automatically to existing or newly created Salesforce records. Scan invoices and
automatically attach them to custom Purchase Order records using the extracted PO
number for lookup. Scan paper documents and automatically populate custom fields in
Content Libraries.
ccScan Advanced features are based upon sophisticated technologies such as barcode
detection, OCR, and Text Pattern search with Regular Expressions. These capabilities are
applied to both the scanning of paper documents in the paper-based office and the
processing of electronic documents in the paperless office.
ccScan Standard for Salesforce is similar to ccScan Advanced without the automation
capabilities. ccScan Standard is typically used in a paper-based office to efficiently scan
paper documents to Salesforce. Eliminate manual steps like scanning locally, naming the
document, creating a folder (in Salesforce Documents), uploading the document to
Salesforce, and finally editing the Salesforce properties of the document such as
description and keywords, or entering values in the custom fields defined for a Salesforce
Content library. Instead, ccScan Standard does all of this in an efficient, single-step
operation.

Capture Components, LLC White Paper Page 3 of 18
Copyright © 2011-2013 by Capture Components, LLC. All rights reserved. Capture Components, LLC encourages the
reader to freely share and distribute this White Paper.
ccScan Overview
Although ccScan costs significantly less than competing products, it is a full-featured,
production-level, document capture system. The software takes full advantage of today’s
multi-core processors. On a quad-core computer the scanning, barcode detection, text
recognition, and export to Salesforce each run on a separate core to maximize throughput.
Consequently most TWAIN-compatible production scanners are operated at rated speed.
Since ccScan has been designed to be enterprise-friendly, it contains a Setup mode and a
User mode. The Setup mode is password protected. Jobs are created in Setup mode and can
be used over and over again in User mode. To make sure ccScan can be used immediately
after installation, without having to create a job first, a set of default jobs is provided to
cover common document capture scenarios.
Jobs can be associated with a scanner button, which can make running a job in User mode
as simple as pressing a button on the scanner. ccScan also contains an Index/QA mode that
allows the operator to check the document or enter indexing data before the document is
sent to Salesforce. Documents are automatically separated if barcode sheets are used.
On platforms that contain no native document viewing options such as Amazon S3 and
Windows Azure, ccScan provides the capability to create View jobs that will list all
documents entries or a subset in either a sequential list or hierarchical format. View jobs,
however, are not enabled for Salesforce since Salesforce natively provides document
viewing capabilities.
ccScan uses the Salesforce REST API to upload documents to Salesforce. The Salesforce
REST API is also used to issue SOQL queries to find the records to attach documents to.
Although there is no need to know anything about the Salesforce REST API to use ccScan,
Salesforce users interested in learning more about this API can go to
http://developer.force.com/REST.
Despite its low price, ccScan has all the high-end features and no restrictions such as page
click charges. For detailed information about ccScan or to download a free trial version,
please visit Capture Component’s website at www.capturecomponents.com.
Capture Components, LLC White Paper Page 4 of 18
Copyright © 2011-2013 by Capture Components, LLC. All rights reserved. Capture Components, LLC encourages the
reader to freely share and distribute this White Paper.
Typical Scenario
To give the reader a flavor of capturing and storing documents in Salesforce with ccScan
the following sections contain walkthroughs annotated with screenshots of a typical
scanning and bulk import scenario. Although the default set of jobs installed with ccScan
cover capturing and storing documents in Salesforce, the example scenarios assume that no
ccScan Jobs have been created previously so both Setup and User modes can be shown.
For ease of illustration certain details such as the creation of an account with Salesforce or
how to enter Setup mode have been left out of these descriptive scenarios.
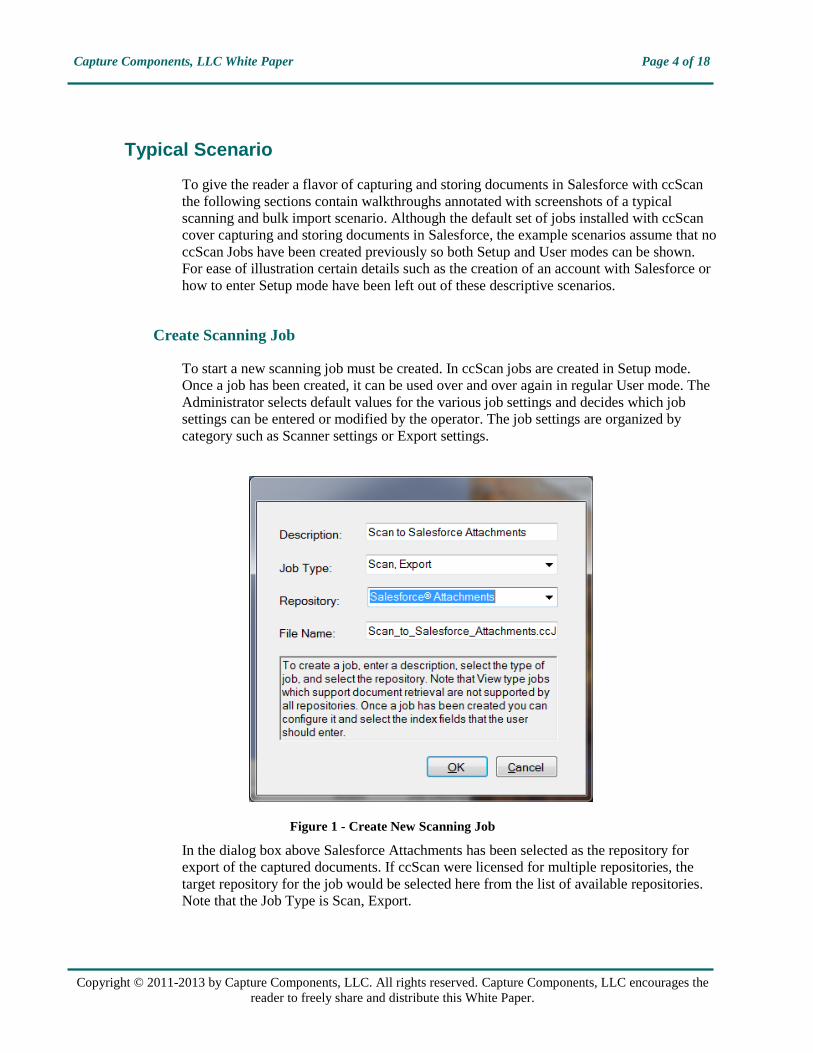
Create Scanning Job
To start a new scanning job must be created. In ccScan jobs are created in Setup mode.
Once a job has been created, it can be used over and over again in regular User mode. The
Administrator selects default values for the various job settings and decides which job
settings can be entered or modified by the operator. The job settings are organized by
category such as Scanner settings or Export settings.
Figure 1 - Create New Scanning Job
In the dialog box above Salesforce Attachments has been selected as the repository for
export of the captured documents. If ccScan were licensed for multiple repositories, the
target repository for the job would be selected here from the list of available repositories.
Note that the Job Type is Scan, Export.

Capture Components, LLC White Paper Page 5 of 18
Copyright © 2011-2013 by Capture Components, LLC. All rights reserved. Capture Components, LLC encourages the
reader to freely share and distribute this White Paper.
Enter Salesforce Credentials
Immediately after the new job has been created, the dialog below comes up to enter the
user name and password for a Salesforce account.
Both in User mode and Setup mode the operator must enter an email/username and
password of an active Salesforce account. When the Login button is pressed ccScan
obtains an authorization token from Salesforce that is subsequently used to request
information from Salesforce such as the numerical ID of the record to attach the documents
to.
Figure 2 - Enter Salesforce Credentials
To prevent users from having to login each time ccScan is started, the obtained
authorization token is stored in between ccScan sessions in an encrypted file that can only
be read by ccScan and only on the PC where it was created. At any time the user has the
option to revoke the authorization token on the Salesforce website. Note that ccScan can be
configured to disable the default auto-logon which requires that users re-enter their
Salesforce credentials each time they use ccScan.

Capture Components, LLC White Paper Page 6 of 18
Copyright © 2011-2013 by Capture Components, LLC. All rights reserved. Capture Components, LLC encourages the
reader to freely share and distribute this White Paper.
Configure New Scanning Job
In the form below the Administrator can configure the new Scanning job. The same form is
used to make modifications to the job later. The name and description of the newly
scanned document to be attached are entered in Name and Description. Private is checked
to restrict the attached document to the owner of the record.
Figure 3 - Configure New Scanning Job
To allow for automated naming, ccScan supports the use of “macros” in document names
that automatically insert counter and barcode values. Automated naming is used with high-
capacity scanners whose hoppers can hold large stacks of documents separated by barcode
sheets.
Attach To Record is used to specify to which Salesforce record(s) the scanned document(s)
should be attached to. ccScan offers two distinct methods, enter a record ID directly or do a

Capture Components, LLC White Paper Page 7 of 18
Copyright © 2011-2013 by Capture Components, LLC. All rights reserved. Capture Components, LLC encourages the
reader to freely share and distribute this White Paper.
Salesforce SOQL lookup. To enter a record ID directly, paste (or drag & drop) the URL of
a Salesforce detail record from the browser to the Attach To Record field. The detail record
could either be a Standard Salesforce record (e.g. Case, Opportunity, etc.) or a Custom
record. ccScan will extract the record ID from the URL and use this to create the
attachment. Typically this method is used when the user has both the browser (containing
the Salesforce detail record) and the ccScan window open (doing drag and drop between
them) when documents must be scanned in (see Figure 8 – ccScan and Salesforce Side-by-
Side).
Figure 4 – Perform SOQL Record Lookup
Alternatively press the magnifying glass button to bring up a dialog box to perform a
Salesforce SOQL query with ccScan. With the dialog the user can select which Standard or
Custom Object to search, what field of the selected Object to use in the search, what
comparison operator to use, and enter the text to match. To locate the records to attach the
documents to, when the Do Lookup button is pressed ccScan performs a Salesforce SOQL
query to find a match or partial match for the selected field of the record. The wild card
Capture Components, LLC White Paper Page 8 of 18
Copyright © 2011-2013 by Capture Components, LLC. All rights reserved. Capture Components, LLC encourages the
reader to freely share and distribute this White Paper.
character (*) can be specified in conjunction with the LIKE operator to find multiple
records. The set of records that are found as the result of issuing the SOQL query are
shown in Records Found. Each record found can be individually selected. When the OK
button is pressed, the record IDs of the selected results are copied to the Attach To Record
field, and the dialog is closed.
The SOQL query can be executed immediately (as depicted above) or can be marked as a
Dynamic Lookup. If Dynamic Lookup is checked the execution of the SOQL query is
deferred to scan time. Typically Dynamic Lookup is used in automated scenarios in
conjunction with barcode detection or OCR text search using ccScan’s macros. Basically at
runtime a barcode macro (e.g. %b1%) or a regular expression macro (e.g. %r1%) is
substituted with the text extracted from the barcode or text matched with the regular
expression, and the SOQL query is performed with this substituted value. In this scenario it
is assumed the user has previously created a Standard or Custom record with the selected
field set to the value of the barcode or the text to search for (so that a match can be found at
scan time). The scanned document is attached to this record provided the SOQL query was
successful.
Job Expiration can be set to the number of seconds of idle time after which the logged-in
Salesforce user is automatically logged out. The default setting of zero disables this
automatic logout. Typically this feature is used in a scanning “kiosk” environment. In
addition to this automated logout a manual logout from a menu selection is available as
well. Also provided are a series of standard PDF settings, such as user and owner
password, which will be applied to the captured documents before they are exported to
Salesforce.
For each setting, the Administrator selects or enters a value. Default values are provided
where possible. The Administrator can also make settings available for the operator to
enter, except for the Administrator-only settings. For the settings to be entered by the
operator, the Administrator determines the order in which these settings are shown,
optionally modifies the default description of each setting, and selects which type of input
control should be presented to the operator.
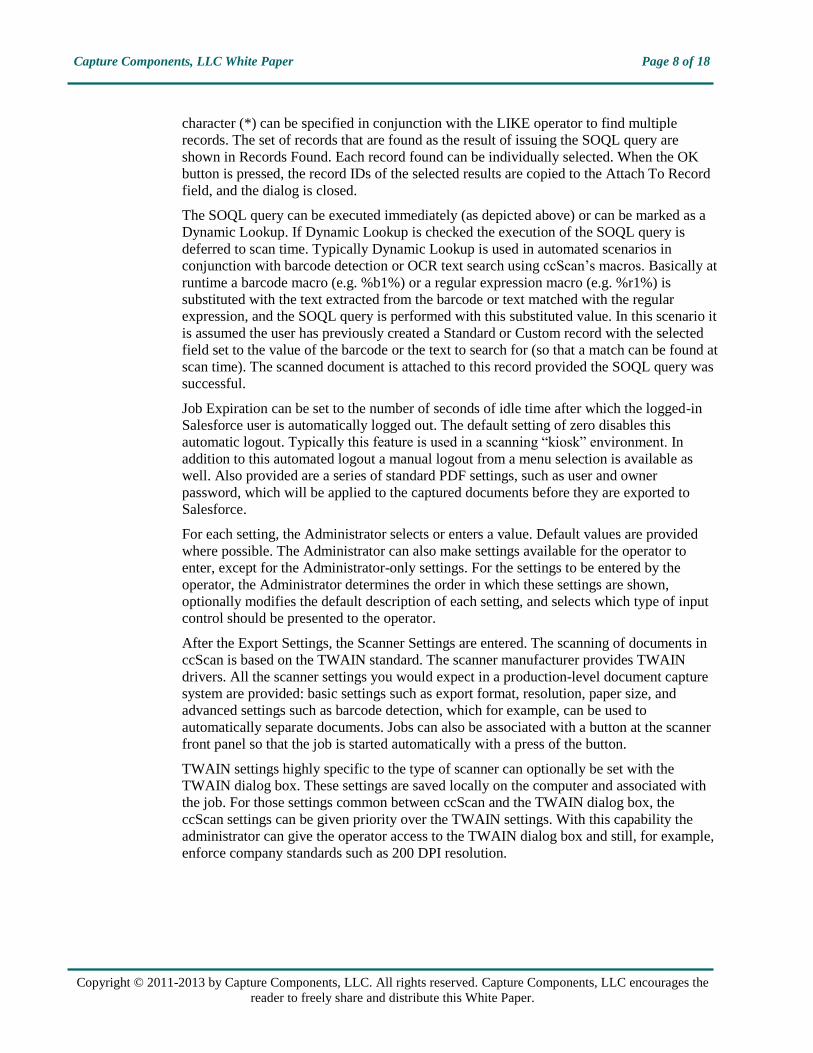
After the Export Settings, the Scanner Settings are entered. The scanning of documents in
ccScan is based on the TWAIN standard. The scanner manufacturer provides TWAIN
drivers. All the scanner settings you would expect in a production-level document capture
system are provided: basic settings such as export format, resolution, paper size, and
advanced settings such as barcode detection, which for example, can be used to
automatically separate documents. Jobs can also be associated with a button at the scanner
front panel so that the job is started automatically with a press of the button.
TWAIN settings highly specific to the type of scanner can optionally be set with the
TWAIN dialog box. These settings are saved locally on the computer and associated with
the job. For those settings common between ccScan and the TWAIN dialog box, the
ccScan settings can be given priority over the TWAIN settings. With this capability the
administrator can give the operator access to the TWAIN dialog box and still, for example,
enforce company standards such as 200 DPI resolution.

Capture Components, LLC White Paper Page 9 of 18
Copyright © 2011-2013 by Capture Components, LLC. All rights reserved. Capture Components, LLC encourages the
reader to freely share and distribute this White Paper.
Run this Scanning Job
Once the job has been created it can be run over and over again in User mode. The job is
started either from the scanner front panel or with the Start Job button in ccScan.
Figure 5 - Run this Scanning Job
Typically jobs are configured so that the operator must enter at least a document name
unless ccScan’s automated naming capabilities are used. Optionally the operator can
change default scanner settings or enter or select additional Salesforce fields.
Once the job is started, ccScan disables the Start Scan button and does not allow any
changes to the form. However, the operator is allowed to press the Cancel button. To
provide visual feedback the scanned pages are displayed while the job is running.
Capture Components, LLC White Paper Page 10 of 18
Copyright © 2011-2013 by Capture Components, LLC. All rights reserved. Capture Components, LLC encourages the
reader to freely share and distribute this White Paper.
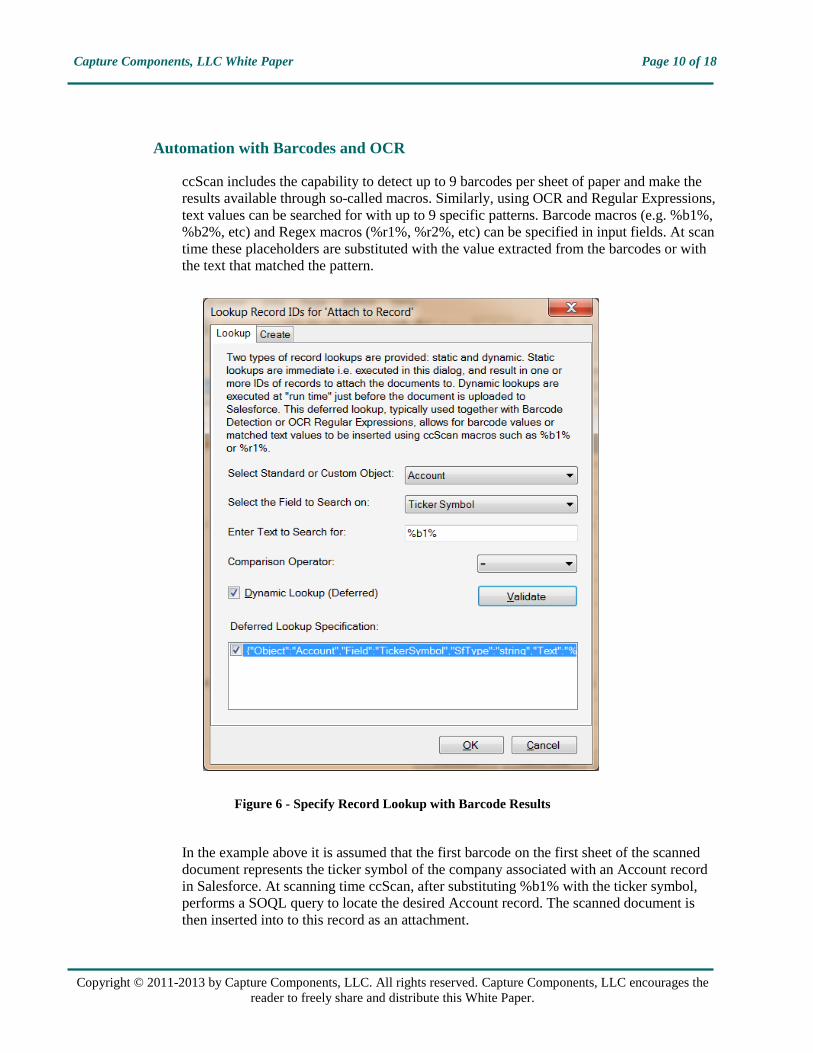
Automation with Barcodes and OCR
ccScan includes the capability to detect up to 9 barcodes per sheet of paper and make the
results available through so-called macros. Similarly, using OCR and Regular Expressions,
text values can be searched for with up to 9 specific patterns. Barcode macros (e.g. %b1%,
%b2%, etc) and Regex macros (%r1%, %r2%, etc) can be specified in input fields. At scan
time these placeholders are substituted with the value extracted from the barcodes or with
the text that matched the pattern.
Figure 6 - Specify Record Lookup with Barcode Results
In the example above it is assumed that the first barcode on the first sheet of the scanned
document represents the ticker symbol of the company associated with an Account record
in Salesforce. At scanning time ccScan, after substituting %b1% with the ticker symbol,
performs a SOQL query to locate the desired Account record. The scanned document is
then inserted into to this record as an attachment.
Capture Components, LLC White Paper Page 11 of 18
Copyright © 2011-2013 by Capture Components, LLC. All rights reserved. Capture Components, LLC encourages the
reader to freely share and distribute this White Paper.
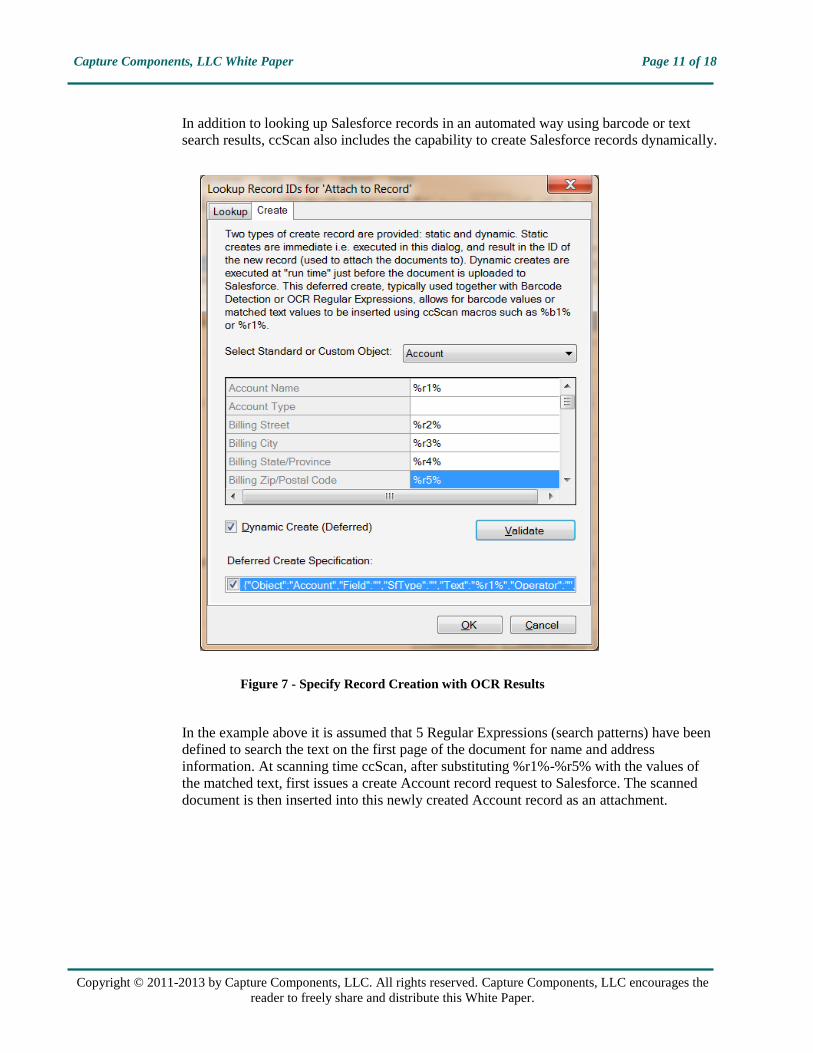
In addition to looking up Salesforce records in an automated way using barcode or text
search results, ccScan also includes the capability to create Salesforce records dynamically.
Figure 7 - Specify Record Creation with OCR Results
In the example above it is assumed that 5 Regular Expressions (search patterns) have been
defined to search the text on the first page of the document for name and address
information. At scanning time ccScan, after substituting %r1%-%r5% with the values of
the matched text, first issues a create Account record request to Salesforce. The scanned
document is then inserted into this newly created Account record as an attachment.

Capture Components, LLC White Paper Page 12 of 18
Copyright © 2011-2013 by Capture Components, LLC. All rights reserved. Capture Components, LLC encourages the
reader to freely share and distribute this White Paper.
ccScan and Salesforce Side-by-Side
ccScan can be used in a stand-alone fashion looking up records to attach documents to with
the ccScan SOQL query dialog (see Figure 4 – Perform SOQL Record Lookup). The more
popular way is to run ccScan side-by-side with Salesforce dragging and dropping the URLs
of Salesforce detail pages from the browser to ccScan.
Figure 8 – ccScan and Salesforce Side-by-Side
Running ccScan this makes it convenient to locate Salesforce records “natively” in the
browser and quickly scan and attach a document when needed. Although this setup works
fine with a wide-screen monitor, the most productive setup is a PC with dual monitors.

Capture Components, LLC White Paper Page 13 of 18
Copyright © 2011-2013 by Capture Components, LLC. All rights reserved. Capture Components, LLC encourages the
reader to freely share and distribute this White Paper.
Create Import Job
Import jobs are used to “import” electronic documents into Salesforce. To start a new
Import job it must be created. In ccScan jobs are created in Setup mode. Once a job has
been created, it can be used over and over again in regular User mode. The Administrator
selects default values for the various job settings and decides which job settings can be
entered or modified by the operator. The job settings are organized by category such as
Import settings or Export settings.
Figure 9 - Create New Import Job
In the dialog box above Salesforce Attachments has been selected as the repository for
export of the imported documents. If ccScan was licensed for multiple repositories the
target repository for the job would be selected here from the list of available repositories.
Note that the Job Type is Import, Export.
Enter Salesforce Credentials
Immediately after the new job has been created and the Salesforce credentials have not
been entered yet, the user name and password for a Salesforce account must be entered
with the dialog described earlier in this document.

Capture Components, LLC White Paper Page 14 of 18
Copyright © 2011-2013 by Capture Components, LLC. All rights reserved. Capture Components, LLC encourages the
reader to freely share and distribute this White Paper.
Configure New Import Job
In the form below the Administrator can configure the new Import job. The same form is
used to make modifications to the job later. The name of the newly imported document is
entered in Name. If Name is left blank, the new document will get the same name as the
imported file (or the name of the first file if multiple files are imported). All the Salesforce
fields mentioned earlier for scanning are available for import as well.
Figure 10 - Configure New Import Job
For each setting, the Administrator selects or enters a value. Default values are provided
where possible. The Administrator can also make settings available for the operator to
enter, except for the Administrator-only settings. For the settings to be entered by the
operator, the Administrator determines the order in which these settings are shown,
optionally modifies the default description of each setting, and selects what type of input
control should be presented to the operator.

Capture Components, LLC White Paper Page 15 of 18
Copyright © 2011-2013 by Capture Components, LLC. All rights reserved. Capture Components, LLC encourages the
reader to freely share and distribute this White Paper.
After the Export Settings, the Import Settings are entered. First the type of import must be
selected, either File Import or Bulk Import. File Import brings up the standard Windows
file selection dialog and allows the user to navigate to a particular folder and select one or
more files to import.
The most interesting option for Salesforce Attachments, however, is Bulk Import. Bulk
Import allows the selection of a folder and for ccScan to automatically walk through this
folder (optionally recursively so all subfolders and their subfolders are included) and
import all files that match one more wildcards (such as *.*, *.pdf, ccitt_?.tif?, etc). Even
wildcards can be specified to exclude certain types of files. Also, for files containing
scanned images only, there is an option to combine all files into a single file and import
only this combined file (optionally de-skewing the images first).
In Bulk Import Folder either enter the name of the folder to traverse (or select from a list of
folders). The wildcard specification to include files is entered in Bulk Inclusion Pattern
while the wildcard specification to exclude files is entered in Bulk Exclusion Pattern. To
recursively traverse subfolders enable Bulk Folder Recursion.
Automated Processing of Electronic Documents
Earlier in the document it was shown how the creation of attachments in the Notes &
Attachments section of selected records could be automated using Barcode Detection or
OCR text search with Regular Expressions. At run time ccScan substitutes the macros
(placeholders) in the input fields containing SOQL queries, with the obtained barcode
values or text matches to allow automatic look up of Salesforce Standard or Custom
records, or even create the records to insert these attachments into.
Note that both the Barcode Detection and OCR text search with Regular Expressions are
fully available for use with Import jobs too. This provides a whole new dimension to the
processing of electronic documents. For example, customers could be provided with fax
cover sheets containing a barcode that could be used to automatically look up their
Account record in Salesforce. Assuming the fax system will store incoming electronic
faxes in a folder on the Intranet, a ccScan Import job could be configured to periodically
poll this folder and automatically insert the incoming documents as attachments into the
Account record, all in an unattended manner.
Likewise, a ccScan Import job could be configured to periodically poll a mapped, shared
Cloud folder (from Dropbox, Google Drive, Box, SkyDrive, etc) and import electronic
documents into Salesforce as attachments automatically based on text matches obtained
with Regular Expressions. Note that the text search based on patterns defined with Regular
Expressions works both with image-only PDF files and regular text PDF files.

Capture Components, LLC White Paper Page 16 of 18
Copyright © 2011-2013 by Capture Components, LLC. All rights reserved. Capture Components, LLC encourages the
reader to freely share and distribute this White Paper.
Run this Import Job
Once the Import job has been created it can be run over and over again in User mode. The
job is started with the Start Job button.
Figure 11 - Run this Import Job
Typically jobs are configured so that the operator must enter at least a document title
unless the new document must be named after the imported document.
Once the job is started, ccScan disables the Start Import button and does not allow any
changes to the form. However, the operator is allowed to press the Cancel button. To
provide visual feedback, the imported pages are displayed while the job is running.

Capture Components, LLC White Paper Page 17 of 18
Copyright © 2011-2013 by Capture Components, LLC. All rights reserved. Capture Components, LLC encourages the
reader to freely share and distribute this White Paper.
Annotation and Redaction
It is not uncommon to annotate or redact selected paragraphs of documents that are shared.
For example, redaction is used routinely in the legal sector. To allow review, correction, or
annotation of documents before they are stored as Salesforce Attachments, ccScan provides
an optional Index/QA mode. This mode can be enabled on a per-job basis by checking the
Index/QA Later field. When enabled the documents produced with a Scanning or Import
job are cached locally and made available in the Index/QA tab of ccScan.
Figure 12 - Index/QA Mode
Before releasing the documents to Salesforce from Index/QA, descriptive information can
be added to index fields, and pages can be deleted or inserted. Index information can be

Capture Components, LLC White Paper Page 18 of 18
Copyright © 2011-2013 by Capture Components, LLC. All rights reserved. Capture Components, LLC encourages the
reader to freely share and distribute this White Paper.
entered manually using the keyboard or extracted automatically from selected zones of the
image using OCR (Optical Character Recognition).
In addition, pages can be annotated with text and selected portions of the pages could be
redacted. Note that the annotations and redactions become permanent once they are saved
and cannot be removed later.
Afterword
We at Capture Components LLC hope that this White Paper is of benefit to you. If it is and you are
able to conveniently and efficiently capture and import your documents as Salesforce Attachments,
then we have achieved a measure of success. If you choose to use ccScan as your document capture
application, we will do our best to provide you with the highest quality product and support.
Visit us at http://www.capturecomponents.com