SBAdmin Command Reference Guide - Storix System Backup Administrator - 3 - Version 8.2 Commands...
61
Commands Reference Version 8.2
Transcript of SBAdmin Command Reference Guide - Storix System Backup Administrator - 3 - Version 8.2 Commands...
Commands Reference
Version 8.2

Storix System Backup Administrator - 2 - Version 8.2 Commands Reference
Trademarks and Copyrights
© Copyright Storix, Inc. 1999-2018 USA Storix is a registered trademark of Storix, Inc. in the USA SBAdmin is a trademark of Storix, Inc in the USA and other countries Linux is a registered trademark of Linus Torvalds. Intel, Pentium, IA32, IA64, Itanium, Celeron and IA64 are registered trademarks of Intel Corporation. AMD, Opteron, and Athlon are registered trademarks of Advanced Micro Devices. HP Integrity servers are registered trademarks of Hewlett-Packard Development Company IBM, AIX, Tivoli, iSeries and pSeries are registered trademarks of International Business Machines Corporation. Xwindows is a trademark of Massachusetts Institute of Technology. Microsoft and Windows are registered trademarks of Microsoft Corporation. Macintosh and Mac OS X are registered trademarks of Apple Computer, Inc. Oracle is a registered trademark of Oracle Corporation, All other company/product names and service marks may be trademarks or registered trademarks of their respective companies.
*Encryption Software
System Backup Administrator Backup Data Encryption Feature has a cryptographic component, using Advanced Encryption Standard (AES) "Rijndael" encryption algorithm in Cipher Block Feedback (stream) mode (CFB-128), supporting 128, 192 and 256-bit keys.
It is not for export or redistribution to any of what are called the "T-10 Terrorist States" as determined by the U.S. Department of State. System Backup Administrator Backup Data Encryption Feature has been registered with U.S. Bureau of Information and Security and is distributed under Export Control Classification Number (ECCN) 5D992. This encryption item is authorized for export and re-export under section 742.15 (B)(2) of the Export Administration Regulations (EAR).
Storix System Backup Administrator - 3 - Version 8.2 Commands Reference
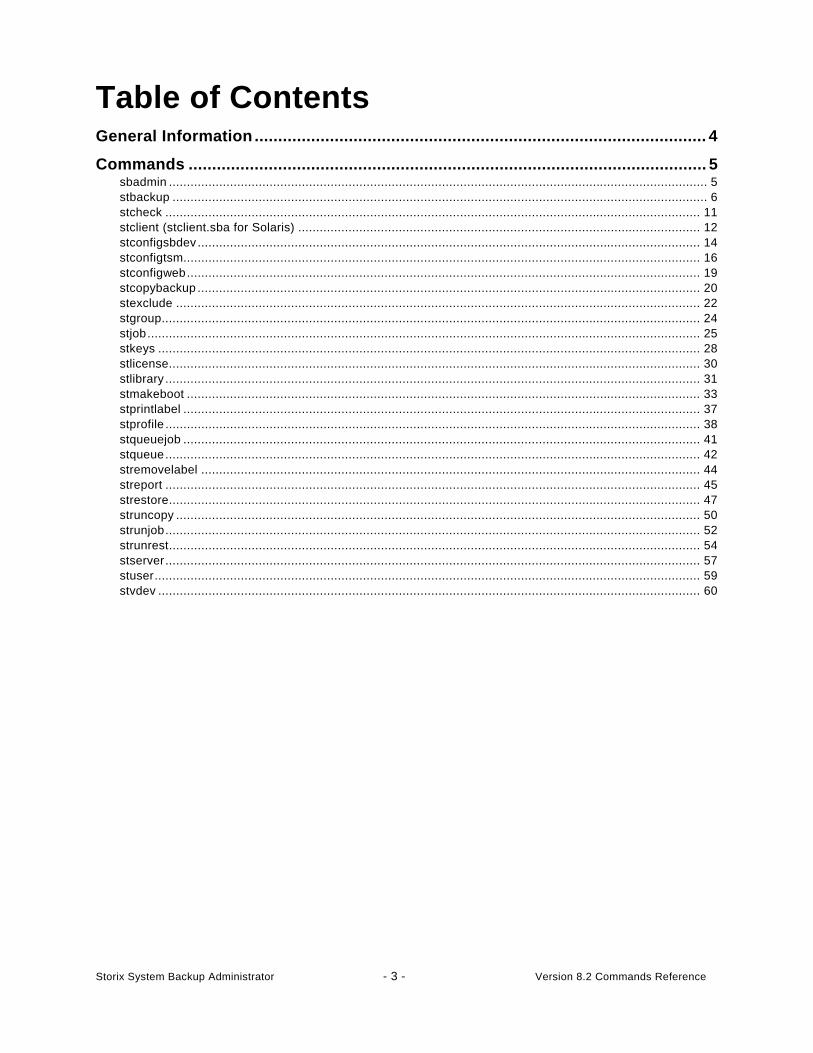
Table of Contents General Information ................................................................................................ 4
Commands .............................................................................................................. 5 sbadmin ...................................................................................................................................................... 5 stbackup ..................................................................................................................................................... 6 stcheck ..................................................................................................................................................... 11 stclient (stclient.sba for Solaris) ................................................................................................................ 12 stconfigsbdev ............................................................................................................................................ 14 stconfigtsm................................................................................................................................................ 16 stconfigweb............................................................................................................................................... 19 stcopybackup ............................................................................................................................................ 20 stexclude .................................................................................................................................................. 22 stgroup...................................................................................................................................................... 24 stjob.......................................................................................................................................................... 25 stkeys ....................................................................................................................................................... 28 stlicense.................................................................................................................................................... 30 stlibrary ..................................................................................................................................................... 31 stmakeboot ............................................................................................................................................... 33 stprintlabel ................................................................................................................................................ 37 stprofile ..................................................................................................................................................... 38 stqueuejob ................................................................................................................................................ 41 stqueue..................................................................................................................................................... 42 stremovelabel ........................................................................................................................................... 44 streport ..................................................................................................................................................... 45 strestore.................................................................................................................................................... 47 struncopy .................................................................................................................................................. 50 strunjob..................................................................................................................................................... 52 strunrest.................................................................................................................................................... 54 stserver..................................................................................................................................................... 57 stuser........................................................................................................................................................ 59 stvdev ....................................................................................................................................................... 60

Storix System Backup Administrator - 4 - Version 8.2 Commands Reference
General Information Although all operations may be performed from either the SBAdmin Graphical User Interface, or the Web Interface, it is sometimes desirable to run commands at the command-line to perform certain tasks. This section lists the commands that may be run from the command line. Some commands are used on the Administrator System and others on the Client or Server system, as indicated. All command specified here are found in /usr/bin and should not be run directly from the software installation directory (/opt/storix/bin or /usr/lpp/storix/bin.
In this section, the following command syntax conventions are used:
bold text in bold font is the command name or other argument typed as shown italics replace the italicized word with a value (which may be optional) [argument] argument is optional {-n arg} flag -n must be supplied with a valid arg {arg1 | arg2} either arg1 or arg2 must be supplied -n,--arg value specify either “-n value” or “--arg value”
Unless otherwise noted, these commands may only be executed by the root user, or a user defined (by the root user). Refer to Configuring Users section of the SBAdmin User Guide for more information.

Storix System Backup Administrator - 5 - Version 8.2 Commands Reference
Commands sbadmin Purpose:
Start the SBAdmin Xwindows graphical user interface.
Use on:
Administrator
Syntax:
sbadmin [options]
Options:
-U username/password
Specifies under which username and password sbadmin should start
-G group
Specifies the group sbadmin should use when starting
-d display
Specifies the Xserver display to use when starting
About Displays version and license usage information
Details:
This is the command used to start the SBAdmin Xwindows graphical user interface. The interface will be shown on the display indicated by the DISPLAY environment variable, if set.
When running as an account with access to more than one configured SBAdmin user. The –U flag may be used to avoid being prompted for this information. The –G flag indicates under which group sbadmin should open. Multiple versions of sbadmin may be launched to administer different groups, however only one instance per group may be run.
Refer to the SBAdmin User Guide for complete information on all functions of SBAdmin and using the graphical user interface.

Storix System Backup Administrator - 6 - Version 8.2 Commands Reference
stbackup Purpose:
Run a backup outside of a job
Use on:
Administrator or Client
Syntax:
stbackup [options] {–t type} {–d device|directory} data {…}
Options:
-b --buffer bufsize
Buffer size of backup data. Default is 64 Kbytes.
-C, --compress level
Compression level: (1) low, (2) medium, (3) high
-d --device device/dir
Configured backup device name or physical tape device/directory name if writing locally. For TSM backups use “API” (see “-s server”).
-D --desc description
Backup description. Any text up to 60 characters, excluding colons (:), may be used. If the text contains spaces, surround the entire text string by double quotes.
-e --eject Eject tape at end of backup
-h –hostperm permission
If writing to a disk file, indicates host read permission (a=any host, h=original host only). Does not apply to tape backups.
-I --rawpp Include raw partitions, slices and meta-disks in the backup. Applies to System and Volume Group/Zpool backups. (Linux and Solaris only)
-l --level level
Incremental backup level (0-9). If not specified, no incremental level will apply. Level 0 applies to System, Volume Group/Zpool, Filesystem backups; levels 1-9 apply to Volume Group/Zpool, Filesystem backups.
-N --raw Include raw logical volumes and ZFS volumes in the backup. Applies to System and Volume Group/Zpool backups. (Linux and Solaris only)
-O --overwrite Allow overwriting of another SBAdmin backup. If this flag is not specified and another backup exists on the tape, the command will fail and no data will be written.
-r --rewind Rewind tape before starting backup
-s --server server
If backup is performed to a device on a remote server, this option indicates the backup server name. This option only applies to client systems in a Network Edition environment.
For TSM backups, set device to “API” and use server in the format “-s TSM@serverName”
Storix System Backup Administrator - 7 - Version 8.2 Commands Reference
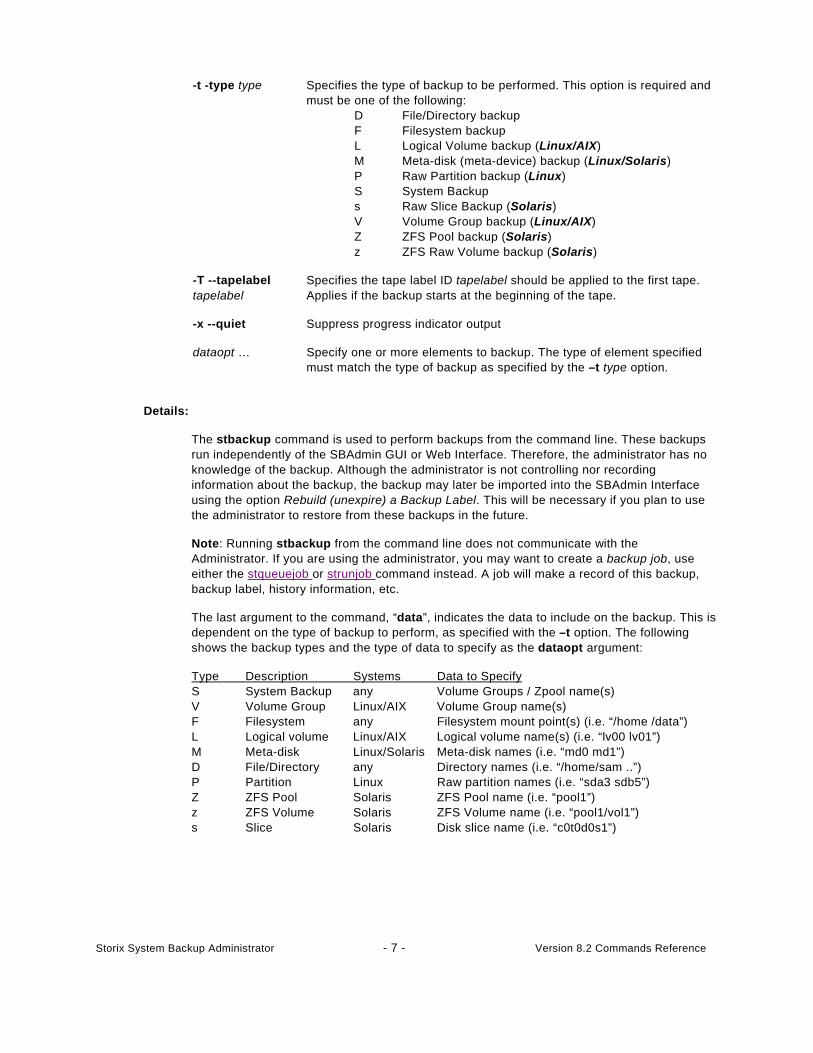
-t -type type Specifies the type of backup to be performed. This option is required and must be one of the following: D File/Directory backup F Filesystem backup L Logical Volume backup (Linux/AIX) M Meta-disk (meta-device) backup (Linux/Solaris) P Raw Partition backup (Linux) S System Backup s Raw Slice Backup (Solaris) V Volume Group backup (Linux/AIX) Z ZFS Pool backup (Solaris) z ZFS Raw Volume backup (Solaris)
-T --tapelabel tapelabel
Specifies the tape label ID tapelabel should be applied to the first tape. Applies if the backup starts at the beginning of the tape.
-x --quiet Suppress progress indicator output
dataopt … Specify one or more elements to backup. The type of element specified must match the type of backup as specified by the –t type option.
Details:
The stbackup command is used to perform backups from the command line. These backups run independently of the SBAdmin GUI or Web Interface. Therefore, the administrator has no knowledge of the backup. Although the administrator is not controlling nor recording information about the backup, the backup may later be imported into the SBAdmin Interface using the option Rebuild (unexpire) a Backup Label. This will be necessary if you plan to use the administrator to restore from these backups in the future.
Note: Running stbackup from the command line does not communicate with the Administrator. If you are using the administrator, you may want to create a backup job, use either the stqueuejob or strunjob command instead. A job will make a record of this backup, backup label, history information, etc.
The last argument to the command, “data”, indicates the data to include on the backup. This is dependent on the type of backup to perform, as specified with the –t option. The following shows the backup types and the type of data to specify as the dataopt argument:
Type Description Systems Data to Specify S System Backup any Volume Groups / Zpool name(s) V Volume Group Linux/AIX Volume Group name(s) F Filesystem any Filesystem mount point(s) (i.e. “/home /data”) L Logical volume Linux/AIX Logical volume name(s) (i.e. “lv00 lv01”) M Meta-disk Linux/Solaris Meta-disk names (i.e. “md0 md1”) D File/Directory any Directory names (i.e. “/home/sam ..”) P Partition Linux Raw partition names (i.e. “sda3 sdb5”) Z ZFS Pool Solaris ZFS Pool name (i.e. “pool1”) z ZFS Volume Solaris ZFS Volume name (i.e. “pool1/vol1”) s Slice Solaris Disk slice name (i.e. “c0t0d0s1”)

Volume Group and Logical Volume backups are only available on Linux systems if LVM (Logical Volume Manager) is installed. Meta-disk backups are only available on Linux if meta-disk (Software RAID) support is installed.
TSM Edition allows only System (-t S) backups.
System Backups: When performing a System Backup (S), the data is a list of volume groups (AIX or Linux) or ZFS Pools (Solaris) to include on the backup. For AIX systems, the rootvg volume group is always included, so it need not be specified. In that case, if no volume groups are specified, only the rootvg volume group is included. On Linux systems, this option only applies if LVM is implemented on the system and there are volume groups configured. If no volume groups are specified, then no volume group data (including filesystems and raw logical volumes) will be included on the backup. Whether AIX, Linux or Solaris, you may specify “all” to include all available volume group (or zpools in the case of Solaris) data. Note, however, that raw volume data (volumes that do not include filesystems) will also be included unless you specify the –n option.
The –l (incremental level) may be specified to indicate that only files which have changed since the last prior level backup should be included. Level 0 indicates that all files should be backed up and is used as a base for all subsequent incremental backup levels. Level 0 may be specified with a System Backup to indicate that this backup should act as a full incremental from which latter incremental levels may be applied.
Backups may run faster when using a larger buffer size (-b option) than the default of 64 Kbytes. If the tape device supports a larger than 64 Kbyte buffer, increasing this value will often cause backups to run faster. Try buffer sizes that are a power of 2, such as 128K, 256K and 512K. This value will only support up to 1024 Kbytes (1 Megabyte).
If a server is specified with the –s option, you must have first configured the backup device where the backup will be stored. Refer to stserver and stvdev to configure servers and devices.
The stbackup command will exit with a completion message and one of the following exit codes:
0 Success 1 Backup failed 2 Pre-backup failure (no data written) 6 Non-bootable System backup created (warning - backup completed) 7 Cannot overwrite tape 9 Internal program error 11 Possible incomplete backup (warning - backup completed - verify required) 99 Killed by user (Ctrl-C)
Storix System Backup Administrator - 8 - Version 8.2 Commands Reference
Storix System Backup Administrator - 9 - Version 8.2 Commands Reference
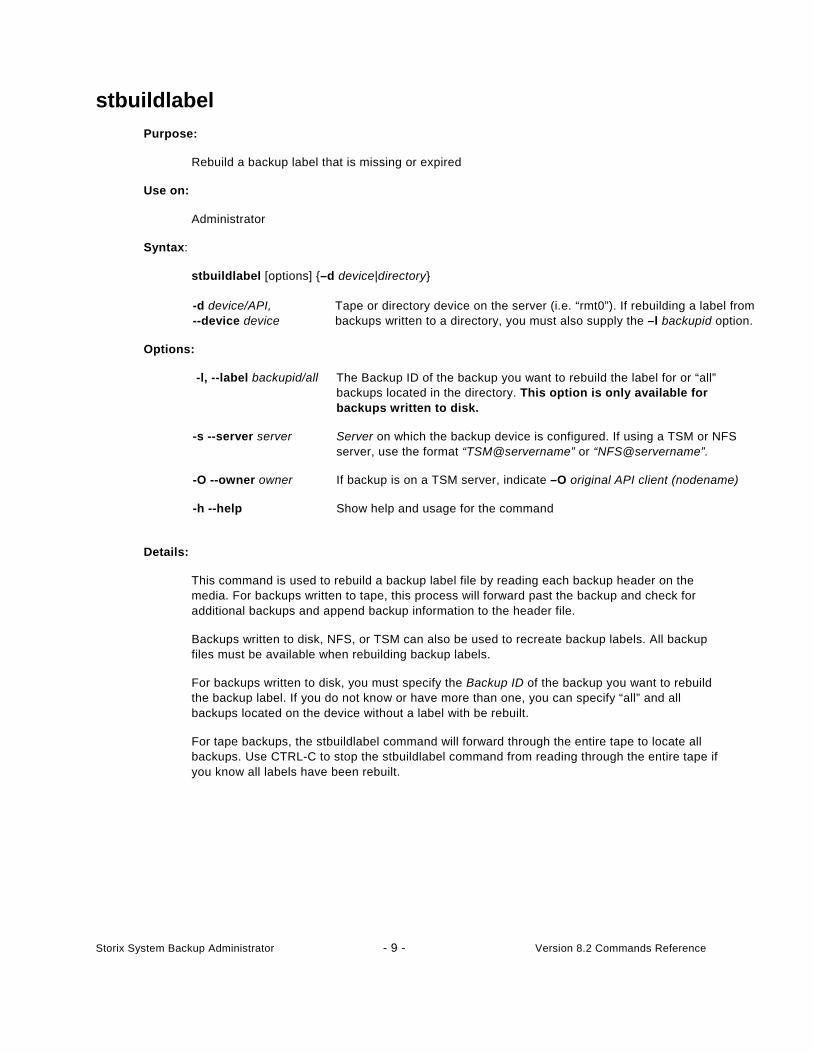
stbuildlabel Purpose:
Rebuild a backup label that is missing or expired
Use on:
Administrator
Syntax:
stbuildlabel [options] {–d device|directory}
-d device/API, --device device
Tape or directory device on the server (i.e. “rmt0”). If rebuilding a label from backups written to a directory, you must also supply the –l backupid option.
Options:
-l, --label backupid/all The Backup ID of the backup you want to rebuild the label for or “all” backups located in the directory. This option is only available for backups written to disk.
-s --server server Server on which the backup device is configured. If using a TSM or NFS server, use the format “TSM@servername” or “NFS@servername”.
-O --owner owner If backup is on a TSM server, indicate –O original API client (nodename)
-h --help Show help and usage for the command
Details:
This command is used to rebuild a backup label file by reading each backup header on the media. For backups written to tape, this process will forward past the backup and check for additional backups and append backup information to the header file.
Backups written to disk, NFS, or TSM can also be used to recreate backup labels. All backup files must be available when rebuilding backup labels.
For backups written to disk, you must specify the Backup ID of the backup you want to rebuild the backup label. If you do not know or have more than one, you can specify “all” and all backups located on the device without a label with be rebuilt.
For tape backups, the stbuildlabel command will forward through the entire tape to locate all backups. Use CTRL-C to stop the stbuildlabel command from reading through the entire tape if you know all labels have been rebuilt.

Storix System Backup Administrator - 10 - Version 8.2 Commands Reference
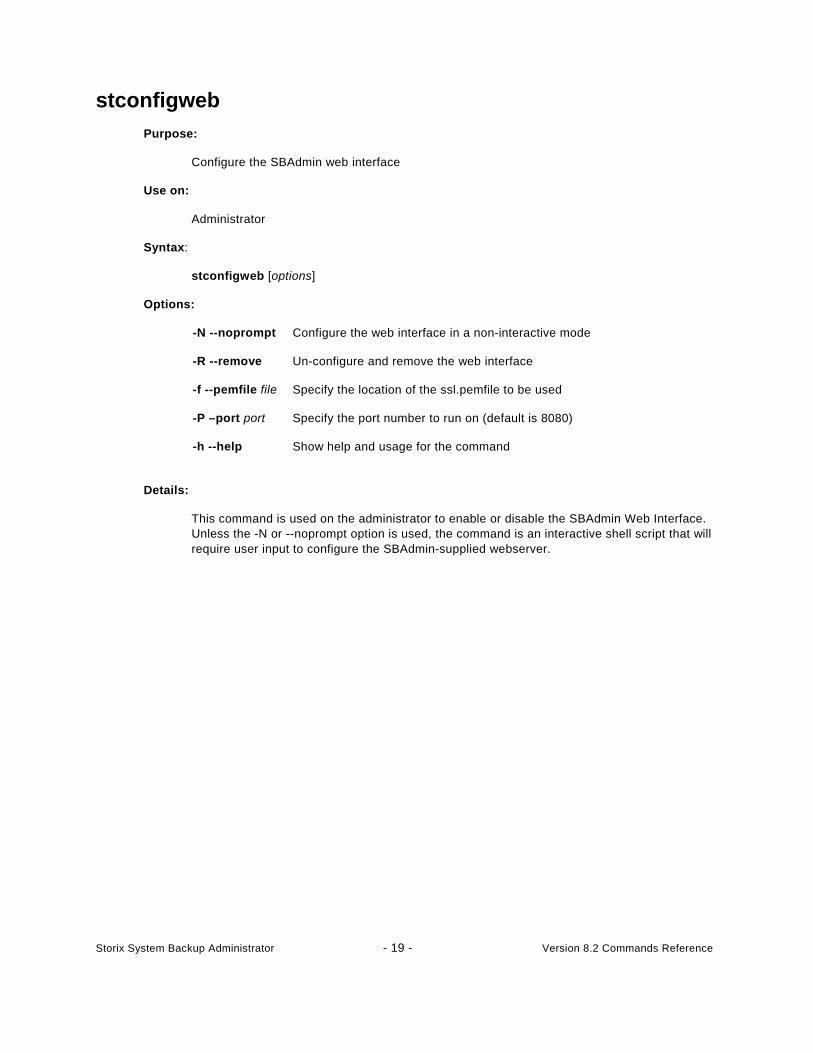
stconfigweb Purpose:
Configure the SBAdmin web interface
Use on:
Administrator
Syntax:
stconfigweb [options]
Options:
-N --noprompt Configure the web interface in a non-interactive mode
-R --remove Un-configure and remove the web interface
-f --pemfile file Specify the location of the ssl.pemfile to be used
-P –port port Specify the port number to run on (default is 8080)
-h --help Show help and usage for the command
Details:
This command is used on the administrator to enable or disable the SBAdmin Web Interface. Unless the -N or --noprompt option is used, the command is an interactive shell script that will require user input to configure the SBAdmin-supplied webserver.

Storix System Backup Administrator - 11 - Version 8.2 Commands Reference
stcheck Purpose:
Check the network communication between any systems running System Backup Administrator
Use on:
Network or TSM Edition Administrator, Client or Server
Syntax:
stcheck [-a {MyIPaddress | MyHostname}] {Hostname | IPAddress}
Options:
-a myaddr Specifies the IP address (MyIPAddress) or hostname (MyHostname) of the local network adapter to use to contact the client or server
Hostname Hostname of the client or server to contact
IPAddress IP Address of the client or server to contact
Details:
This command may be used to determine communication errors. If a client or server shows as unavailable from the SBAdmin interface, or if an error such as “Cannot contact server” occurs during normal operations, this command can help determine the cause.
The following command was used to check for communications problems with an Administrator (sales1) and a Server host (sales3). Should a communication error occur, one or more possible reasons will be listed along with the steps to check or repair the problem.
sales1.storix> stcheck sales3
Communications check for sales3
Actual name is sales3.storix
Timeout is 10 seconds
Contacting remote host...
Remote host responded:
My IP address: 192.168.1.203
My (actual) hostname: sales3.storix
My port numbers: 5026 and 5027
Your IP address: 192.168.1.201
Your (resolved) hostname: sales1.storix
Your port numbers: 58086 and 58087
Your group name: main
Your group ID: 432393373a36c4c6
Your host (sales1.storix) is a valid Admin System for sales3.storix.
Host sales3.storix is a valid backup server for your group.
Host sales3.storix is a valid backup server for your host.

Storix System Backup Administrator - 12 - Version 8.2 Commands Reference
stclient (stclient.sba for Solaris) Purpose:
Configure Linux, Solaris or AIX clients. Lists configured clients and check client availability, turn on and off optional license features, configure backup preferences.
Use on:
Network or TSM Edition Administrator
Syntax:
stclient <operation> [options] client {...}
Operations:
-a --add Add/edit client
-A --check Show availability of client(s) (default all clients)
-r --remove Remove client(s)
-l --list List configured clients
Options:
-Ey, --enable-encryption Enable encryption support
-En, --disable-encryption Disable encryption support
-Ty, --enable-tsm Enable TSM support (assumes this is a configured TSM node)
-Tn, --disable-tsm Disable TSM support for this client
-f, --force Remove client from backup jobs (used with –r)
-H, --admin-host host Append Admin system to system_admin_hosts file
-sy, --sparse Preserve sparse files on restore (default)
-sn, --nosparse Don’t preserve sparse files on restore
-ty, --atime Preserve file access times on the backup
-tn, --noatime Don’t preserve file access times on the backup (default)
-v, --verbose Show features list (used with –l)
Details:
The stclient command is used to add, remove and list clients configured on the Administrator System.
To list clients, use the –l option. By default, only client names are shown. If the –v option is also provided; the client features and options will also be displayed.

Storix System Backup Administrator - 13 - Version 8.2 Commands Reference
If you want to also show the client availability as well as the system type, use –A with -l. This will indicate the client availability as either available or down, and will display the system (AIX, Solaris or Linux) and machine type (i386, ppc, sparc) or “unknown” if the client cannot be contacted. If no client name is provided, all clients are listed, indicating whether or not the client is currently available. Availability is determined by whether or not the Network Edition Administrator can communicate with the client. If not, you can use the stcheck command to help isolate the problem.
TSM Clients If this client is configured as a TSM client (i.e. this is a TSM node to be backed up to a TSM server), use the “-Ty” flag to turn on TSM support. You must then use the stconfigtsm command to configure the TSM client options.
Changing a client If a client is currently defined, you can change specific options by specifying only that option and its new argument. For example, to disable encryption for a client, use the following command:
stclient -aEn mickey or stserver -a --disable-encryption mickey
Removing a client To remove a currently configured client, specify –r and the client name, such as:
stclient –r mickey
Note that if the client is currently assigned to a backup job, you may use the –f flag to have the client removed from all backup jobs it is currently assigned to. When using the –f flag, if the client you are removing is the only client assigned to the job then the job will be removed. If you do not use the –f flag, then you will need to edit the job settings to remove the client, or remove the backup job, before removing the client.

Storix System Backup Administrator - 14 - Version 8.2 Commands Reference
stconfigsbdev Purpose:
Configure a client local tape, disk or NFS device
Use on:
Workstation, Network or TSM Edition Administrator
Syntax:
stconfigsbdev <operation> [options] device {...}
Operations:
-a –add Add system backup device
-i –import Import/find system backup disk (disk only)
-r –remove Remove system backup device
-l --list List system backup devices
-j –eject Eject configured system backup disk (disk only)
Options:
-b, --bootdisk Make system backup disk bootable (disk only)
-c, --client client Client name
-d, --disktype type Disk storage type (P)artition, (L)VM or ZFS (disk only)
-e, --efiboot Configure disk capable of booting from UEFI (disk only)
-f, --force Force import of SBDIR device (disk only)
-L, --label label Label to identify disk(s) within SBAdmin. (disk only)
-p, --pptype type Partition table type (“msdos” or “gpt”) (disk only)
-o, --opts options NFS mount options (nfs only)
-n, --nfsserver server NFS server name (nfs only)
-m, --mountpt mountpoint System backup device mountpoint (workstation nfs only)
-t, --type type System backup device type (“disk”, “tape”, or “nfs”)
-v, --volsize size Maximum Volume size in MB (disk and nfs only)
-D, --redefine Redefine NFS mount (nfs only)
-M, --remount Remount NFS mount (nfs only)
-N, --nfs4 NFSv4 share (nfs only)

Storix System Backup Administrator - 15 - Version 8.2 Commands Reference
-U, --undefine Unmount and undefined (nfs unconfigure only)
-V, --verbose Verbose listing. (with –l)
-x, --colonformat Colon format output (with –l)
Details:
The stconfigsbdev command is used to configure a disk, tape, or NFS share (local to a client) for system backups. By configuring a local disk, a job may be setup to use SBDIR as a backup device when creating a backup job on the Administrator. By configuring a local tape, a job may be setup to use SBTAPE as a backup device. By configuring a local NFS share, a job may be setup to use SBNFS as a backup device. By configuring a system backup device, the client does not need to be configured as a server to write backups to itself.
SBDIR applies to Network and Workstation Edition. SBNFS applies to Workstation edition. SBTAPE applies to Network and TSM Edition. When using Network and TSM Edition, specify “local” as the server to access SBDIR or SBTAPE devices.

Storix System Backup Administrator - 16 - Version 8.2 Commands Reference
stconfigtsm Purpose:
Configure TSM clients and servers
Use on:
Network or TSM Edition Administrator
Syntax:
stconfigtsm <operation> [options] tsmhost {...}
Operations:
-a --add Add or change a TSM client or server
-l --list List configured TSM clients and servers
-r --remove Remove TSM client(s) or server(s)
General Options:
-t --type type Indicate if configuring a (C)lient or (S)erver.
-v, --verbose Show features list (used with -l)
TSM Server Options:
-b,--tcpbuffsize size TCP Buffer size (in Kbytes)
-c,--compression state COMPRESSIon <yes|no> (default: no)
-i, --tcpserveraddress addr TCPServeraddress (hostname or IP address)
-n, --tcpnodelay state TCPNodelay <yes|no> (default: no) (default: 1510)
-p, --tcpport port TCPPort (default: 1500)
-u, --adminuser userid User ID of TSM Administrator
-M, --adminpass password Password of TSM Administrator
-w, --tcpwindowsize size TCPWindowsize (in Kb)
-x, --passwordaccess type PASSWORDAccess: generate or prompt (default: generate)
TSM Client Options:
-W, --newpass password Reset password (For PASSWORDAccess "generate")
-N, --nodename name NODEname (default: tsmhost)
-P, --password password PASSWORD (For PASSWORDAccess "prompt") or if changing password (with –G)
-s, --server server Server for which to change password (with -W)

Details:
The stconfigtsm command is used to add, remove and list TSM clients or servers configured on the Network or TSM Administrator system. This command is only valid if a TSM license is installed with the Network Edition or of TSM Edition is installed.
When configuring a TSM client, you must first have configured a SBAdmin client using the stclient command and enabled TSM support for that client with the –T option.
To configure a TSM Client: Only the NODEname (-N) option is required. However, if this client is to backup to a TSM server which has been configure with PASSWORDaccess “prompt”, the PASSWORD (-P) is also required.
To change the TSM Node Password: To change the node’s password on a TSM server, use the command:
stconfigtsm –P currentPassword –G newPassword –s Server ClientName
Note that ClientName is the name of the SBAdmin client configured for TSM support.
If the Server is configured for PASSWORDaccess “prompt”, the password will be changed on the server. If configured for PASSWORDaccess “generate”, a new encrypted password will be generated and saved on the client. For the latter, the password will not be required when performing backups and restores of the client.
If you have multiple servers (using PASSWORDaccess “prompt”), you must perform the command for each server.
To configure a TSM Server: Only the TCPServeraddress (-i) and TSM administrator username and password (-u and -U) options are required. You must supply the username of a TSM administrator configured within TSM that has been configured for Storage, Policy or System authority.
All other TSM server options are optional and will affect the network communication and performance. These are dependent on the network and server settings, and you should refer to your TSM administration guides for details on these options.
if you wish to add other TSM server options (used in the System User Configuration File “dsm.sys” ) that are not indicated here, you can manually edit the configuration file created on the SBAdmin administrator system created by this command. This file is /storix/main/data/tsm/tsmserver:serverName. Any options you add other than those explained here will be retained when you change other options and must be manually changed or removed as needed.
To remove a TSM Client (node) or Server: To remove a currently configured TSM node or TSM server, specify –r and the client or TSM server name, such as:
stconfigtsm –tC –r mickey or stconfigtsm –tS –r sully
Storix System Backup Administrator - 17 - Version 8.2 Commands Reference

Storix System Backup Administrator - 18 - Version 8.2 Commands Reference
Note that, when removing a TSM node, you must specify the SBAdmin client name. You will be removing the TSM node information for this client, but will not remove the SBAdmin client (since you may still want to backup this client to other (non-TSM) devices).
Note that you cannot remove a client or server if it is currently assigned to a backup job. You will need to edit the job settings to remove the client from the job, change the job to send the backup to a different server, or remove the backup job.
Storix System Backup Administrator - 19 - Version 8.2 Commands Reference
stconfigweb Purpose:
Configure the SBAdmin web interface
Use on:
Administrator
Syntax:
stconfigweb [options]
Options:
-N --noprompt Configure the web interface in a non-interactive mode
-R --remove Un-configure and remove the web interface
-f --pemfile file Specify the location of the ssl.pemfile to be used
-P –port port Specify the port number to run on (default is 8080)
-h --help Show help and usage for the command
Details:
This command is used on the administrator to enable or disable the SBAdmin Web Interface. Unless the -N or --noprompt option is used, the command is an interactive shell script that will require user input to configure the SBAdmin-supplied webserver.

Storix System Backup Administrator - 20 - Version 8.2 Commands Reference
stcopybackup Purpose:
Copy an existing backup to different server, or device.
Use on:
Network Edition Backup Server or Workstation Edition Administrator
Syntax:
stcopybackup [options] { -l backupID} {-d InputDevice} {-D outputDevice}
Options:
-b --bufsize bufsize
Buffer size to use for new backup. Default is to keep same buffer size of original backup.
-d --source device
Source device containing backup to copy. Specify “API” if copying from a TSM server.
-D --destination device
Destination device to write new backup to. Specify “API” if copying to a TSM server.
-h --hostperm hostperm
If writing to a directory device or TSM, indicates host read permission (a=any host, h=original host only). Default is “a” if copying from tape, and defaults to the original host permission if copying from directory device to directory device.
-l --sourceid backup ID
Backup ID to read if copying from a directory device or TSM server
-L –destinationid backup ID
If writing to a directory device backup and appending to an existing backup label, specify the backup ID of the backup to append. Not used when appending tape backups.
-n, --startseq startingSeqnum
Beginning backup sequence number to copy from source if there are multiple backups on the media
-r --rewind Rewind the output tape device before starting the copy
-S –tsmsource server
TSM Server name if reading from a TSM server. Specify the server in the format “TSM@serverName”.
-s --tsmdestination server
Server name if output device or directory is on a remote server. If sending to a TSM server, format is “TSM@serverName”.
Details:
This command is used on the backup media server containing the original backup to copy. Any backup may be copied from a tape or directory device to any other tape or directory device, either on the local system or to another server.

Storix System Backup Administrator - 21 - Version 8.2 Commands Reference
Important Note: Since this command is run on a backup server, not the administrator, no backup label or history information is created for the output backup. If this information is required, you must use the Utility option to Rebuild a Backup Label from the output media, or use the struncopy command on the administrator instead.
If writing the backup to a different server, the local system must have been configured as a valid client for the destination server.
This command will only copy one backup at a time to the output device or directory. Even if the source device or backup label contained multiple backups, only one may be copied at one time. You may, however, append multiple backups to the output device (or backup label if writing to disk). To indicate which source backup to copy (from a backup label containing multiple clients or backup jobs), use the –n seqnum option. To copy all backups from source to destination, run this command multiple times, in creating the seqnum option by one each time.
Stacking backups to tape When copying to a tape device, you may indicate if you want to rewind before starting the backup and if the tape should be rewound and ejected at the end of the backup. If you do not rewind at the start of the backup, you may append the source backup to the end of the destination media (if the destination media is currently at the beginning of volume. The destination backup label will be appended with the selected source backup.
Buffer Size You may alter the buffer size of the backup by entering a buffer size (in Kbytes) using the –b bufsize option. This is quite useful in increasing the performance of backups when writing to different media. For example, the default 64K buffer size may be adequate when you wrote your original disk backup file, but when copying to a high-speed tape drive, a higher buffer size (i.e. 256K) may provide much greater backup performance. To use the same buffer size for the destination as was used for the source, do not specify a new buffer size.
Host Read Permission If using Network or TSM Edition, and the destination backup is written to a directory device or TSM server, you may also change whether only the original client host or any host may read the backup data by using the –h hostperm option. If copying from tape to directory/TSM, the default is to allow all hosts (-h a) to read the backup. If copying from directory/TSM to directory/TSM, the default is to leave the original setting unchanged. To allow only the original host which wrote the backup to read it, use –h h.
Storix System Backup Administrator - 22 - Version 8.2 Commands Reference
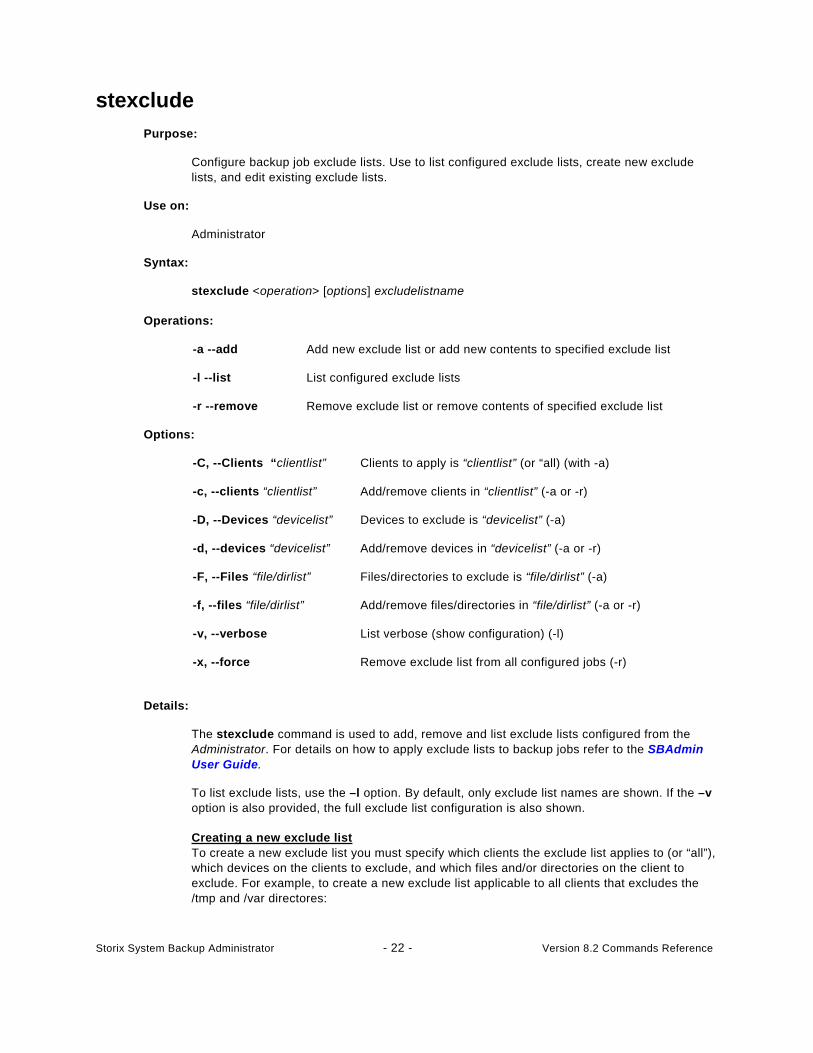
stexclude Purpose:
Configure backup job exclude lists. Use to list configured exclude lists, create new exclude lists, and edit existing exclude lists.
Use on:
Administrator
Syntax:
stexclude <operation> [options] excludelistname
Operations:
-a --add Add new exclude list or add new contents to specified exclude list
-l --list List configured exclude lists
-r --remove Remove exclude list or remove contents of specified exclude list
Options:
-C, --Clients “clientlist” Clients to apply is “clientlist” (or “all) (with -a)
-c, --clients “clientlist” Add/remove clients in “clientlist” (-a or -r)
-D, --Devices “devicelist” Devices to exclude is “devicelist” (-a)
-d, --devices “devicelist” Add/remove devices in “devicelist” (-a or -r)
-F, --Files “file/dirlist” Files/directories to exclude is “file/dirlist” (-a)
-f, --files “file/dirlist” Add/remove files/directories in “file/dirlist” (-a or -r)
-v, --verbose List verbose (show configuration) (-l)
-x, --force Remove exclude list from all configured jobs (-r)
Details:
The stexclude command is used to add, remove and list exclude lists configured from the Administrator. For details on how to apply exclude lists to backup jobs refer to the SBAdmin User Guide.
To list exclude lists, use the –l option. By default, only exclude list names are shown. If the –v option is also provided, the full exclude list configuration is also shown.
Creating a new exclude list To create a new exclude list you must specify which clients the exclude list applies to (or “all”), which devices on the clients to exclude, and which files and/or directories on the client to exclude. For example, to create a new exclude list applicable to all clients that excludes the /tmp and /var directores:

Storix System Backup Administrator - 23 - Version 8.2 Commands Reference
stexclude -a -C all -F “/tmp /var” newlist
Changing an exclude list If an exclude list already exists, you may change it by adding or removing the applicable clients, the devices to exclude, or the files/directories to exclude.
To remove a client and a directory from a configured exclude list:
stexclude -r -c mickey -f /var oldlist
To add a client, a device, and a directory to exclude from an existing exclude list:
stexclude -a -c minnie -d /dev/lv0 -f /home oldlist
To replace the excluded devices on an existing exclude list:
stexclude -a -D “/dev/lv4 /dev/lv5” oldlist
Note that you may not add and remove exclude list contents in the same command.
Removing an exclude list To remove a currently configured exclude list, specify –r and the exclude list name, such as:
stexclude –r oldlist
Note that you may not remove an exclude list that is currently configured to be used by a backup job. You may, however, use the -x flag to force the removal of the exclude list configuration from all backup jobs when removing the exclude list.

Storix System Backup Administrator - 24 - Version 8.2 Commands Reference
stgroup Purpose:
Add, delete or list configured groups
Use on:
Network or TSM Edition Administrator
Syntax:
stgroup <operation> [options] {group}
Operations:
-a --add Add or change group
-r –remove Remove group
-l --list List groups
Options:
-d –desc “description” Description of the group.
-n --name name Change group name to “name”
-u --userlist “userlist” Users with access to this group
-v, --verbose Verbose output (for list operation)
-x, --colonformat Colon-delimited output (for list operation)
Details:
The stgroup command is used to add, rename or remove groups from the Administrator. This command also updates the list of users with access to this group.

Storix System Backup Administrator - 25 - Version 8.2 Commands Reference
stjob Purpose:
Add, delete or list configured backup jobs
Use on:
Administrator
Syntax:
stjob <operation> [options] jobid
Operations:
-a –add Add or change the specified job
-l –list List configured jobs
-r –remove Remove the specified job
-n --copyto new_jobid Copy jobid to new_jobid
-N --moveto new_jobid Rename jobid to new_jobid
Options:
-A, --altnet IP/hostname Use alternate server network
-B, --bootmedia Boot media options. Either “cdrom” or “network” can be specified along with the server the boot media should be copied to. (i.e. “cdrom server-hostname”)
-b, --backupdata “data” Datalist to backup (overrides datalist in profile, if any)
-c, --clients “clients” Client list to backup (if Network or TSM Edition). Required with –a flag. Specify one or more clients when backing up to a server, or a single client if backing up to a client local system backup device (SBTAPE or SBDIR).
-d device/API, --device device
Device to write backup to. Required with –a flag. If backing up to a TSM server, indicate –d API. For TSM Edition, only API (TSM server) or a tape device (client local tape) is allowed.
-D, --desc “description” Backup job description (overrides description in backup profile)
-e ,--schedule “string” Backup schedule in cron format. Required with –regularly or –later flags.
-E, --encryption keyID Enable encryption with supplied encryption key ID
-p, --profile profile Backup profile name (required if adding a new job)
-Ry, --remove Remove backup job after run successfully (with --later or --ondemand only)

-Rn, --noremove Do not remove backup job after run successfully (default)
-s, --server server Server to write backup to (if Network Edition). If backup is to a TSM server, indicate “TSM@serverName”. If using either Network or TSM Edition and you want to backup a client to its own local system backup device (SBTAPE or SBDIR), specify the client name as the server also.
-Sy, --enable-snapshot Use snapshot backups with this job (if configured)
-Sn, --disable-snapshot Do not use snapshot backups with this job (default)
-v, --verbose Show detailed information on jobs or named job (with –l option)
-Vy, --enable-verify Perform auto-verify after successful backup
-Vn, --disable-verify Do not perform auto-verify after backup (default)
-wr, --regularly Backup will be run regularly (-e schedule required)
-wl, --later Backup will be run later (-e schedule required)
-wo, --ondemand Backup will be run only on demand (no schedule)
-X, --exclude “exlist” Enable and use specified exclude list name(s) when job is run.
Details:
The stjob command is used to add, remove, change, copy, rename and list backup jobs configured on the Administrator system.
To list currently configured jobs, use the –l option. By default, only Job Ids are shown. To show all of the details of a job, use the –v flag also. This will display a paragraph of information for each configured job showing all options configured.
If you want to configure a new job, use the –a option and specify the Job ID at the end of the command. You will be required to specify a backup profile using the –p flag. If no list of data to backup is provided in the profile, then you must also specify the –b “datalist” option. All other options will be written with a default value. After adding a job, be sure to list it with the –vl options to display the full list of settings.
To copy a configured backup job use the –n flag, and to rename a configured backup job use the –N flag. You will need to specify the new jobid to be copied/renamed to as an argument to each flag. Note that when you copy or rename a backup job, any changes to the backup options that are specified on the command line will only be applied to the new jobid.
Certain options, if not specified, will default to a value contained in the backup profile. Those include the backup description (--desc) and data list (--datalist) flags.
NOTE: Be careful to use quotes around any argument to flags which contain multiple words.
Specifying the data list
If using TSM Edition, only System Backups are supported.
Storix System Backup Administrator - 26 - Version 8.2 Commands Reference

Storix System Backup Administrator - 27 - Version 8.2 Commands Reference
If the data list is not provided in the backup profile, you will need to specify it in the job settings. The data list differs depending on the type of data to backup. The following is the list of data types for each backup type:
Description Systems Data to Specify Volume Group Linux/AIX Volume Group name(s) Filesystem any mount point(s) (i.e. “/home /data”) Logical volume Linux/AIX Logical volume name(s) (i.e. “lv00 lv01”) Meta-disk Linux/Solaris Meta-disk names (i.e. “md0 md1”) File/Directory any Directory names (i.e. “/home/sam ..”) Partition Linux Raw partition names (i.e. “sda3 sdb5”) ZFS Pool Solaris ZFS Pool name (i.e. “pool1”) ZFS Volume Solaris ZFS Volume name (i.e. “pool1/vol1”) Slice Solaris Disk slice name (i.e. “c0t0d0s1”)
Scheduling a job The default is to configure a job to run on demand (--ondemand). If a job is to be run only once, but at a specific time, or on a regular basis, specify the --later or --regularly options respectively. You will then be required to add the –e schedule option, where schedule is a cron-style entry in the following format:
Minute Hour DayOfMonth Month DayOfWeek
Each of the above fields are required and must be separated by a single space. You may specify any number of options for each field, each separated by commas. For example:
0 17 * * 1,2,3,4,5
indicates that at 5:00 PM (minute 0 of hour 17) on every day of the month (*) of every month of the year (*), the backup should run, but only on Monday through Friday (1,2,3,4,5).
Changing a job If a job currently exists, you can change specific options by specifying only that option and its new argument. For example, to turn on auto-verify for job “myjob1”, use the following command:
stjob –aVy myjob1 or stjob –a –verify myjob1
When changing a job, you may enter “none” to remove any previous values that do not require an entry (i.e. “-D none”)
Storix System Backup Administrator - 28 - Version 8.2 Commands Reference
stkeys Purpose:
Create encryption keys on a client for use in encrypting and decrypting backup data.
Use on:
Network or TSM Edition Client or Workstation Edition Administrator
Syntax:
stkeys <operation> [options] –k Keyid
Operations:
-a, --add “description” Add a new encryption key
-r, --remove “string” Remove specified keyed
-l, --list keyID List configured keys
Options:
-b, --bits numbits Number of encryption bits (128, 192, 256)
-f, --force Force keys to be removed without prompting (use with -r)
-h, --hex Encryption key in Hex (length must be at least bits/4)
-k, --key KeyID Encryption Key ID (up to 20 chars)
-t, --text textkey Encryption key in ASCII text (length must be at least bits/8)
Details:
This command is available on every client, and is used to configure the encryption keys used in encrypting and decrypting backup data. The encryption keys are 128, 192 or 256 bits.
NOTE: This command is always used on the client to configure the keys in place of doing so from the administrator application. For security reasons, this prevents any network traffic that might contain the encryption key itself.
Once an encryption key is created and used for a backup, the same key MUST be used to decrypt the data! If they key is changed or lost, there is no way to restore the backup data again (and please don’t call Storix, because even they won’t be able to help you)!
The configured keys are stored in a local file on the client, and are referenced using only the Encryption Key ID you assign to it. This prevents the need to remember the entire encryption key, and also prevent the need to send the encryption key from one system to another when using a Network or TSM Edition Administrator.
Encryption keys may be specified either as a hexadecimal number or as a text string that the command will convert to a hexadecimal number for you. A text string may contain any alpha or numeric characters, as well as any punctuation characters except for quote (“), colon (:) or

Storix System Backup Administrator - 29 - Version 8.2 Commands Reference
back-tick (`). Using a text string, such as “My-Encryption-Key!” will help you to remember the key in case it is lost or changed, but will limit the range of hexadecimal characters that are generated.
Note that the encryption key (or text string) that is entered must be the following number of characters, based on the encryption bits setting:
Bits Hex String (length)
ASCII text string (length)
128 32 16
192 48 24
256 64 32
Storix System Backup Administrator - 30 - Version 8.2 Commands Reference
stlicense Purpose:
This command is used to register the software, add a feature, or list current licensing information.
Use on:
Administrator
Syntax:
stlicense [options]
Operations:
-t --type feature Add specified feature. (E = encryption, T = TSM support)
-i --info Display licensing information
-k --key key Key to be registered
-r --registeredto “Register to” Name that the license key is registered to.

Storix System Backup Administrator - 31 - Version 8.2 Commands Reference
stlibrary Purpose:
This command is used to list, inventory and perform tape movement operations on a random tape library.
Use on:
Network or Workstation Edition Administrator
Syntax:
stlibrary <operations> [options] { vdev | libname }
Operations:
-c --checktape Check if tape loaded
-g, --getpos List last/current tapes for each drive.
-I --inventory Display library inventory
-l --list List defined libraries
-L --load Load tape (-t) from assigned slot to assigned drive
-r --reset Reset next tape (-t) to insert in drive (-d)
-U --unload Unload tape (-t) from assigned drive and return to assigned slot
Options:
-d, --drive Library drive number
-e, --eject Eject before unloading (with -u)
-I, --inserted Indicates tape is already inserted (with –r)
-s, --server server Server hostname (if Network Edition)
-t, --tape tape Library tape (slot) number
-v, --verbose Show library configuration (with –l)
-x, --colonformat Colon-delimited output (with –l)
Details:
This option may be used to check, list and perform tape library operations. You must specify either a defined library (libname) device (vdev) with this command. If a device is specified, it must have been configured as a random tape library. In this case, the libname will be retrieved from the device information.

Storix System Backup Administrator - 32 - Version 8.2 Commands Reference
This command requires that a library is already configured. Steps to configuring a random library must be performed using the SBAdmin user interface. Refer to the SBAdmin User Guide for details.
Operations which require access to the tape drive itself require that you specify the device name. For instance, you can display the inventory for a library by specifying the library name, but to check if a tape is loaded in the library device, you must use the device name (only then do we know the names of the physical devices attached to the library).
If using the Network Edition, you must also supply the server name with the –server flag.
To check if a tape is currently loaded in the library, use the command:
stlibary –c –s servername vdev
To display the tape inventory on the library, use the command:
stlibrary –I libname
Set or Reset the next tape to use for backups/restores: SBAdmin backup jobs performed to a device configured as a tape library require that the next tape to use, or the current tape in the drive, be known before the backup begins. SBAdmin will then keep track of the tape that is in the drive, or the next/last one used as the backup progresses. If you have manually moved a tape in the library, or ejected a tape for the drive, you must reset the current or next tape to use when the next backup or restore is performed. To do so, use the command:
stlibrary –r –tape tapenum –drive drivenum libname
Note that the tapenum and drivenum are numbers, starting with 1, which represent the tape slots and drive slots in the library. It is assumed that tapenum is in its current slot in the library and will be moved to its drive the next time a backup is performed. If tapenum is already inserted in the drive, you must add the –inserted flag.
To move tapes in the library: You need only specify the tapenum to move and the direction (load from slot to drive or unload from drive to slot) and whether or not the tape must first be ejected from the drive. This assumes that the current positions of the tapes in the library are correct (refer to Set or Reset next tape” above). For example:
stlibrary –Uet3 libname or stlibrary –Ue --tape 3 libname
The above commands will move tape number 3 from the drive to its original slot in the library after ejecting it from the drive. If using Network Edition, add the –server option if remote. Note that you can also specify a device name to use in place of the library name.
Storix System Backup Administrator - 33 - Version 8.2 Commands Reference
stmakeboot Purpose:
Create Boot Media for booting a system to the SBAdmin System Recovery process.
Use on:
Network or TSM Edition Client or Workstation Edition Administrator
Syntax:
stmakeboot -t tape {-d dev} [options] stmakeboot -t disk {-d dev} [options] stmakeboot -t cdrom {-o output_file} [options] stmakeboot -t netboot {-d dev} {-l imagename} {-s bootserver} [options] stmakeboot -t netclient -r {-c client}
Operations:
-r, --remove Remove network boot client configuration indicated with –c option (default is to add or update existing configuration)
Options:
-a, --hwaddr hwaddr Network adapter hardware address (MAC) to use when adding network boot configuration
-A, --alt-server IP Alternate server network to use when adding network configuration
-b, --bootloader loader Linux: Bootloader to use: GRUB (default), LILO, ISOLINUX
-c, --client client Name of client to add or remove network boot configuration
-C, --console console Boot console device name (i.e. tty0,ttyS0, hvc0)
-d, --device device Device name for which to create a boot tape, bootable disk, or AIX network boot image
-e, --efi-boot Network boot on UEFI firmware (Linux x86 only)
-E, --no-efi Exclude UEFI support (default=include if available)
-g, --gateway gateway Gateway IP to use on network boot client
-k, --kernel kernel AIX: Kernel type (up, mp or 64) used to create boot image Linux: Kernel filename to use to create boot image (default is to find kernel for matching release) Solaris: Not applicable
-I, --image image Name of network boot image name to create or update
-M, --multiboot image Linux: Multiboot image filename needed to boot kernel
-m, --subnet subnet Subnet mask to use on network boot client

-N, --nomods Linux: Do not automatically load current SCSI or network modules when booting from this media. Default is that all currently loaded modules be loaded on boot.
-o, --outfile outfile Output cdrom ISO image filename to create or initrd image name (if creating disk or initrd image for Linux)
-p, --platform platform AIX: Platform type (rs6k, rspc, chrp) of boot image
-P, --alt-client-ip IP Alternate client IP to use when adding network boot coniguration
-R, --release release Linux: Kernel release (suffix) to use. For initrd images, there must be a /lib/modules/release directory matching this entry. If omitted, the release the system is currently booted under will be used.
-s, --server server If writing a boot tape, this is the name of server on which tape is attached. If configuring a network boot client, specify the server only if the client will boot from the server using a different IP address or hostname than the default. If creating a cdrom or network boot image, this is the server the image will be copied to.
-S, --includescsi Linux: Include SCSI CDROM modules (required only if booting SCSI CDROM). This option only applies when creating a CDROM ISO image.
-t, --type type Type of boot media to create. See details below.
-z, --api APItype API software to include on boot media. Currently, only “TSM” is supported. This option is required if you will be installing from a backup on a TSM server.
If using TSM Edition or Network Edition and this is a TSM client and you will be installing from a backup located on a TSM server, you MUST include the option “-z TSM” at the command-line.
Details:
This command is used to create various boot media for booting to the SBAdmin System Recovery process. Boot media types include CDROM images, network boot images, bootable tapes or hard disks.
This command must be run on the system from which the boot image is to be created. If writing a tape, you may add the –s server option to write the actual boot image onto a remote tape drive. If creating a CDROM or network boot image, you may add the –s server option to copy the images onto a remote server.
Updating the boot loader on a Linux system or creating or updating an initrd image may only be done on a local system. Therefore, this command must be run on the client or server directly, if needed.
The –t option must be one of the following:
Storix System Backup Administrator - 34 - Version 8.2 Commands Reference

Storix System Backup Administrator - 35 - Version 8.2 Commands Reference
cdrom: This option does not write to the CDROM drive. Therefore, no CDROM is required on the system used to create the ISO. A CDROM “ISO” filesystem image will be created, which should then be “burned” to a CDROM/DVD disc. If a server is specified (with the -s option), the image will be copied to the “Directory for CLIENT CDROM/network boot images” configured on the server.
disk: This option will make a Local System Backup Disk bootable. The disk to make bootable must first have been configured as a Local System Backup Disk. Refer to the SBAdmin User Guide for more information.
tape: Create a bootable tape. The tape images will be created on the local system, but may be written to a remote tape drive if the –s server option is specified. This option is currently only available on IBM System p and System i systems, since they are the only supported systems which have firmware capable of detecting and booting from tapes.
netboot: Create network boot image. You must specify a name for the image using the –l imagename option. If the specified image already exists, it will be overwritten by the new image. If a server is specified (with the -s option), the network boot images will be copied to the “Directory for CLIENT CDROM/network boot images” configured on the server.
netclient: Configure or unconfigure a client for network boot. This option must be performed on the network boot server. If configuring a network boot client, the –l imagename option is required as well as the –c client option. The imagename specified must have first been created using the –t netboot option in a separate stmakeboot command.
initrd-disk: For Linux, this option will create the initrd/initramfs image without updating the boot loader. This is helpful if you want to create an initrd image and configure your boot loader manually. You may specify the name of the image to create (with the –o option), or SBAdmin will create one as /boot/initrd-storix-disk (where disk is the hard disk to boot from).
If you want to create boot media for a different platform or kernel type than the current system, you may specify the –p platform and –k kernel options respectively. If you want to create the boot image suitable for booting the local system, you do not need to specify these options. If you specify a platform type, the device support for the specified platform must have been installed onto the local system. Likewise, if a different kernel type is specified, the fileset containing the specified kernel must also be installed.
On AIX, for instance, the local system is an RSPC system running under the “up” (uniprocessor) kernel, but you want to create boot media which will boot a CHRP system with a 64-bit kernel, specify “-p chrp –k 64”. Note that the resulting boot media will not boot the local system, but can be used to migrate a system backup to new hardware.
Likewise, for Linux, you may specify a specific kernel to use with the –k when creating boot media or when updating the disk boot loader. You may also use the –R option to specify the release level of the kernel to use. In this case, the command will search for a kernel which uses the specified release level as a suffix (in the /boot or /yaboot directories). If specifying a release level, there must be a matching modules directly as /lib/modules/release. If both –k and –R are omitted, the release level the system was booted under (displayed with “uname –m”) will be used.
On Linux, Specify the –C option only if you have a serial terminal attached to the first serial port of the system and wish to perform the system installation using that display. If –C is specified, the attached terminal must be set to 9600 baud, 8 bits, 1 stop bit and no parity for proper communication. Omit the –C option if you want to perform the installation using the graphical console attached to a graphics adapter.

Storix System Backup Administrator - 36 - Version 8.2 Commands Reference
There are a number of options which may be specified when configuring a network boot client. These are discussed in detail in the section Enable/Disable a Network Boot Client in the SBAdmin User Guide and the SBAdmin Recovery Guides.
Storix System Backup Administrator - 37 - Version 8.2 Commands Reference
stprintlabel Purpose:
Send a backup label to the printer, email address, or append to file
Use on:
Administrator
Syntax:
stprintlabel {-q printer | Email | File} {-b backupid | -t tapelabelid}
Options:
-q, --queue printer Name of print queue. If not specified, label will be sent to standard output.
-e, Email, --email The report will be sent to the email address specified in Report Preferences
-f, File, --file The report will be appended to the file specified in Report Preferences
-b, --backupid backupid Specifies a Backup ID if printing backup label given a backup ID.
-t, --tapelabel tapelabelid Specifies a Tape Label ID when printing backup label given a tape label ID
-d, --details Show profile details
-o, --output Show backup status/output
Details:
This option will format and output a backup label to the specified printer queue, email address, or append to a file. The default is to send to standard output.
The name of the print queue, email address, or file name to append must be defined in Report Preferences prior to choosing the option to output the backup label.
Specify either a backup id (-b) or tape label id (-l) for which to format and print the backup label. Although specifying a tape label id, the entire backup label will be shown, including a list of other tape label IDs used in the backup.
Use the (-d) option to show the backup profile details used when the backup was run.
Use the (-o) option to show the backup status and output messages when the backup was run.

Storix System Backup Administrator - 38 - Version 8.2 Commands Reference
stprofile Purpose:
This command will be used to create new profiles based on the default (supplied) profile types. It may also be used to customize a profile assigned to a specific job.
Use on:
Administrator
Syntax:
stprofile <operation> [options] [profile {…} | {-j jobid}]
Operations:
-a, --add Add or change the specified profile
-l, --list List configured profiles
-r, --remove Remove the specified profile
Options:
-b, --bufsize bufsize Buffer size in KB (default 128)
-B, --backuppriority Backup process priority (0-10)
-c, --compress level Compress backup data at specified compression. Valid level is (1)low, (2)medium, (3)high
-cn, --nocompress Do not compress backup data (default)
-C, --show-custom Include customized job profiles (with –l and –v flags)
-d, --data datalist Backup data list (of appropriate type)
-D, --desc “description” Backup description
-ey, --eject Eject tape at end of backup job
-en, --noeject Do not eject tape at end of backup job (default)
-h, --hostperm [host | all] Backup file read permission (default=all)
-i, --incr num Incremental backup level (0-9)
-j, --job jobid Add/change/remove customized profile for jobid (main “profile” will be unaffected)
-Ly, --rawlv Include raw LV and ZFS volume data (System/VG/Zpool backups)
-Ln, --norawdev Don’t include raw LV or ZFS volume data (System/VG/Zpool backups) (default)

Storix System Backup Administrator - 39 - Version 8.2 Commands Reference
-m, --retaindays Number of days to retain a backup before expiring
-n, --retainbackups Number of backups to retain before expiring
-Ry, --rawpp Include raw partitions (Linux) and slices (Solaris) on system backups
-Rn, --norawpp Don’t include raw partitions (Linux) or slices (Solaris) on system backups (default)
-s, --sendlab where Send backup label to defined report preference (where is file, email, or printer name)
-t, --type type Backup type (see description section)
-v, --verbose List all profile details (with –l flag)
-wy, --rewind Rewind tape before starting backup job
-wn, --norewind Do not rewind tape at start of backup (default)
--preprog progam Run program on each client before backup (if Network or TSM Edition)
--postprog program Run program on each client after backup (if Network or TSM Edition)
--svpreprog program Run program on server before starting job (or local system if not Network Edition). Not used for TSM Edition.
--svpostprog program Run program on server after all client backups (or local system if not Network Edition). Not used for TSM Edition.
--presnapprog program Run program on client before creating snapshots (or local system if not Network or TSM Edition)
--postsnapprog program Run program on client after creating snapshots (or local system if not Network or TSM Edition)
Details:
The stprofile command is used to add, remove, change and list backup profiles. It may also be used to customize a default profile for use with a particular job. In that case, the customized profile options will be used in place of the default profile only for the specified job (no other jobs using the default profile will be affected).
If creating a customized profile for a job, specify the –j jobid value, where jobid is the Job ID of a job that was already configured. In this case, you do not specify a profile name. The profile type that is currently associated with the backup job will be used. Any options that you do not change will be taken from the original profile. Those specified will override the values of the original profile. The original profile, and any other jobs that use the original profile, will be unaffected when creating a customized job profile.
The –t type flag is required when creating a new profile. See the table below for a list of types and their description.

If using TSM Edition, only System Backups are supported.
For all profile types, a data list may be specified with the “–b datalist” argument. If it is not specified, the user will be required to specify the data to backup when configuring a backup job which uses this profile. If a datalist is specified, the user will still have the option to override this default value when configuring the backup job. The datalist must be one of the following, based on the profile type:
Type Description Systems Data to Specify S System Backup any Volume Group / Zpool name(s) V Volume Group Linux/AIX Volume Group name(s) F Filesystem any Filesystem mount point(s) (i.e. “/home /data”) L Logical volume Linux/AIX Logical volume name(s) (i.e. “lv00 lv01”) M Meta-disk Linux/Solaris Meta-disk names (i.e. “md0 md1”) D File/Directory any Directory names (i.e. “/home/sam ..”) P Partition Linux Raw partition names (i.e. “sda3 sdb5”) Z ZFS Pool Solaris ZFS Pool name (i.e. “pool1”) z ZFS Volume Solaris ZFS Volume name (i.e. “pool1/vol1”) s Slice Solaris Disk slice name (i.e. “c0t0d0s1”)
Changing a profile If a profile (or customized profile) currently exists, you can change specific options by specifying only that option and its new argument. For example, to turn eject tape at end of backups for jobs using profile “mysystem”, use the following command:
stprofile –aey mysystem or stjob –a –eject mysystem
When adding a customized profile, or changing an existing profile, you may specify “none” to remove the current or default value (i.e. “–preprog none”).
Storix System Backup Administrator - 40 - Version 8.2 Commands Reference

Storix System Backup Administrator - 41 - Version 8.2 Commands Reference
stqueuejob
Purpose:
Add a job to the backup queue
Use on:
Administrator
Syntax:
stqueue JobID
Options: NONE
Details:
This is a link to stqueue –A. For further reference please see stqueue.

Storix System Backup Administrator - 42 - Version 8.2 Commands Reference
stqueue
Purpose:
Perform various operations on a backup queue, such as listing, adding and deleting jobs
Use on:
Administrator
Syntax:
stqueue <operation> [options] JobID
Operations:
-A, --add Indicates the specified JobID should be added to the queue
-L, --list List all jobs currently in queue. Each job will be listed on one line.
-D, --delete Delete the specified JobID from the queue
-H, --hold Place the specified JobID on hold, preventing this and other jobs submitted after it to be run until the queue is restarted.
-K, --kill Kill the specified JobID if currently running
-R, --restart Restart the specified JobID. Use this if a previous job failed or was placed on hold
-S, --status Displays the progress indicator, command output, status and error messages for a job that is currently running or has failed.
Options:
-d, --queuedate date
Queue Date (as displayed with –L flag) of the specific job to add, delete, change or show. Use this option if JobID appears multiple times in the queue to indicate the specific occurrence of the job.
Details:
This command provides all of the functions of adding jobs, manipulating, and displaying jobs in a backup queue. This command is particularly useful to administrators that must access the administrator system remotely in order to handle a backup job that failed and cannot use the SBAdmin GUI or Web Interface.
Use the –L option to list all queues. This will show the current status of each job, whether currently running, pending, on hold, or failed.
All options except –L require a JobID. When a JobID is specified, the queue name (server:device) is retrieved from the configured job information.

Storix System Backup Administrator - 43 - Version 8.2 Commands Reference
Adding a Job to the Queue
Use the –A option to add a pre-defined backup job to the queue. If there are jobs in the same queue, the added job will be run after all prior jobs in the same queue complete. Note, if a prior job had failed, the queue will not process any new jobs until the failed job is either restarted or removed. Refer to the Job Queues section of the SBAdmin User Guide for information on monitoring/changing the status of queues using the SBAdmin GUI or Web Interface.
When jobs are run from the queue and the SBAdmin GUI or Web Interface is not running, no job status messages will be reported on the screen. Status messages, in this case, will always be reported using the Alternate Notification method (mailed to a user or appended to a text file). The backup output and progress information may later be displayed after running the SBAdmin GUI or Web Interface and selecting the View Backup Status/Output options.
Note that the stqueue command will return as soon as the job is added to the queue. The exit code of this command will be 0 if the job was queued successfully, or 1 if the job could not be queued (usually because the JobID supplied is invalid). If, for instance, the server for the job is not available, the stqueue command will succeed, but the job will fail after it is executed by the queuing system, and will remain in the queue until it is restarted or removed.
Killing a Running Job
To kill a job that is currently running, use the –K flag. This will sent a kill signal to the backup process. It may take some time for the job to stop since it may be necessary to complete the current operation before the process will die.
When a job configured to write to tape is killed, it will remain in the queue in a “failed” state, which will prevent other jobs in the same queue from starting. Jobs that write to disk image files will be automatically removed from the queue, since “disk” queues will allow jobs to run simultaneously anyway.
When a job is killed, the tape drive, if used, will be rewound to prevent any other backup jobs from being appended to an incomplete backup. If the Tape Overwrite/Retention Policy does not allow overwriting of current (unexpired) backups, any subsequent jobs started after removing the failed job from the queue will fail with an overwrite protection error. If this is the case, use the stremovelabel program to expire the failed backup label. Then restart the queue to allow other jobs to continue.
Removing a Job from the Queue
Use the –D flag to delete a job from the queue. Removing a job from the queue will not delete the original job information, but only removes it from the queue. It can be resubmitted using the –A option if desired. You cannot delete a job from the queue if it is currently running. To delete a job already running, first kill it with the –K option.
Displaying Job Output
If a job has failed, it may be necessary to display the output messages of the backup command to determine the cause. To do so, specify the –S option. The progress indicator (indicating the percentage of backup data written to the media), output and error messages of the backup command will be displayed to standard output.
If this option produces no output, then the backup command had not yet started. If the job had failed, it is due to a pre-backup error such as a tape overwrite protection error, or because a device or server was unavailable. In these cases, the message indicating the problem was sent using the notification process defined in the preferences options.

Storix System Backup Administrator - 44 - Version 8.2 Commands Reference
stremovelabel Purpose:
Remove a backup label. Also removes the associated backup if written to disk.
Use On:
Administrator
Syntax:
stremovelabel [-f] backupid
Options:
-f, --force If the backup label to remove is of a backup written to a directory/disk device, this flag is required to force the removal of the backup from disk. If not supplied, disk backup labels cannot be removed. If the backup was to tape device, this flag is ignored.
Details:
The stremovelabel command provides a way to remove a backup label, and associated disk backup images from the command line or from a script. If you have a routine that watches for errors in backup status reporting, the routine can automatically expire the backup label associated with the backup to allow other backups to be written over the same tape or directory device.
Important note: Once a backup label has been expired, it will not be possible to verify, restore, or install a client from this backup. If a backup has been expired or the label history has been inadvertently removed from the system, it is still possible to rebuild this information. Refer to Rebuild (unexpire) a Backup Label from Tape in the SBAdmin User Guide for details.

Storix System Backup Administrator - 45 - Version 8.2 Commands Reference
streport Purpose:
Generate various reports
Use on:
Network Edition, TSM Edition, or Workstation Edition Administrator
Syntax:
streport -t type [options]
Types:
-t netinst Generate network install clients report
-t expiration Generate backup expiration report
-t history Generate backup history report
-t restore Generate restore history report
Network Install Clients Report Options:
-s server Show clients configured for boot on server
-n name Show clients configured for boot using boot image name
-e Show currently enabled clients only
Backup Expiration Report Options:
-E opt Expiration report option (all, current, specify)
-D date Expiration date (MM/DD/YY) (with –E specify)
-T Show tape labels
Backup History Report Options:
-h type Base history on type (client or job)
-k “opt1 opt2” History of specific options (jobid or clientname)
-b Include subtotals
-f date History start date (MM/DD/YY)
-l date History end date (MM/DD/YY)

Storix System Backup Administrator - 46 - Version 8.2 Commands Reference
Restore History Report Options:
-h type Base history on type (job or backupid)
-k “opt1 opt2” History of specific options (jobid or backupid)
-g Update history from server restore logs
-f date History start date (MM/DD/YY)
-l date History end date (MM/DD/YY)
Details:
The streport command is available on an Administrator and is used to generate various reports.

Storix System Backup Administrator - 47 - Version 8.2 Commands Reference
strestore Purpose:
List, verify or restore backup data from a local or remote device
Use on:
Network or TSM Edition Client or Workstation Edition Administrator
Syntax:
strestore <operation> [options] -d {device {–L backupid}} {-t datatype} datalist …
Operations:
-l, --list List contents (of specified backup type)
-r, --restore Restore backup data (default)
-v, --verify Verify backup data (read only)
Options:
-d, --device device Device containing backup data to read. If reading from a TSM server, specify “-d API” (see –s server).
-D, --dest destination Directory or raw device into which data should be restored.
-f, --showfiles Show filelist during verify or restore
-L, --label backupid The Backup ID of disk backup
-O --owner owner Original TSM client (owner) of the backup to read
-p, --positioned Indicates tape drive is at desired position
-s, --server server Server on which the backup device is attached. If not used, a local device is assumed. This option is used only on clients in a Network or TSM Edition environment. When restoring from a TSM server, specify the server as “TSM@serverName”.
-S, --seq “seqlist” If verifying, you may specify a list of backup sequence numbers to verify. If restoring, you may specify only one. The default is sequence number 1 if this flag is omitted.
-t, --type datatype Specify the type of data to list, verify, or restore
datalist … Indicates one or more data elements of the specified datatype to be verified or restored. You may specify “all” to indicate all data of the corresponding datatype is to be restored.

Storix System Backup Administrator - 48 - Version 8.2 Commands Reference
Details:
The strestore command is used to list, verify or restore data from any SBAdmin backup. When restoring data, the data will be restored to the system from which the command is executed.
Specify the –v flag to perform a verify of the backup by reading through the contents. Specify the -l flag to list data contained in the backup header. If the –v or -l flags are not specified, a restore of the data is assumed.
The datatype must be specified using the –t flag when using the -l or -r options.
The type of data to list must be one of the following:
Type Description B System configuration table C System configuration files E Encryption key ID f Backup disk files (volumes) H Header information r Image/filelist T Table of contents
The type of data to verify or restore must be one of the following:
Type Description Systems Data to Specify V Volume Group Linux/AIX Volume Group name(s) F Filesystem any Filesystem mount point(s) (i.e. “/home /data”) L Logical volume Linux/AIX Logical volume name(s) (i.e. “lv00 lv01”) M Meta-disk Linux/Solaris Meta-disk names (i.e. “md0 md1”) D File/Directory any Directory names (i.e. “/home/sam ..”) P Partition Linux Raw partition names (i.e. “sda3 sdb5”) Z ZFS Pool Solaris ZFS Pool name (i.e. “pool1”) z ZFS Volume Solaris ZFS Volume name (i.e. “pool1/vol1”) s Slice Solaris Disk slice name (i.e. “c0t0d0s1”)
You must specify the datalist as shown above which corresponds to the datatype you are verifying or restoring. Any elements of the datalist that are multiple words must be surrounded by double quotes (i.e. strestore –d st0 –tD /shared “/root/User Docs” /mail ).
Note: Volume Group and Logical volume restores are only available on Linux systems if LVM (Logical Volume Manager) is installed. Meta-disk restores are only available on Linux if meta-disk (Software RAID) support is installed.
You may also specify a backup sequence number with the –S flag if there is more than one backup stacked on the media. If the backup was created using a backup job which contained multiple clients, each client backup will be a separate backup sequence number. If you performed multiple backups to the same media without rewinding, then each new backup will comprise a new backup sequence number. The data will be read from the backup corresponding to the specified backup sequence number.
If the tape is already positioned to the start of the backup sequence number you wish to read, you may also specify the –p flag in place of the –S flag to indicate that you wish to read from the backup at the current tape position.
You may specify a device using the –d flag (i.e. “rmt0”). If you are restoring from a disk image backup, you must specify the directory device in which the backup was written as well as the –

Storix System Backup Administrator - 49 - Version 8.2 Commands Reference
L flag followed by the Backup ID. Refer to the Backup Labels section of the SBAdmin User Guide for details on the backup IDs.
If you want to restore the data to a different destination than it was originally read from, specify the –D flag followed by the destination. The destination must be appropriate the the datatype being restored. For example, logical volume data must be restored to a logical volume, and a directory name should be specified for filesystem/directory data restores. For all restores, except when restoring single filesystems, the data will be restored to the new directory relative to the original full pathname of the files. For instance, the /home/roger directory, when restored to the /tmp directory, will be restored as /tmp/home/roger. This prevents files by the same name, but in different directories, from being restored over one another.
When restoring only a single filesystem to a new destination, the files will be restored relative to the original filesystem mount point. In this case, a file “/home/file1” in the /home filesystem, when restored to the /home1 directory (or filesystem), will be restored as /home1/file1. This allows filesystem data to be moved from one filesystem to another.
The strestore command will exit with a completion message and one of the following exit codes:
0 Successful 1 Error reading or writing backup data 2 Error occurred prior to reading or writing data 3 Completed with warnings – one or more files may not have been restored 9 Internal program error 99 Killed by user (Ctrl-C)

Storix System Backup Administrator - 50 - Version 8.2 Commands Reference
struncopy Purpose:
Copy backups between servers or devices
Use on:
Administrator
Syntax:
struncopy [options] {-d source Device} {-D destination Device}
Options:
-b, --bufsize bufsize Buffer size to use for new backup. Default is to keep same buffer size of original backup.
-d, --source device Source device containing backup to copy. If source is a TSM server, specify “-d API” (see –s server).
-D, --destination device
Destination device to write new backup to. If destination is a TSM server, specify “-d API” (see –S server).
-e, --ejectsrc Eject tape from the source device when copy is complete
-E, --ejectdest Eject tape from the destination device when copy is complete
-h, --hostperm hostperm
If writing to a disk file, indicates host read permission (a=any host, h=original host only). Default is “a” if copying from tape, and defaults to the original host permission setting if copying from disk to disk.
-l, --sourceid backup ID
Backup ID to read if copying from a disk backup
-n, --startseq startingSeqnum
Beginning backup sequence number to copy from source if there are multiple backups on the media.
-N, --endseq endingSeqnum
Ending backup sequence number to copy from source if there are multiple backups on the media.
-r, --rewindsrc Rewind the input tape device before starting the copy
-R, --rewinddest Rewind the output tape device before starting the copy
-s, --sourceserver sourceServer
Server name where the source input device or directory is located. If reading from a TSM server, use the format “TSM@serverName”.
-S, --destinationserver destinationServer
Server name where the destination output device or directory is located. If writing to a TSM server, use the format “TSM@serverName”.
Storix System Backup Administrator - 51 - Version 8.2 Commands Reference
Details:
The struncopy command is used on an administrator system to copy backups from one server to another, from any backup media type to another. Any backup may be copied from device to any other device. Backups originating from different backup media may even be appended onto the same output media.
When using Network Edition with TSM support, backups to TSM servers may also be copied to a local tape or directory device or to another SBAdmin server. Likewise, local or remote backups to SBAdmin servers may be copied to a TSM server or backups may be copied from one TSM server to another.
When copying a disk backup, you must specify the device where the backup is stored with the –d option (use “–d API –s TSM@serverName” for TSM servers), and the backup id with the –I backupid option. When a new backup is created (either by writing to the beginning of a tape or writing a backup to disk), a new backup ID is generated automatically. If a backup is appended to an existing tape backup, this backup will be appended to the same label, and therefore will use the same backup ID as the previous backups on the tape.
By default, all backups will be copied from the source media to the destination media. This includes all clients (if backup was made from using Network or TSM Edition and included multiple clients), or multiple jobs (if multiple jobs were appended to the source tape media). Every Backup Label contains at least one backup sequence number, starting with 1 and ending with the last backup written (one for each client backup appended to the same label/media). To determine the backup sequence numbers within a backup label, use the command:
stprintlabel –b backupID
If copying to a tape device, you may indicate if you want to rewind before starting the backup and if the tape should be rewound and ejected at the end of the backup. If you do not rewind at the start of the backup, you may append the source backup to the end of the destination media (if the destination media is currently at the of volume). The destination backup label will be appended with the selected source backup. This is commonly referred to as stacking backups to tape.
You may alter the buffer size of the backup by entering a buffer size (in Kbytes) using the –b bufsize option. This is quite useful in increasing the performance of backups when writing to different media. For example, the default 64K buffer size may be adequate when you wrote your original disk backup file, but when copying to a high-speed tape drive, a higher buffer size (i.e. 256K) may provide much greater backup performance. To use the same buffer size for the destination as was used for the source; do not specify a new buffer size.
If using Network or TSM Edition, and the destination backup is written to a directory device or TSM server, you may also change whether only the original client host or any host may read the backup data by using the –h hostperm option. When copying from tape to disk, the default is to allow all hosts (-h a) to read the backup. If copying from disk to disk, the default is to leave the original setting unchanged. To allow only the original host which wrote the backup to read it, use –h h.
You may use a device configured as a random tape library for the output device, but not the input device. This is because the command is only able to track the tape positions of one library at a time. Therefore, if you need to copy from a random library, you will need to specify only the tape device name as the input device. You will be prompted to change the volumes manually on the source device, but the destination device, if a random library, will change tapes automatically. Note that devices configured as sequential autoloaders may be used for either source or destination devices.

Storix System Backup Administrator - 52 - Version 8.2 Commands Reference
strunjob Purpose:
Run a backup job in the foreground
Use on:
Administrator
Syntax:
strunjob JobID
Details:
The strunjob command will perform the backups for all clients configured for the job (referenced by JobID) just as it would when executed from the job queues. The job status information, command output and error messages, and backup label information will be saved for future viewing using the View Backup Labels from the SBAdmin GUI or Web Interface. The command output and error messages will also be sent to standard output and standard error, shown on the screen by default. If you wish to save this output to a file, you may type the command as follows:
strunjob JobID > filename 2>&1
The strunjob command will continue running until all clients in the job have been backed up or until an error causes the command to terminate. The command will exit with one of the following return codes, indicating the status of the job:
0 Job completed successfully
1 Job terminated because a client backup failed. Since partial data has been written to the media, no additional client backups have been started. Failure of a client backup may be due to a media write error or a network failure.
2 Job terminated due to an error that occurred while saving the backup command output, status information, or label information.
3 Job terminated due to an error in pre-processing tasks. This might include such things as a backup device already in use or the backup server or network unavailable.
4 The client backups completed, but a post-processing error occurred. This might include the inability to update the backup label or history information after the backup completes, or an error ejecting the tape from the drive when the job requires the tape to be ejected when complete.
5 Client backups completed but a minor error occurred in post-processing. Should not affect the backup history or label, nor should it affect other jobs appended to the same media.
6 The job completed successfully, but one or more clients in the job were not included in the backup. The reason may be because the client or network was unavailable or because the client could not reach the server over the network. This error will also occur

Storix System Backup Administrator - 53 - Version 8.2 Commands Reference
if a pre- backup program was set to run on the client and failed.
7 Job terminated without writing any data to the server because the backup media was either write-protected, or contained a prior backup label that could not be overwritten due to the tape overwrite/retention policy setting.
8 Warning only. All client backups failed with non-fatal errors
99 The command terminated because the process was killed (SIGINT or Control-C)
When running the strunjob command at the command line, the status message of the jobs will not be reported using the backup status reporting method defined in the SBAdmin Preferences. The only exception is when previous backup labels are expired based on the backup overwrite/retention policy defined.

Storix System Backup Administrator - 54 - Version 8.2 Commands Reference
strunrest Purpose:
Verify or restore data from any server to any client
Use on:
Administrator
Syntax:
strunrest <operation> [options] –f {device {–l backupid}} {-t datatype}
Operations:
-v, --verify Indicates verify is to be performed. If omitted, a restore is performed
Options:
-c, --client client
Client to restore the data to. Only used if restoring data.
-d, --datalist “datalist”
If datatype is specified, you should also specify the list of data to verify or restore of the specified datatype. If this argument is omitted, then all data of the specified datatype will be verified or restored.
-D, --destination destination
Destination raw device or directory to restore data.
-f, --device device
Tape or directory device on the server (i.e. “rmt0”). If restoring from a directory device, you must also supply the –l backupid option. If backup is to a TSM server, indicate –f API (see –s server).
-l, --backupid backupid
The Backup ID of the backup to restore if restoring from a disk backup. Not used if restoring from tape device.
-p, --curseq curSeqnum
If the tape is already positioned at the beginning of a specific backup, you may specify the current sequence number of that backup to prevent rewinding and re-forwarding of the tape.
-P, --showprogress
Indicates the progress indicator should be shown, displaying the progress of the verify or restore. The progress indicator is sent to standard error.
-s, --server server
Server on which the backup device is configured. If using a TSM server, use the format “TSM@serverName”.
-S, --seq “seqlist”
If verifying from tape device, you may specify a list of backup sequence numbers to verify. If restoring, you may specify only one. The default is sequence number 1 if this flag is omitted. Display the backup label for a list of backup sequence numbers on the tape.

Storix System Backup Administrator - 55 - Version 8.2 Commands Reference
-t, --type datatype
Specify the type of data to restore from the backup. If omitted, the entire contents of the backup will be restored.
Details:
The strunrest command may be used to either verify or restore the contents of a backup. This command is only run on the admin system, although the backup data may exist on any server and may be restored to any client.
You must specify both the server and device to read, and the client to restore to (if restoring). If you are restoring from a disk backup, and the backup was created with read permission only by the original client from which the backup was made, only the original client may be restored to. This is to prevent the backup file from being read by other hosts. However, if you wish to change the permission of the backup file to allow it to be restored to a different host, use the option Change Read Permission of a Disk Backup as described in the SBAdmin User Guide.
Note that the datatype and datalist arguments must correspond. For instance, if you select to restore a filesystem (-t F), then you must supply a list of filesystems to restore (“/home /tmp”) as they are defined on the backup. If any of the filesystems supplied do not exist on the backup, no restore will take place. Note also that you must surround multiple restore options with double quotes. The different datatypes are as follows:
Type Description Systems Data to Specify V Volume Group Linux/AIX Volume Group name(s) F Filesystem any Filesystem mount point(s) (i.e. “/home /data”) L Logical volume Linux/AIX Logical volume name(s) (i.e. “lv00 lv01”) M Meta-disk Linux/Solaris Meta-disk names (i.e. “md0 md1”) D File/Directory any Directory names (i.e. “/home/sam ..”) P Partition Linux Raw partition names (i.e. “sda3 sdb5”) Z ZFS Pool Solaris ZFS Pool name (i.e. “pool1”) z ZFS Volume Solaris ZFS Volume name (i.e. “pool1/vol1”) s Slice Solaris Disk slice name (i.e. “c0t0d0s1”)
You may also specify a sequence list (seqlist) using the –S flag if there is more than one backup stacked on the media. If the backup was created using a backup job which contained multiple clients, each client backup will be a separate backup sequence number. If you performed multiple backups to the same media without rewinding, then each new backup will comprise a new backup sequence number. When verifying backups, you may specify one or more sequence numbers, surrounded by double-quotes. When restoring data, you may specify only one backup sequence number. The data will be read from the backup, or backups, corresponding to the specified backup sequence number list.
Important note: If you are restoring a volume group or filesystem from an incremental backup level 0 and you do not specify a datalist to restore, then all files will be restored. If the incremental level is 0, all files currently in the corresponding filesystems will be removed before the restore takes place. This is to ensure that the filesystem, when completed, will contain ONLY the files that existed when the backup was created. If you do not want to remove existing files before restoring, then you should not restore a filesystem or volume group. Instead, select “directory” as the data type (-t D), then specify the list of directories to restore.
If you supply both the –L and –P flags, you should redirect either standard output or standard error to a file. Otherwise, both will be shown on the screen and the progress indicator data will be intermixed with the file list.

Storix System Backup Administrator - 56 - Version 8.2 Commands Reference
If you want to restore the data to a different destination than it was originally read from, specify the –D flag followed by the destination. The destination must be a logical volume name (i.e. “lv00”) for logical volume restores, or a directory name for all other restores. For all restores, except when restoring single filesystems, the data will be restored to the new directory relative to the original full pathname of the files. For instance, the /home/roger directory, when restored to the /tmp directory, will be restored as /tmp/home/roger. This prevents files by the same name, but in different directories, from being restored over one another.
When restoring only a single filesystem to a new destination, the files will be restored relative to the original filesystem mount point. In this case, a file “/home/file1” in the /home filesystem, when restored to the /home1 directory (or filesystem), will be restored as /home1/file1. This allows filesystem data to be moved from one filesystem to another.
The strunrest command will exit with a completion message and one of the following exit codes:
0 Success 1 Failed verifying or restoring data 9 Internal program error 99 Killed by user (Ctrl-C) 101 The strunrest command failed after verify/restore started 102 Syntax error calling the strunrest command 103 The strunrest command failed with an error prior to verify/restore starting

Storix System Backup Administrator - 57 - Version 8.2 Commands Reference
stserver Purpose:
Add, change, list or remove SBAdmin server information. For TSM servers, refer to the stconfigtsm command instead.
Use on:
Network and TSM Edition Administrator
Syntax:
stserver <operation> [options] server {...}
Operations:
-a, --add Add or change the specified server
-A, --check Show server availability (when –l is used)
-r, --remove Remove the specified server
-l, --list List configured servers
Options:
-B, --bootdir directory Directory for client CDROM ISO and network boot images
-c, --adminlist “admins” Admin systems which may backup to this server
-C, --admin “hostname/IP” Controlling Admin with authority over this server
-d, --defaultdevs Create default backup directory devices when adding new server
-D, --showdevs Include device list (with –v)
-f, --force Force removal of server configuration
-g, --grouplist “groups” Groups which may backup to this server
-n, --altnet “hostname/IP” Alternate networks to be used on this server
-O, --other-clients “clients” Optional clients with access to all groups
-v, --verbose Show verbose listing of servers (with –l flag)
Details:
The stserver command is used to add, remove, change and list servers configured on the Network and TSM Edition Administrator.
To list currently configured servers, use the –l option. By default, only server names are shown. To show all of the attributes of a server, use the –v flag also.
Storix System Backup Administrator - 58 - Version 8.2 Commands Reference
If you want to also show the server availability as well as the system type, use –A with -l. This will indicate the server availability as either available or down, and will display the system (AIX, Solaris or Linux) and machine type (i386, ppc, sparc) or “unknown” if the server cannot be contacted. Availability is determined by whether or not the administrator system can communicate with the server. If not, you can use the stcheck command to help isolate the problem.
If you want to configure a new server, use the –a option and specify the server name at the end of the command. All attributes will be set to their default values (or none) unless explicitly set. After adding a server, list it with the –vl options to display the full list of settings.
NOTE: Be careful to use quotes around any argument to flags which contain multiple words.
Changing a server If a server currently exists, you can change specific options by specifying only that option and its new argument. For example, to configure the alternate network, use the following command:
stserver –an 192.168.1.1 buserver or stserver –a –altnet 192.168.1.1 buserver
When changing the configuration, or to remove any default options, you may enter “none” for options which require an argument.
Removing a server To remove a currently configured server, specify –r and the server name, such as:
stserver –r buserver
Note that you cannot remove a server if it is currently assigned to a backup job. Also, when removing a server, all devices which may have been configured for that server will also be deleted.

Storix System Backup Administrator - 59 - Version 8.2 Commands Reference
stuser Purpose:
Add, change, list or remove SBAdmin users
Use on:
Administrator
Syntax:
stuser <operation> [options] {user}
Operations:
-a, --add Add or change user
-r, --remove Remove the specified user
-l, --list List configured users
Options:
-g, --group “group” Set default group
-L, --level "level" Set user level (0-5)
-p, --password newpass Change password
-v, --verbose Verbose output (when listing)
-x, --colonformat Colon-delimited output (when listing)
Details:
The stuser command is run on the Administrator to add, remove, or change role-based user accounts. This only affects SBAdmin users and is not associated with the system users.

Storix System Backup Administrator - 60 - Version 8.2 Commands Reference
stvdev Purpose:
Add, change, list or remove device definitions
Use on:
Network or Workstation Edition Administrator
Syntax:
stvdev <operation> [options] devicename {...}
Operations:
-a, --add Add or change the selected device
-r, --remove Remove the specified device
-l, --list List configured devices
Options:
-d, --devices “devices” List of devices
-D, --desc "description" Device description (or "default")
-L, --library libname Random library name
-m, --maxvolsize size Maximum file size to use in MB (0=unlimited)
-N, --nolib Device is not a library or autoloader (default)
-R, --randomlib Device is a random tape library
-S, --seqloader Device is a sequential autoloader
-s, --server server Server name on which device exists (if Network Edition)
-t, --type type Device type: S=sequential, P=parallel, M=multi-copy
-uy, --sysbu Allow system backup to directory(s)
-un, --nosysbu Do not allow System backups to directory(s)
-oy, --otherbu Allow non-system backups to directory(s)
-on, --nootherbu Do not allow non-system backups to directory(s)
-T, --devtype type Device type: (t=Tape, d=directory)
-v, --verbose Show all configuration (for use with –l flag)

Storix System Backup Administrator - 61 - Version 8.2 Commands Reference
Details:
The stvdev command is used to add, remove, change and list devices.
To list currently configured devices, use the –l option. By default, only device names are shown. To show all of the attributes of a device, use the –v flag also.
When adding a new device the –T option must be used to indicate the device type (either tape or directory).
A tape device may be a single tape drive or multiple tape drives, each of which may be in a sequential autoloader or random tape library. The “–t type” option must be specified when adding a new tape device. The type may be one of the following:
S (sequential) – tapes are written to sequentially (one drive at a time) P (parallel) – tapes are written to in parallel (data is striped across drives) C (multi-copy) – same data is written to all tapes concurrently (mirrored)
A directory device may contain a single directory, or directories that are mounted on multiple disks. The -uy and –oy flags may only be used with directory devices.
You should refer to the SBAdmin User Guide for complete details on the types of devices and library options.
If the device you are configuring represents a random tape library, you must specify the “–library libname” option. The libname is the name of a tape library previously defined using the SBAdmin interface.
Changing a device If a device currently exists, you can change specific options by specifying only that option and its new argument. For example, to change the list of tape devices contained in the device named “vdev0”, use the following command:
stvdev –a –Tt –tS –d “st0 st1” vdev0
NOTE: Be careful to use quotes around any argument to flags which contain multiple words.
When changing the configuration, or to remove any default options, you may enter “none” for options which require an argument (i.e. “--desc none”).
Removing a device To remove a currently configured device, specify –r and the vdev name name, such as:
stvdev –r vdev0
Note that you cannot remove a device name that is currently assigned to a backup job.