Sargent and Greenleaf Electronic Safe Lock...
40
Sargent and Greenleaf Electronic Safe Lock Guide
Transcript of Sargent and Greenleaf Electronic Safe Lock...

Sargent and Greenleaf Electronic Safe Lock Guide
Sargent and Greenleaf is a company dedicated to providing security. Not just a sense of
security, but real security designed to meet real-world needs. We offer mechanical locks that
deliver an unbeatable combination of quality and value. Electronic locks that take control to a
level never before possible. And exit devices that achieve the highest standard of safety. Since
1857, Sargent and Greenleaf has provided innovative security solutions to financial institutions,
businesses and governments across the globe. Today, we are a subsidiary of Stanley Security
Solutions, a growing division of Stanley Black & Decker.
Contents
Product Overview . . . . . . . . . . . . . . . . . . . . . . . . . . . . . . . . . . . . . . 1
6120 / 6123 Installation Instructions. . . . . . . . . . . . . . . . . . . . . . . . . . . . . 3
6120 Operating Instructions . . . . . . . . . . . . . . . . . . . . . . . . . . . . . . . . . 8
6123 Operating Instructions . . . . . . . . . . . . . . . . . . . . . . . . . . . . . . . . . 12
6123 Quick Reference Programming Guide . . . . . . . . . . . . . . . . . . . . . . . . . 20
6120 / 6123 Battery Changing Instructions—Two-Battery Keypad . . . . . . . . . . . . 22
6120 / 6123 Battery Changing Instructions—One-Battery Keypad . . . . . . . . . . . . . 24
6120 / 6123 Troubleshooting Guide . . . . . . . . . . . . . . . . . . . . . . . . . . . . . 26
6120 / 6123 Troubleshooting Checklist . . . . . . . . . . . . . . . . . . . . . . . . . . . 31
6120 / 6123 Management Reset Code Technical Bulletin. . . . . . . . . . . . . . . . . . 32
6120 / 6123 Commonly Asked Questions . . . . . . . . . . . . . . . . . . . . . . . . . . 33
A Brief History of Sargent & Greenleaf . . . . . . . . . . . . . . . . . . . . . . . . . . . 36
1© Copyright 2011, Sargent & Greenleaf, Inc.
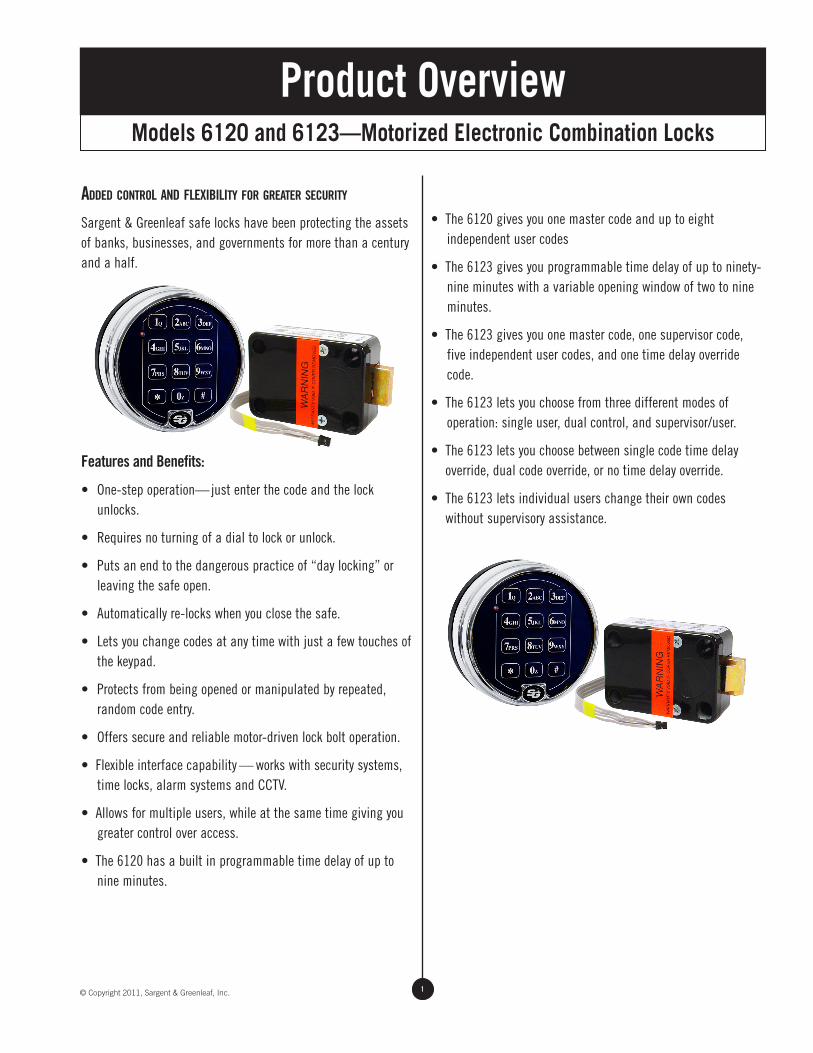
Added control And flexibility for greAter security
Sargent & Greenleaf safe locks have been protecting the assets of banks, businesses, and governments for more than a century and a half.
Features and Benefits:
• One-step operation—just enter the code and the lock unlocks.
• Requires no turning of a dial to lock or unlock.
• Puts an end to the dangerous practice of “day locking” or leaving the safe open.
• Automatically re-locks when you close the safe.
• Lets you change codes at any time with just a few touches of the keypad.
• Protects from being opened or manipulated by repeated, random code entry.
• Offers secure and reliable motor-driven lock bolt operation.
• Flexible interface capability — works with security systems, time locks, alarm systems and CCTV.
• Allows for multiple users, while at the same time giving you greater control over access.
• The 6120 has a built in programmable time delay of up to nine minutes.
• The 6120 gives you one master code and up to eight independent user codes
• The 6123 gives you programmable time delay of up to ninety-nine minutes with a variable opening window of two to nine minutes.
• The 6123 gives you one master code, one supervisor code, five independent user codes, and one time delay override code.
• The 6123 lets you choose from three different modes of operation: single user, dual control, and supervisor/user.
• The 6123 lets you choose between single code time delay override, dual code override, or no time delay override.
• The 6123 lets individual users change their own codes without supervisory assistance.
Product OverviewModels 6120 and 6123—Motorized Electronic Combination Locks

2 © Copyright 2011, Sargent & Greenleaf, Inc.
Product OverviewModels 6120 and 6123—Motorized Electronic Combination Locks
the secure, smArt wAy to protect your Assets.Easy to use. Just enter your personal six-digit code and the Comptronic lock automatically unlocks your safe door in one easy step. It’s as simple as punching in a telephone number. There’s no dial to turn.
Relocks automatically. There’s nothing to turn, and it re-locks itself after 6 seconds. That’s because the bolt mechanism on Comptronic locks is driven by an extremely reliable DC motor.
Easy to program. Every Comptronic lock gives you a choice of one million six-digit codes. Change them yourself anytime. Programming is easy and done through the keypad. There is no need for additional tools, programming boxes, or disassembly of your lock or safe.
Control access. The 6120 conveniently lets you assign up to eight individual employee access codes. Perhaps more importantly, you can delete and reprogram these codes at any time with your Master Code, even if the code being deleted is not known.
The 6123 lets you assign a Supervisor Code, a time delay override code, and up to five individual employee access codes. Either the Master Code holder or Supervisor Code holder can delete and reprogram these codes at any time, even if the employee access code is unknown.
Time delay opening and control. No robber can afford to wait for a safe to be opened. The Comptronic 6120 lets you program an opening delay of up to nine minutes. The 6123 time delay can be set up to ninety-nine minutes. Employees enter their access code, wait the delay period, and re-enter their code to open the safe.
Protects against random dialing. With a million possible codes, it’s unlikely a thief would ever have time to randomly enter the right code, but why take a chance? Anytime four incorrect codes are entered into the Comptronic 6120 or 6123, they automatically shut down for five minutes.
Fits new and existing safes. You can request a Comptronic 6120 or 6123 for a new safe, or you can replace the lock on your existing safe. And because it’s available in a variety of attractive keypad finishes (including 24 karat gold), your Comptronic lock will look as good on your safe as it works.
Over 8,000 openings between battery changes. Two 9-volt alkaline batteries are housed in the standard keypad (S&G recommends Duracell®). When batteries get low, the Comptronic’s audio signal changes pitch to let you know it’s time for fresh ones. Your access codes remain unchanged while you install new batteries.
The support of the industry leader. S&G is a leading global manufacturer of high security safe combination locks, with the broadest array of locks available. Our electronic locks have more applications than all others. We provide excellence in all areas, from our ISO 9001, U.L., and other worldwide certifications to our experienced customer service staff. And, as with all our products, we stand behind the 6120 and 6123 with one of the best warranties in the industry.
3© Copyright 2011, Sargent & Greenleaf, Inc.
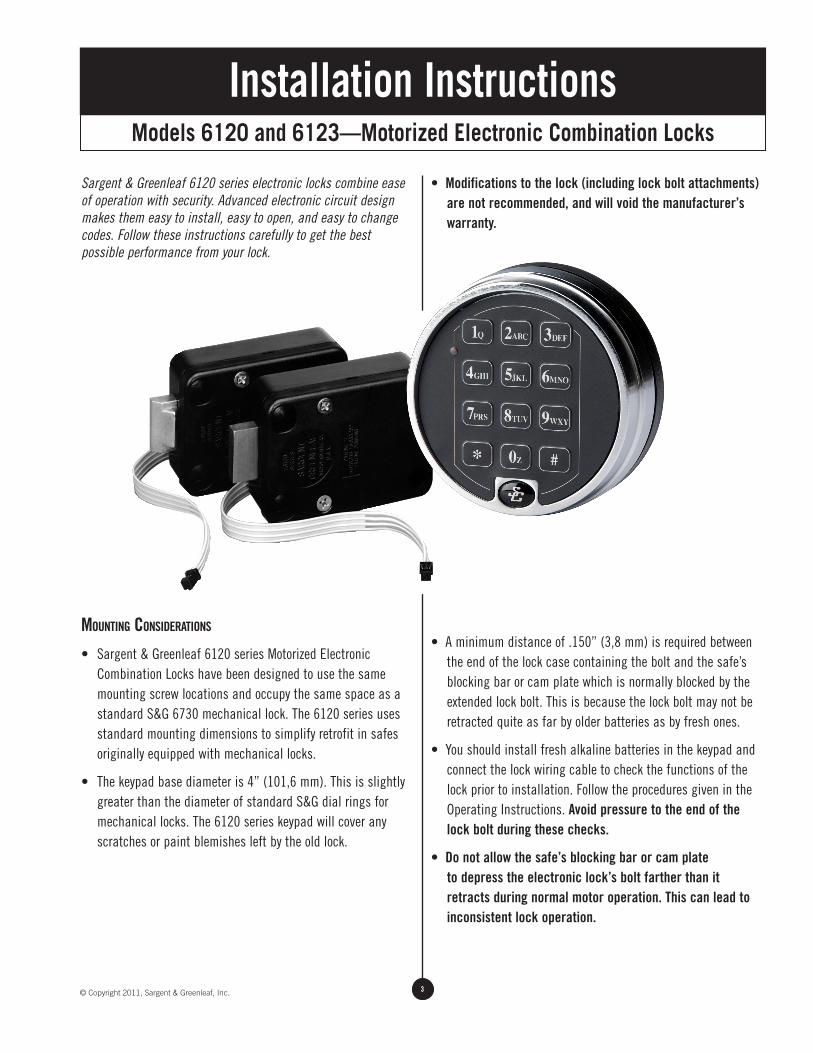
Sargent & Greenleaf 6120 series electronic locks combine ease of operation with security. Advanced electronic circuit design makes them easy to install, easy to open, and easy to change codes. Follow these instructions carefully to get the best possible performance from your lock.
mounting considerAtions
• Sargent & Greenleaf 6120 series Motorized Electronic Combination Locks have been designed to use the same mounting screw locations and occupy the same space as a standard S&G 6730 mechanical lock. The 6120 series uses standard mounting dimensions to simplify retrofit in safes originally equipped with mechanical locks.
• The keypad base diameter is 4” (101,6 mm). This is slightly greater than the diameter of standard S&G dial rings for mechanical locks. The 6120 series keypad will cover any scratches or paint blemishes left by the old lock.
• Modifications to the lock (including lock bolt attachments) are not recommended, and will void the manufacturer’s warranty.
• A minimum distance of .150” (3,8 mm) is required between the end of the lock case containing the bolt and the safe’s blocking bar or cam plate which is normally blocked by the extended lock bolt. This is because the lock bolt may not be retracted quite as far by older batteries as by fresh ones.
• You should install fresh alkaline batteries in the keypad and connect the lock wiring cable to check the functions of the lock prior to installation. Follow the procedures given in the Operating Instructions. Avoid pressure to the end of the lock bolt during these checks.
• Do not allow the safe’s blocking bar or cam plate to depress the electronic lock’s bolt farther than it retracts during normal motor operation. This can lead to inconsistent lock operation.
Installation InstructionsModels 6120 and 6123—Motorized Electronic Combination Locks
4 © Copyright 2011, Sargent & Greenleaf, Inc.
Models 6120 and 6123—Motorized Electronic Combination Locks
Installation Instructions
instAllAtion notes
Although the 6120 series is easy to install, we recommend the following procedures be performed only by an experienced locksmith or safe technician. Your safe may incorporate relocking devices that are attached to the combination lock. Misalignment or detachment of these devices can result in a lockout—a condition that makes it unlikely that the safe can be opened without damage.
AdditionAl items you will need
The 6120 series requires two 9-volt alkaline batteries (not included). We recommend fresh Duracell® batteries. Do not use old or partially drained batteries in your lock. New batteries will power your lock for approximately 8,000 openings when used without the time delay feature.
Many installations can be performed with nothing more that a medium Phillips screwdriver. If the manufacturer of your safe has made external relock device attachments to the lock, specialized tools and knowledge may be required.
instAllAtion
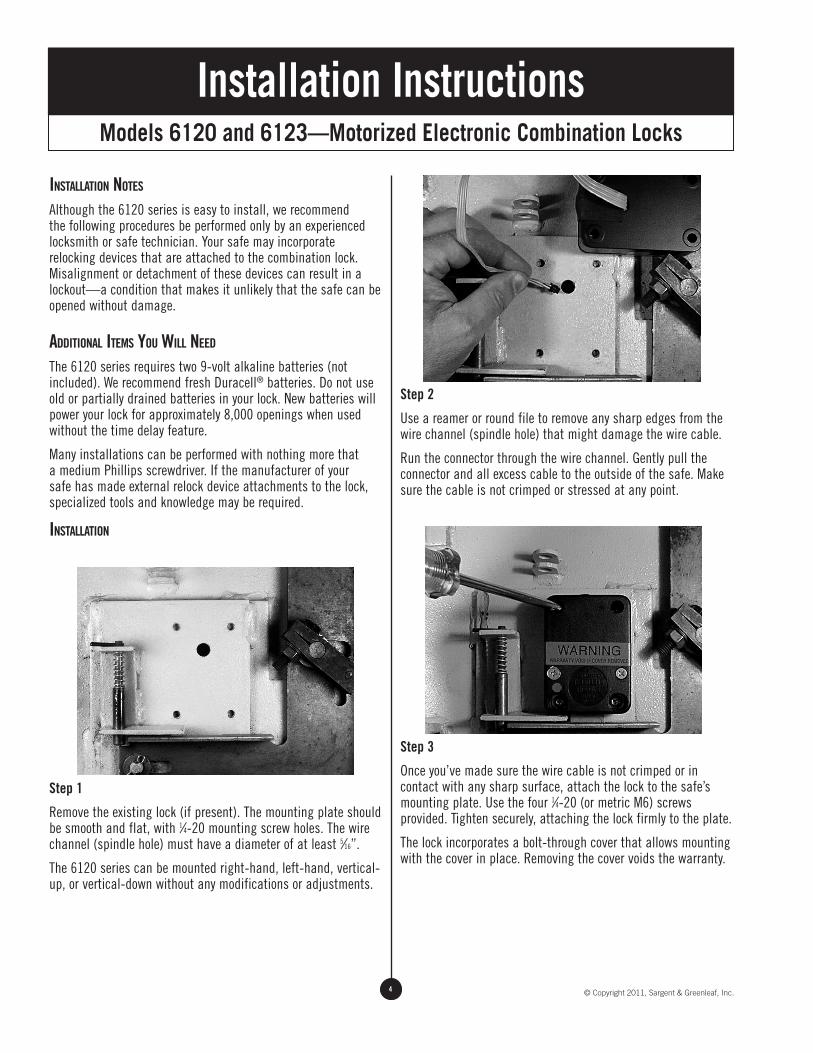
Step 1
Remove the existing lock (if present). The mounting plate should be smooth and flat, with 1⁄4-20 mounting screw holes. The wire channel (spindle hole) must have a diameter of at least 5⁄16”.
The 6120 series can be mounted right-hand, left-hand, vertical-up, or vertical-down without any modifications or adjustments.
Step 2
Use a reamer or round file to remove any sharp edges from the wire channel (spindle hole) that might damage the wire cable.
Run the connector through the wire channel. Gently pull the connector and all excess cable to the outside of the safe. Make sure the cable is not crimped or stressed at any point.
Step 3
Once you’ve made sure the wire cable is not crimped or in contact with any sharp surface, attach the lock to the safe’s mounting plate. Use the four 1⁄4-20 (or metric M6) screws provided. Tighten securely, attaching the lock firmly to the plate.
The lock incorporates a bolt-through cover that allows mounting with the cover in place. Removing the cover voids the warranty.
5© Copyright 2011, Sargent & Greenleaf, Inc.
Models 6120 and 6123—Motorized Electronic Combination Locks
Installation Instructions
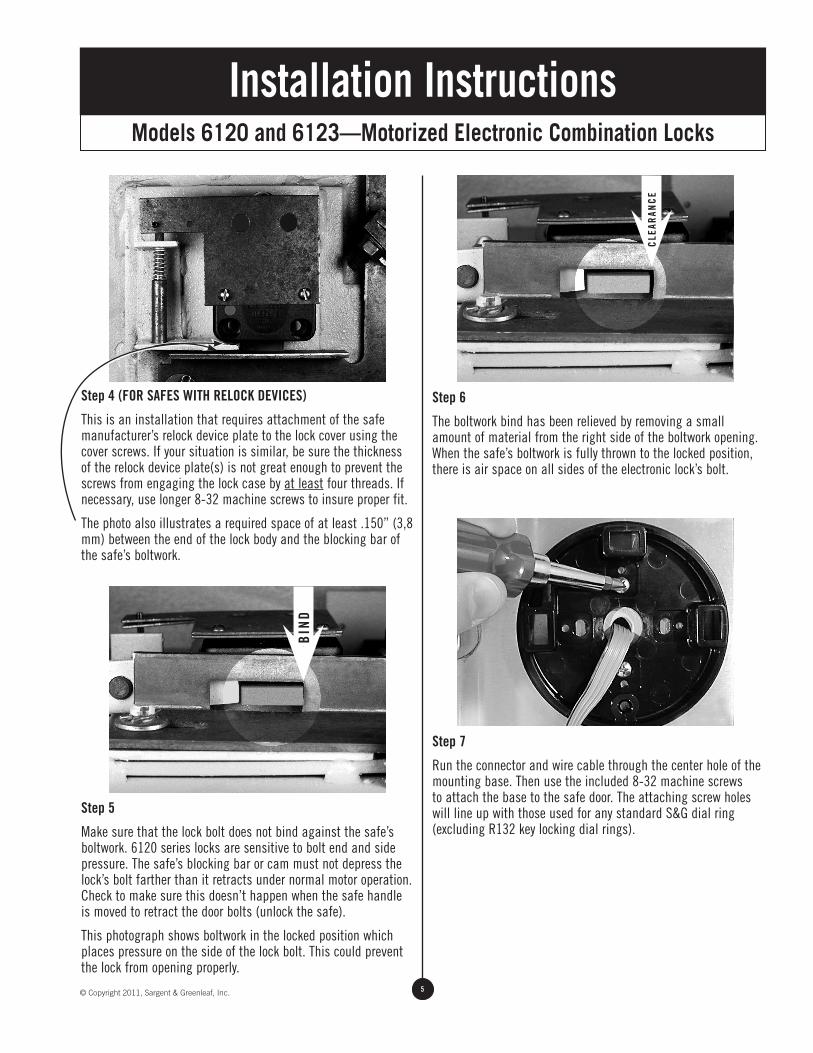
Step 4 (FOR SAFES WITH RELOCK DEVICES)
This is an installation that requires attachment of the safe manufacturer’s relock device plate to the lock cover using the cover screws. If your situation is similar, be sure the thickness of the relock device plate(s) is not great enough to prevent the screws from engaging the lock case by at least four threads. If necessary, use longer 8-32 machine screws to insure proper fit.
The photo also illustrates a required space of at least .150” (3,8 mm) between the end of the lock body and the blocking bar of the safe’s boltwork.
Step 5
Make sure that the lock bolt does not bind against the safe’s boltwork. 6120 series locks are sensitive to bolt end and side pressure. The safe’s blocking bar or cam must not depress the lock’s bolt farther than it retracts under normal motor operation. Check to make sure this doesn’t happen when the safe handle is moved to retract the door bolts (unlock the safe).
This photograph shows boltwork in the locked position which places pressure on the side of the lock bolt. This could prevent the lock from opening properly.
Step 6
The boltwork bind has been relieved by removing a small amount of material from the right side of the boltwork opening. When the safe’s boltwork is fully thrown to the locked position, there is air space on all sides of the electronic lock’s bolt.
Step 7
Run the connector and wire cable through the center hole of the mounting base. Then use the included 8-32 machine screws to attach the base to the safe door. The attaching screw holes will line up with those used for any standard S&G dial ring (excluding R132 key locking dial rings).
BIN
D
CLE
ARAN
CE

6 © Copyright 2011, Sargent & Greenleaf, Inc.
Installation InstructionsModels 6120 and 6123—Motorized Electronic Combination Locks
Step 8
Install a new 9-volt alkaline battery in each of the keypad’s battery holders (Duracell® is recommended). Support the top of each holder as the battery is inserted. This will prevent bending or breaking the holder.
Step 9
The wire cable connector is shaped so that it will fit into the circuit board receptacle only when aligned correctly. Insert the connector into its receptacle in the keypad housing. If it does not slide easily into place, do not force it. This means you need to turn it 180º before attempting to insert it again.
Step 10
Make a loose coil of the excess wire cable. Hold the coil away from the spring clips that will secure the keypad to the mounting base.
ALIGN RIDGE WITH SLOT

7© Copyright 2011, Sargent & Greenleaf, Inc.
Installation InstructionsModels 6120 and 6123—Motorized Electronic Combination Locks
Step 11
Place the keypad over the base. Make sure the wire cable is still clear of the spring clips, then push the keypad firmly onto the base. It should snap into place.
Step 12
The installation is complete. Refer to your lock’s Operating Instructions for opening, code changing, time delay, and battery changing instructions.
Make sure your lock is fully operational before closing the safe door for the first time.
importAnt dimensions
1.62
4" (4
1,2
mm
)
1.00
0" (2
5,4
mm
)
2.40
0" (6
1,0
mm
)
3.320" (84,3 mm)
2.624" (66,6 mm)
1.165" (29,6 mm)
.312" 7,9 mm
.281" 7,1 mm
8 © Copyright 2011, Sargent & Greenleaf, Inc.
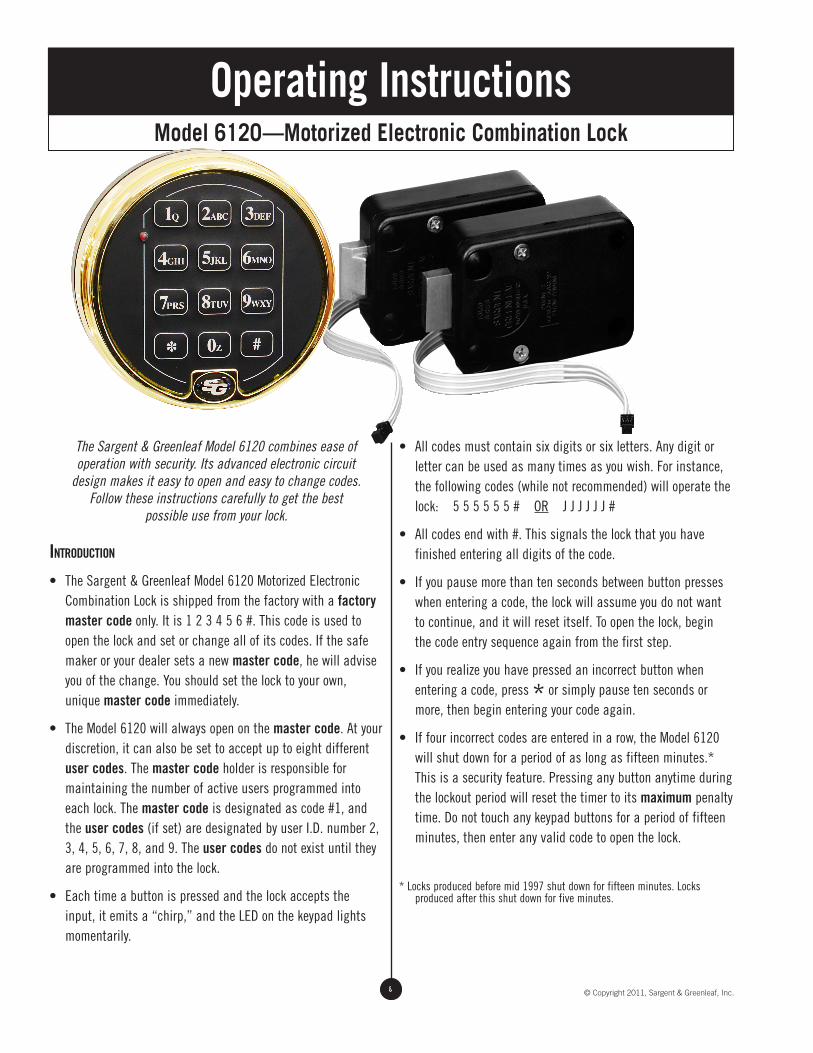
The Sargent & Greenleaf Model 6120 combines ease of operation with security. Its advanced electronic circuit
design makes it easy to open and easy to change codes. Follow these instructions carefully to get the best
possible use from your lock.
introduction
• The Sargent & Greenleaf Model 6120 Motorized Electronic Combination Lock is shipped from the factory with a factory master code only. It is 1 2 3 4 5 6 #. This code is used to open the lock and set or change all of its codes. If the safe maker or your dealer sets a new master code, he will advise you of the change. You should set the lock to your own, unique master code immediately.
• The Model 6120 will always open on the master code. At your discretion, it can also be set to accept up to eight different user codes. The master code holder is responsible for maintaining the number of active users programmed into each lock. The master code is designated as code #1, and the user codes (if set) are designated by user I.D. number 2, 3, 4, 5, 6, 7, 8, and 9. The user codes do not exist until they are programmed into the lock.
• Each time a button is pressed and the lock accepts the input, it emits a “chirp,” and the LED on the keypad lights momentarily.
• All codes must contain six digits or six letters. Any digit or letter can be used as many times as you wish. For instance, the following codes (while not recommended) will operate the lock: 5 5 5 5 5 5 # OR J J J J J J #
• All codes end with #. This signals the lock that you have finished entering all digits of the code.
• If you pause more than ten seconds between button presses when entering a code, the lock will assume you do not want to continue, and it will reset itself. To open the lock, begin the code entry sequence again from the first step.
• If you realize you have pressed an incorrect button when entering a code, press * or simply pause ten seconds or more, then begin entering your code again.
• If four incorrect codes are entered in a row, the Model 6120 will shut down for a period of as long as fifteen minutes.* This is a security feature. Pressing any button anytime during the lockout period will reset the timer to its maximum penalty time. Do not touch any keypad buttons for a period of fifteen minutes, then enter any valid code to open the lock.
* Locks produced before mid 1997 shut down for fifteen minutes. Locks produced after this shut down for five minutes.
Operating InstructionsModel 6120 —Motorized Electronic Combination Lock
9© Copyright 2011, Sargent & Greenleaf, Inc.
If all of the preceding remedies have been exhausted and the lock still does not open, contact a qualified safe technician in your area for professional service.
to open the lock
Press the code digits or letters in order, followed by #. The lock bolt will retract for six seconds, allowing you time to operate the safe handle and open the door. Do not put any pressure on the safe handle until after the code has been entered. The Model 6120 will lock automatically when the safe door is closed and the handle is turned to the locked position.
Note: The Master Code Holder is responsible for maintaining the number of active users programmed into each lock.
in cAse of trouble
If your lock should fail to open when a valid code is entered, check for the following:
1. The boltwork of a safe can, under certain conditions, place pressure on the side of the lock’s bolt. This is often caused by something inside the safe pressing against the door or by something caught between the safe door and its frame. When
this occurs, the lock will not operate properly. To relieve side pressure on the lock bolt, move the safe’s handle to the fully locked position, then re-enter a working code. The lock should open after the pressure is removed.
2. If the lock “chirps” when keys are pressed, but it will not open, the batteries may be drained to the point that they will not operate the lock’s motor. Follow the battery replacement procedure in this manual.
3. If the lock makes no sound when any of the keys are pressed, dead batteries are likely to be the cause. Follow the battery replacement procedure in this manual.
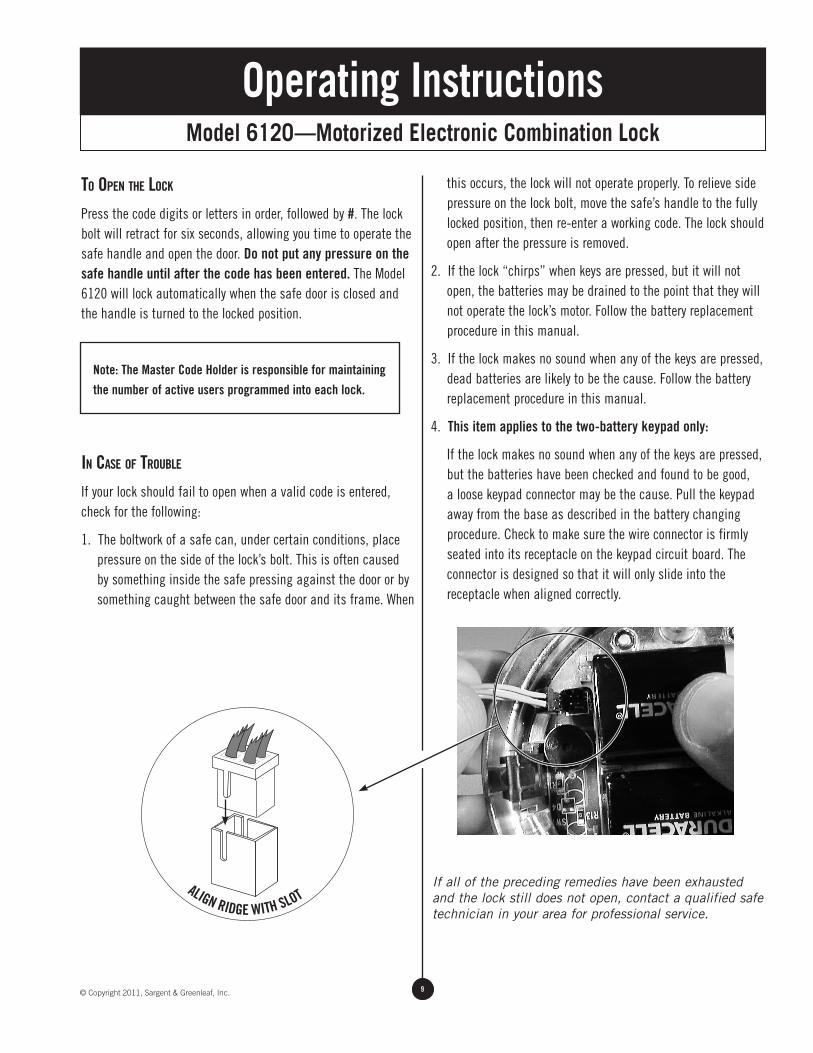
4. This item applies to the two-battery keypad only:
If the lock makes no sound when any of the keys are pressed, but the batteries have been checked and found to be good, a loose keypad connector may be the cause. Pull the keypad away from the base as described in the battery changing procedure. Check to make sure the wire connector is firmly seated into its receptacle on the keypad circuit board. The connector is designed so that it will only slide into the receptacle when aligned correctly.
ALIGN RIDGE WITH SLOT
Operating InstructionsModel 6120 —Motorized Electronic Combination Lock

10 © Copyright 2011, Sargent & Greenleaf, Inc.
Model 6120 —Motorized Electronic Combination Lock
Operating Instructions
mrc—mAnAgement reset code
If a management reset code is used, it must be programmed into the lock before the master code is changed for the first time. Once the master code is changed, the lock cannot accept an MRC. Conversely, once an MRC is programmed into a lock, it is always present. It cannot be deleted or changed.
Some 6120 locks have factory installed management reset codes, You cannot install a new MRC to replace an existing one.
The management reset code is used to regain control of a lock when its master code is lost. When the MRC is employed, it deletes all codes and changes the master code back to 1 2 3 4 5 6 #. See the technical bulletin on page 32 for detailed information on how to set and use a management reset code.
About chAnging codes
Always keep the safe door open when changing codes and making other programming changes.
All code changing procedures begin by pressing SG* (the same as 74*), followed by the existing six-digit master code and #. The lock immediately chirps five times ( ). If the lock emits a series of closely spaced chirps (nearly a continuous tone) you’ve made a mistake and must start again.
to chAnge the mAster code (code #1)Press SG* (___) # 1 * (___) # (___) #
Whenever # is pressed, the lock chirps to acknowledge the entry. Wait for the chirps before proceeding. If a long series of closely spaced chirps (almost a continuous tone) sounds when # is pressed, the new master code will not be accepted—the old code is retained.
to enter or chAnge A user code (codes #2-#9)Press SG* (___) # (user I.D.) * (___) # (___) #
Whenever # is pressed, the lock chirps to acknowledge the entry. Wait for the chirps before proceeding. If a long series of closely spaced chirps (almost a continuous tone) sounds when # is pressed, the new code will not be accepted. Any existing user code remains.
For instance, if you want to enable the #3 user code to open the lock with a code of 4 4 6 6 3 3, you will use the following procedure.
Press SG* (____) # 3 * 446633 # 446633 #
This same procedure would change any existing #3 user code to 4-4-6-6-3-3.
to delete A user code
You may find that a particular user code which you have enabled is no longer needed. It is a good security policy to remove any unneeded codes. To do so, follow this procedure.
Press SG* (___) # (user I.D. 2 through 9) * # #
Whenever # is pressed, the lock chirps to acknowledge the entry. Wait for the chirps before proceeding. If a long series of closely spaced chirps (almost a continuous tone) sounds when # is pressed, the user code will not be deleted.
In this procedure, the Model 6120 lock will not allow you to inadvertently remove the master code.
security Advisory
If your lock is used many times a day (50 or more openings daily), it is advisable to use as many different keys as possible in your code number. Avoid using a key more than once whenever possible. Check the keypad frequently for visible wear which indicates which keys are being pressed for code entry. Change the code to use different keys when wear is evident. If necessary, have a qualified service technician replace the keypad.
existing master code new master code new master code(7 4)
new user code new user codeexisting master code(7 4)
new user code new user codeexisting master code(7 4)
existing master code(7 4)
11© Copyright 2011, Sargent & Greenleaf, Inc.
Model 6120 —Motorized Electronic Combination Lock
Operating Instructions
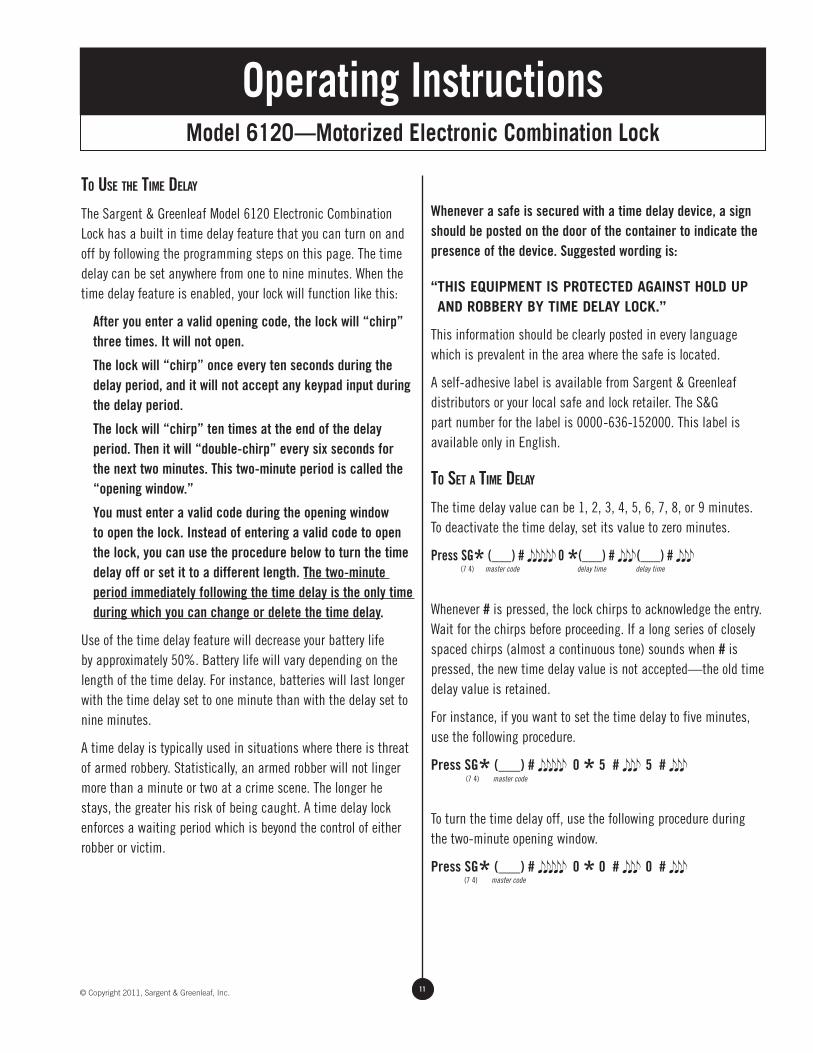
to use the time delAy
The Sargent & Greenleaf Model 6120 Electronic Combination Lock has a built in time delay feature that you can turn on and off by following the programming steps on this page. The time delay can be set anywhere from one to nine minutes. When the time delay feature is enabled, your lock will function like this:
After you enter a valid opening code, the lock will “chirp” three times. It will not open.
The lock will “chirp” once every ten seconds during the delay period, and it will not accept any keypad input during the delay period.
The lock will “chirp” ten times at the end of the delay period. Then it will “double-chirp” every six seconds for the next two minutes. This two-minute period is called the “opening window.”
You must enter a valid code during the opening window to open the lock. Instead of entering a valid code to open the lock, you can use the procedure below to turn the time delay off or set it to a different length. The two-minute period immediately following the time delay is the only time during which you can change or delete the time delay.
Use of the time delay feature will decrease your battery life by approximately 50%. Battery life will vary depending on the length of the time delay. For instance, batteries will last longer with the time delay set to one minute than with the delay set to nine minutes.
A time delay is typically used in situations where there is threat of armed robbery. Statistically, an armed robber will not linger more than a minute or two at a crime scene. The longer he stays, the greater his risk of being caught. A time delay lock enforces a waiting period which is beyond the control of either robber or victim.
Whenever a safe is secured with a time delay device, a sign should be posted on the door of the container to indicate the presence of the device. Suggested wording is:
“ THIS EQUIPMENT IS PROTECTED AGAINST HOLD UP AND ROBBERY BY TIME DELAY LOCK.”
This information should be clearly posted in every language which is prevalent in the area where the safe is located.
A self-adhesive label is available from Sargent & Greenleaf distributors or your local safe and lock retailer. The S&G part number for the label is 0000-636-152000. This label is available only in English.
to set A time delAy
The time delay value can be 1, 2, 3, 4, 5, 6, 7, 8, or 9 minutes. To deactivate the time delay, set its value to zero minutes.
Press SG* (___) # 0 *(___) # (___) #
Whenever # is pressed, the lock chirps to acknowledge the entry. Wait for the chirps before proceeding. If a long series of closely spaced chirps (almost a continuous tone) sounds when # is pressed, the new time delay value is not accepted—the old time delay value is retained.
For instance, if you want to set the time delay to five minutes, use the following procedure.
Press SG* (___) # 0 * 5 # 5 #
To turn the time delay off, use the following procedure during the two-minute opening window.
Press SG* (___) # 0 * 0 # 0 #
master code delay time delay time(7 4)
master code(7 4)
master code(7 4)
12 © Copyright 2011, Sargent & Greenleaf, Inc.
Operating InstructionsModel 6123—Motorized Electronic Combination Lock
The Sargent & Greenleaf Model 6123 combines ease of operation with security and flexibility. Its advanced electronic
circuit design makes it easy to open and easy to change codes. Follow these instructions carefully to get the best
possible use from your lock.
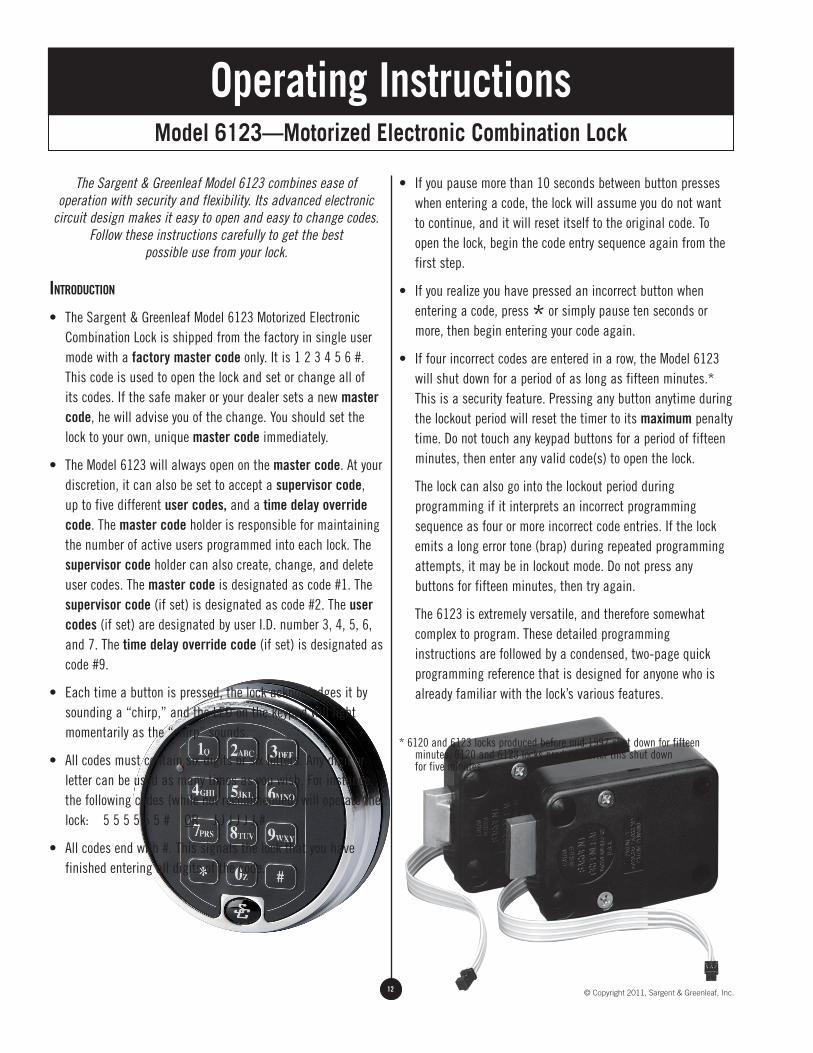
introduction
• The Sargent & Greenleaf Model 6123 Motorized Electronic Combination Lock is shipped from the factory in single user mode with a factory master code only. It is 1 2 3 4 5 6 #. This code is used to open the lock and set or change all of its codes. If the safe maker or your dealer sets a new master code, he will advise you of the change. You should set the lock to your own, unique master code immediately.
• The Model 6123 will always open on the master code. At your discretion, it can also be set to accept a supervisor code, up to five different user codes, and a time delay override code. The master code holder is responsible for maintaining the number of active users programmed into each lock. The supervisor code holder can also create, change, and delete user codes. The master code is designated as code #1. The supervisor code (if set) is designated as code #2. The user codes (if set) are designated by user I.D. number 3, 4, 5, 6, and 7. The time delay override code (if set) is designated as code #9.
• Each time a button is pressed, the lock acknowledges it by sounding a “chirp,” and the LED on the keypad will light momentarily as the “chirp” sounds.
• All codes must contain six digits or six letters. Any digit or letter can be used as many times as you wish. For instance, the following codes (while not recommended) will operate the lock: 5 5 5 5 5 5 # OR J J J J J J #
• All codes end with #. This signals the lock that you have finished entering all digits of the code.
• If you pause more than 10 seconds between button presses when entering a code, the lock will assume you do not want to continue, and it will reset itself to the original code. To open the lock, begin the code entry sequence again from the first step.
• If you realize you have pressed an incorrect button when entering a code, press * or simply pause ten seconds or more, then begin entering your code again.
• If four incorrect codes are entered in a row, the Model 6123 will shut down for a period of as long as fifteen minutes.* This is a security feature. Pressing any button anytime during the lockout period will reset the timer to its maximum penalty time. Do not touch any keypad buttons for a period of fifteen minutes, then enter any valid code(s) to open the lock.
The lock can also go into the lockout period during programming if it interprets an incorrect programming sequence as four or more incorrect code entries. If the lock emits a long error tone (brap) during repeated programming attempts, it may be in lockout mode. Do not press any buttons for fifteen minutes, then try again.
The 6123 is extremely versatile, and therefore somewhat complex to program. These detailed programming instructions are followed by a condensed, two-page quick programming reference that is designed for anyone who is already familiar with the lock’s various features.
* 6120 and 6123 locks produced before mid 1997 shut down for fifteen minutes. 6120 and 6123 locks produced after this shut down for five minutes.

13© Copyright 2011, Sargent & Greenleaf, Inc.
Operating InstructionsModel 6123—Motorized Electronic Combination Lock
to open the lock
Press the code digits or letters in order, followed by #. The lock bolt will retract for six seconds, allowing you time to operate the safe handle and open the door. Do not put any pressure on the safe handle until after the code has been entered. The Model 6123 will lock automatically when the safe door is closed and the handle is turned to the locked position.
Note: The Master Code Holder is responsible for maintaining the number of active users programmed into each lock.
in cAse of trouble
If your lock should fail to open when a valid code is entered, check for the following:
1. The boltwork of a safe can, under certain conditions, place pressure on the side of the lock’s bolt. This is often caused by something inside the safe pressing against the door or by something caught between the safe door and its frame. When
this occurs, the lock will not operate properly. To relieve side pressure on the lock bolt, move the safe’s handle to the fully locked position, then re-enter a working code. The lock should open.
2. If the lock “chirps” when keys are pressed, but it will not open, the batteries may be drained to the point that they will not operate the lock’s motor. Follow the battery replacement procedure in this manual.
3. If the lock makes no sound when any of the keys are pressed, dead batteries are likely to be the cause. Follow the battery replacement procedure in this manual.
4. This item applies to the two-battery keypad only:
If the lock makes no sound when any of the keys are pressed, but the batteries have been checked and found to be good, a loose keypad connector may be the cause. Pull the keypad away from the base as described in the battery changing procedure. Check to make sure the wire connector is firmly seated into its receptacle on the keypad circuit board. The connector is designed so that it will only slide into the receptacle when aligned correctly.
If all of the preceding remedies have been exhausted and the lock still does not open, contact a qualified safe technician in your area for professional service.
ALIGN RIDGE WITH SLOT

14 © Copyright 2011, Sargent & Greenleaf, Inc.
Operating InstructionsModel 6123—Motorized Electronic Combination Lock
decisions—mrc And tdomrc—mAnAgement reset code
Before any buttons are pressed, you need to make some decisions. The first is whether or not your lock is to have a management reset code, also known as the MRC. This code must be programmed into the lock before the master code is changed for the first time. After the master code is changed, the lock can never be programmed with an MRC. Conversely, when an MRC is programmed into a lock, it is always present. It cannot be deleted or changed.
Some 6123 locks have factory installed management reset codes, depending on how they were ordered by the safe maker or dealer. You cannot install a new MRC to replace an existing one.
The management reset code is used to regain control of a lock when its master code is lost. When the MRC is employed, it deletes the supervisor and all user codes present in the lock and changes the master code to the factory default of 1 2 3 4 5 6 #. While this can be a real time and money saving feature if a master code is lost, the presence of a management reset code in a lock could also be viewed as a security weakness under some circumstances. Carefully consider whether or not you want to program an MRC into you lock. If you decide to use this feature, here’s what you need to know.
Important: All programming and code changing should be done with the safe door open. Do not close the safe door until all programming and/or code changes are completed and triple checked to make sure everything is working correctly.
An MRC consists of seven digits, including one [01] or [03] pair that can appear once anywhere in the code. When entering the MRC, these two digits are pressed simultaneously. An example of an acceptable management reset code is:
7 4 8 1 [1 0] 5
Before programming the MRC into the lock, enter the master code (123456#) to make sure the lock is functioning correctly on the factory default master code. When the bolt extends, press:
* * # 1 2 3 4 5 6 # (______) # (______) #
The [01] or [03] pair of digits in your management reset code must be pressed at the same time. The lock will emit three rapid beeps after the final # is pressed to acknowledge successful programming of the MRC. If you don’t hear those three beeps, the MRC has not been programmed. If you hear a long tone (called a “brap”) while trying to program the MRC, either you’ve made an error in the entry sequence, the lock already has an MRC, or the master code has been changed. Even if the master code is changed, then set back to 1 2 3 4 5 6 #, the management reset code cannot be set.
The procedure for using the management reset code to reset a lock with a lost master code is found later in the manual.
tdo—time delAy override
Note: Time delay override is not available if the lock is used in
supervisor/user mode.
If your 6123 will be using a time delay, you may also want to program a time delay override capability. Like the MRC, you’ve got to make this decision and do the programming before the master code is changed for the first time.
A time delay is used to deter armed robbery. Statistics show that the longer an armed robber has to wait for a safe to open, the less likely he is to initiate the crime. The 6123‘s time delay feature enforces a waiting time between the entry of the lock code and the opening of the safe.
Often a safe that requires a time delay lock is involved in a cash carrier or armored car pickup process. Excess cash receipts are picked up at various intervals by armored car services. In the interest of security and efficiency, it is important that these couriers do not spend any more time than is absolutely necessary to access the safe, remove the excess valuables, and be on their way. This is where the time delay override code comes into play. It allows one code to override the lock’s time delay and open the safe immediately.
Before the lock’s master code is changed for the first time, you should determine whether or not you will need a time delay override code or not. If you will need a TDO, you must decide if it will be a single user time delay override or a dual control time delay override.
management reset code
management reset code
15© Copyright 2011, Sargent & Greenleaf, Inc.
Operating InstructionsModel 6123—Motorized Electronic Combination Lock
If you do not want your 6123 to have time delay override capability, use the following programming sequence to permanently remove it:
8 3 * 1 2 3 4 5 6 # 1 # 1 #
The lock will emit three rapid beeps after the final # is pressed to acknowledge that the time delay override capability has been irrevocably removed. If you don’t hear those three beeps, or if you hear a long tone (called a “brap”) while following this procedure, either you’ve made an error in the entry sequence, or the master code has already been changed.
A single user time delay override code allows the holder of the code to enter it into the lock and immediately gain access to the safe. He does not have to wait for the time delay, and there are no other actions required.
To program the lock for single user time delay override, use the following procedure:
4 6 * 1 2 3 4 5 6 # 2 # 2 #
The lock will emit three rapid beeps after the final # is pressed to acknowledge that the single user time delay override capability has been set. If you don’t hear those three beeps, or if you hear a long tone (called a “brap”) while following this procedure, either you’ve made an error in the entry sequence, or the master code has already been changed.
A dual control time delay override is somewhat similar, with one restriction placed on it. The override code will only open the safe when it is entered within one minute of another code holder entering his or her code to start the time delay. For example, when the armored car shows up at the safe, a store employee would enter the master code, the supervisor code, or any user code to start the lock’s time delay. Within one minute, the armored car person would enter his code. The safe would immediately open, rather than enforcing the entire time delay period.
The dual control time delay override is often preferred, because it imposes a supervisory restriction on the only person who has a code that will circumvent the time delay. To set the lock for dual control time delay capability, press:
4 6 * 1 2 3 4 5 6 # 1 # 1 #
The lock will emit three rapid beeps after the final # is pressed to acknowledge that the dual control time delay override capability has been set. If you don’t hear those three beeps, or if you hear a long tone (called a “brap”) while following this procedure, either you’ve made an error in the entry sequence, or the master code has already been changed.
Once you’ve successfully set a management reset code (if desired) and a time delay override method (or deleted the capability permanently), you can perform any of the lock’s other programming functions, including changing the master code. Any programming you do from this point on can be changed.
Either type of time delay override still requires you to select and set the actual six-digit TDO code number that will be used to open the safe. Even if the capability for TDO has been programmed, it is useless until a code is programmed. The code can be set, changed, or deleted at any time by the holder of the lock’s master code. It is easiest to set the time delay override code before a time delay period is programmed. To do so, press:
Press SG* (_____) # 9 * (____) # (____) #
If a time delay period is already programmed into the lock, the time delay override code can only be set, changed, or deleted during the opening window, which is explained later in the manual.
Access methods—modes of operAtion single user mode
One person with a single, valid, six-digit code can open the lock. Lock features can include time delay and time delay override code, if desired. The holder of the master code can perform all programming functions. The holder of the supervisor code (if it’s set) can set, change, and delete user codes. He can also change and delete his own code. User code holders can change their own codes. Your lock left S&G’s factory in single user mode (the default mode). If it’s in another mode and you want to change it to single user mode, follow this programming sequence:
3 2 * (_____) # 0 # 0 #
existing master code new TDO code(7 4)
existing master code
new TDO code
16 © Copyright 2011, Sargent & Greenleaf, Inc.
Operating InstructionsModel 6123—Motorized Electronic Combination Lock
duAl control mode
This is also referred to as dual user mode. It requires two different valid lock codes to be entered within one minute of each other for the lock to open. The idea is that no one person has the ability to open the safe alone. Lock features can include time delay and time delay override code, if desired. The holder of the master code can perform all programming functions. The holder of the supervisor code cannot perform any programming or code changes. He cannot even change or delete his own code. User code holders can change their own codes. You should also be aware that a single user time delay override code can open the lock immediately without entry of a second code. The dual control time delay override will require another code to start the time delay before it can be used to open the safe. A time delay period of at least one minute must be programmed into the lock for a time delay override code of either variety to work. It cannot open a lock that is not using the time delay feature.
If your lock is in another mode and you want to change it to dual control mode, follow this programming sequence:
3 2 * (_____) # 1 # 1 #
supervisor/user mode
This is sometimes referred to as supervisor/subordinate mode. In this mode, the master code and the supervisor code cannot open the lock. Instead, they are used to enable and disable the lock for opening by the user codes. When either the master code or the supervisor code (if set) is entered, the lock will emit four short beeps or two long beeps. If it gives the four short beeps, any user code can subsequently be used to open the lock. The next time the master code or supervisor code is entered, the lock will emit the two long beeps. Now the user codes cannot open the lock. When the lock is disabled and a user code is entered, it does not open, but emits two long beeps instead. The master code and supervisor code are effectively used to toggle the lock back and forth between usable and non-usable states. Lock features can include time delay, but the time delay override is not available in this mode. The holder of the master code can perform all programming functions. The holder of the supervisor code (if it’s set) can set, change, and delete user
codes. He can also change and delete his own code. User code holders can change their own codes and open the lock when it is enabled by the master code or supervisor code.
To place your 6123 lock in supervisor/user mode, press:
3 2 * (_____) # 2 # 2 #
setting / chAnging / deleting codes
the mAster code
As mentioned previously, the master code can perform all programming functions for the 6123 lock. The master code can be changed, but the lock will not allow you to delete it. The factory default master code is 1 2 3 4 5 6 #. We strongly suggest you change it to a six-digit code of your own choosing before storing anything of value in your safe. Only the holder of the master code can change the master code. The sequence is:
Press SG* (___) # 1 * (___) # (___) #
If the long error tone (brap) sounds at any time during the master code changing procedure, you have made an error. The old master code is retained.
the supervisor code
The supervisor code can change and delete itself (once set). It can be set, changed, and deleted by the holder of the master code. The process for using the master code to set or change the supervisor code is:
Press SG* (___) # 2 * (___) # (___) #
If the long error tone (brap) sounds at any time during the supervisor code changing procedure, you have made an error. The old supervisor code is retained.
To delete the supervisor code, the master code holder enters:
Press SG* (___) # 2 * # #
existing master code
existing master code
existing master code new master code new master code(7 4)
existing master code new supervisor code new supervisor code(7 4)
existing master code(7 4)
17© Copyright 2011, Sargent & Greenleaf, Inc.
Operating InstructionsModel 6123—Motorized Electronic Combination Lock
If the long error tone (brap) sounds at any time during the supervisor code deletion procedure, you have made an error. The old supervisor code is retained.
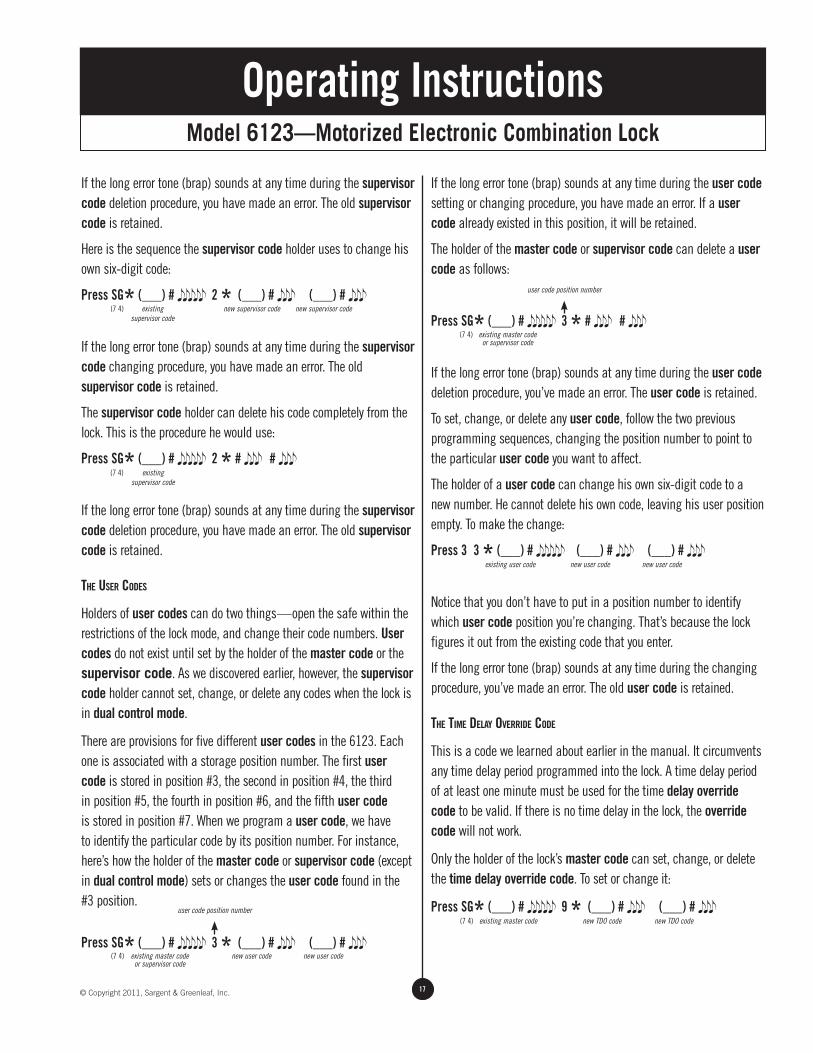
Here is the sequence the supervisor code holder uses to change his own six-digit code:
Press SG* (___) # 2 * (___) # (___) #
If the long error tone (brap) sounds at any time during the supervisor code changing procedure, you have made an error. The old supervisor code is retained.
The supervisor code holder can delete his code completely from the lock. This is the procedure he would use:
Press SG* (___) # 2 * # #
If the long error tone (brap) sounds at any time during the supervisor code deletion procedure, you have made an error. The old supervisor code is retained.
the user codes
Holders of user codes can do two things—open the safe within the restrictions of the lock mode, and change their code numbers. User codes do not exist until set by the holder of the master code or the supervisor code. As we discovered earlier, however, the supervisor code holder cannot set, change, or delete any codes when the lock is in dual control mode.
There are provisions for five different user codes in the 6123. Each one is associated with a storage position number. The first user code is stored in position #3, the second in position #4, the third in position #5, the fourth in position #6, and the fifth user code is stored in position #7. When we program a user code, we have to identify the particular code by its position number. For instance, here’s how the holder of the master code or supervisor code (except in dual control mode) sets or changes the user code found in the #3 position.
Press SG* (___) # 3 * (___) # (___) #
If the long error tone (brap) sounds at any time during the user code setting or changing procedure, you have made an error. If a user code already existed in this position, it will be retained.
The holder of the master code or supervisor code can delete a user code as follows:
Press SG* (___) # 3 * # #
If the long error tone (brap) sounds at any time during the user code deletion procedure, you’ve made an error. The user code is retained.
To set, change, or delete any user code, follow the two previous programming sequences, changing the position number to point to the particular user code you want to affect.
The holder of a user code can change his own six-digit code to a new number. He cannot delete his own code, leaving his user position empty. To make the change:
Press 3 3 * (___) # (___) # (___) #
Notice that you don’t have to put in a position number to identify which user code position you’re changing. That’s because the lock figures it out from the existing code that you enter.
If the long error tone (brap) sounds at any time during the changing procedure, you’ve made an error. The old user code is retained.
the time delAy override code
This is a code we learned about earlier in the manual. It circumvents any time delay period programmed into the lock. A time delay period of at least one minute must be used for the time delay override code to be valid. If there is no time delay in the lock, the override code will not work.
Only the holder of the lock’s master code can set, change, or delete the time delay override code. To set or change it:
Press SG* (___) # 9 * (___) # (___) #
existing master code or supervisor code
new user code(7 4)
existing supervisor code
new supervisor code new supervisor code(7 4)
existing supervisor code
new user code
user code position number
existing master code or supervisor code
(7 4)
(7 4)
existing user code new user code
existing master code new TDO code new TDO code(7 4)
user code position number
new user code
18 © Copyright 2011, Sargent & Greenleaf, Inc.
Operating InstructionsModel 6123—Motorized Electronic Combination Lock
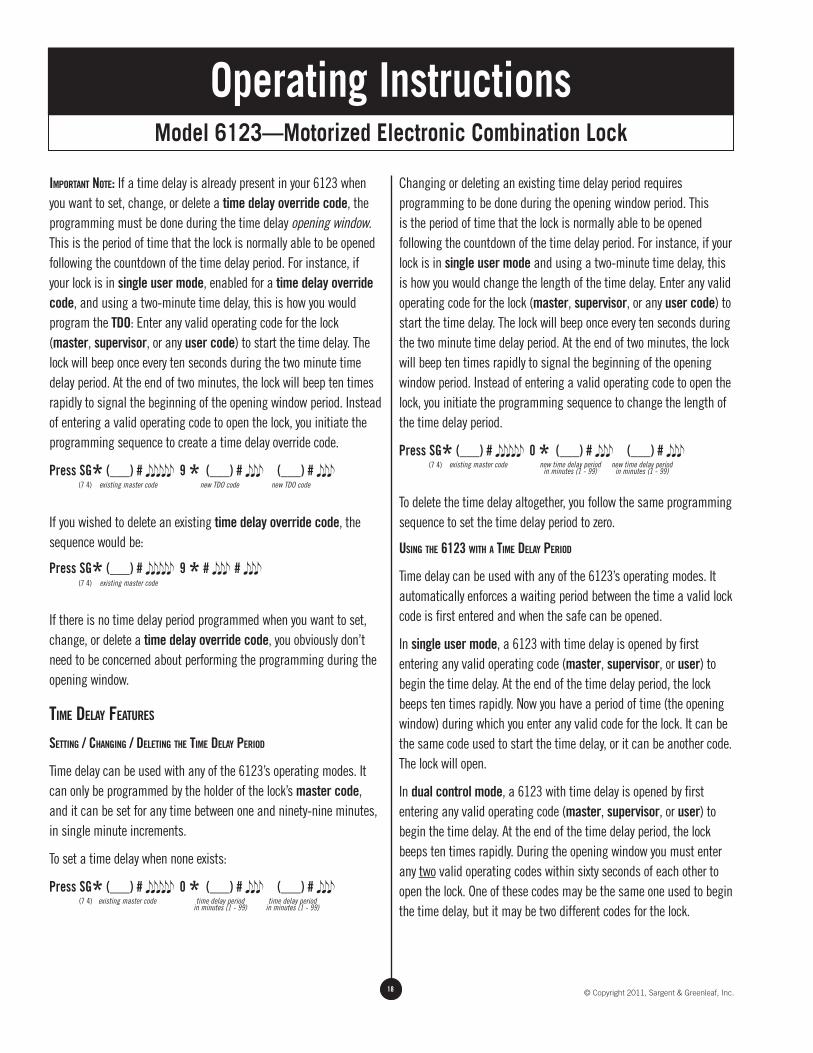
importAnt note: If a time delay is already present in your 6123 when you want to set, change, or delete a time delay override code, the programming must be done during the time delay opening window. This is the period of time that the lock is normally able to be opened following the countdown of the time delay period. For instance, if your lock is in single user mode, enabled for a time delay override code, and using a two-minute time delay, this is how you would program the TDO: Enter any valid operating code for the lock (master, supervisor, or any user code) to start the time delay. The lock will beep once every ten seconds during the two minute time delay period. At the end of two minutes, the lock will beep ten times rapidly to signal the beginning of the opening window period. Instead of entering a valid operating code to open the lock, you initiate the programming sequence to create a time delay override code.
Press SG* (___) # 9 * (___) # (___) #
If you wished to delete an existing time delay override code, the sequence would be:
Press SG* (___) # 9 * # #
If there is no time delay period programmed when you want to set, change, or delete a time delay override code, you obviously don’t need to be concerned about performing the programming during the opening window.
time delAy feAtures
setting / chAnging / deleting the time delAy period
Time delay can be used with any of the 6123’s operating modes. It can only be programmed by the holder of the lock’s master code, and it can be set for any time between one and ninety-nine minutes, in single minute increments.
To set a time delay when none exists:
Press SG* (___) # 0 * (___) # (___) #
Changing or deleting an existing time delay period requires programming to be done during the opening window period. This is the period of time that the lock is normally able to be opened following the countdown of the time delay period. For instance, if your lock is in single user mode and using a two-minute time delay, this is how you would change the length of the time delay. Enter any valid operating code for the lock (master, supervisor, or any user code) to start the time delay. The lock will beep once every ten seconds during the two minute time delay period. At the end of two minutes, the lock will beep ten times rapidly to signal the beginning of the opening window period. Instead of entering a valid operating code to open the lock, you initiate the programming sequence to change the length of the time delay period.
Press SG* (___) # 0 * (___) # (___) #
To delete the time delay altogether, you follow the same programming sequence to set the time delay period to zero.
using the 6123 with A time delAy period
Time delay can be used with any of the 6123’s operating modes. It automatically enforces a waiting period between the time a valid lock code is first entered and when the safe can be opened.
In single user mode, a 6123 with time delay is opened by first entering any valid operating code (master, supervisor, or user) to begin the time delay. At the end of the time delay period, the lock beeps ten times rapidly. Now you have a period of time (the opening window) during which you enter any valid code for the lock. It can be the same code used to start the time delay, or it can be another code. The lock will open.
In dual control mode, a 6123 with time delay is opened by first entering any valid operating code (master, supervisor, or user) to begin the time delay. At the end of the time delay period, the lock beeps ten times rapidly. During the opening window you must enter any two valid operating codes within sixty seconds of each other to open the lock. One of these codes may be the same one used to begin the time delay, but it may be two different codes for the lock.
existing master code new TDO code new TDO code(7 4)
existing master code(7 4)
existing master code time delay period in minutes (1 - 99)
time delay period in minutes (1 - 99)
(7 4)
existing master code new time delay period in minutes (1 - 99)
new time delay period in minutes (1 - 99)
(7 4)
19© Copyright 2011, Sargent & Greenleaf, Inc.
Operating InstructionsModel 6123—Motorized Electronic Combination Lock
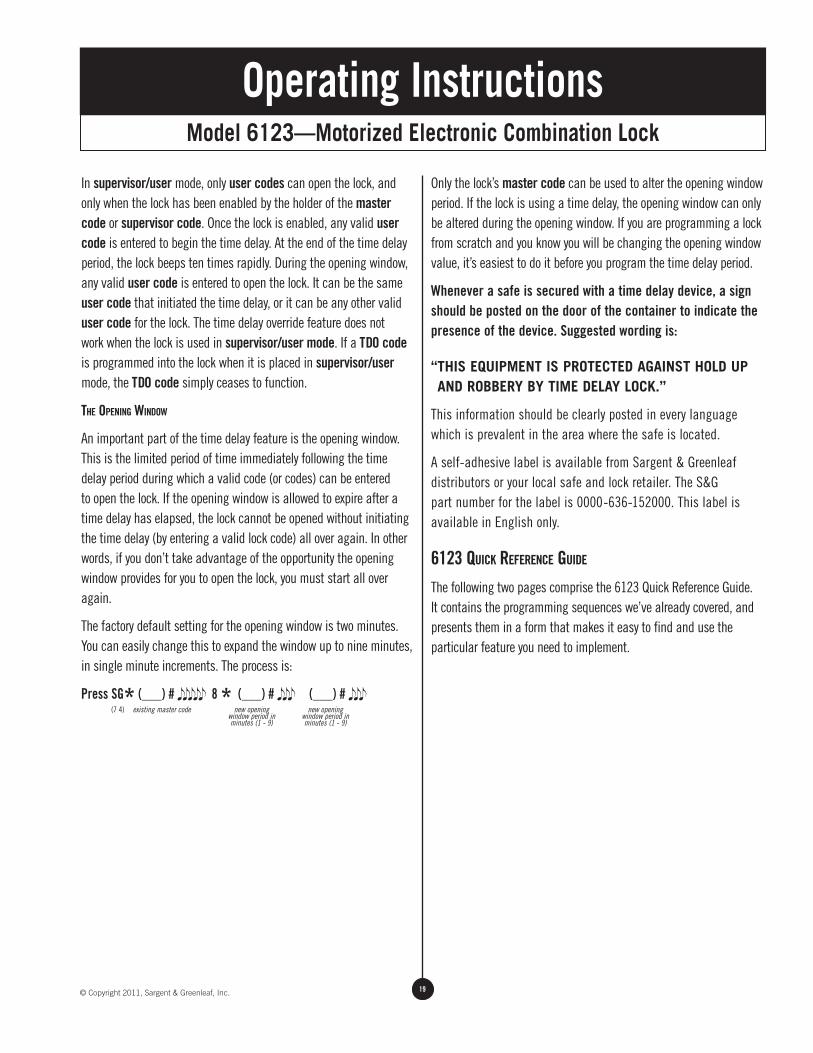
In supervisor/user mode, only user codes can open the lock, and only when the lock has been enabled by the holder of the master code or supervisor code. Once the lock is enabled, any valid user code is entered to begin the time delay. At the end of the time delay period, the lock beeps ten times rapidly. During the opening window, any valid user code is entered to open the lock. It can be the same user code that initiated the time delay, or it can be any other valid user code for the lock. The time delay override feature does not work when the lock is used in supervisor/user mode. If a TDO code is programmed into the lock when it is placed in supervisor/user mode, the TDO code simply ceases to function.
the opening window
An important part of the time delay feature is the opening window. This is the limited period of time immediately following the time delay period during which a valid code (or codes) can be entered to open the lock. If the opening window is allowed to expire after a time delay has elapsed, the lock cannot be opened without initiating the time delay (by entering a valid lock code) all over again. In other words, if you don’t take advantage of the opportunity the opening window provides for you to open the lock, you must start all over again.
The factory default setting for the opening window is two minutes. You can easily change this to expand the window up to nine minutes, in single minute increments. The process is:
Press SG* (___) # 8 * (___) # (___) #
Only the lock’s master code can be used to alter the opening window period. If the lock is using a time delay, the opening window can only be altered during the opening window. If you are programming a lock from scratch and you know you will be changing the opening window value, it’s easiest to do it before you program the time delay period.
Whenever a safe is secured with a time delay device, a sign should be posted on the door of the container to indicate the presence of the device. Suggested wording is:
“ THIS EQUIPMENT IS PROTECTED AGAINST HOLD UP AND ROBBERY BY TIME DELAY LOCK.”
This information should be clearly posted in every language which is prevalent in the area where the safe is located.
A self-adhesive label is available from Sargent & Greenleaf distributors or your local safe and lock retailer. The S&G part number for the label is 0000-636-152000. This label is available in English only.
6123 Quick reference guide
The following two pages comprise the 6123 Quick Reference Guide. It contains the programming sequences we’ve already covered, and presents them in a form that makes it easy to find and use the particular feature you need to implement.
existing master code new opening window period in minutes (1 - 9)
(7 4) new opening window period in minutes (1 - 9)
20 © Copyright 2011, Sargent & Greenleaf, Inc.
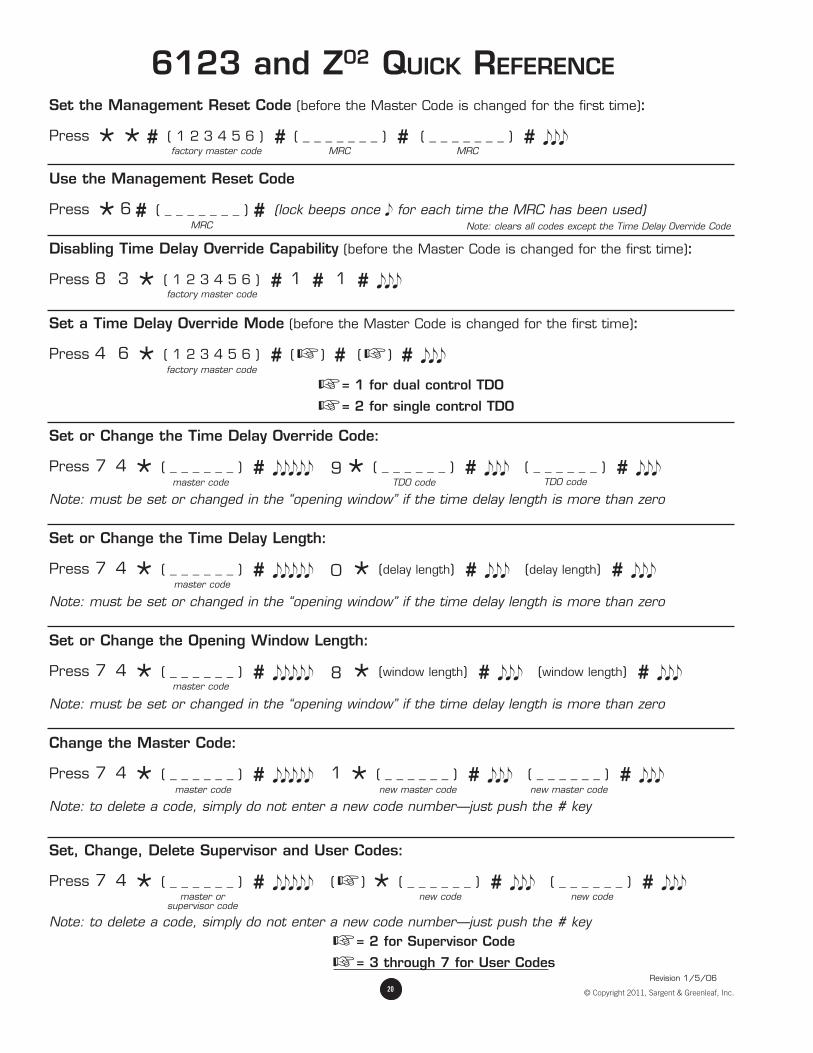
Set the Management Reset Code (before the Master Code is changed for the first time):
Press * *# ( 1 2 3 4 5 6 ) # ( _ _ _ _ _ _ _ ) # ( _ _ _ _ _ _ _ ) #
Use the Management Reset Code
Press * 6 # ( _ _ _ _ _ _ _ ) # (lock beeps once for each time the MRC has been used)
Set or Change the Time Delay Override Code:
Press 7 4 * ( _ _ _ _ _ _ ) # 9* ( _ _ _ _ _ _ ) # ( _ _ _ _ _ _ ) #
Note: must be set or changed in the “opening window” if the time delay length is more than zero
Set or Change the Time Delay Length:
Press 7 4 * ( _ _ _ _ _ _ ) # 0 * (delay length) # (delay length) #
Note: must be set or changed in the “opening window” if the time delay length is more than zero
Set or Change the Opening Window Length:
Press 7 4 * ( _ _ _ _ _ _ ) # 8 * (window length) # (window length) #
Note: must be set or changed in the “opening window” if the time delay length is more than zero
Change the Master Code:
Press 7 4 * ( _ _ _ _ _ _ ) # 1 * ( _ _ _ _ _ _ ) # ( _ _ _ _ _ _ ) #
Note: to delete a code, simply do not enter a new code number—just push the # key
Set, Change, Delete Supervisor and User Codes:
Press 7 4 * ( _ _ _ _ _ _ ) # (☞ ) * ( _ _ _ _ _ _ ) # ( _ _ _ _ _ _ ) #
Note: to delete a code, simply do not enter a new code number—just push the # key
☞= 2 for Supervisor Code
☞= 3 through 7 for User Codes
6123 and Z02 Quick RefeRence
factory master code MRC MRC
MRC
Set a Time Delay Override Mode (before the Master Code is changed for the first time):
Press 4 6 * ( 1 2 3 4 5 6 ) # (☞ ) # (☞ ) #
☞= 1 for dual control TDO
☞= 2 for single control TDO
factory master code
Disabling Time Delay Override Capability (before the Master Code is changed for the first time):
Press 8 3 * ( 1 2 3 4 5 6 ) # 1 # 1 # factory master code
master code TDO code TDO code
master code
master code
master orsupervisor code
new code new code
master code new master code new master code
Note: clears all codes except the Time Delay Override Code
Revision 1/5/06

21© Copyright 2011, Sargent & Greenleaf, Inc.
Setting the Access Mode:
Press 3 2 * ( _ _ _ _ _ _ ) # (☞ ) # (☞ ) #
☞= 0 for Single User access
☞= 1 for Dual User access
☞= 2 for Supervisor/Subordinate access Notes: 1time delay override does not work in S/S mode 2a supervisor code must be set before changing to S/S mode
User Changes His Own Code:
Press 3 3 * ( _ _ _ _ _ _ ) # ( _ _ _ _ _ _ ) # ( _ _ _ _ _ _ ) #
Note: users cannot delete their own codes
current user code
new user code new user code
master code
Notes:
• The Supervisor code cannot set, change, or delete any codes in Dual Control mode.
• Time Delay Override (TDO) is not available in Supervisor/Subordinate mode.
Recovering a 6123 with Unknown Programming:
You will need the Management Reset Code (MRC) for the lock.
1. Make sure there are good batteries in the keypad.
2. The lock cable must be plugged into the keypad.
3. DO NOT PRESS ANY BUTTONS FOR AT LEAST 15 MINUTES!
4. Press * 6 # ( _ _ _ _ _ _ _ ) # (lock beeps once for each time the MRC has been used)
5. Press 3 2 * 1 2 3 4 5 6 # 0 # 0 #
The lock should now be in Single User Mode, and the Master Code is 1 2 3 4 5 6 .
Repeat steps 1 through 5 if necessary.
To make sure a Time Delay Override Code is not retained in the lock:
Press 7 4 * 1 2 3 4 5 6 # 9* # #
MRC
6123 and Z02 Quick RefeRence

22 © Copyright 2011, Sargent & Greenleaf, Inc.
low bAttery condition
These locks use two 9-volt alkaline batteries when equipped with the standard keypad. We recommend Duracell® brand. If the batteries in your lock need to be replaced, twenty consecutive beeps will be heard after the last number of the code and # have been pressed. The batteries must be replaced before the lock can open.
Note: A low battery simulator is built into the 6120 and 6123 so that you can familiarize yourself with how the lock sounds under a low battery condition. To activate the low battery simulator, depress the * key for approximately three seconds, until the lock emits three chirps. Immediately enter your code. Each time you press a key, the chirp will sound distinctly different than it does during normal operation. Approximately two seconds after you enter the code and open the lock, it will revert to normal operation.
bAttery replAcement procedure
The lock will NOT forget your code(s) during battery change. Codes are stored in non-volatile memory, which will retain data for extended periods of time (about ten years) without power.
Step 1 —Remove the keypad from its mounting base by pulling the bottom of the keypad housing away from the base. Grip the keypad housing as shown in the photograph for best results. Support the keypad housing so that the wires which are attached to its circuit board are not pulled or stressed. do not let the keypAd hAng from its wires.
Battery Changing InstructionsModels 6120 and 6123 Using a Two-Battery Keypad
Step 2—Turn the keypad over and remove both batteries. This is best done by grasping the bottom of a battery and pulling it gently away from the keypad circuit board. Do not use any type of tool to pry a battery from its holder.
Step 3—Install new batteries by pushing them directly into the battery connectors attached to the keypad circuit board. It’s important to support the connectors so they will not become bent during battery insertion. The connectors are designed to make it very difficult to install a battery incorrectly. Pay close attention to battery polarity so as not to damage a connector by forcing a battery into it backwards.
Step 4—Hold the keypad housing close to the mounting base while you coil excess wire inside the housing. Position the wire away from the spring clips that hold the keypad housing to the mounting base.

23© Copyright 2011, Sargent & Greenleaf, Inc.
Battery Changing InstructionsModels 6120 and 6123 Using a Two-Battery Keypad
Step 5—Align the spring clips with the receptacles in the base. Using steady pressure, push the keypad housing back onto its mounting base. Don’t allow any wire(s) to be damaged by contact with the spring clips. The keypad housing will snap into place on the base.
Step 6—Check the master code and all user codes at least three times with the safe door open. Close the safe door only after the lock has been thoroughly checked to make sure it’s operating properly.
Note: The 6120 and 6123 will operate with just one 9-volt alkaline battery attached to either connector of the standard, two-battery keypad. This is only recommended under emergency conditions when a second replacement battery is not available. Using a single battery will not harm the lock in any way.
24 © Copyright 2011, Sargent & Greenleaf, Inc.
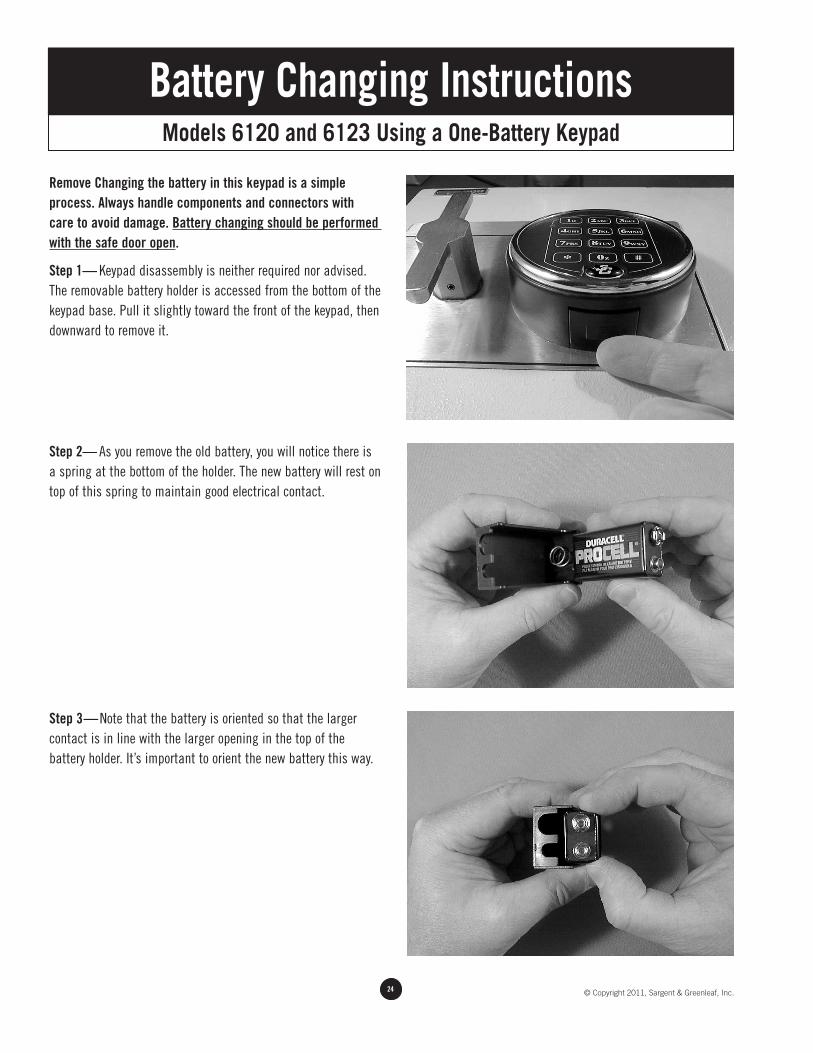
Remove Changing the battery in this keypad is a simple process. Always handle components and connectors with care to avoid damage. Battery changing should be performed with the safe door open.
Step 1 — Keypad disassembly is neither required nor advised. The removable battery holder is accessed from the bottom of the keypad base. Pull it slightly toward the front of the keypad, then downward to remove it.
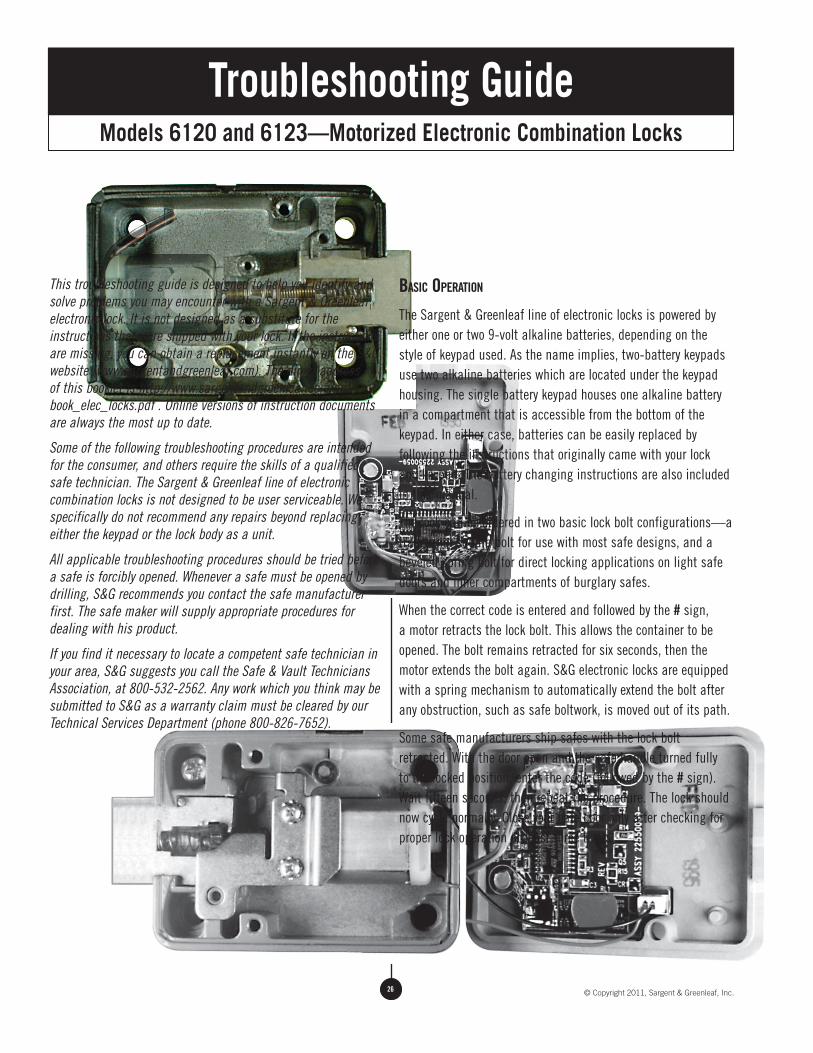
Step 2— As you remove the old battery, you will notice there is a spring at the bottom of the holder. The new battery will rest on top of this spring to maintain good electrical contact.
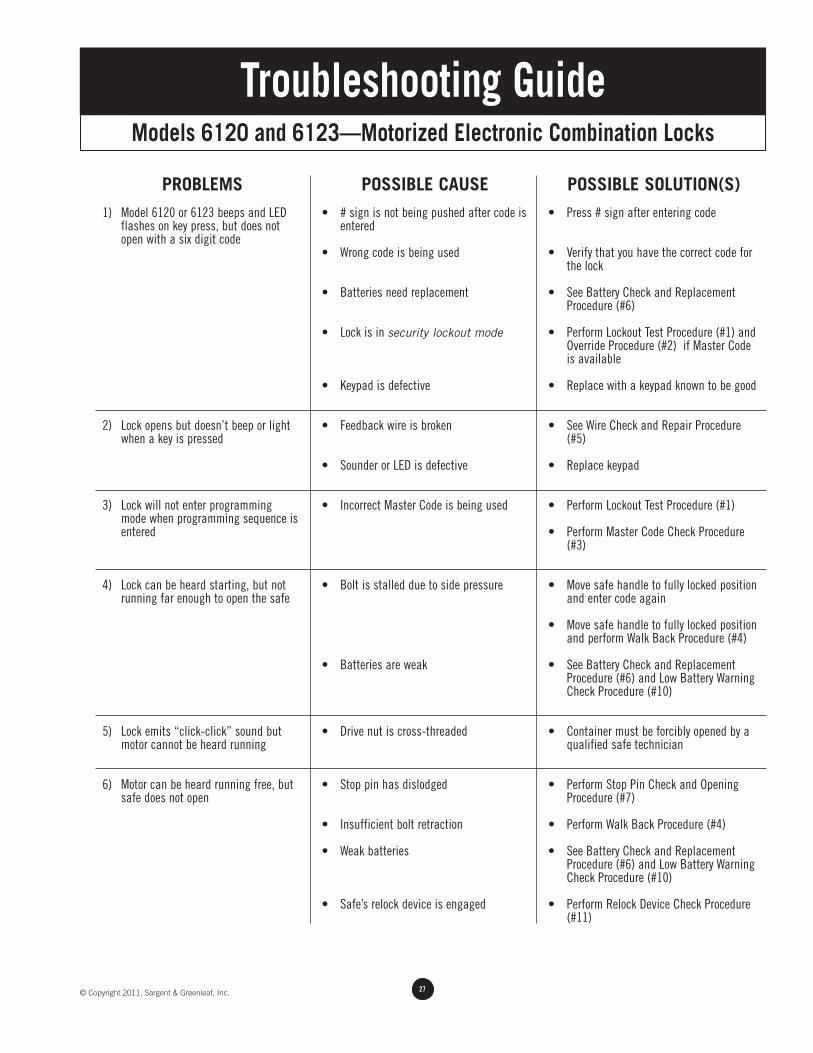
Step 3—Note that the battery is oriented so that the larger contact is in line with the larger opening in the top of the battery holder. It’s important to orient the new battery this way.
Battery Changing InstructionsModels 6120 and 6123 Using a One-Battery Keypad

25© Copyright 2011, Sargent & Greenleaf, Inc.
Step 4 —With the new battery in the holder, slide the holder into the base of the keypad until it clicks into place. If your lock does not operate properly, don’t press any buttons for five minutes, then try it again.
Battery Changing InstructionsModels 6120 and 6123 Using a One-Battery Keypad
26 © Copyright 2011, Sargent & Greenleaf, Inc.
This troubleshooting guide is designed to help you identify and solve problems you may encounter with a Sargent & Greenleaf electronic lock. It is not designed as a substitute for the instructions that were shipped with your lock. If the instructions are missing, you can obtain a replacement instantly on the S&G website (www.sargentandgreenleaf.com). The direct address of this booklet is http://www.sargentandgreenleaf.com/pdf/book_elec_locks.pdf . Online versions of instruction documents are always the most up to date.
Some of the following troubleshooting procedures are intended for the consumer, and others require the skills of a qualified safe technician. The Sargent & Greenleaf line of electronic combination locks is not designed to be user serviceable. We specifically do not recommend any repairs beyond replacing either the keypad or the lock body as a unit.
All applicable troubleshooting procedures should be tried before a safe is forcibly opened. Whenever a safe must be opened by drilling, S&G recommends you contact the safe manufacturer first. The safe maker will supply appropriate procedures for dealing with his product.
If you find it necessary to locate a competent safe technician in your area, S&G suggests you call the Safe & Vault Technicians Association, at 800-532-2562. Any work which you think may be submitted to S&G as a warranty claim must be cleared by our Technical Services Department (phone 800-826-7652).
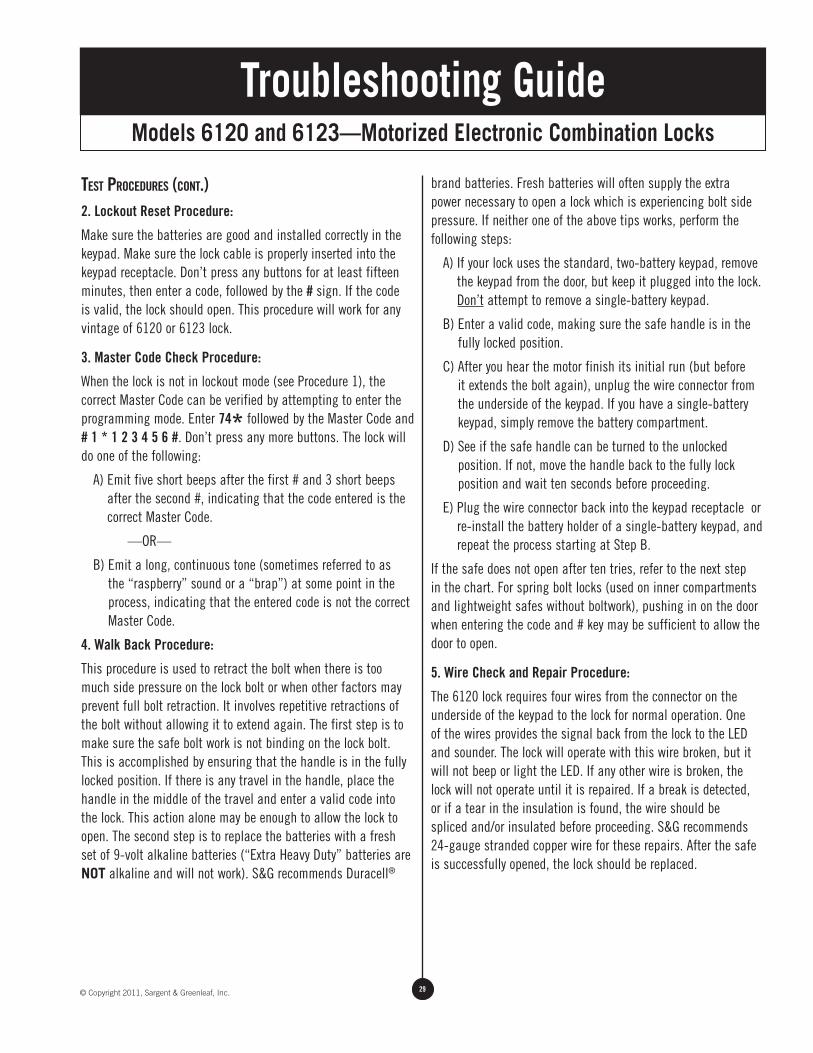
bAsic operAtion
The Sargent & Greenleaf line of electronic locks is powered by either one or two 9-volt alkaline batteries, depending on the style of keypad used. As the name implies, two-battery keypads use two alkaline batteries which are located under the keypad housing. The single battery keypad houses one alkaline battery in a compartment that is accessible from the bottom of the keypad. In either case, batteries can be easily replaced by following the instructions that originally came with your lock and keypad. The battery changing instructions are also included in this manual.
The lock can be ordered in two basic lock bolt configurations—a traditional square bolt for use with most safe designs, and a beveled spring bolt for direct locking applications on light safe doors and inner compartments of burglary safes.
When the correct code is entered and followed by the # sign, a motor retracts the lock bolt. This allows the container to be opened. The bolt remains retracted for six seconds, then the motor extends the bolt again. S&G electronic locks are equipped with a spring mechanism to automatically extend the bolt after any obstruction, such as safe boltwork, is moved out of its path.
Some safe manufacturers ship safes with the lock bolt retracted. With the door open and the safe handle turned fully to the locked position, enter the code (followed by the # sign). Wait fifteen seconds, then repeat the procedure. The lock should now cycle normally. Close your safe door only after checking for proper lock operation at least three times.
Troubleshooting GuideModels 6120 and 6123—Motorized Electronic Combination Locks
27© Copyright 2011, Sargent & Greenleaf, Inc.
PROBLEMS1) Model 6120 or 6123 beeps and LED
flashes on key press, but does not open with a six digit code
2) Lock opens but doesn’t beep or light when a key is pressed
3) Lock will not enter programming mode when programming sequence is entered
4) Lock can be heard starting, but not running far enough to open the safe
5) Lock emits “click-click” sound but motor cannot be heard running
6) Motor can be heard running free, but safe does not open
POSSIBLE CAUSE• # sign is not being pushed after code is
entered
• Wrong code is being used
• Batteries need replacement
• Lock is in security lockout mode
• Keypad is defective
• Feedback wire is broken
• Sounder or LED is defective
• Incorrect Master Code is being used
• Bolt is stalled due to side pressure
• Batteries are weak
• Drive nut is cross-threaded
• Stop pin has dislodged
• Insufficient bolt retraction
• Weak batteries
• Safe’s relock device is engaged
POSSIBLE SOLUTION(S)• Press # sign after entering code
• Verify that you have the correct code for the lock
• See Battery Check and Replacement Procedure (#6)
• Perform Lockout Test Procedure (#1) and Override Procedure (#2) if Master Code is available
• Replace with a keypad known to be good
• See Wire Check and Repair Procedure (#5)
• Replace keypad
• Perform Lockout Test Procedure (#1)
• Perform Master Code Check Procedure (#3)
• Move safe handle to fully locked position and enter code again
• Move safe handle to fully locked position and perform Walk Back Procedure (#4)
• See Battery Check and Replacement Procedure (#6) and Low Battery Warning Check Procedure (#10)
• Container must be forcibly opened by a qualified safe technician
• Perform Stop Pin Check and Opening Procedure (#7)
• Perform Walk Back Procedure (#4)
• See Battery Check and Replacement Procedure (#6) and Low Battery Warning Check Procedure (#10)
• Perform Relock Device Check Procedure (#11)
Troubleshooting GuideModels 6120 and 6123—Motorized Electronic Combination Locks

28 © Copyright 2011, Sargent & Greenleaf, Inc.
PROBLEMS7) Lock opens intermittently when using
valid codes
8) Lock beeps three times when code is entered, but doesn’t open
9) Unable to delete time delay
11) After entering the code for a spring bolt lock, the motor starts, but the safe door cannot be opened
12) Lock motor runs continuously after a battery change, and the lock stays locked
13) Lock opens okay, but bolt will not re-extend far enough to lock safe
POSSIBLE CAUSE• Connection of wires to back
of keypad is loose
• Keypad is bad
• Lock is in time delay mode
• Time delay can only be deleted during the opening window
• You are using a code other than the Master Code
• Bolt of the lock is binding against the door frame or door strike
• The logic circuit did not reset properly when power was restored to the logic circuits
• Batteries are weak
POSSIBLE SOLUTION(S)• Perform Keypad Connector Check (#8)
• Replace with new keypad
• Wait for time delay to expire, then delete time delay—see lock operating instructions or consult toll free help line
• Wait for opening window before attempting to delete time delay—see lock operating instructions or consult toll free help line
• The Master Code must be used to delete the time delay. Perform Master Code Check Procedure (#3)—see lock operating instructions or consult toll free help line
• Push in on the door while entering the code; remove the source of the binding after the door is open
• Perform Walk Back Procedure (#4)
• Unplug the wire connector from the back of the keypad, leave it unplugged for at least 30 seconds, then plug it back into the receptacle on the back of the keypad. The processor should reset properly
• See Battery Check and Replacement Procedure (#6)
Troubleshooting GuideModels 6120 and 6123—Motorized Electronic Combination Locks
test procedures
1. Lockout Mode Test Procedure:
The S&G 6120 lock has a wrong code lockout feature that prevents the lock from operating for a period of time after four consecutive incorrect code entries. Locks produced before mid 1997 have a fifteen minute lockout period which can be overridden by entering the master code twice. Locks made after mid 1997 have a five minute lockout period which cannot be overridden. The purpose of the lockout period is to prevent tampering. During this period, the lock will beep and the LED will flash each time a key is pressed, but the lock will emit an error tone (long “brap”) whenever the # key is pressed.
29© Copyright 2011, Sargent & Greenleaf, Inc.
test procedures (cont.)2. Lockout Reset Procedure:
Make sure the batteries are good and installed correctly in the keypad. Make sure the lock cable is properly inserted into the keypad receptacle. Don’t press any buttons for at least fifteen minutes, then enter a code, followed by the # sign. If the code is valid, the lock should open. This procedure will work for any vintage of 6120 or 6123 lock.
3. Master Code Check Procedure:
When the lock is not in lockout mode (see Procedure 1), the correct Master Code can be verified by attempting to enter the programming mode. Enter 74* followed by the Master Code and # 1 * 1 2 3 4 5 6 #. Don’t press any more buttons. The lock will do one of the following:
A) Emit five short beeps after the first # and 3 short beeps after the second #, indicating that the code entered is the correct Master Code.
—OR—
B) Emit a long, continuous tone (sometimes referred to as the “raspberry” sound or a “brap”) at some point in the process, indicating that the entered code is not the correct Master Code.
4. Walk Back Procedure:
This procedure is used to retract the bolt when there is too much side pressure on the lock bolt or when other factors may prevent full bolt retraction. It involves repetitive retractions of the bolt without allowing it to extend again. The first step is to make sure the safe bolt work is not binding on the lock bolt. This is accomplished by ensuring that the handle is in the fully locked position. If there is any travel in the handle, place the handle in the middle of the travel and enter a valid code into the lock. This action alone may be enough to allow the lock to open. The second step is to replace the batteries with a fresh set of 9-volt alkaline batteries (“Extra Heavy Duty” batteries are NOT alkaline and will not work). S&G recommends Duracell®
brand batteries. Fresh batteries will often supply the extra power necessary to open a lock which is experiencing bolt side pressure. If neither one of the above tips works, perform the following steps:
A) If your lock uses the standard, two-battery keypad, remove the keypad from the door, but keep it plugged into the lock. Don’t attempt to remove a single-battery keypad.
B) Enter a valid code, making sure the safe handle is in the fully locked position.
C) After you hear the motor finish its initial run (but before it extends the bolt again), unplug the wire connector from the underside of the keypad. If you have a single-battery keypad, simply remove the battery compartment.
D) See if the safe handle can be turned to the unlocked position. If not, move the handle back to the fully lock position and wait ten seconds before proceeding.
E) Plug the wire connector back into the keypad receptacle or re-install the battery holder of a single-battery keypad, and repeat the process starting at Step B.
If the safe does not open after ten tries, refer to the next step in the chart. For spring bolt locks (used on inner compartments and lightweight safes without boltwork), pushing in on the door when entering the code and # key may be sufficient to allow the door to open.
5. Wire Check and Repair Procedure:
The 6120 lock requires four wires from the connector on the underside of the keypad to the lock for normal operation. One of the wires provides the signal back from the lock to the LED and sounder. The lock will operate with this wire broken, but it will not beep or light the LED. If any other wire is broken, the lock will not operate until it is repaired. If a break is detected, or if a tear in the insulation is found, the wire should be spliced and/or insulated before proceeding. S&G recommends 24-gauge stranded copper wire for these repairs. After the safe is successfully opened, the lock should be replaced.
Troubleshooting GuideModels 6120 and 6123—Motorized Electronic Combination Locks
30 © Copyright 2011, Sargent & Greenleaf, Inc.
6. Battery Check Procedure: (voltmeter that can measure 9 v.d.c is required)
Make sure the batteries being used with the lock are marked as alkaline. “Extra Heavy Duty” batteries are NOT alkaline. Use a voltmeter to check the voltage level of each battery. Each one should indicate at least 7.75 volts. If either battery is below this voltage, replace both with fresh batteries. Fresh batteries will indicate voltage levels of 9.2 volts or greater.
7. Stop Pin Check and Opening Procedure:
Check: The stop pin is the pin which holds the lock bolt in the lock. On a few early models it could dislodge and prevent the drive mechanism from engaging. The motor can be heard running, but the lock bolt does not retract. To verify this problem, make sure the safe boltwork is not binding the lock bolt (see the information in Step 4). Enter a valid code and listen to the sound the motor makes. If it makes no sound at all, the problem is not a dislodged stop pin. If the motor seems to run normally, wait until it goes through its retraction and extension cycle (about 6 seconds). Then enter a valid code while pulling the safe handle toward the unlocked position. If the motor sounds the same as it did during the previous cycle (free running), a dislodged stop pin is the most likely problem.
Opening: If the safe can be moved, the most successful method is to orient the safe so the lock is in a vertical-up position (with the lock bolt pointing up). Gravity may help the drive mechanism engage long enough to unlock the safe. The lock may need to be operated two or three times with the safe in this position. The handle should be tried after each attempt. If this technique is unsuccessful, drilling is the remaining option. Contact the safe manufacturer for recommendations.
8. Keypad Connector Check:
Note: This technique is for standard, two-battery keypads only.
If the lock works intermittently, check for loose wires at the keypad connector (underside of the keypad). It is a four-wire
connection. Inspect each wire while pushing it and attempting to gently rotate the wire where it enters the connector. If any motion is noted, try pushing in on the wire to attempt to tighten it. Operate the lock with a valid code. If the looseness is still present, S&G recommends replacing the lock.
10. Low Battery Warning Check Procedure:
Your lock is equipped with a low battery warning feature that changes the pitch of the sounder when the batteries need to be replaced. It also incorporates a low battery tester and warning demonstrator that simulates the low battery warning signal for one lock cycle. To operate the demonstrator, press and hold the * key until three beeps are heard. Now enter a valid code while listening to the sounder. If the sounder has changed pitch, the batteries are okay (although it is always a good idea to check them with a voltmeter). If the sounder does not change pitch, the lock was already in low battery mode when the demonstrator was engaged, and the batteries should be changed before any further troubleshooting is attempted.
11. Safe Relock Device Engaged Check Procedure:
It is possible for the safe’s relock device(s) to activate during shipment. If the safe has recently been serviced or handled roughly during shipment, the relock device could be engaged. Use the following procedure to verify this.
A) With the lock in the locked condition, note the amount of motion in the safe handle
B) Locate the safe handle in the middle of its travel range, and operate the lock with a valid code
C) As soon as the lock bolt retracts, again note the range of motion in the safe handle
If the handle moves farther when the lock bolt is retracted, but the safe does not open, a relock device is probably the cause. The service of a trained and experienced safe technician should be employed. Contact the safe manufacturer for recommendations.
The Safe & Vault Technicians Association, based in Dallas, Texas, can refer you to a safe technician in your area. The association’s number is (214) 827-7233.
Troubleshooting GuideModels 6120 and 6123—Motorized Electronic Combination Locks

31© Copyright 2011, Sargent & Greenleaf, Inc.
Use this checklist to ensure you have covered all aspects of 6120 troubleshooting before resorting to forced entry of a container. This checklist should be used in conjunction with S&G’s 6120 Troubleshooting Guide (document no. 630-325).
Have batteries been replaced with fresh, 9-volt, alkaline (preferably Duracell®) batteries?
Have you waited at least 15 minutes (without pressing any buttons) to time out a lockout ?
Is # being pressed after the code is entered?
Do you get a beep and a light whenever a key is pressed?
Has the Master Code been verified by attempting to change the Master Code?
Have you been able to successfully use the Management Reset Code?
Have you checked for free play in the safe door and handle to relieve any possible side pressure on the lock bolt?
Can you hear the motor run after an operating code is entered?
Can you hear the motor relay click after an operating code is entered?
Is the lock using a time delay?
Can you remove the time delay by waiting until the start of the opening window, then entering 7 4 * (master code) (wait for 5 chirps) 0 * 0 # (wait for 3 chirps) 0 # (3 chirps)?
Have you checked to make sure the wire connector that is attached to the back of the keypad is making a good connection with its receptacle?
Have you inspected the lock cable for breaks, kinks, or scraped insulation?
Have you replaced the keypad with one known to be good and then entered an operating code?
Have you checked to ensure the safe’s relock device is not activated?
Have you disconnected the batteries for one minute, then reconnected and checked the lock?
6120/6123 Troubleshooting ChecklistModels 6120 and 6123—Motorized Electronic Combination Locks
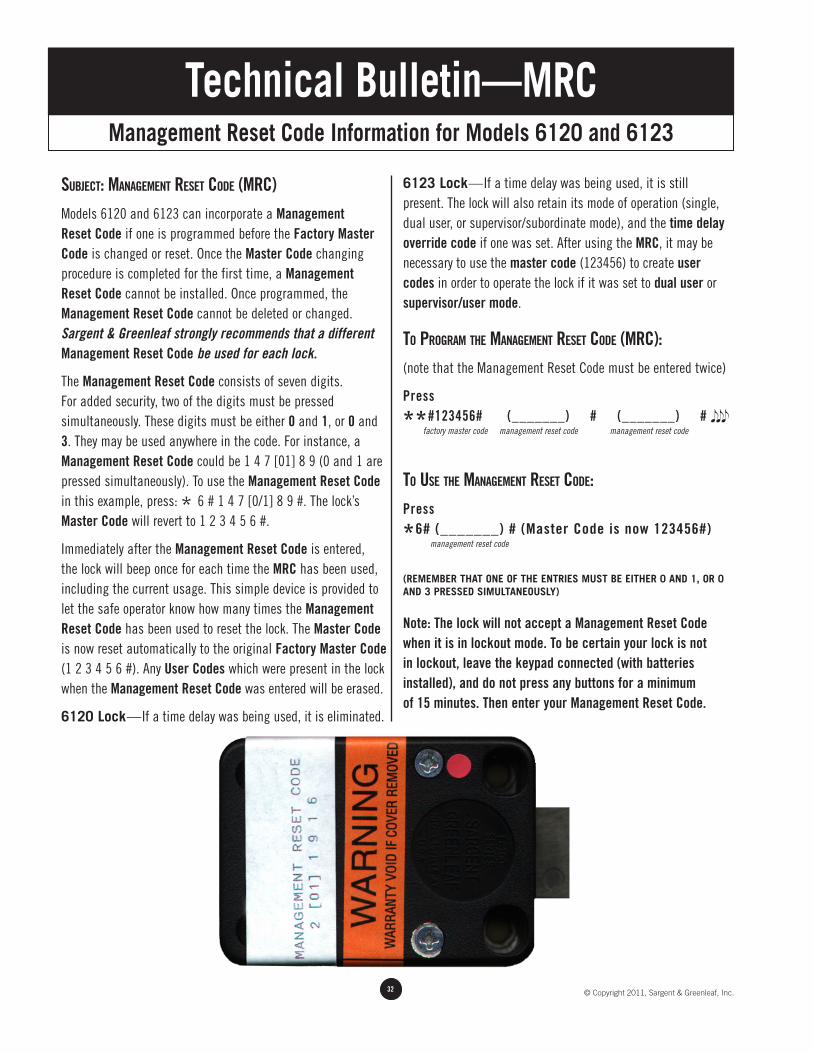
32 © Copyright 2011, Sargent & Greenleaf, Inc.
subject: mAnAgement reset code (mrc)Models 6120 and 6123 can incorporate a Management Reset Code if one is programmed before the Factory Master Code is changed or reset. Once the Master Code changing procedure is completed for the first time, a Management Reset Code cannot be installed. Once programmed, the Management Reset Code cannot be deleted or changed. Sargent & Greenleaf strongly recommends that a different Management Reset Code be used for each lock.
The Management Reset Code consists of seven digits. For added security, two of the digits must be pressed simultaneously. These digits must be either 0 and 1, or 0 and 3. They may be used anywhere in the code. For instance, a Management Reset Code could be 1 4 7 [01] 8 9 (0 and 1 are pressed simultaneously). To use the Management Reset Code in this example, press: * 6 # 1 4 7 [0/1] 8 9 #. The lock’s Master Code will revert to 1 2 3 4 5 6 #.
Immediately after the Management Reset Code is entered, the lock will beep once for each time the MRC has been used, including the current usage. This simple device is provided to let the safe operator know how many times the Management Reset Code has been used to reset the lock. The Master Code is now reset automatically to the original Factory Master Code (1 2 3 4 5 6 #). Any User Codes which were present in the lock when the Management Reset Code was entered will be erased.
6120 Lock—If a time delay was being used, it is eliminated.
6123 Lock—If a time delay was being used, it is still present. The lock will also retain its mode of operation (single, dual user, or supervisor/subordinate mode), and the time delay override code if one was set. After using the MRC, it may be necessary to use the master code (123456) to create user codes in order to operate the lock if it was set to dual user or supervisor/user mode.
to progrAm the mAnAgement reset code (mrc):(note that the Management Reset Code must be entered twice)
Press
**#123456# (_______) # (_______) #
to use the mAnAgement reset code:Press
*6# (_______) # (Master Code is now 123456#)
(REMEMBER THAT ONE OF THE ENTRIES MUST BE EITHER 0 AND 1, OR 0 AND 3 PRESSED SIMULTANEOUSLY)
Note: The lock will not accept a Management Reset Code when it is in lockout mode. To be certain your lock is not in lockout, leave the keypad connected (with batteries installed), and do not press any buttons for a minimum of 15 minutes. Then enter your Management Reset Code.
factory master code management reset code management reset code
management reset code
Technical Bulletin—MRCManagement Reset Code Information for Models 6120 and 6123
33© Copyright 2011, Sargent & Greenleaf, Inc.
What happens if the batteries go dead? Are the codes lost? How long will the electronics remember the codes?
Codes will be retained in the lock’s electronic processor for up to 10 years, even if batteries are removed or go dead. Batteries are easily replaced by removing the keypad housing.
What is the battery life in S&G’s 6120 and 6123?
During S&G accelerated laboratory testing, which is more demanding on batteries than daily normal use, we routinely exceeded 8,000 opening and closing cycles using Duracell® 9-volt alkaline batteries.
What happens if carbon batteries are used rather than the recommended alkaline batteries?
Carbon batteries do not allow as much current draw as alkaline batteries, and even new carbon batteries will not retract the bolt sufficiently for frequent openings. So, be sure to use alkaline batteries, preferably Duracell® brand.
Is there a recommended procedure for installing batteries in standard, two-battery keypads?
Yes – install new batteries by pushing them directly into the battery connectors attached to the keypad circuit board. It is important to support the connectors so they are not bent due to excessive force.
Does the lock function properly in high humidity conditions?
Yes – S&G’s 6120 design protects the electronic boards with a coating that shields the lock’s electronic components from the effects of humidity. Locks have been tested in uncured fire safes for a 90-day period and shipped cross-country without incident, and they continued to function properly.
Has the 6120 been tested for electromagnetic interference (EMI), and static electricity?
Yes—under stun gun attacks, the 6120 fails secure. Locks produced after March, 1995 provide ground paths that allow static electricity to dissipate into the safe body, preventing circuit damage. In the first quarter of 1996, a ground circuit was also added to the keypad.
What is the effect of magnetism on the product?
None—magnetic fields cannot be used to compromise 6120 or 6123 locks as they can with some locks that rely on solenoid locking devices.
What happens when the 6120 or 6123 lock is electronically attacked?
If attacked with low voltage, the lock is not affected. If high voltage is applied, the lock is designed to fail secure (the lock remains closed). Therefore, attempts to defeat the lock will be unsuccessful. After an attack with high voltages, some electrical components could be damaged and may require lock replacement.
What is the maximum distance the lock can be located from the keypad?
The 6120 and 6123 can be supplied with wire lengths up to 10 feet, at an additional cost. Greater lengths are not recommended.
How can the 6120 or 6123 be used to retrofit a mechanical lock that incorporates a wingback cover?
Using longer cover screws, the mechanical lock’s wingback cover can be fastened directly on top of the 6120 or 6123 lock cover. Before doing this, use a file or grinder to remove any projections from the underside of the wingback cover.
Commonly Asked Questions & AnswersModels 6120 and 6123—Motorized Electronic Combination Locks
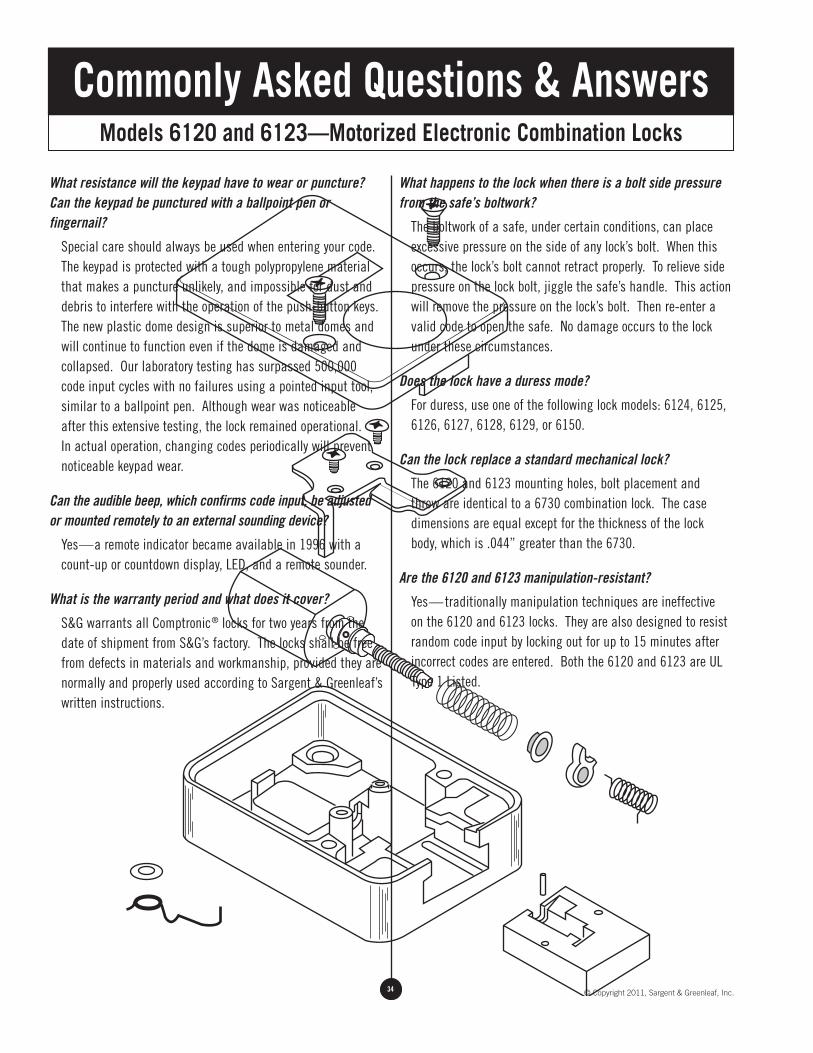
34 © Copyright 2011, Sargent & Greenleaf, Inc.
What resistance will the keypad have to wear or puncture? Can the keypad be punctured with a ballpoint pen or fingernail?
Special care should always be used when entering your code. The keypad is protected with a tough polypropylene material that makes a puncture unlikely, and impossible for dust and debris to interfere with the operation of the push-button keys. The new plastic dome design is superior to metal domes and will continue to function even if the dome is damaged and collapsed. Our laboratory testing has surpassed 500,000 code input cycles with no failures using a pointed input tool, similar to a ballpoint pen. Although wear was noticeable after this extensive testing, the lock remained operational. In actual operation, changing codes periodically will prevent noticeable keypad wear.
Can the audible beep, which confirms code input, be adjusted or mounted remotely to an external sounding device?
Yes—a remote indicator became available in 1996 with a count-up or countdown display, LED, and a remote sounder.
What is the warranty period and what does it cover?
S&G warrants all Comptronic® locks for two years from the date of shipment from S&G’s factory. The locks shall be free from defects in materials and workmanship, provided they are normally and properly used according to Sargent & Greenleaf’s written instructions.
What happens to the lock when there is a bolt side pressure from the safe’s boltwork?
The boltwork of a safe, under certain conditions, can place excessive pressure on the side of any lock’s bolt. When this occurs, the lock’s bolt cannot retract properly. To relieve side pressure on the lock bolt, jiggle the safe’s handle. This action will remove the pressure on the lock’s bolt. Then re-enter a valid code to open the safe. No damage occurs to the lock under these circumstances.
Does the lock have a duress mode?
For duress, use one of the following lock models: 6124, 6125, 6126, 6127, 6128, 6129, or 6150.
Can the lock replace a standard mechanical lock?
The 6120 and 6123 mounting holes, bolt placement and throw are identical to a 6730 combination lock. The case dimensions are equal except for the thickness of the lock body, which is .044” greater than the 6730.
Are the 6120 and 6123 manipulation-resistant?
Yes—traditionally manipulation techniques are ineffective on the 6120 and 6123 locks. They are also designed to resist random code input by locking out for up to 15 minutes after incorrect codes are entered. Both the 6120 and 6123 are UL Type 1 Listed.
Commonly Asked Questions & AnswersModels 6120 and 6123—Motorized Electronic Combination Locks
35© Copyright 2011, Sargent & Greenleaf, Inc.
What are the service or maintenance requirements for the 6120 and 6123?
Due to the design, substantiated by S&G testing, no service is needed, even in harsh environments. S&G laboratory testing consistently exceeded 500,000 opening cycles without problems. Changing the batteries is the only service required.
How should the lock be mounted?
Either lock can be mounted in any position, including the standard positions of right-hand, left-hand, vertical-up, and vertical-down.
Is the 6120/6123 a unique S&G design?
Yes—the electronics, motor, and all other component parts are unique S&G designs. S&G has a license arrangement with another company to assure there are no infringements on existing patents.
How long does the bolt stay retracted after code entry?
The bolt retracts for 6 seconds, allowing sufficient time to turn the safe’s handle.
How far does the lock bolt retract?
Under normal operation, the bolt retracts at least .375”, leaving no more than .109” extended (our installation requirements are .150”, case to boltwork). These are the same dimensions as the standard bolt of the 6730 mechanical combination lock. Lock bolt retraction is dependent on battery condition.
If user codes and time delay are entered through a Master Code, what happens to the user codes and time delay if the Master Code is changed?
Nothing, because a Master Code is only a means to implement the change procedure for user codes or time delays. For the 6123, it can also set the mode of lock operation, time delay window duration, and set the time delay override code.
How do I change the Master Code?
Press 74*. Press the six digits of your code, followed by #. Wait for the lock to beep 5 times. Press 1*. Press the six digits of your new code, followed by #. Wait for the lock to beep 3 times. Again press the six digits of your new code, followed by #. The lock will again beep 3 times.
How do I know that the code changed?
If your lock emits a continuous tone for about one second anytime during the code changing procedure, you have made an error. When this happens, the lock ignores your new code and reverts to the old one. For more detailed changing instructions, see the complete version of the operating instructions found earlier in this manual.
What if the master code and user codes are forgotten?
S&G recommends ordering locks with the management reset code (MRC) option. This allows the lock to be reset to the factory master code setting (1,2,3,4,5,6 #).
What happens if someone takes my keypad. Can they determine my code(s):
The keypad is a “dumb” input terminal. Your codes and security information are stored in the lock body, inside the safe. No one can steal your codes by taking the keypad. To operate your lock, simply plug in a new keypad.
If my keypad is taken and the lock cable cut, how can I get in my safe?
A qualified safe technician can temporarily attach a new keypad and cable section and use your code to open the safe. Once the safe is open, the lock body (and attached cable) should be replaced.
Commonly Asked Questions & AnswersModels 6120 and 6123—Motorized Electronic Combination Locks
36 © Copyright 2011, Sargent & Greenleaf, Inc.
Sargent & Greenleaf prides itself on a tradition of quality and innovation which stretches back to 1857. It was then that James Sargent, a bright and inventive young sales agent for Yale & Greenleaf Lock Manufacturers, made the decision to build a lock that would offer security far surpassing that of any device available of the time. The result
of his resolve and genius was Sargent’s Magnetic Bank Lock, the first successful key changeable combination lock. The lock gained almost immediate acceptance from safe manufacturers and the United States Treasury Department, bringing financial stability and paving the way for James Sargent to continue bringing new ideas and products to the security industry.
In 1865, one of Mr. Sargent’s former employers, Halbert Greenleaf, became his equal partner in the firm of Sargent & Greenleaf. A manufacturing facility was built in Rochester, New York, and the company remained in that city until 1975. James Sargent was never one to rest on the success of past achievements. In 1868, he invented Sargent’s Automatic Lock, bringing refinements to the original Sargent’s Magnetic Bank Lock.
Then, in 1873, using parts from locks and a pair of eight-day kitchen clocks, Mr. Sargent created the first time lock to be installed on a bank vault door. He personally connected the time lock to the vault door of the First National Bank in Morrison, Illinois, on May 26, 1874. This lock continued to secure the vault for nearly forty years until the bank was remodeled and a larger vault was built.
In 1880, Mr. Sargent connected one of his combination locks to a delay timer, creating the first Time Combination Lock, a lock that would remain locked for a predetermined amount of time after the combination was dialed. This was the forerunner of today’s Sargent & Greenleaf Timebination.
These inventions are just a sampling of the numerous advancements and innovations in security hardware that can be attributed directly to James Sargent. His tireless efforts and clear vision of what comprises good security were responsible for the success of his young company. These same qualities continue to drive Sargent & Greenleaf today.
Times have changed since the early days in Rochester, New York. Sargent & Greenleaf now occupies 100,000 square feet of manufacturing space and 22,000 square feet of offices in Nicholasville, Kentucky. The company also serves European and other international customers from a facility in Switzerland. Safe manufacturers, independent safe technicians, and locksmiths throughout the United States and the world rely on the quality and value of S&G products.
Today’s Sargent & Greenleaf offers a full line of mechanical and electronic locks for safes, vaults, and safe deposit boxes, as well as other specialty security devices. S&G makes locks that secure safes designed to store sensitive information. In addition, doors that secure special areas where classified information is developed and stored are protected by Sargent & Greenleaf combination-locked deadbolts. Special designs even combine a high degree of security for these rooms while providing easy, one motion exit for the room’s occupants in case of a life threatening emergency.
From combination locks in commercial and government service—from time locks to safe deposit locks—from high security exit devices to special purpose padlocks—Sargent & Greenleaf remains committed to the ideals of its founder, James Sargent. That is to provide security, quality, and value by leading the security industry with innovative products and a thorough understanding of the security needs of our customers.
A Brief History of S>he Sargent & Greenleaf Story—Over a Century of Security


Corporate Headquarters
One Security Drive
Nicholasville, KY 40356
Phone 859.885.9411
FAX 859.885.3063
European Headquarters
9, chemin du Croset
1024 Ecublens
Switzerland
Phone 41 21 694 34 00
FAX 41 21 694 34 09
www.sargentandgreenleaf.com
rev. 3/2/2011
Document 630-673