SAP Leonardo IoT Bridge Configuration and … · Configuration Guide PUBLIC Document Version: 1.0.1...
132
Configuration Guide PUBLIC Document Version: 1.0.1 – 2018-07-09 SAP Leonardo IoT Bridge Configuration and Administration
Transcript of SAP Leonardo IoT Bridge Configuration and … · Configuration Guide PUBLIC Document Version: 1.0.1...
Configuration Guide PUBLIC
Document Version: 1.0.1 – 2018-07-09
SAP Leonardo IoT Bridge Configuration and Administration
Content
1 Document History. . . . . . . . . . . . . . . . . . . . . . . . . . . . . . . . . . . . . . . . . . . . . . . . . . . . . . . . . . . . . . 5
2 Introduction. . . . . . . . . . . . . . . . . . . . . . . . . . . . . . . . . . . . . . . . . . . . . . . . . . . . . . . . . . . . . . . . . . 6
3 Subscription. . . . . . . . . . . . . . . . . . . . . . . . . . . . . . . . . . . . . . . . . . . . . . . . . . . . . . . . . . . . . . . . . . 73.1 Subscribing on SAP Cloud Platform. . . . . . . . . . . . . . . . . . . . . . . . . . . . . . . . . . . . . . . . . . . . . . . . . . .7
4 Configuration. . . . . . . . . . . . . . . . . . . . . . . . . . . . . . . . . . . . . . . . . . . . . . . . . . . . . . . . . . . . . . . . . 94.1 Configuring Scenarios. . . . . . . . . . . . . . . . . . . . . . . . . . . . . . . . . . . . . . . . . . . . . . . . . . . . . . . . . . . . 9
Viewing a Scenario. . . . . . . . . . . . . . . . . . . . . . . . . . . . . . . . . . . . . . . . . . . . . . . . . . . . . . . . . . . . 9Copying an Existing Scenario. . . . . . . . . . . . . . . . . . . . . . . . . . . . . . . . . . . . . . . . . . . . . . . . . . . . 10Creating a Scenario. . . . . . . . . . . . . . . . . . . . . . . . . . . . . . . . . . . . . . . . . . . . . . . . . . . . . . . . . . . 10Editing a Scenario. . . . . . . . . . . . . . . . . . . . . . . . . . . . . . . . . . . . . . . . . . . . . . . . . . . . . . . . . . . . 11Deleting a Scenario. . . . . . . . . . . . . . . . . . . . . . . . . . . . . . . . . . . . . . . . . . . . . . . . . . . . . . . . . . . 11
4.2 Configuring Personas. . . . . . . . . . . . . . . . . . . . . . . . . . . . . . . . . . . . . . . . . . . . . . . . . . . . . . . . . . . . 11Working with Personas. . . . . . . . . . . . . . . . . . . . . . . . . . . . . . . . . . . . . . . . . . . . . . . . . . . . . . . . .12Working with Cards. . . . . . . . . . . . . . . . . . . . . . . . . . . . . . . . . . . . . . . . . . . . . . . . . . . . . . . . . . . 17
4.3 Configuring Resolution Options. . . . . . . . . . . . . . . . . . . . . . . . . . . . . . . . . . . . . . . . . . . . . . . . . . . . .44Creating a Resolution Option. . . . . . . . . . . . . . . . . . . . . . . . . . . . . . . . . . . . . . . . . . . . . . . . . . . . 44Editing a Resolution Option. . . . . . . . . . . . . . . . . . . . . . . . . . . . . . . . . . . . . . . . . . . . . . . . . . . . . 45Deleting a Resolution Option. . . . . . . . . . . . . . . . . . . . . . . . . . . . . . . . . . . . . . . . . . . . . . . . . . . . 46Additional Resolution Support Information. . . . . . . . . . . . . . . . . . . . . . . . . . . . . . . . . . . . . . . . . . 46
4.4 Configuring Notifications. . . . . . . . . . . . . . . . . . . . . . . . . . . . . . . . . . . . . . . . . . . . . . . . . . . . . . . . . 52Creating a Notification Definition. . . . . . . . . . . . . . . . . . . . . . . . . . . . . . . . . . . . . . . . . . . . . . . . . 52Editing a Notification Definition. . . . . . . . . . . . . . . . . . . . . . . . . . . . . . . . . . . . . . . . . . . . . . . . . . 56Deleting a Notification Definition. . . . . . . . . . . . . . . . . . . . . . . . . . . . . . . . . . . . . . . . . . . . . . . . . 56
4.5 Configuring Events. . . . . . . . . . . . . . . . . . . . . . . . . . . . . . . . . . . . . . . . . . . . . . . . . . . . . . . . . . . . . .57Creating an Event. . . . . . . . . . . . . . . . . . . . . . . . . . . . . . . . . . . . . . . . . . . . . . . . . . . . . . . . . . . . 57Editing an Event. . . . . . . . . . . . . . . . . . . . . . . . . . . . . . . . . . . . . . . . . . . . . . . . . . . . . . . . . . . . . 61Deleting an Event. . . . . . . . . . . . . . . . . . . . . . . . . . . . . . . . . . . . . . . . . . . . . . . . . . . . . . . . . . . . 62
4.6 Configuring Processes. . . . . . . . . . . . . . . . . . . . . . . . . . . . . . . . . . . . . . . . . . . . . . . . . . . . . . . . . . . 62Creating a Process Node Type. . . . . . . . . . . . . . . . . . . . . . . . . . . . . . . . . . . . . . . . . . . . . . . . . . . 63Creating a Process Node. . . . . . . . . . . . . . . . . . . . . . . . . . . . . . . . . . . . . . . . . . . . . . . . . . . . . . . 64Timeline Process Node Renderer. . . . . . . . . . . . . . . . . . . . . . . . . . . . . . . . . . . . . . . . . . . . . . . . . 65Associating a Process Node with an Event. . . . . . . . . . . . . . . . . . . . . . . . . . . . . . . . . . . . . . . . . . . 67
4.7 Configuring KPIs. . . . . . . . . . . . . . . . . . . . . . . . . . . . . . . . . . . . . . . . . . . . . . . . . . . . . . . . . . . . . . . 68Creating a KPI. . . . . . . . . . . . . . . . . . . . . . . . . . . . . . . . . . . . . . . . . . . . . . . . . . . . . . . . . . . . . . 69Associating a KPI to an Event. . . . . . . . . . . . . . . . . . . . . . . . . . . . . . . . . . . . . . . . . . . . . . . . . . . . 71
2 P U B L I CSAP Leonardo IoT Bridge Configuration and Administration
Content
Associating a KPI to a Resolution Option. . . . . . . . . . . . . . . . . . . . . . . . . . . . . . . . . . . . . . . . . . . . 724.8 Configuring Services. . . . . . . . . . . . . . . . . . . . . . . . . . . . . . . . . . . . . . . . . . . . . . . . . . . . . . . . . . . . 73
Registering a Service. . . . . . . . . . . . . . . . . . . . . . . . . . . . . . . . . . . . . . . . . . . . . . . . . . . . . . . . . .73Editing a Service. . . . . . . . . . . . . . . . . . . . . . . . . . . . . . . . . . . . . . . . . . . . . . . . . . . . . . . . . . . . . 74Removing a Service. . . . . . . . . . . . . . . . . . . . . . . . . . . . . . . . . . . . . . . . . . . . . . . . . . . . . . . . . . .75
4.9 Configuring Floorplan Settings. . . . . . . . . . . . . . . . . . . . . . . . . . . . . . . . . . . . . . . . . . . . . . . . . . . . . 75General Settings. . . . . . . . . . . . . . . . . . . . . . . . . . . . . . . . . . . . . . . . . . . . . . . . . . . . . . . . . . . . . 75KPI Sensor Mappings. . . . . . . . . . . . . . . . . . . . . . . . . . . . . . . . . . . . . . . . . . . . . . . . . . . . . . . . . 76Space Model. . . . . . . . . . . . . . . . . . . . . . . . . . . . . . . . . . . . . . . . . . . . . . . . . . . . . . . . . . . . . . . 76Configuring Floorplan Navigation. . . . . . . . . . . . . . . . . . . . . . . . . . . . . . . . . . . . . . . . . . . . . . . . . 85
4.10 Configuring Object Detail and List Pages. . . . . . . . . . . . . . . . . . . . . . . . . . . . . . . . . . . . . . . . . . . . . . 884.11 Configuring Translations. . . . . . . . . . . . . . . . . . . . . . . . . . . . . . . . . . . . . . . . . . . . . . . . . . . . . . . . . 90
Defining Translations for a Configuration. . . . . . . . . . . . . . . . . . . . . . . . . . . . . . . . . . . . . . . . . . . . 914.12 Configuring Card Translation. . . . . . . . . . . . . . . . . . . . . . . . . . . . . . . . . . . . . . . . . . . . . . . . . . . . . . . 91
Defining Translations for a Card Configuration. . . . . . . . . . . . . . . . . . . . . . . . . . . . . . . . . . . . . . . . 924.13 Configuring Data Segregation. . . . . . . . . . . . . . . . . . . . . . . . . . . . . . . . . . . . . . . . . . . . . . . . . . . . . . 92
Filtering Back-End Data by Role. . . . . . . . . . . . . . . . . . . . . . . . . . . . . . . . . . . . . . . . . . . . . . . . . . 93Configuring Role-Based Filtering. . . . . . . . . . . . . . . . . . . . . . . . . . . . . . . . . . . . . . . . . . . . . . . . . 94
4.14 Importing and Exporting Scenarios. . . . . . . . . . . . . . . . . . . . . . . . . . . . . . . . . . . . . . . . . . . . . . . . . . 94Exporting a Scenario. . . . . . . . . . . . . . . . . . . . . . . . . . . . . . . . . . . . . . . . . . . . . . . . . . . . . . . . . .94Editing the Export Archive. . . . . . . . . . . . . . . . . . . . . . . . . . . . . . . . . . . . . . . . . . . . . . . . . . . . . . 95Importing a Scenario. . . . . . . . . . . . . . . . . . . . . . . . . . . . . . . . . . . . . . . . . . . . . . . . . . . . . . . . . 96
4.15 Process: Adding a Scenario Tile. . . . . . . . . . . . . . . . . . . . . . . . . . . . . . . . . . . . . . . . . . . . . . . . . . . . 96Create a Scenario (MyScenario). . . . . . . . . . . . . . . . . . . . . . . . . . . . . . . . . . . . . . . . . . . . . . . . . . 97Create a Persona (CustomPersona). . . . . . . . . . . . . . . . . . . . . . . . . . . . . . . . . . . . . . . . . . . . . . . 97Add Cards to the Scenario. . . . . . . . . . . . . . . . . . . . . . . . . . . . . . . . . . . . . . . . . . . . . . . . . . . . . . 98Assign End Users to the CustomPersona. . . . . . . . . . . . . . . . . . . . . . . . . . . . . . . . . . . . . . . . . . . 101
5 Administration. . . . . . . . . . . . . . . . . . . . . . . . . . . . . . . . . . . . . . . . . . . . . . . . . . . . . . . . . . . . . . .1035.1 System Administration. . . . . . . . . . . . . . . . . . . . . . . . . . . . . . . . . . . . . . . . . . . . . . . . . . . . . . . . . . 103
Maintaining Source System Connections. . . . . . . . . . . . . . . . . . . . . . . . . . . . . . . . . . . . . . . . . . .103Maintaining HCI iFlow Configurations for System Connections. . . . . . . . . . . . . . . . . . . . . . . . . . . 104Maintaining Application Navigation Targets. . . . . . . . . . . . . . . . . . . . . . . . . . . . . . . . . . . . . . . . . 105
5.2 User Administration. . . . . . . . . . . . . . . . . . . . . . . . . . . . . . . . . . . . . . . . . . . . . . . . . . . . . . . . . . . . 107Defining Content Access Rights for Users. . . . . . . . . . . . . . . . . . . . . . . . . . . . . . . . . . . . . . . . . . 107Assigning and Maintaining Roles. . . . . . . . . . . . . . . . . . . . . . . . . . . . . . . . . . . . . . . . . . . . . . . . . 110
5.3 Map Configuration. . . . . . . . . . . . . . . . . . . . . . . . . . . . . . . . . . . . . . . . . . . . . . . . . . . . . . . . . . . . . 114Creating a Map Configuration. . . . . . . . . . . . . . . . . . . . . . . . . . . . . . . . . . . . . . . . . . . . . . . . . . . 114Assigning the Map Configuration to a Card. . . . . . . . . . . . . . . . . . . . . . . . . . . . . . . . . . . . . . . . . . 116Assigning a Map Configuration to a User Context. . . . . . . . . . . . . . . . . . . . . . . . . . . . . . . . . . . . . 117
5.4 Relationship Service. . . . . . . . . . . . . . . . . . . . . . . . . . . . . . . . . . . . . . . . . . . . . . . . . . . . . . . . . . . . 119Viewing Relationship Records. . . . . . . . . . . . . . . . . . . . . . . . . . . . . . . . . . . . . . . . . . . . . . . . . . . 119
SAP Leonardo IoT Bridge Configuration and AdministrationContent P U B L I C 3

5.5 Integration with SAP BUILD. . . . . . . . . . . . . . . . . . . . . . . . . . . . . . . . . . . . . . . . . . . . . . . . . . . . . . . 121Creating a Bridge Scenario in SAP BUILD. . . . . . . . . . . . . . . . . . . . . . . . . . . . . . . . . . . . . . . . . . . 121Publishing an SAP BUILD Prototype to SAP Leonardo IoT Bridge. . . . . . . . . . . . . . . . . . . . . . . . . . 122Importing an SAP BUILD Prototype. . . . . . . . . . . . . . . . . . . . . . . . . . . . . . . . . . . . . . . . . . . . . . . 123Custom Cards in SAP BUILD. . . . . . . . . . . . . . . . . . . . . . . . . . . . . . . . . . . . . . . . . . . . . . . . . . . 124
5.6 Integration with SAP CoPilot. . . . . . . . . . . . . . . . . . . . . . . . . . . . . . . . . . . . . . . . . . . . . . . . . . . . . . 124Configuring a CoPilot Tenant. . . . . . . . . . . . . . . . . . . . . . . . . . . . . . . . . . . . . . . . . . . . . . . . . . . 124
5.7 Customer Decommissioning. . . . . . . . . . . . . . . . . . . . . . . . . . . . . . . . . . . . . . . . . . . . . . . . . . . . . . 129
4 P U B L I CSAP Leonardo IoT Bridge Configuration and Administration
Content
1 Document History
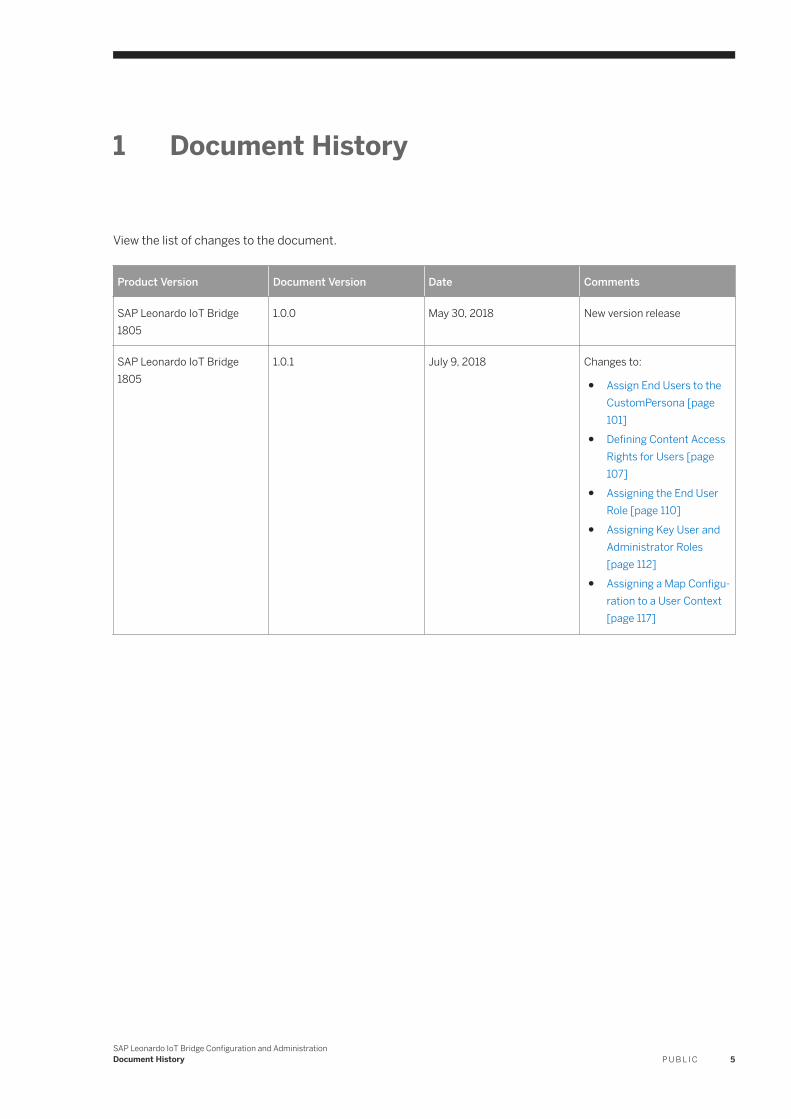
View the list of changes to the document.
Product Version Document Version Date Comments
SAP Leonardo IoT Bridge 1805
1.0.0 May 30, 2018 New version release
SAP Leonardo IoT Bridge 1805
1.0.1 July 9, 2018 Changes to:
● Assign End Users to the CustomPersona [page 101]
● Defining Content Access Rights for Users [page 107]
● Assigning the End User Role [page 110]
● Assigning Key User and Administrator Roles [page 112]
● Assigning a Map Configuration to a User Context [page 117]
SAP Leonardo IoT Bridge Configuration and AdministrationDocument History P U B L I C 5

2 Introduction
6 P U B L I CSAP Leonardo IoT Bridge Configuration and Administration
Introduction
3 Subscription
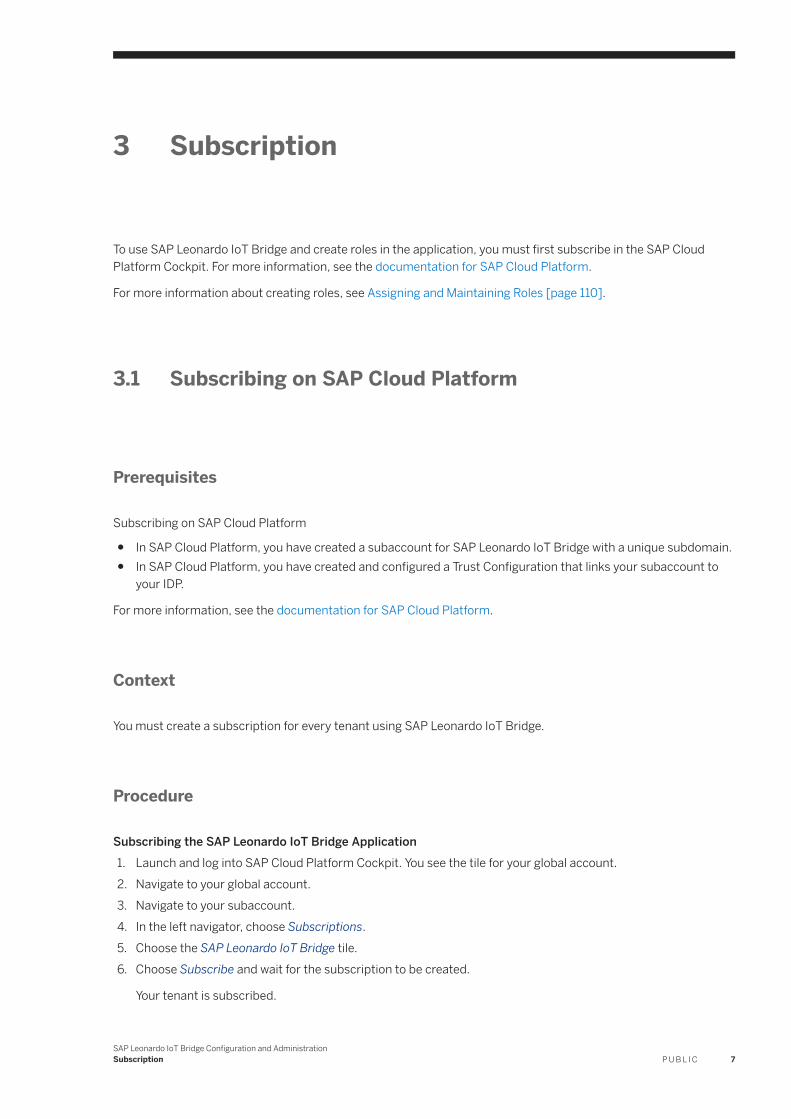
To use SAP Leonardo IoT Bridge and create roles in the application, you must first subscribe in the SAP Cloud Platform Cockpit. For more information, see the documentation for SAP Cloud Platform.
For more information about creating roles, see Assigning and Maintaining Roles [page 110].
3.1 Subscribing on SAP Cloud Platform
Prerequisites
Subscribing on SAP Cloud Platform
● In SAP Cloud Platform, you have created a subaccount for SAP Leonardo IoT Bridge with a unique subdomain.● In SAP Cloud Platform, you have created and configured a Trust Configuration that links your subaccount to
your IDP.
For more information, see the documentation for SAP Cloud Platform.
Context
You must create a subscription for every tenant using SAP Leonardo IoT Bridge.
Procedure
Subscribing the SAP Leonardo IoT Bridge Application1. Launch and log into SAP Cloud Platform Cockpit. You see the tile for your global account.2. Navigate to your global account.3. Navigate to your subaccount.4. In the left navigator, choose Subscriptions.5. Choose the SAP Leonardo IoT Bridge tile.6. Choose Subscribe and wait for the subscription to be created.
Your tenant is subscribed.
SAP Leonardo IoT Bridge Configuration and AdministrationSubscription P U B L I C 7

Subscribing the SAP Leonardo IoT Bridge ServicesCreate a subscription for each tenant to allow external applications to communicate with SAP Leonardo IoT Bridge.7. In the left navigator, choose Overview.8. Choose Enable Cloud Foundry.9. In the Create Cloud Foundry Organization dialog box, enter a unique organization name and choose Create.
Create a Space10. In the left navigator, choose Spaces.11. Choose New Space. This step creates the space where the application and its services are deployed.12. In the New Space dialog box, enter a name for the space and choose Save.
Assign Entitlements13. In your global account, in the left navigator, choose Entitlements.14. Choose Edit.15. Locate Leonardo IoT Bridge Services and assign 1 to the newly created space.
16. Save your changes.Create an Instance17. Navigate to the space and in the left navigator, choose Service Marketplace.18. Choose the Leonardo IoT Bridge Services tile.19. In the left navigator, choose Instances.20.Choose New Instance to create a new instance for the service.21. In the New Instance wizard, do the following:
a. Accept the default values.b. On the last page of the wizard, enter a unique name (such as Bridge Service) for the Instance Name.c. Choose Finish.
The created service appears.Create Service Keys (Client ID and Client Secret)22. Choose the new service to open it.23. In the left navigator, choose Service Keys.24. In the Create Service Key dialog box, enter a name (such as BridgeServiceKeys) and choose Save.
A JSON file is created. The client ID and client secret values are included in this file. These values are required for iFlows to communicate with the SAP Leonardo IoT Bridge application.
Run the Application25. In the left navigator of the SAP Cloud Platform Cockpit, choose Subscriptions.26. In the SAP Leonardo IoT Bridge tile, choose the Go to Application link.
The SAP Leonardo IoT Bridge application is launched.
8 P U B L I CSAP Leonardo IoT Bridge Configuration and Administration
Subscription
4 Configuration
The topics in this section describe how to configure the SAP Leonardo IoT Bridge application for use by end users.
The tasks in this section should be performed by a key user.
4.1 Configuring Scenarios
In SAP Leonardo IoT Bridge, a scenario is a logical group containing a number of personas. By default, the application provides predefined scenarios, which you can customize and copy to meet your specific business needs.
Related Information
Configuring Personas [page 11]
4.1.1 Viewing a Scenario
Procedure
1. On the launchpad, choose the Quick Create and Configure tile.2. Choose Scenarios and Roles.3. On the Scenario Configuration page, select the right arrow for a scenario to open it.
You see the scenario details, including general information and a list of personas.
SAP Leonardo IoT Bridge Configuration and AdministrationConfiguration P U B L I C 9

4.1.2 Copying an Existing Scenario
Context
You can create a new scenario by copying an existing scenario. Copying a scenario also copies all of its personas.
You must be a key user to copy a scenario.
Procedure
1. On the Scenario Configuration page, choose the radio button for a scenario.2. Choose Copy to copy the scenario.3. Choose Edit to edit the scenario name, description, and persona information as needed.4. Save your changes.
4.1.3 Creating a Scenario
Context
You can create a scenario from scratch and add personas as needed.
You must be a key user to create a scenario.
Procedure
1. On the Scenario Configuration page, choose the + icon.2. Enter a name and description for the scenario and choose Save.3. Choose the right arrow for the newly created scenario to open it.4. In the Personas area, create one or more personas for the scenario. For more information, see Creating a
Persona Manually [page 13].
10 P U B L I CSAP Leonardo IoT Bridge Configuration and Administration
Configuration

4.1.4 Editing a Scenario
Procedure
1. On the launchpad, choose the Quick Create and Configure tile.2. Choose Scenarios and Roles.3. On the Scenario Configuration page, select the right arrow for a scenario to open it.4. In the scenario page, choose Edit.5. Make changes to the scenario name, description, and persona information as needed.6. Save your changes.
4.1.5 Deleting a Scenario
Procedure
1. On the launchpad, choose the Quick Create and Configure tile.2. Choose Scenarios and Roles.3. On the Scenario Configuration page, select the right arrow for a scenario to open it.4. Choose Delete.
The scenario is deleted.
4.2 Configuring Personas
A set of personas constitutes a scenario. Personas are assigned to users and determine the following:
● Which cards a user can see.● Which cards a user can create.● Which events and notifications a user can see.
Note that one user can be assigned multiple personas.
SAP Leonardo IoT Bridge Configuration and AdministrationConfiguration P U B L I C 11

Related Information
Configuring Scenarios [page 9]
4.2.1 Working with Personas
4.2.1.1 Viewing a Persona in a Scenario
Procedure
1. On the launchpad, choose the Quick Create and Configure tile.2. Choose Scenarios and Roles.3. On the Scenario Configuration page, select the right arrow for a scenario to open it.4. In the Personas area, do the following:
a. To see the Overview page for a persona, choose the link in the Persona Configuration column.b. To see persona details, select the right arrow for a persona to open it.
You see a list of the cards the persona can see and any events associated with the persona.
4.2.1.2 Creating a Scenario and Persona with Quick Create
Context
You can use the Quick Create feature to create a new scenario and a persona based on an existing scenario and persona.
You must be a key user to use Quick Create.
Procedure
1. On the launchpad, choose the Quick Create and Configuration tile.2. From the lists, select the scenario and the role you want to use for the persona.3. Choose Next.
12 P U B L I CSAP Leonardo IoT Bridge Configuration and Administration
Configuration
4. Enter new names for the scenario and role and choose Let's Go!.5. Use the Card Settings icon to configure the Overview page for the new persona. For more information, see
Working with Cards [page 17].6. After configuring the Overview page, return to the Personas area and select the right arrow for the persona to
open it.7. Choose Edit.8. To edit the list of cards the persona can see, do the following:
a. In the Card Type Whitelist area, choose Add Card Type or Remove Card Type.b. Select cards as needed and choose Add or Remove.
9. To edit the list of events associated with the persona, do the following:a. In the Events area, choose Add Event or Remove Event.b. Select events as needed and choose Add or Remove.
10. To edit the list of services the persona can see and access, do the following:a. In the Events area, choose Add Event or Remove Event.b. Select events as needed and choose Add or Remove.
NoteUsers can only access a service if it has been whitelisted in a persona to which they belong.
11. Save your changes.
4.2.1.3 Creating a Persona Manually
Prerequisites
The UaaUser role is assigned to the key user.
Context
You must be a key user to create a persona.
Procedure
1. On the launchpad, choose the Quick Create and Configuration tile and then choose Scenarios and Roles.2. Select the scenario to which to add the persona.
SAP Leonardo IoT Bridge Configuration and AdministrationConfiguration P U B L I C 13
3. In the toolbar of the Personas area, choose the + icon.4. To create a persona, do the following:
a. Enter a name and description for the persona.b. Select the correct End User group from the User Groups list. This step enables the system to automatically
create a role and a corresponding role collection and then assign the new role collection to the selected user group.
NoteTo display the User Groups list, the UaaUser role must be assigned to the key user.
NoteTo change the user role assigned to a persona, or to assign additional roles to the persona, you must use the Cloud Cockpit in SAP Cloud Platform Cloud Foundry. For more information, see Assigning and Maintaining Roles [page 110].
5. Choose the link in the Persona Configuration column to launch the Overview page for this persona.6. Use the Card Settings icon to configure the Overview page as needed for this persona. For more information,
see Working with Cards [page 17].7. After configuring the Overview page, return to the Personas area and select the right arrow for the persona to
open it.8. Choose Edit.9. To edit the list of cards the persona can see, do the following:
a. In the Card Type Whitelist area, choose Add Card Type or Remove Card Type.b. Select cards as needed and choose Add or Remove.
10. To edit the list of events associated with the persona, do the following:a. In the Events area, choose Add Event or Remove Event.b. Select events as needed and choose Add or Remove.
11. To edit the list of services the persona can see and access, do the following:a. In the Events area, choose Add Event or Remove Event.b. Select events as needed and choose Add or Remove.
NoteUsers can only access a service if it has been whitelisted in a persona to which they belong.
12. Save your changes.
Next Steps
Assign the persona to a user. See Assigning the End User Role [page 110].
14 P U B L I CSAP Leonardo IoT Bridge Configuration and Administration
Configuration

4.2.1.4 Copying a Persona
Prerequisites
To automate automatic role and role collection creation and user group assignment, the UaaUser role must be assigned to the key user.
Procedure
1. On the launchpad, choose the Quick Create and Configure tile.2. Choose Scenarios and Roles.3. On the Scenario Configuration page, select the right arrow for a scenario to open it.4. In the Personas area, select the radio button for the persona to copy.5. Choose Copy.6. On the persona details page, choose Edit and make changes to the copied persona as needed. For more
information, see Editing a Persona [page 15].7. Save your changes.
NoteProvided the prerequisites are fulfilled, the system automatically creates a new role and a corresponding role collection for the copied persona. The new role collection is assigned to the User Group of the original persona.
NoteTo change the user role assigned to a persona, or to assign additional roles to the persona, you must use the Cloud Cockpit in SAP Cloud Platform Cloud Foundry. For more information, see Assigning and Maintaining Roles [page 110].
4.2.1.5 Editing a Persona
Procedure
1. On the launchpad, choose the Quick Create and Configure tile.
SAP Leonardo IoT Bridge Configuration and AdministrationConfiguration P U B L I C 15
2. Choose Scenarios and Roles.3. On the Scenario Configuration page, select the right arrow for a scenario to open it.
Edit the Overview Page4. Use the Card Settings icon to edit the Overview page for the persona. For more information, see Working with
Cards [page 17].Edit the Persona Name and Description5. Choose Edit.6. In the Personas area, edit the name and description as needed.
NoteYou can also edit this information on the persona details page.
7. Save your changes.Edit Persona Details8. In the Personas area, select the right arrow for a persona to open it.9. Choose Edit.10. Edit the persona name and description as needed.11. To edit the list of cards the persona can see, do the following:
a. In the Card Type Whitelist area, choose Add Card Type or Remove Card Type.b. Select cards as needed and choose Add or Remove.
12. To edit the list of events associated with the persona, do the following:a. In the Events area, choose Add Event or Remove Event.b. Select events as needed and choose Add or Remove.
13. To edit the list of services the persona can see and access, do the following:a. In the Events area, choose Add Event or Remove Event.b. Select events as needed and choose Add or Remove.
NoteUsers can only access a service if it has been whitelisted in a persona to which they belong.
14. Save your changes.
4.2.1.6 Deleting a Persona
Procedure
1. On the launchpad, choose the Quick Create and Configure tile.2. Choose Scenarios and Roles.3. On the Scenario Configuration page, select the right arrow for a scenario to open it.
16 P U B L I CSAP Leonardo IoT Bridge Configuration and Administration
Configuration
4. In the Personas area, select the radio button for the persona to delete.5. Choose Delete.
The persona is deleted.
4.2.2 Working with Cards
The topics in this section describe how to work with cards on a Overview page that is configured for a persona.
NoteWhen you make changes to a persona's Overview page, the changes apply to all users with that persona. Users can override your changes by customizing their own Overview pages.
For information about working with cards on your own Overview page, see the SAP Leonardo IoT Bridge Outbound Logistics Scenario User Guide.
4.2.2.1 Creating and Adding Cards
4.2.2.1.1 Adding a Sample Card to an Overview Page
Context
To add a card to the Overview page for a persona in a scenario, do the following.
Procedure
1. On the launchpad, choose the Quick Create and Configure tile.2. Choose Scenarios and Roles.3. On the Scenario Configuration page, select the right arrow for the scenario containing the persona.4. In the Personas area, choose the link in the Persona Configuration column.5. Choose the Card Settings icon and choose Add Card.6. From the Sample Cards list, choose the sample card to add.
You see the card details window.
SAP Leonardo IoT Bridge Configuration and AdministrationConfiguration P U B L I C 17
7. Ensure that Display on Overview Page is selected.8. Choose Add.
The card is added to the Overview page.9. Return to the Quick Create and Configure page and navigate to the persona details page.10. Optionally, add the sample card to the Card Types Whitelist.
NoteWhitelisting a card allows end users to add the card to their own Overview pages. When an end user adds a card to an Overview page, the card is private to that user.
a. In the Card Types Whitelist area, choose Add Card Type.b. Choose the card type and choose Add.c. Save your changes.
4.2.2.1.2 Creating a New Card for an Overview Page
Context
In addition to the sample cards provided with the application, you can create new cards to display additional data on the Overview page for a persona. This card is displayed for all users with that persona.
Procedure
1. On the launchpad, choose the Quick Create and Configure tile.2. Choose Scenarios and Roles.3. On the Scenario Configuration page, select the right arrow for the scenario containing the persona.
You see the persona details page.4. In the Personas area, choose the link in the Persona Configuration column.5. Choose the Card Settings icon and choose Add Card.
You see a list of all the cards in the persona's Overview page, as well as a list of card types you can use to create a new card.
6. Under Create a New Card, choose one of the following card types:
18 P U B L I CSAP Leonardo IoT Bridge Configuration and Administration
Configuration
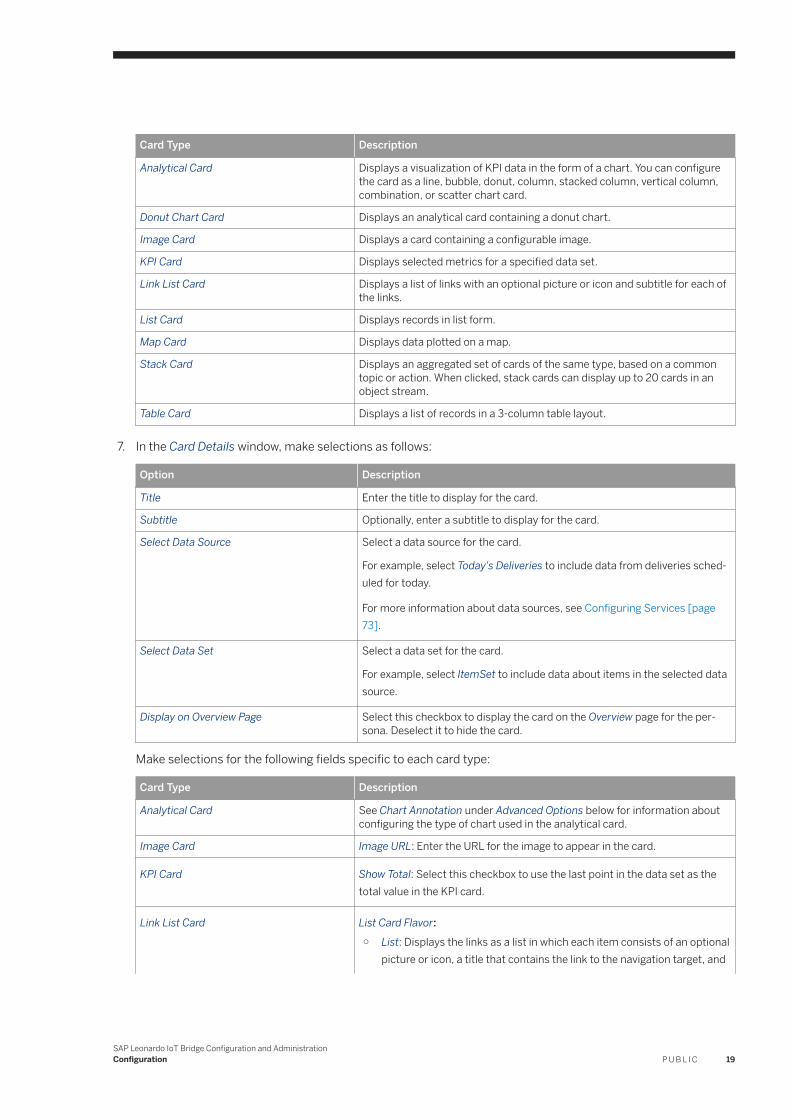
Card Type Description
Analytical Card Displays a visualization of KPI data in the form of a chart. You can configure the card as a line, bubble, donut, column, stacked column, vertical column, combination, or scatter chart card.
Donut Chart Card Displays an analytical card containing a donut chart.
Image Card Displays a card containing a configurable image.
KPI Card Displays selected metrics for a specified data set.
Link List Card Displays a list of links with an optional picture or icon and subtitle for each of the links.
List Card Displays records in list form.
Map Card Displays data plotted on a map.
Stack Card Displays an aggregated set of cards of the same type, based on a common topic or action. When clicked, stack cards can display up to 20 cards in an object stream.
Table Card Displays a list of records in a 3-column table layout.
7. In the Card Details window, make selections as follows:
Option Description
Title Enter the title to display for the card.
Subtitle Optionally, enter a subtitle to display for the card.
Select Data Source Select a data source for the card.
For example, select Today's Deliveries to include data from deliveries scheduled for today.
For more information about data sources, see Configuring Services [page 73].
Select Data Set Select a data set for the card.
For example, select ItemSet to include data about items in the selected data source.
Display on Overview Page Select this checkbox to display the card on the Overview page for the persona. Deselect it to hide the card.
Make selections for the following fields specific to each card type:
Card Type Description
Analytical Card See Chart Annotation under Advanced Options below for information about configuring the type of chart used in the analytical card.
Image Card Image URL: Enter the URL for the image to appear in the card.
KPI Card Show Total: Select this checkbox to use the last point in the data set as the total value in the KPI card.
Link List Card List Card Flavor:○ List: Displays the links as a list in which each item consists of an optional
picture or icon, a title that contains the link to the navigation target, and
SAP Leonardo IoT Bridge Configuration and AdministrationConfiguration P U B L I C 19
Card Type Description
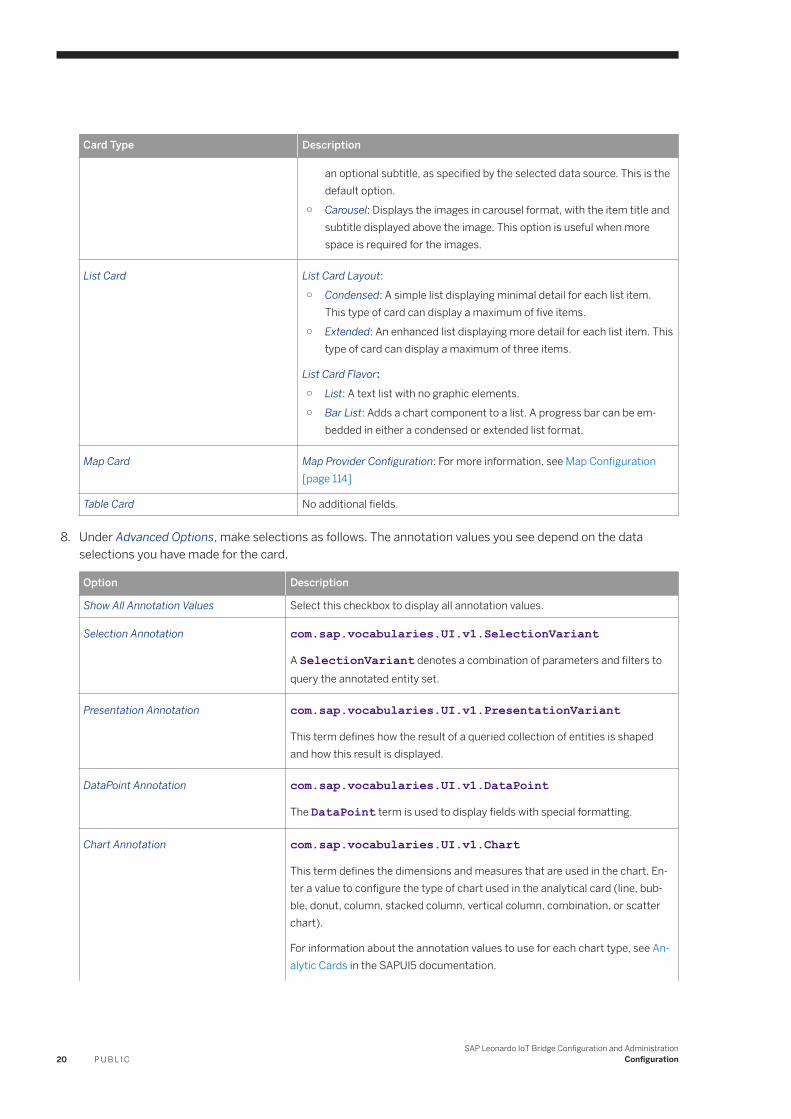
an optional subtitle, as specified by the selected data source. This is the default option.
○ Carousel: Displays the images in carousel format, with the item title and subtitle displayed above the image. This option is useful when more space is required for the images.
List Card List Card Layout:○ Condensed: A simple list displaying minimal detail for each list item.
This type of card can display a maximum of five items.○ Extended: An enhanced list displaying more detail for each list item. This
type of card can display a maximum of three items.
List Card Flavor:○ List: A text list with no graphic elements.○ Bar List: Adds a chart component to a list. A progress bar can be em
bedded in either a condensed or extended list format.
Map Card Map Provider Configuration: For more information, see Map Configuration [page 114]
Table Card No additional fields.
8. Under Advanced Options, make selections as follows. The annotation values you see depend on the data selections you have made for the card.
Option Description
Show All Annotation Values Select this checkbox to display all annotation values.
Selection Annotation com.sap.vocabularies.UI.v1.SelectionVariant
A SelectionVariant denotes a combination of parameters and filters to query the annotated entity set.
Presentation Annotation com.sap.vocabularies.UI.v1.PresentationVariant
This term defines how the result of a queried collection of entities is shaped and how this result is displayed.
DataPoint Annotation com.sap.vocabularies.UI.v1.DataPoint
The DataPoint term is used to display fields with special formatting.
Chart Annotation com.sap.vocabularies.UI.v1.Chart
This term defines the dimensions and measures that are used in the chart. Enter a value to configure the type of chart used in the analytical card (line, bubble, donut, column, stacked column, vertical column, combination, or scatter chart).
For information about the annotation values to use for each chart type, see Analytic Cards in the SAPUI5 documentation.
20 P U B L I CSAP Leonardo IoT Bridge Configuration and Administration
Configuration

Option Description
NoteSAP Leonardo IoT Bridge requires the annotation to be included in the OData metadata file. Therefore, all annotation terms must have fully qualified namespaces. For example, SAPUI5 documentation references to UI.ChartType/Column must be replaced with com.sap.vocabularies.UI.v1.Chart.ChartType/Column.
For more information, see Creating and Editing Annotation Files [page 24].
Identification Annotation com.sap.vocabularies.UI.v1.Identification
The Identification term is used to retrieve information about card actions. The following record types are supported:
○ com.sap.vocabularies.UI.v1.DataFieldForAction○ com.sap.vocabularies.UI.v1.DataFieldForIntentBased
Navigation○ com.sap.vocabularies.UI.v1.DataFieldWithUrl
For more information about UI annotation, see Cards Used in Overview Pages in the SAPUI5 documentation.
9. Choose Add.
The card is displayed in the persona's Overview page.10. Return to the Quick Create and Configure page and navigate to the persona details page.11. Optionally, add the sample card to the Card Types Whitelist.
NoteWhitelisting a card allows end users to add the card to their own Overview pages. When an end user adds a card to an Overview page, the card is private to that user.
a. Choose Edit.b. In the Card Types Whitelist area, choose Add Card Type.c. Choose the card type and choose Add.d. Save your changes.
4.2.2.1.2.1 Enabling View Switch
Context
Overview Page Card View Switch enables a user to filter card data using predefined filter values. View Switch is rendered as a Select control between the card header and content area.
SAP Leonardo IoT Bridge Configuration and AdministrationConfiguration P U B L I C 21

View Switch is supported by the following card types:
● List Card● Table Card● KPI Card● Analytical Card
Enable View Switch for a card as follows.
Procedure
1. Create a card. For more information, see Creating a New Card for an Overview Page [page 18].2. In the Card Details window, select a Data Source containing the SelectionVariant annotation. For more
information about this annotation, see Using the SelectionVariant Annotation for View Switch [page 28].
3. Under Advanced Options Selection Annotation , select the default View Switch entry, if there is more than one entry.
4. Choose Add.
4.2.2.1.3 Creating a New Card Using a Sample Card
Context
You can base a new card on a sample card if you want to preserve some of the card's elements while changing others. For example, you might use a Date Accuracy card as the basis for an Item Accuracy card, and simply change the data set for the new card.
This card will be displayed for all users with that persona.
Procedure
1. On the launchpad, choose the Quick Create and Configure tile.2. Choose Scenarios and Roles.3. On the Scenario Configuration page, select the right arrow for the scenario containing the persona.4. In the Personas area, choose the link in the Persona Configuration column.
22 P U B L I CSAP Leonardo IoT Bridge Configuration and Administration
Configuration

5. Choose the Card Settings icon and choose Add Card.
You see a list of all the cards in the persona Overview page, as well as a list of card types you can use to create a new card.
6. In the Sample Cards list, choose the card to copy.
One of the sample card types is the FloorPlan map card. For more information about this card, see FloorPlan Map Card [page 32].
7. In the Card Details window, make selections as follows:
Option Description
Title Enter the new title for the card.
Subtitle Optionally, enter a new subtitle for the card.
Data Source Optionally, select a data source other than the default.
Data Set Optionally, select a data set other than the default.
Display on Overview Page Select this checkbox to display the card on the Overview page for the persona. Deselect it to hide the card.
8. Under Advanced Options, make selections as follows. The annotation values you see depend on the data selections you have made for the card.
Option Description
Show All Annotation Values Select this checkbox to display all annotation values.
Selection Annotation com.sap.vocabularies.UI.v1.SelectionVariant
A SelectionVariant denotes a combination of parameters and filters to query the annotated entity set.
Presentation Annotation com.sap.vocabularies.UI.v1.PresentationVariant
This term defines how the result of a queried collection of entities is shaped and how this result is displayed.
DataPoint Annotation com.sap.vocabularies.UI.v1.DataPoint
The DataPoint term is used to display fields with special formatting.
Chart Annotation com.sap.vocabularies.UI.v1.Chart
This term defines the dimensions and measures that will be used in the chart.
Identification Annotation com.sap.vocabularies.UI.v1.Identification
The Identification term is used to retrieve information about card actions. The following record types are supported:
○ com.sap.vocabularies.UI.v1.DataFieldForAction○ com.sap.vocabularies.UI.v1.DataFieldForIntentBased
Navigation○ com.sap.vocabularies.UI.v1.DataFieldWithUrl
9. Choose Add.
SAP Leonardo IoT Bridge Configuration and AdministrationConfiguration P U B L I C 23
The card is displayed in the Overview page.10. Return to the Quick Create and Configure page and navigate to the persona details page.11. Optionally, add the sample card to the Card Types Whitelist.
NoteWhitelisting a card allows end users to add the card to their own Overview pages.When an end user adds a card to an Overview page, the card is private to that user.
a. Choose Edit.b. In the Card Types Whitelist area, choose Add Card Type.c. Choose the card type and choose Add.d. Save your changes.
4.2.2.1.3.1 Creating and Editing Annotation Files
In SAP Leonardo IoT Bridge, a data source is required when adding a card to Overview page. A data source is an OData service provider that provides data for the card. For example, one data source is an iFlow defined in HANA Cloud Integration (HCI) The iFlow must be defined as an OData service and an OData metadata document must be defined for the service. The metadata file contains the definition of an OData service as well as the annotations that are used by a card.
Annotations are used by standard SAP Fiori smart controls. For more information, see Annotations Used in Overview Pages in the SAP Fiori documentation.
4.2.2.1.3.1.1 Adding an Annotation to OData Metadata document
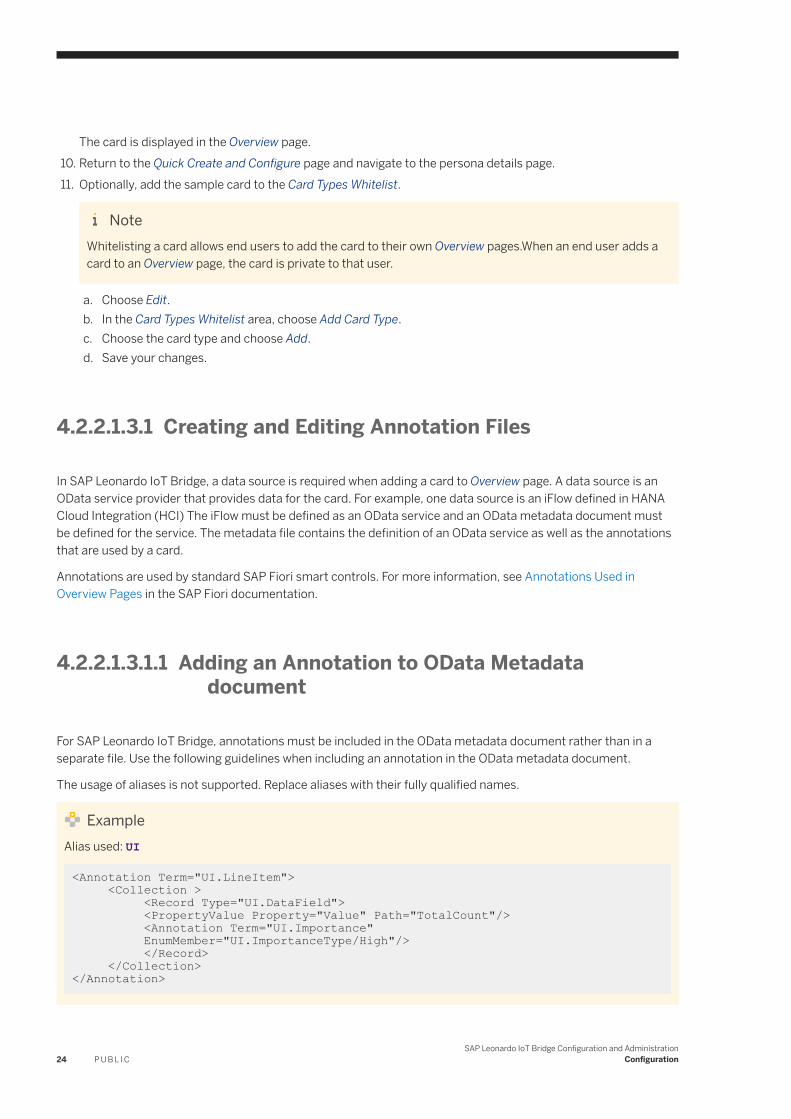
For SAP Leonardo IoT Bridge, annotations must be included in the OData metadata document rather than in a separate file. Use the following guidelines when including an annotation in the OData metadata document.
The usage of aliases is not supported. Replace aliases with their fully qualified names.
ExampleAlias used: UI
<Annotation Term="UI.LineItem"> <Collection > <Record Type="UI.DataField"> <PropertyValue Property="Value" Path="TotalCount"/> <Annotation Term="UI.Importance" EnumMember="UI.ImportanceType/High"/> </Record> </Collection></Annotation>
24 P U B L I CSAP Leonardo IoT Bridge Configuration and Administration
Configuration

ExampleAlias UI replaced with com.sap.vocabularies.UI.v1
<Annotation Term="com.sap.vocabularies.UI.v1.LineItem"> <Collection > <Record Type="com.sap.vocabularies.UI.v1.DataField"> <PropertyValue Property="Value" Path="TotalCount"/> <Annotation Term="com.sap.vocabularies.UI.v1.Importance" EnumMember="com.sap.vocabularies.UI.v1.ImportanceType/High"/> </Record> </Collection></Annotation>
ExampleMetadata document with an annotation
<?xml version="1.0" ?> <edmx:Edmx xmlns:edmx="http://schemas.microsoft.com/ado/2007/06/edmx" xmlns:sap="http://www.sap.com/Protocols/SAPData" xmlns:ux="http://www.sap.com/Protocols/OData4SAP/UX" xmlns:gp="http://www.sap.com/Protocols/SAPData/GenericPlayer" Version="1.0"> <edmx:DataServices xmlns:m="http://schemas.microsoft.com/ado/2007/08/dataservices/metadata" m:DataServiceVersion="2.0"> <Schema xmlns="http://schemas.microsoft.com/ado/2008/09/edm" Namespace="com.sap.iot.scb.digitalspace.retail"> <EntityType Name="StatusCountsType"> <Key> <PropertyRef Name="GeneratedId"/> </Key> <Property Name="GeneratedId" Type="Edm.String" Nullable="false"/> <Property Name="Status" Type="Edm.String"/> <Property Name="Description" Type="Edm.String"/> <Property Name="Icon" Type="Edm.String"/> <Property Name="StatusField" Type="Edm.String"/> <Property Name="TotalCount" Type="Edm.Int32"/> <Property Name="BeginDate" Type="Edm.DateTime" sap:display-format="Date"/> <Property Name="EndDate" Type="Edm.DateTime" sap:display-format="Date"/> <Property Name="DateField" Type="Edm.String"/> </EntityType> <EntityContainer Name="v2" m:IsDefaultEntityContainer="true"> <EntitySet Name="StatusCounts" EntityType="com.sap.iot.scb.digitalspace.retail.StatusCountsType"/> </EntityContainer> <Annotations xmlns="http://docs.oasis-open.org/odata/ns/edm" Target="com.sap.iot.scb.digitalspace.retail.StatusCountsType"> <Annotation Term="com.sap.vocabularies.UI.v1.LineItem"> <Collection > <Record Type="com.sap.vocabularies.UI.v1.DataField"> <PropertyValue Property="Value" Path="TotalCount"/> <Annotation Term="com.sap.vocabularies.UI.v1.Importance" EnumMember="com.sap.vocabularies.UI.v1.ImportanceType/High"/> </Record> </Collection> </Annotation> </Annotations> </Schema> </edmx:DataServices></edmx:Edmx>
SAP Leonardo IoT Bridge Configuration and AdministrationConfiguration P U B L I C 25
4.2.2.1.3.1.2 Heuristics for Default Annotation Values
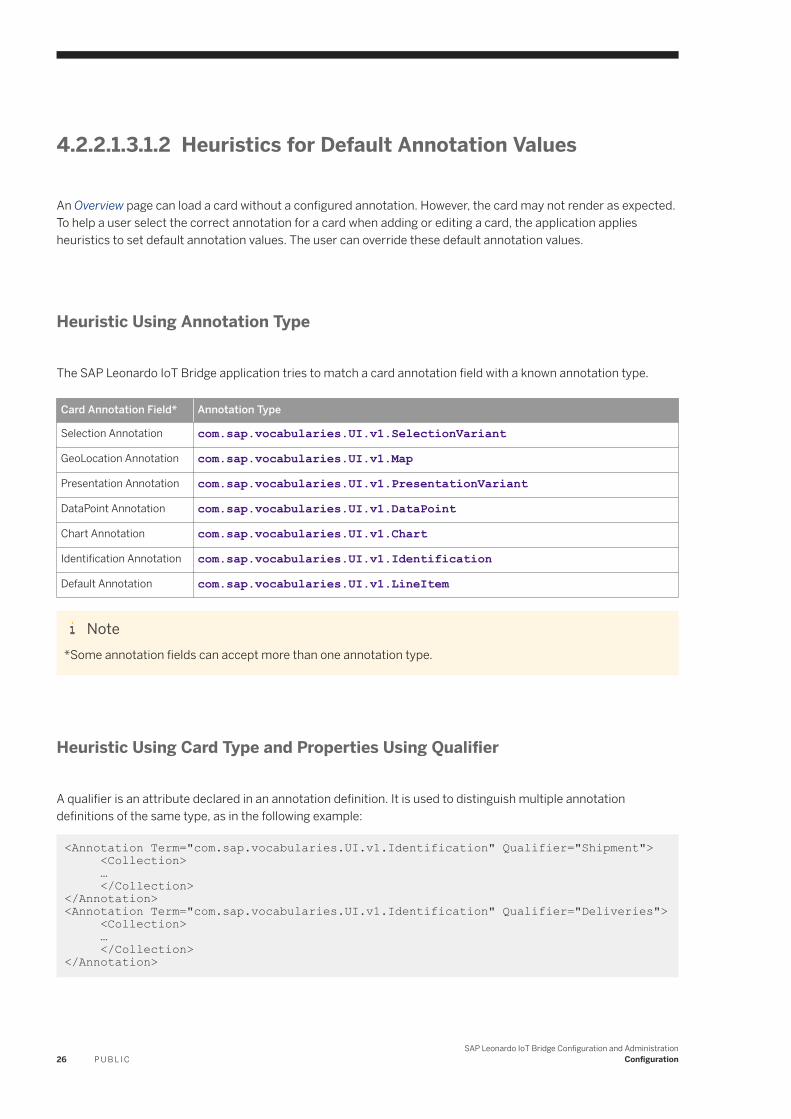
An Overview page can load a card without a configured annotation. However, the card may not render as expected. To help a user select the correct annotation for a card when adding or editing a card, the application applies heuristics to set default annotation values. The user can override these default annotation values.
Heuristic Using Annotation Type
The SAP Leonardo IoT Bridge application tries to match a card annotation field with a known annotation type.
Card Annotation Field* Annotation Type
Selection Annotation com.sap.vocabularies.UI.v1.SelectionVariant
GeoLocation Annotation com.sap.vocabularies.UI.v1.Map
Presentation Annotation com.sap.vocabularies.UI.v1.PresentationVariant
DataPoint Annotation com.sap.vocabularies.UI.v1.DataPoint
Chart Annotation com.sap.vocabularies.UI.v1.Chart
Identification Annotation com.sap.vocabularies.UI.v1.Identification
Default Annotation com.sap.vocabularies.UI.v1.LineItem
Note*Some annotation fields can accept more than one annotation type.
Heuristic Using Card Type and Properties Using Qualifier
A qualifier is an attribute declared in an annotation definition. It is used to distinguish multiple annotation definitions of the same type, as in the following example:
<Annotation Term="com.sap.vocabularies.UI.v1.Identification" Qualifier="Shipment"> <Collection> … </Collection></Annotation><Annotation Term="com.sap.vocabularies.UI.v1.Identification" Qualifier="Deliveries"> <Collection> … </Collection></Annotation>
26 P U B L I CSAP Leonardo IoT Bridge Configuration and Administration
Configuration
Qualifiers by Card Types and Properties
Qualifier is a free text attribute that can be defined in an annotation definition. The above example contains two annotations of the same type: com.sap.vocabularies.UI.v1.Identification. In order to distinguish between them, a qualifier is defined for each of them: Shipment and Deliveries.
SAP Leonardo IoT Bridge leverages annotation qualifiers to determine the default annotation value for an annotation field. The tables below summarize the qualifiers used in the application.
These qualifiers must be used in conjunction with the rules defined above, under Heuristic Using Annotation Type, to enable the application to determine the best annotation value match for an annotation field.
Note the following about qualifiers:
● Qualifiers are case insensitive.● Qualifiers are optional. If they are defined as specified below, the application will use them to set default
annotation values for each card type.● Customers can define their own qualifiers but the application will not use them in determining default
annotation values.
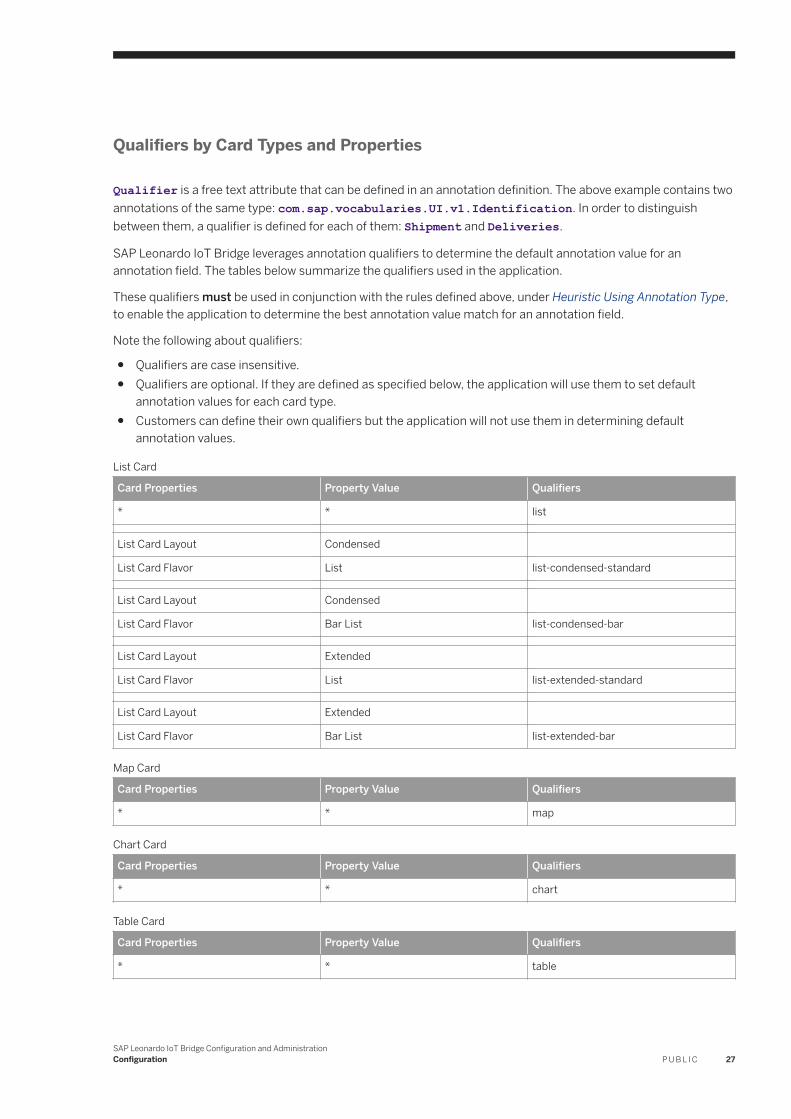
List Card
Card Properties Property Value Qualifiers
* * list
List Card Layout Condensed
List Card Flavor List list-condensed-standard
List Card Layout Condensed
List Card Flavor Bar List list-condensed-bar
List Card Layout Extended
List Card Flavor List list-extended-standard
List Card Layout Extended
List Card Flavor Bar List list-extended-bar
Map Card
Card Properties Property Value Qualifiers
* * map
Chart Card
Card Properties Property Value Qualifiers
* * chart
Table Card
Card Properties Property Value Qualifiers
* * table
SAP Leonardo IoT Bridge Configuration and AdministrationConfiguration P U B L I C 27
KPI Card
Card Properties Property Value Qualifiers
* * metric
FloorPlan Card
Card Properties Property Value Qualifiers
* * floorplan
The following is an example of a generic qualifier for a List card for the LineItem annotation:
<Annotation Term="com.sap.vocabularies.UI.v1.LineItem" Qualifier=”list”> <Collection > <Record Type="com.sap.vocabularies.UI.v1.DataField"> <PropertyValue Property="Value" Path="TotalCount"/> <Annotation Term="UI.Importance" EnumMember="UI.ImportanceType/High"/> </Record> </Collection></Annotation>
The following is an example of a qualifier for a List card of Condensed layout and List flavor for for the LineItem annotation:
<Annotation Term="com.sap.vocabularies.UI.v1.LineItem" Qualifier=”list-condensed-standard”> <Collection > <Record Type="com.sap.vocabularies.UI.v1.DataField"> <PropertyValue Property="Value" Path="TotalCount"/> <Annotation Term="UI.Importance" EnumMember="UI.ImportanceType/High"/> </Record> </Collection></Annotation>
4.2.2.1.3.1.3 Using the SelectionVariant Annotation for View Switch
The SelectionVariant (com.sap.vocabularies.UI.v1.SelectionVariant) annotation is used to define a combination of parameters and filters. In the following example, the SelectionVariant contains two filter values:
Field Value
KPIType DELITEMDATEAVG
Example: SelectionVariant Annotation
<Annotation xmlns="http://docs.oasis-open.org/odata/ns/edm" Term="com.sap.vocabularies.UI.v1.SelectionVariant" Qualifier="ontime_delivery"> <Record xmlns="http://docs.oasis-open.org/odata/ns/edm"> <PropertyValue xmlns="http://docs.oasis-open.org/odata/ns/edm" Property="Label" String="On Time "></PropertyValue> <PropertyValue xmlns="http://docs.oasis-open.org/odata/ns/edm" Property="SelectOptions"> <Collection xmlns="http://docs.oasis-open.org/odata/ns/edm"> <Record xmlns="http://docs.oasis-open.org/odata/ns/edm">
28 P U B L I CSAP Leonardo IoT Bridge Configuration and Administration
Configuration
<PropertyValue xmlns="http://docs.oasis-open.org/odata/ns/edm" Property="PropertyName" PropertyPath="KPIType"></PropertyValue> <PropertyValue xmlns="http://docs.oasis-open.org/odata/ns/edm" Property="Ranges"> <Collection xmlns="http://docs.oasis-open.org/odata/ns/edm"> <Record xmlns="http://docs.oasis-open.org/odata/ns/edm"> <PropertyValue xmlns="http://docs.oasis-open.org/odata/ns/edm" Property="Sign" EnumMember="com.sap.vocabularies.UI.v1.SelectionRangeSignType/I"></PropertyValue> <PropertyValue xmlns="http://docs.oasis-open.org/odata/ns/edm" Property="Option" EnumMember="com.sap.vocabularies.UI.v1.SelectionRangeOptionType/EQ"></PropertyValue> <PropertyValue xmlns="http://docs.oasis-open.org/odata/ns/edm" Property="Low" String="DELITEMDATEAVG"></PropertyValue> </Record> </Collection> </PropertyValue> </Record> </Collection> </PropertyValue> </Record></Annotation>
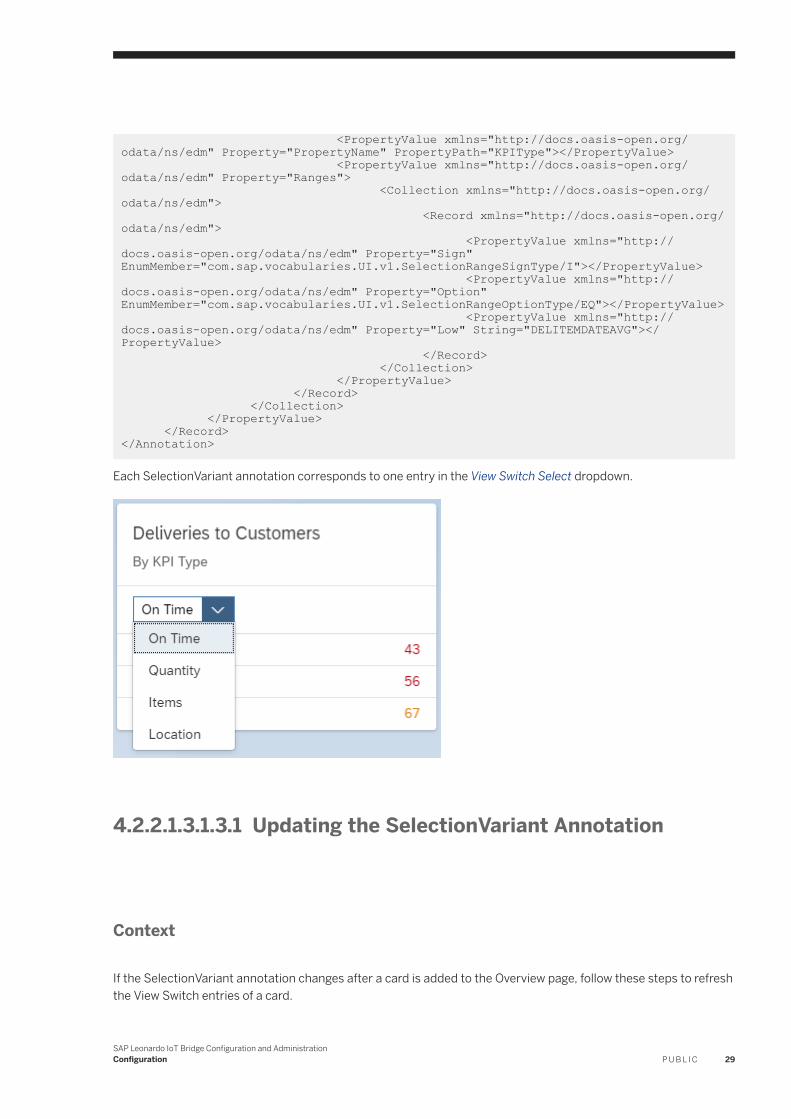
Each SelectionVariant annotation corresponds to one entry in the View Switch Select dropdown.
4.2.2.1.3.1.3.1 Updating the SelectionVariant Annotation
Context
If the SelectionVariant annotation changes after a card is added to the Overview page, follow these steps to refresh the View Switch entries of a card.
SAP Leonardo IoT Bridge Configuration and AdministrationConfiguration P U B L I C 29
Procedure
1. In SAP Leonardo IoT Bridge, navigate to the Overview page to update.2. Choose Settings and select Edit Card.3. Select the card to update.4. Under Advanced Options, optionally update the default Selection Annotation.5. Choose Save.
After the card is reloaded, the View Switch contains the changes to the SelectionVariant annotation.
4.2.2.2 Hiding Cards on an Overview Page
Context
You can use Card Settings to hide a card on the Overview page for a persona.
NoteTo completely remove access to this card for the persona, you can delete it from the Card Type Whitelist. For more information, see Editing a Persona [page 15].
Procedure
1. On the launchpad, choose the Quick Create and Configure tile.2. Choose Scenarios and Roles.3. On the Scenario Configuration page, select the right arrow for the scenario containing the persona.4. In the Personas area, choose the link in the Persona Configuration column.5. Choose the Card Settings icon and choose Edit Cards.
You see a list of all the cards that were added to the persona's Overview page.6. In the My Cards list, choose the right arrow for the card to hide.7. In the card details window, deselect Display on Overview Page.8. Choose Save.
The card is displayed in the Overview page.
30 P U B L I CSAP Leonardo IoT Bridge Configuration and Administration
Configuration
4.2.2.3 Rearranging Cards on an Overview Page
Procedure
1. On the launchpad, choose the Quick Create and Configure tile.2. Choose Scenarios and Roles.3. On the Scenario Configuration page, select the right arrow for a scenario to open it.4. In the Personas area, choose the link in the Persona Configuration column.
You see the Overview page for the persona.5. Drag and drop the cards on the Overview page to arrange them into the desired locations.
4.2.2.4 Deleting a Card
Context
When you delete a card, you permanently remove the card from the persona and from the application. You must be a key user to delete a card.
To hide a card without deleting it, see Hiding Cards on an Overview Page [page 30].
Procedure
1. On the launchpad, choose the Quick Create and Configure tile.2. Choose Scenarios and Roles.3. On the Scenario Configuration page, select the right arrow for the scenario containing the persona.4. In the Personas area, choose the link in the Persona Configuration column.5. Choose the Card Settings icon and choose Edit Cards.6. Choose the right arrow for the card to delete.
You see the card details window.7. Choose Delete.8. In the confirmation window, choose Delete.
The card is deleted.
SAP Leonardo IoT Bridge Configuration and AdministrationConfiguration P U B L I C 31
4.2.2.5 Working with Card Types
The topics in this section describe how to work with particular card types.
4.2.2.5.1 FloorPlan Map Card
One of the sample cards provided by SAP Leonardo IoT Bridge is the FloorPlan map card.
4.2.2.5.1.1 Configuring the Floorplan Map Card
Prerequisites
You have an IoT Services URL and credentials for your tenant.
Context
You must configure the Floorplan Map card as follows before it can be added to a persona in SAP Leonardo IoT Bridge.
Procedure
Create Metadata on an IoT Services API Hub PageFor each KPI to include, you must create a set of metadata including Capability/MessageType, Sensor Type, Device, and Sensor.1. Go to the IOT Services API Hub page: <IOT service HOST URL>/iot/core/api/v1/doc/2. Create a Capability.3. Modify the JSON to add the properties for the KPI you are adding.
Examples
Sample CodeSample capability JSON for the AVAILABILITY KPI
{ "alternateId": "CapabilityAlternateId",
32 P U B L I CSAP Leonardo IoT Bridge Configuration and Administration
Configuration

"name": "CapabilityName", "properties": [ { "name": "inUse", "dataType": "string" }, { "name": "faulty", "dataType": "string" }, { "name": "sensorId", "dataType": "string" }, { "name": "timestamp", "dataType": "string" } ]}
Sample CodeSample capability JSON for the OCCUPANCY/CLUSTERING KPI
{ "name": "CapabilityName", "properties": [ { "formatter": { "swap": false, "dataType": "string", "shift": 0, "scale": 0 }, "unitOfMeasure": "", "dataType": "string", "name": "lat" }, { "formatter": { "swap": false, "dataType": "string", "shift": 0, "scale": 0 }, "unitOfMeasure": "", "dataType": "string", "name": "lng" }, { "formatter": { "swap": false, "dataType": "string", "shift": 0, "scale": 0 }, "unitOfMeasure": "", "dataType": "string", "name": "floorId" }, { "formatter": { "swap": false, "dataType": "string",
SAP Leonardo IoT Bridge Configuration and AdministrationConfiguration P U B L I C 33
"shift": 0, "scale": 0 }, "unitOfMeasure": "", "dataType": "string", "name": "timestamp" }, { "formatter": { "swap": false, "dataType": "string", "shift": 0, "scale": 0 }, "unitOfMeasure": "", "dataType": "string", "name": "objectId" } ]}
Sample CodeSample capability JSON for a generic KPI
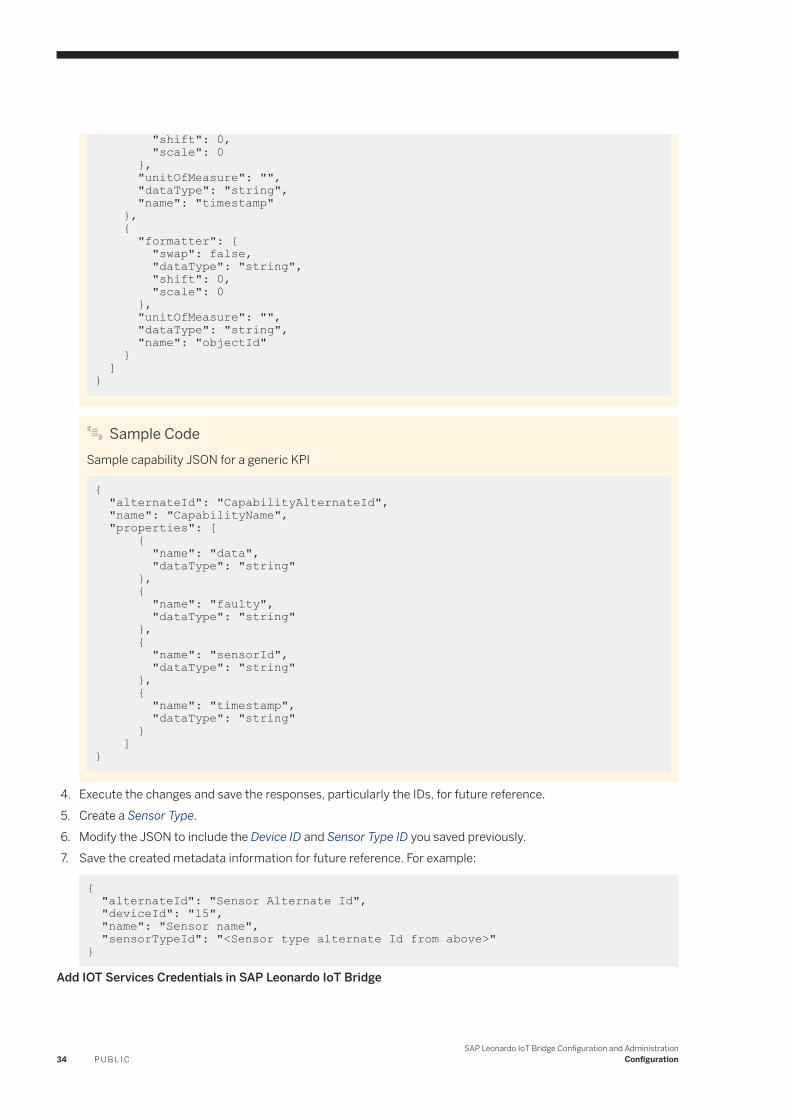
{ "alternateId": "CapabilityAlternateId", "name": "CapabilityName", "properties": [ { "name": "data", "dataType": "string" }, { "name": "faulty", "dataType": "string" }, { "name": "sensorId", "dataType": "string" }, { "name": "timestamp", "dataType": "string" } ]}
4. Execute the changes and save the responses, particularly the IDs, for future reference.5. Create a Sensor Type.6. Modify the JSON to include the Device ID and Sensor Type ID you saved previously.7. Save the created metadata information for future reference. For example:
{ "alternateId": "Sensor Alternate Id", "deviceId": "15", "name": "Sensor name", "sensorTypeId": "<Sensor type alternate Id from above>"}
Add IOT Services Credentials in SAP Leonardo IoT Bridge
34 P U B L I CSAP Leonardo IoT Bridge Configuration and Administration
Configuration
8. In SAP Leonardo IoT Bridge, on the launchpad, choose the Quick Create and Configure tile.
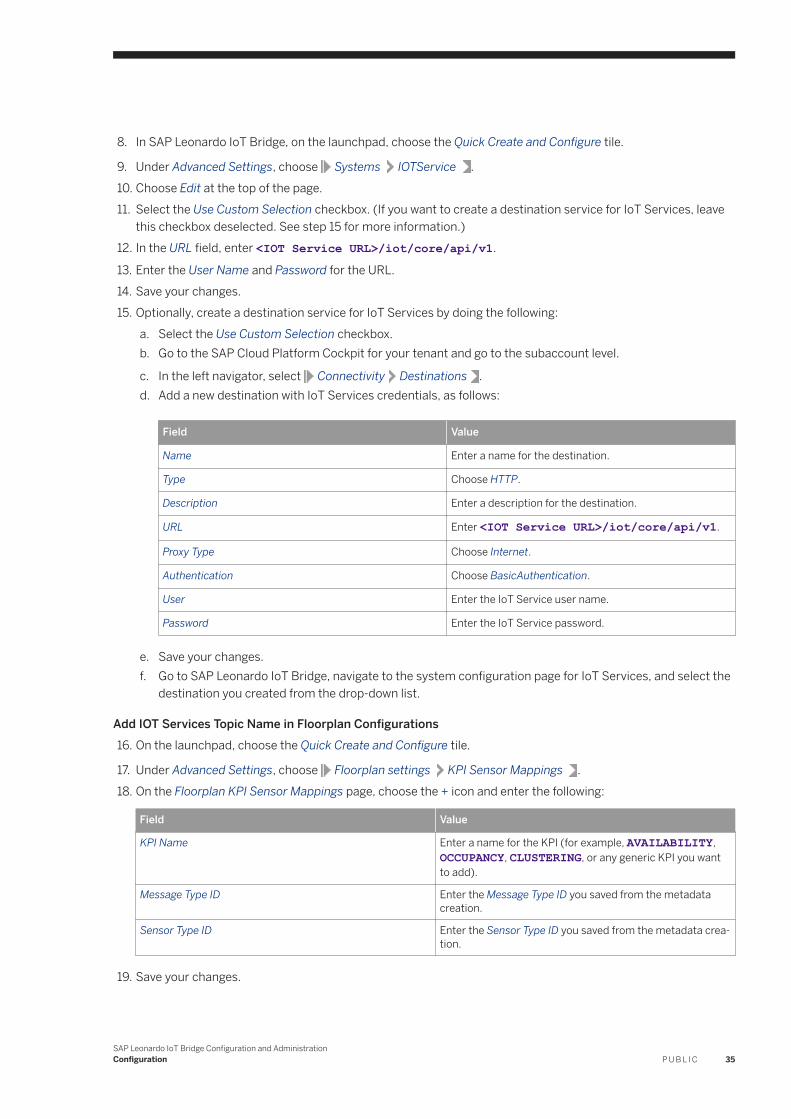
9. Under Advanced Settings, choose Systems IOTService .10. Choose Edit at the top of the page.11. Select the Use Custom Selection checkbox. (If you want to create a destination service for IoT Services, leave
this checkbox deselected. See step 15 for more information.)12. In the URL field, enter <IOT Service URL>/iot/core/api/v1.
13. Enter the User Name and Password for the URL.14. Save your changes.15. Optionally, create a destination service for IoT Services by doing the following:
a. Select the Use Custom Selection checkbox.b. Go to the SAP Cloud Platform Cockpit for your tenant and go to the subaccount level.
c. In the left navigator, select Connectivity Destinations .d. Add a new destination with IoT Services credentials, as follows:
Field Value
Name Enter a name for the destination.
Type Choose HTTP.
Description Enter a description for the destination.
URL Enter <IOT Service URL>/iot/core/api/v1.
Proxy Type Choose Internet.
Authentication Choose BasicAuthentication.
User Enter the IoT Service user name.
Password Enter the IoT Service password.
e. Save your changes.f. Go to SAP Leonardo IoT Bridge, navigate to the system configuration page for IoT Services, and select the
destination you created from the drop-down list.
Add IOT Services Topic Name in Floorplan Configurations16. On the launchpad, choose the Quick Create and Configure tile.
17. Under Advanced Settings, choose Floorplan settings KPI Sensor Mappings .18. On the Floorplan KPI Sensor Mappings page, choose the + icon and enter the following:
Field Value
KPI Name Enter a name for the KPI (for example, AVAILABILITY, OCCUPANCY, CLUSTERING, or any generic KPI you want to add).
Message Type ID Enter the Message Type ID you saved from the metadata creation.
Sensor Type ID Enter the Sensor Type ID you saved from the metadata creation.
19. Save your changes.
SAP Leonardo IoT Bridge Configuration and AdministrationConfiguration P U B L I C 35

20.Choose Sync Metadata.Upload Space Model, Thing Assignment, and Time Profile21. On the launchpad, choose the Quick Create and Configure tile.
22. Under Advanced Settings, choose Floorplan settings Space Model .23. Choose Upload Space Model.24. Browse to the JSON file for the space model and choose Upload.25. Repeat steps 22 and 23 for the thing assignment and time profile.
4.2.2.5.1.2 Adding the FloorPlan Map Card
Prerequisites
● The Space Model and Time Profile have been uploaded● A Thing Assignment for the Space Model is available
Context
To add the FloorPlan Map card to the Overview page for a persona, do the following.
NoteA key user can add a maximum of two Floorplan Map cards to an Overview page. An end user can also add two Floorplan Map cards to the Overview page, if the key user has not already done so.
For information about Floorplan settings, see Configuring Floorplan Settings [page 75].
Procedure
Whitelist the Floorplan Service and the Floorplan Map Card1. On the launchpad, choose the Quick Create and Configure tile.2. Choose Scenarios and Roles.3. On the Scenario Configuration page, select the right arrow for the scenario containing the persona.4. In the Personas area, choose the link in the Persona Configuration column.5. Under Card Type Whitelist, choose Add card type.6. From the Available Card Types list, select the Floorplan Map card and choose Add.7. Scroll down to the Service Whitelist area and choose Add service.
36 P U B L I CSAP Leonardo IoT Bridge Configuration and Administration
Configuration
8. From the Available Services list, select Floor Plan and choose Add.Add the Floorplan Map Card9. On the launchpad, choose the Quick Create and Configure tile.10. Choose Scenarios and Roles.11. On the Scenario Configuration page, select the right arrow for the scenario containing the persona.12. In the Personas area, choose the link in the Persona Configuration column.13. Choose the Card Settings icon and choose Add Card.14. From the Sample Cards list, choose Floorplan Map.15. In the Card Details window, make selections as follows:
Option Description
Title Enter the title to display for the card.
Subtitle Use the default subtitle, Indoor Analytics, or enter a new one as needed.
Enter KPI Display Name Enter a display name for the KPI being tracked by the card.
Enter KPI Unit of Measurement Enter a unit of measurement for the KPI.
By default, this value is %, but you can change it as needed to reflect an appropriate measurement for your KPI. For example, for a Windspeed KPI, you might select Rotation/Min.
Enter Availability Display Name Enter a display name for the object or asset. This reflects the KPI displayed at the Thing level, where a Thing might be Desks for an office setting, Treadmills for a gym setting, or Windmills for a wind power plant.
Enter Event Name Enter the name of an event for which you have configured the sensor to send a notification.
For example, in the case of a windmill, you might enter Inspection Needed in this field if the sensor is configured to send a notification when the windmill is in need of inspection. You might enter Sensor Error if the sensor is configured to send a notification when the sensor malfunctions.
This text is displayed on the Floorplan Map card next to a red indicator if the specified event occurs.
Space Select a campus to display on the Floorplan Map card. Only buildings for the selected campus are displayed on the card.
Supported KPI Select the KPI you want to display.
Select Data Source Select Floor Plan.
Select Data Set Leave this field blank. It is not relevant for the Floorplan Map card.
Display Historic Data on Object Level Select this checkbox to display objectspecific details in the card. Leave it unchecked to display an average for all objects.
For example, for a Windspeed KPI, you might do the following:○ Select this checkbox to display windspeed for each windmill in the card.
The windspeed value is indicated by the color of the windmill, as shown in the card legend.
SAP Leonardo IoT Bridge Configuration and AdministrationConfiguration P U B L I C 37
Option Description
○ Leave the checkbox unchecked to display the average windspeed for all windmills in the space. The windspeed value is indicated by the color of the space background, as shown in the card legend.
38 P U B L I CSAP Leonardo IoT Bridge Configuration and Administration
Configuration
Option Description
Display on Overview Page Select this checkbox to display the card on the Overview page for the persona. Deselect it to hide the card.
Advanced Options Description
Show All Annotation Values Select this checkbox to display all annotation values.
Default Annotation This annotation value is determined automatically by the value in the Data Set field.
Heat Map Refresh Interval The frequency at which the heat map data is refreshed in the card, in seconds. Use the default value of 30 (recommended), or enter a new one as needed.
Heat Map Opacity The opacity of the color in the heat map (the higher the value, the more opaque the color). Enter a number between 0.1 and 1.0.
SAP Leonardo IoT Bridge Configuration and AdministrationConfiguration P U B L I C 39
Advanced Options Description
Heat Map Value Range The intensity of the color in the heat map (the higher the value, the more intense the color). Enter a range of numbers between 0 and 50.
Heat Map Radius Range The size of the circles in the heat map (the higher the value, the larger the circles). Enter a number between 0.0001 and 0.0005.
Availability Refresh Interval The frequency at which the availability data is refreshed in the card, in seconds. Available assets are displayed as green in the card. Use the default value of 30 (recommended), or enter a new one as needed.
KPI Refresh Interval The frequency at which the KPI percentage number is refreshed in the card, in seconds. Use the default value of 30 (recommended), or enter a new one as needed.
Map Provider Configuration Displays the default map provider.
16. Choose Add.
The card is added to the Overview page.
4.2.2.5.2 Purchase Order KPI Card
A Purchase Order KPI card allows you to monitor purchase orders with data in the back-end S4 or ECC system. The card displays the following:
● The status of each purchase order● The total number of purchase orders within a selected time range● The total number of the statuses of all purchase orders in the selected time range
4.2.2.5.2.1 Adding a Purchase Order KPI Card
Procedure
1. In the Overview page, choose Card Settings and choose Add Card.2. Choose the KPI Card and do the following:
Field Value
Title Enter a title for the card.
Data Source Select the relevant data source:○ S4 Purchase Order Status Count○ ECC Purchase Order Generic
Data Set Select the data set for the card.
40 P U B L I CSAP Leonardo IoT Bridge Configuration and Administration
Configuration
Field Value
Show Total Select this checkbox if you want to display the total number of purchase orders on the card.
3. Choose Add.
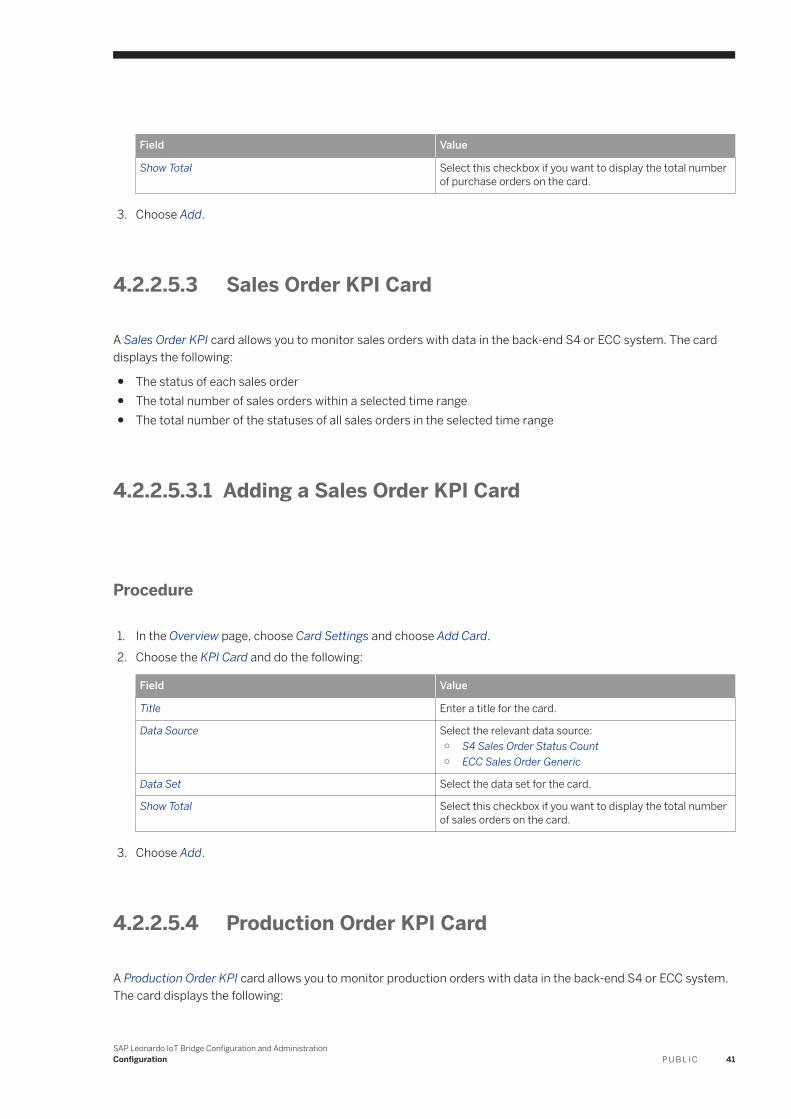
4.2.2.5.3 Sales Order KPI Card
A Sales Order KPI card allows you to monitor sales orders with data in the back-end S4 or ECC system. The card displays the following:
● The status of each sales order● The total number of sales orders within a selected time range● The total number of the statuses of all sales orders in the selected time range
4.2.2.5.3.1 Adding a Sales Order KPI Card
Procedure
1. In the Overview page, choose Card Settings and choose Add Card.2. Choose the KPI Card and do the following:
Field Value
Title Enter a title for the card.
Data Source Select the relevant data source:○ S4 Sales Order Status Count○ ECC Sales Order Generic
Data Set Select the data set for the card.
Show Total Select this checkbox if you want to display the total number of sales orders on the card.
3. Choose Add.
4.2.2.5.4 Production Order KPI Card
A Production Order KPI card allows you to monitor production orders with data in the back-end S4 or ECC system. The card displays the following:
SAP Leonardo IoT Bridge Configuration and AdministrationConfiguration P U B L I C 41

● The status of each production order● The total number of production orders within a selected time range● The total number of the statuses of all production orders in the selected time range
4.2.2.5.4.1 Adding a Production Order KPI Card
Procedure
1. In the Overview page, choose Card Settings and choose Add Card.2. Choose the KPI Card and do the following:
Field Value
Title Enter a title for the card.
Data Source Select the relevant data source:○ S4 Production Order Status Count○ ECC Production Order Generic
Data Set Select the data set for the card.
Show Total Select this checkbox if you want to display the total number of production orders on the card.
3. Choose Add.
4.2.2.5.5 Inbound Delivery KPI Card
An Inbound Delivery KPI card allows you to monitor Inbound deliveries with data in the back-end S4 system. The card displays the following:
● The status of each Inbound delivery● The total number of Inbound deliveries within a selected time range● The total number of the statuses of all Inbound deliveries in the selected time range
42 P U B L I CSAP Leonardo IoT Bridge Configuration and Administration
Configuration
4.2.2.5.5.1 Adding an Inbound Delivery KPI Card
Procedure
1. In the Overview page, choose Card Settings and choose Add Card.2. Choose the KPI Card and do the following:
Field Value
Title Enter a title for the card.
Data Source Select S4 Inbound Delivery.
Data Set Select the data set for the card.
Show Total Select this checkbox if you want to display the total number of Inbound deliveries on the card.
3. Choose Add.
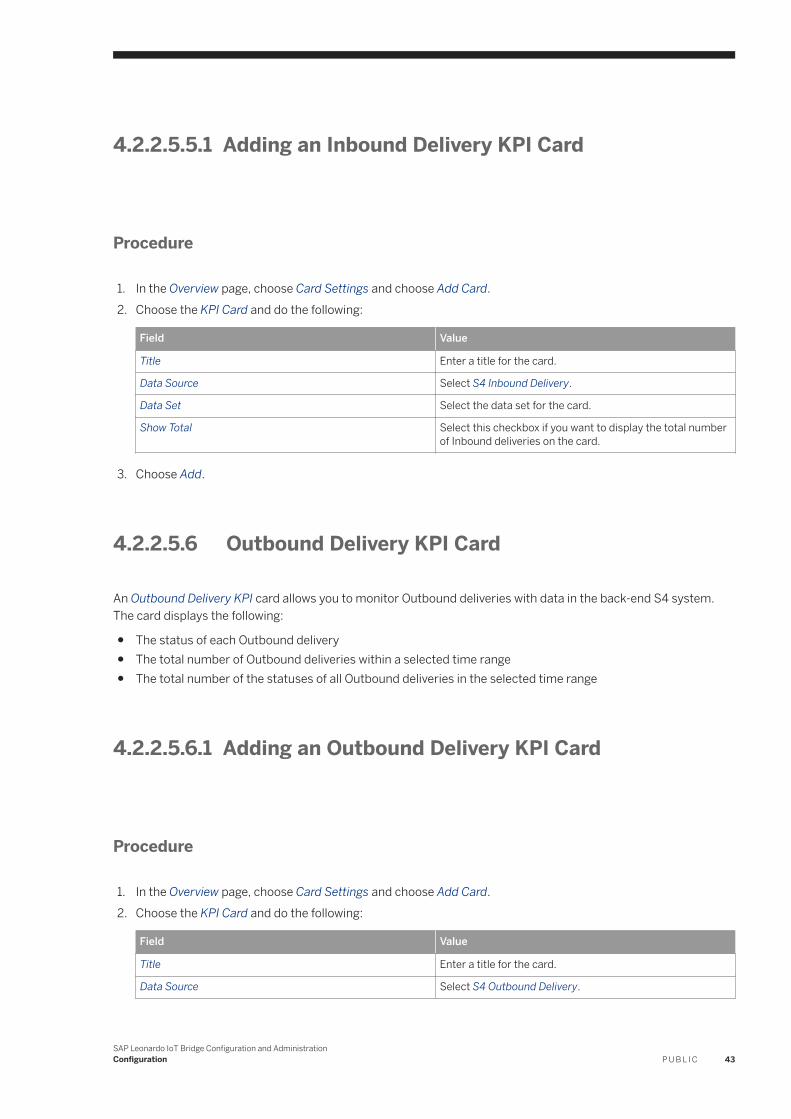
4.2.2.5.6 Outbound Delivery KPI Card
An Outbound Delivery KPI card allows you to monitor Outbound deliveries with data in the back-end S4 system. The card displays the following:
● The status of each Outbound delivery● The total number of Outbound deliveries within a selected time range● The total number of the statuses of all Outbound deliveries in the selected time range
4.2.2.5.6.1 Adding an Outbound Delivery KPI Card
Procedure
1. In the Overview page, choose Card Settings and choose Add Card.2. Choose the KPI Card and do the following:
Field Value
Title Enter a title for the card.
Data Source Select S4 Outbound Delivery.
SAP Leonardo IoT Bridge Configuration and AdministrationConfiguration P U B L I C 43
Field Value
Data Set Select the data set for the card.
Show Total Select this checkbox if you want to display the total number of Outbound deliveries on the card.
3. Choose Add.
4.3 Configuring Resolution Options
You create resolution options to enable users to respond to notifications of events. Each notification can be associated with up to three possible resolution options.
4.3.1 Creating a Resolution Option
Context
You must be a key user to create a resolution option.
After you create a resolution option, you can associate it with an event and add a navigation target to that association. For more information, see Creating an Event [page 57].
Procedure
1. On the launchpad, choose the Quick Create and Configuration tile and then choose Resolution Options.2. On the Resolution Options page, choose the + icon.3. On the New Resolution Option page, do the following:
Field Description
Title Enter a title for the resolution option. This field is required.
Description Enter a description of the resolution option. This field is required.
Referencing a Data Service
If you want to reference the result of a data service call made when the Resolution Support page is loaded, use this field to include reference fields from the result. Use the same syntax that is used for referencing static event data. The paths to the data values must exist within the data service response to be shown at runtime.
44 P U B L I CSAP Leonardo IoT Bridge Configuration and Administration
Configuration
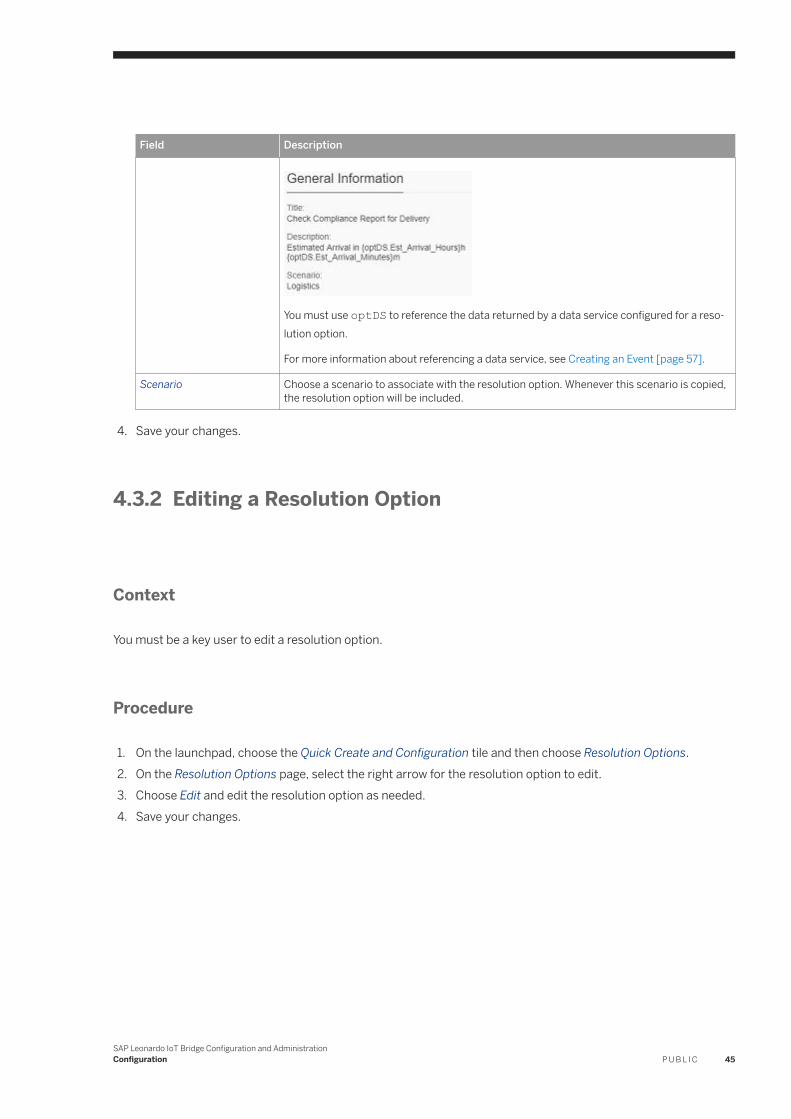
Field Description
You must use optDS to reference the data returned by a data service configured for a resolution option.
For more information about referencing a data service, see Creating an Event [page 57].
Scenario Choose a scenario to associate with the resolution option. Whenever this scenario is copied, the resolution option will be included.
4. Save your changes.
4.3.2 Editing a Resolution Option
Context
You must be a key user to edit a resolution option.
Procedure
1. On the launchpad, choose the Quick Create and Configuration tile and then choose Resolution Options.2. On the Resolution Options page, select the right arrow for the resolution option to edit.3. Choose Edit and edit the resolution option as needed.4. Save your changes.
SAP Leonardo IoT Bridge Configuration and AdministrationConfiguration P U B L I C 45

4.3.3 Deleting a Resolution Option
Context
You must be a key user to delete a resolution option.
Procedure
1. On the launchpad, choose the Quick Create and Configuration tile and then choose Resolution Options.2. On the Resolution Options page, select the radio button for the resolution option to delete.3. Choose Delete.
4.3.4 Additional Resolution Support Information
The Resolution Support page can render additional information related to a notification to help users decide how to resolve an event. This information is displayed in the KPI and Affected Items areas.
Each of these sections requires a particular structure for the data. This structure allows for some flexibility in what is displayed, within certain design constraints.
The following example highlights the additional information areas in the Resolution Support page. The KPI area is highlighted in green, the Affected Items area in orange, and notifications in gray.
46 P U B L I CSAP Leonardo IoT Bridge Configuration and Administration
Configuration
4.3.4.1 Adding KPIs to Resolution Support
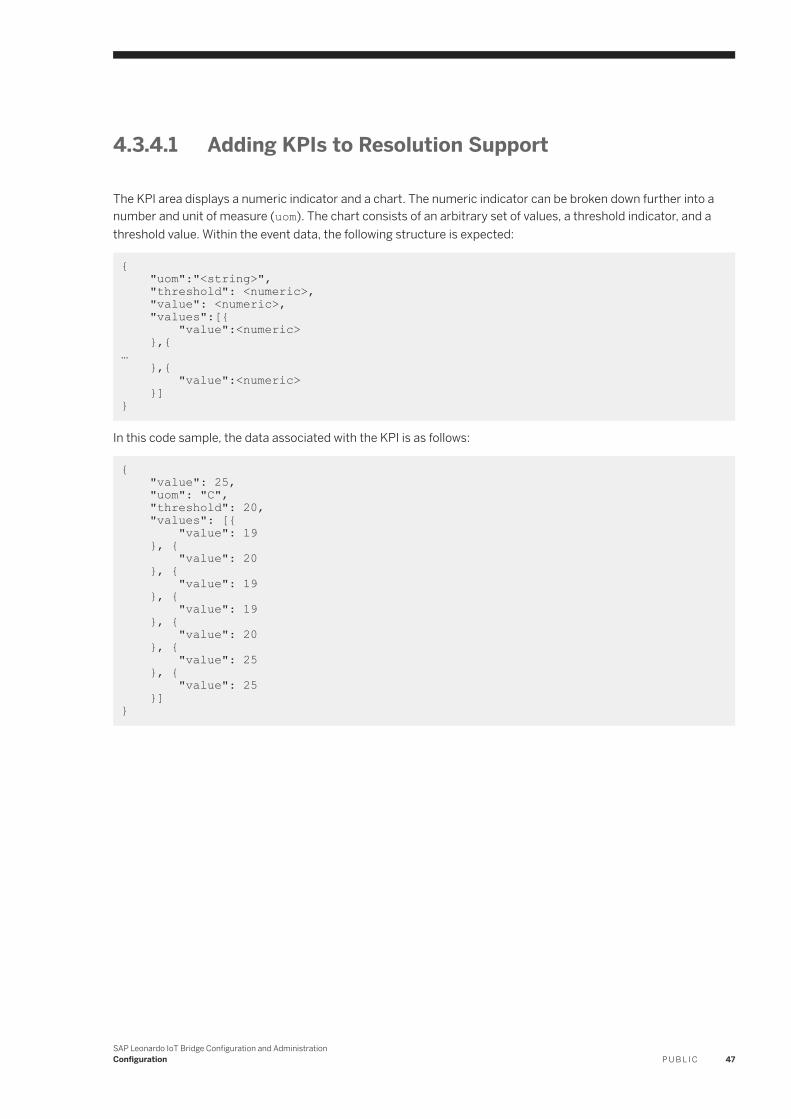
The KPI area displays a numeric indicator and a chart. The numeric indicator can be broken down further into a number and unit of measure (uom). The chart consists of an arbitrary set of values, a threshold indicator, and a threshold value. Within the event data, the following structure is expected:
{ "uom":"<string>", "threshold": <numeric>, "value": <numeric>, "values":[{ "value":<numeric> },{… },{ "value":<numeric> }]}
In this code sample, the data associated with the KPI is as follows:
{ "value": 25, "uom": "C", "threshold": 20, "values": [{ "value": 19 }, { "value": 20 }, { "value": 19 }, { "value": 19 }, { "value": 20 }, { "value": 25 }, { "value": 25 }]}
SAP Leonardo IoT Bridge Configuration and AdministrationConfiguration P U B L I C 47

On the Event-Notification Configuration page, the key user must define the path to the KPI information in the event data. Therefore, if the event data sent to Bridge is as follows:
Then the key user must enter {properties.kpi} (as indicated by the green arrow above) in the KPI Path field on the Event-Notification Configuration page.
4.3.4.2 Adding Affected Items to Resolution Support
The Affected Items area requires a specific data structure to generate UI elements. Two UI field types are supported: header_fields and body_fields. You can specify an unlimited number of these fields in the event data.
48 P U B L I CSAP Leonardo IoT Bridge Configuration and Administration
Configuration
Field Type: header_fields
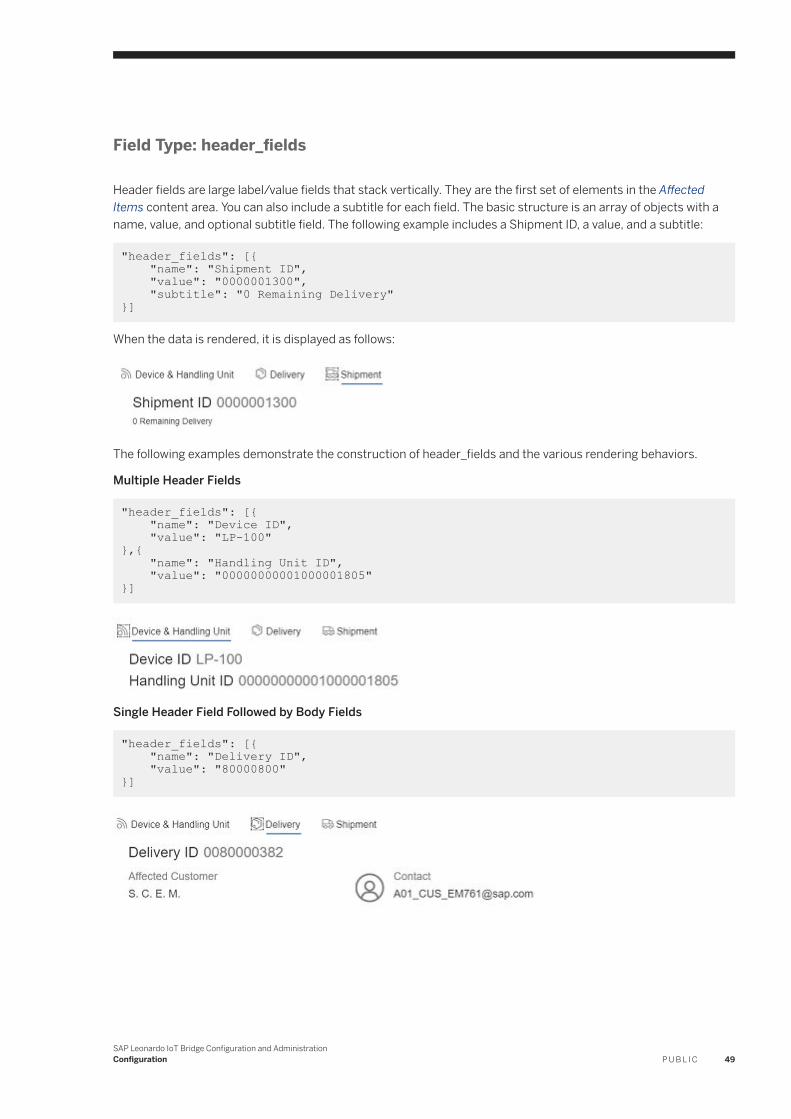
Header fields are large label/value fields that stack vertically. They are the first set of elements in the Affected Items content area. You can also include a subtitle for each field. The basic structure is an array of objects with a name, value, and optional subtitle field. The following example includes a Shipment ID, a value, and a subtitle:
"header_fields": [{ "name": "Shipment ID", "value": "0000001300", "subtitle": "0 Remaining Delivery"}]
When the data is rendered, it is displayed as follows:
The following examples demonstrate the construction of header_fields and the various rendering behaviors.
Multiple Header Fields
"header_fields": [{ "name": "Device ID", "value": "LP-100"},{ "name": "Handling Unit ID", "value": "00000000001000001805"}]
Single Header Field Followed by Body Fields
"header_fields": [{ "name": "Delivery ID", "value": "80000800"}]
SAP Leonardo IoT Bridge Configuration and AdministrationConfiguration P U B L I C 49

4.3.4.3 Configuring Affected Items
To specify the set of affected items to be displayed in the Affected Items area, the key user must define the following in the Affected Items section of the Event Notification Configuration page:
● Display name● Icon● Navigation● Data binding path: Points to the part of the event data from which the UI should be generated
Each item defined in the list will be displayed in the Affected Items area.
The items on the Event Notification Configuration directly map to the tabs on the Resolution Support page.
When you add a new item, a form screen is displayed to configure the affected items. The following is the configuration form for the example above:
50 P U B L I CSAP Leonardo IoT Bridge Configuration and Administration
Configuration
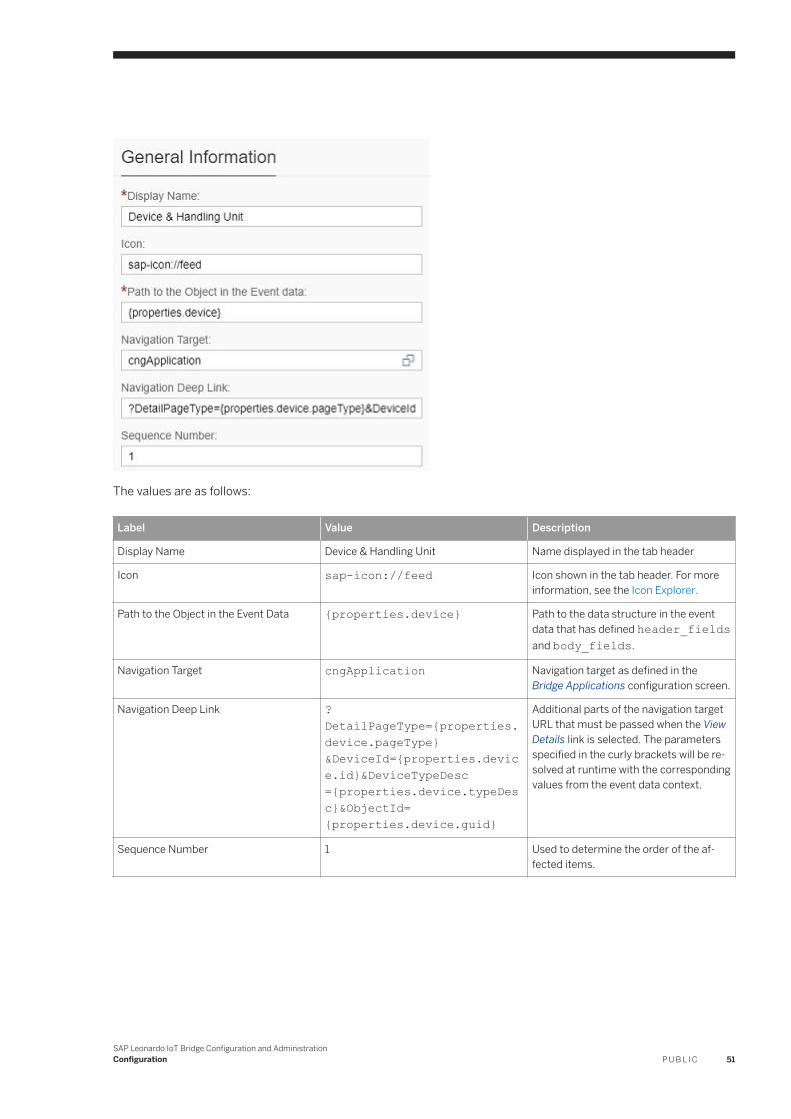
The values are as follows:
Label Value Description
Display Name Device & Handling Unit Name displayed in the tab header
Icon sap-icon://feed Icon shown in the tab header. For more information, see the Icon Explorer.
Path to the Object in the Event Data {properties.device} Path to the data structure in the event data that has defined header_fields and body_fields.
Navigation Target cngApplication Navigation target as defined in the Bridge Applications configuration screen.
Navigation Deep Link ?DetailPageType={properties.device.pageType} &DeviceId={properties.device.id}&DeviceTypeDesc ={properties.device.typeDesc}&ObjectId= {properties.device.guid}
Additional parts of the navigation target URL that must be passed when the View Details link is selected. The parameters specified in the curly brackets will be resolved at runtime with the corresponding values from the event data context.
Sequence Number 1 Used to determine the order of the affected items.
SAP Leonardo IoT Bridge Configuration and AdministrationConfiguration P U B L I C 51
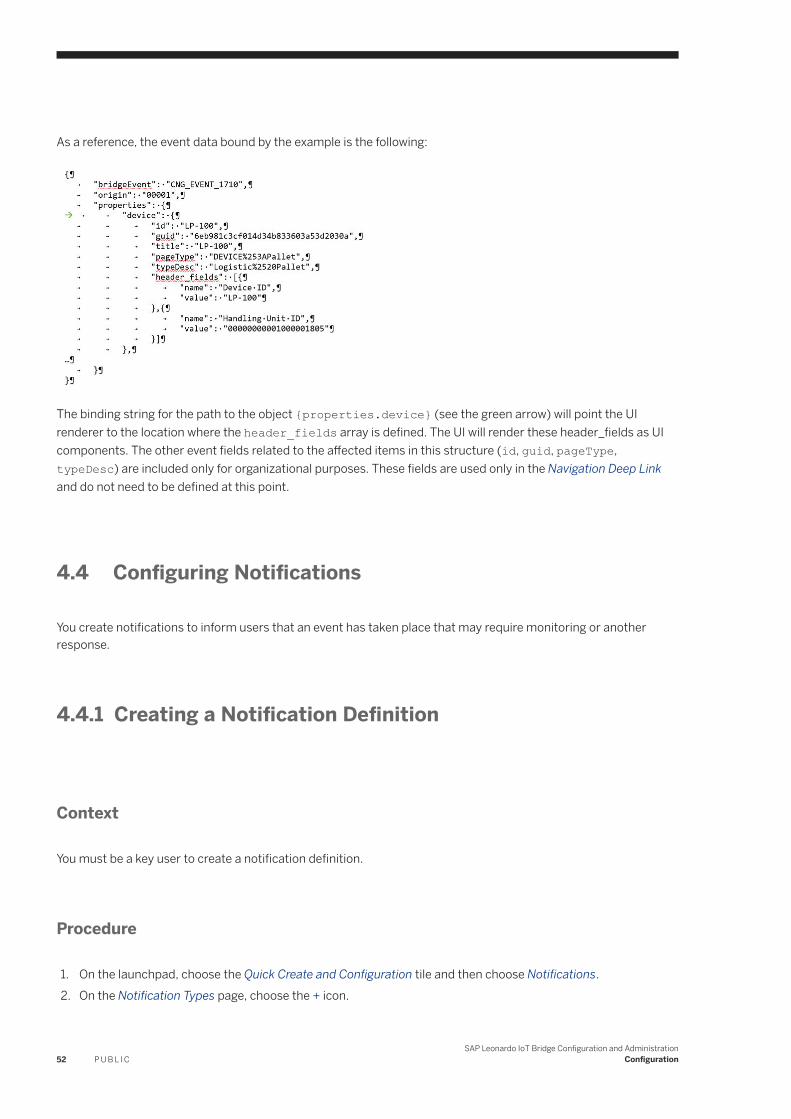
As a reference, the event data bound by the example is the following:
The binding string for the path to the object {properties.device} (see the green arrow) will point the UI renderer to the location where the header_fields array is defined. The UI will render these header_fields as UI components. The other event fields related to the affected items in this structure (id, guid, pageType, typeDesc) are included only for organizational purposes. These fields are used only in the Navigation Deep Link and do not need to be defined at this point.
4.4 Configuring Notifications
You create notifications to inform users that an event has taken place that may require monitoring or another response.
4.4.1 Creating a Notification Definition
Context
You must be a key user to create a notification definition.
Procedure
1. On the launchpad, choose the Quick Create and Configuration tile and then choose Notifications.2. On the Notification Types page, choose the + icon.
52 P U B L I CSAP Leonardo IoT Bridge Configuration and Administration
Configuration
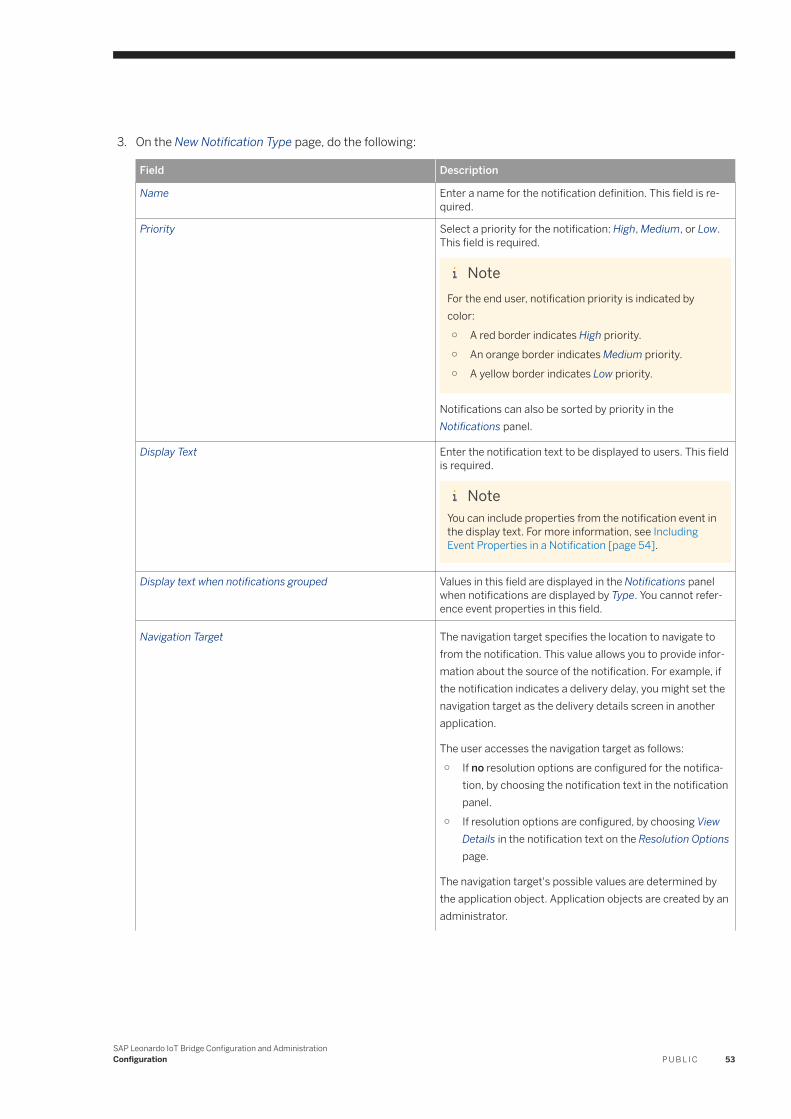
3. On the New Notification Type page, do the following:
Field Description
Name Enter a name for the notification definition. This field is required.
Priority Select a priority for the notification: High, Medium, or Low. This field is required.
NoteFor the end user, notification priority is indicated by color:○ A red border indicates High priority.○ An orange border indicates Medium priority.○ A yellow border indicates Low priority.
Notifications can also be sorted by priority in the Notifications panel.
Display Text Enter the notification text to be displayed to users. This field is required.
NoteYou can include properties from the notification event in the display text. For more information, see Including Event Properties in a Notification [page 54].
Display text when notifications grouped Values in this field are displayed in the Notifications panel when notifications are displayed by Type. You cannot reference event properties in this field.
Navigation Target The navigation target specifies the location to navigate to from the notification. This value allows you to provide information about the source of the notification. For example, if the notification indicates a delivery delay, you might set the navigation target as the delivery details screen in another application.
The user accesses the navigation target as follows:○ If no resolution options are configured for the notifica
tion, by choosing the notification text in the notification panel.
○ If resolution options are configured, by choosing View Details in the notification text on the Resolution Options page.
The navigation target's possible values are determined by the application object. Application objects are created by an administrator.
SAP Leonardo IoT Bridge Configuration and AdministrationConfiguration P U B L I C 53
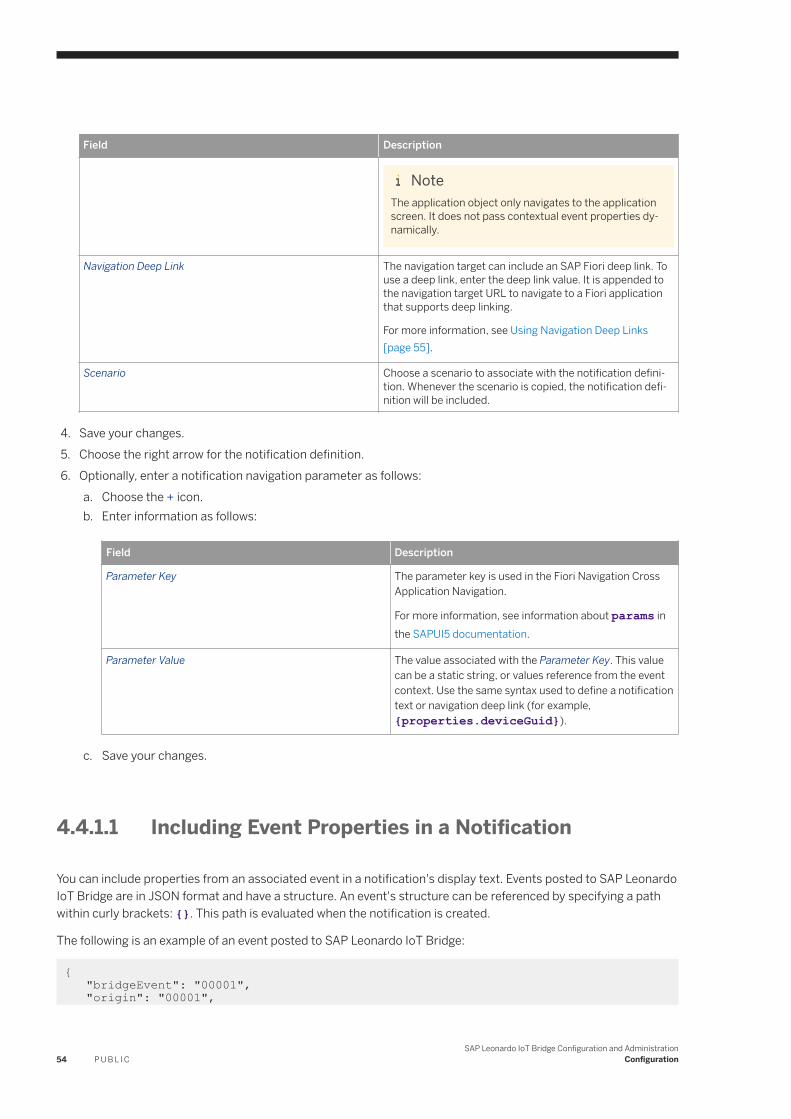
Field Description
NoteThe application object only navigates to the application screen. It does not pass contextual event properties dynamically.
Navigation Deep Link The navigation target can include an SAP Fiori deep link. To use a deep link, enter the deep link value. It is appended to the navigation target URL to navigate to a Fiori application that supports deep linking.
For more information, see Using Navigation Deep Links [page 55].
Scenario Choose a scenario to associate with the notification definition. Whenever the scenario is copied, the notification definition will be included.
4. Save your changes.5. Choose the right arrow for the notification definition.6. Optionally, enter a notification navigation parameter as follows:
a. Choose the + icon.b. Enter information as follows:
Field Description
Parameter Key The parameter key is used in the Fiori Navigation Cross Application Navigation.
For more information, see information about params in the SAPUI5 documentation.
Parameter Value The value associated with the Parameter Key. This value can be a static string, or values reference from the event context. Use the same syntax used to define a notification text or navigation deep link (for example, {properties.deviceGuid}).
c. Save your changes.
4.4.1.1 Including Event Properties in a Notification
You can include properties from an associated event in a notification's display text. Events posted to SAP Leonardo IoT Bridge are in JSON format and have a structure. An event's structure can be referenced by specifying a path within curly brackets: {}. This path is evaluated when the notification is created.
The following is an example of an event posted to SAP Leonardo IoT Bridge:
{ "bridgeEvent": "00001", "origin": "00001",
54 P U B L I CSAP Leonardo IoT Bridge Configuration and Administration
Configuration
"properties": { "deviceGuid": "CTRGLS-DE-132", "documentJsonArray": [ { "Internal_HU_Number": "0000000674", "Internal_HU_Item": "000001", "External_HU_Number": "00000000001000000446", "External_HU_Number2": "CTRGLS-DE-120",… "Delivery_Status": "Pick Complete" } ],… }}
The following sample display text input references some values passed in via the event posting:
Device {properties.deviceGuid} exceeded temperature threshold. The following deliveries are being shipped in the device: {properties.documentJsonArray.Internal_HU_Number }.
In the example event posting JSON, the deviceGuid (via the path {properties.deviceGuid}) resolves to CTRGLS-DE-132. The Internal_HU_Number resolves to 0000000674. The Display Text field will therefore create a notification with the following text:
Device CTRGLS-DE-132 exceeded temperature threshold. The following deliveries are being shipped in the device: 0000000674.
If an array is present, as denoted by square brackets [] in the JSON, the values from the event posting JSON are included in the display text in a comma-separated list. If there were two deliveries indicated in the example JSON, the display text would read as follows:
Device CTRGLS-DE-132 exceeded temperature threshold. The following deliveries are being shipped in the device: 0000000674, 0000000675.
4.4.1.2 Using Navigation Deep Links
Navigation in SAP Leonardo IoT Bridge is based on SAP Fiori intent-based navigation. This navigation framework supports deep links . Deep links allow navigation to screens within an SAP Fiori application. This navigation typically includes a unique object ID.
For example, assume you want to link to an application that can show the details of the deviceGuid sent in the example event posting data in Including Event Properties in a Notification [page 54]. If the application URL is as follows, the highlighted portion indicates the deep link:
https://<hostname>/component/index.html#Device-display&/Devices(‘CTRGLS-DE-132’)
For this example, you would specify values on the Notification Type page as follows:
Field Value
Navigation Target https://<hostname>/component/index.html#Device-display
Navigation Deep Link &/Devices(‘CTRGLS-DE-132’)
SAP Leonardo IoT Bridge Configuration and AdministrationConfiguration P U B L I C 55

The deviceGuid is resolved in the example above, but to specify that based on the data coming in from the event, the data can be referenced again by specifying the path to the data within curly brackets {}. For example, the deep link above can be specified as follows:
&/Devices('{properties.deviceGuid}')
4.4.2 Editing a Notification Definition
Context
You must be a key user to edit a notification definition.
Procedure
1. On the launchpad, choose the Quick Create and Configuration tile and then choose Notifications.2. On the Notification Types page, choose the right arrow for the notification definition to edit.3. Choose Edit and make changes to the notification definition as needed. For more information, see Creating a
Notification Definition [page 52].4. Save your changes.
4.4.3 Deleting a Notification Definition
Context
You must be a key user to delete a notification definition.
Procedure
1. On the launchpad, choose the Quick Create and Configuration tile and then choose Notifications.2. On the Notification Types page, select the radio button for the notification to delete.3. Choose Delete.
56 P U B L I CSAP Leonardo IoT Bridge Configuration and Administration
Configuration
4.5 Configuring Events
Events are the starting point for the notifications and resolution options displayed to the end user.
Events are triggered from an external application. They enter SAP Leonardo IoT Bridge via a REST API and are linked by an agreed-upon source event key. A source key is a field in a Bridge event and must be passed in via the REST API. On calling the REST API, a bridgeEvent parameter is specified. This parameter is checked against all defined events for a matching source event key. For each match that is found, event processing starts. Event processing includes:
● Determining the set of end user notification recipients (via persona assignment to end users and event assignment to personas)
● Creating notifications with information about the configured resolution options
You must be a key user to work with events.
4.5.1 Creating an Event
Context
You must be a key user to create an event.
Procedure
Create the Event1. On the launchpad, choose the Quick Create and Configuration tile and then choose Events.2. On the Events page, choose the + icon.3. On the New Event page, do the following:
Field Description
Source Event Key Enter the source event key value. This field is required.
This value must match the value passed in via the bridgeEvent field of the REST API. If using an HCI iFlow, the REST API is called there with this value passed in. The source event key can be the same for more than one registered event. This allows the posting of one back-end event to be handled by one or more personas with one or more event configurations.
Description Enter a description of the event to be displayed to the end user.
Scenario Choose a scenario to associate with the event. Whenever the scenario is copied, the event is included.
SAP Leonardo IoT Bridge Configuration and AdministrationConfiguration P U B L I C 57
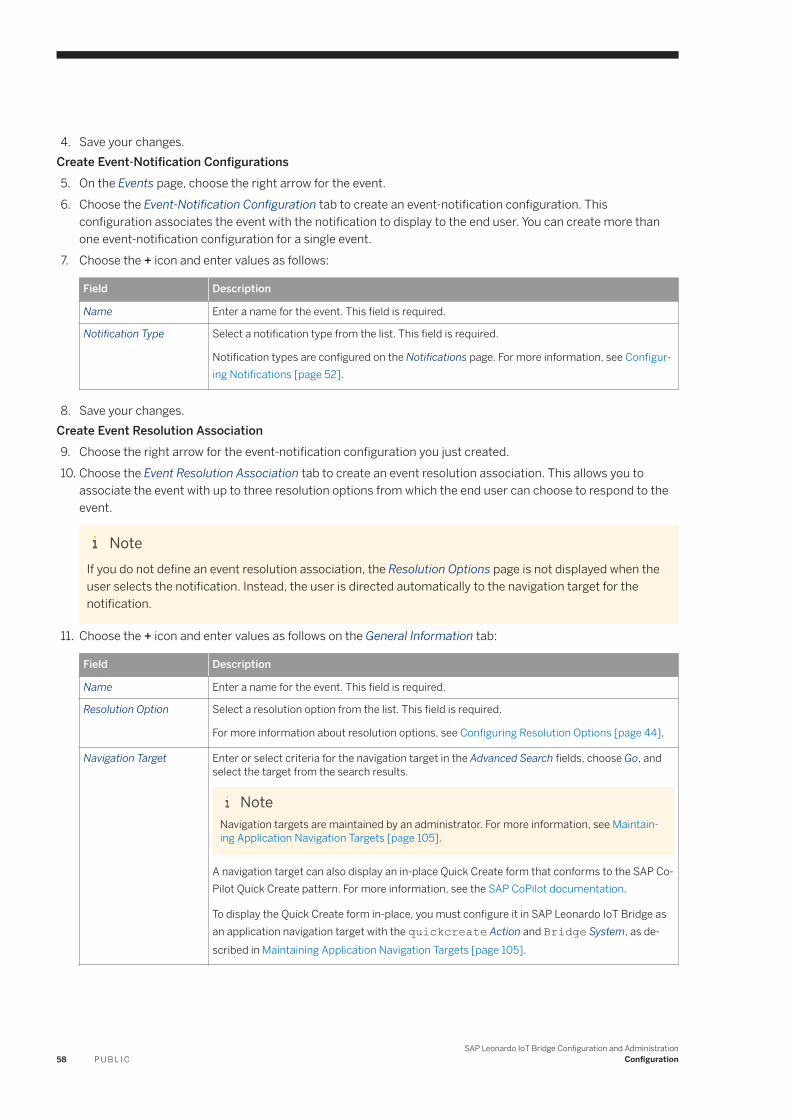
4. Save your changes.Create Event-Notification Configurations5. On the Events page, choose the right arrow for the event.6. Choose the Event-Notification Configuration tab to create an eventnotification configuration. This
configuration associates the event with the notification to display to the end user. You can create more than one eventnotification configuration for a single event.
7. Choose the + icon and enter values as follows:
Field Description
Name Enter a name for the event. This field is required.
Notification Type Select a notification type from the list. This field is required.
Notification types are configured on the Notifications page. For more information, see Configuring Notifications [page 52].
8. Save your changes.Create Event Resolution Association9. Choose the right arrow for the eventnotification configuration you just created.10. Choose the Event Resolution Association tab to create an event resolution association. This allows you to
associate the event with up to three resolution options from which the end user can choose to respond to the event.
NoteIf you do not define an event resolution association, the Resolution Options page is not displayed when the user selects the notification. Instead, the user is directed automatically to the navigation target for the notification.
11. Choose the + icon and enter values as follows on the General Information tab:
Field Description
Name Enter a name for the event. This field is required.
Resolution Option Select a resolution option from the list. This field is required.
For more information about resolution options, see Configuring Resolution Options [page 44].
Navigation Target Enter or select criteria for the navigation target in the Advanced Search fields, choose Go, and select the target from the search results.
NoteNavigation targets are maintained by an administrator. For more information, see Maintaining Application Navigation Targets [page 105].
A navigation target can also display an in-place Quick Create form that conforms to the SAP CoPilot Quick Create pattern. For more information, see the SAP CoPilot documentation.
To display the Quick Create form in-place, you must configure it in SAP Leonardo IoT Bridge as an application navigation target with the quickcreate Action and Bridge System, as described in Maintaining Application Navigation Targets [page 105].
58 P U B L I CSAP Leonardo IoT Bridge Configuration and Administration
Configuration
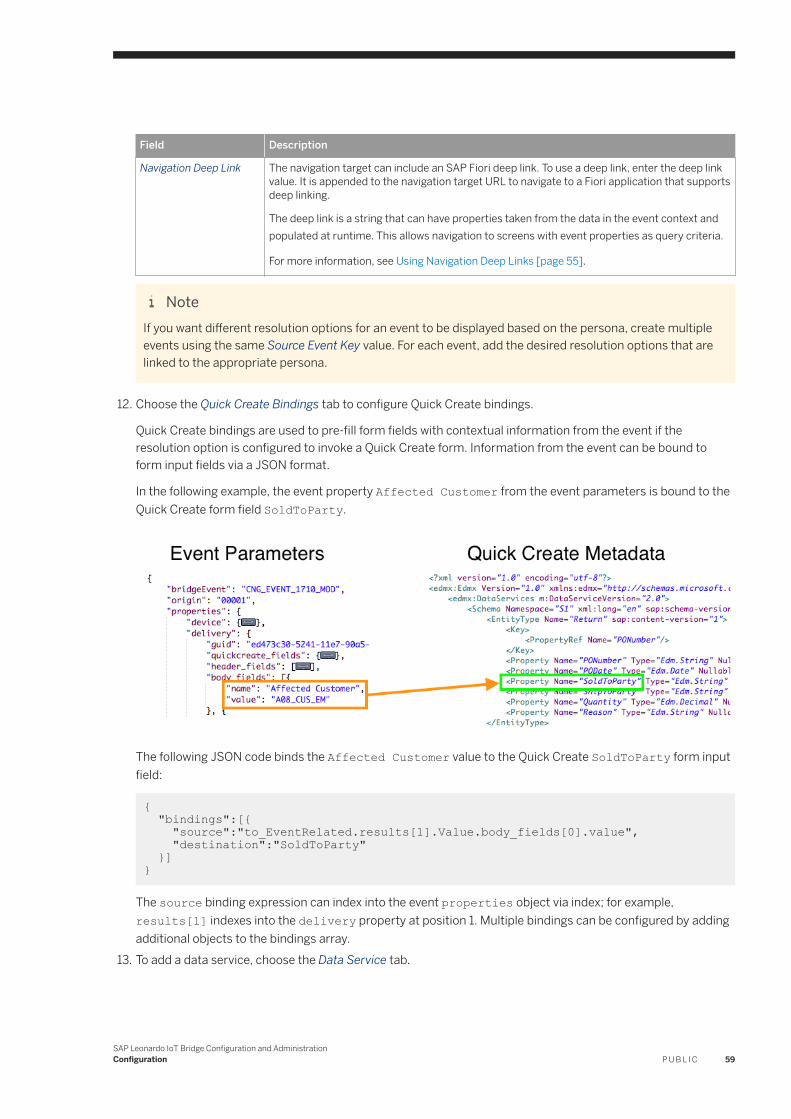
Field Description
Navigation Deep Link The navigation target can include an SAP Fiori deep link. To use a deep link, enter the deep link value. It is appended to the navigation target URL to navigate to a Fiori application that supports deep linking.
The deep link is a string that can have properties taken from the data in the event context and populated at runtime. This allows navigation to screens with event properties as query criteria.
For more information, see Using Navigation Deep Links [page 55].
NoteIf you want different resolution options for an event to be displayed based on the persona, create multiple events using the same Source Event Key value. For each event, add the desired resolution options that are linked to the appropriate persona.
12. Choose the Quick Create Bindings tab to configure Quick Create bindings.
Quick Create bindings are used to prefill form fields with contextual information from the event if the resolution option is configured to invoke a Quick Create form. Information from the event can be bound to form input fields via a JSON format.
In the following example, the event property Affected Customer from the event parameters is bound to the Quick Create form field SoldToParty.
The following JSON code binds the Affected Customer value to the Quick Create SoldToParty form input field:
{ "bindings":[{ "source":"to_EventRelated.results[1].Value.body_fields[0].value", "destination":"SoldToParty" }]}
The source binding expression can index into the event properties object via index; for example, results[1] indexes into the delivery property at position 1. Multiple bindings can be configured by adding additional objects to the bindings array.
13. To add a data service, choose the Data Service tab.
SAP Leonardo IoT Bridge Configuration and AdministrationConfiguration P U B L I C 59
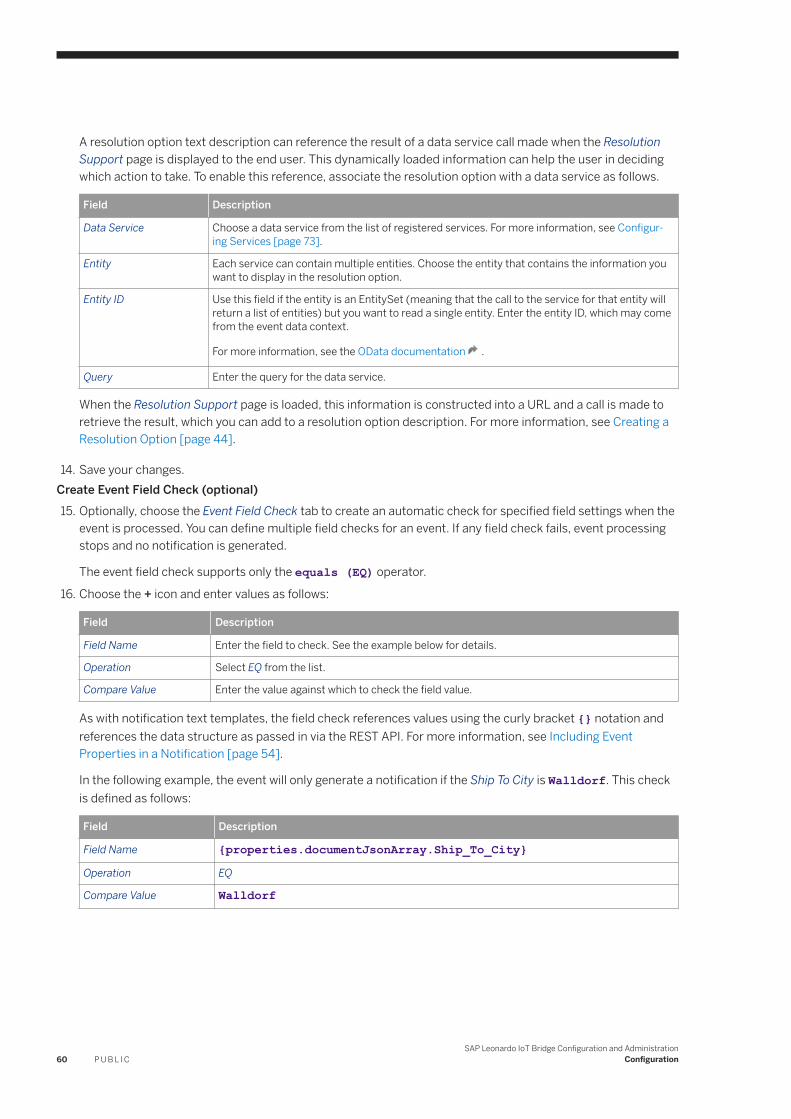
A resolution option text description can reference the result of a data service call made when the Resolution Support page is displayed to the end user. This dynamically loaded information can help the user in deciding which action to take. To enable this reference, associate the resolution option with a data service as follows.
Field Description
Data Service Choose a data service from the list of registered services. For more information, see Configuring Services [page 73].
Entity Each service can contain multiple entities. Choose the entity that contains the information you want to display in the resolution option.
Entity ID Use this field if the entity is an EntitySet (meaning that the call to the service for that entity will return a list of entities) but you want to read a single entity. Enter the entity ID, which may come from the event data context.
For more information, see the OData documentation .
Query Enter the query for the data service.
When the Resolution Support page is loaded, this information is constructed into a URL and a call is made to retrieve the result, which you can add to a resolution option description. For more information, see Creating a Resolution Option [page 44].
14. Save your changes.Create Event Field Check (optional)15. Optionally, choose the Event Field Check tab to create an automatic check for specified field settings when the
event is processed. You can define multiple field checks for an event. If any field check fails, event processing stops and no notification is generated.
The event field check supports only the equals (EQ) operator.
16. Choose the + icon and enter values as follows:
Field Description
Field Name Enter the field to check. See the example below for details.
Operation Select EQ from the list.
Compare Value Enter the value against which to check the field value.
As with notification text templates, the field check references values using the curly bracket {} notation and references the data structure as passed in via the REST API. For more information, see Including Event Properties in a Notification [page 54].
In the following example, the event will only generate a notification if the Ship To City is Walldorf. This check is defined as follows:
Field Description
Field Name {properties.documentJsonArray.Ship_To_City}Operation EQ
Compare Value Walldorf
60 P U B L I CSAP Leonardo IoT Bridge Configuration and Administration
Configuration
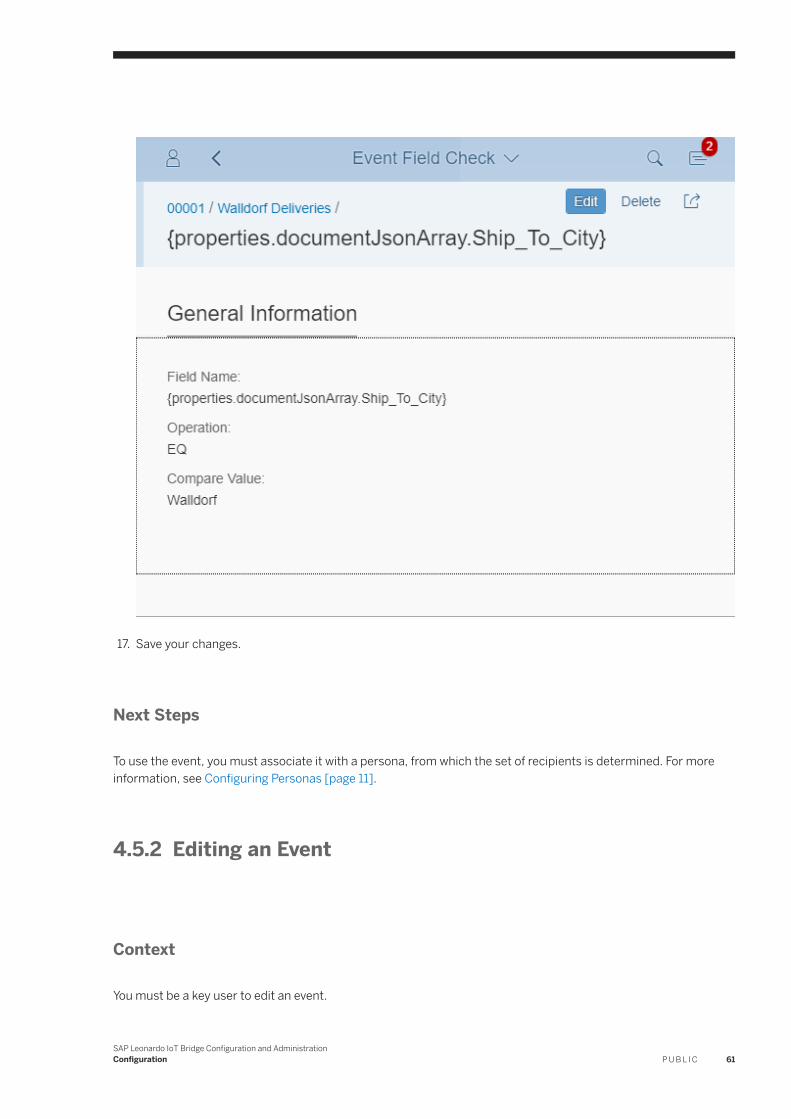
17. Save your changes.
Next Steps
To use the event, you must associate it with a persona, from which the set of recipients is determined. For more information, see Configuring Personas [page 11].
4.5.2 Editing an Event
Context
You must be a key user to edit an event.
SAP Leonardo IoT Bridge Configuration and AdministrationConfiguration P U B L I C 61
Procedure
1. On the launchpad, choose the Quick Create and Configuration tile and then choose Events.2. On the Events page, choose the right arrow for the event to edit.3. Choose Edit and make changes to the event as needed. For more information, see Creating an Event [page 57].4. Save your changes.
4.5.3 Deleting an Event
Context
You must be a key user to delete an event.
Procedure
1. On the launchpad, choose the Quick Create and Configuration tile and then choose Events.2. On the Events page, select the radio button for the event to delete.3. Choose Delete.
4.6 Configuring Processes
When an event occurs and the Resolution Center page is displayed, it can be helpful for the end user to know where the event-triggering object is in the process. This additional context can be used to help the user make an informed decision about how to resolve the issue.
The key user can define processes to visualize them in this way. The following example depicts a visualized process. In this example, the Ordering process has five subprocesses: Inbound Delivery, Supply Inventory Management, Production, Outbound Warehouse Management, and Outbound Delivery. The Ordering node is defined as a Business Process and the subnodes as Process Steps. The subnodes are connected in a particular sequence.
62 P U B L I CSAP Leonardo IoT Bridge Configuration and Administration
Configuration
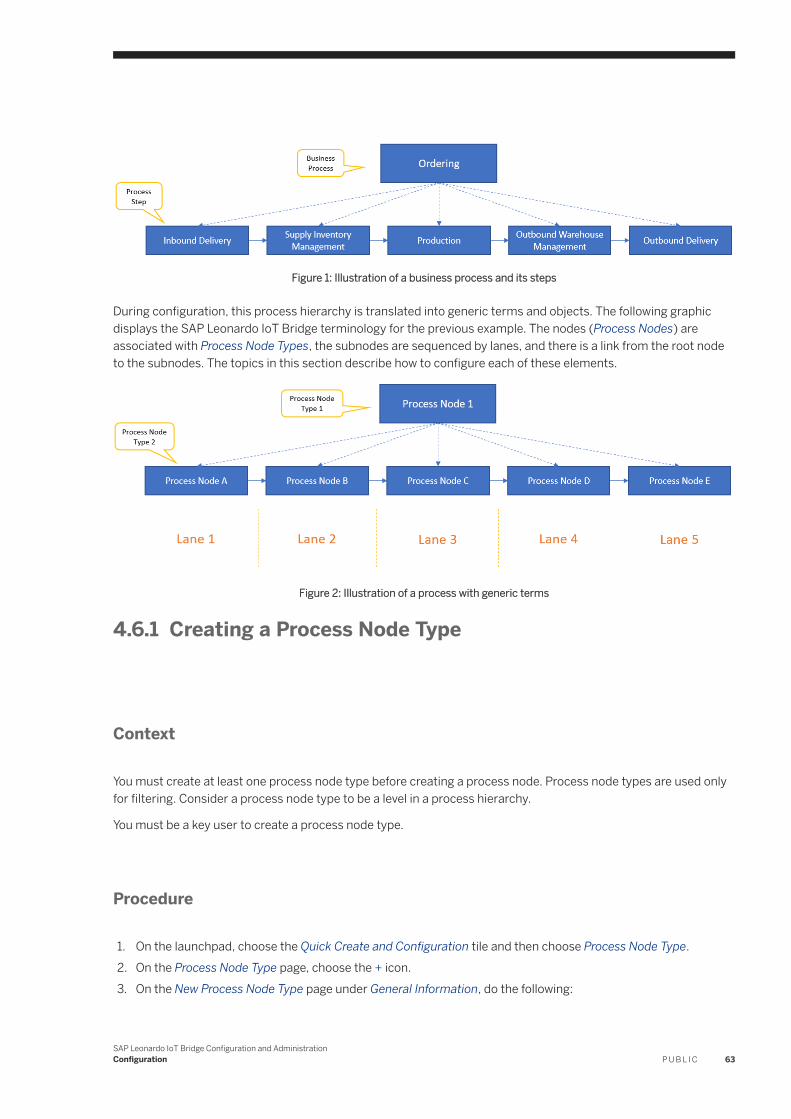
Figure 1: Illustration of a business process and its steps
During configuration, this process hierarchy is translated into generic terms and objects. The following graphic displays the SAP Leonardo IoT Bridge terminology for the previous example. The nodes (Process Nodes) are associated with Process Node Types, the subnodes are sequenced by lanes, and there is a link from the root node to the subnodes. The topics in this section describe how to configure each of these elements.
Figure 2: Illustration of a process with generic terms
4.6.1 Creating a Process Node Type
Context
You must create at least one process node type before creating a process node. Process node types are used only for filtering. Consider a process node type to be a level in a process hierarchy.
You must be a key user to create a process node type.
Procedure
1. On the launchpad, choose the Quick Create and Configuration tile and then choose Process Node Type.2. On the Process Node Type page, choose the + icon.3. On the New Process Node Type page under General Information, do the following:
SAP Leonardo IoT Bridge Configuration and AdministrationConfiguration P U B L I C 63
Field Value
Name Enter the name of the process node type. The Name field is used to reference this object in the Process Node configuration screens.
Description Enter a description to document its use.
4.6.2 Creating a Process Node
Prerequisites
A process node type has been created. For more information, see Creating a Process Node Type [page 63].
Context
You must be a key user to create a process node.
Procedure
1. On the launchpad, choose the Quick Create and Configuration tile and then choose Process Node.2. On the Process Node page, choose the + icon.3. On the New Process Node page under General Information, do the following:
Field Value
Name Enter a name for the process node. The Name field is used to reference this object when associating a link between nodes during configuration.
Description Enter a description of the process node to document its use.
Process Node Type Select a process node type from the list.
4. On the New Process Node page under Service, do the following:
Field Value
Service Optionally, associate an OData service with the process node. The OData service should have annotations defined and will render a timeline when associated with an event. For more information, see the annotation documentation for the Timeline Process Node Renderer [page 65].
64 P U B L I CSAP Leonardo IoT Bridge Configuration and Administration
Configuration
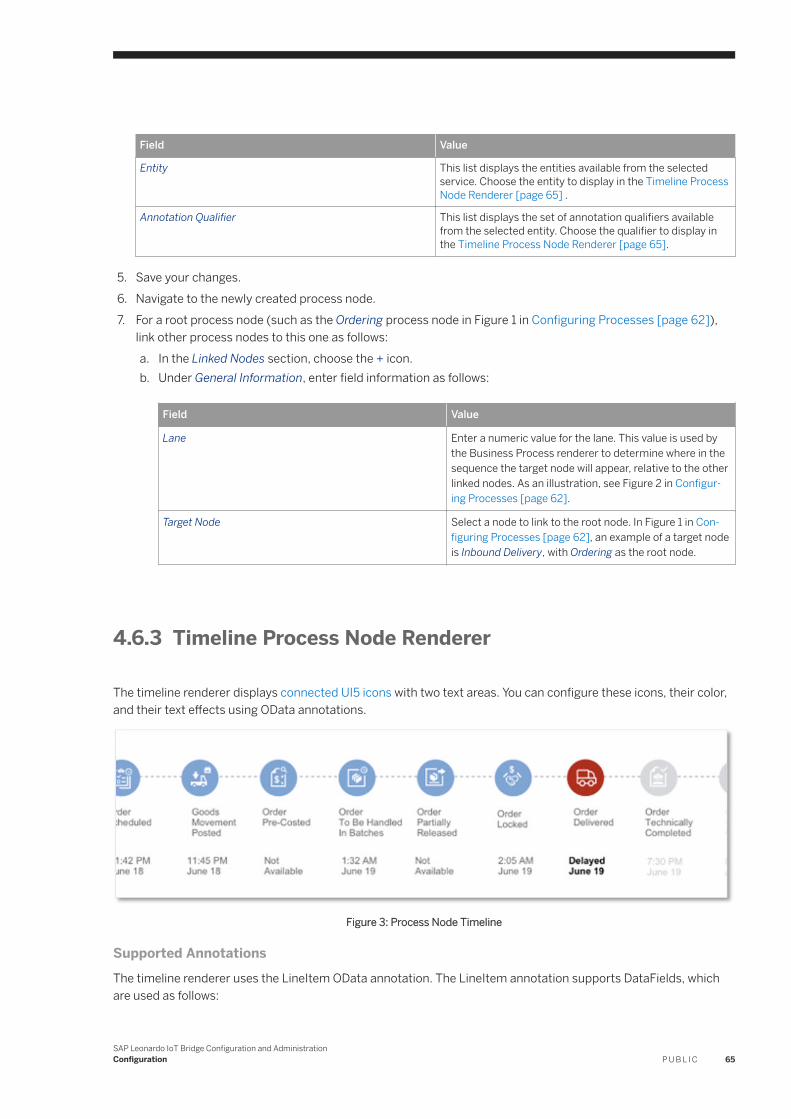
Field Value
Entity This list displays the entities available from the selected service. Choose the entity to display in the Timeline Process Node Renderer [page 65] .
Annotation Qualifier This list displays the set of annotation qualifiers available from the selected entity. Choose the qualifier to display in the Timeline Process Node Renderer [page 65].
5. Save your changes.6. Navigate to the newly created process node.7. For a root process node (such as the Ordering process node in Figure 1 in Configuring Processes [page 62]),
link other process nodes to this one as follows:a. In the Linked Nodes section, choose the + icon.b. Under General Information, enter field information as follows:
Field Value
Lane Enter a numeric value for the lane. This value is used by the Business Process renderer to determine where in the sequence the target node will appear, relative to the other linked nodes. As an illustration, see Figure 2 in Configuring Processes [page 62].
Target Node Select a node to link to the root node. In Figure 1 in Configuring Processes [page 62], an example of a target node is Inbound Delivery, with Ordering as the root node.
4.6.3 Timeline Process Node Renderer
The timeline renderer displays connected UI5 icons with two text areas. You can configure these icons, their color, and their text effects using OData annotations.
Figure 3: Process Node Timeline
Supported AnnotationsThe timeline renderer uses the LineItem OData annotation. The LineItem annotation supports DataFields, which are used as follows:
SAP Leonardo IoT Bridge Configuration and AdministrationConfiguration P U B L I C 65
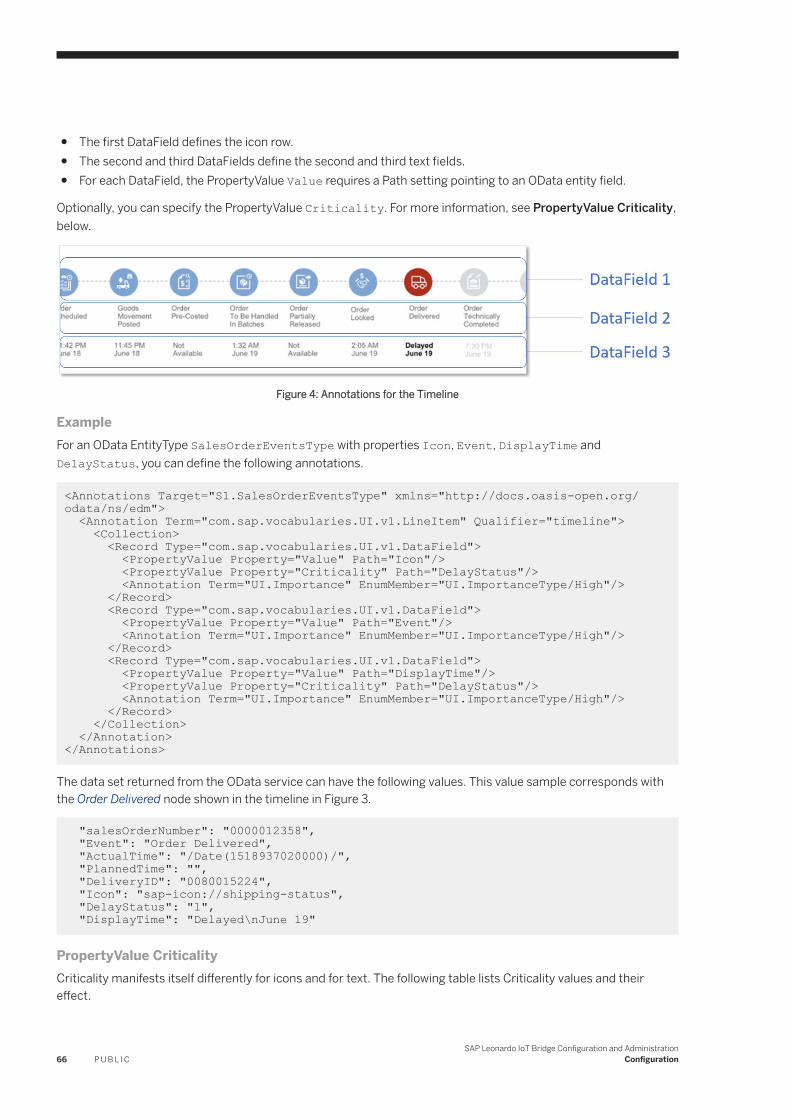
● The first DataField defines the icon row.● The second and third DataFields define the second and third text fields.● For each DataField, the PropertyValue Value requires a Path setting pointing to an OData entity field.
Optionally, you can specify the PropertyValue Criticality. For more information, see PropertyValue Criticality, below.
Figure 4: Annotations for the Timeline
ExampleFor an OData EntityType SalesOrderEventsType with properties Icon, Event, DisplayTime and DelayStatus, you can define the following annotations.
<Annotations Target="S1.SalesOrderEventsType" xmlns="http://docs.oasis-open.org/odata/ns/edm"> <Annotation Term="com.sap.vocabularies.UI.v1.LineItem" Qualifier="timeline"> <Collection> <Record Type="com.sap.vocabularies.UI.v1.DataField"> <PropertyValue Property="Value" Path="Icon"/> <PropertyValue Property="Criticality" Path="DelayStatus"/> <Annotation Term="UI.Importance" EnumMember="UI.ImportanceType/High"/> </Record> <Record Type="com.sap.vocabularies.UI.v1.DataField"> <PropertyValue Property="Value" Path="Event"/> <Annotation Term="UI.Importance" EnumMember="UI.ImportanceType/High"/> </Record> <Record Type="com.sap.vocabularies.UI.v1.DataField"> <PropertyValue Property="Value" Path="DisplayTime"/> <PropertyValue Property="Criticality" Path="DelayStatus"/> <Annotation Term="UI.Importance" EnumMember="UI.ImportanceType/High"/> </Record> </Collection> </Annotation></Annotations>
The data set returned from the OData service can have the following values. This value sample corresponds with the Order Delivered node shown in the timeline in Figure 3.
"salesOrderNumber": "0000012358", "Event": "Order Delivered", "ActualTime": "/Date(1518937020000)/", "PlannedTime": "", "DeliveryID": "0080015224", "Icon": "sap-icon://shipping-status", "DelayStatus": "1", "DisplayTime": "Delayed\nJune 19"
PropertyValue CriticalityCriticality manifests itself differently for icons and for text. The following table lists Criticality values and their effect.
66 P U B L I CSAP Leonardo IoT Bridge Configuration and Administration
Configuration
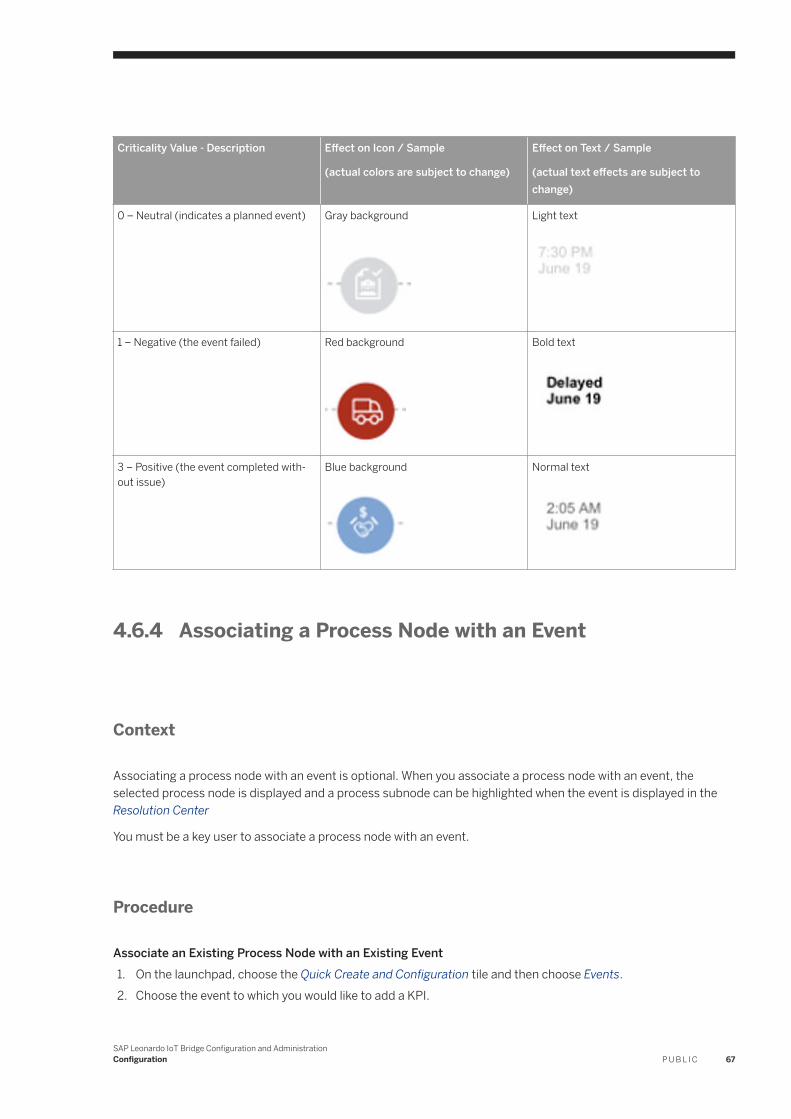
Criticality Value - Description Effect on Icon / Sample
(actual colors are subject to change)
Effect on Text / Sample
(actual text effects are subject to change)
0 – Neutral (indicates a planned event) Gray background Light text
1 – Negative (the event failed) Red background Bold text
3 – Positive (the event completed without issue)
Blue background Normal text
4.6.4 Associating a Process Node with an Event
Context
Associating a process node with an event is optional. When you associate a process node with an event, the selected process node is displayed and a process subnode can be highlighted when the event is displayed in the Resolution Center
You must be a key user to associate a process node with an event.
Procedure
Associate an Existing Process Node with an Existing Event1. On the launchpad, choose the Quick Create and Configuration tile and then choose Events.2. Choose the event to which you would like to add a KPI.
SAP Leonardo IoT Bridge Configuration and AdministrationConfiguration P U B L I C 67
3. Choose the Event Notification Configuration to which you would like to add the KPI.4. Navigate to the Process section.5. Choose Edit at the top of the page and do the following:
Process Node Select a process node with linked subnodes. (For more information about processes, see Configuring Processes [page 62]
Selected Process Node The list displays linked subnodes of the process node selected in the Process Node field. Select a process node from the list. This process node will be displayed and highlighted when the event is displayed in the Resolution Center.
6. Save your changes.Add Event-Specific Configurations to the Process Nodes (Optional)To show a process timeline in the context of the associated event, you must further configure the selected process node. (For more information about timeline rendering, see Timeline Process Node Renderer [page 65]). For example, if the event was triggered by a delivery, the displayed timeline should show events for that delivery only.7. On the Event configuration page, navigate to the Process Node Config section.8. Choose the + icon and enter information as follows:
Process Node The list displays linked subnodes of the process node selected in the Process Node field in the Process section. Select a process node to configure.
Subtitle Enter a subtitle for the selected process node. This subtitle can contain references to the event’s data context using curly bracket syntax. For example:
Delivery {properties.delivery.id} has an issue
Filter Enter an OData filter string to add to the OData service call associated with this process node. For more information, see OData Filter Field [page 73].
9. Save your changes.
4.7 Configuring KPIs
68 P U B L I CSAP Leonardo IoT Bridge Configuration and Administration
Configuration
4.7.1 Creating a KPI
Context
You must be a key user to create a KPI.
Procedure
1. On the launchpad, choose the Quick Create and Configuration tile and then choose KPI Configurations.2. On the KPI Configurations page, choose the + icon.3. On the New KPI page, under General Information, do the following:
Field Value
Name Enter the name of the KPI. The Name field is used to reference this KPI in the configuration screens (for example, when associating the KPI with an event).
Renderer Select a UI renderer.
NoteEach renderer may have different requirements for annotations. For more information, see KPI Renderers.
Title (overrides service-defined title) Some renderers may support titles. If a title is specified here, it overrides any title specified in the service annotations.
Subtitle (overrides service-defined subtitle) Some renderers may support subtitles. If a subtitle is specified here, it overrides any subtitle specified in the service annotations.
4. On the New KPI page, under Service, do the following:
Field Value
Service Select one of the configured OData services from the list. The KPI uses the selected service, with any required annotations, to display data. For information about annotations, see KPI Renderers.
Entity This list displays the set of entities available from the selected service. Choose the entity to display in the KPI renderer.
Annotation Qualifier This list displays the set of annotation qualifiers available from the selected entity. Choose the qualifier to display in the KPI renderer.
5. Save your changes.
SAP Leonardo IoT Bridge Configuration and AdministrationConfiguration P U B L I C 69
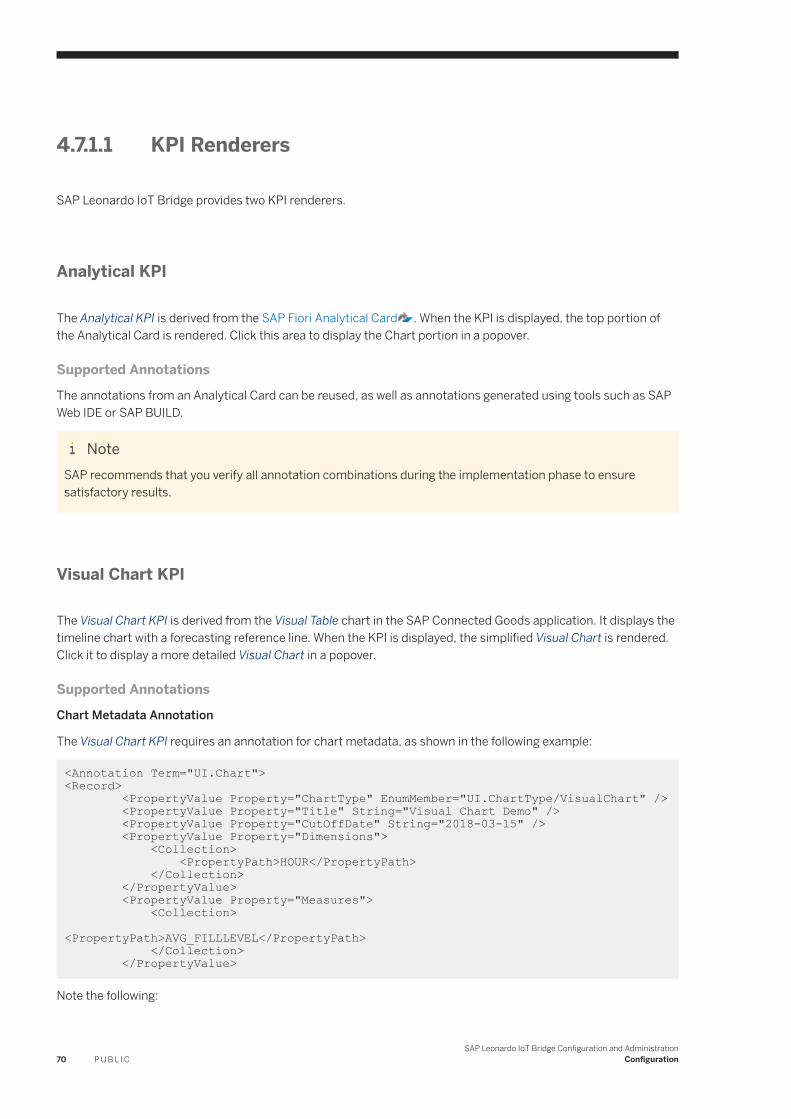
4.7.1.1 KPI Renderers
SAP Leonardo IoT Bridge provides two KPI renderers.
Analytical KPI
The Analytical KPI is derived from the SAP Fiori Analytical Card . When the KPI is displayed, the top portion of the Analytical Card is rendered. Click this area to display the Chart portion in a popover.
Supported AnnotationsThe annotations from an Analytical Card can be reused, as well as annotations generated using tools such as SAP Web IDE or SAP BUILD.
NoteSAP recommends that you verify all annotation combinations during the implementation phase to ensure satisfactory results.
Visual Chart KPI
The Visual Chart KPI is derived from the Visual Table chart in the SAP Connected Goods application. It displays the timeline chart with a forecasting reference line. When the KPI is displayed, the simplified Visual Chart is rendered. Click it to display a more detailed Visual Chart in a popover.
Supported AnnotationsChart Metadata Annotation
The Visual Chart KPI requires an annotation for chart metadata, as shown in the following example:
<Annotation Term="UI.Chart"> <Record> <PropertyValue Property="ChartType" EnumMember="UI.ChartType/VisualChart" /> <PropertyValue Property="Title" String="Visual Chart Demo" /> <PropertyValue Property="CutOffDate" String="2018-03-15" /> <PropertyValue Property="Dimensions"> <Collection> <PropertyPath>HOUR</PropertyPath> </Collection> </PropertyValue> <PropertyValue Property="Measures"> <Collection> <PropertyPath>AVG_FILLLEVEL</PropertyPath> </Collection> </PropertyValue>
Note the following:
70 P U B L I CSAP Leonardo IoT Bridge Configuration and Administration
Configuration
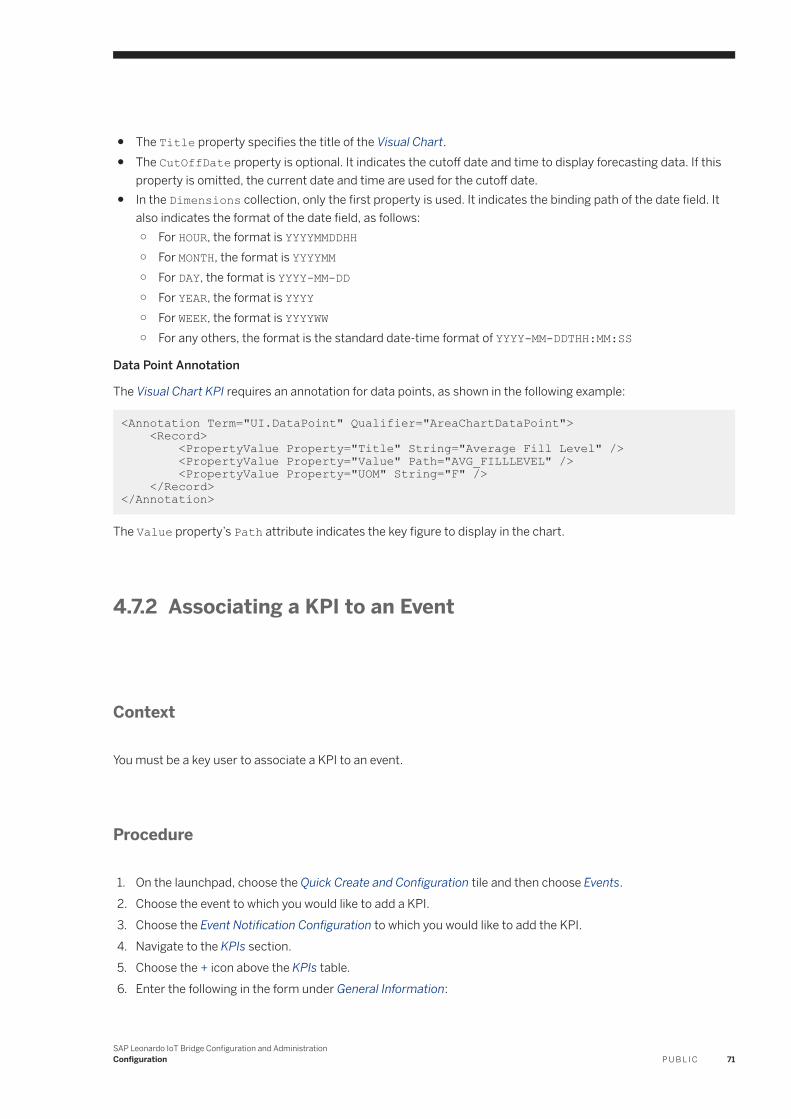
● The Title property specifies the title of the Visual Chart.● The CutOffDate property is optional. It indicates the cutoff date and time to display forecasting data. If this
property is omitted, the current date and time are used for the cutoff date.● In the Dimensions collection, only the first property is used. It indicates the binding path of the date field. It
also indicates the format of the date field, as follows:○ For HOUR, the format is YYYYMMDDHH○ For MONTH, the format is YYYYMM○ For DAY, the format is YYYY-MM-DD○ For YEAR, the format is YYYY○ For WEEK, the format is YYYYWW○ For any others, the format is the standard date-time format of YYYY-MM-DDTHH:MM:SS
Data Point Annotation
The Visual Chart KPI requires an annotation for data points, as shown in the following example:
<Annotation Term="UI.DataPoint" Qualifier="AreaChartDataPoint"> <Record> <PropertyValue Property="Title" String="Average Fill Level" /> <PropertyValue Property="Value" Path="AVG_FILLLEVEL" /> <PropertyValue Property="UOM" String="F" /> </Record></Annotation>
The Value property’s Path attribute indicates the key figure to display in the chart.
4.7.2 Associating a KPI to an Event
Context
You must be a key user to associate a KPI to an event.
Procedure
1. On the launchpad, choose the Quick Create and Configuration tile and then choose Events.2. Choose the event to which you would like to add a KPI.3. Choose the Event Notification Configuration to which you would like to add the KPI.4. Navigate to the KPIs section.5. Choose the + icon above the KPIs table.6. Enter the following in the form under General Information:
SAP Leonardo IoT Bridge Configuration and AdministrationConfiguration P U B L I C 71
KPI Select the KPI to associate it with the event.
Sequence Number Enter a numeric value to indicate the placement of the KPI relative to the other KPIs associated with the event.
Filter Optionally enter an OData filter string to support the KPI in the context of the event. When the KPI is loaded in the Resolution Center, this filter is applied to the OData service associated with the KPI. For more information, see OData Filter Field [page 73].
7. Save your changes.
4.7.3 Associating a KPI to a Resolution Option
Context
You must be a key user to associate a KPI to a resolution option.
Procedure
1. On the launchpad, choose the Quick Create and Configuration tile and then choose Events.2. Choose the event to which you would like to add a KPI.3. Choose the Event Notification Configuration to which you would like to add the KPI.4. Choose the Resolution Option Association to which you would like to add the KPI.5. Navigate to the KPIs section.6. Choose the + icon above the KPIs table.7. Enter the following in the form under General Information:
KPI Select the KPI to associate it with the event.
Sequence Number Enter a numeric value to indicate the placement of the KPI relative to the other KPIs associated with the resolution option.
Filter Optionally enter an OData filter string to support the KPI in the context of the event. When the KPI is loaded in the Resolution Center, this filter is applied to the OData service associated with the KPI. For more information, see OData Filter Field [page 73].
8. Save your changes.
72 P U B L I CSAP Leonardo IoT Bridge Configuration and Administration
Configuration

4.7.3.1 OData Filter Field
As with other event fields, an event’s data context can be referenced in the filter using a bracketed path. This reference allows dynamic filters to be passed to the associated OData service. For example, you may want to filter an OData service by the Delivery associated with an event. In this case, the value of the delivery ID from the inbound event can be passed as part of the filter string and compared against the OData property DeliveryID as follows:
DeliveryID eq '{properties.delivery.id}'
Because some filters may not be supported by the OData services (see SAP Note 1574568 , first verify that such a filter can be applied to a service by invoking it directly against the OData service.
4.8 Configuring Services
Services enable SAP Leonardo IoT Bridge to communicate with source applications. Key users can register and remove services in the Services area.
4.8.1 Registering a Service
Prerequisites
The source application is configured to work with SAP Leonardo IoT Bridge.
Context
You must be a key user to register a service.
Procedure
1. On the launchpad, choose the Quick Create and Configuration tile and then choose Services.2. On the Services page, choose the + icon.3. On the New Service page, do the following:
SAP Leonardo IoT Bridge Configuration and AdministrationConfiguration P U B L I C 73
Field Description
Name Enter a name for the service. This field is required.
Description Enter a description of the service.
System Select a preconfigured system from the list. This field is required.
Path Enter the relative path to the service. The path is added to the system URL to create the service URL. This field is required.
For example:
If the service Path is: /gw/odata/SAP/TT_DELIVERY_SERVICE;v=1
And the system URL is: https://server.hcisb.int.sap.hana.ondemand.com
The service URL links the Path to the system URL as follows:
https://server.hcisb.int.sap.hana.ondemand.com/gw/odata/SAP/TT_DELIVERY_SERVICE;v=1
4. Save your changes.
4.8.2 Editing a Service
Context
You must be a key user to edit a service.
Procedure
1. On the launchpad, choose the Quick Create and Configuration tile and then choose Services.2. On the Services page, choose the right arrow for the service to edit.3. Choose Edit and make changes to the service as needed. For more information, see Registering a Service
[page 73].4. Save your changes.
74 P U B L I CSAP Leonardo IoT Bridge Configuration and Administration
Configuration
4.8.3 Removing a Service
Context
You must be a key user to remove a service.
Procedure
1. On the launchpad, choose the Quick Create and Configuration tile and then choose Services.2. On the Services page, select the radio button for the service to delete.3. Choose Delete.
4.9 Configuring Floorplan Settings
With the Floorplan functionality, you can represent the indoor plans of facilities and buildings. Floorplan in SAP Leonardo IoT Bridge allows a view of the indoor spaces of facilities, factory shop floor layouts, warehouses, or other buildings. The Floorplan component can be configured to connect to sensor systems that detect activities and utilization within these spaces and calculate KPIs such as occupancy and utilization. This helps operational users get an overview of the utilization of the space and also see peak usage times. Floorplan also provides a live view to assist with planning operational activities.
For example, knowing the currently unoccupied loading bays within a distribution center helps direct transportation vehicles. Understanding the peak and low usage times of the loading bays can help improve the scheduling of transportation activities. Additionally, knowing the low utilization periods for an elevator can help in scheduling its maintenance. The Floorplan component can be configured to meet the requirements and needs of a specific business scenario.
The Floorplan configuration settings are described in the following sections. You must be an Administrator to configure Floorplan settings.
To configure Floorplan settings, go to the launchpad and navigate to Configuration Quick Create and ConfigureAdvanced Settings Floorplan Settings .
For information about the Floorplan Map card, see the SAP Leonardo IoT Bridge Scenario User Guide.
4.9.1 General Settings
This component contains the global Floorplan configurations, including time zone and ingestion layer settings.
SAP Leonardo IoT Bridge Configuration and AdministrationConfiguration P U B L I C 75
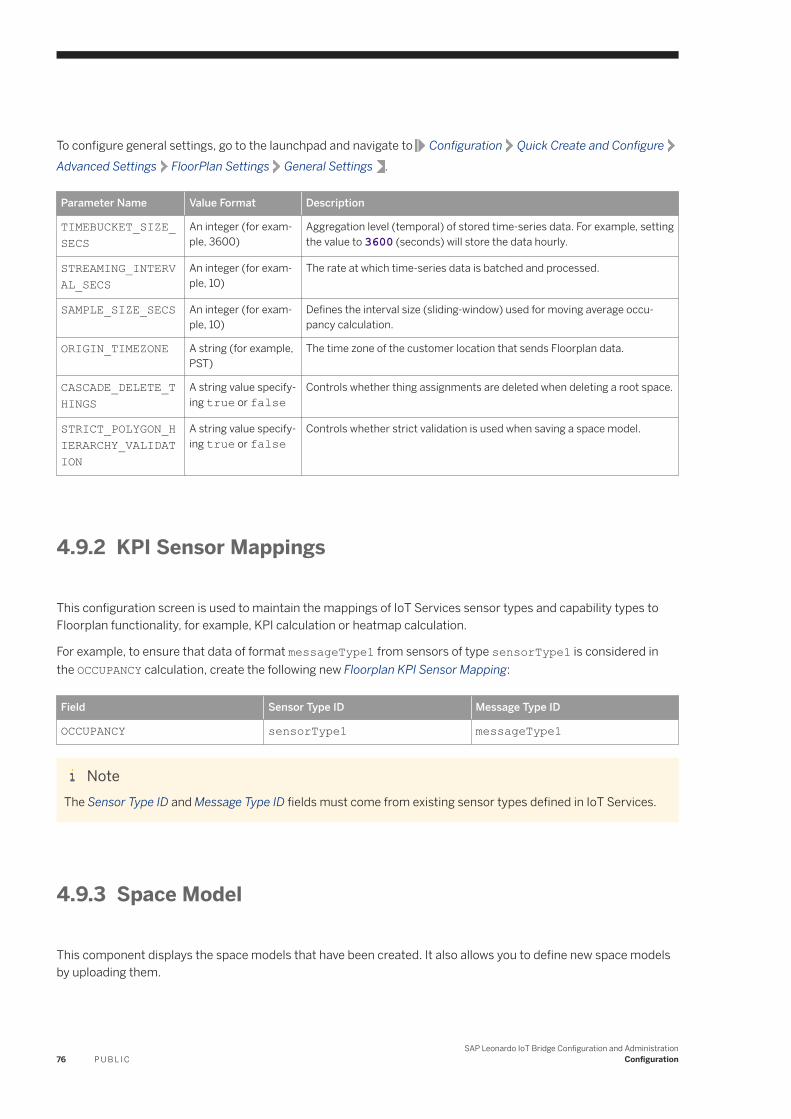
To configure general settings, go to the launchpad and navigate to Configuration Quick Create and ConfigureAdvanced Settings FloorPlan Settings General Settings .
Parameter Name Value Format Description
TIMEBUCKET_SIZE_SECS
An integer (for example, 3600)
Aggregation level (temporal) of stored time-series data. For example, setting the value to 3600 (seconds) will store the data hourly.
STREAMING_INTERVAL_SECS
An integer (for example, 10)
The rate at which time-series data is batched and processed.
SAMPLE_SIZE_SECS An integer (for example, 10)
Defines the interval size (sliding-window) used for moving average occupancy calculation.
ORIGIN_TIMEZONE A string (for example, PST)
The time zone of the customer location that sends Floorplan data.
CASCADE_DELETE_THINGS
A string value specifying true or false
Controls whether thing assignments are deleted when deleting a root space.
STRICT_POLYGON_HIERARCHY_VALIDATION
A string value specifying true or false
Controls whether strict validation is used when saving a space model.
4.9.2 KPI Sensor Mappings
This configuration screen is used to maintain the mappings of IoT Services sensor types and capability types to Floorplan functionality, for example, KPI calculation or heatmap calculation.
For example, to ensure that data of format messageType1 from sensors of type sensorType1 is considered in the OCCUPANCY calculation, create the following new Floorplan KPI Sensor Mapping:
Field Sensor Type ID Message Type ID
OCCUPANCY sensorType1 messageType1
NoteThe Sensor Type ID and Message Type ID fields must come from existing sensor types defined in IoT Services.
4.9.3 Space Model
This component displays the space models that have been created. It also allows you to define new space models by uploading them.
76 P U B L I CSAP Leonardo IoT Bridge Configuration and Administration
Configuration
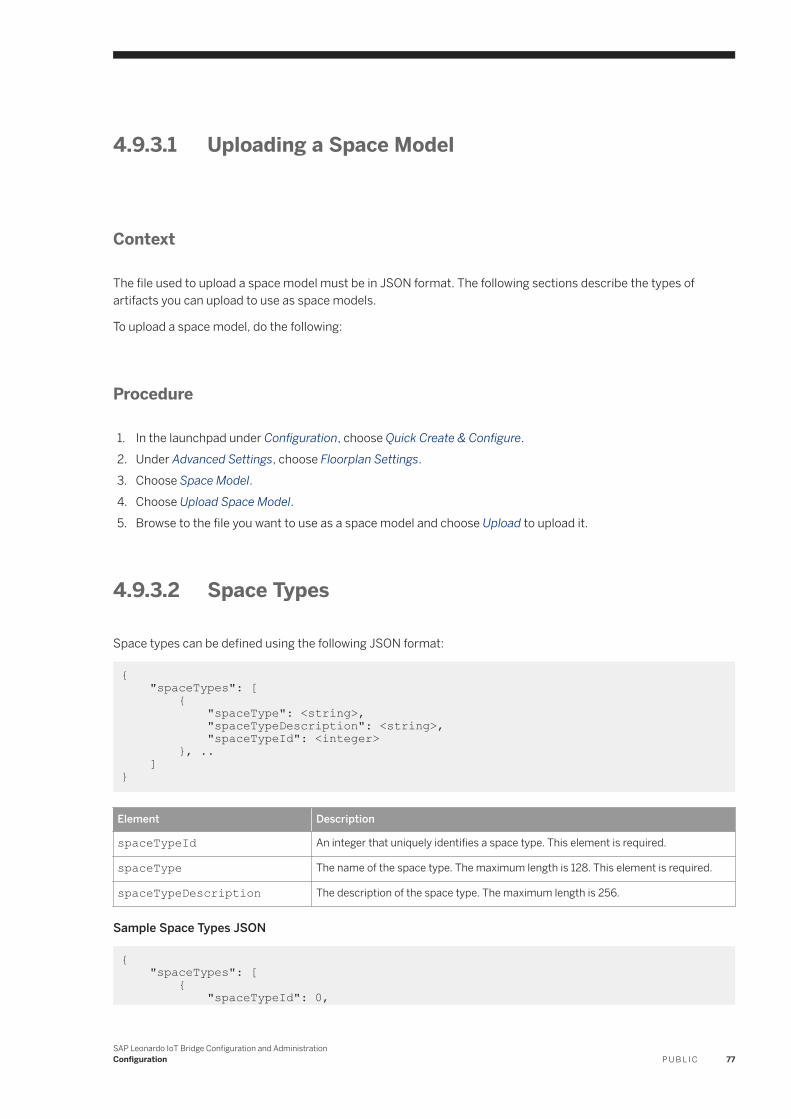
4.9.3.1 Uploading a Space Model
Context
The file used to upload a space model must be in JSON format. The following sections describe the types of artifacts you can upload to use as space models.
To upload a space model, do the following:
Procedure
1. In the launchpad under Configuration, choose Quick Create & Configure.2. Under Advanced Settings, choose Floorplan Settings.3. Choose Space Model.4. Choose Upload Space Model.5. Browse to the file you want to use as a space model and choose Upload to upload it.
4.9.3.2 Space Types
Space types can be defined using the following JSON format:
{ "spaceTypes": [ { "spaceType": <string>, "spaceTypeDescription": <string>, "spaceTypeId": <integer> }, .. ]}
Element Description
spaceTypeId An integer that uniquely identifies a space type. This element is required.
spaceType The name of the space type. The maximum length is 128. This element is required.
spaceTypeDescription The description of the space type. The maximum length is 256.
Sample Space Types JSON
{ "spaceTypes": [ { "spaceTypeId": 0,
SAP Leonardo IoT Bridge Configuration and AdministrationConfiguration P U B L I C 77

"spaceType": "Campus", "spaceTypeDescription": "Space type for campus which contains buildings" }, { "spaceTypeId": 1, "spaceType": "Building", "spaceTypeDescription": "Space type for a building" }, { "spaceTypeId": 2, "spaceType": "Floor", "spaceTypeDescription": "Space type for a floor" }, { "spaceTypeId": 6, "spaceType": "Room", "spaceTypeDescription": "Space type for a room" }, { "spaceTypeId": 7, "spaceType": "Desk", "spaceTypeDescription": "Space type for a desk" } ]}
4.9.3.3 Spaces
The space model determines the polygons and the building or floor selection values that are displayed on the Floorplan card. The space hierarchy, along with the polygon boundaries, can be defined using the following JSON format:
{ "spaces": [ { "spaceId": <integer>, "spaceName": <string>, "description": <string>, "spaceTypeId": <integer>, "parentSpaceId": integer, "boundaries": <string>, "floorId": <integer>, "maxOccupancy": <integer>, "validFrom": <timestamp>, "validTo": <timestamp> }, ... ]}
78 P U B L I CSAP Leonardo IoT Bridge Configuration and Administration
Configuration
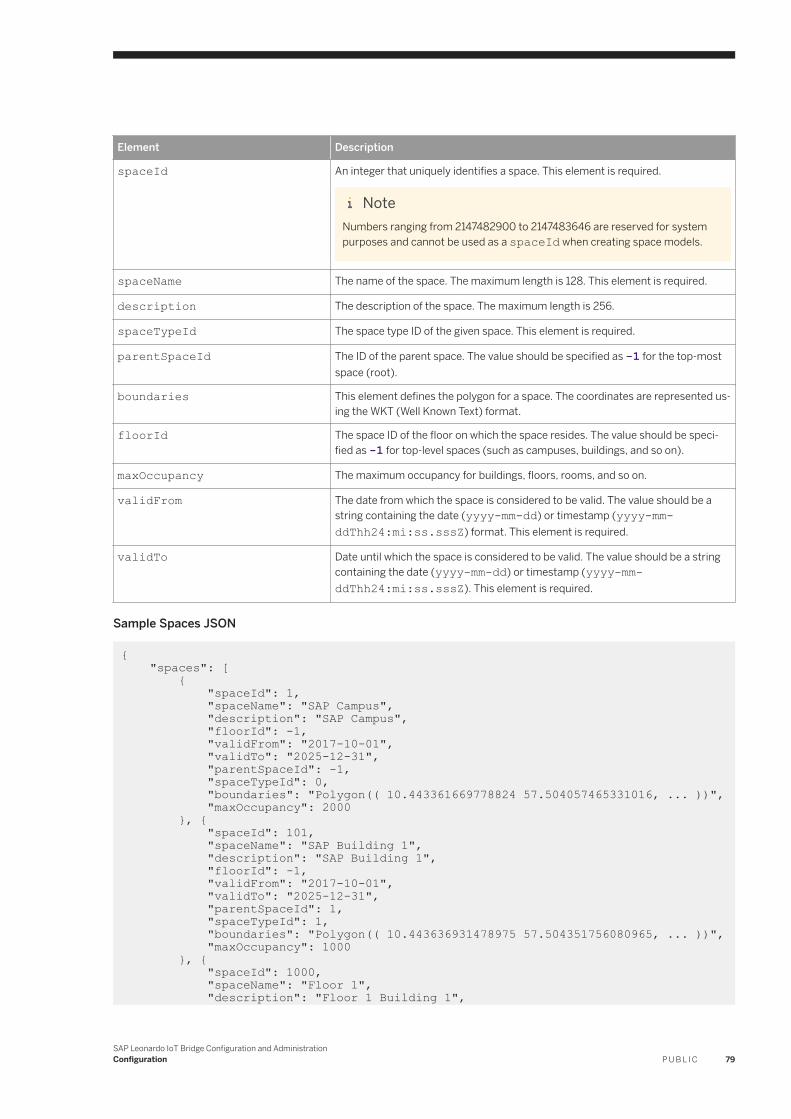
Element Description
spaceId An integer that uniquely identifies a space. This element is required.
NoteNumbers ranging from 2147482900 to 2147483646 are reserved for system purposes and cannot be used as a spaceId when creating space models.
spaceName The name of the space. The maximum length is 128. This element is required.
description The description of the space. The maximum length is 256.
spaceTypeId The space type ID of the given space. This element is required.
parentSpaceId The ID of the parent space. The value should be specified as -1 for the top-most space (root).
boundaries This element defines the polygon for a space. The coordinates are represented using the WKT (Well Known Text) format.
floorId The space ID of the floor on which the space resides. The value should be specified as -1 for top-level spaces (such as campuses, buildings, and so on).
maxOccupancy The maximum occupancy for buildings, floors, rooms, and so on.
validFrom The date from which the space is considered to be valid. The value should be a string containing the date (yyyy-mm-dd) or timestamp (yyyy-mm-ddThh24:mi:ss.sssZ) format. This element is required.
validTo Date until which the space is considered to be valid. The value should be a string containing the date (yyyy-mm-dd) or timestamp (yyyy-mm-ddThh24:mi:ss.sssZ). This element is required.
Sample Spaces JSON
{ "spaces": [ { "spaceId": 1, "spaceName": "SAP Campus", "description": "SAP Campus", "floorId": -1, "validFrom": "2017-10-01", "validTo": "2025-12-31", "parentSpaceId": -1, "spaceTypeId": 0, "boundaries": "Polygon(( 10.443361669778824 57.504057465331016, ... ))", "maxOccupancy": 2000 }, { "spaceId": 101, "spaceName": "SAP Building 1", "description": "SAP Building 1", "floorId": -1, "validFrom": "2017-10-01", "validTo": "2025-12-31", "parentSpaceId": 1, "spaceTypeId": 1, "boundaries": "Polygon(( 10.443636931478975 57.504351756080965, ... ))", "maxOccupancy": 1000 }, { "spaceId": 1000, "spaceName": "Floor 1", "description": "Floor 1 Building 1",
SAP Leonardo IoT Bridge Configuration and AdministrationConfiguration P U B L I C 79
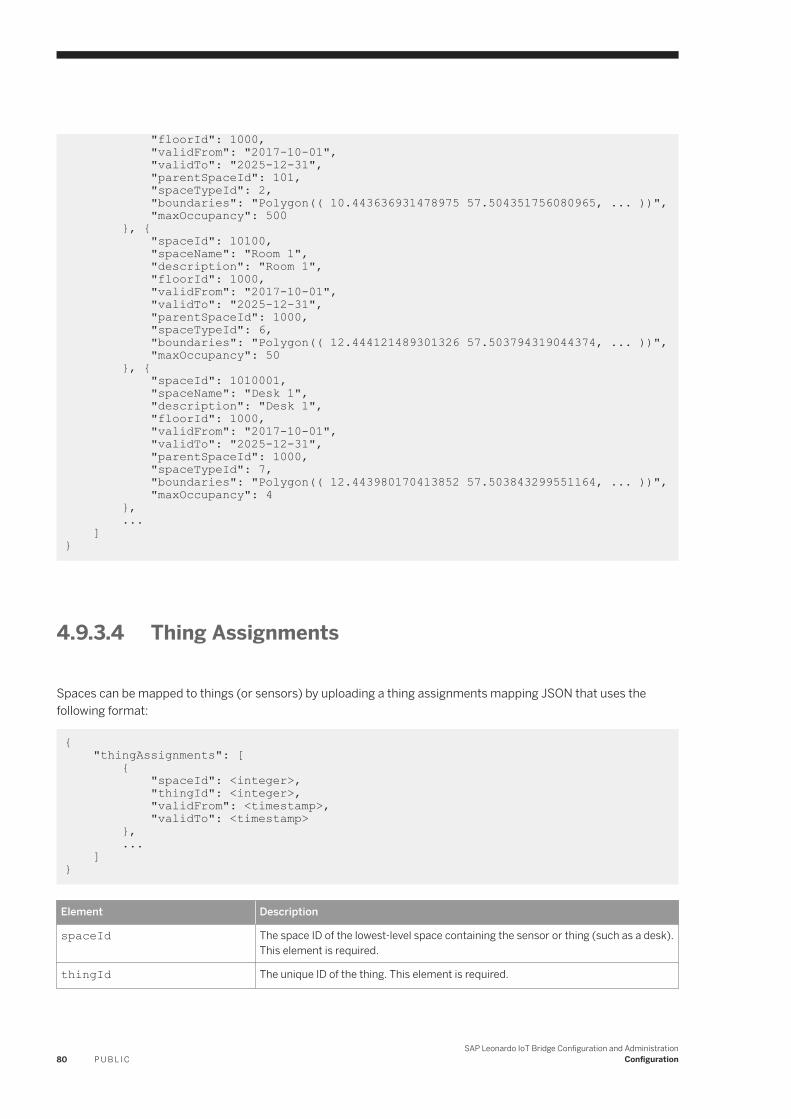
"floorId": 1000, "validFrom": "2017-10-01", "validTo": "2025-12-31", "parentSpaceId": 101, "spaceTypeId": 2, "boundaries": "Polygon(( 10.443636931478975 57.504351756080965, ... ))", "maxOccupancy": 500 }, { "spaceId": 10100, "spaceName": "Room 1", "description": "Room 1", "floorId": 1000, "validFrom": "2017-10-01", "validTo": "2025-12-31", "parentSpaceId": 1000, "spaceTypeId": 6, "boundaries": "Polygon(( 12.444121489301326 57.503794319044374, ... ))", "maxOccupancy": 50 }, { "spaceId": 1010001, "spaceName": "Desk 1", "description": "Desk 1", "floorId": 1000, "validFrom": "2017-10-01", "validTo": "2025-12-31", "parentSpaceId": 1000, "spaceTypeId": 7, "boundaries": "Polygon(( 12.443980170413852 57.503843299551164, ... ))", "maxOccupancy": 4 }, ... ]}
4.9.3.4 Thing Assignments
Spaces can be mapped to things (or sensors) by uploading a thing assignments mapping JSON that uses the following format:
{ "thingAssignments": [ { "spaceId": <integer>, "thingId": <integer>, "validFrom": <timestamp>, "validTo": <timestamp> }, ... ]}
Element Description
spaceId The space ID of the lowest-level space containing the sensor or thing (such as a desk). This element is required.
thingId The unique ID of the thing. This element is required.
80 P U B L I CSAP Leonardo IoT Bridge Configuration and Administration
Configuration
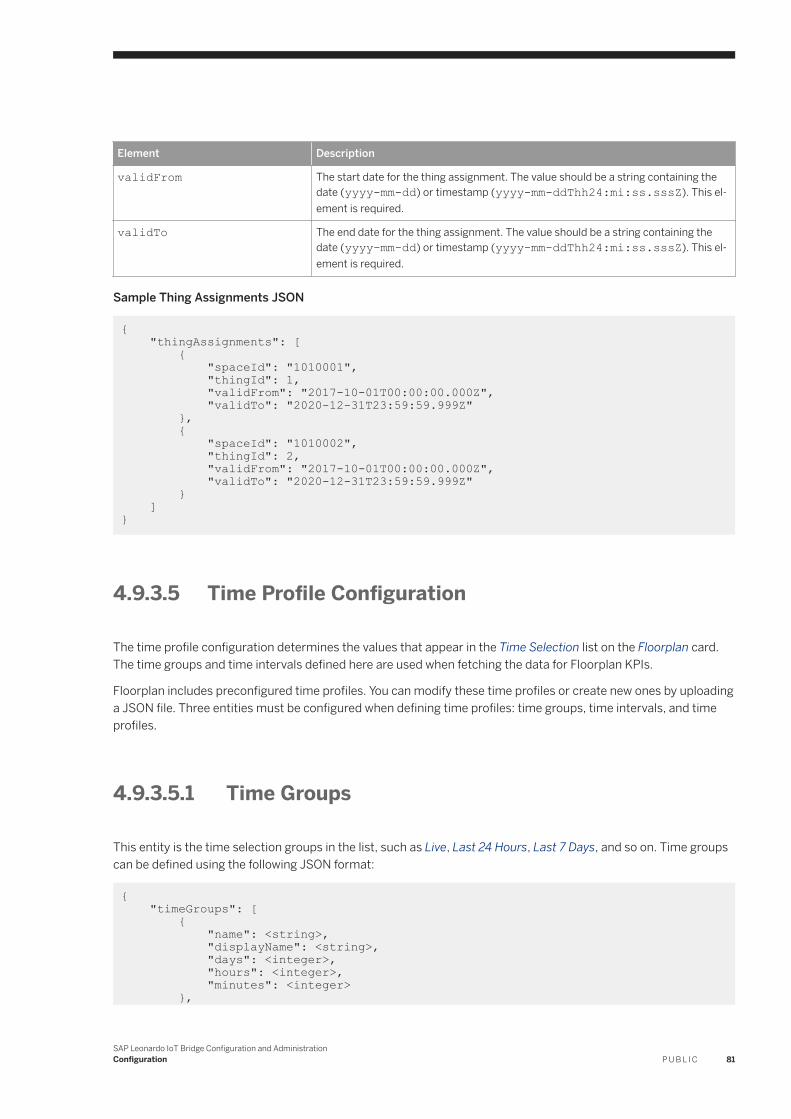
Element Description
validFrom The start date for the thing assignment. The value should be a string containing the date (yyyy-mm-dd) or timestamp (yyyy-mm-ddThh24:mi:ss.sssZ). This element is required.
validTo The end date for the thing assignment. The value should be a string containing the date (yyyy-mm-dd) or timestamp (yyyy-mm-ddThh24:mi:ss.sssZ). This element is required.
Sample Thing Assignments JSON
{ "thingAssignments": [ { "spaceId": "1010001", "thingId": 1, "validFrom": "2017-10-01T00:00:00.000Z", "validTo": "2020-12-31T23:59:59.999Z" }, { "spaceId": "1010002", "thingId": 2, "validFrom": "2017-10-01T00:00:00.000Z", "validTo": "2020-12-31T23:59:59.999Z" } ]}
4.9.3.5 Time Profile Configuration
The time profile configuration determines the values that appear in the Time Selection list on the Floorplan card. The time groups and time intervals defined here are used when fetching the data for Floorplan KPIs.
Floorplan includes preconfigured time profiles. You can modify these time profiles or create new ones by uploading a JSON file. Three entities must be configured when defining time profiles: time groups, time intervals, and time profiles.
4.9.3.5.1 Time Groups
This entity is the time selection groups in the list, such as Live, Last 24 Hours, Last 7 Days, and so on. Time groups can be defined using the following JSON format:
{ "timeGroups": [ { "name": <string>, "displayName": <string>, "days": <integer>, "hours": <integer>, "minutes": <integer> },
SAP Leonardo IoT Bridge Configuration and AdministrationConfiguration P U B L I C 81
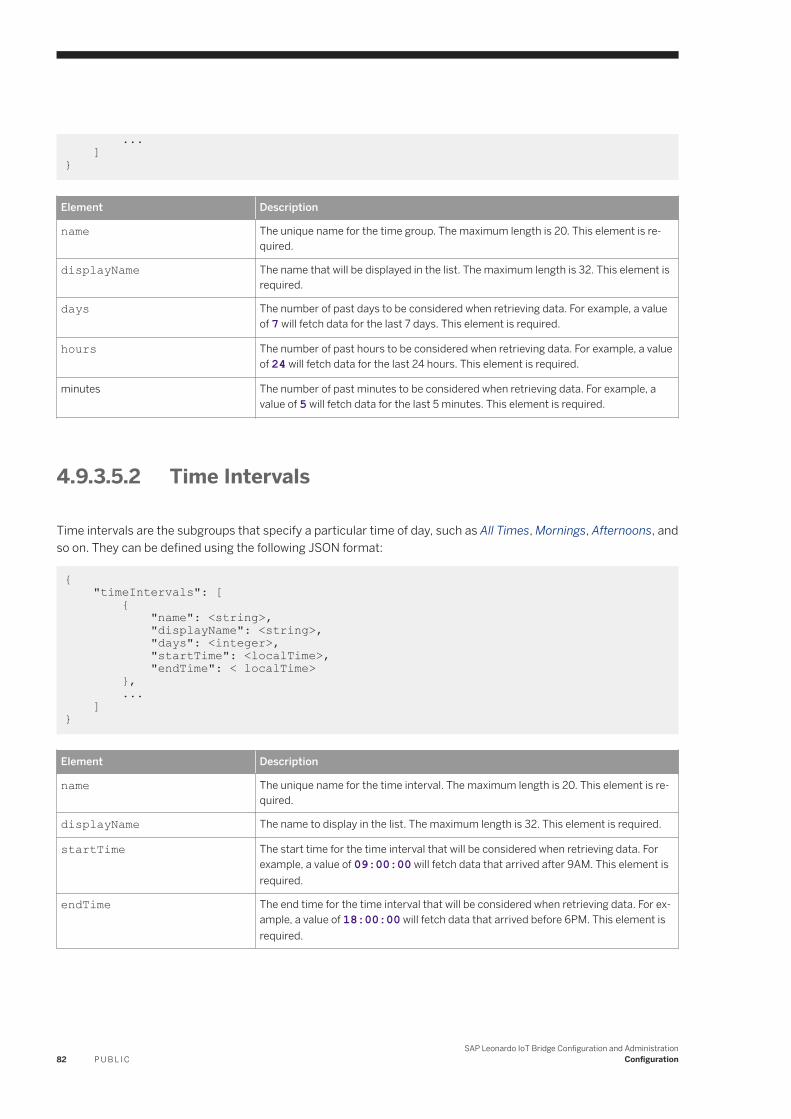
... ]}
Element Description
name The unique name for the time group. The maximum length is 20. This element is required.
displayName The name that will be displayed in the list. The maximum length is 32. This element is required.
days The number of past days to be considered when retrieving data. For example, a value of 7 will fetch data for the last 7 days. This element is required.
hours The number of past hours to be considered when retrieving data. For example, a value of 24 will fetch data for the last 24 hours. This element is required.
minutes The number of past minutes to be considered when retrieving data. For example, a value of 5 will fetch data for the last 5 minutes. This element is required.
4.9.3.5.2 Time Intervals
Time intervals are the subgroups that specify a particular time of day, such as All Times, Mornings, Afternoons, and so on. They can be defined using the following JSON format:
{ "timeIntervals": [ { "name": <string>, "displayName": <string>, "days": <integer>, "startTime": <localTime>, "endTime": < localTime> }, ... ]}
Element Description
name The unique name for the time interval. The maximum length is 20. This element is required.
displayName The name to display in the list. The maximum length is 32. This element is required.
startTime The start time for the time interval that will be considered when retrieving data. For example, a value of 09:00:00 will fetch data that arrived after 9AM. This element is required.
endTime The end time for the time interval that will be considered when retrieving data. For example, a value of 18:00:00 will fetch data that arrived before 6PM. This element is required.
82 P U B L I CSAP Leonardo IoT Bridge Configuration and Administration
Configuration
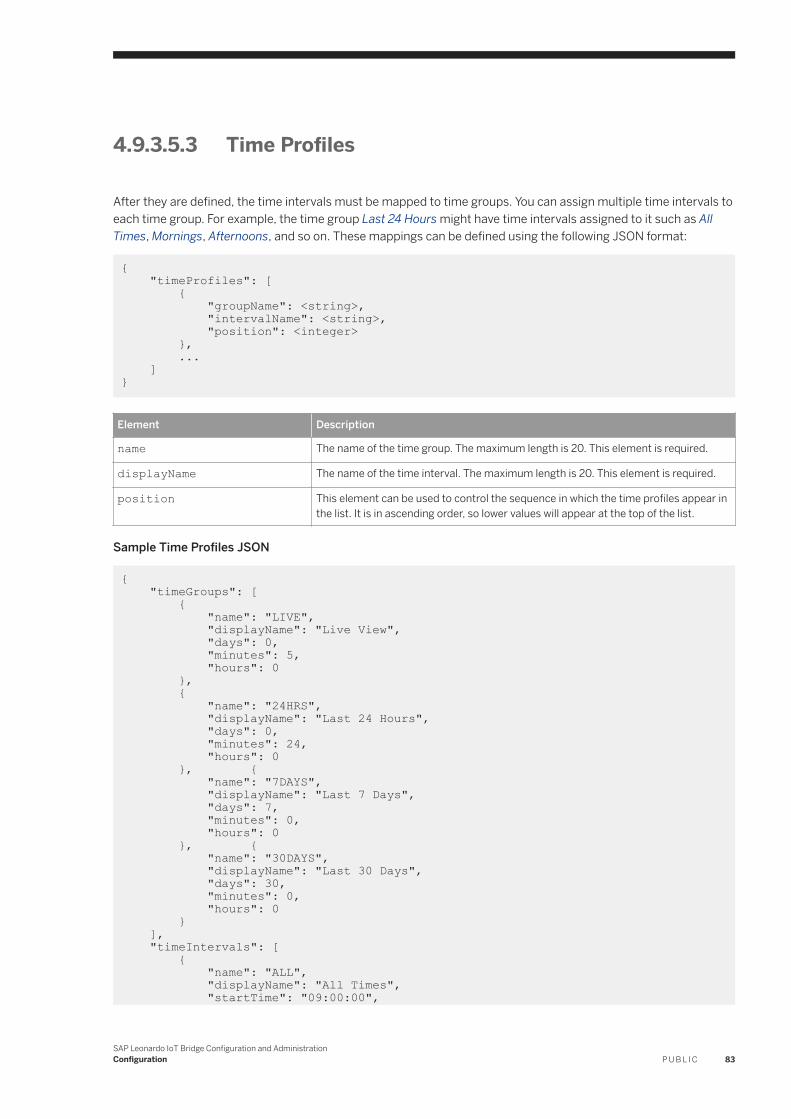
4.9.3.5.3 Time Profiles
After they are defined, the time intervals must be mapped to time groups. You can assign multiple time intervals to each time group. For example, the time group Last 24 Hours might have time intervals assigned to it such as All Times, Mornings, Afternoons, and so on. These mappings can be defined using the following JSON format:
{ "timeProfiles": [ { "groupName": <string>, "intervalName": <string>, "position": <integer> }, ... ]}
Element Description
name The name of the time group. The maximum length is 20. This element is required.
displayName The name of the time interval. The maximum length is 20. This element is required.
position This element can be used to control the sequence in which the time profiles appear in the list. It is in ascending order, so lower values will appear at the top of the list.
Sample Time Profiles JSON
{ "timeGroups": [ { "name": "LIVE", "displayName": "Live View", "days": 0, "minutes": 5, "hours": 0 }, { "name": "24HRS", "displayName": "Last 24 Hours", "days": 0, "minutes": 24, "hours": 0 }, { "name": "7DAYS", "displayName": "Last 7 Days", "days": 7, "minutes": 0, "hours": 0 }, { "name": "30DAYS", "displayName": "Last 30 Days", "days": 30, "minutes": 0, "hours": 0 } ], "timeIntervals": [ { "name": "ALL", "displayName": "All Times", "startTime": "09:00:00",
SAP Leonardo IoT Bridge Configuration and AdministrationConfiguration P U B L I C 83
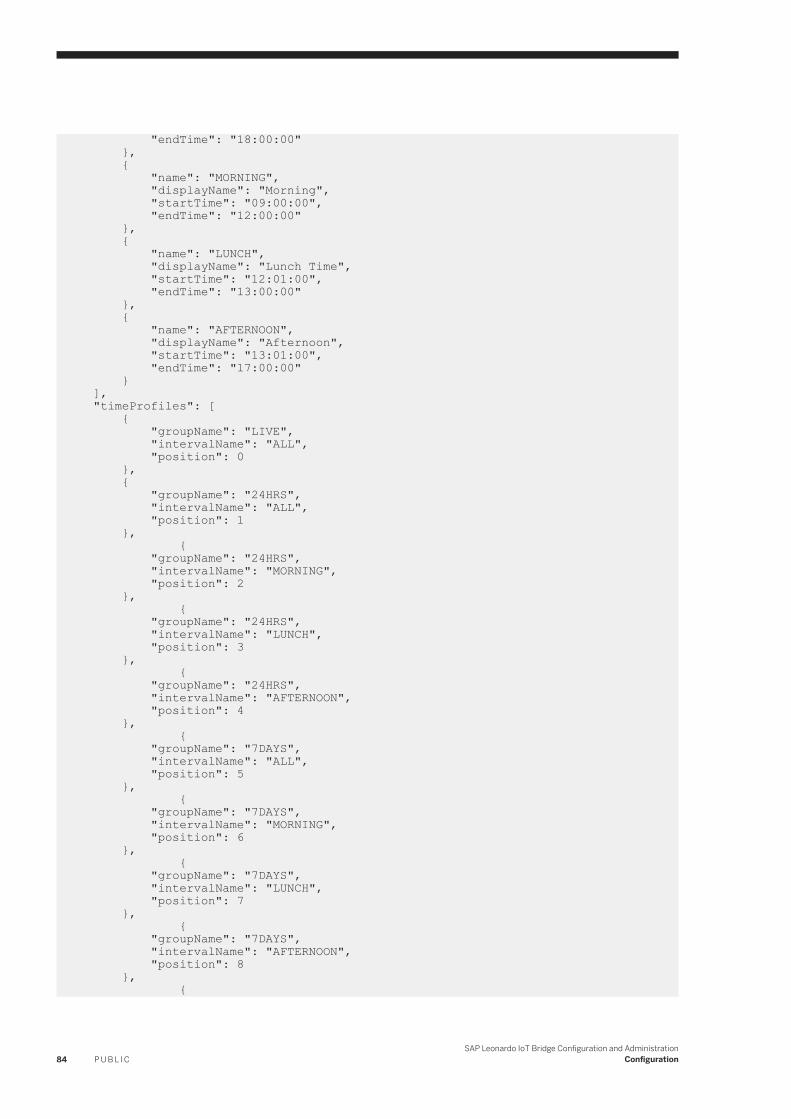
"endTime": "18:00:00" }, { "name": "MORNING", "displayName": "Morning", "startTime": "09:00:00", "endTime": "12:00:00" }, { "name": "LUNCH", "displayName": "Lunch Time", "startTime": "12:01:00", "endTime": "13:00:00" }, { "name": "AFTERNOON", "displayName": "Afternoon", "startTime": "13:01:00", "endTime": "17:00:00" } ], "timeProfiles": [ { "groupName": "LIVE", "intervalName": "ALL", "position": 0 }, { "groupName": "24HRS", "intervalName": "ALL", "position": 1 }, { "groupName": "24HRS", "intervalName": "MORNING", "position": 2 }, { "groupName": "24HRS", "intervalName": "LUNCH", "position": 3 }, { "groupName": "24HRS", "intervalName": "AFTERNOON", "position": 4 }, { "groupName": "7DAYS", "intervalName": "ALL", "position": 5 }, { "groupName": "7DAYS", "intervalName": "MORNING", "position": 6 }, { "groupName": "7DAYS", "intervalName": "LUNCH", "position": 7 }, { "groupName": "7DAYS", "intervalName": "AFTERNOON", "position": 8 }, {
84 P U B L I CSAP Leonardo IoT Bridge Configuration and Administration
Configuration

"groupName": "30DAYS", "intervalName": "ALL", "position": 9 }, { "groupName": "30DAYS", "intervalName": "MORNING", "position": 10 }, { "groupName": "30DAYS", "intervalName": "LUNCH", "position": 11 }, { "groupName": "30DAYS", "intervalName": "AFTERNOON", "position": 12 } ]}
4.9.3.6 Text Field Guidelines
Text field guidelines for the space model are as follows:
● Each Floorplan space model uses only language at a time.The space model also contains names and descriptions that are displayed to the user. These texts are defined upon creation of the space model and can contain any single language, but cannot contain multiple languages (that is, it cannot display different languages to different users). The user will always see the texts defined in the space model.
● Special character texts inside a space model must be written in Unicode format.If text in the space model contains any special characters, such as German umlauts (üäö) or Hebrew characters, define them in Unicode format (for example, \u00E4 rather than ä).
4.9.4 Configuring Floorplan Navigation
Prerequisites
● The Floorplan Service is available● The Space Model and Time Profile have been uploaded● A Thing Assignment for the Space Model is available● The navigation OData Services fulfill the semantic object navigation annotations
SAP Leonardo IoT Bridge Configuration and AdministrationConfiguration P U B L I C 85
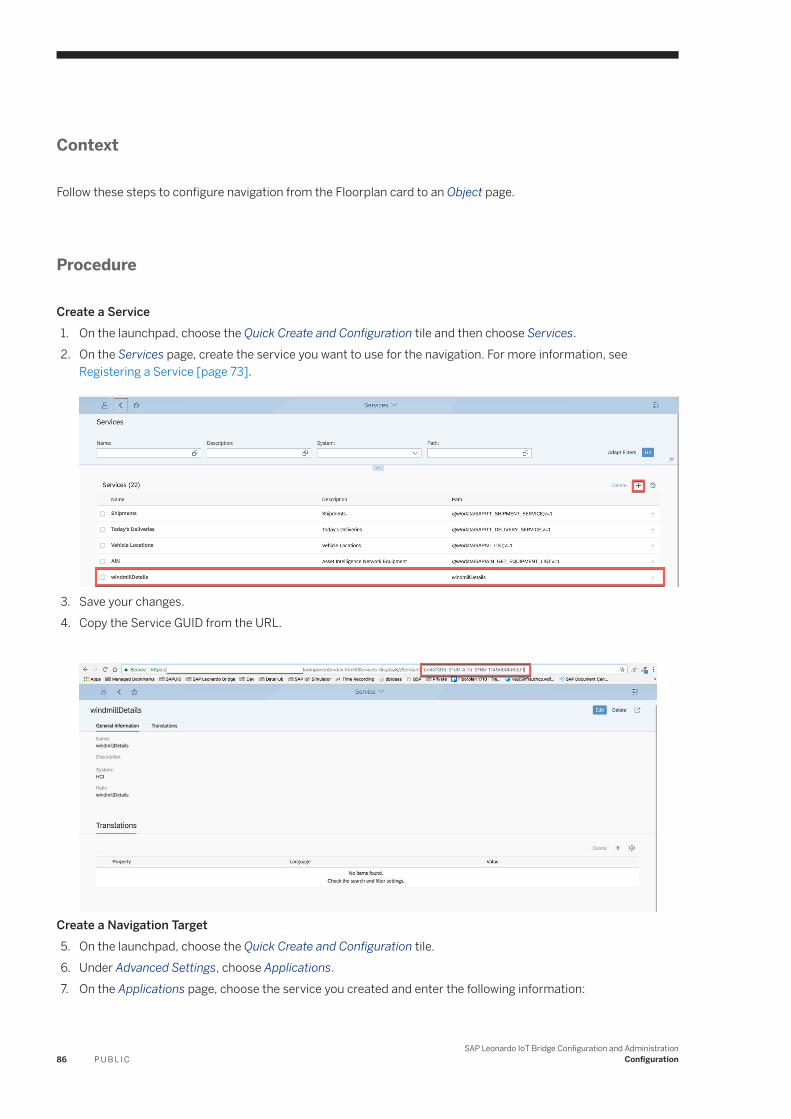
Context
Follow these steps to configure navigation from the Floorplan card to an Object page.
Procedure
Create a Service1. On the launchpad, choose the Quick Create and Configuration tile and then choose Services.2. On the Services page, create the service you want to use for the navigation. For more information, see
Registering a Service [page 73].
3. Save your changes.4. Copy the Service GUID from the URL.
Create a Navigation Target5. On the launchpad, choose the Quick Create and Configuration tile.6. Under Advanced Settings, choose Applications.7. On the Applications page, choose the service you created and enter the following information:
86 P U B L I CSAP Leonardo IoT Bridge Configuration and Administration
Configuration
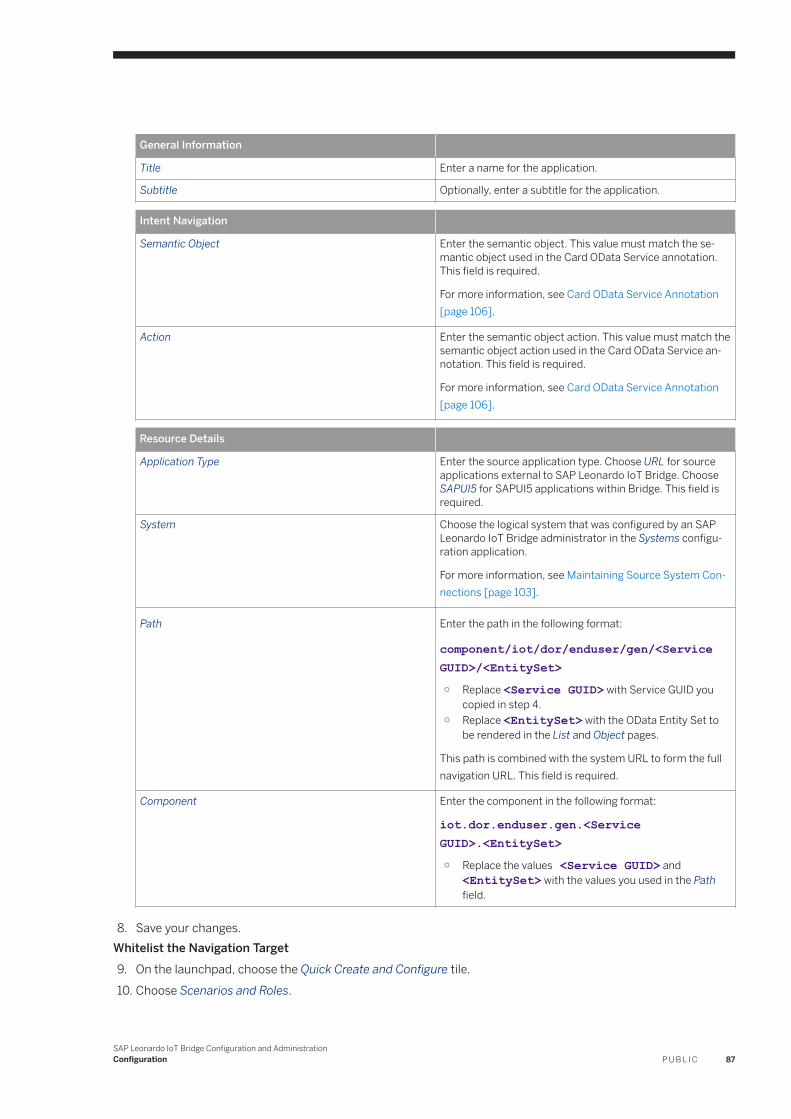
General Information
Title Enter a name for the application.
Subtitle Optionally, enter a subtitle for the application.
Intent Navigation
Semantic Object Enter the semantic object. This value must match the semantic object used in the Card OData Service annotation. This field is required.
For more information, see Card OData Service Annotation [page 106].
Action Enter the semantic object action. This value must match the semantic object action used in the Card OData Service annotation. This field is required.
For more information, see Card OData Service Annotation [page 106].
Resource Details
Application Type Enter the source application type. Choose URL for source applications external to SAP Leonardo IoT Bridge. Choose SAPUI5 for SAPUI5 applications within Bridge. This field is required.
System Choose the logical system that was configured by an SAP Leonardo IoT Bridge administrator in the Systems configuration application.
For more information, see Maintaining Source System Connections [page 103].
Path Enter the path in the following format:
component/iot/dor/enduser/gen/<Service GUID>/<EntitySet>○ Replace <Service GUID> with Service GUID you
copied in step 4.○ Replace <EntitySet> with the OData Entity Set to
be rendered in the List and Object pages.
This path is combined with the system URL to form the full navigation URL. This field is required.
Component Enter the component in the following format:
iot.dor.enduser.gen.<Service GUID>.<EntitySet>○ Replace the values <Service GUID> and
<EntitySet> with the values you used in the Path field.
8. Save your changes.Whitelist the Navigation Target9. On the launchpad, choose the Quick Create and Configure tile.10. Choose Scenarios and Roles.
SAP Leonardo IoT Bridge Configuration and AdministrationConfiguration P U B L I C 87
11. On the Scenario Configuration page, select the right arrow for the scenario containing the persona.12. In the Personas area, choose the link in the Persona Configuration column.13. Scroll down to the Application Whitelist area and choose Add Application.14. From the Available Applications list, select the application you created and choose Add.
Add the Navigation Target to the Card Settings15. Navigate to the Overview page you want to update.16. Choose Settings and select Edit Card.17. Select the Floorplan Map card.18. Under Advanced Options, select a Navigation Target.19. Select a service from the drop-down list.20.Choose Save.
4.10 Configuring Object Detail and List Pages
Context
In SAP Leonardo IoT Bridge, you can render an OData service within Fiori Elements List and Object pages without code development or deployment. You must define appropriate OData annotations and embed them in the OData metadata to tell the Fiori Element screens how to render them.
After configuring the Object and List pages, you can navigate to them using the standard SAP Leonardo IoT Bridge intent-based navigation.
Procedure
Define the OData Service1. Define and embed the annotations in the OData service metadata. This step requires an understanding of the
specific annotation structure that the List and Object Page support.
NoteFor simplicity, the edm namespace has been removed from the following annotation samples. In an actual OData metadata (EDMX) file, you must scope the annotations correctly.
List Page Annotation Examples
88 P U B L I CSAP Leonardo IoT Bridge Configuration and Administration
Configuration

By default, the LineItem annotation is used when rendering the List page. You specify the set of visible columns here; for example, the following annotation snippet defines seven fields for display. You add or remove fields in this annotation section to show or hide the fields on the List page.
<Annotation Term="UI.LineItem"> <Collection> <Record Type="UI.DataField"> <PropertyValue Property="Value" Path="deliveryId"/> </Record> <Record Type="UI.DataField"> <PropertyValue Property="Value" Path="deliveryDate"/> </Record> <Record Type="UI.DataField"> <PropertyValue Property="Value" Path="loadingDate"/> </Record> <Record Type="UI.DataField"> <PropertyValue Property="Value" Path="salesOrderId"/> </Record> <Record Type="UI.DataField"> <PropertyValue Property="Value" Path="shippingStatusText"/> </Record> <Record Type="UI.DataField"> <PropertyValue Property="Value" Path="deliveryStatusText"/> </Record> <Record Type="UI.DataField"> <PropertyValue Property="Value" Path="CustomerName"/> </Record> </Collection></Annotation>
Object Page Annotation Examples
For the Object page, HeaderInfo, HeaderFacets, and Facets are the basic annotations that describe the page. You show or hide a field by adding or removing the annotation referencing its field name. For full descriptions of possible annotations, see Preparing UI Annotations.
The following is an example of a Field Group displayed in the Facets (body) section of the Object page:
<Annotation Term="UI.FieldGroup" Qualifier="Column1"> <Record Type="UI.FieldGroupType"> <PropertyValue Property="Data"> <Collection> <Record Type="UI.DataField"> <PropertyValue Property="Value" Path="deliveryStatusText"/> </Record> <Record Type="UI.DataField"> <PropertyValue Property="Value" Path="deliveryDate"/> </Record> <Record Type="UI.DataField"> <PropertyValue Property="Value" Path="loadingDate"/> </Record> </Collection> </PropertyValue> </Record></Annotation>
Register the OData Service2. After the OData service is annotated, add it to the set of registered services in Leonardo Iot Bridge. For more
information, see Registering a Service [page 73].Register the UI5 ApplicationRegister a UI5 application based on the registered OData service as follows.
SAP Leonardo IoT Bridge Configuration and AdministrationConfiguration P U B L I C 89
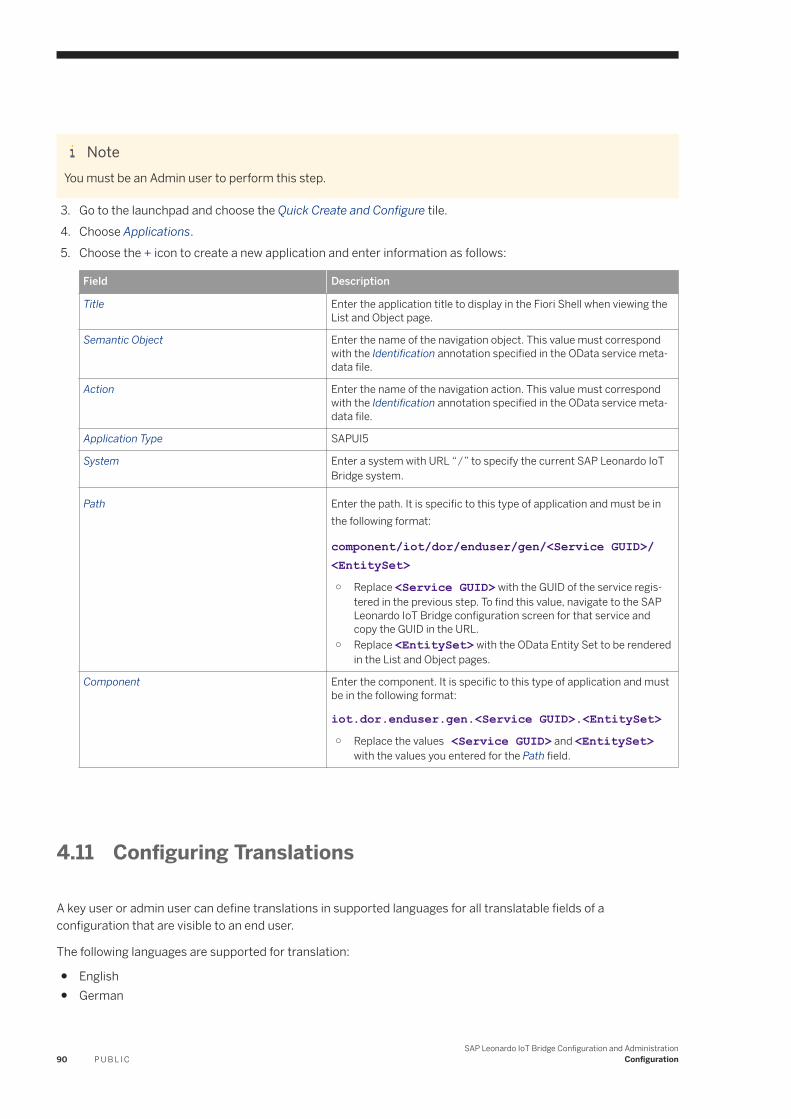
NoteYou must be an Admin user to perform this step.
3. Go to the launchpad and choose the Quick Create and Configure tile.4. Choose Applications.5. Choose the + icon to create a new application and enter information as follows:
Field Description
Title Enter the application title to display in the Fiori Shell when viewing the List and Object page.
Semantic Object Enter the name of the navigation object. This value must correspond with the Identification annotation specified in the OData service metadata file.
Action Enter the name of the navigation action. This value must correspond with the Identification annotation specified in the OData service metadata file.
Application Type SAPUI5
System Enter a system with URL “/” to specify the current SAP Leonardo IoT Bridge system.
Path Enter the path. It is specific to this type of application and must be in the following format:
component/iot/dor/enduser/gen/<Service GUID>/<EntitySet>○ Replace <Service GUID> with the GUID of the service regis
tered in the previous step. To find this value, navigate to the SAP Leonardo IoT Bridge configuration screen for that service and copy the GUID in the URL.
○ Replace <EntitySet> with the OData Entity Set to be rendered in the List and Object pages.
Component Enter the component. It is specific to this type of application and must be in the following format:
iot.dor.enduser.gen.<Service GUID>.<EntitySet>○ Replace the values <Service GUID> and <EntitySet>
with the values you entered for the Path field.
4.11 Configuring Translations
A key user or admin user can define translations in supported languages for all translatable fields of a configuration that are visible to an end user.
The following languages are supported for translation:
● English● German
90 P U B L I CSAP Leonardo IoT Bridge Configuration and Administration
Configuration
● Dutch● Hebrew
If translations are defined for a field in a configuration, SAP Leonardo IoT Bridge displays the translated value of the language that matches the locale setting defined in the user's browser. If no match is found, SAP Leonardo IoT Bridge displays the default value defined for the field.
Source systems are responsible for translating data-related text, which is part of source system data and displayed in the SAP Leonardo IoT Bridge user interface.
Source system metadata-related language translations, such as field labels displayed in the Overview Cards and List Report, require translation of SAP Cloud Platform Integration iFlow EDMX/metadata. Currently, iFlows do not handle translations of OData EDMX/metadata automatically. A separate iFlow must be created and configured for each language.
4.11.1 Defining Translations for a Configuration
Procedure
1. On the Launchpad, choose the Quick Create and Configure tile.2. Choose Scenarios and Personas or another Configuration application that has translatable fields. See
Translatable Fields for more information.3. In the Translation facet, choose the + icon to add a translation for a field.4. In the Property field, choose the property for which you would like to add a translation.5. In the Language field, choose the language for which you would like to add a translation.6. In the Value field, enter the value of the translation. This value is displayed to a user with the corresponding
language setting defined in the browser.7. Repeat steps 3 through 6 for all fields for which you want to add translations.
NoteFor each field and language, enter only one translated value.
4.12 Configuring Card Translation
A key user or admin user can define translations in supported languages for all text-based card configurations that are visible to an end user.
The following languages are supported for translation:
● English
SAP Leonardo IoT Bridge Configuration and AdministrationConfiguration P U B L I C 91

● German● Dutch● Hebrew
If translations are defined for a field in the card configuration, SAP Leonardo IoT Bridge displays the translated value of the language that matches the locale setting defined in the user's browser. If no match is found, SAP Leonardo IoT Bridge displays the default value defined for the field.
4.12.1 Defining Translations for a Card Configuration
Procedure
1. Add a card (see Creating a New Card for an Overview Page [page 18]) or open an existing card for editing. Translatable fields are indicated with a globe icon.
NoteBefore adding translations for a field, enter a value for the field. This value is displayed by default if no translation is defined.
2. Choose the globe icon for a field for which you want to add or edit translations.3. In the Translation screen, choose a language from the drop-down list.4. In the text field, enter the translated value for the selected language.
NoteFor each language, enter only one translated value.
5. To enter additional translations, choose the + icon and repeat Steps 3 and 4.6. Choose Back to return to the Card Details screen.7. Repeat steps 2 through 6 for all fields for which you want to add translations.
4.13 Configuring Data Segregation
92 P U B L I CSAP Leonardo IoT Bridge Configuration and Administration
Configuration
4.13.1 Filtering Back-End Data by Role
SAP Leonardo IoT Bridge allows you to restrict access to data by user group. The best method is to define data access rights in the back end of the application and use principle propagation. However, in some situations, you may need to handle data restriction differently. For example:
● Your organization uses a single technical user rather than creating back-end users for each end user.● Some infrastructure components do not yet fully support principle propagation.
For these and similar cases, SAP Leonardo IoT Bridge supports forwarding a specific UAA scope attribute through the HTTP header of service requests. The service then reads and applies the filter to the back-end call.
The filter value itself comes as a custom HTTP header (X-Sap-Servicefilter) for all service calls from SAP Leonardo IoT Bridge.
Best Practices
● Because the filter parameters can be separated from the underlying OData service, you have the freedom to define a format of the filters that is conducive to consumption in an iFlow, such as a JSON string. Since other formats are possible, SAP recommends that you keep a namespace prefixed to the filter for each defined role.
● A user can also be assigned multiple roles with different filter scope attributes. In this case, use a defined separator (the "pipe" character: |) to split the incoming string from SAP Leonardo IoT Bridge in an iFlow.
● In one common use case, a basic set of fields must be applied directly as filters. In this case, you can specify a simple JSON string and match all fields as input fields.
● If the HTTP header is missing or a field required for filtering is not in the filter string, the service should not return any results or even an unauthorized response. The service should not default to sending all data, or users without the filter set will get access to all data.
● If an all filter is needed (for example, for a manager), the value should be explicitly handled in the service implementation (that is, the use of * is interpreted as "no filter").
Security Aspects
This feature can be used to segregate data based on a user role. Therefore it must not be possible to "spoof" a filter via manipulation of the HTTP header requests coming from a user's web browser. To prevent this, the custom header (X-Sap-Servicefilter) is always removed from the request to the iFlow by the underlying Bridge infrastructure. The value set to the custom header comes directly from the JSON Web Token (JWT) produced by UAA, which is not modifiable from the web browser and is passed via service-to-service calls on the CF stack.
SAP Leonardo IoT Bridge Configuration and AdministrationConfiguration P U B L I C 93
4.13.2 Configuring Role-Based Filtering
Context
Set up a role-based filter as follows.
Procedure
1. Create a new role using the role template EndUserServiceFilter from the SAP Leonardo IoT Bridge application. For information about roles and role collections, see Assigning and Maintaining Roles [page 110].
NoteAs a best practice, use a namespace to prefix the format of the filter. If the format is not specified, all scope attribute values must be of the same format.
2. Assign the role to any existing role collection and associate it as needed with user groups.
4.14 Importing and Exporting Scenarios
The lifecycle management functions of importing and exporting scenario provide a method of packaging and delivering SAP Leonardo IoT Bridge content. This feature also allows you to back up a scenario on a client machine and move a scenario between systems.
You must be a key user to import and export scenarios.
4.14.1 Exporting a Scenario
Context
When you export a scenario, a zip archive is produced and downloaded to the client. This archive contains a manifest file with details about the export and the scenario. It also contains several .csv files with the scenario metadata.
Note the following:
94 P U B L I CSAP Leonardo IoT Bridge Configuration and Administration
Configuration

● Certain attributes of the manifest file can be edited before importing the scenario into another system. For more information, see Editing the Export Archive [page 95].
● It is not recommended to edit the contents of the .csv files.● The naming convention for the exported file is Bridge_Scenario_<scenario guid>.zip.● Exported scenarios have the properties of a template when they are imported into another system. That is, an
imported scenario can be configured for use but cannot be edited. To edit the scenario specific objects (Persona, Layout, Cards, Events) of an imported scenario, you must first copy the scenario.
Procedure
1. On the launchpad, choose the Quick Create and Configure tile.2. Choose Scenarios and Roles.3. On the Scenario Configuration page, select the scenario to export.4. Choose Export.
After the request is processed, a zip archive is downloaded by the browser.
If the export fails, you see an error message. If this occurs, open a support ticket with SAP under component IOT-BDG.
4.14.2 Editing the Export Archive
Certain attributes in the manifest file (manifest.json) in the archive can be edited before importing the file into a system. These attributes enable version management and are used to add the fields ProvidedBy and Version to the Scenario Configuration page, as shown in the following example:
The corresponding fields in the manifest JSON are provided_by and export_version. These fields can be modified to any String value (with a maximum length of 255 characters) as follows:
{"entity":"com.sap.iot.doc.jpa.model.Scenario", "entity_ids":["scenario0001"],"bridge_version":"1805","export_version":"1.0","created_time":"2018-01-01 00:00:00","provided_by":"","related_entities":[]}
You cannot edit any other attributes in the manifest file.
SAP Leonardo IoT Bridge Configuration and AdministrationConfiguration P U B L I C 95
4.14.3 Importing a Scenario
Context
The import function allows you to upload a scenario archive file to the system. An imported scenario takes on the characteristics of a template. That is, it can be configured for use, but cannot be edited.
Procedure
1. On the launchpad, choose the Quick Create and Configure tile.2. Choose Scenarios and Roles.3. On the Scenario Configuration page, choose Import.4. In the Import Scenario dialog box, do the following:
a. Select a valid Bridge archive file from the file system.b. If the scenario being imported already exists in the target system, select the Overwrite the scenario if it
already exists checkbox. Checking this box indicates that you intend to overwrite the scenario. If the scenario exists and you do not want to overwrite it, choose Cancel.
c. Choose Upload.
After the request is processed, a message appears, indicating the status of the import.
If the import fails due to a general or nonspecific error message, open a support ticket with SAP under component IOT-BDG.
4.15 Process: Adding a Scenario Tile
Procedure
Create a Scenario1. On the Scenario Configuration page, choose the + icon.2. Enter a name and description for the scenario and choose Save.3. Choose the right arrow for the newly created scenario to open it.4. In the Personas area, create one or more personas for the scenario. For more information, see Creating a
Persona Manually [page 13].Create a Custom Persona
96 P U B L I CSAP Leonardo IoT Bridge Configuration and Administration
Configuration
5. On the launchpad, choose the Quick Create and Configuration tile and then choose Scenarios and Roles.6. Select the scenario to which to add the persona.7. In the toolbar of the Personas area, choose the + icon.8. Enter a name and description for the persona and choose Save.9. Choose the link in the Persona Configuration column to launch the Overview page for this persona.10. Use the Card Settings icon to configure the Overview page as needed for this persona. For more information,
see Working with Cards [page 17].
4.15.1 Create a Scenario (MyScenario)
Procedure
1. On the Scenario Configuration page, choose the + icon.2. Enter the name MyScenario and a description and choose Save.
3. Choose the right arrow for the new scenario to open it.
4.15.2 Create a Persona (CustomPersona)
Procedure
1. On the launchpad, choose the Quick Create and Configuration tile and then choose Scenarios and Roles.2. Select the scenario to which to add the persona.3. In the toolbar of the Personas area, choose the + icon.4. Enter the name CustomPersona and a description and choose Save.
5. Choose the link in the Persona Configuration column to launch the Overview page for this persona.6. Use the Card Settings icon to configure the Overview page as needed for this persona. For more information,
see Working with Cards [page 17].
SAP Leonardo IoT Bridge Configuration and AdministrationConfiguration P U B L I C 97
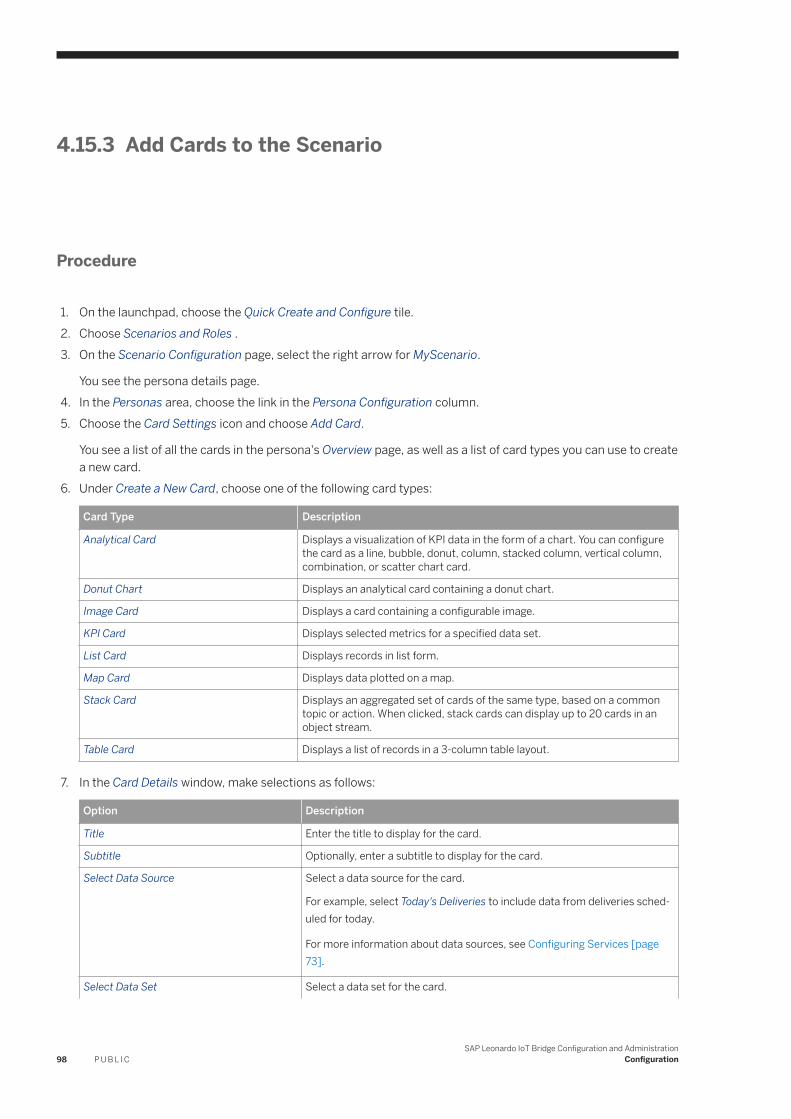
4.15.3 Add Cards to the Scenario
Procedure
1. On the launchpad, choose the Quick Create and Configure tile.2. Choose Scenarios and Roles .3. On the Scenario Configuration page, select the right arrow for MyScenario.
You see the persona details page.4. In the Personas area, choose the link in the Persona Configuration column.5. Choose the Card Settings icon and choose Add Card.
You see a list of all the cards in the persona's Overview page, as well as a list of card types you can use to create a new card.
6. Under Create a New Card, choose one of the following card types:
Card Type Description
Analytical Card Displays a visualization of KPI data in the form of a chart. You can configure the card as a line, bubble, donut, column, stacked column, vertical column, combination, or scatter chart card.
Donut Chart Displays an analytical card containing a donut chart.
Image Card Displays a card containing a configurable image.
KPI Card Displays selected metrics for a specified data set.
List Card Displays records in list form.
Map Card Displays data plotted on a map.
Stack Card Displays an aggregated set of cards of the same type, based on a common topic or action. When clicked, stack cards can display up to 20 cards in an object stream.
Table Card Displays a list of records in a 3-column table layout.
7. In the Card Details window, make selections as follows:
Option Description
Title Enter the title to display for the card.
Subtitle Optionally, enter a subtitle to display for the card.
Select Data Source Select a data source for the card.
For example, select Today's Deliveries to include data from deliveries scheduled for today.
For more information about data sources, see Configuring Services [page 73].
Select Data Set Select a data set for the card.
98 P U B L I CSAP Leonardo IoT Bridge Configuration and Administration
Configuration
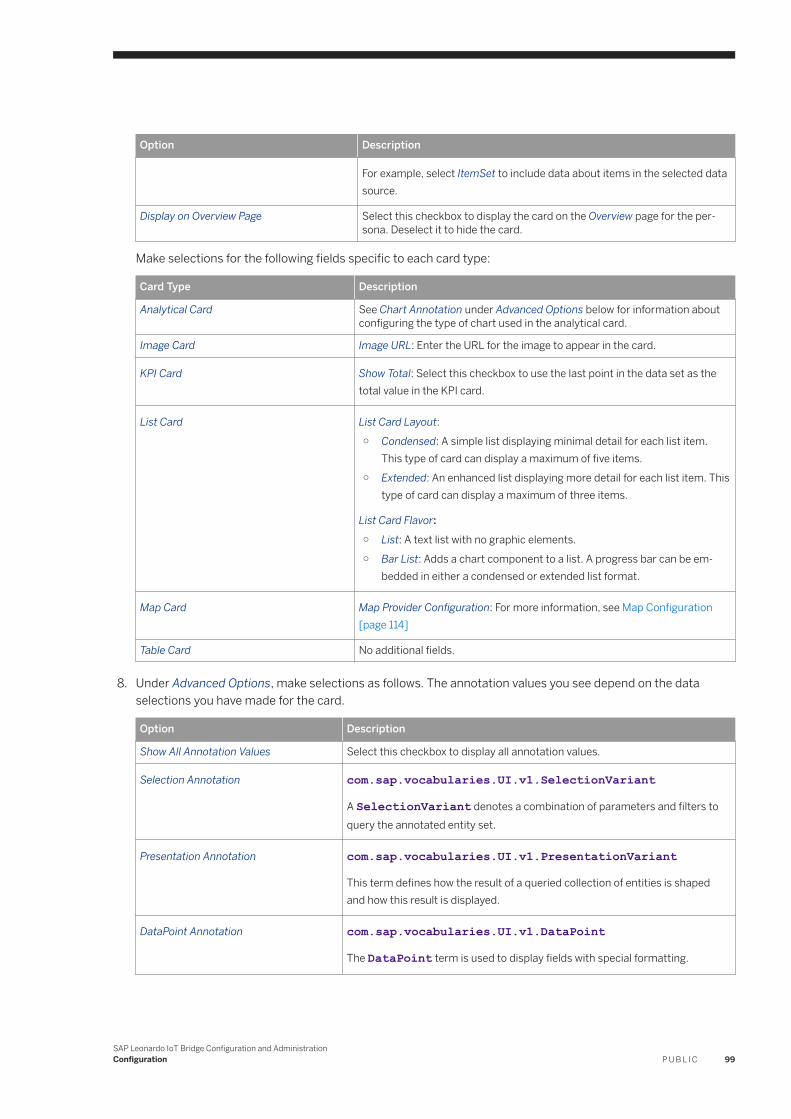
Option Description
For example, select ItemSet to include data about items in the selected data source.
Display on Overview Page Select this checkbox to display the card on the Overview page for the persona. Deselect it to hide the card.
Make selections for the following fields specific to each card type:
Card Type Description
Analytical Card See Chart Annotation under Advanced Options below for information about configuring the type of chart used in the analytical card.
Image Card Image URL: Enter the URL for the image to appear in the card.
KPI Card Show Total: Select this checkbox to use the last point in the data set as the total value in the KPI card.
List Card List Card Layout:○ Condensed: A simple list displaying minimal detail for each list item.
This type of card can display a maximum of five items.○ Extended: An enhanced list displaying more detail for each list item. This
type of card can display a maximum of three items.
List Card Flavor:○ List: A text list with no graphic elements.○ Bar List: Adds a chart component to a list. A progress bar can be em
bedded in either a condensed or extended list format.
Map Card Map Provider Configuration: For more information, see Map Configuration [page 114]
Table Card No additional fields.
8. Under Advanced Options, make selections as follows. The annotation values you see depend on the data selections you have made for the card.
Option Description
Show All Annotation Values Select this checkbox to display all annotation values.
Selection Annotation com.sap.vocabularies.UI.v1.SelectionVariant
A SelectionVariant denotes a combination of parameters and filters to query the annotated entity set.
Presentation Annotation com.sap.vocabularies.UI.v1.PresentationVariant
This term defines how the result of a queried collection of entities is shaped and how this result is displayed.
DataPoint Annotation com.sap.vocabularies.UI.v1.DataPoint
The DataPoint term is used to display fields with special formatting.
SAP Leonardo IoT Bridge Configuration and AdministrationConfiguration P U B L I C 99
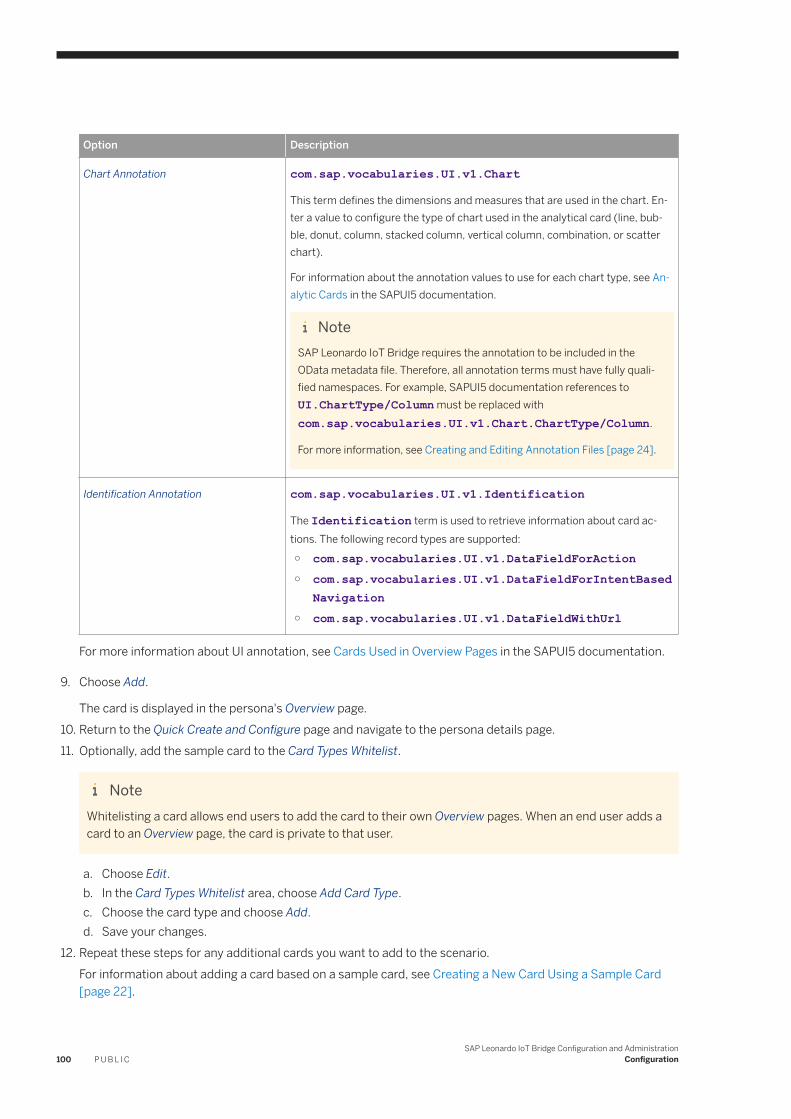
Option Description
Chart Annotation com.sap.vocabularies.UI.v1.Chart
This term defines the dimensions and measures that are used in the chart. Enter a value to configure the type of chart used in the analytical card (line, bubble, donut, column, stacked column, vertical column, combination, or scatter chart).
For information about the annotation values to use for each chart type, see Analytic Cards in the SAPUI5 documentation.
NoteSAP Leonardo IoT Bridge requires the annotation to be included in the OData metadata file. Therefore, all annotation terms must have fully qualified namespaces. For example, SAPUI5 documentation references to UI.ChartType/Column must be replaced with com.sap.vocabularies.UI.v1.Chart.ChartType/Column.
For more information, see Creating and Editing Annotation Files [page 24].
Identification Annotation com.sap.vocabularies.UI.v1.Identification
The Identification term is used to retrieve information about card actions. The following record types are supported:
○ com.sap.vocabularies.UI.v1.DataFieldForAction○ com.sap.vocabularies.UI.v1.DataFieldForIntentBased
Navigation○ com.sap.vocabularies.UI.v1.DataFieldWithUrl
For more information about UI annotation, see Cards Used in Overview Pages in the SAPUI5 documentation.
9. Choose Add.
The card is displayed in the persona's Overview page.10. Return to the Quick Create and Configure page and navigate to the persona details page.11. Optionally, add the sample card to the Card Types Whitelist.
NoteWhitelisting a card allows end users to add the card to their own Overview pages. When an end user adds a card to an Overview page, the card is private to that user.
a. Choose Edit.b. In the Card Types Whitelist area, choose Add Card Type.c. Choose the card type and choose Add.d. Save your changes.
12. Repeat these steps for any additional cards you want to add to the scenario.For information about adding a card based on a sample card, see Creating a New Card Using a Sample Card [page 22].
100 P U B L I CSAP Leonardo IoT Bridge Configuration and Administration
Configuration
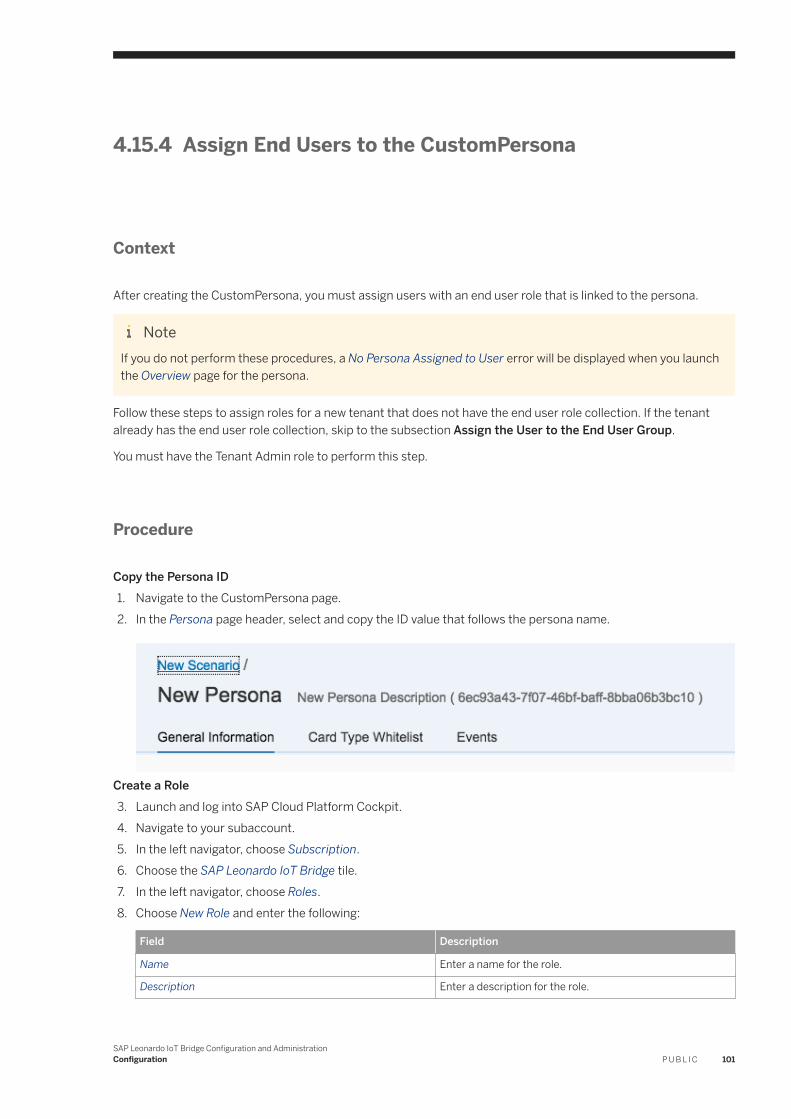
4.15.4 Assign End Users to the CustomPersona
Context
After creating the CustomPersona, you must assign users with an end user role that is linked to the persona.
NoteIf you do not perform these procedures, a No Persona Assigned to User error will be displayed when you launch the Overview page for the persona.
Follow these steps to assign roles for a new tenant that does not have the end user role collection. If the tenant already has the end user role collection, skip to the subsection Assign the User to the End User Group.
You must have the Tenant Admin role to perform this step.
Procedure
Copy the Persona ID1. Navigate to the CustomPersona page.2. In the Persona page header, select and copy the ID value that follows the persona name.
Create a Role3. Launch and log into SAP Cloud Platform Cockpit.4. Navigate to your subaccount.5. In the left navigator, choose Subscription.6. Choose the SAP Leonardo IoT Bridge tile.7. In the left navigator, choose Roles.8. Choose New Role and enter the following:
Field Description
Name Enter a name for the role.
Description Enter a description for the role.
SAP Leonardo IoT Bridge Configuration and AdministrationConfiguration P U B L I C 101
Field Description
Template Choose EndUserContext from the list.
Attributes Enter the ID you copied from the Persona page.
NoteYou can add only one persona ID to the Attributes field. You cannot assign multiple personas to a user by adding multiple values in this field. For more information, see Assigning Multiple Personas to a User [page 112].
9. Choose Save.Assign the Role to a Role Collection10. In the left navigator of the SAP Cloud Platform Cockpit, under Security, choose Role Collections.11. Choose New Role Collection to create a new role collection.12. Enter a name for the new role collection (for example, {tenantid}-enduser-rc and choose Save.
13. Choose Add Role and enter the following:
Field Description
Application Identifier Choose the relevant application from the list.
Role Template Choose EndUserContext from the list.
Role Choose the role you just created from the list.
14. Choose Save.Assign the Role Collection to an End User Group15. In the left navigator of the SAP Cloud Platform Cockpit, under Security, choose Trust Configuration.16. Select the Trust by choosing its name.17. In the left navigator, choose Role Collection Mappings.18. Choose New Role Collection Mapping.19. In the Role Collection list, select the role collection you just created.20.In the Value field, enter the user group name.21. Choose Save.
Assign the User to the End User Group
NoteTo perform the following steps, you must have IdP access.
22. Launch your identity provider administrator page to access user and authorization management.23. Locate and assign the user to the appropriate user group. For details, see the documentation for your identity
provider.24. To activate the role assignment, log out of your current session and log in again.
When users log into SAP Leonardo IoT Bridge, they see the My Scenario tile and CustomPersona. Choosing this tile displays the Overview Page for this persona.
102 P U B L I CSAP Leonardo IoT Bridge Configuration and Administration
Configuration
5 Administration
The topics in this section describe how to administer the SAP Leonardo IoT Bridge application.
The tasks in this section must be performed by an administrator.
5.1 System Administration
5.1.1 Maintaining Source System Connections
Context
In order for an external system to communicate with SAP Leonardo IoT Bridge, it must have a source system connection. Administrators maintain source system connections using the Systems configuration application.
You must be an administrator to create, edit, or delete source system connections.
Procedure
1. On the launchpad, choose the Quick Create and Configuration tile.2. Under Advanced Settings, choose Systems.3. On the Systems page, choose the + icon and do the following:
General Information
Name Enter the name of the source system. This field is required.
Description Enter a description for the source system.
Connectivity
Use Custom Connection Select this checkbox to configure a custom connection with Basic Authentication. Deselect this option to use a destination from the SAP Cloud Platform Destination Service.
SAP Leonardo IoT Bridge Configuration and AdministrationAdministration P U B L I C 103
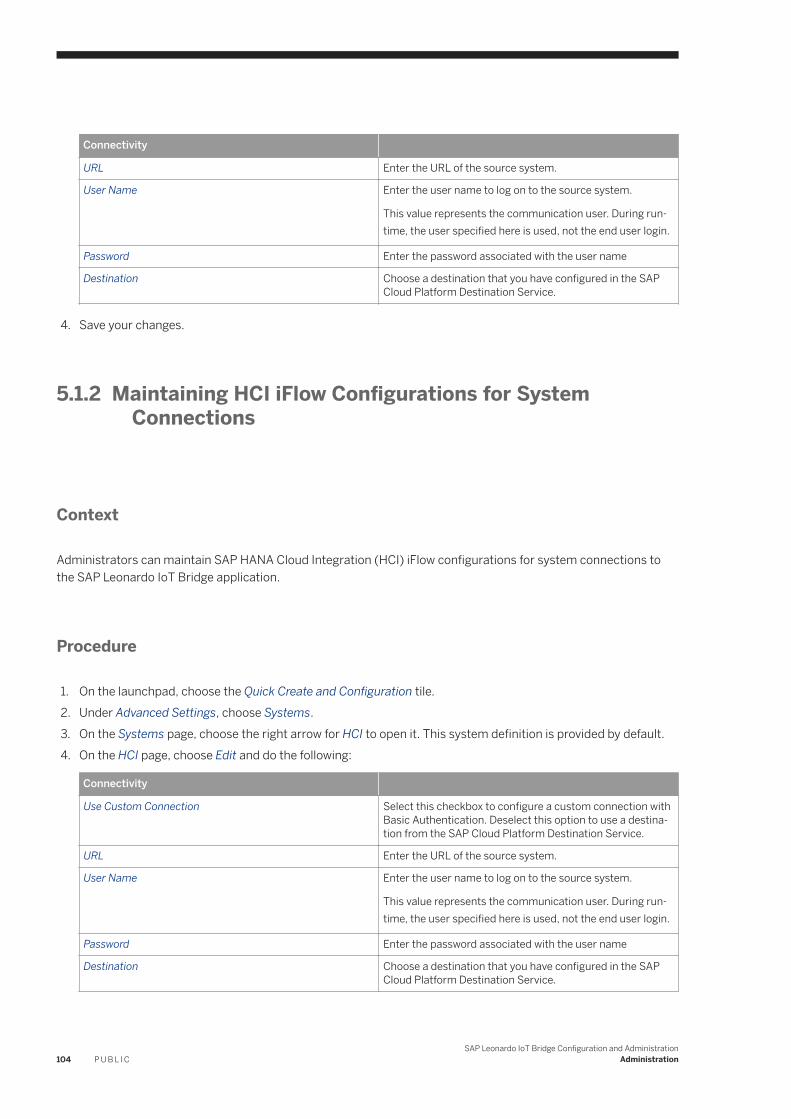
Connectivity
URL Enter the URL of the source system.
User Name Enter the user name to log on to the source system.
This value represents the communication user. During runtime, the user specified here is used, not the end user login.
Password Enter the password associated with the user name
Destination Choose a destination that you have configured in the SAP Cloud Platform Destination Service.
4. Save your changes.
5.1.2 Maintaining HCI iFlow Configurations for System Connections
Context
Administrators can maintain SAP HANA Cloud Integration (HCI) iFlow configurations for system connections to the SAP Leonardo IoT Bridge application.
Procedure
1. On the launchpad, choose the Quick Create and Configuration tile.2. Under Advanced Settings, choose Systems.3. On the Systems page, choose the right arrow for HCI to open it. This system definition is provided by default.4. On the HCI page, choose Edit and do the following:
Connectivity
Use Custom Connection Select this checkbox to configure a custom connection with Basic Authentication. Deselect this option to use a destination from the SAP Cloud Platform Destination Service.
URL Enter the URL of the source system.
User Name Enter the user name to log on to the source system.
This value represents the communication user. During runtime, the user specified here is used, not the end user login.
Password Enter the password associated with the user name
Destination Choose a destination that you have configured in the SAP Cloud Platform Destination Service.
104 P U B L I CSAP Leonardo IoT Bridge Configuration and Administration
Administration
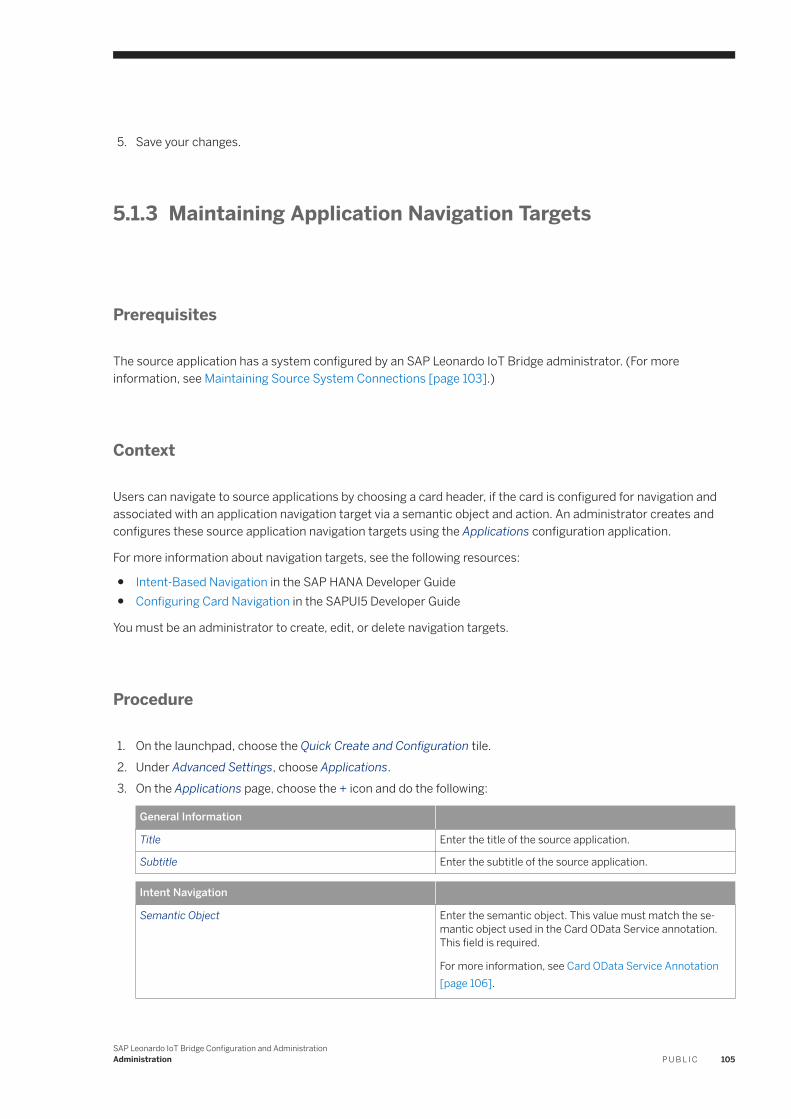
5. Save your changes.
5.1.3 Maintaining Application Navigation Targets
Prerequisites
The source application has a system configured by an SAP Leonardo IoT Bridge administrator. (For more information, see Maintaining Source System Connections [page 103].)
Context
Users can navigate to source applications by choosing a card header, if the card is configured for navigation and associated with an application navigation target via a semantic object and action. An administrator creates and configures these source application navigation targets using the Applications configuration application.
For more information about navigation targets, see the following resources:
● Intent-Based Navigation in the SAP HANA Developer Guide● Configuring Card Navigation in the SAPUI5 Developer Guide
You must be an administrator to create, edit, or delete navigation targets.
Procedure
1. On the launchpad, choose the Quick Create and Configuration tile.2. Under Advanced Settings, choose Applications.3. On the Applications page, choose the + icon and do the following:
General Information
Title Enter the title of the source application.
Subtitle Enter the subtitle of the source application.
Intent Navigation
Semantic Object Enter the semantic object. This value must match the semantic object used in the Card OData Service annotation. This field is required.
For more information, see Card OData Service Annotation [page 106].
SAP Leonardo IoT Bridge Configuration and AdministrationAdministration P U B L I C 105
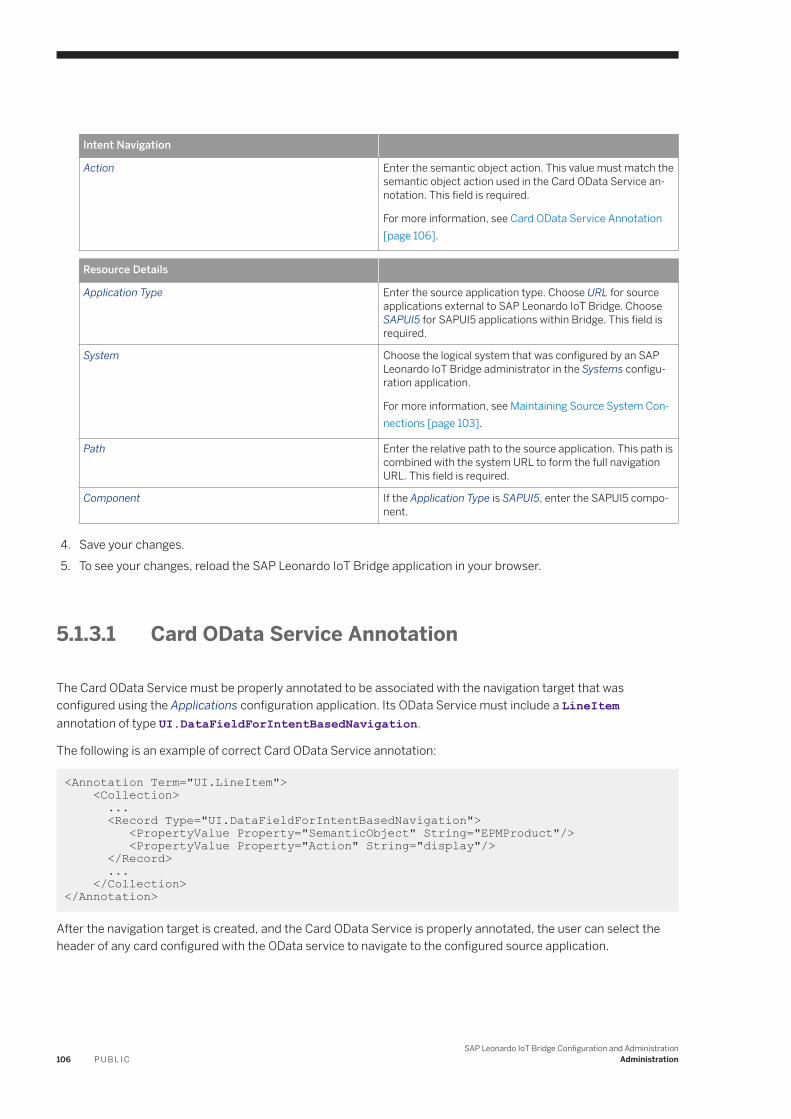
Intent Navigation
Action Enter the semantic object action. This value must match the semantic object action used in the Card OData Service annotation. This field is required.
For more information, see Card OData Service Annotation [page 106].
Resource Details
Application Type Enter the source application type. Choose URL for source applications external to SAP Leonardo IoT Bridge. Choose SAPUI5 for SAPUI5 applications within Bridge. This field is required.
System Choose the logical system that was configured by an SAP Leonardo IoT Bridge administrator in the Systems configuration application.
For more information, see Maintaining Source System Connections [page 103].
Path Enter the relative path to the source application. This path is combined with the system URL to form the full navigation URL. This field is required.
Component If the Application Type is SAPUI5, enter the SAPUI5 component.
4. Save your changes.5. To see your changes, reload the SAP Leonardo IoT Bridge application in your browser.
5.1.3.1 Card OData Service Annotation
The Card OData Service must be properly annotated to be associated with the navigation target that was configured using the Applications configuration application. Its OData Service must include a LineItem annotation of type UI.DataFieldForIntentBasedNavigation.
The following is an example of correct Card OData Service annotation:
<Annotation Term="UI.LineItem"> <Collection> ... <Record Type="UI.DataFieldForIntentBasedNavigation"> <PropertyValue Property="SemanticObject" String="EPMProduct"/> <PropertyValue Property="Action" String="display"/> </Record> ... </Collection></Annotation>
After the navigation target is created, and the Card OData Service is properly annotated, the user can select the header of any card configured with the OData service to navigate to the configured source application.
106 P U B L I CSAP Leonardo IoT Bridge Configuration and Administration
Administration
5.2 User Administration
5.2.1 Defining Content Access Rights for Users
An administrator can define content access rights through user contexts and visibility settings.
Context
You may want certain cards or card types to be visible only to certain user groups. For example, a map card in a persona might be configured with the HERE map provider. If this map provider is not available for a particular region or organization, users in that area should not have access to this card.
User attributes can be determined based on a customer's specific needs. Note the following:
● You build multiple user contexts with multiple user attributes and assign those contexts to user roles.● User contexts are persona independent.● Visibility settings determine which cards or card types should be restricted for a user.● Visibility settings use the user context attributes to check for a match.
RecommendationCreate a super persona containing cards for all your regions and restrict particular cards using visibility settings.
You must be an administrator to define content access rights.
Procedure
Create a User Context1. In the launchpad, choose the Quick Create and Configure tile.2. Choose User Attributes.3. On the User Context Key/Value Stores page, choose the + icon and do the following:
General Information
Name Enter a name for the user context.
Description Enter a description for the user context.
4. Save your changes.5. Select the right arrow for the new user context to open it.
SAP Leonardo IoT Bridge Configuration and AdministrationAdministration P U B L I C 107
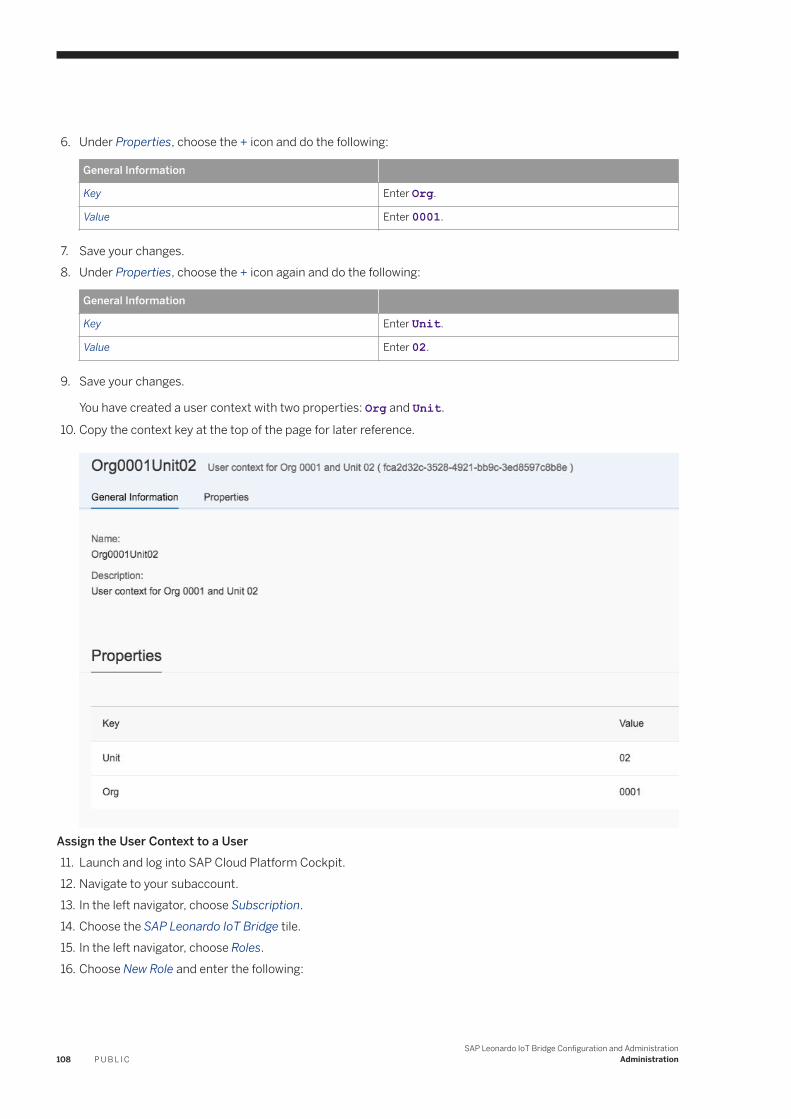
6. Under Properties, choose the + icon and do the following:
General Information
Key Enter Org.
Value Enter 0001.
7. Save your changes.8. Under Properties, choose the + icon again and do the following:
General Information
Key Enter Unit.
Value Enter 02.
9. Save your changes.
You have created a user context with two properties: Org and Unit.
10. Copy the context key at the top of the page for later reference.
Assign the User Context to a User11. Launch and log into SAP Cloud Platform Cockpit.12. Navigate to your subaccount.13. In the left navigator, choose Subscription.14. Choose the SAP Leonardo IoT Bridge tile.15. In the left navigator, choose Roles.16. Choose New Role and enter the following:
108 P U B L I CSAP Leonardo IoT Bridge Configuration and Administration
Administration
Field Description
Name Enter a name for the role.
Description Enter a description for the role.
Template Choose EndUserContext from the list.
Attributes Enter the key you copied from the User Context page.
17. Choose Save.Assign the Role to a Role Collection18. In the left navigator of the SAP Cloud Platform Cockpit, under Security, choose Role Collections.19. Select a role collection in the Role Collections list or create a new one.20.Choose Add Role and enter the following:
Field Description
Application Identifier Choose the relevant application from the list.
Role Template Choose EndUserContext from the list.
Role Choose the role you just created from the list.
21. Choose OK.22. Save your changes.
Assign the Role Collection to an End User Group23. In the left navigator of the SAP Cloud Platform Cockpit, under Security, choose Trust Configuration.24. Select the Trust by choosing its name.25. In the left navigator, choose Role Collection Mappings.26. Choose New Role Collection Mapping.27. In the Role Collection list, select the role collection you just created.28. In the Value field, enter the user group name.29. Choose Save.
Create Visibility Settings30.Return to the Quick Create and Configure page.31. Choose Visibility Settings.32.On the Visibility Settings page, choose the + icon and do the following:
General Information
Name Enter a name for the visibility setting.
Description Enter a description for the visibility setting.
33. Save your changes.34.Select the right arrow for the new visibility setting to open it.35. Under Checks, choose the + icon and do the following:
General Information
Field Enter Org.
Compare Value Enter 0001.
SAP Leonardo IoT Bridge Configuration and AdministrationAdministration P U B L I C 109
36. Save your changes.37. Under Checks, choose the + icon again and do the following:
General Information
Key Enter Unit.
Value Enter 02.
38.Save your changes.39. Choose Edit.40.Under Excludes, choose Add.41. In the Available Artifacts window, select the cards and card types you want to exclude.42.Choose Add to confirm your selections.43. Save your changes.44.Verify your changes by logging on as an end user to see whether the cards you excluded have been hidden.
5.2.2 Assigning and Maintaining Roles
5.2.2.1 Assigning the End User Role
Context
After creating a persona, you must assign the user with an end user role that is linked to the persona.
NoteIf you do not perform these procedures, a No Persona Assigned to User error is displayed when you launch the Overview page for the persona.
NoteIf you create the persona manually following the steps in Creating a Persona Manually [page 13], these steps are included.
Follow these steps to assign roles for a new tenant that does not have the end user role collection. If the tenant already has the end user role collection, skip to the subsection Assign the User to the End User Group.
You must be a key user with the Administrator role to perform this step.
110 P U B L I CSAP Leonardo IoT Bridge Configuration and Administration
Administration
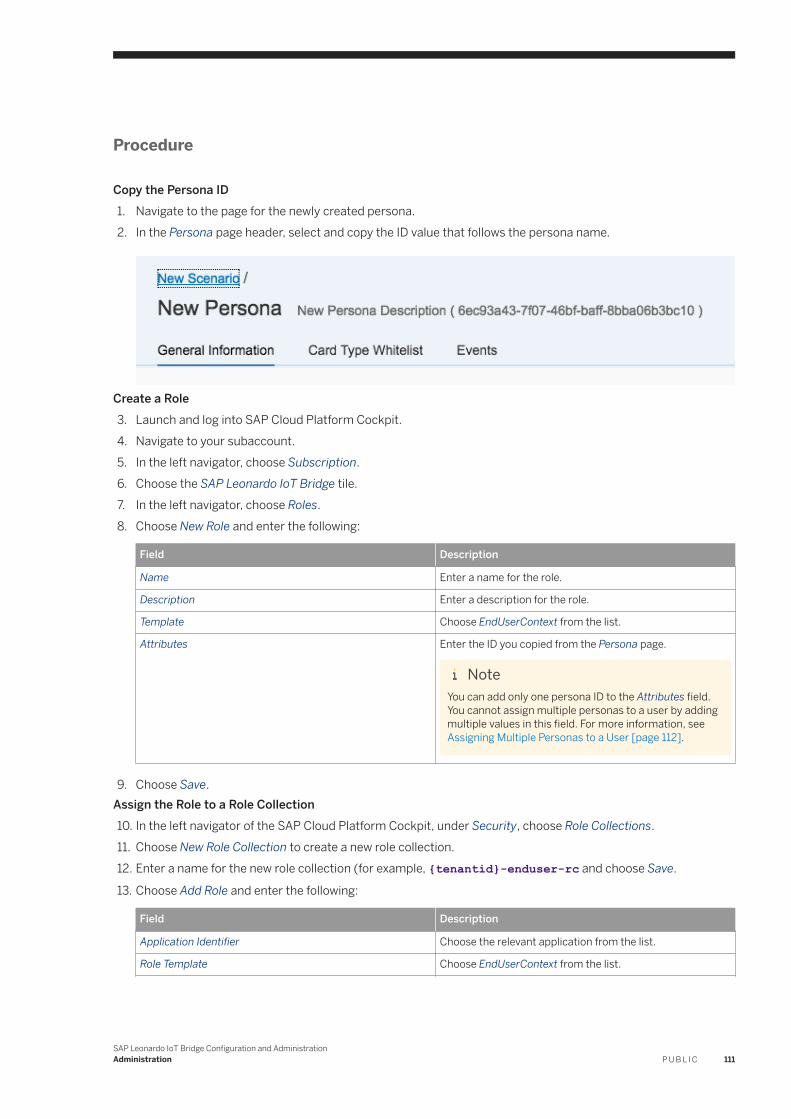
Procedure
Copy the Persona ID1. Navigate to the page for the newly created persona.2. In the Persona page header, select and copy the ID value that follows the persona name.
Create a Role3. Launch and log into SAP Cloud Platform Cockpit.4. Navigate to your subaccount.5. In the left navigator, choose Subscription.6. Choose the SAP Leonardo IoT Bridge tile.7. In the left navigator, choose Roles.8. Choose New Role and enter the following:
Field Description
Name Enter a name for the role.
Description Enter a description for the role.
Template Choose EndUserContext from the list.
Attributes Enter the ID you copied from the Persona page.
NoteYou can add only one persona ID to the Attributes field. You cannot assign multiple personas to a user by adding multiple values in this field. For more information, see Assigning Multiple Personas to a User [page 112].
9. Choose Save.Assign the Role to a Role Collection10. In the left navigator of the SAP Cloud Platform Cockpit, under Security, choose Role Collections.11. Choose New Role Collection to create a new role collection.12. Enter a name for the new role collection (for example, {tenantid}-enduser-rc and choose Save.
13. Choose Add Role and enter the following:
Field Description
Application Identifier Choose the relevant application from the list.
Role Template Choose EndUserContext from the list.
SAP Leonardo IoT Bridge Configuration and AdministrationAdministration P U B L I C 111
Field Description
Role Choose the role you just created from the list.
14. Choose Save.Assign the Role Collection to an End User Group15. In the left navigator of the SAP Cloud Platform Cockpit, under Security, choose Trust Configuration.16. Select the Trust by choosing its name.17. In the left navigator, choose Role Collection Mappings.18. Choose New Role Collection Mapping.19. In the Role Collection list, select the role collection you just created.20.In the Value field, enter the user group name.21. Choose Save.
Assign the User to the End User Group
NoteTo perform the following steps, you must have IdP access.
22. Launch your identity provider administrator page to access user and authorization management.23. Locate and assign the user to the appropriate user group. For details, see the documentation for your identity
provider.24. To activate the role assignment, log out of your current session and log in again.
5.2.2.1.1 Assigning Multiple Personas to a User
To assign multiple personas to a user, create a role for each persona and assign the roles to the role collection for the user (for example, EndUser). You cannot add multiple persona IDs to a single role.
5.2.2.2 Assigning Key User and Administrator Roles
Context
The key user and administrator roles are used to restrict access to certain resources and applications.
Launchpad tile groups are visible or hidden based on user roles.
Follow these steps to assign roles for a new tenant that does not have the key user or administrator role collection. If the tenant already has the key user or administrator role collection, skip to the subsection Assign the User to the Key/Admin User Group.
112 P U B L I CSAP Leonardo IoT Bridge Configuration and Administration
Administration
NoteWhen performing these steps, replace {KeyUser|AdminUser} with KeyUser or AdminUser, and {key|admin} with key or admin.
You must be a key user with the Administrator role to perform this step.
Procedure
Create a Role Collection1. Launch and log into SAP Cloud Platform Cockpit.2. Navigate to your subaccount.3. In the left navigator, under Security, choose Role Collections.4. Choose New Role Collection to create a new role collection.5. Enter a name for the new role collection (for example, {tenantid}-{keyuser|adminuser}-rc and choose
Save.6. Choose Add Role and enter the following:
Field Description
Application Identifier Choose the relevant application from the list.
Role Template Choose {KeyUser|AdminUser}.
Role Choose {KeyUser|AdminUser}.
Map the Role Collection to a User Group7. In the left navigator of the SAP Cloud Platform Cockpit, under Security, choose Trust Configuration.8. Select the Trust by choosing its name.9. In the left navigator, choose Role Collection Mappings.10. Choose New Role Collection Mapping.11. In the Role Collection list, select the role collection you just created.12. In the Value field, enter the user group name.13. Choose Save.
Assign the User to the Key/Admin User Group
NoteTo perform the following steps, you must have IdP access.
14. Launch your identity provider administrator page to access user and authorization management.15. Locate and assign the user to the appropriate administration user group. For details, see the documentation
for your identity provider.16. To activate the role assignment, log out of your current session and log in again.
SAP Leonardo IoT Bridge Configuration and AdministrationAdministration P U B L I C 113
5.3 Map Configuration
NoteSubscription to SAP Leonardo IoT Bridge does not include subscription to a map provider. The customer is responsible for providing a valid subscription to a map provider that can be used in SAP Leonardo IoT Bridge.
SAP Leonardo IoT Bridge provides a flexible mechanism for assigning map configurations to UI elements, including:
● Map cards and Floor Plan card● Object Detail pages for Shipment and Delivery
A map configuration defines the following:
● The available map providers (for example, HERE or Openweather). Map providers must support raster map tiles via a URL in the X,Y,Z format.
● The available layer stacks and layers (for example, traffic, rain, temperature, and combinations of these)
To use a map card, you must create a map configuration. The sample configuration provided with the application is for demonstration purposes only and not meant for productive use. To add a map provider, you must purchase provider licenses and add the provider URLs to your own map configuration.
Map configurations can be assigned as follows:
● By a key user via Card Settings in the Overview page● By an end user via Card Settings in the Overview page (with the appropriate permissions, and only for map
cards created by that user)● By a key user through a User Context attribute. This is the only way to assign a map configuration to the Object
Detail pages.
5.3.1 Creating a Map Configuration
Context
You must be a key user to create a map configuration.
Procedure
Create a Map Configuration1. On the launchpad, choose the Quick Create and Configuration tile and then choose Maps.
114 P U B L I CSAP Leonardo IoT Bridge Configuration and Administration
Administration
2. On the Map Configurations page, choose the + icon.3. On the New Configuration page, do the following:
General Information
Name Enter a name for the configuration. This field is required.
Description Enter a description for the configuration.
4. Save your changes.Create a Map Provider5. Choose the right arrow for the new configuration.6. Under Map Providers, choose the + icon and do the following:
General Information
Name Enter a name for the map provider. This field is required.
Description Enter a description for the map provider.
Copyright Enter copyright information for the map provider.
7. Save your changes.Create Map Provider Sources8. Choose the right arrow for the new map provider.9. Under Map Provider Sources, choose the + icon and do the following:
General Information
URL Enter the custom map provider URL that you received with the map provider license.
Note the following:
{X}{Y}{LOD} The values in brackets are replaced with real coordinates before the request is sent.
app_key and app_code The provider's unique license validation.
10. Save your changes.11. Optionally, if the map provider has multiple URLs for load balancing, repeat steps 9 and 10 to create additional
map provider sources with the remaining URLs.Create Layer Stacks12. Layer stacks provide choices for the end user in a map UI element, either on a card or an Object Detail page.
Under Map Layer Stacks, choose the + icon and do the following:
General Information
Name Enter a name for the layer stack (for example, Traffic). This field is required.
13. Save your changes.14. On the Map Config Template page, choose the right arrow for the new layer stack.15. Choose Edit.
SAP Leonardo IoT Bridge Configuration and AdministrationAdministration P U B L I C 115
16. In the Map Layers area, choose Add.17. In the Create a New Layer window, do the following:
Field Description
Name Enter a name for the layer.
Opacity Use the slider to choose how opaque or transparent the layer should be.
Map Provider Choose a previously configured map provider from the list.
18. Choose Add.19. Repeat steps 16 through 18 for every layer you want to offer the user in this layer stack.
Next Steps
Assign the new map configuration to a card. For more information, see Assigning the Map Configuration to a Card [page 116].
5.3.2 Assigning the Map Configuration to a Card
Context
You assign a map configuration to a card using scenario and role configuration.
Procedure
1. On the launchpad, choose the Quick Create and Configuration tile and then choose Scenarios and Roles.2. On the Scenario Configuration page, choose the right arrow for a scenario to open it.3. On the scenario details page under Personas, choose Persona Configuration link (for example, Logistics
Manager) to launch the Overview page for the persona.4. Choose Card Settings.5. Choose Add Card and choose the card to which you want to add the map configuration.6. On the card details page, optionally choose the map configuration from the Map Provider Configuration list. If
you do not select a map configuration, it will be derived from the user context.7. Save your changes.
116 P U B L I CSAP Leonardo IoT Bridge Configuration and Administration
Administration
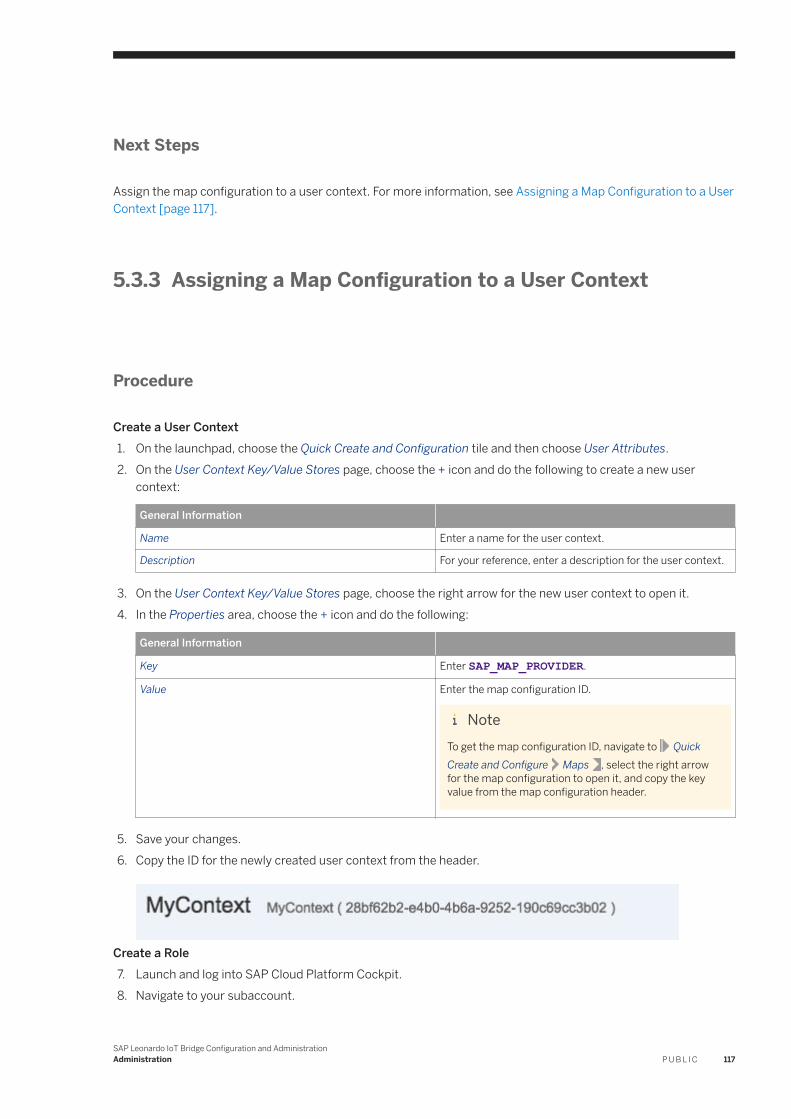
Next Steps
Assign the map configuration to a user context. For more information, see Assigning a Map Configuration to a User Context [page 117].
5.3.3 Assigning a Map Configuration to a User Context
Procedure
Create a User Context1. On the launchpad, choose the Quick Create and Configuration tile and then choose User Attributes.2. On the User Context Key/Value Stores page, choose the + icon and do the following to create a new user
context:
General Information
Name Enter a name for the user context.
Description For your reference, enter a description for the user context.
3. On the User Context Key/Value Stores page, choose the right arrow for the new user context to open it.4. In the Properties area, choose the + icon and do the following:
General Information
Key Enter SAP_MAP_PROVIDER.
Value Enter the map configuration ID.
NoteTo get the map configuration ID, navigate to Quick Create and Configure Maps , select the right arrow for the map configuration to open it, and copy the key value from the map configuration header.
5. Save your changes.6. Copy the ID for the newly created user context from the header.
Create a Role7. Launch and log into SAP Cloud Platform Cockpit.8. Navigate to your subaccount.
SAP Leonardo IoT Bridge Configuration and AdministrationAdministration P U B L I C 117
9. In the left navigator, choose Subscription.10. Choose the SAP Leonardo IoT Bridge tile.11. In the left navigator, choose Roles.12. Choose New Role and enter the following:
Field Description
Name Enter a name for the role.
Description Enter a description for the role.
Template Choose EndUserContext from the list.
Attributes Enter the key you copied from the user context in the Attribute Value field.
NoteYou can add only one persona ID to the Attributes field. You cannot assign multiple personas to a user by adding multiple values in this field. For more information, see Assigning Multiple Personas to a User [page 112].
13. Choose Save.Assign the Role to a Role Collection14. Choose + from the action list for the newly created role.15. Choose one or more role collections by selecting their checkboxes.
NoteIf no role collection is available, do the following to create one:1. In the left navigator of the SAP Cloud Platform Cockpit, under Security, choose Role Collections.2. Choose New Role Collection to create a new role collection.3. Enter a name for the new role collection (for example, {tenantid}-enduser-rc and choose Save.4. Select the newly created role collection.5. Choose Add Role and enter the following:
Field Description
Application Identifier Choose the relevant application from the list.
Role Template Choose EndUserContext from the list.
Role Choose the role you just created from the list.
6. Choose Save.
16. Choose Save.Assign the Role Collection to an End User Group17. In the left navigator of the SAP Cloud Platform Cockpit, under Security, choose Trust Configuration.18. Select the Trust by choosing its name.19. In the left navigator, choose Role Collection Mappings.20.Choose New Role Collection Mapping.
118 P U B L I CSAP Leonardo IoT Bridge Configuration and Administration
Administration

21. In the Role Collection list, select the role collection you just created.22. In the Value field, enter the user group name.23. Choose Save.
5.4 Relationship Service
The Relationship Service enables you to view all relationship records created in SAP Leonardo IoT Bridge.
You must be an administrator to work with the Relationship Service.
5.4.1 Viewing Relationship Records
Procedure
1. Log into SAP Leonardo IoT Bridge as an administrator.2. In the launchpad, choose Quick Create and Configure.3. Under Advanced Settings, choose Relationship Service.
You see the Relationship Records page, displaying all relationships in the system.
4. Choose a relationship record to see its Details page.
SAP Leonardo IoT Bridge Configuration and AdministrationAdministration P U B L I C 119
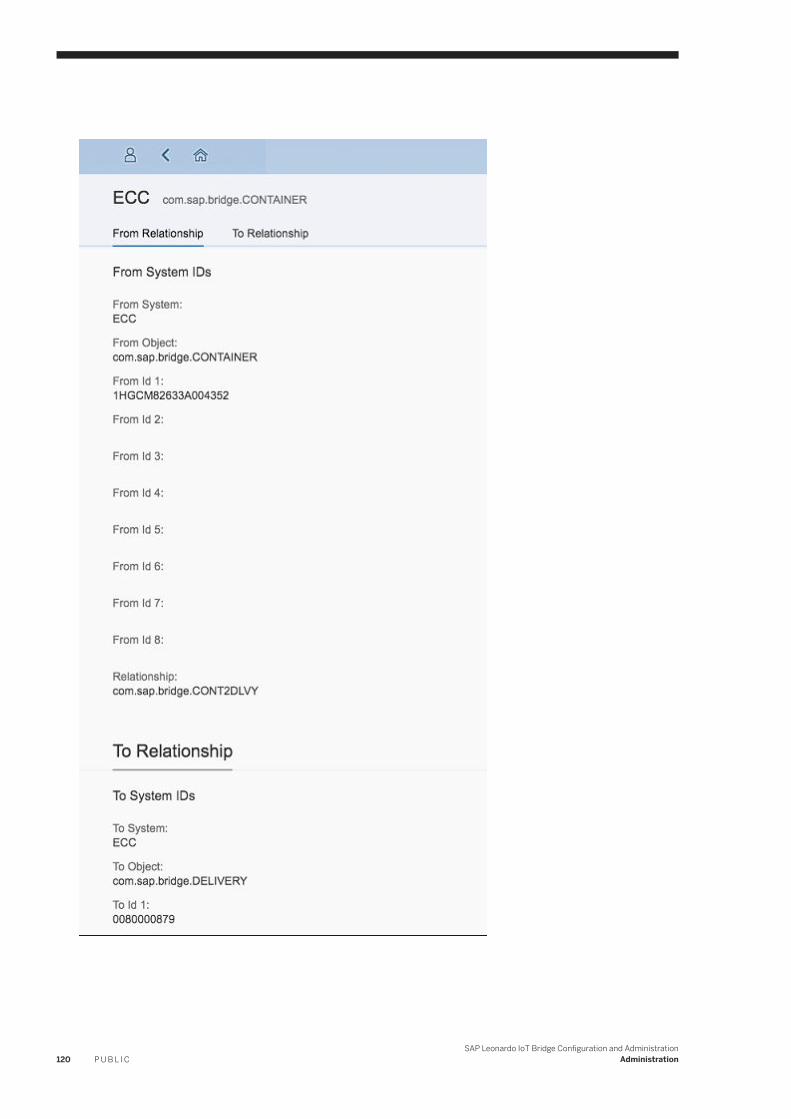
120 P U B L I CSAP Leonardo IoT Bridge Configuration and Administration
Administration
5.5 Integration with SAP BUILD
You can create Bridge scenarios in SAP BUILD and publish or import them into your SAP Leonardo IoT Bridge environment. SAP BUILD allows you to create an SAP Fiori Elements Smart Template Overview Prototype or List Report Prototype page that are compatible with SAP Leonardo IoT Bridge. The SAP BUILD Fiori Elements Smart Template Overview and SAP Fiori Elements Smart Template List Report Prototypes can contain cards and resources such as images and sample data that can be published or imported into a Bridge scenario.
NoteBecause SAP BUILD is a prototyping tool, not all SAPUI5 or SAP Fiori Elements features can be configured or used in the SAP BUILD prototyping environment. Additionally, not all SAPUI5 or SAP Fiori Elements features configured in a SAP BUILD prototype can be imported into SAP Leonardo IoT Bridge. Visualizations and functionality configured in SAP BUILD prototyping may appear different, may not be displayed, may work differently, or may not work at all when imported into the SAP Leonard IoT Bridge environment.
NoteSAP Leonardo IoT Bridge supports only one level of navigation from the SAP Fiori Elements List Report to the Object Detail page.
5.5.1 Creating a Bridge Scenario in SAP BUILD
Context
To create a Bridge scenario in SAP BUILD that can be imported into SAP Leonardo IoT Bridge, do the following. For information about SAP BUILD-related procedures, see the SAP BUILD in-app documentation.
Procedure
1. Log into http://build.me (or the URL for the SAP BUILD instance for your organization).
2. Create a new project.3. Start prototyping.4. Choose Start with Template and then choose Overview Page (SAP Fiori Elements) or List Report (SAP Fiori
Elements) as your template. You can add an Object Detail page within the List Report page.
NoteOnly these page styles can be imported into SAP Leonardo IoT Bridge.
SAP Leonardo IoT Bridge Configuration and AdministrationAdministration P U B L I C 121
5. Edit the page by adding cards, images, and sample data.
5.5.2 Publishing an SAP BUILD Prototype to SAP Leonardo IoT Bridge
Context
As a key user, you can publish an SAP BUILD Prototype directly to SAP Leonardo IoT Bridge. Note the following:
● Currently, only an SAP Fiori Elements Smart Template Overview Prototype can be published from SAP BUILD.● Publishing to SAP Leonardo IoT Bridge is not available in the SAP BUILD standard tenant (for example,
https://standard.build.me). It is available in all other tenants.
Procedure
1. In SAP BUILD, navigate to your SAP Fiori Elements Smart Template Overview Prototype.
2. Choose Share Leonardo IoT Bridge .3. Enter your IoT Bridge Server Name.
NoteYou can obtain your IoT Bridge Server Name by logging into SAP Leonardo IoT Bridge as a key user and choosing the Key User Settings icon in the launchpad header.
4. Choose Authorize.
You are redirected to log into SAP Leonardo IoT Bridge with your key user account. After you log in, you will be redirected back to SAP BUILD.
5. Choose an existing Scenario and Persona or create a new Scenario and Persona.6. Choose Publish.7. Choose the Link to Explore Prototype on IOT Bridge to navigate to your scenario in SAP Leonardo IoT Bridge.
122 P U B L I CSAP Leonardo IoT Bridge Configuration and Administration
Administration

5.5.3 Importing an SAP BUILD Prototype
Prerequisites
The UaaUser role is assigned to the key user.
Context
You must have the key user role in SAP Leonardo IoT Bridge to perform these steps.
Procedure
1. In the SAP BUILD prototype editor, choose Share and choose the Download tab.2. Download the ZIP file for your prototype or prototypes and save it to your hard drive.3. Launch SAP Leonardo IoT Bridge.4. In the launchpad, choose Quick Create and Configure.5. Under Make Changes to Your Scenario, choose Import Scenario.
NoteYou only see Make Changes to Your Scenario if you have the key user role.
6. Do one of the following:
○ To import your prototype into an existing scenario, select Choose Existing and then select an existing scenario and persona.
NoteYou cannot import prototypes into SAP-delivered scenarios and personas. You can select only newly created scenarios and personas or those that have been copied from SAP-delivered scenarios and personas.
○ To import your prototype into a new scenario, select Create New and enter a scenario and persona name.7. Choose Browse… and select the ZIP file you downloaded previously.8. Select the correct End User group from the User Groups list. This step enables the system to automatically
create a role and a corresponding role collection and then assign the new role collection to the selected user group.
NoteTo display the User Groups list, the UaaUser role must be assigned to the key user.
SAP Leonardo IoT Bridge Configuration and AdministrationAdministration P U B L I C 123
9. Select Import and wait for your SAP BUILD prototype to be imported.10. Do the following to set Overview page card navigation to the List Report:
a. Import two ZIP files into the same scenario/persona: one file for the Overview page and one for the List Report.
b. Open the Overview Page Card for editing.c. Under Advanced Options, set the Select a Navigation Target field to the same value as the application that
was created in step 8.d. Save your changes.
You see the Overview page for your scenario and persona, displaying the contents of your SAP BUILD prototype.
5.5.4 Custom Cards in SAP BUILD
The following SAP Leonardo IoT Bridge custom cards may be available in your SAP BUILD Prototyping environment.
Card Type Description
KPI Card A KPI Card displays a list of KPIs, each composed of a number, an icon, and a description text.
GeoMap Card A GeoMap Card displays geographic elements like roads, cities, forests, and other details. It is the best choice if you have location-based data and want to show a road map, satellite map, or other map in the background.
5.6 Integration with SAP CoPilot
You integrate SAP Leonardo IoT Bridge with SAP CoPilot as follows.
5.6.1 Configuring a CoPilot Tenant
A tenant in SAP CoPilot is represented by a SAP Cloud Platform Neo subaccount and a corresponding subscription to the SAP CoPilot Provider account. To use SAP CoPilot, an SAP Leonardo IoT Bridge customer must have an existing tenant subaccount in SAP Cloud Platform Neo and must do the following:
● Configure the identity provider and authentication in a SAP Cloud Platform Neo subaccount.● Configure the SAP CoPilot destination in a SAP Cloud Platform Cloud Foundry subaccount. Only subaccount-
based tenants can be configured with SAP CoPilot.
124 P U B L I CSAP Leonardo IoT Bridge Configuration and Administration
Administration
Steps to Configure a Tenant
Step Landscape
Configure tenantspecific trust and OAuth client in SAP Cloud Platform Neo (as described in this section)
SAP Cloud Platform Neo
Configure tenantspecific destination in SAP Cloud Platform Cloud Foundry (as described in this section)
SAP Cloud Platform Cloud Foundry
5.6.1.1 Downloading the SAP Cloud Platform Cloud Foundry Tenant Subaccount X509 Trust Certificate
Context
As a prerequisite to onboarding, you must download the destination service X509 trust certificate from the Cloud Cockpit in SAP Cloud Platform Cloud Foundry to be used for configuring the tenantspecific trust and OAuth client in SAP Cloud Platform Neo.
Perform the following steps in the Cloud Cockpit in SAP Cloud Platform Cloud Foundry.
Procedure
1. Navigate to the tenant subaccount.
2. Select Connectivity Destinations .3. Select Download Trust.
5.6.1.2 Configuring the Tenant-specific Trust and OAuth Client
Prerequisites
● The SAP Cloud Platform Cloud Foundry tenant is subscribed to the Destination Service.● You have identified or created a SAP Cloud Platform Neo tenant.● The SAP Cloud Platform Neo tenant is subscribed to the SAP CoPilot Production Provider account.
SAP Leonardo IoT Bridge Configuration and AdministrationAdministration P U B L I C 125

● You have downloaded the SAP Cloud Platform Cloud Foundry tenant subaccount X509 Trust Certificate. For more information, see Downloading the SAP Cloud Platform Cloud Foundry Tenant Subaccount X509 Trust Certificate [page 125].
Context
The tenant subaccount in SAP Cloud Platform Neo must establish trust with the SAP Cloud Platform Cloud Foundry destination service and an OAuth client must be created. Perform the following steps in the Cloud Cockpit in SAP Cloud Platform Neo.
The following configuration values are required for configuring the tenantspecific destination in SAP Cloud Platform Cloud Foundry:
● Local Provider Name● OAuth Client ID● OAuth Client Secret● OAuth Token Endpoint● CoPilot Service URL
Procedure
Configure the Local Service Provider1. Navigate to the tenant subaccount where the SAP CoPilot subscription has been created.
2. Select Security Trust and then select Local Service Provider.3. Select Edit.4. For Configuration Type, choose Custom.5. Save your changes.6. Note the Local Provider Name value. It is required to configure the destination in SAP Cloud Platform Cloud
Foundry.Add a Trusted Identity Provider7. Select the Application Identity Provider tab and then select Add Trusted Identity Provider.8. Enter the following parameter information:
Field Value
Name {CF Apps Host}/{Sub Account Id}
For example: cfapps.eu10.hana.ondemand.com/sap-iot
Note that {Sub Account Id} may be a guid such as b1ee7037-6d65-47b3-a6b9-1f2516875b68, and it must match the subaccount ID with which trust is being established.
Description {same as Name}
126 P U B L I CSAP Leonardo IoT Bridge Configuration and Administration
Administration

Field Value
Signing Certificate {X509 Trust Certificate contents}
Only copy the contents between '-----BEGIN CERTIFICATE-----' and '-----END CERTIFICATE-----'.
Only for IDP-Initiated SSO Select this checkbox.
Create the OAuth Client
9. Select Security OAuth and then select Clients.10. Select Register New Client and enter the following parameter information:
Field Value
Name {Sub Account Name}/copilot
For example: sap-iot/copilot
Subscription {CoPilot subscription}
Confidential Checked
Secret Create a secure secret to use as a password.
Redirect URL {URL to Bridge on Cloud Foundry}
For example: https://iotbridget1-iotbridge.cfapps.eu10.hana.ondemand.com/component/index.html
Token Lifetime {empty}
Refresh Token Lifetime {empty}
11. Save your changes.12. Note the following parameter values. They are required to configure the destination in SAP Cloud Platform
Cloud Foundry.
○ ID (client id)○ Secret (client secret)
Copy the Token Endpoint URL
13. Select Security OAuth and then select Branding.14. Copy the OAuth token endpoint URL.
Copy the CoPilot Service URL
15. Select Applications Subscriptions and then select the CoPilot Provider application.16. Copy the CoPilot Service URL.
SAP Leonardo IoT Bridge Configuration and AdministrationAdministration P U B L I C 127

5.6.1.3 Configuring the Tenant-specific Destination
Prerequisites
You have configured the tenantspecific trust and OAuth client in SAP Cloud Platform Neo. For more information, see Configuring the Tenantspecific Trust and OAuth Client [page 125].
Context
You must create the destination for the SAP CoPilot microservice in the tenantspecific subaccount in SAP Cloud Platform Cloud Foundry.
Perform the following steps in the Cloud Cockpit in SAP Cloud Platform Cloud Foundry.
Procedure
1. Navigate to the tenant subaccount.
2. Select Connectivity Destinations and then select New Destination.3. Enter the following values:
Field Value
Name copilotURL {CoPilot Service URL}Authentication OAuth2SAMLBearerAssertionAudience {Local Provider Name}Client Key {OAuth Client ID}Token Service URL {OAuth Token Endpoint}
Token Service User {OAuth Client ID}Token Service Password {OAuth Client Secret}
4. Under Additional Properties, add the following properties:
Option Description
authnContextClassRef urn:oasis:names:tc:SAML:2.0:ac:classes:PreviousSession
nameIdFormat urn:oasis:names:tc:SAML:1.1:nameid-format:unspecified
128 P U B L I CSAP Leonardo IoT Bridge Configuration and Administration
Administration
5. Save your changes.6. To verify that SAP CoPilot has been configured properly, log into SAP IoT Leonardo Bridge and confirm that
the SAP CoPilot icon is now visible in the launchpad header.
5.7 Customer Decommissioning
Context
When decommissioning a customer system, the customer is given a grace period for exporting the data before SAP destroys the data stored in the SAP cloud.
To export this data, do the following:
Procedure
1. Terminate user access to the system (except for tenant administrator access) by revoking user access to the application. This prevents users from changing the data while it is being exported and potentially creating an inconsistent export.
2. Request SAP DevOps to enable an export of data for your tenant.3. Log in as an administrator and navigate to {server-root}/Admin/exportTables. This page displays
export links for every SAP Leonardo IoT Bridge exportable database table holding customer data for the tenant. Opening a link for the table displays the page with the content of this table.
4. After the browser completes loading the page for the table, save the page using File Save Page As (or the corresponding path in your browser). Data is exported in HTML format with a basic structure that is easily parseable. The encoding is UTF-8.
As a convenience aid, instead of exporting every table individually, tables can be exported as sets. Tables are grouped into three sets: sap.iot.doc.model::*, ns and event. To open the set, choose the link for the set at the top of the page. The produced HTML page contains the data for all tables in the set.
If a table contains a large number of records, so that exporting it causes network or browser performance issues, you can export data in batches (pages) by including the parameters start and count in the URL. For example, adding &start=10&count=7 to the table URL or set URL will export records 10...17 for that table (or records in range 10…17 for every table in the set, assuming the table has records in this range). Row numbering starts from 1.
SAP Leonardo IoT Bridge Configuration and AdministrationAdministration P U B L I C 129

Important Disclaimers and Legal Information
HyperlinksSome links are classified by an icon and/or a mouseover text. These links provide additional information.About the icons:
● Links with the icon : You are entering a Web site that is not hosted by SAP. By using such links, you agree (unless expressly stated otherwise in your agreements with SAP) to this:
● The content of the linked-to site is not SAP documentation. You may not infer any product claims against SAP based on this information.● SAP does not agree or disagree with the content on the linked-to site, nor does SAP warrant the availability and correctness. SAP shall not be liable for any
damages caused by the use of such content unless damages have been caused by SAP's gross negligence or willful misconduct.
● Links with the icon : You are leaving the documentation for that particular SAP product or service and are entering a SAP-hosted Web site. By using such links, you agree that (unless expressly stated otherwise in your agreements with SAP) you may not infer any product claims against SAP based on this information.
Beta and Other Experimental FeaturesExperimental features are not part of the officially delivered scope that SAP guarantees for future releases. This means that experimental features may be changed by SAP at any time for any reason without notice. Experimental features are not for productive use. You may not demonstrate, test, examine, evaluate or otherwise use the experimental features in a live operating environment or with data that has not been sufficiently backed up.The purpose of experimental features is to get feedback early on, allowing customers and partners to influence the future product accordingly. By providing your feedback (e.g. in the SAP Community), you accept that intellectual property rights of the contributions or derivative works shall remain the exclusive property of SAP.
Example CodeAny software coding and/or code snippets are examples. They are not for productive use. The example code is only intended to better explain and visualize the syntax and phrasing rules. SAP does not warrant the correctness and completeness of the example code. SAP shall not be liable for errors or damages caused by the use of example code unless damages have been caused by SAP's gross negligence or willful misconduct.
Gender-Related LanguageWe try not to use genderspecific word forms and formulations. As appropriate for context and readability, SAP may use masculine word forms to refer to all genders.
130 P U B L I CSAP Leonardo IoT Bridge Configuration and Administration
Important Disclaimers and Legal Information

SAP Leonardo IoT Bridge Configuration and AdministrationImportant Disclaimers and Legal Information P U B L I C 131

go.sap.com/registration/contact.html
© 2018 SAP SE or an SAP affiliate company. All rights reserved.No part of this publication may be reproduced or transmitted in any form or for any purpose without the express permission of SAP SE or an SAP affiliate company. The information contained herein may be changed without prior notice.Some software products marketed by SAP SE and its distributors contain proprietary software components of other software vendors. National product specifications may vary.These materials are provided by SAP SE or an SAP affiliate company for informational purposes only, without representation or warranty of any kind, and SAP or its affiliated companies shall not be liable for errors or omissions with respect to the materials. The only warranties for SAP or SAP affiliate company products and services are those that are set forth in the express warranty statements accompanying such products and services, if any. Nothing herein should be construed as constituting an additional warranty.SAP and other SAP products and services mentioned herein as well as their respective logos are trademarks or registered trademarks of SAP SE (or an SAP affiliate company) in Germany and other countries. All other product and service names mentioned are the trademarks of their respective companies.Please see https://www.sap.com/about/legal/trademark.html for additional trademark information and notices.