
SAP Data Maintenance by Vistex, Pricing option for SAP S ...
491
Application Help Document Version: 1.0 – Final Date: December 12, 2019 Public SAP Data Maintenance by Vistex, Pricing option for SAP S/4HANA 1909
Transcript of SAP Data Maintenance by Vistex, Pricing option for SAP S ...

Application Help
Document Version: 1.0 – Final
Date: December 12, 2019
Public
SAP Data Maintenance by Vistex, Pricing option for SAP
S/4HANA 1909

1909 Pricing
Help Documentation
i
Table of Contents
1 Navigation ..................................................................................................... 1
1.1 Help Navigation ................................................................................................................. 1 1.1.1 Contents ............................................................................................................... 1 1.1.2 Documentation ..................................................................................................... 1
2 Data Maintenance Pricing ................................................................................. 5
2.1 Introduction ....................................................................................................................... 5 2.1.1 Definition .............................................................................................................. 5 2.1.2 Purpose ................................................................................................................ 5
2.2 Benefits of Data Maintenance Pricing ............................................................................... 6 2.3 Price Sheet ....................................................................................................................... 7
2.3.1 Price Sheet Overview ........................................................................................... 7 2.3.2 Price Policy ........................................................................................................ 10 2.3.3 Time Period Pricing ............................................................................................ 13
2.4 Pricing Formulas ............................................................................................................. 16 2.4.1 Master Formula Workbench ............................................................................... 16 2.4.2 Sheet Formulas and Procedures Workbench ..................................................... 17 2.4.3 Flex Formulas Workbench .................................................................................. 19 2.4.4 Explosion Profile Formula Workbench ................................................................ 21
2.5 Price Maintenance .......................................................................................................... 21 2.5.1 Price Maintenance Overview .............................................................................. 22 2.5.2 Pricing Area and Pricing Workbench .................................................................. 25 2.5.3 Pricing Information Upload
31 2.5.4 Price Maintenance Methods ............................................................................... 33 2.5.5 Automated Price Maintenance ........................................................................... 59
2.6 Price Simulation .............................................................................................................. 61 2.6.1 Price Simulation Workbench .............................................................................. 62 2.6.2 Upload/Download ............................................................................................... 64
2.7 Price Proposal................................................................................................................. 66 2.7.1 Price Proposal Overview .................................................................................... 67 2.7.2 Price Proposal .................................................................................................... 68 2.7.3 Upload/Download ............................................................................................... 68
2.8 Price Review ................................................................................................................... 71 2.8.1 Price Review Workbench ................................................................................... 71 2.8.2 Review Template Workbench ............................................................................. 74 2.8.3 Upload/Download ............................................................................................... 75
2.9 Approvals/Status Flow .................................................................................................... 78 2.9.1 Approvals ........................................................................................................... 78 2.9.2 Status Flow Overview ......................................................................................... 81 2.9.3 Status Flow Workbench ..................................................................................... 84 2.9.4 Status Profile Workbench ................................................................................... 86 2.9.5 Activity Workbench ............................................................................................. 87 2.9.6 Activity Template Workbench ............................................................................. 88

Table of Contents
ii
2.10 Catalog ........................................................................................................................... 89 2.10.1 Catalog Overview ............................................................................................... 89 2.10.2 Segment Workbench .......................................................................................... 92 2.10.3 Catalog Workbench ............................................................................................ 93 2.10.4 Catalog Frequency Workbench .......................................................................... 95 2.10.5 Upload/Download ............................................................................................... 96
2.11 Pricing Reporting and Analytics ...................................................................................... 98 2.11.1 Reporting and Analytics Overview ...................................................................... 99 2.11.2 Analytics Setup ................................................................................................ 104
2.12 hybris eCommerce Integration ...................................................................................... 112 2.12.1 hybris Installation Guide ................................................................................... 112 2.12.2 Custom Extensions Overview ........................................................................... 115
3 Business Register ....................................................................................... 123
3.1 Introduction ................................................................................................................... 123 3.1.1 Delivered Objects ............................................................................................. 123
3.2 Benefits of Business Register ....................................................................................... 124 3.3 Government Pricing ...................................................................................................... 124
3.3.1 Introduction to Government Pricing .................................................................. 125 3.3.2 Government Pricing Master Data ..................................................................... 126 3.3.3 Government Pricing Sales Data ....................................................................... 169 3.3.4 Government Pricing Processing ....................................................................... 187
3.4 Medical Rebates ........................................................................................................... 247 3.4.1 Introduction to Medicaid Rebate Processing .................................................... 247 3.4.2 Medicaid Rebate Master Data .......................................................................... 248 3.4.3 Medicaid Rebate Processing ............................................................................ 290
3.5 Federal Supply Schedule/Public Health Service ............................................................ 297 3.5.1 Federal Supply Schedule ................................................................................. 297 3.5.2 FSS/PHS Master Data ..................................................................................... 298 3.5.3 FSS/PHS Processing ....................................................................................... 323
3.6 Business Register Reporting and Analytics ................................................................... 375 3.6.1 Reporting and Analytics Overview .................................................................... 375 3.6.2 Business Register Reports ............................................................................... 381 3.6.3 Analytics Setup ................................................................................................ 382
3.7 Business Register Extras .............................................................................................. 390 3.7.1 Automated Document Maintenance ................................................................. 390 3.7.2 Approvals/Status Flow ...................................................................................... 392 3.7.3 Organizational Objects ..................................................................................... 413 3.7.4 Restrictions ...................................................................................................... 432
3.8 Business Register Utilities ............................................................................................. 440 3.8.1 Business Partner Workbench ........................................................................... 440 3.8.2 IP Correspondence Triggers ............................................................................ 442 3.8.3 Batch Trigger for Correspondence ................................................................... 443 3.8.4 Business Register User Settings ...................................................................... 444
3.9 Trade Calendar ............................................................................................................. 445 3.9.1 Trade Calendar Overview ................................................................................. 445 3.9.2 Trade Calendar Object Maintenance Workbench ............................................. 449

1909 Pricing Documentation
iii
3.9.3 Trade Calendar Maintenance Workbench ........................................................ 450 3.9.4 Period Profile Workbench ................................................................................. 451
4 User Experience ......................................................................................... 453
4.1 Role Workbench ........................................................................................................... 453 4.1.1 Definition .......................................................................................................... 453 4.1.2 Access ............................................................................................................. 453 4.1.3 Structure .......................................................................................................... 454 4.1.4 Procedures ....................................................................................................... 454
4.2 Workspace Workbench ................................................................................................. 455 4.2.1 Definition .......................................................................................................... 455 4.2.2 Access ............................................................................................................. 455 4.2.3 Structure .......................................................................................................... 455 4.2.4 Procedures ....................................................................................................... 456
4.3 Search Profile Workbench ............................................................................................ 456 4.3.1 Definition .......................................................................................................... 456 4.3.2 Access ............................................................................................................. 456 4.3.3 Structure .......................................................................................................... 457 4.3.4 Procedures ....................................................................................................... 458
4.4 UI Profile Workbench .................................................................................................... 458 4.4.1 Definition .......................................................................................................... 458 4.4.2 Access ............................................................................................................. 459 4.4.3 Structure .......................................................................................................... 459 4.4.4 Procedures ....................................................................................................... 460
4.5 Designer ....................................................................................................................... 460 4.5.1 Definition .......................................................................................................... 460
4.6 Display Profile (GUI) ..................................................................................................... 462 4.6.1 Display Profile for Business Register ................................................................ 462 4.6.2 Pricing Display Profiles ..................................................................................... 465
5 Vistex Technical ......................................................................................... 467
5.1 Enhancements Workbench ........................................................................................... 467 5.1.1 Definition .......................................................................................................... 467 5.1.2 Access ............................................................................................................. 467 5.1.3 Structure .......................................................................................................... 467 5.1.4 Procedures ....................................................................................................... 468
5.2 File Submission Workbench .......................................................................................... 468 5.2.1 Definition .......................................................................................................... 468 5.2.2 Access ............................................................................................................. 469 5.2.3 Structure .......................................................................................................... 469 5.2.4 Procedures ....................................................................................................... 469
5.3 Message Class Workbench........................................................................................... 470 5.3.1 Definition .......................................................................................................... 470 5.3.2 Access ............................................................................................................. 470 5.3.3 Structure .......................................................................................................... 470 5.3.4 Procedures ....................................................................................................... 470
5.4 Archiving ....................................................................................................................... 471
Table of Contents
iv
5.4.1 Agreement and Pricing Archiving ..................................................................... 471 5.4.2 Bucket Archiving .............................................................................................. 472 5.4.3 Composite Archiving ........................................................................................ 473 5.4.4 IP Archiving ...................................................................................................... 475
5.5 Business Script ............................................................................................................. 478 5.5.1 Business Script Overview ................................................................................. 478 5.5.2 Business Script Editor ...................................................................................... 479 5.5.3 Business Script Workbench .............................................................................. 481 5.5.4 Global Messages ............................................................................................. 482

1 Navigation
1.1 Help Navigation
The help screen is organized into two panes:
• Contents, which appears in the left pane. The opening display is considered the Home page. NOTE: This pane also displays search results. To quickly locate documentation for a specific topic, enter the word(s) to search for in the Search field and click on the Go button. From the resulting list of documents, click on a specific document title.
• Documentation, which appears in the right pane
1.1.1 Contents
Use the Contents pane to view a list of topics included in the documentation. The following icons are
used in the list:
• Folder, which stores the documents for a topic (and sometimes other folders). Click on the
icon to expand the topic list. When expanded, the icon changes to ; click on this icon to collapse the topic list.
• Topic, which links to a specific document. NOTE: To hide the Contents pane, click on the X (Hide Navigation Component) control. To re-display the
Contents pane, click on the Contents button at the top of the page.
1.1.2 Documentation
Each document contains the following information:
• Breadcrumb • Title Icon • Hypertext Links

Navigation
SAP Data Maintenance by Vistex, Pricing option for SAP S/4HANA by Vistex for SAP S/4HANA
Application Help – Version: 1.0 – Final
December 12, 2019
© 2019 Vistex, Inc. All Rights Reserved.
© 2019 SAP SE or an SAP affiliate company. All rights reserved.
1.1.2.1 Breadcrumb
When you display a document, in the top right corner of the screen is a breadcrumb, which indicates the
path used to display the document.
For example, the breadcrumb: Home > User Experience > Launchpad > Launchpad Overview illustrates
that from the Home page you opened the User Experience folder, opened the Launchpad folder, and
then displayed the Launchpad Overview document.
1.1.2.2 Title Icon
One of the following icons may appear at the beginning of a document title, to indicate the purpose of
the document:
Information Used for overview documents.
Transaction Used for non-workbench transactions, such as mass processing transactions and upload transactions.
Workbench Each workbench document describes how to access and use the workbench. Links are provided to the following:
• Search and Worklist, which provides detailed information on the Search and Worklist tabs.
• Work Area, which describes the Work Area in detail. Links are provided to information for each tab.
• Tabs • Procedures
Search and Worklist The document contains detail for both the Search and Worklist tabs.
Search Screen Enter values in the search criteria,as needed. The Search screen may be a single list divided into topics (such as General or Dates), or may be divided into multiple tabs of criteria. NOTE: For Web transactions, this icon represents the Initial screen that includes both the search criteria and results.
Results Screen In certain GUI transactions, results from the values entered on the Search screen appear on the Results screen. NOTE: For Web transactions, this icon represents the Details screen.

1909 Pricing Documentation
Work Area The document describes the Work Area in detail. Links are provided to information for each tab.
Tab The document contains detail on the fields, columns, and/or buttons that appear on the tab. For a workbench, each tab document is accessed from the list of tabs in the Work Area. (You also may search for the tab name in the Search field at the top of the page.)
Procedure Each procedure document consists of a list of numbered steps that describe how to perform one or more specific tasks. In a workbench or transaction document, the Procedures section contains links to each procedure document.
1.1.2.3 Links within Documents
Within a document, hypertext links provide quick access to other documents.


2 Data Maintenance Pricing
Data Maintenance Pricing
2.1 Introduction
IMPORTANT: This documentation can contain functionality from SAP Paybacks and Chargebacks by
Vistex, SAP Incentive Administration by Vistex, and SAP Data Maintenance for ERP by Vistex.
2.1.1 Definition
Gaining visibility of the complex pricing situations that exist for customers, manufacturers, and suppliers
can be quite challenging. Inaccuracy and inconsistency of pricing data may result in the potential loss of
revenue and margins. Transaction pricing is undeniably one of the most critical levers you can use to
gain competitive advantages in today's marketplace. A company must be able to pro-actively focus on
the maintenance of pricing and agreements. To keep up with corporate compliance, it is vital to enforce
pricing policies. Pricing management also enables an organization to close more deals and gain visibility
into profit performance.
Recent studies have shown that organizations that implement a pricing solution by replacing
cumbersome processes with a system that brings transaction pricing, agreements, and analytics into a
uniform, integrated view will significantly increase their business performance and improve revenues
and margins.
2.1.2 Purpose
Embedded into your SAP environment, SAP Data Maintenance (DM) for ERP by Vistex, Pricing addresses
the ease and visibility needed for efficient management and consistent execution of pricing transactions
and agreements. DM Pricing also provides a pricing analytic tool for analysis, modeling, and "what-if"
testing. The manageability of the pricing dynamics in DM Pricing is largely due to a function that enables
the creation of pricing maintenance profiles that bring together related pricing elements for quicker and
deeper insights into your pricing data. You will see improved processes and workflow, a comprehensive,

Data Maintenance Pricing
SAP Data Maintenance by Vistex, Pricing option for SAP S/4HANA by Vistex for SAP S/4HANA
Application Help – Version: 1.0 – Final
December 12, 2019
© 2019 Vistex, Inc. All Rights Reserved.
© 2019 SAP SE or an SAP affiliate company. All rights reserved.
convenient view for pricing execution and maintenance, and the necessary analytic tools to generate
more profitable deals while maintaining compliance of your organization's pricing policies.
Vistex also includes powerful global tools such as dynamic pricing (behind the scenes configured price
grouping) and flexible groups (no configuration required workbench format that allows for grouping and
exclusions by customer group, material group, industry, and so on) for determining eligibility for pricing.
Virtually any grouping is possible. With these tools wasteful data entry is eliminated or streamlined as
the created groups may be used time and again and no permanent system tables, condition records
keys, or structures are required.
2.2 Benefits of Data Maintenance Pricing
The following pricing business issues are addressed in SAP Data Maintenance (DM) for ERP by Vistex -
Pricing:
• Customers need to see a variety of data while maintaining prices. • Price changes require a lot of manual effort and usually trail the actual events resulting in price
discrepancies. • Customers cannot enforce price policies to prevent "Margin Leakage". • Lack of extensive analytical tools to monitor price performance. • Absence of Workflow integration for price changes. • Customers need visibility into Structured Pricing, for example bills of material (BOMs).
In addition, the following are the benefits of maintaining pricing data using DM Pricing:
• Ongoing price maintenance in an efficient manner. • Bring condition records to life with a dynamic user interface. • Intelligent maintenance of related condition types such as purchase price from vendors and
sales price and discounts for customers. • Apply pricing policies and guidelines. • Analyze pricing data with unprecedented flexibility. • Enhance Vistex contracts and agreements with utmost ease. • Mass execution of price changes without labor-intensive activities. • Slim footprint with enormous payback. • Dramatically improves price maintenance productivity.

1909 Pricing Documentation
2.3 Price Sheet
2.3.1 Price Sheet Overview
2.3.1.1 Definition
A price sheet is a combination of a condition type (such as price, discount, or surcharge) and a condition
table (the fields that form the key for a condition record) for an application (sales or purchasing). Price
sheets serve as a flexible, user friendly way to create pricing condition records (pricing values). These
pricing conditions are accessed through VK13 during claim processing for validation purposes using
standard pricing procedures.
NOTE: IP specific pricing conditions cannot be created in VK11, and are never to be maintained or
modified in VK12. All IP specific condition records are created and maintained using rules in the
Agreement Workbench.
Price sheets must be defined during configuration before condition records can be created and stored
on each price sheet within Data Maintenance Pricing.
2.3.1.2 Setup
During configuration, the following settings must be defined for a price sheet:
• application Sales or purchasing
• condition type • condition table
Multiple condition tables can be attached to the same condition type. In addition, the following configuration can be defined for each price sheet:
• alias An alias is a user-friendly description that identifies the unique condition type/table combination (price sheet). For example, in the Deal or Sheet Formulas and Procedures Workbench, price sheets are listed by their alias.
• default values, such as the currency, pricing unit, or unit of measure. If defaults are not defined, material master information will default into the condition record during creation. Default values are helpful when keys do not contain a material. In addition, the pricing unit and unit of measure can be defined as editable or non-editable fields.

Data Maintenance Pricing
SAP Data Maintenance by Vistex, Pricing option for SAP S/4HANA by Vistex for SAP S/4HANA
Application Help – Version: 1.0 – Final
December 12, 2019
© 2019 Vistex, Inc. All Rights Reserved.
© 2019 SAP SE or an SAP affiliate company. All rights reserved.
• user-defined field labels, to add descriptions (per language) for the columns on a price sheet. The short, medium, and long descriptions and the field heading are modified when preparing the field catalog at the sheet level. For example, user-defined fields might be created to use company-specific terms as column descriptions, such as "product category" instead of material group.
• view profile (used for agreements and deals) and proposal profile (used for agreement requests, deal requests, master requests, and price proposals), which allow the following types of fields to be displayed and used during price sheet processing: • user fields, which can be used to:
• display text for a value (such as the customer name, material description, or material group description)
• pull in additional fields from master data (such as material group for the material)
• pull in other condition records (such as a list price or cost when entering a customer price)
• pull in the price source field, used to track the condition record source for informational purposes
• pull in values from the Price Type Workbench Additional fields also can be used in user exits. These fields, which are derived, cannot be used in the key.
• extension fields, which are saved to a table. When you create an extension field, it is automatically created as a user field as well. Extension fields are entered as part of the condition record and saved instead of being derived.
Global user fields are stored in structures /IRM/S_GPRCR_EATR and /IRM/S_GPRCR_EXTA. Price
sheet specific fields are store in a separate structure, /IRM/S_GPRCR_SEAT, to enhance system
performance. To create tables for view profile related fields, use transaction code /IRM/GPR31; to
create tables for proposal profile related fields, use transaction code /IRM/GPR32. The extension
tables then are assigned to the price sheet in configuration.
• date check, which is a flag that indicates whether or not overlapping dates are allowed (defaults to blank). If checked, when you insert a different price, the system will automatically end date the old price.
• enhancement class Each enhancement class adds a button to the price sheet, to view additional information related to customers, materials, vendors, and other data maintained in condition records. Vistex delivers several optional enhancement classes for price sheets.
• toolbar groups, which are (user-defined) menus that access a dropdown list of selected options, replacing the corresponding Vistex buttons on the price sheet.
• price method, used to define currency per units combinations, such as dollars per each, to be applied to condition records. Specify one method as the default, which can be changed at the condition record level.

1909 Pricing Documentation
• scales • computation, which uses formulas to define calculations across multiple price records assigned
to a price sheet. • lock level, which determines whether any key fields on a price sheet are required when
performing a search. If a price sheet is assigned the No Lock Level option, you are not required to enter data in any key field (no question mark will appear in the field), allowing you to search without the key field.
• previous rate, the previous rate can be filled in the price sheet to display historical data. If this flag is enabled, the previous rate field is not updated on the price sheet if the rate is changed.
• time window, which allows condition to be in effect during a specific date/time range. Time windows are defined in the Time Window Workbench.
• relationships for a bill of material explosion The available options for pricing by a bill of material (BOM) and its associated components are: • Dynamic
Dynamic BOMs allow you to create the components of the BOM on-the-fly to roll-up prices to the top level. If this option is chosen with a line selected, a pop-up will appear that allows entry of the components and their associated prices. They will be stored as a lower level item to the item originally selected.
• Static Static BOMs automatically pull in the components of the SAP (sales, engineering, or manufacturing) BOM for the item selected. You then can price at the item level and roll-up or have formulas roll-up prices through computations. If a static BOM is selected, a plant needs to be defined on the price sheet as well as the material and application that the BOM should come from.
• Variant configuration Variant configuration allows you to use the standard SAP options to pull in and price items based on the variant configuration engine. In order for this to work, a material needs to be defined as part of the price sheet, either part of the key or a user field.
2.3.1.2.1 Hybrid Configuration
Release 1909 introduced hybrid configuration, allowing matrix configuration activities to occur in a
workbench instead of SPRO. Some items offered through hybrid configuration include formulas, formula
set up, creation of color map templates, layouts, and the addition of new fields.
2.3.1.2.2 Pricing Message
You can attach a pricing message, such as "Government floor price", to a condition record. Define the
message in a price policy, and then set up an additional field in the price sheet to store the message
after the policy is run.

Data Maintenance Pricing
SAP Data Maintenance by Vistex, Pricing option for SAP S/4HANA by Vistex for SAP S/4HANA
Application Help – Version: 1.0 – Final
December 12, 2019
© 2019 Vistex, Inc. All Rights Reserved.
© 2019 SAP SE or an SAP affiliate company. All rights reserved.
2.3.1.2.3 Price Source
The "Record Source" field, which can be used for information purposes, may be added to the view
profile of a price sheet. The field provides a business definition of the source for a condition record or
why the record was created. The field is in the Price Condition Extended Attributes structure
(/IRM/S_GPRCR_EATR). In configuration, define all price sources that will be used to manually update
the condition records.
2.3.1.2.4 Sheets as Tabs in Grids
In prior releases, price sheets were only available as a layout. For 1909 SP1, price sheets each have their
own tabs in the grid, offering similar functionality to a Microsoft Excel™ workbook.
2.3.2 Price Policy
2.3.2.1 Price Policy Workbench
2.3.2.1.1 Definition
Price policies calculate thresholds for pricing exceptions and generate warnings when a price
requirement on a price sheet has been violated. Price policies can be set to auto execute when condition
records are created or policies can be called on demand.
Use the Price Policy Workbench to create and maintain reusable price policies that are assigned to
condition type/table combinations (price sheets). Multiple policies can be assigned to a price sheet. The
sequence for execution can be defined, as well as what should happen to subsequent policies if a prior
one is met. A where-used list shows all of the price sheets where the policy is being used.
When you define a price policy you assign a validity period. As needed, price policies can be uniquely
assigned per sales organization/distribution channel. Each price policy is assigned to a group of pricing
conditions that must follow particular rules. You can dynamically add fields to condition records for the
purpose of policy evaluation. Using the Business Script Editor (replacement for the Formula Builder), you

1909 Pricing Documentation
may derive dynamic fields that are only used in the policy. The dynamic fields are assigned to the policy
not to the condition record.
Based on configuration, price policies can be sent through an approval process prior to activation.
Approvals can be tied to workflow.
NOTE: Price policies are not supported in Fiori.
2.3.2.1.2 Access
Transaction code: /IRM/GPRPLM
2.3.2.1.3 Structure
The Price Policy Workbench screen is organized into the following areas:
• Search and Worklist Use the Search and Worklist to view selected price policies in a grid format. From the grid, click on a price policy number to display that price policy in focus in the Work Area.
• Work Area Use the Work Area to maintain one price policy. In the standard Vistex implementation, the Work Area contains the following tabs: • General
• Calculation
• Definition
• Violation
• Text
• Status
• Admin Data
• Override, which is used to specify override messages
• Where Used List, which lists the price sheets to which the policy is assigned
• Organization
NOTE: Functions accessed from the menu bar apply only to the price policy displayed in focus in the
Work Area and do not apply to the data in the Search and Worklist.

Data Maintenance Pricing
SAP Data Maintenance by Vistex, Pricing option for SAP S/4HANA by Vistex for SAP S/4HANA
Application Help – Version: 1.0 – Final
December 12, 2019
© 2019 Vistex, Inc. All Rights Reserved.
© 2019 SAP SE or an SAP affiliate company. All rights reserved.
2.3.2.1.4 Procedures
Displaying a Price Policy
Creating a Price Policy
Changing a Price Policy
Assigning a Price Policy to a Price Sheet
Viewing a Where-Used List for a Price Policy
Deleting a Price Policy
2.3.2.2 Message Class Workbench
2.3.2.2.1 Definition
Use Message Class Workbench to create messages that can be assigned to a price policy or formula,
such as alert formulas based on participant date. The system provides two message classes: GMSG1 and
GMSG2. Each class can hold up to 999 user-defined messages.
2.3.2.2.2 Access
Transaction code: /IRM/GMSGM
2.3.2.2.3 Structure
The Message Class Workbench screen is organized into the following areas:
• Search and Worklist Use the Search and Worklist to view selected message classes in a grid format. From the grid, click on a message class to display it in focus in the Work Area.
• Work Area Use the Work Area to maintain the messages for one message class.
NOTE: Functions accessed from the menu bar apply only to the message class displayed in focus in the
Work Area and do not apply to the data in the Search and Worklist.
1909 Pricing Documentation
2.3.2.2.4 Procedures
Displaying Messages for a Message Class
Adding a Message to a Message Class
Changing a Message in a Message Class
Deleting a Message from a Message Class
2.3.3 Time Period Pricing
2.3.3.1 Time Period Pricing Overview
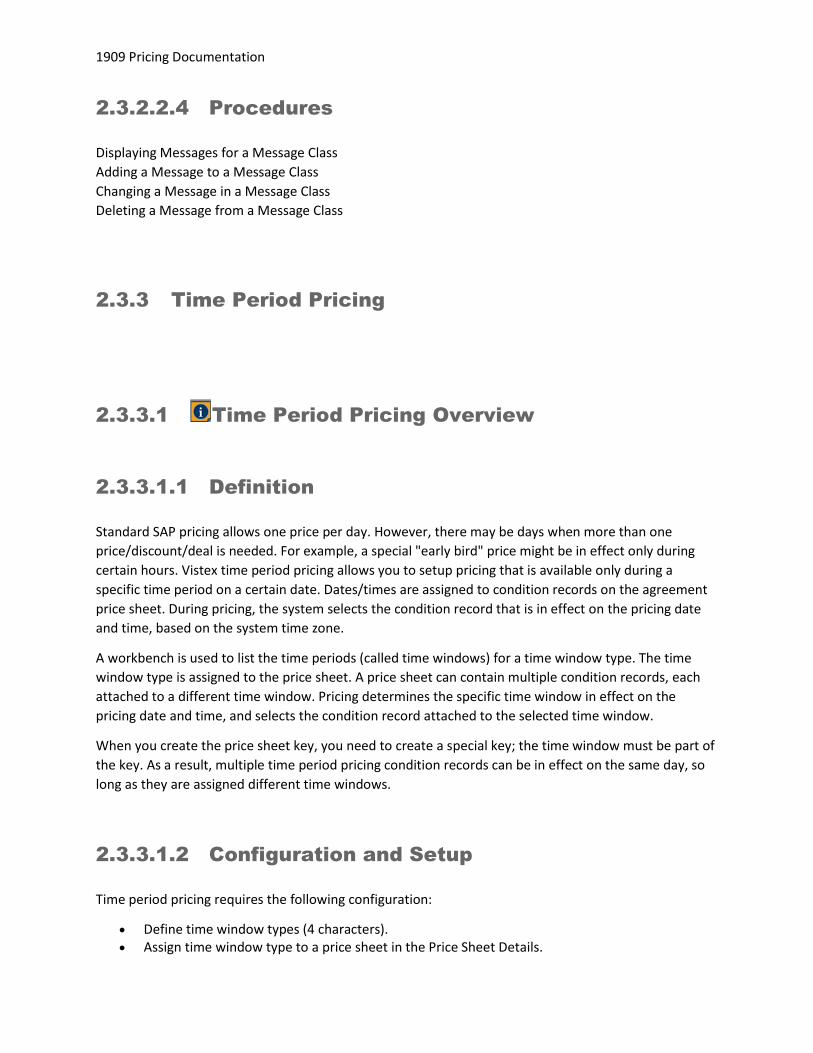
2.3.3.1.1 Definition
Standard SAP pricing allows one price per day. However, there may be days when more than one
price/discount/deal is needed. For example, a special "early bird" price might be in effect only during
certain hours. Vistex time period pricing allows you to setup pricing that is available only during a
specific time period on a certain date. Dates/times are assigned to condition records on the agreement
price sheet. During pricing, the system selects the condition record that is in effect on the pricing date
and time, based on the system time zone.
A workbench is used to list the time periods (called time windows) for a time window type. The time
window type is assigned to the price sheet. A price sheet can contain multiple condition records, each
attached to a different time window. Pricing determines the specific time window in effect on the
pricing date and time, and selects the condition record attached to the selected time window.
When you create the price sheet key, you need to create a special key; the time window must be part of
the key. As a result, multiple time period pricing condition records can be in effect on the same day, so
long as they are assigned different time windows.
2.3.3.1.2 Configuration and Setup
Time period pricing requires the following configuration:
• Define time window types (4 characters). • Assign time window type to a price sheet in the Price Sheet Details.

Data Maintenance Pricing
SAP Data Maintenance by Vistex, Pricing option for SAP S/4HANA by Vistex for SAP S/4HANA
Application Help – Version: 1.0 – Final
December 12, 2019
© 2019 Vistex, Inc. All Rights Reserved.
© 2019 SAP SE or an SAP affiliate company. All rights reserved.
• Add the time window field (IRM_TMWIN) to the price sheet's A table. This field is part of the key.
• Assign a requirement routine at the access sequence level. This routine has an include to determine the time window for the pricing date and time.
After configuration, perform the following setup:
• Create time windows in the Time Window Workbench. • Assign a time window to the condition record, using the Time Window field on the Rules tab in
the agreement. NOTE: The time window field must be part of the key of the price sheet for time pricing to work properly.
2.3.3.1.3 Pricing Process
Pricing uses the following information to select the time period pricing condition record:
• date and time when pricing is performed • Price Sheet Details (from configuration)
2.3.3.1.3.1 Pricing Steps
Pricing then performs the following steps:
• From the Price Sheet Details, get the time window type assigned to the price sheet. • From the Time Window Workbench, get the time windows for the time window type. • Select the time window that includes the pricing date and time. ** • Choose the condition record assigned the selected time window.
**NOTE: If multiple time windows include the date and time, the first time window is selected. If no
condition record is found for that time window, the next time window in the sequence is selected.

1909 Pricing Documentation
2.3.3.2 Time Window Workbench
2.3.3.2.1 Definition
Use the Time Window Workbench to list time periods associated with a time window type. Each time
window contains one or multiple time periods, which may overlap. Each time period consists of the date
range and its corresponding time range. Use the same line to enter the date range (on the Dates tab)
and its time range (on the Intervals tab).
Example:
Time window 1 is in effect from May 1-21, between 10:00am and 11:00am
Time window 2 is in effect from May 17-28, between 8:00am and 9:00am
• Dates tab entries (dates in effect): • Line 1 - Start date 05/01; End date 05/21
• Line 2 - Start date 05/17; End date 05/28
• Intervals tab entries (times in effect): • Line 1 - Start time 10:00:00; End time 11:00:00
• Line 2 - Start time 08:00:00; End time 09:00:00
In the price sheet condition record, when you press F4 on the Time Window field the system displays a
pop-up window that lists the available time windows for the time window type assigned to that price
sheet.
2.3.3.2.2 Access
Transaction code: /IRM/GPRTWM
2.3.3.2.3 Structure
The Time Window Workbench screen is organized into the following areas:
• Search and Worklist Use the Search and Worklist to view selected time windows in a grid format. From the grid, click on a time window to display it in focus in the Work Area.
• Work Area Use the Work Area to maintain one time window.
NOTE: Functions accessed from the menu bar apply only to the time window displayed in focus in the
Work Area and do not apply to the data in the Search and Worklist.

Data Maintenance Pricing
SAP Data Maintenance by Vistex, Pricing option for SAP S/4HANA by Vistex for SAP S/4HANA
Application Help – Version: 1.0 – Final
December 12, 2019
© 2019 Vistex, Inc. All Rights Reserved.
© 2019 SAP SE or an SAP affiliate company. All rights reserved.
2.3.3.2.4 Procedures
Displaying a Time Window
Creating a Time Window
Maintaining a Time Window
Deleting a Time Window
2.4 Pricing Formulas
2.4.1 Master Formula Workbench
2.4.1.1 Definition
Use the Master Formula Workbench to create global (reusable) formulas that can be assigned to one or
multiple price sheets, in addition to the formulas created specifically for each individual price sheet. For
example, the formula to calculate profit margin might be entered as a master formula and used on all
price sheets for customer prices.
Formulas are created and maintained using Business Script. No ABAP programming is needed to create,
maintain, or delete master formulas. A formula simulation can be run in the Business Script Editor to
make sure the formula is correct. A change history is available to track who changed the formulas and
when the changes were made.
After the formula has been created, it can be assigned to specific price sheets using the Sheet Formulas
and Procedures Workbench. You can assign formulas individually, or configure a sequence of master (and
sheet) formulas in a formula profile and assign the formula profile to the price sheet in a procedure.
2.4.1.2 Access
Transaction code: /IRM/GPRMFM

1909 Pricing Documentation
2.4.1.3 Structure
The Master Formula Workbench screen is organized into the following areas:
• Search and Worklist Use the Search and Worklist to view selected formulas in a grid format. From the grid, click on a formula number to display that formula in focus in the Work Area.
• Work Area Use the Work Area to maintain one formula. In the standard Vistex implementation, the Work Area contains the following tabs: • Master Formula, which displays the formula in HTML format
• Assigned Fields, used to maintain the assigned fields for that master formula. These assigned fields are similar to VADAT fields in sheet formulas.
• Master Formula Variables
NOTE: Functions accessed from the menu bar apply only to the master formula displayed in focus in the
Work Area and do not apply to the data in the Search and Worklist.
2.4.1.4 Procedures
Creating a Master Formula
Displaying a Master Formula
Changing a Master Formula
Deleting a Master Formula
2.4.2 Sheet Formulas and Procedures Workbench
2.4.2.1 Definition
Use the Sheet Formulas and Procedures Workbench to perform the following:
• Assign formulas to a price sheet. You may view the formula in HTML format or maintain the formula in the Business Script Editor.
• Create formula profiles, which contain a sequence of master formulas and sheet formulas to be assigned to the price sheet.
Data Maintenance Pricing
SAP Data Maintenance by Vistex, Pricing option for SAP S/4HANA by Vistex for SAP S/4HANA
Application Help – Version: 1.0 – Final
December 12, 2019
© 2019 Vistex, Inc. All Rights Reserved.
© 2019 SAP SE or an SAP affiliate company. All rights reserved.
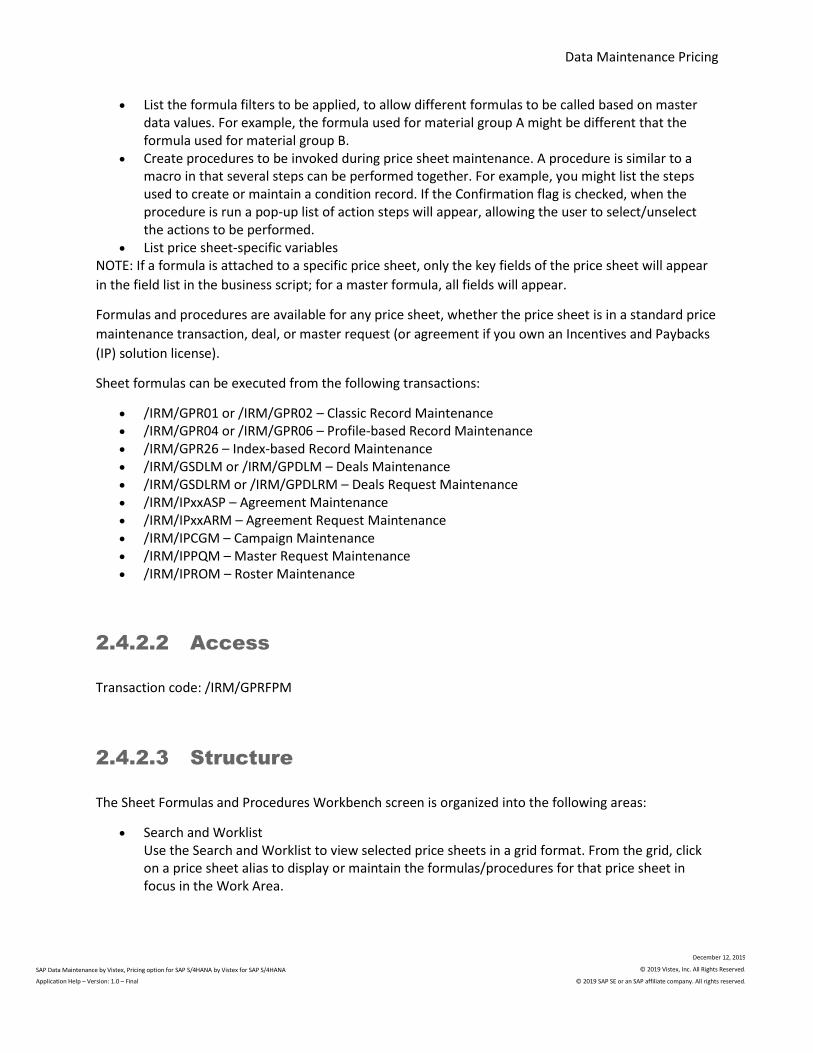
• List the formula filters to be applied, to allow different formulas to be called based on master data values. For example, the formula used for material group A might be different that the formula used for material group B.
• Create procedures to be invoked during price sheet maintenance. A procedure is similar to a macro in that several steps can be performed together. For example, you might list the steps used to create or maintain a condition record. If the Confirmation flag is checked, when the procedure is run a pop-up list of action steps will appear, allowing the user to select/unselect the actions to be performed.
• List price sheet-specific variables NOTE: If a formula is attached to a specific price sheet, only the key fields of the price sheet will appear
in the field list in the business script; for a master formula, all fields will appear.
Formulas and procedures are available for any price sheet, whether the price sheet is in a standard price
maintenance transaction, deal, or master request (or agreement if you own an Incentives and Paybacks
(IP) solution license).
Sheet formulas can be executed from the following transactions:
• /IRM/GPR01 or /IRM/GPR02 – Classic Record Maintenance • /IRM/GPR04 or /IRM/GPR06 – Profile-based Record Maintenance • /IRM/GPR26 – Index-based Record Maintenance • /IRM/GSDLM or /IRM/GPDLM – Deals Maintenance • /IRM/GSDLRM or /IRM/GPDLRM – Deals Request Maintenance • /IRM/IPxxASP – Agreement Maintenance • /IRM/IPxxARM – Agreement Request Maintenance • /IRM/IPCGM – Campaign Maintenance • /IRM/IPPQM – Master Request Maintenance • /IRM/IPROM – Roster Maintenance
2.4.2.2 Access
Transaction code: /IRM/GPRFPM
2.4.2.3 Structure
The Sheet Formulas and Procedures Workbench screen is organized into the following areas:
• Search and Worklist Use the Search and Worklist to view selected price sheets in a grid format. From the grid, click on a price sheet alias to display or maintain the formulas/procedures for that price sheet in focus in the Work Area.

1909 Pricing Documentation
• Work Area Use the Work Area to maintain one sheet formula. In the standard Vistex implementation, the Work Area contains the following tabs: • Formula
• Formula Profile
• Formula Filter, used to list the formula filters to be applied, to allow different formulas to be called based on master data values. For example, the formula used for material group A might be different that the formula used for material group B.
• Procedure
• Variables
NOTE: Functions accessed from the menu bar apply only to the price sheet displayed in focus in the
Work Area and do not apply to the data in the Search and Worklist.
2.4.2.4 Procedures
Displaying the Sheet Formulas and Procedures for a Price Sheet
Assigning Sheet Formulas to a Price Sheet
Maintaining a Sheet Formula
Deleting a Sheet Formula from a Price Sheet
Deleting a Sheet Formula
Creating a Formula Profile for a Price Sheet
Creating a Procedure for a Price Sheet
2.4.3 Flex Formulas Workbench
2.4.3.1 Definition
Use the Flex Formulas Workbench to create (VOFM) formulas that are used during pricing execution
rather than at price creation. As a result, pricing of products can be set based on complex calculations. In
the case of materials that incorporate commodities, the variable commodity price is one component of
the defined calculation. Scale-based formulas can be created, such as a formula to scale off margin.
Formulas can be created and maintained with a user-driven Business Script Editor. No ABAP
programming is needed to create, maintain, or delete formulas. Flex formulas are price sheet

Data Maintenance Pricing
SAP Data Maintenance by Vistex, Pricing option for SAP S/4HANA by Vistex for SAP S/4HANA
Application Help – Version: 1.0 – Final
December 12, 2019
© 2019 Vistex, Inc. All Rights Reserved.
© 2019 SAP SE or an SAP affiliate company. All rights reserved.
independent; you assign the formula to a pricing procedure in configuration, as either a requirement,
calculation type, or scale-based formula. A formula simulation can be run to make sure the formulas are
correct.
A change history is available to track who changed the formulas and when the changes were made.
NOTE: This workbench can replace the standard SAP VOFM ABAP routines and requirements.
2.4.3.2 Access
Transaction code: /IRM/GPRFFM
2.4.3.3 Structure
The Flex Formulas Workbench screen is organized into the following areas:
• Search and Worklist Use the Search and Worklist to view selected formulas in a grid format. From the grid, click on a formula number to display that formula in focus in the Work Area.
• Work Area Use the Work Area to maintain one formula.
NOTE: Functions accessed from the menu bar apply only to the formula displayed in focus in the Work
Area and do not apply to the data in the Search and Worklist.
2.4.3.4 Procedures
Displaying a Flex Formula
Creating a Flex Formula
Assigning a Flex Formula to a Pricing Procedure
Viewing the Flex Formula Change Log
Deleting a Flex Formula

1909 Pricing Documentation
2.4.4 Explosion Profile Formula Workbench
2.4.4.1 Definition
Explosion profiles can be used to display an exploded structure. For example, a master request type can
be configured to display exploded bill of material pricing at the price sheet level. An explosion profile
attached to the master request type controls the source of the BOM (standard SAP or DM) and price
sheets assigned to the material type, as well as the default values in the Explosion pop-up.
In configuration, define the explosion profiles. Then use the Explosion Profile Formula Workbench to
assign formulas to the existing explosion profiles.
2.4.4.2 Access
Transaction code: /IRM/GPREFM
2.4.4.3 Structure
The Explosion Profile Formula Workbench screen is organized into the following areas:
• Search and Worklist Use the Search and Worklist to view existing explosion profiles in a grid format. From the grid, click on an explosion profile name to display that explosion profile in focus in the Work Area.
• Work Area Use the Work Area to maintain the formulas assigned to one explosion profile.
2.5 Price Maintenance

Data Maintenance Pricing
SAP Data Maintenance by Vistex, Pricing option for SAP S/4HANA by Vistex for SAP S/4HANA
Application Help – Version: 1.0 – Final
December 12, 2019
© 2019 Vistex, Inc. All Rights Reserved.
© 2019 SAP SE or an SAP affiliate company. All rights reserved.
2.5.1 Price Maintenance Overview
2.5.1.1 Definition
In Vistex, individual condition records on a price sheet can be created, maintained, and displayed using
the following methods:
• Pricing Area Maintenance • Classic Maintenance • Profile-based Maintenance • Index-based Maintenance
2.5.1.1.1 Pricing Area Maintenance
A pricing area is a set of predefined criteria that controls which pricing records are selected for
maintenance. After a pricing area is defined, you can maintain standard condition records in the Pricing
Workbench or agreement condition records (rules) in the Maintenance Request Workbench. Pricing
areas can be assigned to individual users.
Transactions:
• Pricing Area Workbench /IRM/GPRPAM • Pricing Workbench /IRM/GPRPWM, which can be used in place of the Classic Maintenance,
Profile-based Maintenance, and Index-based Maintenance transactions • Pricing Report Workbench /IRM/GPRRPTM • Maintenance Request Workbench /IRM/IPMRM
2.5.1.1.2 Classic Maintenance
Classic Maintenance is the simplest maintenance method available to create/maintain/display condition
records. It provides a centralized view through which mass creation and changes can be implemented
easily and quickly. Only one price sheet at a time can be accessed.
Transactions:
• Create Pricing Records /IRM/GPR01 • Change Pricing Records /IRM/GPR02 • Display Pricing Records /IRM/GPR03
1909 Pricing Documentation
2.5.1.1.3 Pricing Summary in Fiori
1909 SP1 also offers a pricing summary in Fiori similar to the rules summary displayed in the GUI. To
generate a pricing summary in the UI profile, the price data area’s qualifier is set to summary. The
pricing summary can be displayed as a unique tab in the Price Review Fiori app or grouped with the
other price sheets.
The fields displayed in the pricing summary cannot be selected or changed, as the columns shown in the
summary are determined by the fields common to all of the price sheets in the price proposal
document. The records shown in the summary cannot be maintained and are only displayed.
2.5.1.1.4 Profile-based Maintenance
Profile-based maintenance utilizes price profiles created during configuration. When you choose a
profile to maintain or display, the system lists the condition types/tables (price sheets) assigned to that
profile. The price profile provides a summary view of all price sheets that share the price profile, as well
as an individual view of each price sheet that shares the price profile.
NOTE: Each price sheet must be maintained individually, unless using composite profiles, which allow
you to mass create or maintain condition records across price sheets.
Transactions:
• Create Price Profile /IRM/GPR04 • Maintain Price Profile /IRM/GPR06 • Display Price Profile /IRM/GPR05
2.5.1.1.5 Index-based Maintenance
Index-based maintenance utilizes the index profiles created in the Pricing Control Parameters. Index
profiles are logical collections of related indexed tables. In index-based pricing, when you choose an
index profile to maintain or display, the system lists all the condition records categorized by the
condition types/tables (price sheets) assigned to that index profile.
Transactions:
• Display Price Records Using Indices /IRM/GPR25 • Maintain Price Records Using Indices /IRM/GPR26

Data Maintenance Pricing
SAP Data Maintenance by Vistex, Pricing option for SAP S/4HANA by Vistex for SAP S/4HANA
Application Help – Version: 1.0 – Final
December 12, 2019
© 2019 Vistex, Inc. All Rights Reserved.
© 2019 SAP SE or an SAP affiliate company. All rights reserved.
2.5.1.2 Functionality
The following functionality applies to all price maintenance methods:
• Price Methods • Condition Class D (Taxes)
2.5.1.2.1 Price Methods
Use the price methods functionality to define default values for condition record fields such as rate and
currency. If a price method is assigned to a price sheet in configuration, the Price Method button is
enabled (for Change mode) in the condition record maintenance transactions. Use the Price Method
button to select the price method to be used.
2.5.1.2.2 Condition Class D (Taxes)
Condition types assigned condition class D (taxes) are supported in the price maintenance transactions.
The corresponding condition records can be created, maintained, and displayed in all price maintenance
transactions, as well as the deal and deal request workbenches.
2.5.1.2.3 Auto Adjusting Condition Record Validity
Dates
Upon save the system will automatically adjust the dates (by either changing the dates, splitting the
records, or deleting records) and will display a message stating what changes were made.
Auto adjustment of validity dates is performed in the following Data Maintenance Pricing transactions:
• Create Pricing Records /IRM/GPR01 • Change Pricing Records /IRM/GPR02 • Create Price Profile /IRM/GPR04 • Maintain Price Profile /IRM/GPR06 • Maintain Price Records Using Indices /IRM/GPR26 • Deals Workbench /IRM/GSDLM
1909 Pricing Documentation
2.5.1.2.4 Composite Maintenance
For ease of maintenance, composite maintenance allows you to mass create or maintain condition
records either:
• Across multiple tables tied to the same condition type • Across multiple condition types tied to the same table
To use this functionality, composite groups must be created in configuration. Only one condition type
can be grouped with multiple condition tables in a composite group. Multiple condition groups can be
assigned to a composite profile, which, in turn, is assigned to a price profile (or agreement type). Data is
stored at the individual price sheet level, rather than at the composite group level.
NOTE: In Composite Maintenance configuration, if the Show Individual Sheets flag is enabled, the main
composite profile sheet along with its individual sheets are displayed, in Display mode only. In Change
mode, the individual sheets are displayed as one under the composite profile sheet, regardless of
whether the flag is checked or not.
2.5.2 Pricing Area and Pricing Workbench
2.5.2.1 Pricing Area Workbench
2.5.2.1.1 Definition
A pricing area is a set of predefined criteria that controls which pricing records are selected for
maintenance. For example, the criteria might include a specific sales organization, division, customer,
and range of materials. The pricing area acts as a source for the following:
• Pricing Workbench The user selects a pricing area from the worklist to go directly to the list of condition records and begin maintenance. No values have to be input in selection fields, as in the GPR transactions.
• Maintenance Request Workbench The user assigns pricing areas to the maintenance request to select the condition records to be maintained.
Use the Pricing Area Workbench to create and maintain the pricing areas. Access to the pricing areas can
be controlled using authorization groups.
Data Maintenance Pricing
SAP Data Maintenance by Vistex, Pricing option for SAP S/4HANA by Vistex for SAP S/4HANA
Application Help – Version: 1.0 – Final
December 12, 2019
© 2019 Vistex, Inc. All Rights Reserved.
© 2019 SAP SE or an SAP affiliate company. All rights reserved.
2.5.2.1.1.1 Setup
In configuration, define the pricing area types to be used. Each type is assigned one of the following
usages:
• Prices, assigned to pricing area types used for the Pricing Workbench. Allowed maintenance types are Index Profile, Price Profile, and Individual Sheets.
• Prices + Rules, assigned to pricing area types used for maintenance requests. Allowed maintenance types are Index Profile and Individual Sheets.
2.5.2.1.2 Access
Transaction code: /IRM/GPRPAM
2.5.2.1.3 Structure
The Pricing Area Workbench screen is organized into the following areas:
• Search and Worklist Use the Search and Worklist to view a list of selected pricing areas in a grid format. From the grid, click on a pricing area name to display that pricing area in focus in the Work Area.
• Work Area Use the Work Area to maintain one pricing area. In the standard Vistex implementation, the Work Area contains the following tabs: • Definition
• Admin Data
NOTE: Functions accessed from the menu bar apply only to the pricing area displayed in focus in the
Work Area and do not apply to the data in the Search and Worklist.
IMPORTANT: Because Vistex software is extremely versatile, the user screen may be customized. As a
result, the screen may appear different from the standard screen described in this document.
2.5.2.1.4 Procedures
Displaying a Pricing Area
Creating a Pricing Area
Copying a Pricing Area

1909 Pricing Documentation
Maintaining a Pricing Area
Deleting a Pricing Area
2.5.2.2 Pricing Workbench
Documentation for the pricing workbench is available for the following screen formats:
• UI Application (SAP Fiori) • SAP GUI
2.5.2.3 Maintenance Request Workbench
2.5.2.3.1 Definition
Maintenance requests provide the ability to periodically maintain prices (using an approvals process) in
the Incentives Administration and Paybacks & Chargebacks (IP) and Data Maintenance Pricing at the
same time.
Examples:
• Price increases For example, you might increase a price across contracts.
• Product replacements • Reference prices • New products added across different areas
NOTE: For users who do not license Data Maintenance Pricing, maintenance requests can be used to
maintain prices across multiple agreement types.
The system uses a predefined pricing area and predefined procedures to find the documents to be
maintained, and then stores the data in a maintenance request document. When a maintenance
request is posted, the system creates a master request, which can be reviewed in the Master Request
Workbench and then, using the Activities tab, posted to the standard price sheets and agreement rule
sheets.
To post multiple maintenance requests in a background job, use the Post Maintenance Request
(/IRM/IPMR60) transaction.
Data Maintenance Pricing
SAP Data Maintenance by Vistex, Pricing option for SAP S/4HANA by Vistex for SAP S/4HANA
Application Help – Version: 1.0 – Final
December 12, 2019
© 2019 Vistex, Inc. All Rights Reserved.
© 2019 SAP SE or an SAP affiliate company. All rights reserved.
2.5.2.3.2 Setup
Before maintenance requests can be created, the following setup is needed in Data Maintenance
Pricing:
• Define the pricing area in the Pricing Area Workbench (/IRM/GPRPAM), using a pricing area type with a Prices + Rules usage. The pricing area is the source for the maintenance request. In the pricing area, list the standard price sheets and/or agreement rule sheets to be maintained.
• Create the procedures, as well as any master variables (used across all procedures) and sheet variables, in the Sheet Formulas and Procedures Workbench (/IRM/GPRFPM). Assign actions and variables to each procedure step. Master variables can be used to derive field values, or static field values can be specified.
In addition, maintenance request types and master variables need to be set up in configuration.
2.5.2.3.3 Access
Transaction code: /IRM/IPMRM
2.5.2.3.4 Structure
The Maintenance Request Workbench screen is organized into the following areas:
• Search and Worklist Use the Search and Worklist to view information for selected maintenance requests in a grid format. From the grid, click on a maintenance request name to display that maintenance request in focus in the Work Area.
• Work Area Use the Work Area to maintain one maintenance request. In the standard Vistex implementation, the Work Area contains the following tabs: • Pricing Area
• Agreements, tab that appears when a pricing area is configured for agreement price sheets. List the agreements for each configured application. The agreement number is a hot key to view that agreement.
• Procedures, which lists all the price sheets/rule sheets maintained in the pricing areas. Assign procedures to each price sheet (standard pricing) or rule sheet (agreement pricing), as needed. The procedure description is a hot key to view that procedure in the Sheet Formulas and Procedures Workbench (/IRM/IPMRM).
• Variables

1909 Pricing Documentation
• Source, to view data (for a particular procedure and its agreements) derived the last time the
Generate Source button was clicked. In Change mode, the tab contains a Lock
Source button, which disables the Generate Source button and locks the sheet. The Unlock Source button can be used to enable the Generate Source button and unlock the sheet.
• Status
• Admin Data
2.5.2.3.5 Procedures
Displaying a Maintenance Request
Creating a Maintenance Request
Copying a Maintenance Request
Maintaining a Maintenance Request
Posting a Maintenance Request
Deleting a Maintenance Request
2.5.2.4 Pricing Report Workbench
2.5.2.4.1 Definition
Use the Pricing Report Workbench to view reports created for a pricing area in the Pricing Workbench.
Report results can be set up to contain existing and/or missing records within a price sheet for specified
attributes.
2.5.2.4.1.1 Setup
Pricing report types, defined in Pricing Area configuration, can be created to show all current records
and/or all missing records, based on the pricing area selection criteria. Field values can be entered only
for fields that have the Filter flag enabled in the pricing area; otherwise the report is for display only.
• Current Records For the given selection, the system will get all the records that are maintained.

Data Maintenance Pricing
SAP Data Maintenance by Vistex, Pricing option for SAP S/4HANA by Vistex for SAP S/4HANA
Application Help – Version: 1.0 – Final
December 12, 2019
© 2019 Vistex, Inc. All Rights Reserved.
© 2019 SAP SE or an SAP affiliate company. All rights reserved.
• Missing Records For the given selection, the system will get all the records that are not maintained.
Within a pricing report type, you can configure a record status and a corresponding status color for each
record category.
2.5.2.4.2 Access
Transaction code: /IRM/GPRRPTM
Alternately, you can navigate from the Pricing Workbench by clicking on the Navigate to
Reports button.
2.5.2.4.3 Structure
The Pricing Report Workbench screen is organized into the following areas:
• Search and Worklist Use the Search and Worklist to view a list of selected pricing reports in a grid format. From the grid, click on a pricing report name to display that pricing report in focus in the Work Area.
• Work Area Use the Work Area to view one report. In the standard Vistex implementation, the Work Area contains the following tabs: • Selection, to view the selections used to create the report. Separate selection tabs display for
Current and Missing records.
• Result, to view the condition records in the report results.
NOTE: Functions accessed from the menu bar apply only to the pricing report displayed in focus in the
Work Area and do not apply to the data in the Search and Worklist.
IMPORTANT: Because Vistex software is extremely versatile, the user screen may be customized. As a
result, the screen may appear different from the standard screen described in this document.
2.5.2.4.4 Procedures
Displaying a Pricing Report
Downloading a Pricing Report
Deleting a Pricing Report
1909 Pricing Documentation
2.5.3 Pricing Information Upload
2.5.3.1 Upload Price Record
2.5.3.1.1 Definition
Use Upload Price Records to import price records from a file, such as an Excel spreadsheet, rather than
manually entering the data. Files can be uploaded from the following locations:
• Desktop, to upload from the local PC • File submission, to upload based on a file submission entry • File server, to upload directly from the application server
File templates can be created to control the fields and format of files during upload. To create a file
template, use the File Template for Price Record Workbench.
NOTE: The document template is not meant to store the scales in file data. If uploading condition
records with scales, all non-scale fields must come before the scale fields in the spreadsheet. The scale
fields must be last in the spreadsheet in the sequence:
• Scale quantity 1 • Scale rate 1 • Scale quantity 2 • Scale rate 2 • And so on
2.5.3.1.2 Access
Transaction code: /IRM/GPRUPL
2.5.3.1.3 Procedure
Uploading Condition Records

Data Maintenance Pricing
SAP Data Maintenance by Vistex, Pricing option for SAP S/4HANA by Vistex for SAP S/4HANA
Application Help – Version: 1.0 – Final
December 12, 2019
© 2019 Vistex, Inc. All Rights Reserved.
© 2019 SAP SE or an SAP affiliate company. All rights reserved.
2.5.3.2 File Template for Price Record
2.5.3.2.1 Definition
Use File Template for Price Record Workbench to create and maintain templates that control the fields
and format of condition record files during upload.
2.5.3.2.2 Access
Transaction code: /IRM/GPRFTM
2.5.3.2.3 Structure
The File Template for Price Record Workbench screen is organized into the following areas:
• Search and Worklist Use the Search and Worklist to view selected file templates in a grid format. From the grid, click on file template number to display that file template in focus in the Work Area.
• Work Area Use the Work Area to maintain one file template. In the standard Vistex implementation, the Work Area contains the following tabs: • Section
• Mapping
• Conversion
• Submitter
• Crystal Layout, which is used with Crystal Reports
• Admin Data
NOTE: Functions accessed from the menu bar apply only to the file template displayed in focus in the
Work Area and do not apply to the data in the Search and Worklist.
1909 Pricing Documentation
2.5.3.2.4 Procedures
Displaying a File Template for Price Record
Creating a File Template for Price Record
Copying a File Template for Price Record
Maintaining a File Template for Price Record
Deleting a File Template for Price Record
2.5.4 Price Maintenance Methods
2.5.4.1 Classic Maintenance
2.5.4.1.1 Create, Change or Display Condition
Records
2.5.4.1.1.1 Definition
When you create, change, or display condition records, you specify the condition type and condition
table. This unique combination also is referred to as a price sheet.
NOTE: To be available for use, a price sheet must already have been configured.
Condition records can be created using one of the following methods:
• manually add lines to the active price sheet • mass import condition records online from a spreadsheet into the active price sheet • copy existing lines
2.5.4.1.1.2 Access
The transactions used for classic maintenance are:
• Create Pricing Records /IRM/GPR01

Data Maintenance Pricing
SAP Data Maintenance by Vistex, Pricing option for SAP S/4HANA by Vistex for SAP S/4HANA
Application Help – Version: 1.0 – Final
December 12, 2019
© 2019 Vistex, Inc. All Rights Reserved.
© 2019 SAP SE or an SAP affiliate company. All rights reserved.
• Change Pricing Records /IRM/GPR02 • Display Pricing Records /IRM/GPR03
2.5.4.1.1.3 Structure
When you enter the transaction, the system displays a dialog window used to select the price sheet to
be displayed in a grid format.
The following buttons appear above the grid:
Button Action Alternate Access
Save Save and activate the condition records. NOTE: Button not enabled in transaction /IRM/GPR03 Display Pricing Records.
Ctrl+S
Selection Content Displays the key fields for each combination.
F6
Other Price Records Access Sequence Choose another Condition Type/Condition Table combination of the same application.
Shift+F8
Refresh All Sheets Used to refresh all of the sheets listed in the Current Sheet dropdown. NOTE: Button not displayed in transaction /IRM/GPR03 Display Pricing Records.
F8
Save as Price Proposal Saves the price sheet(s) as a price proposal instead of saving as an active condition record(s). NOTE: Button not displayed in transaction /IRM/GPR03 Display Pricing Records.
Shift+F11
Use the following grid buttons to enter pricing condition record information:
Button Action
Price Record Details Detailed information for each condition record can be drilled into by clicking on
the button. In the detail screen, you can create, change, and display information on the following tabs:
• Scales: Shows scales related to this condition record.

1909 Pricing Documentation
• Text: If a text procedure is assigned through standard SAP configuration for the condition type, then text can be saved.
• Key: Displays the key and key entries for the selected condition record. • Validity Periods: Lists the existing condition records for the selected row
along with their respective validity periods, rates, and deletion indicators.
Check and Complete Checks the validity of the condition record before saving.
• If formulas are set up, check and complete will run the formulas. • If a price policy is set up, check and complete will run the price policy. • If, for this particular combination, the flag Date Check is set in the
Condition Type Table Enhancement table, then overlapping validity periods of condition records for that combination are not permitted.
NOTE: Button not displayed in transaction /IRM/GPR03 Display Pricing Records.
Refresh Refresh the current price sheet. To refresh all of the open price sheets, click on
the Refresh button in the application toolbar. NOTE: Button not displayed in transaction /IRM/GPR03 Display Pricing Records.
Create Add one line, five lines, or ten lines to the record. For example, to add three lines you can either:
• Click on the button and select 1 from the dropdown three times • Click on the button, select 5 from the dropdown, highlight two lines, then
click on the Delete button and select the Delete option from the dropdown.
• Click on the button, then select 10 from the dropdown, highlight seven lines, then click on the Delete button and select the Delete option from the dropdown.
NOTE: Button not displayed in transaction /IRM/GPR03 Display Pricing Records.
Delete Delete or undelete a selected condition record. When a previously saved record is flagged for deletion it can be undeleted before the changes are saved. When an unsaved record is deleted it cannot be undeleted. If the condition type is configured to delete, the condition record will be deleted but you can undelete until you Save. If the condition type is configured to not delete, then you can undelete even after saving. NOTE: Button not displayed in transaction /IRM/GPR03 Display Pricing Records.
Select Values Used to add multiple lines by selecting the key fields. For example, Condition Type PR00 (Price) and Condition Table A005 (Customer-Material) would have the option to add lines by selecting multiple materials, customers, distribution channels, and/or sales organizations. The standard search help screens will be shown for selection processes. NOTE: Button not displayed in transaction /IRM/GPR03 Display Pricing Records.
Copy Price Records

Data Maintenance Pricing
SAP Data Maintenance by Vistex, Pricing option for SAP S/4HANA by Vistex for SAP S/4HANA
Application Help – Version: 1.0 – Final
December 12, 2019
© 2019 Vistex, Inc. All Rights Reserved.
© 2019 SAP SE or an SAP affiliate company. All rights reserved.
Displays the Copy Price Records dialog window. Specify the target sheet and number of copies. Check the Copy texts checkbox to copy texts. If none of the direct input field checkboxes are selected, the system will copy the values in those fields as they are on the original condition record. If one, some, or all of the direct input fields are selected, and different values are entered, it will copy all original values in the fields where the values were not changed and it will override the values that have been selected to be overridden. NOTE: Button not displayed in transaction /IRM/GPR03 Display Pricing Records.
Import Price Records Used to import condition records from an Excel file. Enter values in the following fields:
• Start Row, where the user specifies the first row that contains the data in the selected file to import.
• File Path, contains the path to the file to be imported. You can search for the file path by clicking on the Search Help button (or pressing F4).
• Field Position, used to specify the column that contains the field data in the selected file to import.
• Field Value, contains a designated default value, if needed. NOTE: Button not displayed in transaction /IRM/GPR03 Display Pricing Records.
Search and Replace Used to search and replace the selected values within the current price sheet. NOTE: Button not displayed in transaction /IRM/GPR03 Display Pricing Records.
Set Values Displays the Set Rate dialog box, which is used to mass create rates for the selected condition records. Enter values in the following fields:
• Valid From, date that the rate for the selected condition record will start. • Valid To, date that the rate for the selected condition record will end. • Rounding Rule, the rule that determines how the system rounds off
condition values during pricing. The last digit will be rounded. For example, in rounding rule 'A', values are always rounded up: 10.459 → 10.46 DEM
• Rounding Formula, the specified formula to direct the rounding routine. • New, a checkbox signifying if a new condition record should be created
with the specified rate or if the specified rate should be applied to the existing condition record.
• Update Scales, a checkbox signifying if the specified condition record rate change should update the scales or not.
• Rate fields: Example: Original Price Record Rate(s) = 15.00 USD. Using the Increase By option (rate field 1) to increase the rate by 5.00 (rate field 2) units (rate field 3) would change the condition record rate(s) to 20.00 USD. • Rate Field 1 contains a dropdown to select the manner in which the
rate should be changed.
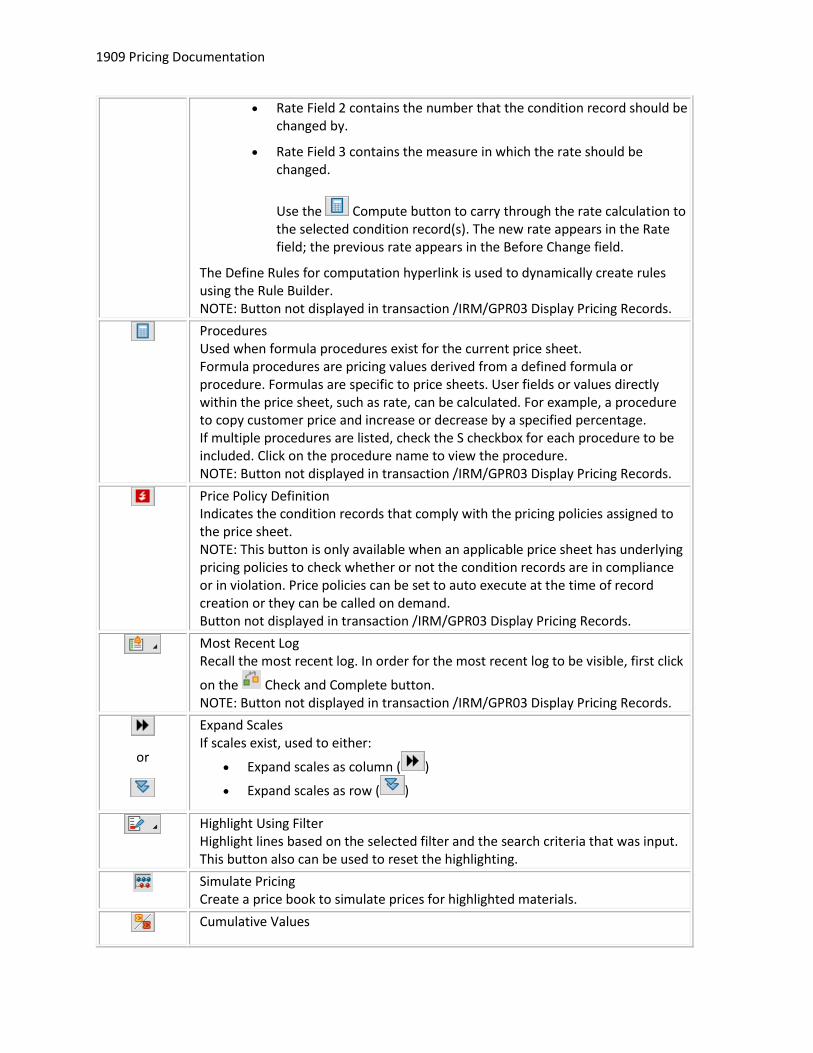
1909 Pricing Documentation
• Rate Field 2 contains the number that the condition record should be changed by.
• Rate Field 3 contains the measure in which the rate should be changed.
Use the Compute button to carry through the rate calculation to the selected condition record(s). The new rate appears in the Rate field; the previous rate appears in the Before Change field.
The Define Rules for computation hyperlink is used to dynamically create rules using the Rule Builder. NOTE: Button not displayed in transaction /IRM/GPR03 Display Pricing Records.
Procedures Used when formula procedures exist for the current price sheet. Formula procedures are pricing values derived from a defined formula or procedure. Formulas are specific to price sheets. User fields or values directly within the price sheet, such as rate, can be calculated. For example, a procedure to copy customer price and increase or decrease by a specified percentage. If multiple procedures are listed, check the S checkbox for each procedure to be included. Click on the procedure name to view the procedure. NOTE: Button not displayed in transaction /IRM/GPR03 Display Pricing Records.
Price Policy Definition Indicates the condition records that comply with the pricing policies assigned to the price sheet. NOTE: This button is only available when an applicable price sheet has underlying pricing policies to check whether or not the condition records are in compliance or in violation. Price policies can be set to auto execute at the time of record creation or they can be called on demand. Button not displayed in transaction /IRM/GPR03 Display Pricing Records.
Most Recent Log Recall the most recent log. In order for the most recent log to be visible, first click
on the Check and Complete button. NOTE: Button not displayed in transaction /IRM/GPR03 Display Pricing Records.
or
Expand Scales If scales exist, used to either:
• Expand scales as column ( )
• Expand scales as row ( )
Highlight Using Filter Highlight lines based on the selected filter and the search criteria that was input. This button also can be used to reset the highlighting.
Simulate Pricing Create a price book to simulate prices for highlighted materials.
Cumulative Values

Data Maintenance Pricing
SAP Data Maintenance by Vistex, Pricing option for SAP S/4HANA by Vistex for SAP S/4HANA
Application Help – Version: 1.0 – Final
December 12, 2019
© 2019 Vistex, Inc. All Rights Reserved.
© 2019 SAP SE or an SAP affiliate company. All rights reserved.
View the cumulated values from sales orders and from billing for the selected record.
Change Documents Displays existing Change documents that are related to the selected row in the Changes for Condition Record window. Use the Filter button to filter the display. Options:
• All Changes • Date Selection
Select the date range for the display. NOTE: Button not displayed in transaction /IRM/GPR01 Create Pricing Records.
Filter Records Displays a pop-up used to specify filter criteria at the price sheet level. Use a filter to improve performance by limiting processing to the selected records. In the Record Count field specify the number of records to be displayed. This value overrides the default number of records defined for price sheet in configuration.
Column to Row Shuffle Change the layout of the condition records in the grid, based on a selected column. Use this button to switch between a vertical (column) and a horizontal (row) display. NOTE: Certain functions available in the horizontal display are not available in the vertical display.
Details View selected records in a vertical column format in a separate window.
Sort in Ascending Order Sort the data in a selected column in ascending alphanumeric sequence.
Sort in Descending Order Sort the data in a selected column in descending alphanumeric sequence.
Find Find a term within the grid values. The system highlights any cell that contains the term.
Find Next Find the next instance of a term searched for previously.
Set Filter Select a column, and then click the Set Filter button to set and delete column filters.
Total (restricted to relevant numeric columns) Highlight at least one numeric column, and then select a type of calculation (Total, Minimum, or Maximum) from the dropdown list.
Print Print the price sheet(s).
Views

1909 Pricing Documentation
Generate a Print Preview of the current price sheet and/or a Crystal Reports preview of the current price sheet.
Export Export the entire contents of the grid area to the selected document type/file type.
Choose Layout Choose, change, save, and manage column layouts within the ALV grid.
2.5.4.1.1.4 Procedures
Manually Adding Condition Records
Importing Condition Records
Creating a Price Proposal
Creating a Price Simulation (Classic Maintenance)
Changing Condition Records
Mass Changing Condition Record Validity Dates and Rates
Viewing a Condition Record Change Log
Displaying Condition Records
Running the Display Pricing Records Job in the Background
2.5.4.2 Profile-based Maintenance
2.5.4.2.1 Profile-based Maintenance Overview
2.5.4.2.1.1 Definition
Profile-based maintenance utilizes the price profiles created during configuration. In profile-based
pricing, when you choose a profile to maintain or display, the system lists the condition types/tables
(price sheets) assigned to that profile. The price profile provides a summary view of all price sheets that
share the price profile, as well as an individual view of each price sheet that shares the price profile. If
configured, you may perform composite maintenance across multiple price sheets in a single view. All
sheets for a material are combined into a single grid for simultaneous viewing and maintenance.

Data Maintenance Pricing
SAP Data Maintenance by Vistex, Pricing option for SAP S/4HANA by Vistex for SAP S/4HANA
Application Help – Version: 1.0 – Final
December 12, 2019
© 2019 Vistex, Inc. All Rights Reserved.
© 2019 SAP SE or an SAP affiliate company. All rights reserved.
A price profile can be set up before price sheets are created. During configuration, multiple price sheets
can be assigned to a single price profile, which allows the user to view and maintain multiple price
sheets at the same time. After the price profile is defined, price sheets are assigned to the price profile
and the display sequence is defined, allowing for dependencies and comparisons. For example, to
simultaneously view and maintain all pricing available for a material, you might assign the purchase
price, list price, customer list price, and customer group price to a price profile.
Abstract BOM
BOM information for an ECC material can be viewed on the price sheet, based on configuration of the
price profile. For the price profile, configure the following:
• Material field from the price sheet (Field for Structure field) • Plant, Usage, and Application, to explode the standard SAP bill of material
In addition, to explode DM bill of material, the ECC material is attached to the DM (BOM) structure in
the Structured Material Workbench.
When you enter the Maintain Price Profile transaction, select the profile and criteria field values. Click
on the Structured Materials button. Information from configuration defaults into the Structured
Materials pop-up. The Explode BOM checkbox will be checked if either the Plant, Usage, and Application
fields (for ECC structures) or the Application Type field (for DM structures) are populated. The Level Up
and Level Down fields indicate how many levels can be viewed (default to 1).
On the price sheet, the system will display BOM information in the BOM Level field for the material (Has
Parents, Has Children, or Has Parents and Children). Click on the icon in the BOM Level Icon field to
view the bill of material structure in a tree format. (NOTE: Recursive bills of material will be highlighted
in red in the tree).
Computations that are assigned to an additional price field in configuration will be run automatically
when you click on the Check and Complete button.

1909 Pricing Documentation
2.5.4.2.2 Create, Maintain or Display Price Profile
2.5.4.2.2.1 Definition
When you create, change, or display condition records that are assigned to a specific price profile, you
specify the condition type and condition table. This unique combination also is referred to as a price
sheet.
NOTE: To be available for use, a price sheet must already have been configured.
2.5.4.2.2.2 Access
The transactions used for profile-based maintenance are:
• Create Price Profile /IRM/GPR04 • Maintain Price Profile /IRM/GPR06 • Display Price Profile /IRM/GPR05
2.5.4.2.2.3 Structure
When you enter the transaction, the system displays a dialog window used to select the price profile
that contains the condition records to be displayed in a grid format.
The following buttons appear above the grid:
Button Action Alternate Access
Save Save and activate the condition records. NOTE: Button not enabled in transaction /IRM/GPR05 Display Price Profile.
Ctrl+S
Selection Content Displays the key fields for each combination.
F6
Other Price Records Access Sequence Choose another Condition Type/Condition Table combination of the same application. NOTE: Button not available in transaction /IRM/GPR05 Display Price Profile.
Shift+F8
Refresh All Sheets F8
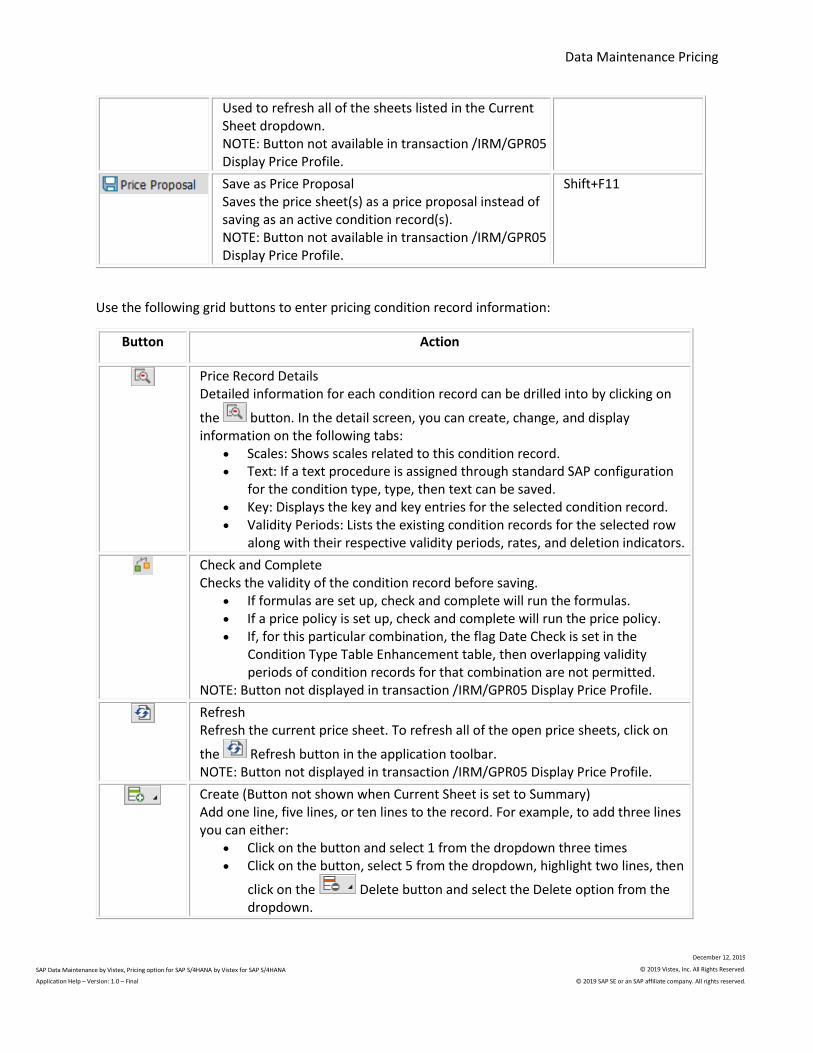
Data Maintenance Pricing
SAP Data Maintenance by Vistex, Pricing option for SAP S/4HANA by Vistex for SAP S/4HANA
Application Help – Version: 1.0 – Final
December 12, 2019
© 2019 Vistex, Inc. All Rights Reserved.
© 2019 SAP SE or an SAP affiliate company. All rights reserved.
Used to refresh all of the sheets listed in the Current Sheet dropdown. NOTE: Button not available in transaction /IRM/GPR05 Display Price Profile.
Save as Price Proposal Saves the price sheet(s) as a price proposal instead of saving as an active condition record(s). NOTE: Button not available in transaction /IRM/GPR05 Display Price Profile.
Shift+F11
Use the following grid buttons to enter pricing condition record information:
Button Action
Price Record Details Detailed information for each condition record can be drilled into by clicking on
the button. In the detail screen, you can create, change, and display information on the following tabs:
• Scales: Shows scales related to this condition record. • Text: If a text procedure is assigned through standard SAP configuration
for the condition type, type, then text can be saved. • Key: Displays the key and key entries for the selected condition record. • Validity Periods: Lists the existing condition records for the selected row
along with their respective validity periods, rates, and deletion indicators.
Check and Complete Checks the validity of the condition record before saving.
• If formulas are set up, check and complete will run the formulas. • If a price policy is set up, check and complete will run the price policy. • If, for this particular combination, the flag Date Check is set in the
Condition Type Table Enhancement table, then overlapping validity periods of condition records for that combination are not permitted.
NOTE: Button not displayed in transaction /IRM/GPR05 Display Price Profile.
Refresh Refresh the current price sheet. To refresh all of the open price sheets, click on
the Refresh button in the application toolbar. NOTE: Button not displayed in transaction /IRM/GPR05 Display Price Profile.
Create (Button not shown when Current Sheet is set to Summary) Add one line, five lines, or ten lines to the record. For example, to add three lines you can either:
• Click on the button and select 1 from the dropdown three times • Click on the button, select 5 from the dropdown, highlight two lines, then
click on the Delete button and select the Delete option from the dropdown.

1909 Pricing Documentation
• Click on the button, then select 10 from the dropdown, highlight seven lines, then click on the Delete button and select the Delete option from the dropdown.
NOTE: Button not displayed in transaction /IRM/GPR05 Display Price Profile.
Delete Delete or undelete a selected condition record. When a previously saved record is flagged for deletion it can be undeleted before the changes are saved. When an unsaved record is deleted it cannot be undeleted. If the condition type is configured to delete, the condition record will be deleted but you can undelete until you Save. If the condition type is configured to not delete, then you can undelete even after saving. NOTE: Button not displayed in transaction /IRM/GPR05 Display Price Profile.
Select Values (Button not shown when Current Sheet is set to Summary) Used to add multiple lines by selecting the key fields. For example, Condition Type PR00 (Price) and Condition Table A005 (Customer-Material) would have the option to add lines by selecting multiple materials, customers, distribution channels, and/or sales organizations. The standard search help screens will be shown for selection processes. NOTE: Button not displayed in transaction /IRM/GPR05 Display Price Profile.
Copy Price Records (Button not shown when Current Sheet is set to Summary) Copy the selected records across price sheet within the profile. If none of the direct input field checkboxes are selected, the system will copy the values in those fields as they are on the original condition record. If one, some, or all of the direct input fields are selected, and different values are entered, it will copy all original values in the fields where the values were not changed and it will override the values that have been selected to be overridden. NOTE: Button not displayed in transaction /IRM/GPR05 Display Price Profile.
Import Price Records (Button not shown when Current Sheet is set to Summary) Used to import condition records from an Excel file. Enter values in the following fields:
• Start Row, where the user specifies the first row that contains the data in the selected file to import.
• File Path, contains the path to the file to be imported. You can search for the file path by clicking on the Search Help button (or pressing F4).
• Field Position, used to specify the column that contains the field data in the selected file to import.
• Field Value, contains a designated default value, if needed. NOTE: Button not displayed in transaction /IRM/GPR05 Display Price Profile.
Search and Replace (Button not shown when Current Sheet is set to Summary) Used to search and replace the selected values within the current price sheet. NOTE: Button not displayed in transaction /IRM/GPR05 Display Price Profile.
Set Values (Button not shown when Current Sheet is set to Summary) Displays the Set Rate dialog box, which is used to mass create rates for the selected condition records. Enter values in the following fields:
• Valid From, the date that the rate for the selected condition record will start.

Data Maintenance Pricing
SAP Data Maintenance by Vistex, Pricing option for SAP S/4HANA by Vistex for SAP S/4HANA
Application Help – Version: 1.0 – Final
December 12, 2019
© 2019 Vistex, Inc. All Rights Reserved.
© 2019 SAP SE or an SAP affiliate company. All rights reserved.
• Valid To, the date that the rate for the selected condition record will end. • Rounding Rule, the rule that determines how the system rounds off
condition values during pricing. The last digit will be rounded. For example, in rounding rule 'A', values are always rounded up: 10.459 → 10.46 DEM
• Rounding Formula, the specified formula to direct the rounding routine. • New, a checkbox signifying if a new condition record should be created
with the specified rate or if the specified rate should be applied to the existing condition record.
• Update Scales, a checkbox signifying if the specified condition record rate change should update the scales or not.
• Rate fields: Example: Original Price Record Rate(s) = 15.00 USD. Using the Increase By option (rate field 1) to increase the rate by 5.00 (rate field 2) units (rate field 3) would change the condition record rates) to 20.00 USD.
• Rate Field 1 contains a dropdown to select the manner in which the rate should be changed.
• Rate Field 2 contains the number that the condition record should be changed by.
• Rate Field 3 contains the measure in which the rate should be changed.
Use the Compute button to carry through the rate calculation to the selected condition record(s). The new rate appears in the Rate field; the previous rate appears in the Before Change field.
The Define Rules for computation hyperlink is used to dynamically create rules using the Rule Builder. NOTE: Button not available in transaction /IRM/GPR05 Display Price Profile.
Compute Used when formula profiles exist for the current price sheet. Formula procedures are pricing values derived from a defined formula or procedure. Formulas are specific to price sheets. User fields or values directly within the price sheet, such as rate, can be calculated. For example, a procedure to copy customer price and increase or decrease by a specified percentage. If multiple procedures are listed, check the S checkbox for each procedure to be included. Click on the procedure name to view the procedure. NOTE: Button not available in transaction /IRM/GPR05 Display Price Profile.
Price Policy Definition Indicates the condition records that comply with the pricing policies assigned to the price sheet. NOTE: This button is only available when an applicable price sheet has underlying pricing policies to check whether or not the condition records are in compliance

1909 Pricing Documentation
or in violation. Price policies can be set to auto execute at the time of record creation or they can be called on demand. Button not displayed in transaction /IRM/GPR05 Display Price Profile.
Most Recent Log (Not shown when Current Sheet is set to Summary) Recall the most recent log. In order for the most recent log to be visible, first click
on the Check and Complete button. NOTE: Button not displayed in transaction /IRM/GPR05 Display Price Profile.
Error/Warning Records This button appears only when there are errors in the condition records. Click to view only the lines with errors or to show all lines. Options:
• Errors, to limit the display to lines with errors • Show All Records
or
Expand Scales If scales exist, used to either:
• Expand scales as column ( )
• Expand scales as row ( )
Highlight Using Filter (Not shown when Current Sheet is set to Summary) Highlight lines based on the selected filter and the search criteria that was input. This button also can be used to reset the highlighting.
Simulate Pricing (Not shown when Current Sheet is set to Summary) Create a price book to simulate prices for highlighted materials.
Cumulative Values (Not shown when Current Sheet is set to Summary) View the cumulated values from sales orders and from billing for the selected record.
Change Documents Displays existing Change documents that are related to the selected row in the Changes for Condition Record window. Use the Filter button to filter the display. Options:
• All Changes • Date Selection
Select the date range for the display. NOTE: Button not displayed in transaction /IRM/GPR06 Maintain price Profile.
Filter Records Displays a pop-up used to specify filter criteria at the price sheet level. Use a filter to improve performance by limiting processing to the selected records. In the Record Count field specify the number of records to be displayed. This value overrides the default number of records defined for price sheet in configuration.
Column to Row Shuffle Change the layout of the condition records in the grid, based on a selected column. Use this button to switch between a vertical (column) and a horizontal (row) display.
Details
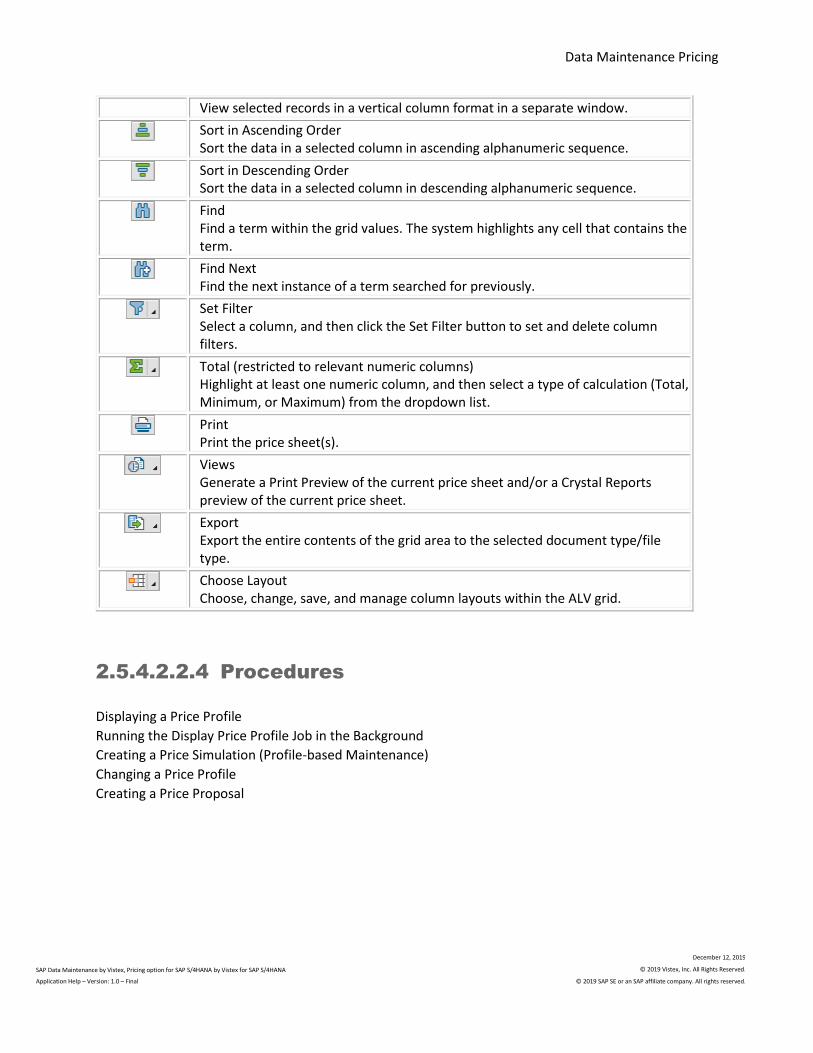
Data Maintenance Pricing
SAP Data Maintenance by Vistex, Pricing option for SAP S/4HANA by Vistex for SAP S/4HANA
Application Help – Version: 1.0 – Final
December 12, 2019
© 2019 Vistex, Inc. All Rights Reserved.
© 2019 SAP SE or an SAP affiliate company. All rights reserved.
View selected records in a vertical column format in a separate window.
Sort in Ascending Order Sort the data in a selected column in ascending alphanumeric sequence.
Sort in Descending Order Sort the data in a selected column in descending alphanumeric sequence.
Find Find a term within the grid values. The system highlights any cell that contains the term.
Find Next Find the next instance of a term searched for previously.
Set Filter Select a column, and then click the Set Filter button to set and delete column filters.
Total (restricted to relevant numeric columns) Highlight at least one numeric column, and then select a type of calculation (Total, Minimum, or Maximum) from the dropdown list.
Print Print the price sheet(s).
Views Generate a Print Preview of the current price sheet and/or a Crystal Reports preview of the current price sheet.
Export Export the entire contents of the grid area to the selected document type/file type.
Choose Layout Choose, change, save, and manage column layouts within the ALV grid.
2.5.4.2.2.4 Procedures
Displaying a Price Profile
Running the Display Price Profile Job in the Background
Creating a Price Simulation (Profile-based Maintenance)
Changing a Price Profile
Creating a Price Proposal

1909 Pricing Documentation
2.5.4.3 Index-based Maintenance
2.5.4.3.1 Index-based Maintenance Overview
2.5.4.3.1.1 Definition
Index-based maintenance utilizes the index profiles created in the Pricing Control Parameters. Index
profiles are logical collections of related indexed tables. In index-based pricing, when you choose an
index profile to maintain or display, the system lists all the condition records categorized by the
condition types/tables (price sheets) assigned to that index profile.
For example, you might search all records across multiple condition types for a certain material,
customer, agreement, or date range.
2.5.4.3.1.2 Access
The transactions used for index-based maintenance are:
• Display Price Records Using Indices /IRM/GPR25 • Maintain Price Records Using Indices /IRM/GRP26
2.5.4.3.2 Display or Maintain Condition Records
Using Indices
2.5.4.3.2.1 Definition
When you choose an index profile to maintain or display, the system lists all the condition records that
categorized by the condition types/tables (price sheets) assigned to that index profile.
NOTE: To be available for use, a price sheet must already have been configured.

Data Maintenance Pricing
SAP Data Maintenance by Vistex, Pricing option for SAP S/4HANA by Vistex for SAP S/4HANA
Application Help – Version: 1.0 – Final
December 12, 2019
© 2019 Vistex, Inc. All Rights Reserved.
© 2019 SAP SE or an SAP affiliate company. All rights reserved.
2.5.4.3.2.2 Access
The transactions used for index-based maintenance are:
• Display Price Records Using Indices /IRM/GPR25 • Maintain Price Records Using Indices /IRM/GPR26
2.5.4.3.2.3 Structure
When you enter the transaction, the system displays a dialog window used to select the price sheet to
be displayed in a grid format.
When you display a price sheet, the following button appears above the grid:
Button Action Alternate Access
Selection Content Displays the key fields for each combination.
F6
The default view is the Summary view, in which all condition records that meet the search criteria are
displayed. To display records for each price sheet, use the dropdown menu in the Current Sheet field.
Additional grid buttons appear in the grid when a combination is chosen.
Button Action
Price Record Details Detailed information for each condition record can be drilled into by clicking on
the Price Record Details button. In the detail screen, you can create, change, and display information on the following tabs:
• Scales: Shows scales related to this condition record. • Text: if a text procedure is assigned through standard SAP configuration
for the condition type, then text can be saved. • Key: Displays the key and key entries for the selected condition record. • Validity Periods: Lists the existing condition records for the selected row
along with their respective validity periods, rates, and deletion indicators.
Check and Complete Checks the validity of the condition record before saving.
• If formulas are set up, check and complete will run the formulas. • If a price policy is set up, check and complete will run the price policy. • If, for this particular combination, the flag Date Check is set in the
Condition Type Table Enhancement table, then overlapping validity periods of condition records for that combination are not permitted.

1909 Pricing Documentation
NOTE: Button not displayed in transaction /IRM/GPR25 Display Pricing Records Using Indices.
Refresh Refresh the current price sheet. To refresh all of the open price sheets, click on
the Refresh button in the application toolbar. NOTE: Button not displayed in transaction /IRM/GPR25 Display Pricing Records Using Indices.
Create Add one line, five lines, or ten lines to the record. For example, to add three lines you can either:
• Click on the button and select 1 from the dropdown three times • Click on the button, select 5 from the dropdown, highlight two lines, then
click on the Delete button and select the Delete option from the dropdown.
• Click on the button, then select 10 from the dropdown, highlight seven lines, then click on the Delete button and select the Delete option from the dropdown.
NOTE: Button not displayed in transaction /IRM/GPR25 Display Pricing Records Using Indices.
Delete Delete or undelete a selected condition record. When a previously saved record is flagged for deletion it can be undeleted before the changes are saved. When an unsaved record is deleted it cannot be undeleted. If the condition type is configured to delete, the condition record will be deleted but you can undelete until you Save. If the condition type is configured to not delete, then you can undelete even after saving. NOTE: Button not displayed in transaction /IRM/GPR25 Display Pricing Records Using Indices.
Select Values Used to add multiple lines by selecting the key fields. For example, Condition Type PR00 (Price) and Condition Table A005 (Customer-Material) would have the option to add lines by selecting multiple materials, customers, distribution channels, and/or sales organizations. The standard search help screens will be shown for selection processes. NOTE: Button not displayed in transaction /IRM/GPR25 Display Pricing Records Using Indices.
Copy Price Records Displays the Copy Price Records dialog window. Specify the target sheet and number of copies. Check the Copy texts checkbox to copy texts. If none of the direct input field checkboxes are selected, the system will copy the values in those fields as they are on the original condition record. If one, some, or all of the direct input fields are selected, and different values are entered, it will copy all original values in the fields where the values were not changed and it will override the values that have been selected to be overridden.

Data Maintenance Pricing
SAP Data Maintenance by Vistex, Pricing option for SAP S/4HANA by Vistex for SAP S/4HANA
Application Help – Version: 1.0 – Final
December 12, 2019
© 2019 Vistex, Inc. All Rights Reserved.
© 2019 SAP SE or an SAP affiliate company. All rights reserved.
NOTE: Button not displayed in transaction /IRM/GPR25 Display Pricing Records Using Indices.
Import Price Records Used to import condition records from Excel. Enter values in the following fields:
• Start Row, where the user specifies the first row that contains the data in the selected file to import.
• File Path, contains the path to the file to be imported. You can search for the file path by clicking on the Search Help button (or pressing F4).
• Field Position, used to specify the column that contains the field data in the selected file to import.
• Field Value, contains a designated default value, if needed. NOTE: Button not displayed in transaction /IRM/GPR25 Display Pricing Records Using Indices.
Search and Replace Used to search and replace the selected values within the current price sheet. NOTE: Button not displayed in transaction /IRM/GPR25 Display Pricing Records Using Indices.
Set Values Displays the Set Rate dialog box, which is used to mass create rates for the selected condition records. Enter values in the following fields:
• Valid From, date that the rate for the selected condition record will start. • Valid To, date that the rate for the selected condition record will end. • Rounding Rule, the rule that determines how the system rounds off
condition values during pricing. The last digit will be rounded. For example, in rounding rule 'A', values are always rounded up: 10.459 → 10.46 DEM
• Rounding Formula, the specified formula to direct the rounding routine. • New, a checkbox signifying if a new condition record should be created
with the specified rate or if the specified rate should be applied to the existing condition record.
• Update Scales, a checkbox signifying if the specified condition record rate change should update the scales or not.
• Rate fields: Example: Original Price Record Rate(s) = 15.00 USD. Using the Increase By option (rate field 1) to increase the rate by 5.00 (rate field 2) units (rate field 3) would change the condition record rate(s) to 20.00 USD. • Rate Field 1 contains a dropdown to select the manner in which the
rate should be changed.
• Rate Field 2 contains the number that the condition record should be changed by.
• Rate Field 3 contains the measure in which the rate should be changed.

1909 Pricing Documentation
Use the Compute button to carry through the rate calculation to the selected condition record(s). The new rate appears in the Rate field; the previous rate appears in the Before Change field.
The Define Rules for computation hyperlink is used to dynamically create rules using the Rule Builder. NOTE: Button not displayed in transaction /IRM/GPR25 Display Pricing Records Using Indices.
Compute Used when formula profiles exist for the current price sheet. Formula pricing is pricing values derived from a defined formula. Formulas are specific to price sheets. User fields or values directly within the price sheet, such as rate, can be calculated. NOTE: Button not displayed in transaction /IRM/GPR25 Display Pricing Records Using Indices.
Price Policy Definition Indicates the condition records that comply with the pricing policies assigned to the price sheet. NOTE: This button is only available when an applicable price sheet has underlying pricing policies to check whether or not the condition records are in compliance or in violation. Price policies can be set to auto execute at the time of record creation or they can be called on demand. Button not displayed in transaction /IRM/GPR25 Display Pricing Records Using Indices.
Most Recent Log Recall the most recent log. In order for the most recent log to be visible, first click
on the Check and Complete button. NOTE: Button not displayed in transaction /IRM/GPR25 Display Pricing Records Using Indices.
Highlight Using Filter Highlight lines based on the selected filter and the search criteria that was input. This button also can be used to reset the highlighting.
Simulate Pricing Create a price book to simulate prices for highlighted materials.
Cumulative Values View the cumulated values from sales orders and from billing for the selected record.
Change Documents Displays existing Change documents that are related to the selected row in the Changes for Condition Record window. Use the Filter button to filter the display. Options:
• All Changes • Date Selection
Select the date range for the display. NOTE: Button not displayed in transaction /IRM/GPR01 Create Pricing Records.

Data Maintenance Pricing
SAP Data Maintenance by Vistex, Pricing option for SAP S/4HANA by Vistex for SAP S/4HANA
Application Help – Version: 1.0 – Final
December 12, 2019
© 2019 Vistex, Inc. All Rights Reserved.
© 2019 SAP SE or an SAP affiliate company. All rights reserved.
Filter Records Displays a pop-up used to specify filter criteria at the price sheet level. Use a filter to improve performance by limiting processing to the selected records. In the Record Count field specify the number of records to be displayed. This value overrides the default number of records defined for price sheet in configuration.
Column to Row Shuffle Change the layout of the condition records in the grid, based on a selected column. Use this button to switch between a vertical (column) and a horizontal (row) display.
Details View selected records in a vertical column format in a separate window.
Sort in Ascending Order Sort the data in a selected column in ascending alphanumeric sequence.
Sort in Descending Order Sort the data in a selected column in descending alphanumeric sequence.
Find Find a term within the grid values. The system highlights the field that contains the term.
Find Next Find the next instance of a term searched for previously.
Set Filter Select a column, and then click the Set Filter button to set and delete column filters.
Total (restricted to relevant numeric columns) Highlight at least one numeric column, and then select a type of calculation (Total, Minimum, or Maximum) from the dropdown list.
Print Print the price sheet(s).
Views Generate a Print Preview of the current price sheet and/or a Crystal Reports preview of the current price sheet.
Export Export the entire contents of the grid area to the selected document type/file type.
Choose Layout Choose, change, save, and manage column layouts within the ALV grid.

1909 Pricing Documentation
2.5.4.3.2.4 Procedures
Maintaining Condition Records Using Indices
Creating a Price Proposal
Creating a Price Simulation (Index-based Maintenance)
Displaying Condition Records Using Indices
Running the Display Price Records Using Indices Job in the Background
2.5.4.4 Function-based Rule Maintenance
2.5.4.4.1 Maintenance Groups
2.5.4.4.1.1 Definition
Use maintenance groups to perform function based rule maintenance used to maintain condition
records across Incentives Administration and Paybacks & Chargebacks (IP) and Data Maintenance Pricing
at the same time. For example, maintenance groups can be used to end date a price. Maintenance
groups are similar to a price profile and replace the use of Condition Accesses (/IRM/IPGCS).
Maintenance groups are defined in configuration. For each maintenance group, specify the category and
assign the applicable price sheets. For composite maintenance, can assign a composite profile to the
maintenance group. In IP, the available categories of maintenance groups and their corresponding
create, change, and display transaction codes are:
• Agreement Priority and Resolution (/IRM/IPAPR01, /IRM/IPAPR02, /IRM/IPARP03) • Sales Credit (/IRM/IPSC01, /IRM IPSC02, IPSC03) • Transaction Adjudication (/IRM/IPTA01, /IRM/IPTA02, /IRM/IPTA03)
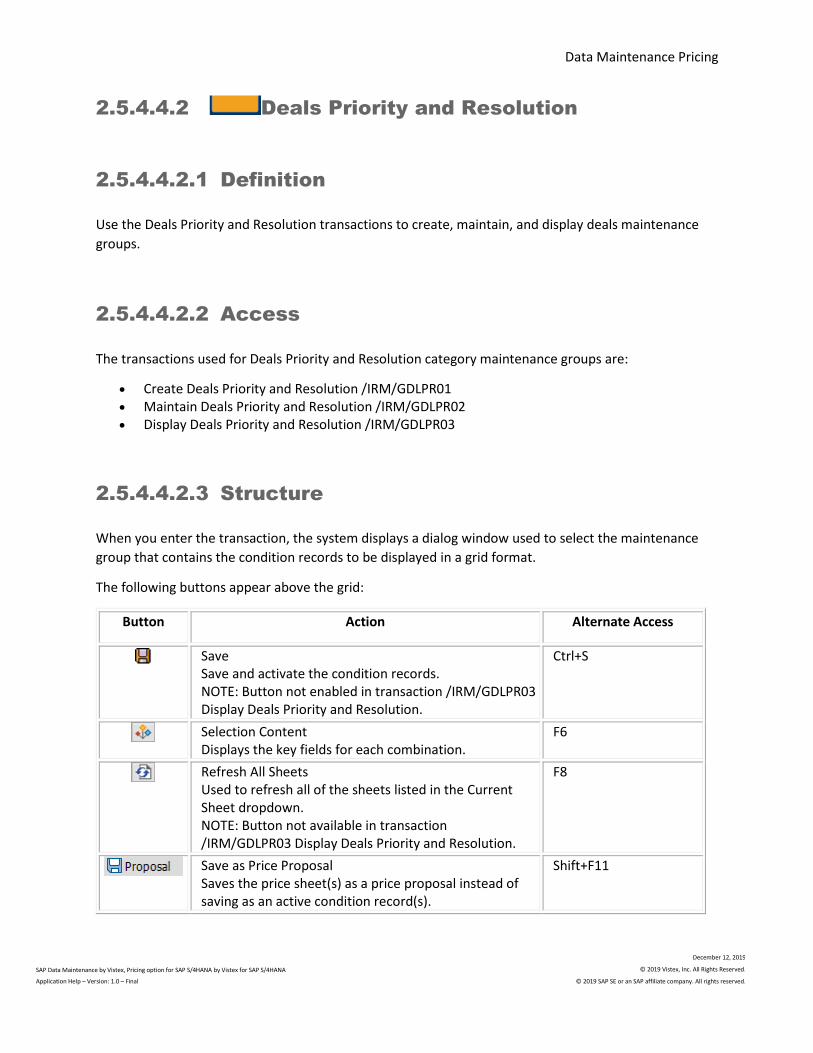
Data Maintenance Pricing
SAP Data Maintenance by Vistex, Pricing option for SAP S/4HANA by Vistex for SAP S/4HANA
Application Help – Version: 1.0 – Final
December 12, 2019
© 2019 Vistex, Inc. All Rights Reserved.
© 2019 SAP SE or an SAP affiliate company. All rights reserved.
2.5.4.4.2 Deals Priority and Resolution
2.5.4.4.2.1 Definition
Use the Deals Priority and Resolution transactions to create, maintain, and display deals maintenance
groups.
2.5.4.4.2.2 Access
The transactions used for Deals Priority and Resolution category maintenance groups are:
• Create Deals Priority and Resolution /IRM/GDLPR01 • Maintain Deals Priority and Resolution /IRM/GDLPR02 • Display Deals Priority and Resolution /IRM/GDLPR03
2.5.4.4.2.3 Structure
When you enter the transaction, the system displays a dialog window used to select the maintenance
group that contains the condition records to be displayed in a grid format.
The following buttons appear above the grid:
Button Action Alternate Access
Save Save and activate the condition records. NOTE: Button not enabled in transaction /IRM/GDLPR03 Display Deals Priority and Resolution.
Ctrl+S
Selection Content Displays the key fields for each combination.
F6
Refresh All Sheets Used to refresh all of the sheets listed in the Current Sheet dropdown. NOTE: Button not available in transaction /IRM/GDLPR03 Display Deals Priority and Resolution.
F8
Save as Price Proposal Saves the price sheet(s) as a price proposal instead of saving as an active condition record(s).
Shift+F11

1909 Pricing Documentation
NOTE: Button is not supported in /IRM/GDLPR02 and /IRM/GDLPR03.
Use the following grid buttons to enter pricing condition record information:
Button Action
Price Record Details Detailed information for each condition record can be drilled into by clicking on
the button. In the detail screen, you can create, change, and display information on the following tabs:
• Scales: Shows scales related to this condition record. • Text: If a text procedure is assigned through standard SAP configuration
for the condition type, type, then text can be saved. • Key: Displays the key and key entries for the selected condition record. • Validity Periods: Lists the existing condition records for the selected row
along with their respective validity periods, rates, and deletion indicators.
Check and Complete Checks the validity of the condition record before saving.
• If formulas are set up, check and complete will run the formulas. • If a price policy is set up, check and complete will run the price policy. • If, for this particular combination, the flag Date Check is set in the
Condition Type Table Enhancement table, then overlapping validity periods of condition records for that combination are not permitted.
NOTE: Button not displayed in transaction /IRM/GDLPR03 Display Deals Priority and Resolution.
Refresh Refresh the current price sheet. To refresh all of the open price sheets, click on
the Refresh button in the application toolbar. NOTE: Button not displayed in transaction /IRM/GDLPR03 Display Deals Priority and Resolution.
Create (Button not shown when Current Sheet is set to Summary) Add one line, five lines, or ten lines to the record. For example, to add three lines you can either:
• Click on the button and select 1 from the dropdown three times • Click on the button, select 5 from the dropdown, highlight two lines, then
click on the Delete button and select the Delete option from the dropdown.
• Click on the button, then select 10 from the dropdown, highlight seven lines, then click on the Delete button and select the Delete option from the dropdown.
NOTE: Button not displayed in transaction /IRM/GDLPR03 Display Deals Priority and Resolution.
Delete
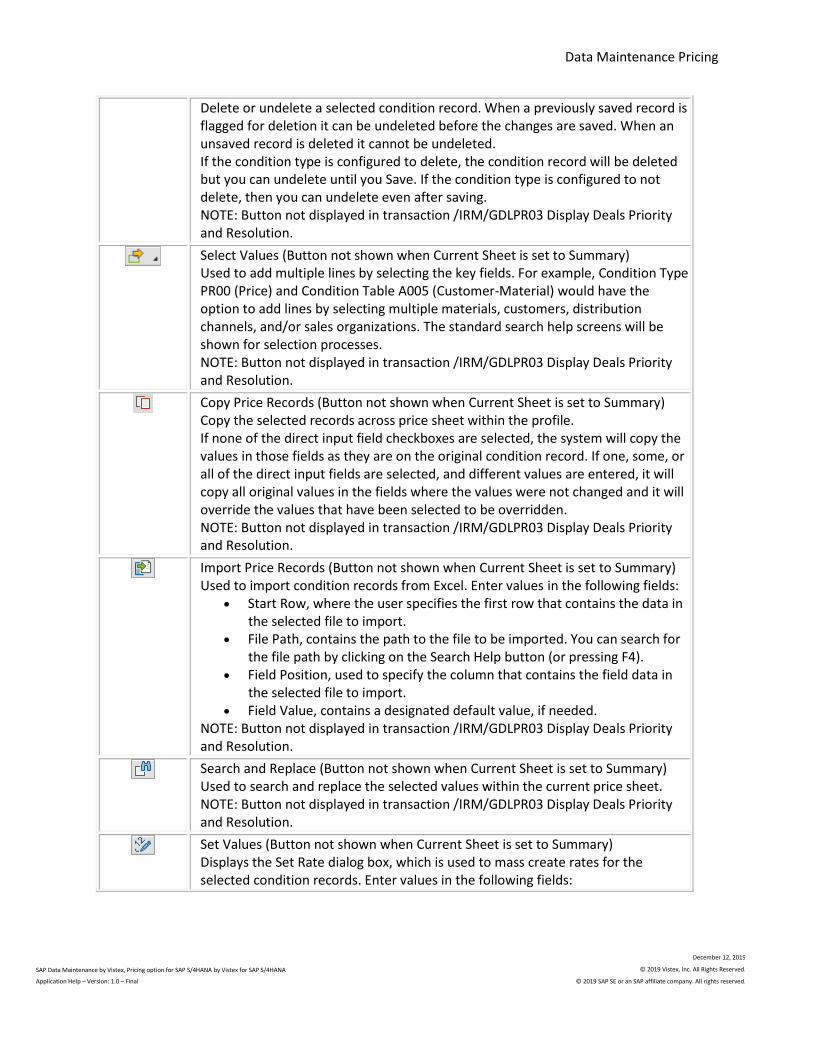
Data Maintenance Pricing
SAP Data Maintenance by Vistex, Pricing option for SAP S/4HANA by Vistex for SAP S/4HANA
Application Help – Version: 1.0 – Final
December 12, 2019
© 2019 Vistex, Inc. All Rights Reserved.
© 2019 SAP SE or an SAP affiliate company. All rights reserved.
Delete or undelete a selected condition record. When a previously saved record is flagged for deletion it can be undeleted before the changes are saved. When an unsaved record is deleted it cannot be undeleted. If the condition type is configured to delete, the condition record will be deleted but you can undelete until you Save. If the condition type is configured to not delete, then you can undelete even after saving. NOTE: Button not displayed in transaction /IRM/GDLPR03 Display Deals Priority and Resolution.
Select Values (Button not shown when Current Sheet is set to Summary) Used to add multiple lines by selecting the key fields. For example, Condition Type PR00 (Price) and Condition Table A005 (Customer-Material) would have the option to add lines by selecting multiple materials, customers, distribution channels, and/or sales organizations. The standard search help screens will be shown for selection processes. NOTE: Button not displayed in transaction /IRM/GDLPR03 Display Deals Priority and Resolution.
Copy Price Records (Button not shown when Current Sheet is set to Summary) Copy the selected records across price sheet within the profile. If none of the direct input field checkboxes are selected, the system will copy the values in those fields as they are on the original condition record. If one, some, or all of the direct input fields are selected, and different values are entered, it will copy all original values in the fields where the values were not changed and it will override the values that have been selected to be overridden. NOTE: Button not displayed in transaction /IRM/GDLPR03 Display Deals Priority and Resolution.
Import Price Records (Button not shown when Current Sheet is set to Summary) Used to import condition records from Excel. Enter values in the following fields:
• Start Row, where the user specifies the first row that contains the data in the selected file to import.
• File Path, contains the path to the file to be imported. You can search for the file path by clicking on the Search Help button (or pressing F4).
• Field Position, used to specify the column that contains the field data in the selected file to import.
• Field Value, contains a designated default value, if needed. NOTE: Button not displayed in transaction /IRM/GDLPR03 Display Deals Priority and Resolution.
Search and Replace (Button not shown when Current Sheet is set to Summary) Used to search and replace the selected values within the current price sheet. NOTE: Button not displayed in transaction /IRM/GDLPR03 Display Deals Priority and Resolution.
Set Values (Button not shown when Current Sheet is set to Summary) Displays the Set Rate dialog box, which is used to mass create rates for the selected condition records. Enter values in the following fields:

1909 Pricing Documentation
• Valid From, the date that the rate for the selected condition record will start.
• Valid To, the date that the rate for the selected condition record will end. • Rounding Rule, the rule that determines how the system rounds off
condition values during pricing. The last digit will be rounded. For example, in rounding rule 'A', values are always rounded up: 10.459 → 10.46 DEM
• Rounding Formula, the specified formula to direct the rounding routine. • New, a checkbox signifying if a new condition record should be created
with the specified rate or if the specified rate should be applied to the existing condition record.
• Update Scales, a checkbox signifying if the specified condition record rate change should update the scales or not.
• Rate fields: Example: Original Price Record Rate(s) = 15.00 USD. Using the Increase By option (rate field 1) to increase the rate by 5.00 (rate field 2) units (rate field 3) would change the condition record rates) to 20.00 USD.
• Rate Field 1 contains a dropdown to select the manner in which the rate should be changed.
• Rate Field 2 contains the number that the condition record should be changed by.
• Rate Field 3 contains the measure in which the rate should be changed.
Use the Compute button to carry through the rate calculation to the selected condition record(s). The new rate appears in the Rate field; the previous rate appears in the Before Change field.
The Define Rules for computation hyperlink is used to dynamically create rules using the Rule Builder. NOTE: Button not available in transaction /IRM/GDLPR03 Display Deals Priority and Resolution.
Compute Used when formula profiles exist for the current price sheet. Formula procedures are pricing values derived from a defined formula or procedure. Formulas are specific to price sheets. User fields or values directly within the price sheet, such as rate, can be calculated. For example, a procedure to copy customer price and increase or decrease by a specified percentage. If multiple procedures are listed, check the S checkbox for each procedure to be included. Click on the procedure name to view the procedure. NOTE: Button not available in transaction /IRM/GDLPR03 Display Deals Priority and Resolution.
Price Policy Definition Indicates the condition records that comply with the pricing policies assigned to the price sheet.
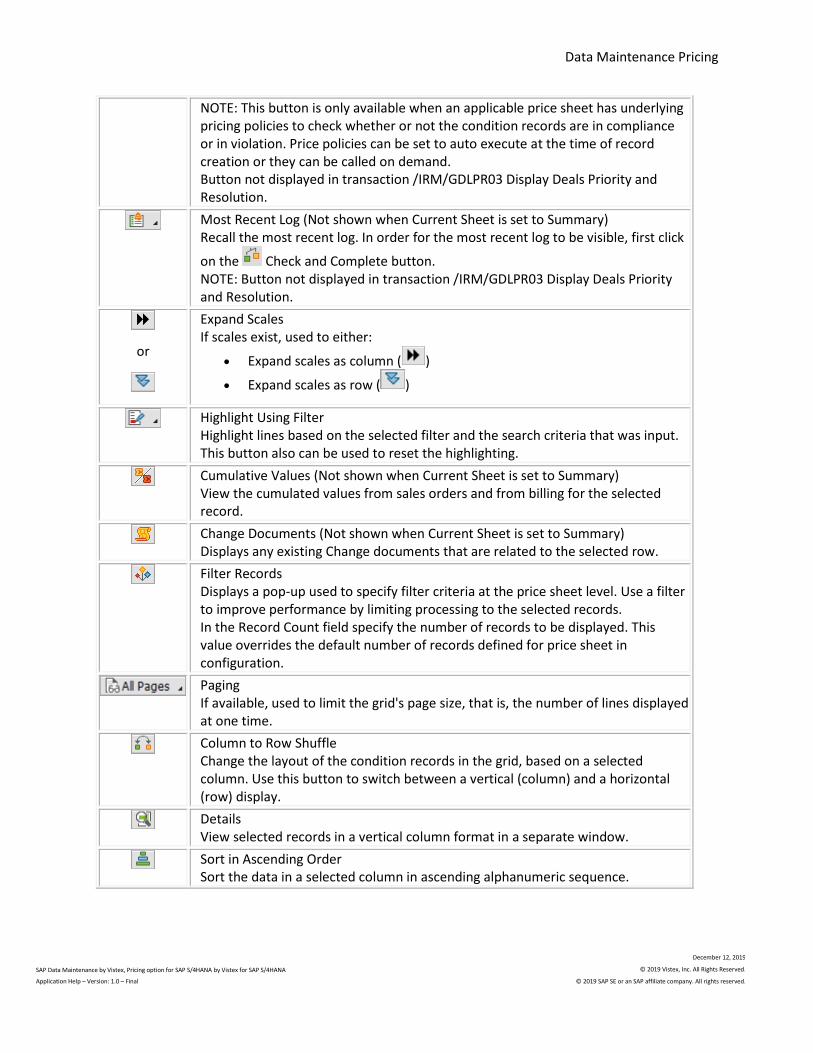
Data Maintenance Pricing
SAP Data Maintenance by Vistex, Pricing option for SAP S/4HANA by Vistex for SAP S/4HANA
Application Help – Version: 1.0 – Final
December 12, 2019
© 2019 Vistex, Inc. All Rights Reserved.
© 2019 SAP SE or an SAP affiliate company. All rights reserved.
NOTE: This button is only available when an applicable price sheet has underlying pricing policies to check whether or not the condition records are in compliance or in violation. Price policies can be set to auto execute at the time of record creation or they can be called on demand. Button not displayed in transaction /IRM/GDLPR03 Display Deals Priority and Resolution.
Most Recent Log (Not shown when Current Sheet is set to Summary) Recall the most recent log. In order for the most recent log to be visible, first click
on the Check and Complete button. NOTE: Button not displayed in transaction /IRM/GDLPR03 Display Deals Priority and Resolution.
or
Expand Scales If scales exist, used to either:
• Expand scales as column ( )
• Expand scales as row ( )
Highlight Using Filter Highlight lines based on the selected filter and the search criteria that was input. This button also can be used to reset the highlighting.
Cumulative Values (Not shown when Current Sheet is set to Summary) View the cumulated values from sales orders and from billing for the selected record.
Change Documents (Not shown when Current Sheet is set to Summary) Displays any existing Change documents that are related to the selected row.
Filter Records Displays a pop-up used to specify filter criteria at the price sheet level. Use a filter to improve performance by limiting processing to the selected records. In the Record Count field specify the number of records to be displayed. This value overrides the default number of records defined for price sheet in configuration.
Paging If available, used to limit the grid's page size, that is, the number of lines displayed at one time.
Column to Row Shuffle Change the layout of the condition records in the grid, based on a selected column. Use this button to switch between a vertical (column) and a horizontal (row) display.
Details View selected records in a vertical column format in a separate window.
Sort in Ascending Order Sort the data in a selected column in ascending alphanumeric sequence.

1909 Pricing Documentation
Sort in Descending Order Sort the data in a selected column in descending alphanumeric sequence.
Find Find a term within the grid values. The system highlights any cell that contains the term.
Find Next Find the next instance of a term searched for previously.
Set Filter Select a column, and then click the Set Filter button to set and delete column filters.
Total (restricted to relevant numeric columns) Highlight at least one numeric column, and then select a type of calculation (Total, Minimum, or Maximum) from the dropdown list.
Print Print the price sheet(s).
Views Generate a Print Preview of the current price sheet and/or a Crystal Reports preview of the current price sheet.
Export Export the entire contents of the grid area to the selected document type/file type.
Choose Layout Choose, change, save, and manage column layouts within the ALV grid.
2.5.5 Automated Price Maintenance
2.5.5.1 Definition
Automated Price Maintenance (APM) is used to automatically copy or process multiple values within
condition records at the same time in batch mode. For example, you might use APM to mass update
commodity prices each night. If needed, the changes can be saved as a price proposal so that the
changes can be reviewed prior to posting them to SAP.

Data Maintenance Pricing
SAP Data Maintenance by Vistex, Pricing option for SAP S/4HANA by Vistex for SAP S/4HANA
Application Help – Version: 1.0 – Final
December 12, 2019
© 2019 Vistex, Inc. All Rights Reserved.
© 2019 SAP SE or an SAP affiliate company. All rights reserved.
2.5.5.1.1 Variants
When you save a variant, enter the following information:
• Variant Name and Variant Text (description) • Default
A variant can be designated as the default that is displayed when you enter the transaction, but the screen layout can be changed as saved to that layout or saved as a new layout.
• Selection Fields List the selection fields, in the sequence they will appear. If needed, assign a Selection Type to the selection fields. Available selection types are: • T Table Variable from TVARVC, to populate the selection field using a value set up in a
selection variable.
Click on the Create Variable button to display the Selection Variables (TVARVC) table and set the variable value.
• D Dynamic Date Calculation, for dates to be derived dynamically
• Z Dynamic Time Calculation, for times to be derived dynamically
2.5.5.1.2 Procedures
Procedures can be defined in the Sheet Formulas and Procedures Workbench (/IRM/GPRFPM) to
automate manual price maintenance steps; procedure step types Set Values, Apply Policies, and Execute
Formulas are supported for APM and the Selection Type should be set to All Records. Procedures
containing any other step types will not appear in the Procedures field dropdown list.
2.5.5.2 Access
Transaction code: /IRM/GPR15
2.5.5.3 Structure
The Automated Price Maintenance transaction is organized into the following areas:
• Source, used to select the application and price sheet to be copied or processed. • Action
Click on a button to choose one of the following actions:

1909 Pricing Documentation
• Copy, used to submit a job to copy condition records. For example, you can copy all prices to a different customer. If the condition record being copied has text, click on the Copy texts checkbox to include the text in the copy.
• Process, used to submit a job to mass change rates, validity dates, currency, and units. For example, you can increase all fuel surcharge rates by 5%. You may also adjust the scales. For example, if the rate of the selected condition record(s) is increased and the adjust scales flag is enabled, the rate and scales will be adjusted accordingly. When changing a rate, in the Set Rate pop-up check the New checkbox to create a new condition by copying the original record. The rate is changed only in the new record; the original record remains unchanged. Check the Adjust Scales checkbox to adjust the scales. For example, if the rate of the selected condition record(s) is increased and the adjust scales flag is enabled, it will adjust the rate and scales accordingly.
• Target, used to define the target price sheet when copying and map the target fields to the source fields. Use the Procedure field to apply a procedure to condition records. For this field, only the Set Values, Apply Policies, and Execute Formulas step types are supported.
• Set, used when processing to define values for the rate, validity dates, currency, and/or unit. When setting values for the rate, use the New flag to create new condition records from the selected existing condition records. If both the New and Adjust Scales flags are selected, new condition records will be created while adjusting the scales values. After rules are established and assigned to a price sheet, existing condition records can be processed against the rules to determine compliance.
2.5.5.4 Procedures
Copying Condition Records in Batch Mode
Changing Condition Record Values in Batch Mode
2.6 Price Simulation
Data Maintenance Pricing
SAP Data Maintenance by Vistex, Pricing option for SAP S/4HANA by Vistex for SAP S/4HANA
Application Help – Version: 1.0 – Final
December 12, 2019
© 2019 Vistex, Inc. All Rights Reserved.
© 2019 SAP SE or an SAP affiliate company. All rights reserved.
2.6.1 Price Simulation Workbench
2.6.1.1 Definition
Use the Price Simulation Workbench to calculate item prices, for internal simulations. A price simulation
is similar to a catalog, but runs faster since it has less functionality (no output, no evaluation). The price
simulation runs a pricing procedure over products for a specified date range. The resulting price
simulation document can be used when creating proforma documents.
Plant determination for a price simulation uses the following hierarchy:
• Customer material info record • Header level customer data • Item level material master data
If a price simulation document is used to create a proforma, that price simulation document can be
viewed from the Proforma tab in the agreement, agreement request, or program. The price simulation
document number is a hot key to display the document. When a proforma is deleted, the corresponding
price simulation is deleted automatically; after a proforma is posted, no further changes can be made to
the corresponding price simulation.
The price simulation type assigned to the price simulation controls the configuration, including the
numbering, pricing procedure, partner roles, item category, and display profiles to be used.
2.6.1.1.1 Price Monitoring
The Price Monitoring functionality is designed for Government Pricing users, to calculate multiple kinds
of prices to find the best price. The Calculation Items tab will be displayed when the price simulation
type is configured to calculate multiple prices for each item, using a different pricing procedure to
calculate each price. For example, for a customer/material you could calculate the billback amount,
distributor fee, volume rebate, and revenue growth rebate, each using a different pricing procedure.
A BAdI is provided to calculate the best price based on results in the Calculation Items tab.
2.6.1.2 Access
Transaction code: /IRM/GPSM
1909 Pricing Documentation
2.6.1.2.1 Price Simulation in Fiori
Price simulation functionality is available as a Fiori application in release 1909 SP1. However, only
records that are maintained in the Vistex Calculation Engine are supported for the Price Simulation Fiori
application. Price records maintained via SAP pricing are not supported.
2.6.1.3 Structure
The Price Simulation Workbench screen is organized into the following areas:
• Search and Worklist Use the Search and Worklist to view selected price simulations in a grid format. From the grid, click on a price simulation number to display that price simulation in focus in the Work Area.
• Work Area Use the Work Area to maintain one price simulation. In the standard Vistex implementation, the Work Area contains the following tabs: • Header
• Items
• Calculation Items, used when the price simulation type is configured to calculate multiple prices for each item, using a different pricing procedure to calculate each price. This functionality was added for Government Pricing, to calculate multiple kinds of prices to find the best price.
• Proforma
• Notes
• Admin Data
NOTE: Functions accessed from the menu bar apply only to the price simulation displayed in focus in the
Work Area and do not apply to the data in the Search and Worklist.
IMPORTANT: Because Vistex software is extremely versatile, the user screen may be customized. As a
result, the screen may appear different from the standard screen described in this document.
2.6.1.4 Procedures
Displaying a Price Simulation
Creating a Price Simulation
Maintaining a Price Simulation
Exporting a Price Simulation to a File
Deleting a Price Simulation
Viewing Output
Data Maintenance Pricing
SAP Data Maintenance by Vistex, Pricing option for SAP S/4HANA by Vistex for SAP S/4HANA
Application Help – Version: 1.0 – Final
December 12, 2019
© 2019 Vistex, Inc. All Rights Reserved.
© 2019 SAP SE or an SAP affiliate company. All rights reserved.
2.6.2 Upload/Download
2.6.2.1 Upload Price Simulation
2.6.2.1.1 Definition
Use Upload Price Simulation to import pricing information from a file, such as an Excel spreadsheet,
rather than manually entering the data. Files can be uploaded from the following locations:
• Desktop, to upload from the local PC • File submission, to upload based on a file submission entry • File server, to upload directly from the application server
File templates can be created to control the fields and format of price simulation files during upload. To
create a file template, either save the information entered on the screen, or use the File Template for
Price Simulation Workbench to create a template.
Uploaded information can be viewed in the Price Simulation Workbench.
2.6.2.1.2 Access
Transaction code: /IRM/GPSUPL
2.6.2.1.3 Procedure
Uploading Price Simulations
1909 Pricing Documentation
2.6.2.2 Download Price Simulation
2.6.2.2.1 Definition
Use Download Price Simulation to download a price simulation to a specific file on a desktop or file
server. For large downloads, this transaction can be run as a background job.
File templates are used to control the fields and format of files during download. To create a template,
use the File Template for Price Simulation Workbench.
2.6.2.2.2 Access
Transaction code: /IRM/GPSDNL
2.6.2.2.3 Procedure
Downloading Price Simulations
2.6.2.3 File Template for Price Simulation
2.6.2.3.1 Definition
Use File Template for Price Simulation Workbench to create and maintain templates that control the
fields and format of price simulation files during upload.
2.6.2.3.2 Access
Transaction code: /IRM/GPSFTM
Data Maintenance Pricing
SAP Data Maintenance by Vistex, Pricing option for SAP S/4HANA by Vistex for SAP S/4HANA
Application Help – Version: 1.0 – Final
December 12, 2019
© 2019 Vistex, Inc. All Rights Reserved.
© 2019 SAP SE or an SAP affiliate company. All rights reserved.
2.6.2.3.3 Structure
The File Template for Price Simulation Workbench screen is organized into the following areas:
• Search and Worklist Use the Search and Worklist to view selected file templates in a grid format. From the grid, click on file template number to display that file template in focus in the Work Area.
• Work Area Use the Work Area to maintain one file template. In the standard Vistex implementation, the Work Area contains the following tabs: • Section
• Mapping
• Conversion
• Submitter
• Crystal Layout, which is used with Crystal Reports
• Admin Data
NOTE: Functions accessed from the menu bar apply only to the file template displayed in focus in the
Work Area and do not apply to the data in the Search and Worklist.
2.6.2.3.4 Procedures
Displaying a File Template for Price Simulation
Creating a File Template for Price Simulation
Copying a File Template for Price Simulation
Maintaining a File Template for Price Simulation
Deleting a File Template for Price Simulation
2.7 Price Proposal

1909 Pricing Documentation
2.7.1 Price Proposal Overview
2.7.1.1 Definition
A price proposal is initiated to request approval for the creation or maintenance of condition records.
Price proposals cannot be created in the Price Proposal Workbench. Instead, use any of the following
transactions to create a price proposal:
• Master Request Workbench • Price Type Workbench • Create Pricing Records (Classic Maintenance) • Change Pricing Records (Classic Maintenance) • Create Price Profile (Profile-based Maintenance) • Maintain Price Profile (Profile-based Maintenance) • Maintain Price Records Using Indices (Index-based Maintenance) • Upload Price Records • Automated Price Maintenance
In certain transactions listed above, the Save as Price Proposal button can be used to
save the condition records as a price proposal instead of as active condition records. If needed, the
standard Save button can be disabled to prevent saving a price proposal and posting the price records
before approvals have been granted.
A price proposal can be created for one price sheet or for multiple sheets if profile-based pricing is being
used. After they are created, price proposals can be maintained and displayed in the Price Proposal
Workbench. Multiple price proposal types can be created for the various levels of approval required.
Approval steps are assigned to a status profile which, in turn, is assigned to the price proposal type. This
status profile can then be tied into standard SAP workflow.
To post proposals use the Price Proposal Workbench; to post in batch, use the Post Proposals
/IRM/GPP60 transaction.
Based on price sheet configuration you can enable a flag to not copy the source price sheet and only
create the price proposal for target information.
2.7.1.2 Configuration
The following configuration needs to be performed prior to creating price proposals:
• Define price proposal types, which include numbering definition and status profile • Assign date types to the price proposal type • Assign price sheets to the price proposal type • Assign a mapping profile, created in the Mapping Profile Workbench, to the price proposal type

Data Maintenance Pricing
SAP Data Maintenance by Vistex, Pricing option for SAP S/4HANA by Vistex for SAP S/4HANA
Application Help – Version: 1.0 – Final
December 12, 2019
© 2019 Vistex, Inc. All Rights Reserved.
© 2019 SAP SE or an SAP affiliate company. All rights reserved.
2.7.1.3 Access
Price proposals can created from any of the following transactions:
• /IRM/IPPQM Master Request Workbench • /IRM/GPTM Price Type Workbench • /IRM/GPR01 Create Pricing Records • /IRM/GPR02 Change Pricing Records • /IRM/GRP04 Create Price Profile • /IRM/GPR06 Maintain Price Profile • /IRM/GPR26 Maintain Price Records Using Indices • /IRM/GPRUPL Upload Price Record • /IRM/GPR15 Automated Price Maintenance
2.7.2 Price Proposal
Documentation for price proposals is available for the following screen formats:
• UI Application (SAP Fiori) • SAP GUI
2.7.3 Upload/Download
2.7.3.1 Upload Price Proposal
2.7.3.1.1 Definition
Use Upload Price Proposal to import a price proposal from a file, such as an Excel spreadsheet, rather
than manually entering the data. Files can be uploaded from the following locations:
• Desktop, to upload from the local PC • File submission, to upload based on a file submission entry

1909 Pricing Documentation
• File server, to upload directly from the application server You must specify a file template for the upload. File templates can be created to control the fields and
format of files during upload. To create a file template, use the File Template for Price Proposal Workbench
to create a template.
2.7.3.1.2 Access
Transaction code: /IRM/GPPUPLN
2.7.3.1.3 Procedure
Uploading Price Proposals
2.7.3.2 Download Price Proposal
2.7.3.2.1 Definition
Use Download Price Proposal to download selected price proposals to a specific file on a desktop or file
server. For large downloads, this transaction can be run as a background job.
File templates are used to control the fields and format of files during download. To create a template,
use the File Template for Price Proposal Workbench.
2.7.3.2.2 Access
Transaction code: /IRM/GPPDNLN
2.7.3.2.3 Procedure
Downloading Price Proposals

Data Maintenance Pricing
SAP Data Maintenance by Vistex, Pricing option for SAP S/4HANA by Vistex for SAP S/4HANA
Application Help – Version: 1.0 – Final
December 12, 2019
© 2019 Vistex, Inc. All Rights Reserved.
© 2019 SAP SE or an SAP affiliate company. All rights reserved.
2.7.3.3 File Template for Price Proposal
2.7.3.3.1 Definition
Use File Template for Price Proposal Workbench to create and maintain templates that control the fields
and format of price proposal files during upload.
2.7.3.3.2 Access
Transaction code: /IRM/GPPFTPM
2.7.3.3.3 Structure
The File Template for Price Proposal Workbench screen is organized into the following areas:
• Search and Worklist Use the Search and Worklist to view selected file templates in a grid format. From the grid, click on file template number to display that file template in focus in the Work Area.
• Work Area Use the Work Area to maintain one file template. In the standard Vistex implementation, the Work Area contains the following tabs: • Section
• Mapping
• Conversion
• Submitter
• Crystal Layout, which is used with Crystal Reports
• Admin Data
NOTE: Functions accessed from the menu bar apply only to the file template displayed in focus in the
Work Area and do not apply to the data in the Search and Worklist.
1909 Pricing Documentation
2.7.3.3.4 Procedures
Displaying a File Template for Price Proposal
Creating a File Template for Price Proposal
Copying a File Template for Price Proposal
Maintaining a File Template for Price Proposal
Deleting a File Template for Price Proposal
2.8 Price Review
2.8.1 Price Review Workbench
2.8.1.1 Definition
Price review functionality was added in Release 1909, which allows the mass change of rules across
applications. Users can pull the data from different sources, perform the required actions, and post the
data to the respective applications using this functionality.
To use price review, the user first needs to create a new price sheet or convert an existing price sheet in
the Price Sheet Workbench. Next, in the Review Template Workbench, the user has to set up the
configuration using different sources. Then, in the Price Review Workbench, the data can be generated
based on the configuration set up in the review template.
The Mapping Profiles tab was removed from the pricing-object level and added to the price review
template. This tab contains the mapping profiles to generate planning documents from the price review.
2.8.1.1.1 Setup
The following configuration needs to be performed prior to creating price reviews:
• For new file templates, new file submission types must be created • Submission type is based on the object type, and each object type must be defined
NOTE: If not submission type is defined, that submission type will be shown for every application.
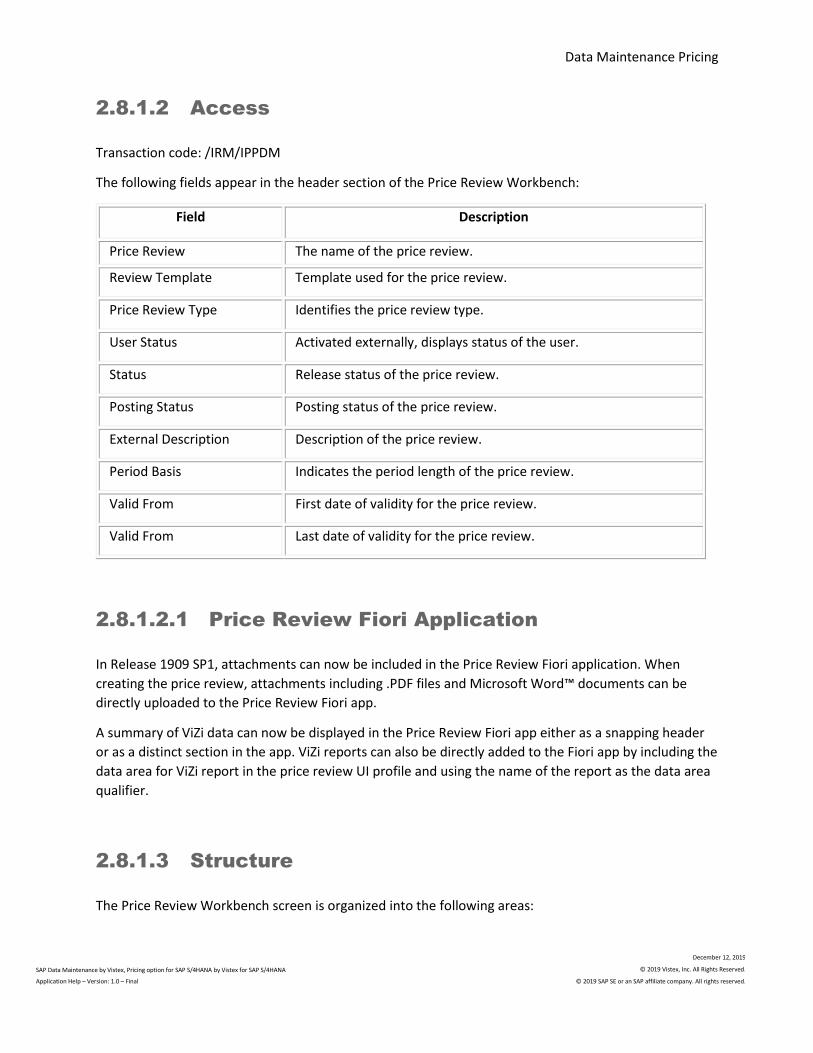
Data Maintenance Pricing
SAP Data Maintenance by Vistex, Pricing option for SAP S/4HANA by Vistex for SAP S/4HANA
Application Help – Version: 1.0 – Final
December 12, 2019
© 2019 Vistex, Inc. All Rights Reserved.
© 2019 SAP SE or an SAP affiliate company. All rights reserved.
2.8.1.2 Access
Transaction code: /IRM/IPPDM
The following fields appear in the header section of the Price Review Workbench:
Field Description
Price Review The name of the price review.
Review Template Template used for the price review.
Price Review Type Identifies the price review type.
User Status Activated externally, displays status of the user.
Status Release status of the price review.
Posting Status Posting status of the price review.
External Description Description of the price review.
Period Basis Indicates the period length of the price review.
Valid From First date of validity for the price review.
Valid From Last date of validity for the price review.
2.8.1.2.1 Price Review Fiori Application
In Release 1909 SP1, attachments can now be included in the Price Review Fiori application. When
creating the price review, attachments including .PDF files and Microsoft Word™ documents can be
directly uploaded to the Price Review Fiori app.
A summary of ViZi data can now be displayed in the Price Review Fiori app either as a snapping header
or as a distinct section in the app. ViZi reports can also be directly added to the Fiori app by including the
data area for ViZi report in the price review UI profile and using the name of the report as the data area
qualifier.
2.8.1.3 Structure
The Price Review Workbench screen is organized into the following areas:

1909 Pricing Documentation
• Search and Worklist Use the Search and Worklist to view a list of selected pricing areas in a grid format. From the grid, click on a pricing area name to display that pricing area in focus in the Work Area.
• Work Area Use the Work Area to maintain one pricing area. In the standard Vistex implementation, the Work Area contains the following tabs: • Source - displays the rule used as the source of the price review.
• Steps
• Overview
• Pricing Data
• Price Sheets
• Proforma
• Status
• Partners
• Notes
• Clauses
• Additional Data
• Admin Data
NOTE: Functions accessed from the menu bar apply only to the pricing area displayed in focus in the
Work Area and do not apply to the data in the Search and Worklist.
IMPORTANT: Because Vistex software is extremely versatile, the user screen may be customized. As a
result, the screen may appear different from the standard screen described in this document.
2.8.1.4 Procedures
Displaying a Price Review
Creating a Price Review
Copying a Price Review
Maintaining a Price Review
Deleting a Price Review
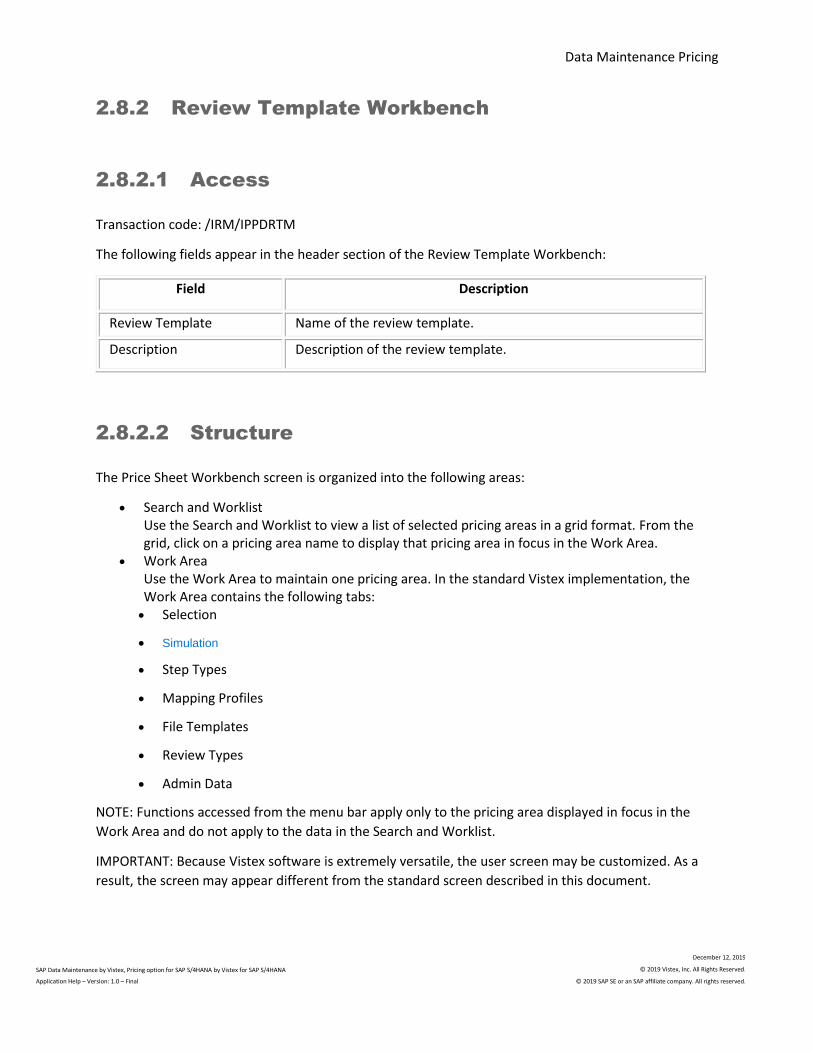
Data Maintenance Pricing
SAP Data Maintenance by Vistex, Pricing option for SAP S/4HANA by Vistex for SAP S/4HANA
Application Help – Version: 1.0 – Final
December 12, 2019
© 2019 Vistex, Inc. All Rights Reserved.
© 2019 SAP SE or an SAP affiliate company. All rights reserved.
2.8.2 Review Template Workbench
2.8.2.1 Access
Transaction code: /IRM/IPPDRTM
The following fields appear in the header section of the Review Template Workbench:
Field Description
Review Template Name of the review template.
Description Description of the review template.
2.8.2.2 Structure
The Price Sheet Workbench screen is organized into the following areas:
• Search and Worklist Use the Search and Worklist to view a list of selected pricing areas in a grid format. From the grid, click on a pricing area name to display that pricing area in focus in the Work Area.
• Work Area Use the Work Area to maintain one pricing area. In the standard Vistex implementation, the Work Area contains the following tabs: • Selection
• Simulation
• Step Types
• Mapping Profiles
• File Templates
• Review Types
• Admin Data
NOTE: Functions accessed from the menu bar apply only to the pricing area displayed in focus in the
Work Area and do not apply to the data in the Search and Worklist.
IMPORTANT: Because Vistex software is extremely versatile, the user screen may be customized. As a
result, the screen may appear different from the standard screen described in this document.

1909 Pricing Documentation
2.8.2.3 Procedures
Displaying a Review Template
Creating a Review Template
Copying a Review Template
Maintaining a Review Template
Deleting a Review Template
2.8.3 Upload/Download
2.8.3.1 Upload Price Review
2.8.3.1.1 Definition
Use Upload Price Proposal to import a price proposal from a file, such as an Excel spreadsheet, rather
than manually entering the data. Files can be uploaded from the following locations:
• Desktop, to upload from the local PC • File submission, to upload based on a file submission entry • File server, to upload directly from the application server
You must specify a file template for the upload. File templates can be created to control the fields and
format of files during upload. To create a file template, use the File Template for Price Review Workbench to
create a template.
2.8.3.1.2 Access
Transaction code: /IRM/GPRUPLN
2.8.3.1.3 Procedure
Uploading Price Reviews

Data Maintenance Pricing
SAP Data Maintenance by Vistex, Pricing option for SAP S/4HANA by Vistex for SAP S/4HANA
Application Help – Version: 1.0 – Final
December 12, 2019
© 2019 Vistex, Inc. All Rights Reserved.
© 2019 SAP SE or an SAP affiliate company. All rights reserved.
2.8.3.2 Download Price Review
2.8.3.2.1 Definition
Use Download Price Review to download selected price reviews to a specific file on a desktop or file
server. For large downloads, this transaction can be run as a background job.
File templates are used to control the fields and format of files during download. To create a template,
use the File Template for Price Review Workbench.
2.8.3.2.2 Access
Transaction code: /IRM/GPR03
2.8.3.2.3 Procedure
Downloading Price Reviews
2.8.3.3 File Template for Price Review
2.8.3.3.1 Definition
Use File Template for Price Review Workbench to create and maintain templates that control the fields
and format of price review files during upload.
Note: in Release 1909 Price Reviews use the global file template.

1909 Pricing Documentation
2.8.3.3.2 Access
Transaction code: /IRM/GPRFTPM
Transaction code: /IRM/IPPDTPM
2.8.3.3.3 Structure
The File Template for Price Review Workbench screen is organized into the following areas:
• Search and Worklist Use the Search and Worklist to view selected file templates in a grid format. From the grid, click on file template number to display that file template in focus in the Work Area.
• Work Area Use the Work Area to maintain one file template. In the standard Vistex implementation, the Work Area contains the following tabs: • Section
• Mapping
• Conversion
• Submitter
• Admin Data
The top of the work area contains two fields introduced in Release 1909:
• Processing Type Indicates whether the indicator refers to a specific row or column within the uploaded file template, or whether multiple data areas are included in a single row.
• Skip Value Conversion When flagged, values will not be converted when uploading or downloading a file template in order to retain the internal data.
NOTE: Functions accessed from the menu bar apply only to the file template displayed in focus in the
Work Area and do not apply to the data in the Search and Worklist.
2.8.3.3.4 Procedures
Displaying a File Template for Price Review
Creating a File Template for Price Review
Copying a File Template for Price Review
Maintaining a File Template for Price Review
Deleting a File Template for Price Review

Data Maintenance Pricing
SAP Data Maintenance by Vistex, Pricing option for SAP S/4HANA by Vistex for SAP S/4HANA
Application Help – Version: 1.0 – Final
December 12, 2019
© 2019 Vistex, Inc. All Rights Reserved.
© 2019 SAP SE or an SAP affiliate company. All rights reserved.
2.9 Approvals/Status Flow
2.9.1 Approvals
2.9.1.1 Definition
In Vistex, the approval process is based on a status profile that is created from an SAP status profile
(BC02) and then attached to the object type. The status profile contains a sequenced list of the user
statuses in the approval process.
Various options are available for setting up how notifications and recording approvals/rejections will be
performed, using a combination of manual and automated processes. The options include:
• Notification: • Manual
Notifications can be manual, regardless of the method chosen to record approvals.
• SAP Workflow Approvals can be tied into SAP Workflow.
• email Vistex Status Flow can be used to send automated notifications.
• Recording Approvals: • Manual
The Status tab in the object workbench can be used to set approvals manually. If using Status Flow, approvals also can be recorded in the activity workbench. NOTE: In composite processing of calculation runs, configured approval codes entered manually in the calculation run can be used with or without Status Flow.
• email Using Status Flow, the approval can be recorded from the notification email.

1909 Pricing Documentation
2.9.1.2 Status Flow
Status Flow, a less complex alternative to SAP Workflow, consists of a point-and-click user interface
designed to allow advanced business users to establish and maintain the most common workflow
processes without technical assistance from IT or outside resources. Status Flow provides the ability to:
• Design various types of status flows. The following status flows designs are available: • Sequential
One approval is required for each step.
• Parallel Multiple approvals can be required in one step.
• Conditional/automated Business Script is integrated into the status flow, and can be used to automate the flow or to conditionally change to another status flow, such as for an accelerated approval process.
• Create a picture of the entire status flow A graphic can be assigned to each step in the status flow, to preview a graphical representation of the entire status flow.
• Redirect the approval process from the standard flow to an alternate flow The Vistex status profile consists of a list of triggers, each of which starts a status flow. For example, the default trigger starts the standard flow, but a second trigger in the status profile can be set up to stop the current flow and start a rush/shortened flow. A different trigger can be started manually or started automatically based on a business script.
• Define re-usable templates to format the communication to be sent to the user The communication is based on application-related data, and can contain placeholders that are replaced with document data at runtime. In addition, the communication can contain links to additional information and/or buttons to record a response.
• Attach activities to status flow steps When the event in a step occurs, the system generates an activity document, which will be used to track communication and the progress of the process until an outcome for the activity is set.
• Send notifications or approval emails to various types of recipients Supported recipients include: user who changed a document (changed by), user who created a document (created by), organizational object, external person, SAP personnel number, partner function (for example a contact person attached to the sold-to on an agreement), or SAP user.
• Allow alternate responses Rather than setting an approval/rejection, the user can choose to hold, defer, or redirect the email. Comments can be added to the reply, as needed. For example, the email might be redirected to the sales representative asking that person to provide additional information.
2.9.1.3 Objects Supported
The following objects support using manual approvals or approvals that are tied into standard SAP
Workflow:
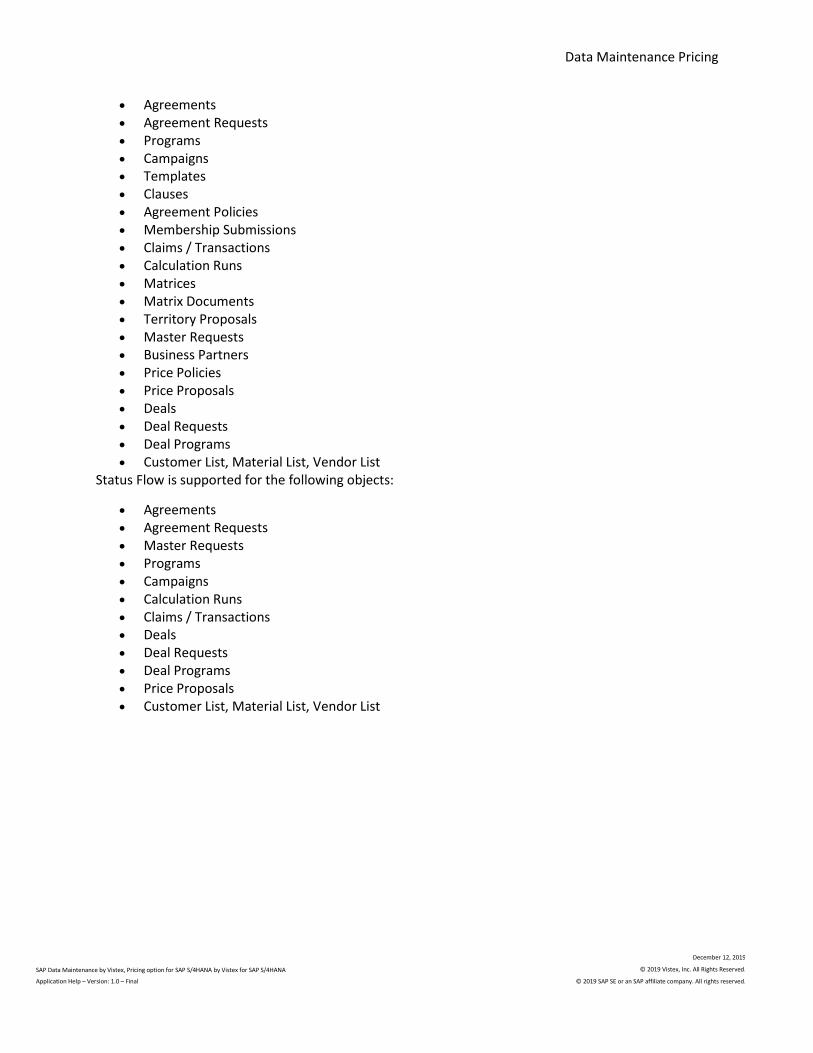
Data Maintenance Pricing
SAP Data Maintenance by Vistex, Pricing option for SAP S/4HANA by Vistex for SAP S/4HANA
Application Help – Version: 1.0 – Final
December 12, 2019
© 2019 Vistex, Inc. All Rights Reserved.
© 2019 SAP SE or an SAP affiliate company. All rights reserved.
• Agreements • Agreement Requests • Programs • Campaigns • Templates • Clauses • Agreement Policies • Membership Submissions • Claims / Transactions • Calculation Runs • Matrices • Matrix Documents • Territory Proposals • Master Requests • Business Partners • Price Policies • Price Proposals • Deals • Deal Requests • Deal Programs • Customer List, Material List, Vendor List
Status Flow is supported for the following objects:
• Agreements • Agreement Requests • Master Requests • Programs • Campaigns • Calculation Runs • Claims / Transactions • Deals • Deal Requests • Deal Programs • Price Proposals • Customer List, Material List, Vendor List

1909 Pricing Documentation
2.9.2 Status Flow Overview
2.9.2.1 Definition
Status Flow is a flexible approval process tool that can be managed by business users. Status Flow
provides the ability to:
• Create an approval process for creating or changing a Vistex object. • Set an approval either in the Status tab of the object workbench (such as Agreement
Workbench) or in an email. • Change the approval flow from one predefined path to another either based on preset triggers
or on-the-fly.
2.9.2.2 Processing Steps
1. The process begins when an object document requires approval.
For example, when an agreement is created it must be approved by a list of users in a
predefined sequence.
2. Default trigger starts the standard flow.
The connection between a Vistex object (such as an agreement type) and the status flow is the
Vistex status profile, which leverages the statuses defined in a standard SAP status profile. A
Vistex status profile consists of a list of triggers, each of which starts a status flow.
For example, the default trigger starts the standard flow, but a second trigger in the status
profile can be set up to stop the current flow and start a rush/shortened flow. A different trigger
can be started manually (when a person is on vacation, for example) or started automatically
based on a business script (for example, when the agreement amount is greater than a preset
limit).
3. Step one in the status flow sends a communication (such as an email) to the first person who
must approve the document. This communication may be a notification that the user should set
the approval in a workbench, or may include buttons to set the approval. The text, buttons, and
links are set up in a template assigned to the activity in the status flow step.
NOTE: The system can be set up to receive offline approvals from email recipients who have
access to email but not to the SAP system. The recipient replies by entering the button text
(such as Approve) in the first line of the reply email. The reply is sent automatically to the SAP
Business Workplace Inbox for the "Approvals" user. That user then runs a report to process the
offline approvals.
If needed, communications can be sent to multiple recipients, all of whom must approve the
document before it is sent to the next status flow step.
Data Maintenance Pricing
SAP Data Maintenance by Vistex, Pricing option for SAP S/4HANA by Vistex for SAP S/4HANA
Application Help – Version: 1.0 – Final
December 12, 2019
© 2019 Vistex, Inc. All Rights Reserved.
© 2019 SAP SE or an SAP affiliate company. All rights reserved.
Supported types of recipients (processors) are: changed by, created by, organizational unit,
external person, SAP personnel number, partner function (for example a contact person
attached to the sold-to on an agreement), position, or SAP user.
4. If approved, the process continues to the processor(s) in the next step of the status flow.
Other outcomes assigned in the flow step will indicate what action will be performed. For
example, if rejected, a communication might be sent to the sales representative asking that
person to provide additional information. Or, the activity might be redirected to another
processor.
5. If set up, the system will generate an activity document for each step in the process to track
communication.
Activity documents for a specific time period, status, or type of activity can be viewed in a
workbench.
6. The process continues until the flow is complete.
The final step in the status flow might be to send a communication to the user who first created
the agreement.
2.9.2.3 Transactions
The following transactions are used to set up status flow:
• BS02 Create a standard SAP status profile. For each status, enter the Status and Short Text field values and flag one of the statuses as the Initial status. DO NOT make any entry for Status Number and the Highest and Lowest Status number fields. Set the transaction control for each status. Assign the appropriate Vistex object type to the status profile.
• Status Profile /IRM/GSPM Activate an existing SAP status profile for Vistex processing. Selection of an SAP status profile in this workbench flags the system to use Vistex status flow. The statuses from that SAP status profile will be used in the Vistex status profile and status flow (and appear in the Statuses tab). The SAP statuses can be renamed, if needed. NOTE: In configuration, assign the Vistex status profile to the object type Define and set one trigger as the default starting point, and define additional triggers, as needed. Assign a status flow to each trigger (can transfer directly to the Status Flow Workbench).
• Status Flow /IRM/GSFM Define the flow steps, and indicate which step is the starting (default) step. For each step, set the possible outcome(s), which identify the actions available to a user when the status flow step is reached as well as the next status flow step, based on the chosen outcome.
1909 Pricing Documentation
Possible flow designs include the following: • Sequential
One approval is required for each step.
• Parallel Multiple concurrent approvals can be required in one step.
• Conditional Business script functionality is integrated into the status flow, and can be used to automate the flow or to conditionally switch to another trigger, such as for an accelerated approval process.
• Delegation Workbench /IRM/GDGM) When a processor will be unavailable, such as on vacation, their approvals can be delegated to another processor. Create the delegation, which lists the substitute processor(s), and assign it to the organizational unit for the substitute processor(s). If multiple processors are assigned, only one has to respond to the communication. The Delegation User Assignment (/IRM/GDGUA) transaction can be used to assign SAP users to existing delegations.
• Activity transactions: NOTE: Activity types, priority codes, and reason codes are defined in Activities configuration. • Activity Template (/IRM/GACTPM)
Define the templates to be used for activities in the flow steps and statuses at the outcome level. For example, design the email used to request an approval, including the text, buttons, attachments, and links. The text may include dynamic values, as needed. Approval is performed by clicking on a predefined button. Attachments and/or links can be used to provide additional information.
• Activities Activities are defined in the status flow. When an event occurs, the system creates an activity document to track the approval process. Use the Activity Workbench to view and maintain the activity documents.
• Activity Mass Process (/IRM/GACMP) Run this batch program to process activities that have been flagged as Set Auto Outcome, Send Reminder, or Redirect. NOTE: The same processing can be performed in the Activity Workbench, using mass processing.
• Activity Office Approvals (/IRM/GACOA) Offline approvals are used, for example, when the processor has no access to SAP. Run this report to process offline approvals by setting the outcome. Two options are available: Static (all) and Failed (only the failed approvals).
• Trigger Workbench (/IRM/GTRGM) Triggers are reminders to send an activity out on a given date
Data Maintenance Pricing
SAP Data Maintenance by Vistex, Pricing option for SAP S/4HANA by Vistex for SAP S/4HANA
Application Help – Version: 1.0 – Final
December 12, 2019
© 2019 Vistex, Inc. All Rights Reserved.
© 2019 SAP SE or an SAP affiliate company. All rights reserved.
• Activity Date Type Process (/IRM/GACDP) Enter the information for the object and date type a trigger is assigned to. When you execute the transaction, the system sends out all the related activities.
2.9.3 Status Flow Workbench
2.9.3.1 Definition
Use the Status Flow Workbench to create and maintain the list of the steps (and their possible
outcomes) in a status flow. Outcomes define the next steps and activities triggered when the particular
step is reached. Status flows are assigned to triggers in a status profile that is assigned to an object type,
such as an agreement type or claim type.
The following status flows designs are available:
• Sequential One approval is required for each step.
• Parallel Multiple approvals can be required in one step.
• Conditional/automated Business Script functionality is integrated into the status flow, and can be used to automate the flow or to conditionally switch to another trigger, such as for an accelerated approval process.
A graphic can be assigned to each step in the status flow, to preview a graphical representation of the
entire status flow.
2.9.3.2 Access
Transaction code: /IRM/GSFM
Enter this transaction directly or from the Status Profile Workbench.
2.9.3.3 Structure
The Status Flow Workbench screen is organized into the following areas:
1909 Pricing Documentation
• Search and Worklist Use the Search and Worklist to view selected flows in a grid format. From the grid, click on a status flow identifier to display that flow in focus in the Work Area.
• Work Area Use the Work Area to maintain one status flow. In the standard Vistex implementation, the Work Area contains the following tabs: • Steps
• Preview, which displays a graphical representation of the flow (if Step Style is selected for each step).
• Statuses
• Script, which indicates whether or not a Step and/or Outcome business script exists. Step scripts are used to skip approval steps; Outcome scripts are used to select an outcome. Click
on the Create icon to create a script, Maintain icon to change the existing script, and
Delete icon to delete the existing script.
• Admin Data
NOTE: Functions accessed from the menu bar apply only to the status flow displayed in focus in the
Work Area and do not apply to the data in the Search and Worklist.
IMPORTANT: Because Vistex software is extremely versatile, the user screen may be customized. As a
result, the screen may appear different from the standard screen described in this document.
2.9.3.4 Procedures
Displaying a Status Flow
Creating a Status Flow
Copying a Status Flow
Maintaining a Status Flow
Deleting a Status Flow

Data Maintenance Pricing
SAP Data Maintenance by Vistex, Pricing option for SAP S/4HANA by Vistex for SAP S/4HANA
Application Help – Version: 1.0 – Final
December 12, 2019
© 2019 Vistex, Inc. All Rights Reserved.
© 2019 SAP SE or an SAP affiliate company. All rights reserved.
2.9.4 Status Profile Workbench
2.9.4.1 Definition
Use the Status Profile Workbench to select an existing SAP status profile that will be attached to a new
Vistex status profile of the same name. Selection of an SAP status profile in this workbench flags the
system to use Vistex status flow.
The statuses from the SAP status profile will appear on the Statuses tab. If the SAP status profile was
assigned an object type in the following configuration, that object type appears in the header of this
workbench:
• For all objects except claims and transactions, the status profile is assigned in object type configuration.
• For claims and transactions, the status profile is assigned in Header Control for Sales Documents configuration.
The Vistex status profile contains a list of triggers, each of which starts the status flow it is linked to. For
example, you might attach one trigger to the standard flow and another trigger to an abbreviated flow.
As needed, an authorized user can manually change the trigger in the Status tab of the object
workbench to redirect the approval process from one flow to another. Business Script functionality also
can be used to change triggers conditionally.
Create any number of triggers and list them on the Flow tab. One trigger must be set as the default, and
all must be flagged as a User Entry. To attach a status flow to each trigger, either select from the list of
existing status flows or navigate to the Status Flow Workbench to create a new status flow.
2.9.4.2 Access
Transaction code: /IRM/GSPM
2.9.4.3 Structure
The Status Profile Workbench screen is organized into the following areas:
• Search and Worklist Use the Search and Worklist to view selected profiles in a grid format. From the grid, click on a status profile number to display that profile in focus in the Work Area.
1909 Pricing Documentation
• Work Area Use the Work Area to maintain one status profile. In the standard Vistex implementation, the Work Area contains the following tabs: • Flow
• Statuses
• Admin Data
NOTE: Functions accessed from the menu bar apply only to the status profile displayed in focus in the
Work Area and do not apply to the data in the Search and Worklist.
IMPORTANT: Because Vistex software is extremely versatile, the user screen may be customized. As a
result, the screen may appear different from the standard screen described in this document.
2.9.4.4 Procedures
Displaying a Status Profile
Creating a Status Profile
Maintaining a Status Profile
Deleting a Status Profile
2.9.5 Activity Workbench
Documentation for the Activity Workbench is available for the following screen formats:
• UI Application (SAP Fiori) • SAP GUI

Data Maintenance Pricing
SAP Data Maintenance by Vistex, Pricing option for SAP S/4HANA by Vistex for SAP S/4HANA
Application Help – Version: 1.0 – Final
December 12, 2019
© 2019 Vistex, Inc. All Rights Reserved.
© 2019 SAP SE or an SAP affiliate company. All rights reserved.
2.9.6 Activity Template Workbench
2.9.6.1 Definition
Use the Activity Template Workbench to format the email to be sent to the user (processor) involved in
the processing. Content of the message is based on application-related data, and can contain
placeholders that are replaced with document data at runtime. In addition, links to additional
information and/or buttons to set an outcome can be added.
2.9.6.2 Access
Transaction code: /IRM/GACTPM
2.9.6.3 Structure
The Activity Template Workbench screen is organized into the following areas:
• Search and Worklist Use the Search and Worklist to view a list of selected activity templates in a grid format. From the grid, click on an activity template name to display that template in focus in the Work Area.
• Work Area Use the Work Area to maintain one activity template. In the standard Vistex implementation, the Work Area contains the following tabs: • Text
• Extended Data, appears if the Display Usage is General & Launchpad.
• Attachments
• Admin Data
NOTE: Functions accessed from the menu bar apply only to the activity template displayed in focus in
the Work Area and do not apply to the data in the Search and Worklist.
IMPORTANT: Because Vistex software is extremely versatile, the user screen may be customized. As a
result, the screen may appear different from the standard screen described in this document.
1909 Pricing Documentation
2.9.6.4 Procedures
Displaying an Activity Template
Creating an Activity Template
Copying an Activity Template
Maintaining an Activity Template
Deleting an Activity Template
2.10 Catalog
2.10.1 Catalog Overview
2.10.1.1 Definition
Price catalogs are a way to externally communicate pricing to your partners, for example to publish and
distribute pricing to customers and sales reps. Catalogs can be created manually or in batch based on a
user-defined segment, which is a variant/collection of agreements, customers, materials, and/or
vendors.
2.10.1.1.1 Redemption Catalog
For loyalty programs, Vistex Data Maintenance (DM) materials and their attributes can be used to allow
redemption for products that are fulfilled through a catalog system and not carried in your SAP system.
A flag in the award request type controls the use of catalogs for redemption.
In the Catalog Workbench, you create a redemption catalog and enter the roster name to attach the
catalog to the redemption agreement. The Items tab pulls in the DM material data for the items in the
catalog.
Separate catalogs can be used for different tiers. For example, a catalog of high end items might be
available only for Premier members. Enter the roster tier in the catalog header. A pricing procedure to
get catalog redemption values can be attached to that roster tier.

Data Maintenance Pricing
SAP Data Maintenance by Vistex, Pricing option for SAP S/4HANA by Vistex for SAP S/4HANA
Application Help – Version: 1.0 – Final
December 12, 2019
© 2019 Vistex, Inc. All Rights Reserved.
© 2019 SAP SE or an SAP affiliate company. All rights reserved.
2.10.1.1.2 Frequency Calendar
A segment's frequency calendar is a list of dates when a price catalog should be created for each type of
calendar assigned to the segment. Each segment can be analyzed by comparing the scheduled dates to
the actual dates a catalog was created. Color coding illustrates, by catalog type, which catalogs were
created as scheduled, which were not created, and which are scheduled for creation on future dates.
Analysis is available in a workbench and a batch transaction.
2.10.1.1.3 Reference Catalog
The Reference Catalog functionality provides the ability in the Catalog Workbench to compare a newly
created catalog to the previous version of that catalog. Color coded line items on the new catalog
indicate whether the item is new, unchanged, or contains a price change. The catalog number of the
reference catalog will appear in the new catalog's header (Reference Catalog field).
To enable this functionality, in the catalog type configuration set the Previous Catalog flag. Catalogs
must be generated using the Create Catalog (/IRM/GCT21) transaction.
NOTE: You also can use Manage Layouts option of the Choose Layout button to add the Item Status field
to view (and filter by) codes that equal the colors.
When using reference catalog comparison functionality, you have the option to create an append
structure for custom fields. Otherwise, the comparison is limited to standard catalog fields. The
structure must be assigned to the catalog type in configuration.
2.10.1.1.4 Facet Integration
By assigning a facet profile to a catalog type, facets can be used as views to search in a catalog for DM
customers, materials, or vendors. The Views button will appear on the Items tab.
2.10.1.2 Transactions
Catalogs use the following transactions:
• Create Catalog /IRM/GCT21, to create catalogs in batch for a selected catalog type and range of segments.
• Segment Workbench /IRM/EPSGM, to create and maintain segments. • Catalog Workbench /IRM/GCTM, to manually create and maintain catalogs.

1909 Pricing Documentation
• Catalog Frequency Workbench /IRM/GCTFQM, to create a frequency calendar for a segment. • Catalog Frequency /IRM/GCT05, to compare the frequency calendar to the dates calendars were
generated. • Catalog Download /IRM/GCTDNL • Upload Catalog /IRM/GCTUPL • File Template for Catalogs /IRM/GCTFTM • Display Profile for Catalog /IRM/GCTDSP, to create header, item, list, and import display profiles
for the Catalog Workbench. • Pricing Catalog Outbound IDoc /IRM/GCTIDOC, to generate an outbound IDoc to move catalog
date to legacy systems. Enter the catalog number and logical system. To populate only header information, also check the Only Header checkbox; if unchecked, then header, organization, items, facets, and hierarchical nodes in facet data will be moved.
2.10.1.3 Setup
In the Catalogs section of the Pricing Implementation Guide, define the following:
• Catalog Types Partner roles and display profiles are optional. For use in the Catalog Workbench, define the header and item tab sequences, if different from the standard implementation, and set required fields and item default fields, as needed. Required fields are required only when manually creating the catalog. Item default fields appear on the Fast Entry pop-up accessed from the Items tab. Configuration of the catalog type controls duplication checks during catalog creation. The system can be set up to either display and error message and prevent saving the catalog when duplicate line items exist or display a message but allow the catalog to be saved. You may assign multiple partners to a partner function. • Award Relevant field
Awards are supported in catalogs. Check the Award Relevant checkbox to use awards in the catalog type. The system will store awards in the Awards tab at the catalog line item level.
• Material Source field Data Maintenance (DM) Resources materials are supported in catalogs. Select either DM Materials or SAP Materials as the material source for the catalog type.
• Partner Roles for the Partner Field NOTE: To enable the Reference Catalog functionality, the Previous Catalog flag must be set for the
catalog type.

Data Maintenance Pricing
SAP Data Maintenance by Vistex, Pricing option for SAP S/4HANA by Vistex for SAP S/4HANA
Application Help – Version: 1.0 – Final
December 12, 2019
© 2019 Vistex, Inc. All Rights Reserved.
© 2019 SAP SE or an SAP affiliate company. All rights reserved.
2.10.2 Segment Workbench
2.10.2.1 Definition
Segments are collections of objects that will be used for reporting purposes. Objects for the following
component types can appear in a segment:
• agreements • customers • materials • vendors
In Data Maintenance - Resources configuration, define segment types. For each segment type, assign
the components to be included. For each component, assign the field to which output for that
component of the segment will be resolved. A maintenance level can be assigned to each component.
Use the Segment Workbench to create and maintain segments. When creating a segment, you select a
segment type. Components assigned in configuration to that segment type appear as tabs in the Work
Area. Information entered on the tabs determines which objects will be selected.
2.10.2.2 Access
Transaction code: /IRM/EPSGM
2.10.2.3 Structure
The Segment Workbench screen is organized into the following areas:
• Search and Worklist Use the Search and Worklist to view selected segments in a grid format. From the grid, click on a segment number to display that segment in focus in the Work Area.
• Work Area Use the Work Area to maintain one segment.
NOTE: Functions accessed from the menu bar apply only to the segment displayed in focus in the Work
Area and do not apply to the data in the Search and Worklist.
IMPORTANT: Because Vistex software is extremely versatile, the user screen may be customized. As a
result, the screen may appear different from the standard screen described in this document.

1909 Pricing Documentation
2.10.2.4 Procedures
Displaying a Segment
Creating a Segment
Copying a Segment
Maintaining a Segment
Deleting a Segment
2.10.3 Catalog Workbench
2.10.3.1 Definition
A price catalog is a list of prices of multiple products for multiple customers. Price catalogs may be
created either:
• manually in the workbench, by entering the data manually or by importing the data from an external source type NOTE: Mandatory fields are used only when price catalog items are created manually.
• in batch by running the Create Catalog transaction (/IRM/GCT21) Catalog items can be derived from the following external source types, based on configuration:
• segment Define the segment in the Segment Workbench (/IRM/EPSGM) and then enter the segment number on the Header tab in the catalog.
• pricing area The pricing area usage must be set as "prices" and the pricing area must only have one price sheet assigned to it.
• flexible group Inclusion and exclusion categories must have been maintained in the flexible group.
NOTE: The catalog type can be configured to use either SAP materials or Data Maintenance Resources
materials in the catalog line items.
Plant determination for a catalog uses the following hierarchy:
• Customer material info record • Header level customer data • Item level material master data

Data Maintenance Pricing
SAP Data Maintenance by Vistex, Pricing option for SAP S/4HANA by Vistex for SAP S/4HANA
Application Help – Version: 1.0 – Final
December 12, 2019
© 2019 Vistex, Inc. All Rights Reserved.
© 2019 SAP SE or an SAP affiliate company. All rights reserved.
2.10.3.2 Access
Transaction code: /IRM/GCTM
2.10.3.3 Structure
The Catalog Workbench screen is organized into the following areas:
• Search and Worklist Use the Search and Worklist to view selected catalogs in a grid format. From the grid, click on a catalog number to bring that catalog in focus in the Work Area.
• Work Area Use the Work Area to maintain the catalog in focus. In the standard Vistex implementation, the Work Area contains the following tabs: • Header
• Items
• Partners, which displays the partners from the segment. NOTE: For a catalog, multiple partners can be assigned to a partner function.
• Notes
• Admin Data
2.10.3.4 Procedures
Displaying a Catalog
Creating a Catalog Manually
Creating a Catalog in Batch
Maintaining a Catalog
Viewing a Catalog Change Log
Exporting a Catalog to a File
Deleting a Catalog
Viewing Output

1909 Pricing Documentation
2.10.4 Catalog Frequency Workbench
2.10.4.1 Definition
Use the Catalog Frequency Workbench perform the following tasks:
• maintain a segment's frequency calendar, which is a list of dates when a price catalog should be created for each calendar type assigned to the segment. Catalogs are generated by running the Create Catalog transaction (/IRM/GCT21).
• review a color coded list of scheduled dates for a segment, within a specific date range. The color coding illustrates, by catalog type, which catalogs were created as scheduled, which were not created, and which are scheduled for creation on future dates. This list also can be generated by running the Catalog Frequency (/IRM/GCT05) transaction.
2.10.4.2 Access
Transaction code: /IRM/GCTFQM
2.10.4.3 Structure
The Catalog Frequency Workbench screen is organized into the following areas:
• Search and Worklist Use the Search and Worklist to view selected segments in a grid format. From the grid, click on a segment number to bring that segment in focus in the Work Area.
• Work Area Use the Work Area to maintain the segment in focus. In the standard Vistex implementation, the Work Area contains the following tabs: • Catalog
• Analysis
2.10.4.4 Procedures
Displaying a Frequency Calendar
Creating a Frequency Calendar
Maintaining a Frequency Calendar
Deleting a Frequency Calendar
Analyzing Frequency Calendar Results

Data Maintenance Pricing
SAP Data Maintenance by Vistex, Pricing option for SAP S/4HANA by Vistex for SAP S/4HANA
Application Help – Version: 1.0 – Final
December 12, 2019
© 2019 Vistex, Inc. All Rights Reserved.
© 2019 SAP SE or an SAP affiliate company. All rights reserved.
2.10.5 Upload/Download
2.10.5.1 Upload Catalog
2.10.5.1.1 Definition
Use Upload Catalog to create or change price catalogs by uploading them from a file, such as an Excel
spreadsheet, rather than manually entering the data. Files can be uploaded from the following locations:
• Desktop, to upload from the local PC • File submission, to upload based on a file submission entry • File server, to upload directly from the application server
File templates can be created to control the fields and format of files during upload. To create a file
template, use the File Template for Catalogs Workbench to create a template.
2.10.5.1.2 Access
Transaction code: /IRM/GCTUPL
2.10.5.1.3 Procedure
Uploading Catalogs

1909 Pricing Documentation
2.10.5.2 Catalog Download
2.10.5.2.1 Definition
Use Catalog Download to download selected catalogs to a specific file on a presentation server or an
application server.
File templates are used to control the fields and format of files during download. To create a template,
use the File Template for Catalogs Workbench.
2.10.5.2.2 Access
Transaction code: /IRM/GCTDNL
2.10.5.2.3 Procedure
Downloading Catalogs
2.10.5.3 File Template for Catalogs
2.10.5.3.1 Definition
Use File Template for Catalogs Workbench to create and maintain re-usable templates that control the
fields and format of catalogs files during upload and/or download.
2.10.5.3.2 Access
Transaction code: /IRM/GCTFTM
Data Maintenance Pricing
SAP Data Maintenance by Vistex, Pricing option for SAP S/4HANA by Vistex for SAP S/4HANA
Application Help – Version: 1.0 – Final
December 12, 2019
© 2019 Vistex, Inc. All Rights Reserved.
© 2019 SAP SE or an SAP affiliate company. All rights reserved.
2.10.5.3.3 Structure
The File Template for Catalogs Workbench screen is organized into the following areas:
• Search and Worklist Use the Search and Worklist to view selected file templates in a grid format. From the grid, click on file template number to display that file template in focus in the Work Area.
• Work Area Use the Work Area to maintain one file template. In the standard Vistex implementation, the Work Area contains the following tabs: • Section
• Mapping
• Conversion
• Submitter
• Crystal Layout, which is used with Crystal Reports
• Admin Data
NOTE: Functions accessed from the menu bar apply only to the file template displayed in focus in the
Work Area and do not apply to the data in the Search and Worklist.
2.10.5.3.4 Procedures
Displaying a File Template for Catalogs
Creating a File Template for Catalogs
Copying a File Template for Catalogs
Maintaining a File Template for Catalogs
Deleting a File Template for Catalogs
2.11 Pricing Reporting and Analytics
1909 Pricing Documentation
2.11.1 Reporting and Analytics Overview
2.11.1.1 Definition
The Vistex advanced analytics tool provides one place to have visibility to results from multiple systems.
Data can be captured from your Vistex system, BI/BW, external databases, and paid data collection
agencies, then replicated to the analytics system and stored locally. Imported data can be cleaned,
validated, enriched, and manipulated, based on user-defined rules. The resulting data is presented as a
data set, which in Vistex is called a "report". Each report contains the aggregated data, which can be
given to a reporting application content creator to design how the data will be presented visually for the
end user to explore.
Vistex data also can be included in reports created using the following:
• Business Intelligence/Business Warehouse Vistex delivers extractors, cubes, and content for SAP BW.
• Crystal reports Native integration within Vistex for formatted visualization.
• SAP BusinessObjects Explorer, SAP BusinessObjects Cloud, SAP BusinessObjects Lumira
2.11.1.2 Analytics Content Access Points
Analytics content can be accessed from the following:
• Embedded analytics in Fiori Contextual analytics can be accessed from Vistex Fiori transactions, such as tracking.
• Dashboards Data from combined sources can be accessed from dashboards in Vistex Fiori transactions.
• Statements Designed using the Vistex Statement Designer in Fiori. (The design tool in Fiori also is used to create agreement clauses and templates.)
2.11.1.2.1 VIZI Statements
Vistex statements are used to create printable partner or employee statements for a specific period.
Statement setup includes the following:
• Configuration The Statements node in /IRM/IPSPRO provides configuration to define content repositories for statement content and images, and then assign a repository to a statement type.

Data Maintenance Pricing
SAP Data Maintenance by Vistex, Pricing option for SAP S/4HANA by Vistex for SAP S/4HANA
Application Help – Version: 1.0 – Final
December 12, 2019
© 2019 Vistex, Inc. All Rights Reserved.
© 2019 SAP SE or an SAP affiliate company. All rights reserved.
• Data sources Statement data sources are defined in the Data Source Workbench and the Report Workbench.
• Statement Workbench You can use the GUI Statement Workbench (/VIZI/STM) to assign data sources/context to the statement. Statement design is performed in the Fiori transaction, which is set up using the Statement Workbench UI Profile Workbench (/VTA/BSTUPM) and Search Profile Workbench (/VTA/BSTUSPM). The Sections and Pages tabs in the (GUI) Statement Workbench are populated from the Statement Designer. A Log tab (in both GUI and Fiori versions) tracks the generated statement. In Fiori, use the Statement Designer (Layout tab in the Fiori version of the Statement Workbench) to format the statement. The Statement Designer provides drag and drop functionality to design and change the header, footer, and content areas on each page. Components of an area can include text, formatted addresses, tables, forms, bar codes, and images. A preview option is provided from both the Fiori and GUI versions of the workbench.
NOTE: Vistex statements can be published to VIBES.
2.11.1.3 Back-end Core Components
Following is a description of the Vistex analytics building blocks:
• Data Model A business logical collection of data areas, which defines the application for reporting. Each data area in the data model points to a table, and the data model specifies the relationship between the tables. When Vistex is the source system, data models used to pull data from the Vistex IP applications into reports are delivered in Vistex and can be inherited to the analytics system. If Vistex is not the source system, the data model must be built from scratch.
• Reporting Fields Fields used in a report can be imported from the data model or created, if needed. Each reporting field contains a description and the field's properties, which can be unique to the field or inherited from a user-defined field type.
• Entity (optional) Generated table that stores values for a group of related reporting fields, for example, customer address or other customer master data fields. Entities are used to avoid repeating data in each record of the results; the results instead point to the entity number.
• Description Store (optional) Text table used to store characteristic values for a key reporting field. Values can be stored by language, if needed.
• Data Sources Data can be fetched from source system tables, views, or data models; in an SAP source system, data also can be gathered from infoset and BEx queries and function modules. In addition, a data store can be used as the data source, rather than reading directly from the source system.

1909 Pricing Documentation
• Data Store Storage container for data aggregated from various data sources; acts like a table. Saves time by eliminating the need to collect data from the source system every time a report is generated. Data objects can be used to cleanse data imported from a file, before it is stored in a data store. Data stores can be updated from data objects and/or replication.
• Replication Automates the process of updating the data stores based on changes to source system data.
• Extract Subset of the results. The extracted report can be stored in one of the following application file formats: Excel, JSON, CSV, or QlikView (QVD, QVW).
2.11.1.4 Configuration and Setup
In Vistex, the Data Administrator performs configuration and setup to:
• Configure the General Settings and Basic Functions described below. • Import (or build) the data models. • Create the reporting fields, as needed. • Define the data stores where collected data will be stored. • Pull/import data from data sources.
Imported data can be cleansed using Data Objects before it is stored in the data store. • Create, execute, and save the reports.
NOTE: Additional configuration is required in SAP to define a logical system and create an RFC
connection.
2.11.1.4.1 Vistex Configuration
Configuration, accessed from the transaction /VIZI/SETUP, includes the following nodes:
• General Settings, which stores the user-defined number ranges for the analytics components, plus additional settings
• Data Objects, which contains activities for the data object functionality used by the analytics components
• Basic Functions, which contains activities used to define the following: • Domain, a categorization/label assigned to the source system, used to connect pieces of
configuration. Example domains: Vistex Claims, BI Data, Third Party Data
• Source System, to name and define the source system, including the category (SAP, eGTMS (Vistex), GTMS (Vistex in the cloud), or BI) and, for remote systems, the RFC (Remote Function Call) destination connection (maintained in SM59 in SAP).
• Field Group, logical collection of reporting fields

Data Maintenance Pricing
SAP Data Maintenance by Vistex, Pricing option for SAP S/4HANA by Vistex for SAP S/4HANA
Application Help – Version: 1.0 – Final
December 12, 2019
© 2019 Vistex, Inc. All Rights Reserved.
© 2019 SAP SE or an SAP affiliate company. All rights reserved.
• Period Profile (optional), to define reporting periods to be used rather than entering date ranges for report data
• Report Type, a label used to describe a type of data extract and the file path for storing the report results. When you create a report, you assign it a report type.
2.11.1.4.2 Vistex Setup
The following setup transactions are accessed from the transaction /VIZI/SETUP:
• Data Model Workbench (/VIZI/DMM), used to build each non-delivered application. If Vistex is the source system, the data models are delivered. Use the Data Model Workbench to view a list of the data models delivered for a specific domain and source system, and then select the ones to be imported. When re-importing a data model previously imported, you can either overwrite the existing data model or specify a name for the new one. Data model specific fields can be created, and fields can be excluded from the import.
• Reporting Field Workbench (/VIZI/RFM), to define the characteristics and values of each field assigned to reports. • Description Store Workbench (/VIZI/DESTM), to define a storage location used to store the
description of characteristic values for a specific reporting (key) field. Descriptions can be captured from a source system (Update Mapping tab) or uploaded from a file (Upload button or use the transaction /VIZI/DESTUPL). Use the Data tab, as needed, to manually maintain the descriptions. When done, activate the store using the Activate button. Based on display controls in the report, descriptions from the description store may be displayed in the report.
• Data Source Workbench (/VIZI/DSM), to define the data sources used in the reports • Data Store Workbench (/VIZI/DSTM), to store aggregated data from various sources. Data can
be uploaded from a file into the data store, posted from data objects, or mapped from a source system using the replication process. In the workbench, define the data store on the Fields tab and then activate it to have the system generate the new data store. Anchor fields assigned to the data store can be individual reporting fields or entity reporting fields. To track how data is updated from the source system using the replication process, the Admin Data tab displays the name of the table that stores the links between the data store records and source documents, for the Data Model and Anchor Area specified in the Update Mapping tab.
• Replication Workbench (/VIZI/RPLM), to generate the tables and triggers used to update the data stores to include changes made in source system data.
• Report Workbench (/VIZI/REPM), to define selections for running a report, define the results to be analyzed, prepare the report based on a sequence of steps, map stored data fields to the result fields, and use business script to manipulate the field data, as needed.
Additional setup transactions can be accessed from the /VTA/ namespace:
• Data Objects, to cleanse (non-SAP, non-Vistex) data uploaded from an external system. Configure and activate the data model in Data Objects, then generate a file template from the data model version. Upload the file from the external system using transaction /VTA/BDOUPL.

1909 Pricing Documentation
Process the uploaded data, using rules defined for the data model. After the uploaded object is cleansed, post it to a data store using the Create Subsequent Objects /VTA/BDOSOC transaction with Load Data Store as the Posting option. • Document Map for Data Stores (/VIZI/DSTDCM), to define how cleansed (source) data will be
mapped to data store (target) fields. For each field, indicate if the system should overwrite or accumulate the data store field value each time the data store is updated. In the Data Model Workbench, enter the document map name on the Postings tab for the cleansed version before posting data to the data store.
• Business Script, to create global formulas in the applications to manipulate data in a reporting field.
2.11.1.4.3 Additional Transactions
NOTE: Upload transactions require a file template.
• Execute Report /VIZI/RPUPL You can execute a report from either this transaction or the Report Workbench. Report execution can be scheduled as a background job. The new extract(s) can either overwrite the existing file(s), be appended to the existing file(s), or be stored separately.
• Upload Data Store /VIZI/DSTUPL NOTE: Requires a file template created in the Data Store File Template Workbench (/VIZI/DSTFTPM). Upload execution can be scheduled as a background job.
• Delta Load Data Store /VIZI/DST_LOAD You can execute the delta load for selected data stores/data models. Load execution can be scheduled as a background job.
• Upload Description Store /VIZI/DESTUPL NOTE: Requires a file template created in the Description Store File Template Workbench (/VIZI/DESTFTPM). You can perform the upload either from this transaction or from the Description Store Workbench (/VIZI/DESTM). Upload execution can be scheduled as a background job.
• Export Description Store /VIZI/DESTEXP Specify the file format for the export. You can perform the export either from this transaction or from the Description Store Workbench (/VIZI/DESTM). Export execution can be scheduled as a background job.
• Upload Entity /VIZI/ENUPL NOTE: Requires a file template created in the Entity File Template Workbench (/VIZI/ENFTPM). Upload execution can be scheduled as a background job.
• Upload Value Table /VIZI/VTUPL NOTE: Requires a file template. Upload execution can be scheduled as a background job.
• Load Description Store /VIZI/DESTLOAD Load execution can be scheduled as a background job.
Data Maintenance Pricing
SAP Data Maintenance by Vistex, Pricing option for SAP S/4HANA by Vistex for SAP S/4HANA
Application Help – Version: 1.0 – Final
December 12, 2019
© 2019 Vistex, Inc. All Rights Reserved.
© 2019 SAP SE or an SAP affiliate company. All rights reserved.
• Load Value Table Master Data /VIZI/VT_LOAD Specify one or multiple replication data models. Load execution can be scheduled as a background job.
2.11.1.5 Report Consumption
The consumption layer takes the report results or extracts and consumes the data for end users to view.
Use the Dashboard Workbench (/VIZI/RAM) to create the following:
• reporting views, to produce charts and tiles that contain report data. • dashboards, to create a tile-based user interface that provides links to the reporting views. Six
tiles appear per page.
2.11.2 Analytics Setup
2.11.2.1 Reporting Field Workbench
2.11.2.1.1 Definition
Output related fields used in a report can be imported from the data model or created in the Reporting
Fields Workbench. Each reporting field contains a description and the field's properties, which can be
unique to the field or inherited from a user-defined field type.
2.11.2.1.2 Access
Transaction code: /VIZI/RFM

1909 Pricing Documentation
2.11.2.1.3 Structure
The Reporting Fields Workbench is organized into three sections, each accessed from the vertical blue
menu in the left pane:
• Field Types • Reporting Fields • Value Table
Click on a section name in the menu to view that section. Each section consists of two areas:
• Search and Worklist Use the Search and Worklist to view selected data in a grid format. From the grid, click on a field type/field/value table name to display it in focus in the Work Area.
• Work Area Use the Work Area to maintain one field type/field/value table.
NOTE: Functions accessed from the menu bar apply only to the data displayed in focus in the Work Area
and do not apply to the data in the Search and Worklist.
2.11.2.1.3.1 Field Types (Optional)
Use the Field Types section of the workbench to create, maintain, and activate re-usable generic field
types. For example, you may need 20 fields that have the same technical characteristics, such as data
type and number of decimal places. You can create a custom field type, and then assign that field type
to multiple reporting fields; the field to field type relationship is the same as the field to data element
relationship. When creating a reporting field, if you do not assign a field type, the system will generate a
field type.
NOTE: After the field type is activated, the field type description and Details tab data cannot be
changed. After a field type is assigned to a field, that field type cannot be deleted.
2.11.2.1.3.2 Reporting Fields
In the Reporting Fields section you can create, create with reference, or import (to either create or
change existing) reporting fields for a specific domain/source system/source type. If importing, the
system assigns color codes to the fields
Creating Fields
When creating a reporting field, you enter a name and description, and then select a field group (from
configuration). Assign one of the following categories:
• 1 Characteristic, to define non-measurable fields, such as a character string or currency key • 2 Metric, to define measurable fields, for example, a currency field.
Data Maintenance Pricing
SAP Data Maintenance by Vistex, Pricing option for SAP S/4HANA by Vistex for SAP S/4HANA
Application Help – Version: 1.0 – Final
December 12, 2019
© 2019 Vistex, Inc. All Rights Reserved.
© 2019 SAP SE or an SAP affiliate company. All rights reserved.
• 3 Period, to assign a periodic representation, such as a date format or period format. • 4 Entity, a collection of fields, which acts as master data in reporting
On the General tab, select the Field Type option and enter an existing field type, or select the Data Type
option to enter technical characteristics for the field (the system will generate a non-reusable field type
from the field definition).
Importing Fields
When importing fields, you select the domain, source system, and source type. The system lists the
available fields, color coded to indicate whether the field already exists in the analytics system. For
example, certain fields already may have been imported from another source data model.
Fields can be created with a user-defined prefix or suffix added to the field name, if needed. Also, a field
to be imported can be flagged to include in a cross reference that tracks the object associated with the
field.
2.11.2.1.3.3 Value Table
The value range of a reporting field can be defined in a value table. The value table data is fetched from
a specified field in the source system, using one of two load types: Full Load or Delta Load. Use the
Simulate button to preview the list of values. If needed, descriptions of the characteristic values can be
stored in a text table called a "description store".
2.11.2.2 Data Source Workbench
2.11.2.2.1 Definition
Use the Data Source Workbench to define each data source from which data will be fetched for the
reports. The following data source types are available:
• Table or Multiple tables • View, HANA view, External view, Attribute view, Analytic view, or Calculation view; or CDS (core
data services) view if using HANA • InfoSet query, or BEx query if using Business Explorer to work with data in BW • Data model • Data store or Data store object

1909 Pricing Documentation
• Function module • Report • From file • Cube • Central fields • BW fields • Procedure • AMDP
When you create a data source, enter a name and description. Use the configured lists to select a
domain and a source system. Specify a source types and add additional data, as needed, for that source
type. A data source also can be created by copying an existing data source. In Release 1909, ViZi can be
used as a data source for the source types listed above.
If additional business logic is needed to filter the data, use the Load Script field to create the business
script.
To view the data in the data source displayed in the Work Area, click on the Simulate button in the
application toolbar. Fields defined in the Selection tab can be used to filter the data included in the
simulation.
2.11.2.2.2 Access
Transaction code: /VIZI/DSM
2.11.2.2.3 Structure
The Data Source Workbench screen is organized into the following areas:
• Search and Worklist Use the Search and Worklist to view selected data sources in a grid format. From the grid, click on a data source name to display that data source in focus in the Work Area.
• Work Area Use the Work Area to maintain one data source. In the standard Vistex implementation, the Work Area contains the following tabs: • Mapping
From the Source Fields list, select and move fields to the mapping grid, which is used to map each source field to a reporting field. For each selected source field, the system will propose a reporting field that has similar properties. You can override the proposed reporting field, as needed. Use the arrow keys to sequence the fields.
• Selection (optional) Use this tab to define filters that will be applied when you perform a simulation.
• Variants

Data Maintenance Pricing
SAP Data Maintenance by Vistex, Pricing option for SAP S/4HANA by Vistex for SAP S/4HANA
Application Help – Version: 1.0 – Final
December 12, 2019
© 2019 Vistex, Inc. All Rights Reserved.
© 2019 SAP SE or an SAP affiliate company. All rights reserved.
• Restriction
• Action
• Where-Used List List of reports that use the data source. Click on the report name to view that report.
• Admin Data Displays user ID and date/time when the data source was created and last changed.
2.11.2.3 Replication Workbench
2.11.2.3.1 Definition
Use the Replication Workbench to define and maintain the "replications" used to replicate source
system changes into the data stores. Each replication specifies the data areas (in a certain data model)
whose changes will be tracked and replicated. For example, in a Claims data model changes might be
tracked in the header and item data areas.
To create a replication, specify the data model and a description of the replication. On the Replication
tab, enter the data area(s) to be tracked. Activate the replication to have the system generate the tables
(in the /VGM/ namespace) and triggers needed to initiate the replication process. The generated tables
are:
• Source Change Pointer Updated by a trigger; a time stamped entry is added for each changed value.
• Replication Replica of the source table values; changes are copied to this table.
• Replication Log Stores the previous/old values when a change is made
• New Entries Log Stores key fields for inserted/new entries

1909 Pricing Documentation
2.11.2.3.1.1 Replication Process
When a change, addition, or deletion occurs in a data area in the source system, a trigger adds entries to
the Source Change Pointer file. On the Replication tab, the affected data area rows are highlighted in
yellow, indicating that data replication is needed. Click on the Replicate button (or select the Replicate
option from the Extras menu or schedule the replication program as a background job) to update the
replication tables from the data source. Then click on the Update Data Stores button (or select the
Update Data Stores option from the Extras menu, or schedule the update program as a background job)
to replicate (load) the changes to the data store. Changes made to the data store can be viewed from
the Data Stores tab.
NOTE: For delta replications (changes to existing values), only the delta values are recorded to the data
store. For example, if an existing claim amount is changed from $350 to $400, then only the $50 change
is recorded in the data store.
2.11.2.3.2 Access
Transaction code: /VIZI/RPLM
2.11.2.3.3 Structure
The Replication Workbench screen is organized into the following areas:
• Search and Worklist Use the Search and Worklist to view selected replications in a grid format. From the grid, click on a data model name to display that replication in focus in the Work Area.
• Work Area Use the Work Area to maintain one replication. In the standard Vistex implementation, the Work Area contains the following tabs: • Replication
Displays a list of data areas and the names of the replication tables for each data area. For each generated table, the number of records is displayed next to the table name. Click on the number to view detail for the entries.
• Data Stores Lists the changed data stores. Click on the number of records changed to view the detail for the changed records.
• Admin Data Displays user ID and date/time when the replication was created and last processed.
Data Maintenance Pricing
SAP Data Maintenance by Vistex, Pricing option for SAP S/4HANA by Vistex for SAP S/4HANA
Application Help – Version: 1.0 – Final
December 12, 2019
© 2019 Vistex, Inc. All Rights Reserved.
© 2019 SAP SE or an SAP affiliate company. All rights reserved.
2.11.2.4 Report Workbench
2.11.2.4.1 Definition
In Vistex analytics, a "report" is a data extract rather than what the end user views in the reporting tool.
Each report is defined in the Report Workbench. Use this workbench to:
• prepare the report, building the sequence of nested steps used to manipulate/aggregate data from data sources
• define the layouts available for the report • map data source fields into result reporting fields • attach business scripts used to introduce logic within the manipulation of field values • simulate the results, using the Simulate button in the application toolbar, to test the report prior
to execution. Tracing can be activated for the simulation to provide detail for each step's output. • specify selections/filters used when running the report • execute the report, using the Execute button in the application toolbar. A selection screen is
used to specify the result/layout and choose the application format for the extract file. When you create a report, you enter a report name and description, assign a validity date range, and
select a report type from the configured list. Then use the Preparation tab to list the steps the system
will follow to fetch and aggregate the data from specific data sources.
Filters can be applied to the report data at various levels, to limit the data included in a report extract:
• data source level In the data source definition (Data Source Workbench) a business script can be applied at the header level to filter the source data.
• field level In the Preparation tab, click on the Operation field for a step to view the Change Operation for Step window. In the Results section, a business script can be entered from the After Merge Script field. In the Fields Mapping tab, a business script can be applied at the mapped field level.
• extract level In the Extract tab, a business script can be applied to the extracted data.
• report simulation/execution In the Selection tab, selection field values can be entered during report simulation and execution.
2.11.2.4.2 Access
Transaction code: /VIZI/REPM

1909 Pricing Documentation
2.11.2.4.3 Structure
The Report Workbench screen is organized into the following areas:
• Search and Worklist Use the Search and Worklist to view selected reports in a grid format. From the grid, click on a report name to display that report in focus in the Work Area.
• Work Area Use the Work Area to maintain one report. In the standard Vistex implementation, the Work Area contains the following tabs: • Selection (optional)
After completing the list of steps on the Preparation tab, you can list the selection fields (from the data sources on the Preparation tab) to be used to further filter/limit the data during report execution. For example, you might add an Employee ID field to run the report for one specific employee or add Validity Date fields to run the report only for a certain date range.
• Results For a report, multiple output layouts ("results") can be defined, each consisting of a sequenced list of reporting fields from various data sources. Results can be used as intermediate results used to prepare the main result. Each main result can be flagged for storage in a user-defined file path when you execute the report. The tab consists of two grids: Results and Result Fields. In the Results grid, click on the icon in the Results field to maintain the list of fields in the Result Fields grid; the result line is highlighted in yellow when its corresponding Result Fields grid is displayed. In the Result Fields grid, use the buttons above the grid to: create a new reporting field in the Reporting Field Workbench, add fields from a selected data source, add mass fields, or delete selected fields. Use the arrow buttons to sequence the list. In the grid, use the Drilldown field to specify whether to provide functionality to drill down to a report, data source, data store, or value table. When you execute a report, you can specify a result, multiple results, or range of results to be executed and stored. If you do not specify a result on the execute selection screen, the system will export all results that are flagged for storage, in the file format(s) chosen on the execution selection screen. Report execution can be scheduled as a background job.
• Preparation List a sequence of steps to tell the system to read, merge (to merge two results into one), or exclude data in a specific data source. You can drill down from the data source name to view the data source. Click on the icon in the Origin field to specify the step type, input parameters, and selections (if any) for each step. Click on the icon in the Operation field to prepare the step results. To merge data from multiple data sources, in the Operation detail use a business script to indicate which data is being merged.
• Variants Variants can be created to set selections when executing a report.

Data Maintenance Pricing
SAP Data Maintenance by Vistex, Pricing option for SAP S/4HANA by Vistex for SAP S/4HANA
Application Help – Version: 1.0 – Final
December 12, 2019
© 2019 Vistex, Inc. All Rights Reserved.
© 2019 SAP SE or an SAP affiliate company. All rights reserved.
• Log Lists the user ID, date/time, variant, and selections for each run.
• Admin Data Displays user ID and date/time when the report was created and last changed.
2.12 hybris eCommerce Integration
2.12.1 hybris Installation Guide
2.12.1.1 Definition
Use this document to configure the following:
• hybris server • data-hub server
NOTE: Configuration may vary depending upon the version of hybris system. This document was written
for hybris 5.6 with Standalone Apache Tomcat 7.0.63 for the data-hub server.
2.12.1.1.1 Prerequisites
The following should be pre-installed on the installing machine:
• JAVA 8 • Maven • Apache Tomcat • MySQL
1909 Pricing Documentation
2.12.1.2 Configuring the hybris Server
1. Download hybris Commerce Suite from the hybris downloads page.
(https://wiki.hybris.com/display/downloads/Download)
2. Extract the hybris suite.
3. Clone the git repository from Bitbucket.
Repository URL: https://bitbucket.org/vistex/vistex.git
4. Copy the custom folder from “/hybris/bin/custom” in the downloaded repository into the
extracted hybris at the “/hybris/bin” location.
5. Copy and replace the local.properties and localextensions.xml files from “/hybris/config” in the
downloaded repository into the extracted hybris at “/hybris/config” location.
6. Create a new MySQL database schema named “vistex”.
Username=root
Password=Passw0rd
NOTE: You can change the database name, username and password, but make relevant changes
in the local.properties file.
7. Open the command prompt and navigate to “/hybris/bin/platform”. Run the following
commands in the given order:
1 ‘setantenv.bat’ (to set the ANT environment])
2. ‘ant all’ (to check if everything compiles successfully)
3. ‘ant initialize’ (to initialize the hybris system])
4. ‘hybrisserver.bat’ (to start the hybris server)
8. After the server starts up, access the electronics website at the following URL: http://localhost:9001/vistexstorefront/?site=electronics
NOTE: Please make sure that the following ‘SITE_NAME.local’ entry is present in the hosts file in the
C: /Windows/System32/drivers/etc directory:
• 127.0.0.1 localhost • 127.0.0.1 electronics.local or 127.0.0.1 shoeMagic.local
2.12.1.3 Configuring the Data-Hub Server
1. Download and install the latest Apache Tomcat server.
2. Copy the data-hub war file (provided out-of-the-box) from the extracted hybris Commerce Suite
(from
“/hybris/bin/ext-integration/datahub/web-app”) and extract it.
3. Copy the following data-hub extensions (provided out-of-the-box) from the extracted hybris
Commerce Suite (from “/hybris/bin/ext-integration/datahub/extensions/sap”) into the folder
“/datahub usables/datahub-dependencies” in the cloned repository that contains the custom
developed data-hub extensions:

Data Maintenance Pricing
SAP Data Maintenance by Vistex, Pricing option for SAP S/4HANA by Vistex for SAP S/4HANA
Application Help – Version: 1.0 – Final
December 12, 2019
© 2019 Vistex, Inc. All Rights Reserved.
© 2019 SAP SE or an SAP affiliate company. All rights reserved.
• sapcoreconfiguration-5.6.0.0-RC5.jar
• sapcustomer-5.6.0.0-RC5.jar
• sapidocintegration-5.6.0.0-RC5.jar
• sapidocoutboundadapter-5.6.0.0-RC5.jar
• saporder-5.6.0.0-RC5.jar
• sappricing-5.6.0.0-RC5.jar
• sapproduct-5.6.0.0-RC5.jar
4. Copy the following from the “/datahub usables” folder in the cloned repository, into the
Tomcat’s lib folder:
• mysql-connector-java-5.1.27-bin.jar
• encryption-key.txt (Contains the generated encryption key. You can create a key using Openssl and replace it with the given key value.)
5. Copy the “datahubserver.bat” file from the “/datahub usables” folder in the cloned repository,
into Tomcat’s bin folder.
6. Copy the “datahub-webapp.xml” file from the “/datahub usables” folder in the cloned
repository, into Tomcat’s “/conf/catalina/localhost” folder.
7. Edit the "datahub-webapp.xml" file, with the changes mentioned in the comments:
8. Create a new MySQL database schema named “Integration”.
Username=root

1909 Pricing Documentation
Password=Passw0rd
NOTE: You can change the database name, username and password, but make relevant changes in the
local.properties file.
9. Start the data-hub server by running (double-click) or via command prompt, the
datahubserver.bat under the Tomcat’s /bin directory.
10. You can change the following properties for connecting data-hub, hybris, and the SAP system
from the local.properties file under the /hybris/config directory in the extracted hybris Commerce Suite:
• datahub.extension.exportURL=http://localhost:9001/datahubadapter
• datahub.extension.userName=admin
• datahub.extension.password=nimda
• datahub.encryption.key.path=encryption-key.txt
• datahub.secure.data.masking.mode=true
• datahub.secure.data.masking.value=*******
• dataSource.className=com.mysql.jdbc.jdbc2.optional.MysqlDataSource
• dataSource.jdbcUrl=jdbc:mysql://localhost/integration?useConfigs=maxPerformance
• dataSource.username=root
• dataSource.password=passw0rd
• media.dataSource.className=com.mysql.jdbc.jdbc2.optional.MysqlDataSource
• media.dataSource.jdbcUrl=jdbc:mysql://localhost/integration?useConfigs=maxPerformance
• media.dataSource.username=root
• media.dataSource.password=Passw0rd
2.12.2 Custom Extensions Overview
2.12.2.1 Introduction
The Vistex Deals integration to hybris E-commerce includes a number of delivered custom extensions.
These extensions can be classified into two groups:
• Data-hub custom extensions

Data Maintenance Pricing
SAP Data Maintenance by Vistex, Pricing option for SAP S/4HANA by Vistex for SAP S/4HANA
Application Help – Version: 1.0 – Final
December 12, 2019
© 2019 Vistex, Inc. All Rights Reserved.
© 2019 SAP SE or an SAP affiliate company. All rights reserved.
• hybris back-end and storefront custom extensions
2.12.2.2 Data-Hub Custom Extensions
Data-hub is the method used to transport master data from Vistex to the hybris system. Data-hub
extensions are required to convert the incoming information (in the form of IDOCs) into various Raw,
Canonical, and Target elements at the data-hub end.
2.12.2.2.1 Vistex to hybris Data Flow
The following diagram illustrates how data is transported from Vistex to the hybris system via the data-
hub:
The data-hub provides bulk data import for the following types of data, which are imported using
custom extensions created from scratch or by extending a hybris extension:
• Customer Data Extension - vistex-sapcustomer-datahub-extension
• Product Data Extension - vistex-sapproduct-datahub-extension
• Price Data Extension - vistex-sappricing-datahub-extension
• Deals/Promotions Data Extension - vistex-sapdeal-datahub-extension

1909 Pricing Documentation
• Catalog Data Extension - vistex-sapcatalog-datahub-extension
2.12.2.2.2 vistex-sapcustomer-datahub-extension
A new custom extension, extending the customer extension sapcustomer-5.6.0.0-RC5, to import
customer data from SAP to hybris. This extension will import SAP customer, contact person, or
consumer information through the DEBMAS IDOC into the hybris B2B or B2C customer model.
The following table summarizes the customer terminology:
hybris Commerce Suite SAP ERP Definition Condition
B2B Unit Customer A company <KTOKD>DEBI</KTOKD>
B2B Customer Contact person A person ordering on behalf of the company
B2C Customer Consumer A person ordering on their own behalf
<KTOKD>0170</KTOKD>
2.12.2.2.3 vistex-sapproduct-datahub-extension
A new custom extension, extending the product extension sapproduct-5.6.0.0-RC5, to import
product/material data from SAP to hybris. Imports SAP material data through the MATMAS05 IDOC into
the hybris product model.
2.12.2.2.4 vistex-sappricing-datahub-extension
A new custom extension, extending the pricing extension sappricing-5.6.0.0-RC5, to import
product/material data from SAP to hybris. Imports SAP pricing data through the COND_A IDOC into the
hybris PDT model.
2.12.2.2.5 vistex-sapdeal-datahub-extension
A new custom extension, vistex-sapdeal-datahub-extension, will load the deals information into the
hybris system. Vistex deal data will be sent in the form of an IDOC through the data-hub and uploaded
into hybris.
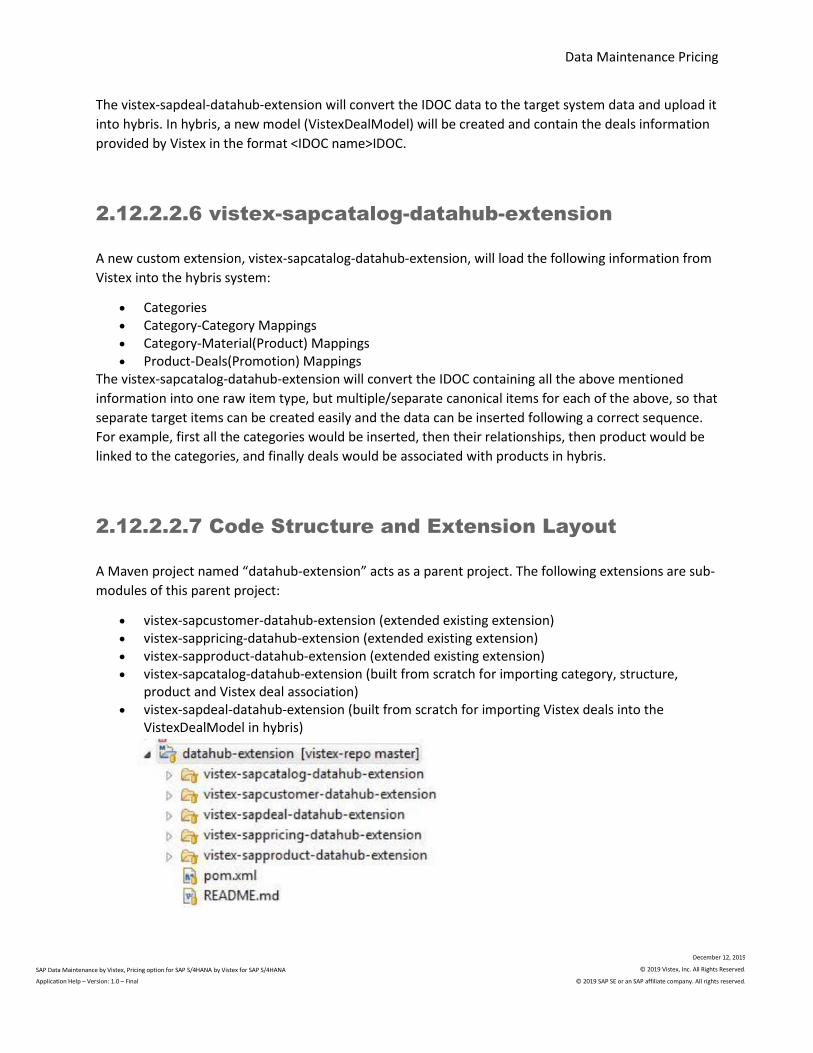
Data Maintenance Pricing
SAP Data Maintenance by Vistex, Pricing option for SAP S/4HANA by Vistex for SAP S/4HANA
Application Help – Version: 1.0 – Final
December 12, 2019
© 2019 Vistex, Inc. All Rights Reserved.
© 2019 SAP SE or an SAP affiliate company. All rights reserved.
The vistex-sapdeal-datahub-extension will convert the IDOC data to the target system data and upload it
into hybris. In hybris, a new model (VistexDealModel) will be created and contain the deals information
provided by Vistex in the format <IDOC name>IDOC.
2.12.2.2.6 vistex-sapcatalog-datahub-extension
A new custom extension, vistex-sapcatalog-datahub-extension, will load the following information from
Vistex into the hybris system:
• Categories • Category-Category Mappings • Category-Material(Product) Mappings • Product-Deals(Promotion) Mappings
The vistex-sapcatalog-datahub-extension will convert the IDOC containing all the above mentioned
information into one raw item type, but multiple/separate canonical items for each of the above, so that
separate target items can be created easily and the data can be inserted following a correct sequence.
For example, first all the categories would be inserted, then their relationships, then product would be
linked to the categories, and finally deals would be associated with products in hybris.
2.12.2.2.7 Code Structure and Extension Layout
A Maven project named “datahub-extension” acts as a parent project. The following extensions are sub-
modules of this parent project:
• vistex-sapcustomer-datahub-extension (extended existing extension) • vistex-sappricing-datahub-extension (extended existing extension) • vistex-sapproduct-datahub-extension (extended existing extension) • vistex-sapcatalog-datahub-extension (built from scratch for importing category, structure,
product and Vistex deal association) • vistex-sapdeal-datahub-extension (built from scratch for importing Vistex deals into the
VistexDealModel in hybris)
1909 Pricing Documentation
For each sub-module, SAP coding convention and code structure are followed, in terms of modelling and
mapping Raw, Canonical and Target Items. A few custom handlers were also added so that categories
and Vistex deals are added into the Catalog that is configured in hybris based on sales organization and
distribution channel.
2.12.2.3 hybris Back-end and Storefront Custom
Extensions
A number of custom extensions were developed to support the Vistex deals, pricing API’s, and Order
Cancel/Return and Partial Cancel/Amend order functionality.
These extensions can be classified into two groups:
• template-based extensions • Vistex extensions
2.12.2.3.1 Template-based Extensions
The following basic extensions will receive modified cart data from Vistex and show a modified cart with
Vistex promotions on the storefront, disabling the out-of-the-box promotions:
• vistexcockpit Currently no changes, but specific cockpit changes would go in this extension
• vistexcore All core model changes, model DAO’s, custom value providers changes, HMC localizations and customization
• vistexfacades • vistexfulfilmentprocess
Currently no changes; generated as part of standard modulegen command • vistexinitialdata
Added SAP global configurations, initial data changes, updated content catalog impexes • vistexstorefront
Changes related product and cart populators, controllers, UI changes, cart changes, added voucher functionality, added select manual add-on wizard, cancellation and amend order functionality changes
• vistextest Currently no changes, generated as part of standard modulegen command
The above listed extensions are generated using the modulegen command. The main purpose of these
extensions is to:
• Incorporate the required changes in the data model needed to override existing models to show Vistex data, received via data-hub or RFC calls.
• Showcase the additional attributes added on the storefront.

Data Maintenance Pricing
SAP Data Maintenance by Vistex, Pricing option for SAP S/4HANA by Vistex for SAP S/4HANA
Application Help – Version: 1.0 – Final
December 12, 2019
© 2019 Vistex, Inc. All Rights Reserved.
© 2019 SAP SE or an SAP affiliate company. All rights reserved.
• Make changes in populators and SOLR’s data value providers for custom defined attributes. • Update HMC configuration and localization for newly added attributes in hybris. • Keep open support for future storefront customization and requirement changes.
2.12.2.3.2 Vistex Extensions
A number of Vistex extensions were created using the extgen command, which extended the provided
hybris extensions, with the Vistex related data model changes, HMC configurations, fulfillment
extension, etc.
2.12.2.3.2.1 vistexsapmodel
• All custom attributes for Various Itemtypes that are present in SAP are modelled in hybris using this extension.
2.12.2.3.2.2 vistexcheckoutaddon
• To modify the checkout process to include Manual and Auto Add-on information. • To change the checkout step controllers to make RFC call to SAP system for order confirmation.
2.12.2.3.2.3 vistexsapintegration
• Overrides the default calculation services to recalculate the API. • Hybris promotions will not be applied on the storefront. Any promotions or deals come via
Vistex, using this extension. • Whenever any cart modifications occur this service's recalculate method will be called to parse
the cart model, generate shopping cart information, and pass that shopping cart information to make a synchronous call to the Vistex deals pricing API.
• Recalculation /calculation is done only at Vistex. • API has the interface parameters used to pass the cart information, then it calls the Vistex deal
engine to determine prices, deals, discounts, and taxes of the cart that will be sent back into various interface outbound parameters.
• Updated cart information will be transformed to the cart model using mapper. • Updates the cart model in the hybris system. • This synchronous call will be made whenever the cart needs to be updated and during
application of potential promotions and vouchers.

1909 Pricing Documentation


3 Business Register
Business Register
3.1 Introduction
Business Register provides a fully integrated end-to-end solution for government price calculations,
compliance reporting, and Medicaid rebate processing. Its architecture allows for rapid incorporation of
additional functionality to enable companies to comply with emerging reporting requirements. Other
companies with complex pricing compliance reporting requirements (such as “best” customer pricing)
can also benefit by using the Vistex Business Register for SAP application.
Data flows directly from generated SAP documents, such as direct and indirect sales, returns, and
adjustments into the business register. External data will flow into a separate transaction repository so
the actual data can be captured. From there, if required, the external data can be further processed
before allowing the information into the business register. Transactions are then aggregated to be used
in the price type calculations.
Business Register provides the ability to track the full data lineage of the calculations. You will always
know where the data came from and, if generated in SAP, you will be able to trace back to the original
transaction.
3.1.1 Delivered Objects
Business Register is a preconfigured solution that is delivered with the following:
• Copy control routines used to copy internal and external sales transactions to Business Register • Business Register and transaction document types • Transaction types used for grouping sales transactions, plus the condition types used to
maintain the determination of the transaction types • Transaction filters • Deployment code for each delivered price type, with prebuilt tracking screen for each price type • Agreement types • Claim types
NOTE: Pricing procedures are not delivered with Business Register.

Business Register
SAP Data Maintenance by Vistex, Pricing option for SAP S/4HANA by Vistex for SAP S/4HANA
Application Help – Version: 1.0 – Final
December 12, 2019
© 2019 Vistex, Inc. All Rights Reserved.
© 2019 SAP SE or an SAP affiliate company. All rights reserved.
3.2 Benefits of Business Register
Business Register provides the following benefits:
• End-to-end data management of data, including the ability to: • View all data associated with any price type
• Track a specific transaction back to its source
• View an audit trail for all transactions and adjustments
• Understand the impact of transactions, and filter changes on price reporting
• Improve decision making and regulatory compliance reporting
• Ensure calculations are accurate and claim adjudication is timely to control costs and ensure compliance
• Lower implementation and maintenance costs • SAP-validated application seamlessly integrates with SAP ERP • Leverages existing data without need for interfaces or data transfers: • Transactions sourced from contract transaction repository but able to supplement the
repository without affecting contract operations • Transaction filters use customer master and contract data • Contracts may use government prices for basis prices or validation of contract prices/rebates to
corporate or government floors/ceilings • Lowers risk of non-compliance and margin erosion • Enforces documented policies with full audit trail for deviations • Provides workflow for review and approval of policies (filters, formulas) and calculation results • Versioned policies enable impact assessment of policy changes prior to execution of changes • Embedded functionality allows impact assessment of price and rebate changes on government
prices and Medicaid claims prior to execution of changes
3.3 Government Pricing

1909 Pricing Documentation
3.3.1 Introduction to Government Pricing
3.3.1.1 Definition
The Government Pricing section of Business Register provides preconfigured processes that allow you to
meet your federal reporting obligations. Data flows directly from SAP documents, such as direct and
indirect sales, returns, and adjustments, into the Government Pricing transaction documents. External
data flows into a separate transaction repository, so that the actual data can be captured. If required,
the external data can be further processed before being added to the Government Pricing transaction
documents. The transactions then are aggregated for use in the price type calculations.
3.3.1.2 Process Overview
Government Pricing processing includes the following steps:
• Set up master data, pricing data, and transaction types. Assign participating products to each price
type. • Capture SAP and external sales data and copy it to the business register.

Business Register
SAP Data Maintenance by Vistex, Pricing option for SAP S/4HANA by Vistex for SAP S/4HANA
Application Help – Version: 1.0 – Final
December 12, 2019
© 2019 Vistex, Inc. All Rights Reserved.
© 2019 SAP SE or an SAP affiliate company. All rights reserved.
• Filter and aggregate the sales data to a composite matrix. • Calculate prices. • Review results and adjust the data, as needed. • Post the results. • Generate the price files.
3.3.2 Government Pricing Master Data
3.3.2.1 Delivered Objects
3.3.2.1.1 Transaction Types
Transaction types are groups used during filtering of transactional data.
Prior to setting up the filters, the transaction types (such as direct retail sales, mail order sales, and so
on) must be set up in configuration. Each transaction type is assigned a 4-position code (such as CR01)
and a description. When the transaction types are defined, each filter is assigned by transaction type to
the price calculation (as a subcomponent of the price type deployment code).
3.3.2.1.1.1 Delivered Transaction Types
The following standard transaction types are delivered with Business Register.
Credits/Adjustments
• CR01 Returns • CR02 Non Returns Adjustment • CR03 Non US Returns • CR04 Federal Government Returns • CR05 340B/APX Returns • CR06 Direct Retail Pharmacy returns • CR07 Institutional Returns • CR08 Re-sellers/Re-Packers/Re-labelers Return • CR09 Physicians Returns
1909 Pricing Documentation
• CR10 Mail Order Returns Direct Sales
• D001 Wholesale Sales • D002 Institutional Sales • D003 Mail Order Sales • D004 Direct Retail Sales • D005 Direct Sales Non-Retail • D006 Direct Government Sales • D007 US Territories Sales • D008 Re-sellers/Re-Packers/Re-labelers • D009 Direct 340B/APX Sales • D010 Direct Sales Donations • D011 Direct FSS Sales • D012 Direct Exempt Sales
In-Direct Sales
• I001 Hospital Sales • I002 Clinic Sales • I003 FSS Sales • I004 340B Sales • I005 Retail Ind. Sales • I006 Retail Chain Sales • I007 Indirect Sales Exempt • I008 Indirect non-US Sales • I009 Exempt Tricare Sales • I010 Indirect Donations • I011 Indirect Non federal Govt Sales • I012 Hospital Sales (AMP exempt) • I013 Clinic Sales (AMP exempt) • I014 Indirect Re-sellers/Re-Packers/Re-labelers
PBM Sales
• P001 PBM Sales Rebates
• R001 Wholesale Rebates • R002 Institutional Rebates • R003 Mail Order Rebates • R004 PBM Rebates • R005 US Territories Rebates • R006 Retail Rebates • R007 Admin Fees • R008 Government Rebates • R009 Re-sellers/Re-Packers/Re-labelers Rebate • R010 Non Fed Govt Rebates • R011 Medicaid Rebates

Business Register
SAP Data Maintenance by Vistex, Pricing option for SAP S/4HANA by Vistex for SAP S/4HANA
Application Help – Version: 1.0 – Final
December 12, 2019
© 2019 Vistex, Inc. All Rights Reserved.
© 2019 SAP SE or an SAP affiliate company. All rights reserved.
3.3.2.2 Master Data Procedures
3.3.2.2.1 Defining Master Data
The following master data items must be defined, and the field names documented. Work with your
master data resources to complete this setup to ensure it meets enterprise guidelines.
Customer Master
The Class of Trade (COT) is a manufacturer's designation assigned to each customer or contract to
determine the price paid for a product. The COT is a key data element used to filter transactions to be
used in Government Pricing. The data element used to house this information must be defined in the
Government Pricing process. In order to define the filtering accurately, the user should have a clear
definition of the COTs.
Assign a COT grouping to each customer. Customers can be assigned to more than one COT, but it must
be a different COT for each division.
NOTE: When linking a COT to an aggregation, you may override an incorrect historical customer COT to
ensure prior periods are recalculated with correct data. To perform an override, the override COT must
exist in the customer master.
Material Master
The Centers for Medicare and Medicaid Services (CMS) unit of measure (UOM) and its conversion factor
to the standard UOM must be defined in the material master. The CMS UOM is the unit dosage level or
unit of use level of the product, which is used as the reporting UOM to CMS and the UOM used to
validate and pay state and federal Medicaid plan rebates.
NOTE: The CMS unit of measure and its conversion factor to the standard unit of measure also are
defined in the participation list (transaction /IRM/IPPTMA Product Price Type Participation).
Optional Master Data
You also may enter drug definitions, such as Innovator, Multi-Source (Generic), Anticoagulant, and
Pediatric, in the master data. the system can be defined to use this information from the master data.
Alternately, you may enter this data when the product is listed as a participant for the price type.
1909 Pricing Documentation
3.3.2.2.2 Entering Pricing Data
3.3.2.2.2.1 Definition
Use the Price Type Condition Records transaction (/IRM/IPGTTCS) to enter the following data used in
pricing calculations:
• Consumer Price Index – Urban (CPI-U) The CPI-U is the inflation rate for urban areas in the United States, as published by the Department of Labor, and is used in RPU (Rebate Price Unit) and FCP (Federal Ceiling Price) calculations. Monthly CPI-U data can be loaded manually or uploaded from a spreadsheet. The initial load will most likely be done from a spreadsheet, with monthly updates done manually.
• Treasury Bill Rates Treasury bill rates are required to calculate the interest on any late payments made by the manufacturer.
3.3.2.2.2.2 Procedures
Loading Monthly CPI-U Data
1. Access transaction code /IRM/IPGTTCS.
2. Under Transaction Type (Sales), click on transaction type X990 - Monthly CPI-U to display the
monthly CPI-U condition type on the right side of the screen.
3. Click on the Create button to display the Create Monthly CPI-U screen.
4. Either manually enter the values into the table, or click on the Import Price Record button
to import the data.
To manually enter values, click on the Create button to add more lines. Enter the index,
rate, and effective dates.
5. Save the data.
Loading Treasury Bill Rates
1. Access transaction code /IRM/IPGTTCS.
2. Under Transaction Type (Sales), click on transaction type X992 - T-Bills to display the T-Bill
condition type on the right side of the screen.
3. Click on the Create button to display the Create T-Bill screen.
4. Either manually enter the values into the table, or click on the Import Price Record button
to import the data.

Business Register
SAP Data Maintenance by Vistex, Pricing option for SAP S/4HANA by Vistex for SAP S/4HANA
Application Help – Version: 1.0 – Final
December 12, 2019
© 2019 Vistex, Inc. All Rights Reserved.
© 2019 SAP SE or an SAP affiliate company. All rights reserved.
To manually enter values, click on the Entries button to add more lines. Enter the rate,
currency, and effective dates.
5. Save the data.
3.3.2.3 Master Data Transactions
3.3.2.3.1 Cross References
3.3.2.3.1.1 Material Cross Reference
Definition
Use the material cross reference to store possible incoming material identification numbers. The cross
reference can be used globally or just for the partner and/or organization it was created for.
The cross reference is used to link the current system records with the incoming record numbers so the
records can be matched and incoming documents can be processed. Cross reference mapping may be
performed in product lists, claims, transactions, price sheets, and price types.
Cross references can be set with a finite validity or an infinite validity.
Access
Transaction code: /IRM/GMXREF
Work Area
The following buttons appear above the Work Area:
Button Action Alternate Access
Display ↔ Change Toggle between Display mode and Change mode.
F6
Search Find a material cross reference previously created using General and Admin Data search fields.
Shift+F6 or Menu bar: Cross Reference → Search
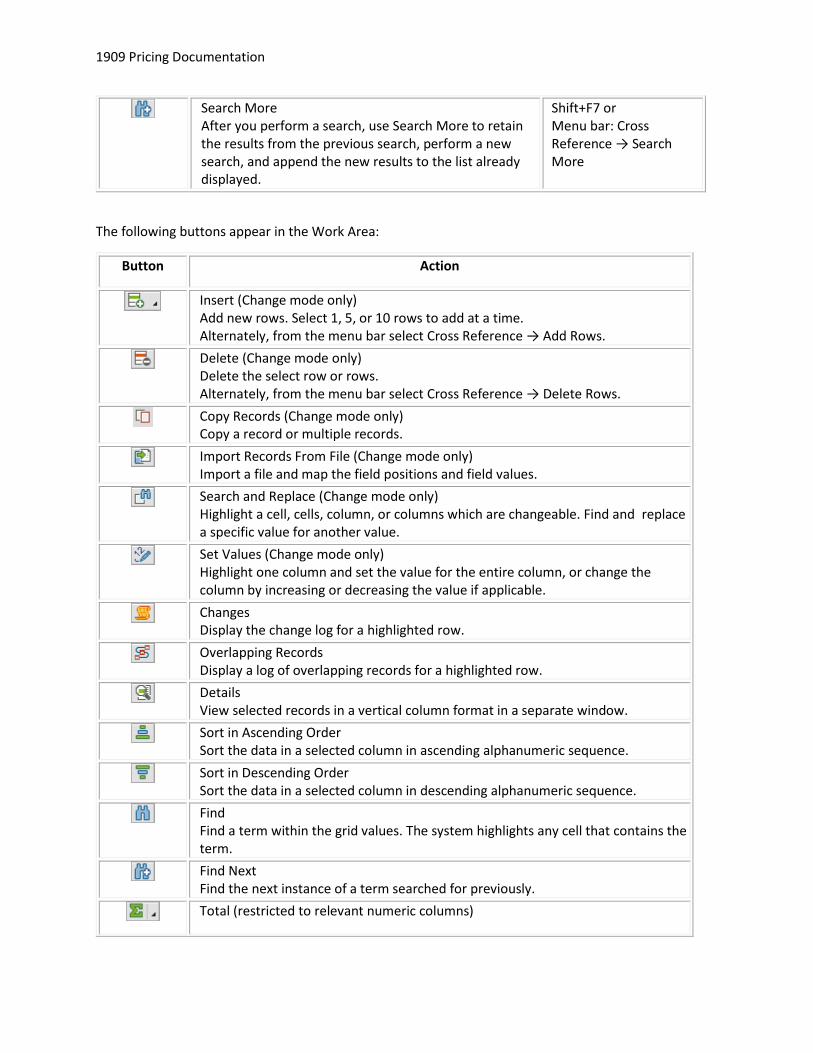
1909 Pricing Documentation
Search More After you perform a search, use Search More to retain the results from the previous search, perform a new search, and append the new results to the list already displayed.
Shift+F7 or Menu bar: Cross Reference → Search More
The following buttons appear in the Work Area:
Button Action
Insert (Change mode only) Add new rows. Select 1, 5, or 10 rows to add at a time. Alternately, from the menu bar select Cross Reference → Add Rows.
Delete (Change mode only) Delete the select row or rows. Alternately, from the menu bar select Cross Reference → Delete Rows.
Copy Records (Change mode only) Copy a record or multiple records.
Import Records From File (Change mode only) Import a file and map the field positions and field values.
Search and Replace (Change mode only) Highlight a cell, cells, column, or columns which are changeable. Find and replace a specific value for another value.
Set Values (Change mode only) Highlight one column and set the value for the entire column, or change the column by increasing or decreasing the value if applicable.
Changes Display the change log for a highlighted row.
Overlapping Records Display a log of overlapping records for a highlighted row.
Details View selected records in a vertical column format in a separate window.
Sort in Ascending Order Sort the data in a selected column in ascending alphanumeric sequence.
Sort in Descending Order Sort the data in a selected column in descending alphanumeric sequence.
Find Find a term within the grid values. The system highlights any cell that contains the term.
Find Next Find the next instance of a term searched for previously.
Total (restricted to relevant numeric columns)
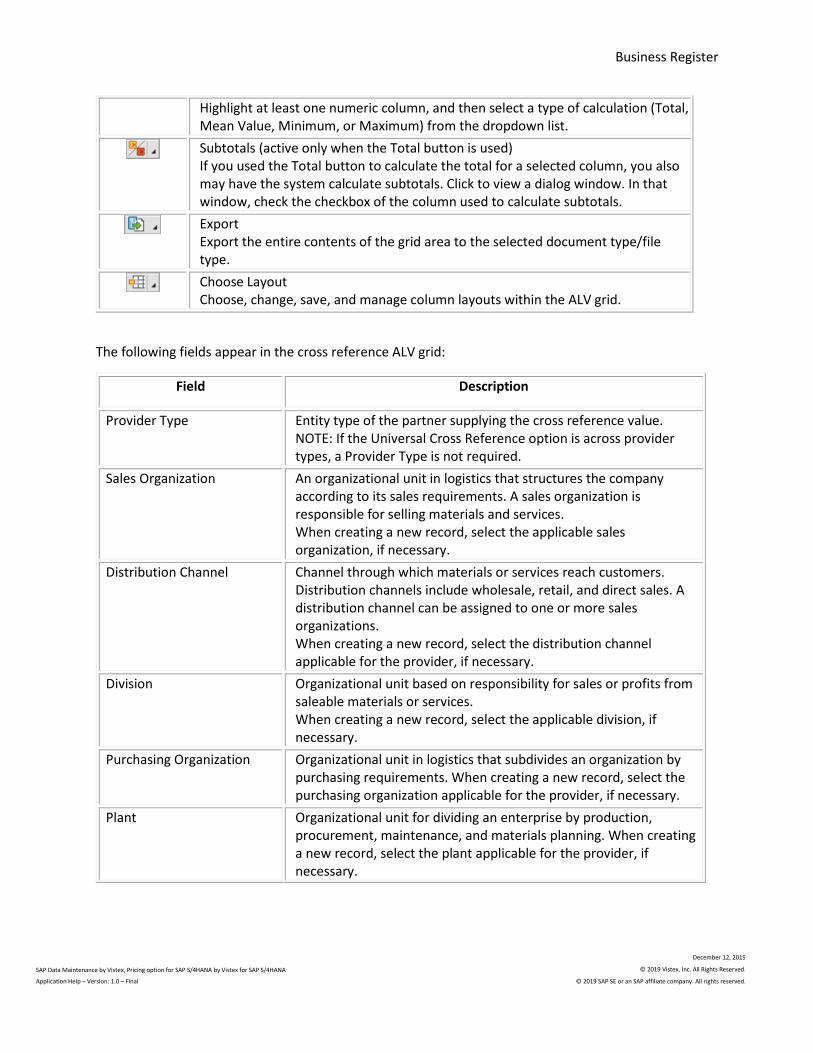
Business Register
SAP Data Maintenance by Vistex, Pricing option for SAP S/4HANA by Vistex for SAP S/4HANA
Application Help – Version: 1.0 – Final
December 12, 2019
© 2019 Vistex, Inc. All Rights Reserved.
© 2019 SAP SE or an SAP affiliate company. All rights reserved.
Highlight at least one numeric column, and then select a type of calculation (Total, Mean Value, Minimum, or Maximum) from the dropdown list.
Subtotals (active only when the Total button is used) If you used the Total button to calculate the total for a selected column, you also may have the system calculate subtotals. Click to view a dialog window. In that window, check the checkbox of the column used to calculate subtotals.
Export Export the entire contents of the grid area to the selected document type/file type.
Choose Layout Choose, change, save, and manage column layouts within the ALV grid.
The following fields appear in the cross reference ALV grid:
Field Description
Provider Type Entity type of the partner supplying the cross reference value. NOTE: If the Universal Cross Reference option is across provider types, a Provider Type is not required.
Sales Organization An organizational unit in logistics that structures the company according to its sales requirements. A sales organization is responsible for selling materials and services. When creating a new record, select the applicable sales organization, if necessary.
Distribution Channel Channel through which materials or services reach customers. Distribution channels include wholesale, retail, and direct sales. A distribution channel can be assigned to one or more sales organizations. When creating a new record, select the distribution channel applicable for the provider, if necessary.
Division Organizational unit based on responsibility for sales or profits from saleable materials or services. When creating a new record, select the applicable division, if necessary.
Purchasing Organization Organizational unit in logistics that subdivides an organization by purchasing requirements. When creating a new record, select the purchasing organization applicable for the provider, if necessary.
Plant Organizational unit for dividing an enterprise by production, procurement, maintenance, and materials planning. When creating a new record, select the plant applicable for the provider, if necessary.

1909 Pricing Documentation
Provider Provider SAP identification number. For example, customer number or vendor number. NOTE: If the Universal Cross Reference option is across provider types, a Provider is not required.
One-line short form of formatted address
Address associated with the provider. This field will automatically populate after the provider is entered.
Material Entered Material value submitted by an outside party.
Description User-defined description of the Material Entered.
Unit of Measure Provided Measurement of the material records provided.
Valid From Date the cross reference begins. After creation of the row, this is a locked field.
Valid To Date the cross reference ends.
Material Identification Type When creating or maintaining a record, select a material identification type from the dropdown menu.
Material Material referred to from the system.
Description Characters describing a material. Derived from the material.
Converted UoM Measurement of the material records in measurement units.
Measurement Unit Text Default unit in which the measurement was recorded.
Denominator Used to calculate unit of measure conversions for the quantity entered on a claim/transaction when this material entered and unit of measure entered are used. The denominator is the number to be used as the divisor. For example, if 3 pieces equals 5 kilograms, when converting from pieces to kilograms, the divisor would be 5.
Numerator Used to calculate unit of measure conversions for the quantity entered on a claim/transaction when this material entered and unit of measure entered are used. The numerator is the number to be used as the multiplier. For example, if 3 pieces equals 5 kilograms, when converting from pieces to kilograms, the multiplier would be 3.
Universal Cross Reference Indicates whether the entry applies across organizations, providers, or both. Options:
• V Across Provider & Organization • W Across Organization • X Across Provider
Created By User ID of the author of the original record. This field is populated when the cross reference is saved.
Created On Date the record was created. This field is populated when the cross reference is saved.
Time Time when the cross reference was created. This field is populated when the cross reference is saved.
Changed By User ID of the person who changed the cross reference.
Business Register
SAP Data Maintenance by Vistex, Pricing option for SAP S/4HANA by Vistex for SAP S/4HANA
Application Help – Version: 1.0 – Final
December 12, 2019
© 2019 Vistex, Inc. All Rights Reserved.
© 2019 SAP SE or an SAP affiliate company. All rights reserved.
This field is populated when the cross reference is saved.
Changed On Date when the cross reference was changed. This field is populated when the cross reference is saved.
Time of Change Time when the cross reference was changed. This field is populated when the cross reference is saved.
Message Row Display of error messages for the row.
Procedures
Displaying Material Cross References
Creating Material Cross References
Importing Material Cross References
Changing Material Cross References
Copying Material Cross References
Viewing a Material Cross Reference Change Log
Deleting Material Cross References
3.3.2.3.1.2 Partner Cross Reference
Definition
Use the partner cross reference to store possible incoming partner identification numbers. The cross
reference can be used globally or just for the partner and/or organization it was created for.
The cross reference is used to link the current system records with the incoming record numbers so the
records can be matched and incoming documents can be processed. Cross reference mapping may be
performed in memberships, claims, transactions, price sheets, and price types.
Cross references can be set with a finite validity or an infinite validity.
Access
Transaction code: /IRM/GPXREF
Work Area
The following buttons appear above the Work Area:
Button Action Alternate Access
Display ↔ Change Toggle between Display mode and Change mode.
F6 or
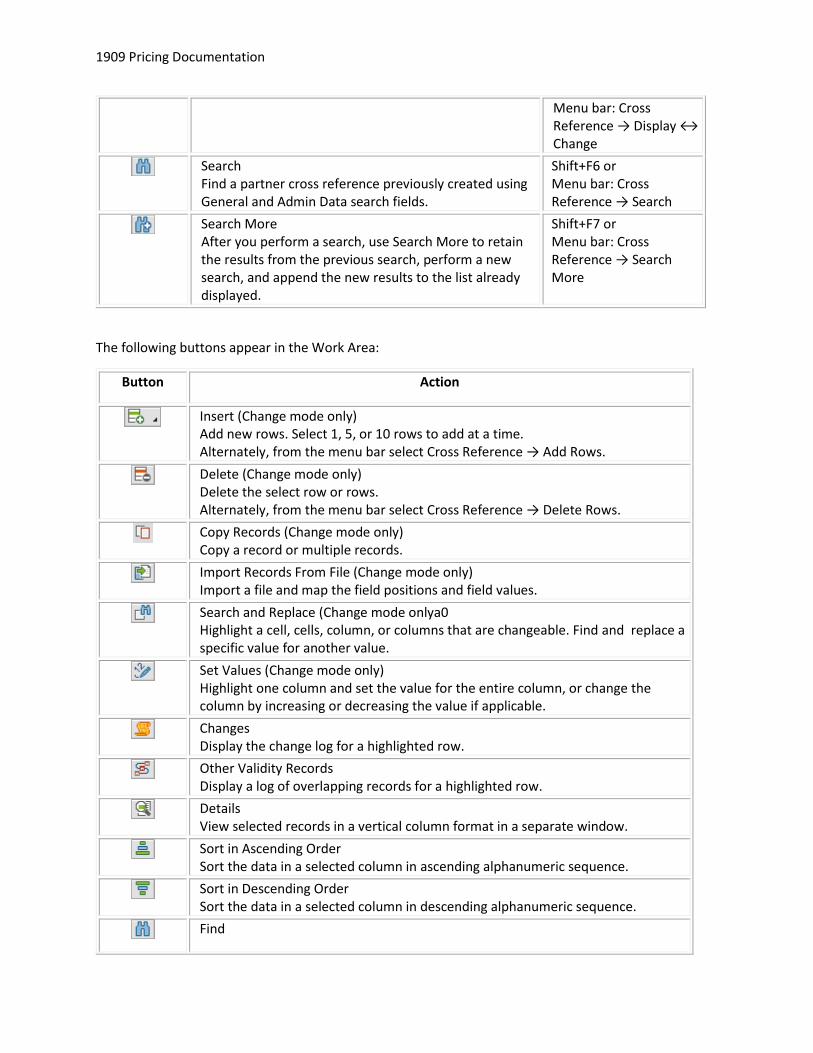
1909 Pricing Documentation
Menu bar: Cross Reference → Display ↔ Change
Search Find a partner cross reference previously created using General and Admin Data search fields.
Shift+F6 or Menu bar: Cross Reference → Search
Search More After you perform a search, use Search More to retain the results from the previous search, perform a new search, and append the new results to the list already displayed.
Shift+F7 or Menu bar: Cross Reference → Search More
The following buttons appear in the Work Area:
Button Action
Insert (Change mode only) Add new rows. Select 1, 5, or 10 rows to add at a time. Alternately, from the menu bar select Cross Reference → Add Rows.
Delete (Change mode only) Delete the select row or rows. Alternately, from the menu bar select Cross Reference → Delete Rows.
Copy Records (Change mode only) Copy a record or multiple records.
Import Records From File (Change mode only) Import a file and map the field positions and field values.
Search and Replace (Change mode onlya0 Highlight a cell, cells, column, or columns that are changeable. Find and replace a specific value for another value.
Set Values (Change mode only) Highlight one column and set the value for the entire column, or change the column by increasing or decreasing the value if applicable.
Changes Display the change log for a highlighted row.
Other Validity Records Display a log of overlapping records for a highlighted row.
Details View selected records in a vertical column format in a separate window.
Sort in Ascending Order Sort the data in a selected column in ascending alphanumeric sequence.
Sort in Descending Order Sort the data in a selected column in descending alphanumeric sequence.
Find

Business Register
SAP Data Maintenance by Vistex, Pricing option for SAP S/4HANA by Vistex for SAP S/4HANA
Application Help – Version: 1.0 – Final
December 12, 2019
© 2019 Vistex, Inc. All Rights Reserved.
© 2019 SAP SE or an SAP affiliate company. All rights reserved.
Find a term within the grid values. The system highlights any cell that contains the term.
Find Next Find the next instance of a term searched for previously.
Total (restricted to relevant numeric columns) Highlight at least one numeric column, and then select a type of calculation (Total, Mean Value, Minimum, or Maximum) from the dropdown list.
Subtotals (active only when the Total button is used) If you used the Total button to calculate the total for a selected column, you also may have the system calculate subtotals. Click to view a dialog window. In that window, check the checkbox of the column used to calculate subtotals.
Export Export the entire contents of the grid area to the selected document type/file type.
Choose Layout Choose, change, save, and manage column layouts within the ALV grid.
The following fields appear in the cross reference ALV grid:
Field Description
Provider Type Entity type of the partner supplying the cross reference value. NOTE: If the Universal Cross Reference option is across provider types, a Provider Type is not required.
Sales Organization An organizational unit in logistics that structures the company according to its sales requirements. A sales organization is responsible for selling materials and services. When creating a new record, select the applicable sales organization, if necessary.
Distribution Channel Channel through which materials or services reach customers. Distribution channels include wholesale, retail, and direct sales. A distribution channel can be assigned to one or more sales organizations. When creating a new record, select the distribution channel applicable for the provider, if necessary.
Division Organizational unit based on responsibility for sales or profits from saleable materials or services. When creating a new record, select the applicable division, if necessary.
Purchasing Organization Organizational unit in logistics that subdivides an organization by purchasing requirements. When creating a new record, select the purchasing organization applicable for the provider, if necessary.

1909 Pricing Documentation
Provider Provider SAP identification number. For example, customer number or vendor number. NOTE: If the Universal Cross Reference option is across provider types, a Provider is not required.
One-line short form of formatted address
Address associated with the provider. This field will automatically populate after the provider is entered.
Valid From Date the cross reference begins. After creation of the row, this is a locked field.
Valid To Date the cross reference ends.
Partner Identification Type When creating or maintaining a record, select a partner identification type from the dropdown menu.
Partner Function Partner function that will be using the cross reference mapping.
Identification Provided Identification used by the provider when entering a partner.
Partner Determined SAP partner number used to determine when the identification provided is entered.
One-line short form of formatted address
Address associated with the SAP partner. This field will automatically populate after the determined partner is entered.
Universal Cross Reference Indicates whether the entry applies across organizations, providers, or both. Options:
• V Across Provider & Organization • W Across Organization • X Across Provider
Created By User ID of the author of the original record. This field is populated when the cross reference is saved.
Created On Date the record was created. This field is populated when the cross reference is saved.
Time Time when the cross reference was created. This field is populated when the cross reference is saved.
Changed By User ID of the person who changed the cross reference. This field is populated when the cross reference is saved.
Changed On Date when the cross reference was changed. This field is populated when the cross reference is saved.
Time of Change Time when the cross reference was changed. This field is populated when the cross reference is saved.
Message Row Display of error messages for the row.
Procedures
Displaying Partner Cross References
Creating Partner Cross References
Importing Partner Cross References
Changing Partner Cross References
Copying Partner Cross References

Business Register
SAP Data Maintenance by Vistex, Pricing option for SAP S/4HANA by Vistex for SAP S/4HANA
Application Help – Version: 1.0 – Final
December 12, 2019
© 2019 Vistex, Inc. All Rights Reserved.
© 2019 SAP SE or an SAP affiliate company. All rights reserved.
Viewing a Partner Cross Reference Change Log
Deleting Partner Cross References
3.3.2.3.1.3 Unit of Measure Cross Reference
Definition
Use the unit of measure cross reference to store possible incoming unit of measure identification types
and convert them into the unit of measure used in the organization's records.
The cross reference can be used globally or just for the partner and/or organization it was created for,
and is used in claims and transactions. Cross references can be set with a finite validity or an infinite
validity.
Access
Transaction code: /IRM/GUXREF
Work Area
The following buttons appear above the Work Area:
Button Action Alternate Access
Display ↔ Change Toggle between Display mode and Change mode.
F6 or Menu bar: Cross Reference → Display ↔ Change
Search Find a unit of measure cross reference previously created using General and Admin Data search fields.
Shift+F6 or Menu bar:Cross Reference → Search
Search More After you perform a search, use Search More to retain the results from the previous search, perform a new search, and append the new results to the list already displayed.
Shift+F7 or Menu bar: Cross Reference → Search More
The following buttons appear in the Work Area:
Button Action

1909 Pricing Documentation
Insert (Change mode only) Add new rows. Select 1, 5, or 10 rows to add at a time. Alternately, from the menu bar select Cross Reference → Add Rows.
Delete (Change mode only) Delete the select row or rows. Alternately, from the menu bar select Cross Reference → Delete Rows.
Copy Records (Change mode only) Copy a record or multiple records.
Import Records From File (Change mode only) Import a file and map the field positions and field values.
Search and Replace (Change mode only) Highlight a cell, cells, column, or columns that are changeable. Find and replace a specific value for another value.
Set Values (Change mode only) Highlight one column and set the value for the entire column, or change the column by increasing or decreasing the value if applicable.
Changes Display the change log for a highlighted row.
Overlapping Records Display a log of overlapping records for a highlighted row.
Details View selected records in a vertical column format in a separate window.
Sort in Ascending Order Sort the data in a selected column in ascending alphanumeric sequence.
Sort in Descending Order Sort the data in a selected column in descending alphanumeric sequence.
Find Find a term within the grid values. The system highlights any cell that contains the term.
Find Next Find the next instance of a term searched for previously.
Total (restricted to relevant numeric columns) Highlight at least one numeric column, and then select a type of calculation (Total, Mean Value, Minimum, or Maximum) from the dropdown list.
Subtotals (active only when the Total button is used) If you used the Total button to calculate the total for a selected column, you also may have the system calculate subtotals. Click to view a dialog window. In that window, check the checkbox of the column used to calculate subtotals.
Export Export the entire contents of the grid area to the selected document type/file type.
Choose Layout Choose, change, save, and manage column layouts within the ALV grid.

Business Register
SAP Data Maintenance by Vistex, Pricing option for SAP S/4HANA by Vistex for SAP S/4HANA
Application Help – Version: 1.0 – Final
December 12, 2019
© 2019 Vistex, Inc. All Rights Reserved.
© 2019 SAP SE or an SAP affiliate company. All rights reserved.
The following fields appear in the cross reference ALV grid:
Field Description
Provider Type Entity type of the partner supplying the cross reference value. NOTE: If the Universal Cross Reference option is across provider types, a Provider Type is not required.
Sales Organization An organizational unit in logistics that structures the company according to its sales requirements. A sales organization is responsible for selling materials and services. When creating a new record, select the applicable sales organization, if necessary.
Distribution Channel Channel through which materials or services reach customers. Distribution channels include wholesale, retail, and direct sales. A distribution channel can be assigned to one or more sales organizations. When creating a new record, select the distribution channel applicable for the provide, if necessary.
Division Organizational unit based on responsibility for sales or profits from saleable materials or services. When creating a new record, select the applicable division, if necessary.
Purchasing Organization Organizational unit in logistics that subdivides an organization by purchasing requirements. When creating a new record, select the purchasing organization applicable for the provider, if necessary.
Plant Organizational unit for dividing an enterprise by production, procurement, maintenance, and materials planning. When creating a new record, select the plant applicable for the provider, if necessary.
Provider Provider SAP identification number. For example, customer number or vendor number. NOTE: If the Universal Cross Reference option is across provider types, a Provider is not required.
One-line short form of formatted address
Address associated with the provider. This field will automatically populate after the provider is entered.
Unit of Measure Provided Unit of measure value submitted by an outside party.
Valid From Date the cross reference begins. After creation of the row, this is a locked field.
Valid To Date the cross reference ends.
Converted UoM Unit of measure that will be converted from the Unit of Measure Provided.
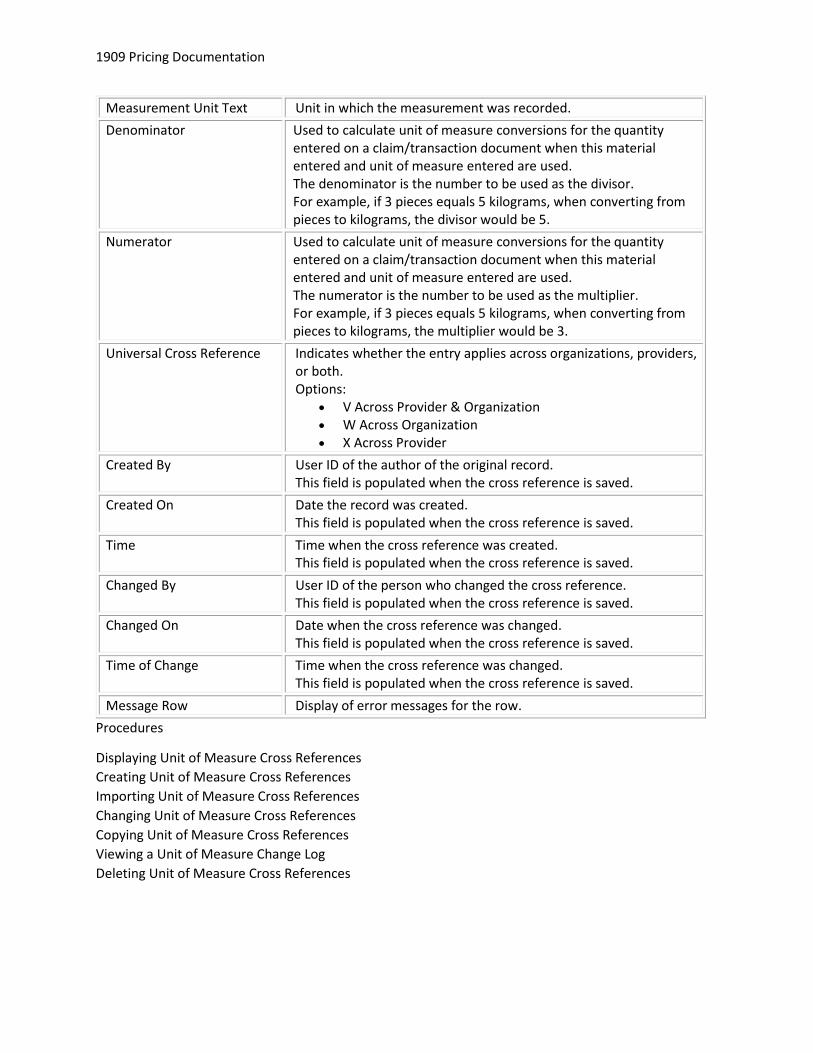
1909 Pricing Documentation
Measurement Unit Text Unit in which the measurement was recorded.
Denominator Used to calculate unit of measure conversions for the quantity entered on a claim/transaction document when this material entered and unit of measure entered are used. The denominator is the number to be used as the divisor. For example, if 3 pieces equals 5 kilograms, when converting from pieces to kilograms, the divisor would be 5.
Numerator Used to calculate unit of measure conversions for the quantity entered on a claim/transaction document when this material entered and unit of measure entered are used. The numerator is the number to be used as the multiplier. For example, if 3 pieces equals 5 kilograms, when converting from pieces to kilograms, the multiplier would be 3.
Universal Cross Reference Indicates whether the entry applies across organizations, providers, or both. Options:
• V Across Provider & Organization • W Across Organization • X Across Provider
Created By User ID of the author of the original record. This field is populated when the cross reference is saved.
Created On Date the record was created. This field is populated when the cross reference is saved.
Time Time when the cross reference was created. This field is populated when the cross reference is saved.
Changed By User ID of the person who changed the cross reference. This field is populated when the cross reference is saved.
Changed On Date when the cross reference was changed. This field is populated when the cross reference is saved.
Time of Change Time when the cross reference was changed. This field is populated when the cross reference is saved.
Message Row Display of error messages for the row.
Procedures
Displaying Unit of Measure Cross References
Creating Unit of Measure Cross References
Importing Unit of Measure Cross References
Changing Unit of Measure Cross References
Copying Unit of Measure Cross References
Viewing a Unit of Measure Change Log
Deleting Unit of Measure Cross References
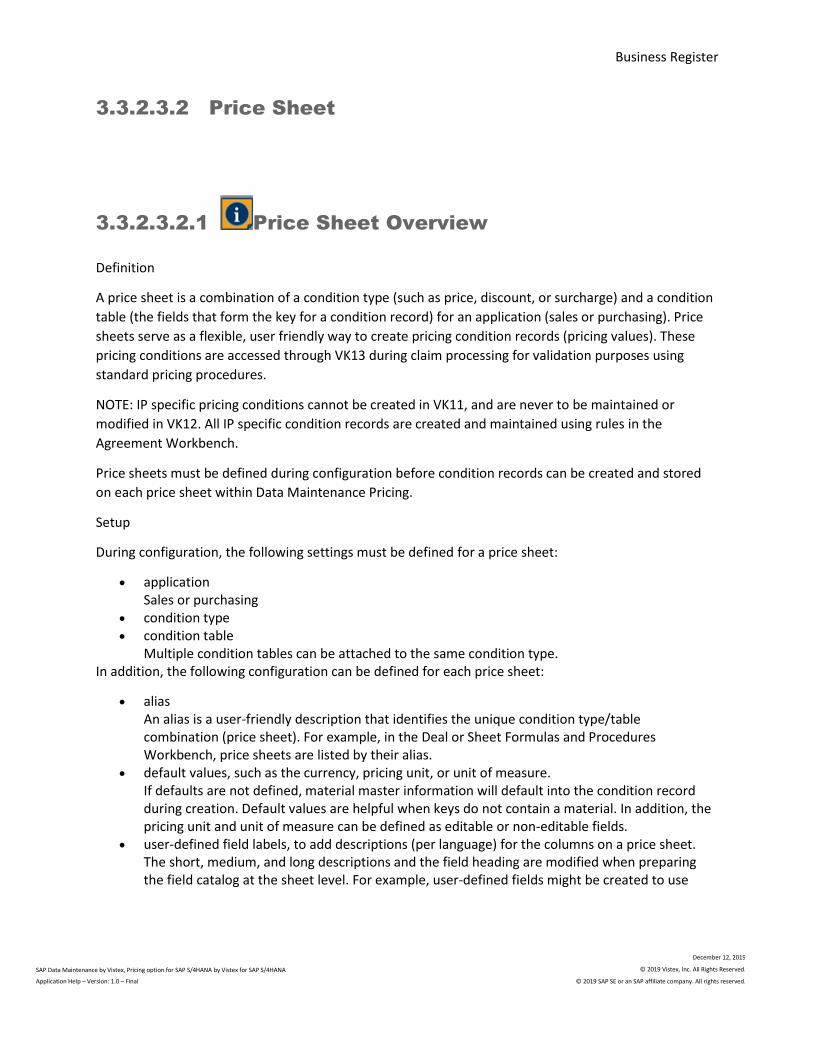
Business Register
SAP Data Maintenance by Vistex, Pricing option for SAP S/4HANA by Vistex for SAP S/4HANA
Application Help – Version: 1.0 – Final
December 12, 2019
© 2019 Vistex, Inc. All Rights Reserved.
© 2019 SAP SE or an SAP affiliate company. All rights reserved.
3.3.2.3.2 Price Sheet
3.3.2.3.2.1 Price Sheet Overview
Definition
A price sheet is a combination of a condition type (such as price, discount, or surcharge) and a condition
table (the fields that form the key for a condition record) for an application (sales or purchasing). Price
sheets serve as a flexible, user friendly way to create pricing condition records (pricing values). These
pricing conditions are accessed through VK13 during claim processing for validation purposes using
standard pricing procedures.
NOTE: IP specific pricing conditions cannot be created in VK11, and are never to be maintained or
modified in VK12. All IP specific condition records are created and maintained using rules in the
Agreement Workbench.
Price sheets must be defined during configuration before condition records can be created and stored
on each price sheet within Data Maintenance Pricing.
Setup
During configuration, the following settings must be defined for a price sheet:
• application Sales or purchasing
• condition type • condition table
Multiple condition tables can be attached to the same condition type. In addition, the following configuration can be defined for each price sheet:
• alias An alias is a user-friendly description that identifies the unique condition type/table combination (price sheet). For example, in the Deal or Sheet Formulas and Procedures Workbench, price sheets are listed by their alias.
• default values, such as the currency, pricing unit, or unit of measure. If defaults are not defined, material master information will default into the condition record during creation. Default values are helpful when keys do not contain a material. In addition, the pricing unit and unit of measure can be defined as editable or non-editable fields.
• user-defined field labels, to add descriptions (per language) for the columns on a price sheet. The short, medium, and long descriptions and the field heading are modified when preparing the field catalog at the sheet level. For example, user-defined fields might be created to use

1909 Pricing Documentation
company-specific terms as column descriptions, such as "product category" instead of material group.
• view profile (used for agreements and deals) and proposal profile (used for agreement requests, deal requests, master requests, and price proposals), which allow the following types of fields to be displayed and used during price sheet processing: • user fields, which can be used to:
• display text for a value (such as the customer name, material description, or material group description)
• pull in additional fields from master data (such as material group for the material)
• pull in other condition records (such as a list price or cost when entering a customer price)
• pull in the price source field, used to track the condition record source for informational purposes
• pull in values from the Price Type Workbench Additional fields also can be used in user exits. These fields, which are derived, cannot be used in the key.
• extension fields, which are saved to a table. When you create an extension field, it is automatically created as a user field as well. Extension fields are entered as part of the condition record and saved instead of being derived.
Global user fields are stored in structures /IRM/S_GPRCR_EATR and /IRM/S_GPRCR_EXTA. Price
sheet specific fields are store in a separate structure, /IRM/S_GPRCR_SEAT, to enhance system
performance. To create tables for view profile related fields, use transaction code /IRM/GPR31; to
create tables for proposal profile related fields, use transaction code /IRM/GPR32. The extension
tables then are assigned to the price sheet in configuration.
• date check, which is a flag that indicates whether or not overlapping dates are allowed (defaults to blank). If checked, when you insert a different price, the system will automatically end date the old price.
• enhancement class Each enhancement class adds a button to the price sheet, to view additional information related to customers, materials, vendors, and other data maintained in condition records. Vistex delivers several optional enhancement classes for price sheets.
• toolbar groups, which are (user-defined) menus that access a dropdown list of selected options, replacing the corresponding Vistex buttons on the price sheet.
• price method, used to define currency per units combinations, such as dollars per each, to be applied to condition records. Specify one method as the default, which can be changed at the condition record level.
• scales • computation, which uses formulas to define calculations across multiple price records assigned
to a price sheet. • lock level, which determines whether any key fields on a price sheet are required when
performing a search.

Business Register
SAP Data Maintenance by Vistex, Pricing option for SAP S/4HANA by Vistex for SAP S/4HANA
Application Help – Version: 1.0 – Final
December 12, 2019
© 2019 Vistex, Inc. All Rights Reserved.
© 2019 SAP SE or an SAP affiliate company. All rights reserved.
If a price sheet is assigned the No Lock Level option, you are not required to enter data in any key field (no question mark will appear in the field), allowing you to search without the key field.
• previous rate, the previous rate can be filled in the price sheet to display historical data. If this flag is enabled, the previous rate field is not updated on the price sheet if the rate is changed.
• time window, which allows condition to be in effect during a specific date/time range. Time windows are defined in the Time Window Workbench.
• relationships for a bill of material explosion The available options for pricing by a bill of material (BOM) and its associated components are: • Dynamic
Dynamic BOMs allow you to create the components of the BOM on-the-fly to roll-up prices to the top level. If this option is chosen with a line selected, a pop-up will appear that allows entry of the components and their associated prices. They will be stored as a lower level item to the item originally selected.
• Static Static BOMs automatically pull in the components of the SAP (sales, engineering, or manufacturing) BOM for the item selected. You then can price at the item level and roll-up or have formulas roll-up prices through computations. If a static BOM is selected, a plant needs to be defined on the price sheet as well as the material and application that the BOM should come from.
• Variant configuration Variant configuration allows you to use the standard SAP options to pull in and price items based on the variant configuration engine. In order for this to work, a material needs to be defined as part of the price sheet, either part of the key or a user field.
Hybrid Configuration
Release 1909 introduced hybrid configuration, allowing matrix configuration activities to occur in a
workbench instead of SPRO. Some items offered through hybrid configuration include formulas, formula
set up, creation of color map templates, layouts, and the addition of new fields.
Pricing Message
You can attach a pricing message, such as "Government floor price", to a condition record. Define the
message in a price policy, and then set up an additional field in the price sheet to store the message
after the policy is run.
Price Source
The "Record Source" field, which can be used for information purposes, may be added to the view
profile of a price sheet. The field provides a business definition of the source for a condition record or
why the record was created. The field is in the Price Condition Extended Attributes structure
(/IRM/S_GPRCR_EATR). In configuration, define all price sources that will be used to manually update
the condition records.
Sheets as Tabs in Grids

1909 Pricing Documentation
In prior releases, price sheets were only available as a layout. For 1909 SP1, price sheets each have their
own tabs in the grid, offering similar functionality to a Microsoft Excel™ workbook.
3.3.2.3.2.2 Price Policy Workbench
Definition
Price policies calculate thresholds for pricing exceptions and generate warnings when a price
requirement on a price sheet has been violated. Price policies can be set to auto execute when condition
records are created or policies can be called on demand.
Use the Price Policy Workbench to create and maintain reusable price policies that are assigned to
condition type/table combinations (price sheets). Multiple policies can be assigned to a price sheet. The
sequence for execution can be defined, as well as what should happen to subsequent policies if a prior
one is met. A where-used list shows all of the price sheets where the policy is being used.
When you define a price policy you assign a validity period. As needed, price policies can be uniquely
assigned per sales organization/distribution channel. Each price policy is assigned to a group of pricing
conditions that must follow particular rules. You can dynamically add fields to condition records for the
purpose of policy evaluation. Using the Business Script Editor (replacement for the Formula Builder), you
may derive dynamic fields that are only used in the policy. The dynamic fields are assigned to the policy
not to the condition record.
Based on configuration, price policies can be sent through an approval process prior to activation.
Approvals can be tied to workflow.
NOTE: Price policies are not supported in Fiori.
Access
Transaction code: /IRM/GPRPLM
Structure
The Price Policy Workbench screen is organized into the following areas:
• Search and Worklist Use the Search and Worklist to view selected price policies in a grid format. From the grid, click on a price policy number to display that price policy in focus in the Work Area.
• Work Area Use the Work Area to maintain one price policy. In the standard Vistex implementation, the Work Area contains the following tabs: • General
• Calculation
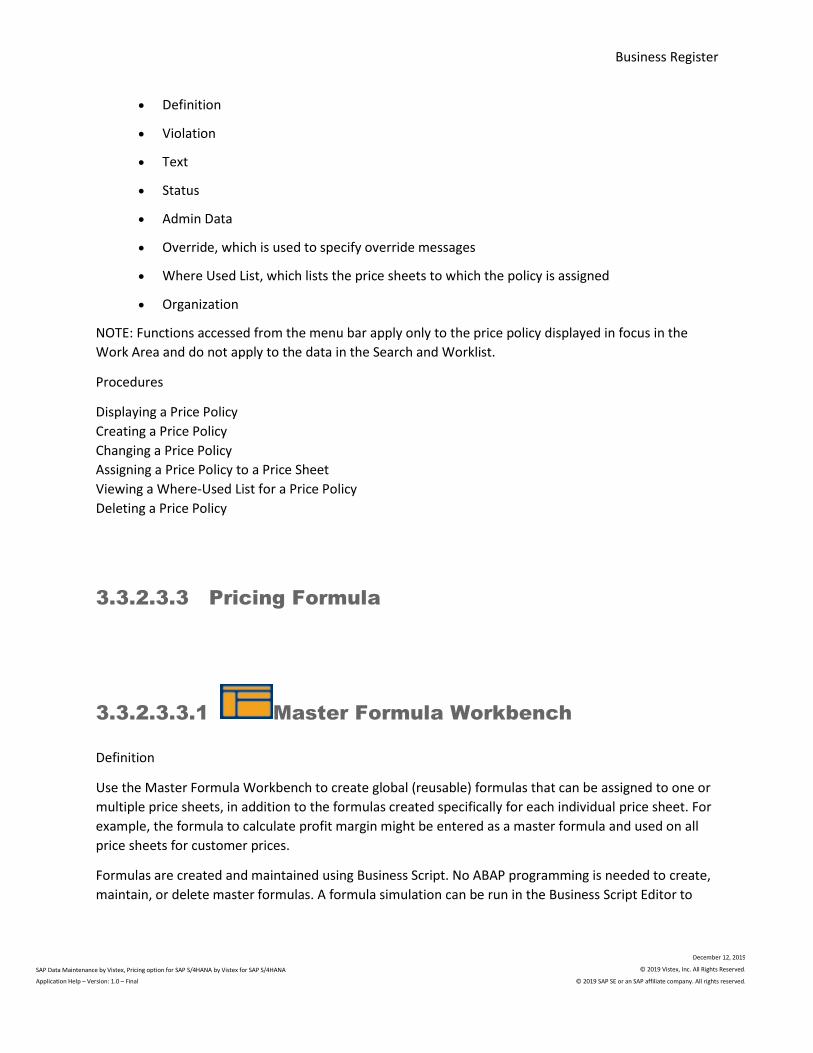
Business Register
SAP Data Maintenance by Vistex, Pricing option for SAP S/4HANA by Vistex for SAP S/4HANA
Application Help – Version: 1.0 – Final
December 12, 2019
© 2019 Vistex, Inc. All Rights Reserved.
© 2019 SAP SE or an SAP affiliate company. All rights reserved.
• Definition
• Violation
• Text
• Status
• Admin Data
• Override, which is used to specify override messages
• Where Used List, which lists the price sheets to which the policy is assigned
• Organization
NOTE: Functions accessed from the menu bar apply only to the price policy displayed in focus in the
Work Area and do not apply to the data in the Search and Worklist.
Procedures
Displaying a Price Policy
Creating a Price Policy
Changing a Price Policy
Assigning a Price Policy to a Price Sheet
Viewing a Where-Used List for a Price Policy
Deleting a Price Policy
3.3.2.3.3 Pricing Formula
3.3.2.3.3.1 Master Formula Workbench
Definition
Use the Master Formula Workbench to create global (reusable) formulas that can be assigned to one or
multiple price sheets, in addition to the formulas created specifically for each individual price sheet. For
example, the formula to calculate profit margin might be entered as a master formula and used on all
price sheets for customer prices.
Formulas are created and maintained using Business Script. No ABAP programming is needed to create,
maintain, or delete master formulas. A formula simulation can be run in the Business Script Editor to
1909 Pricing Documentation
make sure the formula is correct. A change history is available to track who changed the formulas and
when the changes were made.
After the formula has been created, it can be assigned to specific price sheets using the Sheet Formulas
and Procedures Workbench. You can assign formulas individually, or configure a sequence of master (and
sheet) formulas in a formula profile and assign the formula profile to the price sheet in a procedure.
Access
Transaction code: /IRM/GPRMFM
Structure
The Master Formula Workbench screen is organized into the following areas:
• Search and Worklist Use the Search and Worklist to view selected formulas in a grid format. From the grid, click on a formula number to display that formula in focus in the Work Area.
• Work Area Use the Work Area to maintain one formula. In the standard Vistex implementation, the Work Area contains the following tabs: • Master Formula, which displays the formula in HTML format
• Assigned Fields, used to maintain the assigned fields for that master formula. These assigned fields are similar to VADAT fields in sheet formulas.
• Master Formula Variables
NOTE: Functions accessed from the menu bar apply only to the master formula displayed in focus in the
Work Area and do not apply to the data in the Search and Worklist.
Procedures
Creating a Master Formula
Displaying a Master Formula
Changing a Master Formula
Deleting a Master Formula
3.3.2.3.3.2 Sheet Formulas and Procedures
Workbench
Definition
Use the Sheet Formulas and Procedures Workbench to perform the following:
Business Register
SAP Data Maintenance by Vistex, Pricing option for SAP S/4HANA by Vistex for SAP S/4HANA
Application Help – Version: 1.0 – Final
December 12, 2019
© 2019 Vistex, Inc. All Rights Reserved.
© 2019 SAP SE or an SAP affiliate company. All rights reserved.
• Assign formulas to a price sheet. You may view the formula in HTML format or maintain the formula in the Business Script Editor.
• Create formula profiles, which contain a sequence of master formulas and sheet formulas to be assigned to the price sheet.
• List the formula filters to be applied, to allow different formulas to be called based on master data values. For example, the formula used for material group A might be different that the formula used for material group B.
• Create procedures to be invoked during price sheet maintenance. A procedure is similar to a macro in that several steps can be performed together. For example, you might list the steps used to create or maintain a condition record. If the Confirmation flag is checked, when the procedure is run a pop-up list of action steps will appear, allowing the user to select/unselect the actions to be performed.
• List price sheet-specific variables NOTE: If a formula is attached to a specific price sheet, only the key fields of the price sheet will appear
in the field list in the business script; for a master formula, all fields will appear.
Formulas and procedures are available for any price sheet, whether the price sheet is in a standard price
maintenance transaction, deal, or master request (or agreement if you own an Incentives and Paybacks
(IP) solution license).
Sheet formulas can be executed from the following transactions:
• /IRM/GPR01 or /IRM/GPR02 – Classic Record Maintenance • /IRM/GPR04 or /IRM/GPR06 – Profile-based Record Maintenance • /IRM/GPR26 – Index-based Record Maintenance • /IRM/GSDLM or /IRM/GPDLM – Deals Maintenance • /IRM/GSDLRM or /IRM/GPDLRM – Deals Request Maintenance • /IRM/IPxxASP – Agreement Maintenance • /IRM/IPxxARM – Agreement Request Maintenance • /IRM/IPCGM – Campaign Maintenance • /IRM/IPPQM – Master Request Maintenance • /IRM/IPROM – Roster Maintenance
Access
Transaction code: /IRM/GPRFPM
Structure
The Sheet Formulas and Procedures Workbench screen is organized into the following areas:
• Search and Worklist Use the Search and Worklist to view selected price sheets in a grid format. From the grid, click on a price sheet alias to display or maintain the formulas/procedures for that price sheet in focus in the Work Area.
• Work Area Use the Work Area to maintain one sheet formula. In the standard Vistex implementation, the Work Area contains the following tabs: • Formula
1909 Pricing Documentation
• Formula Profile
• Formula Filter, used to list the formula filters to be applied, to allow different formulas to be called based on master data values. For example, the formula used for material group A might be different that the formula used for material group B.
• Procedure
• Variables
NOTE: Functions accessed from the menu bar apply only to the price sheet displayed in focus in the
Work Area and do not apply to the data in the Search and Worklist.
Procedures
Displaying the Sheet Formulas and Procedures for a Price Sheet
Assigning Sheet Formulas to a Price Sheet
Maintaining a Sheet Formula
Deleting a Sheet Formula from a Price Sheet
Deleting a Sheet Formula
Creating a Formula Profile for a Price Sheet
Creating a Procedure for a Price Sheet
3.3.2.3.3.3 Flex Formulas Workbench
Definition
Use the Flex Formulas Workbench to create (VOFM) formulas that are used during pricing execution
rather than at price creation. As a result, pricing of products can be set based on complex calculations. In
the case of materials that incorporate commodities, the variable commodity price is one component of
the defined calculation. Scale-based formulas can be created, such as a formula to scale off margin.
Formulas can be created and maintained with a user-driven Business Script Editor. No ABAP
programming is needed to create, maintain, or delete formulas. Flex formulas are price sheet
independent; you assign the formula to a pricing procedure in configuration, as either a requirement,
calculation type, or scale-based formula. A formula simulation can be run to make sure the formulas are
correct.
A change history is available to track who changed the formulas and when the changes were made.
NOTE: This workbench can replace the standard SAP VOFM ABAP routines and requirements.
Access
Transaction code: /IRM/GPRFFM
Business Register
SAP Data Maintenance by Vistex, Pricing option for SAP S/4HANA by Vistex for SAP S/4HANA
Application Help – Version: 1.0 – Final
December 12, 2019
© 2019 Vistex, Inc. All Rights Reserved.
© 2019 SAP SE or an SAP affiliate company. All rights reserved.
Structure
The Flex Formulas Workbench screen is organized into the following areas:
• Search and Worklist Use the Search and Worklist to view selected formulas in a grid format. From the grid, click on a formula number to display that formula in focus in the Work Area.
• Work Area Use the Work Area to maintain one formula.
NOTE: Functions accessed from the menu bar apply only to the formula displayed in focus in the Work
Area and do not apply to the data in the Search and Worklist.
Procedures
Displaying a Flex Formula
Creating a Flex Formula
Assigning a Flex Formula to a Pricing Procedure
Viewing the Flex Formula Change Log
Deleting a Flex Formula
3.3.2.3.4 Price Maintenance
3.3.2.3.4.1 Classic Maintenance
Create, Change or Display Condition Records
Definition
When you create, change, or display condition records, you specify the condition type and condition
table. This unique combination also is referred to as a price sheet.
NOTE: To be available for use, a price sheet must already have been configured.
Condition records can be created using one of the following methods:
• manually add lines to the active price sheet • mass import condition records online from a spreadsheet into the active price sheet • copy existing lines
Access

1909 Pricing Documentation
The transactions used for classic maintenance are:
• Create Pricing Records /IRM/GPR01 • Change Pricing Records /IRM/GPR02 • Display Pricing Records /IRM/GPR03
Structure
When you enter the transaction, the system displays a dialog window used to select the price sheet to
be displayed in a grid format.
The following buttons appear above the grid:
Button Action Alternate Access
Save Save and activate the condition records. NOTE: Button not enabled in transaction /IRM/GPR03 Display Pricing Records.
Ctrl+S
Selection Content Displays the key fields for each combination.
F6
Other Price Records Access Sequence Choose another Condition Type/Condition Table combination of the same application.
Shift+F8
Refresh All Sheets Used to refresh all of the sheets listed in the Current Sheet dropdown. NOTE: Button not displayed in transaction /IRM/GPR03 Display Pricing Records.
F8
Save as Price Proposal Saves the price sheet(s) as a price proposal instead of saving as an active condition record(s). NOTE: Button not displayed in transaction /IRM/GPR03 Display Pricing Records.
Shift+F11
Use the following grid buttons to enter pricing condition record information:
Button Action
Price Record Details Detailed information for each condition record can be drilled into by clicking on
the button. In the detail screen, you can create, change, and display information on the following tabs:
• Scales: Shows scales related to this condition record. • Text: If a text procedure is assigned through standard SAP configuration
for the condition type, then text can be saved. • Key: Displays the key and key entries for the selected condition record.
Business Register
SAP Data Maintenance by Vistex, Pricing option for SAP S/4HANA by Vistex for SAP S/4HANA
Application Help – Version: 1.0 – Final
December 12, 2019
© 2019 Vistex, Inc. All Rights Reserved.
© 2019 SAP SE or an SAP affiliate company. All rights reserved.
• Validity Periods: Lists the existing condition records for the selected row along with their respective validity periods, rates, and deletion indicators.
Check and Complete Checks the validity of the condition record before saving.
• If formulas are set up, check and complete will run the formulas. • If a price policy is set up, check and complete will run the price policy. • If, for this particular combination, the flag Date Check is set in the
Condition Type Table Enhancement table, then overlapping validity periods of condition records for that combination are not permitted.
NOTE: Button not displayed in transaction /IRM/GPR03 Display Pricing Records.
Refresh Refresh the current price sheet. To refresh all of the open price sheets, click on
the Refresh button in the application toolbar. NOTE: Button not displayed in transaction /IRM/GPR03 Display Pricing Records.
Create Add one line, five lines, or ten lines to the record. For example, to add three lines you can either:
• Click on the button and select 1 from the dropdown three times • Click on the button, select 5 from the dropdown, highlight two lines, then
click on the Delete button and select the Delete option from the dropdown.
• Click on the button, then select 10 from the dropdown, highlight seven lines, then click on the Delete button and select the Delete option from the dropdown.
NOTE: Button not displayed in transaction /IRM/GPR03 Display Pricing Records.
Delete Delete or undelete a selected condition record. When a previously saved record is flagged for deletion it can be undeleted before the changes are saved. When an unsaved record is deleted it cannot be undeleted. If the condition type is configured to delete, the condition record will be deleted but you can undelete until you Save. If the condition type is configured to not delete, then you can undelete even after saving. NOTE: Button not displayed in transaction /IRM/GPR03 Display Pricing Records.
Select Values Used to add multiple lines by selecting the key fields. For example, Condition Type PR00 (Price) and Condition Table A005 (Customer-Material) would have the option to add lines by selecting multiple materials, customers, distribution channels, and/or sales organizations. The standard search help screens will be shown for selection processes. NOTE: Button not displayed in transaction /IRM/GPR03 Display Pricing Records.
Copy Price Records Displays the Copy Price Records dialog window. Specify the target sheet and number of copies. Check the Copy texts checkbox to copy texts.
1909 Pricing Documentation
If none of the direct input field checkboxes are selected, the system will copy the values in those fields as they are on the original condition record. If one, some, or all of the direct input fields are selected, and different values are entered, it will copy all original values in the fields where the values were not changed and it will override the values that have been selected to be overridden. NOTE: Button not displayed in transaction /IRM/GPR03 Display Pricing Records.
Import Price Records Used to import condition records from an Excel file. Enter values in the following fields:
• Start Row, where the user specifies the first row that contains the data in the selected file to import.
• File Path, contains the path to the file to be imported. You can search for the file path by clicking on the Search Help button (or pressing F4).
• Field Position, used to specify the column that contains the field data in the selected file to import.
• Field Value, contains a designated default value, if needed. NOTE: Button not displayed in transaction /IRM/GPR03 Display Pricing Records.
Search and Replace Used to search and replace the selected values within the current price sheet. NOTE: Button not displayed in transaction /IRM/GPR03 Display Pricing Records.
Set Values Displays the Set Rate dialog box, which is used to mass create rates for the selected condition records. Enter values in the following fields:
• Valid From, date that the rate for the selected condition record will start. • Valid To, date that the rate for the selected condition record will end. • Rounding Rule, the rule that determines how the system rounds off
condition values during pricing. The last digit will be rounded. For example, in rounding rule 'A', values are always rounded up: 10.459 → 10.46 DEM
• Rounding Formula, the specified formula to direct the rounding routine. • New, a checkbox signifying if a new condition record should be created
with the specified rate or if the specified rate should be applied to the existing condition record.
• Update Scales, a checkbox signifying if the specified condition record rate change should update the scales or not.
• Rate fields: Example: Original Price Record Rate(s) = 15.00 USD. Using the Increase By option (rate field 1) to increase the rate by 5.00 (rate field 2) units (rate field 3) would change the condition record rate(s) to 20.00 USD. • Rate Field 1 contains a dropdown to select the manner in which the
rate should be changed.
• Rate Field 2 contains the number that the condition record should be changed by.
• Rate Field 3 contains the measure in which the rate should be changed.
Business Register
SAP Data Maintenance by Vistex, Pricing option for SAP S/4HANA by Vistex for SAP S/4HANA
Application Help – Version: 1.0 – Final
December 12, 2019
© 2019 Vistex, Inc. All Rights Reserved.
© 2019 SAP SE or an SAP affiliate company. All rights reserved.
Use the Compute button to carry through the rate calculation to the selected condition record(s). The new rate appears in the Rate field; the previous rate appears in the Before Change field.
The Define Rules for computation hyperlink is used to dynamically create rules using the Rule Builder. NOTE: Button not displayed in transaction /IRM/GPR03 Display Pricing Records.
Procedures Used when formula procedures exist for the current price sheet. Formula procedures are pricing values derived from a defined formula or procedure. Formulas are specific to price sheets. User fields or values directly within the price sheet, such as rate, can be calculated. For example, a procedure to copy customer price and increase or decrease by a specified percentage. If multiple procedures are listed, check the S checkbox for each procedure to be included. Click on the procedure name to view the procedure. NOTE: Button not displayed in transaction /IRM/GPR03 Display Pricing Records.
Price Policy Definition Indicates the condition records that comply with the pricing policies assigned to the price sheet. NOTE: This button is only available when an applicable price sheet has underlying pricing policies to check whether or not the condition records are in compliance or in violation. Price policies can be set to auto execute at the time of record creation or they can be called on demand. Button not displayed in transaction /IRM/GPR03 Display Pricing Records.
Most Recent Log Recall the most recent log. In order for the most recent log to be visible, first click
on the Check and Complete button. NOTE: Button not displayed in transaction /IRM/GPR03 Display Pricing Records.
or
Expand Scales If scales exist, used to either:
• Expand scales as column ( )
• Expand scales as row ( )
Highlight Using Filter Highlight lines based on the selected filter and the search criteria that was input. This button also can be used to reset the highlighting.
Simulate Pricing Create a price book to simulate prices for highlighted materials.
Cumulative Values View the cumulated values from sales orders and from billing for the selected record.
Change Documents

1909 Pricing Documentation
Displays existing Change documents that are related to the selected row in the Changes for Condition Record window. Use the Filter button to filter the display. Options:
• All Changes • Date Selection
Select the date range for the display. NOTE: Button not displayed in transaction /IRM/GPR01 Create Pricing Records.
Filter Records Displays a pop-up used to specify filter criteria at the price sheet level. Use a filter to improve performance by limiting processing to the selected records. In the Record Count field specify the number of records to be displayed. This value overrides the default number of records defined for price sheet in configuration.
Column to Row Shuffle Change the layout of the condition records in the grid, based on a selected column. Use this button to switch between a vertical (column) and a horizontal (row) display. NOTE: Certain functions available in the horizontal display are not available in the vertical display.
Details View selected records in a vertical column format in a separate window.
Sort in Ascending Order Sort the data in a selected column in ascending alphanumeric sequence.
Sort in Descending Order Sort the data in a selected column in descending alphanumeric sequence.
Find Find a term within the grid values. The system highlights any cell that contains the term.
Find Next Find the next instance of a term searched for previously.
Set Filter Select a column, and then click the Set Filter button to set and delete column filters.
Total (restricted to relevant numeric columns) Highlight at least one numeric column, and then select a type of calculation (Total, Minimum, or Maximum) from the dropdown list.
Print Print the price sheet(s).
Views Generate a Print Preview of the current price sheet and/or a Crystal Reports preview of the current price sheet.
Export Export the entire contents of the grid area to the selected document type/file type.

Business Register
SAP Data Maintenance by Vistex, Pricing option for SAP S/4HANA by Vistex for SAP S/4HANA
Application Help – Version: 1.0 – Final
December 12, 2019
© 2019 Vistex, Inc. All Rights Reserved.
© 2019 SAP SE or an SAP affiliate company. All rights reserved.
Choose Layout Choose, change, save, and manage column layouts within the ALV grid.
Procedures
Manually Adding Condition Records
Importing Condition Records
Creating a Price Proposal
Creating a Price Simulation (Classic Maintenance)
Changing Condition Records
Mass Changing Condition Record Validity Dates and Rates
Viewing a Condition Record Change Log
Displaying Condition Records
Running the Display Pricing Records Job in the Background
3.3.2.3.4.2 Profile-based Maintenance
Profile-based Maintenance Overview
Definition
Profile-based maintenance utilizes the price profiles created during configuration. In profile-based
pricing, when you choose a profile to maintain or display, the system lists the condition types/tables
(price sheets) assigned to that profile. The price profile provides a summary view of all price sheets that
share the price profile, as well as an individual view of each price sheet that shares the price profile. If
configured, you may perform composite maintenance across multiple price sheets in a single view. All
sheets for a material are combined into a single grid for simultaneous viewing and maintenance.
A price profile can be set up before price sheets are created. During configuration, multiple price sheets
can be assigned to a single price profile, which allows the user to view and maintain multiple price
sheets at the same time. After the price profile is defined, price sheets are assigned to the price profile
and the display sequence is defined, allowing for dependencies and comparisons. For example, to
simultaneously view and maintain all pricing available for a material, you might assign the purchase
price, list price, customer list price, and customer group price to a price profile.
Abstract BOM
BOM information for an ECC material can be viewed on the price sheet, based on configuration of the
price profile. For the price profile, configure the following:
• Material field from the price sheet (Field for Structure field)
1909 Pricing Documentation
• Plant, Usage, and Application, to explode the standard SAP bill of material In addition, to explode DM bill of material, the ECC material is attached to the DM (BOM) structure in
the Structured Material Workbench.
When you enter the Maintain Price Profile transaction, select the profile and criteria field values. Click
on the Structured Materials button. Information from configuration defaults into the Structured
Materials pop-up. The Explode BOM checkbox will be checked if either the Plant, Usage, and Application
fields (for ECC structures) or the Application Type field (for DM structures) are populated. The Level Up
and Level Down fields indicate how many levels can be viewed (default to 1).
On the price sheet, the system will display BOM information in the BOM Level field for the material (Has
Parents, Has Children, or Has Parents and Children). Click on the icon in the BOM Level Icon field to
view the bill of material structure in a tree format. (NOTE: Recursive bills of material will be highlighted
in red in the tree).
Computations that are assigned to an additional price field in configuration will be run automatically
when you click on the Check and Complete button.
Create, Maintain or Display Price Profile
Definition
When you create, change, or display condition records that are assigned to a specific price profile, you
specify the condition type and condition table. This unique combination also is referred to as a price
sheet.
NOTE: To be available for use, a price sheet must already have been configured.
Access
The transactions used for profile-based maintenance are:
• Create Price Profile /IRM/GPR04 • Maintain Price Profile /IRM/GPR06 • Display Price Profile /IRM/GPR05
Structure
When you enter the transaction, the system displays a dialog window used to select the price profile
that contains the condition records to be displayed in a grid format.
The following buttons appear above the grid:
Button Action Alternate Access
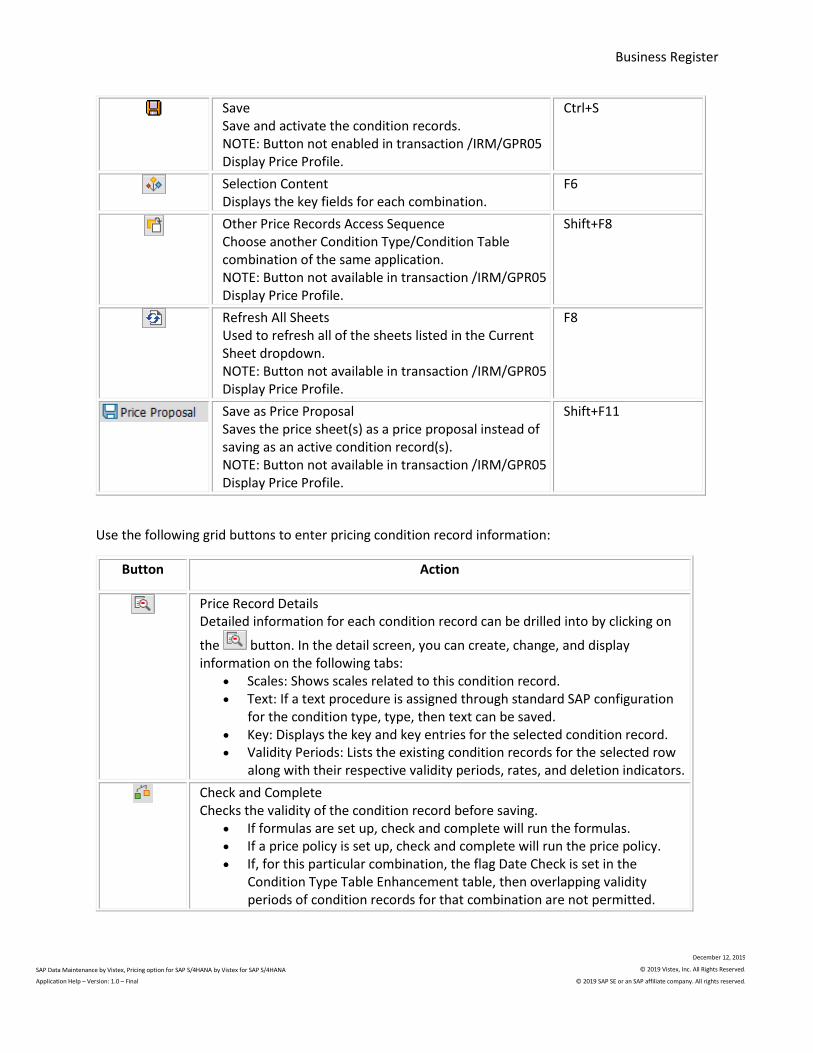
Business Register
SAP Data Maintenance by Vistex, Pricing option for SAP S/4HANA by Vistex for SAP S/4HANA
Application Help – Version: 1.0 – Final
December 12, 2019
© 2019 Vistex, Inc. All Rights Reserved.
© 2019 SAP SE or an SAP affiliate company. All rights reserved.
Save Save and activate the condition records. NOTE: Button not enabled in transaction /IRM/GPR05 Display Price Profile.
Ctrl+S
Selection Content Displays the key fields for each combination.
F6
Other Price Records Access Sequence Choose another Condition Type/Condition Table combination of the same application. NOTE: Button not available in transaction /IRM/GPR05 Display Price Profile.
Shift+F8
Refresh All Sheets Used to refresh all of the sheets listed in the Current Sheet dropdown. NOTE: Button not available in transaction /IRM/GPR05 Display Price Profile.
F8
Save as Price Proposal Saves the price sheet(s) as a price proposal instead of saving as an active condition record(s). NOTE: Button not available in transaction /IRM/GPR05 Display Price Profile.
Shift+F11
Use the following grid buttons to enter pricing condition record information:
Button Action
Price Record Details Detailed information for each condition record can be drilled into by clicking on
the button. In the detail screen, you can create, change, and display information on the following tabs:
• Scales: Shows scales related to this condition record. • Text: If a text procedure is assigned through standard SAP configuration
for the condition type, type, then text can be saved. • Key: Displays the key and key entries for the selected condition record. • Validity Periods: Lists the existing condition records for the selected row
along with their respective validity periods, rates, and deletion indicators.
Check and Complete Checks the validity of the condition record before saving.
• If formulas are set up, check and complete will run the formulas. • If a price policy is set up, check and complete will run the price policy. • If, for this particular combination, the flag Date Check is set in the
Condition Type Table Enhancement table, then overlapping validity periods of condition records for that combination are not permitted.
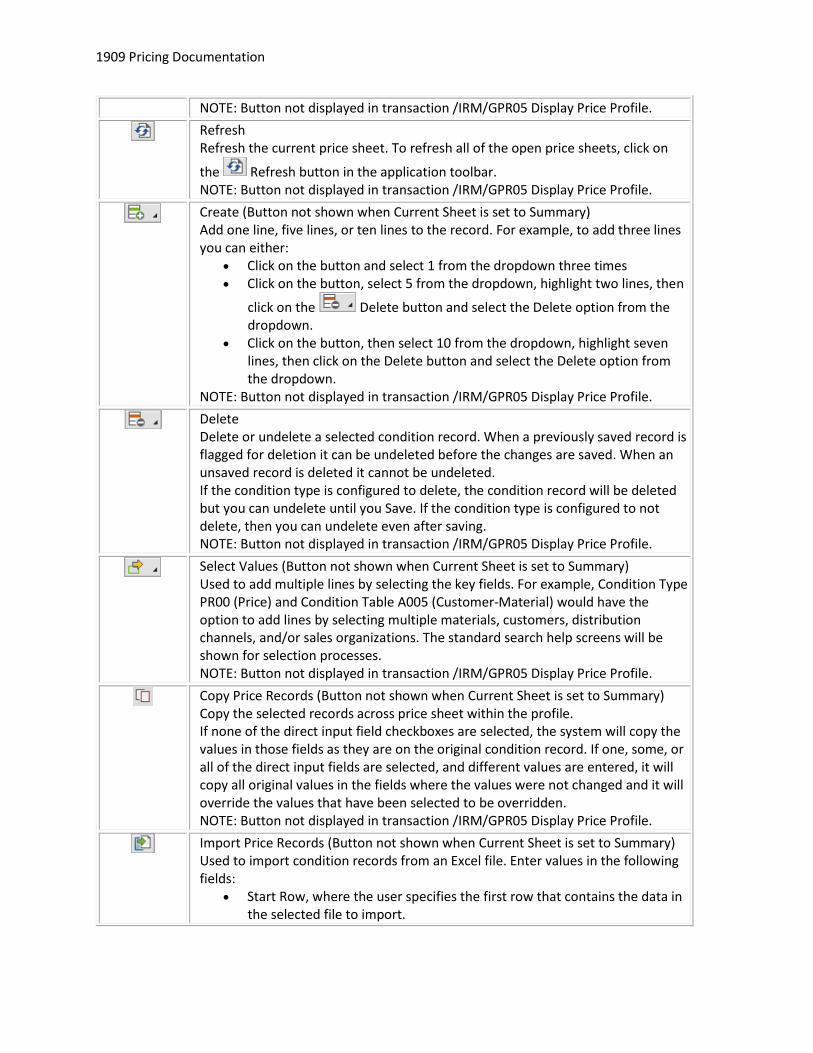
1909 Pricing Documentation
NOTE: Button not displayed in transaction /IRM/GPR05 Display Price Profile.
Refresh Refresh the current price sheet. To refresh all of the open price sheets, click on
the Refresh button in the application toolbar. NOTE: Button not displayed in transaction /IRM/GPR05 Display Price Profile.
Create (Button not shown when Current Sheet is set to Summary) Add one line, five lines, or ten lines to the record. For example, to add three lines you can either:
• Click on the button and select 1 from the dropdown three times • Click on the button, select 5 from the dropdown, highlight two lines, then
click on the Delete button and select the Delete option from the dropdown.
• Click on the button, then select 10 from the dropdown, highlight seven lines, then click on the Delete button and select the Delete option from the dropdown.
NOTE: Button not displayed in transaction /IRM/GPR05 Display Price Profile.
Delete Delete or undelete a selected condition record. When a previously saved record is flagged for deletion it can be undeleted before the changes are saved. When an unsaved record is deleted it cannot be undeleted. If the condition type is configured to delete, the condition record will be deleted but you can undelete until you Save. If the condition type is configured to not delete, then you can undelete even after saving. NOTE: Button not displayed in transaction /IRM/GPR05 Display Price Profile.
Select Values (Button not shown when Current Sheet is set to Summary) Used to add multiple lines by selecting the key fields. For example, Condition Type PR00 (Price) and Condition Table A005 (Customer-Material) would have the option to add lines by selecting multiple materials, customers, distribution channels, and/or sales organizations. The standard search help screens will be shown for selection processes. NOTE: Button not displayed in transaction /IRM/GPR05 Display Price Profile.
Copy Price Records (Button not shown when Current Sheet is set to Summary) Copy the selected records across price sheet within the profile. If none of the direct input field checkboxes are selected, the system will copy the values in those fields as they are on the original condition record. If one, some, or all of the direct input fields are selected, and different values are entered, it will copy all original values in the fields where the values were not changed and it will override the values that have been selected to be overridden. NOTE: Button not displayed in transaction /IRM/GPR05 Display Price Profile.
Import Price Records (Button not shown when Current Sheet is set to Summary) Used to import condition records from an Excel file. Enter values in the following fields:
• Start Row, where the user specifies the first row that contains the data in the selected file to import.

Business Register
SAP Data Maintenance by Vistex, Pricing option for SAP S/4HANA by Vistex for SAP S/4HANA
Application Help – Version: 1.0 – Final
December 12, 2019
© 2019 Vistex, Inc. All Rights Reserved.
© 2019 SAP SE or an SAP affiliate company. All rights reserved.
• File Path, contains the path to the file to be imported. You can search for the file path by clicking on the Search Help button (or pressing F4).
• Field Position, used to specify the column that contains the field data in the selected file to import.
• Field Value, contains a designated default value, if needed. NOTE: Button not displayed in transaction /IRM/GPR05 Display Price Profile.
Search and Replace (Button not shown when Current Sheet is set to Summary) Used to search and replace the selected values within the current price sheet. NOTE: Button not displayed in transaction /IRM/GPR05 Display Price Profile.
Set Values (Button not shown when Current Sheet is set to Summary) Displays the Set Rate dialog box, which is used to mass create rates for the selected condition records. Enter values in the following fields:
• Valid From, the date that the rate for the selected condition record will start.
• Valid To, the date that the rate for the selected condition record will end. • Rounding Rule, the rule that determines how the system rounds off
condition values during pricing. The last digit will be rounded. For example, in rounding rule 'A', values are always rounded up: 10.459 → 10.46 DEM
• Rounding Formula, the specified formula to direct the rounding routine. • New, a checkbox signifying if a new condition record should be created
with the specified rate or if the specified rate should be applied to the existing condition record.
• Update Scales, a checkbox signifying if the specified condition record rate change should update the scales or not.
• Rate fields: Example: Original Price Record Rate(s) = 15.00 USD. Using the Increase By option (rate field 1) to increase the rate by 5.00 (rate field 2) units (rate field 3) would change the condition record rates) to 20.00 USD.
• Rate Field 1 contains a dropdown to select the manner in which the rate should be changed.
• Rate Field 2 contains the number that the condition record should be changed by.
• Rate Field 3 contains the measure in which the rate should be changed.
Use the Compute button to carry through the rate calculation to the selected condition record(s). The new rate appears in the Rate field; the previous rate appears in the Before Change field.
The Define Rules for computation hyperlink is used to dynamically create rules using the Rule Builder. NOTE: Button not available in transaction /IRM/GPR05 Display Price Profile.

1909 Pricing Documentation
Compute Used when formula profiles exist for the current price sheet. Formula procedures are pricing values derived from a defined formula or procedure. Formulas are specific to price sheets. User fields or values directly within the price sheet, such as rate, can be calculated. For example, a procedure to copy customer price and increase or decrease by a specified percentage. If multiple procedures are listed, check the S checkbox for each procedure to be included. Click on the procedure name to view the procedure. NOTE: Button not available in transaction /IRM/GPR05 Display Price Profile.
Price Policy Definition Indicates the condition records that comply with the pricing policies assigned to the price sheet. NOTE: This button is only available when an applicable price sheet has underlying pricing policies to check whether or not the condition records are in compliance or in violation. Price policies can be set to auto execute at the time of record creation or they can be called on demand. Button not displayed in transaction /IRM/GPR05 Display Price Profile.
Most Recent Log (Not shown when Current Sheet is set to Summary) Recall the most recent log. In order for the most recent log to be visible, first click
on the Check and Complete button. NOTE: Button not displayed in transaction /IRM/GPR05 Display Price Profile.
Error/Warning Records This button appears only when there are errors in the condition records. Click to view only the lines with errors or to show all lines. Options:
• Errors, to limit the display to lines with errors • Show All Records
or
Expand Scales If scales exist, used to either:
• Expand scales as column ( )
• Expand scales as row ( )
Highlight Using Filter (Not shown when Current Sheet is set to Summary) Highlight lines based on the selected filter and the search criteria that was input. This button also can be used to reset the highlighting.
Simulate Pricing (Not shown when Current Sheet is set to Summary) Create a price book to simulate prices for highlighted materials.
Cumulative Values (Not shown when Current Sheet is set to Summary) View the cumulated values from sales orders and from billing for the selected record.
Change Documents Displays existing Change documents that are related to the selected row in the Changes for Condition Record window. Use the Filter button to filter the display. Options:
• All Changes

Business Register
SAP Data Maintenance by Vistex, Pricing option for SAP S/4HANA by Vistex for SAP S/4HANA
Application Help – Version: 1.0 – Final
December 12, 2019
© 2019 Vistex, Inc. All Rights Reserved.
© 2019 SAP SE or an SAP affiliate company. All rights reserved.
• Date Selection Select the date range for the display.
NOTE: Button not displayed in transaction /IRM/GPR06 Maintain price Profile.
Filter Records Displays a pop-up used to specify filter criteria at the price sheet level. Use a filter to improve performance by limiting processing to the selected records. In the Record Count field specify the number of records to be displayed. This value overrides the default number of records defined for price sheet in configuration.
Column to Row Shuffle Change the layout of the condition records in the grid, based on a selected column. Use this button to switch between a vertical (column) and a horizontal (row) display.
Details View selected records in a vertical column format in a separate window.
Sort in Ascending Order Sort the data in a selected column in ascending alphanumeric sequence.
Sort in Descending Order Sort the data in a selected column in descending alphanumeric sequence.
Find Find a term within the grid values. The system highlights any cell that contains the term.
Find Next Find the next instance of a term searched for previously.
Set Filter Select a column, and then click the Set Filter button to set and delete column filters.
Total (restricted to relevant numeric columns) Highlight at least one numeric column, and then select a type of calculation (Total, Minimum, or Maximum) from the dropdown list.
Print Print the price sheet(s).
Views Generate a Print Preview of the current price sheet and/or a Crystal Reports preview of the current price sheet.
Export Export the entire contents of the grid area to the selected document type/file type.
Choose Layout Choose, change, save, and manage column layouts within the ALV grid.
Procedures
1909 Pricing Documentation
Displaying a Price Profile
Running the Display Price Profile Job in the Background
Creating a Price Simulation (Profile-based Maintenance)
Changing a Price Profile
Creating a Price Proposal
3.3.2.3.4.3 Upload Price Record
Definition
Use Upload Price Records to import price records from a file, such as an Excel spreadsheet, rather than
manually entering the data. Files can be uploaded from the following locations:
• Desktop, to upload from the local PC • File submission, to upload based on a file submission entry • File server, to upload directly from the application server
File templates can be created to control the fields and format of files during upload. To create a file
template, use the File Template for Price Record Workbench.
NOTE: The document template is not meant to store the scales in file data. If uploading condition
records with scales, all non-scale fields must come before the scale fields in the spreadsheet. The scale
fields must be last in the spreadsheet in the sequence:
• Scale quantity 1 • Scale rate 1 • Scale quantity 2 • Scale rate 2 • And so on
Access
Transaction code: /IRM/GPRUPL
Procedure
Uploading Condition Records
3.3.2.3.4.4 File Template for Price Record
Definition

Business Register
SAP Data Maintenance by Vistex, Pricing option for SAP S/4HANA by Vistex for SAP S/4HANA
Application Help – Version: 1.0 – Final
December 12, 2019
© 2019 Vistex, Inc. All Rights Reserved.
© 2019 SAP SE or an SAP affiliate company. All rights reserved.
Use File Template for Price Record Workbench to create and maintain templates that control the fields
and format of condition record files during upload.
Access
Transaction code: /IRM/GPRFTM
Structure
The File Template for Price Record Workbench screen is organized into the following areas:
• Search and Worklist Use the Search and Worklist to view selected file templates in a grid format. From the grid, click on file template number to display that file template in focus in the Work Area.
• Work Area Use the Work Area to maintain one file template. In the standard Vistex implementation, the Work Area contains the following tabs: • Section
• Mapping
• Conversion
• Submitter
• Crystal Layout, which is used with Crystal Reports
• Admin Data
NOTE: Functions accessed from the menu bar apply only to the file template displayed in focus in the
Work Area and do not apply to the data in the Search and Worklist.
Procedures
Displaying a File Template for Price Record
Creating a File Template for Price Record
Copying a File Template for Price Record
Maintaining a File Template for Price Record
Deleting a File Template for Price Record
3.3.2.3.4.5 Automated Price Maintenance
Definition
1909 Pricing Documentation
Automated Price Maintenance (APM) is used to automatically copy or process multiple values within
condition records at the same time in batch mode. For example, you might use APM to mass update
commodity prices each night. If needed, the changes can be saved as a price proposal so that the
changes can be reviewed prior to posting them to SAP.
Variants
When you save a variant, enter the following information:
• Variant Name and Variant Text (description) • Default
A variant can be designated as the default that is displayed when you enter the transaction, but the screen layout can be changed as saved to that layout or saved as a new layout.
• Selection Fields List the selection fields, in the sequence they will appear. If needed, assign a Selection Type to the selection fields. Available selection types are: • T Table Variable from TVARVC, to populate the selection field using a value set up in a
selection variable.
Click on the Create Variable button to display the Selection Variables (TVARVC) table and set the variable value.
• D Dynamic Date Calculation, for dates to be derived dynamically
• Z Dynamic Time Calculation, for times to be derived dynamically
Procedures
Procedures can be defined in the Sheet Formulas and Procedures Workbench (/IRM/GPRFPM) to
automate manual price maintenance steps; procedure step types Set Values, Apply Policies, and Execute
Formulas are supported for APM and the Selection Type should be set to All Records. Procedures
containing any other step types will not appear in the Procedures field dropdown list.
Access
Transaction code: /IRM/GPR15
Structure
The Automated Price Maintenance transaction is organized into the following areas:
• Source, used to select the application and price sheet to be copied or processed. • Action
Click on a button to choose one of the following actions: • Copy, used to submit a job to copy condition records. For example, you can copy all prices to
a different customer. If the condition record being copied has text, click on the Copy texts checkbox to include the text in the copy.
• Process, used to submit a job to mass change rates, validity dates, currency, and units. For example, you can increase all fuel surcharge rates by 5%. You may also adjust the scales. For example, if the rate of the selected condition record(s) is increased and the adjust scales flag is enabled, the rate and scales will be adjusted accordingly.
Business Register
SAP Data Maintenance by Vistex, Pricing option for SAP S/4HANA by Vistex for SAP S/4HANA
Application Help – Version: 1.0 – Final
December 12, 2019
© 2019 Vistex, Inc. All Rights Reserved.
© 2019 SAP SE or an SAP affiliate company. All rights reserved.
When changing a rate, in the Set Rate pop-up check the New checkbox to create a new condition by copying the original record. The rate is changed only in the new record; the original record remains unchanged. Check the Adjust Scales checkbox to adjust the scales. For example, if the rate of the selected condition record(s) is increased and the adjust scales flag is enabled, it will adjust the rate and scales accordingly.
• Target, used to define the target price sheet when copying and map the target fields to the source fields. Use the Procedure field to apply a procedure to condition records. For this field, only the Set Values, Apply Policies, and Execute Formulas step types are supported.
• Set, used when processing to define values for the rate, validity dates, currency, and/or unit. When setting values for the rate, use the New flag to create new condition records from the selected existing condition records. If both the New and Adjust Scales flags are selected, new condition records will be created while adjusting the scales values. After rules are established and assigned to a price sheet, existing condition records can be processed against the rules to determine compliance.
Procedures
Copying Condition Records in Batch Mode
Changing Condition Record Values in Batch Mode
3.3.2.3.5 Reported Material
3.3.2.3.5.1 Reported Material Workbench
Definition
Use the Reported Material Workbench to create and maintain reported materials, and to list the date
ranges when each reported material replaces a specified ECC material.
The name of the reported material will appear in the calculation line item detail.
Access
Transaction code: /IRM/GRPMTM
Structure

1909 Pricing Documentation
The Reported Material Workbench screen is organized into the following areas:
• Search and Worklist Use the Search and Worklist to view a list of selected reported materials in a grid format. From the grid, click on a reported material name to display that template in focus in the Work Area.
• Work Area Use the Work Area to maintain one reported material. In the standard Vistex implementation, the Work Area contains the following tabs: • General
• Hierarchy, to assign the reported material to an ECC material for a specific date range. When a business register document is created, the system uses the reported material category of the IP type and the MATNR and pricing date of the line item to find the reported material in effect.
• Admin Data
NOTE: Functions accessed from the menu bar apply only to the reported material displayed in focus in
the Work Area and do not apply to the data in the Search and Worklist.
IMPORTANT: Because Vistex software is extremely versatile, the user screen may be customized. As a
result, the screen may appear different from the standard screen described in this document.
3.3.2.3.5.2 Upload/Download
Reported Material Upload
Definition
Use Reported Material Upload to create or change reported materials by uploading them from a file,
such as an Excel spreadsheet, rather than manually entering the data. Files can be uploaded from the
following locations:
• Desktop, to upload from the local PC • File submission, to upload based on a file submission entry • File server, to upload directly from the application server
You must specify a file template for the upload. File templates are created to control the fields and
format of files during upload. To create a file template, use the File Template for Reported Material
Workbench.
Access
Transaction code: /IRM/GRPMUPL

Business Register
SAP Data Maintenance by Vistex, Pricing option for SAP S/4HANA by Vistex for SAP S/4HANA
Application Help – Version: 1.0 – Final
December 12, 2019
© 2019 Vistex, Inc. All Rights Reserved.
© 2019 SAP SE or an SAP affiliate company. All rights reserved.
Procedure
Uploading Reported Materials
Download Reported Material
Definition
Use Download Reported Material to download selected reported material data to a specific file on a
desktop or file server. For large downloads, this transaction can be run as a background job.
You must specify a file template for the download. File templates are used to control the fields and
format of files during download. To create a file template, use the File Template for Reported Material
Workbench.
Access
Transaction code: /IRM/GRPMDNL
Procedure
Downloading Reported Material
File Template for Reported Material
Definition
Use File Template for Reported Material Workbench to create and maintain templates that control the
fields and format of reported material files during upload and/or download.
Access
Transaction code: /IRM/GRPMFTM
Structure
The File Template for Reported Material Workbench screen is organized into the following areas:
• Search and Worklist Use the Search and Worklist to view selected file templates in a grid format. From the grid, click on file template number to display that file template in focus in the Work Area.
• Work Area Use the Work Area to maintain one file template. In the standard Vistex implementation, the Work Area contains the following tabs:
1909 Pricing Documentation
• Section
• Mapping
• Conversion
• Submitter
• Crystal Layout, which is used with Crystal Reports
• Admin Data
NOTE: Functions accessed from the menu bar apply only to the file template displayed in focus in the
Work Area and do not apply to the data in the Search and Worklist.
Procedures
Displaying a File Template for Reported Material
Creating a File Template for Reported Material
Copying a File Template for Reported Material
Maintaining a File Template for Reported Material
Deleting a File Template for Reported Material
3.3.3 Government Pricing Sales Data
3.3.3.1 Delivered Objects
3.3.3.1.1 Transaction Filters
3.3.3.1.1.1 Definition
A manufacturer must be able to collate its sales and transactional data to include only eligible data in a
price calculation. In Business Register, you can filter the data by specific contracts, customers, vendors,
or products, or define domestic and international transactions. Transaction filtering is used to map
transactions to transaction types.
Transactions are mapped to one or more filters. The filters, in turn, are linked to transaction types.
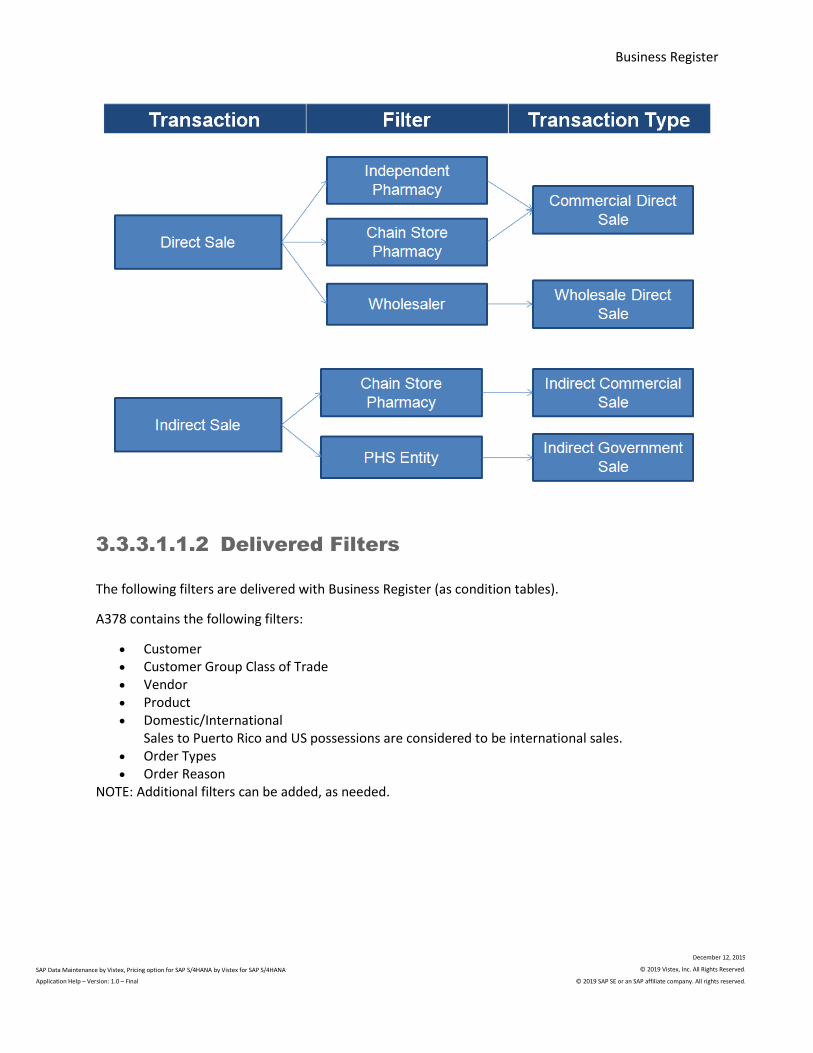
Business Register
SAP Data Maintenance by Vistex, Pricing option for SAP S/4HANA by Vistex for SAP S/4HANA
Application Help – Version: 1.0 – Final
December 12, 2019
© 2019 Vistex, Inc. All Rights Reserved.
© 2019 SAP SE or an SAP affiliate company. All rights reserved.
3.3.3.1.1.2 Delivered Filters
The following filters are delivered with Business Register (as condition tables).
A378 contains the following filters:
• Customer • Customer Group Class of Trade • Vendor • Product • Domestic/International
Sales to Puerto Rico and US possessions are considered to be international sales. • Order Types • Order Reason
NOTE: Additional filters can be added, as needed.
1909 Pricing Documentation
3.3.3.1.2 Business Register Document Types
The Business Register is similar to other Vistex documents (billbacks, chargebacks, sales incentives, sales
rebates, and purchasing rebates), except that it can be created by copying another document.
3.3.3.1.2.1 Delivered Document Types
The following business register IP types are delivered with Business Register:
• X901, Direct Sales • X902, Indirect Sales • X903, Rebates • X904, Indirect Non-purchasing Rebate • X911, Medicaid Rebate • X914, Sales Returns • X915, Non return Adjustments • X916, Tricare • X925, Alternative for deviations in Non-return Adjustments • X926, Alternative for deviations in Direct Sales
3.3.3.2 Sales Data Procedures
3.3.3.2.1 Capturing Sales Data
3.3.3.2.1.1 SAP Sales Data
SAP data, such as invoices, sales orders, delivery documents, and purchase orders are copied to business
register documents using copy control routines. These routines typically are run daily. Any Vistex
documents in the system, such as chargebacks, also are copied into the business register.
Business Register
SAP Data Maintenance by Vistex, Pricing option for SAP S/4HANA by Vistex for SAP S/4HANA
Application Help – Version: 1.0 – Final
December 12, 2019
© 2019 Vistex, Inc. All Rights Reserved.
© 2019 SAP SE or an SAP affiliate company. All rights reserved.
3.3.3.2.1.2 External Sales Data
Data from external sources can be entered into Business Register using Transaction Documents. After the
data is entered in the system, the transaction documents are copied into business register documents
using a copy control routine.
3.3.3.2.2 Filtering and Aggregating Sales Data
3.3.3.2.2.1 Class of Trade (COT) Filter
The Customer Class of Trade (COT) is one of the primary delivered filters used in Business Register. To
determine how the transactions will be aggregated, a predefined price sheet is used to link a COT to a
sales organization, customer group, IP (sale) type, and transaction type. Each combination is assigned an
effectivity date range.
An aggregation then is linked to the subcomponents of the price type calculation, to determine how the
aggregated data is used in the price type calculation.
NOTE: Only COT values defined in master data can be included in a specific aggregation.
3.3.3.2.2.2 Procedure
Assigning a COT to a Transaction Aggregation
1. Access transaction code /IRM/IPGTTCS Price Type Condition Search.
2. Under Transaction Type (Sales), click on transaction type X980.
3. Select the filter, such as Customer Group - COT.
4. Click on the Create button.
5. To manually enter values, click on the Entries button to add more lines. For each line,
select a Sales Type, assign it to the filter, and assign it to a transaction type. Enter effectivity
dates in the Valid From and Valid To fields.
To import values from a spreadsheet, click on the on the Import Price Record button.
6. Save the data.

1909 Pricing Documentation
NOTE: If needed, you may override a historical customer COT. On s new line, enter the correct COT. The
override COT must exist in the customer master. All overrides can have a defined effectivity.
3.3.3.3 Sales Data Transactions
3.3.3.3.1 Transaction Documents
3.3.3.3.1.1 Transaction Document Overview
Overview
The transaction document is used to bring external transactions into the system. A transaction
document can be received in a flat file such as an Excel spreadsheet or text file, directly on the
manufacturer’s website, through electronic data interchange (EDI), by fax, email or phone. When the
transaction document is submitted using a flat file, fax, email or phone, it must be entered in the
manufacturer’s system.
NOTE: Although this help documentation often refers to the partners involved in a transaction
document as a manufacturer and distributor, the partners may also be known by other names such as a
vendor and wholesaler.
Definition
A transaction document is used to record the partner's incoming external transactions in the system for
any purpose. When a partner sends in transactions, then those original transactions must be recorded
as is in the system. This is done so that the manufacturer has a copy of the original transactions
submitted by the distributor. A transaction document is similar in architecture to a claim; however a
transaction document is more flexible because it allows materials and quantities to be made optional
through configuration. A transaction document can be used for sales or purchasing transactions.
Transactions can be transmitted in the following ways:
• Excel spreadsheet or text file When a distributor submits a transaction document as a spreadsheet or text file, the file can be uploaded to the ERP system using Upload Transaction (/IRM/GRCAUPL) or the Transaction
Workbench. Upload Transaction can use a configured document template to create the

Business Register
SAP Data Maintenance by Vistex, Pricing option for SAP S/4HANA by Vistex for SAP S/4HANA
Application Help – Version: 1.0 – Final
December 12, 2019
© 2019 Vistex, Inc. All Rights Reserved.
© 2019 SAP SE or an SAP affiliate company. All rights reserved.
transaction documents from the uploaded data or can be used manually to dynamically create the transaction document.
• Manufacturer’s Website The distributor can submit a transaction document using the manufacturer’s Website by entering all the information online. After the transaction document is entered, the distributor may also use the Website to review the status of the submitted transaction document.
• Electronic Data Interchange (EDI) / IDoc If the distributor and manufacturer are using different computer systems, the distributor can submit a transaction document using EDI to create a transaction document in the ERP system. If both the distributor and manufacturer use SAP, the transaction document can be submitted using an IDoc type.
• Fax, email or phone If the distributor faxes the transaction document, then the transaction document must be created manually by entering all the information in the Transaction Workbench transaction (/IRM/GRCAM).
When a transaction document is created in the system, the document is checked to ensure the
authenticity of the submitted data. If the transaction document contains errors or an invalid material, a
rejection reason should be entered on the corresponding line item(s) before the document is posted. A
posted transaction document is eligible to be used as a source document for business register document
creation. The transaction document is further validated to ensure that the amounts are correct, and
within or outside a configured tolerance. A business register document is then created using the
transaction document as a source document, and the business register document is accrued and settled
in order to credit the distributor for the submitted transaction document.
Transaction Packages
If a transaction document contains so many line items that processing time is slowed, it can be divided
into a parent transaction document and a series of packages (child transaction documents). The parent
transaction document is the source document used to create the business register document.
In configuration of the transaction type, activate packages and set the package size. The package size is
configured to specify the number of line items that will appear in each package. For example, a
transaction document with 50,000 lines on it can be broken up into packages containing 5,000 lines on
each. In the Parameters transaction (Customer: /IRM/IPBRCSP or Vendor: /IRM/IPBRVSP), select the
Settle by Source Document checkbox to ensure that all packages are settled on the same settlement
document. Settlement transaction selection must select all child transaction documents. Packages can
accrue separately and can settle separately.
A transaction package can only be created with EDI or Upload Transaction (/IRM/GRCAUPL). The parent
transaction document contains header information only. Line items are added to the packages, which
are listed in the Package tab of the parent transaction document. Click a package number to view its

1909 Pricing Documentation
details in the item grid. The Package tab only appears on transaction documents that contain packages.
Click a package number to view its details in the item grid.
NOTE: Whenever transaction documents are searched by either the parent transaction document or the
child transaction documents, only the parent transaction document appears in the results.
Transaction Resubmission
The resubmission of a transaction document may be necessary when a previously denied or short-paid
transaction document is returned by the distributor back to the manufacturer, or errors are found in the
original source document. The manufacturer may then choose to pay out additional amounts while
referencing the original transaction document.
Lines for resubmission must be highlighted using the original transaction document. Resubmission
creates a new transaction document that contains only the line items being resubmitted, and uses a pre-
delivered formula to calculate changed line item values. The new transaction document references the
original document and determines the already settled amount on the line item.
Resubmissions also may be created manually, from a file that includes line item detail, from a file with
header and line item detail, from an IDoc, or using Automated Document Maintenance (ADM).
3.3.3.3.1.2 Transaction Document
Documentation for transaction documents is available for the following screen formats:
• UI Application (SAP Fiori) • SAP GUI
3.3.3.3.1.3 Upload/Download
Upload Transaction
Definition
Use Upload Transaction to import transaction documents from a file, such as an Excel spreadsheet,
rather than manually entering the data. Files can be uploaded from the following locations:
• Desktop, to upload from the local PC

Business Register
SAP Data Maintenance by Vistex, Pricing option for SAP S/4HANA by Vistex for SAP S/4HANA
Application Help – Version: 1.0 – Final
December 12, 2019
© 2019 Vistex, Inc. All Rights Reserved.
© 2019 SAP SE or an SAP affiliate company. All rights reserved.
• File submission, to upload based on a file submission entry • File server, to upload directly from the application server
You must specify a file template for the upload. File templates control the fields and format of files
during upload. To create a file template, use the File Template for Transaction Workbench.
NOTE: To maintain a list of specific field values for the upload, without changing the file template, use
the Criteria for Transaction Workbench (/IRM/GRCACM). Enter the name assigned to the criteria in the
Criteria field. If needed, click on the Display Criteria button to view that criteria in a pop-up window.
Access
Transaction code: /IRM/GRCAUPL
Procedure
Uploading Transactions
Download Transaction
Definition
Use Download Transaction to download selected transaction data to a specific file on a desktop or file
server. For large downloads, this transaction can be run as a background job.
You must specify a file template for the download. File templates are used to control the fields and
format of files during download. To create a file template, use the File Template for Transaction Workbench.
Access
Transaction code: /IRM/GRCADNL
Procedure
Downloading Transactions
File Template for Transaction
Definition
Use File Template for Transaction Workbench to create and maintain templates that control the fields
and format of transaction document files during upload and/or download.
Access

1909 Pricing Documentation
Transaction code: /IRM/GRCAFTM
Structure
The File Template for Transaction Workbench screen is organized into the following areas:
• Search and Worklist Use the Search and Worklist to view selected file templates in a grid format. From the grid, click on file template number to display that file template in focus in the Work Area.
• Work Area Use the Work Area to maintain one file template. In the standard Vistex implementation, the Work Area contains the following tabs: • Section
• Mapping
• Conversion
• Submitter
• Crystal Layout, which is used with Crystal Reports
• Admin Data
NOTE: Functions accessed from the menu bar apply only to the file template displayed in focus in the
Work Area and do not apply to the data in the Search and Worklist.
Procedures
Displaying a File Template for Transaction
Creating a File Template for Transaction
Copying a File Template for Transaction
Maintaining a File Template for Transaction
Deleting a File Template for Transaction
3.3.3.3.2 Business Register Documents
3.3.3.3.2.1 Business Register Document
Overview
Business Register documents can be created using one of the following source documents:
• Billing documents

Business Register
SAP Data Maintenance by Vistex, Pricing option for SAP S/4HANA by Vistex for SAP S/4HANA
Application Help – Version: 1.0 – Final
December 12, 2019
© 2019 Vistex, Inc. All Rights Reserved.
© 2019 SAP SE or an SAP affiliate company. All rights reserved.
• Claims • Delivery documents • Business register or composite postings • Purchasing documents • Sales documents • Transaction document, if external transactions are brought into the system
The information derived from these source documents includes the following:
• General information about the end sale (invoice number, agreement complied with, reason for claim, deductions)
• All partners involved in the sales transaction • Product pricing • Material information (quantity, rate, currency, unit of measure)
In addition to the source document, data in the business register document originates from master
records (such as the customer, vendor, and material masters) and control settings in configuration. In
addition, data determined from the master records and source documents can be extended or modified
by using routines defined in the VOFM Data Transfer and Requirements transaction /IRM/GVOFM.
Control Settings of a Business Register Document
Creation of a business register document is controlled using the data set up in configuration:
• Sales area of the source document Concatenation of the sales organization, distribution channel, and division
• Partner functions from source documents The business register document(s) can be created for every incoming claim or incoming transaction based on the partners on the source document.
• Source Document Category and Type At times, it may be required that business register documents are created only for certain source document types.
• IP Type The IP type primarily controls whether the business register document is incoming (calculating an expense) or outgoing (calculating an income).
• Item Category from Source Documents Only certain items from the source documents may be eligible for inclusion in the business register document. This is controlled by the item categories in the source document in conjunction with the IP type.
Accrual and settlement of a business register document are controlled using the following profiles
maintained in configuration:
• Accrual Profile The accrual profile controls how the income/expense is posted, as well as the FI document type and posting keys used during the accrual. It is also important to specify a Clearing Account to record the income/expense to until the business register document is settled.
• Settlement Profile The settlement profile controls whether the actual settlement takes place as Accounts Payable or Account Receivable and the FI document type used during settlement.

1909 Pricing Documentation
Business Register Functions
Business register documents can be processed using the Business Register Workbench, search and process
transactions, or mass processing transactions. The following functions can be performed on a
document:
• Cancel and reverse cancel • Delete • Reprice • Re-create • Park and reverse park • Accrue and reverse accrue • Settle and reverse settle • Adjust after settlement
Document Log
If configured, the system records a snapshot of the business register at the time accrual, parking, or
settlement (and the corresponding reversals) were performed. These logs can be accessed from the
workbench. Click on the Document Flow button to display the Document Flow dialog window. In
the window, click on the accrual, parking, or settlement document number to view that document. From
the document, click on the Display Log Documents button to view the log.
The system creates logs only for the functions specified in configuration. In the IP Type configuration,
check one or more of the following checkboxes: Log Accrual, Log Parking, and Lot Settlements. Also
specify the Log Range Interval (used for both transaction and composite logs).
Repricing
Pricing of a document is based on standard SAP pricing. Tolerances for amounts can be incorporated, as
needed. If pricing data changes (such as prices on the source document or agreement), the document
can be repriced until settlement takes place. Repricing updates the existing business register and does
not affect pricing on the source document.
NOTE: The business register document can be repriced even after the source document has been
archived. A flag in configuration specifies that the system will not read the source document after the
business register document has been created.
Repricing updates the current document to reflect the most recent pricing changes made to an
agreement or source document. Repricing is needed if the following change:
• Agreement r changes after the sale, during reconciliation, or after accrual Changes in the agreement may be due to a change in the conditions tied to the agreement. This, in turn, would affect the pricing of the items on the business register document.
• Item pricing in the source document changes after the business register document has been created If the document has been accrued then after repricing it is required to accrue the document again due to a change in the amount.
Under the following circumstances, Repricing will create additional business register documents for
missed/invalid items (if chargeback already exists). As a result, running Recreating may not be needed:

Business Register
SAP Data Maintenance by Vistex, Pricing option for SAP S/4HANA by Vistex for SAP S/4HANA
Application Help – Version: 1.0 – Final
December 12, 2019
© 2019 Vistex, Inc. All Rights Reserved.
© 2019 SAP SE or an SAP affiliate company. All rights reserved.
• If a new agreement was added, Repricing will create a business register document for that agreement.
• If an invalid item is now valid, Repricing will create a business register document for that item. • If the original billing document was split, when a new item is added to the billing document,
Repricing will create business registers for that item. Repricing cannot be carried out if repricing is blocked on the business register document. To find if the
document has a repricing block, go to the Admin tab of the header data of the business register
document.
Re-creating
Re-creating the business register may be needed if data other than pricing data changes on the source
document or agreement. The system deletes the original business register (physical delete if no
accounting document is linked to the business register or soft delete if accounting documents are linked
to the business register) and creates a new document using the most current data. If the business
register has been accrued or settled, then a reverse accrual/settlement must occur before the document
can be re-created.
3.3.3.3.2.2 Business Register Workbench
Definition
The Business Register Workbench can be used to create and maintain business register documents.
After a document is created, you can use the workbench to perform the following functions on the
document:
• Delete • Cancel and reverse cancel • Reprice • Re-create • Accrue and reverse accrue (transactional only) • Park and reverse park • Settle and reverse settle (transactional only) • Adjust after settlement (transactional only)
NOTE: To perform functions on a large volume of documents, use the search and process or mass
processing programs.
Access
Transaction code: /IRM/IPBRM

1909 Pricing Documentation
Structure
The Business Register Workbench is organized into the following areas:
• Search and Worklist Use the Search and Worklist to view selected documents in a grid format. From the grid, click on a document number to display that document in focus in the Work Area.
• Work Area Use the Work Area to maintain one document. In the standard Vistex implementation, the Work Area contains the following tabs: • Header, which displays general information about the document. None of the fields are
editable.
• Partners
• Status
• Notes
• Admin Data
NOTE: Functions accessed from the menu bar apply only to the document displayed in focus in the Work
Area and do not apply to the data in the Search and Worklist.
IMPORTANT: Because Vistex software is extremely versatile, the user screen may be customized. As a
result, the screen may appear different from the standard screen described in this document.
The following graphic displays the basic elements of the Business Register Workbench. Please note that
the graphic is not drawn to scale.
Procedures
Displaying a Business Register Document
Creating a Business Register Document
Maintaining a Business Register Document
Repricing a Business Register Document

Business Register
SAP Data Maintenance by Vistex, Pricing option for SAP S/4HANA by Vistex for SAP S/4HANA
Application Help – Version: 1.0 – Final
December 12, 2019
© 2019 Vistex, Inc. All Rights Reserved.
© 2019 SAP SE or an SAP affiliate company. All rights reserved.
Re-creating a Business Register Document
Accruing (or Reverse Accruing) a Business Register Document
Settling (or Reverse Settling) a Business Register Document
Adjusting a Business Register Document After Settlement
Viewing a Change Log for Individual Business Register Documents
Generating a Change Log for Multiple Business Register Documents
Cancelling a Business Register Document
Reverse Cancelling a Business Register Document
Deleting a Business Register Document
Viewing Business Register User Settings
Viewing the Agreement Log
3.3.3.3.2.3 Business Register Document Processing
Business Register documents can be processed using the Business Register Workbench or batch
processing transactions.
Business Register Workbench
Use the Business Register Workbench to perform the following functions:
• Create a business register from a single source document • Maintain an existing business register • Reprice one or multiple selected business registers • Accrue or reverse accrue • Park or reverse park • Settle or reverse settle • Cancel or delete one or multiple selected business registers
If the business register has no accounting documents attached to it, the system performs a
physical delete. The business register is completely removed from the database. If accounting
documents are attached to the business register, the system soft deletes the document. The
document still exists in the database but is inactive.
Batch Processing
Business register documents can be created for a range of source documents using the Search and
Process or Mass Processing transactions.
Search and Process
Search and Process transactions display a list of documents that satisfy the search criteria. After further
selection, the list is sent for processing.
1909 Pricing Documentation
The following Search and Process transactions are available:
• Process Claims /IRM/IPBR30 • Process Billing Documents /IRM/IPBR31 • Process Sales Documents /IRM/IPBR32 • Process Delivery Documents /IRM/IPBR37 • Process Purchasing Documents /IRM/IPBR38 • Process Transactions /IRM/IPBR39 • Process Business Register /IRM/IPBR33
Mass Processing
For mass processing transactions, all the documents that satisfy the search criteria are directly processed
without being displayed.
The following Mass Processing transactions either can be run on demand or scheduled to run as
background batch jobs:
• Mass Processing of Claims /IRM/IPBR20 • Mass Processing of Billing Documents /IRM/IPBR21 • Mass Processing of Sales Documents /IRM/IPBR22 • Mass Processing of Delivery Documents /IRM/IPBR27 • Mass Processing of Purchasing Documents /IRM/IPBR28 • Mass Processing of Transactions /IRM/IPBR29 • Mass Processing of Business Register /IRM/IPBR23
Document Index Processing
If changes to agreements and pricing condition records affect a large number of business register
documents, the collective processing of all source documents for functions such as repricing and re-
creation can be very processing intensive.
If the affected source documents are already known, they can be recorded in the Document Index table
to ensure faster processing of business register documents. The Document Index table entries can be
accessed/maintained using transaction /IRM/IPGINDX.
Document Index Processing is used during the mass processing transactions with source documents. In
these transactions, the Doc Index checkbox is selected if the Document Index table is to be used as a
search criterion. If checked, then only source documents in the Document Index table will be selected
for document processing. These documents must be within the specified source document range, as
well as have the same function and IP type specified in the selection criteria screen.
Procedures
Displaying the Document Index Table
Adding an Entry to the Document Index Table
Deleting an Entry from the Document Index Table

Business Register
SAP Data Maintenance by Vistex, Pricing option for SAP S/4HANA by Vistex for SAP S/4HANA
Application Help – Version: 1.0 – Final
December 12, 2019
© 2019 Vistex, Inc. All Rights Reserved.
© 2019 SAP SE or an SAP affiliate company. All rights reserved.
3.3.3.3.2.4 Business Register Mass Processing
Run the mass processing transactions to submit documents for processing without previewing the
selected list of documents. Mass processing can be carried out online or in the background.
Use one of the following mass processing transactions to process business register documents,
depending on the source documents to be used:
• Mass Processing of Claims /IRM/IPBR20 • Mass Processing of Billing Documents /IRM/IPBR21 • Mass Processing of Sales Documents /IRM/IPBR22 • Mass Processing of Delivery Documents /IRM/IPBR27 • Mass Processing of Purchasing Documents /IRM/IPBR28 • Mass Processing of Transactions /IRM/IPBR29 • Mass Processing of Business Registers /IRM/IPBR23
Message Log
When you run mass processing in background, select the kind of messages you want the system to
capture while the task is being processed in the background. A message log is saved to the database for
further analysis.
To view the message log, access the transaction /IRM/IPBRLOG. Enter the message log number, if
known, or enter other search criteria and click on the Execute button to list the message logs that
match the search criteria. To view a particular message log on the list, double click on the log.
NOTE: To locate the message log number, you may use the standard SAP transaction Simple Job
Selection (SM37) to view the job log. Execute the job for the user ID. On the Job Overview screen, select
the job and then click on the Job Log button. One of the entries in the job log specifies the message log
number.
Procedures
Creating Business Register Documents
Maintaining Business Register Documents
Repricing Business Register Documents
Re-creating Business Register Documents
Accruing Business Register Documents
Settling Business Register Documents
Cancelling Business Register Documents
Reverse Cancelling Business Register Documents
Deleting Business Register Documents
Generating a Change Log for Multiple Business Register Documents
1909 Pricing Documentation
3.3.3.3.2.5 Business Register Search and Process
Run the search and process transactions to preview (and adjust) the selected list of documents before
submitting the documents for processing.
Use one of the following search and process transactions to process business registers, depending on the
source documents to be used:
• Process Claims /IRM/IPBR30 • Process Billing Documents /IRM/IPBR31 • Process Sales Documents /IRM/IPBR32 • Process Delivery Documents /IRM/IPBR37 • Process Purchasing Documents /IRM/IPBR38 • Process Transactions /IRM/IPBR39 • Process Business Register /IRM/IPBR33
Procedures
Maintaining Business Register Documents
Repricing Business Register Documents
Re-creating Business Register Documents
Accruing Business Register Documents
Settling Business Register Documents
Cancelling Business Register Documents
Deleting Business Register Documents
Generating a Change Log for Multiple Business Register Documents
3.3.3.3.2.6 Business Register Reports
Process Management Reports
The following process management reports are provided:
• Price Type Trend Analysis, to compare a price type across periods • Price Type Compare, across price types for a given period • Unit Rebate Amount Detail • Nominal Sales, lists all sales for which prices are less than 10% of the WAC
Standard DDR Reports
The following standard reports are provided:
• Non-state Specific: • Monthly AMP
• Quarterly AMP, BP, NP, PP Price

Business Register
SAP Data Maintenance by Vistex, Pricing option for SAP S/4HANA by Vistex for SAP S/4HANA
Application Help – Version: 1.0 – Final
December 12, 2019
© 2019 Vistex, Inc. All Rights Reserved.
© 2019 SAP SE or an SAP affiliate company. All rights reserved.
• Quarterly NonFAMP
• Quarterly ASP Addendum A
• Annual NonFAMP
• DDR Drug Product
• State Specific: • Quarterly PA PACE (text and Excel file)
• Quarterly Maine AMP BP
• Quarterly Vermont AMP-BP-WAC
• Quarterly California AMP BP
• New York Epic Product
• Quarterly New York Epic Price
• Quarterly Texas Price File
• Annual New Mexico Submission File
Medicaid Reports
Reports
The following standard Medicaid reports can be configured as required:
• Medicaid Rebate Status • Unit Rebate Amount • Medicaid Dispute
Smart Forms
The following Smart forms are delivered with Business Register:
• Reconciliation of State Invoice (ROSI) - smart form /IRM/BR_ROSI_SF The invoice submitted by the manufacturer to the state agency. The report details the current quarter's rebates, by NDC.
• Prior Quarter Adjustment Statement (PQAS) - smart form /IRM/BR_PQAD_SF The statement used for reporting discrepancies found in the previous quarter.
1909 Pricing Documentation
3.3.4 Government Pricing Processing
3.3.4.1 Delivered Objects
3.3.4.1.1 Business Register Price Types
Each Business Register price type is preset as a deployment code, which has preassigned tracking
components. User-determined subcomponents are assigned, as needed.
3.3.4.1.1.1 Delivered Price Types
The following standard government price types are delivered in Business Register:
• mAMP, monthly Average Manufacturer Price (deployment code 9000000) calculated at the drug level
The mAMP price type derives the average price at the unit dose (such as tablet) size that would be
charged to the end user through the retail pharmacy class of trade. It utilizes direct, indirect, and
various fee and rebate payments to derive the final calculation.
Since indirect and rebate sales usually lag behind the actual current period direct sales, the last 12
months of lagged sales are accumulated and a ratio derived between the last twelve months of
accumulated sales and the last 12 months of lagged sales. Those ratios are used to determine the
amount of indirect sales that should be removed from the current direct sales. The same will be
done with the other lagged data.
The system also can unbundle sales made based on bundling agreements or promotions. By
having access to the agreement pricing that generated the bundled sale, the system can unbundle
the sale transaction and ensure the sales data attributable to each part of the of the bundle is
applied properly in the price type.
• qAMP, quarterly Average Manufacturer Price (deployment code 9000001) The qAMP price type is the average of the individual mAMP prices calculated for the quarter. First
Quarter AMP would be the average of the mAMPs for January, February, and March. This final
price is used by CMS and the manufacturer in the Unit Rebate Amount used in Medicaid
calculations to determine rebate amounts.
This price type has two calculation methodologies because different companies have interpreted
the rule in different ways:

Business Register
SAP Data Maintenance by Vistex, Pricing option for SAP S/4HANA by Vistex for SAP S/4HANA
Application Help – Version: 1.0 – Final
December 12, 2019
© 2019 Vistex, Inc. All Rights Reserved.
© 2019 SAP SE or an SAP affiliate company. All rights reserved.
• The first methodology takes the results of the monthly calculations and sums the final summary numbers (final eligible dollars and final eligible numbers) and then divides them by three.
• The second methodology performs the same calculation on the quarterly AMP using three months of data as you would on the monthly AMP.
• BPR, quarterly Best Price (deployment code 9000002) The BPR price type is designed to find the best price that the manufacturer offers to the retail
class of trade, taking into account all rebates, chargebacks, discounts, or other pricing
adjustments, excluding nominal prices. It uses the same source data but different aggregations to
produce its output. This data is used for tracking the best commercial price.
• URA, quarterly Unit Rebate Amount (deployment code 9000003) - used for Medicaid Rebates The government mandated URA calculations are performed using the quarterly AMP, quarterly
BPR, and CPI-U data.
• Generic drugs = quarterly AMP x mandated percent (currently 13 %)
• Pediatric Only or Clotting Factor drugs = posted quarterly AMP x 17.1 %
• Branded drugs = greater of quarterly AMP x 23.1 percent OR AMP-BP. An inflation penalty may be added if the drug price has risen faster than the rate of inflation.
• ASP, quarterly Average Sales Price (deployment code 9000004) The ASP price type takes the same source data and changes how some of the aggregations are
used in the calculation. The results of this calculation are used by CMS to determine pricing for
drugs used by Medicare recipients.
• NFAMP, quarterly non-Federal AMP (deployment code 9000005) On a quarterly basis, NFAMP is run to determine if any prices for the items on the Federal Supply
Schedule (FSS) contract have changed when compared to the annual NFAMP. Based on the
outcome changes to the FSS contact may be submitted to the VA. This again is calculated and
presented much the same as the monthly AMP calculation. The only difference is how the filtering
is defined. Additional transactional data is defined as nongovernmental retail sales. This price type
can also be configured as using actual transactional data with no smoothing methodology used or
using the same smoothing that is used for the other price type calculations
• NFAMP, annual non-Federal AMP (deployment code 9000006) The annual NFAMP price type is generated on an annual basis at the end of the third quarter. It is
a key price type used to calculate and track the price that will be charged for branded product on
the Federal Supply Schedule (FSS) contract which is managed by the VA for the Federal
Government Big Three (DoD, VA, Coast Guard). It is calculated and presented much the same as
the monthly AMP calculation. The only difference is how the filtering is defined. Additional
transactional data is defined as nongovernmental retail sales. This price type can also be
configured as using actual transactional data with no smoothing methodology used or using the
same smoothing that is used for the other price type calculations
• FCP, annual Federal Ceiling Price (deployment code 9000007)
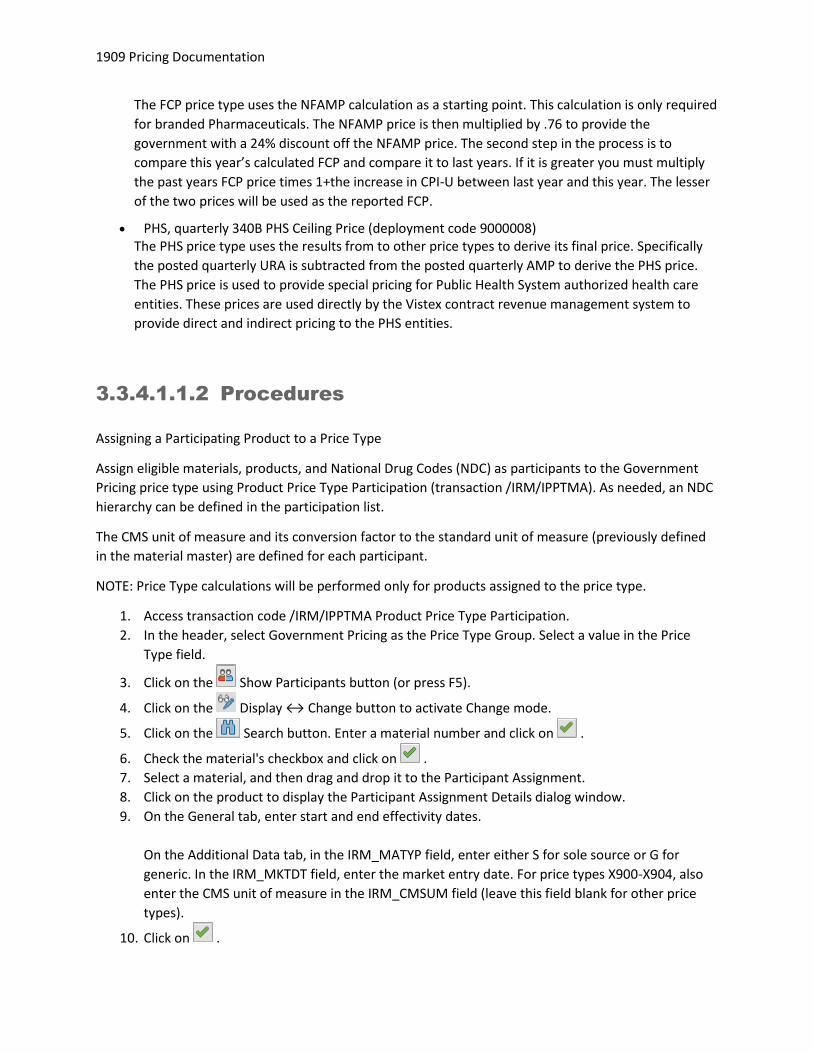
1909 Pricing Documentation
The FCP price type uses the NFAMP calculation as a starting point. This calculation is only required
for branded Pharmaceuticals. The NFAMP price is then multiplied by .76 to provide the
government with a 24% discount off the NFAMP price. The second step in the process is to
compare this year’s calculated FCP and compare it to last years. If it is greater you must multiply
the past years FCP price times 1+the increase in CPI-U between last year and this year. The lesser
of the two prices will be used as the reported FCP.
• PHS, quarterly 340B PHS Ceiling Price (deployment code 9000008) The PHS price type uses the results from to other price types to derive its final price. Specifically
the posted quarterly URA is subtracted from the posted quarterly AMP to derive the PHS price.
The PHS price is used to provide special pricing for Public Health System authorized health care
entities. These prices are used directly by the Vistex contract revenue management system to
provide direct and indirect pricing to the PHS entities.
3.3.4.1.1.2 Procedures
Assigning a Participating Product to a Price Type
Assign eligible materials, products, and National Drug Codes (NDC) as participants to the Government
Pricing price type using Product Price Type Participation (transaction /IRM/IPPTMA). As needed, an NDC
hierarchy can be defined in the participation list.
The CMS unit of measure and its conversion factor to the standard unit of measure (previously defined
in the material master) are defined for each participant.
NOTE: Price Type calculations will be performed only for products assigned to the price type.
1. Access transaction code /IRM/IPPTMA Product Price Type Participation.
2. In the header, select Government Pricing as the Price Type Group. Select a value in the Price
Type field.
3. Click on the Show Participants button (or press F5).
4. Click on the Display ↔ Change button to activate Change mode.
5. Click on the Search button. Enter a material number and click on .
6. Check the material's checkbox and click on .
7. Select a material, and then drag and drop it to the Participant Assignment.
8. Click on the product to display the Participant Assignment Details dialog window.
9. On the General tab, enter start and end effectivity dates.
On the Additional Data tab, in the IRM_MATYP field, enter either S for sole source or G for
generic. In the IRM_MKTDT field, enter the market entry date. For price types X900-X904, also
enter the CMS unit of measure in the IRM_CMSUM field (leave this field blank for other price
types).
10. Click on .
Business Register
SAP Data Maintenance by Vistex, Pricing option for SAP S/4HANA by Vistex for SAP S/4HANA
Application Help – Version: 1.0 – Final
December 12, 2019
© 2019 Vistex, Inc. All Rights Reserved.
© 2019 SAP SE or an SAP affiliate company. All rights reserved.
11. Save the participant.
Linking Aggregations to Price Type Subcomponents
1. Access transaction code /IRM/IPCWB.
2. In the Workbench Selection dialog window, select Business Register in the IP Application field.
3. Click on the Execute button.
4. In the Deployment Codes section of the elements tree, click on the price type to display the
components for that price type in the Work Area.
5. In the Assigned Components section of the Work Area, click on a subcomponent number
(Subcmpt field) to view the Maintain Subcomponents dialog window. Enter the transaction
types to be used in that part of the calculation and save the list. If needed, enter effectivity
dates for the aggregation. If the date fields are blank, the aggregation is considered available
from when the aggregation was defined until infinity.
6. Repeat step 5 for each subcomponent.
7. Save the changes
Reviewing a Price Type Calculation
1. Access transaction code /IRM/IPCWB.
2. In the Workbench Selection dialog window, select Business Register in the IP Application field.
3. Click on the Execute button.
4. In the Deployment Codes section of the elements tree, click on the price type to display the
components for that price type in the Work Area.
5. For the subcomponent, click on the Formula icon in the CPD Formula field.
3.3.4.1.2 Business Register Deployment Codes
Each Business Register price type is preset as a deployment code.
3.3.4.1.2.1 Delivered Deployment Codes
Following is a list of deployment codes included in Business Register:
• X9000000, AMP Monthly Calculation

1909 Pricing Documentation
• X9000001, AMP Quarterly Calculation • X9000002, Best Price Calculation • X9000003, URA Calculation • X9000004, ASP Quarterly Calculation • X9000005, NFAMP Quarterly Calculation • X9000006, NFAMP Annual Calculation • X9000007, FCP Calculation • X9000008, 340B • X9000011, Annual FSS
3.3.4.2 Processing Procedures
3.3.4.2.1 Calculating Prices
3.3.4.2.1.1 Definition
Use the transaction Calculation Run Mass Create for Price Type to calculate prices for all or selected
materials for a price type. A calculation run is a snapshot of calculated prices for a price type, and can be
sent through a configured approval process prior to posting.
The price types must be calculated in a specific sequence, beginning with the Monthly AMP.
3.3.4.2.1.2 Access
Transaction code: /IRM/IPPTCRCMP
3.3.4.2.1.3 Procedure
Calculating Prices for a Price Type
1. Access transaction code /IRM/IPPTCRCMP.
2. In the General Information section, enter the Price Type. Select the material(s).
3. In the Calculation Run section, select a Calculation Run Type and enter a Description.
Business Register
SAP Data Maintenance by Vistex, Pricing option for SAP S/4HANA by Vistex for SAP S/4HANA
Application Help – Version: 1.0 – Final
December 12, 2019
© 2019 Vistex, Inc. All Rights Reserved.
© 2019 SAP SE or an SAP affiliate company. All rights reserved.
4. Click on the Execute button to create the Calculation Run.
5. A message will appear indicating that the pricing has been completed.
3.3.4.2.2 Analyzing the Results
3.3.4.2.2.1 Definition
Use Individual Tracking to review and analyze the results of the Calculation Run. The layout of the
tracking screen is delivered for each price type.
From the tracking screen you can perform the following:
• For each component, view the data used to derive the price, including any subcomponents attached to the component.
• From the detail, drill down to a specific business register document, and from there trace back to view the original transaction document.
• Perform basic modeling to simulate the impact of anticipated changes, such as higher rebates, increased PHS sales, or a product coming off patent. The first component displayed will be the modeling component.
3.3.4.2.2.2 Tracking Screen Components
Monthly AMP and Quarterly AMP
The following components appear on both the monthly and quarterly AMP tracking screens:
• Indirect Retail Sales • Direct Wholesale Sales
• Lagged Indirect Exempt Sales The system calculates the ration of the last 12 months of exempt sales divided by the last 12 months of eligible sales. The ration then is applied to the current period eligible sales to determine what sales should be exempt from the current period.
• Legged Retail Chargebacks This component is used to reduce the total value of retail sales by the chargeback paid to the wholesaler for indirect sales to retail entities. The chargeback amount is based on the
1909 Pricing Documentation
difference between the amount the wholesaler paid for the product and the price charged the customer, based on the contract with the manufacturer.
• Lagged Wholesale Rebates This component reduces the total value of retail sales by the rebates paid to the wholesalers.
• Lagged Bundled Adjustments For bundled sales, the value of the discounts is reallocated between the products.
• Direct Retail Sales • Direct Retail Sales
This component is the total of sales made directly to a retail class of trade customers, as defined in the transaction type filter.
• Lagged Retail Rebates This component generates a deduction for the current period based on a ratio of the last 12 months of rebates to the total retail sals for the last 12 months. This ration is applied against current period sales to calculate the rebate amount to be deducted from the current period retail sales.
• Lagged Bundled Adjustments For bundled sales, the value of the discounts is reallocated between the products.
• Rebates These rebates primarily are managed care rebates, which are lagged transactions.
• Average Manufacturer Price This component displays a summary.
Best Price
The following components appear on the Best Price tracking screen:
• Direct Sales • Indirect Sales • Non Purchasing Rebates • Lagged Wholesale Rebates • Best Price
This component provides a summary. URA Calculation
The following component appears on the URA Calculation tracking screen:
• Unit Rebate Amount ASP Quarterly Calculation
The following components appear on the quarterly ASP tracking screen:
• Direct Commercial Sales • Lagged Indirect Exempt Sales • Additional Discounts
• Lagged Commercial Chargebacks
• Lagged Commercial Rebates

Business Register
SAP Data Maintenance by Vistex, Pricing option for SAP S/4HANA by Vistex for SAP S/4HANA
Application Help – Version: 1.0 – Final
December 12, 2019
© 2019 Vistex, Inc. All Rights Reserved.
© 2019 SAP SE or an SAP affiliate company. All rights reserved.
• Lagged Cash Discounts
• Lagged Admin Fees
• Lagged Bundled Adjustments • Average Sales Price
This component provides a summary. Quarterly NFAMP and Annual NFAMP
The following components appear on the quarterly and annual NFAMP tracking screens:
• Direct Wholesale Sales • Lagged Indirect Exempt Sales • Additional Discounts
• Lagged Wholesale Chargebacks
• Lagged Wholesale Rebates
• Lagged Wholesale Cash Discount
• Lagged Bundled Adjustments • Quarterly (or Annual) Non-FAMP
FCP Calculation
The following component appears on the FCP Calculation tracking screen:
• Federal Ceiling Price 340B Calculation
The following component appears on the 340B Calculation tracking screen:
• 340B Amount Annual FSS
The following component appears on the annual FSS tracking screen:
• Annual FSS Price • Federal Supply Schedule
IFF Rebate
The following component appears on the IFF Rebate tracking screen:
• Rebate Payable
3.3.4.2.2.3 Access
Transaction code: /IRM/IPBRCIP
1909 Pricing Documentation
3.3.4.2.2.4 Procedures
Reviewing Calculated Prices for a Price Type
1. Access transaction code /IRM/IPBRCIP.
2. Enter the price type in the Deployment Code field, period in the Period field, and material.
3. Click on the Execute button to display the requested price type.
4. On the vertical menu, select a component to view data for that component.
5. Select a subcomponent to view the data for that subcomponent. Transaction groupings that
make up the total appear on the screen for reference.
6. Click on the IP Documents button to view the List of Business Registers. Click on a Business
Register number to view the source document. From the source document you can link to the
original invoice.
Performing Basic Modeling for a Component
1. Access transaction code /IRM/IPBRCIP.
2. Select the price type in the Deployment Code field, period in the Period Mode field, and
material.
3. Click on the Execute button.
4. On the vertical menu, select the Modeling for AMP (first) component.
5. Update the information in a Change in % field and press ENTER. Click on the Simulate button
to update the data.
6. To reset the numbers to their original values, click on the Reset button.
3.3.4.2.3 Posting the Results
3.3.4.2.3.1 Definition
Approving and posting the calculated prices are performed in the Calculation Run transaction
(/IRM/IPBRPCRM). There is no settlement process in Government Pricing; you post to each price type,
and then the postings are sent to the government.

Business Register
SAP Data Maintenance by Vistex, Pricing option for SAP S/4HANA by Vistex for SAP S/4HANA
Application Help – Version: 1.0 – Final
December 12, 2019
© 2019 Vistex, Inc. All Rights Reserved.
© 2019 SAP SE or an SAP affiliate company. All rights reserved.
3.3.4.2.3.2 Posting Rules
The following posting rules are used in Business Register:
• Predecessor calculations: • Months must be posted in sequence, for example January must be posted before February.
• Monthly posting must be performed before quarterly posting.
• AMP must be posted before URA; URA must be posted before PHS can be posted.
• FCP is not posted until NFAMP is posted.
• Zero/negative rules: • If AMP is negative, report the last quarter with a positive AMP; If no positive AMP, report the
WAC.
• If PHS is zero or negative, report $.01
• If ASP is negative, set to zero.
• All prices are calculated to six significant digits except the URA, which is calculated to four significant digits. If the URA at four significant digits is zero, calculated to five digits; if zero at five digits, calculated to six digits.
• Additional rules: • Calculated URA cannot be greater than the AMP; if greater than AMP, URA is capped at the
AMP value.
3.3.4.2.4 Finalizing and Filing the Price
3.3.4.2.4.1 Definition
Use the CMS File Download transaction to generate the necessary monthly and quarterly state specific
and non-state specific exportable flat files.
NOTE: Price type calculations must be posted to be available for pricing file generation.
Supported state specific files include the following:
• Quarterly Pennsylvania Pace • Quarterly Maine AMP-BP

1909 Pricing Documentation
• Quarterly Vermont AMP-BP-WAC • NY EPIC Product • Quarterly NY EPIC Price • Quarterly Texas Price File • Annual New Mexico Submission
Supported non-state specific files include the following:
• Monthly AMP • Quarterly AMP, BP, NP, PP Price • Quarterly nonFAMP • Quarterly ASP Addendum A • Annual Tricare Appendix A • Annual nonFAMP • DDR Drug Product
3.3.4.2.4.2 Procedure
Generating the Price Files
1. Access transaction code /IRM/GPTDNL.
2. Select either the Non State Specific or State Specific radio button.
3. In the Transmission Fie Type section, select a file type.
4. In the General section, enter a Price Type, Material, and Fiscal year (reporting period).
5. In the File Selected for Download section, enter the File path and File type.
6. Click on the Execute button.
3.3.4.3 Processing Transactions
3.3.4.3.1 Price Type

Business Register
SAP Data Maintenance by Vistex, Pricing option for SAP S/4HANA by Vistex for SAP S/4HANA
Application Help – Version: 1.0 – Final
December 12, 2019
© 2019 Vistex, Inc. All Rights Reserved.
© 2019 SAP SE or an SAP affiliate company. All rights reserved.
3.3.4.3.1.1 Price Type Overview
In addition to creating condition records using classic maintenance, condition records can be created
through an upload process using price type functionality. Use this process for uploading large quantities
of external prices that are loaded periodically, such as commodity prices.
Examples of prices to be uploaded may be from the following sources:
• vendor, such as a purchase price list • external data source, such as a commodity price list
Price types are defined in configuration. Each price type is assigned a number range, name, application,
and price sheet. A price type anchor may be assigned but is not required. Price Type Builder can be used
to view the configuration detail for each delivered price type and to perform the configuration required
to build a price type in the system, if needed.
When prices are uploaded, you may choose to have the system create active condition records or allow
the price type records to be reviewed and approved before they are posted (created in SAP). Uploaded
price type records can be reviewed in the Price Type Workbench. Reviewed records can be saved into the
system or saved as a price proposal. Records saved as a proposal will be sent through a predefined
approval process before active condition records are created. Invalid records can be saved for future
reference.
Cross reference tables for material, partner, or unit of measure are available. If an invalid material,
partner, or unit of measure is uploaded into the system, the values can be cross referenced in the cross
reference table transactions. Invalid line items can be reprocessed within the Price Type Workbench to
pull in the new, correct values based on the cross reference tables. The cross reference transactions are:
• Material Cross Reference (/IRM/GMXREF) • Partner Cross Reference (/IRM/GPXREF) • Unit of Measure Cross Reference (/IRM/GUXREF)
In addition, the Vistex lookup engine can be used to control (by configuration) the search strategy for
determining the material or partner number. The lookup engine allows you to control the search
sequence as well as what data sources are used for the search. For example, (if configured), the Material
Entered field leverages the material lookup engine to find the material using the material lookup profile
assigned to the price type and/or the ID type entered, otherwise it defaults to the standard system
determined search sequence.
1909 Pricing Documentation
3.3.4.3.1.2 Price Type Workbench
Definition
Use the Price Type Workbench to review uploaded external price catalogs. Reviewed price type records
may be saved into the system or saved as a price proposal. Records saved as a price proposal will be
sent through a predefined approval process before condition records are created in SAP.
Price types have the same features regular condition records, except that they have a fixed structure
and fixed maintenance levels. View profiles apply to price types as well.
In configuration, price types can be flagged to accept invalid entries. Invalid records will be uploaded but
labeled as INVALID. These records will appear in red and a rejection reason code will be assigned (if
configured).
Access
Transaction code: /IRM/GPTM
Structure
When you enter the transaction, a search screen appears. Results from the search appear in a grid that
can be sorted and searched.
The following buttons appear above the grid:
Button Action Alternate Access
Search Click to view the search criteria screen. Enter the search
criteria, and then click on the Execute button to perform the search. NOTE: Search results are not retained when you leave the transaction.
Shift+F1
Search More After you perform a search, use Search More to retain the results from the previous search, perform a new search, and append the new results to the list already displayed.
Shift+F2
Display ↔ Change Toggle between Display mode and Change mode.
F6 or Menu bar: Price Type → Display ↔ Change
The following buttons may appear in the grid:
Button Action

Business Register
SAP Data Maintenance by Vistex, Pricing option for SAP S/4HANA by Vistex for SAP S/4HANA
Application Help – Version: 1.0 – Final
December 12, 2019
© 2019 Vistex, Inc. All Rights Reserved.
© 2019 SAP SE or an SAP affiliate company. All rights reserved.
Save and Post (Change mode only) Save and post all valid price type records to create condition records in SAP. When posted, the records no longer can be displayed using this transaction. Use /IRM/GRP03 or VK13 to display posted condition records.
Save as Price Proposal (Change mode only) Save the price type as a price proposal that must go through an approval process before the condition records are created.
Check and Complete (Change mode only) Check the validity of the current sheet otherwise known as the price sheet before saving. If formulas are set up, check and complete will run the formulas. If a price policy is set up, check and complete will run the price policy.
Set Values (Change mode only) Mass change and create rates for the selected condition record. The set values will apply to all items on a rule if nothing is highlighted. For example, the type of values changed will be validity, rates and/or extension fields.
Items Reprocess (Change mode only) Reprocess selected records.
Copy Price Records (Change mode only) Copy selected price type records.
Import Price Records (Change mode only) Import condition records from an external source and dynamically define the destination. Each external data field is mapped to be entered in a corresponding field in the rule.
Create (Change mode only) Add new records to the displayed price sheet. When you select this button the system displays the following options:
• 1, to add one record • 5, to add five records • 10, to add ten records
Delete (Change mode only) Delete a selected price type record.
Price History View a price history for a selected line. Alternately, press Shift+F6 to view the price history.
Change Documents View a list of all changes to each price type record. The changes can be viewed together or one-by-one.
Scales If scales exist, view the scales for a selected item.
Details View selected records in a vertical column format in a separate window.
1909 Pricing Documentation
Sort in Ascending Order Sort the data in a selected column in ascending alphanumeric sequence.
Sort in Descending Order Sort the data in a selected column in descending alphanumeric sequence.
Find Find a term within the grid values. The system highlights any cell that contains the term.
Find Next Find the next instance of a term searched for previously.
Set Filter Select a column, and then click the Set Filter button to set and delete column filters.
Total (restricted to relevant numeric columns) Highlight at least one numeric column, and then select a type of calculation (Total, Mean Value, Minimum, or Maximum) from the dropdown list.
Subtotals (active only when the Total button is used) If you used the Total button to calculate the total for a selected column, you also may have the system calculate subtotals. Click to view a dialog window. In that window, check the checkbox of the column used to calculate subtotals.
Export Export the entire contents of the grid area to the selected document type/file type.
Choose Layout Choose, change, save, and manage column layouts within the ALV grid.
Procedures
Displaying Price Type Records
Changing Price Type Records
Creating a Price Proposal from the Price Type Workbench
Mass Processing of a Price Type
Mass Posting Price Type Condition Records
3.3.4.3.1.3 Upload/Download
Upload Price Type
Definition
Use Upload Price Types to import pricing condition records from a file, such as an Excel spreadsheet,
rather than manually entering the data. Files can be uploaded from the following locations:
Business Register
SAP Data Maintenance by Vistex, Pricing option for SAP S/4HANA by Vistex for SAP S/4HANA
Application Help – Version: 1.0 – Final
December 12, 2019
© 2019 Vistex, Inc. All Rights Reserved.
© 2019 SAP SE or an SAP affiliate company. All rights reserved.
• Desktop, to upload from the local PC • File submission, to upload based on a file submission entry • File server, to upload directly from the application server
File templates can be created to control the fields and format of price type files during upload. To create
a file template, either save the information entered on the screen, or use the File Template for Price Type
Workbench to create a template.
Uploaded information can be viewed in the Price Type Workbench. The condition records can be released
immediately or saved to a proposal that must go through an approval process prior to being released.
Access
Transaction code: /IRM/GPTUPL
Procedure
Uploading a Price Type
Download Price Types
Definition
Use Download Price Types to download selected price types to a specific file on a desktop or file server.
For large downloads, this transaction can be run as a background job.
File templates are used to control the fields and format of files during download. To create a template,
use the File Template for Price Type Workbench.
Access
Transaction code: /IRM/GPTDNL
Procedure
Downloading Price Types
File Template for Price Type
Definition
Use File Template for Price Type Workbench to create and maintain templates that control the fields
and format of price type files during upload.
Access
1909 Pricing Documentation
Transaction code: /IRM/GPTFTM
Structure
The File Template for Price Type Workbench screen is organized into the following areas:
• Search and Worklist Use the Search and Worklist to view selected file templates in a grid format. From the grid, click on file template number to display that file template in focus in the Work Area.
• Work Area Use the Work Area to maintain one file template. In the standard Vistex implementation, the Work Area contains the following tabs: • Section
• Mapping
• Conversion
• Submitter
• Crystal Layout, which is used with Crystal Reports
• Admin Data
NOTE: Functions accessed from the menu bar apply only to the file template displayed in focus in the
Work Area and do not apply to the data in the Search and Worklist.
Procedures
Displaying a File Template for Price Type
Creating a File Template for Price Type
Copying a File Template for Price Type
Maintaining a File Template for Price Type
Deleting a File Template for Price Type
3.3.4.3.2 Building a Composite Plan
3.3.4.3.2.1 Composite Building Blocks
Building Blocks
Building blocks (also known as elements) are the key factors of the Composite model. They are
interrelated to calculate final rebate amounts.

Business Register
SAP Data Maintenance by Vistex, Pricing option for SAP S/4HANA by Vistex for SAP S/4HANA
Application Help – Version: 1.0 – Final
December 12, 2019
© 2019 Vistex, Inc. All Rights Reserved.
© 2019 SAP SE or an SAP affiliate company. All rights reserved.
Composite has several building blocks/elements (click on a box for more information on that building
block):
Participants
Participants
A participant is the entity to whom the final amount is being paid or from whom the final amount is
received. Participants in a deployment code may be customers, vendors, brokers, employees, licensees,
licensors, agreements, and materials (SAP materials and DM materials).
Participants may be assigned to one or more deployment codes. If a participant(s) participates in a
multiple deployment codes, the tracking information and results for all deployment codes can be
simultaneously presented. The end user does not have to know how many plans the participant is in,
they can search by participant name and other search criteria. This allows the plan administrator to view
results for several participants or for managers/distributors to view the results of business partners
participating in multiple plans.
Participation can be versioned allowing you to do "what-if" analysis.
Participation Hierarchies
A hierarchy of participants can be created to view root level and lower level participants in a plan . For
example, in a buying group plan, the amount to be paid to the buying group is dependent on the results
of directly assigned distributors.

1909 Pricing Documentation
The participation can be based on the organization structure already in place or can be entered and
controlled directly by user input. If the hierarchy is dedicated to a specific plan, the participant hierarchy
is entered manually in the Participation Workbench. Vistex also supports the following types of
hierarchies that can be re-used across plans:
• Standard SAP customer hierarchy • Standard SAP vendor hierarchy • Standard SAP HCM hierarchy • IP hierarchy type/version • Membership list
Changes made to a re-usable hierarchy are reflected automatically in all places where that hierarchy is
used.
The re-usable participation hierarchy is assigned in the configuration of the deployment code/version. A
source code will appear in the Participation Workbench to indicate which type of hierarchy has been
assigned to the plan.
Automatic Assignment
Based on agreement type configuration, a participant can be automatically assigned to a deployment
code when a partner is added to the agreement or a new agreement is created. Auto assignment
eliminates the step of manually adding the participant in the Participant Workbench.
Automatic assignment supports the following participation options:
NOTE: The following participation options allow the Participation Workbench and tracking screen to be
accessed directly from the Performance tab in the agreement, rather than having to exit the agreement.
If the participant number is in the agreement, that participant will appear on the tracking screen.
Performance functionality can be used even if participants are not being automatically assigned.
• Agreement Only: The agreement will be assigned to the deployment code as an agreement. The start date and end date of the participant will be the start date and end date of agreement.
• Agreement with Partners: Participants are from rules or the Partners tab. For each partner a participant will be added as an agreement and the partner will become the settlement partner. The partner start date and end date will become the start date and end date for the participant (if one exists), otherwise the agreement start date and end date will be used.
• Partners with Agreements: Participants are from rules or the Partners tab. For each partner a participant will be added with the participation type of the partner and the system fills in the agreement number field. The partner start date and end date will become the start date and end date for participant (if one exists), otherwise the agreement start date and end date will be used.
• Partners Only: Participants are from rules or the Partners tab. For each partner a participant will be added with the participation type of the partner, but the system does not fill in the agreement number field. The partner start date and end date will become the start date and end date for participant (if one exists), otherwise the agreement start date and end date will be used.
Participant Groups

Business Register
SAP Data Maintenance by Vistex, Pricing option for SAP S/4HANA by Vistex for SAP S/4HANA
Application Help – Version: 1.0 – Final
December 12, 2019
© 2019 Vistex, Inc. All Rights Reserved.
© 2019 SAP SE or an SAP affiliate company. All rights reserved.
Participant groups functionality can be used to decrease the number of compensation plans by allowing
the a plan to be used across multiple participant roles that have the same plan structure. For example,
suppose five teams of sales representatives are paid a sales commission based on revenue, but the
formula used to calculate the payout needs to differ slightly for each team. Rather than setting up
individual plans, the reps can be grouped by team into participant groups, which can be used in plan
formulas.
Each participant can be assigned to up to three participant groups. In the Participation Workbench,
three participant group fields (Group 1, Group 2, Group 3) appear on the General tab in the Participant
Details dialog window. For each field, you may select a group from the F4 list of groups that were
defined using the corresponding participant group transaction in Participation configuration. The three
participant group fields are available for use in plan formulas. Conditional statements in a formula can
include the participant group name, as needed.
NOTE: User exits also can include participant groups.
Virtual Participation
For companies who track thousands of participants, storing participation information for each
deployment code results in very large participant tables. For performance reasons, global search help
variants can be used to store the list of participants, and these variants are stored in the tables. The list
of participants is derived dynamically in composite tracking and reporting at runtime.
Setup includes:
• Configuration In Deployment Code / Participants configuration, check the Virtual Participation checkbox to indicate that the deployment code will be using virtual participation.
• Variant Workbench (/IRM/IPBRVM) For the deployment code, create a Participation variant to list the participants to be fetched at runtime. .
• Participation Workbench Assign the variant as a participant. Use the search pane to select the variants, then drag and drop them to the list in the left pane. The Assign Participants dialog window to assign attributes (such as start/end dates and calendars) that will apply to all the derived participants for that variant. Save the variant.
NOTE: A user exit is needed to allow the participants assigned to a variant to have different start and
end dates, as well as other attributes.
Participation Workbench:
When you select a deployment code also specify a range of variants in the Variant fields. The system lists
the participant variants in the grid. To view a list of participants on-the-fly, select a listed variant and
click on the Participants of Variant button (above the participant grid). The system displays pop-up
that lists the participants in the variant. From the pop-up, click on the Display Postings button to view
the postings.
1909 Pricing Documentation
Individual Tracking:
Select the deployment code. Then either enter the variant name in the Part. Variant field or press F4 and
select the variant from the Participation Variant pop-up. In the Participant field, either enter the
participant or press F4 to view the dynamically derived list in the Select Participants pop-up. Select the
participant to track.
Create Calculation Run:
Select the deployment code. Then either enter the variant in the Participation Variant field or press F4
and select the variant from the Participation Variant pop-up. To limit the participants, click on the
Participants button to view the dynamically derived list of participants in the Select Participants pop-up.
Select the participants to include.
Participation Workbench
Definition
Use the Participation Workbench to assign individual participants to a deployment code, as well as to
enter and maintain specific information about a plan participant. Participant level information overrides
plan level information.
You may create a participant hierarchy on-the-fly in this workbench. If you create a hierarchy, however,
that hierarchy is not transferred to membership or other participant hierarchies. The hierarchy can
contain multiple tiers.
Access
Transaction code: /IRM/IPBRPA
Structure
The screen is organized into the following areas:
• Search Area Use the Search Area (on the right side of the screen) to search for partners to add to a plan.
• Work Area Use the Work Area to view a list of plan participants in a tree format. Double click on a listed participant to view and maintain detail for that participant. In the standard Vistex implementation, the Work Area contains the following tabs: • General
• Additional Data, used to display additional fields or derived fields, if configured.
• Components, used to assign components and subcomponent characteristics. Validity dates can be assigned at the participant level for both the components and subcomponents. For a participant, a component can be flagged to skip processing or can be hidden.
Business Register
SAP Data Maintenance by Vistex, Pricing option for SAP S/4HANA by Vistex for SAP S/4HANA
Application Help – Version: 1.0 – Final
December 12, 2019
© 2019 Vistex, Inc. All Rights Reserved.
© 2019 SAP SE or an SAP affiliate company. All rights reserved.
• Period Profile
• Formulas
• Admin Data
Procedures
Displaying a List of Participants for a Plan
Viewing Participant Detail
Maintaining Participant Detail
Assigning a Period Profile to Participants
Upload Participants
Definition
Use Upload Participants to import participants for a specific deployment code version from a file, such
as an Excel spreadsheet, rather than manually entering the participants.
Access
Transaction code: /IRM/IPCIPU
Procedure
Uploading Participants
3.3.4.3.2.2 Composite Workbench
Definition
The Composite Workbench provides a central view of the composite building blocks, including:
• Deployment Group • Deployment Codes • Deployment Components • Agreements • Matrices • IP Types • Participation

1909 Pricing Documentation
• Administration & Performance Access
Transaction code: /IRM/IPCWB
Structure
The Composite Workbench screen is organized into the following areas:
• List of Elements The list presents a tree view, with each building block as a folder. From the list, click on an entry to view it in focus in the Work Area.
• Work Area Use the Work Area to display detail of one entry.
Procedures
Displaying the Building Blocks
Displaying a Deployment Group
Displaying a Deployment Code
Displaying an Agreement
Displaying a Matrix
Displaying an IP Type
Displaying a Participant
Transferring to Configuration
3.3.4.3.2.3 Incentive Plan Builder
Definition
The Incentive Plan Builder provides a user-friendly way to set up a plan. You may use this transaction
instead of the Composite Workbench. All configuration required to create a plan can be done from this
transaction.
The transaction leads you through the following steps:
• Definition • Assembly • Execution
When a plan exists, the Incentive Plan Explorer transaction (/IRM/IPCPE) can be used to view the plan.
Access
Transaction code: /IRM/IPCPB

Business Register
SAP Data Maintenance by Vistex, Pricing option for SAP S/4HANA by Vistex for SAP S/4HANA
Application Help – Version: 1.0 – Final
December 12, 2019
© 2019 Vistex, Inc. All Rights Reserved.
© 2019 SAP SE or an SAP affiliate company. All rights reserved.
3.3.4.3.3 Planning
3.3.4.3.3.1 Matrix Planning
Planning Document/Grid
Planning Documents
Planning Document
Documentation for planning documents is available for the following screen formats:
• UI Application (SAP Fiori) • SAP GUI (Web Dynpro Grid)
Planning Object Workbench
Definition
Use the Planning Object Workbench to define the planning objects used to create planning documents
for a specific matrix and territory assignment type. You select the territory price sheets from which data
will be pulled, and map the price sheet fields to the corresponding matrix fields.
Price sheets can be grouped into sets, to Cartesian the data into combinations based on the sets. For
example, price sheets with the customers might be in one set, and the price sheet with the materials in
another set. The system will Cartesian the data into combinations of customer and material. Only data
for those combinations will be pulled from the matrix.
Access
Transaction code: /IRM/IPMXTPOM
Structure
The Planning Object Workbench screen is organized into the following areas:
• Search and Worklist Use the Search and Worklist to view information for selected planning objects in a grid format. From the grid, click on a planning object name to display that planning object in focus in the Work Area.
1909 Pricing Documentation
• Work Area Use the Work Area to maintain a planning object. In the standard Vistex implementation, the Work Area contains the following tabs: • Price Sheets, to list the price sheets from which data will be fetched for the matrix assigned
to the planning object. Map the matrix fields to the price sheet fields. An extended selection function module can be specified to explode the data characteristics.
• Scenarios, to list the planning scenarios used by the planning object.
• Admin Data
NOTE: Functions accessed from the menu bar apply only to the planning object displayed in focus in the
Work Area and do not apply to the data in the Search and Worklist.
IMPORTANT: Because Vistex software is extremely versatile, the user screen may be customized. As a
result, the screen may appear different from the standard screen described in this document.
Procedures
Displaying a Planning Object
Creating a Planning Object
Copying a Planning Object
Maintaining a Planning Object
Deleting a Planning Object
Planning Scenario Workbench
Definition
A planning scenario specifies the territories and periods used to select the matrix data to be pulled into
the planning document. Use the Planning Scenario Workbench to associate a planning object with a
subset and usage, and assign the territories and periods from which the data will be pulled.
If needed, an authorization group can be assigned to the planning scenario.
Access
Transaction code: /IRM/IPMXTPSM
Structure
The Planning Scenario Workbench screen is organized into the following areas:
• Search and Worklist Use the Search and Worklist to view information for selected planning scenarios in a grid format. From the grid, click on a planning scenario name to display that planning scenario in focus in the Work Area.
Business Register
SAP Data Maintenance by Vistex, Pricing option for SAP S/4HANA by Vistex for SAP S/4HANA
Application Help – Version: 1.0 – Final
December 12, 2019
© 2019 Vistex, Inc. All Rights Reserved.
© 2019 SAP SE or an SAP affiliate company. All rights reserved.
• Work Area Use the Work Area to maintain a planning scenario. In the standard Vistex implementation, the Work Area contains the following tabs: • Territories, to list the territories from which to get data for the planning document.
• Selection, to specify the planning periods or planning start date and number of periods.
• Admin Data
NOTE: Functions accessed from the menu bar apply only to the planning scenario displayed in focus in
the Work Area and do not apply to the data in the Search and Worklist.
IMPORTANT: Because Vistex software is extremely versatile, the user screen may be customized. As a
result, the screen may appear different from the standard screen described in this document.
Procedures
Displaying a Planning Scenario
Creating a Planning Scenario
Copying a Planning Scenario
Maintaining a Planning Scenario
Deleting a Planning Scenario
Planning Grid
Planning Grid
The Planning Grid is a tool used to maintain matrix data. Based on configuration, the Grid can be
accessed in the following ways:
• Planning document From the Fiori version of the planning document, the Planning Grid is displayed when you click on the Go to Grid button.
• Scenario Planning page (Fiori) From the Launchpad (or URL), click on a link to navigate to the Scenario page. Select a scenario (created in the Scenario Workbench /IRM/IPMXVARM) from the dropdown or input help (per workspace configuration) to display the selection criteria fields. Enter values in the fields and click on the Go button or Grid tab to display the Planning Grid for that scenario.
Planning Grid Features
Summaries
Summaries provide access to user-defined sets of data. The summaries assigned to the layout are listed
as tabs above the navigation toolbar. Click on a tab to display the summary; click on the Grid tab to
return to the grid data display. User-defined summaries can be created on-the-fly using the Summaries
button on the Side Bar.

1909 Pricing Documentation
Grid Application Toolbar
Use the icons above the grid for navigation or to perform certain functions:
• Toggle Compact, to show all the toolbar options • Undo and Redo, to undo or redo any change made to the data in the grid • Copy and Paste, to copy and paste cell values • Quick Filter, to filter the hierarchy trees • Arrows, to navigate left, right, up and down • Procedures, which lists all available functions and procedures. Select a function or
procedure, then click the Next button and select remaining criteria for the function or procedure. From the criteria summary, click on the Execute button to perform the function/procedure. Default procedures include: • Update rows within dataset using various criteria
Update all rows, a selected row, using filters, or using a formula. The Next button shows the Summary and Preview of the changes to be applied. Click on the Execute button to apply the changes.
• Clone rows within dataset using two step criteria Select multiple records to be copied and then select the copy to location.
• Copy rows with dataset using map Copy a row of data to another row.
• Add new rows to dataset using filters
• Import from Excel Import the data from an Excel spreadsheet, or drag the spreadsheet to view the mapping and uncheck any data not to be imported. Click on the Preview button to view the records to be added to the grid.
• Export, to download the grid data to an Excel spreadsheet • Change Distribution Type, to apply one of the following distribution types, which are similar to
certain functions: • Equal, which works like the DIST_OVR function. Apply this function only at the higher level
node. Change the value and then press ENTER to distribute the new value equally to the child values for the node.
• Equal with Delta, same as the Equal type but check the With Delta checkbox to add the new value to the previously existing value.
• Weighted, which works like the DIST_DIFF function. Apply this function only at the higher level node. Change the value and then press ENTER to distribute the new value per the existing ratio.
• Weighted with Delta, same as the Weighted type but check the With Delta checkbox to add the new value to the previously existing value.
• Sweep, to copy the value down to the child levels if that Key Figure is assigned the No Roll up with Sweep option in the Matrix Workbench. This function works in Fiori only if each key figure is in an individual column in the layout.

Business Register
SAP Data Maintenance by Vistex, Pricing option for SAP S/4HANA by Vistex for SAP S/4HANA
Application Help – Version: 1.0 – Final
December 12, 2019
© 2019 Vistex, Inc. All Rights Reserved.
© 2019 SAP SE or an SAP affiliate company. All rights reserved.
• Sweep with Delta, same as the Sweep type but check the With Delta checkbox to add the new value to the previously existing value.
• Metrics Visibility, to show/hide grid columns. • Comments, to view existing comments that you added to the selected cell, or add new
comments to a selected cell. • Validation Rules
For a selected row, you can view the validation results. • Log Manager, to view error, warning, info, and success messages. Click on the Load More button
to load logs when there are multiple activities. Click on the Save Log button to save the logs to a Notepad file.
• Toggle Settings, to view the side bar Grid Functions
The toolbar in the top right corner of the page includes the following:
• Refresh Derivation To refresh derivations to the latest values from the source.
• Snapshot Overwrite To overwrite the grid data with the currently displayed snapshot data. After you then save the data, the system populates the Overwritten By and Overwritten On dates in the Snapshots tab.
• Save as Snapshot Displays the Select Snapshot Type pop-up. Select a snapshot type, enter a description for the snapshot, and then click OK to save an instance of grid data for future reference. The snapshots cannot be edited.
• Change Layout Select the layout from the dropdown list.
• Enter Full Screen/Exit Full Screen Expand the grid to the entire page. You cannot save changes in the full screen; click on Exit Full Screen and then save the changes.
From the grid, the following buttons appear at the bottom of the page: Back to Main Page and Discard
Changes.
Grid Side Bar
The buttons on the side bar are used to perform the following functions:
Button Function
Metrics Management Manage metrics settings. You may add new temporary metrics, if needed. Metrics management shows the color mapping assigned to the layout, as defined in the Matrix
Workbench. Color can be used to highlight individual cells, based on the values in the cells. Color maps indicate the range of cell values that correspond the each color.
Grid Hierarchy Define the layout for the horizontal axis (columns) and vertical axis (rows).

1909 Pricing Documentation
Variables Manager Displays all available variables above the grid. When you roll over a variable, the system displays a slider with minimum and maximum values for the variable. Adjust the slider (or enter a value directly) and click on Apply to change the variable in the grid data. You may add new temporary variables, if needed.
Grid Layout Default grid layout settings can be defined in the Subset Workbench. Change the following, as needed:
• Fixed Columns Width - check to fix the column width for the entire column. • Show Grand Total (Column and Row) -check to display the grade total for the column
or row at the starting position of the layout hierarchy • Nested - display the columns/rows in a nested format. • Classic - display the columns/rows in a tree format. • Flat - display the columns/rows in a flat format.
Active Filters Apply custom filters that contain selected matrix characteristics and time periods. The applied filter can be removed to show all data. NOTE: The filters are temporary and cannot be saved.
Assumptions Maintain the value for the variable used in the assumptions defined in the Matrix Workbench. After you change variable value, click on the Apply Changes button to store the new values for the session. Then apply on demand functions, as needed.
Summaries Create a user-specific summary that includes a desired list of fields. NOTE: Summaries are retained for proformas and planning documents; summaries are not retained when the grid is displayed from a scenario.
Validation Rules Create document-specific validation rules. Validation can be set as either Auto (automatically validates) or Manual (requires you to click on the Validate button).
Help The Help Center contains the following:
• Quick Tour, a tour of the Planning Grid for new users • Formulas, a list of available functions that can be used in formulas • Keyboard Shortcuts, a list of available shortcuts
Scenario Workbench - GUI
Definition
Use the Scenario Workbench to create variants that will be available in Planning. Rather than entering
all the criteria on the initial screen, you can select a predefined variant to fill the criteria fields, including
the planning parameters, compare with usages, period selection values, layout, and selections. Use the

Business Register
SAP Data Maintenance by Vistex, Pricing option for SAP S/4HANA by Vistex for SAP S/4HANA
Application Help – Version: 1.0 – Final
December 12, 2019
© 2019 Vistex, Inc. All Rights Reserved.
© 2019 SAP SE or an SAP affiliate company. All rights reserved.
Filters tab to indicate the selection fields that will appear in the Scenario Planning Grid. Check the
Changeable checkbox for each field to be included on the selection screen.
During creation, a scenario can be marked as user specific. If a variant is user specific, it will be visible
only for that user; otherwise, the variants are available for use by all users.
NOTE: The Scenario Fiori application does not have its own search profile or UI profile.
Access
Transaction code: /IRM/IPMXVARM
Structure
The Scenario Workbench screen is organized into the following areas:
• Search and Worklist Use the Search and Worklist to view selected scenarios in a grid format. From the grid, click on a scenario number to display that variant in focus in the Work Area.
• Work Area Use the Work Area to maintain one scenario. In the standard Vistex implementation, the Work Area contains the following tabs: • Selection, which displays the Selection and Compare with fields for the specified matrix.
Enter values in the fields. The system allows you to enter wild cards in the selection fields, to support the use of wild cards in the Planning selections.
• Period Defaults, to view the Periods information of the specified matrix. Enter default values in the fields. You have the option of using a standard SAP period calculation type to overwrite the normal assigned matrix period. Click on the Calculation icon and select one of the available options.
• Filters, to list the fields that will be listed as Filters on the selection screen in Scenario Planning. Check the Changeable checkbox for each field to be included on the selection screen.
• Functions, to list the functions allowed for the scenario on the Planning screen. This list of functions can be filtered for a layout by using the Functions field on the Layouts tab; leave the field blank to not filter the list.
• Layouts, to list the layouts allowed for the scenario. Flag one layout as the default.
• Variables, to list the default value for each variable assigned to the scenario.
• Waterfall Views, to list the available waterfall views for the scenario. Flag one view as the default.
• Admin Data
NOTE: Functions accessed from the menu bar apply only to the variant displayed in focus in the Work
Area and do not apply to the data in the Search and Worklist.
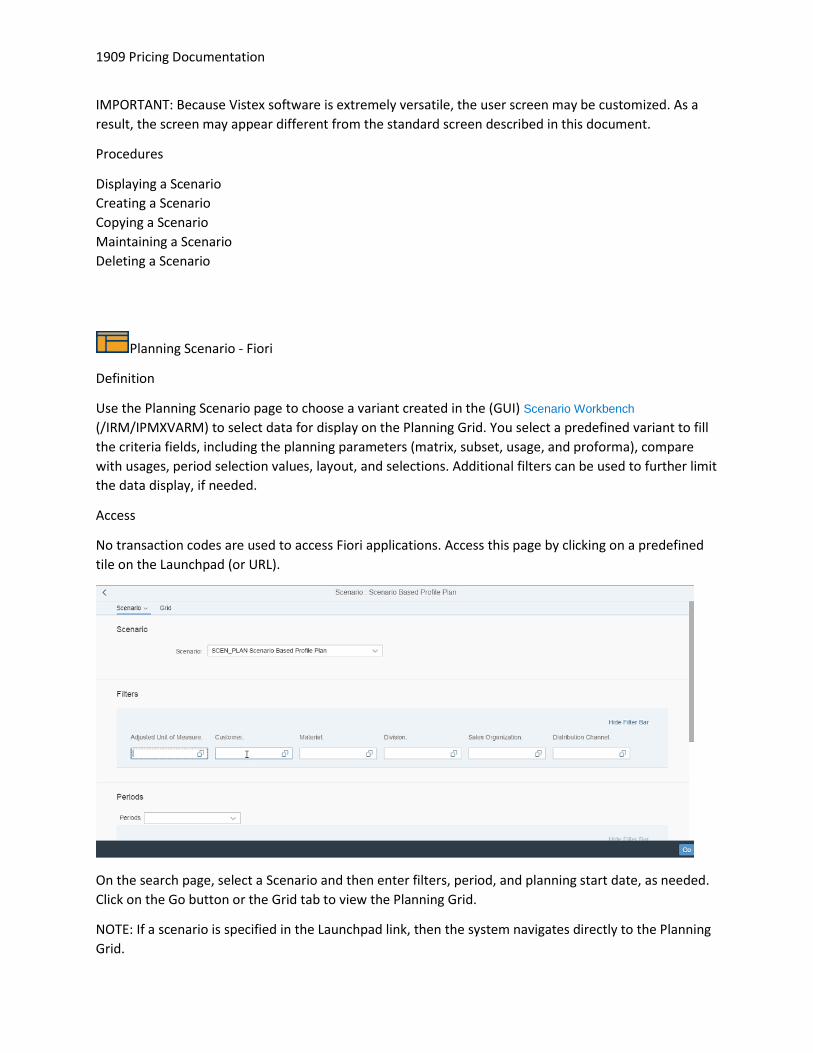
1909 Pricing Documentation
IMPORTANT: Because Vistex software is extremely versatile, the user screen may be customized. As a
result, the screen may appear different from the standard screen described in this document.
Procedures
Displaying a Scenario
Creating a Scenario
Copying a Scenario
Maintaining a Scenario
Deleting a Scenario
Planning Scenario - Fiori
Definition
Use the Planning Scenario page to choose a variant created in the (GUI) Scenario Workbench
(/IRM/IPMXVARM) to select data for display on the Planning Grid. You select a predefined variant to fill
the criteria fields, including the planning parameters (matrix, subset, usage, and proforma), compare
with usages, period selection values, layout, and selections. Additional filters can be used to further limit
the data display, if needed.
Access
No transaction codes are used to access Fiori applications. Access this page by clicking on a predefined
tile on the Launchpad (or URL).
On the search page, select a Scenario and then enter filters, period, and planning start date, as needed.
Click on the Go button or the Grid tab to view the Planning Grid.
NOTE: If a scenario is specified in the Launchpad link, then the system navigates directly to the Planning
Grid.

Business Register
SAP Data Maintenance by Vistex, Pricing option for SAP S/4HANA by Vistex for SAP S/4HANA
Application Help – Version: 1.0 – Final
December 12, 2019
© 2019 Vistex, Inc. All Rights Reserved.
© 2019 SAP SE or an SAP affiliate company. All rights reserved.
Matrix Setup
Matrix Overview
Definition
A matrix is a 3-dimensional table consisting of characteristics (who we are tracking for, such as material
group), key figures (what measurable metrics we are tracking, such as revenue), and a time period.
Actual data is not updated to the matrix; the matrix is used only for targets, quotas, historical data from
external sources (such as BI), and planning data.
Design
The matrix design allows dynamic aggregation and segmentation by subset. Subset-based planning
allows multiple users to update a matrix for their respective areas of responsibility.
Setup
• Matrix In a workbench, define the characteristics and key figures to be used, generate the matrix, and then design the layouts to be used on the Planning screen. Define the variables, derivations, and functions that will be available.
• Subset When creating a subset assigned to a matrix, select a date range and one or multiple levels of periodicity. Assign layouts, variables, derivations, and functions that were defined for the matrix.
• Usages Define each usage and members for each. Also, can define data sets used to pull data into the matrix.
Load Data into the Matrix
Loading data into the matrix is a two-step process:
1. When data is updated, the updated lines from the source document are stored in matrix staging
tables.
2. The Staging Data Update into Matrix report (/IRM/IPMX_STAGING_DATA_UPDATE) must be
executed for the staged data date and time, to load the staged data into the matrix.
Update the Matrix
• Matrix Group Define how to update the subsets.
• Matrix Planning Update data manually using the matrix planning tool.

1909 Pricing Documentation
• Proforma Based on configuration, the matrix will be updated when a proforma is saved or posted.
Transactions
The following transactions are used to create and maintain matrices:
• Matrix Workbench /IRM/IPMXM, to define and generate matrix tables. • Subset Workbench /IRM/IPMXSM, to define the set of data to be loaded into a matrix table. To
load the data, either click on the Load button or use the Load Subset Usage Data (/IRM/IPMXSLOAD) transaction.
• Proforma Workbench /IRM/IPMXPM, to view proforma documents. • Data Set Workbench /IRM/GDSTM, to create data sets that define the data to populate a matrix. • Matrix Group Workbench /IRM/IPMXSGM, to create a matrix group assigned a data set used to pull
actual data into a matrix/subset/usage. • Upload Subset Data /IRM/IPMXSUPL, used when data is uploaded from a file into the matrix table. • File Template for Matrix /IRM/IPMXFTM, provides a template for uploading data from a file.
The following utility reports are available:
• Copy Management /IRM/IPMXSCM, to copy and/or delete selected matrix data. • Matrix Utilities in Background /IRM/IPMXSCMBG, to execute a matrix utilities job using a variant
that specifies the job time period. • Simulate Matrix Update for Claims /IRM/IPCLAIMMXS, to analyze claim data in the form of a
matrix, before the data is pushed into the matrix. • Update Matrix for Claims /IRM/IPCLAIMMX, to push the claim data into the matrix. • Simulate Matrix Update for Transactions /IRM/IPRCAMXS, to analyze transaction document data
in the form of a matrix, before the data is pushed into the matrix. • Update Matrix for Transactions /IRM/IPRCAMX, to push the transaction document data into the
matrix. • Update Matrix for Calculation Run (/IRM/IPCBBMX), to push the calculation run data into a
specific matrix. Select the Redetermine Matrix Group checkbox if configuration has changed, and check the Update Documents with Matrix Group checkbox to use the latest from configuration.
• Matrix BI Data Update (/IRM/IPMXBIU), to pull Business Intelligence (BI) data for a specific matrix.
• APD Structure Workbench (/IRM/IPMXAPDM), to define and generate Analysis Process Designer (APD) structures used to push Business Intelligence (BI) data into the matrix.
• HANA Source Workbench (/IRM/IPMXHANAM), to select HANA view data to be pushed into the matrix .
• HANA Data Update (/IRM/IPMXHANAU), if sourcing matrix data from HANA, used to pull data from the HANA view(s) into a specific usage.
• Matrix Staging Data Update (/IRM/IPMXSTGU), to upload updated staging data to the matrix. Data is pushed to staging when the matrix group is assigned to the IP type header criteria. Optional processing can be added to load the changed data into a table for later viewing.
• Load Subset Usage Data (/IRM/IPMXSLOAD), to load subset data. This program can be entered
directly or by clicking on the Load button in the Subset Workbench (/IRM/IPMXSM).
Business Register
SAP Data Maintenance by Vistex, Pricing option for SAP S/4HANA by Vistex for SAP S/4HANA
Application Help – Version: 1.0 – Final
December 12, 2019
© 2019 Vistex, Inc. All Rights Reserved.
© 2019 SAP SE or an SAP affiliate company. All rights reserved.
Matrix Workbench
Definition
Use the Matrix Workbench to define and generate the matrix, as well as to define the following master
data that can be assigned to the subsets (matrix scenarios) attached to that matrix:
• Layouts A layout is used to generate a view that can be used for proformas. Each layout contains sequenced lists of the field displayed in a row hierarchy and column hierarchy, and can include fields from other subsets (set up as derivations).
• Variables Define the variables that can be used in computation functions and user-defined functions.
• Functions Create and activate the functions used to maintain matrix data.
Access
Transaction code: /IRM/IPMXM
Structure
The Matrix Workbench screen is organized into the following areas:
• Search and Worklist Use the Search and Worklist to view information for selected matrices in a grid format. From the grid, click on a matrix number to display that matrix in focus in the Work Area.
• Work Area Use the Work Area to maintain a matrix. In the standard Vistex implementation, the Work Area contains the following tabs: • Characteristics
• Key Figures
• Derivations
• Dynamic Derivations
• Key Figure Groups
• Color Maps
• Layouts
• Variables
• Assumptions
• Functions
• Procedures
1909 Pricing Documentation
• Where Used
• Admin Data
NOTE: Functions accessed from the menu bar apply only to the matrix displayed in focus in the Work
Area and do not apply to the data in the Search and Worklist.
IMPORTANT: Because Vistex software is extremely versatile, the user screen may be customized. As a
result, the screen may appear different from the standard screen described in this document.
Procedures
Displaying a Matrix
Defining a Matrix
Copying a Matrix
Maintaining a Matrix
Deleting a Matrix
Viewing a Matrix Where-used List
Subset Workbench
Definition
A subset is used to populate a matrix table either by loading a set of data defined in a data set or by
uploading data from a file. Each matrix can be assigned one or multiple subsets.
Use the Subset Workbench to define the following:
• matrix table into which the data will be loaded • usages, which are versions of the subset.
One usage must be defined as the actual data; another can be used for planned data. • periodicity, to define the type of periods to be used
One level is required, but up to three additional levels can be maintained as a hierarchy. The second period has to fully contain the first period, and so on. The hierarchy must be sequenced from smallest to largest period, for example: day, week, month, and year. Period fields can be added to the column or row hierarchy in the layouts.
• default planning horizon • key figure units, such as the currency assigned to an amount field or a unit of measure assigned
to a quantity field In addition, use this workbench to assign layouts and functions defined in the Matrix Workbench to a
subset.
Uploading data into the matrix table is performed by uploading data from the following:
• Data sets, which are used to select the data to be pushed into the matrix. Create data sets in the Data Set Workbench (/IRM/GDSTM). Then on the Usages tab in the Subset Workbench, use the Datasets tab to map the data set result fields to the matrix characteristic and key figure fields. For each key figure field, enter a period field name.
Business Register
SAP Data Maintenance by Vistex, Pricing option for SAP S/4HANA by Vistex for SAP S/4HANA
Application Help – Version: 1.0 – Final
December 12, 2019
© 2019 Vistex, Inc. All Rights Reserved.
© 2019 SAP SE or an SAP affiliate company. All rights reserved.
• HANA views, using structures created in the HANA Source Workbench. • External file, which is imported using the Upload Subset Data transaction.
After the data is loaded, the data can be viewed directly from this workbench.
Access
Transaction code: /IRM/IPMXSM
Structure
The Subset Workbench screen is organized into the following areas:
• Search and Worklist Use the Search and Worklist to view information for selected subsets in a grid format. From the grid, click on a subset name to display that subset in focus in the Work Area.
• Work Area Use the Work Area to maintain a subset. In the standard Vistex implementation, the Work Area contains the following tabs: • Usages
• Periods
• Planning
• Admin Data
NOTE: Functions accessed from the menu bar apply only to the subset displayed in focus in the Work
Area and do not apply to the data in the Search and Worklist.
IMPORTANT: Because Vistex software is extremely versatile, the user screen may be customized. As a
result, the screen may appear different from the standard screen described in this document.
Procedures
Creating a Subset
Loading Subset Data from a Data Set
Transferring to Upload Subset Data
Displaying Subset Data
Copying a Subset
Maintaining a Subset
Deleting a Subset
Scenario Workbench - GUI
Definition
1909 Pricing Documentation
Use the Scenario Workbench to create variants that will be available in Planning. Rather than entering
all the criteria on the initial screen, you can select a predefined variant to fill the criteria fields, including
the planning parameters, compare with usages, period selection values, layout, and selections. Use the
Filters tab to indicate the selection fields that will appear in the Scenario Planning Grid. Check the
Changeable checkbox for each field to be included on the selection screen.
During creation, a scenario can be marked as user specific. If a variant is user specific, it will be visible
only for that user; otherwise, the variants are available for use by all users.
NOTE: The Scenario Fiori application does not have its own search profile or UI profile.
Access
Transaction code: /IRM/IPMXVARM
Structure
The Scenario Workbench screen is organized into the following areas:
• Search and Worklist Use the Search and Worklist to view selected scenarios in a grid format. From the grid, click on a scenario number to display that variant in focus in the Work Area.
• Work Area Use the Work Area to maintain one scenario. In the standard Vistex implementation, the Work Area contains the following tabs: • Selection, which displays the Selection and Compare with fields for the specified matrix.
Enter values in the fields. The system allows you to enter wild cards in the selection fields, to support the use of wild cards in the Planning selections.
• Period Defaults, to view the Periods information of the specified matrix. Enter default values in the fields. You have the option of using a standard SAP period calculation type to overwrite the normal assigned matrix period. Click on the Calculation icon and select one of the available options.
• Filters, to list the fields that will be listed as Filters on the selection screen in Scenario Planning. Check the Changeable checkbox for each field to be included on the selection screen.
• Functions, to list the functions allowed for the scenario on the Planning screen. This list of functions can be filtered for a layout by using the Functions field on the Layouts tab; leave the field blank to not filter the list.
• Layouts, to list the layouts allowed for the scenario. Flag one layout as the default.
• Variables, to list the default value for each variable assigned to the scenario.
• Waterfall Views, to list the available waterfall views for the scenario. Flag one view as the default.
• Admin Data

Business Register
SAP Data Maintenance by Vistex, Pricing option for SAP S/4HANA by Vistex for SAP S/4HANA
Application Help – Version: 1.0 – Final
December 12, 2019
© 2019 Vistex, Inc. All Rights Reserved.
© 2019 SAP SE or an SAP affiliate company. All rights reserved.
NOTE: Functions accessed from the menu bar apply only to the variant displayed in focus in the Work
Area and do not apply to the data in the Search and Worklist.
IMPORTANT: Because Vistex software is extremely versatile, the user screen may be customized. As a
result, the screen may appear different from the standard screen described in this document.
Procedures
Displaying a Scenario
Creating a Scenario
Copying a Scenario
Maintaining a Scenario
Deleting a Scenario
Copy Management
Definition
Run the Copy Management utility transaction to perform the following actions for a selected
matrix/subset/usage:
• Copy To copy data from one matrix/subset/usage to another matrix/subset/usage.
• Copy + Delete To copy data from one matrix/subset/usage to another, then delete the source data. If you select Copy or Copy+Delete, the following tabs appear: • Target
Specify the copy to matrix/subset/usage. The target matrix can be saved as a proforma if you specify a Proforma Type. Choose a Transformation Method: Mapping (apply the mapping specified on the Mapping tab) or User-defined (apply the user-defined copy method in the subset usage's enhancement class). You also can select a user function from those defined in the target matrix's subset. This function will be applied after the copy. To overwrite existing data during the copy, check the Overwrite checkbox. To copy members only, check the Only Members checkbox.
• Mapping When the selected Transformation Method is Mapping, use the Mapping tab to map the source data to the target data.

1909 Pricing Documentation
Check the Source Unit checkbox to copy the source field, from one usage to another, in the source currency/unit. Leave the checkbox blank to convert the source field to the Target usage's default currency/unit when it is copied.
• Selection Use the Selection tab to choose specific data to be copied or deleted, for that matrix/subset/usage. You also can specify the date on which the background job will be run.
• Delete To delete data from one matrix/subset/usage. The Selection tab will appear to select the specific data to be deleted. For example, you might delete data only for a specific customer or range of customers.
• Process The Process action might be used to schedule a background job to process the remaining distribution levels for a function that was assigned to stop at a Distribution Level (on the Functions tab in the matrix). If you select Process, the following tabs appear: • Procedures
List the procedures, which will be processed in sequence. For each procedure, click on the Variables icon to specify the default values for any variables assigned to the procedure. Procedures will be run before the functions are processed.
• Functions List the functions in the sequence in which they will be applied to the data. For each function, click on the Variables icon to specify the default values for any variables assigned to the function.
Scheduling Jobs for Future Periods
Variants can be used to schedule background jobs for future time periods (such as the first day of next
month or Last day of the current month). Create a variant for any of the matrix utilities (copy, delete,
copy and delete, or process). When saving the variant, in the Periods section click on the Calculation
icon for the period (Week, Month, Quarter, or Year) and choose one of the options in the Choose Period
Calculation pop-up.
For example, a variant can be created to run a Process job on the last day of the month. When you save
the variant, click on Calculation Type icon in the Month field row to display the Choose Period
Calculation pop-up. Select the Last Day of the Current Month option and then click on the Choose
button.
You can run the variant using one of the following transactions:
• Copy Management /IRM/IPMXSCM When you select the variant, the system fills in the date on the Selection tab.
• Matrix Utilities in Background /IRM/IPMXSCMBG Specify the Job name and Variant Name, then execute or schedule the job. Use Simple Job Selection (OSM37) to start and verify the execution process for the background job. Later, the job status can be checked in the Analyze Application Log (OSLG1).
Access
Business Register
SAP Data Maintenance by Vistex, Pricing option for SAP S/4HANA by Vistex for SAP S/4HANA
Application Help – Version: 1.0 – Final
December 12, 2019
© 2019 Vistex, Inc. All Rights Reserved.
© 2019 SAP SE or an SAP affiliate company. All rights reserved.
Transaction code: /IRM/IPMXSCM
Procedures
Copying a Subset Usage
Copying Members from One Subset Usage to Another
Processing the Remaining Distribution Levels for a Function
Matrix Group Workbench
Definition
Use the Matrix Group Workbench to create a matrix group assigned a dataset that is used to populate
actual data from into the matrix for a usage. Matrix groups are defined at the application level. In a
matrix group, specify the set of matrix/subset/usage to be updated.
NOTE: The matrix group must be specified for the IP Type in both the Header and Item Criteria for Sales
Documents or Purchasing Documents configuration.
For each matrix/subset/usage in the matrix group, assign the dataset to be used to evaluate document
data. The dataset contains a set of conditions. Only data that meets the conditions will update the
matrix, based on mapping between the dataset result fields and the matrix fields. Datasets are defined
in the Data Set Workbench. When creating evaluation datasets, use the IP areas 47-53.
NOTE: If the user creates a new member, the user can see that new member in the subset data.
However, that new member is not going to be inserted in Subset Workbench usage members.
Moreover, the Planning workbench will show the update of data for existing members only.
Access
Transaction code: /IRM/IPMXSGM
Structure
The Matrix Group Workbench screen is organized into the following areas:
• Search and Worklist Use the Search and Worklist to view information for selected matrix groups in a grid format. From the grid, click on a matrix group name to display that subset group in focus in the Work Area.
• Work Area Use the Work Area to maintain a matrix group. In the standard Vistex implementation, the Work Area contains the following tabs: • Definition
1909 Pricing Documentation
• Admin Data
NOTE: Functions accessed from the menu bar apply only to the matrix group displayed in focus in the
Work Area and do not apply to the data in the Search and Worklist.
IMPORTANT: Because Vistex software is extremely versatile, the user screen may be customized. As a
result, the screen may appear different from the standard screen described in this document.
Procedures
Displaying a Matrix Group
Creating a Matrix Group
Copying a Matrix Group
Maintaining a Matrix Group
Deleting a Matrix Group
Data Set Workbench
Definition
Data sets are used to define the (basic) formulas or criteria used to pull data from source tables and
push that data to target tables.
Typical ways to use a data set include:
• Matrix update from selected header and line item fields The data set defines the data to be pushed into the matrix. Specify the data set in the scenario group.
• Matrix update from selected source documents: sales documents, billing documents, delivery documents, or purchasing documents
• Matrix update from calculation run results The scenario group assigned to the calculation run type holds the data set name.
• Accounting at the composite line item level The data set defines the formula or criteria used to push all applicable line items into financial allocation tables for processing a composite plan.
• Controlling the data used for IP level allocation (Allocation tab) in a calculation run • Pushing line items to the tracking screen
To select the line items displayed when you click on the Line Items button in the tracking screen. • Subcomponent level characteristic mapping
Subcomponent characteristics can be used to filter the line items displayed when you click on the Line Items button on the tracking screen, rather than displaying all line items, for performance reasons. For example, if there are ten materials in a material group, can limit the display to two materials.
• Claim item derivation using agreement scheduling To push and filter data into claims that are triggered from the agreement Schedules tab.
Business Register
SAP Data Maintenance by Vistex, Pricing option for SAP S/4HANA by Vistex for SAP S/4HANA
Application Help – Version: 1.0 – Final
December 12, 2019
© 2019 Vistex, Inc. All Rights Reserved.
© 2019 SAP SE or an SAP affiliate company. All rights reserved.
In configuration, Vistex provides pre-defined dataset areas for the uses listed above. Custom fields can
be added by appending the relevant structures.
Use the Data Set Workbench to create a data set. After using the Simulate functionality to test the data
set, assign the data set in configuration, as applicable, or in transactions such as Subset Workbench (to
load data into a usage).
Access
Transaction code: /IRM/GDSTM
Structure
The Data Set Workbench screen is organized into the following areas:
• Search and Worklist Use the Search and Worklist to view a list of selected data sets in a grid format. From the grid, click on a data set number to display that report in focus in the Work Area.
• Work Area Use the Work Area to maintain one data set. In the standard Vistex implementation, the Work Area contains the following tabs: • Definition
• Review, to view the formula/logic statements in words.
• Result Fields, appears only for data sets configured as expression data sets (not for selection data sets). Define all the fields to be pulled from the source document. These fields are required for mapping the data set to the fields in the scenario group.
• Admin Data
NOTE: Functions accessed from the menu bar apply only to the data set displayed in focus in the Work
Area and do not apply to the data in the Search and Worklist.
Procedures
Creating a Data Set
Copying a Data Set
Reviewing a Data Set in Words
Simulating a Data Set
Maintaining a Data Set
Deleting a Data Set
Available Periods Workbench
Definition
1909 Pricing Documentation
Use the Available Periods Workbench to lock matrix data on the Planning Screen for particular periods in
a specific year, at the usage level.
Closed periods are for display only on the Planning Screen. If a period is closed, you cannot edit the data.
Access
Transaction code: /IRM/IPMXPERM
Structure
The Available Periods Workbench screen is organized into the following areas:
• Search and Worklist Use the Search and Worklist to view selected matrix/subset/usage in a grid format. From the grid, click on a matrix name to display it in focus in the Work Area.
• Work Area Use the Work Area to maintain periods for one matrix/subset/usage.
NOTE: Functions accessed from the menu bar apply only to the matrix displayed in focus in the Work
Area and do not apply to the data in the Search and Worklist.
Data Sources
APD Structure Workbench
Definition
Use the APD Structure Workbench to create a structure that contains a list of APD (Analysis Process
Designer) fields. Existing APD structures can be used as the source for matrix explosions and derivations.
APD structures in Vistex are exact replicas of BI APD structures. When creating an APD structure, also
create a function module to update the matrix from BI. Its interface will contain a table type APD
structure that will call the API from the BI system. A report will be written to pull data from BI system
and push into the ECC matrix.
Access
Transaction code: /IRM/IPMXAPDM
Structure
The APD Structure Workbench screen is organized into the following areas:
• Search and Worklist Use the Search and Worklist to view selected APD structures in a grid format. From the grid, click on a structure name to display it in focus in the Work Area.
• Work Area Use the Work Area to maintain one APD structure. In the standard Vistex implementation, the Work Area contains the following tabs:

Business Register
SAP Data Maintenance by Vistex, Pricing option for SAP S/4HANA by Vistex for SAP S/4HANA
Application Help – Version: 1.0 – Final
December 12, 2019
© 2019 Vistex, Inc. All Rights Reserved.
© 2019 SAP SE or an SAP affiliate company. All rights reserved.
• Fields
• Admin Data
NOTE: Functions accessed from the menu bar apply only to the APD structure displayed in focus in the
Work Area and do not apply to the data in the Search and Worklist.
Procedures
Displaying an APD Structure
Creating an APD Structure
Copying an APD Structure
Maintaining an APD Structure
Deleting an APD Structure
HANA Source Workbench
Definition
Use the HANA Source Workbench to list the fields to be used for the following purposes:
• pull HANA view data into a matrix HANA fields can be assigned and mapped at the subset usage level. Then use HANA Data Update (/IRM/IPMXHANAU) to upload the HANA data to the assigned matrix/subset/usage combination.
• source for matrix explosions Assigned at the subset usage level.
• source for matrix derivations To pull HANA view information into the Planning Screen on-the-fly. Can be assigned at the matrix and subset usage level (higher priority than at the matrix level), with its own source mapping for retrieving HANA view data.
Access
Transaction code: /IRM/IPMXHANAM
Structure
The HANA Source Workbench screen is organized into the following areas:
• Search and Worklist Use the Search and Worklist to view selected HANA sources in a grid format. From the grid, click on a HANA source name to display it in focus in the Work Area.
• Work Area Use the Work Area to maintain one HANA source. In the standard Vistex implementation, the Work Area contains the following tabs:

1909 Pricing Documentation
• Fields
• Admin Data
NOTE: Functions accessed from the menu bar apply only to the HANA source displayed in focus in the
Work Area and do not apply to the data in the Search and Worklist.
Procedures
Displaying a HANA Source
Creating a HANA Source
Copying a HANA Source
Maintaining a HANA Source
Deleting a HANA Source
Matrix Upload
Upload Subset Data
Definition
Use Upload Subset Data to import subsets (including members) from a file, such as an Excel
spreadsheet, rather than manually entering the data. Uploaded information can be posted immediately
or saved to a submission that must go through an approval process prior to being released.
File templates can be created to control the fields and format of files during upload. To create a file
template, either save the information entered on the screen, or use the File Template for Matrix Workbench.
Access
Transaction code: /IRM/IPMXSUPL
Procedure
Uploading Subset Data
File Template for Matrix
Definition
Use File Template for Matrix Workbench to create and maintain templates that control the fields and
format of matrix files during upload and/or download.
The system delivers MX0061 as the default file template used when the matrix is generated if no user-
created file template exists.
Business Register
SAP Data Maintenance by Vistex, Pricing option for SAP S/4HANA by Vistex for SAP S/4HANA
Application Help – Version: 1.0 – Final
December 12, 2019
© 2019 Vistex, Inc. All Rights Reserved.
© 2019 SAP SE or an SAP affiliate company. All rights reserved.
NOTE: The file template is matrix specific. A file template created for one matrix cannot be used for
another matrix.
Access
Transaction code: /IRM/IPMXFTM
Structure
The File Template for Matrix Workbench screen is organized into the following areas:
• Search and Worklist Use the Search and Worklist to view selected file templates in a grid format. From the grid, click on file template number to display that file template in focus in the Work Area.
• Work Area Use the Work Area to maintain one file template. In the standard Vistex implementation, the Work Area contains the following tabs: • Section
• Mapping
• Conversion
• Submitter
• Crystal Layout, which is used with Crystal Reports
• Admin Data
NOTE: Functions accessed from the menu bar apply only to the file template displayed in focus in the
Work Area and do not apply to the data in the Search and Worklist.
Procedures
Displaying a File Template for Matrix
Creating a File Template for Matrix
Copying a File Template for Matrix
Maintaining a File Template for Matrix
Deleting a File Template for Matrix
3.3.4.3.3.2 Proforma Planning
Proforma Document
Definition

1909 Pricing Documentation
A proforma document is a worksheet at a usage level that provides data to be reviewed and approved
before the data is posted to a matrix. Proformas provide a formal request process to change matrix
data. For example, proformas might be used to create either a Profit & Loss Statement for a promotional
spend or a commission schedule. Proformas can be used as profitability simulations, or for budgeting,
overall planning, account planning, promotion planning, incentive modeling, and accrual modeling.
Proforma documents can be created from the following transactions:
• Subset Workbench (/IRM/IPMXSM) You may flag a usage to create a proforma when loading data.
• Load Subset Usage Data (/IRM/IPMXSLOAD) To create a proforma, select the proforma type used to perform the load.
• Planning Grid • Upload Subset Data (/IRM/IPMXSUPL)
To create a proforma, specify the Proforma Type in the upload parameters. Planning data can be saved as a proforma.
• Proforma tab in the agreement/agreement request/program/master request/calculation run Used to create a proforma and to view a list of proformas created from the transaction.
The layout of the proforma document is user-defined and may include such data as the following:
• net price customer will pay for the product - by customer, by product • committed volume per time period • calculated revenue • anticipated rebate percentage or amount • total cost • margin / net profitability
Proforma values can be pulled in from price simulation, matrix/BI data, rules, tracking, calculation runs,
and business script calculations.
Any existing proforma document can be viewed in the Proforma Workbench. Use the workbench to post
the data to the matrix after the proforma is approved.
Additional Functionality
Based on configuration, the following functions can be activated:
• Recreate A Recreate button can be enabled on the Proforma tab, based on the proforma profile.
• Refresh A Refresh button can be enabled on the Proforma tab, based on the proforma profile.
• Pushback (Write back) When a proforma is changed, the data can be pushed back to the source document. Based on proforma profile key figure mapping configuration, the source document can be updated either when the proforma is saved or when it is posted.
Setup
Prior to creating proformas, the proforma type and price simulation type need to be defined in
configuration. Also, create mapping profiles, as needed.
Proforma Type

Business Register
SAP Data Maintenance by Vistex, Pricing option for SAP S/4HANA by Vistex for SAP S/4HANA
Application Help – Version: 1.0 – Final
December 12, 2019
© 2019 Vistex, Inc. All Rights Reserved.
© 2019 SAP SE or an SAP affiliate company. All rights reserved.
The proforma type controls the proforma document number range and status profile. A proforma type
is assigned to the proforma profile.
Price Simulation Type (Optional)
Price simulation types, defined in Data Maintenance Pricing configuration, control the price simulation
document number range and tab sequence.
Mapping Profile
Use the Mapping Profile Workbench (/IRM/IPMXMPM) to create mapping profiles. Each mapping profile
specifies the matrix/subset/usage to be used, as well as the proforma type (mandatory) and description.
The remaining fields differ, depending on the proforma model. The profile is assigned one of the
following models:
• 1, rule-based Source is a rules-based document, such as an agreement/direct agreement, agreement request/direct agreement request, deal, deal request, campaign, or master request. A mapping profile is assigned to the document type (agreement type, for example). Multiple mapping profiles can be assigned to the document type. Map the matrix characteristics to the rule fields. A characteristic can be mapped from multiple sources, as needed. For example, a material can be mapped from multiple rule sheets. One characteristic can be flagged as the validity anchor to base selection on that characteristic's validity dates. At the key figure level, you can configure the system to push data from the proforma to the key figures either on save or on post.
• 2, tracking Used to analyze composite tracking data. Source is the calculation run. A deployment code and version are assigned to the proforma profile. Map both components (participant level) and subcomponents. Validity dates are proposed when the proforma is created.
• 3, simulation Source is the price simulation document. Map the matrix characteristics to the price simulation document fields. The proforma is created in the price simulation, using the simulation line items.
• 4, prices model Source is the price proposal document. Map the price sheets used for price proposals. The proforma is created in the Price Proposal Workbench, using the price sheets maintained in the price proposal.
• 5, planning document Used to post planning document data to the matrix. In the Subset Workbench (/IRM/IPMXSM), on the Planning Document Types tab in Usages list the Document Type and Mapping Profile. During posting, the system first checks for this configuration; if blank, posts to the matrix/subset/usage of the planning document. Configuration allows you to post to different matrices/subset/usages, based on the mapping profile.
In the key figures mapping configuration, a flag can be set to use the source (currency/quantity) unit in
the proforma (no conversion is done). If the flag is not enabled, the amounts are converted to the unit

1909 Pricing Documentation
from the usage level reference key figure field. In the key figures conditions configuration, you may use
the Value field to specify one fixed value, instead of entering a matrix characteristic.
Based on mapping, the system sends data to the price simulation engine to calculate pricing based on
document validity dates and subset periods.
Proforma
Documentation for proforma documents is available for the following screen formats:
• UI Application (SAP Fiori) • SAP GUI (Web Dynpro Grid)
3.3.4.3.4 Tracking
3.3.4.3.4.1 Individual Tracking
Documentation for individual tracking is available for the following screen formats:
• UI Application (SAP Fiori) • SAP GUI
3.3.4.3.4.2 Participant Tracking
Definition
Use the Participant Tracking transaction to simultaneously track data for a participant across multiple
plans.
Access
Transaction code: /IRM/IPBRCPP
Structure

Business Register
SAP Data Maintenance by Vistex, Pricing option for SAP S/4HANA by Vistex for SAP S/4HANA
Application Help – Version: 1.0 – Final
December 12, 2019
© 2019 Vistex, Inc. All Rights Reserved.
© 2019 SAP SE or an SAP affiliate company. All rights reserved.
The screen is organized into the following areas:
• Selection Fields • Participant Tracking Data, which displays data for the participant across all plans that include the
participant. Procedure
Tracking Participant Information
3.3.4.3.4.3 Tracking Screen Functions
Info Key Figures
Definition
Info key figures allow you to view additional information about tracking screen fields on demand. The
information appears in a pop-up that is accessed from either a hot key or an icon next to the tracking
screen field.
This functionality is enhancement class based. Vistex delivers the enhancement class
/IRM/CL_IPCI_SCALES_DISPLAY to display scales ($ or %) in a pop-up. Using the sample enhancement
class as a guide, you can define your own enhancement class to view other information, such as
materials in a material group, from a field on the tracking screen.
Setup
To use an info key figure:
• define an info key figure and assign it to your Current Period (CPD)/Period-to-Date (PTD) structures. In the component formula, tie the info key figure to an attribute lookup for a condition record number. The system uses the condition record number when the icon or hot key is clicked on the tracking screen.
• in the Screen Layout Parameters configuration for deployment codes, use the Assign Component Key Figures tab to assign the Tracking Info Key Figure (that provides the data) to the Tracking Key Figure (that displays the data). Assign the enhancement class, and if using an icon, specify the icon.
Interactive Tracking
Definition

1909 Pricing Documentation
Any tracking key figure on the individual tracking screen can be designated as editable, allowing you to
perform "what-if" calculations on the fly. Editable fields, which appear as textboxes, can appear at the
group level and the subcomponent level.
Enter a new temporary amount in an editable field and press ENTER. In the application toolbar, click on
the Simulate Tracking button to have the system recalculate other field values based on the edited
field value. To reset the data back to the original values, click on the Reset Simulation button.
Since the layout controls whether the fields are editable, you may create multiple layouts and assign
them to the deployment code/version. On the tracking screen, click on the Layout button to select a
layout from the dropdown list of available layouts. Authorizations can be set for layouts.
Configuration
For editable fields at the group level, perform the following Composite configuration:
• Set the Editable flag for the Assigned Tracking Key Figure in the Deployment Code & Versions configuration.
• In Layout configuration, assign the tracking key figure group that contains the editable key figure field to the layout.
For editable fields at the subcomponent level, perform the following Composite configuration:
• Assign the subcomponent tracking key figures to the layout. • Set the Editable flag for the affected key figures.
Trace Log
Definition
You may create a trace log to view how the tracking result was derived, including postings, formula
steps, participation sources, component and subcomponent information, and mapping. Use this log
when testing that your data is being mapped in correctly or when performing "what-if" analysis, to see
how the different pieces of information came into the tracking screen.
NOTE: All sources for mapping data can be viewed in the trace, including calculation buckets, matrix,
evaluations, and mapping from the General Ledger.
To activate the trace log function, click on the Activate Trace button before executing tracking. After
executing, click on the Log button to view the trace log.

Business Register
SAP Data Maintenance by Vistex, Pricing option for SAP S/4HANA by Vistex for SAP S/4HANA
Application Help – Version: 1.0 – Final
December 12, 2019
© 2019 Vistex, Inc. All Rights Reserved.
© 2019 SAP SE or an SAP affiliate company. All rights reserved.
The trace log sample above illustrates a Period to Date Component Formula created using Business
Script. The log includes the following :
• Before Formula: values that existed prior to the formula being applied
• Component Calculation Formula: icon is a link to the trace log containing the formula steps. Click on each step to view the results for that step. If more than one value was calculated for a step, click on the icon in the Value column to display the values. NOTE: If using Formula Builder instead of Business Script, the formula steps and values appear in a grid on the trace log screen.
• Component Result: values determined after the formula was applied
3.3.4.3.5 Calculation Run
1909 Pricing Documentation
3.3.4.3.5.1 Calculation Run Overview
Definition
A calculation run is a snapshot of the eligible accrual and/or settlement values. Calculation runs can be
used for the following purposes:
• Review and approve accrual/settlement values for specific participants before the postings take place. Since approval status is tracked at the calculation run header level, the whole calculation run document is either approved or not. The process can be manual or can be automated by using the batch program to create the calculation runs, which are sent through an automated approval process using SAP Workflow or Vistex Status Flow. When approved, the calculation runs are accrued and settled using a batch program.
• Validate settlement values with external partners to ensure they are in agreement with the claim amounts. Any discrepancies can be reconciled prior to settlement postings.
• For composite, capture and report line item detail for applicable accruals/settlements (if accounting done at the calculation line item level).
Transaction Codes - Composite Calculation Runs
Transaction codes used to create and process composite calculation runs:
• Create Composite Calculation Run /IRM/IPBRPCRCMP, batch program used to create and save calculation runs. Check the Individual Calculation Run checkbox to create a separate calculation run for each participant. Based on the participant type selected, the corresponding participant field becomes editable, to directly enter participants for the calculation run. Also, based on configuration the following posting functions can be executed when the calculation run is created: accrual, interim settlement, and settlement.
• Mass Processing of Composite Calculation Run /IRM/IPBRPCRPMP, batch program used to perform a specific function (accrual, settlement, settlement adjustment, posting, create claim, create proforma) for selected composite calculation runs.
• Composite Calculation Run /IRM/IPBRPCRM, used to create a composite calculation run that can be reviewed before it is saved, or to review calculation runs created using other transaction codes.
Often, multiple batch programs are run for multiple deployment codes, in an attempt to create
calculation runs at the right time. The following checks are performed by the Create Calculation Run
batch job to help prevent unwanted calculation runs:
• Evaluation date (posting date, usually end of month) selection screen parameter If the Calculation Run type is set up for accrual and/or settlement, the system checks whether the Evaluation date is in the accrual/settlement calendar, to determine whether the calculation run should be created.
• Participant date, to determine whether the participant should be considered • Deployment code effective date
Business Register
SAP Data Maintenance by Vistex, Pricing option for SAP S/4HANA by Vistex for SAP S/4HANA
Application Help – Version: 1.0 – Final
December 12, 2019
© 2019 Vistex, Inc. All Rights Reserved.
© 2019 SAP SE or an SAP affiliate company. All rights reserved.
• In configuration for the deployment code calculation run type, a flag can be checked to prevent duplicate calculation runs. The system checks for duplicates by deployment code / version / calculation run type / period / participant.
Transaction Codes - Transactional Calculation Runs
Transaction codes used to create and process transactional calculation runs:
• Calculation Run Data Model /IRM/IPTTCM, to define the calculation run by application, including what data will be stored.
• Mass Processing of Transactional Calculation Run /IRM/IPTTPMP, batch program used to perform a specific function (accrual, settlement, reverse accrual, reverse settlement, and deletion) for selected transactional calculation runs.
• Transactional Calculation Run /IRM/IPTTM, used to create a transactional calculation run. Configuration
A calculation run is assigned a configured calculation run type. Separate configuration exists for
transactional calculation run types and composite calculation run types.
Transactional Calculation Run Type
For transactional processing, the calculation run type controls the number range, period profile, status
profile, and posting date.
Composite Calculation Run Type
For composite, he calculation run is assigned a configured calculation run type that controls the
following:
• relevant posting types for the calculation run • what tabs will appear in the calculation run Work Area • name of the status profile used for approvals. If different approval processes are required for
each function (such as accrual and settlement), a calculation run type can be defined specifically for a function.
• name of each evaluation type (see the Evaluation Overview for more information) • which Calculation Run logs will appear, to view the system messages created when functions are
performed on a calculation run. For composite, the calculation run type must be attached to the deployment code.
The evaluation anchor indicates whether tracking should be based on the evaluation period or
evaluation date. A default evaluation anchor can be assigned at the deployment code/calculation run
type level, but can be overridden when the calculation run is created.
The following options are available:
• Provide period then participant The evaluation period is entered first. Based on that period, the participant will be fetched and tracked.
• Provide participant then period The participant is entered first. Periods maintained for the participant based on the period
1909 Pricing Documentation
profile will appear in the Period field dropdown list. After the period is selected, tracking will be performed. To use this option, the Periodicity must be F (Flexible Periods) in the deployment code period parameters configuration.
• Provide evaluation date then participant The evaluation date is entered first. The system determines the period in which the evaluation date falls and will track the participant for that period.
• Provide evaluation date as end date The evaluation date entered will be considered as the evaluation end date rather than the period end date in which the evaluation date falls.
3.3.4.3.5.2 Calculation Run
Documentation for calculation runs is available for the following screen formats:
• UI Application (SAP Fiori) • SAP GUI
3.3.4.3.6 Evaluation
3.3.4.3.6.1 Evaluation Overview
Definition
Evaluation is a data collection tool similar to a survey. Each evaluation consists of a set of fields and/or
grids used to record and track data. The global evaluation tool can be used for various situations, such
as:
• Contextual validation Data complexity can make it difficult to validate whether an agreement or claim is complete and accurate. Evaluations can perform complex checks and verifications.
• Outcome based contracting: • Census recording, to enter data collected at customer sites, such as characteristics of the
customer's business or the customer's use of the product sold. This data can be used to determine eligibility or compliance to agreement terms.

Business Register
SAP Data Maintenance by Vistex, Pricing option for SAP S/4HANA by Vistex for SAP S/4HANA
Application Help – Version: 1.0 – Final
December 12, 2019
© 2019 Vistex, Inc. All Rights Reserved.
© 2019 SAP SE or an SAP affiliate company. All rights reserved.
• Compliance checking, to record compliance data, which can be combined with a Business Script to calculate a compliance score that determines the subjective rebate amount. A button appears on the screen to rerun the script after the evaluation data is maintained.
• MBO evaluation Evaluations can be used to track MBO incentives data rather than storing the data in the matrix. Compensation can be based on the evaluation results.
• Suitability An evaluation can be designed as a questionnaire whose answers help select applicable agreements or programs.
Setup
Use the following workbenches to set up evaluations:
• Evaluation Element (/IRM/GEVELM), used to define individual elements, such as textboxes, dropdown menus, and multiple choice questions.
• Evaluation Template (/IRM/GEVTPM), used to arrange individual elements and groups of elements into a display view.
• Evaluation Type (/IRM/GEVTM), used to link a template to an object, and define how frequently an evaluation can be performed. An evaluation type then can be linked to a specific object type (agreement type, for example) in configuration.
Evaluation Processing
An evaluation can be performed, viewed, or maintained using the Evaluation tab in the following:
• Agreement Workbench • Calculation Run • Campaign Workbench • Claim Workbench • Evaluation (/IRM/GEVM), used to create and maintain standalone evaluations not attached to
an object. When an evaluation is performed, the system creates an evaluation document to store the data.
Individual evaluation documents can be accessed from the Evaluation tab in the agreement, calculation
run, campaign, claim, or evaluation workbenches.
Composite Tracking
Data from evaluation documents can be displayed on the composite individual tracking screen, based on
composite configuration.
In Mapping configuration, select Evaluation as the Source Type for the Source Key Figure ID. Specify an
evaluation type, object type, element, and sub-element (if the specified element is a grid). Then,
maintain the source key figure ID, characteristics mapping, subcomponent definition (Evaluation
section), and subcomponent characteristics mapping.
Status Flow
1909 Pricing Documentation
Status Flow is integrated into evaluations. When a status profile is defined for an evaluation type, the
Status tab is enabled in the Evaluation Workbench.
Evaluation approvals can be performed from the evaluation document, email, or activities.
3.3.4.3.6.2 Element Workbench
Definition
Use the Element Workbench to define the individual items that will appear in an evaluation. There are
two categories of elements:
• Basic • Grid
Basic Elements
The following table illustrates the data required to create the available types of Basic elements:
Element Type Description General Tab Data Values Tab Data Preview Tab Data
Direct Data Type
Requests user to enter characters, amount, date, number, quantity, time or text.
Depends on the data type
Value Source and Values NOTE: This tab does not appear for Text data type elements.
Display Properties
Button Displays a button Enhancement Class and button text
N/A N/A
Message Displays a message from the Message Class Workbench
Data Type defaults to Character and length defaults to 80
N/A
Message Variables: Message class, number, and type of message; can add up to 4 message variables
Reference Element
Applies properties from the reference element to this element
Reference Element N/A N/A
Reference Field
Applies properties from the reference field to the element
Reference table and field
Value Source and Values
Display Properties

Business Register
SAP Data Maintenance by Vistex, Pricing option for SAP S/4HANA by Vistex for SAP S/4HANA
Application Help – Version: 1.0 – Final
December 12, 2019
© 2019 Vistex, Inc. All Rights Reserved.
© 2019 SAP SE or an SAP affiliate company. All rights reserved.
Data type, length, and decimal positions default from the reference field
Grid Elements
A grid element consists of a collection of other elements. Each element that appears in a grid first must
be defined as a Basic element. At least one element must be flagged as a Key. If needed, an element can
be for display only.
Available grid properties include:
• Display Format: The elements in a grid can display text and/or a value ID. • Height: The height in pixels may be specified, if needed. • Show Border: The grid can contain grid lines and a border. • Enable Comment: A comment textbox can be included beneath the grid, if needed.
Access
Transaction code: /IRM/GEVELM
Structure
The Element Workbench screen is organized into the following areas:
• Search and Worklist Use the Search and Worklist to view selected elements in a grid format. From the grid, click on an element name to bring that element in focus in the Work Area.
• Work Area Use the Work Area to maintain the element in focus. In the standard Vistex implementation, the Work Area contains the following tabs: • General
• Elements, which appears only for Grid category elements.
• Values, which appears only for Basic category elements.
• Preview
• Admin Data
NOTE: Functions accessed from the menu bar apply only to the element displayed in focus in the Work
Area and do not apply to the data in the Search and Worklist.
IMPORTANT: Because Vistex software is extremely versatile, the user screen may be customized. As a
result, the screen may appear different from the standard screen described in this document.
Procedures
Displaying an Element

1909 Pricing Documentation
Creating a Basic Element
Creating a Grid Element
Copying an Element
Maintaining an Element
Deleting an Element
3.3.4.3.6.3 Evaluation Template Workbench
Definition
Use the Evaluation Template Workbench to arrange individual elements and groups of elements into a
display view.
Access
Transaction code: /IRM/GEVTPM
Structure
The Evaluation Template Workbench screen is organized into the following areas:
• Search and Worklist Use the Search and Worklist to view selected evaluation templates in a grid format. From the grid, click on an evaluation template name to bring that template in focus in the Work Area.
• Work Area Use the Work Area to maintain the evaluation template in focus. In the standard Vistex implementation, the Work Area contains the following tabs: • Elements
• Preview
• Admin Data
NOTE: Functions accessed from the menu bar apply only to the evaluation template displayed in focus in
the Work Area and do not apply to the data in the Search and Worklist.
IMPORTANT: Because Vistex software is extremely versatile, the user screen may be customized. As a
result, the screen may appear different from the standard screen described in this document.
Procedures
Displaying an Evaluation Template
Creating an Evaluation Template
Copying an Evaluation Template
Maintaining an Evaluation Template
Deleting an Evaluation Template

Business Register
SAP Data Maintenance by Vistex, Pricing option for SAP S/4HANA by Vistex for SAP S/4HANA
Application Help – Version: 1.0 – Final
December 12, 2019
© 2019 Vistex, Inc. All Rights Reserved.
© 2019 SAP SE or an SAP affiliate company. All rights reserved.
3.3.4.3.6.4 Evaluation Type Workbench
Definition
Use the Evaluation Type Workbench to link a template to an object, and define how frequently the
evaluation can be performed. An evaluation type then can be linked to a specific object type (agreement
type, for example) in configuration.
Access
Transaction code: /IRM/GEVTM
Structure
The Evaluation Type Workbench screen is organized into the following areas:
• Search and Worklist Use the Search and Worklist to view selected evaluation types in a grid format. From the grid, click on an evaluation type name to bring that evaluation type in focus in the Work Area.
• Work Area Use the Work Area to maintain the evaluation type in focus. In the standard Vistex implementation, the Work Area contains the following tabs: • General
• Preview
• Admin Data
NOTE: Functions accessed from the menu bar apply only to the evaluation type displayed in focus in the
Work Area and do not apply to the data in the Search and Worklist.
IMPORTANT: Because Vistex software is extremely versatile, the user screen may be customized. As a
result, the screen may appear different from the standard screen described in this document.
Procedures
Displaying an Evaluation Type
Creating an Evaluation Type
Copying an Evaluation Type
Maintaining an Evaluation Type
Deleting an Evaluation Type

1909 Pricing Documentation
3.3.4.3.6.5 Evaluations
Documentation for evaluations is available for the following screen formats:
• UI Application (SAP Fiori) • SAP GUI
3.4 Medical Rebates
3.4.1 Introduction to Medicaid Rebate Processing
3.4.1.1 Definition
Under the Medicaid Drug Rebate Program, manufacturers report the Average Manufacturer Price (AMP)
and Best Price (BPR) on a monthly and/or quarterly basis. The government uses the data to determine
the rebate amount, updated quarterly, that each state Medicaid program receives on every unit of that
manufacturer's products that the state pays for in a given quarter.
Business Register provides the ability to create Medicaid agreements and automatically process claims
against those agreements. Claims are validated against the product and agreements, and checked for
reasonableness. If any validations are violated, a warning message is displayed and the system calculates
a recommended dispute amount. After a payment amount is determined by the user, the system
prepares the payment and produces the necessary Reconciliation of State Invoice (ROSI) for original
invoices and Prior Quarter Adjustment Statement (PQAS) for adjustments to prior periods.
3.4.1.1.1 Federal Medicaid Program
The Federal Medicaid Program is fixed by statute. Therefore, the primary function of the system is to
perform the necessary claim processing.

Business Register
SAP Data Maintenance by Vistex, Pricing option for SAP S/4HANA by Vistex for SAP S/4HANA
Application Help – Version: 1.0 – Final
December 12, 2019
© 2019 Vistex, Inc. All Rights Reserved.
© 2019 SAP SE or an SAP affiliate company. All rights reserved.
3.4.1.1.2 State Medicaid Programs
The state supplemental, SPAP, ADAP, and other programs require an agreement to define the products,
states, and formulas used to manage and pay the claims. Most states belong to a Federal program and
can have several programs of their own. Some state programs have multiple states associated with
them. The agreements will also contain the products for which the manufacturer has agreed to pay a
rebate to the specific state. Payment will be based on formulas defined within the agreement product
record.
Based on these agreements the states submit invoices to the manufacturer for payment of the Medicaid
rebate. Business Register allows the entry and adjudication of the claims. When approved, the claims
will be settled and seamlessly sent on to Finance for payment processing .
3.4.1.2 Process Overview
Medicaid Rebate processing includes the following steps:
• Define and manage Medicaid program agreements. • Accept and process Medicaid claims. • Calculate the recommended rebate amount and adjudicate the claim. • Settle the claims and send to Finance for payment processing. Generate the ROSI/PQAS reports,
which can be printed by the Finance department.
3.4.2 Medicaid Rebate Master Data
3.4.2.1 Delivered Objects
3.4.2.1.1 Medicaid Agreement Types and Formulas
The following agreement types and formulas are provided in Business Register:
Medicaid Agreement Types
1909 Pricing Documentation
The following agreement types are delivered in Business Register:
• X901, Federal Medicaid • X902, Supplemental Medicaid • X903, Medicaid SPAP • X904, J Code • X905, ADAP • X906, Managed Care (MMCO) • X907, MMCO J Code
Medicaid Formulas
Business Register is delivered with Medicaid rebate formulas, which may contain variables that would
be defined in the agreement. Formulas may be re-used across agreements.
Business Script can be used to view the delivered formulas, and to change and build new formulas if the
delivered formulas do not meet the manufacturer's needs.
The following formulas are delivered with Business Register:
• SUPMED, standard Medicaid formula • SUPP, supplemental formula that requires entry of a contract price
(Formula = WAC - URA - Contract price) • SUPPAMP, supplemental AMP-based formula that requires entry of a contract price
(Formula = AMP - URA - Contract price) • NJVAR, New Jersey formula
(Formula = Rate from the invoice x URA) • PACE, Pennsylvania formula • FLEXBASE, which requires entry of a basis and contract price used as a percentage rate (Formula
= Rate x Basis)
3.4.2.2 Master Data Procedures
3.4.2.2.1 Medicaid Agreements
3.4.2.2.1.1 Definition
State Medicaid programs are built as agreements in Business Register. Based on these agreements,
states will submit invoices to the manufacturer for payment of the Medicaid rebate. An agreement must
be set up before a state Medicaid invoice claim can be processed.

Business Register
SAP Data Maintenance by Vistex, Pricing option for SAP S/4HANA by Vistex for SAP S/4HANA
Application Help – Version: 1.0 – Final
December 12, 2019
© 2019 Vistex, Inc. All Rights Reserved.
© 2019 SAP SE or an SAP affiliate company. All rights reserved.
3.4.2.2.1.2 Process
Use the Agreement Workbench to create and maintain agreements. An agreement must be set up
before a state Medicaid invoice claim can be processed. In the agreement, specify the program
(agreement) type, description, and duration. Use rules to assign the eligible states (vendors) and
products. Define each product that the state(s) will be allowed to submit invoices for, and assign the
associated Medicaid formula that will be used to price the claim line items.
Calculation of the program unit rebate amount is defined in the agreement. This calculation can include
values from previously calculated price types, such as AMP and URA, and can include variables to be
filled during claim receipt and invoice calculation.
Creating an Agreement
NOTE: Certain fields can be added to a rule, as needed. For example, to add the vendor name to the
vendor rule, click on the Change Layout button. On the Displayed Columns tab, select the Vendor Name
field from the Column Set box, and then click the Right arrow to move that field to the Displayed
Columns box.
1. Access the Agreement Workbench.
2. Click on the Create button to display the Create Agreement dialog window. Alternately, from
the menu bar select Agreement → Create.
3. In the Create Agreement dialog window, enter the agreement description, dates, and sales
organization. Click on to continue.
4. Display the Rules tab.
5. Select the vendor/state price sheet from the list in the Current Sheet field.
Add lines by selecting the Create button. Click on the Create button to add one, five
and/or ten records. For example, adding three records can be accomplished in the following
ways:
• Click on the Create button and select 1 from the dropdown three times.
• Click on the Create button, select 5 from the dropdown, highlight two of the five new records, click on the Delete button, and then select Delete from the dropdown.
• Click on the Create button, select 10 from the dropdown, highlight seven of the ten new records, click on the Delete button, and then select Delete from the dropdown.
6. Use the Valid From and Valid To fields to adjust the dates if the vendor/state or product will not
be included for the full term of the agreement.
7. Click on the Check and Complete button to validate the vendor/states you entered.

1909 Pricing Documentation
8. Select the product price sheet from the list in the Current Sheet field.
9. For each product, enter the product number and adjust the dates, if needed. You also must
select a formula.
10. Click on the Check and Complete button to validate the products you entered.
11. Save the agreement. The system will assign an agreement number.
12. To release the agreement for use, in the Release status field in the Header, select the Released
option. Save the agreement again.
Copying an Agreement
Use the copy feature to create a new agreement that is similar to an existing agreement. The copy
feature is available in both Display mode and Change mode.
1. Access the Agreement Workbench.
2. In the Search and Worklist, perform a search or display your worklist. Click on an agreement
number to display that agreement in focus in the Work Area.
3. Click on the Copy Agreement button to display the Copy Agreement window.
4. Enter the new agreement name and description.
5. Specify additional information in the Copy As, Basic Data, Copy With, Organizational Data, and
Source sections, as needed.
To make multiple copies, check the MltCopy checkbox, and then specify the number of copies in
the No. of copies field.
In the Basic Data section, the Reference type (reason for the copy) field value can be selected
during the copy process only; the field is non-editable on the agreement.
In the Copy With section, click on either Same Validity (valid from and to dates will be the same
as the copy from agreement) or New Validity (enter a value in the Valid On field).
6. Check the Copy checkboxes to copy the Partner tab, Texts tab, and Clauses tab information, as
needed.
7. For each condition type to copy, check the Selection checkbox.
8. Use the first two buttons at the bottom of the window to either save the new agreement or
preview the new agreement without saving it.
Alternately, use the As Request buttons to save the new agreement as an agreement request or
to preview the new agreement as an agreement request without saving it.
Maintaining Header Data in Multiple Agreements
1. Access the Agreement Workbench.
2. In the Search and Worklist, perform a search or display your worklist. In the grid, select the
agreements to be changed.
3. Click on the Display ↔ Change button so the agreement is in Change mode.
4. Click on the Mass Change button to display a dropdown menu.

Business Register
SAP Data Maintenance by Vistex, Pricing option for SAP S/4HANA by Vistex for SAP S/4HANA
Application Help – Version: 1.0 – Final
December 12, 2019
© 2019 Vistex, Inc. All Rights Reserved.
© 2019 SAP SE or an SAP affiliate company. All rights reserved.
5. Select the Header Data option to display the Mass Change Agreement dialog window.
6. You may change any of the listed fields (predefined in configuration by agreement type). For
each field to be changed, specify the new (change to) value.
Use the Reset flag to set the value to null or blank.
NOTE: You must use Mass Update to change the Valid From/Valid To values, even if for one
agreement; there is no manual way to update these fields.
7. Click on to make the changes.
To save the changes as an agreement request, click on the Save as Request button. If the system
is configured to allow collective requests, you may check the Collective Request checkbox to
create a single agreement request for all agreements in the mass change.
Mass Adding a Product to Multiple Agreements
1. Access the Agreement Workbench.
2. In the Search and Worklist, perform a search or display your worklist. In the grid, select the
agreements to be changed.
3. Click on the Display ↔ Change button to activate Change mode.
4. Click on the Mass Change button to display a dropdown menu.
5. Select the Create Rules (first) option to display the agreements on the Mass Change Agreements
page.
6. In the Current Sheet field, select the rule.
7. Click on the Create button and select 1. The system will add one open line to each
agreement you selected.
8. Select the Material column. Click on the Set Values button to display the Select and
Compute dialog window.
9. “Set to” is the only option for the first box. Enter the material you wish to add to the
agreements in the second box. The third box is not open for any entry. Click on the
Calculator button.
10. Click on the Check and Complete button to validate the product you added.
11. Save the agreements. The system will request a mass reference number for logging purposes.
Enter the reference number and click on .
Changing Agreement Rules
NOTE: You can update the data in multiple agreements across multiple agreement types.
1. Access the Agreement Workbench.
2. In the Search and Worklist, perform a search or display your worklist. In the grid, select the
agreements to be changed.

1909 Pricing Documentation
3. Click on the Display ↔ Change button to activate Change mode.
4. Click on the Mass Change button to display a dropdown menu.
5. Select the Change Rules (second) option to display the agreements on the Mass Change
Agreements page.
6. Change the listed items, as needed.
A mass reference number will be assigned to all changed agreements.
Viewing the Agreement Change Log
The change log provides a list of changes made to the selected agreement. You may view either all
changes to an agreement (Document View) or a list of packages (Package View). Each package is a set of
changes made at the same time and labeled by the change date, time, and user.
1. Access the Agreement Workbench.
2. In the Search and Worklist, perform a search or display your worklist. Click on an agreement
number to display that agreement in focus in the Work Area.
3. From the menu bar, select Environment → Changes.
4. Use the Document View and Package View buttons to toggle between the two views.
3.4.2.3 Master Data Transactions
3.4.2.3.1 Agreements
3.4.2.3.1.1 Business Register Agreement Overview
The agreement summarizes the pricing conditions of the items and the settlement parameters. Each
agreement can pertain to many customers or just one customer. Agreements can be national, local, or
limited to a specific customer location.
The agreement is entered into the system using the Agreement Workbench transaction. Agreements can
be created and maintained directly in this workbench, however Vistex recommends creating an
agreement request and then posting the request to create or change the agreement.
NOTE: The agreement is stored in an SAP condition contract, based on the condition contract type
assigned to the agreement type in configuration.

Business Register
SAP Data Maintenance by Vistex, Pricing option for SAP S/4HANA by Vistex for SAP S/4HANA
Application Help – Version: 1.0 – Final
December 12, 2019
© 2019 Vistex, Inc. All Rights Reserved.
© 2019 SAP SE or an SAP affiliate company. All rights reserved.
Business Register Agreement Transactions
The following workbenches can be used to provide information used in agreements, or to perform
functions using existing agreements:
• Agreement Request Although agreements can be created and maintained directly, the Vistex best practice is to create an agreement request and then post the request to create or change the agreement.
• Clause Clauses are distinct articles, stipulations, or provisions in a legal document, such as a contract. From a system stand point, a clause is the text created for a distinct article, stipulation, or provision.
• Template A template is a group of clauses that are sequenced and assigned levels to form the layout of a clause structure for a type of agreement. Multiple versions of a template can exist, and, as needed, a template can contain clause variations, such as alternate clauses.
• Agreement Policy Agreement policies are used to calculate thresholds for pricing exceptions and alert the user when a price requirement has been violated. Agreement policies generate warnings on an agreement if the agreement rules do not fit the specifications in the policy. For example, the policy can alert the user when a price is outside a defined target range.
Additional Transactions
Direct Agreements
Rather than creating application-specific agreements, you have the option of creating direct
agreements. Direct agreements are the Vistex version of SAP contract pricing. A direct agreement is
used to develop a contract directly with the customer/vendor. Direct agreements can be applied directly
to the order.
Master Requests
A master request is initiated for master contracts and bid management scenarios, as a starting point for
all negotiations. From the Master Request Workbench, approved master request information can be
copied to create or change agreement requests, agreements, price proposals, master requests, and deal
requests/deals (based on configuration).
The Vistex master request brings multiple price elements together in one workbench for analysis
purposes. In a master request, “editions” can be created to track changes to rules and postings.
However, if you need the ability to differentiate quotes and bids, or need to track changes to legally
binding documents, you can use a master agreement, created in the Master Agreement Workbench, to
change a master request, with full tracking.
Campaigns
Campaigns can be used for trade planning, to estimate future sales of a new product during its test
marketing, launch, or rollout period. Not just for special promotions, campaigns manage full-blown
campaigns. Multiple contracts and events (such as a road show) can be tracked and evaluated in one

1909 Pricing Documentation
document. The Campaign Workbench, which is similar to the Agreement Workbench, is used to create and
maintain campaign documents.
3.4.2.3.1.2 Business Register Agreement
Documentation for business register agreements is available for the following screen formats:
• UI Application (SAP Fiori) • SAP GUI
3.4.2.3.1.3 Upload/Download
Agreement Upload
Definition
Use Upload Agreement to create or change an agreement by uploading it from a file, such as an Excel
spreadsheet, rather than manually entering the data. Files can be uploaded from the following locations:
• Desktop, to upload from the local PC • File submission, to upload based on a file submission entry • File server, to upload directly from the application server
You must specify a file template for the upload. File templates can be created to control the fields and
format of files during upload. To create a file template, use the File Template for Agreement Workbench.
Access
Transaction code: /IRM/IPBRAGUPL
You may access this transaction directly, or use the Goto → Upload Agreement option from the menu
bar in the Agreement Workbench.
Procedure
Uploading an Agreement
Business Register
SAP Data Maintenance by Vistex, Pricing option for SAP S/4HANA by Vistex for SAP S/4HANA
Application Help – Version: 1.0 – Final
December 12, 2019
© 2019 Vistex, Inc. All Rights Reserved.
© 2019 SAP SE or an SAP affiliate company. All rights reserved.
Agreement Download
Definition
Use Agreement Download to download selected agreements to a specific file on a desktop or file server.
For large downloads, this transaction can be run as a background job.
You must specify a file template for the download. File templates are used to control the fields and
format of files during download. To create a file template, use the File Template for Agreements Workbench.
Access
Transaction code: /IRM/IPBRAGDNL
Procedure
Downloading Agreements
File Template for Agreements
Definition
Use File Template for Agreements Workbench to create and maintain templates that control the fields
and format of agreements files during upload.
Access
Transaction code: /IRM/IPAGFTM
Structure
The File Template for Agreement Workbench screen is organized into the following areas:
• Search and Worklist Use the Search and Worklist to view selected file templates in a grid format. From the grid, click on file template number to display that file template in focus in the Work Area.
• Work Area Use the Work Area to maintain one file template. In the standard Vistex implementation, the Work Area contains the following tabs: • Section
• Mapping
• Conversion
• Submitter
• Crystal Layout, which is used with Crystal Reports

1909 Pricing Documentation
• Admin Data
NOTE: Functions accessed from the menu bar apply only to the file template displayed in focus in the
Work Area and do not apply to the data in the Search and Worklist.
Procedures
Displaying a File Template for Agreements
Creating a File Template for Agreements
Copying a File Template for Agreements
Maintaining a File Template for Agreements
Deleting a File Template for Agreements
3.4.2.3.1.4 Business Register Agreement Mass
Process
Definition
The Business Register Agreements Mass Process transaction enables the user to easily mass process
multiple agreements. Use this transaction to perform the following functions:
• mass change agreements • save mass changes as an agreement request • mass copy agreements to create new agreements • mass copy agreements to create agreement requests
Access
Transaction code: /IRM/IPBRAME
Structure
The Mass Process transaction is organized into two sections:
• Activity Menu This vertical menu bar is used to choose the following activities, which are performed in sequence: • Search
• Selection
• Actions
• Execute

Business Register
SAP Data Maintenance by Vistex, Pricing option for SAP S/4HANA by Vistex for SAP S/4HANA
Application Help – Version: 1.0 – Final
December 12, 2019
© 2019 Vistex, Inc. All Rights Reserved.
© 2019 SAP SE or an SAP affiliate company. All rights reserved.
• Results As each activity is performed, the results of that activity are shown in this section of the screen.
Procedures
Changing Selected Agreements
Creating an Agreement Request to Change Agreements
Creating New Agreements
Copying Agreements to Create an Agreement Request
3.4.2.3.2 Agreement Requests
3.4.2.3.2.1 Business Register Agreement Request
Documentation for business register agreement requests is available for the following screen formats:
• UI Application (SAP Fiori) • SAP GUI
3.4.2.3.2.2 Upload/Download
Agreement Request Upload
Definition
Use Upload Agreement Request to create or change agreement requests by uploading them from a file,
such as an Excel spreadsheet, rather than manually entering the data. Files can be uploaded from the
following locations:
• Desktop, to upload from the local PC • File submission, to upload based on a file submission entry • File server, to upload directly from the application server

1909 Pricing Documentation
You must specify a file template for the upload. File templates can be created to control the fields and
format of files during upload. To create a file template, use the File Template for Agreement Request
Workbench.
Access
Transaction code: /IRM/IPBRARUPL
You may access this transaction directly, or use the Goto → Upload Request(s) option from the menu
bar in the Agreement Request Workbench.
Procedure
Uploading Agreement Requests
Agreement Request Download
Definition
Use Agreement Request Download to download selected agreement requests to a specific file on a
desktop or file server. For large downloads, this transaction can be run as a background job.
You must specify a file template for the download. File templates are used to control the fields and
format of files during download. To create a file template, use the File Template for Agreement Requests
Workbench.
Access
Transaction code: /IRM/IPBRARDNL
Procedure
Downloading Agreement Requests
File Template for Agreement Request
Definition
Use File Template for Agreement Request Workbench to create and maintain templates that control the
fields and format of agreement request files during upload.
Access
Transaction code: /IRM/IPARFTM
Structure

Business Register
SAP Data Maintenance by Vistex, Pricing option for SAP S/4HANA by Vistex for SAP S/4HANA
Application Help – Version: 1.0 – Final
December 12, 2019
© 2019 Vistex, Inc. All Rights Reserved.
© 2019 SAP SE or an SAP affiliate company. All rights reserved.
The File Template for Agreement Workbench screen is organized into the following areas:
• Search and Worklist Use the Search and Worklist to view selected file templates in a grid format. From the grid, click on file template number to display that file template in focus in the Work Area.
• Work Area Use the Work Area to maintain one file template. In the standard Vistex implementation, the Work Area contains the following tabs: • Section
• Mapping
• Conversion
• Submitter
• Crystal Layout, which is used with Crystal Reports
• Admin Data
NOTE: Functions accessed from the menu bar apply only to the file template displayed in focus in the
Work Area and do not apply to the data in the Search and Worklist.
Procedures
Displaying a File Template for Agreement Requests
Creating a File Template for Agreement Requests
Copying a File Template for Agreement Requests
Maintaining a File Template for Agreement Requests
Deleting a File Template for Agreement Requests
3.4.2.3.3 Campaigns
3.4.2.3.3.1 Campaign Workbench - GUI
Definition
Campaigns can be used for trade planning, to estimate future sales of a new product during its test
marketing, launch, or rollout period. Not just for special promotions, campaigns manage full-blown
campaigns. The campaign functionality allows direct analysis, planning, execution, and measures

1909 Pricing Documentation
promotional activities before creating an agreement or other subsequent document. Multiple contracts
and events (such as a road show) can be tracked and evaluated in one document.
Configuration for campaigns includes defining the following:
• location types Define the locations to be used for the campaign events.
• agenda item types Define agenda items for campaign events, such as presentations.
• element types Element types are used to classify campaign elements that have similar characteristics. Each element type is categorized as either an element (target market, for example) or an event. Location types and agenda item types used for events are assigned at the element type level.
• campaign types Define logical collections of campaigns, and assign numbering, partners, price sheets, and profiles. Element types are assigned to each campaign type.
An IDOC is provided to move campaigns from a legacy system into Vistex. The IDOC supports the
movement of header, dates, texts, organization, and partner data.
Use the Campaign Workbench to create and maintain campaign documents, and then to create other
application documents directly from the campaign. These documents, such as a billback agreement for
example, contain a reference to the campaign.
Access
Transaction code: /IRM/IPCGM
Structure
The Campaign Workbench screen is organized into the following areas:
• Search and Worklist Use the Search and Worklist to view selected campaigns in a grid format. From the grid, click on a campaign number to display that campaign in focus in the Work Area.
• Work Area Use the Work Area to maintain one campaign. In the standard Vistex implementation, the Work Area contains the following tabs: • General
• Elements
• Assignments
• Fast Entry
• Rules Overview
• Rules
• Organization
• Partners

Business Register
SAP Data Maintenance by Vistex, Pricing option for SAP S/4HANA by Vistex for SAP S/4HANA
Application Help – Version: 1.0 – Final
December 12, 2019
© 2019 Vistex, Inc. All Rights Reserved.
© 2019 SAP SE or an SAP affiliate company. All rights reserved.
• Dates
• Texts
• Clauses
• Notes
• Status
• Territories
• Evaluation
• Documents
• Proforma
• Additional Data 1 and Additional Data 2, which are extra tabs that can hold additional fields programmed to appear
• Admin Data
NOTE: Functions accessed from the menu bar apply only to the campaign displayed in focus in the Work
Area and do not apply to the data in the Search and Worklist.
IMPORTANT: Because Vistex software is extremely versatile, the user screen may be customized. As a
result, the screen may appear different from the standard screen described in this document.
The following graphic displays the basic elements of the Campaign Workbench. Please note that the
graphic is not drawn to scale.

1909 Pricing Documentation
Procedures
Displaying a Campaign
Creating a Campaign
Copying a Campaign
Maintaining a Campaign
Deleting a Campaign
Uploading or Downloading a Campaign
Transferring to Upload Campaign
Transferring to the Clause or Template Workbench
Performing an Evaluation
Viewing the Campaign Change Log
Creating an Application from a Campaign
Mass Changing Campaigns
Mass Changing Campaign Status
Outbound Processing Campaigns
Viewing Output

Business Register
SAP Data Maintenance by Vistex, Pricing option for SAP S/4HANA by Vistex for SAP S/4HANA
Application Help – Version: 1.0 – Final
December 12, 2019
© 2019 Vistex, Inc. All Rights Reserved.
© 2019 SAP SE or an SAP affiliate company. All rights reserved.
3.4.2.3.3.2 Campaign Policy Workbench
Definition
Use the Campaign Policy Workbench to create and maintain reusable campaign policies that are
assigned to price sheets. Each campaign policy is a group of pricing conditions that must follow
particular rules. Price policies calculate thresholds for pricing exceptions and generate warnings when a
price requirement on a price sheet has been violated. The campaign policies can be set to auto execute
when condition records are created or policies can be called on demand.
When you define an campaign policy you assign a validity period. As needed, price policies can be
uniquely assigned per sales organization/distribution channel. Based on configuration, price policies can
be sent through an approval process prior to activation. Approvals can be tied to workflow.
Multiple policies can be assigned to a price sheet. The sequence for execution can be defined, as well as
what should happen to subsequent policies if a prior one is met. A where-used list shows all of the
condition type/table combinations where the policy is being used.
Access
Transaction code: /IRM/IPCGPLM
Structure
The Campaign Policy Workbench screen is organized into the following areas:
• Search and Worklist Use the Search and Worklist to view selected campaign policies in a grid format. From the grid, click on a policy number to display that campaign policy in focus in the Work Area.
• Work Area Use the Work Area to maintain one campaign policy. In the standard Vistex implementation, the Work Area contains the following tabs: • General
• Calculation
• Definition
• Violation
• Text
• Status
• Admin Data
• Override, which is used to specify override messages
• Where Used List, which lists the price sheets to which the policy is assigned
• Organization

1909 Pricing Documentation
NOTE: Functions accessed from the menu bar apply only to the campaign policy displayed in focus in the
Work Area and do not apply to the data in the Search and Worklist.
Procedures
Displaying a Campaign Policy
Creating a Campaign Policy
Changing a Campaign Policy
Assigning a Campaign Policy to a Price Sheet
Deleting a Campaign Policy
3.4.2.3.3.3 Upload/Download
Upload Campaigns
Definition
Use Upload Campaigns to import campaigns from a file, such as an Excel spreadsheet, rather than
manually entering the data. Files can be uploaded from the following locations:
• Desktop, to upload from the local PC • File submission, to upload based on a file submission entry • File server, to upload directly from the application server
You must specify a file template for the upload. File templates can be created to control the fields and
format of files during upload. To create a file template, use the File Template for Campaigns Workbench.
Access
Transaction code: /IRM/IPCGUPL
Procedure
Uploading Campaigns
Campaign Download
Definition
Use Campaign Download to download selected campaigns to a specific file on a desktop or file server.
For large downloads, this transaction can be run as a background job.

Business Register
SAP Data Maintenance by Vistex, Pricing option for SAP S/4HANA by Vistex for SAP S/4HANA
Application Help – Version: 1.0 – Final
December 12, 2019
© 2019 Vistex, Inc. All Rights Reserved.
© 2019 SAP SE or an SAP affiliate company. All rights reserved.
You must specify a file template for the download. File templates are used to control the fields and
format of files during download. To create a file template, use the File Template for Campaigns Workbench.
Access
Transaction code: /IRM/IPCGDNL
Procedure
Downloading Campaigns
File Template for Campaigns
Definition
Use File Template for Campaigns Workbench to create and maintain templates that control the fields
and format of campaign files during upload and/or download.
Access
Transaction code: /IRM/IPCGFTM
Structure
The File Template for Campaigns Workbench screen is organized into the following areas:
• Search and Worklist Use the Search and Worklist to view selected file templates in a grid format. From the grid, click on file template number to display that file template in focus in the Work Area.
• Work Area Use the Work Area to maintain one file template. In the standard Vistex implementation, the Work Area contains the following tabs: • Section
• Mapping
• Conversion
• Submitter
• Crystal Layout, which is used with Crystal Reports
• Admin Data
NOTE: Functions accessed from the menu bar apply only to the file template displayed in focus in the
Work Area and do not apply to the data in the Search and Worklist.
Procedures
1909 Pricing Documentation
Displaying a File Template for Campaigns
Creating a File Template for Campaigns
Copying a File Template for Campaigns
Maintaining a File Template for Campaigns
Deleting a File Template for Campaigns
3.4.2.3.4 Lists
3.4.2.3.4.1 Product List
Product List Workbench
Definition
A product list is a flexible way to group materials together. The product list contains a hierarchy or
multiple hierarchies maintained so that any offering of materials may be grouped. Product lists are often
used on agreements instead of individually adding materials one at a time.
To create a product list, either:
• Use the Product List Workbench to create and maintain products lists, either manually or by uploading data from an Excel spreadsheet.
• From the Rules tab in an agreement or agreement request, right-click in the List field and select the Create a List option (if no list specified) or Change a List option (if an existing list is specified).
Access
Transaction code: /IRM/GPLM
Structure
The Product List Workbench screen is organized into the following areas:
• Search and Worklist Use the Search and Worklist to view selected product lists in a grid format. From the grid, click on a product list number to display that product list in focus in the Work Area.
• Work Area Use the Work Area to maintain one product list. In the standard Vistex implementation, the Work Area contains the following tabs in the Header section: • Header
• Additional Data

Business Register
SAP Data Maintenance by Vistex, Pricing option for SAP S/4HANA by Vistex for SAP S/4HANA
Application Help – Version: 1.0 – Final
December 12, 2019
© 2019 Vistex, Inc. All Rights Reserved.
© 2019 SAP SE or an SAP affiliate company. All rights reserved.
• Notes
• Admin Data
The Products section contains the following tabs:
• Layout
• Review
NOTE: Functions accessed from the menu bar apply only to the product list displayed in focus in the
Work Area and do not apply to the data in the Search and Worklist.
IMPORTANT: Because Vistex software is extremely versatile, the user screen may be customized. As a
result, the screen may appear different from the standard screen described in this document.
Procedures
Displaying a Product List
Creating a Product List
Copying a Product List
Viewing Materials in the Product List that are Valid on a Specific Date
Uploading a Product List
Exporting the Product List to a File
Deleting Items from the Product List
Upload/Download
Upload Product List
Definition
Use Upload Product List to import a product list from a file, such as an Excel spreadsheet, rather than
manually entering the data. Files can be uploaded from the following locations:
• Desktop, to upload from the local PC • File submission, to upload based on a file submission entry • File server, to upload directly from the application server
File templates can be created to control the fields and format of files during upload. To create a file
template, either save the information entered on the screen, or use the File Template for Product List
Workbench.
The screen is organized into two sections:
• Source information Specify the source information for either the desktop file or server file being uploaded. Either

1909 Pricing Documentation
enter the information in the source information fields or use a file template to populate the fields.
• Field mapping Map each file field to its corresponding product list field or specify a file template that contains the mapping.
Access
Transaction code: /IRM/GPLUPL
Procedure
Uploading a Product List
Download Product List
Definition
Use Download Product List to download selected product lists to a specific file on a desktop or file
server. For large downloads, this transaction can be run as a background job.
You must specify a file template for the download. File templates are used to control the fields and
format of files during download. To create a file template, use the File Template for Product List Workbench.
Access
Transaction code: /IRM/GPLDNL
Procedure
Downloading Product Lists
File Template for Product List
Definition
Use File Template for Product List Workbench to create and maintain templates that control the fields
and format of product list files during upload and/or download.
Access
Transaction code: /IRM/GPLFTM
Structure
The File Template for Product List Workbench screen is organized into the following areas:

Business Register
SAP Data Maintenance by Vistex, Pricing option for SAP S/4HANA by Vistex for SAP S/4HANA
Application Help – Version: 1.0 – Final
December 12, 2019
© 2019 Vistex, Inc. All Rights Reserved.
© 2019 SAP SE or an SAP affiliate company. All rights reserved.
• Search and Worklist Use the Search and Worklist to view selected file templates in a grid format. From the grid, click on file template number to display that file template in focus in the Work Area.
• Work Area Use the Work Area to maintain one file template. In the standard Vistex implementation, the Work Area contains the following tabs: • Section
• Mapping
• Conversion
• Submitter
• Crystal Layout, which is used with Crystal Reports
• Admin Data
NOTE: Functions accessed from the menu bar apply only to the file template displayed in focus in the
Work Area and do not apply to the data in the Search and Worklist.
Procedures
Displaying a File Template for Product List
Creating a File Template for Product List
Copying a File Template for Product List
Maintaining a File Template for Product List
Deleting a File Template for Product List
3.4.2.3.4.2 Customer List
Customer List Workbench
Definition
Use the Customer List Workbench to create, copy, maintain, and approve customer lists. A customer list
is a method used to import, export, or change customer data in mass. There are several categories of
customer lists:
• incoming Customer lists can be imported using the file upload transaction /IRM/EPKULFTUPL Upload Customer List. Data on imported lists may originate from such data sources as catalogs, legacy systems, or Master Data Management (MDM).
• outgoing

1909 Pricing Documentation
• request for change • ECC synchronization
In some cases a system or process may directly update ECC data. In order to synchronize ECC to DM, this custom category can be created.
If you know up front that the list is for only one customer, the processing type for the customer list type
can be configured as "single". For a list type configured as single, data entry and display will occur on a
single screen.
A business-defined approval process can be accessed from the Status tab. Approved customer lists can
be posted from the workbench or using the mass processing transaction /IRM/EPKUL60 Customer Lists
Post.
NOTE: Based on configuration, you may add a posting block to prevent line items from being posted
when they are still incomplete. Yellow indicates a blocked line item.
To view a change log, use the transaction /IRM/EPKULLOG Display Customer List Log.
Authority Check
Authority checks can be performed at the list type level. In configuration, the following authority can be
assigned:
• Display (no Add or Delete buttons) • Change (both Display and Change)
Partners at Global or Maintenance Level
In configuration, you may define whether partners will be at the global level, at the maintenance level,
or at both levels (default). If partner roles are not defined in configuration, than mandatory partners are
not proposed in the list. When the list is posted, mandatory partners will appear in the customer.
Customer Additions
The Customer Additions (/IRM/EPCA) transaction can be used to add custom fields to the customer,
customer list, and customer dashboard grids.
Individual and/or Collective Processing and Posting
In configuration, each customer list is assigned a processing type and posting type. Processing may be
individual (detail information is specific to each customer) or collective (detail information applies to all
customers in the list). Posting may be individual (each customer is individually posted and validated) or
collective (all customers are posted in one batch). For collective posting to occur, all customers must be
valid. After it is posted, no changes can be made to the list.
The possible combinations are:
• Individual processing and individual posting Customer properties can be set individually. Each customer is individually posted to DM. Only customers without errors will be posted.
• Individual processing and collective posting Customer properties can be set individually. All the customers are collectively posted to DM; if any customer has an error, none of the customers in the list will be posted.
Business Register
SAP Data Maintenance by Vistex, Pricing option for SAP S/4HANA by Vistex for SAP S/4HANA
Application Help – Version: 1.0 – Final
December 12, 2019
© 2019 Vistex, Inc. All Rights Reserved.
© 2019 SAP SE or an SAP affiliate company. All rights reserved.
• Collective processing and individual posting One set of data is provided to all customers assigned to the list. Only customers without errors will be posted.
• Collective processing and collective posting One set of data is provided to all customers assigned to the list. All the customers are collectively posted to DM; if any customer has an error, none of the customers in the list will be posted.
Maintenance Levels
Maintenance of data for all maintenance level dependent areas for extended user maintenance levels is
supported in the customer workbench, list, and dashboard.
Maintenance View
The Maintenance View was designed to allow maintenance of values for all relevant areas for a
maintenance level at the same time, rather than clicking on the Maintenance Level button and
maintaining values in the Assigned Maintenance Levels dialog window.
Two views are available in the customer list (as well as the customer workbench, dashboard, and
domain transactions): Maintenance View and Complete View. When in Maintenance View, only areas
that are relevant to the maintenance level specified in configuration, plus general areas and attributes,
will be visible. Areas and attributes that depend on other maintenance levels will be hidden.
Access
Transaction code: /IRM/EPKULM
Structure
The Customer List Workbench screen is organized into the following areas:
• Search and Worklist Use the Search and Worklist to view selected customer lists in a grid format. From the grid, click on a customer list number to display that list in focus in the Work Area.
• Work Area Use the Work Area to maintain one customer list. The Work Area is divided into the following sections: • Header
In the standard Vistex implementation, the Header contains the following tabs:
• General
• Extension, which displays any custom header fields that have been extended in configuration to the customer header.
• Status
• Dates
• Notes

1909 Pricing Documentation
• Admin Data
• Customer The customer section contains the following menu options, which correspond to tabs in the Customer Workbench: NOTE: If the Processing Type is Individual, in the Items grid select an item and click on the
Item Details button to view these tabs. If the Processing type is Collective, click on the Item Details button in the application toolbar.
• Sales
• Financial
• Address
• Address Overview
• Contact Persons
• Partners
• Hierarchy
• Identification
• Additional Data, which is an extra tab that can hold additional fields programmed to appear.
• Classification
• Attachments, which can be used to attach documents to the customer, if the Document Repository is set up for the business object type.
• Admin Data
NOTE: Functions accessed from the menu bar apply only to the Customer List displayed in focus in the
Work Area and do not apply to the data in the Search and Worklist.
Procedures
Displaying a Customer List
Creating a Customer List
Copying a Customer List
Maintaining a Customer List
Viewing the Data Flow Status
Mass Changing Customer List Status
Setting a Customer List as Complete
Upload/Download
Upload Customer List
Definition
Business Register
SAP Data Maintenance by Vistex, Pricing option for SAP S/4HANA by Vistex for SAP S/4HANA
Application Help – Version: 1.0 – Final
December 12, 2019
© 2019 Vistex, Inc. All Rights Reserved.
© 2019 SAP SE or an SAP affiliate company. All rights reserved.
Use Upload Customer List to import a customer list from a file, such as an Excel spreadsheet, rather than
manually entering the data. Files can be uploaded from the following locations:
• Desktop, to upload from the local PC • File submission, to upload based on a file submission entry • File server, to upload directly from the application server
You must specify a file template for the upload. File templates can be created to control the fields and
format of files during upload. To create a file template, use the File Template for Customer List Workbench.
Access
Transaction code: /IRM/GCULUPL
Procedure
Uploading a Customer List
Download Customer List
Definition
Use Download Customer List to download selected customer lists to a specific file on a desktop or file
server. For large downloads, this transaction can be run as a background job.
You must specify a file template for the download. File templates are used to control the fields and
format of files during download. To create a file template, use the File Template for Customer List
Workbench.
Access
Transaction code: /IRM/EPKULDNLN
Procedure
Downloading a Customer List
File Template for Customer List
Definition
Use File Template for Customer List Workbench to create and maintain templates that control the fields
and format of customer list files during upload and/or download.
Qualifiers can be used to maintain selected section data in the same row. To maintain the customer list
qualifiers use the transaction File Template Qualifier for Customer List (/IRM/AFTERWORDS). For each
qualifier, assign a section and the anchor field, the first field of the section.
Access
1909 Pricing Documentation
Transaction code: /IRM/EPKULFTPM
Structure
The File Template for Customer List Workbench screen is organized into the following areas:
• Search and Worklist Use the Search and Worklist to view selected file templates in a grid format. From the grid, click on file template number to display that file template in focus in the Work Area.
• Work Area Use the Work Area to maintain one file template. In the standard Vistex implementation, the Work Area contains the following tabs: • Attribute, used to assign a list type, resent indicator, and discontinue indicator to the file
template. In configuration, composite attributes are assigned to each list type.
• Section
• Mapping
• Conversion
• Submitter
• Admin Data
NOTE: Functions accessed from the menu bar apply only to the file template displayed in focus in the
Work Area and do not apply to the data in the Search and Worklist.
Procedures
Displaying a File Template for Customer List
Creating a File Template for Customer List
Maintaining a File Template for Customer List
Deleting a File Template for Customer List
3.4.2.3.4.3 Vendor List
Vendor List Workbench
Definition
A vendor list is a flexible way to group associated vendors together. The vendor list contains a hierarchy
or multiple hierarchies maintained so that any combination of vendors may be grouped.
Uses of vendor lists:
Business Register
SAP Data Maintenance by Vistex, Pricing option for SAP S/4HANA by Vistex for SAP S/4HANA
Application Help – Version: 1.0 – Final
December 12, 2019
© 2019 Vistex, Inc. All Rights Reserved.
© 2019 SAP SE or an SAP affiliate company. All rights reserved.
• In agreements and agreement requests, instead of individually adding vendors one at a time, you can enter the list name in the condition record.
• In claims and transaction documents, a vendor list can be added to the duplication check for a claim type. The system will check for duplicates across all the companies/locations in the list. A claim/transaction will be rejected if it already has been submitted from any other company/location on the list. . NOTE: That specific customer list must be used exclusively for duplication checks..
To create a vendor list, either:
• Use the Vendor List Workbench to create and maintain vendor lists, either manually or by uploading data from an Excel spreadsheet.
• From the Rules tab in an agreement or agreement request, right-click in the List field and select the Create a List option (if no list specified) or Change a List option (if an existing list is specified).
Lists also can be created using an agreement request IDOC. During IDOC processing, data from a price
sheet (created for the agreement request type) triggers creation of the list. The created list can be used
in agreement and agreement request rules, eliminating the need to enter all vendors separately.
Access
Transaction code: /IRM/GVNLM
Structure
The Vendor List Workbench screen is organized into the following areas:
• Search and Worklist Use the Search and Worklist to view selected vendor lists in a grid format. From the grid, click on a vendor list number to display that vendor list in focus in the Work Area.
• Work Area Use the Work Area to maintain one vendor list. In the standard Vistex implementation, the Work Area contains the following tabs in the Header section: • Header
• Additional Data, which is an extra tab that can hold additional fields programmed to appear
• Notes
• Admin Data
The Vendors section contains the following tabs:
• Layout
• Review
NOTE: Functions accessed from the menu bar apply only to the vendor list displayed in focus in the
Work Area and do not apply to the data in the Search and Worklist.
IMPORTANT: Because Vistex software is extremely versatile, the user screen may be customized. As a
result, the screen may appear different from the standard screen described in this document.
1909 Pricing Documentation
Procedures
Displaying a Vendor List
Creating a Vendor List
Importing a Vendor List from a File
Maintaining a Vendor List
Deleting a Vendor from a Vendor List
Downloading a Vendor List
Viewing a Vendor List Where-used List
Upload/Download
Upload Vendor List
Definition
Use Upload Vendor List to import a vendor list from a file, such as an Excel spreadsheet, rather than
manually entering the data. Files can be uploaded from the following locations:
• Desktop, to upload from the local PC • File submission, to upload based on a file submission entry • File server, to upload directly from the application server
You must specify a file template for the upload. File templates are created to control the fields and
format of files during upload. To create a file template use the File Template for Vendor List Workbench.
Access
Transaction code: /IRM/GVNLUPL
Procedure
Uploading a Vendor List
Download Vendor List
Definition
Use Download Vendor List to download selected vendor lists to a specific file on a desktop or file server.
For large downloads, this transaction can be run as a background job.
You must specify a file template for the download. File templates are used to control the fields and
format of files during download. To create a file template, use the File Template for Vendor List Workbench.
Access

Business Register
SAP Data Maintenance by Vistex, Pricing option for SAP S/4HANA by Vistex for SAP S/4HANA
Application Help – Version: 1.0 – Final
December 12, 2019
© 2019 Vistex, Inc. All Rights Reserved.
© 2019 SAP SE or an SAP affiliate company. All rights reserved.
Transaction code: /IRM/GVNLDNL
Procedure
Downloading a Vendor List
File Template for Vendor List
Definition
Use File Template for Vendor List Workbench to create and maintain templates that control the fields
and format of vendor list files during upload and/or download.
Access
Transaction code: /IRM/GVNLFTM
Structure
The File Template for Vendor List Workbench screen is organized into the following areas:
• Search and Worklist Use the Search and Worklist to view selected file templates in a grid format. From the grid, click on file template number to display that file template in focus in the Work Area.
• Work Area Use the Work Area to maintain one file template. In the standard Vistex implementation, the Work Area contains the following tabs: • Section
• Mapping
• Conversion
• Submitter
• Crystal Layout, which is used with Crystal Reports
• Admin Data
NOTE: Functions accessed from the menu bar apply only to the file template displayed in focus in the
Work Area and do not apply to the data in the Search and Worklist.
Procedures
Displaying a File Template for Vendor List
Creating a File Template for Vendor List
Copying a File Template for Vendor List
Maintaining a File Template for Vendor List

1909 Pricing Documentation
Deleting a File Template for Vendor List
3.4.2.3.5 Cross References
3.4.2.3.5.1 Material Cross Reference
Definition
Use the material cross reference to store possible incoming material identification numbers. The cross
reference can be used globally or just for the partner and/or organization it was created for.
The cross reference is used to link the current system records with the incoming record numbers so the
records can be matched and incoming documents can be processed. Cross reference mapping may be
performed in product lists, claims, transactions, price sheets, and price types.
Cross references can be set with a finite validity or an infinite validity.
Access
Transaction code: /IRM/GMXREF
Work Area
The following buttons appear above the Work Area:
Button Action Alternate Access
Display ↔ Change Toggle between Display mode and Change mode.
F6
Search Find a material cross reference previously created using General and Admin Data search fields.
Shift+F6 or Menu bar: Cross Reference → Search
Search More After you perform a search, use Search More to retain the results from the previous search, perform a new search, and append the new results to the list already displayed.
Shift+F7 or Menu bar: Cross Reference → Search More
The following buttons appear in the Work Area:

Business Register
SAP Data Maintenance by Vistex, Pricing option for SAP S/4HANA by Vistex for SAP S/4HANA
Application Help – Version: 1.0 – Final
December 12, 2019
© 2019 Vistex, Inc. All Rights Reserved.
© 2019 SAP SE or an SAP affiliate company. All rights reserved.
Button Action
Insert (Change mode only) Add new rows. Select 1, 5, or 10 rows to add at a time. Alternately, from the menu bar select Cross Reference → Add Rows.
Delete (Change mode only) Delete the select row or rows. Alternately, from the menu bar select Cross Reference → Delete Rows.
Copy Records (Change mode only) Copy a record or multiple records.
Import Records From File (Change mode only) Import a file and map the field positions and field values.
Search and Replace (Change mode only) Highlight a cell, cells, column, or columns which are changeable. Find and replace a specific value for another value.
Set Values (Change mode only) Highlight one column and set the value for the entire column, or change the column by increasing or decreasing the value if applicable.
Changes Display the change log for a highlighted row.
Overlapping Records Display a log of overlapping records for a highlighted row.
Details View selected records in a vertical column format in a separate window.
Sort in Ascending Order Sort the data in a selected column in ascending alphanumeric sequence.
Sort in Descending Order Sort the data in a selected column in descending alphanumeric sequence.
Find Find a term within the grid values. The system highlights any cell that contains the term.
Find Next Find the next instance of a term searched for previously.
Total (restricted to relevant numeric columns) Highlight at least one numeric column, and then select a type of calculation (Total, Mean Value, Minimum, or Maximum) from the dropdown list.
Subtotals (active only when the Total button is used) If you used the Total button to calculate the total for a selected column, you also may have the system calculate subtotals. Click to view a dialog window. In that window, check the checkbox of the column used to calculate subtotals.
Export

1909 Pricing Documentation
Export the entire contents of the grid area to the selected document type/file type.
Choose Layout Choose, change, save, and manage column layouts within the ALV grid.
The following fields appear in the cross reference ALV grid:
Field Description
Provider Type Entity type of the partner supplying the cross reference value. NOTE: If the Universal Cross Reference option is across provider types, a Provider Type is not required.
Sales Organization An organizational unit in logistics that structures the company according to its sales requirements. A sales organization is responsible for selling materials and services. When creating a new record, select the applicable sales organization, if necessary.
Distribution Channel Channel through which materials or services reach customers. Distribution channels include wholesale, retail, and direct sales. A distribution channel can be assigned to one or more sales organizations. When creating a new record, select the distribution channel applicable for the provider, if necessary.
Division Organizational unit based on responsibility for sales or profits from saleable materials or services. When creating a new record, select the applicable division, if necessary.
Purchasing Organization Organizational unit in logistics that subdivides an organization by purchasing requirements. When creating a new record, select the purchasing organization applicable for the provider, if necessary.
Plant Organizational unit for dividing an enterprise by production, procurement, maintenance, and materials planning. When creating a new record, select the plant applicable for the provider, if necessary.
Provider Provider SAP identification number. For example, customer number or vendor number. NOTE: If the Universal Cross Reference option is across provider types, a Provider is not required.
One-line short form of formatted address
Address associated with the provider. This field will automatically populate after the provider is entered.
Material Entered Material value submitted by an outside party.
Description User-defined description of the Material Entered.
Unit of Measure Provided Measurement of the material records provided.

Business Register
SAP Data Maintenance by Vistex, Pricing option for SAP S/4HANA by Vistex for SAP S/4HANA
Application Help – Version: 1.0 – Final
December 12, 2019
© 2019 Vistex, Inc. All Rights Reserved.
© 2019 SAP SE or an SAP affiliate company. All rights reserved.
Valid From Date the cross reference begins. After creation of the row, this is a locked field.
Valid To Date the cross reference ends.
Material Identification Type When creating or maintaining a record, select a material identification type from the dropdown menu.
Material Material referred to from the system.
Description Characters describing a material. Derived from the material.
Converted UoM Measurement of the material records in measurement units.
Measurement Unit Text Default unit in which the measurement was recorded.
Denominator Used to calculate unit of measure conversions for the quantity entered on a claim/transaction when this material entered and unit of measure entered are used. The denominator is the number to be used as the divisor. For example, if 3 pieces equals 5 kilograms, when converting from pieces to kilograms, the divisor would be 5.
Numerator Used to calculate unit of measure conversions for the quantity entered on a claim/transaction when this material entered and unit of measure entered are used. The numerator is the number to be used as the multiplier. For example, if 3 pieces equals 5 kilograms, when converting from pieces to kilograms, the multiplier would be 3.
Universal Cross Reference Indicates whether the entry applies across organizations, providers, or both. Options:
• V Across Provider & Organization • W Across Organization • X Across Provider
Created By User ID of the author of the original record. This field is populated when the cross reference is saved.
Created On Date the record was created. This field is populated when the cross reference is saved.
Time Time when the cross reference was created. This field is populated when the cross reference is saved.
Changed By User ID of the person who changed the cross reference. This field is populated when the cross reference is saved.
Changed On Date when the cross reference was changed. This field is populated when the cross reference is saved.
Time of Change Time when the cross reference was changed. This field is populated when the cross reference is saved.
Message Row Display of error messages for the row.
Procedures

1909 Pricing Documentation
Displaying Material Cross References
Creating Material Cross References
Importing Material Cross References
Changing Material Cross References
Copying Material Cross References
Viewing a Material Cross Reference Change Log
Deleting Material Cross References
3.4.2.3.5.2 Partner Cross Reference
Definition
Use the partner cross reference to store possible incoming partner identification numbers. The cross
reference can be used globally or just for the partner and/or organization it was created for.
The cross reference is used to link the current system records with the incoming record numbers so the
records can be matched and incoming documents can be processed. Cross reference mapping may be
performed in memberships, claims, transactions, price sheets, and price types.
Cross references can be set with a finite validity or an infinite validity.
Access
Transaction code: /IRM/GPXREF
Work Area
The following buttons appear above the Work Area:
Button Action Alternate Access
Display ↔ Change Toggle between Display mode and Change mode.
F6 or Menu bar: Cross Reference → Display ↔ Change
Search Find a partner cross reference previously created using General and Admin Data search fields.
Shift+F6 or Menu bar: Cross Reference → Search
Search More After you perform a search, use Search More to retain the results from the previous search, perform a new search, and append the new results to the list already displayed.
Shift+F7 or Menu bar: Cross Reference → Search More

Business Register
SAP Data Maintenance by Vistex, Pricing option for SAP S/4HANA by Vistex for SAP S/4HANA
Application Help – Version: 1.0 – Final
December 12, 2019
© 2019 Vistex, Inc. All Rights Reserved.
© 2019 SAP SE or an SAP affiliate company. All rights reserved.
The following buttons appear in the Work Area:
Button Action
Insert (Change mode only) Add new rows. Select 1, 5, or 10 rows to add at a time. Alternately, from the menu bar select Cross Reference → Add Rows.
Delete (Change mode only) Delete the select row or rows. Alternately, from the menu bar select Cross Reference → Delete Rows.
Copy Records (Change mode only) Copy a record or multiple records.
Import Records From File (Change mode only) Import a file and map the field positions and field values.
Search and Replace (Change mode onlya0 Highlight a cell, cells, column, or columns that are changeable. Find and replace a specific value for another value.
Set Values (Change mode only) Highlight one column and set the value for the entire column, or change the column by increasing or decreasing the value if applicable.
Changes Display the change log for a highlighted row.
Other Validity Records Display a log of overlapping records for a highlighted row.
Details View selected records in a vertical column format in a separate window.
Sort in Ascending Order Sort the data in a selected column in ascending alphanumeric sequence.
Sort in Descending Order Sort the data in a selected column in descending alphanumeric sequence.
Find Find a term within the grid values. The system highlights any cell that contains the term.
Find Next Find the next instance of a term searched for previously.
Total (restricted to relevant numeric columns) Highlight at least one numeric column, and then select a type of calculation (Total, Mean Value, Minimum, or Maximum) from the dropdown list.
Subtotals (active only when the Total button is used) If you used the Total button to calculate the total for a selected column, you also may have the system calculate subtotals. Click to view a dialog window. In that window, check the checkbox of the column used to calculate subtotals.

1909 Pricing Documentation
Export Export the entire contents of the grid area to the selected document type/file type.
Choose Layout Choose, change, save, and manage column layouts within the ALV grid.
The following fields appear in the cross reference ALV grid:
Field Description
Provider Type Entity type of the partner supplying the cross reference value. NOTE: If the Universal Cross Reference option is across provider types, a Provider Type is not required.
Sales Organization An organizational unit in logistics that structures the company according to its sales requirements. A sales organization is responsible for selling materials and services. When creating a new record, select the applicable sales organization, if necessary.
Distribution Channel Channel through which materials or services reach customers. Distribution channels include wholesale, retail, and direct sales. A distribution channel can be assigned to one or more sales organizations. When creating a new record, select the distribution channel applicable for the provider, if necessary.
Division Organizational unit based on responsibility for sales or profits from saleable materials or services. When creating a new record, select the applicable division, if necessary.
Purchasing Organization Organizational unit in logistics that subdivides an organization by purchasing requirements. When creating a new record, select the purchasing organization applicable for the provider, if necessary.
Provider Provider SAP identification number. For example, customer number or vendor number. NOTE: If the Universal Cross Reference option is across provider types, a Provider is not required.
One-line short form of formatted address
Address associated with the provider. This field will automatically populate after the provider is entered.
Valid From Date the cross reference begins. After creation of the row, this is a locked field.
Valid To Date the cross reference ends.
Partner Identification Type When creating or maintaining a record, select a partner identification type from the dropdown menu.
Partner Function Partner function that will be using the cross reference mapping.
Identification Provided Identification used by the provider when entering a partner.

Business Register
SAP Data Maintenance by Vistex, Pricing option for SAP S/4HANA by Vistex for SAP S/4HANA
Application Help – Version: 1.0 – Final
December 12, 2019
© 2019 Vistex, Inc. All Rights Reserved.
© 2019 SAP SE or an SAP affiliate company. All rights reserved.
Partner Determined SAP partner number used to determine when the identification provided is entered.
One-line short form of formatted address
Address associated with the SAP partner. This field will automatically populate after the determined partner is entered.
Universal Cross Reference Indicates whether the entry applies across organizations, providers, or both. Options:
• V Across Provider & Organization • W Across Organization • X Across Provider
Created By User ID of the author of the original record. This field is populated when the cross reference is saved.
Created On Date the record was created. This field is populated when the cross reference is saved.
Time Time when the cross reference was created. This field is populated when the cross reference is saved.
Changed By User ID of the person who changed the cross reference. This field is populated when the cross reference is saved.
Changed On Date when the cross reference was changed. This field is populated when the cross reference is saved.
Time of Change Time when the cross reference was changed. This field is populated when the cross reference is saved.
Message Row Display of error messages for the row.
Procedures
Displaying Partner Cross References
Creating Partner Cross References
Importing Partner Cross References
Changing Partner Cross References
Copying Partner Cross References
Viewing a Partner Cross Reference Change Log
Deleting Partner Cross References
3.4.2.3.5.3 Unit of Measure Cross Reference
Definition
1909 Pricing Documentation
Use the unit of measure cross reference to store possible incoming unit of measure identification types
and convert them into the unit of measure used in the organization's records.
The cross reference can be used globally or just for the partner and/or organization it was created for,
and is used in claims and transactions. Cross references can be set with a finite validity or an infinite
validity.
Access
Transaction code: /IRM/GUXREF
Work Area
The following buttons appear above the Work Area:
Button Action Alternate Access
Display ↔ Change Toggle between Display mode and Change mode.
F6 or Menu bar: Cross Reference → Display ↔ Change
Search Find a unit of measure cross reference previously created using General and Admin Data search fields.
Shift+F6 or Menu bar:Cross Reference → Search
Search More After you perform a search, use Search More to retain the results from the previous search, perform a new search, and append the new results to the list already displayed.
Shift+F7 or Menu bar: Cross Reference → Search More
The following buttons appear in the Work Area:
Button Action
Insert (Change mode only) Add new rows. Select 1, 5, or 10 rows to add at a time. Alternately, from the menu bar select Cross Reference → Add Rows.
Delete (Change mode only) Delete the select row or rows. Alternately, from the menu bar select Cross Reference → Delete Rows.
Copy Records (Change mode only) Copy a record or multiple records.
Import Records From File (Change mode only) Import a file and map the field positions and field values.
Search and Replace (Change mode only) Highlight a cell, cells, column, or columns that are changeable. Find and replace a specific value for another value.

Business Register
SAP Data Maintenance by Vistex, Pricing option for SAP S/4HANA by Vistex for SAP S/4HANA
Application Help – Version: 1.0 – Final
December 12, 2019
© 2019 Vistex, Inc. All Rights Reserved.
© 2019 SAP SE or an SAP affiliate company. All rights reserved.
Set Values (Change mode only) Highlight one column and set the value for the entire column, or change the column by increasing or decreasing the value if applicable.
Changes Display the change log for a highlighted row.
Overlapping Records Display a log of overlapping records for a highlighted row.
Details View selected records in a vertical column format in a separate window.
Sort in Ascending Order Sort the data in a selected column in ascending alphanumeric sequence.
Sort in Descending Order Sort the data in a selected column in descending alphanumeric sequence.
Find Find a term within the grid values. The system highlights any cell that contains the term.
Find Next Find the next instance of a term searched for previously.
Total (restricted to relevant numeric columns) Highlight at least one numeric column, and then select a type of calculation (Total, Mean Value, Minimum, or Maximum) from the dropdown list.
Subtotals (active only when the Total button is used) If you used the Total button to calculate the total for a selected column, you also may have the system calculate subtotals. Click to view a dialog window. In that window, check the checkbox of the column used to calculate subtotals.
Export Export the entire contents of the grid area to the selected document type/file type.
Choose Layout Choose, change, save, and manage column layouts within the ALV grid.
The following fields appear in the cross reference ALV grid:
Field Description
Provider Type Entity type of the partner supplying the cross reference value. NOTE: If the Universal Cross Reference option is across provider types, a Provider Type is not required.
Sales Organization An organizational unit in logistics that structures the company according to its sales requirements. A sales organization is responsible for selling materials and services.
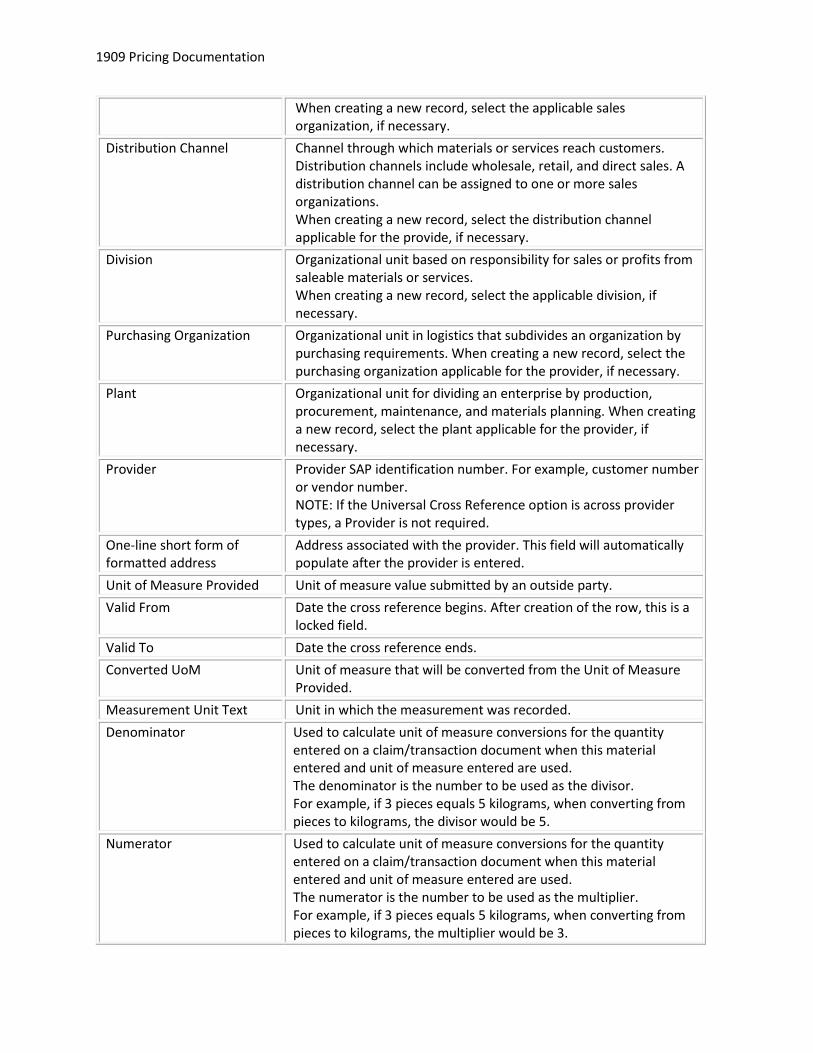
1909 Pricing Documentation
When creating a new record, select the applicable sales organization, if necessary.
Distribution Channel Channel through which materials or services reach customers. Distribution channels include wholesale, retail, and direct sales. A distribution channel can be assigned to one or more sales organizations. When creating a new record, select the distribution channel applicable for the provide, if necessary.
Division Organizational unit based on responsibility for sales or profits from saleable materials or services. When creating a new record, select the applicable division, if necessary.
Purchasing Organization Organizational unit in logistics that subdivides an organization by purchasing requirements. When creating a new record, select the purchasing organization applicable for the provider, if necessary.
Plant Organizational unit for dividing an enterprise by production, procurement, maintenance, and materials planning. When creating a new record, select the plant applicable for the provider, if necessary.
Provider Provider SAP identification number. For example, customer number or vendor number. NOTE: If the Universal Cross Reference option is across provider types, a Provider is not required.
One-line short form of formatted address
Address associated with the provider. This field will automatically populate after the provider is entered.
Unit of Measure Provided Unit of measure value submitted by an outside party.
Valid From Date the cross reference begins. After creation of the row, this is a locked field.
Valid To Date the cross reference ends.
Converted UoM Unit of measure that will be converted from the Unit of Measure Provided.
Measurement Unit Text Unit in which the measurement was recorded.
Denominator Used to calculate unit of measure conversions for the quantity entered on a claim/transaction document when this material entered and unit of measure entered are used. The denominator is the number to be used as the divisor. For example, if 3 pieces equals 5 kilograms, when converting from pieces to kilograms, the divisor would be 5.
Numerator Used to calculate unit of measure conversions for the quantity entered on a claim/transaction document when this material entered and unit of measure entered are used. The numerator is the number to be used as the multiplier. For example, if 3 pieces equals 5 kilograms, when converting from pieces to kilograms, the multiplier would be 3.

Business Register
SAP Data Maintenance by Vistex, Pricing option for SAP S/4HANA by Vistex for SAP S/4HANA
Application Help – Version: 1.0 – Final
December 12, 2019
© 2019 Vistex, Inc. All Rights Reserved.
© 2019 SAP SE or an SAP affiliate company. All rights reserved.
Universal Cross Reference Indicates whether the entry applies across organizations, providers, or both. Options:
• V Across Provider & Organization • W Across Organization • X Across Provider
Created By User ID of the author of the original record. This field is populated when the cross reference is saved.
Created On Date the record was created. This field is populated when the cross reference is saved.
Time Time when the cross reference was created. This field is populated when the cross reference is saved.
Changed By User ID of the person who changed the cross reference. This field is populated when the cross reference is saved.
Changed On Date when the cross reference was changed. This field is populated when the cross reference is saved.
Time of Change Time when the cross reference was changed. This field is populated when the cross reference is saved.
Message Row Display of error messages for the row.
Procedures
Displaying Unit of Measure Cross References
Creating Unit of Measure Cross References
Importing Unit of Measure Cross References
Changing Unit of Measure Cross References
Copying Unit of Measure Cross References
Viewing a Unit of Measure Change Log
Deleting Unit of Measure Cross References
3.4.3 Medicaid Rebate Processing
3.4.3.1 Processing Transactions
3.4.3.1.1 Business Register Calculations
1909 Pricing Documentation
3.4.3.1.1.1 Business Register Calculations
Overview
Calculations for Vistex transactions are performed by the Vistex calculation engine. Calculation result
detail is stored in Vistex tables and can be accessed for the following:
• For business register calculation line items, calculation conditions are displayed on the Calculations tab in the calculation bucket that stores the source document line items. Detail can be viewed on the Calculation Analysis screen and agreement log accessed from the tab.
• For claim and transaction document line items, calculation conditions are displayed on the Conditions tab in the Claim/Transaction Workbench. Detail can be viewed on the Calculation Analysis screen and agreement log accessed from the tab.
Configuration
Configuration for the calculation engine includes the following:
• SAP Condition Type Standard SAP condition types created in the V/06 transaction, used for pricing maintenance and pricing evaluation
• Vistex Calculation Path Series of steps (similar to an SAP access sequence) used to read tables (in defined sequence) for Vistex transactions. Each step includes mapping between each source document field and its corresponding condition table field.
• Vistex Calculation Procedure Series of steps in execution sequence (similar to an SAP pricing procedure) used for calculations and for condition search to derive the agreement. For condition search, the calculation procedure is attached to the condition search profile.
• Vistex IP Type Controls the application and condition search profile for a calculation bucket.
• Vistex Calculation Bucket Internal technical object used to define calculation data.
• Search Profile for Calculation Bucket Use transaction /IRM/IPCLBUSM to create search profiles used when posting calculation buckets. A default search profile is pre-delivered.
Calculation Buckets
Information to be stored in calculation buckets is based on configured calculation bucket types. Use
transaction code /IRM/IPCLBCM) to define a calculation bucket type for each application and source
document combination. Supported types of source documents are:
• Sales document • Billing document • Delivery • Purchase document • Claim • Transaction document

Business Register
SAP Data Maintenance by Vistex, Pricing option for SAP S/4HANA by Vistex for SAP S/4HANA
Application Help – Version: 1.0 – Final
December 12, 2019
© 2019 Vistex, Inc. All Rights Reserved.
© 2019 SAP SE or an SAP affiliate company. All rights reserved.
A configured bucket group is assigned to the calculation bucket. The bucket group stores the calculation
procedure and condition search profile used to determine the agreement used to update the line item
buckets.
Use the Calculation Bucket Workbench (/IRM/IPCLBM) to create calculation buckets, which can capture
lean data from source documents related to an agreement and/or partner. The calculation bucket
includes only those fields specified during bucket definition. Bucket data is visible in the
transactional/composite calculation runs and tracking. Data can be stored or, for virtual calculation
buckets, pulled to create calculation runs for posting.
Buckets can be updated either:
• Automatically, from agreements or settlement parameter groups • In batch, using the Mass Processing of Calculation Buckets (/IRM/IPCLBPMP) transaction • Manually, from the Calculation Bucket Workbench (/IRM/IPCLBM)
Source Document Buckets
Claim/transaction document data can be stored in buckets created in the following workbenches:
• Claim Bucket Workbench (/IRM/IPBCKCRM) Buckets are populated directly from claims when the claims are created or maintained. If you change the conditions of a bucket, you need to reconstruct that bucket to delete and recreate the bucket items. Reconstruction can be run either from the workbench or by running Reconstruct Claim Buckets (/IRM/IPBCK27).
• Transaction Bucket Workbench (/IRM/IPBCKRCAM) Buckets are populated directly from transaction documents when the transaction documents are created or maintained. If you change the conditions of a bucket, you need to reconstruct that bucket to delete and recreate the bucket items. Reconstruction can be run either from the workbench or by running Reconstruct Transaction Buckets (/IRM/IPBCK28).
Composite Buckets
Calculation buckets can be used as a source for mapping to subcomponent key figures. The calculation
bucket type is stored in the subcomponent definition.
Bucket Processing
The Mass Processing of Business Register Source Documents (/IRM/IPBRCLBSMP) transaction can be
used to process (build calculation buckets), reprocess (delete and recreate calculation buckets), and
reprice (to reprice line items).
3.4.3.1.2 Settlement

1909 Pricing Documentation
3.4.3.1.2.1 Settlement Overview
Definition
Settlement is the process that completes the financial postings initiated by the accrual.
Purpose
Settlement is performed to reflect the transfer of funds between the manufacturer/vendor and
distributor/retailer/customer.
For Business Register, the customer's account is credited and the clearing account is debited. Settlement
results in balancing the clearing account, debiting the business register expense account, and crediting
the customer's account by the final business register amount.
Settlement Approaches
The standard system supports settlement to SAP Condition Contract Settlement (CCS), based on
configuration of a settlement profile. Settlement profiles are defined at the bucket group level.
An internal settlement approach is available for use with internal claims.
Settlement Types
The following settlement types can be applied to a partner:
• Settle without Parking Settlement takes place without delay. All items are settled, unless a settlement block has been assigned. Immediate settlement does not involve reconciliation prior to settlement.
• Park The company submitting the claim provides the vendor/manufacturer with a detailed claim request and waits for a response approving or denying the request. When the business register document is parked (held for response), settlement will take place after the business register document has completed the reconciliation process. For standard settlement profiles, EDI 844 can be used for the claim submission; EDI 849 is used for the response.
• Park and Interim Settle After the claim request is submitted, the vendor/manufacturer may respond with a lesser amount. Interim settlement is a way for the customer/retailer/distributor to recognize the agreed upon claim amount while reconciliation continues for the remaining balance. Generally, interim settlement is not used for business registers.
Settlement Parameters
Settlement parameters are set up to indicate the rules for settlement.
For business registers:
• If settlement is performed using Accounts Receivable, the customer/retailer/distributor receiving payment is set up as a customer, and the settlement parameters are defined in the Customer Settlement Parameters transaction.

Business Register
SAP Data Maintenance by Vistex, Pricing option for SAP S/4HANA by Vistex for SAP S/4HANA
Application Help – Version: 1.0 – Final
December 12, 2019
© 2019 Vistex, Inc. All Rights Reserved.
© 2019 SAP SE or an SAP affiliate company. All rights reserved.
• If settlement is performed using Accounts Payable, the company receiving the claim is set up as a vendor. A vendor number must be specified in the customer master and the settlement parameters are defined in the Vendor Settlement Parameters transaction.
Rather than defining settlement parameters by customer/vendor, parameters can be defined for a
settlement group. Group definition is highly flexible; a group can be defined globally by agreement type,
customer group, or sales organization, for example.
Date-based parameters can be used to maintain multiple sets of settlement parameters, each assigned
to a different date range. Assigning date ranges allow different parameters to go into effect as of a
certain date. Parameters cannot be created with overlapping dates, however.
Parameters can be changed at the agreement level. The agreement settlement parameters always take
precedence over the parameters maintained in the Settlement Parameters transaction.
If settlement is done periodically on scheduled dates, a settlement calendar must be defined. For
example, if settlement will be on the last day of each month, a settlement calendar would be used to
mark the last day of each month in a year. Use the Settlement Calendar Maintenance transaction to create
and maintain settlement calendars.
Processing
In the transactional model, business register documents can be settled using the following methods:
• Business Register Workbench • Business Register Mass Processing • Business Register Search and Process • resolution (in claim or transaction document) • buckets
In the composite model, business register documents can be settled in the following transactions:
• Calculation Run Workbench • Create Calculation Run • Calculation Run Mass Processing
3.4.3.1.2.2 Settlement Parameters
Customer Settlement Parameters
Definition
1909 Pricing Documentation
Settlement parameters are set up at the customer level to indicate the rules for settlement when
settlement is performed using Accounts Receivable. For Business Register, the
customer/retailer/distributor receiving the payment is set up as a customer.
The following setup options are available:
• parameters for a specific customer and company code • group parameters
The group can be the only key. Group definition is highly flexible; a group can be defined globally by agreement type, customer group, or sales organization, for example. In participation, a group can be assigned to the participant in the Participation Assignments Details.
Date-based parameters can be used to maintain multiple sets of settlement parameters, each assigned
to a different date range. Assigning date ranges allow different parameters to go into effect as of a
certain date. Parameters cannot be created with overlapping dates, however.
Parameters defined for a customer can be changed at the agreement level. The agreement settlement
parameters always take precedence over the parameters maintained in the Customer Settlement
Parameters transaction.
Access
Transaction code: /IRM/IPBRCSP
Structure
The Customer Settlement Parameters screen is organized into the following areas:
• Search and Worklist Use the Search and Worklist to view the settlement parameter information for selected customers in a grid format. From the grid, click on a customer number to display that customer in focus in the Work Area.
• Work Area Use the Work Area to maintain the settlement parameters for one customer.
NOTE: Functions accessed from the menu bar apply only to the customer displayed in focus in the Work
Area and do not apply to the data in the Search and Worklist.
IMPORTANT: Because Vistex software is extremely versatile, the user screen may be customized. As a
result, the screen may appear different from the standard screen described in this document.
Procedures
Displaying Settlement Parameters for a Customer
Creating Settlement Parameters for a Customer
Maintaining Settlement Parameters for a Customer
Viewing the Customer Parameters Change Log
Deleting Settlement Parameters for a Customer
Creating Multiple Buckets

Business Register
SAP Data Maintenance by Vistex, Pricing option for SAP S/4HANA by Vistex for SAP S/4HANA
Application Help – Version: 1.0 – Final
December 12, 2019
© 2019 Vistex, Inc. All Rights Reserved.
© 2019 SAP SE or an SAP affiliate company. All rights reserved.
3.4.3.1.2.3 Settlement Calendar Maintenance
Definition
The settlement calendar extends the definition of the SAP calendar maintained in the transaction SCAL.
If settlement is done periodically on scheduled dates, a settlement calendar must be defined. For
example, if settlement will be on the last day of each month, a settlement calendar would be used to
mark the last day of each month in a year.
Use the Maintain Calendar transaction to create and maintain settlement calendars. Use the Maintain
Calendar transaction to create and maintain settlement calendars. Each settlement calendar is assigned
an IP calendar ID that is defined in configuration.
When the settlement frequency in the settlement parameters, agreement, agreement request, or
program is set to the Settlement Calendar option, click on the Settlement Calendar button to view
the specified settlement calendar.
Access
Transaction code: /IRM/IPSCALM
Structure
The Calendar screen is organized into the following areas:
• Application Toolbar • Calendar
Application Toolbar
The buttons on the application toolbar are:
Button Action Alternate Access
Display ↔ Change Toggle between Display mode and Change mode.
F6 or Menu bar: IP Calendar → Display ↔ Change
Mark Settlement Date (Change mode only) Displays the Recurrence Dates dialog window, used to add settlement dates to the displayed calendar.
F5 or Menu bar: Edit → Settlement Date → Mark
Delete Settlement Dates (Change mode only) Delete a settlement date from the displayed settlement calendar.
Shift+F2 or

1909 Pricing Documentation
Menu bar: Edit → Settlement Date → Delete
Other IP Calendar View a specific settlement calendar.
Shift+F5 or Menu bar: Goto → Other IP Calendar
Calendar
The selected calendar appears, with the current date highlighted. Each month is a column and each day
is a row. Use the horizontal scroll bar to move to previous or later months/years.
Procedures
Displaying a Settlement Calendar
Adding Dates to a Settlement Calendar
Deleting Dates from a Settlement Calendar
3.5 Federal Supply Schedule/Public Health Service
3.5.1 Federal Supply Schedule
3.5.1.1 Definition
Manufacturers must enter into a master agreement with the Department of Veterans Affairs (VA). This
agreement requires a manufacturer to make its products available to government agencies on the
Federal Supply Schedule (FSS) at a discount, updated annually. FSS prices are based on prices
manufacturers charge their most favored non-Federal customers under comparable terms and
conditions.
3.5.1.2 Process
Business Register provides the following special processing for FSS contracts:

Business Register
SAP Data Maintenance by Vistex, Pricing option for SAP S/4HANA by Vistex for SAP S/4HANA
Application Help – Version: 1.0 – Final
December 12, 2019
© 2019 Vistex, Inc. All Rights Reserved.
© 2019 SAP SE or an SAP affiliate company. All rights reserved.
• Special pricing rules facilitate management of the Most Favored/Tracking Customer (or customer group). These agreement rules allow you to manage your pricing, tracking customer/customer group, and IFF rebate all on one agreement.
• Ability to define policies on commercial contracts to minimize risk of requiring an FSS price change
• Standard FSS outputs are provided for VA filing.
3.5.1.3 Additional Supported Processes
The following compliance processes are supported:
• MediGap, coverage gap rebate • TRICARE, the health care program serving Uniformed Service members, retirees and their
families worldwide. The system provides a TRICARE Dispute Report and TRICARE Reconciliation of Quarterly Utilization (RQU) Report.
• Industrial Funding Fee (IFF) Quarterly Rebate, a rebate of the fee paid to fund the cost of the schedules program. The rebate document will be accrued on a daily basis. These accrued rebate documents are accumulated on a quarterly basis in the composite model under the IFF rebate plan.
3.5.2 FSS/PHS Master Data
3.5.2.1 Delivered Objects
3.5.2.1.1 FSS/PHS Agreement Type and Rules
The following agreement types and rules are delivered in Business Register:
3.5.2.1.1.1 FSS Agreement Type
The agreement type provided for FSS contracts is:

1909 Pricing Documentation
• X911 FSS Contract
3.5.2.1.1.2 FSS Agreement Rules
The following agreement rules are provided to facilitate management of the Most Favored/Tracking
Customer:
• Tracking Customer / NDC / Material • Tracking Customer Group / NDC • Tracking Sales Organization / NDC / Material • Tracking NDC / Material
Track individual customers or groups of customers,along with the appropriate commercial pricing floor.
NOTE: IFF rebates can be included on the same agreement.
3.5.2.1.1.3 PHS Agreement Type
The agreement type provided for PHS contracts is:
• X912 PHS Contract
3.5.2.1.2 Federal Supply Schedule
3.5.2.1.2.1 Commercial Contract Compliance
If the calculated FSS pricing is violated on the commercial agreement, an error message appears when
you perform a Check and Complete function on the agreement.
3.5.2.1.2.2 Standard FSS Outputs
Business Register includes the standard FSS outputs for VA filing.

Business Register
SAP Data Maintenance by Vistex, Pricing option for SAP S/4HANA by Vistex for SAP S/4HANA
Application Help – Version: 1.0 – Final
December 12, 2019
© 2019 Vistex, Inc. All Rights Reserved.
© 2019 SAP SE or an SAP affiliate company. All rights reserved.
3.5.2.2 Master Data Transactions
3.5.2.2.1 Membership
3.5.2.2.1.1 Trade Organization Attribute Workbench
Definition
Use the Trade Organization Attribute Workbench to assign values to a configured list of attributes for a
specific trade organization. When a membership list is created for the trade organization, the attribute
values will automatically populate the Trade Organization Attributes tab in the Membership Workbench.
Both customer and vendor trade organizations are supported. Attribute lists can be used to populate
only new unreleased membership lists, and are effectively date based.
Access
Transaction code: /IRM/GTOAM
Structure
The Trade Organization Attributes Workbench screen is organized into the following areas:
• Search and Worklist Use the Search and Worklist to view selected trade organization attributes lists in a grid format. From the grid, click on a trade organization number to display that trade organization attribute list in focus in the Work Area.
• Work Area Use the Work Area to maintain one trade organization attributes list.
NOTE: Functions accessed from the menu bar apply only to the attribute list displayed in focus in the
Work Area and do not apply to the data in the Search and Worklist.
Procedures
Displaying a List of Trade Organization Attribute Values
Creating a List of Trade Organization Attribute Values
Copying a List of Trade Organization Attribute Values
Maintaining a List of Trade Organization Attribute Values
Deleting a List of Trade Organization Attribute Values

1909 Pricing Documentation
3.5.2.2.2 Product List
3.5.2.2.2.1 Product List Workbench
Definition
A product list is a flexible way to group materials together. The product list contains a hierarchy or
multiple hierarchies maintained so that any offering of materials may be grouped. Product lists are often
used on agreements instead of individually adding materials one at a time.
To create a product list, either:
• Use the Product List Workbench to create and maintain products lists, either manually or by uploading data from an Excel spreadsheet.
• From the Rules tab in an agreement or agreement request, right-click in the List field and select the Create a List option (if no list specified) or Change a List option (if an existing list is specified).
Access
Transaction code: /IRM/GPLM
Structure
The Product List Workbench screen is organized into the following areas:
• Search and Worklist Use the Search and Worklist to view selected product lists in a grid format. From the grid, click on a product list number to display that product list in focus in the Work Area.
• Work Area Use the Work Area to maintain one product list. In the standard Vistex implementation, the Work Area contains the following tabs in the Header section: • Header
• Additional Data
• Notes
• Admin Data
The Products section contains the following tabs:
• Layout
• Review
NOTE: Functions accessed from the menu bar apply only to the product list displayed in focus in the
Work Area and do not apply to the data in the Search and Worklist.

Business Register
SAP Data Maintenance by Vistex, Pricing option for SAP S/4HANA by Vistex for SAP S/4HANA
Application Help – Version: 1.0 – Final
December 12, 2019
© 2019 Vistex, Inc. All Rights Reserved.
© 2019 SAP SE or an SAP affiliate company. All rights reserved.
IMPORTANT: Because Vistex software is extremely versatile, the user screen may be customized. As a
result, the screen may appear different from the standard screen described in this document.
Procedures
Displaying a Product List
Creating a Product List
Copying a Product List
Viewing Materials in the Product List that are Valid on a Specific Date
Uploading a Product List
Exporting the Product List to a File
Deleting Items from the Product List
3.5.2.2.2.2 Upload/Download
Upload Product List
Definition
Use Upload Product List to import a product list from a file, such as an Excel spreadsheet, rather than
manually entering the data. Files can be uploaded from the following locations:
• Desktop, to upload from the local PC • File submission, to upload based on a file submission entry • File server, to upload directly from the application server
File templates can be created to control the fields and format of files during upload. To create a file
template, either save the information entered on the screen, or use the File Template for Product List
Workbench.
The screen is organized into two sections:
• Source information Specify the source information for either the desktop file or server file being uploaded. Either enter the information in the source information fields or use a file template to populate the fields.
• Field mapping Map each file field to its corresponding product list field or specify a file template that contains the mapping.
Access
Transaction code: /IRM/GPLUPL

1909 Pricing Documentation
Procedure
Uploading a Product List
Download Product List
Definition
Use Download Product List to download selected product lists to a specific file on a desktop or file
server. For large downloads, this transaction can be run as a background job.
You must specify a file template for the download. File templates are used to control the fields and
format of files during download. To create a file template, use the File Template for Product List Workbench.
Access
Transaction code: /IRM/GPLDNL
Procedure
Downloading Product Lists
File Template for Product List
Definition
Use File Template for Product List Workbench to create and maintain templates that control the fields
and format of product list files during upload and/or download.
Access
Transaction code: /IRM/GPLFTM
Structure
The File Template for Product List Workbench screen is organized into the following areas:
• Search and Worklist Use the Search and Worklist to view selected file templates in a grid format. From the grid, click on file template number to display that file template in focus in the Work Area.
• Work Area Use the Work Area to maintain one file template. In the standard Vistex implementation, the Work Area contains the following tabs: • Section
• Mapping
Business Register
SAP Data Maintenance by Vistex, Pricing option for SAP S/4HANA by Vistex for SAP S/4HANA
Application Help – Version: 1.0 – Final
December 12, 2019
© 2019 Vistex, Inc. All Rights Reserved.
© 2019 SAP SE or an SAP affiliate company. All rights reserved.
• Conversion
• Submitter
• Crystal Layout, which is used with Crystal Reports
• Admin Data
NOTE: Functions accessed from the menu bar apply only to the file template displayed in focus in the
Work Area and do not apply to the data in the Search and Worklist.
Procedures
Displaying a File Template for Product List
Creating a File Template for Product List
Copying a File Template for Product List
Maintaining a File Template for Product List
Deleting a File Template for Product List
3.5.2.2.3 Flexible Groups
3.5.2.2.3.1 Flexible Groups
Documentation for flexible groups is available for the following screen formats:
• UI Application (SAP Fiori) • SAP GUI
3.5.2.2.3.2 Upload Flexible Grouping
Definition
Use Upload Flexible Grouping to import a flexible groups from a file, such as an Excel spreadsheet,
rather than manually entering the data. Files can be uploaded from the following locations:

1909 Pricing Documentation
• Desktop, to upload from the local PC • File submission, to upload based on a file submission entry • File server, to upload directly from the application server
File templates can be created to control the fields and format of files during upload. To create a file
template, either save the data entered on the upload screen or use the File Template for Flexible Groups
Workbench.
The screen is organized into two sections:
• Source information Specify the source information for either the desktop file or server file being uploaded. Either enter the information in the source information fields or use a file template to populate the fields.
• Field mapping Map each file field to its corresponding flexible group field or specify a file template that contains the mapping.
Access
Transaction code: /IRM/GFGUPL
Procedure
Uploading Flexible Groups
3.5.2.2.3.3 File Template for Flexible Groups
Definition
Use File Template for Flexible Groups Workbench to create and maintain re-usable templates that
control the fields and format of flexible groups files during upload and/or download.
Access
Transaction code: /IRM/GFGFTM
Structure
The File Template for Flexible Groups Workbench screen is organized into the following areas:
• Search and Worklist Use the Search and Worklist to view selected file templates in a grid format. From the grid, click on file template number to display that file template in focus in the Work Area.
• Work Area Use the Work Area to maintain one file template. In the standard Vistex implementation, the Work Area contains the following tabs: • Section
Business Register
SAP Data Maintenance by Vistex, Pricing option for SAP S/4HANA by Vistex for SAP S/4HANA
Application Help – Version: 1.0 – Final
December 12, 2019
© 2019 Vistex, Inc. All Rights Reserved.
© 2019 SAP SE or an SAP affiliate company. All rights reserved.
• Mapping
• Conversion
• Submitter
• Crystal Layout, which is used with Crystal Reports
• Admin Data
NOTE: Functions accessed from the menu bar apply only to the file template displayed in focus in the
Work Area and do not apply to the data in the Search and Worklist.
Procedures
Displaying a File Template for Flexible Groups
Creating a File Template for Flexible Groups
Copying a File Template for Flexible Groups
Maintaining a File Template for Flexible Groups
Deleting a File Template for Flexible Groups
3.5.2.2.4 Cross References
3.5.2.2.4.1 Material Cross Reference
Definition
Use the material cross reference to store possible incoming material identification numbers. The cross
reference can be used globally or just for the partner and/or organization it was created for.
The cross reference is used to link the current system records with the incoming record numbers so the
records can be matched and incoming documents can be processed. Cross reference mapping may be
performed in product lists, claims, transactions, price sheets, and price types.
Cross references can be set with a finite validity or an infinite validity.
Access
Transaction code: /IRM/GMXREF
Work Area

1909 Pricing Documentation
The following buttons appear above the Work Area:
Button Action Alternate Access
Display ↔ Change Toggle between Display mode and Change mode.
F6
Search Find a material cross reference previously created using General and Admin Data search fields.
Shift+F6 or Menu bar: Cross Reference → Search
Search More After you perform a search, use Search More to retain the results from the previous search, perform a new search, and append the new results to the list already displayed.
Shift+F7 or Menu bar: Cross Reference → Search More
The following buttons appear in the Work Area:
Button Action
Insert (Change mode only) Add new rows. Select 1, 5, or 10 rows to add at a time. Alternately, from the menu bar select Cross Reference → Add Rows.
Delete (Change mode only) Delete the select row or rows. Alternately, from the menu bar select Cross Reference → Delete Rows.
Copy Records (Change mode only) Copy a record or multiple records.
Import Records From File (Change mode only) Import a file and map the field positions and field values.
Search and Replace (Change mode only) Highlight a cell, cells, column, or columns which are changeable. Find and replace a specific value for another value.
Set Values (Change mode only) Highlight one column and set the value for the entire column, or change the column by increasing or decreasing the value if applicable.
Changes Display the change log for a highlighted row.
Overlapping Records Display a log of overlapping records for a highlighted row.
Details View selected records in a vertical column format in a separate window.
Sort in Ascending Order Sort the data in a selected column in ascending alphanumeric sequence.

Business Register
SAP Data Maintenance by Vistex, Pricing option for SAP S/4HANA by Vistex for SAP S/4HANA
Application Help – Version: 1.0 – Final
December 12, 2019
© 2019 Vistex, Inc. All Rights Reserved.
© 2019 SAP SE or an SAP affiliate company. All rights reserved.
Sort in Descending Order Sort the data in a selected column in descending alphanumeric sequence.
Find Find a term within the grid values. The system highlights any cell that contains the term.
Find Next Find the next instance of a term searched for previously.
Total (restricted to relevant numeric columns) Highlight at least one numeric column, and then select a type of calculation (Total, Mean Value, Minimum, or Maximum) from the dropdown list.
Subtotals (active only when the Total button is used) If you used the Total button to calculate the total for a selected column, you also may have the system calculate subtotals. Click to view a dialog window. In that window, check the checkbox of the column used to calculate subtotals.
Export Export the entire contents of the grid area to the selected document type/file type.
Choose Layout Choose, change, save, and manage column layouts within the ALV grid.
The following fields appear in the cross reference ALV grid:
Field Description
Provider Type Entity type of the partner supplying the cross reference value. NOTE: If the Universal Cross Reference option is across provider types, a Provider Type is not required.
Sales Organization An organizational unit in logistics that structures the company according to its sales requirements. A sales organization is responsible for selling materials and services. When creating a new record, select the applicable sales organization, if necessary.
Distribution Channel Channel through which materials or services reach customers. Distribution channels include wholesale, retail, and direct sales. A distribution channel can be assigned to one or more sales organizations. When creating a new record, select the distribution channel applicable for the provider, if necessary.
Division Organizational unit based on responsibility for sales or profits from saleable materials or services. When creating a new record, select the applicable division, if necessary.

1909 Pricing Documentation
Purchasing Organization Organizational unit in logistics that subdivides an organization by purchasing requirements. When creating a new record, select the purchasing organization applicable for the provider, if necessary.
Plant Organizational unit for dividing an enterprise by production, procurement, maintenance, and materials planning. When creating a new record, select the plant applicable for the provider, if necessary.
Provider Provider SAP identification number. For example, customer number or vendor number. NOTE: If the Universal Cross Reference option is across provider types, a Provider is not required.
One-line short form of formatted address
Address associated with the provider. This field will automatically populate after the provider is entered.
Material Entered Material value submitted by an outside party.
Description User-defined description of the Material Entered.
Unit of Measure Provided Measurement of the material records provided.
Valid From Date the cross reference begins. After creation of the row, this is a locked field.
Valid To Date the cross reference ends.
Material Identification Type When creating or maintaining a record, select a material identification type from the dropdown menu.
Material Material referred to from the system.
Description Characters describing a material. Derived from the material.
Converted UoM Measurement of the material records in measurement units.
Measurement Unit Text Default unit in which the measurement was recorded.
Denominator Used to calculate unit of measure conversions for the quantity entered on a claim/transaction when this material entered and unit of measure entered are used. The denominator is the number to be used as the divisor. For example, if 3 pieces equals 5 kilograms, when converting from pieces to kilograms, the divisor would be 5.
Numerator Used to calculate unit of measure conversions for the quantity entered on a claim/transaction when this material entered and unit of measure entered are used. The numerator is the number to be used as the multiplier. For example, if 3 pieces equals 5 kilograms, when converting from pieces to kilograms, the multiplier would be 3.
Universal Cross Reference Indicates whether the entry applies across organizations, providers, or both. Options:
• V Across Provider & Organization • W Across Organization • X Across Provider

Business Register
SAP Data Maintenance by Vistex, Pricing option for SAP S/4HANA by Vistex for SAP S/4HANA
Application Help – Version: 1.0 – Final
December 12, 2019
© 2019 Vistex, Inc. All Rights Reserved.
© 2019 SAP SE or an SAP affiliate company. All rights reserved.
Created By User ID of the author of the original record. This field is populated when the cross reference is saved.
Created On Date the record was created. This field is populated when the cross reference is saved.
Time Time when the cross reference was created. This field is populated when the cross reference is saved.
Changed By User ID of the person who changed the cross reference. This field is populated when the cross reference is saved.
Changed On Date when the cross reference was changed. This field is populated when the cross reference is saved.
Time of Change Time when the cross reference was changed. This field is populated when the cross reference is saved.
Message Row Display of error messages for the row.
Procedures
Displaying Material Cross References
Creating Material Cross References
Importing Material Cross References
Changing Material Cross References
Copying Material Cross References
Viewing a Material Cross Reference Change Log
Deleting Material Cross References
3.5.2.2.4.2 Partner Cross Reference
Definition
Use the partner cross reference to store possible incoming partner identification numbers. The cross
reference can be used globally or just for the partner and/or organization it was created for.
The cross reference is used to link the current system records with the incoming record numbers so the
records can be matched and incoming documents can be processed. Cross reference mapping may be
performed in memberships, claims, transactions, price sheets, and price types.
Cross references can be set with a finite validity or an infinite validity.
Access
Transaction code: /IRM/GPXREF
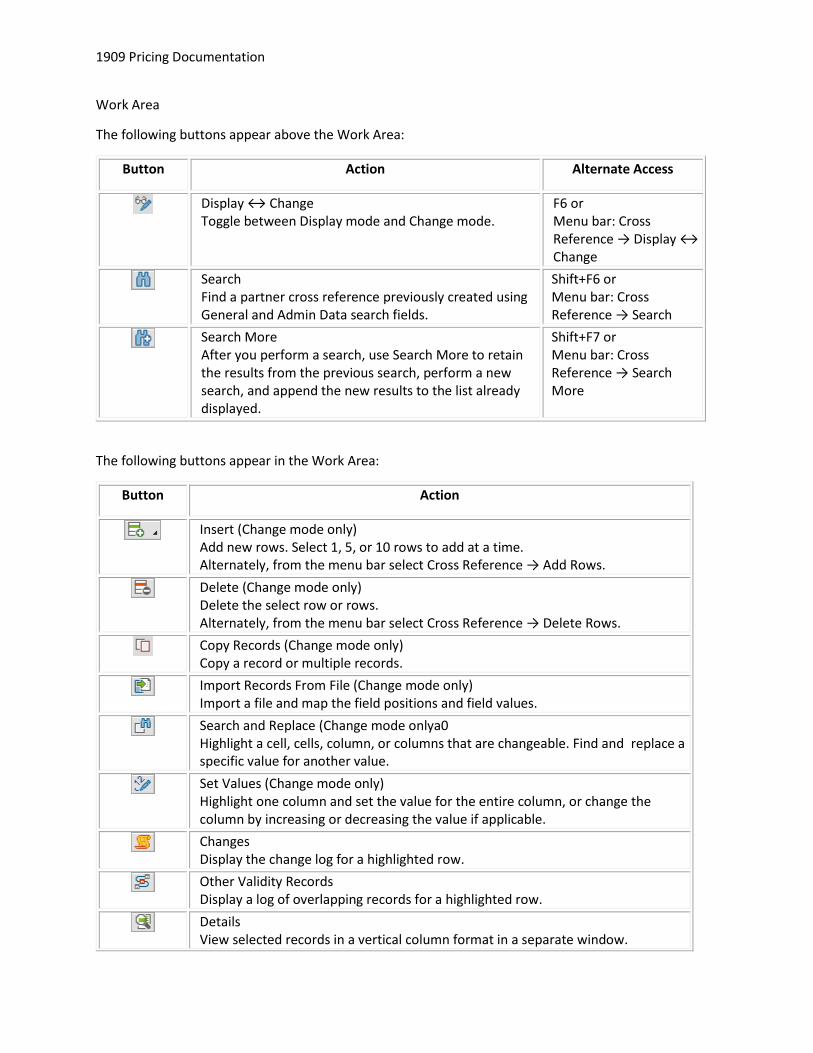
1909 Pricing Documentation
Work Area
The following buttons appear above the Work Area:
Button Action Alternate Access
Display ↔ Change Toggle between Display mode and Change mode.
F6 or Menu bar: Cross Reference → Display ↔ Change
Search Find a partner cross reference previously created using General and Admin Data search fields.
Shift+F6 or Menu bar: Cross Reference → Search
Search More After you perform a search, use Search More to retain the results from the previous search, perform a new search, and append the new results to the list already displayed.
Shift+F7 or Menu bar: Cross Reference → Search More
The following buttons appear in the Work Area:
Button Action
Insert (Change mode only) Add new rows. Select 1, 5, or 10 rows to add at a time. Alternately, from the menu bar select Cross Reference → Add Rows.
Delete (Change mode only) Delete the select row or rows. Alternately, from the menu bar select Cross Reference → Delete Rows.
Copy Records (Change mode only) Copy a record or multiple records.
Import Records From File (Change mode only) Import a file and map the field positions and field values.
Search and Replace (Change mode onlya0 Highlight a cell, cells, column, or columns that are changeable. Find and replace a specific value for another value.
Set Values (Change mode only) Highlight one column and set the value for the entire column, or change the column by increasing or decreasing the value if applicable.
Changes Display the change log for a highlighted row.
Other Validity Records Display a log of overlapping records for a highlighted row.
Details View selected records in a vertical column format in a separate window.
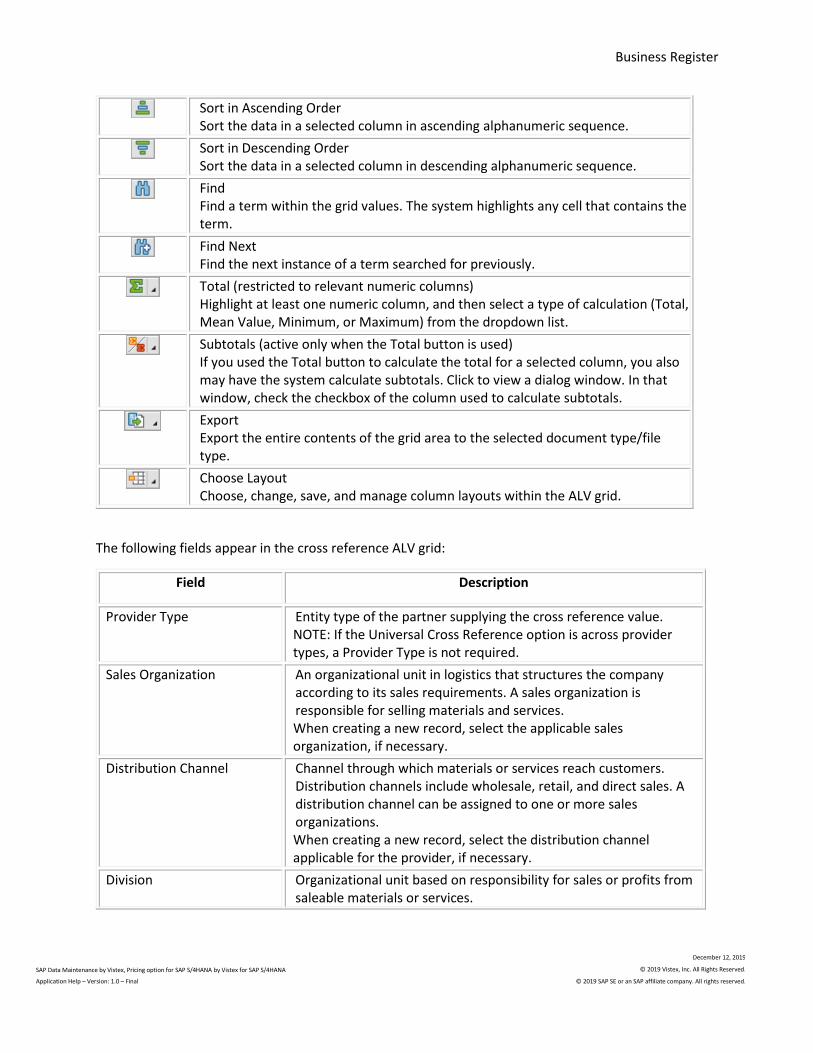
Business Register
SAP Data Maintenance by Vistex, Pricing option for SAP S/4HANA by Vistex for SAP S/4HANA
Application Help – Version: 1.0 – Final
December 12, 2019
© 2019 Vistex, Inc. All Rights Reserved.
© 2019 SAP SE or an SAP affiliate company. All rights reserved.
Sort in Ascending Order Sort the data in a selected column in ascending alphanumeric sequence.
Sort in Descending Order Sort the data in a selected column in descending alphanumeric sequence.
Find Find a term within the grid values. The system highlights any cell that contains the term.
Find Next Find the next instance of a term searched for previously.
Total (restricted to relevant numeric columns) Highlight at least one numeric column, and then select a type of calculation (Total, Mean Value, Minimum, or Maximum) from the dropdown list.
Subtotals (active only when the Total button is used) If you used the Total button to calculate the total for a selected column, you also may have the system calculate subtotals. Click to view a dialog window. In that window, check the checkbox of the column used to calculate subtotals.
Export Export the entire contents of the grid area to the selected document type/file type.
Choose Layout Choose, change, save, and manage column layouts within the ALV grid.
The following fields appear in the cross reference ALV grid:
Field Description
Provider Type Entity type of the partner supplying the cross reference value. NOTE: If the Universal Cross Reference option is across provider types, a Provider Type is not required.
Sales Organization An organizational unit in logistics that structures the company according to its sales requirements. A sales organization is responsible for selling materials and services. When creating a new record, select the applicable sales organization, if necessary.
Distribution Channel Channel through which materials or services reach customers. Distribution channels include wholesale, retail, and direct sales. A distribution channel can be assigned to one or more sales organizations. When creating a new record, select the distribution channel applicable for the provider, if necessary.
Division Organizational unit based on responsibility for sales or profits from saleable materials or services.

1909 Pricing Documentation
When creating a new record, select the applicable division, if necessary.
Purchasing Organization Organizational unit in logistics that subdivides an organization by purchasing requirements. When creating a new record, select the purchasing organization applicable for the provider, if necessary.
Provider Provider SAP identification number. For example, customer number or vendor number. NOTE: If the Universal Cross Reference option is across provider types, a Provider is not required.
One-line short form of formatted address
Address associated with the provider. This field will automatically populate after the provider is entered.
Valid From Date the cross reference begins. After creation of the row, this is a locked field.
Valid To Date the cross reference ends.
Partner Identification Type When creating or maintaining a record, select a partner identification type from the dropdown menu.
Partner Function Partner function that will be using the cross reference mapping.
Identification Provided Identification used by the provider when entering a partner.
Partner Determined SAP partner number used to determine when the identification provided is entered.
One-line short form of formatted address
Address associated with the SAP partner. This field will automatically populate after the determined partner is entered.
Universal Cross Reference Indicates whether the entry applies across organizations, providers, or both. Options:
• V Across Provider & Organization • W Across Organization • X Across Provider
Created By User ID of the author of the original record. This field is populated when the cross reference is saved.
Created On Date the record was created. This field is populated when the cross reference is saved.
Time Time when the cross reference was created. This field is populated when the cross reference is saved.
Changed By User ID of the person who changed the cross reference. This field is populated when the cross reference is saved.
Changed On Date when the cross reference was changed. This field is populated when the cross reference is saved.
Time of Change Time when the cross reference was changed. This field is populated when the cross reference is saved.
Message Row Display of error messages for the row.
Procedures

Business Register
SAP Data Maintenance by Vistex, Pricing option for SAP S/4HANA by Vistex for SAP S/4HANA
Application Help – Version: 1.0 – Final
December 12, 2019
© 2019 Vistex, Inc. All Rights Reserved.
© 2019 SAP SE or an SAP affiliate company. All rights reserved.
Displaying Partner Cross References
Creating Partner Cross References
Importing Partner Cross References
Changing Partner Cross References
Copying Partner Cross References
Viewing a Partner Cross Reference Change Log
Deleting Partner Cross References
3.5.2.2.4.3 Unit of Measure Cross Reference
Definition
Use the unit of measure cross reference to store possible incoming unit of measure identification types
and convert them into the unit of measure used in the organization's records.
The cross reference can be used globally or just for the partner and/or organization it was created for,
and is used in claims and transactions. Cross references can be set with a finite validity or an infinite
validity.
Access
Transaction code: /IRM/GUXREF
Work Area
The following buttons appear above the Work Area:
Button Action Alternate Access
Display ↔ Change Toggle between Display mode and Change mode.
F6 or Menu bar: Cross Reference → Display ↔ Change
Search Find a unit of measure cross reference previously created using General and Admin Data search fields.
Shift+F6 or Menu bar:Cross Reference → Search
Search More After you perform a search, use Search More to retain the results from the previous search, perform a new search, and append the new results to the list already displayed.
Shift+F7 or Menu bar: Cross Reference → Search More

1909 Pricing Documentation
The following buttons appear in the Work Area:
Button Action
Insert (Change mode only) Add new rows. Select 1, 5, or 10 rows to add at a time. Alternately, from the menu bar select Cross Reference → Add Rows.
Delete (Change mode only) Delete the select row or rows. Alternately, from the menu bar select Cross Reference → Delete Rows.
Copy Records (Change mode only) Copy a record or multiple records.
Import Records From File (Change mode only) Import a file and map the field positions and field values.
Search and Replace (Change mode only) Highlight a cell, cells, column, or columns that are changeable. Find and replace a specific value for another value.
Set Values (Change mode only) Highlight one column and set the value for the entire column, or change the column by increasing or decreasing the value if applicable.
Changes Display the change log for a highlighted row.
Overlapping Records Display a log of overlapping records for a highlighted row.
Details View selected records in a vertical column format in a separate window.
Sort in Ascending Order Sort the data in a selected column in ascending alphanumeric sequence.
Sort in Descending Order Sort the data in a selected column in descending alphanumeric sequence.
Find Find a term within the grid values. The system highlights any cell that contains the term.
Find Next Find the next instance of a term searched for previously.
Total (restricted to relevant numeric columns) Highlight at least one numeric column, and then select a type of calculation (Total, Mean Value, Minimum, or Maximum) from the dropdown list.
Subtotals (active only when the Total button is used) If you used the Total button to calculate the total for a selected column, you also may have the system calculate subtotals. Click to view a dialog window. In that window, check the checkbox of the column used to calculate subtotals.
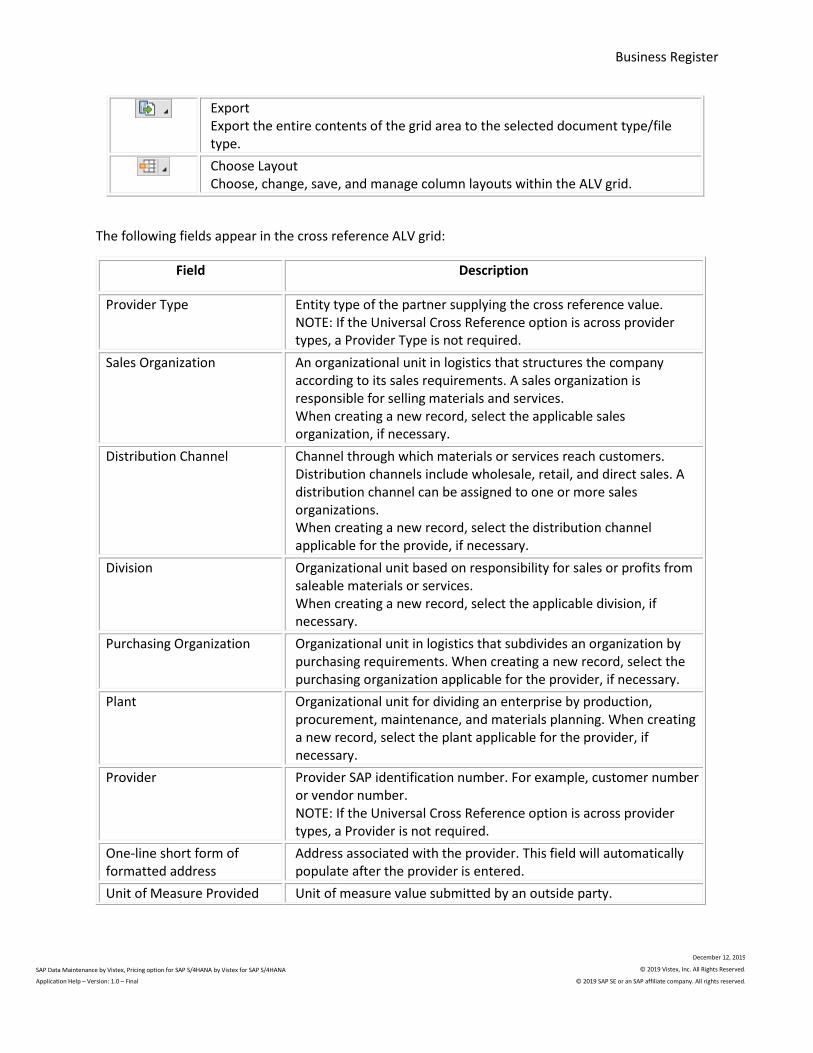
Business Register
SAP Data Maintenance by Vistex, Pricing option for SAP S/4HANA by Vistex for SAP S/4HANA
Application Help – Version: 1.0 – Final
December 12, 2019
© 2019 Vistex, Inc. All Rights Reserved.
© 2019 SAP SE or an SAP affiliate company. All rights reserved.
Export Export the entire contents of the grid area to the selected document type/file type.
Choose Layout Choose, change, save, and manage column layouts within the ALV grid.
The following fields appear in the cross reference ALV grid:
Field Description
Provider Type Entity type of the partner supplying the cross reference value. NOTE: If the Universal Cross Reference option is across provider types, a Provider Type is not required.
Sales Organization An organizational unit in logistics that structures the company according to its sales requirements. A sales organization is responsible for selling materials and services. When creating a new record, select the applicable sales organization, if necessary.
Distribution Channel Channel through which materials or services reach customers. Distribution channels include wholesale, retail, and direct sales. A distribution channel can be assigned to one or more sales organizations. When creating a new record, select the distribution channel applicable for the provide, if necessary.
Division Organizational unit based on responsibility for sales or profits from saleable materials or services. When creating a new record, select the applicable division, if necessary.
Purchasing Organization Organizational unit in logistics that subdivides an organization by purchasing requirements. When creating a new record, select the purchasing organization applicable for the provider, if necessary.
Plant Organizational unit for dividing an enterprise by production, procurement, maintenance, and materials planning. When creating a new record, select the plant applicable for the provider, if necessary.
Provider Provider SAP identification number. For example, customer number or vendor number. NOTE: If the Universal Cross Reference option is across provider types, a Provider is not required.
One-line short form of formatted address
Address associated with the provider. This field will automatically populate after the provider is entered.
Unit of Measure Provided Unit of measure value submitted by an outside party.

1909 Pricing Documentation
Valid From Date the cross reference begins. After creation of the row, this is a locked field.
Valid To Date the cross reference ends.
Converted UoM Unit of measure that will be converted from the Unit of Measure Provided.
Measurement Unit Text Unit in which the measurement was recorded.
Denominator Used to calculate unit of measure conversions for the quantity entered on a claim/transaction document when this material entered and unit of measure entered are used. The denominator is the number to be used as the divisor. For example, if 3 pieces equals 5 kilograms, when converting from pieces to kilograms, the divisor would be 5.
Numerator Used to calculate unit of measure conversions for the quantity entered on a claim/transaction document when this material entered and unit of measure entered are used. The numerator is the number to be used as the multiplier. For example, if 3 pieces equals 5 kilograms, when converting from pieces to kilograms, the multiplier would be 3.
Universal Cross Reference Indicates whether the entry applies across organizations, providers, or both. Options:
• V Across Provider & Organization • W Across Organization • X Across Provider
Created By User ID of the author of the original record. This field is populated when the cross reference is saved.
Created On Date the record was created. This field is populated when the cross reference is saved.
Time Time when the cross reference was created. This field is populated when the cross reference is saved.
Changed By User ID of the person who changed the cross reference. This field is populated when the cross reference is saved.
Changed On Date when the cross reference was changed. This field is populated when the cross reference is saved.
Time of Change Time when the cross reference was changed. This field is populated when the cross reference is saved.
Message Row Display of error messages for the row.
Procedures
Displaying Unit of Measure Cross References
Creating Unit of Measure Cross References
Importing Unit of Measure Cross References
Changing Unit of Measure Cross References
Copying Unit of Measure Cross References
Business Register
SAP Data Maintenance by Vistex, Pricing option for SAP S/4HANA by Vistex for SAP S/4HANA
Application Help – Version: 1.0 – Final
December 12, 2019
© 2019 Vistex, Inc. All Rights Reserved.
© 2019 SAP SE or an SAP affiliate company. All rights reserved.
Viewing a Unit of Measure Change Log
Deleting Unit of Measure Cross References
3.5.2.2.5 Business Register Agreements
3.5.2.2.5.1 Business Register Agreement Overview
The agreement summarizes the pricing conditions of the items and the settlement parameters. Each
agreement can pertain to many customers or just one customer. Agreements can be national, local, or
limited to a specific customer location.
The agreement is entered into the system using the Agreement Workbench transaction. Agreements can
be created and maintained directly in this workbench, however Vistex recommends creating an
agreement request and then posting the request to create or change the agreement.
NOTE: The agreement is stored in an SAP condition contract, based on the condition contract type
assigned to the agreement type in configuration.
Business Register Agreement Transactions
The following workbenches can be used to provide information used in agreements, or to perform
functions using existing agreements:
• Agreement Request Although agreements can be created and maintained directly, the Vistex best practice is to create an agreement request and then post the request to create or change the agreement.
• Clause Clauses are distinct articles, stipulations, or provisions in a legal document, such as a contract. From a system stand point, a clause is the text created for a distinct article, stipulation, or provision.
• Template A template is a group of clauses that are sequenced and assigned levels to form the layout of a clause structure for a type of agreement. Multiple versions of a template can exist, and, as needed, a template can contain clause variations, such as alternate clauses.
• Agreement Policy Agreement policies are used to calculate thresholds for pricing exceptions and alert the user when a price requirement has been violated. Agreement policies generate warnings on an agreement if the agreement rules do not fit the specifications in the policy. For example, the policy can alert the user when a price is outside a defined target range.
1909 Pricing Documentation
Additional Transactions
Direct Agreements
Rather than creating application-specific agreements, you have the option of creating direct
agreements. Direct agreements are the Vistex version of SAP contract pricing. A direct agreement is
used to develop a contract directly with the customer/vendor. Direct agreements can be applied directly
to the order.
Master Requests
A master request is initiated for master contracts and bid management scenarios, as a starting point for
all negotiations. From the Master Request Workbench, approved master request information can be
copied to create or change agreement requests, agreements, price proposals, master requests, and deal
requests/deals (based on configuration).
The Vistex master request brings multiple price elements together in one workbench for analysis
purposes. In a master request, “editions” can be created to track changes to rules and postings.
However, if you need the ability to differentiate quotes and bids, or need to track changes to legally
binding documents, you can use a master agreement, created in the Master Agreement Workbench, to
change a master request, with full tracking.
Campaigns
Campaigns can be used for trade planning, to estimate future sales of a new product during its test
marketing, launch, or rollout period. Not just for special promotions, campaigns manage full-blown
campaigns. Multiple contracts and events (such as a road show) can be tracked and evaluated in one
document. The Campaign Workbench, which is similar to the Agreement Workbench, is used to create and
maintain campaign documents.
3.5.2.2.5.2 Business Register Agreement
Documentation for business register agreements is available for the following screen formats:
• UI Application (SAP Fiori) • SAP GUI
Business Register
SAP Data Maintenance by Vistex, Pricing option for SAP S/4HANA by Vistex for SAP S/4HANA
Application Help – Version: 1.0 – Final
December 12, 2019
© 2019 Vistex, Inc. All Rights Reserved.
© 2019 SAP SE or an SAP affiliate company. All rights reserved.
3.5.2.2.5.3 Business Register Agreement Request
Documentation for business register agreement requests is available for the following screen formats:
• UI Application (SAP Fiori) • SAP GUI
3.5.2.2.5.4 Agreement Policy Workbench
Definition
Use the Agreement Policy Workbench to create and maintain reusable agreement policies that are
assigned to price sheets. Each agreement policy is a group of pricing conditions that must follow
particular rules. Price policies calculate thresholds for pricing exceptions and generate warnings when a
price requirement on a price sheet has been violated. The agreement policies can be set to auto execute
when condition records are created or policies can be called on demand.
When you define an agreement policy you assign a validity period. As needed, price policies can be
uniquely assigned per sales organization/distribution channel. Based on configuration, price policies can
be sent through an approval process prior to activation. Approvals can be tied to workflow.
Multiple policies can be assigned to a price sheet. The sequence for execution can be defined, as well as
what should happen to subsequent policies if a prior one is met. A where-used list shows all of the
condition type/table combinations where the policy is being used.
Access
Transaction code: /IRM/IPAGPLM
Structure
The Agreement Policy Workbench screen is organized into the following areas:
• Search and Worklist Use the Search and Worklist to view selected agreement policies in a grid format. From the grid, click on a policy number to display that agreement policy in focus in the Work Area.
• Work Area Use the Work Area to maintain one agreement policy. In the standard Vistex implementation, the Work Area contains the following tabs: • General
• Calculation

1909 Pricing Documentation
• Definition
• Violation
• Text
• Status
• Admin Data
• Override, which is used to specify override messages
• Where Used List, which lists the price sheets to which the policy is assigned
• Organization
NOTE: Functions accessed from the menu bar apply only to the agreement policy displayed in focus in
the Work Area and do not apply to the data in the Search and Worklist.
Procedures
Displaying an Agreement Policy
Creating an Agreement Policy
Changing an Agreement Policy
Assigning an Agreement Policy to a Price Sheet
Deleting an Agreement Policy
3.5.2.2.5.5 Clause Workbench
Documentation for the Clause Workbench is available for the following screen formats:
• UI Application (SAP Fiori) • SAP GUI
3.5.2.2.5.6 Template Workbench
Documentation for the Template Workbench is available for the following screen formats:
• UI Application (SAP Fiori) • SAP GUI

Business Register
SAP Data Maintenance by Vistex, Pricing option for SAP S/4HANA by Vistex for SAP S/4HANA
Application Help – Version: 1.0 – Final
December 12, 2019
© 2019 Vistex, Inc. All Rights Reserved.
© 2019 SAP SE or an SAP affiliate company. All rights reserved.
3.5.2.2.5.7 Business Register Agreement Mass
Process
Definition
The Business Register Agreements Mass Process transaction enables the user to easily mass process
multiple agreements. Use this transaction to perform the following functions:
• mass change agreements • save mass changes as an agreement request • mass copy agreements to create new agreements • mass copy agreements to create agreement requests
Access
Transaction code: /IRM/IPBRAME
Structure
The Mass Process transaction is organized into two sections:
• Activity Menu This vertical menu bar is used to choose the following activities, which are performed in sequence: • Search
• Selection
• Actions
• Execute
• Results As each activity is performed, the results of that activity are shown in this section of the screen.
Procedures
Changing Selected Agreements
Creating an Agreement Request to Change Agreements
Creating New Agreements
Copying Agreements to Create an Agreement Request

1909 Pricing Documentation
3.5.3 FSS/PHS Processing
3.5.3.1 Processing Transactions
3.5.3.1.1 Business Register Calculations
3.5.3.1.1.1 Business Register Calculations
Overview
Calculations for Vistex transactions are performed by the Vistex calculation engine. Calculation result
detail is stored in Vistex tables and can be accessed for the following:
• For business register calculation line items, calculation conditions are displayed on the Calculations tab in the calculation bucket that stores the source document line items. Detail can be viewed on the Calculation Analysis screen and agreement log accessed from the tab.
• For claim and transaction document line items, calculation conditions are displayed on the Conditions tab in the Claim/Transaction Workbench. Detail can be viewed on the Calculation Analysis screen and agreement log accessed from the tab.
Configuration
Configuration for the calculation engine includes the following:
• SAP Condition Type Standard SAP condition types created in the V/06 transaction, used for pricing maintenance and pricing evaluation
• Vistex Calculation Path Series of steps (similar to an SAP access sequence) used to read tables (in defined sequence) for Vistex transactions. Each step includes mapping between each source document field and its corresponding condition table field.
• Vistex Calculation Procedure Series of steps in execution sequence (similar to an SAP pricing procedure) used for calculations and for condition search to derive the agreement. For condition search, the calculation procedure is attached to the condition search profile.
• Vistex IP Type Controls the application and condition search profile for a calculation bucket.
• Vistex Calculation Bucket Internal technical object used to define calculation data.

Business Register
SAP Data Maintenance by Vistex, Pricing option for SAP S/4HANA by Vistex for SAP S/4HANA
Application Help – Version: 1.0 – Final
December 12, 2019
© 2019 Vistex, Inc. All Rights Reserved.
© 2019 SAP SE or an SAP affiliate company. All rights reserved.
• Search Profile for Calculation Bucket Use transaction /IRM/IPCLBUSM to create search profiles used when posting calculation buckets. A default search profile is pre-delivered.
Calculation Buckets
Information to be stored in calculation buckets is based on configured calculation bucket types. Use
transaction code /IRM/IPCLBCM) to define a calculation bucket type for each application and source
document combination. Supported types of source documents are:
• Sales document • Billing document • Delivery • Purchase document • Claim • Transaction document
A configured bucket group is assigned to the calculation bucket. The bucket group stores the calculation
procedure and condition search profile used to determine the agreement used to update the line item
buckets.
Use the Calculation Bucket Workbench (/IRM/IPCLBM) to create calculation buckets, which can capture
lean data from source documents related to an agreement and/or partner. The calculation bucket
includes only those fields specified during bucket definition. Bucket data is visible in the
transactional/composite calculation runs and tracking. Data can be stored or, for virtual calculation
buckets, pulled to create calculation runs for posting.
Buckets can be updated either:
• Automatically, from agreements or settlement parameter groups • In batch, using the Mass Processing of Calculation Buckets (/IRM/IPCLBPMP) transaction • Manually, from the Calculation Bucket Workbench (/IRM/IPCLBM)
Source Document Buckets
Claim/transaction document data can be stored in buckets created in the following workbenches:
• Claim Bucket Workbench (/IRM/IPBCKCRM) Buckets are populated directly from claims when the claims are created or maintained. If you change the conditions of a bucket, you need to reconstruct that bucket to delete and recreate the bucket items. Reconstruction can be run either from the workbench or by running Reconstruct Claim Buckets (/IRM/IPBCK27).
• Transaction Bucket Workbench (/IRM/IPBCKRCAM) Buckets are populated directly from transaction documents when the transaction documents are created or maintained. If you change the conditions of a bucket, you need to reconstruct that bucket to delete and recreate the bucket items. Reconstruction can be run either from the workbench or by running Reconstruct Transaction Buckets (/IRM/IPBCK28).
Composite Buckets
Calculation buckets can be used as a source for mapping to subcomponent key figures. The calculation
bucket type is stored in the subcomponent definition.

1909 Pricing Documentation
Bucket Processing
The Mass Processing of Business Register Source Documents (/IRM/IPBRCLBSMP) transaction can be
used to process (build calculation buckets), reprocess (delete and recreate calculation buckets), and
reprice (to reprice line items).
3.5.3.1.2 Accrual and Settlement
3.5.3.1.2.1 Settlement Overview
Definition
Settlement is the process that completes the financial postings initiated by the accrual.
Purpose
Settlement is performed to reflect the transfer of funds between the manufacturer/vendor and
distributor/retailer/customer.
For Business Register, the customer's account is credited and the clearing account is debited. Settlement
results in balancing the clearing account, debiting the business register expense account, and crediting
the customer's account by the final business register amount.
Settlement Approaches
The standard system supports settlement to SAP Condition Contract Settlement (CCS), based on
configuration of a settlement profile. Settlement profiles are defined at the bucket group level.
An internal settlement approach is available for use with internal claims.
Settlement Types
The following settlement types can be applied to a partner:
• Settle without Parking Settlement takes place without delay. All items are settled, unless a settlement block has been assigned. Immediate settlement does not involve reconciliation prior to settlement.
• Park The company submitting the claim provides the vendor/manufacturer with a detailed claim request and waits for a response approving or denying the request. When the business register document is parked (held for response), settlement will take place after the business register document has completed the reconciliation process.
Business Register
SAP Data Maintenance by Vistex, Pricing option for SAP S/4HANA by Vistex for SAP S/4HANA
Application Help – Version: 1.0 – Final
December 12, 2019
© 2019 Vistex, Inc. All Rights Reserved.
© 2019 SAP SE or an SAP affiliate company. All rights reserved.
For standard settlement profiles, EDI 844 can be used for the claim submission; EDI 849 is used for the response.
• Park and Interim Settle After the claim request is submitted, the vendor/manufacturer may respond with a lesser amount. Interim settlement is a way for the customer/retailer/distributor to recognize the agreed upon claim amount while reconciliation continues for the remaining balance. Generally, interim settlement is not used for business registers.
Settlement Parameters
Settlement parameters are set up to indicate the rules for settlement.
For business registers:
• If settlement is performed using Accounts Receivable, the customer/retailer/distributor receiving payment is set up as a customer, and the settlement parameters are defined in the Customer Settlement Parameters transaction.
• If settlement is performed using Accounts Payable, the company receiving the claim is set up as a vendor. A vendor number must be specified in the customer master and the settlement parameters are defined in the Vendor Settlement Parameters transaction.
Rather than defining settlement parameters by customer/vendor, parameters can be defined for a
settlement group. Group definition is highly flexible; a group can be defined globally by agreement type,
customer group, or sales organization, for example.
Date-based parameters can be used to maintain multiple sets of settlement parameters, each assigned
to a different date range. Assigning date ranges allow different parameters to go into effect as of a
certain date. Parameters cannot be created with overlapping dates, however.
Parameters can be changed at the agreement level. The agreement settlement parameters always take
precedence over the parameters maintained in the Settlement Parameters transaction.
If settlement is done periodically on scheduled dates, a settlement calendar must be defined. For
example, if settlement will be on the last day of each month, a settlement calendar would be used to
mark the last day of each month in a year. Use the Settlement Calendar Maintenance transaction to create
and maintain settlement calendars.
Processing
In the transactional model, business register documents can be settled using the following methods:
• Business Register Workbench • Business Register Mass Processing • Business Register Search and Process • resolution (in claim or transaction document) • buckets
In the composite model, business register documents can be settled in the following transactions:
• Calculation Run Workbench • Create Calculation Run
1909 Pricing Documentation
• Calculation Run Mass Processing
3.5.3.1.2.2 Settlement Parameters
Customer Settlement Parameters
Definition
Settlement parameters are set up at the customer level to indicate the rules for settlement when
settlement is performed using Accounts Receivable. For Business Register, the
customer/retailer/distributor receiving the payment is set up as a customer.
The following setup options are available:
• parameters for a specific customer and company code • group parameters
The group can be the only key. Group definition is highly flexible; a group can be defined globally by agreement type, customer group, or sales organization, for example. In participation, a group can be assigned to the participant in the Participation Assignments Details.
Date-based parameters can be used to maintain multiple sets of settlement parameters, each assigned
to a different date range. Assigning date ranges allow different parameters to go into effect as of a
certain date. Parameters cannot be created with overlapping dates, however.
Parameters defined for a customer can be changed at the agreement level. The agreement settlement
parameters always take precedence over the parameters maintained in the Customer Settlement
Parameters transaction.
Access
Transaction code: /IRM/IPBRCSP
Structure
The Customer Settlement Parameters screen is organized into the following areas:
• Search and Worklist Use the Search and Worklist to view the settlement parameter information for selected customers in a grid format. From the grid, click on a customer number to display that customer in focus in the Work Area.
• Work Area Use the Work Area to maintain the settlement parameters for one customer.
Business Register
SAP Data Maintenance by Vistex, Pricing option for SAP S/4HANA by Vistex for SAP S/4HANA
Application Help – Version: 1.0 – Final
December 12, 2019
© 2019 Vistex, Inc. All Rights Reserved.
© 2019 SAP SE or an SAP affiliate company. All rights reserved.
NOTE: Functions accessed from the menu bar apply only to the customer displayed in focus in the Work
Area and do not apply to the data in the Search and Worklist.
IMPORTANT: Because Vistex software is extremely versatile, the user screen may be customized. As a
result, the screen may appear different from the standard screen described in this document.
Procedures
Displaying Settlement Parameters for a Customer
Creating Settlement Parameters for a Customer
Maintaining Settlement Parameters for a Customer
Viewing the Customer Parameters Change Log
Deleting Settlement Parameters for a Customer
Creating Multiple Buckets
3.5.3.1.2.3 Settlement Calendar Maintenance
Definition
The settlement calendar extends the definition of the SAP calendar maintained in the transaction SCAL.
If settlement is done periodically on scheduled dates, a settlement calendar must be defined. For
example, if settlement will be on the last day of each month, a settlement calendar would be used to
mark the last day of each month in a year.
Use the Maintain Calendar transaction to create and maintain settlement calendars. Use the Maintain
Calendar transaction to create and maintain settlement calendars. Each settlement calendar is assigned
an IP calendar ID that is defined in configuration.
When the settlement frequency in the settlement parameters, agreement, agreement request, or
program is set to the Settlement Calendar option, click on the Settlement Calendar button to view
the specified settlement calendar.
Access
Transaction code: /IRM/IPSCALM
Structure
The Calendar screen is organized into the following areas:
• Application Toolbar • Calendar

1909 Pricing Documentation
Application Toolbar
The buttons on the application toolbar are:
Button Action Alternate Access
Display ↔ Change Toggle between Display mode and Change mode.
F6 or Menu bar: IP Calendar → Display ↔ Change
Mark Settlement Date (Change mode only) Displays the Recurrence Dates dialog window, used to add settlement dates to the displayed calendar.
F5 or Menu bar: Edit → Settlement Date → Mark
Delete Settlement Dates (Change mode only) Delete a settlement date from the displayed settlement calendar.
Shift+F2 or Menu bar: Edit → Settlement Date → Delete
Other IP Calendar View a specific settlement calendar.
Shift+F5 or Menu bar: Goto → Other IP Calendar
Calendar
The selected calendar appears, with the current date highlighted. Each month is a column and each day
is a row. Use the horizontal scroll bar to move to previous or later months/years.
Procedures
Displaying a Settlement Calendar
Adding Dates to a Settlement Calendar
Deleting Dates from a Settlement Calendar
3.5.3.2 Composite Transactions
3.5.3.2.1 Building a Composite Plan
3.5.3.2.1.1 Composite Building Blocks
Building Blocks

Business Register
SAP Data Maintenance by Vistex, Pricing option for SAP S/4HANA by Vistex for SAP S/4HANA
Application Help – Version: 1.0 – Final
December 12, 2019
© 2019 Vistex, Inc. All Rights Reserved.
© 2019 SAP SE or an SAP affiliate company. All rights reserved.
Building blocks (also known as elements) are the key factors of the Composite model. They are
interrelated to calculate final rebate amounts.
Composite has several building blocks/elements (click on a box for more information on that building
block):
Participants
Participants
A participant is the entity to whom the final amount is being paid or from whom the final amount is
received. Participants in a deployment code may be customers, vendors, brokers, employees, licensees,
licensors, agreements, and materials (SAP materials and DM materials).
Participants may be assigned to one or more deployment codes. If a participant(s) participates in a
multiple deployment codes, the tracking information and results for all deployment codes can be
simultaneously presented. The end user does not have to know how many plans the participant is in,
they can search by participant name and other search criteria. This allows the plan administrator to view
results for several participants or for managers/distributors to view the results of business partners
participating in multiple plans.
Participation can be versioned allowing you to do "what-if" analysis.
Participation Hierarchies
1909 Pricing Documentation
A hierarchy of participants can be created to view root level and lower level participants in a plan . For
example, in a buying group plan, the amount to be paid to the buying group is dependent on the results
of directly assigned distributors.
The participation can be based on the organization structure already in place or can be entered and
controlled directly by user input. If the hierarchy is dedicated to a specific plan, the participant hierarchy
is entered manually in the Participation Workbench. Vistex also supports the following types of
hierarchies that can be re-used across plans:
• Standard SAP customer hierarchy • Standard SAP vendor hierarchy • Standard SAP HCM hierarchy • IP hierarchy type/version • Membership list
Changes made to a re-usable hierarchy are reflected automatically in all places where that hierarchy is
used.
The re-usable participation hierarchy is assigned in the configuration of the deployment code/version. A
source code will appear in the Participation Workbench to indicate which type of hierarchy has been
assigned to the plan.
Automatic Assignment
Based on agreement type configuration, a participant can be automatically assigned to a deployment
code when a partner is added to the agreement or a new agreement is created. Auto assignment
eliminates the step of manually adding the participant in the Participant Workbench.
Automatic assignment supports the following participation options:
NOTE: The following participation options allow the Participation Workbench and tracking screen to be
accessed directly from the Performance tab in the agreement, rather than having to exit the agreement.
If the participant number is in the agreement, that participant will appear on the tracking screen.
Performance functionality can be used even if participants are not being automatically assigned.
• Agreement Only: The agreement will be assigned to the deployment code as an agreement. The start date and end date of the participant will be the start date and end date of agreement.
• Agreement with Partners: Participants are from rules or the Partners tab. For each partner a participant will be added as an agreement and the partner will become the settlement partner. The partner start date and end date will become the start date and end date for the participant (if one exists), otherwise the agreement start date and end date will be used.
• Partners with Agreements: Participants are from rules or the Partners tab. For each partner a participant will be added with the participation type of the partner and the system fills in the agreement number field. The partner start date and end date will become the start date and end date for participant (if one exists), otherwise the agreement start date and end date will be used.
• Partners Only: Participants are from rules or the Partners tab. For each partner a participant will be added with

Business Register
SAP Data Maintenance by Vistex, Pricing option for SAP S/4HANA by Vistex for SAP S/4HANA
Application Help – Version: 1.0 – Final
December 12, 2019
© 2019 Vistex, Inc. All Rights Reserved.
© 2019 SAP SE or an SAP affiliate company. All rights reserved.
the participation type of the partner, but the system does not fill in the agreement number field. The partner start date and end date will become the start date and end date for participant (if one exists), otherwise the agreement start date and end date will be used.
Participant Groups
Participant groups functionality can be used to decrease the number of compensation plans by allowing
the a plan to be used across multiple participant roles that have the same plan structure. For example,
suppose five teams of sales representatives are paid a sales commission based on revenue, but the
formula used to calculate the payout needs to differ slightly for each team. Rather than setting up
individual plans, the reps can be grouped by team into participant groups, which can be used in plan
formulas.
Each participant can be assigned to up to three participant groups. In the Participation Workbench,
three participant group fields (Group 1, Group 2, Group 3) appear on the General tab in the Participant
Details dialog window. For each field, you may select a group from the F4 list of groups that were
defined using the corresponding participant group transaction in Participation configuration. The three
participant group fields are available for use in plan formulas. Conditional statements in a formula can
include the participant group name, as needed.
NOTE: User exits also can include participant groups.
Virtual Participation
For companies who track thousands of participants, storing participation information for each
deployment code results in very large participant tables. For performance reasons, global search help
variants can be used to store the list of participants, and these variants are stored in the tables. The list
of participants is derived dynamically in composite tracking and reporting at runtime.
Setup includes:
• Configuration In Deployment Code / Participants configuration, check the Virtual Participation checkbox to indicate that the deployment code will be using virtual participation.
• Variant Workbench (/IRM/IPBRVM) For the deployment code, create a Participation variant to list the participants to be fetched at runtime. .
• Participation Workbench Assign the variant as a participant. Use the search pane to select the variants, then drag and drop them to the list in the left pane. The Assign Participants dialog window to assign attributes (such as start/end dates and calendars) that will apply to all the derived participants for that variant. Save the variant.
NOTE: A user exit is needed to allow the participants assigned to a variant to have different start and
end dates, as well as other attributes.
Participation Workbench:
When you select a deployment code also specify a range of variants in the Variant fields. The system lists
the participant variants in the grid. To view a list of participants on-the-fly, select a listed variant and

1909 Pricing Documentation
click on the Participants of Variant button (above the participant grid). The system displays pop-up
that lists the participants in the variant. From the pop-up, click on the Display Postings button to view
the postings.
Individual Tracking:
Select the deployment code. Then either enter the variant name in the Part. Variant field or press F4 and
select the variant from the Participation Variant pop-up. In the Participant field, either enter the
participant or press F4 to view the dynamically derived list in the Select Participants pop-up. Select the
participant to track.
Create Calculation Run:
Select the deployment code. Then either enter the variant in the Participation Variant field or press F4
and select the variant from the Participation Variant pop-up. To limit the participants, click on the
Participants button to view the dynamically derived list of participants in the Select Participants pop-up.
Select the participants to include.
Participation Workbench
Definition
Use the Participation Workbench to assign individual participants to a deployment code, as well as to
enter and maintain specific information about a plan participant. Participant level information overrides
plan level information.
You may create a participant hierarchy on-the-fly in this workbench. If you create a hierarchy, however,
that hierarchy is not transferred to membership or other participant hierarchies. The hierarchy can
contain multiple tiers.
Access
Transaction code: /IRM/IPBRPA
Structure
The screen is organized into the following areas:
• Search Area Use the Search Area (on the right side of the screen) to search for partners to add to a plan.
• Work Area Use the Work Area to view a list of plan participants in a tree format. Double click on a listed participant to view and maintain detail for that participant. In the standard Vistex implementation, the Work Area contains the following tabs: • General
• Additional Data, used to display additional fields or derived fields, if configured.

Business Register
SAP Data Maintenance by Vistex, Pricing option for SAP S/4HANA by Vistex for SAP S/4HANA
Application Help – Version: 1.0 – Final
December 12, 2019
© 2019 Vistex, Inc. All Rights Reserved.
© 2019 SAP SE or an SAP affiliate company. All rights reserved.
• Components, used to assign components and subcomponent characteristics. Validity dates can be assigned at the participant level for both the components and subcomponents. For a participant, a component can be flagged to skip processing or can be hidden.
• Period Profile
• Formulas
• Admin Data
Procedures
Displaying a List of Participants for a Plan
Viewing Participant Detail
Maintaining Participant Detail
Assigning a Period Profile to Participants
Upload Participants
Definition
Use Upload Participants to import participants for a specific deployment code version from a file, such
as an Excel spreadsheet, rather than manually entering the participants.
Access
Transaction code: /IRM/IPCIPU
Procedure
Uploading Participants
3.5.3.2.1.2 Composite Workbench
Definition
The Composite Workbench provides a central view of the composite building blocks, including:
• Deployment Group • Deployment Codes • Deployment Components

1909 Pricing Documentation
• Agreements • Matrices • IP Types • Participation • Administration & Performance
Access
Transaction code: /IRM/IPCWB
Structure
The Composite Workbench screen is organized into the following areas:
• List of Elements The list presents a tree view, with each building block as a folder. From the list, click on an entry to view it in focus in the Work Area.
• Work Area Use the Work Area to display detail of one entry.
Procedures
Displaying the Building Blocks
Displaying a Deployment Group
Displaying a Deployment Code
Displaying an Agreement
Displaying a Matrix
Displaying an IP Type
Displaying a Participant
Transferring to Configuration
3.5.3.2.1.3 Incentive Plan Builder
Definition
The Incentive Plan Builder provides a user-friendly way to set up a plan. You may use this transaction
instead of the Composite Workbench. All configuration required to create a plan can be done from this
transaction.
The transaction leads you through the following steps:
• Definition • Assembly • Execution
When a plan exists, the Incentive Plan Explorer transaction (/IRM/IPCPE) can be used to view the plan.
Access

Business Register
SAP Data Maintenance by Vistex, Pricing option for SAP S/4HANA by Vistex for SAP S/4HANA
Application Help – Version: 1.0 – Final
December 12, 2019
© 2019 Vistex, Inc. All Rights Reserved.
© 2019 SAP SE or an SAP affiliate company. All rights reserved.
Transaction code: /IRM/IPCPB
3.5.3.2.2 Planning
3.5.3.2.2.1 Matrix Planning
Planning Document/Grid
Planning Documents
Planning Document
Documentation for planning documents is available for the following screen formats:
• UI Application (SAP Fiori) • SAP GUI (Web Dynpro Grid)
Planning Object Workbench
Definition
Use the Planning Object Workbench to define the planning objects used to create planning documents
for a specific matrix and territory assignment type. You select the territory price sheets from which data
will be pulled, and map the price sheet fields to the corresponding matrix fields.
Price sheets can be grouped into sets, to Cartesian the data into combinations based on the sets. For
example, price sheets with the customers might be in one set, and the price sheet with the materials in
another set. The system will Cartesian the data into combinations of customer and material. Only data
for those combinations will be pulled from the matrix.
Access
Transaction code: /IRM/IPMXTPOM
Structure
The Planning Object Workbench screen is organized into the following areas:

1909 Pricing Documentation
• Search and Worklist Use the Search and Worklist to view information for selected planning objects in a grid format. From the grid, click on a planning object name to display that planning object in focus in the Work Area.
• Work Area Use the Work Area to maintain a planning object. In the standard Vistex implementation, the Work Area contains the following tabs: • Price Sheets, to list the price sheets from which data will be fetched for the matrix assigned
to the planning object. Map the matrix fields to the price sheet fields. An extended selection function module can be specified to explode the data characteristics.
• Scenarios, to list the planning scenarios used by the planning object.
• Admin Data
NOTE: Functions accessed from the menu bar apply only to the planning object displayed in focus in the
Work Area and do not apply to the data in the Search and Worklist.
IMPORTANT: Because Vistex software is extremely versatile, the user screen may be customized. As a
result, the screen may appear different from the standard screen described in this document.
Procedures
Displaying a Planning Object
Creating a Planning Object
Copying a Planning Object
Maintaining a Planning Object
Deleting a Planning Object
Planning Scenario Workbench
Definition
A planning scenario specifies the territories and periods used to select the matrix data to be pulled into
the planning document. Use the Planning Scenario Workbench to associate a planning object with a
subset and usage, and assign the territories and periods from which the data will be pulled.
If needed, an authorization group can be assigned to the planning scenario.
Access
Transaction code: /IRM/IPMXTPSM
Structure
The Planning Scenario Workbench screen is organized into the following areas:

Business Register
SAP Data Maintenance by Vistex, Pricing option for SAP S/4HANA by Vistex for SAP S/4HANA
Application Help – Version: 1.0 – Final
December 12, 2019
© 2019 Vistex, Inc. All Rights Reserved.
© 2019 SAP SE or an SAP affiliate company. All rights reserved.
• Search and Worklist Use the Search and Worklist to view information for selected planning scenarios in a grid format. From the grid, click on a planning scenario name to display that planning scenario in focus in the Work Area.
• Work Area Use the Work Area to maintain a planning scenario. In the standard Vistex implementation, the Work Area contains the following tabs: • Territories, to list the territories from which to get data for the planning document.
• Selection, to specify the planning periods or planning start date and number of periods.
• Admin Data
NOTE: Functions accessed from the menu bar apply only to the planning scenario displayed in focus in
the Work Area and do not apply to the data in the Search and Worklist.
IMPORTANT: Because Vistex software is extremely versatile, the user screen may be customized. As a
result, the screen may appear different from the standard screen described in this document.
Procedures
Displaying a Planning Scenario
Creating a Planning Scenario
Copying a Planning Scenario
Maintaining a Planning Scenario
Deleting a Planning Scenario
Planning Grid
Planning Grid
The Planning Grid is a tool used to maintain matrix data. Based on configuration, the Grid can be
accessed in the following ways:
• Planning document From the Fiori version of the planning document, the Planning Grid is displayed when you click on the Go to Grid button.
• Scenario Planning page (Fiori) From the Launchpad (or URL), click on a link to navigate to the Scenario page. Select a scenario (created in the Scenario Workbench /IRM/IPMXVARM) from the dropdown or input help (per workspace configuration) to display the selection criteria fields. Enter values in the fields and click on the Go button or Grid tab to display the Planning Grid for that scenario.
Planning Grid Features
Summaries
1909 Pricing Documentation
Summaries provide access to user-defined sets of data. The summaries assigned to the layout are listed
as tabs above the navigation toolbar. Click on a tab to display the summary; click on the Grid tab to
return to the grid data display. User-defined summaries can be created on-the-fly using the Summaries
button on the Side Bar.
Grid Application Toolbar
Use the icons above the grid for navigation or to perform certain functions:
• Toggle Compact, to show all the toolbar options • Undo and Redo, to undo or redo any change made to the data in the grid • Copy and Paste, to copy and paste cell values • Quick Filter, to filter the hierarchy trees • Arrows, to navigate left, right, up and down • Procedures, which lists all available functions and procedures. Select a function or
procedure, then click the Next button and select remaining criteria for the function or procedure. From the criteria summary, click on the Execute button to perform the function/procedure. Default procedures include: • Update rows within dataset using various criteria
Update all rows, a selected row, using filters, or using a formula. The Next button shows the Summary and Preview of the changes to be applied. Click on the Execute button to apply the changes.
• Clone rows within dataset using two step criteria Select multiple records to be copied and then select the copy to location.
• Copy rows with dataset using map Copy a row of data to another row.
• Add new rows to dataset using filters
• Import from Excel Import the data from an Excel spreadsheet, or drag the spreadsheet to view the mapping and uncheck any data not to be imported. Click on the Preview button to view the records to be added to the grid.
• Export, to download the grid data to an Excel spreadsheet • Change Distribution Type, to apply one of the following distribution types, which are similar to
certain functions: • Equal, which works like the DIST_OVR function. Apply this function only at the higher level
node. Change the value and then press ENTER to distribute the new value equally to the child values for the node.
• Equal with Delta, same as the Equal type but check the With Delta checkbox to add the new value to the previously existing value.
• Weighted, which works like the DIST_DIFF function. Apply this function only at the higher level node. Change the value and then press ENTER to distribute the new value per the existing ratio.

Business Register
SAP Data Maintenance by Vistex, Pricing option for SAP S/4HANA by Vistex for SAP S/4HANA
Application Help – Version: 1.0 – Final
December 12, 2019
© 2019 Vistex, Inc. All Rights Reserved.
© 2019 SAP SE or an SAP affiliate company. All rights reserved.
• Weighted with Delta, same as the Weighted type but check the With Delta checkbox to add the new value to the previously existing value.
• Sweep, to copy the value down to the child levels if that Key Figure is assigned the No Roll up with Sweep option in the Matrix Workbench. This function works in Fiori only if each key figure is in an individual column in the layout.
• Sweep with Delta, same as the Sweep type but check the With Delta checkbox to add the new value to the previously existing value.
• Metrics Visibility, to show/hide grid columns. • Comments, to view existing comments that you added to the selected cell, or add new
comments to a selected cell. • Validation Rules
For a selected row, you can view the validation results. • Log Manager, to view error, warning, info, and success messages. Click on the Load More button
to load logs when there are multiple activities. Click on the Save Log button to save the logs to a Notepad file.
• Toggle Settings, to view the side bar Grid Functions
The toolbar in the top right corner of the page includes the following:
• Refresh Derivation To refresh derivations to the latest values from the source.
• Snapshot Overwrite To overwrite the grid data with the currently displayed snapshot data. After you then save the data, the system populates the Overwritten By and Overwritten On dates in the Snapshots tab.
• Save as Snapshot Displays the Select Snapshot Type pop-up. Select a snapshot type, enter a description for the snapshot, and then click OK to save an instance of grid data for future reference. The snapshots cannot be edited.
• Change Layout Select the layout from the dropdown list.
• Enter Full Screen/Exit Full Screen Expand the grid to the entire page. You cannot save changes in the full screen; click on Exit Full Screen and then save the changes.
From the grid, the following buttons appear at the bottom of the page: Back to Main Page and Discard
Changes.
Grid Side Bar
The buttons on the side bar are used to perform the following functions:
Button Function
Metrics Management Manage metrics settings. You may add new temporary metrics, if needed.
1909 Pricing Documentation
Metrics management shows the color mapping assigned to the layout, as defined in the Matrix
Workbench. Color can be used to highlight individual cells, based on the values in the cells. Color maps indicate the range of cell values that correspond the each color.
Grid Hierarchy Define the layout for the horizontal axis (columns) and vertical axis (rows).
Variables Manager Displays all available variables above the grid. When you roll over a variable, the system displays a slider with minimum and maximum values for the variable. Adjust the slider (or enter a value directly) and click on Apply to change the variable in the grid data. You may add new temporary variables, if needed.
Grid Layout Default grid layout settings can be defined in the Subset Workbench. Change the following, as needed:
• Fixed Columns Width - check to fix the column width for the entire column. • Show Grand Total (Column and Row) -check to display the grade total for the column
or row at the starting position of the layout hierarchy • Nested - display the columns/rows in a nested format. • Classic - display the columns/rows in a tree format. • Flat - display the columns/rows in a flat format.
Active Filters Apply custom filters that contain selected matrix characteristics and time periods. The applied filter can be removed to show all data. NOTE: The filters are temporary and cannot be saved.
Assumptions Maintain the value for the variable used in the assumptions defined in the Matrix Workbench. After you change variable value, click on the Apply Changes button to store the new values for the session. Then apply on demand functions, as needed.
Summaries Create a user-specific summary that includes a desired list of fields. NOTE: Summaries are retained for proformas and planning documents; summaries are not retained when the grid is displayed from a scenario.
Validation Rules Create document-specific validation rules. Validation can be set as either Auto (automatically validates) or Manual (requires you to click on the Validate button).
Help The Help Center contains the following:
• Quick Tour, a tour of the Planning Grid for new users • Formulas, a list of available functions that can be used in formulas • Keyboard Shortcuts, a list of available shortcuts
Scenario Workbench - GUI

Business Register
SAP Data Maintenance by Vistex, Pricing option for SAP S/4HANA by Vistex for SAP S/4HANA
Application Help – Version: 1.0 – Final
December 12, 2019
© 2019 Vistex, Inc. All Rights Reserved.
© 2019 SAP SE or an SAP affiliate company. All rights reserved.
Definition
Use the Scenario Workbench to create variants that will be available in Planning. Rather than entering
all the criteria on the initial screen, you can select a predefined variant to fill the criteria fields, including
the planning parameters, compare with usages, period selection values, layout, and selections. Use the
Filters tab to indicate the selection fields that will appear in the Scenario Planning Grid. Check the
Changeable checkbox for each field to be included on the selection screen.
During creation, a scenario can be marked as user specific. If a variant is user specific, it will be visible
only for that user; otherwise, the variants are available for use by all users.
NOTE: The Scenario Fiori application does not have its own search profile or UI profile.
Access
Transaction code: /IRM/IPMXVARM
Structure
The Scenario Workbench screen is organized into the following areas:
• Search and Worklist Use the Search and Worklist to view selected scenarios in a grid format. From the grid, click on a scenario number to display that variant in focus in the Work Area.
• Work Area Use the Work Area to maintain one scenario. In the standard Vistex implementation, the Work Area contains the following tabs: • Selection, which displays the Selection and Compare with fields for the specified matrix.
Enter values in the fields. The system allows you to enter wild cards in the selection fields, to support the use of wild cards in the Planning selections.
• Period Defaults, to view the Periods information of the specified matrix. Enter default values in the fields. You have the option of using a standard SAP period calculation type to overwrite the normal assigned matrix period. Click on the Calculation icon and select one of the available options.
• Filters, to list the fields that will be listed as Filters on the selection screen in Scenario Planning. Check the Changeable checkbox for each field to be included on the selection screen.
• Functions, to list the functions allowed for the scenario on the Planning screen. This list of functions can be filtered for a layout by using the Functions field on the Layouts tab; leave the field blank to not filter the list.
• Layouts, to list the layouts allowed for the scenario. Flag one layout as the default.
• Variables, to list the default value for each variable assigned to the scenario.

1909 Pricing Documentation
• Waterfall Views, to list the available waterfall views for the scenario. Flag one view as the default.
• Admin Data
NOTE: Functions accessed from the menu bar apply only to the variant displayed in focus in the Work
Area and do not apply to the data in the Search and Worklist.
IMPORTANT: Because Vistex software is extremely versatile, the user screen may be customized. As a
result, the screen may appear different from the standard screen described in this document.
Procedures
Displaying a Scenario
Creating a Scenario
Copying a Scenario
Maintaining a Scenario
Deleting a Scenario
Planning Scenario - Fiori
Definition
Use the Planning Scenario page to choose a variant created in the (GUI) Scenario Workbench
(/IRM/IPMXVARM) to select data for display on the Planning Grid. You select a predefined variant to fill
the criteria fields, including the planning parameters (matrix, subset, usage, and proforma), compare
with usages, period selection values, layout, and selections. Additional filters can be used to further limit
the data display, if needed.
Access
No transaction codes are used to access Fiori applications. Access this page by clicking on a predefined
tile on the Launchpad (or URL).

Business Register
SAP Data Maintenance by Vistex, Pricing option for SAP S/4HANA by Vistex for SAP S/4HANA
Application Help – Version: 1.0 – Final
December 12, 2019
© 2019 Vistex, Inc. All Rights Reserved.
© 2019 SAP SE or an SAP affiliate company. All rights reserved.
On the search page, select a Scenario and then enter filters, period, and planning start date, as needed.
Click on the Go button or the Grid tab to view the Planning Grid.
NOTE: If a scenario is specified in the Launchpad link, then the system navigates directly to the Planning
Grid.
Matrix Setup
Matrix Overview
Definition
A matrix is a 3-dimensional table consisting of characteristics (who we are tracking for, such as material
group), key figures (what measurable metrics we are tracking, such as revenue), and a time period.
Actual data is not updated to the matrix; the matrix is used only for targets, quotas, historical data from
external sources (such as BI), and planning data.
Design
The matrix design allows dynamic aggregation and segmentation by subset. Subset-based planning
allows multiple users to update a matrix for their respective areas of responsibility.
Setup
• Matrix In a workbench, define the characteristics and key figures to be used, generate the matrix, and then design the layouts to be used on the Planning screen. Define the variables, derivations, and functions that will be available.

1909 Pricing Documentation
• Subset When creating a subset assigned to a matrix, select a date range and one or multiple levels of periodicity. Assign layouts, variables, derivations, and functions that were defined for the matrix.
• Usages Define each usage and members for each. Also, can define data sets used to pull data into the matrix.
Load Data into the Matrix
Loading data into the matrix is a two-step process:
1. When data is updated, the updated lines from the source document are stored in matrix staging tables.
2. The Staging Data Update into Matrix report (/IRM/IPMX_STAGING_DATA_UPDATE) must be executed for the staged data date and time, to load the staged data into the matrix.
Update the Matrix
• Matrix Group Define how to update the subsets.
• Matrix Planning Update data manually using the matrix planning tool.
• Proforma Based on configuration, the matrix will be updated when a proforma is saved or posted.
Transactions
The following transactions are used to create and maintain matrices:
• Matrix Workbench /IRM/IPMXM, to define and generate matrix tables. • Subset Workbench /IRM/IPMXSM, to define the set of data to be loaded into a matrix table. To
load the data, either click on the Load button or use the Load Subset Usage Data (/IRM/IPMXSLOAD) transaction.
• Proforma Workbench /IRM/IPMXPM, to view proforma documents. • Data Set Workbench /IRM/GDSTM, to create data sets that define the data to populate a matrix. • Matrix Group Workbench /IRM/IPMXSGM, to create a matrix group assigned a data set used to pull
actual data into a matrix/subset/usage. • Upload Subset Data /IRM/IPMXSUPL, used when data is uploaded from a file into the matrix table. • File Template for Matrix /IRM/IPMXFTM, provides a template for uploading data from a file.
The following utility reports are available:
• Copy Management /IRM/IPMXSCM, to copy and/or delete selected matrix data. • Matrix Utilities in Background /IRM/IPMXSCMBG, to execute a matrix utilities job using a variant
that specifies the job time period. • Simulate Matrix Update for Claims /IRM/IPCLAIMMXS, to analyze claim data in the form of a
matrix, before the data is pushed into the matrix. • Update Matrix for Claims /IRM/IPCLAIMMX, to push the claim data into the matrix. • Simulate Matrix Update for Transactions /IRM/IPRCAMXS, to analyze transaction document data
in the form of a matrix, before the data is pushed into the matrix.
Business Register
SAP Data Maintenance by Vistex, Pricing option for SAP S/4HANA by Vistex for SAP S/4HANA
Application Help – Version: 1.0 – Final
December 12, 2019
© 2019 Vistex, Inc. All Rights Reserved.
© 2019 SAP SE or an SAP affiliate company. All rights reserved.
• Update Matrix for Transactions /IRM/IPRCAMX, to push the transaction document data into the matrix.
• Update Matrix for Calculation Run (/IRM/IPCBBMX), to push the calculation run data into a specific matrix. Select the Redetermine Matrix Group checkbox if configuration has changed, and check the Update Documents with Matrix Group checkbox to use the latest from configuration.
• Matrix BI Data Update (/IRM/IPMXBIU), to pull Business Intelligence (BI) data for a specific matrix.
• APD Structure Workbench (/IRM/IPMXAPDM), to define and generate Analysis Process Designer (APD) structures used to push Business Intelligence (BI) data into the matrix.
• HANA Source Workbench (/IRM/IPMXHANAM), to select HANA view data to be pushed into the matrix .
• HANA Data Update (/IRM/IPMXHANAU), if sourcing matrix data from HANA, used to pull data from the HANA view(s) into a specific usage.
• Matrix Staging Data Update (/IRM/IPMXSTGU), to upload updated staging data to the matrix. Data is pushed to staging when the matrix group is assigned to the IP type header criteria. Optional processing can be added to load the changed data into a table for later viewing.
• Load Subset Usage Data (/IRM/IPMXSLOAD), to load subset data. This program can be entered
directly or by clicking on the Load button in the Subset Workbench (/IRM/IPMXSM).
Matrix Workbench
Definition
Use the Matrix Workbench to define and generate the matrix, as well as to define the following master
data that can be assigned to the subsets (matrix scenarios) attached to that matrix:
• Layouts A layout is used to generate a view that can be used for proformas. Each layout contains sequenced lists of the field displayed in a row hierarchy and column hierarchy, and can include fields from other subsets (set up as derivations).
• Variables Define the variables that can be used in computation functions and user-defined functions.
• Functions Create and activate the functions used to maintain matrix data.
Access
Transaction code: /IRM/IPMXM
Structure
The Matrix Workbench screen is organized into the following areas:

1909 Pricing Documentation
• Search and Worklist Use the Search and Worklist to view information for selected matrices in a grid format. From the grid, click on a matrix number to display that matrix in focus in the Work Area.
• Work Area Use the Work Area to maintain a matrix. In the standard Vistex implementation, the Work Area contains the following tabs: • Characteristics
• Key Figures
• Derivations
• Dynamic Derivations
• Key Figure Groups
• Color Maps
• Layouts
• Variables
• Assumptions
• Functions
• Procedures
• Where Used
• Admin Data
NOTE: Functions accessed from the menu bar apply only to the matrix displayed in focus in the Work
Area and do not apply to the data in the Search and Worklist.
IMPORTANT: Because Vistex software is extremely versatile, the user screen may be customized. As a
result, the screen may appear different from the standard screen described in this document.
Procedures
Displaying a Matrix
Defining a Matrix
Copying a Matrix
Maintaining a Matrix
Deleting a Matrix
Viewing a Matrix Where-used List
Subset Workbench
Definition
Business Register
SAP Data Maintenance by Vistex, Pricing option for SAP S/4HANA by Vistex for SAP S/4HANA
Application Help – Version: 1.0 – Final
December 12, 2019
© 2019 Vistex, Inc. All Rights Reserved.
© 2019 SAP SE or an SAP affiliate company. All rights reserved.
A subset is used to populate a matrix table either by loading a set of data defined in a data set or by
uploading data from a file. Each matrix can be assigned one or multiple subsets.
Use the Subset Workbench to define the following:
• matrix table into which the data will be loaded • usages, which are versions of the subset.
One usage must be defined as the actual data; another can be used for planned data. • periodicity, to define the type of periods to be used
One level is required, but up to three additional levels can be maintained as a hierarchy. The second period has to fully contain the first period, and so on. The hierarchy must be sequenced from smallest to largest period, for example: day, week, month, and year. Period fields can be added to the column or row hierarchy in the layouts.
• default planning horizon • key figure units, such as the currency assigned to an amount field or a unit of measure assigned
to a quantity field In addition, use this workbench to assign layouts and functions defined in the Matrix Workbench to a
subset.
Uploading data into the matrix table is performed by uploading data from the following:
• Data sets, which are used to select the data to be pushed into the matrix. Create data sets in the Data Set Workbench (/IRM/GDSTM). Then on the Usages tab in the Subset Workbench, use the Datasets tab to map the data set result fields to the matrix characteristic and key figure fields. For each key figure field, enter a period field name.
• HANA views, using structures created in the HANA Source Workbench. • External file, which is imported using the Upload Subset Data transaction.
After the data is loaded, the data can be viewed directly from this workbench.
Access
Transaction code: /IRM/IPMXSM
Structure
The Subset Workbench screen is organized into the following areas:
• Search and Worklist Use the Search and Worklist to view information for selected subsets in a grid format. From the grid, click on a subset name to display that subset in focus in the Work Area.
• Work Area Use the Work Area to maintain a subset. In the standard Vistex implementation, the Work Area contains the following tabs: • Usages
• Periods
• Planning
• Admin Data

1909 Pricing Documentation
NOTE: Functions accessed from the menu bar apply only to the subset displayed in focus in the Work
Area and do not apply to the data in the Search and Worklist.
IMPORTANT: Because Vistex software is extremely versatile, the user screen may be customized. As a
result, the screen may appear different from the standard screen described in this document.
Procedures
Creating a Subset
Loading Subset Data from a Data Set
Transferring to Upload Subset Data
Displaying Subset Data
Copying a Subset
Maintaining a Subset
Deleting a Subset
Scenario Workbench - GUI
Definition
Use the Scenario Workbench to create variants that will be available in Planning. Rather than entering
all the criteria on the initial screen, you can select a predefined variant to fill the criteria fields, including
the planning parameters, compare with usages, period selection values, layout, and selections. Use the
Filters tab to indicate the selection fields that will appear in the Scenario Planning Grid. Check the
Changeable checkbox for each field to be included on the selection screen.
During creation, a scenario can be marked as user specific. If a variant is user specific, it will be visible
only for that user; otherwise, the variants are available for use by all users.
NOTE: The Scenario Fiori application does not have its own search profile or UI profile.
Access
Transaction code: /IRM/IPMXVARM
Structure
The Scenario Workbench screen is organized into the following areas:
• Search and Worklist Use the Search and Worklist to view selected scenarios in a grid format. From the grid, click on a scenario number to display that variant in focus in the Work Area.
• Work Area Use the Work Area to maintain one scenario. In the standard Vistex implementation, the Work Area contains the following tabs: • Selection, which displays the Selection and Compare with fields for the specified matrix.
Enter values in the fields.
Business Register
SAP Data Maintenance by Vistex, Pricing option for SAP S/4HANA by Vistex for SAP S/4HANA
Application Help – Version: 1.0 – Final
December 12, 2019
© 2019 Vistex, Inc. All Rights Reserved.
© 2019 SAP SE or an SAP affiliate company. All rights reserved.
The system allows you to enter wild cards in the selection fields, to support the use of wild cards in the Planning selections.
• Period Defaults, to view the Periods information of the specified matrix. Enter default values in the fields. You have the option of using a standard SAP period calculation type to overwrite the normal assigned matrix period. Click on the Calculation icon and select one of the available options.
• Filters, to list the fields that will be listed as Filters on the selection screen in Scenario Planning. Check the Changeable checkbox for each field to be included on the selection screen.
• Functions, to list the functions allowed for the scenario on the Planning screen. This list of functions can be filtered for a layout by using the Functions field on the Layouts tab; leave the field blank to not filter the list.
• Layouts, to list the layouts allowed for the scenario. Flag one layout as the default.
• Variables, to list the default value for each variable assigned to the scenario.
• Waterfall Views, to list the available waterfall views for the scenario. Flag one view as the default.
• Admin Data
NOTE: Functions accessed from the menu bar apply only to the variant displayed in focus in the Work
Area and do not apply to the data in the Search and Worklist.
IMPORTANT: Because Vistex software is extremely versatile, the user screen may be customized. As a
result, the screen may appear different from the standard screen described in this document.
Procedures
Displaying a Scenario
Creating a Scenario
Copying a Scenario
Maintaining a Scenario
Deleting a Scenario
Copy Management
Definition
Run the Copy Management utility transaction to perform the following actions for a selected
matrix/subset/usage:

1909 Pricing Documentation
• Copy To copy data from one matrix/subset/usage to another matrix/subset/usage.
• Copy + Delete To copy data from one matrix/subset/usage to another, then delete the source data. If you select Copy or Copy+Delete, the following tabs appear: • Target
Specify the copy to matrix/subset/usage. The target matrix can be saved as a proforma if you specify a Proforma Type. Choose a Transformation Method: Mapping (apply the mapping specified on the Mapping tab) or User-defined (apply the user-defined copy method in the subset usage's enhancement class). You also can select a user function from those defined in the target matrix's subset. This function will be applied after the copy. To overwrite existing data during the copy, check the Overwrite checkbox. To copy members only, check the Only Members checkbox.
• Mapping When the selected Transformation Method is Mapping, use the Mapping tab to map the source data to the target data. Check the Source Unit checkbox to copy the source field, from one usage to another, in the source currency/unit. Leave the checkbox blank to convert the source field to the Target usage's default currency/unit when it is copied.
• Selection Use the Selection tab to choose specific data to be copied or deleted, for that matrix/subset/usage. You also can specify the date on which the background job will be run.
• Delete To delete data from one matrix/subset/usage. The Selection tab will appear to select the specific data to be deleted. For example, you might delete data only for a specific customer or range of customers.
• Process The Process action might be used to schedule a background job to process the remaining distribution levels for a function that was assigned to stop at a Distribution Level (on the Functions tab in the matrix). If you select Process, the following tabs appear: • Procedures
List the procedures, which will be processed in sequence. For each procedure, click on the Variables icon to specify the default values for any variables assigned to the procedure. Procedures will be run before the functions are processed.
• Functions List the functions in the sequence in which they will be applied to the data. For each
Business Register
SAP Data Maintenance by Vistex, Pricing option for SAP S/4HANA by Vistex for SAP S/4HANA
Application Help – Version: 1.0 – Final
December 12, 2019
© 2019 Vistex, Inc. All Rights Reserved.
© 2019 SAP SE or an SAP affiliate company. All rights reserved.
function, click on the Variables icon to specify the default values for any variables assigned to the function.
Scheduling Jobs for Future Periods
Variants can be used to schedule background jobs for future time periods (such as the first day of next
month or Last day of the current month). Create a variant for any of the matrix utilities (copy, delete,
copy and delete, or process). When saving the variant, in the Periods section click on the Calculation
icon for the period (Week, Month, Quarter, or Year) and choose one of the options in the Choose Period
Calculation pop-up.
For example, a variant can be created to run a Process job on the last day of the month. When you save
the variant, click on Calculation Type icon in the Month field row to display the Choose Period
Calculation pop-up. Select the Last Day of the Current Month option and then click on the Choose
button.
You can run the variant using one of the following transactions:
• Copy Management /IRM/IPMXSCM When you select the variant, the system fills in the date on the Selection tab.
• Matrix Utilities in Background /IRM/IPMXSCMBG Specify the Job name and Variant Name, then execute or schedule the job. Use Simple Job Selection (OSM37) to start and verify the execution process for the background job. Later, the job status can be checked in the Analyze Application Log (OSLG1).
Access
Transaction code: /IRM/IPMXSCM
Procedures
Copying a Subset Usage
Copying Members from One Subset Usage to Another
Processing the Remaining Distribution Levels for a Function
Matrix Group Workbench
Definition
Use the Matrix Group Workbench to create a matrix group assigned a dataset that is used to populate
actual data from into the matrix for a usage. Matrix groups are defined at the application level. In a
matrix group, specify the set of matrix/subset/usage to be updated.
NOTE: The matrix group must be specified for the IP Type in both the Header and Item Criteria for Sales
Documents or Purchasing Documents configuration.

1909 Pricing Documentation
For each matrix/subset/usage in the matrix group, assign the dataset to be used to evaluate document
data. The dataset contains a set of conditions. Only data that meets the conditions will update the
matrix, based on mapping between the dataset result fields and the matrix fields. Datasets are defined
in the Data Set Workbench. When creating evaluation datasets, use the IP areas 47-53.
NOTE: If the user creates a new member, the user can see that new member in the subset data.
However, that new member is not going to be inserted in Subset Workbench usage members.
Moreover, the Planning workbench will show the update of data for existing members only.
Access
Transaction code: /IRM/IPMXSGM
Structure
The Matrix Group Workbench screen is organized into the following areas:
• Search and Worklist Use the Search and Worklist to view information for selected matrix groups in a grid format. From the grid, click on a matrix group name to display that subset group in focus in the Work Area.
• Work Area Use the Work Area to maintain a matrix group. In the standard Vistex implementation, the Work Area contains the following tabs: • Definition
• Admin Data
NOTE: Functions accessed from the menu bar apply only to the matrix group displayed in focus in the
Work Area and do not apply to the data in the Search and Worklist.
IMPORTANT: Because Vistex software is extremely versatile, the user screen may be customized. As a
result, the screen may appear different from the standard screen described in this document.
Procedures
Displaying a Matrix Group
Creating a Matrix Group
Copying a Matrix Group
Maintaining a Matrix Group
Deleting a Matrix Group
Data Set Workbench
Definition
Data sets are used to define the (basic) formulas or criteria used to pull data from source tables and
push that data to target tables.

Business Register
SAP Data Maintenance by Vistex, Pricing option for SAP S/4HANA by Vistex for SAP S/4HANA
Application Help – Version: 1.0 – Final
December 12, 2019
© 2019 Vistex, Inc. All Rights Reserved.
© 2019 SAP SE or an SAP affiliate company. All rights reserved.
Typical ways to use a data set include:
• Matrix update from selected header and line item fields The data set defines the data to be pushed into the matrix. Specify the data set in the scenario group.
• Matrix update from selected source documents: sales documents, billing documents, delivery documents, or purchasing documents
• Matrix update from calculation run results The scenario group assigned to the calculation run type holds the data set name.
• Accounting at the composite line item level The data set defines the formula or criteria used to push all applicable line items into financial allocation tables for processing a composite plan.
• Controlling the data used for IP level allocation (Allocation tab) in a calculation run • Pushing line items to the tracking screen
To select the line items displayed when you click on the Line Items button in the tracking screen. • Subcomponent level characteristic mapping
Subcomponent characteristics can be used to filter the line items displayed when you click on the Line Items button on the tracking screen, rather than displaying all line items, for performance reasons. For example, if there are ten materials in a material group, can limit the display to two materials.
• Claim item derivation using agreement scheduling To push and filter data into claims that are triggered from the agreement Schedules tab.
In configuration, Vistex provides pre-defined dataset areas for the uses listed above. Custom fields can
be added by appending the relevant structures.
Use the Data Set Workbench to create a data set. After using the Simulate functionality to test the data
set, assign the data set in configuration, as applicable, or in transactions such as Subset Workbench (to
load data into a usage).
Access
Transaction code: /IRM/GDSTM
Structure
The Data Set Workbench screen is organized into the following areas:
• Search and Worklist Use the Search and Worklist to view a list of selected data sets in a grid format. From the grid, click on a data set number to display that report in focus in the Work Area.
• Work Area Use the Work Area to maintain one data set. In the standard Vistex implementation, the Work Area contains the following tabs: • Definition
• Review, to view the formula/logic statements in words.

1909 Pricing Documentation
• Result Fields, appears only for data sets configured as expression data sets (not for selection data sets). Define all the fields to be pulled from the source document. These fields are required for mapping the data set to the fields in the scenario group.
• Admin Data
NOTE: Functions accessed from the menu bar apply only to the data set displayed in focus in the Work
Area and do not apply to the data in the Search and Worklist.
Procedures
Creating a Data Set
Copying a Data Set
Reviewing a Data Set in Words
Simulating a Data Set
Maintaining a Data Set
Deleting a Data Set
Available Periods Workbench
Definition
Use the Available Periods Workbench to lock matrix data on the Planning Screen for particular periods in
a specific year, at the usage level.
Closed periods are for display only on the Planning Screen. If a period is closed, you cannot edit the data.
Access
Transaction code: /IRM/IPMXPERM
Structure
The Available Periods Workbench screen is organized into the following areas:
• Search and Worklist Use the Search and Worklist to view selected matrix/subset/usage in a grid format. From the grid, click on a matrix name to display it in focus in the Work Area.
• Work Area Use the Work Area to maintain periods for one matrix/subset/usage.
NOTE: Functions accessed from the menu bar apply only to the matrix displayed in focus in the Work
Area and do not apply to the data in the Search and Worklist.
Data Sources

Business Register
SAP Data Maintenance by Vistex, Pricing option for SAP S/4HANA by Vistex for SAP S/4HANA
Application Help – Version: 1.0 – Final
December 12, 2019
© 2019 Vistex, Inc. All Rights Reserved.
© 2019 SAP SE or an SAP affiliate company. All rights reserved.
APD Structure Workbench
Definition
Use the APD Structure Workbench to create a structure that contains a list of APD (Analysis Process
Designer) fields. Existing APD structures can be used as the source for matrix explosions and derivations.
APD structures in Vistex are exact replicas of BI APD structures. When creating an APD structure, also
create a function module to update the matrix from BI. Its interface will contain a table type APD
structure that will call the API from the BI system. A report will be written to pull data from BI system
and push into the ECC matrix.
Access
Transaction code: /IRM/IPMXAPDM
Structure
The APD Structure Workbench screen is organized into the following areas:
• Search and Worklist Use the Search and Worklist to view selected APD structures in a grid format. From the grid, click on a structure name to display it in focus in the Work Area.
• Work Area Use the Work Area to maintain one APD structure. In the standard Vistex implementation, the Work Area contains the following tabs: • Fields
• Admin Data
NOTE: Functions accessed from the menu bar apply only to the APD structure displayed in focus in the
Work Area and do not apply to the data in the Search and Worklist.
Procedures
Displaying an APD Structure
Creating an APD Structure
Copying an APD Structure
Maintaining an APD Structure
Deleting an APD Structure
HANA Source Workbench
Definition

1909 Pricing Documentation
Use the HANA Source Workbench to list the fields to be used for the following purposes:
• pull HANA view data into a matrix HANA fields can be assigned and mapped at the subset usage level. Then use HANA Data Update (/IRM/IPMXHANAU) to upload the HANA data to the assigned matrix/subset/usage combination.
• source for matrix explosions Assigned at the subset usage level.
• source for matrix derivations To pull HANA view information into the Planning Screen on-the-fly. Can be assigned at the matrix and subset usage level (higher priority than at the matrix level), with its own source mapping for retrieving HANA view data.
Access
Transaction code: /IRM/IPMXHANAM
Structure
The HANA Source Workbench screen is organized into the following areas:
• Search and Worklist Use the Search and Worklist to view selected HANA sources in a grid format. From the grid, click on a HANA source name to display it in focus in the Work Area.
• Work Area Use the Work Area to maintain one HANA source. In the standard Vistex implementation, the Work Area contains the following tabs: • Fields
• Admin Data
NOTE: Functions accessed from the menu bar apply only to the HANA source displayed in focus in the
Work Area and do not apply to the data in the Search and Worklist.
Procedures
Displaying a HANA Source
Creating a HANA Source
Copying a HANA Source
Maintaining a HANA Source
Deleting a HANA Source
Matrix Upload
Upload Subset Data
Definition

Business Register
SAP Data Maintenance by Vistex, Pricing option for SAP S/4HANA by Vistex for SAP S/4HANA
Application Help – Version: 1.0 – Final
December 12, 2019
© 2019 Vistex, Inc. All Rights Reserved.
© 2019 SAP SE or an SAP affiliate company. All rights reserved.
Use Upload Subset Data to import subsets (including members) from a file, such as an Excel
spreadsheet, rather than manually entering the data. Uploaded information can be posted immediately
or saved to a submission that must go through an approval process prior to being released.
File templates can be created to control the fields and format of files during upload. To create a file
template, either save the information entered on the screen, or use the File Template for Matrix Workbench.
Access
Transaction code: /IRM/IPMXSUPL
Procedure
Uploading Subset Data
File Template for Matrix
Definition
Use File Template for Matrix Workbench to create and maintain templates that control the fields and
format of matrix files during upload and/or download.
The system delivers MX0061 as the default file template used when the matrix is generated if no user-
created file template exists.
NOTE: The file template is matrix specific. A file template created for one matrix cannot be used for
another matrix.
Access
Transaction code: /IRM/IPMXFTM
Structure
The File Template for Matrix Workbench screen is organized into the following areas:
• Search and Worklist Use the Search and Worklist to view selected file templates in a grid format. From the grid, click on file template number to display that file template in focus in the Work Area.
• Work Area Use the Work Area to maintain one file template. In the standard Vistex implementation, the Work Area contains the following tabs: • Section
• Mapping
• Conversion
1909 Pricing Documentation
• Submitter
• Crystal Layout, which is used with Crystal Reports
• Admin Data
NOTE: Functions accessed from the menu bar apply only to the file template displayed in focus in the
Work Area and do not apply to the data in the Search and Worklist.
Procedures
Displaying a File Template for Matrix
Creating a File Template for Matrix
Copying a File Template for Matrix
Maintaining a File Template for Matrix
Deleting a File Template for Matrix
3.5.3.2.2.2 Proforma Planning
Proforma Document
Definition
A proforma document is a worksheet at a usage level that provides data to be reviewed and approved
before the data is posted to a matrix. Proformas provide a formal request process to change matrix
data. For example, proformas might be used to create either a Profit & Loss Statement for a promotional
spend or a commission schedule. Proformas can be used as profitability simulations, or for budgeting,
overall planning, account planning, promotion planning, incentive modeling, and accrual modeling.
Proforma documents can be created from the following transactions:
• Subset Workbench (/IRM/IPMXSM) You may flag a usage to create a proforma when loading data.
• Load Subset Usage Data (/IRM/IPMXSLOAD) To create a proforma, select the proforma type used to perform the load.
• Planning Grid • Upload Subset Data (/IRM/IPMXSUPL)
To create a proforma, specify the Proforma Type in the upload parameters. Planning data can be saved as a proforma.
• Proforma tab in the agreement/agreement request/program/master request/calculation run Used to create a proforma and to view a list of proformas created from the transaction.
The layout of the proforma document is user-defined and may include such data as the following:
• net price customer will pay for the product - by customer, by product • committed volume per time period

Business Register
SAP Data Maintenance by Vistex, Pricing option for SAP S/4HANA by Vistex for SAP S/4HANA
Application Help – Version: 1.0 – Final
December 12, 2019
© 2019 Vistex, Inc. All Rights Reserved.
© 2019 SAP SE or an SAP affiliate company. All rights reserved.
• calculated revenue • anticipated rebate percentage or amount • total cost • margin / net profitability
Proforma values can be pulled in from price simulation, matrix/BI data, rules, tracking, calculation runs,
and business script calculations.
Any existing proforma document can be viewed in the Proforma Workbench. Use the workbench to post
the data to the matrix after the proforma is approved.
Additional Functionality
Based on configuration, the following functions can be activated:
• Recreate A Recreate button can be enabled on the Proforma tab, based on the proforma profile.
• Refresh A Refresh button can be enabled on the Proforma tab, based on the proforma profile.
• Pushback (Write back) When a proforma is changed, the data can be pushed back to the source document. Based on proforma profile key figure mapping configuration, the source document can be updated either when the proforma is saved or when it is posted.
Setup
Prior to creating proformas, the proforma type and price simulation type need to be defined in
configuration. Also, create mapping profiles, as needed.
Proforma Type
The proforma type controls the proforma document number range and status profile. A proforma type
is assigned to the proforma profile.
Price Simulation Type (Optional)
Price simulation types, defined in Data Maintenance Pricing configuration, control the price simulation
document number range and tab sequence.
Mapping Profile
Use the Mapping Profile Workbench (/IRM/IPMXMPM) to create mapping profiles. Each mapping profile
specifies the matrix/subset/usage to be used, as well as the proforma type (mandatory) and description.
The remaining fields differ, depending on the proforma model. The profile is assigned one of the
following models:
• 1, rule-based Source is a rules-based document, such as an agreement/direct agreement, agreement request/direct agreement request, deal, deal request, campaign, or master request. A mapping profile is assigned to the document type (agreement type, for example). Multiple mapping profiles can be assigned to the document type.

1909 Pricing Documentation
Map the matrix characteristics to the rule fields. A characteristic can be mapped from multiple sources, as needed. For example, a material can be mapped from multiple rule sheets. One characteristic can be flagged as the validity anchor to base selection on that characteristic's validity dates. At the key figure level, you can configure the system to push data from the proforma to the key figures either on save or on post.
• 2, tracking Used to analyze composite tracking data. Source is the calculation run. A deployment code and version are assigned to the proforma profile. Map both components (participant level) and subcomponents. Validity dates are proposed when the proforma is created.
• 3, simulation Source is the price simulation document. Map the matrix characteristics to the price simulation document fields. The proforma is created in the price simulation, using the simulation line items.
• 4, prices model Source is the price proposal document. Map the price sheets used for price proposals. The proforma is created in the Price Proposal Workbench, using the price sheets maintained in the price proposal.
• 5, planning document Used to post planning document data to the matrix. In the Subset Workbench (/IRM/IPMXSM), on the Planning Document Types tab in Usages list the Document Type and Mapping Profile. During posting, the system first checks for this configuration; if blank, posts to the matrix/subset/usage of the planning document. Configuration allows you to post to different matrices/subset/usages, based on the mapping profile.
In the key figures mapping configuration, a flag can be set to use the source (currency/quantity) unit in
the proforma (no conversion is done). If the flag is not enabled, the amounts are converted to the unit
from the usage level reference key figure field. In the key figures conditions configuration, you may use
the Value field to specify one fixed value, instead of entering a matrix characteristic.
Based on mapping, the system sends data to the price simulation engine to calculate pricing based on
document validity dates and subset periods.
Mapping Profile Workbench
Definition
The Mapping Profile Workbench increases flexibility when posting by allowing you to post to different
matrices and usages. Use this workbench to retrieve data from the following sources:
• rules To retrieve rules data from price sheets in agreements, agreement requests, master requests, direct agreements, and direct agreement requests. (In Pricing, deals and deal requests also can
Business Register
SAP Data Maintenance by Vistex, Pricing option for SAP S/4HANA by Vistex for SAP S/4HANA
Application Help – Version: 1.0 – Final
December 12, 2019
© 2019 Vistex, Inc. All Rights Reserved.
© 2019 SAP SE or an SAP affiliate company. All rights reserved.
be data sources.) Data can be moved back to the rules from the proforma, creating new records on the price sheet.
• calculation run/tracking • price simulation • price proposal • planning document
Used to post planning document data to the matrix. In the Subset Workbench (/IRM/IPMXSM), on the Planning Document Types tab in Usages list the Document Type and Mapping Profile. During posting, the system first checks for this configuration; if blank, posts to the matrix/subset/usage of the planning document. Configuration allows you to post to different matrices/subset/usages, based on the mapping profile.
Access
Transaction code: /IRM/IPMXMPM
Structure
The Mapping Profile Workbench screen is organized into the following areas:
• Search and Worklist Use the Search and Worklist to view information for a selected mapping profile in a grid format. From the grid, click on a mapping profile name to display that mapping profile in focus in the Work Area.
• Work Area Use the Work Area to maintain one mapping profile. In the standard Vistex implementation, the Work Area contains the following tabs: • Source, to list and map the source fields
Multiple entries are allowed for a key figure. The system searches the sources in sequence; when a hit is found the search will end.
• Simulation, to map all required price simulation fields.
• Targets, to post the proforma data to specific price sheets (if Rules is the target type) or matrices (if Matrix is the target type). Click on the Propose Targets button to propose price sheets/matrices from the source mapping.
• Admin Data
Proforma
Documentation for proforma documents is available for the following screen formats:
• UI Application (SAP Fiori) • SAP GUI (Web Dynpro Grid)

1909 Pricing Documentation
3.5.3.2.3 Tracking
3.5.3.2.3.1 Individual Tracking
Documentation for individual tracking is available for the following screen formats:
• UI Application (SAP Fiori) • SAP GUI
3.5.3.2.3.2 Participant Tracking
Definition
Use the Participant Tracking transaction to simultaneously track data for a participant across multiple
plans.
Access
Transaction code: /IRM/IPBRCPP
Structure
The screen is organized into the following areas:
• Selection Fields • Participant Tracking Data, which displays data for the participant across all plans that include the
participant. Procedure
Tracking Participant Information

Business Register
SAP Data Maintenance by Vistex, Pricing option for SAP S/4HANA by Vistex for SAP S/4HANA
Application Help – Version: 1.0 – Final
December 12, 2019
© 2019 Vistex, Inc. All Rights Reserved.
© 2019 SAP SE or an SAP affiliate company. All rights reserved.
3.5.3.2.3.3 Tracking Screen Features
Info Key Figures
Definition
Info key figures allow you to view additional information about tracking screen fields on demand. The
information appears in a pop-up that is accessed from either a hot key or an icon next to the tracking
screen field.
This functionality is enhancement class based. Vistex delivers the enhancement class
/IRM/CL_IPCI_SCALES_DISPLAY to display scales ($ or %) in a pop-up. Using the sample enhancement
class as a guide, you can define your own enhancement class to view other information, such as
materials in a material group, from a field on the tracking screen.
Setup
To use an info key figure:
• define an info key figure and assign it to your Current Period (CPD)/Period-to-Date (PTD) structures. In the component formula, tie the info key figure to an attribute lookup for a condition record number. The system uses the condition record number when the icon or hot key is clicked on the tracking screen.
• in the Screen Layout Parameters configuration for deployment codes, use the Assign Component Key Figures tab to assign the Tracking Info Key Figure (that provides the data) to the Tracking Key Figure (that displays the data). Assign the enhancement class, and if using an icon, specify the icon.
Interactive Tracking
Definition
Any tracking key figure on the individual tracking screen can be designated as editable, allowing you to
perform "what-if" calculations on the fly. Editable fields, which appear as textboxes, can appear at the
group level and the subcomponent level.
Enter a new temporary amount in an editable field and press ENTER. In the application toolbar, click on
the Simulate Tracking button to have the system recalculate other field values based on the edited
field value. To reset the data back to the original values, click on the Reset Simulation button.
1909 Pricing Documentation
Since the layout controls whether the fields are editable, you may create multiple layouts and assign
them to the deployment code/version. On the tracking screen, click on the Layout button to select a
layout from the dropdown list of available layouts. Authorizations can be set for layouts.
Configuration
For editable fields at the group level, perform the following Composite configuration:
• Set the Editable flag for the Assigned Tracking Key Figure in the Deployment Code & Versions configuration.
• In Layout configuration, assign the tracking key figure group that contains the editable key figure field to the layout.
For editable fields at the subcomponent level, perform the following Composite configuration:
• Assign the subcomponent tracking key figures to the layout. • Set the Editable flag for the affected key figures.
Trace Log
Definition
You may create a trace log to view how the tracking result was derived, including postings, formula
steps, participation sources, component and subcomponent information, and mapping. Use this log
when testing that your data is being mapped in correctly or when performing "what-if" analysis, to see
how the different pieces of information came into the tracking screen.
NOTE: All sources for mapping data can be viewed in the trace, including calculation buckets, matrix,
evaluations, and mapping from the General Ledger.
To activate the trace log function, click on the Activate Trace button before executing tracking. After
executing, click on the Log button to view the trace log.

Business Register
SAP Data Maintenance by Vistex, Pricing option for SAP S/4HANA by Vistex for SAP S/4HANA
Application Help – Version: 1.0 – Final
December 12, 2019
© 2019 Vistex, Inc. All Rights Reserved.
© 2019 SAP SE or an SAP affiliate company. All rights reserved.
The trace log sample above illustrates a Period to Date Component Formula created using Business
Script. The log includes the following :
• Before Formula: values that existed prior to the formula being applied
• Component Calculation Formula: icon is a link to the trace log containing the formula steps. Click on each step to view the results for that step. If more than one value was calculated for a step, click on the icon in the Value column to display the values. NOTE: If using Formula Builder instead of Business Script, the formula steps and values appear in a grid on the trace log screen.
• Component Result: values determined after the formula was applied
3.5.3.2.3.4 Flexible Periods
Flexible Periods Overview
1909 Pricing Documentation
Definition
Various levels of flexibility can be incorporated in the posting periods used for composite deployment
codes in agreements, agreement requests, and participant assignment. Posting periods can be defined,
based on the any of the following:
• standard year, with 12 posting periods defined as January-December • year that contains non-standard periods, such as 4 quarterly posting periods during the year • non-standard year, such as a financial year that runs from April 1 of one year to March 31 of the
following year • multiple years, with periods of varying lengths, such as a 2-year plan when each positing period
in the first year is 4 months and each period in the second year is 6 months (called a Period Set) Global posting periods can be defined and maintained in the Period Profile Workbench (/IRM/GFPM), and
then assigned to an agreement, agreement request, or group of participants. Or, if needed, an
agreement-specific, request-specific, or participant-specific period profile can be created on-the-fly.
These period profiles replace the need for fiscal period variants.
Agreements
In the agreement or agreement request, if the Periods tab is configured to appear for an agreement
type (or agreement request type), the contract staff may either assign a global period profile or create a
period profile. These time periods will be used to filter the transactions to be used in the calculation of
pricing or incentives.
NOTE: Any changes to periods in the agreement request will be reflected in the agreement when the
request is posted.
Participants
In the Participation Workbench, the Participant Assignment Details dialog window contains a Period Profile
tab. You can assign a global period profile to selected participants that use the same start and end date,
or create participant-specific periods to use different dates for each participant.
NOTE: If using the Auto Add feature to create participants from the Agreement Workbench, the ability
to maintain periods is not supported.
Tracking
In Individual Tracking and Participant Tracking, first select the participant to be tracked. When you press
ENTER, the system populates the list of available posting periods from which to select the period to
track.
Period Profile Workbench
Definition

Business Register
SAP Data Maintenance by Vistex, Pricing option for SAP S/4HANA by Vistex for SAP S/4HANA
Application Help – Version: 1.0 – Final
December 12, 2019
© 2019 Vistex, Inc. All Rights Reserved.
© 2019 SAP SE or an SAP affiliate company. All rights reserved.
Use the Period Profile Workbench to create, activate, and maintain global period profiles, which can be
assigned to individual or groups of participants, as well as to agreements and agreement requests.
After you create a period profile, use the Review tab to view periods within a given time period, to make
sure the periods are correctly defined.
NOTE: Only active period profiles are available in the F4 listing in participation, an agreement or an
agreement request.
Access
Transaction code: /IRM/GFPM
Structure
The Period Profile Workbench screen is organized into the following areas:
• Search and Worklist Use the Search and Worklist to view selected period profiles in a grid format. From the grid, click on period profile number to display that period profile in focus in the Work Area.
• Work Area Use the Work Area to maintain one period profile. In the standard Vistex implementation, the Work Area contains the following tabs: • Periods
• Review
• Admin Data
NOTE: Functions accessed from the menu bar apply only to the period profile displayed in focus in the
Work Area and do not apply to the data in the Search and Worklist.
Procedures
Displaying a Period Profile
Creating a Period Profile
Copying a Period Profile
Activating/Deactivating a Period Profile
Maintaining a Period Profile
Deleting a Period Profile
Reviewing a List of Periods
Assigning a Period Profile to a Composite Agreement
Assigning a Period Profile to a Composite Agreement Request
Assigning a Period Profile to Participants

1909 Pricing Documentation
3.5.3.2.4 Accrual and Settlement
3.5.3.2.4.1 Composite Accrual and Settlement
Definition
Accrual is a process that involves financial postings against an expense account and a clearing account.
During accrual, there is no physical transfer of funds between the accounts. The accrual process helps
the company to predetermine what its financial position will be after the expenses of a plan have been
processed.
In the Composite model, accrual and settlement take place at the participant level rather than at the
document level. Accrual and settlement can be initiated manually or run automatically based on the
settlement calendar assigned to either the deployment code or the participant.
Accounting Levels
Based on deployment code version configuration, financial accounting for composite plans can be done
at the following levels:
• subcomponent Accounts for the entire amount as it relates to each subcomponent, such as brand or material group, to retain tracking of the amount for each subcomponent.
• bucket line item Use of a summarization profile is recommended.
• deployment code (not recommended) Full amount is accrued and settled. No profitability analysis is available.
Examples
Period-to-Date (PTD) Plan
If a plan is set up as a Period-to-Date (PTD) plan, then all data depends on the cumulative totals of all
previous periods. This example covers three months:
• Month 1, the administrator accrues $1,000 for that month. The participant, who is owed 50% of his commission after settlement, is paid a sales incentive amount of $500.
• Month 2, the administrator accrues a new amount of $1,200. The system reverse accrues the amount from the previous month ($1,000). Since the employee was paid for the first month, he receives, per the agreement, 50% of the remaining amount. The final amount for second month is $100.
• Month 3, the administrator accrues $1,500. The system reverse accrues the previous amount of $1,200. Before settlement, the manager pays $50 earlier than the scheduled payment date. The settlement amount is $300 but per the agreement, the final payment is 50% of that amount, or $150. Since the employee has already received $50 as interim settlement, the final payout amount is $100.

Business Register
SAP Data Maintenance by Vistex, Pricing option for SAP S/4HANA by Vistex for SAP S/4HANA
Application Help – Version: 1.0 – Final
December 12, 2019
© 2019 Vistex, Inc. All Rights Reserved.
© 2019 SAP SE or an SAP affiliate company. All rights reserved.
Month Accrual Reverse Accrual Settlement
Month 1 $1000 $500
Month 2 $1200 -$1000 $100
Month 3 $1500 -$1200 $100
NOTE: When settlement occurs, the Business Script Editor/Formula Builder looks at the agreement and
pulls the information before calculation.
Current Period (CPD) Plan
If a plan is set up as a Current Period (CPD) plan, then all data depends on the totals of the current
period. In this example, the participant receives all the incentives due at the end of the period and no
amounts are carried forward to the next period. The Current Period Plan is on a month-to-month accrual
and settlement basis. Each month the plan will accrue and settle without any reverse accrual for
previous months.
Month Accrual Settlement
Month 1 $100 $100
Month 2 $80 $80
Month 3 $70 $70
3.5.3.2.4.2 Composite Accrual and Settlement
Processing
Definition
Composite accrual and settlement processing can be performed using one of the following:
• Calculation Run Workbench • Create Calculation Run, to create and accrue the calculation run at the same time • Calculation Run Mass Processing
After processing, the postings can be viewed in Individual Tracking.
Calculation Run
1909 Pricing Documentation
If approvals are required before accrual and settlement, create a Calculation Run. Two levels of
approvals are available:
• Approval code can be entered in the Calculation Run transaction. • Status profile can be assigned to calculation runs if more complex approvals are needed.
The approving authority can use the Calculation Run Workbench to view the calculation run and enter
an approval code. Accrual and settlement then can be carried out from the workbench or through mass
processing.
Mass Processing
Two mass processing transactions are available: Mass Processing (/IRM/IPCMP) and Mass Processing of
a Calculation Run (/IRM/IPBRPCRPMP). These transactions run if the Calculation Run has been approved
or if no approval is necessary. Either transaction can be carried out online or in the background:
• Online processing If the document processing is done online, then the results will be displayed in a pop-up window.
• Background processing Processing programs can be set up to run in background mode using variants. The system captures certain messages, as selected by the user, while the task is processed. The message log is saved to the database for further analysis.
Procedures
Performing Accrual/Settlement on a Calculation Run
Performing Mass Processing
Performing Mass Processing of a Calculation Run
3.5.3.2.4.3 Calculation Run
Calculation Run Overview
Definition
A calculation run is a snapshot of the eligible accrual and/or settlement values. Calculation runs can be
used for the following purposes:
• Review and approve accrual/settlement values for specific participants before the postings take place. Since approval status is tracked at the calculation run header level, the whole calculation run document is either approved or not. The process can be manual or can be automated by using the batch program to create the calculation runs, which are sent through an automated approval process using SAP Workflow or
Business Register
SAP Data Maintenance by Vistex, Pricing option for SAP S/4HANA by Vistex for SAP S/4HANA
Application Help – Version: 1.0 – Final
December 12, 2019
© 2019 Vistex, Inc. All Rights Reserved.
© 2019 SAP SE or an SAP affiliate company. All rights reserved.
Vistex Status Flow. When approved, the calculation runs are accrued and settled using a batch program.
• Validate settlement values with external partners to ensure they are in agreement with the claim amounts. Any discrepancies can be reconciled prior to settlement postings.
• For composite, capture and report line item detail for applicable accruals/settlements (if accounting done at the calculation line item level).
Transaction Codes - Composite Calculation Runs
Transaction codes used to create and process composite calculation runs:
• Create Composite Calculation Run /IRM/IPBRPCRCMP, batch program used to create and save calculation runs. Check the Individual Calculation Run checkbox to create a separate calculation run for each participant. Based on the participant type selected, the corresponding participant field becomes editable, to directly enter participants for the calculation run. Also, based on configuration the following posting functions can be executed when the calculation run is created: accrual, interim settlement, and settlement.
• Mass Processing of Composite Calculation Run /IRM/IPBRPCRPMP, batch program used to perform a specific function (accrual, settlement, settlement adjustment, posting, create claim, create proforma) for selected composite calculation runs.
• Composite Calculation Run /IRM/IPBRPCRM, used to create a composite calculation run that can be reviewed before it is saved, or to review calculation runs created using other transaction codes.
Often, multiple batch programs are run for multiple deployment codes, in an attempt to create
calculation runs at the right time. The following checks are performed by the Create Calculation Run
batch job to help prevent unwanted calculation runs:
• Evaluation date (posting date, usually end of month) selection screen parameter If the Calculation Run type is set up for accrual and/or settlement, the system checks whether the Evaluation date is in the accrual/settlement calendar, to determine whether the calculation run should be created.
• Participant date, to determine whether the participant should be considered • Deployment code effective date • In configuration for the deployment code calculation run type, a flag can be checked to prevent
duplicate calculation runs. The system checks for duplicates by deployment code / version / calculation run type / period / participant.
Transaction Codes - Transactional Calculation Runs
Transaction codes used to create and process transactional calculation runs:
• Calculation Run Data Model /IRM/IPTTCM, to define the calculation run by application, including what data will be stored.
• Mass Processing of Transactional Calculation Run /IRM/IPTTPMP, batch program used to perform a specific function (accrual, settlement, reverse accrual, reverse settlement, and deletion) for selected transactional calculation runs.
• Transactional Calculation Run /IRM/IPTTM, used to create a transactional calculation run. Configuration

1909 Pricing Documentation
A calculation run is assigned a configured calculation run type. Separate configuration exists for
transactional calculation run types and composite calculation run types.
Transactional Calculation Run Type
For transactional processing, the calculation run type controls the number range, period profile, status
profile, and posting date.
Composite Calculation Run Type
For composite, he calculation run is assigned a configured calculation run type that controls the
following:
• relevant posting types for the calculation run • what tabs will appear in the calculation run Work Area • name of the status profile used for approvals. If different approval processes are required for
each function (such as accrual and settlement), a calculation run type can be defined specifically for a function.
• name of each evaluation type (see the Evaluation Overview for more information) • which Calculation Run logs will appear, to view the system messages created when functions are
performed on a calculation run. For composite, the calculation run type must be attached to the deployment code.
The evaluation anchor indicates whether tracking should be based on the evaluation period or
evaluation date. A default evaluation anchor can be assigned at the deployment code/calculation run
type level, but can be overridden when the calculation run is created.
The following options are available:
• Provide period then participant The evaluation period is entered first. Based on that period, the participant will be fetched and tracked.
• Provide participant then period The participant is entered first. Periods maintained for the participant based on the period profile will appear in the Period field dropdown list. After the period is selected, tracking will be performed. To use this option, the Periodicity must be F (Flexible Periods) in the deployment code period parameters configuration.
• Provide evaluation date then participant The evaluation date is entered first. The system determines the period in which the evaluation date falls and will track the participant for that period.
• Provide evaluation date as end date The evaluation date entered will be considered as the evaluation end date rather than the period end date in which the evaluation date falls.
Calculation Run
Documentation for calculation runs is available for the following screen formats:
Business Register
SAP Data Maintenance by Vistex, Pricing option for SAP S/4HANA by Vistex for SAP S/4HANA
Application Help – Version: 1.0 – Final
December 12, 2019
© 2019 Vistex, Inc. All Rights Reserved.
© 2019 SAP SE or an SAP affiliate company. All rights reserved.
• UI Application (SAP Fiori) • SAP GUI
3.5.3.2.5 Utilities
3.5.3.2.5.1 Composite Correspondence Trigger
Event
Definition
IP Correspondence refers to the mode of communication used to communicate with the partner. The
decision made by the system for the kind of correspondence to be used is triggered by a particular event
taking place.
Access
Transaction code: /IRM/0IPG26
Structure
The fields used to maintain the events are:
Field Description
IP Doc. Category Function for which correspondence is sent to the participant. Use the dropdown to select the document category.
Deployment Code Plan that the correspondence is about.
IP Type Application for which correspondence is being used.
Participant Role Type of partner involved in the process.
IP Participant Used to specify a particular partner for the process. If all partners of the type specified in the Participant Role field are to be selected, enter an asterisk (*) in this field.
Correspondence Type of correspondence to be used when all the above criteria are met.
Medium Message transmission medium. Output may be printed, faxed, or sent by other means, such as electronic mail or Electronic Data Interchange (EDI).
1909 Pricing Documentation
3.5.3.2.5.2 Composite Message Log Display
Mass processing can be carried out online or in the background:
• Online processing If the document processing is done online, then the results will be displayed in a pop-up window.
• Background processing Processing programs can be set up to run in background mode using variants. The system captures certain messages, as selected by the user, while the task is processed. The message log is saved to the database for further analysis.
To locate the message log number, access the SAP transaction Simple Job Selection (SM37). Enter the
selection criteria and execute to display the overview of all the jobs that satisfy the search criteria.
Check the job for which message log number is required and then click on the Job Log button. One of
the entries in the job log specifies the message log number.
To view the message log, use the transaction /IRM/IPCILOG. Enter the message log number, if known, or
else enter other search criteria and click on the Execute button to display the message logs that
match the search criteria. To view a particular Message Log, double click on the log.
3.6 Business Register Reporting and Analytics
3.6.1 Reporting and Analytics Overview
3.6.1.1 Definition
The Vistex advanced analytics tool provides one place to have visibility to results from multiple systems.
Data can be captured from your Vistex system, BI/BW, external databases, and paid data collection
agencies, then replicated to the analytics system and stored locally. Imported data can be cleaned,

Business Register
SAP Data Maintenance by Vistex, Pricing option for SAP S/4HANA by Vistex for SAP S/4HANA
Application Help – Version: 1.0 – Final
December 12, 2019
© 2019 Vistex, Inc. All Rights Reserved.
© 2019 SAP SE or an SAP affiliate company. All rights reserved.
validated, enriched, and manipulated, based on user-defined rules. The resulting data is presented as a
data set, which in Vistex is called a "report". Each report contains the aggregated data, which can be
given to a reporting application content creator to design how the data will be presented visually for the
end user to explore.
Vistex data also can be included in reports created using the following:
• Business Intelligence/Business Warehouse Vistex delivers extractors, cubes, and content for SAP BW.
• Crystal reports Native integration within Vistex for formatted visualization.
• SAP BusinessObjects Explorer, SAP BusinessObjects Cloud, SAP BusinessObjects Lumira
3.6.1.2 Analytics Content Access Points
Analytics content can be accessed from the following:
• Embedded analytics in Fiori Contextual analytics can be accessed from Vistex Fiori transactions, such as tracking.
• Dashboards Data from combined sources can be accessed from dashboards in Vistex Fiori transactions.
• Statements Designed using the Vistex Statement Designer in Fiori. (The design tool in Fiori also is used to create agreement clauses and templates.)
3.6.1.2.1 VIZI Statements
Vistex statements are used to create printable partner or employee statements for a specific period.
Statement setup includes the following:
• Configuration The Statements node in /IRM/IPSPRO provides configuration to define content repositories for statement content and images, and then assign a repository to a statement type.
• Data sources Statement data sources are defined in the Data Source Workbench and the Report Workbench.
• Statement Workbench You can use the GUI Statement Workbench (/VIZI/STM) to assign data sources/context to the statement. Statement design is performed in the Fiori transaction, which is set up using the Statement Workbench UI Profile Workbench (/VTA/BSTUPM) and Search Profile Workbench (/VTA/BSTUSPM). The Sections and Pages tabs in the (GUI) Statement Workbench are populated from the Statement Designer. A Log tab (in both GUI and Fiori versions) tracks the generated

1909 Pricing Documentation
statement. In Fiori, use the Statement Designer (Layout tab in the Fiori version of the Statement Workbench) to format the statement. The Statement Designer provides drag and drop functionality to design and change the header, footer, and content areas on each page. Components of an area can include text, formatted addresses, tables, forms, bar codes, and images. A preview option is provided from both the Fiori and GUI versions of the workbench.
NOTE: Vistex statements can be published to VIBES.
3.6.1.3 Back-end Core Components
Following is a description of the Vistex analytics building blocks:
• Data Model A business logical collection of data areas, which defines the application for reporting. Each data area in the data model points to a table, and the data model specifies the relationship between the tables. When Vistex is the source system, data models used to pull data from the Vistex IP applications into reports are delivered in Vistex and can be inherited to the analytics system. If Vistex is not the source system, the data model must be built from scratch.
• Reporting Fields Fields used in a report can be imported from the data model or created, if needed. Each reporting field contains a description and the field's properties, which can be unique to the field or inherited from a user-defined field type.
• Entity (optional) Generated table that stores values for a group of related reporting fields, for example, customer address or other customer master data fields. Entities are used to avoid repeating data in each record of the results; the results instead point to the entity number.
• Description Store (optional) Text table used to store characteristic values for a key reporting field. Values can be stored by language, if needed.
• Data Sources Data can be fetched from source system tables, views, or data models; in an SAP source system, data also can be gathered from infoset and BEx queries and function modules. In addition, a data store can be used as the data source, rather than reading directly from the source system.
• Data Store Storage container for data aggregated from various data sources; acts like a table. Saves time by eliminating the need to collect data from the source system every time a report is generated. Data objects can be used to cleanse data imported from a file, before it is stored in a data store. Data stores can be updated from data objects and/or replication.
• Replication Automates the process of updating the data stores based on changes to source system data.
• Extract Subset of the results. The extracted report can be stored in one of the following application file formats: Excel, JSON, CSV, or QlikView (QVD, QVW).

Business Register
SAP Data Maintenance by Vistex, Pricing option for SAP S/4HANA by Vistex for SAP S/4HANA
Application Help – Version: 1.0 – Final
December 12, 2019
© 2019 Vistex, Inc. All Rights Reserved.
© 2019 SAP SE or an SAP affiliate company. All rights reserved.
3.6.1.4 Configuration and Setup
In Vistex, the Data Administrator performs configuration and setup to:
• Configure the General Settings and Basic Functions described below. • Import (or build) the data models. • Create the reporting fields, as needed. • Define the data stores where collected data will be stored. • Pull/import data from data sources.
Imported data can be cleansed using Data Objects before it is stored in the data store. • Create, execute, and save the reports.
NOTE: Additional configuration is required in SAP to define a logical system and create an RFC
connection.
3.6.1.4.1 Vistex Configuration
Configuration, accessed from the transaction /VIZI/SETUP, includes the following nodes:
• General Settings, which stores the user-defined number ranges for the analytics components, plus additional settings
• Data Objects, which contains activities for the data object functionality used by the analytics components
• Basic Functions, which contains activities used to define the following: • Domain, a categorization/label assigned to the source system, used to connect pieces of
configuration. Example domains: Vistex Claims, BI Data, Third Party Data
• Source System, to name and define the source system, including the category (SAP, eGTMS (Vistex), GTMS (Vistex in the cloud), or BI) and, for remote systems, the RFC (Remote Function Call) destination connection (maintained in SM59 in SAP).
• Field Group, logical collection of reporting fields
• Period Profile (optional), to define reporting periods to be used rather than entering date ranges for report data
• Report Type, a label used to describe a type of data extract and the file path for storing the report results. When you create a report, you assign it a report type.
3.6.1.4.2 Vistex Setup
The following setup transactions are accessed from the transaction /VIZI/SETUP:
1909 Pricing Documentation
• Data Model Workbench (/VIZI/DMM), used to build each non-delivered application. If Vistex is the source system, the data models are delivered. Use the Data Model Workbench to view a list of the data models delivered for a specific domain and source system, and then select the ones to be imported. When re-importing a data model previously imported, you can either overwrite the existing data model or specify a name for the new one. Data model specific fields can be created, and fields can be excluded from the import.
• Reporting Field Workbench (/VIZI/RFM), to define the characteristics and values of each field assigned to reports. • Description Store Workbench (/VIZI/DESTM), to define a storage location used to store the
description of characteristic values for a specific reporting (key) field. Descriptions can be captured from a source system (Update Mapping tab) or uploaded from a file (Upload button or use the transaction /VIZI/DESTUPL). Use the Data tab, as needed, to manually maintain the descriptions. When done, activate the store using the Activate button. Based on display controls in the report, descriptions from the description store may be displayed in the report.
• Data Source Workbench (/VIZI/DSM), to define the data sources used in the reports • Data Store Workbench (/VIZI/DSTM), to store aggregated data from various sources. Data can
be uploaded from a file into the data store, posted from data objects, or mapped from a source system using the replication process. In the workbench, define the data store on the Fields tab and then activate it to have the system generate the new data store. Anchor fields assigned to the data store can be individual reporting fields or entity reporting fields. To track how data is updated from the source system using the replication process, the Admin Data tab displays the name of the table that stores the links between the data store records and source documents, for the Data Model and Anchor Area specified in the Update Mapping tab.
• Replication Workbench (/VIZI/RPLM), to generate the tables and triggers used to update the data stores to include changes made in source system data.
• Report Workbench (/VIZI/REPM), to define selections for running a report, define the results to be analyzed, prepare the report based on a sequence of steps, map stored data fields to the result fields, and use business script to manipulate the field data, as needed.
Additional setup transactions can be accessed from the /VTA/ namespace:
• Data Objects, to cleanse (non-SAP, non-Vistex) data uploaded from an external system. Configure and activate the data model in Data Objects, then generate a file template from the data model version. Upload the file from the external system using transaction /VTA/BDOUPL. Process the uploaded data, using rules defined for the data model. After the uploaded object is cleansed, post it to a data store using the Create Subsequent Objects /VTA/BDOSOC transaction with Load Data Store as the Posting option. • Document Map for Data Stores (/VIZI/DSTDCM), to define how cleansed (source) data will be
mapped to data store (target) fields. For each field, indicate if the system should overwrite or accumulate the data store field value each time the data store is updated. In the Data Model Workbench, enter the document map name on the Postings tab for the cleansed version before posting data to the data store.
• Business Script, to create global formulas in the applications to manipulate data in a reporting field.
Business Register
SAP Data Maintenance by Vistex, Pricing option for SAP S/4HANA by Vistex for SAP S/4HANA
Application Help – Version: 1.0 – Final
December 12, 2019
© 2019 Vistex, Inc. All Rights Reserved.
© 2019 SAP SE or an SAP affiliate company. All rights reserved.
3.6.1.4.3 Additional Transactions
NOTE: Upload transactions require a file template.
• Execute Report /VIZI/RPUPL You can execute a report from either this transaction or the Report Workbench. Report execution can be scheduled as a background job. The new extract(s) can either overwrite the existing file(s), be appended to the existing file(s), or be stored separately.
• Upload Data Store /VIZI/DSTUPL NOTE: Requires a file template created in the Data Store File Template Workbench (/VIZI/DSTFTPM). Upload execution can be scheduled as a background job.
• Delta Load Data Store /VIZI/DST_LOAD You can execute the delta load for selected data stores/data models. Load execution can be scheduled as a background job.
• Upload Description Store /VIZI/DESTUPL NOTE: Requires a file template created in the Description Store File Template Workbench (/VIZI/DESTFTPM). You can perform the upload either from this transaction or from the Description Store Workbench (/VIZI/DESTM). Upload execution can be scheduled as a background job.
• Export Description Store /VIZI/DESTEXP Specify the file format for the export. You can perform the export either from this transaction or from the Description Store Workbench (/VIZI/DESTM). Export execution can be scheduled as a background job.
• Upload Entity /VIZI/ENUPL NOTE: Requires a file template created in the Entity File Template Workbench (/VIZI/ENFTPM). Upload execution can be scheduled as a background job.
• Upload Value Table /VIZI/VTUPL NOTE: Requires a file template. Upload execution can be scheduled as a background job.
• Load Description Store /VIZI/DESTLOAD Load execution can be scheduled as a background job.
• Load Value Table Master Data /VIZI/VT_LOAD Specify one or multiple replication data models. Load execution can be scheduled as a background job.
3.6.1.5 Report Consumption
The consumption layer takes the report results or extracts and consumes the data for end users to view.
Use the Dashboard Workbench (/VIZI/RAM) to create the following:
• reporting views, to produce charts and tiles that contain report data.
1909 Pricing Documentation
• dashboards, to create a tile-based user interface that provides links to the reporting views. Six tiles appear per page.
3.6.2 Business Register Reports
3.6.2.1 Process Management Reports
The following process management reports are provided:
• Price Type Trend Analysis, to compare a price type across periods • Price Type Compare, across price types for a given period • Unit Rebate Amount Detail • Nominal Sales, lists all sales for which prices are less than 10% of the WAC
3.6.2.2 Standard DDR Reports
The following standard reports are provided:
• Non-state Specific: • Monthly AMP
• Quarterly AMP, BP, NP, PP Price
• Quarterly NonFAMP
• Quarterly ASP Addendum A
• Annual NonFAMP
• DDR Drug Product
• State Specific: • Quarterly PA PACE (text and Excel file)
• Quarterly Maine AMP BP
• Quarterly Vermont AMP-BP-WAC
• Quarterly California AMP BP
• New York Epic Product
• Quarterly New York Epic Price

Business Register
SAP Data Maintenance by Vistex, Pricing option for SAP S/4HANA by Vistex for SAP S/4HANA
Application Help – Version: 1.0 – Final
December 12, 2019
© 2019 Vistex, Inc. All Rights Reserved.
© 2019 SAP SE or an SAP affiliate company. All rights reserved.
• Quarterly Texas Price File
• Annual New Mexico Submission File
3.6.2.3 Medicaid Reports
3.6.2.3.1 Reports
The following standard Medicaid reports can be configured as required:
• Medicaid Rebate Status • Unit Rebate Amount • Medicaid Dispute
3.6.2.3.2 Smart Forms
The following Smart forms are delivered with Business Register:
• Reconciliation of State Invoice (ROSI) - smart form /IRM/BR_ROSI_SF The invoice submitted by the manufacturer to the state agency. The report details the current quarter's rebates, by NDC.
• Prior Quarter Adjustment Statement (PQAS) - smart form /IRM/BR_PQAD_SF The statement used for reporting discrepancies found in the previous quarter.
3.6.3 Analytics Setup
1909 Pricing Documentation
3.6.3.1 Reporting Field Workbench
3.6.3.1.1 Definition
Output related fields used in a report can be imported from the data model or created in the Reporting
Fields Workbench. Each reporting field contains a description and the field's properties, which can be
unique to the field or inherited from a user-defined field type.
3.6.3.1.2 Access
Transaction code: /VIZI/RFM
3.6.3.1.3 Structure
The Reporting Fields Workbench is organized into three sections, each accessed from the vertical blue
menu in the left pane:
• Field Types • Reporting Fields • Value Table
Click on a section name in the menu to view that section. Each section consists of two areas:
• Search and Worklist Use the Search and Worklist to view selected data in a grid format. From the grid, click on a field type/field/value table name to display it in focus in the Work Area.
• Work Area Use the Work Area to maintain one field type/field/value table.
NOTE: Functions accessed from the menu bar apply only to the data displayed in focus in the Work Area
and do not apply to the data in the Search and Worklist.
3.6.3.1.3.1 Field Types (Optional)
Use the Field Types section of the workbench to create, maintain, and activate re-usable generic field
types. For example, you may need 20 fields that have the same technical characteristics, such as data
type and number of decimal places. You can create a custom field type, and then assign that field type
to multiple reporting fields; the field to field type relationship is the same as the field to data element
relationship. When creating a reporting field, if you do not assign a field type, the system will generate a
field type.
Business Register
SAP Data Maintenance by Vistex, Pricing option for SAP S/4HANA by Vistex for SAP S/4HANA
Application Help – Version: 1.0 – Final
December 12, 2019
© 2019 Vistex, Inc. All Rights Reserved.
© 2019 SAP SE or an SAP affiliate company. All rights reserved.
NOTE: After the field type is activated, the field type description and Details tab data cannot be
changed. After a field type is assigned to a field, that field type cannot be deleted.
3.6.3.1.3.2 Reporting Fields
In the Reporting Fields section you can create, create with reference, or import (to either create or
change existing) reporting fields for a specific domain/source system/source type. If importing, the
system assigns color codes to the fields
Creating Fields
When creating a reporting field, you enter a name and description, and then select a field group (from
configuration). Assign one of the following categories:
• 1 Characteristic, to define non-measurable fields, such as a character string or currency key • 2 Metric, to define measurable fields, for example, a currency field. • 3 Period, to assign a periodic representation, such as a date format or period format. • 4 Entity, a collection of fields, which acts as master data in reporting
On the General tab, select the Field Type option and enter an existing field type, or select the Data Type
option to enter technical characteristics for the field (the system will generate a non-reusable field type
from the field definition).
Importing Fields
When importing fields, you select the domain, source system, and source type. The system lists the
available fields, color coded to indicate whether the field already exists in the analytics system. For
example, certain fields already may have been imported from another source data model.
Fields can be created with a user-defined prefix or suffix added to the field name, if needed. Also, a field
to be imported can be flagged to include in a cross reference that tracks the object associated with the
field.
3.6.3.1.3.3 Value Table
The value range of a reporting field can be defined in a value table. The value table data is fetched from
a specified field in the source system, using one of two load types: Full Load or Delta Load. Use the
Simulate button to preview the list of values. If needed, descriptions of the characteristic values can be
stored in a text table called a "description store".

1909 Pricing Documentation
3.6.3.2 Data Source Workbench
3.6.3.2.1 Definition
Use the Data Source Workbench to define each data source from which data will be fetched for the
reports. The following data source types are available:
• Table or Multiple tables • View, HANA view, External view, Attribute view, Analytic view, or Calculation view; or CDS (core
data services) view if using HANA • InfoSet query, or BEx query if using Business Explorer to work with data in BW • Data model • Data store or Data store object • Function module • Report • From file • Cube • Central fields • BW fields • Procedure • AMDP
When you create a data source, enter a name and description. Use the configured lists to select a
domain and a source system. Specify a source types and add additional data, as needed, for that source
type. A data source also can be created by copying an existing data source. In Release 1909, ViZi can be
used as a data source for the source types listed above.
If additional business logic is needed to filter the data, use the Load Script field to create the business
script.
To view the data in the data source displayed in the Work Area, click on the Simulate button in the
application toolbar. Fields defined in the Selection tab can be used to filter the data included in the
simulation.
3.6.3.2.2 Access
Transaction code: /VIZI/DSM
Business Register
SAP Data Maintenance by Vistex, Pricing option for SAP S/4HANA by Vistex for SAP S/4HANA
Application Help – Version: 1.0 – Final
December 12, 2019
© 2019 Vistex, Inc. All Rights Reserved.
© 2019 SAP SE or an SAP affiliate company. All rights reserved.
3.6.3.2.3 Structure
The Data Source Workbench screen is organized into the following areas:
• Search and Worklist Use the Search and Worklist to view selected data sources in a grid format. From the grid, click on a data source name to display that data source in focus in the Work Area.
• Work Area Use the Work Area to maintain one data source. In the standard Vistex implementation, the Work Area contains the following tabs: • Mapping
From the Source Fields list, select and move fields to the mapping grid, which is used to map each source field to a reporting field. For each selected source field, the system will propose a reporting field that has similar properties. You can override the proposed reporting field, as needed. Use the arrow keys to sequence the fields.
• Selection (optional) Use this tab to define filters that will be applied when you perform a simulation.
• Variants
• Restriction
• Action
• Where-Used List List of reports that use the data source. Click on the report name to view that report.
• Admin Data Displays user ID and date/time when the data source was created and last changed.
3.6.3.3 Replication Workbench
3.6.3.3.1 Definition
Use the Replication Workbench to define and maintain the "replications" used to replicate source
system changes into the data stores. Each replication specifies the data areas (in a certain data model)
1909 Pricing Documentation
whose changes will be tracked and replicated. For example, in a Claims data model changes might be
tracked in the header and item data areas.
To create a replication, specify the data model and a description of the replication. On the Replication
tab, enter the data area(s) to be tracked. Activate the replication to have the system generate the tables
(in the /VGM/ namespace) and triggers needed to initiate the replication process. The generated tables
are:
• Source Change Pointer Updated by a trigger; a time stamped entry is added for each changed value.
• Replication Replica of the source table values; changes are copied to this table.
• Replication Log Stores the previous/old values when a change is made
• New Entries Log Stores key fields for inserted/new entries
3.6.3.3.1.1 Replication Process
When a change, addition, or deletion occurs in a data area in the source system, a trigger adds entries to
the Source Change Pointer file. On the Replication tab, the affected data area rows are highlighted in
yellow, indicating that data replication is needed. Click on the Replicate button (or select the Replicate
option from the Extras menu or schedule the replication program as a background job) to update the
replication tables from the data source. Then click on the Update Data Stores button (or select the
Update Data Stores option from the Extras menu, or schedule the update program as a background job)
to replicate (load) the changes to the data store. Changes made to the data store can be viewed from
the Data Stores tab.
NOTE: For delta replications (changes to existing values), only the delta values are recorded to the data
store. For example, if an existing claim amount is changed from $350 to $400, then only the $50 change
is recorded in the data store.
3.6.3.3.2 Access
Transaction code: /VIZI/RPLM
3.6.3.3.3 Structure
The Replication Workbench screen is organized into the following areas:
Business Register
SAP Data Maintenance by Vistex, Pricing option for SAP S/4HANA by Vistex for SAP S/4HANA
Application Help – Version: 1.0 – Final
December 12, 2019
© 2019 Vistex, Inc. All Rights Reserved.
© 2019 SAP SE or an SAP affiliate company. All rights reserved.
• Search and Worklist Use the Search and Worklist to view selected replications in a grid format. From the grid, click on a data model name to display that replication in focus in the Work Area.
• Work Area Use the Work Area to maintain one replication. In the standard Vistex implementation, the Work Area contains the following tabs: • Replication
Displays a list of data areas and the names of the replication tables for each data area. For each generated table, the number of records is displayed next to the table name. Click on the number to view detail for the entries.
• Data Stores Lists the changed data stores. Click on the number of records changed to view the detail for the changed records.
• Admin Data Displays user ID and date/time when the replication was created and last processed.
3.6.3.4 Report Workbench
3.6.3.4.1 Definition
In Vistex analytics, a "report" is a data extract rather than what the end user views in the reporting tool.
Each report is defined in the Report Workbench. Use this workbench to:
• prepare the report, building the sequence of nested steps used to manipulate/aggregate data from data sources
• define the layouts available for the report • map data source fields into result reporting fields • attach business scripts used to introduce logic within the manipulation of field values • simulate the results, using the Simulate button in the application toolbar, to test the report prior
to execution. Tracing can be activated for the simulation to provide detail for each step's output. • specify selections/filters used when running the report • execute the report, using the Execute button in the application toolbar. A selection screen is
used to specify the result/layout and choose the application format for the extract file. When you create a report, you enter a report name and description, assign a validity date range, and
select a report type from the configured list. Then use the Preparation tab to list the steps the system
will follow to fetch and aggregate the data from specific data sources.

1909 Pricing Documentation
Filters can be applied to the report data at various levels, to limit the data included in a report extract:
• data source level In the data source definition (Data Source Workbench) a business script can be applied at the header level to filter the source data.
• field level In the Preparation tab, click on the Operation field for a step to view the Change Operation for Step window. In the Results section, a business script can be entered from the After Merge Script field. In the Fields Mapping tab, a business script can be applied at the mapped field level.
• extract level In the Extract tab, a business script can be applied to the extracted data.
• report simulation/execution In the Selection tab, selection field values can be entered during report simulation and execution.
3.6.3.4.2 Access
Transaction code: /VIZI/REPM
3.6.3.4.3 Structure
The Report Workbench screen is organized into the following areas:
• Search and Worklist Use the Search and Worklist to view selected reports in a grid format. From the grid, click on a report name to display that report in focus in the Work Area.
• Work Area Use the Work Area to maintain one report. In the standard Vistex implementation, the Work Area contains the following tabs: • Selection (optional)
After completing the list of steps on the Preparation tab, you can list the selection fields (from the data sources on the Preparation tab) to be used to further filter/limit the data during report execution. For example, you might add an Employee ID field to run the report for one specific employee or add Validity Date fields to run the report only for a certain date range.
• Results For a report, multiple output layouts ("results") can be defined, each consisting of a sequenced list of reporting fields from various data sources. Results can be used as intermediate results used to prepare the main result. Each main result can be flagged for storage in a user-defined file path when you execute the report. The tab consists of two grids: Results and Result Fields. In the Results grid, click on the icon in the Results field to maintain the list of fields in the Result Fields grid; the result line is
Business Register
SAP Data Maintenance by Vistex, Pricing option for SAP S/4HANA by Vistex for SAP S/4HANA
Application Help – Version: 1.0 – Final
December 12, 2019
© 2019 Vistex, Inc. All Rights Reserved.
© 2019 SAP SE or an SAP affiliate company. All rights reserved.
highlighted in yellow when its corresponding Result Fields grid is displayed. In the Result Fields grid, use the buttons above the grid to: create a new reporting field in the Reporting Field Workbench, add fields from a selected data source, add mass fields, or delete selected fields. Use the arrow buttons to sequence the list. In the grid, use the Drilldown field to specify whether to provide functionality to drill down to a report, data source, data store, or value table. When you execute a report, you can specify a result, multiple results, or range of results to be executed and stored. If you do not specify a result on the execute selection screen, the system will export all results that are flagged for storage, in the file format(s) chosen on the execution selection screen. Report execution can be scheduled as a background job.
• Preparation List a sequence of steps to tell the system to read, merge (to merge two results into one), or exclude data in a specific data source. You can drill down from the data source name to view the data source. Click on the icon in the Origin field to specify the step type, input parameters, and selections (if any) for each step. Click on the icon in the Operation field to prepare the step results. To merge data from multiple data sources, in the Operation detail use a business script to indicate which data is being merged.
• Variants Variants can be created to set selections when executing a report.
• Log Lists the user ID, date/time, variant, and selections for each run.
• Admin Data Displays user ID and date/time when the report was created and last changed.
3.7 Business Register Extras
3.7.1 Automated Document Maintenance

1909 Pricing Documentation
3.7.1.1 Automated Document Maintenance (ADM)
3.7.1.1.1 Definition
Automated Document Maintenance (ADM) is used to selectively process certain documents that have
changed. Examples of changes that would warrant the use of ADM include repricing based on hierarchy
changes, repricing based on master data (customer, vendor, or material) changes, agreement rule
updates, membership changes, claim resubmissions based on price type changes, and reprocessing
calculation buckets.
The following ADM transaction codes, based on documents being processed, are provided:
• /IRM/GADM: sales orders, purchase orders, and billing documents • /IRM/IPGADM: claims, agreement rules, agreement requests, business registers, and agreement
territories and partners Runs can be executed online using these workbenches or in the background using the following separate
transaction codes:
• /IRM/GADMBG: for same documents as /IRM/GADM • /IRM/IPGADMBG: for same documents as /IRM/IPGADM
Run results can be viewed in separate transaction codes:
• For /IRM/GADM and /IRM/GADMBG, view the run results in Automated Data Run /IRM/GADR • For /IRM/IPGADM and /IRM/IPGADMBG, view the run results in Automated Data Run
/IRM/IPADR
3.7.1.1.2 Access
Transaction codes: /IRM/GADM or /IRM/IPGADM
NOTE: As both transaction codes’ structures and functionality are similar, only /IRM/IPGADM is
highlighted below, except where noted.
3.7.1.1.3 Structure
Automated Document Maintenance is organized into the following areas:
• Application Toolbar Use the toolbar to carry out tasks and view titles applicable to the claims in focus.
• Work Area Use the Work Area to maintain the claims in focus.

Business Register
SAP Data Maintenance by Vistex, Pricing option for SAP S/4HANA by Vistex for SAP S/4HANA
Application Help – Version: 1.0 – Final
December 12, 2019
© 2019 Vistex, Inc. All Rights Reserved.
© 2019 SAP SE or an SAP affiliate company. All rights reserved.
The following graphic displays the basic elements of the Automated Document Maintenance
screen. Please note that the graphic is not drawn to scale.
3.7.1.1.4 Procedures
Automated Document Maintenance provides much functionality and, as such, only select procedures
will be highlighted. However, knowing how one operation is executed will provide the user with the
knowledge to perform other operations.
Claim Repricing Based on an Index Profile
Claim Repricing Based on Customer Hierarchy
Claim Repricing Based on Vendor Hierarchy
Claim Repricing Based on IP Hierarchy
Claim Repricing Based on Price Types
Claim Repricing Based on Master Data Attributes
Resubmitting Claims
Adjusting Agreement Rules
Creating Agreement Requests
3.7.2 Approvals/Status Flow

1909 Pricing Documentation
3.7.2.1 Approvals
3.7.2.1.1 Definition
In Vistex, the approval process is based on a status profile that is created from an SAP status profile
(BC02) and then attached to the object type. The status profile contains a sequenced list of the user
statuses in the approval process.
Various options are available for setting up how notifications and recording approvals/rejections will be
performed, using a combination of manual and automated processes. The options include:
• Notification: • Manual
Notifications can be manual, regardless of the method chosen to record approvals.
• SAP Workflow Approvals can be tied into SAP Workflow.
• email Vistex Status Flow can be used to send automated notifications.
• Recording Approvals: • Manual
The Status tab in the object workbench can be used to set approvals manually. If using Status Flow, approvals also can be recorded in the activity workbench. NOTE: In composite processing of calculation runs, configured approval codes entered manually in the calculation run can be used with or without Status Flow.
• email Using Status Flow, the approval can be recorded from the notification email.
3.7.2.1.2 Status Flow
Status Flow, a less complex alternative to SAP Workflow, consists of a point-and-click user interface
designed to allow advanced business users to establish and maintain the most common workflow
processes without technical assistance from IT or outside resources. Status Flow provides the ability to:
• Design various types of status flows. The following status flows designs are available: • Sequential
One approval is required for each step.
• Parallel Multiple approvals can be required in one step.

Business Register
SAP Data Maintenance by Vistex, Pricing option for SAP S/4HANA by Vistex for SAP S/4HANA
Application Help – Version: 1.0 – Final
December 12, 2019
© 2019 Vistex, Inc. All Rights Reserved.
© 2019 SAP SE or an SAP affiliate company. All rights reserved.
• Conditional/automated Business Script is integrated into the status flow, and can be used to automate the flow or to conditionally change to another status flow, such as for an accelerated approval process.
• Create a picture of the entire status flow A graphic can be assigned to each step in the status flow, to preview a graphical representation of the entire status flow.
• Redirect the approval process from the standard flow to an alternate flow The Vistex status profile consists of a list of triggers, each of which starts a status flow. For example, the default trigger starts the standard flow, but a second trigger in the status profile can be set up to stop the current flow and start a rush/shortened flow. A different trigger can be started manually or started automatically based on a business script.
• Define re-usable templates to format the communication to be sent to the user The communication is based on application-related data, and can contain placeholders that are replaced with document data at runtime. In addition, the communication can contain links to additional information and/or buttons to record a response.
• Attach activities to status flow steps When the event in a step occurs, the system generates an activity document, which will be used to track communication and the progress of the process until an outcome for the activity is set.
• Send notifications or approval emails to various types of recipients Supported recipients include: user who changed a document (changed by), user who created a document (created by), organizational object, external person, SAP personnel number, partner function (for example a contact person attached to the sold-to on an agreement), or SAP user.
• Allow alternate responses Rather than setting an approval/rejection, the user can choose to hold, defer, or redirect the email. Comments can be added to the reply, as needed. For example, the email might be redirected to the sales representative asking that person to provide additional information.
3.7.2.1.3 Objects Supported
The following objects support using manual approvals or approvals that are tied into standard SAP
Workflow:
• Agreements • Agreement Requests • Programs • Campaigns • Templates • Clauses • Agreement Policies • Membership Submissions • Claims / Transactions • Calculation Runs • Matrices
1909 Pricing Documentation
• Matrix Documents • Territory Proposals • Master Requests • Business Partners • Price Policies • Price Proposals • Deals • Deal Requests • Deal Programs • Customer List, Material List, Vendor List
Status Flow is supported for the following objects:
• Agreements • Agreement Requests • Master Requests • Programs • Campaigns • Calculation Runs • Claims / Transactions • Deals • Deal Requests • Deal Programs • Price Proposals • Customer List, Material List, Vendor List
3.7.2.2 Status Flow Overview
3.7.2.2.1 Definition
Status Flow is a flexible approval process tool that can be managed by business users. Status Flow
provides the ability to:
• Create an approval process for creating or changing a Vistex object. • Set an approval either in the Status tab of the object workbench (such as Agreement
Workbench) or in an email. • Change the approval flow from one predefined path to another either based on preset triggers
or on-the-fly.
Business Register
SAP Data Maintenance by Vistex, Pricing option for SAP S/4HANA by Vistex for SAP S/4HANA
Application Help – Version: 1.0 – Final
December 12, 2019
© 2019 Vistex, Inc. All Rights Reserved.
© 2019 SAP SE or an SAP affiliate company. All rights reserved.
3.7.2.2.2 Processing Steps
1. The process begins when an object document requires approval.
For example, when an agreement is created it must be approved by a list of users in a
predefined sequence.
2. Default trigger starts the standard flow.
The connection between a Vistex object (such as an agreement type) and the status flow is the
Vistex status profile, which leverages the statuses defined in a standard SAP status profile. A
Vistex status profile consists of a list of triggers, each of which starts a status flow.
For example, the default trigger starts the standard flow, but a second trigger in the status
profile can be set up to stop the current flow and start a rush/shortened flow. A different trigger
can be started manually (when a person is on vacation, for example) or started automatically
based on a business script (for example, when the agreement amount is greater than a preset
limit).
3. Step one in the status flow sends a communication (such as an email) to the first person who
must approve the document. This communication may be a notification that the user should set
the approval in a workbench, or may include buttons to set the approval. The text, buttons, and
links are set up in a template assigned to the activity in the status flow step.
NOTE: The system can be set up to receive offline approvals from email recipients who have
access to email but not to the SAP system. The recipient replies by entering the button text
(such as Approve) in the first line of the reply email. The reply is sent automatically to the SAP
Business Workplace Inbox for the "Approvals" user. That user then runs a report to process the
offline approvals.
If needed, communications can be sent to multiple recipients, all of whom must approve the
document before it is sent to the next status flow step.
Supported types of recipients (processors) are: changed by, created by, organizational unit,
external person, SAP personnel number, partner function (for example a contact person
attached to the sold-to on an agreement), position, or SAP user.
4. If approved, the process continues to the processor(s) in the next step of the status flow.
Other outcomes assigned in the flow step will indicate what action will be performed. For
example, if rejected, a communication might be sent to the sales representative asking that
person to provide additional information. Or, the activity might be redirected to another
processor.
5. If set up, the system will generate an activity document for each step in the process to track
communication.
Activity documents for a specific time period, status, or type of activity can be viewed in a
workbench.

1909 Pricing Documentation
6. The process continues until the flow is complete.
The final step in the status flow might be to send a communication to the user who first created
the agreement.
3.7.2.2.3 Transactions
The following transactions are used to set up status flow:
• BS02 Create a standard SAP status profile. For each status, enter the Status and Short Text field values and flag one of the statuses as the Initial status. DO NOT make any entry for Status Number and the Highest and Lowest Status number fields. Set the transaction control for each status. Assign the appropriate Vistex object type to the status profile.
• Status Profile /IRM/GSPM Activate an existing SAP status profile for Vistex processing. Selection of an SAP status profile in this workbench flags the system to use Vistex status flow. The statuses from that SAP status profile will be used in the Vistex status profile and status flow (and appear in the Statuses tab). The SAP statuses can be renamed, if needed. NOTE: In configuration, assign the Vistex status profile to the object type Define and set one trigger as the default starting point, and define additional triggers, as needed. Assign a status flow to each trigger (can transfer directly to the Status Flow Workbench).
• Status Flow /IRM/GSFM Define the flow steps, and indicate which step is the starting (default) step. For each step, set the possible outcome(s), which identify the actions available to a user when the status flow step is reached as well as the next status flow step, based on the chosen outcome. Possible flow designs include the following: • Sequential
One approval is required for each step.
• Parallel Multiple concurrent approvals can be required in one step.
• Conditional Business script functionality is integrated into the status flow, and can be used to automate the flow or to conditionally switch to another trigger, such as for an accelerated approval process.
• Delegation Workbench /IRM/GDGM) When a processor will be unavailable, such as on vacation, their approvals can be delegated to another processor. Create the delegation, which lists the substitute processor(s), and assign it to the organizational unit for the substitute processor(s). If multiple processors are assigned, only one has to respond to the communication. The Delegation User Assignment (/IRM/GDGUA) transaction can be used to assign SAP users to existing delegations.
Business Register
SAP Data Maintenance by Vistex, Pricing option for SAP S/4HANA by Vistex for SAP S/4HANA
Application Help – Version: 1.0 – Final
December 12, 2019
© 2019 Vistex, Inc. All Rights Reserved.
© 2019 SAP SE or an SAP affiliate company. All rights reserved.
• Activity transactions: NOTE: Activity types, priority codes, and reason codes are defined in Activities configuration. • Activity Template (/IRM/GACTPM)
Define the templates to be used for activities in the flow steps and statuses at the outcome level. For example, design the email used to request an approval, including the text, buttons, attachments, and links. The text may include dynamic values, as needed. Approval is performed by clicking on a predefined button. Attachments and/or links can be used to provide additional information.
• Activities Activities are defined in the status flow. When an event occurs, the system creates an activity document to track the approval process. Use the Activity Workbench to view and maintain the activity documents.
• Activity Mass Process (/IRM/GACMP) Run this batch program to process activities that have been flagged as Set Auto Outcome, Send Reminder, or Redirect. NOTE: The same processing can be performed in the Activity Workbench, using mass processing.
• Activity Office Approvals (/IRM/GACOA) Offline approvals are used, for example, when the processor has no access to SAP. Run this report to process offline approvals by setting the outcome. Two options are available: Static (all) and Failed (only the failed approvals).
• Trigger Workbench (/IRM/GTRGM) Triggers are reminders to send an activity out on a given date
• Activity Date Type Process (/IRM/GACDP) Enter the information for the object and date type a trigger is assigned to. When you execute the transaction, the system sends out all the related activities.
3.7.2.3 Status Flow Workbench
3.7.2.3.1 Definition
Use the Status Flow Workbench to create and maintain the list of the steps (and their possible
outcomes) in a status flow. Outcomes define the next steps and activities triggered when the particular

1909 Pricing Documentation
step is reached. Status flows are assigned to triggers in a status profile that is assigned to an object type,
such as an agreement type or claim type.
The following status flows designs are available:
• Sequential One approval is required for each step.
• Parallel Multiple approvals can be required in one step.
• Conditional/automated Business Script functionality is integrated into the status flow, and can be used to automate the flow or to conditionally switch to another trigger, such as for an accelerated approval process.
A graphic can be assigned to each step in the status flow, to preview a graphical representation of the
entire status flow.
3.7.2.3.2 Access
Transaction code: /IRM/GSFM
Enter this transaction directly or from the Status Profile Workbench.
3.7.2.3.3 Structure
The Status Flow Workbench screen is organized into the following areas:
• Search and Worklist Use the Search and Worklist to view selected flows in a grid format. From the grid, click on a status flow identifier to display that flow in focus in the Work Area.
• Work Area Use the Work Area to maintain one status flow. In the standard Vistex implementation, the Work Area contains the following tabs: • Steps
• Preview, which displays a graphical representation of the flow (if Step Style is selected for each step).
• Statuses
• Script, which indicates whether or not a Step and/or Outcome business script exists. Step scripts are used to skip approval steps; Outcome scripts are used to select an outcome. Click
on the Create icon to create a script, Maintain icon to change the existing script, and
Delete icon to delete the existing script.
• Admin Data
Business Register
SAP Data Maintenance by Vistex, Pricing option for SAP S/4HANA by Vistex for SAP S/4HANA
Application Help – Version: 1.0 – Final
December 12, 2019
© 2019 Vistex, Inc. All Rights Reserved.
© 2019 SAP SE or an SAP affiliate company. All rights reserved.
NOTE: Functions accessed from the menu bar apply only to the status flow displayed in focus in the
Work Area and do not apply to the data in the Search and Worklist.
IMPORTANT: Because Vistex software is extremely versatile, the user screen may be customized. As a
result, the screen may appear different from the standard screen described in this document.
3.7.2.3.4 Procedures
Displaying a Status Flow
Creating a Status Flow
Copying a Status Flow
Maintaining a Status Flow
Deleting a Status Flow
3.7.2.4 Status Profile Workbench
3.7.2.4.1 Definition
Use the Status Profile Workbench to select an existing SAP status profile that will be attached to a new
Vistex status profile of the same name. Selection of an SAP status profile in this workbench flags the
system to use Vistex status flow.
The statuses from the SAP status profile will appear on the Statuses tab. If the SAP status profile was
assigned an object type in the following configuration, that object type appears in the header of this
workbench:
• For all objects except claims and transactions, the status profile is assigned in object type configuration.
• For claims and transactions, the status profile is assigned in Header Control for Sales Documents configuration.
The Vistex status profile contains a list of triggers, each of which starts the status flow it is linked to. For
example, you might attach one trigger to the standard flow and another trigger to an abbreviated flow.
As needed, an authorized user can manually change the trigger in the Status tab of the object
workbench to redirect the approval process from one flow to another. Business Script functionality also
can be used to change triggers conditionally.
1909 Pricing Documentation
Create any number of triggers and list them on the Flow tab. One trigger must be set as the default, and
all must be flagged as a User Entry. To attach a status flow to each trigger, either select from the list of
existing status flows or navigate to the Status Flow Workbench to create a new status flow.
3.7.2.4.2 Access
Transaction code: /IRM/GSPM
3.7.2.4.3 Structure
The Status Profile Workbench screen is organized into the following areas:
• Search and Worklist Use the Search and Worklist to view selected profiles in a grid format. From the grid, click on a status profile number to display that profile in focus in the Work Area.
• Work Area Use the Work Area to maintain one status profile. In the standard Vistex implementation, the Work Area contains the following tabs: • Flow
• Statuses
• Admin Data
NOTE: Functions accessed from the menu bar apply only to the status profile displayed in focus in the
Work Area and do not apply to the data in the Search and Worklist.
IMPORTANT: Because Vistex software is extremely versatile, the user screen may be customized. As a
result, the screen may appear different from the standard screen described in this document.
3.7.2.4.4 Procedures
Displaying a Status Profile
Creating a Status Profile
Maintaining a Status Profile
Deleting a Status Profile
Business Register
SAP Data Maintenance by Vistex, Pricing option for SAP S/4HANA by Vistex for SAP S/4HANA
Application Help – Version: 1.0 – Final
December 12, 2019
© 2019 Vistex, Inc. All Rights Reserved.
© 2019 SAP SE or an SAP affiliate company. All rights reserved.
3.7.2.5 Activity Workbench
Documentation for the Activity Workbench is available for the following screen formats:
• UI Application (SAP Fiori) • SAP GUI
3.7.2.6 Activity Template Workbench
3.7.2.6.1 Definition
Use the Activity Template Workbench to format the email to be sent to the user (processor) involved in
the processing. Content of the message is based on application-related data, and can contain
placeholders that are replaced with document data at runtime. In addition, links to additional
information and/or buttons to set an outcome can be added.
3.7.2.6.2 Access
Transaction code: /IRM/GACTPM
3.7.2.6.3 Structure
The Activity Template Workbench screen is organized into the following areas:
• Search and Worklist Use the Search and Worklist to view a list of selected activity templates in a grid format. From the grid, click on an activity template name to display that template in focus in the Work Area.
• Work Area Use the Work Area to maintain one activity template. In the standard Vistex implementation, the Work Area contains the following tabs: • Text
• Extended Data, appears if the Display Usage is General & Launchpad.

1909 Pricing Documentation
• Attachments
• Admin Data
NOTE: Functions accessed from the menu bar apply only to the activity template displayed in focus in
the Work Area and do not apply to the data in the Search and Worklist.
IMPORTANT: Because Vistex software is extremely versatile, the user screen may be customized. As a
result, the screen may appear different from the standard screen described in this document.
3.7.2.6.4 Procedures
Displaying an Activity Template
Creating an Activity Template
Copying an Activity Template
Maintaining an Activity Template
Deleting an Activity Template
3.7.2.7 Delegation Workbench
3.7.2.7.1 Definition
Use the Delegation Workbench to indicate the substitute processor(s) when the original processor is on
vacation or otherwise unavailable:
1. Create the delegation rule.
2. Assign the delegation rule to an organizational object or external person in the Access tab of the
organizational object or external person workbench. Specify the date range for the substitution.
If desired, indicate that a copy of the communications should be sent to the original processor.
NOTE: If multiple substitute processors are assigned, only one must respond for the status flow to
continue to the next step.
Emails will be sent using the email address from the Address tab of the organizational object/external
person.
To assign SAP users to existing delegation rules for a validity date range, use the Delegation User
Assignment (/IRM/GDGUA) transaction. Assignments can be filtered by user, delegation, or validity date
range.

Business Register
SAP Data Maintenance by Vistex, Pricing option for SAP S/4HANA by Vistex for SAP S/4HANA
Application Help – Version: 1.0 – Final
December 12, 2019
© 2019 Vistex, Inc. All Rights Reserved.
© 2019 SAP SE or an SAP affiliate company. All rights reserved.
3.7.2.7.2 Access
Transaction code: /IRM/GDGM
3.7.2.7.3 Structure
The Delegation Workbench screen is organized into the following areas:
• Search and Worklist Use the Search and Worklist to view selected delegations in a grid format. From the grid, click on a delegation name to display it in focus in the Work Area.
• Work Area Use the Work Area to maintain one delegation. In the standard Vistex implementation, the Work Area contains the following tabs: • Processors
• Admin Data
NOTE: Functions accessed from the menu bar apply only to the delegation displayed in focus in the
Work Area and do not apply to the data in the Search and Worklist.
IMPORTANT: Because Vistex software is extremely versatile, the user screen may be customized. As a
result, the screen may appear different from the standard screen described in this document.
3.7.2.7.4 Procedures
Displaying a Delegation
Creating a Delegation
Maintaining a Delegation
Copying a Delegation
Deleting a Delegation
Assigning a Delegation

1909 Pricing Documentation
3.7.2.8 Recipient List Workbench
3.7.2.8.1 Definition
Use the Recipient List Workbench to create a reusable list of recipients, which can be used in place of
entering multiple processors. Rather than entering the name of a processor, enter the name of the
recipient list as processor type RL.
NOTE: Using a recipient list can save processing time by having one record rather than multiple records.
The recipient list can be used for the following:
• User Statuses dialog window, accessed from the Steps tab in the Status Flow Workbench (/IRM/GSFM)
• Processors tab in the Recipient List Workbench (/IRM/GDGM)
3.7.2.8.2 Access
Transaction code: /IRM/GRCM
3.7.2.8.3 Structure
The Recipient List Workbench screen is organized into the following areas:
• Search and Worklist Use the Search and Worklist to view selected recipient lists in a grid format. From the grid, click on a list number to display that list in focus in the Work Area.
• Work Area Use the Work Area to maintain one recipient list. In the standard Vistex implementation, the Work Area contains the following tabs: • Processors
• Admin Data
NOTE: Functions accessed from the menu bar apply only to the list displayed in focus in the Work Area
and do not apply to the data in the Search and Worklist.
IMPORTANT: Because Vistex software is extremely versatile, the user screen may be customized. As a
result, the screen may appear different from the standard screen described in this document.
Business Register
SAP Data Maintenance by Vistex, Pricing option for SAP S/4HANA by Vistex for SAP S/4HANA
Application Help – Version: 1.0 – Final
December 12, 2019
© 2019 Vistex, Inc. All Rights Reserved.
© 2019 SAP SE or an SAP affiliate company. All rights reserved.
3.7.2.8.4 Procedures
Displaying a Recipient List
Creating a Recipient List
Maintaining a Recipient List
Copying a Recipient List
Deleting a Recipient List
3.7.2.9 Trigger Workbench
3.7.2.9.1 Definition
Triggers are reminders to send an activity out on a given date. Use the Trigger Workbench to create the
trigger. Then assign it to the corresponding object type in the Date Type configuration for the object.
To process the activities, access the transaction Activity Date Type Process (/IRM/GACDP). Enter the
information for the corresponding object and date type the trigger is assigned to. When you execute the
transaction, the system sends out all the related activities.
3.7.2.9.2 Access
Transaction code: /IRM/GTRGM
3.7.2.9.3 Structure
The Trigger Workbench screen is organized into the following areas:
• Search and Worklist Use the Search and Worklist to view a list of selected triggers in a grid format. From the grid, click on a trigger name to display that activity in focus in the Work Area.
• Work Area Use the Work Area to maintain one trigger. In the standard Vistex implementation, the Work Area contains the following tabs:

1909 Pricing Documentation
• Activities
• Admin Data
NOTE: Functions accessed from the menu bar apply only to the trigger displayed in focus in the Work
Area and do not apply to the data in the Search and Worklist.
IMPORTANT: Because Vistex software is extremely versatile, the user screen may be customized. As a
result, the screen may appear different from the standard screen described in this document.
3.7.2.9.4 Procedures
Displaying a Trigger
Creating a Trigger
Copying a Trigger
Maintaining a Trigger
Deleting a Trigger
3.7.2.10 Notifications
3.7.2.10.1 Notification Event Workbench
3.7.2.10.1.1 Definition
Notifications are messages sent to notify users that objects have been created or changed. A notification
event contains the criteria the system will use when sending the message.
Use the Notification Event Workbench to enter criteria for each event, including the Object Type,
Application, Notification Activity Type (configured), Activity Template, and the message medium. In
configuration, an activity type is categorized as a notification, which then can be used in a status flow or
on the Tile view of the Launchpad.
After creating notification events, assign them to a notification profile in the Notification Profile
Workbench (/IRM/GNFPM). Then assign the profile to SAP user IDs.
Business Register
SAP Data Maintenance by Vistex, Pricing option for SAP S/4HANA by Vistex for SAP S/4HANA
Application Help – Version: 1.0 – Final
December 12, 2019
© 2019 Vistex, Inc. All Rights Reserved.
© 2019 SAP SE or an SAP affiliate company. All rights reserved.
NOTE: After a notification event is created, a BAdI is required for the system to generate the messages
for the event.
3.7.2.10.1.2 Access
Transaction code: /IRM/GNFEM
3.7.2.10.1.3 Structure
The Notification Event screen is organized into the following areas:
• Search and Worklist Use the Search and Worklist to view selected notification events in a grid format. From the grid, click on a notification event name to display that display event in focus in the Work Area.
• Work Area Use the Work Area to maintain one notification event. In the standard Vistex implementation, the Work Area contains the following tabs: • General
• Qualifiers, to enter qualifiers (if configured)
• Admin Data
NOTE: Functions accessed from the menu bar apply only to the notification event displayed in focus in
the Work Area and do not apply to the data in the Search and Worklist.
IMPORTANT: Because Vistex software is extremely versatile, the user screen may be customized. As a
result, the screen may appear different from the standard screen described in this document.
3.7.2.10.1.4 Procedures
Displaying a Notification Event
Creating a Notification Event
Copying a Notification Event
Maintaining a Notification Event
Deleting a Notification Event

1909 Pricing Documentation
3.7.2.10.2 Notification Profile Workbench
3.7.2.10.2.1 Definition
A notification profile is a collection of notification events. The system uses the profile to determine
which notifications are sent to specific SAP user IDs.
Use the Notification Profile Workbench to create the notification profile. After a profile is created, SAP
user IDs can be assigned to the notification profile using one of the following:
• User Assignment button, to assign one SAP user ID at a time to a notification profile • Assign Notification Profile transaction /IRM/GNFPUA, to assign multiple SAP user IDs at the
same time to a notification profile Notification profiles also can be assigned to organizational objects using the Access tab in the
organizational object workbenches.
3.7.2.10.2.2 Access
Transaction code: /IRM/GNFPM
3.7.2.10.2.3 Structure
The Notification Profile screen is organized into the following areas:
• Search and Worklist Use the Search and Worklist to view selected notification profiles in a grid format. From the grid, click on a notification profile number to display that notification profile in focus in the Work Area.
• Work Area Use the Work Area to maintain one notification profile. In the standard Vistex implementation, the Work Area contains the following tabs: • Events
• Processors, to assign processors, if required
• Admin Data
NOTE: Functions accessed from the menu bar apply only to the notification profile displayed in focus in
the Work Area and do not apply to the data in the Search and Worklist.
IMPORTANT: Because Vistex software is extremely versatile, the user screen may be customized. As a
result, the screen may appear different from the standard screen described in this document.

Business Register
SAP Data Maintenance by Vistex, Pricing option for SAP S/4HANA by Vistex for SAP S/4HANA
Application Help – Version: 1.0 – Final
December 12, 2019
© 2019 Vistex, Inc. All Rights Reserved.
© 2019 SAP SE or an SAP affiliate company. All rights reserved.
3.7.2.10.2.4 Procedures
Displaying a Notification Profile
Creating a Notification Profile
Assigning a User to a Notification Profile
Copying a Notification Profile
Maintaining a Notification Profile
Deleting a Notification Profile
3.7.2.10.3 Assign Notification Profile
3.7.2.10.3.1 Definition
Use Assign Notification Profile to assign SAP user IDs to a notification profile.
Alternately, you can assign a single SAP user ID to a notification profile in the Notification Profile
Workbench.
3.7.2.10.3.2 Access
Transaction code: /IRM/GNFPM
3.7.2.10.3.3 Structure
Assign Notification Profile is organized into the following screens:
• Search Notification Profile User Assignment • User Assignment
Search User Assignment
When you launch Assign Notification Profile, the system displays the Search User Assignment screen,
which is used to locate existing assignments for a user, notification profile, and/or date range.
The search button is:
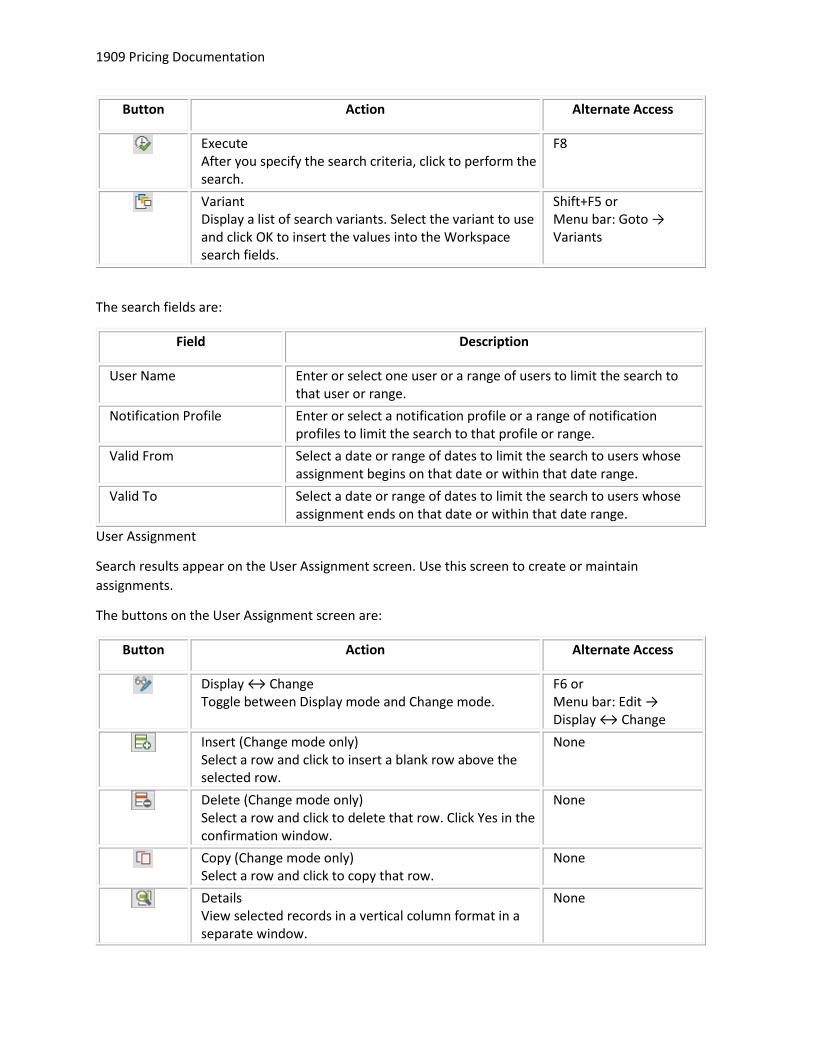
1909 Pricing Documentation
Button Action Alternate Access
Execute After you specify the search criteria, click to perform the search.
F8
Variant Display a list of search variants. Select the variant to use and click OK to insert the values into the Workspace search fields.
Shift+F5 or Menu bar: Goto → Variants
The search fields are:
Field Description
User Name Enter or select one user or a range of users to limit the search to that user or range.
Notification Profile Enter or select a notification profile or a range of notification profiles to limit the search to that profile or range.
Valid From Select a date or range of dates to limit the search to users whose assignment begins on that date or within that date range.
Valid To Select a date or range of dates to limit the search to users whose assignment ends on that date or within that date range.
User Assignment
Search results appear on the User Assignment screen. Use this screen to create or maintain
assignments.
The buttons on the User Assignment screen are:
Button Action Alternate Access
Display ↔ Change Toggle between Display mode and Change mode.
F6 or Menu bar: Edit → Display ↔ Change
Insert (Change mode only) Select a row and click to insert a blank row above the selected row.
None
Delete (Change mode only) Select a row and click to delete that row. Click Yes in the confirmation window.
None
Copy (Change mode only) Select a row and click to copy that row.
None
Details View selected records in a vertical column format in a separate window.
None
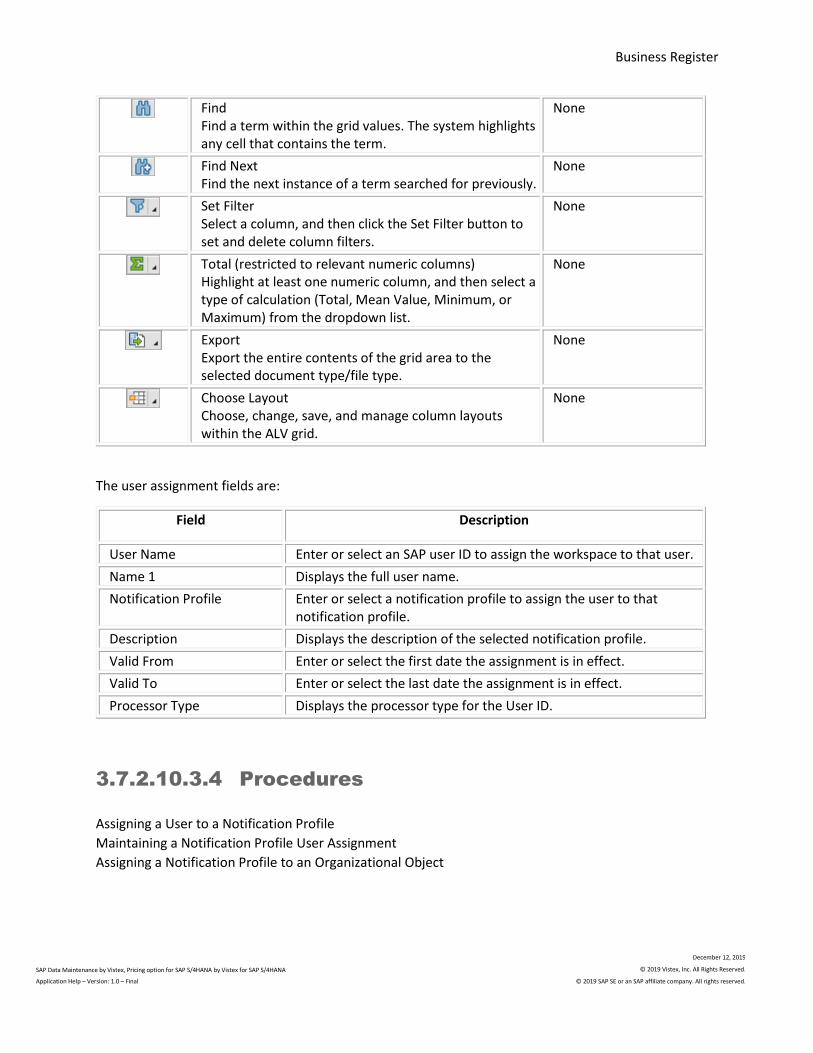
Business Register
SAP Data Maintenance by Vistex, Pricing option for SAP S/4HANA by Vistex for SAP S/4HANA
Application Help – Version: 1.0 – Final
December 12, 2019
© 2019 Vistex, Inc. All Rights Reserved.
© 2019 SAP SE or an SAP affiliate company. All rights reserved.
Find Find a term within the grid values. The system highlights any cell that contains the term.
None
Find Next Find the next instance of a term searched for previously.
None
Set Filter Select a column, and then click the Set Filter button to set and delete column filters.
None
Total (restricted to relevant numeric columns) Highlight at least one numeric column, and then select a type of calculation (Total, Mean Value, Minimum, or Maximum) from the dropdown list.
None
Export Export the entire contents of the grid area to the selected document type/file type.
None
Choose Layout Choose, change, save, and manage column layouts within the ALV grid.
None
The user assignment fields are:
Field Description
User Name Enter or select an SAP user ID to assign the workspace to that user.
Name 1 Displays the full user name.
Notification Profile Enter or select a notification profile to assign the user to that notification profile.
Description Displays the description of the selected notification profile.
Valid From Enter or select the first date the assignment is in effect.
Valid To Enter or select the last date the assignment is in effect.
Processor Type Displays the processor type for the User ID.
3.7.2.10.3.4 Procedures
Assigning a User to a Notification Profile
Maintaining a Notification Profile User Assignment
Assigning a Notification Profile to an Organizational Object

1909 Pricing Documentation
3.7.3 Organizational Objects
3.7.3.1 Organizational Objects Overview
3.7.3.1.1 Definition
Organizational objects are groupings of departments, positions, roles, and individuals (employees and
external persons) used to store additional information about customers, vendors, and employees. These
groupings allow users to create and maintain organizational structures. This functionality provides the
flexibility to maintain resources at all levels of the organizational tree, including employee personal data,
job responsibilities, position, and pay grade information.
NOTE: Posting organizational objects to SAP HCM is not supported.
Organizational objects are supported for the following functionality:
• Status Flow and Status Profile • Restrictions (Access Framework/Authorizations) • Workspace Definition and Launchpad Profile (Launchpad) • Domain Search (Freestyle Search used on the Launchpad) • Composite (Roll-ups and roll-downs / assignments in participation)
NOTE: Organizational objects replaces the use of teams/departments in older Vistex releases, and either
replacing or supplementing the use of SAP organizational structures.
Available levels of organizational objects, in standard flow sequence, include the following:
• Organization Unit, highest level object, such as a team or department • Job, generic responsibility such as a manager • Position, more specific responsibility such as Quality Assurance Manager • Employee, the person assigned to a position
NOTE: When organizational objects are created in Vistex, only the object ID is sent to the SAP database,
to prevent ID overlap. No mapping is required.
3.7.3.1.1.1 Attributes
To capture and track information, you can use the same attribute concept as used in Data Maintenance
Resources. Organizational object attributes and composite attributes can be created and grouped, then
tied to various organizational objects. Attributes can be included in multiple attribute groups, as needed.

Business Register
SAP Data Maintenance by Vistex, Pricing option for SAP S/4HANA by Vistex for SAP S/4HANA
Application Help – Version: 1.0 – Final
December 12, 2019
© 2019 Vistex, Inc. All Rights Reserved.
© 2019 SAP SE or an SAP affiliate company. All rights reserved.
NOTE: Attribute values are not posted to SAP.
3.7.3.1.1.2 Hierarchy
Hierarchies created using the Organizational Object Hierarchy transaction can be used to depict the
structure of the organizational objects as they are used for internal structures or external partner
structures. External persons and multiple levels of employees can be included in the hierarchies.
Hierarchy types are defined in configuration. You can specify in configuration, how the organizational
object types can be nested. For example, you can specify that a certain employee type (or all employee
types) can only be linked to a specific job type (or all job types).
3.7.3.1.2 Access
3.7.3.1.2.1 Organizational Object Workbenches
• Organizational Unit Workbench /IRM/GOUM • Position Workbench /IRM/GOPM • Job Workbench /IRM/GOJM • Employee Workbench /IRM/GOEM
3.7.3.1.2.2 Organizational Object Attributes
• Create Attributes for Employees /IRM/GOEUA • Organizational Object Attribute Workbench /IRM/GOOATM • Organizational Object Composite Attribute Workbench /IRM/GOOCAM • Attribute Group Workbench /IRM/GOOAGM
3.7.3.1.2.3 Organizational Object Hierarchy
• Organizational Object Hierarchy /IRM/GOOHIM

1909 Pricing Documentation
3.7.3.1.3 Setup
Use the Organizational Object Management section of configuration to define the following:
• Object types: unit type, position type, job type, employee type Attribute groups and address types (mailing, shipping, etc.) can be attached to each object type.
• Hierarchy types: assign organizational category and additional (display only/required) fields
3.7.3.2 Organizational Unit Workbench
3.7.3.2.1 Definition
Use the Organizational Unit Workbench to create and maintain organizational unit objects. The
organizational unit is the top level in the organizational structure.
Organizational unit types are defined in configuration. For each organizational unit type, configure the
attribute groups and address types to be used.
3.7.3.2.2 Access
Transaction code: /IRM/GOUM
3.7.3.2.3 Structure
The Organizational Unit Workbench screen is organized into the following areas:
• Search and Worklist Use the Search and Worklist to view selected organizational units in a grid format. From the grid, click on an organizational unit number to display that organizational unit in focus in the Work Area.
• Work Area Use the Work Area to maintain one organizational unit. In the standard Vistex implementation, the Work Area contains the following tabs in the Header section: • Address
• Address Overview

Business Register
SAP Data Maintenance by Vistex, Pricing option for SAP S/4HANA by Vistex for SAP S/4HANA
Application Help – Version: 1.0 – Final
December 12, 2019
© 2019 Vistex, Inc. All Rights Reserved.
© 2019 SAP SE or an SAP affiliate company. All rights reserved.
• Attributes A tab appears for each attribute group defined in configuration for the organizational unit
type. To view the attributes for all groups, click on the Attributes Overview button.
• Access
• Hierarchy, which displays hierarchy information entered using Organizational Object Hierarchy.
• Notes
• Admin Data
NOTE: Functions accessed from the menu bar apply only to the organizational unit displayed in focus in
the Work Area and do not apply to the data in the Search and Worklist.
IMPORTANT: Because Vistex software is extremely versatile, the user screen may be customized. As a
result, the screen may appear different from the standard screen described in this document.
3.7.3.2.4 Procedures
Creating an Organizational Unit
Displaying an Organizational Unit
Copying an Organizational Unit
Maintaining an Organizational Unit
Deleting an Organizational Unit
3.7.3.3 Job Workbench
3.7.3.3.1 Definition
Use the Job Workbench to create and maintain job organizational objects. Jobs represent generic
responsibilities such as a manager or vice president, as opposed to positions, which are more specific
responsibilities such as Quality Assurance Manager or Vice President of Finance.
Job types are defined in configuration. For each job type, configure the attribute groups and address
types to be used.

1909 Pricing Documentation
3.7.3.3.2 Access
Transaction code: /IRM/GOJM
3.7.3.3.3 Structure
The Job Workbench screen is organized into the following areas:
• Search and Worklist Use the Search and Worklist to view selected jobs in a grid format. From the grid, click on an job number to display that job in focus in the Work Area.
• Work Area Use the Work Area to maintain one job. In the standard Vistex implementation, the Work Area contains the following tabs in the Header section: • Attributes
A tab appears for each attribute group defined in configuration for the job type. To view the
attributes for all groups, click on the Attributes Overview button.
• Access
• Hierarchy, which displays hierarchy information entered using Organizational Object Hierarchy.
• Notes
• Admin Data
NOTE: Functions accessed from the menu bar apply only to the job displayed in focus in the Work Area
and do not apply to the data in the Search and Worklist.
IMPORTANT: Because Vistex software is extremely versatile, the user screen may be customized. As a
result, the screen may appear different from the standard screen described in this document.
3.7.3.3.4 Procedures
Creating a Job
Displaying a Job
Copying a Job
Maintaining a Job
Deleting a Job

Business Register
SAP Data Maintenance by Vistex, Pricing option for SAP S/4HANA by Vistex for SAP S/4HANA
Application Help – Version: 1.0 – Final
December 12, 2019
© 2019 Vistex, Inc. All Rights Reserved.
© 2019 SAP SE or an SAP affiliate company. All rights reserved.
3.7.3.4 Position Workbench
3.7.3.4.1 Definition
Use the Position Workbench to create and maintain position organizational objects. Positions represent
specific responsibilities such as Quality Assurance Manager or Vice President of Finance, as opposed to
jobs, which are more generic responsibilities such as manager or vice president.
Position types are defined in configuration. For each position type, configure the attribute groups and
address types to be used.
3.7.3.4.2 Access
Transaction code: /IRM/GOPM
3.7.3.4.3 Structure
The Position Workbench screen is organized into the following areas:
• Search and Worklist Use the Search and Worklist to view selected positions in a grid format. From the grid, click on an position number to display that position in focus in the Work Area.
• Work Area Use the Work Area to maintain one position. In the standard Vistex implementation, the Work Area contains the following tabs in the Header section: • Address
• Address Overview
• Attributes A tab appears for each attribute group defined in configuration for the position type. To view
the attributes for all groups, click on the Attributes Overview button.
• Access
• Hierarchy, which displays hierarchy information entered using Organizational Object Hierarchy.
• Notes
• Admin Data

1909 Pricing Documentation
NOTE: Functions accessed from the menu bar apply only to the position displayed in focus in the Work
Area and do not apply to the data in the Search and Worklist.
IMPORTANT: Because Vistex software is extremely versatile, the user screen may be customized. As a
result, the screen may appear different from the standard screen described in this document.
3.7.3.4.4 Procedures
Creating a Position
Displaying a Position
Copying a Position
Maintaining a Position
Deleting a Position
3.7.3.5 Employee Workbench
3.7.3.5.1 Definition
Use the Employee Workbench to create and maintain employee organizational objects. For companies
that have not implemented SAP HCM, employee organizational objects can be used to pay sales
compensation outside the SAP system.
Employee types are defined in configuration. For each employee type, configure the attribute groups
and address types to be used.
3.7.3.5.2 Access
Transaction code: /IRM/GOEM
3.7.3.5.3 Structure
The Employee Workbench screen is organized into the following areas:
Business Register
SAP Data Maintenance by Vistex, Pricing option for SAP S/4HANA by Vistex for SAP S/4HANA
Application Help – Version: 1.0 – Final
December 12, 2019
© 2019 Vistex, Inc. All Rights Reserved.
© 2019 SAP SE or an SAP affiliate company. All rights reserved.
• Search and Worklist Use the Search and Worklist to view selected employees in a grid format. From the grid, click on an employee number to display that employee in focus in the Work Area.
• Work Area Use the Work Area to maintain one employee. In the standard Vistex implementation, the Work Area contains the following tabs in the Header section: • Personal Data, which is used to store required employee information.
• Address
• Address Overview
• Attributes A tab appears for each attribute group defined in configuration for the employee type. To
view the attributes for all groups, click on the Attributes Overview button.
• Access
• Hierarchy, which displays hierarchy information entered using Organizational Object Hierarchy.
• Notes
• Admin Data
NOTE: Functions accessed from the menu bar apply only to the employee displayed in focus in the Work
Area and do not apply to the data in the Search and Worklist.
IMPORTANT: Because Vistex software is extremely versatile, the user screen may be customized. As a
result, the screen may appear different from the standard screen described in this document.
3.7.3.5.4 Procedures
Creating an Employee
Displaying an Employee
Copying an Employee
Maintaining an Employee
Deleting an Employee

1909 Pricing Documentation
3.7.3.6 Organizational Object Hierarchy
3.7.3.6.1 Definition
Use Organizational Object Hierarchy to create and maintain structures of organizational objects. A
hierarchy can depict an internal organization, such as a Sales Department, or an external structure, such
as the organization of a customer's Contract Department.
External persons and multiple levels of employees can be included in the hierarchies.
Hierarchy types are defined in configuration. Additional fields can be configured to display on the screen
for a specific hierarchy type.
3.7.3.6.2 Access
Transaction code: /IRM/GOOHIM
3.7.3.6.3 Structure
The Organizational Object Hierarchy screen is organized into two panes:
• Hierarchy (left pane) • Search Results (right pane)
The following buttons appear above the left pane:
Button Action Alternate Access
Display ↔ Change Toggle between Display mode and Change mode.
F6
Change Hierarchy Selections Display the Hierarchy Selections window to reselect the display criteria.
Shift+F8
The Valid On or Valid From/Valid To fields above the left pane display the date(s) chosen in the
Hierarchy Selections window. If you select a date range, the resulting hierarchy cannot be edited. The
Valid On date defaults to the current date; the range defaults to the current date through 12/31/9999.

Business Register
SAP Data Maintenance by Vistex, Pricing option for SAP S/4HANA by Vistex for SAP S/4HANA
Application Help – Version: 1.0 – Final
December 12, 2019
© 2019 Vistex, Inc. All Rights Reserved.
© 2019 SAP SE or an SAP affiliate company. All rights reserved.
3.7.3.6.3.1 Hierarchy
The Hierarchy section (left pane) displays the existing hierarchy. The following buttons appear in the
section:
Button Action
Assignment Details For a selected row in the hierarchy, displays the object ID and validity dates.
Unassign To remove the selected object from the hierarchy.
Expand Subtree Expand all levels of the hierarchy.
Collapse Subtree Collapse all levels of the hierarchy.
Find Find a term within the grid values. The system highlights any cell that contains the term.
Recalculate Columns Highlight at least one numeric column, and then select a type of calculation (Total, Mean Value, Minimum, or Maximum) from the dropdown list.
Print View Print the grid content.
Choose Layout Choose, change, save, and manage column layouts within the ALV grid.
Details View selected records in a vertical column format in a separate window.
The following fields appear in the hierarchy:
Field Description
Hierarchy Name of the organizational object, in a nested display.
Object Category Type of organizational object. Options: • Organizational Unit • Position • Job • Employee • External Person
Object Id Numeric identifier for the organizational object. Click on the link to view that organizational object.

1909 Pricing Documentation
Name Name of the organizational object.
Valid From First date the organizational object is valid in the hierarchy, based on the validity date range selected when the object is added to the hierarchy.
Valid To Last date the organizational object is valid in the hierarchy, based on the validity date range selected when the object is added to the hierarchy.
Object Type Organizational object type, such as job type or position type.
Description Description of the organizational object.
3.7.3.6.3.2 Search Results
Use the right pane to search for organizational objects to be added to the hierarchy. The Search pane
appears only in Change mode.
The following buttons appear in the pane:
Button Action
Assignments For the selected organizational object(s), displays the Assignment Details pop-up to enter validity dates, and then adds the object(s) to the hierarchy.
Search View the search criteria screen. Enter the search criteria, and then click on the
Execute button to perform the search.
Search More After you perform a search, use Search More to retain the results from the previous search, perform a new search, and append the new results to the list already displayed.
Other Selection Used to select the organizational object type to search. You must select a type to view the applicable search fields for that type. Options:
• Organizational Unit • Position • Job • Employee • External Person
Sort in Ascending Order Sort the data in a selected column in ascending alphanumeric sequence.
Sort in Descending Order Sort the data in a selected column in descending alphanumeric sequence.
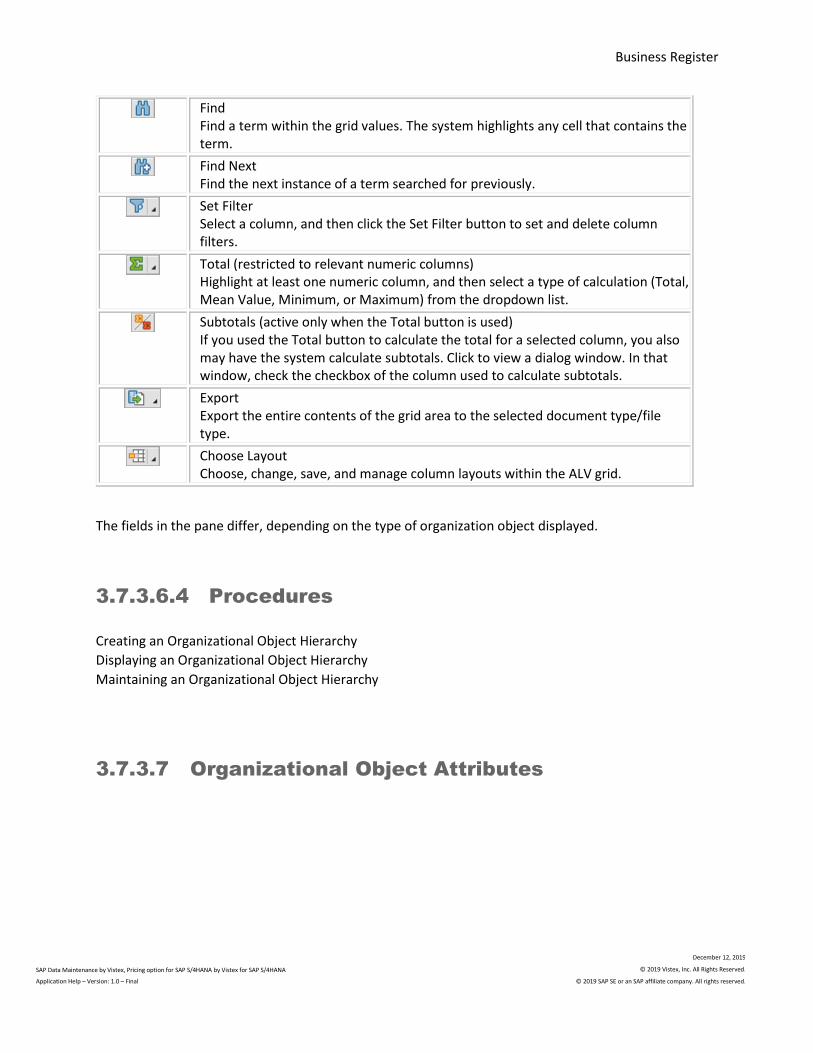
Business Register
SAP Data Maintenance by Vistex, Pricing option for SAP S/4HANA by Vistex for SAP S/4HANA
Application Help – Version: 1.0 – Final
December 12, 2019
© 2019 Vistex, Inc. All Rights Reserved.
© 2019 SAP SE or an SAP affiliate company. All rights reserved.
Find Find a term within the grid values. The system highlights any cell that contains the term.
Find Next Find the next instance of a term searched for previously.
Set Filter Select a column, and then click the Set Filter button to set and delete column filters.
Total (restricted to relevant numeric columns) Highlight at least one numeric column, and then select a type of calculation (Total, Mean Value, Minimum, or Maximum) from the dropdown list.
Subtotals (active only when the Total button is used) If you used the Total button to calculate the total for a selected column, you also may have the system calculate subtotals. Click to view a dialog window. In that window, check the checkbox of the column used to calculate subtotals.
Export Export the entire contents of the grid area to the selected document type/file type.
Choose Layout Choose, change, save, and manage column layouts within the ALV grid.
The fields in the pane differ, depending on the type of organization object displayed.
3.7.3.6.4 Procedures
Creating an Organizational Object Hierarchy
Displaying an Organizational Object Hierarchy
Maintaining an Organizational Object Hierarchy
3.7.3.7 Organizational Object Attributes

1909 Pricing Documentation
3.7.3.7.1 Organizational Object Attribute
Workbench
3.7.3.7.1.1 Definition
An attribute defines the values allowed for an organizational object. You can maintain an unlimited
amount of attributes for an organizational object. There are multiple uses for the attribute, such as:
• Maintaining unlimited attributes using field labels that are customized for your business. • Maintaining attribute data globally that applies to all maintenance levels or individually at the
sales area or company code level. • Displaying organizational object data that is organized and tailored to your company needs. • Maintaining attributes for various organizational objects that your business uses.
3.7.3.7.1.2 Access
Transaction code: /IRM/GOOATM
3.7.3.7.1.3 Structure
The Organizational Object Attribute Workbench screen is organized into the following areas:
• Search and Worklist Use the Search and Worklist to view selected attributes in a grid format. From the grid, click on an attribute number to display that attribute in focus in the Work Area.
• Work Area Use the Work Area to maintain one attribute. In the standard Vistex implementation, the Work Area contains the following tabs: • General
• Values, used to specify the actual attribute values. For example, for a Material Period Indicator Attribute, the attribute values may be P for Period according to the fiscal year, M for Monthly, W for Weekly, T for Daily, and ' ' for Initial Value.
• Keywords, used to store a list of keywords for the attribute.
• Additional Data, an extra tab that can hold additional fields programmed to appear.
• Admin Data
NOTE: Functions accessed from the menu bar apply only to the attribute displayed in focus in the Work
Area and do not apply to the data in the Search and Worklist.

Business Register
SAP Data Maintenance by Vistex, Pricing option for SAP S/4HANA by Vistex for SAP S/4HANA
Application Help – Version: 1.0 – Final
December 12, 2019
© 2019 Vistex, Inc. All Rights Reserved.
© 2019 SAP SE or an SAP affiliate company. All rights reserved.
IMPORTANT: Because Vistex software is extremely versatile, the user screen may be customized. As a
result, the screen may appear different from the standard screen described in this document.
The following graphic displays the basic elements of the Organizational Object Attribute Workbench.
Please note that the graphic is not drawn to scale.
3.7.3.7.1.4 Procedures
Creating an Organizational Object Attribute
Displaying an Organizational Object Attribute
Viewing an Organizational Object Attribute Where-Used List
Maintaining an Organizational Object Attribute
Viewing an Organizational Object Attribute Change Log
Deleting an Organizational Object Attribute
1909 Pricing Documentation
3.7.3.7.2 Organizational Object Composite
Attribute Workbench
3.7.3.7.2.1 Definition
A composite attribute is a collection or grouping of two or more attributes that are tied together and
dependent on each other. The combination of values is used to create a unique record. For example,
two related attributes might be certifications received and training course dates attended. A composite
attribute is created for these two attributes to link them together. When a user enters values for the
composite attribute, the user will always enter both values.
Composite attributes are assigned to attribute groups, just like other attributes. However, they appear
in the organizational object workbenches as a sub-tab of the attribute group tab.
There are three steps to creating a composite attribute:
1. Use the Organizational Object Attribute Workbench to create the attributes to be included in the composite attribute.
2. Use the Organizational Object Composite Attribute Workbench to create a composite attribute, and assign the created attributes to that composite attribute.
3. Use the Organizational Object Attribute Workbench to create an attribute with a composite attribute data type, and assign the composite attribute.
A composite attribute can be created with a change number that will be valid until a new change
number is created. Change numbers have a start date but no end date. If a change number is assigned to
a composite attribute, change numbers must be used for all future maintenance.
NOTE: A composite attribute must be type CATR (composite attribute) to work in an attribute group or
attribute set and to work in the organizational object workbenches.
3.7.3.7.2.2 Access
Transaction code: /IRM/GOOCAM
3.7.3.7.2.3 Structure
The Organizational Object Composite Attribute Workbench screen is organized into the following areas:
• Search and Worklist Use the Search and Worklist to view selected composite attributes in a grid format. From the

Business Register
SAP Data Maintenance by Vistex, Pricing option for SAP S/4HANA by Vistex for SAP S/4HANA
Application Help – Version: 1.0 – Final
December 12, 2019
© 2019 Vistex, Inc. All Rights Reserved.
© 2019 SAP SE or an SAP affiliate company. All rights reserved.
grid, click on a composite attribute number to display that attribute rule in focus in the Work Area.
• Work Area Use the Work Area to maintain one composite attribute.
NOTE: Functions accessed from the menu bar apply only to the composite attribute displayed in focus in
the Work Area and do not apply to the data in the Search and Worklist.
IMPORTANT: Because Vistex software is extremely versatile, the user screen may be customized. As a
result, the screen may appear different from the standard screen described in this document.
3.7.3.7.2.4 Procedures
Creating an Organizational Object Composite Attribute
Displaying an Organizational Object Composite Attribute
Viewing an Organizational Object Composite Attribute Where-Used List
Maintaining an Organizational Object Composite Attribute
Viewing an Organizational Object Composite Attribute Change Log
Deleting an Organizational Object Composite Attribute
3.7.3.7.3 Attribute Group Workbench
3.7.3.7.3.1 Definition
An attribute group allows flexible grouping based on the business requirements as they are defined
rather than how the system thinks they should be defined. Using attribute group allows you to create
and maintain an unlimited variety of groups of attributes.
When an attribute group is created, a relationship between an organizational object type (unit, job,
position, employee) and an attribute group is created in configuration. The attribute groups then appear
as tab headings in the organizational object workbenches, which allows the user to display the specific
tabs/attribute groups for the attributes the user is responsible for entering.
NOTE: Composite attributes assigned to an attribute group appear in the organizational object
workbenches as a sub-tab of the attribute group tab.

1909 Pricing Documentation
3.7.3.7.3.2 Access
Transaction code: /IRM/GOOAGM
3.7.3.7.3.3 Structure
The Attribute Group Workbench screen is organized into the following areas:
• Search and Worklist Use the Search and Worklist to view selected attribute groups in a grid format. From the grid, click on an attribute group number to display that group in focus in the Work Area.
• Work Area Use the Work Area to maintain one attribute group.
NOTE: Functions accessed from the menu bar apply only to the attribute group displayed in focus in the
Work Area and do not apply to the data in the Search and Worklist.
IMPORTANT: Because Vistex software is extremely versatile, the user screen may be customized. As a
result, the screen may appear different from the standard screen described in this document.
The following graphic displays the basic elements of the Attribute Group Workbench. Please note that
the graphic is not drawn to scale.
3.7.3.7.3.4 Procedures
Creating an Attribute Group
Displaying an Attribute Group
Viewing an Attribute Group Where-Used List
Maintaining an Attribute Group
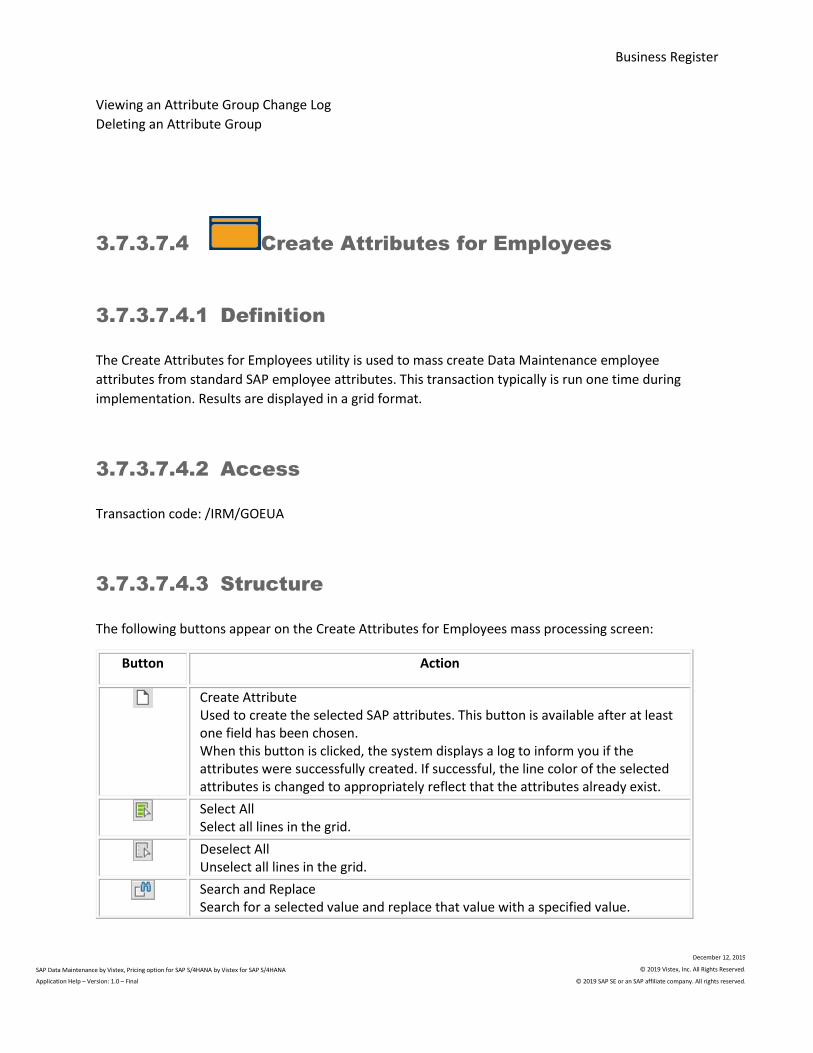
Business Register
SAP Data Maintenance by Vistex, Pricing option for SAP S/4HANA by Vistex for SAP S/4HANA
Application Help – Version: 1.0 – Final
December 12, 2019
© 2019 Vistex, Inc. All Rights Reserved.
© 2019 SAP SE or an SAP affiliate company. All rights reserved.
Viewing an Attribute Group Change Log
Deleting an Attribute Group
3.7.3.7.4 Create Attributes for Employees
3.7.3.7.4.1 Definition
The Create Attributes for Employees utility is used to mass create Data Maintenance employee
attributes from standard SAP employee attributes. This transaction typically is run one time during
implementation. Results are displayed in a grid format.
3.7.3.7.4.2 Access
Transaction code: /IRM/GOEUA
3.7.3.7.4.3 Structure
The following buttons appear on the Create Attributes for Employees mass processing screen:
Button Action
Create Attribute Used to create the selected SAP attributes. This button is available after at least one field has been chosen. When this button is clicked, the system displays a log to inform you if the attributes were successfully created. If successful, the line color of the selected attributes is changed to appropriately reflect that the attributes already exist.
Select All Select all lines in the grid.
Deselect All Unselect all lines in the grid.
Search and Replace Search for a selected value and replace that value with a specified value.

1909 Pricing Documentation
Color Legend View the color legend associated with the grid.
Details View selected records in a vertical column format in a separate window.
Sort in Ascending Order Sort the data in a selected column in ascending alphanumeric sequence.
Sort in Descending Order Sort the data in a selected column in descending alphanumeric sequence.
Find Find a term within the grid values. The system highlights any cell that contains the term.
Find Next Find the next instance of a term searched for previously.
Export Export the entire contents of the grid area to the selected document type/file type.
Choose Layout Choose, change, save, and manage column layouts within the ALV grid.
The following fields appear in the grid:
Field Description
Table Name SAP table name or structure.
Field Name SAP field name within the table name/structure. Click on the link to view the data element.
Short Description SAP short description for the field name.
Field Selection Checkbox is checked if attributes in the grid can be created. NOTE: The checkbox will exist for attributes that cannot be created or already have been created, but the system will prohibit the user from selecting the checkbox.
Attribute Name SAP characteristic name that was created using transaction CT04 (Characteristics).
Attribute Description SAP characteristic description that was created using transaction CT04 (Characteristics).
No input Check the checkbox if the attribute is not ready for input.
Entry Required Check the checkbox is assigning a value to the attribute is required.
Value Rule Selected value rule assigned to the attribute. When a value is added to an attribute, the system performs an ECC check for that attribute. If the assigned value rule is violated, a message will appear, based on the message type assigned in configuration.

Business Register
SAP Data Maintenance by Vistex, Pricing option for SAP S/4HANA by Vistex for SAP S/4HANA
Application Help – Version: 1.0 – Final
December 12, 2019
© 2019 Vistex, Inc. All Rights Reserved.
© 2019 SAP SE or an SAP affiliate company. All rights reserved.
3.7.3.7.4.4 Procedure
Creating Attributes for Selected Employees
3.7.4 Restrictions
3.7.4.1 Restrictions Overview
3.7.4.1.1 Definition
SAP user authorizations control access to screens and fields, and data can be segregated by company
division. However, data within any field cannot be restricted. For example, a user cannot be limited to
entering only specific materials.
Access Framework/Restrictions enables business users to limit the authority to view or maintain a Vistex
data field. Restrictions provide data-level and context-level security and controls to limit the usage of
data per field by organizational object (organizational unit, job, position, employee, external person).
Restrictions can be assigned at any/all organizational object levels. Therefore, a user is not only limited
by restrictions set at the employee level, but also at the position, job, and organizational unit level. All
restrictions defined at all organizational object levels will be executed for a user.
If defined, certain actions will be performed whenever a user attempts to access/maintain restricted
data.
Restrictions are supported for the following business objects:
• Claims • Transactions • Agreements • Master Requests • Deals (Data Maintenance Pricing)

1909 Pricing Documentation
3.7.4.1.2 Setup
The system delivers configuration that lists the available business objects, plus their sections (such as
Header) and qualifiers.
To set up restrictions for a business object, use the following steps:
1. Create restrictions in the Restriction Workbench.
NOTE: If search help variants will be used in restrictions, create them using the Restriction Search
Help Variant Workbench (/IRM/GRTSHM).
2. Group restrictions into a profile in the Restriction Profile Workbench.
3. Assign the profile to users, in the Access tab of the Organizational Object workbenches.
3.7.4.1.2.1 Restriction Workbenches
Use the Restriction workbenches to create and maintain the restrictions. For each restriction, enter the
authorized fields and allowed values, as well as the actions that will occur when an unauthorized user
tries to access/maintain the field.
The following workbenches are provided:
• Claims Restriction (/IRM/GCRRTM) • Transaction Restriction (/IRM/GRCARTM) • Agreement Restriction (/IRM/IPAGRTM) • Master Request Restriction (/IRM/IPPQRTM)
3.7.4.1.2.2 Restriction Profile
Use the Restriction Profile workbenches to create groups of restrictions that will be processed at the
same time. Each restriction profile is assigned a category: Access (header only - used when searching) or
Maintenance (using during maintenance).
The following workbenches are provided:
• Claims Restriction Profile (/IRM/GCRRPM) • Transaction Restriction Profile (/IRM/GRCARPM) • Agreement Restriction Profile (/IRM/IPAGRPM) • Master Request Restriction Profile (/IRM/IPPQRPM)

Business Register
SAP Data Maintenance by Vistex, Pricing option for SAP S/4HANA by Vistex for SAP S/4HANA
Application Help – Version: 1.0 – Final
December 12, 2019
© 2019 Vistex, Inc. All Rights Reserved.
© 2019 SAP SE or an SAP affiliate company. All rights reserved.
3.7.4.2 Restriction Search Help Variant Workbench
3.7.4.2.1 Definition
Use the Restriction Search Help Variant Workbench to create the search help variants used in
restrictions.
3.7.4.2.2 Access
Transaction code: /IRM/GRTSHM
3.7.4.2.3 Structure
The workbench screen is organized into the following areas:
• Search and Worklist Use the Search and Worklist to view selected variants in a grid format. From the grid, click on variant number to display that variant in focus in the Work Area.
• Work Area Use the Work Area to maintain one variant. In the standard Vistex implementation, the Work Area contains the following tabs: • Selections, used to specify the search criteria for the variant.
• Admin Data
NOTE: Functions accessed from the menu bar apply only to the variant displayed in focus in the Work
Area and do not apply to the data in the Search and Worklist.
IMPORTANT: Because Vistex software is extremely versatile, the user screen may be customized. As a
result, the screen may appear different from the standard screen described in this document.
3.7.4.2.4 Procedures
Displaying a Restrictions Variant
Creating a Restrictions Variant
Copying a Restrictions Variant
Maintaining a Restrictions Variant

1909 Pricing Documentation
Deleting a Restrictions Variant
3.7.4.3 Agreement Restriction Workbench
3.7.4.3.1 Definition
Use the Agreement Restriction Workbench to create and maintain restrictions specific to agreements.
For agreements, you may enter restrictions to the header, partner, or rules fields. Enter the authorized
fields and allowed values, as well as the actions that will occur when an unauthorized user tries to
access/maintain the field.
3.7.4.3.2 Access
Transaction code: /IRM/IPAGRTM
3.7.4.3.3 Structure
The workbench screen is organized into the following areas:
• Search and Worklist Use the Search and Worklist to view selected restrictions in a grid format. From the grid, click on restriction name to display that variant in focus in the Work Area.
• Work Area Use the Work Area to maintain one restriction. In the standard Vistex implementation, the Work Area contains the following tabs: • Fields
• Values
• Actions
• Admin Data
NOTE: Functions accessed from the menu bar apply only to the restriction displayed in focus in the Work
Area and do not apply to the data in the Search and Worklist.
IMPORTANT: Because Vistex software is extremely versatile, the user screen may be customized. As a
result, the screen may appear different from the standard screen described in this document.
Business Register
SAP Data Maintenance by Vistex, Pricing option for SAP S/4HANA by Vistex for SAP S/4HANA
Application Help – Version: 1.0 – Final
December 12, 2019
© 2019 Vistex, Inc. All Rights Reserved.
© 2019 SAP SE or an SAP affiliate company. All rights reserved.
3.7.4.3.4 Procedures
Displaying an Agreement Restriction
Creating an Agreement Restriction
Copying an Agreement Restriction
Maintaining an Agreement Restriction
Viewing an Agreement Restriction Where-used List
Deleting an Agreement Restriction
3.7.4.4 Agreement Restriction Profile Workbench
3.7.4.4.1 Definition
Use the Agreement Restriction Profile Workbench to create and maintain groups of agreement
restrictions that will be processed at the same time. Restriction profiles then can be assigned to the
following organizational objects:
• Organization Unit, highest level object, such as a team or department • Job, generic responsibility such as a manager • Position, more specific responsibility such as Quality Assurance Manager • Employee, the person assigned to a position
Each restriction profile is assigned a category: Access (header only - used when searching) or
Maintenance (using during maintenance).
3.7.4.4.2 Access
Transaction code: /IRM/IPAGRPM
3.7.4.4.3 Structure
The workbench screen is organized into the following areas:

1909 Pricing Documentation
• Search and Worklist Use the Search and Worklist to view selected restriction profiles in a grid format. From the grid, click on restriction profile name to display that variant in focus in the Work Area.
• Work Area Use the Work Area to maintain one restriction profile. In the standard Vistex implementation, the Work Area contains the following tabs: • Restriction
• Qualifier, used to specify further conditions, such as specific documents
• Admin Data
NOTE: Functions accessed from the menu bar apply only to the restriction profile displayed in focus in
the Work Area and do not apply to the data in the Search and Worklist.
IMPORTANT: Because Vistex software is extremely versatile, the user screen may be customized. As a
result, the screen may appear different from the standard screen described in this document.
3.7.4.4.4 Procedures
Displaying an Agreement Restriction Profile
Creating an Agreement Restriction Profile
Maintaining an Agreement Restriction Profile
Deleting an Agreement Restriction Profile
3.7.4.5 Transaction Restriction Workbench
3.7.4.5.1 Definition
Use the Transaction Restriction Workbench to create and maintain restrictions specific to transaction
documents. For transactions, you may enter restrictions to the header, item, or partners fields. Enter
the authorized fields and allowed values, as well as the actions that will occur when an unauthorized
user tries to access/maintain the field.
3.7.4.5.2 Access
Transaction code: /IRM/GRCARTM

Business Register
SAP Data Maintenance by Vistex, Pricing option for SAP S/4HANA by Vistex for SAP S/4HANA
Application Help – Version: 1.0 – Final
December 12, 2019
© 2019 Vistex, Inc. All Rights Reserved.
© 2019 SAP SE or an SAP affiliate company. All rights reserved.
3.7.4.5.3 Structure
The workbench screen is organized into the following areas:
• Search and Worklist Use the Search and Worklist to view selected restrictions in a grid format. From the grid, click on restriction name to display that variant in focus in the Work Area.
• Work Area Use the Work Area to maintain one restriction. In the standard Vistex implementation, the Work Area contains the following tabs: • Fields
• Values
• Actions
• Admin Data
NOTE: Functions accessed from the menu bar apply only to the restriction displayed in focus in the Work
Area and do not apply to the data in the Search and Worklist.
IMPORTANT: Because Vistex software is extremely versatile, the user screen may be customized. As a
result, the screen may appear different from the standard screen described in this document.
3.7.4.5.4 Procedures
Displaying a Transaction Restriction
Creating a Transaction Restriction
Copying a Transaction Restriction
Maintaining a Transaction Restriction
Viewing a Transaction Restriction Where-used List
Deleting a Transaction Restriction
1909 Pricing Documentation
3.7.4.6 Transaction Restriction Profile Workbench
3.7.4.6.1 Definition
Use the Transaction Profile Workbench to create and maintain groups of transaction restrictions that
will be processed at the same time. Restriction profiles then can be assigned to the following
organizational objects:
• Organization Unit, highest level object, such as a team or department • Job, generic responsibility such as a manager • Position, more specific responsibility such as Quality Assurance Manager • Employee, the person assigned to a position
Each restriction profile is assigned a category: Access (header only - used when searching) or
Maintenance (using during maintenance).
3.7.4.6.2 Access
Transaction code: /IRM/GRCARPM
3.7.4.6.3 Structure
The workbench screen is organized into the following areas:
• Search and Worklist Use the Search and Worklist to view selected restriction profiles in a grid format. From the grid, click on restriction profile name to display that variant in focus in the Work Area.
• Work Area Use the Work Area to maintain one restriction profile. In the standard Vistex implementation, the Work Area contains the following tabs: • Restriction
• Qualifier, used to specify further conditions, such as specific documents
• Admin Data
NOTE: Functions accessed from the menu bar apply only to the restriction profile displayed in focus in
the Work Area and do not apply to the data in the Search and Worklist.
IMPORTANT: Because Vistex software is extremely versatile, the user screen may be customized. As a
result, the screen may appear different from the standard screen described in this document.
Business Register
SAP Data Maintenance by Vistex, Pricing option for SAP S/4HANA by Vistex for SAP S/4HANA
Application Help – Version: 1.0 – Final
December 12, 2019
© 2019 Vistex, Inc. All Rights Reserved.
© 2019 SAP SE or an SAP affiliate company. All rights reserved.
3.7.4.6.4 Procedures
Displaying a Transaction Restriction Profile
Creating a Transaction Restriction Profile
Maintaining a Transaction Restriction Profile
Deleting a Transaction Restriction Profile
3.8 Business Register Utilities
3.8.1 Business Partner Workbench
3.8.1.1 Definition
Use the Business Partner Workbench to enter one-time business partners, such as customers, rather
than entering a full master data record. Business partners types, which are defined in configuration, can
be a person, organization, or group.
Three change logs are available: general data, address, and address usages.
3.8.1.1.1 Display Profile
In configuration, up to five header display profiles can be attached to a business profile type, to display
up to five custom tabs in the Business Partner Workbench. Use Display Profile for Business Partner
/IRM/GBPDSP to create the display profiles.
3.8.1.1.2 Address Matching
Address matching functionality can be used to check whether the partner address already exists. To
perform address matching, in the Address Overview tab, select an address and click on the Address
1909 Pricing Documentation
Match button. Based on configuration of an address match path, potential matches are listed in the
Address Matching dialog window. If many results appear, you may specify the number of matches to
view on each page, and then select from a list of pages to view later/earlier results.
In configuration, an address match path must be defined to indicate what fields will be used to perform
the match. You may specify the following types of fields:
• Search fields If any of the search fields match an existing address, that partner is listed in the Address Matching window. The system calculates what percentage of the partner address matches the new member's address. In the window you may specify a minimum percentage to filter the results.
• Filter fields All filter fields must match an existing address in order for that partner to be listed in the Address Matching window. For example, if the filter field is City, only partners in the new member's city will appear in the results.
• Display fields These extra fields are not included in matching, but will appear in Address Matching dialog window for information purposes.
The default match path is assigned to a submission type. Initial results in the Address Matching dialog
window are based on that match path. However, in the window you may select from a dropdown list of
match paths, to view results from another match path. In addition, run Index Business Partner Address
(/IRM/GAMBPIDX) to index the existing addresses for the business partners and Index Details of
Partners (/IRM/GAMIDX) to index business partners detail.
3.8.1.2 Access
Transaction code: /IRM/GBPM
3.8.1.3 Structure
The Business Partner Workbench screen is organized into the following areas:
• Search and Worklist Use the Search and Worklist to view selected business partners in a grid format. From the grid, click on a business partner number to display that business partner in focus in the Work Area.
• Work Area Use the Work Area to maintain one business partner. In the standard Vistex implementation, the Work Area contains the following tabs: • Address, used to enter address information and search terms
• Address Overview, used to enter various addresses and address usages
Business Register
SAP Data Maintenance by Vistex, Pricing option for SAP S/4HANA by Vistex for SAP S/4HANA
Application Help – Version: 1.0 – Final
December 12, 2019
© 2019 Vistex, Inc. All Rights Reserved.
© 2019 SAP SE or an SAP affiliate company. All rights reserved.
• Identification, used to enter personal, group, or organization information, depending on the assigned partner type
• Control, used to specify who can use the business partner
• Status
• Notes
• Admin Data
NOTE: Functions accessed from the menu bar apply only to the business partner displayed in focus in
the Work Area and do not apply to the data in the Search and Worklist.
IMPORTANT: Because Vistex software is extremely versatile, the user screen may be customized. As a
result, the screen may appear different from the standard screen described in this document.
3.8.1.4 Procedures
Creating a Business Partner
Displaying a Business Partner
Maintaining a Business Partner
Viewing Business Partner Change Logs
Copying a Business Partner
Deleting a Business Partner
3.8.2 IP Correspondence Triggers
3.8.2.1 Definition
IP Correspondence refers to the mode of communication used to communicate with the partner. The
decision made by the system for the kind of correspondence to be used is triggered by a particular event
taking place.
Use this transaction to maintain the list of correspondence events. To maintain the list by company code
instead, use the Maintain IP Correspondence Triggers (Co Code) transaction (/IRM/0IPG8C).
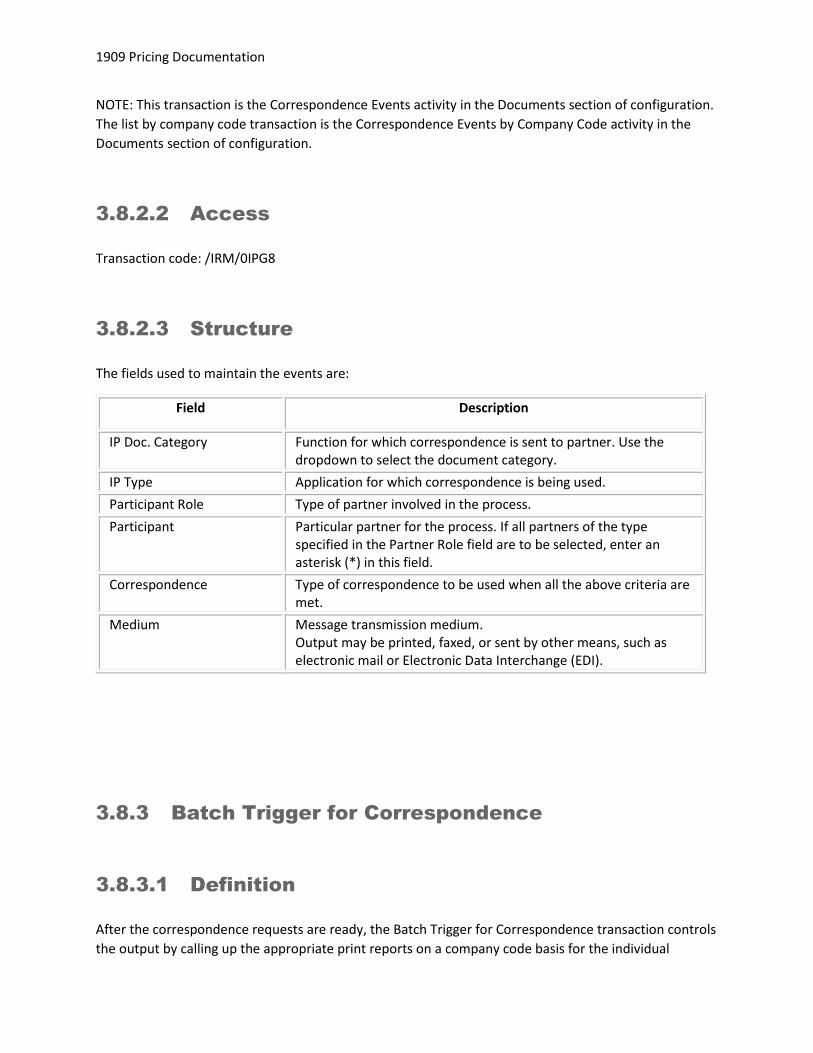
1909 Pricing Documentation
NOTE: This transaction is the Correspondence Events activity in the Documents section of configuration.
The list by company code transaction is the Correspondence Events by Company Code activity in the
Documents section of configuration.
3.8.2.2 Access
Transaction code: /IRM/0IPG8
3.8.2.3 Structure
The fields used to maintain the events are:
Field Description
IP Doc. Category Function for which correspondence is sent to partner. Use the dropdown to select the document category.
IP Type Application for which correspondence is being used.
Participant Role Type of partner involved in the process.
Participant Particular partner for the process. If all partners of the type specified in the Partner Role field are to be selected, enter an asterisk (*) in this field.
Correspondence Type of correspondence to be used when all the above criteria are met.
Medium Message transmission medium. Output may be printed, faxed, or sent by other means, such as electronic mail or Electronic Data Interchange (EDI).
3.8.3 Batch Trigger for Correspondence
3.8.3.1 Definition
After the correspondence requests are ready, the Batch Trigger for Correspondence transaction controls
the output by calling up the appropriate print reports on a company code basis for the individual
Business Register
SAP Data Maintenance by Vistex, Pricing option for SAP S/4HANA by Vistex for SAP S/4HANA
Application Help – Version: 1.0 – Final
December 12, 2019
© 2019 Vistex, Inc. All Rights Reserved.
© 2019 SAP SE or an SAP affiliate company. All rights reserved.
correspondence requests. Additionally, this transaction reorganizes the table for correspondence
requests in accounting and the individual texts entered in it. When reorganization should be carried out
depends on when the processed correspondence requests are deleted.
Batch Trigger for Correspondence is usually scheduled as a job once or twice daily so that the
correspondence requests that have accumulated in the meantime can be output. Correspondence
requests are released for printing. The company codes decide for which correspondence requests
processing should take place for and the number of days after which reorganization should take place.
Job scheduling can be automated by specifying a repetition period.
3.8.3.2 Access
Transaction code: /IRM/IPGCRT
3.8.4 Business Register User Settings
3.8.4.1 Definition
Every user can change his/her settings for Business Register.
The following user settings can be changed to override the settings defined in configuration:
• Create Zero Value Items By default, when calculation line items are created, any line item in the source document whose business register value is zero is not created. If the user wants the zero value items to be created, then the user must check this box.
• Show Zero Value Items If the user chooses to create the zero value items, then by checking this box, the zero value items are shown. If "Create Zero Value Items" is checked but "Show Zero Value Items" is not checked, then the zero value items are created but not shown.
• Switch Signs By default, the business register amount is shown positive and the debit/credit indicator indicates whether the business register is incoming or outgoing. If the checkbox is checked, an outgoing business register will be indicated as a negative value and an incoming business register will be indicated as a positive value.

1909 Pricing Documentation
• Show Deleted Items Check the checkbox to show deleted calculation line items.
• Display Profile If using display profiles, select the default split list display profile to be used.
Click on to use the settings only during the current session; click on the Save button to save the
settings for the current user.
3.8.4.2 Access
Transaction code: /IRM/IPBRUSET
3.9 Trade Calendar
3.9.1 Trade Calendar Overview
3.9.1.1 Definition
The Trade Calendar is a Web view that allows a non-technical person (sales rep or marketing person, for
example) to review and maintain validity dates for all the programs that the person is running, without
logging onto SAP GUI. For example, the calendar might be used to compare current programs with those
being planned, and then to adjust specific dates as needed.
The following types of documents can be displayed in a trade calendar:
• campaigns • agreements • agreement programs • agreement requests • direct agreements • direct agreement requests • master requests • deals (Data Maintenance Pricing) • deal programs (Data Maintenance Pricing) • deal requests (Data Maintenance Pricing)
Business Register
SAP Data Maintenance by Vistex, Pricing option for SAP S/4HANA by Vistex for SAP S/4HANA
Application Help – Version: 1.0 – Final
December 12, 2019
© 2019 Vistex, Inc. All Rights Reserved.
© 2019 SAP SE or an SAP affiliate company. All rights reserved.
Two of the above types of documents can be displayed simultaneously in a trade calendar view. For
example, a view might contain billback agreements and billback agreement requests. Different layouts
can be created to display the documents either horizontally or vertically.
3.9.1.2 Structure
The trade calendar page is organized into the following areas:
• Selection Criteria window, to choose a calendar, view, search, and time scale. After you display the trade calendar, click on the arrow icon to toggle back to the selection window to switch to another view, change the layout for each document type shown in the calendar, or to filter application data.
• Trade Calendar Page Bar, which displays a message icon if messages exist, user name, and logout icon.
• Application Toolbar, which includes the following buttons: • New
Create a new document. Select a document type from the dropdown list. A pop-up will appear to enter the document data. When finished, click on the Create button. A message will display the new document number.
• Extras Switch the positions of the two applications or Hide an application.
• Save and Save as Request, if applicable
• Zoom In and Zoom Out Change the date type incrementally, for example, from year to half year to quarter to month. NOTE: Zoom In and Zoom Out options are not supported if a period profile is defined for the trade calendar.
• Data tree (left) pane, which displays one or two types of application data. The data tree can be resized or hidden, as needed. The columns are defined on the Hierarchy tab of the calendar object. Individual fields can be configured to be editable.
• Charts (right) pane, which displays a color coded bar for each selected document, for the length of its validity period. A separate chart appears for each of the two selected objects. The charts can be resized, as needed. Dynamic adjustment of validity dates is available by dragging and dropping a document's bar in the chart. If events are configured, they appear as subheadings under the chart's date headings.
• Logout The logout button is displayed next to the user name at the top of the trade calendar.

1909 Pricing Documentation
3.9.1.2.1 Features
The following features are available on the page, based on configuration:
• Color bar Color coding for the bars can be defined using business script. Double click on the color bar to view the Document Fields pop-up, which can be used to change field values. The changes can be saved directly to the document or saved as a request. Drag the bar to change the validity, then click on the Save button or Save As Request button to save the new dates.
• Field and row data pop-ups Hover the mouse over a row to view the configured fields data. Double click on a row to view row data in a pop-up. Fields in the pop-up are editable or non-editable based on configuration. Maintain the data, as needed, and save.
3.9.1.3 Trade Calendar Access
Transaction code: /IRM/GTCM_WS
To display a trade calendar:
1. Access transaction code /IRM/GTCM_WS.
2. In the Search tab, select a calendar from the Calendar Name dropdown list of all currently
available calendars.
3. After you select a calendar, the View field is displayed. Choose a view from the dropdown list of
all views configured for the selected calendar.
4. After you choose a view, select a search from the Saved Searches dropdown list.
NOTE: A search name may already appear in the field if that search was defined as the default.
Two buttons are displayed near the Saved Searches field:
• Edit Saved Search To maintain or delete the selected search, click on the pencil icon to display the Calendar Selections window. To delete a search, click on the Delete button. To maintain the search, click on the + (plus) sign to add a row or click on the - (minus) sign to delete a row. When finished making changes, click on either Search to perform the search without saving it, click on Save As to add the search to the Saved Searches list, or click on Save to save the existing search.
• New Search To create a new search, click on the New Search button to display the Calendar Selections window. In the window, select a Search Profile or enter search criteria for the primary and secondary objects assigned to the calendar. Select/enter values in the search fields. Click on the + (plus) sign to add a row; click on the - (minus) sign to delete a row.

Business Register
SAP Data Maintenance by Vistex, Pricing option for SAP S/4HANA by Vistex for SAP S/4HANA
Application Help – Version: 1.0 – Final
December 12, 2019
© 2019 Vistex, Inc. All Rights Reserved.
© 2019 SAP SE or an SAP affiliate company. All rights reserved.
When finished entering your selections, click on either Search to perform the search without saving it or Save As to add the search to the Saved Searches list.
5. If you do not need to maintain the time period for the calendar (timescale), from the Search tab
click on the Go button to display the trade calendar.
If you need to maintain the time period, display the Timescale tab. If a period profile is assigned to the
calendar, the Timescale tab displays the periods proposed by the period profile. Maintain the
information and then click on the Apply button to display the trade calendar.
6. In the calendar, click on the arrow icon in the top corner, if needed, to navigate back to the
selection window.
3.9.1.4 Configuration and Setup
In configuration, you can define event calendars to link individual events, such as seasonal promotions,
to a trade calendar. For each event calendar, enter a name and description, and then list the events. For
each event, provide a description and validity date range. Assign an event calendar to the trade
calendar. When the calendar is displayed, the description of each associated event will appear as a
column heading under the event's validity date range.
The following transactions are used to set up the Trade Calendar:
• Trade Calendar Maintenance Workbench (/IRM/GTCM), to define the trade calendars. • Trade Calendar Object Maintenance Workbench (/IRM/GTCOBM), to configure the objects used to
define trade calendars in the Trade Calendar Maintenance Workbench. Each object controls the layouts and filters that can be applied to the trade calendar data.
• Period Profile Workbench, to maintain the period profile assigned to the trade calendar in the maintenance workbench. For a trade calendar, use the period profile category "Year".
1909 Pricing Documentation
3.9.2 Trade Calendar Object Maintenance Workbench
3.9.2.1 Definition
Use the Trade Calendar Object Maintenance Workbench to configure the objects used in the Trade
Calendar Maintenance Workbench. For each calendar object, business script formulas can be created to
control the layout of the fields and the messages that will be displayed in the Trade Calendar.
3.9.2.2 Access
Transaction code: /IRM/GTCOBM
3.9.2.3 Structure
The Trade Calendar Object Maintenance Workbench screen is organized into the following areas:
• Search and Worklist Use the Search and Worklist to view information for selected trade calendar objects in a grid format. From the grid, click on an object name to display it in focus in the Work Area.
• Work Area Use the Work Area to maintain the trade calendar object in focus. In the standard Vistex implementation, the Work Area contains the following tabs: • Layout
• Filter
• Admin Data
NOTE: Functions accessed from the menu bar apply only to the trade calendar object displayed in focus
in the Work Area and do not apply to the data in the Search and Worklist.
IMPORTANT: Because Vistex software is extremely versatile, the user screen may be customized. As a
result, the screen may appear different from the standard screen described in this document.
3.9.2.4 Procedures
Displaying a Trade Calendar Object
Creating a Trade Calendar Object
Copying a Trade Calendar Object

Business Register
SAP Data Maintenance by Vistex, Pricing option for SAP S/4HANA by Vistex for SAP S/4HANA
Application Help – Version: 1.0 – Final
December 12, 2019
© 2019 Vistex, Inc. All Rights Reserved.
© 2019 SAP SE or an SAP affiliate company. All rights reserved.
Maintaining a Trade Calendar Object
Deleting a Trade Calendar Object
3.9.3 Trade Calendar Maintenance Workbench
3.9.3.1 Definition
Use the Trade Calendar Maintenance Workbench to define the trade calendars that can be viewed in
the Trade Calendar. Each calendar is assigned a time scale and one or multiple views.
3.9.3.2 Access
Transaction code: /IRM/GTCM
3.9.3.3 Structure
The Trade Calendar Maintenance Workbench screen is organized into the following areas:
• Search and Worklist Use the Search and Worklist to view information for selected trade calendars in a grid format. From the grid, click on an trade calendar name to display it in focus in the Work Area.
• Work Area Use the Work Area to maintain the trade calendar in focus. In the standard Vistex implementation, the Work Area contains the following tabs: • Views
• Admin Data
NOTE: Functions accessed from the menu bar apply only to the trade calendar displayed in focus in the
Work Area and do not apply to the data in the Search and Worklist.
IMPORTANT: Because Vistex software is extremely versatile, the user screen may be customized. As a
result, the screen may appear different from the standard screen described in this document.

1909 Pricing Documentation
3.9.3.4 Procedures
Displaying a Trade Calendar
Creating a Trade Calendar
Copying a Trade Calendar
Maintaining a Trade Calendar
Deleting a Trade Calendar
3.9.4 Period Profile Workbench
3.9.4.1 Definition
Use the Period Profile Workbench to create, activate, and maintain global period profiles, which can be
assigned to individual or groups of participants, as well as to agreements and agreement requests.
After you create a period profile, use the Review tab to view periods within a given time period, to make
sure the periods are correctly defined.
NOTE: Only active period profiles are available in the F4 listing in participation, an agreement or an
agreement request.
3.9.4.2 Access
Transaction code: /IRM/GFPM
3.9.4.3 Structure
The Period Profile Workbench screen is organized into the following areas:
• Search and Worklist Use the Search and Worklist to view selected period profiles in a grid format. From the grid, click on period profile number to display that period profile in focus in the Work Area.
• Work Area Use the Work Area to maintain one period profile. In the standard Vistex implementation, the Work Area contains the following tabs:
Business Register
SAP Data Maintenance by Vistex, Pricing option for SAP S/4HANA by Vistex for SAP S/4HANA
Application Help – Version: 1.0 – Final
December 12, 2019
© 2019 Vistex, Inc. All Rights Reserved.
© 2019 SAP SE or an SAP affiliate company. All rights reserved.
• Periods
• Review
• Admin Data
NOTE: Functions accessed from the menu bar apply only to the period profile displayed in focus in the
Work Area and do not apply to the data in the Search and Worklist.
3.9.4.4 Procedures
Displaying a Period Profile
Creating a Period Profile
Copying a Period Profile
Activating/Deactivating a Period Profile
Maintaining a Period Profile
Deleting a Period Profile
Reviewing a List of Periods
Assigning a Period Profile to a Composite Agreement
Assigning a Period Profile to a Composite Agreement Request
Assigning a Period Profile to Participants

4 User Experience
4.1 Role Workbench
4.1.1 Definition
Use the Role Workbench to define roles for the UI applications. The role restricts which workspaces a
user who is assigned to the role can enter. When the user navigates to an application in the UI, the
system displays the UI profiles for the application, based on the active role that the user is assigned to.
To access the Fiori application, each user must be assigned to a role.
For each role, assign the following:
• workspaces, from those defined in the Workspace Workbench (/IRM/GWSM) • UI profiles, from those defined in the UI Profile Workbench • search profiles, from those defined in the Search Profile Workbench
NOTE: If using the UI 2.0 Application, you do not need to assign the search profiles to the role. • search domains, from those defined in the Search Domain Workbench
A search domain can be used to execute a freestyle search from the home page of a Fiori application.
• Launchpad attributes, whether to show/hide Favorites and Search functions • users, each of which can be assigned to only one active role (can be assigned to any number of
inactive roles) NOTE: A role must be activated to be used by the UI.
As of Release 1909, Vistex provides pre-delivered configuration for the UI objects. For each UI object,
the configuration includes the data areas, functions, and structures assigned to each application.
4.1.2 Access
Transaction code: /IRM/GURLM
User Experience
SAP Data Maintenance by Vistex, Pricing option for SAP S/4HANA by Vistex for SAP S/4HANA
Application Help – Version: 1.0 – Final
December 12, 2019
© 2019 Vistex, Inc. All Rights Reserved.
© 2019 SAP SE or an SAP affiliate company. All rights reserved.
4.1.3 Structure
The Role Workbench screen is organized into the following areas:
• Search and Worklist Use the Search and Worklist to view selected roles in a grid format. From the grid, click on a role name to display that role in focus in the Work Area.
• Work Area Use the Work Area to maintain one role. In the standard Vistex implementation, the Work Area contains the following tabs: • Workspaces
• UI Profiles
• Search Profiles NOTE: This tab is not used for the UI 2.0 Application
• Search Domains, to restrict the search to certain domains. Assigning a search domain to a rule will activate the freestyle search functionality on the Fiori home page.
• Attributes, to specify the date format (if using the UI 2.0 Application), and indicate whether to show/hide the Search and Favorites on the Fiori home page.
• Users, to assign users to the role.
• Admin Data
NOTE: Functions accessed from the menu bar apply only to the role displayed in focus in the Work Area
and do not apply to the data in the Search and Worklist.
4.1.4 Procedures
Displaying a Role
Creating a Role
Activating a Role
Copying a Role
Maintaining a Role
Deleting a Role
1909 Pricing Documentation
4.2 Workspace Workbench
4.2.1 Definition
GUI transactions and/or URL’s can be added to a workspace individually or imported to the workspace
from a selected SAP role. Links are grouped into sections, and sections may be nested. Sections are
arranged on the page in a two-column format, based on system-assigned or user-assigned column and
row numbers.
Individual workspaces may be combined into composite workspaces. For a composite workspace, all the
links from the individual workspaces will appear in the Launchpad.
As a workspace is designed or changed, the designer can preview, by language, how the sections will
appear in the Launchpad workspace area.
4.2.2 Access
Transaction code: /IRM/GWSM
4.2.3 Structure
The Workspace Workbench screen is organized into the following areas:
• Search and Worklist Use the Search and Worklist to view information for selected workspaces in a grid format. From the grid, click on a workspace name to display that workspace in focus in the Work Area.
• Work Area Use the Work Area to maintain one workspace. For a composite workspace, a grid is used to list the workspaces in the composite. For an individual workspace, a series of tabs is used to design the workspace. In the standard Vistex implementation, the Work Area contains the following tabs: • Links
• Sections
• Preview
• Notes
• Admin Data
NOTE: Functions accessed from the menu bar apply only to the workspace displayed in focus in the
Work Area and do not apply to the data in the Search and Worklist.
User Experience
SAP Data Maintenance by Vistex, Pricing option for SAP S/4HANA by Vistex for SAP S/4HANA
Application Help – Version: 1.0 – Final
December 12, 2019
© 2019 Vistex, Inc. All Rights Reserved.
© 2019 SAP SE or an SAP affiliate company. All rights reserved.
IMPORTANT: Because Vistex software is extremely versatile, the user screen may be customized. As a
result, the screen may appear different from the standard screen described in this document.
4.2.4 Procedures
Displaying a Workspace
Creating an Individual Workspace
Creating a Composite Workspace
Using a Role to Create a Workspace
Copying a Workspace
Deleting a Workspace
4.3 Search Profile Workbench
4.3.1 Definition
Use the Search Profile Workbench to define the search and results pages used in the UI application and
the GUI search screens.
NOTE: A search profile must be activated to be used.
• UI Application: After the UI profiles are defined, they are attached to roles in the Role Workbench (/IRM/GURLM). and workspace links in the Workspace Workbench (/IRM/GWSM). The role controls which workspaces a user can enter. When the user navigates to an application in the UI, the system displays the search profile and UI profile for the application, based on the role.
• GUI Screens: The active search profiles will be listed in the Search Profile dropdown on the search screens.
4.3.2 Access
The Search Profile Workbench transaction code is application specific:

1909 Pricing Documentation
Object Transaction Code
Agreement /IRM/IPAGUSPM
Agreement Request /IRM/IPARUSPM
Direct Agreement /IRM/IPDAUSPM
Deal /IRM/GDLUSPM
Deal Request /IRM/GDLRUSPM
Claim, Claim Validation /IRM/GCRUSPM
Clause /IRM/GCLUSPM
Template /IRM/GTPUSPM
Evaluation /IRM/GEVUSPM
Flexible Group /IRM/GFGUSPM
Transaction, Transaction Validation
/IRM/GRCAUSPM
Composite - Calculation Run and Individual Tracking
/IRM/IPCIUSPM
Master Request, Master Agreement
/IRM/IPPQUSPM
Matrix, Planning, Proforma /IRM/IPMXUSPM
Price Proposal /IRM/GPPUSPM
4.3.3 Structure
The Search Profile Workbench screen is organized into the following areas:
• Search and Worklist Use the Search and Worklist to view selected search profiles in a grid format. From the grid, click on a search profile name to display that search profile in focus in the Work Area.
• Work Area Use the Work Area to maintain one search profile. In the standard Vistex implementation, the Work Area contains the following tabs: • Search
• Result
• Functions
• Admin Data
NOTE: Functions accessed from the menu bar apply only to the search profile displayed in focus in the
Work Area and do not apply to the data in the Search and Worklist.
User Experience
SAP Data Maintenance by Vistex, Pricing option for SAP S/4HANA by Vistex for SAP S/4HANA
Application Help – Version: 1.0 – Final
December 12, 2019
© 2019 Vistex, Inc. All Rights Reserved.
© 2019 SAP SE or an SAP affiliate company. All rights reserved.
4.3.4 Procedures
Displaying a Search Profile
Creating a Search Profile
Converting a Search Profile to a UI Profile
Activating a Search Profile
Copying a Search Profile
Maintaining a Search Profile
Deleting a Search Profile
4.4 UI Profile Workbench
4.4.1 Definition
Use the UI Profile Workbench to define the view and access of data in each UI application.
After UI profiles are defined, they are attached to roles in the Role Workbench (/IRM/GURLM). The role
controls which workspaces a user can enter. When the user navigates to an application in the UI, the
system displays the search profile and UI profile for that application, based on the role.
In each UI profile define the following:
• sections, which are the tabs displayed in the UI • fields, which can be grouped in a tab under separate headings • functions, which are assigned by section or globally for the application
NOTE: A UI profile must be activated to be used by the UI.
4.4.1.1 Live Planner
In Release 1909 Live Planner is included in the UI Profile Workbench. Live planner maintains the rules
and promotions whenever a mapping profile is saved. The live planner is then automatically generated
when the document is created. In order for the $BB/unit to be displayed in the live planner, users must
maintain the value and validity when mapping key figures in the mapping profile. Additionally, users
must flag the Anchor Rule field to combine $BB/unit based on the flexible period to generate a

1909 Pricing Documentation
cumulative record. When the Anchor Rule field is not flagged, the live planner will only display the
existing record.
After adding a promotion to a master agreement’s rule, when the live planner is refreshed in Fiori the
grid will regenerate to include the new rules.
4.4.1.2 Clauses and Templates
In Release 1909, a new Qualifier section was added to the Clause UI profile transactions. Similar to the
Qualifier section in the GUI, this functionality allows users to easily reference information from a
specified object type. The Qualifier section can be added to any existing Clause UI profile.
When setting up the Clause tile in Fiori the workspace for clauses and templates (ZGBLWRKSP) must be
selected. The UI Type is defined as Document, and the Context is set to Object Type and Application.
4.4.2 Access
Price proposal transaction code: /IRM/GPPUPM
Pricing Workbench Transaction code: /IRM/GPRPWUPM
4.4.3 Structure
The UI Profile Workbench screen is organized into the following areas:
• Search and Worklist Use the Search and Worklist to view selected UI profiles in a grid format. From the grid, click on a UI profile name to display that search profile in focus in the Work Area.
• Work Area Use the Work Area to maintain one UI profile. In the standard Vistex implementation, the Work Area contains the following tabs: • Attributes (Composite/Tracking only), to indicate the applicable deployment codes and
versions.
• Qualifiers (not for Claim Validation, Transaction Validation, or Composite Tracking)
• Sections
• Fields
• Functions
• Field Groups

User Experience
SAP Data Maintenance by Vistex, Pricing option for SAP S/4HANA by Vistex for SAP S/4HANA
Application Help – Version: 1.0 – Final
December 12, 2019
© 2019 Vistex, Inc. All Rights Reserved.
© 2019 SAP SE or an SAP affiliate company. All rights reserved.
• Section Groups (Agreement, Agreement Request, Master Request, and Price Proposal only)
• Snapping Header
• Summary View
• Admin Data
NOTE: Functions accessed from the menu bar apply only to the UI profile displayed in focus in the Work
Area and do not apply to the data in the Search and Worklist.
4.4.4 Procedures
Displaying a UI Profile
Creating a UI Profile
Adding an Extension Function
Activating a UI Profile
Copying a UI Profile
Maintaining a UI Profile
Deleting a UI Profile
4.5 Designer
4.5.1 Definition
Initially released in 1709, Designer in Fiori maintains the text/data for clauses with various customization
options.
4.5.1.1 Language
The user has an option to select the language for the clause. The user clicks on the Add button to select
the required language.

1909 Pricing Documentation
4.5.1.2 Full Screen
The user has an option to view the clause data in full screen using the Full Screen icon at the upper right.
The same button is used to exit from full-screen view.
4.5.1.3 Layout
The layout is present on the left side of the Designer tab. It includes layout options for the page and its
components. The components section includes the icons listed below.
Icon Name Definition
TABLE Insert a table to display filed data from a ViZi data source or report (Row & Column)
CROSS TABLE A cross table is a two-way table consisting of columns and rows. It is also known as a pivot table or a multi-dimensional table.
FORM Display data in a top - down format
ADDRESS If you want to display the address as per SAP standard’s we can use the address component.
TEXT AREA to display static text along with the field data
LINK Here we can display hyperlinks in reports
IMAGE We can upload images on to the Page (like company logo)
HORIZONTAL LINE
We can draw a horizontal line in page
SUB FORM Subform is like section to define the multiple elements adjacent to each other after interactive element
ORDERED LIST To display the data in list format with numbering/dots/etc..
As of Release 1909, Designer in Fiori includes two new features.

User Experience
SAP Data Maintenance by Vistex, Pricing option for SAP S/4HANA by Vistex for SAP S/4HANA
Application Help – Version: 1.0 – Final
December 12, 2019
© 2019 Vistex, Inc. All Rights Reserved.
© 2019 SAP SE or an SAP affiliate company. All rights reserved.
4.5.1.4 Watermark
Users can generate a customized watermark for their documentation. Using text or an uploaded image,
users can adjust the size, position, and rotation of the watermark.
4.5.1.5 Flexible Group Explode
When viewing the Selected Fields for a clause in Fiori, there are two options for viewing the flexible
groups:
• In Place – exploded flexible group appears within the same column of the initial table in the document, better suited to smaller flexible groups
• Appendix – shows full flexible group appended to the end of the document
4.6 Display Profile (GUI)
4.6.1 Display Profile for Business Register
NOTE: Vistex has selected SAP Fiori as the design paradigm for its standard user interface. In cases
where the GUI screens described below are used instead of SAP Fiori, display profiles can be used to
control the layout of the GUI screens.
4.6.1.1 Definition
A display profile controls the layout of fields on a document-based application GUI screen. The following
categories of display profiles can be created:
• Header, used to select fields from multiple tabs, and then position and group those fields on the Overview tab. For each selected field, you may indicate whether the field is required or is for display only. As needed, the Overview tab name and icon can be changed.

1909 Pricing Documentation
You also may customize the screen's title bar. When customizing the title, you may include one or more of the following keywords: • &MODE&, to display the current mode (Create, Display or Change)
• &TYPE&, to display the document type's description
• &NUMBER&, to display the document’s number
• Item, used to format the item level ALV grid, including changing the grid title, as well as choosing and renaming the fields to be displayed.
• List, used to format a list, such as a search result list or a document list. • Split List, used to format both the header and item information when the list contains both.
Creating a display profile does not require configuration; display profiles can be created, assigned to
teams/departments or individual users, and activated by power users.
NOTE: List and split list display profiles are applied when the user enters a display profile name in the
Display Profile field on the search screen. Header and item display profiles, however, must be assigned
to the application document type to take effect.
4.6.1.2 Access
Following is a list of the transaction codes used to create display profiles. Below each transaction code
and name are the categories of display profiles that can be created in that transaction, as well as the
transactions where those display profiles can be used.
• /IRM/IPCGDSP – Display Profile for Campaigns Categories: Header and List Used in: Campaign Workbench /IRM/IPCGM
• /IRM/IPBRAGDSP – Display Profile for Agreements Categories: Header and List Used in: Agreement Workbench /IRM/IPBRASP
• /IRM/IPSDADSP - Display Profile for Direct Sales Agreements Categories: Header and List Used in: Direct Sales Agreement Workbench /IRM/IPSDAM
• /IRM/IPPDADSP - Display Profile for Direct Purchasing Agreements Categories: Header and List Used in: Direct Purchasing Agreement Workbench /IRM/IPPDAM
• /IRM/IPBRARDSP – Display Profile for Agreement Request Categories: Header and List Used in: Agreement Request Workbench /IRM/IPBRARM
• /IRM/IPSDARDSP - Display Profile for Direct Sales Agreement Requests Categories: Header and List Used in: Direct Sales Agreement Request Workbench /IRM/IPSDARM
• /IRM/IPPDARDSP - Display Profile for Direct Purchasing Agreement Requests Categories: Header and List Used in: Direct Purchasing Agreement Request Workbench /IRM/IPPDARM
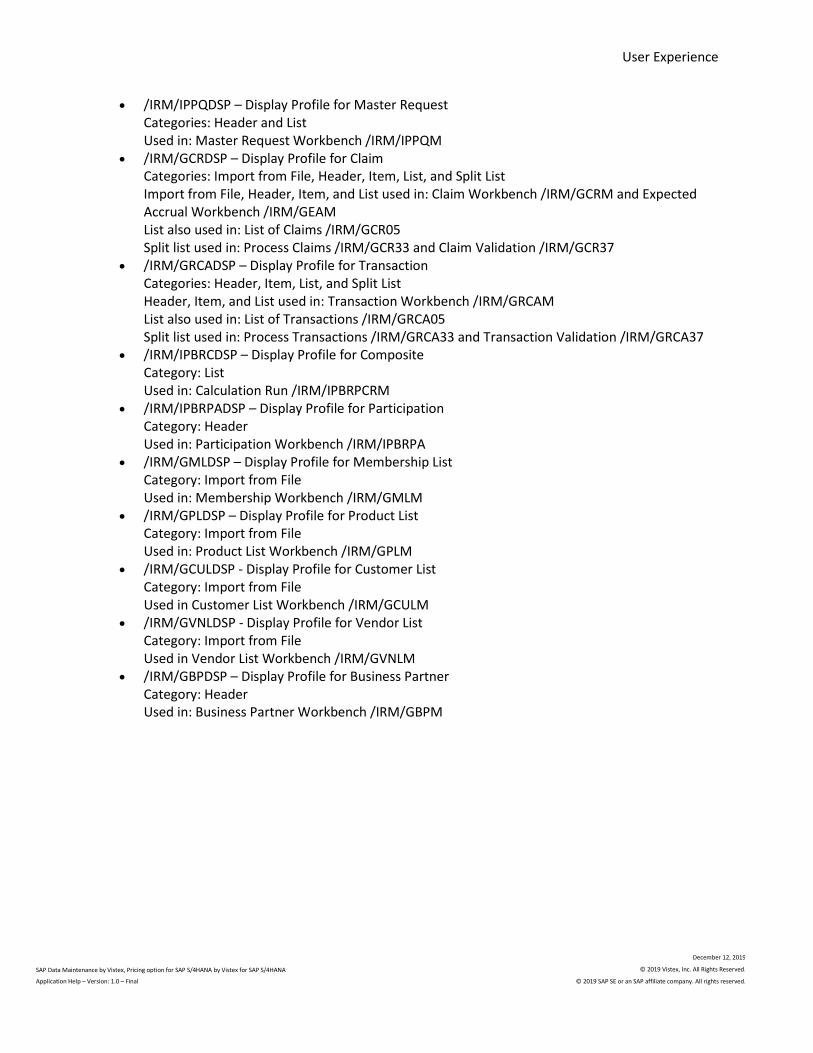
User Experience
SAP Data Maintenance by Vistex, Pricing option for SAP S/4HANA by Vistex for SAP S/4HANA
Application Help – Version: 1.0 – Final
December 12, 2019
© 2019 Vistex, Inc. All Rights Reserved.
© 2019 SAP SE or an SAP affiliate company. All rights reserved.
• /IRM/IPPQDSP – Display Profile for Master Request Categories: Header and List Used in: Master Request Workbench /IRM/IPPQM
• /IRM/GCRDSP – Display Profile for Claim Categories: Import from File, Header, Item, List, and Split List Import from File, Header, Item, and List used in: Claim Workbench /IRM/GCRM and Expected Accrual Workbench /IRM/GEAM List also used in: List of Claims /IRM/GCR05 Split list used in: Process Claims /IRM/GCR33 and Claim Validation /IRM/GCR37
• /IRM/GRCADSP – Display Profile for Transaction Categories: Header, Item, List, and Split List Header, Item, and List used in: Transaction Workbench /IRM/GRCAM List also used in: List of Transactions /IRM/GRCA05 Split list used in: Process Transactions /IRM/GRCA33 and Transaction Validation /IRM/GRCA37
• /IRM/IPBRCDSP – Display Profile for Composite Category: List Used in: Calculation Run /IRM/IPBRPCRM
• /IRM/IPBRPADSP – Display Profile for Participation Category: Header Used in: Participation Workbench /IRM/IPBRPA
• /IRM/GMLDSP – Display Profile for Membership List Category: Import from File Used in: Membership Workbench /IRM/GMLM
• /IRM/GPLDSP – Display Profile for Product List Category: Import from File Used in: Product List Workbench /IRM/GPLM
• /IRM/GCULDSP - Display Profile for Customer List Category: Import from File Used in Customer List Workbench /IRM/GCULM
• /IRM/GVNLDSP - Display Profile for Vendor List Category: Import from File Used in Vendor List Workbench /IRM/GVNLM
• /IRM/GBPDSP – Display Profile for Business Partner Category: Header Used in: Business Partner Workbench /IRM/GBPM
1909 Pricing Documentation
4.6.2 Pricing Display Profiles
NOTE: Vistex has selected SAP Fiori as the design paradigm for its standard user interface. In cases
where the GUI screens described below are used instead of SAP Fiori, display profiles can be used to
control the layout of the GUI screens.
4.6.2.1 Definition
A display profile controls the layout of fields on a document-based application GUI screen. The following
categories of display profiles can be created:
• Import from File, used to specify the fields that will appear in the Import from File dialog window.
• Header, used to select fields from multiple tabs, and then position and group those fields on the Overview tab. For each selected field, you may indicate whether the field is required or is for display only. As needed, the Overview tab name and icon can be changed. You also may customize the screen's title bar. When customizing the title, you may include one or more of the following keywords: • &MODE&, to display the current mode (Create, Display or Change)
• &TYPE&, to display the document type's description
• &NUMBER&, to display the document’s number
• Item, used to format the item level ALV grid, including changing the grid title, as well as choosing and renaming the fields to be displayed.
• List, used to format a list, such as a search result list or a document list. • Split List, used to format both the header and item information when the list contains both.
Creating a display profile does not require configuration; display profiles can be created, assigned to
teams/departments or individual users, and activated by power users.
NOTE: List and split list display profiles are applied when the user enters a display profile name in the
Display Profile field on the search screen. Header and item display profiles, however, must be assigned
to the application document type (billback agreement type, chargeback claim type, and so on) to take
effect.
4.6.2.2 Access
Following is a list of the transaction codes used to create display profiles for pricing. Below each
transaction code and name are the categories of display profiles that can be created in that transaction,
as well as the transactions where those display profiles can be used.

User Experience
SAP Data Maintenance by Vistex, Pricing option for SAP S/4HANA by Vistex for SAP S/4HANA
Application Help – Version: 1.0 – Final
December 12, 2019
© 2019 Vistex, Inc. All Rights Reserved.
© 2019 SAP SE or an SAP affiliate company. All rights reserved.
• /IRM/GPRDSP - Display Profile for Pricing Category: Header Used in: Record tab in the Price Record Details
• /IRM/GCTDSP - Display Profile for Catalog Categories: Import from File, Header, Item, and List Used in: Catalog Workbench /IRM/GCTM
• /IRM/GPSDSP - Display Profile for Price Simulation Categories: Import from File, Header, Item, and List Used in: Price Simulation Workbench /IRM/GPSM

5 Vistex Technical
5.1 Enhancements Workbench
5.1.1 Definition
Prior to Release 1909, to implement BAdIs a user must write the ABAP code for the BAdI
implementation in SAP. No functionality existed to implement the BAdI using Vistex Business Script.
Release 1909 includes functionality called "enhancements". An enhancement is a wrapper around the
SAP BAdI implementation transaction, to allow users to write BAdI implementations using either ABAP
or Vistex Business Script.
Two types of enhancements are available:
• Classic The user selects the implementation type. If ABAP, the system transfers to the ABAP Editor; if Business Script, the system transfers to the Business Script Editor. The BAdI is activated from the application toolbar and then cannot be changed. If changes are needed, de-activate the implementation, make the required changes, and then activate the implementation.
• New Multiple BAdI implementations can be created under one enhancement spot. One BAdI can be activated or deleted at a time.
The class name can be either user-defined or proposed by the system.
Existing BAdIs created without enhancements can be converted to enhancements, as desired.
5.1.2 Access
Transaction code: /IRM/GEHM
5.1.3 Structure
The Enhancements Workbench screen is organized into the following areas:

Vistex Technical
SAP Data Maintenance by Vistex, Pricing option for SAP S/4HANA by Vistex for SAP S/4HANA
Application Help – Version: 1.0 – Final
December 12, 2019
© 2019 Vistex, Inc. All Rights Reserved.
© 2019 SAP SE or an SAP affiliate company. All rights reserved.
• Search and Worklist Use the Search and Worklist to view selected enhancements in a grid format. From the grid, click on an enhancement name to display that enhancement in focus in the Work Area.
• Work Area Use the Work Area to maintain one enhancement. In the standard Vistex implementation, the Work Area contains the following tabs: • General
• Methods, to indicate whether the implementation uses ABAP or Business Script, and to access the appropriate code editor.
• Filters, (appears only if there are filters for the BAdI) to select the type of filter for which to provide the implementation.
• Admin Data
NOTE: Functions accessed from the menu bar apply only to the enhancement displayed in focus in the
Work Area and do not apply to the data in the Search and Worklist.
5.1.4 Procedures
Displaying an Enhancement
Converting an Implementation to an Enhancement
Creating an Enhancement
Maintaining an Enhancement
Deleting an Enhancement
5.2 File Submission Workbench
5.2.1 Definition
Use the File Submission Workbench to create file submission entries that can include files from the
following locations:

1909 Pricing Documentation
• desktop (local files), to be uploaded to the path defined in the configured file submission type, OR
• application server files, to be uploaded to the File Store path specified in the entry File submission entries can be used in the file upload transactions, which support the following file
locations:
• Desktop, to upload data from a local file • File Submission, to upload data from one or multiple existing file submission entries. The user
enters individual, multiple, or a range of file submission types, file stores, file references, submitter roles, submitted by, submission dates, and file statuses.
• File Server, to upload data from a specific file on the application server
5.2.2 Access
Transaction code: /IRM/GFSUB
5.2.3 Structure
The File Submission Workbench screen is organized into the following areas:
• Search and Worklist Use the Search and Worklist to view selected file submission entries in a grid format. From the grid, click on a file submission entry to display it in focus in the Work Area.
• Work Area Use the Work Area to create a file submission entry.
NOTE: Functions accessed from the menu bar apply only to the file submission entry displayed in focus
in the Work Area and do not apply to the data in the Search and Worklist.
5.2.4 Procedures
Creating a File Submission Entry
Displaying a File Submission Entry

Vistex Technical
SAP Data Maintenance by Vistex, Pricing option for SAP S/4HANA by Vistex for SAP S/4HANA
Application Help – Version: 1.0 – Final
December 12, 2019
© 2019 Vistex, Inc. All Rights Reserved.
© 2019 SAP SE or an SAP affiliate company. All rights reserved.
5.3 Message Class Workbench
5.3.1 Definition
Use Message Class Workbench to create messages that can be assigned to a price policy or formula,
such as alert formulas based on participant date. The system provides two message classes: GMSG1 and
GMSG2. Each class can hold up to 999 user-defined messages.
5.3.2 Access
Transaction code: /IRM/GMSGM
5.3.3 Structure
The Message Class Workbench screen is organized into the following areas:
• Search and Worklist Use the Search and Worklist to view selected message classes in a grid format. From the grid, click on a message class to display it in focus in the Work Area.
• Work Area Use the Work Area to maintain the messages for one message class.
NOTE: Functions accessed from the menu bar apply only to the message class displayed in focus in the
Work Area and do not apply to the data in the Search and Worklist.
5.3.4 Procedures
Displaying Messages for a Message Class
Adding a Message to a Message Class
Changing a Message in a Message Class
Deleting a Message from a Message Class
1909 Pricing Documentation
5.4 Archiving
5.4.1 Agreement and Pricing Archiving
5.4.1.1 Definition
The following objects can be archived:
• Agreements • Agreement Requests • Master Requests • Price Proposals
5.4.1.2 Configuration
Before the first use of an archiving object, check the following Vistex application-specific Archiving
configuration, which is used to set the requirements for archiving.
• For agreements, use Agreement Archiving Control /IRM/0IPAGR21 Use the parameters to set the residence time for every combination of sales organization and agreement type.
• For agreement requests, use Agreement Request Archiving Control /IRM/0IPAR21 Use the parameters to set the residence time for every combination of sales organization and agreement request type.
• For master requests, use Master Request Archiving Control /IRM/0GPP21 Use the parameters to set the residence time for every combination of sales organization and master request type.
• For price proposals, use Price Proposal Archiving Control /IRM/0GPP21 Use the parameters to set the residence time for every combination of sales organization and price proposal type.

Vistex Technical
SAP Data Maintenance by Vistex, Pricing option for SAP S/4HANA by Vistex for SAP S/4HANA
Application Help – Version: 1.0 – Final
December 12, 2019
© 2019 Vistex, Inc. All Rights Reserved.
© 2019 SAP SE or an SAP affiliate company. All rights reserved.
5.4.2 Bucket Archiving
5.4.2.1 Definition
Buckets can be archived to reduce the volume of data in the database tables by writing the data to an
archive file outside the database.
5.4.2.2 Configuration
Before archiving buckets, in Archiving configuration access the Setup Archiving Control for Buckets
transaction, which is used to set the requirements for archiving. Enter values in the following fields:
• Bucket Type List the bucket types that will be archived.
• Residence Time Set the residence time in days for each listed bucket type.
5.4.2.3 Archiving Process
The archiving process contains the following steps:
• Set the Completion Status The Set Completion Status is set using the (application specific) transaction Process Buckets of Business Registers /IRM/IPBCK15. Only buckets that are set as complete will be archived.
• Pre-processing Checks whether the buckets can be archived. From the SARA transaction, enter the Archiving Object /IRM/IPBCK and select the Preprocess
action. Enter a variant and maintain the Start Date and Spool Parameters. Click on the Execute button.
• Write Copies the existing database tables and creates the archive files. Deletion of the archived data also occurs when the Write report is executed, unless the Delete With Test Variant checkbox is checked in the Write report. From the SARA transaction, enter the Archiving Object /IRM/IPBCK and select the Write action.
Enter a variant and maintain the Start Date and Spool Parameters. Click on the Execute button.

1909 Pricing Documentation
• Read Creates a report used to read the archived buckets. From the SARA transaction, enter the Archiving Object /IRM/IPBCK and select the Read action.
Click on the Execute button. Enter the bucket(s) to be read and click on . Select the files
to be displayed and click . • Delete
Deletes the archived data from the database, if you chose not to delete the data in the Write program. From the SARA transaction, enter the Archiving Object /IRM/IPBCK and select the Delete action.
Maintain the Start Date and Spool Parameters. Click on the Execute button.
5.4.3 Composite Archiving
5.4.3.1 Definition
The following composite objects can be archived:
• Calculation Run • Deployment Code
5.4.3.2 Calculation Run
Before archiving a calculation run, check that any dependent or posting documents related to the
calculation run are archived.
5.4.3.2.1 Setting the Completion Status
The Set/Reset Completion Status program is run using the transaction code SE38.
In SE38, run the program /IRM/IPPCR_CSTAT_UPDATE. Enter the selection criteria, and in the
Completion Status section select either the Set or Reset option. When you select the Set option, the
system checks the Residence Time, defined in the SARA transaction, to determine whether the

Vistex Technical
SAP Data Maintenance by Vistex, Pricing option for SAP S/4HANA by Vistex for SAP S/4HANA
Application Help – Version: 1.0 – Final
December 12, 2019
© 2019 Vistex, Inc. All Rights Reserved.
© 2019 SAP SE or an SAP affiliate company. All rights reserved.
calculation run status can be set. After the completion status is set to Complete, the system does not
allow changes to the calculation run, unless the completion status is reset.
5.4.3.2.2 Archiving a Calculation Run
The Archiving Calculation Run program is run using the transaction code SE38.
In SE38, run the Write program /IRM/IPPCR_ARCH_WRITE. Two modes are available:
• Test Mode, which is used for testing purposes only. It lists all the tables for the specific calculation run and indicates whether the calculation run can be archived.
• Production Mode, which is used to archive the calculation run. Execute the program in background.
5.4.3.3 Deployment Codes
Before archiving a deployment code, check the following:
• Calculation runs related to the deployment code should be archived. • Posting documents (BKPF documents) related to the deployment code should be archived.
5.4.3.3.1 Setting the Completion Status
The Set/Reset Completion Status program is run using the transaction code SE38.
In SE38, run the program /IRM/IPCI_CSTAT_UPDATE. Enter the selection criteria, and in the Completion
Status section select the Set option. After the completion status is set to Complete, the system does not
allow changes to the deployment code configuration.
5.4.3.3.2 Archiving a Deployment Code
The Archiving Deployment Code program is run using the transaction code SE38.
In SE38, run the Write program /IRM/IPCI_ARCH_WRITE. Two modes are available:
• Test Mode, which is used for testing purposes only. It lists all the participation and deployment code tables for the specific deployment code, and indicates whether the deployment code can be archived.

1909 Pricing Documentation
• Production Mode, which is used to archive the deployment code. Execute the program in background. All the dependent tables will be deleted and archived. NOTE: To run the delete program manually, check the Del. with Test Vart flag. Run the /IRM/IPCI_ARCH_DELETE report using the transaction code SE30.
5.4.4 IP Archiving
5.4.4.1 Definition
The following objects can be archived:
• /IRM/GCR Claims • /IRM/IPBB Billback Documents • /IRM/IPCB Chargeback Documents • /IRM/IPSI Sales Incentive Documents • /IRM/IPCR Sales Rebate Documents • /IRM/IPPR Purchasing Rebate Documents
The archiving process begins with a preprocessing step that sets the documents' Completion Status as
eligible for processing, but does not delete any data from the database. Only documents that are set as
complete will be archived.
The Write program copies the existing database tables and creates the archive files, then the Delete
program deletes the data from the database.
5.4.4.2 Configuration
Before the first use of an archiving object, check the Vistex application-specific Archiving configuration,
which is used to set the requirements for archiving. The following input fields are available:
• Sales organization • Document type, such as claim type for claims • Residence time for a document in days
Use these parameters to set the residence time for every combination of sales organization and document type (such as claim type, for claims).
• FORM routine number If you have defined an additional check routine for a combination of sales organization and document type (such as claim type for claims), you can enter the number of the check routine.
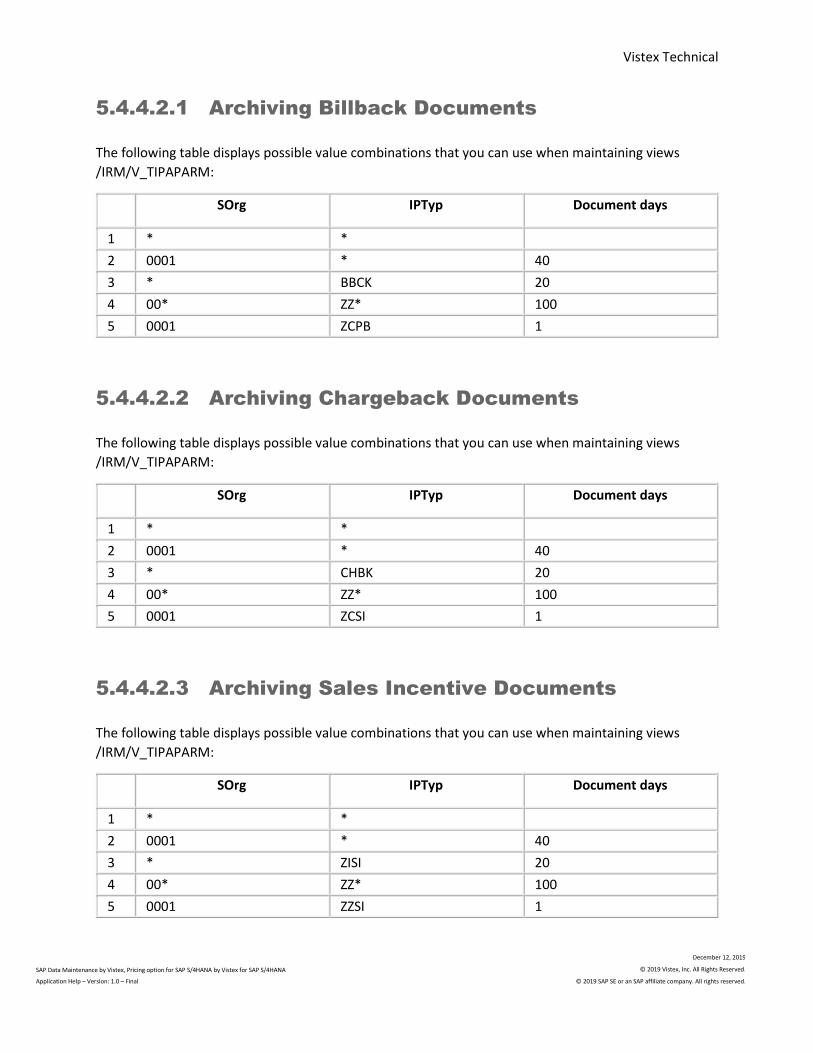
Vistex Technical
SAP Data Maintenance by Vistex, Pricing option for SAP S/4HANA by Vistex for SAP S/4HANA
Application Help – Version: 1.0 – Final
December 12, 2019
© 2019 Vistex, Inc. All Rights Reserved.
© 2019 SAP SE or an SAP affiliate company. All rights reserved.
5.4.4.2.1 Archiving Billback Documents
The following table displays possible value combinations that you can use when maintaining views
/IRM/V_TIPAPARM:
SOrg IPTyp Document days
1 * *
2 0001 * 40
3 * BBCK 20
4 00* ZZ* 100
5 0001 ZCPB 1
5.4.4.2.2 Archiving Chargeback Documents
The following table displays possible value combinations that you can use when maintaining views
/IRM/V_TIPAPARM:
SOrg IPTyp Document days
1 * *
2 0001 * 40
3 * CHBK 20
4 00* ZZ* 100
5 0001 ZCSI 1
5.4.4.2.3 Archiving Sales Incentive Documents
The following table displays possible value combinations that you can use when maintaining views
/IRM/V_TIPAPARM:
SOrg IPTyp Document days
1 * *
2 0001 * 40
3 * ZISI 20
4 00* ZZ* 100
5 0001 ZZSI 1

1909 Pricing Documentation
5.4.4.2.4 Archiving Sales Rebate Documents
The following table displays possible value combinations that you can use when maintaining views
/IRM/V_TIPAPARM:
SOrg IPTyp Document days
1 * *
2 0001 * 40
3 * STRB 20
4 00* ZZ* 100
5 0001 ZCR1 1
5.4.4.2.5 Archiving Claim Documents
The following table displays possible value combinations that you can use when maintaining views
/IRM/V_TIPAPARM:
SOrg IPTyp Document days
1 * *
2 0001 * 40
3 * STRB 20
4 00* ZZ* 100
5 0001 ZGCR 1
5.4.4.2.6 Archiving Purchasing Rebate Documents
The following table displays possible value combinations that you can use when maintaining views
/IRM/V_TIPAPARM:
SOrg IPTyp Document days
1 * *
2 0001 * 40
3 * PVRB 20
4 00* ZZ* 100
5 0001 ZPR1 1
Vistex Technical
SAP Data Maintenance by Vistex, Pricing option for SAP S/4HANA by Vistex for SAP S/4HANA
Application Help – Version: 1.0 – Final
December 12, 2019
© 2019 Vistex, Inc. All Rights Reserved.
© 2019 SAP SE or an SAP affiliate company. All rights reserved.
5.5 Business Script
5.5.1 Business Script Overview
5.5.1.1 Definition
Business Script is a business user scripting language created by Vistex. It contains pre-populated
functions to perform calculations and lookups.
Use Business Script to perform the following:
• Configure business rules, as needed • Define new validations, based on emerging issues • Create pricing or calculation formulas to reflect new strategies
The Business Script Workbench (/VTA/BSEM) can be used to create and maintain global formulas. In
addition, the Business Script Editor is integrated into the following transactions:
• IP Transactions: • Agreement Policy Workbench (/IRM/IPAGPLM), from the Calculation tab
• Composite Workbench (/IRM/IPCWB) or composite configuration Used for alerts, component formulas, subcomponent formulas, version formulas, and ranking formulas. NOTE: Alerts and Version formulas are for display only in the workbench.
• Data Model Configuration (/VTA/BDOCM)
• Matrix Workbench (/IRM/IPMXM), Computation functions from the Functions tab
• Matrix Workbench (IRM/IPMXM), Derivations tab, to override normal derivations at the subset and matrix levels
• Subset Workbench (/IRM/IPMXSM), Derivations tab, to override the matrix level business script derivations
• Participation Workbench (/IRM/IPXXPA), from the Formulas tab

1909 Pricing Documentation
• Business Register Report Workbench (/IRM/IPBRRPM)
• Status Flow Workbench (/IRM/GSFM)
• Pricing Transactions: • Explosion Profile Workbench (/IRM/GPREFM) • Flex Formulas (/IRM/GPRFFM) • Master Formulas (/IRM/GPRMFM) • Price Policy Workbench (/IRM/GPRPLM) • Sheet Formulas and Procedures (/IRM/GPRFPM)
5.5.2 Business Script Editor
5.5.2.1 Definition
Use the Business Script Editor to create business rules and formulas used within a specific application.
Each script is a series of logical steps that can be maintained separately and sequenced.
5.5.2.2 Access
The Business Script Editor is integrated into the following transactions:
• IP Transactions: • Agreement Policy Workbench (/IRM/IPAGPLM), from the Calculation tab
• Composite Workbench (/IRM/IPCWB) or composite configuration Used for alerts, component formulas, subcomponent formulas, version formulas, and ranking formulas. NOTE: Alerts and Version formulas are for display only in the workbench.
• Data Model Configuration (/VTA/BDOCM)
• Matrix Workbench (/IRM/IPMXM), Computation functions from the Functions tab
• Matrix Workbench (IRM/IPMXM), Derivations tab, to override normal derivations at the subset and matrix levels
• Subset Workbench (/IRM/IPMXSM), Derivations tab, to override the matrix level business script derivations
• Participation Workbench (/IRM/IPXXPA), from the Formulas tab

Vistex Technical
SAP Data Maintenance by Vistex, Pricing option for SAP S/4HANA by Vistex for SAP S/4HANA
Application Help – Version: 1.0 – Final
December 12, 2019
© 2019 Vistex, Inc. All Rights Reserved.
© 2019 SAP SE or an SAP affiliate company. All rights reserved.
• Business Register Report Workbench (/IRM/IPBRRPM)
• Status Flow Workbench (/IRM/GSFM)
• Pricing Transactions: • Explosion Profile Workbench (/IRM/GPREFM) • Flex Formulas (/IRM/GPRFFM) • Master Formulas (/IRM/GPRMFM) • Price Policy Workbench (/IRM/GPRPLM) • Sheet Formulas and Procedures (/IRM/GPRFPM)
5.5.2.3 Structure
The Business Script Editor is organized into the following areas:
• Application Toolbar • Script Tabs • Script Logic
5.5.2.3.1 Script Tabs
The Description field appears above the list of tabs. Next to this field is a graphic that indicates whether
the script is active (green) or inactive (red).
• General
• Fields
• Steps, to create the script logic.
• Messages
• Review, to review the logic for all the steps in the script.
• Admin Data
5.5.2.3.2 Script Logic
The script logic screen is used to enter and maintain the logic for each script step. The screen is
organized into the following areas:
• Function Selection
1909 Pricing Documentation
• Logic Entry, used to view the logic.
5.5.2.4 Procedures
Creating a Business Script
Assigning a Global Message to a Business Script
5.5.3 Business Script Workbench
5.5.3.1 Definition
Use the Business Script Workbench to create global business rules and formulas. Business scripts
created in this workbench can be included within application-specific scripts by using the CALL SCRIPT
function.
When activated, the logic in a business script is converted into a function module, which can be viewed
from the Business Script Workbench. All the functional modules generated for a specific application are
assigned to the same function group. Any needed changes should be made to the business script rather
than the function module. Deactivate the entire script, make the changes, and then reactivate the script.
The system will recreate the function module.
5.5.3.2 Access
Transaction code: /VTA/BSEM
5.5.3.3 Structure
The Business Script Workbench is organized into the following areas:
• Search and Worklist Use the Search and Worklist to view a list of selected business scripts in a grid format. From the grid, click on an business script name to display that business script in focus in the Work Area.

Vistex Technical
SAP Data Maintenance by Vistex, Pricing option for SAP S/4HANA by Vistex for SAP S/4HANA
Application Help – Version: 1.0 – Final
December 12, 2019
© 2019 Vistex, Inc. All Rights Reserved.
© 2019 SAP SE or an SAP affiliate company. All rights reserved.
• Work Area Use the Work Area to maintain one business script. In the standard Vistex implementation, the Work Area contains the following tabs: • General
• Fields
• Steps, to create the script logic. From the Steps tab, you access the Script Logic screen.
• Messages
• Review, to review the logic for all the steps in the script.
• Admin Data
5.5.3.4 Procedures
Creating a Business Script
Assigning a Global Message to a Business Script
5.5.4 Global Messages
5.5.4.1 Definition
Use Global Messages to create custom global messages specifically for business scripts. These messages
contain their own numbering. You can either enter this transaction directly or transfer from the business
script editor/workbench from the Messages tab.
After a global message is created, it can be added to the business script using the Insert button on the
Messages tab in the business script editor/workbench.
5.5.4.2 Access
Transaction code: /IRM/BMSM

1909 Pricing Documentation
5.5.4.3 Procedures
Creating a Custom Global Message
Assigning a Global Message to a Business Script


www.sap.com/contactsap
© 2019 SAP SE or an SAP affiliate company. All rights reserved.
No part of this publication may be reproduced or transmitted in any
form or for any purpose without the express permission of SAP SE or
an SAP affiliate company. The information contained herein may be
changed without prior notice.
Some software products marketed by SAP SE and its distributors
contain proprietary software components of other software vendors.
National product specifications may vary.
These materials are provided by SAP SE or an SAP affiliate company
for informational purposes only, without representation or warranty
of any kind, and SAP or its affiliate companies shall not be liable for
errors or omissions with respect to the materials. The only warranties
for SAP or SAP affiliate company products and services are those that
are set forth in the express warranty statements accompanying such
products and services, if any. Nothing herein should be construed as
constituting an additional warranty.
SAP and other SAP products and services mentioned herein as well as
their respective logos are trademarks or registered trademarks of SAP
SE (or an SAP affiliate company) in Germany and other countries. All
other product and service names mentioned are the trademarks of
their respective companies.
Please see https://www.sap.com/about/legal/trademark.html for
additional trademark information and notices.


![] Leveraging Vistex for SAP Implementations Makarand Amte March 31, 2011.](https://static.fdocuments.net/doc/165x107/5a4d1b7a7f8b9ab0599b8ca2/-leveraging-vistex-for-sap-implementations-makarand-amte-march-31-2011.jpg)


