SAP Plant Connectivity (PCo) Meets SAP EWM Material Flow System (MFS)
Configuration Guide
Document Version: 1.1 – FinalDate: February 27, 2017
CUSTOMER
SAP Corporate Connectivity for BankingWestpac
Configuration Guide CUSTOMER
SAP Corporate Connectivity for BankingConfiguration Guide – Version: 1.1 – Final
February 27, 2017© 2017 SAP SE or an SAP affiliate company. All rights reserved. 2
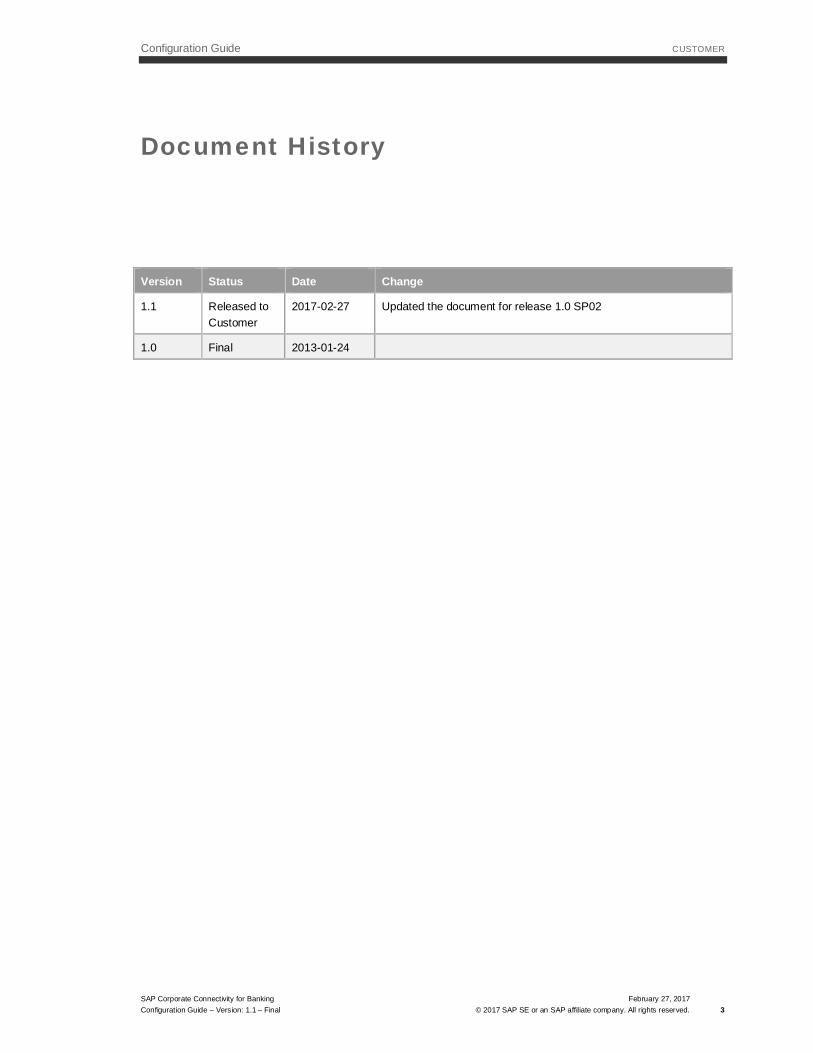
Typographic Conventions
Type Style Description
Example Words or characters quoted from the screen. These include field names, screen titles,pushbuttons labels, menu names, menu paths, and menu options.
Textual cross-references to other documents.
Example Emphasized words or expressions.
EXAMPLE Technical names of system objects. These include report names, program names, transactioncodes, table names, and key concepts of a programming language when they are surroundedby body text, for example, SELECT and INCLUDE.
Example Output on the screen. This includes file and directory names and their paths, messages,names of variables and parameters, source text, and names of installation, upgrade anddatabase tools.
Example Exact user entry. These are words or characters that you enter in the system exactly as theyappear in the documentation.
<Example> Variable user entry. Angle brackets indicate that you replace these words and characters withappropriate entries to make entries in the system.
EXAMPLE Keys on the keyboard, for example, F2 or ENTER .
Configuration Guide CUSTOMER
SAP Corporate Connectivity for BankingConfiguration Guide – Version: 1.1 – Final
February 27, 2017© 2017 SAP SE or an SAP affiliate company. All rights reserved. 3
Document History
Version Status Date Change
1.1 Released toCustomer
2017-02-27 Updated the document for release 1.0 SP02
1.0 Final 2013-01-24
Configuration Guide CUSTOMER
SAP Corporate Connectivity for BankingConfiguration Guide – Version: 1.1 – Final
February 27, 2017© 2017 SAP SE or an SAP affiliate company. All rights reserved. 4
Table of Contents
1 About This Document ....................................................................................................... 61.1 Purpose and Scope ..................................................................................................................................... 61.2 Target Audience.......................................................................................................................................... 61.3 Glossary ..................................................................................................................................................... 61.4 Related Information ..................................................................................................................................... 71.5 Important SAP Notes................................................................................................................................... 7
2 Solution Overview ............................................................................................................. 92.1 Implementation and Configuration – Basic Settings ...................................................................................... 9
2.1.1 Master Data Configuration Details .............................................................................................. 102.1.2 PMW Configuration Details ......................................................................................................... 112.1.3 Finance (FI) Configuration Details............................................................................................... 212.1.4 Integration with BCM .................................................................................................................. 352.1.5 Solution Technical Settings ........................................................................................................ 40
3 Business Scenarios ........................................................................................................ 473.1 Web Service Connectivity .......................................................................................................................... 47
3.1.1 Overview ................................................................................................................................... 473.1.2 Technical System Landscape ..................................................................................................... 473.1.3 Configuration Details – Scenario PINF ........................................................................................ 473.1.4 Configuration Details – Scenario PCNF ...................................................................................... 58
3.2 Role and Authorization Concept for the Solution......................................................................................... 683.2.1 Standard Roles .......................................................................................................................... 683.2.2 Standard Authorization Objects .................................................................................................. 68
4 Operations Information ................................................................................................... 69
5 Monitoring ...................................................................................................................... 705.1.1 Alert Monitoring .......................................................................................................................... 725.1.2 Error Logs .................................................................................................................................. 745.1.3 Workload Monitoring .................................................................................................................. 745.1.4 Interface Monitoring ................................................................................................................... 745.1.5 Background Job Monitoring ........................................................................................................ 74
5.2 Administration and Management ............................................................................................................... 755.2.1 Starting and Stopping ................................................................................................................. 755.2.2 Technical Configuration .............................................................................................................. 755.2.3 Backup and Restore ................................................................................................................... 755.2.4 Periodic Tasks ........................................................................................................................... 755.2.5 User Management...................................................................................................................... 755.2.6 Load Balancing and Scalability ................................................................................................... 755.2.7 High Availability ......................................................................................................................... 75
5.3 Software Change Management ................................................................................................................. 765.4 Troubleshooting ........................................................................................................................................ 76

Configuration Guide CUSTOMER
SAP Corporate Connectivity for BankingConfiguration Guide – Version: 1.1 – Final
February 27, 2017© 2017 SAP SE or an SAP affiliate company. All rights reserved. 5
Configuration Guide CUSTOMER
SAP Corporate Connectivity for BankingConfiguration Guide – Version: 1.1 – Final
February 27, 2017© 2017 SAP SE or an SAP affiliate company. All rights reserved. 6
1 About This Document
1.1 Purpose and Scope
The purpose of this document is to highlight the prerequisites and configuration settings, which need to be applied toleverage standard SAP integration components to support customer requirements.
This configuration information document provides a central starting point for the technical implementation andconfiguration of SAP Corporate Connectivity for Banking. It contains all activities necessary for configuring thesolution.
SAP Corporate Connectivity for Banking supports the following business scenarios:
· CGI ISO2022 V3 Credit and Direct Debit Transfer Payments
· CGI ISO2022 Payment Status Update & Bank Reconciliation Statements
This document mainly provides technical implementation and configuration details for below-given communicationchannels that support above-listed business scenarios.
· Web service Connector
1.2 Target Audience
This document is intended for the following target audiences:
· Consultants
· Partners
· Customers
· System administrators
· Business process owners
· Support specialists
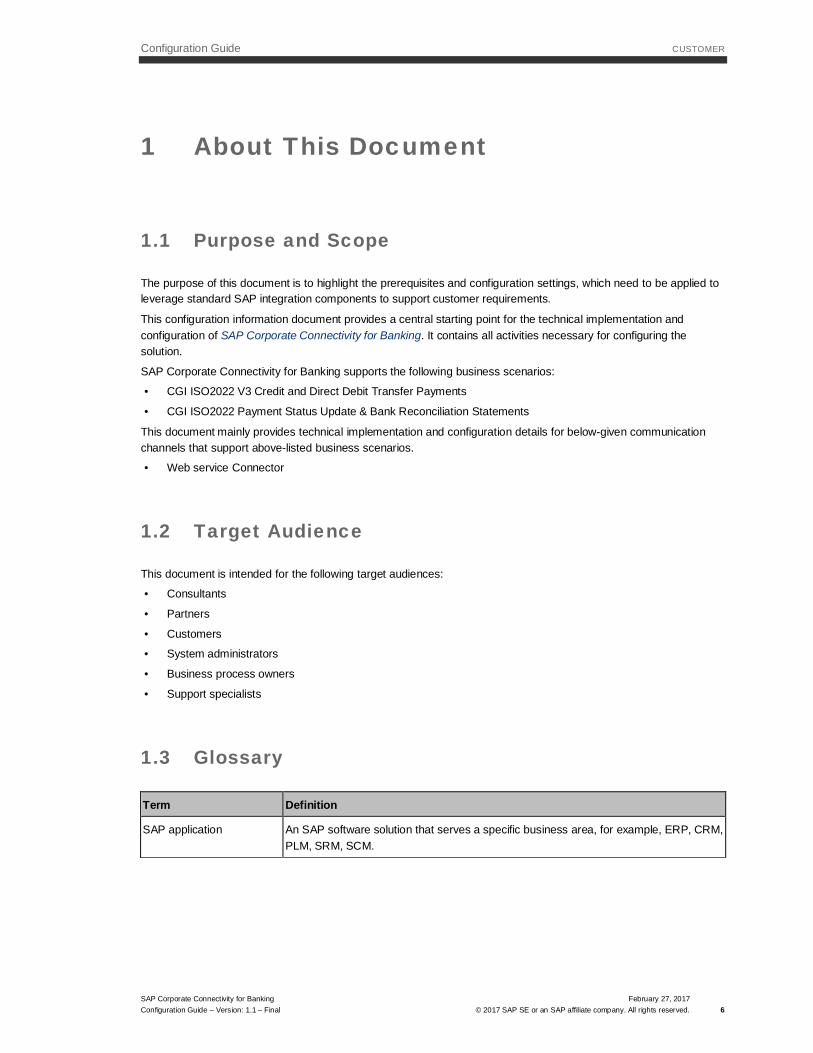
1.3 Glossary
Term Definition
SAP application An SAP software solution that serves a specific business area, for example, ERP, CRM,PLM, SRM, SCM.
Configuration Guide CUSTOMER
SAP Corporate Connectivity for BankingConfiguration Guide – Version: 1.1 – Final
February 27, 2017© 2017 SAP SE or an SAP affiliate company. All rights reserved. 7
Term Definition
Business scenario From a microeconomic perspective, a business scenario is a cycle, which consists ofseveral interconnected logical processes in time.
Typically, a business scenario includes several company departments and involvesother business partners. From a technical point of view, a business scenario needs atleast one SAP application (SAP ERP, SAP SCM, or others) for each cycle and possiblyother third-party systems.
A business scenario is a unit that can be implemented separately and reflects thecustomer’s prospective course of business.
Component The smallest individual unit considered within the Solution Development Lifecycle.
Components are separately produced, delivered, installed and maintained.
1.4 Related Information
· Specification document
· Technical Documentation
· Reference to SAP help portal
· FAQs
· Links to SAP Service Marketplace
· SAP Solution Manager
· Other documentation
1.5 Important SAP Notes
You must ensure that the required software is installed before you start the implementation. You can find theinstallation information in the SAP Notes listed in the table below.
We recommend that you read the SAP Notes before you start to install and implement the solution. The SAPNotes contain the latest information about the installation as well as corrections to the installation information.
Make sure that you have the up-to-date version of each SAP Note, which is available on SAP Service Marketplace athttps://service.sap.com/notes.
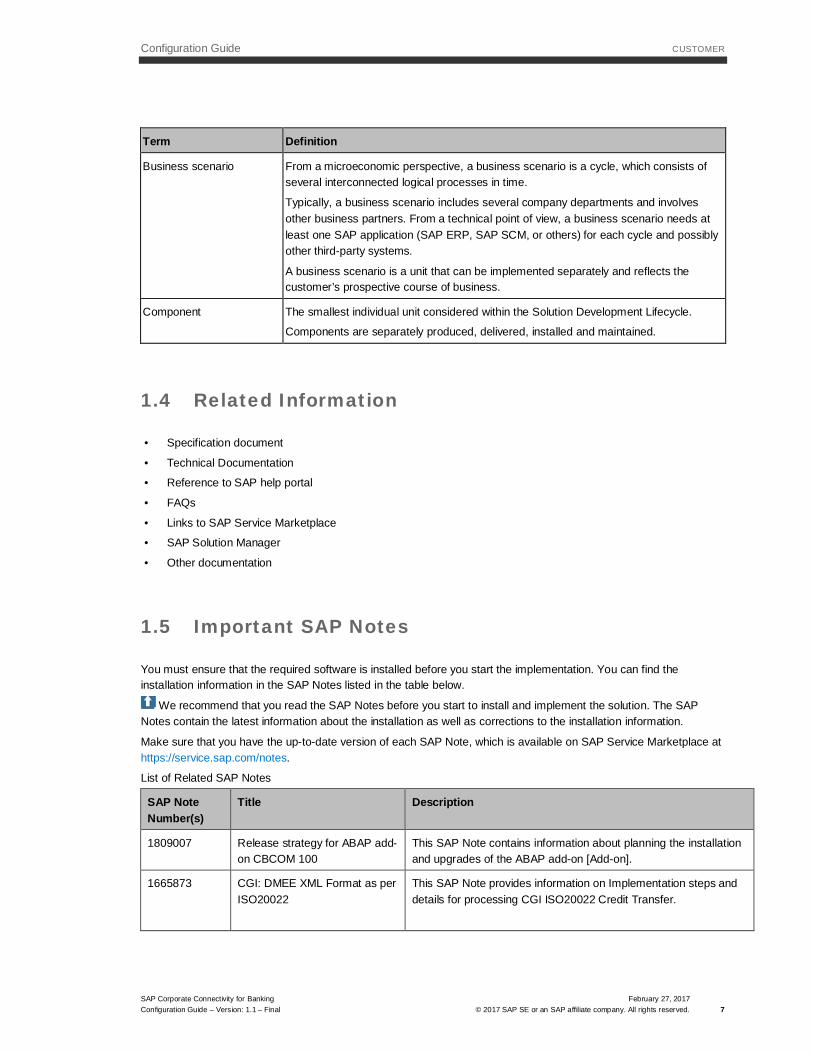
List of Related SAP Notes
SAP NoteNumber(s)
Title Description
1809007 Release strategy for ABAP add-on CBCOM 100
This SAP Note contains information about planning the installationand upgrades of the ABAP add-on [Add-on].
1665873 CGI: DMEE XML Format as perISO20022
This SAP Note provides information on Implementation steps anddetails for processing CGI ISO20022 Credit Transfer.
Configuration Guide CUSTOMER
SAP Corporate Connectivity for BankingConfiguration Guide – Version: 1.1 – Final
February 27, 2017© 2017 SAP SE or an SAP affiliate company. All rights reserved. 8
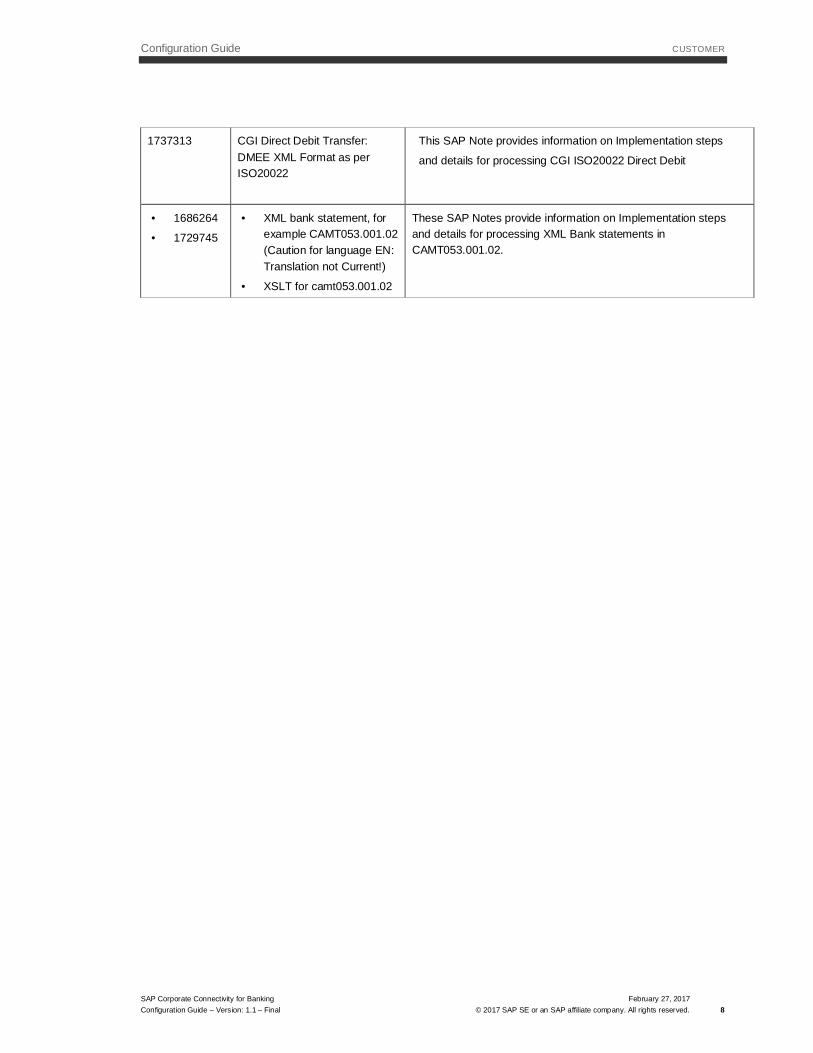
1737313 CGI Direct Debit Transfer:DMEE XML Format as perISO20022
This SAP Note provides information on Implementation steps
and details for processing CGI ISO20022 Direct Debit
· 1686264
· 1729745
· XML bank statement, forexample CAMT053.001.02(Caution for language EN:Translation not Current!)
· XSLT for camt053.001.02
These SAP Notes provide information on Implementation stepsand details for processing XML Bank statements inCAMT053.001.02.

Configuration Guide CUSTOMER
SAP Corporate Connectivity for BankingConfiguration Guide – Version: 1.1 – Final
February 27, 2017© 2017 SAP SE or an SAP affiliate company. All rights reserved. 9
2 Solution Overview
SAP Corporate Connectivity for Banking was developed to exchange messages between your ERP system andWestpac Bank’s PI system as a part of a connectivity solution. Using this connectivity solution, you can send yourpayment instructions to the bank PI for processing. The Bank PI will send status messages back to your SAP ERP toupdate the Payment Run Cockpit. Bank PI will also send the bank statement messages to your system for reconcilingthe payment instructions you have issued to the bank. The solution updates the statuses and makes them availablein the Payment Run Cockpit.
The process flow diagram below shows the SAP Corporate Connectivity for Banking solution with Web servicecommunication channels.
Figure 1: System Landscape
SAP Corporate Connectivity for Banking is designed to function across inter-corporate landscapes.
The solution connects your landscape with the bank’s to process payment information at the bank’s end. Further, italso provides connectivity from the bank to your SAP ERP for processing the Information relevant to post paymentprocessing.
Refer to the Security Configuration Guide provided with solution for more details on the system landscape.
2.1 Implementation and Configuration – Basic Settings
The Configuration Guide is a tool for configuring the SAP system to meet customer requirements.

Configuration Guide CUSTOMER
SAP Corporate Connectivity for BankingConfiguration Guide – Version: 1.1 – Final
February 27, 2017© 2017 SAP SE or an SAP affiliate company. All rights reserved. 10
The Implementation Guide (IMG) covers all steps of the implementation process, the SAP standard (factory)Customizing settings, and the system configuration activities. The hierarchical structure of the IMG is based on theapplication component hierarchy and lists all documentation that is relevant to implementing the SAP system.
This section highlights the prerequisites and configuration settings which need to be applied to leverage standardSAP integration components to support customer requirements.
Westpac requires payments to be transmitted in CGI ISO20022 Pain.001 message format. Customers can leveragethe Payment Medium Workbench tool with DMEE Engine in SAP to generate the required message format.
The PMW/DME functionality can create the appropriate payment file format on the back of a standard paymentproposal and payment run. As part of the configuration in SAP, the payment file format defined in the PMW/DME willbe mapped to a newly-created payment method configured to group all related payments.
As a prerequisite to support the bank's requirements, the following configuration settings are required.
· Master Data Configuration
· FI configuration
· Payment File Configuration
· Integration with BCM
2.1.1 Master Data Configuration Details
All master data (Customer, Vendor, and G/L) configuration settings required to support the processes for paymentswithin SAP should be maintained in the system.
The below-given table lists Information needed to be maintained in customer master and vendor master to providethe requisite Information in payment messages sent to the bank.
Customer / Vendor master Data
ViewField
Mandatory Remarks
Address Data Name X
Country X
Street/housenumber
Postal code/city
Region
PaymentTransactionsView
Bank countryX
Bank keyX Max. 6 digits. To change the length of
bank key, use transaction code OY17
Bank account X
Configuration Guide CUSTOMER
SAP Corporate Connectivity for BankingConfiguration Guide – Version: 1.1 – Final
February 27, 2017© 2017 SAP SE or an SAP affiliate company. All rights reserved. 11
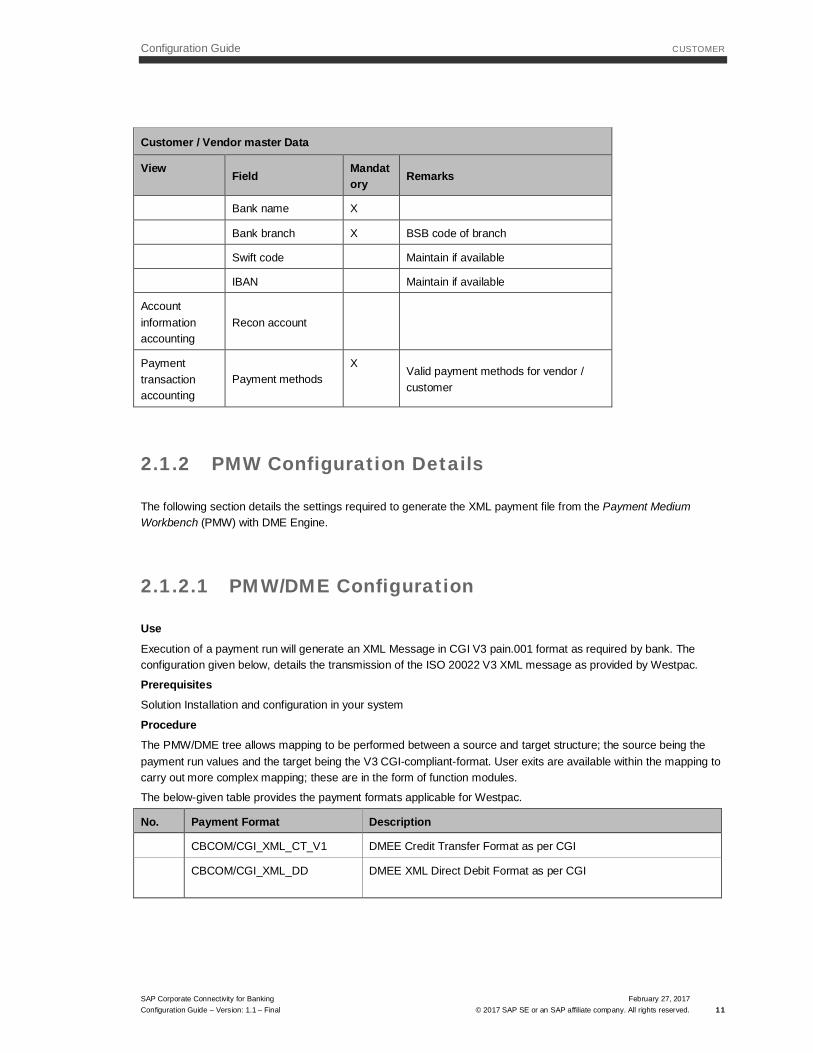
Customer / Vendor master Data
View Field Mandatory Remarks
Bank name X
Bank branch X BSB code of branch
Swift code Maintain if available
IBAN Maintain if available
Accountinformationaccounting
Recon account
Paymenttransactionaccounting
Payment methodsX
Valid payment methods for vendor /customer
2.1.2 PMW Configuration Details
The following section details the settings required to generate the XML payment file from the Payment MediumWorkbench (PMW) with DME Engine.
2.1.2.1 PMW/DME Configuration
Use
Execution of a payment run will generate an XML Message in CGI V3 pain.001 format as required by bank. Theconfiguration given below, details the transmission of the ISO 20022 V3 XML message as provided by Westpac.
PrerequisitesSolution Installation and configuration in your system
ProcedureThe PMW/DME tree allows mapping to be performed between a source and target structure; the source being thepayment run values and the target being the V3 CGI-compliant-format. User exits are available within the mapping tocarry out more complex mapping; these are in the form of function modules.
The below-given table provides the payment formats applicable for Westpac.
No. Payment Format Description
CBCOM/CGI_XML_CT_V1 DMEE Credit Transfer Format as per CGI
CBCOM/CGI_XML_DD DMEE XML Direct Debit Format as per CGI
Configuration Guide CUSTOMER
SAP Corporate Connectivity for BankingConfiguration Guide – Version: 1.1 – Final
February 27, 2017© 2017 SAP SE or an SAP affiliate company. All rights reserved. 12
Step # Description Additional Information
Change View Payment Medium Formats
1. Enter Transaction Code – OBPM1
2. Choose New Entries
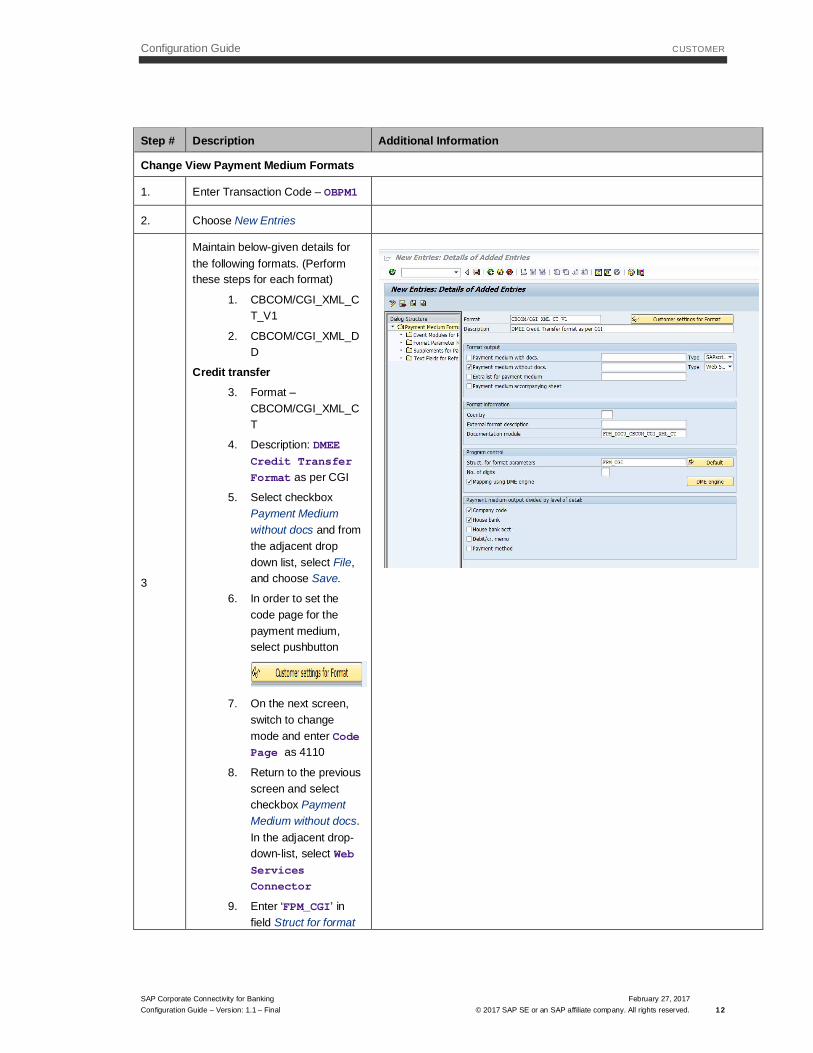
3
Maintain below-given details forthe following formats. (Performthese steps for each format)
1. CBCOM/CGI_XML_CT_V1
2. CBCOM/CGI_XML_DD
Credit transfer3. Format –
CBCOM/CGI_XML_CT
4. Description: DMEECredit TransferFormat as per CGI
5. Select checkboxPayment Mediumwithout docs and fromthe adjacent dropdown list, select File,and choose Save.
6. In order to set thecode page for thepayment medium,select pushbutton
7. On the next screen,switch to changemode and enter CodePage as 4110
8. Return to the previousscreen and selectcheckbox PaymentMedium without docs.In the adjacent drop-down-list, select WebServicesConnector
9. Enter ‘FPM_CGI’ infield Struct for format
Configuration Guide CUSTOMER
SAP Corporate Connectivity for BankingConfiguration Guide – Version: 1.1 – Final
February 27, 2017© 2017 SAP SE or an SAP affiliate company. All rights reserved. 13
Step # Description Additional Information
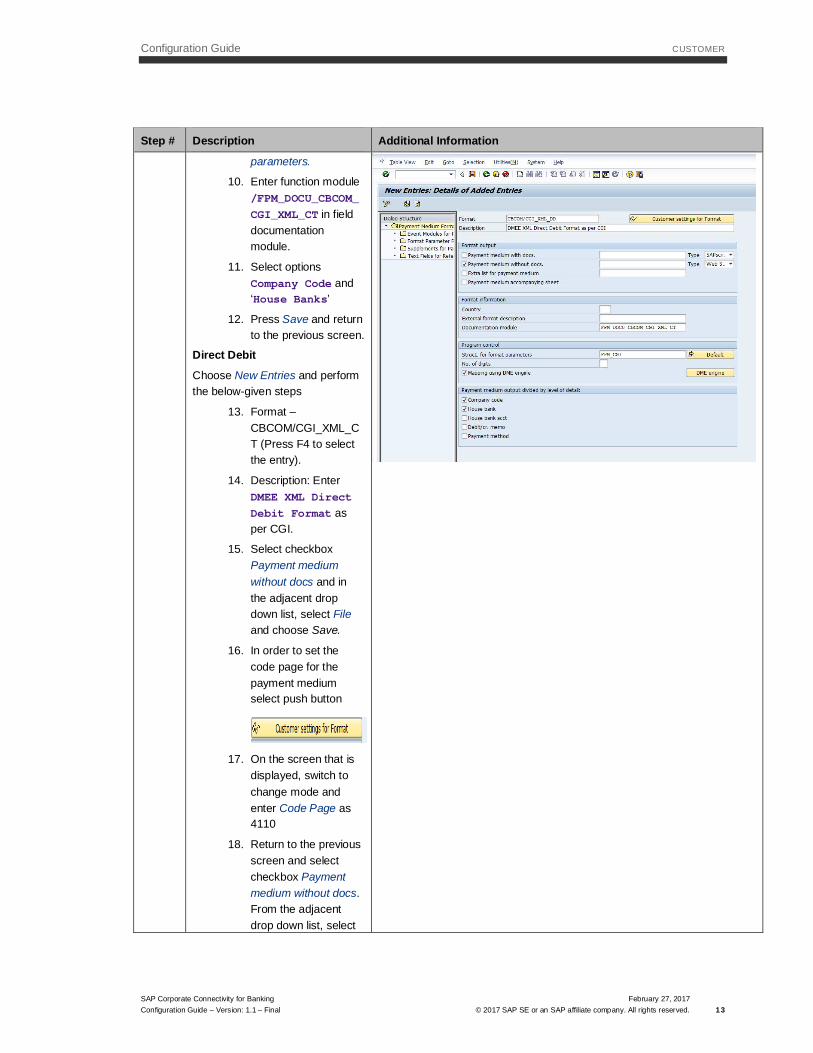
parameters.
10. Enter function module/FPM_DOCU_CBCOM_CGI_XML_CT in fielddocumentationmodule.
11. Select optionsCompany Code and‘House Banks’
12. Press Save and returnto the previous screen.
Direct Debit
Choose New Entries and performthe below-given steps
13. Format –CBCOM/CGI_XML_CT (Press F4 to selectthe entry).
14. Description: EnterDMEE XML DirectDebit Format asper CGI.
15. Select checkboxPayment mediumwithout docs and inthe adjacent dropdown list, select Fileand choose Save.
16. In order to set thecode page for thepayment mediumselect push button
17. On the screen that isdisplayed, switch tochange mode andenter Code Page as4110
18. Return to the previousscreen and selectcheckbox Paymentmedium without docs.From the adjacentdrop down list, select
Configuration Guide CUSTOMER
SAP Corporate Connectivity for BankingConfiguration Guide – Version: 1.1 – Final
February 27, 2017© 2017 SAP SE or an SAP affiliate company. All rights reserved. 14
Step # Description Additional Information
Web ServicesConnector.
19. Enter function module/FPM_DOCU_CBCOM_CGI_XML_CT in fieldDocumentationModule.
20. Enter FPM_CGI in fieldStruct for formatparameters.
21. Select Mappingusing DMEEEngine.
22. Select optionsCompany Code andHouse Banks
23. Press Save and returnto the previous screen.
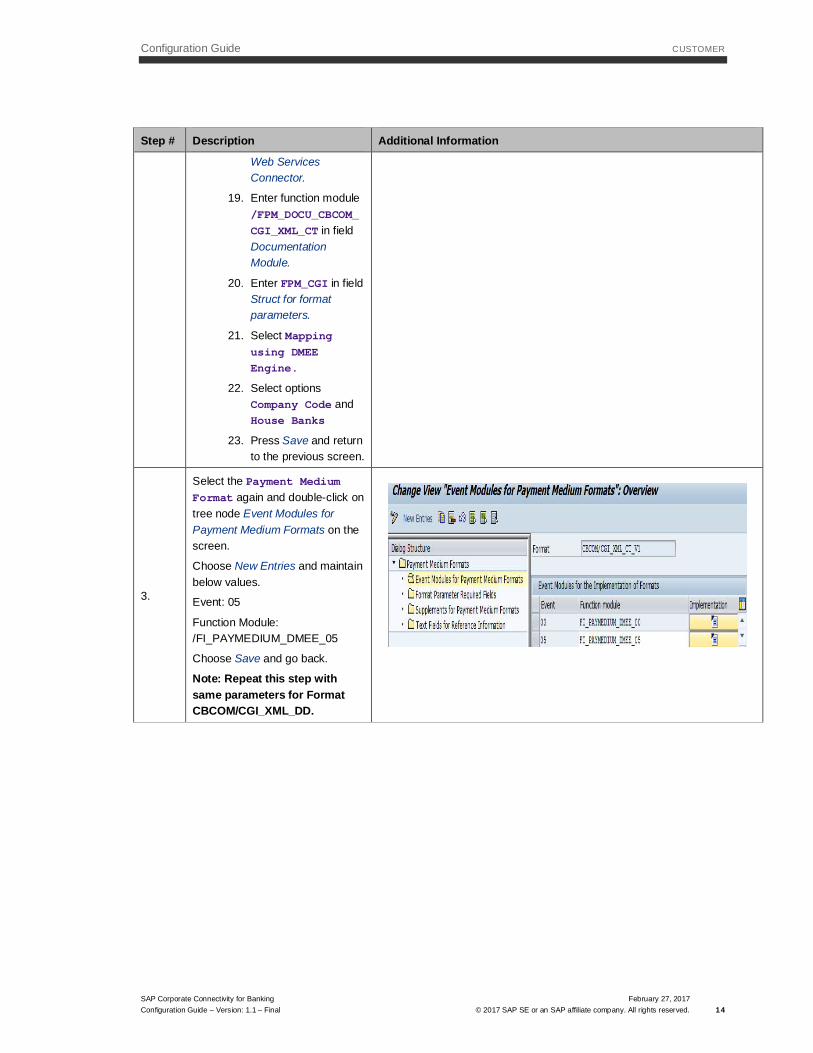
3.
Select the Payment MediumFormat again and double-click ontree node Event Modules forPayment Medium Formats on thescreen.
Choose New Entries and maintainbelow values.
Event: 05
Function Module:/FI_PAYMEDIUM_DMEE_05
Choose Save and go back.
Note: Repeat this step withsame parameters for FormatCBCOM/CGI_XML_DD.
Configuration Guide CUSTOMER
SAP Corporate Connectivity for BankingConfiguration Guide – Version: 1.1 – Final
February 27, 2017© 2017 SAP SE or an SAP affiliate company. All rights reserved. 15
Step # Description Additional Information
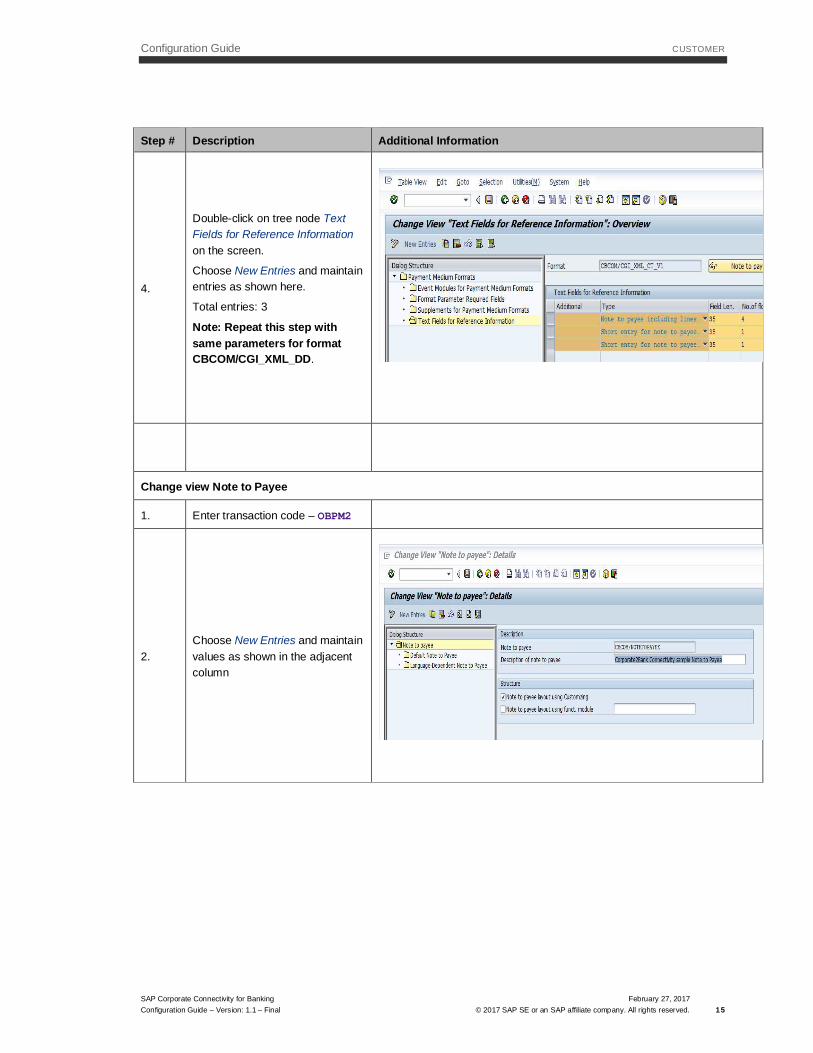
4.
Double-click on tree node TextFields for Reference Informationon the screen.
Choose New Entries and maintainentries as shown here.
Total entries: 3
Note: Repeat this step withsame parameters for formatCBCOM/CGI_XML_DD.
Change view Note to Payee
1. Enter transaction code – OBPM2
2.Choose New Entries and maintainvalues as shown in the adjacentcolumn
Configuration Guide CUSTOMER
SAP Corporate Connectivity for BankingConfiguration Guide – Version: 1.1 – Final
February 27, 2017© 2017 SAP SE or an SAP affiliate company. All rights reserved. 16
Step # Description Additional Information
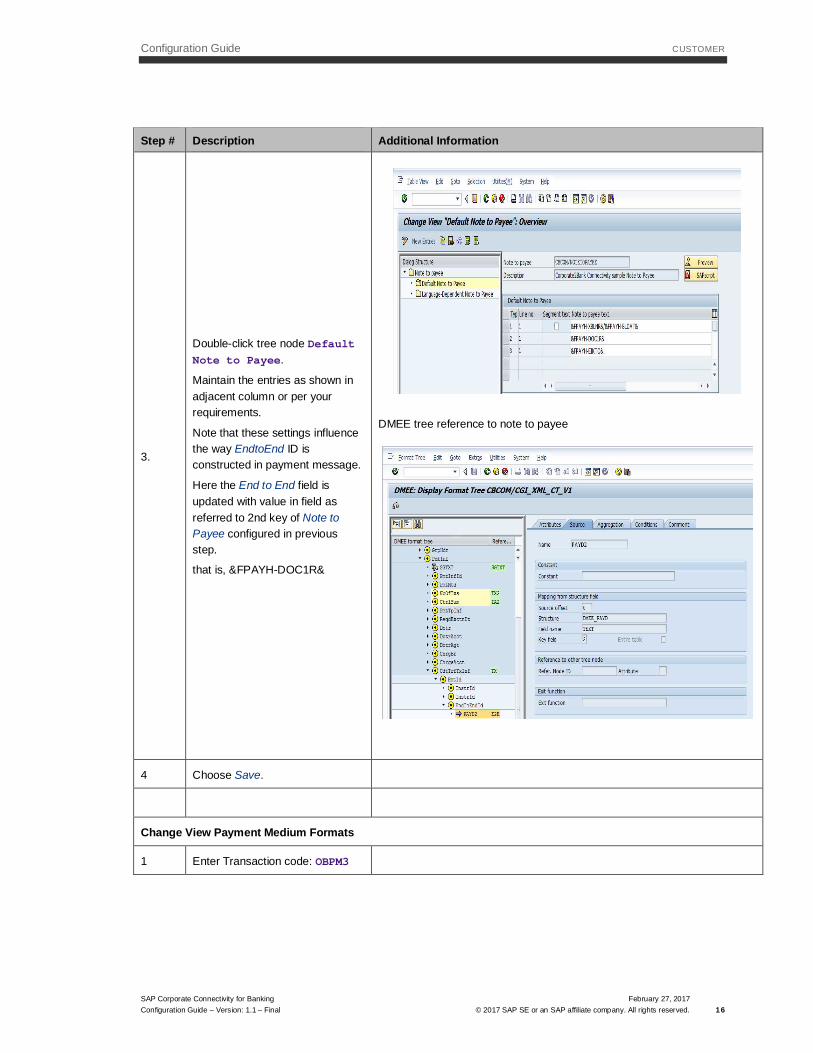
3.
Double-click tree node DefaultNote to Payee.
Maintain the entries as shown inadjacent column or per yourrequirements.
Note that these settings influencethe way EndtoEnd ID isconstructed in payment message.
Here the End to End field isupdated with value in field asreferred to 2nd key of Note toPayee configured in previousstep.
that is, &FPAYH-DOC1R&
DMEE tree reference to note to payee
4 Choose Save.
Change View Payment Medium Formats
1 Enter Transaction code: OBPM3
Configuration Guide CUSTOMER
SAP Corporate Connectivity for BankingConfiguration Guide – Version: 1.1 – Final
February 27, 2017© 2017 SAP SE or an SAP affiliate company. All rights reserved. 17
Step # Description Additional Information
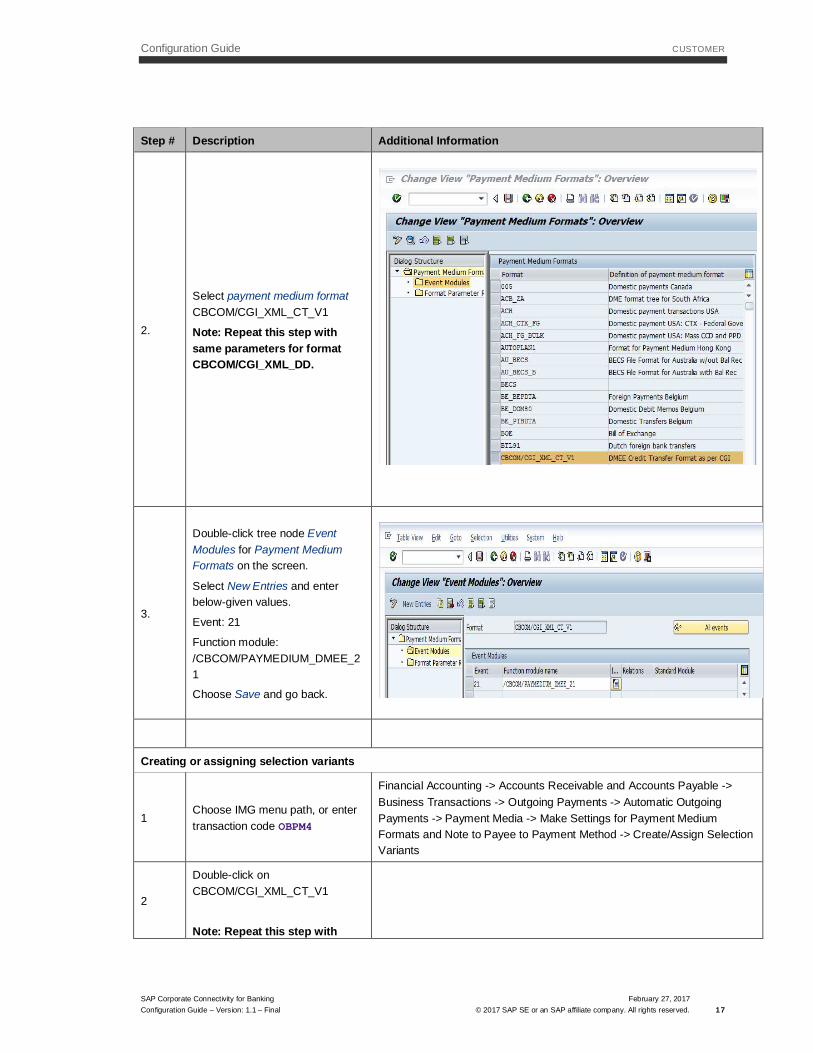
2.
Select payment medium formatCBCOM/CGI_XML_CT_V1
Note: Repeat this step withsame parameters for formatCBCOM/CGI_XML_DD.
3.
Double-click tree node EventModules for Payment MediumFormats on the screen.
Select New Entries and enterbelow-given values.
Event: 21
Function module:/CBCOM/PAYMEDIUM_DMEE_21
Choose Save and go back.
Creating or assigning selection variants
1Choose IMG menu path, or entertransaction code OBPM4
Financial Accounting -> Accounts Receivable and Accounts Payable ->Business Transactions -> Outgoing Payments -> Automatic OutgoingPayments -> Payment Media -> Make Settings for Payment MediumFormats and Note to Payee to Payment Method -> Create/Assign SelectionVariants
2
Double-click onCBCOM/CGI_XML_CT_V1
Note: Repeat this step with
Configuration Guide CUSTOMER
SAP Corporate Connectivity for BankingConfiguration Guide – Version: 1.1 – Final
February 27, 2017© 2017 SAP SE or an SAP affiliate company. All rights reserved. 18
Step # Description Additional Information
same parameters for Format‘CBCOM/CGI_XML_DD’ as well
3
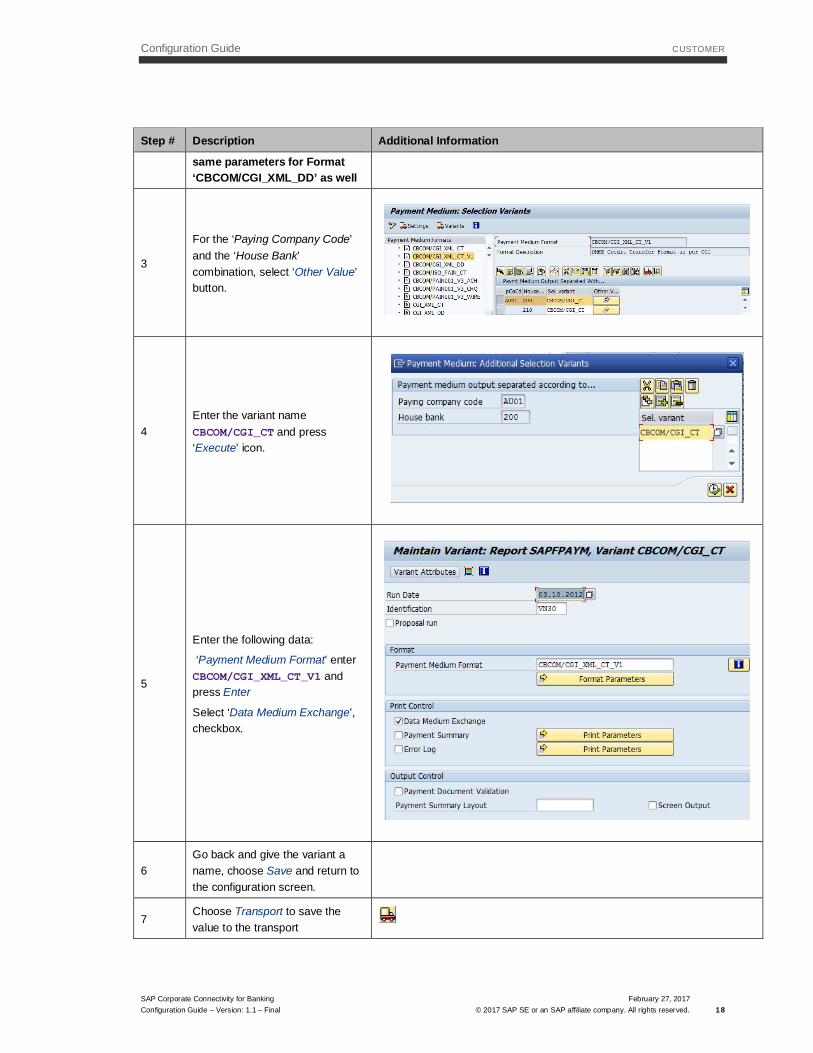
For the ‘Paying Company Code’and the ‘House Bank’combination, select ‘Other Value’button.
4Enter the variant nameCBCOM/CGI_CT and press‘Execute’ icon.
5
Enter the following data:
‘Payment Medium Format’ enterCBCOM/CGI_XML_CT_V1 andpress Enter
Select ‘Data Medium Exchange’,checkbox.
6Go back and give the variant aname, choose Save and return tothe configuration screen.
7Choose Transport to save thevalue to the transport
Configuration Guide CUSTOMER
SAP Corporate Connectivity for BankingConfiguration Guide – Version: 1.1 – Final
February 27, 2017© 2017 SAP SE or an SAP affiliate company. All rights reserved. 19
Step # Description Additional Information
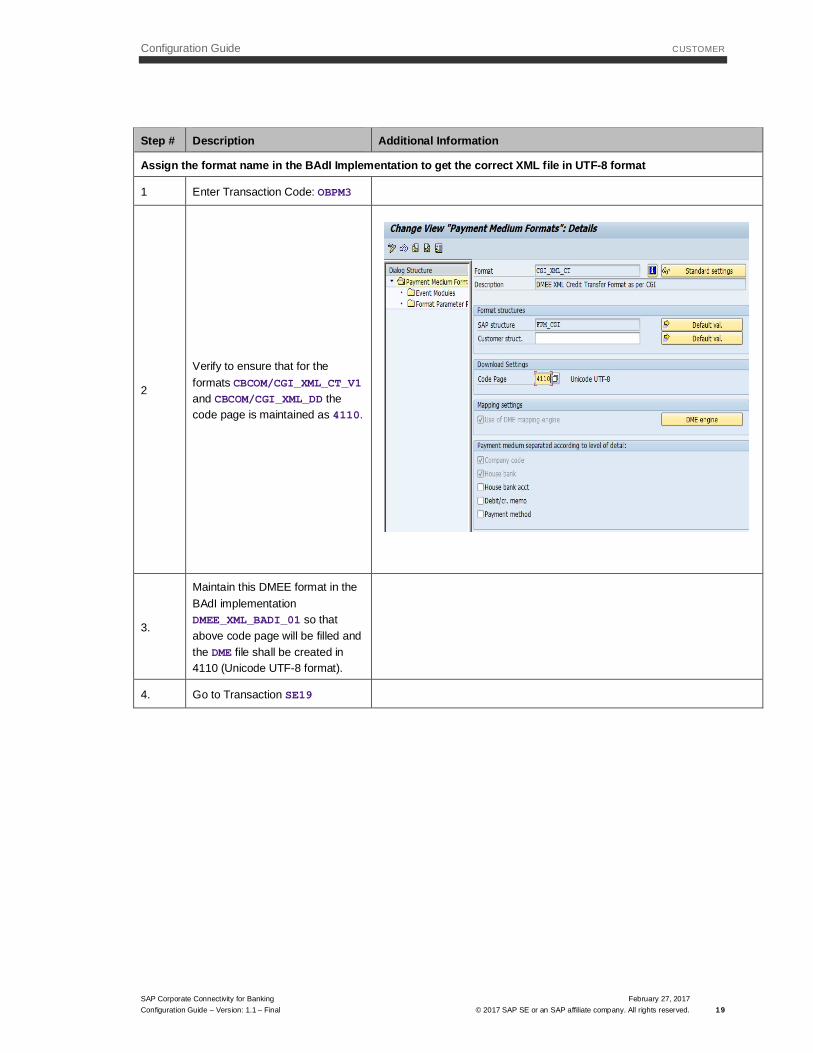
Assign the format name in the BAdI Implementation to get the correct XML file in UTF-8 format
1 Enter Transaction Code: OBPM3
2
Verify to ensure that for theformats CBCOM/CGI_XML_CT_V1and CBCOM/CGI_XML_DD thecode page is maintained as 4110.
3.
Maintain this DMEE format in theBAdI implementationDMEE_XML_BADI_01 so thatabove code page will be filled andthe DME file shall be created in4110 (Unicode UTF-8 format).
4. Go to Transaction SE19
Configuration Guide CUSTOMER
SAP Corporate Connectivity for BankingConfiguration Guide – Version: 1.1 – Final
February 27, 2017© 2017 SAP SE or an SAP affiliate company. All rights reserved. 20
Step # Description Additional Information
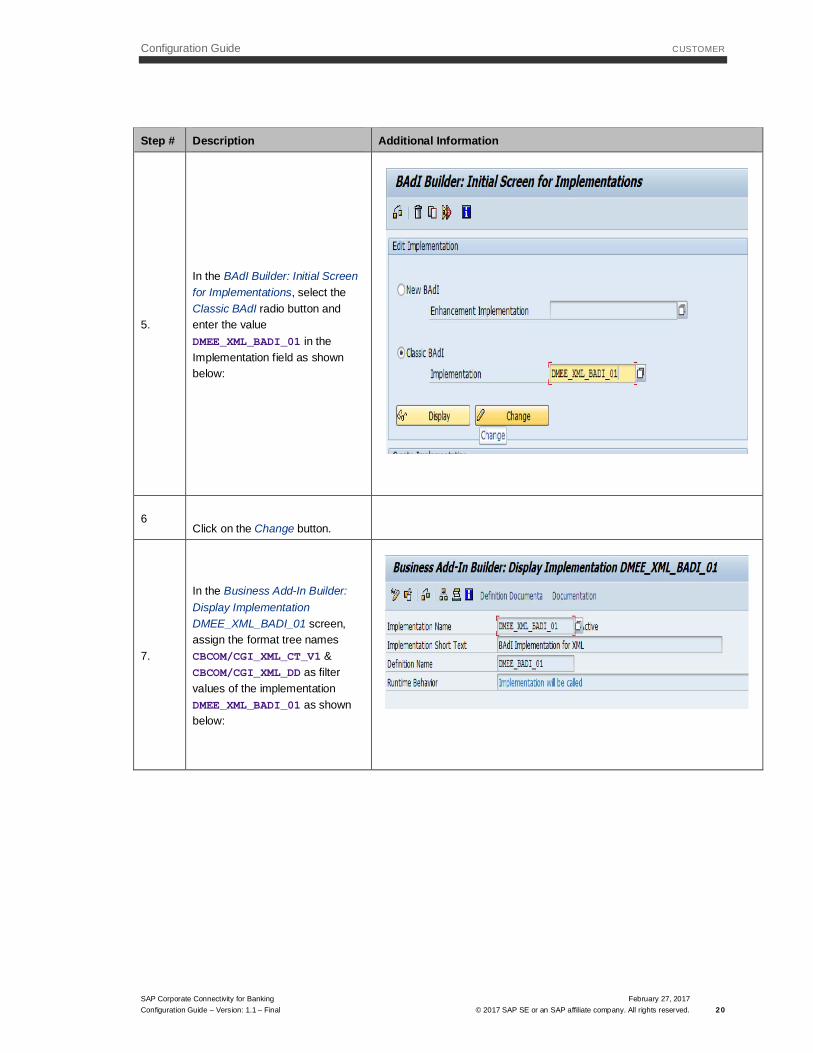
5.
In the BAdI Builder: Initial Screenfor Implementations, select theClassic BAdI radio button andenter the valueDMEE_XML_BADI_01 in theImplementation field as shownbelow:
6Click on the Change button.
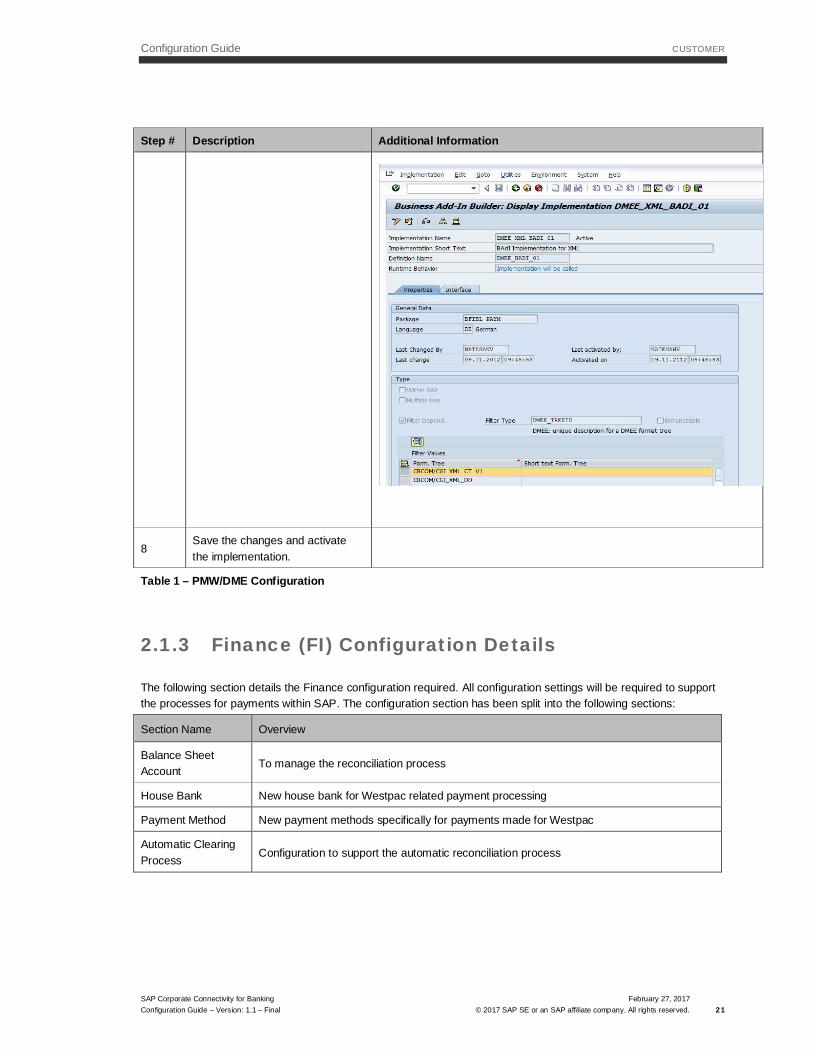
7.
In the Business Add-In Builder:Display ImplementationDMEE_XML_BADI_01 screen,assign the format tree namesCBCOM/CGI_XML_CT_V1 &CBCOM/CGI_XML_DD as filtervalues of the implementationDMEE_XML_BADI_01 as shownbelow:
Configuration Guide CUSTOMER
SAP Corporate Connectivity for BankingConfiguration Guide – Version: 1.1 – Final
February 27, 2017© 2017 SAP SE or an SAP affiliate company. All rights reserved. 21
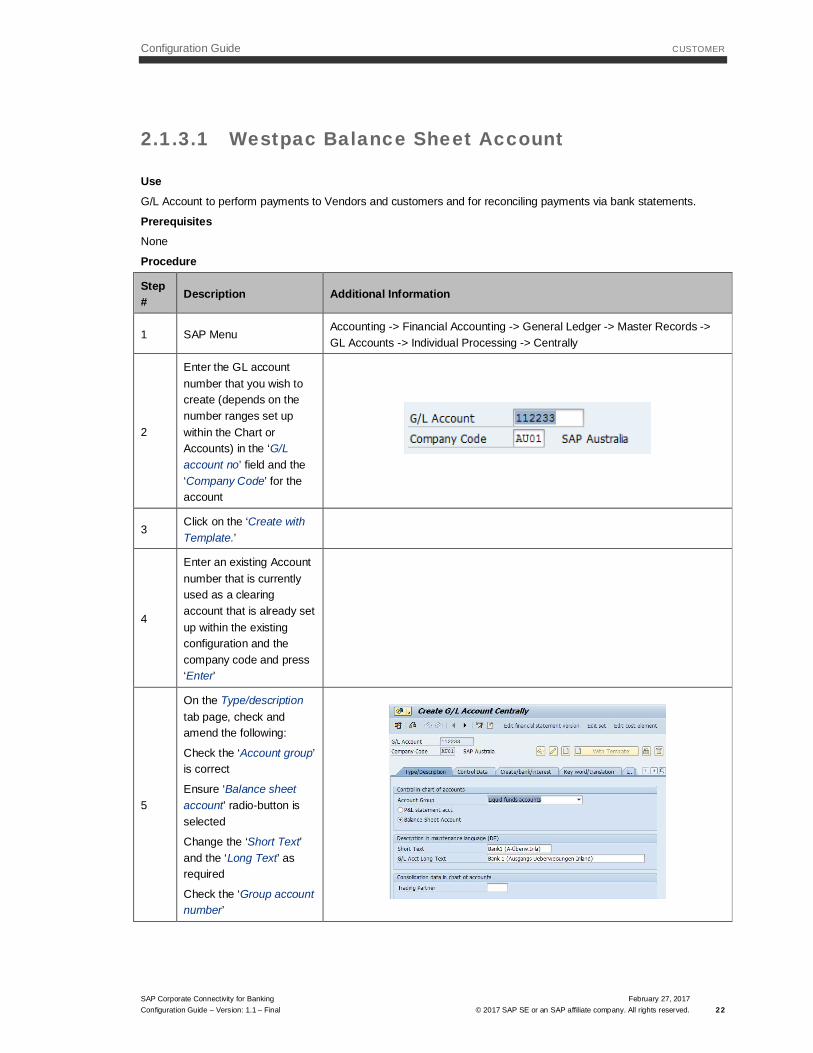
Step # Description Additional Information
8Save the changes and activatethe implementation.
Table 1 – PMW/DME Configuration
2.1.3 Finance (FI) Configuration Details
The following section details the Finance configuration required. All configuration settings will be required to supportthe processes for payments within SAP. The configuration section has been split into the following sections:
Section Name Overview
Balance SheetAccount To manage the reconciliation process
House Bank New house bank for Westpac related payment processing
Payment Method New payment methods specifically for payments made for Westpac
Automatic ClearingProcess Configuration to support the automatic reconciliation process
Configuration Guide CUSTOMER
SAP Corporate Connectivity for BankingConfiguration Guide – Version: 1.1 – Final
February 27, 2017© 2017 SAP SE or an SAP affiliate company. All rights reserved. 22
2.1.3.1 Westpac Balance Sheet Account
UseG/L Account to perform payments to Vendors and customers and for reconciling payments via bank statements.
PrerequisitesNone
Procedure
Step# Description Additional Information
1 SAP MenuAccounting -> Financial Accounting -> General Ledger -> Master Records ->GL Accounts -> Individual Processing -> Centrally
2
Enter the GL accountnumber that you wish tocreate (depends on thenumber ranges set upwithin the Chart orAccounts) in the ‘G/Laccount no’ field and the‘Company Code’ for theaccount
3Click on the ‘Create withTemplate.’
4
Enter an existing Accountnumber that is currentlyused as a clearingaccount that is already setup within the existingconfiguration and thecompany code and press‘Enter’
5
On the Type/descriptiontab page, check andamend the following:
Check the ‘Account group’is correct
Ensure ‘Balance sheetaccount’ radio-button isselected
Change the ‘Short Text’and the ‘Long Text’ asrequired
Check the ‘Group accountnumber’
Configuration Guide CUSTOMER
SAP Corporate Connectivity for BankingConfiguration Guide – Version: 1.1 – Final
February 27, 2017© 2017 SAP SE or an SAP affiliate company. All rights reserved. 23
Step#
Description Additional Information
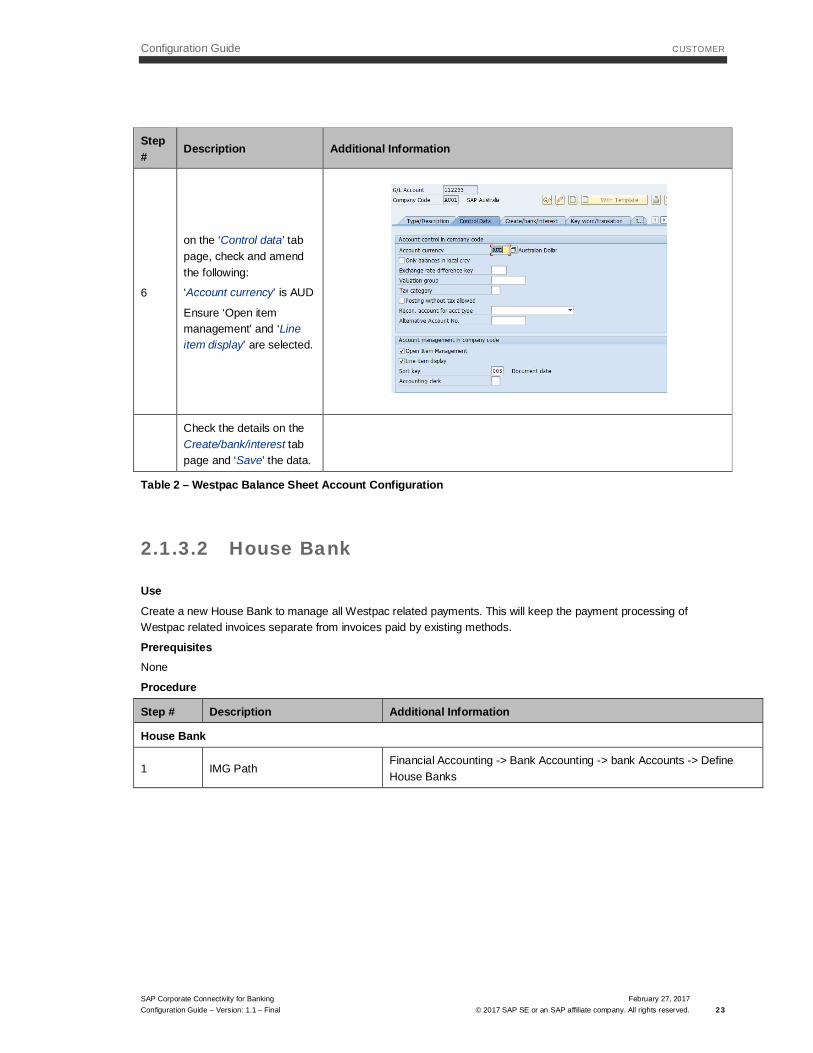
6
on the ‘Control data’ tabpage, check and amendthe following:
‘Account currency’ is AUD
Ensure ‘Open itemmanagement’ and ‘Lineitem display’ are selected.
Check the details on theCreate/bank/interest tabpage and ‘Save’ the data.
Table 2 – Westpac Balance Sheet Account Configuration
2.1.3.2 House Bank
Use
Create a new House Bank to manage all Westpac related payments. This will keep the payment processing ofWestpac related invoices separate from invoices paid by existing methods.
PrerequisitesNone
Procedure
Step # Description Additional Information
House Bank
1 IMG PathFinancial Accounting -> Bank Accounting -> bank Accounts -> DefineHouse Banks

Configuration Guide CUSTOMER
SAP Corporate Connectivity for BankingConfiguration Guide – Version: 1.1 – Final
February 27, 2017© 2017 SAP SE or an SAP affiliate company. All rights reserved. 24
Step # Description Additional Information
2Enter the ‘Company Code’ forthe House Bank and press‘Enter’
3 Press ‘New Entries’
4
Enter the following data:
House bank – AppropriateIdentifier as per your namingconventions
‘Bank Country’ as AU
‘Bank Key’ – Enter a 6-digit BankKey
Press ‘Create’ to create the bankrecord
5
Enter details in the popup for thebank data.
Bank Branch – Branch BSBCode
Swift Code (If available)
6Press ‘Save’ and add theconfiguration to a Customizingtransport request
7Double click on ‘Bank Accounts’on the left hand menu
8 Press ‘New Entries’
Configuration Guide CUSTOMER
SAP Corporate Connectivity for BankingConfiguration Guide – Version: 1.1 – Final
February 27, 2017© 2017 SAP SE or an SAP affiliate company. All rights reserved. 25
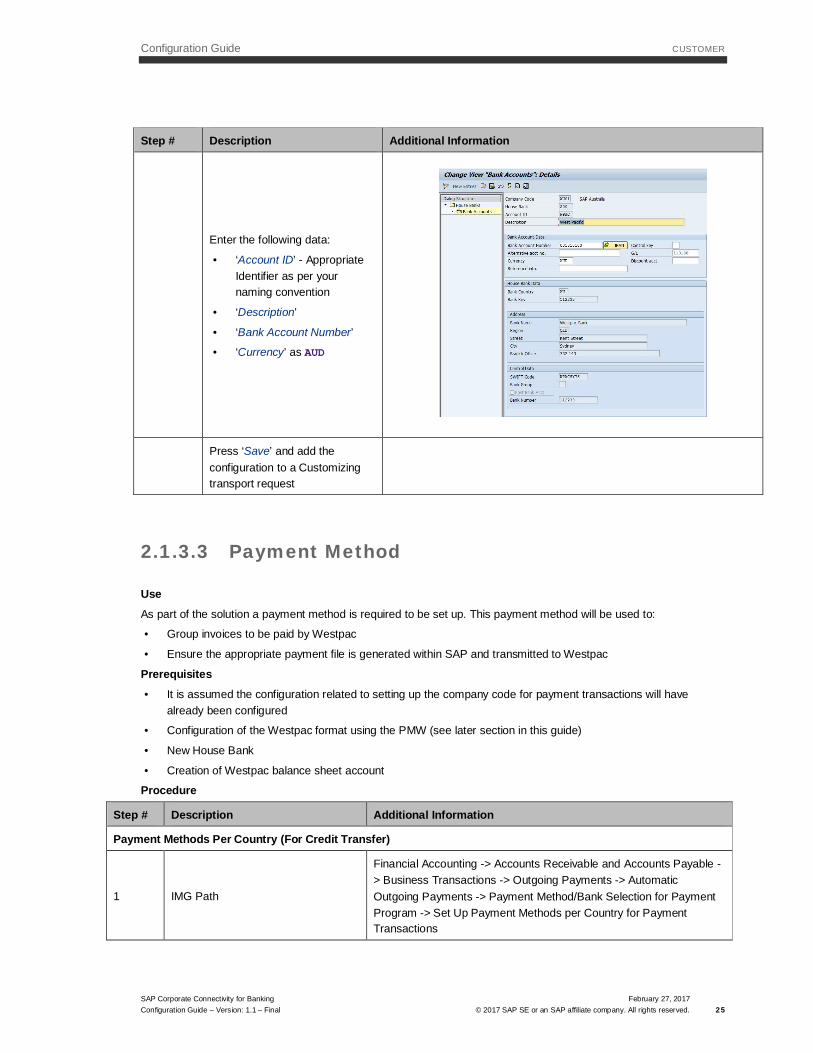
Step # Description Additional Information
Enter the following data:
· ‘Account ID’ - AppropriateIdentifier as per yournaming convention
· ‘Description’
· ‘Bank Account Number’
· ‘Currency’ as AUD
Press ‘Save’ and add theconfiguration to a Customizingtransport request
2.1.3.3 Payment Method
UseAs part of the solution a payment method is required to be set up. This payment method will be used to:
· Group invoices to be paid by Westpac
· Ensure the appropriate payment file is generated within SAP and transmitted to Westpac
Prerequisites· It is assumed the configuration related to setting up the company code for payment transactions will have
already been configured
· Configuration of the Westpac format using the PMW (see later section in this guide)
· New House Bank
· Creation of Westpac balance sheet account
Procedure
Step # Description Additional Information
Payment Methods Per Country (For Credit Transfer)
1 IMG Path
Financial Accounting -> Accounts Receivable and Accounts Payable -> Business Transactions -> Outgoing Payments -> AutomaticOutgoing Payments -> Payment Method/Bank Selection for PaymentProgram -> Set Up Payment Methods per Country for PaymentTransactions
Configuration Guide CUSTOMER
SAP Corporate Connectivity for BankingConfiguration Guide – Version: 1.1 – Final
February 27, 2017© 2017 SAP SE or an SAP affiliate company. All rights reserved. 26
2 Press ‘New Entries’
3.
4.
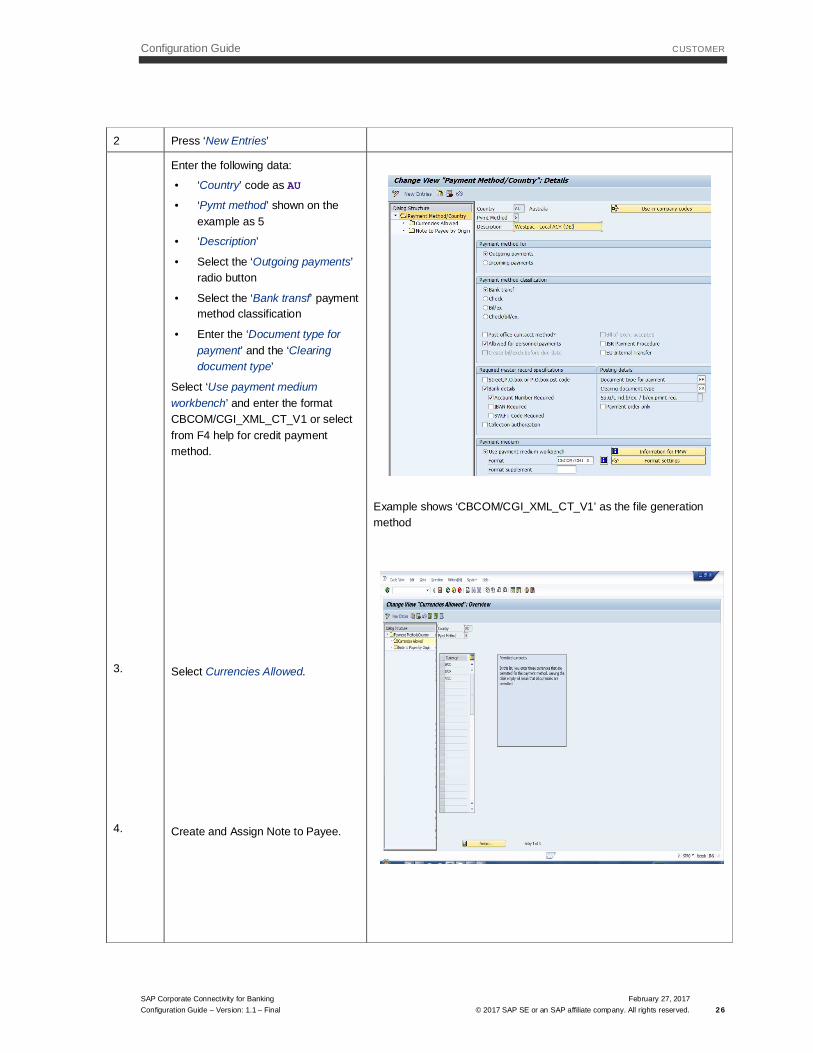
Enter the following data:
· ‘Country’ code as AU
· ‘Pymt method’ shown on theexample as 5
· ‘Description’
· Select the ‘Outgoing payments’radio button
· Select the ‘Bank transf’ paymentmethod classification
· Enter the ‘Document type forpayment’ and the ‘Clearingdocument type’
Select ‘Use payment mediumworkbench’ and enter the formatCBCOM/CGI_XML_CT_V1 or selectfrom F4 help for credit paymentmethod.
Select Currencies Allowed.
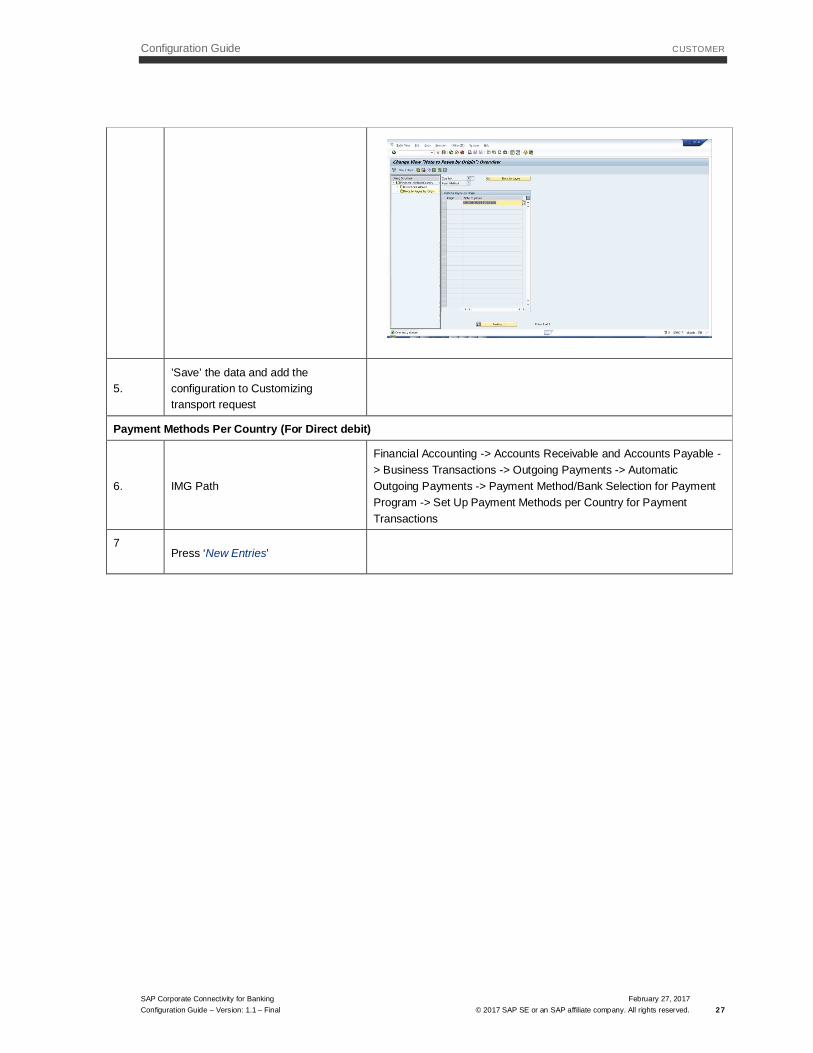
Create and Assign Note to Payee.
Example shows ‘CBCOM/CGI_XML_CT_V1’ as the file generationmethod
Configuration Guide CUSTOMER
SAP Corporate Connectivity for BankingConfiguration Guide – Version: 1.1 – Final
February 27, 2017© 2017 SAP SE or an SAP affiliate company. All rights reserved. 27
5.’Save’ the data and add theconfiguration to Customizingtransport request
Payment Methods Per Country (For Direct debit)
6. IMG Path
Financial Accounting -> Accounts Receivable and Accounts Payable -> Business Transactions -> Outgoing Payments -> AutomaticOutgoing Payments -> Payment Method/Bank Selection for PaymentProgram -> Set Up Payment Methods per Country for PaymentTransactions
7Press ‘New Entries’
Configuration Guide CUSTOMER
SAP Corporate Connectivity for BankingConfiguration Guide – Version: 1.1 – Final
February 27, 2017© 2017 SAP SE or an SAP affiliate company. All rights reserved. 28
8.
9.
10.
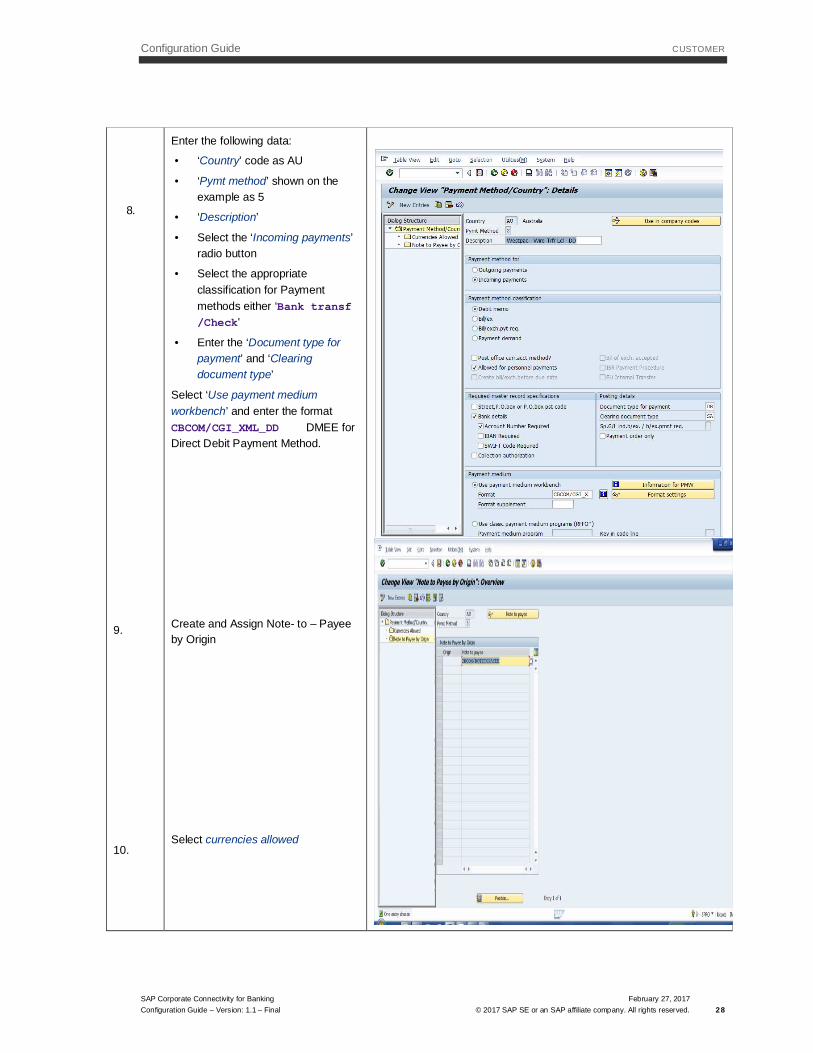
Enter the following data:
· ‘Country’ code as AU
· ‘Pymt method’ shown on theexample as 5
· ‘Description’
· Select the ‘Incoming payments’radio button
· Select the appropriateclassification for Paymentmethods either ‘Bank transf/Check'
· Enter the ‘Document type forpayment’ and ‘Clearingdocument type’
Select ‘Use payment mediumworkbench’ and enter the formatCBCOM/CGI_XML_DD DMEE forDirect Debit Payment Method.
Create and Assign Note- to – Payeeby Origin
Select currencies allowed
Configuration Guide CUSTOMER
SAP Corporate Connectivity for BankingConfiguration Guide – Version: 1.1 – Final
February 27, 2017© 2017 SAP SE or an SAP affiliate company. All rights reserved. 29
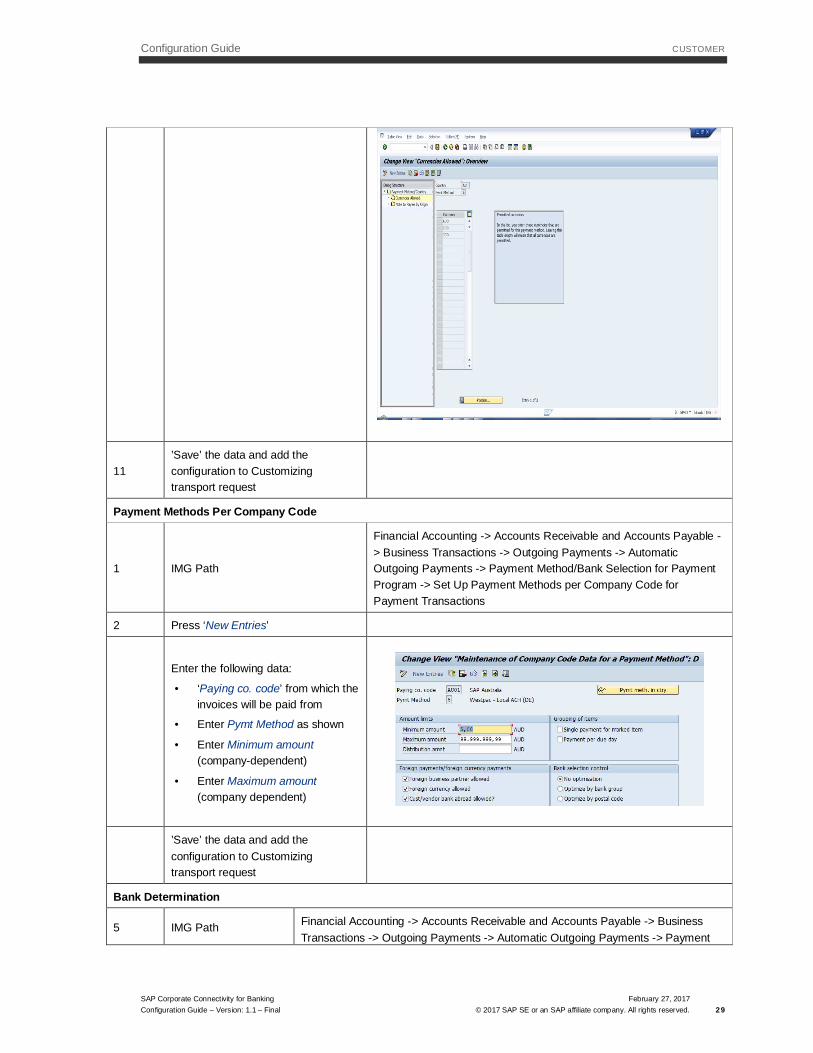
11’Save’ the data and add theconfiguration to Customizingtransport request
Payment Methods Per Company Code
1 IMG Path
Financial Accounting -> Accounts Receivable and Accounts Payable -> Business Transactions -> Outgoing Payments -> AutomaticOutgoing Payments -> Payment Method/Bank Selection for PaymentProgram -> Set Up Payment Methods per Company Code forPayment Transactions
2 Press ‘New Entries’
Enter the following data:
· ‘Paying co. code’ from which theinvoices will be paid from
· Enter Pymt Method as shown
· Enter Minimum amount(company-dependent)
· Enter Maximum amount(company dependent)
’Save’ the data and add theconfiguration to Customizingtransport request
Bank Determination
5 IMG Path Financial Accounting -> Accounts Receivable and Accounts Payable -> BusinessTransactions -> Outgoing Payments -> Automatic Outgoing Payments -> Payment
Configuration Guide CUSTOMER
SAP Corporate Connectivity for BankingConfiguration Guide – Version: 1.1 – Final
February 27, 2017© 2017 SAP SE or an SAP affiliate company. All rights reserved. 30
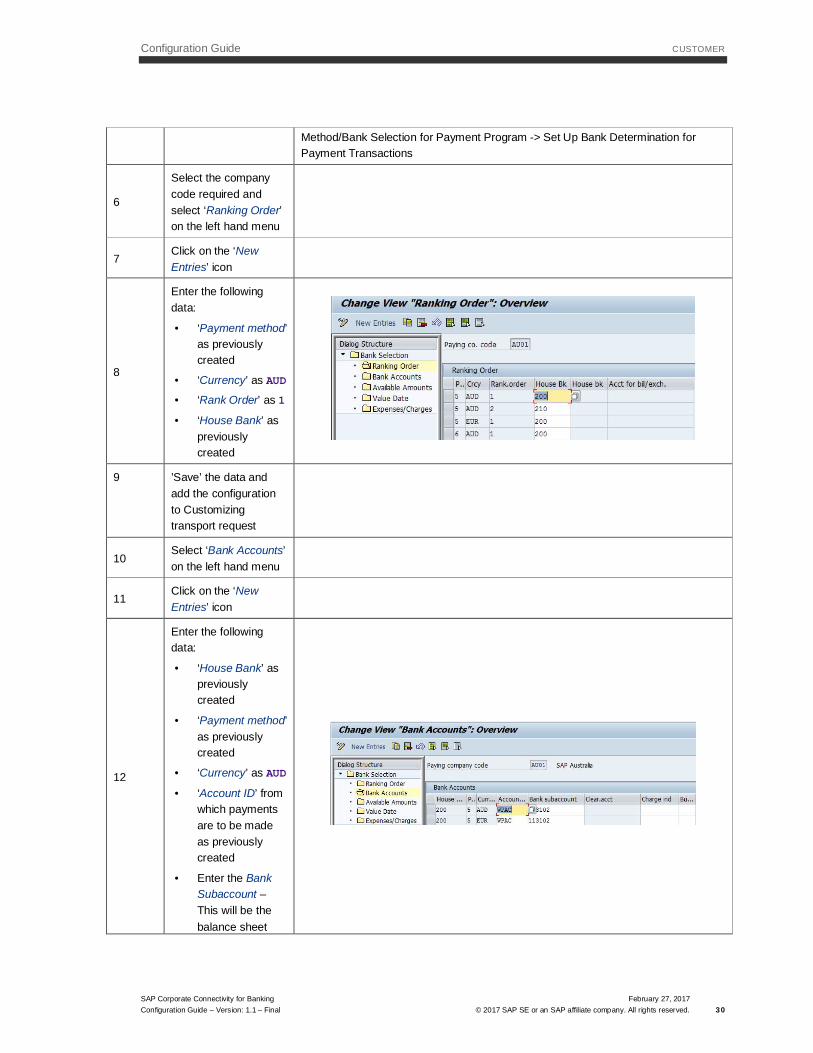
Method/Bank Selection for Payment Program -> Set Up Bank Determination forPayment Transactions
6
Select the companycode required andselect ‘Ranking Order’on the left hand menu
7Click on the ‘NewEntries’ icon
8
Enter the followingdata:
· ‘Payment method’as previouslycreated
· ‘Currency’ as AUD
· ‘Rank Order’ as 1
· ‘House Bank’ aspreviouslycreated
9 ’Save’ the data andadd the configurationto Customizingtransport request
10Select ‘Bank Accounts’on the left hand menu
11Click on the ‘NewEntries’ icon
12
Enter the followingdata:
· ‘House Bank’ aspreviouslycreated
· ‘Payment method’as previouslycreated
· ‘Currency’ as AUD
· ‘Account ID’ fromwhich paymentsare to be madeas previouslycreated
· Enter the BankSubaccount –This will be thebalance sheet

Configuration Guide CUSTOMER
SAP Corporate Connectivity for BankingConfiguration Guide – Version: 1.1 – Final
February 27, 2017© 2017 SAP SE or an SAP affiliate company. All rights reserved. 31
2.1.3.4 Bank Statement Processing
Use
In your system, each payment made to an individual supplier will be posted as an individual FI document. The bankwill process the payments as advised and send the reconciliation status of payments at the end of the day to you.The following section details the necessary configuration to be done for processing bank statements automatically.
Prerequisites
account wherethe clearedinvoicedocuments arereconciled.
13 ’Save’ the data andadd the configurationto a Westpac-specificCustomizing transportrequest
14 Select ‘AvailableAmounts’ on the lefthand menu
15 Click on the ‘NewEntries’ icon
16 Enter the followingdata:
· ‘House Bank’ aspreviouslycreated
· ‘Account ID’ aspreviouslycreated
· ‘Days’ as 999
· ‘Currency’ as AUD
· ‘Available foroutgoingpayments’ as1000000000
17 ’Save’ the data andadd the configurationto a Customizingtransport request
Configuration Guide CUSTOMER
SAP Corporate Connectivity for BankingConfiguration Guide – Version: 1.1 – Final
February 27, 2017© 2017 SAP SE or an SAP affiliate company. All rights reserved. 32
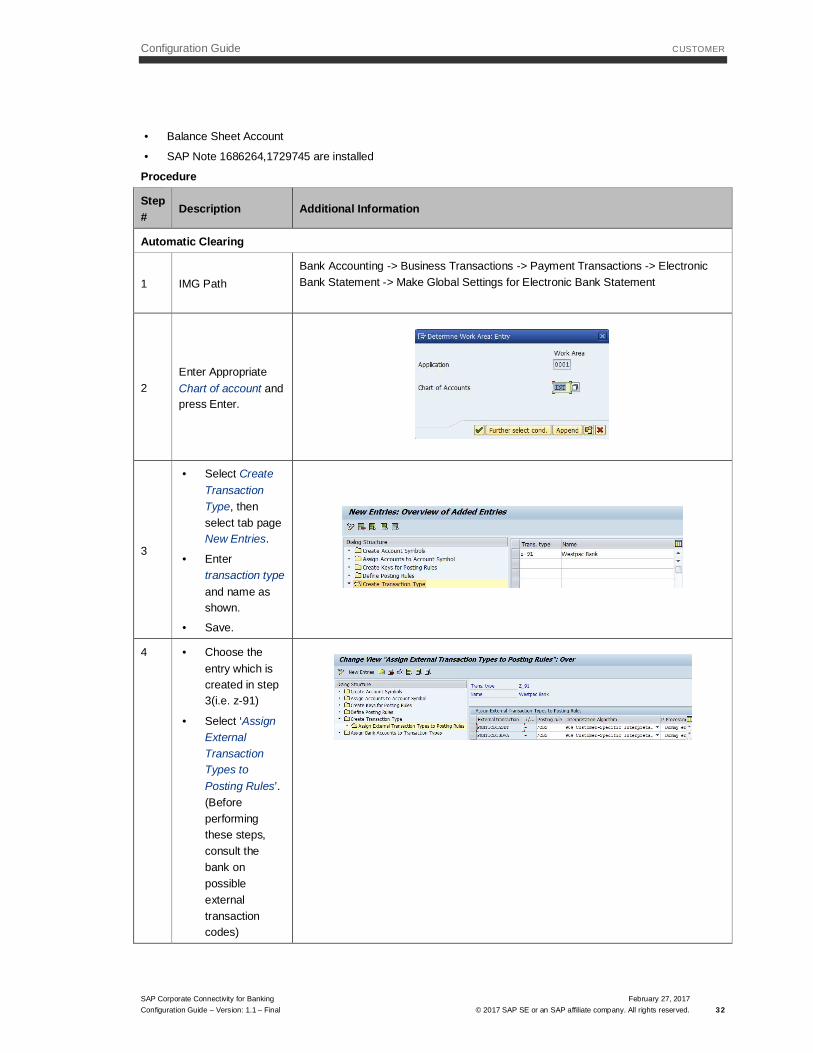
· Balance Sheet Account
· SAP Note 1686264,1729745 are installed
Procedure
Step#
Description Additional Information
Automatic Clearing
1 IMG PathBank Accounting -> Business Transactions -> Payment Transactions -> ElectronicBank Statement -> Make Global Settings for Electronic Bank Statement
2Enter AppropriateChart of account andpress Enter.
3
· Select CreateTransactionType, thenselect tab pageNew Entries.
· Entertransaction typeand name asshown.
· Save.
4 · Choose theentry which iscreated in step3(i.e. z-91)
· Select ‘AssignExternalTransactionTypes toPosting Rules’.(Beforeperformingthese steps,consult thebank onpossibleexternaltransactioncodes)
Configuration Guide CUSTOMER
SAP Corporate Connectivity for BankingConfiguration Guide – Version: 1.1 – Final
February 27, 2017© 2017 SAP SE or an SAP affiliate company. All rights reserved. 33
Step#
Description Additional Information
· Select tab pageNew Entries
· Assign ExternalTransaction,Sign, PostingRule andInterpretationAlgorithm asshown.
· Save.
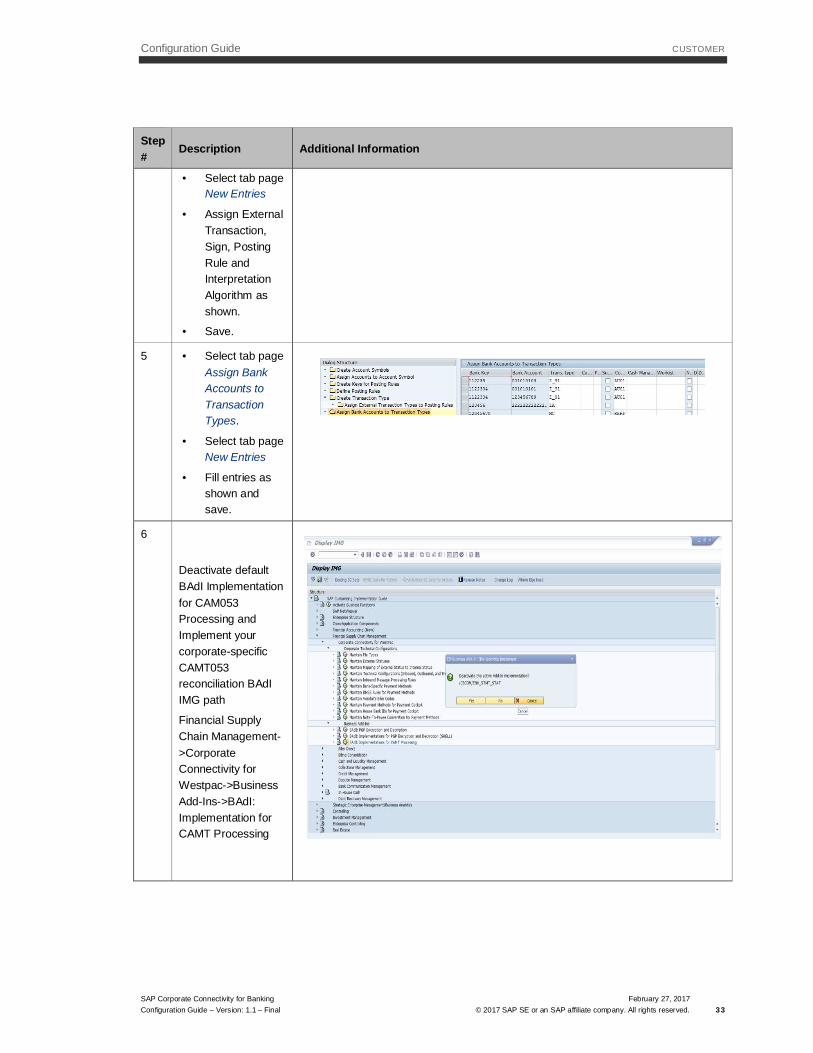
5 · Select tab pageAssign BankAccounts toTransactionTypes.
· Select tab pageNew Entries
· Fill entries asshown andsave.
6
Deactivate defaultBAdI Implementationfor CAM053Processing andImplement yourcorporate-specificCAMT053reconciliation BAdIIMG path
Financial SupplyChain Management->CorporateConnectivity forWestpac->BusinessAdd-Ins->BAdI:Implementation forCAMT Processing
Configuration Guide CUSTOMER
SAP Corporate Connectivity for BankingConfiguration Guide – Version: 1.1 – Final
February 27, 2017© 2017 SAP SE or an SAP affiliate company. All rights reserved. 34
Step#
Description Additional Information
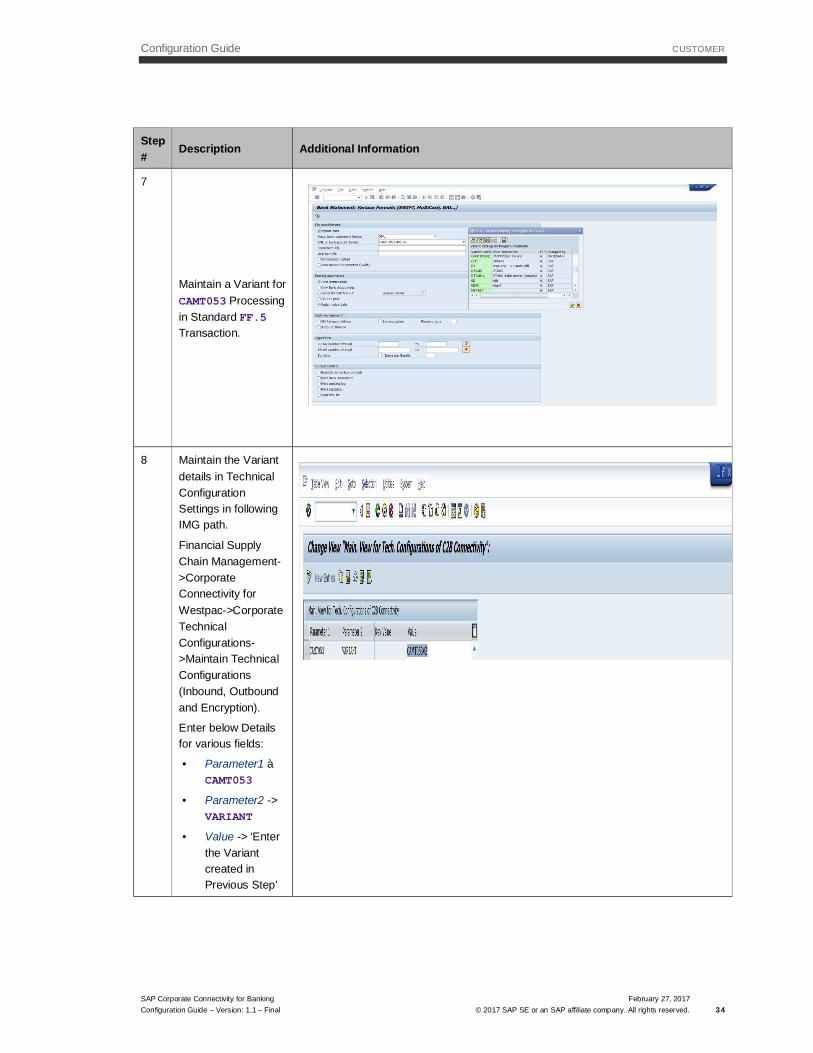
7
Maintain a Variant forCAMT053 Processingin Standard FF.5Transaction.
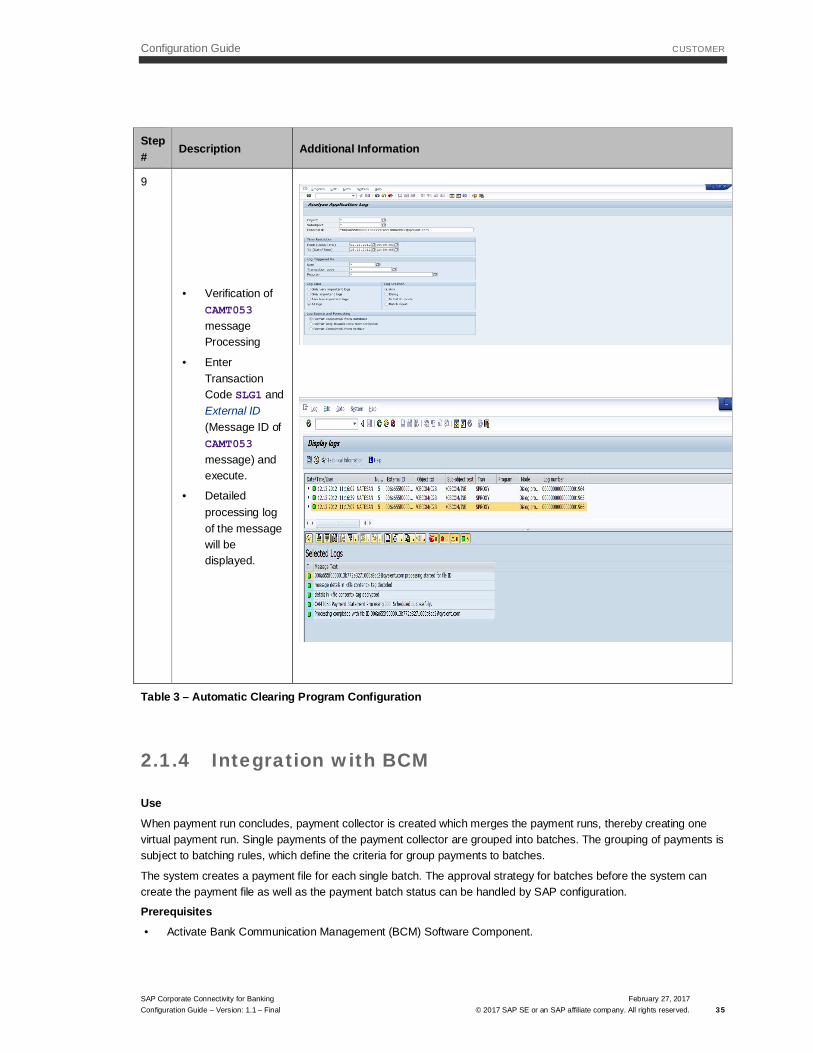
8 Maintain the Variantdetails in TechnicalConfigurationSettings in followingIMG path.
Financial SupplyChain Management->CorporateConnectivity forWestpac->CorporateTechnicalConfigurations->Maintain TechnicalConfigurations(Inbound, Outboundand Encryption).
Enter below Detailsfor various fields:
· Parameter1àCAMT053
· Parameter2 ->VARIANT
· Value -> ‘Enterthe Variantcreated inPrevious Step’
Configuration Guide CUSTOMER
SAP Corporate Connectivity for BankingConfiguration Guide – Version: 1.1 – Final
February 27, 2017© 2017 SAP SE or an SAP affiliate company. All rights reserved. 35
Step#
Description Additional Information
9
· Verification ofCAMT053messageProcessing
· EnterTransactionCode SLG1 andExternal ID(Message ID ofCAMT053message) andexecute.
· Detailedprocessing logof the messagewill bedisplayed.
Table 3 – Automatic Clearing Program Configuration
2.1.4 Integration with BCM
Use
When payment run concludes, payment collector is created which merges the payment runs, thereby creating onevirtual payment run. Single payments of the payment collector are grouped into batches. The grouping of payments issubject to batching rules, which define the criteria for group payments to batches.
The system creates a payment file for each single batch. The approval strategy for batches before the system cancreate the payment file as well as the payment batch status can be handled by SAP configuration.
Prerequisites· Activate Bank Communication Management (BCM) Software Component.
Configuration Guide CUSTOMER
SAP Corporate Connectivity for BankingConfiguration Guide – Version: 1.1 – Final
February 27, 2017© 2017 SAP SE or an SAP affiliate company. All rights reserved. 36
· Requisite BCM Specific customizing for Payment Grouping & Approval.
Procedure
Step# Description Additional Information
Activate BCM for integration with payment run
1SAP Transaction'OBPM5'
2
Click on 'FIAP/AR Paymentprogram forcustomers andvendors' optionbutton.
3
Click on the ‘NewEntries’ icon andEnter the data asshown.
4 Press ‘Save’
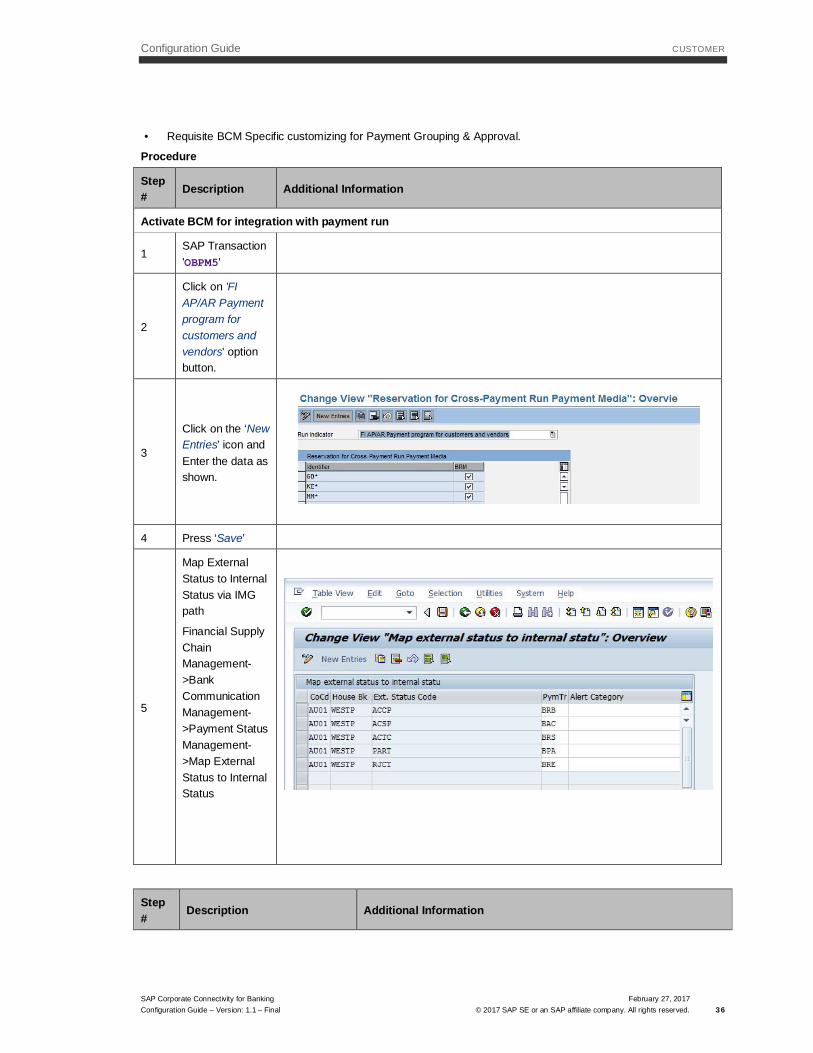
5
Map ExternalStatus to InternalStatus via IMGpath
Financial SupplyChainManagement->BankCommunicationManagement->Payment StatusManagement->Map ExternalStatus to InternalStatus
Step#
Description Additional Information
Configuration Guide CUSTOMER
SAP Corporate Connectivity for BankingConfiguration Guide – Version: 1.1 – Final
February 27, 2017© 2017 SAP SE or an SAP affiliate company. All rights reserved. 37
Step#
Description Additional Information
Technical Configurations to integrate BCM (Only relevant for connector installation with active BCMimplementation)
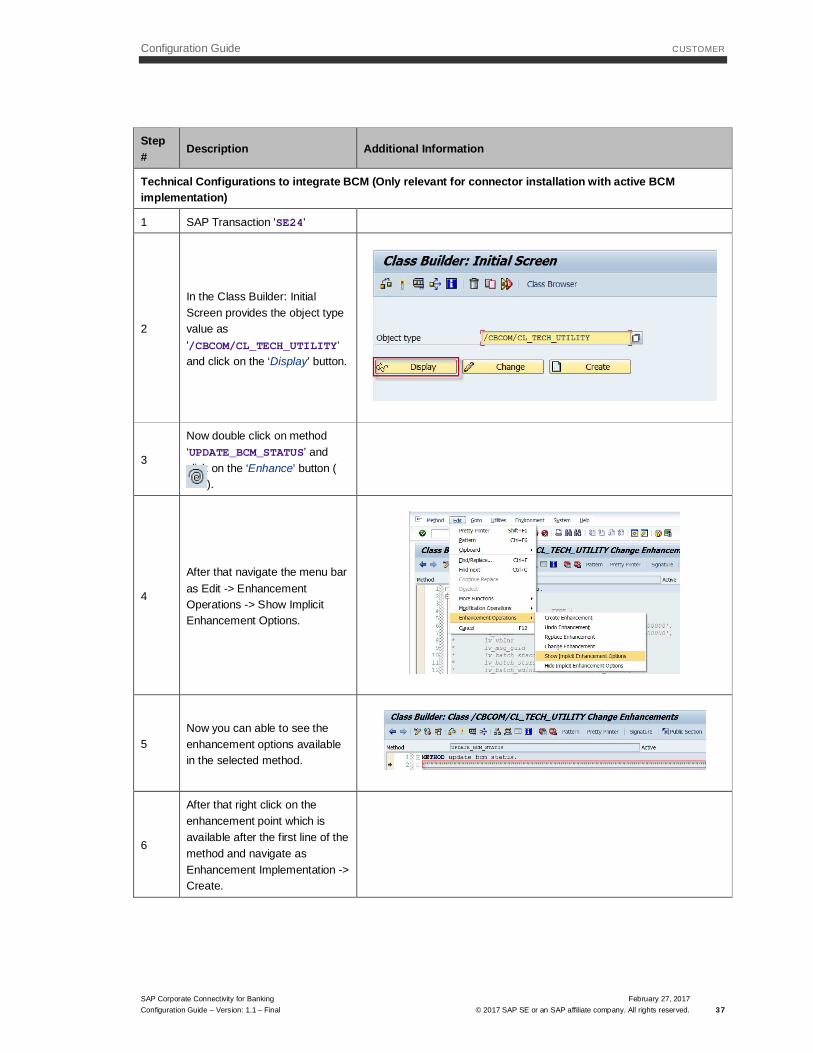
1 SAP Transaction 'SE24'
2
In the Class Builder: InitialScreen provides the object typevalue as'/CBCOM/CL_TECH_UTILITY’and click on the ‘Display’ button.
3
Now double click on method‘UPDATE_BCM_STATUS’ andclick on the ‘Enhance’ button (
).
4
After that navigate the menu baras Edit -> EnhancementOperations -> Show ImplicitEnhancement Options.
5Now you can able to see theenhancement options availablein the selected method.
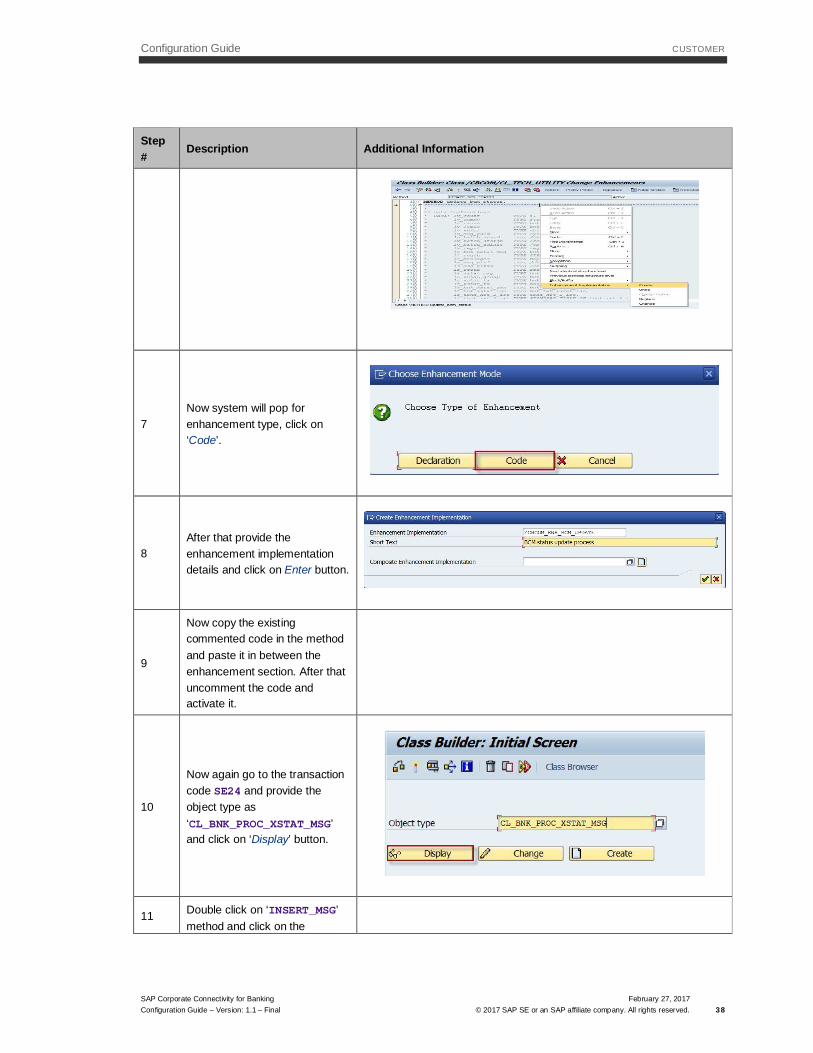
6
After that right click on theenhancement point which isavailable after the first line of themethod and navigate asEnhancement Implementation ->Create.
Configuration Guide CUSTOMER
SAP Corporate Connectivity for BankingConfiguration Guide – Version: 1.1 – Final
February 27, 2017© 2017 SAP SE or an SAP affiliate company. All rights reserved. 38
Step#
Description Additional Information
7Now system will pop forenhancement type, click on‘Code’.
8After that provide theenhancement implementationdetails and click on Enter button.
9
Now copy the existingcommented code in the methodand paste it in between theenhancement section. After thatuncomment the code andactivate it.
10
Now again go to the transactioncode SE24 and provide theobject type as‘CL_BNK_PROC_XSTAT_MSG’and click on ‘Display’ button.
11 Double click on ‘INSERT_MSG’method and click on the

Configuration Guide CUSTOMER
SAP Corporate Connectivity for BankingConfiguration Guide – Version: 1.1 – Final
February 27, 2017© 2017 SAP SE or an SAP affiliate company. All rights reserved. 39
Step#
Description Additional Information
‘Enhance’ button ( ).
12
After that navigate the menu baras Edit -> EnhancementOperations -> Show ImplicitEnhancement Options.
13Now you can able to see theenhancement options availablein the selected method.
14
After that right click on theenhancement point which isavailable before last line of themethod and navigate asEnhancement Implementation ->Create.
15Now system will pop forenhancement type, click on‘Code’.

Configuration Guide CUSTOMER
SAP Corporate Connectivity for BankingConfiguration Guide – Version: 1.1 – Final
February 27, 2017© 2017 SAP SE or an SAP affiliate company. All rights reserved. 40
Step#
Description Additional Information
16Subsequently provide theenhancement implementationdetails and choose Confirm.
17
Copy and paste the code in theadjacent Additional Informationcolumn into the enhancementsection and activate it.
EXPORT guid = l_str_xstat_msg-guid to MEMORY id 'GV_MSG_GUID'.
2.1.5 Solution Technical Settings
The following section details the solution-specific technical configuration required. All configuration settings will berequired to support the processes for payments within SAP and communication to the bank. The configurationsection has been split into the following sections:
1. Solution Customizing (Imported from BC Set)
2. PGP Encryption Specific Settings.
2.1.5.1 Solution Customizing (Imported from BC Set)
The following section details settings required to enable the solution to process the payment messages and send thesame to the bank.
Prerequisites· The solution is installed
· FI – specific settings are completed as mentioned in section 2.1.2
· Solution Specific configurations were provided as Business Configuration Sets and same should be imported asdetailed below.
Step# Description Additional Information
Configuration Guide CUSTOMER
SAP Corporate Connectivity for BankingConfiguration Guide – Version: 1.1 – Final
February 27, 2017© 2017 SAP SE or an SAP affiliate company. All rights reserved. 41
Step#
Description Additional Information
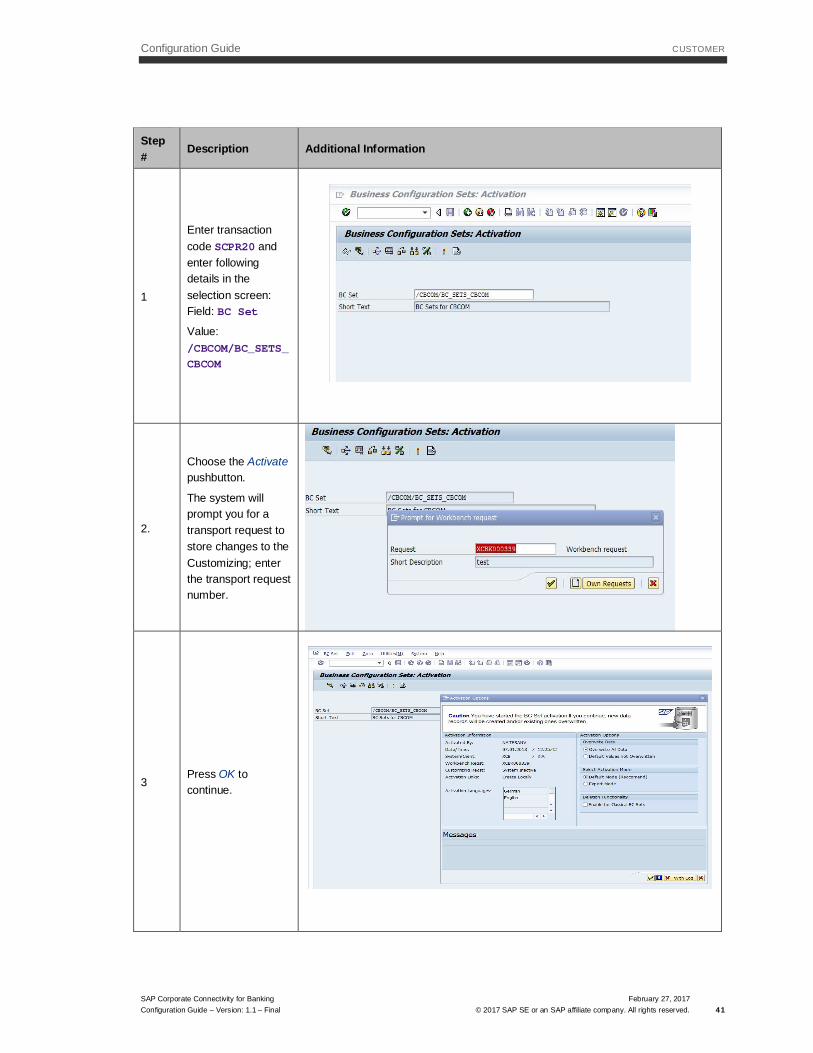
1
Enter transactioncode SCPR20 andenter followingdetails in theselection screen:Field: BC Set
Value:/CBCOM/BC_SETS_CBCOM
2.
Choose the Activatepushbutton.
The system willprompt you for atransport request tostore changes to theCustomizing; enterthe transport requestnumber.
3Press OK tocontinue.
Configuration Guide CUSTOMER
SAP Corporate Connectivity for BankingConfiguration Guide – Version: 1.1 – Final
February 27, 2017© 2017 SAP SE or an SAP affiliate company. All rights reserved. 42
Step#
Description Additional Information
4
Release the TRcreated in Step 2and transport acrosslandscape.
· Following configuration settings shall be maintained based on FI settings explained in section 2.1.2.
· Configurations given below were maintained via IMG path Financial Supply Chain Management -> CorporateConnectivity for Westpac -> Corporate Technical Configurations -> Maintain Technical Configurations (Inbound,Outbound and Encryption).
Step# Description Additional Information
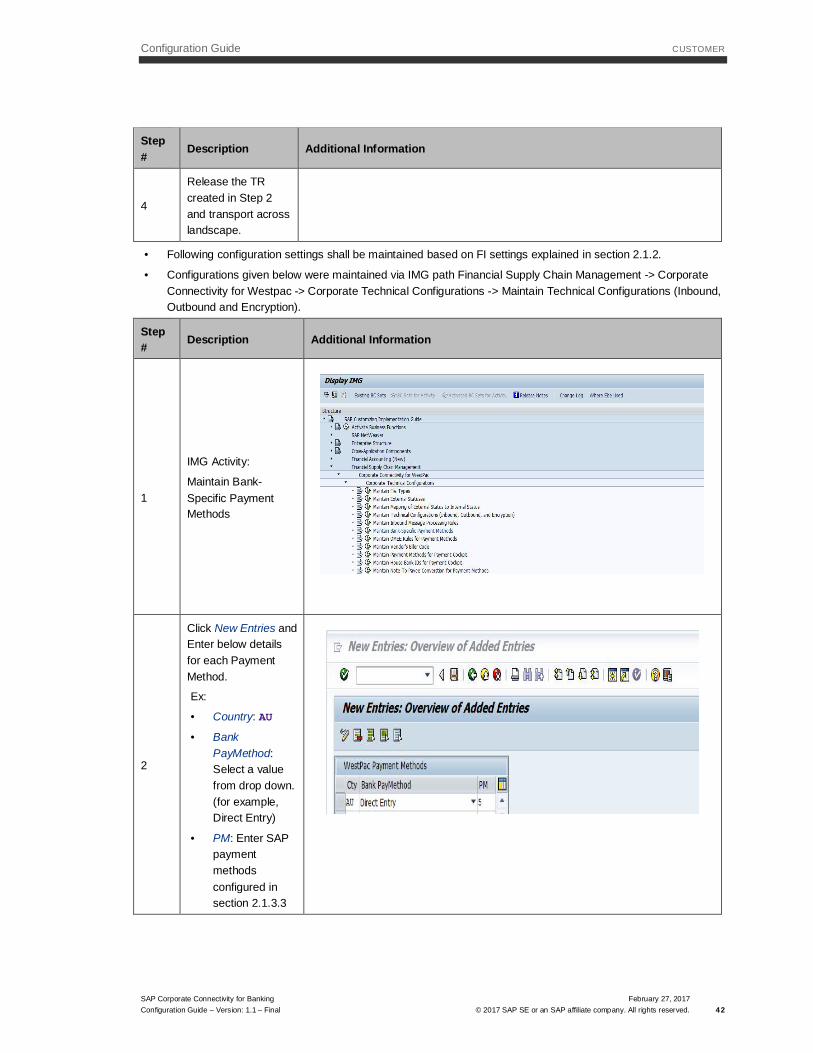
1
IMG Activity:
Maintain Bank-Specific PaymentMethods
2
Click New Entries andEnter below detailsfor each PaymentMethod.
Ex:
· Country: AU
· BankPayMethod:Select a valuefrom drop down.(for example,Direct Entry)
· PM: Enter SAPpaymentmethodsconfigured insection 2.1.3.3
Configuration Guide CUSTOMER
SAP Corporate Connectivity for BankingConfiguration Guide – Version: 1.1 – Final
February 27, 2017© 2017 SAP SE or an SAP affiliate company. All rights reserved. 43
Repeat above Stepsfor the PaymentMethods that shall beused by you to sendthe credit transaction.
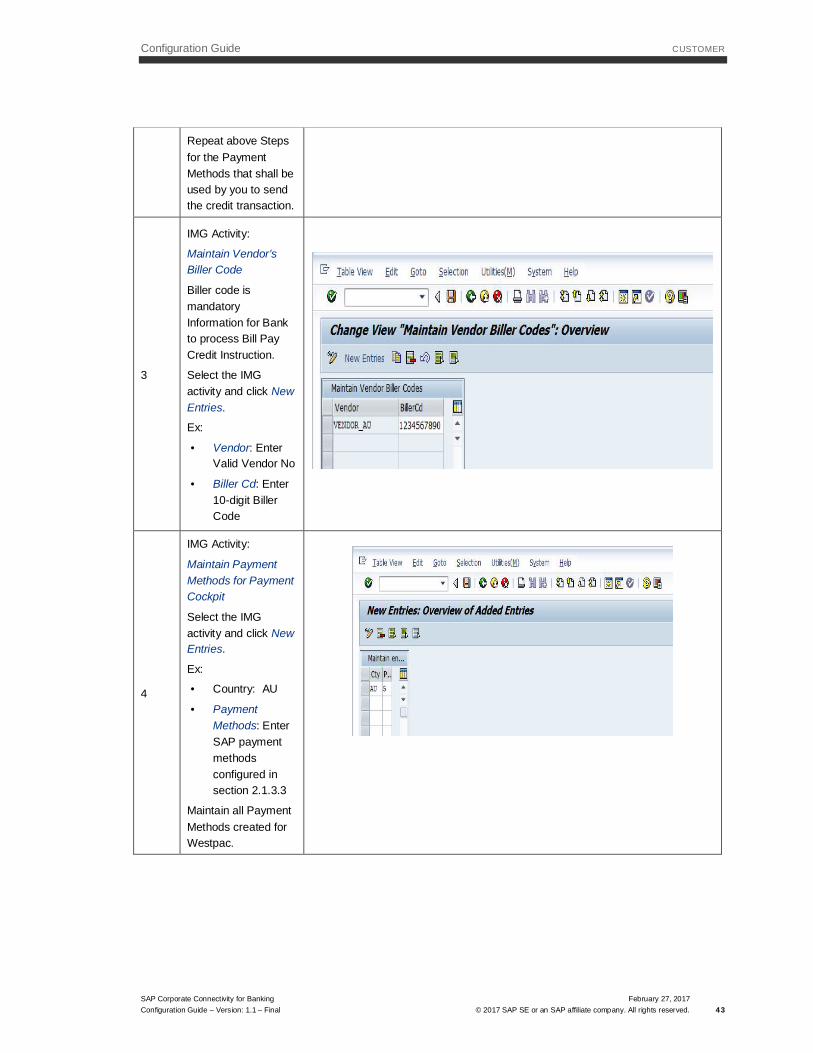
3
IMG Activity:
Maintain Vendor’sBiller Code
Biller code ismandatoryInformation for Bankto process Bill PayCredit Instruction.
Select the IMGactivity and click NewEntries.
Ex:
· Vendor: EnterValid Vendor No
· Biller Cd: Enter10-digit BillerCode
4
IMG Activity:
Maintain PaymentMethods for PaymentCockpit
Select the IMGactivity and click NewEntries.
Ex:
· Country: AU
· PaymentMethods: EnterSAP paymentmethodsconfigured insection 2.1.3.3
Maintain all PaymentMethods created forWestpac.
Configuration Guide CUSTOMER
SAP Corporate Connectivity for BankingConfiguration Guide – Version: 1.1 – Final
February 27, 2017© 2017 SAP SE or an SAP affiliate company. All rights reserved. 44
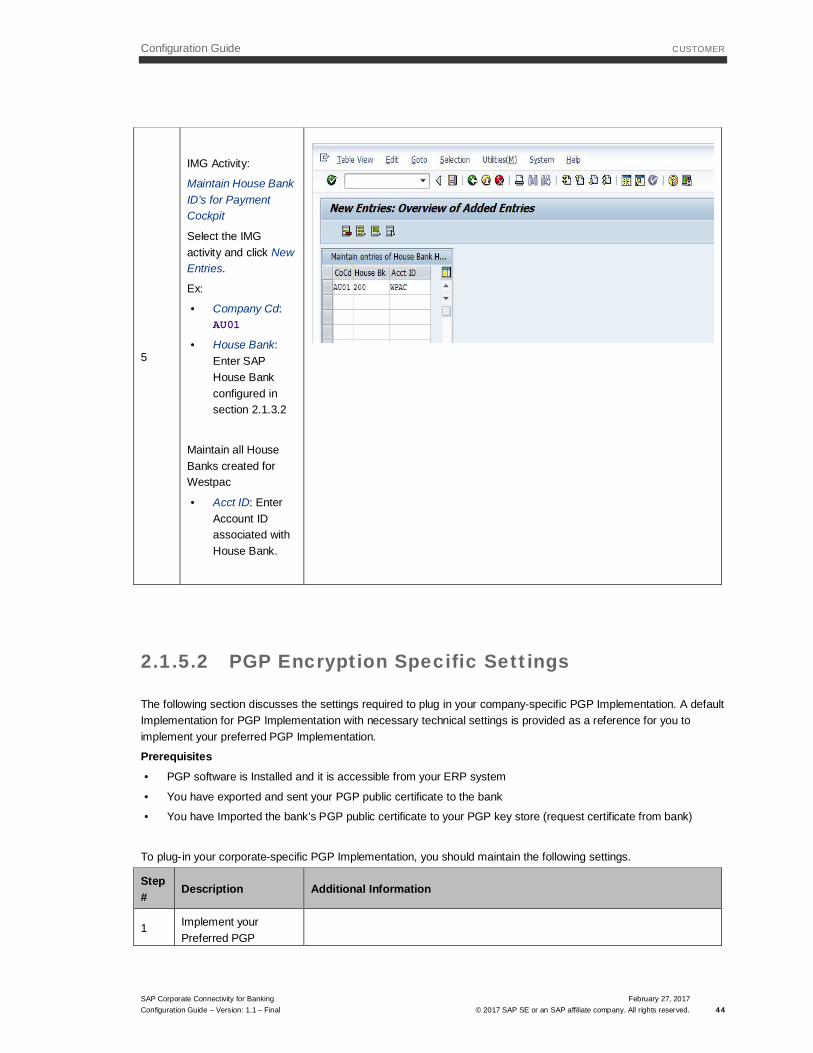
5
IMG Activity:
Maintain House BankID’s for PaymentCockpit
Select the IMGactivity and click NewEntries.
Ex:
· Company Cd:AU01
· House Bank:Enter SAPHouse Bankconfigured insection 2.1.3.2
Maintain all HouseBanks created forWestpac
· Acct ID: EnterAccount IDassociated withHouse Bank.
2.1.5.2 PGP Encryption Specific Settings
The following section discusses the settings required to plug in your company-specific PGP Implementation. A defaultImplementation for PGP Implementation with necessary technical settings is provided as a reference for you toimplement your preferred PGP Implementation.
Prerequisites· PGP software is Installed and it is accessible from your ERP system
· You have exported and sent your PGP public certificate to the bank
· You have Imported the bank's PGP public certificate to your PGP key store (request certificate from bank)
To plug-in your corporate-specific PGP Implementation, you should maintain the following settings.
Step#
Description Additional Information
1 Implement yourPreferred PGP
Configuration Guide CUSTOMER
SAP Corporate Connectivity for BankingConfiguration Guide – Version: 1.1 – Final
February 27, 2017© 2017 SAP SE or an SAP affiliate company. All rights reserved. 45
Step#
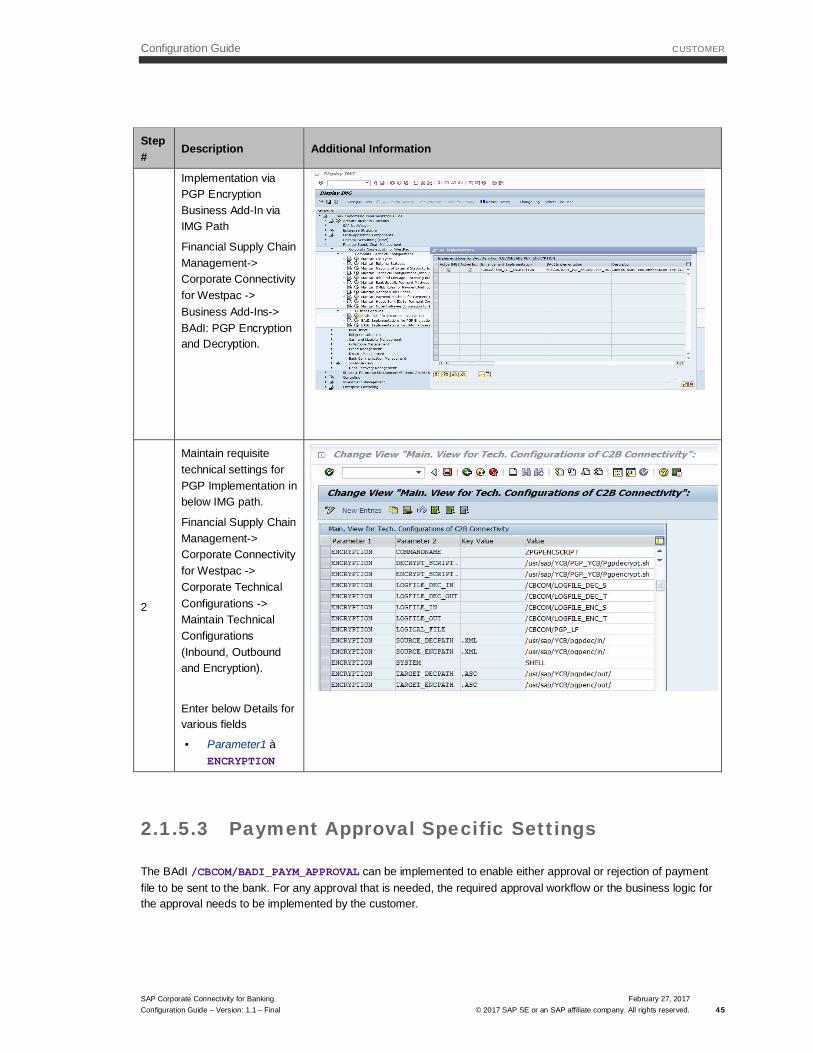
Description Additional Information
Implementation viaPGP EncryptionBusiness Add-In viaIMG Path
Financial Supply ChainManagement->Corporate Connectivityfor Westpac ->Business Add-Ins->BAdI: PGP Encryptionand Decryption.
2
Maintain requisitetechnical settings forPGP Implementation inbelow IMG path.
Financial Supply ChainManagement->Corporate Connectivityfor Westpac ->Corporate TechnicalConfigurations ->Maintain TechnicalConfigurations(Inbound, Outboundand Encryption).
Enter below Details forvarious fields
· Parameter1àENCRYPTION
2.1.5.3 Payment Approval Specific Settings
The BAdI /CBCOM/BADI_PAYM_APPROVAL can be implemented to enable either approval or rejection of paymentfile to be sent to the bank. For any approval that is needed, the required approval workflow or the business logic forthe approval needs to be implemented by the customer.
Configuration Guide CUSTOMER
SAP Corporate Connectivity for BankingConfiguration Guide – Version: 1.1 – Final
February 27, 2017© 2017 SAP SE or an SAP affiliate company. All rights reserved. 46
If this BAdI is implemented, the return parameter of the BAdI decides if the payment can be sent or if any approvalsare needed. In case the payment is pending for approval, a status 'Pending for approval' is shown in the cockpitmonitor.
Once the final approval is done by the customer, the Function Module /CBCOM/APRV_STATUS_UPDATE needs to beexplicitly called to set the relevant status and also to send the payment file to the bank.
An additional button called 'Send Payment' is available in the cockpit monitor. This can be used only when the statusof the payment is 'Payment Approved' in the column approval status text and status is 'Payment Medium Created' inthe payment group status.
PrerequisitesTo plug-in your corporate-specific Payment Approval Workflow Implementation, you should maintain the followingsettings.
Step# Description Additional Information
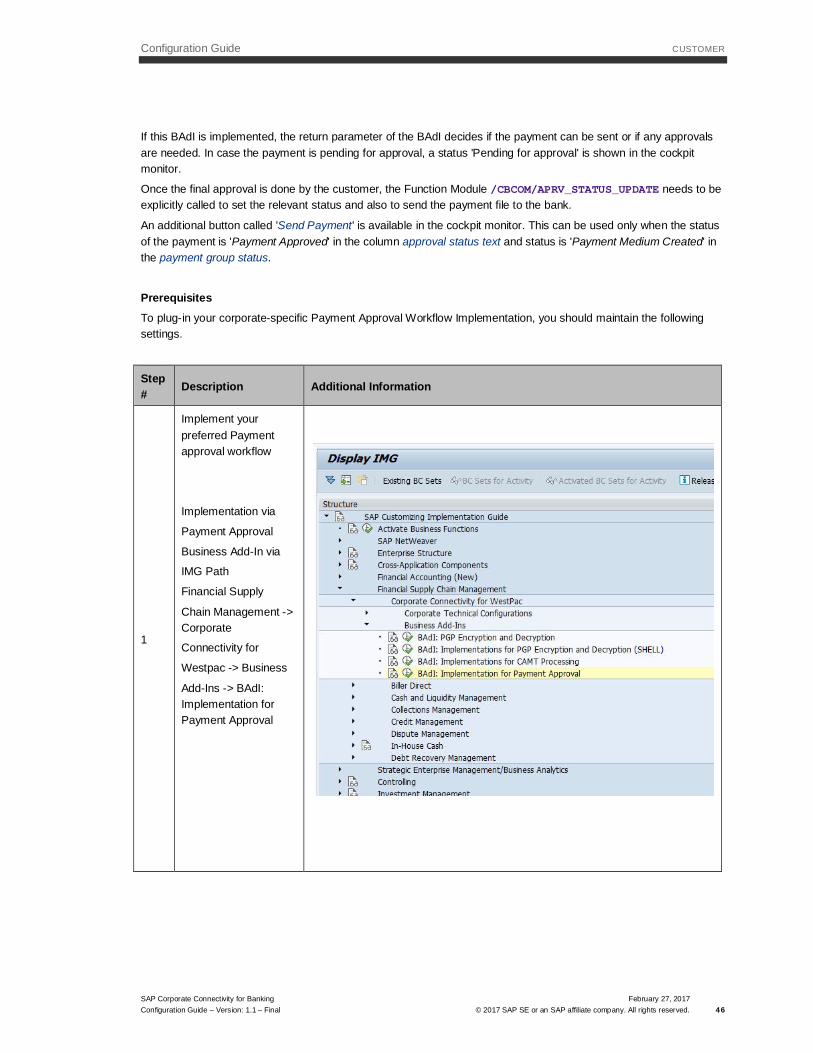
1
Implement yourpreferred Paymentapproval workflow
Implementation via
Payment Approval
Business Add-In via
IMG Path
Financial Supply
Chain Management ->Corporate
Connectivity for
Westpac -> Business
Add-Ins -> BAdI:Implementation forPayment Approval
Configuration Guide CUSTOMER
SAP Corporate Connectivity for BankingConfiguration Guide – Version: 1.1 – Final
February 27, 2017© 2017 SAP SE or an SAP affiliate company. All rights reserved. 47
3 Business Scenarios
3.1 Web Service Connectivity
For the various Business Scenarios, the following topics are covered:
· Overview
· Technical system landscape
· Configuration details
3.1.1 Overview
The Configuration process detailed in this document helps to configure the Proxy and Service as a part of theConsumer and Provider Configurations, elaborated in sections 3.1.3 and 3.1.4 in the ERP that leverages thestandard solution to connect to the Connector Application.
3.1.2 Technical System Landscape
Refer Section 2.1
3.1.3 Configuration Details – Scenario PINF
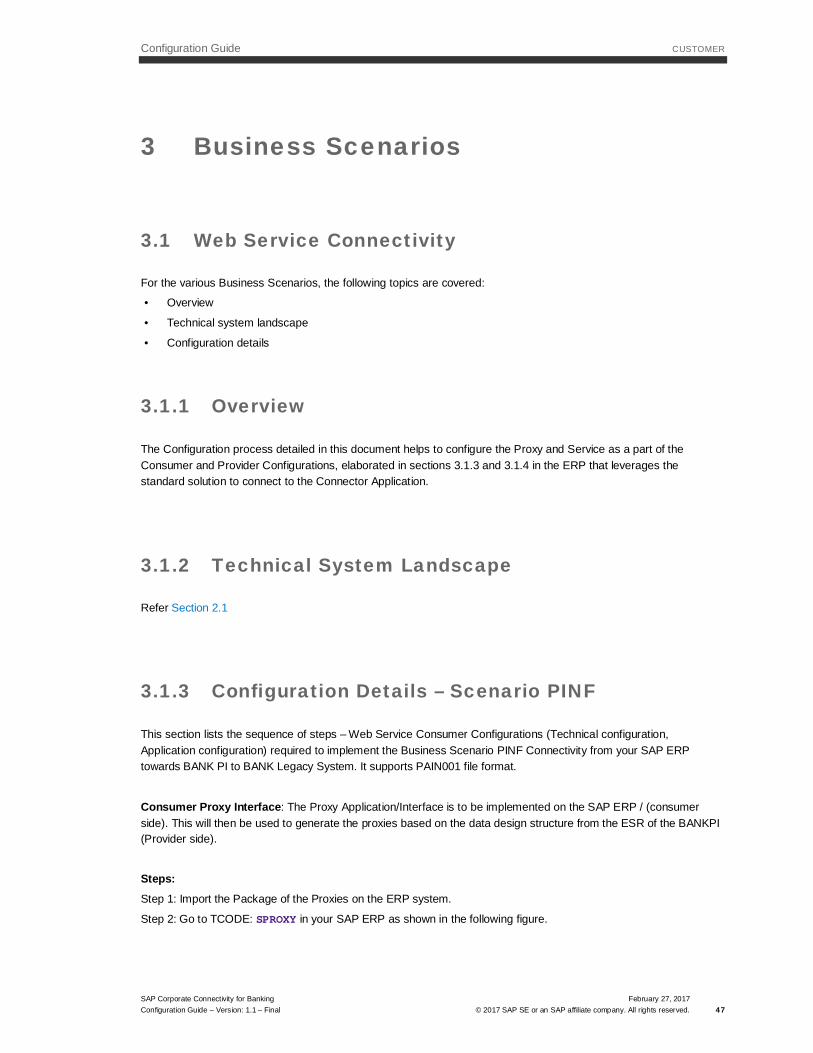
This section lists the sequence of steps – Web Service Consumer Configurations (Technical configuration,Application configuration) required to implement the Business Scenario PINF Connectivity from your SAP ERPtowards BANK PI to BANK Legacy System. It supports PAIN001 file format.
Consumer Proxy Interface: The Proxy Application/Interface is to be implemented on the SAP ERP / (consumerside). This will then be used to generate the proxies based on the data design structure from the ESR of the BANKPI(Provider side).
Steps:Step 1: Import the Package of the Proxies on the ERP system.
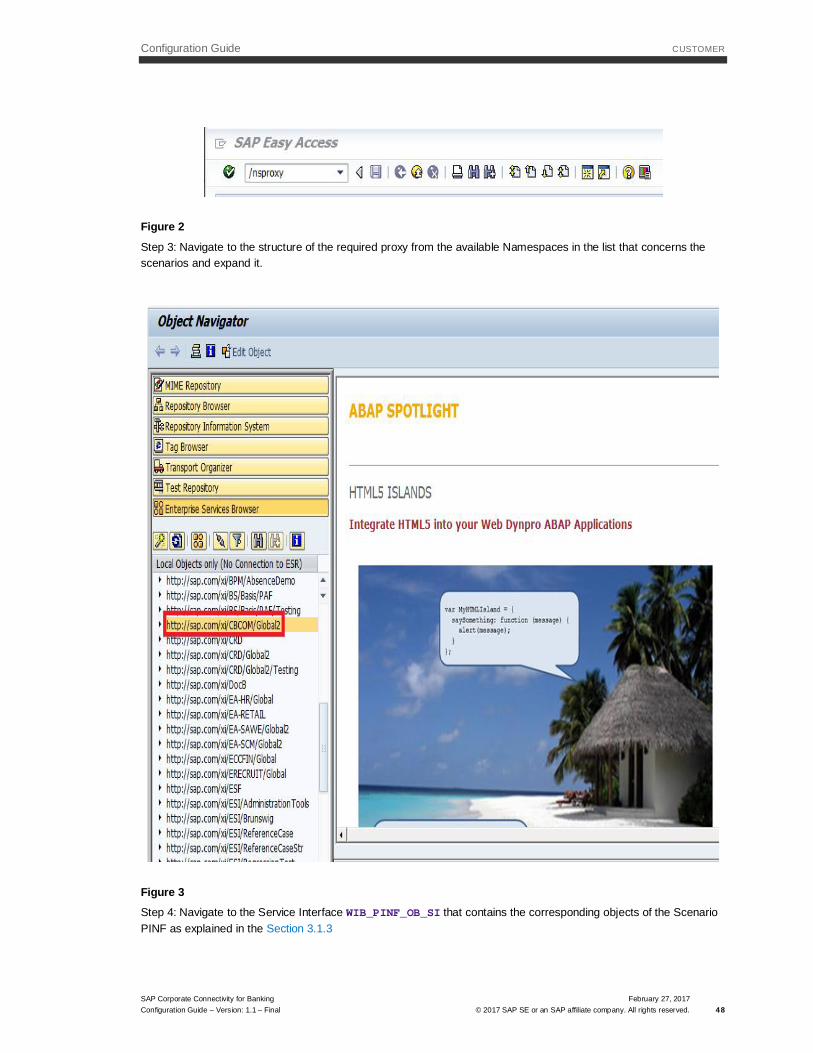
Step 2: Go to TCODE: SPROXY in your SAP ERP as shown in the following figure.
Configuration Guide CUSTOMER
SAP Corporate Connectivity for BankingConfiguration Guide – Version: 1.1 – Final
February 27, 2017© 2017 SAP SE or an SAP affiliate company. All rights reserved. 48
Figure 2
Step 3: Navigate to the structure of the required proxy from the available Namespaces in the list that concerns thescenarios and expand it.
Figure 3Step 4: Navigate to the Service Interface WIB_PINF_OB_SI that contains the corresponding objects of the ScenarioPINF as explained in the Section 3.1.3
Configuration Guide CUSTOMER
SAP Corporate Connectivity for BankingConfiguration Guide – Version: 1.1 – Final
February 27, 2017© 2017 SAP SE or an SAP affiliate company. All rights reserved. 49
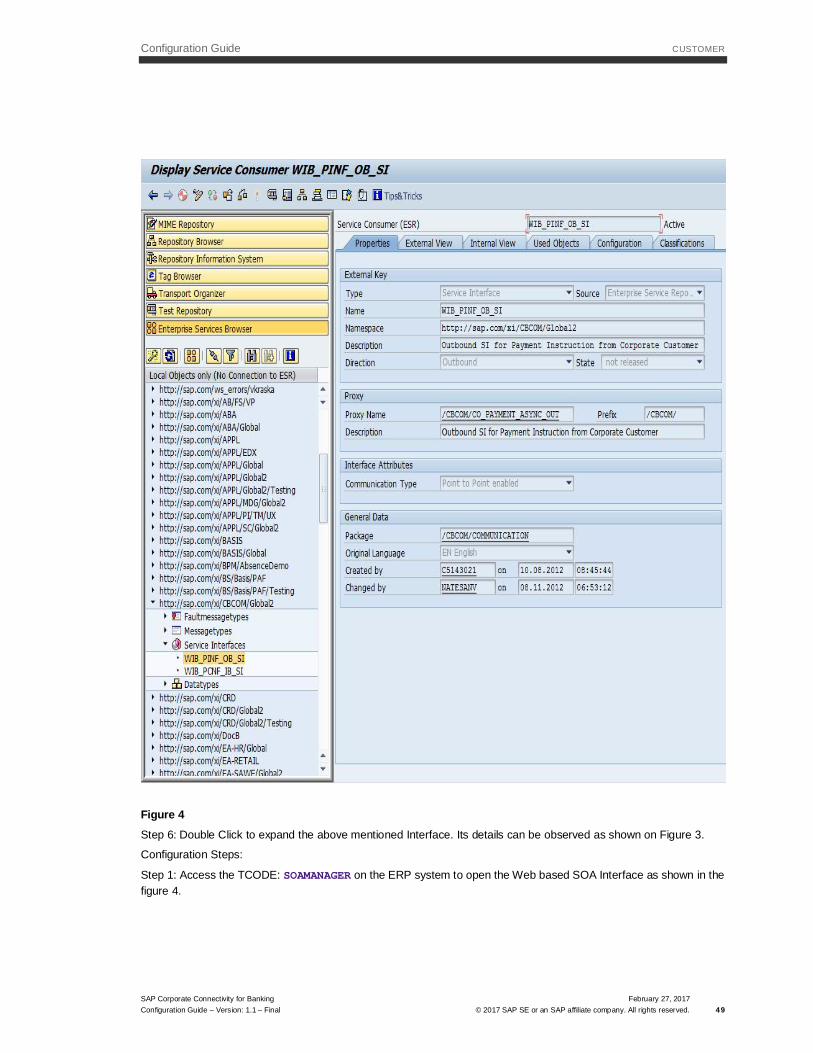
Figure 4Step 6: Double Click to expand the above mentioned Interface. Its details can be observed as shown on Figure 3.
Configuration Steps:
Step 1: Access the TCODE: SOAMANAGER on the ERP system to open the Web based SOA Interface as shown in thefigure 4.
Configuration Guide CUSTOMER
SAP Corporate Connectivity for BankingConfiguration Guide – Version: 1.1 – Final
February 27, 2017© 2017 SAP SE or an SAP affiliate company. All rights reserved. 50
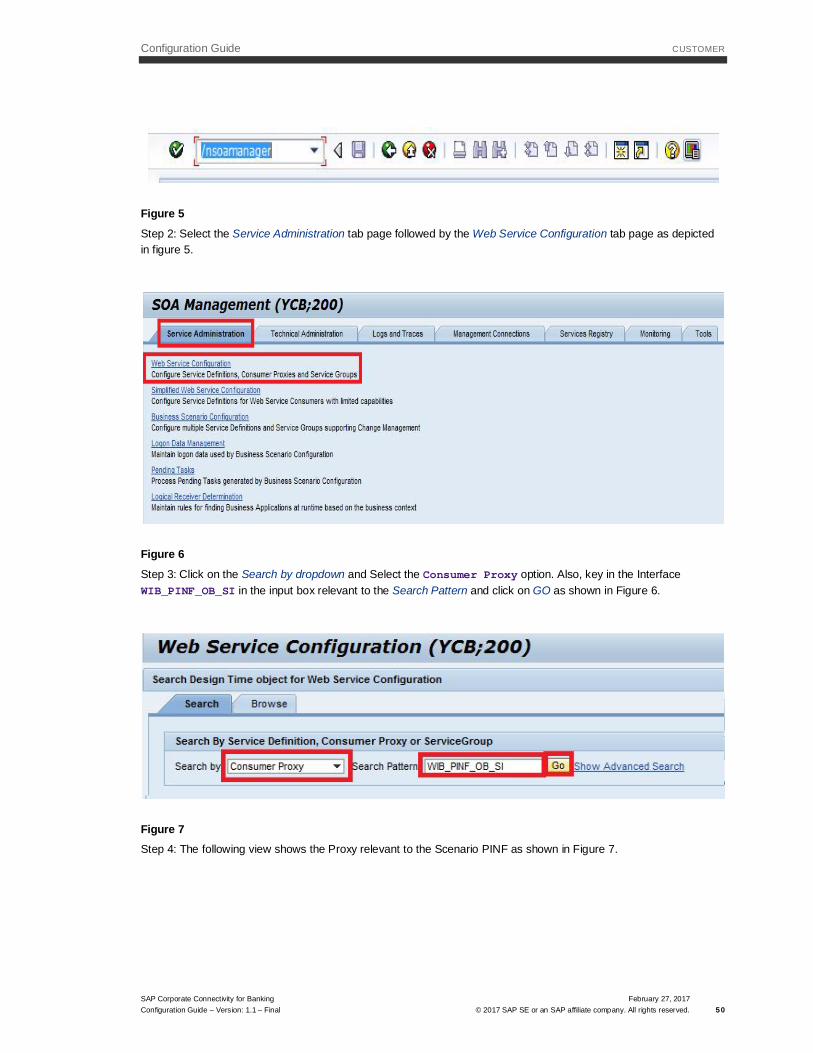
Figure 5Step 2: Select the Service Administration tab page followed by the Web Service Configuration tab page as depictedin figure 5.
Figure 6Step 3: Click on the Search by dropdown and Select the Consumer Proxy option. Also, key in the InterfaceWIB_PINF_OB_SI in the input box relevant to the Search Pattern and click on GO as shown in Figure 6.
Figure 7Step 4: The following view shows the Proxy relevant to the Scenario PINF as shown in Figure 7.

Configuration Guide CUSTOMER
SAP Corporate Connectivity for BankingConfiguration Guide – Version: 1.1 – Final
February 27, 2017© 2017 SAP SE or an SAP affiliate company. All rights reserved. 51
Figure 8
Step 5: Select the Proxy Name and choose the Apply Selection button to access the details of Consumer Proxy asshown in Figure 7. Select the Configuration tab page to create the configuration for the logical port for the proxy asshown in figure 8.
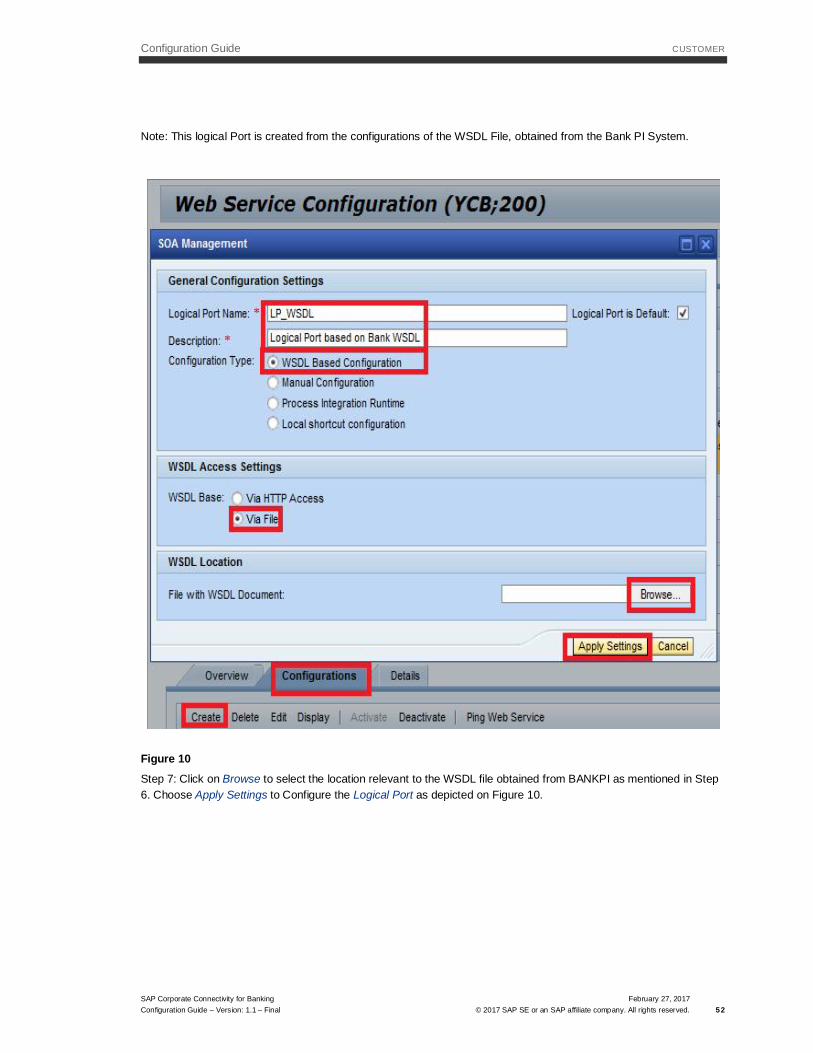
Figure 9Step 6: Click on Configurations -> Create as shown in figure 9 to create a LP. Provide a Name for the LP, Descriptionand check the 'Logical Port is Default' option. Further, select from the available options of Configuration Type asWSDL Based Configuration and WSDL Base as Via File.
Configuration Guide CUSTOMER
SAP Corporate Connectivity for BankingConfiguration Guide – Version: 1.1 – Final
February 27, 2017© 2017 SAP SE or an SAP affiliate company. All rights reserved. 52
Note: This logical Port is created from the configurations of the WSDL File, obtained from the Bank PI System.
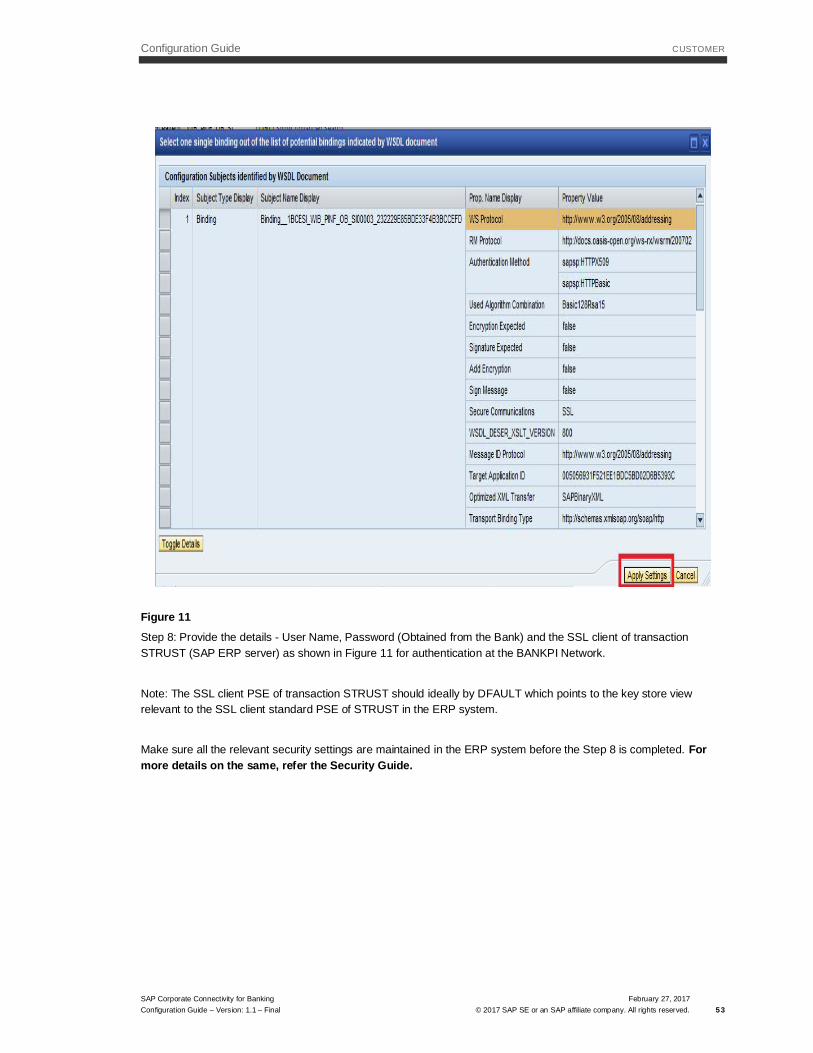
Figure 10Step 7: Click on Browse to select the location relevant to the WSDL file obtained from BANKPI as mentioned in Step6. Choose Apply Settings to Configure the Logical Port as depicted on Figure 10.
Configuration Guide CUSTOMER
SAP Corporate Connectivity for BankingConfiguration Guide – Version: 1.1 – Final
February 27, 2017© 2017 SAP SE or an SAP affiliate company. All rights reserved. 53
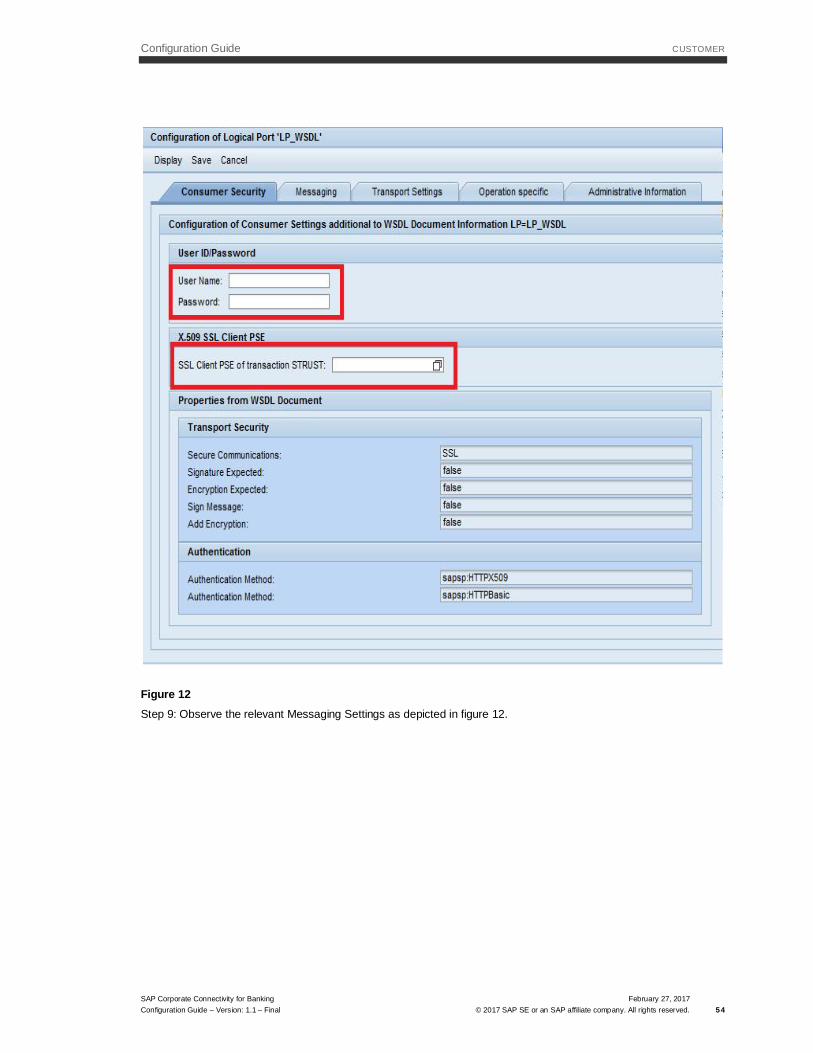
Figure 11Step 8: Provide the details - User Name, Password (Obtained from the Bank) and the SSL client of transactionSTRUST (SAP ERP server) as shown in Figure 11 for authentication at the BANKPI Network.
Note: The SSL client PSE of transaction STRUST should ideally by DFAULT which points to the key store viewrelevant to the SSL client standard PSE of STRUST in the ERP system.
Make sure all the relevant security settings are maintained in the ERP system before the Step 8 is completed. Formore details on the same, refer the Security Guide.
Configuration Guide CUSTOMER
SAP Corporate Connectivity for BankingConfiguration Guide – Version: 1.1 – Final
February 27, 2017© 2017 SAP SE or an SAP affiliate company. All rights reserved. 54
Figure 12Step 9: Observe the relevant Messaging Settings as depicted in figure 12.
Configuration Guide CUSTOMER
SAP Corporate Connectivity for BankingConfiguration Guide – Version: 1.1 – Final
February 27, 2017© 2017 SAP SE or an SAP affiliate company. All rights reserved. 55
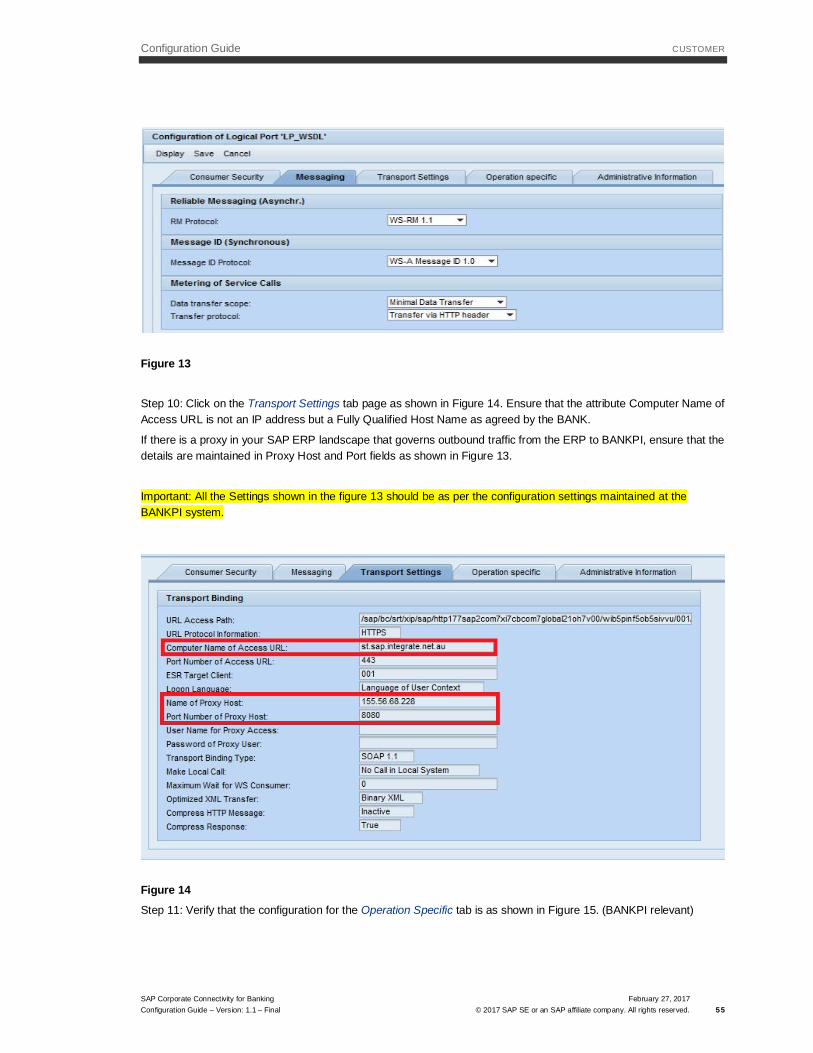
Figure 13
Step 10: Click on the Transport Settings tab page as shown in Figure 14. Ensure that the attribute Computer Name ofAccess URL is not an IP address but a Fully Qualified Host Name as agreed by the BANK.
If there is a proxy in your SAP ERP landscape that governs outbound traffic from the ERP to BANKPI, ensure that thedetails are maintained in Proxy Host and Port fields as shown in Figure 13.
Important: All the Settings shown in the figure 13 should be as per the configuration settings maintained at theBANKPI system.
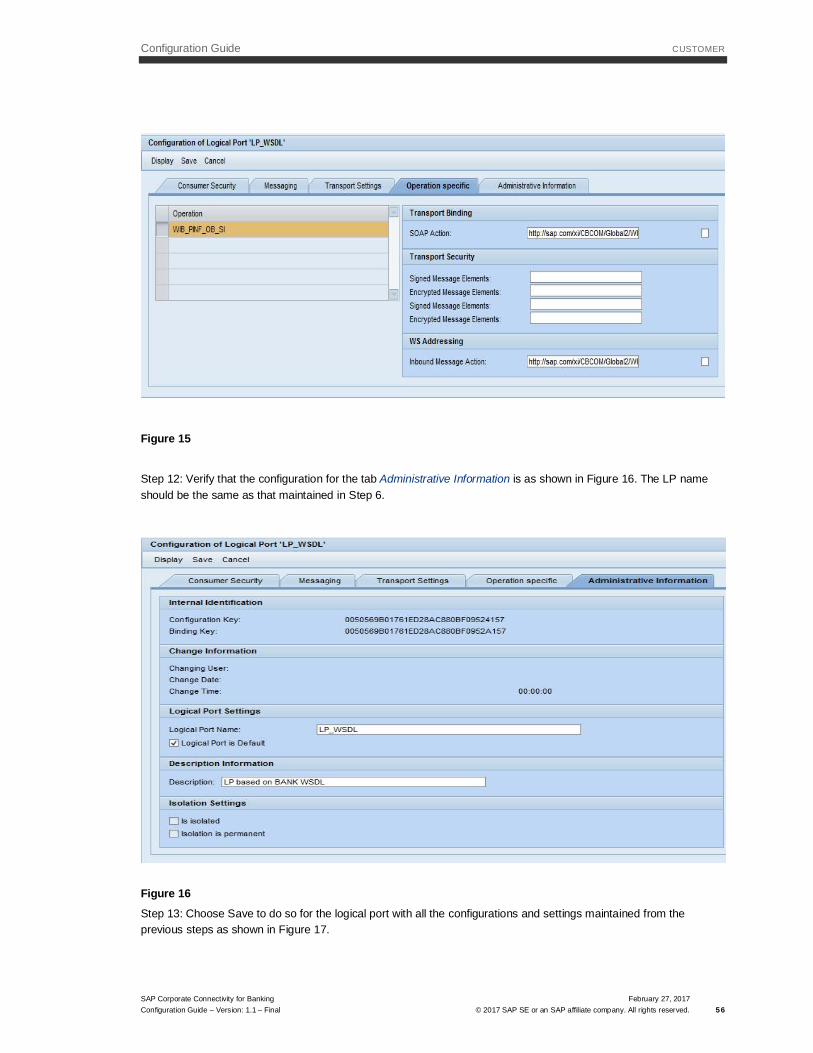
Figure 14Step 11: Verify that the configuration for the Operation Specific tab is as shown in Figure 15. (BANKPI relevant)
Configuration Guide CUSTOMER
SAP Corporate Connectivity for BankingConfiguration Guide – Version: 1.1 – Final
February 27, 2017© 2017 SAP SE or an SAP affiliate company. All rights reserved. 56
Figure 15
Step 12: Verify that the configuration for the tab Administrative Information is as shown in Figure 16. The LP nameshould be the same as that maintained in Step 6.
Figure 16Step 13: Choose Save to do so for the logical port with all the configurations and settings maintained from theprevious steps as shown in Figure 17.
Configuration Guide CUSTOMER
SAP Corporate Connectivity for BankingConfiguration Guide – Version: 1.1 – Final
February 27, 2017© 2017 SAP SE or an SAP affiliate company. All rights reserved. 57
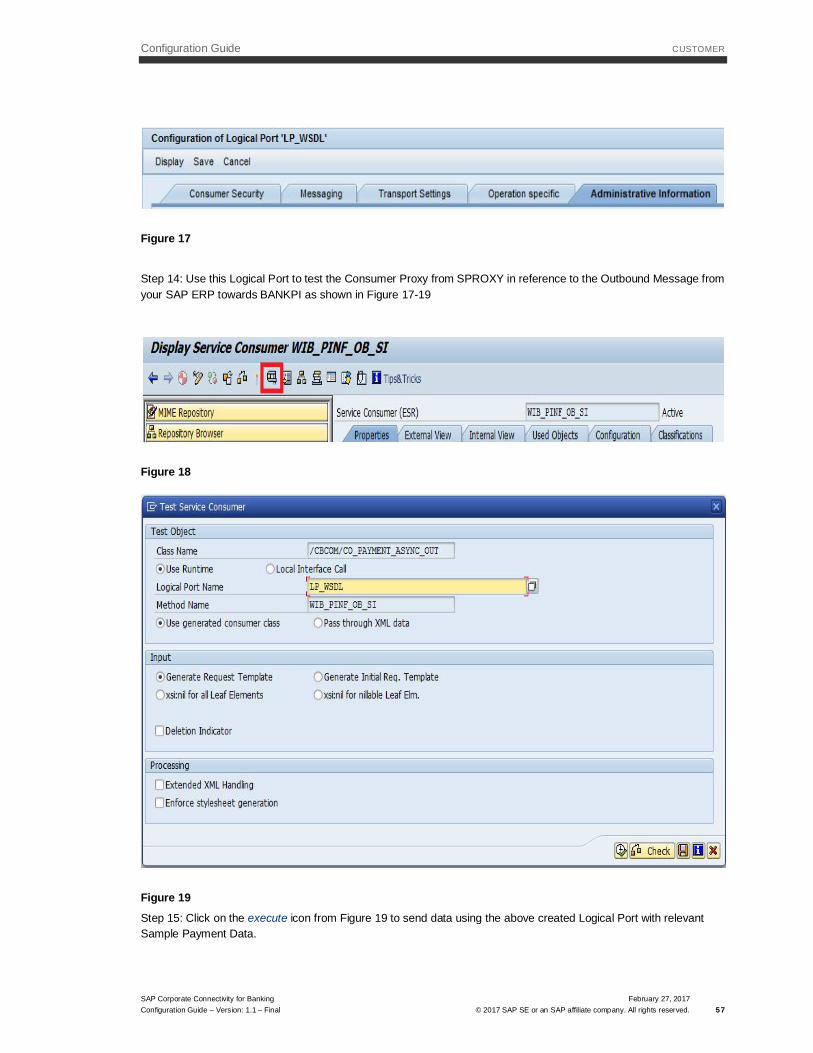
Figure 17
Step 14: Use this Logical Port to test the Consumer Proxy from SPROXY in reference to the Outbound Message fromyour SAP ERP towards BANKPI as shown in Figure 17-19
Figure 18
Figure 19
Step 15: Click on the execute icon from Figure 19 to send data using the above created Logical Port with relevantSample Payment Data.
Configuration Guide CUSTOMER
SAP Corporate Connectivity for BankingConfiguration Guide – Version: 1.1 – Final
February 27, 2017© 2017 SAP SE or an SAP affiliate company. All rights reserved. 58
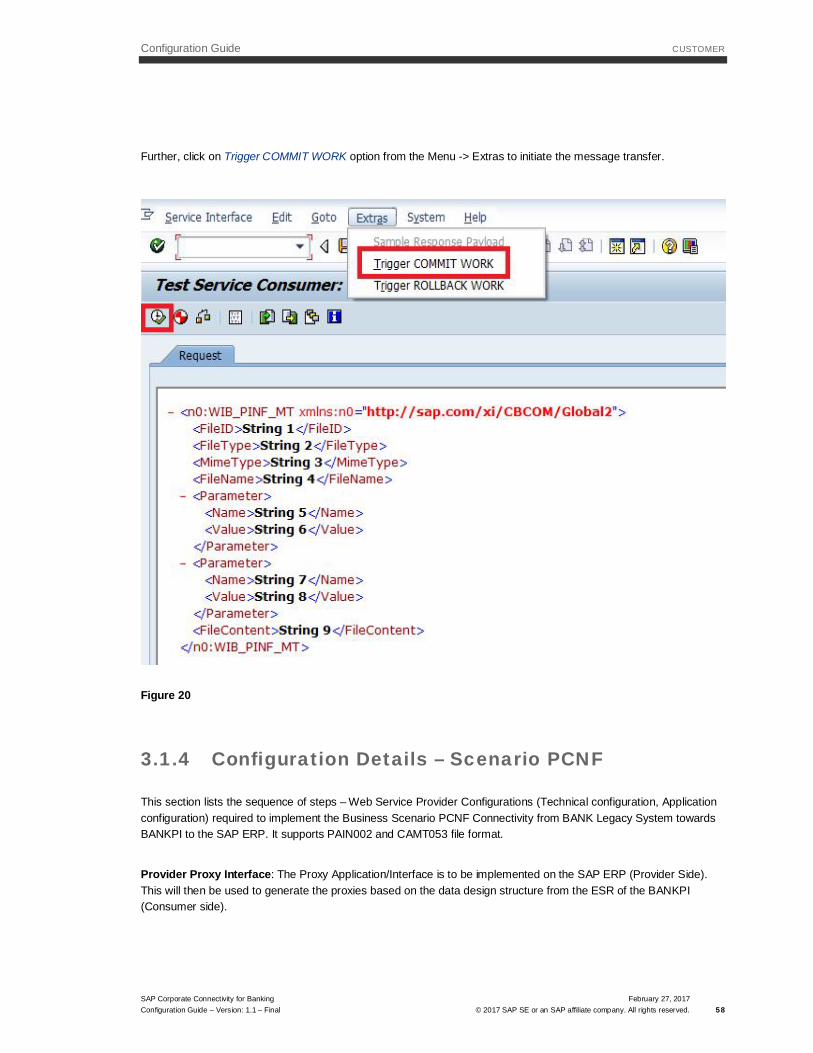
Further, click on Trigger COMMIT WORK option from the Menu -> Extras to initiate the message transfer.
Figure 20
3.1.4 Configuration Details – Scenario PCNF
This section lists the sequence of steps – Web Service Provider Configurations (Technical configuration, Applicationconfiguration) required to implement the Business Scenario PCNF Connectivity from BANK Legacy System towardsBANKPI to the SAP ERP. It supports PAIN002 and CAMT053 file format.
Provider Proxy Interface: The Proxy Application/Interface is to be implemented on the SAP ERP (Provider Side).This will then be used to generate the proxies based on the data design structure from the ESR of the BANKPI(Consumer side).
Configuration Guide CUSTOMER
SAP Corporate Connectivity for BankingConfiguration Guide – Version: 1.1 – Final
February 27, 2017© 2017 SAP SE or an SAP affiliate company. All rights reserved. 59
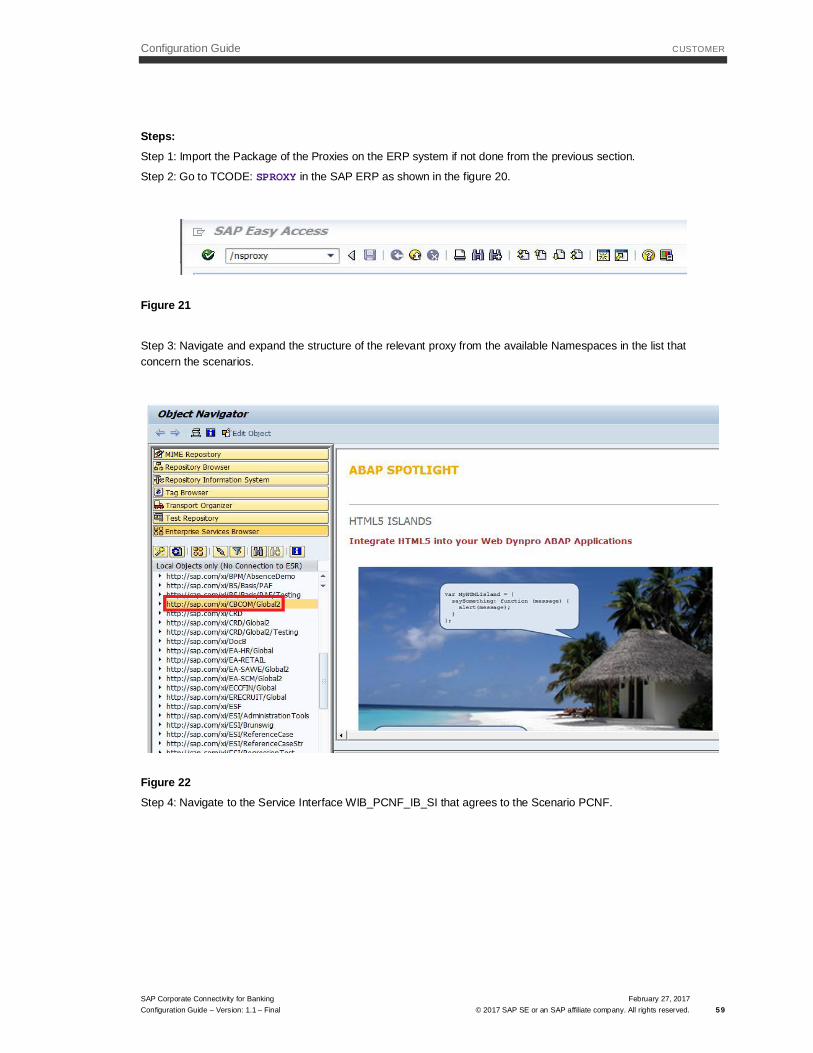
Steps:Step 1: Import the Package of the Proxies on the ERP system if not done from the previous section.
Step 2: Go to TCODE: SPROXY in the SAP ERP as shown in the figure 20.
Figure 21
Step 3: Navigate and expand the structure of the relevant proxy from the available Namespaces in the list thatconcern the scenarios.
Figure 22Step 4: Navigate to the Service Interface WIB_PCNF_IB_SI that agrees to the Scenario PCNF.
Configuration Guide CUSTOMER
SAP Corporate Connectivity for BankingConfiguration Guide – Version: 1.1 – Final
February 27, 2017© 2017 SAP SE or an SAP affiliate company. All rights reserved. 60
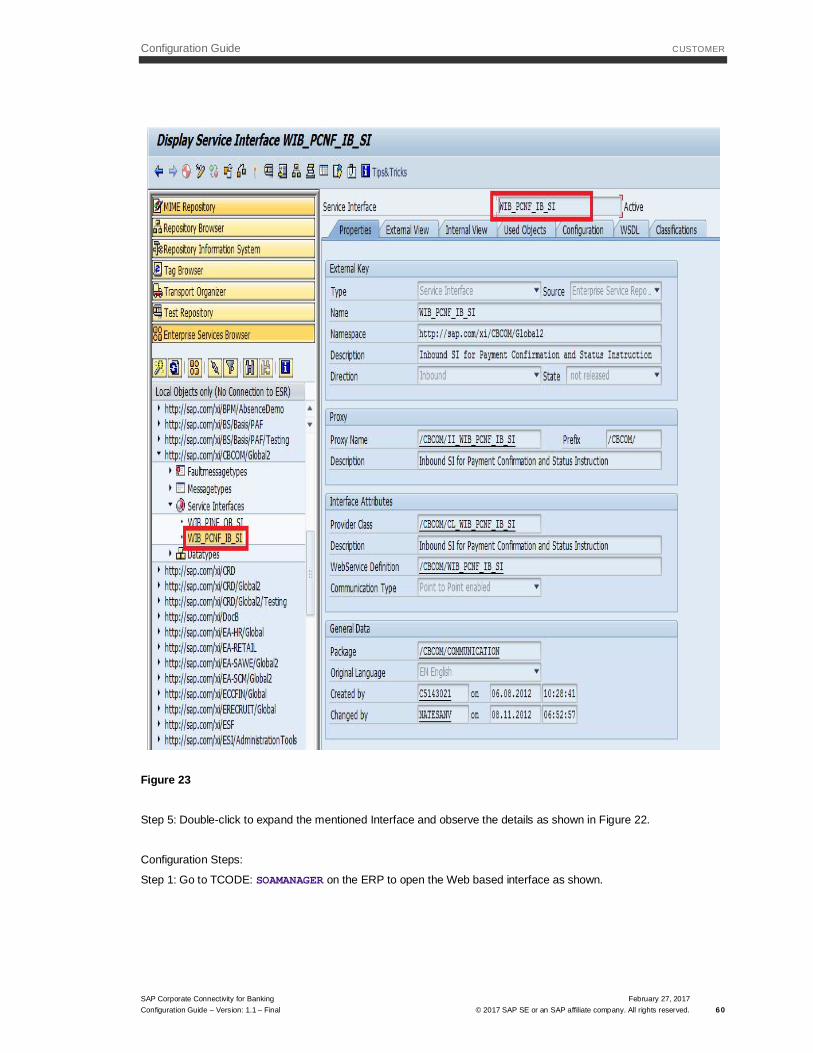
Figure 23
Step 5: Double-click to expand the mentioned Interface and observe the details as shown in Figure 22.
Configuration Steps:
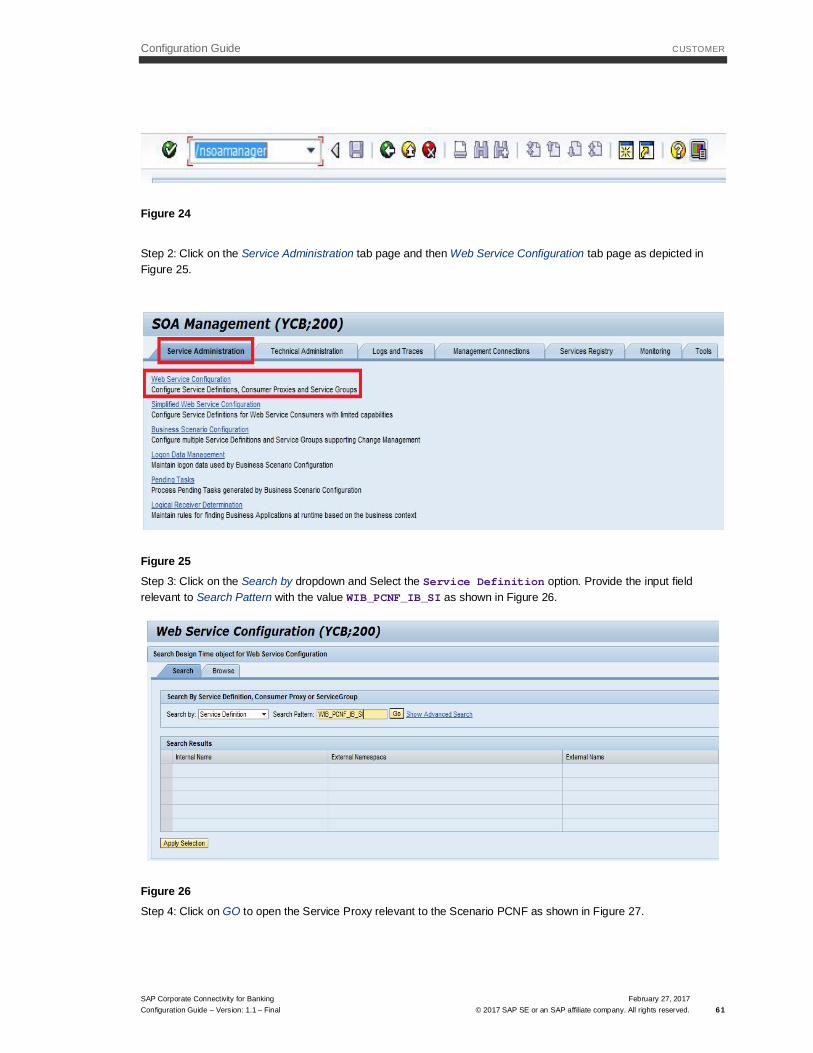
Step 1: Go to TCODE: SOAMANAGER on the ERP to open the Web based interface as shown.
Configuration Guide CUSTOMER
SAP Corporate Connectivity for BankingConfiguration Guide – Version: 1.1 – Final
February 27, 2017© 2017 SAP SE or an SAP affiliate company. All rights reserved. 61
Figure 24
Step 2: Click on the Service Administration tab page and then Web Service Configuration tab page as depicted inFigure 25.
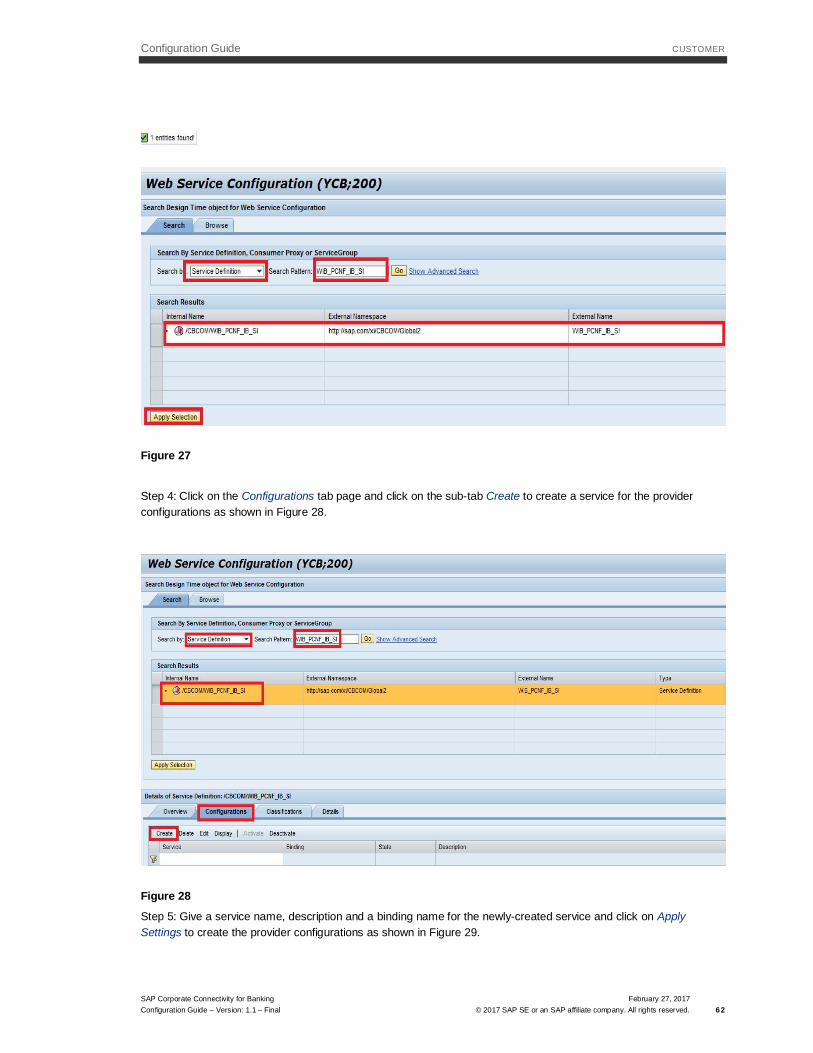
Figure 25Step 3: Click on the Search by dropdown and Select the Service Definition option. Provide the input fieldrelevant to Search Pattern with the value WIB_PCNF_IB_SI as shown in Figure 26.
Figure 26Step 4: Click on GO to open the Service Proxy relevant to the Scenario PCNF as shown in Figure 27.
Configuration Guide CUSTOMER
SAP Corporate Connectivity for BankingConfiguration Guide – Version: 1.1 – Final
February 27, 2017© 2017 SAP SE or an SAP affiliate company. All rights reserved. 62
Figure 27
Step 4: Click on the Configurations tab page and click on the sub-tab Create to create a service for the providerconfigurations as shown in Figure 28.
Figure 28
Step 5: Give a service name, description and a binding name for the newly-created service and click on ApplySettings to create the provider configurations as shown in Figure 29.

Configuration Guide CUSTOMER
SAP Corporate Connectivity for BankingConfiguration Guide – Version: 1.1 – Final
February 27, 2017© 2017 SAP SE or an SAP affiliate company. All rights reserved. 63
Figure 29
Step 6: Maintain Provider Security details as shown in Figure 30. The authentication setting has the authenticationmethod - Transport Channel Authentication -> X.509 SSL Client Certificate.
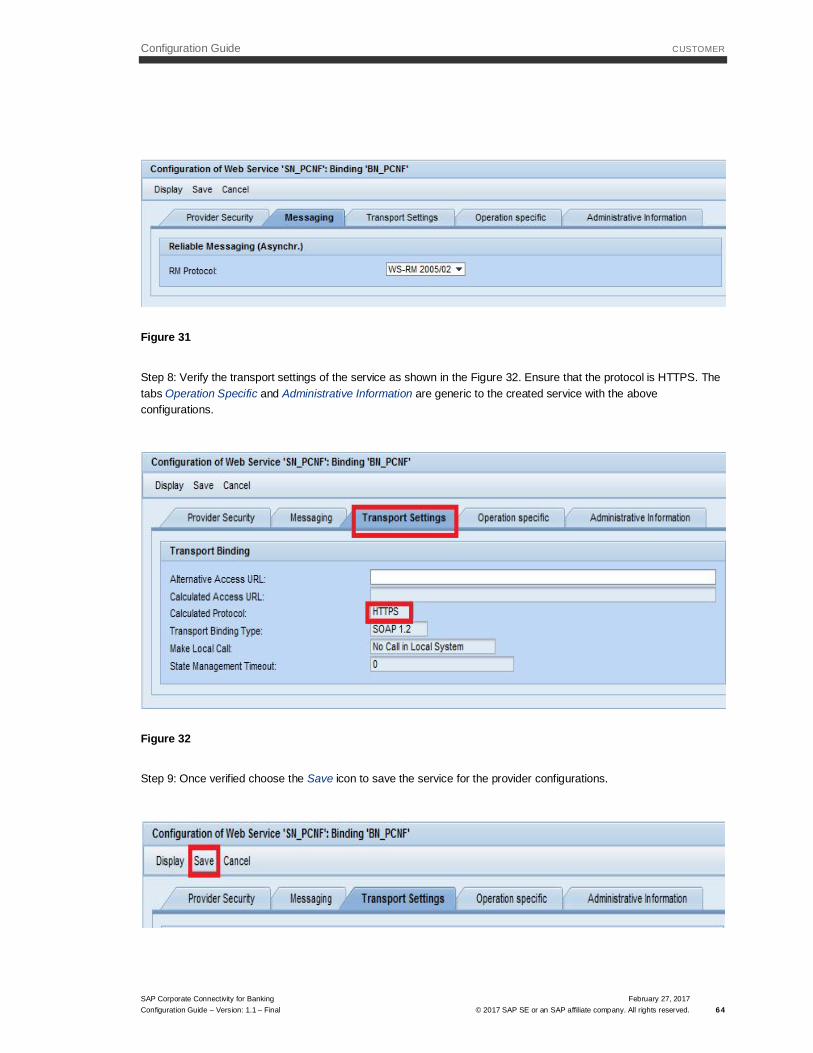
Figure 30Step 7: Verify the parameters on the Messaging tab page of the created binding as shown in Figure 31.
Configuration Guide CUSTOMER
SAP Corporate Connectivity for BankingConfiguration Guide – Version: 1.1 – Final
February 27, 2017© 2017 SAP SE or an SAP affiliate company. All rights reserved. 64
Figure 31
Step 8: Verify the transport settings of the service as shown in the Figure 32. Ensure that the protocol is HTTPS. Thetabs Operation Specific and Administrative Information are generic to the created service with the aboveconfigurations.
Figure 32
Step 9: Once verified choose the Save icon to save the service for the provider configurations.
Configuration Guide CUSTOMER
SAP Corporate Connectivity for BankingConfiguration Guide – Version: 1.1 – Final
February 27, 2017© 2017 SAP SE or an SAP affiliate company. All rights reserved. 65
Figure 33
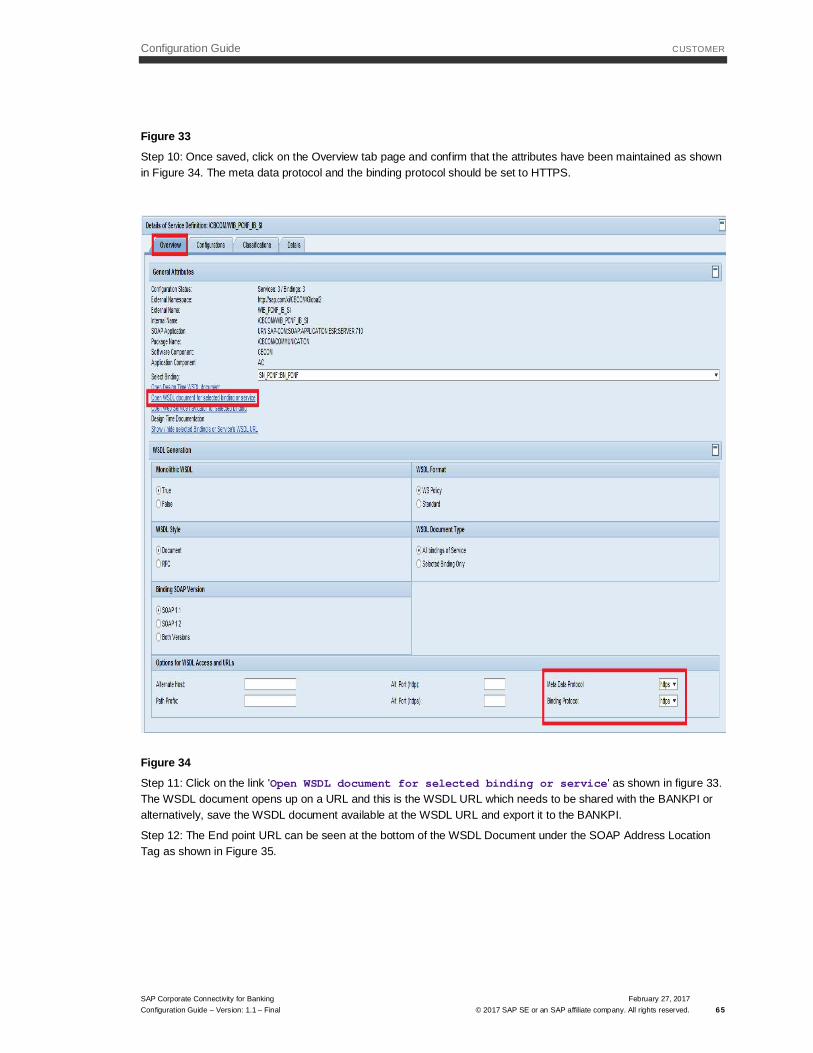
Step 10: Once saved, click on the Overview tab page and confirm that the attributes have been maintained as shownin Figure 34. The meta data protocol and the binding protocol should be set to HTTPS.
Figure 34
Step 11: Click on the link 'Open WSDL document for selected binding or service' as shown in figure 33.The WSDL document opens up on a URL and this is the WSDL URL which needs to be shared with the BANKPI oralternatively, save the WSDL document available at the WSDL URL and export it to the BANKPI.
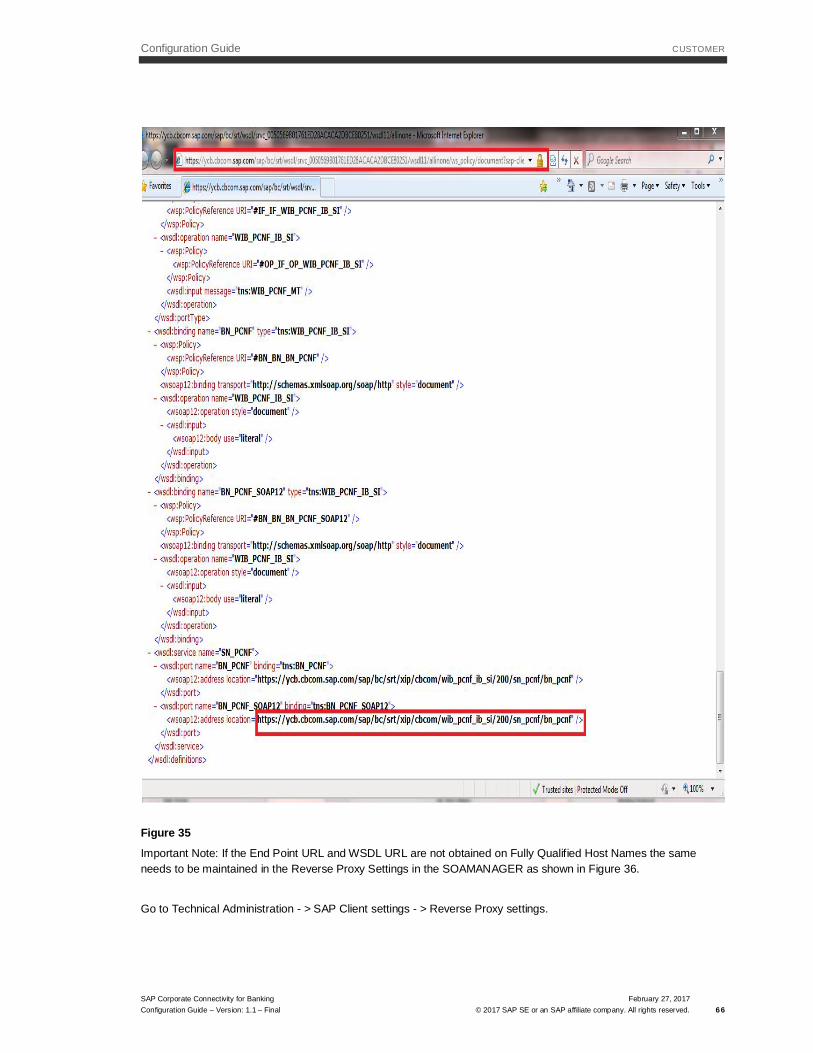
Step 12: The End point URL can be seen at the bottom of the WSDL Document under the SOAP Address LocationTag as shown in Figure 35.
Configuration Guide CUSTOMER
SAP Corporate Connectivity for BankingConfiguration Guide – Version: 1.1 – Final
February 27, 2017© 2017 SAP SE or an SAP affiliate company. All rights reserved. 66
Figure 35
Important Note: If the End Point URL and WSDL URL are not obtained on Fully Qualified Host Names the sameneeds to be maintained in the Reverse Proxy Settings in the SOAMANAGER as shown in Figure 36.
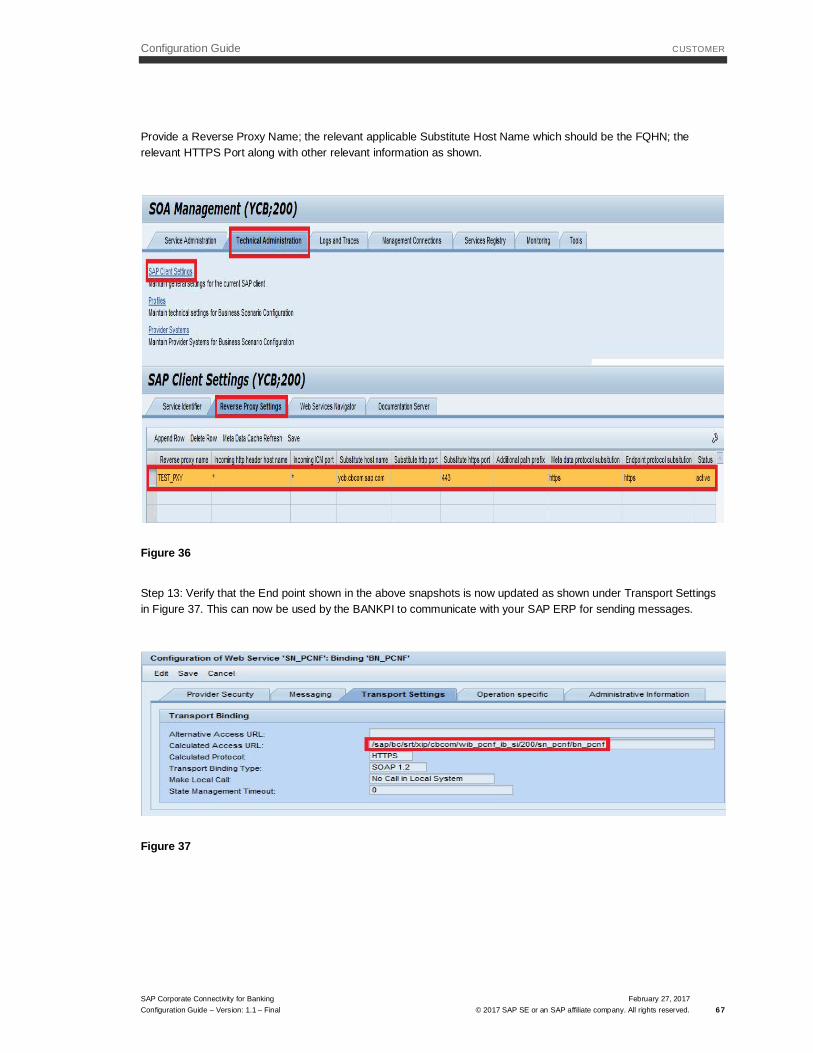
Go to Technical Administration - > SAP Client settings - > Reverse Proxy settings.
Configuration Guide CUSTOMER
SAP Corporate Connectivity for BankingConfiguration Guide – Version: 1.1 – Final
February 27, 2017© 2017 SAP SE or an SAP affiliate company. All rights reserved. 67
Provide a Reverse Proxy Name; the relevant applicable Substitute Host Name which should be the FQHN; therelevant HTTPS Port along with other relevant information as shown.
Figure 36
Step 13: Verify that the End point shown in the above snapshots is now updated as shown under Transport Settingsin Figure 37. This can now be used by the BANKPI to communicate with your SAP ERP for sending messages.
Figure 37
Configuration Guide CUSTOMER
SAP Corporate Connectivity for BankingConfiguration Guide – Version: 1.1 – Final
February 27, 2017© 2017 SAP SE or an SAP affiliate company. All rights reserved. 68
3.2 Role and Authorization Concept for the Solution
3.2.1 Standard Roles
There are no standard roles that are used by the solution.
3.2.2 Standard Authorization Objects
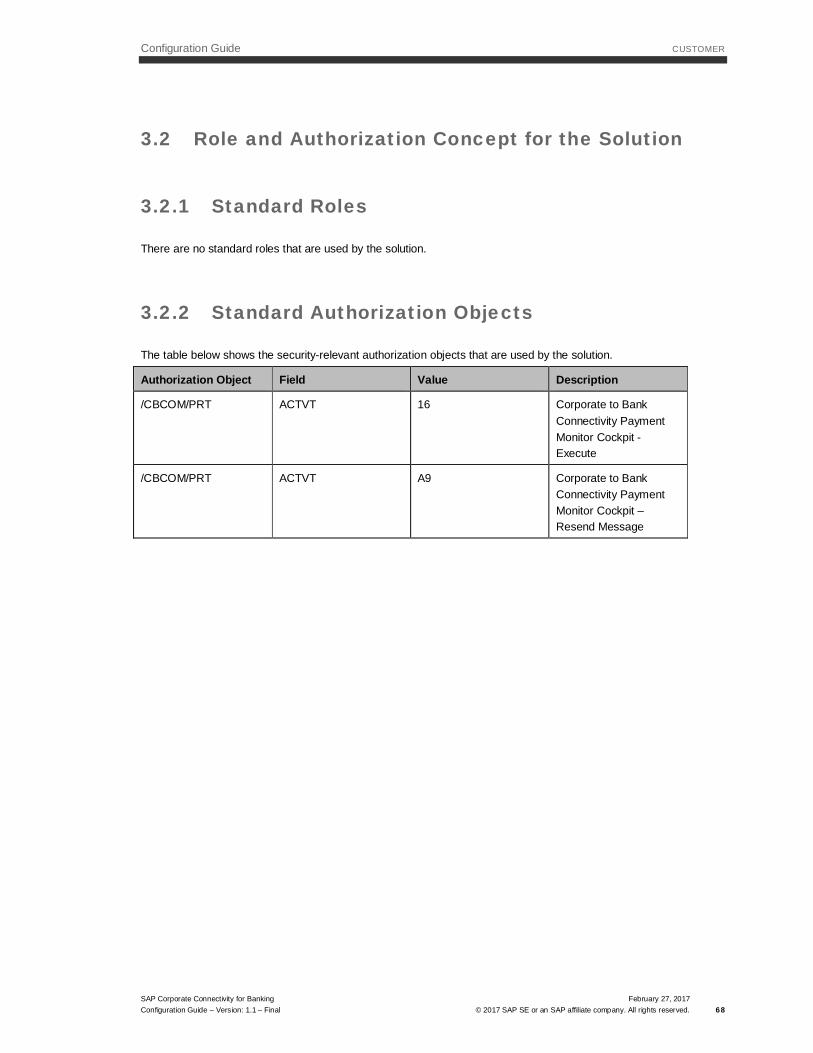
The table below shows the security-relevant authorization objects that are used by the solution.
Authorization Object Field Value Description
/CBCOM/PRT ACTVT 16 Corporate to BankConnectivity PaymentMonitor Cockpit -Execute
/CBCOM/PRT ACTVT A9 Corporate to BankConnectivity PaymentMonitor Cockpit –Resend Message

Configuration Guide CUSTOMER
SAP Corporate Connectivity for BankingConfiguration Guide – Version: 1.1 – Final
February 27, 2017© 2017 SAP SE or an SAP affiliate company. All rights reserved. 69
4 Operations Information
Designing, implementing, and running your SAP applications at peak performance 24 hours a day is vital for yourbusiness success. This chapter contains important information on how to smoothly operate this solution provided bySAP for Westpac. The important topics discussed are Monitoring, Administration, Software Change Management,High Availability, and Troubleshooting. This chapter describes the tasks to execute and the tools to use.
This chapter does not replace the operations handbook in which the customer or the operations organizationdocuments the concrete tasks, involved parties, and interaction procedures.
The solution is based on SAP ECC 6.0 and Software Components SAP_BASIS SP17 Rel. 700, SAP_APPL SP14Rel. 600, SAP_AP SP 14 Rel. 700.
Therefore, the general operations information that is covered in the corresponding operations guides also apply to thesolution.
For a complete list of available SAP Operations Guides, see http://service.sap.com/instguides.
The operations information specific to the solution is described in the following sections. The following areas arecovered:
· Monitoring
· Administration and Management
· Software Change Management
· Troubleshooting
Configuration Guide CUSTOMER
SAP Corporate Connectivity for BankingConfiguration Guide – Version: 1.1 – Final
February 27, 2017© 2017 SAP SE or an SAP affiliate company. All rights reserved. 70
5 Monitoring
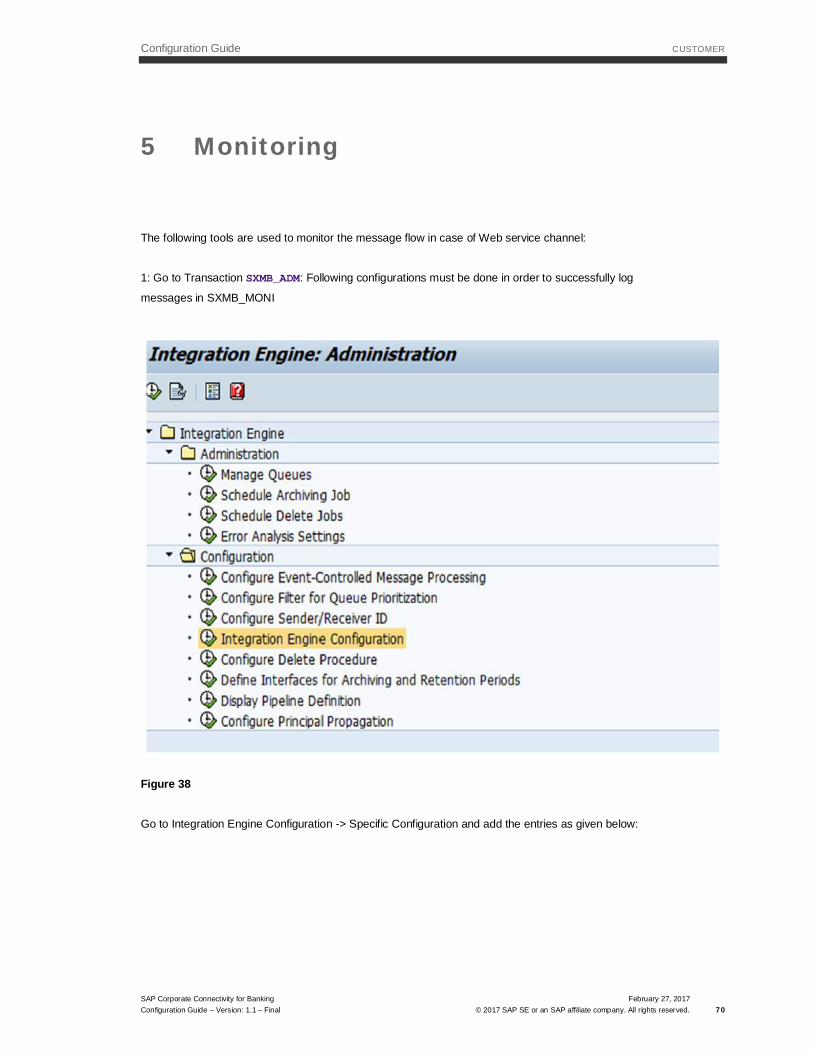
The following tools are used to monitor the message flow in case of Web service channel:
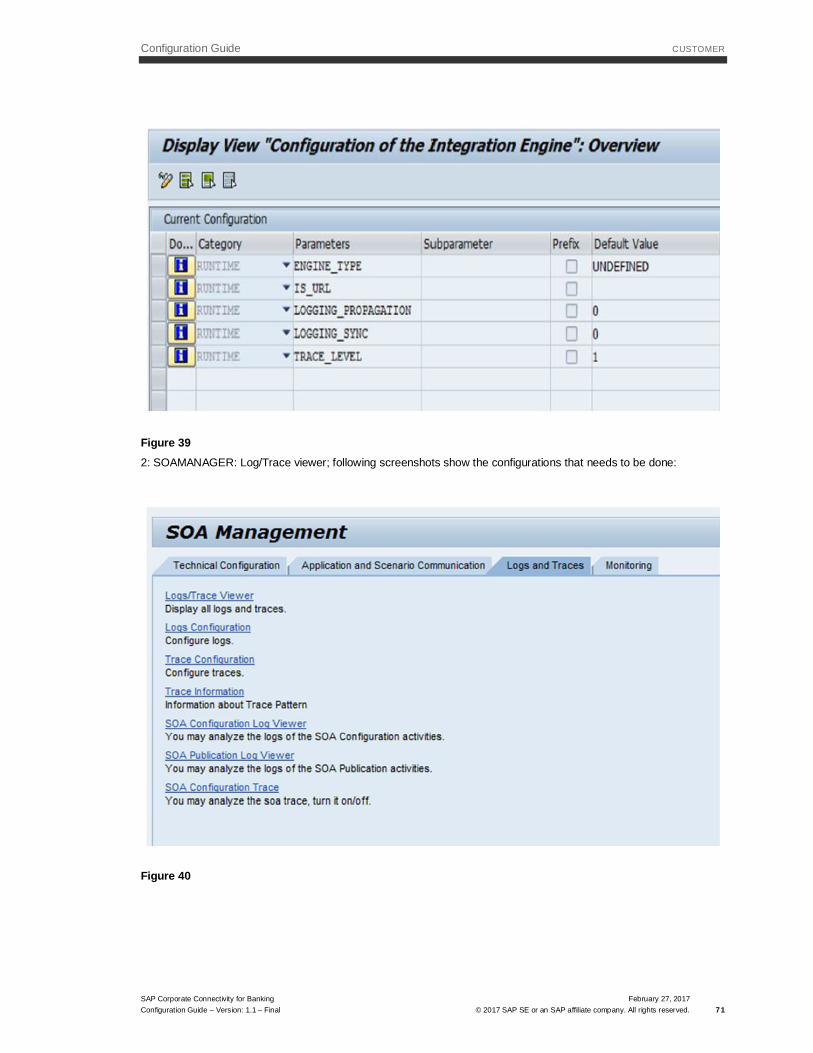
1: Go to Transaction SXMB_ADM: Following configurations must be done in order to successfully log
messages in SXMB_MONI
Figure 38
Go to Integration Engine Configuration -> Specific Configuration and add the entries as given below:
Configuration Guide CUSTOMER
SAP Corporate Connectivity for BankingConfiguration Guide – Version: 1.1 – Final
February 27, 2017© 2017 SAP SE or an SAP affiliate company. All rights reserved. 71
Figure 392: SOAMANAGER: Log/Trace viewer; following screenshots show the configurations that needs to be done:
Figure 40
Configuration Guide CUSTOMER
SAP Corporate Connectivity for BankingConfiguration Guide – Version: 1.1 – Final
February 27, 2017© 2017 SAP SE or an SAP affiliate company. All rights reserved. 72
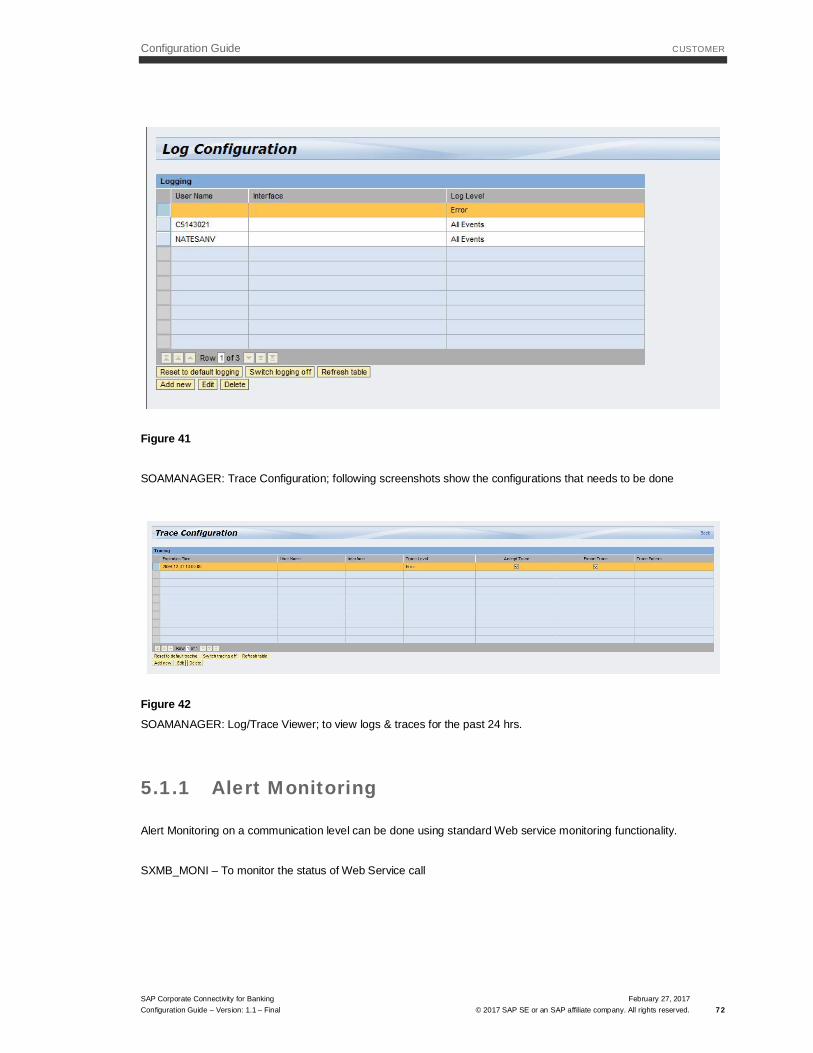
Figure 41
SOAMANAGER: Trace Configuration; following screenshots show the configurations that needs to be done
Figure 42SOAMANAGER: Log/Trace Viewer; to view logs & traces for the past 24 hrs.
5.1.1 Alert Monitoring
Alert Monitoring on a communication level can be done using standard Web service monitoring functionality.
SXMB_MONI – To monitor the status of Web Service call
Configuration Guide CUSTOMER
SAP Corporate Connectivity for BankingConfiguration Guide – Version: 1.1 – Final
February 27, 2017© 2017 SAP SE or an SAP affiliate company. All rights reserved. 73
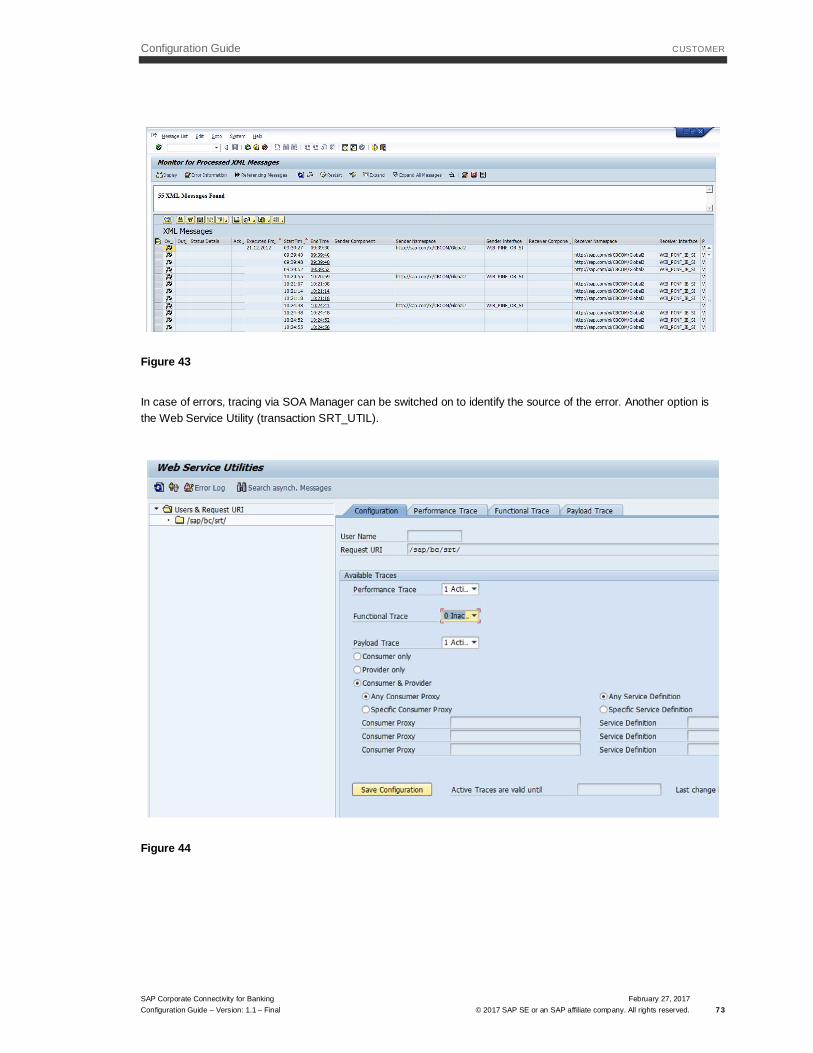
Figure 43
In case of errors, tracing via SOA Manager can be switched on to identify the source of the error. Another option isthe Web Service Utility (transaction SRT_UTIL).
Figure 44
Configuration Guide CUSTOMER
SAP Corporate Connectivity for BankingConfiguration Guide – Version: 1.1 – Final
February 27, 2017© 2017 SAP SE or an SAP affiliate company. All rights reserved. 74
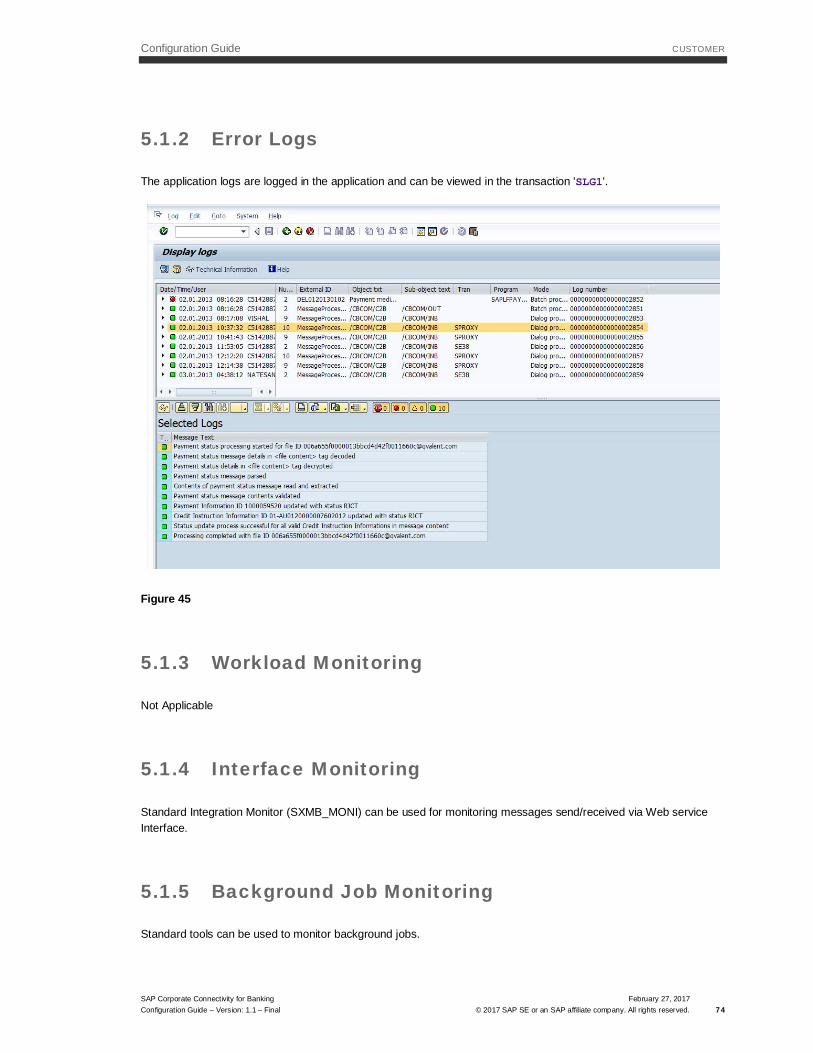
5.1.2 Error Logs
The application logs are logged in the application and can be viewed in the transaction 'SLG1'.
Figure 45
5.1.3 Workload Monitoring
Not Applicable
5.1.4 Interface Monitoring
Standard Integration Monitor (SXMB_MONI) can be used for monitoring messages send/received via Web serviceInterface.
5.1.5 Background Job Monitoring
Standard tools can be used to monitor background jobs.
Configuration Guide CUSTOMER
SAP Corporate Connectivity for BankingConfiguration Guide – Version: 1.1 – Final
February 27, 2017© 2017 SAP SE or an SAP affiliate company. All rights reserved. 75
5.2 Administration and Management
5.2.1 Starting and Stopping
Not Applicable
5.2.2 Technical Configuration
Not Applicable
5.2.3 Backup and Restore
Not Applicable
5.2.4 Periodic Tasks
Not Applicable
5.2.5 User Management
Not Applicable
5.2.6 Load Balancing and Scalability
Not Applicable
5.2.7 High Availability
Not Applicable

Configuration Guide CUSTOMER
SAP Corporate Connectivity for BankingConfiguration Guide – Version: 1.1 – Final
February 27, 2017© 2017 SAP SE or an SAP affiliate company. All rights reserved. 76
5.3 Software Change Management
Not Applicable
5.4 Troubleshooting
Not Applicable

www.sap.com/contactsap
© 2017 SAP SE or an SAP affiliate company. All rights reserved.