S23 p 26 - Embroiderers' Guild · running stitches just below the embroidery, stitching through all...
5
or centuries, nomadic tribes have used folded squares of fabric to create soft containers. These folded squares can be stored flat in the limited living space or opened out to hold various collections of items when they are on the move. The squares are often decorated with tribal patterns and have few or no construction stitches to create the three-dimensional shapes. Studying embroideries from the Middle East, I found many simple folded structures that are derived from decorated squares of cloth. I decided to use some of these structures to create a series of encrusted calico containers. The Mermaid’s Chatelaine is made from small squares of encrusted calico that are folded in different ways to create… a slot for a belt so that it can hang from the waist, a pincushion, a thimble case, a scissors case and a self-closing needlecase. Basic technique The encrusting technique is worked on two layers of calico. Mount one piece of calico in an embroidery hoop (see Back to Basics page 48). Pull taut so that there are no wrinkles. Lay a second piece of calico onto this stretched piece, ensuring that the grains of the fabrics are aligned. To create a raised surface, items are trapped between this second piece of calico and the stretched piece. Items trapped between the two are stab- stitched in place with machine cotton thread to make an uneven raised surface. Raising the surface Add trapped items gradually, one at a time, securing each item as unobtrusively as possible with small stitches and cream cotton machine thread. Excess fabric around these items can be disguised with the surface and raised stitches. • Rings can be made by trapping: bunion pads, ring-file reinforcements A Mermaid’s Jennifer Rochester creates simply folded containers encrusted with stitch PHOTO BY ALAN BENNINGTON 28 A Mermaid’s F
Transcript of S23 p 26 - Embroiderers' Guild · running stitches just below the embroidery, stitching through all...

or centuries, nomadictribes have used foldedsquares of fabric to
create soft containers. Thesefolded squares can be stored
flat in the limited living spaceor opened out to hold variouscollections of items when theyare on the move. The squaresare often decorated with tribal
patterns and have few or noconstruction stitches to createthe three-dimensional shapes.Studying embroideries fromthe Middle East, I found manysimple folded structures thatare derived from decoratedsquares of cloth. I decided touse some of these structuresto create a series of encrustedcalico containers.
The Mermaid’s Chatelaineis made from small squares ofencrusted calico that arefolded in different ways tocreate… a slot for a belt sothat it can hang from thewaist, a pincushion, a thimblecase, a scissors case and aself-closing needlecase.
Basic technique
The encrusting technique isworked on two layers ofcalico. Mount one piece ofcalico in an embroidery hoop(see Back to Basics page 48).Pull taut so that there are nowrinkles. Lay a second pieceof calico onto this stretchedpiece, ensuring that the grainsof the fabrics are aligned. Tocreate a raised surface, itemsare trapped between thissecond piece of calico and thestretched piece. Items trappedbetween the two are stab-stitched in place with machinecotton thread to make anuneven raised surface.
Raising the surface
Add trapped items gradually,one at a time, securing eachitem as unobtrusively aspossible with small stitchesand cream cotton machinethread. Excess fabric aroundthese items can be disguisedwith the surface and raisedstitches.• Rings can be made by
trapping: bunion pads,ring-file reinforcements
A Mermaid’s Jennifer Rochestercreates simply foldedcontainers encrustedwith stitch
PHOTO BY ALAN BENNINGTON
28
A Mermaid’s F

(heaped), cut paper straws,round beads, flat discbeads, washers (not metal,which may rust), curtainrings and plastic rings,slivers of plastic straw,narrow plastic tubing.
• Circles can be made bytrapping: felt and Vileneshapes (single andlayered), buttons (the holescan be useful for addingstitches later), bottle tops,blister packaging (frompills) stuffed so that itholds its shape, paper ballscut in half, large beads.
Sandwiching rings andcircles
Embroidery stitches
Use a variety of threads inneutral shades: shiny, dull,twisted, smooth. ‘Colonies’ ofsimilar stitch make the mostinteresting textures. Vary thesize of the stitches and allowsome stitches to overlap andintegrate. Work with a sharp-pointed crewel needle forstitches that pierce the fabric.Work collections or colonies of
stitches such as seeding andfrench knots, some looselyworked and some overlappingeach other.
Raised stitches
These stitches are worked ona framework of threadsworked with a crewel needle.Once the basic foundation islaid, all further stitches do notenter the fabric but areworked on the surface. Forease they should be workedusing a tapestry (blunt)needle. Wheel stitches, cupstitches and woven picots adddifferent textures to thesurface.
Cut out the squares foreach container using metric(centimetre) graph paper. Foldas in the illustrations to makesure you understand howeach container is formed andwhere the encrusting is to beworked. Make a square cardtemplate for each containerand mark in the fold linescarefully.
The template is marked outin the centre of the reverse ofthe framed piece, with theedge of the square matchingthe grain, as a guide. Mark inall the construction lines.
Areas to be leftundecorated are isolated bytacking through both layers,thus leaving the top fabric freeto be manipulated andembellished above the markedarea.
Insert small circular items,stitch around them and easeany excess fabric byscrunching and stabbing intoplace. Add the encrustingembroidery. Whenembroidering, make sure youkeep within the markedboundary – keep checking onthe reverse. Try to add interestto the places that will becomethe edges when the piece is
ChatelaineChatelaine
Top: Star stitches and a variety of wheelstitches build up the surface of thepebble
Above: Create a raised surface with acolony of trapped items
Below: Allow colonies of frenchknots and seeding stitches tomerge
29
folded, by making the stitchesloose and loopy, and makingthe picots at various angles.
Remove the completedwork from the frame and trim
a little larger than therequired size. Fray out theedges a little to reduce thecloth to the actual requiredsize.
What you need
• 0.5 m calico (washed)• 4.5 cm square of white felt• 15 cm and 10 cm
embroidery frames (roundor square)
• Cream machine cotton forthe trapping stitches
• Items to trap (washers,buttons, cut slivers ofplastic straws, etc.)
• A collection of threads inneutral shades (cotton
pearl, coton à broder,crochet cotton, silk twist)
Equipment:• Pins, needles, fabric
scissors, tape measure• Card – thin for pattern
templates and thick for thepincushion lacing support
• Ruler, set-square, sharphard pencil, paper scissors,metric graph paper
What you do
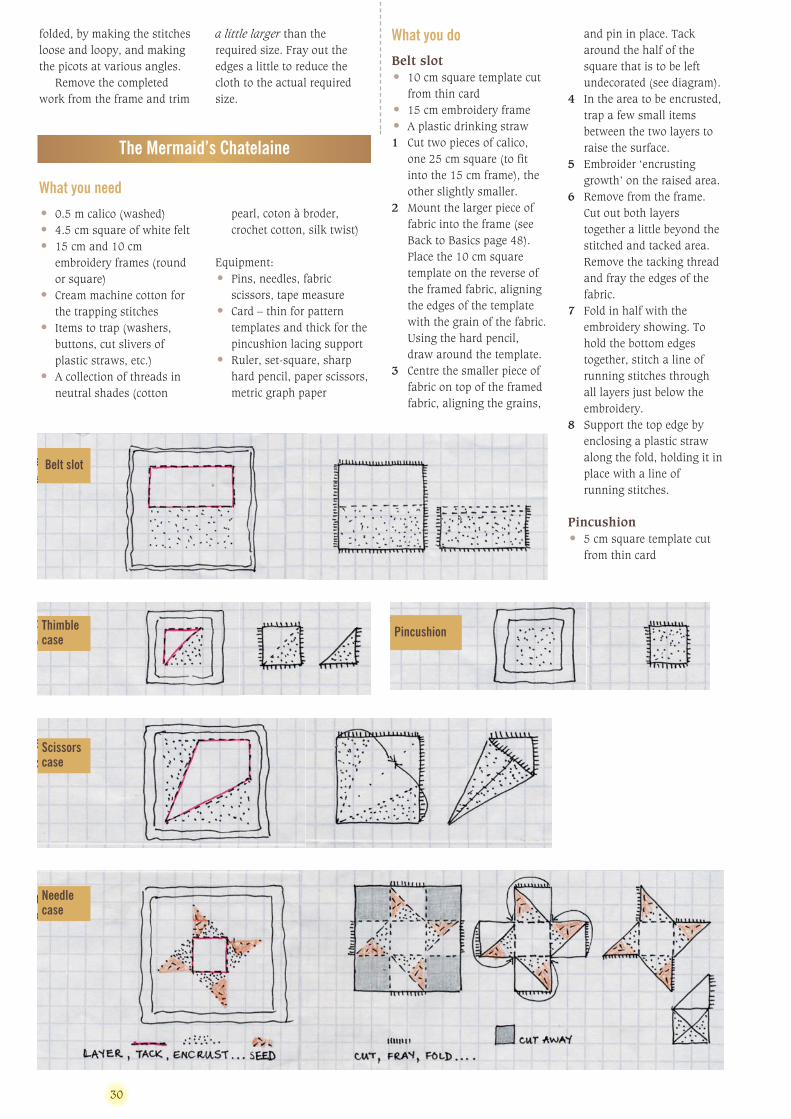
Belt slot• 10 cm square template cut
from thin card• 15 cm embroidery frame• A plastic drinking straw1 Cut two pieces of calico,
one 25 cm square (to fitinto the 15 cm frame), theother slightly smaller.
2 Mount the larger piece offabric into the frame (seeBack to Basics page 48).Place the 10 cm squaretemplate on the reverse ofthe framed fabric, aligningthe edges of the templatewith the grain of the fabric.Using the hard pencil,draw around the template.
3 Centre the smaller piece offabric on top of the framedfabric, aligning the grains,
Belt slot
Thimblecase
Scissorscase
Needlecase
Pincushion
and pin in place. Tackaround the half of thesquare that is to be leftundecorated (see diagram).
4 In the area to be encrusted,trap a few small itemsbetween the two layers toraise the surface.
5 Embroider ‘encrustinggrowth’ on the raised area.
6 Remove from the frame.Cut out both layerstogether a little beyond thestitched and tacked area.Remove the tacking threadand fray the edges of thefabric.
7 Fold in half with theembroidery showing. Tohold the bottom edgestogether, stitch a line ofrunning stitches throughall layers just below theembroidery.
8 Support the top edge byenclosing a plastic strawalong the fold, holding it inplace with a line ofrunning stitches.
Pincushion• 5 cm square template cut
from thin card
The Mermaid’s Chatelaine
30
• Two 5 cm squares of thickcard
• 10 cm embroidery frame1 Cut a piece of calico 20 cm
square (to fit into theframe) and two 7 cmsquares.
2 Mount the larger piece offabric into the frame (seeBack to Basics page 48).Place the 5 cm squaretemplate on top of theframed fabric, aligning theedges of the template withthe grain of the fabric.Using the hard pencil,draw around the template.
3 Centre one of the 7 cmsquares on top of theframed fabric, matchingthe grains. Pin in placealong one edge. Trap andencrust within the markedarea. Remove from theframe.
4 Place the template onto theencrusted top layer andinsert pins around it. Cutthe top layer only,trimming beyond theworked area. Fray the edgeback to the stitching togive a 5 cm square of cloth.
5 Cut the backing fabric atleast 1.5 cm larger allround. Stretch and lace(see Back to Basics page48) over one 5 cm squarepiece of thick card.
6 Stretch and lace theremaining 7 cm square ofcalico onto the second 5cm square of thick card.Ladder-stitch (see page 48)the two together. To use asa pincushion, the pins arepushed into the spacebetween the two layers ofcard.
Thimble case• 5 cm square thin card
template• 10 cm embroidery frame1 Cut a piece of calico 20 cm
square (to fit into theframe) and two 7 cmsquares.
2 Mount the larger piece offabric into the frame (seeBack to Basics page 48).Place the 5 cm squaretemplate on the reverse ofthe framed fabric, aligning
the edges of the templatewith the grain of the fabric.Using the hard pencil, drawaround the template.
3 Centre one of the 7 cmsquares on top of theframed fabric, matching thegrains. Tack around twosides of the marked areaand along the diagonal, toisolate the undecoratedarea (see diagram).
4 Trap and encrust above themarked triangle.
5 Cut both layers together alittle larger than the squaremarked with the template.Cut a third piece of calico tothis size and fray all edges.
6 Fold both the encrustedpiece and the single thirdpiece in half along thediagonal. Pin togetheralong the shorter sides,then join with a line ofrunning stitches just belowthe embroidery, stitchingthrough all of the layers. Tomake the thimble space,oversew part of the wayalong each side theopening.
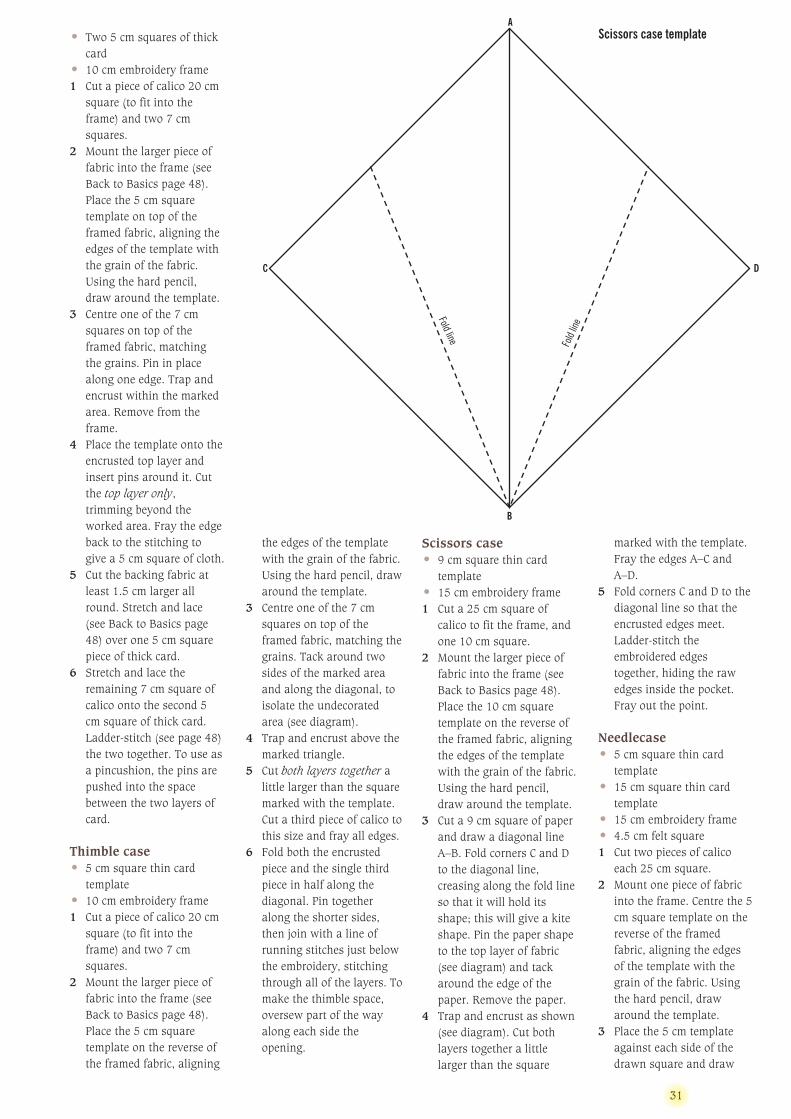
Scissors case• 9 cm square thin card
template• 15 cm embroidery frame1 Cut a 25 cm square of
calico to fit the frame, andone 10 cm square.
2 Mount the larger piece offabric into the frame (seeBack to Basics page 48).Place the 10 cm squaretemplate on the reverse ofthe framed fabric, aligningthe edges of the templatewith the grain of the fabric.Using the hard pencil,draw around the template.
3 Cut a 9 cm square of paperand draw a diagonal lineA–B. Fold corners C and Dto the diagonal line,creasing along the fold lineso that it will hold itsshape; this will give a kiteshape. Pin the paper shapeto the top layer of fabric(see diagram) and tackaround the edge of thepaper. Remove the paper.
4 Trap and encrust as shown(see diagram). Cut bothlayers together a littlelarger than the square
marked with the template.Fray the edges A–C andA–D.
5 Fold corners C and D to thediagonal line so that theencrusted edges meet.Ladder-stitch theembroidered edgestogether, hiding the rawedges inside the pocket.Fray out the point.
Needlecase• 5 cm square thin card
template• 15 cm square thin card
template• 15 cm embroidery frame• 4.5 cm felt square1 Cut two pieces of calico
each 25 cm square.2 Mount one piece of fabric
into the frame. Centre the 5cm square template on thereverse of the framedfabric, aligning the edgesof the template with thegrain of the fabric. Usingthe hard pencil, drawaround the template.
3 Place the 5 cm templateagainst each side of thedrawn square and draw
31
Scissors case templateA
C
Fold
lineFold line
D
B

around it to give a squareon each of the sides (seediagram).
4 Position the felt square ontop of the marked centresquare, pinning it in placefrom the reverse. Lay thesecond piece of calico ontop, sandwiching the feltbetween the layers. Back-stitch around the edge ofthe inner square, stitchingthrough both layers to holdthe felt in place, andremove the pins.
5 Mark the encrusting areas(see diagram). Trap and
encrust and work seedingstitches where indicated.
6 Remove from the frameand cut out, cutting bothlayers together. Fray outthe edges as shown.
7 Fold the unstitchedtriangles to the reverse tohide the back of theencrusting. Secure withrunning stitch along bothedges. Working around thesquare, fold in three flaps,tucking the fourth underthe first to close thecontainer.
To finish
Link the five items. A knottedthread (as shown) may beused, or any handmade cord,fine braid or ribbon is equallysuitable.
Stitches used
Star stitchThis is based on an eyelet stitch, which isusually worked over a square of an evennumber of fabric threads, as shown. To make a star stitch, the straight stitches are worked more freely and with legs of uneven length.
SeedingThis filling stitch is made up ofsmall straight stitches placed atrandom over the surface.
French knotsBring the thread out at the required position, hold the thread down whereit emerges with the left thumb and encircle the thread twice with theneedle (see Fig.1). Still holding thethread firmly with your thumb,twist the needle back to thestarting point and insert itclose to where the threadfirst emerged (not in theexact place or it willsimply pull back through).Pull the needle through tothe back, leaving a small knot on the surface, as shown.
Embroidery stitches
Raised stitches
WheelsAll of these stitches begin with a number of straight stitches radiating from a central point. The straight stitches, which should be of equal length, can be worked on the flat fabric or over a large bead.
Woven wheel: Begin withan uneven number ofspokes in the star. Workaround the wheel weavingunder and over the spokesas shown.
Cup stitchWork a foundation of three straightstitches to create a triangle. Worktwo twisted buttonhole stitches
on each of the base stitches, asshown. To build the stitch higher,continue around, working one stitchinto each of the spaces between thestitches of the previous round. Continuing in
this way until the resulting tube is the height yourequire. To open the structure out add extrastitches into some of the spaces. To close up the
Back stitch wheel: Workclockwise and pick upeach spoke, as shown.This can be worked overany number of spokes.
Stem stitch wheel:Work anti clockwise andpick up each spoke, asshown. This can beworked over any numberof spokes.
structure make the stitches in alternate spaces.Make collections of various stages of this stitchwith different textures of thread.
32
1 2 3 4
A C B A C B
A C B
D
1 2 3 4
Woven picotThis detached flap makes a leaf-like structure.Bring the needle and thread to the surface at A.Insert a pin at D (about 1 cm from A) and make astitch, taking the thread around the pin andinserting the needle at B. Bring the needlethrough again at C and take the thread around thepin. Weave the thread through this foundation, asshown in Figs 1 and 2 until the shape is filled(Fig.3). Remove the pin to leave the end free.Leaves can be short and squat or long and thin.Try all the variations.
1 2
3
SuggestionsThese basic folding ideas workwell with larger squares and alsowith any embroidery technique tomake simple containers.
If you are using a fine fabric thatfrays too easily then use astabiliser such as iron-on Vilene.
•
•
1 2