RUNNING STITCH - Usha InternationalThe fancy stitch is specifically found in Chinese embroidery....
18
RUNNING STITCH The running stitch is one of the simplest stitches that are used to create patterns or texture. It is mostly used for quilting. There are many varieties of running stitch, interlaced running stitch, interlaced double running stitch and whipped running stitch. PROCESS OF MAKING: • First, trace the design on the fabric. Thread the embroidery machine with embroidery thread and try to use it on waste fabric to check the tension of the machine. Adjust it in such a way that the tension is neither tight nor loose. Put the fabric in which the design is traced and fix it in the ring properly. • Keep the frame under the machine needle, such that the motif should be clearly visible. • Pull the bobbin thread up by running the flyer of the machine towards oneself. Here, the upper thread should be kept loose and the lower thread should be kept tight in the machine. • Run the machine on top of the drawn lines and cover all the motif lines, as per the chosen color thread. First do the outline of the motif and then gradually start filling each area from right to left or vice‐ versa. • It is easy to complete the motif by single color first and then switch to another color. ROUND STITCH The round stitch is also referred to as the circle stitch. The round stitch is used to make bags and other similar items. This type of a stitch has numerous applications that generally involve some sort of seaming or over sewing; hence it is very strong but leaves the cut edges of the stitched cloth exposed. Round stitch needs more expertise doing it. It's a basic running stitch but in a circular format. PROCESS OF MAKING • First trace the design on the desired fabric. • For every motif, trace the outline first and then fill the design with simple running stitch, but round in shape, by moving the frame in a circular direction. • The motif should be drawn according to the intricacy of the embroidery, so that there is enough space to fill it easily. If the motif needs to be intricate then one must trace the design big on the fabric. • Each and every round (circle) should be visible enough to look at. Move the frame carefully to get the proper round shape of the stitch. • It is easy to handle and it can cover the errors.
Transcript of RUNNING STITCH - Usha InternationalThe fancy stitch is specifically found in Chinese embroidery....

RUNNING STITCHThe running stitch is one of the simplest stitches that are used to create patterns or texture. It is mostly used for quilting. There are many varieties of running stitch, interlaced running stitch, interlaced double running stitch and whipped running stitch. PROCESS OF MAKING:
• First, trace the design on the fabric. Thread the embroidery machine with embroidery thread and try to use it on waste fabric to check the tension of the machine. Adjust it in such a way that the tension is neither tight nor loose. Put the fabric in which the design is traced and fix it in the ring properly.
• Keep the frame under the machine needle, such that the motif should be clearly visible.
• Pull the bobbin thread up by running the flyer of the machine towards oneself. Here, the upper thread should be kept loose and the lower thread should be kept tight in the machine.
• Run the machine on top of the drawn lines and cover all the motif lines, as per the chosen color thread. First do the outline of the motif and then gradually start filling each area from right to left or vice‐ versa.
• It is easy to complete the motif by single color first and then switch to another color.
ROUND STITCHThe round stitch is also referred to as the circle stitch. The round stitch is used to make bags and other similar items. This type of a stitch has numerous applications that generally involve some sort of seaming or over sewing; hence it is very strong but leaves the cut edges of the stitched cloth exposed. Round stitch needs more expertise doing it. It's a basic running stitch but in a circular format. PROCESS OF MAKING
• First trace the design on the desired fabric. • For every motif, trace the outline first and then fill the design with simple
running stitch, but round in shape, by moving the frame in a circular direction.
• The motif should be drawn according to the intricacy of the embroidery, so that there is enough space to fill it easily. If the motif needs to be intricate then one must trace the design big on the fabric.
• Each and every round (circle) should be visible enough to look at. Move the frame carefully to get the proper round shape of the stitch.
• It is easy to handle and it can cover the errors.

SATIN STITCHThe satin stitch is also called the Damask stitch. It is one of the oldest embroidery stitches that are largely found on traditional embroideries in almost all countries. The traditional embroideries of china and Japan excelled in the use of this stitch. It is formed by working straight stitches close together. Satin stitch is also used on quilting and patch work. PROCESS OF MAKING:
• First trace the design on the desired fabric. This is the most beautiful stitches in machine embroidery.
• The stitch is done between two lines. Make a stitch in such a way that two stitches touch each other.
• The fabric should not be visible between the stitches. • The stitch length varies according to the design and each stitch is done
carefully to give a neat finish. • Move the frame carefully so that the stitches touch each other. • Continue to stitch till the traced design is completed.
EYELET STITCHThe eyelet stitch is also known as the eye stitch. This particular stitch is found on canvas work, pulled work and counted work. It is worked on even weave fabric, with the fabric held under tension in a hoop or a frame. It is made up of stitches arranged in a square. As a filling stitch it create a regular geometric patterns of blocks that, if worked under tension and pulled with each stitch, would have a small hole at the centre. It is one of the finest embroidery in which smallest motif can be made Circular /oval small sizes can be done nicely with eyelet stitch. PROCESS OF MAKING
• First trace the design on the fabric on the desired fabric. • The motif is outlined with satin stitch in a circular way without filling it
inside. This creates a small circle. • A hole is created in d middle of the circle with the help of any pointed
object such as pen or toothpick. • It then forms a tiny finished hole known as an eyelet.

CORDING STITCHFabric‐wrapped cording is often used to add strength and a decorative touch to the stitch. The styling options of contrasting cording double welting and jumbo cording give a decorator look to slipcovers, bedspreads, pillows, window treatment ad table cloth hems. Jumbo cording can also be used to make plain, knotted, twisted or braided drapery tiebacks. Cording embroidery has very strong visibility as compare to other normal stitch. It is not embroidery with which you fill your motif. Geometrical motif would be preferably used for this embroidery stitch. PROCESS OF MAKING:
• To make cording stitch embroidery a cord (Dori) is needed on top of which embroidery is done. It's a 3D looking embroidery; cord makes it more dimensional and different sizes of cords are available in the market.
• First, trace the design on the desired fabric. The cord is a thick thread which is used to make the outline of the design. It is not used to fill the motif.
• Take a cord, put it along the traced design, and cover it with a satin stitch. Cut the cord carefully after fixing it.
• Fill the inside of the design with simple running stitch. This makes the design look beautiful and neat.
• Flexibility of cording is limited; it cannot give you sharp edges, hence curvy designs are preferred
LONG AND SHORT STITCHThis stitch is practically painting with needle. it is a filler stitch that fills the motif, flowers etc. with colored embroidery thread. it is a simple modification of the satin stitch, where the length of the stitches are at two levels. It is used when the space to be filled is too big to be covered with the satin stitch. It is also to give a shaded effect. in the first row the stitch are alternately long and short and follow the outline of the shape. The stitch in the following rows is worked in the same manner to give a smooth appearance. PROCESS OF MAKING:
• First trace the design on the desired fabric. • The name is self explanatory. It’s a combination of long stitches
and short stitches. • Move the hand right to left and then back to right simultaneously
to create longer stitches and shorter stitch alternately. • Outline the motif before filling of the motif is decided.

FANCY STITCHThe fancy stitch is specifically found in Chinese embroidery. This type of a stitch often comes under basic stitches, like satin stitch, scroll stitch, and eyelet stitch, etc. It's a basically a combination of all various stitches together to make an interesting composition. It's a fun stitch where people think out of the box and create something aesthetic. PROCESS OF MAKING:
• First trace the design on the desired fabric. • Outline the design with desired multi colored threads with
either running or satin stitch. • The stitch should follow a geometric pattern to give it a
symmetrical look. • Color variation should be made appropriately so that the
differences in d various stitches can be easily recognized.
SCROLL STITCHThe scroll stitch is also known as the single knotted line stitch and creates a knotted line, which follows the curve of a design well. The scroll embroidery is a typical Chinese stitch that is mainly used for making monograms, Victorian scrolls and curlicues embroidery designs, and for making pillow cases ad embroidered borders of napkins, table covers etc. Modern machines are equipped well to get the finishing of the scroll stitch. PROCESS OF MAKING:
• First trace the design on the desired fabric. Now motif outlines can be first done with running stitch as shown in the figure or the outline edges could be fixed with a cord by satin stitch.
• Now, fill the design in M/W shapes in the open area within the outlined edges. The M/W shape depicts the мω shape.
• Continue to stitch till the motif is filled. • It is mainly used in home furnishings like cushion and quilted bed sheets.
However, in embroidery design we use it this in wider space between the enclosed motifs.

DORI WORKThe dori embroidery is most widely known amongst garment manufacturers, exporter and embroidery. This is suitable for both hand and machine embroidery. With up gradation in machine technology, the dori work is making a place in the fashion industries too. PROCESS OF MAKING:
• Take a plain fabric and trace the required design onto the back of the fabric.
• Dori is done through the simple running stitch. • The dori stitch is done at the back of the fabric. • Now turn the fabric and cover the dori with a simple satin stitch. • Continue the stitch till the traced design is completed. • While making the trace try to make a continuous line so that we
need not have to cut the dori again and again.
CHAIN STITCHThe chain stitch is a sewing machine embroidery technique in which a series of looped stitches from a chain‐like pattern The chain stitch was the default stitch used by the sewing machines earlier; however, as it is easily unraveled from the fabric, this was soon replaced with the more secure Lock stitch. The modern machines are equipped to make these stitches easily. Now, machine embroidery in the chain stitch, often in traditional hand‐worked crewel designs, is found on curtains, bed linens, and upholstery fabrics. PROCESS OF MAKING:
• First trace the design on the desired fabric. • Make two parallel satin stitches close to each other such that
it appears to be only one. • Bring the needle in the middle of the two stitches and make a
single satin stitch. • When this happens the third stitch forms a loop with the
previous two stitches and forms a chain or a loop ahead. • Keep repeating the stitch on a particular line till it achieves a
desired thickness • Repeat the stitch in the same pattern along the outline till the
design is completed. • The chain stitch should be used in combination with some
more filler stitches.

STEM STITCHThe stem stitch is mainly done to give the outline of a motif or to make flower stems, and is hence, called so. In the stem stitch, the stitch runs from left to right. The thread always emerges in the left side of the previous stitch. It can also be worked as a filing stitch, if worked closely together within a shape, until it is completely filled. The modern machines are equipped enough to enable you to do this stitch easily. It is another version of satin stitch and is the simplest amongst all. PROCESS OF MAKING:
• First trace the design on the desired fabric. • Now make a simple running stitch along the outline of the
motif. However, care should be taken that the second stitch run by the machine starts from above the midpoint of the first one and hence the process continues with the third one starting at the midpoint of the second.
• Care should be taken that the length of each stitch drawn is equal.
• Continue the stitch till the traced design is outlined.
PIN WORKAs the name suggests Pin work is done with the help of a pin and it is very simple in nature. Pin Work is mainly done to give an effect of elevated designs that make the embroidery all the more beautiful and gorgeous. As the stitch runs around the pin, it has got a round impressive shape of design on the fabric. Starting from traditional stitches of Rajasthan to Gujarat and Bengal, all have adopted pin work in their works. This stitch is done for making designs on pillow covers, bed covers, handkerchiefs and various other costumes for both men and women. PROCESS OF MAKING:
• First trace the design onto the desired fabric. • Here hand needles are required to finish the motif. Put the pin in a
horizontal/vertical direction within the traced area of the fabric where the pin work has to be done.
• Make a satin stitch in between the edges of the pin such that the whole pin gets fully covered.
• When one needle is finished put the 2nd one close to it in opposite direction. This is because a needle varies in thickness. It is thicker at the eye and gradually thins down at the tip. To even out the pin work we place the needles in opposite direction alternately.
• Pull the pin carefully after the completion of the stitch. Continue the stitch till the traced design is completed.
• Direction of needle is very important subject in this embroidery because of the shape of needle.
• Care should be taken that the needle does not touch the pin while making the stitch.

BUTTONHOLE STITCHThe buttonhole stitch and the related blanket stitch are used in tailoring, embroidery, and needle lace‐making. A complete buttonhole stitch in some ways resembles the English letter L; depending on the spacing of the stitches. PROCESS OF MAKING:
• First trace the design on the desired fabric. • Make a vertical stitch along the design, followed by horizontal stitch
from the base of vertical stitch. • Continue the stitch till the traced design is completed. • Repeat the stitch in a particular line till the desired thickness is
achieved. • Move the frame carefully so that the horizontal stitch touches the
base of the vertical stitch in an (L) shaped pattern.
TAR KASH WORKThe art of Tar Kashi (wire embroidery) is a minute and intricate depiction of flowers, fish, birds and animals, dancing postures of Radha and Krishna, Ganeshji, Vishwakarama, dancing peacocks, various poses of dance and dresses. The creatively as well as the neatness of the work done by the artist makes this art stand apart among the other crafts.
PROCESS OF MAKING: • Tar kasha stitch is generally done on the borders of the
garment. • It has geometric shapes (squares only). • Fill the squares in a particular manner. • The stitch comes inside at the midpoint of each square from
all sides of the square. • From one corner needle goes inside and creates a loop and
then comes at the midpoint and gets inside to create another loop.
• Again the needle has to go back to the same line of square box to create another loop
• These steps will be repeated till the whole box gets filled by the thread.

SHADE WORK STITCHThe shade work with threads of varying colors is an old style of embroidery commonly used in many countries. The shade work is can easily be done on an automatic sewing machine where a design or motif is fed with defined colors for the spread work on the fabric. PROCESS OF MAKING:
• First trace the design on the desired fabric. • Select varying colors belonging to the same family to complete
one motif e.g. flower. One family color can be defined by an example of red. If one is selecting red then the other colors used along with red should be lighter red such as pink and darker red such as maroon so that the motif can have shading from dark to light.
• Shade work is done with long and short stitch. • The dark color thread is filled on the outer part of d motif. As the
needle moves inside within the motif, the thread color changes. It becomes lighter in the middle and then at last the lightest color thread is used in the inner most part, e.g. a petal of the flower.
• Once the motif, (e.g. leaf) changes the color family changes and so would the varying colors belonging to the family.
• However the process of working on the motif with long and short stitch remains the same.
SHADOW WORKAs the name would suggest, the basic idea is to use sheer fabric where only the barest outline of the pattern appears on the surface and the crisscrossed threads underneath show through, thereby creating a "shadow" pattern. It is the opacity of the threads being worked on sheer fabric which defines this form of embroidery more than any single stitch or color combination. White on white is probably the oldest and most prevalent form of shadow work, which is why it is often lumped in with white work embroidery. Although it is thought to have originated in other lands, this ancient textile art really flowered in India, where it is called Chikankari. Much of it is still white on white, pastels on white, or tone on tone. However, brightly colored threads worked under sheer fabrics have tremendous eye appeal. PROCESS OF MAKING:
• Trace the design on the desired fabric. Fill the motif with satin or long and short stitch.
• Put organza tissue fabric, preferably white on top of the filled motif. White organza enhances the colored motif beneath it.
• Now make outline of the motif on top of the organza with running stitch.
• Each and every motif of the design has to be outlined on top of the organza to make visibility more clear.
• Extra organza can be cut in the end. Care should be taken while cutting the excess organza since the fabric is very sheer.

CUT WORKCut work embroidery is a beautiful form of needle work, where portions of the background fabric are cut away and discarded, with the edges worked over in buttonhole/satin or zigzag stitch. PROCESS OF MAKING:
• First, trace the design onto the desired fabric. • Make a satin stitch on the outline of the areas which have to be
cut. • Cut open the inner part of the fabric around which satin stitch
has been done neatly so that the stitch is not destroyed. • To finish the open edge properly do cording stitch or a running
stitch around. • The rest of the area where cut work is not happening can be
completed with various embroideries like chain/long and short stitch or round stitch.
MIRROR WORK As the name suggests, glass work is done specifically to fix glasses (mirrors) onto the fabric. This is very popular embroidery prevalent in Gujarat, Rajasthan, and Punjab and also in certain pockets of Uttar Pradesh. Lately, glass work has become much popular and even designers are using this art form in their work. PROCESS OF MAKING:
• First trace the design on the desired fabric. • Wherever the mirror has to be put; cut the fabric of the open
area of the design and finish the round edges with a satin stitch or button hole particularly.
• Once the finishing of the open cut area is done, put the glass from below by pasting it on another fabric.
• Attach both the fabric with a running stitch on the outer side of the satin stitch.
• This serves 2 purposes: it attaches the mirror from behind and it also gives a finishing to the satin stitch on the front.
• Care should be taken that the needle does not touch the mirror as this may lead to a needle breakage.

SEQUINS WORKBy making use of sequins work, one can craft fine embroidery on sarees, lehngas and Salwar kameez. Sequins work is extensively used by designers for making bridal costumes. Sequins work can also be done by machine. PROCESS OF MAKING:
• First trace the design on the desired fabric. • Sequins are available in two types in the market; flat and Katori. The
flat sequins are easy to attach than the Katori sequins. • To start, place the sequin on the outline of the design. Put the
threaded needle inside the hole of sequins and pull the needle out so that it forms a loop at the lower end.
• Once the needle comes out through the same hole of the first sequin, place another sequin beneath the first one such that the next drop of the needle falls into the hole of the second sequin. The overlapping of the sequin depends on the stitch length.
• Repeat the process till the whole motif is completed. • With Katori sequins first put all the sequins in a thread like a string.
Do not tie knots on the string ends. A string is required because the sequins are not flat in this case. Due to its 3‐D structure it is easier to handle them by aligning them in a string.
• Put this string onto the motif. Keep running the machine like before by drawing the sequins in the string close to each other. Later when the motif gets completed and the sequins are attached on the fabric pull the string out carefully.
• Avoid using metal sequins as that would lead to needle breakage.
ZARI WORKZari is the fine glittery thread of gold and silver, and the embroidery made by using them is called zari work. The stitches are extremely fine and are worked with dexterity and skill, with the embroidery starting from the center and proceeding to the outer edges in a circular fashion. Zari designs are used for table linens and also for making articles f personal wear. A vast variety of shawls are hand‐crafted in is also done with machines that have certain technical advantages to work with silver and gold threads. PROCESS OF MAKING:
• Trace the design on the desired fabric. An Indian motif is preferred since the gold zari thread looks the best with such a kind of motif.
• For zari work start, to fill your bobbin with the same zari thread and tension of thread should not be too tight, it has to be looser than upper thread to maintain the looping of the thread.
• Zari thread (Lurex) is available in the market in metallic shades. • The motif is outlined and filled with either a running stitch or a
satin stitch or a zigzag stitch. Repeat the process to make the filling prominent is needed.
• Once the design is filled, remember to outline the filled motif with a contrasting color to give a clean and enhanced look.
• Sequins/moti can be combined with zari to give a rich effect to the piece.

CHINESE STITCHThe Chinese embroidery is particularly known for its exquisite workmanship. Executed in fine close stitches, it close stitches, it looks smooth, neat and glossy. The stitches are hardly visible. The clever uses of thick and thin coloured silk threads, and a rich variety of stitches, guarantee its superb quality. PROCESS OF MAKING:
• First trace the design on the desired fabric. • Make an outline with a straight running stitch and then fill the
design with satin stitch. • Repeat the satin stitch to make the line even thicker and denser. • Now make a running stitch along the edges of the satin stitch to
give it a clean and neat look. • Different colors can be used to make the motif stylish and rich.
QUILTING STITCHThe quilting stitch is a simple stitch that starts at the center of the quilt and goes outwards in a sunburst effect. In this way, the fabrics can be kept even all around. It is always recommended to have a quilting needle, which is very small for this work ad quilting thread, as it is stronger than ordinary thread.
PROCESS OF MAKING: • First trace the design on the desired fabric. • Now put a fabric of a different color and the foam below the
traced fabric. • Make a satin stitch along the edges and bind the three of them
together. • The stain stitch is done to give the layers more strength and
the edges also look neat. • Always start the embroidery from the centre and then
gradually move towards the outer area to avoid wrinkles in the base fabric.

PATCH WORKThe patch work was initially used for mending and was especially useful in hiding torn in blankets/clothes. Lately as you must have had noticed embroidery is gradually finding prominence in contemporary fashion wear. Similarly Patch work has also now being extensively used as a decorative stitch rather than for merely mending as it was done earlier. PROCESS OF MAKING:
• First select a printed fabric or a motif that has to be patched. • It is easy to do with a printed fabric since a motif for
patchwork can be extracted as it is. • The motif is then placed onto the base fabric and a running
stitch is done to fix both the layers. • Now, make a satin stitch along the edges to make it more
fashionable. • Continue the stitch till the traced design is completed. • Now cut the upper fabric neatly to get rid of extra fabric. • Care should be taken to while cutting the patched fabric.
WOOL WORKThe wool work is a general term for various works done with wool. In wool work, floral designs can be give three dimensional effect using wool yarns. Cut the wool at different level to give 3D effect to the design. PROCESS OF MAKING:
• First trace the design on the desired fabric. • Then place the wool on the motif by twisting them like loops
and sew it onto the fabric with a straight running stitch. • Placement of the wool ant the stitch used to fix it on the fabric
should be in opposite directions. • Number of straight stitches may vary with the length of the
wool. • Cut the wool on both the sides after completion of the stitch. • Use as many as possible different colors to distinguish areas
easily since its fluffy and 3D in effect.

• Cutting should be done carefully and edges should be finished neatly.
NET WORK‐FANCY STITCHThe net work fancy stitch is a pretty stitch, which is used for mini amulet pouches. Many workers use beads with the net work for bags and other such items. However, the network can be done with the use of sufficient threads of different colors. Net, thus made, can again be decorated with fancy stitch, patch work and organdie over it. PROCESS OF MAKING:
• Trace the design on the desired fabric. • Attach a net below the fabric on which the design is traced by a simple
running stitch along the outline of the motif. • Cut the upper fabric carefully so that net behind is visible on the front side over
the areas where the net work is required.
• Cover that running stitch with satin stitch again for design and strength. • Now start filling the net entirely with satin stitch. Fill it completely such that it still
looks like a net in the end as shown in the picture. • Rest of the motif can be filled with any stitch e.g. scroll stitch as shown in the
picture. • Care should be taken while cutting the fabric along the trace so that the net
remains intact.
OPEN WORK The open work is a pattern of continuous stitches for making scarves, covers and also sometimes, a pullover. The pattern, thus attained, looks like a piece of clothing with holes on its entire body. PROCESS OF MAKING:
• First trace the design on the desired fabric. • Do running stitch all around (edges) the motif twice, so the
fabric would not fray or stretch wide. This will give strength and create foundation for the stitch.
• Now cut the fabric along the traced design and make a running stitch through the cut area between the edges of the cut area.
• Repeat this step more than once in the same line to make it thick.
• Make a complete checked pattern as shown in the figure. • Now make a satin stitch above the thread to give a stylish
look. • Also make stain stitch at the intersection points where the
lines meet to make them stronger. • Fill the cut area of the fabric in the same way till the design is
completed.

MOTIF WORKMotif work is basically a type of a stitching for mounting a design on a fabric and the procedure may vary as per requirement. A motif can be mounted directly on any garment, be it your pullover, sweater or just a pair of jeans. Mount the selected motif on a chosen area by simply stitching the outer‐line with the garment. Try this out and enjoy your work. PROCESS OF MAKING:
• First trace the design on the desired fabric. • Fuse buckram on the back side of the traced design such that the
entire motif gets fused with it. The buckram just allows the design to get stiff for embroidery.
• Now out another fabric from below the fused fabric and make a satin stitch along the edges, and bind them together.
• Fill the motif with desired colors and stitches. • When the motif gets completes cut the extra fabric clearly from the
outline of the motif such that the design is not destroyed • This motif is now ready to be mounded or patched onto garments or
another fabric with a running or satin stitch. • Some more add‐on embroidery could be done around the motif on
the fabric itself on which it’s mounted to give a better look. E.g. the rabbit motif has been mounted and some add‐on grass and flowers have been embroidered to give the rabbit an enhanced look.
BEADS WORKThe history of beads work is several hundred years old. The first evidence of bead work was found in Egyptian culture. There are several types of beads found in the world (gold, jade, bone, turquoise stone, and polished shell beads). PROCESS OF MAKING:
• At the outset, trace the design on the desired fabric. • Make a string of beads first. Align the bead chain along the
outline of the motif. • Start making satin stitch along the beads. It locks the beads in
the fabric along the trace. • After every bead give a bar tack to lock them onto the fabric. • Bar tack gives the beads stability. • Remember beads strings cannot be used to fill the motif; it is just
required to outline the motif.

COMPOSITE EMBROIDERY
Running stitch
Stem stitch
Buttonhole stitch
Chain stitch
Satin stitch
Long and short stitch
Round stitch
Pin work

Running stitch
Long and short stitch
Satin stitch
Zari work
Sequins work
Bead work
Cut work
Satin stitch
Running stitch
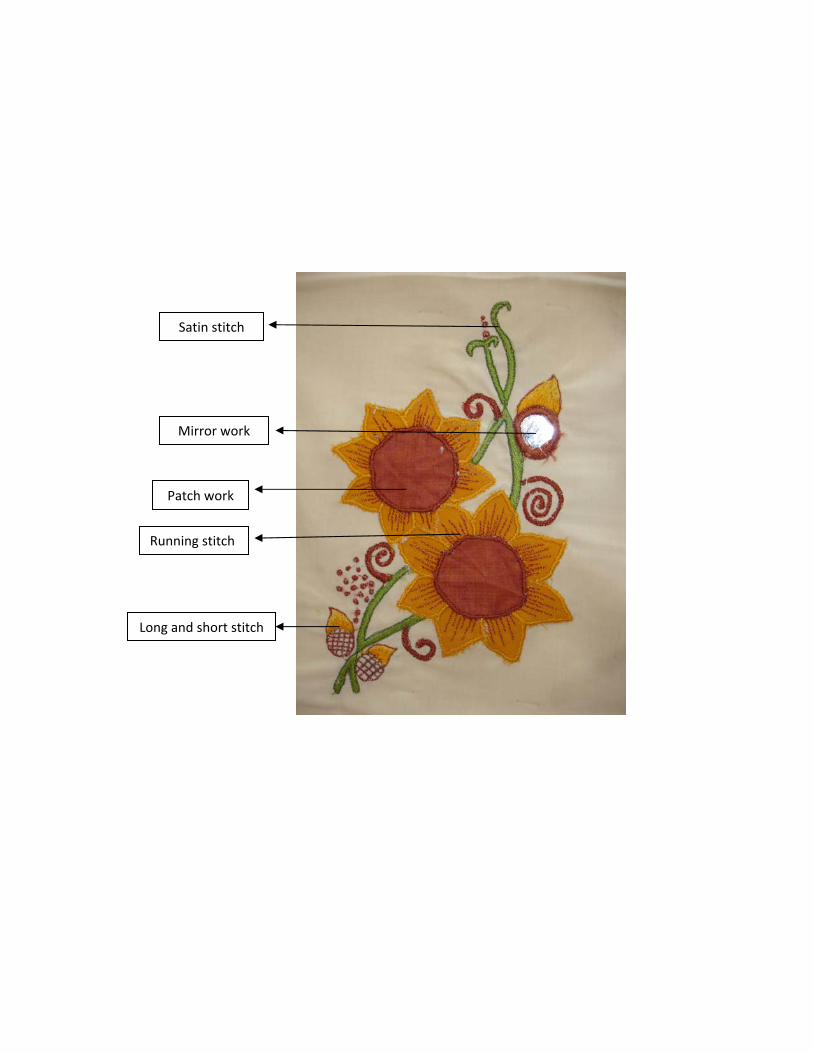
Mirror work
Patch work
Long and short stitch

Stem stitch
Zari work
Shade work
Round stitch
Satin stitch
Cut work
Long and short stitch