Role Concept - V1 - Shipping KPIs · The role concept is now introduced to the Shipping KPI System...
9
Role Concept - V1.2 Shipping KPI System October 2016
Transcript of Role Concept - V1 - Shipping KPIs · The role concept is now introduced to the Shipping KPI System...

Role Concept - V1.2 Shipping KPI System
October 2016

2
Contents 1. Overview ............................................................................................................................................... 3
2. Preconfigured “Global” roles ................................................................................................................ 4
3. Managing roles ...................................................................................................................................... 5
4. Assigning a role to a user ...................................................................................................................... 8
5. Roles and Access Requests ................................................................................................................... 9

3
1. Overview The role concept is now introduced to the Shipping KPI System in order to cater for two main user
needs:
The ability to hide SPIs KPIs, PIs, META data and CUSTOM fields the user doesn’t want to see
while entering data, benchmarking, etc.
The ability to forbid certain users in your company (as an account manager) to see certain SPIs
KPIs, PIs, META data and CUSTOM fields if they are not supposed to.
Each user can at any given time only be assigned ONE role which is assigned to them by their account
manager. Pages influenced by the role a user has include the “My ships” page, the benchmark,
import/export of data and the Shipping KPI API. The Shipping KPI book continues to give access to all
available SPIs KPIs, PIs, META data and CUSTOM fields.
4
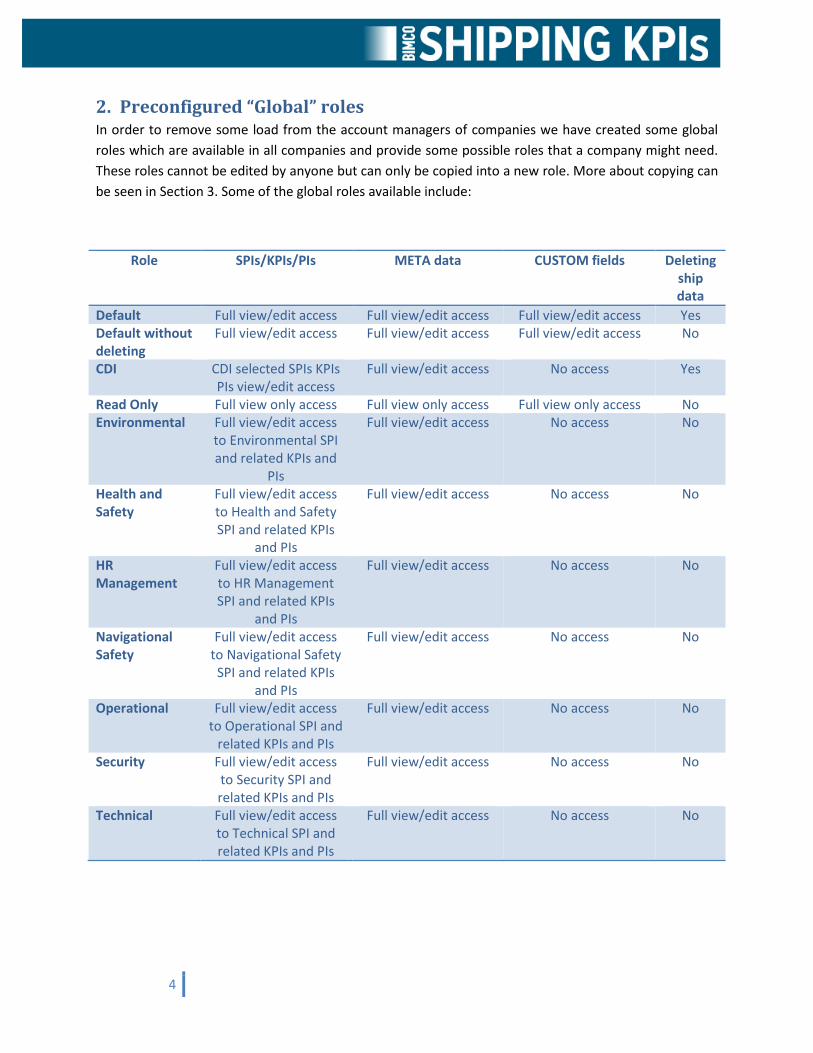
2. Preconfigured “Global” roles In order to remove some load from the account managers of companies we have created some global
roles which are available in all companies and provide some possible roles that a company might need.
These roles cannot be edited by anyone but can only be copied into a new role. More about copying can
be seen in Section 3. Some of the global roles available include:
Role SPIs/KPIs/PIs META data CUSTOM fields Deleting ship data
Default Full view/edit access Full view/edit access Full view/edit access Yes Default without deleting
Full view/edit access Full view/edit access Full view/edit access No
CDI CDI selected SPIs KPIs PIs view/edit access
Full view/edit access No access Yes
Read Only Full view only access Full view only access Full view only access No Environmental Full view/edit access
to Environmental SPI and related KPIs and
PIs
Full view/edit access No access No
Health and Safety
Full view/edit access to Health and Safety SPI and related KPIs
and PIs
Full view/edit access No access No
HR Management
Full view/edit access to HR Management SPI and related KPIs
and PIs
Full view/edit access No access No
Navigational Safety
Full view/edit access to Navigational Safety SPI and related KPIs
and PIs
Full view/edit access No access No
Operational Full view/edit access to Operational SPI and
related KPIs and PIs
Full view/edit access No access No
Security Full view/edit access to Security SPI and related KPIs and PIs
Full view/edit access No access No
Technical Full view/edit access to Technical SPI and related KPIs and PIs
Full view/edit access No access No

5
3. Managing roles Since the global roles in Section 2 might not be sufficient you can create your own roles. To do so, you
can go to the My Company page and click on “User Roles” and you should receive a screen similar to the
one shown in Figure 1. In the dropdown you can choose a role from the existing ones. Global roles are
signified by the word “Global” in brackets next to their names. Since you cannot modify global roles you
can create a copy of this global role to create your own by clicking “Save As”. Before doing so you need
to choose a name for your role which isn’t the same as any of your existing or global roles.
Figure 1 - Saving a role into a new one
Once you click Save as you will get a page as the one shown in Figure 2. Here you can rename and
change the description of your role as well as the permissions of the role. After making any change you
need to press “Save” to save any changes (“Save” is disabled if no changes have been made since last
save). To copy this role into a new one, you again have to pick a new name for your role and click the
“Save As” button. If you would like to delete a role you can click the “Delete” button but this requires
that the role is not assigned to any user.

6
Figure 2 - Editing your own role
Regarding the permissions of the role you can choose to give the user the ability to delete a ship entry
from a quarter, so you can give this ability to the user of the role by checking this box. From here you
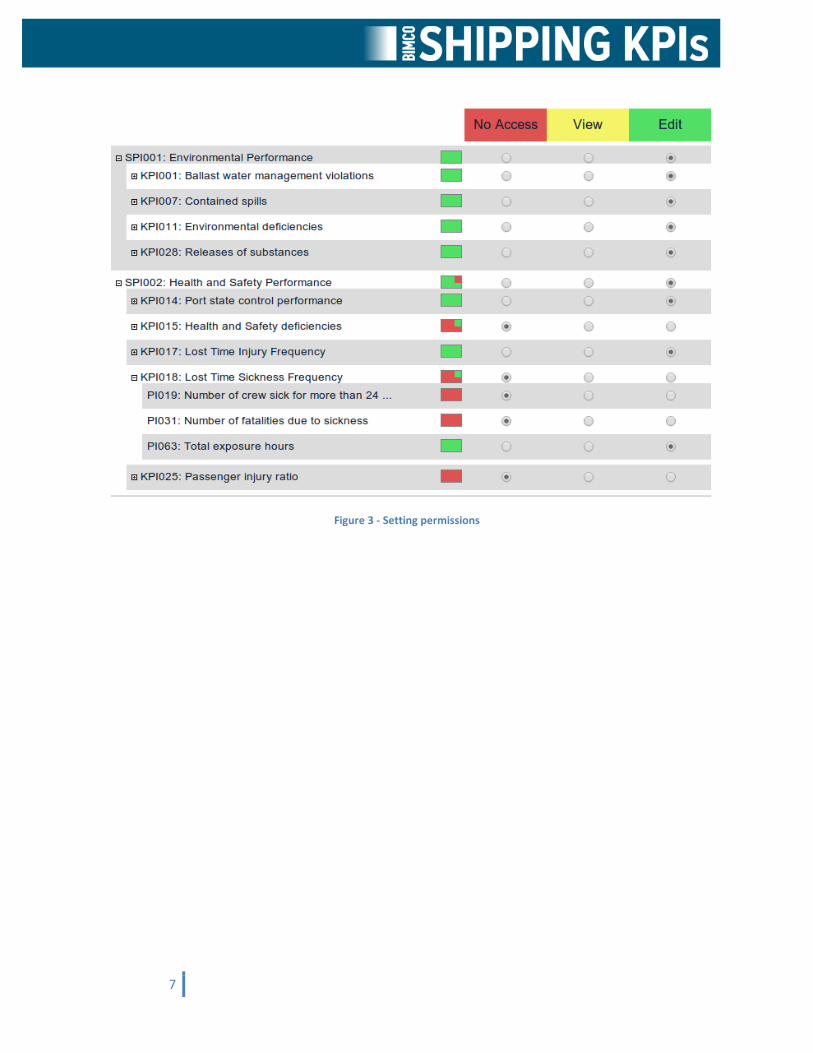
can select which SPIs/KPIs/PIs a role has access to. The screen as shown in Figure 3 allows you to set the
permissions on the Performance Indicator hierarchy. By clicking the collapse buttons on the left you
access the KPIs of each SPI and PIs of each KPI, etc. By setting the permission on an SPI the same
permission is automatically given to the rest of its sub-elements. If you would like to set a different
permission on the sub-element you can do so by setting it directly on that sub-element itself. The
coloured box on the right of each SPI/KPI/PI indicates the permission it has:
Green for view and edit
Yellow for view only
Red for no access
If for example, as shown in Figure 3, KPI025 has no access but SPI002 has view and edit permissions, the
SPI002 indicator box on the right has a colour of green with a small box inside of red. This indicates that
at least one sub-element of SPI002 has a no access permission set.
7
Figure 3 - Setting permissions

8
4. Assigning a role to a user By default all customers have the Default role assigned to them which as mentioned in Section 2 allows
for full access to the ship. In order to view the role of a user (assuming you are the account manager),
you can go to the My Company page and click on Users. Here you see the list of users in your company
and on the far right you can see the role the user is assigned to have as shown in Figure 4.
Figure 4 - Viewing the role of the user
To change the role of user click on their email, like you normally do to edit them, and as shown in Figure
5 you can select from a dropdown list the role you would like to give them
Figure 5 - Changing the role of a user

9
5. Roles and Access Requests The access requests mechanism works the same way as before but now allows you to ask access with a
specific role as shown in Figure 6. You can only request for access with a role from the list of global roles
and it’s up to the manager of the ship to allow that role or change it to something else.
Figure 6 - Request Access to ships
As a manager of a ship like before you can grant access to a ship and give specific role permissions to an
access request, as shown in Figure 7. This role can either be a global role or a role available for your
company. This limits users accessing your ships only to the fields you give them access to.
Figure 7 - Grant Access to user