Robotium Automated Testing for Android - Packt … · Graphical User Interface (GUI) ... to call...
16
Robotium Automated Testing for Android Hrushikesh Zadgaonkar Chapter No. 1 "Getting Started with Robotium"
Transcript of Robotium Automated Testing for Android - Packt … · Graphical User Interface (GUI) ... to call...
Robotium Automated Testing for Android
Hrushikesh Zadgaonkar
Chapter No. 1 "Getting Started with Robotium"
In this package, you will find: A Biography of the author of the book
A preview chapter from the book, Chapter NO.1 "Getting Started with Robotium"
A synopsis of the book’s content
Information on where to buy this book
About the Author Hrushikesh Zadgaonkar is a Software Developer by profession. He is currently working at Persistent Systems Limited, Nagpur, in the Telecommunication Business Unit. He studied engineering and was a Microsoft Student Partner and IBM Campus Ambassador in his college. He has been actively working on distinct domains such as .NET, Android, and the Robotium Framework. He was appointed as a NetBeans Certified Associate by the Oracle Corporation. Hrushikesh is a semi-finalist for the Imagine Cup 2010, a global competition organized annually by Microsoft. His research paper was selected for presentation at the CSE-IT International Level Conference 2010, Thailand.
He has been actively participating in various technical events in different colleges in Nagpur. His leisure activities include portrait sketching, playing the tabla, guitar, and sports such as cricket, football, and snooker. He is fond of social networking and appreciates innovation. He is a quick learner. Hrushikesh is an uncompromising fan of Sachin Tendulkar and Manchester United Football Club. His music interests lie with Enrique Iglesias, Bryan Adams, and A.R. Rahman.
For More Information: www.packtpub.com/robotium-automated-testing-for-android/book
When he isn't coding, he likes to hang out with his family and friends. He finds time every day to workout at the gymnasium. He is popularly called "Mr. Z" among his colleagues. He currently lives in Nagpur, India with his parents.
You can mail him at [email protected] and he can be found tweeting at @MsWizKid.
I wish to thank my Mother who have always guided and supported me throughout my life and made me capable!
For More Information: www.packtpub.com/robotium-automated-testing-for-android/book
Robotium Automated Testing for Android Automation testing on mobile devices has been around for a number of years, although it has really taken off with the advent of the Robotium Framework.
With the help of automating test cases, business components are extensively reused and help to execute complex test cases. Due to a number of different key features added to the Robotium Framework, it has been the world's leading Android test automation framework and most industry experts and professionals are using this framework for testing their Android business applications.
The main aim to bring this book into the market is to provide users with detailed knowledge of the Robotium Framework and its features. After reading it, you should be good to go and create the automated test cases and run them for your Android project!
Welcome to Robotium automated testing for Android!
What This Book Covers Chapter 1, Getting Started with Robotium, discusses the Robotium Framework and helps us install and set up the Android environment on Windows in a step-by-step manner.
Chapter 2, Creating a Test Project Using Robotium, guides you through the creation of a test project and helps to run it using Eclipse.
Chapter 3, Robotium APIs, introduces you to the Solo class and information about the APIs present in the framework. It will also teach you about internationalization.
Chapter 4, Web Support in Robotium, briefs you about accessing the Web Elements in Android using web support in Robotium.
Chapter 5, Comparison with Other Frameworks, aims to provide a comparison between Robotium and other testing frameworks based on certain parameters.
Chapter 6, Remote Control in Robotium, introduces you to the Software Automation Framework Support and the working of the Remote Control in Android.
Chapter 7, Other Robotium Utilities, consists of various utilities present in the Robotium Framework. These utilities include the RobotiumUtils class, XPath usage, Robotium usage for the already installed Android applications, and the signature process involved during the application sign-unsign operation to perform tests.
Chapter 8, Robotium with Maven, briefs you on the Maven tool that helps you to attach an Android project to a build process. This chapter also explains the different configurations you need to use Robotium with Maven.
For More Information: www.packtpub.com/robotium-automated-testing-for-android/book
Getting Started with Robotium
Automated testing helps us to maintain high software quality and provides a facility to capture if any code changes affect the actual use case. This chapter introduces the Robotium framework, its different features, and its benefi ts in the world of automated testing. By the end of this chapter, we will have a complete setup of the Android Environment in Eclipse IDE to get started with Robotium.
Robotium frameworkRobotium is an open source automation testing framework that is used to write a robust and powerful black box for Android applications (the emphasis is mostly on black box test cases). It fully supports testing for native and hybrid applications. Native apps are live on the device, that is, designed for a specifi c platform and can be installed from the Google Play Store, whereas Hybrid apps are partly native and partly web apps. These can also be installed from the app store, but require the HTML to be rendered in the browser.
Robotium is mostly used to automate UI test cases and internally uses run-time binding to Graphical User Interface (GUI) components.
Robotium is released under the Apache License 2.0. It is free to download and can be easily used by individuals and enterprises and is built on Java and JUnit 3. It will be more appropriate to call Robotium an extension of the Android Test Unit Framework, available at http://developer.android.com/tools/testing/testing_android.html. Robotium can also work without the application, under the test's source code.
For More Information: www.packtpub.com/robotium-automated-testing-for-android/book
Getting Started with Robotium
[ 6 ]
The test cases written using Robotium can either be executed on the Android Emulator (Android Virtual Device (AVD))—we will see how to create an AVD during installation in the following section—or on a real Android device. Developers can write function, system, and acceptance test scenarios across multiple activities.
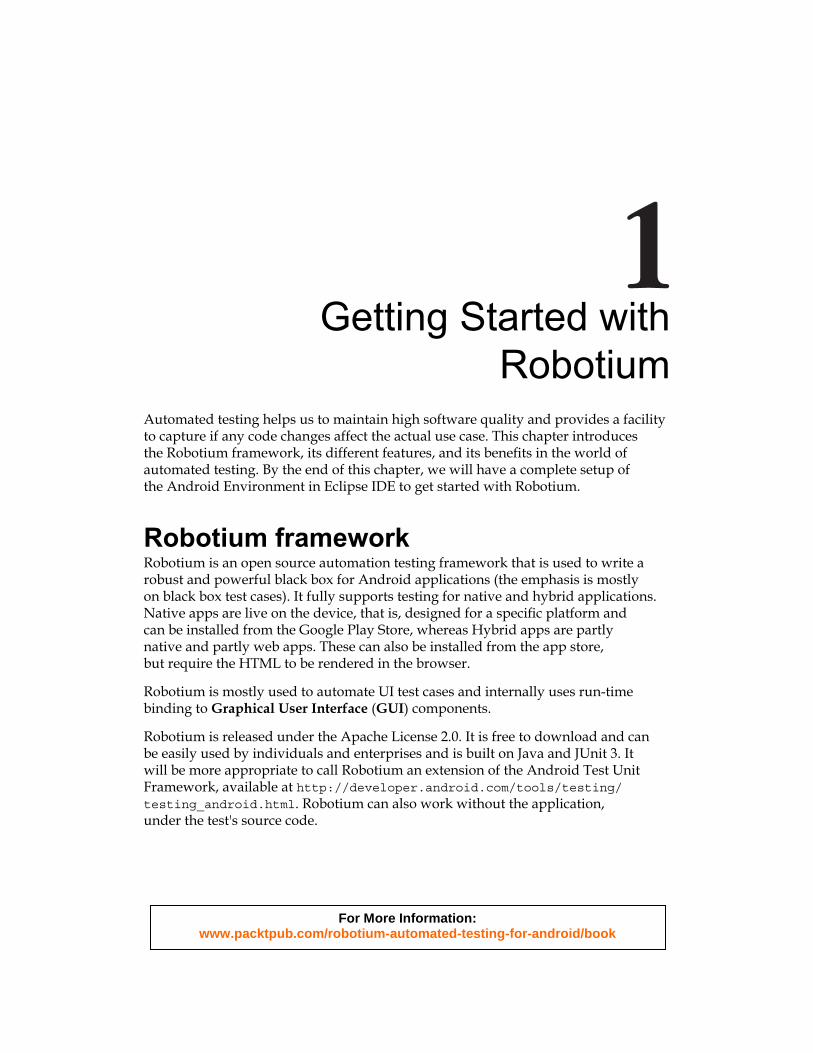
It is currently the world's leading Automation Testing Framework, and many open source developers are contributing to introduce more and more exciting features in subsequent releases. The following screenshot is of the git repository website for the Robotium project:
As Robotium is an open source project, anyone can contribute for the purpose of development and help in enhancing the framework with many more features. The Robotium source code is maintained at GitHub and can be accessed using the following link:
https://github.com/jayway/robotium
You just need to fork the project. Make all your changes in a clone project and click on Pull Request on your repository to tell core team members which changes to bring in. If you are new to the git environment, you can refer to the GitHub tutorial at the following link:
https://help.github.com/
For More Information: www.packtpub.com/robotium-automated-testing-for-android/book
Chapter 1
[ 7 ]
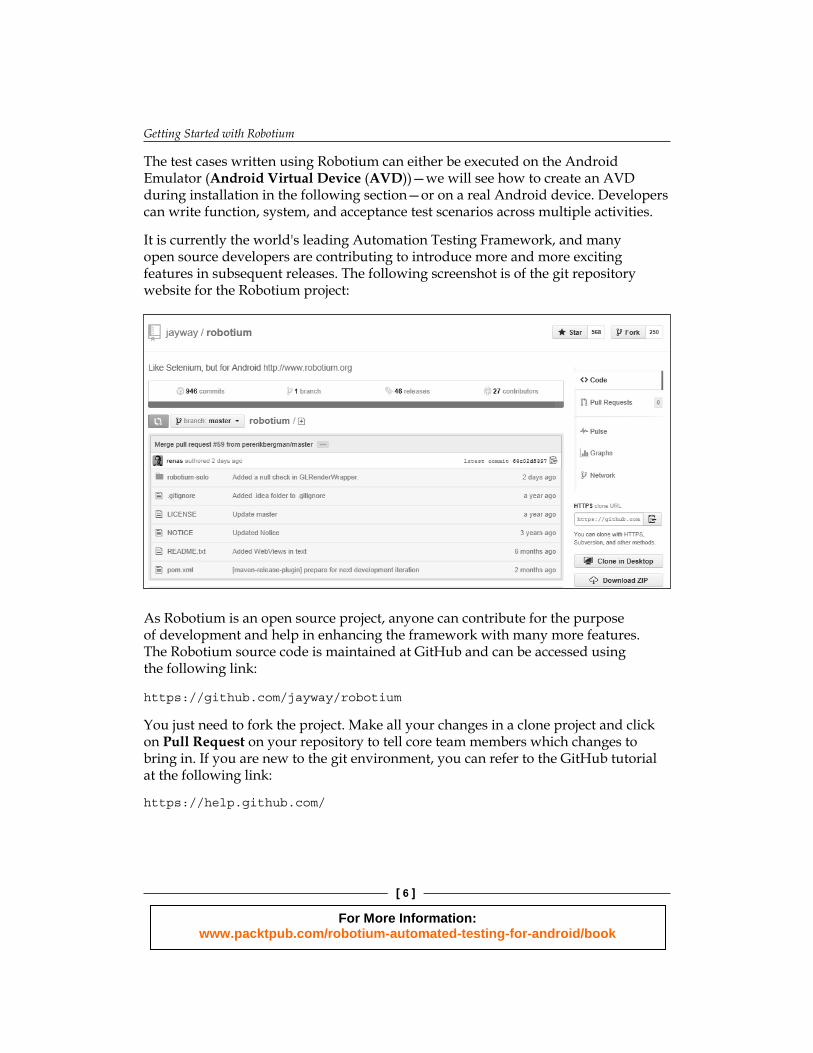
Robotium is like Selenium but for Andr oid. This project was started in January 2010 by Renas Reda. He is the founder and main developer for Robotium. The project initiated with v1.0 and continues to be followed up with new releases due to new requirements. It has support for Android features such as activities, toasts, menus, context menus, web views, and remote controls.
Let's see most of the Robotium features and benefi ts for Android test case developers.
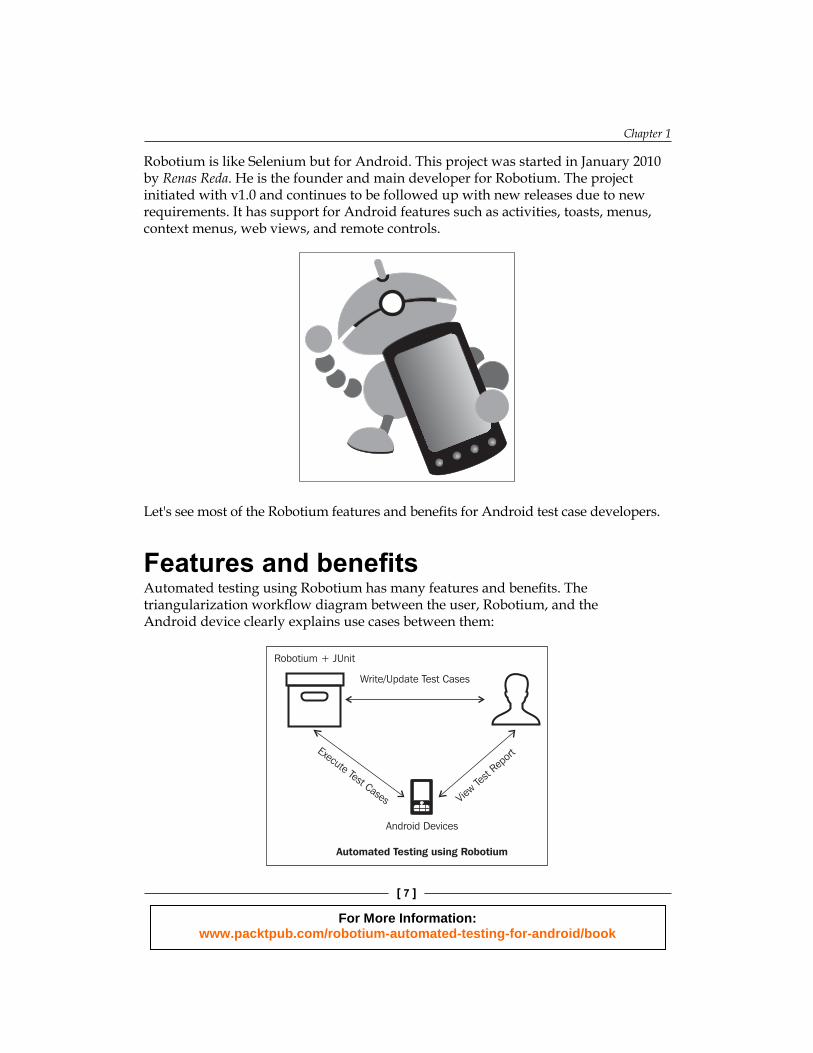
Features and benefi tsAutomated testing using Robotium has many features and benefi ts. The triangularization workfl ow diagram between the user, Robotium, and the Android device clearly explains use cases between them:
Robotium + JUnit
Write/Update Test Cases
Android Devices
Automated Testing using Robotium
Execute Test Cases View
Test R
eport
For More Information: www.packtpub.com/robotium-automated-testing-for-android/book
Getting Started with Robotium
[ 8 ]
The features and benefi ts of Robotium are as follows:
• Robotium helps us to quickly write powerful test cases with minimal knowledge of the application under test.
• Robotium offers APIs to directly interact with UI controls within the Android application such as EditText, TextView, and Button.
• Robotium offi cially supports Android 1.6 and above versions.• The Android platform is not modifi ed by Robotium.• The Robotium test can also be executed using command prompt.• Robotium can be integrated smoothly with Maven or Ant. This helps
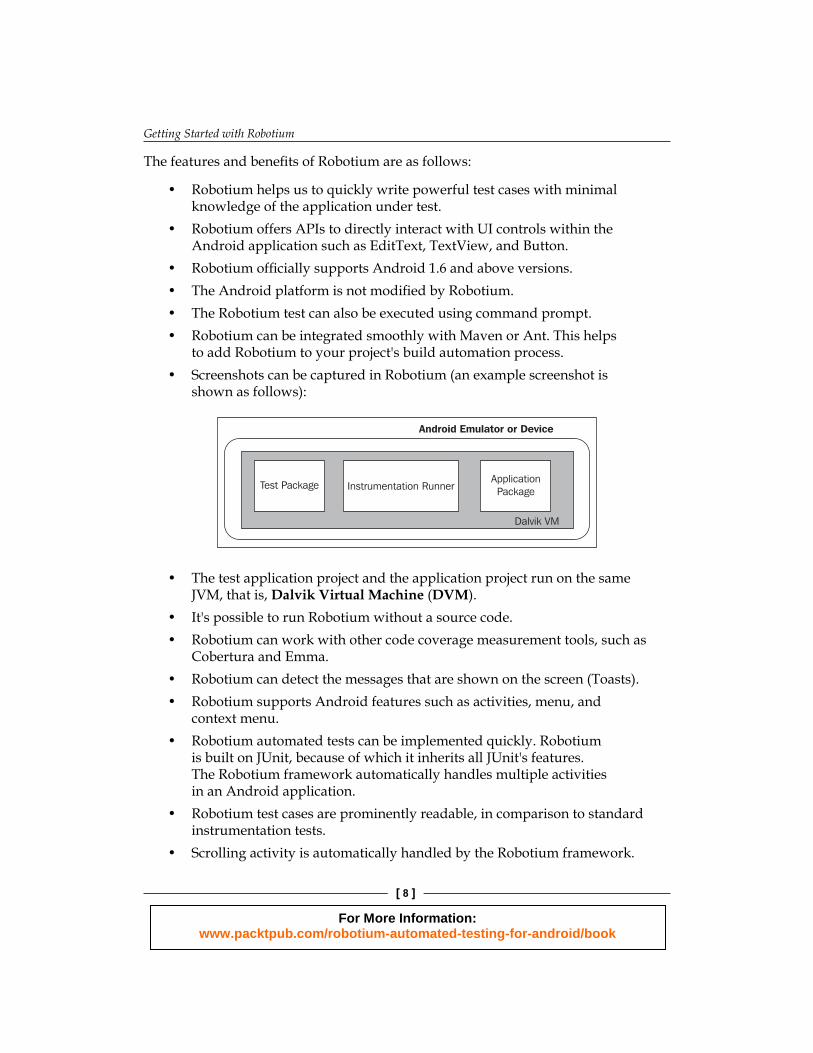
to add Robotium to your project's build automation process.• Screenshots can be captured in Robotium (an example screenshot is
shown as follows):
Test Package Instrumentation RunnerApplicationPackage
Dalvik VM
Android Emulator or Device
• The test application project and the application project run on the same JVM, that is, Dalvik Virtual Machine (DVM).
• It's possible to run Robotium without a source code.• Robotium can work with other code coverage measurement tools, such as
Cobertura and Emma.• Robotium can detect the messages that are shown on the screen (Toasts).• Robotium supports Android features such as activities, menu, and
context menu.• Robotium automated tests can be implemented quickly. Robotium
is built on JUnit, because of which it inherits all JUnit's features. The Robotium framework automatically handles multiple activities in an Android application.
• Robotium test cases are prominently readable, in comparison to standard instrumentation tests.
• Scrolling activity is automatically handled by the Robotium framework.
For More Information: www.packtpub.com/robotium-automated-testing-for-android/book
Chapter 1
[ 9 ]
• Recent versions of Robotium support hybrid applications. Hybrid applications use WebViews to present the HTML and JavaScript fi les in full screen, using the native browser rendering engine.
Setting up an Android environmentYou can set up an Android environment in Eclipse, which is the primary step to use Robotium for creating a test project, as follows:
RequirementsBefore the actual setup of the Android environment for Robotium, you will need to check all the following required elements:
• The Java Development Kit (JDK) must be installed (you can install it from http://www.oracle.com/technetwork/java/javase/downloads/index.html)
• Eclipse IDE must be installed
Standard Eclipse IDE (http://www.eclipse.org/downloads/) Eclipse IDE with built-in Android Developer Tools (ADT)
(http://developer.android.com/sdk/index.html) For Robotium for Android Starter, we will use Standard Eclipse
IDE, which is mostly used by tech enthusiasts and developers across industries. Eclipse IDE with built-in ADT has an Android plugin and there is no need to set up the Android SDK. Only one of the two Eclipse IDEs is needed.
To use standard Eclipse IDE for Android Development and setup a new SDK, you need to download SDK tools and select the additional SDK packages to install. In the existing version of Eclipse IDE, add ADT plugin
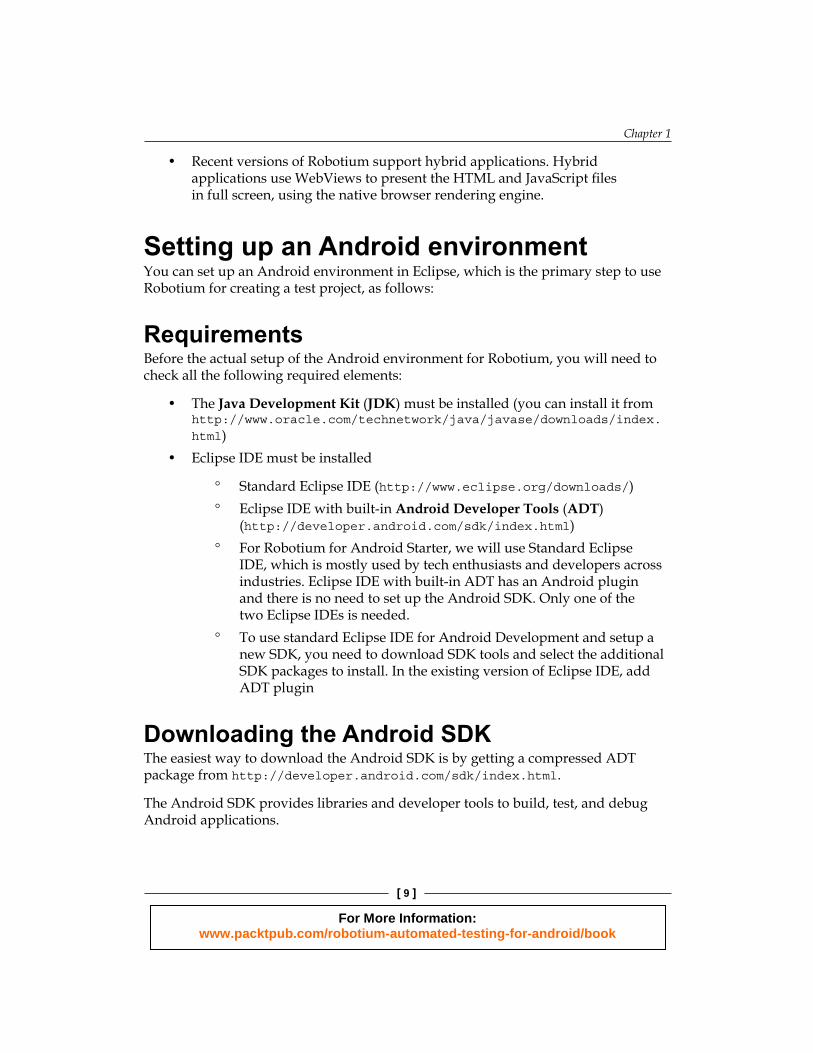
Downloading the Android SDKThe easiest way to download the Android SDK is by getting a compressed ADT package from http://developer.android.com/sdk/index.html.
The Android SDK provides libraries and developer tools to build, test, and debug Android applications.
For More Information: www.packtpub.com/robotium-automated-testing-for-android/book
Getting Started with Robotium
[ 10 ]
Unpack it to a safe location on your system. We will use this package in the following steps.
Installing ADTYou can install ADT by following the listed steps:
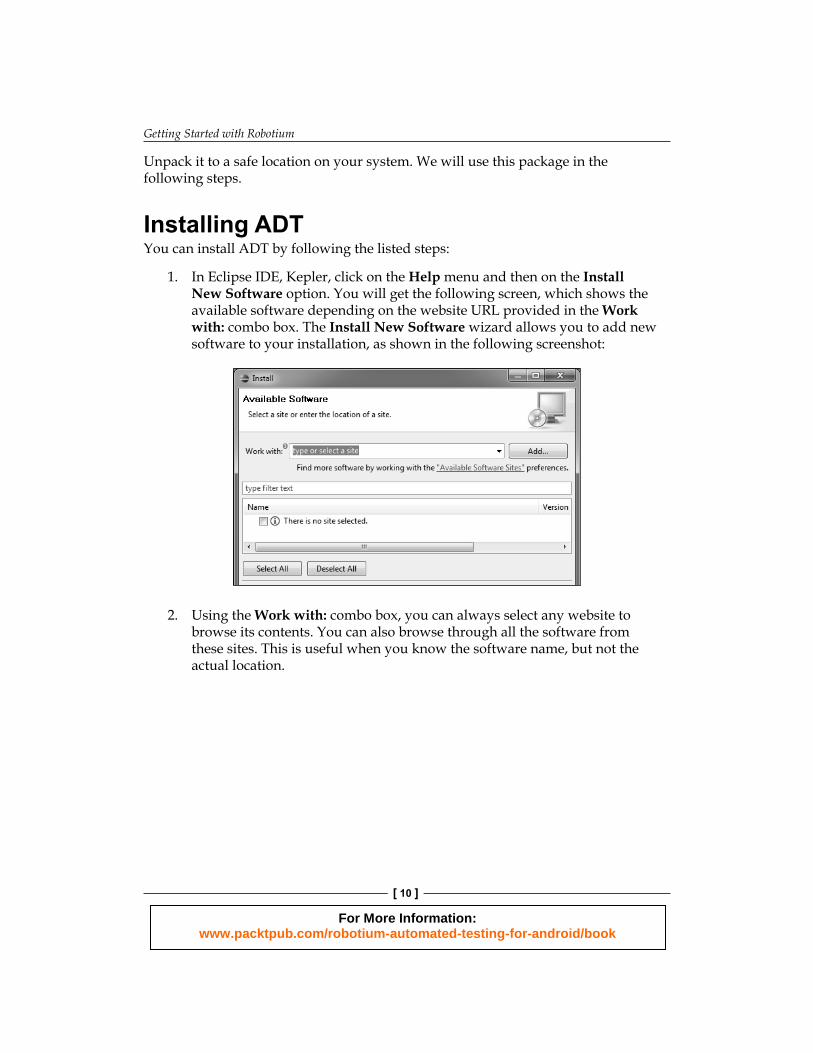
1. In Eclipse IDE, Kepler, click on the Help menu and then on the Install New Software option. You will get the following screen, which shows the available software depending on the website URL provided in the Work with: combo box. The Install New Software wizard allows you to add new software to your installation, as shown in the following screenshot:
2. Using the Work with: combo box, you can always select any website to browse its contents. You can also browse through all the software from these sites. This is useful when you know the software name, but not the actual location.
For More Information: www.packtpub.com/robotium-automated-testing-for-android/book
Chapter 1
[ 11 ]
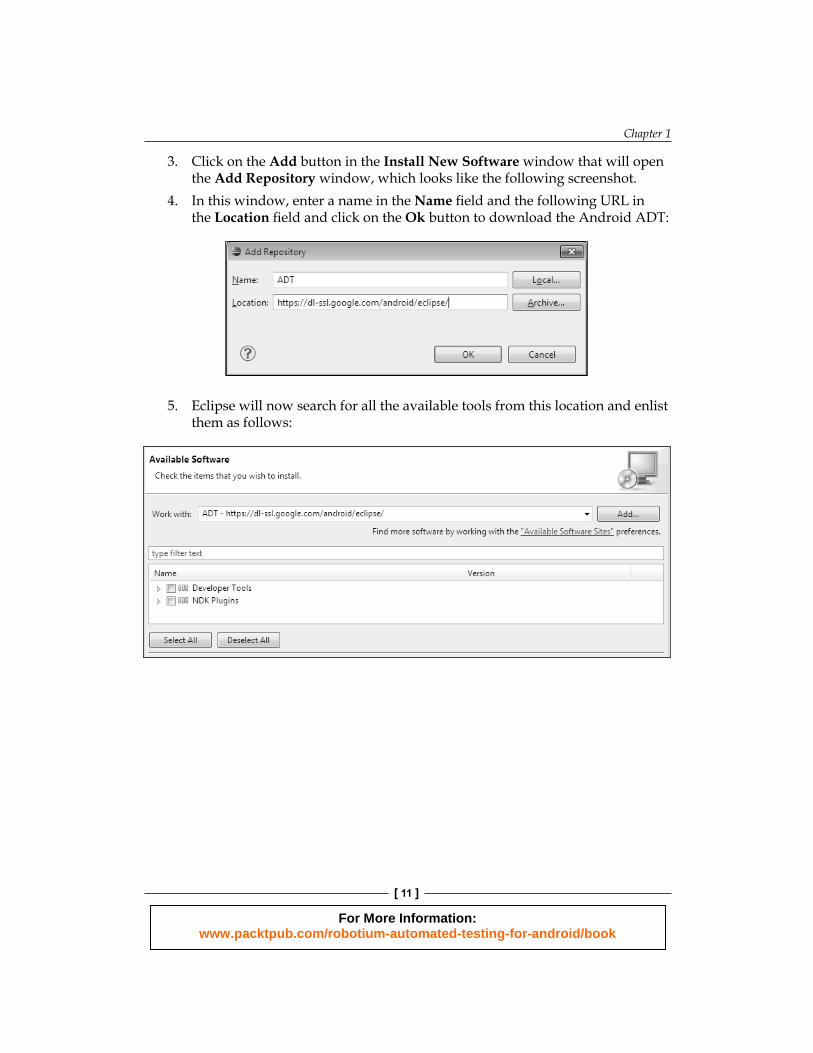
3. Click on the Add button in the Install New Software window that will open the Add Repository window, which looks like the following screenshot.
4. In this window, enter a name in the Name fi eld and the following URL in the Location fi eld and click on the Ok button to download the Android ADT:
5. Eclipse will now search for all the available tools from this location and enlist them as follows:
For More Information: www.packtpub.com/robotium-automated-testing-for-android/book
Getting Started with Robotium
[ 12 ]
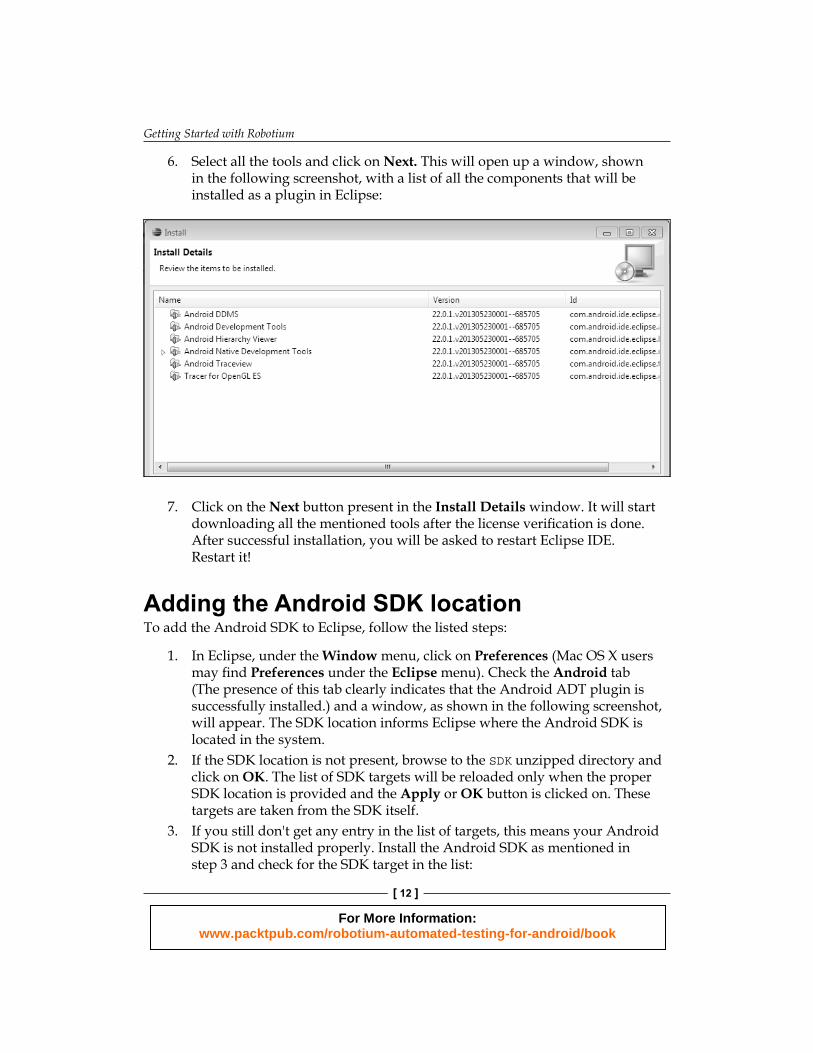
6. Select all the tools and click on Next. This will open up a window, shown in the following screenshot, with a list of all the components that will be installed as a plugin in Eclipse:
7. Click on the Next button present in the Install Details window. It will start downloading all the mentioned tools after the license verifi cation is done. After successful installation, you will be asked to restart Eclipse IDE. Restart it!
Adding the Android SDK locationTo add the Android SDK to Eclipse, follow the listed steps:
1. In Eclipse, under the Window menu, click on Preferences (Mac OS X users may fi nd Preferences under the Eclipse menu). Check the Android tab (The presence of this tab clearly indicates that the Android ADT plugin is successfully installed.) and a window, as shown in the following screenshot, will appear. The SDK location informs Eclipse where the Android SDK is located in the system.
2. If the SDK location is not present, browse to the SDK unzipped directory and click on OK. The list of SDK targets will be reloaded only when the proper SDK location is provided and the Apply or OK button is clicked on. These targets are taken from the SDK itself.
3. If you still don't get any entry in the list of targets, this means your Android SDK is not installed properly. Install the Android SDK as mentioned in step 3 and check for the SDK target in the list:
For More Information: www.packtpub.com/robotium-automated-testing-for-android/book
Chapter 1
[ 13 ]
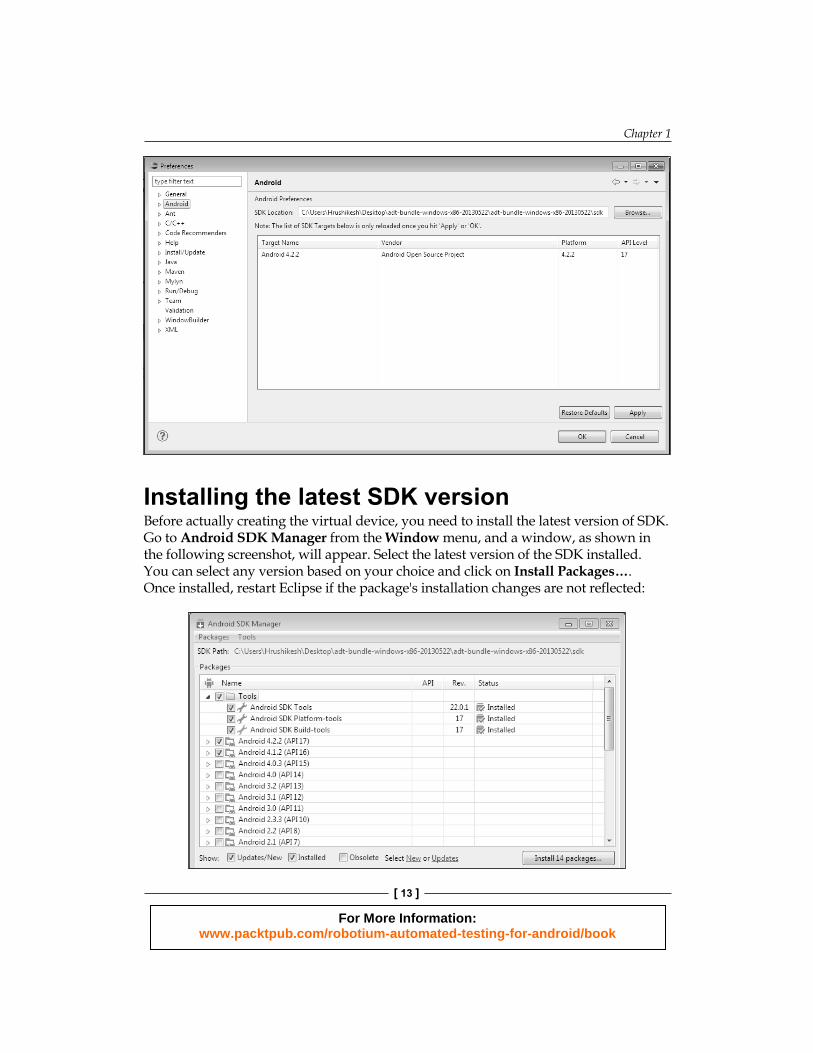
Installing the latest SDK versionBefore actually creating the virtual device, you need to install the latest version of SDK. Go to Android SDK Manager from the Window menu, and a window, as shown in the following screenshot, will appear. Select the latest version of the SDK installed. You can select any version based on your choice and click on Install Packages…. Once installed, restart Eclipse if the package's installation changes are not refl ected:
For More Information: www.packtpub.com/robotium-automated-testing-for-android/book
Getting Started with Robotium
[ 14 ]
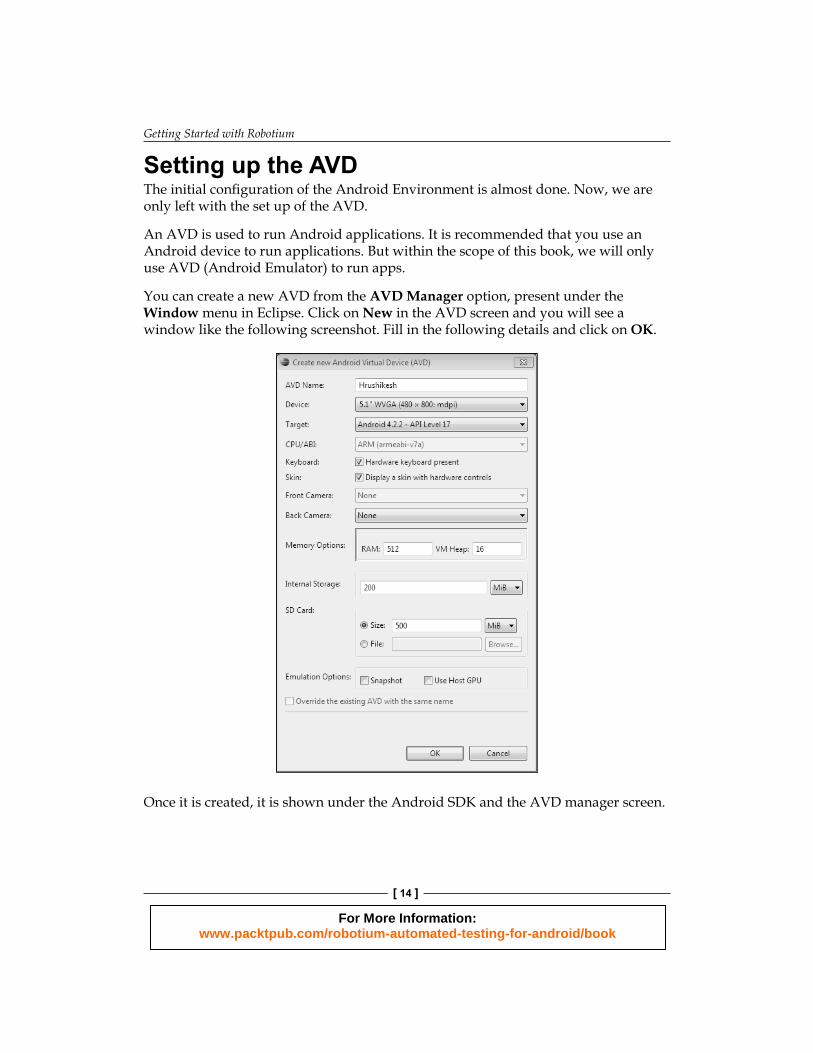
Setting up the AVDThe initial confi guration of the Android Environment is almost done. Now, we are only left with the set up of the AVD.
An AVD is used to run Android applications. It is recommended that you use an Android device to run applications. But within the scope of this book, we will only use AVD (Android Emulator) to run apps.
You can create a new AVD from the AVD Manager option, present under the Window menu in Eclipse. Click on New in the AVD screen and you will see a window like the following screenshot. Fill in the following details and click on OK.
Once it is created, it is shown under the Android SDK and the AVD manager screen.
For More Information: www.packtpub.com/robotium-automated-testing-for-android/book

Chapter 1
[ 15 ]
To run the created AVD, right-click on the project and navigate to Run As | Android Application. A Deployment Target Selection Mode window will pop up, asking you to select an AVD or a connected Android device to run your application; select either one of them and the application gets installed on the selected device/AVD. The following screenshot is of the Deployment Target Selection Mode window:
By this point, you should have a working setup of the Android Environment to start with Robotium's test case writing and execution. You are free to play around and discover more about it.
SummaryIn this chapter, we've learnt about the Robotium framework and what are the different steps you need to perform to make your Android Environment ready to get started with the framework.
In the next chapter, we'll start implementing our fi rst test project using Robotium. So, keep reading if you want to learn about test case implementation.
For More Information: www.packtpub.com/robotium-automated-testing-for-android/book
Where to buy this book You can buy Robotium Automated Testing for Android from the Packt Publishing website: http://www.packtpub.com/robotium-automated-testing-for-android/book. Free shipping to the US, UK, Europe and selected Asian countries. For more information, please read our shipping policy.
Alternatively, you can buy the book from Amazon, BN.com, Computer Manuals and most internet book retailers.
www.PacktPub.com
For More Information: www.packtpub.com/robotium-automated-testing-for-android/book