ROASTER OVEN / HORNO ASADOR User Guide/ Guía del Usuario · 2017-02-23 · ROASTER OVEN / HORNO...
18
ROASTER OVEN / HORNO ASADOR User Guide/ Guía del Usuario www.oster.com P.N. 140722 For product questions contact: Sunbeam Consumer Service USA : 1.800.334.0759 Canada : 1.800.667.8623 www.oster.com ©2010 Sunbeam Products, Inc. doing business as Jarden Consumer Solutions. All rights reserved. Distributed by Sunbeam Products, Inc. doing business as Jarden Consumer Solutions, Boca Raton, Florida 33431. Para preguntas sobre los productos llame: Sunbeam Consumer Service EE.UU.: 1.800.334.0759 www.oster.com ©2010 Sunbeam Products, Inc. operando bajo el nombre de Jarden Consumer Solutions. Todos los derechos reservados. Distribuido por Sunbeam Products, Inc. operando bajo el nombre de Jarden Consumer Solutions, Boca Raton, Florida 33431. GCDS-OST17772-JC Printed in China Impreso en China Safety Seguridad How to use Cómo usar Cleaning Cuidado y Limpieza Recipes Recetas Warranty Garantía CKSTRS18_23_10ESM1.indd 24-1 CKSTRS18_23_10ESM1.indd 24-1 5/25/10 8:54:49 AM 5/25/10 8:54:49 AM
Transcript of ROASTER OVEN / HORNO ASADOR User Guide/ Guía del Usuario · 2017-02-23 · ROASTER OVEN / HORNO...
ROASTER OVEN / HORNO ASADOR
User Guide/ Guía del Usuario
www.oster.com
P.N. 140722
For product questions contact:
Sunbeam Consumer ServiceUSA : 1.800.334.0759Canada : 1.800.667.8623www.oster.com
©2010 Sunbeam Products, Inc. doing business as Jarden Consumer Solutions. All rights reserved. Distributed by Sunbeam Products, Inc. doing business as Jarden Consumer Solutions, Boca Raton, Florida 33431.
Para preguntas sobre los productos llame:
Sunbeam Consumer Service EE.UU.: 1.800.334.0759 www.oster.com
©2010 Sunbeam Products, Inc. operando bajo el nombre de Jarden Consumer Solutions. Todos los derechos reservados. Distribuido por Sunbeam Products, Inc. operando bajo el nombre de Jarden Consumer Solutions, Boca Raton, Florida 33431.
GCDS-OST17772-JC
Printed in China Impreso en China
SafetySeguridad
How to useCómo usar
CleaningCuidado y Limpieza
RecipesRecetas
WarrantyGarantía
CKSTRS18_23_10ESM1.indd 24-1CKSTRS18_23_10ESM1.indd 24-1 5/25/10 8:54:49 AM5/25/10 8:54:49 AM
www.oster.com www.oster.com
IMPORTANT SAFEGUARDSWhen using electrical appliances, basic safety precautions should always be followed, including the following:
1. Read all instructions before using. Do not touch hot surfaces. Use handles or knobs. 2.
To protect against electrical shock do not immerse roaster base, cord, or plug in 3. water or other liquid.
Close supervision is necessary when any appliance is used by or near children. 4.
Unplug from outlet when not in use and before cleaning. Allow to cool before 5. putting on or taking off parts and before cleaning.
Do not operate roaster oven with a damaged cord or plug or after the appliance 6. malfunctions, or has been damaged in any manner. Contact Oster’s Consumer Service Department (see warranty) to return for examination, repair or adjustment.
The use of accessory attachments not recommended by Oster 7. TM may cause injuries.
Do not use outdoors. 8.
Do not let cord hang over edge of table or counter, or touch hot surfaces, including 9. the stove.
Do not place on or near a hot gas or electric burner or in a heated oven.10.
Extreme caution must be used when moving an appliance containing hot oil or 11. other hot liquids.
12. CAUTION: Steam escaping from under cover or food warming pans is hot and can cause burns.
Do not use appliance for other than its intended use.13.
Use oven mitts to remove the REMOVABLE ROASTING PAN from the roaster oven; or 14. to remove a baking pan or cooked food from the REMOVABLE ROASTING PAN.
To disconnect, turn TEMPERATURE CONTROL to OFF, then remove plug from wall 15. outlet.
Some countertop surfaces such as Corian® and other surfaces are not designed to 16. withstand the prolonged heat generated by certain appliances. We recommend placing a hot plate or trivet under your OsterTM product to prevent possible damage to the surface.
THIS UNIT IS INTENDED FOR HOUSEHOLD USE ONLY
These appliances are for HOUSEHOLD USE ONLY. No user-serviceable parts inside. Do not attempt to service these products. Do not immerse base in water or other liquid.
This appliance has a polarized alternating current plug (one blade is wider than the other). To reduce the risk of electric shock, as a safety feature, this plug will fi t in a polarized outlet only one way. If the plug does not insert fully in the outlet, reverse the plug. If it still fails to fi t, contact a qualifi ed electrician.
DO NOT ATTEMPT TO DEFEAT THIS SAFETY FEATURE.
EXTENSION CORD USE A short power supply cord is provided to reduce the hazards resulting from entanglement or tripping over a longer cord. AN EXTENSION CORD MAY BE USED WITH CARE; HOWEVER, THE MARKED ELECTRICAL RATING SHOULD BE AT LEAST AS GREAT AS THE ELECTRICAL RATING OF THE ROASTER OVEN. The extension cord should not be allowed to drape over the counter or tabletop where it can be pulled on by children or tripped over.
SAVE THESE INSTRUCTIONSThank you for purchasing the OsterTM Roaster Oven. Before you use this product for the fi rst time, please take a few moments to read these instructions and keep it for reference. Pay particular attention to the Safety Instructions provided. Please review the product service and warranty statements. To learn more about OsterTM products, please visit us at www.oster.com or call us at 1-800-334-0759.
2 3
CKSTRS18_23_10ESM1.indd Sec1:2-Sec1:3CKSTRS18_23_10ESM1.indd Sec1:2-Sec1:3 5/25/10 8:54:53 AM5/25/10 8:54:53 AM
www.oster.com www.oster.com
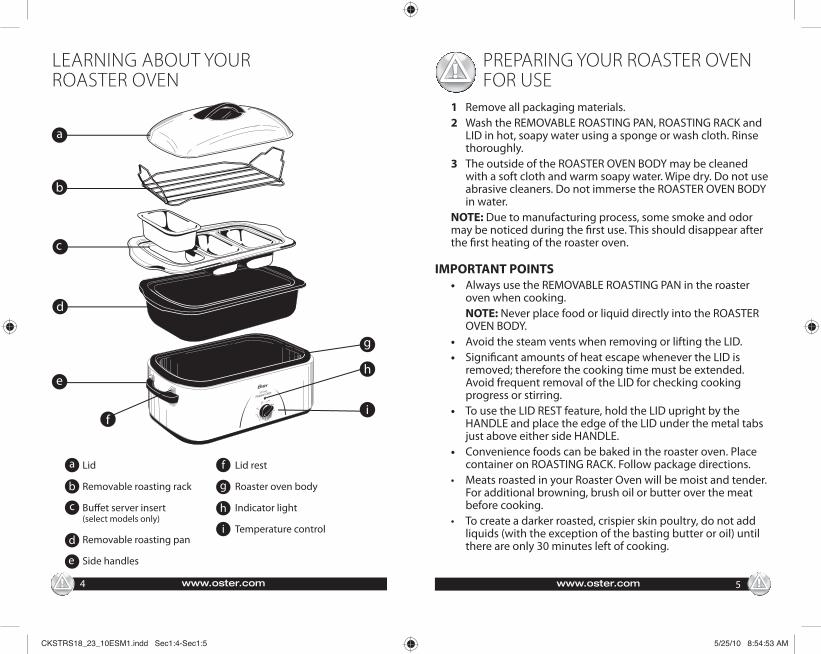
LEARNING ABOUT YOUR ROASTER OVEN
4 5
PREPARING YOUR ROASTER OVEN FOR USE
1 Remove all packaging materials.2 Wash the REMOVABLE ROASTING PAN, ROASTING RACK and
LID in hot, soapy water using a sponge or wash cloth. Rinse thoroughly.
3 The outside of the ROASTER OVEN BODY may be cleaned with a soft cloth and warm soapy water. Wipe dry. Do not use abrasive cleaners. Do not immerse the ROASTER OVEN BODY in water.
NOTE: Due to manufacturing process, some smoke and odor may be noticed during the fi rst use. This should disappear after the fi rst heating of the roaster oven.
IMPORTANT POINTS• Always use the REMOVABLE ROASTING PAN in the roaster
oven when cooking. NOTE: Never place food or liquid directly into the ROASTER
OVEN BODY.• Avoid the steam vents when removing or lifting the LID.• Signifi cant amounts of heat escape whenever the LID is
removed; therefore the cooking time must be extended. Avoid frequent removal of the LID for checking cooking progress or stirring.
• To use the LID REST feature, hold the LID upright by the HANDLE and place the edge of the LID under the metal tabs just above either side HANDLE.
• Convenience foods can be baked in the roaster oven. Place container on ROASTING RACK. Follow package directions.
• Meats roasted in your Roaster Oven will be moist and tender. For additional browning, brush oil or butter over the meat before cooking.
• To create a darker roasted, crispier skin poultry, do not add liquids (with the exception of the basting butter or oil) until there are only 30 minutes left of cooking.
a
b
g
d
h
i
e
c
f
a Lid
Removable roasting rack
Buff et server insert(select models only)
Removable roasting pan
Side handles
Lid rest
Roaster oven body
Indicator light
Temperature control
b
c
d
f
g
h
i
e
CKSTRS18_23_10ESM1.indd Sec1:4-Sec1:5CKSTRS18_23_10ESM1.indd Sec1:4-Sec1:5 5/25/10 8:54:53 AM5/25/10 8:54:53 AM
www.oster.com www.oster.com6 7
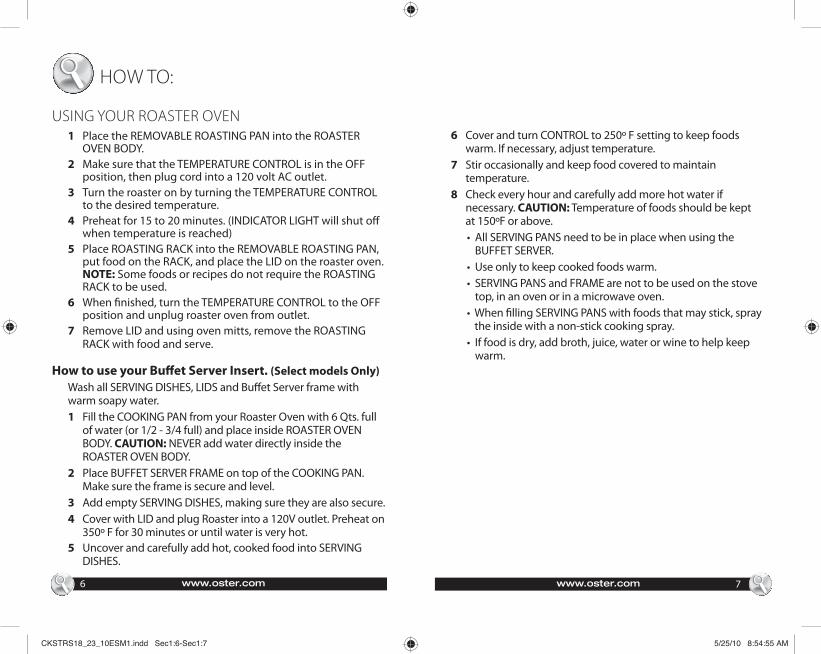
6 Cover and turn CONTROL to 250º F setting to keep foods warm. If necessary, adjust temperature.
7 Stir occasionally and keep food covered to maintain temperature.
8 Check every hour and carefully add more hot water if necessary. CAUTION: Temperature of foods should be kept at 150ºF or above.
• All SERVING PANS need to be in place when using the BUFFET SERVER.
• Use only to keep cooked foods warm. • SERVING PANS and FRAME are not to be used on the stove
top, in an oven or in a microwave oven. • When fi lling SERVING PANS with foods that may stick, spray
the inside with a non-stick cooking spray. • If food is dry, add broth, juice, water or wine to help keep
warm.
HOW TO:
USING YOUR ROASTER OVEN 1 Place the REMOVABLE ROASTING PAN into the ROASTER
OVEN BODY.2 Make sure that the TEMPERATURE CONTROL is in the OFF
position, then plug cord into a 120 volt AC outlet.3 Turn the roaster on by turning the TEMPERATURE CONTROL
to the desired temperature.4 Preheat for 15 to 20 minutes. (INDICATOR LIGHT will shut off
when temperature is reached)5 Place ROASTING RACK into the REMOVABLE ROASTING PAN,
put food on the RACK, and place the LID on the roaster oven. NOTE: Some foods or recipes do not require the ROASTING RACK to be used.
6 When fi nished, turn the TEMPERATURE CONTROL to the OFF position and unplug roaster oven from outlet.
7 Remove LID and using oven mitts, remove the ROASTING RACK with food and serve.
How to use your Buff et Server Insert. (Select models Only)Wash all SERVING DISHES, LIDS and Buff et Server frame with warm soapy water.1 Fill the COOKING PAN from your Roaster Oven with 6 Qts. full
of water (or 1/2 - 3/4 full) and place inside ROASTER OVEN BODY. CAUTION: NEVER add water directly inside the ROASTER OVEN BODY.
2 Place BUFFET SERVER FRAME on top of the COOKING PAN. Make sure the frame is secure and level.
3 Add empty SERVING DISHES, making sure they are also secure.4 Cover with LID and plug Roaster into a 120V outlet. Preheat on
350º F for 30 minutes or until water is very hot.5 Uncover and carefully add hot, cooked food into SERVING
DISHES.
CKSTRS18_23_10ESM1.indd Sec1:6-Sec1:7CKSTRS18_23_10ESM1.indd Sec1:6-Sec1:7 5/25/10 8:54:55 AM5/25/10 8:54:55 AM
www.oster.com www.oster.com8 9
CARE & CLEANING
This appliance should be cleaned after every use.NOTE: Do not immerse the ROASTER OVEN BODY in water or other liquid. Do not put REMOVABLE ROASTING PAN in dishwasher.1 Turn temperature control to the “OFF” position.2 Unplug the roaster oven from outlet and allow unit to cool.3 Allow the roaster oven to cool completely before cleaning.4 Wash the REMOVABLE ROASTING PAN, LID and ROASTING
RACK in hot soapy water – using a sponge or cloth. Rinse thoroughly in hot water, then towel dry.
5 Wipe the inside and outside of the ROASTER OVEN BODY with a damp cloth
How to clean your Buff et Server InsertCAUTION: BUFFET SERVER is hot. Handle Carefully.• Always allow the BUFFET SERVER to completely cool before
cleaning.• SERVING DISH, LIDS and FRAME from BUFFET SERVER may
be cleaned in hot soapy water or in dishwasher. Rinse and dry completely.
• SERVING DISH LIDS may be cleaned in warm soapy water.
COOKING GUIDE
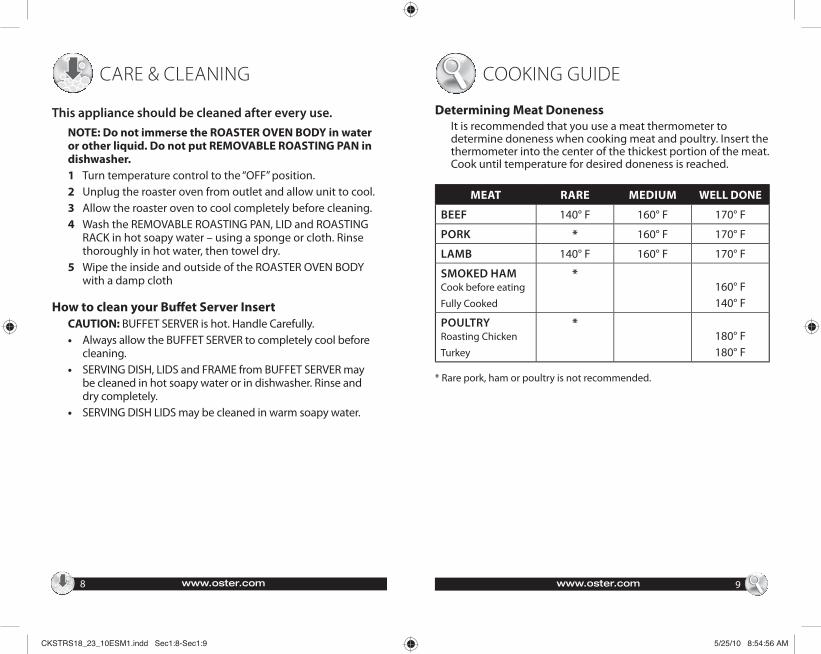
Determining Meat DonenessIt is recommended that you use a meat thermometer to determine doneness when cooking meat and poultry. Insert the thermometer into the center of the thickest portion of the meat. Cook until temperature for desired doneness is reached.
MEAT RARE MEDIUM WELL DONE
BEEF 140° F 160° F 170° F
PORK * 160° F 170° F
LAMB 140° F 160° F 170° F
SMOKED HAMCook before eating
Fully Cooked
*160° F140° F
POULTRYRoasting Chicken
Turkey
*180° F180° F
* Rare pork, ham or poultry is not recommended.
CKSTRS18_23_10ESM1.indd Sec1:8-Sec1:9CKSTRS18_23_10ESM1.indd Sec1:8-Sec1:9 5/25/10 8:54:56 AM5/25/10 8:54:56 AM
www.oster.com www.oster.com10 11
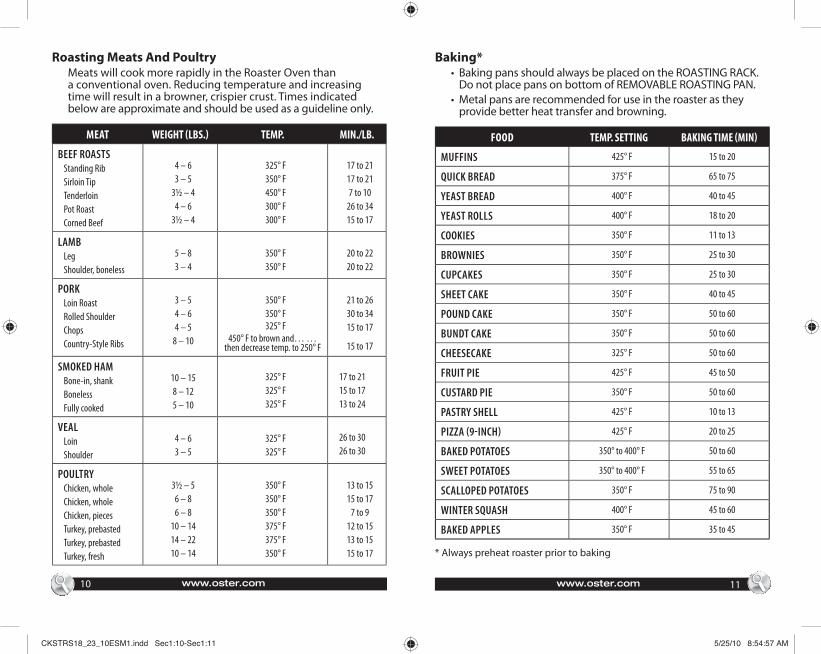
Roasting Meats And PoultryMeats will cook more rapidly in the Roaster Oven than a conventional oven. Reducing temperature and increasing time will result in a browner, crispier crust. Times indicated below are approximate and should be used as a guideline only.
MEAT WEIGHT (LBS.) TEMP. MIN./LB.
BEEF ROASTSStanding Rib
Sirloin Tip
Tenderloin
Pot Roast
Corned Beef
4 – 6
3 – 5
3½ – 4
4 – 6
3½ – 4
325° F
350° F
450° F
300° F
300° F
17 to 21
17 to 21
7 to 10
26 to 34
15 to 17
LAMBLeg
Shoulder, boneless
5 – 8
3 – 4
350° F
350° F
20 to 22
20 to 22
PORKLoin Roast
Rolled Shoulder
Chops
Country-Style Ribs
3 – 5
4 – 6
4 – 5
8 – 10
350° F
350° F
325° F
450° F to brown and… …then decrease temp. to 250° F
21 to 26
30 to 34
15 to 17
15 to 17
SMOKED HAMBone-in, shank
Boneless
Fully cooked
10 – 15
8 – 12
5 – 10
325° F
325° F
325° F
17 to 21
15 to 17
13 to 24
VEALLoin
Shoulder
4 – 6
3 – 5
325° F
325° F
26 to 30
26 to 30
POULTRYChicken, whole
Chicken, whole
Chicken, pieces
Turkey, prebasted
Turkey, prebasted
Turkey, fresh
3½ – 5
6 – 8
6 – 8
10 – 14
14 – 22
10 – 14
350° F
350° F
350° F
375° F
375° F
350° F
13 to 15
15 to 17
7 to 9
12 to 15
13 to 15
15 to 17
Baking*• Baking pans should always be placed on the ROASTING RACK.
Do not place pans on bottom of REMOVABLE ROASTING PAN.• Metal pans are recommended for use in the roaster as they
provide better heat transfer and browning.
FOOD TEMP. SETTING BAKING TIME (MIN)
MUFFINS 425° F 15 to 20
QUICK BREAD 375° F 65 to 75
YEAST BREAD 400° F 40 to 45
YEAST ROLLS 400° F 18 to 20
COOKIES 350° F 11 to 13
BROWNIES 350° F 25 to 30
CUPCAKES 350° F 25 to 30
SHEET CAKE 350° F 40 to 45
POUND CAKE 350° F 50 to 60
BUNDT CAKE 350° F 50 to 60
CHEESECAKE 325° F 50 to 60
FRUIT PIE 425° F 45 to 50
CUSTARD PIE 350° F 50 to 60
PASTRY SHELL 425° F 10 to 13
PIZZA 9INCH 425° F 20 to 25
BAKED POTATOES 350° to 400° F 50 to 60
SWEET POTATOES 350° to 400° F 55 to 65
SCALLOPED POTATOES 350° F 75 to 90
WINTER SQUASH 400° F 45 to 60
BAKED APPLES 350° F 35 to 45
* Always preheat roaster prior to baking
CKSTRS18_23_10ESM1.indd Sec1:10-Sec1:11CKSTRS18_23_10ESM1.indd Sec1:10-Sec1:11 5/25/10 8:54:57 AM5/25/10 8:54:57 AM
www.oster.com www.oster.com
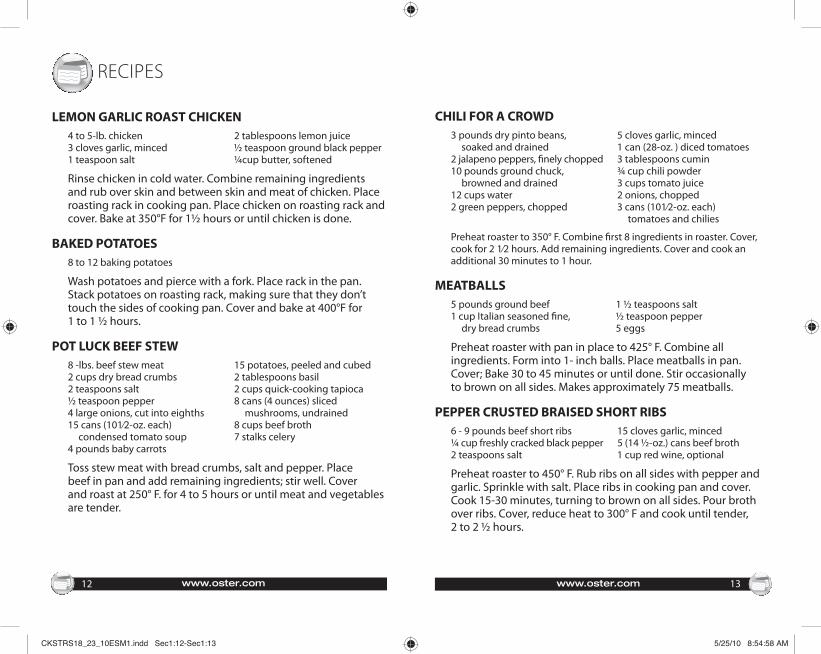
CHILI FOR A CROWD3 pounds dry pinto beans, 5 cloves garlic, minced soaked and drained 1 can (28-oz. ) diced tomatoes2 jalapeno peppers, fi nely chopped 3 tablespoons cumin10 pounds ground chuck, ¾ cup chili powder browned and drained 3 cups tomato juice12 cups water 2 onions, chopped2 green peppers, chopped 3 cans (101⁄2-oz. each) tomatoes and chilies
Preheat roaster to 350° F. Combine fi rst 8 ingredients in roaster. Cover, cook for 2 1⁄2 hours. Add remaining ingredients. Cover and cook an additional 30 minutes to 1 hour.
MEATBALLS5 pounds ground beef 1 ½ teaspoons salt1 cup Italian seasoned fi ne, ½ teaspoon pepper dry bread crumbs 5 eggs
Preheat roaster with pan in place to 425° F. Combine all ingredients. Form into 1- inch balls. Place meatballs in pan. Cover; Bake 30 to 45 minutes or until done. Stir occasionally to brown on all sides. Makes approximately 75 meatballs.
PEPPER CRUSTED BRAISED SHORT RIBS6 - 9 pounds beef short ribs 15 cloves garlic, minced¼ cup freshly cracked black pepper 5 (14 ½-oz.) cans beef broth2 teaspoons salt 1 cup red wine, optional
Preheat roaster to 450° F. Rub ribs on all sides with pepper and garlic. Sprinkle with salt. Place ribs in cooking pan and cover. Cook 15-30 minutes, turning to brown on all sides. Pour broth over ribs. Cover, reduce heat to 300° F and cook until tender, 2 to 2 ½ hours.
12 13
RECIPES
LEMON GARLIC ROAST CHICKEN4 to 5-lb. chicken 2 tablespoons lemon juice3 cloves garlic, minced ½ teaspoon ground black pepper1 teaspoon salt ¼cup butter, softened
Rinse chicken in cold water. Combine remaining ingredients and rub over skin and between skin and meat of chicken. Place roasting rack in cooking pan. Place chicken on roasting rack and cover. Bake at 350°F for 1½ hours or until chicken is done.
BAKED POTATOES8 to 12 baking potatoes
Wash potatoes and pierce with a fork. Place rack in the pan. Stack potatoes on roasting rack, making sure that they don’t touch the sides of cooking pan. Cover and bake at 400°F for 1 to 1 ½ hours.
POT LUCK BEEF STEW8 -lbs. beef stew meat 15 potatoes, peeled and cubed2 cups dry bread crumbs 2 tablespoons basil2 teaspoons salt 2 cups quick-cooking tapioca½ teaspoon pepper 8 cans (4 ounces) sliced 4 large onions, cut into eighths mushrooms, undrained15 cans (101⁄2-oz. each) 8 cups beef broth condensed tomato soup 7 stalks celery4 pounds baby carrots
Toss stew meat with bread crumbs, salt and pepper. Place beef in pan and add remaining ingredients; stir well. Cover and roast at 250° F. for 4 to 5 hours or until meat and vegetables are tender.
CKSTRS18_23_10ESM1.indd Sec1:12-Sec1:13CKSTRS18_23_10ESM1.indd Sec1:12-Sec1:13 5/25/10 8:54:58 AM5/25/10 8:54:58 AM
www.oster.com www.oster.com
PORK ROAST4 - 5 lb. pork loin roast ½ teaspoon pepper4 cloves garlic, minced ½ cup Italian dressing1 teaspoon salt ¼ cup Worcestershire sauce
Preheat roaster to 350° F. Place roast on rack. Press minced garlic into surface of the roast. Place rack in roaster. Combine dressing and Worcestershire sauce. Brush roast with marinade. Cover; cook for 2 to 2 ½ hours or until done.
BAKED BEANS2 cans (7-lbs. each) pork and beans 1⁄2 cup Worcestershire sauce1 ½ cup molasses 2 tablespoons dry mustard1 ¼ cup ketchup powder 1 pound bacon, cooked ¾ cup prepared barbecue sauce until just crisp and cut up
Combine all ingredients in an oven safe dish and place in roaster pan. Cover and cook at 300° F for 2 hours or until heated through. Stir occasionally.
14 15
SPAGHETTI SAUCE1 can (48-oz.) tomato juice 1⁄3 cup basil leaves4 cans (28-oz.) diced tomatoes ¼ cup oregano leaves2 cans (12-oz.) tomato paste 1 ½ tablespoons parsley2 tablespoons Worcestershire sauce 1 tablespoon thyme6 cups water 1 tablespoon salt5 cloves garlic, minced 1 teaspoon pepper
Turn roaster to 350° F. Add all ingredients to an oven safe dish, stirring well to combine. Cover, cook 3 to 4 hours until thick, adding meatballs during last 1 to 1 ½ hours. Stir occasionally.
SPICY BEEF ROAST2 (2 ½ to 3-lb.) beef tip or rump roast ¼ cup soy sauce2 - 3 tablespoons cracked 2 tablespoons Worcestershire black peppercorns sauce4 cloves garlic, minced 1 ½ teaspoons dry mustard3 tablespoons balsamic vinegar ½ teaspoon salt
Preheat roaster to 350° F. Make several slits in top of roasts. Place roasts on rack. Set rack in roaster. Combine vinegar, soy sauce, Worcestershire sauce and mustard. Brush marinade over roasts. Combine cracked pepper and garlic. Rub over meat. Sprinkle with salt. Cover; roast 20 to 25 minutes per pound or until roast reaches desired doneness.
CKSTRS18_23_10ESM1.indd Sec1:14-Sec1:15CKSTRS18_23_10ESM1.indd Sec1:14-Sec1:15 5/25/10 8:54:59 AM5/25/10 8:54:59 AM
www.oster.com www.oster.com
1 Year Limited WarrantySunbeam Products, Inc. doing business as Jarden Consumer Solutions or if in Canada, Sunbeam Corporation (Canada) Limited doing business as Jarden Consumer Solutions (collectively “JCS”) warrants that for a period of one year from the date of purchase, this product will be free from defects in material and workmanship. JCS, at its option, will repair or replace this product or any component of the product found to be defective during the warranty period. Replacement will be made with a new or remanufactured product or component. If the product is no longer available, replacement may be made with a similar product of equal or greater value. This is your exclusive warranty. Do NOT attempt to repair or adjust any electrical or mechanical functions on this product. Doing so will void this warranty.
This warranty is valid for the original retail purchaser from the date of initial retail purchase and is not transferable. Keep the original sales receipt. Proof of purchase is required to obtain warranty performance. JCS dealers, service centers, or retail stores selling JCS products do not have the right to alter, modify or any way change the terms and conditions of this warranty.
This warranty does not cover normal wear of parts or damage resulting from any of the following: negligent use or misuse of the product, use on improper voltage or current, use contrary to the operating instructions, disassembly, repair or alteration by anyone other than JCS or an authorized JCS service center. Further, the warranty does not cover: Acts of God, such as fi re, fl ood, hurricanes and tornadoes.
What are the limits on JCS’s Liability?
JCS shall not be liable for any incidental or consequential damages caused by the breach of any express, implied or statutory warranty or condition.
Except to the extent prohibited by applicable law, any implied warranty or condition of merchantability or fi tness for a particular purpose is limited in duration to the duration of the above warranty.
JCS disclaims all other warranties, conditions or representations, express, implied, statutory or otherwise.
16 17
JCS shall not be liable for any damages of any kind resulting from the purchase, use or misuse of, or inability to use the product including incidental, special, consequential or similar damages or loss of profi ts, or for any breach of contract, fundamental or otherwise, or for any claim brought against purchaser by any other party.
Some provinces, states or jurisdictions do not allow the exclusion or limitation of incidental or consequential damages or limitations on how long an implied warranty lasts, so the above limitations or exclusion may not apply to you.
This warranty gives you specifi c legal rights, and you may also have other rights that vary from province to province, state to state or jurisdiction to jurisdiction.
How to Obtain Warranty Service
In the U.S.A.
If you have any question regarding this warranty or would like to obtain warranty service, please call 1-800-334-0759 and a convenient service center address will be provided to you.
In Canada
If you have any question regarding this warranty or would like to obtain warranty service, please call 1-800-667-8623 and a convenient service center address will be provided to you.
In the U.S.A., this warranty is off ered by Sunbeam Products, Inc. doing business as Jarden Consumer Solutions located in Boca Raton, Florida 33431. In Canada, this warranty is off ered by Sunbeam Corporation (Canada) Limited doing business as Jarden Consumer Solutions, located at 20 B Hereford Street, Brampton, Ontario L6Y 0M1. If you have any other problem or claim in connection with this product, please write our Consumer Service Department.
PLEASE DO NOT RETURN THIS PRODUCT TO ANY OF THESE ADDRESSES OR TO THE PLACE OF PURCHASE.
CKSTRS18_23_10ESM1.indd Sec1:16-Sec1:17CKSTRS18_23_10ESM1.indd Sec1:16-Sec1:17 5/25/10 8:54:59 AM5/25/10 8:54:59 AM
www.oster.com www.oster.com
PRECAUCIONES IMPORTANTESAl usar aparatos eléctricos, siempre debe seguir precauciones básicas de seguridad, incluyendo las siguientes:
1. Lea completamente las instrucciones antes de utilizarlo.No toque las superfi cies calientes. Utilice las asas o perillas. 2.
Para evitar una descarga eléctrica, no sumerja la base del horno, el cable o el enchufe en agua 3. o cualquier otro líquido.
Tenga mucho cuidado al utilizar cualquier aparato eléctrico cerca de niños. 4.
Desenchúfelo del tomacorriente cuando no lo utilice y antes de limpiarlo. Deje que se enfríe 5. antes de ponerle o quitarle partes, y antes de limpiarlo.
No utilice el horno si el cable o el enchufe están dañados o luego de una falla, o si ha sufrido 6. cualquier tipo de daño. Llame al Departamento de Servicio al Cliente de OsterTM (ver garantía) para que sea examinado, reparado o ajustado.
El uso de accesorios no recomendados por Oster puede ocasionar daños. 7.
No lo utilice en el exterior. 8.
No permita que el cable cuelgue por el borde de la mesa o mesada, o que toque 9. superfi cies calientes, incluyendo la estufa.
No lo coloque sobre o cerca de un quemador eléctrico o a gas, o dentro de un horno 10. caliente.
Debe tener mucho cuidado al mover un artefacto que contenga aceite u otros líquidos 11. calientes.
12. CUIDADO: El vapor que sale por debajo de la tapa o de las cacerolas de comida está caliente y puede causar quemaduras.
No utilice el artefacto para ningún otro uso distinto al indicado.13.
Utilice guantes protectores para remover la BANDEJA ASADORA del horno, o para 14. remover una cacerola o comida de la BANDEJA ASADORA.
Para desconectarlo, gire el control de temperatura a la posición OFF, luego saque el 15. enchufe del tomacorriente.
Algunas superfi cies de mesada como Corian® no están diseñadas para soportar el calor 16. generado por ciertos artefactos durante mucho tiempo. Le recomendamos colocar una base para el calor o posafuentes debajo de su producto OsterTM para evitar dañar la superfi cie.
18 19
PARA USO DOMÉSTICO SÓLAMENTEEste artefacto es para uso DOMÉSTICO ÚNICAMENTE. No posee partes reparables por el usuario en su interior. No intente reparar este producto. No sumerja la base en agua o ningún otro líquido.
Este artefacto tiene un enchufe polarizado (una de las patas es más ancha que la otra). Para reducir el riesgo de una descarga eléctrica, este enchufe entra de una sola forma en un tomacorriente polarizado. De no ser así, inviértalo, y si aún no entra, llame a un electricista califi cado.
NO INTENTE IGNORAR ESTA CARACTERÍSTICA DE SEGURIDAD.
USO DE UN CABLE DE EXTENSIÓN El aparato viene con un cable corto de suministro de potencia para reducir el riesgo que resulta de enredarse o tropezar con un cable más largo. Se puede usar un cable de extensión con precaución. Si se usa un cable de extensión, la califi cación eléctrica del cable debe ser al menos igual que la del aparato. El cable de extensión se debe acomodar de manera que no quede colgando sobre la superfi cie del mostrador o mesa donde los niños lo pueden halar o se puedan tropezar accidentalmente.
CONSERVE ESTAS INSTRUCCIONESGracias por comprar el Horno Asador OsterTM. Antes de usar este producto por primera vez, tómese un momento para leer estas instrucciones y consérvelas para referencia. Preste particular atención a las instrucciones de seguridad que se ofrecen. Revise la declaración de servicio y garantía del producto. Para conocer más acerca de los productos de OsterTM, visítenos en www.oster.com o llámenos al 1-800-334-0759.
CKSTRS18_23_10ESM1.indd Sec1:18-Sec1:19CKSTRS18_23_10ESM1.indd Sec1:18-Sec1:19 5/25/10 8:55:00 AM5/25/10 8:55:00 AM
www.oster.com www.oster.com20 21
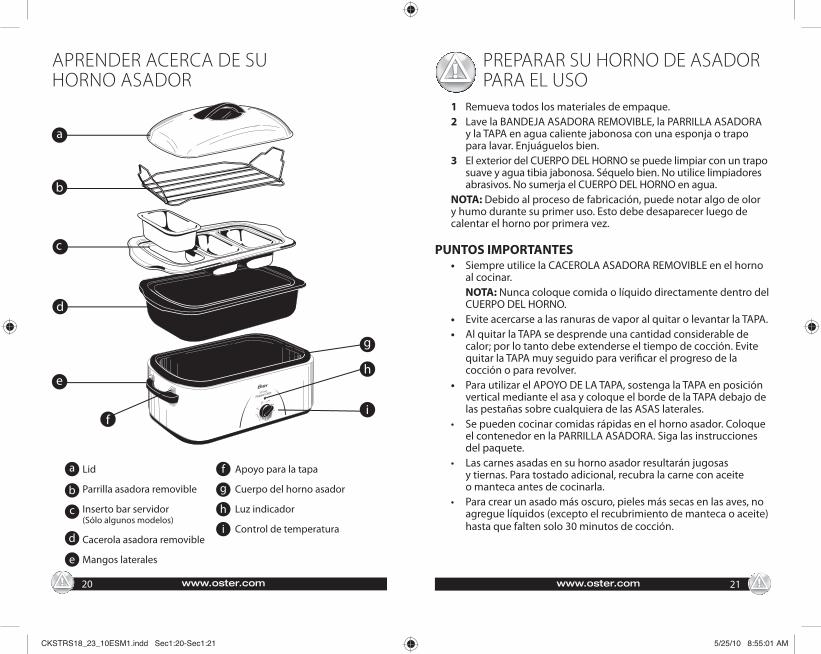
APRENDER ACERCA DE SU HORNO ASADOR
PREPARAR SU HORNO DE ASADOR PARA EL USO
1 Remueva todos los materiales de empaque.2 Lave la BANDEJA ASADORA REMOVIBLE, la PARRILLA ASADORA
y la TAPA en agua caliente jabonosa con una esponja o trapo para lavar. Enjuáguelos bien.
3 El exterior del CUERPO DEL HORNO se puede limpiar con un trapo suave y agua tibia jabonosa. Séquelo bien. No utilice limpiadores abrasivos. No sumerja el CUERPO DEL HORNO en agua.
NOTA: Debido al proceso de fabricación, puede notar algo de olor y humo durante su primer uso. Esto debe desaparecer luego de calentar el horno por primera vez.
PUNTOS IMPORTANTES• Siempre utilice la CACEROLA ASADORA REMOVIBLE en el horno
al cocinar. NOTA: Nunca coloque comida o líquido directamente dentro del CUERPO DEL HORNO.
• Evite acercarse a las ranuras de vapor al quitar o levantar la TAPA.• Al quitar la TAPA se desprende una cantidad considerable de
calor; por lo tanto debe extenderse el tiempo de cocción. Evite quitar la TAPA muy seguido para verifi car el progreso de la cocción o para revolver.
• Para utilizar el APOYO DE LA TAPA, sostenga la TAPA en posición vertical mediante el asa y coloque el borde de la TAPA debajo de las pestañas sobre cualquiera de las ASAS laterales.
• Se pueden cocinar comidas rápidas en el horno asador. Coloque el contenedor en la PARRILLA ASADORA. Siga las instrucciones del paquete.
• Las carnes asadas en su horno asador resultarán jugosas y tiernas. Para tostado adicional, recubra la carne con aceite o manteca antes de cocinarla.
• Para crear un asado más oscuro, pieles más secas en las aves, no agregue líquidos (excepto el recubrimiento de manteca o aceite) hasta que falten solo 30 minutos de cocción.
a
b
g
d
h
i
e
c
f
a Lid
Parrilla asadora removible
Inserto bar servidor(Sólo algunos modelos)
Cacerola asadora removible
Mangos laterales
Apoyo para la tapa
Cuerpo del horno asador
Luz indicador
Control de temperatura
b
c
d
f
g
h
i
e
CKSTRS18_23_10ESM1.indd Sec1:20-Sec1:21CKSTRS18_23_10ESM1.indd Sec1:20-Sec1:21 5/25/10 8:55:01 AM5/25/10 8:55:01 AM
www.oster.com www.oster.com22 23
4 Cubra con la TAPA y enchufe el Asador en un tomacorriente de 120 voltios. Precaliente a 350F por 30 minutos o hasta que el agua esté bien caliente.
5 Descubra y añada cuidadosamente la comida caliente y cocida dentro de las FUENTES PARA SERVIR.
6 Cubra y seleccione el CONTROL a 250F para mantener las comidas calientes. Si es necesario ajuste la temperatura.
7 Mueva ocasionalmente y mantenga la comida cubierta para mantener la temperatura.
8 Revise cada hora y añada más agua cuidadosamente si es necesario. PRECAUCIÓN: La temperatura de las comidas deben mantenerse a 150F o más.
• Todas las FUENTES PARA SERVIR deben estar en su lugar cuando use el BAR SERVIDOR
• Use solamente para mantener calientes las comidas cocidas • Las FUENTES PARA SERVIR y el MARCO no son adecuadas
para usarse en las hornillas de la cocina, o en un horno convencional o microondas.
• Cuando llene las FUENTES PARA SERVIR con comidas que se puedan pegar, rocíe el interior con un aceite antiadherente.
• Si la comida esta seca, añada caldo, jugo, agua o vino para ayudar a que se mantenga caliente.
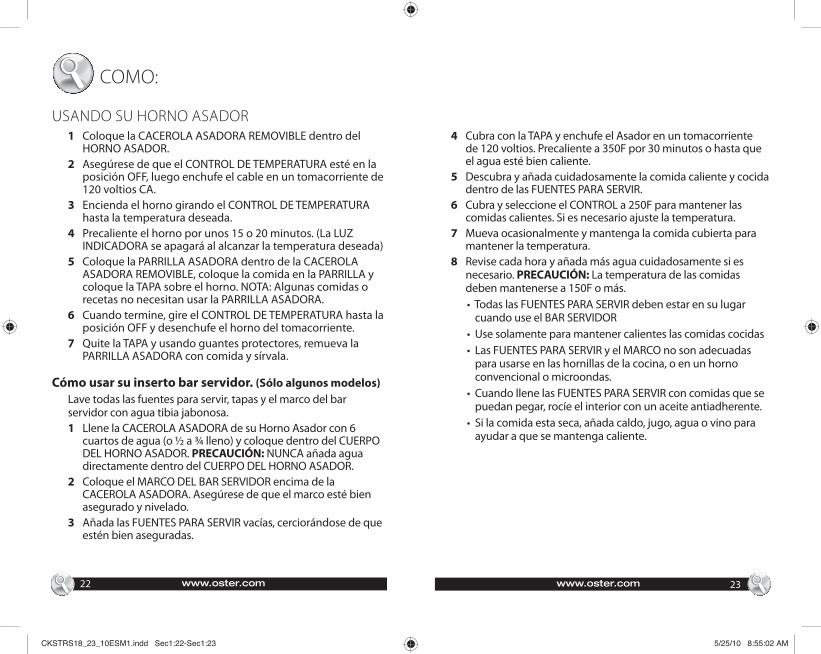
COMO:
USANDO SU HORNO ASADOR1 Coloque la CACEROLA ASADORA REMOVIBLE dentro del
HORNO ASADOR.2 Asegúrese de que el CONTROL DE TEMPERATURA esté en la
posición OFF, luego enchufe el cable en un tomacorriente de 120 voltios CA.
3 Encienda el horno girando el CONTROL DE TEMPERATURA hasta la temperatura deseada.
4 Precaliente el horno por unos 15 o 20 minutos. (La LUZ INDICADORA se apagará al alcanzar la temperatura deseada)
5 Coloque la PARRILLA ASADORA dentro de la CACEROLA ASADORA REMOVIBLE, coloque la comida en la PARRILLA y coloque la TAPA sobre el horno. NOTA: Algunas comidas o recetas no necesitan usar la PARRILLA ASADORA.
6 Cuando termine, gire el CONTROL DE TEMPERATURA hasta la posición OFF y desenchufe el horno del tomacorriente.
7 Quite la TAPA y usando guantes protectores, remueva la PARRILLA ASADORA con comida y sírvala.
Cómo usar su inserto bar servidor. (Sólo algunos modelos)Lave todas las fuentes para servir, tapas y el marco del bar servidor con agua tibia jabonosa.1 Llene la CACEROLA ASADORA de su Horno Asador con 6
cuartos de agua (o ½ a ¾ lleno) y coloque dentro del CUERPO DEL HORNO ASADOR. PRECAUCIÓN: NUNCA añada agua directamente dentro del CUERPO DEL HORNO ASADOR.
2 Coloque el MARCO DEL BAR SERVIDOR encima de la CACEROLA ASADORA. Asegúrese de que el marco esté bien asegurado y nivelado.
3 Añada las FUENTES PARA SERVIR vacías, cerciorándose de que estén bien aseguradas.
CKSTRS18_23_10ESM1.indd Sec1:22-Sec1:23CKSTRS18_23_10ESM1.indd Sec1:22-Sec1:23 5/25/10 8:55:02 AM5/25/10 8:55:02 AM
www.oster.com www.oster.com24 25
CUIDADO Y LIMPIEZA
Este aparato se debe limpiar después de cada uso.NOTA: No sumerja el CUERPO DEL HORNO en agua u otro líquido. No ponga la CACEROLA ASADORA REMOVIBLE en el lavavajillas.1 Gire el control de temperatura hasta la posición OFF.2 Desenchufe el horno del tomacorriente y deje que se enfríe.3 Permita que se enfríe completamente antes de limpiarlo.4 Lave la BANDEJA ASADORA REMOVIBLE, la PARRILLA
ASADORA y la TAPA en agua caliente jabonosa con una esponja o trapo para lavar. Enjuáguelos bien con agua caliente, luego séquelos con un repasador.
5 Repase el interior y exterior del CUERPO DEL HORNO con un trapo húmedo
Cómo limpiar el Inserto de Bar ServidorPRECAUCIÓN: EL BAR SERVIDOR está caliente. Manipule con cuidado.• Siempre deje enfriar por completo el BAR SERVIDOR antes
de limpiar.• las FUENTES PARA SERVIR, las TAPAS y el MARCO del BAR
SERVIDOR pueden lavarse en agua caliente jabonosa o en la lavadora de platos. Enjuague y seque completamente.
• las TAPAS de las FUENTES PARA SERVIR pueden lavarse en agua tibia jabonosa.
GUÍA DE COCINA
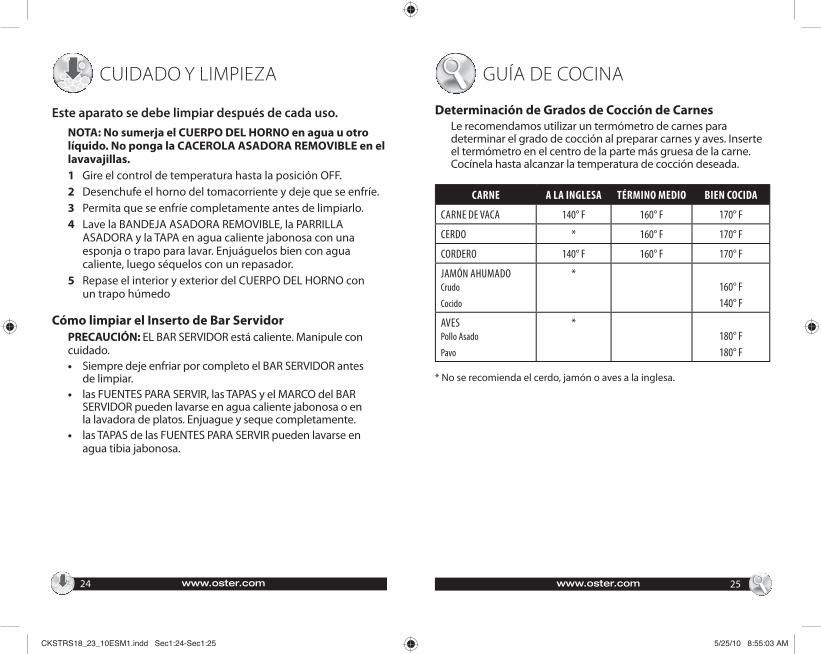
Determinación de Grados de Cocción de CarnesLe recomendamos utilizar un termómetro de carnes para determinar el grado de cocción al preparar carnes y aves. Inserte el termómetro en el centro de la parte más gruesa de la carne. Cocínela hasta alcanzar la temperatura de cocción deseada.
CARNE A LA INGLESA TÉRMINO MEDIO BIEN COCIDA
CARNE DE VACA 140° F 160° F 170° F
CERDO * 160° F 170° F
CORDERO 140° F 160° F 170° F
JAMÓN AHUMADOCrudo
Cocido
*160° F
140° F
AVESPollo Asado
Pavo
*180° F
180° F
* No se recomienda el cerdo, jamón o aves a la inglesa.
CKSTRS18_23_10ESM1.indd Sec1:24-Sec1:25CKSTRS18_23_10ESM1.indd Sec1:24-Sec1:25 5/25/10 8:55:03 AM5/25/10 8:55:03 AM
www.oster.com www.oster.com26 27
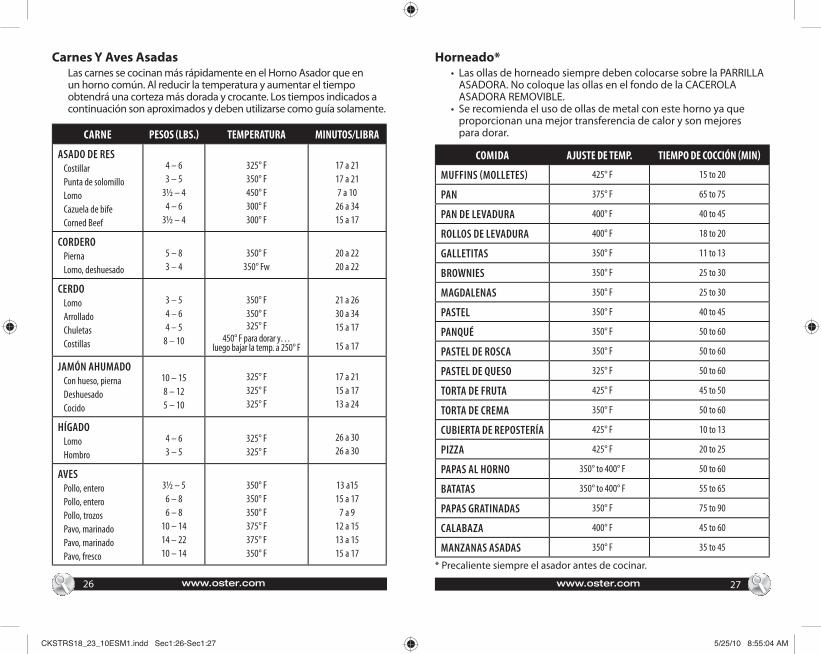
Carnes Y Aves AsadasLas carnes se cocinan más rápidamente en el Horno Asador que en un horno común. Al reducir la temperatura y aumentar el tiempo obtendrá una corteza más dorada y crocante. Los tiempos indicados a continuación son aproximados y deben utilizarse como guía solamente.
CARNE PESOS (LBS.) TEMPERATURA MINUTOS/LIBRA
ASADO DE RESCostillar
Punta de solomillo
Lomo
Cazuela de bife
Corned Beef
4 – 6
3 – 5
3½ – 4
4 – 6
3½ – 4
325° F
350° F
450° F
300° F
300° F
17 a 21
17 a 21
7 a 10
26 a 34
15 a 17
CORDEROPierna
Lomo, deshuesado
5 – 8
3 – 4
350° F
350° Fw
20 a 22
20 a 22
CERDOLomo
Arrollado
Chuletas
Costillas
3 – 5
4 – 6
4 – 5
8 – 10
350° F
350° F
325° F
450° F para dorar y…luego bajar la temp. a 250° F
21 a 26
30 a 34
15 a 17
15 a 17
JAMÓN AHUMADOCon hueso, pierna
Deshuesado
Cocido
10 – 15
8 – 12
5 – 10
325° F
325° F
325° F
17 a 21
15 a 17
13 a 24
HÍGADOLomo
Hombro
4 – 6
3 – 5
325° F
325° F
26 a 30
26 a 30
AVESPollo, entero
Pollo, entero
Pollo, trozos
Pavo, marinado
Pavo, marinado
Pavo, fresco
3½ – 5
6 – 8
6 – 8
10 – 14
14 – 22
10 – 14
350° F
350° F
350° F
375° F
375° F
350° F
13 a15
15 a 17
7 a 9
12 a 15
13 a 15
15 a 17
Horneado*• Las ollas de horneado siempre deben colocarse sobre la PARRILLA
ASADORA. No coloque las ollas en el fondo de la CACEROLA ASADORA REMOVIBLE.
• Se recomienda el uso de ollas de metal con este horno ya que proporcionan una mejor transferencia de calor y son mejorespara dorar.
COMIDA AJUSTE DE TEMP. TIEMPO DE COCCIÓN (MIN)
MUFFINS MOLLETES 425° F 15 to 20
PAN 375° F 65 to 75
PAN DE LEVADURA 400° F 40 to 45
ROLLOS DE LEVADURA 400° F 18 to 20
GALLETITAS 350° F 11 to 13
BROWNIES 350° F 25 to 30
MAGDALENAS 350° F 25 to 30
PASTEL 350° F 40 to 45
PANQUÉ 350° F 50 to 60
PASTEL DE ROSCA 350° F 50 to 60
PASTEL DE QUESO 325° F 50 to 60
TORTA DE FRUTA 425° F 45 to 50
TORTA DE CREMA 350° F 50 to 60
CUBIERTA DE REPOSTERÍA 425° F 10 to 13
PIZZA 425° F 20 to 25
PAPAS AL HORNO 350° to 400° F 50 to 60
BATATAS 350° to 400° F 55 to 65
PAPAS GRATINADAS 350° F 75 to 90
CALABAZA 400° F 45 to 60
MANZANAS ASADAS 350° F 35 to 45
* Precaliente siempre el asador antes de cocinar.
CKSTRS18_23_10ESM1.indd Sec1:26-Sec1:27CKSTRS18_23_10ESM1.indd Sec1:26-Sec1:27 5/25/10 8:55:04 AM5/25/10 8:55:04 AM
www.oster.com www.oster.com28 29
CHILI PARA UNA MULTITUD3 libras de frijoles pinto, 5 dientes de ajo, picados enjuagados y escurridos 2 chiles jalapeños, picados fi no1 lata (28 onzas) de tomates picados 3 cucharadas de comino10 lib. cuarto delantero picado, ¾ taza de ají en polvo cocido y escurrido 3 tazas de jugo de tomate12 tazas de agua 2 cebollas picadas2 pimientos verdes picados 3 latas (10 fi oz c/u) de sopa de tomates y ají
Precaliente el asador a 350ºF. Combine los primeros 8 ingredientes en el asador. Tápelos y cocínelos durante 2 fi horas. Agregue el resto de los ingredientes. Tápelos y cocínelos otros 30 minutos o 1 hora.
ALBÓNDIGAS5 libras de carne picada 1½ cucharaditas de sal1 taza de pan molido ½ cucharadita de pimienta a la italiana condimentado 5 huevos
Precaliente el asador con la cacerola colocada a 425ºF. Mezcle todos los ingredientes. Haga bolitas de 1 pulgada. Colóquelas en la cacerola. Tápelas, cocínelas durante 30-45 minutos o hasta que estén hechas. Mezcle ocasionalmente para que se doren en todos lados. Hace aproximadamente 75 albóndigas.
COSTILLAS CORTAS ASADAS A LA PIMIENTA6 - 9 libras de costillas cortas 15 dientes de ajo, picados¼ taza de pimienta 5 latas (14 ½-oz.) de caldo negra recién molida de carne 2 cucharaditas de sal 1 taza de vino tinto, opcional
Precaliente el asador a 450ºF. Frote todos los lados de las costillas con pimienta y ajo. Espolvoréelas con sal. Colóquelas en la cacerola y tápelas. Cocínelas por 15-30 minutos, dándolas vuelta para que se doren por todos lados. Vierta el caldo sobre las costillas. Tápelo, baje el calor a 300ºF y cocínelo hasta que estén tiernas, 2-2 fi horas.
RECIPES
POLLO ASADO AL LIMÓN Y AJO4 a 5-lb. de pollo 2 cucharadas de jugo de limón3 dientes de ajo, picados ½ cucharadita de pimienta 1 cucharadita de sal negra molida¼ taza de manteca, blanda
Enjuague el pollo en agua fría. Mezcle todos los ingredientes y frótelos sobre la piel y entre la piel y la carne del pollo Coloque la parrilla en la cacerola. Coloque el pollo en la parrilla y tápelo. Cocínelo a 350ºF por 1fi horas o hasta que esté cocido.
PAPAS AL HORNO8 a 12 papas
Lave las papas y pínchelas con un tenedor. Coloque la parrilla en la olla. Apile las papas sobre la parrilla asadora, asegurándose de que no toquen los lados de la cacerola. Tápelas y cocínelas a 400º F durante 1 - 1fi horas.
GUISO DE CARNE COMUNITARIO8 -lbs. carne para guiso 15 papas, peladas y 2 tazas de pan molido cortadas en cubitos2 cucharaditas de sal 2 cucharadas de albahaca ½ cucharadita de pimienta 2 tazas de tapioca 4 cebollas grandes de cocción rápida cortadas en trozitos 8 latas (4 onzas) de hongos4 libras de zanahorias bebé cortados, sin drenar8 tazas de caldo de carne 7 tallos de apio15 latas (10fi oz c/u) de sopa de tomates concentrada
Mezcle la carne con los trozos de pan molido, sal y pimienta. Coloque la carne en la cacerola y agregue los demás ingredientes; mezcle bien. Tápela y cocínela a 250º F durante 4 o 5 horas o hasta que la carne y las verduras estén tiernas.
CKSTRS18_23_10ESM1.indd Sec1:28-Sec1:29CKSTRS18_23_10ESM1.indd Sec1:28-Sec1:29 5/25/10 8:55:05 AM5/25/10 8:55:05 AM
www.oster.com www.oster.com30 31
SALSA PARA PASTA1 lata (48-oz.) de jugo de tomate 1⁄3 taza de hojas de albahaca4 latas (28-oz.) de tomates picados ¼ taza de hojas de orégano2 latas (12-oz.) de extracto de tomate 1 ½ cucharadas de perejil2 cucharadas de salsa inglesa 1 cucharada de tomillo6 tazas de agua 1 cucharada de sal5 dientes de ajo, picados 1 cucharadita de pimienta
Coloque el asador a 350ºF. Agregue todos los ingredientes en un tazón para horno, mezclando bien para que se combinen. Tápelo, cocínelo por 3-4 horas hasta que se espese, agregando las albóndigas durante la última hora o 1 ½ horas. Mezclar ocasionalmente.
CARNE ASADA PICANTE2 (2 ½ a 3-lb.) bifes ¼ taza de salsa de soya de aguja o cuadril 2 cucharadas de salsa inglesa2 - 3 cucharadas de pimienta 4 dientes de ajo, picados en grano molida ½ cucharadita de sal1 ½ cucharadita 3 cucharadas de mostaza en polvo de vinagre balsámico
Precaliente el asador a 350ºF. Haga varios cortes en la parte de arriba de la carne. Coloque la carne en la parrilla Coloque la parrilla en el asador. Mezcle el vinagre, salsa de soya, salsa inglesa y mostaza. Cepille la carne con el adobo Mezcle la pimienta molida con el ajo. Frótela sobre la carne. Espolvoréelas con sal. Tápelo, cocínelo por 20-25 minutos por libra o hasta que la carne se haga a su gusto.
ASADO DE CERDO4 - 5 lb. de lomo de cerdo ½ cucharadita de pimienta4 dientes de ajo, picados ½ taza de salsa italiana1 cucharadita de sal ¼ taza de salsa inglesa
Precaliente el asador a 350ºF. Coloque el lomo en la parrilla Presione el ajo picado sobre la superfi cie del lomo. Coloque la parrilla en el asador. Mezcle la salsa italiana e inglesa. Cepille el lomo con el adobo. Tápelo, cocínelo durante 2-2 fi horas o hasta que esté hecho.
FRIJOLES COCIDOS2 latas (7-lbs. c/u) ½ taza de salsa inglesa de cerdo y frijoles 2 cucharadas de mostaza en polvo1 ½ taza de melaza 1 libra de tocino, cocido hasta que 1 ¼ taza de ketchup esté crocante y cortado¾ taza de salsa BBQ
Mezcle los ingredientes en un tazón para horno y colóquelo en la cacerola. Tápelo y cocínelo a 300ºF por 2 horas o hasta que se haya calentado bien. Mezclar ocasionalmente.
CKSTRS18_23_10ESM1.indd Sec1:30-Sec1:31CKSTRS18_23_10ESM1.indd Sec1:30-Sec1:31 5/25/10 8:55:06 AM5/25/10 8:55:06 AM
www.oster.com www.oster.com
Garantía Limitada de 1 AñoSunbeam Products, Inc. operando bajo el nombre de Jarden Consumer Solutions, o en Canadá, Sunbeam Corporation (Canada) Limited operando bajo el nombre de Jarden Consumer Solutions, (en forma conjunta, “JCS”), garantiza que por un período de un año a partir de la fecha de compra, este producto estará libre de defectos de materiales y mano de obra. JCS, a su elección, reparará o reemplazará este producto o cualquier componente del mismo que presente defectos durante el período de garantía. El reemplazo se realizará por un producto o componente nuevo o reparado. Si el producto ya no estuviera disponible, se lo reemplazará por un producto similar de valor igual o superior. Ésta es su garantía exclusiva. No intente reparar o ajustar ninguna función eléctrica o mecánica de este producto. Al hacerlo elimínará ésta garantía.
La garantía es válida para el comprador minorista original a partir de la fecha de compra inicial y la misma no es transferible. Conserve el recibo de compra original. Para solicitar servicio en garantía se requiere presentar un recibo de compra. Los agentes y centros de servicio de JCS o las tiendas minoristas que venden productos de JCS no tienen derecho a alterar, modifi car ni cambiar de ningún otro modo los términos y las condiciones de esta garantía.
Esta garantía no cubre el desgaste normal de las piezas ni los daños que se produzcan como resultado de uso negligente o mal uso del producto, uso de voltaje incorrecto o corriente inapropiada, uso contrario a las instrucciones operativas, y desarme, reparación o alteración por parte de un tercero ajeno a JCS o a un Centro de Servicio autorizado por JCS. Asimismo, la garantía no cubre actos fortuitos tales como incendios, inundaciones, huracanes y tornados
¿Cuál es el límite de responsabilidad de JCS?
JCS no será responsable de daños incidentales o emergentes causados por el incumplimiento de alguna garantía o condición expresa, implícita o legal.
Excepto en la medida en que lo prohíba la ley aplicable, cualquier garantía o condición implícita de comerciabilidad o aptitud para un fi n determinado se limita, en cuanto a su duración, al plazo de la garantía antes mencionada.
JCS queda exenta de toda otra garantías, condiciones o manifestaciones, expresa, implícita, legal o de cualquier otra naturaleza.
32 33
JCS no será responsable de ningún tipo de daño que resulte de la compra, uso o mal uso del producto, o por la imposibilidad de usar el producto, incluidos los daños incidentales, especiales, emergentes o similares, o la pérdida de ganancias, ni de ningún incumplimiento contractual, sea de una obligación esencial o de otra naturaleza, ni de ningún reclamo iniciado contra el comprador por un tercero.
Algunas provincias, estados o jurisdicciones no permiten la exclusión o limitación de los daños incidentales o emergentes ni las limitaciones a la duración de las garantías implícitas, de modo que es posible que la exclusión o las limitaciones antes mencionadas no se apliquen en su caso.
Esta garantía le otorga derechos legales específi cos y es posible que usted tenga otros derechos que varían de un estado, provincia o jurisdicción a otro.
Cómo solicitar el servicio en garantía
En los Estados Unidos
Si tiene alguna pregunta sobre esta garantía o desea recibir servicio de garantía, llame al 1-800-334-0759 y podrá obtener la dirección del centro de servicio que le resulte más conveniente.
En Canadá
Si tiene alguna pregunta sobre esta garantía o desea recibir servicio de garantía, llame al 1-800-667-8623 y podrá obtener la dirección del centro de servicio que le resulte más conveniente.
En los Estados Unidos, esta garantía es ofrecida por Sunbeam Products, Inc. operando bajo el nombre de Jarden Consumer Solutions, Boca Ratón, Florida 33431. En Canadá, esta garantía es ofrecida por Sunbeam Corporation (Canada) Limited operando bajo el nombre de Jarden Consumer Solutions, 20 B Hereford Street, Brampton, Ontario L6Y 0M1. Si usted tiene otro problema o reclamo en conexión con este producto, por favor escriba al Departamento de Servicio al Consumidor.
POR FAVOR NO DEVUELVA ESTE PRODUCTO A NINGUNA DE ESTAS DIRECCIONES NI AL LUGAR DE COMPRA.
CKSTRS18_23_10ESM1.indd Sec1:32-Sec1:33CKSTRS18_23_10ESM1.indd Sec1:32-Sec1:33 5/25/10 8:55:07 AM5/25/10 8:55:07 AM
www.oster.com www.oster.com
NOTAS NOTES
CKSTRS18_23_10ESM1.indd Sec1:34-Sec1:35CKSTRS18_23_10ESM1.indd Sec1:34-Sec1:35 5/25/10 8:55:08 AM5/25/10 8:55:08 AM