RMX 1800 - Polycom
115
Version 8.3 Incremental | May 2014 | DOC2739B Release Notes RealPresence Collaboration Server RMX 1500 / 1800 / 2000 / 4000
Transcript of RMX 1800 - Polycom

Version 8.3 Incremental | May 2014 | DOC2739B
Release Notes
RealPresence Collaboration Server RMX 1500 / 1800 / 2000 / 4000

© 2014 Polycom, Inc. All rights reserved.
Polycom, Inc. 6001 America Center Drive San Jose CA 95002 USA
No part of this document may be reproduced or transmitted in any form or by any means, electronic or mechanical, for any purpose, without the express written permission of Polycom, Inc. Under the law, reproducing includes translating into another language or format.
As between the parties, Polycom, Inc., retains title to and ownership of all proprietary rights with respect to the software contained within its products. The software is protected by United States copyright laws and international treaty provision. Therefore, you must treat the software like any other copyrighted material (e.g., a book or sound recording).
Every effort has been made to ensure that the information in this manual is accurate. Polycom, Inc., is not responsible for printing or clerical errors. Information in this document is subject to change without notice.
i
Trademark Information POLYCOM® and the names and marks associated with Polycom's products are trademarks and/or service marks of Polycom, Inc., and are registered and/or common law marks in the United States and various other countries.
All other trademarks are the property of their respective owners.
Patent Information The accompanying product may be protected by one or more U.S. and foreign patents and/or pending patent applications held by Polycom, Inc.
This document provides the latest information for security-conscious users running Version 8.3 software.The information in this document is not intended to imply that DoD or DISA certifies Polycom RMX systems.
End User License Agreement
Use of this software constitutes acceptance of the terms and conditions of the Polycom® RealPresence® Collaboration Server (RMX) 1500/1800/2000/4000 system end-user license agreements (EULA).
The EULA for your version is available on the Polycom Support page for the Polycom® RealPresence® Collaboration Server (RMX®) 1500/1800/2000/4000 system.
This software has not achieved UC APL certification.

RMX Release Notes Version 8.3
Polycom, Inc. ii
Regulatory Notices
Warning
Warning
• No user-serviceable parts inside. Do not open.
• The plug-socket combination must be accessible at all times, because it serves as the main disconnecting device
• This equipment must be earthed. Do not power this equipment if the integrity of themains earthing conductor cannot be verified
• Only trained and qualified personnel should be allowed to install, replace, service or repair this equipment
• To prevent system overheating do not operate in an ambient temperature exceeding 40° C / 104° F
• Installation of this equipment must comply with local and national electrical codes.
Environmental
This product is compliant with the requirements of the recast RoHS Directive 2011/65/EU. Information can be obtained from Polycom Ltd, 270 Bath Road, Slough, Berkshire, SL1 4DX, UK or via: [email protected]
Information on recycling can be found at: www.polycom.com/WEEE
Disposal of this equipment should be carried out in accordance with local environmental guidelines and regulations for waste. For further information please contact: [email protected]
Batteries
Below is a listing of batteries that could be present in the product:
Description:Internal CMOS battery
Type:CR2032 Lithium Coin Cell
Weight:3.3g
Batteries used in this product are in compliance with EU Battery Directive 2006/66/EC.
Batteries in this product are not based on mercury, lead or cadmium technologies.
Batteries in this product are not intended to be replaced or removed by the user
Additional information on the safe use and recycling of batteries can be found at: www.polycom.com/batteries

RMX Release Notes Version 8.3
Polycom, Inc. iii
United States Federal Communication Commission (FCC)
This equipment has been tested and found to comply with the limits for a Class A digital device, pursuant to Part 15 of the FCC Rules. These limits are designed to provide reasonable protection against harmful interference when the equipment is operated in a commercial environment. This equipment generates, uses, and can radiate radio frequency energy and, if not installed and used in accordance with the instruction manual, may cause harmful interference to radio communications. Operation of this equipment in a residential area is likely to cause harmful interference in which case the user will be required to correct the interference at his own expense.
This device complies with Part 15 of the FCC Rules. Operation is subject to the following two conditions:
1. This device may not cause harmful interference.
2. This device must accept any interference received, including interference that may cause undesired operation.
Modifications: Any modifications made to this device that are not approved by Polycom, Inc. may void the authority granted to the user by the FCC to operate this equipment.
Industry Canada (IC)
This Class [A] digital apparatus complies with Canadian ICES-003
Cet appareil numerique de la classe [A] est conforme a la norme NMB-003 du Canada
European Economic Area (EEA)
Česky [Czech]: Polycom (UK) Ltd tímto prohlašuje, že tento Polycom RMX je ve shodě se základními požadavky a dalšími příslušnými ustanoveními směrnice 1999/5/ES.
Dansk [Danish]: Undertegnede Polycom (UK) Ltd erklærer herved, at følgende udstyr Polycom RMX overholder de væsentlige krav og øvrige relevante krav i direktiv 1999/5/EF.
Deutsch [German]: Hiermit erklärt Polycom (UK) Ltd, dass sich das Gerät Polycom RMX in Übereinstimmung mit den grundlegenden Anforderungen und den übrigen einschlägigen Bestimmungen der Richtlinie 1999/5/EG befindet.
Eesti [Estonian]: Käesolevaga kinnitab Polycom (UK) Ltd seadme Polycom RMX vastavust direktiivi 1999/5/EÜ põhinõuetele ja nimetatud direktiivist tulenevatele teistele asjakohastele sätetele.
English: Hereby, Polycom (UK) Ltd. Declares that this Polycom RMX is in compliance with the essential requirements and other relevant provisions of Directive 1999/5/EC.
Español [Spanish]: Por medio de la presente Polycom (UK) Ltd declara que el Polycom RMX cumple con los requisitos esenciales y cualesquiera otras disposiciones aplicables o exigibles de la Directiva 1999/5/CE.
Ελληνική [Greek]: ΜΕ ΤΗΝ ΠΑΡΟΥΣΑ Polycom (UK) Ltd ∆ΗΛΩΝΕΙ ΟΤΙ Polycom RMX ΣΥΜΜΟΡΦΩΝΕΤΑΙ ΠΡΟΣ ΤΙΣ ΟΥΣΙΩ∆ΕΙΣ ΑΠΑΙΤΗΣΕΙΣ ΚΑΙ ΤΙΣ ΛΟΙΠΕΣ ΣΧΕΤΙΚΕΣ ∆ΙΑΤΑΞΕΙΣ ΤΗΣ Ο∆ΗΓΙΑΣ 1999/5/ΕΚ.
Français [French]: Par la présente Polycom (UK) Ltd déclare que l’appareil Polycom RMX est conforme aux exigences essentielles et aux autres dispositions pertinentes de la directive 1999/5/CE.

RMX Release Notes Version 8.3
Polycom, Inc. iv
Italiano [Italian]: Con la presente Polycom (UK) Ltd dichiara che questo Polycom RMX è conforme ai requisiti essenziali ed alle altre disposizioni pertinenti stabilite dalla direttiva 1999/5/CE.
Íslenska (Icelandic): Hér með lýsir Polycom (UK) Ltd yfir því að Polycom RMX er í samræmi við grunnkröfur og aðrar kröfur, sem gerðar eru í tilskipun 1999/5/EC
Latviski [Latvian]: Ar šo Polycom (UK) Ltd deklarē, ka Polycom RMX atbilst Direktīvas 1999/5/EK būtiskajām prasībām un citiem ar to saistītajiem noteikumiem.
Lietuvių [Lithuanian]: Šiuo Polycom (UK) Ltd deklaruoja, kad šis Polycom RMX atitinka esminius reikalavimus ir kitas 1999/5/EB Direktyvos nuostatas.
Nederlands [Dutch]: Hierbij verklaart Polycom (UK) Ltd dat het toestel Polycom RMX in overeenstemming is met de essentiële eisen en de andere relevante bepalingen van richtlijn 1999/5/EG.
Malti [Maltese]: Hawnhekk, Polycom (UK) Ltd, jiddikjara li dan Polycom RMX jikkonforma mal-ħtiġijiet essenzjali u ma provvedimenti oħrajn relevanti li hemm fid-Dirrettiva 1999/5/EC.
Magyar [Hungarian]: Alulírott, Polycom (UK) Ltd nyilatkozom, hogy a Polycom RMX megfelel a vonatkozó alapvetõ követelményeknek és az 1999/5/EC irányelv egyéb elõírásainak.
Norsk [Norwegian]: Polycom (UK) Ltd erklærer herved at utstyret Polycom RMX er i samsvar med de grunnleggende krav og øvrige relevante krav i direktiv 1999/5/EF.
Polski [Polish]: Niniejszym Polycom (UK) Ltd oświadcza, że Polycom RMX jest zgodne z zasadniczymi wymaganiami oraz innymi stosownymi postanowieniami Dyrektywy 1999/5/WE.
Português [Portuguese]: Polycom (UK) Ltd declara que este Polycom RMX está conforme com os requisitos essenciais e outras disposições da Directiva 1999/5/CE.
Slovensko [Slovenian]: Polycom (UK) Ltd týmto vyhlasuje, že Polycom RMX spĺňa základné požiadavky a všetky príslušné ustanovenia Smernice 1999/5/ES.
Slovensky [Slovak]: Polycom (UK) Ltd týmto vyhlasuje, že Polycom RMX spĺňa základné požiadavky a všetky príslušné ustanovenia Smernice 1999/5/ES.
Suomi [Finnish]: Polycom (UK) Ltd vakuuttaa täten että Polycom RMX tyyppinen laite on direktiivin 1999/5/EY oleellisten vaatimusten ja sitä koskevien direktiivin muiden ehtojen mukainen.
Svenska [Swedish]: Härmed intygar Polycom (UK) Ltd att denna Polycom RMX står I överensstämmelse med de väsentliga egenskapskrav och övriga relevanta bestämmelser som framgår av direktiv 1999/5/EG.
A full copy of the Declaration of Conformity can be obtained from Polycom Ltd, 270 Bath Road, Slough, Berkshire, SL1 4DX, UK.
European Economic Area (EEA)

RMX Release Notes Version 8.3
Polycom, Inc. v
Taiwan BSMI EMC statement
Japan VCCI EMC statement
This is a Class A product based on the standard of the Voluntary Control Council for Interference by Information Technology Equipment (VCCI). If this equipment is used in a domestic environment, radio disturbance may arise. When such trouble occurs, the user may be required to take corrective actions.
Worldwide EMC statement
This is a class A product. In a domestic environment this product may cause radio interference in which case the user may be required to take adequate measures.
Optional ISDN interface card
If the above is fitted to the system then the following statements also apply;
United States Federal Communication Commission (FCC)
This equipment complies with Part 68 of the FCC rules and the requirements adopted by the ACTA. On the ISDN card itself is a label that contains, among other information, a product identifier in the format US:AAAEQ##TXXXX. If requested, this number must be provided to the telephone company.
The following USOC, FIC and SOC codes are applicable to this equipment;
USOC Jacks: RJ48S
Service Order Code: 6.0N
Facility Interface Code: 04DU9.DN, 04DU9.BN, 04DU9.1KN, 04DU9.1SN
If this equipment causes harm to the telephone network, the telephone company will notify you in advance that temporary discontinuance of service may be required. But if advance notice isn't practical, the telephone company will notify the customer as soon as possible. Also, you will be advised of your right to file a complaint with the FCC if you believe it is necessary.
The telephone company may make changes in its facilities, equipment, operations or procedures that could affect the operation of the equipment. If this happens the telephone company will provide advance notice in order for you to make necessary modifications to maintain uninterrupted service.
If trouble is experienced with this equipment, for repair or warranty information, please contact Polycom Inc in the U.S.A. 1-888-248-8294. If the equipment is causing harm to the telephone network, the telephone company may request that you disconnect the equipment until the problem is resolved.
Connection to party line service is subject to state tariffs. Contact the state public utility commission, public service commission or corporation commission for information.
Polycom, Inc. i
Contents
New Hardware - RMX 1800 . . . . . . . . . . . . . . . . . . . . . . . . . . . . . . . . . . . . . . . . . . . . 1
New Hardware - MPMRx Media Card . . . . . . . . . . . . . . . . . . . . . . . . . . . . . . . . . . . . 2Front Panel & LEDs . . . . . . . . . . . . . . . . . . . . . . . . . . . . . . . . . . . . . . . . . . . . . . . . . . . . . . . . . . 3
NEW RTM LAN - with 4 LAN Ports . . . . . . . . . . . . . . . . . . . . . . . . . . . . . . . . . . . . . . . . . . . . . . 3
RTM LAN - 4 LAN Ports LEDs . . . . . . . . . . . . . . . . . . . . . . . . . . . . . . . . . . . . . . . . . . . . . . . . . 4
New Control (CNTL) Units for RMX 2000/4000 . . . . . . . . . . . . . . . . . . . . . . . . . . . . . . . . . . . . . 4
New Power Supply for RMX 2000 . . . . . . . . . . . . . . . . . . . . . . . . . . . . . . . . . . . . . . . . . . . . . . . 5
New Features List . . . . . . . . . . . . . . . . . . . . . . . . . . . . . . . . . . . . . . . . . . . . . . . . . . . 6
Changes to Existing Features . . . . . . . . . . . . . . . . . . . . . . . . . . . . . . . . . . . . . . . . . 7
Interoperability Table . . . . . . . . . . . . . . . . . . . . . . . . . . . . . . . . . . . . . . . . . . . . . . . . 9Devices . . . . . . . . . . . . . . . . . . . . . . . . . . . . . . . . . . . . . . . . . . . . . . . . . . . . . . . . . . . . . . . . . . . 9
Polycom Solution Support . . . . . . . . . . . . . . . . . . . . . . . . . . . . . . . . . . . . . . . . . . . 13
Collaboration Server (RMX) Web Client . . . . . . . . . . . . . . . . . . . . . . . . . . . . . . . . 14
Windows 7™ Security Settings . . . . . . . . . . . . . . . . . . . . . . . . . . . . . . . . . . . . . . . 15
Internet Explorer 8 Configuration . . . . . . . . . . . . . . . . . . . . . . . . . . . . . . . . . . . . . 17
Upgrade Package Contents . . . . . . . . . . . . . . . . . . . . . . . . . . . . . . . . . . . . . . . . . . 20Where to Get the Latest Product Information . . . . . . . . . . . . . . . . . . . . . . . . . . . . . . . . . . . . . 21
RMX 1500/2000/4000 Software Upgrade Procedures . . . . . . . . . . . . . . . . . . . . . 22Upgrade Guidelines . . . . . . . . . . . . . . . . . . . . . . . . . . . . . . . . . . . . . . . . . . . . . . . . . . . . . . . . . 22
Safe Upgrade Paths to Version 8.3 . . . . . . . . . . . . . . . . . . . . . . . . . . . . . . . . . . . . . . . . . . 23
Preparing for the Upgrade . . . . . . . . . . . . . . . . . . . . . . . . . . . . . . . . . . . . . . . . . . . . . . . . . 25
Upgrading from Version 7.0.1 / 7.0.2 / 7.0.3 / 7.1 / 7.2 / 7.2.1/ 7.2.2 / 7.5.0J/7.5.1J/7.6/7.6.1/7.7/7.8/8.1 to Version 8.3. . . . . . . . . . . . . . . . . . . . . . . . . . . . . . . . . . . 27

Doc Title in Header
Polycom, Inc. ii
Upgrading from Version 7.0 to Version 8.3 . . . . . . . . . . . . . . . . . . . . . . . . . . . . . . . . . . . . . . . 29
Upgrading from Version 7.0 to Version 7.0.3 . . . . . . . . . . . . . . . . . . . . . . . . . . . . . . . . . . . . . 29
Upgrade from Version 7.0.3 to Version 8.3 . . . . . . . . . . . . . . . . . . . . . . . . . . . . . . . . . . . . . . . 30
Upgrading from Version 6.0.2 to Version 8.3 . . . . . . . . . . . . . . . . . . . . . . . . . . . . . . . . . . . . . 30
Intermediate Upgrade from Version 6.0.2 to Version 7.0.3 . . . . . . . . . . . . . . . . . . . . . . . . 30
Upgrade from Version 7.0.3 to Version 8.3 . . . . . . . . . . . . . . . . . . . . . . . . . . . . . . . . . . . . . . . 31
Upgrading from Versions 6.0/6.0.1 to Version 8.3 . . . . . . . . . . . . . . . . . . . . . . . . . . . . . . . . . . 31
Intermediate Upgrade from Version 6.0/6.0.1 to Version 6.0.2 . . . . . . . . . . . . . . . . . . . . . 31
Intermediate Upgrade from Version 6.0.2 to Version 7.0.3 . . . . . . . . . . . . . . . . . . . . . . . . 32
Upgrade from Version 7.0.3 to Version 8.3 . . . . . . . . . . . . . . . . . . . . . . . . . . . . . . . . . . . . . . . 33
Upgrading from Version 5.0.2 to Version 8.3 . . . . . . . . . . . . . . . . . . . . . . . . . . . . . . . . . . . . . 33
Intermediate Upgrade from Version 5.0.2 to Version 7.0.3 . . . . . . . . . . . . . . . . . . . . . . . . 33
Upgrade from Version 7.0.3 to Version 8.3 . . . . . . . . . . . . . . . . . . . . . . . . . . . . . . . . . . . . . . . 34
Upgrading from Versions 5.0/5.0.1 to Version 8.3 . . . . . . . . . . . . . . . . . . . . . . . . . . . . . . . . . . 34
Intermediate Upgrade from Version 5.0/5.0.1 to Version 5.0.2 . . . . . . . . . . . . . . . . . . . . . 34
Intermediate Upgrade from Version 5.0.2 to Version 7.0.3 . . . . . . . . . . . . . . . . . . . . . . . . 34
Upgrade from Version 7.0.3 to Version 8.3 . . . . . . . . . . . . . . . . . . . . . . . . . . . . . . . . . . . . . . . 35
Additional/Optional System Updates After Upgrading . . . . . . . . . . . . . . . . . . . . 36IVR Services Update . . . . . . . . . . . . . . . . . . . . . . . . . . . . . . . . . . . . . . . . . . . . . . . . . . . . . . . . 36
Gathering Settings . . . . . . . . . . . . . . . . . . . . . . . . . . . . . . . . . . . . . . . . . . . . . . . . . . . . . . . . . . 37
SIP Registration . . . . . . . . . . . . . . . . . . . . . . . . . . . . . . . . . . . . . . . . . . . . . . . . . . . . . . . . . . . . 38
Media Encryption . . . . . . . . . . . . . . . . . . . . . . . . . . . . . . . . . . . . . . . . . . . . . . . . . . . . . . . . . . . 39
Automatic Muting of Noisy AVC-based Endpoints . . . . . . . . . . . . . . . . . . . . . . . . . . . . . . . . . 39
RealPresence DMA system Compatibility . . . . . . . . . . . . . . . . . . . . . . . . . . . . . . . . . . . . . . . . 40
Upgrading the RMX Manager Application . . . . . . . . . . . . . . . . . . . . . . . . . . . . . . 41
Upgrading the RMX 2000/4000 Hardware to MPMRx . . . . . . . . . . . . . . . . . . . . . . 43
Detailed Description - New Features . . . . . . . . . . . . . . . . . . . . . . . . . . . . . . . . . . . 44RMX 1800 Overview . . . . . . . . . . . . . . . . . . . . . . . . . . . . . . . . . . . . . . . . . . . . . . . . . . . . . . . . 44
RMX 1800 Feature Changes and Additions . . . . . . . . . . . . . . . . . . . . . . . . . . . . . . . . . . . 45
Resource Capacity . . . . . . . . . . . . . . . . . . . . . . . . . . . . . . . . . . . . . . . . . . . . . . . . . . . 46
Hardware Monitor . . . . . . . . . . . . . . . . . . . . . . . . . . . . . . . . . . . . . . . . . . . . . . . . . . . . 49
Initial Setup Utility . . . . . . . . . . . . . . . . . . . . . . . . . . . . . . . . . . . . . . . . . . . . . . . . . . . . 49
RMX 1800 Name in the Banner . . . . . . . . . . . . . . . . . . . . . . . . . . . . . . . . . . . . . . . . . 50
Network Connectivity . . . . . . . . . . . . . . . . . . . . . . . . . . . . . . . . . . . . . . . . . . . . . . . . . 50
Fast Configuration Wizard . . . . . . . . . . . . . . . . . . . . . . . . . . . . . . . . . . . . . . . . . . . . . 51
New Features in Version 8.3 . . . . . . . . . . . . . . . . . . . . . . . . . . . . . . . . . . . . . . . . . . . . . . . 51
MPMRx Overview . . . . . . . . . . . . . . . . . . . . . . . . . . . . . . . . . . . . . . . . . . . . . . . . . . . . . . . . . . 55

Doc Title in Header
Polycom, Inc. iii
MPMRx Guidelines . . . . . . . . . . . . . . . . . . . . . . . . . . . . . . . . . . . . . . . . . . . . . . . . . . . . . . 55
MPMRx Conferencing Capacities . . . . . . . . . . . . . . . . . . . . . . . . . . . . . . . . . . . . . . . . . . . 55
MPMRx System Mode . . . . . . . . . . . . . . . . . . . . . . . . . . . . . . . . . . . . . . . . . . . . . . . . . . . 57
Operating Mode Selection During Startup / Restart . . . . . . . . . . . . . . . . . . . . . . . . . . 57
MPMRx Resolutions . . . . . . . . . . . . . . . . . . . . . . . . . . . . . . . . . . . . . . . . . . . . . . . . . . 57
Resolution Configuration . . . . . . . . . . . . . . . . . . . . . . . . . . . . . . . . . . . . . . . . . . . . . . . . . . 58
RMX 2000/ RMX 4000 MPMRx Resource Capacities . . . . . . . . . . . . . . . . . . . . . . . . . . . 58
RMX 2000/ RMX 4000 Resource Capacities in Video Switching (VSW) Conferences 58
MPMRx Resource Capacities in Non-Mixed CP and SVC Conferences . . . . . . . . . . 59
MPMRx Resource Capacities in CP and SVC Mixed Conferences . . . . . . . . . . . . . . 60
Total Resource Capacities per MPMRx-D Card in CP & SVC Conferences . . . . . . . 61
Total Resource Capacities per MPMRx-S Card in CP & SVC Conferences . . . . . . . 62
System Information Change . . . . . . . . . . . . . . . . . . . . . . . . . . . . . . . . . . . . . . . . . . . . 63
Switching to the MPMRx Configuration Mode . . . . . . . . . . . . . . . . . . . . . . . . . . . . . . 63
New MPMRx Flag . . . . . . . . . . . . . . . . . . . . . . . . . . . . . . . . . . . . . . . . . . . . . . . . . . . . . . . 65
MPMRx Hardware Monitoring . . . . . . . . . . . . . . . . . . . . . . . . . . . . . . . . . . . . . . . . . . . . . . 65
MPMRx Properties . . . . . . . . . . . . . . . . . . . . . . . . . . . . . . . . . . . . . . . . . . . . . . . . . . . 65
MPMRx Hardware Diagnostics . . . . . . . . . . . . . . . . . . . . . . . . . . . . . . . . . . . . . . . . . . 67
MPMRx Resource Report . . . . . . . . . . . . . . . . . . . . . . . . . . . . . . . . . . . . . . . . . . . . . . . . . 67
Port Gauge Change . . . . . . . . . . . . . . . . . . . . . . . . . . . . . . . . . . . . . . . . . . . . . . . . . . . . . 67
Video/Voice Port Configuration Change . . . . . . . . . . . . . . . . . . . . . . . . . . . . . . . . . . . . . . 67
Gateway Calls to Remote SIP Domain . . . . . . . . . . . . . . . . . . . . . . . . . . . . . . . . . . . . . . . . . . 69
Guidelines . . . . . . . . . . . . . . . . . . . . . . . . . . . . . . . . . . . . . . . . . . . . . . . . . . . . . . . . . . . . . 69
Calling a SIP Endpoint in a Remote Domain . . . . . . . . . . . . . . . . . . . . . . . . . . . . . . . . . . 69
Limitation . . . . . . . . . . . . . . . . . . . . . . . . . . . . . . . . . . . . . . . . . . . . . . . . . . . . . . . . . . . . . . 69
Changes to Existing Features . . . . . . . . . . . . . . . . . . . . . . . . . . . . . . . . . . . . . . . . 70HD1080p60 Symmetric Resolution Support . . . . . . . . . . . . . . . . . . . . . . . . . . . . . . . . . . . . . . 70
Guidelines for Using HD1080p60 Video Resolution Symmetrically . . . . . . . . . . . . . . . . . 70
Selecting HD1080p60 Symmetric Video Resolution . . . . . . . . . . . . . . . . . . . . . . . . . . . . . 72
HD1080p30 and HD1080p60 Content Support . . . . . . . . . . . . . . . . . . . . . . . . . . . . . . . . . . . . 73
HD1080p30 and HD1080p60 Content Support Guidelines . . . . . . . . . . . . . . . . . . . . . . . . 73
Sharing Base and High Profile Content with HD1080p30/60 Resolution . . . . . . . . . . . . . 73
Changes to the Video Quality Dialog Box . . . . . . . . . . . . . . . . . . . . . . . . . . . . . . . . . . . . . 74
Corrections and Known Limitations . . . . . . . . . . . . . . . . . . . . . . . . . . . . . . . . . . . 80Corrections Between Version 8.3 and Version 8.3 Inc . . . . . . . . . . . . . . . . . . . . . . . . . . . . . . 80
OpenSSL 'Heartbleed' Vulnerability . . . . . . . . . . . . . . . . . . . . . . . . . . . . . . . . . . . . . . . . . 80
Purpose . . . . . . . . . . . . . . . . . . . . . . . . . . . . . . . . . . . . . . . . . . . . . . . . . . . . . . . . . . . 80
Prerequisites and Configuration Considerations . . . . . . . . . . . . . . . . . . . . . . . . . . . . 80

Doc Title in Header
Polycom, Inc. iv
Installation Notes . . . . . . . . . . . . . . . . . . . . . . . . . . . . . . . . . . . . . . . . . . . . . . . . . . . . 80
Rollback Considerations . . . . . . . . . . . . . . . . . . . . . . . . . . . . . . . . . . . . . . . . . . . . . . . 80
Resolved Issues . . . . . . . . . . . . . . . . . . . . . . . . . . . . . . . . . . . . . . . . . . . . . . . . . . . . . 81
Version 8.3 Inc Known Limitations . . . . . . . . . . . . . . . . . . . . . . . . . . . . . . . . . . . . . . . . . . . . . 84
Troubleshooting Instructions . . . . . . . . . . . . . . . . . . . . . . . . . . . . . . . . . . . . . . . . 95Collaboration Server Web Client Installation - Troubleshooting Instructions . . . . . . . . . . . . . . 95
Procedure 1: Ending all Internet Explorer Sessions . . . . . . . . . . . . . . . . . . . . . . . . . . . . . 96
Procedure 2: Deleting the Temporary Internet Files, RMX Cookie and RMX Object . . . . 96
Deleting the Temporary Internet Files . . . . . . . . . . . . . . . . . . . . . . . . . . . . . . . . . . . . 97
Deleting the RMX/Collaboration Server Cookie . . . . . . . . . . . . . . . . . . . . . . . . . . . . . 99
Deleting the RMX/Collaboration Server ActiveX Object . . . . . . . . . . . . . . . . . . . . . . 101
Procedure 3: Managing Add-ons Collisions . . . . . . . . . . . . . . . . . . . . . . . . . . . . . . . . . . 102
Procedure 4: Add the Collaboration Server to the Internet Explorer Trusted Sites List . 103
Procedure 5: Browser Hosting Controls (Optional) . . . . . . . . . . . . . . . . . . . . . . . . . . . . . 104

RMX Release Notes Version 8.3 Inc New Hardware - RMX 1800
Polycom, Inc. 1
New Hardware - RMX 1800
The Polycom RealPresence Collaboration Server (RMX) 1800 system is the latest Multipoint Control Unit (MCU) in the RMX family. The RMX 1800 system is a high performance, scalable, IP-network (H.323 and Session Initiation Protocol [SIP]) MCU that provides feature-rich and easy-to-use multipoint voice and video conferencing.

RMX Release Notes Version 8.3 Inc New Hardware - MPMRx Media Card
Polycom, Inc. 2
New Hardware - MPMRx Media Card
RMX Version 8.3.1 supports the latest MPMRx (Media Processing Module) card which increases the RMX’s capacity and capabilities.
The new MPMRx card (Media Processing Module) when installed in RMX running version 8.3 offers:
Increased resource capacity
New Symmetric HD1080p60 fps video resolution
Two types of MPMRx card with different port capacities are available:
MPMx-D (double mezzanine)
MPMx-S (single mezzanine)
For more information on MPMRX card capacities, see The MPMRx card is supported from version 8.3 and above. When this card is installed on any RMX 2000/4000 MCU, software version downgrades are not supported. Mixed modes with other MPM/MPM+/MPMx cards installed on the system are not supported.
MPMRx-D Card
MPMRx-S Card
When MPMRx card is installed, the RMX operates in MPMRx Mode giving the administrator enhanced control and monitoring of Resource Capacity and usage within the system.
Two upgrade kits are provided for the RMX platform:
RMX 2000 - VRMX2000RXUP: this kit includes a new power supply, new control (CNTL 2000) unit and two RTM LAN cards
MPMRx cards are supported only with software version 8.3 and above
RMX2000 systems requires chassis of the type D or E.
RMX2000 systems with MPMRx cards require a new power supply, new control (CNTL 2000) unit and two new RTM LAN cards.
RMX4000 systems with MPMRx cards are supported only with new control (CNTL 4000) unit.

RMX Release Notes Version 8.3 Inc New Hardware - MPMRx Media Card
Polycom, Inc. 3
RMX 4000 - VRMX4000RXUP: this kit includes the new control (CNTL 4000) unit
The following table lists the changes in version 8.3 to support the new MPMRx card:
Front Panel & LEDsIn terms of Look and Feel and LED functionality, the MPMRx front panel is identical to that of the MPMx.
NEW RTM LAN - with 4 LAN PortsThe RTM LAN card routes data between the MPMRx cards and components of the system, and sends media by IP packets and provides connectivity to external IP networks.
The RTM LAN card with four 1 GB ports is required on the RMX 2000 when MPMRx cards are installed on the system. On RMX 4000 systems, RTM LAN cards with either two or four 1 GB ports can be used with the MPMRx card(s). However on systems with ISDN networks, the RTM ISDN can also be used instead of the RTM LAN.
An RTM LAN card must connect directly to an MPMx/MPMRx card. In an RMX with a single MPMx/MPMRx card, the RTM LAN card must be installed in the rear panel slot on the same level as the MPMx/MPMRx card.
On the RMX 2000/4000, LAN 2* is used to connect the LAN cable. For LAN Redundancy and Multiple Services connect to LAN 1*.
Category Feature Name Description
General Card Configuration Mode A new Card Configuration Mode - MPMRx has been added to support the new media card.
General Hardware Monitor The status and properties of the MPMRx card can be viewed and monitored in the Hardware Monitor list pane.
General Video/Voice Port Configuration The Resource slider(s) in the Video/Voice Port Configuration dialog box reflect the MPMRx card capacities.
General Resource Report The resource report reflects the MPMRx card capacities.
General Port Gauges The Video Port gauge shows the MPMRx card capacities.
• An MPMRx card on the front of the RMX must always be seated or connected opposite to either an RTM LAN - 4 ports or RTM ISDN card on the rear of the chassis.
• The RTM LAN card is always required with Multiple Networks and LAN Redundancy configurations.
* MPMx cards are required connect to LAN 4. For LAN Redundancy and Multiple Services connect to LAN 3.

RMX Release Notes Version 8.3 Inc New Hardware - MPMRx Media Card
Polycom, Inc. 4
New ports on the RTM LAN card are:
1 Gb LAN ports No. 3-4, used with MPMx cards (*see note above).
DBG - Debug port, for internal use.
ARM/CM - Switch, for internal use.
RTM LAN - with 4 LAN Ports
RTM LAN - 4 LAN Ports LEDsThe following LEDs appear on the RTM LAN:
New Control (CNTL) Units for RMX 2000/4000 The Control (CNTL) Unit contains the management component and CPU of the RMX. When MPMRx-D card or cards are installed on the RMX 2000 and RMX 4000, each MCU requires a new control unit (CNTL). The CNTL unit manages the software and hardware on the system.New on the Control Unit is a VGA (video) port but this is for internal use only.
The two models are:
CNTL 2000
CNTL 4000
CNTL 2000
Function Name LED Name LED Color Description
LAN 1-4 LEDs 1 Gb Amber ON when 1Gb connection is online, flickers with Packet activity.
LNK Green ON with an active network connection, flickers with Packet activity.
HS LED Blue OFF - Normal.
Flashes - During the startup of a media card and control unit. Also flashes when the RTM LAN card is powered down.
ON - RTM LAN card may be removed.

RMX Release Notes Version 8.3 Inc New Hardware - MPMRx Media Card
Polycom, Inc. 5
CNTL 4000
New Power Supply for RMX 2000The power supply provides electricity to the different components of the RMX 2000.The RMX 2000 system with MPMRx-D cards installed requires a new power supply with a higher power specification. The new power supply has a usage rating of: 4-8 AMPs, 1000 Watts and a BTU of 3412.14 per hour.

RMX Release Notes Version 8.3 Inc New Features List
Polycom, Inc. 6
New Features List
The following table lists the new features in Version 8.3. Full information about these features can be found in the RealPresence Collaboration Server (RMX) 1500/1800/2000/4000 Administrator’s Guide.
# CategoryFeature Name Description
Card Mode
MPMx MPMRx
1 Microsoft Gateway calls to remote SIP domain.
The RMX’s Gateway functionality can be used to enhance Polycom’s Microsoft Solution, enabling the connection of Legacy endpoints to connect to Lync 2010 endpoints.
2 Resources Resource Reporting
The unit used for reporting video resource usage in the Resource Report is HD720p30 CP. Results are rounded to the nearest integer. The MPM Rx does not support the Fixed Resource Capacity mode.
3 Resources Video/Voice Port Configuration
The Resource slider(s) in the Video/Voice Port Configuration dialog box reflect the MPMRx card capacities.
4 Video System Flag A new System Flag: LIMIT_SD_AND_CIF_BW_MPMRX, when added to system.cfg and set to YES (default), limits the maximum negotiated and opened bit rate for resolutions equal or lower than SD to 1Mbps.
When set to NO no limitation is applicable to SD and CIF bit rates.

RMX Release Notes Version 8.3 Inc Changes to Existing Features
Polycom, Inc. 7
Changes to Existing Features
The following table lists the new features in Version 8.3. Full information about these features can be found in the RealPresence Collaboration Server (RMX) 1500/1800/2000/4000 Administrator’s Guide.
Table 1 Version 8.3 - New Features List
# Category Feature Name
Description Card Mode
MPMx MPM Rx
1 Conferencing VMR Entry Queue - Change of Behavior
With Version 8.3 Incremental, users are able to change the behavior of the policy of number collection for VMR Entry Queues, Conference-IDs and Passwords, allowing a time-out to be used as a stop indicator for the input string.
1 Video HD1080p60 Symmetric Resolution Support
HD1080p60 Resolution is symmetric.
2 Video HD1080p30/60 Content
Content is supported at resolutions of HD1080p30 and HD1080p60 in both Base and High Profiles.
An additional check box H.264 High Profile and an additional Content Rate drop-down menu have been added to the Video Quality dialog box.
3 POCN TIP Content Beginning with this version, TIP Content can be sent to Legacy Endpoints.
4 Conferencing Address Book
All users can now add or modify Address Book entries.
5 DTMF Codes System Flag RFC2833_DTMF System Flag, which controls receipt of in-band or out-of-band DTMF Codes can be accessed and modified by the user.
6 Video (RMX 1800)
6Mbps supported
The RealPresence Collaboration Server (RMX) 1800 supports AVC-CP conferences at a line rates up to and including 6Mbps.

RMX Release Notes Version 8.3 Inc Changes to Existing Features
Polycom, Inc. 8
7 General System Flag In Collaboration Server (RMX) 1500/2000/4000 systems with MPMx cards, the maximum number of PCM sessions is set by a system flag NUM_OF_PCM_IN_MPMX. The default value of this flag is set according to the SVC license:
• If SVC is enabled in the license the default value (and the only possible value is 1.
• If SVC is disabled in the license, the default value is 4 and the range is between 1 and 4.
To change this flag value you must first add it to the System Configuration.
(Not
required)
8 General System Flag The support of External IVR Services via the MCCF-IVR package is enabled by default in the Collaboration Server (RMX) systems, by the flag ENABLE_MCCF which is set to YES.
However, in Ultra Secure Mode and in secured environments where the External IVR Services via the MCCF-IVR package is not required and unused ports should be closed, this flag should be set to NO.
To change this flag value from YES to No, you must first add it to the System Configuration.
Table 1 Version 8.3 - New Features List (continued)
# Category Feature Name
Description Card Mode
MPMx MPM Rx

RMX Release Notes Version 8.3 Inc Interoperability Table
Polycom, Inc. 9
Interoperability Table
DevicesThe following table lists the devices tested with Version 8.3 Inc.
Device Version
Gatekeepers/Proxies
Polycom CMA Polycom CMA 6.2.5 (RMX1800 only)
Polycom RealPresence Resource Manager (XMA) Polycom XMA 8.0.1
Polycom PathNavigator 7.0.14
Polycom SE200 3.00.07
Polycom RMX Gateway 8.2
Cisco (Tandberg) VCS X7.2.2
Cisco (Tandberg) Gatekeeper N6.3
Microsoft Lync 2010 Server (Microsoft Lync 2010 Server is 4.0.7577.216 (CU8))
Microsoft Lync 2013 Server Microsoft Lync Server 2013- 5.0.8308.0
Broadsoft Proxy AS version Rel_19.sp1_1.574
Polycom RealPresence Access Director (RPAD 3.0
Recorder
Polycom RSS 4000 8.5.1.0-37259
MCUs, Call Managers, Network Devices, and Add Ins
Polycom RealPresence Distributed Media Application (DMA) system 7000
6.0.2.1, RMX 1800 requires version 6.0.3.
Polycom Conferencing Add in for Microsoft Outlook Polycom Conferencing for Outlook (PCO) 1.4.0
Avaya Aura Session Manager 6.3.0.8.5682-6.3.8.1814
Cisco Call Manager 9.1
Cisco (Tandberg) Codian 4505 MCU 4.4(3.49)
IBM WebSphere Application Server 7.0.0.15 (Network Deployment) plus required WebSphere iFixes.

RMX Release Notes Version 8.3 Inc Interoperability Table
Polycom, Inc. 10
Siemens Server V7.00.01.ALL.07_PS0030.E06
Acme Packets SBC ACME Net-Net 3800 Firmware SCX6.4.0 MR-3 GA (Build 298)
Endpoints
Polycom HDX Family 3.1.2-35267
Polycom GS Family 4.1.1.1 Ursa
Polycom OTX 3.1.2-35267
Polycom RPX 3.1.2-35267
Polycom VSX and V-Series Family 9.0.6.2
Polycom Viewstation Family 7.5.4 or higher
Polycom Viewstation FX/EX/4000 6.0.5 or higher
Polycom CMA Desktop 5.2.x
Polycom CMA Desktop for MAC 5.2.3
Polycom QDX6000 4.0.3
Polycom RealPresence Mobile Android 3.0
Polycom RealPresence Mobile iPad 3.0
Polycom m100 1.0.6
Polycom VVX1500 4.0.4
Polycom VVX500 4.1.5
Polycom VVX600 4.1.5
SoundPointIP 650 4.0.4
Polycom Sound Point 601 SIP 3.1.7
Polycom PVX 8.0.16
Polycom SoundStation IP4000 SIP 3.1.7
Polycom SoundStation IP7000 4.0.4
Polycom HDX Touch Controller 1.8
Polycom Group Series Touch Controller 4.1.1.1
Avaya Voice Phone S3.171b
Avaya one-X Communicator 6.1.8.06-SP8-40314
Avaya 1000 series endpoint 4.8.3
Avaya Flare Desktop 1.1.3.14
Device Version

RMX Release Notes Version 8.3 Inc Interoperability Table
Polycom, Inc. 11
Avaya ADVD 1_1_2_020002
Avaya Flare Mobile (iOS) 1.1.1.0
LifeSize 200 4.7.22(3)
LifeSize Room and Express 4.7.22(3)
LifeSize Desktop Client 2.0.2.191
LifeSize Express 220 4.11.13(1)
LifeSize Team 220 4.11.13(1)
LifeSize Passport 4.11.13(1)
LifeSize SoftPhone 8.1.12
Cisco (Tandberg) EX90 6.2
Cisco (Tandberg) C Series 6.2
Cisco (Tandberg) MXP F-series F9.3.1
Cisco E20 4.1.2
Cisco CTS3010 (Telepresence) 1.10.1
Cisco CTS1300 (Telepresence) 1.10.1
Cisco CTS500 (Telepresence) 6.0.2
Radvision SCOPIA XT1000 endpoint 2.5.416
Radvision Scopia XT5000 3.1.1.37
Sony PCS –1 3.42
Sony PCS –G50 2.72
Sony PCS –TL50 2.42
Sony PCS-G90 2.22
Sony PCS-XG80 2.37
Tandberg 1700 MXP F9.3.1
Tandberg Edge95 MXP F9.3.1
CSS Server 1.1.1
Addon client 1.1.1
Microsoft Lync 2013 client Lync 2013 client 15.0.4517.1504
Microsoft Lync 2010 client Lync 2010 client 4.0.7577.4392)
Siemens Client V7R1.17.0
Device Version
RMX Release Notes Version 8.3 Inc Interoperability Table
Polycom, Inc. 12
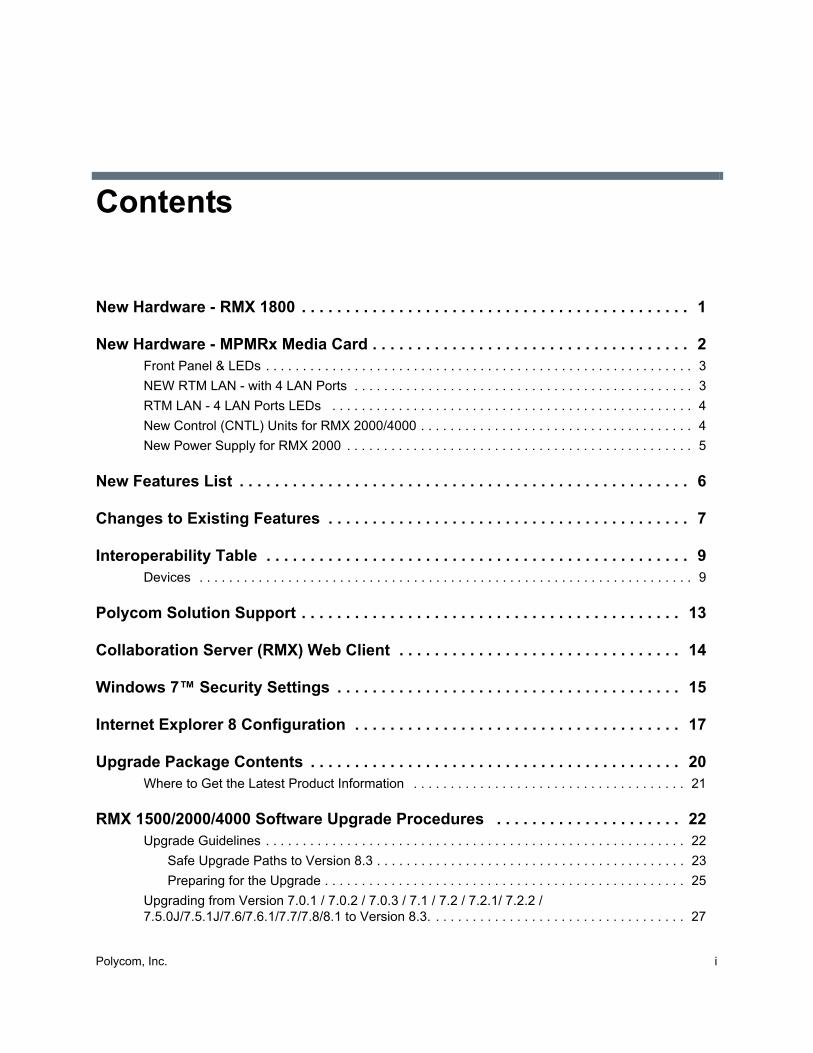
Siemens OpenStage Desktop Voice V3R1 43
IBM DB2 Database Server 9.7
IBM Domino® Enterprise Server V8.5.2
IBM Notes client V8.5.2
IBM Sametime Media Manager V8.5.2 IFR 1
IBM Sametime System Console V8.5.2 IFR 1
IBM Sametime Community Server V8.5.2 IFR 1
IBM Sametime Proxy Server V8.5.2 IFR 1
IBM Sametime Meeting Server V8.5.2 IFR 1
For more information about partner product interoperability, refer to the partner deployment guides.
Device Version

RMX Release Notes Version 8.3 Inc Polycom Solution Support
Polycom, Inc. 13
Polycom Solution Support
Polycom Implementation and Maintenance services provide support for Polycom solution components only. Additional services for supported third-party Unified Communications (UC) environments integrated with Polycom solutions are available from Polycom Global Services and its certified Partners. These additional services will help customers successfully design, deploy, optimize and manage Polycom visual communications within their UC environments.
Professional Services for Microsoft Integration is mandatory for Polycom Conferencing for Microsoft Outlook and Microsoft Office Communications Server integrations. For additional information and details please see http://www.polycom.com/services/professional_services/index.html or contact your local Polycom representative.

RMX Release Notes Version 8.3 Inc Collaboration Server (RMX) Web Client
Polycom, Inc. 14
Collaboration Server (RMX) Web Client
The following table lists the environments (Web Browsers and Operating Systems) with which the Collaboration Server (RMX) Web Client was tested.
Web Browser Operating System
Internet Explorer 7 Windows Vista™
Windows 7
Internet Explorer 8 Windows 7
Internet Explorer 9 Windows 7 and Windows 8
Internet Explorer 10 Windows 8
It is not recommended to run RMX Web Client and Polycom CMAD applications simultaneously on the same workstation.

RMX Release Notes Version 8.3 Inc Windows 7™ Security Settings
Polycom, Inc. 15
Windows 7™ Security Settings
If Windows 7 is installed on the workstation, Protected Mode must be disabled before downloading the software to the workstation.
To disable Protected Mode:
1 In the Internet Options dialog box, click the Security tab.
The Security tab is displayed.
2 Clear the Enable Protected Mode check box for each of the following tabs:
Internet
Local intranet
Trusted sites
RMX Release Notes Version 8.3 Inc Windows 7™ Security Settings
Polycom, Inc. 16
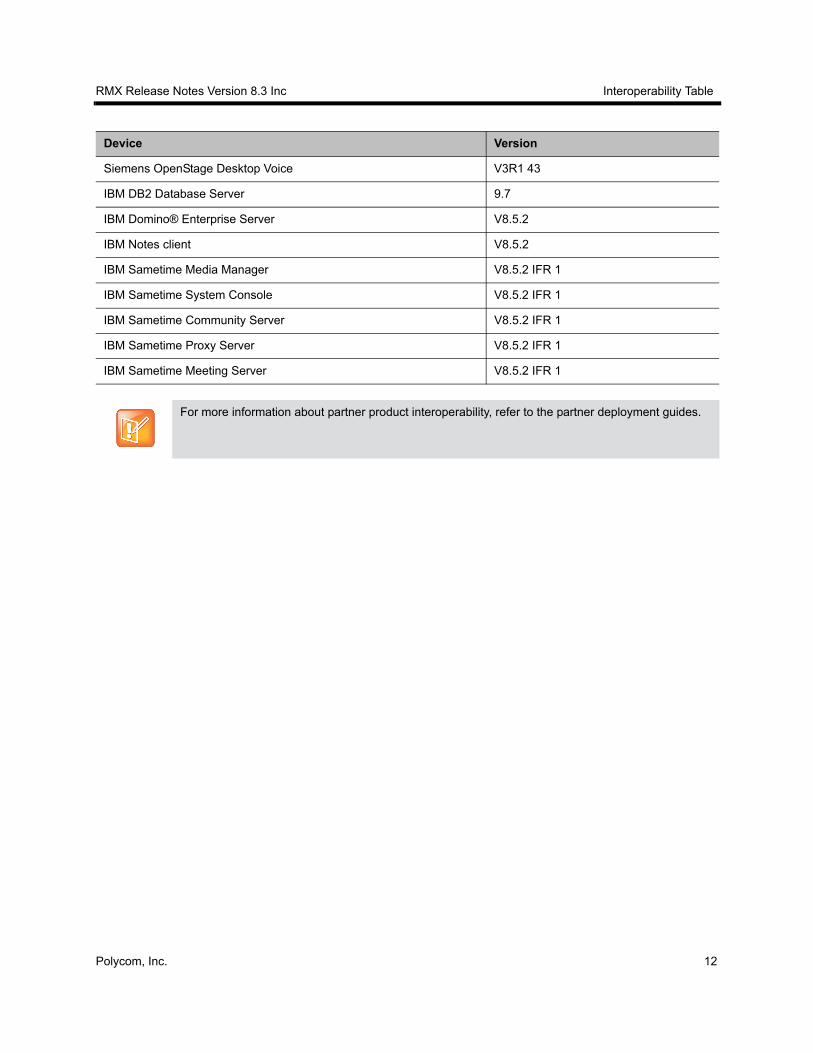
3 After successful connection to Collaboration Server (RMX), the Enable Protected Mode check boxes can be selected to enable Protected Mode for the following tabs:
Internet
Local intranet

RMX Release Notes Version 8.3 Inc Internet Explorer 8 Configuration
Polycom, Inc. 17
Internet Explorer 8 Configuration
When using Internet Explorer 8 to run the Collaboration Server Web Client or RMX Manager applications, it is important to configure the browser according to the following procedure.
To configure Internet Explorer 8:
1 Close all browsers running on the workstation.
2 Use the Windows Task Manager to verify that no iexplore.exe processes are running on the workstation. If any processes are found, use the End Task button to end them.
3 Open Internet Explorer but do not connect to the MCU.
4 In the Internet Explorer menu bar select Tools >> Internet Options.
The Internet Options dialog box is displayed with General tab open.
5 In the Browsing history section, click the Delete button.
The Delete Browsing History dialog box is displayed.

RMX Release Notes Version 8.3 Inc Internet Explorer 8 Configuration
Polycom, Inc. 18
6 Select the Temporary Internet files and Cookies check boxes.
7 Click the Delete button.
8 The Delete Browsing History dialog box closes and the files are deleted.
9 In the Internet Options dialog box, click the Settings button.
The Temporary Internet Files and History Settings dialog box is displayed.
10 Click the View objects button.
The Downloaded Program Files folder containing the installed Program Files is displayed.

RMX Release Notes Version 8.3 Inc Internet Explorer 8 Configuration
Polycom, Inc. 19
11 Select the EMAClassLoader.dll file and press the Delete key on the workstation or right-click the EMA.ClassLoader.dll file and then click Delete.
12 Close the Downloaded Program Files folder and the Temporary Internet Files and History Settings dialog box.
13 In the Internet Options dialog box, click the OK button to save the changes and close the dialog box.

RMX Release Notes Version 8.3 Inc Upgrade Package Contents
Polycom, Inc. 20
Upgrade Package Contents
The Version 8.3 upgrade package must be downloaded from the Polycom Resource Center and includes the following items:
lan.cfg file
LanConfigUtility.exe
RealPresence Collaboration Server (RMX) 1500/1800/2000/4000 Documentation
RealPresence Collaboration Server (RMX) 1500/1800/2000/4000 Version 8.3 Release Notes
RealPresence Collaboration Server (RMX) 1500/1800/2000/4000 Getting Started Guide
RealPresence Collaboration Server (RMX) 1500/1800/2000/4000 Administrator’s Guide
RealPresence Collaboration Server (RMX) 1500/1800/2000/4000 Hardware Guide
RealPresence Collaboration Server (RMX) 1500/1800/2000/4000 Quick Installation Booklet
Installation Quick Start Guide for RealPresence Collaboration Server (RMX) 1500/1800/2000/4000
RMX Third Party Licenses
External DB Tools
RealPresence Collaboration Server (RMX) 1500/1800/2000/4000 External Database API Programmer’s Guide
Sample Scripts
RMX XML API Kit Version 8.3
RealPresence Collaboration Server (RMX) 1500/1800/2000/4000 XML API Version 8.3 Release Notes
RealPresence Collaboration Server (RMX) 1500/1800/2000/4000 API Overview
RealPresence Collaboration Server (RMX) 1500/1800/2000/4000 API Schema Reference Guide
MGC to RMX XML API Conferencing Comparison
Polycom XML Tracer User’s Guide
XML Schemas
Polycom XML Tracer application
Translations of RealPresence Collaboration Server (RMX) 1500/1800/2000/4000 Version 8.1 Documentation:
Getting Started Guide:
French, German, Japanese, Russian, Simplified Chinese, Hebrew and Portuguese
Hardware Guide:
French, German, Japanese, Korean, Russian, Simplified Chinese, Spanish

RMX Release Notes Version 8.3 Inc Upgrade Package Contents
Polycom, Inc. 21
Where to Get the Latest Product InformationTo view the latest Polycom product documentation, visit the DOCUMENTS & DOWNLOADS section of the Polycom website at http://support.polycom.com

RMX Release Notes Version 8.3 Inc RMX 1500/2000/4000 Software Upgrade Procedures
Polycom, Inc. 22
RMX 1500/2000/4000 Software Upgrade Procedures
Upgrade Guidelines Ensure that the Control Unit memory size is at least 1024MB. If memory size is 512MB, DO NOT
perform the upgrade procedure. Contact Polycom Support.
To upgrade to 8.3 with the new MPMRx card, perform the following procedures:
1 Upgrade the MCU to software version 8.3 following the specific upgrade procedures for your current version.
2 If the MCU contains MPM or MPM+ cards, make sure that these cards are disabled.
3 Remove the existing cards from the MCU and insert the MPMRx card.
4 In the Hardware Monitor screen, click the reset button to reset the MCU.
5 If required, perform the following additional steps:
IVR Service Update. For more information, see IVR Services Update .
Gathering Settings. For more information, see Gathering Settings .
SIP Registration. For more information, see SIP Registration .
Media Encryption. For more information, see Media Encryption .
Noise Reduction. For more information, see Automatic Muting of Noisy AVC-based Endpoints .
RealPresence DMA System Capabilities. For more information, see RealPresence DMA system Compatibility .
To check the MCU’s memory size:
» In the RMX Web Client/RMX Manager go to Administration > System Information.
• Version 8.3 does not support MPM or MPM+ cards. DO NOT upgrade to Version 8.3 if MPM or /MPM+ cards are installed in the RMX and contact Polycom Support.
• If the upgrade process includes upgrading the Media cards, refer to the RealPresence Collaboration Server (RMX) 1500/1800/2000/4000 MPMx Migration Procedure documentation.
• Its is recommend you use Backup Configuration function prior to upgrading your MCU. For more information see the RealPresence Collaboration Server (RMX) 1500/1800/2000/4000 Administrator's Guide, Software Management.

RMX Release Notes Version 8.3 Inc RMX 1500/2000/4000 Software Upgrade Procedures
Polycom, Inc. 23
If Windows7™ is installed on the workstation, Protected Mode must be disabled before downloading the RMX software to the workstation. For more information see Windows 7™ Security Settings .
To maximize conferencing performance, especially in high bit rate call environments, a 1 Gb connection is recommended for each LAN connection.
If the default POLYCOM user is defined in the Collaboration Server Web Client, an Active Alarm is created and the MCU status changes to MAJOR until a new Administrator user replaces the default user.
To use the new features such as Exit and Entry Tones the IVR Services must be updated. For more details, see Additional/Optional System Updates After Upgrading .
If upgrading from a version that does not include Gathering Phase, to enable it in the existing Profiles you must modify the Profiles assigned to the conferencing entities. For more details, see Gathering Settings .
To keep the conferencing entities registered with the SIP Server defined in the IP Network Service, registration must be enabled in the Profiles assigned to these entities. For more details, see SIP Registration .
If upgrading from a version that does not include the Auto Mute noisy participants option, to enable it in the existing Profiles you must modify the Profiles assigned to the conferencing entities. For more details, see Automatic Muting of Noisy AVC-based Endpoints .
Safe Upgrade Paths to Version 8.3The RMX includes a safety mechanism to ensure that a viable and safe software version installation is selected on an RMX. It ensures that the current RMX software version and the new software installation are matched to an internal logic table, and enables or rejects the software installation. When an incorrect or non-viable version upgrade/downgrade path is attempted, an alarm and fault are activated on the RMX.

RMX Release Notes Version 8.3 Inc RMX 1500/2000/4000 Software Upgrade Procedures
Polycom, Inc. 24
The following table lists the software versions that are approved for upgrade by Safe Upgrade process for Version 8.3.
If your RMX version is not listed above, refer to the table below for intermediate and safe upgrade paths to version 8.3.
Software Version RMX 1500X RMX 1500Q RMX 1800RMX 2000
MPMxRMX 4000
MPMx
8.2
8.1.8
8.1.5
8.1
7.8
7.7
7.6/7.6.1
7.5.0J/7.5.1J
7.2/7.2.x
7.1
7.0.x/7.0.2C
7.0
6.x
5.x
4.7.2
If you are upgrading from version 2.x, 3.x or 4.x, DO NOT upgrade to Version 8.3 Inc and contact Polycom Support for the appropriate upgrade paths.

RMX Release Notes Version 8.3 Inc RMX 1500/2000/4000 Software Upgrade Procedures
Polycom, Inc. 25
You can disable the safety upgrade mechanism by changing the default setting of the ENFORCE_SAFE_UPGRADE system flag to NO.
Preparing for the Upgrade
To prepare for the upgrade:
1 If the RMX is used with a RealPresence DMA system, disable the RealPresence DMA system functionality:
a Log into the DMA that handles call transfers for the RMX.
b Select Network > MCU > MCUs.
c Select the MCU and choose either Stop Using or Busy Out.
2 Verify that all conferences, including permanent conferences, have been terminated.
3 If upgrading from 7.0.1 or higher:
Current Version
First Intermediate Upgrade
Second Intermediate Upgrade
Third Intermediate Upgrade New Version
Version Key Version Key Version Key Version Key
8.2 N/A N/A N/A 8.2 Yes
8.1 N/A N/A N/A 8.2 Yes
7.8 N/A N/A N/A 8.2 Yes
7.7 N/A N/A N/A 8.2 Yes
7.6/7.6.1 N/A N/A N/A 8.2 Yes
7.5.0J/7.5.1J N/A N/A N/A 8.2 Yes
7.2 / 7.2.1 / 7.2.2 N/A N/A N/A 8.2 Yes
7.0.1 / 7.0.2 / 7.0.3 / 7.1
N/A N/A N/A 8.2 Yes
7.0 7.0.3 No N/A N/A 8.2 Yes
6.0.2 7.0.3 Yes N/A N/A 8.2 Yes
6.0 / 6.0.1 6.0.2 No 7.0.3 Yes N/A 8.2 Yes
5.0.2 7.0.3 Yes N/A N/A 8.2 Yes
5.0 / 5.0.1 5.0.2 No 7.0.3 Yes N/A 8.2 Yes
• After the upgrade is complete, all permanent conferences must be manually rescheduled.
• MPMx cards are not supported from version 8.1

RMX Release Notes Version 8.3 Inc RMX 1500/2000/4000 Software Upgrade Procedures
Polycom, Inc. 26
a Download the Version 8.3 software from the Polycom Resource Center web site.
b Obtain the Version 8.3 Inc Product Activation Key from the Polycom Resource Center web site. For more information, see the RealPresence Collaboration Server (RMX) 1500/1800/2000/4000 Getting Started Guide.
4 If upgrading from 7.0:
a Download the Version 7.0.3 software and the Version 8.3 Inc software from the Polycom Resource Center web site.
b Obtain the Version 8.3 Inc Product Activation Key from the Polycom Resource Center web site. For more information, see the RealPresence Collaboration Server (RMX) 1500/1800/2000/4000 Getting Started Guide, Obtaining the Activation Key.
5 If upgrading from 5.0.2 or 6.0.2:
a Download the Version 7.0.3 software and the Version 8.3 Inc software from the Polycom Resource Center web site.
b Obtain the Version 7.0.3 Product Activation Key and the Version 8.3 Inc Product Activation Key from the Polycom Resource Center web site. For more information, see the RealPresence Collaboration Server (RMX) 1500/1800/2000/4000 Getting Started Guide, Obtaining the Activation Key.
6 If upgrading from 6.0 or 6.0.1:
a Download the Version 6.0.2 software, the Version 7.0.3 software, and the Version 8.3 Inc software from the Polycom Resource Center web site.
b Obtain the Version 7.0.3 Product Activation Key and the Version 8.3 Inc Product Activation Key from the Polycom Resource Center web site. For more information, see the RealPresence Collaboration Server (RMX) 1500/1800/2000/4000 Getting Started Guide, Obtaining the Activation Key.
7 If upgrading from 5.0 or 5.0.1:
a Download the Version 5.0.2 software, the Version 7.0.3 software, and the Version 8.3 Inc software from the Polycom Resource Center web site.
b Obtain the Version 7.0.3 Product Activation Key and the Version 8.3 Inc Product Activation Key from the Polycom Resource Center web site. For more information, see the RealPresence Collaboration Server (RMX) 1500/1800/2000/4000 Getting Started Guide, Obtaining the Activation Key.
8 If upgrading from 4.x:
a Download the Version 5.0.2 software, the Version 7.0.3 software, and the Version 8.3 Inc software from the Polycom Resource Center web site.
b Obtain the Version 5.0.2 Product Activation Key, the Version 7.03 Product Activation Key, and the Version 8.3 Inc Product Activation Key from the Polycom Resource Center web site. For more information, see the RealPresence Collaboration Server (RMX) 1500/1800/2000/4000 Getting Started Guide Obtaining the Activation Key.
9 If upgrading from 2.x or 3.x:
a Download the Version 4.1.1 software, the Version 5.0.2 software, the Version 7.0.3 software, and the Version 8.3 Inc software from the Polycom Resource Center web site.
b Obtain the Version 4.1.1 software, the Version 7.0.3 Product Activation Key and the Version 8.3 Inc Product Activation Key from the Polycom Resource Center web site. For more information, see the RealPresence Collaboration Server (RMX) 1500/1800/2000/4000 Getting Started Guide, Obtaining the Activation Key.

RMX Release Notes Version 8.3 Inc RMX 1500/2000/4000 Software Upgrade Procedures
Polycom, Inc. 27
10 Backup the configuration file. For more information, see the RealPresence Collaboration Server (RMX) 1500/1800/2000/4000 Administrator’s Guide, Software Management.
Upgrading from Version 7.0.1 / 7.0.2 / 7.0.3 / 7.1 / 7.2 / 7.2.1/ 7.2.2 / 7.5.0J/7.5.1J/7.6/7.6.1/7.7/7.8/8.1 to Version 8.3.
1 Install MCU Software Version 8.3 Inc. On the RMX menu, click Administration> Software Management > Software Download.
2 Browse to the Install Path, selecting the Version 8.3.x.x.bin file in the folder where Version 8.3 is saved and click Install.
3 The Install Software information box that the file Copying files is In progress.
At the end of the Copying Files process the system displays an indication that the software copying procedure is Done.
When an incorrect or non viable version upgrade/downgrade is attempted, an alarm and fault are activated on the RMX.
Click OK. The RMX software installation procedure is aborted and a system alert activates in the Faults List as shown below.
During any upgrade or downgrade software version installation when the Safe Software Version Installation warning has been activated your current browser session will block any new installation attempt. This applies to all software versions, except for version 7.6 which will still enable version downgrades. As a workaround close and then re-open a new browser session, which will enable you to start a new software version installation.

RMX Release Notes Version 8.3 Inc RMX 1500/2000/4000 Software Upgrade Procedures
Polycom, Inc. 28
4 Click the OK button.
The Install Software information box indicates that Software Loading is in progress.
A series of Active Alarms are displayed indicating the progress of the upgrade process.
The Install Software information box indicates that IPMC Burning is in progress.
A further series of Active Alarms are displayed indicating the progress of the upgrade process.
The upgrade procedure takes approximately 20 minutes.
A system message alert may be displayed, if so then click Next/Cancel.
Sometimes, when updating the Version 8.3 license key, the system displays the active alarm show below:
Ignore this Active Alarm and complete this installation procedure.

RMX Release Notes Version 8.3 Inc RMX 1500/2000/4000 Software Upgrade Procedures
Polycom, Inc. 29
Connection to the RMX is terminated and you are prompted to reopen the browser.
5 Approximately 10 minutes after receiving this message, close and reopen the browser.
6 Enter the IP address of the RMX Control Unit in the browser’s address line and press Enter to reconnect to RMX.
If the browser displays a message indicating that it cannot display the requested page, close and reopen the browser and connect to the RMX.
The version number in the Welcome screen has changed to 8.3.
7 In the Collaboration Server Web Client – Welcome screen, enter your User Name and Password and click Login.
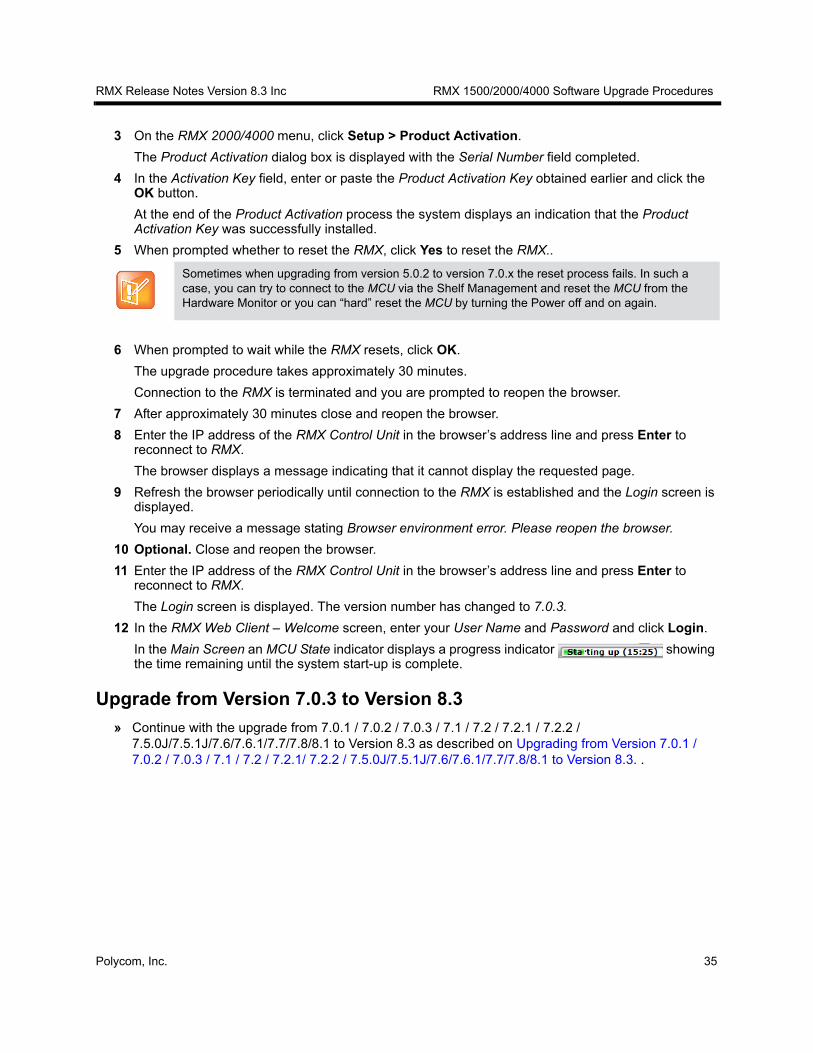
In the Main Screen an MCU State indicator displays a progress indicator showing the time remaining until the system start-up is complete.
To use the new features such as Operator Assistance and Gateway Sessions the IVR Services must be updated. For more details, see Additional/Optional System Updates After Upgrading .
8 If the Collaboration Server (RMX) is used with a RealPresence DMA system, enable the RealPresence DMA system functionality:
9 Log into the RealPresence DMA system that handles call transfers for the Collaboration Server (RMX).
10 Select Network > MCU > MCUs.
11 Select the MCU and choose Start Using.
12 Verify that the version number is updated signifying that the upgrade is complete.
Upgrading from Version 7.0 to Version 8.3This upgrade requires an intermediate upgrade from Version 7.0 to Version 7.0.3.
Upgrading from Version 7.0 to Version 7.0.31 Install MCU Software Version 7.0.3.
On the RMX menu, click Administration> Software Management > Software Download.
If the error “Browser environment error. Please close all the browser sessions” appears, close all the browser sessions, and reconnect to the RMX. If the error message appears again, either run the automatic troubleshooter utility or manually preform the suggested troubleshooting procedures. For more details, see Troubleshooting Instructions .

RMX Release Notes Version 8.3 Inc RMX 1500/2000/4000 Software Upgrade Procedures
Polycom, Inc. 30
2 Browse to the Install Path, selecting the Version 7.0.3.x.bin file in the folder where Version 7.0.3 is saved and click Install.
The Install Software information box indicates that Copying Files is In progress.
The Install Software information box indicates that Software Loading is In progress.
A series of Active Alarms are displayed indicating the progress of the upgrade process.
The Install Software information box indicates that IPMC Burning is In progress.
A further series of Active Alarms are displayed indicating the progress of the upgrade process.
The upgrade procedure takes approximately 20 minutes.
Connection to the RMX is terminated and you are prompted to reopen the browser.
3 Approximately 5 minutes after receiving this message, close and reopen the browser.
4 Enter the IP address of the RMX Control Unit in the browser’s address line and press Enter to reconnect to RMX.
If the browser displays a message indicating that it cannot display the requested page close and re-open the browser and connect to the RMX.
The version number in the Welcome screen has changed to 7.0.3.
5 In the RMX Web Client – Welcome screen, enter your User Name and Password and click Login.
In the Main Screen an MCU State indicator displays a progress indicator showing the time remaining until the system start-up is complete.
Upgrade from Version 7.0.3 to Version 8.3
» Continue with the upgrade from 7.0.1 / 7.0.2 / 7.0.3 / 7.1 / 7.2 / 7.2.1 / 7.2.2 / 7.5.0J/7.5.1J/7.6/7.6.1/7.7 /7.8 to Version 7.8 as described on Upgrading from Version 7.0.1 / 7.0.2 / 7.0.3 / 7.1 / 7.2 / 7.2.1/ 7.2.2 / 7.5.0J/7.5.1J/7.6/7.6.1/7.7/7.8/8.1 to Version 8.3. .
Upgrading from Version 6.0.2 to Version 8.3This upgrade requires an intermediate upgrade from Version 6.0.2 to Version 7.0.3.
Intermediate Upgrade from Version 6.0.2 to Version 7.0.3
1 Install MCU Software Version 7.0.3. On the RMX menu, click Administration > Software Management > Software Download.
2 Browse to the Install Path, selecting the Version 7.0.3.x.bin file in the folder where Version 7.0.3 is saved and click Install.
The Install Software information box that Copying Files is In progress.
At the end of the installation process the system displays an indication that the software copying procedure is Completed and that a new Activation Key is required.
3 Click the OK button.
4 On the RMX menu, click Setup > Product Activation.
The Product Activation dialog box is displayed with the Serial Number field completed.

RMX Release Notes Version 8.3 Inc RMX 1500/2000/4000 Software Upgrade Procedures
Polycom, Inc. 31
5 In the Activation Key field, enter or paste the Product Activation Key obtained earlier and click the OK button.
At the end of the Product Activation process the system displays an indication that the Product Activation Key was successfully installed.
6 Click the OK button.
The Install Software information box indicates that Software Loading is In progress.
A series of Active Alarms are displayed indicating the progress of the upgrade process.
The Install Software information box indicates that IPMC Burning is In progress.
A further series of Active Alarms are displayed indicating the progress of the upgrade process.
After about 30 minutes, close and reopen the browser and connect to the RMX. If the browser was not closed and reopened, the following error message is displayed: Browser environment error. Please reopen the browser. If this occurs, close and re-open the browser and connect to the RMX.
The version number in the Welcome screen has changed to 7.0.3.
7 In the RMX Web Client – Welcome screen, enter your User Name and Password and click Login.
In the Main Screen an MCU State indicator displays a progress indicator showing the time remaining until the system start-up is complete.
Upgrade from Version 7.0.3 to Version 8.3
» Continue with the upgrade from 7.0.1 / 7.0.2 / 7.0.3 / 7.1 / 7.2 / 7.2.1 / 7.2.2 / 7.5.0J/7.5.1J/7.6/7.6.1/7.7 /7.8/8.1 to Version 8.3 as described on Upgrading from Version 7.0.1 / 7.0.2 / 7.0.3 / 7.1 / 7.2 / 7.2.1/ 7.2.2 / 7.5.0J/7.5.1J/7.6/7.6.1/7.7/7.8/8.1 to Version 8.3. .
Upgrading from Versions 6.0/6.0.1 to Version 8.3This upgrade requires the following intermediate upgrade procedures:
1 Upgrade from Version 6.0./6.0.1 to Version 6.0.2.
2 Upgrade from Version 6.0.2 to Version 7.0.3.
Intermediate Upgrade from Version 6.0/6.0.1 to Version 6.0.2
1 Install MCU Software Version 6.0.2. On the RMX menu, click Administration > Software Management > Software Download.

RMX Release Notes Version 8.3 Inc RMX 1500/2000/4000 Software Upgrade Procedures
Polycom, Inc. 32
2 Browse to the Install Path, selecting the Version 6.0.2.x.bin file in the folder where Version 6.0.2 is saved and click Install.
The Install Software information box indicatesthat Copying Files is In progress.
The Install Software information box indicates that Software Loading is In progress.
A series of Active Alarms are displayed indicating the progress of the upgrade process.
The Install Software information box indicates that IPMC Burning is In progress.
A further series of Active Alarms are displayed indicating the progress of the upgrade process.
The upgrade procedure takes approximately 20 minutes.
Connection to the RMX is terminated and you are prompted to reopen the browser.
3 After approximately 5 minutes close and reopen the browser.
4 Enter the IP address of the RMX Control Unit in the browser’s address line and press Enter to reconnect to RMX.
If the browser displays a message indicating that it cannot display the requested page close and re-open the browser and connect to the RMX.
The Login screen is displayed. The version number has changed to 6.0.2.
5 In the RMX Web Client – Welcome screen, enter your User Name and Password and click Login.
In the Main Screen an MCU State indicator displays a progress indicator showing the time remaining until the system start-up is complete.
Intermediate Upgrade from Version 6.0.2 to Version 7.0.3
» Continue with the upgrade from Version 6.0.2 to Version 7.0.3 as described starting on Intermediate Upgrade from Version 6.0.2 to Version 7.0.3 .
When upgrading from version 6.0.1, if after 20 minutes the system remains in the Loading Software stage:
and sometimes the following Active Alarm is displayed:
Close the Install Software window, access the Hardware Monitor and Reset the RMX.
After reset, the upgrade process continues as described below.

RMX Release Notes Version 8.3 Inc RMX 1500/2000/4000 Software Upgrade Procedures
Polycom, Inc. 33
Upgrade from Version 7.0.3 to Version 8.3
» Continue with the upgrade from 7.0.1 / 7.0.2 / 7.0.3 / 7.1 / 7.2 / 7.2.1 / 7.2.2 / 7.5.0J/7.5.1J/7.6/7.6.1/7.7/7.8 to Version 8.3 as described on Upgrading from Version 7.0.1 / 7.0.2 / 7.0.3 / 7.1 / 7.2 / 7.2.1/ 7.2.2 / 7.5.0J/7.5.1J/7.6/7.6.1/7.7/7.8/8.1 to Version 8.3. .
Upgrading from Version 5.0.2 to Version 8.3This upgrade requires an intermediate upgrade from Version 5.0.2 to Version 7.0.3.
Intermediate Upgrade from Version 5.0.2 to Version 7.0.3
1 Install MCU Software Version 7.0.3. On the RMX menu, click Administration > Software Management > Software Download.
2 Browse to the Install Path, selecting the Version 7.0.3.x.bin file in the folder where Version 7.0.3. is saved and click Install.
At the end of the installation process the Install Software dialog box indicates that the installed software is being checked. The system then displays an indication that the software was successfully downloaded and that a new activation key is required.
3 On the RMX 2000/4000 menu, click Setup > Product Activation.
The Product Activation dialog box is displayed with the Serial Number field completed.
4 In the Activation Key field, enter or paste the Product Activation Key obtained earlier and click the OK button.
At the end of the Product Activation process the system displays an indication that the Product Activation Key was successfully installed.
5 When prompted whether to reset the RMX, click Yes to reset the RMX
6 When prompted to wait while the RMX resets, click OK.
The upgrade procedure takes approximately 30 minutes.
Connection to the RMX is terminated and you are prompted to reopen the browser.
7 After approximately 30 minutes close and reopen the browser.
8 Enter the IP address of the RMX Control Unit in the browser’s address line and press Enter to reconnect to RMX.
If the browser displays a message indicating that it cannot display the requested page, refresh the browser periodically until connection to the RMX is established and the Login screen is displayed.
You may receive a message stating Browser environment error. Please reopen the browser. If this occurs, close and re-open the browser and connect to the RMX.
9 Optional. Close and reopen the browser.
10 Enter the IP address of the RMX Control Unit in the browser’s address line and press Enter to reconnect to RMX.
The Login screen is displayed. The version number has changed to 7.0.3.
11 In the RMX Web Client – Welcome screen, enter your User Name and Password and click Login.
In the Main Screen an MCU State indicator displays a progress indicator showing the time remaining until the system start-up is complete.

RMX Release Notes Version 8.3 Inc RMX 1500/2000/4000 Software Upgrade Procedures
Polycom, Inc. 34
Upgrade from Version 7.0.3 to Version 8.3
» Continue with the upgrade from 7.0.1 / 7.0.2 / 7.0.3 / 7.1 / 7.2 / 7.2.1 / 7.2.2 / 7.5.0J/7.5.1J/7.6/7.6.1/7.7/7.8/8.1 to Version 8.3 as described on Upgrading from Version 7.0.1 / 7.0.2 / 7.0.3 / 7.1 / 7.2 / 7.2.1/ 7.2.2 / 7.5.0J/7.5.1J/7.6/7.6.1/7.7/7.8/8.1 to Version 8.3. .
Upgrading from Versions 5.0/5.0.1 to Version 8.3
This upgrade requires the following intermediate upgrade procedures:
1 Upgrade from Version 5.0./5.0.1 to Version 5.0.2.
2 Upgrade from Version 5.0.2 to Version 7.0.3.
Intermediate Upgrade from Version 5.0/5.0.1 to Version 5.0.2
1 Install MCU Software Version 5.0.2. On the RMX menu, click Administration> Software Management > Software Download.
2 Browse to the Install Path, selecting the Version 5.0.2.x.bin file in the folder where Version 5.0.2 is saved and click Install.
At the end of the installation process the system displays an indication that the software was successfully downloaded and that a new activation key is required.
3 Click Close to close the Install Software dialog box.
4 When prompted whether to reset the MCU, click Yes to reset the MCU.
At the end of the installation process the system displays an indication that the software was successfully downloaded.
The upgrade procedure takes about 30 minutes during which time an Active Alarm - System Upgrade is displayed.
The RMX resets itself during the upgrade process and connection to the RMX Web Client may be lost. If the workstation is logged in to the RMX Web Client during the resets, the MCU State indicator at the bottom right corner of the RMX Web Client screen indicates STARTUP.
5 After about 30 minutes, close and reopen the browser and connect to the RMX. If the browser was not closed and reopened, the following error message is displayed: Browser environment error. Please reopen the browser.
The version number in the Welcome screen has changed to 5.0.2.
6 In the RMX Web Client – Welcome screen, enter your User Name and Password and click Login.
In the Main Screen an MCU State indicator displays a progress indicator showing the time remaining until the system start-up is complete.
Intermediate Upgrade from Version 5.0.2 to Version 7.0.3
1 Install MCU Software Version 7.0.3. On the RMX menu, click Administration > Software Management > Software Download.
2 Browse to the Install Path, selecting the Version 7.0.3.x.bin file in the folder where Version 7.0.3. is saved and click Install.
At the end of the installation process the Install Software dialog box indicates that the installed software is being checked. The system then displays an indication that the software was successfully downloaded and that a new activation key is required.
RMX Release Notes Version 8.3 Inc RMX 1500/2000/4000 Software Upgrade Procedures
Polycom, Inc. 35
3 On the RMX 2000/4000 menu, click Setup > Product Activation.
The Product Activation dialog box is displayed with the Serial Number field completed.
4 In the Activation Key field, enter or paste the Product Activation Key obtained earlier and click the OK button.
At the end of the Product Activation process the system displays an indication that the Product Activation Key was successfully installed.
5 When prompted whether to reset the RMX, click Yes to reset the RMX..
6 When prompted to wait while the RMX resets, click OK.
The upgrade procedure takes approximately 30 minutes.
Connection to the RMX is terminated and you are prompted to reopen the browser.
7 After approximately 30 minutes close and reopen the browser.
8 Enter the IP address of the RMX Control Unit in the browser’s address line and press Enter to reconnect to RMX.
The browser displays a message indicating that it cannot display the requested page.
9 Refresh the browser periodically until connection to the RMX is established and the Login screen is displayed.
You may receive a message stating Browser environment error. Please reopen the browser.
10 Optional. Close and reopen the browser.
11 Enter the IP address of the RMX Control Unit in the browser’s address line and press Enter to reconnect to RMX.
The Login screen is displayed. The version number has changed to 7.0.3.
12 In the RMX Web Client – Welcome screen, enter your User Name and Password and click Login.
In the Main Screen an MCU State indicator displays a progress indicator showing the time remaining until the system start-up is complete.
Upgrade from Version 7.0.3 to Version 8.3
» Continue with the upgrade from 7.0.1 / 7.0.2 / 7.0.3 / 7.1 / 7.2 / 7.2.1 / 7.2.2 / 7.5.0J/7.5.1J/7.6/7.6.1/7.7/7.8/8.1 to Version 8.3 as described on Upgrading from Version 7.0.1 / 7.0.2 / 7.0.3 / 7.1 / 7.2 / 7.2.1/ 7.2.2 / 7.5.0J/7.5.1J/7.6/7.6.1/7.7/7.8/8.1 to Version 8.3. .
Sometimes when upgrading from version 5.0.2 to version 7.0.x the reset process fails. In such a case, you can try to connect to the MCU via the Shelf Management and reset the MCU from the Hardware Monitor or you can “hard” reset the MCU by turning the Power off and on again.

RMX Release Notes Version 8.3 Inc Additional/Optional System Updates After Upgrading
Polycom, Inc. 36
Additional/Optional System Updates After Upgrading
IVR Services UpdateWhen upgrading from version 4.0 and earlier, Operator Assistance and the Gateway calls options require that the IVR Services include specific (new) DTMF Codes and voice messages. These additions are not automatically added to existing IVR Services in order to avoid conflicts with existing DTMF codes. Therefore, to use these options, new Conference and Entry Queue IVR Services must be created.
In Version 6.0, recording can be controlled from the HDX remote control using the designated recording buttons. This is enabled by changing the existing definitions of the DTMF codes of the Roll Call and Recording actions in the Conference IVR Services already defined in the RMX.
In Version 7.x, PCM for ISDN participants is enabled by a DTMF code. The code must be added to the DTMF Codes tab to enable the PCM for ISDN participants. Default value is 1.
In Version 7.6.1, a participant can invite another participant to the conference using a DTMF code. This code must be added manually to the existing Conference IVR Services. In addition, the Invite Participant voice message requesting the participant to enter the destination number must be selected in the General tab.
To modify the Conference IVR Service:
1 In the IVR Services list, double-click the service to modify or right click the service and select Properties.
2 To add the gateway voice messages and dial tones, click the General tab and select the appropriate *.wav files.
3 To modify the DTMF codes, click the DTMF Codes tab.
4 Modify the DTMF codes as follows:
Action Existing DTMF Code New DTMF Code
Enable Roll Call *32 *42
Disable Roll Call #32 #42
Roll Call Review Names *33 *43
Roll Call Stop Review #33 #43
Start/Resume Recording *73 *2
Stop Recording *74 *3
Pause Recording *75 *1
Request Private Assistance *0

RMX Release Notes Version 8.3 Inc Additional/Optional System Updates After Upgrading
Polycom, Inc. 37
5 To add the Operator Assistance Options, click the Operator Assistance tab and select the appropriate options and messages.
For details on modifying the IVR Services, see RMX 2000 Administrator’s Guide, Defining a New Service.
Gathering SettingsWhen upgrading from earlier versions, the Enable Gathering check box in the Profile Properties - Gathering Settings dialog box is not selected by default for existing Profiles.
To set Enable Gathering as default:
1 In the RMX Management pane, click Conference Profiles.
2 In the Conference Profiles pane, double-click the Profile or right-click the Profile, and then click Profile Properties.
The Profile Properties – General dialog box opens.
3 Click Gathering Settings.
4 Select the Enable Gathering check box.
5 Click the OK Button.
For more information, see the RealPresence Collaboration Server (RMX) 1500/2000/4000 Administrator’s Guide, Gathering Phase.
Request Assistance for the conference 00
PCM (for ISDN participants only) ##
Invite Participant *72
Disconnect Last Invited Participant #72
Action Existing DTMF Code New DTMF Code

RMX Release Notes Version 8.3 Inc Additional/Optional System Updates After Upgrading
Polycom, Inc. 38
SIP RegistrationStarting with Version 7.1, enabling the registration of the conferencing entities with the SIP proxy is moved from the IP Network Service to the Conference Profile - Network Services. To ensure that conferencing entities that were registered with the SIP Server remain registered after upgrading to Version 8.3 Inc, the appropriate conference Profile must be updated accordingly.
To enable the registration with the SIP Server:
1 Verify which Profile is used by conferencing entities you wish to register with the SIP Server.
2 List the Conference Profiles.
3 Display the Profile Properties by double-clicking it or right-clicking the Profile and then selecting Properties.The Profile Properties - General dialog box opens.
4 Click the Network Services tab.
The Profile - Network Services dialog box is displayed.
The system lists the IP Network Services currently defined in the RMX depending on the system configuration (single Network or Multiple Networks).
5 In the SIP Registration column, click the check box of the Network Service to enable the registration of the conferencing entity to which this profile is assigned with the SIP Server defined in that Network Service.
6 To prevent dial in participants from connecting to a conferencing entity when connecting via a certain Network Service, clear the Accept Calls check box of that Network Service.
7 Click OK.

RMX Release Notes Version 8.3 Inc Additional/Optional System Updates After Upgrading
Polycom, Inc. 39
Media EncryptionWhen upgrading from a version prior to 7.6.1, the ALLOW_NON_ENCRYPT_PARTY_IN_ENCRYPT_CONF System Flag is replaced by a value in the Conference Profile. Therefore, it is essential that the encryption settings of all existing conference Profiles are verified, and if necessary, modified to meet the encryption requirements through the new encryption options according to the table below.
Automatic Muting of Noisy AVC-based EndpointsWhen upgrading from a previous version, the Auto mute noisy endpoints option is not automatically enabled in the existing Profiles and it has to be manually enabled, if required.In new Profiles that are created after the upgrade, the Auto mute noisy endpoints option is automatically enabled.
Encryption Setting
Versions prior to 7.6.1 Version 7.6.1 and Later
Parameter Value Parameter Value
Profile Encryption Setting
YES Profile Encryption Setting Encrypt All
Profile Encryption Setting
NO Profile Encryption Setting No Encryption
System Flag ALLOW_NON_ENCRYPT_PARTY_IN_ENCRYPT_CONF=YES
Profile Encryption Setting Encrypt when possible

RMX Release Notes Version 8.3 Inc Additional/Optional System Updates After Upgrading
Polycom, Inc. 40
To enable the automatic muting of noisy endpoints in existing Conference Profiles:
1 Double-click an existing Conference Profile to display its properties.
2 Click the Audio Settings tab.
In existing profiles (after software upgrade from a version prior to 8.3), the Auto mute noisy endpoints check box is cleared.
3 Click the Auto mute noisy endpoints check box to enable the automatic muting of noisy endpoints.
4 Click OK.
RealPresence DMA system Compatibility In Version 7.7, if a Polycom RealPresence DMA system is installed in your environment, you must change the value of the flag MAX_CONF_PASSWORD_REPEATED_CHAR to 4 to maintain the compatibility between the RMX and the RealPresence DMA system.
For more details, see the RealPresence Collaboration Server (RMX) 1500/1800/2000/4000 Administrator’s Guide, Modifying System Flags.

RMX Release Notes Version 8.3 Inc Upgrading the RMX Manager Application
Polycom, Inc. 41
Upgrading the RMX Manager Application
The RMX Manager application can be downloaded from one of the RMX systems installed in your site or from Polycom web site at http://www.polycom.com/support.
To install RMX Manager (downloading the application from the MCU):
1 Start Internet Explorer and connect to the Collaboration Server (RMX) from which the current RMX Manager version was installed.
The Login screen is displayed.
2 Click the Install RMX Manager link on the upper right corner of the Login screen.
The installer verifies the application’s requirements on the workstation.
• When upgrading the RMX Manager application, it is recommended to backup the MCU list using the Export RMX Manager Configuration option. For more details, see RealPresence Collaboration Server (RMX) 1500/1800/2000/4000 Getting Started Guide, Software Management .
• When upgrading the RMX Manager from a major version (for example, version 7.0) to a maintenance version of that version (for example, 7.x), the installation must be performed from the same MCU (IP address) from which the major version (for example, version 7.0) was installed. If you are upgrading from another MCU (different IP address), you must first uninstall the RMX Manager application using Control Panel > Add or Remove Programs.
If the following error message is displayed, you are upgrading from an MCU that is other than the one used for the installed version (different IP address). In such a case, first uninstall the RMX Manager application using Control Panel > Add or Remove Programs.

RMX Release Notes Version 8.3 Inc Upgrading the RMX Manager Application
Polycom, Inc. 42
The Install dialog box is displayed.
3 Click the Install button.
The installation proceeds.
The installation completes, the application loads and the RMX Manager - MCUs screen is displayed.
The list includes the previously defined MCUs.
If the MCUs list is empty, import the backed up list using the Import RMX Manager Configuration option. For more details, see the RealPresence Collaboration Server (RMX) 1500/1800/2000/4000 Administrator’s Guide Import/Export RMX Manager Configuration .
MCUs Pane
MCUs Toolbar

RMX Release Notes Version 8.3 Inc Upgrading the RMX 2000/4000 Hardware to MPMRx
Polycom, Inc. 43
Upgrading the RMX 2000/4000 Hardware to MPMRx
Two upgrade kits are provided for the RMX platform:
RMX 2000 - VRMX2000RXUP:
CNTL unit
Power Module
2 RTM LAN cards
at least one MPMRx-D/MPMRx-S card
Software Activation Key, for the latest RMX software version
Version 8.3 Documentation
RMX 4000 - VRMX4000RXUP:
CNTL unit
at least one MPMRx-D/ MPMRx-S card
Software Activation Key, for the latest RMX software version
Version 8.3 Documentation
Upgrading the RMX with MPMRx cards involves the following processes:
Process 1: Removing RMX Hardware
Process 2: Installing RMX Hardware
Process 3: Software Upgrade
Process 4: Install MPMRx card(s) on the RMX 2000/4000
For more information on the upgrade process refer to the RMX® 2000/4000 MPMRx Migration Procedure that is included in your upgrade kit documentation set.

RMX Release Notes Version 8.3 Inc Detailed Description - New Features
Polycom, Inc. 44
Detailed Description - New Features
RMX 1800 OverviewThe Polycom RealPresence Collaboration Server (RMX) 1800 system is the latest Multipoint Control Unit (MCU) in the RMX family. The RMX 1800 system is a high performance, scalable, IP-network (H.323 and Session Initiation Protocol [SIP]) MCU that provides feature-rich and easy-to-use multipoint voice and video conferencing.
The following figure shows a typical multipoint conferencing system using an RMX1800 system.

RMX Release Notes Version 8.3 Inc Detailed Description - New Features
Polycom, Inc. 45
Multipoint video conferencing using an RMX 1800 system
RMX 1800 Feature Changes and AdditionsThe RMX1800 system offers the key features included in the Polycom RMX 1500, RMX 2000, and RMX 4000 systems with the additions and changes shown in the following table. These features are described more fully in the sections that follow.
RMX 1800 Additions and Changes
Feature Name Description
1080p 60 content The system receives and sends content with the resolution of up to 1080p 60.
6M bit rate (CP mode) In continuous presence (CP) mode, the system transfers data with a bit rate up to
6 Mbps.
Resource capacity System capacity depends on the video resolution and the number of DSP media cards inserted.
For more information on the system capacity, see Resource Capacity .
New media card The RMX 1800 uses DSP cards as the media cards.
RMX type indication The RMX 1800 model name is shown in the web client banner and on Welcome page headings.

RMX Release Notes Version 8.3 Inc Detailed Description - New Features
Polycom, Inc. 46
Resource CapacityThe RMX 1800 system allocates port resources in AVC HD720p30 units. The number of unit ports each type of call requires differs for AVC-SVC mixed conferences and non-mixed conferences.Listed are the resource capacities for different system configurations, licenses, and conferencing modes.
Resource Capacity in Non-Mixed Conferences
The port consumption ratios of different calls against that of a HD 720 p30 call are as shown in this table.
for example, to make a1080p60 call, you need four 720p 30 ports; to make a 1080p 30 call, you need two 720p 30 ports; and so forth.
When the required resource is not a whole number, it’s rounded up to the nearest whole number. For example, to make an SVC call requiring1/3 of an HD 720 p30 port. In fact, one port will be allocated.
The following table lists the system capacities for each license in non-mixed conferences when the system has one DSP card.
Fast Configuration Wizard
RMX 1800 is added to the Fast Configuration Wizard. As RMX 1800 system drops the support for PSTN and ISDN, the PSTN- and ISDN-relevant configuration pages are also removed from this wizard.
Network connectivity Media, signaling and management networks can be logically separated on the RMX 1800 system to provide enhanced security.
Symmetric1080p 60 The system receives and sends video up to the resolution of HD1080p 60fps.
Port consumption ratios of different calls
HD1080p60 HD1080p30 HD720p30 AVC SD AVC CIF Audio SVC
4 2 1 0.5 0.5 0.5 0.334
Licensed capacity for systems with three DSP cards, non-mixed mode
Licensed ports HD1080p60 HD1080p30 AVC HD AVC SD AVC CIF Audio SVC
5 1 2 5 10 10 10 15
10 2 5 10 20 20 20 30
15 3 7 15 30 30 30 45
20 5 10 20 40 40 40 60
25 6 12 25 50 50 50 75
30 7 15 30 60 60 60 90
35 8 17 35 70 70 70 105
RMX 1800 Additions and Changes
Feature Name Description

RMX Release Notes Version 8.3 Inc Detailed Description - New Features
Polycom, Inc. 47
The following table lists the system capacities for each license in non-mixed conferences when the system has one DSP card.
Resource Capacities in Mixed Conferences
The the port consumption of different calls in mixed conferences are shown in the following table.
Table: Port consumption of different calls, in mixed conferences (Base Ratios)
In other words, to make one 720 p30 call in a mixed conference, you need two license ports; to make one 1080 p30 call, three license ports; and so forth.
When the required resource is not a whole number, it’s rounded up to the nearest whole number. For example, to make an SVC call requiring1/3 of a license port. In fact, one port will be allocated.
40 10 20 40 80 80 80 120
45 11 22 45 90 90 90 135
50 12 25 50 100 100 100 150
55 13 27 55 110 110 110 165
60 15 30 60 120 120 120 180
65 16 32 65 130 130 130 195
70 17 35 70 140 140 140 210
75 18 37 75 150 150 150 225
Licensed capacity for systems with one DSP card, non-mixed mode
Licensed ports HD1080p60 HD1080p30 AVC HD AVC SD AVC CIF Audio SVC
5 1 2 5 10 10 10 15
10 2 5 10 20 20 20 30
15 3 7 15 30 30 30 45
20 5 10 20 40 40 40 60
25 6 12 25 50 50 50 75
AVC HD1080p60
AVC HD1080p30
AVC HD720p30
AVC SD
AVC CIF Audio SVC
NA 3 1.5 0.75 0.75 0.75 0.333
Licensed capacity for systems with three DSP cards, non-mixed mode
Licensed ports HD1080p60 HD1080p30 AVC HD AVC SD AVC CIF Audio SVC

RMX Release Notes Version 8.3 Inc Detailed Description - New Features
Polycom, Inc. 48
The following table lists the system capacities for each license in mixed conferences when the system has 3 DSP cards.
Licensed capacity for systems with three DSP cards, in mixed conferences
The following table lists the system capacities in non-mixed conferences when the system has one DSP card.
Licensed ports
HD1080p30 AVC HD AVC SD AVC CIF Audio SVC
5 1 3 6 6 6 15
10 3 6 13 13 13 30
15 5 10 20 20 20 45
20 6 13 26 26 26 60
25 8 16 33 33 33 75
30 10 20 40 40 40 90
35 11 23 46 46 46 105
40 13 26 53 53 53 120
45 15 30 60 60 60 135
50 16 33 66 66 66 150
55 18 36 73 73 73 150
60 20 40 75 75 75 150
65 21 42 75 75 75 150
70 23 42 75 75 75 150
75 25 42 75 75 75 150
Table: Licensed capacity for systems with one DSP card, in mixed conferences
Licensed ports
HD1080p30 AVC HD AVC SD AVC CIF Audio SVC
5 1 3 6 6 6 15
10 3 6 13 13 13 30
15 5 10 20 20 20 45
20 6 13 26 26 26 52
25 8 14 26 26 26 52
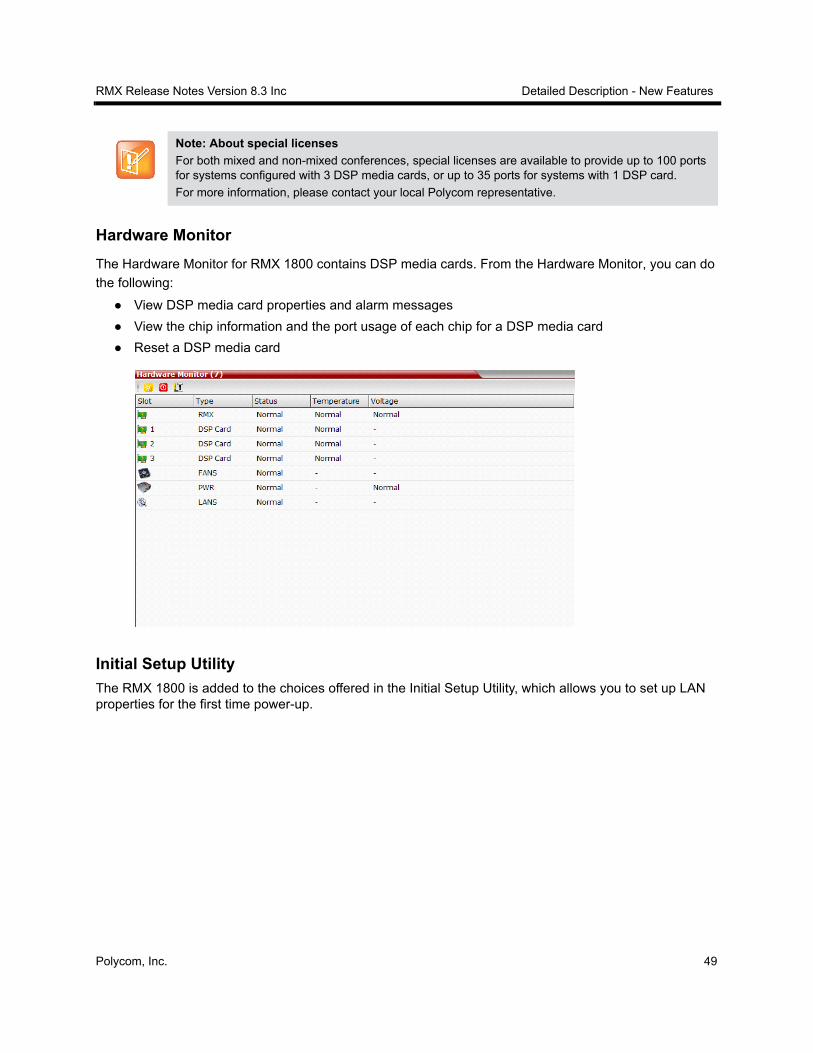
RMX Release Notes Version 8.3 Inc Detailed Description - New Features
Polycom, Inc. 49
Hardware Monitor
The Hardware Monitor for RMX 1800 contains DSP media cards. From the Hardware Monitor, you can do
the following:
View DSP media card properties and alarm messages
View the chip information and the port usage of each chip for a DSP media card
Reset a DSP media card
Initial Setup Utility
The RMX 1800 is added to the choices offered in the Initial Setup Utility, which allows you to set up LAN properties for the first time power-up.
Note: About special licenses
For both mixed and non-mixed conferences, special licenses are available to provide up to 100 ports for systems configured with 3 DSP media cards, or up to 35 ports for systems with 1 DSP card.
For more information, please contact your local Polycom representative.

RMX Release Notes Version 8.3 Inc Detailed Description - New Features
Polycom, Inc. 50
RMX 1800 Name in the Banner
You can view the RMX 1800 model name in the system web client banner and in the Welcome page
.
Network Connectivity
In normal working mode, the RMX 1800 handles system management and IP conferencing on separate LAN ports. System management uses LAN 1; media and signaling processing use LAN 2.
When the LAN redundancy feature is enabled, LAN 1 is used for management, media and signaling network connection; LAN 2 works as the backup of LAN 1.

RMX Release Notes Version 8.3 Inc Detailed Description - New Features
Polycom, Inc. 51
Fast Configuration Wizard
Because the RMX 1800 system drops support for PSTN and ISDN, the following PSTN- and ISDN-relevant configuration pages are removed from the Fast Configuration Wizard:
ISDN/PSTN
PRI Settings
Span Definition
Phones
Spans
New Features in Version 8.3The RMX 1800 system was first unveiled in the China market (as V8.1.5c and V8.1.8). V8.3 is its first worldwide release.
When compared to previous releases, this release introduces the following new features:
Content to legacy endpoints

RMX Release Notes Version 8.3 Inc Detailed Description - New Features
Polycom, Inc. 52
You can now send content to H.323 and SIP endpoints (legacy endpoints) that do not support H.239
content.
H.264 high profile content support
The H.264 High Profile is a new addition to the H.264 video protocol suite. It uses the most efficient
video data compression algorithms to even further reduce bandwidth requirements for video data
streams. Sending content using H.264 High Profile, you can maintain the content quality at bit rates
that are up to 50% lower than previously required.
Multiple content resolutions
You can now send content with more than one resolution to H.263 and H.264 endpoints. This allows
endpoints with different protocols to join or leave the conference without having to restart content
sharing in the middle of a conference.
1080p 30/60 content support
You can now send or receive 1080p 30/60 content.
IPv4, IPv6, and IPv4 & IPv6 mixed IP addressing environments
Version 8.3 adds support to dial in, dial out, and manage the system in the IPv4, IPv6, or IPv6 & IPv4
mixed IP addressing environment.
Support for SVC, and mixed SVC & AVC conferencing.
Version 8.3 adds support for SVC-enabled endpoints. You can also have SVC and AVC endpoints in
the same conference.
Microsoft Interactive Connectivity Establishment (ICE) implementation support
SIP endpoints can now traverse a variety of firewalls between the RMX 1800 system or other
endpoints by using the Microsoft ICE technology.
Microsoft ICE is also the only way for remote Microsoft Office Communicator or Lync users to call
into an enterprise without a VPN.
TIP
TIP is a proprietary protocol created by Cisco for deployment in Cisco Telepresence systems (CTS).
Version 8.3 allows the RMX 1800 system to inter-operate with CTS, ensuring optimum quality
multi-screen and multipoint calls.
DSP media card enabling and disabling
You can now enable or disable a specific DSP media card. This helps to isolate problems in system
troubleshooting.
Gathering phase support for AVC calls
The gathering phase of an AVC (CP only) conference is the time period during which participants
are connecting to a conference. During the gathering phase, you can view the video of connected
endpoints, along with text information about the conference.
Click and view support for AVC calls
You can now select a video layout during a conference from your endpoint.
Polycom Video Clarity™ and auto brightness

RMX Release Notes Version 8.3 Inc Detailed Description - New Features
Polycom, Inc. 53
In Version 8.3, the RMX 1800 system adopts video enhancing algorithms to incoming video streams
of resolutions up to and including Standard Definition (SD).
The system can also detect and automatically adjusts the brightness of video windows that are
dimmer than other video windows in the conference layout.
Roll call
Roll call is now supported as part of the conference IVR service. The system can record the
participants’ names for playback when the participants join or leave a conference.
RTV B-frame
This version supports Microsoft RTV B-frame encoder of real-time video experience on Microsoft
Lync clients. This encoder delivers a better quality video picture by splitting a video frame into pixel
segments or slices and by predicting the pixel segments in the next video frame.
RTV FEC
This version supports Microsoft RTV FEC, which controls and corrects packet loss in receiving and
sending video streams using the Microsoft Lync Server 2010.
ITP - Picture in picture (PIP) layout and ITP cropping mode flags
You can preserve the aspect ratio of video for all telepresence modes using the system flag
ITP_CROPPING.
Personal Conference Menu (PCM)
Conference chairmen can use DTMF tone ## to bring out a local system menu on endpoints and
control the conference.
Speaker change threshold setting
You can now configure the amount of time a participant must speak continuously before becoming
the current speaker.
DTLS negotiation for content encryption
The RMX1800 system will first attempt to exchange keys using Datagram Transport Layer Security
(DTLS). If DTLS fails, SIP TLS encrypted with Session Description Protocol Security Descriptions
(SDES) is used to exchange media encryption keys.
Interoperability with Tandberg endpoints
Interoperability is now enhanced by offering the following two features:
Force HD 720p video resolution and a line rate of 2048 kbps for Tandberg endpoints.
Provide the resolution of W448p (768x448 pixels) at 25 fps for Tandberg endpoints.
Network quality indication
You can now view the network quality of either yourself or other participants from the network
indicator shown in the conference video.
Recording indication
When you record a conference, you can now display a recording indicator to all participants,
informing them that the conference is being recorded.
RMX Release Notes Version 8.3 Inc Detailed Description - New Features
Polycom, Inc. 54
ITP overlay layouts
You can display additional participant endpoints in 1x1 conference video layouts.
These overlay layouts are available in ITP (Telepresence) conferences only when support for
overlay layouts is included in the Polycom Multipoint Layout (MLA) application.
Hot backup
The Hot backup implements a high availability and rapid recovery solution. Two Collaboration
Servers are configured in a Master/Slave relationship: the Master MCU is active while the Slave acts
as a passive, fully redundant Hot backup of the Master MCU. All conferencing activities and
configuration changes that do not require a System Reset are mirrored on the Slave MCU five
seconds after they occur on the Master MCU.
Up to 6 Mbps bit rate.
In continuous presence (CP) mode, the system transfers data with a bit rate up to 6 Mbps.

RMX Release Notes Version 8.3 Inc Detailed Description - New Features
Polycom, Inc. 55
MPMRx OverviewRMX Version 8.3 supports the latest MPMRx (Media Processing Module) card which increases the RMX’s capacity and capabilities.
MPMRx GuidelinesNew MPMRx-D/MPMRx-S media cards for the RMX 2000/4000. The MPMRx cards are supported from version and 8.3 and above. When this card is installed on any RMX 2000/4000 MCU, software version downgrades are not supported.
Guidelines are:
Mixed modes with other MPM/MPM+/MPMx cards installed on the system are not supported.
ISDN support is the same as for MPMx cards, with a limit of 200 B channels.
MPMRx Fixed Mode is not supported.
Downgrading from version 8.3 with MPMRx cards on the system is not supported.
MPMRx-D Card
MPMRx-S Card
When MPMRx card is installed, the RMX operates in MPMRx Mode giving the administrator enhanced control and monitoring of Resource Capacity and usage within the system.
Two upgrade kits are provided with the RMX platform:
RMX 2000 - VRMX2000RXUP: this kit includes a power supply, control (CNTL 2000) unit and two RTM Lan cards
RMX 4000 - VRMX4000RXUP: this kit includes the new control (CNTL 4000) unit
MPMRx Conferencing CapacitiesThe table below lists the maximum conferencing capacities of RMX 4000 and RMX 2000 when used with MPMRx card(s).
MPMRx cards are supported only with D/E-type chassis and software version 8.3.

RMX Release Notes Version 8.3 Inc Detailed Description - New Features
Polycom, Inc. 56
System Functions MPMRx RMX 2000 MPMRx RMX 4000
Maximum number of Video participants in a conference 400 800
Maximum number of PSTN participants in a conference 400 400
Maximum number of VOIP participants in a conference 800 800
Maximum number of Audio calls per second 5 5
Maximum number of Video calls per second 2 2
Maximum number of conferences 800 800
Maximum number of Meeting Rooms 2000 2000
Maximum number of Entry Queues 80 80
Maximum number of Profiles 80 80
Maximum number of Conference Templates 200 200
Maximum number of SIP Factories 80 80
Maximum number of IP Services 4 8
Maximum number of ISDN Services 2 2
Maximum number of IVR Services 80 80
Maximum number of Recording Links 20 (default) 20 (default)
Maximum number of IVR Video Slides 150 150
Maximum number of Log Files (1Mb max.) 8000 8000
Maximum number of CDR Files 2000 4000
Maximum number of Fault Files 1000 1000
Number of Participant alerts Unlimited Unlimited
Maximum number of concurrent RealPresence Collaboration Server Web Client connections to the MCU
20 20
Maximum number Address Book entries 4000 4000
Maximum number of Users 100 100
Maximum number of Gateway Profiles 80 80
Maximum number of Reservations (internal Scheduler) 4000 4000

RMX Release Notes Version 8.3 Inc Detailed Description - New Features
Polycom, Inc. 57
MPMRx System Mode MPMRx Mode is the mode in which the RMX operates to fully utilize the increased power and
capacity of MPMRx cards. With version 8.3 MPMRx mode is the default mode on startup. However, if the RMX has been set to the MPMx mode and an MPMRx card is inserted, the RX card will be powered down.
Operating Mode Selection During Startup / Restart
When version 8.3 software is installed, the RMX enters the MPMRx Mode by default. However, after upgrade you are required to reset the RMX.
MPMRx Resolutions
The Maximum Resolution of the RMX can be set to one of the following:
HD1080p60
HD1080p30
HD720p60
HD720p30
SD60
SD30
CIF60
CIF30
When MPMx, and MPM+ and MPMcards are installed in the system they cannot be used and must be removed.
The RMX 2000/4000 only operates in the MPMRx mode with MPM-Rx cards.

RMX Release Notes Version 8.3 Inc Detailed Description - New Features
Polycom, Inc. 58
Resolution ConfigurationThe title for the Detailed Configuration AVC/CP section of the Resolution Configuration section shows that the resource allocation is based on AVC/CP. Explanations as to how many resources are utilized by each resolution are not shown.
RMX 2000/ RMX 4000 MPMRx Resource CapacitiesThe following sections list the resource capacities of the RMX 2000/4000.
RMX 2000/ RMX 4000 Resource Capacities in Video Switching (VSW) Conferences
The table below lists the maximum resource capacities of RMX 2000/RMX 4000 per line rate in VSW conferences (line rate being the deciding factor) when used with MPMRx cards.Resource Capacities in Video Switching (VSW) Conferences
Resource Type and Line Rate Resources with MPMx Resources with MPMRx
VSW 2Mb 160 130
VSW 4Mb 80 130
VSW 6Mb 40 120
ISDN 7 E1 or 9 T1(per RTM ISDN card)
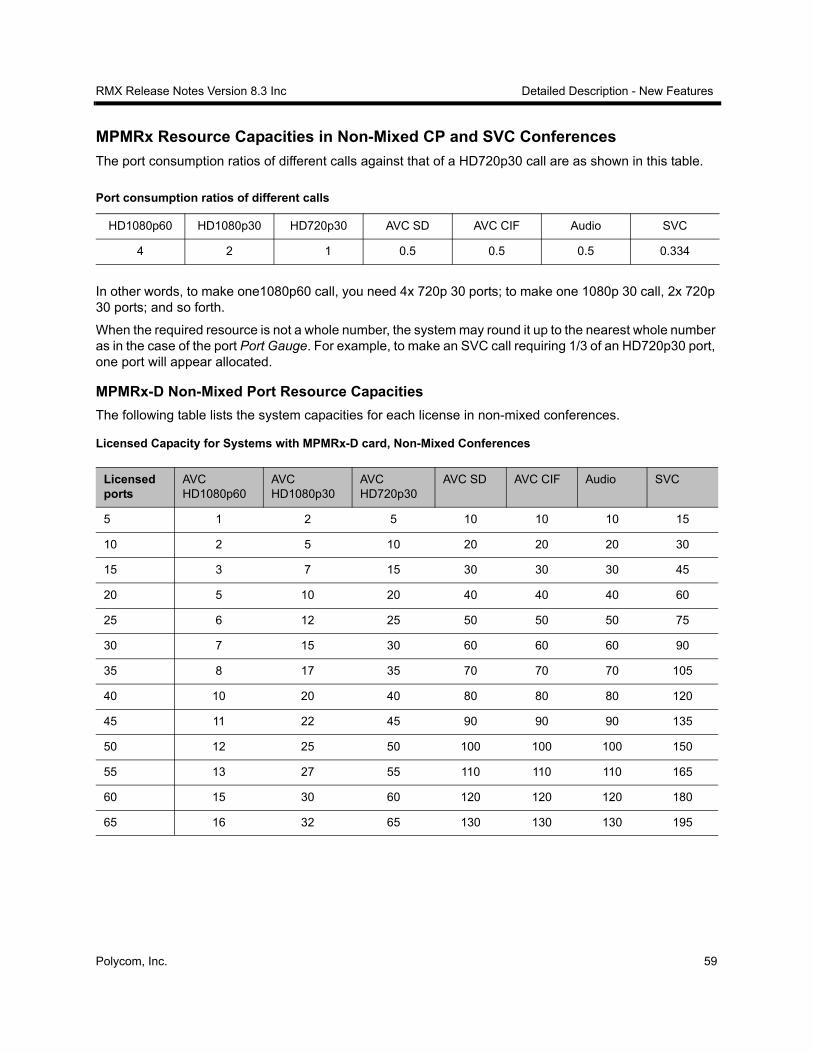
RMX Release Notes Version 8.3 Inc Detailed Description - New Features
Polycom, Inc. 59
MPMRx Resource Capacities in Non-Mixed CP and SVC Conferences
The port consumption ratios of different calls against that of a HD720p30 call are as shown in this table.
In other words, to make one1080p60 call, you need 4x 720p 30 ports; to make one 1080p 30 call, 2x 720p 30 ports; and so forth.
When the required resource is not a whole number, the system may round it up to the nearest whole number as in the case of the port Port Gauge. For example, to make an SVC call requiring 1/3 of an HD720p30 port, one port will appear allocated.
MPMRx-D Non-Mixed Port Resource Capacities
The following table lists the system capacities for each license in non-mixed conferences.
Licensed Capacity for Systems with MPMRx-D card, Non-Mixed Conferences
Port consumption ratios of different calls
HD1080p60 HD1080p30 HD720p30 AVC SD AVC CIF Audio SVC
4 2 1 0.5 0.5 0.5 0.334
Licensed ports
AVC HD1080p60
AVC HD1080p30
AVC HD720p30
AVC SD AVC CIF Audio SVC
5 1 2 5 10 10 10 15
10 2 5 10 20 20 20 30
15 3 7 15 30 30 30 45
20 5 10 20 40 40 40 60
25 6 12 25 50 50 50 75
30 7 15 30 60 60 60 90
35 8 17 35 70 70 70 105
40 10 20 40 80 80 80 120
45 11 22 45 90 90 90 135
50 12 25 50 100 100 100 150
55 13 27 55 110 110 110 165
60 15 30 60 120 120 120 180
65 16 32 65 130 130 130 195

RMX Release Notes Version 8.3 Inc Detailed Description - New Features
Polycom, Inc. 60
MPMRx-S Non-Mixed Port Resource Capacities
The following table lists the system capacities for each license in non-mixed conferences.
Licensed Capacity for Systems with MPMRx-S card, Non-Mixed Conferences
MPMRx Resource Capacities in CP and SVC Mixed Conferences
The following table shows the port consumption ratios of different calls against that of an HD720p30 call.
Port Consumption Ratios, in Mixed Conferences
In other words, to make one1080p30 call, you need 3x 720p30 ports; to make one 720p30 call, 1.5x 720p30 ports; and so forth.
When the required resource is not a whole number, the system may round it up to the nearest whole number as in the case of the port Port Gauge. For example, to make an SVC call requiring 1/3 of an HD720p30 port, one port will appear allocated.
MPMRx-D Mixed Port Resource Capacities
The following table lists the system capacities for each license in mixed conferences.
Licensed Capacity for Systems with MPMRx-D card, Mixed Conferences
Licensed ports
AVC HD1080p60
AVC HD1080p30
AVC HD720p30
AVC SD AVC CIF Audio SVC
5 1 2 5 10 10 10 15
10 2 5 10 20 20 20 30
15 3 7 15 30 30 30 45
20 5 10 20 40 40 40 60
HD1080p60 HD1080p30 HD720p30 AVC SD AVC CIF Audio SVC
NA 3 1.5 0.75 0.75 0.75 0.3333
Licensed ports
AVC HD1080p60
AVC HD1080p30
AVC HD720p30
AVC SD AVC CIF Audio SVC
5 NA 1 3 6 6 6 15
10 NA 3 6 13 13 13 30
15 NA 5 10 20 20 20 45
20 NA 6 13 26 26 26 60
25 NA 8 16 33 33 33 75
30 NA 10 20 40 40 40 90

RMX Release Notes Version 8.3 Inc Detailed Description - New Features
Polycom, Inc. 61
MPMRx-S Mixed Port Resource Capacities
The following table lists the system capacities for each license in mixed conferences.
Licensed Capacity for Systems with MPMRx-S card, Mixed Conferences
Total Resource Capacities per MPMRx-D Card in CP & SVC Conferences
The RMX system allocates port resources in AVC HD720p30 units. The number of ports used for each types of calls differs between AVC-SVC mixed conferences and non-mixed conferences.
The table below lists the maximum resource capacities of RMX 4000 and RMX 2000 per resolution in CP Conferencing and SVC modes when used with MPMRx-D card.
Total Resource Capacities per MPMRx-D Card
35 NA 11 23 46 46 46 105
40 NA 13 26 53 53 53 120
45 NA 15 30 60 60 60 135
50 NA 16 33 66 66 66 150
55 NA 18 36 73 73 73 150
60 NA 20 40 75 75 75 150
65 NA 21 42 75 75 75* 150
Licensed ports
AVC HD1080p60
AVC HD1080p30
AVC HD720p30
AVC SD AVC CIF Audio SVC
5 NA 1 3 6 6 6 15
10 NA 3 6 13 13 13 30
15 NA 5 10 20 20 20 45
20 NA 6 12 22 22 22 45*
25 NA 8 12* 22* 22* 22* 45*
Resolutions Non-Mixed Endpoints Mixed Endpoints
Audio 130 75
AVC SD 130 75
AVC CIF 130 75
SVC 195 150
HD720p30 65 42
Licensed ports
AVC HD1080p60
AVC HD1080p30
AVC HD720p30
AVC SD AVC CIF Audio SVC

RMX Release Notes Version 8.3 Inc Detailed Description - New Features
Polycom, Inc. 62
Total Resource Capacities per MPMRx-S Card in CP & SVC Conferences
The RMX system allocates port resources in AVC HD720p30 units. The number of ports used for each types of calls differs between AVC-SVC mixed conferences and non-mixed conferences.
The table below lists the maximum resource capacities of RMX 4000 and RMX 2000 per resolution in CP Conferencing and SVC modes when used with MPMRx-S card.
Total Resource Capacities per MPMRx-S Card
HD720p TIP 65 42
HD720p RTV 65 42
HD1080p30 32 21
HD1080p60 16 NA
Resolutions Non-Mixed Endpoints Mixed Endpoints
Audio 40 22
AVC SD 40 22
AVC CIF 40 22
SVC 60 45
HD720p30 20 12
HD720p TIP 20 12
HD720p RTV 20 12
HD1080p30 10 6
HD1080p60 5 NA
Note: About special licenses
For both mixed and non-mixed conferences, special licenses are available to provide up to 100 ports for MPMRx-D, or up to 30 ports for MPMRx-S.
For more information, please contact your local Polycom representative.
Resolutions Non-Mixed Endpoints Mixed Endpoints

RMX Release Notes Version 8.3 Inc Detailed Description - New Features
Polycom, Inc. 63
System Information Change
The number of CP licenses are reported as HD720p30 ports. When a license is upgraded, it is converted to HD720p30 ports at a ratio of 3 CIF CP ports to 1 HD720p30 port.
Switching to the MPMRx Configuration Mode
Prior to switching card configuration modes you must first perform a software upgrade to RMX version 8.3.x.
Example 1:
Current status
An RMX has two MPM+ cards installed.
The Card Configuration Mode is MPM+.
Both MPM+ cards are enabled.
Action
» Upgrade the RMX software version to 8.3.x, remove the MPM+ cards and insert an MPMRx card(s).
Result
The Card Configuration Mode remains MPM+. The inserted MPMRx card is disabled.

RMX Release Notes Version 8.3 Inc Detailed Description - New Features
Polycom, Inc. 64
After System Reset
The Card Configuration Mode is MPMRx.
The inserted MPMRx card is enabled.
Example 2:
Current status
An RMX has one MPMx card installed.
The Card Configuration Mode is MPMx and the MPMx card is enabled.
Action
» Upgrade the RMX software version to 8.3.x, remove the MPMx card and insert an MPMRx card.
Result
The Card Configuration Mode remains MPMx.
The inserted MPMRx card is enabled.
After System Reset
The Card Configuration Mode is MPMRx.
The inserted MPMRx card is enabled.
Example 3:
Current status
An RMX has MPMx card installed.
The Card Configuration Mode is MPMx and the MPMx card is enabled.
Action
» Upgrade the RMX software version to 8.3.x, remove the MPM+ card and insert an MPMRx card.
Result
The Card Configuration Mode remains MPMx.
The inserted MPMRx card is enabled.
After System Reset
The Card Configuration Mode is MPMRx
The inserted MPMRx card is enabled.

RMX Release Notes Version 8.3 Inc Detailed Description - New Features
Polycom, Inc. 65
New MPMRx FlagA new MPM-Rx only flag has been added to the RMX. The following System Flag must be added to system.cfg - MCMS user section if the value is to be modified:
LIMIT_SD_AND_CIF_BW_MPMRX - Limits the maximum negotiated and opened bit rate for resolutions equal or lower than SD to 1Mbps. When set to NO, there is NO limitation on SD and CIF bit rates.
a Default: YES.
b Range: YES/NO.
MPMRx Hardware MonitoringThe status and properties of the MPMRx Card can be viewed and monitored in the Hardware Monitor list pane. The Hardware monitor pane displays the number of MPMRx card installed on the RMX 2000/4000. For more information, see the RMX 1500/1800/2000/4000 Administrator’s Guide, Collaboration Server Hardware Monitoring.
MPMRx Properties
To View the Supporting Hardware Components Properties:
In the Hardware Monitor pane, either double-click or right-click and select properties for the desired supporting hardware component.
The component’s properties dialog box will appear with the tabs displayed.
The UI above displays the RMX 4000.

RMX Release Notes Version 8.3 Inc Detailed Description - New Features
Polycom, Inc. 66
MPMRx General Info tab
MPMRx Event Log tab
MPMRx Active Alarms tab

RMX Release Notes Version 8.3 Inc Detailed Description - New Features
Polycom, Inc. 67
MPMRx Hardware Diagnostics
Diagnostics can be performed on the MPMRx card(s) when the MCU is in Diagnostics mode.
To Monitor the MPMRx Card:
In the Hardware Monitor pane select the MPMRx card and click Diagnostics from the drop-down menu. For more information, see the RMX 1500/1800/2000/4000 Administrator’s Guide, Diagnostic Mode (RealPresence Collaboration Server (RMX) 1500/2000/4000).
MPMRx Resource ReportThe basic unit used for reporting video resource usage in the Resource Report is HD720p30 CP. Results are rounded to the nearest integer. The MPM-Rx does not support the Fixed Resource Capacity mode.
For more details about Resource Report, see the RMX 1500/1800/2000/4000 Administrator’s Guide, Resource Reports.
Port Gauge ChangeThe basic unit used for reporting resource usage in the Port Gauges is HD720p30 CP. Results are rounded to the nearest integer.
Video/Voice Port Configuration ChangeFixed Resource Capacity mode has been disabled in the Video/Voice Port Configuration. If Fixed Resource Capacity mode is being used at the time of the upgrade, Flexible Resource Capacity mode will automatically be used. The settings from the last time Flexible Resource Capacity mode was used on the RealPresence Collaboration Server will be implemented when the upgrade is complete.

RMX Release Notes Version 8.3 Inc Detailed Description - New Features
Polycom, Inc. 68

RMX Release Notes Version 8.3 Inc Detailed Description - New Features
Polycom, Inc. 69
Gateway Calls to Remote SIP DomainThe RMX’s Gateway functionality has been enhanced, enabling the connection of H.323 and SIP endpoints residing in a domain, to SIP endpoints residing in a remote domain.
Guidelines The calling endpoint may be H.323 or SIP.
The destination endpoint must be SIP.
RMX 1800 is not supported as it does not yet support Gateway functionality.
Calling a SIP Endpoint in a Remote DomainThe dial string from the calling endpoint to the RMX includes the gateway dial-out number of the SIP endpoint that is located in the remote domain.
By definition, a dial-in string cannot contain two domains and it is therefore necessary that the dial string be of the following format:
mcu-meeting-room*dest%40dest-domain@mcu-domain
Where:
The domain of the gateway call is mcu-domain
The remote destination domain is dest%40dest-domain.
The “%40” is replaced with an “@” when the gateway call is dialed to the remote SIP destination.
Limitation DTMF tones and Caller-id are not passed end-to-end.
In order to support RTV, the SIP Server Type must be defined as Microsoft.

RMX Release Notes Version 8.3 Inc Changes to Existing Features
Polycom, Inc. 70
Changes to Existing Features
Users are able to change the behavior of the policy of number collection for VMR Entry Queues, Conference-IDs and Passwords, allowing a time-out to be used as a stop indicator for the input string.
In previous versions, a # input at the end of the input string indicated completion of the input.
The administrator can configure the system, using the ENABLE_DTMF_NUMBER_WO_DELIMITER system flag to change the previous system behavior, allowing a time-out to be used as a stop indicator for the string input for the local IVR, when the MCU collects the Conference-ID in the local Entry Queue or the Password (chairperson or participant) while routed to the conference.
The flag must be manually added to the System Configuration and its value modified as follows:
A System Reset in not required for the flag setting to take effect.
For more information see, Modifying System Flags in the Collaboration Server (RMX) Administrator’s
Guide.
HD1080p60 Symmetric Resolution SupportFrom Version 8.3, the Collaboration Server supports HD1080p60 video resolution symmetrically; both receiving and sending HD1080p60 video resolution.
Guidelines for Using HD1080p60 Video Resolution SymmetricallyHD1080p60 video resolution is supported symmetrically:
On MPMRx media cards only.
With H.264 video protocol.
For conference profiles with Video Quality set to Motion.
For H.323 and SIP participants.
At line rates up to 4Mbps.
Flag NameValue / Description
YES NO
ENABLE_DTMF_NUMBER_WO_DELIMITER
If the timer expires, the received digits validated even if there is no delimiter.
If the received number is not valid, the system will prompt again for the number according to number of retries. that are configured.
This is the default setting for backward compatibility.
If the timer expires because no delimiter is received, the number input is not valid.
The system will prompt again for the number according to number of retries. that are configured.
RMX Release Notes Version 8.3 Inc Changes to Existing Features
Polycom, Inc. 71
HD1080p60 video resolution is not supported symmetrically:
In 1X1 layouts, including 1X1 layouts in Telepresence Mode. Instead, the Collaboration Server transmits the current speaker endpoint’s video resolution and frames per second.
In TIP environments.
For ISDN participants.
For Content sharing.
With RTV video protocol.
Video Switching (VSW) mode is unchanged supporting HD1080p60 Symmetric Resolution at line rates up to 6Mbps.
For information about resources consumed by HD1080p60 resolution see Resource Capacity. There are 65 video resources per MPMRx card, with four ports consumed per participant connected at HD1080p60 video resolution. A total of 25 HD1080p60 connections are supported per MPMRx card.

RMX Release Notes Version 8.3 Inc Changes to Existing Features
Polycom, Inc. 72
Selecting HD1080p60 Symmetric Video ResolutionHD1080p60 video resolution is selected in the Motion tab of the Resolution Configuration dialog box.

RMX Release Notes Version 8.3 Inc Changes to Existing Features
Polycom, Inc. 73
HD1080p30 and HD1080p60 Content SupportBeginning with Version 8.3, Content is supported at resolutions of HD1080p30 and HD1080p60 in both Base and High Profiles.
HD1080p30 and HD1080p60 Content Support GuidelinesHD1080p30 Content is supported:
On Realpresence Collaboration Server model 1800.
On Realpresence Collaboration Server models 2000 and 4000, with MPMRx cards installed.
At a maximum content rate of 2048 kbps on Realpresence Collaboration Server models 1800, 2000 and 4000.
4096 kbps is the maximum content rate for 1080p60.
HD1080p30 and HD1080p60 Content are supported:
On the Realpresence Collaboration Server 1800.
In the normal (switched) Content mode.
In AVC-CP conferencing mode only.
With SIP and H.323 endpoints
With the H.263 and H.264 Auto Selection, H.264 HD and H.264 Cascade and SVC Optimized. Content protocol options.
With Customized Content Rates.
In (H.323) Cascaded conferences.
On Legacy Endpoints when the Send Content to Legacy Endpoints option is selected.
Content is shared using the video channel.
HD1080p30 and HD1080p60 Content are not supported:
By MCUs containing MPMx cards.
With RealPresence® Content Sharing Suite for Microsoft® Lync® endpoints.
By ISDN endpoints.
When TIP compatibility is set to Prefer TIP or Video and Content.
TIP Content is shared at XGA Resolution at 5 frames per second.
By H.263 Content Protocol.
In Content Transcoding mode.
If the Content was defined as High Profile, endpoints which support only Base Profile Content will not be able to receive Content using the Content channel. If the Send Content to Legacy Endpoints option is selected they can receive Content shared using the video channel.
Sharing Base and High Profile Content with HD1080p30/60 ResolutionIn Base Profile, Content sharing at the new 1080p30 and 1080p60 rates will behave as in previous versions:

RMX Release Notes Version 8.3 Inc Changes to Existing Features
Polycom, Inc. 74
In non-Cascaded environments Content Video Switching mode, Content sharing rate, resolution and frame rate is negotiated according to the capabilities of highest common capabilities of all endpoints connected to the conference. Endpoints which do not support High Profile will not receive content through the Content channel.
In Cascaded environments Content sharing rate, resolution and frame rate must be pre-defined and endpoints which do not support these capabilities will not receive content though the Content channel.
For more information see the RealPresence Collaboration Server (RMX) 1500/1800/2000/4000 Administrator’s Guide, Multiple Content Resolutions.
Changes to the Video Quality Dialog BoxAn additional check box H.264 High Profile and an additional Content Rate drop-down menu have been added to the Video Quality dialog box.
The H.264 High Profile check box is un-checked by default and is displayed next to the Content Protocol drop-down menu if all the following conditions are met:
The MCU is a Realpresence Collaboration Server 1800, or 2000/4000 containing MPMRx cards.
The selected Conferencing Mode is AVC-CP.
Multiple Resolutions (Content Transcoding) is not selected.
RMX Release Notes Version 8.3 Inc Changes to Existing Features
Polycom, Inc. 75
The selected Content Protocol is H.264 HD, H.264 Cascade and SVC Optimized or H.263 and H.264 Auto Selection.
If H.264 HD, H.264 Cascade and SVC Optimized is selected, the Content Resolution is set according to the line rate.
If H.263 and H.264 Auto Selection is selected, the Content Resolution is automatically set according to the line rate and the H.264 High Profile check box is automatically unchecked and disabled.
TIP Compatibility (in the Profile - Advanced dialog box) is selected as None or Video Only.
The conference Line Rate is sufficient to support HD1080p30/60 content.
For more information about conference line rates and allocated content rates, see the following tables and the RealPresence Collaboration Server (RMX) 1500/2000/4000 Administrator’s Guide, Content Sharing.
The Content Rate drop-down menu is displayed next to the Content Resolution drop-down menu when:
H.264 Cascade and SVC Optimized is the selected Content Protocol
and
CustomizedContentRate is the selected Content Setting.
The Content Rate is dependent on the MCU type (Realpresence Collaboration Server with MPMRx or Realpresence Collaboration Server 1800) and can be up to 66% of the conference line rate. In MCUs with MPMRx cards the Content Rate is limited to 2048 kbps, while when used with the Realpresence Collaboration Server 1800 the Content Rate is limited to 4096 kbps.
Conference Line Rate and Content Allocation Rate for Base Profile
Bit Rate Allocated to ContentChannel (Kbps)
Content
Maximum Resolution Frames/Second
64-512 H.264 HD720 5
512-768 H.264 HD720 30
768-1536 H.264 HD1080 15
1536-2048 / 3072 (Realpresence Collaboration Server 1800)
H.264 HD1080 30
3072-4096 H.264 HD1080 60

RMX Release Notes Version 8.3 Inc Changes to Existing Features
Polycom, Inc. 76
Highest Common Content Bit Rate Allocation for Base Profile
* 2560 (Realpresence Collaboration Server 1800)

RMX Release Notes Version 8.3 Inc Changes to Existing Features
Polycom, Inc. 77
Bit Rate Allocation to Content Channel per Conference Line Rate for H.264 Cascade and SVC Optimizedfor Base Profile
*3072, ‡2560 (Realpresence Collaboration Server 1800)

RMX Release Notes Version 8.3 Inc Changes to Existing Features
Polycom, Inc. 78
Conference Line Rate and Content Allocation Rate for High Profile
Highest Common Content Bit Rate Allocation for High Profile
Bit Rate Allocated to ContentChannel (Kbps)
Content
Maximum Resolution Frames/Second
64-384 H.264 HD720 5
384-512 H.264 HD720 30
512-768 H.264 HD1080 15
768-2048 H.264 HD1080 30
2048-4096 H.264 HD1080 60

RMX Release Notes Version 8.3 Inc Changes to Existing Features
Polycom, Inc. 79
Bit Rate Allocation to Content Channel per Conference Line Rate for H.264 Cascade and SVC Optimizedfor High Profile

RMX Release Notes Version 8.3 Inc Corrections and Known Limitations
Polycom, Inc. 80
Corrections and Known Limitations
Corrections Between Version 8.3 and Version 8.3 Inc
OpenSSL 'Heartbleed' VulnerabilityA HotFix Note was issued pertaining to US – CERT, Alert (TA14-098A):
Released file: RMX_8.3.0.245.bin
Affected version: 8.3
Release date: April 22, 2014
Purpose
RMX_8.3.0.245.bin addresses the vulnerability in OpenSSL that could allow a remote attacker to expose sensitive data, possibly including user authentication credentials and secret keys, through incorrect memory handling in the TLS heartbeat extension.
For a full description see US – CERT, Alert (TA14-098A) at https://www.us-cert.gov/ncas/alerts/TA14-098A.
Prerequisites and Configuration Considerations
Install RMX_8.3.0.245.bin only on RealPresence Collaboration Servers (RMX) with v8.3 installed.
Functionality Affected
RMX_8.3.0.245.bin was built by compiling the OpenSSL module with OpenSSL flag OPENSSL_NO_HEARTBEATS which disables the TLS heartbeat extension mechanism.
There is no further system functionality impact.
Installation Notes
Upgrade and installation are as described in the RealPresence Collaboration Server RMX 1500 / 1800 / 2000 / 4000 Release Notes for Version 8.3 and Version 8.3.Incremental.
Rollback Considerations
Downgrade procedures to a version prior to v8.3.0.245 are as described in the RealPresence Collaboration Server RMX 1500 / 1800 / 2000 / 4000 Release Notes for Version 8.3 and Version 8.3.Incremental.
RMX Release Notes Version 8.3 Inc Corrections and Known Limitations
Polycom, Inc. 81
Resolved Issues
Corrections Between Version 8.3 and Version 8.3 Inc
RMX_8.3.0.245.bin addresses the following issue.
Issue # Description
CVE-2014-0160 The (1) TLS and (2) DTLS implementations in OpenSSL 1.0.1 before 1.0.1g do not properly handle Heartbeat Extension packets, which allows remote attackers to obtain sensitive information from process memory via crafted packets that trigger a buffer over-read, as demonstrated by reading private keys, related to d1_both.c and t1_lib.c, aka the Heartbleed bug. For more information see http://cve.mitre.org/cgi-bin/cvename.cgi?name=CVE-2014-0160.
Issue ID Category DescriptionFound in Version
BRIDGE-12220
Audio Failure to delete either the conference or one audio-only EP after disconnecting and then attempting to reconnect 100 audio-only EPs in a Mixed Mode conference running on an RMX 4000 (MPMx).
V8.3 Inc
BRIDGE-12221
Audio Failure to clear audio resources after disconnecting and then attempting to reconnect 100 audio-only EPs led to the inability to add more than 37 audio-only EPs in a Mixed Mode conference running on an RMX 4000 (MPMx).
V8.3 Inc
BRIDGE-12279
Audio Audio Only icon registers real audio-only participants but also wrongly includes Cascade Audio-Only participants in a conference running on an RMX 2000 (MPMx) registered to a DMA.
V8.3 Inc
BRIDGE-12406
Audio Audio channel connected for a Lync client in a conference registered to the DMA and running on an RMX 2000 in which no audio channel connection has been specified.
V8.3 Inc
BRIDGE-11967
Content In a cascaded call, when an RMX 2000 sends content, the RMX 4000 user receives content, but endpoints connected to conference on RMX 4000 do not receive content.
V7.6.1
BRIDGE -12459
General MCU internal problem "ACK” not receivedConfPartyMcuInternalProblem" sometimes occurs.
V8.3 Inc
BRIDGE-11566
General PCO issue with meetings that share the same subject name. V8.1
BRIDGE-12004
General An ad-hoc call dialing into a Virtual Meeting Room disconnects intermittently.
V8.1
BRIDGE-12257
General Core dump occurs after creating cascade in an AVC-only conference running on an RMX 2000 (MPMx).
V8.3 Inc

RMX Release Notes Version 8.3 Inc Corrections and Known Limitations
Polycom, Inc. 82
BRIDGE-12478
General In RMX 1800 when using Chinese, one of the field name in the System Information dialog-box is mis-translated, as well as the message in all the confirmation pop-ups.
V8.3
BRIDGE-11696
Interoperability SIP Audio trunk through from Telica Signaling Media GW through Cisco ASA not working.
V8.1
BRIDGE-12467
ISDN In a 2 mbps AVC only conference, when right-clicking on an ISDN endpoint and selecting Participant Debug Info, the ISDN endpoint disconnects.
V8.3
BRIDGE-11540
IVR The IVR is heard twice on the slave MCU by the chairperson, when selecting *5 to mute all conference parties over a cascade link.
V8.1
BRIDGE-11033
Layout Slave conference in Cascade is not set to 1x1, not Auto Layout, even though DMA sends correct XML string.
V8.1
BRIDGE-12358
Licensing Licensing failure after upgrading to RMX 2000 8.3.0.245.27 V8.3 Inc
BRIDGE-11508
Media Card Media Card crash occurs if a conference is hosted on more than one media card.
V8.3
BRIDGE-12354
Media Card Alarm fails to indicate when MPMRX-S card status is Major. V8.3
BRIDGE-12493
Media Card MPMRx Media Card fails on start-up. V8.3
BRIDGE-10599
Microsoft - Partners
A Lync 2013 client using a Logitech 930e USB camera receives poor video quality. A Lync 2013 client is capable of receiving and sending up to 720p with RTV, however when using the same USB camera (Logitech 930e) the Lync Room System only sends CIF.
V8.2
BRIDGE-12377
Microsoft - Partners
Lync Cascade client fails to disconnect after Lync user is terminated in an AVC-only conference running on an RMX 2000 registered to a DMA.
V8.3 Inc
BRIDGE-12379
Microsoft - Partners
Lync Cascade client failed to open video channels after connecting as Audio Only and start video in an AVC conference running on an RMX 2000 (MPMx).
V8.3 Inc
BRIDGE-10697
Security A Group Series in maximum security mode endpoint registerted as AS SIP to a Redcom LSC could not connect to a RealPresence Collaboration Server in Ultra Secure Mode, also registered as AS SIP to the Redcom LSC.
V8.2
BRIDGE-11692
SIP Core dumps occur due to SIP Request containing a null header parameter.
V8.2
BRIDGE-12271
SIP All calls fail and the RMX reports a core dump when participants dial in to a Virtual Meeting room using SIP in a conference running on a RMXRx card.
V8.3
Issue ID Category DescriptionFound in Version

RMX Release Notes Version 8.3 Inc Corrections and Known Limitations
Polycom, Inc. 83
BRIDGE-12098
Upgrading The upgrade procedure from 8.2.0.85 to 8.3.0.245 fails due to differences in the GRUB configuration files.
V8.3
BRIDGE-10567
Video During ISDN calls, video freezes after several seconds of operation on RMX with latest version of RTM ISDN card inserted behind MPMRx media card. In a 384 kbps AVC-only conference that dials out to an HDX 7006 using H.320 over ISDN using the new ISDN card, the video freezes after a few seconds.
V8.3
BRIDGE-11538
Video Video DSP crash due to Encoder1080 creation failure, caused by wrong resolution width parameter.
V8.3
BRIDGE-11544
Video Poor lip sync experienced by Lync clients, with audio preceeding video by approximately 1 second, during sub-optimal network conditions.
V8.3
Issue ID Category DescriptionFound in Version

RMX Release Notes Version 8.3 Inc Corrections and Known Limitations
Polycom, Inc. 84
Version 8.3 Inc Known LimitationsVersion 8.3 Inc Known Limitations
Issue ID Category Description Found In Workaround
BRIDGE-6345
Audio AVC participant Content audio is also muted by microphone mute setting when dialing into SVC/AVC Mixed mode conference.
V8.1
BRIDGE-10722
Cascading When cascaded VMR conferences are created via the DMA pushed profile with the "Cascade for bandwidth" option enabled, the DTMF are working locally (*6 etc...) but not thru the cascaded link.
V8.1.7
BRIDGE-2003
Cascading An ISDN Cascading Link cannot be connected to cascading conferences.
V7.8.0
BRIDGE-442
Cascading During a Cascaded conference, the cascaded link sometimes send a "need help" message to participants.
V7.8.0
BRIDGE-10815
Content In an encrypted AVC only conference set to Encrypt When Possible, using AS SIP with 2 Group Series endpoints connecting over SIP, the Group Series endpoints do not receive content.
V8.3
BRIDGE-11294
Content In a 512 kbps conference with 120 endpoints including 3 HDX's, after starting and stopping content 3 times content remains displayed on one of the HDX's.
V8.3
BRIDGE-11403
Content When the content resolution changes in a cascaded environment, the new content resolution is not updated in the slave MCU.
V8.3
BRIDGE-559
Content During a CP conference with dial-in HDX endpoints, after sending content from a desktop, the content displays in a single cell of the CP layout.
V7.8.0
BRIDGE-6519
Content On a conference set to LPR and content, the CSS clients sends content to the RPD endpoint at 380Kbps, however the RPD negotiated content line rate settings should be set to 192 Kbps.
V8.1.7
BRIDGE-6579
Content When an RPD is sharing content and applications, VVX endpoints failed to receive content.
V8.1.7
BRIDGE-450
Diagnostics When the RMX is in a Diagnostic mode, in the Hardware Monitor, Loop Tests fail on the ISDN card.
V7.8.0

RMX Release Notes Version 8.3 Inc Corrections and Known Limitations
Polycom, Inc. 85
BRIDGE-458
Diagnostics When the RMX is in Hardware Monitor - Diagnostic mode, Loop Tests fail on the ISDN card.
V7.8.0
BRIDGE-7540
Diagnostics Diagnostic doesn't work when the system is not in Ultra Secure Mode. (By design, Diagnostics Mode does not function when the RMX is in Ultra Secure Mode.)
V8.2
BRIDGE-341
FECC It is possible to choose an empty layout cell for far camera control.
V7.8.0
BRIDGE-10067
General In an encrypted 768 kbps conference with LPR enabled, after 38 minutes the MCU encountered an internal hardware problem, which was corrected automatically.
V8.3
BRIDGE-1027
General CS baseline in the Comlog problems during RMX startup.
V7.8.0
BRIDGE-10377
General When the RealPresence Collaboration Server received multiple invalid API requests, the RealPresence Collaboration Server generated a High CPU usage alarm and then rebooted.
V7.8.0
BRIDGE-10400
General A core dump was created In a cascaded conference, when sending content from the Master to the Slave, and the participant sending the content disconnected.
V7.7
BRIDGE-10403
General Endpoints with Unicode names exceeding 80 characters caused the RealPresence Collaboration Server to crash.
V7.8.0
BRIDGE-10515
General Endpoints connecting at less than 64 kbps could cause the RealPresence Collaboration Server (RMX) to crash.
V7.8.0
BRIDGE-10516
General The MCU uses incorrect conference ID parameter in IRR which causes a 3rd party gatekeeper to send DRQ to RMX followed by the RMX disconnecting the endpoints
V7.8.0
BRIDGE-1167
General After upgrading the RMX 4000 to version 7.7 and installing certificates they do not appear in the Certification Repository page. An RMX reset is required to update the Certification Repository page.
V7.8.0
BRIDGE-3684
General When the Encryption mode is "encryption when possible" is enabled in the RMX Collaboration Client, the HDX fails to share content and sometimes other endpoints view a blue screen instead of content.
V8.1.7, V8.3
Issue ID Category Description Found In Workaround

RMX Release Notes Version 8.3 Inc Corrections and Known Limitations
Polycom, Inc. 86
BRIDGE-400
General In Multiple Networks Configuration, Recording Links use the default Network Service to connect to conferences, therefore the recording system must be defined on the default network Service to enable the recording.
V7.8.0
BRIDGE-418
General When upgrading the RMX and changing from Event Mode to CP mode, a conference template which is a mismatch for CP mode can be scheduled as a reservation, even though it cannot be used to start a conference immediately.
V7.8.0
BRIDGE-4212
General When the SIP_ENCRYPTION_KEY_EXCHANGE_MODE flag is set to SDES, endpoints that attempt to hold and then resume are disconnected.
V8.1.1
BRIDGE-443
General After changing the conference name and the Profile to the SIP Registration profile and then clicking OK, the changes do not take affect nor are they registered.
V7.8.0
BRIDGE-478
General When there are more than one conferences configured to "Video Quality Optimized" or H.323 running simultaneously, some dial-out participants will not connect to a conference, receiving a "resource deficiency - 0" in the Call Disconnection Cause field in the endpoint Properties box.
V7.8.0
BRIDGE-567
General In an Event Mode conference, after selecting an HDX to be the chairperson, nothing happened when using a PCM remote control to Mute& Block audio / suspend video of the chairperson.
V7.8.0
BRIDGE-591
General When selecting one of the last three colors from the Message Overlay color drop down menu, the color selection is not implemented during the conference.
V7.8.0
BRIDGE-626
General When trying to control the conference using PCM via a virtual remote control, some of the PCM options cannot be selected.
V7.8.0
BRIDGE-7604
General An error message saying, "Failure Status" is sometimes shown when attempting to save a conference template.
V8.2 Reset the RMX.
BRIDGE-13146
General System starts even if control and/or power-supply hardware is not compliant.
V8.3.Inc
Issue ID Category Description Found In Workaround

RMX Release Notes Version 8.3 Inc Corrections and Known Limitations
Polycom, Inc. 87
BRIDGE-13130
General When inserting an MPMRx card during system operation, voltage problem is logged erroneously.
V8.3 Restart system.
BRIDGE-13135
General When replacing RTM IP Card, for RMX 2000 and 4000, MPMX may stay in startup. An Active Alarm, "MPL start up failure no production activation”, is raised. Several minutes later an Active Alarm, “MCU currently in MPMRx mode” is raised.
V8.3 Hard reset.
BRIDGE-10139
General When replacing CNTL BRD2212D-L0, Generic card does not start properly.
V8.1.7 Two hard resets.
BRIDGE‐13136
General On RMX1500, if a single DSP malfunctions, the MPMX reports Major status but there is no active alarm message the "MCU State" is reported as Normal.
V8.3.1
BRIDGE-9871
Hardware In an encrypted SVC conference with 75 participants, after one hour the MCU suffered from a recoverable hardware problem, but video was not restored after hardware recovery.
V8.3
BRIDGE-10299
Interoperability When a Sametime 9 clients are connected to the MCU using a DMA, after suspending video the video cannot be resumed, and regardless the video resumes automatically within 1 minute.
V8.3
BRIDGE-10628
Interoperability In a 4 mbps confererence with TIP enabled, the resolution set to auto, with a Cisco endpoint and an HDX 8000 registered to CUCM, the HDX receives 720p60 resolution instead of 1080p30.
V8.3
BRIDGE-10921
Interoperability In a 2 mbps AVC only conference, when right-clicking on an ISDN endpoint and selecting Participant Debug Info, the ISDN endpoint disconnects.
V8.3
BRIDGE-10956
Interoperability When a Siemens OpenStage endpoint dials into an encrypted conference using IPv4 with the SEND_SRTP_MKI flag set to NO tries to hold a conference, the MCU deletes the OpenStage participant from the conference. The OpenStage participant cannot rejoin the conference.
V8.3
Issue ID Category Description Found In Workaround

RMX Release Notes Version 8.3 Inc Corrections and Known Limitations
Polycom, Inc. 88
BRIDGE-10974
Interoperability When an MXP 6000 using serial ISDN, an HDX 7000 using H.323, and a Vidyo Softclient connect using SVC to an RMX 1500 using a DMA 7000 and Vidyo Gateway and Vidyo Suite, the H.320 endpoint cannot share or receive content.
V8.1.4
BRIDGE-327
Interoperability RSS 2000 Connection H.323 Link Status pane, E.164 column displays RMX Conference ID instead of E.164 data when recording RMX conference that is enabled to start recording immediately.
V7.8.0
BRIDGE-433
Interoperability When the RMX and HDX endpoints are registered with a CMA, after dialing out from an HDX endpoint a numerical error message appears.
V7.8.0
BRIDGE-538
Interoperability A Sony PCS-G90 is unable to connect over H.323 to an encrypted conference running on RMX 1500.
V7.8.0
BRIDGE-5396
Interoperability CTS3010 endpoint disconnects after Hold and Resume when Music on Hold is enabled in CUCM.
V8.1.1 Configure SIP trunks from CUCM to Polycom system components with Music on Hold disabled.
BRIDGE-556
Interoperability When the RMX is registered with the Broadsoft server, a SIP to H.323 gateway call fails when dialing directly to the destination endpoint.
V7.8.0 Use the Gateway IVR routing method.
BRIDGE-6492
Interoperability "When the RMX is used as ISDN-Gateway (H.320) with OpenScapeVoice ( Siemens SoftMCU), after connecting Tandberg MXP6000 & Tandberg Edge95 ISDN endpoints, Sip endpoints hear only audio and cannot view the Welcome screen.
V7.8.0
BRIDGE-6560
Interoperability ITP endpoint’s Slave endpoints do not connect in RMX dial out call.
V7.8.0
BRIDGE-7105
Interoperability Unable to open more than 9 SD endpoints on a single Netra DSP.
V8.1.8 To enable 12 CIF/SD ports per Netra unit add the following flag: Flag name: LIMIT_CIF_SD_PORTS_PER_NETRA_UNIT Value: 'NO'
Issue ID Category Description Found In Workaround
RMX Release Notes Version 8.3 Inc Corrections and Known Limitations
Polycom, Inc. 89
BRIDGE-7869
Interoperability Polycom CMAD and the Telepresence M100 endpoints fail to share content with Group Series endpoints after dialing in over SIP to a mixed CP and SVC conference.
V8.2
BRIDGE-7884
Interoperability During a CP conference, Radvision Scopia XT1000 & XT5000 endpoints registered to the DMA and connected via SIP share content via the video channel and not the content channel.
V8.2
BRIDGE-7885
Interoperability During a CP conference running at a line rate of 4MB, Tandberg 1700 (MXP) endpoints registered to a DMA fail to receive content from a Tandberg Edge95 (MXP) endpoint.
V8.2
BRIDGE-793
Interoperability When CTS 3000 connects as dial in through RealPresence DMA system, the Gathering Slide on CTS 3000 endpoint flickers and displays artifacts. Conference is CP, gathering enabled, TIP; Video &Content at 2560kbps, 1080p resolution with No Encryption.
V7.8.0
BRIDGE-8244
Interoperability When an HDX 8000 HD endpoint set to a maximum speed of 128kbps for receiving calls gets a call in a conference on an RMX 1800 running at 256kbps, the call disconnects.
V8.1
BRIDGE-8352
Interoperability Nortel 1140 endpoints experience one-way audio then all parties are dropped and the conference terminates when participants resume the call after putting the conference on 'Music on Hold'.
V8.1.4
BRIDGE-9624
Interoperability The ISDN spans list in the Hardware Monitor is empty when using the new ISDN card.
V8.3
BRIDGE-9997
Interoperability In a conference with Lync 2013 participants dialing in via a DMA with IVR disabled and gathering phase disabled, the first participant sees artifacts after connecting.
V8.3
VNGFE-7750
Interoperability CMA Version 6.2.5 cannot view or manage ongoing conferences on RMX Versions 8.2 and higher unless they are scheduled by CMA. This issue does not apply to RMX1800.
V8.2
VNGFE-7949
Interoperability RMX doesn’t support packets of over 30ms duration.
V7.8
BRIDGE-8396
Interoperability/Partners
Cisco CTS3010 and TX9000 endpoints experience poor resolution in a CP conference sharing video and content with both RMX 1800 and Lync clients registered to a Lync server.
V8.3
Issue ID Category Description Found In Workaround

RMX Release Notes Version 8.3 Inc Corrections and Known Limitations
Polycom, Inc. 90
BRIDGE-10783
ISDN A VTC endpoint sometimes got stuck in an entry queue, and eventually received a busy tone.
V7.8.0
BRIDGE-10268
IVR When IVR was enabled with Roll Call enabled, a participant who entered the pound sign after stating his name entered the conference unannounced, and without the "Joined the Conference" message.
V7.8.0
BRIDGE-329
IVR When DTMF codes have been entered by the participants, the volume of the IVR Message may be suppressed or the message may be cut.
V7.8.0
BRIDGE-387
IVR In the IVR Services when replacing/changing a music file and clicking on Play, the music file does not start.
V7.8.0
BRIDGE-976
IVR When two Avaya 1XC Softphone endpoints join a conference, the IVR Service "first to join conference" music continues to play as if there is just one person in the conference.
V7.8.0
BRIDGE-1139
Multilingual When using the RMX Manager or Web Client in any language other than English, the Send Certificate Button in the Certificate Repository window is not translated into any language.
V7.8.0
BRIDGE-11461
Multilingual When the alert, "SSH is enabled" was translated into Chinese, the Chinese equivalent was, "Music file failed”.
V8.3
BRIDGE-1601
Multilingual When using the RMX Manager or Web Client in Russian, the right-click menu on a group in the address group shows several items not translated into Russian.
V7.8.0
BRIDGE-300
Multilingual When using the RMX Manager or Web Client in German, the text next to the dropdown for encryption options in the advanced tab of Conference Profile properties uses two lines. The second line is cut off.
V7.8.0
BRIDGE-644
Multilingual A number of fields in the RMX Manager and Web Client are not translated into Traditional Chinese
V7.8.0
BRIDGE-948
Multilingual The RMX Time menu option was not properly translated in Russian. The user interface in Russian displays the menu item for RMX Time, which does not contain the word, "RMX", although it is included for other languages,
V7.8.0
Issue ID Category Description Found In Workaround

RMX Release Notes Version 8.3 Inc Corrections and Known Limitations
Polycom, Inc. 91
BRIDGE-10970
Partners - Microsof
When dialing in to a Lync 2013 registered conference as audio only and then escalating to video, the Lync 2013 client sometimes sees video for a few seconds and then the video stops or disconnects completely.
V8.3
BRIDGE-6511
Partners - Microsof
After Lync Clients dial-in into a meeting room, if there is inadequate network bandwidth the RMX MPMx card crashes and a core dump is created.
V8.1.7
BRIDGE-9513
Partners - Microsof
The Real-Time Video resolution changes every four to five seconds when a Microsoft Lync client running on an RealPresence Collaboration Server (RMX) 1800 dials in to a 256kbps conference.
V8.2
BRIDGE-10513
Partners - Microsoft
Lync clients displayed red bars in the video. V8.1.7
BRIDGE-10772
Partners - Microsoft
After two to three weeks, Lync 2010 stops routing calls to the RealPresence Collaboration Server.
V7.8.0 Restart the RealPresense Collaboration Server
BRIDGE-1560
Partners - Microsoft
When a Lync client dials in using TCP only the Channel Status - Advanced tab in the participant properties window shows it is connecting using UDP instead, even though it is really connecting using TCP.
V7.8.0
BRIDGE-2201
Partners - Microsoft
"Call Admission Control (CAC) calls from HDX get disconnected after approximately 1 hour when both SIP_TCP_PORT_ADDR_STRATEGY and MS_KEEP_ALIVE_ENABLE System Flags are set to NO.
V7.8.0 Set both flags SIP_TCP_PORT_ADDR_STRATEGY and MS_KEEP_ALIVE_ENABLE to YES.
BRIDGE-447
Resource Capacity
Two VSW conferences each with participants are all located on one MPMx card, when it is expected that each conference and its participants should be located on separate MPMx cards.
V7.8.0
BRIDGE-1488
RMX Web Client
In the Profile Properties Video Settings dialog box, some field descriptions are incomplete in the Russian User Interface.
V7.8.0
BRIDGE-1490
RMX Web Client
In Hardware Monitor, Location Header and Card Location data are displayed in English in the Russian User Interface.
V7.8.0
BRIDGE-1593
RMX Web Client
"In the Profile Gathering Settings dialog box, some fields are displayed in English in the Russian User Interface.
V7.8.0
Issue ID Category Description Found In Workaround

RMX Release Notes Version 8.3 Inc Corrections and Known Limitations
Polycom, Inc. 92
BRIDGE-1609
RMX Web Client
"Information Collector, when interrupted, displays Collection Info Status message in English in the Russian User Interface.
V7.8.0
BRIDGE-5292
RMX Web Client
Alternate SIP Servers are not supported, although configuration fields are displayed in user interface.
V7.8
BRIDGE-11469
Security The RMX could not detect a proper version of BIOS of Ultra Secure Mode.
V8.1.4
BRIDGE-2044
Security When using the White List for IP addresses access is allowed to the Shelf Management page from an IP not on the white list.
V7.8.0
BRIDGE-5937
Security SIP registration fails in an RMX conference running in ultra-secure mode in auto configuration for IPv6 with OCSP on, and the IPv6 global responder URL specified.
V8.1.4, V8.3
BRIDGE-7549
Security System Rescue procedure using the Standby button fails when the system is in Ultra Secure Mode resulting in the RMX remaining in Startup mode.
V8.1.4 Workaround: Reset the RMX to Factory Defaults to disable ULTRA_SECURE MODE before performing the System Rescue procedure.
BRIDGE-524
SIP When multiple Network Services are configured on RMX with an MPM+ card, each of which is registered with a SIP registrar, and one of those SIP registrars has a problem, an alarm will be raised but it will not specify the network service or the SIP registrar.
V7.8.0
BRIDGE-8152
SIP Alternate SIP servers are not supported. V8.1.1
BRIDGE-9814
SIP A RealPresence Mobile client running on iOS connecting using SIP to an AVC only conference with the content profile set to H264 Cascade and SVC Optimized cannot receive content.
V8.3
BRIDGE-410
Software Version
VVX dial in participant's IPAddress/Phone field in Participants List field is listed as 0.0.0.0 instead of the VVX's actual IP Address or phone number.
V7.8.0
Issue ID Category Description Found In Workaround

RMX Release Notes Version 8.3 Inc Corrections and Known Limitations
Polycom, Inc. 93
BRIDGE-6017
Software Version
The SAN field, DNS Name (FQDN) in the Create Certificate Request dialog box is not used for Machine Account validation. For example, the RealPresence DMA system will not validate the RMX unless the FQDN field in the User Properties dialog box is correctly filled in.
V8.1.4
BRIDGE-6037
Software Version
On IPv6 configured RMX, when changing IPv6 Configuration Method from Manual to Auto (Stateless) for IPv6 only RMX, RMX the Internal System Configuration during Startup alarm is displayed with a duration of 10 minutes or longer after system start up.
V8.1.4 Use Manual IPv6 Configuration Method with IPv6.
BRIDGE-670
Software Version
Manual connection can take up to 30 seconds to begin in 2048kbps conference, with manual dial out to over 80 participants.
V7.8.0
BRIDGE-467
Upgrade Process
After upgrading from version 7.6.1.136 to 7.7.0.41, an activation key is not requested.
V7.8.0
BRIDGE-10473
Video In a mixed AVC-SVC non-encrypted 768 kbps confernece with a password with a RealPresence Mobile Android connecting using H.323 and AVC and a Macintosh RealPresene Desktop client using SIP and SVC, the Mac client shows a bright border on the bottom of the video.
V8.3
BRIDGE-10765
Video In an SVC conference on an MCU using IPv6 only, participants only saw the speaker and not any of the other participants.
V8.3,
BRIDGE-10767
Video When a participant's connection to a conference was terminated in a non-standard way, the layout for multiple participants was not built.
V7.8.0
BRIDGE-10809
Video When a multi-screen endpoint using TIP disconnects after a regular H.323 endpoint connects, the video displayed has a line of artifacts.
V8.3
BRIDGE-11211
Video When an HDX connecting over ISDN connects to a recorded conference hosted on an MCU connected securely to a DMA which is connected insecurely to another MCU, the HDX sees all participants instead of only the active speaker.
V8.3
BRIDGE-11406
Video The MCU did not update the layout of an HDX from 4x3 to 16x9.
V7.8.0
Issue ID Category Description Found In Workaround

RMX Release Notes Version 8.3 Inc Corrections and Known Limitations
Polycom, Inc. 94
BRIDGE-1176
Video QCIF resolution option is not listed in the Profiles, Video Quality, Maximum Resolution menu.
V7.8.0
BRIDGE-232
Video When the camera of a 1080p 60-enabled endpoint connected at a resolution of 1080p60 is quickly moved, the top half of the video is sometimes not synced with the bottom half.
V7.8.0
BRIDGE-440
Video Auto Scan does not work when Same Layout is active.
V7.8.0
BRIDGE-486
Video When running a conference set to Same Layout, Auto layout and Polycom skin on the RMX whose resolution configuration for SD is set to 128Kbps, one of the layout cells displayed on some of the endpoints is distorted.
V7.8.0
BRIDGE-6448
Video When the VMR profile is set to prefer TIP and LPR enabled, after connecting to the conference, a SIP RPX has video problems.
V8.1.1
BRIDGE-925
Video When the Telepresence Mode is enabled in the Conference Profile, conferences are able to start even though the flag: "ITP_CERTIFICATION" is set to NO. This flag should disable Telepresence features in the Conference Profile.
V7.8.0
BRIDGE-9369
Video In a 4096 kbps conference with site names and message overlay enabled whose Video Quality is set to Motion, the next on an HDX using 4CIF resolution saw stretched text while endpoints using other resolutions received correctly proportioned text.
V8.1.5
BRIDGE-9501
Video In a 2048 mbps motion lecture conference, an HDX set to receive PAL resolution at 768 kbps or 256 kbps line rates receives NTSC resolutions or 736X400 and 448X240.
V8.1.8
Issue ID Category Description Found In Workaround
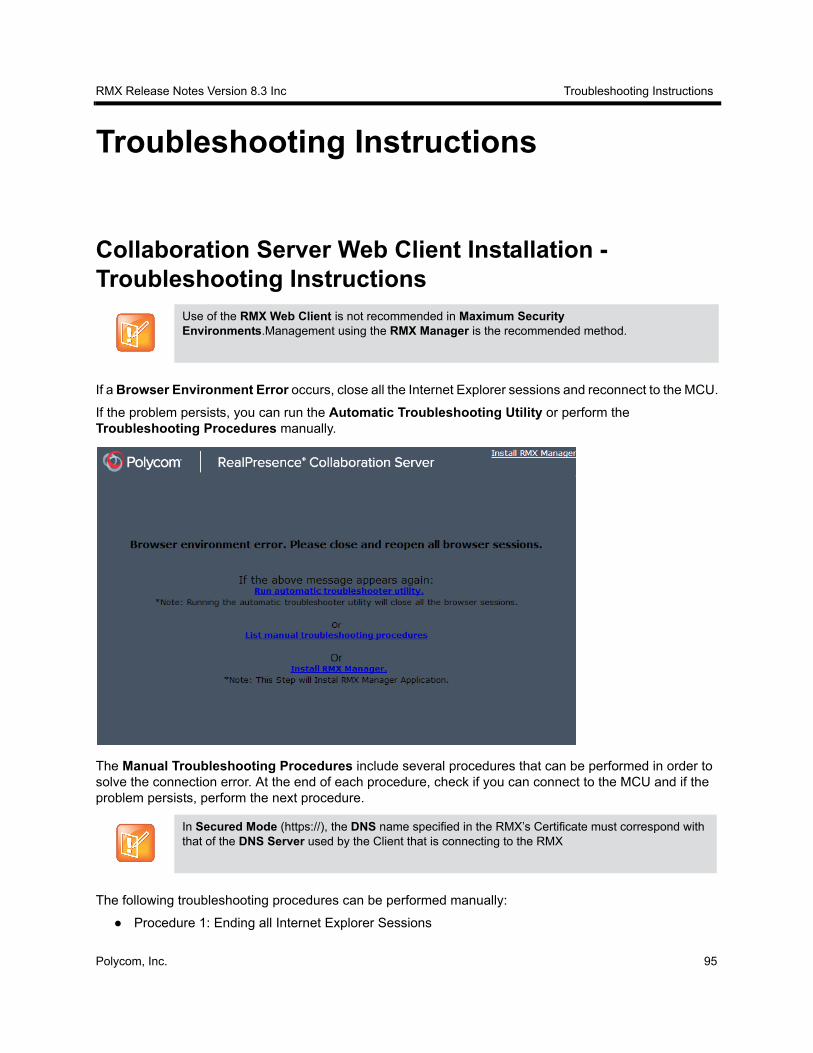
RMX Release Notes Version 8.3 Inc Troubleshooting Instructions
Polycom, Inc. 95
Troubleshooting Instructions
Collaboration Server Web Client Installation - Troubleshooting Instructions
If a Browser Environment Error occurs, close all the Internet Explorer sessions and reconnect to the MCU.
If the problem persists, you can run the Automatic Troubleshooting Utility or perform the Troubleshooting Procedures manually.
The Manual Troubleshooting Procedures include several procedures that can be performed in order to solve the connection error. At the end of each procedure, check if you can connect to the MCU and if the problem persists, perform the next procedure.
The following troubleshooting procedures can be performed manually:
Procedure 1: Ending all Internet Explorer Sessions
Use of the RMX Web Client is not recommended in Maximum Security Environments.Management using the RMX Manager is the recommended method.
In Secured Mode (https://), the DNS name specified in the RMX’s Certificate must correspond with that of the DNS Server used by the Client that is connecting to the RMX

RMX Release Notes Version 8.3 Inc Troubleshooting Instructions
Polycom, Inc. 96
Procedure 2: Deleting the Temporary Internet Files, Collaboration Server Cookie and Collaboration Server Object
Procedure 3: Managing Add-ons Collisions
Procedure 4: Add the Collaboration Server to the Internet Explorer Trusted Sites List
Procedure 5: Browser Hosting Controls (Optional)
Procedure 1: Ending all Internet Explorer Sessions
In some cases, although all the Internet Explorer sessions were closed, the system did not end one or several IE processes. These processes must be ended manually.
To end all Internet Explorer sessions:
Start the Task Manager and click the Processes tab.
1 Select an iexplore process and click the End Process button.
2 Repeat this process for all iexplore processes that are currently active.
3 Close the Windows Task Manager dialog box.
4 Open the Internet Explorer and connect to the MCU.
5 If the problem persists, continue with Procedure 2.
Procedure 2: Deleting the Temporary Internet Files, RMX Cookie and RMX Object
If at the end of Procedure 1 the error message is still displayed, and you cannot connect to the MCU, perform the following operations:
Delete the Temporary Internet files
Delete the RMX/Collaboration Server Cookie
Delete the RMX/RMX ActiveX Object

RMX Release Notes Version 8.3 Inc Troubleshooting Instructions
Polycom, Inc. 97
Deleting the Temporary Internet Files
To delete the Temporary files:
1 In the Internet Explorer, click Tools > Internet Options.The Internet Options dialog box opens.
2 In the Browsing history pane, click the Delete button.
The Delete Browsing History dialog box opens.

RMX Release Notes Version 8.3 Inc Troubleshooting Instructions
Polycom, Inc. 98
3 It is recommended to delete only the Temporary Internet files. By default, the Cookies option is also selected. Clear it if you do not want to clear the cookies from your computer.
4 Click the Delete button.
5 When the process is complete, the system return to the Internet Options dialog box.

RMX Release Notes Version 8.3 Inc Troubleshooting Instructions
Polycom, Inc. 99
Deleting the RMX/Collaboration Server Cookie
To delete the RMX Cookie:
1 In the Internet Options dialog box - Browsing History pane, click the Settings button.
The Temporary Internet Files and History Settings dialog box is displayed.
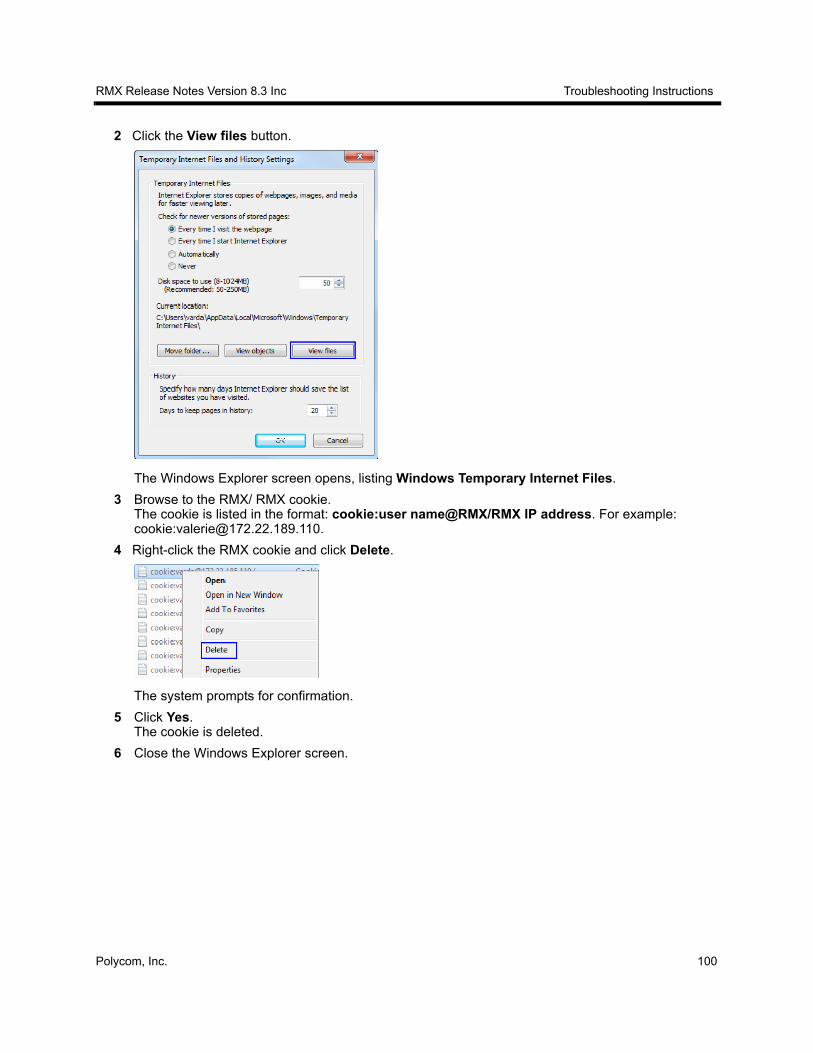
RMX Release Notes Version 8.3 Inc Troubleshooting Instructions
Polycom, Inc. 100
2 Click the View files button.
The Windows Explorer screen opens, listing Windows Temporary Internet Files.
3 Browse to the RMX/ RMX cookie. The cookie is listed in the format: cookie:user name@RMX/RMX IP address. For example: cookie:[email protected].
4 Right-click the RMX cookie and click Delete.
The system prompts for confirmation.
5 Click Yes.The cookie is deleted.
6 Close the Windows Explorer screen.

RMX Release Notes Version 8.3 Inc Troubleshooting Instructions
Polycom, Inc. 101
Deleting the RMX/Collaboration Server ActiveX Object
To delete the RMX/RMX ActiveX Object:
1 In the Temporary Internet Files and History Settings dialog box, click the View objects button.
The Windows Explorer screen opens, listing the Windows Downloaded Program Files.
2 Right-click the EMA.ClassLoader.dll and then click Delete.
The system prompts for confirmation.
3 Click Yes.The RMX object is deleted.

RMX Release Notes Version 8.3 Inc Troubleshooting Instructions
Polycom, Inc. 102
4 Close the Windows Explorer screen.
5 In the Temporary Internet Files and History Settings dialog box, click OK.
6 In the Internet Options dialog box, click OK to close it.
7 Close the Internet Explorer session and reopen it.
8 Connect to the RMX.
If the problem persists, continue with Procedure 3.
Procedure 3: Managing Add-ons Collisions
In some cases, previously installed add-ons, such as anti virus programs can create collisions between applications and prevent the installation of a new add on. Disabling these add-ons may be required in order to install the RMX Web Client.
To disable an add-on:
1 In the Internet Explorer, click Tools > Manage Add-ons.The Manage Add-ons - Toolbars and Extensions dialog box opens.
2 Scroll to the add-on to disable (for example, the anti virus add-on), right-click it and then click Disable.
Alternatively, select the add-on and click the Disable button.
3 Click the Close button to close this dialog box.
4 Connect to the RMX.
If the problem persists, continue with the Procedure 4.

RMX Release Notes Version 8.3 Inc Troubleshooting Instructions
Polycom, Inc. 103
Procedure 4: Add the Collaboration Server to the Internet Explorer Trusted Sites List
In some cases, local security settings may prevent Internet Explorer from accessing the RMX.
To add the RMX to the Internet Explorer Trusted Sites list:
1 In the Internet Options dialog box, click the Security tab.
The Security tab is displayed.
2 Click the Trusted Sites tab.
3 Click the Sites button.
The Trusted sites dialog is displayed.
4 If the Collaboration Server (RMX) is using Secure Mode:

RMX Release Notes Version 8.3 Inc Troubleshooting Instructions
Polycom, Inc. 104
a In the Add this website to the zone: field, enter, “https://” followed by the IP address or the DNS name of the Collaboration Server (RMX).
b Click the Add button.
c Click the Close button.
5 If the Collaboration Server (RMX) is using Standard Security Mode:
a In the Add this website to the zone: field, enter, “https://” followed by the IP address or the DNS name of the Collaboration Server (RMX).
b Click the Add button.
c Clear the Require server verification (https:) for all sites in this zone checkbox.
d Click the Close button.
Procedure 5: Browser Hosting Controls (Optional)
If the Collaboration Server (RMX) Web Client does not load and run after Procedures 1-4 have been performed, the reason may be that .NET Framework 4 or higher is running on the workstation with Managed Browser Hosting Controls disabled.
Managed Browser Hosting Controls is an Internet Explorer operating mode required by the Collaboration Server (RMX) Web Client. By default, .NET Framework 4 and higher are not enabled to support Managed Browser Hosting Controls.
Perform Procedure 5 to:
Determine whether .NET Framework 4 or higher is running on the workstation.
Determine whether a 32-bit or 64-bit version of Windows is running on the workstation.
Enable Managed Browser Hosting Controls if .NET Framework 4 or higher is running on the workstation.
To enable Managed Browser Hosting Controls:
1 Determine whether .NET Framework 4 or higher is running on the workstation.
a On the Windows Desktop, click Start.
b In the Start Menu, click Control Panel.
c In the Control Panel, click Programs and Features.
d Inspect the Programs and Features list for the version of Microsoft .NET Framework Client Profile that is installed.
2 Determine whether a 32-bit or 64-bit version of Windows is running on the workstation:
a On the Windows Desktop, click Start.
b In the Start Menu, click Computer.
c In the Computer Menu, System properties and inspect the value of the System type field in the System section
3 Enable Managed Browser Hosting Controls if .NET Framework 4 or higher is running on the workstation.
a Open the Registry.
b Navigate to the Subkey:
32-bit System: HKEY_LOCAL_MACHINE\SOFTWARE\MICROSOFT\.NETFramework

RMX Release Notes Version 8.3 Inc Troubleshooting Instructions
Polycom, Inc. 105
64-bit System: HKEY_LOCAL_MACHINE\SOFTWARE\Wow6432Node\Microsoft\.NETFramework
c Add the Dword Value: EnableIEHosting
d Set value of EnableIEHosting to 1.
e Close the Registry.
f Close and re-open Internet Explorer.


![RMX 2000 Hardware Guide · Italiano [Italian]: Con la presente Polycom (UK) Ltd dichiara che questo Polycom RMX è conforme ai requisiti essenziali ed alle altre disposizioni pertinenti](https://static.fdocuments.net/doc/165x107/5c6c8d0c09d3f216708c6e4c/rmx-2000-hardware-guide-italiano-italian-con-la-presente-polycom-uk-ltd.jpg)