RMC-PCM02 Turkish Arabic World - 8thstreet.com Turkish Arabic World PCM Expansion Card SOME...
12
RMC-PCM02 Turkish Arabic World PCM Expansion Card SOME INFORMATION ON THE CARD The card’s content. This card includes new Samples, Pro- grams, Drum Kit Programs, and Styles. Samples have been recorded at the standard CD quality (16 bit, 44.1kHz), using only first-rate gears. These Samples are at the basis of the new Programs and Drum Kit Programs, that are at the basis of the new Styles. Note: Parameters like Drum Mapping and Kick & Snare Designation may alter the correct playback of Drum Kits. Please leave them to the default status. Note: When assigning the new Drum Kits to existing Styles, some instruments may be replaced with unsuitable ones. The map of percussive instruments may be different from the map of internal Drum Kits. How to select the card’s content. To access the data it contains, simply insert the card in the FLASH CARD slot on the back of the instrument (see illustration). You don’t need to load any data into the instrument’s internal memory. • To access the Styles, press the leftmost button in the STYLE section various times, until both LEDs are turned on. Press the [0] button in the STYLE section to access the CARD Styles. Use the PAGE buttons to browse through the available pages of the selected bank (or repeatedly press the bank’s button to cycle through the pages). • To access the Programs, press the PROGRAM button near the PROGRAM/PER- FORMANCE section, then press the leftmost button in the PROGRAM/PERFOR- MANCE section various times, until both LEDs are turned on. You will find the new Programs under buttons [1]-[3], Percussive Programs under buttons [7] and [8], and Drum Kit Programs under button [9] of this section. Use the PAGE but- tons to browse through the available pages of the selected bank (or repeatedly press the bank’s button to cycle through the pages). Some usage notes. When using the card, please consider the following: • When you insert a card, and the instrument is in Record mode, data cannot be accessed until you exit the Record mode. • You can’t read data from the card until the WRITE/DISK IN USE LED is not turned off after inserting the card in the slot. • When playing back a Song made with any Program included in the card, the card must be inserted in the slot, in order to play back the Song with the right instruments. The same Song saved as a Standard MIDI File will not play in the same way in a different instrument. • You can’t permanently save any change to the CARD Style Performance or STS. If you try to save a Style Performance or STS (“Current Style” or “STS” option after pressing WRITE), the original settings will be restored when selecting a different Style, or turning the instrument off. To save your changes, please select a Performance after pressing the WRITE button. • Being a ROM Flash Card, this card cannot be used to store User data. Additional Styles available on the web. You may find other (freely-downloadable) Styles and Songs based on the sounds contained in this card on our web site: www .k o rg pa.c o m . STYLES AND ARABIC SCALES Styles made by Ayoub Bassam (from Style 0-32-0 to Style 0-32-14, see table “Styles” below) allow you to use the Quarter Tone function, together with the different chords played on the keyboard, to select various Arabic scales for the Intro and the Ending. The selected Intro or Ending will play with the selected Arabic scale. Note: Prior to play one of these Styles, you should assign the Quarter Tone function to a foot- switch or an EC5 switch (see “Page 4 - Assignable Pedal/Footswitch, Assignable Slider, EC5” in the “Global edit environment” chapter of the User’s Manual), or to one of the Pads (see “New functions added to the Pads” in the additional manual for Operating System version 3.0; you need at least this version to assign the Quarter Tone function to the Pads). See Tutorial 6 (“The Arabic Scale”) in the User’s Manual for information on the use of the Quarter Tone function. These Styles include two Intros and two Endings. In thirteen of them (all excluding Saidi and Chegga), Intro 1 and Ending 1 contain two Chord Variations each (one for Major chords, the other for Minor chords). Intro 2 and Ending 2 contain only one Chord Vari- ation (for Major chords). Furthermore, the Saidi and Chegga Styles contain an additional Chord Variation (for Minor chords) for the Intro 2. To select the right Arabic scale, you must do as follows: 1. Keep the pedal pressed to select the Quarter Tone function, and lower the notes listed in the subsequent tables. Then release the pedal. 2. Select the desired INTRO or ENDING button. 3. In the case of an Intro, start the Style. 4. Play a Major or Minor chord, depending on the selected Style Element. You will get the desired Arabic scales. RMC-PCM02 (ENGLISH) Style Element Chord Variation Example Intro 1 Major Play a C Major chord.You get the Agam C scale. Press the pedal and lower the E and B notes. Play a C Major chord. You get the Rast C / Bayati D scales. Minor Play a C Minor chord. You get the Nahawand C scale. Press the pedal and lower the D and A notes. Play a C Minor chord. You get the Rast A# /Bayati C scales. Intro 2 Major Play a C Major chord.You get the Agam C scale. Press the pedal and lower the E and B notes. Play a C Major chord. You get the Rast C / Bayati D scales. Minor (only with Saidi and Chegga) Play a C Minor chord. You get the Nahawand C scale. Press the pedal and lower the D and A notes. Play a C Minor chord. You get the Rast A# /Bayati C scales. Ending 1 Major Play a C Major chord.You get the Agam C scale. Press the pedal and lower the E and B notes. Play a C Major chord. You get the Rast C / Bayati D scales. Minor Play a C Minor chord. You get the Nahawand C scale. Press the pedal and lower the D and A notes. Play a C Minor chord. You get the Rast A# /Bayati C scales. Ending 2 Major Play a C Major chord.You get the Agam C scale. Press the pedal and lower the E and B notes. Play a C Major chord. You get the Rast C / Bayati D scales. Thank you for purchasing the KORG Turkish/Arabic World PCM Expansion Card. This card for the KORG Pa80 Professional Arranger is an 8MB ROM (Read Only Memory) Card containing new Programs, Drum Kits, Samples and Styles created with the assistance and perfor- mance of some of the most skilled and talented Turkish and Arabian musicians. To ensure trouble-free enjoyment of these sounds, please read carefully the following instructions. Félicitation et merci d’avoir choisi la Carte d’Expansion PCM KORG Turkish/Arabic World. Cette expansion, destinée à l’Arrangeur Profession- nel KORG Pa80, est une carte de 8Mo ROM (Read Only Memory) qui contient de nouveaux Programs, Drum Kits, Echantillons et Styles créés en collaboration avec les plus fameux et talentueux musiciens Turques et Arabes. Lisez attentivement les instructions suivantes pour reproduire ces sons de manière excellente. Vielen Dank dafür, dass Sie sich für den Kauf einer KORG Turkish/Arabic World PCM Expansion Card entschieden haben. Diese Karte für den KORG Pa80 Professional Arranger ist eine 8MB ROM (Read Only Memory) Card mit neuen Programmen, Drum Kits, Samples und Styles, die unter der Anleitung und Mitwirkung der besten und begabtesten türkischen und arabischen Musiker entstanden sind. Um Ihnen einen problemlosen Umgang mit diesen Sounds zu gewährleisten, sollten Sie die nachfolgenden Anweisungen sorgfältig durchlesen. Grazie per avere acquistato la scheda di espansione suoni KORG Turkish/Arabic World. Questa scheda ROM (a sola lettura) per il KORG Pa80 Professional Arranger contiene 8MB di nuovi Program, Drum Kit, Sample e Style, creati con l’assistenza e la performance di alcuni tra i migliori musicisti arabi e turchi. Per assicurarvi un uso corretto della scheda, leggete attentamente le seguenti istruzioni.
-
Upload
trinhkhuong -
Category
Documents
-
view
228 -
download
0
Transcript of RMC-PCM02 Turkish Arabic World - 8thstreet.com Turkish Arabic World PCM Expansion Card SOME...

RMC-PCM02
TurkishArabicWorld
PCM Expansion Card
Thank you for purchasing the KORG Turkish/Arabic World PCM Expansion Card. This card for the KORG Pa80 Professional Arranger isan 8MB ROM (Read Only Memory) Card containing new Programs, Drum Kits, Samples and Styles created with the assistance and perfor-mance of some of the most skilled and talented Turkish and Arabian musicians. To ensure trouble-free enjoyment of these sounds, pleaseread carefully the following instructions.Félicitation et merci d’avoir choisi la Carte d’Expansion PCM KORG Turkish/Arabic World. Cette expansion, destinée à l’Arrangeur Profession-nel KORG Pa80, est une carte de 8Mo ROM (Read Only Memory) qui contient de nouveaux Programs, Drum Kits, Echantillons et Styles créés encollaboration avec les plus fameux et talentueux musiciens Turques et Arabes. Lisez attentivement les instructions suivantes pour reproduire cessons de manière excellente.Vielen Dank dafür, dass Sie sich für den Kauf einer KORG Turkish/Arabic World PCM Expansion Card entschieden haben. Diese Karte fürden KORG Pa80 Professional Arranger ist eine 8MB ROM (Read Only Memory) Card mit neuen Programmen, Drum Kits, Samples undStyles, die unter der Anleitung und Mitwirkung der besten und begabtesten türkischen und arabischen Musiker entstanden sind. Um Ihneneinen problemlosen Umgang mit diesen Sounds zu gewährleisten, sollten Sie die nachfolgenden Anweisungen sorgfältig durchlesen.Grazie per avere acquistato la scheda di espansione suoni KORG Turkish/Arabic World. Questa scheda ROM (a sola lettura) per il KORG Pa80 Professional Arranger contiene 8MB di nuovi Program, Drum Kit, Sample e Style, creati con l’assistenza e la performance di alcuni tra i migliori musicisti arabi e turchi. Per assicurarvi un uso corretto della scheda, leggete attentamente le seguenti istruzioni.
SOME INFORMATION ON THE CARDThe card’s content. This card includes new Samples, Pro-grams, Drum Kit Programs, and Styles. Samples havebeen recorded at the standard CD quality (16 bit,44.1kHz), using only first-rate gears. These Samples are atthe basis of the new Programs and Drum Kit Programs,that are at the basis of the new Styles.Note: Parameters like Drum Mapping and Kick & SnareDesignation may alter the correct playback of Drum Kits.Please leave them to the default status.Note: When assigning the new Drum Kits to existing Styles,some instruments may be replaced with unsuitable ones.The map of percussive instruments may be different from
the map of internal Drum Kits.
How to select the card’s content. To access the data it contains, simply insert the card inthe FLASH CARD slot on the back of the instrument (see illustration). You don’t need toload any data into the instrument’s internal memory.• To access the Styles, press the leftmost button in the STYLE section various times,
until both LEDs are turned on. Press the [0] button in the STYLE section to accessthe CARD Styles. Use the PAGE buttons to browse through the available pages ofthe selected bank (or repeatedly press the bank’s button to cycle through thepages).
• To access the Programs, press the PROGRAM button near the PROGRAM/PER-FORMANCE section, then press the leftmost button in the PROGRAM/PERFOR-MANCE section various times, until both LEDs are turned on. You will find thenew Programs under buttons [1]-[3], Percussive Programs under buttons [7] and[8], and Drum Kit Programs under button [9] of this section. Use the PAGE but-tons to browse through the available pages of the selected bank (or repeatedly pressthe bank’s button to cycle through the pages).
Some usage notes. When using the card, please consider the following:• When you insert a card, and the instrument is in Record mode, data cannot be accesseduntil you exit the Record mode.• You can’t read data from the card until the WRITE/DISK IN USE LED is not turned offafter inserting the card in the slot.• When playing back a Song made with any Program included in the card, the card mustbe inserted in the slot, in order to play back the Song with the right instruments. Thesame Song saved as a Standard MIDI File will not play in the same way in a differentinstrument.• You can’t permanently save any change to the CARD Style Performance or STS. If youtry to save a Style Performance or STS (“Current Style” or “STS” option after pressingWRITE), the original settings will be restored when selecting a different Style, or turningthe instrument off. To save your changes, please select a Performance after pressing theWRITE button.• Being a ROM Flash Card, this card cannot be used to store User data.
Additional Styles available on the web. You may find other (freely-downloadable)Styles and Songs based on the sounds contained in this card on our web site:www.korgpa.com.
STYLES AND ARABIC SCALESStyles made by Ayoub Bassam (from Style 0-32-0 to Style 0-32-14, see table “Styles”below) allow you to use the Quarter Tone function, together with the different chordsplayed on the keyboard, to select various Arabic scales for the Intro and the Ending. Theselected Intro or Ending will play with the selected Arabic scale.Note: Prior to play one of these Styles, you should assign the Quarter Tone function to a foot-switch or an EC5 switch (see “Page 4 - Assignable Pedal/Footswitch, Assignable Slider, EC5”in the “Global edit environment” chapter of the User’s Manual), or to one of the Pads (see“New functions added to the Pads” in the additional manual for Operating System version3.0; you need at least this version to assign the Quarter Tone function to the Pads).See Tutorial 6 (“The Arabic Scale”) in the User’s Manual for information on the use of theQuarter Tone function.These Styles include two Intros and two Endings. In thirteen of them (all excluding Saidiand Chegga), Intro 1 and Ending 1 contain two Chord Variations each (one for Majorchords, the other for Minor chords). Intro 2 and Ending 2 contain only one Chord Vari-ation (for Major chords).Furthermore, the Saidi and Chegga Styles contain an additional Chord Variation (forMinor chords) for the Intro 2.To select the right Arabic scale, you must do as follows:1. Keep the pedal pressed to select the Quarter Tone function, and lower the notes
listed in the subsequent tables. Then release the pedal.2. Select the desired INTRO or ENDING button.3. In the case of an Intro, start the Style.4. Play a Major or Minor chord, depending on the selected Style Element. You will
get the desired Arabic scales.
RMC-PCM02 (ENGLISH)
Style Element Chord Variation Example
Intro 1 Major Play a C Major chord.You get the Agam C scale.Press the pedal and lower the E and B notes. Play a C Major chord. You get the Rast C / Bayati D scales.
Minor Play a C Minor chord. You get the Nahawand C scale.Press the pedal and lower the D and A notes. Play a C Minor chord. You get the Rast A# /Bayati C scales.
Intro 2 Major Play a C Major chord.You get the Agam C scale.Press the pedal and lower the E and B notes. Play a C Major chord. You get the Rast C / Bayati D scales.
Minor (only with Saidi and Chegga)
Play a C Minor chord. You get the Nahawand C scale.Press the pedal and lower the D and A notes. Play a C Minor chord. You get the Rast A# /Bayati C scales.
Ending 1 Major Play a C Major chord.You get the Agam C scale.Press the pedal and lower the E and B notes. Play a C Major chord. You get the Rast C / Bayati D scales.
Minor Play a C Minor chord. You get the Nahawand C scale.Press the pedal and lower the D and A notes. Play a C Minor chord. You get the Rast A# /Bayati C scales.
Ending 2 Major Play a C Major chord.You get the Agam C scale.Press the pedal and lower the E and B notes. Play a C Major chord. You get the Rast C / Bayati D scales.

Hint: To preserve the selected Arabic scale when selecting a different Style, set the “ScaleLock” parameter to “On”, on “Page 24 - Preferences: Lock” of the Style Play mode. When stillin this page, press WRITE to save settings in the Global.Note: You can apply the Arabic scale to the Realtime tracks only (default setting), to theUpper tracks only, or to all tracks (Realtime and Style). To change this setting, go to “Page 25- Preferences: Controls” of the Style Play mode, and set the Scale Mode parameter as desired.When still in this page, press WRITE to save settings in the Global.
HOW TO USE THE NEW PROGRAMS AND DRUM KIT PROGRAMSYou can assign the new Programs and Drum Kit Programs to existing Performance,Styles and Songs.
Performance or Single Touch Setting (STS)You can assign the new Programs to any of the four available Realtime tracks (Upper 1-3,Lower). You can then save the changes into a Performance or STS in memory.1. Insert the card into the FLASH CARD drive, located on the back of the instru-
ment. Wait until the WRITE/DISK IN USE LED is turned off.2. Press STYLE PLAY to switch to the Style Play mode.3. Use the PROGRAM/PERFORMANCE buttons to select the Performance to be
edited (see “Basic operations” in the User’s Manual).4. Press one of the VOLUME/VALUE (E-H) buttons, to select one of the Realtime
tracks. 5. Press the PROGRAM button next to the PROGRAM/PERFORMANCE section;
then repeatedly press the leftmost ([CARD]) button of the PROGRAM/PERFOR-MANCE section, to let both button’s LEDs turn on.
6. Press one of the [1]-[3] buttons in this section to access the corresponding Pro-gram banks, [7] or [8] buttons to select a Percussive Program bank, or the [9] but-ton to select a Drum Kit Program bank. Use the VOLUME/VALUE buttons toselect one of the Programs or Drum Kit Programs. Use the PAGE buttons tobrowse through the available pages of the selected bank (or repeatedly press thebank’s button to cycle through the pages).
7. Press EXIT to exit the selection window.8. To save the changes into a Performance press WRITE to open the Write window,
then select “Perf.No”. Select one of the available Performance locations in memory,then press ENTER to start saving. The “Are you sure?” message appears. PressENTER to confirm, EXIT to abort.To save the changes into a STS press WRITE to open the Write window, then select“STS No.”. Select one of the four available STS locations in the currently selectedStyle, then press ENTER to start saving. The “Are you sure?” message appears.Press ENTER to confirm, EXIT to abort.
StyleYou can assign the new Programs to any of the melodic/harmonic Style tracks (Bass,Acc1-5), and the Drum Kit Programs to the Drum or Percussion tracks. You can thensave the changes into the current Style (Style Performance).1. Insert the card into the FLASH CARD drive, located on the back of the instru-
ment. Wait until the WRITE/DISK IN USE LED is turned off.2. Press STYLE PLAY to switch to the Style Play mode.3. Use the STYLE buttons to select the Style to be edited (see “Basic operations” in
the User’s Manual).4. Press MENU, select “Sty Ctrls”, then press PAGE+ to jump to Page 21(“StyCtl:
Wrap/Rng”).5. Set the “Prog” parameter to On. This way, you will be able to assign different Pro-
gram Changes to the Style tracks, to replace the original Programs of the Style pat-tern. Note: Program Changes inserted into the Chord Variation will be replaced bythe Programs that will be assigned to the tracks. To restore the original ProgramChanges, set this parameter back to Original.
6. Press EXIT to go back to the Main page of the Style Play mode.7. Press TRK.SELECT to see the Style tracks. The button’s LED turns on.8. Press one of the VOLUME/VALUE buttons, to select one of the Style tracks. 9. Press the PROGRAM button next to the PROGRAM/PERFORMANCE section;
then repeatedly press the leftmost ([CARD]) button of the PROGRAM/PERFOR-MANCE section, to let both button’s LEDs turn on.
10. Press one of the [1]-[3] buttons in this section to access the corresponding Pro-gram banks, [7] or [8] buttons to select a Percussive Program bank, or the [9] but-ton to select a Drum Kit Program bank. Use the VOLUME/VALUE buttons toselect one of the Programs or Drum Kit Programs. Use the PAGE buttons tobrowse through the available pages of the selected bank (or repeatedly press thebank’s button to cycle through the pages).
11. Press EXIT to exit the selection window.12. Press WRITE to open the Write window, then select “Current Style”. Press ENTER
to start saving. The “Are you sure?” message appears. Press ENTER to confirm,EXIT to abort.
SongYou can assign the new Programs to any of the melodic/harmonic tracks of a Song, andthe Drum Kit Programs to the Drum or Percussion tracks.Note: When saving the Song as a Standard MIDI File, the Arabic and Turkish sounds arenot available when playing back the Song on another instrument.1. Insert the card into the FLASH CARD drive, located on the back of the instru-
ment. Wait until the WRITE/DISK IN USE LED is turned off.2. Press SONG to switch to the Song mode.3. In the Main page of the Song mode, select the “Load Song” command.4. The Song Select window appears. Select a Standard MIDI File (see “Basic opera-
tions” in the User’s Manual), then press F2 (Load) to load the Song. The “Are yousure?” message appears. Press ENTER to confirm, EXIT to abort.
5. Use the TRK.SELECT button to see tracks 1-8 or 9-16.6. Press one of the VOLUME/VALUE buttons to select a track.7. Press the PROGRAM button next to the PROGRAM/PERFORMANCE section;
then repeatedly press the leftmost ([CARD]) button of the PROGRAM/PERFOR-MANCE section, to let both button’s LEDs turn on.
8. Press one of the [1]-[3] buttons in this section to access the corresponding Pro-gram banks, [7] or [8] buttons to select a Percussive Program bank, or the [9] but-ton to select a Drum Kit Program bank. Use the VOLUME/VALUE buttons toselect one of the Programs or Drum Kit Programs. Use the PAGE buttons tobrowse through the available pages of the selected bank (or repeatedly press thebank’s button to cycle through the pages).
9. Press EXIT to exit the selection window.10. Press the TRK.SELECT button again, to turn the LED off and go back to the Main
page of the Song mode.11. Select the “Save Song” command.12. The Save Song window appears (see the User’s Manual, “Song operating mode”
chapter). At this point, you can save the Song on a new or existing file.• To save on an existing file, move the file on the first line of the display. Theselected file will be deleted and replaced with file you are saving.• To create a new file, move the “NEW_NAME.MID” item to the first line of thedisplay. Press the right VOLUME/VALUE [DRUM/PERC] button to enter textediting. Move the cursor with the DOWN/- and UP/+ buttons, and select thecharacter using the DIAL. Insert a new character by pressing the INSERT button.Use the DELETE button to delete the character at the cursor position.
13. Press ENTER to start saving. The “Are you sure?” appears. Press ENTER to con-firm, EXIT to abort.
= Quarter tone
LA CARTEContenu de la carte. Cette carte contient de nouveauxEchantillons, Programs, Drum Kit Programs et Styles. Laqualité d’enregistrement des Echantillons est celle standardpour les CD (16 bit, 44.1kHz), en utilisant uniquement desdispositifs d’excellente qualité. Ces Echantillons sont la basedes nouveaux Programs et Drum Kit Programs, qui sont àleur tour la base des nouveaux Styles.Note : Les paramètres Drum Mapping et Kick & SnareDesignation peuvent altérer la correcte reproduction desDrum Kits. On conseille de ne pas modifier les valeurs dedéfaut.Note : Lorsque vous affectez les nouveaux Drum Kits à des
Styles existants, certains instruments pourraient être remplacés par d’autres instruments quine joueront donc pas correctement. La disposition des instruments de percussion peut êtredifférente de la disposition des Drum Kits internes.
Comment sélectionner le contenu de la carte. Pour accéder aux données de la carte, il suf-fit de l’insérer dans la fente FLASH CARD prévue en face arrière de l’instrument (voir illus-tration). Il n’est pas nécessaire de charger les données dans la mémoire interne del’instrument.• Pour accéder aux Styles, appuyez plusieurs fois sur le dernier bouton de gauche dans la
section STYLE afin d’allumer les deux témoins. Appuyez sur le bouton [0] dans la sec-tion STYLE pour accéder aux CARD Styles. Appuyez sur les boutons PAGE pour par-courir les pages disponibles de la banque sélectionnée (ou appuyez en succession sur lebouton de la banque pour défiler les pages en cycle).
• Pour accéder aux Programs, appuyez sur le bouton PROGRAM à côté de la sectionPROGRAM/PERFORMANCE, ensuite appuyez plusieurs fois sur le dernier boutonde gauche pour allumer les deux témoins. Les nouveaux Programs sont disponiblessous les boutons [1]-[3], les Programs de percussion sous les boutons [7] et [8] et lesDrum Kit Programs sous le bouton [9] de cette section. Appuyez sur les boutons PAGEpour parcourir les pages disponibles de la banque sélectionnée (ou appuyez en succes-sion sur le bouton de la banque pour défiler les pages en cycle).
Quelques conseils. Lorsque vous utilisez la carte, rappelez-vous que :• Si vous insérez la carte lorsque l’instrument est prédisposé en mode Record, vous ne pouvezpas accéder aux données tant que vous ne quittez pas le mode Record.• Vous pouvez lire les données de la carte uniquement lorsque le témoin de WRITE/DISK INUSE s’éteint après avoir inséré la carte dans la fente.• Lorsque vous reproduisez un morceau réalisé à l’aide d’un Program de la carte, celle-ci doitêtre insérée dans la fente afin que le Morceau soit reproduit avec les bons instruments. Cemême Morceau, sauvegardé sous forme de Fichier Standard MIDI, ne joue pas de la mêmemanière si reproduit avec un instrument différent.• Vous pouvez sauvegarder de manière permanente toute modification apportée aux CARDStyle Performance ou STS. Si vous essayez de sauvegarder une Style Performance ou un STS(option “Current Style” ou “STS” après avoir appuyé sur WRITE), les valeurs originalesseront rétablies lorsque vous sélectionnerez un Style différent ou que vous mettez hors tensionvotre instrument. Pour sauvegarder les modifications, il faut sélectionner une Performanceaprès avoir appuyé sur le bouton WRITE.• Cette carte, étant une ROM Flash Card, ne peut pas être utilisée comme dispositif de sau-vegarde pour les données de l’Utilisateur.
Styles supplémentaires disponibles sur Internet. Vous trouvez d’autres (téléchargeableslibrement) Styles et Morceaux réalisés avec les sons de la carte en contactant notre site :www.korgpa.com.
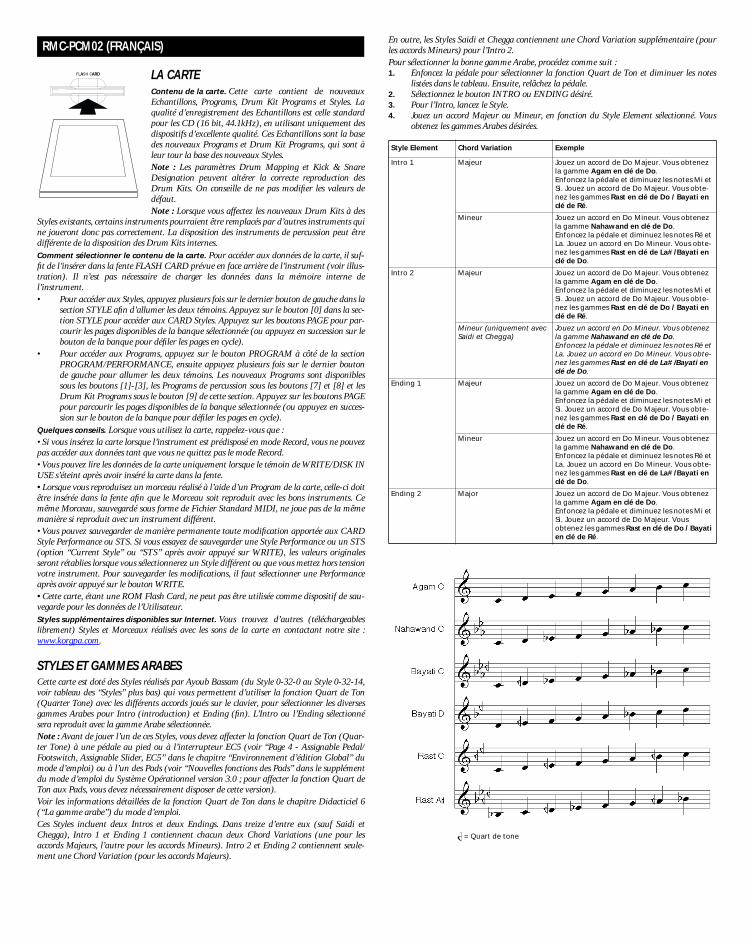
STYLES ET GAMMES ARABESCette carte est doté des Styles réalisés par Ayoub Bassam (du Style 0-32-0 au Style 0-32-14,voir tableau des “Styles” plus bas) qui vous permettent d’utiliser la fonction Quart de Ton(Quarter Tone) avec les différents accords joués sur le clavier, pour sélectionner les diversesgammes Arabes pour Intro (introduction) et Ending (fin). L’Intro ou l’Ending sélectionnésera reproduit avec la gamme Arabe sélectionnée.Note : Avant de jouer l’un de ces Styles, vous devez affecter la fonction Quart de Ton (Quar-ter Tone) à une pédale au pied ou à l’interrupteur EC5 (voir “Page 4 - Assignable Pedal/Footswitch, Assignable Slider, EC5” dans le chapitre “Environnement d’édition Global” dumode d’emploi) ou à l’un des Pads (voir “Nouvelles fonctions des Pads” dans le supplémentdu mode d’emploi du Système Opérationnel version 3.0 ; pour affecter la fonction Quart deTon aux Pads, vous devez nécessairement disposer de cette version).Voir les informations détaillées de la fonction Quart de Ton dans le chapitre Didacticiel 6(“La gamme arabe”) du mode d’emploi.Ces Styles incluent deux Intros et deux Endings. Dans treize d’entre eux (sauf Saidi etChegga), Intro 1 et Ending 1 contiennent chacun deux Chord Variations (une pour lesaccords Majeurs, l’autre pour les accords Mineurs). Intro 2 et Ending 2 contiennent seule-ment une Chord Variation (pour les accords Majeurs).
En outre, les Styles Saidi et Chegga contiennent une Chord Variation supplémentaire (pourles accords Mineurs) pour l’Intro 2.Pour sélectionner la bonne gamme Arabe, procédez comme suit :1. Enfoncez la pédale pour sélectionner la fonction Quart de Ton et diminuer les notes
listées dans le tableau. Ensuite, relâchez la pédale.2. Sélectionnez le bouton INTRO ou ENDING désiré.3. Pour l’Intro, lancez le Style.4. Jouez un accord Majeur ou Mineur, en fonction du Style Element sélectionné. Vous
obtenez les gammes Arabes désirées.
RMC-PCM02 (FRANÇAIS)
Style Element Chord Variation Exemple
Intro 1 Majeur Jouez un accord de Do Majeur. Vous obtenez la gamme Agam en clé de Do.Enfoncez la pédale et diminuez les notes Mi et Si. Jouez un accord de Do Majeur. Vous obte-nez les gammes Rast en clé de Do / Bayati en clé de Ré.
Mineur Jouez un accord en Do Mineur. Vous obtenez la gamme Nahawand en clé de Do.Enfoncez la pédale et diminuez les notes Ré et La. Jouez un accord en Do Mineur. Vous obte-nez les gammes Rast en clé de La# /Bayati en clé de Do.
Intro 2 Majeur Jouez un accord de Do Majeur. Vous obtenez la gamme Agam en clé de Do.Enfoncez la pédale et diminuez les notes Mi et Si. Jouez un accord de Do Majeur. Vous obte-nez les gammes Rast en clé de Do / Bayati en clé de Ré.
Mineur (uniquement avec Saidi et Chegga)
Jouez un accord en Do Mineur. Vous obtenez la gamme Nahawand en clé de Do.Enfoncez la pédale et diminuez les notes Ré et La. Jouez un accord en Do Mineur. Vous obte-nez les gammes Rast en clé de La# /Bayati en clé de Do.
Ending 1 Majeur Jouez un accord de Do Majeur. Vous obtenez la gamme Agam en clé de Do.Enfoncez la pédale et diminuez les notes Mi et Si. Jouez un accord de Do Majeur. Vous obte-nez les gammes Rast en clé de Do / Bayati en clé de Ré.
Mineur Jouez un accord en Do Mineur. Vous obtenez la gamme Nahawand en clé de Do.Enfoncez la pédale et diminuez les notes Ré et La. Jouez un accord en Do Mineur. Vous obte-nez les gammes Rast en clé de La# /Bayati en clé de Do.
Ending 2 Major Jouez un accord de Do Majeur. Vous obtenez la gamme Agam en clé de Do.Enfoncez la pédale et diminuez les notes Mi et Si. Jouez un accord de Do Majeur. Vous obtenez les gammes Rast en clé de Do / Bayati en clé de Ré.
= Quart de tone

Astuce : Pour que la gamme Arabe sélectionnée ne soit pas modifiée lors de la sélection d’unStyle différent, réglez à “On” le paramètre “Scale Lock” à “Page 24 - Preferences: Lock” dumode Style Play. Toujours dans cette page, appuyez sur WRITE pour sauvegarder les réglagesdans Global.Note : Vous pouvez appliquez la gamme Arabe aux pistes clavier (réglage de défaut), unique-ment aux pistes Upper ou à toutes les pistes (pistes clavier et Style). Pour modifier ce réglage,allez à “Page 25 - Preferences: Controls” du mode Style Play et réglez le paramètre ScaleMode à votre gré. Toujours dans cette page, appuyez sur WRITE pour sauvegarder les régla-ges dans Global.
COMMENT UTILISER LES NOUVEAUX PROGRAMS ET DRUM KIT PROGRAMSVous pouvez associer les nouveaux Programs et Drum Kit Programs à des Performances, desStyles et des Morceaux déjà existants.
Performance ou Single Touch Setting (STS)Pour affecter les nouveaux Programs à l’une des quatre pistes clavier disponibles (Upper 1-3,Lower). Vous pouvez sauvegarder les modifications dans une Performance ou un STS de lamémoire.1. Insérez la carte dans le lecteur FLASH CARD situé en face arrière de l’instrument.
Attendre jusqu’à ce que le témoin de WRITE/DISK IN USE s’éteint.2. Appuyez sur STYLE PLAY pour aller au mode Style Play.3. Appuyez sur les boutons PROGRAM/PERFORMANCE pour sélectionner la Perfor-
mance que vous désirez modifier (voir le chapitre “Opérations de base” du moded’emploi).
4. Appuyez sur l’un des boutons de VOLUME/VALUE (E-H) pour sélectionner une pisteclavier.
5. Appuyez sur le bouton PROGRAM situé à côté de la section PROGRAM/PERFOR-MANCE ; ensuite appuyez plusieurs fois sur le dernier bouton ([CARD]) de gauchede la section PROGRAM/PERFORMANCE jusqu’à allumer les deux témoins desboutons.
6. Dans cette section, appuyez sur l’un des boutons [1]-[3] pour aller aux correspondan-tes banques des Programs, sur les boutons [7] ou [8] pour sélectionner la banque desPercussive Programs ou sur le bouton [9] pour sélectionner la banque des Drum KitPrograms. Appuyez sur les boutons de VOLUME/VALUE pour sélectionner l’un desPrograms ou des Drum Kit Programs. Appuyez sur les boutons PAGE pour parcourirles pages disponibles de la banque sélectionnée (ou appuyez en succession sur le boutonde la banque pour défiler les pages en cycle).
7. Appuyez sur EXIT pour quitter la fenêtre de sélection.8. Pour sauvegarder les modifications dans une Performance, appuyez sur WRITE pour
ouvrir la fenêtre Write, ensuite sélectionnez “Perf.No”. Sélectionnez l’un des emplace-ments de la mémoire disponible pour la Performance et ensuite appuyez sur ENTERpour lancer la sauvegarde. L’écran affiche le message “Are you sure? (sûr ?)”. Appuyezsur ENTER pour confirmer, sur EXIT pour annuler.
9. Pour sauvegarder les modifications dans un STS, appuyez sur WRITE pour ouvrir lafenêtre Write, ensuite sélectionnez “STS No.”. Sélectionnez l’un des quatre emplace-ments disponibles pour les STS dans le Style sélectionné et ensuite appuyez surENTER pour lancer la sauvegarde. L’écran affiche le message “Are you sure? (sûr ?)”.Appuyez sur ENTER pour confirmer, sur EXIT pour annuler.
StyleVous pouvez affecter les nouveaux Programs à l’une des pistes de la mélodie/harmonie duStyle (Bass, Acc1-5) et les Drum Kit Programs aux pistes Drum ou Percussion. Vous pouvezsauvegarder les modifications dans le Style sélectionné (Style Performance).1. Insérez la carte dans le lecteur FLASH CARD situé en face arrière de l’instrument.
Attendre jusqu’à ce que le témoin de WRITE/DISK IN USE s’éteint.2. Appuyez sur STYLE PLAY pour aller au mode Style Play.3. Appuyez sur les boutons STYLE pour sélectionner le Style que vous désirez modifier
(voir le chapitre “Opérations de base” du mode d’emploi).4. Appuyez sur MENU, sélectionnez “Sty Ctrls” et ensuite appuyez sur PAGE+ pour aller
à Page 21(“StyCtl: Wrap/Rng”).5. Réglez le paramètre “Prog” à On. Maintenant, vous pouvez associer divers Change-
ments de Programs (Program Changes) aux pistes de Style, pour remplacer les Pro-grams originaux du modèle du Style. Note : Les Changements de Programs (ProgramChanges) insérés dans une Chord Variation seront remplacés par les Programs affectésaux pistes. Pour rétablir les Changements de programs originaux, réglez ce paramètreà Original.
6. Appuyez sur EXIT pour retourner à la page principale du mode Style Play.7. Appuyez sur TRK.SELECT pour afficher les pistes du Style. Le témoin du bouton
s’allume.8. Appuyez sur l’un des boutons de VOLUME/VALUE pour sélectionner une piste du
Style. 9. Appuyez sur le bouton PROGRAM situé à côté de la section PROGRAM/PERFOR-
MANCE ; ensuite appuyez plusieurs fois sur le dernier bouton ([CARD]) de gauche
de la section PROGRAM/PERFORMANCE jusqu’à allumer les deux témoins desboutons.
10. Dans cette section, appuyez sur l’un des boutons [1]-[3] pour aller aux correspondan-tes banques des Programs, sur les boutons [7] ou [8] pour sélectionner la banque desPercussive Programs ou sur le bouton [9] pour sélectionner la banque des Drum KitPrograms. Appuyez sur les boutons de VOLUME/VALUE pour sélectionner l’un desPrograms ou des Drum Kit Programs. Appuyez sur les boutons PAGE pour parcourirles pages disponibles de la banque sélectionnée (ou appuyez en succession sur le boutonde la banque pour défiler les pages en cycle).
11. Appuyez sur EXIT pour quitter la fenêtre de sélection.12. Appuyez sur WRITE pour ouvrir la fenêtre Write et ensuite sélectionnez “Current
Style”. Appuyez sur ENTER pour lancer la sauvegarde. L’écran affiche le message “Areyou sure? (sûr ?)”. Appuyez sur ENTER pour confirmer, sur EXIT pour annuler.
SongVous pouvez affecter les nouveaux Programs à l’une des pistes de la mélodie/harmonie duSong et les Drum Kit Programs aux pistes Drum ou Percussion.Note : Lors de la sauvegarde du Morceau sous forme de Fichier Standard MIDI, les sons Ara-bes ne joueront pas si vous reproduisez le Morceau avec un autre instrument.1. Insérez la carte dans le lecteur FLASH CARD situé en face arrière de l’instrument.
Attendre jusqu’à ce que le témoin de WRITE/DISK IN USE s’éteint.2. Appuyez sur SONG pour aller au mode Song.3. Sélectionnez la commande “Load Song” dans la page principale du mode Song.4. L’écran affiche la fenêtre Song Select. Sélectionnez un Fichier Standard MIDI (voir le
chapitre “Opérations de base” du mode d’emploi) et ensuite appuyez sur F2 (Load)pour charger le Morceau. L’écran affiche le message “Are you sure? (sûr ?)”. Appuyezsur ENTER pour confirmer, sur EXIT pour annuler.
5. Appuyez sur les boutons TRK.SELECT pour afficher les pistes 1-8 ou 9-16.6. Appuyez sur un bouton de VOLUME/VALUE pour sélectionner une piste.7. Appuyez sur le bouton PROGRAM situé à côté de la section PROGRAM/PERFOR-
MANCE ; ensuite appuyez plusieurs fois sur le dernier bouton ([CARD]) de gauchede la section PROGRAM/PERFORMANCE jusqu’à allumer les deux témoins desboutons.
8. Dans cette section, appuyez sur l’un des boutons [1]-[3] pour aller aux correspondan-tes banques des Programs, sur les boutons [7] ou [8] pour sélectionner la banque desPercussive Programs ou sur le bouton [9] pour sélectionner la banque des Drum KitPrograms. Appuyez sur les boutons de VOLUME/VALUE pour sélectionner l’un desPrograms ou des Drum Kit Programs. Appuyez sur les boutons PAGE pour parcourirles pages disponibles de la banque sélectionnée (ou appuyez en succession sur le boutonde la banque pour défiler les pages en cycle).
9. Appuyez sur EXIT pour quitter la fenêtre de sélection.10. Appuyez de nouveau sur TRK.SELECT pour allumer le témoin et retourner à la page
principale du mode Song.11. Sélectionnez la commande “Save Song”.12. L’écran affiche la fenêtre Save Song (voir le chapitre “Mode opérationnel Song” du
mode d’emploi). Maintenant, vous pouvez sauvegarder le Morceau sous forme denouveau morceau ou dans un fichier existant.• Pour sauvegarder dans un fichier existant, déplacez le fichier désiré sur la premièreligne de l’écran. Le fichier sélectionné sera effacé et remplacé par celui dont la sauve-garde est en cours.• Pour créer un nouveau fichier, déplacez le paramètre “NEW_NAME.MID” sur lapremière ligne de l’écran. Appuyez sur le bouton de droite de VOLUME/VALUE[DRUM/PERC] pour entrer la saisie du texte. Déplacez le curseur en appuyant sur lesboutons En bas/- et En haut/+ et sélectionnez le caractère désiré en tournant le DIAL.Insérez un nouveau caractère en appuyant sur le bouton INSERT. Appuyez sur le bou-ton DELETE pour supprimer le caractère sur la position du curseur.
13. Appuyez sur ENTER pour lancer la sauvegarde. L’écran affiche le message “Are yousure? (sûr ?)”. Appuyez sur ENTER pour confirmer, sur EXIT pour annuler.

INFORMATIONEN ZUR KARTEInhalt der Karte. Diese Karte enthält neue Samples, Pro-grams, Drum Kit Programs und Styles. Samples wurdenmit Standard CD Qualität (16 bit, 44.1kHz) aufgenom-men, wozu ausschließlich erstklassige Geräte verwendetwurden. Diese Samples sind die Grundlage der neuenProgramme und Drum Kit Programme, die die Grund-lage der neuen Styles bilden.Anmerkung: Parameter wie Drum Mapping und Kick &Snare Zuweisung können die korrekte Wiedergabe derDrum Kits beeinträchtigen. Bitte belassen Sie sie in ihremursprünglichen Status.Anmerkung: Wenn die neuen Drum Kits den bereits exi-
stierenden Styles zugewiesen werden, könnten bestimmte Instrumente möglicherweise durchweniger geeignete ersetz werden. Die Perkussionsinstrument-Tabelle unterscheidet sich unterUmständen von der Tabelle der internen Drum Kits.
Selektion des Karteninhalts. Um Zugang zu den auf der Karte enthaltenen Daten zu er-halten, stecken Sie diese einfach in den FLASH CARD Schlitz auf der Rückseite desInstruments (siehe Abbildung). Sie brauchen die Daten nicht in den internen Speicherdes Instruments zu laden. • Um die Styles aufzurufen, drücken Sie mehrmals den äußersten linken Taster der
STYLE Sektion, bis beide LEDs sich einschalten. Drücken Sie den [0] Taster in derSTYLE Sektion, um Zugang zu den auf der Karte enthaltenen Styles zu er-halten.Benutzen Sie die PAGE Taster, um alle Seiten der selektierten Bank zu durch-blättern (oder drücken Sie mehrmals den Bank-Taster, um die Seiten zyklischnacheinander aufzurufen).
• Um Zugang zu den Programmen zu erhalten, drücken Sie den PROGRAM Tasterneben der PROGRAM/PERFORMANCE Sektion. Drücken Sie dann mehrmalsden äußersten linken Taster der PROGRAM/PERFORMANCE Sektion, bis beideLEDs sich einschalten. Sie können die neuen Programme mit den Tastern [1]-[3],die Perkussionsprogramme mit den Tastern [7] und [8] und die Drum Kit Pro-gramme mit dem Taster [9] dieser Sektion aufrufen. Benutzen Sie die PAGE Taster,um alle Seiten der selektierten Bank zu durchblättern (oder drücken Sie mehrmalsden Bank-Taster, um die Seiten zyklisch nacheinander aufzurufen).
Einige Hinweise zur Benutzung. Bei der Benutzung der Karte sollten Sie folgende Hin-weise beachten:• Wenn Sie die Karte einstecken und das Instrument sich im Record Modus befindet,haben Sie keinen Zugang zu den Daten. Verlassen Sie also den Record Modus. • Sie können die auf der Karte enthaltenen Daten erst dann lesen, wenn die WRITE/DISK IN USE LED nach dem Einstecken der Karte in den Schlitz sich ausgeschaltet hat. • Beim Abspielen eines Song, der mit einem auf der Karte enthaltenen Programmen erstelltwurde, muss die Karte in den Schlitz eingesteckt sein, damit der Song mit den richtigenInstrumenten gespielt wird. Wenn dieser Song als Standard MIDI Datei gespeichert wird,wird er von einem anderen Instrument nicht in derselben Weise wie-dergegeben. • Sie können Änderungen der Style Performance oder des STS auf der Karte nicht perma-nent speichern. Wenn Sie versuchen, eine Style Performance oder STS (Option “aktuellerStyle” oder “STS” nach dem Drücken von WRITE) zu speichern, werden bei Selektioneines anderen Style oder beim Ausschalten des Instruments wieder die ursprünglichen Ein-stellungen eingestellt. Zum Speichern der von Ihnen vorgenommenen Änderungen müs-sen Sie nach Drücken des WRITE Tasters eine Performance selektieren.• Da es sich um eine ROM Flash Card handelt, können keine User-Daten darauf abge-speichert werden.
Zusätzliche, im Internet erhältliche Styles. Sie können aus dem Internet weitere (kosten-lose) Styles und Songs herunterladen, die auf den Sounds dieser Karte basieren. GehenSie dazu auf folgende Web-Seite: www.korgpa.com.
STYLES UND ARABISCHE TONLEITERN Bei den von Ayoub Bassam kreierten Styles (Style 0-32-0 bis Style 0-32-14, siehe “Styles”Tabelle unten) kann die Viertelton-Funktion zusammen mit verschiedenen, auf demKeyboard gespielten Akkorden benutzt werden, um verschiedene arabische Tonleiternfür das Intro und das Ending zu selektieren. Das selektierte Intro oder Ending wird dannmit den jeweils eingestellten arabischen Tonleiter gespielt. Anmerkung: Vor dem Spielen dieser Styles sollten Sie die Viertelton-Funktion einem Fuß-schalter oder einem EC5 Schalter (siehe “Seite 4 - Assignable Pedal/Footswitch, AssignableSlider, EC5” im Kapitel “Global Edit Umgebung” der Bedienungsanleitung) oder einem derPads zuweisen (siehe “Zusatzfunktionen bei den Pads” im Zusatzhandbuch für die Betriebs-systemversion 3.0; Sie benötigen diese oder eine höhere Version, um den Pads die Viertelton-Funktion zuweisen zu können).Siehe Tutorial 6 (“Arabische Temperierung”) in der Bedienungsanleitung, wenn Sie weitereInformationen über die Viertelton-Funktion benötigen.
Diese Styles umfassen zwei Intros und zwei Endings. Bei dreizehn dieser Styles (sie ent-halten alle Saidi und Chegga) enthalten Intro 1 und Ending 1 je zwei Akkordvariationen(eine für Dur-Akkorde und die andere für Moll-Akkorde). Intro 2 und Ending 2 enthal-ten nur eine Akkordvariation (für Dur-Akkorde).Außerdem enthalten die Saidi und Chegga Styles eine zusätzliche Akkordvariation (fürMoll-Akkorde) für Intro 2.Um die richtige arabische Tonleiter zu selektieren, müssen Sie wie folgt vorgehen:1. Halten Sie das Pedal gedrückt, um die Viertelton-Funktion zu selektieren. Setzen
Sie die in der nachstehenden Tabelle aufgeführten Noten herab und lassen Siedann das Pedal los.
2. Selektieren Sie den gewünschten INTRO oder ENDING Taster.3. Wenn Sie ein INTRO gewählt haben, starten Sie den Style.4. Spielen Sie je nach selektiertem Style Element einen Dur- oder Moll-Akkord. Auf
diese Weise rufen Sie die gewünschten arabischen Tonleitern auf.
RMC-PCM02 (DEUTSCH)
Style Element Akkord-Variation Beispiel
Intro 1 Dur Spielen Sie einen C Dur-Akkord. Damit rufen Sie die Agam C Tonleiter auf.Drücken Sie das Pedal und setzen Sie die Noten E und B herab. Spielen Sie einen C Dur-Akkord. Damit rufen Sie die Rast C / Bayati D Tonleitern auf.
Moll Spielen Sie einen C Moll-Akkord. Damit rufen Sie die Nahawand C Tonleiter auf.Drücken Sie das Pedal und setzen Sie die Noten D und A herab. Spielen Sie einen C Moll-Akkord. Damit rufen Sie die Rast A# /Bayati C Tonleitern auf.
Intro 2 Dur Spielen Sie einen C Dur-Akkord. Damit rufen Sie die Agam C Tonleiter auf.Drücken Sie das Pedal und setzen Sie die Noten E und B herab. Spielen Sie einen C Dur-Akkord. Damit rufen Sie die Rast C / Bayati D Tonleitern auf.
Moll (nur mit Saidi und Chegga)
Spielen Sie einen C Moll-Akkord. Damit rufen Sie die Nahawand C Tonleiter auf.Drücken Sie das Pedal und setzen Sie die Noten D und A herab. Spielen Sie einen C Moll-Akkord. Damit rufen Sie die Rast A# /Bayati C Tonleitern auf.
Ending 1 Dur Spielen Sie einen C Dur-Akkord. Damit rufen Sie die Agam C Tonleiter.Drücken Sie das Pedal und setzen Sie die Noten E und B herab. Spielen Sie einen C Dur-Akkord. Damit rufen Sie die Rast C / Bayati D Tonleitern auf.
Moll Spielen Sie einen C Moll-Akkord. Damit rufen Sie die Nahawand C Tonleiter auf.Drücken Sie das Pedal und setzen Sie die Noten D und A herab. Spielen Sie einen C Moll-Akkord. Damit rufen Sie die Rast A# /Bayati C Tonleitern auf.
Ending 2 Dur Spielen Sie einen C Dur-Akkord.Damit rufen Sie die Agam C Tonleiter auf.Drücken Sie das Pedal und setzen Sie die Noten E und B herab. Spielen Sie einen C Dur-Akkord. Damit rufen Sie die Rast C / Bayati D Tonleitern auf.
= Quarter Tone

Tipp: Um die selektierte arabische Tonleiter auch bei Auswahl eines anderen Style beizube-halten, stellen Sie den “Scale Lock” Parameter auf “On”. Gehen Sie dazu auf “Seite 24 - Pre-ferences: Lock” des Style Play Modus. Bleiben Sie auf dieser Seite und drücken Sie WRITE,um die Einstellungen im Global zu speichern. Anmerkung: Sie können die arabische Tonleiter nur den Realtime Spuren (Default-Einstel-lung) oder nur den Upper Spuren oder allen Spuren (Realtime und Style) zuweisen. ZumÄndern dieser Einstellung rufen Sie “Seite 25 - Preferences: Controls” des Style Play Modusauf und stellen Sie den Tonleiter-Modus-Parameter wie gewünscht ein. Bleiben Sie auf die-ser Seite und drücken Sie WRITE, um die Einstellungen im Global zu speichern.
VERWENDUNG DER NEUEN PROGRAMME UND DRUM KIT PROGRAMMESie können den bereits bestehenden Performances, Styles und Songs die neuen Pro-gramme und Drum Kit Programme zuweisen.
Performance oder Single Touch Einstellung (STS)Sie können die neuen Programme jeder der vier verfügbaren Realtime Spuren (Upper 1-3, Lower) zuweisen. Anschließend können Sie die Änderungen dann in einer Perfor-mance oder STS speichern.1. Stecken Sie die Karte in das FLASH CARD Laufwerk, das sich auf der Rückseite
des Instruments befindet. Warten Sie, bis die WRITE/DISK IN USE LED erlischt. 2. Drücken Sie STYLE PLAY, um den Style Play Modus aufzurufen.3. Benutzen Sie die PROGRAM/PERFORMANCE Taster, um die zu editierende Per-
formance zu selektieren (siehe “Grundlegende Bedienschritte” in der Bedienungs-anleitung).
4. Drücken Sie einen der VOLUME/VALUE (E-H) Taster, um eine der Realtime Spu-ren zu selektieren.
5. Drücken Sie den PROGRAM Taster neben der PROGRAM/PERFORMANCE Sek-tion. Drücken Sie anschließend mehrmals den äußersten linken ([CARD]) Tasterder PROGRAM/PERFORMANCE Sektion, so dass beide LEDs sich einschalten.
6. Drücken Sie einen der [1]-[3] Taster in dieser Sektion, um die entsprechendenProgramm-Bänke aufzurufen. Drücken Sie dann die Taster [7] oder [8], um einePerkussionsprogramm-Bank bzw. den Taster [9], um eine Drum Kit Bank zuselektieren. Mit den VOLUME/VALUE Tastern wählen Sie dann ein Programmoder ein Drum Kit Programm. Benutzen Sie die PAGE Taster, um alle Seiten derselektierten Bank zu durchblättern (oder drücken Sie mehrmals den Bank-Taster,um die Seiten zyklisch nacheinander aufzurufen).
7. Drücken Sie EXIT, um das Auswahlfenster zu schließen. 8. Um die Änderungen in einer Performance zu speichern, drücken Sie WRITE, um
das Write Fenster zu öffnen und selektieren Sie dann “Perf.No”. Selektieren Sieeinen der verfügbaren Performance Speicherplätze im Speicher und drücken SieENTER, um den Speichervorgang zu starten. Daraufhin erscheint die Meldung“Are you sure?”. Drücken Sie ENTER zur Bestätigung oder EXIT, um den Vorgangabzubrechen.Um die Änderungen in einer STS zu speichern, drücken Sie WRITE, um das WriteFenster zu öffnen und selektieren dann “STS No.”. Selektieren Sie einen der vierverfügbaren STS Speicherplätze in dem gerade selektierten Style und drücken SieENTER, um den Speichervorgang zu starten. Daraufhin erscheint die Meldung“Are you sure?”. Drücken Sie ENTER zur Bestätigung oder EXIT, um den Vorgangabzubrechen.
StyleSie können die neuen Programme jeder Melodie-/Harmonie-Spur des Style (Bass, Acc1-5) und die Drum Kit Programme den Drum oder Perkussionsspuren zuweisen. Die vor-genommen Änderungen können Sie dann in dem gerade selektierten Style (Style Perfor-mance) speichern.1. Stecken Sie die Karte in das FLASH CARD Laufwerk, das sich auf der Rückseite
des Instruments befindet. Warten Sie, bis die WRITE/DISK IN USE LED erlischt.2. Drücken Sie STYLE PLAY, um den Style Play Modus aufzurufen.3. Benutzen Sie die STYLE Taster, um den zu editierenden Style zu selektieren (siehe
“Grundlegende Bedienschritte” in der Bedienungsanleitung).4. Drücken Sie MENU, selektieren Sie “Sty Ctrls” und drücken Sie dann PAGE+, um
Seite 21 aufzurufen (“StyCtl: Wrap/Rng”).5. Stellen Sie “Prog” Parameter auf On. Auf diese Weise können Sie verschiedene Pro-
gram Changes den Style Spuren zuweisen, um die Originalprogramme des StylePattern zu ersetzen. Anmerkung: Die in die Akkordvariationen eingegebenen Pro-gram Changes werden durch die Programme ersetzt, die den Spuren zugewiesen wer-den. Zur Wiederherstellung der Original-Programm-Changes stellen Sie diesenParameter auf den Original-Wert zurück.
6. Drücken Sie EXIT, um auf die Hauptseite des Style Play Modus zurückzukehren.7. Drücken Sie TRK.SELECT, um die Style Spuren anzeigen zu lassen. Die LED des
Taster schaltet sich ein.8. Drücken Sie einen der VOLUME/VALUE Taster, um eine der Style Spuren zu
selektieren.
9. Drücken Sie den PROGRAM Taster neben der PROGRAM/PERFORMANCE Sek-tion; drücken Sie dann mehrmals den äußersten linken ([CARD]) Taster der PRO-GRAM/PERFORMANCE Sektion, so dass die LEDs beider Taster sich einschalten.
10. Drücken Sie einen der [1]-[3] Taster in dieser Sektion, um die entsprechendenProgramm-Bänke aufzurufen. Drücken Sie dann die Taster [7] oder [8], um einePerkussionsprogramm-Bank bzw. den Taster [9], um eine Drum Kit Bank zuselektieren. Mit den VOLUME/VALUE Tastern wählen Sie dann ein Programmoder ein Drum Kit Programm. Benutzen Sie die PAGE Taster, um alle Seiten derselektierten Bank zu durchblättern (oder drücken Sie mehrmals den Bank-Taster,um die Seiten zyklisch nacheinander aufzurufen).
11. Drücken Sie EXIT, um das Auswahlfenster zu schließen.12. Drücken Sie WRITE, um das Write Fenster zu öffnen und selektieren Sie dann
“Current Style”. Drücken Sie ENTER, um den Speichervorgang zu starten. Darauf-hin erscheint die Meldung “Are you sure?”. Drücken Sie ENTER zur Bestätigungoder EXIT, um den Vorgang abzubrechen.
SongSie können die neuen Programme jeder Melodie-/Harmonie-Spur des Song und dieDrum Kit Programme den Drum- oder Perkussionsspuren zuweisen. Anmerkung: Wenn der Song als Standard MIDI Datei gespeichert wird, stehen die ara-bischen Klänge beim Abspielen des Song auf einem anderen Instrument nicht zur Verfü-gung.1. Stecken Sie die Karte in das FLASH CARD Laufwerk, das sich auf der Rückseite
des Instruments befindet. Warten Sie, bis die WRITE/DISK IN USE LED erlischt.2. Drücken Sie SONG, um den Song Modus aufzurufen.3. Wenn Sie sich auf der Hauptseite des Song Modus befinden, selektieren Sie den
Befehl “Load Song”.4. Das Song Select Fenster öffnet sich. Selektieren Sie eine Standard MIDI Datei
(siehe “Grundlegende Bedienschritte” in der Bedienugnsanleitung) und drückenSie dann F2 (Load), um den Song zu laden. Daraufhin erscheint die Meldung “Areyou sure?”. Drücken Sie ENTER zur Bestätigung oder EXIT, um den Vorgang abzu-brechen.
5. Benutzen Sie die TRK.SELECT Taster, um die Spuren 1-8 oder 9-16 anzeigen zulassen.
6. Drücken Sie einen der VOLUME/VALUE Taster, um eine Spur zu selektieren. 7. Drücken Sie den PROGRAM Taster neben der PROGRAM/PERFORMANCE Sek-
tion. Drücken Sie anschließend mehrmals den äußersten linken ([CARD]) Tasterder PROGRAM/PERFORMANCE Sektion, so dass beide LEDs sich einschalten.
8. Drücken Sie einen der [1]-[3] Taster in dieser Sektion, um die entsprechendenProgramm-Bänke aufzurufen. Drücken Sie dann die Taster [7] oder [8], um einePerkussionsprogramm-Bank bzw. den Taster [9], um eine Drum Kit Bank zuselektieren. Mit den VOLUME/VALUE Tastern wählen Sie dann ein Programmoder ein Drum Kit Programm. Benutzen Sie die PAGE Taster, um alle Seiten derselektierten Bank zu durchblättern (oder drücken Sie mehrmals den Bank-Taster,um die Seiten zyklisch nacheinander aufzurufen).
9. Drücken Sie EXIT, um das Auswahlfenster zu schließen.10. Drücken Sie nochmals den TRK.SELECT Taster, so dass die LED erlischt. Kehren
Sie auf die Hauptseite des Song Modus zurück.11. Selektieren Sie den Befehl “Save Song”.12. Das Save Song Fenster öffnet sich (siehe Kapitel “Song Betriebsmodus” in der
Bedienungsanleitung). Nun können Sie den Song in einer neuen oder bereits vor-handenen Datei speichern.• Zum Speichern in einer bereits vorhandenen Datei verschieben Sie die Datei indie erste Displayzeile. Die so selektierte Datei wird gelöscht und durch die vonIhnen gerade gespeicherte Datei ersetzt. • Zum Anlegen einer neuen Datei verschieben Sie die Option “NEW_NAME.MID”in die erste Displayzeile. Drücken Sie den rechten VOLUME/VALUE [DRUM/PERC] Taster, um die Text-Editierung aufzurufen. Bewegen Sie den Cursor mitden Pfeiltasten DOWN/- und UP/+ und selektieren Sie den gewünschten Buchsta-ben durch Drücken des INSERT Tasters. Benutzen Sie die DELETE Taster, um denBuchstaben an der Cursorposition zu löschen.
13. Drücken Sie ENTER, um den Speichervorgang zu starten Daraufhin erscheint dieMeldung “Are you sure?”. Drücken Sie ENTER zur Bestätigung oder EXIT, um denVorgang abzubrechen.

INFORMAZIONI SULLA CARDContenuto della card. Questa card contiene nuovi Sample,Program, Drum Kit Program e Style. I sample sono staticampionati a qualità CD (16 bit, 44,1kHz), usando esclusi-vamente attrezzature di alta classe. Questi sample sono allabase di nuovi Program e Drum Kit Program, che sono a lorovolta alla base dei nuovi Style.Nota: I parametri Drum Mapping e Kick & Snare Designa-tion non si comportano correttamente con i Drum Kit. Non modificateli e lasciateli al loro stato iniziale.Nota: Quando si assegna un nuovo Drum Kit agli Style esi-stenti, alcuni strumenti potrebbero venir sostituiti da altrinon adatti. La mappa dei suoni percussivi può essere diversa
dalla mappa dei Drum Kit interni allo strumento.
Come selezionare i dati contenuti nella card. Per accedere ai dati contenuti nella card,inserite la card nell’apertura FLASH CARD sul retro dello strumento (vedi immagine). Nonoccorre prima caricare i dati nella memoria interna dello strumento.• Per usare gli Style, premete ripetutamente il tasto più a sinistra nella sezione STYLE,
finché non si accendono entrambi i led. Premete il tasto [0] nella sezione STYLE peraccedere agli Style della card. Usate i tasti PAGE per scorrere le pagine del banco sele-zionato (o premete ripetutamente il tasto del banco per scorrere le pagine in ciclo).
• Per usare i Program, premete il tasto PROGRAM accanto alla sezione PROGRAM/PERFORMANCE, poi premete ripetutamente il tasto più a sinistra nella sezionePROGRAM/PERFORMANCE, finché non si accendono entrambi i led. I nuovi Pro-gram si trovano sotto i tasti [1]-[3], i Percussive Program sotto i tasti [7] ed [8], iDrum Kit Program sotto il tasto [9] di questa sezione. Usate i tasti PAGE per scorrerele pagine del banco selezionato (o premete ripetutamente il tasto del banco per scor-rere le pagine in ciclo).
Note sparse. Quando usate la card, tenete presente quanto segue:• Se si inserisce la card mentre lo strumento è in modo Record, non è possibile accedere ai dati finché non si esce dal modo Record.• Non è possibile accedere ai dati contenuti nella card mentre il led del tasto WRITE/DISK IN USE è acceso (dopo l’inserimento della card nel lettore).• Quando si desidera ascoltare una Song realizzata con uno dei Program contenuti nella card, la card deve essere inserita nel lettore, per evitare di ascoltare la Song con i suoni sba-gliati. La stessa Song, salvata come Standard MIDI File, non suonerà allo stesso modo su un altro strumento.• Non è possibile salvare in maniera permanente le modifiche apportate alla Style Perfor-mance o ad uno degli STS degli Style contenuti nella card. Se si tenta di salvare una Style Performance o un STS (opzione “Current Style” o “STS” selezionata dopo aver premuto WRITE), quando si seleziona un diverso Style, o si spegne lo strumento, vengono richiamate le impostazioni originali. Per salvare le modifiche, occorre selezionare una Performance dopo aver premuto il tasto WRITE.• Questa card è di tipo ROM (a sola scrittura), e non può quindi essere usata per memoriz-zare dati User.
Style gratuiti in rete. Potete prelevare Style e Song (liberamente scaricabili), basati sui daticontenuti in questa card, dal nostro sito: www.korgpa.com.
STYLE E SCALE ARABEGli Style realizzati da Ayoub Bassam (dallo Style numero 0-32-0 allo Style numero 0-32-14,vedi più avanti la tabella “Styles”) consentono di utilizzare la funzione Quarter Tone,insieme agli accordi suonati sulla tastiera, per selezionare le varie scale arabe per l’Intro el’Ending. L’Intro o l’Ending selezionato suoneranno con la scala araba selezionata.Nota: Prima di utilizzare uno di questi Style, è necessario assegnare la funzione QuarterTone ad un interruttore a pedale o ad un pedale della pedaliera EC5 (vedi “Pagina 4 - Assi-gnable Pedal/Footswitch, Assignable Slider, EC5” nel capitolo “Ambiente di edit Global” delManuale di istruzioni), oppure ad uno dei Pad (vedi “Nuove funzioni assegnabili ai Pad”nel manuale di aggiornamento della versione 3.0 del sistema operativo; è necessario avereinstallato almeno questa versione di sistema operativo per poter assegnare la funzione Quar-ter Tone ai Pad).Vedi il Tutorial 6 (“La scala araba”) nel Manuale di istruzioni per informazioni sull’usodella funzione Quarter Tone.Questi Style comprendono due Intro e due Ending. In tredici di essi (cioè tutti, ad esclusionedi Saidi e Chegga), Intro 1 ed Ending 1 contengono ciascuno due Chord Variation (una pergli accordi maggiori, l’altra per gli accordi minori). Intro 2 ed Ending 2 contengono solo unaChord Variation (per gli accordi maggiori).Inoltre, gli Style Saidi e Chegga contengono una Chord Variation aggiuntiva (per gli accordiminori) per l’Intro 2.Ecco come selezionare la scala araba desiderata:
1. Tenete premuto il pedale per selezionare la funzione Quarter Tone, e abbassate l’into-nazione delle note elencate nella tabella seguente. Poi rilasciate il pedale.
2. Selezionate il tasto INTRO o ENDING desiderato.3. Se avete selezionato un Intro, avviate lo Style.4. Suonate un accordo maggiore o minore, a seconda dello Style Element selezionato.
Viene selezionata la scala araba desiderata.
Suggerimento: Per conservare la stessa scala araba quando si seleziona uno Style diverso, poneteil parametro “Scale Lock” ad “On”, a “Pagina 24 - Preferences: Lock” del modo Style Play. Mentrevi trovate ancora in questa pagina, premete WRITE per salvare le impostazioni nel Global.Nota: Potete applicare la scala araba alle sole tracce Realtime (impostazione iniziale), alle soletracce Upper, o a tutte le tracce (Realtime e Style). Per modificare questa impostazione, andate a“Pagina 25 - Preferences: Controls” del modo Style Play, e programmate il parametro Scale Modecome preferite. Mentre vi trovate ancora in questa pagina, premete WRITE per salvare le impo-stazioni nel Global.
RMC-PCM02 (ITALIANO)
Style Element Chord Variation Esempio
Intro 1 Maggiore Suonate un accordo di Do maggiore. Viene selezionata la scala Agam C.Premete il pedale e abbassate le note Mi e Si. Suonate un accordo di Do maggiore. Viene selezionata la scala Rast C / Bayati D.
Minore Suonate un accordo di Do minore. Viene selezionata la scala Nahawand C.Premete il pedale e abbassate le note Re e La. Suonate un accordi di Do minore. Viene selezionata la scala Rast A# /Bayati C.
Intro 2 Maggiore Suonate un accordo di Do maggiore. Viene selezionata la scala Agam C.Premete il pedale e abbassate le note Mi e Si. Suonate un accordo di Do maggiore. Viene selezionata la scala Rast C / Bayati D.
Minore (solo con Saidi e Chegga)
Suonate un accordo di Do minore. Viene selezionata la scala Nahawand C.Premete il pedale e abbassate le note Re e La. Suonate un accordi di Do minore. Viene selezionata la scala Rast A# /Bayati C.
Ending 1 Maggiore Suonate un accordo di Do maggiore. Viene selezionata la scala Agam C.Premete il pedale e abbassate le note Mi e Si. Suonate un accordo di Do maggiore. Viene selezionata la scala Rast C / Bayati D.
Minore Suonate un accordo di Do minore. Viene selezionata la scala Nahawand C.Premete il pedale e abbassate le note Re e La. Suonate un accordi di Do minore. Viene selezionata la scala Rast A# /Bayati C.
Ending 2 Maggiore Suonate un accordo di Do maggiore. Viene selezionata la scala Agam C.Premete il pedale e abbassate le note Mi e Si. Suonate un accordo di Do maggiore. Viene selezionata la scala Rast C / Bayati D.
= Quarto di tono

USARE I NUOVI PROGRAM E DRUM KIT PROGRAMÈ possibile usare i nuovi Program e Drum Kit Program nelle Performance, negli STS, negli Style e nelle Song.
Performance e Single Touch Setting (STS)È possibile assegnare i nuovi Program alle quattro tracce Realtime (Upper 1-3, Lower). Poipotete salvare le modifiche in una Performance o in uno STS in memoria.1. Inserite la card nell’apposita fessura del lettore FLASH CARD, posto sul retro dello
strumento. Attendete che il led WRITE/DISK IN USE si spenga.2. Premete STYLE PLAY per passare al modo Style Play.3. Usate i tasti PROGRAM/PERFORMANCE per selezionare la Performance che desi-
derate modificare (vedi “Operazioni di base” nel Manuale di istruzioni).4. Premete uno dei tasti VOLUME/VALUE (E-H), per selezionare una delle tracce Real-
time. 5. Premete il tasto PROGRAM situato presso la sezione PROGRAM/PERFORMANCE;
poi premete ripetutamente il tasto più a sinistra ([CARD]) nella sezione PROGRAM/PERFORMANCE, finché non si accendono entrambi i led.
6. Premete uno dei tasti [1]-[3] di questa sezione per accedere al corrispondente bancodi Program normali, [7] od [8] per accedere ad un banco di Program percussivi, o iltasto [9] per accedere al banco dei Drum Kit Program. Usate i tasti VOLUME/VALUEper selezionare uno dei Program o dei Drum Kit Program. Usate i tasti PAGE perscorrere le pagine del banco selezionato (o premete ripetutamente il tasto del bancoselezionato per scorrere in ciclo le pagine).
7. Premete EXIT per uscire dalla finestra di selezione.8. Per salvare le modifiche in una Performance, premete WRITE per aprire la finestra
Write, poi selezionate il parametro “Perf.No”. Selezionate una delle locazioni di Per-formance disponibili in memoria, poi premete ENTER per avviare il salvataggio.Appare il messaggio “Are you sure?”. Premete ENTER per confermare, EXIT perannullare.Per salvare le modifiche in un STS, premete WRITE per aprire la finestra Write, poiselezionate il parametro “STS No.”. Selezionate una delle quattro locazioni STS dispo-nibili all’interno dello Style selezionato, poi premete ENTER per avviare il salvatag-gio. Appare il messaggio “Are you sure?”. Premete ENTER per confermare, EXIT perannullare.
StylePotete assegnare i nuovi Program ad una delle tracce melodico/armoniche dello Style (Bass,Acc1-5), e i nuovi Drum Kit Program alle tracce Drum o Percussion. Poi potete salvare lemodifiche nello Style selezionato (Style Performance).1. Inserite la card nell’apposita fessura del lettore FLASH CARD, posto sul retro dello
strumento. Attendete che il led WRITE/DISK IN USE si spenga.2. Premete STYLE PLAY per passare al modo Style Play.3. Usate i tasti della sezione STYLE per selezionare lo Style da porre in edit (vedi “Ope-
razioni di base” nel Manuale di istruzioni).4. Premete MENU, selezionate “Sty Ctrls”, poi premete PAGE+ per passare a Pagina 21
(“StyCtl: Wrap/Rng”).5. Ponete il parametro “Prog” ad On. In questo modo, sarete in grado di assegnare Pro-
gram Change diversi alle tracce dello Style, per sostituire i Program originali contenutinel pattern dello Style.Nota: I Program Change inseriti nell’intestazione della Chord Variation vengonosostituiti dai Program assegnati alla traccia. Per recuperare i Program Change origi-nali, ponete questo parametro ad Original.
6. Premete EXIT per tornare alla pagina principale del modo Style Play.7. Premete TRK.SELECT per vedere le tracce dello Style. Il led del tasto si accende.8. Premete uno dei tasti VOLUME/VALUE per selezionare una delle tracce dello Style. 9. Premete il tasto PROGRAM situato presso la sezione PROGRAM/PERFORMANCE;
poi premete ripetutamente il tasto più a sinistra ([CARD]) nella sezione PROGRAM/PERFORMANCE, finché non si accendono entrambi i led.
10. Premete uno dei tasti [1]-[3] di questa sezione per accedere al corrispondente bancodi Program normali, [7] od [8] per accedere ad un banco di Program percussivi, o iltasto [9] per accedere al banco dei Drum Kit Program. Usate i tasti VOLUME/VALUEper selezionare uno dei Program o dei Drum Kit Program. Usate i tasti PAGE perscorrere le pagine del banco selezionato (o premete ripetutamente il tasto del bancoselezionato per scorrere in ciclo le pagine).
11. Premete EXIT per uscire dalla finestra di selezione.12. Premete WRITE per aprire la finestra Write, poi selezionate il parametro “Current
Style”. Premete ENTER per avviare il salvataggio. Appare il messaggio “Are you sure?”.Premete ENTER per confermare, EXIT per annullare.
SongPotete assegnare i nuovi Program alle tracce melodico/armoniche delle Song, e i Drum KitProgram alle tracce Drum o Percussion.Nota: Quando si salva una Song come Standard MIDI File (SMF), i suoni arabi e turchinon sono disponibili quando si ascolta la Song con uno strumento diverso.1. Inserite la card nell’apposita fessura del lettore FLASH CARD, posto sul retro dello
strumento. Attendete che il led WRITE/DISK IN USE si spenga.2. Premete SONG per passare al modo Song.3. Nella pagina principale del modo Song, selezionate i comando “Load Song”.4. Appare la finestra Song Select. Selezionate uno Standard MIDI File (vedi “Operazioni
di base” nel Manuale di istruzioni), poi premete F2 (Load) per caricare la Song.Appare il messaggio “Are you sure?”. Premete ENTER per confermare, EXIT perannullare.
5. Usate il tasto TRK.SELECT per vedere le tracce 1-8 e 9-16.6. Premete uno dei tasti VOLUME/VALUE per selezionare una traccia.7. Premete il tasto PROGRAM situato presso la sezione PROGRAM/PERFORMANCE;
poi premete ripetutamente il tasto più a sinistra ([CARD]) nella sezione PROGRAM/PERFORMANCE, finché non si accendono entrambi i led.
8. Premete uno dei tasti [1]-[3] di questa sezione per accedere al corrispondente bancodi Program normali, [7] od [8] per accedere ad un banco di Program percussivi, o iltasto [9] per accedere al banco dei Drum Kit Program. Usate i tasti VOLUME/VALUEper selezionare uno dei Program o dei Drum Kit Program. Usate i tasti PAGE perscorrere le pagine del banco selezionato (o premete ripetutamente il tasto del bancoselezionato per scorrere in ciclo le pagine).
9. Premete EXIT per uscire dalla finestra di selezione.10. Premete nuovamente il tasto TRK.SELECT, per far spegnere entrambi i led e tornare
alla pagina principale del modo Song.11. Selezionate il comando “Save Song”.12. Appare la finestra Save Song (vedi il Manuale di istruzioni, capitolo “Modo operativo
Song”). A questo punto, potete salvare la Song in un file nuovo o già esistente.• Per salvare su un file già esistente, portate il file nella prima riga del display. Il fileselezionato verrà cancellato e sostituito da quello che state salvando.• Per creare un nuovo file, portate il file “NEW_NAME.MID” nella prima riga deldisplay. Premete il tasto VOLUME/VALUE [DRUM/PERC] destro per accedereall’edit del testo. Spostate il cursore con i tasti DOWN/- ed UP/+, e selezionate i carat-teri con il DIAL. Premete INSERT per inserire un nuovo carattere. Premete DELETEper cancellare il carattere alla posizione del cursore.
13. Premete ENTER per avviare il salvataggio. Appare il messaggio “Are you sure?”. Pre-mete ENTER per confermare, EXIT per annullare.

STYLES
(1) Styles created by Ayoub Bassam (2) Styles created by Mehmet Dogdu(1) Styles créés par Ayoub Bassam (2) Styles créés par Mehmet Dogdu(1) von Ayoub Bassam kreierte Styles (2) von Mehmet Dogdu kreierte Styles(1) Style creati da Ayoub Bassam (2) Style creati da Mehmet Dogdu
PROGRAMS
All Programs created by Ayoub Bassam, except where marked with (*), created by Mehmet DogduTous les Programs sont créés par Ayoub Bassam, sauf ceux identifiés par (*) qui ont été créés par Mehmet DogduAlle Programme wurden von Ayoub Bassam kreiert, mit Ausnahme der mit (*) gekennzeichneten Programme, die von Mehmet Dogdu kreiert wurdenTutti i Program creati da Ayoub Bassam, ad eccezione di quelli contrassegnati dall’asterisco (*), creati da Mehmet Dogdu
DRUM KIT PROGRAMS
All Drum Kit Programs created by Ayoub Bassam, except where marked with (*), created by Mehmet DogduTous les Kit Programs sont créés par Ayoub Bassam, sauf ceux identifiés par (*) qui ont été créés par Mehmet DogduAlle Drum Kit Programme wurden von Ayoub Bassam kreiert, mit Ausnahme der mit (*) gekennzeichneten Pro-gramme, die von Mehmet Dogdu kreiert wurdenTuti i Drum Kit Program creati da Ayoub Bassam, ad eccezione di quelli contrassegnati dall’asterisco (*), creati da Meh-met Dogdu
MULTISAMPLES
All Multisamples created by Ayoub Bassam, except where marked with (*), created by Mehmet DogduTous les Multiéchantillons sont créés par Ayoub Bassam, sauf ceux identifiés par (*) qui ont été créés par Mehmet DogduAlle Multisamples wurden von Ayoub Bassam kreiert, mit Ausnahme der mit (*) gekennzeichneten Programme, die von Meh-met Dogdu kreiert wurdenTutti i Multisample creati da Ayoub Bassam, ad eccezione di quelli contrassegnati dall’asterisco (*), creati da Mehmet Dogdu
CC#00 CC#32 PC Styles Names Country
0 32 0 Ayoub(1) Arabic Countries
1 Cifteteli2(1) Arabic Countries and Turkey
2 Maksum(1) Arabic Countries
3 Malfuf(1) Arabic Countries
4 Saidi(1) Arabic Countries
5 Chegga(1) Syria, Turkey, Iran, Kurdistan
6 Daleona(1) Syria, Lebanon, Jordania
7 Bonawara(1) Tunisia
8 Morocco1(1) Morocco
9 Samai 10/8(1) Arabic Countries and Turkey
10 Masmodi1(1) Arabic Countries
11 Schubi(1) Arabic Countries
12 Wachda(1) Arabic Countries
13 Masmodi2(1) Arabic Countries
14 Katakofti(1) Arabic Countries
33 0 2/4(2) Arabic Countries and Turkey
1 Arap(2) Arabic Countries and Turkey
2 Vahde(2) Arabic Countries and Turkey
3 Cifteteli1(2) Arabic Countries and Turkey
4 5/8(2) Arabic Countries and Turkey
5 Sebari(2) Arabic Countries and Turkey
6 Misket(2) Arabic Countries and Turkey
7 3/4(2) Arabic Countries and Turkey
8 Halay(2) Arabic Countries and Turkey
9 Duble(2) Arabic Countries and Turkey
10 9/8(2) Arabic Countries and Turkey
11 6/8(2) Arabic Countries and Turkey
12 TSM 9/8(2) Arabic Countries and Turkey
13 7/8(2) Arabic Countries and Turkey
14 Sek(2) Arabic Countries and Turkey
CC#00 CC#32 PC Program Names
121 68 0 Arab.Kanun
1 Arabic Oud1
2 TremoloOud1
3 Acoust.Sas1
4 Tremolo Sas
5 ElectricSas(*)
6 Arab Mizmar
7 Turkish Mizmar(*)
8 Zurna
9 Zurna Vibr.
10 Megwez/1
11 Megwez/2
12 Megwez/1+2
13 May1
14 May2
15 May3
16 Turkish Ud(*)
17 Acoust.Sas2(*)
18 Wah Wah Fx
19 Arabic Oud2
20 TremoloOud2
24 May Vibrato1(*)
25 May Vibrato2(*)
32 Arab.Keman1(*)
33 Turk.Kanun(*)
121 68 34 Turk.Ney(*)
35 Club J.Gtr3(*)
121 68 36 Arab.Keman2(*)
37 Arab.Guitar(*)
38 Klarinet(*)
39 Trumpet 3(*)
32 Dohola
33 Req
34 Claps&Sagat
35 Djembé
36 Bongos
37 Tabel
38 TablaMaksum
39 Solo Tabla
48 TablaFachar
49 TablaMetal
50 Daf
51 Bandir
52 Voice Efx
53 Zagruta
54 Man Voices
55 Turk.Voices(*)
CC#00 CC#32 PC Drum Kit Program Names
120 68 0 ArabianKit1
1 Arab.Perc1
2 Arab.Perc2
3 TurkishKit1(*)
4 TurkishKit2(*)
# Multisample Name # Multisample Name
0 Dohola 1 Req
2 Claps & Sagat 3 Djembé
4 Bongos 5 Tabel
6 Tabla Maksum 7 Solo Tabla
8 Tabla Fachar 9 Tabla Metal
10 Daf 11 Bandir
12 Voice Effects 13 Zagruta
14 Man Voices 15 Turkish Voices(*)
16 Acoustis Sas1 17 Acoustis Sas2
18 Electric Sas(*) 19 Arabic Mizmar
20 Turkish Mizmar(*) 21 Kanun 1
22 May1 23 May2
24 May3 25 May vibrato1(*)
26 May vibrato2(*) 27 Megwez 1
28 Megwez 2 29 Zurna
30 Zurna Vibrato 31 Tremolo Sas
32 Arabic Oud 33 Turkish Ud(*)
34 Tremolo Oud 35 Gtr Wah Wah
CC#00 CC#32 PC Program Names

DRUM KITSIn the following tables, the new drum samples included in the card are marked in bold italic, while the remaining samples are the standard factory drum samples. Only the High veloc-ity layer is used with these Drum Kits.Dans les tableaux suivants, les nouveaux échantillons de batterie contenus dans la carte sont rédigés en gras italique, tandis que les autres échantillons sont les échantillons standards fournisd’usine. Pour ces Drum Kits, on n’utilise que le niveau de dynamique High.In den nachfolgenden Tabellen wurden die neuen Drum Samples in fettgedruckter Kursivschrift dargestellt, die übrigen Samples sind hingegen Standard-Drum-Samples. Bei diesenDrum Kits wird nur der Hochgeschwindigkeitslayer eingesetzt. Nelle seguenti tabelle, i nuovi campioni percussivi contenuti nella card sono indicati in neretto corsivo, mentre i rimanenti campioni sono quelli standard. In questi Drum Kit è utilizzato ilsolo livello di dinamica High.
120-68-0: Arabian Kit 1 120-68-1: Arabian Percussion 1 120-68-2: Arabian Percussion 2 120-68-3: Turkish Kit 1 120-68-4: Turkish Kit 2
Note High Excl. High Excl. High Excl. High Excl. High Excl.
0 C-1 216 GtrWah_1 Off 216 GtrWah_1 Off 216 GtrWah_1 Off 362 empty Off 216 GtrWha_1 Off
1 C#-1 217 GtrWah_2 Off 217 GtrWah_2 Off 217 GtrWah_2 Off 362 empty Off 217 GtrWha_2 Off
2 D-1 218 GtrWah_3 Off 218 GtrWah_3 Off 218 GtrWah_3 Off 362 empty Off 218 GtrWha_3 Off
3 D#-1 219 GtrWah_4 Off 219 GtrWah_4 Off 219 GtrWah_4 Off 362 empty Off 219 GtrWha_4 Off
4 E-1 220 GtrWah_5 Off 220 GtrWah_5 Off 220 GtrWah_5 Off 362 empty Off 220 GtrWha_5 Off
5 F-1 221 GtrWah_6 Off 221 GtrWah_6 Off 221 GtrWah_6 Off 362 empty Off 221 GtrWha_6 Off
6 F#-1 222 GtrWah_7 Off 222 GtrWah_7 Off 222 GtrWah_7 Off 362 empty Off 222 GtrWha_7 Off
7 G-1 223 GtrWah_8 Off 223 GtrWah_8 Off 223 GtrWah_8 Off 362 empty Off 223 GtrWha_8 Off
8 G#-1 362 empty Off 362 empty Off 362 empty Off 0 BD-Dry 1 Off 362 empty Off
9 A-1 17 BD-House 1 Off 362 empty Off 362 empty Off 17 BD-House 1 Off 17 BD-House 1 Off
10 A#-1 125 99-SD Off 362 empty Off 362 empty Off 125 99-SD Off 125 99-SD Off
11 B-1 123 88-BD Off 362 empty Off 362 empty Off 123 88-BD Off 123 88-BD Off
12 C0 124 88-SD Off 362 empty Off 362 empty Off 124 88-SD Off 124 88-SD Off
13 C#0 37 SD-Full Room Off 362 empty Off 362 empty Off 37 SD-Full Room Off 37 SD-Full Room Off
14 D0 48 SD-Processed 1 362 empty Off 362 empty Off 48 SD-Processed 1 48 SD-Processed 1
15 D#0 0 BD-Dry 1 Off 362 empty Off 362 empty Off 0 BD-Dry 1 Off 0 BD-Dry 1 Off
16 E0 12 BD-Tight Off 362 empty Off 362 empty Off 12 BD-Tight Off 12 BD-Tight Off
17 F0 31 SD-Dry 1 Off 362 empty Off 362 empty Off 31 SD-Dry 1 Off 31 SD-Dry 1 Off
18 F#0 87 HH1 Closed2 1 362 empty Off 362 empty Off 87 HH1 Closed2 1 87 HH1 Closed2 1
19 G0 2 BD-Dry 3 Off 362 empty Off 362 empty Off 2 BD-Dry 3 Off 2 BD-Dry 3 Off
20 G#0 73 SideStickAmb Off 362 empty Off 362 empty Off 73 SideStickAmb Off 73 SideStickAmb Off
21 A0 74 DrumStickHit Off 362 empty Off 362 empty Off 74 DrumStickHit Off 74 DrumStickHit Off
22 A#0 283 Tubular Off 362 empty Off 362 empty Off 283 Tubular Off 283 Tubular Off
23 B0 225 Cowbell Off 362 empty Off 362 empty Off 225 Cowbell Off 225 Cowbell Off
24 C1 225 Cowbell Off 94 Tabla_01 Off 362 empty Off 225 Cowbell Off 225 Cowbell Off
25 C#1 119 SD-Orch.Roll Off 95 Tabla_02 Off 362 empty Off 119 SD-Orch.Roll Off 119 SD-Orch.Roll Off
26 D1 121 FingerSnaps Off 96 Tabla_03 Off 362 empty Off 121 FingerSnaps Off 121 FingerSnaps Off
27 D#1 143 Zap2 Off 97 Tabla_04 Off 362 empty Off 143 Zap2 Off 143 Zap2 Off
28 E1 87 HH1 Closed2 Off 98 Tabla_05 Off 362 empty Off 87 HH1 Closed2 Off 87 HH1 Closed2 Off
29 F1 145 DJ-Scratch2 Off 99 Tabla_06 Off 362 empty Off 145 DJ-Scratch2 Off 145 DJ-Scratch2 Off
30 F#1 145 DJ-Scratch2 Off 100 Tabla_07 Off 362 empty Off 145 DJ-Scratch2 Off 145 DJ-Scratch2 Off
31 G1 74 DrumStickHit Off 101 Tabla_08 Off 362 empty Off 74 DrumStickHit Off 74 DrumStickHit Off
32 G#1 165 CongaHi-Slap2 Off 102 Tabla_09 Off 362 empty Off 165 CongaHi-Slap2 Off 165 CongaHi-Slap2 Off
33 A1 249 Click Off 103 Tabla_10 Off 362 empty Off 249 Click Off 249 Click Off
34 A#1 249 Click Off 104 Tabla_11 Off 362 empty Off 249 Click Off 249 Click Off
35 B1 2 BD-Dry 3 Off 105 Tabla_12 Off 362 empty Off 2 BD-Dry 3 Off 2 BD-Dry 3 Off
36 C2 12 BD-Tight Off 106 Tabla_13 Off 68 T_Mak_Tak_1 Off 17 BD-House 1 Off 183 Bandir_Dom Off
37 C#2 72 SideStickDry Off 107 Tabla_14 Off 79 T_Mak_Tak_2 Off 72 SideStickDry Off 180 Daf_Sak_3 Off
38 D2 33 SD-Dry 3 Off 108 Tabla_15 Off 63 T_Mak_Dom_1 Off 48 SD-Processed Off 184 Bandir_Tak_1 Off
39 D#2 122 Hand Claps Off 109 Tabla_16 Off 87 T_Mak_Tak_3 Off 337 Alkis Off 180 Daf_Sak_3 Off
40 E2 33 SD-Dry 3 Off 110 Tabla_17 Off 88 T_Mak_Tak_4 Off 49 SD-CrackerRoom Off 184 Bandir_Tak_1 Off
41 F2 79 Tom 2-Floor Off 111 Tabla_18 Off 89 T_Mak_Tak_5 Off 79 Tom 2-Floor Off 185 Bandir_Tak_2 Off
42 F#2 90 HH1 Open 2 1 112 Tabla_19 Off 64 T_Mak_Dom_2 Off 88 HH1 Foot 1 185 Bandir_Tak_2 1
43 G2 79 Tom 2-Floor Off 113 Tabla_20 Off 90 T_Mak_Tak_6 Off 79 Tom 2-Floor Off 7 Req_Dom 1
44 G#2 94 HH2 Foot 1 114 Tabla_21 Off 91 T_Mak_Tak_7 Off 97 HH-OldClose1 1 11 Req_Tak1 1
45 A2 78 Tom 2-Lo Off 115 Tabla_22 Off 92 T_Mak_Tak_8 Off 78 Tom 2-Lo Off 14 Req_Ziel2 Off
46 A#2 89 HH1 Open 1 1 116 Tabla_23 Off 93 T_Mak_Tak_9 Off 98 HH-Old Open1 1 10 Req_Sak 1
47 B2 78 Tom 2-Lo Off 117 Tabla_24 Off 65 T_Mak_Dom_3 Off 78 Tom 2-Lo Off 14 Req_Ziel2 Off
48 C3 77 Tom 2-Hi Off 118 Tabla_25 Off 69 T_Mak_Tak_10 Off 77 Tom 2-Hi Off 8 Req_Rool_E Off
49 C#3 104 Crash Cymbal 1 Off 119 Tabla_26 Off 70 T_Mak_Tak_11 Off 104 Crash Cymbal 1 Off 361 Tef 3 1
50 D3 77 Tom 2-Hi Off 120 Tabla_27 Off 71 T_Mak_Tak_12 Off 77 Tom 2-Hi Off 66 T_Mak_Dom_4 Off
51 D#3 113 Ride-Edge 2 Off 121 Tabla_28 Off 72 T_Mak_Tak_13 Off 95 HH2 FootOpen Off 154 Tabla_61 2
52 E3 0 Dohola_Dom Off 122 Tabla_29 Off 73 T_Mak_Tak_14 Off 352 Hollo 1 Off 341 Darbuka 1 Tek7 Off
53 F3 4 Dohola_Sak_1 Off 123 Tabla_30 Off 66 T_Mak_Dom_4 Off 353 Hollo 2 Off 341 Darbuka 1 Tek7 Off
54 F#3 1 Dohola_Sak_2 Off 124 Tabla_31 Off 74 T_Mak_Tak_15 Off 211 Tambourin-Acc1 Off 156 T_Fak_Sak_1 2
55 G3 2 Dohola_Tak_1 Off 125 Tabla_32 Off 75 T_Mak_Tak_16 Off 345 Darbuka 2 Off 129 Tabla_36 Off
56 G#3 3 Dohola_Tak_3 Off 126 Tabla_33 Off 76 T_Mak_Tak_17 Off 225 Cowbell Off 1 Dohola_Sak2 2
57 A3 5 Dohola_Tak_2 Off 127 Tabla_34 Off 77 T_Mak_Tak_18 Off 345 Darbuka 2 Off 207 Tbl_Libano_dom Off
58 A#3 6 Dohola_Tak_4 Off 128 Tabla_35 Off 67 T_Mak_Dom_5 Off 219 Cabasa-Up Off 209 Tbl_Libano_faq_1 2
59 B3 7 Req_Dom Off 129 Tabla_36 Off 78 T_Mak_Tak_19 Off 339 Bandir Closed Off 208 Tbl_Libano_ef_1 Off
60 C4 10 Req_Sak Off 130 Tabla_37 Off 80 T_Mak_Tak_20 Off 353 Hollo 2 Off 16 Clap_1 Off
61 C#4 13 Req_Ziel_1 Off 131 Tabla_38 Off 81 T_Mak_Tak_21 Off 168 BongoLo-Open Off 188 Turk_EmrM1.01 Off
62 D4 14 Req_Ziel_2 Off 132 Tabla_39 Off 82 T_Mak_Tak_22 Off 353 Hollo 2 Off 189 Turk_EmrM1.05 Off
63 D#4 15 Req_Ziel_3 Off 133 Tabla_40 Off 83 T_Mak_Tak_23 Off 171 BongoHi-Open Off 189 Turk_EmrM1.05 Off
64 E4 11 Req_Tak_1 Off 134 Tabla_41 Off 84 T_Mak_Tak_24 Off 305 Douf-rim-ak Off 190 Turk_EmrM1.12 Off
65 F4 12 Req_Tak_2 Off 135 Tabla_42 Off 85 T_Mak_Tak_25 Off 344 Darbuka 1 Closed Off 358 Ramazan DVL3 Off
66 F#4 9 Req_Rool_Ziel Off 136 Tabla_43 Off 86 T_Mak_Tak_26 Off 348 Darbuka D1 4 323 Sagat-HalfOpen 4
67 G4 8 Req_Rool_End Off 137 Tabla_44 Off 177 Daf_Dom Off 346 Darbuka 3 4 324 Sagat-Close 4
68 G#4 16 Clap_1 Off 138 Tabla_45 Off 178 Daf_Sak_1 Off 347 Darbuka 4 Off 324 Sagat-Close Off
69 A4 17 Clap_2 Off 139 Tabla_46 Off 179 Daf_Sak_2 Off 346 Darbuka 3 Off 324 Sagat-Close Off
70 A#4 18 Sagat_1 Off 140 Tabla_47 Off 180 Daf_Sak_3 Off 350 Darbuka D3 Off 192 Turk_EmrM2.22 Off
(continues)

120-68-0: Arabian Kit 1 120-68-1: Arabian Percussion 1 120-68-2: Arabian Percussion 2 120-68-3: Turkish Kit 1 120-68-4: Turkish Kit 2
Note High Excl. High Excl. High Excl. High Excl. High Excl.
71 B4 19 Sagat_2 Off 141 Tabla_48 Off 181 Daf_Tak_1 Off 343 Darbuka 1 Tek5 Off 191 Turk_EmrM2.01 Off
72 C5 20 Sagat_3 Off 142 Tabla_49 Off 182 Daf_Tak_2 Off 359 Tef 1 Off 192 Turk_EmrM2.22 Off
73 C#5 21 Djambe_Dom Off 143 Tabla_50 Off 183 Bandir_Dom Off 360 Tef 2 Off 195 Turk_Darb1.05 Off
74 D5 22 Djambe_Tak_1 Off 144 Tabla_51 Off 184 Bandir_Tak_1 Off 320 Rik1 Off 193 Turk_Darb1.02 Off
75 D#5 23 Djambe_Tak_2 Off 145 Tabla_52 Off 185 Bandir_Tak_2 Off 322 Rik3 Off 196 Turk_Darb1.06 Off
76 E5 24 Djambe_Tak_3 Off 146 Tabla_53 Off 186 Bandir_Tak_3 Off 360 Tef 2 Off 197 Turk_Darb1.13 Off
77 F5 25 Djambe_Tak_4 Off 147 Tabla_54 Off 187 Bandir_Tak_4 Off 359 Tef 1 Off 194 Turk_Darb1.04 Off
78 F#5 29 Bong_Tak_1 Off 148 Tabla_55 Off 102 Solo_Tabla_09 Off 360 Tef 2 Off 198 Turk_Darb1.14 Off
79 G5 30 Bong_Tak_2 Off 149 Tabla_56 Off 103 Solo_Tabla_10 Off 318 Rek-dom-ak Off 66 T_Mak_Dom_4 Off
80 G#5 31 Bong_Tak_3 Off 150 Tabla_57 Off 104 Solo_Tabla_11 Off 359 Tef 1 Off 72 T_Mak_Tak_13 Off
81 A5 32 Bong_Tak_4 Off 151 Tabla_58 Off 105 Solo_Tabla_12 Off 321 Rik2 Off 138 Tabla_45 Off
82 A#5 33 Bong_Tak_5 Off 152 Tabla_59 Off 106 Solo_Tabla_13 Off 361 Tef 3 Off 72 T_Mak_Tak_13 Off
83 B5 34 3Bong_Tak_6 Off 153 Tabla_60 Off 107 Solo_Tabla_14 Off 360 Tef 2 Off 153 Tabla_60 Off
84 C6 35 Bong_Tak_7 Off 154 Tabla_61 Off 108 Solo_Tabla_15 Off 312 Bells Open 2 203 Daf_Lib_dom1 2
85 C#6 26 Bong_Rool_1 Off 155 T_Fac_Dom Off 109 Solo_Tabla_16 Off 323 Sagat-HalfOpen 2 204 Daf_Lib_racche1 2
86 D6 27 Bong_Rool_2 Off 156 T_Fac_Sak_1 Off 111 Solo_Tabla_18 Off 324 Sagat-Close 2 205 Daf_Lib_song1 2
87 D#6 28 Bong_Rool_3 Off 350 Darbuka D3 Off 112 Solo_Tabla_19 Off 351 Davul Off 205 Daf_Lib_song1 Off
88 E6 36 Tabel_Dom Off 158 T_Fac_Tak_1 Off 113 Solo_Tabla_20 Off 357 Ramazan DVL2 3 206 Daf_Lib_tak end 3
89 F6 37 Tabel_Sak Off 159 T_Fac_Tak_2 Off 114 Solo_Tabla_21 Off 356 Ramazan DVL1 3 37 Sak 3
90 F#6 38 Tabel_Tak_1 Off 160 T_Fac_Tak_3 Off 115 Solo_Tabla_22 Off 358 Ramazan DVL3 3 38 Tak_1 3
91 G6 39 Tabel_Tak_2 Off 161 T_Fac_Tak_4 Off 116 Solo_Tabla_23 Off 355 Kup 2 5 39 Tak_2 5
92 G#6 42 Ha_1 Off 162 T_Fac_Tak_5 Off 117 Solo_Tabla_24 Off 83 Tom Jazz Hi 5 55 Zagruta1 5
93 A6 43 Ha_2 Off 163 T_Met_Dom Off 118 Solo_Tabla_25 Off 355 Kup 2 5 54 Hoppa 5
94 A#6 49 He_1 Off 164 T_Met_Sak_1 Off 119 Solo_Tabla_26 Off 354 Kup 1 Off 49 He_1 Off
95 B6 50 He_2 Off 165 T_Met_Sak_2 Off 120 Solo_Tabla_27 Off 2 BD-Dry 3 Off 50 He_2 Off
96 C7 48 He3 Off 166 T_Met_Tak_1 Off 121 Solo_Tabla_28 Off 354 Kup 1 Off 201 Turk_Voice2 Off
97 C#7 43 Ha_3 Off 167 T_Met_Tak_2 Off 122 Solo_Tabla_29 Off 362 empty Off 44 Ha_3 Off
98 D7 45 Ha_4 Off 169 T_Met_Tak_4 Off 123 Solo_Tabla_30 Off 362 empty Off 45 Ha_4 Off
99 D#7 51 He_4 Off 169 T_Met_Tak_4 Off 124 Solo_Tabla_31 Off 362 empty Off 51 He_4 Off
100 E7 52 He_5 Off 170 T_Met_Tak_5 Off 150 Solo_Tabla_57 Off 362 empty Off 52 He_5 Off
101 F7 53 He_6 Off 171 T_Met_Tak_6 Off 151 Solo_Tabla_58 Off 362 empty Off 53 He_6 Off
102 F#7 46 HaY_1 Off 172 T_Met_Tak_7 Off 152 Solo_Tabla_59 Off 362 empty Off 46 HaY_1 Off
103 G7 47 HaY_2 Off 173 T_Met_Tak_8 Off 153 Solo_Tabla_60 Off 362 empty Off 47 HaY_2 Off
104 G#7 40 Aahh Off 174 T_Met_Tak_9 Off 154 Solo_Tabla_61 Off 362 empty Off 40 Aahh Off
105 A7 41 Aiwa Off 175 T_Met_Tak_10 Off 214 Roll1Tabla Off 362 empty Off 41 Aiwa Off
106 A#7 54 Hoppa Off 176 T_Met_Tak_11 Off 215 Roll2Tabla Off 362 empty Off 54 Hoppa Off
107 G#5 55 Zagruta 1-1 Off 177 Daf_Dom Off 362 empty Off 362 empty Off 55 Zagruta1 Off
108 A5 56 Zagruta 1-2 Off 178 Daf_Sak_1 Off 362 empty Off 362 empty Off 56 Zagruta2 Off
109 A#5 59 Yahala_1 Off 179 Daf_Sak_2 Off 362 empty Off 362 empty Off 59 Yahala_1 Off
110 B5 59 Yahala_1 Off 180 Daf_Sak_3 Off 362 empty Off 362 empty Off 59 Yahala_1 Off
111 C6 57 Beddef Off 181 Daf_Tak_1 Off 362 empty Off 362 empty Off 57 Beddef Off
112 C#6 58 Berrabeh Off 182 Daf_Tak_2 Off 362 empty Off 362 empty Off 58 Berrabeh Off
113 D6 61 Yahalabelde Off 183 Bandir_Dom Off 362 empty Off 362 empty Off 61 Yahalabelde Off
114 D#6 62 Yahalabelra Off 184 Bandir_Tak_1 Off 362 empty Off 362 empty Off 62 Yahalabelra Off
115 E6 210 Turk_Voice2a Off 185 Bandir_Tak_2 Off 362 empty Off 362 empty Off 210 Turk_Voice2a Off
116 F6 211 Turk_Voice2b Off 186 Bandir_Tak_3 Off 362 empty Off 362 empty Off 211 Turk_Voice2b Off
117 F#6 212 Turk_Voice3a Off 187 Bandir_Tak_4 Off 362 empty Off 362 empty Off 212 Turk_Voice3a Off
118 G6 213 Turk_Voice3b Off 214 Roll1Tabla Off 362 empty Off 362 empty Off 213 Turk_Voice3b Off
119 G#6 214 Roll1Tabla Off 215 Roll2Tabla Off 362 empty Off 362 empty Off 214 Roll1Tabla Off
120 A6 215 Roll2Tabla Off 362 empty Off 362 empty Off 362 empty Off 215 Roll2Tabla Off

DRUM SAMPLES
(*) Samples created by E.B.Antoun(*) Samples développés par E.B.Antoun(*) Samples von E.B.Antoun kreiert(*) Sample creati da E.B.Antoun
# File Name
0 Dohola_Dom
1 Dohola_Sak2
2 Dohola_Tak1
3 Dohola_Tak3
4 Dohola_Sak1
5 Dohola_Tak2
6 Dohola_Tak4
7 Req_Dom
8 Req_Rool_End
9 Req_Rool_Ziel
10 Req_Sak
11 Req_Tak1
12 Req_Tak2
13 Req_Ziel1
14 Req_Ziel2
15 Req_Ziel3
16 Clap_1
17 Clap_2
18 Sagat_1
19 Sagat_2
20 Sagat_3
21 Djembe_Dom
22 Djembe_Tak1
23 Djembe_Tak2
24 Djembe_Tak3
25 Djembe_Tak4
26 Bongos_Rool1
27 Bongos_Rool2
28 Bongos_Rool3
29 Bongos_Tak1
30 Bongos_Tak2
31 Bongos_Tak3
32 Bongos_Tak4
33 Bongos_Tak5
34 Bongos_Tak6
35 Bongos_Tak7
36 Tabel_Dom
37 Tabel_Sak
38 Tabel_Tak_1
39 Tabel_Tak_2
40 Aahh
41 Aiwa
42 Ha_1
43 Ha_2
44 Ha_3
45 Ha_4
46 HaY_1
47 HaY_2
48 He_3
49 He_1
50 He_2
51 He_4
52 He_5
53 He_6
54 Hoppa
55 Zagruta1
56 Zagruta2
57 Beddef
58 Berrabeh
59 Yahala_1
60 Yahala_2
61 Yahalabelde
62 Yahalabelra
63 T_Mak_Dom_1
64 T_Mak_Dom_2
65 T_Mak_Dom_3
66 T_Mak_Dom_4
67 T_Mak_Dom_5
68 T_Mak_Tak_01
69 T_Mak_Tak_10
70 T_Mak_Tak_11
71 T_Mak_Tak_12
72 T_Mak_Tak_13
73 T_Mak_Tak_14
74 T_Mak_Tak_15
75 T_Mak_Tak_16
# File Name
76 T_Mak_Tak_17
77 T_Mak_Tak_18
78 T_Mak_Tak_19
79 T_Mak_Tak_02
80 T_Mak_Tak_20
81 T_Mak_Tak_21
82 T_Mak_Tak_22
83 T_Mak_Tak_23
84 T_Mak_Tak_24
85 T_Mak_Tak_25
86 T_Mak_Tak_26
87 T_Mak_Tak_03
88 T_Mak_Tak_04
89 T_Mak_Tak_05
90 T_Mak_Tak_06
91 T_Mak_Tak_07
92 T_Mak_Tak_08
93 T_Mak_Tak_09
94 Solo_Tabla_01
95 Solo_Tabla_02
96 Solo_Tabla_03
97 Solo_Tabla_04
98 Solo_Tabla_05
99 Solo_Tabla_06
100 Solo_Tabla_07
101 Solo_Tabla_08
102 Solo_Tabla_09
103 Solo_Tabla_10
104 Solo_Tabla_11
105 Solo_Tabla_12
106 Solo_Tabla_13
107 Solo_Tabla_14
108 Solo_Tabla_15
109 Solo_Tabla_16
110 Solo_Tabla_17
111 Solo_Tabla_18
112 Solo_Tabla_19
113 Solo_Tabla_20
114 Solo_Tabla_21
# File Name
115 Solo_Tabla_22
116 Solo_Tabla_23
117 Solo_Tabla_24
118 Solo_Tabla_25
119 Solo_Tabla_26
120 Solo_Tabla_27
121 Solo_Tabla_28
122 Solo_Tabla_29
123 Solo_Tabla_30
124 Solo_Tabla_31
125 Solo_Tabla_32
126 Solo_Tabla_33
127 Solo_Tabla_34
128 Solo_Tabla_35
129 Solo_Tabla_36
130 Solo_Tabla_37
131 Solo_Tabla_38
132 Solo_Tabla_39
133 Solo_Tabla_40
134 Solo_Tabla_41
135 Solo_Tabla_42
136 Solo_Tabla_43
137 Solo_Tabla_44
138 Solo_Tabla_45
139 Solo_Tabla_46
140 Solo_Tabla_47
141 Solo_Tabla_48
142 Solo_Tabla_49
143 Solo_Tabla_50
144 Solo_Tabla_51
145 Solo_Tabla_52
146 Solo_Tabla_53
147 Solo_Tabla_54
148 Solo_Tabla_55
149 Solo_Tabla_56
150 Solo_Tabla_57
151 Solo_Tabla_58
152 Solo_Tabla_59
153 Solo_Tabla_60
# File Name
154 Solo_Tabla_61
155 T_Fak_Dom
156 T_Fak_Sak_1
157 T_Fak_Sak_2
158 T_Fak_Tak_1
159 T_Fak_Tak_2
160 T_Fak_Tak_3
161 T_Fak_Tak_4
162 T_Fak_Tak_5
163 T_Met_Dom
164 T_Met_Sak_1
165 T_Met_Sak_2
166 T_Met_Tak_01
167 T_Met_Tak_02
168 T_Met_Tak_03
169 T_Met_Tak_04
170 T_Met_Tak_05
171 T_Met_Tak_06
172 T_Met_Tak_07
173 T_Met_Tak_08
174 T_Met_Tak_09
175 T_Met_Tak_10
176 T_Met_Tak_11
177 Daf_Dom
178 Daf_Sak_1
179 Daf_Sak_2
180 Daf_Sak_3
181 Daf_Tak_1
182 Daf_Tak_2
183 Bandir_Dom
184 Bandir_Tak_1
185 Bandir_Tak_2
186 Bandir_Tak_3
187 Bandir_Tak_4
188 Turk_EmrM1.01
189 Turk_EmrM1.05
190 Turk_EmrM1.12
191 Turk_EmrM2.01
192 Turk_EmrM2.22
# File Name
193 Turk_Darb1.02
194 Turk_Darb1.04
195 Turk_Darb1.05
196 Turk_Darb1.06
197 Turk_Darb1.13
198 Turk_Darb1.14
199 Turk_Voice0
200 Turk_Voice1
201 Turk_Voice2
202 Turk_Voice3
203 Daf_Lib_dom1
204 Daf_Lib_racche1(*)
205 Daf_Lib_song1(*)
206 Daf_Lib_tak_end(*)
207 Tbl_Libano_dom(*)
208 Tbl_Libano_ef_1(*)
209 Tbl_Libano_faq_1(*)
210 Turk_Voice2a
211 Turk_Voice2b
212 Turk_Voice3a
213 Turk_Voice3b
214 Roll1Tabla
215 Roll2Tabla
216 GtrWha_1
217 GtrWha_2
218 GtrWha_3
219 GtrWha_4
220 GtrWha_5
221 GtrWha_6
222 GtrWha_7
223 GtrWha_8
# File Name
Sounds and Styles developed by: / Sons et Styles développés par : / Sounds und Styles von: / Suoni e Style sviluppati da:• Studio Bassam Ayoub - Wiesbaden, Germany - Phone: 0049-611-29797 - E-mail: [email protected] - Web: www.ayoub-music.de• Mehmet Dogdu, Can Elektronik - Istanbul, Turkey - E-mail [email protected]• E.B. Antoun, Antoun’s Music - Beirut, Lebanon - E-mail [email protected]
© 2002 Korg Italy Spa