Right Turn Bag - Janome · 2014-11-11 · Right Turn Bag by Anna Maria Horner forJanome Finished...
7
Transcript of Right Turn Bag - Janome · 2014-11-11 · Right Turn Bag by Anna Maria Horner forJanome Finished...


Right Turn Bag by Anna Maria Horner forJanomeFinished Dimensions:Small Bag, 17 x 17” excluding strapLarge Bag, 22 x 22” excluding strap
Materials Needed:-Assorted fat quarter prints & 2-3 solids for strip pieced front (either size) (will yield leftovers)-2/3 yard woven cotton as foundation for strip piecing (small)~or~ ¾ yard woven cotton as foundation for strip piecing (large)-3/4 yard fabric for bag back & strap (small) ~or~ 1 yard fabric for bag back & strap (large)
-2/3 yard lining fabric (small) ~or~ 1 1/3 yard lining fabric (large)-1 ¾ yard medium weight 22”w fusible interfacing (small)
~or~ 2 ¼ yards medium weight 22”w fusible interfacing (large)
Notions Needed:-Magnetic snap -One spool Coats ® Dual Duty Tread for construction -Assorted colors of machine thread for decorative stitching -Assorted decorative ribbons -Clear quilting ruler -Water soluble fabric pen – Rotary cutter & Cutting mat
Cutting:*Use the following chart to to cut specific dimensions for all of your pattern pieces based on whether you are making a Small Bag or a Large Bag.
pattern piece SMALL LARGEStrips for piecing 22” long strips that vary in
width from 1.5” to 2.5”22” long strips that vary in
width from 1.5” to 2.5”Foundation 18.5 x 20” (cut 1) 23.5 x 25” (cut 1)
Bag Outer Back 18 x 18” (cut 1) 23 x 23” (cut 1)Linings 18 x 18” (cut 2) 23 x 23” (cut 2)Strap 3.5 x 29” (cut 2) 3.5 x 31” (cut 2)
Interfacing18.5 x 20” (cut 1 for front)18 x 18” (cut 1 for back)3.5 x 29” (cut 2 for strap)
23.5 x 25” (cut 1 for front-will have to be pieced when using 22” interfacing)
23 x 23” (cut 1 for back-will have to be pieced when using 22” interfacing)
3.5 x 29” (cut 2 for strap)

*The following sewing and assembly instructions are the same whether you are making a Small or Large Right Turn bag, have fun!
Interfacing:1. Using a warm iron, fuse all interfacing pieces to their corresponding pattern pieces with
the fusible side of the interfacing against the wrong side of the fabric. Do this for Foundation, Outer Back, and both Strap pieces.
Prepare & Mark Foundation:1. To prepare the right side of the Foundation
for strip piecing, frst orient the fabric so that the larger dimension (20” or 25”) is running horizontally, and the smaller dimension (18.5” or 23.5”) is running vertically.
2. Using a clear quilting ruler and water soluble pen, mark the top and the bottom of the
Foundation ½ way across the horizontal width. For the Small bag this is at 10” and for the Large bag this is at 12.5”. Ten draw a vertical line from those ½ way points so that you have divided the Foundation into a left and right side.
3. Using a square quilting ruler (or any perfectly square template- even cut cardboard or paper), line up two opposite points of the square on the line drawn in Step 2. Tis will orient the square as a diamond. Trace the 45 degree lines from the top of the diamond onto the fabric. Slide the ruler or any straight edge now and continue drawing ensure that those diagonal lines extend all the way to the edges of the right and left sides of the Foundation.
4. You can now cut on the vertical line that you made in Step 2 in order to separate the left side from the right side and begin strip piecing.
Strip Piecing:*Before sewing the strips on place, you might consider laying your assorted prints and solids out, one next to another to establish an order than you are happy with. You can then leave them laid out in sequence so that you can sew them similarly.
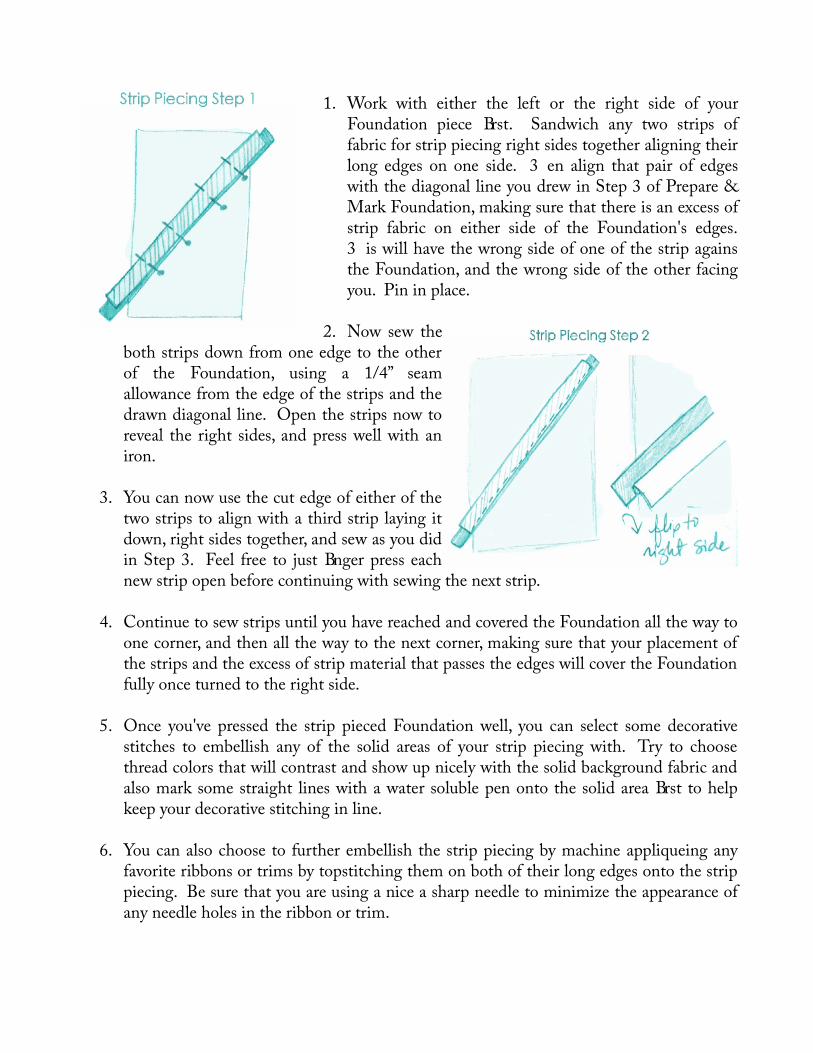
1. Work with either the left or the right side of your Foundation piece frst. Sandwich any two strips of fabric for strip piecing right sides together aligning their long edges on one side. Ten align that pair of edges with the diagonal line you drew in Step 3 of Prepare & Mark Foundation, making sure that there is an excess of strip fabric on either side of the Foundation's edges. Tis will have the wrong side of one of the strip agains the Foundation, and the wrong side of the other facing you. Pin in place.
2. Now sew the both strips down from one edge to the other of the Foundation, using a 1/4” seam allowance from the edge of the strips and the drawn diagonal line. Open the strips now to reveal the right sides, and press well with an iron.
3. You can now use the cut edge of either of the two strips to align with a third strip laying it down, right sides together, and sew as you did in Step 3. Feel free to just fnger press each new strip open before continuing with sewing the next strip.
4. Continue to sew strips until you have reached and covered the Foundation all the way to one corner, and then all the way to the next corner, making sure that your placement of the strips and the excess of strip material that passes the edges will cover the Foundation fully once turned to the right side.
5. Once you've pressed the strip pieced Foundation well, you can select some decorative stitches to embellish any of the solid areas of your strip piecing with. Try to choose thread colors that will contrast and show up nicely with the solid background fabric and also mark some straight lines with a water soluble pen onto the solid area frst to help keep your decorative stitching in line.
6. You can also choose to further embellish the strip piecing by machine appliqueing any favorite ribbons or trims by topstitching them on both of their long edges onto the strip piecing. Be sure that you are using a nice a sharp needle to minimize the appearance of any needle holes in the ribbon or trim.

7. Turn the fnished Foundation piece to the wrong side, and trim away all excess strips that surpass the Foundation's four edges using a straight edge and rotary cutter. Now further trim the piece to fnal size, making sure all edges are square. For the Small bag trim to 9.5 x 18” and for the Large bag trim to 12 x 23”.
8. Repeat Strip Piecing Steps 1-8 for the remaining Foundation piece.
9. Decide which long edges of the two fnished Foundation pieces you would liked to align in the center of your Bag. With right sides together and using a 1/2” seam allowance sew the long edges together. Press seam allowances open. Tis joined piece will now be referred to as Outer Front for the remainder of the steps. Te Small Outer Front should measure 18 x 18” and the Large Outer Front should measure 23 x 23”. Set aside.
Prepare Strap & Linings:*If your Outer Front turned out to be trimmed to a slightly diferent size than the above mentioned dimensions, be sure that your Lining pieces, and Outer Back match the size of the Outer Front exactly before continuing.
1. Use the package directions with the Magnetic Snap to install each of the snap pieces at the center of the Lining pieces, two inches away from their top edges. It's a good ideas to include a few layers of scrap interfacing onto the areas where the snap will be installed.
2. If you'd like to add a pocket to either or both of the lining pieces, you can use some scrap from the printed assortment of fabric to do that now.
3. With right sides together (making sure snap is in line) and using a 1/2” seam allowance, sew the two Lining pieces together along one side, across the bottom- stopping and backstitching to leave a 8” opening along the bottom edge before backstitching and beginning again-, then up the other side. Tis will form a U-shaped seam (with an

opening at the bottom) and leave the top edge that has the snap open. Press seam allowances open. Set aside.
4. With right sides together and using a 1/2” seam allowance, sew the two Strap pieces together along one side of their long edges. Press open. Also press a crease at the remaining cut long edge of each Strap piece towards its wrong side by 1/2”.
5. Turn Strap pieces wrong sides together so that the pressed creases from the previous step are aligned and sew them together along that edge using a 1/4” seam allowance. Also Topstitch the other long edge that already has a seam using a 1/4” seam allowance. Press well and set aside.
Final Assembly:*Note: the strip piecing will either point down or up at the center depending on which side you leave open as the top in Step 1. So be sure that you choose your open bag top accordingly.
1. With right sides together and using a 1/2” seam allowance sew the Outer Front to the Outer Back starting at the top of one side edge, continuing across the bottom and then back up the other side edge. Press all seam allowances open and leave Outer Bag wrong side out.
2. To create a box corner, pull Outer Front and Outer Back pieces away from each other at one bottom corner, align the bottom seam line with side seam, then press together with
your fngers, thereby creating a triangular corner, and pin in place.
3. Use a clear quilting ruler to align the seam at the center of the triangle with the 2” mark, and ruler down until the 0” mark of the ruler is at one bottom point of the triangle and the 4” of the ruler is at the other point of the triangle. Draw a line across the bottom of the triangle (which will be perpendicular to the seam line) and then sew across the corner at this line. Trim of excess seam allowance to about 3/8”.

4. Repeat Steps 2 and 3 with the other bottom corner of the Outer Bag.5. Repeat Steps 2 and 3 with both bottom corners of the Lining and leave wrong side out.
6. Turn Outer Bag right side out, smoothing bottom corners with your fngers. Place one short end of the fnished Strap at the top edge of the Outer Bag, centering it's width on the right side of the Outer bag side seam and pin in place. Do the same now with the other end of the Strap and the other side seam, making sure not to twist the Strap. (you can machine tack in place if desired but it's not necessary.)
7. Settle the Outer Bag down inside the Lining, so that their right sides are together, their side seams are aligned and the top edges are aligned. Pin together all around the top edge circumference of the bag, transferring the pins from the Strap ends to include all layers now. Sew top edges together all around the bag using a 1/2” seam allowance.
8. Using the opening left at the bottom edge of the Lining, carefully pull the Outer bag through to the right side, then continue to turn through until the Lining right side is facing out.
9. Turn the open edges of the Lining bottom towards their wrong sides and pin together so that their creases are in line with one another. Use a scant 1/8” seam allowance to topstitch the opening shut. Turn Lining into the wrong side of the Outer Bag and smooth neatly into position at the bottom corners.
10. Press top well so that the seam between the outer and lining of the Bag is at the very top edge. Topstitch around the top edge of the bag using a 1/4” seam allowance to fnish. Enjoy!