Riddle solutions and partial Walkthrough for · PDF fileRiddle solutions and partial...
12
Riddle solutions and partial Walkthrough for Demonheart – Chapter I
Transcript of Riddle solutions and partial Walkthrough for · PDF fileRiddle solutions and partial...

Riddle solutions and partial Walkthrough for
Demonheart – Chapter I

Chapter IChapter IWith this module being so much bigger than the Prelude, and all the work I've had to do recently, I am providing only a partial walkthrough. If it doesn't prove to be enough, the walkthrough will grow.
– Lamb, May 17. 2013
Cheating and Debugging
Debug Scripts will be listed in the ReadMe from now on, since they appear in every module.
Military Camp
...If everything is right with your character, you shouldn't be kept in the starting area (named “...”, all dark, just one platform). If you ended up standing in this area, talk to the big hand to see what's wrong.
• If you somehow leveled up your character from the Prelude, you will be allowed to play if your level is at most 5 (allowed for those who hate fighting and only play for the talks). You will still be treated as a level 1 character! I don't want to hear how you should have passed that Strength check, broken that bastard's jaw and so on!
• If it says that DH_DEBUG is set, that means I accidentally uploaded a module set up for testing (which is not impossible, being that I always play with this variable set). In that case, you can probably still play if you talk to the column and tell it to take you to module start, but you will be getting weird debug messages, and you should report this.
The Golden Forest – RoseA conversation should start with Rose Jayden. When she joins you, go north-east, uphill. You will encounter a monstrous badger and have a little talk about it once it's dead. Continue uphill; another conversation with Rose will trigger.
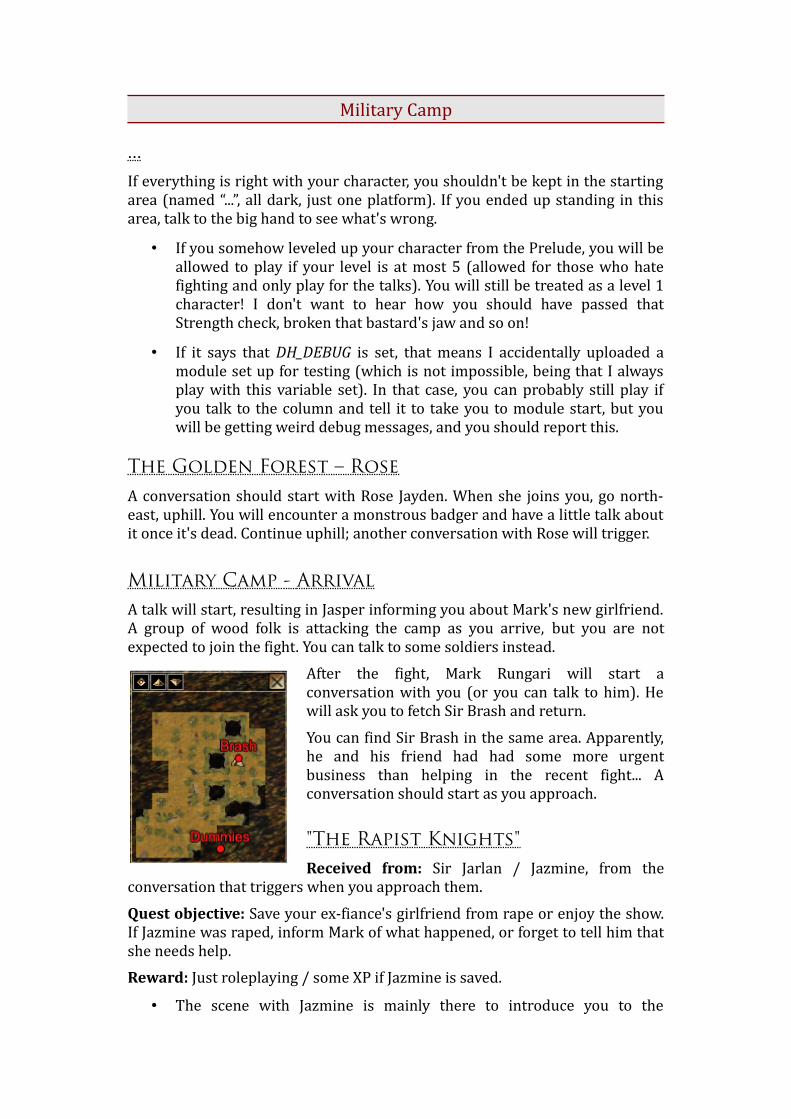
Military Camp - Arrival A talk will start, resulting in Jasper informing you about Mark's new girlfriend. A group of wood folk is attacking the camp as you arrive, but you are not expected to join the fight. You can talk to some soldiers instead.
After the fight, Mark Rungari will start a conversation with you (or you can talk to him). He will ask you to fetch Sir Brash and return.
You can find Sir Brash in the same area. Apparently, he and his friend had had some more urgent business than helping in the recent fight... A conversation should start as you approach.
"The Rapist Knights"Received from: Sir Jarlan / Jazmine, from the
conversation that triggers when you approach them.
Quest objective: Save your ex-fiance's girlfriend from rape or enjoy the show. If Jazmine was raped, inform Mark of what happened, or forget to tell him that she needs help.
Reward: Just roleplaying / some XP if Jazmine is saved.
• The scene with Jazmine is mainly there to introduce you to the

Scarcewall knights, and as such, it wasn't meant to be avoidable. However, after some complaints from a faithful friend who claimed to feel sick after exposure to this module, I've made it possible to talk Sir Jarlan out of raping Jazmine.
Options:
• You can try to save Jazmine if you choose the option, "Not so fast. You'll let Jazmine go!", when Sir Brash attempts to divert your attention. If you choose any other option, it will be assumed that you don't want to save her and it will be too late.
◦ If you've moved the talk in the right direction, you will get Persuade, Bluff and Intimidate options. Each requires a score of 6+ to succeed. This is a high requirement for a Level 1 character, but that's because, as Sir Jarlan states when you fail, it isn't his first time raping, and no one has been able to stop him before.
◦ Your initial Intimidate reply will fail by default, but you can still succeed with your next reply.
• Any attempt to fight the knights will result in failure. Don't try to use the “Attack” option outside of the conversation.
• You can deliberately ignore what's going on, or secretly enjoy it, by agreeing to come aside with Sir Brash instead of complaining about Jazmine's situation.
When you return to Mark, Sir Brash should be there also. If you didn't save Jazmine, you will get an opportunity to tell Mark what happened. Again, you should tell him as soon as you get the option, if you want to do it.
Camp, Day 1After Mark leaves, you get a journal entry about being under Sir Brash's command, so you should talk to the knight again. When he tells you to meet him at the combat dummies, go south-east.
• Showing up naked or in the revealing armor bought from Raphael (also in camp) will cause some reactions if you talk to Brash or Jarlan.
• The first time you talk to Brash naked or in the indecent armor, you can acquire Brash's clothes if you pass a Persuade or Bluff check (there is no rolling dice, only checking your skill rank).
• If you want to talk to Sir Jarlan to see what else he has to say, you should talk to him after this training, or when he appears after Brash's training tomorrow, because he isn't always there. Talk to him twice (while decently dressed) to see everything.
Next, you need to train with Fisher, at the archery range, which is west (in the same area). You will need to shoot one of the targets 4 times or so.
• You can be mean to Fisher for some sick pleasure (glare at him, then call him a fool, or say how you don't need to be nice because Brash sent you), or be nice and unlock some little conversations (mainly about the

knights), which you can have by talking to him any time except when he's training you.
After training, one of the bedrolls (southern campfire) should become useable and you should “use” it to start a conversation.
Camp, Day 2Follow the journal and train with Sir Brash, then with Fisher again. When you are done with whatever else you want to do in camp, talk to your bed.
When you go to sleep, something should happen, culminating in Sir Brash dragging you out of camp.
Proceeding with partial walkthrough, only covering optional quests, riddles and important choices.

The Golden Forest
The Watchers' LodgeYou need to enter the lodge and sleep there to remove your fatigue (the slow effect). You can't proceed further without doing this.
Upon entering the lodge, you should get a conversation that's mostly between Sir Brash and Wolfe. After that, Brash sits by the window. Don't interrupt his walk. You can talk with Brash, then go to sleep, or just go to sleep by talking to the rug that serves as your bed. You will get a dream.
Upstairs in the lodge, you can talk to Robin and take some food. Robin has a quest for you: "The Blue Wood Folk".
• If you would like to see what Sir Brash has to say about Robin's quest, rest downstairs first, to get Sir Brash back before talking to Robin.
• If you accept Blu's offer to come with you, you will not be attacked in the next area.
Blu (The Blue Wood Folk)
• In case you got Blu as a companion, note that if you manage to keep her upon entering the wood folk's lair or the ghosts area, or if the other wood folk attack you at any point while she is in the party, this is a bug and should be reported!
Tammi Quest (Trapped by the wood folk)Received from: Young Woman from the jail in the Wood Folk's Lair.
Quest objective: Find out what happened to Tammi, save her if possible.
Solutions:
Proceed down into the wood folk's lair, fight your way until you find the stairs which lead to another level below (you need to cross the bridge over the chasm, north-west). In the next area, when you reach a round arena, a talk with yourself should start. After this, you have two options:
• Attack any of the wood folk. They should be easy to kill. When the battle is over, a conversation should start on its own. It's impossible to save Tammi. You can release the other girl from prison when you tell her about Tammi's death (she won't leave otherwise).
◦ Important for Brash lovers: your character can give Brash a blowjob after you kill the band of wood folk. Brash will suggest it if he likes your character or if he thinks she's a slut, or you can ask on your own (“I would suck your cock for less”), unless you end the conversation too early. But you will miss out on this grand opportunity if you ask stupid questions, like whether he's going to kill you afterward. The possibility of a blowjob here was added only for those who will go insane from Brash's refusal. If you really want to do it so much and if

you stick around for so long (exploring optional dungeons together), why wouldn't he let you?
• The second “solution”: go around exploring, or go right back without attacking the wood folk. Tammi lives and you never learn how she feels about her situation (unless you want to assume, like my pessimistic paladin boyfriend). The other girl won't escape if Tammi is alive.
Rivera's Den
Hospital DreamThe cloth door wants you to kill someone – any of the three living people you've met. You don't get any Evil points whatever you do, because it's just a dream.
You might die from the traps the first time you pass through the door, or if you attack the dream version of yourself (it might take 2 deaths to kill her). That is because your character is being tortured and is dying in the real world.
The Levers – The Other Demonheart's CellMove past the explanations if you just want to see the picture with the correct lever positions.
Starting position
The normal way
• If you pass a Spot check, you will see a web on one of the levers – that's the one you aren't supposed to move.
• There are a few clues to point you to binary numbers (the note “Binary

for Apprentices” and an orange floor marking right next to the levers saying “111→001”, which might be difficult to read).
• Raze mentions that you shouldn't touch the levers until you've explored around (the point is just to remember the lever position for opening your own cell).
• If you try to use the doors of the cells while holding a torch, you will read some numbers on some of the doors, which, if you know binary numbers from 0 to 7, will help you figure out the number of the other demonheart's cell. If you don't, it should eliminate some of the combinations. It says “100” on the door of your cell, so you should know which lever position is 0 and which is 1.
• Failing to open the right door immediately, you could run around and try to escape the monsters. The monsters should flee the lightning field near the prison exit, if you pass through it while they chase you. They should also flee the cell you need to open, once you've opened it, because there's poisonous air inside. (No, you aren't supposed to be able to kill the monsters. I don't believe monstrously strong lunatic women can be sexy, sorry. )
• Scroll down for the solution.
The hard way
You could solve this riddle without reading the placards or the floor markings or seeing the web, as long as you know binary numbers up to 7. This is the way the riddle was originally meant to be solved, until my math-hating friends convinced me to leave some clues. (They actually tried to convince me that I was insane for expecting mere mortals to solve the riddle my way. One of them asked me to make the monsters defeatable, the other probably wanted me to ditch the whole thing.)
• Test how the levers work on the door of your cell (the three levers are already set to open it). You see that you get a conversation option to close the door immediately once you start opening it.
• Figure out that the 3 levers represent a 3-digit binary number. This just has to occur to you, maybe after seeing the note that says “Binary for Apprentices”.
• You don't know which lever position represents which digit, but your cell is number 4 counted in any direction, so the levers, in the way you first found them, represented the digits 100.
To discover whether the cells are numbered left-to-right or right-to left, make the combination 001 or 111, then try to open the door. (It's safe to try 000 also, then nothing happens.) If the combination unlocks the door right next to you (mortal danger), you will “see” it opening (in the lever's conversation), so you should quickly move the lever back (which is also an option in the conversation). Now you know from which direction to count.
• If you are already being attacked by a monster, conversations are disabled by default, so the lever will move immediately instead of asking you if you want to push it back, and then you can't do it this way.

The solution
“010” or ↑ ↓ ↑.
(And you need to push the double lever, then pull it.)
The Other Demonheart's Cell, InsideAs for making your choice here, you can do whatever you want and he won't be mad at you. Well, maybe he will be, a little. But I recommend stabbing him a few times, it makes the relationship more dramatic. :)
Garden Five
Since Garden Five is a maze, there is no right way to write the walkthrough, so you might get spoiled if you are reading this while being in the middle of the dungeon.
Riddle HintsThere are two items of importance here: a “Note” (Rivera's), and the book “On the Corruption of Witches”.
In her note, Rivera says that the other witch set her security questions to be word puzzles, and that the solution is usually to “put some letters together to form a word”. So, the yellow doors, the two of them that remain in the upper level of Garden Five, are about figuring out some letters.
The third yellow door (below) requires that you read the other witch's book. Or you could take a wild guess.
Rivera's secret questions don't need to be answered (though there are only two of them).

Riddle Answers
• Name of Rivera's teacher: “Alonda”. This can be answered by Arana, or if you have enough Lore, or spelled out if you remember it. Also, you can lockpick or bash the locked door nearby instead of answering this.
• Name of Rivera's true love: “nothing”. You are not expected to guess this. Rivera doesn't want intruders solving her riddles, anyway. Opening the nearby yellow door gives the same result as opening this one.
• “Think about the words that end in GRY...” - this is a spoof and a Planescape: Torment reference; the door should open on its own.
• “He begins and ends my pain... … ...what would be my bane?” Answer: “headache”.
• “The end of power, the beginning of eternity, the head of an Infernal beast (demon).” Answer: “red”. It's one of her letter games. I later changed the riddle to ask you for a color. Do you think it would have been too difficult in its original form? :)
• “You find yourself in my lair... … ... To enter, name me something they knew and I did not.” There are several answers. The correct answers include: “love” (which was supposed to be the main answer), “lover”, “sex”, “havingsex”, “apprentice”, “anapprentice”, “havinganapprentice” and a few others. The hints for this riddle are in the book “On the Corruption of Witches” found in the library on the upper level (#5 in the picture below).
You don't have to answer all the riddles in order to reach every place of Garden Five, so I hope this wasn't too terrible.
A Rogue or Bard might be able to skip the south-western part of the map, with the help of the Thieves' Tools +4 found in the tunnels (#3) if she then has enough skill to open the northern door leading to the pot (#4).
Escaping Garden FiveMap, upper level.
#1 – starting position.
#2 – passage (into Tunnels – to Myconid Giant).
#3 – into Tunnels (to Thieves' Tools +4).
#4 – giant pot.
#5 – library.
#6 – magical supplies.
#7 – small portal (takes you to the stairs, still in Garden Five).

You need to find the stairs down, first. Then, in the next area, talk to the friendly demon and talk to the big portal, too. Then you need to create a teleport activator stone.
For the stone, you need to:
• Know the recipe for the teleport activator. It can be acquired from a bookshelf (#5). Alternatively, Arana can tell you the recipe when you interact with the portal itself. The recipe will be written in your journal.
• Pass some riddles in order to find your way around.
• Collect the ingredients:
• Ambrosia – an “unidentified” glowing liquid found in a chest in the magical supplies room (#6). You can identify it if you have enough Lore, but Arana should start a talk immediately and tell you what it is. If she is dead, you can ask Xaxo about the glowing liquid. Ambrosia needs to be identified before use.
• Ripe plant heart – found in Myconid Giant's corpse after you defeat him, in the area “Garden Five, Tunnels” (use the passage #2 to get there).
• Demon Claw Dust – made by using File (useable item found inside a chest near the pot (#4)) once you have Xaxo's Claw (acquired during “Xaxo's Friend” quest).
• Cook the ingredients in the giant pot. In some cases, you need to “talk” to the portal on the lower level of Garden Five, first.
• If you had Arana as a henchman, she should stop being your henchman once you've made the activator. If you want to save her, you need to drag her downstairs, either immediately, or after returning to talk with her. You cannot use the portal while Arana is your henchman (because it was planned for her to be removed, and if it didn't happen, that's a bug – this happened while we were testing). There is a way to get Arana back as a henchman, but that happens only after you leave Garden Five.
• Activate the portal. Arana can do this if she is saved, or you can start choosing the symbols in the same order they are written on Arana's Bracelet (which she should give you when you make the teleport activator, or you can take it from her corpse if she is dead).
Quest: “Xaxo's Friend”Although Xaxo didn't ask you to kill Endara, you need to do it in order to proceed. Endara is the undead witch in the ruined library, in the same area as Xaxo.
• Tip for killing Endara: have Arana follow you or stand way back where the undead thing won't attack her, and lead Endara over the square panels (traps) in the hall you came from. To do this, you'll need to unlock the door to the hall, first, by using the lever from the other side.

Arana won't trigger these traps.
Saving Arana (“Arana Dying” quest)Don't drag Arana through the portal while she's still bleeding. She might have told you earlier that it wouldn't help, because she can only set the portal to bring you to a forest, and she needs specific medicine to stay alive, not found in that forest.
The only way to save her is to turn her into a demonheart, by abusing Xaxo's sensitive side. You need to talk to him about her. You can even attack him, but do it only from conversation and don't actually attack, or you're toast. If/When Xaxo gives you his demon flesh, bring it to Arana to eat.
• If you want to be evil (and let her die), you can eat the flesh yourself.
• If you wait too long, the flesh will return to Xaxo and he won't be willing to help you again.
Road to Ravage
• Arana stops having unlimited ammo once you've saved her (when you pass through the portal), but you gain access to her inventory.
Everything after Garden Five should be straightforward, until the very end when you are intercepted by an adversary. Raze will ask you what's wrong. If you tell him, he will come to aid you in battle. If you don't, you can call him during the battle if you “use” his amulet, or he will come on his own when you are wounded (but this could be very risky, as your enemies could kill you quickly).
When the battle is done, a conversation should start with Raze, even if he isn't there (through the amulet). This is the end of the module.
Export your character by talking to the lamb in the black area, not manually!