RF 603 II - YONGNUO · RF-603 II with FSK system, can be more effective to guarantee speed, ... As...
32
Wireless Flash Trigger 无线引闪器 RF-603 II User Manual 使用手册
Transcript of RF 603 II - YONGNUO · RF-603 II with FSK system, can be more effective to guarantee speed, ... As...

Wireless Flash Trigger
无线引闪器
RF-603 II
User Manual
使用手册


Thank you for purchasing YongNuo products in advance.Please read this user manual carefully and learn how to use camera and flash before.This product is a wireless transceiver integrated design, for the convenience of description,the product will named “transmitter” when mounted on the camera hot shoe in some cases, while named “receiver” when mounted or connected to the flash.
Contents
General description . . . . . . . . . . . . . . . . . . . . . . . . . . . . . . . . . . . . . . . . . . 1 Cautions. . . . . . . . . . . . . . . . . . . . . . . . . . . . . . . . . . . . . . . . . . . . . . . . . . . 2
The name of each part for RF-603 II . . . . . . . . . . . . . . . . . . . . . . . . . . . . . 4 Preparation before using . . . . . . . . . . . . . . . . . . . . . . . . . . . . . . . . . . . . 5-7 Wireless flash trigger awaken & testing . . . . . . . . . . . . . . . . . . . . . . . . . . 8 Wired/wireless remote shutter release . . . . . . . . . . . . . . . . . . . . . . . . . . . 9 Function extend . . . . . . . . . . . . . . . . . . . . . . . . . . . . . . . . . . . . . . . . . 10-11 Troubleshooting. . . . . . . . . . . . . . . . . . . . . . . . . . . . . . . . . . . . . . . . . . . . 12Specification . . . . . . . . . . . . . . . . . . . . . . . . . . . . . . . . . . . . . . . . . . . . . . 13
Include items/Optional Accessories . . . . . . . . . . . . . . . . . . . . . . . . . . . . 3

General description
�RF-603 II adopts a global free FSK 2.4GHz wireless channel which can be suitable in many countries. RF-603 II with FSK system, can be more effective to guarantee speed, distance and stability. Within capacious areas, the remote control distance may reach to 100m, and suitable for RF-603I.
�RF-603 II wireless flash trigger kit is formed by two same transceivers. It can be set to single transmit state (TX), which will be more convenient for testing flash, and can be set to transceiver state (TRX), automatically switch transmit and receive state, adopts focus and shutter function in “TX” and “TRX” state respectively.
�Transmitter supports single contact triggering, supports wireless wakening up and triggering the flash through the camera hot shoe, with PC sync cable (optional) can be trigger studio lights, with specially camera shutter connecting cable can realize wired / wireless shutter release remote control, supports controlling multiple cameras and flashes at the same time.
�The highest flash sync speed up to 1/320 second (some of models may only reach to 1/250s or less, difference combination of models of flash and camera using may achieved difference flash sync speed).
2 levers button design , it will realize the awakening, flash testing,
1

Cautions
1. As this is an electronic product accessory, some of the environment causes may affect the working. However this is hardly ever to get this situation, don't worry.
2. Do not pull the wires and turn off the camera when connecting.3. For a long time non-use, please turn the transceiver off and remove the
batteries.4. Do not put it in high temperature, such as a closed car under direct sunlight,
the control panel and other high temperature areas.5. Keep dry, do not use wet hands contact with the product, the product must
not be immersed in water or exposed to rain, and this may and this may lead to not work properly.
6. Do not used in the flammable occasion in violation of this warning may cause an explosion or fire.
7. Owing to this product include battery, please operate it strictly according to related rules, otherwise maybe cause explosion, fire or physical injury.
8. Do not trigger the flash close to a person's eyes, it may impair the person's vision.
2
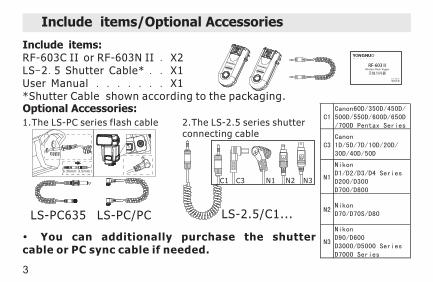
2.The LS-2.5 series shutterconnecting cable
1.The LS-PC series flash cableC1
Canon60D/350D/450D/500D/550D/600D/650D/700D Pentax Series
C3Canon1D/5D/7D/10D/20D/30D/40D/50D
N1
NikonD1/D2/D3/D4 SeriesD200/D300D700/D800
N2NikonD70/D70S/D80
N3
NikonD90/D600D3000/D5000 SeriesD7000 Series
Include items/Optional Accessories
3
Include items:RF-603C II or RF-603N II . X2LS-2.5 Shutter Cable* . . X1User Manual . . . . . . . X1*Shutter Cable shown according to the packaging.Optional Accessories:
LS-PC635 LS-PC/PC
�You can additionally purchase the shutter cable or PC sync cable if needed.
LS-2.5/C1...

The name of each parts of RF-603 II
The RF-603C II is more suitable for Canon cameras.
The RF-603N II is more suitable for Nikon cameras.
4
A: Focusing indicator light (green) / Shutter indicator light (red)
B: 2.5mm shutter remote cable socket C: Hot shoe / Hot shoe contacts D:PC socket(output) E: Awakening indicator light (green) /
Flash trigger indicator light (red) F: Multifunction button
G:Power switch-1.TX 2.TRX(transmit-receive )
H:Locking ring I: Hot shoe mounting foot J: Contacts K: Channel setting switch L: Battery room M:Battery door
(transmit)

Preparation before using
1.Channel Setting:Use the channel setting switch to set the transceivers to the same code, total 16 channels.
2.Battery Installation:Slide to open the battery room, install two AAA batteries(not include) for two transceiver according to the "+/-" marks shown.
3.Fix the transceiver on the camera hot shoe: Mount the transceiver on the hot shoe of the camera by hot shoe mounting foot, then tight the locking screw.
�Support installing the flash on the transceiver (The On-Top Flash,as the picture shown).
5

Preparation before using
4.Fix the transceiver on light stand or flash bracket :Mount the transceiver on the mini stand of the flash attached or other fixed device (not included), and tight the locking screw.
5.Fix the flash on transceiver:Install the flash on the hot shoe of the transceiver, lock the flash and ensure all links are fixed well.
6.Use the PC port to connect other type of flashes :To realize the function you need to additionally purchase the LS-PC series cable according to the different interface.
1.Inset the PC cable with the end of nutsert to PC socket of the transceiver, and tight the nutsert.
2.Inset another end of the cable to the synchronous socket of the the flash.
�The PC port just used as output to connect the flash.
6

Preparation before using
7.Power Switch and Transmit-receive State Settings:Set the power switch on TX (single transmit) or TRX (transmit-receive automatic switch) state according to different shooting requirement. When it used as wireless triggering transmitter and flash testing, set to "TX"; while used as wireless triggering receiver, using shutter release or other extended functions, set to "TRX", as the table shown, set to OFF means turn off the power.
7
FMake sure all the transceivers have been fixed before using , the flash need to set to manual “M” mode.

1.The flash Awakening Half press the multifunction button of the transmitter or the button of camera shutter, the awakening indicator light of transmitter and receiver will be bright (Green), at the moment if the flash is in dormant state, it will be awakened. 2.Test and trigger the flash Fully press the multifunction button of transmitter to test the flash once. When fully pressing the release button of camera shutter, it will synchronously trigger the on-top flash and off-camera flash, the flash trigger indicator light of transmitter and receiver will be bright (Red).
FIt requires compatible transmitter when using the camera shutter to awake
the flash, non specialized transmitter can also wireless trigger the flash normally (single contact trigger).
Wireless flash trigger & testing
8

Wired/wireless remote shutter release function
This product can achieve wired /wireless remote shutter release function, need to LS-2.5 series shutter connecting cable(or purchase) according to the different cameras. When using the shutter release, the power switch need to set in”TRX” state. 1.As the picture shown, use the shutter release between the
shutter socket of camera and transceiver.
2.Single transceiver can be used as wired shutter release. 3.When using as a wireless shutter release, fix a transceiver
on the camera hot shoe or fix around the camera with the external socket of camera shutter through specialized shutter cable to connect, another transceiver set on hand.
4.Half press the multifunction button of transmitter, the camera will enter into focusing. The Focusing indicator light will bright, fully press the button, the camera will enter into shooting, at the moment, the red shutter indicator light bright.
9

Function extend
1.Handhold the flash for remote flash trigger syncTake the RF-603II on the flash as shutter release remote control, LS-2.5mm series shutter connecting cable needs to be used. The transceivers should set in “TRX” state.
10
1.Install the handhold flash on the hot shoe of the transceiver as transmitter, and lock the flash.
2.Fixed the camera (such as on a tripod), installed the other transceiver on the hot shoe of the camera as receiver,and connected with specialized shutter cable to the external shutter socket of the camera.
3.Press the multifunction button of the transceiver on flash for remote shooting, and the flash will be trigger with shutter synchronously.
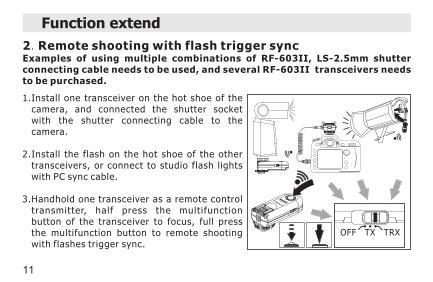
2.Remote shooting with flash trigger syncExamples of using multiple combinations of RF-603II, LS-2.5mm shutter connecting cable needs to be used, and several RF-603II transceivers needs to be purchased.
Function extend
11
1.Install one transceiver on the hot shoe of the camera, and connected the shutter socket with the shutter connecting cable to the camera.
2.Install the flash on the hot shoe of the other transceivers, or connect to studio flash lights with PC sync cable.
3.Handhold one transceiver as a remote control transmitter, half press the multifunction button of the transceiver to focus, full press the multifunction button to remote shooting with flashes trigger sync.

Troubleshooting
1.Unable or wireless trigger the flash FFSet the power switch of transmitter to TX state then test the flash, it could not test flash when setting to TRX state. FMake sure the flash have been prepared and set to manual “M” mode.
FThe poor contact between transmitter, camera and flash will cause the triggering problem, ensure the contacts are clean and have been installed to the correct position.
2.Unable to awake the flashFWhen using the non specialized transmitter, it need to half press the button of transmitter to awake the flash when the transmitter set in TX state. If the flash could not be awaken, it need to manual awake the flash or turn off the power saving mode.
3.The shutter could not be releasedFWhen part of the cameras could not find the focus, it could not proceed to shoot even if receiving the shooting signal. The focus mode of camera should be adjusted to “M”.
to test the flash Make sure the battery is full and the transceivers are in the same channel.
12

Type: FSK 2.4GHz wireless remote control systemTransmission distance: 100mChannels: 16 channelsShutter release: half-press, full-pressShutter interface: 2.5mm socketStudio flash light interface: standard PC socketMax Sync Speed: 1/320 secondBattery: AAA×2(3V )Stand-by time:about 400 hours in TX state,about 45 hours in TRX mode. Size (W x H x D): 38MM x 88MM x 33.5MMThe functions of this user manual are based on test conditions of our company.Further notice will not be given if the design and specifications change.The YONGNUO logo in this manual includes the registered trademark or trademark of Shenzhen Yongnuo Photography Equipment Co.,Ltd in China or/and other countries(regions).All other trademarks are the property of their respective owners.
Specification
13

首先感谢您购买永诺产品。使用前请您务必通读并理解本使用说明书和相机及闪光灯的使用方法。本产品使用收发一体设计,为方便描述,本说明书在一些情况下将安装于相机热靴时称之为发射器,安装或连接闪光灯时称之为接收器。
产品功能简介 . . . . . . . . . . . . . . . . . . . . . . . . 1 注意事项 . . . . . . . . . . . . . . . . . . . . . . . . . . 2 包装内容及选购件 . . . . . . . . . . . . . . . . . . . . . . 3RF-603II各部位名称 . . . . . . . . . . . . . . . . . . . . . 4使用前准备 . . . . . . . . . . . . . . . . . . . . . . . . 5-7 无线引闪及测试 . . . . . . . . . . . . . . . . . . . . . . . 8 有线/无线快门线功能. . . . . . . . . . . . . . . . . . . . . 9 功能延伸 . . . . . . . . . . . . . . . . . . . . . . . . 10-11 故障排除 . . . . . . . . . . . . . . . . . . . . . . . . . . 12 规格 . . . . . . . . . . . . . . . . . . . . . . . . . . . . 13
目录

产品功能简介
�RF-603 II 产品使用2.4GHz无线频道,适用更多国家免费频道。采用FSK制式更有效保证速度、距离及其稳定性,在空旷环境遥控距离最远可达100米,兼容RF-603 一代产品。
�RF-603 II 无线引闪器套装由两只相同的收发器组成,可通过电源开关设置为单发射状态(TX),更方便地测试闪光,也可设置为收发一体状态(TRX),自动切换发射和接收状态,使用两段按钮设计,在TX及TRX状态分别实现唤醒、测试引闪及对焦、快门功能。
�发射器支持单触点引闪,支持通过相机热靴无线唤醒及引闪闪光灯,搭配同步触发PC线(另购)可引闪影室灯,搭配相机专用快门线可实现有/无线快门遥控功能,可在无线遥控快门的同时引闪闪光灯。支持单独购买收发器,可同时控制多台相机及闪光灯。
�闪光同步速度最高达1/320秒(部分相机型号只能达到1/250秒甚至更低,不同型号的闪光灯与相机组合使用的同步速度不同)。
1

注意事项
1.本产品属电子产品的附件,有可能因外界环境因素影响而造成相机不能拍摄或异常动作。请勿担心,这种情况的可能性非常小。
2.连接线与相机连接时,请勿拉扯连接线,并在关闭相机电源时连
接。
3.长时间不使用本产品时,请将电源关闭,并将电池取出。
4.请勿置于高温中,如阳光直射下的封闭汽车内、控制面板等高温地方。
5.请保持干燥,勿用湿手接触产品,亦不可将产品浸入水中或暴露雨中,否则可能引起无法正常使用,甚至损坏。
6.请勿在易燃易爆场合中使用,违反此警告可能引起爆炸或火灾。
7.本产品涉及电池,关于电池的使用请严格按照相关规定,否则会引起财产损失或人身伤害。
8.搭配闪光灯使用时,请勿将闪光灯靠近人眼闪光,否则可能造成视力伤害。
2

2.LS 2 5- . 系列快门连接线1.LS-PC 系列闪光灯连接线C1
Canon60D/350D/450D/500D/550D/600D/650D/700D Pentax 系列
C3Canon1D/5D/7D/10D/20D/30D/40D/50D
N1
NikonD1/D2/D3/D4 系列D200/D300D700/D800
N2NikonD70/D70S/D80
N3
NikonD90/D600D3000系列/D5000系列D7000系列
LS-PC635 LS-PC PC/
包装内容及选购件
�可根据拍摄需要额外选购快门连接线或PC连接线。
3
包装内容:RF-603C II 或RF-603N II X2LS-2.5 快门线*. . . . . X1使用手册 . . . . . . . . X1*快门线型号根据外包装所示。
选购件:
LS-2.5/C1...

RF-603CII适合佳能相机
更
RF 603 II 各部位名称-
RF-603N II适合尼康相机
更
A:对焦指示灯(绿色)/快门指示灯(红色)B:2.5mm快门线插座C:热靴座/热靴触点D:PC接口(输出)E:唤醒指示灯(绿色)/引闪指示灯(红色)F:多功能按钮G:电源开关-1.单发射(TX)2.收发自动切换(TRX)
H:锁紧环I:热靴固定脚J:触点K:频道设置开关L :电池仓M:电池仓盖
4

5
使用前准备
1.频道设置:使用频道设置开关把收发器设置在相同的编码位置,共有16个频道。
2.电池安装:打开电池仓,依照电池仓上的 "+/-"指示分别为两只收发器安装两只AAA电池(不含)。
3.固定收发器于相机热靴座:利用热靴固定脚安装在相机机顶热靴并锁紧旋钮。
�支持在相机机顶的收发器上安装闪光灯(机顶闪光灯,如图所示)。

使用前准备4.固定收发器于灯架上或闪光灯支架上 :将收发器安装在闪光灯附带的微型支架或其他固定装置(不含),并锁紧旋钮。
5.闪光灯固定于收发器上:安装机载闪光灯在收发器的热靴座上,锁紧闪光灯,确保各环节连接牢固。
6.使用PC接口连接其他类型闪光灯:实现此功能需要另购永诺LS-PC系列连接线,根据不同接口使用不同的连接线。
1).使用PC连接线带螺母插头一端插入收发器PC插座并旋紧螺母。
2).使用连接线插头另一端插入闪光灯同步插座。
�PC接口只作为输出连接闪光灯使用。
6

电源开关 状态 初始化指示灯多功能按钮
功能 指示灯 指示灯示意图
半按唤醒机顶及离机闪光灯
唤醒指示灯(绿色)
全按机顶及离机闪光灯测试引闪
引闪指示灯(红灯)
半按有线或无线对焦功能
对焦指示灯(绿色)
全按有线或无线快门功能
快门指示灯(红色)
TX(单发射)
TRX(收发自动
切换)
唤醒指示灯(绿色)亮2秒后熄灭
对焦指示灯(绿色 )亮2秒后,隔2秒闪烁一次
使用前准备7.电源开关及收发状态设置:
根据不同的拍摄需求将电源开关设置在"TX (单发射)或"TRX"(收发自动切换)状态,作无线引闪发射器及测试引闪使用时设置在"TX",作无线引闪接收器、使用快门线或其他延伸功能时设置在"TRX",如下表所示。不使用无线引闪器时,设置在OFF关闭电源。
"
F使用前请确认所有设备已固定牢固,闪光灯需设置在手动"M"模式。
7

1.闪光灯唤醒:半按发射器多功能按钮或相机快门按钮,发射器及接收器 唤醒指示灯点亮(绿色),如果此时闪光灯处于休眠状态,将会被唤醒。
2.测试及引闪闪光灯:完全按下发射器多功能按钮测试闪光一次。完全按下相机快门释放按钮时,将同步引闪机顶及离机闪光灯,发射器及接收器的引闪指示灯点亮(红色)。
的
无线引闪及测试
F使用相机快门按钮唤醒闪光灯需兼容的发射器,非专用的发射器也可正常无线引闪闪光灯(单触点引闪)。
8

有线快门线 /无线快门线功能本产品可实现有线快门线/无线快门线功能,根据不同相机型号使用(或另购)相应型号的LS-2.5系列快门连接线。使用快门线功能时,需将电源开关设置在"TRX"状态。
1.如图示,在相机快门插座与收发器之间使用快门连接线连接。
2.单只收发器可作为有线快门线使用。
3.作无线快门线使用时,将一只收发器固定在相机热靴座上或固定在相机附近并与相机快门外接插座使用专用快门连接线连接,另一只收发器置于手中。
4.半按手中收发器的多功能按钮,相机进行对焦动作。对焦指示灯亮(绿色),完全按下按钮,相机进行拍摄动作,同时快门指示灯亮(红色)。
9

功能延伸1.手持闪光灯遥控拍摄并同步引闪使用装上闪光灯的RF-603 II作为快门遥控并同步引闪,本功能需使用LS-2.5mm 系列快门连接线。收发器均设置为"TRX"状态。
1.手持闪光灯安装在一个收发器的热靴座上作为发射器,并锁紧闪光灯。
2.固定好相机(如三脚架上),使用另一只收发器装于相机机顶热靴作接收器,并通过专 用快门连接线与相机的外接快门插座连接。
3.按下手中闪光灯上的收发器多功能按钮可以对相机进行遥控拍摄操作,闪光灯将与快门同步引闪。
10

功能延伸2.无线遥控拍摄并同步引闪闪光灯多个RF-603II组合使用的例子,需使用LS-2.5快门连接线及多只RF-603 II收发器,收发器均设置为"TRX"状态。
1.将一只收发器安装在相机机顶热靴座上,并使用快门连接线与相机快门插座连接。
2.将闪光灯安装在其余收发器的热靴座上,或与影室灯使用PC连接线连接。
3.手持一只收发器作为遥控发射器,半按该收发器多功能按钮,受控相机相机进行对焦,全按下多功能按钮时,相机进行拍摄动作,闪光灯同步引闪。
11

故障排除1.无法测试或FF将发射器电源开关设置在TX状态后测试闪光,在TRX状态不能测试闪光。F确保闪光灯就绪且闪光灯已设置在手动M档。F收发器与相机、闪光灯接触不良会导致无法引闪,确保已安装到正确位置。
2.无法唤醒闪光灯F使用非专用的发射器时,需在发射器TX状态下半按发射器按钮将闪光灯唤醒,如果闪光灯不能被唤醒,需手动唤醒闪光灯或关闭其节电模式。
3.快门无法释放F部分相机未找到焦点时,即使收到拍摄信号也不会进行拍摄,应将相机镜头对焦模式调整为"M"。
引闪闪光灯确保设备电力充足,收发器使用相同的频道。
12

类型: 无线遥控系统传送距离:100米 频道:16个频道快门释放:半按,全按快门接口:2.5MM接口影室灯接口:标准PC接口最高同步速度:1/320秒电池:AAA×2(3V)待机时间:TX状态约400小时,TRX状态约45小时体积(宽×高×深):38MM×88MM×33.5MM
本手册中的功能是依据本公司的测试条件获得。设计和规格如有变更,恕不另行通知。
本手册中的永诺(YONGNUO)徽标是深圳市永诺摄影器材股份有限公司在中国或/和其他国家(地区)的注册商标。其他所有商标均为其各自所有者拥有。
FSK 2.4GHz
规格
13

产品保修卡Warranty card
用户名称Name
联系电话Phone
地址Address
故障说明Failure Description
序列号SN.
购买日期Purchase Date
产品名称Product Model
邮编Zip Code