Revision History - d1b10bmlvqabco.cloudfront.net · Web viewThe mobile phone with . Android 4.4.4...
100
SWE 574 Software Development as a Team, Fall 2015 Instructor: Suzan Üsküdarlı PEP: Pink Elephant Project Software Product Manual Revision 1.4 05.01.2016
Transcript of Revision History - d1b10bmlvqabco.cloudfront.net · Web viewThe mobile phone with . Android 4.4.4...

SWE 574 Software Development as a Team, Fall 2015Instructor: Suzan Üsküdarlı
PEP: Pink Elephant Project
Software Product Manual
Revision 1.4
05.01.2016
By Group 2Barış Özcanlı, Hayri Can Akyel, Mehmet Çelikel, Orkun Koçyiğit,
Recep Günay, Sinan Can Sürücü

Revision History
Revision Date ExplanationDraft 30.11.2015 Draft software product manual1.0 7.12.2015 ● 4.1.1.5.1.1. View All Groups, 4.1.1.5.5. Create
New Discussion, 4.1.1.4.1 Edit Profile, 4.1.1.4.2 Edit Profile Privacy, 4.1.1.4.3 View Profile Feed, 4.1.1.5.1.2. Join Group, 4.1.1.5.1.3. Leave Group sections are added.
● 4.2.1.2. Login/Logout as a User section is renamed as 4.2.1.2. Login/Logout as a User and the content is revised.
1.1 14.12.2015 4.1.1.4.3 View Profile Feed, 4.1.2. Admin Operations, 4.1.3. Master Admin Operations, 4.1.4. Moderator Operations, 4.1.5. Writer Operations, 4.2.2. Admin Operations, 4.2.3. Master Admin Operations, 4.2.4. Moderator Operations, 4.2.5. Writer Operations sections are deleted. They will be added when the functions are usable.
The figures in the following sections were revised due to UI revisions: 4.1.1.4. My Profile Page, 4.1.1.4.1 Edit Profile, 4.1.1.4.2 Edit Profile Privacy, 4.1.1.5.2. Create New Group, 4.1.1.5.4. Create New Meeting, 4.1.1.5.5. Create New Discussion.
3. Testing section is revised.1.2 21.12.2015 2.2. Software Tools section in 2. Implementation
section, 3. Testing section, 4. Application Installation, Configuration and Operation section and its subsections as marked in Table of Contents and References section are revised.
1.3 04.01.2016 4.1.1.4.3 Upload Profile Picture, 4.2.1.5.6. Relate Meeting with a Discussion, 4.2.1.1.5.6.1. Relate Meeting in Create New Discussion Page, 4.2.1.5.7. Create New Resource, 4.2.1.5.8. Update Discussion, 4.2.1.5.9. Update Note, 4.1.1.7. Search, 4.2.1.4.1. Edit Profile, 4.2.1.4.2. Upload Profile Picture, 4.2.1.4.3. Privacy Settings, 4.2.1.5.1. Create New Group, 4.2.1.6. Messages Screen, 4.2.1.7. Group Details Screen, 4.2.1.7.1. Create Discussion, 4.2.1.7.2. Create Note,
Page 2 / 76

4.2.1.7.3. View Discussion, 4.2.1.7.4. View Note, 4.2.1.7.5 View Meeting sections are added.
3. Testing, 4. Application Installation, Configuration and Operation, 4.1. Web Application, 4.1.1. User Operations, 4.1.1.1. Register as a User, 4.1.1.4. My Profile Page, 4.1.1.4.1 Edit Profile, 4.1.1.4.2 Edit Profile Privacy, 4.1.1.5. Groups Page, 4.1.1.5.5. Create New Discussion, 4.2. Mobile Application, 4.2.1. User Operations, 4.2.1.2. Login/Logout as a User, 4.2.1.4. My Profile Screen, 4.2.1.5. Groups Screen, References sections are revised.
1.4 05.01.2016 4.3. Application Installation and Configuration section and sub-sections are added.
Page 3 / 76

Table of Contents
Revision History...................................................................................................................................2Table of Contents.................................................................................................................................41. Introduction......................................................................................................................................72. Implementation.................................................................................................................................72.1. Source Code and Executable Organization...................................................................................72.2. Software Tools..............................................................................................................................72.3. Platform.........................................................................................................................................73. Testing..............................................................................................................................................74. Application Installation, Configuration and Operation....................................................................84.1. Web Application............................................................................................................................84.1.1. User Operations..........................................................................................................................84.1.1.1. Register as a User....................................................................................................................84.1.1.2. Login as a User......................................................................................................................104.1.1.3. Forgotten Password...............................................................................................................134.1.1.4. My Profile Page.....................................................................................................................134.1.1.4.1 Edit Profile..........................................................................................................................144.1.1.4.2 Edit Profile Privacy.............................................................................................................164.1.1.5. Groups Page..........................................................................................................................204.1.1.5.1. View Group........................................................................................................................214.1.1.5.1.1. View All Groups.............................................................................................................224.1.1.5.1.2. Join Group.......................................................................................................................234.1.1.5.1.3. Leave Group....................................................................................................................244.1.1.5.2. Create New Group..............................................................................................................244.1.1.5.3. View Meeting.....................................................................................................................264.1.1.5.4. Create New Meeting...........................................................................................................274.1.1.5.5. Create New Discussion......................................................................................................284.2.1.5.6. Relate Meeting with a Discussion......................................................................................304.2.1.1.5.6.1. Relate Meeting in Create New Discussion Page..........................................................304.2.1.5.7. Create New Resource.........................................................................................................324.2.1.5.8. Update Discussion..............................................................................................................354.2.1.5.9. Update Note........................................................................................................................364.1.1.6. Logout as a User....................................................................................................................374.1.1.7. Search....................................................................................................................................374.2. Mobile Application......................................................................................................................384.2.1. User Operations........................................................................................................................384.2.1.1. Register as a User..................................................................................................................384.2.1.2. Login/Logout as a User.........................................................................................................404.2.1.3. Forgotten Password...............................................................................................................424.2.1.4. My Profile Screen..................................................................................................................444.2.1.4.1. Edit Profile.........................................................................................................................464.2.1.4.2. Upload Profile Picture........................................................................................................474.2.1.4.3. Privacy Settings..................................................................................................................494.2.1.5. Groups Screen.......................................................................................................................504.2.1.5.1. Create New Group..............................................................................................................524.2.1.6. Messages Screen....................................................................................................................534.2.1.7. Group Details Screen.............................................................................................................544.2.1.7.1. Create Discussion...............................................................................................................584.2.1.7.2. Create Note.........................................................................................................................59
Page 4 / 76

4.2.1.7.3. View Discussion.................................................................................................................604.2.1.7.4. View Note...........................................................................................................................614.2.1.7.5 View Meeting......................................................................................................................624.3. Application Installation and Configuration.................................................................................634.3.1. Web Application.......................................................................................................................634.3.1.1. Core and Web Project Installation.........................................................................................634.3.1.2. Jenkins Installation and Configuration..................................................................................644.3.2. Mobile Application...................................................................................................................654.3.2.1. Mobile Application Apk Installation.....................................................................................654.3.2.2. Mobile Project Installation....................................................................................................654.3.2.2.1. How to Set Up JDK............................................................................................................654.3.2.2. How to Set Up Android SDK................................................................................................654.3.2.2. Adding GitHub Repo Into Android Studio...........................................................................664.3.2.2. Setting Up Platform Tools.....................................................................................................664.3.2.2. Setting Up Debug Devices....................................................................................................66References..........................................................................................................................................68Appendices.........................................................................................................................................69Appendix A: Source Code and Executable Delivery.........................................................................69A.1 core_repo Folder..........................................................................................................................69A.1.1 pinkelephant-api Folder............................................................................................................69A.1.1.1 src Folder...............................................................................................................................69A.1.1.1.1 main Folder.........................................................................................................................69A.1.1.1.1.1 java/com/boun Folder......................................................................................................69A.1.1.1.1.1.1 config Folder................................................................................................................69A.1.1.1.1.1.2 web Folder....................................................................................................................69A.1.1.1.1.1.2.1 advice Folder.............................................................................................................69A.1.1.1.1.1.2.2 controller Folder........................................................................................................70A.1.1.1.1.1.2.3 filter Folder................................................................................................................70A.1.1.1.1.2 resources Folder...............................................................................................................70A.1.1.1.2 test/java/com/boun/pinkelephant/test Folder......................................................................70A.2 webapp_repo Folder....................................................................................................................70A.2.1 nbproject Folder........................................................................................................................70A.2.2 public_html Folder...................................................................................................................70A.2.2.1 Content Folder.......................................................................................................................71A.2.2.2.1 assets Folder.......................................................................................................................71A.2.2.2.1.1 css Folder.........................................................................................................................71A.2.2.2.1.1.1 pages Folder..................................................................................................................71A.2.2.2.1.1.2 themes Folder...............................................................................................................72A.2.2.2.1.2 fonts Folder......................................................................................................................72A.2.2.2.1.3 img Folder.......................................................................................................................72A.2.2.2.1.4 plugins Folder..................................................................................................................73A.2.2.2.1.5 scripts Folder...................................................................................................................74A.2.2.3.1 images Folder.....................................................................................................................75A.2.2.4.1 scripts Folder......................................................................................................................76A.2.2.5.1 styles Folder........................................................................................................................76A.2.2.6.1 views Folder.......................................................................................................................76A.2.2.2 assets Folder..........................................................................................................................76A.2.2.3 images Folder........................................................................................................................76A.2.2.4 scripts Folder.........................................................................................................................77A.2.2.5 styles Folder...........................................................................................................................77
Page 5 / 76

A.2.2.6 views Folder..........................................................................................................................77A.3 android_repo Folder....................................................................................................................77A.3.1 .idea Folder...............................................................................................................................78A.3.1.1 copyright Folder....................................................................................................................78A.3.2 .settings Folder.........................................................................................................................78A.3.3 app Folder.................................................................................................................................78A.3.3.1 jni Folder...............................................................................................................................78A.3.3.1.1 libjpeg Folder......................................................................................................................78A.3.3.2 libs Folder..............................................................................................................................80A.3.3.2.1 armeabi-v7a Folder.............................................................................................................80A.3.3.2.2 armeabi Folder....................................................................................................................80A.3.3.2.3 x86 Folder...........................................................................................................................80A.3.3.3 obj/local Folder......................................................................................................................80A.3.3.3.1 armeabi-v7a Folder.............................................................................................................80A.3.3.3.2 armeabi Folder....................................................................................................................80A.3.3.3.3 x86 Folder...........................................................................................................................80A.3.3.4 src Folder...............................................................................................................................80A.3.3.4.1 androidTest/java/swe574/boun/edu/androidproject Folder................................................80A.3.3.4.2 main Folder.........................................................................................................................81A.3.3.4.3 test/java/swe574/boun/edu/androidproject Folder..............................................................81A.3.4 gradle/wrapper Folder..............................................................................................................81
Page 6 / 76

1. Introduction
The purpose of the software project Pink Elephant is to combine discussion, meeting, note, resource and semantic search aspects and enhance it in a usable way, both in web and mobile platforms.
2. Implementation
2.1. Source Code and Executable Organization
The source code organization is managed by GitHub. There are three repositories in the project.
● The back end repository folder is called “core_repo”● The front end repository folder is called “webapp_repo”● The mobile repository folder is called “android_repo”● This main folder has two subfolders and one file ● The content of the “core_repo” folder is specified in Appendix A.1.● The content of the “webapp_repo” folder is specified in Appendix A.2.● The content of the “android_repo” folder is specified in Appendix A.3.
2.2. Software Tools
The software tools used during source code development are specified below:
● GitHub● Android Studio● Swagger● IntelliJ IDEA Java IDE● Eclipse IDE● MongoVUE as MongoDB viewer● Jenkins● Trello● Ganttify
2.3. Platform
The software is implemented and tested and also is expected to operate on following plaftorms:
● Android 4.4.4 KitKat mobile operating system● Google Chrome 46.0.2490.86 m web browser
3. Testing
Register, Login, View/update profile, Apply to/leave group, Tag content Create/view/update/archive group, Create/view/update/delete meeting, Create/view/update/delete note and Create/view/update/delete discussion use cases has been tested sufficiently and operating correctly.
Page 7 / 76

Upload/delete resource, Search subject, Make private messaging, View group members, Archive user account, Propose a meeting, Invite person/user, Archive user account and Send/view/respond meeting invitation use cases have been implemented but they do not cover all cases that may be assumed as critical.
View/modify/approve membership requests, Manage custom user roles, Report content, View/modify/approve reported content, and Export user data use cases have not been implemented yet.
4. Application Installation, Configuration and Operation
The operation manuals of every user role type are stated below.
4.1. Web Application
4.1.1. User Operations
4.1.1.1. Register as a User
When the Pink Elephant URL (http://162.243.18.170/) is entered in a web browser, the login page will appear as seen in Figure 4.1.1.1.1. “Create an account” button should be clicked in order to register.
Figure 4.1.1.1.1 Login Page
When the “Create an account” button is clicked, Sign Up page will be opened as can be seen in Figure 4.1.1.1.2.
Page 8 / 76

Figure 4.1.1.1.2 Sign Up Page
The required fields should be filled and “Sign Up” button should be clicked in order to complete the registration as shown in Figure 4.1.1.1.3.
Figure 4.1.1.1.3 Complete Registration
If some of the registration credentials are not correct, warning messages will appear as shown in Figure 4.1.1.1.4.
Page 9 / 76

Figure 4.1.1.1.4. Invalid Registration Credentials
4.1.1.2. Login as a User
When the Pink Elephant URL is entered in a web browser, the login screen will appear as seen in Figure 4.1.1.2.1.
Page 10 / 76

Figure 4.1.1.2.1 Login Page
Login information should be entered and the “Login” button should be clicked in order to login as can bee seen in Figure 4.1.1.2.2.
Figure 4.1.1.2.2 Login Button
Groups page will be opened if the login credentials are correct as shown in Figure 4.1.1.2.3.
Page 11 / 76

Figure 4.1.1.2.3. Homepage
If the login credentials are not correct, warning message will be shown as can be seen in Figure 4.1.1.2.4.
Figure 4.1.1.2.4 Invalid Login Credentials
Page 12 / 76

4.1.1.3. Forgotten Password
Is the password of the user account is forgotten, “here” button should be clicked as shown in Figure 4.1.1.3.1.
Figure 4.1.1.3.1 Forgotten Password Button
4.1.1.4. My Profile Page
My Profile screen can be opened anytime by opening the menu via clicking the menu button and then clicking the “My Profile” button as shown in Figure 4.1.1.4.1.
Page 13 / 76

Figure 4.1.1.4.1 My Profile Button
Profile information is shown in the My Profile page as can be seen in Figure 4.1.1.4.2.
Figure 4.1.1.4.2 My Profile Page
4.1.1.4.1 Edit Profile
Profile information can be edited by clicking the “Edit Info” button and opening the regarding panel as shown in Figure 4.1.1.4.1.1.
Page 14 / 76

Figure 4.1.1.4.1.1 Edit Info Button
When the update is done, “Save” button should be clicked as can be seen in Figure 4.1.1.4.1.2.
Page 15 / 76

Figure 4.1.1.4.1.2 Save Profile
4.1.1.4.2 Edit Profile Privacy
Profile privacy information can be edited by clicking the “Privacy” button and opening the regarding panel as shown in Figure 4.1.1.4.2.1.
Page 16 / 76

Figure 4.1.1.4.2.1 Privacy Button
When the update is done, “Save” button should be clicked as can be seen in Figure 4.1.1.4.2.2.
Figure 4.1.1.4.2.2 Save Profile Privacy
4.1.1.4.3 Upload Profile Picture
Page 17 / 76

Profile picture can be uploaded by clicking the “Upload Profile Picture” button and opening the regarding panel as shown in Figure 4.1.1.4.3.1.
Figure 4.1.1.4.3.1 Upload Profile Picture Panel
When the page is loaded, image file to be uploaded can be browsed by clicking “Select file” button as can be seen in Figure 4.1.1.4.3.2.
Figure 4.1.1.4.3.2 Select file
The desired file is selected and “Open” button is clicked as shown in Figure 4.1.1.4.3.3.
Page 18 / 76

Figure 4.1.1.4.3.3 Open File
“Change” button can be clicked if another file is needed to be browsed and uploaded as shown in Figure 4.1.1.4.3.4.
Figure 4.1.1.4.3.4 Change Button
“Remove” button can be clicked if the existing file is needed to be removed from the upload list as can be seen in Figure 4.1.1.4.3.5.
Page 19 / 76

Figure 4.1.1.4.3.5 Remove Button
“Submit” button can be clicked in order to save the uploaded file as the profile picture as shown in Figure 4.1.1.4.3.6.
Figure 4.1.1.4.3.6 Submit Button
4.1.1.5. Groups Page
Groups screen can be opened anytime by opening the menu via tapping the menu button and then tapping the “Groups” button as shown in Figure 4.1.1.5.1.
Page 20 / 76

Figure 4.1.1.5.1 Groups Button
Group information is shown in the Groups screen as can be seen in Figure 4.1.1.5.2.
Figure 4.1.1.5.2 Groups Screen
4.1.1.5.1. View Group
Group details can be viewed by clicking a group name in the Groups page as shown in Figure 4.1.1.5.1.1.
Page 21 / 76
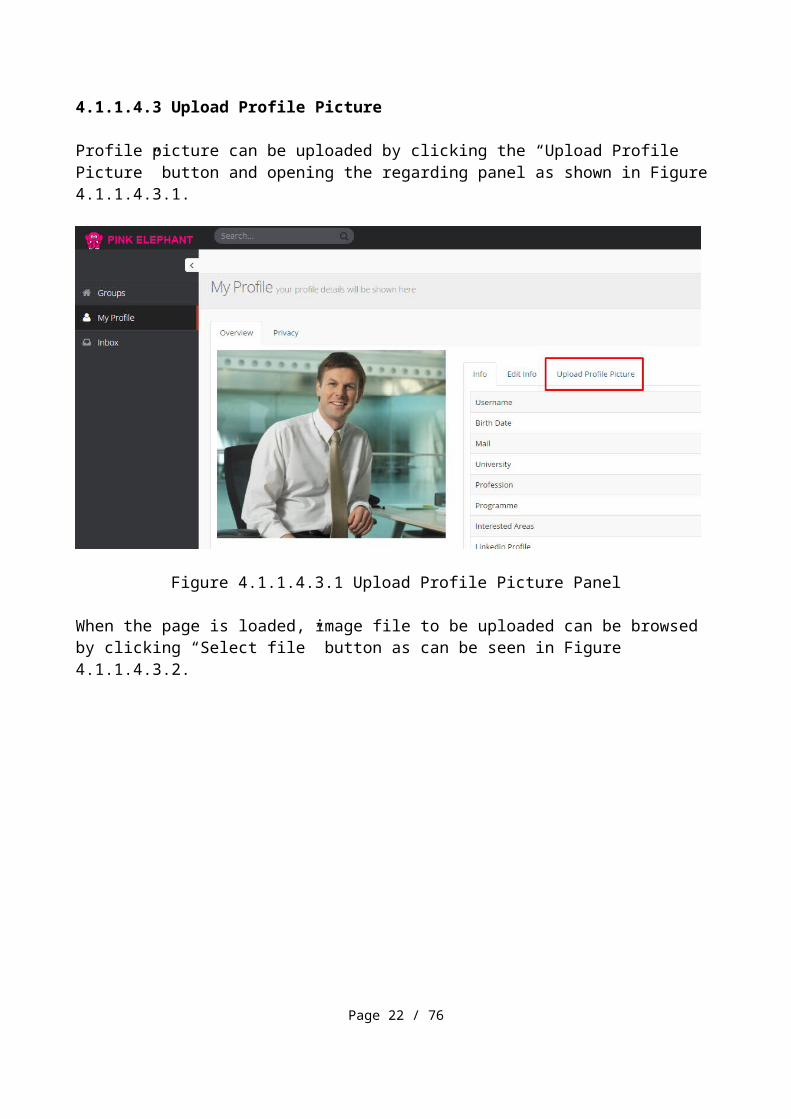
Figure 4.1.1.5.1.1 View Group
4.1.1.5.1.1. View All Groups
All groups in a list can be viewed by clicking the “View More” button in the Groups page as shown in Figure 4.1.1.5.1.1.1.
Figure 4.1.1.5.1.1.1 View More Button
All groups will be listed as shown in Figure 4.1.1.5.1.1.2.
Page 22 / 76

Figure 4.1.1.5.1.1.2 View All Groups
4.1.1.5.1.2. Join Group
To join a group, “Join Group” button should be clicked as shown in Figure 4.1.1.5.1.2.1.
Figure 4.1.1.5.1.2.1 Join GroupPage 23 / 76

4.1.1.5.1.3. Leave Group
To leave a group, “Leave Group” button should be clicked as shown in Figure 4.1.1.5.1.3.1.
Figure 4.1.1.5.1.3.1 Leave Group
4.1.1.5.2. Create New Group
To create a new group “Create New Group” button should be clicked as shown in Figure 4.1.1.5.2.1.
Figure 4.1.1.5.2.1 Create New Group Button
Page 24 / 76

The required group information should be filled in the Create New Group page. When it is done, “Create Group” button should be clicked as shown in Figure 4.1.1.5.2.2.
Figure 4.1.1.5.2.2 Create Group Screen
If there is an existing group, the user will be warned as can be seen in Figure 4.1.1.5.2.3.
Figure 4.1.1.5.2.3 Create Group ScreenPage 25 / 76

4.1.1.5.3. View Meeting
In a group details page, when the name of a desired meeting is clicked as shown in Figure 4.1.1.5.3.1, meeting details page will be opened as can be seen in Figure 4.1.1.5.3.2.
Figure 4.1.1.5.3.1 Meeting Button
Page 26 / 76

Figure 4.1.1.5.3.2 Meeting Details Page
4.1.1.5.4. Create New Meeting
In order to create a new meeting, click the add button with a plus icon and then the “Create New Meeting” button should be clicked as shown in Figure 4.1.1.5.4.1.
Figure 4.1.1.5.4.1 Create New Meeting Button
The required meeting information should be filled in the Create Meeting page. When it is done, “Save” button should be clicked as shown in Figure 4.1.1.5.1.4.2.
Page 27 / 76

Figure 4.1.1.5.1.4.2. Create Meeting Page
4.1.1.5.5. Create New Discussion
In order to create a new discussion, click the add button with a plus icon and then the “Create New Discussion” button should be clicked as shown in Figure 4.1.1.5.5.1.
Page 28 / 76

Figure 4.1.1.5.5.1 Create New Discussion Button
The required meeting information should be filled in the Create Discussion page. When it is done, “Save” button should be clicked as shown in Figure 4.1.1.5.1.5.2.
Page 29 / 76

Figure 4.1.1.5.1.5.2. Create Discussion Page
4.2.1.5.6. Relate Meeting with a Discussion
4.2.1.1.5.6.1. Relate Meeting in Create New Discussion Page
In order to relate meeting with a new discussion, click the add button with a plus icon and then the “Create New Discussion” button should be clicked as shown in Figure 4.1.1.5.6.1.1.
Figure 4.1.1.5.6.1.1 Create New Discussion Button
The desired meeting to be related should be entered into the field in Related Meetings tab. When the first few characters of an existing meeting is written, system would recommend the meeting on the panel as can be seen in Figure 4.1.1.5.6.1.2.
Page 30 / 76

Figure 4.1.1.5.6.1.2 Related Meetings Panel
When the existing meeting is clicked, it will be related to the discussion to be created as shown in Figure 4.1.1.5.6.1.3. “Delete” button can be clicked if the relation is needed to be removed.
Page 31 / 76

Figure 4.1.1.5.6.1.3 Relate Meeting
4.2.1.5.7. Create New Resource
In order to create a new resource, the add button with a plus icon should be clicked and then the “Create New Resource” button should be clicked as shown in Figure 4.1.1.5.7.1.
Figure 4.1.1.5.7.1 Create New Resource Button
Page 32 / 76

To browse the desired file to be uploaded, “Select file” button should be clicked as shown in Figure 4.1.1.5.7.2.
Figure 4.1.1.5.7.2 Select File Button
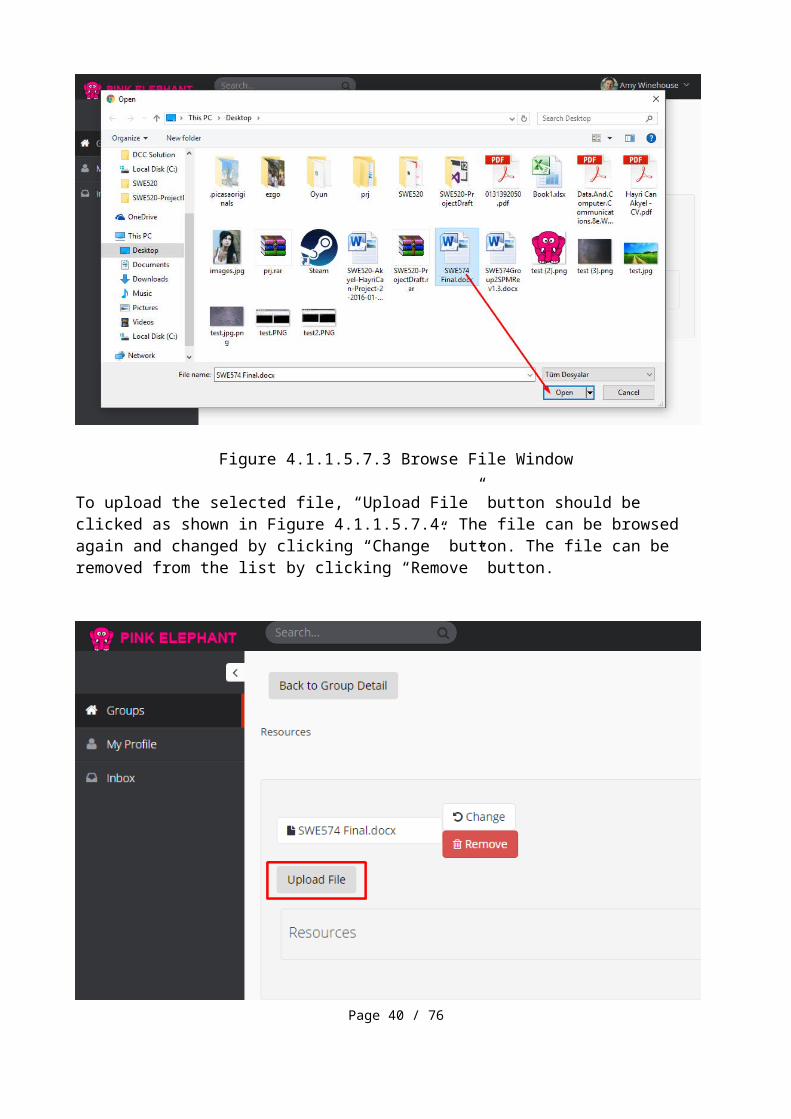
To select the desired file to be uploaded, it should be selected in the browse window and “Open” button should be clicked as shown in Figure 4.1.1.5.7.3.
Page 33 / 76

Figure 4.1.1.5.7.3 Browse File Window
To upload the selected file, “Upload File” button should be clicked as shown in Figure 4.1.1.5.7.4. The file can be browsed again and changed by clicking “Change” button. The file can be removed from the list by clicking “Remove” button.
Figure 4.1.1.5.7.4 Upload File Button
Page 34 / 76

4.2.1.5.8. Update Discussion
In order to update a discussion, “Update Discussion” button should be clicked in the discussion details page as shown in Figure 4.1.1.5.8.1.
Figure 4.1.1.5.8.1 Update Discussion Button
Desired information should be updated and “Update Discussion” button should be clicked in order to complete the operation as can be seen in Figure 4.1.1.5.8.2.
Page 35 / 76

Figure 4.1.1.5.8.2 Update Discussion Page
4.2.1.5.9. Update Note
In order to update a discussion, “Update Discussion” button should be clicked in the discussion details page as shown in Figure 4.1.1.5.9.1.
Page 36 / 76

Figure 4.1.1.5.9.1 Update Note Button
Desired information should be updated and “Update” button should be clicked in order to complete the operation as can be seen in Figure 4.1.1.5.9.2.
Figure 4.1.1.5.9.2 Update Note Page
4.1.1.6. Logout as a User
To logout, the panel over the right top of the page can be opened anytime on the web site and then the “Log Out” button can be tapped as shown in Figure 4.1.1.6.1.
Figure 4.1.1.6.1 Log Out Button
4.1.1.7. Search
Page 37 / 76

To search a word in the system, write the desired search input into the search bar in the footer and press click the search button as shown in Figure 4.1.1.7.1.
Figure 4.1.1.7.1 Search Button
4.2. Mobile Application
4.2.1. User Operations
4.2.1.1. Register as a User
When the Pink Elephant application is executed in a mobile phone, the login screen will appear as seen in Figure 4.2.1.1.1.
Figure 4.2.1.1.1 Login
Page 38 / 76

When the “REGISTER” button is tapped, Register screen will be opened as can be seen in Figure 4.2.1.1.2.
Figure 4.2.1.1.2 Register
The required fields should be filled and “REGISTER” button should be tapped in order to complete the registration shown in Figure 4.2.1.1.3.
Figure 4.2.1.1.3. Complete Registration
Page 39 / 76
If some of the registration credentials are not correct, warning messages will appear as shown in Figure 4.2.1.1.4.
Figure 4.2.1.1.4. Invalid Registration Credentials
4.2.1.2. Login/Logout as a User
When the Pink Elephant application is executed in a mobile phone, the login screen will appear as seen in Figure 4.2.1.2.1.
Page 40 / 76

Figure 4.2.1.2.1 Open Application
Login information should be entered and the “SIGN IN” button should be tapped in order to login as can bee seen in Figure 4.2.1.2.2.
Figure 4.2.1.2.2 Login
Home screen will be opened if the login credentials are correct as shown in Figure 4.2.1.2.3.
Figure 4.2.1.2.3. Home Screen
Page 41 / 76

If the login credentials are not correct, warning message will be shown as can be seen in Figure 4.2.1.2.4.
Figure 4.2.1.2.4 Invalid Login Credentials
4.2.1.3. Forgotten Password
Is the password of the user account is forgotten, “FORGOTTEN PASSWORD” button should be tapped as shown in Figure 4.2.1.3.1.
Figure 4.2.1.3.1 Forgotten Password Button
Page 42 / 76

E-mail address regarding to the account of the forgotten password should be entered in the “Email” field and “SEND PASSWORD” button should be tapped as shown in Figure 4.2.1.3.2.
Figure 4.2.1.3.2 Forgotten Password Screen
If the entered e-mail address is invalid, warning message can be seen as shown in Figure 4.2.1.3.3.
Figure 4.2.1.3.3 Invalid E-mail AddressPage 43 / 76

If the entered e-mail address regarding to a user account does not exist, warning message will be shown as can be seen in Figure 4.2.1.3.4.
Figure 4.2.1.3.4 E-mail Address Does Not Exist
4.2.1.4. My Profile Screen
My Profile screen can be opened anytime by opening the menu via tapping the hamburger button and then tapping the “My Profile” button as shown in Figure 4.2.1.4.1.
Figure 4.2.1.4.1 My Profile Button
Page 44 / 76

Profile information is shown in the My Profile screen as can be seen in Figure 4.2.1.4.2.
Figure 4.2.1.4.2 My Profile Screen
When the “Archive Account” button is tapped, the text box with the terms and conditions message will appear as shown in Figure 4.2.1.4.3. If “YES, I AGREE” button is tapped, the account will be archived and the user will be redirected to the login screen.
Figure 4.2.1.4.3 Archive Account
Page 45 / 76

4.2.1.4.1. Edit Profile
In order to edit profile information, three dot icon in the right upper corner in My Profile screen should be tapped. Then Edit Profile button should be tapped as can be seen in Figure 4.2.4.1.1.
Figure 4.2.1.4.1.1 Edit Profile Button
The desired profile information is updated and Update Profile button is tapped as shown in Figure 4.2.1.4.1.2.
Figure 4.2.1.4.1.2 Update Profile
Page 46 / 76

4.2.1.4.2. Upload Profile Picture
In order to upload profile picture, profile picture icon in My Profile page should be tapped as can be seen in Figure 4.2.1.4.2.1.
Figure 4.2.1.4.2.1 Profile Picture Icon
Gallery button should be tapped in order to browse images in the mobile phone as shown in Figure 4.2.1.4.2.2.
Figure 4.2.1.4.2.2 Gallery Button
Page 47 / 76

The desired image file is choosed by tapping as can be seen in Figure 4.2.1.4.2.3.
Figure 4.2.1.4.2.3 Select Image
The profile picture is uploaded and saved after the operation is done, as shown in Figure 4.2.1.4.2.4.
Figure 4.2.1.4.2.4.
Page 48 / 76

4.2.1.4.3. Privacy Settings
To change the privacy settings of the account, PRIVACY SETTINGS button should be tapped in My Profile page as shown in Figure 4.2.1.4.3.1.
Figure 4.2.1.4.3.1 Privacy Settings Button
The privacy setting will be pre defined as “Everyone can send you messages” as shown in Figure 4.2.1.4.3.2. Tap the ON / OFF button to change it.
Figure 4.2.1.4.3.2 Privacy Settings Screen
Page 49 / 76

If the privacy setting has been changed, it will be shown as “No one can send you messages.” as can be seen in Figure 4.2.1.4.3.3.
Figure 4.2.1.4.3.3 Change Privacy Setting
4.2.1.5. Groups Screen
Groups screen can be opened anytime by opening the menu via tapping the hamburger button and then tapping the “Groups” button as shown in Figure 4.2.1.5.1.
Figure 4.2.1.5.1 Groups Button
Group information is shown in the Groups screen as can be seen in Figure 4.2.1.5.2.
Page 50 / 76

Figure 4.2.1.5.2 Groups Screen
All groups can be viewed by tapping the “VIEW ALL GROUPS” button in the Groups screen as shown in Figure 4.2.1.5.3.
Figure 4.2.1.5.3 All Groups ScreenPage 51 / 76

4.2.1.5.1. Create New Group
To create a new group “Create Group” button should be tapped via tapping the three point icon in the Groups screen as shown in Figure 4.2.1.5.1.1.
Figure 4.2.1.5.1.1 Create Group Button
The required group information should be filled in the Create Group screen. When it is done, “Create Group” button should be tapped as shown in Figure 4.2.1.5.1.2.
Figure 4.2.1.5.1.2 Create Group Screen
Page 52 / 76

4.2.1.6. Messages Screen
Messages screen can be opened anytime when by opening the menu via tapping the hamburger button and then tapping the “Messages” button as shown in Figure 4.2.1.6.1.
Figure 4.2.1.6.1 Messages Button
Message information is shown in Messages screen as can be seen in Figure 4.2.1.6.2.
Figure 4.2.1.6.2 Messages Screen
Page 53 / 76

4.2.1.7. Group Details Screen
Name of a group can be tapped in Groups screen in order to reach the group details screen of that group, as shown in Figure 4.2.1.7.1.
Figure 4.2.1.7.1 Group Details Button
Group Details screen is opened as can be seen in Figure 4.2.1.7.2.
Figure 4.2.1.7.2 Group Details Screen
Page 54 / 76

Meetings in that group will be listed when “Meetings” button in the navigation panel is tapped as shown in Figure 4.2.1.7.3.
Figure 4.2.1.7.3 Meetings Button
Existing meetings in the group are listed as can be seen in Figure 4.2.1.7.4.
Figure 4.2.1.7.4 Meetings Screen
Page 55 / 76

Discussions in that group will be listed when “Discussions” button in the navigation panel is tapped as shown in Figure 4.2.1.7.5.
Figure 4.2.1.7.5 Discussions Button
Existing discussions in the group are listed as can be seen in Figure 4.2.1.7.6.
Figure 4.2.1.7.6 Discussions Screen
Page 56 / 76

Notes in that group will be listed when “Notes” button in the navigation panel is tapped as shown in Figure 4.2.1.7.7.
Figure 4.2.1.7.7 Notes Button
Existing notes in the group are listed as can be seen in Figure 4.2.1.7.8.
Figure 4.2.1.7.8 Notes Screen
Page 57 / 76

4.2.1.7.1. Create Discussion
Create Discussion button can be tapped after tapping three dot icon in Discussions Screen in order to create a new discussion, as shown in Figure 4.2.1.7.1.1.
Figure 4.2.1.7.1.1 Create Discussion Button
The required fields are filled and “Create Discussion” button is tapped in order to create a new discussion, as shown in Figure 4.2.1.7.1.2.
Figure 4.2.1.7.1.2 Create Discussion
Page 58 / 76

4.2.1.7.2. Create Note
Create Note button can be tapped after tapping three dot icon in Notes Screen in order to create a new discussion, as shown in Figure 4.2.1.7.2.1.
Figure 4.2.1.7.2.1 Create Note Button
The required fields are filled and “Create Note” button is tapped in order to create a new note, as shown in Figure 4.2.1.7.2.2.
Figure 4.2.1.7.2.2 Create Note
Page 59 / 76

4.2.1.7.3. View Discussion
The name of the desired discussion can be tapped in Discussions Screen in order to view the details, as can be seen in Figure 4.2.1.7.3.1.
Figure 4.2.1.7.3.1 Tap Discussion
Discussion details screen will be opened as shown in Figure 4.2.1.7.3.2.
Figure 4.2.1.7.3.2 Discussion Details ScreenPage 60 / 76

4.2.1.7.4. View Note
The name of the desired note can be tapped in Notes Screen in order to view the details, as can be seen in Figure 4.2.1.7.4.1.
Figure 4.2.1.7.4.1 Tap Note
Note details screen will be opened as shown in Figure 4.2.1.7.4.2.
Figure 4.2.1.7.4.2 Note Details Screen
Page 61 / 76

4.2.1.7.5 View Meeting
The name of the desired meeting can be tapped in Meetings Screen in order to view the details, as can be seen in Figure 4.2.1.7.5.1.
Figure 4.2.1.7.5.1 Tap Meeting
Meeting details screen will be opened as shown in Figure 4.2.1.7.5.2.
Figure 4.2.1.7.5.2 Meeting Details
Page 62 / 76

4.3. Application Installation and Configuration
4.3.1. Web Application
4.3.1.1. Core and Web Project Installation
The details of core and web project installation can be examined in Table 4.3.1.1.1.
# Step1 Issue the following command to reload the local package database;
sudo apt-get update2 You can install either the latest stable version of MongoDB.
sudo apt-get install -y mongodb-org3 Issue the following command to start mongod (primary daemon process for the MongoDB
system)
sudo service mongod start4 Run command in order to install latest version of Apache Maven
sudo apt-get install maven5 Issue the following command to install the latest stable version of JDK 7.
sudo apt-get install oracle-java7-installer6 To install apache, open terminal and type in these commands.
sudo apt-get install apache27 Run the following command in order to create directory to keep startup scripts
mkdirs /swe574/code/scripts8 Copy following scripts into "/swe574/code/scripts" directory.
-checkoutAndBuildWEB.sh: This script checkouts web project and copies into apache's "/var/www/html/" folder.
-checkoutAndBuild.sh: This script checkouts, builds and runs backend project.
-run.sh: This script runs the pink elephant backend.
-killApplication.sh: This script finds the running pink elephant application and stops it immediately.
Note: You can find these scripts in annex.9 Run the following command in order to change owner of /swe574 folder;
chown jenkins /swe574chown jenkins /var/www
10 Copy following files into "/swe574/resources" directory.
- dbpedia_2015-04.owl- yago_taxonomy.nt
Note: You can find these files in annex. Download link:
Page 63 / 76

https://onedrive.live.com/redir?resid=1571C717A54B2868!6798&authkey=!AINWHkFw2AeWZ8w&ithint=file%2crar
Table 4.3.1.1.1 Core and Web Project Installation Steps
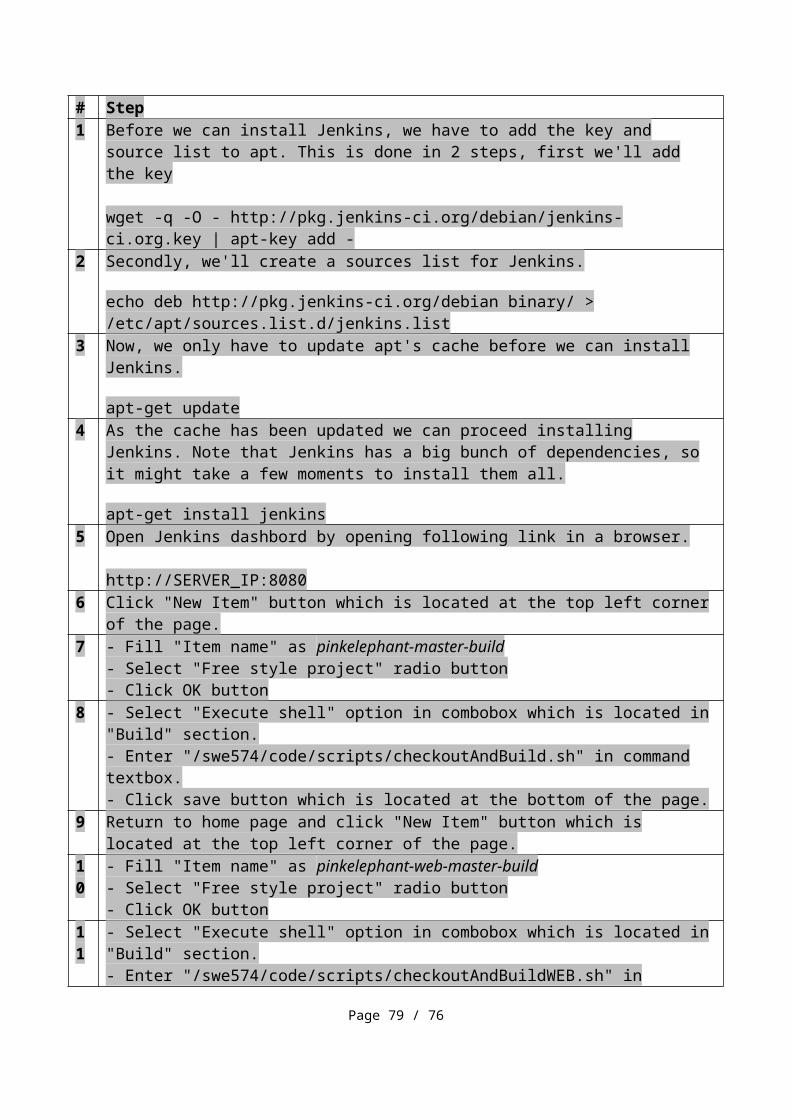
4.3.1.2. Jenkins Installation and Configuration
The details of Jenkins installation and configuration can be examined in Table 4.3.1.2.1.
# Step1 Before we can install Jenkins, we have to add the key and source list to apt. This is done in 2
steps, first we'll add the key
wget -q -O - http://pkg.jenkins-ci.org/debian/jenkins-ci.org.key | apt-key add -2 Secondly, we'll create a sources list for Jenkins.
echo deb http://pkg.jenkins-ci.org/debian binary/ > /etc/apt/sources.list.d/jenkins.list3 Now, we only have to update apt's cache before we can install Jenkins.
apt-get update4 As the cache has been updated we can proceed installing Jenkins. Note that Jenkins has a big
bunch of dependencies, so it might take a few moments to install them all.
apt-get install jenkins5 Open Jenkins dashbord by opening following link in a browser.
http://SERVER_IP:80806 Click "New Item" button which is located at the top left corner of the page.7 - Fill "Item name" as pinkelephant-master-build
- Select "Free style project" radio button- Click OK button
8 - Select "Execute shell" option in combobox which is located in "Build" section.- Enter "/swe574/code/scripts/checkoutAndBuild.sh" in command textbox.- Click save button which is located at the bottom of the page.
9 Return to home page and click "New Item" button which is located at the top left corner of the page.
10 - Fill "Item name" as pinkelephant-web-master-build- Select "Free style project" radio button- Click OK button
11 - Select "Execute shell" option in combobox which is located in "Build" section.- Enter "/swe574/code/scripts/checkoutAndBuildWEB.sh" in command textbox.- Click save button which is located at the bottom of the page.
12 Open following link in browser in order to configure a hook in core repository. By doing this, whenever a new commit pushes into repository, we will trigger jenkins build job.
https://github.com/swe574-2015fall-group2/core_repo/settings/hooks13 Click "Add new hook" button.14 Enter following link to "Payload URL" field in opened page. Then click save button.
Page 64 / 76

http://SERVER_IP:8080/job/pinkelephant-web-master-build/build?delay=0sec15 Open following link in browser in order to configure a hook in webapp repository. By doing
this, whenever a new commit pushes into repository, we will trigger jenkins build job.
https://github.com/swe574-2015fall-group2/webapp_repo/settings/hooks16 Click "Add new hook" button.17 Enter following link to "Payload URL" field in opened page. Then click save button.
http://SERVER_IP:8080/job/pinkelephan-master-build/build?delay=0sec
Table 4.3.1.2.1 Jenkins Installation and Configuration
4.3.2. Mobile Application
4.3.2.1. Mobile Application Apk Installation
Pink Elephant Apk file which is included in mobile application CD should be copied to local computer.
The mobile phone with Android 4.4.4 KitKat mobile operating system is connected to the computer in debug mode.
Command prompt is opened in the directory where Apk file is copied. “adb devices” command is written in the console and enter button is pressed. Device list is
waited to be listed. After the devices are listed, “adb install – r app-debug.apk” command is written in the
console and enter button is pressed. The user should wait until installation to mobile phone is complete.
4.3.2.2. Mobile Project Installation
4.3.2.2.1. How to Set Up JDK
You need java 7 version in order to develop Android Applications.http://www.oracle.com/technetwork/java/javase/downloads/jdk7-downloads-1880260.html
If the Windows is 64-bit then download and install both 32-bit and 64-bit versions. For 32-bit Windows only 32-bit version is enough. For linux/mac get whatever your operation system is.
4.3.2.2. How to Set Up Android SDK
First of all install Android Studio from given link below. (1.1 GB)https://developer.android.com/sdk/index.html
Setup is pretty straight forward. Might have to download more updates. (Takes 6 minutes in SSD)https://imgur.com/a/1qiDJ
After setup is finished start Android Studio, first start may take a while. It will start download updates, process is automatic.
At startup screen choose "Configure" then choose "SDK Manager" then press "Launch Standalone SDK Manager".
Page 65 / 76

https://imgur.com/a/ZQHpz Press "deselect all" then Select "Updates". Then make sure "Android SDK Platform Tools"
are also selected. By default Android Studio always come with latest API version installed. However our application targets api 19 as such we need to install it and other tools.
You can use the images as I posted below or follow the instructions. (Image instructions are only for PC’s with virtualization support. The option must be enabled from the BIOS. Guide is provided here: http://www.howtogeek.com/213795/how-to-enable-intel-vt-x-in-your-computers-bios-or-uefi-firmware)https://imgur.com/a/bicIj
Go to "Android 4.4.2 (API 19)" Folder and select SDK Platform and Sources. If virtualization is enabled in BIOS choose Intel x86 Atom System Image and Google APIs x86 however if it is not enabled then choose ARM EABI v7a System Image and Google APIs (ARM System Image).
Go to Extras and select Android Support Library (Optional), Google USB Driver. If your pc supports virtualization also install Intel x86 Emulator Accelerator.
Press install, accept all of the licenses and press install again. After it is done close the SDK Manager and Android Studio.
4.3.2.2. Adding GitHub Repo Into Android Studio
If you are using command line to use git, you should go to "C:\Users<User Name>\AndroidStudioProjects", run cmd/shell there and enter this command for linux "git clone https://github.com/swe574-2015fall-group2/android_repo.git tmp && mv tmp/.git . && rm -rf tmp && git reset --hard" or this command for windows "git clone https://github.com/swe574-2015fall-group2/android_repo.git tmp && move tmp/.git . && del -rf tmp && git reset --hard".
For GitHub Client, open the gui, press the + icon, press clone tab, select swe574-2015fall-group2, select android_repo. When Browse for folder appears, go to "C:\Users<User Name>\AndroidStudioProjects" and press OK.
4.3.2.2. Setting Up Platform Tools
First of all locate where the platform tools are installed. By default they are located at "C:\Users<User Name>\AppData\Local\Android\sdk\platform-tools".
To debug applications platform tools must be added to the path. To do this right click on "My Computer" then "Advanced System Settings". From new window press "Advanced" then "Enviroment Variables". At "System Variables" menu, go down until you found PATH variable. Press Edit button, From the new menu, go to end of the item Variable Value. Put a ";" of the end of it, if it doesn't exist then put the path of android platform tools as such given below. (Note that paths doesn't need to be same)https://imgur.com/a/gf7G0
Press OK to the all menus until we are back to desktop. Close any instance of cmd, if it is open.
To check if it is correctly installed, open new instance of cmd then enter this command "adb devices". If it says "List of Attechted Devices" then it is installed correctly.
4.3.2.2. Setting Up Debug Devices
There are two ways to debug Android Applications. First is using actual device (reccomended).
Page 66 / 76

Open your device and go to "Settings" app. From there go to "About Phone" list item. Find the item called "Build Number". Now press on it 5 times, the phone will say "You become a developer now".
Go back to settings app and press developer options, Press ON if it is required then make sure "USB debugging" is on.
Connect your phone to your pc. Now enter "adb kill-server" then "adb devices" into cmd. Make sure your phone's screen is on.
The phone will be promt authentication, press okay and make sure you check the box says always trust this pc.
Press adb devices again, now it shuold show your device with a serial number. Second way is using AVD (Android Virtual Device). To create AVD open Android Studio. Our Git-Hub project should have appered at the left side of the menu screen now, below of
the recent projects. Select that. If not press open an exisiting Android Studio project then navigate to the repo folder. First run might take a while due to gradle integration.
Press AVD Manager icon from right side of the run buttons. (Looks like tablet with android).
Remove the default API 23 device. Then press Create Virtual Device. Select Nexus 4 from the list, then select kitkat with Google Inc.Press next then finish.
Page 67 / 76

References
1. Özcanlı, B., Akyel, H. C., Çelikel, M., Koçyiğit, O., Günay, R., Sürücü, S. C., “PEP: Pink Elephant Project Software Product Manual”, 2015, v1.3.
2. Özcanlı, B., Akyel, H. C., Çelikel, M., Koçyiğit, O., Günay, R., Sürücü, S. C., “PEP: Pink Elephant Project Requirements Specifications Document”, 2015, v1.6.
3. Özcanlı, B., Akyel, H. C., Çelikel, M., Koçyiğit, O., Günay, R., Sürücü, S. C., “PEP: Pink Elephant Project Design Specifications Document”, 2015, v1.0.
4. Bennett, S., McRobb, S., Farmer, R. “Object-Oriented Systems Analysis and Design Using UML: Fourth Edition”, Pearson Education Limited, 2003.
Page 68 / 76

Appendices
Appendix A: Source Code and Executable Delivery
A.1 core_repo Folder
● pinkelephant-api Folder (See Appendix A.1.1)● pinkelephant-commons Folder (See Appendix A.1.2)● pinkelephant-services Folder (See Appendix A.1.3)● README.md File● install.sh File
A.1.1 pinkelephant-api Folder
● src Folder (See Appendix A.1.1.1)● .gitignore File● dump.rdb File● pom.xml File
A.1.1.1 src Folder
● main Folder (See Appendix A.1.1.1.1)● test/java/com/boun/pinkelephant/test Folder (See Appendix A.1.1.1.2)
A.1.1.1.1 main Folder
● java/com/boun Folder (See Appendix A.1.1.1.1.1)● resources Folder (See Appendix A.1.1.1.1.2)
A.1.1.1.1.1 java/com/boun Folder
● config Folder (See Appendix A.1.1.1.1.1.1)● web Folder (See Appendix A.1.1.1.1.1.2)● PinkElephantApiApplication.java File
A.1.1.1.1.1.1 config Folder
● AppConfig.java● SwaggerConfig.java
A.1.1.1.1.1.2 web Folder
● advice Folder (See Appendix A.1.1.1.1.1.2.1)● controller Folder (See Appendix A.1.1.1.1.1.2.2)● filter Folder (See Appendix A.1.1.1.1.1.2.3)
A.1.1.1.1.1.2.1 advice Folder
● PinkElephantControllerAdvice.java File
Page 69 / 76

A.1.1.1.1.1.2.2 controller Folder
● DiscussionController.java File● GroupController.java File● MeetingController.java File● NoteController.java File● ResourceController.java File● RoleController.java File● UserController.java File
A.1.1.1.1.1.2.3 filter Folder
● CORSFilter.java File● RequestFilter.java File
A.1.1.1.1.2 resources Folder
● application-dev.properties File● application-prod.properties File● application.properties File● log4j.properties File
A.1.1.1.2 test/java/com/boun/pinkelephant/test Folder
● UserControllerTest.java File
A.2 webapp_repo Folder
● nbproject Folder (See Appendix A.2.1)● public_html Folder (See Appendix A.2.2)
A.2.1 nbproject Folder
● project.properties File
A.2.2 public_html Folder
● Content Folder (See Appendix A.2.2.1)● assets Folder (See Appendix A.2.2.2)● images Folder (See Appendix A.2.2.3)● scripts Folder (See Appendix A.2.2.4)● styles Folder (See Appendix A.2.2.5)● views Folder (See Appendix A.2.2.6)● Web.config File● index.html File● index_1.html File● login.html File
Page 70 / 76

A.2.2.1 Content Folder
● assets Folder (See Appendix A.2.2.2.1)● images Folder (See Appendix A.2.2.3.1)● scripts Folder (See Appendix A.2.2.4.1)● styles Folder (See Appendix A.2.2.5.1)● views Folder (See Appendix A.2.2.6.1)● Web.config File● index.html File● index_1.html File● login.html File
A.2.2.2.1 assets Folder
● css Folder (See Appendix A.2.2.2.1.1)● fonts Folder (See Appendix A.2.2.2.1.2)● img Folder (See Appendix A.2.2.2.1.3)● plugins Folder (See Appendix A.2.2.2.1.4)● scripts Folder (See Appendix A.2.2.2.1.5)
A.2.2.2.1.1 css Folder
● pages Folder (See Appendix A.2.2.2.1.1.1)● themes Folder (See Appendix A.2.2.2.1.1.2)● animate.css File● custom.css File● plugins.css File● print.css File● print.css File● style-conquer.css File● style-non-responsive.css File● style-responsive.css File● style.css File
A.2.2.2.1.1.1 pages Folder
● about.us.css File● blog.css File● error.css File● image-crop.css File● inbox.css File● invoice.css File● lock.css File● login.css File● portfolio.css File● pricing-tables.css File● profile.css File● promo.css File● tasks.css File
Page 71 / 76

A.2.2.2.1.1.2 themes Folder
● blue.css File● default.css File● grey.css File● light.css File● red.css File
A.2.2.2.1.2 fonts Folder
● DXI1ORHCpsQm3Vp6mXoaTXhCUOGz7vYGh680lGh-uXM.woff File● MTP_ySUJH_bn48VBG8sNSnhCUOGz7vYGh680lGh-uXM.woff File● cJZKeOuBrn4kERxqtaUH3T8E0i7KZn-EPnyo3HZu7kw.woff File● font.css File● k3k702ZOKiLJc3WVjuplzHhCUOGz7vYGh680lGh-uXM.woff File
A.2.2.2.1.3 img Folder
● blog Folder (See Appendix A.2.2.2.1.3.1)● file_types Folder (See Appendix A.2.2.2.1.3.2)● flags Folder (See Appendix A.2.2.2.1.3.3)● gallery Folder (See Appendix A.2.2.2.1.3.4)● invoice Folder (See Appendix A.2.2.2.1.3.5)● pages Folder (See Appendix A.2.2.2.1.3.6)● social Folder (See Appendix A.2.2.2.1.3.7)● works Folder (See Appendix A.2.2.2.1.3.8)● ajax.loading.gif File● ajax-modal-loading.gif File● arrow-down.png File● avatar.png File● avatar1.jpg File● avatar1_small.jpg File● avatar2.jpg File● avatar3.jpg File● avatar3_small.jpg File● bg-opacity.png File● bg-white-lock.png File● bg-white.png File● datatable-row-openclose.png File● icon-color-close.png File● icon-img-down.png File● icon-img.up.png File● input-spinner.gif File● loading.gif File● logo.png File● menu-toggler.png File● overlay-icon.png File● photo1.jpg File● photo2.jpg File● portlet-collapse-icon-white.png File
Page 72 / 76

● portlet-collapse-icon.png File● portlet-config-icon-white.png File● portlet-config-icon.png File● portlet-expand-icon-white.png File● portlet-expand-icon.png File● portlet-reload-icon-white.png File● portlet-reload-icon.png File● portlet-remove-icon-white.png File● portlet-remove-icon.png File● remove-icon-small.png File● search-icon.png File● sidebar-search-close.png File● sidebar-toggler.jpg File● sidebar-toggler.png File
A.2.2.2.1.4 plugins Folder
● bootbox Folder● bootstrap-colorpicker Folder ● bootstrap-datepaginator Folder ● bootstrap-datepicker Folder ● bootstrap-daterangepicker Folder ● bootstrap-datetimepicker Folder ● bootstrap-editable Folder ● bootstrap-fileupload Folder● bootstrap-hover-dropdown Folder● bootstrap-markdown Folder ● bootstrap-maxlength Folder ● bootstrap-modal Folder ● bootstrap-sessiontimeout Folder ● bootstrap-switch Folder ● bootstrap-timepicker Folder ● bootstrap-toastr Folder ● bootstrap-touchspin Folder ● bootstrap-wizard Folder ● bootstrap-wysihtml5 Folder ● bootstrap Folder ● ckeditor Folder● clockface Folder● countdown Folder ● data-tables Folder ● dropzone Folder ● fancybox Folder● flot Folder ● font-awesome Folder● fuelux Folder ● fullcalendar Folder ● gmaps Folder ● gritter Folder● ion.rangeslider Folder
Page 73 / 76

● jcrop Folder ● jquery-bootpag Folder● jquery-easy-pie-chart Folder● jquery-file-upload Folder ● jquery-idle-timeout Folder● jquery-inputmask Folder ● jquery-knob Folder ● jquery-mixitup Folder ● jquery-multi-select Folder ● jquery-nestable Folder ● jquery-slimscroll Folder● jquery-tags-input Folder ● jquery-ui-touch-punch Folder ● jquery-ui Folder ● jquery-validation Folder ● jquery.pwstrenght.bootstrap Folder ● jqvmap Folder ● nouislider Folder ● select2 Folder ● uniform Folder ● excanvas.min.js File● holder.js File● jquery-1.10.2.min.js File● jquery-1.10.2.min.map File● jquery-migrate-1.2.1.min.js File● jquery.blockui.min.js File● jquery.cokie.min.js File● jquery.input-ip-address-control-1.0.min.js File● jquery.mockjax.js File● jquery.peity.min.js File● jquery.pulsate.min.js File● jquery.sparkline.min.js File● moment.min.js File● respond.min.js File
A.2.2.2.1.5 scripts Folder
● app.js File● calendar.js File● charts.js File● contact-us.js File● custom.js File● form-components.js File● form-dropzone.js File● form-editable.js File● form-fileupload.js File● form-image-crop.js File● form-samples.js File● form-validation.js File● form-wizard.js File
Page 74 / 76

● idle-timeout.js File● inbox.js File● index.js File● login.js File● maps-google.js File● maps-vector.js File● portfolio.js File● portlet-draggable.js File● table-advanced.js File● table-ajax.js File● table-editable.js File● table-managed.js File● tasks.js File● ui-datepaginator.js File● ui-extended-modals.js File● ui-general.js File● ui-ion-sliders.js File● ui-jqueryui-sliders.js File● ui-knob.js File● ui-nestable.js File● ui-nouisliders.js File● ui-toastr.js File● ui-tree.js File
A.2.2.3.1 images Folder
● about.png File● demo1.jpg File● demo10.jpg File● demo11.jpg File● demo12 jpg File● demo13.jpg File● demo14.jpg File● demo15.jpg File● demo16.jpg File● demo2.jpg File● demo3.jpg File● demo4.jpg File● demo5.jpg File● demo6.jpg File● demo7.jpg File● demo8.jpg File● demo9.jpg File● favDelete.png File● favIcon.png File● home.png File● sidebarSlice.png File● standard_month.png File● star.png File
Page 75 / 76

A.2.2.4.1 scripts Folder
● controllers Folder● directives Folder● filters Folder● services Folder● vendoer Folder● app.js File● main.js File
A.2.2.5.1 styles Folder
● images Folder● bootstrap.css File● colorbox.css File● jquery-ui.css File● main.css File
A.2.2.6.1 views Folder
● demo Folder● discussion Folder● groups Folder● meeting Folder● notes Folder● my_profile.html File
A.2.2.2 assets Folder
● css Folder● fonts Folder● img Folder● plugins Folder● scripts Folder
A.2.2.3 images Folder
● about.png File● demo1.jpg File● demo10.jpg File● demo11.jpg File● demo12 jpg File● demo13.jpg File● demo14.jpg File● demo15.jpg File● demo16.jpg File● demo2.jpg File● demo3.jpg File● demo4.jpg File● demo5.jpg File
Page 76 / 76

● demo6.jpg File● demo7.jpg File● demo8.jpg File● demo9.jpg File● favDelete.png File● favIcon.png File● home.png File● sidebarSlice.png File● star.png File
A.2.2.4 scripts Folder
● controllers Folder● directives Folder● filters Folder● services Folder● vendor Folder● app.js File● main.js File
A.2.2.5 styles Folder
● images Folder● bootstrap.css File● colorbox.css File● jquery-ui.css File● main.css File
A.2.2.6 views Folder
● demo Folder● login.html File● register.html File
A.3 android_repo Folder
● .idea Folder (See Appendix A.3.1)● .settings Folder (See Appendix A.3.2)● app Folder (See Appendix A.3.3)● gradle/wrapper Folder (See Appendix A.3.4)● .classpath File● .gitignore File● .project File● README.md File● android_repo.iml File● build.gradle File● gradle.properties File● gradlew File● gradlew.bat File● settings.gradle File
Page 77 / 76

A.3.1 .idea Folder
● copyright Folder (See Appendix A.3.1.1)● .name File● compiler.xml File● encodings.xml File● gradle.xml File● misc.xml File● modules.xml File● runConfigurations.xml File● vcs.xml File
A.3.1.1 copyright Folder
● profiles_settings.xml File
A.3.2 .settings Folder
● org.eclipse.jdt.core.prefs File
A.3.3 app Folder
● jni Folder (See Appendix A.3.3.1)● libs Folder (See Appendix A.3.3.2)● obj/local Folder (See Appendix A.3.3.3)● src Folder (See Appendix A.3.3.4)● .gitignore File● app-debug.apk File● app.iml File● build.gradle File● proguard-rules.pro File
A.3.3.1 jni Folder
● libjpeg Folder (See Appendix A.3.3.1.1)● Android.mk File● Application.mk File● image.c File● utils.c File● utils.h File
A.3.3.1.1 libjpeg Folder
● armv6_idct.S File● jcapimin.c File● jcapistd.c File● jccoefct.c File● jccolor.c File● jcdctmgr.c File
Page 78 / 76
● jchuff.c File● jchuff.h File● jcinit.c File● jcmainct.c File● jcmarker.c File● jcmaster.c File● jcomapi.c File● jconfig.h File● jcparam.c File● jcphuff.c File● jcprepct.c File● jcsample.c File● jctrans.c File● jdapimin.c File● jdapistd.c File● jdatadst.c File● jdatasrc.c File● jdcoefct.c File● jdcolor.c File● jdct.h File● jddctmgr.c File● jdhuff.c File● jdhuff.h File● jdinput.c File● jdmainct.c File● jdmarker.c File● jdmaster.c File● jdmerge.c File● jdphuff.c File● jdpostct.c File● jdsample.c File● jdtrans.c File● jerror.c File● jfdctflt.c File● jfdctfst.c File● jfdctint.c File● jidctflt.c File● jidctint.c File● jidctred.c File● jinclude.h File● jmemmgr.c File● jmemnobs.c File● jmemsys.h File● jmorecfg.h File● jpegint.h File● jpeglib.h File● jquant1.c File● jquant2.c File● jutils.c File● jversion.h File
Page 79 / 76

A.3.3.2 libs Folder
● armeabi-v7a Folder (See Appendix A.3.3.2.1)● armeabi Folder (See Appendix A.3.3.2.2)● x86 Folder (See Appendix A.3.3.2.3)
A.3.3.2.1 armeabi-v7a Folder
● libchat.4.so File
A.3.3.2.2 armeabi Folder
● libchat.4.so File
A.3.3.2.3 x86 Folder
● libchat.4.so File
A.3.3.3 obj/local Folder
● armeabi-v7a Folder (See Appendix A.3.3.3.1)● armeabi Folder (See Appendix A.3.3.3.2)● x86 Folder (See Appendix A.3.3.3.3)
A.3.3.3.1 armeabi-v7a Folder
● objs/chat.4 Folder● libchat.4.so File
A.3.3.3.2 armeabi Folder
● objs/chat.4 Folder● libchat.4.so File
A.3.3.3.3 x86 Folder
● objs/chat.4 Folder● libchat.4.so File
A.3.3.4 src Folder
● androidTest/java/swe574/boun/edu/androidproject Folder (See Appendix A.3.3.4.1)● main Folder (See Appendix A.3.3.4.2)● test/java/swe574/boun/edu/androidproject Folder (See Appendix A.3.3.4.3)
A.3.3.4.1 androidTest/java/swe574/boun/edu/androidproject Folder
● ApplicationTest.java File
Page 80 / 76

A.3.3.4.2 main Folder
● assets/emoji Folder● java/swe574/boun/edu/androidproject Folder● libs Folder● res Folder● AndroidManifest.xml File
A.3.3.4.3 test/java/swe574/boun/edu/androidproject Folder
● ExampleUnitTest.java File
A.3.4 gradle/wrapper Folder
● gradle-wrapper.jar File● gradle-wrapper.properties File
Page 81 / 76