
Retain Wallchart Technical Implementation Guide · Retain Wallchart Technical Implementation Guide...
59
Retain Wallchart Technical Implementation Guide Retain International 33 Beaufort Court Admirals Way London E14 9XL United Kingdom 1 646 688 4496 (USA) 0845 458 8660 (UK) +44 20 7538 4774 (World) [email protected] www.retaininternational.com © 2009 ... Retain International Limited
Transcript of Retain Wallchart Technical Implementation Guide · Retain Wallchart Technical Implementation Guide...

Retain Wallchart Technical Implementation Guide
Retain International33 Beaufort Court
Admirals WayLondonE14 9XL
United Kingdom
1 646 688 4496 (USA)0845 458 8660 (UK)
+44 20 7538 4774 (World)
© 2009 ... Retain International Limited

Contents
22
Table of Contents
.....................................................................................................................................41 Introduction
.......................................................................................................................................................................41.1 Introduction
.......................................................................................................................................................................51.2 About Retain
.......................................................................................................................................................................61.3 About this guide
.......................................................................................................................................................................61.4 Where to get support
.....................................................................................................................................72 Installing Retain
.......................................................................................................................................................................72.1 Installation overview
.......................................................................................................................................................................82.2 Installation files
.......................................................................................................................................................................82.3 Setting up a database for Retain
...................................................................................................................................................................8Database overview
...................................................................................................................................................................8Database platform requirements
...................................................................................................................................................................9Microsoft SQL Server 2005 setup
...................................................................................................................................................................10Oracle setup
...................................................................................................................................................................11Database customisation
................................................................................................................................................11Database customisation overview
................................................................................................................................................11Tailoring the scripts
...................................................................................................................................................................12Supported data types
.......................................................................................................................................................................132.4 Installing Retain Server software
...................................................................................................................................................................13Retain Server Installation overview
...................................................................................................................................................................13Server machine requirements
...................................................................................................................................................................14Configuring Retain Server
................................................................................................................................................14Retain Server configuration tools
................................................................................................................................................17SvrCnfg.ini
...................................................................................................................................................................20Running Retain Server as a service
................................................................................................................................................20Retain Server service overview
................................................................................................................................................21Configuring the service
................................................................................................................................................22Installing the service
................................................................................................................................................22Starting the service
................................................................................................................................................23Stopping the service
................................................................................................................................................23Uninstalling the service
................................................................................................................................................23Synchronisation with the database
...................................................................................................................................................................24Log and tid files
.......................................................................................................................................................................242.5 Installing Retain Client software
...................................................................................................................................................................24Retain Client installation overview
...................................................................................................................................................................25Client machine requirements
...................................................................................................................................................................25Configuring Retain Client
................................................................................................................................................25Retain Client configuration overview
................................................................................................................................................26Servers.ini
................................................................................................................................................27ClntCnfg.ini
................................................................................................................................................28Retaine.ini
................................................................................................................................................30bkgDialog.ini
...................................................................................................................................................................36Initial set-up after installation
...................................................................................................................................................................36Distributing to users
................................................................................................................................................36Distribution overview
................................................................................................................................................37Distributing tested installation
.....................................................................................................................................383 Reference
.......................................................................................................................................................................383.1 Technical specification
.......................................................................................................................................................................403.2 Appendix A
...................................................................................................................................................................40Customising the SQL Server database
...................................................................................................................................................................40Customising the Oracle database
...................................................................................................................................................................41Updating bookings with the changed time/rate information
...................................................................................................................................................................41Field mapping for old notebooks
.......................................................................................................................................................................443.3 Appendix B
...................................................................................................................................................................44Retain components

Contents
3
.......................................................................................................................................................................453.4 Appendix C
...................................................................................................................................................................45Details of installed files
................................................................................................................................................45Essential Retain Client files
................................................................................................................................................46Essential Retain Server files
................................................................................................................................................46Files and folders
...................................................................................................................................................................47Calculated Fields Reference
................................................................................................................................................47Introduction
................................................................................................................................................48Customisation
................................................................................................................................................48Rules for Designing Calculated Fields
................................................................................................................................................50Adding Calculated Fields
................................................................................................................................................50Constants
.............................................................................................................................................50CalcFields.cff
.............................................................................................................................................50DefineCompany.cff
.............................................................................................................................................50CompanyConsts.cff
...................................................................................................................................................................52Built-in Calculated Fields
................................................................................................................................................52Calculated Fields Files
................................................................................................................................................52Calculated Fields for Diaries
................................................................................................................................................53Conflicts
................................................................................................................................................53Define Company
................................................................................................................................................53Database Independence
................................................................................................................................................53Fast Time
................................................................................................................................................53Company Constants
................................................................................................................................................53Phonetics
................................................................................................................................................53Pre-calculated Fields
................................................................................................................................................53Request Economics
................................................................................................................................................53Scenarios
................................................................................................................................................54Security
................................................................................................................................................54Triggers
................................................................................................................................................54Team
................................................................................................................................................54Variance
................................................................................................................................................54Wallchart
................................................................................................................................................54Calculated fields and replacement strings
.....................................................................................................................................574 Support Services
..........................................................................................................................................58Index

Introduction
44
1 Introduction
1.1 Introduction
Retain Wallchart Technical Implementation Guide
Corporate Edition
www.retaininternational.com
© 2009 ... Retain International Limited

Introduction
5
1.2 About Retain
Retain Wallchart is a flexible planning tool for viewing and managing staff and job allocations through a userfriendly graphical interface. It has been designed to resemble the manual 'wallchart' booking system but it ismuch more versatile than any manual booking system:
Retain Wallchart provides a wide range of functionality relating to resource planning. See Retain WallchartUser Guide for more information.
In a typical client/server setup, the database software runs on the server computer and a program that canaccess the database runs on client computers. Retain Wallchart uses an extra server component, specificallywritten for Retain, called Retain Server. All the client applications talk to Retain Server which in turn interactswith the database software. This architecture allows the client software to be fully independent from thedatabase and requires minimal setup on the client computer.
The client program, called the front-end (Retain Wallchart), allows users to access information stored withinthe database through an easy to use Windows-style interface. The database server, called the back-end,handles the database side of the application. Retain Server is located between these two, acting as interpreterand adding additional functionality to the database system. The front-end program requests services of theback-end by querying Retain Server. These queries are then passed to the back-end in the form of SQLstatements. The back-end processes SQL statements and returns the results to the front-end program, againvia Retain Server. The use of a client/server back-end enables larger scale databases plus access over awide area network or dial-up.
Retain Wallchart looks similar and operates similarly to other editions of Retain. However, there are additionalclient programs that provide further functionality (such as Booking Requests and Enterprise Reports) that canbe setup on selected client machines after Retain Server is installed.

Introduction
66
1.3 About this guide
This document is a technical guide to assist people who are implementing Retain in their organisation. Theguidelines provided here should be followed together with your organisation's specific user guides forinstalling, configuring and distributing the software.
The guide assumes that your organisation has the necessary technical resources to support your databaseplatform, therefore it only addresses those areas of each platform that are relevant to setting up RetainWallchart and Retain Server.
The term Retain refers to the whole Retain Resource Planning System which includes the client applications(Retain Wallchart, Retain Security) and the server application (Retain Server).
Note that this implementation guide is not intended for the end-users of Retain Wallchart. For information onhow to use the software please refer to Retain Wallchart User Guide.
1.4 Where to get support
If you have any issues with Retain which you are unable to resolve using this user guide or through your localsupport contacts, please contact your Support Service Provider.

Installing Retain
7
2 Installing Retain
2.1 Installation overview
Before installing Retain, you should ensure that your system has sufficient processor speed, disk space andRAM to run this application.
Detailed system requirements for the database platform, server machine and client machines are outlined inthe following sections:
Database platform requirements
Server machine requirements
Client machine requirements
If your client operating system is an earlier version than Windows 2000 (e.g. Windows 95), you need toensure that the TCP/IP network drivers are set up. Your network administrator should be able to do this.
Retain installation can be divided into the following stages:
Install Retain software by running the RetainCorporate5Setup.exe which is available from yourvendor. from the 'Wallchart' folder. Follow the on-screen instructions to complete the installation.
If installing Retain for the first time, select the 'Server and Client Setup' option as the installation type. Toset up the client application on each additional machine, select the 'Client only Setup'.
Create an empty database or convert an existing one. Populate it with one of the provided scripts (Oracleor SQL) to create the required tables.
Note that if you are using an Oracle database, the Oracle client files will have to be installed on the machinehosting Retain Server.
Configure Retain Server to ensure it can connect to the database. Configure the SvrCnfg.ini file, found inthe 'Server' sub-folder.
Run Retain Server by going to 'Start-> Programs-> RetainEnterprise_v5-> Retain Server'.
Run Retain Wallchart by going to 'Start-> Programs-> RetainEnterprise_v5-> Retain'.
Once you have established a connection between your test client and your database, use the RetainSecurity Manager application to configure your security settings such as access roles, colour schemes,charge rates and so on. See the Initial set-up after installation section as well as Retain Security ManagerUser Guide for more information.
Distribute the client application to all client machines.
For a list of all Retain components that come with your installation see the Retain components section.
The installation process will set up:
Retain database on your database platform,
Retain Server on your chosen server machine, and
client software on client machines
Related Topics:

Installing Retain
88
Setting up a database for RetainInstalling Retain Client software
2.2 Installation files
Whether you have downloaded Retain installation files from Retain's website or have been provided with aninstallation CD, you will find RetainCorporate5Setup.exe and other setup executables in the install.
You may also find a licence file (licence.ein) in the install. Alternatively, it will be provided separately if youalready have a trial or demo version of Retain.
Before installing Retain, you should put the licence file in the same folder as RetainCorporate5Setup.exe, sothat the setup can detect which components to install.
Note that if it is a trial or demo version you are installing, you would not need a separate licence file.
To install Retain you need to copy RetainCorporate5Setup.exe, the setup executables of appropriatecomponent(s) and possibly the licence file to a local temporary location. Once you have done that, run the RetainCorporate5Setup.exe which will start the installation on your destination machine.
2.3 Setting up a database for Retain
Database overview
All Retain data is stored in a database. All Retain applications connect to the database via Retain Server. Thesupported database platforms are Oracle 8i, 9i and 10g; Microsoft SQL Server 2005 with full text indexing.See the Database platform requirements section for more information.
To set up a Retain database, an empty database needs to be created, after which it must be populated byrunning the scripts provided in the installation to create the default Retain tables.
The procedure of creating the database for Oracle is different from that for Microsoft SQL Server but the tablestructure is the same for both. To tailor the table structure to suit your organisation's needs, see the Databasecustomisation chapter to find out what modifications you can perform on Retain database tables.
Database platform requirements
Retain supports various database platforms. The installation varies depending on which database platformyou use.
Supported database platforms:
Microsoft SQL Server 2005
Oracle 8i, 9i, 10g
Hardware/Software platforms supported by the above database platforms:
Microsoft SQL Server supports Windows Server 2003 and Windows Server 2008.
Oracle supports most of the known platforms including Windows-based platforms, Linux Intel, Sun Solarisand so on.

Installing Retain
9
The hardware specification for the database will vary depending on the expected number of users and thelevel of concurrency.
The notes below provide some approximate guidance but you should consult Retain for the most appropriatehardware specification for your organisation.
Database disk space:
Allow for 500 MB per 1,000 staff being planned.
Typical Intel specification for a database server machine for supporting 1,000 staff:
2 GB free disk space2 GB RAM2.4GHz Xeon processor
Typical Intel specification for a database server machine for supporting 10,000 staff:
10 GB free disk space4 GB RAMQuad 2.4GHz Xeon processors
Microsoft SQL Server 2005 setup
To create a database in Microsoft SQL Server the following steps are required:
1. Microsoft SQL Server and SQL Server FullText Search should be installed and running as a service.
2. Run Microsoft SQL Server Management Studio and connect to the SQL Server machine which willbe hosting the Retain database.
3. Right-click on Databases and select 'New Database...' from the context menu. In the 'New database'dialog, we recommend entering 'Retain' as the database name (if it is the first Retain databasesetup). Ensure you tick the 'Use full-text indexing' checkbox and click on 'OK' to create the database.
4. Set up access rights for the Retain Server.
The Retain Server will normally be run under a user account which requires access to the Retaindatabase. You can either choose to use SQL Server security which requires a separate user nameand password (the SQL Server instance needs to be configured with mixed mode security), orintegrated security where the relevant Windows user account is given access to the database.
Expand 'Security' (below 'Databases'), right-click on 'Logins' and select 'New Login...' to add a newuser. In the 'New Login' dialog you can either choose to use Windows integrated security (so thatyou will log into SQL Server using your Windows login) or SQL Server Authentication (which allowsyou to set up a separate username and password for your database).
- When using integrated security, tick the 'Windows authentication' checkbox and find therelevant user by clicking on the 'Search' button.
- When using SQL Server Authentication, tick the 'SQL Server authentication' checkbox andenter the appropriate log in name in the 'Login name' box. Enter your chosen password in the'Password' box.
Note: The password you enter here is the same one you should use for the connection stringdescribed in the SvrCnfg.ini section. However, the password will appear to be longer due toencryption. Some versions of Microsoft Windows do not support security mechanisms such aspassword expiry, therefore if you get an error message about this, uncheck the 'Enforcepassword policy' checkbox.
Set the created Retain database as the 'Default database' for this login, and select '<default>' as

Installing Retain
1010
the 'Default language'.
No entries are required in the 'Server Roles' section.
In the 'User Mapping' section, select the Retain database and tick 'db_owner' checkbox to set theuser as the Database Owner.
5. Run Command Prompt (cmd) and navigate to the 'DatabaseScripts-> SQLServer' folder. Run theSetupSQL.bat with the following syntax:
SetupSQL <Sql server name> <database name> <Login id> <Password>
For example: SetupSQL MyServer Retain sa mypassword
Alternatively, each script can be run in the SQL Server query window against the Retain database inthe following order:
1. RWPBaseModelSQL.SQL2. RWPAdditionalFunctionsSQL.SQL3. RWPAddsSQL.SQL4. SoundexFNSQL.SQL5. PopRSESQL.SQL6. PrepErrsSQL.SQL7. PopErrsSQL.SQL8. InstallFTSSQL.SQL
Note: In the SetupLog.txt file you may see a warning message related to the 'AVB' table. This is adefault SQL Server warning message and can be ignored. Check the 'Log' folder for errors.
6. Configure the Retain Server to connect to the database. After successfully running the RetainServer, you will need to stop the Retain Server and run UpdateSQL.bat from the Command Prompt:
UpdateSQL <Sql server name> <database name> <Login id> <Password>
For example: UpdateSQL MyServer Retain sa mypassword
Alternatively, you can run the RecurringSQL.sql script against the Retain database from the'DatabaseScripts-> SQLServer-> RecurringScripts' folder. Either the UpdateSQL.bat orRecurringSQL.sql script should be configured to run on a nightly basis. This script populates tablesto improve reporting performance.
You can customise the database tables, if necessary. See the Database customisation chapter for moreinformation.
Oracle setup
To create a database in Oracle you will need at least 500 MB of disk space. Because the interfaces of theOracle platform vary among organisations, only basic instructions for creating a new Oracle database forRetain are provided below:
1. In Oracle Enterprise Manager Console create a new Oracle user for Retain to connect to.
2. Run the following database script (found in the 'DatabaseScripts-> Oracle' folder) against the emptydatabase schema to create the Retain table structures:
SetupORA.sql
Alternatively, you can run the scripts from the 'DatabaseScripts-> Oracle-> Setup' folder in thefollowing order:
1. RWPBaseModelORA.SQL2. RWPAdditionalFunctionsORA.SQL

Installing Retain
11
3. RWPAddsORA.SQL4. SoundexFNORA.SQL5. PopRSEORA.SQL6. PrepErrsORA.SQL7. PopErrsORA.SQL
Check the 'Log' folder for any errors.
3. Configure the Retain Server to connect to the schema. After successfully running the Retain Server,you will need to stop the Retain Server and run UpdateORA.sql script against the schema from the'DatabaseScripts-> Oracle' folder. The UpdateORA.sql script should be configured to run on a nightlybasis. This script populates tables to improve reporting performance.
Case Insensitive Sort Order for Oracle
By default Oracle uses case sensitive sorts which does not result in intuitive results. This can be changed byusing a French or German sort order. In addition, a trigger can be used to ensure that all users are operatingwith this sort order.
An example procedure for this purpose would be:
create or replace trigger CaseInsensitiveSortafter logon on Retain.schemadeclarebeginexecute immediate'alter session set NLS_SORT = French ';end;
Database customisation
Database customisation overview
The Retain database is flexible for storing customised data and easy to maintain.
The following section describes how to customise a database for your data. Tailor the existing scripts tocustomise the database before you run them. Alternatively, create new scripts to add tables or fields and run itafter creating the Retain database. See the Tailoring the scripts section for more information.
Once a Retain database is set up, changes to the database tables are performed using the platform specifictools such as Microsoft SQL Server Management Studio.
See the Customising an SQL Server database and Customising an Oracle database sections for moreinformation.
Tailoring the scripts
The batch files that need to be run for setting up the SQL Server database are:
1. SetupSQL.bat 2. UpdateSQL.bat
Note: In the SetupLog.txt file you may see a warning message related to the 'AVB' table. This is a defaultSQL Server warning message and can be ignored.
The scripts that need to be run to set up the Oracle database are:
1. SetupORA.sql2. UpdateORA.sql

Installing Retain
1212
Note: The batch files should be run in the order specified above, with the setup one being first and update thesecond.
The SetupSQL.bat and SetupORA.sql will generate the main tables (such as RES, JOB and BKG) that storethe end-user data as well as additional tables that store the operational data.
The UpdateSQL.bat and UpdateORA.sql will update indexes to improve the reporting performance.
Changes to the Main Tables
The main tables are:
RES (Resources)JOB (Jobs)BKG (Bookings)
With regards to changes in the main tables, you need to ensure that the fields are long enough toaccommodate the data that your organisation wishes to store in Retain.
Any changes made to the fields in the BKG table also need to be duplicated in the BKG_LOG andBKG_CFET tables.
See the Supported data types section for information on supported data types.
If you have more than one database connecting to your Retain Server, you need to edit the name of theserver ('cde_value') in the last insert statement ('Insert into CDE'). This defines the alias name of thedatabase(s) used for caching, which should be a unique name. This is necessary to avoid any issues thatmay be caused by multiple databases using one cache folder.
Any other changes made to the default tables, such as field name aliases, should be performed using RetainSecurity Manager, rather than directly editing the scripts.
See Appendix A for examples on how to customise SQL and Oracle databases.
Note: The scripts should not be modified in any way other than those described above unless you havespecific requirements. In that case, you should consult with your Support Service Provider.
Supported data types
Microsoft SQL Server data types:
Supported: bit, char, varchar, datetime, small, datetime, int, smallint, float
Unsupported: binary, nvarchar, bigint
Oracle data types:
Supported: number, char, varchar2, date
Unsupported: nchar, nvarchar2, clob, nclob, long, binary datatypes

Installing Retain
13
2.4 Installing Retain Server software
Retain Server Installation overview
Retain Server will run on a Windows NT, 2000 Server or Server 2003 machine with a static IP address or astatic DNS name. The client machines do not need to access any of the files on the server machine. RetainServer can be installed on the same machine as the database server for fast communication. However, it is atrade-off between the condition of the server machine and the speed of the network connection.
In very high load environments the database and Retain Server may be run on separate machines; in suchcase they should be placed in close proximity to each other to ensure a high bandwidth connection betweenRetain Server and database server. Ideally, they should be sitting on a local area network running at least 100Mb/sec. Each Retain client application will connect to the server as the application starts up and will performall of its interactions with the database via Retain Server.
Note that Retain Server is a Windows executable which normally runs as a service. You may set up Windowsservice(s) that can automatically stop and restart Retain Server(s) on a nightly basis.
To install Retain Server you will need to:
Check the server machine specifications. See the Server machine requirements section for moreinformation.
In order to install Retain Server you will only need the following files: RetainCorporate5Setup.exe andlicence.ein (licence file). However, it is recommended that you also install all the client software onthe server machine at the same time, in order to test the connection.
Run RetainCorporate5Setup.exe and follow the on-screen instructions to install Retain software. Seethe Essential Retain Server files section for more information.
Configure SvrCnfg.ini.
Start Retain Server manually or using the service to test its connection to the database. See the Server configuration tools section for more information.
If the database server is automatically restarted (because the database backup procedure shutdownand restarted the database, for example), then Retain Server will need to be restarted as well. Seethe Synchronisation with the database section for more information.
Server machine requirements
If Retain Server is running on the same machine as the database, the hardware specifications listed in the Database platform requirements section will be applicable.
The software itself takes up a small amount of disk space (allow for up to 100 MB), stores no data itself, has arelatively small memory footprint (allow for 2MB plus 200K per concurrent client connection) and usesprocessor time similar to the database.
If the Server software is being run on a separate machine than the database, a suitable specification for mostscenarios would be the following:
Intel Xeon or Pentium Class processor 2.4 GHz Microsoft Windows Server 2003 At least 2 GB of RAM
100 MB Disk space TCP/IP network protocol

Installing Retain
1414
Static IP address (or a static DNS name)
For larger environments where a large number of staff are being supported (e.g. 5,000), it is advisable toconsider multi-processor hardware and more than one Retain Server machine to spread the load and toprovide some safety if one of the machines fails.
Configuring Retain Server
Retain Server configuration tools
ServerCnfg.exe
You may find this tool as Server Configuration Manager (ServerCnfg.exe) under Utilities from RetainEnterprise group in Start Menu. It provides you with an interface to specify the settings discussed in the SvrCnfg.ini file.
Expand the 'Database' section and you will be able to change the Database Driver and Name:
Note that you always need to select a Database Type to activate the Database Name look up button.
SQL Server Connection
To set up a database connection for an SQL Server database follow the instructions below.
1. Click on the look up button for the Database Name field. The 'Data Link Properties' dialog will open,allowing you to generate a connection string:

Installing Retain
15
2. Select a database type (for a SQL database, select 'Microsoft OLE DB Provider for SQL Server') and clickon the 'Next >>' button.
3. In the 'Connection' tab specify the database server machine, the type of security and select the databasecreated in earlier steps from the drop down list:
4. Test the connection by clicking on the 'Test Connection' button.

Installing Retain
1616
Note: The type of security depends on what you have chosen to use when you set up your database securityin Microsoft SQL Server setup. If you used SQL Server security ensure that the 'Allow saving password'checkbox is ticked, as shown above.
5. Click on 'OK' and you should see the connection string displayed in the Database Name field (in the 'ServerConfiguration' dialog).
6. The User Name and Password fields should be blank.
7. Click on the 'Edit file' tab and set UseDBCalcFields = 1.
Oracle Connection
To set up a connection to the Retain schema in Oracle, run ServerCnfg.exe and enter the connection settingsas follows:
Database Type: DOADatabase Name: TNS NameUser Name: Oracle UserPassword: User Password
Test database connection
Select 'Check-> Check Database connection' from the menu. If the connection is successful, you should getthe following message: 'DB Opened successfully'.Alternatively, if you will get a failed login error message, check that your connection string is correctly set up.
To further test that your Retain Server can connect to your database, you need to save the changes in theServerCnfg.exe and run Retain Server manually. You should see the port number in the title bar of the RetainServer window. If you can not then there is a problem in the connection. In this case you need to check theport settings in the SvrCnfg.ini file.
If your Retain Server connects to the database, i.e. the port number was shown, you should try to open aclient application such as Retain Security Manager, to see if it can open (assuming you already installed onewhen running Setup.exe). If the client application runs, the connection has been established successfully.Alternatively, check your connection string again.
The 'Edit file' tab in the 'Server Configuration' dialog simply shows you the contents of the SvrCnfg.ini file. Youcan manually modify the settings using this tab. For example, if you are connecting to a Microsoft SQL Serverand you want to comment out the Default Username and Default Password fields for setting up theconnection, you can do it using this tab:

Installing Retain
17
SvrCnfg.ini
Basic settings
For the first installation of Retain server you will only need to adjust the [Global] settings in SvrCnfg.ini. Thefollowing example shows an Oracle database setting:
[Global]
DBDriver=DOADBName=Retain.WorldDefaultUser=RetainDefaultPassword=Retain
DBDriverThis will be the driver used for your database system. The Microsoft SQL Server driver is ADO_SQL and the
Oracle driver is DOA.
DBNameThis will be one of the following:
If you are using Oracle, this can be the name set up in the TNSNAMES.ORA file, e.g. Retain.World.
If you are using SQL Server, this can be the name of the server machine. It can be the stringproduced by server configuration tools which eliminate the need to specify the user and database(you can then comment out the DefaultUser and DefaultPassword settings). Otherwise, theDefaultUser and DefaultPassword are used.
DefaultUserThe user name assigned to database, e.g. Retain. If you are using SQL Server and ADOConnectionString.exe/ServerCnfg.exe does not include the connection information, then this user musthave the Retain database set up as its default database.
DefaultPasswordThe password assigned to the database, e.g. Retain.
Note: The DefaultUser and DefaultPassword entries must be commented out if you have used integratedsecurity in setting up your login to the database.
You should now be able to run Retain server and to test the connection to the database.
Further settings
LogClientConnection=1This setting records the user connections in the ULG table when set to 1.
MaxStackTraceLength=0

Installing Retain
1818
Represents the stack trace level in the log table: 0 = No stack trace; 10 = 10 Lines; -1 = Unlimited.
UpdateDiarySumIt is false by default. If false, does not populate the table and instead the user would probably want to run theUpdate scripts. If true, the DGD_SUM table is populated by the Retain Server whenever a diary changes, andalso on start up. In larger deployments with multiple servers, it is recommended that this setting is applied to aserver that is used by administrators who could potentially change the diaries.
UpdateDiaryDetailIt is false by default. If true, populates the DGD table when Retain Server is first started.
MaxUsersThe maximum number of users allowed on to the database through Retain server at any one time.
MaxClientSendAccepted=5000000The limit (in bytes) that the server will accept in any single communication from a client application. The aboveis the default value.
ThreadPoolCountMaximum number of threads that Retain server will use to process concurrent requests. The default is 32which will almost certainly be more than enough.
ServerPortThe port number of the database server. The server will only run on the designated port and will notautomatically try the next port. It will fail to run if there is a server already running on the port. Note thisinformation should be available from your database administrator and should not require alteration after theinitial set-up.
BypassClientCalcPresence=1By default, Retain performs a check for certain calculated fields before start up (the value is 0). You canbypass this check by setting the value to 1, although it is recommended to leave it unchanged.
ShowErrorMessages=0The default vale is 0 and it means that errors will only be written to the log file. If set to '1', they will alsoappear in a dialog.
USEPWHTABLE=1This setting encrypts passwords (which are then stored in the PWH table).
FFASTRING=1=1If set to 1=1, this setting grants full functional access to the users (within licencing restrictions), regardless theset up in Security Manager. If set to 1=0, the users will be limited to the settings defined in Security Manager.You can also specify certain IP addresses that will be allowed full functional access. For example:FFASTRING=IPADDRESS='127.0.0.1'.
AcceptDifferentCPIf set to 1, Retain does not perform a check whether Retain Wallchart has a different codepage to RetainServer. The default value is 1.
[Compression]
Compression allows large amounts of data to be compacted before being sent across a network connection,therefore reducing latency times.
Threshold=10000Sets the minimum threshold in bytes above which data packets are compressed. Compression does involveextra server processing so there is a trade off between performance and bandwidth usage
Level=1To alter the compression level, change the number to the desired setting (1 being the minimum amount ofcompression and 9 being the maximum). This setting can vastly affect the speed of Retain and should be left

Installing Retain
19
on its default of 1.
[BookingRequest]
AppendNoteWhenRejecting
If set to 1, allows users to add comments to the existing booking request note� when rejecting that bookingrequest.
Additional settings
[DBConnect]
MaxTries=5This setting specifies the number of times Retain server will try to connect to the database (for Oracle only).Five is the default value.
RetryAfter=3000This setting determines the time delay in minutes between the connections. The default is 3000.
[DATABASE]
ForceRetrieveAll=1This setting is for SQL Server database connections only. It reduces the SQL Server lock conflicts.
Note that Retain server can also be run with command line parameters which will override any settings in theini file.
PORTSpecify the port that Retain server will run on.
CONFIGThe full path of the configuration file (default is SvrCnfg.ini).
ORACLEHOMEOracle home directory, only required for multiple Oracle installations.
OCIDLLOracle OCI dll. It defines the interface dll and should not be required in normal circumstances.
[Views]
ShowAll=0ShowAll will accept all views as tables. The default value is 0 (i.e. the setting is off). If ShowAll=0 then youneed to list all views you want the server to treat as tables. For example, RES=View
[Security]
AcceptUserLogon=0Determines whether you can accept a user name different to the network logon or not. The default is 0 (cannot accept). You would normally only enable this (by setting to 1) where passwords are implemented.
[Locale]
SizeToNumCharsDivider=4 Defines how many bytes a character can represent for Retain Server. In this case, it will be four bytes.

Installing Retain
2020
Advanced settings
The settings below should not be changed without consulting with your Retain support provider.
Each Retain server reserves IDs for each table in blocks of 500 (by default) and uses them sequentially.Youcan change this default (to 50 for example) but also override this default for specific tables, e.g. BKG:
[TableReserveBatch]
Default=50BKG=100
Note that Retain does not recommend setting the default to 1.
[ScenarioClrSchMappings]
Default=DefaultScenarioThis setting changes the currently selected colour scheme but only if it corresponds to the name in themapping (e.g. 'Default'). If another colour scheme is selected, the setting will not be used. On the lefthand-side of the equation is the colour scheme used when scenario bookings are hidden and on theright-hand side is the scheme that is used when scenario bookings are visible.
[ORACLE_SESSION]
NLS_SORT=BINARY_CIThis setting is not enabled by default. If used, allows ‘Alter session’ commands to be sent to Oracle oninitialisation.
Running Retain Server as a service
Retain Server service overview
Retain Server can be run either manually or as a Windows service using RetainServersService.exe.
A service can be set up for one or more servers. Each Retain service monitors all the Retain Servers it isresponsible for. If a Retain Server crashes or is no longer responding, the service will start a new RetainServer to ensure a minimal down time in the event of a failure.
Retain service will ensure that Retain Server is running, either as a desktop application or in the background(as long as the server machine is on).
Related Topics:
Configuring the serviceInstalling the serviceStarting the serviceStopping the serviceUninstalling the serviceSynchronisation with the database

Installing Retain
21
Configuring the service
RetainServersService.exe is configured using RetainServersService.ini which is found in the 'Server'sub-folder. This ini file contains three sections: [Settings], [Programs] and [Dependencies]. For example:
[Settings]DisplayName=RetainServersService
[Programs]p1=c:\Program Files\Retain Enterprise\Server\RetainServer.exe Port=11372p2=c:\Program Files\Retain Enterprise\Server\RetainServer.exe Port=11374
[Dependencies]d1=OracleServiceORCL
The [Settings] section defines the display name of the Retain service. The default name isRetainServersService. If you rename the default name you will need to update the StartService.bat andStopService.bat to reflect this change.
The [Programs] section lists all the Retain Servers that you may want to run. When migrating or upgradingRetain Server, you will have to change the path to point to the new Retain Server. You will only need tospecify the port number if the service is running on more than one server.
The [Dependencies] section defines any dependent services. If Retain Server is running on the samemachine as the database server then it can be setup to be dependent on the database service, such thatwhen the database service is stopped and started, the Retain Server(s) is/are stopped and started at thesame time. See the Synchronisation with the database section for more information.
A single instance of Retain service can manage a number of Retain Servers. This will reduce administrativehassle.However, Retain service can be renamed. This allows for a number of Retain services on one machine witheach of them independently managing a different Retain Server. This is recommended if servers areoperating against different environments, for example one of them is a test system where changes are beingexperimented with. It gives flexibility where starting/stopping individual servers is required. To have multipleservices on one machine you will need separate directories containing the RetainServersService.exe andRetainServersService.ini because each service will have different configuration.
Notes:
Any changes to the RetainServersService.ini file require the service to be either stoppedand restarted or the computer to be restarted.
The suggested port numbers are of the form 11xxx where 11xxx is an even number. Forexample, Retain Server might use port number 11372. By choosing an even number,the notification port will be an odd number as it defaults to 1+ Port Number.
By default, Retain Server runs under the Local System account but if run underIntegrated Security you need to choose the alternative.

Installing Retain
2222
Installing the service
Once you have configured Retain service, it can be installed by running InstallService.bat from the 'Server'sub-folder.
For Windows Vista and Windows Server 2008, you need to run the batch through the Command Prompt asthe Administrator:
By default, when the service is installed, it is set to automatically start when the computer starts up. This is thebest setting if you are restarting the computer frequently.
Starting the service
To start Retain service:
1. Go to Control Panel-> Administrative Tools-> Services. Right-click onRetainServersService-> Start.
2. Run StartService.bat from the 'Server' sub-folder. It contains the following command: netstart RetainServersService
Note: If the display name of Retain service changes, you will need to update this command as well.
The default is for the service not to interact with the desktop so that the service will be stopped by a userlogging out. You can change the setting by going to Control Panel-> Administrative Tools-> Services,right-clicking on RetainServersService and selecting Properties-> Log On. Tick the 'Allow service to interactwith desktop' checkbox. However, you will need to manually stop the Retain Server when the interaction is on.
Notes:
If you access the machine that runs Retain Server through an application such asPCAnywhere and you have set it to interact with the desktop, closing the PCAnywheresession will stop Retain Server.
RetainServersService monitors all the Retain Servers it is responsible for. If a RetainServer dies or is no longer responding, the service will restart a new Retain Server toensure a minimal down-time in the event of a failure.

Installing Retain
23
Stopping the service
To stop Retain service:
1. Go to Control Panel-> Administrative Tools-> Services. Right-click on RetainServersService->Stop.
2. Run StopService.bat from the 'Server' sub-folder. It contains the following command: net stopRetainServersService.
Note: If the display name of Retain service changes, you will need to update this command as well.
Uninstalling the service
After you have stopped the service, run UninstallService.bat from the 'Server' sub-folder to uninstall theservice.
Click on 'OK' to confirm that you wish to uninstall the service.
Synchronisation with the database
Retain Server software should be started after the database server and stopped before the database softwareis stopped.
Servers on one machine
If Retain Server is on the same machine as the database server, you can link the two services together using RetainServersService.ini file, as described in the Configuring the service section. After setting updependencies between the services, you can:
Stop both services using the following command: net stop RetainServersService /y
Start both services using the following command: net start RetainServersService
Servers on separate machines
You can use the Windows scheduler to stop Retain Server before the database server is shut down and startit after the database server has been restarted.
A typical scenario would be to restart Retain Server after the nightly database backup. Here is an example ofusing command lines to stop and restart Retain service using the Windows scheduler at 1am and 6am,respectively:
at 1:00 /every:M,T,W,Th,F,S,Su c:\Program Files\Retain Enterprise v5\Server\StopService.batat 6:00 /every:M,T,W,Th,F,S,Su c:\Program Files\Retain Enterprise v5\Server\StartService.bat

Installing Retain
2424
Log and tid files
.log files
When Retain Server is run, it automatically creates two additional files. These are named according to thedatabase, port and IP address, to ensure uniqueness if multiple servers are running on the same machine.
For example, the files may appear as:
LogID131083427_11372_10-20-30-23.log
LogID131083427_11372_10-20-30-23.tid
The log file contains details of when the server is stopped and started as well as details of any errors thatoccur while the server is running. It can be deleted safely.
.tid files
The .tid file is an ID control file. It stores the range of IDs that the server has reserved against various tablesand will use when creating new rows. It ensures that when Retain Server is stopped and started, it will use theIDs sequentially.
Note: If you rebuild the database or import data without updating the IDC table, the .tid file should be deletedbefore restarting Retain Server.
2.5 Installing Retain Client software
Retain Client installation overview
Once Retain Server has been installed and you have confirmed that it can connect to the database, you canstart installing the client software. It is advisable to set up all the necessary client software on the servermachine or a test machine before distributing to users.
If you have not already installed the client software while installing the Server, run RetainCorporate5Setup.exeand follow the on-screen instructions.
After installing the client software on the test machine, you should:
1. Configure Servers.ini and ClntCnfg.ini. See the Configuring Retain Client section for more information.
2. Run RetainSecurity.exe to set up user names and access rights. See the Initial set-up after installationsection as well as Retain Security Manager User Guide for more information.
3. Run Retain Wallchart and confirm that you can connect to Retain Server. Create a new Retain Notebookthat displays the data from the database. See Retain Wallchart User Guide for more information.
4. Distribute the client software to other client machines. See the Distributing to users chapter formore information.

Installing Retain
25
Client machine requirements
We recommend the following specification for your client machines:
Intel Pentium III-Class processor, 450 MHz or better Microsoft Windows 2000, XP Professional, Vista At least 256 MB of RAM
50 MB free hard disk space XGA (1,024 x 768) or higher resolution monitor Mouse or other Windows pointing device TCP/IP network protocol (Bequeath should not be used)
For Windows 95 machines it may be necessary to run 50comupd.exe which is a Microsoft update for thecommon controls. It resolves bugs relating to the date time picking control and those that can causeapplication errors.
Retain Wallchart has been developed to provide good performance in a high latency environment. Althoughlatencies of less than 50 milliseconds (ms) is desirable, latencies of less than 400 ms would not impact onperformance so as to make the client applications unusable. You would however see a slowdown whenprocessing a large amount of data. In a high latency environment, we would suggest changing the thresholdat which packets are compressed.
Network bandwidth usage is low. Typical rates for a database with 100 resources, 500 jobs and 16000bookings:
User connection to Retain Server (and database) peaks at 12KB
Navigating the Wallchart 2KB
Updating all resource records 4KB
Running a booking level report 16KB
To update personal calendars using Retain Calendar Link or send e-mails (with schedules attached) usingRetain Notifier, users would require Microsoft Outlook or Lotus Notes.
Note: If Lotus Notes is being used as the email software, the application folder which contains 'nnotes.dll'must be in the path. Otherwise, Booking Requests and the email notification applications will not run (youwould get an error indicating that 'vim32.dll' or 'nnotes.dll' cannot be loaded).
Configuring Retain Client
Retain Client configuration overview
All client software will normally be installed into the same application directory. All applications share commonconfiguration files which also sit in the application directory.
The configuration files for the client applications are:
Servers.ini Defines the location of Retain Servers.ClntCnfg.ini Defines general client settings.Retaine.ini Defines application specific settings.bkgDialog.ini Defines the 'Booking' dialog settings.

Installing Retain
2626
FieldMapping.ini Configuration file used for upgrading. Should not be changed without consulting yourRetain service provider.
RetainSecurity.tdf Retain Security Manager configuration file.VCLTranslations.sil Retain Wallchart data file. Should not be changed without consulting your Retain service
provider.
These will normally be configured on a test machine initially and then subsequently distributed to all clientmachines as part of the standard configuration.
Retain notebooks and report files may also be distributed as part of the standard installation. Alternatively,they can be stored in a shared directory on the file server.
Servers.ini
This configuration file resides on the client machines. It contains information required by the Retain client toconnect to one or more Retain Servers. The syntax for this file is as follows:
[SERVER_ALIAS]London=ServerParis=Server
This section contains the list of servers that will be visible in the drop down list when users connect to thedatabase through any Retain client application.
For each server listed above, the connection information is provided. Each entry can have several serverslinked to it:
[London_1] ;Main server Server1 = 10.20.30.8:8880
[London_2] ;Backup server Server1 = 10.44.236.184:8760
[Paris_1] ;Multiple servers selected at random to spread the load Server1 = 54.263.156.98:8880 Server2 = 10.144.36.14:8960 Server3 = 246.23.164.87:8900
Each group requires a minimum of one server and one port number. There are two different ways of definingmultiple alternative servers for a particular site.
In the example above, the London site has a main server and a backup server that should be used in theorder displayed. The order is defined by numbering the groups using the above syntax. In other words,10.20.30.8:8880 will always be tried first but if it fails, the client will try 10.44.236.184:8760 next.
If more than one server is specified on a given number for a given site, Retain will randomly select one of theservers to connect to and if unsuccessful, try the subsequent ones. This random selection balances the load ifthere are multiple Windows NT servers pointing to the same database.

Installing Retain
27
ClntCnfg.ini
This configuration file resides on the client machines.
[CACHE]
TABLENAME=CACHE SIZE (number of records)The cache settings are normally not used (the cache is unlimited), although might be set for the BKG tableonly.
[CONNECT]
ProgressBarWhen set to 1, Retain shows a progress bar while it is connecting.
[SECURITY]
CONFIRMCHANGESIf set to 1, the user will be asked if he/she wants to save the changes made using Retain Security. If set to 0,the changes will be saved automatically. The default value is 0.
[log]
writelogIf set to 2, provides useful debugging information when Retain is not working or is running particularly slowly.
[ScenarioManager]
AlwaysShowFilterArrowWhen set to 1, the filter arrow next to column names in the Scenario Manager is always shown. When set to0, the filter arrow is shown only when you move the cursor over the column name.
ShowBkgFilteringWhen set to 1, the filtering for scenario bookings in the Scenario Manager is enabled.
BookingsViewSyncModeWhen set to 1, the same filtering and settings are shown for all of the scenario bookings within the ScenarioManager. When set to 0, each set of scenario bookings has a separate filtering and settings.
UnselectAllAtStartWhen set to 1, all the scenarios in the Scenario Manager are deselected by default.
ShowCustomFilteringWhen set to 1, shows the custom filters in the Scenario Manager. The default value is 1.
[DropDown]
VisibleCompareMechanismsThis setting defines which linked field operators are enabled. The default value is 'Like,LikeCaseSensitive'.
To enable multiple operators, separate them by a comma. The possible values are:
- Like
- LikeCaseSensitive

Installing Retain
2828
- Equals
- NotEquals
- GreaterThan
- LessThan
- GreaterEquals
- LessEquals
[Wallchart]
DisableDefaultNotebookWhen set to 1, disables the Default notebook feature within Wallchart. The default value is 0, that is the 'SaveAs Default Notebook' option is enabled.
[SUPPORT]
[email protected] setting allows you to specify an e-mail address that will be used by Retain Error Submitter to send theerror logs.
Retaine.ini
Retaine.ini file defines the various settings for Retain applications.
If it does not exist, gets created automatically within the same folder as your Retain executables.
[Attributes]
Main=AchievedThe value of this setting should match the name of the attribute level used within the deployment (see theATB table). The default value is 'Achieved' which corresponds to 'Achieved/Wanted' attribute levels. You canalso use the 'User' value which corresponds to 'User/Goal' levels.
The following Retain Wallchart settings require manual set-up
[Overallocation] DoTest=1 Threshold=100This setting enables the over-allocation test. A warning will be displayed when moving or resizing a booking insuch a way that the total loading increases above the specified threshold. In this example, a warning will bedisplayed if loading equals to more than 100%. Note that when making a new booking, this threshold will notbe applied.
[Language]
Codepage=1If set to 1, the font scripts are used according to your regional settings.
[Security_Maintables]
This section allows you to define the tables which will be grouped as 'Main' within Retain Security Manager.

Installing Retain
29
The syntax is: [table name]=1. For example:
RES=1JOB=1BKG=1CMP=1JAS=1
To display these tables in the 'Main' group in Security Manager, right-click on the Tables node and select'Group by-> Common Tables'.
[SecurityOutline]
This section of the file defines settings for Retain Security.
[Wallchart]
This section defines general Wallchart settings.
OldStyleHistoryControlIf set to 1, this setting allows the user to see all the history values when not in edit mode. When set to 0,presents the user with only the current value when not in edit mode.
BypassDialogConCheckIf set to 1, bypasses the connection check done by the 'Edit/View Record' dialog when the user clicks on 'OK'.
Wallchart report settings
You can use the special features of fields to control how numeric fields are totalled in Retain Wallchartreporting.
By default, Retain will sum all numeric fields:
[RETAIN TABLENAME (e.g. Booking, Resource, Job, Assignment or Client)] FIELDNAME_Special=Value
The possible values are:
256 - Do not total512 - Average total
For example:
To not total booking IDs:[Booking]BKG_ID_Special=256
To show average IQ values:[Resource]RES_IQ_Special=512
View selections
You can enter view selections which will restrict the view of the data seen by the user. Care should be takenwhen setting up these selections. They also affect the booking request interface, and will restrict the bookingrequests displayed in the admin queue to those containing resources in the view selection.
The booking request interface can have its own specific views set up which override the default view

Installing Retain
3030
selections.
For example:
Booking Request view selection overrides the main view selection, if present:[Resource]ViewSelection=RES_OFFICE='Local'BRViewSelection=RES_SECURITY='A'DDViewSelection=RES_SECURITY='A' or RES_SECURITY='B'
Limits view to jobs table:[Job]ViewSelection=JOB_COUNTRY='UK'BRViewSelection=JOB_SECURITY='A'
[Booking]ViewSelection=BKG_BTY_ID=1
ViewSelection relates to the selection used by Retain and Booking Requests.
This can be overwritten by 2 additional items:
BRViewSelection relates to the items available in Booking Requests.
DDViewSelection relates to the drop down lists in Retain Wallchart. This is particularly relevant to the'Booking' dialog, where you may want to book against a job which has yet to appear elsewhere in Retain. Youmay need to set the condition to 1=1 if you want the drop downs to list all items, where the ViewSelection isset to be more restrictive.
[BookingRequests] resDDCalc=DGAvalTme resDDCalcTitle=Avail Selection
This setting allows you to add additional Booking Request search fields. In this case, an additional columnwhich allows you to search by availability when adding resources to a job based request will be added.
Note that the additional column only appears when a date range is defined.
Table Alias
Under the section for the relevant table, e.g [Resource], put
tablename=individual
This will alias the RES table to be displayed as 'individual' (rather than the default 'resource') within RetainWallchart.
bkgDialog.ini
Using the bkgDialog.ini you can configure the 'Booking' dialog. You can:
add/remove tabs;
reorganise and add/remove fields;
define controls for fields (e.g. checkboxes, drop down lists, etc.);
rename field aliases and much more.

Installing Retain
31
bkgDialog.ini can be found in the same folder as your Retain Wallchart executable. This file has to be presentin order to see and use the 'Booking' dialog (a warning message will appear if a bkgDialog.ini is missing onstart-up).
[General]
DefaultWidth=440DefaultHeight=400
These settings define the default size of the 'Booking' dialog when it is opened for the first time. The width andheight is defined in pixels. If these settings are not applied, the dimensions of the dialog will be 800x600pixels.
NTABS=2This setting determines the number of tabs in the 'Booking' dialog. In this case, two tabs will be present.
SwitchWidth=400This setting reorganises the layout of the 'Booking' dialog when the dialog is reduced to to a certain width (inthis case 400 pixels). If the user reduces the width below this threshold, the labels will appear above theirrespective components rather than to their left. This is especially useful when the dialog is 'docked'.
MinWidth=700This setting defines the minimal width of the 'Booking' dialog. In this case, the minimum width of the dialog willbe restricted to 700 pixels. However, if you 'dock' the 'Booking' dialog and then remove it from the dockablepane, you will be able to resize the dialog beyond this threshold.
MinHeight=500This setting defines the minimal height of the 'Booking' dialog. In this case, the minimum height of the dialogwill be restricted to 500 pixels. However, if you 'dock' the 'Booking' dialog and then remove it from thedockable pane, you will be able to resize the dialog beyond this threshold.
UseColorScheme=1If set to 1, this setting will colour the background of each value in the relative drop down list depending on thecurrently selected colour scheme. For example, if the current colour scheme is based on booking type andyou have a 'Booking Type' field in the 'Booking' dialog, the backgrounds for the values of that field will becoloured accordingly. The default value is 1 (the setting is applied).
AskRefreshRepository=0This setting defines whether a confirmation dialog appears or not when you edit a booking graphically. If set to0 or the setting does not exist in the bkgDialog.ini, the dialog is not shown. If the value is set to 1, theconfirmation dialog will be displayed.
UseOldBkgDialog=1If set to 1, allows you to revert to the old style 'Booking' dialog.
AlwaysOpenUndocked=0If set to 1, the 'Booking' dialog will always be opened undocked, regardless of whether it was docked or notbefore closing.
UseSeparateCloseBtn=0If set to 1, adds an additional 'Close' button to the 'Booking' dialog.
FeedbackMinHeight=120This setting defines the minimal size of the feedback window in the 'Booking' dialog.
[Tab1]
You can have a number of tabs within the 'Booking' dialog (see the NTABS setting above). The settings foreach tab should be defined within the appropriate sections: the settings for the first tab should be within[Tab1] section, the second under [Tab2] section and so on.

Installing Retain
3232
Name=MainThis setting defines the name of the tab as it will be displayed within the 'Booking' dialog. In this case, the tabwill be called 'Main'.
HelpId=301This setting points to the relevant section within the user help file and should not be changed.
NFields=6This setting defines the number of fields within the tab (in this case six).
NCols=1This setting defines the number of columns within the tab (in this case one).
NRows=7This setting defines the number of rows within the tab (in this case seven).
Row1Resizable=1If set to 1, this setting makes that row (in this case row 1) resizable, allowing you to expand and contract it.Normally, this functionality will be disabled (value set to 0) for most rows.
Column1Resizable=1If set to 1, this setting makes that column (in this case column 1) resizable, allowing you to expand andcontract it. Normally, this functionality will be disabled (value set to 0) for most columns.
MarginSize=5This setting defines the size of the margin between the rows and columns within the tab. In this case, it will be5 pixels.
CaptionColHeight=30This setting defines the height of the caption for the field label. In this case, it will be 30 pixels.
CaptionColSize=80This setting defines the width of the caption for the field label. In this case, it will be 80 pixels.
Row1SizeType=ssPercentRow1SizeValue=15
These two settings define the size of the row when the dialog is resized. You need to define both the size typeand value.If the row size type is set to 'ssPercent', the size of the row will be calculated as a percentage. In this example,the size of the row will remain 15% when the 'Booking' dialog is resized. You can also set the row size type to'ssAbsolute' if you wish the size of the row to be calculated in pixels and remain of fixed size when the dialogis resized.
Note that the first row within the tab is called 'Row1', the second 'Row2' and so on.
Field Properties
For each field within the tab (Field1, Field2, etc.), define the following settings:
Field1=BKG_RES_IDThis setting defines the field which the control will represent and allow to change. In this case, the first fieldwithin the tab will be based on the BKG_RES_ID.
Note: If the user does not have appropriate security rights to view a certain field (E.g. BKG_JAS_ID), that fieldwill not be visible to them in the ‘Booking’ dialog, regardless of this setting.
Field1NRows=1The number of rows within the cell you are working in. In this case, the first field will have one row.
Field1NCols=1

Installing Retain
33
The number of columns within the cell you are working in. In this case, the first field will have one column.
Field1Row1SizeType=ssPercentField1Row1SizeValue=100
These two settings define the width of the field with regards to the size of a row. You need to define both thesize type and value.If the row size type is set to 'ssPercent', the width of the field will be calculated as a percentage. In this case,the first field will take up 100% of the first row's width. You can also set the row size type to 'ssAbsolute' if youwish the width of the field to be calculated in pixels instead.
Field1Col1SizeType=ssPercentField1Col1SizeValue=100
These two settings define the height of the field with regards to the size of a column. You need to define boththe size type and value.If the column size type is set to 'ssPercent', the height of the field will be calculated as a percentage. In thiscase, the first field will take up 100% of the first row's height. You can also set the column size type to'ssAbsolute' if you wish the height of the field to be calculated in pixels instead.
Field1LabelLayout=tlTopThis setting defines the position of the field label. The possible values are: 'tlCenter' (places the label at thecenter of the field); 'tlTop' (the top of the field); 'tlBottom' (the bottom of the field). Note: This setting can onlyhave one value.
Field1HideLabel=0This setting defines the visibility of the field label within the 'Booking' dialog. If set to 0, the label is shown andif set to 1, the label is hidden.
Field1Border=Left,Right,Top,BottomThis setting allows you to add a border to the field. You can define the position of the border with these fourvalues: 'Left', 'Right', 'Top' and 'Bottom'. Use all four values to visually frame the field.
Field1MinSize=100,20This setting allows you to define the minimum size of each field. The first value is the width and the second isthe height in pixels.
Field Control Types
Field1Control1=This setting defines which type of control will be displayed to the user for that field.
The possible values are:
- CheckboxAdds a checkbox for the field.
- CustomRatesAdds the Revenue and Cost charge rates and ability to edit them.
- DateTimeAdds the following booking date and time controls: 'Start', 'End', 'Loading' and 'Time'.
- DropDownControlLists the database values for the field in a drop-down list. This control is used with linked fields.
- GridControlLists all the values for that field in a list display.
- TEXTAdds an editable text box for the field.
- BlankAdds a blank space instead of a control. Should normally be used with the Field1NControls setting only.

Installing Retain
3434
- FILELINKAdds a control that allows storing a file path to the database (but not the file itself). The file can be opened if
the file path is valid and you click on the button. Note: You will need to set the field's 'Link Type' to 'File'within Retain Security Manager.
- STANDARDDROPDOWNLists the default values for the field in a drop-down list. The default values need to be specified in RetainSecurity Manager.
- DATECONTROLAdds a date picker control for the field.
Field1Control1ListAll=1This setting is applied to fields with the DropDownControl only. If set to 1, it displays all the values for the fieldwhen the drop-down list is open. The setting should only be applied to fields with less than 5,000 values. Thedefault value is 0, i.e. the setting is not applied.
Field1Control1AddButton=1If set to 1, the 'Add' button which allows you to add a new entity (e.g. resource, job, component - dependingon the Field1 value) is added for the field. In this case, the first field will have an add button which will allowyou to create a new resource and then select it when making a booking. If you do not wish to have the 'Add'button for the field, set the value to 0.
Field1NControls=2 This setting allows you to define the number of controls for a field. You would normally only use this settingwith one of the controls having the Blank value:Field1Control1=Blank (and the other control being of any other type). If you define two controls but onlyspecify one of them, the TEXT value will be used for the undefined control.
Field Control Properties
Field1Control1Properties=This setting defines the properties of the controls for the field. A number of possible values can be assigned tothis setting.For example, Field1Control1Properties=MultiLines,HorizontalScrollBar,VerticalScrollBar will allow multiplelines as well as horizontal and vertical scroll bars for the second field. You can apply such values for a 'Notes'field, for instance.
Note: When using several values for the same field control you need to separate them with commas (',').
The possible values are:
- MultiLinesIf present, allows the field to span multiple text lines.
- HorizontalScrollBarIf present, adds a horizontal scroll bar for the field.
- VerticalScrollBarIf present, adds a vertical scroll bar for the field.
-ShowAmPmIf present, adds the 'Book Partial Day' menu but only if the ShowTimeActionMenu value is also present. Note:This menu appears only when the selected booking starts and ends on the same day.
- ShowSeparateDateTimeControlsIf present, adds two different controls for date and time. If not present, only one control is used.
-ShowAlwaysTimeThis value should be used only when the ShowSeparateDateTimeControls is not present.

Installing Retain
35
Allows the time to always be be displayed in the 'Start' and 'End' date controls. If this value is not used, thetime will be shown and editable only when the'Book partial day' checkbox is ticked.
- ShowNonWorkIf present, adds the 'Include non-working days' checkbox.
- ShowNonDiaryIf present, adds the 'Book partial day' checkbox.
- ShowTimeActionMenuIf present, adds the 'Move and Change' menu.
For the DateTime field controls you can define the alias for the fields using the following syntax:Alias|BKG_FIELD_NAME|NEW_ALIAS. For example:Field1Control1Properties=ShowNonWork,Alias|BKG_NON_WORK|Include~non-working~days. Note: Use ~to display a space between words within the alias.
- applyWallchartSelectionIf present, reflects the selection currently applied to Wallchart to resources and jobs. Only applicable to DropDownControl and GridControl types of control for the BKG_RES_ID and BKG_JOB_ID fields.
- IncSearchColorWhen using GridControl field controls, the matching text is highlighted as you type it in. This setting definesthe background colour of the highlighted text through the following syntax:IncSearchColor|#Red#|#Green#|#Blue# where #Red#, #Green# and #Blue# are replaced by the requiredvalues. For example, to set the background colour to yellow, use Red=255, Green=255, Blue=0:Field1Control1Properties=IncSearchColor|255|255|0.
- WordWrapIf present, enables word wrapping for the TEXT field controls. Note: the horizontal scroll bar is not shownwhen this value is used.
Attachments tab
To enable attachments functionality within the ‘Booking’ dialog, follow these steps:
1. Increase the tab number by one: [General] NTABS
For example, if you have two tabs in the ‘Booking’ dialog, change NTABS=2 to NTABS=3.
2. Change the [TabN] setting by replacing 'N' with the appropriate number, depending on the settingabove.
For example, if you have two tabs, change [TabN] to [Tab3].
3. Save the changes. If you have Wallchart running, you do not need to restart it, simply right-clickwithin the ‘Booking’ dialog and choose ‘Reset Dimensions’.

Installing Retain
3636
Initial set-up after installation
After installing the client software you can configure the initial settings using Retain Security Manager.
One of the most important uses of Retain Security Manager is to set up roles allowing various levels ofaccess to Retain functionalities and assign these roles to users so that they can access various Retainmodules such as Booking Requests, Enterprise Reports, etc.
1. Set up user security.
If you are opening Retain Security Manager for the first time, you should find a Default User underthe 'Users' section. The Default User allows you to access Retain Security Manager and RetainWallchart with limited rights (such as Read Only or Edit Own Line) when there are no other users setup. Once you have assigned a security role to a particular user (i.e. given them access rights forRetain Security Manager), you should un-assign the security role assigned to the Default User. Thisensures a minimum user access to the Security Manager module.
However, if you accidentally delete the user who has the access to Retain Security Manager, youcan always run it on the same machine as Retain Server.
Note: Although there is an option for passwords in User Details, it is not recommended that it beused since network names are already used for security purposes.
2. Configure Retain database settings:
Manage field properties
Define colour and shape schemes
Set up initial charge rates and charge periods
Define standard working diaries
Define standard grades
List various database servers that Retain Sever might be connecting to
Note: You can amend these settings later if needed but it is strongly recommended that these are set upbefore making any bookings. See the Retain Security Manager User Guide for more information.
Distributing to users
Distribution overview
There are two approaches to distributing Retain software:
You can copy Retain Enterprise installation files to your local machine then configure the setup files prior toinstalling into the desired network location and client machines.
Alternatively, you can setup a client on a test machine, perform the initial setup and confirm it operates asexpected then copy the required client software to client machines on the network. See the Distributingtested installation section for more information

Installing Retain
37
Distributing tested installation
All client machines should have TCP/IP enabled and should be able to 'Ping' the server machine, i.e. test thenetwork connection to the server machine.
For example, in the command prompt on a client machine type in 'ping server IP address <enter>' to test theconnection. Once it is confirmed that all the client machines can connect to Retain Server and clientapplications can run successfully on the test machine, you are ready to distribute the installation to users.
Since Retain Client software does not use any specific system dlls or registry settings, the directory structureof a successful installation can simply be copied to other machines. The possible approaches to do this aredescribed below.
Distribution by manual copying
1. Create a destination folder called Retain Enterprise on the client machine.
2. Selectively copy the required client files from the main installation directory on the server or testmachine to the destination folder on the client machines.
For example, for general users you should copy the following files:
RetainWallchart.exeRetainCLS.exerrpErr.exerigc.dllrrpExcel.dlls2email.dllServers.iniClntCnfg.iniRetaine.inibkgDialog.inirtlog.iniVCLTranslations.silRetain.chmSupport.chm
3. Copy the 'data' sub-folder that contains Retain Notebook (.RetainNotebook) files that you havecreated to the destination folder on the client machines. For Retain Enterprise Reports users youalso need to copy the 'ReportTemplates' folder.
Distribution by mini-install scripts
You could distribute the client files by creating a mini-install script as a batch file that users can run in order tocopy the relevant files to their local machines and modify the relevant server path.

Reference
3838
3 Reference
3.1 Technical specification
Retain product:
Product name & version number:Retain Wallchart Version 5.
What is its business function?To schedule resources against jobs using a graphical interface resembling to a manual Wallchart whichcan be used in conjunction with other modules, such as a Booking Requests module, to complete thevarious processes involved in requesting, approving, modifying and comparing changes to the resourceplan as well as reporting.
What language is it written in?Borland C++, Delphi
What database format and version number does it support?Oracle 8i, 9i and 10g as well as SQL Server 2005.
What engine?Native drivers are used on the server, depending on the database platform you require. Either the Oracleclient or a current version of ADO (2.8) for SQL Server.
ODBC drivers required?Retain Enterprise does not require any drivers on the client machines.
Does it make direct calls to the Network operating system and hence use any specific protocols?TCP/IP needs to be enabled to allow Retain Enterprise client software to communicate with RetainServer software.
What network operating systems and versions will it run on?We primarily support Windows 2000 and XP as the client platform, although the software will operatewith earlier versions. The Retain Server platform has to be Windows 2000 Server or Server 2003. Thedatabase server software can be run on any platform supported by the database software.
Files:
See the Retain components section for a list of installation setup files and the Files and folders section for atypical file structure created after the installation.
Installation:
What minimum system specification is required for the product?See the Installation overview section for details.
What bandwidth is required?On average, we would expect an active user to use bandwidth of about 1,600 bits/sec but a user wouldrequire a peak rate of 6,400 bits/sec to get reasonable performance when first opening a screen on alarge view. Users who have Retain open but are not actively using the system do not use up anybandwidth.
The activity of users, the size of the database and the density of bookings will all affect the bandwidthrequirements.
How can bandwidth be minimised?Users Enter Retain once during the day and leave open Avoid running reports involving utilisation and availability calculations more than necessary Use notebooks with pre-defined selections (both on resources and jobs)

Reference
39
Use refresh sparingly Keep defaults lists for fields to a reasonable level
Database server Unnecessary fields - hide through views or remove altogether
What user accounts are required?Although it is possible to setup many users against the database, for ease of implementation we typicallyset up one Retain user against each database with access rights to insert, delete and update all of theRetain tables. In more complex cases we set up a few users with access rights to different views of thedatabase.
What is the installation procedure?See the Installation overview section for details.
In event of product failure, how is the product reinstalled?Perform the installation again.
Are the product install files held on all servers?The install files can be held on any number of file servers.
Is it possible to 'Uninstall' the product using Add/Remove programs within the Control Panel?Yes.
Functionality:
How is the product launched?By double clicking on the Retain Wallchart icon and opening a new Retain notebook file or from 'Start'menu.
Does the product auto-backup user files? Does it create temporary files?No. The main data is held on the database server.
Installer information:
Is the vendor's technical support willing to be on site for half a day to review installer requirements?Yes.
Has the vendor used an industry recognised installer such as Install Shield or has their own?InstallAware is used.
How many annual updates are expected?1-2 maintenance releases are made available throughout the year, major releases occur less frequently.
Is client or other data shared on the same location or nationally and internationally?The data is stored in an Oracle/SQL Server database the location of which is determined by yourorganisation.
Do users expect to access their data from remote or other locations?Data should be accessible across Wide Area Networks. The performance down dial up lines will dependon the size of the database.
Documentation:
What other documents are provided to users?Retain Wallchart User Guide and Retain Security Manager User Guide.
Support:

Reference
4040
What Service Level Agreements are in place?A minimum of one year telephone support and software maintenance.
3.2 Appendix A
Customising the SQL Server database
After you have consulted with your Support Service Provider, you may follow the step-by-step instructionsbelow to customise a table in SQL Server:
1. Microsoft SQL Server should be installed and running as a service.
2. Run SQL Server Management Studio and locate the server where the database is running.
3. Expand 'Databases' to show all existing databases and expand the Retain database that you wishto edit.
4. Click on 'Tables' to show a list of all tables that make up your database.
5. Right-click the table you wish to edit and select 'Modify'.
6. Make the required changes to the table by either adding new fields or amending existing fields.E.g. by changing the column names, length or precision and then close the table.
7. Make the exact same changes to the corresponding _Log table, if there is one.
If you need to make changes by running a script (which may be provided by your Support Service Providerafter a consultation) you may do the following:
1. In SQL Server Management Studio, select the required database from the list.
2. Click on 'New Query'.
3. Copy and paste the script from the .sql file provided into the query window and run the script byclicking on the 'Execute' button in the tool bar.
4. Check that changes have been made by expanding 'Tables' section for that database.
Customising the Oracle database
The Oracle platform has a similar user interface to SQL Server Management Studio. However, somedatabase administrators may prefer to use the command line to connect to the database. The example belowis for using the Oracle user interface:
1. Run the Oracle Enterprise Manager Console.
2. Expand 'Databases' and click on the database server that your database resides.
3. You will be asked to provide Username and Password - normally the name of a database schemaon the server.
4. Once connected, expand 'Schema' to see the list of all the databases on the server connected.
5. Click on the database schema you want to edit and you should be able to see all the databaseobjects such as tables, views, index, triggers and functions on the right hand side.
6. Right-click on an object in the list and select 'View-> Edit Details...' to change the design, or'View-> Edit Contents...' to change the contents of an object.
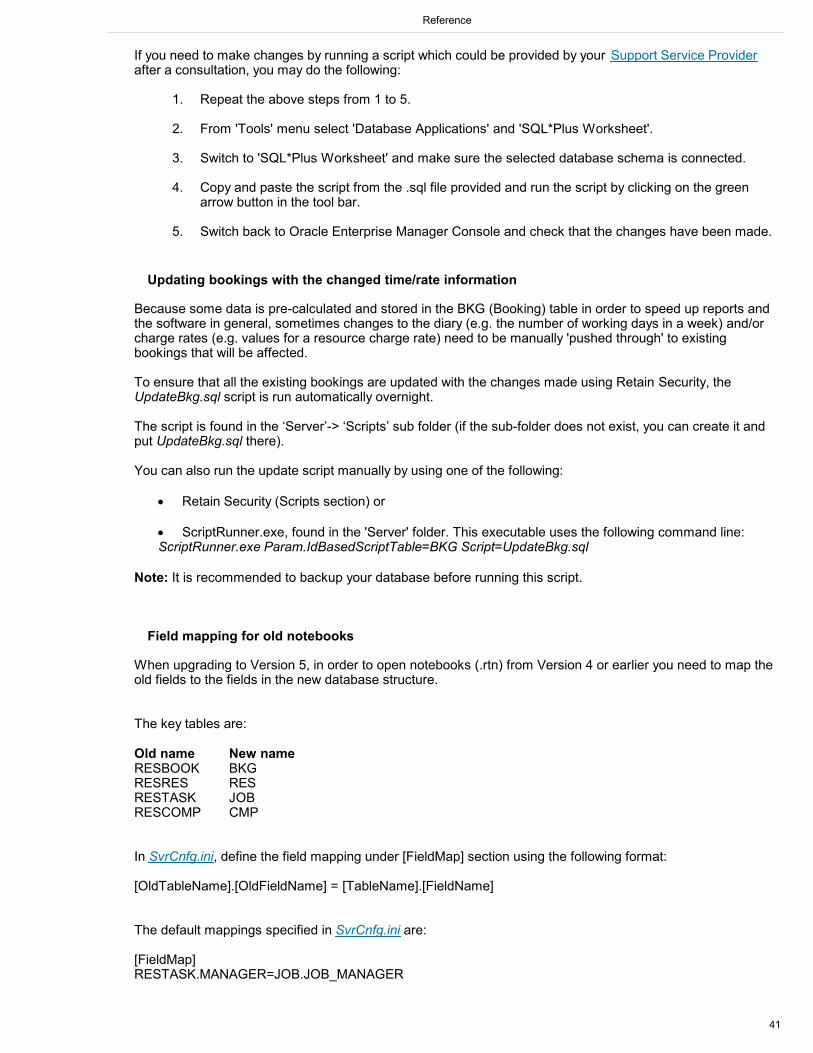
Reference
41
If you need to make changes by running a script which could be provided by your Support Service Providerafter a consultation, you may do the following:
1. Repeat the above steps from 1 to 5.
2. From 'Tools' menu select 'Database Applications' and 'SQL*Plus Worksheet'.
3. Switch to 'SQL*Plus Worksheet' and make sure the selected database schema is connected.
4. Copy and paste the script from the .sql file provided and run the script by clicking on the greenarrow button in the tool bar.
5. Switch back to Oracle Enterprise Manager Console and check that the changes have been made.
Updating bookings with the changed time/rate information
Because some data is pre-calculated and stored in the BKG (Booking) table in order to speed up reports andthe software in general, sometimes changes to the diary (e.g. the number of working days in a week) and/orcharge rates (e.g. values for a resource charge rate) need to be manually 'pushed through' to existingbookings that will be affected.
To ensure that all the existing bookings are updated with the changes made using Retain Security, theUpdateBkg.sql script is run automatically overnight.
The script is found in the ‘Server’-> ‘Scripts’ sub folder (if the sub-folder does not exist, you can create it andput UpdateBkg.sql there).
You can also run the update script manually by using one of the following:
Retain Security (Scripts section) or
ScriptRunner.exe, found in the 'Server' folder. This executable uses the following command line: ScriptRunner.exe Param.IdBasedScriptTable=BKG Script=UpdateBkg.sql
Note: It is recommended to backup your database before running this script.
Field mapping for old notebooks
When upgrading to Version 5, in order to open notebooks (.rtn) from Version 4 or earlier you need to map theold fields to the fields in the new database structure.
The key tables are:
Old name New nameRESBOOK BKGRESRES RESRESTASK JOBRESCOMP CMP
In SvrCnfg.ini, define the field mapping under [FieldMap] section using the following format:
[OldTableName].[OldFieldName] = [TableName].[FieldName]
The default mappings specified in SvrCnfg.ini are:
[FieldMap]RESTASK.MANAGER=JOB.JOB_MANAGER

Reference
4242
RESTASK.ID=JOB.JOB_IDRESTASK.NAME=JOB.JOB_DESCRRESTASK.PRIORITY=JOB.JOB_BKG_BTY_IDRESTASK.ANALYSIS=JOB.JOB_CRD_IDRESTASK.RECOVERY=JOB.JOB_RECOVERYRESTASK.STARTDATE=JOB.JOB_STARTRESTASK.ENDDATE=JOB.JOB_ENDRESTASK.UPDATED_ON=JOB.JOB_CHANGE_DATERESTASK.UPDATED_BY=JOB.JOB_UPDATED_BYRESTASK.RESTASK_CLOSED=JOB.JOB_RESTASK_CLOSEDRESTASK.COMP_LIST=JOB.JOB_COMP_LISTRESTASK.GROUPNAME=JOB.JOB_GROUPNAMERESTASK.JOBCODE=JOB.JOB_CODERESTASK.SUPERVISOR=JOB.JOB_SUPERVISORRESTASK.RECURRING_BIT=JOB.JOB_RECURRING_BITRESTASK.SECURITY=JOB.JOB_SECURITYRESTASK.TEXT1=JOB.JOB_TEXT1RESTASK.TEXT2=JOB.JOB_TEXT2RESTASK.TEXT3=JOB.JOB_TEXT3RESTASK.TEXT4=JOB.JOB_TEXT4RESTASK.TEXT5=JOB.JOB_TEXT5RESTASK.TEXT6=JOB.JOB_TEXT6RESTASK.TEXT7=JOB.JOB_TEXT7RESTASK.TEXT8=JOB.JOB_TEXT8RESTASK.TEXT9=JOB.JOB_TEXT9RESTASK.TEXT10=JOB.JOB_TEXT10RESTASK.NUMBER1=JOB.JOB_NUMBER1RESTASK.NUMBER2=JOB.JOB_NUMBER2RESTASK.NUMBER3=JOB.JOB_NUMBER3RESTASK.INTEGER1=JOB.JOB_INTEGER1RESTASK.INTEGER2=JOB.JOB_INTEGER2RESTASK.INTEGER3=JOB.JOB_INTEGER3RESTASK.DATE1=JOB.JOB_DATE1RESTASK.DATE2=JOB.JOB_DATE2RESTASK.DATE3=JOB.JOB_DATE3RESTASK.LOGIC1_BIT=JOB.JOB_LOGIC1_BITRESTASK.LOGIC2_BIT=JOB.JOB_LOGIC2_BITRESTASK.LOGIC3_BIT=JOB.JOB_LOGIC3_BITRESTASK.TASK_TYPE=JOB.JOB_TASK_TYPERESTASK.LOCATION=JOB.JOB_LOCATIONRESTASK.FOCUSES=JOB.JOB_FOCUSESRESTASK.SKILLS=JOB.JOB_SKILLSRESTASK.PARTNER=JOB.JOB_PARTNERRESTASK.CONTACT=JOB.JOB_CONTACTRESTASK.CATEGORY=JOB.JOB_CATEGORYRESTASK.FEE=JOB.JOB_FEERESTASK.BUDGETCOST=JOB.JOB_BUDGETCOSTRESTASK.BUDGETTIME=JOB.JOB_BUDGETTIMERESTASK.CLIENTGROUP=JOB.JOB_CLIENTGROUPRESTASK.PHONE=JOB.JOB_PHONERESTASK.YEAREND=JOB.JOB_YEARENDRESTASK.TASKTYPE=JOB.JOB_TASKTYPERESTASK.calcTaskPriority=JOB.JOB_BKG_BTY_IDcalculated.adjustedRevenue=JOB.AdJobRevDolrscalculated.jobTime=JOB.BookTmecalculated.jobDays=JOB.BookTmeDayscalculated.jobBookingCount=JOB.jobBookingCountcalculated.jobRevenue=JOB.RevDolrs
RESRES.ID=RES.RES_IDRESRES.GRADE=RES.CurrCRDDESCRRESRES.NAME=RES.RES_DESCRRESRES.STARTDATE=RES.ResStartDateRESRES.ENDDATE=RES.ResEndDate

Reference
43
RESRES.UPDATED_BY=RES.RES_UPDATED_BYRESRES.UPDATED_ON=RES.RES_CHANGE_DATERESRES.EMAIL=RES.RES_EMAILRESRES.GROUPNAME=RES.RES_GROUPNAMERESRES.OFFICE=RES.RES_OFFICERESRES.STAFFNO=RES.RES_STAFFNORESRES.GRADEDESCR=RES.RES_GRADEDESCRRESRES.GRADEORDER=RES.RES_GRADEORDERRESRES.SECURITY=RES.RES_SECURITYRESRES.TEXT1=RES.RES_TEXT1RESRES.TEXT2=RES.RES_TEXT2RESRES.TEXT3=RES.RES_TEXT3RESRES.TEXT4=RES.RES_TEXT4RESRES.TEXT5=RES.RES_TEXT5RESRES.NUMBER1=RES.RES_NUMBER1RESRES.NUMBER2=RES.RES_NUMBER2RESRES.NUMBER3=RES.RES_NUMBER3RESRES.DATE1=RES.RES_DATE1RESRES.DATE2=RES.RES_DATE2RESRES.DATE3=RES.RES_DATE3RESRES.LOGIC1_BIT=RES.RES_LOGIC1_BITRESRES.LOGIC2_BIT=RES.RES_LOGIC2_BITRESRES.LOGIC3_BIT=RES.RES_LOGIC3_BITRESRES.INTEGER1=RES.RES_INTEGER1RESRES.INTEGER2=RES.RES_INTEGER2RESRES.INTEGER3=RES.RES_INTEGER3RESRES.NOTESID=RES.RES_NOTESIDRESRES.WORKINGHOURS=RES.RES_WORKINGHOURSRESRES.SKILLS=RES.RES_SKILLSRESRES.FOCUSES=RES.RES_FOCUSESRESRES.LOCATION=RES.RES_LOCATIONRESRES.MOBILITY=RES.RES_MOBILITYRESRES.PARTNER=RES.RES_PARTNERRESRES.MANAGER=RES.RES_MANAGERcalculated.utilisation=RES.JobCUtilcalculated.availability=RES.DGAvailcalculated.utilised=RES.JobCUtilTmcalculated.available=RES.DGAvalTmecalculated.utilisableTime=RES.JobCUtilDenominatorcalculated.resourceDays=RES.BookDayscalculated.resourceTime=RES.BookTmecalculated.maxBooked=RES.maxBookedcalculated.standardTime=RES.DGDryTmecalculated.utilisedDays=RES.utilisedDayscalculated.availableDays=RES.availableDayscalculated.standardDays=RES.DiaryDayscalculated.resourceBookingCount=RES.resBookingCount
RESBOOK.ID=BKG.BKG_IDRESBOOK.RES_ID=BKG.BKG_RES_IDRESBOOK.TASK_ID=BKG.BKG_JOB_IDRESBOOK.STARTDATE=BKG.BKG_STARTRESBOOK.STARTTIME=BKG.BKG_STARTRESBOOK.ENDDATE=BKG.BKG_ENDRESBOOK.ENDTIME=BKG.BKG_ENDRESBOOK.TIME1=BKG.BKG_TIMERESBOOK.PRIORITY=BKG.BKG_PRIORITYRESBOOK.CHARGERATE=BKG.BKG_RATE1RESBOOK.NOTES=BKG.BKG_NOTESRESBOOK.ACTUALTIME=BKG.BKG_NUMBER2RESBOOK.PLANNEDTME=BKG.BKG_TIMERESBOOK.RESGRADE=BKG.BKG_GRADERESBOOK.CHARGETYPE=BKG.BKG_CODERESBOOK.UPDATED_BY=BKG.BKG_UPDATED_BY
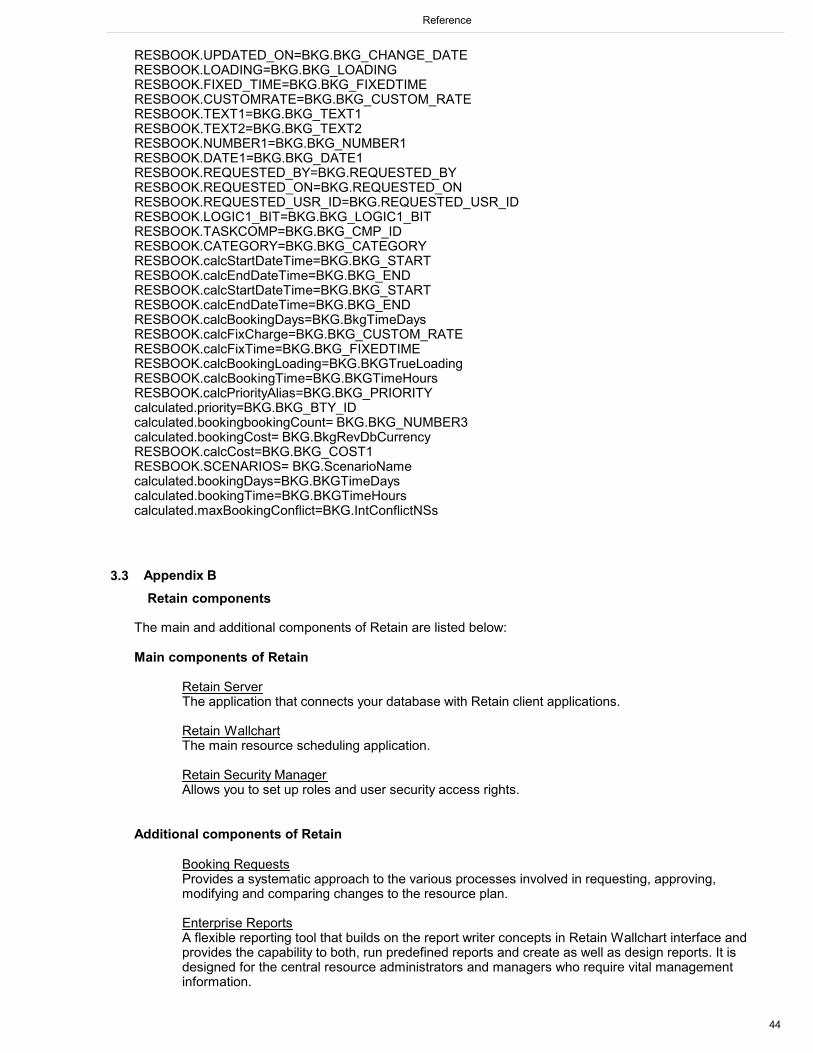
Reference
4444
RESBOOK.UPDATED_ON=BKG.BKG_CHANGE_DATERESBOOK.LOADING=BKG.BKG_LOADINGRESBOOK.FIXED_TIME=BKG.BKG_FIXEDTIMERESBOOK.CUSTOMRATE=BKG.BKG_CUSTOM_RATERESBOOK.TEXT1=BKG.BKG_TEXT1RESBOOK.TEXT2=BKG.BKG_TEXT2RESBOOK.NUMBER1=BKG.BKG_NUMBER1RESBOOK.DATE1=BKG.BKG_DATE1RESBOOK.REQUESTED_BY=BKG.REQUESTED_BYRESBOOK.REQUESTED_ON=BKG.REQUESTED_ONRESBOOK.REQUESTED_USR_ID=BKG.REQUESTED_USR_IDRESBOOK.LOGIC1_BIT=BKG.BKG_LOGIC1_BITRESBOOK.TASKCOMP=BKG.BKG_CMP_IDRESBOOK.CATEGORY=BKG.BKG_CATEGORYRESBOOK.calcStartDateTime=BKG.BKG_STARTRESBOOK.calcEndDateTime=BKG.BKG_ENDRESBOOK.calcStartDateTime=BKG.BKG_STARTRESBOOK.calcEndDateTime=BKG.BKG_ENDRESBOOK.calcBookingDays=BKG.BkgTimeDaysRESBOOK.calcFixCharge=BKG.BKG_CUSTOM_RATERESBOOK.calcFixTime=BKG.BKG_FIXEDTIMERESBOOK.calcBookingLoading=BKG.BKGTrueLoadingRESBOOK.calcBookingTime=BKG.BKGTimeHoursRESBOOK.calcPriorityAlias=BKG.BKG_PRIORITYcalculated.priority=BKG.BKG_BTY_IDcalculated.bookingbookingCount= BKG.BKG_NUMBER3calculated.bookingCost= BKG.BkgRevDbCurrencyRESBOOK.calcCost=BKG.BKG_COST1RESBOOK.SCENARIOS= BKG.ScenarioNamecalculated.bookingDays=BKG.BKGTimeDayscalculated.bookingTime=BKG.BKGTimeHourscalculated.maxBookingConflict=BKG.IntConflictNSs
3.3 Appendix B
Retain components
The main and additional components of Retain are listed below:
Main components of Retain
Retain ServerThe application that connects your database with Retain client applications.
Retain WallchartThe main resource scheduling application.
Retain Security ManagerAllows you to set up roles and user security access rights.
Additional components of Retain
Booking RequestsProvides a systematic approach to the various processes involved in requesting, approving,modifying and comparing changes to the resource plan.
Enterprise ReportsA flexible reporting tool that builds on the report writer concepts in Retain Wallchart interface andprovides the capability to both, run predefined reports and create as well as design reports. It isdesigned for the central resource administrators and managers who require vital managementinformation.

Reference
45
Retain NotifyA utility that can be run periodically to send information about booking request changes both to theresources involved and to the requester. The notifications are generated from the audit trail of allbooking requests and booking amendments.
Retain Calendar LinkUpdate Outlook or Lotus Notes calendars with bookings made in Retain Wallchart.
Retain ImporterTransfers or updates data from an external source into a Retain Enterprise database. This allowsRetain to be kept up-to-date from other systems without re-keying. The source data can be a Dbaseformat file or a BDE alias which allows for data to be extracted directly from an Oracle or SQL Serverdatabase.
Retain TimeDesigned to integrate with Retain Wallchart for sharing its database of jobs and resources and usingbookings to plan time sheets.
Retain SkillsDesigned to integrate with Retain Wallchart to allow detailed selection and maintenance ofresources' skills.
3.4 Appendix C
Details of installed files
Essential Retain Client files
All client software will normally be installed into the main installation directory and share commonconfiguration files. For details of a typical install see the Files and folders section.
The essential files required by Retain clients are:
Main application files:
RetainWallchart.exe - Retain Enterprise executable. RetainCLS.exe - The splash screen for Retain Wallchart. rrpErr.exe - Retain Error Submitter, is be run automatically in the unlikely event of Retain
crashing. rigc.dll - Memory management module for Retain software. rrpExcel.dll - Functions for exporting reports to Microsoft Excel. s2email.dll - Functions for sending e-mails with errors. VCLTranslations.sil - Language specific file for menus and dialogs. Retain.chm - Retain Wallchart user guide. Support.chm - Support information.
Retain Security Manager files:
RetainSecurity.exe - Retain Security Manager executable. RetainSecurity.tdf - Retain Security Manager layout settings.
Configuration files:
Servers.ini - Contains Retain Server connection information. ClntCnfg.ini - Contains main client configurations. Retaine.ini - Contains module specific settings. bkgDialog.ini - Contains booking dialog properties. rtlog.ini - Contains Delphi configurations.

Reference
4646
If Retain Booking Requests, Enterprise Reports, Importer or Notifier is installed, you need to use RetainSecurity Manager to edit the functional access for the users who will use these modules. See the Initial set-upafter installation section for more information.
After the initial set-up, these modules can be distributed to the users who need them. See the Distributinginstallation to users section for more information.
Essential Retain Server files
The installation creates a 'Server' sub-folder under the main installation directory.
These are the essential files required by Retain Server:
The main application files:
RetainServer.exe - Retain Server Manager application. RetainServersService.exe - This application may be run as a service and will manage one or more
Retain Servers. RetainServersService.ini - Retain Service configuration file. RSManager.exe - Retain Server remote managing tool. RSServices.ini - Remote server configuration file. LicenceManager.exe - Licence administration tool. LicenceManager.chm - Licence Manager user guide. rigc.dll - Memory management module for Retain applications.
Configuration tools and files:
ServerCnfg.exe - Configure Retain Server using this tool. SvrCnfg.ini - Retain Server database connection configuration file. Servers.ini - Defines location of Retain Servers.
Additional files:
CalcFieldFiles (folder) - Contains definitions for the calculated fields.
For a list of all the installed sub-folders and files see the Files and folders section.
Files and folders
A typical file structure created after the first setup on a test machine should look like the one below. Thisshows a basic install which includes the most essential components.
Root folder Sub folder Folder or file Description
[RetainCorporateV5]
[Data] Contains notebook files (.RetainNotebook) and Retainreports (.rvs) created by the users
[Documentation] Contains the relevant help documents in the PDF format
[Server] Files and folders related to Retain Server
RetainServer.exe Retain Server executable
ServerCnfg.exe Retain Server configuration tool
LicenceManager.exe Licence managing tool
RSManager.exe Retain Server remote managing tool

Reference
47
RetainServersService.exe Retain service configuration tool
rigc.dll Memory management module for Retain
LicenceManager.chm LicenceManager help file
Retaine.ini Application specific configuration file
RetainServersService.ini Retain service configuration file
SvrCnfg.ini Information required by Retain client to connect to RetainServer(s)
[Licence] Retain licensing information
[DatabaseScripts] Oracle and SQL Server database scripts
ADOConnectionString.exe Tool for producing connection string to Microsoft SQL Serverdatabase
[CalcFieldFiles] Contains calculated fields used by Retain
InstallService.bat Install Retain Server serviceStartService.bat Start Retain Server serviceStopService.bat Stop Retain Server serviceUninstallService.bat Uninstall Retain Server service
RetainCLS.exe The splash screen for Retain Wallchart
RetainWallchart.exe Retain Wallchart executablerrpErr.exe Retain Error Submitter. It is run automatically in the unlikely
event of Retain crashing
Retaine.ini Application specific configuration fileInstall.ini Installation configuration file (generated during installation)Servers.ini Retain Server connection configuration fileClntCnfg.ini Main client application configuration filebkgDialog.ini Settings for the 'Booking' dialog within Wallchart
RetainSecurity.exe Retain Security Manager executableRetainSecurity.tdf Retain Security Manager settings
VCLTranslations.sil Translations of strings used in the 'Booking' and 'ScenarioManager' dialogs
WhoAmI.exe Displays Retain user informationretain.chm Retain Wallchart help fileSupport.chm Support service provider informationRetainSecurity.chm Retain Security Manager help file
Calculated Fields Reference
Introduction
Retain uses calculated fields to pre-calculate values that are used in different areas of the application.Calculated fields provide additional derived information to the user and are used by the software internally todetermine certain values. Another advantage of using calculated fields is speeding up calculations thusenhancing performance.
When Retain Server is fired up, it registers, calculates and stores a number of calculated fields that are usedmultiple times in Retain Web processes. This allows the server to calculate the fields once and reuse themafterwards, avoiding redundancy. Calculated fields are specified in the text files with a .cff (calculated field file) extension. By default, all thecalculated field files are in the 'CalcField' folder in the root folder of Retain installation (this might varydepending on the installation). Retain Servers are configured from SvrConfg.ini initialisation file to use specificset of calculated field files. You can use the relative or absolute path to point to calculated field files folder.
You can customise existing/create new calculated fields according to your requirements with RetainInternational's supervision and consent only. Furthermore, the standard set of calculated fields should beenough to work with and adding or changing the standard set of files should be avoided.
A calculated field file can contain:

Reference
4848
Calculated/Function field Calculated Table Calculated View Macros
Calculated tables and views act like database tables and views although they are created dynamically anddestroyed when Retain Server is shutdown.
Customisation
You can customise certain areas of Retain using calculated fields but only with Retain International’ssupervision and consent.
For example, you can add custom fields to appear in reports if you are using Retain Enterprise Reports.Another area is configuring security, for instance how the values will appear in the drop-down lists for aspecific user. Possible areas which you might consider customising are:
Company Constants Security
Rules for Designing Calculated Fields
General Instructions
This sections is intended for users who want to create calculated fields. You should have a basic knowledgeof SQL and general principles of programming. A good knowledge of underlying database structure can bevery useful and helps in writing and understanding calculated fields.
Comments
A comment is the text that will be ignored while processing calculations in calculated field files. You can usecomments when writing calculated fields. Writing comments is always recommended as they are helpful forfuture reference. You can use the following comment styles:
Bracketed Comments: Introduced by /* and ended with */ bracketed comments can span overmultiple lines. Curly Brackets: Introduced by { and ended with } these comments can also span over multiple
lines. Semi Colon: Comments that are introduced by semi colon and can only appear at the beginning of
the line. They are used for commenting on a single line. Double Forward Slash: Comments that are introduced by // and can only appear at the beginning of
the line. They are also used for commenting on a single line.
Naming Conventions
The following rules should be followed when naming is constructed (Function fields, Functions, Macros, etc.): Field names should be self explanatory and should reflect the intention of the field. Do not use special characters. Do not use spaces. Name the fields using the first letter of a word in upper case.
Available Structures/Objects
The following structures/objects can be specified when creating calculated fields:
Tables Function Fields

Reference
49
Views Macros
Structure of the File
There are no strict rules for the structure of a calculated field file. Ideally, it should be similar to the following:
General information about the file List of USE Statements List of Macros List of tables and its Function fields
Tables and Function Fields
Function fields will be based on database tables. To write function fields for a database table, follow thissyntax:
Table = <Table name>{ FunctionField {
FieldName = <Field name>FieldDescription = <Field description>Calc = <Calculation formula>From = <From clause to pull values from a table>BaseField = <Base field>Link = <Link>Condition = <One or more conditions to filter the data>NullValue = <Value if result is Null>FieldType = <Type of the field>Category = <Category the field belongs to>
}}
Table Name: The name of the table that the calculated field will be based on. Field Name: The calculated field name. Field Description: The description of the field. This should provide a clear indication of the
purpose of the calculated field and its usage. Calc: The calculation formula that will be used to calculate the result. From: This is similar to the SQL From clause and specifies the names of tables that the field
should pull the data from. We can also use this to alias the table names. BaseField: The value that a calculated field will be based on. Link: Link specifies the potential link between two fields. NullValue: The value in case the result is null. FieldType: The field type of the result, e.g.: integer, string, etc. Category: The name of the category that the field belongs to. You can categorise calculated fields
as necessary by entering any value, e.g.: 'Main calculated fields'. The categories will be displayed inan alphabetical order in the table tree for interactive reports, allowing you to show the most usedcalculated fields first, for example.
You can specify as many fields as you like for a table. Fields should be nested inside the body of a table, i.e.within the curly brackets.
Views
Views defined in calculated fields are similar to views in the database. They are used to represent data frommultiple tables.

Reference
5050
Macros
Macros are essentially SQL statements that are grouped together to compute specific data. This is similar tofunctions in some programming languages. Macros can be called multiple times and you can also passarguments to macros.
Conditional Logic
Calculated fields support specification of conditional logic statements. Specify Boolean conditions using thefollowing syntax:
? <condition(1)>action if condition true
|? <condition(2)>action if condition true
|? <condition(n)>action if condition true
/?
Available Functions
The predefined functions, which can be used while creating calculated fields, are:
REPL: Replace the string with specified value. DB_CODE: Sspecify the target database.
Adding Calculated Fields
It is possible to add calculated fields but this is not advisable or supported. Moreover, no utilities exist thatwould aid the creation of fields. However, if you have decided to make changes, the following guidelinesshould be observed:
1. Back up the existing files before making any changes.2. Create new calculated fields wherever possible and do not delete/amend the existing ones.3. Add fields to the end of the file. A table can exist in more than one group, thus there is no need to squeezethe calculated field at the top of the file.4. Clearly mark the changes you have made, so that if the altered file is supplied by Retain, your changescould be easily fitted into the modified file.5. Read through the existing set of calculated fields.6. Calculated fields can refer to other fields or calculated fields against a table and currently no mechanismexists for referring to fields from another table.7. Do not make calculated fields that may directly or indirectly refer back to themselves.8. Work on a file using a test server.
Constants
Constants defined in Retain yield the same value throughout the Retain Web process.
Constants that need to be configured when Retain is installed for the first time are the following:
Company Name Skill attributes Any Company Constants

Reference
51
CalcFields.cff
CalcFields.cff specifies the files included in the calculation. By default, a number of files are provided forRetain server to be able to run. Calculated files can be included using the USE keyword.
If you want to included a file, apply the USE keyword followed by the equal sign and the file name. Forexample, if you want to include a file called ABC.cff, type in:
USE=ABC.cff
Note that the file should be in the same folder and that the specification of absolute or relative paths is notsupported.
DefineCompany.cff
To customise Retain according to a specific installation, some of the constants that will be used throughoutRetain have to be defined.
DefineCompany.cff file specifies the name of the company for which Retain is implemented. This name will beused in other calculated field files.
By default, the define company file looks like this:
REPL(COMPANY) = NOCOMPANY
Replace NOCOMPANY with the name of your company and save the file. After changing your company nameyou need to rename the NOCOMPANYConsts.cff file to the company name you have specified in theDefineCompany.cff file. For example, if the name of your company is ABC, set the following values:
DefineCompany.cff
REPL(COMPANY) = ABC
NOCOMPANYConsts.cff
Rename the file to ABCConsts.cff
Note that only the 'NOCOMPANY' string is changed and Consts.cff remains the same.
CompanyConsts.cff
Company constants are defined in the CompanyConts.cff file. By default, the file looks like this:
CompanyConsts.cff
REPL(RESUMEID) = 1REPL(SKILLSDOCID) = 1003REPL(BOOKINGHISTORYDOCID) = 1000REPL(RESOURCEDATADOCID) = 1001REPL(RESPREFDOCID) = 1002REPL(RESUMENAME) = CVREPL(SKILLDOCNAME) = SKILLSDOC
REPL function is used to specify values for the following constants: Resume, Skills, Booking History,Resource Data, Resource Preference Documents as well as Resume Name and Skills Document Name.These constants represent the unique IDs of attributes in the ATR table.
If you want to add another skill attribute, you need to add it to Retain database as well as the CompanyConts.

Reference
5252
cff file. For example, if you want to add skill attribute Qualification Matrix with ID 108 to the database, youneed to type in:
REPL(QUALIFICATIONMATRIXID) = 108
Built-in Calculated Fields
The following calculated field files are installed by default together with Retain:CalcFields.cff CalcFieldsDGD.cff ConflictsAllScenarios.cff ConflictsNoScenarios.cff ConflictsSA.cff DBInd.cff Debug.cff DefineCompany.cff Dependencies.cff FastTime.cff Forecast.cff ModelSecurity.cff NOCOMPANYConsts.cff OldRevenueCost.cff OriginalTime.cff Phonetics.cff Precalc.cff RequestEconomics.cff RevenueCost.cff ScenarioFilter.cff scenarios.cff Security.cff Team.cff Triggers.cff Variance.cff Wallchart.cff
Calculated Fields Files
This file defines the files that Retain will use in calculations. The files are included by using the key word'USE'.
For example, if you want to include a new file called NewCalcFldFile.cff, add the following to the CalcFields.cff:
USE=NewCalcFldFile.cff.
Calculated Fields for Diaries
This file contains the fields that are used in diaries.

Reference
53
Conflicts
The following files contain the fields that are involved in booking conflicts: ConflictsAllScenarios.cff ConflictsNoScenarios.cff ConflictsSA.cff
Define Company
This file contains the company name. It should be replaced by a specific company name.
Database Independence
This file contains the function mapping that is available for a different database.
Fast Time
These are the basic calculation fields that are used when scheduling.
Company Constants
By default, NOCOMPANYconsts.cff file contains company constants.
This file should be renamed according to a specific company. Also, the constants defined for skills should bemodified according to the database settings.
Phonetics
This file contains functional fields/tables used by Retain Wallchart's phonetic algorithm for indexing names bysound.
Pre-calculated Fields
Pre-calculated fields speed up calculations. They are mostly used for reports.
Request Economics
This file contains fields that are used for the booking requests calculations.
Scenarios
This file is used by Retain Wallchart for the functionality of scenarios. Scenarios are mechanisms used forgrouping bookings together.

Reference
5454
Security
These macros are mostly used to represent security and business rules, such as the drop down values thatwill be visible to a specific user. You might consider customising these fields in the Security.cff file.
Triggers
This file contains database triggers that are run upon specific events. A database trigger is a code that isautomatically executed in response to certain events on a particular table in the database. By default, thereare two files for triggers: Triggers and SQL Triggers.
Team
These calculated fields are related to the team functionality.
This file is to be edited before deployment in order to reflect the company's decisions on how the managerand administrator roles are determined and how to affect the team work flow.
Variance
These calculated fields define the variance calculated fields which compare budgeted time, revenue and costto the planned schedule.
Wallchart
These calculated fields are used by Retain Wallchart.
Calculated fields and replacement strings
Below is a list of the calculated fields for the three main tables in Retain: RES (Resource), JOB (Job) andBKG (Booking).
Note that depending on your deployment, not all of these fields may be available to you.
Table Calculated Field Alias DescriptionRES
GhostBookTme All booked time Total booked time within the reporting period, including time coming fromghost bookings
DGAvail Availability The resource's availability percentage in the reporting periodDGAvalTme Available Time The resource's available time (in minutes) within the reporting period with
no negative values allowedBookDays Booked Days Total amount of time (in days) the resource has been booked on within the
reporting periodBookTme Booked Time Total amount of time (in minutes) the resource has been booked on within
the reporting periodCurrCRDDESCR Current Charge Band The current value of the resource's 'Charge band' history fieldCurrentDiary Current Diary Resource's diaryDGDefaultDryTme Default Diary Time Total diary time for the default diary (in minutes) within the reporting periodResEndDate End Date End date of the Blank diaryDGDryTme Diary Time Total diary time for the resource (in minutes) within the reporting period
GhostJobCUtil Ghost UtilisationUtilisation percentage for the reporting period based on the charge band ofthe jobs and including ghost bookings
GhostNonUDryTme Ghost true diary timeUtilisation percentage for the reporting period, computed using the diarytime excluding holidays (including those generated by ghost bookings)
DGGhostAvail Ghosted availability Availability percentage for the resource including time generated by ghostbookings in the computation
HolBkgTme Holiday Booking time Total time (in minutes) the resource is booked on holidays in the reportingperiod
IsInSubmittedBRQ Is in submitted booking request Returns 'Y' if the resource has a submitted request; 'N' otherwise

Reference
55
LastBkgChange Last Booking Change Date Returns the last change date of a live booking made against the resourceCost1DBCurrency Revenue RevenueResStartDate Start Date Start date of the Default diary
JobCUtil UtilisationUtilisation percentage for the resource within the reporting period based onthe charge rate of the jobs the resource is assigned to
JobCUtilTm Utilised Time Total utilised time (in minutes) for the resource within the reporting periodmaxBooked Maximum Loading % Maximum percentage booked in a day within the periodutilisedDays Utilised Days Utilised days within the period by resourceavailableDays Available Days Available days within the period for a resourceresBookingCount Booking Count Number of bookings within the period for a given resourceDiaryDays Diary Days Total amount of diary time (in days) for the resourceResourceWarning Diary Warning Calculated field used to determine whether a resource has bookings after
the termination dateIsCoachFor Is Coach for this resource Returns 'Y' if the resource is coached by the currently logged on user; 'N'
otherwise
ScnDGAvalTme Scenario Available TimeThe resource available time (in minutes) within the currently displayed daterange including active scenario bookings
ScnDGAvail Scenario AvailabilityThe resource's availability percentage within the currently displayed daterange including active scenario bookings
ScnJobCUtil Scenario UtilisationUtilisation percentage for the resource within the displayed date rangebased on the charge rate of the jobs the resource is assigned to, includingscenario bookings
ScnBookTme Scenario Booked TimeTotal booked time against the resource in the currently displayed daterange including scenario bookings
ScnJobCUtilTm Scenario Utilised TimeTotal utilised time (in hours) for the resource within the currently displayeddate range including scenario bookings
AttachmentCount Attachments Count The number of attachments associated with the resourceJOB
BookDays Booked Days Total amount of time (in days) booked against the job within the reportingperiod
BookTme Booked Time (Hours) Total amount of time (in hours) booked against the job within the reportingperiod
Cost1DBCurrency Revenue Job revenueRevVariance Revenue Variance Job revenue varianceTimeVariance Time Variance Time variance (in hours) between the job budgeted time and the total
booked time against itTotBookTmeHrs Total Booked Time (Hours) Total hours booked against a job regardless of the reporting periodjobBookingCount Booking Count Number of bookings within the period for a given jobAttachmentCount Attachments Count The number of attachments associated with the job
BKGBrqSubmitDate BRQ Submit Date Returns the earliest request submission dateBKGClass Booking Class Displays the booking class: line of a booking request, actual or ghostBkgConflict Booking Conflict Total loading for the reporting periodBRQNotes Booking Request Notes Returns the notes stored against booking requestsFastBKGTimeHours Fast Time (Hours) Time (in hours) against a booking for the reporting period
IsActiveScenarioBKG
Is Active Scenario Booking Returns 'Y' if the booking is in an active scenario; 'N' otherwise
IsLiveOrSubmittedBrq
Is Live Booking or SubmittedBRQ
Returns 'Y' if the booking is a live or submitted request; 'N' otherwise
IsSubmittedBrqLine Is Submitted BRQ line Returns 'Y' for submitted requests; 'N' otherwiseIsBrqAdminLine Is a Administered Booking
Request LineReturns 'Y' if the request is in the currently logged on user's administeredqueue; 'N' otherwise
IsManagedJobConflict
Is in conlict on managed job? Returns 1 if there is a conflict on a job managed by the currently logged onuser; 0 otherwise
IsManagedResConflict
Is in conflict on managedresource?
Returns 1 if there is a conflict on a resource managed by currently loggedon user; 0 otherwise
RESDGDryTme Resource Diary Time The amount of diary hours against the booked user during the date rangeof the booking
RESDGDryTmeEmgResource Emergency DiaryTime
The resource emergency time (in hours) during the date range of thebooking
ScenarioId Scenario ID of booking The Scenario ID which the booking belongs to ScenarioName Scenario Name Name of the scenario which the live booking belongs toScenarioStatusCodeScenario Status Code Returns the status code of the scenario bookingBKGTimeDays Time (Days) Total time of the booking in daysBKGTimeHours Time (Hours) The time of the booking in hoursBKGTrueLoading True Loading True loading for fixed time bookingsBKGTrueTime True Time The time of the booking in hours used to fix up fixed loading BookingsBkgRecordTmeHrs Booking Record Time (Hours) Total booking hours irrespective of the currently displayed date rangeBkgRecordTmeDys Booking Record Time (Days) Total booking days irrespective of the currently displayed date rangeMaxBooked Maximum Loading % Maximum percentage booked in a day within the periodAttachmentCount Attachments Count The number of attachments associated with the booking

Reference
5656

Support Services
57
4 Support Services
Support for Retain is available worldwide. This topic is linked to your support provider's information: SupportService Provider.
retaininternational
USA phone: 1 646 688 4496UK phone: 0845 458 8660World phone: +44 20 7538 4774
USA fax: 1 646 478 9475World fax: +44 845 458 8661
General E-mail: [email protected] E-mail: [email protected]
Postal Address: Retain International Ltd33 Beaufort CourtAdmirals WayLondon, E14 9XLUnited Kingdom
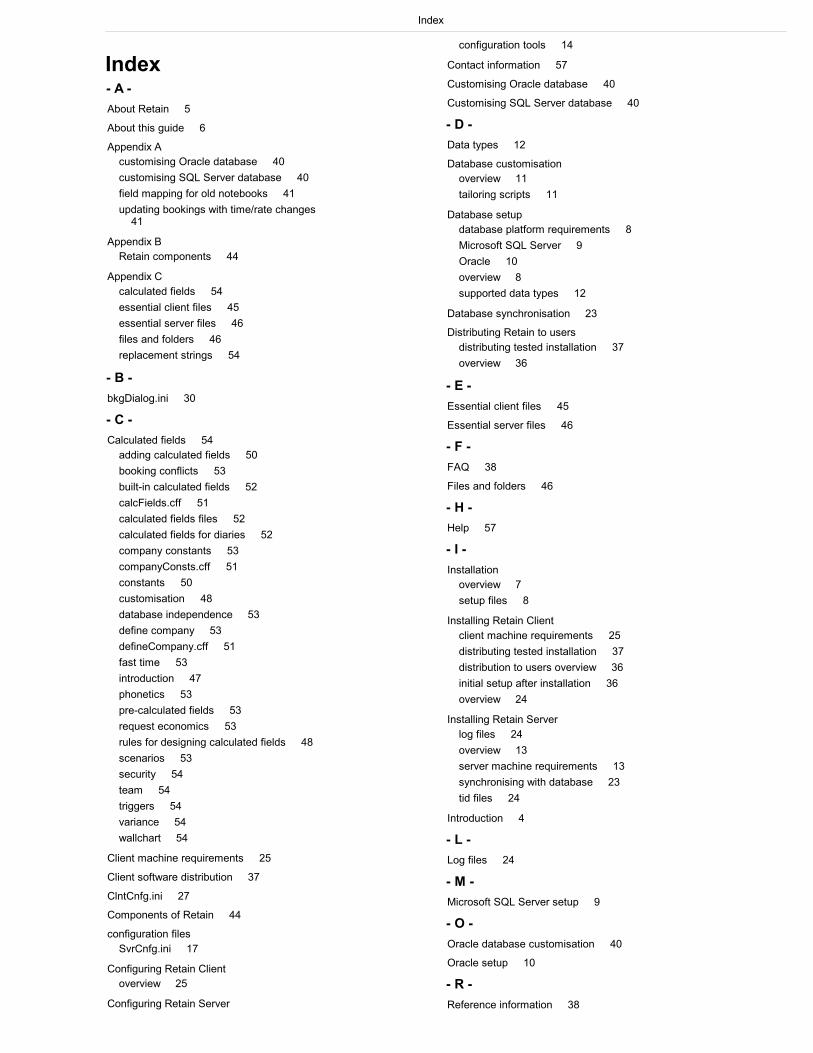
Index
58
Index- A -
About Retain 5
About this guide 6
Appendix A
customising Oracle database 40
customising SQL Server database 40
field mapping for old notebooks 41
updating bookings with time/rate changes 41
Appendix B
Retain components 44
Appendix C
calculated fields 54
essential client files 45
essential server files 46
files and folders 46
replacement strings 54
- B -
bkgDialog.ini 30
- C -
Calculated fields 54
adding calculated fields 50
booking conflicts 53
built-in calculated fields 52
calcFields.cff 51
calculated fields files 52
calculated fields for diaries 52
company constants 53
companyConsts.cff 51
constants 50
customisation 48
database independence 53
define company 53
defineCompany.cff 51
fast time 53
introduction 47
phonetics 53
pre-calculated fields 53
request economics 53
rules for designing calculated fields 48
scenarios 53
security 54
team 54
triggers 54
variance 54
wallchart 54
Client machine requirements 25
Client software distribution 37
ClntCnfg.ini 27
Components of Retain 44
configuration files
SvrCnfg.ini 17
Configuring Retain Client
overview 25
Configuring Retain Server
configuration tools 14
Contact information 57
Customising Oracle database 40
Customising SQL Server database 40
- D -
Data types 12
Database customisation
overview 11
tailoring scripts 11
Database setup
database platform requirements 8
Microsoft SQL Server 9
Oracle 10
overview 8
supported data types 12
Database synchronisation 23
Distributing Retain to users
distributing tested installation 37
overview 36
- E -
Essential client files 45
Essential server files 46
- F -
FAQ 38
Files and folders 46
- H -
Help 57
- I -
Installation
overview 7
setup files 8
Installing Retain Client
client machine requirements 25
distributing tested installation 37
distribution to users overview 36
initial setup after installation 36
overview 24
Installing Retain Server
log files 24
overview 13
server machine requirements 13
synchronising with database 23
tid files 24
Introduction 4
- L -
Log files 24
- M -
Microsoft SQL Server setup 9
- O -
Oracle database customisation 40
Oracle setup 10
- R -
Reference information 38

Index
59
Replacement strings 54
Retain 5
Retain Server configuration tools 14
Retain Server service configuration 21
Retain Server service installation 22
Retaine.ini 28
Running Retain Server as service
overview 20
service configuration 21
service installation 22
starting service 22
stopping service 23
uninstalling service 23
- S -
Scripts 11
Server machine requirements 13
Servers.ini 26
Setup files 8
Setup of Retain Client after installation 36
SQL Server database customisation 40
SQL Server setup 9
Starting Retain Server service 22
Stopping Retain Server service 23
Support
contact information 57
Supported data types 12
SvrCnfg.ini 17
- T -
Tailoring scripts 11
Technical specification 38
Tid files 24
- U -
Uninstalling Retain Server service 23
Updating bookings 41
- W -
Where to get support 6


