Resizing Digital Images for Art Competitions/Exhibitions · Resizing Digital Images for Art...
5
Resizing Digital Images for Art Competitions/Exhibitions Many competitive art shows are now requiring that entries be sent digitally, either emailed as an attachment, uploaded to a specific site or snail-mailed on a CD. Digital images can be easily resized in any image editing program (these directions use PhotoShop). Download your images to your computer, and do any color correc- tion or cropping that is needed. In our sample below - part of the matt shows - that needs to be cropped out, and the overly yellow tone adjusted. Once that’s finished, or if you are using an image from a CD or your digital camera that needs no adjustment, you are ready to resize the image. Step One: Open your image if not already open in your image editor (like PhotoShop). Then from the menu bar (usually at the top) select IMAGE, then from the drop down menu, select IMAGE SIZE. This dialog box tells you several things about your open image: • The total file size in kilobytes (K) or megabytes (M). 1000K or kb = 1 Megabyte • The individual pixel dimensions of the file (width and height) expressed in pixels or another unit of measurement you can specify. • The document size, in inches, pixels or another unit of measurement you can specify. • The resolution, usually in pixels/inch (ppi) which is commonly referred to as dpi (dots per inch).
-
Upload
phungduong -
Category
Documents
-
view
223 -
download
1
Transcript of Resizing Digital Images for Art Competitions/Exhibitions · Resizing Digital Images for Art...

Resizing Digital Images for Art Competitions/Exhibitions
Many competitive art shows are now requiring that entries be sent digitally, either emailed as an attachment, uploaded to a specific site or snail-mailed on a CD. Digital images can be easily resized in any image editing program (these directions use PhotoShop). Download your images to your computer, and do any color correc-tion or cropping that is needed. In our sample below - part of the matt shows - that needs to be cropped out, and the overly yellow tone adjusted. Once that’s finished, or if you are using an image from a CD or your digital camera that needs no adjustment, you are ready to resize the image.
Step One:Open your image if not already open in your image editor (like PhotoShop). Then from the menu bar (usually at the top) select IMAGE, then from the drop down menu, select IMAGE SIZE.
This dialog box tells you several things about your open image:• The total file size in kilobytes (K) or megabytes (M). 1000K or kb = 1 Megabyte• The individual pixel dimensions of the file(width and height) expressed in pixels or another unit of measurement you can specify.• The document size, in inches, pixels or another unit of measurement you can specify.• The resolution, usually in pixels/inch (ppi) which is commonly referred to as dpi (dots per inch).

File size, dimensions and resolution are all related, but you need to be careful that you don’t change the pro-portions of your image when you resize it, or degrade the quality of your image any more than you have to by downsampling the pixel dimensions.
Every show will have its own requirements, so you need to read the prospectus carefully.
For this example, the show prospectus required that the image be uploaded to their website after completing an online entry form, and paying the entry fee online with a credit card. The digital image could be no larger than 1024 x 768, 1000 kb total, and no smaller than 768 x 512. The file format was to be .jpg or .jpeg, and the image file was to be named with the title of the painting (example: DewdropOnTulips.jpg).
A note here about naming: filenames containing capital letters, spaces and odd characters like exclamation points and question marks can be problematic. You’re better off using lowercase letters separated by either hy-phens or underscores. (example: dewdrops_on_tulips.jpg). That being said: follow the directions in the prospec-tus exactly when it comes to naming your file, or your entry may be rejected.
When you open the image size dialog box, it says that this image is currently 17.4 M (megabytes) in size at 2848 x 2136 pixels. It is 39.556 inches wide x 29.667 inches high at a resolution of 72 ppi (or dpi). That’s way too large for the show, so we will have to resize the image.
But before I do any resizing, I need to crop the image to get rid of the mat and adjust the color so that is is as close to my original as possible. A note here on color correction. Unless you have a calibrated monitor, and recalibrate it regularly, what you see on screen may be very different than what will print and may also look dif-ferent depending on the brand and type of monitor the image is viewed on. If you’re not experienced with color adjustments, your best bet is to set your monitor to the Adobe RGB color space (a little less saturated than the sRGB color space) and then use AUTO COLOR under Image Adjustments.

Step Two:Make sure the Scale Styles, Constrain Proportions and Resample Image boxes are all CHECKED. Then select the largest of the two pixel dimensions (width or height) and change it to the largest dimension required in the prospectus - in our sample that was 1024. Because you have constrained the proportions, the other dimension will change automatically.
Note that when you change the pixel width and height, the overall file size (pixel dimensions) changes too. In our case, the file size dropped from 15.9M to 2.27M - still too large to meet the 1000kb (or 1MB) file size requirement for this particu-lar show.
We’ll have to do some additional tweaking to our image size.

In order to get the overall file size down to 1000kb (or 1Megabyte), change one of the document size dimensions, and continue to lower this dimension until the file size is reduced to what you need.
Watch the overall pixel dimensionsas you are changing the document dimensions because it will change asyou change the dimensions of the image.Depending on the format of yourpainting, your pixels dimensions maynot match the 1024 x 768 (or other showrequirement) exactly, but at least onedimension (height or width) should matchor be very close to the show’s requirement.
In our sample, we’re just a little over theminimum height requirement, and overallfile size.
When your image is properly resized, save it with a new file name that corresponds to the directions in the prospectus.
Some shows not only specify the pixel di-mensions they want, but also specify a cer-tain image resolution (like 300 dpi or ppi).
If that’s the case, then we have to do our resizing in another way in order to get this image ready to submit.
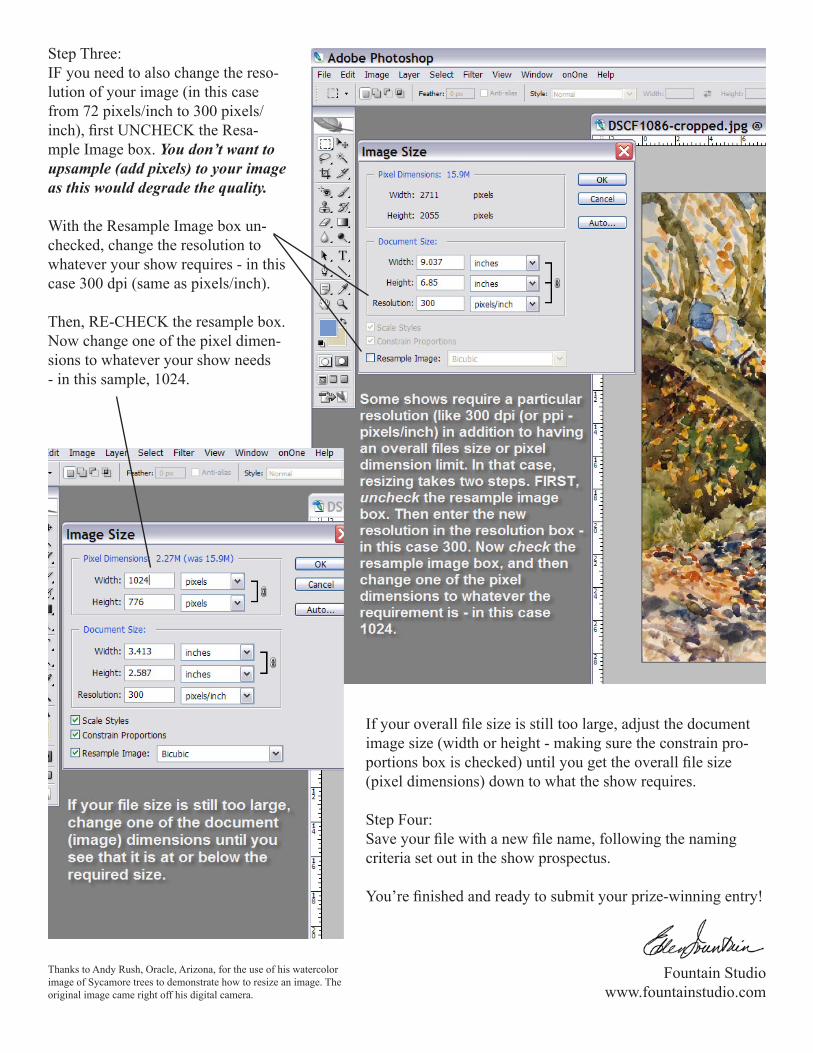
Step Three:IF you need to also change the reso-lution of your image (in this case from 72 pixels/inch to 300 pixels/inch), first UNCHECK the Resa-mple Image box. You don’t want to upsample (add pixels) to your image as this would degrade the quality.
With the Resample Image box un-checked, change the resolution to whatever your show requires - in this case 300 dpi (same as pixels/inch).
Then, RE-CHECK the resample box. Now change one of the pixel dimen-sions to whatever your show needs - in this sample, 1024.
If your overall file size is still too large, adjust the document image size (width or height - making sure the constrain pro-portions box is checked) until you get the overall file size (pixel dimensions) down to what the show requires.
Step Four:Save your file with a new file name, following the naming criteria set out in the show prospectus.
You’re finished and ready to submit your prize-winning entry!
Fountain Studio www.fountainstudio.com
Thanks to Andy Rush, Oracle, Arizona, for the use of his watercolor image of Sycamore trees to demonstrate how to resize an image. The original image came right off his digital camera.