Reproduction - bsintek.basco.combsintek.basco.com/BriggsDocumentDisplay/mojpuHq.-FzXFix2.pdf ·...
18
KVSP Owner’s Manual Part No 891204 (C) 1 Form No F102315B Image shown with optional accessories KV VACUUM Owner's Manual KV600SP, KV650SPH, TKV650SPH, KV600SPFB, KV650SPHFB, TKV650SPHFB Beginning Serial #: 102515001 Accessories Original Instructions IMPORTANT- READ CAREFULLY BEFORE USE AND KEEP FOR FUTURE REFERENCE. ON BOARD VACUUM HOSE KIT 4" x 7.5' (102mm x 2.13m) For vacuuming in hard to reach areas. P/N 891125 OPTIONAL FELT/MESH DEBRIS BAG For use in leaves and grass in dusty conditions. P/N 891126 FELT BAG P/N 891132 MESH BAG NOZZLE WEAR GUARD KIT For use in increasing the life of your nozzle by protecting it from damage P/N 891127 CASTER KIT To allow for easy rolling and maneuverability on smooth surfaces. P/N 891128 SHREDDER KIT Shreds leaves, reducing total volume. P/N 891153 KV LINER KIT Increases the life of the housing by protecting it from damage. P/N 891134 PROTECTIVE COVER Protects the machine from the environment when not in use. P/N 891137 Not for Reproduction
Transcript of Reproduction - bsintek.basco.combsintek.basco.com/BriggsDocumentDisplay/mojpuHq.-FzXFix2.pdf ·...

KVSP Owner’s Manual
Part No 891204 (C) 1 Form No F102315B
Image shown with optional accessories
KV VACUUM Owner's Manual KV600SP, KV650SPH, TKV650SPH, KV600SPFB, KV650SPHFB, TKV650SPHFB
Beginning Serial #: 102515001
Accessories
Original Instructions
IMPORTANT- READ CAREFULLY BEFORE USE AND KEEP FOR FUTURE REFERENCE.
ON BOARD VACUUM HOSE
KIT
4" x 7.5' (102mm x 2.13m) For vacuuming in hard to reach areas.
P/N 891125
OPTIONAL FELT/MESH
DEBRIS BAG
For use in leaves and grass in dusty conditions.
P/N 891126 FELT BAG P/N 891132 MESH BAG
NOZZLE WEAR
GUARD KIT
For use in increasing the life of your nozzle by protecting it from damage
P/N 891127
CASTER KIT
To allow for easy rolling and maneuverability on smooth surfaces.
P/N 891128
SHREDDER
KIT
Shreds leaves, reducing total volume.
P/N 891153
KV LINER KIT
Increases the life of the housing by protecting it from damage.
P/N 891134
PROTECTIVE
COVER
Protects the machine from the environment when not in use.
P/N 891137
Not for
Rep
roduc
tion

KVSP Owner’s Manual
Part No 891204 Form No F102315B
2
CONTENTS
SPECIFICATIONS AND SOUND/VIBRATION 3 INSTRUCTION LABELS 4 PACKING CHECKLIST & ASSEMBLY 5 ASSEMBLY 6 OPERATION 7-8 MAINTENANCE 9-11 TROUBLESHOOTING 12 ILLUSTRATED PARTS & PART LISTS 13-15 DECLARATION OF CONFORMITY 16-18
Go to http://www.billygoat.com for French-Canadian translations of the product manuals.
Visitez http://www.billygoat.com pour la version canadienne-française des manuels de produits. Not for
Rep
roduc
tion

KVSP Owner’s Manual
Part No 891204 Form No F102315B
3
SPECIFICATIONS
KV600SP KV650SPH TKV650SPH KV600SPFB KV650SPHFB TKV650SPHFB
Engine HP 6.0 (4.47kW) 6.5 (4.85kW) 6.5 (4.85kW) 6.0 (4.47kW) 6.5 (4.85kW) 6.5 (4.85kW)
Engine type B&S Quantum HONDA HONDA B&S Quantum HONDA HONDA
Engine model 112K020124E1 GSV190AN1L GSV190AN1L 112K020124E1 GSV190AN1L GSV190AN1L
Engine fuel capacity 1.5 qt. (1.4 L) 1.6 qt. (1.5 L) 1.6 qt. (1.5 L) 1.5 qt. (1.4 L) 1.6 qt. (1.5 L) 1.6 qt. (1.5 L)
Engine oil capacity 0.63 qt. (0.6 L) 0.58 qt. (0.54 L) 0.58 qt. (0.54 L) 0.63 qt. (0.6 L) 0.58 qt. (0.54 L) 0.58 qt. (0.54 L)
Total unit weight #129 (58.5 kg) #132 (58.9 kg) 141# (64 kg) #129 (58.5 kg) #132 (58.9 kg) 141# (64 kg)
Overall length 59” (1.5m) 59” (1.5m) 59” (1.5m) 59” (1.5m) 59” (1.5m) 59” (1.5m)
Overall width 25.5” (.6m) 25.5” (.6m) 25.5” (.6m) 25.5” (.6m) 25.5” (.6m) 25.5” (.6m)
Overall height 42.75” (1.1m) 42.75” (1.1m) 42.75” (1.1m) 42.75” (1.1m) 42.75” (1.1m) 42.75” (1.1m)
Max. operating slope 200 200 200 200 200 200
Sound in accordance with 2000/14/EEC standards
109 dBa 109 dBa 112 dBa 109 dBa 109 dBa 112 dBa
Sound at operator’s ear 88 dBa 89 dBa 91 dBa 88 dBa 89 dBa 91 dBa
Vibration at operator position
0.71 g (6.96m/s2) 0.32 g (3.16m/s2) 0.43 g (4.25m/s2) 0.71 g (6.96m/s2) 0.32 g (3.16m/s2)
0.43 g (4.25m/s2)
SOUND
SOUND LEVEL 92 dB(a) at Operator Position 112 dB Sound tests were conducted in accordance with 2000/14/EEC, and were performed on 7-25-07 under the conditions listed below.
Sound power level listed is the highest value for any model covered in this manual. Please refer to serial plate on the unit for the sound power level for your model.
VIBRATION DATA
VIBRATION LEVEL 0.34g (3.29m/s2)
Vibration levels at the operator’s handles were measured in the vertical, lateral and longitudinal directions using calibrated vibration test equipment. Tests were performed on 12-19-2007 under the conditions listed below.
General Conditions: Sunny Temperature: 88oF (31.1oC) Wind Speed: 2 mph (3.8 kmh) Wind Direction: South Southeast Humidity: 44% Barometric Pressure: 30.07”Hg (764 mm Hg)
General Conditions: Sunny Temperature: 50oF (10oC) Wind Speed: 4 mph (6.4kph) Wind Direction: South Southeast Humidity: 68% Barometric Pressure: 30 Hg (101.6kpa)
Not for
Rep
roduc
tion

KVSP Owner’s Manual
Part No 891204 Form No F102315B
4
INSTRUCTION LABELS
The labels shown below were installed on your BILLY GOAT® KV Vacuum. If any labels are damaged or missing, replace them before operating this equipment. For your convenience in ordering replacement labels, part numbers are included in the Illustrated Parts List. The correct position for each label may be determined by referring to the Figure and Item numbers shown.
LABEL EXPLOSIVE FUEL CHIPPER WARNING LABEL LABEL DANGER GUARD ITEM # 16 P/N 400268 ITEM #82 P/N 890152 (TKV ONLY) ITEM #39 P/N 900327
ENGINE LABELS
ENGINE AND TRANSMISSION CONTROLS
HONDA BRIGGS & STRATTON Read Owner’s Manual Before Operating.
Lire le manuel d’utilisation avant la mise en route. Vor Inbetriebnahme Bedienungs - und Wartungsanleitung lesen. Favor leer las instrucciones de operacion antes de operar el motor. Consultare il Manuale Uso e Manutenzione prima dell utilizzo. Las Skotselinstruktionen Innan Start.
Honda Throttle Control Briggs Throttle Control Bail Drive Engage/Disengage label
BAG FOLDING INSTRUCTIONS
LOCATED ON BAG
LABEL DANGER KEEP HANDS AND FEET AWAY
ITEM #18 P/N 400424
LABEL SAFETY PROTECT ITEM #20
P/N 100346 DANGER FLYING DEBRIS
ITEM #19 P/N 810736 LABEL SPARK ARRESTOR
P/N 100252
Not for
Rep
roduc
tion
KVSP Owner’s Manual
Part No 891204 Form No F102315B
5
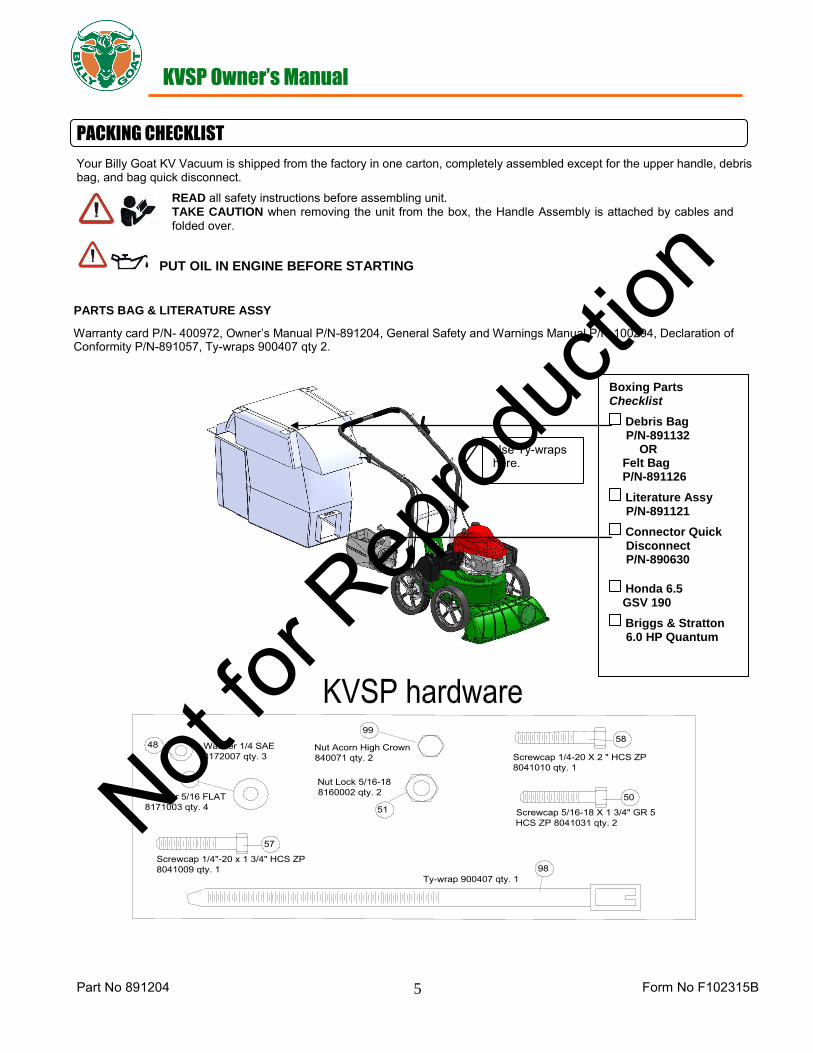
PACKING CHECKLIST
Your Billy Goat KV Vacuum is shipped from the factory in one carton, completely assembled except for the upper handle, debris bag, and bag quick disconnect.
PUT OIL IN ENGINE BEFORE STARTING
READ all safety instructions before assembling unit. TAKE CAUTION when removing the unit from the box, the Handle Assembly is attached by cables and folded over.
Boxing Parts Checklist
Debris Bag P/N-891132 OR Felt Bag P/N-891126
Literature Assy P/N-891121
Connector Quick Disconnect P/N-890630
Honda 6.5 GSV 190
Briggs & Stratton 6.0 HP Quantum
PARTS BAG & LITERATURE ASSY
Warranty card P/N- 400972, Owner’s Manual P/N-891204, General Safety and Warnings Manual P/N-100294, Declaration of Conformity P/N-891057, Ty-wraps 900407 qty 2.
Use Ty-wraps here.
98Ty-wrap 900407 qty. 1
57
58
Screwcap 1/4-20 X 2 " HCS ZP 8041010 qty. 1
50
Screwcap 5/16-18 X 1 3/4" GR 5 HCS ZP 8041031 qty. 2
Washer 1/4 SAE 8172007 qty. 3
48
49
Washer 5/16 FLAT 8171003 qty. 4
Nut Acorn High Crown 840071 qty. 2
99
Nut Lock 5/16-18 8160002 qty. 2
51
Screwcap 1/4"-20 x 1 3/4" HCS ZP 8041009 qty. 1
Not for
Rep
roduc
tion

KVSP Owner’s Manual
Part No 891204 Form No F102315B
6
ASSEMBLY
NOTE: Items in ( ) can be referenced in the Parts Illustration and Parts List on pages 13-15. 1. ASSEMBLE the upper handle (item 11), with the hardware from the parts bag (items 50, 49, and 51) to the lower handle
(item 10). Tighten the hardware securely. (See Fig. 1.) 2. ATTACH the throttle lever (item 22) to the handle (Left hand side for Honda. Right side for Briggs and Stratton.) with the
hardware from the parts bag (items 58, 48, and 99). Secure the cable with the Ty-Wrap (item 98). 3. ATTACH the clutch cable (item 24) to the inner right side of the handle with the hardware (items 99, 48, and 57). Then
attach the end of the cable to the bail. After it is attached, check to make sure it is functioning properly. 4. UNFOLD the debris bag (item 21) and fasten bag neck to bag quick disconnect (item 12). Attach firmly to housing
exhaust (item 1). (See Fig. 2 and 3.) 5. ATTACH bag to four posts (item 13), preassembled to upper handle. 6. CONNECT spark plug wire.
Fig. 3
Insert the quick disconnect from the inside of the bag, tilt the handle so it can be fed through first. Then slide the connecting end through and tighten the strap.
Fig. 1
Fig. 2
Not for
Rep
roduc
tion

KVSP Owner’s Manual
Part No 891204 Form No F102315B
7
OPERATION
VACUUMING OPERATION
VACUUM NOZZLE HEIGHT ADJUSTMENT: Nozzle height is raised and lowered by rotating the red knob near the left rear wheel. Nozzle height should be adjusted based on the task being performed (see Fig. 4). FOR MAXIMUM PICKUP: Adjust nozzle close to debris, but without blocking airflow into the nozzle. NOTE: Never bury nozzle into debris. CLEARING A CLOGGED NOZZLE & EXHAUST: Turn the engine off and wait for impeller to stop completely and disconnect the spark plug wire. Wearing durable gloves, remove clog. Danger, the clog may contain sharp materials. Reconnect spark plug wire.
DEBRIS BAG
Optional debris bags are available for changing conditions.
Debris bags are normal replaceable wear items.
NOTE: Frequently empty debris to prevent bag overloading with more weight than you can lift. An optional felt bag is available for use where debris will be vacuumed in dusty conditions (see “Accessories” shown on page 1). DO NOT place bag on or near hot surface, such as engine. Be sure engine has come to a complete stop before removing or emptying bag. This vacuum is designed for picking up trash, organic material and other similar debris (see “Safety and General Operation” manual). However, many vacuums are used where dust is mixed with trash. Your unit can intermittently vacuum in dusty areas. Dust is the greatest cause of lost vacuum performance. Following these rules will help maintain your machine's ability to vacuum in dusty conditions:
• Run machine at idle to quarter throttle. • The debris bag must be cleaned more frequently. A vacuum with a clean, pillow soft bag will have good pickup performance.
One with a dirty, tight bag will have poor pickup performance. If dirty, empty debris and vigorously shake bag free of dust. • Pressure-wash debris bag if normal cleaning does not fully clean bag. Bag should be thoroughly dry before use. NOTE: Having one or more spare debris bags is a good way to reduce down time while dirty bags are being cleaned.
DO NOT leave debris in bag while in storage.
COMPOST
Vacuumed leaves, grass and other organic material from your own yard can be emptied into a pile or composter to provide enriched soil for later use as fertilizer in gardens and flower beds. NOTE: Allow green chips to dry before spreading around living plants.
Fig. 4
Not for
Rep
roduc
tion

KVSP Owner’s Manual
Part No 891204 Form No F102315B
8
MULCH
Wood chips made from branches in your own yard make excellent mulch. A thick blanket of wood chips around plants and flowers to keeps weeds out and moisture in.
CHIPPER OPERATION (TKV only)
Your TKV chipper is designed to process tree branches and limbs up to 2" (50.8mm) diameter (see Fig. 5). Several small branches can be grouped together and fed together into the chipper (see Fig. 6). When feeding forked branches, squeeze forks together and feed into chipper entrance. DO NOT overload. If forks are too large, use a pair of loppers to trim forks down to size. A lopper storage bracket is provided on every unit (loppers are not included).
CLEARING A CLOGGED CHIPPER (TKV only)
Under normal circumstances, allow time for machine to clear all wood from chipper hopper before stopping engine. Otherwise, remaining pieces of wood will jam inside of chipper when engine stops. (See “TAMPER” below.) Disconnect spark plug wire.
Remove debris bag quick disconnect from debris outlet on machine. Wearing
durable gloves, access impeller through debris outlet on fan housing and rotate impeller counter clock wise to dislodge and remove jam and remove debris from hopper with tongs or equivalent. Reconnect debris bag quick disconnect to machine and then reconnect the spark plug wire.
TAMPER (TKV only)
Before turning machine off, use the tamper to slowly push remaining pieces of wood through the chipper. This can prevent any remaining wood from jamming in the chipper when machine is turned off (see Fig. 7). Do not leave tamper on the ground, store tamper in the chipper hopper.
Fig. 5
Fig. 6
Fig. 7
Not for
Rep
roduc
tion

KVSP Owner’s Manual
Part No 891204 Form No F102315B
9
MAINTENANCE
PERIODIC MAINTENANCE
Periodic maintenance should be performed at the following intervals: Maintenance Operation Every Use (Daily) Every 5 Hrs (Daily) Every 25 Hours
Inspect for loose, worn or damaged parts
Clean debris bag
Check bag strap tightness
Engine (See Engine Manual)
Check for excessive vibration
IMPELLER REMOVAL 1. Wait for engine to cool and disconnect spark plug. 2. Drain fuel and oil from the engine. 3. Remove bag, quick release and upper handle. Do not kink, stretch, or break control cables, control housings, or end
fittings while removing handles. 4. Remove the transmission cover, idler pulley, transmission and the belt from the transmission. 5. Remove the transmission plate and the housing top plate by removing bolts around outside of housing. 6. Leaving engine fastened to top plate; turn it upside down so the impeller is on top. 7. Remove impeller bolt and lock washer. 8. Lift impeller upward. If impeller slides freely, proceed to step 10. 9. If the impeller does not loosen, obtain a 3/4-16x3” (Billy Goat P/N 440192) or longer bolt. Thread bolt by hand into
nut until bolt rests against the shaft. Tighten the bolt slowly, which will pull the impeller away from the shaft, remove impeller from shaft. Using a penetrating oil can help loosen a stuck impeller.
10. Using a new impeller bolt, lockwasher, and washer, reinstall new impeller in reverse order. 11. Tighten impeller bolt. Torque impeller bolt to 33-38 ft. lbs. (44-51 N.m) (see item 45 on page 14). 12. Reinstall engine onto housing in reverse order of removal. Make sure the belt is inside the two fingers on the belt
plate and that the belt is on the transmission pulley before securing the transmission. 13. Gas and oil engine. 14. Reconnect spark plug wire.
DRIVE CHAIN REPLACEMENT AND ALIGNMENT 1. Wait for engine to cool and disconnect spark plug. 2. To replace a chain, first prop up the rear of the machine with small blocks to get the rear wheels off of the ground. 3. Remove the transmission cover, and the belt from the transmission. 4. Remove the bolts on both sides of the transmission holding the flange bearings; this should give enough slack to
slip the chain off. 5. Replace the old chain with a new one. 6. Once the chain is on, put the bolts back into the flange bearings and tighten. 7. Finally, make sure the wheels rotate freely. If not, loosen the bearings and shift them to get the chain running
straight up and down. 8. Reassemble the transmission components removed in steps 1-3 in reverse order.
Not for
Rep
roduc
tion

KVSP Owner’s Manual
Part No 891204 Form No F102315B
10
BELT TENSION ADJUSTMENT DO NOT ADJUST WHILE THE MACHINE IS RUNNING!
1. Wait for engine to cool and disconnect spark plug. 2. Remove the transmission cover. 3. Using two 1/2” wrenches, loosen the two nuts on the cable that connects to the idler arm. 4. The setting of the tension on the belt is controlled by the distance on the threads of the cable. To loosen tension,
move the position towards the end of the threads. Move in the opposite direction to tighten. 5. Check the travel of the idler arm by engaging the bail. The drive should start to engage when the bail is 2 1/2 inches
away from the handle. The spring, at a relaxed state should be 1 1/2 inches long on the coil, and when the bail is in contact with the handle it should be 1 3/4 inches long. If the belt is too tight it can cause premature failure and if it is too loose it can come off of the pulley. (See Fig. 8 below.)
6. When satisfied with the position, place the transmission cover back into place and secure. Then run the machine to make sure the transmission is engaging properly. If the drive will not engage or will not disengage, repeat the previous steps.
BELT REPLACEMENT 1. Wait for engine to cool and disconnect spark plug. 2. Drain fuel and oil from the engine. 3. Remove bag, quick release and upper handle. Do not kink, stretch, or break control cables, control housings, or end
fittings while removing handles. 4. Remove the transmission cover, idler pulley, transmission and the belt from the transmission. 5. Remove the transmission plate and the housing top plate by removing bolts around outside of housing. 6. Leaving engine fastened to top plate, turn it upside down so the impeller is on top. 7. Remove impeller bolt and lock washer. 8. Lift impeller upward. If impeller slides freely, proceed to (step 10.) 9. If the impeller does not loosen, obtain a 3/4-16x3” (Billy Goat P/N 440192) or longer bolt. Thread bolt by hand into nut
until the bolt rests against the shaft. Tighten the bolt slowly, which will pull the impeller away from the shaft. Remove the impeller from the shaft. If necessary, use a penetrating oil as it can help loosen a stuck impeller.
10. Place the new belt on the shaft. 11. Using a new impeller bolt and lockwasher, reinstall new impeller in reverse order. 12. Tighten impeller bolt. Torque impeller bolt to 33-40 Ft. Lbs. (44-54 N.m). (See item 45 on page 15.) 13. Make sure the belt is in the groove on the impeller and feed it through the hole in the top plate. 14. Reinstall engine onto housing in reverse order of removal. Make sure the belt is inside the two fingers on the belt plate
and that the belt is on the transmission pulley before securing the transmission. 15. Gas and oil engine. 16. Reconnect spark plug wire.
Spring length 1.5”- resting. 1.75”- bail at handle.
Fig. 8
Not for
Rep
roduc
tion
KVSP Owner’s Manual
Part No 891204 Form No F102315B
11
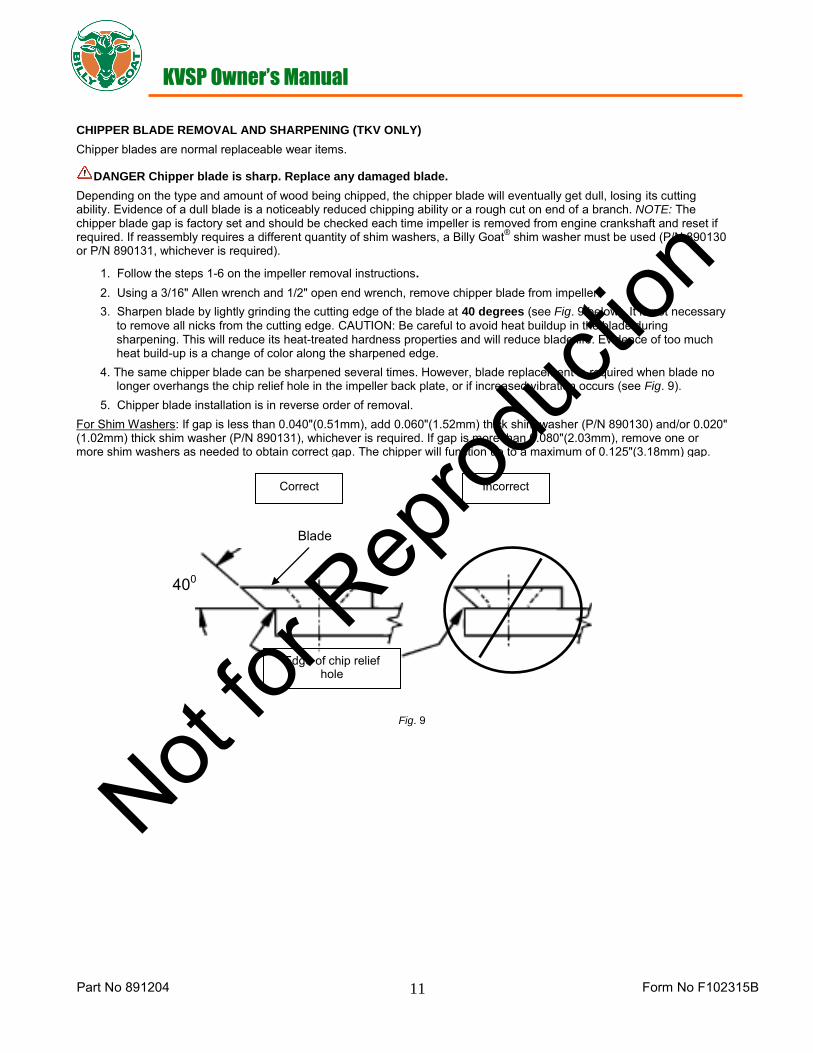
CHIPPER BLADE REMOVAL AND SHARPENING (TKV ONLY) Chipper blades are normal replaceable wear items.
DANGER Chipper blade is sharp. Replace any damaged blade.
Depending on the type and amount of wood being chipped, the chipper blade will eventually get dull, losing its cutting ability. Evidence of a dull blade is a noticeably reduced chipping ability or a rough cut on end of a branch. NOTE: The chipper blade gap is factory set and should be checked each time impeller is removed from engine crankshaft and reset if required. If reassembly requires a different quantity of shim washers, a Billy Goat® shim washer must be used (P/N 890130 or P/N 890131, whichever is required).
1. Follow the steps 1-6 on the impeller removal instructions. 2. Using a 3/16" Allen wrench and 1/2" open end wrench, remove chipper blade from impeller. 3. Sharpen blade by lightly grinding the cutting edge of the blade at 40 degrees (see Fig. 9 below). It is not necessary
to remove all nicks from the cutting edge. CAUTION: Be careful to avoid heat buildup in the blade during sharpening. This will reduce its heat-treated hardness properties and will reduce blade life. Evidence of too much heat build-up is a change of color along the sharpened edge.
4. The same chipper blade can be sharpened several times. However, blade replacement is required when blade no longer overhangs the chip relief hole in the impeller back plate, or if increased vibration occurs (see Fig. 9).
5. Chipper blade installation is in reverse order of removal. For Shim Washers: If gap is less than 0.040"(0.51mm), add 0.060"(1.52mm) thick shim washer (P/N 890130) and/or 0.020" (1.02mm) thick shim washer (P/N 890131), whichever is required. If gap is more than 0.080"(2.03mm), remove one or more shim washers as needed to obtain correct gap. The chipper will function up to a maximum of 0.125"(3.18mm) gap.
Correct Incorrect
Edge of chip relief hole
400
Blade
Fig. 9
Not for
Rep
roduc
tion

KVSP Owner’s Manual
Part No 891204 Form No F102315B
12
TROUBLESHOOTING
Problem Possible Cause SolutionAbnormal vibration Loose or out of balance impeller or loose
engine.Check impeller and replace if required. Check engine.
Will not vacuum or has poor vacuum performance
Dirty debris bag. Hose kit cap missing. Clogged nozzle or exhaust. Excessive quantity of debris. Improper nozzle height.
Clean debris bag. Shake bag clean or wash. Check for hose kit cap. Unclog nozzle or exhaust. Allow air to feed with debris. Adjust nozzle height so that it is closer to the debris.
Engine will not start Throttle in off position. Engine not in full choke position. Out of gasoline. Bad or old gasoline. Sparkplug wire disconnected. Dirty air cleaner .
Check stop switches, throttle, choke position and gasoline. Connect spark plug wire. Clean or replace air filter. Or contact a qualified service person.
Engine is locked, will not pull over
Debris locked in impeller. Engine problem.
See page 7. Contact an engine service dealer for engine problems.
Nozzle scrapes ground in lowest height setting
Nozzle height out of adjustment. Adjust nozzle height (See "NOZZLE HEIGHT ADJUSTMENT" for hard surfaces on page 7.
No self-propelling Drive bail not engaged. Engage the drive bail.Drive belt worn or broken. Check the drive belt.Drive clutch cable out of adjustment or broken.
Check the drive clutch cable (see page 10).
Drive chain off the sprocket. Check the drive chain (see page 9).Self propelled drive will not release
Improper drive clutch cable adjustment or cable is kinked.
Check the drive clutch cable (see page 10).
Noisy or broken chain No chain lubrication. Lubricate chain.Chain misalignment or tension. Check the drive chain (see page 9).
Unit does not free-wheel backwards
None. Push the unit slightly forward then the unit will free-wheel.
Too much dust coming from bag
Vacuuming very dry, brittle or small debris. Switch to felt bag (see "Accessories" page 1).
Not for
Rep
roduc
tion
KVSP Owner’s Manual
Part No 891204 Form No F102315B
13
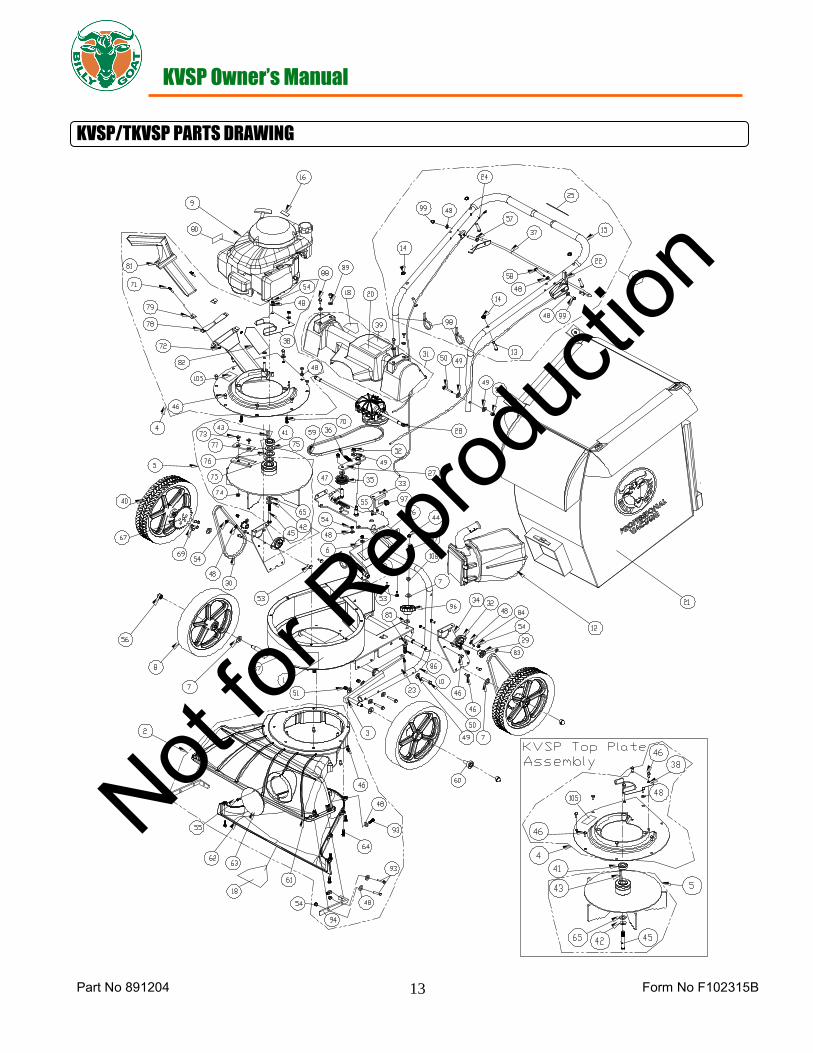
KVSP/TKVSP PARTS DRAWING
Not for
Rep
roduc
tion

KVSP Owner’s Manual
Part No 891204 Form No F102315B
14
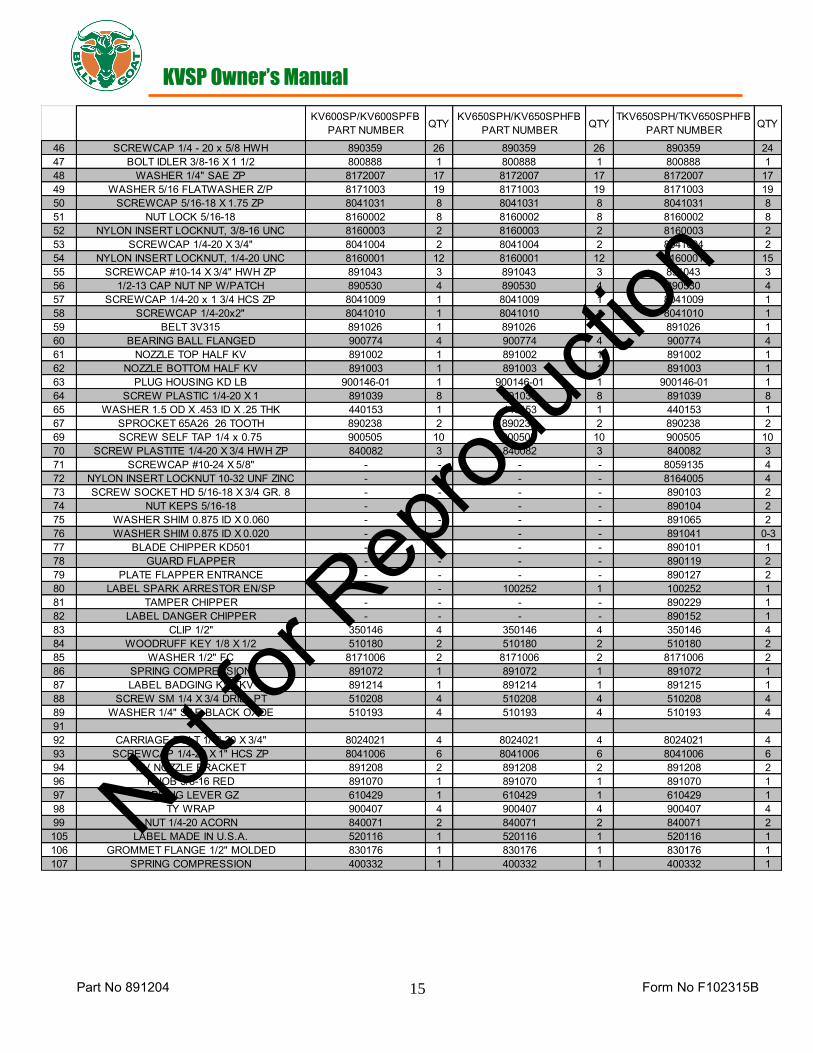
KVSP/TKVSP PARTS LIST
ITEM NO.
Description KV600SP/KV600SPFB PART NUMBER
QTY KV650SPH/KV650SPHFB PART NUMBER
QTY TKV650SPH/TKV650SPHFB PART NUMBER
QTY
1 MAIN FRAME HOUSING KV 891100-S 1 891100-S 1 891100-S 12 NOZZLE ASSEMBLY TKV 891110-S 1 891110-S 1 891110-S 13 AXLE WA KV MICRO 891138 1 891138 1 891138 14 PLATE TOP WA KVSP 891101-S 1 891101-S 1 891107-S 15 IMPELLER SERRATED 14.25 WA KVSP 891104-S 1 891104-S 1 891109-S 16 DOOR EXHAUST ASSY RAW 890148-01 1 890148-01 1 890148-01 17 WASHER 1/2" SAE Z/P 8172011 5 8172011 5 8172011 58 WHEEL ASSY 12" X 2.5" TREAD 900509 2 900509 2 900509 29 ENGINE 6.5 HP HONDA GSV190AN1L - - 840069 1 840069 1
ENGINE 6 BRIGGSAND STRATTON 890622 1 - - - -10 LOWER HANDLE KV 891050 1 891050 1 891050 111 HANDLE UPPER KVSP 891054-S 1 891054-S 1 891054-S 112 QUICK DISCONNECT 890630 1 890630 1 890630 113 PIN CLEVIS 3/8" x 2.125" LONG 520120 4 520120 4 520120 414 RETAINER 360279 4 360279 4 360279 415 GRIP HANDLE 1"X 9.5" LG 430342 2 430342 2 430342 216 LABEL HOT ENGINE EN/SP 100261 1 - - - -1718 LABEL WARNING DANGER 400424 2 400424 2 400424 219 LABEL DANGER FLYING DEBRIS 810736 1 810736 1 810736 120 LABEL SAFETY PROTECT READ MANUAL 100346 1 100346 1 100346 121 BAG DEBRIS NO ZIPPER KV 891132 1 891132 1 891132 1
BAG FELT W/SKIRT KV (FB MODELS) 891211 1 891211 1 891211 122 CABLE THROTTLE ASSY 42" W/CHOKE 891036 1 891027 1 891027 123 J BOLT 3/8-16 X 6" 891071 1 891071 1 891071 124 CABLE CLUTCH DRIVE ASSY 40" KVSP 891032 1 891032 1 891032 125 LABEL CLUTCH VQ 900328 1 900328 1 900328 126 BRACKET TRANS MOUNT WA KV 891106 1 891106 1 891106 127 ARM IDLER DRIVE WA KV 891105 1 891105 1 891105 128 TRANS SINGLE SPEED W/DIFF 891020 1 891020 1 891020 129 SPROCKET 8 TOOTH #43 OR #65 891022 2 891022 2 891022 230 CHAIN #43 X 58 PITCHES 891023 2 891023 2 891023 231 GUARD DRIVE KV 891004-S 1 891004-S 1 891004-S 132 BEARING 1/2" PRESSED STEEL HOUSING 891025 2 891025 2 891025 233 BRACKET TRANS FIX KV 891012 1 891012 1 891012 134 PLATE CHAIN REINFORCE KV 891014 2 891014 2 891014 235 PULLEY IDLER 2" OD X 3/8" ID 840087 1 840087 1 840087 136 SPRING TENSION 800242 1 800242 1 800242 137 BAIL CLUTCH WA KVSP 891102 1 891102 1 891102 138 BRACKET IDLER BELT FINGER KV 891028 1 891028 1 891028 139 LABEL DANGER GUARD 900327 1 900327 1 900327 140 WHEEL ASSY SP 26T SPROCKET 890242 2 890242 2 890242 241 SPACER 1.50OD X .890ID X .5 THK - - 840083 1 840083 142 WASHER LOCK 3/8 ST MED 8177012 1 8177012 1 8177012 143 SQ KEY 2.125 X .187 9201087 1 9201087 1 9201087 144 NUT LOCK 3/8-16 THIN 8161042 1 8161042 1 8161042 145 SCREWCAP 3/8-24 x 3 1/2 GR. 8 W/PATCH 440151 1 440151 1 440151 1
Not for
Rep
roduc
tion
KVSP Owner’s Manual
Part No 891204 Form No F102315B
15
KV600SP/KV600SPFB PART NUMBER QTY
KV650SPH/KV650SPHFB PART NUMBER QTY
TKV650SPH/TKV650SPHFB PART NUMBER QTY
46 SCREWCAP 1/4 - 20 x 5/8 HWH 890359 26 890359 26 890359 2447 BOLT IDLER 3/8-16 X 1 1/2 800888 1 800888 1 800888 148 WASHER 1/4" SAE ZP 8172007 17 8172007 17 8172007 1749 WASHER 5/16 FLATWASHER Z/P 8171003 19 8171003 19 8171003 1950 SCREWCAP 5/16-18 X 1.75 ZP 8041031 8 8041031 8 8041031 851 NUT LOCK 5/16-18 8160002 8 8160002 8 8160002 852 NYLON INSERT LOCKNUT, 3/8-16 UNC 8160003 2 8160003 2 8160003 253 SCREWCAP 1/4-20 X 3/4" 8041004 2 8041004 2 8041004 254 NYLON INSERT LOCKNUT, 1/4-20 UNC 8160001 12 8160001 12 8160001 1555 SCREWCAP #10-14 X 3/4" HWH ZP 891043 3 891043 3 891043 356 1/2-13 CAP NUT NP W/PATCH 890530 4 890530 4 890530 457 SCREWCAP 1/4-20 x 1 3/4 HCS ZP 8041009 1 8041009 1 8041009 158 SCREWCAP 1/4-20x2" 8041010 1 8041010 1 8041010 159 BELT 3V315 891026 1 891026 1 891026 160 BEARING BALL FLANGED 900774 4 900774 4 900774 461 NOZZLE TOP HALF KV 891002 1 891002 1 891002 162 NOZZLE BOTTOM HALF KV 891003 1 891003 1 891003 163 PLUG HOUSING KD LB 900146-01 1 900146-01 1 900146-01 164 SCREW PLASTIC 1/4-20 X 1 891039 8 891039 8 891039 865 WASHER 1.5 OD X .453 ID X .25 THK 440153 1 440153 1 440153 167 SPROCKET 65A26 26 TOOTH 890238 2 890238 2 890238 269 SCREW SELF TAP 1/4 x 0.75 900505 10 900505 10 900505 1070 SCREW PLASTITE 1/4-20 X 3/4 HWH ZP 840082 3 840082 3 840082 371 SCREWCAP #10-24 X 5/8" - - - - 8059135 472 NYLON INSERT LOCKNUT 10-32 UNF ZINC - - - - 8164005 473 SCREW SOCKET HD 5/16-18 X 3/4 GR. 8 - - - - 890103 274 NUT KEPS 5/16-18 - - - - 890104 275 WASHER SHIM 0.875 ID X 0.060 - - - - 891065 276 WASHER SHIM 0.875 ID X 0.020 - - - - 891041 0-377 BLADE CHIPPER KD501 - - - - 890101 178 GUARD FLAPPER - - - - 890119 279 PLATE FLAPPER ENTRANCE - - - - 890127 280 LABEL SPARK ARRESTOR EN/SP - - 100252 1 100252 181 TAMPER CHIPPER - - - - 890229 182 LABEL DANGER CHIPPER - - - - 890152 183 CLIP 1/2" 350146 4 350146 4 350146 484 WOODRUFF KEY 1/8 X 1/2 510180 2 510180 2 510180 285 WASHER 1/2" FC 8171006 2 8171006 2 8171006 286 SPRING COMPRESSION 891072 1 891072 1 891072 187 LABEL BADGING KV/TKV 891214 1 891214 1 891215 188 SCREW SM 1/4 X 3/4 DRILL PT 510208 4 510208 4 510208 489 WASHER 1/4" SAE BLACK OXIDE 510193 4 510193 4 510193 49192 CARRIAGE BOLT 1/4"-20 X 3/4" 8024021 4 8024021 4 8024021 493 SCREWCAP 1/4-20 X 1" HCS ZP 8041006 6 8041006 6 8041006 694 KV NOZZLE BRACKET 891208 2 891208 2 891208 296 KNOB 3/8-16 RED 891070 1 891070 1 891070 197 SPRING LEVER GZ 610429 1 610429 1 610429 198 TY WRAP 900407 4 900407 4 900407 499 NUT 1/4-20 ACORN 840071 2 840071 2 840071 2105 LABEL MADE IN U.S.A. 520116 1 520116 1 520116 1106 GROMMET FLANGE 1/2" MOLDED 830176 1 830176 1 830176 1107 SPRING COMPRESSION 400332 1 400332 1 400332 1
Not for
Rep
roduc
tion

KVSP Owner’s Manual
Part No 891204 Form No F102315B
16
en English bg български език cs Čeština da Dansk de Deutsch es Español et eesti keel
fi Suomi fr Français el Ελληνικά hr Hrvatski hu Magyar it Italiano lt Lietuvių
lv Latviešu nl Nederlands no Norsk pl Polski pt Português ro Română
ru Руccкий sl Slovenščina sk Slovák sv Svenska tr Türkçe
en EC Declaration of Conformity
bg Декларация за съответствие с европейските
стандарти
cs ES Prohlášení o shodě da EC Overensstemmelseserklæring
de EG-Konformitätserklärung es Declaración de Conformidad de la CE
et Eü vastavustunnistus
fi EC- vaatimustenmukaisuusvakuutus fr Déclaration de conformité CE
el Δήλωση συμμόρφωσης ΕΚ hu EU Megfelelőségi nyilatkozat hr EC Deklaracija o sukladnosti it Dichiarazione di conformità CE lt EB atitikties deklaracija lv EK Atbilstības deklarācija nl E.G, Conformiteitverklaring no CE konformitetserklæring
pl Deklaracja zgodności UE
pt Declaração de Conformidade à CE
ro Declaraţie de conformitate C.E.
ru Заявление о соответствии стандартам и нормам ЕС
sl ES izjava o skladnosti sk Vyhlásenie o zhode sv EG-försäkran om överensstämmelse
tr EC Uygunluk Deklarasyonu
en This is to certify that the products listed in this document meet the requirements of the European Community Law, and can carry the CE mark.
These models comply with the following Directives and related Standards.
bg Декларацията се издава в удостоверение на това, че изброените продукти съответстват на стандартите на правните норми на Европейския съюз и
могат да носят знака CE. Моделите изпълняват директивите и техните стандарти, както следва.
cs Tímto stvrzujeme, že výrobky uvedené v tomto dokladu splňují požadavky zákonů Evropského společenství a mohou být
označeny značkou CE. Tyto modely splňují následující směrnice a související normy.
da Det bekræftes hermed, at de produkter, der er nævnt i dette dokument, opfylder bestemmelserne i EU-lovgivningen og kan bære CE-mærkatet.
Disse modeller er i overensstemmelse med følgende direktiver og relaterede standarder:
de Hiermit wird bescheinigt, dass die in diesem Dokument aufgeführten Produkte mit den gesetzlichen Bestimmungen der Europäischen Gemeinschaft übereinstimmen
und das CE- Zeichen tragen können. Diese Modelle erfüllen die folgenden Richtlinien sowie weitere anzuwendende Normen.
es La presente certifica que los productos enumerados en este documento cumplen con los requerimientos de la Legislación de la Comunidad Europea, y que pueden portar la marca CE.
Estos modelos cumplen con las siguientes Directrices y Estándares relacionados: et Kinnitame,et eespool nimetatud tooted vastavad Euroopa Ühenduse seadusandluse nõuetele ja kannavad CE-märgistust. Eespool nimetatud mudelid vastavad järgmistele
direktiividele ja seotud standardile:
fi Vakuutamme, että tässä asiakirjassa luetellut tuotteet täyttävät Euroopan Unionin lainsäädännön asettamat vaatimukset ja voi saada CE-merkinnän.
Nämä mallit täyttävät seuraavien direktiivien ja niitä koskevien standardien vaatimukset:
fr Nous déclarons par la présente que les produits mentionnés dans le document sont conformes à la législation de la Communauté européenne et peuvent porter le marquage CE.
Ces modèles sont conformes aux directives suivantes et aux normes connexes :
el Με την παρούσα δήλωση πιστοποιείται ότι τα προϊόντα που αναφέρονται στην παρούσα πληρούν τις απαιτήσεις της Ευρωπαϊκής Κοινοτικής Νομοθεσίας και μπορούν να φέρουν τη
σήμανση CE. Τα μοντέλα αυτά συμμορφώνονται με τις ακόλουθες Οδηγίες και τα σχετικά Πρότυπα.
hu Ez annak tanúsítására szolgál, hogy e dokumentumban felsorolt termékek megfelelnek az Európai közösségi jog követelményeinek és viselheti a CE jelzést.
Ezek a modellek eleget tesznek a következő irányelveknek és vonatkozó szabványoknak.
hr Ovo je potvrda da proizvodi koji su navedeni u ovom dokumentu odgovaraju zakonima europske zajednice i da nose CE oznaku.
Ovi modeli zadovoljavaju sljedeće direktive i odgovarajuće standarde.
it Si certifica che i prodotti elencati nel presente documento soddisfano i requisiti della legislazione della Comunità Europea e possono recare il marchio CE.
Questi modelli sono conformi alle seguenti norme e direttive:
lt Šiuo patvirtiname kad šiame dokumente paminėti produktai atitinka Europos Bendrijos Įstatymų reikalavimus ir jie gali būti pažymėti CE ženklu.
Šie modeliai atitinka sekančias direktyvas ir standartus.
lv Ar šo tiek apstiprināts, ka šajā dokumentā uzskaitītie izstrādājumi atbilst Eiropas Kopienas Likuma prasībām un var tikt marķēti ar emblēmu CE.
Šie modeļi atbilsts sekojošajām Direktīvām un attiecīgajām Normām.
nl Hiermee wordt gecertificeerd dat de producten die in deze lijst staan opgesomd, voldoen aan de wettelijke voorschriften van de Europese Gemeenschap en mogen worden
voorzien van de CE markering. Deze modellen voldoen aan de volgende richtlijnen en bijbehorende normen:
no Dette sertifiserer at produktene som er nevnt i dette dokumentet oppfyller kravene som stilles av EU, og at de dermed kan CE-merkes.
Disse modellene tilfredsstiller følgende direktiver og relaterte standarder:
pl Niniejszym zaświadcza się, że produkty wymienione w niniejszym dokumencie spełniają wymogi Prawa Wspólnoty Europejskiej i mogą nosić
oznakowanie CE. Modele te spełniają wymogi następujących dyrektyw i powiązanych norm.
pt O presente documento certifica que os produtos listados neste documento atendem aos requisitos das Leis da Comunidade Européia e podem levar a marca CE.
Esses modelos estão de acordo com as seguintes diretivas e padrões relacionados.
ro Prin prezenta se atestă faptul că produsele menţionate în acest document îndeplinesc cerinţele de Drept Comunitar European şi pot
purta sigla C.E. Aceste modele sunt în conformitate cu următoarele directive şi standarde asociate.
ru Настоящим удостоверяется, что перечисленные в этом документе изделия соответствуют требованиям законов Европейского Союза и могут быть
обозначены знаком CE. Эти модели отвечают требованиям следующих директив и соответствующих стандартов.
sl To služi kot potrditev, da izdelki, ki so navedeni v tem dokumentu, ustrezajo zahtevam zakonodaje Evropske skupnosti in so lahko opremljeni z oznako CE. Ti modeli so v skladu z naslednjimi direktivami in povezanimi standardi.
sk Týmto vyhlasujeme, že výrobky uvedené v tomto dokumente, spĺňajú požiadavky zákonov ES a môžu byť označené značkou CE. Tieto modely vyhovujú
nasledujúcim smerniciam príslušným normám.
sv Härmed försäkras att produkterna som finns listade i detta dokument uppfyller kraven i Europeiska gemenskapens lagstiftning och kan förses med CE-märket.
Modellerna uppfyller följande direktiv och tillhörande normer. tr Bu belgede belirtilen ürünlerin Avrupa Birliği Yasası gereksinimlerini karşılayarak CE işareti taşıyabilmesini onaylamak içindir. Bu modeller aşağıdaki Direktif ve ilgili Standartlarla uyumludur
en Category Vacuum bg Категория вакуум cs Kategorie Vakuové da Kategori vakuum de Kategorie Vakuum es Categoría Aspiradora et Kategooría vaakum fi Kategoria tyhjiö fr Catégorie vide
el Κατηγορία κενό hu Kategória vákuum hr Kategorija Vakuum it Categoria vuoto lt Kategorija Dulkių lv Kategorija vakuums nl Categorie vacuüm no Kategori vacuum
pl Kategoria Próżnia pt Categoria vácuo ro Categorie vid ru Категория вакуум sl Kategorija vakuumska sk Kategória vákuové sv Kategori vakuum tr Kategori Vakum
Not for
Rep
roduc
tion

KVSP Owner’s Manual
Part No 891204 Form No F102315B
17
en Directive: 2006/42/EC bg Директива: 2006/42/EC cs Směrnice č. 2006/42/EC da Direktiv: 2006/42/EF de Richtlinie: 2006/42/EG es Directriz: 2006/42/EC et Direktiiviga: 2006/42/EÜ fi Direktiivi: 2006/42/EC fr Directives : 2006/42/CE
hu Irányelv: 2006/42/EC el Οδηγία: 2006/42/EC hr Direktiva: 2006/42/EC it Direttiva: 2006/42/EF lt Direktyva: 2006/42/EG lv Direktīva: 2006/42/EC nl Richtlijn: 2006/42/EÜ no Direktiv: 2006/42/EC pl Dyrektywy: 2006/42/CE
pt Diretiva: 2006/42/EC ru Директива: 2006/42/EC ro Directiva: 2006/42/EC sl Direktiva: 2006/42/EF sk Smernica: 2006/42/EG sv Direktiv: 2006/42/EC tr Direktif: 2006/42/EÜ
en M odelGuaranteed Sound
Power LevelM easured Sound Power
Level Sound Pressure Level at Operator’s Ear (1) Engine Net Power Hand/Arm Vibrat ion (2) M ass
Užitečný výkon Vibrace
motoru rukou/paží (2)
Vibrat ion
af hånd/arm (2)
Niveau sonore au niveau
de l’oreille de l’opérateur (1)
el ΜοντέλοΕγγυημένη στάθμη
ηχητι κής ι σχύος
Μετρηθεί σα στάθμη ηχητι κής ι σχύος
Στάθμη ηχητι κής πί εσης στο αυτί του χει ρι στή (1) Καθαρή ι σχύς κι νητήρα Χει ροβραχι ονι κή δόνηση (2) Μάζα
Hangnyomás szint M otor hasznos
a gépkezelő fülénél (1) teljesítménye
Zajamčena razina Razina zvučnog t laka
snage zvuka na uhu rukovatelja (1)
Garso spaudimo
lygis įrangos naudotojui (1)
Skaņas spiediena līmenis Dzinēja Rokas/pleca
pie operatora auss (1) neto jauda vibrācija (2)
Trilling
van hand/arm (2)
Lydtrykk-nivå Hånd/
ved operatørens øre (1) arm-vibrasjon (2)
Poziom ciśnienia Drgania
akustycznego w uchu operatora (1) ręki/ramienia (2)
Nivel de presiune acust ică
la urechea operatorului (1)
Уровень звукового давления
на месте оператора (1)
Raven zvočnega t laka Izhodna
pri ušesu uporabnika (1) moč motorja
čisty výkon Ruka/Rameno
motora Vibrácia (2)
Ljudtrycksnivå
vid operatörens öra (1)
Ölçülen Ses Gücü
Seviyesi
KV600 110 dB(A) 109 dB(A) 89 dB(A) 4.47 kW 4.95 m/s2 50.8 kg
KV600FB 110 dB(A) 109 dB(A) 89 dB(A) 4.47 kW 4.95 m/s2 50.8 kg
KV650H 110 dB(A) 109 dB(A) 89 dB(A) 4.85 kW 4.95 m/s2 51.3 kg
KV650HFB 110 dB(A) 109 dB(A) 89 dB(A) 4.85 kW 4.95 m/s2 51.3 kg
KV600SP 110 dB(A) 109 dB(A) 89 dB(A) 4.47 kW 58.5 m/s2 58.5 kg
KV600SPFB 110 dB(A) 109 dB(A) 89 dB(A) 4.47 kW 3.29 m/s2 58.5 kg
KV650SPH 110 dB(A) 109 dB(A) 89 dB(A) 4.85 kW 3.29 m/s2 58.9 kg
KV650SPHFB 110 dB(A) 109 dB(A) 89 dB(A) 4.85 kW 3.29 m/s2 58.9 kg
TKV650SPH 113 dB(A) 112 dB(A) 92 dB(A) 4.85 kW 3.29 m/s2 64 kg
TK650SPHFB 113 dB(A) 112 dB(A) 92 dB(A) 4.85 kW 3.29 m/s2 64 kg
M assa
M ass
Garanteret støjniveau M ålt støjniveau
Niveau de bruit mesuré
sk M odel
sv M odell
t r M odel M akine Net Gücü
M otoreffekt netto
M asse
M asa
M assa
Вес
M asa
M assi
Paino
M asse
Tömeg
M asa
M assa
hr M odel
fr M odèle
f i M alli
bg Модел Маса
Váha
Vægt
M asse
M asa
M askine Netto kraft
M otornettoleistung
da M odel
Vibrat ionen an Hand/Arm (2)
Nivel garant izado de potencia acúst ica
Nivel medido de potencia acúst ica
Nivel de presión acúst ica en el oído del operador (1) Potencia neta del motor Vibración mano / brazo (2)
Garantovaná hladina akust ického výkonu
Změřená hladina akust ického výkonu
Hladina akust ického t laku naměřená u ucha obsluhující osoby (1)
Lydtryksniveau ved brugerens øre (1)
Garant ierter Schallleistungspegel
Gemessener Schallleistungspegel Schalldruckpegel am Ohr der Bedienungsperson (1)
Гарантирано ниво на звука
Измерено ниво на звука
es M odelo
de M odell
cs M odel
et M udel
hu M odel
Ağırlık
ro M odel
pt M odelo
pl M odel
no M odell
it M odello Livello acust ico misurato
nl M odel
ru Модель
sl M odel
Garanterad ljudeffektnivå
Uppmätt ljudeffektnivå Hand-/ armvibrat ioner (2)
Garant ili Ses Gücü Seviyesi
Operatörün Kulağındaki Ses Basınç Seviyesi (1) El/Kol Titreşimi (2)
Zajamčena raven zvočne moči
Izmerjena raven zvočne moči
Tresljaji na rokah (2)
Zaručená hladina akust ického výkonu
Nameraná hladina akust ického výkonu
Hladina akust ického t laku pôsobiaceho na ucho obsluhy (1)
M asă
Гарантированный уровень звуковой
мощности
Измеренный уровень звуковой мощности
Полезная мощность двигателяИнтенсивность вибрации на
ладонях/руках (2)
M asa
Vibração na mão/braço (2)
Nivel de zgomot garantat
Nivel de zgomot măsurat Putere netă motor Vibraţie mână/braţ (2)
Gwarantowany poziom mocy akustycznej
Zmierzony poziom mocy akustycznej
M oc netto silnika
Nível de potência de som garant ido
Nível de potência de som medido
Níveis de pressão do som no ouvido do operador (1) Potência út il do motor
Gegarandeerd geluidsdrukniveau
Gemeten geluidsdrukniveau Geluidsdrukniveau bij het oor van de gebruiker (1) Netto motorvermogen
Garantert lydstyrkenivå M ålt lydstyrkenivå M otorens netto krefter
M asė
lv M odelis Garantētais skaņas jaudas līmenis
Izmērī tais skaņas jaudas līmenis
M asa
lt M odelis Garantuotas triukšmo
lygisPamatuotas triukšmo
lygisVariklio bendras galingumas Rankenos vibracija (2)
Izmjerena razina snage zvuka
Neto snaga motora Vibracije šake/ruke (2)
Livello acust ico garant ito
Livello di pressione acust ica all’orecchio dell’operatore
(1) Potenza netta motore Vibrazioni a mani/braccia (2)
Niveau de bruit garant i Puissance nette du moteurVibrat ions au niveau de la
main/du bras (2)
Garantált hangteljesítmény szint
M ért hangteljesítmény szint
Kéz/kar vibráció (2)
Налягане на звука, измерено на нивото на ухото на оператора (1) Мощност на двигателя
Вибрация на дланта и на ръката (2)
Garanteeritud helivõimsuse tase
M õõdetud helivõimsuse tase Helirõhu tase kasutaja kõrva juures (1) M asin puhas töötav Võkumine käsi / käsivars (2)
Taattu äänitehotaso M itattu äänitehotaso Äänenpaine taso käyttäjän korvan tasolla (1) M oottorin nettoteho Käden/käsivarren tärinä (2)
Not for
Rep
roduc
tion

KVSP Owner’s Manual
Part No 891204 Form No F102315B
18
(1) ISO 5395-1:2013 F.7 (EN 4871:1996) (2) ISO 5395-1:2013 G.8 (EN 12096:1997, D.1)
en Manufacturing Place / Keeper of Documentation bg Място на производство / Архивар cs Místo výroby / Držitel dokumentace da Fremstillingssted / Indehaver af dokumentationen de Herstellungsort / Verantwortlicher für die Dokumentation es Lugar de manufactura / Guardián de documentación et Valmistamiskoht / Dokumentatsiooni hoidja fi Valmistuspaikka / Asiakirjojen haltija fr Lieu de fabrication / Personne chargée de conserver la documentation
pl Miejsce produkcji / Osoba odpowiedzialna za przechowywanie dokumentów pt Local de Fabrico / Responsável pela Documentação ro Loc de fabricaţie / Păstrător documentaţie ru Место производства / Владелец документации sl Kraj izdelave / Hranitelj dokumentacije sk Miesto výroby / Dokumentácia majiteľa sv Tillverkningsplats / Dokumentförvaring tr Üretim Yeri / Doküman Sorumlusu
1803 S.W. Jefferson Lees Summit, MO 64063-0308 USA 10/05/2015
Jeroen Engelen Schepersweg 4a 6049CV Herten, NL
Ted Melin Engineering Manager
Part No. 891057
Revision: F102315A
el Τόπος κατασκευής / Υπεύθυνος τήρησης αρχείων τεκμηρίωσης hu Gyártás helye / A dokumentáció őrzője hr Mjesto proizvodnje / Čuvar dokumentacije it Sede di produzione / Archiviatore di documentazione lt Pagaminimo vieta / Dokumentacijos turėtojas lv Ražošanas vieta / Dokumentācijas glabātājs nl Productieplaats / Documentatiebeheerder no Produksjonssted / Dokumentasjonsholder
Not for
Rep
roduc
tion