
ReportWork s Versio n 1 2.6 Installa tion · ReportWork s Versio n 1 2.6 Installa tion ......
25
ReportWorks Version 12.6 Installation Page 1 of 23 Introduction Thank you for choosing to install R&R ReportWorks. The information in this file is designed to familiarize you with the components of ReportWorks and to guide you through the install process. It is suggested that you review this document in its entirety prior to beginning your installation of ReportWorks. Installation Overview The ReportWorks Infinity Installshield Wizard works with the Microsoft Windows installer to install R&R ReportWorks Infinity for either local or shared access. When you use the installer, you are prompted to select the licensing model that is appropriate for your environment. Minimum Installation Requirements You can install ReportWorks on machines that meet the following minimum requirements. Operating System Windows 98 Windows XP Windows Server Versions 2003, 2008, 2008 R2, 2012 Windows Vista Windows 7 Windows 8 / 8.1 Windows 10 Memory At least 512 megabytes (MB) of RAM. 1024 MB recommended. Disk Space 250 MB Drive CD-ROM or DVD drive To view the documentation files, you must have a utility that supports reading documents in PDF and RTF format. If you are running in an environment that has defined user roles (such as Windows Vista with UAC enabled), you will need administrator privileges to install ReportWorks since the install does create registry entries as well as installing files to system locations. See the section Vista Installation Considerations at the conclusion of this document for a discussion on running ReportWorks under Vista. It is also suggested that you create a system restore point prior to running the install. It is not anticipated that you will experience any problems as a result of the installation but it is a prudent practice to create a restore point prior to making any kind of system change.
Transcript of ReportWork s Versio n 1 2.6 Installa tion · ReportWork s Versio n 1 2.6 Installa tion ......
ReportWorks Version 12.6 Installation
Page 1 of 23
Introduction
Thank you for choosing to install R&R ReportWorks. The information in this file is
designed to familiarize you with the components of ReportWorks and to guide you
through the install process. It is suggested that you review this document in its
entirety prior to beginning your installation of ReportWorks.
Installation Overview
The ReportWorks Infinity Installshield Wizard works with the Microsoft Windows
installer to install R&R ReportWorks Infinity for either local or shared access. When
you use the installer, you are prompted to select the licensing model that is
appropriate for your environment.
Minimum Installation Requirements
You can install ReportWorks on machines that meet the following minimum
requirements.
Operating System Windows 98
Windows XP
Windows Server Versions 2003, 2008, 2008 R2, 2012
Windows Vista
Windows 7
Windows 8 / 8.1
Windows 10
Memory At least 512 megabytes (MB) of RAM. 1024 MB recommended.
Disk Space 250 MB
Drive CD-ROM or DVD drive
To view the documentation files, you must have a utility that supports reading
documents in PDF and RTF format.
If you are running in an environment that has defined user roles (such as Windows
Vista with UAC enabled), you will need administrator privileges to install
ReportWorks since the install does create registry entries as well as installing files to
system locations. See the section Vista Installation Considerations at the
conclusion of this document for a discussion on running ReportWorks under Vista.
It is also suggested that you create a system restore point prior to running the
install. It is not anticipated that you will experience any problems as a result of the
installation but it is a prudent practice to create a restore point prior to making any
kind of system change.
ReportWorks Version 12.6 Installation
Page 2 of 23
Upgrading from an earlier release
If you are installing Version 12 on a machine has an existing installation of R&R
release, it is recommended that you back up any modified R&R files and then un-
install your earlier release prior to the installation of Version 12. Although the
current release may be installed on a machine that contains a previous version, we
do not officially support or recommend that multiple versions be present on a single
machine.
What to back up prior to uninstall:
Any user function library files RR.UDF/SYSRR.UDF for Xbase, RSW.UDF/SYSRSW.UDF for SQL
Found in R&R program folder
SQL Initialization file
RSWSQL.INI
Found in R&R program folder
Sort rule files
RRW.SRT for Xbase, RSW.SRT for SQL
Found in R&R program folder
Report Librarian and Data Dictionary data files All files with extension DBF, CDX and FPT
Found in RL folder below the R&R program folder
Program initialization files
RRW.INI for Xbase, RSW.INI for SQL
Found in root of operating system folder
Once you have backed up your files, you can then safely uninstall your current
version. Note that uninstall will not remove your RRW.INI and RSW.INI files. You
can then install Version 12 using the install CD. Running the install will create a
new R&R program folder and will modify any existing RRW.INI/RSW.INI files to
point to the Version 12 folder.
When installation is complete, you should compare your backup RRW.INI/RSW.INI
to the current version that was updated by the installer to make sure that the
settings reflect your desired preferences.
You can then copy your backup versions of R?W.UDF, RSWSQL.INI and R?W.SRT to
the new Version 12 folder. Note that this step is only required if you had modified
these files in your earlier release.
Finally you should copy your backup Report Librarian and Data Dictionary data files
to the RL subfolder in your Version 12 installation so you will have your existing
Report Librarian and Data Dictionary files.
ReportWorks Version 12.6 Installation
Page 3 of 23
Contents of the installation CD
Autorun.INF
ReadMe.RTF
ReportWorksInfinity.msi ReportWorks V12 Installation Guide.PDF
PDFDOCS folder (contains all documentation in PDF format)
ReportWorks Version 12.6 Installation
Page 4 of 23
Installation Procedure
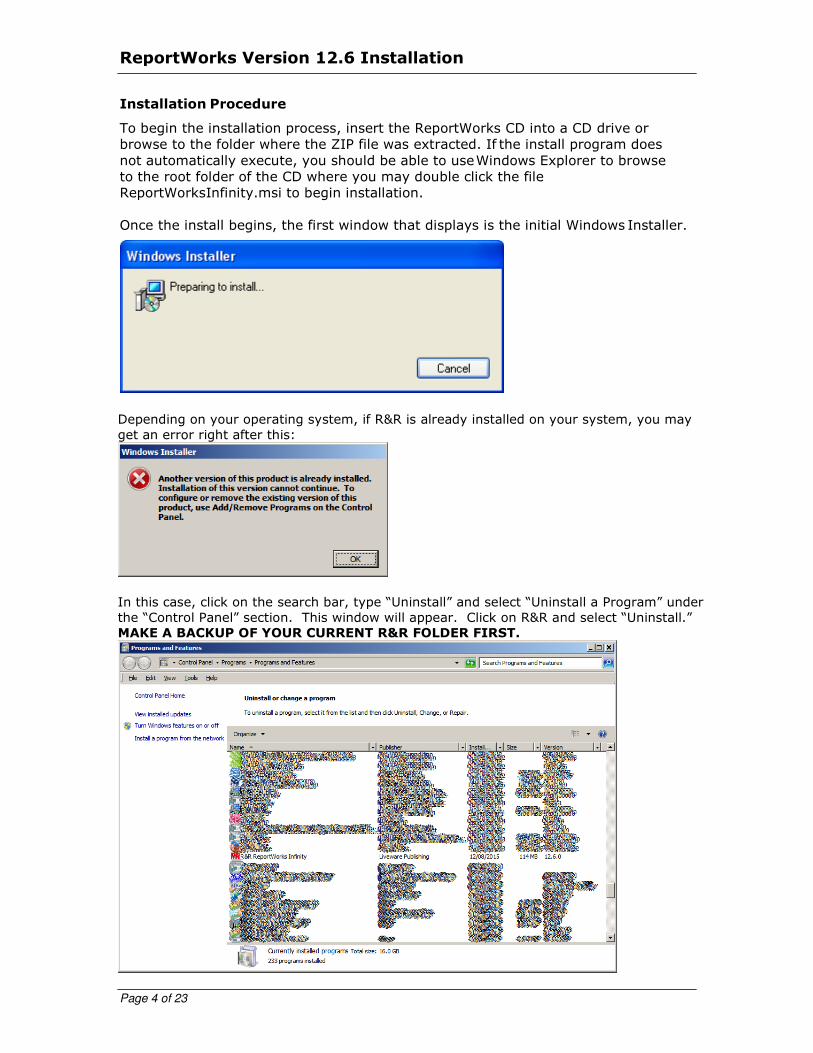
To begin the installation process, insert the ReportWorks CD into a CD drive or
browse to the folder where the ZIP file was extracted. If the install program does
not automatically execute, you should be able to use Windows Explorer to browse
to the root folder of the CD where you may double click the file
ReportWorksInfinity.msi to begin installation.
Once the install begins, the first window that displays is the initial Windows Installer.
Depending on your operating system, if R&R is already installed on your system, you may
get an error right after this:
In this case, click on the search bar, type “Uninstall” and select “Uninstall a Program” under
the “Control Panel” section. This window will appear. Click on R&R and select “Uninstall.”
MAKE A BACKUP OF YOUR CURRENT R&R FOLDER FIRST.
ReportWorks Version 12.6 Installation
Page 5 of 23
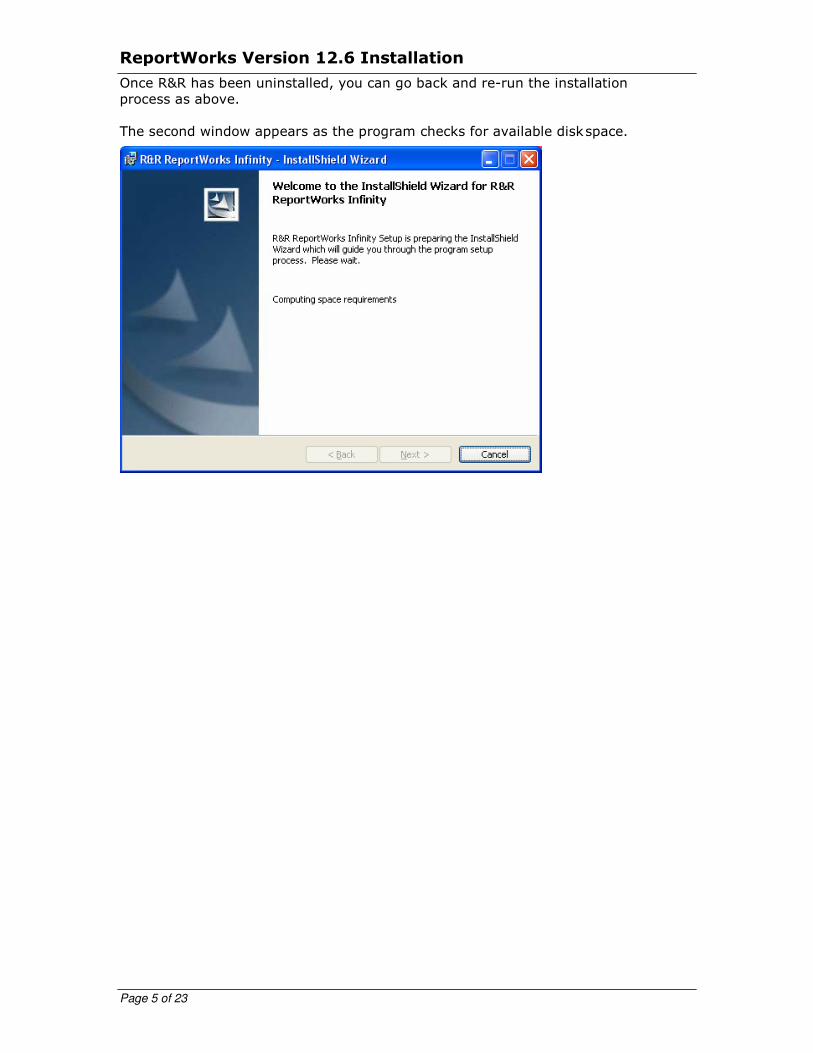
Once R&R has been uninstalled, you can go back and re-run the installation
process as above.
The second window appears as the program checks for available disk space.
ReportWorks Version 12.6 Installation
Page 6 of 23
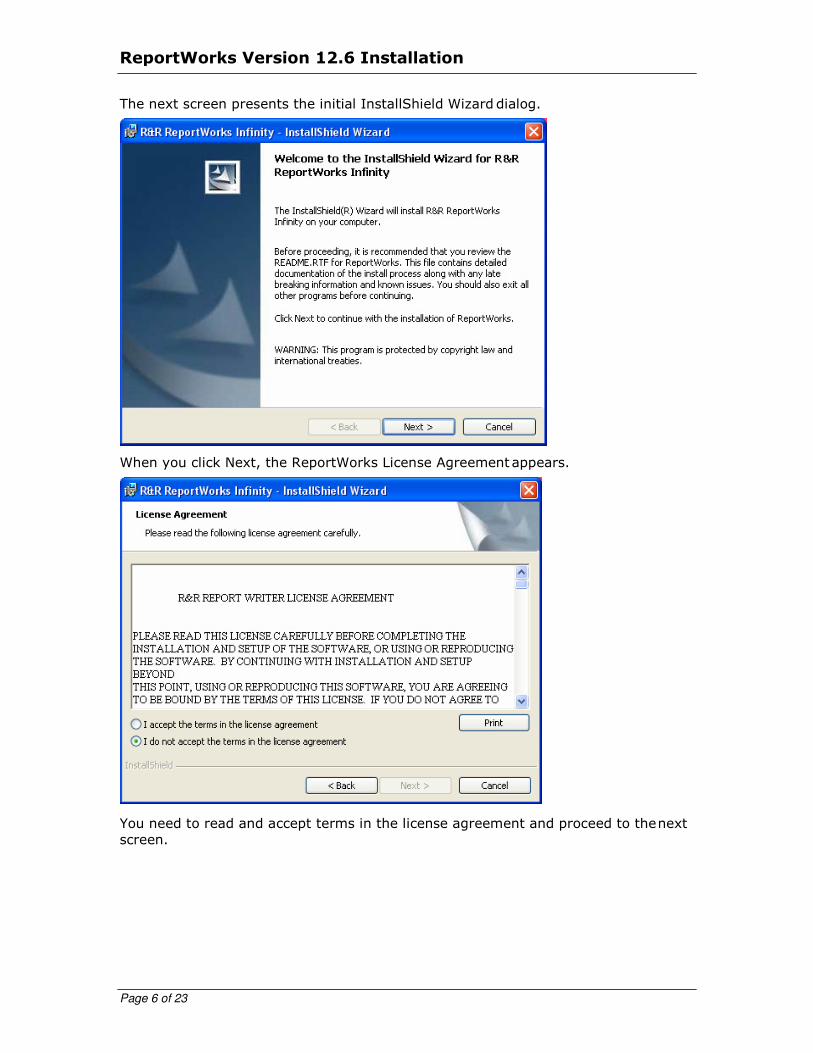
The next screen presents the initial InstallShield Wizard dialog.
When you click Next, the ReportWorks License Agreement appears.
You need to read and accept terms in the license agreement and proceed to the next
screen.
ReportWorks Version 12.6 Installation
Page 7 of 23
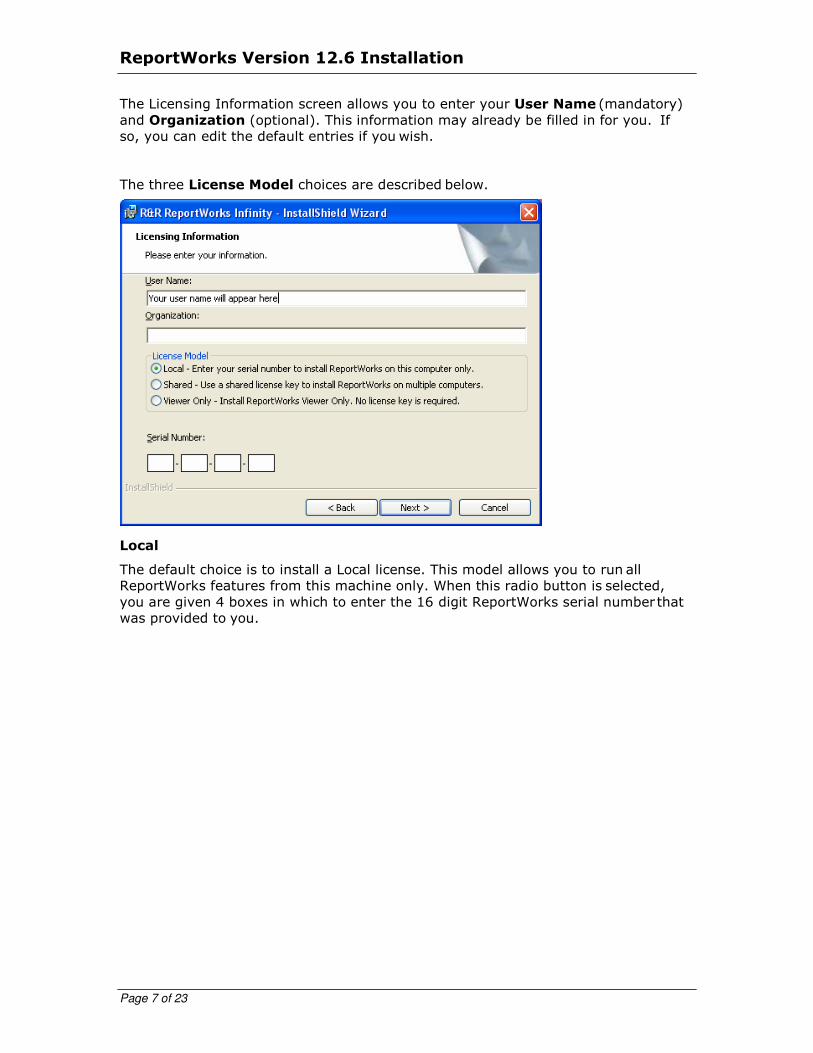
The Licensing Information screen allows you to enter your User Name (mandatory)
and Organization (optional). This information may already be filled in for you. If
so, you can edit the default entries if you wish.
The three License Model choices are described below.
Local
The default choice is to install a Local license. This model allows you to run all
ReportWorks features from this machine only. When this radio button is selected,
you are given 4 boxes in which to enter the 16 digit ReportWorks serial number that
was provided to you.
ReportWorks Version 12.6 Installation
Page 8 of 23
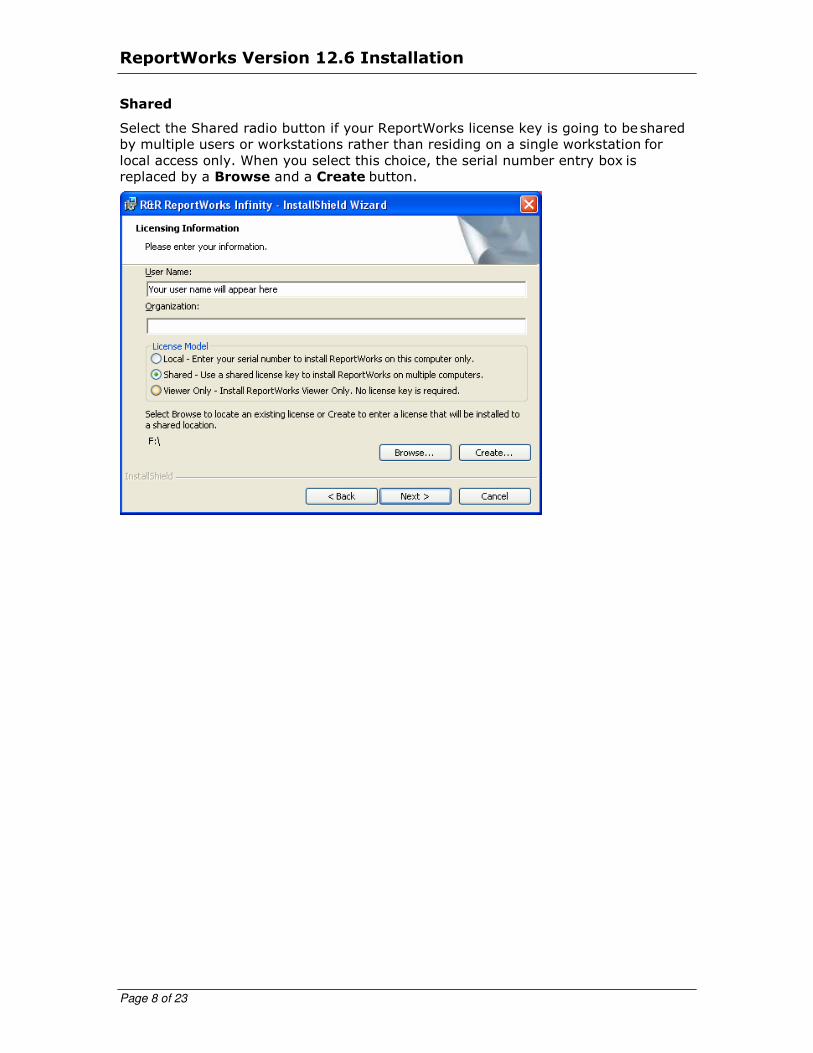
Shared
Select the Shared radio button if your ReportWorks license key is going to be shared
by multiple users or workstations rather than residing on a single workstation for
local access only. When you select this choice, the serial number entry box is
replaced by a Browse and a Create button.
ReportWorks Version 12.6 Installation
Page 9 of 23
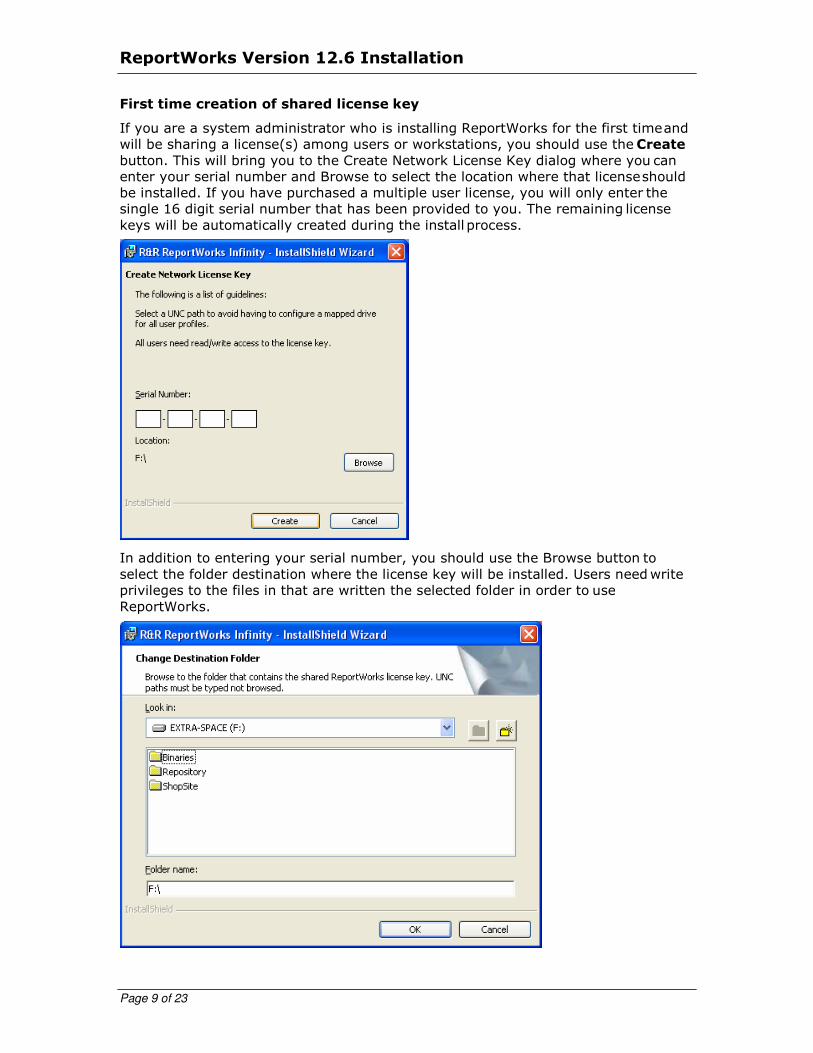
First time creation of shared license key
If you are a system administrator who is installing ReportWorks for the first time and
will be sharing a license(s) among users or workstations, you should use the Create
button. This will bring you to the Create Network License Key dialog where you can
enter your serial number and Browse to select the location where that license should
be installed. If you have purchased a multiple user license, you will only enter the
single 16 digit serial number that has been provided to you. The remaining license
keys will be automatically created during the install process.
In addition to entering your serial number, you should use the Browse button to
select the folder destination where the license key will be installed. Users need write
privileges to the files in that are written the selected folder in order to use
ReportWorks.
ReportWorks Version 12.6 Installation
Page 10 of 23
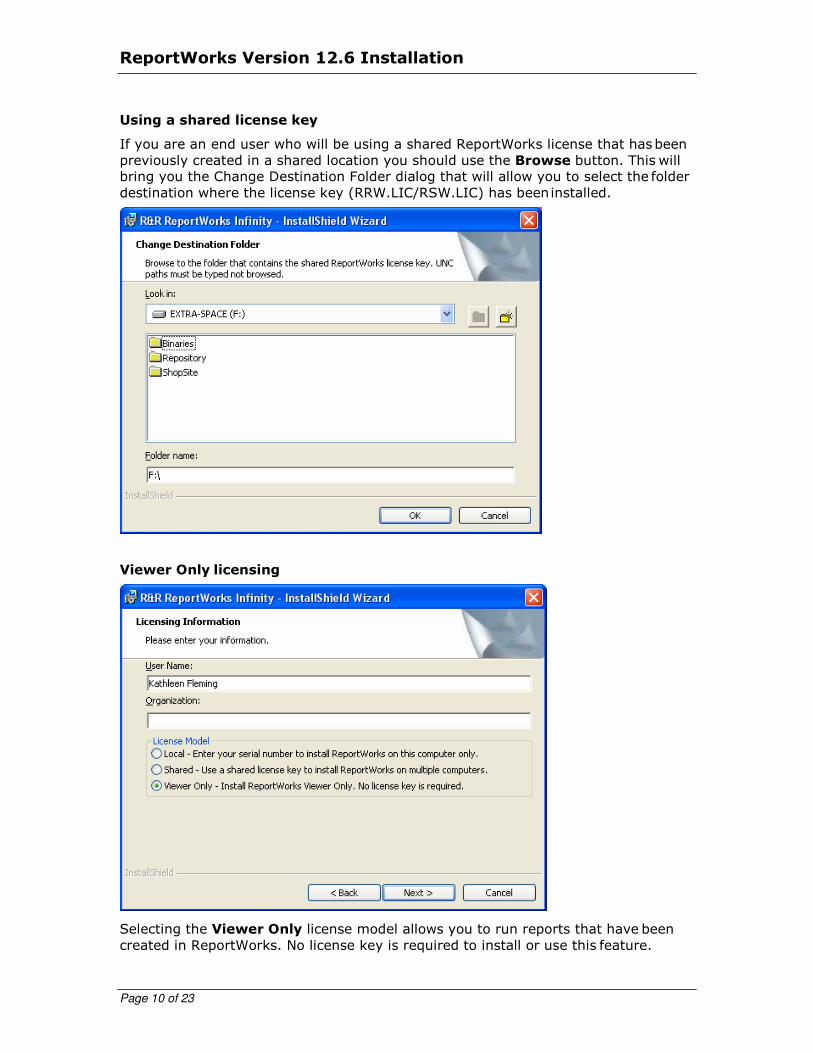
Using a shared license key
If you are an end user who will be using a shared ReportWorks license that has been
previously created in a shared location you should use the Browse button. This will
bring you the Change Destination Folder dialog that will allow you to select the folder
destination where the license key (RRW.LIC/RSW.LIC) has been installed.
Viewer Only licensing
Selecting the Viewer Only license model allows you to run reports that have been
created in ReportWorks. No license key is required to install or use this feature.
ReportWorks Version 12.6 Installation
Page 11 of 23
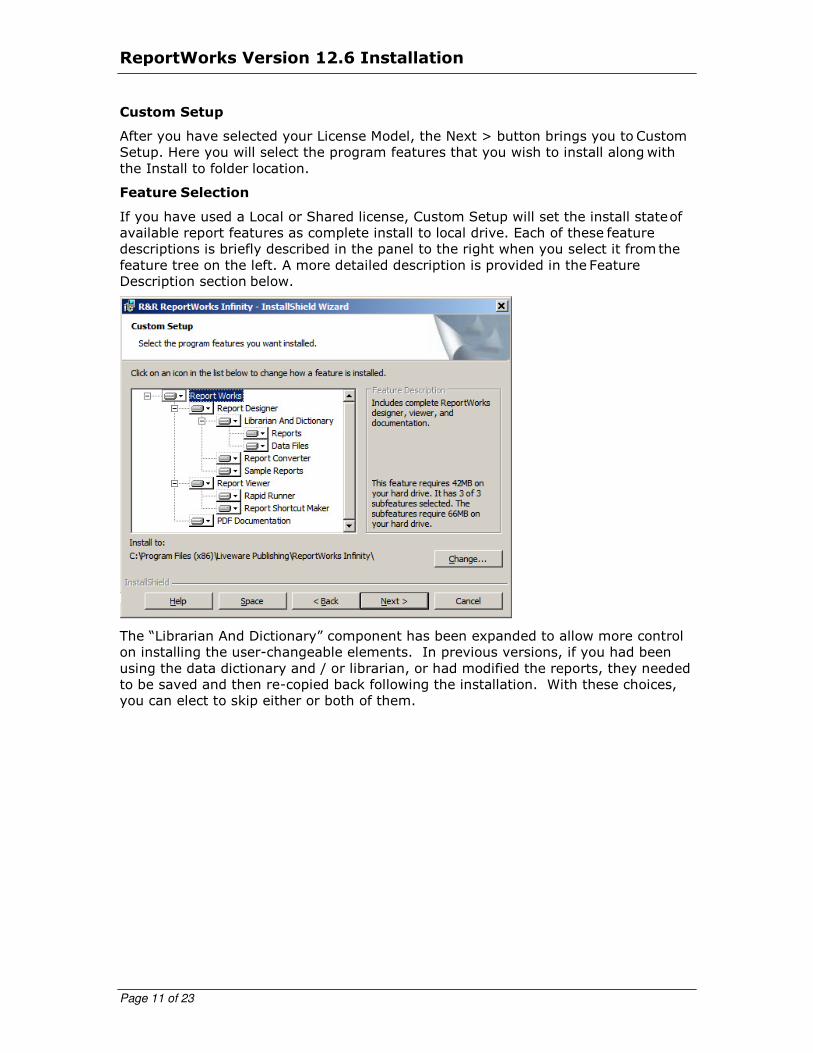
Custom Setup
After you have selected your License Model, the Next > button brings you to Custom
Setup. Here you will select the program features that you wish to install along with
the Install to folder location.
Feature Selection
If you have used a Local or Shared license, Custom Setup will set the install state of
available report features as complete install to local drive. Each of these feature
descriptions is briefly described in the panel to the right when you select it from the
feature tree on the left. A more detailed description is provided in the Feature
Description section below.
The “Librarian And Dictionary” component has been expanded to allow more control
on installing the user-changeable elements. In previous versions, if you had been
using the data dictionary and / or librarian, or had modified the reports, they needed
to be saved and then re-copied back following the installation. With these choices,
you can elect to skip either or both of them.
ReportWorks Version 12.6 Installation
Page 12 of 23
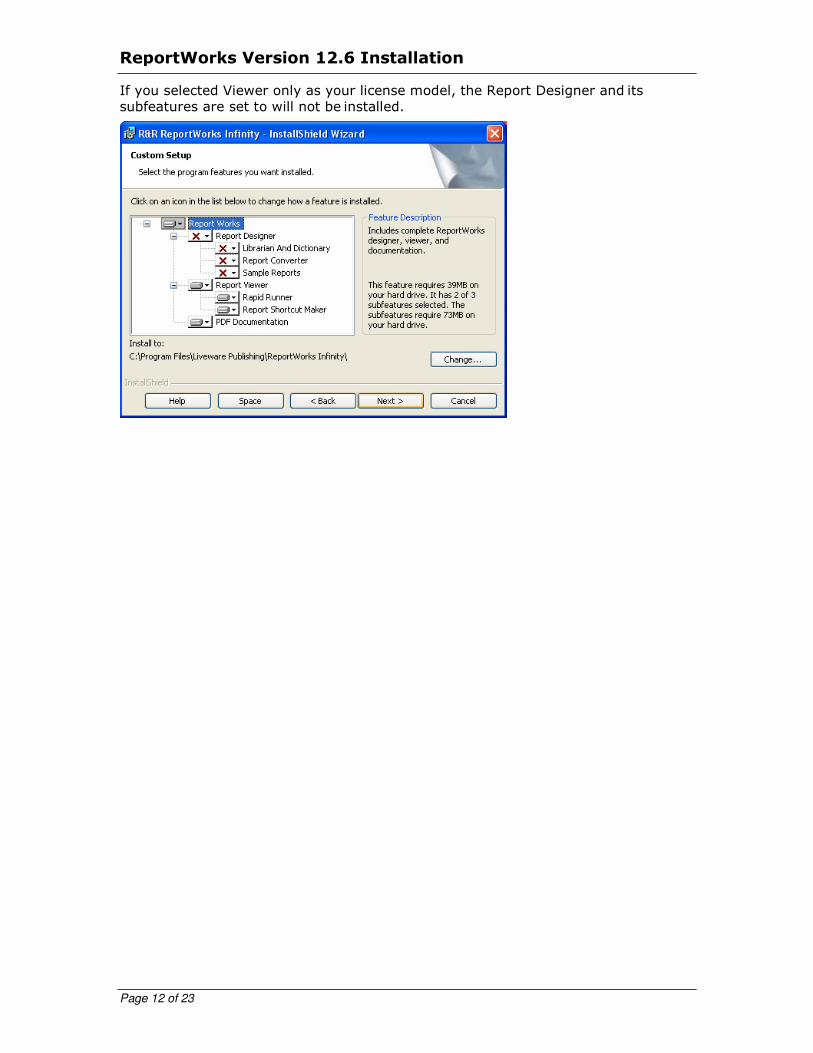
If you selected Viewer only as your license model, the Report Designer and its
subfeatures are set to will not be installed.
ReportWorks Version 12.6 Installation
Page 13 of 23
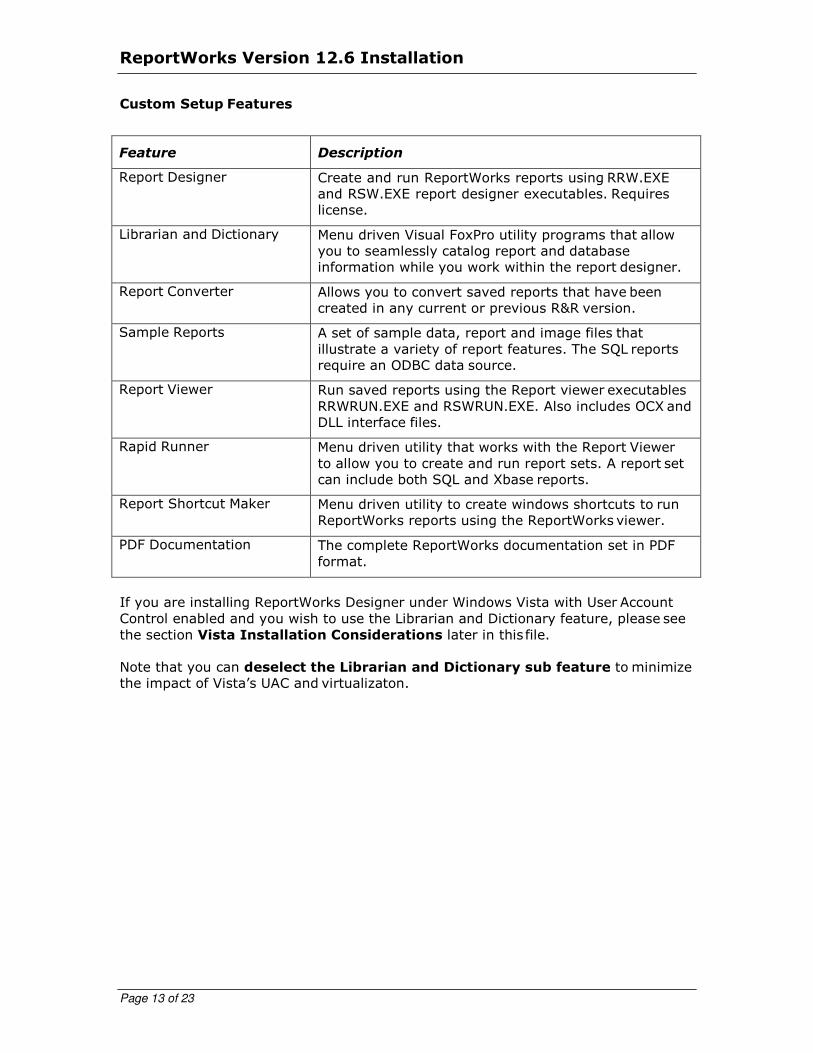
Custom Setup Features
Feature Description
Report Designer Create and run ReportWorks reports using RRW.EXE
and RSW.EXE report designer executables. Requires
license.
Librarian and Dictionary Menu driven Visual FoxPro utility programs that allow
you to seamlessly catalog report and database
information while you work within the report designer.
Report Converter Allows you to convert saved reports that have been
created in any current or previous R&R version.
Sample Reports A set of sample data, report and image files that
illustrate a variety of report features. The SQL reports
require an ODBC data source.
Report Viewer Run saved reports using the Report viewer executables
RRWRUN.EXE and RSWRUN.EXE. Also includes OCX and
DLL interface files.
Rapid Runner Menu driven utility that works with the Report Viewer
to allow you to create and run report sets. A report set
can include both SQL and Xbase reports.
Report Shortcut Maker Menu driven utility to create windows shortcuts to run
ReportWorks reports using the ReportWorks viewer.
PDF Documentation The complete ReportWorks documentation set in PDF
format.
If you are installing ReportWorks Designer under Windows Vista with User Account
Control enabled and you wish to use the Librarian and Dictionary feature, please see
the section Vista Installation Considerations later in this file.
Note that you can deselect the Librarian and Dictionary sub feature to minimize
the impact of Vista’s UAC and virtualizaton.

ReportWorks Version 12.6 Installation
Page 14 of 23
Install to Location
For all license models, the Install to location is the root folder where the program
files will be installed. This folder automatically defaults to:
C:\Program Files\Liveware Publishing\ReportWorks Infinity\
Unless you are installing on a Vista 64 machine. In that case the default becomes
C:\Program Files (x86)\Liveware Publishing\ReportWorks Infinity\
You can use the Change button to select a different destination folder for the
program files. If the selected folder does not exist, it will be created by the installer.
If you are installing ReportWorks under Windows Vista with User Account Control
enabled please see the section Vista Installation Considerations at the conclusion
of this document for a discussion how Vista implements the VirtualStore for legacy
applications that are installed within the Program Files folder structure.
ReportWorks Version 12.6 Installation
Page 15 of 23
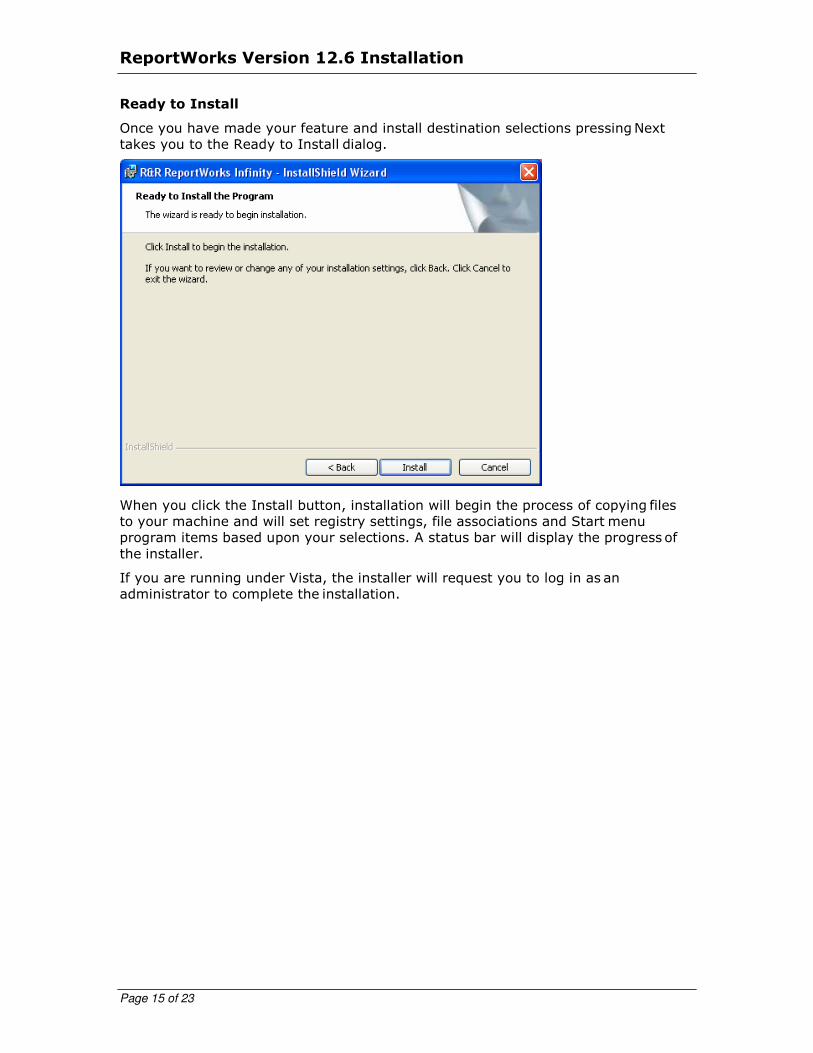
Ready to Install
Once you have made your feature and install destination selections pressing Next
takes you to the Ready to Install dialog.
When you click the Install button, installation will begin the process of copying files
to your machine and will set registry settings, file associations and Start menu
program items based upon your selections. A status bar will display the progress of
the installer.
If you are running under Vista, the installer will request you to log in as an
administrator to complete the installation.
ReportWorks Version 12.6 Installation
Page 16 of 23
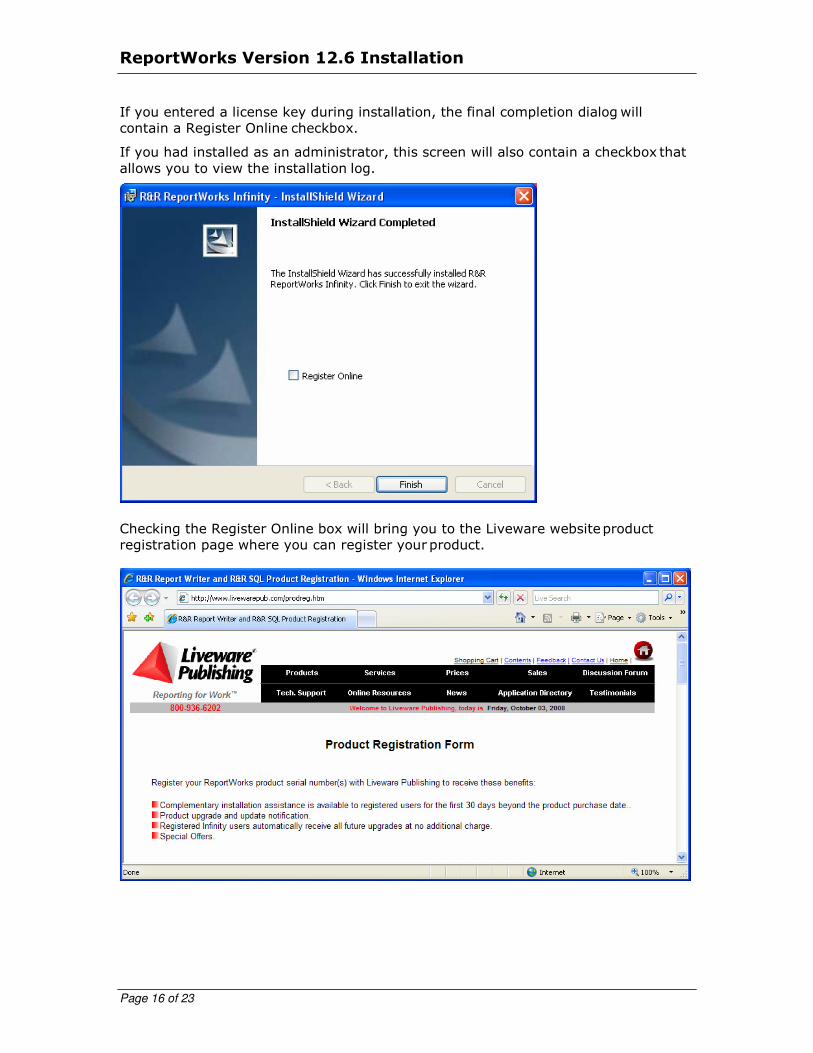
If you entered a license key during installation, the final completion dialog will
contain a Register Online checkbox.
If you had installed as an administrator, this screen will also contain a checkbox that
allows you to view the installation log.
Checking the Register Online box will bring you to the Liveware website product
registration page where you can register your product.
ReportWorks Version 12.6 Installation
Page 17 of 23
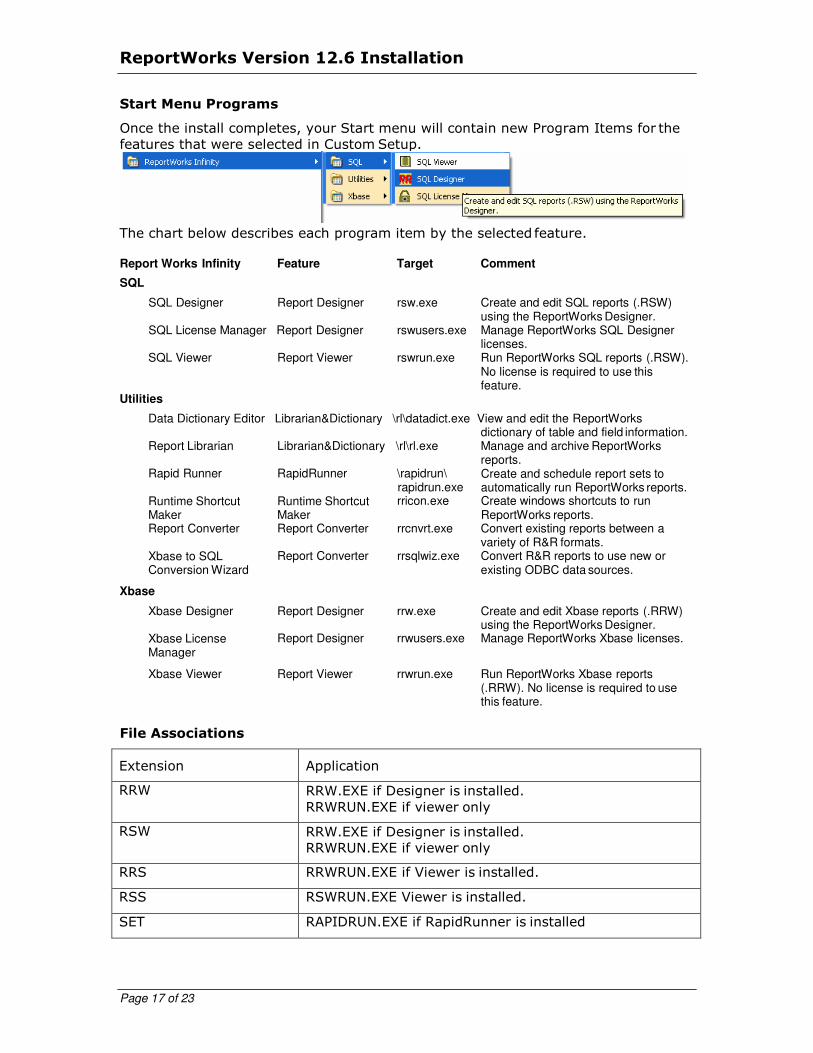
Start Menu Programs
Once the install completes, your Start menu will contain new Program Items for the
features that were selected in Custom Setup.
The chart below describes each program item by the selected feature.
Report Works Infinity Feature Target Comment
SQL
SQL Designer Report Designer rsw.exe Create and edit SQL reports (.RSW) using the ReportWorks Designer.
SQL License Manager Report Designer rswusers.exe Manage ReportWorks SQL Designer licenses.
SQL Viewer Report Viewer rswrun.exe Run ReportWorks SQL reports (.RSW). No license is required to use this feature.
Utilities
Data Dictionary Editor Librarian&Dictionary \rl\datadict.exe View and edit the ReportWorks dictionary of table and field information.
Report Librarian Librarian&Dictionary \rl\rl.exe Manage and archive ReportWorks reports.
Rapid Runner RapidRunner \rapidrun\ rapidrun.exe
Create and schedule report sets to automatically run ReportWorks reports.
Runtime Shortcut Maker
Runtime Shortcut Maker
rricon.exe Create windows shortcuts to run ReportWorks reports.
Report Converter Report Converter rrcnvrt.exe Convert existing reports between a variety of R&R formats.
Xbase to SQL Conversion Wizard
Xbase
Report Converter rrsqlwiz.exe Convert R&R reports to use new or existing ODBC data sources.
Xbase Designer Report Designer rrw.exe Create and edit Xbase reports (.RRW) using the ReportWorks Designer.
Xbase License Manager
Report Designer rrwusers.exe Manage ReportWorks Xbase licenses.
Xbase Viewer Report Viewer rrwrun.exe Run ReportWorks Xbase reports (.RRW). No license is required to use this feature.
File Associations
Extension Application
RRW RRW.EXE if Designer is installed.
RRWRUN.EXE if viewer only
RSW RRW.EXE if Designer is installed.
RRWRUN.EXE if viewer only
RRS RRWRUN.EXE if Viewer is installed.
RSS RSWRUN.EXE Viewer is installed.
SET RAPIDRUN.EXE if RapidRunner is installed
ReportWorks Version 12.6 Installation
Page 18 of 23
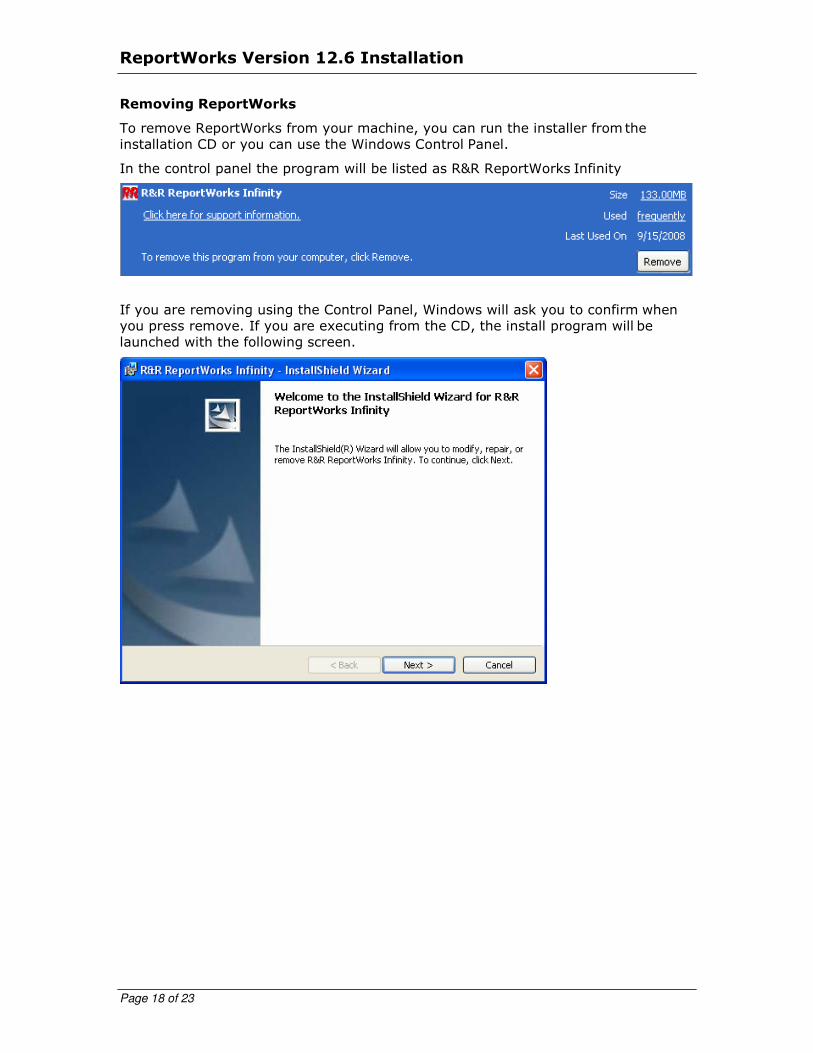
Removing ReportWorks
To remove ReportWorks from your machine, you can run the installer from the
installation CD or you can use the Windows Control Panel.
In the control panel the program will be listed as R&R ReportWorks Infinity
If you are removing using the Control Panel, Windows will ask you to confirm when
you press remove. If you are executing from the CD, the install program will be
launched with the following screen.
ReportWorks Version 12.6 Installation
Page 19 of 23
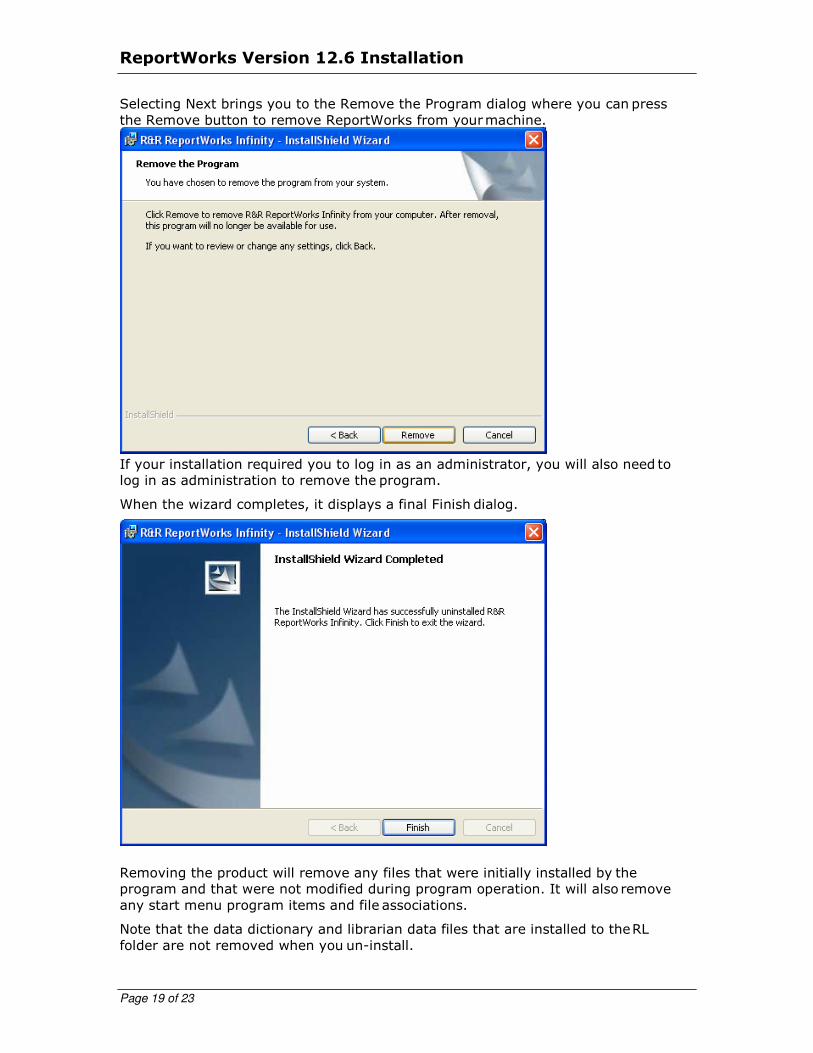
Selecting Next brings you to the Remove the Program dialog where you can press
the Remove button to remove ReportWorks from your machine.
If your installation required you to log in as an administrator, you will also need to
log in as administration to remove the program.
When the wizard completes, it displays a final Finish dialog.
Removing the product will remove any files that were initially installed by the
program and that were not modified during program operation. It will also remove
any start menu program items and file associations.
Note that the data dictionary and librarian data files that are installed to the RL
folder are not removed when you un-install.
ReportWorks Version 12.6 Installation
Page 20 of 23
Vista Installation Considerations
When you install ReportWorks on a Vista machine, you need to be aware of the
impact of the additional security restrictions that are imposed by User Account
Control (UAC). You also need to consider the protection that Vista adds through file
virtualization.
In our testing environment, the only area that we have found as
problematic under Vista has been in using the Report Data Dictionary
utilities. Note that you can deselect the Librarian and Dictionary feature
during installation or can disable the Dictionary after the program is
installed by editing the RRW.INI and RSW.INI initialization files..
The next sections give an overview of UAC and virtualization and describe the areas
with ReportWorks where these features may come into play. The last section of the
document describes using Report Librarian and Data Dictionary under Vista.
User Account Control (UAC)
With User Account control enabled, installation of any program requires that system
Administrator credentials be supplied at the time of installation. You will need to
have those credentials available in order to install or remove ReportWorks. There is
not a way to bypass this requirement. Once the program is installed, it may then be
run by a regular user account. Note that if shared license location was selected
during installation, the user must be able to write to the LIC file that resides in that
folder.
File Virtualization
Legacy applications such as ReportWorks have traditionally been designed to have
full access to their install folder and subfolders and to use the root of the operating
system folder as the location of INI or initialization files. With Vista, Microsoft has
tightened system security significantly. Installation programs are still allowed to
install files in the operating system and Program Files folders. But in Vista, when you
run the installed programs that may need to write to files in these protected
locations, instead of writing to the actual source, Vista create a modified copy of the
files to a new VirtualStore location and from that point on, will read/write data to the
VirtualStore copy of the file.
Virtual stores are located in the path
C:\users\UserName\AppData\Local\VirtualStore
ReportWorks Version 12.6 Installation
Page 21 of 23
Within the Virtual store folder are subfolders for Program Files and for Windows.
From the application perspective, it continues to use the source path. The redirection
that is done by Vista is in most cases transparent to the application with one notable
exception. If an application contains code that asks for the current path of a file that
has been virtualized, the operating system returns the non-virtualized path of the
file. This may cause an application to not see the most recently modified version of
a file.
Microsoft has advised application developers that future versions of Vista may
remove Virtual Store capability and suggest that applications be recoded so that any
data that is written, be saved to a non-protected location.
Because of our extensive installed base of legacy users who may still be running on
non-Vista machines, the current version of ReportWorks does not totally eliminate
protected folder access.
If you are installing in a Vista environment, you will want to be aware of following
instances where virtualization may impact installing and using ReportWorks.
Files that are installed in the Windows folder and are subject to
virtualization
RRW.INI and RSW.INI
These INI files are the main initial files for the Report Designer and Viewer. They are
created in the Windows folder when you install either the Report Designer or the
Report Viewer. Vista will virtualize these files as soon as ReportWorks makes a
request to update the file.
The Report Designer writes to the INI file when you make changes within the Options
menu, whenever you save a report file and when you exit the program.
The Viewer reads the INI file but does not make changes to it. If you have used the
Designer, then it is likely that you will have two separate RRW.INI files, the original
one in the Windows folder and the current one in the VirtualStore/Windows folder.
Vista will present the virtualized copy of the file to the designer and the runtime
executables so that they will see the latest changes.
Most of the changes that are required to the RRW.INI and RSW.INI are made
indirectly through the Report Designer. But there are available settings that can only
be made by manually editing the file in a text editor such as changing FlexLink
prompting in the Xbase version or adding a DATABASE section in the SQL version. If
you need to make these changes, they must be done to the Virtual store copy of the
file if it exists since the Virtual store takes precedence over the actual windows copy
of the file.
ReportWorks Program Folder files
If you install ReportWorks with the Program Files folder, Vista will virtualize any
files that are added or changed within this structure. If you want to avoid
virtualization, you can use the Change button in the Custom Setup dialog to select
folder location that is not within Program Files for install.
ReportWorks Version 12.6 Installation
Page 20 of 23
RRWLINK.INI and RSWLINK.INI
The link files are installed in the installation program folder except when a viewer
only install is performed. These files contain an entry that tells ReportWorks where
to find the license key file and where to write any user defined function files.
Typically you would not need to edit these files after installation. If a local license
installation was done, then the link settings will point to the ReportWorks program
folder itself.
RRW.LIC and RSW.LIC
If you install a local license to the default Program Files location, then RRW.LIC and
RSW.LIC will be virtualized to the corresponding folder within the VirtualStore. The
license files are updated each time you start or exit the Report Designer. Also any
user defined function files will be written to the VirtualStore.
Reports
If you elect to save a report file to a protected location (any folder with Program
Files), Vista will virtualize that file to the VirtualStore.

ReportWorks Version 12.6 Installation
Page 21 of 23
Data Dictionary and Librarian configuration
The DBF, FPT and CDX files within the RL folder are used to store dictionary and
librarian data. When the Dictionary and Librarian are enabled, these files are updated
to any time a table is selected or a report file is saved.
You can enable/disable the dictionary and librarian by editing your RRW.INI/RSW.INI
initialization file.
With the [DEFAULTS] section of the file are two parameters, LIBRARIAN and
DICTIONARY. These parameters are not case sensitive and may appear anywhere
within the [DEFAULTS] section.
To disable Librarian and Dictionary the file will contain (new
default setting for v12.6):
[DEFAULTS]
LIBRARIAN=OFF
DICTIONARY=0
To enable Librarian and Dictionary the file will contain:
[DEFAULTS]
LIBRARIAN=ON
DICTIONARY=1
In addition to enabling and disabling these utilities you can also configure the
location of the librarian and dictionary data files. To do this you add an RL.INI
initialization file to the RL sub folder. The RL.INI file can contain a section and
parameter named RLDATA that can point to an alternative location for the librarian
and dictionary data files. Here is an example of an RL.INI that sets the location of
the RL data files to J:\shared\InfinityDict
[RLDATA]
RLDATA= J:\shared\InfinityDict
In addition to creation of the RL.INI file, you also need to copy all of the
DBF/CDX/FPT/RRW files to the RLDATA folder.
ReportWorks Version 12.6 Installation
Page 22 of 23
How the Librarian and Dictionary interface with the Report Designer
Librarian
When you save a report in the Report Designer with Librarian enabled, a file named
RPTSPEC.TXT is written to the \RL subfolder. Then a Visual FoxPro cataloging
program (RLCAT.EXE for Xbase, RLSCAT.EXE) is called. The catalog program then
reads the RPTSPEC.TXT and updates the existing librarian data files.
The Librarian utility program RL.EXE allows you to view details about the reports that
have been catalogued through the Report Designer.
Data Dictionary
When you select a table in the Report Designer with Dictionary enabled, a
VisualFoxpo cataloging program (DDFLDUP.EXE) to update the data dictionary data
files with information about the table and its fields. If a table has been catalogued in
the dictionary, when you select it in Report Designer and right click, choosing
Dictionary will invoke the program Visual Foxpro program FLDVIEW.EXE and the
current data dictionary entry for that field will be displayed. Unlike the Librarian, the
temporary files used to update the dictionary reside the windows temp folder rather
than the RL folder.
Under Vista, if the RL data files have been installed with the Program Files folder
structure, files will be virtualized (have their most recent version copied to the
VirtualStore folder structure) as they are modified. So you may find that some of the
files are in the virtual store and others are in the actual program files folder.
What currently happens when the Dictionary is enabled under Vista
If UAC is enabled and you accept the default install location, the first time that you
use the designer and select a table, the dictionary temp file does get written to the
temp folder of the current user. But if you right click on a field, you get the message
that the field is not in the dictionary.
When you exit ReportWorks you get a message from Vista that the program has had
a problem and that the next time it is executed, it will be set to run in compatibility
mode.
If you come back into the Designer a second time and create a new report, when you
select the table you get a UAC elevation prompt that DDFLDUP.EXE requires admin
permission. If you allow it to execute, then the dictionary is updated and you can
right click the fields.
If you install to location that is not within Program Files, you still see the problem of
the files not being updated on the first attempt and you get the compatibility prompt
on exit. The next time you run, the dictionary is correctly updated and you do not
see the UAC elevation prompt (because you are now running from a non-virtualized
folder.)
We are working on finding and fixing its cause. In the current release you can: • Deselect the Librarian and Dictionary feature during installation
• Disable the Dictionary through editing the RRW.INI/RSW.INI
• Install to a non virtualized fold
ReportWorks Version 12.6 Installation
Page 23 of 23


![Franquisme versio reduida[1]](https://static.fdocuments.net/doc/165x107/5594cb7b1a28abc63c8b479d/franquisme-versio-reduida1.jpg)


