REPLACING A PHYSICAL HARD DRIVE IN A TWO- WAY · PDF file3 EXECUTIVE SUMMARY "Storage Spaces"...
26
1 REPLACING A PHYSICAL HARD DRIVE IN A TWO- WAY-MIRRORED "STORAGE SPACE" IN "WINDOWS 8"
Transcript of REPLACING A PHYSICAL HARD DRIVE IN A TWO- WAY · PDF file3 EXECUTIVE SUMMARY "Storage Spaces"...
1
REPLACING A PHYSICAL
HARD DRIVE IN A TWO-
WAY-MIRRORED
"STORAGE SPACE" IN
"WINDOWS 8"

2
Web location for this
presentation:
http://aztcs.orgClick on
“Meeting Notes”

3
EXECUTIVE SUMMARY"Storage Spaces" is a feature in
"Windows 8..". that provides for
various hard drive enhancements
including real-time, automatic drive
mirroring so that two hard drives
always contain the same data files
and folders in real time. Here is the
procedure for replacing a physical
hard drive in a two-way-mirrored
"Storage Space".

4
REPLACING A
PHYSICAL HARD
DRIVE IN A
TWO-WAY-
MIRRORED
"STORAGE SPACE"

5
Replacing A Physical Hard Drive In
A.."Storage Space" (continued)
• You cannot logically
remove a physical hard
drive from a mirrored
"Storage Space" unless
you first add in another
hard drive to the "Storage
Pool":
6
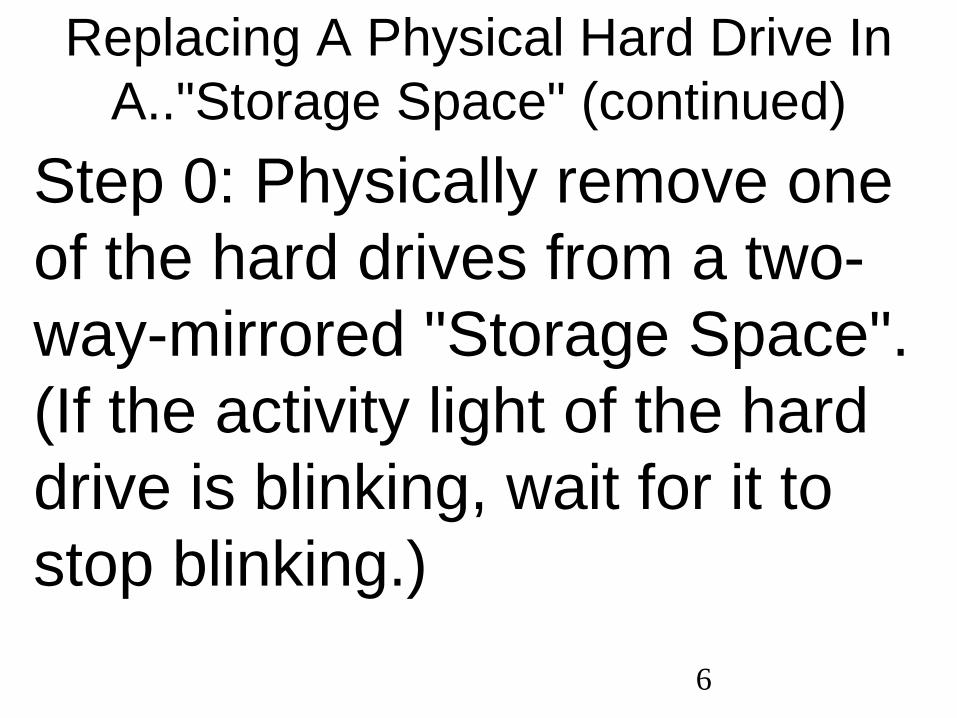
Replacing A Physical Hard Drive In
A.."Storage Space" (continued)
Step 0: Physically remove one
of the hard drives from a two-
way-mirrored "Storage Space".
(If the activity light of the hard
drive is blinking, wait for it to
stop blinking.)
7
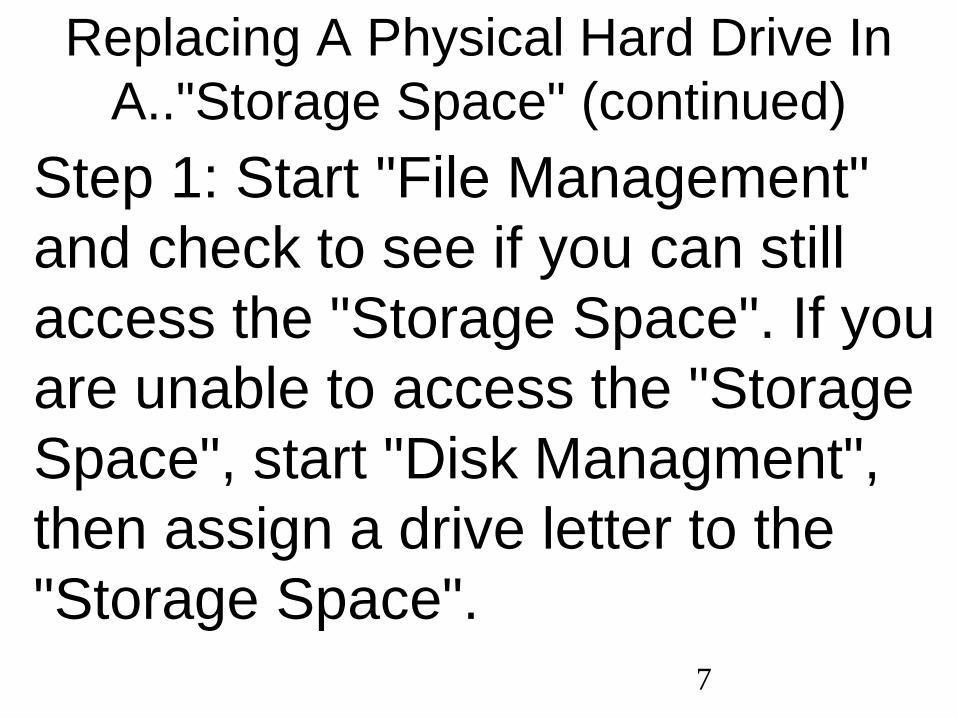
Replacing A Physical Hard Drive In
A.."Storage Space" (continued)
Step 1: Start "File Management"
and check to see if you can still
access the "Storage Space". If you
are unable to access the "Storage
Space", start "Disk Managment",
then assign a drive letter to the
"Storage Space".
8
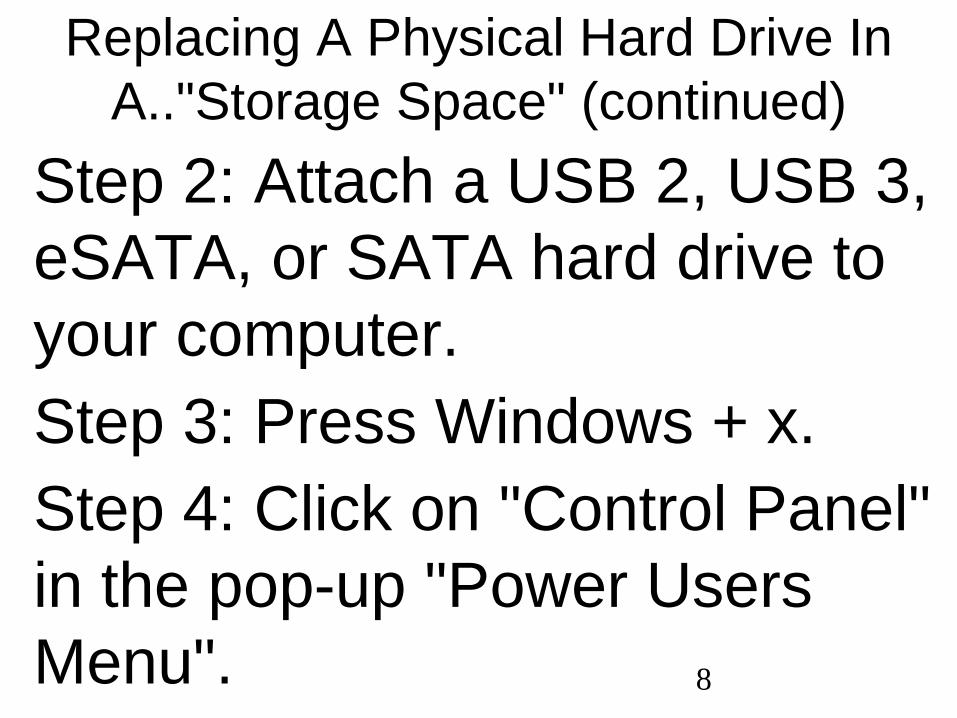
Replacing A Physical Hard Drive In
A.."Storage Space" (continued)
Step 2: Attach a USB 2, USB 3,
eSATA, or SATA hard drive to
your computer.
Step 3: Press Windows + x.
Step 4: Click on "Control Panel"
in the pop-up "Power Users
Menu".
9
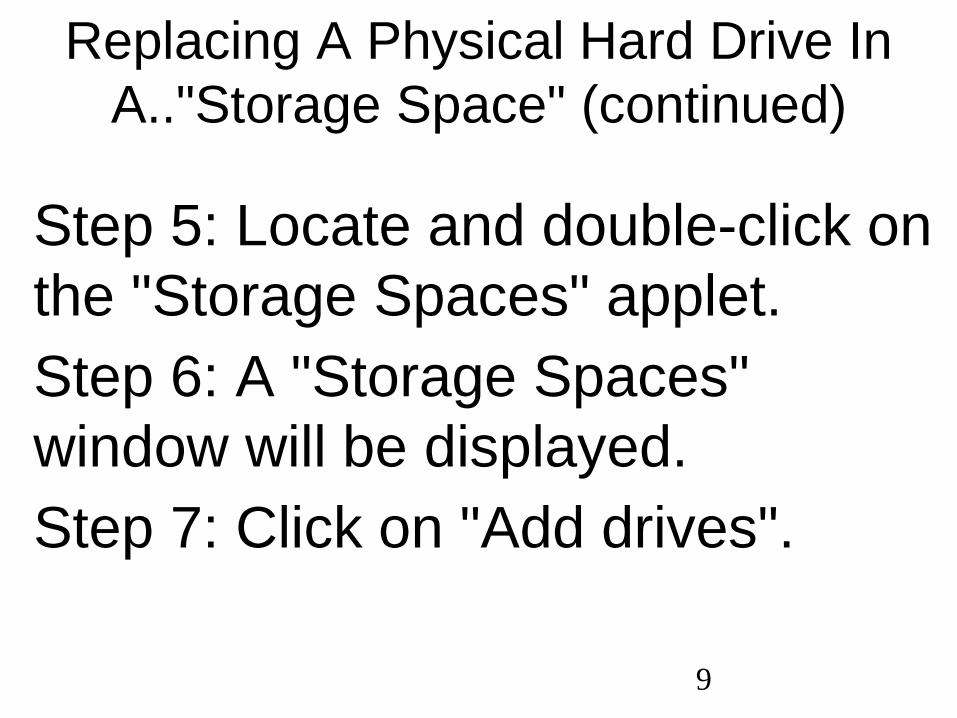
Replacing A Physical Hard Drive In
A.."Storage Space" (continued)
Step 5: Locate and double-click on
the "Storage Spaces" applet.
Step 6: A "Storage Spaces"
window will be displayed.
Step 7: Click on "Add drives".

10

11
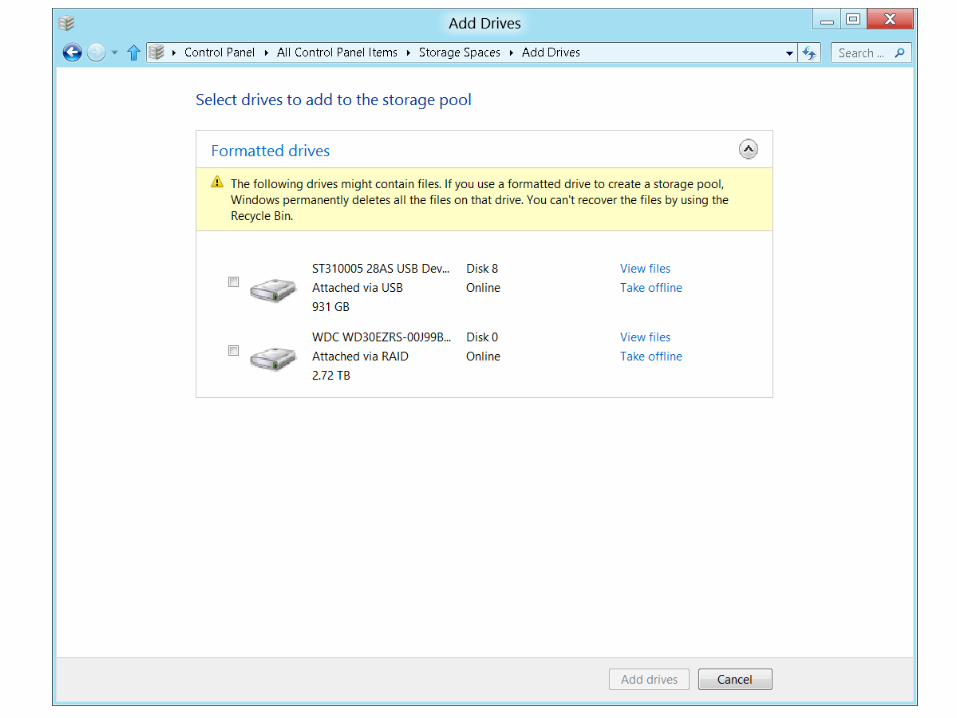
Replacing A Physical Hard Drive In
A.."Storage Space" (continued)
Step 8: A "Select drives to add to
the storage pool" window will be
displayed:
12
13
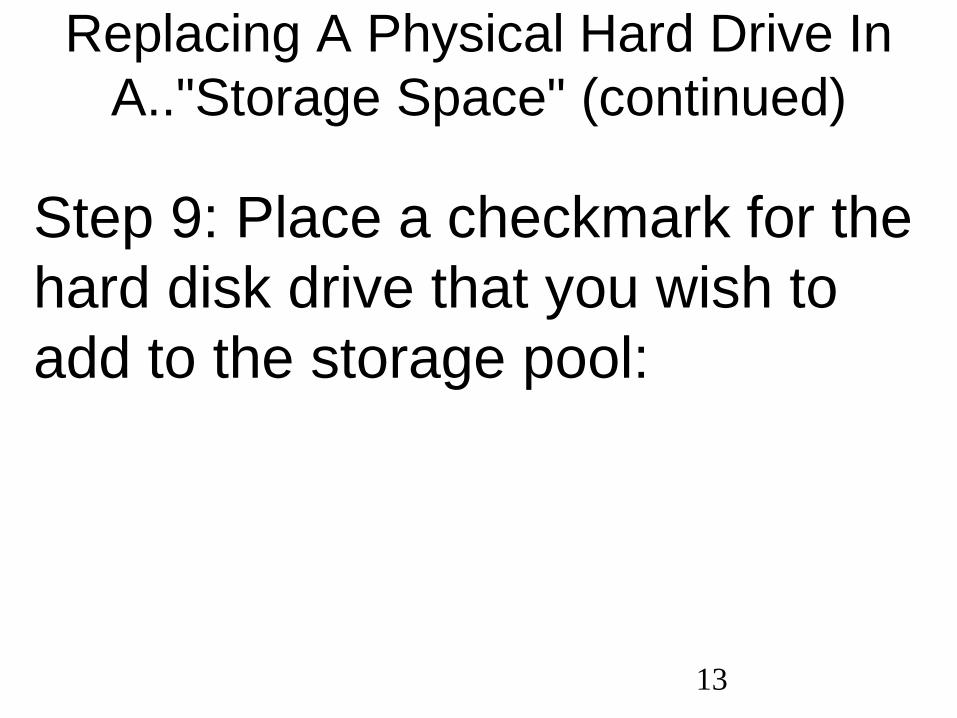
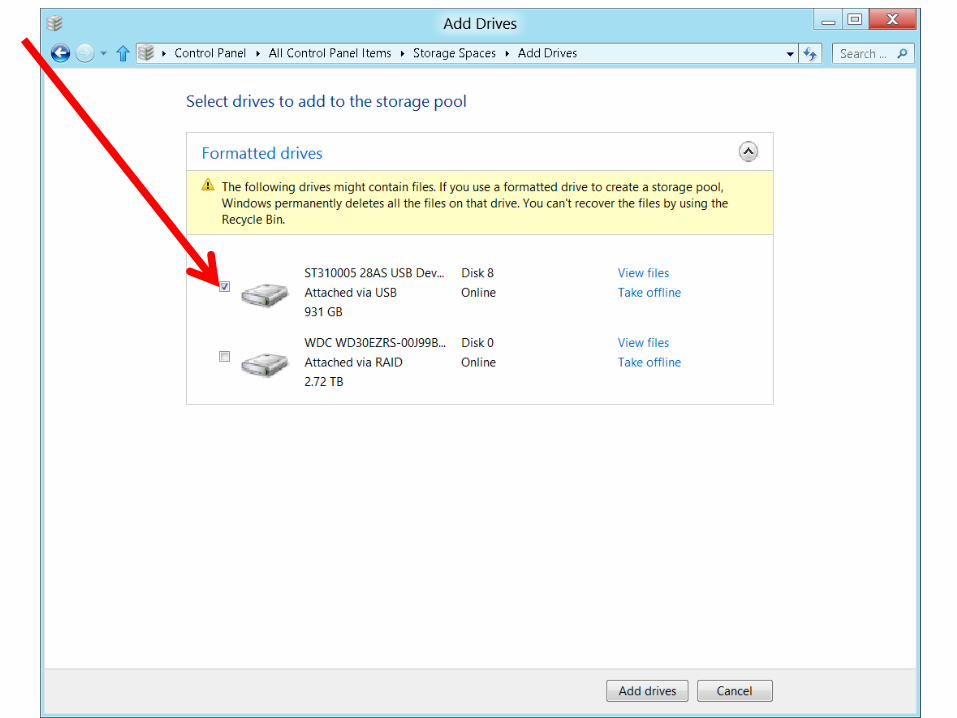
Replacing A Physical Hard Drive In
A.."Storage Space" (continued)
Step 9: Place a checkmark for the
hard disk drive that you wish to
add to the storage pool:
14
15
Replacing A Physical Hard Drive In
A.."Storage Space" (continued)
Step 10: Click on the "Add drives"
button:

16

17
Replacing A Physical Hard Drive In
A.."Storage Space" (continued)
Step 11: "Storage Spaces" will
start "Repairing.." the newly-added
hard drive by copying data files
and folders from the existing hard
drive to the newly-added hard
drive.
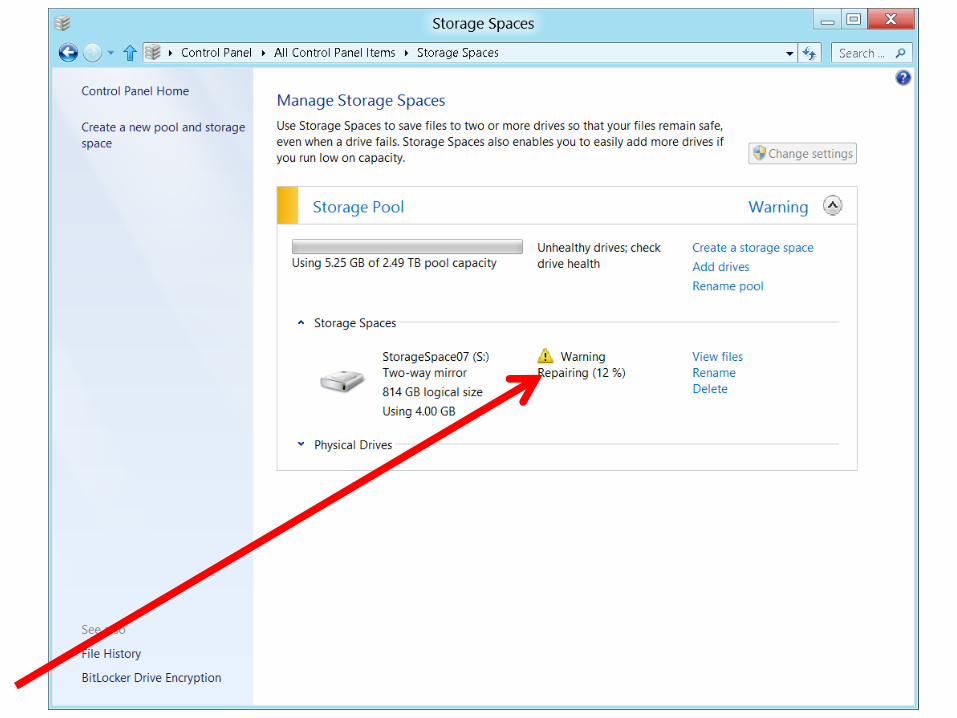
18

19
Replacing A Physical Hard Drive In
A.."Storage Space" (continued)
Step 12: Click on "Remove" for the
hard drive that you wish to
logically remove from the "Storage
Space".

20
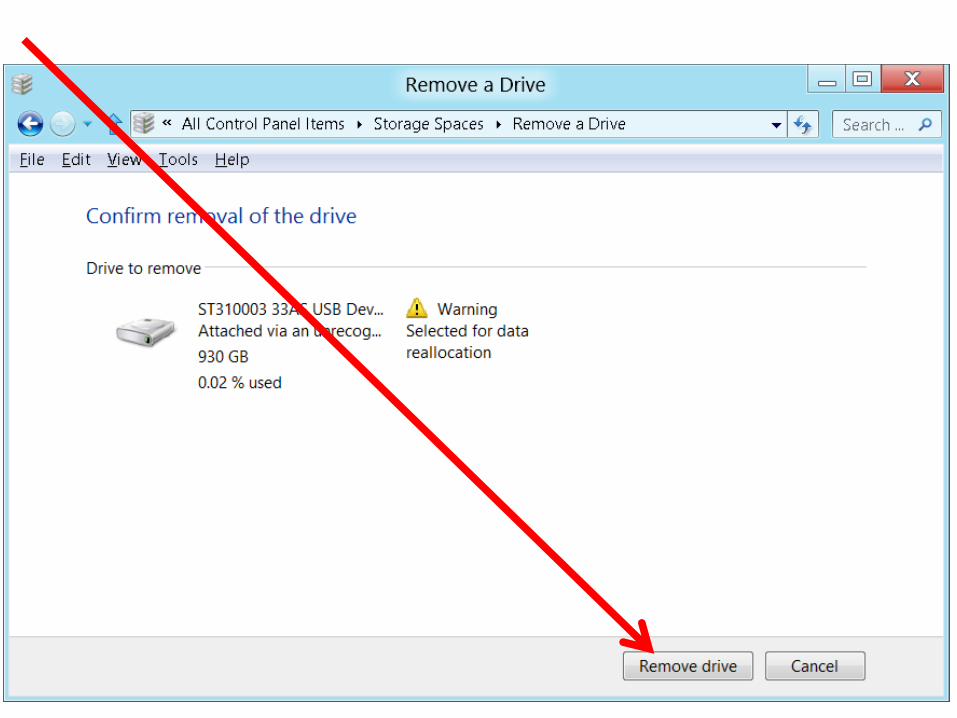
21
Replacing A Physical Hard Drive In
A.."Storage Space" (continued)
Step 13: Click on the "Remove"
button:
22
23
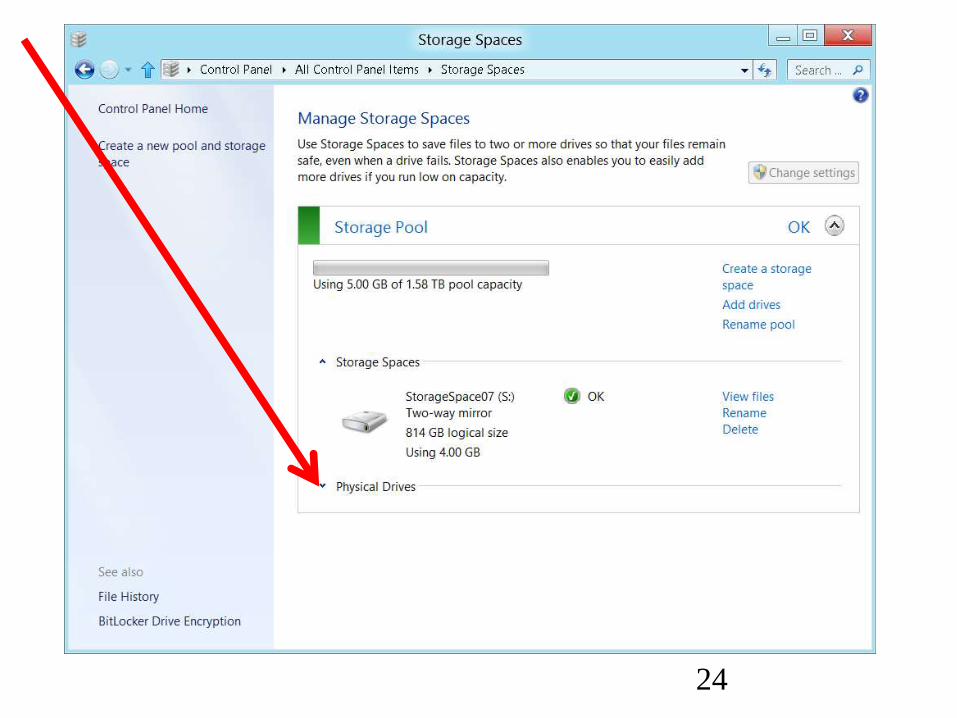
Replacing A Physical Hard Drive In
A.."Storage Space" (continued)
Step 14: Click on the downward
pointing caret to the left of
"Physical Drives":
24
25
Replacing A Physical Hard Drive In
A.."Storage Space" (continued)
Step 15: Note that the hard drive
that you wanted logically-removed
from the "Storage Space" is no
longer displayed:

26


![BackTrack Hard Drive Installation Hard Drive... · · 2016-07-07BackTrack Hard Drive Installation BackTrack Development Team jabra [at] remote-exploit ... Mount the Devices ...](https://static.fdocuments.net/doc/165x107/5ae57f027f8b9a6d4f8b5d64/backtrack-hard-drive-installation-hard-drive2016-07-07backtrack-hard-drive-installation.jpg)