Ren instrukcja 01 EN - Wydawnictwo PHALANX · since the Axis defense is getting stronger and...
16
Transcript of Ren instrukcja 01 EN - Wydawnictwo PHALANX · since the Axis defense is getting stronger and...
11
10
9
8
7
6
1. IntroductIonThe game is based on historical events of the year 1944. Players, in the roles of Al-lied commanders, take part in a true race to the Rhine. Whoever reaches the river first, wins the game and ends World War II before Christmas. But time is short, since the Axis defense is getting stronger and stronger, and the window of opportu-nity may not be opened for long.
Each player controls three or four Corps, and players move in turns. During each turn, players may take two actions: move their Corps (and fight a battle, if they encounter Axis troops!), get supplies, get transport trucks, and make use of their air supremacy. Cross the Rhine river first, and you win. Each of these Corps needs:
gas, to move, ammo, to fight Axis units met along the way, food, to prevent soldiers from starving.
Players must not only play the role of commander, but also of quartermaster in order to reach the Rhine before the others. During their march, players’ Corps gain help from the French Resistance movement, find abandoned Axis supplies, and meet crowds of civilians who may be celebrating the liberation — or might just demand food to feed the hungry.
Will you use your transport capacity to send fuel to make your Corps move faster, or will you transport ammo to help them win against Axis troops met along the way? Will you lead like Patton and bend all the safety rules, or like Monty to make slow but certain progress? And don’t forget about food for your soldiers, because if the supply check comes, it will be too late... Keep in mind that your situation will only get worse as the Axis defense will become stronger with each mile you advance toward the Rhine.
2. Game componentsThe game box should contain:- this rulebook;- game board;- 3 commander cards (Monty, Patton and Brad);- wooden blocks in 3 colors: 4 red, 3 white and 3 blue;- 10 corps cards (4 red, 3 white and 3 blue);- 66 pursuit cards - 3 decks of 22 cards for each player;- 24 Axis unit cards;- 3 player aid cards (in two sets: English and Polish);- wooden supplies: 35 gas barrels, 30 ammo, 25 food;- 32 transport trucks;- counters: 25 Axis markers; 120 Allied markers - 40 in each color (red, white and blue), 20 medals, 1 limited supply base (Ostende), 4 airborne units, 3 air support markers, 1 weather marker;- stickers (10) for blocks;- 3 black 6-sided dice (used only in solitaire game);- plastic zip bags.
Before the first game, please carefully attach one sticker to each block, making sure that each block has a sticker of the same color.
Should any of these components be missing, please contact your retailer.
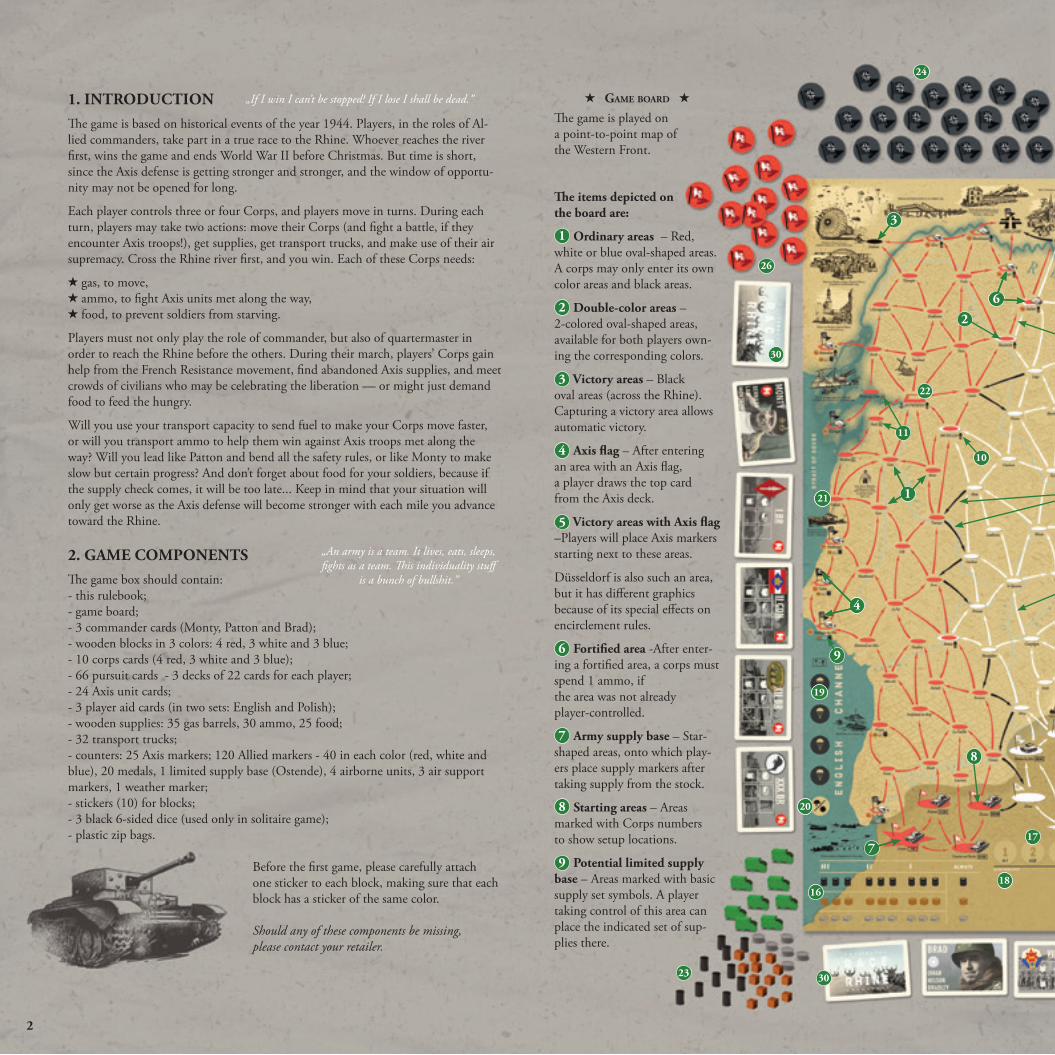
Game board The game is played on a point-to-point map of the Western Front.
The items depicted on the board are:
1 ordinary areas – Red, white or blue oval-shaped areas. A corps may only enter its own color areas and black areas.
2 double-color areas – 2-colored oval-shaped areas, available for both players own-ing the corresponding colors.
3 Victory areas – Black oval areas (across the Rhine). Capturing a victory area allows automatic victory.
4 axis flag – After entering an area with an Axis flag, a player draws the top card from the Axis deck.
5 Victory areas with axis flag –Players will place Axis markers starting next to these areas.
Düsseldorf is also such an area, but it has different graphics because of its special effects on encirclement rules.
6 Fortified area -After enter-ing a fortified area, a corps must spend 1 ammo, if the area was not already player-controlled.
7 army supply base – Star-shaped areas, onto which play-ers place supply markers after taking supply from the stock.
8 starting areas – Areas marked with Corps numbers to show setup locations.
9 potential limited supply base – Areas marked with basic supply set symbols. A player taking control of this area can place the indicated set of sup-plies there.
112121
2222
1616
23
1717
1818
1919
2020
2
23
34
24
26
2
30
30
„If I win I can’t be stopped! If I lose I shall be dead.”
„An army is a team. It lives, eats, sleeps, fights as a team. This individuality stuff
is a bunch of bullshit.”
14
13
12
9
8
7
5
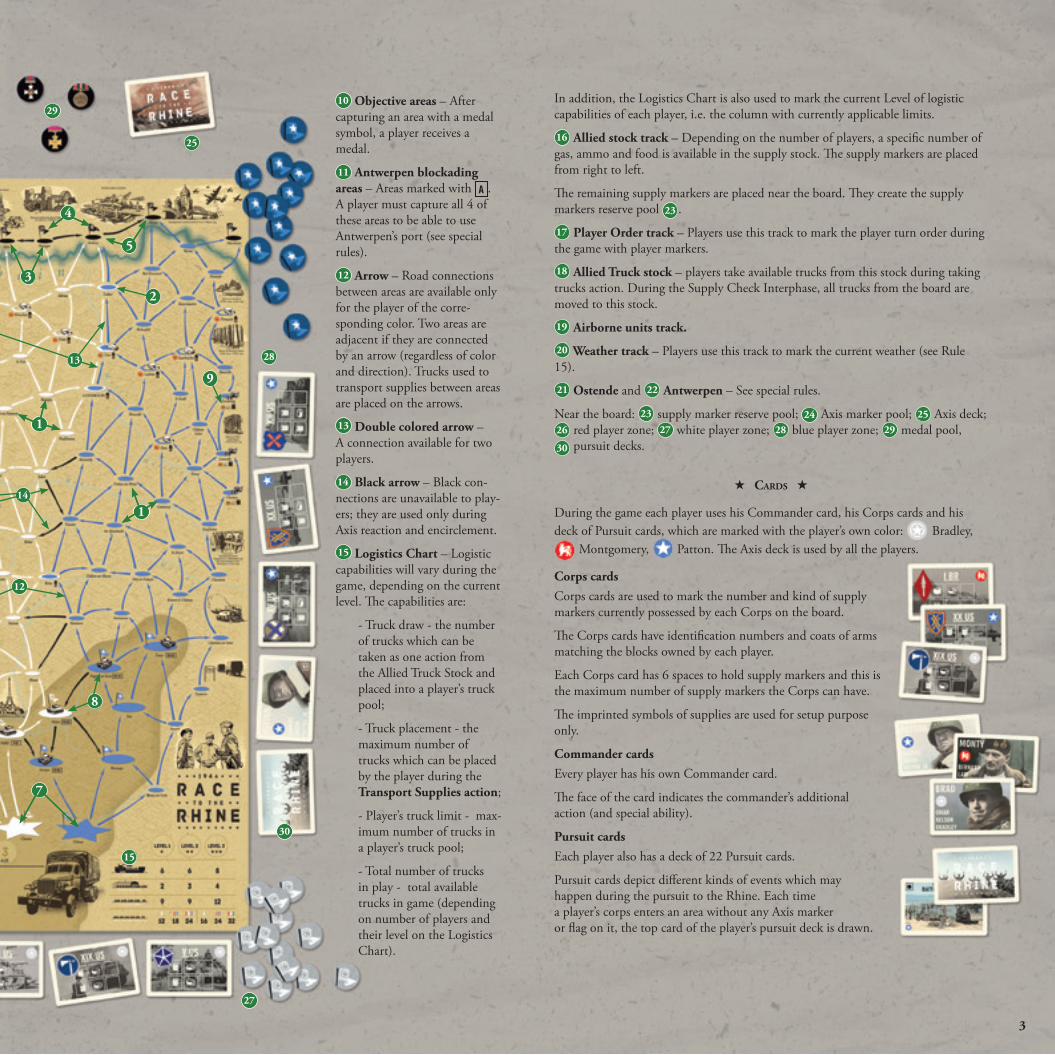
In addition, the Logistics Chart is also used to mark the current Level of logistic capabilities of each player, i.e. the column with currently applicable limits.
16 allied stock track – Depending on the number of players, a specific number of gas, ammo and food is available in the supply stock. The supply markers are placed from right to left.
The remaining supply markers are placed near the board. They create the supply markers reserve pool 23 .
17 player order track – Players use this track to mark the player turn order during the game with player markers.
18 allied truck stock – players take available trucks from this stock during taking trucks action. During the Supply Check Interphase, all trucks from the board are moved to this stock.
19 airborne units track.
20 Weather track – Players use this track to mark the current weather (see Rule 15).
21 ostende and 22 antwerpen – See special rules.
Near the board: 23 supply marker reserve pool; 24 Axis marker pool; 25 Axis deck; 26 red player zone; 27 white player zone; 28 blue player zone; 29 medal pool, 30 pursuit decks.
Cards
During the game each player uses his Commander card, his Corps cards and his deck of Pursuit cards, which are marked with the player’s own color: Bradley,
Montgomery, Patton. The Axis deck is used by all the players.
corps cardsCorps cards are used to mark the number and kind of supply markers currently possessed by each Corps on the board.
The Corps cards have identification numbers and coats of arms matching the blocks owned by each player.
Each Corps card has 6 spaces to hold supply markers and this is the maximum number of supply markers the Corps can have.
The imprinted symbols of supplies are used for setup purpose only.
commander cardsEvery player has his own Commander card.
The face of the card indicates the commander’s additional action (and special ability).
pursuit cardsEach player also has a deck of 22 Pursuit cards.
Pursuit cards depict different kinds of events which may happen during the pursuit to the Rhine. Each time a player’s corps enters an area without any Axis marker or flag on it, the top card of the player’s pursuit deck is drawn.
10 objective areas – After capturing an area with a medal symbol, a player receives a medal.
11 antwerpen blockading areas – Areas marked with . A player must capture all 4 of these areas to be able to use Antwerpen’s port (see special rules).
12 arrow – Road connections between areas are available only for the player of the corre-sponding color. Two areas are adjacent if they are connected by an arrow (regardless of color and direction). Trucks used to transport supplies between areas are placed on the arrows.
13 double colored arrow – A connection available for two players.
14 Black arrow – Black con-nections are unavailable to play-ers; they are used only during Axis reaction and encirclement.
15 Logistics chart – Logistic capabilities will vary during the game, depending on the current level. The capabilities are:
- Truck draw - the number of trucks which can be taken as one action from the Allied Truck Stock and placed into a player’s truck pool;
- Truck placement - the maximum number of trucks which can be placed by the player during the transport supplies action;
- Player’s truck limit - max-imum number of trucks in a player’s truck pool;
- Total number of trucks in play - total available trucks in game (depending on number of players and their level on the Logistics Chart).
1515
11
232
34
11
25
27
28
29
3
30

axis cardsThese cards represent the Axis organized defense which the Allies may face before reaching the Rhine. Each time a player’s corps enters an area with an Axis marker or flag on it, the top card of the Axis deck is drawn.
There is only one Axis deck, which is used by all the players.
If the Axis deck or a player’s Pursuit deck ever becomes empty, immediately reshuffle that deck’s discard pile to form a new deck.
player aid cardEach player has his own Player Aid. There is a summary of player’s turn on the front and summary of the Supply Check Interphase on the back the card.
Counters There are also several cardboard counters used to mark important information for the players.
allied player markersPlayer markers are used to mark areas on the board which are controlled (or liberated) by each player.
In addition, these markers are also used to indicate the players’ order on the Player Order Track as well as players’ logistic levels on the Logistics Chart.
The starting areas (e.g. Paris) and areas within the starting front line (the darkened background on the board) are also regarded as having an imprinted player’s marker.
Therefore these areas will always be player-controlled.
axis markersAxis markers represent organized Axis defense on the areas with such markers.
In addition, these markers are used as a timer – once they are all placed on the board, the game will be over (at the end of the round).
Some areas on the map have an imprinted Axis flag – such an area has the same effects as an area with an Axis marker.
The backside of several Axis markers contain numbers used only in the Solitaire Game. In the 2- and 3-player game these markers are used only with their front side, just as the other markers.
medalsMedals awarded to players represent the prestige gained by each of the commanders.Medals are awarded for liberating important cities (indicated on the map), as well as from certain Events in the Pursuit Deck.Some Axis cards are also marked with medals. The imprinted medals on such cards have the same value as the medals on counters – if a player gains such a card with a medal, the player does not also receive a medal counter with it.
air support markersEvery player has one air support marker in his own color. This marker is used to perform the air support action.
airborne unitsThere are 4 Airborne unit markers, which are shared by all players. They are used during the airborne landing action.
Limited supply base (ostende) markerThis marker is used to indicate the one-time possibility of using the Ostende port.
Weather markerThis marker is used to indicate the current weather status.
Wooden markers trucks – sused during the transport of supplies action.Supply markers:
gas – used for movement of the Corps and sometimes during combat;ammo – used for combat and sometimes during Corps movement;food – used in the Supply Check Interphase and sometimes during movement.
3. oBject oF the GameA player wins automatically if any of his corps enters and captures an area across the Rhine (an objective area). However, to be able to claim victory, this corps must have a continuous connection of player-controlled areas to his Army supply base.
Should there be no automatic victory, then at the end of the game, the player who has the most medals is the victor.
4. settInG up the GameEach player takes the role of one of the available commanders: Monty, Patton or Brad, receiving the corresponding Commander card. Commanders can be chosen by mutual consent, or assigned randomly.
Players sit near the table in a way that white player sits opposite to the bottom of the board, with the red player (Monty) sitting on his left and blue player (Patton) sitting on his right (see: the picture on pages 2 and 3). Next, each player places his Corps cards and Commander card in front of him, all face up. Corps cards start with supply markers matching the supplies printed on the cards. (Blank spaces are left empty.) Each player places his markers, his air support marker, and 6 trucks near these cards.
Each player takes his own pursuit deck, shuffles it, and places it next to his board edge, face down.
The Axis deck should also be shuffled and placed on the eastern edge of the board (across the Rhine). Axis markers are placed near the Axis deck. The number of markers depends on the number of players:
- 25 in a game with 3 players,- 18 in a game with 2 players,- the pool is not created in a solo game.
Any remaining Axis markers should be placed in the box; they will not be used during the game (exception: Solitaire Game).
Corps blocks should be placed lying horizontally, face up, in their corresponding starting areas (indicated on the map by the corresponding corps number).
4
„There is only one kind of discipline: perfect discipline.”
“Sure, we want to go home. We want this war over with. Before the Goddamned Marines get all of the credit.”
6 trucks should also be placed in the Allied Truck Stock Chart on the Board. The remaining trucks should be placed in reserve near the board. The medal counters should also be placed near the board.
The supply markers are placed on the Allied Stock Chart in the amount resulting from the number of players.Example: In a 2-player game, only 6 gas, 6 ammo and 6 food markers are placed on the Chart, leaving the very left column empty.
Each player uses one of his player markers to mark his current supply level on the Logistics Chart. Monty and Patton start the game at Level 1, while Brad starts the game at Level 2 (see: Rule 13).
Airborne unit counters should be placed on the Airborne units track.
The Ostende marker should be placed near the Ostende area.
If players are using the optional Weather rule (see Rule 15), the weather marker should also be placed on the corresponding track, sunshine side up.
The 6-sided dice are used only in solitaire play.
Finally, one of the players takes 1 player marker from each player, mixes them, and places them in random order on the Player Order track.
Example: The random order of the players is: white, red and blue. White player marker is placed onto area with number 1, red player marker is placed onto area with number 2 and blue player marker is placed onto area with number 3.
In a 2-player game, the areas belonging to the third commander (including the double-color areas) are permanently controlled by this third commander: place his markers on them. Players cannot move into such areas and gain control over them. Exception: if Patton and Monty are playing, then double-color areas of Monty and Brad as well as Brad and Patton are not controlled by Brad (thus players are allowed to enter them).It is strongly recommended to play adjacent commanders (either Patton and Brad, or Brad and Monty) in a 2-player game.
5. course oF the Game
It is recommended to play the basic game first, just to learn the basic game mechanisms, before playing any regular games. While playing the basic game, do not use the Rules 11, 12, 13 and 15 (which are marked with “*” symbol.).Skip these Rules if you are reading this Rulebook for the first time, as well as Rule 17, which regulates the Solitaire Game.
The game is played in rounds. In each round each player takes one turn, in the order shown on the Player Order track.
In each turn, a player performs 2 player actions. There are six kinds of actions player may choose from:
take supply from the stock (see: Rule 6), take trucks (see: Rule 7), transport supplies (see: Rule 8), Corps movement (see: Rule 10), Air support (see: Rule 11), Airborne landing (see: Rule 12).
In a player’s turn additional actions can be performed if a player uses the Resist-ance card (no more than one per turn) and/or if a player uses the “Recon” card (no more than one per turn). A player may also use his additional action or special ability on his Commander card.A player can perform the same action more than once during his turn, if the ac-tion’s description does not say otherwise, or a player can do 2 different actions, in whichever order the player likes. Each action must be completed before any other action may be started.Example: A player has already moved his corps two areas ahead. Before the third (and last) step of this move, the player cannot use air support, since this would be a different action.The course of the player’s turn may be paused by the Supply Check Interphase (see: Rule 9), which is performed by all the players. After resolving the Supply Check Interphase, the action in player’s turn is resumed.After a player has finished his turn actions, the player performs the Axis reaction (see: Rule 14). Then, the next player performs his turn, etc., until the end of the round, after which a new round starts.Example: It’s Patton’s turn. He starts by taking supplies. Next, he uses his Commander card to perform an additional action: corps movement. Next, he performs his second ac-tion: transport of supplies. Should the player have a Recon or a Resistance card, he could use either or both for additional actions. Next, Patton performs the Axis reaction, after which another player’s turn begins.
6. take suppLy From the stockSupply can be placed into a player’s army supply base or into a limited supply base, if it is controlled by the player.Into your army supply base you can place:
- a basic supply set (1 Gas, 1 Ammo, 1 Food - taken from the supply markers reserve pool)
or- a set of 3 matching supply pieces of the same kind (taken from the allied stock track).
Only a basic supply set (1 Gas, 1 Ammo, 1 Food) can be placed into a limited sup-ply base. These are taken from the supply markers reserve pool.Please note that there is a limited number of the 3-piece matching sets on the Allied Stock Track, and each one taken should be removed from this track. The number of basic sets is unlimited, until the pieces in the supply marker reserve pool run out. (If not all 3 types remain in the pool, a player may choose to take a partial basic set, e.g. 1 Gas and 1 Ammo). The number of supply markers is intentionally limited. Should there be no marker of a given type in the stock or in the reserve pool, it means that this type of supply is currently unavailable.An army supply base can hold up to 9 supply pieces. All other friendly areas (including a limited supply base) can hold up to 6 supply pieces. Supply pieces on a Corps card do not count against this area base limit. If the supply piece limit is about to be exceeded, the player who controls the area decides which supply pieces are removed to the supply marker reserve pool.Supply markers may be placed on the board only onto player controlled areas. If the player marker is removed from the area, any supply markers are also removed from such an area and placed into the supply markers reserve pool.
5
„A good solution applied with vigor now is better than a perfect solution applied ten minutes later.”
“My men can eat their belts, but my tanks have gotta have gas”.
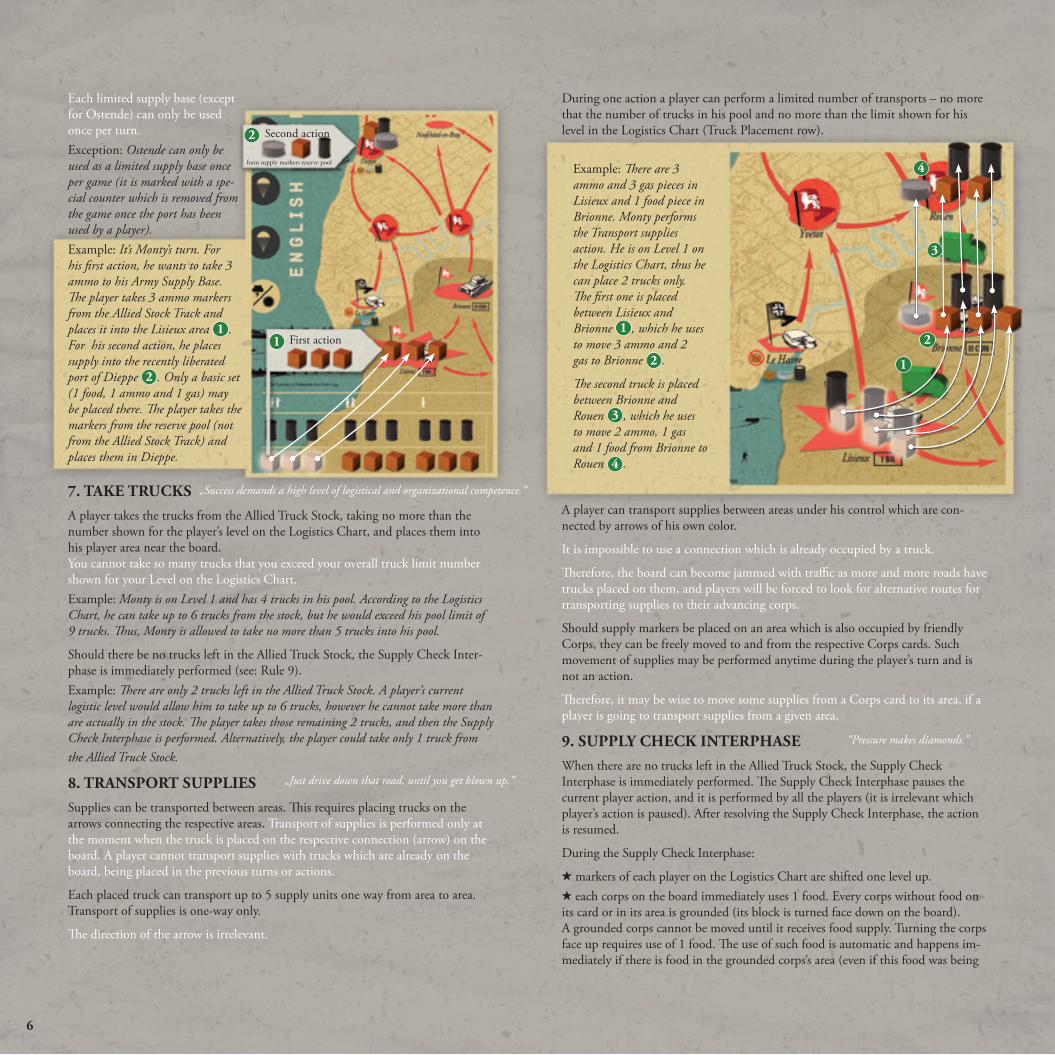
Each limited supply base (except for Ostende) can only be used once per turn. Exception: Ostende can only be used as a limited supply base once per game (it is marked with a spe-cial counter which is removed from the game once the port has been used by a player). Example: It’s Monty’s turn. For his first action, he wants to take 3 ammo to his Army Supply Base. The player takes 3 ammo markers from the Allied Stock Track and places it into the Lisieux area 1 . For his second action, he places supply into the recently liberated port of Dieppe 2 . Only a basic set (1 food, 1 ammo and 1 gas) may be placed there. The player takes the markers from the reserve pool (not from the Allied Stock Track) and places them in Dieppe.
7. take trucksA player takes the trucks from the Allied Truck Stock, taking no more than the number shown for the player’s level on the Logistics Chart, and places them into his player area near the board. You cannot take so many trucks that you exceed your overall truck limit number shown for your Level on the Logistics Chart.Example: Monty is on Level 1 and has 4 trucks in his pool. According to the Logistics Chart, he can take up to 6 trucks from the stock, but he would exceed his pool limit of 9 trucks. Thus, Monty is allowed to take no more than 5 trucks into his pool.
Should there be no trucks left in the Allied Truck Stock, the Supply Check Inter-phase is immediately performed (see: Rule 9).Example: There are only 2 trucks left in the Allied Truck Stock. A player’s current logistic level would allow him to take up to 6 trucks, however he cannot take more than are actually in the stock. The player takes those remaining 2 trucks, and then the Supply Check Interphase is performed. Alternatively, the player could take only 1 truck from the Allied Truck Stock.
8. transport suppLIesSupplies can be transported between areas. This requires placing trucks on the arrows connecting the respective areas. Transport of supplies is performed only at the moment when the truck is placed on the respective connection (arrow) on the board. A player cannot transport supplies with trucks which are already on the board, being placed in the previous turns or actions.
Each placed truck can transport up to 5 supply units one way from area to area. Transport of supplies is one-way only.
The direction of the arrow is irrelevant.
During one action a player can perform a limited number of transports – no more that the number of trucks in his pool and no more than the limit shown for his level in the Logistics Chart (Truck Placement row).
Example: There are 3 ammo and 3 gas pieces in Lisieux and 1 food piece in Brionne. Monty performs the Transport supplies action. He is on Level 1 on the Logistics Chart, thus he can place 2 trucks only. The first one is placed between Lisieux and Brionne 1 , which he uses to move 3 ammo and 2 gas to Brionne 2 .
The second truck is placed between Brionne and Rouen 3 , which he uses to move 2 ammo, 1 gas and 1 food from Brionne to Rouen 4 .
A player can transport supplies between areas under his control which are con-nected by arrows of his own color.
It is impossible to use a connection which is already occupied by a truck.
Therefore, the board can become jammed with traffic as more and more roads have trucks placed on them, and players will be forced to look for alternative routes for transporting supplies to their advancing corps.
Should supply markers be placed on an area which is also occupied by friendly Corps, they can be freely moved to and from the respective Corps cards. Such movement of supplies may be performed anytime during the player’s turn and is not an action.
Therefore, it may be wise to move some supplies from a Corps card to its area, if a player is going to transport supplies from a given area.
9. suppLy check InterphaseWhen there are no trucks left in the Allied Truck Stock, the Supply Check Interphase is immediately performed. The Supply Check Interphase pauses the current player action, and it is performed by all the players (it is irrelevant which player’s action is paused). After resolving the Supply Check Interphase, the action is resumed.
During the Supply Check Interphase:
markers of each player on the Logistics Chart are shifted one level up. each corps on the board immediately uses 1 food. Every corps without food on
its card or in its area is grounded (its block is turned face down on the board).A grounded corps cannot be moved until it receives food supply. Turning the corps face up requires use of 1 food. The use of such food is automatic and happens im-mediately if there is food in the grounded corps’s area (even if this food was being
1
2 Second action
form supply markers reserve pool
First action
1
2
3
4
6
„Success demands a high level of logistical and organizational competence.”
„Just drive down that road, until you get blown up.”
“Pressure makes diamonds.”

transported through and the player had no intent of giving this food to this corps).Example: Brad has three corps on the board. V US has 2 food markers, XIX US has 1 food markers and VII US has no food markers. After the Supply Check Interphase, V- US has only 1 food marker left, XIX US has no food markers and VII US is grounded (and its block is flipped) 1 until a food marker is delivered to this corps.
all players remove all trucks from the board (but not from the players’ pools) and return them to the Allied truck stock.
After any player reaches Level 3 on the Logistics Chart, 2 extra trucks (plus 2 extra trucks per player) are placed into the stock. This increase happens only once per game, the first time any player reaches Level 3.
Example: In a 3-player game, after some player has reached Level 3 on the Logistics Chart, 8 trucks from the reserve pool are placed into the Allied Truck Stock.
the Allied supply stock is refilled with the appropriate numbers of supplies, depending on the number of players.
Example: Since the last Supply Check Interphase, 6 gas, 3 ammo and 3 food were taken from the stock. Thus 6 gas, 3 ammo and 3 food should be added back to it to bring supplies back to their original amounts of 6 gas, 6 ammo, and 6 food.
all commander cards which are face down from being used are now turned face up again.
Finally, the turn of the player whose action triggered the Supply Check is continued.
10. corps moVementIt requires 1 gas to move a corps. Gas is taken from the Corps card only.
A given corps can be activated to move only once during a player’s turn. This restriction applies also to additional actions resulting from the card “Resistance” as well as Patton’s special ability.Example: Patton has already moved XII US Corps in his turn. He cannot activate this corps to move again, even by using the Resistance card or his Commander card.
A corps can move up to 3 areas during its movement. It can enter only areas marked with the proper color (its own and black), moving along the arrow in its color. The direction of the arrow is irrelevant.
There are several double-color areas on the map (e.g. Amiens, Trier). Generally, both players may enter such area until it is liberated by one of them. Once a player marker is placed into such area, other player’s corps cannot enter it.
When a corps enters an area containing supply markers, they can be immediately moved onto the Corps card. In addition, the moving corps can also freely move supplies from its card into the areas through which the corps is passing (or remaining).
Entering a fortified area without a player marker requires immediately spending 1 ammo (this is also indicated on the board).
Immediately after entering an unoccupied area, a card is drawn from the appropriate deck:
Pursuit deck for areas without an axis marker or axis flagor
Axis deck for areas with an axis marker or axis flag (e.g. Le Havre, Remagen).
Movement through areas with a player marker does not cause a card draw.
Next, the card effect is resolved:
Les Boches results in stopping the movement; movement may be continued by spending 1 more gas,
an enemy division results in combat and stopping the movement, which may be continued by spending 1 more gas, if the enemy division was defeated (see below for details);
all other cards do not affect corps movement.
If there is a card effect which a player wants to execute, it must be done before continuing the corps movement and before performing another action.
Next, the player discards the card used. “No effect” cards are discarded immediately.
Exception: A player can keep Recon and Resistance cards which are marked with a hand symbol to use for additional actions in a later turn. Please note that a Resistance card without a hand symbol must be used in the same turn that it was drawn from the deck, but after completion of the current action – corps movement.
After resolving the card’s effect, the player places his marker on the liberated area, unless the player has lost a combat and has to withdraw.
All supply markers used during a Corps movement are returned to the supply marker reserve pool near the board.
Supply markers acquired/exchanged due to Pursuit cards’ effects are taken from the marker reserve pool.
pursuit cards and their effects
starving civilians
The player may spend 1 food marker from the Corps card of the moving corps and receive 1 medal.
This opportunity is one-time only and may not be used later. Regardless of the player’s decision, the card is discarded.
captured stock
The player must place 1 ammo marker from the marker reserve pool into the area just entered. Then the card is discarded.
1
1
7
+1
„Go forward until the last round is fired and the last drop of gas is expended...then go forward on foot!”
‚,Fixed fortifications are a monument to the stupidity of man. Anything built by man, can be destroyed by him.”
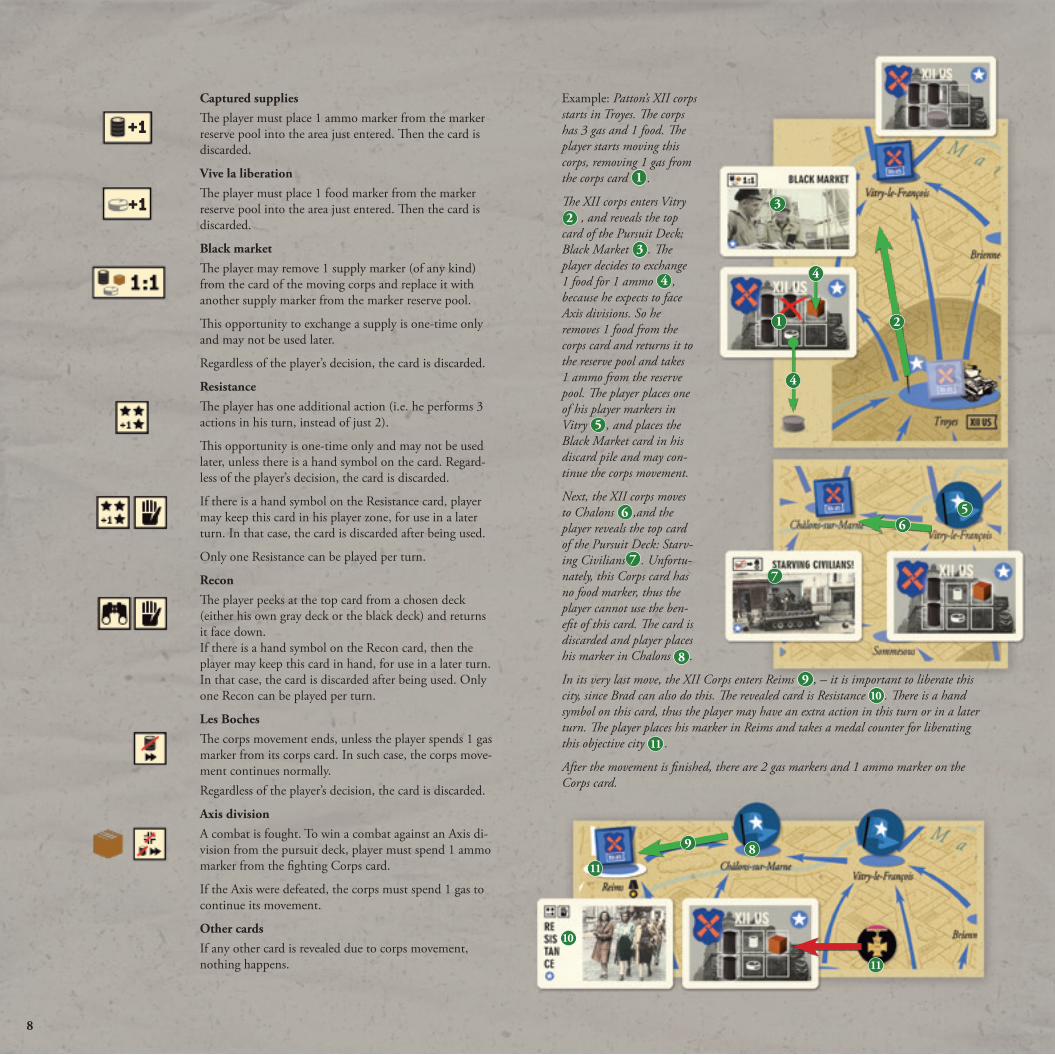
captured supplies The player must place 1 ammo marker from the marker reserve pool into the area just entered. Then the card is discarded.
Vive la liberation The player must place 1 food marker from the marker reserve pool into the area just entered. Then the card is discarded.
Black market The player may remove 1 supply marker (of any kind) from the card of the moving corps and replace it with another supply marker from the marker reserve pool.
This opportunity to exchange a supply is one-time only and may not be used later.
Regardless of the player’s decision, the card is discarded.
resistance The player has one additional action (i.e. he performs 3 actions in his turn, instead of just 2).
This opportunity is one-time only and may not be used later, unless there is a hand symbol on the card. Regard-less of the player’s decision, the card is discarded.
If there is a hand symbol on the Resistance card, player may keep this card in his player zone, for use in a later turn. In that case, the card is discarded after being used.
Only one Resistance can be played per turn.
recon The player peeks at the top card from a chosen deck (either his own gray deck or the black deck) and returns it face down. If there is a hand symbol on the Recon card, then the player may keep this card in hand, for use in a later turn. In that case, the card is discarded after being used. Only one Recon can be played per turn.
Les Boches The corps movement ends, unless the player spends 1 gas marker from its corps card. In such case, the corps move-ment continues normally. Regardless of the player’s decision, the card is discarded.
axis division A combat is fought. To win a combat against an Axis di-vision from the pursuit deck, player must spend 1 ammo marker from the fighting Corps card.
If the Axis were defeated, the corps must spend 1 gas to continue its movement.
other cards If any other card is revealed due to corps movement, nothing happens.
Example: Patton’s XII corps starts in Troyes. The corps has 3 gas and 1 food. The player starts moving this corps, removing 1 gas from the corps card 1 .
The XII corps enters Vitry 2 , and reveals the top
card of the Pursuit Deck: Black Market 3 . The player decides to exchange 1 food for 1 ammo 4 , because he expects to face Axis divisions. So he removes 1 food from the corps card and returns it to the reserve pool and takes 1 ammo from the reserve pool. The player places one of his player markers in Vitry 5 , and places the Black Market card in his discard pile and may con-tinue the corps movement.
Next, the XII corps moves to Chalons 6 ,and the player reveals the top card of the Pursuit Deck: Starv-ing Civilians 7 . Unfortu-nately, this Corps card has no food marker, thus the player cannot use the ben-efit of this card. The card is discarded and player places his marker in Chalons 8 .
In its very last move, the XII Corps enters Reims 9 , – it is important to liberate this city, since Brad can also do this. The revealed card is Resistance 10 . There is a hand symbol on this card, thus the player may have an extra action in this turn or in a later turn. The player places his marker in Reims and takes a medal counter for liberating this objective city 11 .
After the movement is finished, there are 2 gas markers and 1 ammo marker on the Corps card.
+1
1
3
4
4
2
8
56
7
89
11
11
10
+1

Example 2: The situation begins the same as in the previous example 1 , but the card revealed after entering Vitry 2 is: Les Boches 3 . To continue move-ment of the XII Corps, the player must spend 1 gas marker 4 from the Corps card. Patton’s priority is to liberate Reims before Brad can do it, so he decides to spend the extra gas.
After entering Chalons 5 , the player reveals a Captured supplies card 6 . Thanks to this, 1 gas marker is placed in Chalons 7 . The player immediately transfers this gas to the Corps card 8 .
For its third part of its move, the XII Corps enters Reims 9 and the card revealed is: Battle of Angaur – no effect 10 .
The player now has player markers in Vitry, Chalons and Reims, 11 as well as receiving 1 medal for liberating Reims 12 .
After the movement is fin-ished, there are 2 gas mark-ers and 1 ammo marker on the Corps card.
axis cards and their effects
axis division A combat must be fought. To win this combat, the player must remove 2 ammo markers from his fighting Corps card.
axis elite division A combat must be fought. To win this combat, the player must remove 3 ammo
markers from his fighting Corps card.axis armored division A combat must be fought. To win this combat, the player must remove 2 ammo markers and 1 gas marker from his fight-ing Corps card.
comBat
Combat means spending as many ammo and gas as shown on the enemy division card. Weak divisions require less ammo and strong divisions require more ammo to defeat. The supplies must come from the card of the corps which is fighting.
If the corps has and spends the necessary supplies to defeat the enemy, the enemy division card is collected by the player (see below for information about medals) and the corps may continue its movement (unless it was the third area it entered during its movement) by spending 1 gas.
If the victorious combat was the result of a corps entering an area with an Axis marker on it, the Axis marker is returned to the Axis marker pool.
Example: Patton’s XII Corps is in Thionville. There are 2 gas and 4 ammo on the Corps card.
The player starts moving the corps, using 1 gas (i.e. moving 1 gas from the corps card to the supply marker reserve pool) 1 . The first part of the corps move is into Luxembourg 2 . The player draws the top card of his Pursuit Deck, revealing the 711 Infanterie Div 3 .
The player spends 1 ammo from his Corps card and wins the combat 4 . He places the card of the defeated division under his Com-mander card and places his marker into the area of Luxembourg 5 . Luxembourg is an objective city, thus the player is awarded a medal for liberating it. This medal is also placed near the Command-er card (Patton) 6 .
If the corps does not have enough supplies to defeat the enemy, it uses as many as it has, and withdraws to the area where it just came from. In this case, the corps stops and its movement is over for the turn. The victorious enemy division card is shuffled back into the card deck from which it came (it shall return sooner or later).
3
2
9
1
4
2
36
41
57
6
8
9
10
1111 11
12
“Battle is the most magnificent competition in which a human being can indulge.”
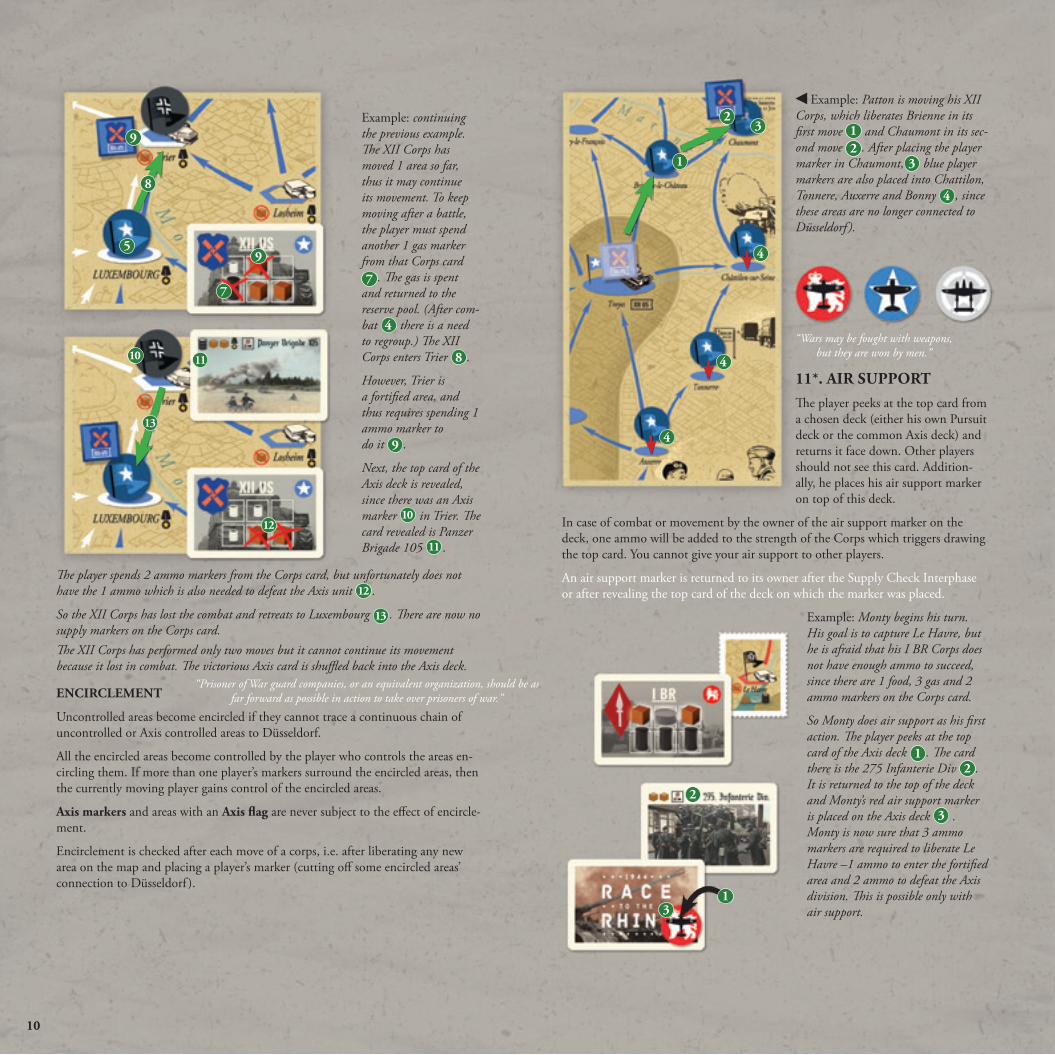
Example: continuing the previous example. The XII Corps has moved 1 area so far, thus it may continue its movement. To keep moving after a battle, the player must spend another 1 gas marker from that Corps card 7 . The gas is spent
and returned to the reserve pool. (After com-bat 4 there is a need to regroup.) The XII Corps enters Trier 8 .
However, Trier is a fortified area, and thus requires spending 1 ammo marker to do it 9 .
Next, the top card of the Axis deck is revealed, since there was an Axis marker 10 in Trier. The card revealed is Panzer Brigade 105 11 .
The player spends 2 ammo markers from the Corps card, but unfortunately does not have the 1 ammo which is also needed to defeat the Axis unit 12 .
So the XII Corps has lost the combat and retreats to Luxembourg 13 . There are now no supply markers on the Corps card. The XII Corps has performed only two moves but it cannot continue its movement because it lost in combat. The victorious Axis card is shuffled back into the Axis deck.
encIrcLement
Uncontrolled areas become encircled if they cannot trace a continuous chain of uncontrolled or Axis controlled areas to Düsseldorf.
All the encircled areas become controlled by the player who controls the areas en-circling them. If more than one player’s markers surround the encircled areas, then the currently moving player gains control of the encircled areas.
axis markers and areas with an axis flag are never subject to the effect of encircle-ment.
Encirclement is checked after each move of a corps, i.e. after liberating any new area on the map and placing a player’s marker (cutting off some encircled areas’ connection to Düsseldorf ).
Example: Patton is moving his XII Corps, which liberates Brienne in its first move 1 and Chaumont in its sec-ond move 2 . After placing the player marker in Chaumont, 3 blue player markers are also placed into Chattilon, Tonnere, Auxerre and Bonny 4 , since these areas are no longer connected to Düsseldorf ).
11*. aIr supportThe player peeks at the top card from a chosen deck (either his own Pursuit deck or the common Axis deck) and returns it face down. Other players should not see this card. Addition-ally, he places his air support marker on top of this deck.
In case of combat or movement by the owner of the air support marker on the deck, one ammo will be added to the strength of the Corps which triggers drawing the top card. You cannot give your air support to other players.
An air support marker is returned to its owner after the Supply Check Interphase or after revealing the top card of the deck on which the marker was placed.
Example: Monty begins his turn. His goal is to capture Le Havre, but he is afraid that his I BR Corps does not have enough ammo to succeed, since there are 1 food, 3 gas and 2 ammo markers on the Corps card.
So Monty does air support as his first action. The player peeks at the top card of the Axis deck 1 . The card there is the 275 Infanterie Div 2 . It is returned to the top of the deck and Monty’s red air support marker is placed on the Axis deck 3 . Monty is now sure that 3 ammo markers are required to liberate Le Havre –1 ammo to enter the fortified area and 2 ammo to defeat the Axis division. This is possible only with air support.
10
7
59
9
12
13
1
2
31
8
10 11
23
4
4
4
“Prisoner of War guard companies, or an equivalent organization, should be as far forward as possible in action to take over prisoners of war.”
“Wars may be fought with weapons, but they are won by men.”
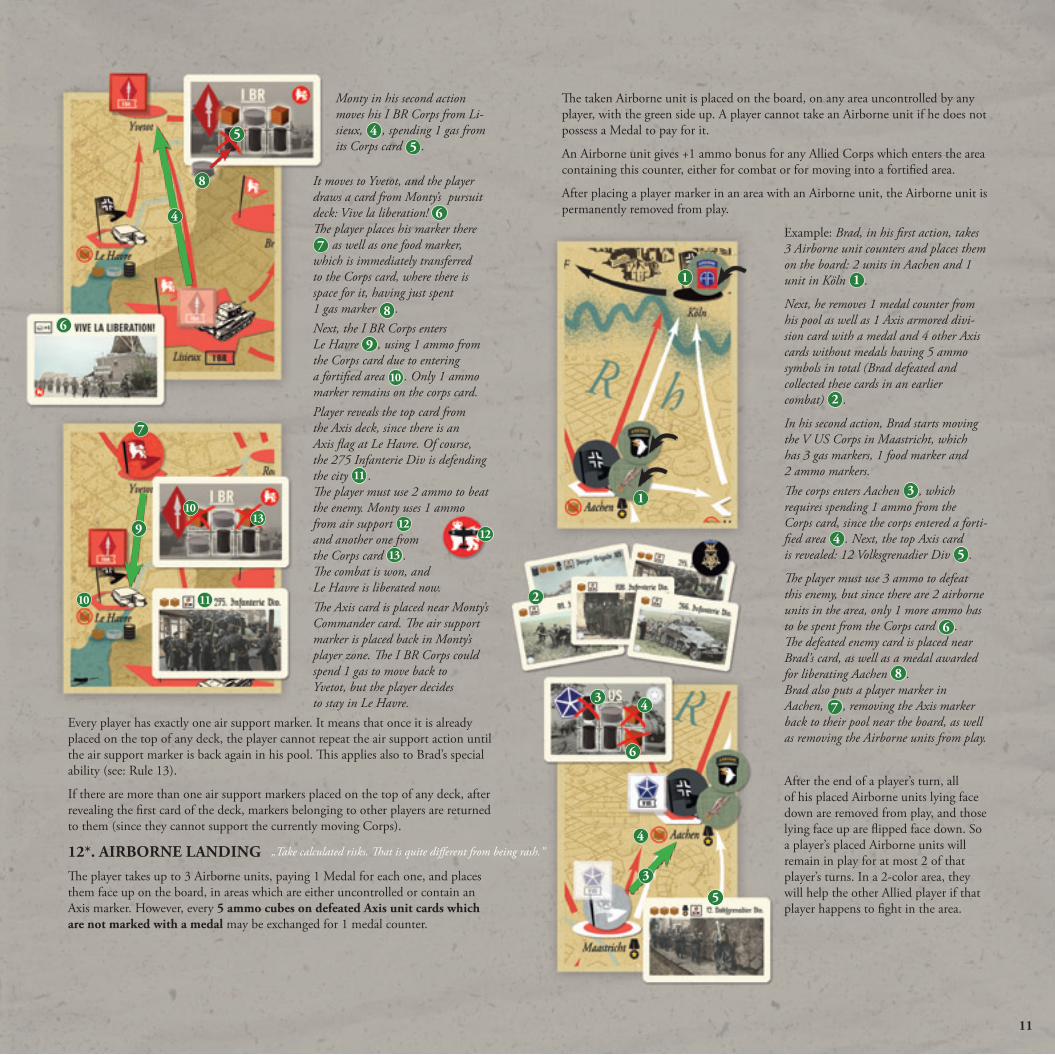
Monty in his second action moves his I BR Corps from Li-sieux, 4 , spending 1 gas from its Corps card 5 .
It moves to Yvetot, and the player draws a card from Monty’s pursuit deck: Vive la liberation! 6 The player places his marker there 7 as well as one food marker,
which is immediately transferred to the Corps card, where there is space for it, having just spent 1 gas marker 8 . Next, the I BR Corps enters Le Havre 9 , using 1 ammo from the Corps card due to entering a fortified area 10 . Only 1 ammo marker remains on the corps card. Player reveals the top card from the Axis deck, since there is an Axis flag at Le Havre. Of course, the 275 Infanterie Div is defending the city 11 . The player must use 2 ammo to beat the enemy. Monty uses 1 ammo from air support 12 and another one from the Corps card 13 . The combat is won, and Le Havre is liberated now. The Axis card is placed near Monty’s Commander card. The air support marker is placed back in Monty’s player zone. The I BR Corps could spend 1 gas to move back to Yvetot, but the player decides to stay in Le Havre.
Every player has exactly one air support marker. It means that once it is already placed on the top of any deck, the player cannot repeat the air support action until the air support marker is back again in his pool. This applies also to Brad’s special ability (see: Rule 13).
If there are more than one air support markers placed on the top of any deck, after revealing the first card of the deck, markers belonging to other players are returned to them (since they cannot support the currently moving Corps).
12*. aIrBorne LandInGThe player takes up to 3 Airborne units, paying 1 Medal for each one, and places them face up on the board, in areas which are either uncontrolled or contain an Axis marker. However, every 5 ammo cubes on defeated axis unit cards which are not marked with a medal may be exchanged for 1 medal counter.
The taken Airborne unit is placed on the board, on any area uncontrolled by any player, with the green side up. A player cannot take an Airborne unit if he does not possess a Medal to pay for it.
An Airborne unit gives +1 ammo bonus for any Allied Corps which enters the area containing this counter, either for combat or for moving into a fortified area.
After placing a player marker in an area with an Airborne unit, the Airborne unit is permanently removed from play.
Example: Brad, in his first action, takes 3 Airborne unit counters and places them on the board: 2 units in Aachen and 1 unit in Köln 1 .
Next, he removes 1 medal counter from his pool as well as 1 Axis armored divi-sion card with a medal and 4 other Axis cards without medals having 5 ammo symbols in total (Brad defeated and collected these cards in an earlier combat) 2 .
In his second action, Brad starts moving the V US Corps in Maastricht, which has 3 gas markers, 1 food marker and 2 ammo markers. The corps enters Aachen 3 , which requires spending 1 ammo from the Corps card, since the corps entered a forti-fied area 4 . Next, the top Axis card is revealed: 12 Volksgrenadier Div 5 .
The player must use 3 ammo to defeat this enemy, but since there are 2 airborne units in the area, only 1 more ammo has to be spent from the Corps card 6 . The defeated enemy card is placed near Brad’s card, as well as a medal awarded for liberating Aachen 8 . Brad also puts a player marker in Aachen, 7 , removing the Axis marker back to their pool near the board, as well as removing the Airborne units from play.
After the end of a player’s turn, all of his placed Airborne units lying face down are removed from play, and those lying face up are flipped face down. So a player’s placed Airborne units will remain in play for at most 2 of that player’s turns. In a 2-color area, they will help the other Allied player if that player happens to fight in the area.
11
4
5
6
7
9
10
10 11
12
1
1
2
3
3
4
4
5
6
8
13
„Take calculated risks. That is quite different from being rash.”
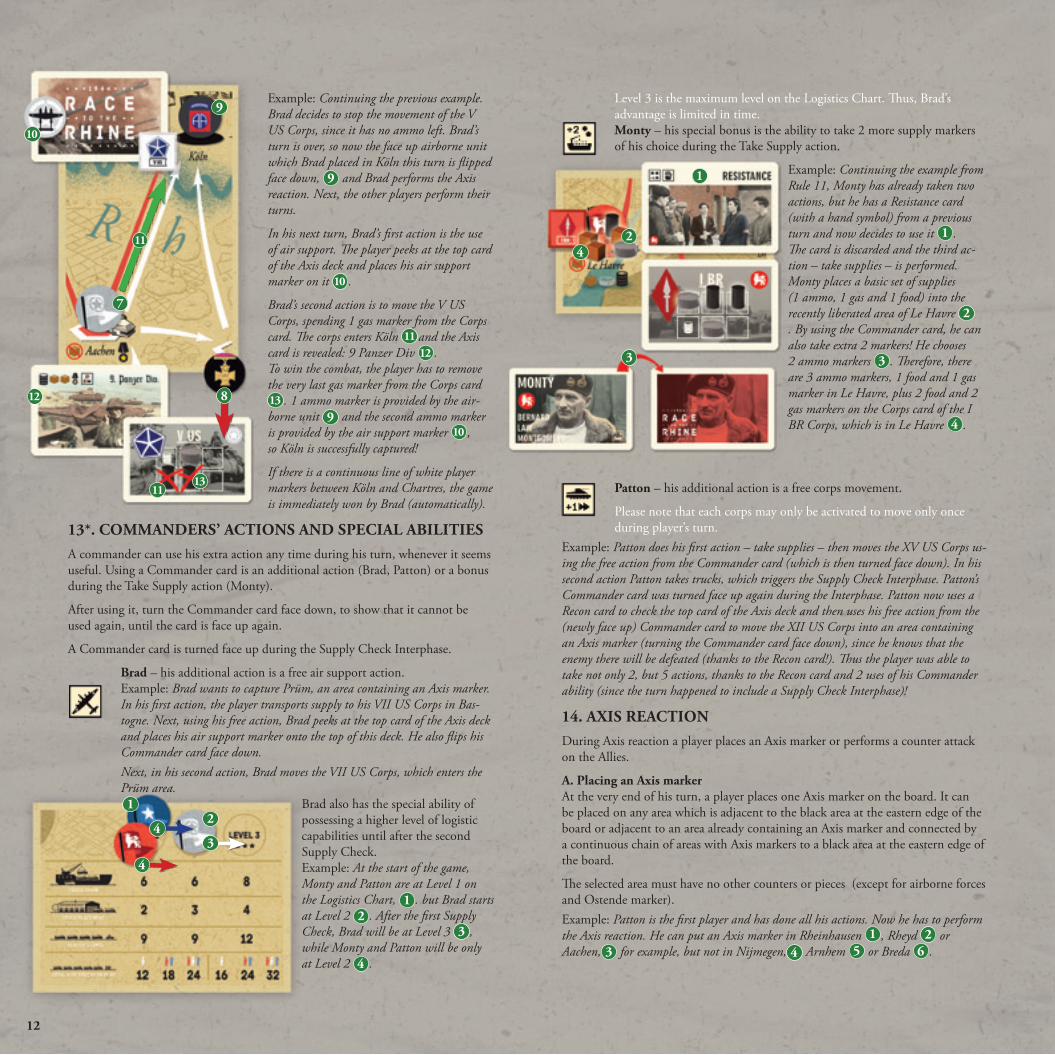
Example: Continuing the previous example. Brad decides to stop the movement of the V US Corps, since it has no ammo left. Brad’s turn is over, so now the face up airborne unit which Brad placed in Köln this turn is flipped face down, 9 and Brad performs the Axis reaction. Next, the other players perform their turns.
In his next turn, Brad’s first action is the use of air support. The player peeks at the top card of the Axis deck and places his air support marker on it 10 .
Brad’s second action is to move the V US Corps, spending 1 gas marker from the Corps card. The corps enters Köln 11 and the Axis card is revealed: 9 Panzer Div 12 . To win the combat, the player has to remove the very last gas marker from the Corps card 13 . 1 ammo marker is provided by the air-borne unit 9 and the second ammo marker is provided by the air support marker 10 , so Köln is successfully captured!
If there is a continuous line of white player markers between Köln and Chartres, the game is immediately won by Brad (automatically).
13*. commanders’ actIons and specIaL aBILItIesA commander can use his extra action any time during his turn, whenever it seems useful. Using a Commander card is an additional action (Brad, Patton) or a bonus during the Take Supply action (Monty).
After using it, turn the Commander card face down, to show that it cannot be used again, until the card is face up again.
A Commander card is turned face up during the Supply Check Interphase.
Brad – his additional action is a free air support action. Example: Brad wants to capture Prüm, an area containing an Axis marker. In his first action, the player transports supply to his VII US Corps in Bas-togne. Next, using his free action, Brad peeks at the top card of the Axis deck and places his air support marker onto the top of this deck. He also flips his Commander card face down.Next, in his second action, Brad moves the VII US Corps, which enters the Prüm area.
Brad also has the special ability of possessing a higher level of logistic capabilities until after the second Supply Check. Example: At the start of the game, Monty and Patton are at Level 1 on the Logistics Chart, 1 . but Brad starts at Level 2 2 . After the first Supply Check, Brad will be at Level 3 3 , while Monty and Patton will be only at Level 2 4 .
Level 3 is the maximum level on the Logistics Chart. Thus, Brad’s advantage is limited in time.monty – his special bonus is the ability to take 2 more supply markers of his choice during the Take Supply action.
Example: Continuing the example from Rule 11, Monty has already taken two actions, but he has a Resistance card (with a hand symbol) from a previous turn and now decides to use it 1 .The card is discarded and the third ac-tion – take supplies – is performed.Monty places a basic set of supplies (1 ammo, 1 gas and 1 food) into the recently liberated area of Le Havre 2. By using the Commander card, he can also take extra 2 markers! He chooses 2 ammo markers 3 . Therefore, there are 3 ammo markers, 1 food and 1 gas marker in Le Havre, plus 2 food and 2 gas markers on the Corps card of the I BR Corps, which is in Le Havre 4 .
patton – his additional action is a free corps movement.
Please note that each corps may only be activated to move only once during player’s turn.
Example: Patton does his first action – take supplies – then moves the XV US Corps us-ing the free action from the Commander card (which is then turned face down). In his second action Patton takes trucks, which triggers the Supply Check Interphase. Patton’s Commander card was turned face up again during the Interphase. Patton now uses a Recon card to check the top card of the Axis deck and then uses his free action from the (newly face up) Commander card to move the XII US Corps into an area containing an Axis marker (turning the Commander card face down), since he knows that the enemy there will be defeated (thanks to the Recon card!). Thus the player was able to take not only 2, but 5 actions, thanks to the Recon card and 2 uses of his Commander ability (since the turn happened to include a Supply Check Interphase)!
14. axIs reactIonDuring Axis reaction a player places an Axis marker or performs a counter attack on the Allies.
a. placing an axis markerAt the very end of his turn, a player places one Axis marker on the board. It can be placed on any area which is adjacent to the black area at the eastern edge of the board or adjacent to an area already containing an Axis marker and connected by a continuous chain of areas with Axis markers to a black area at the eastern edge of the board.
The selected area must have no other counters or pieces (except for airborne forces and Ostende marker).Example: Patton is the first player and has done all his actions. Now he has to perform the Axis reaction. He can put an Axis marker in Rheinhausen 1 , Rheyd 2 or Aachen, 3 for example, but not in Nijmegen, 4 Arnhem 5 or Breda 6 .
12
12
3
9
10
11
11
12
13
8
7
1
2
3
4
4
4
Please note that placing an Axis marker in an area occupied by an Airborne Unit does not cause combat.
If there is no area eligible to receive the Axis marker, it is removed from play (but the game continues).
After placing the very last Axis marker, the current round is played until its end, i.e. other players in turn order may perform their turns. They will not place any Axis markers (but they may counter-attack normally).
B. counter-attackInstead of simple placing an Axis marker, a player may decide to perform a coun-ter-attack, i.e. remove a player marker of some other player (Exception: solitaire game). The removed player marker :
- cannot be adjacent to an area with any Allied Corps or starting area or army sup-ply base and
- must be adjacent to an unoccupied area or an area with an Axis marker or flag which has a continuous connection by arrows of any color with the Düsseldorf area (i.e. there is no player marker in between).
Counter-attack removes another player’s marker from the board.
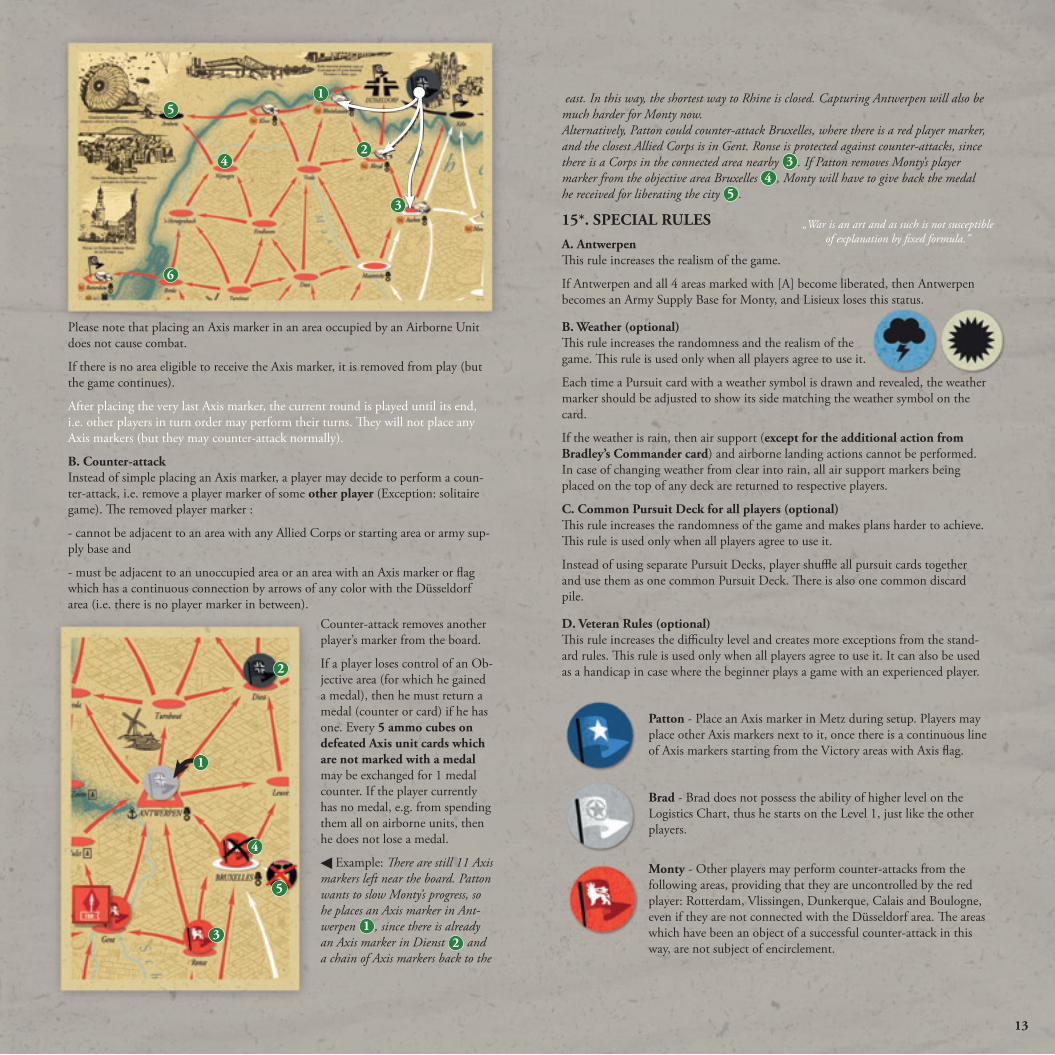
If a player loses control of an Ob-jective area (for which he gained a medal), then he must return a medal (counter or card) if he has one. Every 5 ammo cubes on defeated axis unit cards which are not marked with a medal may be exchanged for 1 medal counter. If the player currently has no medal, e.g. from spending them all on airborne units, then he does not lose a medal.
Example: There are still 11 Axis markers left near the board. Patton wants to slow Monty’s progress, so he places an Axis marker in Ant-werpen 1 , since there is already an Axis marker in Dienst 2 and a chain of Axis markers back to the
east. In this way, the shortest way to Rhine is closed. Capturing Antwerpen will also be much harder for Monty now. Alternatively, Patton could counter-attack Bruxelles, where there is a red player marker, and the closest Allied Corps is in Gent. Ronse is protected against counter-attacks, since there is a Corps in the connected area nearby 3 . If Patton removes Monty’s player marker from the objective area Bruxelles 4 , Monty will have to give back the medal he received for liberating the city 5 .
15*. specIaL ruLesa. antwerpenThis rule increases the realism of the game.
If Antwerpen and all 4 areas marked with [A] become liberated, then Antwerpen becomes an Army Supply Base for Monty, and Lisieux loses this status.
B. Weather (optional)This rule increases the randomness and the realism of the game. This rule is used only when all players agree to use it.
Each time a Pursuit card with a weather symbol is drawn and revealed, the weather marker should be adjusted to show its side matching the weather symbol on the card.
If the weather is rain, then air support (except for the additional action from Bradley’s commander card) and airborne landing actions cannot be performed. In case of changing weather from clear into rain, all air support markers being placed on the top of any deck are returned to respective players.
c. common pursuit deck for all players (optional)This rule increases the randomness of the game and makes plans harder to achieve. This rule is used only when all players agree to use it.
Instead of using separate Pursuit Decks, player shuffle all pursuit cards together and use them as one common Pursuit Deck. There is also one common discard pile.
d. Veteran rules (optional)This rule increases the difficulty level and creates more exceptions from the stand-ard rules. This rule is used only when all players agree to use it. It can also be used as a handicap in case where the beginner plays a game with an experienced player.
patton - Place an Axis marker in Metz during setup. Players may place other Axis markers next to it, once there is a continuous line of Axis markers starting from the Victory areas with Axis flag.
Brad - Brad does not possess the ability of higher level on the Logistics Chart, thus he starts on the Level 1, just like the other players.
monty - Other players may perform counter-attacks from the following areas, providing that they are uncontrolled by the red player: Rotterdam, Vlissingen, Dunkerque, Calais and Boulogne, even if they are not connected with the Düsseldorf area. The areas which have been an object of a successful counter-attack in this way, are not subject of encirclement.
13
2
3
1
4
5
1
2
3
4
5
6
„War is an art and as such is not susceptible of explanation by fixed formula.”
16. Game endThe game ends when one of the following two situations occurs:
A player achieves automatic victory - i.e. one of his Corps crosses the Rhine and captures one of the areas across the Rhine (marked with black color) and this corps has a continuous connection of areas controlled by its owner back to its army’s supply base.
At the very end of the round in which the last Axis marker was placed. If the last Axis marker was not placed by the last player in the player order, all players still play their turns normally before the round ends, except for not placing Axis mark-ers (however counter-attacks are still allowed). Then the player who has the most medals is the victor.
Players count their collected medals - both from medal counters as well as medals printed on defeated Axis unit cards.
Every 5 ammo cubes on defeated axis unit cards which are not marked with a medal may be exchanged for 1 medal counter.
Example: Bradley has gained 4 medal counters, 2 Axis cards with medals as well as 5 Axis unit cards without medals. Those 5 Axis cards have a total of 7 ammo symbols on them, so Brad’s final score is therefore 4+2+1=7.
In case of a tie, the winner is the player who has defeated more Axis divisions and brigades. If there is still a tie, the winner is the tying player later in the turn order sequence.
17. soLItaIre GameThe solitaire game uses the standard rules with the following modifications:
a. setting up the game
Besides the standard set up, numerical counters are placed on the map in the cho-sen sector, as shown in the illustration below. The other Axis markers have no im-pact for the game, but they may be used to count the number of the turns played.
While playing Brad, place Monty’s markers into Brussels and Maastricht - these cities are excluded from your sector. All other areas are considered to be in the player’s color only.
Three 6-sided dice are also used in the game.
B. object of the gamePlayer should try to achieve an automatic victory in the lowest possible number of turns.Once a player achieves an automatic victory, then in his next game, he should try to achieve a better result (i.e. automatic victory in fewer turns). If the player wins in the same number of turns, then he should compare the number of collected medals.
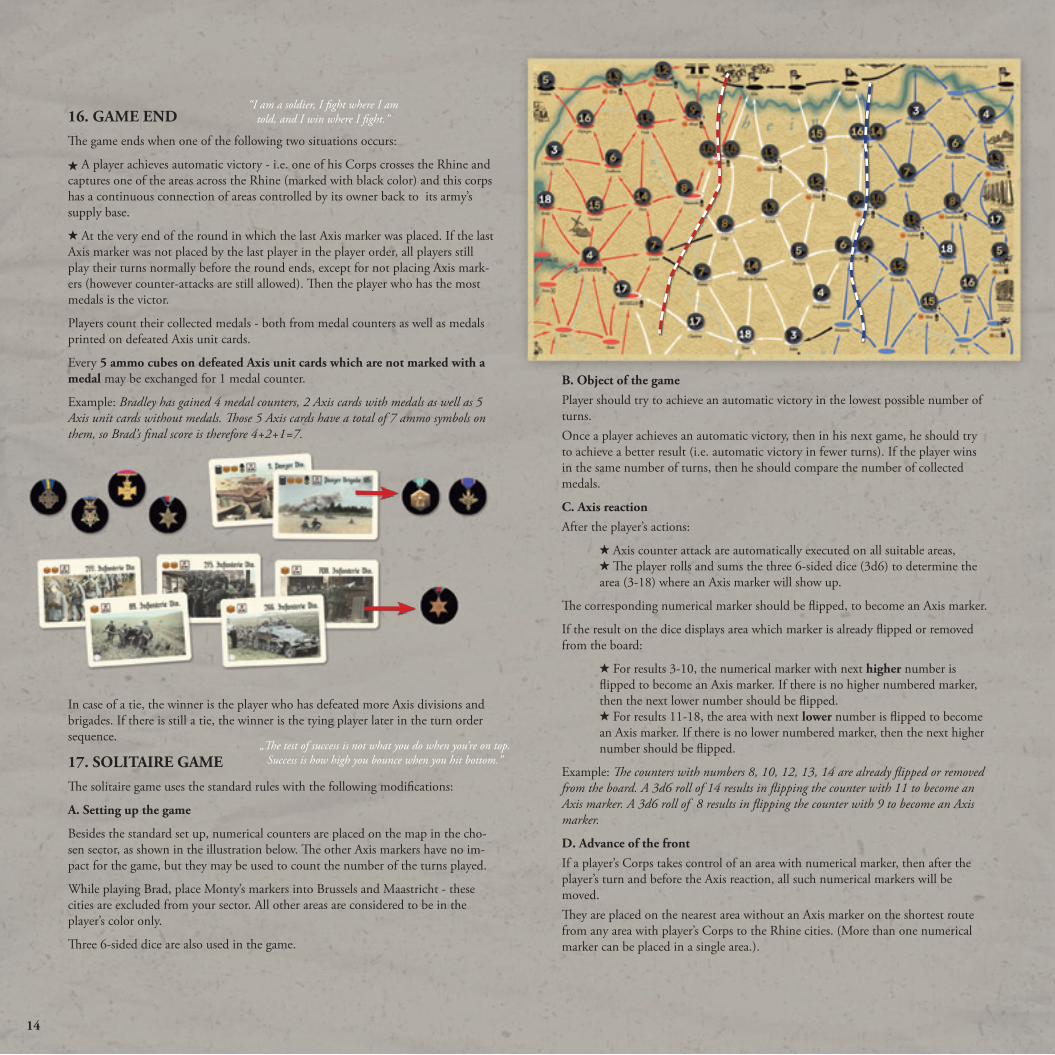
c. axis reactionAfter the player’s actions:
Axis counter attack are automatically executed on all suitable areas, The player rolls and sums the three 6-sided dice (3d6) to determine the
area (3-18) where an Axis marker will show up.
The corresponding numerical marker should be flipped, to become an Axis marker.
If the result on the dice displays area which marker is already flipped or removed from the board:
For results 3-10, the numerical marker with next higher number is flipped to become an Axis marker. If there is no higher numbered marker, then the next lower number should be flipped.
For results 11-18, the area with next lower number is flipped to become an Axis marker. If there is no lower numbered marker, then the next higher number should be flipped.
Example: The counters with numbers 8, 10, 12, 13, 14 are already flipped or removed from the board. A 3d6 roll of 14 results in flipping the counter with 11 to become an Axis marker. A 3d6 roll of 8 results in flipping the counter with 9 to become an Axis marker.
d. advance of the frontIf a player’s Corps takes control of an area with numerical marker, then after the player’s turn and before the Axis reaction, all such numerical markers will be moved.They are placed on the nearest area without an Axis marker on the shortest route from any area with player’s Corps to the Rhine cities. (More than one numerical marker can be placed in a single area.).
14
“I am a soldier, I fight where I am told, and I win where I fight.”
„The test of success is not what you do when you’re on top. Success is how high you bounce when you hit bottom.”
If there are several eligible areas (all equally close to player-controlled areas and all on shortest routes), then the repositioned numerical markers should be placed in as many eligible areas as possible. If there are fewer markers than eligible areas, then the player chooses which areas receive numerical markers and which not. If some areas end up with more than one numerical marker, then do this in such a way that the sums of the numbers in each area are as close to each other as possible (e.g. 2 closest areas with 3 markers assigned as 3+6 and 8, not as 3 and 6+8).If all areas on all shortest routes to the Rhine are already occupied by Axis markers, then the numerical markers are placed on the nearest areas of the shortest possible routes to the Rhine which still have some area without an Axis marker.The procedure above applies, if there are multiple numerical markers in an area and one of them becomes an Axis marker.
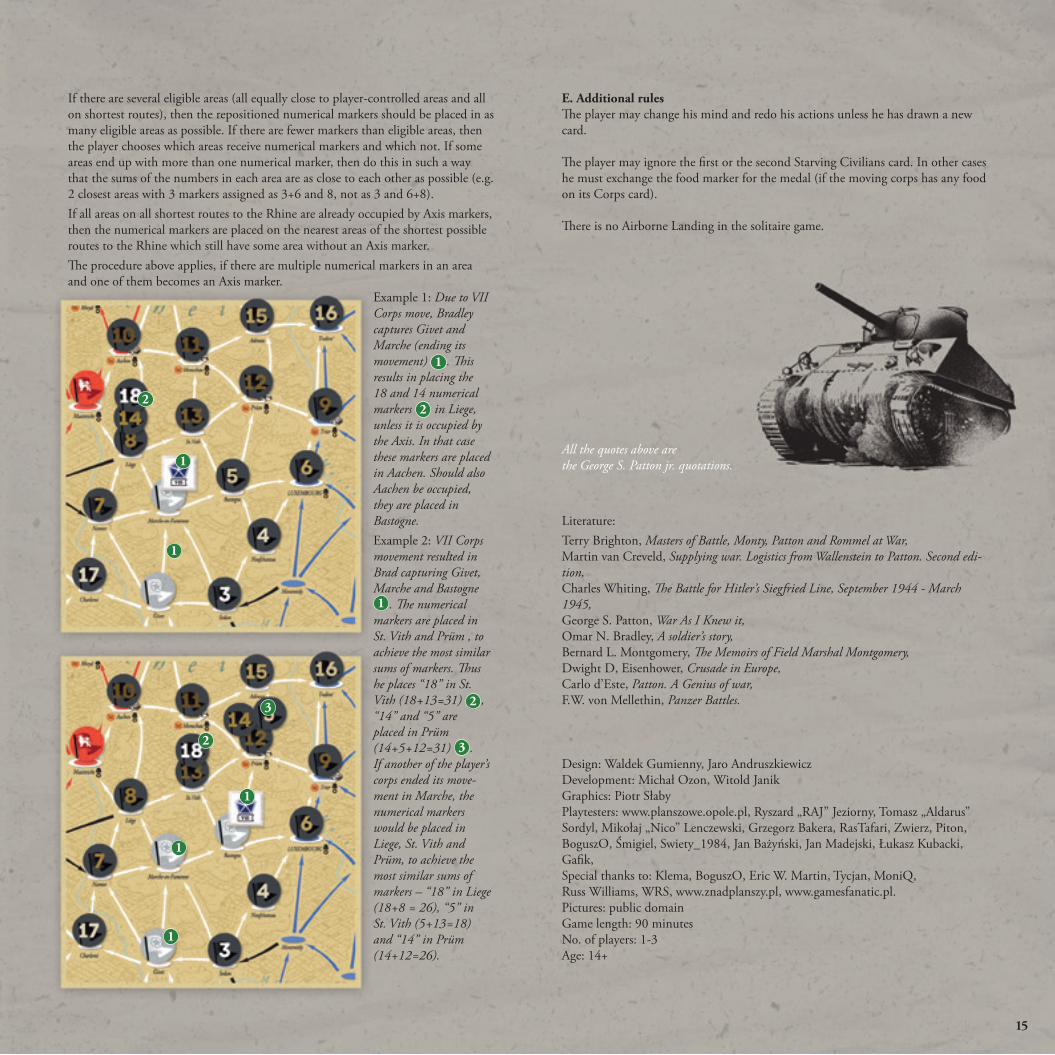
Example 1: Due to VII Corps move, Bradley captures Givet and Marche (ending its movement) 1 . This results in placing the 18 and 14 numerical markers 2 in Liege, unless it is occupied by the Axis. In that case these markers are placed in Aachen. Should also Aachen be occupied, they are placed in Bastogne.Example 2: VII Corps movement resulted in Brad capturing Givet, Marche and Bastogne 1 . The numerical
markers are placed in St. Vith and Prüm , to achieve the most similar sums of markers. Thus he places “18” in St. Vith (18+13=31) 2 , “14” and “5” are placed in Prüm (14+5+12=31) 3 .If another of the player’s corps ended its move-ment in Marche, the numerical markers would be placed in Liege, St. Vith and Prüm, to achieve the most similar sums of markers – “18” in Liege (18+8 = 26), “5” in St. Vith (5+13=18) and “14” in Prüm (14+12=26).
e. additional rulesThe player may change his mind and redo his actions unless he has drawn a new card.
The player may ignore the first or the second Starving Civilians card. In other cases he must exchange the food marker for the medal (if the moving corps has any food on its Corps card).
There is no Airborne Landing in the solitaire game.
All the quotes above are the George S. Patton jr. quotations.
Literature:Terry Brighton, Masters of Battle, Monty, Patton and Rommel at War, Martin van Creveld, Supplying war. Logistics from Wallenstein to Patton. Second edi-tion, Charles Whiting, The Battle for Hitler’s Siegfried Line, September 1944 - March 1945, George S. Patton, War As I Knew it, Omar N. Bradley, A soldier’s story, Bernard L. Montgomery, The Memoirs of Field Marshal Montgomery, Dwight D, Eisenhower, Crusade in Europe, Carlo d’Este, Patton. A Genius of war, F.W. von Mellethin, Panzer Battles.
Design: Waldek Gumienny, Jaro AndruszkiewiczDevelopment: Michał Ozon, Witold JanikGraphics: Piotr SłabyPlaytesters: www.planszowe.opole.pl, Ryszard „RAJ” Jeziorny, Tomasz „Aldarus” Sordyl, Mikołaj „Nico” Lenczewski, Grzegorz Bakera, RasTafari, Zwierz, Piton, BoguszO, Śmigiel, Swiety_1984, Jan Bażyński, Jan Madejski, Łukasz Kubacki, Gafik,Special thanks to: Klema, BoguszO, Eric W. Martin, Tycjan, MoniQ, Russ Williams, WRS, www.znadplanszy.pl, www.gamesfanatic.pl. Pictures: public domain Game length: 90 minutes No. of players: 1-3 Age: 14+
15
1
1
1
1
1
2
2
3
General information The order of players is random, but it does not change during the game.Round – all turns of all the players. Player’s Turn – 2 Actions (A) of six types available plus additional actions (if available):
1 action by using the Resistance card 1 action by Rusing the Recon card1 action on Commander card (active only) and finally axis reaCtion – either placing Axis marker or counter attack
aCtions a1 take supply from the stock
into army supply base Take a set of 3 supply pieces of the same kind from the allied stock track or 3 differ-ent supply pieces from the supply markers reserve pool. An Army Supply Base can hold up to 9 supply pieces!
into limited supply base Take 3 different supply pieces from the supply markers reserve pool. A Limited Supply Base can hold up to 6 supply pieces and may be used once per turn only!
a2 take trucks Take the trucks from the Allied Truck Stock, taking no more than the number shown for the player’s level on the Logistics Chart (Truck Draw). You cannot take so many trucks that you exceed your overall truck limit number shown for your Level on the Logistics Chart.should there be no trucks left in the allied truck stock, the current turn is paused and the Supply Check Interphase is immediately performed
a3 transport supplies Place truck on empty arrow in you color between areas you control and move up to 5 supply pieces (one way only) between these areas.You cannot place more trucks than indicated by your current level of Truck place-ment on the Logistics Chart.You can always freely move supply pieces between the Corps card and the area occupied by this Corps.
a4 corps movement once per turn, for 1 gas marker taken from the respective Corps card, move the Corps up to 3 areas in your color (or black one) along the arrows in your color.Corps cannot enter or move through area occupied by any other corps or by markers of other players (even in case of double-colored areas).When a corps enters an area containing supply markers, they can be immediately moved onto the Corps card.The moving corps can also freely move supplies from its card into the areas through which the corps is passing (or remaining).Entering a fortified area without a player marker requires immediately spending 1 ammo.Entering an unoccupied area results in drawing a card from the Pursuit deck.Entering an area with axis marker or axis flag results in drawing a card from the Axis deck.
cards description: Les Boches– results in stopping the movement; movement may be continued by spending 1 more gas. Axis division Combat. If the combat is won, Corps may continue its movement by spending 1 gas. Other cards – no impact on movement. Some cards’ effect are instant. You must use them at once, or just discard them.Some cards containg a hand symbol ( ), which means that they can be held for use in later turns.After use, the card is discarded to the respective discard pile (except for the undefeated Axis divisions).
Combat you must remove the supplies indicated on the Axis division card.If you can match all the supplies indicated, the combat is won and the Axis division card is addd into your pool.If you cannot match all the supplies indicated, then you must remove as many supplies as you can and the movement is ended. The Axis division card is shuffled back into its deck.
a5 air support You can peek at the top card from a chosen deck (either your Pursuit deck or the com-mon Axis deck) and place your air support marker on it. In case of combat or movement by the owner of the air support marker on the deck, one ammo will be added to the strength of the Corps which triggers drawing the top card. The air support marker is then returned to you.
a6 airborne landingTake up to 3 Airborne units, paying 1 Medal for each one, and place them face up on the board, in areas which are either uncontrolled or contain an Axis marker. An Airborne unit gives +1 ammo bonus for any Allied Corps which enters the area con-taining this counter, either for combat or for moving into a fortified area.After the end of a player’s turn, all of his placed Airborne units lying face down are removed from play, and those lying face up are flipped face down.
additional actionsThey are performed above the limit of 2 actions per turn. They can be performed after completing any other action.1 action by using the Resistance card1 action by using the Recon card 1 action on Commander card (active only)
supply check Interphase markers of each player on the Logistics Chart are shifted one level up. each corps on the board immediately uses 1 food.
If it is impossible then the corps is grounded and cannot be moved until it receives food supply. Turning the corps face up requires use of 1 food. The use of such food is automatic (even if this food was being transported through and the player had no intent of giving this food to this corps).
all players remove all trucks from the board and return them to the Allied Truck Stock.
After any player reaches Level 3 on the Logistics Chart, 2 extra trucks (plus 2 extra trucks per player) are placed into the stock (1 player – 4 trucks, 2 players – 6, 3 players – 8)
the Allied Supply Stock is refilled with the appropriate number of supplies. all Commander cards are placed face up.
axis reaction Place an Axis marker orPerform a counter attak placing axis marker
Place one Axis marker on any area which is adjacent to the black area with Axis flag at the eastern edge of the board or adjacent to an area already containing an Axis marker and connected by a continuous chain of areas with Axis markers to a black area at the eastern edge of the board. placing the very last axis marker starts the end of the game procedure.
counter-attackRemove a player marker, if the following conditions are met:
not adjacent to any Allied corps, not adjacent to any starting area, not adjacent to Army supply base, adjacent to any unocuppied area or an area with an Axis marker or flag which has
a continuous connection by arrows of any color with the Düsseldorf area. Important: Succesful counter attack may result in losing a medal!