Secure & Controlled Access to your business applications with the Citrix Access Platform.
GTS Training
1 White & Case
Remote Applications Access with Citrix
Overview of Citrix
Citrix is a Web-based application that allows you to access your White & Case applications, such as, Outlook, iManage, Word, etc., outside of the office.
Requirements for Use
You will need:
• a Windows or Mac PC with a broadband Internet connection • to know your White & Case network User Name, Password, and domain • your RSA SecurID token and to know your SecurID passcode
If you currently do not have a token, please contact the GTS Service Desk.
Accessing Citrix
���� If you are logging into Citrix from your home PC or Mac for the first time or are prompted to install a newer version of the software, see Installing the Citrix Client.
Step 1: On the Employee Remote Access page under Remote Applications, click your region (Americas, EMEA, or Asia (via Singapore or Asia (via Tokyo) ).
Step 2: From the Citrix XenApp - Logon screen, type your User Name and network Password.
Step 3: Enter your SecurID Passcode.
���� If SecurID has not been not activated, please contact the GTS Service Desk. If accessing Citrix from the office, SecurID is not required.
Step 4: Click Login. The Citrix XenApp - Applications window displays with your White & Case applications.
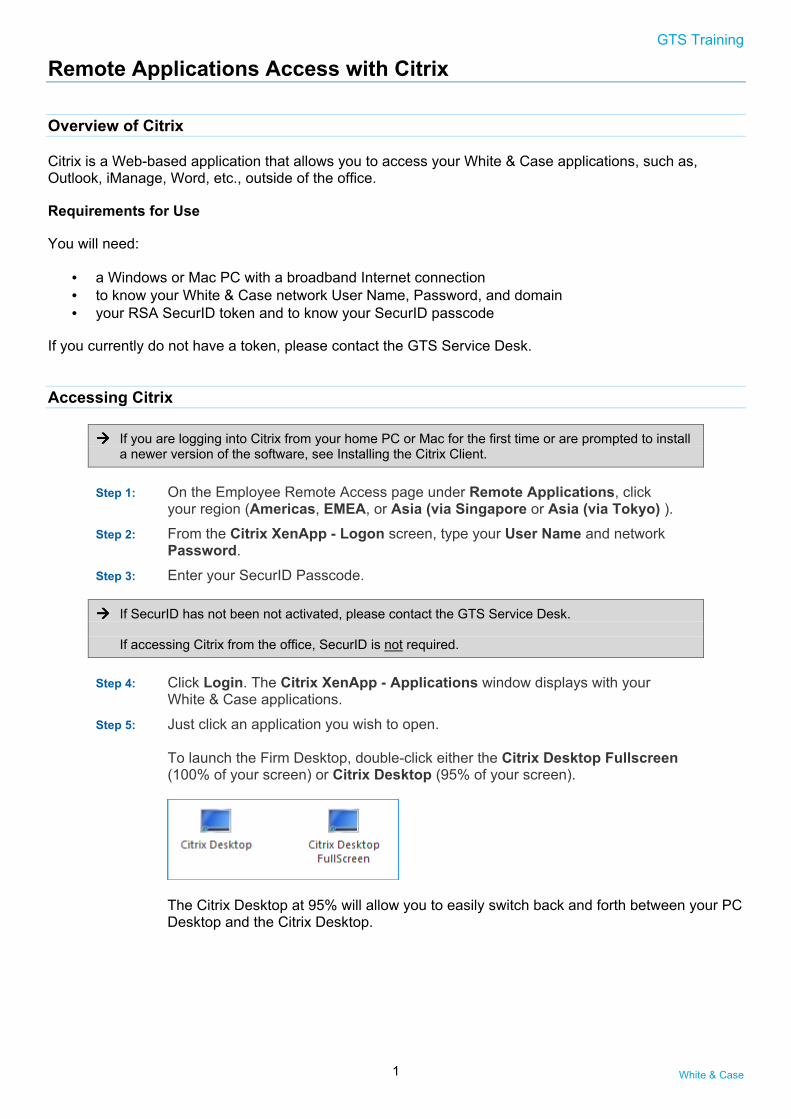
Step 5: Just click an application you wish to open. To launch the Firm Desktop, double-click either the Citrix Desktop Fullscreen (100% of your screen) or Citrix Desktop (95% of your screen).
The Citrix Desktop at 95% will allow you to easily switch back and forth between your PC Desktop and the Citrix Desktop.

2 White & Case
Displayed Messages
Depending on whether you use Windows or Mac, you will receive certain messages while trying to access Citrix applications:
Windows Displayed Messages
If you receive the following message when accessing an application:
First select the Do not ask me again
for this site check box and then click
No. Otherwise you could compromise
data security on your PC.
First select the Do not ask me again
for this site check box and then click
Block Access.

3 White & Case
Mac Displayed Messages
When accessing an application for the first time via your Mac, the following message displays:
If you are using your own Mac, select the Remember these settings for this drive check box and click No Access.
If you haven't installed the Citrix client for Mac
The Connection Center dialog displays after clicking an application.
If a Certificate message displays, click Trust.
If you are using your own Mac, click Yes when the CDM Read Access Warning displays. Click No if you are not using your own Mac and wish to prevent Citrix from writing any files to the hard drive of the Mac you are using.

4 White & Case
Installing the Citrix Client
To ensure support for your Web browser and offer the best performance on your home PC, you should install the Citrix client that is available for either Windows or Mac PCs.
���� If you are accessing Citrix via Internet Explorer, before running Citrix the first time, add the following sites to your Trusted sites list.
Step 1: In Internet Explorer, click the Tools button, and then click Internet Options.
Step 2: Click the Security tab, and then click the Trusted sites security zone.
Step 3: Click the Sites button.
Step 4: Type the Internet address (URL) for the web site that you want to add to this zone, and then click Add.
Step 5: Repeat step 4 for each site you want to add to the zone.
Step 6: When you are finished adding sites, click Close, and then click OK.
Step 7: Close and restart Internet Explorer to ensure they take effect. The trust settings enable Citrix client detection in IE to function properly and to ensure you can launch applications.
• https://emcitrix.whitecase.com
• https://amcitrix1.whitecase.com
• https://apcitrix.whitecase.com
• https://apcitrix2.whitecase.com
You may access Citrix for your region as described in Accessing Citrix. If your PC or device does not have a Citrix client installed, you will first see the following screen:
Choose your operating system to proceed with client-specific instructions:
Windows
To install/update the Citrix client for your browser:
Step 1: Access Citrix for your region as described in Accessing Citrix. The Citrix XenApp - Upgrade screen displays.
5 White & Case
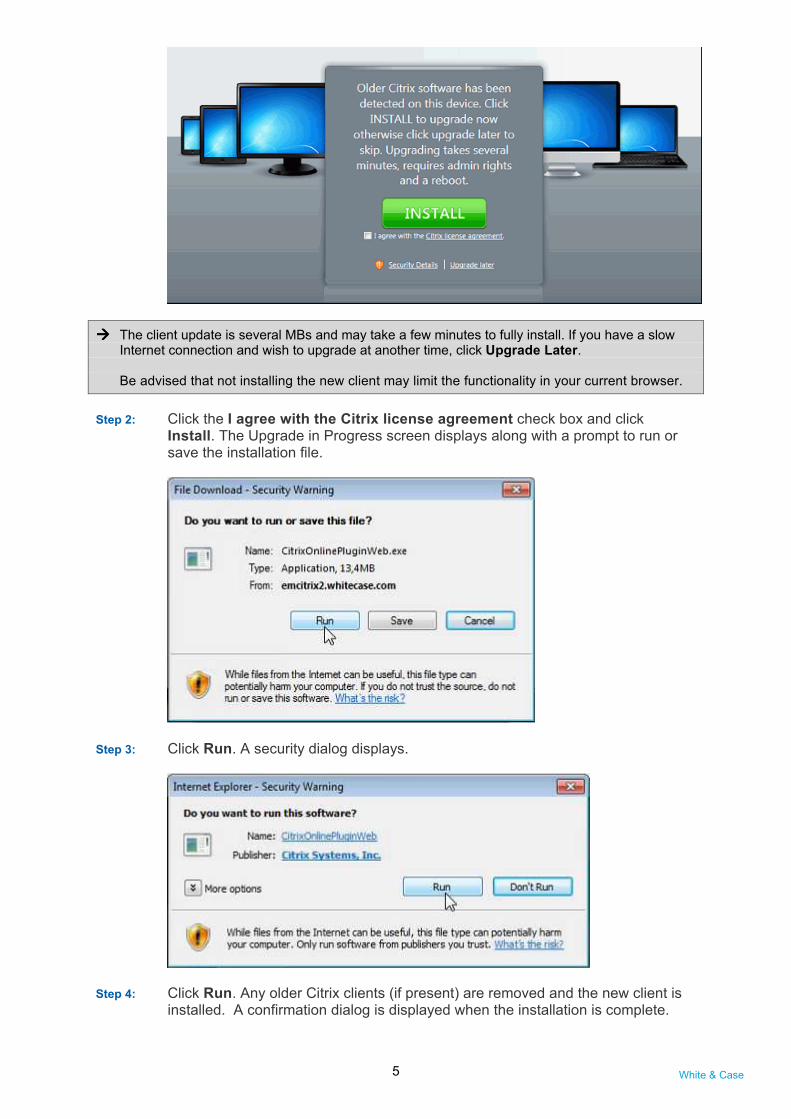
���� The client update is several MBs and may take a few minutes to fully install. If you have a slow Internet connection and wish to upgrade at another time, click Upgrade Later. Be advised that not installing the new client may limit the functionality in your current browser.
Step 2: Click the I agree with the Citrix license agreement check box and click Install. The Upgrade in Progress screen displays along with a prompt to run or save the installation file.
Step 3: Click Run. A security dialog displays.
Step 4: Click Run. Any older Citrix clients (if present) are removed and the new client is installed. A confirmation dialog is displayed when the installation is complete.

6 White & Case
Step 5: Restart your browser and log on to Citrix.
Mac
To install/update the Citrix client for your browser:
Step 1: Access Citrix for your region as described in Accessing Citrix. The Citrix XenApp - Upgrade screen displays.
���� The client update is several MBs and may take a few minutes to fully install. If you have a slow Internet connection and wish to upgrade at another time, click Upgrade later. Be advised that not installing the new client may limit the functionality in your current browser.
Step 2: Click the I agree with the Citrix license agreement check box and click Install.
Step 3: When the download is complete, start the installation package:
Step 4: Follow the installation prompts as shown here:

7 White & Case

8 White & Case

9 White & Case
Step 5: Click OK. Any older Citrix clients (if present) are removed and the new client is installed. A confirmation dialog is displayed when the installation is complete:
Step 6: Click Close and restart your browser and log on to Citrix.
Working with Documents in Citrix
When working in Word, Excel, or PowerPoint, files can be saved either to WorkSite or to local drives on a Firm-owned device. To save locally (hard drive of the computer), be sure to select C$ (Windows) or H$ (Mac). The Local Disk (C:) option is the local drive of the Citrix computer you are logged into.
���� For the purpose of accessing files from a USB drive or other device, be aware that mapping drives in Citrix to personal (non Firm-owned) devices is against Firm policy.
���� When creating new documents or editing an attachment, be sure to save the documents first, either locally or to iManage. After first saving and while the document is being edited, it is strongly recommended to periodically save the document (File | Save or Ctrl + S) since iManage disrupts the auto save feature in Microsoft Word.
Saving Your Work
To ensure the security of White & Case documents, Citrix times out and severs its connection with a user after 60 minutes of inactivity. If you have a document open that has not been saved for a period of time exceeding 60 minutes, all changes will be lost. Expand one of the following methods for more information on ensuring document revisions are maintained.
Saving Documents While in Citrix
Saving frequently while working on a document will prevent Citrix from timing out and ensure that all revisions are maintained.
Saving a Document to iManage
Step 1: Click File | Save As?. The Save As Options dialog displays.

10 White & Case
Step 2: In the Options pane, select Replace Original.
Step 3: Click OK.
���� Clicking File | Save does not update the network copy of the document. In the event that the Citrix connection is severed, any changes made would be lost.
Saving a Document Locally
Step 1: Click File | Local Save As?.
Step 2: Select “C$” drive and the desired sub folder (e.g., My Documents).
Step 3: Click Save.
���� See Saving and Checking Out Locally in Citrix for instructions on choosing the correct local drive.
Checking Documents In or Out via IManage
Checking out an IManage document via DeskSite or FileSite (in Outlook) allows you to edit the document on your local PC. After the document is checked out, you can log off Citrix and work on the document locally. After you are finished making revisions, the Citrix connection can be re-established and the document can be checked back in.
���� You may select multiple documents for checkout or checkin by pressing Ctrl + the documents in your list.
Checking Out A Document
Step 1: In DeskSite or FileSite, locate the document to be checked out (e.g. in your Document Worklist).
Step 2: Right-click the selected document and select Check Out.... The Checkout dialog box displays.
Step 3: Click Browse and select the location where the document should be saved.
���� See Saving and Checking Out Locally in Citrix for instructions on choosing the correct local drive.
Step 4: Click OK.
���� You may now log off from Citrix to work on the document locally. When finished, you can reconnect to Citrix and check in the document as described below.
Checking In a Document
Step 1: In DeskSite or FileSite, click the Checked-Out Documents link in the left pane. All checked out documents are displayed.
Step 2: Select the document to be checked back in.
Step 3: Right-click the selected document and select Checkin. The Save As Options dialog displays.
Step 4: Select Replace Original, New Version, or New Document.
���� If the New Version or New Document option is selected, the Document Profile window displays. If necessary, make any changes as appropriate and click Save.

11 White & Case
Step 5: Click OK.
Saving and Checking Out Locally in Citrix
To save or check out documents locally (hard drive of the computer), you must select “C$” drive. The Local Disk (C:) option is the local drive of the Citrix computer you are logged into and won’t be accessible after you have logged out of Citrix.
���� Documents stored on local drives (e.g., “H” drive or “C$” drive) can only be accessed by opening the application in which the document was created and then clicking File | Local Open?
Accessing Local PC Files and Printing Documents
After connecting, Citrix recognizes your current PC’s local C:\ drive and maps directly to your Firm network drive (typically the H:\ drive) for access to files stored there.
Citrix will automatically recognize most plug and play devices, such as home printers or USB sticks. If you are having difficulty installing a printer from home, contact the GTS Service Desk
���� Printing is not supported on iPad and Android devices.
Logging Out
To log out of Citrix, close any applications and then click Log Off | Disconnect in the upper-right corner of the screen.
Follow any displayed prompts to ensure a secure logout.
If while using Citrix your Internet connection is lost, click Reconnect to reactivate the applications.
12 White & Case
Citrix Frequently Asked Questions
Do I always need to install the Citrix Client?
No. Citrix Web access works without having to install the Citrix client. Simply select an application from the Citrix applications list and Citrix will automatically download and use a Java client.
Can I print from Citrix?
Yes, most recent commercial printers are supported; however not all home printers can be supported.
Citrix will automatically recognize most plug and play devices, such as home printers or USB sticks. If you are having difficulty installing a printer from home, contact the GTS Service Desk.
Why are Citrix applications not loading?
If you are using the Java client and your Web browser is configured to block pop-ups, then applications will not load. The solution is to either install the Citrix client (preferred solution) or temporarily disable Pop-Up blocking as follows:
Step 1: Launch Internet Explorer.
Step 2: Select Tools | Pop-up Blocker ���� Turn Off Pop-up Blocker.
Step 3: Click the Refresh button in the Internet Explorer toolbar.