Remedy Tasks - LearnFlex Tasks Student Guide Manitoba eHealth Page 6 of 31 CHANGE TICKET The...
33
S S t t u u d d e e n n t t G G u u i i d d e e R R e e m m e e d d y y T T a a s s k k s s Version 1.5 Modified: 01/21/2013
-
Upload
nguyenngoc -
Category
Documents
-
view
216 -
download
2
Transcript of Remedy Tasks - LearnFlex Tasks Student Guide Manitoba eHealth Page 6 of 31 CHANGE TICKET The...

SSttuuddeenntt GGuuiiddee
RReemmeeddyy TTaasskkss
VVeerrssiioonn 11..55
MMooddiiffiieedd:: 0011//2211//22001133


RReemmeeddyy TTaasskkss SSttuuddeenntt GGuuiiddee
Manitoba eHealth Page 1 of 31
Table of Contents Introduction....................................................................................................................................... 2
Purpose ............................................................................................................................................................... 2 Scope .................................................................................................................................................................. 2 Icons ................................................................................................................................................................... 2
Tasks and eHealth Processes ............................................................................................................ 3 Incident Management ........................................................................................................................................... 3 Change Management ............................................................................................................................................ 3
Overview of Tasks ............................................................................................................................. 4 Ticket Relationships .............................................................................................................................................. 4 Change Ticket Task Phases ................................................................................................................................... 4 Task Statuses ....................................................................................................................................................... 5 Task Workflow ..................................................................................................................................................... 5 Task Notifications ................................................................................................................................................. 6
Working with Tasks ........................................................................................................................... 7 Overview Console ................................................................................................................................................. 7 Task Console ....................................................................................................................................................... 8
Assigning a Task .............................................................................................................................. 13 Creating an Ad Hoc Task ..................................................................................................................................... 13 Using a Task Template ........................................................................................................................................ 18 Using a Task Group Template .............................................................................................................................. 19 Modifying a Task ................................................................................................................................................ 21 Canceling a Task ................................................................................................................................................ 22 Sequencing Tasks ............................................................................................................................................... 23 Activating a Task ................................................................................................................................................ 26
Receiving a Task .............................................................................................................................. 28 Starting a Task ................................................................................................................................................... 28 Updating a Task ................................................................................................................................................. 28 Closing a Task .................................................................................................................................................... 30
References ....................................................................................................................................... 31 Manitoba eHealth Documents .............................................................................................................................. 31 BMC Remedy Help .............................................................................................................................................. 31
RReemmeeddyy TTaasskkss SSttuuddeenntt GGuuiiddee
Manitoba eHealth Page 2 of 31
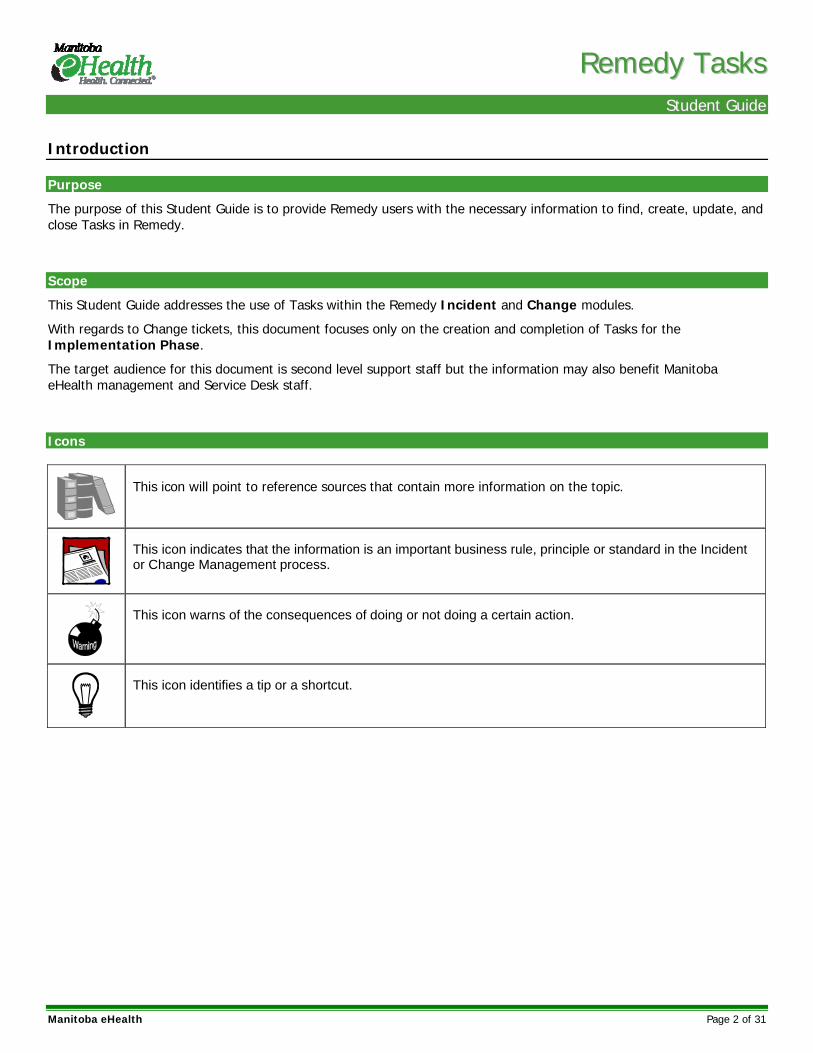
Introduction
Purpose
The purpose of this Student Guide is to provide Remedy users with the necessary information to find, create, update, and close Tasks in Remedy.
Scope
This Student Guide addresses the use of Tasks within the Remedy Incident and Change modules.
With regards to Change tickets, this document focuses only on the creation and completion of Tasks for the Implementation Phase.
The target audience for this document is second level support staff but the information may also benefit Manitoba eHealth management and Service Desk staff.
Icons
This icon will point to reference sources that contain more information on the topic.
This icon indicates that the information is an important business rule, principle or standard in the Incident or Change Management process.
This icon warns of the consequences of doing or not doing a certain action.
This icon identifies a tip or a shortcut.

RReemmeeddyy TTaasskkss SSttuuddeenntt GGuuiiddee
Manitoba eHealth Page 3 of 31
Tasks and eHealth Processes
The following documents provide details on the Manitoba eHealth Incident Management and Change Management processes.
Incident_Mgmt Process Guide
Incident_Mgmt Process Principle Guide
Incident_Mgmt Process Workflow
Change_Mgmt Process Guide
Change_Mgmt Process Principle Guide
Change_Mgmt Process Workflow
See the “References” section on page 31 for a description of how to access these documents.
Incident Management
Tasks should only be used when Incident Type = User Service Request.
Change Management
The use of the Task feature in Remedy is optional for Change tickets. If a Change Coordinator decides not to use the Task feature, then all Task details and assignments must still be documented within the RFC (Request For Change) as part of the Implementation or Release Plan.
The Task feature should NOT be relied upon to secure resources or communicate Task assignment.
Do not create a Task for work that should be submitted as a separate RFC.
Tasks should not be used in Break/Fix situations because they do not have automated escalations and resolution targets that drive the rapid restoration of service that is needed when a service is degraded or down.
Incident (Service Request)
Incident (Break/Fix)
No Tasks Task(s)

RReemmeeddyy TTaasskkss SSttuuddeenntt GGuuiiddee
Manitoba eHealth Page 4 of 31
Overview of Tasks
Ticket Relationships
Tasks may be used in Remedy to assign work that needs to be performed in order to fulfill a service request or a request for change.
Tasks are created from within an Incident or Change (parent) ticket. Multiple Tasks may be associated with each parent ticket (no limit).
You must close all child Tasks in order to close the parent ticket. The following messages will appear if you try to resolve an Incident or complete an RFC that has open Tasks.
Change Ticket Task Phases
In a Change ticket, Tasks may be associated with one of three phases in the parent RFC: Review, Business Approval, Implementation.
The Phase in which the Task is created determines when it will become active in the lifecycle of the parent ticket.
Parent Ticket
Child Tasks
Change Ticket
Task 1
Task 2
Task 3
Incident Ticket (Service Request)
Task 1
Task 2
Task 3
Review Tasks initiate when Process flow changes to Initiate Approval
Business Approval Tasks initiate when Process flow changes to Review & Authorize
Implementation Tasks initiate when Process flow changes to Implement Normal
This document focuses on Implementation Tasks only
RReemmeeddyy TTaasskkss SSttuuddeenntt GGuuiiddee
Manitoba eHealth Page 5 of 31
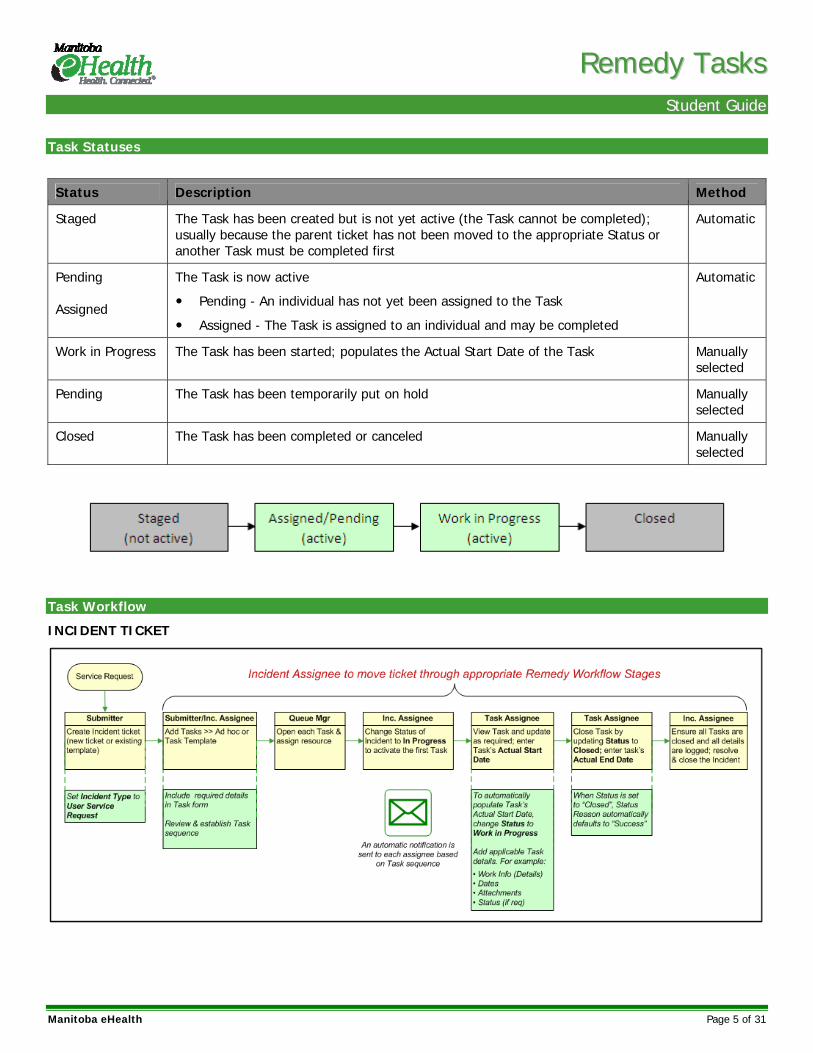
Task Statuses
Status Description Method
Staged The Task has been created but is not yet active (the Task cannot be completed); usually because the parent ticket has not been moved to the appropriate Status or another Task must be completed first
Automatic
Pending Assigned
The Task is now active
Pending - An individual has not yet been assigned to the Task
Assigned - The Task is assigned to an individual and may be completed
Automatic
Work in Progress The Task has been started; populates the Actual Start Date of the Task Manually selected
Pending The Task has been temporarily put on hold Manually selected
Closed The Task has been completed or canceled Manually selected
Task Workflow
INCIDENT TICKET

RReemmeeddyy TTaasskkss SSttuuddeenntt GGuuiiddee
Manitoba eHealth Page 6 of 31
CHANGE TICKET
The following workflow is for Implementation Tasks.
Task Notifications
The following system generated email notifications will be sent for Tasks (no escalations):
Recipient Trigger
Queue Manager Task is assigned to his/her group and the Task Status = Pending (i.e. the Task is active but no one has been assigned to it)
Task Assignee Task Status = Assigned
Task Assignee Someone else adds a Work Info entry into his/her Task
Owner of Parent Ticket Task Status = Closed

RReemmeeddyy TTaasskkss SSttuuddeenntt GGuuiiddee
Manitoba eHealth Page 7 of 31
Working with Tasks
Overview Console
By default, open Tasks appear at the bottom of the list in your Overview Console. The Request ID starts with TAS.
Task settings for the Overview Console are controlled in Application Preferences > Task Management tab.
If you open a Task from the Overview Console, it opens in the main Remedy window.
Parent Ticket
There is no Close button in this Task form. Use the Breadcrumb to get back to the Overview Console.
Opens the
parent ticket

RReemmeeddyy TTaasskkss SSttuuddeenntt GGuuiiddee
Manitoba eHealth Page 8 of 31
Task Console
OPENING THE TASK CONSOLE
Select Applications > Quick Links > Shift + eHealth Task Management Console.
If you do not hold the Shift key down before selecting eHealth Task Management Console, the Task Console will open in the main Remedy window making it difficult to get back to your Overview Console. The Shift key forces the Task Console to open in a new window.
Select Task Console from the Functions section at the left side of the Incident or Change Console. Note: The Task Console automatically opens in a new window from this location.
Add/remove columns, set Refresh Rate, save settings

RReemmeeddyy TTaasskkss SSttuuddeenntt GGuuiiddee
Manitoba eHealth Page 9 of 31
If you open a Task from the Task Console, it opens in a separate window.
FILTERING TASKS
1. Select the options that you want in the Show and/or Filter By sections at the top of the Task Console.
2. Click .
Records that match the criteria appear in the table in the Task Console.
When “Assigned To My Selected Groups” is selected, you will be able to choose one of your groups from My Support Groups.
When “Status” or “Status & Territory” is selected, you will be able to select option(s) in the Task Status section.
When “Territory” or “Status & Territory” is selected, you will be able to choose
from the Territory drop down list.
Reset the filters back to the default settings
Refresh the Task list based on current filter settings
Click the Close button to close the Task and return to the Task Console.
Opens the
parent ticket

RReemmeeddyy TTaasskkss SSttuuddeenntt GGuuiiddee
Manitoba eHealth Page 10 of 31
SEARCHING TASKS
1. Click at the top of the Task Console.
The Task (Search) window appears.
2. Enter the criteria into the form field(s).
-OR-
Click and enter the criteria into the search bar at the bottom of the form.
3. Click . Records that match the criteria appear in a results pane at the top of the search form.
When you double-click a record in the results pane at the top of the Search window, the Task will open in a separate window.
The percent symbol (%) may be used as a wildcard character.

RReemmeeddyy TTaasskkss SSttuuddeenntt GGuuiiddee
Manitoba eHealth Page 11 of 31
Syntax Examples for an Advanced Search
All Tasks created in April 2012 and assigned to Support Staff15:
'Create Date' >= "4/1/2012" AND 'Create Date' <= "4/30/2012" AND 'Assignee+' = "Support Staff15"
All open Tasks assigned to any eChart group:
'Status*' != "Closed" AND 'Assignee Group+' LIKE "%echart%"
All Tasks that are in a status of Pending and assigned to either the Infra group or the MS-Citrix group:
'Status*'="Pending” AND ( 'Assignee Group+'="Infra" OR 'Assignee Group+'="MS-Citrix")
Working with Searches
Objective Instructions Button
Clear the current search criteria and results Click the New search button.
Run a recent search Select Searches > Run Recent.
Load recently used criteria into the form or search bar
Select Searches > Load Recent.
Save a search 1. Run the search. 2. Select Searches > Save Search. 3. Type a Search Name. 4. Click OK.
Run a saved search Select Searches > Run My Searches.
Load saved search criteria into the form or search bar
Select Searches > Load My Searches.
Delete a search 1. Select Searches > Manage My Searches. 2. Select the search to be deleted. 3. Click Delete and then Save.

RReemmeeddyy TTaasskkss SSttuuddeenntt GGuuiiddee
Manitoba eHealth Page 12 of 31
Export or Print Search Results
To export or print search results:
1. Run the desired search.
2. In the results pane at the top of the Search window, select the records to be exported.
3. Click the Report button at the bottom of the results pane. The Report Console window appears.
4. Click the New button. The New Report form appears.
5. Type a name into the Name field.
6. Click OK. The Report Console re-appears.
7. Optional: Use the Columns tab to add or remove fields to/from the report.
8. Optional: Use the Sorting and Grouping tab to sort and group the records.
9. Click . The Report Preview window appears.
10. Click Export report and/or Print report and follow the prompts to export and/or print the report.
11. Close the Report Preview window.
12. Close the Report Console window.
This is a one-time export of data, not a dynamic report that can be refreshed.
Selected records

RReemmeeddyy TTaasskkss SSttuuddeenntt GGuuiiddee
Manitoba eHealth Page 13 of 31
Assigning a Task
Creating an Ad Hoc Task
In an Ad Hoc Task, the Task form fields are populated manually.
FROM AN INCIDENT TICKET
To create an Ad Hoc Task from within an Incident ticket:
1. Select Tasks from the Links section on the left.
The Incident Tasks window appears.
2. Select Ad Hoc from the Request Type drop down list.
3. Click the Relate button. The Create Task window appears.
4. Enter the required details into the Task form.
Note: See the “Task Form Fields” section below for a description of these fields.
5. Click .
The Create Task window closes. The Task appears in the Incident Tasks window.
If you close the Incident before saving it, the Tasks you created do not exist since there is no parent ticket.

RReemmeeddyy TTaasskkss SSttuuddeenntt GGuuiiddee
Manitoba eHealth Page 14 of 31
FROM A CHANGE TICKET
To create an Ad Hoc Implementation Task from within a Change ticket:
1. Select the Tasks tab.
2. Select Implementation from the Phase drop down list.
If Implementation is not selected, your Tasks will not be available during the Implementation stage of your RFC.
3. Ensure Ad Hoc is selected in the Request Type field.
4. Click the Relate button. The Create Task window appears.
5. Enter the required details into the Task form.
Note: See the “Task Form Fields” section below for a description of these fields.
6. Click .
The Create Task window closes. The Task appears on the Tasks tab.
If you close the RFC before saving it, the Tasks you created do not exist since there is no parent ticket.

RReemmeeddyy TTaasskkss SSttuuddeenntt GGuuiiddee
Manitoba eHealth Page 15 of 31
TASK FORM FIELDS
Main Form
Field Description
Name Required; Type a descriptive name for the Task
Summary Required; Type a brief description of the Task
Notes Enter a detailed description of the Task

RReemmeeddyy TTaasskkss SSttuuddeenntt GGuuiiddee
Manitoba eHealth Page 16 of 31
General Tab
Enter the location where the Task will be performed.
Requester Tab
Enter information about the person creating the Task (Requester) and the intended target of the Task (Requested For).
Classification Tab
Enter information about the operational and product categorizations for the Task.

RReemmeeddyy TTaasskkss SSttuuddeenntt GGuuiiddee
Manitoba eHealth Page 17 of 31
Assignment/Dates Tab
Field Description
Assignee Company Assignee Organization Assignee Group
Select the Company, Organization, and Group to which the Task will be assigned
Assignee IF you have been assigned a specific resource for the Task, select his/her name from the list; otherwise, leave this field blank and the Queue Manager for the Assignee Group will assign a Task Implementer
Notify Assignee Select Yes (if necessary)
Scheduled Start Date Optional: Enter an estimated start date for the Task
Scheduled End Date Optional: Enter an estimated end date for the Task
If the Assignee field is not populated when the Task becomes active, the system-generated notification will not be sent to the Assignee. Ensure names are assigned to each Task early so the Assignee receives notification that he/she can begin working on the Task.
Relationships Tab
The Relationships tab is not being used at this time.
RReemmeeddyy TTaasskkss SSttuuddeenntt GGuuiiddee
Manitoba eHealth Page 18 of 31
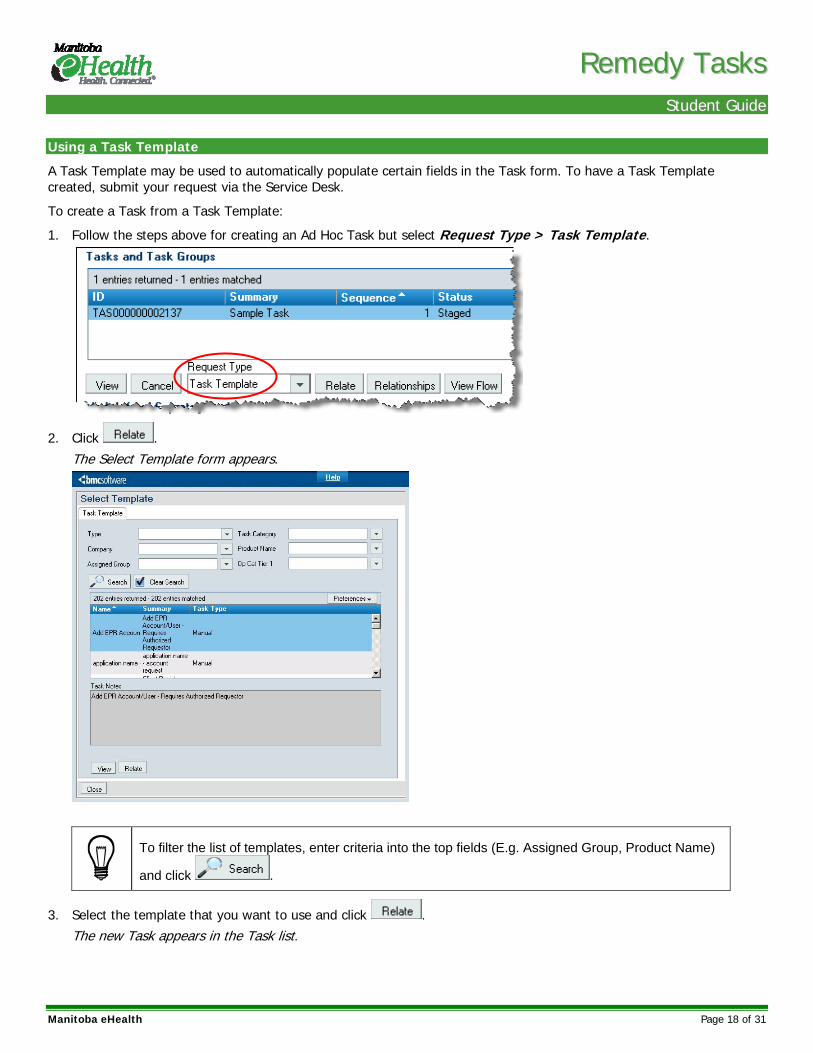
Using a Task Template
A Task Template may be used to automatically populate certain fields in the Task form. To have a Task Template created, submit your request via the Service Desk.
To create a Task from a Task Template:
1. Follow the steps above for creating an Ad Hoc Task but select Request Type > Task Template.
2. Click .
The Select Template form appears.
To filter the list of templates, enter criteria into the top fields (E.g. Assigned Group, Product Name)
and click .
3. Select the template that you want to use and click .
The new Task appears in the Task list.

RReemmeeddyy TTaasskkss SSttuuddeenntt GGuuiiddee
Manitoba eHealth Page 19 of 31
Using a Task Group Template
A Task Group Template generates a Task that has two or more sub-tasks (child Tasks). To have a Task Group Template created, submit your request via the Service Desk.
CREATING A TASK FROM A TASK GROUP TEMPLATE
1. Follow the steps above for creating an Ad Hoc Task but select Request Type > Task Group Template.
2. Click . The Select Template form appears.
Use the Type and/or Task Category fields at the top of the form to filter the list of templates.
3. Select the template that you want to use and click .
The new Task appears in the Task list. The ID starts with TGR.

RReemmeeddyy TTaasskkss SSttuuddeenntt GGuuiiddee
Manitoba eHealth Page 20 of 31
VIEWING CHILDREN TASKS
Each Child Task within the Task Group must be assigned separately.
To view the child Tasks from an Incident or Change ticket, double-click the Group Task and select the Tasks tab.
In an Incident ticket, the child Tasks are also displayed at the bottom of the Incident Tasks window.

RReemmeeddyy TTaasskkss SSttuuddeenntt GGuuiiddee
Manitoba eHealth Page 21 of 31
In a Change ticket, the child Tasks are also displayed at the bottom of the Tasks tab.
Modifying a Task
1. Double-click the Task to be modified.
If you do not see your Task on the Tasks tab in a Change ticket, check that the Phase field is set to Implementation (for Implementation Tasks).
The Task opens in the main Remedy window.
RReemmeeddyy TTaasskkss SSttuuddeenntt GGuuiiddee
Manitoba eHealth Page 22 of 31
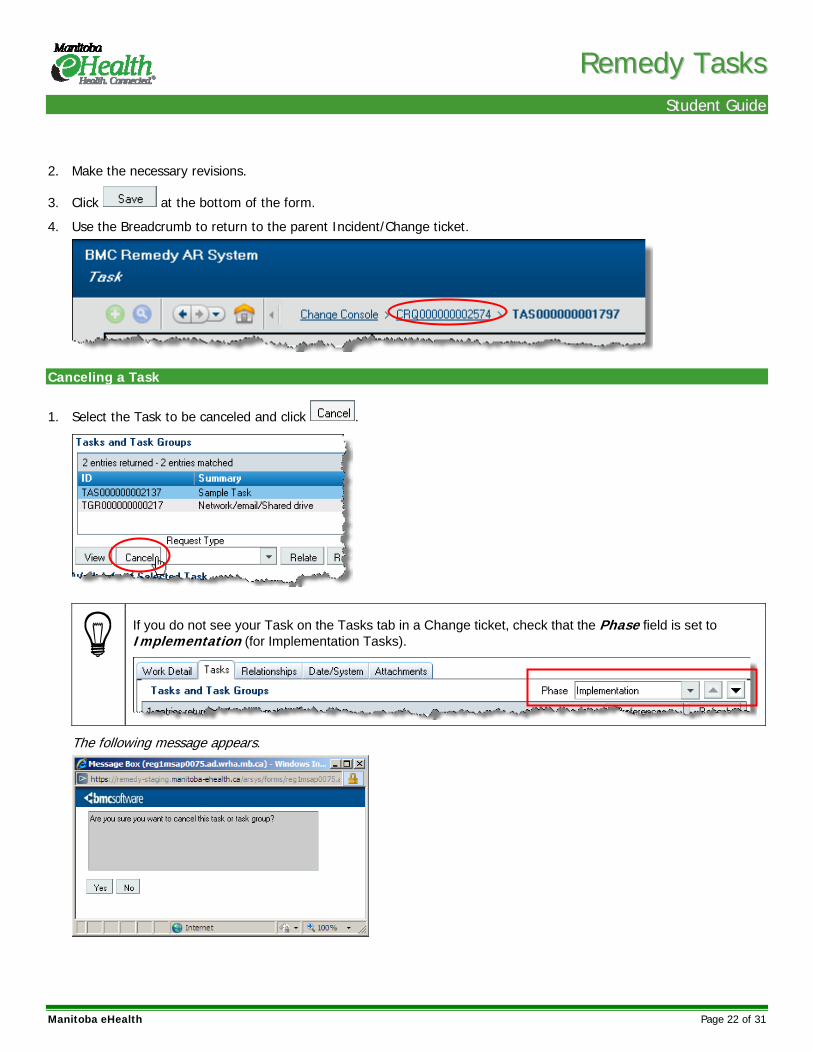
2. Make the necessary revisions.
3. Click at the bottom of the form.
4. Use the Breadcrumb to return to the parent Incident/Change ticket.
Canceling a Task
1. Select the Task to be canceled and click .
If you do not see your Task on the Tasks tab in a Change ticket, check that the Phase field is set to Implementation (for Implementation Tasks).
The following message appears.

RReemmeeddyy TTaasskkss SSttuuddeenntt GGuuiiddee
Manitoba eHealth Page 23 of 31
2. Click Yes. The Status of the canceled Task changes to Closed.
Note: If a Task Group has been canceled, all Tasks within the Group will be Closed.
Sequencing Tasks
OVERVIEW OF TASK SEQUENCING
When you relate Tasks or Task Groups to an Incident or Change, they are automatically sequenced in the order in which you related them to the parent ticket. This sequence is strictly enforced; meaning that Task 1 must be closed before Task 2 can be completed, Task 2 must be closed before Task 3 can be completed, etc.
You can, however, reassign the sequence in which Tasks and Task Groups are performed. You can also assign the same sequence number to more than one Task or children Tasks of a Task Group. If two Tasks or children Tasks of a Task Group have the same sequence number, they are considered peers. You can work on peer Tasks in any order.
Peer Tasks

RReemmeeddyy TTaasskkss SSttuuddeenntt GGuuiiddee
Manitoba eHealth Page 24 of 31
REASSIGNING TASK SEQUENCE NUMBERS
Tasks can only be rearranged while in a Status of Staged. It’s imperative to do any Task re-sequencing or canceling BEFORE:
An Incident (Service Request) ticket moves to a Status of In Progress
A Change ticket moves to a Status of Implementation in Progress
To reassign a Task sequence number:
1. Select the Task to be moved.
2. Click the up arrow or the down arrow next to the table.
From an Incident:
From an RFC:
The selected Task moves either higher or lower in the sequence. Note: Only the selected Task will be renumbered. All other Tasks retain their same sequence number.
To avoid delays in workflow, ensure that any Tasks that can be done simultaneously have the same sequence number (peer Tasks).

RReemmeeddyy TTaasskkss SSttuuddeenntt GGuuiiddee
Manitoba eHealth Page 25 of 31
SEQUENCING AND CANCELED TASKS
From within an Incident ticket, any Staged Tasks below a canceled Task can only move up to the canceled sequence level (level 3 in the image below). They cannot move above this level as the canceled Task sequence becomes locked.
If Tasks above a canceled Task are still in a Status of Staged, you can move them down to the number that matches the Task below the canceled one.
Move the unwanted Task up to the top of the list and THEN cancel it. This allows you to move the Task below up to sequence 1 since the Closed sequence is locked at 1.
Note: Tasks within a Change ticket may be moved above or below a canceled Task.
Cannot move above this level
These 2 Staged Tasks can be moved down to a level 3 or 4 (below the canceled (Closed) Task)

RReemmeeddyy TTaasskkss SSttuuddeenntt GGuuiiddee
Manitoba eHealth Page 26 of 31
Activating a Task
The Task Assignee will not be able to complete his/her Task until it moves to a Status of ASSIGNED. To initiate this, move the Status of the parent
INCIDENT (Service Request) ticket to IN PROGRESS
CHANGE ticket to IMPLEMENTATION IN PROGRESS
Tasks can only be rearranged while in a Status of Staged. Be sure to do any Task re-sequencing or canceling BEFORE activating the Task.
See “Task Statuses” on page 5 for a description of each Status.
*If the Assignee field has not yet been populated in the Task form, the Status will be Pending.
**For a Task created in the Implementation Phase.
Task Status
Incident Status = In Progress
Staged (not active)
Change Status = Implementation
in Progress**
Assigned* (active)
Work in Progress (active)
Closed

RReemmeeddyy TTaasskkss SSttuuddeenntt GGuuiiddee
Manitoba eHealth Page 27 of 31
The Status of the 1st Task is determined by the Status of the parent Incident/Change ticket. The Status of subsequent Tasks is determined by the Status of the previous Task(s) in the sequence order.
The Task Assignee does not receive the system generated notification until the Task Status = Assigned. It is the responsibility of the owner of the parent Incident/Change ticket to make sure all Task Assignees are informed of the work they are expected to perform. This is especially important for Implementation Tasks in Change tickets.
The 1st Task will move to Assigned when Incident Status = In Progress or Change Status = Implementation in Progress
This Task will move to Assigned when Task 1 is Closed
This Task will move to Assigned when Task 2 is Closed

RReemmeeddyy TTaasskkss SSttuuddeenntt GGuuiiddee
Manitoba eHealth Page 28 of 31
Receiving a Task
Starting a Task
1. Open the Task from your Overview or Task Console.
2. Select Status > Work in Progress.
3. Click at the bottom of the Task form.
The Actual Start Date is populated on the Dates tab.
Updating a Task
ADDING AN ATTACHMENT
Click to add a document or click to add a web link. The maximum file size per attachment is 2 MB.

RReemmeeddyy TTaasskkss SSttuuddeenntt GGuuiiddee
Manitoba eHealth Page 29 of 31
ADDING A NOTE
1. Select the Work Info tab.
2. Select a Work Info Type that corresponds with the type of note you are adding.
3. Type your note into the Work Info Notes field.
4. Click at the bottom of the Task form.
The note appears in the Work Info History table.
The content in the Notes field (at the top of the Task form) is searchable.

RReemmeeddyy TTaasskkss SSttuuddeenntt GGuuiiddee
Manitoba eHealth Page 30 of 31
Closing a Task
Tasks can be edited in a Status of Staged, but they cannot be closed until Status = Assigned or Work in Progress.
To close a Task:
1. Open the Task to be closed.
2. Ensure all relevant notes and attachments have been added to the Task.
3. Select the Dates tab and enter the Actual Start Date for the Task (if not already populated).
4. Select Status > Closed.
5. Click at the bottom of the Task form.
The Actual End Date is populated and the Task is closed.
Actual Start and End Dates MUST be entered in the Task in order to close it. If you change the Status to Closed and Save the Task without entering the Actual Start Date first, you will receive the following error message.

RReemmeeddyy TTaasskkss SSttuuddeenntt GGuuiiddee
Manitoba eHealth Page 31 of 31
References
Manitoba eHealth Documents
To view the Manitoba eHealth Process Documents or Remedy Training Material, log into Remedy and select the Document Viewer.
RELATED PROCESS DOCUMENTS
Incident_Mgmt Process Guide
Incident_Mgmt Process Principle Guide
Change_Mgmt Process Guide
Change_Mgmt Process Principle Guide
BMC Remedy Help
For further information on working with Tasks from within an Incident ticket, please refer to Creating and monitoring tasks in the BMC Remedy Incident Management Help.
For further information on working with Tasks from within a Change ticket, please refer to the following topics in the BMC Remedy Change Management Help.
Change coordinator role > Implement stage – Working with tasks
Task implementer role
Select the Help module that you want to open.