Release Notes v9.0
97
Call 877-346-7962 for customer service or e-mail us at [email protected]. Page 1 of 97 Go to TOP Release Notes – v9.0.42 Proprietary Notice Information: This document provides information about the new features with the upcoming upgrade release. The content in this document is provided for informational purposes only and is subject to change without notice. This document also does not guarantee the delivery of these new features in anyway whatsoever. While every effort has been made to ensure that the information contained within this document and the features and changes described are accurate, IHCS cannot and does not accept any liability for errors or omissions arising from the use of this information. Any questions regarding the release notes should be addressed to [email protected] or call 877-346-7962 for customer service. Some exciting features in this release! ✓ EMR Highlights • Random Lab/Drug Testing Module • Alert/Hardstop if a Program is not updated while closing an Encounter • Patient Portal Enhancements • Habilitation Tracker Enhancements • E & M Calculator Enhancements ✓ PM Highlights • Ability to pre-populate patient’s email address for consent and payment on EasyPay • Ability to upload Insurance card image from Patient Portal • Ability to Auto Collect Patient responsible balance through Card on file (EasyPay) • Ability to Auto Collect Co-Pay through Card on File (EasyPay)
Transcript of Release Notes v9.0

Call 877-346-7962 for customer service or e-mail us at [email protected]. Page 1 of 97
Go to TOP
Release Notes – v9.0.42
Proprietary Notice Information: This document provides information about the new features with the upcoming upgrade release. The content
in this document is provided for informational purposes only and is subject to change without notice. This document also does not guarantee the
delivery of these new features in anyway whatsoever. While every effort has been made to ensure that the information contained within this
document and the features and changes described are accurate, IHCS cannot and does not accept any liability for errors or omissions arising from
the use of this information.
Any questions regarding the release notes should be addressed to [email protected] or call 877-346-7962 for customer service.
Some exciting features in this release!
✓ EMR Highlights
• Random Lab/Drug Testing Module
• Alert/Hardstop if a Program is not updated while closing an Encounter
• Patient Portal Enhancements
• Habilitation Tracker Enhancements
• E & M Calculator Enhancements
✓ PM Highlights
• Ability to pre-populate patient’s email address for consent and payment on
EasyPay
• Ability to upload Insurance card image from Patient Portal
• Ability to Auto Collect Patient responsible balance through Card on file
(EasyPay)
• Ability to Auto Collect Co-Pay through Card on File (EasyPay)

V9.0.42 Release Notes – Table of Contents
Call 877-346-7962 for customer service or e-mail us at [email protected]. Page 2 of 97
Go to TOP
Contents
EMR Features ................................................................................................................................................................................. 4
Dashboard: Display Sent To Do Count for Specific Number of Days ................................................................................................... 4
Patient Demographics: Ability to Select Multiple Facilities per Patient ............................................................................................. 5
Quick Patient Registration: Red Notification Bubble for Pending Approvals in Bookmark ................................................................ 7
Scheduler: Enhanced with New Changes ............................................................................................................................................ 8
Alert User when Searching Resource Availability may take More Time ........................................................................................ 8
Ability to Alert Patient Portal Users to Complete Assessment Tools Before Joining Telemedicine Meeting ................................ 8
First Name and Last Name in Appointment Reminder Auto Process .......................................................................................... 10
Privacy Settings: Restricted Authorized Users to Book an Appointment on behalf of Unauthorized Users ..................................... 10
Telemedicine: Send Email when Telemedicine Visit is Converted to In-Person Visit ........................................................................ 10
Encounters: Enhanced with New Changes ....................................................................................................................................... 12
Alert for Time Overlap when Booking an Appointment or Starting an Encounter ...................................................................... 12
Restrict User From Starting an Encounter for Any Other Encounter Type if the Care Plan is not Completed ............................ 12
Restriction to Start Encounter for Same Patient or All Patients .................................................................................................. 14
Alert/Hardstop if a Program is not Updated while closing an Encounter .................................................................................... 16
Facesheet: Display List of Encounters in Facesheet Context Menu ............................................................................................. 17
Manually Select POS When Starting a New Encounter ................................................................................................................ 17
Ability to Capture Provider / Credential When Starting Group Encounter .................................................................................. 18
Ability to Capture Start / End Time for each Patient When Starting or Ending Group Encounter .............................................. 19
Ability to Set the Sequence for Individual and Group Therapy Note on the Encounter Note ..................................................... 20
Group Encounter Note: Ability to Display Modified Visit / Encounter Type ................................................................................ 21
Care Plan: Added “Months” Filter in Review Frequency in Care Plan Review Tracking .............................................................. 22
Antepartum: Carry Forward Flowsheet Comments for the Same Pregnancy.............................................................................. 23
Antepartum Form: Ability to Access the Antepartum Information from Facesheet ................................................................... 23
Assessment Tools: New Tools Added (DLA-20 Youth and Fagerstrom Tolerance Scale) ............................................................. 24
Newly Enhanced E & M Calculator............................................................................................................................................... 26
Reports: Enhanced with New Changes ............................................................................................................................................. 33
Encounter Report: Ability to Generate Report for Not Started and Checked In Visits ................................................................ 33
Appointments Report: Filter Patients Not Visited in Certain Days / Number of Visits ................................................................ 36
eMAR: Enhanced with New Changes ............................................................................................................................................... 37
On-the-Fly Configuration for Prescriber, Type, and Frequency made Permission-based............................................................ 37
Mapped Frequency for the Medications Imported from eRx ...................................................................................................... 38
eMAR and Vitals: Ability to Record Glucose Value in Decimal .................................................................................................... 40
Productivity / Performance Dashboard: Enhanced with New Changes ........................................................................................... 41
Random Lab/Drug Testing Module .................................................................................................................................................. 48
MAT: Enhanced with New Changes .................................................................................................................................................. 53
Flexibility to Log out the User by Authenticated Users ............................................................................................................... 53
Ability to Capture MAT# in Patient Demographics ...................................................................................................................... 54
Ability to Assign Room Upon Check In ......................................................................................................................................... 56

V9.0.42 Release Notes – Table of Contents
Call 877-346-7962 for customer service or e-mail us at [email protected]. Page 3 of 97
Go to TOP
Habilitation Tracker: Enhanced with New Changes ......................................................................................................................... 59
Added Few More Customized Preferences .................................................................................................................................. 59
Configure “One Time / Recurrence” Option in Frequency .......................................................................................................... 62
Patient Portal: Enhanced with New Changes ................................................................................................................................... 65
Patient Portal Enhancements ...................................................................................................................................................... 65
Made it Mandatory to Keep At Least One Card on File ............................................................................................................... 72
Ability to Add Authorization Details from Patient Portal ............................................................................................................. 73
Moved Patient Portal Settings from Practice Level Configuration to a New Page ...................................................................... 74
Ability to Set Sequence of Features Available in Left Menu ........................................................................................................ 76
PM Features ................................................................................................................................................................................. 78
Ability to Stop Sending Suffix/Credentials in the 837 File ................................................................................................................. 78
Send the Other Entity's Adjudication or Payment/Remittance Date in LOOP 2330B ....................................................................... 79
Insurance Management: Ability to Configure Multiple Payers for the Same Filing Vendor ............................................................. 81
File Validation While Uploading Duplicate Authorization File.......................................................................................................... 82
Insurance Management: Display the Actual Reason for Not Uploading the G-File .......................................................................... 82
Financials: Ability to Restrict the Change in Responsibility of the Insurance ................................................................................... 83
Report: Updates in Payment Activity report ..................................................................................................................................... 84
Auto Generate Claim Settings also Applicable in Business Rule and Rule Engine ............................................................................ 85
Consider the Most Recent Denial Transaction while Rebilling the Claim ......................................................................................... 85
Ability to Upload Insurance Card Image from Patient Portal ........................................................................................................... 86
Claim History: Display Denied CPT Details........................................................................................................................................ 87
Ability to pre-populate patient’s email address for consent and payment on Easy Pay .................................................................. 88
UB04 Claims: Ability to Print CPT Description in Box 43 on the Claim .............................................................................................. 89
Ability to Configure UMPI Number for Payer and Facility ................................................................................................................ 90
Financial Liability Form: Ability to Auto Calculate Data ................................................................................................................... 92
Auto Populate Codes from Claim in the NTE Segment of 837 File .................................................................................................... 94
Patient Portal: Display the Most Recent Card by Default on the ePayment Screen ......................................................................... 95
Ability to Auto Collect Patient responsible balance and Co-pay through Card on file (EasyPay) ..................................................... 96

Release Notes — v9.0.42 (EMR Features)
Call 877-346-7962 for customer service or e-mail us at [email protected]. Page 4 of 97
Go to TOP
EMR FEATURES
Back
This section highlights the EMR features released in this version.
DASHBOARD: DISPLAY SENT TO DO COUNT FOR SPECIFIC NUMBER OF DAYS
You can now display the Sent To Do count on the Dashboard for the last 15 days by default. You can increase these days
if you wish to view more Sent To Dos on the Dashboard.
To configure the days for Sent To Dos, click on the orange wheel icon from the bottom left corner of your screen.
On the “User Profile” screen, select the “Dashboard” tab from the left pane. In the “Default View for To Do on
Dashboard” panel, locate the following field:
Show Unread/Sent Count from Last __ Days: If you want to view the Sent To Dos for the most recent 20 days, then
select 20 in the dropdown box.
The number of To Do Sent over the last 20 days will display in the Sent count on the Dashboard.
Release Notes — v9.0.42 (EMR Features)
Call 877-346-7962 for customer service or e-mail us at [email protected]. Page 5 of 97
Go to TOP
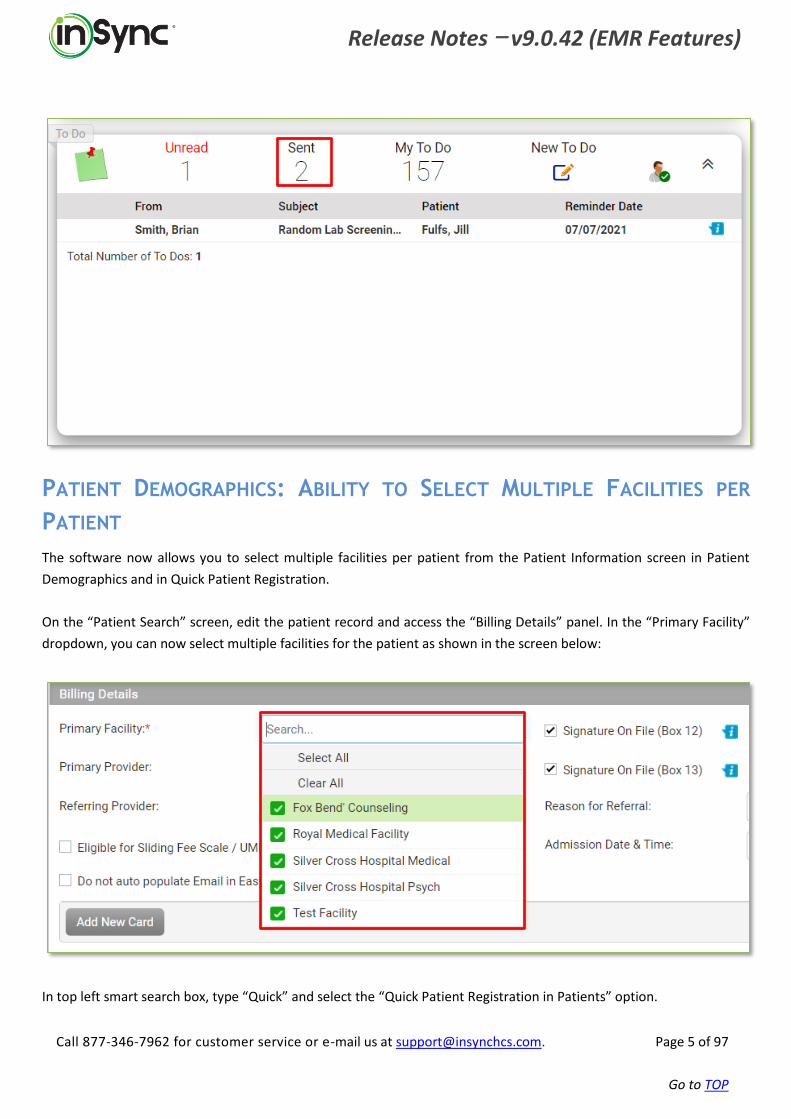
PATIENT DEMOGRAPHICS: ABILITY TO SELECT MULTIPLE FACILITIES PER
PATIENT
The software now allows you to select multiple facilities per patient from the Patient Information screen in Patient
Demographics and in Quick Patient Registration.
On the “Patient Search” screen, edit the patient record and access the “Billing Details” panel. In the “Primary Facility”
dropdown, you can now select multiple facilities for the patient as shown in the screen below:
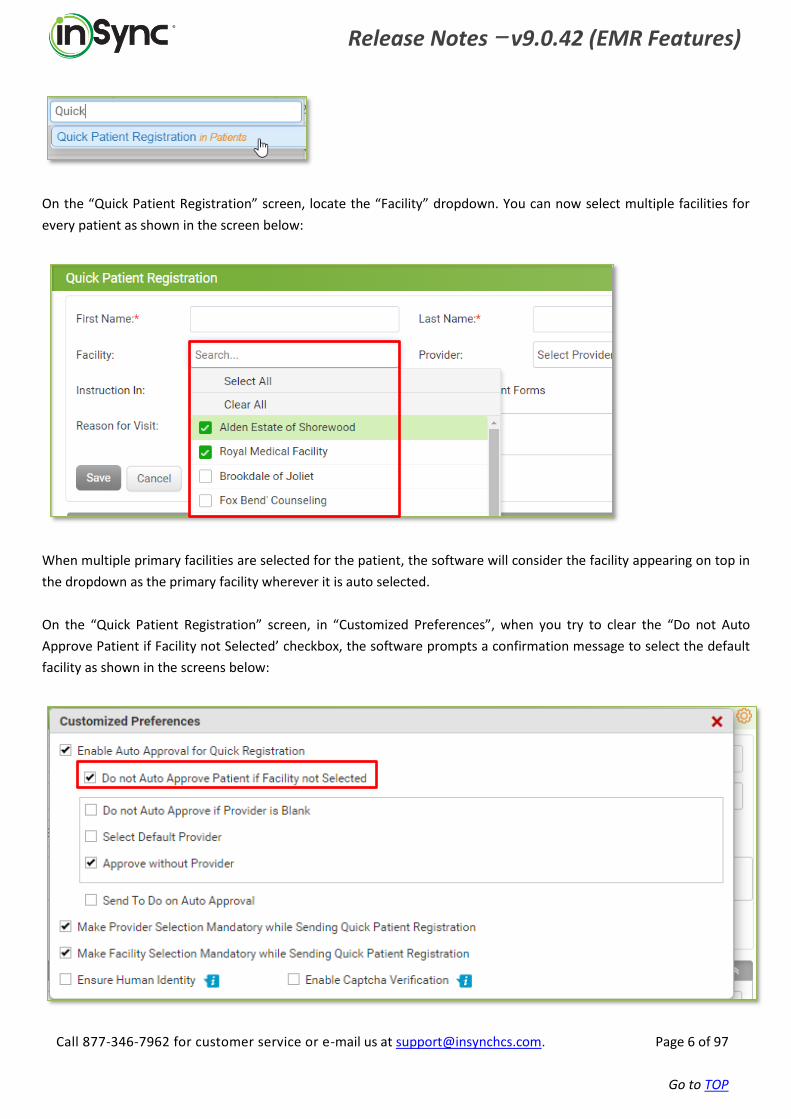
In top left smart search box, type “Quick” and select the “Quick Patient Registration in Patients” option.
Release Notes — v9.0.42 (EMR Features)
Call 877-346-7962 for customer service or e-mail us at [email protected]. Page 6 of 97
Go to TOP
On the “Quick Patient Registration” screen, locate the “Facility” dropdown. You can now select multiple facilities for
every patient as shown in the screen below:
When multiple primary facilities are selected for the patient, the software will consider the facility appearing on top in
the dropdown as the primary facility wherever it is auto selected.
On the “Quick Patient Registration” screen, in “Customized Preferences”, when you try to clear the “Do not Auto
Approve Patient if Facility not Selected’ checkbox, the software prompts a confirmation message to select the default
facility as shown in the screens below:

Release Notes — v9.0.42 (EMR Features)
Call 877-346-7962 for customer service or e-mail us at [email protected]. Page 7 of 97
Go to TOP
QUICK PATIENT REGISTRATION: RED NOTIFICATION BUBBLE FOR PENDING
APPROVALS IN BOOKMARK
The software now provides you with a red notification bubble over the Quick Patient Registration bookmark to let you
know how many registrations are pending approvals.

Release Notes — v9.0.42 (EMR Features)
Call 877-346-7962 for customer service or e-mail us at [email protected]. Page 8 of 97
Go to TOP
SCHEDULER: ENHANCED WITH NEW CHANGES
This section includes changes within the Scheduler.
ALERT USER WHEN SEARCHING RESOURCE AVAILABILITY MAY TAKE MORE TIME
When searching for the resource availability, if you select a large number of values in the “Facility” and “Resource” fields,
the software will alert you that it might take more time to perform the search.
On the “Scheduler” screen, click on the “Resource Availability Search” icon as shown in the screen below:
On the “Resource Availability Search” screen, if you select more than 10 combined values in the “Facility” and “Resource”
drop-down fields, the software will show an alert as shown in the screen below:
ABILITY TO ALERT PATIENT PORTAL USERS TO COMPLETE ASSESSMENT TOOLS BEFORE
JOINING TELEMEDICINE MEETING
The software allows you to prevent users from checking in patient, starting an encounter, or starting a telemedicine visit
for patient portal users until selected forms are completed. The feature does have the flexibility to allow users to check
in the patient or start the encounter with a notification that appears to advise them that a form needs to be completed.
You can prevent patient portal users from joining a Telemedicine meeting without completing the Assessment Tools.
You can also configure when to send the “Join Meeting” email to the patient portal users.
In the top left smart search box, type “Scheduler” and select the “Scheduler Configuration in Administration” option.

Release Notes — v9.0.42 (EMR Features)
Call 877-346-7962 for customer service or e-mail us at [email protected]. Page 9 of 97
Go to TOP
On the “Scheduler Configuration” screen, locate the following flag as shown in the screen below:
• Enable Restriction for Checking In Patient, Starting Encounter, and Starting Telemedicine Visit based on Patient
Form / Survey Form / Assessment Tool
Applicable Encounter Type: Select the encounter types for which you want to enable this feature.
Applicable Patient Group: Select the patient groups for which you want to enable this feature.
Applicable Patient Program: Select the patient programs for which you want to enable this feature.
Form Type: Select one or more form types. You can view a list of forms in the adjacent field.
Required Forms: Select the forms that you want the patient to fill out before checking them in, starting an encounter,
or starting a Telemedicine visit.
Required to be Filled Within: Select the duration within which you want the patient to fill out the selected forms.
Restrict When: You can restrict the user from checking in the patient, starting an encounter, or starting a telemedicine
visit without filling out the forms. Select the desired restriction type.
Restriction Type: Restriction can be of 2 types. Restrict or Warning. You can either allow the users to proceed with a
warning or restrict them.
Restrict: Select this checkbox to prevent the users from checking in patient, starting an encounter, or starting a
telemedicine visit if the selected forms are not filled out.
Warning: Select this checkbox to warn the users when checking in patient, starting an encounter, or starting a
telemedicine visit if the selected forms are not filled out. The users can still proceed in this case.
Allow Provider to Override the Preferences and Continue: When the restriction is configured, you can still allow the
provider to check in the patient or start an encounter without filling out the forms. The provider must provide the
remarks when performing the corresponding action.

Release Notes — v9.0.42 (EMR Features)
Call 877-346-7962 for customer service or e-mail us at [email protected]. Page 10 of 97
Go to TOP
To configure when to send the “Join Meeting” link in email, click the icon from the bookmarks on the left side of the
screen. On the “Practice Level Configuration” screen, expand the “Telemedicine” panel and locate the new flag as shown
in the screen given below:
• Preference for Sending “Join Meeting” Link in Telemedicine Email
There are 2 ways you can send the link for joining the meeting to patient portal users.
Include Join Now Link in Email: Select this checkbox to send the JOIN MEETING link in the email for the patient portal
user. They can click on the link in the email to join the meeting.
Include Instructions to Join Meeting from Portal: Select this checkbox to send the instructions for joining the meeting
in an email. In this case, the patient portal user will receive instructions via email how they can join the meeting from
the portal.
FIRST NAME AND LAST NAME IN APPOINTMENT REMINDER AUTO PROCESS
When sending automatic appointment reminders, the provider’s name and the patient’s name will now be addressed
as First Name and Last Name instead of Last Name, First Name.
PRIVACY SETTINGS: RESTRICTED AUTHORIZED USERS TO BOOK AN
APPOINTMENT ON BEHALF OF UNAUTHORIZED USERS
Previously, when a user was restricted from accessing a specific patient, another user was able to book an appointment
on the first user’s scheduler. Now, when a user is restricted from accessing a specific patient, none of the other users
will be able to book an appointment on his/her scheduler.
TELEMEDICINE: SEND EMAIL WHEN TELEMEDICINE VISIT IS CONVERTED TO IN-
PERSON VISIT
When the Telemedicine is converted to In-Person visit, the software sends an email automatically to the patient or
patient’s representative as per the configuration. You can now stop the system from sending this email if desired.
To stop sending an email when the Telemedicine visit is converted to In-Person visit, click the icon from the
bookmarks on your left. On the “Practice Level Configuration” screen, expand the “Telemedicine” panel, and locate the
new checkbox as shown in the screen below:

Release Notes — v9.0.42 (EMR Features)
Call 877-346-7962 for customer service or e-mail us at [email protected]. Page 11 of 97
Go to TOP
Send Email when Telemedicine Visit is Converted to In-Person Visit: This checkbox allows you to send an email to the
patient and/or patient’s representative (as per selection) upon converting Telemedicine visit to In-Person visit. Clear this
checkbox if you don’t want this email sent.

Release Notes — v9.0.42 (EMR Features)
Call 877-346-7962 for customer service or e-mail us at [email protected]. Page 12 of 97
Go to TOP
ENCOUNTERS: ENHANCED WITH NEW CHANGES
This section includes changes within the Encounters.
ALERT FOR TIME OVERLAP WHEN BOOKING AN APPOINTMENT OR STARTING AN
ENCOUNTER
When booking an appointment or starting an encounter, the software now checks to see if there is an encounter already
in progress for the patient at the same time. In the Confirmation pop-up, the “Encounter Duration” column will display
as shown in the screen below:
RESTRICT USER FROM STARTING AN ENCOUNTER FOR ANY OTHER ENCOUNTER TYPE
IF THE CARE PLAN IS NOT COMPLETED
Previously, in Care Plan Review Tracking, you could prevent users from starting an encounter for specific encounter types
if the care plan is not completed. Now you can prevent users from starting an encounter for multiple encounter types.
A switch “Applicable for / Not Applicable for” is introduced in the Restriction field.
If you want to restrict starting an encounter for multiple encounter types, you can select the “Not Applicable for” option
and pick only those encounter types for which you want to allow an encounter to start.
In the top left smart search box, type “treatment” and select the “Treatment Plan in Administration” option.
On the “Treatment Plan Configuration” screen, click on the “Configure Custom Preferences for Care Plan” icon.

Release Notes — v9.0.42 (EMR Features)
Call 877-346-7962 for customer service or e-mail us at [email protected]. Page 13 of 97
Go to TOP
It opens the “Care Plan Configuration” screen as shown below:
On the “Care Plan Configuration” screen, under the “Care Plan Review Tracking” tab, locate the new “Restriction:
Applicable for; Not Applicable for” switch.
For booking an appointment or starting an encounter, you can now apply the restriction for multiple encounter types
with the help of this switch.
Applicable for: Select this option when you want to apply restrictions for specific encounter types and exempt more
encounter types.
Not Applicable for: Select this option when you want to apply restrictions for more encounter types and exempt fewer
encounter types.
For example, if you select the “Not Applicable for” option and then select the “Treatment Plan Visit” encounter type,
the software will prevent you from booking an appointment/starting an encounter for all the other encounter types
except the “Treatment Plan Visit” encounter type.

Release Notes — v9.0.42 (EMR Features)
Call 877-346-7962 for customer service or e-mail us at [email protected]. Page 14 of 97
Go to TOP
RESTRICTION TO START ENCOUNTER FOR SAME PATIENT OR ALL PATIENTS
There is a flag introduced in the software in the recent release to set an alert to complete the encounter note. When
you enabled that flag, you can prevent the users from starting a new encounter for that patient if the previous encounter
is not yet completed. Now, you can prevent the users from starting an encounter for all patients. If the encounter is not
completed for any patient within the configured duration, they won’t be able to start an encounter for any other patient.
You can decide whether you want to prevent the users from starting an encounter for the same patient or all the
patients.
Click the icon from bookmarks on your left. On the “Practice Level Configuration” screen, expand the “Encounter /
Charting” panel, and enable the following flag:
• Set Timely Alert to Complete Encounter Note
Restrict to Start New Encounter: You can prevent the users from starting a new encounter if the encounter is not
signed/co-signed in the stipulated period.
For Same Patient: Select this checkbox if you want to prevent the users from starting a new encounter for the
same patient for which the existing encounter is not signed/co-signed in the stipulated period.
For All Patients: Select this checkbox if you want to prevent the users from starting a new encounter for all the
patients because an existing encounter for any single patient is not signed/co-signed in the stipulated period.
Based on: The restriction can be applied in 2 ways; either when the encounter is not ended (signed) or when the
encounter is not co-signed.
End Encounter: Select this option if you want to prevent the users from starting a new encounter when the existing
encounter is not ended (signed).
End Encounter with Co-Sign: Select this option if you want to restrict the users from starting a new encounter when the
existing encounter is not co-signed.

Release Notes — v9.0.42 (EMR Features)
Call 877-346-7962 for customer service or e-mail us at [email protected]. Page 15 of 97
Go to TOP
Restrict: Select this option to prevent the users from starting a new encounter. In this case, the users won’t be able to
proceed without signing/co-signing the existing encounter.
Warning: Select this option to warn the users when starting a new encounter. In this case, the users will be able to
proceed without signing/co-signing the existing encounter.

Release Notes — v9.0.42 (EMR Features)
Call 877-346-7962 for customer service or e-mail us at [email protected]. Page 16 of 97
Go to TOP
ALERT/HARDSTOP IF A PROGRAM IS NOT UPDATED WHILE CLOSING AN ENCOUNTER
Back
The software now alerts you if a program is not linked or updated with the encounter while closing it. Based on your
preference, you can choose to restrict, to allow with a confirmation message, or to allow without any restriction at all
to close the encounter.
In the top left smart search box, type “Program” and select the “Program Management in Patients” option.
On the “Program Management” screen, under “Customized Preferences”, locate the new “Allow Ending Encounter
without Program Selection” checkbox as shown in the screen below:
Allow Ending Encounter without Program Selection: Enable this feature to alert users when they end an encounter
without mapping a program.
Allow with confirmation message: To alert users to select a program while ending an encounter, choose this option.
Do not allow: To restrict the users from ending an encounter without selecting a program, choose this option.
No restriction: To end an encounter without selecting a program, choose this option.

Release Notes — v9.0.42 (EMR Features)
Call 877-346-7962 for customer service or e-mail us at [email protected]. Page 17 of 97
Go to TOP
FACESHEET: DISPLAY LIST OF ENCOUNTERS IN FACESHEET CONTEXT MENU
When you access the “Facesheet” option from the context menu from any location in the software, you can now also
view a list of encounters for the patient.
MANUALLY SELECT POS WHEN STARTING A NEW ENCOUNTER
When you start an encounter, the software displays the POS automatically based on its mapping with the facility. The
software now allows you to select the POS manually if you don’t want to populate it automatically. To select the POS
manually, click the icon from bookmarks on your left. On the “Practice Level Configuration” screen, expand the
“Encounter / Charting” panel, and select the No option in the following flag:
• Auto Populate POS based on Mapping while Starting Encounter

Release Notes — v9.0.42 (EMR Features)
Call 877-346-7962 for customer service or e-mail us at [email protected]. Page 18 of 97
Go to TOP
ABILITY TO CAPTURE PROVIDER / CREDENTIAL WHEN STARTING GROUP ENCOUNTER
The software now allows you to capture the Credentials when starting a group encounter. The “Provider” field is now
renamed as “Provider/Credential” on the Group Start Encounter screen.
When you create a claim from the group encounter, if the credentials are captured, they will populate in claim as well.

Release Notes — v9.0.42 (EMR Features)
Call 877-346-7962 for customer service or e-mail us at [email protected]. Page 19 of 97
Go to TOP
ABILITY TO CAPTURE START / END TIME FOR EACH PATIENT WHEN STARTING OR
ENDING GROUP ENCOUNTER
You can now capture start date/time and end date/time individually for each patient in a group encounter. On the Group
Start Encounter screen, locate the drop-down arrow for the Start and End Date/Time fields. When you click on this
arrow, it opens a list of all the patients in the group. You can then capture Start and End Date/Time individually for each
of them.
Locate the “Start Date/Time” and “End Date/Time” fields in the Start Encounter pop up and End Encounter pop up.

Release Notes — v9.0.42 (EMR Features)
Call 877-346-7962 for customer service or e-mail us at [email protected]. Page 20 of 97
Go to TOP
ABILITY TO SET THE SEQUENCE FOR INDIVIDUAL AND GROUP THERAPY NOTE ON THE
ENCOUNTER NOTE
The software now allows you to set the sequence for the Individual and Group Therapy Notes on the Encounter Note.
In the top left smart search box, type “Encounter” and select the “Encounter Note & Letters in Administration” option.
On the “Notes & Letter Configuration” screen, locate the “Therapy Notes – Individual” and “Therapy Notes – Group”
checkboxes in the Elements section as shown in the screen below:

Release Notes — v9.0.42 (EMR Features)
Call 877-346-7962 for customer service or e-mail us at [email protected]. Page 21 of 97
Go to TOP
GROUP ENCOUNTER NOTE: ABILITY TO DISPLAY MODIFIED VISIT / ENCOUNTER TYPE
When you modify the visit/encounter type for a patient within the group appointment, the software now provides you
the ability to display either the original group encounter type, the modified visit/encounter type, or both.
To display the desired visit/encounter type for group appointments, in the top left smart search box, type “Scheduler”
and select the “Scheduler Configuration in Administration” option.
On the “Scheduler Configuration” screen, enable the following flag as shown in the screen below.
• Allow Changing Patient’s Visit Type in Group Appointment
Locate the following options added in this flag: Display Visit / Encounter Type in Note as: There are 3 options available to display the desired encounter type on the Group Encounter Note. Original Group Encounter Type: Select this checkbox to display the original group encounter type on the Encounter
Note.
Modified Visit / Encounter Type: Select this checkbox to display the modified visit/encounter type on the Encounter
Note that is changed for patient individually.
Both: Select this checkbox to display both, the original group encounter type, and the modified visit/encounter type on
the Encounter Note. The modified visit/encounter type that is changed for patient individually will appear in parenthesis
on the Encounter Note, for example ‘Group Encounter Type (Modified Encounter Type)’.

Release Notes — v9.0.42 (EMR Features)
Call 877-346-7962 for customer service or e-mail us at [email protected]. Page 22 of 97
Go to TOP
CARE PLAN: ADDED “MONTHS” FILTER IN REVIEW FREQUENCY IN CARE PLAN REVIEW
TRACKING
The software now allows you to configure the care plan review frequency based on “Months”.
In the top left smart search box, type “treatment” and select the “Treatment Plan in Administration” option.
On the “Treatment Plan Configuration” screen, click on the “Configure Custom Preferences for Care Plan” icon.
On the “Care Plan Configuration” screen, select the “Care Plan Review Tracking” tab. In the “Review Frequency” field,
locate the new “Months” option as shown in the screen below.

Release Notes — v9.0.42 (EMR Features)
Call 877-346-7962 for customer service or e-mail us at [email protected]. Page 23 of 97
Go to TOP
ANTEPARTUM: CARRY FORWARD FLOWSHEET COMMENTS FOR THE SAME PREGNANCY
The comments added in the Flowsheet tab will now carry forward in the next encounter for the same pregnancy.
ANTEPARTUM FORM: ABILITY TO ACCESS THE ANTEPARTUM INFORMATION FROM
FACESHEET
You can now access the antepartum summary from the Facesheet without accessing the encounter.
On the “Facesheet”, locate the new “Antepartum Summary” icon in the “Patient Ribbon” as shown in the screen
below:
Upon clicking the icon, the “Antepartum Summary” screen opens as shown in the screen below:

Release Notes — v9.0.42 (EMR Features)
Call 877-346-7962 for customer service or e-mail us at [email protected]. Page 24 of 97
Go to TOP
ASSESSMENT TOOLS: NEW TOOLS ADDED (DLA-20 YOUTH AND FAGERSTROM
TOLERANCE SCALE)
In Assessment Tools, the following two tools have been added to the software. To add these tools to your charting
elements, please contact our Customer Support Team.
• DLA-20 Youth
• Fagerstrom Tolerance Scale

Release Notes — v9.0.42 (EMR Features)
Call 877-346-7962 for customer service or e-mail us at [email protected]. Page 25 of 97
Go to TOP

Release Notes — v9.0.42 (EMR Features)
Call 877-346-7962 for customer service or e-mail us at [email protected]. Page 26 of 97
Go to TOP
NEWLY ENHANCED E & M CALCULATOR
Back
The E & M Calculator module is completely enhanced with a new look and feel. When configuring E & M settings, you
can define the CPT rule in the “Encounter Type” tab and use the same while configuring it for the other charting elements
such as E & M HPI, E & M ROS, and so forth.
In top left smart search box, type “E & M” and select the “E & M Calc in Administration” option.
The “Evaluation & Management Configuration (E & M Configuration)” screen appears as shown below.
Encounter Type
This tab allows you to configure E & M Rules based on Encounter Type, Provider, Provider Category, and Program. You
can map your encounter types with the corresponding E & M Encounter Type. For each rule, you can configure various
level ranges and assign CPT to each level. Once you assign the CPTs for different levels, you can save this as a rule and
map it with various charting elements to populate weightage/points based on the mapped rules.

Release Notes — v9.0.42 (EMR Features)
Call 877-346-7962 for customer service or e-mail us at [email protected]. Page 27 of 97
Go to TOP
E & M HPI
Points will be calculated based on each HPI Answer recorded. HPI will have maximum 5 points. 1 point will be considered
for 1 answer. When the answer is not configured, the point will be considered for the recorded question from the
configured list. When the score is between 1 to 3, “Brief” will appear in description in E & M Charting. For the score more
than 3, “Extended” will appear in description.
E & M ROS
Points will be calculated based on each review of system recorded. ROS will have maximum 10 points. 1 point will be
considered for 1 review system. When the score is 1, “Pertinent to Problem” will appear in description in E & M Charting.
When the score is between 2 to 7, “Extended” will appear in description. When the score is 8 or higher, “Complete” will
appear in description.

Release Notes — v9.0.42 (EMR Features)
Call 877-346-7962 for customer service or e-mail us at [email protected]. Page 28 of 97
Go to TOP
E & M History
Points will be calculated for each history element recorded, i.e., Social History, Family History, Medical History, and
Surgical History. For Social History, 1 point will be calculated only when the exact element/sub element is matched. For
Family History, Medical History, and Surgical History, 1 point each will be calculated when they are recorded in charting.
When the score is 1, “Pertinent” will appear in description in E & M Charting. When the score is 1 or higher, “Complete”
will appear in description.
E & M Physical Exam
Points will be calculated based on the findings recorded. Physical Exam will have maximum 10 points. 1 point will be
considered for 1 finding. In the Description column next to Total in E & M Charting, “Problem Focused” will appear when
the score is 1, “Detailed” will appear when the score is between 2 to 7 (i.e., 2 to 7 findings are recorded in one system),
“Comprehensive” will appear when 8 or more findings are recorded (within the single system), “Expanded Problem
Focused” will appear when more than 1 finding is recorded in multiple systems.

Release Notes — v9.0.42 (EMR Features)
Call 877-346-7962 for customer service or e-mail us at [email protected]. Page 29 of 97
Go to TOP
E & M Vitals
Vitals points will be included under the Examination section in the Description column next to Total in E & M Charting.
Points will be calculated based on the applicable vital signs configured here. When the vital sign configured in this section
is recorded in charting, 1 point will be added. Similarly, if there are 3 vital elements matched as per configuration, 3
points will be added in E & M Charting in the Examination section total.
E & M Risk Level
Level of Risk in E & M Charting can be decided from the predefined list (Minimum, Low, Moderate, and High) in E & M
Configuration. Based on the matching parameters selected, the corresponding weightage will be displayed in the E & M
Calculator.

Release Notes — v9.0.42 (EMR Features)
Call 877-346-7962 for customer service or e-mail us at [email protected]. Page 30 of 97
Go to TOP
E & M Diagnosis Weightage
Points in the Diagnosis section will be added based on the matching Diagnosis Code and Weightage. When the Diagnosis
Code configured in this section is recorded in charting, the weightage configured here will appear in Dx in E & M Charting
MDM section. When any other Dx Code is recorded which is not configured in this section, the Weightage will still
increase by 1.
E & M CPT Weightage
Points in the CPT section will be added based on the matching CPT Code and Weightage. When the CPT Code configured
in this section is recorded in charting, the weightage configured here will appear in CPT in E & M Charting MDM section.
If you want to increase the points only upon matching the exact CPT description, you can click on the “Desc” icon next
to CPT Code. When any other CPT Code is recorded which is not configured in this section, the Weightage will still
increase by 1.
E & M MDM Configuration
You can configure the various levels of MDM for a range of points. For example, if you have configured Level 1 for points
ranging from 1 to 10 and selected Weightage as 3, the system will calculate the total points of CPT and Diagnosis, and if
the total count is between 1 to 10, it will show MDM Weightage as 3 in E & M Charting. The corresponding MDM Level
(Straight Forward, Low Complex, Moderate Complex, High Complex) will be automatically selected in E & M Charting.

Release Notes — v9.0.42 (EMR Features)
Call 877-346-7962 for customer service or e-mail us at [email protected]. Page 31 of 97
Go to TOP
E & M in Charting
Once you do the necessary settings in the E & M Calculator Configuration, you can access the E & M in charting as shown
below. Locate a new icon on the Facesheet which appears when an encounter is in session.
The E & M Calculator screen in charting will appear as shown below. Based on your configuration, the weightage will
calculate automatically and will appear in the designated boxes.

Release Notes — v9.0.42 (EMR Features)
Call 877-346-7962 for customer service or e-mail us at [email protected]. Page 32 of 97
Go to TOP
Release Notes — v9.0.42 (EMR Features)
Call 877-346-7962 for customer service or e-mail us at [email protected]. Page 33 of 97
Go to TOP
REPORTS: ENHANCED WITH NEW CHANGES
This section includes changes within the Reports.
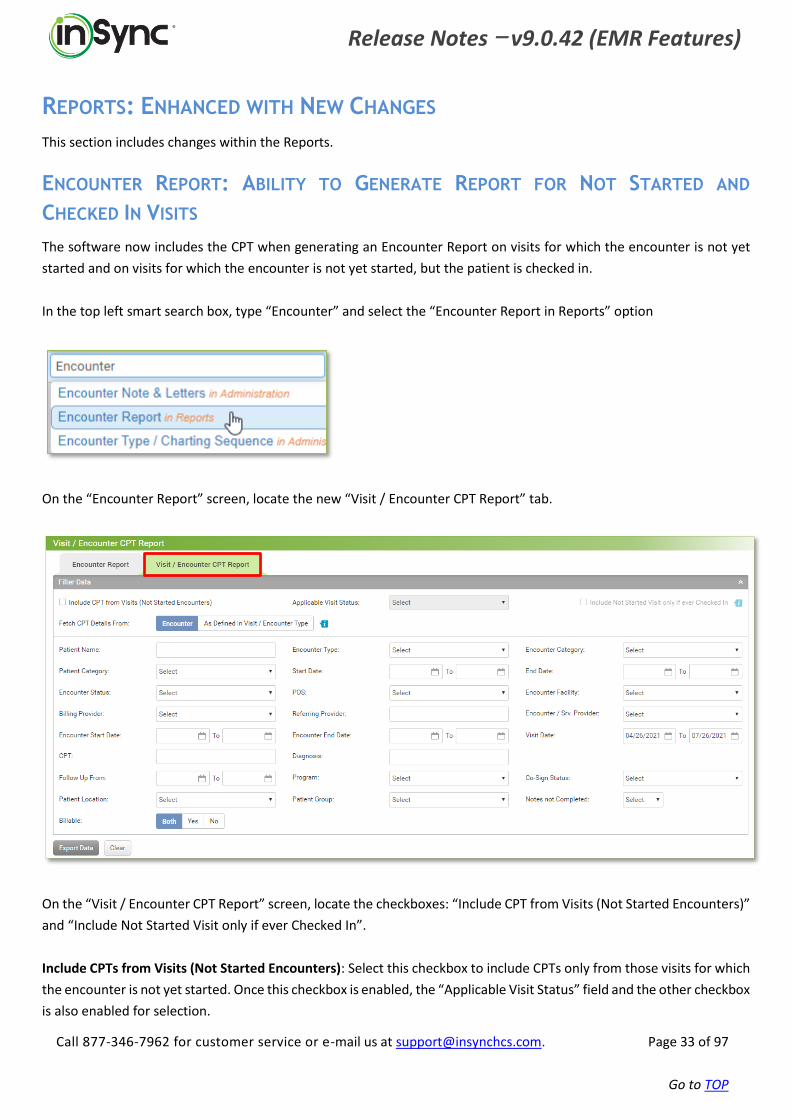
ENCOUNTER REPORT: ABILITY TO GENERATE REPORT FOR NOT STARTED AND
CHECKED IN VISITS
The software now includes the CPT when generating an Encounter Report on visits for which the encounter is not yet
started and on visits for which the encounter is not yet started, but the patient is checked in.
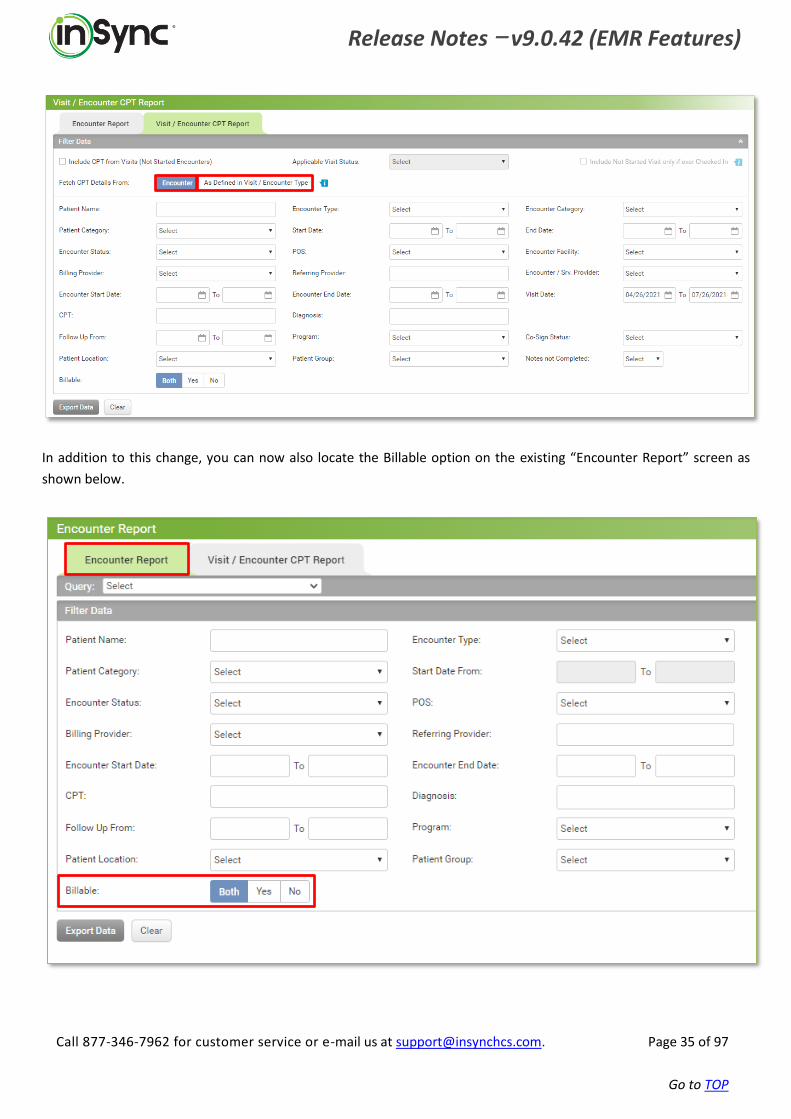
In the top left smart search box, type “Encounter” and select the “Encounter Report in Reports” option
On the “Encounter Report” screen, locate the new “Visit / Encounter CPT Report” tab.
On the “Visit / Encounter CPT Report” screen, locate the checkboxes: “Include CPT from Visits (Not Started Encounters)”
and “Include Not Started Visit only if ever Checked In”.
Include CPTs from Visits (Not Started Encounters): Select this checkbox to include CPTs only from those visits for which
the encounter is not yet started. Once this checkbox is enabled, the “Applicable Visit Status” field and the other checkbox
is also enabled for selection.

Release Notes — v9.0.42 (EMR Features)
Call 877-346-7962 for customer service or e-mail us at [email protected]. Page 34 of 97
Go to TOP
Applicable Visit Status: Select one or more visit statuses from this drop-down. All the CPTs mapped with these visit
statuses will appear when you export the data. The drop-down will also show mapped visit statuses, for example, if you
have mapped ‘Arrived’ visit status with ‘Check In’, you can also pull CPTs for ‘Arrived’ visit status.
Include Not Started Visits Only If Ever Checked In: Select this checkbox if you want to pull CPTs only from those visits
for which the encounter is not yet started, but the patient is checked in.
Fetch CPT Details from: There are two options to fetch CPT details.
Encounter: Select this option to include CPTs recorded in the encounter.
As Defined in Visit / Encounter Type: Select this option to include CPTs that are configured in the Visit / Encounter Type.
It will not include the CPTs which are later updated in the appointment or encounter.
Release Notes — v9.0.42 (EMR Features)
Call 877-346-7962 for customer service or e-mail us at [email protected]. Page 35 of 97
Go to TOP
In addition to this change, you can now also locate the Billable option on the existing “Encounter Report” screen as
shown below.

Release Notes — v9.0.42 (EMR Features)
Call 877-346-7962 for customer service or e-mail us at [email protected]. Page 36 of 97
Go to TOP
APPOINTMENTS REPORT: FILTER PATIENTS NOT VISITED IN CERTAIN DAYS / NUMBER
OF VISITS
Like the Encounter Report, you can now see the “Not Visited Within __ Days” and “Patient with __ Visits” options on the
Appointments Report. It allows you to generate the report for the patients that have not visited within a certain number
of days or the patients that have not visited after a certain number of visits.
In the top left smart search box, type “Appointment” and select the “Appointments in Reports” option.
On the “Appointments Report” screen, locate the new “Not Visited Within” and “Patient With” fields on the “Active
Appointments” tab.

Release Notes — v9.0.42 (EMR Features)
Call 877-346-7962 for customer service or e-mail us at [email protected]. Page 37 of 97
Go to TOP
eMAR: ENHANCED WITH NEW CHANGES
This section includes changes within the eMAR module.
ON-THE-FLY CONFIGURATION FOR PRESCRIBER, TYPE, AND FREQUENCY MADE
PERMISSION-BASED
On the Manage Medications screen, there is an orange wheel icon available for on-the-fly configuration of the Prescriber,
Type, and Frequency fields. This feature is now permission-based and only authorized users can make on-the-fly
configurations for these 3 fields.
In the top left smart search box, type “Roles” and select the “Roles & Permissions in Administration” option.
On the “Roles & Permission” screen, type “eMAR” in the Search bar on the top right and select the “eMAR in Patients”
option as shown in the screen below:
Click on the + to expand the “eMAR” function, then locate the following 3 options:
• eMAR On the fly Prescriber Configuration
• eMAR On the fly Type Configuration
• eMAR On the fly Frequency Configuration

Release Notes — v9.0.42 (EMR Features)
Call 877-346-7962 for customer service or e-mail us at [email protected]. Page 38 of 97
Go to TOP
MAPPED FREQUENCY FOR THE MEDICATIONS IMPORTED FROM eRX
In eMAR, when you import the medication from the eRx module, the software now also auto-populates the frequency
and allows you to make necessary changes. Below are the changes explained with screenshots.
• The ‘Frequency’ field displays differently, it now appears as a drop-down field.
• When you import medication from the eRx module, the frequency will also auto-populate along with other
fields.

Release Notes — v9.0.42 (EMR Features)
Call 877-346-7962 for customer service or e-mail us at [email protected]. Page 39 of 97
Go to TOP
• The ‘Number of Dosages per Applicable Day’ will auto-populate as recorded in the eRx. You can change it if
desired. When you select the Applicable Time Slots, the software will automatically put the relevant number in
this field.

Release Notes — v9.0.42 (EMR Features)
Call 877-346-7962 for customer service or e-mail us at [email protected]. Page 40 of 97
Go to TOP
eMAR AND VITALS: ABILITY TO RECORD GLUCOSE VALUE IN DECIMAL
The software now allows you to record the glucose value in decimal in eMAR and Vitals.
In the bookmarks on your left, click the eMAR icon .
On the eMAR Dashboard screen, click the “Manage Medications” icon as shown in the screen below.
On the “Manage Medications” screen, select the patient and then select the “Glucose” option from the “Med.
Parameter” dropdown as shown below. Click the icon next to the dropdown field.

Release Notes — v9.0.42 (EMR Features)
Call 877-346-7962 for customer service or e-mail us at [email protected]. Page 41 of 97
Go to TOP
It opens the “Glucose Range Configuration” screen as shown below. You can locate the glucose range in the decimal in
this screen.
PRODUCTIVITY / PERFORMANCE DASHBOARD: ENHANCED WITH NEW
CHANGES
The Productivity / Performance Dashboard feature is now enhanced with new changes. To view the changes in the
Dashboard, expand the left pane and select the “Productivity / Performance Dashboard” option as shown below.
The Productivity / Performance Dashboard feature is now enhanced with the following changes:

Release Notes — v9.0.42 (EMR Features)
Call 877-346-7962 for customer service or e-mail us at [email protected]. Page 42 of 97
Go to TOP
• On the top of the screen, you can now locate the wheel with pin to view the graphical representation of
provider’s data.
• The settings that appeared on right side can now be accessed from the left pane so that the more space can be
utilized to represent the widgets.
• It is now configurable to view other users’ data. Only authorized users can access other users’ data as in the
above screen. On the “Roles & Permissions” screen, search for the “Productivity / Performance Dashboard”
function and select the “Personalize” checkbox from extreme right side as shown in the screen below. This will
allow the users of this role to access other users’ data.

Release Notes — v9.0.42 (EMR Features)
Call 877-346-7962 for customer service or e-mail us at [email protected]. Page 43 of 97
Go to TOP
• The data within the widgets now appears as links. You can click on the link to view a list of encounters for the
achieved visits.
Upon clicking the link, the “Encounter List” screen appears as shown in the screen below.

Release Notes — v9.0.42 (EMR Features)
Call 877-346-7962 for customer service or e-mail us at [email protected]. Page 44 of 97
Go to TOP
Productivity / Performance Report: On the “Productivity / Performance Dashboard” screen, locate the icon in the top
right corner as shown in the screen below.
On the “Productivity / Performance Report” screen, select the parameters as desired and click the Export button. The
report will be exported into an excel file.
When you generate the report, the “% Achieved” column will now show the cells with background color depending on
the achieved percentage. Below 40%, it will show in red, between 40 to 70%, it will appear in yellow, and above 70%, it
will appear in green.

Release Notes — v9.0.42 (EMR Features)
Call 877-346-7962 for customer service or e-mail us at [email protected]. Page 45 of 97
Go to TOP
Send a To Do when Applying for Leave / Time Off / Other Request: When any resource applies for a leave, time off, or
any other requested time off, you can send a To Do to specific recipients including the supervisor. On the “Timecard
Management” screen, click on the orange wheel icon from top right corner. In Customized Preferences, locate the new
“Send a To Do when Applying for Leave / Time Off / Other Request” checkbox.
Exempt from Performance Tracking: You can exempt a user from performance tracking during the time they are on
leave. To do so, expand the left pane and select the “Time Off Tracker” option as shown below.

Release Notes — v9.0.42 (EMR Features)
Call 877-346-7962 for customer service or e-mail us at [email protected]. Page 46 of 97
Go to TOP
On the “Timecard Management” screen, select the “Time Off Tracker” tab, select the “Exempt from Performance
Tracking” checkbox as shown below.
Calculate Productivity Hours based on Clock In / Clock Out Task/Type: You can now calculate the productivity hours
based on the Clock In / Clock Out Task/Type. To do so, expand the left pane and select the “Productivity / Performance
Configuration” option as shown below.

Release Notes — v9.0.42 (EMR Features)
Call 877-346-7962 for customer service or e-mail us at [email protected]. Page 47 of 97
Go to TOP
On the “Productivity / Performance Configuration” screen, expand the “Configure Productivity / Performance [Weekly]”
panel and select the “Dependent on Clock In / Clock Out” checkbox as shown in the screen below. You can then select
the desired Task and Type from the adjacent dropdown fields.

Release Notes — v9.0.42 (EMR Features)
Call 877-346-7962 for customer service or e-mail us at [email protected]. Page 48 of 97
Go to TOP
RANDOM LAB/DRUG TESTING MODULE
Back
The software allows you to perform random lab screening for patients.
• You can configure random lab screening based on patient, patient group, program, patient category, and primary
provider.
• You can either configure it for a specific facility or all the facilities in your practice.
• When selecting patients for random lab screening, you can choose to have them only from today’s appointments
or only from the MAT schedule as desired.
• You can configure the lab screening so that the notification for the screening can be given to the users on the
same day or a few days in advance.
• You can configure the random lab test cycle as daily, weekly, monthly, or yearly.
• You can configure any days within the week to perform the random lab screening.
• You can configure the number of patients you want to randomly screen on a daily basis.
• You can consider both manual and electronic labs for random lab screening.
• You can allow the users to override the test if they wish to do so. You can also configure if you want them to
enter the reason to override the test.
In top left smart search box, type “random” and select the “Random Lab Screening in Patients” option.
The Random Lab Screening screen appears as shown below.
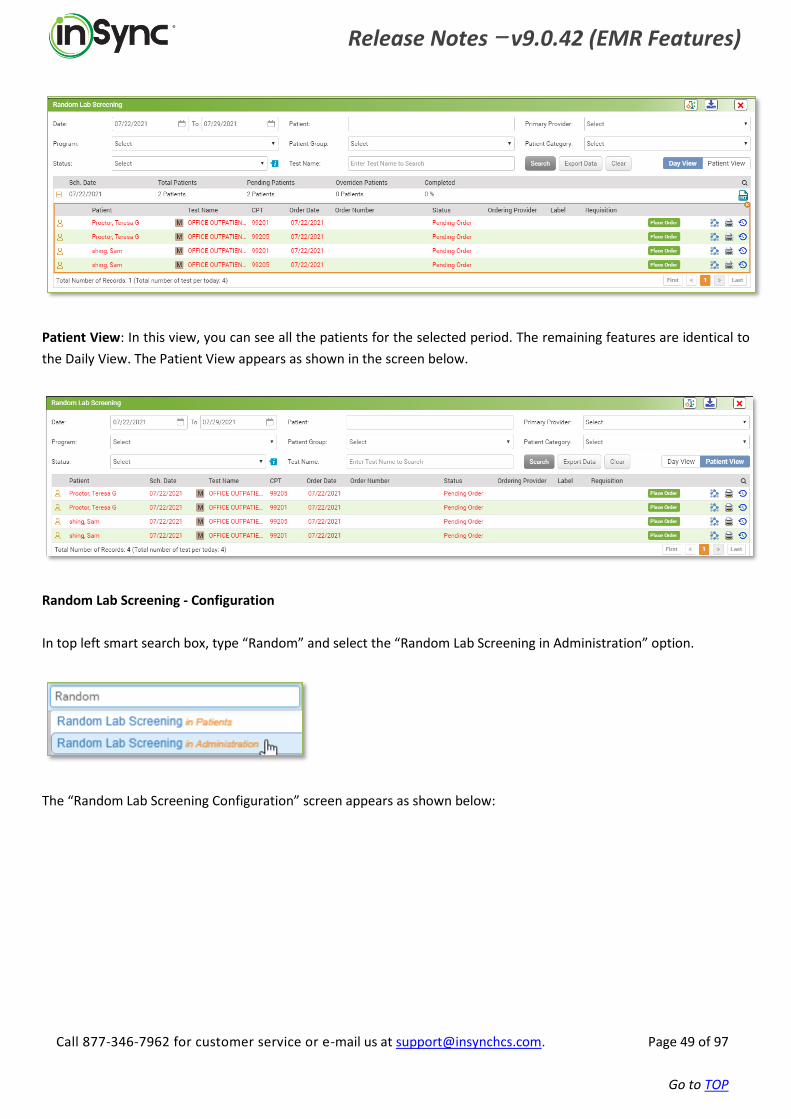
There are 2 types: Day View and Patient View. You can select the desired view from the top right corner of the screen.
Day View: In this view, you can see a summary of the patients that are currently scheduled for random lab screening,
such as Total Patients, Pending Patients, Overridden Patients, and Completed %. When you click on the plus sign, you
can see a detailed view of the patient list including test name, order date, order number, and so forth. You can also place
an order, override the test, print the screening details, and view the order history from this screen.
Release Notes — v9.0.42 (EMR Features)
Call 877-346-7962 for customer service or e-mail us at [email protected]. Page 49 of 97
Go to TOP
Patient View: In this view, you can see all the patients for the selected period. The remaining features are identical to
the Daily View. The Patient View appears as shown in the screen below.
Random Lab Screening - Configuration
In top left smart search box, type “Random” and select the “Random Lab Screening in Administration” option.
The “Random Lab Screening Configuration” screen appears as shown below:

Release Notes — v9.0.42 (EMR Features)
Call 877-346-7962 for customer service or e-mail us at [email protected]. Page 50 of 97
Go to TOP
Turn on Random Lab Screening By: There are various methods in which you can choose the random patients for lab
screening. You can choose them either based on patient group, program, patient category, or primary provider. If you
don’t want to choose any of these options, select the “Patient” option, then you can type in the desired patient names
and select them from the “Select Patients” field.
Select Patient(s): Type a patient’s name and select from the list being populated. A link will appear after the box to show
a list of selected patients. You can select more patients as desired.
Select Patients based on Today’s Schedule: Select this checkbox to randomly select the patients for which an
appointment is booked in the Scheduler and the patients that are available in the Bed Board module.
Select Patients based on MAT Schedule: Select this checkbox to randomly select the patients that are scheduled in the
MAT module.
All Applicable Patients: Select this checkbox to randomly select patients from all the patients in the practice.
Generate Random Patient List on: You can generate a patient list either on the same day or a few days in advance.
Same Applicable Day: When this option is selected, a random patient list will be generated on the same day as the day
the test is to be performed for those patients.
Before __ Days: You can configure number of days in advance you want to schedule the tests for the patients.
Random Lab Test Cycle: There are four options to select the Random Lab Test Cycle: Daily, Weekly, Monthly, Yearly.
Select Applicable Labs for Random Test: You can select two types of labs for the random test: Manual and eLab.
Allow User to Override Random Scheduled Test: When the random lab test is scheduled for patients, you can allow the
users to override the test if they desire to do so. You can also determine whether to make an override reason mandatory
or optional.
With Reason: Select this option if you want to make it mandatory for users to enter a reason when overriding the test.

Release Notes — v9.0.42 (EMR Features)
Call 877-346-7962 for customer service or e-mail us at [email protected]. Page 51 of 97
Go to TOP
Without Reason: Select this option if you want to allow users to override the test without entering a reason.
Send To Do if Overridden: Select one or more recipients who should receive a To Do when the test is overridden.
Include Primary Provider: Select this checkbox to send a To Do to the primary provider when the test is overridden.
Once you configure the necessary details, click Save. The configured details will appear in the following grid.
MAT - Random Lab Screening
You can perform random lab screening of patients at the time of checking in and dispensing the dose to the patient in
the MAT module.
In top left smart search box, type “MAT” and select the “MAT in Patients” option.
On the “MAT” screen, click on the “MAT Configuration” icon as shown in the screen below:
On the “MAT Configuration” screen, under “Customized Preferences” locate the following flag as shown in the screen
below:
• Enable Random Lab Screening

Release Notes — v9.0.42 (EMR Features)
Call 877-346-7962 for customer service or e-mail us at [email protected]. Page 52 of 97
Go to TOP
When this feature is enabled, the software allows you to perform random lab screening of the patients at the time of
checking in the patients or at the time of dispensing the dose to the patients.
Prompt for Random Lab Screening at the Time of Check In (if Applicable): If you have configured random lab screening
for a patient, the software will alert you while checking in the patient if you have selected this checkbox.
Do not Allow to Check In if Order not Placed: Select this checkbox if you want to prevent the user from checking in the
patient without placing a lab order.
Do not Allow to Check In if Result not Captured: Select this checkbox if you want to prevent the user from checking in
the patient without recording the result.
Prompt for Random Lab Screening at the Time of Dispense: If you have configured random lab screening for a patient,
the software will alert you while dispensing the dose to the patient if you have selected this checkbox.
Do not Allow to Dispense if Order not Placed: Select this checkbox if you want to prevent the user from dispensing the
dose to the patient without placing a lab order.
Do not Allow to Dispense if Result not Captured: Select this checkbox if you want to prevent the user from dispensing
the dose to the patient without recording the result.

Release Notes — v9.0.42 (EMR Features)
Call 877-346-7962 for customer service or e-mail us at [email protected]. Page 53 of 97
Go to TOP
MAT: ENHANCED WITH NEW CHANGES
This section includes changes within the MAT module.
FLEXIBILITY TO LOG OUT THE USER BY AUTHENTICATED USERS
The software now allows authenticated users to forcefully log a user out of a station the user is logged into, so that the
authenticated user can log on to that same station.
In the top left smart search box, type “MAT” and select the “MAT in Patients” option.
On the MAT screen, locate the new “Manage Stations” icon as shown in the screen below:
Upon clicking the icon, the software opens the “Manage Stations” pop-up as shown in the screen below:

Release Notes — v9.0.42 (EMR Features)
Call 877-346-7962 for customer service or e-mail us at [email protected]. Page 54 of 97
Go to TOP
Upon clicking the “Force Logout” button, the software logs out the user who was already logged on to the station with
a confirmation message as shown in the screen below:
When the user tries to access the MAT module at a later time, the software shows the below pop-up as shown in the
screen below:
ABILITY TO CAPTURE MAT# IN PATIENT DEMOGRAPHICS
You can capture the unique MAT# for the patient from the “Patient Details” panel on the “Patient Information” screen.
The MAT# once captured will appear on the “MAT” screen and the “MAT Check In” screen. You can also search the
patient records using the MAT# from the “Patient Search” screen.
In the top left smart search box, type “MAT” and select the “MAT in Patients” option.

Release Notes — v9.0.42 (EMR Features)
Call 877-346-7962 for customer service or e-mail us at [email protected]. Page 55 of 97
Go to TOP
On the “MAT” screen, click the MAT Configuration icon as shown in the screen below:
On the “MAT Configuration” screen, in the “Customized Preferences” panel, locate the new flag as shown in the screen
below:
• Enable Capturing MAT# in Patient Demographics
Once you enable this feature, there are three ways you can record the MAT#.
User MRN as MAT#: Select this option if you want to keep the MRN as your MAT#.
Use External MRN as MAT#: Select this option if you want to keep the external MRN as your MAT#.
Create New Field as MAT#: Select this option if you want to capture your MAT# separately regardless of the MRN or
external MRN.

Release Notes — v9.0.42 (EMR Features)
Call 877-346-7962 for customer service or e-mail us at [email protected]. Page 56 of 97
Go to TOP
You can also prevent the user from checking in the patient, dispensing the dose, or placing an order if the MAT# is not
recorded.
Do not Allow to Check in if MAT# is not Present: Select this option if you don’t want to allow the user to check in the
patient if the MAT# is not recorded for that patient.
Do not Allow to Dispense if MAT# is not Present: Select this option if you don’t want to allow the user to dispense the
dose for the patient if the MAT# is not recorded for that patient.
Do not Allow to Place Order if MAT# is not Present: Select this option if you don’t want to allow the user to place an
order for the patient if the MAT# is not recorded for that patient.
ABILITY TO ASSIGN ROOM UPON CHECK IN
The software now allows you to assign a room to a patient upon checking in. Once the MAT patient is checked in and
the room is assigned, you can keep a track that how much time the patient has spent in the allocated room. If the patient
is shifted to a different room, the waiting time spent in the new room is also calculated automatically.
In the top left smart search box, type “MAT” and select the “MAT in Patients” option.
On the "MAT” screen, click the “MAT Configuration” icon as shown in the screen below:
On the “MAT Configuration” screen, locate the following flag in the “Customized Preferences” panel.
• Enable Room Tracking after Check In

Release Notes — v9.0.42 (EMR Features)
Call 877-346-7962 for customer service or e-mail us at [email protected]. Page 57 of 97
Go to TOP
When this feature is enabled, the software provides you an option to select a room while checking in the patient. If the
desired room is not available in the list, you can click on the orange wheel icon to configure a new room.
Once you allocate the room, the software starts tracking the patient and shows the current room details upon hovering
the mouse over the Token Number.
Release Notes — v9.0.42 (EMR Features)
Call 877-346-7962 for customer service or e-mail us at [email protected]. Page 58 of 97
Go to TOP
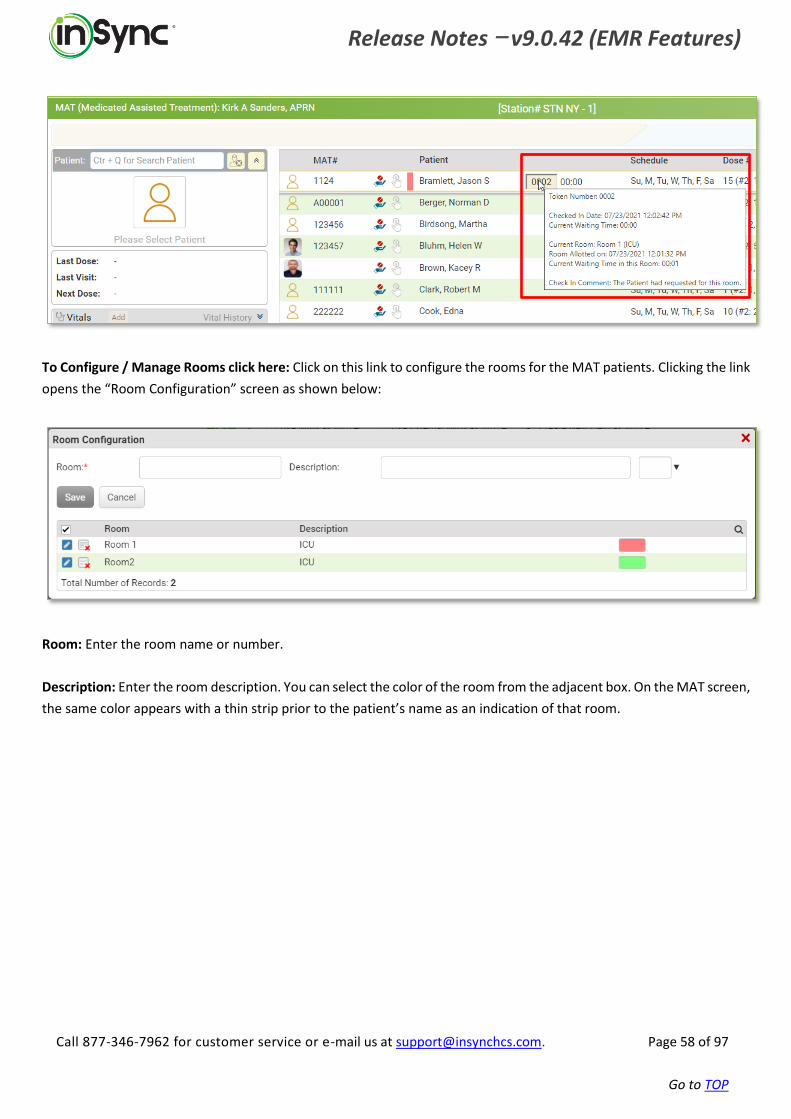
To Configure / Manage Rooms click here: Click on this link to configure the rooms for the MAT patients. Clicking the link
opens the “Room Configuration” screen as shown below:
Room: Enter the room name or number.
Description: Enter the room description. You can select the color of the room from the adjacent box. On the MAT screen,
the same color appears with a thin strip prior to the patient’s name as an indication of that room.

Release Notes — v9.0.42 (EMR Features)
Call 877-346-7962 for customer service or e-mail us at [email protected]. Page 59 of 97
Go to TOP
HABILITATION TRACKER: ENHANCED WITH NEW CHANGES
Back
This section includes changes within the Habilitation Tracker module.
ADDED FEW MORE CUSTOMIZED PREFERENCES
The “Habilitation Tracker” module is enhanced with some more customized preferences. In top left smart search box, type “Habilitation” and select the “Habilitation Tracker Configuration in Administration” option.
On the “Habilitation Tracker Configuration” screen, expand the “Customized Preferences” panel to locate the newly added options as shown in the screen below. Auto Create Claim: When this checkbox is selected, the software will automatically create a claim with the “Not Generated” status when the service is completed for the patient. Generate Claim Automatically: When this checkbox is selected, the software will automatically generate the claim that was created when the service was completed for the patient.

Release Notes — v9.0.42 (EMR Features)
Call 877-346-7962 for customer service or e-mail us at [email protected]. Page 60 of 97
Go to TOP
Generate Encounter Note when: There are 2 actions upon which the encounter can be generated automatically, you can select the desired action: All Service Marked as Completed: When this option is selected, the encounter note will be generated when either the service is marked as completed or each activity of that service is marked as completed. Day Close for All Patients: When this option is selected, the encounter note will be generated upon closing the day for all the patients.
Additionally, for the Day Close for All Patient, on the ‘Manage Day Hab Tracker’ screen, there is a checkbox to close the day for all the patients at once.

Release Notes — v9.0.42 (EMR Features)
Call 877-346-7962 for customer service or e-mail us at [email protected]. Page 61 of 97
Go to TOP
Enable Capturing Skills on Activity Level: When this feature is enabled, you can capture the skill details (grade and progress) for each activity.
A plus sign will appear prior to the activity name. You can expand the plus icon to view a list of all the skills of that activity.

Release Notes — v9.0.42 (EMR Features)
Call 877-346-7962 for customer service or e-mail us at [email protected]. Page 62 of 97
Go to TOP
Compute Service Day as: You can define the duration for full day and half day for the services from this section.
Full Day __ Hours: Enter number of hours that you want to configure as full day for the service.
Half Day __ Hours: Enter number of hours that you want to configure as half day for the service.
Compute Full / Half Day based on: You can compute full day or half day based on either the Time Tracker duration or the Activity Tracker duration.
Time Tracker: When this option is selected, the software will compute full day/half day for the patients based on their total IN time in that service.
Activity Tracker: When this option is selected, the software will compute full day/half day for the patients based on the total duration they have spent on each activity. Auto Complete Service when Day Close for All Patients: You can enable this feature if you want to complete the service for all the patients automatically upon closing the day. On the “Manage Day Hab Tracker” screen, there is a checkbox to close the day for all the patients at once.
CONFIGURE “ONE TIME / RECURRENCE” OPTION IN FREQUENCY
When creating or managing a service, you can now configure the frequency as desired. The Frequency can be “One
Time” or “Recurrent”.
In top left smart search box, type “Habilitation” and select the “Habilitation Tracker in Scheduler” option.

Release Notes — v9.0.42 (EMR Features)
Call 877-346-7962 for customer service or e-mail us at [email protected]. Page 63 of 97
Go to TOP
On the “Habilitation Tracker” screen, click the “Create / Start a New Service” button or the “Manage Services” button.
On the “New Habilitation Service” screen, locate the “One Time” and “Recurrence” options in the “Frequency” field as
shown in the screen below.
In the patient section, locate the new icons to mark in the patient. You can click this icon to mark the patient In.

Release Notes — v9.0.42 (EMR Features)
Call 877-346-7962 for customer service or e-mail us at [email protected]. Page 64 of 97
Go to TOP
Once the patient is marked IN, the icon will appear as shown below.

Release Notes — v9.0.42 (EMR Features)
Call 877-346-7962 for customer service or e-mail us at [email protected]. Page 65 of 97
Go to TOP
PATIENT PORTAL: ENHANCED WITH NEW CHANGES
This section includes changes within the Patient Portal module.
PATIENT PORTAL ENHANCEMENTS
Back
Previously, the software allowed only patients and their representatives to access patients' clinical details. Now, the
software can be configured to also enable access to clinical details by a patient's delegate and Caseworkers. For example,
you can define the delegate’s or Caseworker’s name, configure their email and username for them, and assign their
access to the patient’s clinical details.
Patient Delegates and Portal Access
When you add or update a patient, in the “Patient Information” tab within their Demographics, you can now locate a
new “Patient Delegates and Portal Access” panel as shown below.
To assign portal access to the patient, select the “Enable Portal Login for Patient” checkbox. You can select the ‘Patient
Forms’ checkbox and select the forms from the drop-down list that you want the patient portal user to fill out. When
you add a new patient, the ‘Patient Delegates and Portal Access’ panel appears as shown below.
Once you add the patient and delegates, the ‘Patient Delegates and Portal Access’ panel appears as shown below.

Release Notes — v9.0.42 (EMR Features)
Call 877-346-7962 for customer service or e-mail us at [email protected]. Page 66 of 97
Go to TOP
Delegate Type: Once you assign the patient portal access, you can select the delegate type from the dropdown list. Click
the orange wheel icon to configure the delegate type. Enter the email address and username for the delegate from the
adjacent fields.
Access Template: Select the access template to assign the rights to the patient delegate for the desired modules of
portal. Click the orange wheel icon to configure the access templates.
Manage Portal Access Rights for the Delegates
Once you add patient delegates, you can assign the portal access rights for them by clicking on the
button from the grid. It opens the screen as shown below.
On this screen, the set of portal accesses given to the user appears as defined/configured in the selected template. If
you like to change the template, you can click on the Edit icon from the left side of the data grid. Also, if you want to
add/modify any access setting(s) just for the user, you may select/deselect the applicable checkboxes on this screen.
Please note it will not change your template configuration.

Release Notes — v9.0.42 (EMR Features)
Call 877-346-7962 for customer service or e-mail us at [email protected]. Page 67 of 97
Go to TOP
If you have not selected the Access Template, the button appears in gray. When you click on this
button, the screen appears as shown below.
Once you save the delegate details, they will appear in the following grid. Later, if desired, you can stop the access for
any delegate from the grid using the on/off switch which will appear on the right side of the grid.
Patient Portal Configuration
In top left smart search box, type “Patient Portal” and select the “Patient Portal Configuration in Administration”
option.
On the “Patient Portal Configuration” screen, you can view three panels as shown below.
Portal Preferences
Locate all the patient portal features under the “Portal Preferences” panel as shown below.

Release Notes — v9.0.42 (EMR Features)
Call 877-346-7962 for customer service or e-mail us at [email protected]. Page 68 of 97
Go to TOP
Run Time Access Settings for Patient Delegates When you configure patient delegates inside patient demographics, you can assign which elements they can access for
patient from the portal. However, the software also allows you to change the access settings on-the-fly at entry level,
on performing certain action(s).
For the specific set of actions where we need to show the on-the-fly access settings, please select the respective
checkboxes, so that when you perform the action, the system will prompt which specific delegates you want to give
access to for the respective entry only.

Release Notes — v9.0.42 (EMR Features)
Call 877-346-7962 for customer service or e-mail us at [email protected]. Page 69 of 97
Go to TOP
If you select the “Allow to Change / Override Delegate on the Fly” checkbox in the above screen for the “Book
Appointment” option, then while booking an appointment, the software will show the pop up below. You can select only
those delegates to whom you want to allow access to that appointment.
Manage Caseworkers
This section allows you to configure Caseworker details who are looking after multiple patients. You can add the
Caseworker’s demographic details and click the Add button.
When the caseworkers log on to the portal, they see the below popup to select the patient. If there is a single patient
assigned for the caseworker, the software will automatically open the patient’s portal after the caseworker enters the
required credentials.

Release Notes — v9.0.42 (EMR Features)
Call 877-346-7962 for customer service or e-mail us at [email protected]. Page 70 of 97
Go to TOP
When the case workers access portal for specific patient, they can navigate to the different patients’ portal by changing
the patient’s name from the ‘Current Profile Selected’ dropdown on top of the screen as mentioned below. The name
of the care worker appears below the patient’s name in top right corner.

Release Notes — v9.0.42 (EMR Features)
Call 877-346-7962 for customer service or e-mail us at [email protected]. Page 71 of 97
Go to TOP
Patient Portal – New Pages
Patient portal users can now see the following pages with new look and feel: Problems, Results, Medications, Allergies,
Vitals, HPI, Education Material, and Clinical Summary. Below is a view of the Clinical Summary page with its new design.

Release Notes — v9.0.42 (EMR Features)
Call 877-346-7962 for customer service or e-mail us at [email protected]. Page 72 of 97
Go to TOP
MADE IT MANDATORY TO KEEP AT LEAST ONE CARD ON FILE
The software now allows you to configure a setting for the patient portal users to delete/remove the card by themselves.
You can make it mandatory for the patient portal users to keep at least one card on file. If configured, the patient portal
users must add a new card in order to remove the last card from their saved cards list.
In the top left smart search box, type “Patient” and select the “Patient Consent for Card on File in Administration” option.
On the “Patient Consent for Card on File” screen, under “Preferences for Consent of Card on File” panel, locate the
following flag as shown in the screen below:
• Allow to Delete / Remove Saved Card from Portal
When this flag is enabled, the patient portal users can delete/remove the cards saved on file. If you want to ensure they
cannot delete/remove all cards and must keep at least one card on file, select the below checkbox.
Do Not Allow to Remove all Cards on File (At least one must be present): Select this checkbox if you want it mandatory
that the patient portal users have at least one card on file.

Release Notes — v9.0.42 (EMR Features)
Call 877-346-7962 for customer service or e-mail us at [email protected]. Page 73 of 97
Go to TOP
ABILITY TO ADD AUTHORIZATION DETAILS FROM PATIENT PORTAL
The software now allows you to rename the “Comment” field that appears to the patient portal users in the Insurance
section. You can rename this field as “Authorization” and the same will appear in Patient Portal (My Profile > Insurance
section) and in the “Insurance” tab in the software. When the patient portal users enter the authorization details in this
field, they can be accessed from the “Insurance” tab in patient demographics.
To configure the authorization details, click the icon from bookmarks on your left. On the “Practice Level
Configuration” screen, expand the “Portal” panel, and locate the following flag:
• Rename “Comment” Label under Insurance as

Release Notes — v9.0.42 (EMR Features)
Call 877-346-7962 for customer service or e-mail us at [email protected]. Page 74 of 97
Go to TOP
MOVED PATIENT PORTAL SETTINGS FROM PRACTICE LEVEL CONFIGURATION TO A NEW
PAGE
Previously, the portal settings were accessible from the “Practice Level Configuration” screen (that appeared by clicking
on the icon from bookmarks) which are now moved to another page as a separate section.
To access these settings, in top left smart search box, type “portal” and select the “Patient Portal Configuration in Administration” option as shown below.
On the “Patient Portal Configuration” screen, expand the “Portal Preferences” panel to access the portal settings as
shown in the screen below.

Release Notes — v9.0.42 (EMR Features)
Call 877-346-7962 for customer service or e-mail us at [email protected]. Page 75 of 97
Go to TOP

Release Notes — v9.0.42 (EMR Features)
Call 877-346-7962 for customer service or e-mail us at [email protected]. Page 76 of 97
Go to TOP
ABILITY TO SET SEQUENCE OF FEATURES AVAILABLE IN LEFT MENU
The patient portal users can access the different sections from the left pane. You can now set the sequence of these
elements that appear in the left pane.
To set the sequence for patient portal elements, in top left smart search box, type “portal” and select the “Patient Portal Configuration in Administration” option.

Release Notes — v9.0.42 (EMR Features)
Call 877-346-7962 for customer service or e-mail us at [email protected]. Page 77 of 97
Go to TOP
On the “Patient Portal Configuration” screen, expand the “Portal Preferences” panel and scroll down to access the “Features available to patients” section. Locate the box for numbering in the far-right side. You can enter the desired numbers to set the sequence for these elements. Additionally, you can also drag-and-drop the elements to change the sequence.
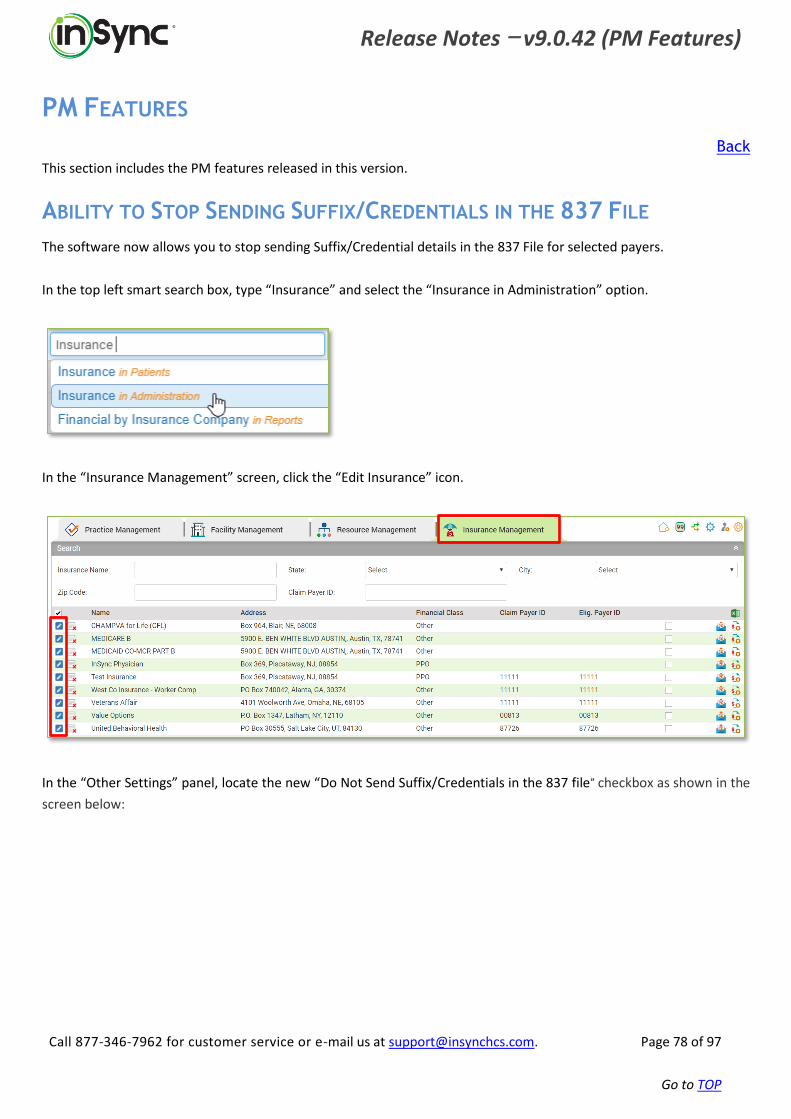
Release Notes — v9.0.42 (PM Features)
Call 877-346-7962 for customer service or e-mail us at [email protected]. Page 78 of 97
Go to TOP
PM FEATURES
Back
This section includes the PM features released in this version.
ABILITY TO STOP SENDING SUFFIX/CREDENTIALS IN THE 837 FILE
The software now allows you to stop sending Suffix/Credential details in the 837 File for selected payers.
In the top left smart search box, type “Insurance” and select the “Insurance in Administration” option.
In the “Insurance Management” screen, click the “Edit Insurance” icon.
In the “Other Settings” panel, locate the new “Do Not Send Suffix/Credentials in the 837 file” checkbox as shown in the
screen below:

Release Notes — v9.0.42 (PM Features)
Call 877-346-7962 for customer service or e-mail us at [email protected]. Page 79 of 97
Go to TOP
Do not Send Suffix/Credentials in the 837 File: Select this checkbox if you don’t want to send the Suffix/Credentials of
the provider to the Clearinghouse in the 837 File.
SEND THE OTHER ENTITY'S ADJUDICATION OR PAYMENT/REMITTANCE DATE
IN LOOP 2330B
The software now allows you transmit the date of the primary payment in the 837 File while submitting the claim to the
secondary payer. Similarly, when submitting the claim to the tertiary payer, both the primary and secondary payment
dates will be transmitted in the 837 File.
In the top right search box, type “Insurance” and select the “Insurance in Administration” option.
In the “Insurance Management” screen, click the “Edit Insurance” icon.

Release Notes — v9.0.42 (PM Features)
Call 877-346-7962 for customer service or e-mail us at [email protected]. Page 80 of 97
Go to TOP
In the “Other Settings” panel, locate the new “Send Other Entity’s Adjudication or Payment/Remittance Date in Loop
2330B for a Specific Payer” checkbox as shown in the screen below:
Send Other Entity’s Adjudication or Payment/Remittance Date in Loop 2330B for Specific Payer: When this checkbox
is selected, the primary payment date will be transmitted in the 837 File while submitting the claim to the secondary
payer. Similarly, when submitting the claim for the tertiary payer, both the primary and secondary payment dates will
be transmitted in the 837 File.
Note: When the primary payment is posted multiple times or from multiple payers, only the last payment date will be
considered.
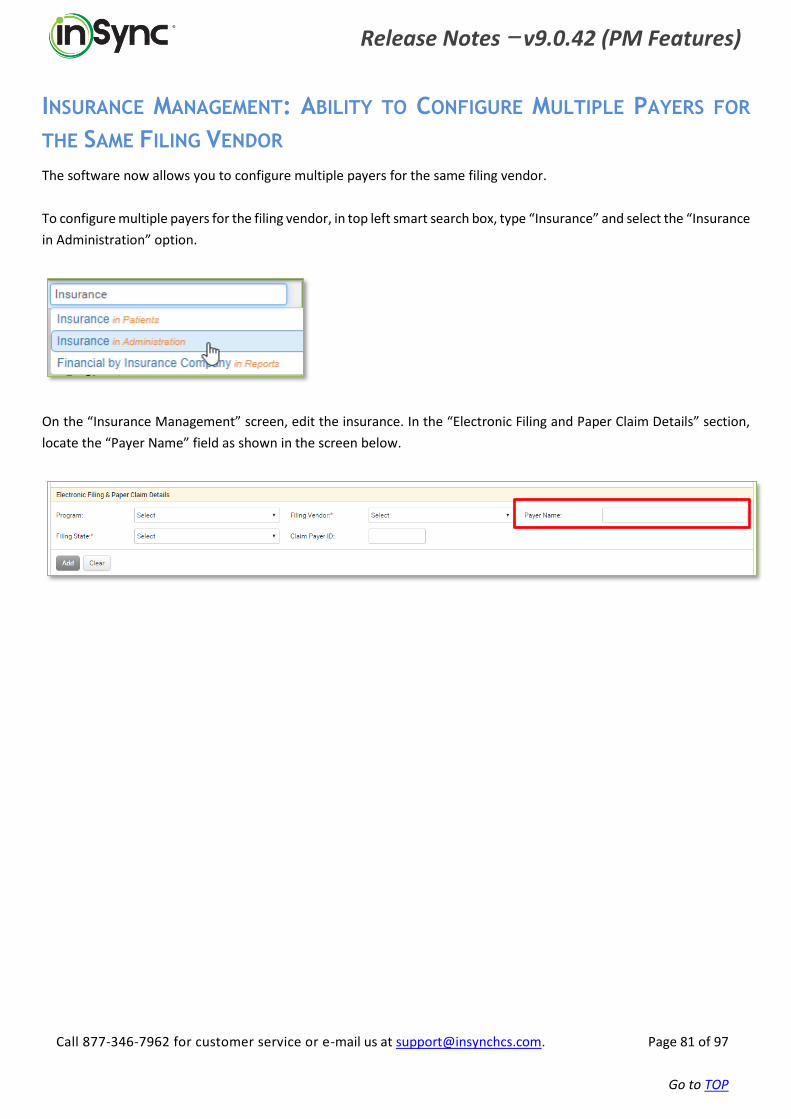
Release Notes — v9.0.42 (PM Features)
Call 877-346-7962 for customer service or e-mail us at [email protected]. Page 81 of 97
Go to TOP
INSURANCE MANAGEMENT: ABILITY TO CONFIGURE MULTIPLE PAYERS FOR
THE SAME FILING VENDOR
The software now allows you to configure multiple payers for the same filing vendor.
To configure multiple payers for the filing vendor, in top left smart search box, type “Insurance” and select the “Insurance
in Administration” option.
On the “Insurance Management” screen, edit the insurance. In the “Electronic Filing and Paper Claim Details” section,
locate the “Payer Name” field as shown in the screen below.

Release Notes — v9.0.42 (PM Features)
Call 877-346-7962 for customer service or e-mail us at [email protected]. Page 82 of 97
Go to TOP
FILE VALIDATION WHILE UPLOADING DUPLICATE AUTHORIZATION FILE
When you upload a new authorization file, the software now checks for a duplicate entry based on the following
parameters.
• Authorization Number
• Authorization Name
• Authorization Units
• Start Date
• End Date
INSURANCE MANAGEMENT: DISPLAY THE ACTUAL REASON FOR NOT
UPLOADING THE G-FILE
When you upload the G-File, the software will now display the actual reason for not uploading the file instead of a
generalized message.
To upload the G-File, in top left smart search box, type “Insurance” and select the “Insurance in Administration” option.
On the “Insurance Management” screen, click the orange wheel icon from top right corner. In “Customized Preferences”,
click on the ‘click here’ link in the ‘To Upload / Download G-File’ flag as shown in the screen below.

Release Notes — v9.0.42 (PM Features)
Call 877-346-7962 for customer service or e-mail us at [email protected]. Page 83 of 97
Go to TOP
On the “Upload / Download G-File” screen, try to upload the file.
FINANCIALS: ABILITY TO RESTRICT THE CHANGE IN RESPONSIBILITY OF THE
INSURANCE
Previously, when you posted the payment for primary and changed the responsibility from primary to secondary, the
software displayed that the secondary payment is posted. Now, even though the responsibility is changed, the software
will show that the primary payment is posted.

Release Notes — v9.0.42 (PM Features)
Call 877-346-7962 for customer service or e-mail us at [email protected]. Page 84 of 97
Go to TOP
REPORT: UPDATES IN PAYMENT ACTIVITY REPORT
The software now allows you to calculate the refund entry based on the dates falling within the Posted Date field.
In the top left smart search box, type “Payment” and select the “Payment Activity in Reports” option.
On the “Payment Activity Report” screen, locate the new checkbox as shown in the screen below.
Show Actual Unapplied Credit Refund: When this checkbox is selected, the system will calculate the refund entry based
on the dates falling within the Posted Date field.

Release Notes — v9.0.42 (PM Features)
Call 877-346-7962 for customer service or e-mail us at [email protected]. Page 85 of 97
Go to TOP
AUTO GENERATE CLAIM SETTINGS ALSO APPLICABLE IN BUSINESS RULE AND
RULE ENGINE
When merging claims through the auto process (“Auto Generate Claim Setting” screen), the rules set in the “Rule Engine”
and “Business Rule” will now apply on the merged claims.
CONSIDER THE MOST RECENT DENIAL TRANSACTION WHILE REBILLING THE
CLAIM
The software now allows you to consider the most recent denial transaction while rebilling the claim.
To enable this feature, click the icon from bookmarks on your left. On the “Practice Level Configuration” screen,
expand the “Billing” panel, and locate the new flag as shown in the screen below:
• Consider the Most Recent Denial Transaction while Rebilling Claim
When multiple denial transactions are posted, you can consider the most recent denial transaction while rebilling the
claim if you have enabled this feature.
When this feature is not enabled, the software will not consider denial transactions while rebilling the claim in the case
of multiple denials and will show the COB error.

Release Notes — v9.0.42 (PM Features)
Call 877-346-7962 for customer service or e-mail us at [email protected]. Page 86 of 97
Go to TOP
ABILITY TO UPLOAD INSURANCE CARD IMAGE FROM PATIENT PORTAL
Back
The software now allows the patient portal users to capture the Insurance Card details using a device camera.
The portal users can now see 2 options, the Upload icon to upload the image from their system and the Camera icon to
capture the image from their device.

Release Notes — v9.0.42 (PM Features)
Call 877-346-7962 for customer service or e-mail us at [email protected]. Page 87 of 97
Go to TOP
CLAIM HISTORY: DISPLAY DENIED CPT DETAILS
On the Claim History screen, you can now view the denied CPT details as shown in the screen below.
To access the Claim History screen, click on the icon from the bookmarks as shown below.
On the Claims screen, click the Search button. Once you see the list of searched claims, click on the the History icon from
the extreme right side in the grid as shown below.
It opens the “History of Claim” screen as shown below.

Release Notes — v9.0.42 (PM Features)
Call 877-346-7962 for customer service or e-mail us at [email protected]. Page 88 of 97
Go to TOP
ABILITY TO PRE-POPULATE PATIENT’S EMAIL ADDRESS FOR CONSENT AND
PAYMENT ON EASY PAY
Back
You can have the patient’s email auto-populate in the Easy Pay payment portal while making a payment.
To auto-populate the patient’s email in the Easy Pay payment portal, click the icon from bookmarks on the left. On
the “Practice Level Configuration” screen, expand the “Billing” panel and locate the following flag:
• Auto-Populate the Patient Email in the Easy Pay Payment Portal
When this feature is enabled, the software auto-populates the patient’s email address while making a payment through
Easy Pay payment portal.
When this feature is disabled, the software will not automatically populate the patient’s email, however, you can enter
the email address while making the payment.
Enable for InSync: Select this checkbox to auto-populate the patient’s email address when the Easy Pay pop-up opens
from InSync.
Enable for Portal: Select this checkbox to auto-populate patient’s email address when the Easy Pay pop-up opens from
portal.
Note: Once you enable this feature at the practice level, you can still disable it for specific patients from the Patient
Information > Billing Information panel.

Release Notes — v9.0.42 (PM Features)
Call 877-346-7962 for customer service or e-mail us at [email protected]. Page 89 of 97
Go to TOP
UB04 CLAIMS: ABILITY TO PRINT CPT DESCRIPTION IN BOX 43 ON THE
CLAIM
The software now allows you to print the CPT description code in the box 43 for UB04 claims.
In the top left smart box, type “Insurance” and select the “Insurance in Administration” option.
In the “Insurance Management” screen, click the “Edit Insurance” icon.
In the “Other Settings” panel, locate the new “Print CPT Description in Box 43 for UB04 Claims” checkbox as shown in
the screen below:
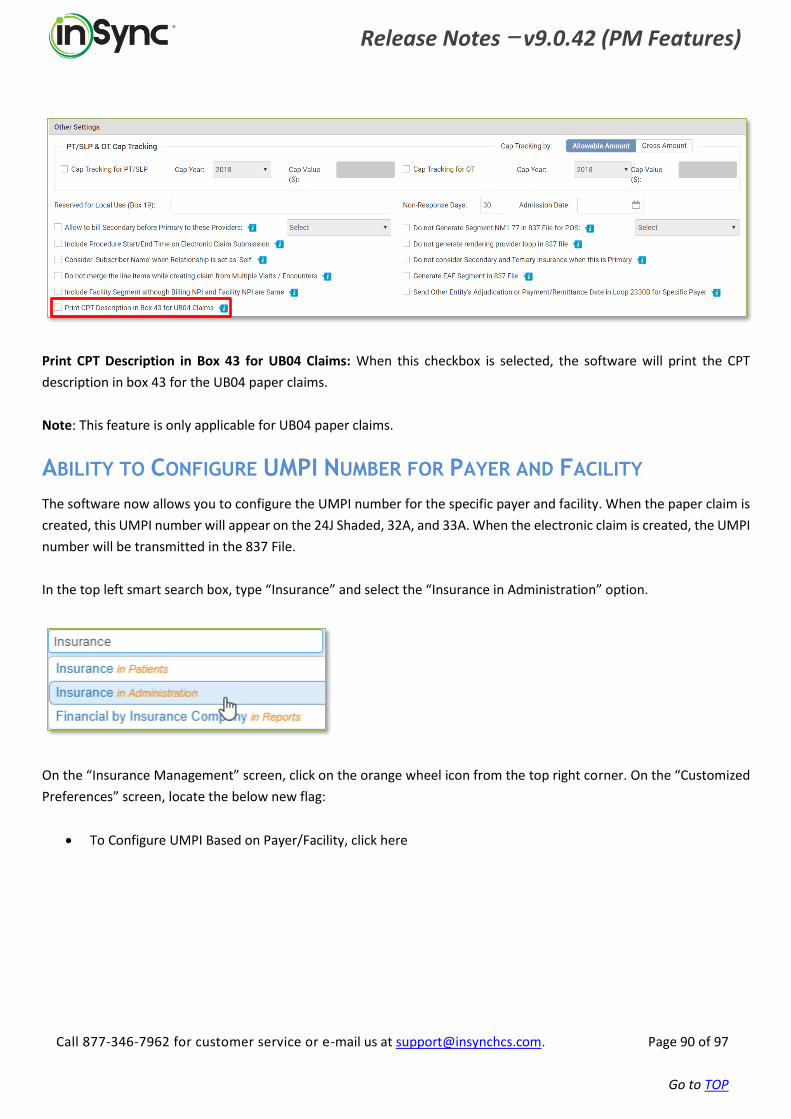
Release Notes — v9.0.42 (PM Features)
Call 877-346-7962 for customer service or e-mail us at [email protected]. Page 90 of 97
Go to TOP
Print CPT Description in Box 43 for UB04 Claims: When this checkbox is selected, the software will print the CPT
description in box 43 for the UB04 paper claims.
Note: This feature is only applicable for UB04 paper claims.
ABILITY TO CONFIGURE UMPI NUMBER FOR PAYER AND FACILITY
The software now allows you to configure the UMPI number for the specific payer and facility. When the paper claim is
created, this UMPI number will appear on the 24J Shaded, 32A, and 33A. When the electronic claim is created, the UMPI
number will be transmitted in the 837 File.
In the top left smart search box, type “Insurance” and select the “Insurance in Administration” option.
On the “Insurance Management” screen, click on the orange wheel icon from the top right corner. On the “Customized
Preferences” screen, locate the below new flag:
• To Configure UMPI Based on Payer/Facility, click here

Release Notes — v9.0.42 (PM Features)
Call 877-346-7962 for customer service or e-mail us at [email protected]. Page 91 of 97
Go to TOP
Upon clicking the ‘click here’ link, the “Configure UMPI Based on Payer/Facility” screen appears as shown in the screen
below:
Payer: Select the payer for which you want to configure UMPI.
Facility: Select the facility for which you want to configure UMPI.
UMPI: Enter the UMPI number you want configure for the selected payer.
When the claim is created for the selected payer and facility, this UMPI number will appear on the box 24J Shaded, 32A,
and 33A in paper claims. For electronic claims, the UMPI number will be transmitted in the 837 File.
This feature is applicable for both Electronic and Paper Claims; and NOT applicable for UB04 Claims.

Release Notes — v9.0.42 (PM Features)
Call 877-346-7962 for customer service or e-mail us at [email protected]. Page 92 of 97
Go to TOP
FINANCIAL LIABILITY FORM: ABILITY TO AUTO CALCULATE DATA
The software now automatically calculates the following data on the “Financial Liability Form”.
To access the “Financial Liability Form”, edit the patient record and select the icon from the top right corner as
shown in the screen below.
• NON-Residential Maximum Liability: The value in this field will be calculated automatically based on the
“Number of households” and their income in the UMDAP configuration.

Release Notes — v9.0.42 (PM Features)
Call 877-346-7962 for customer service or e-mail us at [email protected]. Page 93 of 97
Go to TOP
• State Income Tax, Local Income Tax, and FICA & Self Employment: These values will be calculated automatically
based on Total Family Income (F1+F2+F3).
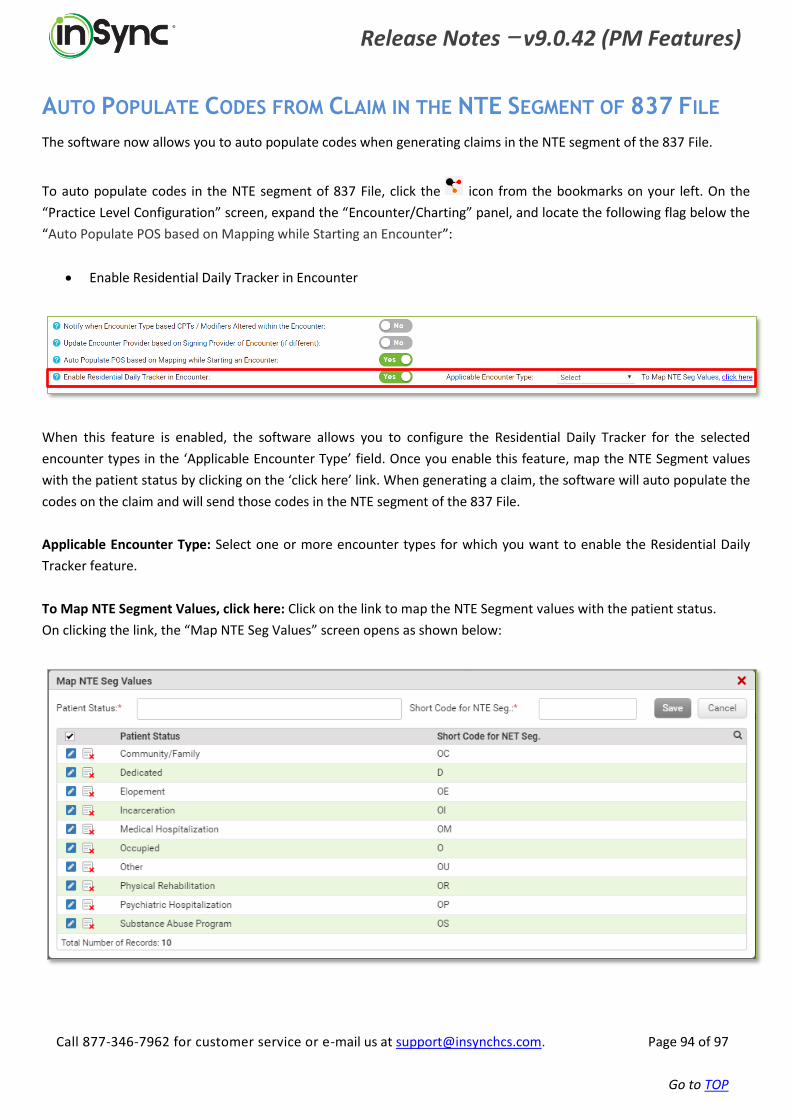
Release Notes — v9.0.42 (PM Features)
Call 877-346-7962 for customer service or e-mail us at [email protected]. Page 94 of 97
Go to TOP
AUTO POPULATE CODES FROM CLAIM IN THE NTE SEGMENT OF 837 FILE
The software now allows you to auto populate codes when generating claims in the NTE segment of the 837 File.
To auto populate codes in the NTE segment of 837 File, click the icon from the bookmarks on your left. On the
“Practice Level Configuration” screen, expand the “Encounter/Charting” panel, and locate the following flag below the
“Auto Populate POS based on Mapping while Starting an Encounter”:
• Enable Residential Daily Tracker in Encounter
When this feature is enabled, the software allows you to configure the Residential Daily Tracker for the selected
encounter types in the ‘Applicable Encounter Type’ field. Once you enable this feature, map the NTE Segment values
with the patient status by clicking on the ‘click here’ link. When generating a claim, the software will auto populate the
codes on the claim and will send those codes in the NTE segment of the 837 File.
Applicable Encounter Type: Select one or more encounter types for which you want to enable the Residential Daily
Tracker feature.
To Map NTE Segment Values, click here: Click on the link to map the NTE Segment values with the patient status.
On clicking the link, the “Map NTE Seg Values” screen opens as shown below:

Release Notes — v9.0.42 (PM Features)
Call 877-346-7962 for customer service or e-mail us at [email protected]. Page 95 of 97
Go to TOP
PATIENT PORTAL: DISPLAY THE MOST RECENT CARD BY DEFAULT ON THE
EPAYMENT SCREEN
The patient portal users can now see the most recent card by default when making the payment from the ePayment
popup, as shown in the screen below.
If there is only a single card on file, it will be automatically selected in the “Select Already Saved Card” dropdown. If there
is no card available on the file, then the “Add New Card” option will appear in this dropdown.
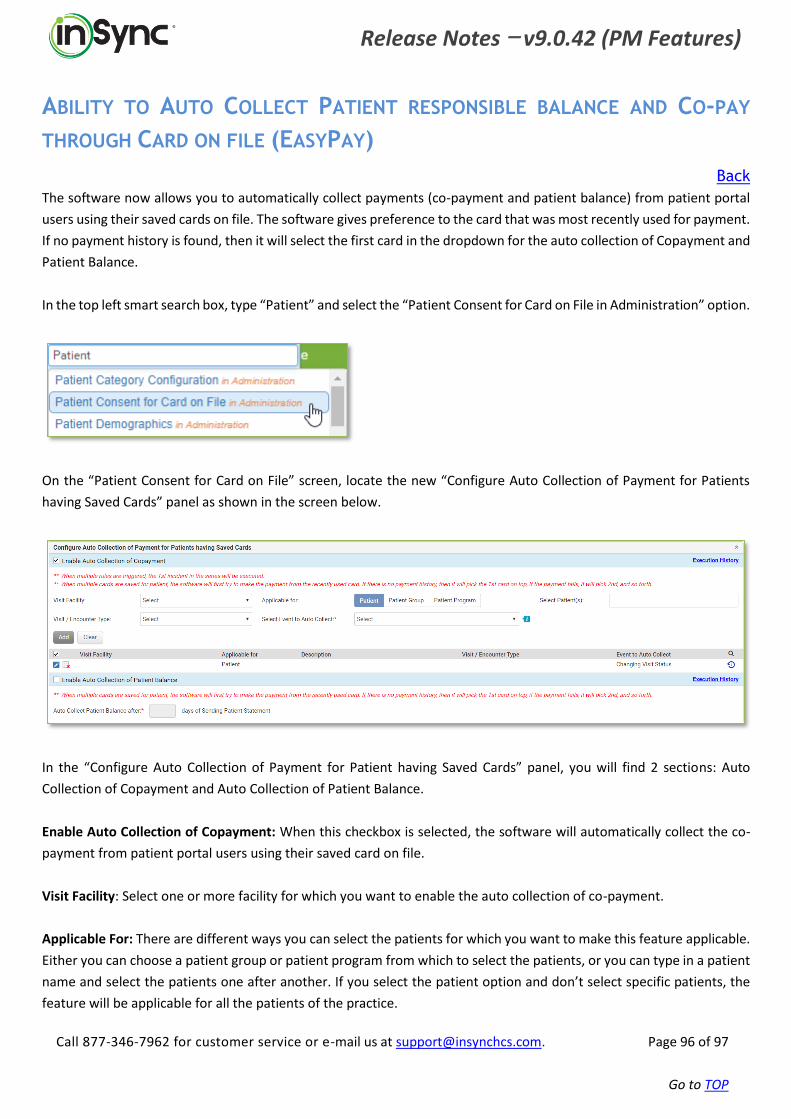
Release Notes — v9.0.42 (PM Features)
Call 877-346-7962 for customer service or e-mail us at [email protected]. Page 96 of 97
Go to TOP
ABILITY TO AUTO COLLECT PATIENT RESPONSIBLE BALANCE AND CO-PAY
THROUGH CARD ON FILE (EASYPAY)
Back
The software now allows you to automatically collect payments (co-payment and patient balance) from patient portal
users using their saved cards on file. The software gives preference to the card that was most recently used for payment.
If no payment history is found, then it will select the first card in the dropdown for the auto collection of Copayment and
Patient Balance.
In the top left smart search box, type “Patient” and select the “Patient Consent for Card on File in Administration” option.
On the “Patient Consent for Card on File” screen, locate the new “Configure Auto Collection of Payment for Patients
having Saved Cards” panel as shown in the screen below.
In the “Configure Auto Collection of Payment for Patient having Saved Cards” panel, you will find 2 sections: Auto
Collection of Copayment and Auto Collection of Patient Balance.
Enable Auto Collection of Copayment: When this checkbox is selected, the software will automatically collect the co-
payment from patient portal users using their saved card on file.
Visit Facility: Select one or more facility for which you want to enable the auto collection of co-payment.
Applicable For: There are different ways you can select the patients for which you want to make this feature applicable.
Either you can choose a patient group or patient program from which to select the patients, or you can type in a patient
name and select the patients one after another. If you select the patient option and don’t select specific patients, the
feature will be applicable for all the patients of the practice.

Release Notes — v9.0.42 (PM Features)
Call 877-346-7962 for customer service or e-mail us at [email protected]. Page 97 of 97
Go to TOP
Visit / Encounter Type: Select one or more visit/encounter types for which you want to enable the Auto Collection of
Co-payment feature.
Select Event to Auto Collect: Select the event that you want to trigger the auto collect of co-payment. Below are the
events:
Booking an Appointment: Select this option if you want to auto collect the co-payment when booking an appointment.
Changing Visit Status: Select this option if you want to auto collect the co-payment when changing the visit status. Once
you select this option, you can select the desired visit status from the adjacent drop-down.
Before / After Visit Date: Select this option if you want to auto collect co-payment before or after specific days from
visit date. Once you select this option, you can select the desired number of days in which you want to collect the co-
payment.
Starting Encounter: Select this option if you want to auto collect the co-payment when starting an encounter.
Ending Encounter: Select this option if you want to auto collect the co-payment when ending an encounter.
Encounter Co-signed: Select this option if you want to auto collect the co-payment when co-signing an encounter.
Enable Auto Collection of Patient Balance: When this checkbox is selected, the software will automatically collect the
patient balance from patient portal users using their saved card on file.
Auto Collect Patient Balance after __ Days of Sending Patient Statement: Enter the number of days that you want the
payment to be collected from the patient’s card after sending the patient statement. If you enter 5 in this box, the
payment will be automatically collected from the patient portal user’s card 5 days after the patient statement was sent.