Reflections Collection - Hot Tub, Swim Spa Collection Owner’s Guide Spa Information My Spa: Model...
24
Transcript of Reflections Collection - Hot Tub, Swim Spa Collection Owner’s Guide Spa Information My Spa: Model...

2
Reflections CollectionOwner ’s Guide
Spa Information
My Spa:
Model Name:
Serial Number:
Date Installed:
Dealer’s Name:
3
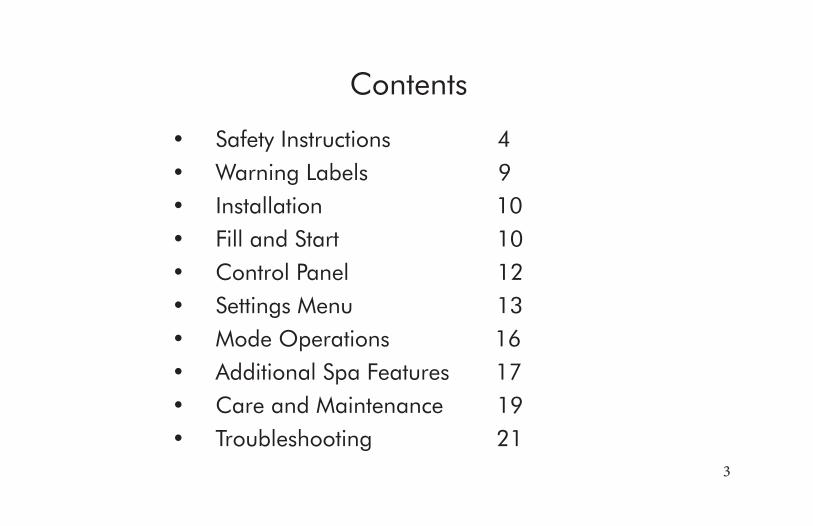
Contents
• Safety Instructions 4• Warning Labels 9• Installation 10• Fill and Start 10• Control Panel 12• Settings Menu 13• Mode Operations 16• Additional Spa Features 17• Care and Maintenance 19• Troubleshooting 21

4
IMPORTANT SAFETY INSTRUCTIONSREAD AND FOLLOW ALL INSTRUCTIONS CAREFULLY
When installing and using this equipment, basic safety precautions should always be followed, including:
• DANGER Risk of Accidental Drowning. Extreme caution must be exercised to prevent unauthorized access by children. To avoid accidents, ensure that children cannot use or approach the spa unless they are supervised at all times.
• DANGER Risk of Serious Injury or Death. The suction fittings in this spa are sized to match the specific water flow created by the pump. Should the need arise to replace the suction fittings or the pump, be sure that the flow rates are compatible. Never operate the spa if the suction fittings are broken or missing. Never replace a suction fitting with one rated less than the flow rate marked on the original suction fitting.
• DANGER Risk of Electric Shock. Install at least 5 FEET (1.5 m), from all metal surfaces. As an alternative, a spa may be installed within 5 feet of metal surfaces if each metal surface is permanently connected by a minimum No. 8 AWG (8.4 mm2) solid copper conductor attached to the wire connector on the grounding lug, inside the equipment compartment on the equipment can.
• DANGER Risk of Electric Shock. Do not permit any electrical appliance, such as a light, telephone, radio, television, etc. within 5 feet (1.5 m) of a spa. Never operate any electrical appliances from inside the spa or when you are wet.
The electrical supply for this spa must include a suitably rated switch or circuit breaker to open all ungrounded supply conductors to comply with section 680-42 of the National Electrical Code, ANSI/NFPA 70-1993. The disconnect must be readily accessible and visible to the spa occupant but installed at least 5 feet (1.5 m), from the spa water.
A grounding wire connector is provided on this spa to connect a minimum No. 8 AWG (8.4 mm2) solid copper conductor between this unit and any metal equipment, metal enclosures of electrical equipment, metal water pipe, or conduit within 5 feet (1.5 m) of the spa. Do not attempt to remove the light housing cover without lowering the water level below the light housing cover.
• To Reduce the Risk of Injury: The water in a spa should never exceed 104° F (40° C). Water temperatures between 100° F (38° C) and 104° F (40° C) are considered safe for a healthy adult. Lower water temperatures are recommended for young children and when spa use exceeds 10 minutes.
• To Reduce the Risk of Injury: Since excessive water temperatures have a high potential for causing fetal damage during the early months of pregnancy, pregnant or possibly pregnant women should limit spa water temperatures to 100° F (38° C).
• To Reduce the Risk of Injury: Before entering a spa, the user should measure the water temperature with an accurate thermometer since the tolerance of water temperature-regulating devices may vary as much as +/- 5° F (2° C).

5
• To Reduce the Risk of Injury: The use of alcohol, drugs, or medication before or during spa use may lead to unconsciousness with the possibility of drowning.
• To Reduce the Risk of Injury: Pregnant women, the elderly, infants, or persons suffering from obesity or with a medical history of heart disease, low or high blood pressure, circulatory system problems, or diabetes, should consult a physician before using a spa. People with infectious diseases should not use a hot tub.
• To Reduce the Risk of Injury: Persons using medication should consult a physician before using a spa since some medication may induce drowsiness, while other medication may affect heart rate, blood pressure, and circulation.
Observe a reasonable time limit when using the spa. Long exposures at high temperatures can cause high body temperature. Symptoms may include dizziness, nausea, fainting, drowsiness, and reduced awareness. These effects could result in possible drowning. Enter and exit the spa slowly. Wet surfaces can be very slippery.
Proper chemical maintenance of spa water is necessary to maintain safe water and prevent possible damage to spa components. Use the spa straps and clip tie downs to secure the cover when not in use. This will help to discourage unsupervised children from entering the spa and keep the spa cover secure in high wind conditions. There is no guarantee that the cover, clip tie downs, actual locks will prevent access to the spa.
SAVE THESE INSTRUCTIONS

6
• Children should not use spas or hot tubs without adult supervision.• Avertissement: ne pas laisser les enfants utiliser une cuve de Relaxation sans surveillance.
• Do not use spas or hot tubs unless all suction guards are installed to prevent body and hair entrapment.• Avertissement: pour éviter que les cheveux ou une partie du corps puissent tre aspirés, ne pas utiliser une cuve de relaxation si lesgrilles de prise d’aspiration ne sont pas toutes en place.
• People using medications and/or having adverse medical history should consult a physician before using a spa or hot tub.• Avertissement: les personnes qui prennent des médicaments ou ont des problèmes de santé devraient consulter un médecin avant d’utiliser use cuve de relaxation.
• People with infectious diseases should not use a spa or hot tub.• Avertissement: les personnes atteintes de maladies infectieuses ne devraient pas utiliser une cuve de relaxation.
• To avoid injury, exercise care when entering or exiting the spa or hot tub.• Avertissement: pour éviter des blessures, user de prudence en entrant dans une cuve de relaxation et e sortant.
• Do not use drugs or alcohol before or during the use of a spa or hot tub to avoid unconsciousness and possible drowning.• Avertissement: pour éviter l’évanouissement et la noyade eventuelle, ne prendre ni drogue ni alcool avant d’utiliser une cuve de relaxation ni quand on s’y trouve.
In addition to the preceding safety instructions, Canadian owners should read and understand the following information from the Canadian Safety Association:
• A green colored terminal or a terminal marked G, GR, Ground, Grounding, or the symbol * is located inside the supply terminal box or compartment. To reduce the risk of electric shock, this terminal must be connected to the grounding means provided in the electric supply service panel with a continuous copper wire equivalent in size to the circuit conductors supplying this equipment.
• IEC Publication 417, Symbol 5019.
• At least two lugs marked “BONDING LUGS” are provided on the external surface or on the inside of the supply terminal box/ compartment. To reduce the risk of electric shock, connect the local common bonding grid in the area of the hot tub or spa to these terminals with an insulated or bare copper conductor not smaller than No. 6 AWG.
• All field-installed metal components such as rails, ladders, drains or other similar hardware within 3 meters of the spa or hot tub shall be bonded to the equipment grounding bus with copper conductors not smaller than No. 6 AWG.

7
• Pregnant or possibly pregnant women should consult a physician before using a spa or hot tub.• Avertissement: les femmes enceintes, que leur grossesse soit confirmée ou non, devraient consulter un médecin avant d’utiliser une cuve de relaxation.
• Water temperature in excess of 38° C may be injurious to your health.• Avertissement: il peut tre dangereux pour la santé de se plonger Dans de l’eau à plus de 38°c.
• Before entering the spa or hot tub, measure the water temperature with an accurate thermometer.• Avertissement: avant d’utiliser une cuve de relaxation mesurer la température de l’eau à l’aide d’un thermomètre précis.
• Do not use a spa or hot tub immediately following strenuous exercise.• Avertissement: ne pas utiliser une cuve de relaxation immediatement après un exercice satigant.
• Prolonged immersion in a spa or hot tub may be injurious to your health.• Avertissement: l’utilisation prolongée d’une cuve de relaxation peut tre dangereuse pour la santé.
• Do not permit electric appliances (such as a light, telephone, radio, television, etc.) within 1.5m of this spa or hot tub.• Avertissement: ne pas placer d’appareil électrique (luminaire, téléphone, radio, téléviseur, etc.) À moins de 1.5 M de cette cuve de relaxation.
• Maintain water chemistry in accordance with manufacturer’s instructions.• Attention: la teneur de l’eau en matierès dissoutes doit tre conforme aux directives du fabricant.
• The use of alcohol or drugs can greatly increase the risk of fatal hyperthermia in hot tubs and spas.• Avertissement: la consomm ation d’alcool ou de drogue augmente considèrablement les risques d’hyperthermie mortelle dans une cuve de relaxation.
SAVE THESE INSTRUCTIONS
8
HYPERTHERMIA
Prolonged immersion in hot water may induce hyperthermia. Hyperthermia occurs when the internal temperature of the body reaches a level several degrees above the normal body temperature of 98.6°F, or 37°C. The symptoms of hyperthermia include dizziness, drowsiness, lethargy, and fainting. The effects of hyperthermia include:
• Failure to perceive heat,
• Failure to recognize the need to exit spa,
• Unawareness of impending hazard,
• Fetal damage in pregnant women,
• Physical inability to exit spa,
• Unconsciousness resulting in the danger of drowning.
SAFETY DO’S AND DONT’S
DO
• DO read all operating instructions.
• DO read, understand and follow all Safety, Danger and
Warning instructions before use.
• DO test water temperature with your hand before entering to
be sure that it is comfortable.
• DO keep the spa cover closed when the spa is not in use. This
is important for safety and for economical spa operation.
DON’T
• DON’T block the equipment compartment vents. Blockage
may cause damage to the spa equipment and will void the
warranty.
• DON’T block or sit on the filter recess area.
• DON’T allow horseplay or unsupervised use of your spa.
• DON’T allow anyone to tamper or play with any of the safety
or suction fittings of your spa.
9
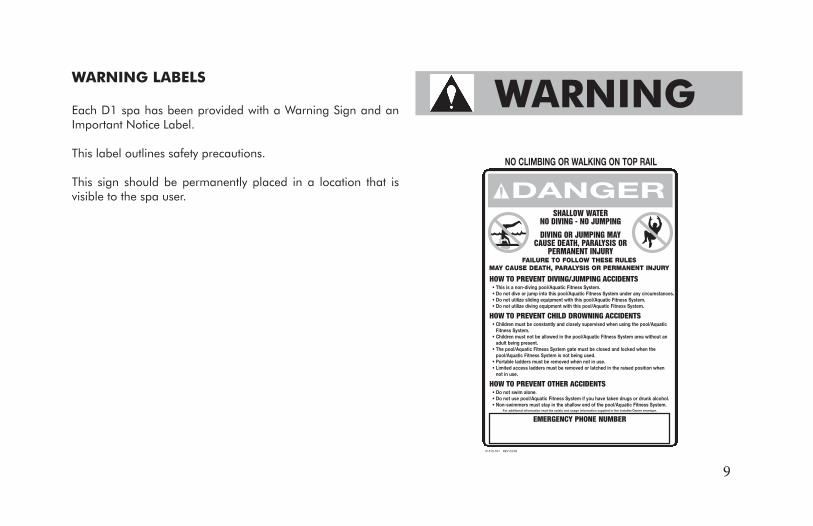
WARNING LABELS
Each D1 spa has been provided with a Warning Sign and an Important Notice Label.
This label outlines safety precautions.
This sign should be permanently placed in a location that is visible to the spa user. DANGER
NO CLIMBING OR WALKING ON TOP RAIL
SHALLOW WATERNO DIVING - NO JUMPING
DIVING OR JUMPING MAY CAUSE DEATH, PARALYSIS OR
PERMANENT INJURYFAILURE TO FOLLOW THESE RULES
MAY CAUSE DEATH, PARALYSIS OR PERMANENT INJURY
HOW TO PREVENT DIVING/JUMPING ACCIDENTS• This is a non-diving pool/Aquatic Fitness System.• Do not dive or jump into this pool/Aquatic Fitness System under any circumstances.• Do not utilize sliding equipment with this pool/Aquatic Fitness System.• Do not utilize diving equipment with this pool/Aquatic Fitness System.
HOW TO PREVENT CHILD DROWNING ACCIDENTS• Children must be constantly and closely supervised when using the pool/Aquatic
Fitness System.• Children must not be allowed in the pool/Aquatic Fitness System area without an
adult being present.• The pool/Aquatic Fitness System gate must be closed and locked when the
pool/Aquatic Fitness System is not being used.• Portable ladders must be removed when not in use.• Limited access ladders must be removed or latched in the raised position when
not in use.
HOW TO PREVENT OTHER ACCIDENTS• Do not swim alone.• Do not use pool/Aquatic Fitness System if you have taken drugs or drunk alcohol.• Non-swimmers must stay in the shallow end of the pool/Aquatic Fitness System.
EMERGENCY PHONE NUMBERFor additional information read the safety and usage information supplied in the Installer/Owner envelope.
01510-531 REV 03/02
WARNING
10
PRE-INSTALLATION TIP
Ask your dealer to check on the following items during installation. If your dealer/electrician is not setting up your tub, you can easily do these two tasks yourself by removing the front panel of equipment compartment using a Phillips screwdriver.
1.Check that the pump unions are hand tight to prevent possible leakage.
2.Remove the shipping bolts located on the front of the pump mount if they have not yet been removed.
INSTALLATION
Installation consists of placing your new hot tub in a suitable location, connecting it to an electrical outlet with the proper rating and filling it with water. Position your hot tub in an area with good drainage and provide a flat, solid surface that fully contacts the bottom of the hot tub.
If you choose to install your hot tub on a raised deck or indoors, we recommend you contact a licensed contractor to confirm the surface will hold the hot tub when filled with water and that the surrounding area is appropriate for installation. Movement of your deck or slab may result in damage which is not covered by warranty. Locate your hot tub so that the equipment is above grade and not subject to flooding. Water should always drain away from the unit. If you are placing your hot tub next to an obstacle, such as a fence or wall, be sure that you place the unit with the equipment compartment facing forward for easy equipment access.
ELECTRICAL CONNECTION
IMPORTANT: About your GFCI Circuit Breaker — The GFCI (Ground Fault Circuit Interrupter — also called a “circuit breaker”) is an electrical safety switch that automatically shuts off power to the spa in case of an electrical malfunction. There must be a GFCI installed according to your local building codes in an electrical power box near your spa.
The GFCI should be OFF before you fill your spa. Manually turn off power to the spa any time by using the GFCI. Just push the switch to the OFF position. After turning off the GFCI, make sure the control panel display window is blank, so you know the power is off. When you are ready to turn the power back on, reset the GFCI by returning the switch to the ON position. Do not use your spa unless you understand the operation of the GFCI.
FILL AND START
WARNING: Do not turn on electrical power to your hot tub until told to do so later in this manual.
First, locate the equipment compartment and use a Phillips head screwdriver to remove screws and open the compartment. With your installer, check the pump unions for hand-tightness and ensure the gate valves are open with red safety clips in place.
NOTE: Have the installer remove the shipping bolts on each pump mount prior to start up.

11
To start-up your new hot tub, follow these instructions:
1. Locate the filter baskets. Lift the center float of the skimmer assembly until it is fully extended. Rotate skimmer assembly counterclockwise and lift to remove. Rotate the lid of the other filter assembly counterclockwise and lift to remove.
2. Rotate the filter cartridge counterclockwise 90 degrees and lift toremove.
3. Unscrew the bleeder valve in the filter area to allow air to escapefrom the pump(s) while filling the spa.
NOTE: Remember to replace the bleeder valve after the pumps are operational.
4. Make sure the drains are closed before filling, by checking that thehose bib is screwed on to the drain. The drain allows you to connect a hose to your hot tub when you want to drain it. Make sure the valve handle is closed, by having the handle perpendicular to the pipe.
5. Place your hose in the empty filter canister on the right and fill the hot tub for 10 minutes. Then place the hose in the other filter canister and fill until the water is six inches from the top. Once full, replace the filter and top lid skimmer and turn on the GFCI circuit breaker.
6. The control panel will turn on and go through a few start-up screensbefore running features such as the fountain and jets for a minute each. If the jets do not start, there is air trapped in the plumbing lines. To eliminate this, press the jet button several times to turn the pumps on and off and force the air through the line.
7. It will take 2 minutes for the temperature to display on screen. Uponinitial start-up, the tub will begin heating to a default temperature of 100 degrees F. If you lose power to your hot tub, the next start up will heat the tub to its most recent temperature setting.
8. Review the Water Care Guide (provided separately) to ensure properwater chemistry.
9. Place the cover on the spa to conserve energy, ensure safety andprotect the spa so it is ready for use.
OPEN CLOSED
12
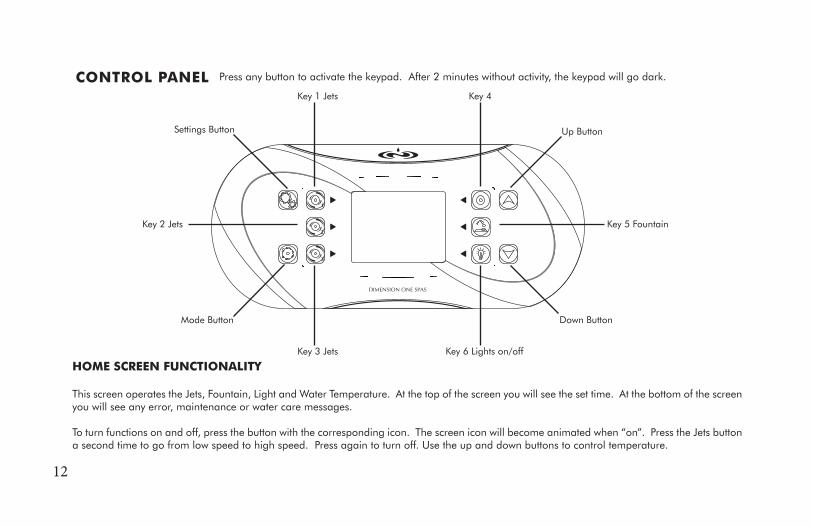
SETTINGS BUTTON
MODE BUTTON
Key 1 Jets
Settings Button
Key 2 Jets Key 5 Fountain
Mode Button
Up Button
Down Button
Key 3 Jets
Key 4
Key 6 Lights on/off
CONTROL PANEL Press any button to activate the keypad. After 2 minutes without activity, the keypad will go dark.
HOME SCREEN FUNCTIONALITY
This screen operates the Jets, Fountain, Light and Water Temperature. At the top of the screen you will see the set time. At the bottom of the screen you will see any error, maintenance or water care messages.
To turn functions on and off, press the button with the corresponding icon. The screen icon will become animated when “on”. Press the Jets button a second time to go from low speed to high speed. Press again to turn off. Use the up and down buttons to control temperature.
12
SETTINGS BUTTON
MODE BUTTON
Key 1 Jets
Settings Button
Key 2 JetsKey 5 Fountain
Mode Button
Up Button
Down Button
Key 3 Jets
Key 4
Key 6 Lights on/off
CONTROL PANELPress any button to activate the keypad. After 2 minutes without activity, the keypad will go dark.
HOME SCREEN FUNCTIONALITY
This screen operates the Jets, Fountain, Light and Water Temperature. At the top of the screen you will see the set time. At the bottom of the screen you will see any error, maintenance or water care messages.
To turn functions on and off, press the button with the corresponding icon. The screen icon will become animated when “on”. Press the Jets button a second time to go from low speed to high speed. Press again to turn off. Use the up and down buttons to control temperature.

13
SETTINGS BUTTON MENUTo access the Settings Menu, press the key in the upper left hand corner of the controller. Use the arrow keys to move
up or down in the list. To select an option, press the lit button beside it (key 2).
At any time, you can press the Settings button or Back icon (key 1) to return to the home screen.
WATER CAREThe water care section helps you set your ideal filtration settings. Upon delivery, your hot tub will default to D1’s factory recommended filtration settings within “Beginner Mode.” Use the arrow keys to move up or down in the list. To select an option, press the lit button beside it (key 2) and a check mark will appear next to the icon to confirm.
Water Care Options
•Beginner: This factory default filtration setting will run for 10 minutes 2x per day at 6:30am and 10:00pm.
•Away From Home: Use this setting during long periods away from your spa. Reduces temperature by 20 degrees F to save energy. Filters for 10 minutes 2x per day at 6:30am and 10:00pm.
•Energy Savings: This setting will reduce the temperature of your spa 20 degrees F during the average peak energy hours (M-F 6am – 6pm) Filters for 10 minutes 2x per day at 6:30am and 10:00pm.
•Super Energy Savings: Use this setting all week to reduce the temperature of your spa 20 degrees F during average peak energy hours (Every Day 6am – 6pm) Filters for 10 minutes 2x per day at 6:30am and 10:00pm.
•Weekender: This setting is for spas with high Friday night through Sunday usage. During the week, the spa’s temperature will be reduced by 20 degrees F. On Friday at noon, regular heating will commence and continue through Sunday night. Filters for 10 minutes 2x per day at 6:30am and 10:00pm.
Modifying Water Care Schedules
To modify a water care setting, select the lit button on the right hand side of the screen (key 5) to open the menu.
Modify the programmed schedule by selecting one and adjusting it using the arrow keys. Use key 2 to move between day, start time and duration. The schedule you select will be repeated each week. Once you have set the schedule, press the lit “back” button (key 1).
If desired, you may also add or delete custom water care settings. Add a schedule by scrolling down to “Add” and selecting with key 2. Delete a schedule by pressing the lit button next to the garbage icon (key 4).
For additional information on Water Care, see the “Care and Maintenance” section.

14
MAINTENANCE To access your desired menu selection, use the arrow keys to go up and down the list. To select, press the lit button beside it (key 2).
MAINTENANCE REMINDERSSelect this option to see how many days remain until you should perform specific spa maintenance. Use the arrow keys to go up and down through the list. To select, press the lit button beside it (key 2). Once you complete the task, press “confirm” and the time will reset until your next scheduled maintenance.
Maintenance Prompts:•Rinse Filter with Hose: every 30 days•Rinse Filter in Solution: every 60 days•Change Water: every 120 days•Have a Spa Check Up: every 720 days•Change Ozonator: every 540 days•Vision (if installed and selected): every 180 days
STANDBYFor extra precaution, use the Standby Mode to turn off all pumps during filter cleaning. You may also use this mode as a 30 minute soak setting. All pumps will remain off for 30 minutes unless you hit “confirm” to exit Standby mode.
DEALER INFOFor easy access to your dealer’s information, we recommend that an Authorized Dimension One dealer input their contact information on this screen during set up.
ERROR LOGThe error log notes each time your spa experiences an unexpected condition. Your dealer may ask for this information when troubleshooting spa concerns. To delete all errors press the lit “trash” button (key 4) to reset. NOTE: D1 recommends that you consult your dealer before deleting the error log.
VISIONThe optional Vision Cartridge uses Silver (Ag) to provide softer feeling water while using less chlorine and chemicals. If installed, use this screen to activate or deactivate the maintenance reminder. Press and hold the “confirm” button for 5 seconds to save the setting or press the “back” key to exit.
AUDIO SYSTEM (CONNECT BLUETOOTH)If you chose the optional Audio package, your hot tub is equipped with a Bluetooth enabled sound system. On this screen you can choose to pair/unpair and connect/disconnect your Bluetooth enabled device. Pairing a device means that the Gecko in.stream audio system will recognize the device when it comes in range of the spa. If you select “unpair” it will delete information about all Bluetooth devices that had been previously paired with the in.stream.
When you are done operating the audio, or if you need to accept a call, make sure to Disconnect the device.
For more information on audio functions, see the “Audio System (Operation)” section.

15
DATE AND TIMEUse this screen to set the correct time. Use the arrow keys to move up or down to the setting you want to adjust. To select an option, press the lit button beside it (key 2) and then use the arrow buttons to adjust that option and press key 2 again to confirm. Once you have set the correct time, press the lit “back” button (key 1).
KEYPAD SETTINGSHere you can modify the Temperature Units and/or Language displayed. Use the arrow keys to move up or down to the setting you want to modify. To select an option, press the lit button beside it (key 2) and then use the arrow buttons to make adjustments. Press key 2 again to confirm. You may view temperature units in Fahrenheit or Celsius. You may choose to display these languages: English, French, Spanish, German, Dutch, Swedish, Norwegian and Polish. ELECTRICAL CONFIGURATIONIMPORTANT: Do not make changes to this section unless you are a qualified spa technician or dealer.
There should be no need for an owner to make changes in this section. If changes are accidentally made, contact your Authorized Dimension One Dealer to reset the configuration.
FACTORY RESETIMPORTANT: A reset should only be done, if necessary, during install or when replacing a part.
There should be no need for an owner to personally reset the settings.
When Factory Reset is selected the system will ask you to confirm the choice by pressing “yes.” After a reset, you must also choose your audio source: in.stream or no audio.
ABOUTThis section displays your software configuration and revisions of equipment components. Your service tech or dealer may ask for this information if you are having technical problems.
16
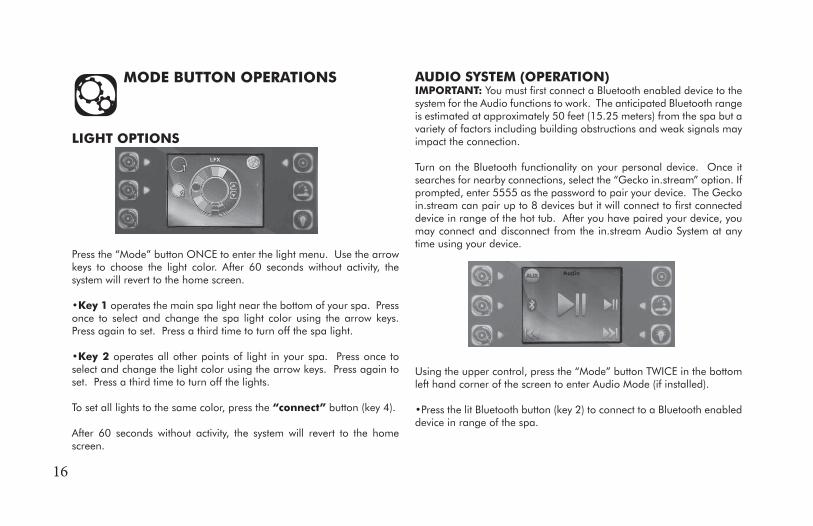
MODE BUTTON OPERATIONS
LIGHT OPTIONS
Press the “Mode” button ONCE to enter the light menu. Use the arrow keys to choose the light color. After 60 seconds without activity, the system will revert to the home screen.
•Key 1 operates the main spa light near the bottom of your spa. Pressonce to select and change the spa light color using the arrow keys. Press again to set. Press a third time to turn off the spa light.
•Key 2 operates all other points of light in your spa. Press once toselect and change the light color using the arrow keys. Press again to set. Press a third time to turn off the lights.
To set all lights to the same color, press the “connect” button (key 4).
After 60 seconds without activity, the system will revert to the home screen.
AUDIO SYSTEM (OPERATION)IMPORTANT: You must first connect a Bluetooth enabled device to the system for the Audio functions to work. The anticipated Bluetooth range is estimated at approximately 50 feet (15.25 meters) from the spa but a variety of factors including building obstructions and weak signals may impact the connection.
Turn on the Bluetooth functionality on your personal device. Once it searches for nearby connections, select the “Gecko in.stream” option. If prompted, enter 5555 as the password to pair your device. The Gecko in.stream can pair up to 8 devices but it will connect to first connected device in range of the hot tub. After you have paired your device, you may connect and disconnect from the in.stream Audio System at any time using your device.
Using the upper control, press the “Mode” button TWICE in the bottom left hand corner of the screen to enter Audio Mode (if installed).
•Press the lit Bluetooth button (key 2) to connect to a Bluetooth enableddevice in range of the spa.
17
•Press the lit Play/Pause button (key 5) to start or pause the audio
•Press the lit Last Track (key 3) or Next Track (key 6) buttons to change tracks
•Press the arrow keys to increase or decrease volume
NOTE: Although an AUX icon is visible on screen, your hot tub audio system does not have an Auxilary connection.
You may also use your personal device to adjust audio functions, but it is recommended that you keep your device a safe distance away from the spa in case of water damage. After 60 seconds without activity, the system will revert to the home screen.
ADDITIONAL SPA FEATURES
JET THERAPY PILLOWD1’s patented Jet Therapy Pillow has five adjustable height positions. Gently pull the bottom of the pillow forward and slide it up or down the guide rails. Adjust the water flow from the jets by rotating each nozzle.
AUXILIARY JET BUTTON (On select models)For added convenience, certain models feature an Auxiliary Jet Switch. Pressing this button will turn on and off the jets in the seat closest to the button, allowing the user to command their experience without accessing the main control.
JET ZONE SELECTOR (Large knob)Rotate the jet zone selector knob(s) to move the flow of water from one group of jets to another.
WATER FEATURE FLOW CONTROL (Small knob)Rotate this control knob to adjust the pressure of water flow coming from the Liquid-FX fountain.
NOTE: The valve will not shut the fountain off completely. To turn off the fountain, simply press the fountain button on the control panel.
LIQUID-FX FOUNTAINThe Liquid-FX fountain can be customized with additional, interchangeable fountainheads available from your spa dealer. To remove a fountainhead, twist the retainer cap, remove the acrylic fountainhead and replace with another, ensuring the rubber “O” ring is in place.

18
SKIRT LIGHTING (OPTIONAL FEATURE)The optional, factory installed skirt lighting package provides attractive downlighting around the exterior of your spa. The skirt lights are set to turn on and off automatically depending on the time of day. You may manually override this setting by hitting a switch located under the bottom left corner of the spa to turn the lights on and off.
DYNAMIC MASSAGE SEQUENCER (ON SELECT MODELS)D1’s Dynamic Massage Sequencer has multiple programs that sequentially massage different muscle groups.
Basic Operation•Push the Jets button to turn the jet pump on and off.
•Push the Sequence button to select between 6 different massage patterns (see detail in Sequence Pattern section)
•The sequence number will blink until you press the Start/Stop button to begin the massage. Once started, that sequence number light will remain on.
NOTE: Pressing Start/Stop again will NOT stop the massage but will Pause the sequence. Press again to continue the massage sequence.
•Press the Speed button to control how quickly the spa moves through the massage sequence. Default speed is 5 seconds per jet pattern (speed light will flash quickly). Press for 15 second intervals (light will flash slowly) and again for 30 second intervals (light will flash very slowly).
Massage ZonesThe lights in the Massage Zone Indicator (Human Figure) show which zone is running. If no Sequence is selected, all lights and jets will be on. If a sequence has not been started, the sequence pattern will flash on the indicator until you press “Start”
A. Neck/Shoulder massageB. Shoulder Blade massageC. Mid back massageD. Low back/Wrist massageE. Thigh massageF. Calf/Foot massage
Sequence Patterns1. Steps through each individual zone one at a time, then reverses the sequence.
2. Activates all zones at once; then deactivates individual zones one at a time.
3. Activates zones A, C, and E all at once; then switches to zones B, D, and F.
4. Steps through each individual zone one at a time, from zone A through F, then starts over in groups of two zones – activating zones A and B, then zones B and C, etc.
5. Starts with zone A, and adds a zone, one at a time, until all zones are on. Then reverses the sequence, and removes zones one at a time until all zones are off.

19
6. Activates random pairs of zones at one time, starting with adjacent zones, (A and B, then B and C, etc.), then opposite zones (A and F, then B and F, etc.), and finally the middle zones (B and E, then C and D, etc.).
CARE AND MAINTENANCE
WATER CHEMISTRY CARE To keep your water clean and clear, follow these water care guidelines:Once a week, check water chemistry with a test strip. Add chlorinating granules, pH up, pH down and other chemicals as required.
Step 1 – Check Alkalinity. It should be between 80 and 120 ppm. Adjust as required with Alkalinity Up pH/Alkalinity Down.
Step 2 – Check pH. It should be between 7.2 and 7.8. Adjust as required with pH Up or with pH/Alkalinity Down.
Step 3 – Check Chlorine Level. 3-5 ppm recommended. Adjust with DiChlor.
TIP: After each use add ½ ounce of DiChlor per user. This will make weekly maintenance easier.
SURFACE CARE
IMPORTANT: Do not use alcohol, ammonia, bleach or any citrus-based cleaners on any of your spa surfaces.
IMPORTANT: Protect the spa surface from the sun and the cold: Keep the hot tub covered when empty of water. Sunlight and extreme cold can damage the surface and cause it to peel or blister.
Spa Interior: Use spa cleaner and a soft rag to clean the inside of your hot tub.
Control Panel: Use baking soda and water to clean the control panel.
Cabinets: For Terracina and/or Envirotect Cabinets: Clean with soap and water to maintain finish.
Vinyl Covers: To maintain a “nearly original” appearance on your vinyl cover, it is recommended that a protectant with a high SPF (sun protection factor) is applied at least once a month if exposed to direct sunlight. You will also want to clean and condition your cover monthly (or as needed based on exposure.) For more information, consult your dealer.
FILTER CLEANING
IMPORTANT: To prevent debris from getting into the system during filter cleaning, D1 recommends that you shut off the power at the GFCI or enter “Standby Mode” – outlined in the Settings section of this manual.
20
FILTER CLEANING (Continued)
We recommend that you clean the filters once a month as preventative maintenance.
Your system has two filters. To access the filter under the skimmer basket, lift the center float off the skimmer assembly until fully extended. Turn counterclockwise until the flats of the basket line up with the securing tabs. Pull the assembly straight up to remove. To access the other filter, turn lid counterclockwise until the flats line up with the securing tabs and pull. Remove each filter by twisting it ¼ turn counterclockwise and lifting out of its canister.
Rinse the filters with a high-pressure garden hose. Every other cleaning, soak the filters in filter-cleaning solution and rinse thoroughly. Reinstall the filters by reversing the steps for removal, replace the skimmer basket or lid and turn the power back on at the GFCI. Run the pumps for a few minutes at high speed before leaving the system to its normal heating and filtration cycles.
ULTRA PUREThe UltraPure Water Management System silently purifies your water, eliminating bacteria by mixing ozone with water. In order to keep the UltraPure System running at its best, it is recommended that you change the UV bulb every 18 months. The UltraPure UV compartment is located within the equipment bay. Contact your authorized Dimension One dealer for replacement parts and/or to service your UltraPure System.
DRAININGDisconnect the power to your hot tub before draining it. Find the hose bib – see Fill and Start section for more information on hose bib location – and attach one end of your garden hose. Place the other end in an area safe for water runoff. Turn the hose bib switch to the open position to release the water. Once the hot tub is drained, turn the switch back to the closed position. IMPORTANT: Keep the hot tub covered when empty of water. Sunlight and extreme cold can damage the surface and cause it to peel or blister.
COLD WEATHERAll D1 spas are designed for year-round use. Your hot tub has an automatic freeze protection mode to circulate water during freezing weather, assuming the system has electrical power and the proper water level. However, if freezing weather prohibits normal use, an authorized service provider should winterize your hot tub. Draining the unit will not prevent freeze damage, as small amounts of water in the plumbing can expand and damage the system. Winterizing the unit is specifically not covered by the manufacturers’ warranty, so you should contact a professional to both winterize and restart your hot tub if necessary.
21
TROUBLESHOOTING
For help troubleshooting common occurrences, contact your local dealer. If you need further assistance, you can email our service department at:
USA: [email protected]
International: [email protected]
ERROR MESSAGESTo keep users safe, the following messages may appear on your control when there are technical difficulties.
If screen reads: DANGER! DO NOT ENTER SPAAdditional lines may read: • Hardware error detected (relay stuck)• Hardware error detected (thermal fuse)Do not enter the water and contact your Authorized D1 dealer immediately for service.
If screen reads: WARNING! DO NOT ENTER SPAAdditional lines may read:• High-limit circuit has tripped• Spa temperature is too highSpa water may be very hot. Do not touch or enter the water and contact your Authorized D1 dealer immediately for service.
If screen reads: ERRORAdditional lines may read:• No Flow condition for more than 2 hours• Elevated internal temperature• No Flow condition • Unexpected flow condition• Hardware error detected (thermistor)• SwimSpa config.: slave unit is missingIt is recommended that you do not enter the water. Contact your Authorized D1 dealer for service.

22

23

www.d1spas.com
©2014 Dimension One Spas. All rights reserved. All trademarks and/or registered trademarks arethe property of their respective owners.
PN:01533-0038-YU