EC2 Plone Presentation - Plone Conference Washington DC, October 8,2008
Upload
nguyenminhCategory
view
216download
0
Using Plone
The College of the Liberal Arts: Guide to Editing Website Content
REFERENCE GUIDE
Unfinished Edit -
Updated material
coming soon.
1 Logging In
CONTENTS
Logging In ........................................................................................................................................ 2
How to Log In .............................................................................................................................. 2
Resetting your password ............................................................................................................ 3
Managing your Content .................................................................................................................. 4
Content Types ............................................................................................................................. 5
Editing Page Properties ............................................................................................................... 6
Changing the Title/ Main Heading .......................................................................................... 6
Changing the Web Address/short name................................................................................. 7
Changing the Summary / Description ..................................................................................... 8
Editing the Page Text & Content ................................................................................................. 9
Uploading and Inserting Images ............................................................................................. 9
Linking to Files and Documents ............................................................................................ 13
Linking to Another Item in PLone ......................................................................................... 15
Linking to External URL ......................................................................................................... 17
Linking to an Email Address .................................................................................................. 18
Linking to within a page (Anchor Links) ................................................................................ 19
Modifying the Basic Properties of a Page ................................................................................. 21
Adding New Content ..................................................................................................................... 22
Adding Content: An Overview .................................................................................................. 22
Adding Folders .......................................................................................................................... 23
Adding Images ........................................................................................................................... 23

2 Logging In
LOGGING IN
HOW TO LOG IN
When you visit a Plone site, there is a log in button in the bottom corner.
After clicking the "Log in" link, either a pop-up will appear or you will be taken to a log in screen
where you can enter your Login Name and Password.
While your Login Name is typically your PSU ID, your password may not be the same as your
Webaccess credentials.
When you have successfully logged in, the login button will display your name. It will also act as
a menu.

3 Logging In
RESETTING YOUR PASSWORD
If you have forgotten your password, you can reset them yourself. Click on the "Log in" button.
At the bottom of the box, Under "Forgot your password?" click on "we can send you a new one"
On the Lost Password page, put in your username and click on "Start password reset". You
should receive an email with a link to reset your password.
If you do not remember your username, or you do not receive an e-mail within 24 hours,
contact the Web Team for further assistance.
4 Managing your Content
MANAGING YOUR CONTENT
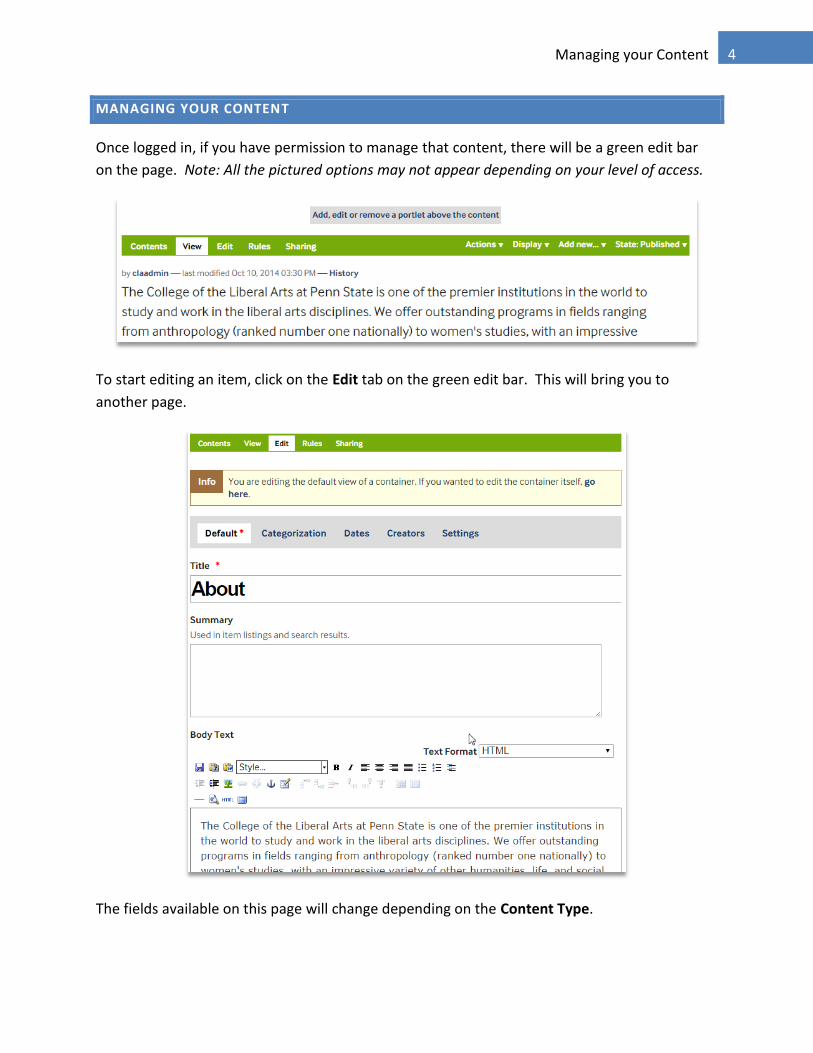
Once logged in, if you have permission to manage that content, there will be a green edit bar
on the page. Note: All the pictured options may not appear depending on your level of access.
To start editing an item, click on the Edit tab on the green edit bar. This will bring you to
another page.
The fields available on this page will change depending on the Content Type.

5 Managing your Content
CONTENT TYPES
In Plone, you can use a number of Content Types to post certain kinds of content. For example,
to upload an image you must use the Image content type. Below is a list of some commonly
available content types:
Type Description
Event
Rather than using the Event type, events should be added directly to the College of the Liberal Arts Calendar at http://psucla.enterprise.localist.com/
File
Any file you wish to upload with the intent that it can be downloaded by your site visitors. Common examples are PDFs, Word Documents, and spreadsheets.
Folder
Folders work in Plone much like they do on your computer. You can use folders to organize your content. Your site navigation will mirror your folder organization.
Image
Used for uploading image files (JPG, GIF, PNG)
Link
Can be used to add external URLS to the site Navigation along with other specialized uses.
News Item
Specifically for posting news or announcements. You can also attach an image directly to a News Item.
Page
Use Pages to write the bulk of your web pages on your Plone website.
For information on more Plone content types visit Plone.org's s Documentation on Content
Types
6 Managing your Content
EDITING PAGE PROPERTIES
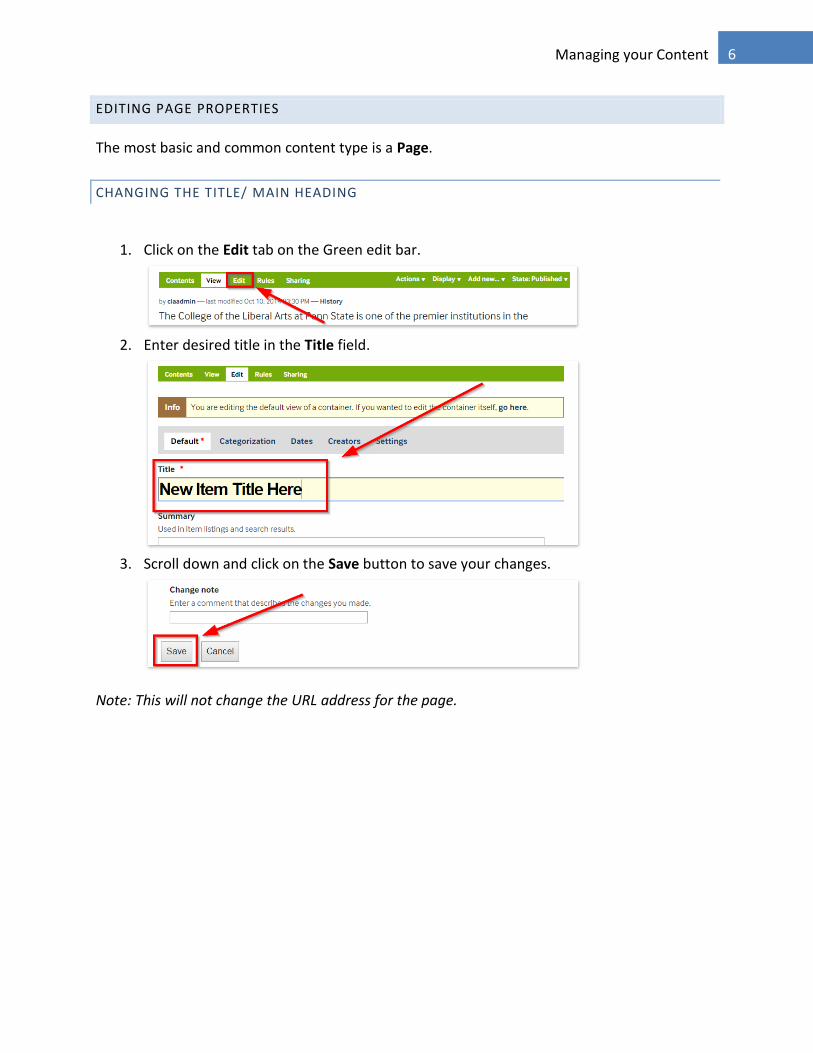
The most basic and common content type is a Page.
CHANGING THE TITLE/ MAIN HEADING
1. Click on the Edit tab on the Green edit bar.
2. Enter desired title in the Title field.
3. Scroll down and click on the Save button to save your changes.
Note: This will not change the URL address for the page.
7 Managing your Content
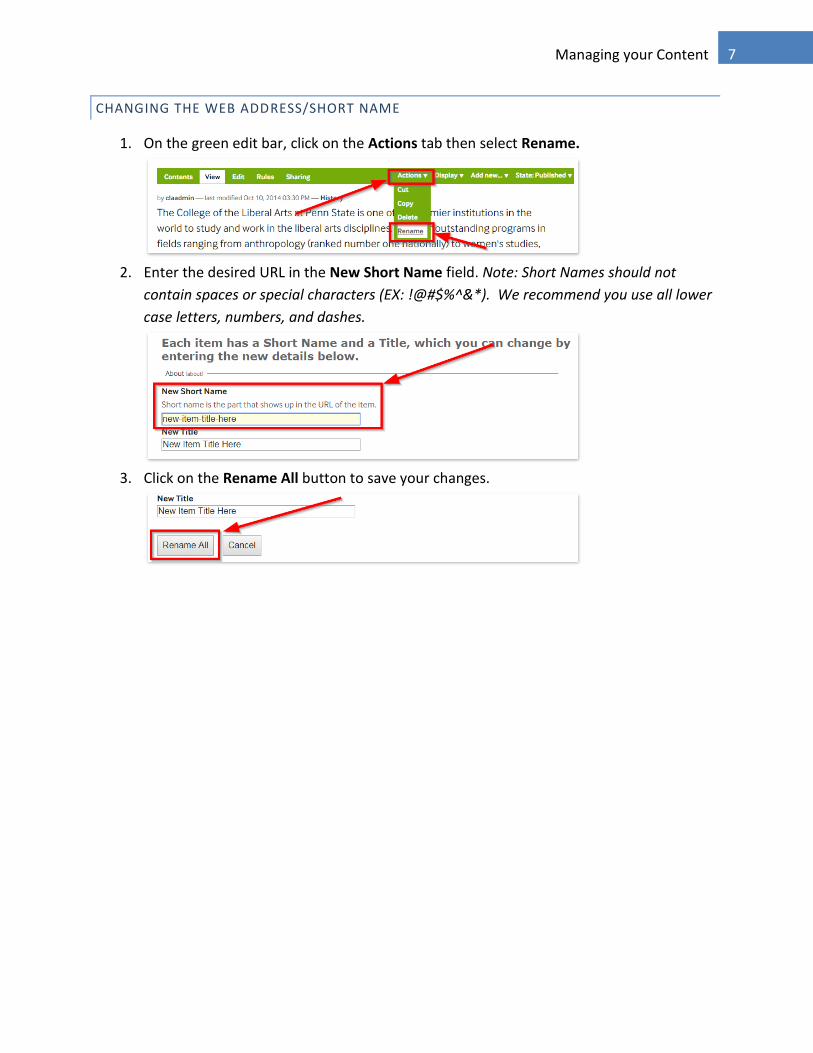
CHANGING THE WEB ADDRESS/SHORT NAME
1. On the green edit bar, click on the Actions tab then select Rename.
2. Enter the desired URL in the New Short Name field. Note: Short Names should not
contain spaces or special characters (EX: !@#$%^&*). We recommend you use all lower
case letters, numbers, and dashes.
3. Click on the Rename All button to save your changes.

8 Managing your Content
CHANGING THE SUMMARY / DESCRIPTION
When a site visitor uses the search tool, the summary/description will appear under the title of
the page in the search results. Summary/Descriptions also appear in the Summary View of
folders.
1. Click on the Edit tab on the Green edit bar.
2. Enter desired description in the Summary box.
3. Scroll down and click on the Save button to save your changes.
9 Managing your Content
EDITING THE PAGE TEXT & CONTENT
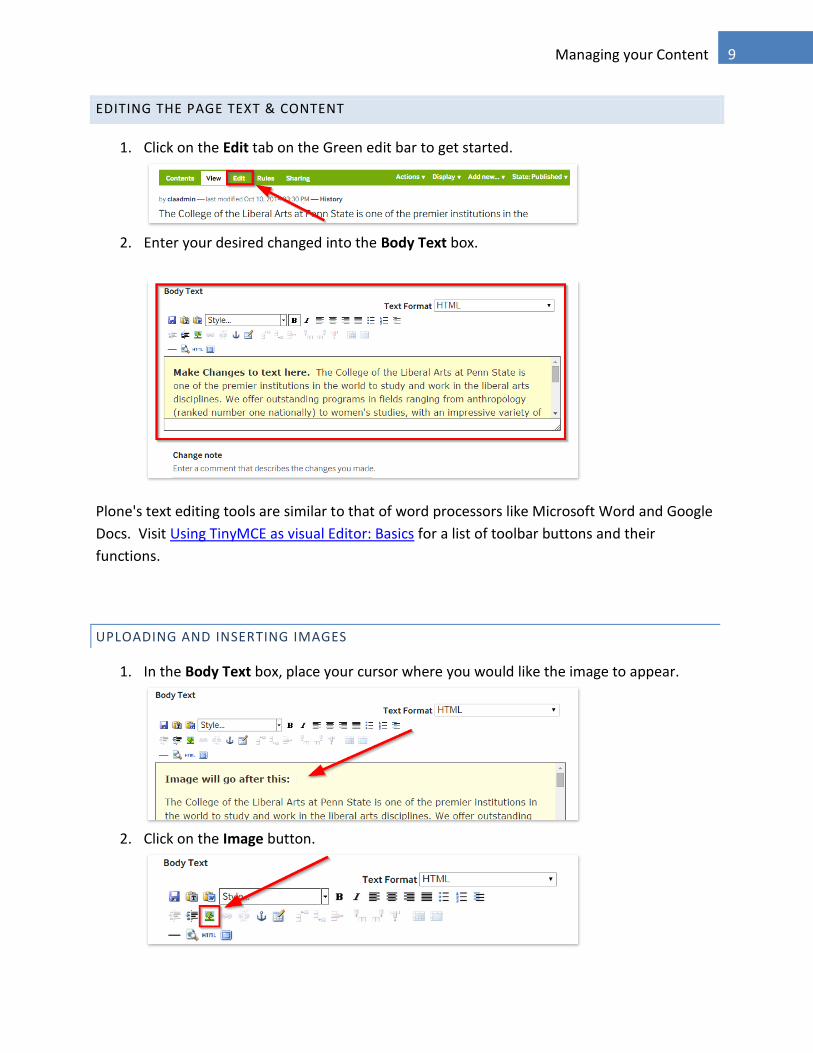
1. Click on the Edit tab on the Green edit bar to get started.
2. Enter your desired changed into the Body Text box.
Plone's text editing tools are similar to that of word processors like Microsoft Word and Google
Docs. Visit Using TinyMCE as visual Editor: Basics for a list of toolbar buttons and their
functions.
UPLOADING AND INSERTING IMAGES
1. In the Body Text box, place your cursor where you would like the image to appear.
2. Click on the Image button.
10 Managing your Content
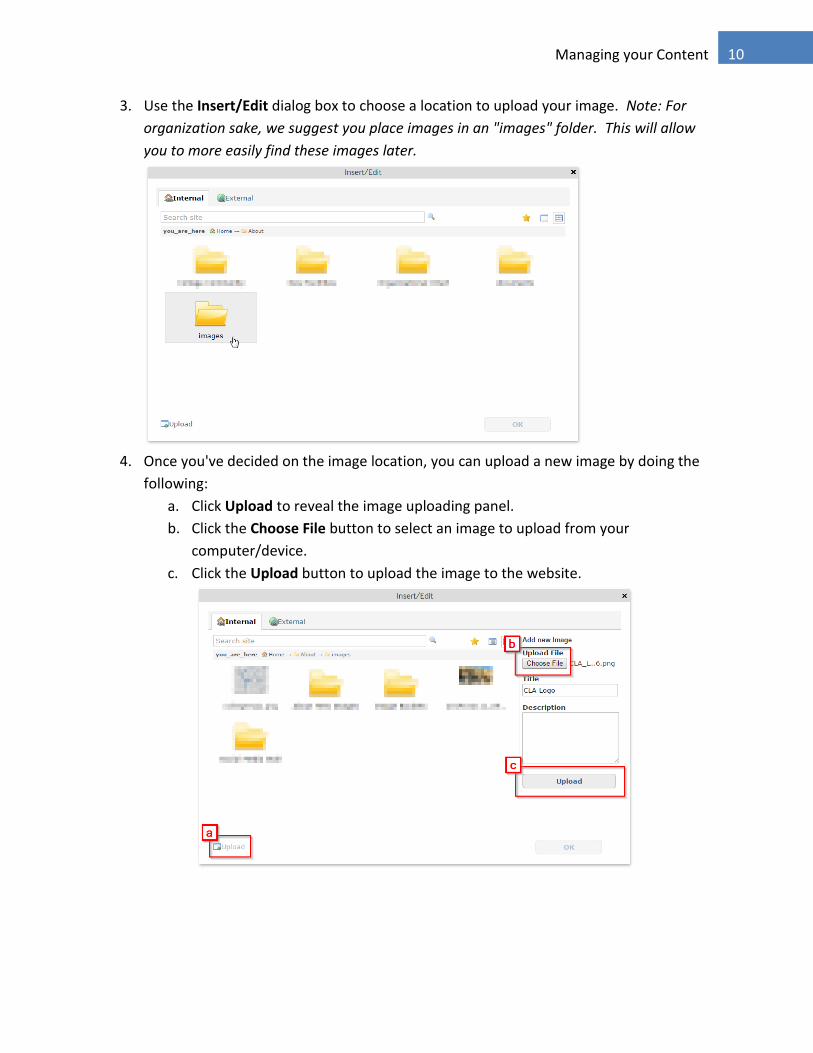
3. Use the Insert/Edit dialog box to choose a location to upload your image. Note: For
organization sake, we suggest you place images in an "images" folder. This will allow
you to more easily find these images later.
4. Once you've decided on the image location, you can upload a new image by doing the
following:
a. Click Upload to reveal the image uploading panel.
b. Click the Choose File button to select an image to upload from your
computer/device.
c. Click the Upload button to upload the image to the website.
11 Managing your Content
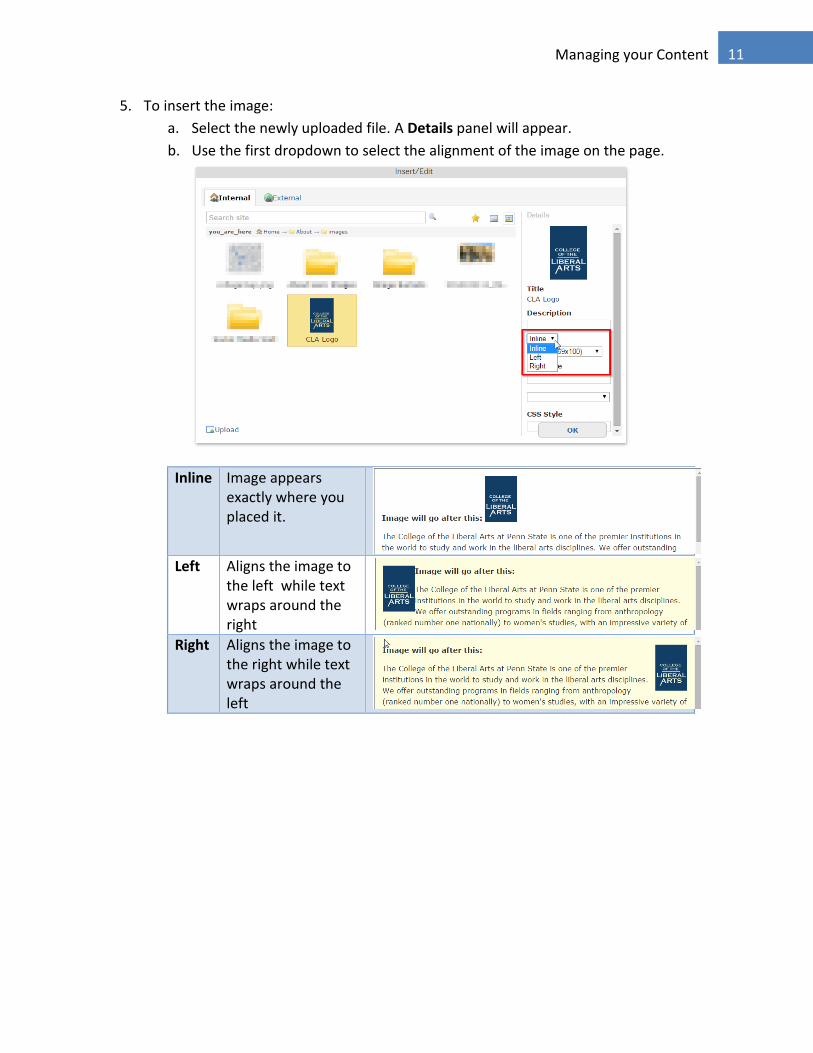
5. To insert the image:
a. Select the newly uploaded file. A Details panel will appear.
b. Use the first dropdown to select the alignment of the image on the page.
Inline Image appears exactly where you placed it.
Left Aligns the image to
the left while text wraps around the right
Right Aligns the image to the right while text wraps around the left
12 Managing your Content
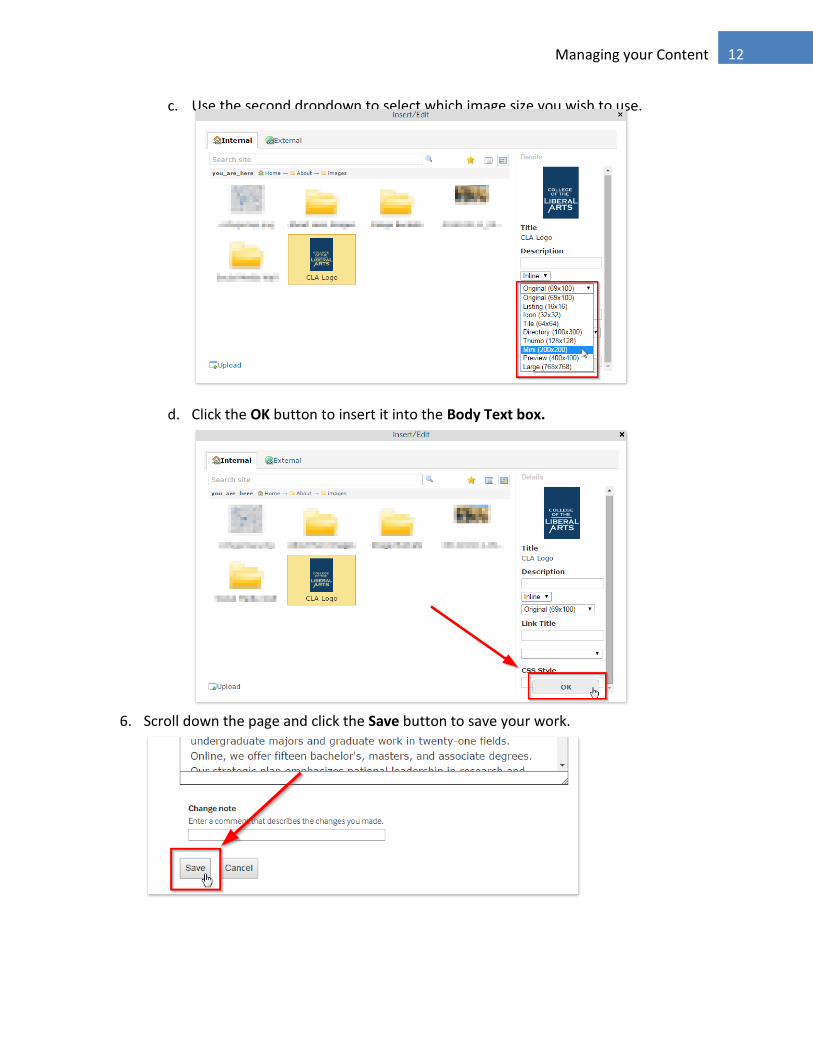
c. Use the second dropdown to select which image size you wish to use.
d. Click the OK button to insert it into the Body Text box.
6. Scroll down the page and click the Save button to save your work.

13 Managing your Content
LINKING TO FILES AND DOCUMENTS
1. In the Body Text field, (a) select the text you would like to be linked. Then, (b) click on
the Insert/Edit Link button.
2. Use the Insert/Edit dialog box to choose a location to upload your document. Note: For
organization sake, we suggest you place documents in a "documents" folder. This will
allow you to more easily find these images later.
14 Managing your Content
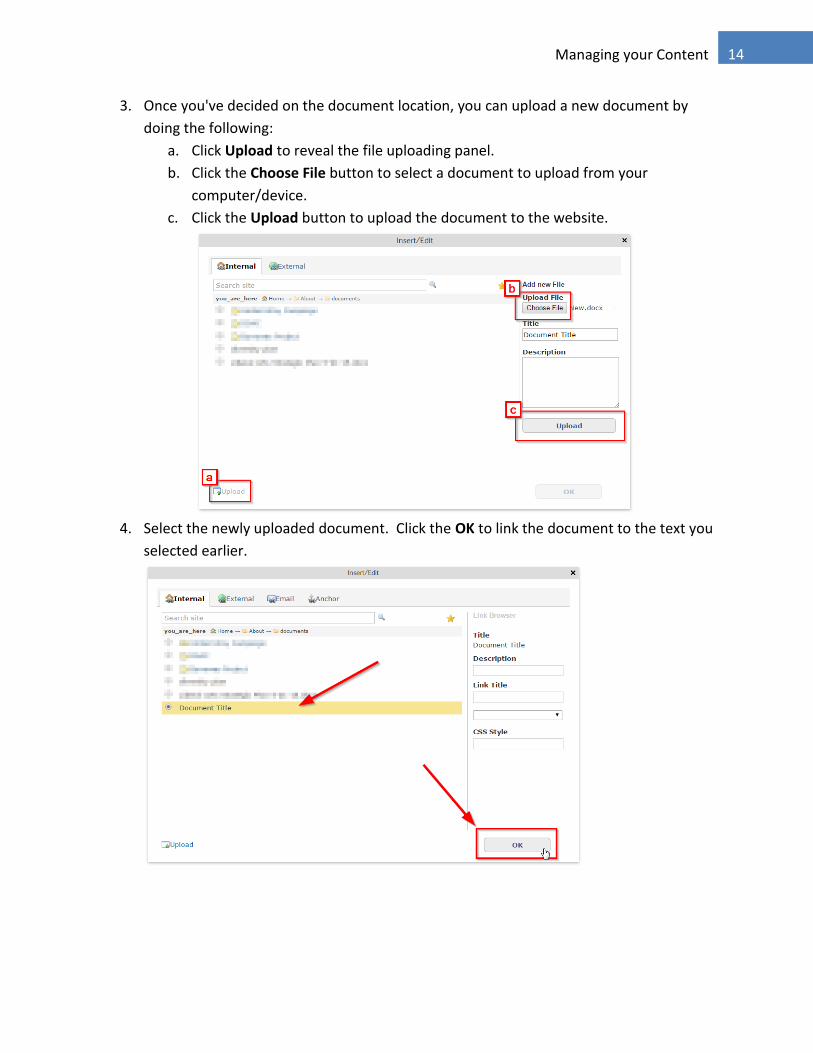
3. Once you've decided on the document location, you can upload a new document by
doing the following:
a. Click Upload to reveal the file uploading panel.
b. Click the Choose File button to select a document to upload from your
computer/device.
c. Click the Upload button to upload the document to the website.
4. Select the newly uploaded document. Click the OK to link the document to the text you
selected earlier.
15 Managing your Content
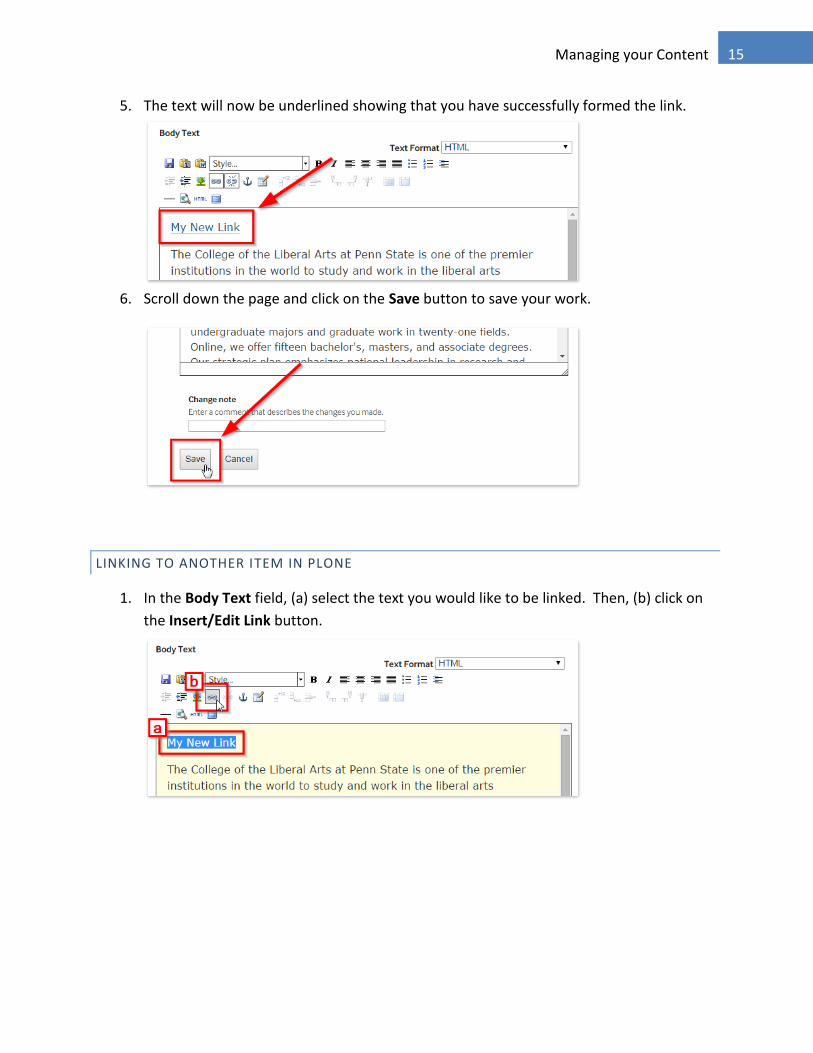
5. The text will now be underlined showing that you have successfully formed the link.
6. Scroll down the page and click on the Save button to save your work.
LINKING TO ANOTHER ITEM IN PLONE
1. In the Body Text field, (a) select the text you would like to be linked. Then, (b) click on
the Insert/Edit Link button.

16 Managing your Content
2. Use the Insert/Edit dialog box to browse the Plone site and select the item you wish to
link. Then, click the OK to link the document to the text you selected earlier.
3. The text will now be underlined showing that you have successfully formed the link.
4. Scroll down the page and click on the Save button to save your work.
17 Managing your Content
LINKING TO EXTERNAL URL
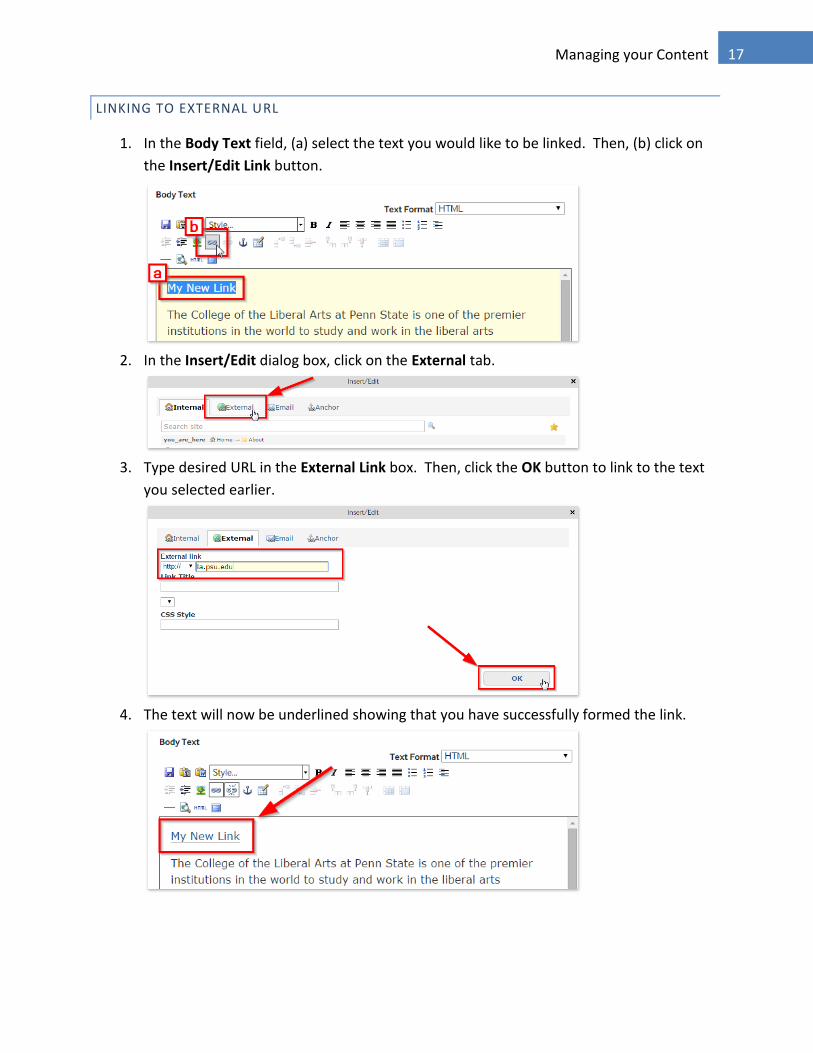
1. In the Body Text field, (a) select the text you would like to be linked. Then, (b) click on
the Insert/Edit Link button.
2. In the Insert/Edit dialog box, click on the External tab.
3. Type desired URL in the External Link box. Then, click the OK button to link to the text
you selected earlier.
4. The text will now be underlined showing that you have successfully formed the link.

18 Managing your Content
5. Scroll down the page and click on the Save button to save your work.
LINKING TO AN EMAIL ADDRESS
1. In the Body Text field, (a) select the text you would like to be linked. Then, (b) click on
the Insert/Edit Link button.
2. In the Insert/Edit dialog box, click on the Email tab.
3. Type desired address in the E-mail box. Then, click the OK to link the document to the
text you selected earlier.
19 Managing your Content
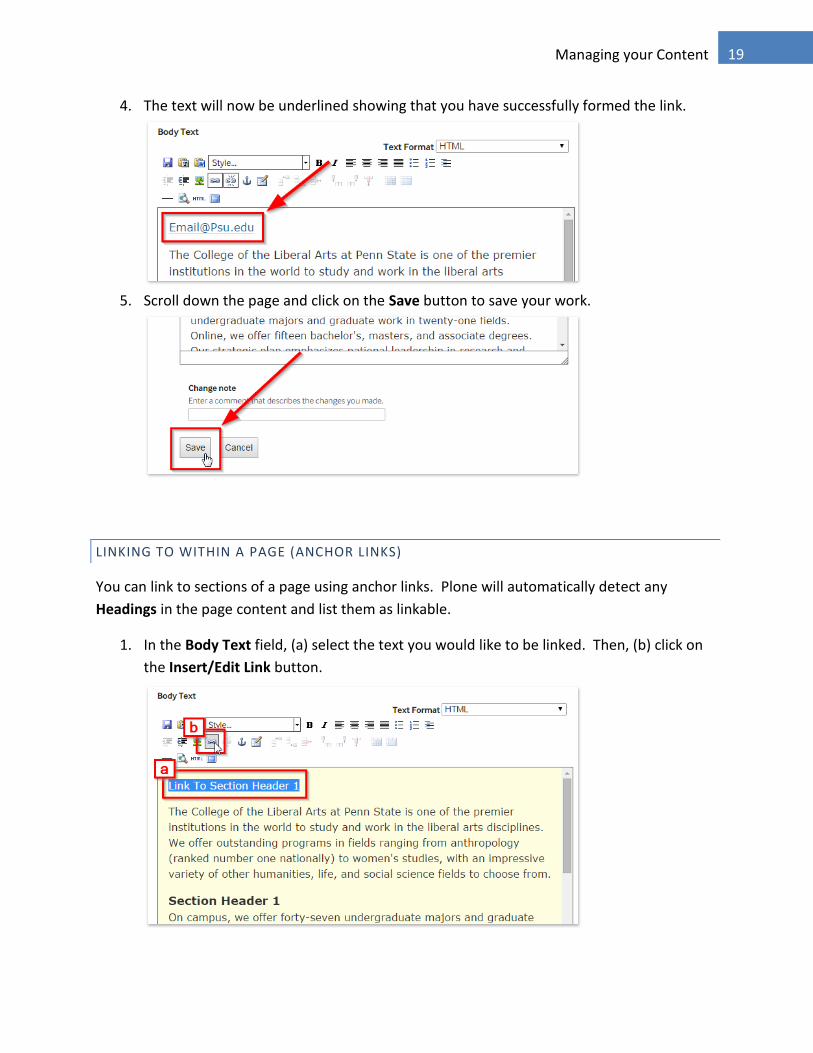
4. The text will now be underlined showing that you have successfully formed the link.
5. Scroll down the page and click on the Save button to save your work.
LINKING TO WITHIN A PAGE (ANCHOR LINKS)
You can link to sections of a page using anchor links. Plone will automatically detect any
Headings in the page content and list them as linkable.
1. In the Body Text field, (a) select the text you would like to be linked. Then, (b) click on
the Insert/Edit Link button.

20 Managing your Content
2. In the Insert/Edit dialog box, click on the Anchor tab.
3. Under the Link to Anchor section, select the heading you would like to link to. Then,
click the OK to link the heading to the text you selected earlier.
4. The text will now be underlined showing that you have successfully formed the link.
There will also be a small Anchor item next to the Heading.
5. Scroll down the page and click on the Save button to save your work.
21 Managing your Content
MODIFYING THE BASIC PROPERTIES OF A PAGE
The gray tabs near the top of the page allow you to change the Basic Properties of that item.
These Basic Properties are grouped into several tabs:
Default, for entering the Title, Description, and other main data fields
Categorization, for specifying categories that apply to the folder (you may know these as keywords),
Dates, for setting the time period when the folder should be available for view on the web site,
Ownership, for specifying the creator and/or contributors for the content item,
Settings, for allowing comments about the item, enabling Next/Previous Navigation, and choosing whether it shows in the navigation menu for the web site.
These tabs are standard among most plone content types.
22 Adding New Content
ADDING NEW CONTENT
ADDING CONTENT: AN OVERVIEW
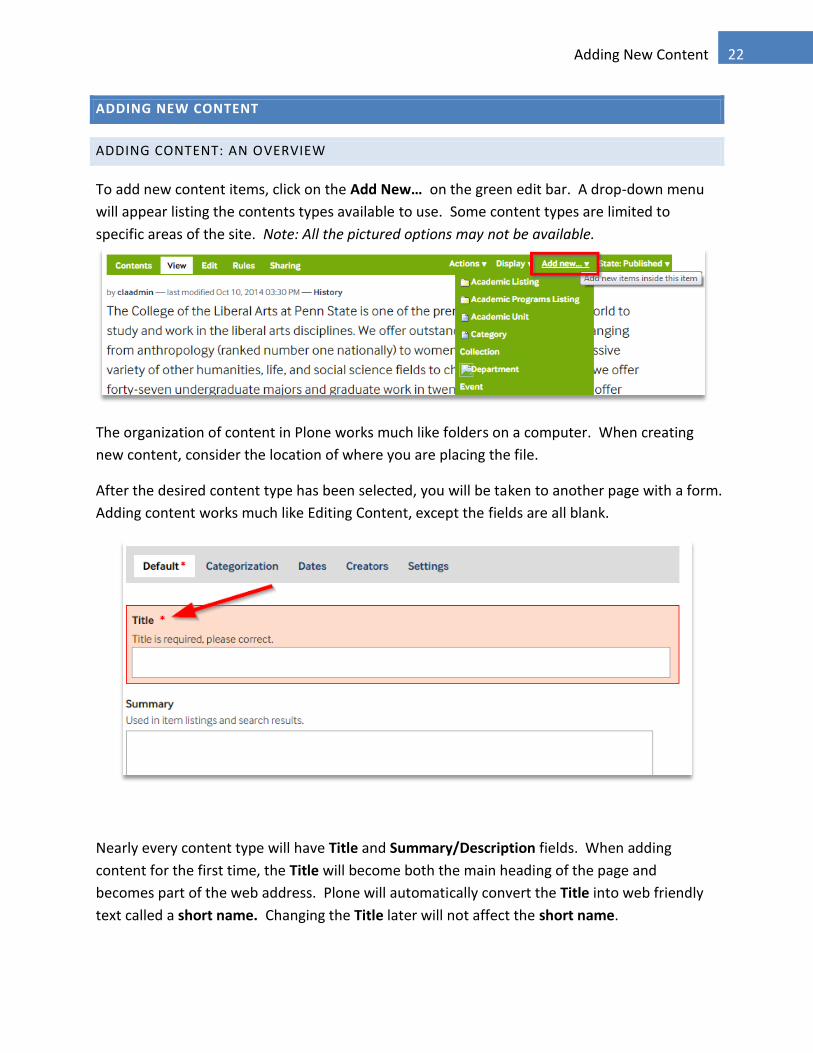
To add new content items, click on the Add New… on the green edit bar. A drop-down menu
will appear listing the contents types available to use. Some content types are limited to
specific areas of the site. Note: All the pictured options may not be available.
The organization of content in Plone works much like folders on a computer. When creating
new content, consider the location of where you are placing the file.
After the desired content type has been selected, you will be taken to another page with a form.
Adding content works much like Editing Content, except the fields are all blank.
Nearly every content type will have Title and Summary/Description fields. When adding
content for the first time, the Title will become both the main heading of the page and
becomes part of the web address. Plone will automatically convert the Title into web friendly
text called a short name. Changing the Title later will not affect the short name.

23 Adding New Content
ADDING FOLDERS
Folders dictate the organization and structure of your web site. A Plone Folder acts to organize
content similarly to those on your computer. To add a new Folder:
1. Select Add New… on the green edit bar and select Folder.
2. Entered desired Title (required) and Description (optional).
3. Click the Save button to confirm the details and create the Folder.
ADDING IMAGES
To add a new Image:
1. Select Add New… on the green edit bar and select Image.
2. Entered desired Title (required) and Description (optional).
3. Click the Save button to confirm the details and create the Folder.
4. This will lead you to another page prompting you for a Title (optional), Description
(optional), and an Image(required). Click on the Browse button to select an image from
your computer or device.
Click the Save button when you have finished. It may take a minute for the image to complete
uploading. If you did not input a Title, the Title and shortname are automatically generated
based on the image name.