Red Hat Desktop Deployment Guide - CentOSvault.centos.org/4.5/docs/pdf/rhd-dg-en.pdf · with Red...
48
Red Hat Desktop Deployment Guide
Transcript of Red Hat Desktop Deployment Guide - CentOSvault.centos.org/4.5/docs/pdf/rhd-dg-en.pdf · with Red...

Red Hat Desktop
Deployment Guide

Red Hat Desktop: Deployment GuideCopyright © 2005 Red Hat, Inc.
Red Hat, Inc.
1801 Varsity DriveRaleigh NC 27606-2072 USAPhone: +1 919 754 3700Phone: 888 733 4281Fax: +1 919 754 3701PO Box 13588Research Triangle Park NC 27709 USA
rhd-dg(EN)-4-Print-RHI (2005-03-09T16:26)Copyright © 2005 by Red Hat, Inc. This material may be distributed only subject to the terms and conditions set forth in theOpen Publication License, V1.0 or later (the latest version is presently available at http://www.opencontent.org/openpub/).Distribution of substantively modified versions of this document is prohibited without the explicit permission of the copyrightholder.Distribution of the work or derivative of the work in any standard (paper) book form for commercial purposes is prohibitedunless prior permission is obtained from the copyright holder.Red Hat and the Red Hat "Shadow Man" logo are registered trademarks of Red Hat, Inc. in the United States and othercountries.All other trademarks referenced herein are the property of their respective owners.The GPG fingerprint of the [email protected] key is:CA 20 86 86 2B D6 9D FC 65 F6 EC C4 21 91 80 CD DB 42 A6 0E

Table of ContentsIntroduction.......................................................................................................................................... i
1. Document Conventions .......................................................................................................... i2. Activate Your Subscription .................................................................................................. iii
2.1. Provide a Red Hat Login....................................................................................... iv2.2. Provide Your Subscription Number ...................................................................... iv2.3. Connect Your System............................................................................................ iv
3. We Need Feedback! .............................................................................................................. v1. Configuration Overview: The GConf System .............................................................................. 1
1.1. Background: Configuration Sources .................................................................................. 11.2. Setting System-Wide Default and Mandatory Preferences ................................................ 3
1.2.1. Using GConf Editor ............................................................................................ 31.2.2. Using the gconftool-2 Utility ......................................................................... 4
2. Configuring the Panel ..................................................................................................................... 52.1. Panel Configuration ........................................................................................................... 5
2.1.1. Configuration Layout .......................................................................................... 52.1.2. Default Configuration ......................................................................................... 62.1.3. Modifying the Default Configuration ................................................................. 6
3. Menu Editing and Configuration .................................................................................................. 93.1. Overview of the Menu System........................................................................................... 93.2. Removing Menu Items for Individual Users.................................................................... 103.3. Removing Submenus for Individual Users ...................................................................... 113.4. Removing Menu Items for All Users............................................................................... 113.5. Removing System Menus for All Users .......................................................................... 11
4. Locking Down the Desktop: Disabling GNOME Desktop Features ........................................ 134.1. Disabling Lock Screen and Log Out................................................................................ 134.2. Disabling [Ctrl]-[Alt]-[Delete] ......................................................................................... 13
4.2.1. Window Manager Configuration....................................................................... 144.2.2. System-Level Configuration ............................................................................. 154.2.3. Disabling [Ctrl]-[Alt]-[Backspace] ................................................................... 15
4.3. Locking Down the Panel .................................................................................................. 154.3.1. Disabling Applets.............................................................................................. 16
4.4. Disabling Command Line Access.................................................................................... 174.5. Restricting the Number of Workspaces ........................................................................... 184.6. Removing Desktop Icons ................................................................................................. 194.7. Other Kiosk-related Configuration Tasks ........................................................................ 22
4.7.1. Preventing Automounting of Drives ................................................................. 224.7.2. Disabling Printing Functionality ....................................................................... 234.7.3. Disabling File Saving........................................................................................ 244.7.4. Disabling Application Force Quit ..................................................................... 254.7.5. Locking Down Preferences for the Firefox Web Browser ................................ 264.7.6. Automatic Login for Public Kiosks .................................................................. 26
5. Remote Desktop Access ................................................................................................................ 295.1. Allowing Access .............................................................................................................. 29
5.1.1. Gaining Remote Administrative Access ........................................................... 305.2. Connecting Using vncviewer ........................................................................................... 315.3. Connecting Using Terminal Server Client ....................................................................... 31
5.3.1. Connecting to a Remote Linux Desktop ........................................................... 325.3.2. Connecting to a Remote Windows Desktop ..................................................... 33
Index................................................................................................................................................... 35Colophon............................................................................................................................................ 37


IntroductionWelcome to the Red Hat Desktop Deployment Guide!Deploying the GNOME Desktop across an organization commonly requires that some aspects ofthe desktop enviroment be modified for that specific deployment. This document aims to enumeratecommon deployment tasks and establish best practices for those tasks.This document is not intended to address the more general topic of system administration and theGNOME Desktop. The GNOME Desktop System Administration Guide already serves this purposeand readers are encouraged to refer to this guide through Applications (the main menu on the panel)=> Help, by selecting the Desktop Category, and then selecting the System Administration GuideDocument from the menu.
1. Document ConventionsWhen you read this manual, certain words are represented in different fonts, typefaces, sizes, andweights. This highlighting is systematic; different words are represented in the same style to indicatetheir inclusion in a specific category. The types of words that are represented this way include thefollowing:
command
Linux commands (and other operating system commands, when used) are represented this way.This style should indicate to you that you can type the word or phrase on the command lineand press [Enter] to invoke a command. Sometimes a command contains words that would bedisplayed in a different style on their own (such as file names). In these cases, they are consideredto be part of the command, so the entire phrase is displayed as a command. For example:Use the cat testfile command to view the contents of a file, named testfile, in the currentworking directory.
file name
File names, directory names, paths, and RPM package names are represented this way. This styleshould indicate that a particular file or directory exists by that name on your system. Examples:The .bashrc file in your home directory contains bash shell definitions and aliases for your ownuse.The /etc/fstab file contains information about different system devices and file systems.Install the webalizer RPM if you want to use a Web server log file analysis program.
applicationThis style indicates that the program is an end-user application (as opposed to system software).For example:Use Mozilla to browse the Web.
[key]A key on the keyboard is shown in this style. For example:To use [Tab] completion, type in a character and then press the [Tab] key. Your terminal displaysthe list of files in the directory that start with that letter.

ii Introduction
[key]-[combination]A combination of keystrokes is represented in this way. For example:The [Ctrl]-[Alt]-[Backspace] key combination exits your graphical session and returns you to thegraphical login screen or the console.
text found on a GUI interfaceA title, word, or phrase found on a GUI interface screen or window is shown in this style. Textshown in this style is being used to identify a particular GUI screen or an element on a GUIscreen (such as text associated with a checkbox or field). Example:Select the Require Password checkbox if you would like your screensaver to require a passwordbefore stopping.
top level of a menu on a GUI screen or windowA word in this style indicates that the word is the top level of a pulldown menu. If you click onthe word on the GUI screen, the rest of the menu should appear. For example:Under File on a GNOME terminal, the New Tab option allows you to open multiple shellprompts in the same window.If you need to type in a sequence of commands from a GUI menu, they are shown like thefollowing example:Go to Applications (the main menu on the panel) => Programming => Emacs Text Editor tostart the Emacs text editor.
button on a GUI screen or windowThis style indicates that the text can be found on a clickable button on a GUI screen. For example:Click on the Back button to return to the webpage you last viewed.
computer output
Text in this style indicates text displayed to a shell prompt such as error messages and responsesto commands. For example:The ls command displays the contents of a directory. For example:Desktop about.html logs paulwesterberg.pngMail backupfiles mail reports
The output returned in response to the command (in this case, the contents of the directory) isshown in this style.
prompt
A prompt, which is a computer’s way of signifying that it is ready for you to input something, isshown in this style. Examples:$
#
[stephen@maturin stephen]$
leopard login:
user inputText that the user has to type, either on the command line, or into a text box on a GUI screen, isdisplayed in this style. In the following example, text is displayed in this style:To boot your system into the text based installation program, you must type in the text com-mand at the boot: prompt.

Introduction iii
<replaceable>
Text used for examples, which is meant to be replaced with data provided by the user, is displayedin this style. In the following example, <version-number> is displayed in this style:The directory for the kernel source is /usr/src/kernels/<version-number>/, where<version-number> is the version and type of kernel installed on this system.
Additionally, we use several different strategies to draw your attention to certain pieces of information.In order of how critical the information is to your system, these items are marked as a note, tip,important, caution, or warning. For example:
NoteRemember that Linux is case sensitive. In other words, a rose is not a ROSE is not a rOsE.
TipThe directory /usr/share/doc/ contains additional documentation for packages installed on yoursystem.
ImportantIf you modify the DHCP configuration file, the changes do not take effect until you restart the DHCPdaemon.
CautionDo not perform routine tasks as root — use a regular user account unless you need to use the rootaccount for system administration tasks.
WarningBe careful to remove only the necessary partitions. Removing other partitions could result in dataloss or a corrupted system environment.

iv Introduction
2. Activate Your SubscriptionBefore you can access service and software maintenance information, and the support documenta-tion included in your subscription, you must activate your subscription by registering with Red Hat.Registration includes these simple steps:
• Provide a Red Hat login• Provide a subscription number• Connect your systemThe first time you boot your installation of Red Hat Enterprise Linux, you are prompted to registerwith Red Hat using the Setup Agent. If you follow the prompts during the Setup Agent, you cancomplete the registration steps and activate your subscription.If you can not complete registration during the Setup Agent (which requires network access), youcan alternatively complete the Red Hat registration process online at http://www.redhat.com/register/.
2.1. Provide a Red Hat LoginIf you do not have an existing Red Hat login, you can create one when prompted during the SetupAgent or online at:
https://www.redhat.com/apps/activate/newlogin.html
A Red Hat login enables your access to:
• Software updates, errata and maintenance via Red Hat Network• Red Hat technical support resources, documentation, and KnowledgebaseIf you have forgotten your Red Hat login, you can search for your Red Hat login online at:
https://rhn.redhat.com/help/forgot_password.pxt
2.2. Provide Your Subscription NumberYour subscription number is located in the package that came with your order. If your package did notinclude a subscription number, your subscription was activated for you and you can skip this step.You can provide your subscription number when prompted during the Setup Agent or by visitinghttp://www.redhat.com/register/.
2.3. Connect Your SystemThe Red Hat Network Registration Client helps you connect your system so that you can begin to getupdates and perform systems management. There are three ways to connect:
1. During the Setup Agent — Check the Send hardware information and Send system packagelist options when prompted.
2. After the Setup Agent has been completed — From Applications (the main menu on the panel),go to System Tools, then select Red Hat Network.
3. After the Setup Agent has been completed — Enter the following command from the commandline as the root user:

Introduction v
• /usr/bin/up2date --register
3. We Need Feedback!If you spot a typographical error in the Red Hat Desktop Deployment Guide, or if you have thought ofa way to make this manual better, we would love to hear from you! Please submit a report in Bugzilla:http://bugzilla.redhat.com/bugzilla/ against the component rhd-dg.When submitting a bug report, be sure to mention the manual’s identifier:
rhd-dg(EN)-4-Print-RHI (2005-03-09T16:26)
If you have a suggestion for improving the documentation, try to be as specific as possible when de-scribing it. If you have found an error, please include the section number and some of the surroundingtext so we can find it easily.

vi Introduction

Chapter 1.Configuration Overview: The GConf SystemThe GConf system is one of the primary means to configure the users’ desktops, therefore a briefoverview of this system is provided below.Many configurable quantities are accessible via key/value pairs using the graphical GConf editor tool.This tool is available from the command-line using the command /usr/bin/gconf-editor, or,more simply by typing gconf-editor in a terminal. The GConf editor is also available throughApplications (the main menu on the panel) => System Tools => Configuration Editor.For more detailed information on GConf Editor, refer to the Configuration Editor Manual throughApplications (the main menu on the panel) => Help, and by selecting the Applications Category, thenthe Utilities Category, and finally, by selecting the Configuration Editor Manual Document.
Figure 1-1. The GConf Editor
1.1. Background: Configuration SourcesThe following provides background material that the administrator may find useful, especially whensaving current desktop preferences.

2 Chapter 1. Configuration Overview: The GConf System
TipReaders might first wish to refer to the GConf section of the GNOME Desktop SystemAdministration Guide available through Applications (the main menu on the panel) => Help, andby selecting the Desktop Category, selecting the System Administration Guide Document, andreading the chapter titled Using GConf , and also the GConf project page located on the web athttp://www.gnome.org/projects/gconf/ before continuing. Specifically, the use of gconftool-2 toload and dump preference settings is not discussed in depth in this document, but is detailed in theGNOME Guide.
GConf stores preferences data in a set of configuration sources. The sources used, their properties,and the order in which they are used by GConf is defined in the /etc/gconf/2/path file.Each configuration source entry has three parts:
Storage Backend IdentifierThe only commonly used configuration backend is the XML backend whose identifier is xml.
Configuration Source FlagsA comma separated list of flags which is interpreted by the storage backend. The XML backendrecognizes two flags - readonly and readwrite which determine whether the configurationsource is writable.
Storage LocationThe location in which the storage backend should store the preferences data. The exact meaningof this storage location depends on the storage backend in use. With the XML backend, thelocation is the path to a filesystem directory.
By default there is a Mandatory Source, a User Source and a Defaults Source. They are:
• xml:readonly:/etc/gconf/gconf.xml.mandatory
• xml:readwrite:$(HOME)/.gconf
• xml:readonly:/etc/gconf/gconf.xml.defaults
The order of the configuration sources is intentional. If a key is set in the Mandatory Source and theDefaults Source, then the value in the Mandatory Source takes precedence. Therefore, by setting thevalue of a key in the Mandatory Source, users will not be able to modify that key.The default GConf path file also includes a number of other path files if they exist. The/etc/gconf/2/path file allows administrators to define new configuration sources and includethem in the set of configuration sources used by GConf. The configuration sources specified in thepath file are included before the standard Defaults Source.One final item of note is that the storage location specifier for a source may also referencethe value of environmental variables. For example, the standard User Source is defined asxml:readwrite:$(HOME)/.gconf. Environmental variables may be defined as follows:
$(HOME)
The user’s home directory.
$(USER)
The user’s username.

Chapter 1. Configuration Overview: The GConf System 3
$(ENV_name)
Any other environmental variable may be referenced by prefixing the environmental variablesname with ENV_.
1.2. Setting System-Wide Default and Mandatory PreferencesYou can set system-wide settings using either the graphical GConf editor or the command line utility,gconftool-2. Examples of each method are given below.
CautionYou should make sure that all users are logged out before changing any system-wide default ormandatory preference settings.
1.2.1. Using GConf EditorWhen logged in as root, you can use GConf editor to set system-wide default and system-widemandatory settings by opening a special GConf editor window. For example, to set mandatorysystem-wide settings, run GConf editor and choose New Mandatory Window from the File menuas shown in Figure 1-2.
Figure 1-2. Mandatory Settings Using GConf Editor

4 Chapter 1. Configuration Overview: The GConf System
TipRefer to the Configuration Editor Manual (available through the online help system) for more detailedinformation on using the GConf editor.
1.2.2. Using the gconftool-2 UtilityFor example, using gconftool-2 you can set the system-wide default number of workspaces to 5 byissuing the command:
# gconftool-2 --direct --config-source \xml:readwrite:/etc/gconf/gconf.xml.defaults \xml:readwrite:/etc/gconf/gconf.xml.defaults --type int --set \/apps/metacity/general/num_workspaces 5
TipRefer to the GConf Section of the GNOME Desktop System Administration Guide (available throughthe online help system) for more detailed information regarding the use of gconftool-2.
Chapter 2.Configuring the Panel
TipFor more information on configuring panels, refer to the GConf chapter of the GNOME Desktop Ad-ministration Guide available through Applications (the main menu on the panel) => Help, selectingthe Desktop Category, and choosing the System Administration Guide Document.
NoteFor information on locking down the panel , refer to Section 4.3 Locking Down the Panel .
2.1. Panel ConfigurationThe following material is meant to serve as a more technical reference for panel configuration.
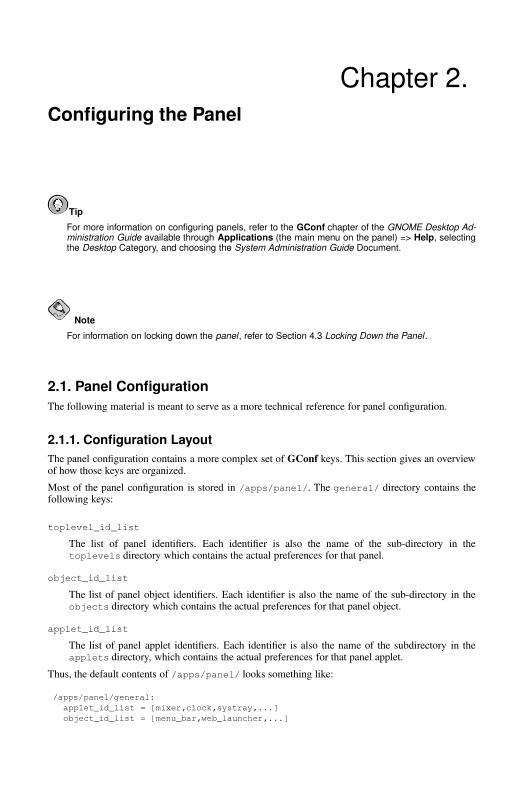
2.1.1. Configuration LayoutThe panel configuration contains a more complex set of GConf keys. This section gives an overviewof how those keys are organized.Most of the panel configuration is stored in /apps/panel/. The general/ directory contains thefollowing keys:
toplevel_id_list
The list of panel identifiers. Each identifier is also the name of the sub-directory in thetoplevels directory which contains the actual preferences for that panel.
object_id_list
The list of panel object identifiers. Each identifier is also the name of the sub-directory in theobjects directory which contains the actual preferences for that panel object.
applet_id_list
The list of panel applet identifiers. Each identifier is also the name of the subdirectory in theapplets directory, which contains the actual preferences for that panel applet.
Thus, the default contents of /apps/panel/ looks something like:
/apps/panel/general:applet_id_list = [mixer,clock,systray,...]object_id_list = [menu_bar,web_launcher,...]

6 Chapter 2. Configuring the Panel
toplevel_id_list = [top_panel,bottom_panel]...
/apps/panel/toplevels/bottom_panel:size = 24expand = truename = Bottom Panelorientation = bottom...
/apps/panel/objects/menu_bar:toplevel_id = top_panelobject_type = menu-barposition = 0locked = true...
/apps/panel/objects/web_launcher:toplevel_id = top_panelobject_type = launcher-objectposition = 1launcher_location = file:///usr/share/applications/redhat-web.desktop...
/apps/panel/applets/clock:toplevel_id = top_panelobject_type = bonobo-appletposition = 1panel_right_stick = truelocked = truebonobo_iid = OAFIID:GNOME_ClockApplet...
2.1.2. Default ConfigurationThe default panel configuration is specified in/etc/gconf/schemas/panel-default-setup.entries. When thepanel is installed, the default configuration is loaded into the Defaults Source using thegconftool-2 "--load" argument:
# gconftool-2 \--config-source=xml:readwrite:/etc/gconf/gconf.xml.defaults \--direct --load /etc/gconf/schemas/panel-default-setup.entries
This command loads the default configuration into the /apps/panel/default_setup GConf di-rectory.
2.1.3. Modifying the Default ConfigurationModifying the default panel configuration can be a difficult task. Unfortunately, it is also one of themore common tasks for administrators wishing to deploy a modified desktop environment configura-tion.

Chapter 2. Configuring the Panel 7
TipRefer to the GNOME Desktop System Administration Guide for an alternative method for changingthe default panel configuration to that described below.
The following provides a more complex example of how to modify the default panel configuration.
2.1.3.1. Example: Removing the Print Manager launcher and the NotificationAreaConsider a relatively straightforward example and assume that we wish to remove the Print Managerlauncher and the Notification Area from the default configuration.
• Make a copy of /etc/gconf/schemas/panel-default-setup.entries:# cp /etc/gconf/schemas/panel-default-setup.entries \
/etc/gconf/schemas/local-panel-default-setup.entries
• Edit local-panel-default-setup.entries, removing the print_launcher entry fromobject_id_list and removing the print_launcher directory from the objects directory:
<value><string>spreadsheet_launcher</string>
</value><value><string>print_launcher</string></value></list></list>
</value></entry>
...<!-- Print Launcher -->
<entry><key>objects/print_launcher/object_type</key><schema_key>/schemas/apps/panel/objects/object_type</schema_key><value>
<string>launcher-object</string></value>
</entry>...<entry>
<key>objects/print_launcher/menu_path</key><schema_key>/schemas/apps/panel/objects/menu_path</schema_key>
</entry><entry>
<key>objects/print_launcher/action_type</key><schema_key>/schemas/apps/panel/objects/action_type</schema_key>
</entry>
<!-- Workspace Switcher Applet -->
• Next, remove the systray entry from applet_id_list and remove the systray directory fromthe applets directory:
<string>mixer</string></value><value>
<string>systray</string></value><value>
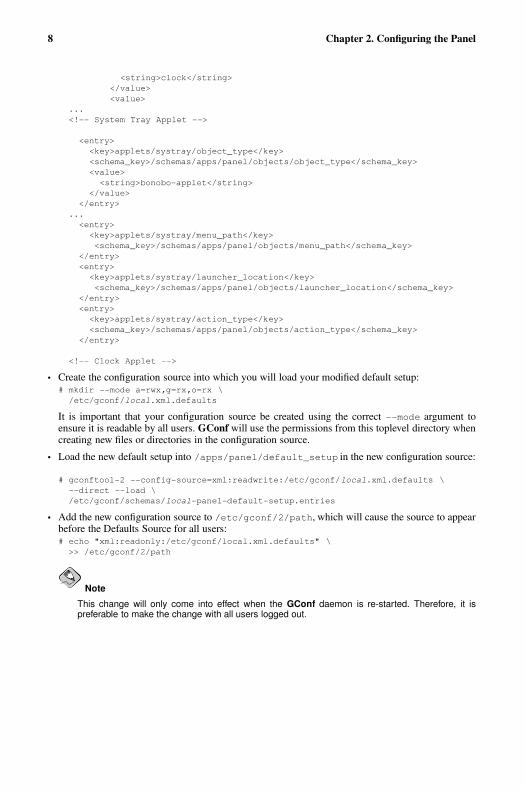
8 Chapter 2. Configuring the Panel
<string>clock</string></value><value>
...<!-- System Tray Applet -->
<entry><key>applets/systray/object_type</key><schema_key>/schemas/apps/panel/objects/object_type</schema_key><value>
<string>bonobo-applet</string></value>
</entry>...<entry>
<key>applets/systray/menu_path</key><schema_key>/schemas/apps/panel/objects/menu_path</schema_key>
</entry><entry>
<key>applets/systray/launcher_location</key><schema_key>/schemas/apps/panel/objects/launcher_location</schema_key>
</entry><entry>
<key>applets/systray/action_type</key><schema_key>/schemas/apps/panel/objects/action_type</schema_key>
</entry>
<!-- Clock Applet -->
• Create the configuration source into which you will load your modified default setup:# mkdir --mode a=rwx,g=rx,o=rx \
/etc/gconf/local.xml.defaults
It is important that your configuration source be created using the correct --mode argument toensure it is readable by all users. GConf will use the permissions from this toplevel directory whencreating new files or directories in the configuration source.
• Load the new default setup into /apps/panel/default_setup in the new configuration source:
# gconftool-2 --config-source=xml:readwrite:/etc/gconf/local.xml.defaults \--direct --load \/etc/gconf/schemas/local-panel-default-setup.entries
• Add the new configuration source to /etc/gconf/2/path, which will cause the source to appearbefore the Defaults Source for all users:# echo "xml:readonly:/etc/gconf/local.xml.defaults" \
>> /etc/gconf/2/path
NoteThis change will only come into effect when the GConf daemon is re-started. Therefore, it ispreferable to make the change with all users logged out.

Chapter 3.Menu Editing and Configuration
TipFor detailed information describing the implementation of the menu system, refer to the DesktopMenu Specification located at the freedesktop.org website: http://standards.freedesktop.org/menu-spec/latest.
It is often useful for an administrator to add or remove items from the main desktop Applicationsmenu. Owing to the complexity of the menu system, modifying the Applications menu can sometimesbe a difficult task. For example, it is much more difficult to add a menu item than it is to remove amenu item.This chapter provides an overview of the menu system and documents methods for:
• Removing menu items for individual users• Removing menu items for all users• Removing submenus for individual users• Removing submenus for all users
3.1. Overview of the Menu System
NoteThis overview of the menu system is not intended to to be comprehensive in its scope. For detailedinformation about the menu system, refer to the various menu-related specifications at the freedesk-top.org web site: http://www.freedesktop.org
The Red Hat menu system is based on the the freedesktop.org Desktop Menu Specification and con-sists of three major sets of configuration and data files:
Menu (*.menu) FilesThe *.menu files are XML configuration files that specify the order, hierarchy, and merging ofboth menus and menu items.The system *.menu files are located in /etc/xdg/menus/. User-specific *.menu files are lo-cated in $HOME/.config/menus/ and can be edited to override the values specified in thesystem *.menu files.In particular, the /etc/xdg/menus/applications.menu file contains the definition of themain application menu layout.

10 Chapter 3. Menu Editing and Configuration
Directory Entry (*.directory) FilesThe *.directory files provide data about a menu such as its name, tooltip, and icon, andare located in /usr/share/desktop-directories/. Refer to the GNOME Desktop SystemAdministration Guide for more information on directory entry files.
Desktop Entry (*.desktop) FilesThe *.desktop files provide data about a menu item such as its name, command to run,and its icon. The desktop entry files also contain keywords that determine the locationof the menu item in the menu hierarchy. The system desktop entry files are located in/usr/share/applications/. Refer to the GNOME Desktop System Administration Guidefor more information on desktop entry files.User-specific desktop entry files are located in $HOME/.local/share/applications/ andcan be used to add applications to the "Open With =>" submenu that appears when right-clicking on a file. The $HOME/.local/share/applications/mimeinfo.cache containsMIME type information associating the $HOME/.local/share/applications/*.desktopapplications with the file types specified in the *.desktop files.
3.2. Removing Menu Items for Individual UsersThe menu configuration files for a given user are located in the $HOME/.config/menus/ directory.The *.menu files are XML configuration files that allow you to override the system menu defaults.For example, to remove the Calculator menu item from the Accessories submenu, edit theapplications.menu file in the $HOME/.config/menus/ directory, adding a new <Menu>
section using the <Exclude> element as shown:
<!DOCTYPE Menu PUBLIC "-//freedesktop//DTD Menu 1.0//EN""http://www.freedesktop.org/standards/menu-spec/1.0/menu.dtd">
<!-- File created by desktop-file-utils version 0.8 --><Menu><Name>Applications</Name><MergeFile>/etc/xdg/menus/applications.menu</MergeFile>
<!-- Removes the Calculator from the Accessories submenu --><Menu>
<Name>Accessories</Name><Exclude>
<Filename>gnome-gcalctool.desktop</Filename></Exclude>
</Menu><!-- END of Calculator removal content -->
</Menu>
The *.desktop file that corresponds to a given menu item can be found in the/usr/share/applications/ directory. The gnome-gcalctool.desktop file corresponds tothe Calculator menu item. Note that the name of the submenu (Accessories, in this case) can bedetermined from the files located in the /usr/share/desktop-directories/ directory.Similar methods can be used to remove other items from the Applications menu and its submenus.
Chapter 3. Menu Editing and Configuration 11
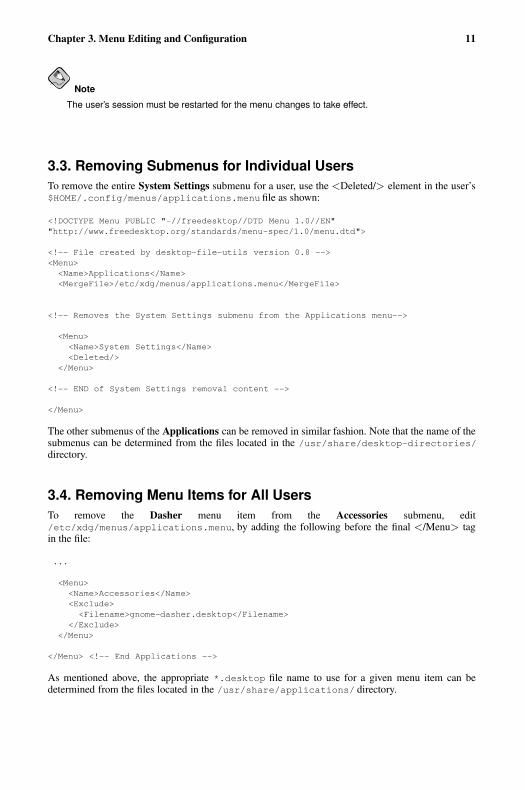
NoteThe user’s session must be restarted for the menu changes to take effect.
3.3. Removing Submenus for Individual UsersTo remove the entire System Settings submenu for a user, use the <Deleted/> element in the user’s$HOME/.config/menus/applications.menu file as shown:
<!DOCTYPE Menu PUBLIC "-//freedesktop//DTD Menu 1.0//EN""http://www.freedesktop.org/standards/menu-spec/1.0/menu.dtd">
<!-- File created by desktop-file-utils version 0.8 --><Menu><Name>Applications</Name><MergeFile>/etc/xdg/menus/applications.menu</MergeFile>
<!-- Removes the System Settings submenu from the Applications menu-->
<Menu><Name>System Settings</Name><Deleted/>
</Menu>
<!-- END of System Settings removal content -->
</Menu>
The other submenus of the Applications can be removed in similar fashion. Note that the name of thesubmenus can be determined from the files located in the /usr/share/desktop-directories/directory.
3.4. Removing Menu Items for All UsersTo remove the Dasher menu item from the Accessories submenu, edit/etc/xdg/menus/applications.menu, by adding the following before the final </Menu> tagin the file:
...
<Menu><Name>Accessories</Name><Exclude>
<Filename>gnome-dasher.desktop</Filename></Exclude>
</Menu>
</Menu> <!-- End Applications -->
As mentioned above, the appropriate *.desktop file name to use for a given menu item can bedetermined from the files located in the /usr/share/applications/ directory.
12 Chapter 3. Menu Editing and Configuration
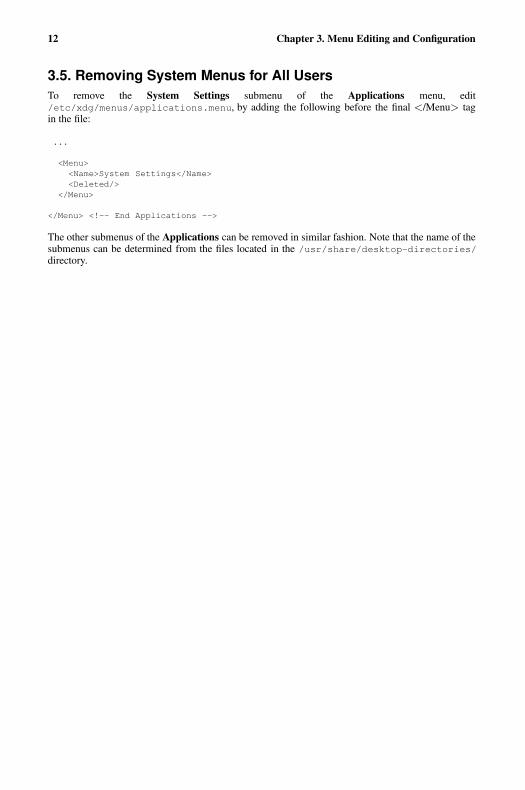
3.5. Removing System Menus for All UsersTo remove the System Settings submenu of the Applications menu, edit/etc/xdg/menus/applications.menu, by adding the following before the final </Menu> tagin the file:
...
<Menu><Name>System Settings</Name><Deleted/>
</Menu>
</Menu> <!-- End Applications -->
The other submenus of the Applications can be removed in similar fashion. Note that the name of thesubmenus can be determined from the files located in the /usr/share/desktop-directories/directory.
Chapter 4.Locking Down the Desktop: Disabling GNOMEDesktop FeaturesThe GNOME desktop can be configured to restrict user access to a number of actions, such as print-ing, access to the command line, and even the ability to log out of the system. The most restrictedconfiguration can be used to form the basis for a public terminal configuration or that of a kiosk-likesetup, in which the user can only perform simple functions like web browsing. This chapter providesthe essential information needed by administrators to perform the various tasks related to lockingdown the desktop.Most of the restricted access can be configured using GConf key/value pairs, hence these will bediscussed first.
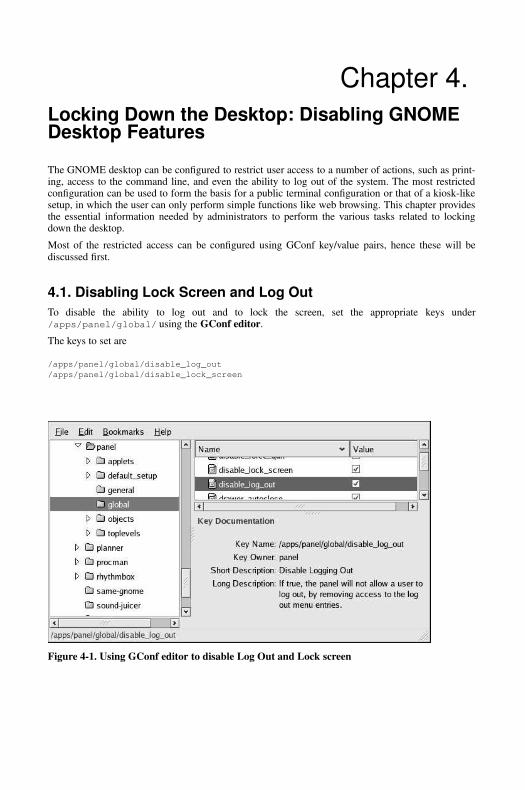
4.1. Disabling Lock Screen and Log OutTo disable the ability to log out and to lock the screen, set the appropriate keys under/apps/panel/global/ using the GConf editor.The keys to set are
/apps/panel/global/disable_log_out/apps/panel/global/disable_lock_screen
Figure 4-1. Using GConf editor to disable Log Out and Lock screen

14 Chapter 4. Locking Down the Desktop: Disabling GNOME Desktop Features
4.2. Disabling [Ctrl]-[Alt]-[Delete]To prevent the key sequence [Ctrl]-[Alt]-[Delete] from rebooting the computer and from displayingthe Log Out dialog, you must make configuration changes at both the window manager level and atthe system level.
4.2.1. Window Manager ConfigurationSetting the following gconf keys will prevent [Ctrl]-[Alt]-[Delete] from displaying the Log Out dia-log.
1. Note in Figure 4-2 that the default global keybinding for [Ctrl]-[Alt]-[Delete] is attached to thegconf key run_command_1.
Figure 4-2. Default Metacity Action for [Ctrl]-[Alt]-[Delete]
2. To change the window manager’s interpretation of [Ctrl]-[Alt]-[Delete], change therun_command_1 key value from gnome-session-save --kill to somethingbenign as shown in Figure 4-3. (Note that the appropriate key to change is/apps/metacity/keybinding_commands/command_1.)

Chapter 4. Locking Down the Desktop: Disabling GNOME Desktop Features 15
Figure 4-3. Resetting the run_command_1 Key
4.2.2. System-Level ConfigurationTo disable [Ctrl]-[Alt]-[Delete] at the system level, comment out the relevant section in/etc/inittab as shown below:
# Trap CTRL-ALT-DELETE#ca::ctrlaltdel:/sbin/shutdown -t3 -r now
4.2.3. Disabling [Ctrl]-[Alt]-[Backspace]To disable the [Ctrl]-[Alt]-[Backspace] key combo from terminating the X session, add aServerflags section to the X configuration file /etc/X11/xorg.conf and add a DontZap optionto the section.
Section "Serverflags"
Option "DontZap" "yes"
EndSection
4.3. Locking Down the PanelTo disable changes to the configuration of the panel, set the
/apps/panel/global/locked_down

16 Chapter 4. Locking Down the Desktop: Disabling GNOME Desktop Features
key using Gconf editor, as shown in Figure 4-4.
Figure 4-4. Locking Down the Panel
4.3.1. Disabling AppletsTo disable certain applets from loading or appearing in the applet menu, you canspecify which applets you wish to disable by adding the appropriate applet IID to the/apps/panel/global/disabled_applets key.For example, to disable the Show Desktop applet, add the applet IIDOAFIID:GNOME_ShowDesktopApplet to the /apps/panel/global/disabled_applets keyas shown in Figure 4-5.

Chapter 4. Locking Down the Desktop: Disabling GNOME Desktop Features 17
Figure 4-5. Disabling Panel Applets
Disabled applets may still appear in the dialog for adding applets, but will not be added to the panels.
NoteThe panel must be restarted for disabled applet changes to take effect.
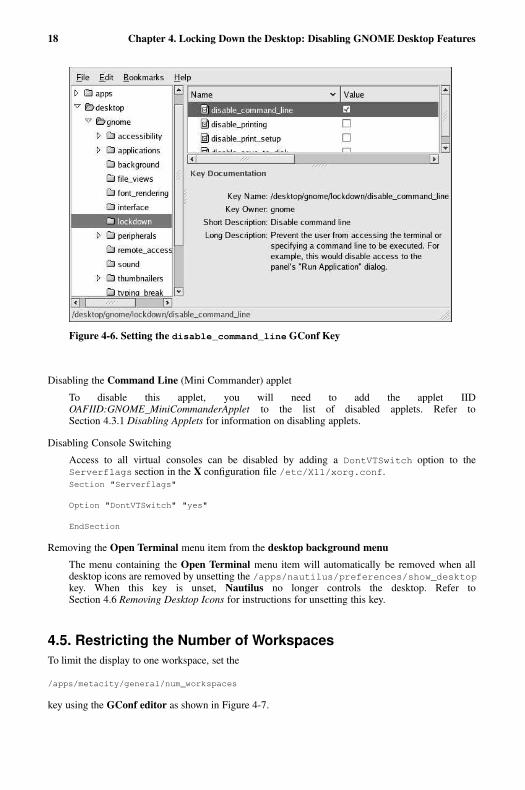
4.4. Disabling Command Line AccessTo completely disable command line access, you will need to make configuration changes in a numberof different contexts:
• Set the disable_command_line gconf key, which prevents the user from accessing the terminalor specifying a command line to be executed
• Disable the Command Line (Mini-Commander) applet• Disable console switching by editing /etc/X11/xorg.conf
• Remove the Open Terminal menu item from the desktop background menuThese steps are described below.
Setting the disable_command_line gconf keySet the /desktop/gnome/lockdown/disable_command_line key by using GConf editoras shown in Figure 4-6. Setting this key also disables access to the Run Application panel dialog.
18 Chapter 4. Locking Down the Desktop: Disabling GNOME Desktop Features
Figure 4-6. Setting the disable_command_line GConf Key
Disabling the Command Line (Mini Commander) appletTo disable this applet, you will need to add the applet IIDOAFIID:GNOME_MiniCommanderApplet to the list of disabled applets. Refer toSection 4.3.1 Disabling Applets for information on disabling applets.
Disabling Console SwitchingAccess to all virtual consoles can be disabled by adding a DontVTSwitch option to theServerflags section in the X configuration file /etc/X11/xorg.conf.Section "Serverflags"
Option "DontVTSwitch" "yes"
EndSection
Removing the Open Terminal menu item from the desktop background menuThe menu containing the Open Terminal menu item will automatically be removed when alldesktop icons are removed by unsetting the /apps/nautilus/preferences/show_desktopkey. When this key is unset, Nautilus no longer controls the desktop. Refer toSection 4.6 Removing Desktop Icons for instructions for unsetting this key.
4.5. Restricting the Number of WorkspacesTo limit the display to one workspace, set the
/apps/metacity/general/num_workspaces
key using the GConf editor as shown in Figure 4-7.

Chapter 4. Locking Down the Desktop: Disabling GNOME Desktop Features 19
Figure 4-7. Setting the Number of Workspaces
4.6. Removing Desktop IconsTo remove one or more of the default icons from the desktop, unset the appropriate key
/apps/nautilus/desktop/*_icon_visible
as shown in Figure 4-8.

20 Chapter 4. Locking Down the Desktop: Disabling GNOME Desktop Features
Figure 4-8. Removing the Computer Desktop Icon
To prevent the appearance of icons representing mounted media such as cdroms, unset the followingkey
/apps/nautilus/desktop/volumes_visible
as shown in Figure 4-9.

Chapter 4. Locking Down the Desktop: Disabling GNOME Desktop Features 21
Figure 4-9. Removing Desktop Volumes Icons
To eliminate all icons from the desktop, unset the following key
/apps/nautilus/preferences/show_desktop
as shown in Figure 4-10.

22 Chapter 4. Locking Down the Desktop: Disabling GNOME Desktop Features
Figure 4-10. Removing All Desktop Icons
NoteUnsetting this key also removes the desktop background menu, thereby eliminating access to theOpen Terminal menu item. This is a recommended step for disabling command line access asdescribed in Section 4.4 Disabling Command Line Access.
4.7. Other Kiosk-related Configuration TasksThis section documents a number of configuration tasks an administrator might find useful in settingup a machine to serve as a public kiosk.
TipRemoving the top panel or its Main Menu is recommended for kiosk operation. To remove the topPanel, right-click on it with the mouse and choose "Delete This Panel..." from the Panel menu.
4.7.1. Preventing Automounting of DrivesTo prevent all drives, such as floppy disks, cdroms, or other removable media from automaticallymounting, unset the
/desktop/gnome/volume_manager/automount_drives/desktop/gnome/volume_manager/automount_media
keys as shown in Figure 4-11.

Chapter 4. Locking Down the Desktop: Disabling GNOME Desktop Features 23
Figure 4-11. Disabling Automounting
4.7.2. Disabling Printing FunctionalityTo disable printing and printing setup, set the following keys
/desktop/gnome/lockdown/printing/desktop/gnome/lockdown/print-setup
as shown in Figure 4-12.

24 Chapter 4. Locking Down the Desktop: Disabling GNOME Desktop Features
Figure 4-12. Disabling Printing Functionality
4.7.3. Disabling File SavingTo prevent a user from saving files to disk and from access to all "Save As..." dialogs, set the
/desktop/gnome/lockdown/save_to_disk
key as shown in Figure 4-13.

Chapter 4. Locking Down the Desktop: Disabling GNOME Desktop Features 25
Figure 4-13. Disabling Writing to Disk
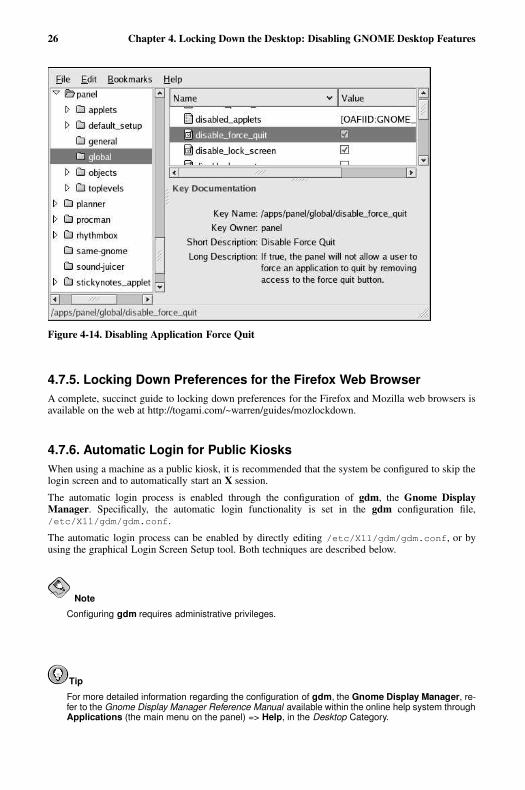
4.7.4. Disabling Application Force QuitTo prevent the user from forcing an application to quit by eliminating access to the force quit button,set the
/apps/panel/global/disable_force_quit
key as shown in Figure 4-14.
26 Chapter 4. Locking Down the Desktop: Disabling GNOME Desktop Features
Figure 4-14. Disabling Application Force Quit
4.7.5. Locking Down Preferences for the Firefox Web BrowserA complete, succinct guide to locking down preferences for the Firefox and Mozilla web browsers isavailable on the web at http://togami.com/~warren/guides/mozlockdown.
4.7.6. Automatic Login for Public KiosksWhen using a machine as a public kiosk, it is recommended that the system be configured to skip thelogin screen and to automatically start an X session.The automatic login process is enabled through the configuration of gdm, the Gnome DisplayManager. Specifically, the automatic login functionality is set in the gdm configuration file,/etc/X11/gdm/gdm.conf.The automatic login process can be enabled by directly editing /etc/X11/gdm/gdm.conf, or byusing the graphical Login Screen Setup tool. Both techniques are described below.
NoteConfiguring gdm requires administrative privileges.
TipFor more detailed information regarding the configuration of gdm, the Gnome Display Manager, re-fer to the Gnome Display Manager Reference Manual available within the online help system throughApplications (the main menu on the panel) => Help, in the Desktop Category.

Chapter 4. Locking Down the Desktop: Disabling GNOME Desktop Features 27
4.7.6.1. Using the Login Screen Setup ToolTo enable automatic login using the graphical Login Screen Setup tool, start the application by either
• typing the commandgdmsetup
or via the menus through• Applications (the main menu on the panel) => System Settings => Login Screen.After typing in the administrative password, the Login Screen Setup tool will appear on your screen.To enable automatic login, check the box labelled "Login a user automatically on first bootup"and enter a valid system user name in the Automatic login username text entry box. Figure 4-15demonstrates this configuration for a fictional user named "sam".
Figure 4-15. Enabling Automatic Login with the Login Screen Setup Tool
4.7.6.2. Editing the gdm.conf Configuration FileTo enable automatic login, add (or change) the following directives to /etc/X11/gdm/gdm.conf:
AutomaticLoginEnable=trueAutomaticLogin=<valid_username>
where <valid_username> is a valid user on the system.

28 Chapter 4. Locking Down the Desktop: Disabling GNOME Desktop Features

Chapter 5.Remote Desktop AccessIn the enterprise environment, system administrators often need to deal with a large number of basicproblems on users’ machines. Remotely taking control of a user’s desktop to fix the problem, while atthe same time training the user how to resolve the problem for themselves, is an effective and simpleway to handle these types of support scenarios. This chapter describes how to use vncviewer andTerminal Server Client to gain remote access to a user’s desktop to aid in the administration of theremote system.Both vncviewer and Terminal Server Client allow the administrator to connect to a user’s desktopsession in a way that allows both the user and the administrator to simultaneously view the samedesktop screen, including all currently active applications and actions (such as mouse movements,etc.)While vncviewer is primarily for connecting to a Linux desktop, Terminal Server Client can be usedto access both Windows and Linux desktops.
NoteThese tools only allow you to connect to a user’s existing session. If the user is not logged in, theconnection will fail.
ImportantAll remote desktop connections described in this chapter use unencrypted connections, therebysending authentication information over the network without encryption. Their use is therefore rec-ommended only inside a trusted, secure network.
5.1. Allowing AccessBefore you can gain access to a remote user’s desktop, the user’s environment must be configuredto allow remote access. There are different levels of access that a desktop user may grant to another,ranging from simple viewing of the user’s desktop, to gaining complete control of the desktop.These different levels of access are configurable through Applications (the main menu on the panel)=> Preferences => Remote Desktop menu item.The default configuration for remote desktop access is shown in Figure 5-1.

30 Chapter 5. Remote Desktop Access
Figure 5-1. Default Remote Desktop Access Control Dialog
As can be seen in the above image, the access can be granted in a number of ways:
• Allow other users to view your desktop• Allow other users to control your desktop• When a user tries to view or control your desktop:
• Ask you for confirmation• Require the user to enter this password (followed by a text input box.)
5.1.1. Gaining Remote Administrative AccessFor remote administration it is recommended that the administrator check all the boxes in the RemoteDesktop dialog and set a required password for the administrator to gain access. This recommendedconfiguration is shown in Figure 5-2.

Chapter 5. Remote Desktop Access 31
Figure 5-2. Remote Desktop Access for Administration
With the above access permissions, the administrator should be able to gain complete access to theuser’s desktop. This method has the further benefit that the user can observe the administrator controlthe user’s desktop in real time. This technique can be particularly effective when combined with an-other simultaneous, synchronous form of communication (such as a telephone conversation), therebyproviding a means for the user to learn to address the problem by on their own in the future. In someremote administration cases, however, it would not be appropriate for the user to take part in theadministration.
5.2. Connecting Using vncviewerTo connect to the user’s desktop from a remote machine, the administrator need only issue thecommand: vncviewer <remote-hostname>:0. For example, if the remote hostname islinux.example.com, the command would take the form: vncviewer linux.example.com:0
vncviewer also has a graphical interface that is available through Applications (the main menu onthe panel) => Accessories => VNC Viewer.
5.3. Connecting Using Terminal Server ClientIn addition to vncviewer, you can also connect to a user’s Windows or Linux desktop using TerminalServer Client, which is available through Applications (the main menu on the panel) => Internet =>Terminal Server Client.

32 Chapter 5. Remote Desktop Access
The Terminal Server Client serves as a graphical interface to the command line programsvncviewer and rdesktop, and can be accessed from the command line using the tsclientcommand.Terminal Server Client is a GNOME 2 application for remotely accessing Microsoft WindowsNT/2000™ Terminal Services and XP Remote Desktop Sharing™ using the Remote Desktop Pro-tocol (RDP). It also supports connections using other remote desktop methods such as vnc, Xnest, andthe Citrix ICA™ client.
5.3.1. Connecting to a Remote Linux DesktopThe minimal configuration for a user named "sam" connecting to a Linux desktop namedlinux.example.com using the VNC protocol is shown in Figure 5-3.

Chapter 5. Remote Desktop Access 33
Figure 5-3. Terminal Server Client Using VNC to Connect to a Linux Desktop
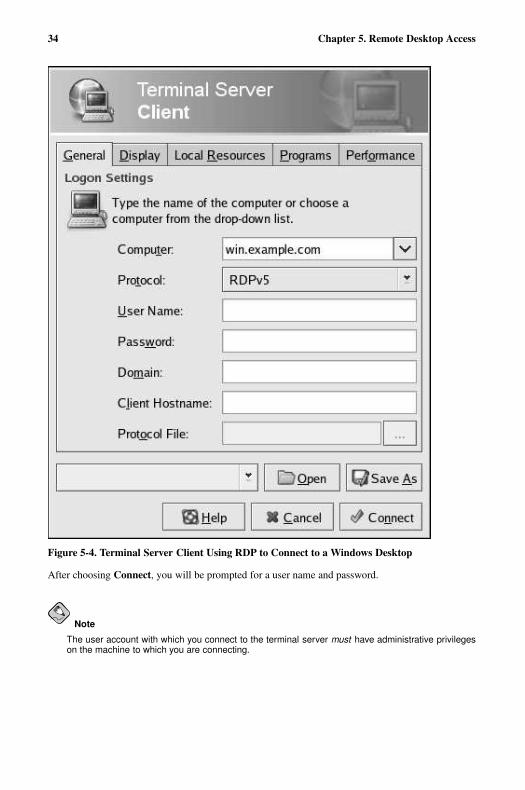
5.3.2. Connecting to a Remote Windows DesktopThe minimal configuration for a user named "sam" connecting to a Windows 2000™ desktop namedwin.example.com using the RDPv5 protocol is shown in Figure 5-3.
34 Chapter 5. Remote Desktop Access
Figure 5-4. Terminal Server Client Using RDP to Connect to a Windows Desktop
After choosing Connect, you will be prompted for a user name and password.
NoteThe user account with which you connect to the terminal server must have administrative privilegeson the machine to which you are connecting.

Index
Aactivating your subscription, ivauto login, 26
editing gdm.conf, 27automounting
disabling, 22
Bbrowser
lockdown, 26
Ccommand line access
disabling, 17configuration sources
gconf, 1console switching
disabling, 17conventions
document, iCtrl-Alt-Backspace
disabling, 15Ctrl-Alt-Delete
disabling, 14
Ddesktop entry files
definition, 9desktop icons
removing, 19removing all, 21volumes
removing, 20desktop menu
removing, 18directory entry files
definition, 9disabling
automounting, 22disk writes, 24file saving, 24force quit, 25printing, 23
disk writesdisabling, 24
Ffeedback
contact information for this manual, vfile saving
disabling, 24Firefox
lockdown, 26force quit
disabling, 25
Ggconf
configuration sources, 1reference, 1
GConf editor, 1introduction, 3
GConf Overviewgconf, 1
gconftool-2, 4and panel configuration, 6
gdmauto login, 26
Iicons
desktopremoving, 19removing all, 21
introductionabout this document, i
Kkiosk
auto login, 26browser lockdown, 26configuration, 13, 22disabling automounting, 22disabling file saving, 24disabling force quit, 25disabling printing, 23
36
LLock Screen
disable, 13key, 13
lockdowndesktop, 13disabling applets, 16
Log Outdisable, 13key, 13
loginautomatic, 26
editing gdm.conf, 27gdmsetup, 27Login Screen Setup Tool, 27
Mmenu files
definition, 9menus, 9
configuration, 9editing, 9
PPanel
configuration, 5configuration example, 7default configuration, 6disabling applets, 16locking down, 15modifying defaults, 6
preferencesdefault, 3mandatory, 3
printingdisabling, 23
Rregistering your subscription, ivremote
desktopaccess, 29administration, 29
Remote Desktopdialog, 29gaining adminstrative access, 30rdesktop, 31settings, 29Terminal Server Client, 31vncviewer, 31
remote desktop access, 29
Ssubscription registration, iv
TTerminal Server Client
connecting, 31thin clients, 29
Vvncviewer
using, 31
Wworkspaces
setting number of, 18
ColophonThe manuals are written in DocBook SGML v4.1 format. The HTML and PDF formats are producedusing custom DSSSL stylesheets and custom jade wrapper scripts. The DocBook SGML files arewritten in Emacs with the help of PSGML mode.Garrett LeSage created the admonition graphics (note, tip, important, caution, and warning). Theymay be freely redistributed with the Red Hat documentation.The Red Hat Product Documentation Team consists of the following people:Sandra A. Moore — Primary Writer/Maintainer of the Red Hat Enterprise Linux Installation Guidefor x86, Itanium™, AMD64, and Intel® Extended Memory 64 Technology (Intel® EM64T); PrimaryWriter/Maintainer of the Red Hat Enterprise Linux Installation Guide for the IBM® POWER Archi-tecture; Primary Writer/Maintainer of the Red Hat Enterprise Linux Installation Guide for the IBM®S/390® and IBM® eServer™ zSeries® ArchitecturesJohn Ha — Primary Writer/Maintainer of the Red Hat Cluster Suite Configuring and Managing aCluster; Co-writer/Co-maintainer of the Red Hat Enterprise Linux Security Guide; Maintainer ofcustom DocBook stylesheets and scriptsEdward C. Bailey — Primary Writer/Maintainer of the Red Hat Enterprise Linux Introduction to Sys-tem Administration; Primary Writer/Maintainer of the Release Notes; Contributing Writer to the RedHat Enterprise Linux Installation Guide for x86, Itanium™, AMD64, and Intel® Extended Memory64 Technology (Intel® EM64T)Karsten Wade — Primary Writer/Maintainer of the Red Hat SELinux Guide; Contributing Writer tothe Red Hat Enterprise Linux System Administration GuideAndrius T. Benokraitis — Primary Writer/Maintainer of the Red Hat Enterprise Linux ReferenceGuide; Co-writer/Co-maintainer of the Red Hat Enterprise Linux Security Guide; Contributing Writerto the Red Hat Enterprise Linux System Administration GuidePaul Kennedy — Primary Writer/Maintainer of the Red Hat GFS Administrator’s Guide; ContributingWriter to the Red Hat Cluster Suite Configuring and Managing a ClusterMark Johnson — Primary Writer/Maintainer of the Red Hat Desktop Deployment GuideMelissa Goldin — Primary Writer/Maintainer of the Red Hat Enterprise Linux Step By Step GuideLucy Ringland — Red Hat Desktop Documentation Editor.The Red Hat Localization Team consists of the following people:Amanpreet Singh Alam — Punjabi translationsJean-Paul Aubry — French translationsDavid Barzilay — Brazilian Portuguese translationsRuna Bhattacharjee — Bengali translationsChester Cheng — Traditional Chinese translationsVerena Fuehrer — German translationsKiyoto Hashida — Japanese translationsN. Jayaradha — Tamil translationsMichelle Jiyeen Kim — Korean translationsYelitza Louze — Spanish translationsNoriko Mizumoto — Japanese translationsAnkitkumar Rameshchandra Patel — Gujarati translationsRajesh Ranjan — Hindi translations

38
Nadine Richter — German translationsAudrey Simons — French translationsFrancesco Valente — Italian translationsSarah Wang — Simplified Chinese translationsBen Hung-Pin Wu — Traditional Chinese translations