Recording Tips for Engineers, Second Edition For cleaner, brighter tracks
257
-
Upload
api-19961276 -
Category
Documents
-
view
661 -
download
5
Transcript of Recording Tips for Engineers, Second Edition For cleaner, brighter tracks


Recording Tips for Engineers

For Grace.
With you, I am awed. Without you, I am odd.

Recording Tips for Engineers
For cleaner, brighter tracks
Second edition
Tim Crich
AMSTERDAM • BOSTON • HEIDELBERG • LONDON • NEW YORK • OXFORD
PARIS • SAN DIEGO • SAN FRANCISCO • SINGAPORE • SYDNEY • TOKYO
Focal Press is an imprint of Elsevier

Focal Press
An imprint of Elsevier
Linacre House, Jordan Hill, Oxford OX2 8DP
30 Corporate Drive, Burlington MA 01803
First published by Black Ink Publishing 2002
Second edition 2005
Copyright © 2002, 2005, Tim Crich. All rights reserved
The right of Tim Crich to be identified as the author of this work has
been asserted in accordance with the Copyright, Designs and
Patents Act 1988
No part of this publication may be reproduced in any material form (includingphotocopying or storing in any medium by electronic means and whetheror not transiently or incidentally to some other use of this publication) withoutthe written permission of the copyright holder except in accordance with theprovisions of the Copyright, Designs and Patents Act 1988 or under the terms of a license issued by the Copyright Licensing Agency Ltd, 90 Tottenham Court Road,London, England W1T 4LP. Applications for the copyright holder’s writtenpermission to reproduce any part of this publication should be addressedto the publisher
Permissions may be sought directly from Elsevier’s Science and Technology RightsDepartment in Oxford, UK: phone: (+44) (0) 1865 843830; fax: (+44) (0) 1865 853333;e-mail: [email protected]. You may also complete your request on-line via theElsevier homepage (www.elsevier.com), by selecting ‘Customer Support’and then ‘Obtaining Permissions’
British Library Cataloguing in Publication DataA catalogue record for this book is available from the British Library
Library of Congress Cataloguing in Publication Data
A catalogue record for this book is available from the Library of Congress
ISBN 0 240 51974 4
Illustrated by Tim Crich
Printed and bound in The Netherlands
For more information on all Focal Press publications visit our website at:
www.focalpress.com

Contents
List of illustrations xi
Acknowledgements xiii
How to be a recording engineer xv
C h a p t e r O n e : T h e R e c o r d i n g E n g i n e e r 1
Becoming a better recording engineer 2
Dealing with clients 4
Getting paid 6
Keeping up 6
Getting work 7
C h a p t e r Tw o : T h e S t u d i o S e t u p 10
The decibel 10
Room preparation 12
Placement 13
Microphone stands 16
Microphones 17
Dynamic microphone 19
Condenser microphone 20
Ribbon microphone 21
Additional microphones 22
Polar patterns 22
Microphone choice 25
Microphone placement 26
Close miking 28
Distant miking 29
X/Y stereo miking 30
‘Spaced pair’ stereo miking 31
v

M/S stereo miking 32
Decca tree stereo miking 33
Cables 34
Running cables 34
Direct box 36
Ground 37
Phase 38
C h a p t e r T h r e e : T h e D r u m s S e t u p 41
Placing the drums 41
Changing drum heads 43
Tuning the drums 45
Preparation 47
Miking the drums 48
Miking the kick drum 48
Miking the snare drum 51
Miking the tom-toms 52
Miking the cymbals/overhead 54
Miking the room ambiance 56
One microphone setups 57
Two microphone setups 58
Three microphone setups 59
Click track 60
Electronic/computer drums 61
Chapter Four: The Electr ic Guitar Setup 64
Amplifier placement 65
Connections in and out 67
Loud amplifiers 68
RHYTHM
TREBLE
Contents
vi

Preparation 70
Miking the amplifiers 71
C h a p t e r F i v e : T h e A c o u s t i c I n s t r u m e n t
S e t u p 77
Acoustic preparation 77
Placing the player 78
Placing the microphones 79
Piano 84
Placing the microphones 85
Keyboards 91
Horns 92
C h a p t e r S i x : T h e Vo c a l s S e t u p 95
Placing the microphone 97
Chapter Seven: The Control Room Setup 102
Control room analysis 102
Control room preparation 103
Digital recording 105
Speakers 107
Console 110
Equalizers 111
Equalizing 114
Compressors 119
Additional processing 121
vii
Contents

Compressing 123
Noise gates 124
C h a p t e r E i g h t : T h e S t a r t i n g Po i n t s 126
Track layout 126
Documentation 128
Drums 130
Kick drum equalization 131
Snare drum equalization 131
High hat equalization 132
Tom-toms equalization 132
Cymbals/overhead equalization 133
Room microphone equalization 133
Drums compression 133
Drum gates 135
Bass Guitar 137
Bass guitar equalization 137
Bass guitar compression 138
Electric Guitar 139
Electric guitar equalization 139
Electric guitar compression 140
Acoustic Guitar 141
Acoustic guitar equalization 141
Acoustic guitar compression 142
Vocals 143
Vocal equalization 143
Vocal compression 144
Horns 146
Horn equalization 146
Horn compression 147
Piano 147
Piano equalization 147
Piano compression 148
Something’s not right 149
viii
Contents

C h a p t e r N i n e : T h e S i g n a l R o u t i n g 150
Levels to record 151
Monitor 154
Cue mix 155
C h a p t e r Te n : T h e R e c o r d i n g 159
Tuning 160
In record/red lights 162
Punching 165
Recording vocals 167
Pitch 170
Post record 171
Recording effects 172
The part 173
Bouncing 173
Doubling 174
Edits 176
End of session 177
C h a p t e r E l e v e n : T h e M i x i n g 180
Pre mix 181
Setting up to mix 183
Mixing basics 185
Processing 187
Equalizing 187
Compressing 189
Contents
ix

Gates and sidechain 190
Effects 193
Reverb 193
Delay and chorus 199
Levels 204
Print prep 209
Printing 211
After printing 214
Mastering 216
C h a p t e r Tw e l v e : T h e D i g i t a l A p p e n d i x 217
Digital conversion 218
Binary codes 218
Bit processors 219
LSB vs. MSB 219
Input processing 220
Dither 220
Aliasing 220
Sample and hold 221
Quantization/error correction 222
Oversampling 223
Digital storage 223
Pulse code modulation 223
Digital multitrack recording 224
Rotating drum 224
Stationary heads 225
Hard drive 225
Files 226
Compact disc 226
DVD 228
I n d e x 231
Contents
x

List of illustrations
2.1 SPL vs. decibel 11
2.2 Baffles used for absorption 13
2.3 Dynamic microphone 19
2.4 Condenser microphone 20
2.5 Ribbon microphone 21
2.6 Cardioid pattern 23
2.7 Omni-directional pattern 23
2.8 Figure-8/bi-polar pattern 24
2.9 Super-cardioid and hyper-cardioid patterns 24
2.10 Three-to-one rule 27
2.11 X/Y microphone setup 30
2.12 Spaced pairs 31
2.13 M/S pattern 32
2.14 Decca tree 33
2.15 Phase cancellation 39
2.16 Minimizing phase cancellation 40
3.1 Microphones inside the kick drum 49
3.2 Kick drum tunnel 50
3.3 One microphone drums setups 57
3.4 Two microphone drums setups 58
3.5 Three microphone drums setups 59
4.1 Amplifier on riser 66
4.2 Back-to-back direct boxes 68
4.3 Close, semi-close and distant 72
4.4 Two microphone amplifier setups 73
5.1 One microphone acoustic setups 81
5.2 Two microphone acoustic setups 82
5.3 One microphone piano setups 87
5.4 Two microphone piano setups 88
5.5 Additional two microphone piano setups 89
xi

5.6 Upright piano 90
5.7 Horn placements 93
6.1 Vocal microphone placements 99
7.1 Studio monitor 107
7.2 Nearfield monitor placement 109
7.3 Equalizer 112
7.4 Q settings 113
7.5 Frequencies to tones 115
7.6 Minimize frequency overlap 116
7.7 Threshold 119
7.8 Ratio 120
7.9 Attack and release 121
7.10 Noise gates 125
9.1 Good chain 152
9.2 Not so good 153
9.3 Opposite polarity speaker setup 157
11.1 Reverb 193
11.2 Delay 199
12.1 Different counting systems 218
12.2 Low bits vs. high 219
12.3 Anti-aliasing filter 220
12.4 A to D conversion 221
12.5 Quantization/error correction 222
12.6 Oversampling 223
12.7 Rotating drum 224
12.8 Pits and flats on a CD 227
List of i l lustrations
xii

Acknowledgements
Ron ‘Obvious’ Vermeulen, Rick Eden, Bob Clearmountain, Bryan Adams, Bob
Rock, Bruce Bartlett, Mike Collins, Beth Howard, Simon Andrews, Jeb Stuart-
Bullock, Frank Filipetti, Bob Schwall, Alan Friedman, Mark Hermann, Noah
Baron, Josiah Gluck, Eric LeMay, Paul McGrath, Blake Havard, Hal Armour,
Rob Pyne, Tim King, Joan and Glenn Crich, Buck Crich, Matthew Crich, Cam
and Inez McLean.
Special thanks to Ron, Bryan and Warehouse Studios. Extra special triple
thanks to my wife Grace.
xiii

This page intentionally left blank

How to be a recording engineer
Many people choose to become recording engineers because they want to
party all day. That’s great for the first few decades, but soon they will realize
that it is a complex job and an art. Understanding what all the knobs do is just
the beginning. Being a recording engineer is not just about using electronic
equipment, it is also about effectively capturing music, sound effects, or the
spoken word. The studio is just a tool. Often so is the studio manager, but
that’s another story.
I invite you to go through this book, choose the things you find applicable,
and leave the rest. There are a few items covered that are also in Assistant
Engineers Handbook but overlap is kept to a minimum. Note that the term ‘he’
is used strictly for ease. There is ample work for everyone, he or she.
Some of the enclosed tips are from other engineers, some are standard
studio practice, and some were learned while on the job. All of them have
helped me in the studio, and I hope they will help you too.
Thank you very much for reading this book, and good luck as a recording
engineer. It can be lucrative and it can be draining. Take the good with the
bad, experiment, stay up late, and have fun.
May your shirts always be louder than your speakers.
Good luck.
Tim Crich
xv

This page intentionally left blank

This book is for the recording engineer who knows what a compressor or limiter
or equalizer does. He wants to know the tried and true methods of using all of the
equipment presently available.
The recording engineer is responsible for keeping the session running
smoothly, including setting up the control room, choosing the microphones,
organizing the signal flow, choosing the track layout, getting the sounds and
pressing the record button. Good sounds or bad, the buck stops with the
recording engineer.
T H E R E C O R D I N G E N G I N E E R
Chapter One

Becoming a Better Recording Engineer
• Praise the lowered. Work at lower volume levels. The sounds will be more
accurate and ear fatigue will be minimized. If the level must be loud, get your
sounds, insert your earplugs and turn it up. Occasionally listen at lower
levels without the earplugs. There is nothing in the recording studio as impor-
tant as your hearing. Longevity in the recording industry means good hear-
ing for decades to come. Plus the loud level might wake up the producer.
• Get musical. Recording music is so much easier if you understand music.
Music plays a key role in a vast majority of recordings so most clients prefer
‘musical’ engineers. If you don’t play an instrument, buy a guitar or keyboard
and learn some basic songs. While learning to play an instrument may seem
daunting, you don’t need to become a virtuoso player, you just need to grasp
song structures and musical progressions. If you get musical, you get work.
• Be consistent. Quality is no accident. Success comes from working every
day at your craft, and that requires hard work and dedication. You become
what you practice. The ultimate goal is to be the recording engineer that
everyone wants to use because of your ears, your expertise, your vibe, and
your impressive collection of Ramones t-shirts.
• I’m maintaining. Keep your body well maintained or long hours will take
their toll. Just like your car, if you give it the best gasoline you will get the
best results. Eat healthy and drink enough water.
• Be professional. This is your craft, and you must work at it. I have seen
engineers lose gigs because they got wasted and became an idiot. Do what I
do – wait until your day off to start drinking at 7 a.m.
• Don’t get mad, get even. An even temperament goes a long way. Mistakes
and frustrations happen in all jobs, and in the long run, so what? A good
engineer keeps the session at ease, especially during stressful times. Do you
want clients and co-workers to remember you as the engineer who blows up,
or the engineer who is a pro and can work around anything?
Recording Tips for Engineers
2

• A breath of fresh air. When you sit at the console next to someone for
hours on end, a toothbrush, mouthwash and breath mints may be in order.
• Fess up. As the engineer, you are responsible for the content of the
recording. If you make a mistake or erase something, say so. You will get
more respect in the long run.
• Discrete recording. Discretion for an engineer means knowing when to
crank the volume for a playback, when to be quiet and twiddle the knobs, and
when to move on. As the engineer, you lead the session. The producer has the
road map, but you drive the car.
• Make it look good. Some engineers go through their careers simply putting
up a microphone and pressing the record button. Engineering is an art. Much
like cooking and sex, presentation is part of the package.
• So shut up already. There’s no reason to broadcast to everyone that you are
manipulating an instrument or vocal sound. Just quietly do it, and if they ask,
tell them any changes are minor. Announcing, ‘I really had to use a lot of
equalization on your vocal’ helps no one. Just get the sound and, as Joe Perry
said, ‘Let the music do the talking.’
• Record what the song requires. If the song requires bagpipes, don’t use
something that sounds sort of like bagpipes, get the bagpipes. Whenever you
compromise, you might save a couple of hours and a couple of dollars, but a
mediocre substitute haunts you long after the money and time are forgotten.
Money comes and goes but a recording is timeless. Especially the bagpipes.
• Record an instrument how it’s supposed to sound. This may be obvious,
but if you are recording an unfamiliar instrument, go into the studio and listen
to the instrument being played. Maybe discuss how it’s supposed to sound with
the player. Some instruments are heavy within a certain frequency range and
are frequency dependent. If the sound dwells within a limited frequency range,
don’t ‘fix’ it with processing – record it how it’s supposed to sound. Then, if
the natural sound of the instrument isn’t working, maybe it’s the wrong part or
the wrong instrument, or both.
The Recording Engineer
3

• Get a good sound fast. People lose perspective when the engineer takes
three hours getting a bass sound. Unless it sounds horrible, move on.
• Spend the most time on the most important factor of the record. If the
main part of the session is scheduled for vocals, don’t spend hours on the drums.
• A/B and see. Once you process a sound, press the bypass button to compare
that the processed sound is an improvement over the unprocessed sound.
• Leave the solo button alone. An instrument in solo sounds a lot different
when the rest of the tracks are in the monitor mix.
• Use microphone choice, setting, and placement over processing. If you
can get a better sound by slightly moving the microphone, do that before
adding equalization and compression.
• Commit to the sound. The confident engineer says, ‘This is the sound we
want, let’s record it,’ rather than, ‘Hey, how’s this?’ Unless someone really
doesn’t like the sound, everyone should go along. But you must be correct.
Without confidence in the engineer, things can quickly deteriorate from
‘Sounds great’ to ‘Gee I don’t know, what do you think?’
• Rule of thumb. Make the guy who signs your check sound best.
Dealing with Clients
• Respect the client. Be punctual. By showing up late, you are saying ‘Your
project is not that interesting to me.’ Clients want to be sure you take them
seriously. If a few minor things go wrong, one guy always says, ‘Yeah, and
he’s never on time either.’
As well, leave your watch at home, remember everybody’s name, and
consider every band or project you work on as ‘the next big thing.’
Recording Tips for Engineers
4

• Respect the music. Keep your own funny versions of a client’s songs to
yourself. Be a professional and respect the people who wrote the lyrics. Don’t
suggest lyric changes, and never say ‘Y’know, this song sounds just like...’
That serves no creative purpose, and makes the songwriter look like a hack.
• If you want loyalty in the music business, buy a dog. Don’t get too
attached to a project. They will say they love you, love your engineering, are
definitely going to use you next time, you’re in the club, the sounds are brilliant.
Next week you hear they are using another engineer. Well don’t let it bug you.
Do your job, take pride in it, and at the end of the day, realize that no matter what
they promise, you don’t have the gig until you’re in the chair.
• Save a copy of everything you do. Who knows who the next major stars
will be. As well, you can track your progress as an engineer over the years.
Keep a copy – even if you think you will never use it again.
• Seven days in the studio makes one weak. Some clients will expect you to
work long hours without a day off. This benefits no one. The eighteenth hour
of the tenth day in a row is when mistakes happen. You want your clients to
remember you for your skills as an engineer, not for erasing the kick drum due
to fatigue. And once you start working long hours, the client expects it.
• Although it may not be your job, keep in mind the budget of the project.
Spending tons of time on a part that really isn’t that important might take
away from precious mixing time. You can’t explain away an average mix.
• Watch it or I’ll flatten your EQ. If you don’t get along with someone in
the sessions, deal with it. Probably you (the lowly engineer) will go before he
(the high and mighty musician) does. But, life isn’t long enough to take abuse
from anyone. But, if you’re being ill-treated, give them a serious staring at,
then walk.
• Be the heavy. Sometimes the engineer must also be the heavy, doing the
unpleasant tasks when sessions get out of hand. State firmly and profession-
ally, ‘You can’t smoke in the control room.’ ‘Please don’t set your drink on
the console.’ ‘You girls put your clothes on this instant!’
The Recording Engineer
5
Getting Paid
• Don’t record for free. Sometimes to get experience, junior engineers
record bands for free. Don’t. Engineering a project for ‘nothing’ makes the
client think you are worth nothing. Even if it’s a token payment of ten dollars
for lunch, take it.
• Due time or do time. Independent engineers often get payment in full with-
out any tax deductions. Because you are a professional, keep all receipts, notes
of sessions, who paid what, and all work orders. You know the government and
taxes. Man, they make a federal case out of everything.
• A taxman attacks man. Recording engineers have certain tax write-offs.
Take advantage of these write-offs. Subscribe to all the applicable magazines.
Buy lots of books, meals, tapes, guitar picks, earplugs, hairplugs, whatever.
Write them all off.
• Paper covers rock. Professional-looking paperwork tells your clients you
are a professional recording engineer, not some hack with a handwritten
invoice and no business card. If you do business like a professional you will
be treated like one.
• Now be honest. No matter how hard you work or how great your sound,
always be honest and professional in your approach. The industry is small,
and bad news travels fast.
Keeping Up
• Install a DAW (Digital Audio Workstation) editing program on your
computer. Improve your ability to edit, equalize, compress and record.
Before buying any studio software, go on-line and read some reviews, check
out the website, and download demos. All product sellers have websites with
demos available. Once armed with the facts, purchase and install the
appropriate software and hardware.
Purchase a quality sound card. The cheap sound cards use low quality
electronics that overload sooner.
Recording Tips for Engineers
6

• Buy at least one good microphone. You’ll soon learn its characteristics and
be able to compare it with other microphones. When you hear a different
microphone next to it, you can say, ‘That’s a little brighter than mine, or the low
end is cloudier.’ Today’s microphones are inexpensive and high quality.
Beware. The audio industry sometimes goes through ‘fads’ where every
studio buys the newest thing, then realizes it isn’t so hot. Buy equipment that
will last for the long haul – and buy from a reputable dealer.
• The joy of specs. Read all the industry magazines to keep up with the latest
technologies. Read all the studio manuals, attend trade shows, surf all the
websites, listen to the sound industry CD ROMs, and check the available
equalization and tone reference discs. Grasping all the workings in a modern
recording studio can only help you. You can bet the big name recording
engineers understand this stuff.
• Use equipment to its max. Don’t be too nervous to try new things out. But
unless the project has an unlimited budget, most clients don’t want to spend
hours on end waiting for you to try a groovy new idea. Come in on your own
time to work on sounds and ideas, then have them in your arsenal. Lay one of
these ideas on the client during the session. Respect soon follows.
Getting Work
• The music business is tough. Work is elusive and you have to hunt it down.
Check out all the local studios. Leave a card. Try to get a rapport with certain
studios. If you bring in a few bands, you may get a break on the cost of the
studio. As well, if they know you and are familiar with your work, they may
call you when they need an engineer.
• Check your hearing. Before you seriously become an active, working
recording engineer, get your head, er...hearing examined. If your hearing is
questionable, it ain’t getting any better. It may be disconcerting if the client
sees you adjusting your hearing aid in the session.
The Recording Engineer
7
• Have ears will travel. Place an ad in the local music paper that you are
available to record bands at a very reasonable rate. Go to clubs and talk to
bands about recording. Print up a demo disc of some of your best work – even
if you must book studio time to do it – and mail it out or hand it out to
whomever may be interested.
Include a business card with a contact number. Don’t scribble, ‘This whole
disc was recorded in half an hour in Dave’s basement with no overdubs and
lots of beer.’ Use professional graphics.
• I love the mall, I love them all. Get to know as many people in the local
scene as possible by hanging around the music and recording gear stores,
going to shows, and supporting local artists. Small-time recording engineers,
managers and local musicians become big name producers, studio owners
and rock stars.
• He shoots, he scores. Do you play hockey, baseball, bowling, curling,
tongue wrestling? Many cities have music industry sports teams. This is a
good way to network in the recording industry. There is nothing like getting
a little sympathy work, so maybe a puck in the head now and again will help
your studio career.
• Intensities in ten cities. Attend the major audio shows and conventions
such as the AES or NAMM. Go to these shows to learn what is on the hori-
zon and to hang out with audio industry leaders.
• Get outta town. You may want to move to a locale that has lots of studios,
like LA, NY, or Nashville. There are many secondary markets other than
these three, but of course these ones are the main places. Note that even
though there are more studios, there is more competition, and big cities aren’t
for everyone.
• And on this team. Just working as a recording engineer today might not
bring in enough work. The competition can be fierce. So many engineers are
teaming up with people such as a producers or mixers and starting their own
production company. With the low cost of equipment, this may be a viable
option for some.
Recording Tips for Engineers
8

• Use your computer to its fullest capacity. Use the Internet to access data on
recording studios, new equipment, and newest techniques. There are many
websites available to research available recording studios in your area, as well
as any new techniques.
Keep a file on all the studios including a short list of the attributes of each
studio, including the names of the studio manager and the studio owner.
Create a website with your photograph, record credits, availability, etc.
Upload your demo, perhaps even parts of songs you have engineered. Check
the legalities of this. Do not upload anything that has not yet been released.
As well, the computer is a great tool if you are learning to play a musical
instrument. Use the computer to take on-line music lessons, to download
song tablatures, and maybe even play along with other on-line learners.
• Start a band. The best way to get as musical as you can is to play music.
No matter what level of player you are, there are others out there who are in
the same boat. Even if you can only play three chords, start a band and learn
some three chord songs. But don’t expect to sell out the local arena, just play
for the fun and experience. Playing in a band lets you concentrate on music,
timing, tuning, and getting along with musicians.
The Recording Engineer
9
The best recordings come from properly designed spaces. Before any equipment
is loaded into the room, before any equipment setup begins, you must determine
the best ways to take advantage of the recording space. Some studios have dead
areas and live areas, each with their individual functions. Some studios have
adjustable wall panels that can liven or deaden areas of the room. You may
decide to, for example, record horns in a live area of the room and an intimate
acoustic guitar in a less live area.
Understanding the physical limitations and characteristics of the room
helps you decide where each setup will sound best. But before placing any
microphones or cables, a complete grasp of the ‘decibel’ is paramount.
The Decibel
The decibel (deci: 1⁄10 and bel: Alexander Graham Bell) keeps track of the
wide changes in acoustic and electrical levels. Bell determined one decibel (dB)
T H E S T U D I O S E T U P
Chapter Two

was the smallest change in volume a human could perceive, no matter what the
level. The decibel is simply a comparison of two numbers: the signal level and
a predetermined 0 reference. With human hearing, the 0 dB SPL reference is the
threshold of hearing. Bell used the decibel to assess, among many other mea-
surements, sound pressure level (dB SPL), voltages (dBu, dBv, and dBV), power
levels (dBm) and changes in signal level (dB).
Figure 2.1 shows how every doubling of pressure level equals an increase
of 6 dB, no matter what that pressure level is. For example, one guitar might
Figure 2.1 SPL vs. decibel
The Studio Setup
11
200 Phons 400 Phons 800 Phons
46 dB
52 dB
58 dB
40 dB
100 Phons34 dB
28 dB
64 dB106 dB100 dB
94 dB
88 dB
82 dB80 dB
76 dB
70 dB
64 dB
60 dB58 dB
52 dB
46 dB
40 dB
34 dB
28 dB
22 dB20 dB
16 dB
6 dB is twice the SPL
6 dB is twice the SPL
6 dB is twice the SPL
120,400100,000 Phons =
51,200
25,600
12,80010,000 Phons =
6,400
3,200
1,600
1,000 Phons =800
400
200
100 Phons =
50
25
1210 Phons =
6
Loud concert
Subdued conversation
Street noise
Loud guitar
Silent sound studio
spl dB

create a level of 80 dB. Bring in another one, and it doubles the SPL, or Phons,
increasing the level by 6 dB resulting in 86 dB. If ten guitars created 100 dB,
ten more would create 106 dB.
Room Preparation
• Clean the place. A clean studio, as with a clean control room, keeps
everyone from getting anxious. It makes you look like a professional, not
some hack who doesn’t care enough to clean out the dirty ashtrays.
• Use it or lose it. Remove everything that isn’t involved in your session, such
as another client’s equipment. Every item in the room rattles, so if it isn’t
there, that’s one less rattle to worry about. As well, when the client books the
studio, he wants the whole studio. It isn’t fair to him when you store some-
one else’s equipment in the corner of the room.
• Go ahead and ask. In an unfamiliar studio, ask a staff member about any
standard instrument placements. Then use that information, along with your
experience when placing each instrument. Maybe sketch the layout of the
studio and use it to decide where each instrument will go.
• Deal with noisy floors and chairs. Oil squeaky chairs and throw down a
carpet over squeaky floors. Everyday noises that are unconsciously blocked
out by our ears are not blocked out by the microphones.
• Diffuse the situation. Use diffusion devices, such as sections of acoustic
foam, stand-alone baffles, perhaps sections of plywood placed on the floor to
fit your specific session needs. Figure 2.2 shows how properly placed baffles
will block and absorb most initial reflections. Reflections coming off the wall
are not an issue. Baffles might be used as absorption devices or reflective
devices, depending on the situation. Note that some frequencies are not
affected by absorption devices.
Recording Tips for Engineers
12

Figure 2.2 Baffles used for absorption
• Any size recording studio can make hit records. Good equipment means
nothing unless the players are up to the task. Thinking you will get a great
recording because you use the best gear is like thinking you can do a great
painting because you have the best paintbrushes. Even a broken pencil can
draw a masterpiece.
Placement
• How many players are recording basic tracks? Most recordings are bro-
ken down into three sections: basics, also called bed tracks, then overdubs
and mixing. In today’s studio, these overlap considerably. Determining how
many players will be in the studio during the basics allows you to choose
which and how many microphones to use on each setup. Different situations
will require different approaches.
The Studio Setup
13

• What is the style of music? Determine player placement by using the style
of music, how prominent each instrument will be, and how many players
there are. Is it:
– A jingle? Jingles are advertisements heard on radio and television – often
30 or 60 seconds long. Recording will often be completed in a single day
so there will not be a lot of time for experimentation. The most important
factor here is usually the time restraints. Because the musicians that play on
jingles are professionals, they will most likely play the part properly every
time. The emphasis here is not on setup or performance. It is assumed that
the setup is good and the performance will be fine. The important factors
here are time and money. Set up and press the record button.
Proper documentation is key for a smooth running jingle session. Many
different versions of a commercial, or ‘spot’ are recorded, and each spot
needs proper documentation during recording, editing and mixing.
– A movie soundtrack? As movies get cheaper and more accessible, more
people are getting into recording movie soundtracks. While most modern
records are recorded to feature vocals or a certain instrument, movie
soundtracks are less focused on the individual player and more on creat-
ing a feel that complements the movie. There is no strict standard, and you
would record what each scene requires, whether a large group of players
or an individual musician. As well, you must deal with ‘movie’ people. To
fit in with everybody, put your hair in a ponytail, wear shoes with no socks,
and call everyone ‘babe.’
– A power rock band? They might sound better in a larger live space. Start
the session by concentrating on bass and drums, but also record reference
vocals and guitars. All aspects of the recording, production and playing
must be of the highest quality. The world (hopefully) is going to hear the
results, so take the time to set up properly and record everything correctly.
– A jazz session? You may prefer a mellower, dryer feel from a less rever-
berant space. With jazz, often players will want to watch each other with-
out headphones. Everything is recorded live with no overdubs. Have
Recording Tips for Engineers
14

enough tape on hand because left to their own devices, jazz players will
never stop playing. Sleep? Food? Time itself? All secondary to the groove.
– A demo? Recording demos is not the time to spend four hours getting that
perfect guitar sound. Take less time on setup, and more time recording.
– A television show? Many televisions have smaller speakers that cannot
recreate a wide range of frequencies. Therefore, a piano, for example,
recorded for a television soundtrack might not have the same equalizer
setting as a piano recording for a rock record because on a television sound-
track, boosting low, low frequencies may not have much of an effect.
– An independent punk band? They might sound best in a smaller, tighter
‘garage’ style room. Not a lot of setup time, and often raw sounds with
live vocals.
– A solo acoustic player/singer? Setup may sound best in a smaller more
intimate space, and the voice and the musical instrument might have
separate microphones. Maybe the microphones will be placed in stereo in
front of her.
• Places please. Most musicians, if they have been playing together for a long
time, get used to certain placement among the rest of the players. Maybe the
rhythm guitar player prefers to stand on the left side, while the bassist may
like the right. Ask the players if they are used to playing in specific locations
in reference to each other.
• Don’t isolate the players. Just because an amplifier is isolated doesn’t
mean that the player must be isolated as well. Commonly, players being
recorded together should be able to see each other, and at least one should be
able to see the engineer. The person who can see the engineer normally gets
a talkback microphone.
The Studio Setup
15

Microphone Stands
• Don’t use a large boomstand. Sometimes a smaller boomstand will be less
obtrusive. Microphone stands can range from a small stand to hold a tiny
microphone, all the way up to a large boom with a big microphone hanging
off the end of it. Match the stand size with the situation.
Microphone stands touch nothing but the floor. A microphone stand won’t
tip over unless it was teetering in the first place.
• Use a large boomstand. Larger boomstands tend to be more stable, with
less resonances and rattles, and they help eliminate rumble from the floor.
• Duct tape rules. Leave a couple of rolls of duct tape around, but only use it
to stop resonance and rattles, not to hold a microphone stand. Duct tape won’t
hold a microphone stand in place for long, and it looks unprofessional. But
sometimes there is no choice. If you must use duct tape to hold anything, don’t
wrap a whole roll around the microphone stand. A few times around will do.
• Stand up. Place all stands and run all cables before attaching the microphone
to the stand. Wheeling large boomstands around a cluttered room is just asking
for damage. Set microphones up last, and break them down first.
• Secure the boomstand. If you must use a smaller tripod boomstand, place
the stand so one leg is directly under the boom, then sandbag the other two
legs to keep them secure. Place a sandbag on the base of the stand to ensure
stability. If someone bumps into it and it topples over, it’s your fault.
• Pair of matching shocks. When setting up to record something in stereo,
use matching stands and microphones. This not only looks professional, but
makes both microphones sound alike. If one microphone has a shockmount,
and the other doesn’t, a slight rumble may creep into the one without the
shockmount. Then you might need to add a low end roll-off, thus changing
the intended matching sound.
• Weight for the boom. Set the counterweight of larger boomstands high
enough so no one hits their head. If someone gets smacked in the nose, it
gives the studio a black eye.
Recording Tips for Engineers
16

Microphones
• What is a microphone? A microphone is a transducer that changes acoustic
energy to electrical energy. Sound causes the diaphragm within the microphone
to vibrate, creating a small voltage. Louder signals cause the microphone’s
diaphragm to vibrate more, creating more voltage.
The diaphragm is the internal membrane (or the ribbon – depending on the
microphone) within the capsule that vibrates. Different microphones will dis-
play different frequency response charts.
A small diaphragm microphone will commonly, but not always, accentuate
mid to high frequencies. Due to the smaller mass of the smaller diaphragm, the
low frequencies may not be as accurate as in a large diaphragm microphone.
Large diaphragm microphones might offer the widest range of frequency
response to capture warmth, as in low strings or vocals. These microphones
tend to naturally recreate better low frequencies, simply due to the mass of the
diaphragm. The larger the mass, the less accurate the transient response.
• Do a listening test. When you understand the characteristics of each
microphone, you are better equipped to choose the best microphone for each
situation. Listening tests such as this will help train your ears to determine
which microphone does what.
Set up the best few microphones available, perhaps four or five at a time,
with the individual capsules adjacent to one another. Use no pads or roll-offs,
and match the polar patterns. Set the faders so all the microphones have the
same perceived volume. Have someone stand at an equal distance from all
microphones and speak or sing. Turn one microphone on at a time and check
which ones:
– Have nice crisp high end.
– Have a warmer midrange.
– Retain warmth and smoothness no matter what frequencies are altered.
Lower quality microphones may start to sound brittle as you boost the
higher frequencies.
The Studio Setup
17

– Have a thick bottom.
– Have hums or buzzes. Microphones with inherent lower levels may have
more buzz simply because the level must be raised to match the rest of the
microphones being tested. Older tube microphones can have this problem
but their great sound makes up for it.
– Change level uniformly as the person moves about the microphone. Some
cardioid microphones are more omni-directional than others, and some may
not be omni-directional at all frequencies.
• What is the proximity effect? The proximity effect is the increase in a
microphone’s low frequency response when it’s placed very close to a sound
source. Microphones with omni-directional patterns are not affected by the
proximity effect.
• What is phantom power? Condenser microphone capsules are very high
impedance, so they need an impedance-converter circuit that requires power
to operate. The power is called phantom power, and it comes from each mixer
microphone input. Dynamic microphones have no active electronics, so phan-
tom power is not needed.
• What is a pre-amplifier? Whether inside or outside the console, the
microphone pre-amp raises the microphone signal level to a usable ‘line level.’
• What does frequency response mean? A device’s frequency response is its
output level versus frequency. Different microphones will display different
frequency response charts. For example, some microphones will have a
smooth high end, while others may have an upper midrange bump.
• What does transient response mean? Transients are the initial sudden
peaks of a sound, and are very short in duration. Transient response is the
measure of how quickly a device responds to these transients. A percussion
instrument contains very high transients, as does vocal sibilance.
Recording Tips for Engineers
18

• Are you experienced? With experience, you will learn the characteristics of
each microphone, and choosing which ones are best for different situations will
come naturally. Microphones are the tools of your trade, learn them.
Dynamic microphone
Dynamic moving coil microphones employ a coil of wires attached to a
diaphragm, which is suspended within a magnetic field (Figure 2.3).
Acoustical vibrations cause the diaphragm and the coil to vibrate within this
magnetic field, creating current that electrically represents the audio signal.
Dynamic microphones tend to be robust, and are commonly used for the
close miking of louder instrument setups including guitar amplifiers, drums
and live vocals. Characteristics include a good transient response, a natural
midrange peak (about 5 kHz), solid low-frequency response and tight polar
pattern to keep leakage at bay. Because of their rugged build, dynamic
microphones are often used in live situations.
Figure 2.3 Dynamic microphone
DiaphragmChassis
Voice coil Positive pole
Protective grille Permanent magnet Negative poles
. ..
. .
...
Negative poles
The Studio Setup
19

Condenser microphone
Condenser microphones use two adjacent plates. One is stationary, while the
other, a diaphragm, vibrates to incoming acoustic signal. These two plates are
charged with a constant voltage – phantom power. As the distance between the
diaphragm and the stationary plate varies with incoming vibrations, a varying
electrical current is generated (Figure 2.4).
Condensers are less robust than dynamics, usually a bit warmer and
smoother, and they capture a wide frequency range. They tend to be used on
instrument setups such as vocals, acoustic instruments, room ambiance and
less powerful electric instruments. Because all condenser microphones have a
pre-amp, their output voltage is much higher than a dynamic microphone.
• What are tube microphones? Standard condenser microphones use internal
transistors to pre-amplify the very small electrical current produced by the
charged diaphragm. Some condensers use tubes. These tube microphones have
their own power supply that charges the tube and the diaphragm. Tube
microphones are expensive and delicate, but create a super warm round sound.
Figure 2.4 Condenser microphone
Front diaphragm
Positive pole
Damping
Stationary plate Negative pole
Protective grille
Backdiaphragm
Positive pole
FrontBack
.
.
.
..
Recording Tips for Engineers
20

Ribbon microphone
Ribbon microphones use the same principle as dynamic microphones, only
rather than a coil of wire, they use a ribbon of metal foil (Figure 2.5). This
foil ribbon vibrates within a strong magnetic field creating a small electric
current. This field is strong. Not strong enough to pull your belt off, but
maybe strong enough to erase a tape, if left too close. Keep your tapes away
from ribbon microphones.
Ribbon microphones traditionally record wonderfully lush low end. Great
for male vocals or bass. Be warned – these microphones are quite sensitive to
air movement and are not as robust as dynamic moving coil microphones; too
much signal can stretch the ribbon. As well, ribbon microphones have a
degree of natural internal compression.
Due to the sensitive nature of the ribbon, make sure the phantom power is
switched off when using a ribbon microphone.
Figure 2.5 Ribbon microphone
Ribbon
Positive pole Negative pole
Protective grille
Permanent magnet
..
.
.
The Studio Setup
21
Additional microphones
Additional microphone styles include:
Boundary microphone. A boundary microphone uses a flat plate and
adjacent microphone capsule placed, commonly duct-taped, on a wall or
floor to pick up direct and reflected sounds in phase.
Lavalier microphone. Contact or lapel microphones are small and com-
monly used for unobtrusive recording, such as when clipped to a lapel in
television interviews.
Shotgun microphone. This ultra-directional microphone receives all the
incoming sounds, but cancels out everything except for what is directly in
front of the microphone.
• What are pads/roll-offs? A microphone pad is a circuit inserted at the
microphone to lower the level reaching the console, such as -10 dB, -20 dB,
even -30 dB. A roll-off is a low-end or high-end filter on the microphone used
to eliminate the high or low frequencies that are not needed as an essential
part of a sound. Use a low-end roll-off (HPF or high-pass filter) to minimize
rumble on a vocal track, or a high-end roll-off (LPF or low-pass filter) to
reduce sizzle from a high hat microphone without adding equalization.
Polar Patterns
A polar pattern is a graph of microphone sensitivity versus the angle of the
incoming sound. Signals picked up in front of the microphone are called on-axis.
Signals arriving away from the front are called off-axis. Some microphones have
only one pattern, and others have switchable patterns, and even others have
changeable capsules, each containing a different pad or polar pattern.
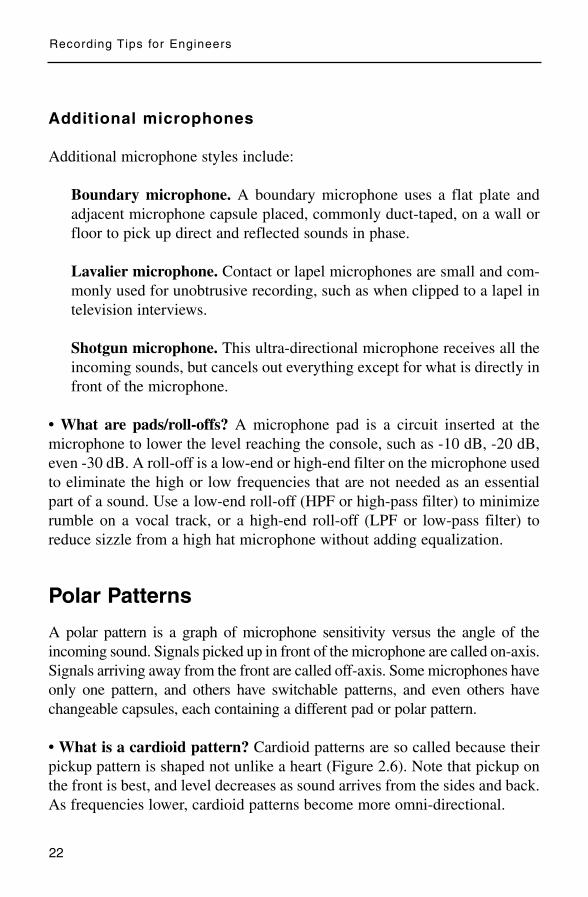
• What is a cardioid pattern? Cardioid patterns are so called because their
pickup pattern is shaped not unlike a heart (Figure 2.6). Note that pickup on
the front is best, and level decreases as sound arrives from the sides and back.
As frequencies lower, cardioid patterns become more omni-directional.
Recording Tips for Engineers
22

Figure 2.6 Cardioid pattern
• What is an omni-directional pattern? Omni-directional patterns are so
called because they pick up signal from all sides equally (Figure 2.7). As the
frequencies rise, the omni microphone becomes more directional.
Figure 2.7 Omni-directional pattern
The Studio Setup
23
300
270 330
150 90
120
240 0
210 30
180 60
Front 0°
Rear 180°
300
270 330
150 90
120
240 0
210 30
180 60
Rear 180°
Front 0°

• What is a figure-8 pattern? The figure-8 (bi-directional or bi-polar) pattern is
so called because it is shaped like an 8, picking up signal from both sides of the
microphone while rejecting off-axis signals. In bi-polar patterns, one side of the
pattern is internally set out-of-phase with the other (Figure 2.8).
Additional, more directional patterns include Figure 2.9(a) super-cardioid
and Figure 2.9(b) hyper-cardioid patterns.
Figure 2.8 figure-8/bi-polar pattern
Figure 2.9 Super-cardioid (a) and hyper-cardioid (b) patterns
Recording Tips for Engineers
24
300
270 330
150 90
120
240 0
210 30
180 60
Front 0°
Rear 180°
(a) (b)0
330 30 30
210 150
180
300 60
270 90
240 120
0
330
210 150
180
300 60
270 90
240 120

Microphone Choice
• Match the microphone to the situation. Match the characteristics of the
microphone with the characteristics of the instrument to complement its
sound. If, for example, a microphone has a natural low-end boost, maybe use
it on a small acoustic guitar that needs a low-end boost, rather than on a bass
amplifier, which may have enough low frequencies. Questions to ask before
choosing the microphones might include:
– Is a microphone even necessary? Some instruments have a direct output
that can be used instead of a microphone. This means no leakage from
other instruments. Sometimes, such as in a live situation, the best
microphone choice is no microphone at all.
– How much air is being pushed? Does the situation call for a dynamic, a
condenser, a ribbon or another kind of microphone?
– What is the dynamic range of the musical instrument? A piano has a wide
frequency range, a triangle doesn’t. Instruments with narrow frequency
ranges may not need the best microphone in the house.
– Will an older tube microphone work better than a new one?
– Should a small or large diaphragm microphone be used? Different
microphones naturally produce different responses – the ears are the final
judge. Commonly, lower-frequency instruments benefit from large
diaphragm microphones due to the larger diaphragm mass which
improves low-frequency response.
– How loud is the microphone? A microphone with a high output might not
be the best choice for a really loud instrument just like a low-sensitivity
microphone might not be the best choice for a low-output instrument.
– Where is the best placement for optimum response? Does the situation
call for direct signal, close miking or not so close miking?
The Studio Setup
25

– What microphone polar patterns are available, and which is best for this
situation?
– How many microphones are needed? Will one be enough, or are two (or
more) needed? Should stereo miking be used?
– Is a pad or roll-off necessary? After the levels have been lowered, is the
signal still too loud?
– Should I have the chicken or the fish for lunch?
Microphone Placement
• Treat microphones with the utmost care. Carry them one at a time, and
don’t place them on the floor. Bring them in and set them up. If you must put
them down, use a blanket or towel. Older tube microphones are expensive to
repair and repair can take months.
• Try all the microphones available. Don’t forget about that one humble
microphone that sits in the corner of your arsenal for years and never gets
used. I wonder how a shotgun microphone aimed at a guitar amplifier would
sound, or a boundary microphone taped to the floor under a guitar amplifier,
or a lavalier clipped to the hole of an acoustic guitar?
• Check please. Double check, then triple check that the microphone is
attached to the stand correctly, not touching any other stands or instruments,
and is solidly in place.
• Mute the microphone before plugging in the cable. At this point of your
setup, the proper cable should lie at the base of the microphone stand. Check
with the control room that the channel is turned off. This avoids a great loud
pop in the speakers and, even worse, through all the headphones.
• Turn off the phantom power. If the microphone has its own power supply,
as many tube microphones do, turn off the phantom power at the console. As
well, turn it off for dynamic and unbalanced microphones.
Recording Tips for Engineers
26

• Three-to-one rule. There is an old rule when placing two or more
microphones on a single source. Place the second microphone at least three
times the distance between the first microphone and the sound source. At this
distance, the second microphone picks up enough of the room ambiance to
minimize any phase interference between the two microphones. Figure 2.10
shows that microphone (a) is one foot from the acoustic guitar source, and
that microphone (b) is beyond the three-foot perimeter.
Figure 2.10 Three-to-one rule
This rule can be broken when two microphones are placed so close together
that they are in phase, such as two microphones taped together and aimed at
a snare drum.
• Four-to-one rule. The distance between the close and distant microphones is
far more critical if the close microphone is very near the sound source. When
miking an acoustic guitar with the close microphone at about three inches from
The Studio Setup
27

the fret board, the distant microphone should be at least four times that distance.
When close miking in a somewhat dead acoustic space, the four-to-one rule
should be applied. In a more traditional open miking situation, the three-to-one
rule can be applied.
• Port noise complaint. Blocking the ports of a microphone will change the
polar pattern. Placing a microphone too close to the floor, wall, window or
any other reflective surface may cause unwanted reflections to bounce back
into the microphone. Tighten the microphone’s polar pattern using damping,
such as a carpet on the surface, to reduce these close reflections.
• Set up a talkback microphone. A talkback microphone is a microphone
placed in the middle of the recording room so the players can communicate
with the people in the control room. Set up an omni-directional patterned
talkback microphone early in the setup because proper communication
between studio and control room shortens setup time.
Close miking
• Just as it sounds. Close miking means placing the microphone within inches
of the source. Some advantages of close miking might include:
– A fuller tighter sound.
– Minimal leakage from other instruments.
– No unwanted ambiance on a track. If needed, ambiance can be added to a
dry track, but once recorded, ambiance cannot be removed.
– Easier to return to the same sound if ambiance is different, such as when
using a different studio.
– More separation when recording in stereo.
• Fine placement. You can really hear differences in the sound as you move the
close microphone around in front of the source. As the microphone moves away
from the source, slight changes in microphone placement aren’t as apparent.
Recording Tips for Engineers
28
A microphone placed too close to a source can compromise warmth. The
hottest part of the match is not right at the head, it is farther away in the flame.
The strongest part of a waterfall is not at the crest, but farther down, where it
has had time to build power.
Distant miking
• Go the distance. Distant miking means the microphone is placed a few feet
or more from the source. Advantages of distant miking include:
– A more ambient sound with greater influence from the surrounding envi-
ronment. Ambiance can help establish a sense of depth. Take note:
ambiance microphones, also called room microphones, can reveal flaws
in the room design.
– Not in the way of players, as they need to be totally comfortable.
– A second distant microphone recorded on a separate track can add
placement flexibility when mixing.
– Able to pick up a large group of musicians. (Have you ever tried to pick
up a large group of musicians?) When distant miking a group of players,
usually for classical music, the tonal balance captured can be better than
recording with separate close microphones. The players can mix them-
selves better than the engineer.
– Less dynamics, often associated with, for example, vocals. With close
miking, a compressor is almost a necessity, unless the singer is really
good and knows how to control the dynamics of his voice. A foot or more
distance between singer and microphone causes less change in level. The
farther away the singer is from the microphone the more the surrounding
environment gets recorded with the vocal. This is when studio design
comes into factor.
The Studio Setup
29

X/Y stereo miking
To produce a full stereo sound, place matching microphones (often
microphones that have concurrent serial numbers are very close in sound) in
an ‘X’ position with their capsules close together (Figure 2.11). This setup
essentially eliminates any phase problems between the two microphones. Use
X/Y miking in restricted spaces where microphones need to be somewhat
close together yet produce a good stereo image such as over a piano, or above
a violin section.
The angle of the microphones will determine the stereo spread. The wider
the angle, the more stereo spread, until the angle gets too wide, creating a
hole in the middle. The narrower the angle, the less of a hole, creating more
of a mono signal.
Set up the two microphones so both are at the same height and have the
same directional polar pattern with matching pads and roll-offs.
Figure 2.11 X/Y microphone setup
Recording Tips for Engineers
30
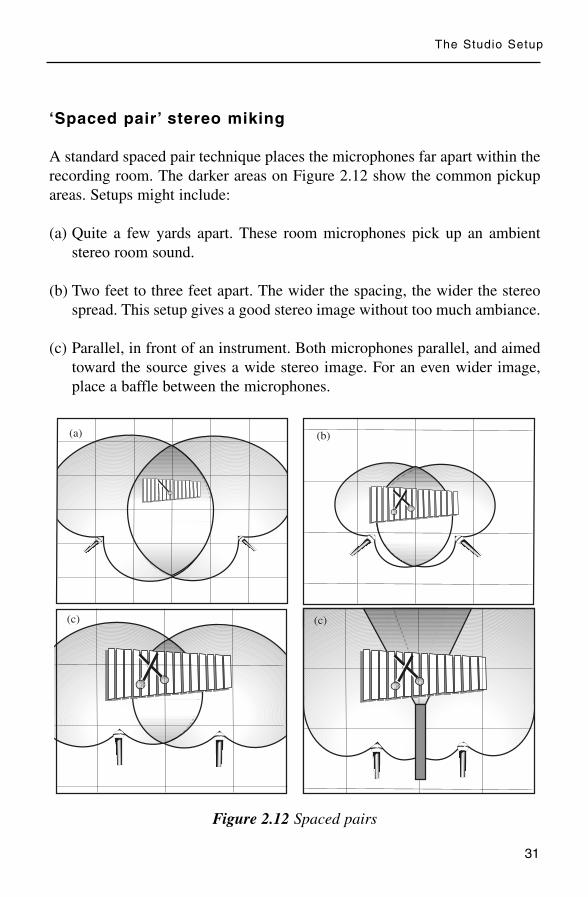
‘Spaced pair’ stereo miking
A standard spaced pair technique places the microphones far apart within the
recording room. The darker areas on Figure 2.12 show the common pickup
areas. Setups might include:
(a) Quite a few yards apart. These room microphones pick up an ambient
stereo room sound.
(b) Two feet to three feet apart. The wider the spacing, the wider the stereo
spread. This setup gives a good stereo image without too much ambiance.
(c) Parallel, in front of an instrument. Both microphones parallel, and aimed
toward the source gives a wide stereo image. For an even wider image,
place a baffle between the microphones.
Figure 2.12 Spaced pairs
The Studio Setup
31
(c) (c)
(a) (b)

M/S stereo miking
M/S stands for mid-side. This method sums and differences the polar patterns
of two microphones. Use M/S when you need to decide later how wide the
stereo image should be (Figure 2.13). To monitor and control the depth of the
stereo image, three channels are needed on the console.
(1) Set up two microphones, one with a cardioid pattern ‘M,’ the other with a
figure-8 pattern ‘S.’
(2) Aim the M microphone toward the source. Position the S microphone on
the same plane, but at a 90 degree angle.
(3) Route the M microphone to record on track one, and route the S
microphone to record on track two. The M microphone returns from the
multitrack recorder into channel one, and the S microphone returns into
channel two.
Figure 2.13 M/S pattern
Recording Tips for Engineers
32

(4) Patch the S signal out of channel two into channel three so it returns on
both two and three. Switch channel three out of phase.
(5) Pan channel one to the center, then pan two and three hard L/R.
(6) Raise channel one to set the appropriate mono level, then raise channels
two and three to control the stereo width.
Decca tree stereo miking
The decca tree setup, used for larger situations, uses a three microphone array
(Figure 2.14). All three are set in an omni-directional pattern, then placed left,
center, and right a few feet behind and about ten feet above the conductor.
Decca tree recording is becoming more popular in L-C-R (left, center, right)
stereo, and 5.1 surround DVD recordings.
Decca tree stereo miking records not only on the left/right location of
instruments but the fore and background location, crucial for orchestral ses-
sions where depth and dimension would be lost with close miking.
Figure 2.14 Decca tree
The Studio Setup
33
6 feet
10 feet
Orchestra
3 feet

Cables
• What are balanced cables? A standard recording studio XLR balanced
cable uses three wires – two to carry the signal and one for the shield. The
three wires are termed hot, cold and common. Both XLR and 1⁄4" stereo
cables are balanced. On a balanced 1⁄4" cable the three wires connected are
tip, ring and sleeve (TRS) with the sleeve being the shield terminal.
Of the two ends that carry the signal, one has the polarity (phase) switched.
Why? Any interference will affect both wires equally. At the balanced input
connector, these equal and opposite interference signals will cancel out. This
process is called ‘balancing’ or common mode rejection. This eliminates inter-
ference so you can use longer cables with minimal hum pickup.
• What are unbalanced cables? A standard guitar cord is an example of an
unbalanced cable. It contains two wires – one wire is the hot, and the other is
the shield. The shield is wrapped around the hot wire and used for the return
signal. Unbalanced cables are normally used for getting mono signal from the
instrument to the amplifier or direct box. Most outboard equipment uses 1⁄4"
inputs, and all consoles have the option of balanced and unbalanced 1⁄4" (line
level) inputs.
Another unbalanced line is a 1⁄4" non-shielded speaker cable. It is two
heavy-gauge parallel wires. Don’t use speaker cable in place of shielded
cable. Cables from amplifier to speaker must be heavy gauge for as little
power loss as possible.
Running cables
• Use the proper cable and connectors. Adapters will always degrade the
signal so use them as a last resort. For the best results, use the proper cables so
no adapters are necessary. One long cable is better than joining two short ones.
• Respect the studio cables. Wrap and unwrap studio cables correctly
and don’t throw them around. Avoid any sort of sticky tape to hold cables
together. Use a specific plastic clip, even a piece of rope with a loop on the
end, anything but tape.
Recording Tips for Engineers
34

• Label the cable. Label both ends of XLR cables for easier tracing. For
example, if cable 28 is connected to a microphone that is not working, rather
than having to trace it through the labyrinth of all the other cables, simply
read the number on the cable, then check where the corresponding number is
plugged in at the input panel.
• Keep it short. Use the shortest unbalanced high-impedance cables as possible.
Longer cables can pick up hum and roll off high frequencies.
• Keep it long. Allow enough length so cables are never taut. Don’t wrap
them up in a coil, just leave the excess cable on the floor by the base of the
microphone stand.
• Leave a channel or two open when plugging in the drums. You want all
the drum microphones to enter the console in the same area. Later in the
session, if you need to add another drum microphone for any reason, you
won’t need to return it somewhere else on the console.
• Use the best cable. Don’t use a suspect cable on a microphone. If you’re
short on cables, use it on headphones. If it fails during the session, the
recording will not be compromised. No one wants to find out half the piano
sound is gone when it comes time to mix. Remove faulty cables from the
room so no one mistakes them for usable cables.
• For best results. Use the shortest thickest highest quality cables on the
vocal microphone.
• Check your shorts. Keep an ohm meter close by to determine where a
problem lies. Is there a short in the cable? Is the microphone not working?
Maybe it can be as simple as a wrong button pressed at the console. A meter
tells you instantly if signal is correctly flowing through a piece of gear.
• Three cord rock and roll. Keep extra everything close by. The session
should never stop due to a lack of workable cables.
The Studio Setup
35
• Power arrangers. Don’t run (high-level) AC power cables parallel with
(low-level) audio signal cables. Cross power cables at right angles from
signal cables to minimize AC buzz leaking into the microphone cables.
• The wall of sound. To avoid interference, run cables a few inches away
from the studio wall. Right behind this wall lies a plethora of power cables
and other audio lines.
• Don’t plug everything into one AC outlet. You will have a hot, smoking
studio with scorching leads and blazing tracks that smolder! Get it?
• Don’t wrap the cable around the stand. Unwrapping and removing a
cable because the placement is wrong is a waste of valuable setup time.
Sometimes, just leave it to hang.
• Wrap the cable around the stand. If you are sure the microphone stand is
properly placed and the signal flow is correct, maybe wrap the cable around
the stand to keep it out of the way.
Direct Box
A direct box, or ‘D.I. box’ changes an electric instrument's high-impedance
unbalanced output signal to a low-impedance balanced signal that will
properly interface with the microphone pre-amp. Some are designed with an
input pad and a ground switch on them. Like microphones and amplifiers,
they vary widely in sound. Direct boxes are available as passive (transformer
only) or active (pre-amp and transformer) where amplification allows level to
be raised higher to improve signal-to-noise ratio. Passive direct boxes might
sound more natural than active ones due to lack of additional processing, but
active boxes may have better frequency response.
Advantages of using a direct box include the absence of leakage, no
amplifier distortion and a full clean sound. A good direct box records the full
spectrum of the instrument, where a microphone in front an amplifier may
not. Many engineers agree that a direct box alone just can’t recreate that
chest-cavity vibrating thump that an amplifier and microphone can deliver.
Recording Tips for Engineers
36

Ground
Ground loop and the resulting hum occur when electrical equipment is
grounded to more than one location, creating multiple paths. As well, hum
can originate from fluorescent lights, video monitors, dimmer switches,
refrigerators and more.
• Eliminate the hum. If your audio equipment setup is humming:
– Use a dedicated AC power circuit for the studio. Some studios have outlets
strictly for audio equipment, often indicated by orange wall outlets.
Sometimes all the audio equipment is plugged into a large 12-outlet box,
with everything on the same circuit. The outlets in the rest of the studio
would be on a separate circuit, and used for the coffee machine, the video
games and the vibrating bed.
– Don’t plug a power strip into another power strip.
– Eliminate all fluorescent lights in the vicinity.
– Don’t use a ground lifter – a converter that changes a three-prong plug to
a two-prong plug. This can be dangerous. The third pin is there to keep
you safe. Most equipment today is fitted with three-prong outlets, the
third being a chassis ground just to avoid any bothersome recording
engineer electrocution issues.
– Use a transformer, or hum remover, made specifically to eliminate hum
by removing any common ground between devices.
– Use the highest quality, shortest cables.
– Rearrange the way the outboard equipment is stacked. A transformer in
one unit may cause hum in an adjacent unit.
– Use a filter. Although not recommended, a 60 Hz hum can be removed
using a filter set at 60 Hz and 120 Hz. But this pulls that frequency on any
musical content and can affect harmonics.
The Studio Setup
37

– Switch the direct box ground. Some direct boxes have a ground switch
which disconnects the input cable shield from the output cable shield,
eliminating ground loops and the resulting hum.
– When the hum is from a guitar amplifier, plug the amplifier into a differ-
ent wall outlet on a different circuit.
– Have the player rotate. Single-coil pickups in guitars are notorious for
humming when the player is aimed in a certain direction. The hum disap-
pears when he points in another direction. When you find the quietest
angle for the player to stand, run a section of sticky tape across the floor
so the player knows just what the angle should be.
– If you still can’t find the hum, use the process of elimination: shut
everything off, and start at the beginning turning everything on again.
When the hum starts, that’s the culprit.
Phase
When identical signals combine, such as when two microphones are bussed
to one track, phase shift can be introduced when one of the signals is delayed.
This shift or delay is measured in degrees. Figure 2.15(a) shows that when
similar sine waves combine with no delays, the signal doubles. Figure 2.15(b)
shows that when one signal is delayed exactly half the length of the sound
wave, its polarity is 180° out-of-phase with the other signal. When combined,
these signals will cancel each other out. Note that phase or phase shift
involves delay. Polarity does not. Polarity refers to the + or - direction of an
electrical signal.
• Check for polarity. Somewhere along the line between microphone and
monitor, the polarity may be reversed. Perhaps it’s a miswired connector or
input jack, maybe even a wrong button pressed. To check for polarity:
(1) Place matching microphones right next to each other, with the capsules as
close as possible, both aimed toward a source.
Recording Tips for Engineers
38

Figure 2.15 Phase cancellation
(2) Have someone stand a few feet away and speak.
(3) Solo the two channels, and listen in mono.
(4) Press the phase button (sometimes mislabeled as polarity) on one of the
microphone channels. If the signal cancels, the microphones have the
same polarity. If the signal cancels when no buttons are pressed, the two
microphones are wired in opposite polarity (the wiring to pins 2 and 3 are
reversed in one microphone’s XLR connector).
• Phase – the facts. Every foot that you move a microphone away from the
source results in about a 1 millisecond delay. If a second microphone is
placed incorrectly, the signal reaches it at a different time in the cycle.
The Studio Setup
39
+
= =
0° 90° 180° 270° 0°0° 90° 180° 270° 0°
0° 90° 180° 270° 0°+
delay
b)Microphone 1
Microphone 2
Result
Mic 1
Mic 2
Result
(a) (b)

At specific distances, certain frequencies will be out-of-phase resulting in a thin
incomplete sound. This phenomenon occurs when recording any sound with
two inputs, such as when combining a direct box and a distant microphone.
Figure 2.16 shows how to minimize phase cancellation between
microphones. Figure 2.16(a) shows two microphones placed as the session
dictates. Solo the two channels, match the levels, and listen in mono. At the
console, press the phase button on the channel with the microphone farthest
from the sound source.
Have the player play, preferably a single note, while an assistant moves
the distant microphone, Figure 2.16(b), stand and all, forward and back.
When the combined sound source almost disappears, the two signals are
out-of-phase, canceling each other.
Place the distant microphone in that spot. Deactivate the phase button on
the console. Figure 2.16(c) shows the farthest microphone is back in phase
with the close microphone.
Figure 2.16 Minimizing phase cancellation
Recording Tips for Engineers
40
0° 180° 0° 180° 0° 180° 0°
0° 180° 0° 180° 0° 180° 0°
0° 180° 0° 180° 0° 180° 0°
(a)
(b)
(c)

There is no great trick to making a set of drums sound like a well tuned,
punchy, solid drum set. First, start with a well tuned, punchy, solid drum set.
Properly tuned, well played drums coupled with good songwriting and solid
engineering will always record the best.
But let’s get real. Some drummers aren’t interested in changing heads or
tuning. They just want to bash away. If this works for the music and the artist,
then bask in the bash.
Placing the Drums
• Arrive early. If you are new to the room, or new to the drummer, set up a
bit earlier than normal, perhaps even the night before the session. This should
give you and the drummer extra time to work out the absolute best sounds.
But don’t tire him out before the session starts.
T H E D R U M S S E T U P
Chapter Three

Recording Tips for Engineers
42
• Determine the best placement for the drums. For a rock record you might
place the drums in the middle of the room to minimize coloration from close
reflections. Maybe place the drums next to a door that opens up into a larger
area such as a loading bay, for ambiance microphones. This isn’t necessarily
for a huge ambient rock drum sound, but for using a bit of the room sound for
placement and focus of the drums.
For a blues session, you might not place them right in the middle, but more
to one side to leave space for other players. For a country session, maybe place
the drums in an isolation booth. Ask the staff where other engineers normally
place the drums.
Work with the drummer to find the best location. You don’t want to place
the drums in the isolation booth, then find out he wants to be on the floor with
the rest of the band. Change your setup for him, don’t expect him to change
his setup for you.
• Get felt in the corner. Take advantage of the room’s acoustics. Some
studios have reversible panels on the walls where one side is reflective wood
and the other side is absorbent padding. Use these acoustic panels to change
the characteristics of different parts of the room. If these measures are not
enough to eliminate errant frequencies or reflections, hang blankets and place
baffles. Wait until all the microphones are set up before placing the baffles.
• Rise and shine. If a whole band is playing together, maybe place the drum
kit on a drum riser to eliminate low-end rumble from neighboring amplifiers,
and to keep rumble from the drums out of the amplifier microphones. The
drummer might play a little better when he is at eye level with the rest of the
players and the engineer. It makes him feel as if he’s on stage.
• Use a carpet under the drums. Lay out a carpet before setting up the drum
kit to keep reflections from bouncing off the floor back into the microphones.
A carpet helps eliminate some of the squeaks and rattles that may occur when
the kit sits on the bare floor. A carpet also helps keep the kit stationary.
But how does it sound without the carpet underneath the kit? Maybe a
drum sound with reflections from the floor will work for your situation. Just
don’t scratch the floor.

The Drums Setup
43
• His rug is taped on. If you know the drummer is in again next week, tape
the markings on the carpet under the kit. Use duct tape to mark exactly where
each drum and stand goes. Different drummers using the same carpet may
need different colors to distinguish whose kit goes where.
• Most drummers will set up the kit themselves. Once the drums are placed
properly according the drummer, set all microphone stands squarely on the
floor at the correct spot. Use the strongest stands available. The placement of
the drums takes precedent over the placement of the microphone stands. Work
the setup around the drums.
• Use a sand bag to hold a stand in place. Set all stands stable enough for
someone to bump into it and have the placement remain unchanged.
• Stop the kick from moving forward. Some drummers really hit the drums,
causing the kick to edge forward, shifting the whole kit. Secure the kick in
place using a cinder block, sandbag or equivalent. Some situations call for
nailing a short plank in front of the kick drum to keep it in place, but this is
an extreme measure.
• Fix faulty felts. Replace worn felt pads and plastic sleeves that hold the
cymbal in place. A worn cymbal sleeve may rattle against its metal stand.
• Bring it from home to me. Encourage the drummer, as with the rest of the
musicians, to bring all of their percussion instruments to the sessions. Different
songs may require different sounds. No one wants to hear, ‘ I have a tambourine,
but I left it at home’ or worse ‘Oops, I just broke my last drumstick.’
• Don’t compromise the drum sound. Take the time to fix problems before
they reach the console.
Changing Drum Heads
• More than one way to skin a kit. As with guitar strings, drum heads (also
called skins) wear out with use. New drum heads record much better than
dead drum heads.

• Do not change the drum heads without approval. It’s not your sound, it’s
the drummers. Some drummers prefer the sound of a dead snare, or certain
tom-tom tunings. Don’t monkey with any musical gear unless you own it, or
you have approval. Musicians tend to get choked when they walk into the room
and find their instrument disassembled across the floor, with you trying to
somehow ‘improve’ the sound.
If you do change the heads on the drums, either replace them with similar
heads, or find out what the drummer wants.
• Go stand on your head. If you must change a drum head:
(1) Use a proper drum key to remove the lugnuts.
(2) Remove the old head from the snare.
(3) Clean out any waste, and wipe the rim clean with a rag.
(4) Check for warpage on the rim by laying the drum upside down on a flat
surface, turning out the lights and shining a flashlight inside the drum to
check for any gaps. If gaps exist, the drum can’t be properly tuned. It
needs to be looked at by a competent professional drum dude.
(5) Seat the new head and connect each lugnut by hand.
(6) Tighten the lugnuts like a you would when changing a tire – not one after
the other, but one then it’s opposite across the drum – for example, one
o’clock, then seven o’clock and on. Twist each lugnut once, then twist the
next one once with single twist. Turn each lugnut gradually so the head
tightens to the shell evenly. As the head tightens, lessen the amount of
each turn. Expect cracks and crackle sounds. That is the head stretching.
Press down on the drum as you tighten the lugnuts to really stretch the
head across the rim. Sometimes drummers kneel, or even stand on the
snare drum head to stretch it.
• Front line assembly. Removing the bottom head of the tom-toms or the
front head of a kick drum results in uneven resonance in the drum shell.
Recording Tips for Engineers
44

Better to install an old head, and trim most of it out, leaving an inch or two
around the perimeter. This leaves the front hardware intact, yet allows full
access to inside the drum for a microphone, if that’s your setup.
Tuning the Drums
• You can’t beat our drums. If you took two wooden sticks and pounded on
a guitar for hours on end, do you think it may need to be tuned now and again?
It’s understandable that pounding on a set of drums over and over, day after
day tends to render the ever-loving life out of them. Keeping drums in tune
with new heads keeps them musical, therefore easier to record.
Tuning works well when the drum heads are left to stretch for at least a
day. Of course, this might not be an option when you are scheduled to record
the drums right now.
• Tune that thing up. Proper tuning enhances the drums’ overtones, and brings
out fundamental resonance. Tuning the drums slightly lower produces a larger
sound because more air is moved. Set too low, and the tone suffers. Tuning a
drum higher raises the drums’ natural lower frequencies. Tom-toms tuned too
high may create additional rattle on the snares under the snare drum.
• Turn the snares off before tuning the snare drum. Tap around the outer
edge of the drum head and listen for differences in pitch. Tighten or loosen
as necessary. This takes a trained ear.
A tighter head gives more attack and crack, and a looser head gives a
deeper, flappier sound with less crack. Some drummers leave the snares loose
because they like the loose, rattle-like sound.
• Tune that thing down. Down tune a small snare drum for a massive snare
sound. Some of those great big drum sounds you heard in music as a kid were
not made by the huge kits you may have imagined.
• Tuning two headed tom-toms. With two-headed tom-toms, sometimes the
drummer prefers the top skin tuned higher than the bottom. He’ll tune the top
skin slightly high, and the bottom skin slightly low to give the drums a more
The Drums Setup
45

Recording Tips for Engineers
46
sustained and pleasing sound. Sometimes for a dryer sound he’ll prefer the
bottom skin tuned higher than the top. For a nice, full sound he likes the top
head tuned the same as the bottom.
Bottom heads help control the tuning and decay of the drum, and give
more body to the tom-tom sound. Two headed tom-toms can be harder to
record than single headed toms, as the tuning can take longer.
Tune each drum, starting with the top head, then adjusting the bottom
head. Keep going down until all tom-toms are tuned. Some drummers tune
their drums by knocking on the shell or tapping the head of the drum, then
listening to the resonant frequency and tuning the heads to that.
• Intervals. A common interval between tom-toms is fourths and, as some
drummers say, a fifth between the lowest tom and the kick. Determining the
interval tends to be the drummer’s domain, not the engineer’s. If he wants
thirds, thirds it is. Ideally, each drum would be tuned to help underscore the
musical chords of the song.
Smaller drums, cymbals, and percussion instruments such as tambourines
and castanets are classed as indefinite pitch, or not of a fixed pitch so they aren’t
normally tuned.
• Alter the pitch a bit. Keep an even tension on all lugnuts so unwanted
overtones are minimized. Maybe create a more complex tom-tom sound by
loosening one lugnut to slightly lower its pitch.
• Carr talk. Well-tuned drums sound great, so take the time needed. When I
worked with KISS, the late, great Eric Carr had a drum tuner in the control
room. Eric would pound the drums for a couple of takes, then the drum tuner
would tweak the tuning before the next take. The drums were always right.
• Drummers always know best. There is no right or wrong way to set up an
instrument. Different people prefer different setups and the drummer knows
best about his own drums. A good drummer will be able to hear the proper
pitch, and tune the drums to minimize sympathetic ringing.
The Drums Setup
47
Preparation
• Dampin’ donuts. To dampen a drum, place a donut (an old drum head with
the middle cut out) on top of the drum head. The drum will have less sustain
than a drum with no damping. For real damping, roll up a wad or two of duct
tape, then duct tape these wads to the drum head. This renders it dead. Don’t
put anything over the area where the drumstick hits the head.
Commercial sticky gum is now available that tears off. Tear off a blob and
smear it across the drum for damping. Some drum heads are manufactured
with a damping system installed, such as a thicker outer rim.
Before damping, consider the song and the rest of the instruments. A full,
fast song may not need drum damping. A drum sound with all the overtones
might not sound as big and ringy when the rest of the instruments are playing.
• King of the ring. Work with the player to eliminate all the drum kit’s
squeaks and rattles – not to be confused with the natural ring of the drums.
Harmonics are part of the sound of the drum kit. Many drummers like this
ringing overtone, which is more a function of tuning. Some engineers, not
understanding that this can be a desirable trait, work on eliminating it.
• Listen, shove it. To deaden the kick drum sound, place a folded packing
blanket or a sand bag inside the kick. Maybe fill the kick drum with torn up
newspaper, or light blankets and towels. Whatever works for the situation.
But before shoving in a blanket, listen to kick drum. Maybe the sound you
want is already there.
• Will that be cash or credit card? For a real click on the kick drum, glue a
quarter right where the beater hits the head. If you are too cheap for that, tape
a charge card (preferably the record producer’s) to the kick drum head with
duct tape. The beater creates a click when it hits the quarter, or the card, and
not the drum head.
• Wooden vs. felt. A felt beater on the kick results in a softer, woofier sound.
A wooden beater can give a clickier, defined kick sound. Many hard rock
players use a wooden beater, while a lot of jazz players use felt beaters. These
choices commonly fall into the drummer’s jurisdiction.

• We don’t have much tape, so let’s wrap it up. Wrap masking tape or duct
tape around the felt beater to give it more attack. Naturally, the tape wears out
after a few takes.
• Spring break. If a new pedal spring is squeaking, oiling it may not be
necessary, just try exercising it. Pull the spring farther ahead than it is supposed
to go, but be careful not to break, or even damage the spring by overstretching
it. There’s nothing like a good stretch before getting started.
Miking the Drums
Miking the kick drum
• Head space. Different placements will result in vastly different kick drum
sounds. The best way to find the perfect spot is to listen in the control room
while your assistant moves the microphone around. As the drummer plays the
kick drum, you listen for the best spot. When you hear it, tell the assistant to
stop. That is the best starting point. Figure 3.1 shows a microphone:
(a) At close range. Aimed within a few inches from where the beater meets
the skin, creating more click and attack than boom.
(b) Pulled back and off-axis. A microphone aimed towards where the shell
meets the head results in a rounder sound, with definition, less attack and
more boom. This is a common starting point.
(c) Distant. Pull the microphone to just outside the open head for a full deep
drum sound, but watch for increased leakage and decreased clarity.
• Dynamics. Due to the high pressure of drums in modern music, dynamic
microphones are commonly used on close-miking situations. Dynamics tend
to be more robust and can handle the solid pressure levels. A large diaphragm
dynamic microphone works well to accurately capture as much low end as
possible. That kick can push a lot of power.
Note that some of today’s condenser microphones are quite rugged, and
certainly up to the task of recording the toughest of drums and drummers.
Recording Tips for Engineers
48

Figure 3.1 Microphones inside the kick drum
• The style of music dictates placement. For a heavier rock sound, you
might put the microphone a few inches from the inner head, then baffle off
the kick drum. For a more jazzy sound, you might leave the front bass drum
head on, then place the microphone a short distance from the front head in a
more open environment.
• Embarrassing leakage. Lessen leakage on the kick drum track by aiming the
microphone inside the kick drum away from the low tom-tom.
• Use a real bass drum. If you aren’t getting that round low kick drum sound
that you desire, bring in a larger bass drum, even as large as a parade style bass
drum, and set it close to the front of the kick drum. Set a microphone in front of
the big drum. As the drummer plays, this low drum will ring sympathetically.
Add this round warm low end into the sound as desired. Use this technique to
give a smaller drum kit a more natural low end.
The Drums Setup
49
(a)
(b)
(c)

Recording Tips for Engineers
50
• Build a kick drum tunnel. Once the microphone setup is complete, build
a tunnel around the kick drum. Figure 3.2 shows how this isolates the rest of
the room from the kick drum microphone, and keeps the kick drum somewhat
isolated from the rest of the room. Some engineers use a chair in front of the
kick, with a blanket over it. Some use two microphone stands to hold the
blanket. This setup works well with one close microphone, and a second one
outside the shell aimed at the pedal. Follow this routine:
(1) Use a proper stand and place the microphone in the kick drum as you
normally would to suit the music.
(2) Place two short microphone stands (or similar apparatus) in front of the
kick drum, then lay a packing blanket over the stands, creating a tunnel.
(3) Duct tape the blanket to the hardware on the kick drum, not the shell. Ask
the drummer before duct taping blankets to his beloved drums. For more
isolation, cover the open end with another blanket, making sure you don’t
move the microphone.
Figure 3.2 Kick drum tunnel

The Drums Setup
51
• A last resort. In a big session where microphone stands are at a premium,
consider laying the microphone directly on the pillow inside the kick drum,
aimed at the beater. Crude but effective.
• A kick drum sound is only as good as the surrounding drum set. Leave
all the drums in the monitor mix when setting up the kick microphone. This
lets you monitor frequency overlap between the tom-toms and the kick drum.
• Let’s dance on. Don’t underestimate the importance of a good kick drum
sound. It carries the downbeat of the music. This is what people dance to.
Miking the snare drum
• Start with a dynamic microphone. A loud snare drum’s high transients
mean that a dynamic microphone may work best. Start by aiming the
microphone across the drum head toward the center of the drum where the
stick meets the head. Keep the microphone about an inch above the rim.
Maybe aim the microphone off-center to eliminate some of the click and to
coax more of the tonality from the drum. Listen and move the microphone to
suit your needs.
Some recording engineers aim the snare microphone off-axis to the high
hat to minimize leakage.
• Use more than one microphone. Place a second microphone underneath
the snare drum to capture the snares hitting the bottom skin. Since the bottom
microphone ‘sees’ the heads move out when the top microphone ‘sees’ the
heads move in, the microphone signals are in opposite polarity. Switch the
polarity on the bottom microphone channel.
• Head to head. Tape a small, hefty condenser microphone along side of the
dynamic microphone on the top of the snare drum. Position the capsules as
close together as possible. This condenser microphone should accentuate the
higher frequencies of the snare, while the dynamic microphone picks up the
punch of the drum. Rather than equalizing the dynamic microphone to get
more highs out of it, raise the level of the condenser microphone to add a nice
crack to the snare sound.

Recording Tips for Engineers
52
If the situation calls for it, maybe use two different microphones on the top
of the snare, plus one on the bottom. Of course this takes three channels on
the console, more time, and may not even be necessary. Rarely will three
microphones sound three times as good.
• Eliminate room rattles. Keep all unused snare drums covered, as the snares
tend to rattle from the room sounds.
• Wanted. Dead or alive. When I worked on ‘Bon Jovi – Slippery When
Wet,’ Tico Torres would remove pockmarks from his snare drum skin by
slowly moving a lit portable lighter above them. The heat caused the pock-
marks to recede, reviving an otherwise dead drum head for one more pass.
Miking the tom-toms
• Dynamic microphones work well on close miked tom-toms where the
player hits hard. Condenser microphones sound good on less aggressive
styles, as they capture the player’s rich subtleties and dynamics. Some close-
miked condensers may overload.
If possible, use the largest capsule microphones on the lowest tom-toms.
• Single headed tom-tom. If the tom-tom has a single head, place the
microphone inside the drum. Aim it away from the cymbals to reduce leakage.
• Bottom microphones. If the tom-tom has two heads, adding a second
microphone underneath can add dimension and depth if done correctly.
Again, the bottom microphone channel would be switched out-of-phase at the
console. Although this adds to the amount of inputs, microphones and time,
it can create a solid tom-tom sound.
• Half your inputs. Normally, both the top and bottom tom-tom microphone
channels are bussed to a single track, then recorded. If certain frequencies
need to be added or pulled on the top microphone, chances are those same
changes are needed on the bottom, so why not combine them, then process
the two microphones as one?
Plug the top microphone into the assigned input at the microphone input
panel, and plug the bottom microphone into the same input at another input

The Drums Setup
53
panel. For example, the top microphone is plugged into input 12, the bottom
microphone would be connected to input 12 at a second wall panel in the room.
The cable on the bottom microphone would be an ‘opposite polarity’ cable. This
can load down the two microphones, possibly causing low-frequency loss. Use
microphones that don’t require phantom power.
Save cables and inputs by making a set of ‘two-to-one’ XLR cables where
two 3-foot long cables each have a female XLR connector at one end. One of
the female ends has the polarity reversed. This means the connections to pins
2 and 3 are switched. At the other end, these two cables combine and connect
to a single male XLR jack.
Mark the reverse polarity connector with red nail polish to show which
female connector is reversed. At least that’s what you can say you’re doing
when they catch you buying red nail polish.
• What’s your angle. Play with the angle and placement of the microphone
to hear the best placement with the least leakage.
• Lost in space. Pull the microphones back some to capture resonance from
the tom-toms that may be lost with close miking. The farther away they are,
the more the rest of the drums affect the sound, picking up more of the bulk
of the drum, rather than the initial hit.
• Try this. Place one microphone between two rack tom-toms and set the
polar pattern in a figure-8 position. Of course, check with the drummer that no
microphone or stand is in his way.
• Isolate your low tom. To get a larger sounding floor tom-tom sound, place
foam pads under the feet of the drum. The tom-tom won’t lose as much low
resonance through the floor.
• A ring for tom. To lower the ringing in the toms, toss a handful of cotton balls
inside the toms. Ringing decreases depending on how many balls are tossed in.
Even properly tuned toms can ring out.
• Reduce the low tom-tom rattle. Hang the drummer’s stick bag off of the
side of the floor tom to reduce rattle.

Miking the cymbals/overhead
• Don’t take the overhead microphones lightly. The drum sound lies in the
overhead microphones. Get a great sound in the overheads, then accentuate
this good sound with well-defined kick and snare – key elements of a good
drum sound.
• Condense to the music. Condenser microphones work well as overheads
because they preserve the natural crispness of the sound. Placing them a few
feet above the drums will result in smooth response and a warm blend of all
the drums nicely meshing.
As the microphones are pulled back, they will reveal more of the room
sound. A properly designed room will enhance your drum sound. A poorly
designed room will make the best of drum kits sound average. Use the song,
proximity to other instruments, and ability of the player to determine the best
placement for the overheads.
• Center the microphones over the snare. For a centered, focused sound, place
two main overhead microphones the same distance from the snare drum.
Commonly, two microphones in a stereo pattern are ample for overheads.
• Height of the mike. Set both overhead microphones to the same height.
From the console, use your eye to match the height of both microphones with
a horizontal plane in the studio, such as where the wall and ceiling meet.
• Do you want to close mike the cymbals? Dynamic microphones work well
when close miking cymbals, due to the combination of high transients and
proximity effect. Because close miking cymbals has the potential for maxi-
mum overload, pad the microphones, use a peak limiter, and set record levels
low. Close miking the cymbals will pick up more low end, but pulling the
microphones back and up results in more overall drums being recorded.
Other than for close miking, dynamic microphones are not recommended for
cymbals or overheads.
If the player is a real basher, pull the cymbal microphones back so less of
the splash will come through. Or add a strip of duct tape across the cymbals
for damping.
Recording Tips for Engineers
54

• You’re hat got blown off. Depending on your needs, either a condenser or
dynamic can work on a high hat. But sometimes a high hat microphone is
either not necessary or there just aren’t enough microphones. Place the snare
microphone in a position to pick up more of the high hat, or aim an overhead
microphone more towards it.
• Start with a cardioid pattern. Drum microphones with a cardioid pattern
will pick up more focused areas than microphones with an omni-directional
pattern. Big stereo tom-tom fills might lose their stereo effect under omni-
directional microphones.
• Pick up your hat. To minimize leakage, aim the high hat microphone away
from the snare drum. Take time to find the sweet spot where you pick up lots
of high hat with minimal leakage from the other drums and cymbals.
• No rush. Aim the high hat microphone so it is away from any rush of air that
occurs when the high hat opens and closes. A narrower polar pattern may be
needed to ease the breeze. Or aim the microphone towards, but not aimed
directly at, the center of the bell. This will result in a heavier sound.
• Use a windscreen on the high hat microphone. A strategically placed
windscreen can minimize any breezes coming from the rush of air into the
high hat microphone.
• Clean cymbals sound better. If cymbals are dead sounding, clean them
with a standard copper or metal cleaner. This returns some if the original
sheen, aural and visual.
• Thin cymbals. Thicker cymbals are louder than thin ones, so if cymbals are
washing over all of your drum tracks, try thinner cymbals.
• Trashy hat sound. Some songs may need the trashiest of high hat sounds. For
serious trash, ask the drummer to bring in an old cracked high hat. Don’t
destroy a perfectly good cymbal to do this in case the sound doesn’t work with
the song. A trashy high hat microphone sound may need a microphone pad.
The Drums Setup
55

Recording Tips for Engineers
56
Miking the room ambiance
• Condenser microphones usually work best for ambiance. Dynamic
microphones tend to have a midrange bump, so they might not be the best
choice. To get a large, ambient drum sound, place a pair of matching
microphones in corners of the room, spaced evenly from the drums. Place
each a couple of feet from each corner, aimed into the corners to record more
reflection and less direct sound. For more freedom while mixing, record
ambiance microphones on their own tracks.
• Set boundaries. Set two boundary microphones on the floor or on the walls
at opposite sides of the studio. These can work well as ambiance microphones,
as long as other instruments do not leak into them. I have heard of engineers
forcing drummers to tape these microphones to the front of their shirts.
• Go beyond your accepted recording space. Place a microphone in an
adjacent room, or an elevator shaft, or a loading bay for a natural reverb. Use
different microphone spacing and combinations to properly place instruments
within the rest of the tracks.
• Added thud. Put a microphone in another room just to catch that low-end
thump that permeates everywhere. Not really the ambiance, but the low-end
rumble. You know that dull thud you hear when your neighbor plays his stereo
too loud? Add to the mix for more bottom.
• Headphones for mike. Place a set of headphones on a microphone stand
across the room. Or hang a set of headphones around the drummer’s neck to
record the drums from his perspective. Because headphones are transducers, like
microphones, they can be plugged into microphone inputs and the stereo signal
will be transmitted. Use the proper adapters, and turn off the phantom power.
• Place the microphones low and in front of the kit. When aimed upward,
these microphones can record an ambient drum sound with ample bottom and
minimal cymbal splash.

The Drums Setup
57
One microphone setups
Sometimes there is no choice but to use one microphone to record the drums.
The fewer the microphones used, the deader the room should be. Figure 3.3
shows three methods to record drums with one microphone. Try:
(a) From above. A microphone placed above the drums has lots of cymbals
and snare, but little kick.
(b) In front. Placing the microphone in front results in lots of kick drum and
little snare.
(c) In the middle of the room. A distant microphone in the room aimed at the
drums is certainly not a tight sound, but more of an ambient sound. Maybe
have someone walk around the room with the microphone while the
player plays, and listen for the best spot.
Figure 3.3 One microphone drums setups
(b)
(a)
(c)

Recording Tips for Engineers
58
Two microphone setups
Two microphones open more options for a good drum sound. Whenever you
combine two or more microphones, check for phase problems. Figure 3.4
shows three methods to record drums using two microphones.
(a) X/Y overhead. Microphones placed in an X/Y pattern over the drummer
record the tom-toms, snare, and cymbals in a nice stereo spread. This
setup loses some kick drum.
(b) In front and wide apart. Placed a couple of feet in front of and above the
drums, this setup captures the full kit with no real direct sounds. Good but
ambient, especially in a live room.
(c) One for the kick and one for the overhead. Determine how close you want
the second microphone to the snare drum. Maybe close miking the snare
works best, or maybe more of an overhead microphone to record the rest
of the drums works best.
Figure 3.4 Two microphone drums setups
(a)
(c)TheTuff
Beans
(c)
(b)

The Drums Setup
59
Three microphone setups
Great for jazz, as the overheads pick up exactly what the player is trying to
translate – often lost when the drums are individually miked. Figure 3.5
shows three methods to record drums with three microphones.
(a) Kick, and a stereo pair over the kit. This is a standard, and very effective
three microphone setup. Many great recordings have been made with this
setup. Choose a stereo microphone setup, and listen to what works best in
your situation. This setup works well for projects on a limited budget.
Fewer microphones mean less time, fewer tracks and fewer distractions.
Just take the time needed to place the microphones right.
(b) Kick, snare, and overhead. This setup will help you hear what happens to
drums sounds when you raise and lower certain frequencies. This is not a
stereo setup as there is only one overhead microphone.
(c) Kick, overhead and distant. Exactly where the third microphone is placed
is up to the engineer. As the number of microphones increases, so do your
options. Set them up and listen.
Figure 3.5 Three microphone drums setups
(c)(b)(a)

• Use four microphones on the drums. Commonly, this would be the same
as the three microphone setup in Figure 3.5(b) with the addition of another
overhead microphone to record the drums in stereo.
• My aim is true. Position the overhead microphones so they aren’t aimed
directly at a tom-tom or at a cymbal. This will avoid one drum or cymbal
sounding too loud in one of the overhead microphones.
Or just aim one of the overheads to pick up more of the high hat.
• Use five or more microphones on the drums. Close miking the drums is
more common today than placing three or four microphones around the kit.
To get a great full sounding kit, place one microphone in the kick drum, one
on the snare, maybe one on the high hat, and two well-placed overheads. Use
the overheads to get spacing and depth between the toms and cymbals. Placed
correctly, they will pick up the toms, cymbals and high hat, plus the snare
evenly. More microphones mean more time.
• Don’t be fooled. Great sounds can be gotten with few microphones. Just
because you don’t have a microphone on each drum and cymbal does not
mean the drums will sound second-rate. The fewer microphones you have,
the longer it takes to place them exactly right, but a few strategically placed
microphones can make a good song sound fantastic.
• ‘Sorry, I was in the studio, how much do I owe?’ The best time to go in the
studio to check the drum microphones is right when the pizza guy arrives.
Click Track
• Click track going to the drummer. A click track is normally sent through
the drummer’s headphones to help him maintain proper tempo throughout the
song. With today’s wide array of sounds available, ask the drummer exactly
what sound he wants the click to be. Some may want a snare, some may want
a cowbell. Maybe he wants the click to be in quarter notes or half notes. Work
this out with the player beforehand to make him as comfortable as possible.
Recording Tips for Engineers
60

• Don’t force players to use a click track. Some players never use a click
when rehearsing or playing live, so they might not do their best in the studio
if they are forced to use one. Some players prefer a song’s natural ebb and
flow to emerge. Perhaps they want to speed up a bit in the chorus, or slow
down a bit during a quiet part. A click is not always a necessity.
• Use a different sound for the off-beat. Sometimes snare and bass drum
mask the click, and he can’t distinguish exactly where it is. Sending an off-
beat click allows him to hear exactly what the beat is.
• Some drummers like the click track loud. Start by turning the click down
to a non-lethal level, then raise the level as the drummer asks.
• Phasing out. If the click track is leaking into some of your tracks, pan the
click to the same place in the mix as the track that contains the click leakage,
then switch the polarity on the click track channel. Slowly raise the gain of the
click track into the mix until it cancels the offending click.
Click track leakage should be avoided in the first place.
Electronic/Computer Drums
Whether a stand-alone drum machine or DAW-based drums, virtually all
studios have some sort of electronically sampled drums. Some engineers use
them as timing reference, some use them to trigger real drum sounds, some
combine live drums with drum loops. Some producers rely totally on drum
machines, while others run at the very sight of one. Whatever works for your
situation is the best way.
• Record live high hat or percussion. If recording real drums is not possible,
at least record a live high hat with programmed drums. Live percussion will
help a lifeless electronic drum track because no drummer is exact or perfect,
and these slight deviations in timing are what give music its groove.
• Use individual returns. Recording every drum to an individual track is
great if you have a plethora of tracks. If you are recording all tracks to stereo,
The Drums Setup
61

Recording Tips for Engineers
62
return the separate outputs from the drum machine into individual tracks on
the console, and buss them over to the two stereo tracks. This allows you to
process each drum sound individually so you can equalize it to work with the
rest of the instruments. This also allows you to separate the sends to any effects
unit so all instruments aren’t going to the same reverb.
Return, for example, three different snare drum sounds to the console,
then buss the three channels to a single track. Record the snare drum track
while changing levels and combinations of the three tracks throughout the
song, just to keep all hits slightly different.
Electronic drum sounds commonly bring a lot of low frequencies to the
table. Individual returns allow you to equalize individual tracks to make room
for other instruments.
• Punch the drummer. To give a drum machine more life, ride the different
tracks as you record them, maybe push the kick a bit in the chorus, or punch the
high hat into a verse, much like a real drummer would do.
• Use different drum fills. No two drum fills or tom rolls should be the same
unless they are an actual written part. For example, the tom-tom roll into the
second chorus of a song should be different, and stronger than the tom-tom
roll into the first chorus.
• Route the electronic drums through a set of speakers in the studio. Set
up two microphones in the studio and aim the microphones into the corners
of the room, not toward the speakers. You want ambiance, not direct signal.
Add this live stereo track in with the originals.
• Distortion. Run the electronic drums through a set of loud distorted speak-
ers in the studio, with close microphones aimed toward the speaker cone.
Bring this live sound in just under the electronic drums.
• Free samples. There is a plethora of sounds and samples on the Internet.
Search out the ones that will be appropriate for your sessions.

The Drums Setup
63
• Get real. Some engineers place live drums in the room, then send the drum
machine signal through the speakers just to record the actual drum overtones
and rattles. But if you have real drums, why are you using a drum machine?
• Get inside the drums. Many machines process their own drum effects.
Access the internal workings and lower the level of the effects processing.
Recording dry drums on separate tracks leaves all mix options available.
• Shy away from hard panning when recording the drum machine tracks
in stereo. Think of an actual drum kit where the cymbal and hat tracks all leak
into each other. Drums, especially cymbals, panned hard left and hard right
sound unnatural.
• Don’t record the drums. Low on tracks? Only record the control track that
drives the drum machine. This allows you to try different sounds and patterns
before committing. Because the drum machine slaves to the control track
code every time, even in the middle of a song, there is never any question
regarding sync.
• Bored to run. Running a repeating drum pattern is boring. Program some
changes, such as off-beats, tom-tom fills, appropriate crash or ride cymbals,
and all the things that a real drummer would do. Work on parts and beats that
will fit within the song.
• Tom fills in on the drums. Drummers have two hands, two feet and one mouth
– usually big. Program a drum track as if they are being played by a real drum-
mer. For example, don’t program a snare drum hit during a tom-tom fill.
• Alter MIDI. MIDI is available to control all aspects of the digital drum
machine, including velocity and dynamics, program change, etc. MIDI is
beyond the scope of this book. There is ample literature available elsewhere.
The best guitar sound starts at the source. The guitar (including bass guitar)
must be properly aligned and intonated, with all knobs, switches and cables
checked and in working order. Most important, it must be in tune. The rest is
up to the player. The finest instrument can sound wretched in the wrong
hands. You want the listener to get a lump in their throat, not their stomach.
• Re-cord your guitar. New properly stretched strings will always get the
richest results.
• For more meat, use thicker strings. Lighter strings are not as meaty as
thicker strings. Thick strings result in a heavier sound, and can be more
difficult to play.
• Bright and oily. Add a few drops of oil to a tissue and oil the strings to keep
string noise at a minimum.
Chapter Four
T H E E L E C T R I C G U I T A R S E T U P
RHYTHM
TREBLE

Amplifier Placement
• Talk to the player. Before doing any setup of amplifiers or instruments, ask
what will make him comfortable when he plays, then set up that way. He may
prefer to be isolated with the amplifiers, in the studio, or even with you in the
control room. The best placement for the player is where the player wants to be.
Check how loud it is going to be. Some players may play quiet enough to
just leave the amplifiers in the room with the drums. If so, then maybe aim
the guitar amplifier away from the drums.
• Use the best amplifier. If applicable, set up all available amplifiers, and try
all combinations. Use an amplifier whose power rating is higher than the
speaker. Better the speakers distort before the amplifiers.
• Place the amplifier as far from the control room as possible. During
basics, the amplifier is often isolated from the rest of the instruments. Unless
the control room is isolated from the studio, low frequencies will go through
walls, floors, and everywhere.
If you can hear or feel the guitar amplifier through the floor or walls, you
won’t get a true indication of how it really sounds. If you hear additional lows,
you might pull the bass frequencies at the console. When you listen back the
sound will be bass shy. Better to record a pass, then listen back to get a true
analysis of the sounds before continuing.
• Space for the bass. Place the bass amplifier in the biggest room possible.
Because bass frequencies are physically longer, and they need space to build.
A large dead room works great for the bass as the room echo and ambiance
are minimized, and the size allows the low frequencies to build.
• Try different places. Place the amplifier at different places in the room,
such as a foot away from a wall, and aiming toward the wall. Maybe lean the
amplifier over so it rests on a wall and place a microphone under it. Maybe
set up baffles around the amplifier to control the lower frequencies or to
change the room response. As with the drums, throw a carpet under the
amplifier to absorb some reflections.
The Electr ic Guitar Setup
65

• The place for the bass. Keep a bass amplifier out of corners and away from
walls, as the wall increases bass reflections into the microphone.
• Aim the amplifier into a reverberant space. Placing a guitar amplifier in
a reverberant room, such as a bathroom or kitchen is great for tight natural
reverb, but a better result might come from placing the amplifier outside the
space, and aiming it in toward the live space. As with the vocals, when the
amplifier is placed in the room and you have a close dynamic microphone and
a far microphone, lots of these live reflections are picked up by both
microphones. When the amplifier is placed outside of the room and aimed in,
the ambiance will sound great, but the close microphone will not have all the
ambiance. The ambiance track will have more depth than if the amplifier was
right in the room.
• Rising high. Figure 4.1(a) shows that when the microphone is placed too
close to the floor, errant reflections are introduced. Figure 4.1(b) shows the
amplifier is raised off the floor to keep reflections from bouncing back into
the microphones. Amplifiers generate a lot of vibrations, so unless the setup
is very stable, there is a chance of it slowly vibrating off the riser. I’ve noted
that sessions go smoother when amplifiers don’t come crashing to the floor.
Figure 4.1 Amplifier on riser
Recording Tips for Engineers
66
(a) (b)

• Turn-ups and leaks. Isolate amplifiers during basics not only to keep the
loud amplifier out of the rest of the microphones, but to prevent leakage into
the microphone placed in front of the amplifier. Fixing a guitar track that has
leakage on it can be tricky, as the repairs won’t have the rest of the players in
the background.
• Leave the amplifiers in the bottom part of the road case. This raises the
amplifier off the floor, isolating it. Lock the wheels on the road case or you
may have a roving amplifier.
• Place two amplifiers together. When splitting a guitar signal into separate
amplifiers/speaker cabinets, either totally isolate each speaker cabinet, or
place the cabinets beside each other. Placing the cabinets next to each other
minimizes delay in leakage. For example, two cabinets in a room are placed
next to each other, and both are close miked. Signal, or leakage from cabinet
A naturally spills into cabinet B’s microphone. Placing cabinet A across the
room means the leakage takes longer to reach cabinet B’s microphone. These
lengthy delays will muddy the signal.
• Barring grille. Grille cloths can buzz and metal grilles can rattle. Record
amplifiers with nothing between the microphones and the speaker cone.
• Baffle the amplifiers. Due to leakage, an amplifier may need to be totally
baffled, but no so much that the amplifier overheats. As well, don’t isolate it
so much that the musician can’t get at it. Let him get his sound, then baffle
off the amplifier. Occasionally, it’s the record producer that’s totally baffled.
Connections In and Out
• Plug in the guitars before turning on the amplifiers. If amplified, the
plug-in transient can blow the amplifier fuses.
• Keep it short. Again, keep all 1⁄4" cables as short as possible. Standard
unbalanced cables connected to the high-impedance input of an amplifier
should be no longer than sixteen feet, as they lose high-frequency signal with
increased length.
The Electr ic Guitar Setup
67

Figure 4.2 Back-to-back direct boxes
• Connect back-to-back direct boxes. To increase a 1⁄4" cable length with
minimal signal loss, set up two direct boxes with an XLR microphone cable
between them. Connect a ‘female to female’ adapter to one end of the XLR
cable. Figure 4.2 shows a short 1⁄4" unbalanced high-impedance cable goes
from the guitar into the first direct box, where the signal switches to balanced
low impedance and runs through an XLR cable to a direct box on the other
end. Then the signal is swapped back to high impedance, and another short
1⁄4" unbalanced cable goes from the direct box into the input of the amplifier.
Loud Amplifiers
• Turn it down. Many guitarists turn their amplifiers all the way up, then play
with the knobs to get the best sounds. Maybe turn the amplifiers down to get
a full clean sound, then turn the amplifiers up, adding a natural distortion to
your full clean sound.
Recording Tips for Engineers
68
Female to female XLR adapter
Direct box # 1
Direct box # 2
XLR cable
1/4-inch cables

• Turn it up. Some say a good ripping guitar tone can only come from a loud
amplifier. Tubes being pushed naturally compress the signal and add a warm
presence to a sound. Different tubes can vastly change an amplifier sound.
Learning about different tube amplifiers and what they do can aid the
engineer in deciding on what works best for what situation. Spend the time
getting the right sound at the amplifier, not in the control room.
• Do not touch. Ask the player before changing the settings on a musical
instrument or amplifier. Note the settings to return to the original sound.
• Low and behold. Some bass players add lots of lows when they are playing
live, and we love that, but excess low end may not be necessary in the studio.
A better sound might come from recording a full round bass, not just the low
frequencies. Come mix time, the engineer can fine tune exactly which low
frequencies will work best.
• Distortion-free bass. Unlike a guitar amplifier, where some distortion may
be wanted, a clean and solid bass guitar sound cuts through and sounds best.
This means that the bass amplifier might not need to be unbelievably loud to
get the job done.
Of course, overload and distortion to the Nth degree is fun too.
• Use the fuses recommended by the manufacturer of the gear. Anything
less, and you may continually blow fuses. Anything more, and you may blow
the amplifier, or worse, cause a fire. If the amplifier is in an isolated booth, this
might not be noticed immediately.
• Ask the player if the output level on the instrument is all the way up.
The cleanest signal is the loudest signal available from the output of the
instrument. But some players use the volume control as part of their sound.
• Virtually a virtuoso. ‘Virtual amplifiers’ are plug-ins or stand-alone units
that have completely changeable parameters and settings to simulate every
major guitar amplifier on the market.
Record the clean output from a direct box to a separate track. At mix time,
if you need more ‘body’ from the guitar sound, run this direct track through
a virtual amplifier, and experiment until you have the perfect sound.
The Electr ic Guitar Setup
69

Preparation
• Listen to all the direct boxes available to you. Direct boxes are like
microphones – they differ widely in frequency response. One that works great
on a bass may sound sluggish on a guitar. Some amplifiers today have built-in
direct-output jacks, eliminating the need for an external direct box. As with
most gear, the cheap ones sound cheap, especially in the low frequencies.
• Try some of the many effects pedals on the market today. They can give
an average guitar sound proper placement. They have modern sounds, and are
great to rent for a few weeks while recording. Many all-in-one effects boxes
today work as a direct box, as well as a harmonizer, delay, tuner, etc. The signal
comes out of the output much like the money comes out of your wallet.
• Just plug it in. Sometimes just plug the electric guitar directly into the pre-
amp of the console, turn them all the way up to distort the inputs and there’s
your sound. A high-impedance cable directly into a low-impedance input will
overload the pickups of the guitar, changing (some say degrading) the tone.
Word is that the famous Beatles ‘Revolution’ guitar sound was overloaded
console pre-amps.
• Using lots of pedals means various changes in gain. Go through each pedal
and set the levels with as much gain as possible and as little noise as possible
without overload. One wrong setting in the signal chain can overload an input.
• Use new batteries. Sometimes the effect is quieter with new batteries rather
than standard AC power. Write the date on a piece of tape and stick it on the
battery. When you are changing batteries, you know how old each one is.
• Run your signal into a portable boom box that has line inputs. The built
in el-cheapo compressors can really distort a sound. Maybe overload the inputs,
or change some equalization settings, then record the output with a cheap
microphone for a dirtier sound.
• Creatively limited. Of course use compression and limiting to lower peaks
and raise overall levels, but also sometimes use it as a creative device to shape
a sound.
Recording Tips for Engineers
70

Miking the Amplifiers
• Use a microphone that can handle it. The sound pressure associated with
close miking, coupled with the inherent low frequencies of a shredding guitar
sound, can damage the sensitive microphone capsule in a condenser or ribbon
microphone. A dynamic microphone is sturdy enough to take a lot of level
without folding, and has a presence peak that can bring out some of the grit on
a guitar sound. A condenser, if it can handle the pressure, can result in a warmer
sound. Newer condenser microphones can handle a lot of pressure, but a
dynamic is still the sturdier choice.
Avoid overload at the microphone. If necessary, move the microphone,
insert pads into the signal or lower the source level. Overloaded signal is
unusable and unrepairable unless that overloaded sound is the goal. Digital
overload is always unpleasant. Ideally, with the right microphone, record the
signal with no microphone distortion and no additional gain. The sound
recorded will be cleaner with less hiss and noise.
• Match the microphone to the speaker. The different speakers within an
amplifier can have different responses, so if the speaker has a lot of bottom,
use a microphone with the opposite characteristic – one that is bass shy.
• Pad early. Pad as close to the source as possible to minimize overload
before the signal reaches the console. Some microphones house removeable
pads that you install between the capsule and the pre-amp. Better to pad at the
microphone than at the console.
• The best sound is the sound that works. There is, of course, a wide range
of methods used to set up amplifiers for recording. Suggestions include:
(a) One microphone close. Figure 4.3 shows a common starting point. Place a
dynamic microphone a few inches from the cone. A close microphone has a
boomier low end due to proximity effect. Pulling the microphone back can
ease this. Turning the microphone away from the speaker results in a duller
sound. If just a bit more ambiance is needed, try changing the polar pattern
to omni-directional. A good spot tends to be right where the cone and the
dome meet.
The Electr ic Guitar Setup
71

(b) One microphone semi-close. A clean guitar sounds great with the
microphone placed one to two feet away and aimed at the cabinet. The
proximity effect is defeated, and a certain warmth comes across when the
microphones are not so close to the speaker. To capture more room sound
than original signal, position the microphone off-axis from the amplifier.
(c) One microphone distant. Use a condenser or ribbon microphone due to the
full, dynamic sound. The room itself can be as much of the sound as the
instrument, but don’t let the milieu of the room overshadow the direct
amplifier sound. An ambient sound can easily turn cloudy and disappear
in a busy mix.
(d) Two microphones – close and close. Figure 4.4 shows one microphone
aimed straight at the edge of the middle cone and another microphone
Figure 4.3 Close, semi-close and distant
Recording Tips for Engineers
72
(a) (b) (c)

angled away at the outer cone. One picks up more of the crunch, while the
other picks up more of the warmth. Sometimes the choice is one or the
other, not both. When combining two close microphones, don’t expect it
to sound twice as good.
(e) Two microphones in stereo pattern. Use this setup for recording either an
amplifier in stereo or to combine the two microphones to a single track.
Note that some amplifier makers purposely switch speaker polarity to get
a more varied sound.
(f) Two microphones – front and back. A second microphone aimed at the
back of a speaker cone might add needed tone without introducing
equalization. Of course the amplifier must have an open back. This setup
has the back microphone aimed somewhat toward the front microphone,
so switch the polarity on the back microphone or risk losing signal due to
phase cancellation.
Figure 4.4 Two microphone amplifier setups
The Electr ic Guitar Setup
73
(d) (e) (f)

• It’s a setup. Additional setups might include:
A direct box. Sometimes there is no choice but to use just a direct box.
Direct boxes are great, but there is a certain magic in the air between an
amplifier and a microphone. A direct box can enhance flaws that an
amplifier in a room may gloss over. String noise, squeaks and clicks come
through more on a clean direct track than through the amplifier. But these
so-called flaws (that are normally only heard in solo mode) are what gives
a track life.
One microphone and a direct box. A close microphone with a direct box
is a common method to record an electric instrument, and the standard
method to record bass guitar. Record the signal from the direct box and the
microphone on separate tracks for more control over the best combination
of good tone and tight low end. Check for phase issues between the
microphone and the direct signal.
Two microphones – close and far. The close microphone adds definition,
clarity and focus, and the far microphone contributes midrange, warmth,
depth and placement. A common setup is where the closer microphone is a
dynamic and the distant microphone is a condenser.
Two microphones – stereo room. Depending on the characteristics of the
room, a proper stereo setup can result in a wide ambient sound. Great for
placing a sound at a specific point in the mix, but easily lost in the haze
as more instruments are introduced.
Three microphones. Though excessive, some engineers get a great sound
with one close microphone, one semi-close, then a third one farther off in
the room. Done correctly, they capture the full crunch from the close
microphone, the warmth and midrange from the middle one, and the
ambiance and full low frequencies from the room microphone.
Some engineers like to record the actual pick hitting the strings on an
electric guitar, so they set up an additional close microphone aimed at
where the pick hits the strings.
Recording Tips for Engineers
74

The Electr ic Guitar Setup
75
Three microphones and a direct box – holy cow. Going for three or
more inputs opens a plethora of options, and these large setups tend to
take a lot of studio time. Sometimes too many options can be a bad thing.
• Consider the polar pattern when setting up to record an amplifier. A
cardioid pattern, rather than an omni-directional pattern on a microphone
placed in front of a guitar amplifier might keep the rest of the instruments
from leaking into the track.
• It’s time to move the capsule if you dare. Once the microphones are
roughly placed in front of the amplifiers and the player has set the settings on
the amplifier, move the microphone around to find the best spot for the music
being recorded. To do this:
(1) Have the player turn the amplifier way down.
(2) Turn the microphone up in the headphones.
(3) Have the player play so you can hear more signal in the headphones than
from the output of the amplifier.
(4) Hold the microphone in front of the amplifier and move it around until
you locate the best spot. Don’t worry, you’ll hear it.
(5) Place the stand and connect it to the microphone without moving the
placement of the microphone – easy to say, maybe not so easy to do.
(6) Ask the player to return his amplifier settings to the original levels.
• You need some help. If you have someone helping you, all the better. Ask
the assistant to:
(1) Wear earplugs and a set of unplugged headphones. Those high volumes
can be damaging to your ears.
(2) Have the player play while the assistant moves the microphone around.
Tell him to stop moving the microphone when the player stops playing.

Recording Tips for Engineers
76
(3) Listen to the microphone in the control room. As the assistant moves the
microphone around in front of the amplifier, listen for where it sounds best.
(4) When the assistant locates the optimum spot, you indicate to the player to
stop playing.
(5) That’s the assistant’s cue to stop moving the microphone. He then sets the
microphone in that position and tightens the microphone stand, leaving
the microphone in the same spot.
• The final countdown. If you know you are going to send a guitar to an
effect, note that some effects sound edgy in the upper midrange and highs. A
guitar recorded with a little warmer sound may counteract that harshness.
• The wrong microphone. If the amplifier needs drastic processing, chances
are you’ve got the wrong microphone. Or, an excuse I have heard, ‘It’s the
right microphone, it’s just on the wrong amplifier.’

Stringed instruments get their sound from plucking, bowing or striking a
stretched string or set of strings. The strings themselves don’t generate much
power, the power comes from the resonances of the body of the instrument.
The size of the instrument, along with the length, thickness and tension of the
strings determine the string’s pitch and the guitar’s harmonic structure.
Naturally a properly tuned rich sounding acoustic guitar will sound better
than the old cracked beach guitar. The intonation, neck and frets must be up
to professional standards with no buzzes, fret noise or other distractions.
Acoustic Preparation
• That same G string is getting pretty dull. Replace old guitar strings to add
crispness and clarity to any acoustic guitar sound.
T H E A C O U S T I C I N S T R U M E N T S E T U P
Chapter Five

• Tension in the studio. Preserve the tension of a stringed instrument by
changing strings one at a time. Removing all the strings at once totally eases
the tension on the neck – not the guitar’s natural state. To allow for proper
stretching, change strings well in advance of the session.
• Start with a good player. It is difficult to record a player who isn’t ready
to be recorded. Better a great player with not-so-good sounding equipment
than the other way around.
• Get intimate with the guitar player. In some situations, do as you would
on a vocal recording. Dim the lights, set up a table and music stand to create
a more intimate atmosphere. Make the effort to pamper the player a bit.
Placing the Player
• Lessen lesson. For an overdub, place the player in the middle of the room,
aimed toward the control room. In bigger studios, place a couple of baffles
around the back and sides of the player, and perhaps throw a rug on the floor
to lessen the room ambiance in the close microphone.
• How live do you want the sound? Using an overly dry absorbent space
may suck up some of the luster of a guitar, especially if the guitar is not close
miked. A natural sounding space with a small degree of inherent liveness,
such as a hardwood floor, works wells to record a full sounding track.
For more variation come mix time, some engineers prefer to record in
totally dead spaces, eliminating the natural reverb of a room.
• Hz rentals. If the instrument is not up to par, consider renting a quality
instrument. A rental is a couple of days. A recording is forever.
• It reflects badly on you. There are few circumstances when recording in a
small, really live room produces the best tracks. Recording an acoustic guitar,
or any instrument, in highly reflective places such as the bathroom will always
generate lots of short, tight reflections. Maybe wait. If needed, this slapback
effect can always be added later.
78
Recording Tips for Engineers

• Yo-yo strings. When recording strings such as violins, placement in the
room is critical. Microphones are often placed a few feet away from the
instrument to pick up all the harmonics and warmth. It’s best to know the
room and understand where frequency bumps are. For example, don’t place
the cellos in a part of the room that has accentuated low frequencies.
Placing the Microphones
• Start with a condenser. Condenser microphones work well on all stringed
instruments due to the wide frequency range and smooth pickup characteristics.
Many dynamic microphones won’t have the appropriate high-end capabilities,
plus they may introduce certain unwanted frequency boosts.
Sometimes a dynamic microphone is perfect for the situation. Or maybe a
ribbon microphone – whatever the situation calls for.
• Take the tube. If available, try a tube microphone. A tube microphone has a
certain warmth and records acoustics instruments very well. But many of
today’s small personal studios simply cannot afford tube microphones.
• Try a large diaphragm microphone to bring out the inherent low end in
any deeper instrument, such as a cello or a stand-up bass.
• The pattern depends on the environment. An omni-directional pattern
picks up the complete sound field, hopefully making the guitar sound a bit
more live. Plus no proximity effect.
The cardioid pattern mostly captures what is placed directly in front of it,
and might work better in a poorly designed space.
• Get down and listen. Once the player is set up and ready, determine the
best placement for the microphone. Because every acoustic instrument and
player are different, get down on your knees and put your finger in one ear
(yours, not the player’s) and listen. As he plays, move around to locate the
spot with the richest sound. Place the microphone there.
The Acoustic Instrument Setup
79

• Who wants punch? Look down the so-called barrel (if applicable) of the
microphone and aim it to where the guitar pick (if used) meets the strings.
• Use your ear as a guide. If the sound is too loud for your ear, consider a
pad. Recording, for example, a light acoustic guitar you probably won’t need
a pad. Recording a trumpet, you might.
• Don’t aim a close microphone directly in front of the sound hole, but off-
axis a bit. As the player plays, the sound hole resonates at a low frequency. This
will create a woof in an improperly placed microphone. Aim the cardioid
microphone capsule more toward the neck and less toward the sound hole so
any ‘woof’ is naturally minimized by the microphone’s polar pattern. If you
must aim the microphone into the sound hole, place a windscreen in front.
• Check your microphone levels. Place the microphone so it picks up all the
strings at the same level. Placed incorrectly, the recording might have just the
high strings with not enough impact. If the guitar is there to simply add
sparkle, you may want less impact. Maybe lower the microphone, or pull it
away to capture more of the higher strings and harmonics. Since the idea is
to get the best sounds without a lot of processing, record the instrument
appropriately for how it will be placed in the final mix.
• Aim the microphone away from the player’s mouth. Any unwanted
breathing noises may spoil an otherwise quiet passage.
• Move it. While you listen in the control room, have someone slowly move the
microphone around in front of the sound hole to get the best placement.
• What works for this may not work for that. Final placement depends on
the style of music. A jazz acoustic guitar would not be miked the way a pop
acoustic guitar would be. A country picking guitar would use a different
placement than a love song. Slow songs would be miked differently than fast
songs. All situations are unique. Figure 5.1 shows:
Recording Tips for Engineers
80

(a) Close miking. Place the microphone one foot or closer for a ‘harder’
sound, with an emphasis the upper midrange. Proximity effect and sound
hole resonance might be a concern. As well, the player must stay still for
the sound not to change. Moving the microphone farther away from the
sound hole should give the player a bit of freedom to move without com-
promising the guitar sound.
(b) Not so close miking. Move the microphone farther away from the guitar in
an acoustically suitable room for a rounder warmer sound. The
microphone will pick up all the parts of the guitar that are missed with
close miking. A single microphone placed from twelve to eighteen inches
away and aimed toward the instrument is a reliable starting point. But a
guitar with too much room sound gets lost in a busy mix.
(c) Pickup microphone. A smaller microphone attached to the guitar ensures
a uniform sound whenever the player moves around, as the microphone
stays the same distance from the instrument at all times. This setup works
well in a live room because the microphone picks up the acoustic guitar
and little else.
Figure 5.1 One microphone acoustic setups
The Acoustic Instrument Setup
81
(b)(a) (c)

• Use two microphones on the acoustic. Common placement for two
microphone setups on an acoustic guitar include:
(a) Close/far. Figure 5.2(a) shows a second, distant microphone is added to
increase ambiance and placement. Due to the sound’s natural delay in
reaching the second microphone, check the phasing between microphones.
(b) Stereo. When using two or more microphones on an acoustic guitar, the
temptation is always to make a real stereo sound. When two microphones
are placed to capture a stereo spread, a hole in the middle becomes more
apparent as the distance between microphones grows.
(c) Neck/sound hole. Set up and connect an additional microphone to record
the string noise, then combine it with the other microphone. One
microphone captures the higher frequencies, and the other microphone
gets the lower frequencies. Adjust for proper highs and lows with the level
faders rather than with equalization. Either use matching microphones for
a uniform sound, or two different styles to capture different tonal nuances
of different areas of the guitar.
Figure 5.2 Two microphone acoustic setups
Recording Tips for Engineers
82
(b)(a) (c)
• Pickup the microphone. If there is a pickup in the acoustic guitar, run the
signal through an amplifier, and then place a microphone in front of the
amplifier. Combine the microphone on the instrument and the microphone on
the amplifier at the console, changing it to more of an electric sound than an
acoustic one.
• Recording a guitar and vocal. When the player wants to sing along but
you don’t want the leakage, try a pickup on the acoustic guitar, and tight polar
patterned microphone for the vocals. A close microphone on the guitar
works, but there will be leakage issues on the vocal microphone. The vocal
sound is more important than the guitar sound.
Some engineers place a microphone stand or Plexiglas plate somewhere
between the player’s mouth and hands to minimize leakage, but this adds reflec-
tions, and results in the player being uncomfortable – the last thing you want.
• Room size vs. close miking. In a large room, use two microphones on a
five-piece string section. In a smaller room, maybe individually mike them.
Placing the microphones closer to each instrument results in less of the room
influence, and more of the direct signal.
• Combine the direct and the miked signal. Use a microphone to capture all
the rich lows, and the direct signal to capture the nice highs. Acoustic pickups
are great for live situations, but in the studio, if you have a choice, a well-placed
microphone will sound better. Perhaps record the pickup on a separate track,
then pan them left and right for a stereo effect. You decide.
• What, this old thing? Violins, cellos, violas, etc. can be expensive
instruments, and the players are normally very good and very expensive to
hire. Come in early to make sure you are totally set up and ready to record
when they walk in the door. Better string players are used on jingle sessions,
where they are on a strict time schedule for the day.
• Don’t close mike violins. Violins really only sound full and rich if there is a
few feet of air between the instrument and the microphone. A single player
might not warrant a stereo microphone setup. To record a two or more violins,
The Acoustic Instrument Setup
83

place cardioid microphones in an X/Y position quite a few feet above the violin
players for a rich, ambient stereo sound. As the string section grows, cellos and
violas get miked from the front, not above.
• Use the riser wiser. In the early days of pre-amplification, stand-up bass
players would use a riser, or raised platform when they performed. Because
the instrument was resting on the riser, the riser itself would resonate
enchancing the overall low frequencies, and making the bass appear louder.
• String a guitar differently. String an acoustic guitar with the higher octave
strings from a 12-string, and have the guitarist play along with an original
acoustic track. Even better, have two guitarists play the same part together
while miking both. This may give more depth to the track. Playing a 12-string
gives the 6-string track a chorus-like effect.
• Cover the sound hole for a deader, dryer, sound. Of course, this stops the
air pressure from getting into or out of the sound hole. The minimal air pres-
sure generated inside the guitar has nowhere to go, so no air pressure means
no microphone capsule movement. Compressed air itself makes no sound at
all, except when my grandfather is involved.
Piano
• Good news, there’s no wrong way to do it. The piano is such a versatile
instrument, there is really no right or wrong way to record it. Different
microphone placements will, of course, result in different sounds. Using a
certain setup for one song may work great; using the same setup for another
song may not work at all. The wide range of piano styles makes it impossi-
ble to say one method of recording is wrong and another method is not.
• Tuning the studio piano. Recording engineers don’t normally tune the
piano. Leave that to a professional.
• Place the piano before the piano tuner arrives. Moving the piano after it
has been tuned may throw it out of tune.
Recording Tips for Engineers
84

• Aim the open lid toward the open studio, not toward a nearby wall. You
don’t want reflections bouncing back from the wall into the piano
microphones. Move an upright piano well away from the wall.
• Check, please. Check all the pedals for squeaks or noises and with the
player, eliminate them by oiling the pedals. Check with the proper people
before dousing the pedals with oil. Maybe a pillow stuffed under the pedals
will work, but the player might object.
• Back to that leakage thing. Sometimes the piano must be recorded in the
main room, with the rest of the instruments. Eliminate leakage using baffles
and packing blankets. If possible, isolate the piano in its own room. Easy to
say, but few studios have a dedicated piano booth.
• Reflect on the day’s work. If the player uses no print music, remove the
built-in music stand on the piano, but leave the lid. The reflections from the
lid are part of a piano sound.
Placing the Microphones
• Open lid – insert head. Once the piano is correctly placed, put your head
in the piano and listen to the player play the music to be recorded. Consider
the part to be played, the player’s ability, the style, the tempo and prominence
of the piano part to be played before placing the microphones.
• What style of microphone? Microphones vary between large and small
diaphragm, each having their own role. Large diaphragm microphones might
work well for more classical and jazz or slower tempo songs, while small
diaphragm microphones might work better on rock songs with faster tempos.
Whatever style of microphone you choose, use the biggest heaviest strongest
microphone stands available.
Tube microphones create the warmest sound and tend to have more of a
pleasing harmonic distortion than solid-state microphones. Condenser
microphones work well to capture the wide range of frequencies produced by
The Acoustic Instrument Setup
85
the piano. Dynamic microphones may capture the piano’s lower frequencies
best. Boundary microphones will minimize leakage when taped to the under-
side of the lid, and the lid is closed or on the short stick, covered with a
moving blanket.
• Close or distant microphones? Because the sound board – where most of
the sound is generated – has a large surface area, really close miking may not
capture the full spectrum of the instrument. Close miking the sound board
will add a brightness that cuts through other instruments and features more
‘hammer hitting the string’ sound. Mid-placement microphones add tone,
while distant microphones contribute more room sound. As the distance
between the microphone and the sound board increases, the more influence
the surrounding area has. In a properly designed acoustic space, distant
miking works very well to capture a full rich piano sound.
Maybe close miking might work for a pop session and a more ambient
sound may work for a jazz or blues session. Often, the style of music is the
final determination for placing the microphones, except perhaps when the
piano is baffled off and part of a full session.
• Use shockmounts on piano microphones. Heavy instruments with an
abundance of low end can make the floor and the microphone stand rumble.
Without shockmounts, the microphones pick up this low rumble.
• Use one microphone on the piano. Reasons for recording the piano in
mono include not enough microphones or inputs at the console. Perhaps the
piano is just a support instrument among many and would get lost in stereo.
Perhaps the mix plan has the piano panned over to one side, so a stereo
recording isn’t needed. Maybe there is just not enough tracks. As a starting
point for setting up one microphone on the piano, Figure 5.3 shows how one
microphone might be:
Recording Tips for Engineers
86

(a) A microphone angled in from the side is aimed sideways toward the high
and low strings using a figure-8 pattern.
(b) A microphone placed across the middle of the sound board perhaps with
an omni-directional pattern.
(c) A boundary microphone is taped to the inside lid of the piano. Use caution
with duct tape on the piano, as it may ruin the finish. Maybe tape it to the
floor or the wall. Maybe.
(d) A microphone is placed a few feet away from the opening of the piano,
just enough to capture the attack of the keys, but not so much as to render
the sound overly ambient.
Figure 5.3 One microphone piano setups
The Acoustic Instrument Setup
87
(c) (d)
(b)
(a)

• Use two microphones on the piano. Commonly, two microphones do a fine
job of recording the grand piano, capturing the complete range of notes across
the board. Figures 5.4 and 5.5 show how different setups might include:
(a) A stereo pattern. Try a well-placed stereo X/Y pattern about a foot above the
sound board, using one microphone to capture the highs, and the other to
capture the lows. This setup results in a bright in-your-face sound. As well
watch the spacing so those all important middle notes aren’t lost in the hole
between the microphones.
(b) High and low. Use one microphone aimed toward the higher strings and
another aimed toward the bottom, or low end of the piano. Some pianos,
such as upright, or baby grand pianos may lack sufficient low end. A large
diaphragm microphone on the lower strings just might capture more of the
lower frequencies.
(c) Across the sound board. Aim two microphones straight down at a point
about a foot above the sound board at 1⁄3 and 2⁄3 of the way across.
Figure 5.4 Two microphone piano setups
Recording Tips for Engineers
88
(a) (b) (c)

Figure 5.5 Additional two microphone piano setups
(d) Both microphones a few feet away. Set them raised high enough to aim
into the piano, maybe or maybe not set in a stereo pattern.
(e) One microphone close and one far. Not a stereo recording, but sometimes
the piano might not need to be recorded in stereo. Record too many stereo
tracks in a song, and they might all melt into one blob of cloudiness.
(f) One microphone aimed at the strings and the other aimed up from under-
neath. Again, because the microphones are aimed at each other, switch the
polarity on the bottom microphone.
• Raise the piano lid. When close miking, raise the lid, if applicable, as high
as you can to minimize the reflections from the lid back into the
microphones. Don’t raise the lid too high if a boundary microphone is taped
to the inside of the lid.
The Acoustic Instrument Setup
89
(d) (e) (f)

• Use three microphones on the piano. As two microphones hold a stereo
pattern over the sound board, a third microphone might capture low end,
especially on the grandest of grand pianos. Or use a third microphone as a
room enhancement to any the above stereo setups.
• Listen to the final sound in mono. If some frequencies disappear, you have
phase issues between microphones.
• Talk to the hand. Record some piano and let the player hear it just for the
sounds. This is good for all instruments of course, but because the piano can
have such a wide variety of sounds, the player, especially a soloist, can be
picky. The player is often happy to voice an opinion. Consider all suggestions
or comments. A happy player plays better.
Figure 5.6 Upright piano
Recording Tips for Engineers
90
(a) (b)(b)

• Upright is not as grand. Recording an upright piano can be a challenge, as
the strings are hard to access, and the piano is usually up against a wall.
Moving it away from the wall may ease reflections into the microphones, but
it may change the amount of perceived bass.
The low end that makes a grand, or baby grand piano sound so rich is the
nice long, low piano strings. The string length is limited on an upright piano.
If possible, remove the top of the piano. Figure 5.6(a) shows an X/Y position
and Figure 5.6(b) shows two spaced microphones over the top of the piano.
You could also lower a microphone into the piano, but due to proximity to the
strings, some notes would be much louder.
Keyboards
• Prepare. Ensure that all the prep work is done beforehand, with everything
programmed and prepared. Hours can be wasted by inexperienced people
learning how to operate equipment on the client’s time.
Unless you or the programmer/player are totally familiar with the
instrument keep the manuals handy. Whoever is sequencing and programming
the computers should know what they are doing.
• Confirm that all sequences are correct before committing. Ideally, you
want to press play, and have the sequence run through totally correct. As well,
some situations require the sequencer to lock up or sequence to a pre-recorded
time code track.
• Place a limiter across the outputs of an unfamiliar keyboard, especially
if you are experimenting with sounds. One blast of a piercing sound can ruin
your speakers, and it won’t help your ears much either.
• Go direct. Modern keyboards have either an XLR or TRS phone-jack
balanced output, so it can be plugged into the line inputs of the console. Older
units may need a direct box, and should be plugged into the microphone
inputs to raise the signal to a usable input level.
The Acoustic Instrument Setup
91

Horns
• Use a live room to record the horns. Nothing sounds better than good
horns in a live room – but not too live or else standing waves and unwanted
ringy overtones may pop up. Toss rugs across the floor and set up baffles to
minimize any errant frequencies.
• Place the horn section to get a nice live ambient feel. Omni-directional
microphones are great for distant miking things like horns and strings, as the
natural reverb of a room comes through.
But placing the horn section too close to a wall or window may result in
too much refection being recorded. When the horn players are lined up and
aimed at the control room the sound may bounce off the window and back
into the microphones.
• Set up the horn section the same as they would on stage. Place all the
players in a row and set up a pair of microphones a few feet away. This setup
will capture the warmth of the horns and eliminate some of the shrill sound
associated with close miking. They will tell you how they prefer to be set up.
• Recording the ribbon section. Ribbon microphones are popular on brass
sections because of their great high-end transient response and smooth warm
lows. Just don’t place them too close to the horns. Ribbon microphones often
can’t handle the serious pressure generated. Dynamic microphones work well
as they capture the sizzle generated without overload.
• Let’s try my pad. Horns tend to range, in volume, from loud to really loud
with lots of transients so microphone pads may be needed. Listen before
pressing the record button, then listen back for distortion.
• Keep it a foot away. For a less clicky and warmer overall sound, keep the
microphone at least a foot away from the bell of the saxophone. The air
between the instrument and the microphone contains life. Placed too close the
wind can really ‘pop’ the microphone.
Recording Tips for Engineers
92

Figure 5.7 Horn placements
• How may microphones are needed to record horns? Different setups for
a horn section may depend on the amount of microphones you choose to use.
(a) Use one microphone. Figure 5.7 shows how one microphone may have all
players standing around it and playing.
(b) Use two microphones. Two microphones may be placed in a stereo pattern,
or in tandem with all players is a row.
(c) Use three microphones. A three microphone setup may allow each horn to
have its own microphone. In this case, follow the three-to-one rule of
microphone placement.
.
• Let’s radiate those transients. Because horns radiate a lot of high transients
from the bell, placing the microphones directly in front will result in a hard
shrill sound. Aiming the microphone at an off-axis angle, such as 45 degrees,
or moving the microphone a few feet away from the bell, should result in a
warmer pleasing sound, as well as minimize any key click sounds associated
with some horns.
The Acoustic Instrument Setup
93
(b)(a) (c)

• Lowest of the low. For some wind or brass instruments, such as clarinet,
flute or saxophone, sounds can come from the whole instrument, not just the
bell. Place the microphone so it records the whole instrument.
• Use polar patterns to your advantage. Polar patterns may play a key role
in choosing and placing a microphone.
• Set up a pop filter. Some wind or brass instruments may need a pop filter
or windscreen to decrease air flow across the microphone capsule.
• Record horn sections together. Good horn sections, like groups of singers,
need to hear each other, and lock in to how they want their sound to blend
with each other. With individual tracks, this blend is left to the engineer at
mixing. Record them together so they can blend with each other.
Listen to the blend of horns at different levels within the mix. Sometimes
horns can sound full and big when loud, but when turned down, only the
trumpets are heard.
Proper microphone choice and placement should allow the whole sound
to come through at a low level within the mix. With improper microphone
choice and placement, only the shrill parts tend to come through the mix
when the horns are set at a lower level.
Recording Tips for Engineers
94

When setting up for the vocals, the most important factors are the singer’s
comfort and confidence. Preparing a vocal station is the key. The singer
should be able to walk in, put on her favorite set of headphones, and sing the
vocals with everything exactly right. Set out whatever will be needed to keep
her relaxed and comfortable, perhaps:
– A carpet on the floor and a chair or stool.
– Some candles or incense.
– Posters of their influences.
– A small table with some water, tea or spirits.
– A box of tissues and a trash bin.
T H E V O C A L S S E T U P
Chapter Six

– Dim the lights and set the temperature of the room.
– A copy of the lyrics with a pencil for any last minute changes.
– A lighted music stand to see the lyrics.
– Perhaps a daring photo of yourself.
• Set up a vocal station for the duration of the project. Or maybe have it
ready, but placed to one side. When the time for vocals hits, the assistant can
quickly grab it and move into place. On days when the singer gets the urge to
belt one out, everything will be ready to go.
• Use an open space with baffles. To get a tight dry sound, place baffles a few
feet behind and beside the singer. The surrounding environment should be live
enough to create a natural ambient sound, yet not overly reflective.
Some engineers prefer a totally dead sound, others go the other way, using
a larger area for the vocal to give it natural depth and placement. If the singer
is in a natural sounding room, a hint of ambiance can give a vocal track more
life – especially background vocals.
• Avoid tiny spaces for vocals. A claustrophobic environment can do more
harm than good. The singer’s comfort will take precedence over microphone
technique. As well, placing the singer in a small booth may color the sound.
A good microphone in a small booth might pick up the lower midrange room
reflections, especially with male singers as their voices tend to be lower.
• Don’t use the bathroom. Put a singer in a small absorbent situation, rather
than a reflective situation, such as a washroom. As with acoustic instruments,
once those natural echoes are recorded on the vocal track they cannot be
removed. That effect can always be recreated if the vocal is recorded in a
more natural sounding environment.
• Mike’s in the ladies room. Another reason not to place a microphone in the
washroom is the privacy issue. People expect privacy. Plus, some rather
dodgy deeds have been known to occur in recording studio washrooms.
96
Recording Tips for Engineers

Placing the Microphone
• There is no one microphone that works best for everyone. For a jazz
session, you might want a warm full sounding microphone. For a rap session,
you may want an edgier, brighter microphone. A female singer might get a
different microphone than a male singer.
• Does the sound sound sound? Maybe a player with a degree of studio
experience will request certain microphones on their vocal or instrument. If
you disagree and use a different microphone, guaranteed the player will not
like the sound. Keep him happy and use his microphone, even if you feel the
sound is compromised.
• The singers hide. Some singers do not want to be seen when they sing –
even by the engineer. Ask him if he would be more comfortable behind a
screen, or facing away from the control room, or maybe in total darkness. It’s
his choice.
• Choose your pattern. If recording one singer, a cardioid pattern may work
best. Two singers opposite each other may need a figure-8 pattern. With four
singers around one microphone, an omni-directional pattern may work best.
If the singer likes to jump around a lot in the studio, maybe try an omni-
directional pattern.
• I’m shocked. Shocked! A microphone installed on a proper shockmount
eliminates much of the room rumble. When no shockmount is available for the
vocal microphone, use a roll-off. Roll-offs are internal microphone filters, and
can color the sound.
• Hang ’em high. Depending on the microphone, try hanging it from a boom-
stand so the capsule dangles, not sits. This can also make room for the singer
to see the music stand, plus he won’t be tempted to hang the headphones on
the stand when the vocal track is done.
97
The Vocals Setup

• Patience is a virtue. Take a few extra minutes to set up a few microphones
and placements to determine which works best with the song and the singer’s
particular style. Figure 6.1 shows six common methods of placing the vocal
microphones:
(a) Six to eight inches in front. This setup tends to be a great starting point,
as the distance adds a warmth that may be lost with close miking. It can
mean less compression is needed if the singer knows what he is doing
and can control his dynamics.
(b) Quite close. For a very intimate vocal, place a singer’s microphone a few
inches away from the mouth to record all the little nuances of the vocal.
This works when the vocal track is dynamically consistent, and the singer
doesn’t suddenly yell into the microphone. Both condenser and dynamic
microphones record well when close miked. Perhaps set up a windscreen.
(c) Over a foot away in front. Placing the microphone farther away, beyond
twelve inches, captures the ‘air’ that can get lost from being too close.
Condenser microphones might work better than dynamic microphones.
This setup works if the singer moves around a lot while recording due to
the distance between singer and microphone.
(d) Perpendicular to the nose. Place the microphone so the front, or pickup
surface is positioned directly parallel with the top of the singer’s nose and
aimed at or around the singer’s mouth so no nasal tone will be registered.
The off-axis placement keeps sibilance from hitting the capsule square on.
A windscreen is suggested, but may not always be necessary.
(e) Perpendicular to the nose, over a foot away. Works well in small
absorbent spaces and in very dynamic situations, where vocals go from
soft to loud. As well, the singer can read the lyrics if the microphone is
not directly in the way.
Recording Tips for Engineers
98

(f) Positioned underneath and aimed up at the mouth. Some singers like to
lean into the microphone when they sing. Place the microphone a touch
lower than the mouth, so the singer’s head can bend down a bit. As well, this
is a natural way to capture resonance from the chest and body cavity.
Figure 6.1 Vocal microphone placements
The Vocals Setup
99
(a) (b)
(c)
(f )(e)
(d)

• Background vocals. Use as few microphones as possible with background
vocals. Try a single omni-directional microphone or a pair of microphones
for a group of singers. When they can see and hear each other, they will create
a proper blend of harmonies between themselves. Listen for who is louder or
softer, and move each singer closer to or farther from the microphone until
the best balance is reached.
• Strip on the floor. Run a strip of tape across the carpet where the
microphone is set up and ask the singer not to cross that line as he sings. If
he has great control of his dynamics, place him closer to the microphone. If
he has less control, maybe place him a foot or two away, and remember this
when setting the limiter.
• Oral and hearty. On those unusual instances where the singer gets very
dynamic, try different microphones for different sections of the song. For
example, in a song with quiet verses and loud choruses, set up two adjacent
microphones where one microphone has the input level set lower. Have him
sing the song, then record each microphone onto separate tracks.
One track will have the verses just right with the choruses too loud and the
other will have the chorus just right, with the verses too quiet. Comp the verses
from one track and the choruses from the other track to a separate master track.
• Who has screen the wind? A windscreen, or pop filter stops the flow of air
across the microphone’s capsule. Some engineers argue that this colors the
sound so rather than use a pop filter, they position the capsule away from the
singer’s mouth.
To keep a singer from getting too close to the microphone, maybe attach
the pop filter to its own stand, and place it at the proper distance from the
microphone. This creates a barrier to allow for sufficient space between the
singer and the microphone. The best recordings come from the singer staying
at a consistent distance from the microphone.
• Wash it, will ya? Occasionally, replace the mesh across the pop filter and
wash or replace the windscreens, especially if they are being used on a
regular basis. With different singers spitting and breathing into it, it may
become a little rank.
Recording Tips for Engineers
100

• Keep pops out of the studio. As a last resort, attach a pencil in front of the
microphone so it splits the pressure and diverts it away from the membrane
inside the capsule.
• Take time to find the best pre-amp for the vocal. Just as microphones have
different sounds, so do pre-amps, equalizers and compressors. Due to the
nature of physics, every device contributes a tiny amount of distortion.
Inexpensive equipment such as cheap pre-amps contain inexpensive circuitry,
which introduces distortion earlier.
• Listen to the microphones through a set of headphones. Because digital
recording is so clean, the quietest air conditioner or the smallest toe tap will
be clearly picked up. Listening with headphones will expose any errant
sounds coming through the microphones.
• Give the singer tight fitting closed-back headphones. If a singer wearing
open-back headphones leans in too close to the microphone, the resulting
feedback can do serious damage to the singer’s ears, and to your perceived
ability to control feedback.
• Reflections. Place a towel (or something similar) on the music stand to
absorb the reflections so the signal does not reflect back into the microphone
and color the sound.
• Use the force. All singers are different. Some have fine technique, and know
how to work a microphone. Others use brute force. Try different placements
out, and find the spot that is most comfortable with the singer, yet works for
you sonically. When the singer is happy with everything, the session goes
smoother and everyone benefits.
The Vocals Setup
101

In the studio room, opening wall panels, moving baffles, laying out carpets,
and hanging blankets are common methods of altering the acoustic space for
your specific needs. In the control room, the opposite is applied. The room
response is set and predicted. In a properly treated room, the reflections are
minimized so sound reaching the engineer is not colored by the influence of
the room characteristics. The environment remains consistent to accurately
monitor what is being recorded and replayed.
Control Room Analysis
• Tune your room. A spectrum analyzer shows an accurate readout of a
room’s frequency response. To analyze a control room, a technician with a
trained ear places a microphone about where the engineer’s ears will be, then
plays pink noise through the speakers at various volume levels. The spectrum
analyzer displays a readout of the room’s frequency response as modified by
the reflections.
T H E C O N T R O L R O O M S E T U P
Chapter Seven

The technician might insert a graphic equalizer between the amplifier and
the speakers to ‘flatten’ the room. He might pull a resonant frequency of the
control room in order to decrease any unwanted influence.
Not unlike using an electronic tuner to tune a musical instrument, the
spectrum analyzer is just an aid. Ultimately, the technician’s trained ear will
determine what sounds correct.
• Place all equipment in its final positions before tuning the room. Once
the room is tuned, moving machines and racks of outboard around may
change that tuning.
• Listen, man. Beginners may not be sure of what sounds ‘right’, so when the
technician is tuning your room, have him explain what he is doing. Listen to
and note what frequencies are boosted or pulled, and why.
• Understand the room’s limitations. If you can’t physically change the
control room or the speaker equalization, at least understand the deficiencies
so you can aurally compensate. For example, if you know the room has an
untrue low-end response, you might want to push the low frequencies a little
more than you normally would. This takes well-trained ears, and usually
comes only with years of experience.
• What is a bass trap? A bass trap is a dissipative device placed or built at
the back, sides or corners of a room to absorb a room’s resonant frequencies,
and therefore its harmonic intervals. Something as simple as another room
behind the control room would be considered a bass trap. Once a control
room has its resonant frequencies controlled, and has the correct mid- and
high-frequency absorption to get uniform reverb time versus frequency, it is
referred to as a neutral room.
Control Room Preparation
• Keep the room clean, organized and stocked. A clean work environment
shows that you are serious about your job. A messy space makes people more
anxious, and if the place is a total wreck, clients think your tracks are the same
way. No matter how much or how little clients are paying, they expect quality.
The Control Room Setup
103

Stock the room with colored felt pens, duct tape, energy bars, band aids,
earplugs, aspirins, vitamins, guitar strings, a drum key, pencils, pens, track
sheets, labels, console tape, speaker fuses (especially when recording loud
drums) and all the peripheral items needed to keep the session going. Place all
computer documents in the same file, and keep everything well labeled.
• Get the lead out. Place a notepad and a couple of sharpened pencils on the
console. While recording, jot down the counter number on any mistakes or
questionable bits, and check them when appropriate.
• Put an air purifier in the control room. A clean smelling control room is
so much nicer to work in. Portable air purifiers can change a room from rank
and dank to clean and pristine.
• Who’s on first? Mute the console and headphone amplifiers before powering
up or down. Power surges can blow fuses, speakers and headphones. Power
amplifiers are the last things turned on before the session, and the first things
turned off at the end of the day.
• EQ placement. Place outboard gear, especially equalizers, where you can
adjust them while you are within the stereo spectrum. If they are across the
room, you won’t be able to hear the changes as you make them.
Equipment needs plenty of ventilation so everything stays nice and cool.
• Confirm equipment rental arrangements. If you sign for the rental, check
the equipment for any dents, scratches, or flaws, and note the serial number.
Like renting a car, if it comes back with a dent, you are responsible.
• Check your gear. Use an oscillator to verify that all recorder and processor
inputs and outputs are correctly connected to the console. Listen to check if all
the processing equipment is indeed coming through as it is supposed to, with
no loading, incorrect patches or unwanted processing at the console. If some-
thing is not working, you want to know before the session begins.
• Open says me. Turn on the computers and open the proper programs. Check
that all inputs and outputs are correct and the system is ready to record.
Recording Tips for Engineers
104

Digital Recording
Due to low cost and high quality results, all studios today have some kind of
digital processing. The function of digital recording is the same as analog.
Record in real time, then edit and mix. Our only limitation is the amount of
free space on our hard drive, and the amount of simultaneous inputs/outputs
that our audio interface or recording software is able to deliver.
• Place the DAW in the middle of the monitor speakers. In some studios,
the computer workstation has its own set of monitors. In others, the output
signal is routed to the main studio monitors. Place the computer monitor
screen so you can see it while facing the monitor speakers.
• Use the highest quality sound card available. The less expensive cards
use cheap A to D converters that do a ‘grainy’ job to your sounds.
• Turn that thing off. Shut off the power before moving the hard drive. The
internal discs are always spinning, so moving the drive might corrupt data.
• Set parameters with the project in mind. Before recording to hard drive,
establish the parameters of use, such as bit depth, sample rate and reference
level. The session setup windows must be addressed when a new session is
started. Some of these cannot be changed later.
• Few standards. The analog world has well-established standards, but the
digital world has few. There are many horror stories of the incompatibility of
files from one DAW not working on another DAW.
Use the following guidelines to make sure you have a smooth running
session. It helps if you know what the final output medium will be. What is
the recommended:
Sample rate? For CDs, 44.1 kHz is the required sampling rate, so
recording at 44.1 kHz avoids the signal degradation of downsampling.
For DVD A (Hi definition audio) use 88.2 kHz, 96 kHz, 192 kHz.
For DVD (Video) use 48 kHz.
For T.V. use 48 kHz.
The Control Room Setup
105

Bit depth? 16-bit or 24-bit. All modern playback systems can handle 24-
bit. With the low cost of modern hard drives, the small amount of space
saved using 16-bit might not be justified. The only time to select 16-bit
would be for final CD-audio mastering.
Reference level? In video and film, -20 dBFS peak level corresponds to
0 VU average, or RMS level. In digital audio there are no standards. The
most common ones are -16 dBFS or -18 dBFS for the multitrack part of
the project. When mixing down to stereo or surround audio -12 dBFS or
-14 dBFS = 0 VU.
• What is a clocking reference? Almost all professional digital equipment
has the ability to have the master clock either derived from the internal clock,
or synchronize to a central, or external clock. Some cheaper digital processing
equipment lacks a high quality, stable internal clock that generates the sample
rate. Using a higher quality external clock will vastly improve the sound of the
converters and plug-ins of your digital processor.
• What are plug-ins? Digital plug-ins are small apps that process the digital
sound file. They represent outboard effects that in an analog world would be part
of the studio’s outboard rack. Equalizers, compressors, gates, reverbs and delays
are ‘plugged in’ after you have recorded the sounds flat to your hard drive. In the
analog world this would be like recording all your sounds flat to the multitrack
recorder, then processing the sounds on the monitor panel part of the console.
• Plug-ins will create a small delay in the sound file. Every plug-in has a
different processor delay (normally stated in samples) called latency. Delay
can be from a few samples to many thousands of samples depending on how
complex the effect is. This timing error can become noticeable if you add
many plug-ins to, for example, the snare and nothing to the kick. What was a
tight drum track is now skewed somehow. Slide it in time with the original
sound file, then remove the original to be sure that all is still in time. Some
DAW software corrects plug-in latency.
• I’ve created a master. Create a master file with everything properly
labeled, bussed and assigned. Start a new session at a moment’s notice with
everything set up just as you like it.
Recording Tips for Engineers
106
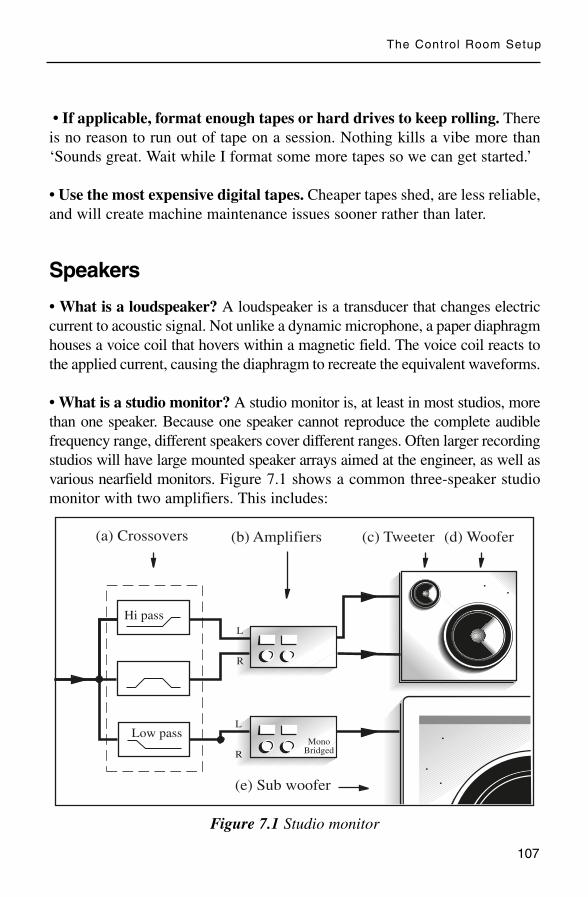
• If applicable, format enough tapes or hard drives to keep rolling. There
is no reason to run out of tape on a session. Nothing kills a vibe more than
‘Sounds great. Wait while I format some more tapes so we can get started.’
• Use the most expensive digital tapes. Cheaper tapes shed, are less reliable,
and will create machine maintenance issues sooner rather than later.
Speakers
• What is a loudspeaker? A loudspeaker is a transducer that changes electric
current to acoustic signal. Not unlike a dynamic microphone, a paper diaphragm
houses a voice coil that hovers within a magnetic field. The voice coil reacts to
the applied current, causing the diaphragm to recreate the equivalent waveforms.
• What is a studio monitor? A studio monitor is, at least in most studios, more
than one speaker. Because one speaker cannot reproduce the complete audible
frequency range, different speakers cover different ranges. Often larger recording
studios will have large mounted speaker arrays aimed at the engineer, as well as
various nearfield monitors. Figure 7.1 shows a common three-speaker studio
monitor with two amplifiers. This includes:
Figure 7.1 Studio monitor
The Control Room Setup
107
(d) Woofer(a) Crossovers
(e) Sub woofer
Hi pass
Low pass
(b) Amplifiers (c) Tweeter
L
R
L
R
MonoBridged
.
.
.
.
.

(a) Crossovers. A crossover is the network of pass band filters that splits the
signal feeding the individual speakers, sending only the high frequencies
to the tweeter, and the low frequencies to the woofer. Some crossovers are
active, or amplified, to allow the user to set the individual speaker level,
the frequency of the transition, and the slope of the crossover. Larger
mounted studio monitors may have more than two speakers, each with its
own amplification.
(b) Amplifiers. In this example, the first amplifier’s left side powers the
tweeter, and the amplifier’s right side powers the woofer. When a second
amplifier is used for the subwoofer, the stereo output is commonly
bridged for a louder mono signal.
(c) Tweeter. A small speaker used for high frequencies. The crossover pulls all
low and mid-frequencies before reaching the tweeter. Larger mounted
speakers sometimes use a ‘horn’ for a tweeter.
(d) Woofer. A larger speaker used for low to mid-frequencies. Frequencies
beyond this speaker’s rated range are rolled off.
(e) Subwoofer. A large heavy-duty speaker designed specifically for the very
lowest frequencies.
• What is a nearfield monitor? Nearfield monitors are placed a few feet in
front of the engineer, often on stands just above and behind the meter bridge.
Whereas room shape and treatment heavily influence the sound from big
mounted studio monitors, nearfield monitoring is influenced far less by the
surrounding environment. Still, all front areas of the room should be designed
to push sound to the engineer’s ears with as little interference as possible.
• Position of power. Figure 7.2(a) shows the nearfield studio monitors and the
listener’s ears in a triangle. With the monitors equidistant from the listener’s
ears, the mix of left and right arrives at both ears simultaneously. Figure 7.2(b)
shows monitor speakers on stands produce fewer console reflections. Woofers
being at ear level are less crucial, as the low frequencies are less directional.
Recording Tips for Engineers
108

Figure 7.2 Nearfield monitor placement
• Keep your speakers free of debris. Any items placed on top of your
nearfield monitors will eventually vibrate off, landing on the console.
• Keep speakers out of corners and away from walls. Close proximity
reflections can cause interference with direct signal, creating phantom images.
If it is not possible to move the speakers, then deaden the corners to reduce
unwanted reflections.
• Rainbows everywhere. Keep your speakers away from video monitors.
The magnets, if unshielded, mess with the colors on the screen.
• High ratio hornblower. Use the best speaker cables available, and add in-
line fuses to your speakers – always install the recommended fuse. High peak
levels, such as when the drummer hits the kick, will translate into high voltages
and can overload the speaker. Hopefully, the fuse will blow before the speaker,
saving the speaker. Replacing a fuse is cheaper.
• Use a powerful monitor amplifier. Low powered amplifiers will overload
sooner, creating unwanted distortion. The speakers should distort well before
the amplifiers distort. Many engineers today use nearfield monitors with
built-in amplifiers.
The Control Room Setup
109
(a) (b)
30° 30°

• Add a subwoofer sparingly. The home listener may not have a subwoofer. If
you are using one with your small speakers, move it around to find the best
placement, and occasionally check the sounds without it. If the low frequencies
in the studio are enhanced with a subwoofer, the sounds might be bass shy
when played somewhere else.
Without a properly connected subwoofer, small speakers can blow
because the low end is too powerful.
• Play with your bottom. Once the nearfield monitors and subwoofers are
correctly placed, set the equalization flat and listen to a favorite disc. Many
professional nearfield monitors allow the user to change the speaker
equalization and crossover frequency. Try different speaker models for an
overall feeling of how the room sounds.
When we know that the room and speakers are properly equalized, we can
rely on our ears knowing that what we hear is a correct representation of what
is being recorded. The room should be designed and tuned so all frequencies
are kept under control – no major frequency bumps or dips exist and all
outside noises stay out and inside noises stay in.
Console
• Understand the console. Of course, the console is the routing station where
all incoming signals are sent on their merry way to wherever you choose,
such as to the multitrack recorder, the monitors, or the auxiliary cue sends.
The console enables you to use equalization, panning, effects and dynamic
range as building blocks for the best possible sound.
And remember the terminology, the console has channels and the multi-
track recorder has tracks. Commonly, the signal is called the track.
Whether it is a 12-channel console, a 48-channel console, or a DAW, they
all share the same principle. The channels process incoming signals such as
microphones, direct signals from instruments, returns from the multitrack
recorder and returns from effects. Signals are then assigned a location, and
finally mixed to a master output, often stereo. Without a total understanding
of the console flow, the engineer cannot use it to its maximum potential.
Recording Tips for Engineers
110

• What are VU and peak meters? VU, or volume unit meters average the
signal level much like the human ear does. VU meter readings correspond
with perceived volume. Peak meters show the peaks, or the maximum signal
of transients that do not register on the VU meters. The peak meter readings
accurately show the recording levels.
• Label the console. Use a scribble strip to clearly label the channels on the
console with all relevant information including microphone and line inputs,
multitrack returns, cue sends and effects. Use a strip of tape across the length
of the console, as it tends not to smudge. A separate strip of tape for each song
can be pulled off the console and taped to the wall for future use, saving time
when changing from song to song.
• Don’t get loaded down at the bay. Clear the patch bay of all patches.
Improperly grounded external equipment can cause hum. Partly plugged-in
patch cords could cause channels to ‘short’ out, or crackle.
• Mute the channel. Mute the channel before making a patch. Dirty patch
cords can cause grounding buzz, click or crackles as the patch is made.
• Check the microphones. Once the console is set and the inputs are properly
routed, have a runner scratch the head of each microphone to check that each
one is properly connected. Or have him snap his fingers in front of the
microphone. Some engineers prefer finger snaps, especially the jazz engineers.
• Check the headphones. Go out to the studio room and listen to all the
headphones to make sure the cue sends are connected and checked for each
individual player. Each player’s headphone set should have ample signal level,
with everyone hearing the talkback microphone.
Equalizers
Most recording studios have racks of outboard signal processors including
equalizers, compressors, limiters and effects. Equalizers process frequencies.
Compressors, limiters, and noise gates process dynamics. Effects such as delays,
reverbs, and choruses process time. See Chapter Eleven for more on effects.
The Control Room Setup
111
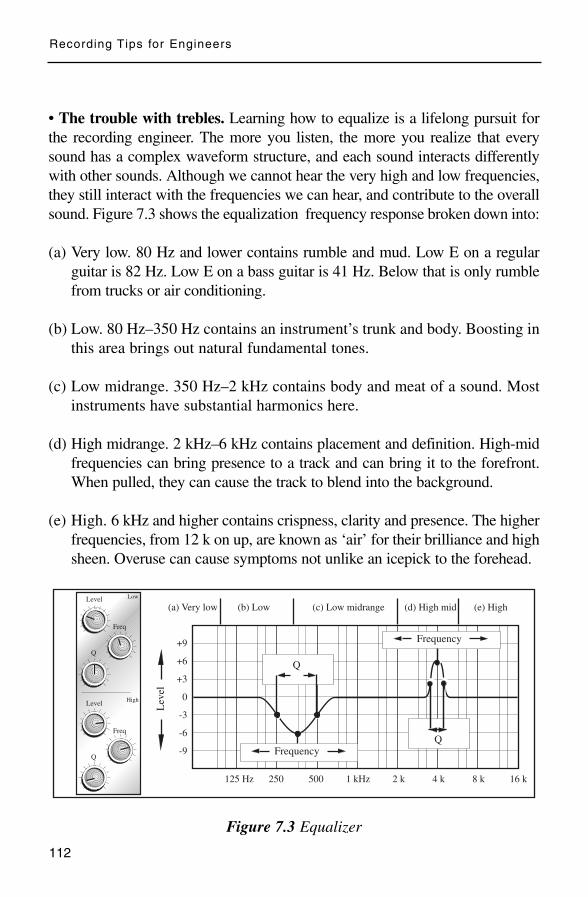
• The trouble with trebles. Learning how to equalize is a lifelong pursuit for
the recording engineer. The more you listen, the more you realize that every
sound has a complex waveform structure, and each sound interacts differently
with other sounds. Although we cannot hear the very high and low frequencies,
they still interact with the frequencies we can hear, and contribute to the overall
sound. Figure 7.3 shows the equalization frequency response broken down into:
(a) Very low. 80 Hz and lower contains rumble and mud. Low E on a regular
guitar is 82 Hz. Low E on a bass guitar is 41 Hz. Below that is only rumble
from trucks or air conditioning.
(b) Low. 80 Hz–350 Hz contains an instrument’s trunk and body. Boosting in
this area brings out natural fundamental tones.
(c) Low midrange. 350 Hz–2 kHz contains body and meat of a sound. Most
instruments have substantial harmonics here.
(d) High midrange. 2 kHz–6 kHz contains placement and definition. High-mid
frequencies can bring presence to a track and can bring it to the forefront.
When pulled, they can cause the track to blend into the background.
(e) High. 6 kHz and higher contains crispness, clarity and presence. The higher
frequencies, from 12 k on up, are known as ‘air’ for their brilliance and high
sheen. Overuse can cause symptoms not unlike an icepick to the forehead.
Figure 7.3 Equalizer
Recording Tips for Engineers
112
Level
Freq
Q
Low
HighLevel
Freq
Q
125 Hz 250 500 1 kHz 2 k 4 k 8 k 16 k
+9
+6
+3
0
-3
-6
-9
Lev
el
Frequency
Frequency
Q
(a) Very low (b) Low (c) Low midrange (d) High mid (e) High
Q

• What is Q? Q, for quality, defines the width of the bell curve that is affected
when boosting or cutting equalization. The bell curve, so named because it is
shaped like a bell, contains the frequencies slightly above and below the center
frequency. These adjacent frequencies are affected as signal level is raised and
lowered. Today’s computer plug-ins allow the user to change the bell curve to
much steeper values than traditional analog design.
• Q the music. The Q value equals the center frequency (in Hz) divided by
the bandwidth (in Hz). Bandwidth is measured at -3 dB of the peak of the
chosen center frequency. When cutting, bandwidth is measured at -3 dB
below the horizontal axis, resulting in thinner Q value.
Figure 7.4 shows a wide Q setting (two octaves), a medium Q (one
octave), and a medium thin Q (half an octave).
Figure 7.4 Q settings
The Control Room Setup
113
3 dB
3 dB
Half an octave
+9 dB
+6 dB
+3 dB
0
-3 dB
-6 dB
-9 dB
Two octaves
One octave
250 Hz 500 750 1 kHz 1.5 k 2 k 4 k
Equalizing
• Don’t twiddle. Ask yourself ‘is equalization necessary?’ Go into the studio
and listen to the actual instrument, or sound source. As the player plays, listen
to what frequencies are apparent in the studio, but missing in the control room
speakers. The ideal situation is to get the right sound at the source, then record
it with as little processing as possible – not always easy to do. Before reaching
for the equalizer, maybe:
– Move the microphone. Higher frequencies are more directional, and some-
times a small placement change can make a world of difference.
– Change parameters on the microphone. Maybe a pad or roll-off could be
installed or removed.
– Change the microphone. All the equalization in the world cannot replace
using the right microphone.
– Ask the player to adjust his instrument or amplifier tone, or maybe even his
playing style.
– Replace the strings or drum heads, if applicable.
– Add, remove or change compression.
– Try something as simple as changing the pan placement.
– Replace the player. Better players sound better, so they are easier to
record. A recording is forever, so bringing in a professional session player
is not uncommon.
• Match and set. Match the equalizer with the situation. A good equalizer is rich
and musical, yet razor sharp at honing in on certain frequencies. As with
microphones, different brands and types of equalizers can be used for different
instruments and situations. For example, if the equalizer is being used to simply
roll-off some low frequencies, you might not need a full bandwidth equalizer.
Recording Tips for Engineers
114

• Smear campaign. Adding equalization also adds phase shift, a degradation in
the waveform that increases with added equalization. This ‘smearing’ can cause
a track, especially a vocal, to lose clarity in the final mix. Plus adding high end
boosts hiss and noise that comes from the microphone, the console, the outboard
equipment, and all else along the audio chain.
• If you must equalize, keep it musical. Use the musical content of the
instrument to determine where to add and pull frequencies. Each musical
note’s complex waveform is made up of its fundamental tone, plus that tone’s
harmonics and overtones. The richness of a sound lies within these overtones
and other harmonic frequencies, so adding and pulling random frequencies
just adds non-musical clutter. If, for example, the song is in the key of A, there
will be a lot of buildup around 220 Hz and its harmonics (440 Hz, 880 Hz, etc.).
Logically, these harmonics are where the meat of the sound resides. Figure 7.5
will help you find specific musical tones and overtones.
Figure 7.5 Frequencies to tones
The Control Room Setup
115
C 523
C# 554
D 587
D# 622
E 659
F 698
F# 739
G 783
G# 830
A 880
A# 932
B 987
C 1046
C# 1108
D 1174
D# 1244
E 1318
F 1398
F# 1474
G 1567
G# 1661
A 1760
A# 1864
B 1975
C 2093
C# 2217
D 2349
D# 2489
E 2637
F 2793
F# 2959
G 3135
G# 3322
A 3520
A# 3729
B 3951
C 4186
C# 4434
D 4698
D# 4978
E 5274
F 5587
F# 5919
G 6271
G# 6644
A 7040
A# 7458
B 7902
C 8372
C# 8869
D 9397
D# 9956
E 10548
F 11175
F# 11839
G 12543
G# 13289
A 14080
A# 14915
B 15804
Octave 5
Note Freq.
Octave 6
Note Freq.
Octave 7
Note Freq.
Octave 8
Note Freq.
Octave 9
Note Freq.
C 16
C# 17
D 18
D# 19
E 20
F 21
F# 23
G 24
G# 25
A 27
A# 29
B 30
C 32
C# 34
D 36
D# 38
E 41
F 43
F# 46
G 48
G# 51
A 55
A# 58
B 61
C 65
C# 69
D 73
D# 77
E 82
F 87
F# 92
G 97
G# 103
A 110
A# 116
B 123
C 130
C# 138
D 146
D# 155
E 164
F 174
F# 184
G 195
G# 207
A 220
A# 233
B 246
C 261
C# 277
D 293
D# 311
E 329
F 349
F# 369
G 392
G# 415
A 440
A# 466
B 493
Octave 0
Note Freq.
Octave 1
Note Freq.
Octave 2
Note Freq.
Octave 3
Note Freq.
Octave 4
Note Freq.

• Pull before adding. Pulling a midrange frequency, then raising the overall
level often works better than adding highs and lows. The response is
smoother with less risk of overload.
• Freq. out. Minimize frequency overlap by pulling offending frequencies that
mask more important sounds. Pulling a frequency on one track changes the
way other tracks interact at those frequencies. Figure 7.6 shows the frequency
response of equalization applied to two guitars.
On guitar (a) around 250 Hz is being pulled with a bump around 4 kHz to
give the guitar some presence. On guitar (b) around 250 Hz is brought up, and
somewhere around 4 kHz is pulled to let the other track shine through. When
all frequencies are accounted for, with no overlap, the result is a tonally
balanced sound with both definition and clarity.
Figure 7.6 Minimize frequency overlap
Recording Tips for Engineers
116
+8
+6
+4
+2
0
-2
-4
-6
-8
125 Hz 250 500 1 kHz 2 k 4 k 8 k 16 k
+8
+6
+4
+2
0
-2
-4
-6
-8
(a) Guitar 1
(b) Guitar 2
125 Hz 250 500 1 kHz 2 k 4 k 8 k 16 k

• Q tips. Proper Q settings can play a key roll in creating distinction between
instruments. Set too wide, it affects frequencies that might not need affecting.
Set too thin and it may not get the job done.
• Thin Q very much. As you sweep to locate certain emphasized frequency
ranges, use the meters to determine where the peaks begin and end. Set your
Q according to these points. The meters are only an indication, and should not
be used as the final determination.
• I boosted it, then I cut. To locate specific frequencies, the tried and true
still stands the test of time.
(1) Lower the track level.
(2) Pan the track to center it between the monitor speakers.
(3) Have the player play the part. Listen for the general frequency range you
wish to address.
(4) Turn up the level of the equalization, adjust the Q and sweep the
equalization until you determine which frequency range needs to be
addressed, whether it’s muddiness being pulled, or crunch being added.
(5) Find the right spot, then return the level and the Q to a less drastic position.
A wider Q pattern can result in a less ‘pointy’ sound.
• Use a wide Q when adding equalization so less level is needed. When
pulling equalization, keep the Q setting narrow, so the richness isn’t lost by
cutting too wide a swath. This may help preserve the tone a little, rather than
make the instrument sound lacking.
• No peaking. Excessively high equalization levels, such as plus or minus 8
or 10 dB or more rarely sound good, and high peaks are a nightmare for the
mastering engineer.
The Control Room Setup
117

• Too much equalization can overload. Because equalizer filters are active
circuits, adding level to one frequency adds level to the overall signal.
Channels easily overload when there is an abundance of equalization.
• Find and pull the instrument’s resonant frequency. Some instruments,
such as the bass guitar can have pronounced boom at certain frequencies.
Sweep the general areas where you feel these resonant frequencies are, and if
necessary, pull them a bit.
• Enhance a frequency. Boost (or cut) at double (or half) a certain frequency,
making the desired change a bit smoother. For example, if you are boosting at
220 Hz add a bit of 440 Hz, and pull off the 110 Hz a bit.
• Zero must tell. Find a specific frequency to change by pulling out all the
low frequencies. This will help zero in on the midrange frequencies. Once set,
bring back the low end.
• Watch your bottom. On budget consoles, the equalization settings may not
be sweepable, but fixed. If the kick drum, the snare drum, the tom-toms, the
bass, the guitars and the vocals are all boosted at 100 Hz, they will meld
together as one indistinct murky blob. Better to use microphone choice and
placement to get your low frequencies just right.
• Don’t overequalize. Think of the painter who wants his painting to be very
bright, so he mixes the brightest greens, with the brightest reds, yellows and
blues. Individually, they are all very bright. Combined, they turn into a mass
of dull brown and gray.
Each instrument must be laid out on the canvas so all colors can be seen
and the whole canvas is used – even if some spaces are left white.
• Overequalize. There are times when drastic equalization is needed. The
trick is to know where and how much. When a feature instrument is not as
large as it should be, maybe that’s the time to lay it on thick. Maybe.
Recording Tips for Engineers
118

Compressors
• What does a compressor do? Most musical instruments and vocals are so
dynamic that a compressor is needed to raise the lowest levels and lower the
highest levels. Like an automatic level control, this process raises the apparent
loudness of the signal, bringing out the quiet notes that may otherwise be lost.
But raising low levels also raises the noise floor. The challenge is recording
the hottest signal level with the lowest noise possible. Compressor controls
can include:
Input/output. Most compressors have, at the very least, a level control.
Raise the input too much and overload the input circuits. With not enough
level, noise is introduced when the compressor output signal is raised.
Threshold. The threshold determines at what point the compression
begins to take effect. Any incoming signal that exceeds the threshold gets
compressed. A higher threshold means less of the signal is affected.
Figure 7.7(a) shows a high threshold where minimal signal is affected.
Figure 7.7(b) shows a medium threshold, and Figure 7.7(c) shows a low
threshold, where most of the signal is affected.
Figure 7.7 Threshold
The Control Room Setup
119
Time
(a) Thresh high Ratio 1:1
Volu
me
Threshold point:High
(b) Thresh med Ratio 1:1
Threshold point:Medium
(c) Thresh low Ratio 1:1
Threshold point:Low
Affected area

Ratio. The ratio is the dB change in the compressor’s input signal compared
to the dB change in the compressor’s output signal. The envelope in Figure
7.8(a) shows that a 1:1 ratio is unity gain, or no change from input level to
output level. Figure 7.8(b) shows a 2:1 ratio. For every 2 dB coming in,
only 1 dB change goes out, once the threshold is reached. Figure 7.8(c)
shows an 8:1 ratio. When the ratio reaches 8:1 or 10:1 the compressor
becomes a limiter. A high ratio combined with a low threshold results in
severe change in sound and level.
Figure 7.8 Ratio
Attack and release. The attack and release functions define the speed of
the compressor action. The attack time is the time the compressor takes to
react to a strong signal. The release time is the time the compressor takes
to return to unity gain after that strong signal has past. Some instruments
take a few milliseconds for the power to build, so their peak point is not
instantaneous. A snare may have a faster release time and a piano may
have a slower release time, due to its natural ringing out.
Figure 7.9(a) shows that if set too slow, the attack will allow the peak
to pass before compression kicks in. If set properly, Figure 7.9(b) shows the
attack and release control the sound properly. Set too fast, Figure 7.9(c)
shows the compressor misses the peak.
Recording Tips for Engineers
120
(b) Thresh low Ratio 2:1
Ratio2:1
(a) Thresh low Ratio 1:1
Ratio1:1
Time
Volu
me
(c) Thresh low Ratio 8:1
Ratio8:1
input level = output level
output level
input level input level
output level
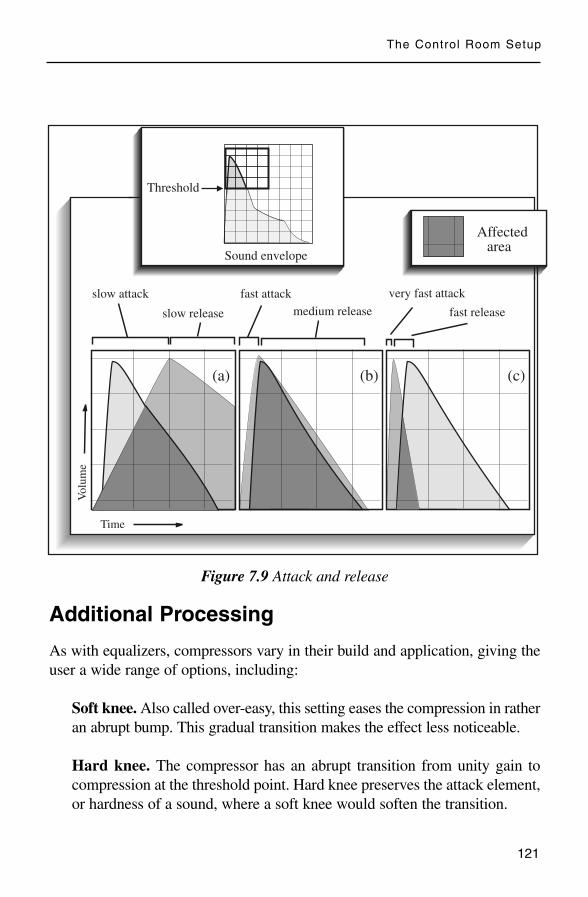
Figure 7.9 Attack and release
Additional Processing
As with equalizers, compressors vary in their build and application, giving the
user a wide range of options, including:
Soft knee. Also called over-easy, this setting eases the compression in rather
an abrupt bump. This gradual transition makes the effect less noticeable.
Hard knee. The compressor has an abrupt transition from unity gain to
compression at the threshold point. Hard knee preserves the attack element,
or hardness of a sound, where a soft knee would soften the transition.
The Control Room Setup
121
medium release
slow attack
slow release
very fast attack
fast release
fast attack
Sound envelope
Threshold
Affectedarea
Time
Volu
me
(a) (b) (c)

Split. Some compressors have a circuit that splits the signal, processes and
distorts one to enhance the harmonics, then allows the user to add this
processed signal back into the signal path.
Multiband compression. Low-, mid-, and high-frequency bands can be
processed individually, allowing the user to compress the low frequencies
on a track different than the high frequencies.
Gain reduction meter. The meter goes from 0 VU and down to display the
gain reduction – the amount of reduction being applied to the signal at any
given time.
Link. To avoid shifting images, some compressors allow the user to link it
with another compressor to process a stereo signal equally in both channels.
Sidechain, or key in, or duck. Used to ‘trigger’ one channel off another.
Normally a compressor reacts to its own incoming signal. Using a sidechain
makes the incoming signal react to the dynamic levels of the sidechain
signal. For example, radio DJs use the sidechain to automatically lower the
music level when they want to talk over the music. When they talk, the voice
plugged into the sidechain triggers the compressor, and lowers the music to
a predetermined level. When the DJ stops talking, the signal returns to its
original level.
De-esser. A compressor with a frequency-dependent sidechain. A de-esser
compresses only high midrange frequencies that contain sibilance, such
as ‘S’ and ‘T.’ The de-esser is used mainly on the vocal track to reduce
sibilance while still retaining the crispness and high end.
• Different compressors include:
Peak limiter. A limiter is a compressor with ratios of 8:1 or 10:1 or higher.
Used to control the very fastest and loudest of signals, it stops the signals’
output from exceeding a certain level, regardless of the input level. The peak
limiter works on the peaks, or initial spikes – the loudest initial part of a
sound, rather than RMS (average) as other compressors do.
Recording Tips for Engineers
122

Leveling amplifier. This is a basic compressor with preset medium attack
and medium release times, and only input/output level controls, with
stepped ratio control.
Vacuum tube/valve. Vintage microphones, amplifiers and limiters may
contain vacuum tubes, also called valves. These tubes distort musically, and
create a warmth that makes tube equipment a favorite for many engineers.
Compressing
• Choose with care. As with microphones, compressors must be chosen for
each situation. The right compressor with the correct settings will improve
intelligibility and placement, making the track appear louder.
• If adding equalization place the compressor before the equalizer. This
allows you to fix the equalization settings without having to compensate on the
compressor. But maybe the pre-amp in the equalizer is better than the pre-amp
in the compressor. This may mean that the equalizer comes first in the chain.
• If pulling equalization, place the equalizer before the compressor. Pull
unwanted frequencies such as low-mid muddiness so the compressor reacts to
the equalized sound, not the pre-equalized sound. Sometimes the equalizer can’t
handle the incoming peak levels, so the sound needs to be compressed first.
• Don’t overcompress. Too much compression tightens up the air and can eat
all the dynamics of the track and produce a lifeless sound. Some engineers
love to use lots of compression as part of their sound.
• Overcompress. Let’s say you have a great guitar sound, but it needs more
attitude for that real in-your-face feel. A low threshold and high ratio, together
with proper input and output settings, will ‘squash’ the sound for a more
ripping tone. Too much compression can suck all the dynamics out of a track
so the output level will stay the same no matter what the input level is.
Overcompression can enhance the low frequencies, but it steps on other
tracks in that frequency range. Once the compressor settings are as you want
them, re-examine the equalizer settings.
The Control Room Setup
123

• First in line gets set up first. If you have set up a compressor, then a peak
limiter, then an equalizer, start with the settings on the compressor.
• Set the attack according to the instrument and the music. A string pad might
have a slower attack time than, say, a jarring staccato violin piece. Consider the
instrument, the music, and how the music is played when setting attack time.
• Set the release time to match the tempo of the music. A faster song would
likely have a faster release time. Too long though, and the release will still be
recovering when the next signal hits.
A longer release time can smooth an instrument’s decay. Too short a
release time results in pumping and breathing – the sound of the release
returning to unity gain too early.
• No compression, but no overload. Add another limiter to totally stop any
signal from going beyond a certain point, but without ‘compressing’ the
signal. Set a very high ratio such as 10:1 (the point of limiting) and set the
threshold on the highest setting to allow everything to go through unaffected.
Play the signal at its loudest, and lower the threshold until you see meter
movement. Go back and forth between ratio and threshold until you find the
right settings for your situation.
• Peaking duck. The limiter output signal level should have the peaks just reach-
ing -1 dB. Set the output level so it doesn’t quite reach the overload point, yet
captures the maximum signal level with minimal noise. The ideal situation is to
set the limiter’s input level so that the dB-reduction meter is not moving during
the main musical parts. When a loud part hits, the compressor kicks in.
Noise Gates
• Gate with the program. A noise gate, also called an expander, works in the
opposite way to the compressor. Unless a certain input level is reached, the
trigger will not open. As with a compressor, a noise gate includes features
such as threshold, attack and release. It may include a ‘hold’ setting which
tells the unit how long to wait before the release, and a ‘duck’ setting, which
activates the sidechain. Noise gates, like compressors, are commonly placed
Recording Tips for Engineers
124

within the chain of a signal track, not across a send, such as a reverb would
be. Figure 7.10(a) shows the incoming signal, (b) the gate settings, and (c) the
outgoing signal.
Figure 7.10 Noise gates
• Hum free. A gate will only eliminate hum when the instrument is not playing.
Once the player starts, the gate opens, and the signal, with the offending hum,
comes through, loud and clear. Best to eliminate all the noise before pressing
the record button.
• Install a reverse gate on the talkback microphone. When the players
play, the volume in the studio will cause the gate to react, in effect turning off
the talkback microphone. When the music stops, the gate opens and activates
the talkback microphone. This allows more freedom than always having to
reach over and continually turn the talkback microphone on and off.
The Control Room Setup
125
Threshold
Attack Hold Release
Incoming signal
Gate settings
Outgoing signal
Sound envelope
Noise
Processed soundenvelope
Time
Vo
lum
e
Affected area
(a)
(b)
(c)

Whether you are recording analog or digital, the incoming signals need to be
routed, recorded and monitored. Depending on the style of music, the artist, and
the tracks available, decide how many tracks will be needed for basics, how
many will be needed for overdubs, and how many will be needed for vocals.
Track Layout
Determine which tracks get higher priority. For example, if the primary artist
is a drummer, more tracks than normal might be allocated to the drums. If the
player is primarily a pianist, record the piano in stereo rather than mono.
These choices are always a challenge, because you must peer into the
future to imagine the final outcome. Using the number of available tracks,
you need to know:
T H E S TA R T I N G P O I N T S
Chapter Eight

– How many instruments will eventually be recorded.
– Which instruments get routed to which tracks.
– How many tracks will each player get. Often drums get the most tracks.
For example, a 48-track session might use numerous tracks for the drums,
giving each tom-tom (maybe both top and bottom) plus the snare drum,
cymbals, and ambiance microphones their own track. However, with only
16 tracks total available, you might want to assign drums to say, five
tracks – kick, snare, hat, then a stereo mix of tom-toms and cymbals.
• Lay your tracks out consistently for every session. When the tracks are
always laid out the same, you get used to where everything is. The console will
become your instrument to play, like a piano. Rather than think, ‘If I want that,
I have to do this,’ your instincts will take over. As well, you may be able to
leave the setups the same from song to song, saving time.
• Layout on the console. If you are using a digital console, banks of tracks
are layered. Assign stereo tracks evenly, such as not having one half in one
bank, and the other half in another bank. As well, you wouldn’t want, for
example, the effects for the drums returning in a block that has the vocals.
Historically, effects have returned on one section of the console. With digital
consoles, effects for the drums should stay with the drums, and effects for the
vocals should stay with the vocals.
• Track trick. Route the vocals to higher channels so they naturally return to the
console more in the middle rather than all the way over to one side. Recording
the vocal on track one usually means leaning way over to address it. Better to be
centered when you dial in those all-important vocal settings.
• Maximize your choices. If tracks are available, try recording different
sounds of the same instrument. For example, record a bass track direct, a bass
track with a microphone through an amplifier, and a bass track going through
some effects. Use different processing on different tracks and come up with
a suitable mix. Any or all can be erased or combined later.
The Star ting Points
127

• Hey, my stereo’s gone. Don’t record too many stereo tracks within a song.
Final placement of stereo spread is determined during mixdown. When
drums, bass, guitars, keyboards, horns, and vocals are recorded in stereo, the
wide imaging of the individual instruments may get lost. I know, sometimes
you wish the musician would get lost.
• Don’t buss single channels. Route the signal directly to the multitrack
recorder. A direct signal is higher quality because it has less processing.
• Scan across the console to confirm that all busses are correct. With all
the signals routed every which way, one wrong button pressed could mean a
great track ruined.
Documentation
• What should the track sheet include? The track sheet is, of course, the
page that documents the date, all locations of contents, where the tracks are,
names of specific files, and additional comments. All must be clear. It also
includes tape speed, equalization curve, reference level, alignment tones, and
recorder manufacturer. Also noted are take numbers, dates and possible small
notes, such as microphones and outboard gear used. Cue lists and BPM are also
commonly listed.
All paperwork must be clear enough so any other person can easily sort
through it. Many times, a project uses any number of studios and recording
engineers. Good, clean, complete and easy-to-understand track sheets are a sta-
ple of the recording environment and an important part of the session.
Information on parameters is also needed in the hard drive world of
recording. Include notes about sample rate, bit depth, reference level, titles,
and dates with the FireWire hard drive. This could be taped with a small card
right onto the hard drive.
• Mark the choice pass on the track sheet. When naming a new track for
the session, give it a proper label, not just ‘guitar 7.’ If a track is a comped
master, label it with a *. If the track is in time, add a second *. If the track is
in tune add *** to the end of the file name. For example, the final lead vocal
was comped from lead vocal 1 through lead vocal 7.
Recording Tips for Eng ineers
128

With many freelance operators hired to add stars 2 and 3 to the sound file, a
logical virtual notes system must be employed. When the project is finally
ready to mix, all the choice tracks will have *** after their file name.
• Labeling, labeling, labeling. Some projects have hundreds if not thousands
of files, including edited files, complete takes, partial takes, and unused takes.
Place all these files in the master file list. Back up everything and remove any
files that will not be used in the final mix.
• Use a notebook for each project. Keep the relevant information there.
Loose pages get torn, mixed up and just plain lost. Personally, I am a fanatic at
keeping paperwork. I have report cards from elementary school, love letters
from Junior High, and that annoying restraining order thing.
• How about a date? Include the year when writing the date on anything.
Years fly by, and, as anyone being audited knows, something with the date
‘July 30’ is pretty much useless.
• Re-zero the counter for every song. Keeping track of cues is easier when
the zero starts at the top of the count-off.
• My song is on the charts. If your project has more than a few songs, make
a large chart with all the titles on one axis, and all the instruments on the
other. Finish a track then check it off on the chart. This makes it clear what
has been done, and what needs to be done. Anyone can look across the room
and see exactly where the project is at.
• Write down favorite settings that you stumble upon while tracking or
overdubbing. Don’t start from scratch on mix day. Experiment throughout the
project. During the session, things are always happening. Often, something
great might fly by, such as a great echo sound at one spot in a song. Writing
a favorite setting down gives you more options by mix time, as you will have
lots of ideas collected. If possible, record this great echo effect onto an open
track. If it moves you, then it should also move the listener.
• Department of redundancy department. Conflicting, redundant, or just
plain wrong information is worse than no information at all.
The Star ting Points
129

• Keep to a schedule. If your project is under great time restraints, make up a
schedule that everyone can agree on. Post this on the wall, and stick to it.
• Drum to your own beat. Rather than blindly use the following settings,
determine the characteristics of the musical instrument you are about to
record. Every instrument sound has its own characteristic envelope.
Drums
Ask yourself a few questions before setting the processors. If bussing a lot of
microphones to a few tracks, will you place a compressor/equalizer across the
buss, or across each incoming signal? How many tracks do you have? More is
not always better. Should the panning be set from the listener’s perspective, or
the drummer’s? How much processing should be used? Should you record any
effects with the signal? Combining tracks can be tricky until you can see where
things will lie within the final mix, and set your levels accordingly.
• Use lower levels. Using a VU meter, set the recording machine input level
of the drums low, occasionally in the yellow – rarely in the reds. Drums can
have a lot of wallop and the transients don’t show up on VU meters. Drums
are often the pillars of a song, and must be sturdy enough to carry the load.
Equalization and compression can bring out the natural crack and boom.
• Peak monitor. If available, use the peak meters to monitor levels of the drums.
Don’t overload the higher frequency instruments, such as high hats and cymbals.
They have a lot of harmonics and high-level transients.
• Use the proper drummer. Have him play the song you are about to record.
Getting sounds with a substitute drummer means nothing.
• Pick a low snare. When getting drum sounds, keep them at a reasonable
level in the monitor mix. All drums sound great when turned up loud, but
lower levels reflect a truer indication of how each drum sounds. If the drums
sound full and clear at a lower level, imagine how great they’ll sound when the
volume is turned up.
Recording Tips for Eng ineers
130

Kick drum equalization
Proper Q settings can help define each drum by minimizing frequency overlap.
Starting points might be:
– Pull below 40 Hz.
– Boost around 60–100 Hz to bring out the thud of the kick, maybe even
lower in certain circumstances such as some dance mixes. Set the kick
drum frequencies in tandem with the settings on the bass guitar. These
two instruments carry the low end of the song and each should be distinct.
Add a frequency on one and pull the same frequency on the other. Note
that a tight kick skin won’t have the low end of a looser skin.
– Pull around 164 Hz in the kick drum to bring clarity to the bass track. 164
Hz is a harmonic of the bass guitar’s fundamental low E note, 41 Hz.
– Add up to 200 Hz for body and fullness. Watch overlap.
– Pull from 200 to 600 Hz or higher to remove unwanted cloudiness and to
open room for other instruments.
– Boost around 2.5–5 kHz for solid thwack.
– Boost at 5–8 kHz for crispness, or a clicky sound. With faster tempo
songs, the kick may need more click to be heard, while slower tempo
songs leave room to allow solid lows to come through.
– Pull 8 kHz and up. These frequencies contribute little. Pulling them won’t
effect the sound much, and may reduce hiss.
Snare drum equalization
– Roll off up to 100 Hz to reduce muddiness.
– Boost somewhere between 100 Hz and 300 Hz for the body of the snare
drum to come through.
The Star ting Points
131

– Boost somewhere between or around 500 Hz–1 kHz for that nice woody
crack sound.
– Boost around 1 kHz for a ‘tink’ sound.
– Boost between 5 kHz and 10 kHz for crispness.
High hat equalization
– Roll-off everything below 180 Hz to remove rumble and leakage from
other drums.
– Pull 500 Hz–1 kHz to remove ‘clang.’
– Boost 3 kHz to add fullness or ring, but this is seldom needed.
– Find sheen at 8–12 kHz.
Tom-toms equalization
– Roll off unwanted low end. Some tom-toms can get pretty low.
– Find and pull the rumble on each tom-tom. Turn up the level control on
the equalizer, but not a lot. Too much low end can carry enough power to
blow out a speaker. Sweep the low frequency as the player hits the drum,
and find any offending rumble, maybe somewhere within 300 Hz–1 kHz
– the floor tom-tom might be lower. Find and pull the frequency using a
narrow Q setting – not enough to radically alter the sound, since there is
a lot of harmonic tone within that frequency area. As well, that frequency
may have a higher harmonic sweet spot, so when you pull the rumble, it
naturally enhances that spot.
– Adding lows, between 100 and 300 Hz, depending on the drum, will bring
out the thud.
Recording Tips for Eng ineers
132

– Pull around 8–900 Hz to lessen the ‘boxy’ effect. Boost in this area to add
boom.
– Use a narrow Q setting, and sweep between 3 kHz and 5 kHz to find the
‘sweet spot’ frequency and raise it. You’ll know it when you hear it.
– Pull a bit around 8 kHz and higher to diminish cymbal leakage.
Cymbals/overhead equalization
– Roll off up 180 Hz to eliminate air conditioning rumble and low-level
street noise.
– Boost a wee bit of 8–12 kHz to add shimmer.
– Sweep the high end to locate any frequencies that may need pulling or
adding. The overheads preside over the whole drum kit, and tend to gel the
individual drums together. A rich, full-sounding kit should have lots of rich
highs, and few clashing lows.
Room microphone equalization
– Use the appropriate microphone roll-off to minimize rumble.
– Pull somewhere within 120–500 Hz to open up room for high priority
instruments. The rich harmonics will still come through, with the power of
the low frequencies coming from the individual drum tracks.
Drums compression
Only the very best drummers can hit the drum the same every time, so using
compression is almost a necessity. Proper compression can bring up the lows
and help deliver solid drum sounds. Commonly, drums can be compressed
more than other instruments because they are less musical and more percussive.
The Star ting Points
133

Use these starting points:
Attack. 5–10 ms or maybe faster. A slower attack time can allow initial
peaks to sneak through before the compression kicks in. This may give a
nice added crack to a snare sound, but watch for overload. Set the attack
time slower on the kick drum, as it may take a few milliseconds to build
to its full potential. Fast attack and release times bring up the body of the
drums and cymbals. An attack set too fast may diminish the initial crack
of the drum.
Release. Start at 250 ms, then move to suit the song. A fast release time can
bring up the level of the decay and raise the sound of the snares.
Ratio. 3:1 or 4:1. Drums, due their nature, have fast natural attack and
release times, with plenty of peaks. A high ratio levels the dynamics while
delivering the meat of the sound. Control the signal enough to record it,
yet don’t overcompress it so as to lose the initial transient crack. Of
course, as the ratio gets higher, past 8:1 or 10:1, the compressor becomes
a limiter. A limiter is great for eliminating transient overload on digital
input circuits.
Threshold. Low. A lower threshold preserves the full impact of the
drums, and can sustain the cymbal’s natural decay.
• Compressing the room. Run the room microphones through a compressor
on high compression and fast release. When the player is playing, the ambient
microphone level is lower, removing any unneeded cloudiness. When the
player stops, the ambient microphones open, making it sound as if the player is
in a large ambient room. As with many things in the studio, compressing room
tracks is your personal preference. Do what you feel works with the song.
• Kick – the habit. If your drum setup has two kick drum microphones,
maybe compress the far one and pull a bit of the high end. Add it in with the
close microphone to get some teeth to the sound. Or try placing a microphone
on the opposite side of the kick drum where the beater makes contact with the
skin. Switch the polarity on this microphone.
Recording Tips for Eng ineers
134

• Level the drums. If the drummer is playing with both sticks on the snare
drum, some of the hits may be louder than the rest. To raise the level of the
lower ones, split the signal into two. Affect one of them how you normally
might, gating out all but the main or loudest hits.
Send the second signal to a limiter, and compress the loudest part. Send
a buss output from the first snare channel into the sidechain of the limiter.
When the snare on the first track hits, that controls the compression of the
limiter. Blend the two tracks until both the crispness of the loudest snares
and the subtle in-between parts are properly audible.
Drum gates
When placing microphones on the drums, complete separation is almost impos-
sible. With proper microphone choice and placement, leakage from one drum
microphone to an adjacent microphone can be minimized. Before you reach for
the noise gate to eliminate leakage, choose the right microphone and place it
properly. Messing with gates during recording can result in painting yourself
into a corner. Sometimes it’s better to wait and gate during the mix, especially
when recording a dynamic drummer.
• Listen to the gates. If you are gating any of the drums while recording
them, listen to the gated sound throughout the song to make sure the gates are
being triggered correctly. Changing the input level of a drum track (some-
times even an equalization change) may alter the triggering of the gate. Check
that all gates have triggered correctly before moving on.
• Gate the drum. It is not uncommon to add some degree of gating on the
kick, snare and tom-toms, but the cymbal microphones are not normally gated
during recording. If the internal trigger on a drum gate isn’t fast enough:
(1) Mount a small contact (pickup or lavalier) microphone to the rim. This
tight microphone will open the noise gate faster.
(2) Listen to the contact microphone, sweep the equalization to find the
drum’s most prominent frequency, and accentuate it.
The Star ting Points
135

(3) Run the signal through a tight noise gate to make it sound like a click.
(4) Plug this into the sidechain input of the noise gate on the drum.
This really only works when the player hits solid drum hits. A drummer
using brushes for drumsticks, or lightly tapping the drums may not trigger the
gates as planned.
• Gate the tom-toms. Eliminate leakage in the tom-tom tracks without using
a separate microphone as a trigger. For each tom-tom:
(1) Split the signal coming from a tom-tom microphone into a second channel
on the console. Insert a noise gate on the first tom-tom channel.
(2) On the second channel, determine the fundamental frequency of the tom-
tom. Accentuate it by setting a thin Q, then pulling the other frequencies.
(3) Gate and equalize the signal so all that comes through is a solid click
when the drummer hits the tom-tom. Leakage from any other instrument,
even other tom-toms, should be dialed out.
(4) Run this output into the input of the sidechain of the noise gate that was
inserted on the first tom-tom channel.
Any time the drummer hits the tom-tom, the trigger opens the noise gate,
allowing the signal through. Due to the slow build of a tom-tom sound, try
using a contact microphone.
• Talk to the drummer. Once you get the sounds to where you want them,
record the drummer playing the song to be recorded, then have him come into
the control room and listen. Once he is happy, you can move on.
• Electronic drum machines commonly have ‘hyped’ sounds. Electronic
drums and percussion are already equalized and compressed, so some of the
previous equalization and compression settings may be unnecessary.
Recording Tips for Eng ineers
136

Bass Guitar
Bass guitar equalization
Because recording bass guitar commonly falls in the realm of basics, it can be
difficult to know what frequencies to add or pull until all other tracks are
recorded. Many engineers record the bass with no equalization. During the
overdubs stage, they play around with different settings to find what works best
in preparation for the final mix.
• Get solid. The bass must be solid. Its job is to hold the low end together, so
any level fluctuations by the player must be made uniform by using filters,
equalization and compression. As a starting point:
– Dial out the very lows, maybe up to 40 Hz, using a high-pass filter so the
compressor doesn’t have to deal with unneeded rumble.
– Add between 50 Hz and 80 Hz for real lows on the bass. But don’t mush
this area with the kick drum. Add (or pull) a frequency on either the bass
or the kick drum, but not both.
– Add around 82 Hz to add weight and to keep the bottom of the song solid.
The punch dwells in these low frequencies.
– Use a narrow Q setting, and pull between 160 Hz and 350 Hz for clarity.
– Add somewhere between 600 Hz and 1.5 kHz for the nuts to come through.
Pull here and raise the overall level to open space for other instruments.
Adding too much here can make the bass guitar sound vague.
– Add 2–2.5 kHz for presence, but watch overlap with other instruments.
– Add around 3 kHz to bring out click and fret noise.
– Pull from 4 kHz on up for a smoother, less attacky sound.
The Star ting Points
137

Bass guitar compression
Often the bass guitar has fewer initial transients than an electric guitar, again
depending on whether the player uses a pick or not, whether he uses a ‘thumb
slap’ style, or whether he uses his fingers. Different amplifiers require different
approaches. A valve (tube) amplifier has a natural musical compression, so
additional compression may not be necessary. A close miked setup will need
different settings than a distant setup. Dynamics play a major role in setting
levels, because a more dynamic part will need different settings than a smooth
part. As a starting point, try:
Attack. 20–60 ms. A slower attack time may help define the bass sound
so that the initial note passes before the compression kicks in. Due to the
low frequencies involved, it takes a bit longer to reach maximum power.
Go faster, 0–20 ms for a ‘clickier’ sound. For a smoother transition from
non-compressed to compressed, try pressing the soft knee button.
Release. Medium to long. Use a longer release for substantial sustain.
Ratio. 4 to 1. It depends on how wild the player is – a good bass track
shouldn’t need a high compression ratio. Adding too much compression
may affect the higher harmonics of the bass guitar.
Threshold. Low. Maybe -25 to -15. Again, it depends on how smooth the
player is. If he keeps his levels uniform, a higher ratio may work. A low
threshold with a high ratio can result in a nice sustain. A ratio that’s too
high, coupled with a threshold that’s too low is noisy and can suck the
dynamics from a track.
• All strings considered. Sometimes you must control certain frequencies, and
not others. Maybe the bass guitar has one note louder than the rest, but pulling
the specific equalization could degrade the sound. Try this:
(1) Return the bass to another channel.
(2) Sweep the frequencies to find the offending note.
Recording Tips for Eng ineers
138
(3) Pull the rest of the frequencies, except for this note.
(4) Patch this equalized signal into the compressor’s sidechain input. The
sidechain dictates the compression, so only the input note is affected. This
channel is for processing, and not part of the audio signal.
• Sneaky peaks. An overly dynamic bass track may need a compressor plus
a limiter to catch any peaks that sneak through.
• Know where you are going. Determine what you want before you start
twiddling. Don’t change things hoping to find some magical sound. Picture it
in your mind and then dial it in.
• Does the player play with a pick during the song? Check beforehand if the
player uses fingers or a pick. Sometimes he may use, for example, a fingering
method during the verse, and a pick during the chorus. This means the settings
on the processors might need changing to compensate.
Electric Guitar
Electric guitar equalization
Of course, you don’t really equalize the guitar, you equalize the microphones
on the guitar amplifiers. With such a wide array of guitars, players, and styles,
it is impossible to say there is a right or wrong guitar sound. Once the setup
is complete and the microphones are correctly placed, have the guitar player
play the part to be recorded and, as a starting point, try:
– Rolling off below 80 Hz. There is little musical information from a guitar
lower than 82 Hz so adding will just add unneeded low resonance. Leave
this area for the designated low-end instruments: the kick drum and the
bass guitar.
– Adding between 80 and 250 Hz for extra fatness. This area contains the
fundamentals of the instrument. Maybe pull here if the guitars are not
the primary musical instrument, or if they overlap with the vocal.
The Star ting Points
139

– Adding between 250 Hz and 1 kHz for content. This is an important guitar
area because the second and third harmonics of the A and D strings live here.
Adding the right frequencies in this area can place the guitar more in the
foreground. Pulling here places it farther away and makes room for vocals
and other instruments.
– Sweeping the upper midrange, between 2 and 6 kHz for the spot that has
enough bite. Somewhere there is a spot where the sound isn’t too brittle
or too boomy, and has just enough distinction.
– Adding 5–8 kHz for added richness, but this can also make any buzzes more
apparent. Due to an amplifier’s limited frequency range, musicality decreas-
es with higher frequencies.
– Adding some very highs, over 8 kHz can give an electric guitar some air,
but can easily turn the sound brittle.
Electric guitar compression
On a loud electric guitar amplifier, there is lots of low frequency harmonics and
overtones, but not a lot of highs. Take proximity effect into consideration while
setting compression levels. Too much low end can dominate, then dictate the
compressor’s reactions.
Medium-loud guitars may need less compression as the proximity effect
on the microphones may not be as apparent. Try:
Attack. Semi-fast to fast, such as 10–50 ms. Semi-fast attack times can
smooth out a lead guitar solo.
Release. Long. From 0.5 to 1 second. Longer release times heighten the
sustain. Shorter times increase pumping, especially with high ratio and
low threshold. Start by setting the release where it returns to zero just as
the next beat of the song hits.
Threshold. Low. Start at -25 and slowly raise it so all the crunch is brought
to the surface. Unfortunately, this also brings up the noise.
Recording Tips for Eng ineers
140

Ratio. At least 5:1, maybe as high as 10:1 for sustained guitars. Use the
peak level control, if available, to keep the initial attacks at bay, especially
if the attack setting is at all slow.
• Compensate at the amplifier before the control room. Once you get the
sound you want, compare the settings on the amplifier with the equalization at
the console. If the amplifier has, for example, certain frequencies pulled, and
you are adding them at the console, set the amplifier settings to compensate
then remove the console equalization. Get the best sound from microphone
placement and the tone controls on the amplifier. Always ask the player before
touching or changing his amplifier setting.
• Use distortion as a creative tool. Use distortion to add edge to a sound.
Tube distortion works best when the tubes are being driven, so turn up that
tube amplifier. But everything distorts differently. Digital overload distortion
will always sound terrible.
Acoustic Guitar
Acoustic guitar equalization
Properly miked, a quality well-tuned acoustic guitar with new strings should
need little equalization – perhaps to add some frequencies for sheen, or
maybe to pull where the sound may mask other instruments.
When equalizing something with as many overtones as an acoustic guitar,
pull the unharmonic overtones and enhance the pleasing harmonics. Here, the
musical recording engineer has the advantage. As a starting point, maybe:
– Roll off below around 82 Hz. The lowest note on the standard acoustic
guitar is E, around 82 Hz.
– Sweep the low-midrange, from 80 Hz to 300 Hz to find the boomy sound,
then pull it using a narrow Q setting.
– If there is room, add somewhere between 80 Hz and 350 Hz for body.
– Add 300 Hz–1 kHz for early harmonics.
The Star ting Points
141

– Add somewhere between 700 Hz and 1.2 kHz for more ‘wood’ or pull
here to ease the secondary harmonics.
– Add 1.5–3 kHz for presence. Pull for hollowness.
– Add 3–5 kHz for presence and attack.
– Add 5 kHz–10 kHz for brightness.
– Add around 10–12 kHz for sparkle. However, it doesn’t take much to go
from sparkle to brittle. Adding highs means adding noise.
Acoustic guitar compression
The characteristics of an acoustic guitar might include wide dynamic range,
semi-fast rich initial transients and substantial sustain. The acoustic guitar
may not have as many peaks as a snare drum, unless the part is percussive,
but it does have peaks. Closer miked sounds may need more compression
than microphones placed a couple of feet away. Try:
Attack. 10–20 ms. A very fast attack can control the initial transients of
a sound.
Release. Medium. Start at 250 ms and raise or lower as the tempo of the
song dictates.
Threshold. Medium to high. A high threshold allows all the natural
sounds and dynamics of the guitar to remain intact. A lower threshold
might bring out more lower body.
Ratio. Low, to begin with, maybe 2:1 or 3:1. A higher compression ratio
may be needed as a player may tend to move off-axis now and again. Play
with the ratio until the quiet bits as well as the loud bits can be heard. A
higher ratio can increase the sound’s density so it fits in with the other
compressed tracks.
Recording Tips for Eng ineers
142

• Choose to use two. If you choose to use two microphones on an acoustic
instrument, the one with more lows – usually the closest microphone – may
need more compression than the distant one.
• De-ess the guitar. Minimize fret squeaks and noise with a de-esser.
• Defeat the proximity effect. Pull some of the low frequencies that may be
created by proximity effect so the compressor won’t react to the added lows.
• Sympathy for the level. When the acoustic instrument is not in use, put it
away, or loud levels in the room will cause it to ring out sympathetically.
Vocals
Vocal equalization
• Eek. You EQ? Better engineers prefer microphone choice and placement
before equalization to get their vocal sound. If you MUST equalize, have the
singer sing the song and:
– Pull up to 80 Hz. This area can be rolled off for most vocals as it holds all
microphone rumble and not a lot of clarity. Pulling these lows on the vocal
will open space for other instruments that benefit from this frequency, such
as the kick or the bass. Try a microphone roll-off instead of an equalizer.
– Add 80–300 Hz for thickness and body. This area contains the vocal fun-
damental tones of many singers, sometimes higher for a female voice, so
it carries a lot of the weight of the vocal sound. Tread lightly in this area.
Pulling these frequencies can result in a hollow boxy sound. Adding here
risks masking other important instruments.
– Pull around 300–500 Hz depending on the voice, to ease offending first har-
monics. Adding too much in the 500 Hz–1 kHz range results in a honky
nasal-like sound.
The Star ting Points
143

– Add 800 Hz–2 kHz for intelligibility. This area adds warmth or quality of
voice. Pulling some of these frequencies can eliminate harshness, but too
much can result in a hard, colder sound.
– Pull around 1 kHz to allow space for other instruments. This works well
on background vocals as they are commonly used as support rather than
the main focus.
– Add 2 kHz–6 kHz for clarity and presence. This where the s’s and the t’s
cut through. Too much in this range and a de-esser may be needed. Pulling
here makes the vocal sound dull. Adding too much makes the vocal sound
shrill.
– Add from 6 kHz to 16 or 18 kHz for sibilance and air. Setting the right
equalization in this area can place a vocal just perfect, but mind the hiss
created by raising these high frequencies.
Vocal compression
The characteristics of vocals, depending on the singer and situation, can include
fast attack and wide dynamic level changes.
Some vocals need limiting and compression, but some vocals don’t. Some
engineers love to compress all vocal tracks, while others choose to record
vocals with as little processing as possible. Maybe choose selective process-
ing, using compression only on the needed bits. Do whatever works, as long
as the louder parts don’t overload and the quiet parts stay out front. The key
to good vocal compression is subtlety. You don’t want to hear the compres-
sor working, you just want to hear every note and nuance.
Compression settings on the vocal depend a lot on the settings on the rest
of the tracks. A rock track may have tighter overall compression settings than
a love ballad. The vocal must stay buoyant among the rest of the tracks, so
settings must be uniform with the rest of the instruments. Try:
Attack. Fast to medium fast, depending on the tempo of the song. Too fast
an attack time can mask the very beginning of the vocal line. A soft knee
setting on the compressor works well on vocals as it smoothes the transi-
tion into compression.
Recording Tips for Eng ineers
144
Release. Set the release time at fast for a faster song, and set it at slow for
a slower song.
Threshold. Start at the highest, then work backward. When you see the
needle move – stop. You want the loud passages to compress and the
regular full voice to move the needle minimally.
Ratio. Start with 3:1 or 4:1 depending on the singer and the part. Get a
solid output, then set the ratio for the best final settings.
• Set the settings according to his abilities. Good singers have control over
their dynamics and know how to work a microphone. They might not need as
much compression or limiting as a less experienced singer. Bryan Adams is
the king of singing loud with no microphone overload just by knowing when
to move off-axis a bit.
• Set the settings according to the song. Determine the dynamics of the
vocal part. If the vocal is consistent in level throughout a song, the settings
would be different than if the vocal were more dynamic in certain sections.
Very dynamic tracks might benefit from limiters over compressors, as a
properly set limiter will not allow the signal to overload.
• Place a peak limiter after the compressor. A dynamic, close miked vocal
can have such seriously high peaks that one compressor alone may not be
able to control them.
• The background vocals have more compression than the lead vocal.
Background vocals are often not as dynamic as the main vocal, so they can be
more compressed to sit nicely in the background. For lead vocal clarity, buss
the lead vocal into the sidechain of the background vocal compressor. This
automatically lowers the background vocals whenever the lead vocal is singing.
• Limit when you record, and compress when you mix. Limiting a pre-
recorded vocal is not like limiting a live vocal. Due to the limitations of analog
recording equipment, a pre-recorded vocal can’t be as dynamic as a live vocal.
A digital recording can preserve the original dynamics.
The Star ting Points
145

• De-ess the vocal. A de-esser placed first in the chain controls any sibilance
problems before reaching the compression and equalization. The de-esser can
eat some of the needed sibilance if it’s set too high. Try waiting until the mix
to ease out the s’s, as long as the vocals are recorded properly.
• I auto-pitch it. Many engineers connect an auto-pitcher in the signal path
in case the singer’s pitch strays a bit. Record the vocal normally, and record
the ‘tuned’ vocal on another track. Then, if the tuning on the first track goes
way out, bounce only the needed bits from the tuned vocal track.
• Gating the vocal is uncommon. Gating the vocal microphone may well be
common in live settings, but studio situations are more intimate. All the vocal
inflections must be heard. A quiet note is no less important than a louder note.
Horns
Horn equalization
Horns can be particularly brittle if recorded incorrectly. Again, microphone
choice and placement have a huge role in getting the best sound. Poorly
written horn parts will be harder to record. Maybe:
– Unless the song relies on horns for the bass parts, install a microphone
roll-off to pull all the frequencies below the horn’s lowest note.
– Add 200–500 Hz for the body to come through, but again, depending on the
placement in the final mix, you may not want the horns masking the vocals.
– Presence at 2–4 kHz. Watch overlap in this area. This is a good area to
pull when the horns aren’t to be feature instruments.
– Boosting from 5 kHz on up can bring out brilliance, but too much and the
sound turns shrill and brittle.
– Boosting 8 kHz and up brings out click from the keys.
Recording Tips for Eng ineers
146

Horn compression
Horns can be dynamic and loud, with high initial transients and little decay.
Too much compression can remove some dynamics and thin out the sound.
Compression may not be needed on all the horns, maybe just the lower horns
such as baritone sax. Higher horns tend to cut through naturally, so they may
not need the compression.
Attack. Fast. For many horn sections, usually as fast as possible.
Release. It depends on the song. If the horn parts are choppy, keep the
release faster. A solo horn might have a medium release time. Horns being
used as pads might have a slower release time.
Threshold. Low, perhaps -10 to -15 dB. A lower threshold can pull up all
the nice growl.
Ratio. 3:1. This is a standard starting point. Raise it a bit to control the
low end, especially if the player likes to move around a lot. Keep the ratio
low, as horn players tend to ‘swell’ a lot as they play. Higher ratios level
these emotional swells. Just don’t overdo it.
• Flugel. Double Flugel. Doubled horn tracks sound great, except for low
horns. The low-frequency area needs clarity, and that area belongs to the bass
guitar and kick drum.
Piano
Piano equalization
A piano has a rich full sound, initial high transients and lots of natural decay.
The sound depends on so many variables, including placement, microphone
choice and placement, player ability, song writing, and so much more, that
these starting points are of little use.
The Star ting Points
147

Recording Tips for Eng ineers
148
If you must equalize the piano, use a wide Q setting with minimal level
changes. Adding too much equalization on the piano results in a mix where the
only piano frequencies you hear are the ones you added. As a starting point:
– Roll off the very lows, below 50 Hz.
– Bring up the low end by boosting 80–150 Hz.
– If the sound is too boomy, pull frequencies in the 200–400 Hz range.
– Add presence and attack by boosting between 4 and 8 kHz.
– Add air by adding 8 kHz and higher.
Piano compression
Start by setting the compressor as a limiter with a high threshold and work
backwards from there. As the player plays the song to be recorded, set the
levels to where the signal moves during the louder bits.
Attack. An up-tempo song may have a faster attack than a slower piece.
Set the attack according to the tempo of the song.
Release. A medium release time is a good starting point. As with the attack
settings, fine tune it once the tempo of the song is determined.
Threshold. A lower threshold means more of the sound is compressed,
and the piano has a full sound, with a lot of fundamentals and overtones.
Set too low, overtones lose distinction. A higher threshold might be a
good starting point.
Ratio. A high ratio ensures the signal will not overload, even if the player
decides to go all ‘Jerry Lee’ at the end of a smooth love song.

Something’s not Right
Sometimes you simply will not be happy with a sound. You’ve changed
microphones, you’ve equalized, you’ve compressed, you’ve put it in a taxi and
sent it round the block – you’ve tried everything. Maybe:
– Remove all processing and listen to the track within the core instruments,
often bass and drums.
– Turn any amplifiers down or up. Listen at different levels.
– Disconnect any or all pedals in the signal line.
– Use a designated heavy-duty cable from the instrument to the amplifier,
or direct box.
– Have the player play the song you are working on.
– Tweak the controls until the sound doesn’t stink. Don’t spend an hour on
it. Pull a bit of the midrange frequencies to clean up any muddiness.
– Change the equalization on the other instruments so it fits in better.
Sometimes equalizing the other instruments that surround a track will give
it more definition.
– Have your assistant move the microphone a bit to get a better sound off
an amplifier or instrument.
– Try different volume levels at the amplifier.
– Change the amplifier or, even more drastic, the tubes inside the amplifier.
– Turn off all pedals or effects, then bring them in one at a time.
– Listen to the sound in the track, with the vocals.
– Wait. The tone will improve as the player gets warmed up.
The Star ting Points
149

In the analog recording world, recording too hot results in distorted sounds.
In the digital world, hotter means cleaner sounds because you are using more
of the ‘volume bits.’ But when signal reaches 0 dBFS, sounds will instantly
become 100% distorted.
Lowering the recording levels would avoid overload, but lower it too
much and signal leaves the high ‘hot’ area, or digital MSB – Most Significant
Bits – and edges into the lower resolution of LSB – Least Significant Bits.
• Set the microphone input fader at zero. This is not off, but about 3⁄4 of
the way up. Set the record input level with the microphone input trim control
to take advantage of the console’s optimum parameters.
• What is trim? The trim knob is an active gain control within the pre-amp.
Because different instruments and microphones can have vastly different levels,
the trim lets you raise and lower incoming signal for optimum level.
T H E S I G N A L R O U T I N G
Chapter Nine

• Avoid overloading the system. Lower your input levels for high transient
tracks such as percussion instruments.
• Lovely read a meter aid. When recording musical instruments with high
transients, rely on your ears and your experience, using the meters only as an aid.
Remember, peak levels tend to be too fast for the VU meters, and might show
inaccurate readings.
• Players will play harder as a song progresses. Perfect levels at the start
of the song may creep into the overload zone by the end of the song. Set input
levels a touch low before pressing the record button.
• What is headroom? Headroom is the distance, measured in decibels,
between a device’s optimum operating level and the distortion point. More
headroom can mean more room for peaks.
• What is signal-to-noise ratio? This is the ratio, measured in decibels,
between the noise floor and the optimum signal level. A higher number is
desired here so more information can be recorded.
Levels to Record
• Keep it quiet. Just like links in a chain, the console is a linked series of
circuits. If one link is low, boosting somewhere else to compensate adds
unnecessary noise and distortion. A little bit of noise here and there adds up
to a whole lot of noise in the final result. On rock records, there may be a bit
of leeway, but on jazz, classical, or solo instrument recordings, unnecessary
noise is unacceptable.
• Get the best level as early as possible in the gain stage. The sound
recorded will be cleaner, with less hiss and noise. A louder signal means less
additional level is needed at the pre-amp stage. A low level will mean raising
gain control resulting in increased noise. Levels that are too hot will overload
the inputs.
Take the needed time to set the optimum operating level for the cleanest
sound and the least noise and distortion.
The Signal Routing
151

• Good vs. bad. Every device introduced to the signal degrades the signal’s
definition. Less processing means purer sound, with more focus and clarity.
The best signal has the least amount of processing. You can dumb down a
good signal, but you can’t smarten up a bad signal.
Figure 9.1 shows good gain staging. Minimize noise while maximizing
gain at:
(a) The input stage. The right microphone enters the console at the proper
level. From there, the pre-amp raises the input level. No pad or trim change
is needed.
(b) The output stage. Compression and equalization are not connected into the
signal path, and a healthy level is going ‘direct’ to the input of the recording
machine.
(c) The monitor stage. The clean signal level then returns to the master fader
at 0 VU.
Figure 9.1 Good chain
Recording Tips for Engineers
152
Pre-ampTrim level
(a) Input (b) Output (c) Monitor
RecordInput Level
Master Fader
0 VU
EQPad CompressorMicInput
Direct
0 VU0 VU

Figure 9.2 shows an unnecessary amount of noise introduced into the signal
chain at:
(a) The input stage. The microphone level is too hot for the input, so the pad
is introduced. This lowers the signal level into the pre-amp so the trim
level must be raised.
(b) The output stage. The input level to the compressor is too hot, so the input
is lowered. To compensate, the output level is then raised so the signal
level overloads the next component, the equalizer. This overloaded signal
level is then lowered at the buss, and this low level signal is sent to a
recording machine input.
(c) The monitor stage. A signal recorded with low level means the fader must
be raised higher than normal for the signal to reach 0 VU.
Figure 9.2 Not so good
The Signal Routing
153
BussLevel
(a) Input (b) Output (c) Monitor
RecordInput Level
Master Fader
0 VU
EQCompressorMicInput
0 VU0 VU
Pre-ampTrim levelPad

Monitor
• Monitor the return from the recorder, not the channel input. Before
setting levels and sounds, route the signal from the microphone through the
console to the recording machine, and back to the monitor section at the con-
sole. By not monitoring the output of the recording machine, you don’t really
know what’s there. An errant buzz or click might slip by unnoticed.
Monitoring the returns from the multitrack recorder allows you to stop
and punch in whenever the situation calls for it. If you are monitoring the
inputs when you record, you won’t hear the recorded track to punch into.
• Get fast. Good engineers can get great monitor mixes in just a few moments
because they know what they want. This isn’t the time to do any kooky
equalization or wild effects. Just quickly set up a solid monitor mix so the
recording can proceed.
• Pan the players. In the monitor mix, place the players as they are in the
studio, including the drums as you see them. For example, if a guitar player is
toward the left side in the studio, pan the guitar to the left side in the control
room. If the high hat is on the right, then pan the high hat to the right.
If you choose to pan the drums from the drummer’s perspective, where the
high hat is on the opposite side, that’s fine. Just pan the cymbal microphones
the same. Don’t, for example, pan the high hat from the drummer’s point of
view, then the cymbal microphones from the listener’s point of view.
• Use the mute buttons. To eliminate unwanted console noise, make a habit
of muting all the unused channels.
• Flange can mean you’re hearing it in two places. If you hear the sounds
‘flanging’ while monitoring the output of the recording machine, perhaps you
are hearing the input as well as the output. Maybe the channel sending signal to
the multitrack recorder is accidentally being sent to the monitor buss too.
• Don’t send everything to everything. Pick and choose which effects works
best with the music. Continually work out your layout and direction on the
rough mixes, listening to which parts pan best with which parts, or what
grooves work with what level changes.
Recording Tips for Engineers
154

• Remember Fletcher/Munson. Another reminder to monitor at low volume
levels, not only for your ears but for your sounds. Fletcher/Munson curves
chart equal loudness points, and state that different frequencies will appear
louder or quieter at different levels. This tells us that what may sound great
at volume 9 may sound bass shy at volume 2.
Cue Mix
• Ignore everything else but this. For the best performance, set a great head-
phone, or cue mix. If a musician is really stoked with the sounds, the cue mix
and the studio vibe, the performance will improve. Take the time to get the
absolute best mixes for everyone.
Go into the studio yourself and listen to each cue mix. Speak into the
microphone, maybe sing along. Have the band play, and listen. Can you hear
everything? Is the vocal going to be loud enough? Too loud? Are the effects
as you want them to be? Are left and right sides equal? Does it sound rich and
full in the headphones?
• I see cue. Determine whether the cue mix should be set at pre-fader or post-
fader. A pre-fader cue mix lets you to change the fader levels in the control
room without changing the headphone levels. A post-fader cue mix means
headphone levels change as the fader levels change.
• Get the proper level for the vocals in the cue mix. If the singer’s vocal
track is not loud enough, he may either slowly move closer to the microphone
as the session progresses or worse, to make up for low levels, sing beyond his
comfort range. This may result in a musically sharp vocal track. Just the
opposite may happen if the vocal is too loud in the cue mix. He will not sing
to his comfortable level, and may sing slightly flat.
• Buzz off. Tell the player to leave the headphones off until you are ready to
press the record button. No one needs to hear the clicks, pops and feedback
that can accidentally shoot through headphones as signals get routed. Only
when you have checked the headphones yourself, and are finally ready to
press the record button should the player don the headphones and begin.
The Signal Routing
155

• Don’t turn the cue all the way up. Set the overall cue mix level from 1⁄2
to 3⁄4 of the way up, so you still have plenty of room for more volume. Loud
enough so they can hear it, yet not so loud it will blow their hearing out.
Better to hear ‘Hey, Buddy, turn the cue up’ than ‘Hey, Moron, the
headphones are too loud.’
• Comfortable is best. Just as the players were set up in the studio as they
normally play with each other, so should the cue mix. For example, if the
drummer is used to hearing the rhythm guitar to his left, set up the cue mix
so that’s how he hears it. It may be vexing to see a player on his left, while
hearing him on the right side of his cue mix.
• The cue mix is a priority, not something to be set and forgotten.
Continually check that each cue mix is the best it can be for each player.
• Avoid abrupt changes in the cue mix, such as level changes or effects
return levels. If you change something on the console and it accidentally goes
to the headphones, it throws the player’s concentration.
• Bad news, you both have mono. If you only have one stereo cue send, but
need two mixes, split the stereo send into two mono signals using the pan and
volume at the console to get the best mono mixes. Of course, stereo mixes
always sound best.
• Use a dedicated reverb for the vocal. At any time of day or night, when-
ever he wants to do a vocal, the effects in his headphones are set exactly how
he likes it.
• Set up out-of-phase speakers. For vocal overdubs, if headphones are too
uncomfortable for a singer to wear, Figure 9.3 shows the opposite polarity
speaker setup.
(1) Place two speakers in front of the singer at ear level.
(2) Make a triangle by placing the microphone directly between the two. Use a
tape measure to guarantee both speakers are equidistant from the
microphone capsule.
Recording Tips for Engineers
156
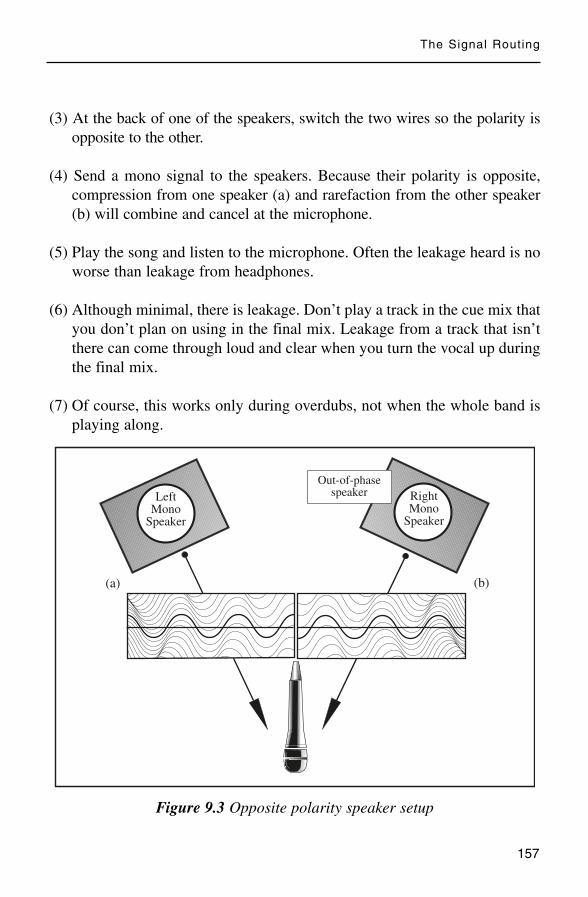
(3) At the back of one of the speakers, switch the two wires so the polarity is
opposite to the other.
(4) Send a mono signal to the speakers. Because their polarity is opposite,
compression from one speaker (a) and rarefaction from the other speaker
(b) will combine and cancel at the microphone.
(5) Play the song and listen to the microphone. Often the leakage heard is no
worse than leakage from headphones.
(6) Although minimal, there is leakage. Don’t play a track in the cue mix that
you don’t plan on using in the final mix. Leakage from a track that isn’t
there can come through loud and clear when you turn the vocal up during
the final mix.
(7) Of course, this works only during overdubs, not when the whole band is
playing along.
Figure 9.3 Opposite polarity speaker setup
The Signal Routing
157
LeftMono
Speaker
RightMono
Speaker
Out-of-phasespeaker
(a) (b)

• Clearly label the instruments on the cue stations. Larger studios today
use individual eight channel consoles at each cue station. Perhaps the drums
return on two tracks, then bass, acoustic guitar, etc. return on the remaining
channels. When the player wants a louder track in his headphones, he just has
to turn it up. Everything should be crystal clear for the musicians, so if they
need more acoustic guitar, they can just reach over and turn it up.
But few players are recording engineers, so a player may hear something
is wrong, but not know exactly what. Go out into the room and set up
everyone’s cue station to their needs. For example, the drummer may need to
hear more click track, or the bass player may need to hear more kick drum.
• Don’t force anyone to wear headphones. Players not too experienced in
the studio may not want to wear cumbersome headphones. Bands rehearse
without headphones all the time, so all of a sudden forcing a player to wear
headphones might make him uncomfortable. To get the best performance, the
players must be at ease.
• Keep the drums low in the headphones during basics. Everyone in the
room can feel the drums because they are usually playing right there next to
them in the room.
• Give the drummer his own cue mix. The drummer may want louder levels,
and maybe no one else wants a loud click pounding away in their headphones.
Other players in the room may not want any click in their headphones, but want
to play along with the drums.
• Keep it simple. During an overdub, mute some of the secondary
instruments in the cue mix. With fewer guidelines a player may come up with
a few ideas that wouldn’t come out if all the other instruments are there.
• Keep the effects on the vocal in the cue mix to a minimum. The singer
needs to hear his own voice. Chorus messes with his tuning, and delay messes
with his timing.
• No fooling. If the player wants a change in the headphones, do not try to
fool the player by pretending to turn up a track, or pretend to change a setting.
This embarrasses him, and makes you look like an amateur.
Recording Tips for Engineers
158

You’ve read it a million times, but it’s true. There is no right or wrong way to
record. That doesn’t mean it’s okay to make a mistake. That means you can
be as creative as you want, just record the tracks right. Before recording, run
through the process one last time in your head:
– All recording machines are cleaned, aligned, professionally maintained
and ready for use.
– All the appropriate microphones are placed in the appropriate locations.
– The instruments are properly set up.
– The players are somewhat conscious.
– All microphones and headphones have been checked.
T H E R E C O R D I N G
Chapter Ten

– All signal flow to and from the recording machines is correct, and the
applicable tracks are in record-ready mode.
– Digital tapes and drives are formatted, exercised and properly cued.
– The console has been checked for routing, processing, monitoring, and
cue mix settings.
– There are no external noises such as noisy refrigerators, heaters, fans or
air conditioners, and all doors are closed tight.
– Any click track or references for the players are low in volume and ready.
Then you are ready to press the record button.
Tuning
• Everyone uses the same tuner. When all the players use the same tuning
reference, all instruments will be in tune with each other. Imagine how it
would sound if each player tuned to a different reference, then all tried to play
together. Probably a lot like my band.
• Buss to the tuner. Use a buss to send the signal from the instrument into
the tuner. If, for example, buss 16 on the console is open, patch the output of
buss 16 into the tuner, then press buss 16 on any channel to route it into the
tuner. This allows the players to check their tuning with no change in setup.
Some tuners have a ‘through’ output plug point that places the tuner into
the signal chain. Don’t use this connection in the studio because the tuner’s
internal electronics may degrade the sound of the instrument. They are great
for rehearsal, but not for recording.
• Record a tuning tone. Better tuners allow the user to set the calibration
with a pure tone, such as a tuning fork, or a single note from a guitar or key-
board. Once the tuner is set, record the note. Then if the tempo of the song
gets changed, the tuner can be properly calibrated at the new pitch.
160
Recording Tips for Engineers

• Mute all effects during tuning. The main features of chorus programs are
to introduce slightly different pitches for a wider, thicker effect. The player
needs to hear only the instrument, not a pitch changing effect.
• Having a hard time tuning to the track? If you must tune an instrument
to a pre-recorded track and there is no tuning tone, run the pre-recorded key-
board or acoustic guitar track into your tuner to align the tuner. Maybe the
sustain of a guitar at the end of a song is enough for the tuner to read. Then
tune the instrument to the now aligned tuner.
• Tune an instrument only with the musician’s permission. Better to leave
the instrument alone and let the player tune it. If you tune a guitar and a string
breaks, it’s your fault. Let the player break the string.
• Don’t play anyone’s instrument. Are you auditioning for the band, or are
you the recording engineer?
• Assault with a medley weapon. Remind players to check their tuning on a
regular basis. Out of tune recordings make people anxious, and makes the
final product sound amateur.
• Louder volume levels mask slight pitch problems. Turn the studio
monitors down to help hear pitch and tuning issues.
• Eliminate all hums and buzzes before pressing the record button. No
gate, equalizer, or quantum gizmoizer can remove unwanted hum. You may
think you are saving time, but time saved is forgotten when this buzz pops up
every time you play the track.
• What is the VSO? The Variable Speed Oscillator changes the speed on the
tape recorder. The VSO changes both the tempo of the music and its pitch.
Hard drives don’t have a VSO, as they alter the tempo and the pitch digitally.
• Turn off the VSO. Remove the varispeed from all recording machines
before pressing the record button. If you unknowingly record a song with the
VSO set at a different speed, then the next time you play the song back on the
machine with the VSO off, it will be the wrong speed – and pitch.
The Recording
161

• Use the VSO for more bottom. To get a large drum sound with lots of lows
and thud, record a click track at the song’s normal speed. Turn up the VSO
and record the drums playing the song at the faster tempo. Remove the VSO,
listen back to the recording and voilà – thick full kicking drums at the correct
tempo. Normal sounding drums will have more lows, bottom and general
boom, some of which may need to be equalized.
A higher speed on the VSO means more high-end frequency loss when
played back at the correct speed. The opposite effect happens when the VSO
is set slower. Drums played back at normal speed sound bass shy.
• Note to self. Place a large note on the VSO button to remind you that it is
activated. This keeps you from accidentally recording the next track at the
wrong speed.
• Get it right. Get the sound right before you press the record button. A ‘fix it
in the mix’ attitude is a distraction that takes too much mix time and energy.
In Record/Red Lights
• Record everything. You are the recording engineer, so record. You have the
option to redo something, but if some musical spark hits and then is gone,
everyone looks at you to see if you recorded it.
If the player is messing around with a sound, or trying out new ideas, or
even waiting for you to finish something, record him on a blank track. Less
experienced players sometimes come up with ideas more readily if they think
they aren’t being recorded.
• Keep track of all signal paths. Continually check that all the equipment is
acting as intended.
• Attention all toe-tappers. Don’t worry if you can hear a singer or player
tapping their toe to the music as they record. The taps are usually along with
the beat of the drums, and will be masked when the rest of the instruments
come into the mix.
Recording Tips For Engineers
162

• Change an input level on a downbeat. If the level of a track being
recorded must be adjusted, do the adjustment on the downbeat of a change,
such as when the verse goes into a chorus. If this shift in level is audible
during the mix, you will know exactly when to make the change because it is
not at some random spot that is difficult to pinpoint.
• Ride the player. If a player changes drastically from soft to really loud
throughout the song, either:
– Compress it more than usual.
– Ride the track. This means to watch the player, and when he goes into
overload mode, physically lower the fader to manually level the louder
parts. This is a tricky bit of engineering, and can be fatal if you ride the
level too much, making repairs in the final mix that much more difficult.
– Re-record the softer parts after the louder parts are complete.
– Use two separate microphones, one for the loud parts, and one for the
softer parts. Record them both on separate tracks.
• Don’t stop the players unless you must. Musicians don’t like to be
stopped when they are playing, so wait for the end of the piece.
• Avoid click track leakage. Lower the level of the click at the end of the
song to keep it from leaking into other tracks as the instruments ring out.
If the player wants the click track really loud in his headphones, lower
the high frequencies on the send before raising the level. This may reduce
some unwanted leakage.
• Take five. If you are doing lots of takes, slate all the takes. Keeping track
of counter numbers is great, but actually recording the words ‘take thirty
seven’ before the count-off leaves absolutely no doubt as to your location.
With digital recording, you have a visual readout on the screen, so slating
might not be needed. Patience would.
The Recording
163

• Changing from one song to another should be fast. If the tracks are
recorded similarly, all the effects used on the previous song should be set and
ready to go. With a little minor tweaking, such as a tempo change on the
delays, you should be ready to press the record button.
• Short of a technical problem, keep anything from bogging down a
session. Don’t spend an hour getting just the right reverb sound for a minor
overdub. Keeping the vibe up means keeping the creativity flowing through-
out the session.
• Take a picture, it lasts longer. Computer snapshots are great to log those
times when everything just seems to sound right. Often during overdubs and
editing, while trying out mix ideas, a verse or chorus sounds perfect. A snap-
shot will preserve this idea until mix time.
• Save a strip for me. Save a favorite equalization setup by matching it to an
out-of-the-way channel. For example, you really like the equalization settings
on the guitar microphone, and you want to use the same settings on another
song later – but the guitar channel is returning to the middle of the console.
Rather than leave it there and take a chance that you may accidentally change
it, move the settings and any patches used to an unused channel at the far end
of the console.
• Space out. Leave enough space between songs on the multitrack recorder
to be able to record a long intro of a song. This leaves the option open to
really let an overdub ring out at the end of the song without the fear of going
into the intro of the next song. Plus more time at the intro will allow for any
future synchronization.
When recording to hard drive, organize passes by setting markers at, for
example, 10 minutes, 20 minutes, 30 minutes, and so on. Start first pass on
marker 1 at 10 minutes. On the first pass, maybe the first chorus is at 11:04.
This will allow you to quickly go to any section on any pass. The first chorus
on take three is at 31:04. The first chorus on take nine is at 91:04.
• Run a second recorder, a cassette recorder, even a portable boom box
between takes to catch all the small talk, ideas, jokes and chatter that most
Recording Tips For Engineers
164

bands do. Maybe the Philharmonic doesn’t, but new bands are always excited
to be in the studio, and often come up with some great fresh ideas on the spot.
• Anticipate what is coming next, and quietly prepare for it. Work like a
duck on a pond. He looks smooth on the surface, but is paddling like crazy
just underneath to get the job done.
• Relax – or we’ll fire you! Keep things light. Nervous or stressed players
can’t expect to be creative. With happy, comfortable and relaxed players, the
session will go smoother and all will inevitably play better.
Punching
• Check, check mate. Some sessions today don’t use punch-ins. They record
the piece a few times, then cut and paste to get the final result. For punch-ins,
even though you’re positive that you have the correct record-ready button
pressed on your recorder, check again. One glance at the track sheet, and a
double check of the tracks can save hours of repair. Listen to the track you are
about to record into. Press the input button in and out and listen. Are you
about to record on the correct track?
• Use bars as your frame of reference. Count the bars for each section. A 4/4
beat count is 1 2 3 4, 2 2 3 4, 3 2 3 4, 4 2 3 4, then back to 1. Maybe the tom-
tom fill before a chorus starts on the 4, 2, which is exactly 2 beats ahead of the
chorus down beat. Counting bars helps you punch in at the exact right beat. It
beats using the ‘I’ll punch in on the chicka-chicka bit into the chorus’ method.
Write the number of bars per verse and chorus on the back of the track sheet.
• Double check if you aren’t sure. Unless you are absolutely sure of the
punch, go back and listen to the in and out spots. Players will be happy to wait.
It is better to take five minutes double checking the punch than spending an
hour repairing an erased part.
• Make a safety before trying a difficult punch-in or punch-out. Practice the
punch using the rehearse button on the multitrack recorder. The machine will
go into ‘input’ without recording, so you can get the feel of the in and out spots.
The Recording
165

• Turn the cue down. Turn the cue level down before playing the music,
especially if the player isn’t expecting it. Many artists like the music in their
headphones loud. When the song stops, of course the cue is quiet. Pressing
‘play’ half way through the song makes it blast out of the headphones.
Turn down the cues, warn him that ‘here it comes’ and press play. Raise
the cue level in the headphones to the previous level.
• Counter intelligence. When punching in repeatedly at the same location,
rewind to the same spot every time – about ten seconds before the punch.
Enough time for the player to know where the ‘in’ spot is, yet not too long so
as to waste time.
• Don’t punch in on the exact downbeat, but a touch early, somewhere
between the previous ‘and’ and the downbeat. Traditionally, this was done
because the relays of the old two-inch multitrack recording machines took a
couple of milliseconds to switch into record mode. Digitally, it works because
it opens a little crossfade window a few milliseconds before the downbeat.
• Be as specific as possible as to what you want the player to do. Simply
having him redo a track with no indication of what is needed helps no one.
All singers need guidance from the control room. Granted this is not usually
the engineer’s job, but the producer’s. Commonly, the more you engineer, the
more you will learn about production.
• Fill track sheets while recording, not before. Things can change fast in
the studio, and the track sheet must stay current. As well, double check that
all information has been noted including specified song tempos, dates of
recordings, players, song titles, digital formats, song structure, and any other
pertinent information.
• Watch those hands. Get to a point where you can recognize chords,
whether by ear or by watching the player’s hands. It may not work so well
with piano, but works great when a guitar player is right there next to you.
You won’t believe how impressed clients will be if you say ‘Let’s punch in
on that second G chord’ and then you do it.
Recording Tips For Engineers
166

Recording Vocals
• Check with the singer. Different singers will be prepared at different times
of day. While one may be raring to go at 9 a.m., another may not really open
up until the late afternoon. A tired singer sings a tired vocal. Schedule the
vocal session for the singer’s best time.
• Encourage the singer to warm up, preferably with scales in the key of the
song to be worked on. No one can be expected to jump in on any creative
endeavor without warming up first. Give him the needed time and privacy.
• Get the lyrics. Write the machine counter readout numbers on the lyric
sheet to help locate the verses, choruses, and bridges. Going directly to the
second chorus of the third take will be a breeze.
• Encourage a singer to memorize the lyrics. Something is lost when the
singer is reading lyrics off a page. Better if they focus on the interpretation
and feel of the vocal, not hunting around for the next line.
• Hold that note. If the singer is a guitar player and he is used to playing
while he sings, by all means, give him a guitar when he does the vocal, even
if he holds it without playing. Record the guitar too.
As well, if a singer is used to holding the microphone when he sings, let
him hold the microphone. This creates a headache for the engineer, who
wants to get the best recording possible. But better emotional perfection than
technical perfection.
• Wear a set of headphones during vocals. When you wear headphones and
monitor the cue mix, you hear exactly what the singer is hearing. This lets
you fine tune the cue mix as the vocal progresses. Lower the control room
monitor levels to avoid influence.
• Kick everyone out of the control room. Only essential people are allowed
in the control room during vocals. Even the best of singers can find concen-
trating on vocal parts difficult with a room full of people staring at them.
The Recording
167

• Pump them up. Get into it. Get the singer into it. It’s much easier to record
an inspired player. Keep the vibe up, be positive, and tell him when he does
a good job. Tell him what you want, not what you don’t want.
• Let it flow. Let the singer sing. Stopping and starting can be distracting to
everyone involved. Let him run through the song to totally get into the flow
of it. Invite him to listen back in the control room where you can work out
any problems together.
• Some days are just tough. On those rare occasions when the emotions just
aren’t flowing, maybe tell the singer to picture one person in his mind. Forget
the studio and the microphones, just picture that person, maybe an old girl-
friend or a movie star, perhaps even a certain recording engineer, and sing
directly to that person.
• Tell the singer to sing along as soon as he hears the music. This ensures
he will have the same groove as the original, rather than starting cold on the
downbeat of the intended punch-in. Once he knows where he is in the song,
switch the track to input, so he hears himself singing. Punch in at the
appropriate time.
• ‘Why are they laughing at me?’ The singer can usually see the people in
the control room, yet not hear them. If there is any delay at all in the control
room, don’t leave the singer hanging. Tell him exactly what is going on. Try
as best you can to keep things rolling smooth as silk. Any delay may take its
toll on the vibe of the vocal.
As well, if everyone in the studio bursts out laughing for any reason, even
the most seasoned professional will wonder if everyone is laughing at him.
Either assure him that it is not his vocal track causing the jubilation or, better
yet, don’t let this happen.
• Bring the singer into the control room. Leave the studio monitors on and
do a vocal in the control room with the music blasting directly at the singer.
This can be the best way to get a solid vocal. Set the microphone monitor
signal just short of feedback with a non-omni-directional pattern.
Or he may want to wear headphones in the control room. If so, the
engineer would wear headphones as well.
Recording Tips For Engineers
168

• She’s too flat, and not so sharp. Singers, like everyone else in the world
(including you), will have bad days. Some days they will sound absolutely
magnificent, and some days they will sound like a train wreck. Your job is to
tell whether the session time could be better spent on other things.
• I hear that strain a comin’. If the singer is pushing too hard, strained vocal
chords come through loud and clear on the recording. And when a singer
pushes too hard, the pitch often suffers. Check that the vocal level in the head-
phone mix is loud enough for him to hear himself properly. Strain is not the
same as growl or punch. Vocal strain usually means it’s time to stop singing
for today.
• Record vocals every day. Encourage the singer to record some vocals every
day. All too often the vocals get recorded in a hurry on the last few days of
the project, and all the work spent on great guitar and drum sounds will be
wasted. Recording vocals every day gives you quite a few vocal passes from
various sessions. Some will be average, but some may be outstanding.
• Get a good lead vocal early in the project so the rest of the instruments
can build around it. The players need to hear that vocal track so they can
stay out of the way. Plus a great vocal track early helps everyone else get
inspired to do their best.
• Have patience. Any singer no matter how good, can lose that excitement
after doing the same take hour after hour. If you lose patience with a player,
it may not be long until he loses patience with you. The door swings both
ways. Not everyone is a virtuoso.
• Take a step back. Once a vocal overdub is recorded, have the singer step
back by a foot or two, then double the track with a matching vocal. Add this
in with the choice vocal to give it more depth and placement.
• Starting to feel thick. For a thicker vocal track, try turning the live side of
the microphone around, and have the singer do a track from the off-axis side.
Add this track to the main vocal at a subtle level.
The Recording
169
• Double your pleasure. When doubling vocals, ask the singer if he wants
the live vocal in one side of the headphones, and the previous vocal pass in
the other side of his headphones. This makes it easier to distinguish his live
vocal from the recorded vocal.
• Flaw hide. Double or triple track vocals to mask minor tuning flaws.
• Dim some. Dim the lights and light the candles, burn the incense, take all
your clothes off – create a mood to help the singer feel comfortable, relaxed
and confident. The more at ease the situation, the better the outcome of the
tracks. A strong vocal track makes the singer and you look good.
Pitch
• Slow pitch. If a singer is continually flat on certain parts of the vocal, use
the VSO to lower the pitch of the recorded music. This may make it easier to
hit the note. When he does hit the note, deactivate the VSO and return to the
normal tempo. This slower speed during recording results in a higher pitch on
the vocal sound when returned to the correct speed. Either record a whole
track, then bounce the needed bits into the main vocal track, or just punch
into the main vocal track at the altered speed. Of course, if he always sings
sharp, do the opposite and raise the speed.
• Cue down. When a singer is having a hard time hitting notes, turn the cue
mix level down, not up. If he insists on a loud mix, pull some of the lower fre-
quencies. Loud lows can mess with a singer’s pitch.
• Take one side off. To help him hear himself, encourage him to remove one
side of the headphones so he can hear himself in one ear, and the cue mix in
the other.
• Record a reference track. To help a singer follow the tuning and melody,
record a simple piano or acoustic guitar track playing the vocal melody – no
chords, just single notes of the melody of the vocal track. (Of course, not to
be used in the final mix.) Add this track into the cue mix, and maybe remove
any other instruments that may be throwing the singer off-pitch.
Recording Tips For Engineers
170

• Don’t use headphones, use speakers. Sometimes using the opposite polarity
speaker setup described on page 157 works to help the singer’s pitch. With no
cumbersome headphones in the way, the singer’s pitch may improve.
Post Record
• Stay in contact with the player. Make all changes quietly and efficiently,
without ever losing contact with the player in the studio. Change tracks when
the singer is having a sip of water or looking at notes, definitely not when he
is speaking to someone in the control room. Changing tracks from one to the
next should be seamless.
• Three ways. If you are recording many passes of the same thing, either:
Use the individual track to monitor. Match the settings on all the intend-
ed tracks the same as the original. For example, if recording vocals on
tracks 14, 15 and 16, match the cue levels, the send and return levels, and
any equalization or processing on these three channels. When you change
over from recording on track 12 to record onto track 13, it’s set the same
as the previous one – so the singer hears no change.
Use a single track to monitor. Patch the output of each track into a single
master track. For example, you record the first vocal pass on track 13.
When you change over to record another on track 14, rather than monitor
channel 14, patch the output of channel 14 into the channel input of 13. All
the subsequent tracks recorded are routed through channel 13, so the singer
hears no change.
Use a single track to record. On a DAW, set up a master track and move
each completed file down to a dedicated playback track. For example, you
record the first vocal pass on track 13. Rather than record the next pass
onto track 14, move pass 13 down to empty track 14, and record the next
vocal pass on track 13. Set the ‘lock’ function to keep the pass 13 from
shifting back and forth.
The Recording
171

• Minimize your choices. Get the best sound, commit to it, record it, then
move on. You will get much more done in the long run. Keeping multiple
takes of different ideas to ‘decide later’ usually wastes too much time.
• I’ve got more tracks – what can we record? Just because you have extra
tracks does not mean you are obliged to record on them. If the song sounds
complete, it probably is. After a certain point, the more instruments that are
added, the more each sounds a little smaller.
• Problems? Keep problems to yourself, and quietly work around them.
Don’t bring the session vibe down with your petty, ‘Hey, I’m choking here.’
Recording Effects
• Don’t record the effects. The traditional thought is, if the guitar effects are
coming through the amplifier, record them. If the guitar effects are created in
the control room, such as delay effects, don’t record them. A fuzz pedal
placed between the guitar and amplifier would, of course, be part of the sound
coming out of the amplifier. You wouldn’t record a clean guitar then add the
fuzz later, as the fuzz sound will help the player play his part better.
If you plan on using the same sound during the mix, you might record the
dry signal, then log the effects settings. This doesn’t always work. All the
proper paperwork in the world doesn’t guarantee the same sound will return.
• Record the effects. Sometimes you find a perfect effect that helps the
player become more creative, and musically, he goes places he normally
wouldn’t. Record the effects if they are part of the sound that influences the
player. If you have available space, record the effects on separate tracks.
Punching in and out can be difficult when effects are involved, because
punches can eliminate the decay of a reverb. Punches are smoother if no
effects are recorded. Any little glitches and pops are smoothed over by adding
reverb over the finished track
• Don’t go overboard with outboard. You can always add more effects later,
but you can’t take an effect away once it has been recorded.
Recording Tips For Engineers
172
The Part
• Assume that all tracks recorded will be keepers. The first pass may be
the best, even if it may not seem like it at the time. Sometimes it can be hard
to tell while the recording is taking place, and only upon playback can you
really hear what is recorded.
Keep a track if there is even a chance the player cannot redo it. How many
great riffs have been erased, and replaced with a sterile copy of a great mistake?
Too many to count.
Maybe tell everyone you want to hear the track one more time, and just
quietly bounce the part to an open track, or set up another track to record on.
If the player does the part better, great. If not, you still have the original intact.
• Listen to the player. Let the players hear the results. Discuss everything
and consider their suggestions. Musicians know how they should sound, and
what they want from their instruments. If you can take their vision, and bring
it up a notch or two beyond their expectations, they might play a bit better.
• Humble beginnings. When a player is not up to a part, maybe suggest that
he try an easier version of it first, then move up to the more difficult one.
Once the easier version is recorded, if the harder one never gets done, you
still have the easier one.
The age old way to get a good pass was to punch in the pieces until the
best pass was recorded. Sometimes, once this pass is done, the player has an
easier time playing along to the good pass.
• It’s not your job to hurry the players along. Leave that to the producer.
Do your work until they tell you to stop. Telling a player to hurry up has a
negative effect.
Bouncing
• Bouncing checks. With limited space, combining two tracks to one track is
common. When combining (called bouncing, or comping) two or more tracks
onto one, listen back to the complete new comped track both by itself in solo,
The Recording
173

and within the song at various levels. The combined tracks may sound great
together, but put them in the mix, and one of them may disappear. Erase the
original tracks once the comp track has been approved.
• To save tracks, combine tracks that don’t overlap. Different instruments
may play at different times throughout the song. If, for example, a shaker is
used in the chorus, and a tambourine is used in the verses, put them on the
same track and split them later during the mix. This may require console
automation, or an extra set of reliable hands.
• When combining tracks, don’t radically alter their sound. Once they
have been individually equalized, tracks bounced from many to few are
unchangeable. Get a clean sound on everything then combine them. Trying to
separate combined tracks is like trying to unscramble an omelette.
• When combining tracks, radically alter their sound. Change the
equalization so opposite tracks are combined, such as a tuba and a triangle.
When you mix, split the tracks and pull all the lows on one – the triangle – and
pull all the highs on the other – the tuba.
• I’d like to see your organ at ten o’clock. When combining stereo tracks,
pan them so that the center of each track is at a different spot in the panning
perspective. For example, bouncing a stereo piano and stereo organ from four
tracks to two, place the center of the organ at ten o’clock, and the piano at two
o’clock.
• Do not erase the count-off. Bounce the count to a safe track. Without a
proper count-off, there is no intro reference.
Doubling
• Double a guitar track with different fingerings of the same chord. Have
the player use a different fingering to play the same chord. A capo, alternate
string tunings or just different fingerings of a chord will make the double
track sound a bit different, but still with the same chords and progressions.
Recording Tips For Engineers
174
• Use the VSO when doubling. Double a guitar track by slightly speeding the
recorder up and recording a pass. Triple the guitar track by slightly slowing the
recorder down and recording a pass. Pan these additional tracks left and right
of the main track. The guitar sounds wide and chorus-like when played back
at regular speed.
• Double tracks must be tight. Of course, a track sounds big by doubling it. But
if double tracks are to be presented, panned and processed as one, sloppiness is
not acceptable. Every bit must be doubled exactly, or the sound turns pretty
vague pretty fast.
• Metal rules. Are you recording music with all electric guitars? Record a
rich acoustic guitar doubling the electric tracks and bring it in just under the
electric guitars. This can make a distorted electric guitar track sound more
musical, full and rich. Keep the acoustic guitar level lower than the electric,
or risk exposing it. Process it together with the electric guitar track so it fits
in more as an enhancement rather than a specific acoustic guitar part with
placement of its own.
• Overdub more than one player at a time. Musicians playing together will
lock into a certain groove. Commonly, the result is better than if they played
the same parts separately. I remember Keith Richards and Ron Wood
recording their guitar overdubs at the same time. They both stood next to each
other in the studio, stared each other down, and let it rip. They played off of
each other in a way that wouldn’t have worked had they each recorded their
parts separately.
• Record different guitars for different sections of a song, such as guitar 1
in the verses, and guitar 2 in the choruses. This can add movement to the track
as long as both are equal in power. If changing actual instruments is not
possible, try different guitar pickups for different sections of the song.
• I love your big bottom. To widen the image of the bass, record a stereo
track of a piano playing low octave bass notes. Add this into the mix for some
stereo bass effect.
The Recording
175

• Listen back every time. No matter how hurried the session, listen back
completely to a final track before moving on. This may save hours in the
future if an unnoticed mistake slips by during the recording. If a track needs
to be repaired, do it now, rather than return to it another time. No engineer
wants an unfinished track hanging over his head, and no artist wants a mix
with half-finished tracks.
Edits
With the ease of digital editing, it is not uncommon for songs to be built from
the best parts of any number of takes. Often the best sections are repeated,
then nudged into time with the other tracks.
• What are crossfades? Digital editing consists of cutting and pasting files
or regions of files together to create coherent sections. Crossfades ensure a
smooth transition to seamlessly join these individual sections together.
Crossfade parameters allow the user to choose between many curves, or even
‘draw’ a custom curve for a specific situation.
• It’s the music. Like analog editing, digital editing is so much easier if you
understand the musical technicalities of the song. Finding, for example, a
specific four-bar section of a guitar track out of another pass means you must
be able to hear the music, understand the changes and the timing, retrieve the
part, and paste it back in at the correct spot.
• Work on a copy. With the ease of making digital safeties, keep the master
intact and edit a safety master.
• The urge to merge. Before editing begins, use the pop-up menu to choose
between the best parts of many takes. With each pass correctly labeled, the
pop-up menu allows you to program different parts from different passes, as
long as each part is properly labeled. This lets you hear the complete song
with all the best parts from each pass before the first edit begins.
• Don’t edit the click track. The click track is the song’s timing reference,
so editing it will render it useless.
Recording Tips For Engineers
176

• Start editing the vocals from the middle of the song. Often, as the singer
gets into it, there are better choice bits to glean from. Find the best one, then
tighten it up, then paste it into all the rest of the choruses.
• HALT! Consider the consequences of pasting the same vocal into every
chorus or verse. Cutting and pasting a vocal track that someone has worked
hard at can get tricky. Check with the singer before pulling all the choruses.
• Don’t solo when you edit. Many edits you hear in solo are gone when the rest
of the music is on. Don’t spend hours cleaning up the tiniest detail that will be
lost when the rest of the tracks are back in the mix. Other instruments in the
monitor mix will help you hear which bits of the vocal are not quite in tune.
• Don’t get lost. Use the digital editor to level out every word, so nothing –
not even a syllable – is lost in the mix.
• Nix the clicks. Minimize clicks between edits by placing the reference lines
where the waveform crosses the zero point. Zoom into the highest level where
you can see the waveform.
Sometimes where two sections butt up against each other, a ‘click’ is
unavoidable. Mask the click by positioning it on a kick, snare or percussion hit.
• A digital editor cannot create groove. There is no substitution for a group
of players watching each other and all being locket into a groove. This
‘grease’ simply cannot be manufactured. Tightening up the timing of a track
will not automatically improve it. If the track is so out of time, maybe redo it.
Or maybe that’s the player’s style.
End of Session
• Print a rough mix. After finishing a major track, print a quick rough mix
for future reference. Mixes from different days throughout the project may
have different feels and different grooves.
Maybe have the assistant write all the settings down for each rough mix you
do. If one of the roughs has a certain feel that everyone likes, use the assistant’s
notes from that mix to refer to on the final mix.
The Recording
177

• The future is limitless. Sometimes after a long day of recording, your
equalization and compression levels have crept a bit too high, due to ear
fatigue. First thing tomorrow, listen to the sound with fresh ears and check for
overprocessing. Next time maybe back it off a bit, relying on experience over
tired ears.
• Remove all digital tapes before turning off the recording machine. With
‘rotating drum’ tape machines, the digital tape wraps around a drum inside
the machine, so turning the machine off and on can stretch the tape. See
Digital Appendix for more on rotating drum technology.
• Rewind all tapes before putting them away. Normal the console, help
clean up the studio, and return any borrowed gear from other rooms on the
premises. Return any wiring changes, such as inputs to a machine, back to
their original connections.
• Store all the microphone accessories in the same place. Keep all extra
clamps, windscreens, external pads, etc. in the same place for easy access
when making a quick change or addition. Store the microphone shockmounts
with the microphones so they won’t get lost.
Some studios leave the microphones set up all the time, with cables on
them ready to be used. Over time, this may be a detriment to microphones, as
a diaphragm can react to moisture, dust, smoke, and changes in temperature.
• For safeties’ sake. Make safety copies of everything and print out a final
track sheet to keep with the recordings.
• Go ahead and back up. Back up data as a safety precaution. Although
many times backups are not needed, it is that once-in-a-blue-moon where
data is lost. Whatever the format or situation, if there is money or talent on
the line, back up your digital data.
• Count everything. Count the microphones at the end of every session. If
something goes missing, ultimately the recording engineer is responsible.
• The music stays with us long after the client has gone. No tapes or hard
drives leave the studio until cleared by management.
Recording Tips For Engineers
178
• Stay until the end. Don’t leave the session until all the rooms are cleaned,
every piece of gear is put away, all documentation is complete, and the place
is ready for the next session.
Or not. If nothing is to be changed, run a strip of tape across the console
so no one touches it, and tape no entry signs on all the doors.
• My studio is a total write-off. Use daily work orders – even if you use your
studio alone. Keep track of every day in the studio, what happened, when you
started, when you finished. When the daily log is signed every day, there will
never be any question about hours used.
• Clean the patch cords. Scrubbing off the buildup with brass cleaner will
eliminate crackles, and will keep the runners in the studio busy. Have them
clean the cymbals and the hardware on the drums too.
• How does a clean guitar sound? Clean the 1⁄4" guitar jack inputs with a
bit of contact cleaner and a nylon-wire bristle rifle cleaning tool, available at
any sporting goods store.
• Erasing all the tracks. Clean the console of any pencil marks, tape or
general studio muck.
• It’s a clean machine. Over time, dirty console knobs may occasionally
crackle with use. Commercial spray cleaners are available to keep the knobs
and dials on the console clean. If you make a slight equalization change while
recording, any crackles caused by the dirty knob get recorded as well.
• I’ve got some great contacts in the studio. Spray your cable connectors
and contacts with commercial electronic spray gunk cleaner. Better contacts
result in better sounds. Do a before and after listening test and see.
• Tired of your grimy old console? Take a day to remove all the knobs, put
them in a laundry bag and do a cold water wash. Air dry them and they will
be clean as new. Take the opportunity to clean the console too.
The Recording
179

Writing on mixing is a difficult task. Try explaining to someone, without
actually being there, how to paint a picture, how to play the blues, or how to
remove a spleen.
This chapter is just a list of basic starting points. There are, of course, a
million different variations on everything mentioned here, and the enclosed
just scratch the surface.
• The trick is, there is no trick. A good mix is akin to a jigsaw puzzle, where
there is a perfect space for every piece, and all spaces are covered. The image
should have width and depth.
The best mixes come from well-written, well-arranged, well-played and
well-recorded songs.
T H E M I X I N G
Chapter Eleven

Pre Mix
• Leave some time between the recording and the mixing. If possible, don’t
record overdubs and mix on the same day. A good mix normally takes at least a
full day, and recording something will throw off the flow of the mix.
When you must do an overdub before the mix, use the input button on the
recording machine to verify the correct signal flow. As tracks are often cross-
patched, or patched into different channel line inputs, it would be a shame to
record over the kick drum while intending to repair a vocal part.
• Clean up your room. Mix in a non-cluttered environment. Music sounds
better in a tidy room the same way your car runs better after being washed.
• Normal the console. It can be frustrating to unmute a channel to find the
line trim has been turned up to maximum from the previous session. Switch
the console to the proper operating status.
• Set unity gain. Use the oscillator to set unity gain on your compressors,
limiters, delays and some equalizers. Use a pink noise generator to set levels
on the reverb and effects units.
• Wire those speakers there. Use the best professional nearfield monitors
available to you, along with highest caliber speaker cable connected to a studio
standard amplifier. Check that the speakers are wired properly.
Use familiar speakers. Setting the right low end can be tricky until you know
exactly what your speakers and control room are capable of.
• A/B CDs. If you are not familiar with the mix room, play a favorite CD
mixed by a top gun engineer against a project that you recently mixed. Are
the high, midrange and low frequencies all there? A/B the two tracks to get a
sense of the room and speaker response.
If, for example, your mixes come across bass heavy, maybe the low end
in your mix room is not properly equalized. The same principle applies to
midrange and high frequencies as well. Tuned or not tuned, the size, shape and
absorption factors all contribute to the final sound. Once you understand the
room, you can judge your own mixes.
The Mixing
181

• Is the song ‘mix ready?’ Starting fresh is always better than wasting time
cleaning up tracks. Before starting the final mix, confirm that:
– All choice tracks are returning properly and correctly labeled.
– All recording and mix machines are cleaned and aligned. All clock rates,
parameters and plug-ins have been checked.
– All files have been correctly loaded and checked.
– All vocals are in tune and in time.
– All music tracks are clean, in time, and in tune.
– All drum tracks, including samples, are just as you want them.
• Check your session notes. Review all the notes on ideas that seemed to
work while tracking and overdubbing.
• Listen to the rough mixes. Sometimes a ten minute mix at the end of the
session can sound better than spending ten hours on it come mix time. Rough
mixes may be heavier, lighter, drier, etc. Listen to which direction captures
the feeling best, and aim the boat that way.
• Mix with your heart, not your head. A certain mindset is needed to start
fresh on the mix. Paint a mental picture of how you want the mix to sound,
then start with a fresh, relaxed attitude.
And just because you aren’t supposed to do something is no reason not to
do it. Something may not be what you are used to, but if it seems to work in
a track, go along with it. Keep it fun and you get better results.
• Don’t start with the best song. When mixing any project of more than a
few songs, you will find there are one or two ‘best’ ones. Don’t mix these best
songs first. Wait until you are knee deep in mixing. Hit your stride, then mix
the best songs.
It’s like making pancakes. Get the bugs out of the mix with the first few,
then proceed.
Recording Tips for Engineers
182

Setting up to Mix
• Buss transfer. If applicable, transfer all tracks to the least amount of tapes.
Machines need time to lock when they switch from rewind to play, and this
lockup adds up to wasted time. Two machines lock faster than three.
• Pattern the tracks the same during all your mixes. Maybe return the
drums on the first twelve channels, then the bass tracks on the next channels,
then guitars, keyboards and vocals. Get used to having the same instruments
return on the same channels throughout the mixing.
• Return the lead vocal to the middle of the console. Set your vocal sound
with your head right between the speakers, not way over to one side.
• Azure mixing or purple pro’s. Use different colors for the various sections
on the scribble strip of tape across the console. Pink, blue, and green page
highlighters can represent drums, guitars or vocals. After mixes the scribble
strip is kept with the mix information. If a mix needs to be recalled, the scrib-
ble strip is an essential part.
• Check the track sheet. As tracks are returned to the console, mark the part
off on the track sheet. When every musical part on the sheet is checked, all
tracks are returning properly. You don’t want to mix a song, then realize you
missed a track.
• Assign the kick drum and bass guitar to a subgroup. The interplay
between the kick and the bass is crucial. If one is changed, the other may
sound off. When the mix needs a touch more low end, preserve this interplay
by moving the subgroup, rather than the individual faders.
Subgrouping instruments together early, such as all the guitars, or all the
background vocals, may help you when experimenting with different level
changes, pans, mutes, and ideas.
• Fix it before you mix it. Go through all the tracks and erase any unwanted
noises such as coughs or instrument sounds. If you have a totally automated
The Mixing
183

console, maybe just mute the bad bits. Realize that this is the time to be extra
careful about not erasing anything. If automation is not available for the mix,
make a digital safety track and practice the cuts, then fix the unwanted bits.
• Eliminate the mistakes. If a section of a track is musically questionable,
options include:
– Lowering the level at the worst parts, then raising the level of another
track to mask it. If this doesn’t work, then mute the track, as long as the
client doesn’t object.
– Finding a similar section of the song, and sending it to a sampler, or ‘cut
and paste’ it to replace the questionable section.
– Having the player re-record the part, but this probably means setting up
the amplifiers again and hoping to match the sounds.
– Leaving it out. If the flaw happens early enough in the song, maybe leave
the track out until the start of a bridge or chorus. The best way is to record
the track correct the first time around.
• Activate the loop mode. The uniform repetition of the song playing over
and over can help with the flow of the mix. Often, like the musicians playing
the song, the mixer can get into a ‘creative groove’ as well.
• Set up all your needed effects. All outboard effects should be patched in and
checked, with the scribble strip across the console properly labeled. Use a small
strip of white tape to label each effect with the appropriate send and return.
Maybe patch all the effects for the instrument with the instrument on the
console. For example, if the drums return on channels 1 to 9, then return the
drum effects to channels 10 to 15.
Perhaps recall a favorite snapshot as a starting point.
Recording Tips for Engineers
184

Mixing Basics
• Spending twenty hours on a mix will not make it twice as good as
spending ten hours on a mix. At some point, the best has been done and
continuing is fruitless. Put it to bed and go home.
• Bring the best things forward in the mix. The so-called ‘hook’ of a song
is its defining entity, or the central core of what keeps it going. Identify one
or two fundamental elements and accentuate them. Enhance the groove and
preserve the emotion and feel.
• Build on the best properties. Build the song like a staircase – step by step.
Introduce instruments as the song progresses rather than giving the listener
everything at once. Create movement throughout the mix by changing the
levels, panning, effects and processing.
• Solo you can’t hear it. As with the recording process, don’t press solo too
often. It’s great to use the solo button to get a basic sense of an instrument, or
to find a problem, but get in the habit of changing equalization with the rest
of the tracks in the monitor mix. When you can’t hear the other tracks, you
can’t effectively equalize a track to fit in.
• Don’t spend too long on any single instrument. If you are working on, for
example, the drums, get a basic drum sound then move on and tweak it
through the mix. Don’t spent six hours getting a perfect drum sound, because
everything changes when you bring in the rest of the instruments.
• Relax your ears. Don’t mix for hours upon hours without taking a silence
break. Your ears need time to relax and rejuvenate. Your ears are organs, not
muscles – overuse does not make them stronger. If that were the case, I would
have a liver of steel.
• Forget the clock. Don’t hurry the mix. Be creative and get it right the first
time. Expect the mix to take longer than you expect.
The Mixing
185

• Run the faders at their optimum level. Pushing faders all the way up adds
distortion, so set them around zero, their optimum operating level, then fine
tune the levels with the gain trim. This will send appropriate levels to any pre-
fader effects.
For clearer, more transparent mixes, set the gain trims as low as possible,
and set the master buss level at zero. This is crucial on budget consoles when
distortion increases as gains are boosted.
With the master fader always set at zero, you know if it has been moved
or not, and you know where to return after every fade.
• Don’t go upstairs. Don’t mix using the biggest studio monitors unless you
are totally familiar with them. Think of the average listener. Using the biggest
honking speakers on the planet may make the mixes sound great in the studio,
but most listeners use average size speakers. Make your mixes sound good on
smaller speakers so you know that they will sound good on the average car
radio or TV speaker.
• Dissociate yourself with the mix. Many times you will fall into the trap
of thinking, ‘What will other engineers think?’ or ‘Will the radio play this if
I do some radical idea?’ Liberate yourself from any preconceived ideas as to
what the mix should sound like.
• If a part doesn’t fit, don’t try to make it fit. Mute it and be done with it.
Each element must be solid. If the song has three guitars playing roughly the
same thing, either clean them up, or use only one of the tracks as a main one.
In the long run, each remaining instrument will have more impact.
• Don’t eliminate parts without authorization. The mixer’s job is to mix,
and the producer’s job is to tell the mixer what to mix. Don’t take it upon
yourself to pull musical parts unless you are the producer. The last thing you
want is a client calling you a week after the mix asking where his favorite
keyboard part is.
Recording Tips for Engineers
186

Processing
Equalizing
• It’s there so I must use it. Properly recorded tracks shouldn’t need drastic
changes in equalization. Overequalization contributes to distortion and vague
sounds, and creates peaks at certain frequencies. In a good mix, all relevant
frequencies are audible. In a bad mix, all you hear are the equalization peaks.
Equalizers, compressors and noise gates are tools, and should be used for
repair. See Chapter Eight to help you determine your individual instrument’s
equalization and compression settings.
• Consider where will the sound lie in reference to other sounds.
Placement of the instrument will influence how it is equalized. If, for
example, a non-feature track is hard panned to the left, you may not want to
equalize it the same as you would if it were a feature track that was panned
toward the center. Non-feature tracks should have certain frequencies pulled
to increase the clarity of the feature tracks.
• Don’t add every frequency to every track. Pick and choose where to add,
where to pull and where to leave alone. Pulling, or notching frequencies on some
instruments opens windows for others. If you have one instrument covering all
the low frequencies, you might need to pull some of its frequencies to make
space for something else. Determine which tracks take up which frequency areas
and where any overlaps occur.
• Keep it musical. Use equalization to enhance the musical tones and down-
play the less musical tones. See the chart on page 115 to determine where the
musical tones lie.
• Use equalization to curb excess noise. Turn down the high frequencies on
a noisy bass amplifier or a noisy reverb return, then run the track through a
harmonic distortion device. This may enhance the low-frequency harmonics,
and bring back the higher harmonics with less noise.
The Mixing
187

• Depth to infidels. Use equalization, compression, reverb and panning to
place instruments sonically in front, behind, above or beside another. A less
prominent instrument can appear to be placed in the background by lowering
certain frequencies on the track and its effects.
For example, if the lead vocal track has a boost at 3 kHz, maybe pull that
frequency on the background vocal tracks to create a ‘bed’ for the lead vocal.
Maybe add a touch of reverb to place it more in the background.
• Pull one frequency to make the other shine. Find and pull a low frequen-
cy with a thin Q setting, then boost an octave harmonic of that frequency to
bring out more of the musical aspects while maintaining a clean solid sound.
This works well on the bass guitar tracks.
• Is equalization really improving the sound? As you change the
equalization settings, periodically A/B between the unprocessed sound and
the processed sound to see if your changes are an improvement.
• Use level changes rather than EQ changes. With two similar tracks in the
mix, pull the higher frequencies from one track and the lower frequencies
from the other. Combine these two to get a proper blend of highs and lows.
Rather than adding high frequencies with the equalizer, simply raise the level
of the brighter track.
• So low the bass and kick. Pull unwanted low, lows on some (but not all) of
the heavier tracks. Determine which tracks, often heavy guitar, bass guitar or
kick drum, are adding unwanted vague rumbles. Rumble is not to be confused
with valid low frequencies of the kick drum or the bass guitar.
Listen to where your changes start cutting into the impact of the track,
then back off a bit.
• If it sounds good, do it. Sometimes you have to turn a frequency way up,
to heck with what all the rules say. And if it sticks out too much in the mix,
the mastering engineer will ease it off.
Recording Tips for Engineers
188

Compressing
• There is no wrong or right compression. Some tracks might need lots of
compression and some tracks might need none. Some engineers prefer to use
as little compression as possible, while other engineers compress everything.
Compression settings should depend on the needs of the song, not the habits
of the recording engineer.
• Compress the vocal. Even though the vocal was probably compressed
during the recording process, it may need additional compression in the mixing
process. Because it is the most important factor, it must stand out. To avoid
doubling up on the same settings, use a different compressor when mixing than
was used on the tracking session. Note that some recording engineers never
‘double compress’ a vocal.
The compression settings used while recording are a rough estimate of the
perfect settings, because during the recording process, no one knows what the
final outcome of the song will be.
Once all instruments are recorded, then the engineer can hear exactly what
compression settings are needed. For example, if all the rest of the instruments
are heavily compressed, some of the vocal lines may get lost if the vocal isn’t
processed similarly.
• Use the best compressor, limiter, de-esser, equalizer and console strip on
the primary instrument, usually the main vocal. Some consoles may have new
or updated strips with better processing circuits installed. Use these strips for
the vocals. If the studio has only one really great equalizer, use it on the main
vocal track to expose the ‘air.’
• Keep all levels consistent throughout the song. Odd notes here and there
must be ironed out, whether that means using compression, riding the levels
or even bouncing the offending track to another track with appropriate moves.
With consistent levels, you can ride a track knowing exactly how it will react.
• Place a de-esser across the send to the vocal reverb. High sound pressure
levels on ‘S’ and ‘T’ can create a spike that may easily overload the input of
the effect.
The Mixing
189

• Instant punch. Good kick drum sounds have the power to rattle your ribcage.
That solid punch comes directly from the movement of the speaker. The over-
compressed kick drum loses that punch because it can’t move the speaker the
same way. Set the threshold higher rather than lower, use a high ratio, then raise
the level of the kick drum track.
• Yes to de-ess. Use a de-esser in the snare drum track to minimize high hat
leakage. A de-esser also works to pull the ‘screech’ or string noise from an
acoustic guitar track.
• Use the local buss system. Blocks of tracks, such as drums, electric guitars,
and vocals, can benefit from additional overall compression. Use two busses to
send the drums into a stereo compressor. Return the compressor back to two
channels on the console. Assign these two channels to the main output buss. Set
the compressor to a high ratio, fast input, and medium output until you get a
real tight hard sound. Raise the level until it adds enough punch to the drums.
Go over the top for a real trashy sound.
• Free samples. Often, if you don’t want to use a snare sample, or if one or
two of the hits in a song don’t ring quite right, sample a good hit from the
same song, and add it in with the rest of the snare. Then you aren’t really
changing the sound of the drums, only enhancing it with the same drum
sound. Some artists are sticklers about this. They want no ‘foreign’ material,
or samples from other sources.
• Chains required. If compression isn’t quite enough to make the vocal stand
out, run the vocal into the sidechain of intrusive instruments, perhaps a piano or
lead guitar, maybe even the whole mix. The vocal dictates to the compression,
so the other tracks are automatically lowered when the vocal is in. Of course,
when the singing stops, the other tracks return.
Gates and sidechain
• Open the gates. Insert noise gates on the room tracks and set them to open
whenever the drummer hits the snare drum. He hits the drum, and the gates on
Recording Tips for Engineers
190

the room tracks open for a large ambient snare sound, then close again. This
keeps the kick drum out of the room sound and gives the snare added size.
• Close the gates. You might get a great snare and tom-tom sound, then bring
up the overhead microphones, and there goes the great snare sound. All you
hear is wash. Insert noise gates in duck mode on the overheads and set them to
close whenever the snare drum hits. This lets the original snare track come
through without the influence of the overheads.
Note that this means your cymbals may not come through as expected.
• Clean up a track. Set a group of instruments to trigger off a main track
so all the tracks open and close uniformly. This can vastly clean up sloppy
tails, when players don’t start or end a phrase together. This works great with,
among others, bass, background vocals, horns and keyboards.
Maybe use the kick drum to trigger a bass that is always ahead. Insert the
noise gate into the bass channel, and set a very fast attack and a slow release.
Send the output of the kick drum to the sidechain input of the gate, so the bass
track opens when the kick hits. Mess with the settings until the kick drum and
bass guitar react as one.
• Use the oscillator to add low end to the kick drum. Sweep the oscillator
to find a nice low frequency, preferably in the key of the song being worked
on. Send the oscillator through a noise gate, then trigger the input off the
existing kick. Whenever the kick hits, the gate opens and this nice low tone
is added to the kick drum sound.
Traditionally, recording engineers have used loud oscillator levels to
effectively expel annoying record executives from the control room.
• Pink or white, I just can’t decide. Use a pink- or white-noise generator to
help with the snare sound. Run the white noise through the noise gate, and
trigger it off of the snare drum. The gate opens then closes with the snare,
adding fullness to the snare sound.
The Mixing
191

• Setting on the ‘duck’ at the bay. The vocal is usually the most important
thing in the mix, so clarity is paramount. Try running the main reverb through
a noise gate on the ‘duck’ mode. He sings and the reverb ducks to give the
vocal some room. When he stops, the gate opens and all the reverb returns.
This also works great on rhythm guitar as the reverb is only really heard at
the tail end of the musical phrase. This tricks the listener into thinking the
reverb is on throughout the musical passage.
• Buenos de-ess. To make a vocal cut through, higher frequencies are added
and that increases increasing sibilance. A good de-esser will control sibilance
problems while maintaining the high frequencies. Use a de-esser on any high
pressure spike, such as vocal sibilance, string noise, even high hat leakage.
• Chop shop. Use the high hat or click track to trigger that choppy pulsing
sound effect. Great on synthesizer tracks.
(1) Use a delay to double the existing quarter-note click track to an eighth-
note click track.
(2) Set the noise gate at a very fast attack and release.
(3) Insert the noise gate into the synthesizer track.
(4) Run the output of the delay into the sidechain input of the noise gate.
(5) Mess with it to get the appropriate ‘chop’ sound.
• We have a pulse. For a good pulsing effect, set the auto-panner at extreme
left and right. Set the timing to the beat of the song, then monitor one side of
the stereo auto-panner from full on to quiet. This pulsing effect works well
on, for example, a keyboard pad. Maybe trigger the timing off the kick, so
every pulse happens in time.
Recording Tips for Engineers
192

Effects
Reverb
• What is reverb? Figure 11.1 shows reverb as a series of dense multiple
reflections of varied repeats that are blended into a smooth decaying tail.
Reverb in today’s studio usually means a digital effects unit or program.
Different companies have different products, but most effects units follow the
same pattern. All have presets that are easily changeable to suit every situation.
Typical parameters may include:
Halls: Good for all purpose reverb or echo effect. Parameters allow users
to create any size or makeup of space.
Rooms: Used more for ambiance than reverb. Great for drums and other
percussion instruments. Can give life to dead sounding instruments.
Figure 11.1 Reverb
The Mixing
193
Time
Am
pli
tude
Pre delay Early reflections Diffused reflections
Decay time / length

Plates: Vocals and acoustic instruments sound large, lush and thick when
sent through a plate. Before digital reverbs, studios used reverb plates – a
metal foil steel plate with a speaker device on one end, and a pickup on the
other. Signal caused the plate to naturally vibrate. The pickup sent the signal
back to the console. A moveable damping pad allowed for different lengths
of reverb. Better studios still have a reverb plate or two.
Size: Perceived size of the room that the reverb simulates. When set for a
larger hall, the signal would last longer than a small room.
Decay time: The length of time the effect takes to return to ‘silence.’
Pre-delay: The delay between the send and its effect. In real life, a sound
takes time to reach an opposing surface then return, creating a natural pre-
delay, or echo. The human ear is used to this effect, so natural sounding
pre-delay enhances depth perception.
Early reflections: The single reflections that occur before the diffuse,
reverberant reflections occur.
Diffusion: The denseness of a sound. Denser being thicker, darker and
more complex.
Low-/high-frequency roll-offs: Some units have internal roll-offs, and
allow the user to roll off low or high frequencies.
Crossover frequencies and levels: Some units have crossover settings
that allow the user to set where the high/low crossover point is, and how
much low or high frequencies are desired within the sound. You may, for
example, want the high frequencies of the reverb to last a bit longer than
the low frequencies.
Input and output levels: I think you know what the input and output
controls do.
Mix or wet/dry: This determines how much of the original signal you
want returning with the sound. Works great when recording, for example,
Recording Tips for Engineers
194

an in-line guitar track where the signal is routed directly through the unit
and then recorded.
• What is the difference between echo, reverb and ambiance? An echo is
specific repeats. Reverb tends to be shorter, more dense repeats and ambiance is
referred to as the shortest of reverbs. You hear echo when you yell in the Grand
Canyon. You here reverb when you yell into the Grand Hotel ballroom. You hear
ambiance when you yell into the Grand Hotel washroom.
• Don’t put every reverb on every track or every track will be lost in the mud.
Make a sound larger by adding something dry for comparison. In a wetter mix,
something dry will stand out. In a dryer mix, something wet will stand out.
Effects used sparsely will leave more room for all instruments to cut through.
• Don’t send everything to one reverb. Send minimal tracks to any one
effect. Reverbs are used for placement and depth for each instrument.
Sending too much of everything to one effect defeats that placement.
But if two tracks, for example a vocal and a guitar, never play at the same
time, you might use the same effects on both of them as the effects would
never overlap.
• Send everything to one reverb. Sending, for example, all the drums to the
same effect, at proper levels, can place drums in a specific room or locale,
rather than having one effect on the snare, and another on the kick, and yet
another on the tom-toms.
• Mixing the manufacturers gives more variance. All of the companies that
manufacture effects units create their own programs and algorithms for their
effects. All equipment the manufacturer releases uses these algorithms.
Using two effects units from the same manufacturer on, for example, a vocal
track, means two sends are going to the same basic algorithms. When sending
the vocal to more than one effects unit, all should have different manufacturers.
Cheaper effects units are not always true stereo. The left side is just a
phase reversed right side. Listen in mono and the effect disappears. Defeat
this by using two similar units in tandem. Split the input and send it into both
units, and listen to the left outputs of both units as your stereo returns.
The Mixing
195

• Don’t wash your bottom. Use reverbs sparingly on the low-end instruments
such as bass guitar. Sounds with lots of bottom can add unwanted wash when
sent through a long reverb unit.
• Use a reverb to mask minor flaws, such as an abrupt stop or a punch.
Camouflage the blips by using a reverb setting that has the same sound quality
as the track. Try setting the same equalization on the track and the reverb unit so
they both become one, sharing a common space in the mix. Determine what you
want before going in and messing with the internal reverb settings.
• Use the reverb plate for the vocals. If you are lucky enough to have a real
reverb plate, use it for vocals and principal instruments in the mix. Reverb
plates and spring reverbs are great to place an instrument or vocal exactly
where you want it. Warning: they may be noisy.
• How long is a pre-delay? Set the pre-delay at anywhere from 40 ms on up to
a few hundreds of milliseconds, depending on where it feels best. The pre-delay
is often set at a multiple of the beats per minute of the song. The longer the
delay is, the less it becomes a pre-delay, and more of an effect itself. Any pre-
delay less than 40 ms is considered part of the sound itself.
• Give the vocal its own reverb. When the vocal track has its own reverb, you
can make all the changes and fine tuning you want without affecting any other
instruments or effects.
• Use two reverbs on the vocal. Sometimes two reverbs combine to get one
great reverb sound. A short reverb then another longer reverb. A longer reverb
with less low end and a longer pre-delay brings out the shorter brighter one.
• Stereo returns from effects don’t necessarily have to remain stereo. Use
one side of an effect for specific placement of an instrument, panning the
instrument and the effect the same. Or pan the instrument to the left, then pan
the effect return to the right. Maybe pull the high end on the distant side of
the reverb.
• Oldie but a goodie. Send a dry signal through a guitar amplifier in the
studio. Use a send from the console, and set it to work with the amplifier
Recording Tips for Engineers
196

input level. Place close microphones in front of the speaker to get more of an
electric sound, or place microphones in the distance, using the room as a live
chamber. For ambiance, place two microphones in opposite corners, about a
foot out and aimed into the corners.
• Delay left, right? To get a real feeling of depth from a live room, place one
microphone in a corner of the live room, and the other one in a nearby hall-
way. Due to microphone placement, signal will hit one microphone before the
other. This creates a slight delay on one side of the audio spectrum. Pan the
instrument toward the side with the early hit. In the track, different delays
create a real sense of width. Check for phase issues.
• Send one effect into another. There is a world of sounds available just by
sending one effect into another, such as reverb effect into a chorus, or chorus into
a delay, or delay into a reverb. The combinations are endless.
• Check your reverb returns in mono. Why? Because, even in this age of
modern videos, many televisions have one little speaker, and out-of-phase
mono signals will cancel each other.
• Pedal to the metal. Bring in effects pedals, delay pedals, distortion pedals,
chorus pedals and all the gear used traditionally for live guitars. Overload them,
distort them, dunk them in the sink, try any combination for creative sounds.
• Pull certain frequencies on a send, then add the same frequencies on the
return. Theoretically, they should cancel each other out, but you may end up
with some interesting sounds.
• Equalize the send to an effect before equalizing the return. Pulling an
errant frequency from a track before it reaches the effect leaves the effect
return unprocessed.
• Lower lows. The faster the tempo, the less low end is needed on reverbs.
• Faster songs benefit from shorter reverbs. Leave the long reverbs for the
slower songs. You lose all the effect after a certain tempo.
The Mixing
197
• Set the end point of the reverb to be complete by the time the next beat
hits, especially on percussion instruments where long reverbs can overlap
into the next beat.
• Long reverbs can clutter important space. Sometimes an equivalent
delay can create the illusion a long reverb without the additional cloudiness.
Keep longer reverbs lower in level.
• Place tracks in the distance using a less dense setting. In nature, a sound
source loses density with distance. For closeness, try increased density.
In a painting, a light shaded background pushes the darker shades foreword.
Similarly, a dense setting on one effect can push a track with a less dense setting
into the background.
• Set the crossover frequency at the key of the song. To set the crossover
point, go into the internal parameters of the effects unit. The crossover points
are lower in level. This may help open up a frequency area that’s already full.
• Rather than equalize a track, maybe equalize the effect instead. Adding
a bit of high end on the effect may be enough to bring a track out of the back-
ground. Of course, this will affect all tracks being sent to that effect.
• Equalize the output of digital reverbs. Change the settings at the unit,
rather than at the console. Why introduce another processor (more noise) into
the chain at the console?
• Mud wrestling. Be aware of the track equalization being sent to the chorus
or harmonizer effects. For example, the equalization on a bass guitar is +3 dB
at 100 kHz. Sending all those low frequencies into a harmonizer will return
as harmonized mud.
Split the signal into two channels. On the second channel, pull the lower
frequencies, then send that signal to the harmonizer. Of course, once you get
your sound, switch this second track out of the main mix buss. The returns of
the effects will have richer bass frequencies with minimal muddiness.
Recording Tips for Engineers
198
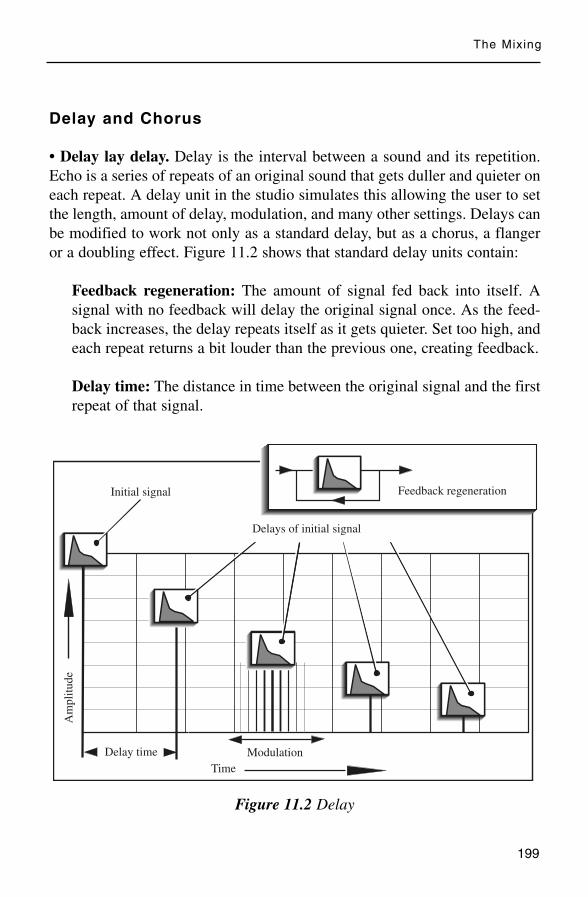
Delay and Chorus
• Delay lay delay. Delay is the interval between a sound and its repetition.
Echo is a series of repeats of an original sound that gets duller and quieter on
each repeat. A delay unit in the studio simulates this allowing the user to set
the length, amount of delay, modulation, and many other settings. Delays can
be modified to work not only as a standard delay, but as a chorus, a flanger
or a doubling effect. Figure 11.2 shows that standard delay units contain:
Feedback regeneration: The amount of signal fed back into itself. A
signal with no feedback will delay the original signal once. As the feed-
back increases, the delay repeats itself as it gets quieter. Set too high, and
each repeat returns a bit louder than the previous one, creating feedback.
Delay time: The distance in time between the original signal and the first
repeat of that signal.
Figure 11.2 Delay
The Mixing
199
Time
Am
pli
tude
Delay time
Initial signal
Modulation
Feedback regeneration
Delays of initial signal

Depth, or modulation: This function allows the user to determine the
movement of the delay. For example, the delay can be set to shift from
100 ms to 120 ms, resulting in a less rigid sound.
Speed or VSO: The speed of the modulation sweeping from the highest
and lowest settings on the modulation. It can be slow, up to a few seconds,
or fast, as fast as a few milliseconds.
• What are chorus and flanging? Chorus and flanging are functions of
delay, with options that also include depth, modulation and speed. Chorus is
an effect in which a signal is combined with its pitch-detuned replica.
Flanging is an effect where a signal is combined with its delayed replica.
The delay is so short (0–20 ms) that the direct and the delayed signals can-
not be resolved – they act like a single sound. Varying the delay creates
phase cancellations that move up and down the frequency spectrum. Chorus
and flanging really must be heard to be understood.
• Thickly sweet. Return a stereo delay to separate channels on the console, then
slightly delay both left and right sides by a few milliseconds. Try prime
numbers. Different settings of depth modulation and delay times can result in
flanging or harmonizing. Pan as necessary.
• Whirled series. Rich sound sources with lots of harmonics sound great with
a chorus effect. Use chorus to add thickness to acoustic guitars or vocals.
Engineers differ in viewpoint on using chorusing on a piano.
• Wide you do that. On slower songs, chorus effect on a bass guitar can give
a wider effect. But too much big thick bottom can eat up valuable headroom,
which lowers the level of all the tracks.
• Extra fat. Record a double track to enhance the original. Delay the double
by 20 or 30 ms and set a varying delay. Bring it in under the main instrument
for fatness and depth. Keep the depth and volume low or risk pitch issues.
• Change for a single. Run the bass through a pitch change program set at an
octave higher, or lower – yikes. Bring it in under the primary bass track.
Recording Tips for Engineers
200
• Use a chorus effect to mask slight pitch problems. Sending a slightly out-
of-tune vocal through a chorus effect can mask pitch problems. Sending a really
out-of-tune vocal through the chorus effect will accentuate pitch problems.
Sometimes doubling or tripling a vocal track can mask tuning problems,
causing the whole vocal to sound somewhat in tune.
• Pitch it. With auto-pitch devices available, no final vocal track should have
tuning issues. But get the best vocal you can to avoid the auto-tuner, then only
tune what is necessary. Too much auto-tuning can pull all the emotional nuances
out of a vocal.
• I’m down. Harmonize the drum room tracks down to get a thicker, heavier
80’s rock drum sound.
• Flange like they used to. The traditional way to flange a sound was to send a
track to a second analog recording machine. Using the distance between the
record head and the playback head on both machines, they would press their
thumb against the moving reel, or flange, on the second machine. The original
sound meshing with the returning track from the second machine produces the
flange effect.
Another old way of getting a natural flange was to place a microphone aimed
at the cone as normal. Have someone hold a second microphone by the cable.
As the microphone hangs, they slowly spin it around. As the signal goes though
the speaker, add the spinning microphone in with the first microphone, then mix
them to hear the effect.
• Swish on the verse, swoosh on the chorus. Sometimes you might want the
chorus or flanger to swoosh a certain way every time. A slower modulation
setting dictates where it randomly swooshes so the effect changes with every
pass. To get the same exact every time, record the swoosh onto two tracks a
few times until it is exactly right. Maybe help it by changing the modulation
settings at the appropriate times, or changing the delay times.
Practice it a few times recording each one until the recorded effect sounds
correct. Once recorded, the effect occurs the same every time. It uses two
tracks, but it frees up the effect for other instruments.
The Mixing
201

• Dig it all delay. When a digital drum signal is sent to a digital reverb input, the
reverb reacts the same every time. Insert a delay between the send and the input
of the digital reverb. Set the delay time short, with no feedback, and adjust the
VSO for medium speed and low depth. With a slight varying pitch input, every
hit into the digital effect will be slightly different in timing and pitch.
• Delay the ambiance tracks to make the room sound larger. Either use the
same delay setting on both left and right side of the stereo room tracks, or go
kooky and set the delays at different times.
• To get a nice thick guitar sound, buss the signal to a pair of delays, both
with short but different delay times – under 100 ms. Add a bit of modulation
on each delay then pan them hard left and right. The guitar is occupying that
middle space normally lost during hard panning.
• Use a very short delay. To raise a track’s high frequencies without adding
equalization, send the track through a quality delay set at less than 40 ms. Pull
the low frequencies, maybe add some compression, then bring this second track
in under the original track.
• Split with an effect. Use a chorus effect to split one track into two, such as
changing a mono keyboard pad to stereo.
• What is slapback. Slap, or slapback is an ancient method of analog delay
used by our engineering grandfathers. These pioneers created a feedback loop,
taking advantage of the distance between the record head and the playback
head on vintage analog recording machines.
In those days, the term ‘most significant bits’ was in reference to the
studio receptionist.
• Drum slap. For a longer snare drum sound set the delay at 1⁄8 or 1⁄16 note,
then send the snare drum to it. Add some feedback to the delay and bring it
in under the original snare drum.
Recording Tips for Engineers
202

• Delay of the land. For a nice stereo spread effect, set one delay to match
the 1⁄4 note beat of the song, and set a second delay at 2⁄3 of the beat. Work
with the delay times, panning and feedback until it suits you.
Strategically set delays can create great spaces, and be used for chorusing,
looping, reverb, pre-delay, mock stereo, and slap.
• Delay sounds. For more distinction between the vocal track and a delay, set
different equalization settings on the delay than on the vocal track. For less
distinction between the vocal and the delay, set the equalization to match.
• Halo, I love you. To get that halo effect around the vocal, set a 1⁄4 note
delay with the high end pulled a bit. Slowly bring the delay in until you hear
it working, then lower it a touch. Turn the overall mix way down, and listen
for the delay. Try adding reverb and experiment as desired. It should be felt
rather than heard. Personally, I’d like to be felt rather than heard.
• Distance yourself from the band. Rather than using the feedback on the delay
unit, create feedback by sending the signal from itself through a channel with
high frequencies lowered so each delay consecutively lowers in fidelity. This can
make the delay sound natural, but not so the listener says ‘Hey, that vocal is
going through an effect.’
• Experiencing long delays. Long delays work great as an effect, but can add
clutter if always left in the mix. Maybe clutter is the desired effect.
• Delayed due to snare. If a single snare shot needs to be replaced, delay the
hit ahead of it by the exact time distance between snares. Then record the new
snare, actually the delayed previous one, over the faulty one. This will require
a delay and an extra channel, often not a luxury while mixing.
Set proper levels and always double check when you record into a snare
track. Maybe record a safety track first.
The Mixing
203

• Use two alternate samples for one snare sound. If you must redo all the
snare hits, don’t use one sample throughout. Set up a panning system with
two samplers. Find two similar snare hits and sample both. Set the panner to
trigger with each hit. When one snare hits, the panner is triggered over to the
other side, then sends the signal to a second snare sample, after this one hits
it goes back to the first sample. This really works well during drum rolls,
where a single sampled snare might be exposed.
• Missed her tambourine, man. To place a tambourine hit on every other
snare drum hit, use the same ‘panner into samplers’ method as above. With a
tambourine hit in one sampler, and silence from the other, every other snare
hit triggers the tambourine hit.
• Less is louder. All the equalization, reverbs, echoes, and choruses add level to
the master buss. Too much of everything means the whole mix lowers in level.
Less processing takes up less space so it naturally sounds louder and better.
• Low on effects? So what? You don’t necessarily need racks of outboard to do
a good mix. One or two reverbs, a delay, maybe a chorus can get great results.
• Too many effects. With the glut of digital effects and mixing gear available
today, it can be easy to overdo it. If an effect helps the flow of the song, that’s
great, but to add some kooky effect just because you can contributes to
unneeded clutter. Your job is to clear away debris, not add to the mess.
Levels
• Listen to where each track lies in relationship to the others. Bring in all
the tracks and set some basic levels and pans. Commonly the kick and snare
drums, bass guitar and lead vocals are in the middle, with the rest of the
instruments strategically panned.
Some engineers start with the drums and bass as they are the foundation
of a song. Some engineers start with the vocals because that is the essence of
the song. But every song is different, so use the first few passes to listen to all
the tracks, then determine your best approach.
Recording Tips for Engineers
204
• Pull the faders down and start over. Sometimes it’s hard to get started. If you
lose the groove in the levels, just pull down all the faders and start over. Bring
each instrument back into the mix and set your new levels.
• Bring the vocal in early. All the instruments will eventually surround the
lead vocal. Bring the lead vocal into the mix early to hear what changes are
needed in other tracks to keep the vocal sounding good.
• Turn down not up. Before changing one track’s level, try lowering another
track, to make the first track jump out a bit. Raising tracks because they keep
getting lost means there may be a equalization problems. Check your settings to
see which frequencies are overlapping.
• A slight change in panning can coax more clarity out of a track. Before
changing a track’s level, check if a simple change in panning works. When two
instruments with the same frequency range are similarly panned, they mesh
together. Pan them apart for distinction.
• Keep things from jumping out in the mix. Small level changes might
work better than drastic level changes. Mixing isn’t about perfect levels, its
about getting a feel across to the listener. It’s an art, not a science.
• Spotlight. Aim a spotlight on the vocal and, when the vocal is not on, aim the
spotlight on a guitar solo or a drum fill. Between vocal lines, push the guitar so
the spotlight is on it, pull it down when the vocal returns. Focus on one thing at
a time within the mix.
• Let me roll it. For emphasis on snare or tom-tom rolls, boost only the drum
reverbs, not the drums themselves. This may give them enough push without
actually changing the drum level.
• Keep the vocal right up front in the mix. In today’s popular music, the
most important element of the mix is the vocal. Make it sound as rich as
possible with every single note heard.
The Mixing
205

Placing the vocal in the mix correctly has a lot to do with the singer. Some
vocal tracks just sound loud no matter where you place them. A strong vocal
performance might not need to be placed as prominent in the mix, as it will
naturally project loud and clear.
Just because you have a great sounding guitar doesn’t mean it always has to
be loud. Guitar lines, drum fills or anything else shouldn’t mask the vocal.
• Left, right? Position the panning so tracks are even throughout the song. Not
necessarily balanced at the same time but throughout the song. For example,
placing a cowbell on the left side during the choruses and a tambourine on the
right side during the verses creates a balance in terms of the total song.
• When panning, check in mono. Phase cancellations may cause tracks that are
loud and clear in stereo to vanish in mono. Change your panning while in mono
to make some instruments disappear and others emerge from the mist.
• You’re right, my instrument left. Set stereo pan-pots around nine o’clock
and three o’clock, rather than hard panning. Hard panning stereo tracks such
as drum overheads or a piano can remove a crucial middle space. As a rule,
lower frequency instruments are less directional, and get panned more toward
the middle. Sometime bass and kick are not panned exactly at twelve o’clock,
but panned off a bit, so they aren’t sonically right on top of each other.
Many engineers love hard panning. Old Beach Boys, Beatles, even Alice
Cooper recordings contain lead vocals or drum tracks panned all the way to
one side. It was a favorite trick to add dimension to a song.
• Split that guitar in half. Try splitting a guitar track into two channels. then
reverse the polarity on one of the two channels. Can be kooky. Check in mono
because the signals will cancel out in mono if set at the same level.
• Six dBs of separation. Stereo acoustic guitars sound wonderful as a featured
instrument, but stereo instruments take up a lot of space. As more instruments
are added to the mix, the less the stereo image remains.
Recording Tips for Engineers
206

• Divide and conquer. Split one channel into two channels for flexibility
when sending a signal to an effect or through a compressor. Use the second
channel to change the reaction of the equipment without changing the sound
in the monitors.
The high and low frequencies of a track may need different compression
settings. A properly equalized instrument should hit the compressor equally,
keeping all levels intact.
Try splitting the return from the vocal into three channels on the console,
and process each a bit differently for different sections of the song.
• Mute me on the high C’s. Try different ideas with the mute buttons, such as
coming in half way through the time signature. Come in on the 2, and out on
the 4, just to hear what happens. Muting one track leaves space for another
track to shine.
• Use channel mutes to send specific hits. When you want specific reverbs,
such as on a single snare hit or a reverb on a certain word within a line, use a
send, not a return.
Return the track to a separate channel, turn up the reverb send, and
remove the channel from the main stereo buss. Unmute the channel on the
specific hit.
• Speed it up. If a mix doesn’t seem to have a lot of life, sometimes speeding
up the tempo of the machine a notch or two will add some spark. However,
some artists don’t like this. I worked on a Rolling Stones record where the
producer tried a tempo change as an idea on one song. Keith was not
impressed, claiming no one messes with Charlie’s grooves.
• Placement in the mix is crucial. Create depth and dimension within the
mix by placing instruments close and far. Place drier brighter instruments up
front, and duller ambient instruments in the distance. Aurally place a track in
the distance by:
– Lowering the volume. Louder instruments will appear closer, so lowering
the level can lessen that closeness.
The Mixing
207

– Panning toward one side. There is a one in 360 degree chance a distant
sound originates in front of us. Instruments, such as vocals, panned to the
center provide equal energy to both left and right speakers making the
instrument appear close.
– Easing off the high end. When a sound originates in the distance, the high
frequencies dissipate before low ones. When you hear a neighbor’s stereo,
you don’t hear the crispness of the track, you hear the low end thud. A
track without high frequencies can sound distant.
– Adding effects. When a sound originates in the distance, we also hear the
wash of the natural echoes and reverbs.
• They panned my mix. Place the instrument using reverb panning. For
example, place an instrument at two o’clock, and the panning of the reverb at
eleven o’clock and five o’clock.
• Plug your ears. While mixing, you might lose a bit of objectivity. Try this.
Set the volume at a reasonable level. Plug your ears with your fingers, close
your eyes and listen. This seems to give a different perspective of levels, and is
a good method of checking the vocal and snare drum levels.
• Catch a buzz. Listen to the mix through headphones to catch any buzzes,
clicks, pops, hums, etc. Tiny flaws sometimes not evident in the monitors can
come through loud and clear in the headphones.
Listen through headphones at a low volume for a true feeling of instrument
placement and level. A lot of listeners enjoy their music through headphones.
• Don’t run out of power. If you run out of CPU power because of the amount
of plug-ins, process (record) some of the files that have compressors, limiters,
de-essers or equalizers, then remove these plug-ins. This will free up pro-
cessing power because playing back a track requires far less CPU power than
playing back a plug-in in real time.
• Smile. Bring in a camera, and let the clients take photos of the sessions. Those
little throw away cameras work great, and they keep everyone occupied while
you fix that piano track you erased.
Recording Tips for Engineers
208
Print Prep
• The stage is late – take the buss. If you use overall compression across the
master buss, wait until the latter stages of the mix to activate it. As more
instruments are added during the mix, the compressor changes the sounds
you have already tweaked.
• Two passes to master. Set up two mix machines and print one mix with no
compression and print another mix with ample compression. Let the mastering
engineer choose which he wants to use.
• It’s time you converted. If you are mixing to digital format, use only the
highest quality A to D converters available, even if you must rent them.
• Print alignment tones. Before printing your mix to digital tape, print align-
ment tones at the head. This gives the mastering engineer the proper references
to master. With a standard level of 0 VU on the console, set the input level of
digital machines to -12 dBFS to -20 dBFS, depending on studio practice.
Some engineers feel these tones are not needed. While these tones are used
traditionally on analog machines to adjust operating level, azimuth, bias, and
high and low frequencies, these parameters are not user adjustable on digital
machines. This debate continues.
Record a tone on the left side first, then both sides. The mastering
engineer reads this information on a label, then confirms that the left and right
sides haven’t been accidentally switched.
• Mix to two. Mixing to two tracks digitally is a poor man’s automation.
Record the mix to two available tracks of the digital multitrack tape. Because
the mix occurs exactly at the same time as the tracks are played, punching in
and out should be seamless. For example, a rhythm guitar is a bit low in the
second verse. Raise it a bit then record, or ‘punch in’ to the mix for the second
verse. Maybe, if space is available, print different passes on separate sets of
tracks and build one great mix.
• Mix to analog. Many engineers agree, and for good reason, that mixing to
analog sounds better than mixing to digital. If you get the opportunity, mix a
The Mixing
209

project to digital and to an analog mix machine, then A/B the result of your
mixing experiment. You can’t tout the great sound your digital recorder gets
until you can compare it with analog.
• DAT’s new to me. Your mixes are important. Use fresh tapes, not ones that
have been previously recorded.
• Exercise your tapes. Rewind any virgin mix tapes to the end, then back
again. This gets the tape and the machine ‘used’ to each other. On analog
tape, this is referred to as exercising.
• Is everything clean and ready? All your equipment must be reliable and
maintained to a professional standard. Check that the mix machines have
been cleaned, aligned, loaded with formatted tapes and drives (if applicable)
and are ready for use.
• Run a safety of all the mixes. DATs, CDs, and hard drives are inexpensive,
Safeties are usually always usable if, for some reason, the final mixes become
lost or unusable.
• See these CDs? If the final mixes will be printed on CD, set the DAT mix
machine at a sampling rate of 44.1 kHz – the sampling rate of CDs. The
signal will not need to be converted from a different sampling rate.
• Add some ‘life.’ To polish up a final mix and give it a bit of life, add some
overall equalization and compression. Done properly, this can add some life to
them, especially if the mixes aren’t going to be mastered professionally.
– Set unity gain on both the best equalizer and compressor available.
– Connect a stereo equalizer to the main buss of the console, keeping the L/R
sides correct.
– Run the stereo equalizers into a stereo compressor, or vice versa, then
back to the stereo buss insert return.
Recording Tips for Engineers
210

– Start with a high threshold and small ratio, and change them as necessary.
A slower attack time may allow some punch to come through before it
kicks in. For example, the attack on the drums can pull down the rest of
the instruments. A slower attack time would miss the punch of the drums,
and react to the less transient instruments. Longer release times will
decrease the pumping and breathing effect. Unless the mix is routed
through a multi-band compressor, the lower frequencies will dominate
how the higher frequencies react.
– Less meter movement means fewer audible changes. This could mean too
much compression.
– Don’t hit the overall mix buss too hard. Turn down the overall buss limiter,
and use compression on the individual tracks to allow the mix to breathe a
bit more. Too much compression inhibits the speaker movement. This
means the volume knob may be set louder, but the punch is still missing.
– Are you doing this process after mixing for twelve hours? Maybe wait a
few days until your ears are fresh before compressing the mix. Compare
your compressed mix with the uncompressed mix, and then compare your
mix with some commercially released projects.
Printing
• Before printing to stereo. Ask a few questions, including:
– Is the low end punchy and solid, with both the kick and the bass guitar
holding their own space?
– Are the midrange frequencies clear and full?
– Are the highs crisp, clean and clear?
– Is each instrument properly panned?
The Mixing
211

– Is each instrument correctly placed sonically in front of or behind other
instruments? All tracks should sound clear individually, yet fit in with all
the rest of the tracks.
– Do the drums sound like a solid cohesive drum kit, or are too many effects
taking away from the groove?
– Do I know all my moves, including all level changes, cuts, pans, special
moves and the final fade?
– Are all levels correct compared with other levels. Specifically is the snare
drum too loud? Turn the master volume down and listen to the level of the
snare drum to verify the proper level.
– Does the mix have liquid movement, with builds and releases, ebbs and
flows and interesting changes? Movement in the mix is about bringing
things in and out, up and down, back and forth. That motion helps the
music from getting boring.
– Does the vocal stand out, with every syllable clear and audible?
– Is any link in any of the signal flow chains overloading?
– Do all sounds combine to make a single cohesive, solid, interesting piece
of music?
– Did that sushi taste funny to anyone else?
• Print hot. As with recording the basic and overdub tracks, print mixes as
hot as possible to digital. Hotter levels mean the signal is higher into the
‘most significant bits’ area. More bits used mean the recording is fuller, bet-
ter. Take full advantage of the usable space between noise and overload.
• Bring in a few extra hands to mix. Delegate one section of the console per
person, and let them do different things during the mix. Often a mix tends to
Recording Tips for Engineers
212

be a one person job, with others telling them to please try this or that,
especially with today’s studio automation. When everyone is at the console
trying different things as the mix is being printed, there will be many different
ideas recorded for edits in different parts of the song.
• The prints of mixes. With today’s digital technology, printing lots of mixes
allows you to get exactly what you want. Print mixes with vocals up, vocals
way up, vocals down, bass up, bass down, dry, wet, a cappella, it’s endless. Take
the time to listen and determine which parts of which mix are best. Do the edits
with your notes close by.
• Print a mix with no lead vocals. Be sure to turn off the effects on the vocal
as well. Previously this was done so the artist could go on TV and have the
music behind him, then do a live vocal. Today it is more for safety’s sake, in
case something on the vocal track needs to be changed after all the mixes are
done. This saves having to do a complete remix just to fix one part. The mix
can also be used to edit out any naughty words for radio airplay.
• Print a mix with lots of lead vocals. Listen to some old records and
hear that some vocals are far louder than the rest of the instruments. Print
a few passes with various vocal levels in case a line in the master pass
needs fixing. A louder vocal track may keep the song moving if it’s a good
vocal. When the vocal is too loud, it can diminish the impact of the rest of the
tracks.
• Undermix. Lower the effects, maybe remove a track or two. Different
emotions tend to emerge from different levels in the mix. Don’t underesti-
mate the power of a simple, dry mix of a well-written, well-recorded song.
• Overmix. After everyone agrees that the final mix is done, print an ‘over
the top’ mix, going a little crazy with the sends and returns – but not so much
that the pass is unusable.
Take it over the top, whatever you interpret that to be. What comes across
as over the top in the studio comes across as dynamics to the listener. Like
movies that have evolved from boring still camera scenes to explosions and
The Mixing
213

movement on every scene, listeners today want more than a standard song,
they want fast paced changes. You owe it to yourself, the client and the whole
recording industry to go all the way to outer space if necessary when trying
new ideas. No one wants the same old stuff. Wouldn’t it be great to be known
as a cutting edge recording engineer?
• Let someone else drive the boat. When listening back, let others sit in the
engineer’s chair. This makes everyone feel more involved in the project. Who
doesn’t like to sit at a mixing console and hear themselves play? Turn it up
so everyone can enjoy it, then retreat to the hallway to rest your ears while
everyone enjoys the mix.
After Printing
• Listen to the mix through all speakers, including small speakers, mono
speakers, speakers in another room and car speakers. Today’s portable ‘boom
boxes’ are a great reference.
Using various references gives a more rounded and overall landscape from
which to listen. If, for example, the vocal isn’t loud enough on every set of
speakers, maybe you should use the mix with the louder vocals. Listen and
compare. If it sounds good on all systems large and small, you have a good mix.
Note that in the car, the background noise of the vehicle will tell you if all
sounds in the mix can be heard. If any sounds are masked by the vehicle noise,
make the sounds more apparent.
People love to listen to music in their car. Maybe turn up the bass and the
treble on the car stereo to check how that sounds.
• Make safety copies of the master mixes. There is no reason not to have
abundant safety masters. Make copies, or clones, of all the mix data. Pop out
the safety tabs on all recorded tapes, especially on masters. On DAT tapes, it
is a little sliding lever that, when open, makes recording impossible.
Recording Tips for Engineers
214

• Proper documentation is paramount. Label everything, including all song
titles, band name, producer, engineer, assistant engineer, date, song choice and
location, and all other relevant information. Tracks and sections of tracks are
commonly shuffled not only from track to track, but from format to format.
Clearly mark all the choice passes and locations. Without proper labeling you
may wade through dozens of passes before finding the pass you want.
• Listen up. If your small studio does not have big honking monitors, take the
mix to a bigger studio and ask if you can listen on the big speakers.
• Leave the mix until tomorrow. Leave the mix set up overnight so you can
return in the morning and do a couple of tweaks then print a final few passes.
But too much twiddling at this stage can undo all of yesterday’s hard work.
• Stacked or what? Mix all of your various versions, master, vocal up, vocal
down, solo up, T.V. and instrumental to a new session. Add enough tracks to
this session so that all the mixes can be stacked in time, e.g. 1-2 master mix, 3-
4 vocal up, 5-6 vocal down. This way you will be able to quickly edit a new
‘master mix’ comp by editing across all the mixes at once. This new mix will
now be ‘in time’ immediately, with no guess work in involved.
• Consolidate crossfades. Improper crossfades can result in noticeable ‘clicks’
at each of these points. Consolidate the file to create a new continuous file,
because the fewer edits a track has, the more easily the hard drive is able to find
it and play it back. All hard drives have a finite amount of data it can ‘through-
put’ at once.
• Watch the levels. If you are assembling master tapes yourself, use your ears
not the meters to match the different levels. Depending on the peak content
of a song, the meters may differ from song to song.
Use the meters as reference, but your ears as the final judge.
The Mixing
215

Mastering
• What is mastering? ‘Mastering’ is where the mixes are given the final
equalization, compression and (sometimes) assembly. A good mastering
engineer will match the sound and levels of all the songs, as well as bringing
a transparent ‘radio’ quality to the project. He will have the proper listening
space and gear. His trained ear from years of experience will bring the final
mix up to professional standards, sort of like the icing on the cake. Some
mastering houses will forward properly coded masters to the pressing plant.
• What about Bob? Get the best mastering engineer available. You will
never regret making a record sound a little bit better.
• Why, master, why? Send the master tapes, or drives, with all the alternate
mixes and out-takes, along with all proper paperwork and locations clearly
labeled, to the mastering lab. The mastering engineer needs access to alternate
mixes. For example, if he feels one section of a song needs louder vocals, he
can retrieve whatever he needs from a properly labeled alternate take.
Sending the uncompressed originals is better because clones and copies
are subject to human error. More transfers mean more chance of lost data. As
well, if you recorded two versions, one with compression and one without
compression, let the mastering engineer hear your compressed versions and
get his view on your skills as a mastering engineer.
• Listen to the master. Listen to the changes the mastering engineer is doing,
and ask questions. Compare and analyze the original mixes with new
changes. This is the final stage. Don’t judge the final result at the mastering
lab. Take it around and listen for a few days. Any minor changes are easily
communicated to the mastering engineer.
Recording Tips for Engineers
216
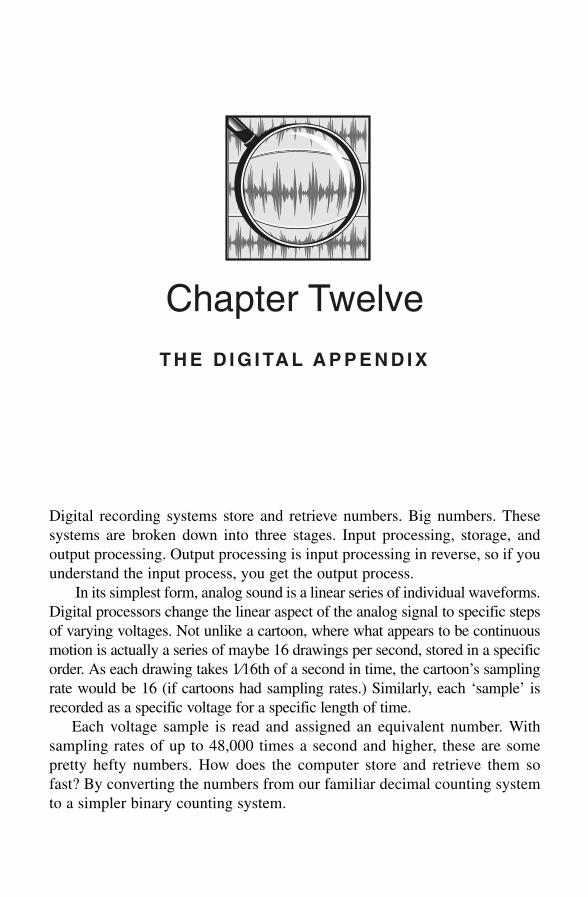
Digital recording systems store and retrieve numbers. Big numbers. These
systems are broken down into three stages. Input processing, storage, and
output processing. Output processing is input processing in reverse, so if you
understand the input process, you get the output process.
In its simplest form, analog sound is a linear series of individual waveforms.
Digital processors change the linear aspect of the analog signal to specific steps
of varying voltages. Not unlike a cartoon, where what appears to be continuous
motion is actually a series of maybe 16 drawings per second, stored in a specific
order. As each drawing takes 1⁄16th of a second in time, the cartoon’s sampling
rate would be 16 (if cartoons had sampling rates.) Similarly, each ‘sample’ is
recorded as a specific voltage for a specific length of time.
Each voltage sample is read and assigned an equivalent number. With
sampling rates of up to 48,000 times a second and higher, these are some
pretty hefty numbers. How does the computer store and retrieve them so
fast? By converting the numbers from our familiar decimal counting system
to a simpler binary counting system.
T H E D I G I TA L A P P E N D I X
Chapter Twelve

Digital Conversion
Binary codes
Do you have a social security number? I have. Do you have a driver’s license
number? I have. Do you have a ‘cheese of the month club’ member number?
I have. One thing can be represented many different ways.
The eggs in Figure 12.1 are commonly represented by the decimal number
12 – ‘1’ block of ten, with ‘2’ left over. In an octal system (8), these eggs are
represented by the number 14 – ‘1’ block of eight with ‘4’ left over. In a binary
system, they are represented by the number 1100.
The binary system is far easier for a computer to deal with, because the
computer recognizes 0101, or 0110 far faster than 9 or 4. There is little room
for error when there are only 2 choices, 1 or 0, on or off. The actual numbers
themselves are longer, but they still represent the same amount. If human
beings had been born with one arm and five fingers instead of two arms and ten
fingers, we would probably count using a pentamel (5) system rather than the
decimal (10) system. Plus way more people would be named Lefty.
Figure 12.1 Different counting systems
218
Recording Tips for Engineers
0 1 2 3 4 5 6 7 8 9 10 11 12 Base 10 - Decimal
0 1 2 3 4 5 6 7 10 11 12 13 14 Base 8 - Octal
0 1 10 11 100 101 110 111 1000 1001 1010 1011 1100 Base 2 - Binary

Bit processors
The processor stores numbers in bits (BInary digiTS). To count to 12 using the
binary system, 4 bits are needed (Figure 12.2). Switch that statement around,
and a 4-bit processor holds up to 16 decimal numbers. For the system to hold
more numbers, or finite steps, a larger processor is needed. A 16-bit processor
can hold up to 65,536 numbers, and a 24-bit processor can hold over
16,777,000 numbers. Longer bit length means more finite steps, and a more
accurate A to D conversion.
Figure 12.2 Low bits vs. high
LSB vs. MSB
The lowest digital levels – all zeros – are referred to as the LSB, or Least
Significant Bits. The highest levels – all ones – are MSB, or Most Significant
Bits. Low incoming levels activate the least significant bits, and hotter levels
activate the most significant bits. The idea is to take advantage of the most bits
possible. Lower levels mean fewer bits are being used, resulting in a ‘grainy’
sound, plus increased noise when the level is raised.
The Digital Appendix
219
101010101010101010
110011001100110011
111100001111000011
111111110000000011
111111111111111100
111111111111111111
16,777,21516,777,21416,777,21316,777,21216,777,21116,777,21016,777,20916,777,20816,777,20716,777,20616,777,20516,777,20416,777,20316,777,20216,777,20116,777,20016,777,19916,777,198
1 0
24 bits system
111111111111111111
111111111111111111
111111111111111111
111111111111111111
111111111111111111
111111111111111111
111111111111111111
111111111111111111
111111111111111111
111111111111111111
111111111111111111
111111111111111111
111111111111111111
111111111111111111
111111111111111111
111111111111111111
111111111111111111
111111111111111111
00
00
00
00
00
00
00
00
00
00
00
00
00
00
00
00
00
00
00
00
00
00
00
10
1514131211109876543210
4 bits system
1010101010101010
1100110011001100
1111000011110000
1111111100000000

Input Processing
Dither
Before the signal can be converted to digital, the input signal needs to be
processed. When an incoming voltage level is not strong enough to reach the
lowest quantization level, digital distortion is introduced. Dither is low-level
noise (white noise, square wave, or sawtooth, depending on the equipment
manufacturer) added to the signal to mask this distortion by increasing the
level beyond the lowest quantization threshold. This moves the incoming
audio level up into more significant bits, producing a more accurate conver-
sion of analog signal. Not unlike bias used in analog recording, this additional
signal is added to improve reproduction.
Adding dither is recommended when converting a signal to a lower bit
depth such as converting a signal from 24-bit to 16-bit. Dithering retains some
of the 24-bit quality in the 16-bit signal.
Aliasing
Aliasing refers to errant frequencies introduced into the audio spectrum. The
Nyquist theorem states that aliasing will occur when the sampling frequency is
not at least two times the size of the audio frequency. So what happens when
Figure 12.3 Anti-aliasing filter
Recording Tips for Engineers
220
8 k 16 k 24 k48 kHz Sampling Rate
24 kHz signal
+6
+3
+2
0
-3
-6
∞
(a) (b)

the sampling rate is set at 48 kHz and the musical overtones reach 24 kHz and
beyond?
Figure 12.3(a) shows that when the frequency equals or is higher than half
the sampling rate the signal is no longer accurately reproduced. Figure 12.3(b)
shows how a low-pass filter, also called an anti-aliasing filter, passes the low
frequencies and stops any frequencies that may cause aliasing.
In this case anything under 24 kHz can pass through. To sample at a rate
of 88.2 kHz, half would be 44.1 kHz. The anti-alias filter would remove all
frequencies over 44.1 kHz. A sampling rate of 96 kHz would need an anti-
alias filter over 48 kHz.
Sample and Hold
The A to D (analog to digital) conversion is done mainly in two steps, first,
sample and hold, then quantize. With a 48 kHz sampling rate, each voltage step
is held for a duration of 1/48,000 of a second, assigned a corresponding binary
number (word) then stored and stacked as packets of information (Figure 12.4).
Figure 12.4 A to D conversion
The Digital Appendix
221
1/48,000 of a secondA/D conversion
Stacked sample periods
Linear time
Analog signal
Sample & hold / Quantize
MSB
LSB
MSB
LSB
MSB
LSB
MSB
LSB
Dither Anti-aliasing

Quantization/error correction
If a binary number is not available for the exact incoming voltage, the con-
verters round out to the closest available number. Figure 12.5(a) shows a 4-
bit processor with an 11 kHz sampling rate. If an incoming voltage level is
0.46012 mV the reader would assign it to the closest available numbers,
maybe 0.5 mV.
Figure 12.5(b) shows a 16-bit processor and 48 kHz sampling rate. Much
less rounding out is applied, vastly lowering the quantization error. An
incoming voltage of 0.46012 mV would be recorded as 0.46012 mV.
Figure 12.5 Quantization/error correction
Recording Tips for Engineers
222
+1
0
-1
4 Bit Processor
11 kHz Sampling Rate
1 V
.875 mV
.75 mV
.625 mV
.5 mV
.375 mV
.250 mV
.125 mV
0 mV
-.143 mV
-.286 mV
-.429 mV
-.572 mV
-.715 mV
-.857 mV
-.1 V
1
0
1
0
1
0
1
0
1
0
1
0
1
0
1
0
1
1
0
0
1
1
0
0
1
1
0
0
1
1
0
0
1
1
1
1
0
0
0
0
1
1
1
1
0
0
0
0
1
1
1
1
1
1
1
1
0
0
0
0
0
0
0
0
15
14
13
12
11
10
9
8
7
6
5
4
3
2
1
0
48 kHz Sampling Rate
16 Bit Processor
111111111
111111111
111111111
111111111
111111111
111111111
111111111
111111111
111111111
111111111
111111111
111111111
111111110
111100001
110011001
1010101010
00000
00000
00000
00000
00000
00000
00000
00000
00000
00000
00000
00000
00000
10000
01100
01010
““ ““ ““ ““““ ““ ““ ““
+1
0
-1
1 v
.9999693 mV
.9999386 mV
.9999079 mV
.9998773 mV
.9998466 mV
.9998159 mV
.9997852 mV
-.9998773 mV
-.9999368 mV
-.9999693 mV
-.1 mV
65,53565,53465,53365,53265,53165,53065,52965,52865,527
43210
(b)
Incoming Signal
(a)

Oversampling
To preserve as much of the higher frequency content before the anti-aliasing
filters, oversampling widens the frequency bandwidth and allows for a
smoother and extended frequency slope. Figure 12.6 shows the process that
averages out the distance between two samples, adding another two samples (or
four samples or eight or on and on). This doubles (or quadruples) the sample
rate. This linear quantization reduces phase distortion and lowers the noise floor.
Figure 12.6 Oversampling
Digital Storage
Pulse code modulation
It’s one thing to convert numbers to binary, and yet another to physically store
them for future reference. PCM, pulse code modulation, is the actual switching
mechanism between a zero and a one. The data stream switches from zeros to
ones using voltage pulses that modulate between on and off. The medium
records a pulse of voltage as a 1, and no pulse as a 0, all within a specific timed
framework referred to as the clock rate. Like an orchestra leader the clock keeps
all operations synchronized to a common reference time.
The Digital Appendix
223
1 / 48,000 second sample
1 / 48,000 second sample
1 / 48,000 second sample
1 / 48,000 second sample
0
.1
.2
.3
0
.1
.2
.3
Voltage(Amplitude)
2x oversampling
4x oversampling
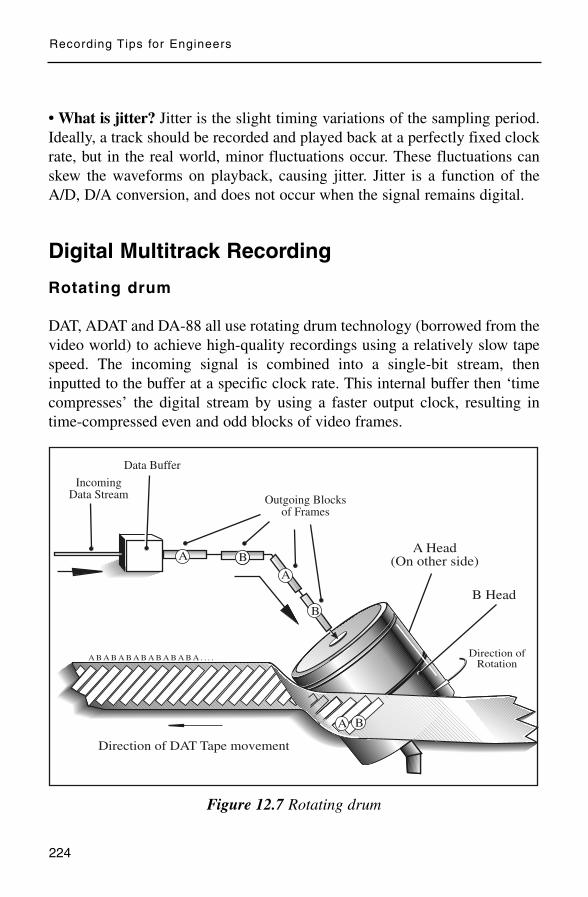
• What is jitter? Jitter is the slight timing variations of the sampling period.
Ideally, a track should be recorded and played back at a perfectly fixed clock
rate, but in the real world, minor fluctuations occur. These fluctuations can
skew the waveforms on playback, causing jitter. Jitter is a function of the
A/D, D/A conversion, and does not occur when the signal remains digital.
Digital Multitrack Recording
Rotating drum
DAT, ADAT and DA-88 all use rotating drum technology (borrowed from the
video world) to achieve high-quality recordings using a relatively slow tape
speed. The incoming signal is combined into a single-bit stream, then
inputted to the buffer at a specific clock rate. This internal buffer then ‘time
compresses’ the digital stream by using a faster output clock, resulting in
time-compressed even and odd blocks of video frames.
Figure 12.7 Rotating drum
Recording Tips for Engineers
224
Direction of DAT Tape movement
IncomingData Stream
Data Buffer
Outgoing Blocksof Frames
B Head
A Head(On other side)BA
A
B
A B A B A B A B A B A B A B A . . . .
B
B
A
Direction ofRotation

Figure 12.7 shows how this system uses two heads, A and B, on opposite
sides of an angled rotating drum. The angle reduces distance between video
tracks, and increases surface area for data. The digital tape is pulled in and
wrapped one quarter of the way around the drum. As the drum spins, the tape
slowly moves in the same direction. Each time the head and the tape meet,
the head lays down a burst of signal from the data buffer.
Stationary heads
DASH (Digital Audio Stationary Head) is an open reel digital tape format
used in professional studios. These are very stable machines, available from
two tracks to 48 tracks. The heads are stationary and not rotating, so the tape
speed must be much faster. An open reel system, rather than video cassettes
are used. Advantages of stationary head recorders are:
– As yet, no HI-8 (DA-88) or VHS (ADAT) cassette can hold over 8 audio
tracks of professional quality audio, although multiple 8-track recorders
can be linked. Some DASH machines hold up to 48 tracks of digital audio
on a half inch thick tape.
– Some allow the user access to the digital buffer to be used as a sampler.
This allows the engineer to fly bits of music around.
– The ability to (carefully) do razor blade edits – impossible with rotating
drum technology.
– The elimination of wasted time waiting for machines to synchronize every
time the engineer presses play. Often projects come into a big studio, and
the digital program recorded from their ADAT or DA-88 is transferred
over to DASH 48 track, or even to a hard drive for mixing.
Hard drive
Magnetic tapes are classed as linear storage because they must be rewound or
fast forwarded to locate specific spots. Hard drives are classed as non-linear
storage, or random access. The most common form of non-linear storage
would be the standard CD. Information is suspended on the disc, and as the
The Digital Appendix
225
disc spins within the drive, the roving head has almost instant access to
anything on the disc.
The hard drive disc controller spins a sealed non-removable stack of
recordable magnetic discs. Between each disc is a roving head that both reads
and writes digital information. Modern hard drives contain upto thirty-two
heads for sixteen stacked discs rotating at 10,000 RPM. Discs move inde-
pendently of each other, and are always in motion. The user cannot access the
specific discs as the whole system acts as a seamless storage.
Files
With non-linear storage, a complete three minute song would normally be
classed as a single computer file, accessed by clicking the icon. This complete
file would be then loaded into the buffer to be accessed.
The hard drive is broken up into volumes, also called partitions. These
volumes hold blocks of files. Each volume is independent of others and each
has a directory indicating file size, type and location within the volume.
Sound files are best stored in adjacent blocks, but sometimes it’s impossible.
Fragmentation occurs when smaller files within a volume have been erased,
forcing the heads to break up a large file into smaller files to store them on
these smaller spaces. This can really slow the system.
Today, with removable hard drives, a complete session can easily be taken
from studio to studio. And no need to download. You can just work off the
hard drive.
Compact disc
The compact disc is today’s standard of pre-recorded consumer discs.
Today’s compact disc is used primarily to store a stereo audio signal.
Increasingly, CDs also carry additional information, including computer
games, programs, live action video, dialog – all forms of multimedia –
stored within the same binary stream. At present the industry standard for
CDs is 44.1 kHz 16-bit, so no matter what sampling rate or bit depth is used
for the recording, eventually before the final release, it will be transferred
down (or up) to 44.1 kHz 16-bit.
Recording Tips for Engineers
226

Figure 12.8 Pits and flats on a CD
While the rotating head converts the stream of frames to time condensed
blocks, the CD records a single stream of CIRC encoded data. The speed of
the CD revolution changes as the disc plays, ensuring the data is read at a
consistent rate. As well, the data is stored from the inside of the disc going
outward, rather than starting at the outside, as with vinyl records.
Figure 12.8 shows a continual stream of different length bits and flats
embedded on the plastic of the disc. Within these bits and flats is the binary
data. One would think that the pits would be stored as 0’s and the flats as 1’s.
Not so. When the pits change to flats, and the flats change to pits is where the
binary data is stored. The laser records the change from either pit to flat, or
back as a ‘1’. The rest are ‘0’s.
The Digital Appendix
227
0000100010000000010010001001000100100000000000000
Laser Beam

DVD
The DVD is essentially the same size as a standard CD, but the standard CD
holds up to 650 megabytes of stereo digital data, and DVD can optimally store
up to 17 gigabytes. These discs are able to store far more data of high-quality
video plus full bandwidth audio. How does it do this? By employing several
different methods including:
– A higher pit density rate for tighter tracks and larger data area.
– Double sided discs, actually two platters bonded back to back, increasing
rigidity and minimizing laser focus problems due to warpage. This dou-
bles the disc’s storage capacity.
– Two layers of data per platter, where the laser changes focus to access the
different layers.
– More efficient error correction and video compression algorithms.
Not all DVDs hold 17 gigabytes of data because they aren’t configured
the same. Different configurations include:
– DVD 5 single sided, single layer 4.7 gigabytes
– DVD 9 single sided, double layer 8.5 GB
– DVD 10 double sided, single layer 9.4 GB
– DVD 18 double sided, double layer 17 GB
All DVD players have capacity to read all the above formats. Some players
require the user to remove the disc and turn it over, because the manufacturers
are too cheap to install separate lasers for both sides.
Many of today’s larger sessions take up so much space, DVDs are used to
store the data. Gone are the good old days when a simple CD would hold all
your data.
Recording Tips for Engineers
228
• What is the difference in actual sound between digital recording and
analog recording? It is not unlike the difference between watching a film
(analog) and watching a video (digital). You can see the difference, but try
explaining it to someone. Differences include:
– With analog, some lower frequencies may be slightly accentuated, adding
a ‘warmth’ not captured with digital.
– Peak levels can oversaturate an analog tape. Some engineers use this as
part of their sound.
– A slight amount of high end may be lost on analog playback, simply due to
limitations of analog tape. Digital recording processes audio with no per-
ceivable loss.
– With digital recording, there is no signal loss due to tape shedding, no cross-
talk, no track leakage, and no such thing as outside track degradation, com-
monly found on tracks 1 and 24 on analog.
– Digital non-audio tracks may be available for synchronization. An 8 track
ADAT machine will have 8 audio tracks, plus at least one more track used
for synchronization. 8 track analog is just that – 8 tracks. Use them how
you will.
– Analog copying will always have generation loss. There is no loss in dig-
ital because a copy is a clone of the ones and zeros.
– Convenience. Today, with removeable hard drives, a complete session can
easily be taken from studio to studio. And no need to download. You can
just work off the hard drive.
– Traditionally, the engineer relied solely on his ears. Now he can see the
waveforms and hear the sound to help him place it in the right spot.
The Digital Appendix
229

This page intentionally left blank

Index
0 dBFS 150
A to D conversion 219
A to D converters 105, 209
ADAT 224
A/B 4
AC power cables 36, 37
Acoustic foam 12
Acoustic guitar compression 142
Acoustic guitar equalization 141
Acoustic preparation 77
Additional guitar setups 74
After printing 214
Air purifier 104
Aliasing 220
Alignment tones 128
Ambiance microphones 29, 42, 56
Amplifier placement 65
Amplifiers 65
Analog 113, 126
Anti-aliasing 220
Attack 120
Audio chain 115
Auto-pitcher 146
Automation 174, 209
Azimuth 209
Back-to-back direct boxes 68
Background vocals 100
Baffles 12
Balanced cables 34
Baritone sax 147
Basic tracks 13, 126
Bass guitar compression 135
Bass guitar equalization 138
Bass trap 103
Bathroom 66, 96
Batteries 70
Beater 47, 134
Beatles 70, 206
Bell 10
Bell curve 113
Bias 209, 220
Binary codes 218
Binary word length 219
Bon Jovi 52
Boom box 70, 164
Boomstand 16
Bottom head 44
Bouncing 173
Boundary microphone 22
Brass section 92
Budget 5
Buss 38, 52, 128, 153
Buzz 154, 161, 208
Capsule 17
Cardioid pattern 22
Carpet 28, 42
Cellos 79, 83
Changeable capsules 22
Chorus 199
Clamps 178
Clarinet 94
Clean cymbals 55
Clean sound 68
Click track 60
Clicks 177
Clients 4
Clip-on microphones 22
Clocking reference 106
Close miking 19, 29, 54, 81
Clutter 115
Compact disc 226
Compressing 134, 211
Compressors 119
Computer 9, 104
Condenser microphones 20
Connections 67
Console 110
Contact microphone 135
Control room analysis 102

Control room preparation 103
Cotton balls 53
Count-off 174
Counter 129, 163
Counter numbers 104, 161
Cowbell 60, 206
Crossfades 176, 214
Crossover 108, 194
Cue list 128
Cue mix 155
Cue sends 110
Cue stations 158
Cut and paste 165, 184
Cymbals/overhead equalization 133
DA-88 224
Damping 28, 47
DASH 225
DAT 210, 214
Data 105, 178
Data buffer 225
DAW 5, 105, 171
De-esser 122, 146, 189
Dead spaces 78
Decay time 194
Decca tree stereo miking 33
Decibel 10
Decimal 217
Delay 199
Delay time 199
Demo 8, 15
Depth 200
Depth perception 194
Diaphragm 17
Diffusion 194
Diffusion devices 12
Digital console 127
Digital conversion 218
Digital editing 176
Digital overload 71
Digital recording 105
Digital storage 223
Digital tapes 107, 160, 178
Direct box 36, 74
232
Index
Discretion 3
Distant miking 29
Distortion 69, 101, 141, 186
Dither 220
Documentation 128
Donut 47
Doubling 174
Doubling vocals 170
Downbeat 51, 163
Drum gates 135
Drum heads 43
Drum key 104
Drum overtones 63
Drum riser 42
Drums 41, 130
Drums compression 133
Drumstick 136
Duck 122, 192
Duct tape 43
Dust 178
DVD 33, 105, 228
Dynamic microphone 19
Early reflections 194
Echo 195
Edits 176, 213
Effects 106, 172, 184
Effects pedals 70, 197
Electric guitar compression 140
Electric guitar equalization 139
Electronic drums 62, 134
End of session 177
Equalization 187
Equalization frequency response 112
Equalizers 111
Equalizing 114, 187
Erasing 179
Eric Carr 46
Errant frequencies 42, 92, 220
Error correction 222
Exercise 160
Fader levels 155
Fatigue 178

Index
233
Faulty cables 35
Feedback 101, 199
Felt pads 43
Figure-8 patterns 24
Files 176, 226
Filter 22
FireWire 128
First pass 164
Flange 154, 201
Fletcher/Munson 155
Floor tom-tom 53, 132
Flute 94
Foam pads 53
Format 107, 160
Four-to-one rule 27
Frequencies 112
Frequencies to tones 115
Frequency bumps 79
Frequency response 17, 70, 102
Full bandwidth equalizer 114
Fuses 69, 109
Gain reduction meter 122
Gain stage 151
Getting paid 6
Grainy sound 105, 219
Grand piano 88
Graphic equalizer 103
Grille cloths 67
Groove 51, 154, 175
Ground 37
Ground lifter 37
Guidance 166
Guitar strings 43, 77
Halls 193
Hard drive 121, 126, 226
Hard knee 121
Hardware 6, 179
Harmonic distortion 85, 187
Harmonics 79, 112, 115
Headphones 56, 101, 156
Headroom 151
High hat equalization 132
High transients 18, 147
Hit records 13
Hold 124
Horn compression 147
Horn equalization 146
Horns 92, 146
Hum 34, 37, 135
Hyper-cardioid pattern 23
In record 162
In-line fuses 109
Input levels 151
Input processing 217
Input stage 152
Interference 27, 34
Intervals 46
Isolation booth 42
Jazz 14, 47
Jingles 14
Jitter 224
Keepers 173
Keeping up 6
Keith Richards 175, 207
Keyboards 91
Kick drum equalization 131
Kick drum tunnel 50
Kiss 46
Knobs 179
Latency 106
Lavalier microphone 22
Leakage 49, 61, 163
Leveling amplifier 123
Levels 11, 130, 181, 189
Limiter 120
Limiting 124
Link 122
Listening test 17, 179
Loading 153
Long hours 5
Longevity 2
Loop mode 184

Index
234
Loud amplifiers 68
Low-end rumble 42, 56
Loyalty 5
LSB 150
Lyrics 167
M/S stereo miking 32
Magnetic field 19, 107
Magnets 109
Management 178
Manufacturers 195
Master buss 204, 209
Master file list 106, 129
Mastering 188, 216
Membrane 17, 101
Metal 175
Meters 111, 117, 130, 215
Microphone choice 25
Microphone placement 26
Microphone pre-amp 36
Microphone stands 16
Microphones 17
Miking the amplifiers 71
Miking the cymbals/overhead 54
Miking the kick drum 48
Miking the room ambiance 56
Miking the snare drum 51
Miking the tom-toms 52
Mistakes 2, 104
Mix levels 204
Mixing basics 185
Monitor 107, 152
Monitor amplifier 109
Monitor mixes 154
Monitor stage 152
Mono 86, 156
Move the capsule 75
MSB 150, 219
Multiband compression 122
Multitrack recorder 106, 110
Multitrack returns 111
Musical tones 115, 187
Mute buttons 154, 207
Nearfield monitors 108
Neutral room 103
Noise 151, 185
Noise floor 149, 221
Noise gates 124, 190
Normal 178
Not so close miking 81
Notebook 129
Notepad 104
Octal system 216
Off-axis 80
Ohm meter 35
Omni-directional 23
On-axis 22
On-line 6
One microphone acoustic setups 81
One microphone guitar setups 71
One microphone piano setups 87
One microphone drum setups 57
Orange wall outlets 37
Opposite polarity speakers 156, 170
Oscillator 104, 181, 191
Output stage 152
Oversampling 223
Overcompression 123
Overdubs 126, 156
Overlap 116, 131, 174
Overload 52, 69, 109
Overtones 45, 115, 141
Packing blanket 47
Pads 22, 71,
Panning 53, 174, 196
Parameters 69, 105, 128, 150
Passive 36
Patch bay 110
Patch cords 110, 177
Patience 98
Peak levels 109, 123, 229
Peak limiter 122
Peak meters 111
Peak monitor 130

Index
235
Peaks 18, 117
Pentamel 218
Percussion 18, 46, 151
Phantom power 18
Phase 38
Phase shift 38, 115
Phons 12
Piano 84
Piano compression 148
Piano equalization 147
Piano tuner 84
Pick 80, 138
Pickup 70
Pink noise 102, 181
Pitch 146, 160, 170
Pitch change 200
Placement 13
Placing the drums 41
Placing the piano 84
Placing the player 78, 154
Placing the vocal microphone 98
Plastic clip 34
Plates 194
Plug-ins 69, 106, 113
Polar patterns 22
Pop filter 94, 100
Post record 171
Power levels 11
Power rock 14
Power surge 104
Pre mix 181
Pre-amplifier 18
Pre-delay 194
Presence 69, 112,
Printing 209, 211
Priority 126
Processors 111, 130
Programmer 91
Proximity effect 18
Pulse code modulation 223
Pumping/breathing 124
Punch-in 154, 165
Punk 15
Q 113, 117
Quality 2
Quantization 220, 222
Ratio 120
Record-ready 160, 165
Recording effects 172
Recording space 10, 56
Recording vocals 167
Red nail polish 53
Reference level 105, 128
Reflections 12
Relax 165
Release 120
Rentals 70, 78, 209
Repairs 163
Resonance 16, 44, 53, 77
Resonant frequency 103, 118
Respect 4
Reverb 193
Reverse gate 125
Ribbon microphone 21
Riser 42, 66
Road case 67
Roll-offs 22, 97
Rolling Stones 207
Ron Wood 175
Room acoustics 42
Room microphone equalization 133
Room preparation 12
Room rattles 52
Room settings 193
Room sound 31, 42, 191, 202
Rotating drum 224
Rough mixes 154, 182
Rumble 16, 42, 86,
Runner 111
Running cables 34
Safeties 176
Safety copies 178
Safety master 214
Sample 62, 105, 184,

Index
236
Sample and hold 221
Sample rate 105, 128, 223
Sampled drums 61
Sampler 184
Samples 190
Sand bag 43
Saxophone 92, 147
Scribble strip 111, 183
Sequencing 91
Session notes 182
Session player 114
Setting up to mix 183
Shielded cables 34, 38
Shockmounts 16, 86, 97
Shotgun microphone 22
Sibilance 18, 98, 122, 145
Sidechain 122, 190
Signal processors 111
Signal-to-noise ratio 151
Slapback 202
Slate 163
Snapshots 164
Snare drum equalization 131
Snares 45
Soft knee 121
Software 6
Solo 140 205,
Solo button 177,185
Song tempos 166
Sound board 86
Sound card 6, 105
Sound hole 80
Sound pressure level 11, 189
Soundtrack 14
Spaced pair stereo miking 31
Speaker cable 34, 109
Speaker triangle 108, 156
Speakers 107
Spectrum analyzer 102
Split 122
Squeaks 47, 143
Squeaky chairs 12
Stereo compressor 190, 210
Stereo tracks 62, 89, 127
Stick bag 53
Strain 169
String section 83
Stringed instruments 77
Strings 17, 64
Studio monitors 105
Subwoofer 108
Subgroup 183
Super-cardioid 24
Sweet spot 55, 132
Sympathetic ringing 46
Talkback 28, 125
Tambourine 46, 204
Tape speed 128, 224
Taxes 6
Television 14, 22, 197
Tempo 60, 124, 161
Tension 46, 77
Thin cymbals 55
Three microphone drum setups 59
Three microphone piano setups 90
Threshold 119
Threshold of hearing 11
Tico Torres 52
Timing error 106
Tip, ring and sleeve 34
Tom-toms equalization 132
Tones 209
Track layout 126
Track sheet 104, 128, 165, 183
Transducer 17, 107
Transfer 183
Transformer 36
Transient response 18, 92
Transients 51, 92
Trigger 61, 122, 135
Trim 148
Trims 184
Tube microphones 20
Tubes 69
Tuner 158
Tuning flaws 168
Tuning the drums 45
Index
237
Tuning tone 158
Tweeters 108
Two microphone acoustic setups 82
Two microphone guitar setups 72
Two microphone piano setups 88
Two microphone drum setups 58
Two skinned tom-toms 46
Two-to-one cables 53
Unbalanced cables 34
Unity gain 120, 181
Upright piano 85, 90
Vague sounds 137, 175, 187
Valve tube 123
Variable speed oscillator 161
Vibe 164
Video frames 224
Violins 79, 83
Vocal compression 144
Vocal equalization 143
Vocal microphone placement 97
Voltage 11, 217
Volume bits 150
VU meters 111
VSO 161
Wall panels 10, 102
Warm up 167
Waveform 107, 115, 177, 217
White noise 191, 220
Windscreen 55, 80, 98
Woofers 108
Work orders 179
XLR 34
X/Y stereo miking 30

This page intentionally left blank

Assistant Engineers Handbook
Tim Crich
❐ Over 275 pages
❐ Fully illustrated
❐ Packed with proven recording studio secrets
❐ Complete setups for basic, overdubs and mixing
❐ Proper microphone handling and setup
❐ Most efficient ways to complete all paperwork
❐ Needed pointers on recording studio etiquette
❐ Established procedures to keep the session moving
❐ Key priorities for before, during and after the session
❐ Essential tips on setup and breakdown of all equipment
❐ Full chapter on tape machines and alignment
❐ Required reading in audio schools throughout America
❐ Much, much more!
About the Author
Tim Crich began his career as an illustrator in Western Canada, but moved to
New York to pursue a career in recording. With over twenty years of experi-
ence in the recording studio, Tim has credits on some of the biggest records in
history, and has engineered for the biggest producers in the world. Tim is a
recording engineer and writer/illustrator living in Vancouver, Canada.
For further details and to order visit www.aehandbook.com
ISBN 0-969-82230-8