Record Transfer from AMS to Colleague (User Manual) V 1 · Record Transfer from AMS to Colleague...
10
1 Record Transfer from AMS to Colleague (User Manual) Introduction 1.0 Manual Transfer 1.1 Fields to Transfer 1.4 Index Automatic Transfer 1.2 Transfer Rules 1.3 Colleague Manual Process 1.5 Help 1.6 V 1.0
Transcript of Record Transfer from AMS to Colleague (User Manual) V 1 · Record Transfer from AMS to Colleague...

1
Record Transfer from AMS to Colleague (User Manual)
Introduction 1.0
Manual Transfer 1.1
Fields to Transfer 1.4
Index
Automatic Transfer 1.2
Transfer Rules 1.3
Colleague Manual Process 1.5
Help 1.6
V 1.0

2
1.0 - Introduction
In a effort to reduce human effort and data entry mistakes in our administrative system, now is
possible to easily transfer records from “AMS” to “Colleague”. The process will standardized
student’s information in both applications making possible the ability to have both IDs in both
systems for easy updates.
The synchronization process takes place in two different ways, manual and automatic.
1.1 - Manual Transfer
This process allows AMS administrators to transfer single or multiple AMS records to Colleague on
demand.
A) On any AMS record, click the “Datatel Transfer” link under the ‘Active Actions’ menu.

3
B) You’ll be presented with the “Datatel Transfer’” screen. From here you can add the AMS record to a text
file that will subsequently and automatically be transferred to Datatel where with a few clicks you’ll be able
to bring the validated data and eventually update AMS record with the corresponding College ID. You have
the option to create a new file or add records to an existing file. The files naming convention is (“ADDT-” +
AMS USERNAME + “-” + DATE + “-” + SEQUENCE # FOR THE DAY + “.TXT”).
The ‘Add to Datatel file’ button will only be enabled when the “Transferable” status is active. From here
you’ll also be able to check the status of any record you’ve transferred to Colleague. College ID updates will
take place a following times (4AM, 12PM, 3PM, 6PM) on a daily basis.
C) Status
Not Transferable: The record is missing some required values.
Transferable: The record is ready, and you can initiate the transfer process.
Transfer In Queue: The transfer process was initiated. Please complete the Colleague process.
Transferred: The record was transferred to Colleague and the College ID was updated in AMS.
D) The transferable status tells you that your record has all the necessary values needed to send the data
to Colleague. Just select “New File” or “Existing File” and click “Add to Datatel file”.
E) The transfer in queue status indicates that you can now process the file in Colleague.

4
G) Copying file name and previewing records in file: The icon next to the “Existing File”
option allows you to copy the selected text file name into the Windows clipboard where you can eventually
paste it in Colleague. Also, you are allowed to preview the records of a single file before you actually
transfer it.
1.2 - Automatic Transfer
At the end of the day, the records not transferred manually will be automatically transferred. The same rules
applied to the manual process are applied to the automated, many fields are required and the status will be
reflected on the “Datatel Transfer” screen. It is important to know that records in queue will be processed
automatically if they match the automatic rule. Also, once a file is created no changes can be made to the
Colleague entry using the manual or automatic method.
F) Transferred: College ID updates will take place the following times (4AM, 12PM, 3PM, 6PM) on
a daily basis. The AMS record will have the corresponding College ID field updated and Colleague
will have the corresponding AMS ID updated as well.
AMS DAILY FILE IS CREATED
COLLEAGUE EXECUTION
AMS UPDATES COLLEGE ID
5
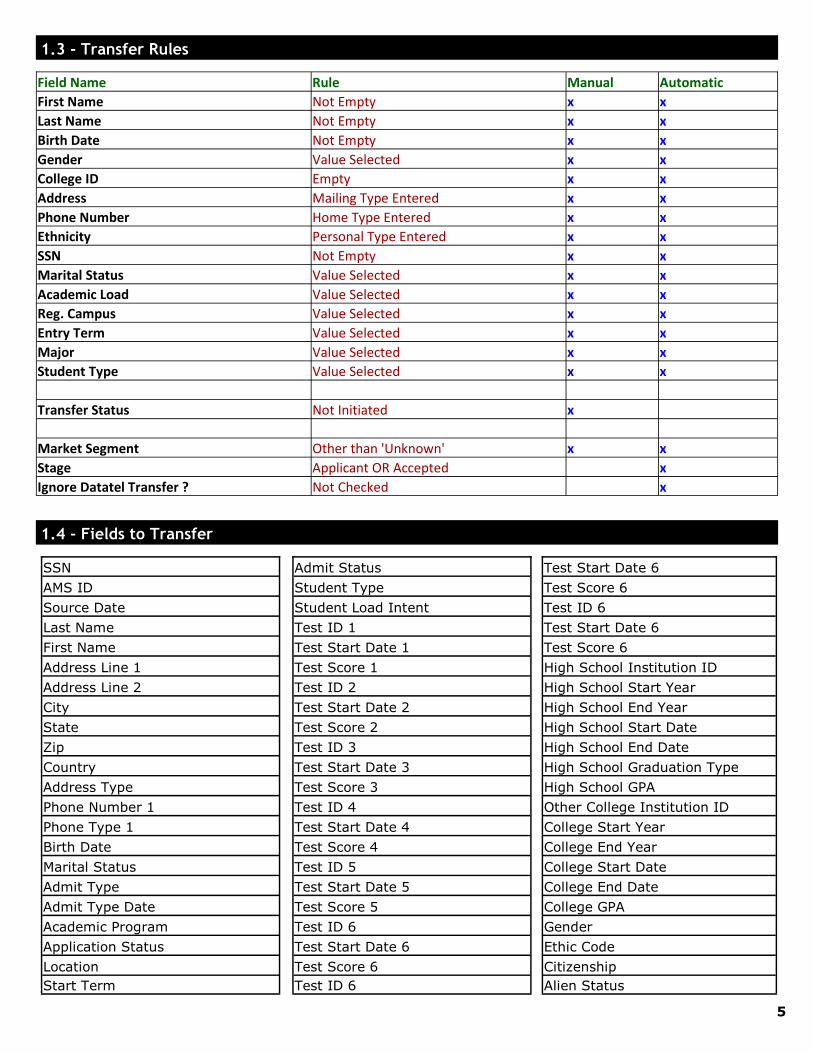
1.3 - Transfer Rules
Field Name Rule Manual Automatic
First Name Not Empty x x
Last Name Not Empty x x
Birth Date Not Empty x x
Gender Value Selected x x
College ID Empty x x
Address Mailing Type Entered x x
Phone Number Home Type Entered x x
Ethnicity Personal Type Entered x x
SSN Not Empty x x
Marital Status Value Selected x x
Academic Load Value Selected x x
Reg. Campus Value Selected x x
Entry Term Value Selected x x
Major Value Selected x x
Student Type Value Selected x x
Transfer Status Not Initiated x
Market Segment Other than 'Unknown' x x
Stage Applicant OR Accepted x
Ignore Datatel Transfer ? Not Checked x
1.4 - Fields to Transfer
SSN
AMS ID
Source Date
Last Name
First Name
Address Line 1
Address Line 2
City
State
Zip
Country
Address Type
Phone Number 1
Phone Type 1
Birth Date
Marital Status
Admit Type
Admit Type Date
Academic Program
Application Status
Location
Start Term
Admit Status
Student Type
Student Load Intent
Test ID 1
Test Start Date 1
Test Score 1
Test ID 2
Test Start Date 2
Test Score 2
Test ID 3
Test Start Date 3
Test Score 3
Test ID 4
Test Start Date 4
Test Score 4
Test ID 5
Test Start Date 5
Test Score 5
Test ID 6
Test Start Date 6
Test Score 6
Test ID 6
Test Start Date 6
Test Score 6
Test ID 6
Test Start Date 6
Test Score 6
High School Institution ID
High School Start Year
High School End Year
High School Start Date
High School End Date
High School Graduation Type
High School GPA
Other College Institution ID
College Start Year
College End Year
College Start Date
College End Date
College GPA
Gender
Ethic Code
Citizenship
Alien Status

6
1.5 - Colleague Manual Transfer
Uploading from AMS to Colleague is a 2 step process on the “Datatel” (Colleague) computer. In the
Admissions Custom Reports section (XAD) of the Admissions module there are 2 mnemonics that control the
process. The first is XAM1 (please note the last character is the number one). The second is XAMI
(please note that the last character is the capital letter “I”) which actually imports the AMS file.
XAM1: XAM1 transfers files from the AMS server to the Colleague server and must therefore be run first. To
run it you can navigate through the menus and double click on it to select it or you can type XAM1 into the
Quick Access area in the upper left hand corner of the menu screen. The process will appear to not do
anything but it will make any files that were created in AMS available in “Datatel”.
XAMI: XAMI is the second step in the process and actually imports student information into Colleague. You can navigate through the menus and double click on it to run it or you can type XAMI into the quick access
box in the upper left hand corner of the menu screen.

7
XAMI will walk you through several screens detailed below.
The first XAMI screen requires 4 pieces of information. The first is the name of the file you want to import.
The second is the default catalog that will be assigned to all students in the upload file. The third is a de-
fault date that will be entered for any information that requires a date but where one has not been pro-
vided in AMS. The last piece of information is the “Update mode” which must always be “Y”. The update
mode of “Y” indicates that you want to import the file and update Colleague.

8
FILE NAME
You can provide the file name in one of 3 ways. The first (and easiest) is to use the cut and paste function-
ality provided by AMS. The second is to type in the file name as it appears in AMS. The third is to look at
the available files in Colleague. You would do this by typing into the file name box the letters ADDT followed
by the ellipse (three dots …). Therefore you would type ADDT… and hit enter. You will be taken to the file
resolution screen (shown in the next screen shot) where you would pick the name of the file you want to
import.
In the file resolution screen you can pick the file by clicking on the box to the left of the name of the file
you want to import (see file name #7 shown above) and click on the blue diskette to save out of the
screen. The name will be carried over to the next screen.
Once you have chosen your file you will be returned to the XAMI main screen.
9
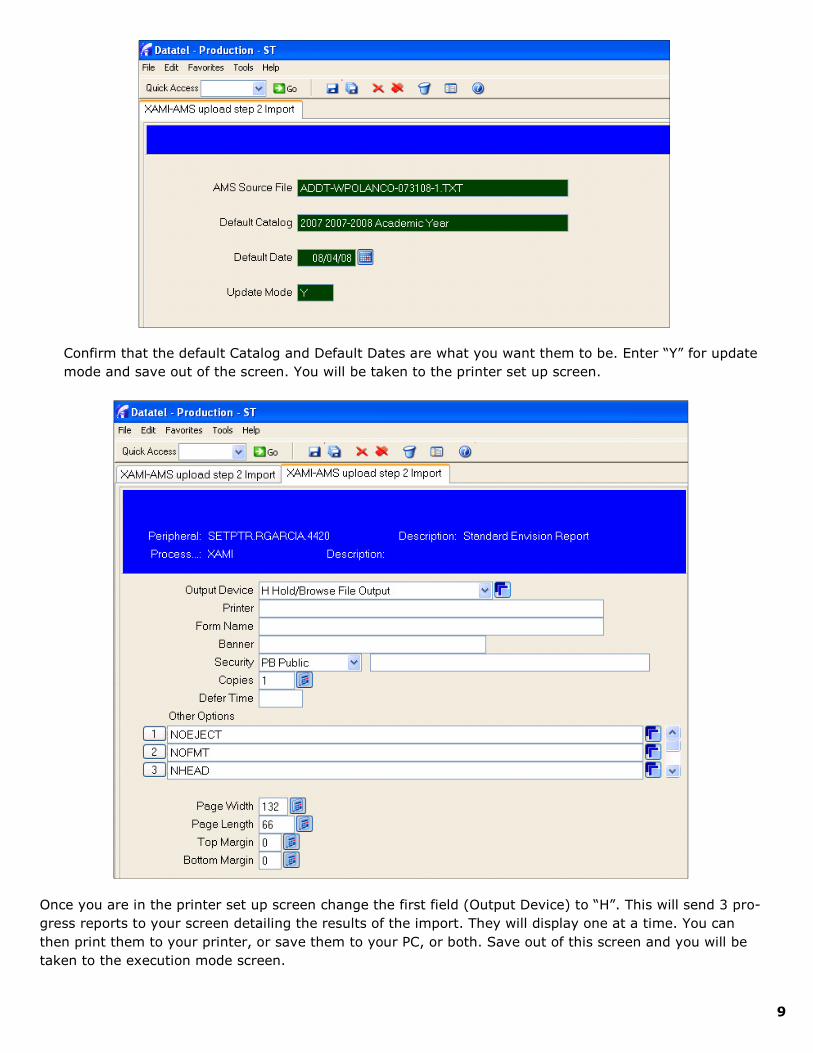
Confirm that the default Catalog and Default Dates are what you want them to be. Enter “Y” for update
mode and save out of the screen. You will be taken to the printer set up screen.
Once you are in the printer set up screen change the first field (Output Device) to “H”. This will send 3 pro-
gress reports to your screen detailing the results of the import. They will display one at a time. You can
then print them to your printer, or save them to your PC, or both. Save out of this screen and you will be
taken to the execution mode screen.

10
Once in the execution mode screen confirm that the “Execute in Background Mode” field contains an “N”.
Save out of this screen to begin the import. This screen is the last opportunity to cancel the upload. Once
you save out of this screen the upload will begin and the resulting reports will display on your screen.
Note: You can cancel the upload at any point in the process by selecting the red “X” at the top of the
screen. Once you save out of this screen the upload will run.
1.6 - Help
Email: [email protected]
Extension: 8290
Should you have any question, please don't hesitate to contact the IT Helpdesk.