Rear Rack M8 x 50mm Hex Bolt Suzuki DR-Z 400 Rear Rack · Inst5528 11/04/2014 Suzuki DR-Z 400 Rear...
2
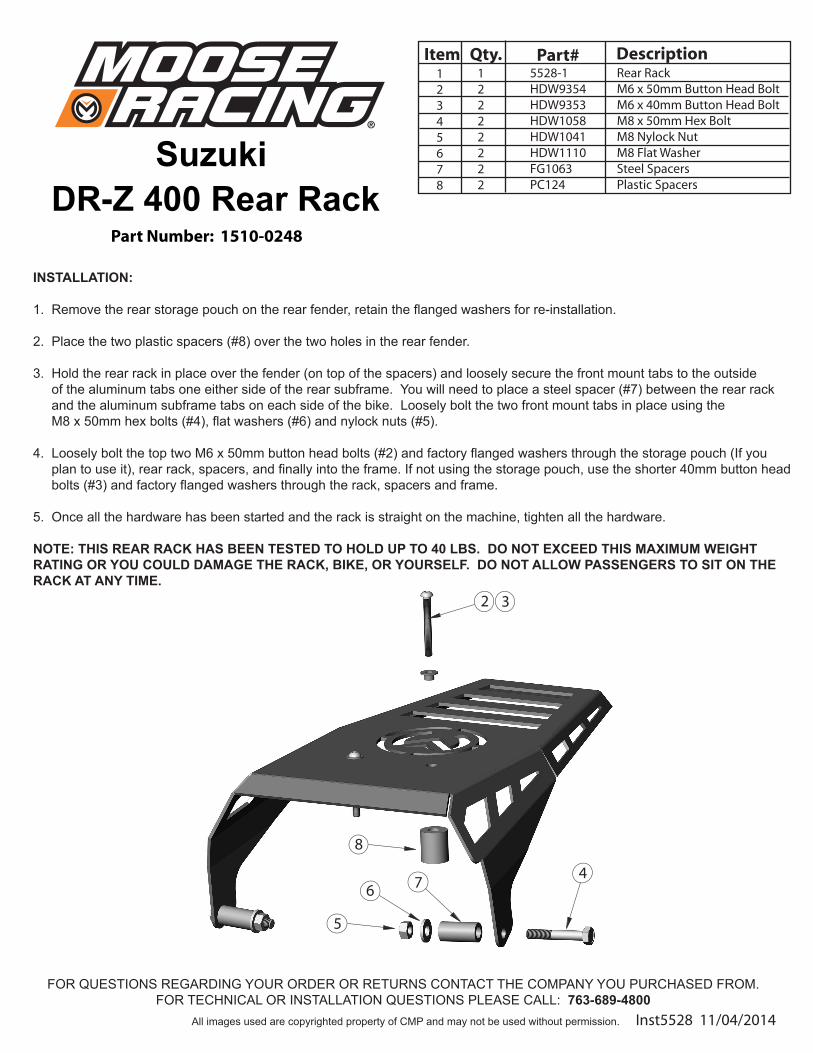
Inst5528 11/04/2014 Suzuki DR-Z 400 Rear Rack Part Number: 1510-0248 All images used are copyrighted property of CMP and may not be used without permission. Part# Description Item Qty. 1 2 3 4 5 6 7 8 1 2 2 2 2 2 2 2 5528-1 HDW9354 HDW9353 HDW1058 HDW1041 HDW1110 FG1063 PC124 Rear Rack M6 x 50mm Button Head Bolt M6 x 40mm Button Head Bolt M8 x 50mm Hex Bolt M8 Nylock Nut M8 Flat Washer Steel Spacers Plastic Spacers FOR QUESTIONS REGARDING YOUR ORDER OR RETURNS CONTACT THE COMPANY YOU PURCHASED FROM. FOR TECHNICAL OR INSTALLATION QUESTIONS PLEASE CALL: 763-689-4800 2 3 8 7 6 5 4 INSTALLATION: 1. Remove the rear storage pouch on the rear fender, retain the flanged washers for re-installation. 2. Place the two plastic spacers (#8) over the two holes in the rear fender. 3. Hold the rear rack in place over the fender (on top of the spacers) and loosely secure the front mount tabs to the outside of the aluminum tabs one either side of the rear subframe. You will need to place a steel spacer (#7) between the rear rack and the aluminum subframe tabs on each side of the bike. Loosely bolt the two front mount tabs in place using the M8 x 50mm hex bolts (#4), flat washers (#6) and nylock nuts (#5). 4. Loosely bolt the top two M6 x 50mm button head bolts (#2) and factory flanged washers through the storage pouch (If you plan to use it), rear rack, spacers, and finally into the frame. If not using the storage pouch, use the shorter 40mm button head bolts (#3) and factory flanged washers through the rack, spacers and frame. 5. Once all the hardware has been started and the rack is straight on the machine, tighten all the hardware. NOTE: THIS REAR RACK HAS BEEN TESTED TO HOLD UP TO 40 LBS. DO NOT EXCEED THIS MAXIMUM WEIGHT RATING OR YOU COULD DAMAGE THE RACK, BIKE, OR YOURSELF. DO NOT ALLOW PASSENGERS TO SIT ON THE RACK AT ANY TIME.
Transcript of Rear Rack M8 x 50mm Hex Bolt Suzuki DR-Z 400 Rear Rack · Inst5528 11/04/2014 Suzuki DR-Z 400 Rear...
Inst5528 11/04/2014
Suzuki DR-Z 400 Rear Rack
Part Number: 1510-0248
All images used are copyrighted property of CMP and may not be used without permission.
Part# DescriptionItem Qty.12345678
12222222
5528-1HDW9354HDW9353HDW1058HDW1041HDW1110FG1063PC124
Rear RackM6 x 50mm Button Head BoltM6 x 40mm Button Head BoltM8 x 50mm Hex BoltM8 Nylock NutM8 Flat WasherSteel SpacersPlastic Spacers
FOR QUESTIONS REGARDING YOUR ORDER OR RETURNS CONTACT THE COMPANY YOU PURCHASED FROM.FOR TECHNICAL OR INSTALLATION QUESTIONS PLEASE CALL: 763-689-4800
2 3
8
76
5
4
INSTALLATION:
1. Remove the rear storage pouch on the rear fender, retain the flanged washers for re-installation.
2. Place the two plastic spacers (#8) over the two holes in the rear fender.
3. Hold the rear rack in place over the fender (on top of the spacers) and loosely secure the front mount tabs to the outside of the aluminum tabs one either side of the rear subframe. You will need to place a steel spacer (#7) between the rear rack and the aluminum subframe tabs on each side of the bike. Loosely bolt the two front mount tabs in place using the M8 x 50mm hex bolts (#4), flat washers (#6) and nylock nuts (#5).
4. Loosely bolt the top two M6 x 50mm button head bolts (#2) and factory flanged washers through the storage pouch (If you plan to use it), rear rack, spacers, and finally into the frame. If not using the storage pouch, use the shorter 40mm button head bolts (#3) and factory flanged washers through the rack, spacers and frame.
5. Once all the hardware has been started and the rack is straight on the machine, tighten all the hardware.
NOTE: THIS REAR RACK HAS BEEN TESTED TO HOLD UP TO 40 LBS. DO NOT EXCEED THIS MAXIMUM WEIGHT RATING OR YOU COULD DAMAGE THE RACK, BIKE, OR YOURSELF. DO NOT ALLOW PASSENGERS TO SIT ON THERACK AT ANY TIME.
Inst5528 11/04/2014
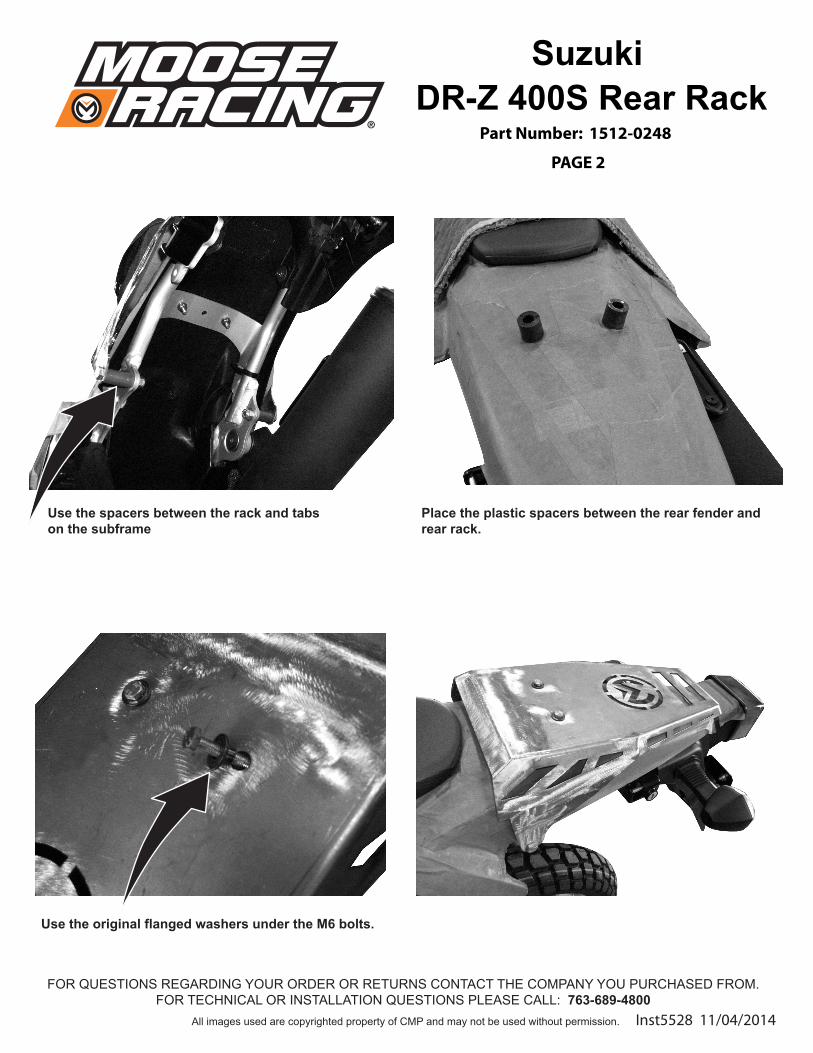
Suzuki DR-Z 400S Rear Rack
Part Number: 1512-0248
PAGE 2
All images used are copyrighted property of CMP and may not be used without permission.
FOR QUESTIONS REGARDING YOUR ORDER OR RETURNS CONTACT THE COMPANY YOU PURCHASED FROM.FOR TECHNICAL OR INSTALLATION QUESTIONS PLEASE CALL: 763-689-4800
Use the spacers between the rack and tabson the subframe
Use the original flanged washers under the M6 bolts.
Place the plastic spacers between the rear fender andrear rack.