RAYMOND DESIGN GUIDELINES - Mississippi Design Guidelines... · RAYMOND DESIGN GUIDELINES...
167
RAYMOND DESIGN GUIDELINES
-
Upload
nguyenphuc -
Category
Documents
-
view
227 -
download
1
Transcript of RAYMOND DESIGN GUIDELINES - Mississippi Design Guidelines... · RAYMOND DESIGN GUIDELINES...

RAYMOND DESIGN GUIDELINES

RAYMOND DESIGN GUIDELINES
Prepared by: David Preziosi, AICP - Mississippi Heritage Trust 2008
RAYMOND DESIGN GUIDELINES

RAYMOND DESIGN GUIDLEINES
RAYMOND DESIGN GUIDELINES
RAYMOND, MISSISSIPPI
ADOPTED NOVEMBER 4, 2008
ACKNOWLEDGMENTS The Raymond Design Guidelines for Raymond, Mississippi were
made possible by concerted efforts of the following groups and individuals:
CITY OF RAYMOND
RAYMOND HISTORIC PRESERVATION COMMISSION
MISSISSIPPI DEPARTMENT OF ARCHIVES AND HISTORY
Todd Sanders - State Coordinator of the Certified Local Government Program This project has been funded with the assistance of a grant-in-aid from the National Park Service, U.S. Department of the Interior, under the provision of the National Historic Preservation Act of 1966, as amended. Historic Preservation grants-in-aid are administered in Mississippi in conjunction with the Certified Local Government program of the Mississippi Department of Archives and History. However, the contents and opinions contained in this publication do not necessarily reflect the views and policies of the National Park Service or the Mississippi Department of Archives and History.

RAYMOND DESIGN GUIDELINES
Architectural Styles in Raymond 23 Greek Revival 24 Queen Anne 26 Colonial Revival 27 Craftsman/Bungalow 28 Tudor Revival 29 Minimal Traditional 30 Ranch 31
GENERAL MAINTENANCE 32 Introduction to Maintenance 32
Maintenance and Inspection Checklist 32 Roof 32 Gutters and Downspouts 32 Siding 33 Doors and Windows 33 Porches 33 Foundation 33
EXTERIOR SIDING, SUPPORTING PIERS, AND CRAWL SPACE ENCLOSURE 34 Exterior Siding 34
Masonry 34 Maintenance and Repair 36 Replacement, Alteration, and Installation 40 Wood 45 Maintenance and Repair 48 Replacement, Alteration, and Installation 50 Substitute Siding 50
CONTENTS INTRODUCTION AND USE OF THE DESIGN GUIDELINES 1 Introduction 1 How to Use the Guidelines 2
Use of the Guidelines by the Raymond Historic Preservation Commission 3
PRESERVATION PRACTICES 3 Introduction to Historic Preservation and Rehabilitation 3 Incentives for Rehabilitation of Historic Structures 4 Secretary of Interior’s Standards 5 Applying the Secretary’s Standards 7
Raymond Historic Preservation Goals 7
CERTIFICATE OF APPROPRIATENESS PROCESS 8 Permit Review Procedure 8 Certificate of Appropriateness Required Support Materials 9 Criteria for Issuance of a Certificate of Appropriateness 11 Procedures for Issuance of a Certificate of Appropriateness 12 HISTORY & ARCHITECTURE 15 Historical and Architectural Background of Raymond 15
i
CONTENTS
RAYMOND DESIGN GUIDLEINES
Use of Substitute or Vinyl Siding in Raymond 54 Metal 58 Maintenance and Repair 59 Replacement, Alteration, and Installation 59
Supporting Piers and Foundation Walls 63 Maintenance, Repair, Replacement, Alteration, and Installation 63 Crawl Space Enclosure 63 Maintenance, Repair, Replacement, Alteration, and Installation 64 ROOFS, GUTTERS, SPOUTS, DRAINAGE 66 Roofs 66
Maintenance and Repair 69 Replacement, Alteration, and Installation 69 Acceptable Roofing Materials for Raymond 70
Gutters, Spouts, and Drainage 71 Maintenance and Repair 71 Replacement, Alteration, and Installation 72 WINDOWS, DOORS, SHUTTERS, AWNINGS AND CANOPIES 75 Windows 75 Maintenance and Repair 77 Replacement 78
Window Replacement in Raymond 78 Alteration and Installation 79
Window Screens 82 Maintenance, Repair, Replacement, Alteration, and Installation 82 Storm Windows 83
Maintenance, Repair, Replacement, Alteration, and Installation 83 Use of Storm Windows in Raymond 84 Security or Burglar Bars 86 Doors 87 Maintenance and Repair 87 Replacement, Alteration, and Installation 87 Screen Doors 89 Maintenance and Repair 89 Replacement, Alteration, and Installation 89 Storm Doors 89 Security or Burglar Doors 90 Shutters 90 Maintenance and Repair 91
Replacement, Alteration, and Installation 91 Awnings and Canopies 92
Maintenance and Repair 93 Replacement, Alteration, and Installation 93 PORCHES, ENTRANCES, ENTRY STEPS, AND ACCESSIBILITY 95 Porches 95 Maintenance and Repair 98 Replacement, Alteration, and Installation 100 Entrances 101 Maintenance and Repair 101 Replacement, Alteration, and Installation 101 Entry Steps 102 Maintenance and Repair 102 Replacement, Alteration, and Installation 102 Accessibility 105
ii

RAYMOND DESIGN GUIDELINES
Health and Safety 107 STOREFRONTS 109
Storefront Architecture 109 Raymond Historic District Commercial Architecture 111 Maintenance and Repair 113 Replacement and Alteration 113 Roofs 115 Exterior Materials 116 Storefront 117 Doors 118 Windows 119 Awnings 119 New Construction 123 New Additions 127 Selecting an Effective Storefront Sign 128
Types of Signs 129 Materials, Lettering, Colors, and Styles 130 Guidelines for Signs in Raymond 131 ADDITIONS TO HISTORIC BUILDINGS, CONNECTIONS BETWEEN HISTORIC BUILDINGS, AND NEW CONSTRUCTION 132
Additions to Historic Buildings 132 New Construction 136 Height 136
Proportion and Scale 137 Massing 138
Rhythm of Spacing and Setbacks 138 Roof Shapes 138
iii
CONTENTS
Orientation 139 Materials and Texture 139
BUILDING SITE, BUILDING SETTING, AND LANDSCAPE FEATURES 140
Outbuildings 140 Maintenance and Repair 140
Replacement, Alteration, and Installation 140 Fences and Walls 141
Maintenance and Repair 142 Replacement, Alteration, and Installation 142 Sidewalks, Walkways, Driveways, Courtyards and Patios 143
Maintenance and Repair 143 Replacement, Alteration, and Installation 143 Landscape Objects and Lighting 144
Maintenance, Repair, Replacement, Alteration, and Installation 144
Trees, Hedges, Bushes, Flower Beds, etc. 145 Maintenance, Replacement, and Installation 145
Building Site, Setting, and Relocation of Historic Buildings 145
GLOSSARY 153 Glossary of Architectural Terms 153 Additional Resources 158

RAYMOND DESIGN GUIDLEINES iv
HISTORIC IMAGES OF RAYMOND
Images courtesy of Pattie Adams Snowball
RAYMOND DESIGN GUIDELINES 1
INTRODUCTION AND USE OF THE RAYMOND DESIGN GUIDELINES ♦ Introduction ♦ How to Use the Guidelines ♦ Use of the Guidelines by the Raymond Historic
Preservation Commission INTRODUCTION Raymond has a significant collection of historic structures typical of small cities in Mississippi. The city has several distinct architectural styles represented in its building inventory from before the Civil War all the way to post World War II. Raymond’s historic structures represent a visual record of the architectural and social history of the city. These historic structures serve as links to the past and as tangible reminders of the people and events that shaped the development of the city. Raymond has its own special story to tell, and its historic resources offer the best way to illustrate that story. The historic resources of Raymond are also important for the future of the community. Heritage tourism is one of the fastest growing industries in our country, and Raymond can take advantage of that due in part to the outstanding historic character of Raymond allowing the economic benefits of that industry. The city’s historic resources can also play an important role in attracting new industry and new residents.
During the last three decades, interest in historic preservation and rehabilitation of historic structures has increased throughout the United States. Increasingly people are realizing the value of historic structures and the contribution they make to a community, both aesthetically and economically. Raymond is no exception. Raymond has a local Heritage District which includes the Raymond Historic District listed on the National Register of Historic Places in 2007. Both districts include the downtown commercial area and surrounding residential areas. Raymond also enacted a historic preservation ordinance in 2003 to protect the historic structure in the Raymond Heritage District. Under the ordinance all changes in the heritage district area must be approved by the Raymond Historic Preservation Commission (RHPC). The purpose of the Raymond Design Guidelines is to encourage historic preservation and high design standards in Raymond’s local heritage district in order to protect and promote the city’s architectural heritage and unique character. The guidelines provide general recommendations for preservation, rehabilitation, alteration, and new construction in Raymond’s heritage district. The guidelines should benefit property owners, architects, contractors, public officials, and members of the RHPC, which has the primary responsibility for managing change in the city’s Heritage Districts. The Raymond Design Guidelines are consistent with preservation principles established by the United States Department of the Interior and expressed in the Secretary of the Interior’s Standards for Rehabilitation. The guidelines address only the exterior of historic buildings and focus on the

2 RAYMOND DESIGN GUIDELINES
architectural features that define the unique character of Raymond. The Raymond Historic Preservation Commission is responsible for reviewing exterior changes in the city’s heritage district and will use the design guidelines and the Secretary of the Interior’s Standards for Rehabilitation in making decisions about what changes are appropriate and which changes are inappropriate. Changes to the exterior of any building in the Heritage District or plans for the construction of a new building within the Heritage District area must be reviewed by the RHPC before any work begins. If the proposed physical changes or new construction plans are consistent with the Raymond Design Guidelines and the Secretary of the Interior’s Standards for Rehabilitation, the applicant will receive a Certificate of Appropriateness (COA) approving the work. Once a COA is obtained WORK CAN BEGIN ONCE ALL NECCESARY PERMITS ARE RECEIVED, including those from any applicable city departments. The Raymond Design Guidelines, used in harmony with the Raymond Historic Preservation Ordinance, will assist the RHPC in protecting and preserving local historic resources. The guidelines do not provide case specific advice or address exceptions; they are only a general guide for changes to historic structures and the design of new construction. The conditions and characteristics of each structure and the appropriateness of proposed alterations will be examined on a case-by-case basis by the Raymond Historic Preservation Commission.
The final authority on the appropriateness of changes or the design of new construction does not rest with Raymond’s design guidelines, but with the property owners, architects, contractors, municipal authorities, and members of the Raymond Historic Preservation Commission. They determine the appropriateness of changes within the heritage district. Ultimately, the preservation of Raymond’s historic resources does not rely on ordinances or design guidelines, but on decisions made by the community and its citizens. HOW TO USE THE GUIDELINES The Raymond Design Guidelines are intended to be easy to use and to allow for quick location of specific information. The Guidelines are divided into topical sections with section headings at the top of every other page for easy reference. Each section is divided into subsections to locate specific information more quickly. The guidelines also include illustrations to clarify the text. The Secretary of the Interior’s Standards for Rehabilitation are incorporated into the guidelines to provide additional information and to consolidate as much information as possible into one publication. The Standards for Rehabilitation appear as shaded text within applicable topical sections. Boxed within the text are titles of applicable National Park Service Preservation Briefs that offer additional technical information. Copies of all of the Preservation Briefs and the Secretary of the Interior's Standards for Rehabilitation are available on-line at www.nps.gov.

RAYMOND DESIGN GUIDELINES 3
Included in the appendix is a glossary of preservation-related terms, resources for additional information, and a list of professional organizations for consultation. USE OF THE GUIDELINES BY THE RAYMOND HISTORIC PRESERVATION COMMISSION The Raymond Historic Preservation Commission will use the Raymond Design Guidelines as a guide to make decisions on applications submitted to the commission. Use of the guidelines will assist the commission in making consistent and fair decisions that are compatible with the Secretary of the Interior’s Standards for Rehabilitation and sound preservation practice.
Property owners, architects, and contractors can use the Raymond Design Guidelines to plan their projects with reasonable assurance that their applications will be approved if the guidelines are followed. Since the commission reviews each application on a case-by-case basis, variances from the guidelines and omissions within the guidelines will be addressed by the Raymond Historic Preservation Commission. PRESERVATION PRACTICES ♦ Introduction to Historic Preservation and Rehabilitation ♦ Incentives for The Rehabilitation of Historic Structures ♦ Secretary of Interior Standards for Rehabilitation ♦ Applying the Standards ♦ Raymond Preservation Goals INTRODUCTION TO HISTORIC PRESERVATION AND REHABILITATION Architecture is an art form, but it cannot be preserved in a climate-controlled, museum environment like fine art and decorative art. Some historic buildings are preserved in near museum-like settings at Colonial Williamsburg or similar restorations, but the vast majority of historic buildings have to evolve to survive. Empty buildings become deteriorated buildings and tomorrow’s vacant lots. Consequently, most work on historic buildings is defined as rehabilitation rather than restoration.
The Raymond Design Guidelines will encourage the preservation of architectural detailing like the original bay with wood double hung wood windows, wood lap siding, wood stairs, and cut balustrade of the 237 North Oak Street, a significant expression of the Queen Anne style of architecture.
PRESERVATION PRACTICES

4 RAYMOND DESIGN GUIDELINES
The federal government defines rehabilitation as the “process of returning a property to a state of utility, through repair or alteration, which makes possible an efficient contemporary use while preserving those portions and features of the property which are significant to its historic, architectural, and cultural values.” The key to a successful rehabilitation is respecting the historic character of the building and preserving as many of the original historic materials and details as possible. Alterations should be easily reversible to allow a future owner to return the building to its original configuration. Owning a historic building or structure is a privilege and responsibility. Owners of historic properties should view themselves as temporary caretakers of a community’s architectural heritage. Many historic buildings enjoy new uses after rehabilitation. The process of rehabilitating a historic building for a new use is termed adaptive reuse. Many historic railroad depots are today home to restaurants, shops, museums, visitor centers, and other uses. Abandoned historic school buildings often become affordable apartments, museums, conference centers, and performing arts centers. Historic houses in commercial areas are often converted to small shops or office space.
INCENTIVES FOR THE REHABILITATION OF HISTORIC STRUCTURES There are special incentives for the restoration or rehabilitation of historic proprieties listed on the National Register of Historic Places or eligible for listing on the National Register. Only structures listed in the Raymond National Register Historic District are eligible for incentives. Structures outside of the Raymond National Register Historic District that are individually listed on the National Register or as part of the Raymond Multiple Property National Register listing in 1986 are also eligible for tax credits. It is possible that some structures in Raymond outside of the National Register district may qualify individually for the National Register and would therefore be eligible for incentives. Questions about the eligibility of a structure for the National Register of Historic Places should be directed to the Historic Preservation Division of the Mississippi Department of Archives and History at 601-576-6940. Tax incentives for preservation are in the form of tax credits for qualified rehabilitation work to historic structures and are available on both the federal and state levels. A tax credit is better than a tax deduction. An income tax deduction merely lowers the amount of income subject to taxation, but a tax credit lowers the amount of tax owed. In general, for each dollar of tax credit earned, the amount of income tax owed will be reduced by one dollar.

PRESERVATION PRACTICES
RAYMOND DESIGN GUIDELINES 5
Federal Tax Credits - Federal tax credits are only available for buildings that are income producing (office, retail, restaurant, residential rental, apartments, Bed & Breakfast, etc.). To qualify the rehabilitation must also be substantial, meaning the rehabilitation costs must exceed the current value of the building minus the value of the land. Owner occupied dwellings do not qualify for the federal tax credit.
Federal tax credits are in the amount of 20% of the money spent on the rehabilitation meaning if you spend $100,000 on a qualified rehabilitation project you would receive $20,000 in tax credits once the project is completed and certified. Unused tax credits can be applied to the previous year’s tax bill and carried forward up to twenty years.
State Tax Credits - Unlike the federal tax credit to qualify for the state tax credit the building does not have to be income producing. Therefore, owner-occupied dwellings will qualify for the credits if the rehabilitation expenditures exceed: $5,000. In the case of a non-owner-occupied dwellings the rehabilitation expenses must exceed 50% of the total basis in the property. Generally, “basis” is the purchase price, less the cost of the land, plus any improvements already made to the property, minus the deprecation taken on the property. Applying for the Credits - To qualify for the credits, either state or federal, an application must be filed with the Historic Preservation Division of the Mississippi Department of Archives and History before any work begins. They must certify that the building is historic and that the project qualifies for the credits. In order to receive the credits the rehabilitation
The owners of 233 North Oak Street took advantage of the federal tax credits to rehabilitate the house for a Bed and Breakfast.
work to the building must follow the Secretary of Interior's Standards for Rehabilitation. For more information and application forms for both the state and federal tax credits for rehabilitation contact the Historic Preservation Division of the Mississippi Department of Archives and History at 601-576-6940 or go online at www.mdah.state.ms.us/hpres/prestaxincent.html. It is highly advisable to contact the Historic Preservation Division of the Department of Archives and History before any work begins to make sure the project will qualify for the tax credits and the application forms are completed properly.

6 RAYMOND DESIGN GUIDELINES
Secretary of the Interior’s Standards for Rehabilitation
1. A property shall be used for its historic purpose or be placed in a new use that requires minimal change to the defining characteristics of the building and its site and environment.
2. The historic character of a property shall be retained and preserved. The removal of historic materials or alteration of features and spaces that characterize a property shall be avoided.
3. Each property shall be recognized as a physical record of its time, place, and use. Changes that create a false sense of historical development, such as adding conjectural features or architectural elements from other buildings, shall not be undertaken.
4. Most properties change over time; those changes that have acquired historic significance in their own right shall be retained and preserved.
SECRETARY OF INTERIOR’S STANDARDS The Raymond Design Guidelines are written to be consistent with the Secretary of the Interior’s Standards for Rehabilitation. These federal standards determine the appropriateness of work treatments for every project taking advantage of either federal grant-in-aids or preservation tax incentives. Property owners and design professionals should reference the Standards for Rehabilitation during the planning process.
5. Distinctive features, finishes, and construction techniques or examples of craftsmanship that characterize an historic property shall be preserved.
6. Deteriorated historic features shall be repaired rather than replaced. Where the severity of deterioration requires replacement of a distinctive feature, the new feature shall match the old in design, color, texture, and other visual qualities and, where possible, materials. Replacement of missing features, shall be substantiated by documentary, physical, or pictorial evidence.
7. Chemical or physical treatments, such as sandblasting, that cause damage to historic materials shall not be used. The surface cleaning of structures, if appropriate, shall be undertaken using the gentlest means possible.
8. Significant archaeological resources affected by a project shall be protected and preserved. If such resources must be disturbed, mitigation measures shall be undertaken.
9. New additions, exterior alterations, or related new construction shall not destroy historic materials that characterize the property. The new work shall be differentiated from the old and shall be compatible with the massing, size, scale, and architectural features to protect the integrity of the property and its environment.
10. New additions and adjacent or related new construction shall be undertaken in such a manner that if removed in the future, the essential form and integrity of the historic property and its environment would be unimpaired.

PRESERVATION PRACTICES
RAYMOND DESIGN GUIDELINES 7
Applying the Secretary of Interior’s Standards
1. Identify, Retain and Preserve the form, materials, and detailing of the property that define the character of t h e historic property.
2. Protect and Maintain the character-defining aspects of the historic property with the least intervention possible and before undertaking other work. Protection includes regular maintenance
3. Repair is the step beyond protect and maintain. It includes patching, piecing-in, splicing, and consolidating. Repairing also includes limited in-kind replacement.
4. Replacement is the last resort in the preservation process and is appropriate only if the missing feature cannot reasonably be repaired. Replace with the same material, if possible, but a substitute material may be necessary.
5. Design for Missing Features should be based on the documented historic appearance of the property. If no documentation exists, a new design is appropriate if it respects the size, scale, and material of the property.
APPLYING THE SECRETARY’S STANDARDS The Standards for Rehabilitation include basic steps in making recommendations. Keeping these steps in mind during the planning process will ensure a successful rehabilitation project during the review process.
RAYMOND HISTORIC PRESERVATION GOALS Raymond’s preservation goals are outlined in the Statement of Purpose of the Raymond Preservation Ordinance, which was adopted by the Mayor and Board of Aldermen on March 4, 2003. The goals of the Raymond ordinance are similar to the goals outlined in the ordinances of many historic communities in Mississippi and across the nation. In adopting its ordinance, the City of Raymond has recognized the importance of Raymond's historic resources including public, commercial, religious, and residential buildings and acknowledged that Raymond's unique qualities are worth preserving for the future.
The general purpose of the Raymond ordinance is to preserve, enhance, and perpetuate those aspects of the city having historical, cultural, architectural, and/or archaeological merit in order to promote and protect the health, safety, prosperity, education, and general welfare of the people living in and visiting Raymond.
6. Alterations/Additions to Historic Buildings are sometimes needed to insure continued use, but they should not radically change, obscure, or destroy character-defining spaces, materials, features, or finishes.

8 RAYMOND DESIGN GUIDELINES
CERTIFICATE OF APPROPRIATENESS PROCESS ♦ Permit Review Procedure ♦ Certificate of Appropriateness Required Support Materials ♦ Criteria for Issuance of a Certificate of Appropriateness ♦ Procedures for Issuance of a Certificate of Appropriateness PERMIT REVIEW PROCEDURE A Certificate of Appropriateness, hereby referred to as COA, is required from the Raymond Historic Preservation Commission (RHPC) before any action can be taken to a building or site within the Raymond Heritage District, whether listed as contributing or non-contributing to the district. No exterior feature of any structure in the district shall be altered, relocated, or demolished until an application for a COA for such work has been approved by the commission. Likewise, no new
More specifically, the Raymond ordinance is designed to achieve the following goals:
A. Protect, enhance and perpetuate resources which represent distinctive and significant elements of the City’s historical, cultural, social, economic, political, archaeological, and architectural identity;
B. Insure the harmonious, orderly, and efficient growth and
development of the City; C. Strengthen civic pride and cultural stability through
neighborhood conservation; D. Stabilize the economy of the City through the continued
use, preservation, and revitalization of its resources; E. Protect and enhance the City's attractions to tourists and
visitors and the support and stimulus to business and industry thereby provided;
F. Promote the use of resources for the education, pleasure,
and welfare of the people of the City of Raymond. G. Provide a review process for the preservation and
appropriate development of the City's resources.
The Raymond Design Guidelines will assist the city in fulfilling the goals outlined in the Raymond Preservation Ordinance by providing written and illustrated guidelines for owners of historic properties, design professionals, and members of the Raymond Historic Preservation Commission.
Having guidelines and standards facilitates the work of the Preservation Commission, whose members can make consistent and defensible decisions based on recognized preservation and design standards. The public benefits, because property owners and building professionals can follow the design guidelines during the planning process with some assurance that their projects will receive approval and help preserve the historic character of the City of Raymond.

RAYMOND DESIGN GUIDELINES 9
construction in the district shall be undertaken without a COA. A map of the area included in the local heritage district is available at the Raymond City Hall. Anyone desiring to undertake work in the local heritage district must submit a COA application to the City of Raymond at Raymond City Hall. Once received the completed COA application shall be forwarded to the RHPC for review. The Commission shall review the COA application at one of its public meetings and make recommendations for changes and modifications, if necessary, in order to meet the standards and guidelines for the work to be performed. If the applicant's plans meet the Commission's approval, a signed COA will be returned to the applicant and copied to the Building Official. After building permits are obtained work may begin. If the work changes during construction from what was originally approved a new COA must be submitted for approval to make sure the new work meets the Preservation Ordinance requirements and the standards in the Raymond Design Guidelines. The Raymond Historic Preservation Commission shall review applications for any action affecting the exterior of any building in the Heritage District, landmarks or landmark sites when subject to public view from any public building, public street or way, or from any building or grounds open to the public. That includes:
1. New construction, additions or extensive renovation or repair to existing buildings;
2. Renovation or repair to existing buildings, including changes in design or materials or roofs, windows, doors;
3. Site Changes: tree removal, changes to or additions of fences, walks, driveways, parking areas, signs: and
4. Demolition or relocation.
In making its evaluation the RHPC shall seek to accomplish the purposes of the Raymond Historic Preservation Ordinance, and in particular to preserve and protect the architectural and historical integrity and character of landmarks, landmark sites or historic districts. CERTIFICATE OF APPROPRIATENESS REQUIRED SUPPORT MATERIALS In order for a COA to be placed on the agenda for a preservation commission meeting the following materials must be submitted with the application. Incomplete applications will not be placed on the Preservation Commission agenda. New construction, additions or extensive renovation or repair to existing buildings:
1. Drawings to scale with dimensions, of all affected exterior elevations.
CERTIFICATE OF APPROPRIATENESS PROCESS

10 RAYMOND DESIGN GUIDELINES
2. Site plan to scale showing: location with dimensions, required setbacks, landscaping and other site features.
3. Floor plan to scale with dimensions as they impact the exterior of the building.
4. Description of all materials proposed for use on the exterior including walls, roof, trim, cornice, windows, doors, etc.
5. Drawings or photographs of architectural details such as columns, railings, balustrades, roof, windows, doors, etc.
6. Photographs of existing building or surroundings of proposed new building.
7. Historic documentation for proposed restoration to earlier appearance., brochures, or drawings to scale, with dimensions, of additions or changes to design or type of features such as roofs, windows, doors, railing, etc.
Renovation or repair to existing buildings:
1. Photographs of existing conditions and location of the area to be repaired or renovated.
2. Drawings to scale, with dimensions, for large scale changes to the exterior design
3. For smaller changes describe the location of those changes along with the requested change and information on any new or replacement materials that
may be used. This includes work to features such as roofs, porches, windows, doors, railings, etc. If available provide brochures describing any new products to be used.
Site changes - tree removal, fences, walks, driveways, parking areas and signs:
1. Site plan, with dimensions, showing placement of any proposed changes or additions.
2. Description of all materials to be used.
3. Drawings to scale or photographs of the type of fence, wall, gate or sign, with dimensions.
Demolition or relocation:
1. Condition report of structure.
2. Photographs of the existing building.
3. Documentation of justification for the relocation or demolition of the structure.
4. Site plan for relocation of the building on new lot.
5. Plans for the site after demolition or relocation.

RAYMOND DESIGN GUIDELINES 11
CRITERIA FOR ISSUANCE OF A CERTIFICATE OF APPROPRIATENESS The commission shall consider the following factors when considering applications for a Certificate of Appropriateness: GENERAL FACTORS
1. Architectural design of existing building, structure, or appurtenance and proposed alteration;
2. Historical significance of the resource;
3. General appearance of the resource;
4. Condition of the resource;
5. Materials composing the resource;
6. Size of the resource;
7. The relationship of the above factors to, and their effect upon the immediate surroundings and, if within a preservation district, upon the district as a whole and its architectural and historical character and integrity.
NEW CONSTRUCTION
1. In advance of new construction, steps shall be taken to insure evaluation of possible archaeological resources, as set forth in the Mississippi Antiquities Act.
2. The following aspects of new construction shall be visually compatible with the buildings and environment with which the new construction is visually related, including but not limited to: the height, the gross volume, the proportion between width and height of the façade(s), the proportions and relationship between doors and windows, the rhythm of solids to voids created by openings in the façade, the materials, the textures, the colors, the patterns, the trims, and the design of the roof.
3. Existing rhythm created by existing building masses and
spaces between them shall be preserved. 4. The landscape plan shall be compatible with the
resource, and it shall be visually compatible with the environment with which it is visually related. Landscaping shall also not prove detrimental to the fabric of a resource, or adjacent public or private improvements like sidewalks and walls.
EXTERIOR ALTERATION
1. All exterior alterations to any building, structure, object, site, or landscape feature in the district shall be compatible with the resource itself and other resources with which it is related. The original design of a building, structure, object, or landscape feature shall be considered in applying these standards. Buildings listed as non-contributing in the district are subject to the same review as contributing buildings.
CERTIFICATE OF APPROPRIATENESS PROCESS

12 RAYMOND DESIGN GUIDELINES
2. Exterior alterations shall not affect the architectural character or historic quality of a landmark and shall not destroy the significance of landmark sites.
DEMOLITION
1. The commission shall consider the individual architectural, cultural, and/or historical significance of the resource.
2. The commission shall consider the importance or
contribution of the resource to the architectural character of the district.
3. The commission shall consider the importance or
contribution of the resource to neighboring property values.
4. The commission shall consider the difficulty or
impossibility of reproducing such a resource because of its texture, design, material or detail.
5. Following recommendation for approval of demolition,
the applicant must seek approval of replacement plans prior to receiving a demolition permit and other permits. Replacement plans for this purpose shall include, but shall not be restricted to, project concept, preliminary elevations and site plans, and completed working drawings for at least the foundation plan which will enable the applicant to receive a permit for foundation construction.
6. Applicants that have received a recommendation for demolition shall be permitted to receive such demolition permit without additional commission action on demolition, following the commission's recommendation of a permit for new construction. Permits for demolition and construction shall be issued simultaneously if requirements of new construction in the historic district are met, and the applicant provides financial proof of his ability to complete the project.
7. When the commission recommends approval of
demolition of a resource, a permit shall not be issued until all plans for the site have received approval from all appropriate city boards, commissions departments, and agencies.
PROCEDURES FOR ISSUANCE OF A CERTIFICATE OF APPROPRIATENESS Anyone desiring to take action requiring a certificate of appropriateness concerning a resource for which a permit, variance, or other authorization from either the city building official or the city is also required, shall make application therefore in the form and manner required by the applicable code section or ordinance. Any such application shall also be considered an application for a certificate of appropriateness and shall include such additional information as may be required by the commission. After receipt of any such application, the city building official shall be assured that the
RAYMOND DESIGN GUIDELINES 13
application is proper and complete.
No building permit shall be issued by the city which affects a resource without a certificate of appropriateness. In the event that a building permit need not be obtained for a building, structure, or object to be erected within a historic district or on a landmark or landmark site, a certificate of appropriateness is still required before such building, structure, or object may be erected. Thereafter, such application shall be reviewed in accordance with the following procedure:
A. When any such application is filed, the City Building Official shall immediately notify the commission chairman or vice-chairman, if the chairman is unavailable, of the application having been filed.
B. If at the time of filing an application, there is not a
Commission meeting already scheduled with thirty (30) days of this filling, the chairman or vice-chairman shall set a time and date, which shall be not later than fifteen (15) days after the filling of the application for a hearing by the commission, and the city building official shall be so informed.
C. The applicant shall, upon request, have the right to a
preliminary conference with a member of the commission or of the commission staff for the purpose of making any changes or adjustments to the application which might be more consistent with the commission's standards.
D. Not later than eight (8) days before the date set for the said hearing, the city building official shall mail notice thereof to the applicant at the address in the application and to all members of the commission.
E. Notice of the time and place of said hearing shall be
given by publication in a newspaper having general circulation in the community at least ten (10) days before such hearing and by posting such notice on the bulletin board in the lobby of city hall.
F. At such hearing, the applicant for a certificate of
appropriateness shall have the right to present any relevant evidence in support of the application. Likewise, the governing body shall have the right to present any additional relevant evidence in support of or in opposition to the application.
G. The Commission shall have the right to recommend
changes and modifications to enable the applicant to meet the requirements of the commission.
H. Within not more than twenty-one (21) days after the
hearing on an application, the Commission shall act upon it, either approving, denying, or deferring action until the next meeting of the commission. Evidence of approval of the application shall be by certificate of appropriateness issued by the commission and, whatever its decision, notice in writing shall be given to the applicant and the city building official. Whenever the preservation commission shall deny or recommend
CERTIFICATE OF APPROPRIATENESS PROCESS

14 RAYMOND DESIGN GUIDELINES
denial of a certificate of appropriateness, the commission must state the reasons for such denial in writing. Thereafter, an applicant must wait six (6) months whenever an application for a certificate of appropriateness is denied for a landmark property of statewide or national significance and notice of any second or subsequent application must be sent to the Mississippi Department of Archives and History as well as to the preservation commission.
I. In all cases of applications affecting National Historic
Landmarks, at least two-thirds (six members of a nine-member board) of the members of the commission must approve a certificate of appropriateness in order for it to be granted.
J. The issuance of a certificate of appropriateness shall not
relieve an applicant for a building permit, special use permit, variance, or other authorization from compliance with any other requirement or provision of the laws of the city concerning zoning, construction, repair, or demolition.
K. Denial of a certificate of appropriateness shall be
binding upon the city building inspector or the agency responsible for issuing a building permits and shall prevent the issuance of other building permits for the same parcel until a certificate of appropriateness is approved. A certificate of appropriateness may be evidenced by either a written and dated letter to an owner or applicant or such a letter accompanied by a
signed and dated stamp on the face of any and all architectural or project drawings prepared for a project.
L. A certificate of appropriateness shall expire after six (6)
months if work has not begun.
All work including maintenance or repair must meet city safety standards and codes.

RAYMOND DESIGN GUIDELINES 15
The following was compiled from the Raymond Historic District National Register Nomination. Historic images courtesy of Pattie Adams Snowball. ESTABLISHMENT OF THE TOWN OF RAYMOND Founded in 1829 as the seat of the newly formed Hinds County, Raymond served as an agricultural and commercial trade center and as one of two county seats of Hinds County starting in 1859. In the nineteenth century it also capitalized on its healthful ridgetop location and mineral waters. The other county seat, Jackson, so designated in 1859, is the state capital and a large city, while Raymond has remained a relatively small town. Raymond’s informal layout, the proximity of mixed uses, and its accretive architectural character recall cumulatively the overall saga of its development.
In contrast to many communities in which chapters of change erased the evidence of preceding eras, Raymond’s architectural fabric retains elements of each era, from the height of its prosperous antebellum era, based on railroading and cotton, to the rebuilding and gradual renewal of the post-Civil War era, and through its modest twentieth century growth encouraged by Hinds County Agricultural High School (est. 1917) and post World War II boom with the growth of the Hinds County Community College (formerly the Hinds County Agricultural High School). Throughout these periods, essential elements of Raymond’s landscape and buildings have persisted, giving the community its unique character. More than most Mississippi towns of the nineteenth and twentieth centuries, Raymond still embodies the informal town plan and, especially important, the mix of uses, classes, and scale that once characterized many small towns. Many small—often ephemeral—components also persist, such as old fences and gates, the stepped iron stile across the (restored) iron fence around the county courthouse, scattered small industrial buildings near the former railroad, a little telephone exchange building, and a host of traditional plantings--all of which add texture to the urban landscape. In addition, while its architectural character reflects its citizens’ responses to national architectural trends, there is a strong continuity of scale, orientation, and the prevalence of certain forms—especially porches of regional type—from the earliest nineteenth century buildings well into the twentieth century.
HISTORY & ARCHITECTURE ♦ Historical and Architectural Background of Raymond ♦ Architectural Styles in Raymond HISTORICAL AND ARCHITECTURAL BACKGROUND OF RAYMOND
HISTORY AND ARCHITECTURE

16 RAYMOND DESIGN GUIDELINES
TOWN PLAN In 1829 the state of Mississippi appointed three commissioners to survey and select a permanent site for the county seat of Hinds County. The commissioners found the exact center of Hinds County, however it was located in a low swampy area not suitable for building a town. Instead they decided to locate the county seat on the first high ridge away from the swampy area. The area they found “began to rise gradually to a high point overlooking rich fertile fields, pine forest, and bottomlands.” The land was owned by Raymond Robinson of the nearby town of Clinton. Reportedly, he agreed to give one square mile for the town with the condition that it be named for him. The commission chose to use his first name, Raymond, for the name of the new county seat. On December 15, 1830 the town of Raymond was officially chartered by the Mississippi legislature. Like many southern towns, Raymond was located at the meeting of old roads, which straighten to fit the town’s grid plan upon entering the town center. Main Street, a segment of the old Jackson to Vicksburg road, runs southeast to northwest, and defines the diagonal orientation of the grid. Crossing it at the town center are two principal streets, also old roads. Beyond the grid, Main and the other streets bend to follow the old, curving routes that lead across the rolling countryside to other communities such as Clinton, and Port Gibson. In contrast to the formality of some county seat town grids, which have axial streets meeting at a central courthouse square, Raymond’s central grid is asymmetrical, with two open squares placed on one side of Main Street. Moreover, in contrast to the frequent positioning of the courthouse at the center of the county seat
plan, since the late 1850s, Raymond’s courthouse square and courthouse are a block away from the Town Square where the main streets intersect. The center of town is the Town or Public Square, of which Main Street forms the southwest edge. This was laid out in 1829 as the central square from which all the streets extended. From the square, Port Gibson Street extends southwest toward the community of Port Gibson, and Clinton Street runs northeast to the town of Clinton. The first Hinds County Courthouse, built in 1827 by James Callahan and William S. Little, stood at the center of this square. It was a brick structure with a bright tin roof and spire. Callahan and Little were two early settlers in Raymond and formed a building company which built many of the early buildings in Raymond including the log jail and the brick courthouse. In the 1840s Raymond became a very busy town and the courtyard square was filled with a variety of businesses including offices for lawyers, shops, and hotels for those that poured into Raymond on court days. People came from all over to do business in the county seat or to visit one of two local resorts. One was the famous Copper’s Well, a resort outside of Raymond which featured a well that supposedly produced water with medicinal benefits, the other was Mississippi Springs which was famous for having seven mineral springs. Growth during the early years of Raymond and Hinds County necessitated a new and larger courthouse to handle the legal business of the county. The citizens felt that a new grand courthouse should represent Hinds County and the architectural

HISTORY AND ARCHITECTURE
RAYMOND DESIGN GUIDELINES 17
elegance of the Deep South. When the new larger courthouse was authorized in the 1850s, its location was moved from the original courthouse site, as it was too small for the planned courthouse, to a larger site a block northwest of the square. The new courthouse was constructed in an imposing Greek Revival style with grand porticoes on all four sides toped by a columned cupola. The iron fence around the courthouse was installed much later.
The growth and prosperity of Raymond in the 1850s was shattered by the outbreak of the Civil War. The Vicksburg Campaign brought the Civil War to Raymond on May 12, 1863, when Confederate General John Gregg’s forces engaged Union General Ulysses S. Grant’s troops about two-and-a-half miles southwest of the town. The Confederates were routed and the Union Army occupied Raymond. With arrival of the wounded, both Confederate and Federal, from the battlefield many buildings in Raymond became temporary hospitals including the courthouse, several churches and homes. The Dupree-Ratliff House is cited in particular in the WPA Guide to Mississippi as being used as a Union hospital. St. Marks Episcopal Church was also used as Union hospital. Consequently the use of many Raymond buildings as hospitals probably saved the town from being burned. The Town Square epitomizes the community’s emphasis on function rather than formality. At the center, on the site of the original courthouse, stands the water tank and tower, a tall open-lattice metal structure with large riveted steel tank constructed in 1905. Framing the square were one– and two-story wood and masonry commercial buildings constructed to handle the needs of a busy county center. The sole antebellum structure remaining on the square is the two-story, brick Probate Building (ca. 1830), which was originally built as an annex to the first courthouse and later was used to house the Keith Press printing business. As typical in many towns, fires obliterated many other nineteenth century buildings. In 1902 on Christmas day a row of frame commercial buildings were destroyed by fire on the
Above is a very early photo of the current Hinds County Courthouse shortly after construction. Notice the lack of tress, and an iron fence that were all added much later.

18 RAYMOND DESIGN GUIDELINES
north side of the square including the Post Office, and Raymond Drug Co. As depicted in the 1925 Sanborn Insurance Map (the only year the company recorded Raymond), the buildings around the square included several stores including drugstores; a bank on a key corner; numerous law and other offices; and a large brick garage (ca. 1925) on a prominent site. Over the years commercial buildings around the Town Square on Main Street have been altered or even replaced by new buildings with new uses.
The old railroad tracks bisected the town a few blocks southeast of the Town Square. These were the tracks of the late nineteenth century Jackson to Natchez route, which later became the Yazoo and Mississippi Valley Railroad. Raymond had gained rail connections early in its history, encouraging its prosperity as a cotton trading center: the Vicksburg to Jackson line, completed in 1840, and the line built from Raymond to Bolton in 1839. The Yazoo and Mississippi Valley route, which crossed East Main Street, created a corridor of trade and an additional commercial and industrial focus. With the tracks now gone, only the ca. 1889 Raymond Depot still stands.
This photo from 1902 shows the Gibbs and Harper buildings which were located at the corner of Port Gibson and Main Street were the service station now sits.
This photo from 1929 shows Town Square with the old two-story Chancery building to the right and fame for the water tower in the center and the Hinds County Courthouse in the background.

HISTORY AND ARCHITECTURE
RAYMOND DESIGN GUIDELINES 19
ARCHITECTURAL OVERVIEW The earliest and most imposing architecture in Raymond encompasses its well-known antebellum buildings, which present handsome regional versions of the popular Greek Revival style. The town’s chief edifice is the Hinds County Courthouse (1857-1859), celebrated as one of the state’s finest Greek Revival public buildings. The rectangular two-story building has stuccoed and scored masonry walls, tall windows at both stories, and towering porticoes of Tuscan order on all four sides. It is capped by an open, columned cupola. The bold and simple Greek Revival style embodies the work of the brothers George and Tom Weldon, a famed architectural and contracting firm from the Natchez area who also designed the 1858 Old Warren County Courthouse in Vicksburg. The Weldon brothers also had a hand in designing and constructing the Gibbs and Harper buildings in the photo to the left. Other surviving antebellum buildings continue the boldness and simplicity of the courthouse on a smaller scale. Believed to be the oldest building in town is the circa 1830 Probate Building (also known as the Keith Press building), a long, two-story structure with its short, two-bay end facing the Town Square. Built of brick laid in Flemish bond, it features handsome stone lintels accentuated by roundel blocks.
In domestic architecture, Raymond has several notable antebellum Greek Revival houses, all one or one-and-a-half stories in height and five bays wide with a central entrance. They are fine examples of the region’s “planter cottages” or “galleried cottages” with broad porches typically inset or undercut beneath the main gabled, hipped, or pyramidal roofs and those with pedimented entrance porches. Tall windows and entrances with transoms and sidelights suggest the open, high-ceilinged interiors, which follow center-passage plans. The porch and roof forms introduced in the antebellum era became a favored element through later periods.
This photo shows the Chancery Building when it was used as the Keith Press building and before they made alterations to the front façade. Those alterations were removed when the current owner remodeled the building.
20 RAYMOND DESIGN GUIDELINES
Exceptions to the prevalence of the Greek Revival style in antebellum years is the oldest church building in town. St. Mark’s Episcopal Church (1845-1855) is an appealing blend of the Greek and Gothic Revival modes in frame, a small rectangular building with pedimented gable front, and its entrance and tall windows topped with pointed arches of Gothic Revival flavor. In the post-Civil War era, chiefly from about 1880 until about 1900, the town regained a degree of prosperity. While farming was slow to recover, Raymond had a reputation for “good schools, good society, good water,” and a nearby mineral springs resort attracted many. During this era, the citizens of Raymond constructed commercial, industrial, and institutional buildings that were generally conservative versions of nationally popular types using mass-produced bricks, millwork, and other elements, which were readily available by rail. Around the Town Square, in this period and subsequent years, numerous brick commercial structures were erected one or two stories tall with simple corbelled detailing and occasionally metal store fronts or other decoration. One of the larger commercial buildings constructed on the Public Square was the Merchants and Planters Bank, a two-story brick building with corbelling located on a prominent corner emphasizing its pivotal location; its original corbelled corner entrance has just been restored, however the original second-floor balcony over the entrance has been replaced by a wrap around two-story modern metal frame gallery.
The principal vestige of the railroad is the two-story, Raymond Depot of the late 1880s, a frame structure with vertical board and batten walls evoking the frequent association of the picturesque modes with railroad facilities in the nineteenth century. Churches of the late 19th century represent a variety of styles, most rendered as modest, rectangular structures with large windows. Especially striking is the 1885 Immaculate Conception Catholic Church (formerly the Nativity of the Blessed Virgin Mary), which despite its late nineteenth century construction takes a simple gable-front, rectangular form with tall, graceful round-arched openings of a type familiar since the early nineteenth century, including the large double-hung windows of clear glass that make the building essentially translucent. The contractor was Russell Patrick of Vicksburg. The Raymond Presbyterian Church (1868 and later) began as a simple gable-fronted frame structure as well, and received Colonial Revival alterations in the twentieth century. Raymond’s residential architecture of the late 19th century shares in the state’s widespread adoption of myriad “Victorian” modes—typically built of frame. There are some clear examples of the Italianate and Queen Anne styles, both cottages and larger residences, replete with the period’s ornate millwork, varied surfaces, and irregular plans and rooflines. Residential examples of buildings in the Queen Anne style are located at 237 North Oak Street, 235 West Main Street, and 301 West Main Street. Likewise important are smaller and more traditional houses, which combine the familiar galleried cottage form with such up-to-date features as ornate millwork on the

HISTORY AND ARCHITECTURE
RAYMOND DESIGN GUIDELINES 21
gallery or porch, a center gable enlivening the front roofline, or possibly a bay window, or projecting gabled front bay. The house at 432 East Palestine Street is an example of this configuration. In nearly every house of the era, the local and regional preference for a broad and deep porch continues as part of the comfortable house, large or small. In the early twentieth century, Raymond experienced a new sense of growth and improvement. Construction of a new water system began in 1903, with the large water tank holding 30,000 gallons, installed high on its iron lattice frame tower at the center of the Town Square as clear evidence of progress. Notable for its tank with a fully rounded bottom (an improvement over flat bottoms), it was among the earliest such tanks built by the Chicago Bridge and Iron Works, a major national builder of water tanks in an era of increasing concern for health and sanitation. A telephone system had begun in the 1890s, but service was poor and according to the Hinds County Gazette citizens were complaining bitterly about it. A small telephone exchange building constructed circa 1935 still stands near the Town Square. Automobiles entered daily life and in 1903 an ordinance was passed giving the citizens of Raymond the right to operate cars in the town. With the addition of cars in Raymond a large, brick “garage” was built in 1925 to repair and possibly display automobiles, also at the Square. In their early twentieth century buildings, Raymond residents continued along familiar conservative lines while turning to a new vocabulary of national styles, especially the Colonial Revival in its many forms and the less formal Craftsman Bungalow. Both modes fit well into existing customs. Some
Colonial Revival houses presented imposing columned porticoes or neo-Georgian formality such as the one at 214 West Main Street. In other cases, citizens built houses generally similar to the galleried cottages of years past, dressing them with simple Colonial Revival colonnades, or building simple rectangular dwellings and adding attached porches with simplified Tuscan or Doric columns, an example of which can be found at 213 West Main Street. The low-slung, often asymmetrical Craftsman/bungalow with its California origins likewise fit into local expectations, especially the undercut or inset porch that was typical of both the nationally popular Craftsman/bungalow mode and popular in Raymond on houses such as 203 Port Gibson Street, 213 East Main Street, and 217 West Main Street. A few feature bold Craftsman details and strikingly broad gables indicative of full-blown examples of the type. Most, however, are more conservative versions distinguished chiefly by characteristic tapered porch posts carrying a deep porch and broad eaves. Some relatively modest frame houses appear to combine elements of the “cottage” and bungalow modes, all sharing the preference for the porch with simple colonnade shading the outdoor living space. Institutional architecture tended to follow state and national norms in relatively conservative fashion. The early decades of the twentieth century brought construction of new public facilities and replacement of older ones. The Raymond Consolidated School (1939) is a U-plan edifice with modest Art Deco detail, which reflects construction guidelines of the state department of education. The tiny, brick Telephone Exchange

22 RAYMOND DESIGN GUIDELINES
Building is utterly plain except for a small canopy over the door with telltale Craftsman angle brackets. After a near hiatus in construction during the Great Depression and World War II, Raymond entered a period of growth spurred by the expansion of the Agricultural School (now Hinds County Community College) and, especially, the returning veterans who swelled the student population. Housing likewise accommodated the growing demand. In some cases, residents constructed small rental units for students and others on their large lots—a remarkable survival of such small, frame houses stands on Belcher Alley, a back street between Palestine and Port Gibson Streets. Many citizens, including newcomers and longtime Raymond families, built homes in a variety of nationally popular forms. These included houses infilling among older neighbors, and others in linear developments that extended a few more blocks outward on the roads toward the countryside. From the 1930s into the 1950s, numerous houses embody the type often called “minimal traditional,” with compact floor plans, one and a half stories tall, with restrained detailing suggestive of the Tudor Revival or the Colonial Revival. Some good examples of this type are located at 223 East Main Street, 240 North Oak Street, and 310 East Palestine Street. By the early 1950s, too, Raymond residents were adopting the popular ranch house form. A few of these showed attention to clearly modernist notions. Many more employed the asymmetrical composition and low-slung silhouette of the ranch house rendered with traditional brick and weather boarded surfaces and modest Colonial Revival details. Houses located at 113 Elm Street, 310 Gillespie
Street, and 316 Gillespie Street are all constructed in the ranch form. In their scale, materials, setback, conservatism, and informal placement among their older neighbors and beneath the old trees, they are part of a continuum of architecture in Raymond. The Raymond Heritage District represents a unique pattern of development from the start of a community with a courthouse and jail to that of a small rural town that still maintains a dual county seat with Jackson, the capital of Mississippi. Over the years the growth of Raymond has varied from the prosperous antebellum period to the less so reconstruction era into the First World War, the Great Depression, and the Second World War, followed by the growth of Raymond after that war. Interestingly buildings still remain in Raymond from all of those periods and present a pattern of development unique to Raymond. The Town Square has remained an active part of the community with the symbol of Raymond, the Water Tower and Tank, in the center ringed by commercial buildings and the extremely significant antebellum Hinds County Courthouse to the northwest. Raymond still retains its rural character and yet has some significant examples of residential architectural styles from Federal to Ranch and most styles in between. Raymond is certainly a unique community to Mississippi and the Raymond Heritage District contains the saga of its development visible in the numerous significant historic structures surviving to this day.

RAYMOND DESIGN GUIDELINES 23
ARCHITECTURAL STYLES IN RAYMOND The city of Raymond has a significant collection of historic buildings and structures, whose architectural styles and forms reflect the history of the city from before the Civil War to the 1950s. Raymond began as a rural county seat. As the town began to grow into a city development brought numerous buildings, both residential and commercial, of various sizes and architectural styles. However the rural character still remains to this day. The railroad enabled the easy delivery of building supplies such as the new mass produced building parts manufactured elsewhere and shipped by rail to Raymond. People used the newly available mass produced decorative features of the turn of the twentieth century such as columns, balustrades, gable trim, etc. to embellish their houses and buildings, especially those in Queen Anne and Colonial Revival style. Later styles of architecture also used decorative features but not to the extent of the Queen Anne and Colonial Revival style. Today, Raymond has numerous architectural styles typical of small cities in Mississippi including Greek Revival, Queen Anne, Colonial Revival, Neo-classical Revival, Craftsman Bungalow, Tudor Revival, Minimal Traditional, and Ranch styles. Generally, as in much of Mississippi, Raymond lagged behind in the construction of buildings in the current architectural styles of the time by several years.
HISTORY AND ARCHITECTURE
Above are some of the architectural features found in Raymond. Typical double entrance doors with sidelights of the Greek Revival style in the upper left, a front porch with tapered wood columns on brick bases characteristic of the Craftsman style in the upper right, a chamfered bay under a gable roof which is a feature of the Queen Anne style in the lower right, and the decorative brick work and corbelling of a commercial building on Main Street in the lower left.

24 RAYMOND DESIGN GUIDELINES
GREEK REVIVAL national date range 1820-1860
Greek Revival buildings, unlike the earlier Roman-inspired Georgian and Federal styles, trace their origins to the temples of ancient Greece. Archaeological investigations in the early nineteenth century heightened interest in Grecian architecture, and the Greek ideals of democracy also appealed to the fledging republic of the United States. Greek Revival buildings tend to be rectangular blocks with low-pitched roofs and often feature a wide band (frieze) of trim beneath the cornice. Buildings exhibit little or no surface decoration. Square-headed openings and rectangular transoms replace the arches and fanlights of the Federal period. Stone was the preferred building material, but scored stucco or rusticated wood provided a good substitute. The Greek classical orders appear on the exterior of Greek Revival houses both as columns and pilasters, with square or box columns being particularly indicative of the style. The absence of bases on columns distinguishes the Grecian Doric from the Roman Doric of the Federal style. Likewise, the angle of the volutes on the Grecian Ionic differs from the Roman Ionic. Doorways and mantel pieces sometimes exhibit an Egyptian influence with architraves that are both shouldered and tapered. Windows during the Greek Revival period tend to have six-over-six, double-hung sash, and doors usually feature two vertical panels or four panels, elaborated with Grecian molding
profiles. The two principal ornaments of the Grecian style are the anthemion and the Grecian fret. Raymond has several examples of the Greek Revival style with the Hinds County Courthouse being the most impressive. The Greek Revival houses are one-story and the majority have full-width front galleries. Most are a variation of the Planter’s cottage. The residential examples of the Greek Revival style include 101 and 104 Dupree Street, 214 Port Gibson, 527 East Palestine. The houses at 233 North Oak Street and 45 Copper’s Well Street were recently moved into Raymond from the county and are also Greek Revival in style. St. Mark’s Church on West Main Street has a Greek Revival form but has Gothic Revival windows and entrance.
The Courthouse has typical Greek Revival characteristics such as rectangular massing, low pitched roof, Grecian Doric columns without bases, and stucco scored to look like stone.

HISTORY AND ARCHITECTURE
RAYMOND DESIGN GUIDELINES 25
104 Dupree Street has a full width inset gallery supported on square vernacular wood columns, and a low-pitched roof typical of the Greek Revival features.
The Greek Revival style house at 233 North Oak Street was moved into Raymond and restored back to its original appearance.
St. Mark’s Church has G r e e k R e v i v a l characteristics with it’s rectangular shape, low pitched roof and wide frieze around the building, however the windows and doorway use pointed arches typical of the Gothic Revival style.
The house at 214 Port Gibson Street is Greek Revival in style with its gabled projecting porch supported on square vernacular columns and typical multi-paned windows.

26 RAYMOND DESIGN GUIDELINES
QUEEN ANNE national date range 1880-1900
The Queen Anne style is characterized by irregularity of plan and massing. Buildings tend to be highly ornamented and exhibit a variety of forms, textures, materials and colors. Distinctive architectural features include steep gables, towers, turrets, tall chimneys, porches, projecting pavilions, bays, and encircling verandas. Colored glass panels are popular and shingles provide texture to wall surfaces. English architects named the style, but it relies more on Medieval precedents than on the early eighteenth-century reign of Queen Anne.
The Queen Anne style was not extremely popular in Raymond and only a few examples survive to this day. Mass produced decorative parts for Queen Anne style homes were brought in on the railroad making it easy to customize the house to ones liking. Raymond has a large two story example of the Queen Anne style at 235 West Main Street which features a chamfered bay under a gable front roof, and cut balustrades typical of the Queen Anne style. One story examples can be found at 237 North Oak Street, 124 East Palestine Street, and 432 East Palestine street. All of the Queen Anne style houses in Raymond have had their original turned porch columns replaced by wood box columns.
235 West Main Street is an excellent example of the Queen Anne style with its chamfered bay under the gable roof projection, original wood double hung windows, typical of the style.
237 North Oak Street has multiple gable roofs, projecting chamfered bay, original wood double hung windows all typical of the Queen Anne style.
HISTORY AND ARCHITECTURE
RAYMOND DESIGN GUIDELINES 27
129 Port Gibson Street
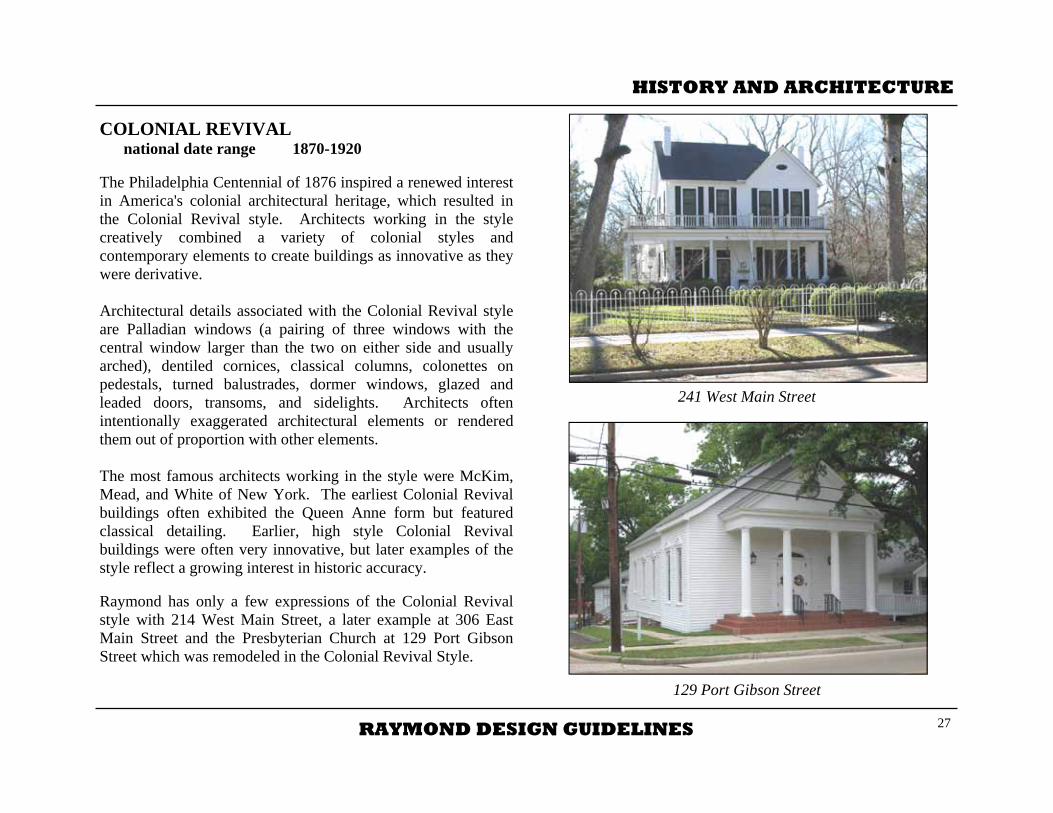
COLONIAL REVIVAL national date range 1870-1920
The Philadelphia Centennial of 1876 inspired a renewed interest in America's colonial architectural heritage, which resulted in the Colonial Revival style. Architects working in the style creatively combined a variety of colonial styles and contemporary elements to create buildings as innovative as they were derivative. Architectural details associated with the Colonial Revival style are Palladian windows (a pairing of three windows with the central window larger than the two on either side and usually arched), dentiled cornices, classical columns, colonettes on pedestals, turned balustrades, dormer windows, glazed and leaded doors, transoms, and sidelights. Architects often intentionally exaggerated architectural elements or rendered them out of proportion with other elements. The most famous architects working in the style were McKim, Mead, and White of New York. The earliest Colonial Revival buildings often exhibited the Queen Anne form but featured classical detailing. Earlier, high style Colonial Revival buildings were often very innovative, but later examples of the style reflect a growing interest in historic accuracy. Raymond has only a few expressions of the Colonial Revival style with 214 West Main Street, a later example at 306 East Main Street and the Presbyterian Church at 129 Port Gibson Street which was remodeled in the Colonial Revival Style.
241 West Main Street

28 RAYMOND DESIGN GUIDELINES
CRAFTSMAN/BUNGALOW national date range 1890-1940
The term bungalow represents both a house form and an architectural style, although the bungalow house form is sometimes dressed in varying architectural styles. Although the name derives from India, inspiration for the style derives more from Japanese architectural traditions. The most common bungalow form is a one-story house with gently pitched broad gables and wide overhanging eaves. Structural members, like purlins, ridge beams, and rafters, are visible and extend beyond the walls and roof. Porch supports often consist of a shorter wood column atop a brick pedestal, and the columns are often tapered. Pergolas are often incorporated into the design of the building or appear as separate garden structures. The English Arts and Crafts movement was influential in the development of both the bungalow style and its interior furnishings. The Arts and Crafts movement emphasized handmade craftsmanship as a response to the machine age. Ironically, bungalows were mass produced in great numbers and could even be ordered from Sears Roebuck and other companies that manufactured pre-fabricated houses.
Raymond has several examples of the Craftsman style at 112 and 124 Dupree Street, 125 and 203 Port Gibson Street, 140 and 217 West Main Street. All exhibit characteristics of the Craftsman style with low pitched gable roofs, overhanging eaves, and large porches.
112 Dupree Street
125 Port Gibson Street

HISTORY AND ARCHITECTURE
RAYMOND DESIGN GUIDELINES 29
TUDOR REVIVAL national date range 1890-1940
The Tudor Revival style derived from a variety of early English building traditions. Houses typically feature steeply pitched roofs, decorative half-timbering, arched doorways, and multi-paned glazing in windows. Chimneys are sometimes elaborately detailed and positioned prominently on the façade. Doors are often board and batten and pierced by glazed panels. Windows tend to be grouped in bands and are sometimes casement windows of either wood or metal. The majority of Tudor Revival houses are brick with stucco or stone trim, however there are also wood examples although much rarer. Raymond only has one example of the Tudor Revival style at 318 East Palestine Street and stylistically, it doesn't have strong Tudor Revival Characteristics. It however does have asymmetrical massing, and diamond pane windows characteristic of the style.
140 West Main Street
217 West Main Street 318 East Palestine Street

30 RAYMOND DESIGN GUIDELINES
MINIMAL TRADITIONAL national date range 1935-50
The economic depression of the 1930s brought on a new simplified style which was restrained in the details and featured small floor plans and simple massing for cost efficiency in construction. Roofs are low pitched and usually have at least one front facing gable and sometimes have multiple gables. Other characteristics are multi-paned windows with applied shutters. Entrances tend to have classical surrounds. The massing of the house and window openings tends to be asymmetrical. After World War II houses in this style were built in great numbers across the country to satisfy the housing demand. Many new subdivisions were created and populated by houses in this style. Raymond has several excellent examples of this style located at 223 East Main Street, 240 West Main Street, 240 North Oak Street, 310 and 412 East Palestine Street, and 229 Port Gibson
310 East Palestine Street
412 East Palestine Street

HISTORY AND ARCHITECTURE
RAYMOND DESIGN GUIDELINES 31
RANCH national date range 1935-75 The Ranch style originated in California in the 1930s and became the dominant style in America for almost forty years. The style is probably an outgrowth of several styles—Spanish, Prairie, Craftsman Bungalow, and the International style. Houses are one-story, asymmetrical compositions with low-pitched roofs and wide overhanging eaves which emphasize the horizontal. Plans for Ranch houses frequently incorporate garages or carports, rear patios, and partially enclosed courtyards. Ranch houses feature cross gable, hipped, and side-gabled roofs. Wall surfaces are finished in both brick and wood and often in a combination of the two materials. Large picture windows and ribbon windows are also popular. Exterior detailing is sometimes based on Spanish or English Colonial precedents. Many Ranch houses feature shutters that are applied and inoperable as original features. Examples of the Ranch style in Raymond include 106 and 113 Elm Street, 304, 310 and 316 Gillespie Street, 212 and 406 East Palestine Street, 230 Port Gibson Street.
113 Elm Street
310 Gillespie Street

32 RAYMOND DESIGN GUIDELINES
GENERAL MAINTENANCE ♦ Introduction to Maintenance ♦ Maintenance and Inspection Checklist INTRODUCTION TO MAINTENANCE: Historic buildings generally require more monitoring and maintenance than modern commercial buildings and sub-division houses. However, historic buildings offer rich detailing that is rarely affordable in today’s new construction. The key to maintaining a historic building is to check regularly for problems and to correct them immediately. Deferring maintenance can have serious consequences and lead to costly repairs in the future. Probably the most common problems in maintaining historic buildings are moisture and water infiltration. A small leak in the roof can cause ceiling and wall damage, buckle wood flooring, and rot wood support members. No gutters are better than leaking or sagging gutters, which can discharge massive amounts of water and cause serious deterioration. The goal in owning a historic building is to preserve the building’s architectural integrity and historic character. Regular inspection and prompt maintenance will preserve original building components. A sample maintenance checklist is included in the design guidelines. This checklist can be modified and expanded to reflect architectural features peculiar to particular buildings.
MAINTENANCE AND INSPECTION CHECKLIST: ROOF Inspect: Every 6 months Check For: Roof shingles and ridge caps that are loose,
broken, torn, or missing Flashing along valleys and parapets and around
chimneys, dormers, and vents Water infiltration visible on interior attic spaces GUTTERS AND DOWNSPOUTS Inspect: Every 3 months Check For: Sagging, bent, or loose gutters
Deteriorated gutters that leak when it rains Gutters that drip when it is no longer raining—usually indicates debris in gutters or holes Gutters coming loose from fascia boards Downspouts coming loose from gutters or walls Clogged downspouts or water pooling at the base of downspouts

RAYMOND DESIGN GUIDELINES 33
SIDING Inspect: Every 6 months Check For: Cracking, blistering, or peeling paint which may
indicate moisture problems
Loose, cracked, or damaged siding boards or bricks Deteriorated mortar in masonry walls which could indicate rising or falling damp Excessive buildup of mold and mildew on surface of siding, which could indicate moisture retention under the siding
DOORS AND WINDOWS Inspect: Every 6 months Check For: Missing or loose caulking around door and
window openings Glass panes with missing or deteriorated glazing. Cracked or loose glass PORCHES Inspect: Every 6 months
Check For: Rotted perimeter beams and joists—often indicated by signs of compression beneath posts or columns
Rotted fascia boards Loose or warped floor boards that could indicate
moisture problems below the porch deck
Rotted or damaged floor boards Water stains on the porch ceiling, possibly indicating problems with the roofing or flashing Damage to columns and/or posts from rot or infestation
FOUNDATION Inspect: Once a year Check For: Signs of pooling water at bases of piers or
foundation walls Recent tilting or shifting of piers
Cracks in mortar joints (indication of settling), brick, concrete, or concrete blocks
Growth of moss or green staining indicating the possibility of moisture retention
GENERAL MAINTENANCE

34 RAYMOND DESIGN GUIDELINES
EXTERIOR SIDING, SUPPORTING PIERS, AND CRAWL SPACE ENCLOSURE ♦ Exterior Siding
◊ Masonry - Stone, Brick, Concrete, Stucco ◊ Wood ◊ Substitute Siding ◊ Metal
♦ Supporting Piers and Foundation Walls ◊ Maintenance, Repair, Replacement, Alteration, and
Installation ♦ Crawl Space Enclosure
◊ Maintenance, Repair, Replacement, Alteration, and Installation EXTERIOR SIDING The primary purpose of exterior siding is to protect the structure and interior of a building from weather. Historic buildings feature a variety of exterior finishes, many of which can be decorative as well as functional. Siding is often a character-defining feature of a building. Queen Anne style houses often mix clapboard and shingle siding, Tudor style houses usually feature combinations of brick and stone, while Craftsman style houses usually are sided in wood clapboard. Changing the siding material can decrease the historic value of a building. Each type of exterior siding comes with its own special benefits and unique preservation challenges.
MASONRY - STONE, BRICK, CONCRETE, STUCCO, AND MORTAR Brick and stone are two of the most durable historic building materials. In the eighteenth and nineteenth centuries, brick and stone served as structural materials as well as siding. In twentieth-century buildings, brick and stone are more likely to be veneers applied to buildings that are framed in wood or metal. The most common types of stone used in historic buildings in the United States are sandstone, limestone, marble, granite, slate, and fieldstone. Stone was not a popular building material in Raymond or Mississippi, since good stone usually had to be imported. The use of stone in early buildings was generally limited to lintels, keystones, thresholds, splash blocks, and paving. In the early twentieth century stone was sometimes used on facades of banks and public buildings.
The circa 1830 commercial building at 234 Town Square has carved stone lintels over the doors and windows.

RAYMOND DESIGN GUIDELINES 35
Concrete is the name used for composition material consisting of sand, gravel, crushed stone, or other coarse material that is bound with cementitious material, such as lime or cements. Adding water causes a chemical reaction that causes the mixture to harden. Various concrete mixtures have been used in building for centuries, but concrete is generally considered to be a twentieth-century building material. Reinforced concrete is strengthened by the inclusion of metal bars, which increase the tensile strength. Both un-reinforced and reinforced concrete can be cast-in-place or pre-cast. Hollow-
cast, concrete blocks with rusticated or vermiculated surfaces became popular in the early twentieth century. Pre-cast concrete buildings were also popular in the early twentieth century, although not many were built in Mississippi. Stucco is the term used for exterior plaster, traditionally a mixture of lime and sand, with hair or straw added as a binder. Typically, stucco is applied as a two or three-part coating directly onto masonry, or applied over wood or metal lath to a wood frame structure. Stucco surfaces were used in both residential and commercial applications in Raymond. The grandest use of stucco in Raymond is on the Hinds County Courthouse where the stucco is scored to look like stone blocks Stucco is also used on the Courthouse annex and the library attached to the annex. Residentially stucco was not used much but does appear on the Craftsman style house at 203 Port Gibson Street. Builders and/or masons sometimes applied stucco to arrest structural deterioration caused by rising damp and soft brick, which easily erode when exposed to the elements. In the early twentieth century, builders and masons, began to use hard portland cement as a stucco finish, which has created problems for owners of historic buildings. Mortar is used to bond masonry units, whether stone, brick, terra cotta, or concrete block. Before 1880, mortar was generally soft and consisted primarily of lime and sand. After 1880, hard Portland-cement mortars became popular. Mortar should be softer than the material that it binds to allow for contraction and expansion and to allow for removal and replacement.
EXTERIOR SIDING, SUPPORTING PIERS, AND CRAWL SPACE ENCLOSURE
The brickwork of the parapets on several commercial buildings in Raymond feature decorative brick pat-terning and projecting bricks to give interest to the façade.
The masonry buildings in Raymond are typically brick. The brick of Raymond’s early twentieth-century commercial build-ings is structural, but most later residential buildings, including Tudor, Craftsman, and Ranch style houses are brick veneer. Brick can be decorative as well as functional with some build-ings featuring brick cornices, recessed brick panels, brick arches defining windows and doors, and patterned brickwork giving visual interest to the façade.

36 RAYMOND DESIGN GUIDELINES
MAINTENANCE AND REPAIR Retain and repair original masonry wherever possible. Although very durable, masonry buildings are susceptible to damage and deterioration from poor materials, lack of maintenance, and/or inappropriate rehabilitation efforts. BRICK AND STONE Most of the brick buildings constructed in Raymond use bricks that were evenly fired and uniform in size which make them more durable and longer lasting if properly maintained. Masonry buildings are subject to rising damp, a situation that occurs when the ground at the base of the building is damp and
moisture wicks up the building. Rising damp causes deterioration of both masonry and mortar and damages interior wall surfaces. Historic brick buildings sometimes have a damp course below or at grade, which is a layer of slate intended to disrupt the capillary action of the moisture in the brick. Masonry buildings are also subject to falling damp, when water penetrates near or at the top of a brick wall and creeps downward. To prevent rising damp, slope ground away from the building to allow proper drainage. Make sure that water from downspouts does not pool at the base of spouts and that the spouts channel water away from the building. Many problems with rising damp have been ameliorated by simply removing foundation plantings, which contribute to moisture retention around the base of buildings. Avoid exterior waterproof coatings, because they prevent rising damp from evaporating through the exterior surface and accelerate deterioration on interior wall surfaces. Falling damp is a problem common to brick buildings that have parapet walls (walls that extend above the roof) and is usually the result of damage, deterioration, or poor flashing installation. Unfortunately, water can penetrate the tops of parapet walls, and sometimes capping the parapet wall with metal is the only solution to falling damp and deteriorating, interior wall surfaces. In an effort to halt and cover the damage caused by rising and falling damp, many property owners and contractors have applied stucco to the bases or tops of walls. Unfortunately, the stucco only accelerates the problem. Impeded from easily evaporating on the lower portion of the wall, rising damp simply climbs higher. Stucco on the upper portion of a wall causes the
The Courthouse has a stucco finish which is scored to look l i ke s tone b locks , a characteristic of the Greek Revival style.

RAYMOND DESIGN GUIDELINES 37
falling damp to extend downward. In many cases, property owners and contractors have used portland-cement stucco and irreparably damaged their historic masonry. Portland cement is harder than brick and stone and is almost impossible to remove without damaging the masonry beneath.
CONCRETE Inferior materials, poor workmanship, inherent structural design defects, environmental factors, and poor maintenance all are sources of deterioration in concrete. Moisture, however, is the primary source of concrete deterioration. Cracking is inevitable over a period of time, and hairline, nonstructural cracks are not a major problem as long as they do not provide a conduit for water to enter the building. Serious concrete problems are often caused by corrosion of reinforcing bars or by deflection of concrete beams and joists.
This kitchen building behind a historic mansion in Natchez shows the effects of rising damp along the base of the build-ing. Water running along the façade and pooling at the base of the side elevation is the source of the problem. Con-trolling water run-off and preventing the pooling of water will correct the problem.
EXTERIOR SIDING, SUPPORTING PIERS, AND CRAWL SPACE ENCLOSURE
This building is suffering from falling damp most likely from water that is infiltrating at the top of the parapet and caus-ing the noticeable stucco discoloration at the top of the wall and the problems with the stucco losing its bond with the brick below and falling off of the building.

38 RAYMOND DESIGN GUIDELINES
Other masonry problems are also usually related to water. Poorly maintained gutters and downspouts that do not control water runoff are far worse than no gutters and downspouts, because large amounts of water can be discharged at one particular spot. Areas adjacent to windows and doors are particularly susceptible to water damage due to poorly maintained sills, flashing, capping, roofing, and caulking. Brick and stone should only be cleaned when necessary to halt deterioration or to remove very heavy soiling. Employ the gentlest means possible and use only low-pressure water and a mild detergent, if necessary. High-pressure water will erode mortar and force too much water into the masonry wall. Sandblasting will not only erode mortar but will also remove the glazed outer surface of brick and hasten deterioration. Bricks and stone that have never been painted should not be painted. Commercial sealants or waterproof coatings should also not be applied. Paint and commercial sealants can trap water in the bricks or stone and create additional problems, especially on the interior surfaces where the water trapped in the brick or stone will try to escape. Paint also becomes a maintenance issue as it tends to flake over time and requires additional repainting. If a brick or stone building is all ready painted it is acceptable to repaint. Paint can also be removed with chemicals or other gentle methods. Never use sandblasting to remove paint as it destroys the protective surface of the brick. Moisture problems in masonry walls are best handled by addressing the source of water infiltration rather than trying to cover them up will coatings of other materials.
This National Park Service photograph well illustrates the negative effects of sandblasting, which should never be used to clean brick buildings. Sandblasting will not only erode mortar but will also remove the glazed outer surface of brick and hasten deterioration.
The owner of this brick building tried to stop the mortar ero-sion and water infiltration by smearing concrete over the de-teriorated areas. This makes it very difficult to properly re-pair the problems in the future and has caused more damage to the brick surface

RAYMOND DESIGN GUIDELINES 39
STUCCO Traditional stucco is applied by hand in a three-part process on solid masonry walls or on lath made of wood or metal (twentieth century). Historic stucco is not a very long-lasting building material and needs regular maintenance. Historic building owners periodically whitewashed stucco, which renewed the finish, filled hairline cracks, and increased stability. Like other masonry materials, most stucco deterioration derives from water infiltration. Water infiltration causes wood lath to rot and metal lath to rust, both of which cause stucco failure. The causes of water infiltration are generally the same for stucco as for other forms of masonry. Repairs should be designed to keep excessive water away from the stucco with emphasis on repairs to the roof, gutters, downspouts, flashing, and parapet walls, as well as directing rainwater runoff at ground level. Inappropriate repairs and treatments often contribute to deterioration, particularly if hard portland cement is used to make repairs. Like mortar used to bond masonry, stucco used in repairs should be softer than the original masonry that it covers. Commercially available caulking compounds are not suitable for patching cracks in stucco, because dirt attaches more readily to the tacky surface of caulk, which also weathers differently. Most stucco repairs require the skill and experience of a professional plasterer. Unlike modern synthetic stucco, cementatious stucco has high impact resistance and sheds water. Stucco of lime and sand also breathes to allow water vapor to escape.
MORTAR Preserve original mortar where possible and replace (repoint) only where necessary. Mortar used to bond masonry should be softer than the material that it binds to which will allow for contraction and expansion and allow for easy removal and replacement when necessary. The recommended formula for brick mortar is one part lime by volume to two parts sand. To increase workability, portland cement can be added, but only to a maximum of one-fifth of the volume of lime. Mortar for repointing should match the original mortar in color, texture, and form (type of mortar joint; manner in which the joint was originally struck by the mason). Mortar joints should be slightly recessed, and masonry surfaces should be free of mortar. Using a mortar that is too hard, like portland cement, will cause cracking and spalling (surface erosion) by preventing bricks from expanding and contracting with changes in temperature and humidity. To match the color of mortar for repointing, samples need to be laid up weeks before work begins to allow for color changes in drying.
EXTERIOR SIDING, SUPPORTING PIERS, AND CRAWL SPACE ENCLOSURE
This photograph supplied by Chagrin Falls Preservation in Ohio illustrates the spalling that can occur only five years after using port-land cement mortar in re-pointing.

40 RAYMOND DESIGN GUIDELINES
REPLACEMENT, ALTERATION, AND INSTALLATION Consider replacement only when it is not feasible to repair masonry features by patching, piecing, or consolidating. Replacement should be based on the physical and/or photographic evidence of the original feature. For example, replacement bricks should match the original in size, color, and texture. Consider substituting compatible materials only if the same kind of material is not technically or economically feasible.
The spot repointing of this brick wall does not match the original in color, texture, or form. Joints are too large and mortar is smeared on the face of bricks. The tell-tale, dark gray color and texture of the mortar indicates that portland cement mortar was used. The cracked brick and the spalled brick (center top) resulted from the hard portland mortar.
ADDITIONAL INFORMATION: Preservation Briefs: 1 - The Cleaning and Waterproof Coating of Masonry Buildings Preservation Briefs: 2 - Repointing Mortar Joints in Historic Brick Buildings Preservation Briefs: 6 - Dangers of Abrasive Cleaning to Historic Buildings Preservation Briefs: 7 - The Preservation of Historic Glazed Architectural Terra-Cotta Preservation Briefs: 15 - Preservation of Historic Concrete: Problems and General Approaches Preservation Briefs: 22 - The Preservation and Repair of Historic Stucco Preservation Briefs: 38 - Removing Graffiti from Historic Masonry Preservation Briefs: 39 - Controlling Unwanted Moisture in Historic Buildings Preservation Briefs: 42 - The Maintenance, Repair and Replacement of Historic Cast Stone
SECRETARY OF INTERIOR’S RECOMMENDATIONS - MASONRY Identify, retain, and preserve Recommended:
Identifying, retaining, and preserving masonry features that are important in defining the overall historic character of a building, such as walls, brackets, railings, cornices, window

EXTERIOR SIDING, SUPPORTING PIERS, AND CRAWL SPACE ENCLOSURE
RAYMOND DESIGN GUIDELINES 41
Recommended: Cleaning masonry only when necessary to halt deterioration
or remove heavy soiling. Not Recommended: Cleaning masonry surfaces when they are not heavily soiled
to create a new appearance, thus needlessly introducing chemicals or moisture into historic materials.
Recommended: Carrying out masonry surface cleaning tests after it has been
determined that such cleaning is appropriate. Tests should be observed over a sufficient period of time so that both the immediate and long range effects are known to enable selection of the gentlest method possible.
Not Recommended: Cleaning masonry surfaces without testing or without
sufficient time for the testing results to be of value.
Recommended: Cleaning masonry surfaces with the gentlest method
possible, such as low pressure water and detergents, using natural bristle brushes.
Not Recommended: Sandblasting brick or stone surfaces using dry or wet grit or
other abrasives. These methods of cleaning permanently erode the surface of the material and accelerate deterioration.
architraves, door pediments, steps, columns and details such as tooling and bonding patterns, coatings, and color.
Not Recommended: Removing or radically changing masonry features which are important in defining the overall historic character of the building so that, as a result, the character is diminished. Replacing or rebuilding a major portion of exterior masonry walls that could be repaired so that, as a result, the building is no longer historic and is essentially a new construction. Applying paint or other coatings such as stucco to masonry that has been historically unpainted or uncoated to create a new appearance. Removing paint from historically painted masonry. Radically changing the type of paint or coating or its color.
Protect and maintain Recommended:
Protecting and maintaining masonry by providing proper drainage so that water does not stand on flat, horizontal surfaces or accumulate in curved decorative features.
Not Recommended: Failing to evaluate and treat the various causes of mortar
joint deterioration such as leaking roofs or gutters, differential settlement of the building, capillary action, or extreme weather exposure.

42 RAYMOND DESIGN GUIDELINES
Using a cleaning method that involves water or liquid chemical solutions when there is any possibility of freezing temperatures.
Cleaning with chemical products that will damage masonry,
such as using acid on limestone or marble, or leaving chemicals on masonry surfaces.
Applying high pressure water cleaning methods that will
damage historic masonry and the mortar joints. Recommended: Inspecting painted masonry surfaces to determine whether
repainting is necessary. Not Recommended: Removing paint that is firmly adhering to, and thus
protecting, masonry surfaces.
Recommended: Removing damaged or deteriorated paint only to the next
sound layer using the gentlest method possible (e.g., hand-scraping) prior to repainting.
Not Recommended: Using methods of removing paint which are destructive to
masonry, such as sandblasting, application of caustic solutions, or high pressure water-blasting.
Recommended: Applying compatible paint coating systems following proper
surface preparation. Not Recommended: Failing to follow manufacturers’ product and application
instructions when repainting masonry. Recommended: Repainting with colors that are historically appropriate to the
building and the district. Not Recommended: Using new paint colors that are inappropriate to the historic
building and district. Recommended: Evaluating the overall condition of the masonry to determine
whether more than protection and maintenance are required, that is, if repairs to the masonry features will be necessary.
Not Recommended: Failing to undertake adequate measures to assure the
protection of masonry features. REPAIR Recommended: Repairing masonry walls and other masonry features by
repointing the mortar joints where there is evidence of deterioration such as disintegrating mortar, cracks in mortar joints, loose bricks, damp walls, or damaged plasterwork.

RAYMOND DESIGN GUIDELINES 43
Recommended: Duplicating old mortar joints in width and in joint profile. Not Recommended: Changing the width or joint profile when repointing. Recommended: Repairing stucco by removing the damaged material and
patching with new stucco that duplicates the old in strength, composition, color, and texture.
Not Recommended Removing sound stucco; or repairing with new stucco that is
stronger than the historic material or does not convey the same visual appearance.
Recommended: Cutting damaged concrete back to remove the source of
deterioration (often corrosion on metal reinforcement bars). The new patch must be applied carefully so it will bond satisfactorily with, and match, the historic concrete.
Not Recommended:
Patching concrete without removing the source of deterioration.
Recommended: Repairing masonry features by patching, piecing-in, or
consolidating the masonry using recognized preservation methods. Repair may also include the limited replacement in kind—or with compatible substitute material—of those
Not Recommended: Removing non-deteriorated mortar from sound joints, then
repointing the entire building to achieve a uniform appearance.
Recommended: Removing deteriorated mortar by carefully hand-raking the
joints to avoid damaging the masonry. Not Recommended: Using electric saws and hammers rather than hand tools to
remove deteriorated mortar from joints prior to repointing. Recommended: Duplicating old mortar in strength, composition, color, and
texture. Not Recommended: Repointing with mortar of high portland cement content
(unless it is the content of the historic mortar). This can often create a bond that is stronger than the historic material and can cause damage as a result of the differing coefficient of expansion and the different porosity of the material and the mortar.
Repointing with a synthetic caulking compound. Using a “scrub” coating technique to re-point instead of
traditional repointing methods.
EXTERIOR SIDING, SUPPORTING PIERS, AND CRAWL SPACE ENCLOSURE

44 RAYMOND DESIGN GUIDELINES
extensively deteriorated or missing parts of masonry features when there are no surviving prototypes such as terra-cotta brackets or stone balusters.
Not Recommended; Replacing an entire masonry feature such as a cornice or
balustrade when repair of the masonry and limited replacement of deteriorated or missing parts are appropriate.
Using a substitute material for the replacement part that does
not convey the visual appearance of the surviving parts of the masonry feature or that is physically or chemically incompatible.
Recommended: Applying new or non-historic surface treatments such as
water-repellent coatings to masonry only after repointing and only if masonry repairs have failed to arrest water penetration problems.
Not Recommended: Applying waterproof, water repellent, or non-historic
coatings such as stucco to masonry as a substitute for repointing and masonry repairs. Coatings are frequently unnecessary, expensive, and may change the appearance of historic masonry as well as accelerate its deterioration.
REPLACE Recommended: Replacing in kind an entire masonry feature that is too
deteriorated to repair—if the overall form and detailing are
still evident—using the physical evidence as a model to reproduce the feature. Examples can include large sections of a wall, a cornice, balustrade, column, or stairway. If using the same kind of material is not technically or economically feasible, then a compatible substitute material may be considered.
Not Recommended: Removing a masonry feature that is not repairable and not
replacing it; or replacing it with a new feature that does not convey the same visual appearance.
Design for Missing Historic Features Recommended: Designing and installing a new masonry feature such as
steps or a door pediment when the historic feature is completely missing. It may be an accurate restoration using historical, pictorial, and physical documentation; or be a new design that is compatible with the size, scale, material, and color of the historic building.
Not Recommended: Creating a false historical appearance because the replaced
masonry feature is based on insufficient historical, pictorial, and physical documentation.
Introducing a new masonry feature that is incompatible in
size, scale, material, and color.

RAYMOND DESIGN GUIDELINES 45
WOOD - CLAPBOARD, WEATHERBOARD, BEVELED SIDING, DROP SIDING, SHIPLAP SIDING, TONGUE-AND-GROOVE SIDING, BOARD-AND-BATTEN SIDING, NOVELTY SIDING, SHINGLE SIDING, DECORATIVE ELEMENTS
Wood has played a major role in the construction of historic buildings in almost every period and style. It is used structurally and as flooring, siding, ornament, and interior finish. The availability of wood and its ability to be planed, sawn, gouged, and carved contribute to its usefulness and popularity. Wood is the most common exterior siding used in residential buildings in Raymond.
Clapboard, weatherboard, and lap siding are generally interchangeable and generic terms to describe wood siding consisting of horizontal boards that overlap to shed water. Typically, board width varies from 6 to 9 inches, and boards overlap at least 1 inch. Very early houses sometimes had siding as wide as 12 or more inches. Beveled siding is a type of lap siding that refers to horizontal boards that are beveled, or tapered with the upper edge thinner than the lower edge. Beveled siding includes both plain and rabbeted patterns. Overlapping beveled siding creates a bold shadow line and leaves a cavity between the siding board and the stud or sheathing behind. St. Mark’s Episcopal Church at 205 West Main Street retains its
original lap siding.
EXTERIOR SIDING, SUPPORTING PIERS, AND CRAWL SPACE ENCLOSURE

46 RAYMOND DESIGN GUIDELINES
The drawings above illustrate the installation of beveled siding. The beveled siding on the left side is plain. The installation of plain beveled siding leaves a cavity behind the siding and creates a bold shadow line. The rabbeted bevel siding on the right features a 1/2 inch rabbet milled to fit over the edge of the preceding board, which allows the siding to lie fat against the studs or sheathing.
Rabbeted beveled siding features a 1/2 inch rabbet milled to fit over the thin edge of the preceding course, which allows the overlapping siding to lie flat against the studs or sheathing. Rabbeted beveled siding is sometimes called drop siding.
Plain beveled siding Rabbeted beveled siding
125 Port Gibson Street uses beveled wood siding which is typical of the Craftsman style of architecture.

RAYMOND DESIGN GUIDELINES 47
The drawings above illustrate the installation of shiplap (left) and tongue-and-groove (right) siding. The shiplap siding on the left is not beveled and lies flat against the studs or sheathing. Each piece of siding is cut to lap over or under the adjoining piece to create a channel. The tongue-and-groove siding on the right is often found on ex-terior walls where they are protected from weather by porches or galleries. Tongue-and-groove siding is some-times called flush siding. A modern lumber-yard term is center-matched siding.
Shiplap siding is not beveled and lies flat against studs or sheathing. Each piece of siding is cut to lap over or under the adjoining piece of siding. Often the boards are cut and nailed to create decorative channels.
Shiplap siding Tongue-and-groove siding
EXTERIOR SIDING, SUPPORTING PIERS, AND CRAWL SPACE ENCLOSURE
The house at 101 Dupree Street uses Shiplap siding on the side of the house.

48 RAYMOND DESIGN GUIDELINES
MAINTENANCE AND REPAIR OF WOOD SIDING If properly installed and maintained, wood will endure for a long time. Retain and repair original wood when possible. Like masonry, wood is susceptible to damage and deterioration from poor materials, lack of maintenance, insect infestation, and inappropriate rehabilitation efforts. Historic board siding should be retained and repaired when possible. The key to preserving wood siding is regular maintenance and repainting to prevent water infiltration.
Board-and-batten siding consists of vertical boards that are laid flat against structural members and are spaced at least 1/2 inch apart to allow for expansion. Wood strips, called battens, are applied atop the boards to cover the spacing. Board-and-batten siding is often associated with vernacular buildings.
Novelty siding is a term sometimes applied to rabbeted siding types that were popular in the twentieth century, particularly the siding that is grooved. Some architectural historians also use the term novelty siding to describe the narrow siding with rounded edges that was popular during the Colonial Revival pe-riod. The term novelty siding is also used to describe late nine-teenth and early twentieth century boards that were beaded and/or grooved for use on exterior ceilings, sheltered exterior walls, and interior wall surfaces. This form of siding is usually referred to as simply “beaded-board,” and it was especially popular for kitchen and bathroom walls in the late nineteenth and early twentieth centuries. Shingle siding is most commonly found on Queen Anne style houses and Craftsman Bungalows. Houses in the Queen Anne style usually feature shingles in combination with other siding materials. Shingle siding appears most frequently on upper wall
The Raymond railroad depot uses a combination of board-and-batten siding over tongue-a n d - g r o o v e beadboard siding.

RAYMOND DESIGN GUIDELINES 49
Inspect frequently for cracked or sprung siding boards, which should be sealed or reattached to prevent water from penetrating. Check also for damage from insects, particularly termites which can climb upward in search of damp wood. Inspect and maintain caulking to prevent water infiltration. Caulk around windows and doors and at junctions of trim and siding. Inspect gutters and downspouts to make sure that leaking gutters or downspouts are not causing damage to the wood siding. Repaint when paint on siding begins to peel and chip. Before repainting, the surface should be scraped, sanded, and washed. If mildew is present, the source of the mildew should be determined, corrected, and cleaned prior to repainting. Some mildew is inevitable on shaded areas in hot, humid climates, but excessive mildew indicates a problem. Mildew preventives can also be added to paint. High-pressure water is not necessary or advisable to clean the surface of wood. Normal hose pressure is sufficient. When sanding, do not use rotary drills with sanding discs, because they can damage the wood and leave marks on the surface of the siding. Also, do not use a rotary wire stripper, which can seriously damage the surface of the siding. Sections of siding that have severe alligatoring or peeling may require total paint removal before repainting. Both the electric heat plate and the electric heat gun are proven to work effectively. Generally, chemicals are not necessary except to
supplement thermal methods. Do not use a blow torch, which can set fire to the building. Follow the instructions of paint manufacturers in making paint selections and in applying paint. If you intend to use latex paint atop oil paint, be sure to apply an oil-based primer before applying latex paint. Also, follow instructions concerning weather conditions and drying time. If a building is painted properly, the painted finish can last ten years with occasional washing and touch-ups.
EXTERIOR SIDING, SUPPORTING PIERS, AND CRAWL SPACE ENCLOSURE
These National Park Service photographs above pillustrate a painted finish with severe peeling (left) and the use of a elec-tric heat gun (right) to remove a deteriorated paint finish.

50 RAYMOND DESIGN GUIDELINES
Problems with exterior paint are most often related to improper preparation. However, some problems result from improper application. For example, not allowing sufficient drying time between coats can cause the top layer to wrinkle. Problem with exterior paint finishes are sometimes related to moisture problems, both interior and exterior. Blown-in insulation in wall cavities can also cause moisture problems and exterior paint failure, because the insulation has no vapor barrier.
REPLACEMENT, ALTERATION, AND INSTALLATION Consider replacement siding only when repair is not feasible. Replacement siding should be based on the physical and/or photographic evidence of the original siding.
Remove and replace rotted siding and badly split siding to prevent moisture penetration. Use boards of the same dimension and thickness for replacement. Make sure that the replacement material conveys the same visual appearance as the original. Using the same type of wood is not always best. For example, modern cypress available at lumberyards is not the best choice to replace historic cypress siding. Modern cypress does not have the qualities of the old-growth cypress used in historic houses and does not typically hold up as well as redwood or some other types of wood. SUBSTITUTE SIDING - ASBESTOS SHINGLES, PERMASTONE, ALUMINUM, VINYL, CEMENT FIBER, SYNTHETIC STUCCO
Substitute siding became popular in the twentieth century. Many homeowners have installed substitute siding in the hope of eliminating maintenance problems associated with wood. Manufacturers and installers usually tout substitute siding as being maintenance free. Prior to World War II, many owners of older houses installed asbestos shingles on top of their existing wood siding. After World War II, homeowners turned first to aluminum siding and, during the past twenty years, to vinyl siding. During the last decade, builders across the nation have begun installing cement fiber siding and synthetic stucco on new houses to simulate the appearance of wood clapboard and lime stucco.
These two Victorian houses in Natchez were restored in the mid-1980s and feature typical late nineteenth-century paint schemes. Both houses were thoroughly scraped, sanded, washed, primed (oil primer), and painted (two finish coats of latex). Both houses have insulated attics but no wall insula-tion. Their mid-1980s paint jobs still looked good over a decade later.

RAYMOND DESIGN GUIDELINES 51
Inappropriate asbestos-shingle siding has been installed over the historic horizontal wood lap siding. The inappropriate siding does not convey the same visual characteristics of the historic wood siding and can obscure moisture and termite damage.
Asbestos-shingle siding, composed of cement and asbestos, is an original siding material on many buildings dating prior to 1960. Many owners of historic houses also installed asbestos shingles on top of their original wood siding. Like vinyl siding today, manufacturers and installers of asbestos shingles touted their product as being maintenance free. However, the color in asbestos shingles fades, and most houses clad in asbestos shingles have been painted. Asbestos shingles are also brittle and subject to cracking. Most important, asbestos shingles are now considered to be a hazardous material and require special handling and disposal. Asbestos shingles are no longer manufactured, but property owners can sometimes locate some replacement shingles from roofers who have small stockpiles of them. Sometimes prop-erty owners can remove a shingle from a less prominent place to replace a damaged shingle on a more prominent location. Many historic homeowners have successfully removed asbestos shingles and exposed their original wood siding. Unfortunately, some property owners have also discovered that their original siding was irreparably damaged during installation of the asbestos shingles, which split the original siding as wood strips were nailed to the surface. Like vinyl and aluminum, asbestos shingles also hamper proper maintenance by concealing moisture and termite damage. Removing asbestos shingles can be costly due to environmental hazards. Many communities require that property owners hire asbestos abatement companies to undertake removal.
Permastone is a trade name that is now generically used to describe a variety of synthetic substances that resemble stone. The term formstone is also used to describe the fake stone panels that were used in the mid-twentieth century as substitute siding. Permastone, which is still available today, was very popular in the Northeast but not as well promoted in the South. The installation of permastone radically changes the exterior appearance of a historic house, and is not recommend for historic buildings in Raymond.
EXTERIOR SIDING, SUPPORTING PIERS, AND CRAWL SPACE ENCLOSURE

52 RAYMOND DESIGN GUIDELINES
Aluminum siding dates to the 1960s and is still available from manufacturers today. Although advertised as being maintenance free, much of the aluminum siding installed in the 1960s has been painted. Aluminum siding is subject to scratching, denting, and chalking. Special care should be taken in cleaning aluminum siding, because power washing can dent the surface. It can also be difficult to replace individual pieces of aluminum siding, since patterns are sometimes discontinued and not easily matched. Follow the directions of paint manufacturers in painting aluminum siding, which requires specially formulated primer. Like asbestos shingle and vinyl siding, aluminum siding hampers proper maintenance by concealing damage from moisture and termites. Vinyl siding is an original siding material on many late twentieth and early twenty-first century houses. Owners of historic buildings all across America have also installed vinyl siding atop their original wood siding. Like asbestos shingles and aluminum siding, manufacturers and installers promote vinyl siding as being maintenance free. Unfortunately, the color in vinyl siding does fade, and vinyl siding can be discolored or spotted by something as simple as a yard sprinkler. Most paint manufacturers are today producing paint especially formulated for vinyl siding, which indicates that many homeowners are now painting their vinyl siding. The inability to match replacement vinyl siding, when making repairs to existing vinyl siding, is a common reason for painting. Like aluminum siding, vinyl siding will dent, so it should not be pressure washed. Heat from fire or a nearby BBQ grill can also cause it to burn and melt.
Examples of vinyl siding showing the installation of J-channels around every opening and the historic trim, if it survived the installation process.
These photographs illustrate how vinyl siding negatively alters the exterior appear-ance of a historic building. The vinyl siding is nearly flush with the trim around the windows, and J-channels have been installed around the windows to prevent water infiltration behind the siding.
The installation of vinyl siding alters the appearance of a historic wood structure. Particularly disconcerting are the J-channels, or vinyl strips, around windows, doors, and corner blocks. Historic citys, like Charleston, Savannah, Vicksburg, and Natchez restrict the use of vinyl siding in historic districts.

RAYMOND DESIGN GUIDELINES 53
Improperly installed vinyl siding, which results in moisture penetration and retention, is very damaging to buildings, and random inspections of houses with vinyl siding reveal that many installers pay little or no attention to the manufacturer’s specifications. Installation of vinyl siding can also irreparably damage original wood siding, which sometimes splits when hanging strips are nailed to the surface. Like asbestos shingle and aluminum siding, vinyl siding hampers proper maintenance by concealing damage from moisture and termites.
This vinyl siding example illus-trates straight drop siding, which better replicates historic siding used in Raymond.
This vinyl siding example illus-trates the coved, grooved, or Dutch lap siding, popular in the mid-twentieth century which is not as appropriate for historic build-ings in Raymond.
EXTERIOR SIDING, SUPPORTING PIERS, AND CRAWL SPACE ENCLOSURE
Cement fiber siding is a relatively new product that is being used all across America in new house construction. The siding is composed of ground sand, portland cement, cellulose fiber, and other additives. Cement fiber siding is more appropriate than vinyl siding for new construction in historic districts, be-cause it installs like wood and looks like wood. Both a shingle pattern siding and lap siding are available in cement fiber. Like wood, it requires periodic painting. Make certain to follow recommendations for installation closely to avoid common problems. Some installation problems are wavy wall surfaces due to underlying foam sheathing and over-nailing by power nailers which will crack the siding. Cement fiber siding is the most appropriate substitute siding for historic buildings that have lost their original siding. Builders need to compensate for irregularities in historic studs before in-stalling the siding, or the newly installed, cement fiber siding will be very wavy.
Rotten wood was found under the vinyl siding on this house in Ripley. Water got trapped be-hind the vinyl siding causing the wood un-derneath to deteriorate without being noticed until the siding fell off.

54 RAYMOND DESIGN GUIDELINES
Synthetic stucco (Drive-It, Dryvit, E.I.F.S.) is used as a substitute for real stucco. E.I.F.S. is an abbreviation for exterior insulation finishing system. Dryvit is a trade name for E.I.F.S. Synthetic stucco systems involve the application of a plasticized cement stucco product on top of an exterior mounted, polystyrene foam-board insulation panel. This system is usually coated with an acrylic polymer sealant. The installation of synthetic stucco can be tricky and it is important that a qualified installer do the installation following the manufacturer’s instructions. Synthetic stucco has been used all across America for siding on residences and commercial buildings, but it has been the focus of multiple lawsuits. The major problem with E.I.F.S. is its ability to retain moisture and to mask termite infestation. Some termite inspectors will require that dirt be excavated from around the slab to prove no termites are present. Some builders recommend E.I.F.S. only for metal-frame structures. The publicity about lawsuits has hurt the resale of houses with synthetic stucco. E.I.F.S. is also not as strong as traditional stucco, which is applied to bricks, concrete blocks, or lath (wood and metal) attached to wood or metal structures. Synthetic stucco has its place, and it sometimes used in the restoration of historic buildings on reconstructed parapets of historic storefronts.
USE OF SUBSTITUTE OR VINYL SIDING IN RAYMOND: The Raymond Historic Preservation Commission does not recommend the use of substitute or vinyl siding for historic buildings. However a policy for the review of requests for substitute or vinyl siding on historic structures has been established and is as follows: 1. Review of substitute siding applications applies to all
structures in the Raymond historic district. 2. All substitute siding applications will be reviewed on a case
by case basis and if a structure is determined to be extremely architecturally significant for Raymond and the substitute or vinyl siding will change the appearance of that structure then it will not be allowed.
3. Substitute siding will generally not be allowed on the front
facades of buildings that are historically significant. 4. Substitute siding will be allowed on the sides and rear of
buildings only if they are not visible from the public right of way.
5. If substitute siding is approved for a building it must match
the pattern of the original siding as closely as possible in style, shape, and dimensions.
6. Substitute siding shall not be applied over decorative trim,
window or door trim, or any existing patterned siding.
Manufacturers maintain that cement fiber siding is impervious to rot and termites, and they generally offer a 50-year manufac-turer’s warranty.

RAYMOND DESIGN GUIDELINES 55
ADDITIONAL INFORMATION: Preservation Briefs: 6 – Dangers of Abrasive Cleaning to Historic Buildings Preservation Briefs: 8 – Aluminum and Vinyl Siding on Historic Buildings: The Appropriateness of Substitute Materials for Resurfacing Historic Wood Frame Buildings Preservation Briefs: 10 – Exterior Paint Problems on Historic Woodwork Preservation Briefs: 16 – The Use of Substitute Materials on Historic Building Exteriors
SECRETARY OF INTERIOR’S RECOMMENDATIONS - WOOD Identify, Retain, and Preserve Recommended: Identifying, retaining, and preserving wood features that are
important in defining the overall historic character of the building such as siding, cornices, brackets, window architraves, and doorway pediments; and their paints, finishes and colors.
Not Recommended: Removing or radically changing the wood features which
are important in defining the overall historic character of the building, so that, as a result, the character is diminished.
Removing a major portion of the historic wood from a facade instead of repairing or replacing only the deteriorated wood, then reconstructing the facade with new material in order to achieve a uniform or "improved" appearance.
Radically changing the type of finish or its color or accent
scheme so that the historic character of the exterior is diminished.
Stripping historically painted surfaces to bare wood, then
applying clear finishes or stains in order to create a “natural look.”
Stripping paint or varnish to bare wood rather than repairing
or reapplying a special finish, i.e., like stripping a grained finish to an exterior wood feature such as a front door.
Protect and Maintain Recommended: Protecting and maintaining wood features by providing
proper drainage so that water is not allowed to stand on flat, horizontal surfaces or accumulate in decorative features.
Not Recommended: Failing to identify, evaluate, and treat the causes of wood
deterioration, including faulty flashing, leaking gutters, cracks and holes in siding, deteriorated caulking in joints and seams, plant material growing too close to wood surfaces, or insect or fungus infestation.
EXTERIOR SIDING, SUPPORTING PIERS, AND CRAWL SPACE ENCLOSURE

56 RAYMOND DESIGN GUIDELINES
Recommended: Applying chemical preservatives to wood features such as
beam ends or outriggers that are exposed to decay hazards and are traditionally unpainted.
Not Recommended: Using chemical preservatives such as creosote which can
change the appearance of wood features unless they were used historically.
Recommended: Retaining coatings such as paint that help protect the wood
from moisture and ultraviolet light. Paint removal should be considered only where there is paint surface de te r io ra t ion and as part of an overall maintenance program which involves repainting or applying other appropriate protective coatings.
Not Recommended: Stripping paint or other coatings to reveal bare wood, thus
exposing historically coated surfaces to the effects of accelerated weathering.
Recommended: Inspecting painted wood surfaces to determine whether
repainting is necessary or if cleaning is all that is required. Not Recommended: Removing paint that is firmly adhering to, and thus,
protecting wood surfaces.
Replacing an entire wood feature such as a cornice or wall when repair of the wood and limited replacement of deteriorated or missing parts are appropriate.
Using substitute material for the replacement part that does
not convey the visual appearance of the surviving parts of the wood feature or that is physically or chemically incompatible.
Recommended: Removing damaged or deteriorated paint to the next sound
layer using the gentlest method possible (hand-scraping and hand-sanding), then repainting.
Not Recommended: Using destructive paint removal methods such as propane or
butane torches, sandblasting or waterblasting. These methods can irreversibly damage historic woodwork.
Recommended: Using with care electric hot-air guns on decorative wood
features and electric heat plates on flat wood surfaces when paint is so deteriorated that total removal is necessary
prior to repainting. Not Recommended: Using thermal devices improperly so that the historic
woodwork is scorched.
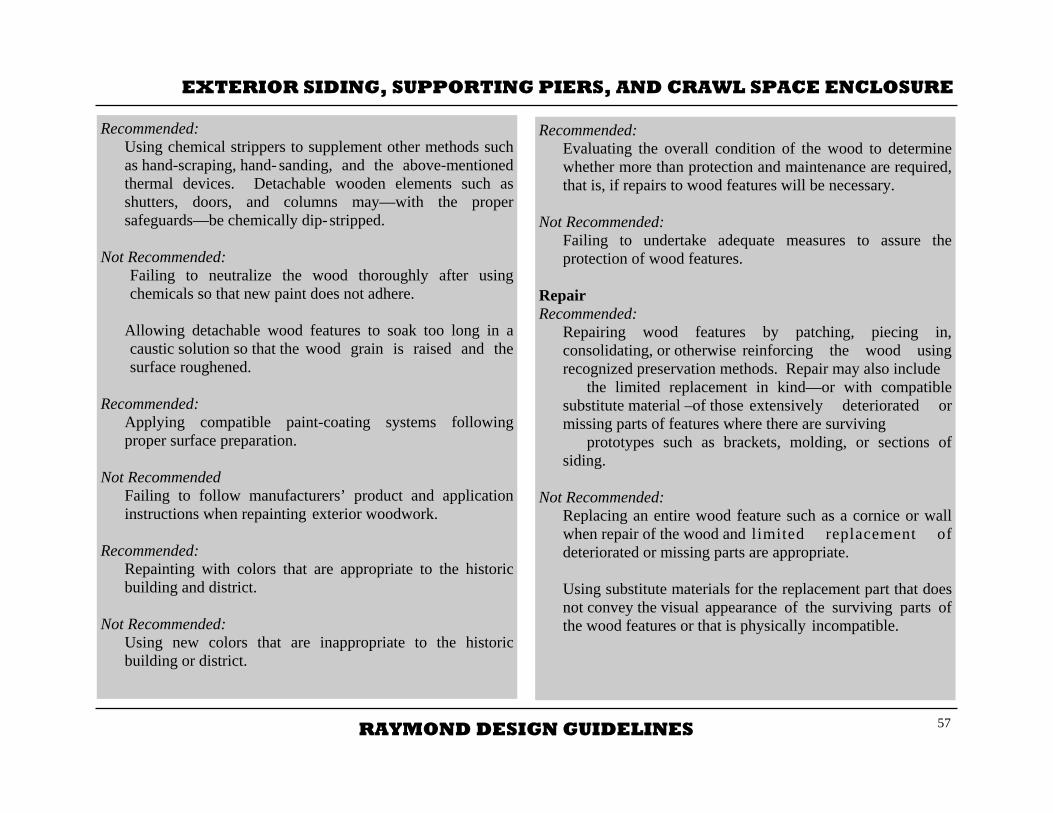
RAYMOND DESIGN GUIDELINES 57
Recommended: Using chemical strippers to supplement other methods such
as hand-scraping, hand- sanding, and the above-mentioned thermal devices. Detachable wooden elements such as shutters, doors, and columns may—with the proper safeguards—be chemically dip- stripped.
Not Recommended: Failing to neutralize the wood thoroughly after using
chemicals so that new paint does not adhere. Allowing detachable wood features to soak too long in a
caustic solution so that the wood grain is raised and the surface roughened.
Recommended: Applying compatible paint-coating systems following
proper surface preparation. Not Recommended Failing to follow manufacturers’ product and application
instructions when repainting exterior woodwork. Recommended: Repainting with colors that are appropriate to the historic
building and district. Not Recommended: Using new colors that are inappropriate to the historic
building or district.
Recommended: Evaluating the overall condition of the wood to determine
whether more than protection and maintenance are required, that is, if repairs to wood features will be necessary.
Not Recommended: Failing to undertake adequate measures to assure the
protection of wood features. Repair Recommended: Repairing wood features by patching, piecing in,
consolidating, or otherwise reinforcing the wood using recognized preservation methods. Repair may also include the limited replacement in kind—or with compatible substitute material –of those extensively deteriorated or missing parts of features where there are surviving prototypes such as brackets, molding, or sections of siding.
Not Recommended: Replacing an entire wood feature such as a cornice or wall
when repair of the wood and limited replacement of deteriorated or missing parts are appropriate.
Using substitute materials for the replacement part that does
not convey the visual appearance of the surviving parts of the wood features or that is physically incompatible.
EXTERIOR SIDING, SUPPORTING PIERS, AND CRAWL SPACE ENCLOSURE

58 RAYMOND DESIGN GUIDELINES
METAL - LEAD, TIN, ZINC, COPPER, BRONZE, BRASS, IRON, STEEL, NICKEL ALLOYS, STAINLESS STEEL AND ALUMINUM Metals used in historic buildings include lead, tin, zinc, copper, bronze, brass, iron, steel, and, to a lesser extent, nickel alloys, stainless steel, and aluminum. Metal has been used both to roof buildings and to clad exterior walls. In the 1920s, 30s and 40s, corrugated tin was used both as a roofing material and siding material in rural America. Corrugated tin as exterior siding returned to popularity in the 1990s, when it was embraced by architects designing modern houses for wealthy clients. Although traditionally associated with interior ceilings, pressed metal has also been used as exterior cladding, particularly in historic storefront architecture. Metal storefronts appeared in New York as early as the 1820s, but the most extravagant use of metal in commercial facades generally dates to the second half of the nineteenth century and the first decade of the twentieth century. By the late nineteenth century, builders all across America had easy access to metal building parts from catalogues that offered entire facades, posts and columns, porches, steps, entablatures, cornices, cresting, scrolls, grilles, window sash, window lintels, and all sorts of decorative details. The elaborate use of metal storefronts and metal ornament is more common in large urban areas, but even small cities in Mississippi like Raymond generally have some examples of architectural metal. Cast iron columns are found on 102 and 104 East Main Street.
Replace Recommended: Replacing in kind an entire wood feature that is too
deteriorated to repair—if the overall form and detailing are still evident—using the physical evidence as a model to reproduce the feature. Examples of wood features include a cornice, entablature or balustrade. If using the same kind of material is not technically or economically feasible, then a compatible substitute material may be considered.
Not Recommended: Removing an entire wood feature that is not repairable and
not replacing it; or replacing it with a new feature that does not convey the same visual appearance.
Design for Missing Historic Features Recommended: Designing and installing a new wood feature such as a
cornice or doorway when the historic feature is completely missing. It may be an accurate restoration using historical, pictorial, and physical documentation; or be a new design that is compatible with the size, scale, material, and color of the historic building.
Not Recommended: Creating a false historical appearance because the replaced
wood feature is based on insufficient historical, pictorial, and physical documentation.
Introducing a new wood feature that is incompatible in size,
scale, material, and color.

RAYMOND DESIGN GUIDELINES 59
MAINTENANCE AND REPAIR Original metal should be preserved and repaired. Metals should be identified to make sure that incompatible metals are not placed together. For example, cast-iron, steel, tin, and aluminum should not be used with copper. Sometimes inexperienced craftsmen unknowingly install copper roofing, gutters, and spouts with incompatible metals. Just like masonry and wood, architectural metal is subject to damage from excessive moisture. Allowing water to stand on architectural metal causes corrosion. Architectural metal ornament is very susceptible to wind damage, so methods of attachment should be routinely inspected and repaired. Repair deteriorated architectural metal by patching, splicing, and reinforcing whenever possible. Use the gentlest means possible in cleaning architectural metal. If sanding, scraping, and wire brushing do not sufficiently prepare the surface for repainting, low-pressure sandblasting can be used safely and effectively. Always make a test patch in an inconspicuous place before sandblasting. Using alkaline paint removers and acidic cleaners on the job site is usually not a good idea, since the chemicals seep through cracks and cause damage to the hidden, interior surfaces. Metals that were originally painted should be repainted following the recommendations of paint manufacturers. Do not use water-based paints, because they cause immediate oxidation on the surface of the metal. Also make sure that metal surfaces are completely dry before painting.
REPLACEMENT, ALTERATION, AND INSTALLATION Architectural metal that is too deteriorated to repair should be replaced, when possible, with metal to match the missing original. Several companies manufacture cast and pressed metal in historic patterns. If the same kind of material is not available or is economically not feasible, use a substitute material that conveys the same visual appearance. Missing cast-iron uprights on storefronts can often be replicated in wood. Some metal ornament can be replicated in fiberglass.
ADDITIONAL INFORMATION: Preservation Briefs: 6 – Dangers of Abrasive Cleaning Preservation Briefs: 11 - Rehabilitating Historic Storefronts Preservation Briefs: 27 - The Maintenance and Repair of Architectural Cast Iron
SECRETARY OF THE INTERIOR’S RECOMMENDATONS - METAL Identify, Retain, and Preserve Recommended: Identifying, retaining, and preserving architectural metal
features such as columns, capitals, window hoods, or stairways that are important in defining the overall historic character of the building; and their finishes and colors. Identification is also critical to differentiate between metals prior to work. Each metal has unique properties and thus requires different treatments.
EXTERIOR SIDING, SUPPORTING PIERS, AND CRAWL SPACE ENCLOSURE

60 RAYMOND DESIGN GUIDELINES
Not Recommended: Removing or radically changing architectural metal features
which are important in defining the overall historic character of the building so that, as a result, the character is diminished.
Removing a major portion of the historic architectural metal
from a façade instead of repairing or replacing only the deteriorated metal, then reconstructing the façade with new material in order to create a uniform, or “improved” appearance.
Radically changing the type of finish or its historic color or
accent scheme. Protect and Maintain Recommended: Protecting and maintaining architectural metals from
corrosion by providing proper drainage so that water does not stand on flat, horizontal surfaces or accumulate in curved, decorative features.
Not Recommended: Failing to identify, evaluate, and treat the causes of
corrosion, such as moisture from leaking roofs or gutters. Placing incompatible metals together without providing a
reliable separation material. Such incompatibility can result in galvanic corrosion of the less noble metal, e.g., copper will corrode cast iron, steel, tin, and aluminum.
Recommended: Cleaning architectural metals, when appropriate, to remove
corrosion prior to repainting or applying other appropriate protective coatings.
Not Recommended: Exposing metals which were intended to be protected from
the environment. Applying paint or other coatings to metals such as copper,
bronze, or stainless steel that were meant to be exposed. Recommended: Identifying the particular type of metal prior to any cleaning
procedure and then testing to assure that the gentlest cleaning method possible is selected or determining that cleaning is inappropriate for the particular metal.
Not Recommended: Using cleaning methods which alter or damage the historic
color, texture, and finish of the metal; or cleaning when it is inappropriate for the metal.
Removing the patina of historic metal. The patina may be a
protective coating on some metals, such as bronze or copper, as well as a significant historic finish.
Recommended: Cleaning soft metals such as lead, tin, copper, terneplate, and
zinc with appropriate chemical methods because their finishes can be easily abraded by blasting methods.

RAYMOND DESIGN GUIDELINES 61
Not Recommended: Cleaning soft metals such as lead, tin, copper, terneplate,
and zinc with grit blasting which will abrade the surface of the metal.
Recommended: Using the gentlest cleaning methods for cast iron, wrought
iron, and steel—hard metals—in order to remove paint buildup and corrosion. If hand-scraping and wire brushing have proven ineffective, low pressure grit blasting may be used as long as it does not abrade or damage the surface.
Not Recommended: Failing to employ gentler methods prior to abrasively
cleaning cast iron, wrought iron, or steel; or using high pressure grit blasting.
Recommended: Applying appropriate paint or other coating systems after
cleaning in order to decrease the corrosion rate of metals or alloys.
Not Recommended: Failing to re-apply protective coating systems to metals or
alloys that require them after cleaning so that accelerated corrosion occurs.
Recommended: Repainting with colors that are appropriate to the historic
building or district.
Not Recommended: Using new colors that are inappropriate to the historic
building or district. Recommended: Applying an appropriate protective coating such as lacquer
to an architectural metal feature such as a bronze door which is subject to heavy pedestrian use.
Not Recommended: Failing to assess pedestrian use or new access patterns so
that architectural metal features are subject to damage by use or inappropriate maintenance such as salting adjacent sidewalks.
Recommended: Evaluating the overall condition of the architectural metals
to determine whether more than protection and maintenance are required, that is, if repairs to features will be necessary.
Not Recommended: Failing to undertake adequate measures to assure the
protection of architectural metal features. Repair Recommended: Repairing architectural metal features by patching, splicing,
or otherwise reinforcing the metal following recognized preservation methods. Repairs may also include the limited
replacement in kind—or with a compatible substitute material—of those extensively deteriorated or missing parts
EXTERIOR SIDING, SUPPORTING PIERS, AND CRAWL SPACE ENCLOSURE

62 RAYMOND DESIGN GUIDELINES
or features when there are surviving prototypes such as porch balusters, column capitals or bases; or porch cresting.
Not Recommended: Replacing an entire architectural metal feature such as a
column or a balustrade when repair of the metal and limited replacement of deteriorated or missing parts are appropriate.
Using a substitute material for the replacement part that
does not convey the visual appearance of the surviving parts of the architectural metal feature or is that physically or chemically incompatible.
Replace Recommended: Replacing in kind an entire architectural metal feature that
is too deteriorated to repair—if the overall form and detailing are still evident—using the physical evidence as a model to reproduce the feature. Examples could include cast-iron porch steps or steel-sash windows. If using the same kind of material is not technically or economically feasible, then a compatible substitute material may be considered.
Not Recommended: Removing an architectural metal feature that is not
repairable and not replacing it; or replacing it with a new architectural metal feature that does not convey the same visual appearance.
Design for Missing Historic Features Recommended: Designing and installing a new architectural metal feature
such as a metal cornice or cast-iron capital when the historic feature is completely missing. It may be an accurate restoration using historical, pictorial, and physical documentation; or be a new design that is compatible with the size, scale, material, and color of the historic building.
Not Recommended: Creating a false historical appearance because the replaced
architectural metal feature is based on insufficient historical, pictorial, and physical documentation.
Introducing a new architectural metal feature that is
incompatible in size, scale, material and color.

RAYMOND DESIGN GUIDELINES 63
SUPPORTING PIERS AND FOUNDATION WALLS Historic frame buildings are traditionally built on piers or foundation walls. Nationwide, most piers and foundation walls of historic frame buildings are built of brick. A lesser number are built of stone, and some vernacular buildings even feature piers fashioned from wood stumps. Only a small number of historic buildings in Mississippi had stone piers and few, if any, had stone foundations. Historically, masons left openings in foundation walls for ventilation, and these openings were often filled with metal grilles or wood architectural features like framed louvers or framed bars. MAINTENANCE, REPAIR, REPLACEMENT, ALTERATION AND INSTALLATION Maintain and repair existing original brick piers and foundation walls, if possible. Follow guidelines in the general masonry section for maintenance and repair of brick piers and foundation walls. If piers are too deteriorated to repair, the mason should build new piers on the perimeter of the building that exactly match or appear to match the deteriorated original. In some cases, the same appearance can be achieved by using reproduction, wood-mould brick to veneer concrete blocks or piers built of less expensive brick. In replacing piers that are not visible, the mason can use concrete block or less expensive brick that do not match the original.
Maintain and repair, if possible, original grilles or other original ventilation infill in foundation walls. Replace to match, if the original feature is too deteriorated to repair. Reproduction grilles are inexpensive and easily obtainable from several sources. Add additional ventilation, if necessary, to address problems of moisture accumulation. Maintain and repair existing original stone or wood stump piers, if possible. Replace to match the original stone or wood stump piers that are visible on the perimeter, if the piers are too deteriorated to repair. Piers that are not visible can be replaced with brick or concrete block. Remember that wood stump piers can serve as conduits for termites migrating from the ground to the structure of the building. Stumps should be treated with wood preservative and periodically checked for termites. Houses can be protected from termites by a bait system, as well as a barrier system. CRAWL SPACE ENCLOSURE Most historic houses that rest on piers originally featured some type of crawl space enclosure to keep animals from getting beneath the house. Spaces between perimeter piers were most frequently filled with lattice panels. However, many historic houses featured decorative brick, louvered panels, spaced horizontal or vertical boards, or simple chicken wire. Usually, the grander the house, the grander the crawl space enclosure. In an attempt to modernize or increase energy efficiency, many of today’s historic homeowners have created solid foundation
EXTERIOR SIDING, SUPPORTING PIERS, AND CRAWL SPACE ENCLOSURE

64 RAYMOND DESIGN GUIDELINES
walls by infilling the space between perimeter piers. Most commonly, homeowners hire masons to construct brick walls to span the space between piers, and the new foundation walls are built flush with the surface of the piers. In addition to compromising the historic appearance of the building, such enclosures can be very visually disruptive. Masons rarely match the brick or mortar color of the piers, and the workmanship is usually inferior. Some historic homeowners, particularly in less affluent neighborhoods, have filled the spaces between perimeter piers with concrete block, tin, vinyl siding, plywood, and plastic.
The lattice used to enclose the crawl space beneath this historic house in Natchez is inappropriately installed, because it overlaps and obscures the brick supporting piers.
This crawl space enclosure between the original brick piers has altered the historic character of this house and is visually inappropriate. The enclosure also has no vents to provide air circulation beneath the house to prevent the build up of moisture under the house..
MAINTENANCE, REPAIR, REPLACEMENT, ALTERATION, AND INSTALLATION Original crawl space enclosures should be preserved and repaired when possible. The design of replacement infill should be based on physical evidence or historic photographs, when available. In the absence of such documentation, the design of the crawl space enclosure should be based on the documentation for a similar property in the same geographic area. Some vernacular buildings, like country stores and tenant houses, never featured any type of crawl space enclosure, and lattice panels would be an inappropriate infill.

RAYMOND DESIGN GUIDELINES 65
The lattice panels between the brick piers appropriately enclose this crawl space.
EXTERIOR SIDING, SUPPORTING PIERS, AND CRAWL SPACE ENCLOSURE
Historic homeowners who seek more enclosure than what is provided by the appropriate historic treatment have options that are inexpensive and do not compromise the historic character of the building. Simply stapling black roofing paper or attaching black-painted, insulation panels to the backs of traditional lattice panels will block chilling winds without being visible. The black backing showing through green lattice simply reads like darkness beneath the house. The backing has the added benefit of preventing the growth of weeds behind the lattice. Homeowners who want total masonry enclosure of the crawl space have alternatives that will not compromise the historic appearance of their houses. New masonry walls can be recessed behind the face of the original piers. When painted black and fronted by lattice panels, the new masonry walls are not visible. Since the new walls will be painted, they can be built from inexpensive brick or concrete block. Even houses that originally had no crawl space enclosure can retain their historic appearance with simple enclosures that are built or installed behind the perimeter piers. Examples include black-painted panels, which are attached behind perimeter piers, or deeply recessed, black-painted masonry walls. The black-painted masonry disappears into the shadow of the crawl space if the wall is deeply recessed. When building crawl space enclosures, be sure to provide adequate ventilation to prevent moisture accumulation beneath the house. At least this homeowner recessed the new brick crawl space
enclosure. This treatment would look more appropriate if the new brick were painted black and faced with lattice.

66 RAYMOND DESIGN GUIDELINES
ADDITIONAL INFORMATION: Preservation Briefs: 39 - Controlling Unwanted Moisture in Historic Buildings
This vernacular house in Natchez features a crawl space appropriately enclosed with vertical boards nailed to a frame between the brick piers.
ROOFS, GUTTERS, SPOUTS, DRAINAGE ♦ Roofs
◊ Maintenance and Repair ◊ Replacement, Alteration, and Installation ◊ Acceptable Roofing Materials for Raymond
♦ Gutters, Spouts, Drainage ◊ Maintenance and Repair ◊ Replacement, Alteration, and Installation
ROOFS A weather-tight roof with good water run-off is essential to the long-term preservation of a historic building. A poorly maintained roof accelerates deterioration and, if unchecked, will ultimately cause general disintegration of the structure. The varying shapes, ornaments, and finishes make roofs decorative as well as functional. A building’s roof provides clues to its style and period of construction. Steeply pitched, complex roofs with multiple gables are typical of the Queen Anne style. Clay tile roofs are distinctive features of Spanish Colonial Revival and Mission style buildings. Roofs with overhanging eaves and exposed rafter tips are indicative of the Craftsman Bungalow style.

RAYMOND DESIGN GUIDELINES 67
ROOFS, GUTTERS, SPOUTS, DRAINAGE
Some features of roofs are both functional and decorative. Chimneys, which are functional, are also indicative of a building’s style and age. Chimneys represent major decorative elements in the Queen Anne, or Tudor Revival styles. Dormers, which light and ventilate upper stories, can represent significant architectural compositions and appear in several different styles, including Queen Anne and Craftsman Bungalow, as well classical revival styles.
104 Dupree Street has a low-pitched side gable roof which is typical of the Greek Revival style.
The Craftsman style house at 217 West Main Street features multiple low-pitched gable roof with exposed rafter tips.
101 Dupree Street has three gabled dormers that were a later addition to the Greek Revival style house.

68 RAYMOND DESIGN GUIDELINES
The house at 213 Main Street features a pyramidal roof.
The Courthouse has an open copula on top of the roof with Doric columns.
Roofs are sometimes crowned by clerestory rooms, towers, cupolas, spires, metal cresting, and balustrades. In some Queen Anne style buildings, roof gables terminate in decorative vergeboards (also called bargeboards) of cut or sawn wood in a decorative pattern. In some cases roof surfaces can also be decorative with patterns and textures created by stamped-metal shingles, tiles, or slate shingles arranged in patterns of color.
In Raymond, most roofs are gabled or hipped. However, the city also has some representative examples of pyramidal, shed, and flat roofs. Wood shingles were used in Mississippi throughout the nineteenth century and into the early twentieth century, but few homeowners opt for wood shingles today. Standing-seam metal roofs were not widely used in Mississippi until after the Civil War and were used more on commercial than residential buildings, until the late nineteenth and early twentieth century when it became more popular for houses. The most common roof materials in Raymond today are asphalt, composition, or asbestos shingles.

RAYMOND DESIGN GUIDELINES 69
MAINTENANCE AND REPAIR Retain and repair, if possible, original roofing materials like slate shingles, standing-seam metal, pressed-metal shingles, clay-tile shingles, and asbestos shingles. Also, retain and repair any ornamental roof detailing, including chimneys. Water-stained ceilings are usually the first indicators of a leaky roof. However, poorly installed or deteriorated flashing is sometimes at fault. Blocked gutters and downspouts can also cause water to back up and damage the interior of a building. Some water-stained ceilings result from rain penetrating windows or siding that has split or popped loose. Stained ceilings can also result from leaking plumbing pipes and central cooling units installed in overhead spaces. Building owners should undertake a thorough investigation before replacing the roof, particularly if the existing roof appears to be in good condition. Finding the source of a roof leak can be difficult, since water sometimes enters at one place, runs along a rafter, and exits some distance from the actual leak. Inspect roofs semi-annually, if possible, to prevent leaks before they occur and cause major damage to interior spaces and furnishings. Metal roofs need periodic painting to inhibit deterioration from rust. Missing or broken shingles and holes in metal are indications that roofs need repair. Examine puffed areas of standing-seam roofs that could indicate failure of the fastening clips. Excessive noise during wind can also indicate failure of roof clips. Inspect the flashing in roof valleys, around chimneys, and along parapets and dormers. Check flashing or seals around roof vents and exhaust pipes. Visit the attic during
heavy rains for evidence of water infiltration. Pin points of light may also be visible from the attic and indicate perforations in standing-seam metal roofs. Roof repair is dangerous and best left to competent professionals. Slate, asbestos, and clay-tile shingles require special expertise, since they crack and break easily. Proper repair of a standing-seam metal roof involves soldering. Competent roofers also know that certain metals, like copper and iron, are incompatible and should not be used together. REPLACEMENT, ALTERATION, AND INSTALLATION Signs that a roof may need replacement include sagging, numerous missing or broken shingles, bare patches with no shingles, excessive wear on composition shingles, and substantial water staining or damaged plaster on interior ceilings. Extensive applications of roofing tar on metal roofs can also indicate that a standing-seam metal roof needs replacement. If too deteriorated to repair, install new roofing to match the original, if feasible. If not feasible, use a substitute material that approximates the original as closely as possible in texture, pattern, and color. If the building originally featured a wood-shingle roof, “architectural” composition shingles in a weathered-wood blend are a less expensive alternative that looks similar to wood shingles when installed.
ROOFS, GUTTERS, SPOUTS, DRAINAGE

70 RAYMOND DESIGN GUIDELINES
Remove old roofing material before installing new roofing material. Installing new roofing atop old roofing produces an uneven surface, adds additional weight to the roof structure, and makes leaks harder to detect. Installation of a new roof represents a substantial financial investment, and property owners should consider seeking the services of an architect or reputable general contractor to insure that the roof is properly installed. Roof installation is dangerous and best undertaken by competent professionals. Experienced contractors and roofers know that v-crimp metal roofs should be attached at the v-crimp and not by screws and washers into the flat surface of the panels, as illustrated by some manufacturers of the product. Often, washers crack when screwed too tight and they also deteriorate with time. Some experienced roofers still prefer to install composition shingles by hand-nailing rather than machine-nailing, since machine-nailing sometimes drives the nail too far into the shingle to hold it securely.
ACCEPTABLE ROOFING MATERIALS FOR RAYMOND: Asphalt or Composition Shingles:
1. Replacement of asphalt roof shingles are acceptable if they are in the following colors: black, gray, brown, or variations of those colors.
2. Any other color choices must be reviewed by the Preservation Commission.
3. Roofing shingles should be 3-Tab shingles or
Architectural shingles. Metal Roofing:
1. Metal roofing shall not be allowed on residential buildings unless there is documented historic evidence that a metal roof was once used. Metal roofs on commercial and out buildings will be allowed on a case by case basis.
2. In no case shall a commercial R-Panel metal roof be
installed on any historic building as it not a historic metal roofing pattern .
3. If metal roofing is approved Standing Seam, V-Crimp or
Corrugated panels are more appropriate for historic buildings.
4. Colors acceptable for metal roofs include silver, gray,
and brown. Other colors must be reviewed by the Preservation Commission.

RAYMOND DESIGN GUIDELINES 71
GUTTERS, SPOUTS, AND DRAINAGE Some historic buildings originally had no gutters or downspouts. Vernacular buildings, in particular, were less likely to have gutters or downspouts. Roof gutters on nineteenth-century buildings were often boxed wood gutters that were an integral part of the cornice. These built-in gutters were sometimes called concealed gutters and often featured metal scuppers that channeled the water to the downspouts. Gutters that were attached rather than integral were generally half-round, and historic downspouts were almost always round. The purpose of gutters and downspouts is to control water run-off
from the roof and to help protect the siding and architectural; features from water damage.
MAINTENANCE AND REPAIR Many historic buildings have lost their original boxed cornices as a result of re-roofing. Surviving, original box gutters and any original scuppers should be retained and repaired, if possible. Often roofers simply do not want to take the time to repair and reline box gutters and will recommend covering the integral gutter and hanging a metal gutter on the face of the cornice. However, attaching a gutter in front of a boxed cornice changes the character of the building. Frequently inspect built-in and attached gutters and downspouts to keep them free of debris and to check for areas that need relining or replacement. During heavy rain, look for gutters that overflow or downspouts that discharge little or no water. No gutters and downspouts are better than deteriorated gutters and downspouts, which discharge large amounts of water at points of poor attachment, joint separation, or perforation from rust and corrosion. Inspect the ground at the base of the building to make sure that water drains away from the building and does not pool at the base of downspouts. Reshape the ground if necessary to allow for proper drainage. Be wary of foundation plantings and brick edging that hold water at the base of buildings. Foundation plantings can be particularly damaging to masonry buildings by keeping the ground at the base of the building moist and contributing to rising damp.
ROOFS, GUTTERS, SPOUTS, DRAINAGE
Corrugated metal is an appropriate roofing material for late nineteenth- and twentieth-century vernacular buildings like tenant houses and out-buildings.
V-crimp metal is an appropriate roofing material for late nineteenth- and twentieth-century vernacular buildings.
R-panel metal roofing is not appropriate for structures in the historic district due to its commercial quality and use.
Types of Metal Roofing Systems
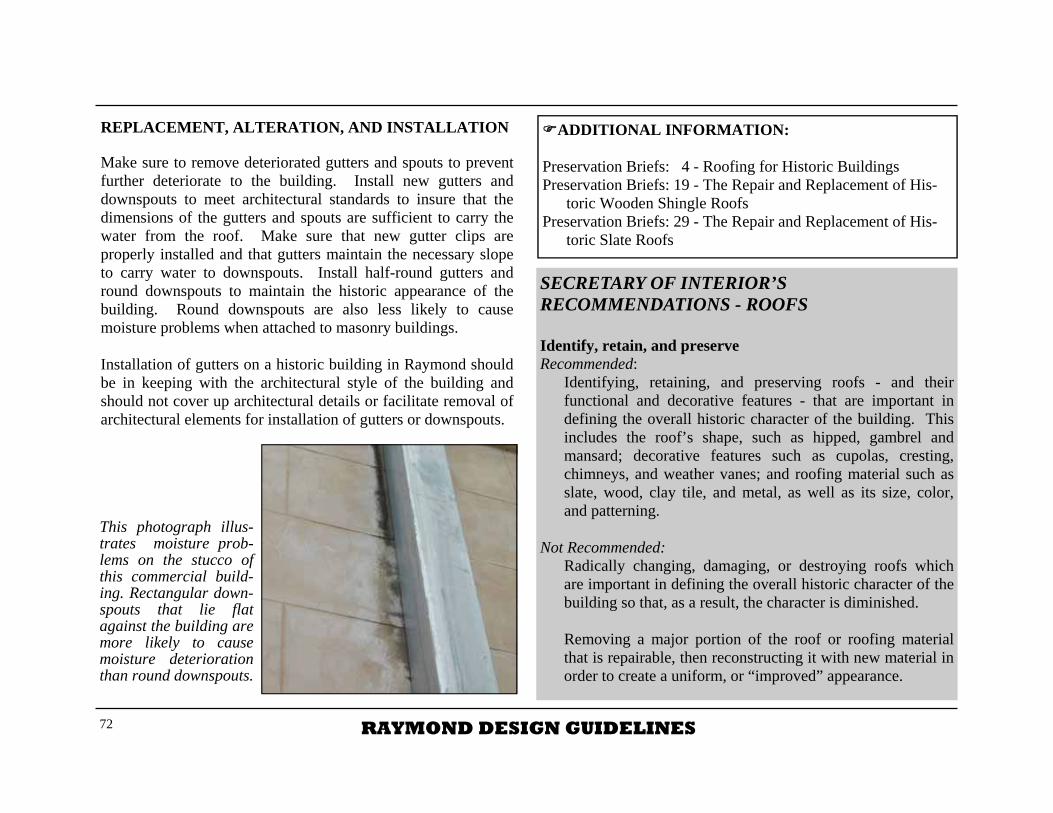
72 RAYMOND DESIGN GUIDELINES
REPLACEMENT, ALTERATION, AND INSTALLATION Make sure to remove deteriorated gutters and spouts to prevent further deteriorate to the building. Install new gutters and downspouts to meet architectural standards to insure that the dimensions of the gutters and spouts are sufficient to carry the water from the roof. Make sure that new gutter clips are properly installed and that gutters maintain the necessary slope to carry water to downspouts. Install half-round gutters and round downspouts to maintain the historic appearance of the building. Round downspouts are also less likely to cause moisture problems when attached to masonry buildings. Installation of gutters on a historic building in Raymond should be in keeping with the architectural style of the building and should not cover up architectural details or facilitate removal of architectural elements for installation of gutters or downspouts.
ADDITIONAL INFORMATION: Preservation Briefs: 4 - Roofing for Historic Buildings Preservation Briefs: 19 - The Repair and Replacement of His-
toric Wooden Shingle Roofs Preservation Briefs: 29 - The Repair and Replacement of His-
toric Slate Roofs
SECRETARY OF INTERIOR’S RECOMMENDATIONS - ROOFS Identify, retain, and preserve Recommended: Identifying, retaining, and preserving roofs - and their
functional and decorative features - that are important in defining the overall historic character of the building. This includes the roof’s shape, such as hipped, gambrel and mansard; decorative features such as cupolas, cresting, chimneys, and weather vanes; and roofing material such as slate, wood, clay tile, and metal, as well as its size, color, and patterning.
Not Recommended: Radically changing, damaging, or destroying roofs which
are important in defining the overall historic character of the building so that, as a result, the character is diminished.
Removing a major portion of the roof or roofing material
that is repairable, then reconstructing it with new material in order to create a uniform, or “improved” appearance.
This photograph illus-trates moisture prob-lems on the stucco of this commercial build-ing. Rectangular down-spouts that lie flat against the building are more likely to cause moisture deterioration than round downspouts.

RAYMOND DESIGN GUIDELINES 73
Changing the configuration of a roof by adding new features such as dormer windows, vents, or skylights so that the historic character is diminished.
Stripping the roof of sound historic material such as slate,
clay tile, wood, and architectural metal. Applying paint or other coatings to roofing material which
has been historically uncoated. Protect Recommended: Protecting and maintaining a roof by cleaning the gutters
and downspouts and replacing deteriorated flashing. Roof sheathing should also be checked for proper venting to prevent moisture condensation and water penetration; and to insure materials are free from insect infestation.
Not Recommended: Failing to clean and maintain gutters and downspouts
properly so that water and debris collect and cause damage to roof fasteners, sheathing, and the underlying structure.
Recommended: Providing adequate anchorage for roofing materials to guard
against wind damage and moisture penetration. Not Recommended: Allowing roof fasteners, such as nails and clips to corrode so
that roofing material is subject to accelerated deterioration.
Recommended: Protecting a leaking roof with plywood and building paper
until it can be properly repaired. Not Recommended: Permitting a leaking roof to remain unprotected so that
accelerated deterioration of historic building materials—masonry, wood, plaster, paint and structural members—occurs.
Repair Recommended: Repairing a roof by reinforcing the historic materials which
comprise roof features. Repairs will also generally include the limited replacement in kind—or with compatible substitute material—of those extensively deteriorated or missing parts of features when there are surviving prototypes such as cupola louvers, dentils, dormer roofing; or slates, tiles, or wood shingles on a main roof.
Not Recommended: Replacing an entire roof feature such as a cupola or dormer
when repair of the historic materials and limited replacement of deteriorated or missing parts are appropriate.
Failing to reuse intact slate or tile when only the roofing
substrate needs replacement. Using a substitute material for the replacement part that does
not convey the visual appearance of the surviving parts of the roof or that is physically or chemically incompatible.
ROOFS, GUTTERS, SPOUTS, DRAINAGE

74 RAYMOND DESIGN GUIDELINES
Replace Recommended: Replacing in kind an entire feature of the roof that is too
deteriorated to repair—if the overall form and detailing are still evident—using the physical evidence as a model to reproduce the feature. Examples can include a large section of roofing, or a dormer or chimney. If using the same kind of material is not technically or economically feasible, then a compatible substitute may be considered.
Not Recommended: Removing a feature of the roof that is unrepairable, such as
a chimney or dormer, and not replacing it; or replacing it with a new feature that does not convey the same visual appearance.
Design for Missing Historic Features Recommended: Designing and constructing a new feature when the historic
feature is completely missing, such as a chimney or cupola. It may be an accurate restoration using historical, pictorial, and physical documentation; or be a new design that is compatible with the size, scale, material, and color of the historic building.
Not Recommended: Creating a false historic appearance because the replaced
feature is based on insufficient historical, pictorial, and physical documentation.
Introducing a new roof feature that is incompatible in size, scale, material, and color.
Alterations/Additions for New Use Recommended: Installing mechanical and service equipment on the roof
such as air conditioning, transformers, or solar collectors when required for the new use so that they are inconspicuous from the public right of way and do not damage or obscure character-defining features.
Not Recommended: Installing mechanical or service equipment so that it
damages or obscures character-defining features, or is conspicuous from the public right of way.
Recommended: Designing additions to roofs such as residential, office, or
storage spaces; elevator housing; decks and terraces; or dormers or skylights when required by the new use so that they are inconspicuous from the public right-of-way and do not damage or obscure character-defining features.
Not Recommended: Radically changing a character-defining roof shape or
damaging or destroying character-defining roofing material as a result of incompatible design or improper installation techniques.

RAYMOND DESIGN GUIDELINES 75
WINDOWS, DOORS, SHUTTERS, AWNINGS AND CANOPIES ♦ Windows
◊ Maintenance and Repair ◊ Replacement ◊ Alteration, and Installation ◊ Window Screens ◊ Storm Windows ◊ Burglar Bars
♦ Doors ◊ Maintenance and Repair ◊ Replacement, Alteration, and Installation ◊ Screen Doors ◊ Storm Doors ◊ Burglar Doors
♦ Shutters ◊ Maintenance and Repair ◊ Replacement, Alteration, and Installation
♦ Awnings and Canopies ◊ Maintenance and Repair ◊ Replacement, Alteration, and Installation
WINDOWS Windows have four basic functions: (1) admitting light to the interior spaces, (2) providing fresh air and ventilation to the interior, (3) providing a visual link to the outside world, and (4) enhancing the appearance of the building. Windows are an important character-defining feature of a building and contribute to its architectural richness, especially in the patterning of the window muntins (also called mullions or sash bars) and in the arrangement of the windows themselves. Windows were a necessity before electricity and air-conditioning, because they provided light and ventilation. Porches and louvered shutters allow windows to remain open during the rain. Screens provide protection from insects.
Lintel/Cornice
Mullion/Muntin
Sash
Glass Pane
Louvered Shutters
Frame
Sill
WINDOWS, DOORS, SHUTTERS, AWNINGS AND CANOPIES

76 RAYMOND DESIGN GUIDELINES
Replacement of original windows devalues a historic building and removes important clues that indicate its age and style. Windows should be considered significant to a building if they:
1. are original, 2. reflect the overall design intent of the building, 3. reflect the period or regional styles or building
practices, 4. reflect changes to the building resulting from major
periods or events, and 5. are examples of exceptional craftsmanship or design.
Today, we rely primarily on electricity to light and cool our buildings, and property owners sometimes regard windows as “energy drains” on heating and cooling systems. In historic houses, windows sometimes become the primary focus of energy conservation efforts. Owners and builders often rush to replace historic wood sash with new wood, vinyl, or metal replacement windows that advertise, but do not always deliver, substantial energy savings and lower maintenance costs. Today’s mass-produced windows do not have the character or detail of historic windows and lack such features as imperfections in glass panes and specially milled sash and muntins that reflect the style and period of the building. Mass-produced windows are usually not as durable as original historic sash. Owners and builders should make every effort to preserve existing historic windows and to repair and restore them, rather than replacing them with new modern windows. The design of a building’s windows is indicative of the building’s age and style. With improvements in technology over time glass manufacturers were able to make larger sheets of glass. The Queen Anne style was the first to take advantage of the new glass manufacturing technology with houses that began to feature windows with two-over-two or one-over-one sash. Later on there are derivations in the number of window panes with Tudor Revival styles reverting back to small panes (typically six-over-six) and Craftsman Bungalow style using a combination of panes with typical three-over-one configurations.
The window on the left is a classic example of a nine-over-nine window from a Greek Revival style house while the window on the right is an example of a two-over-two window characteristic of the Queen Anne style.
Very typical for the Craftsman style is the use of multi-pane sashes over a single pane sash like the n i n e - o v e r - o n e window on the left and twelve-over-one window on the right

RAYMOND DESIGN GUIDELINES 77
The wood used in older sash is generally far better than the wood used today in most replacement sash. Modern insulated sash do conserve energy, but these double-paned sash are subject to moisture infiltration and often become cloudy and nearly opaque over time. The only remedy for a cloudy, insulated sash is replacement. In the hot, moist Mississippi climate, many of the insulated windows installed in the 1980s needed replacement before the year 2000. Modern metal and vinyl windows are not appropriate for historic buildings, and their installation decreases the historic value of a building. Vinyl-coated windows may initially require less painting, but they too are subject to rot. The best way to treat historic windows to conserve energy and preserve historic value is to retain and repair the existing historic windows and to weather strip or install storm windows. The three components of a historic window sash are the (1) wood, (2) glass panes, and (3) glazing compound. The glazing compound is the putty-type substance that holds the glass panes inside the window frame and muntins and is the weakest link of the three components. The glazing compound is intended to be weak to allow for the replacement of broken panes. Over time, glazing compound hardens and cracks, which allows water and air to penetrate the sash. Re-glazing an entire window pane is preferable to patching, which is more likely to allow water to penetrate. Windows need re-glazing about every twenty years. Homeowners should examine window frames and sashes regularly to check for operational soundness. The window sill, joints between the sill and the jamb, corners of the bottom rails, and muntin joints are typical points where water collects and
MAINTENANCE AND REPAIR Repair of historic windows is preferable to replacement. Historic wood windows have proved their value in their very survival. In Natchez, for example, many houses dating from 150 to 200 years old retain the majority of their original wood windows. All too often builders and owners think a window is beyond repair when it is easily repairable. Peeling paint, loose putty, broken sash cords, stuck sash, and broken glass panes are not indications that windows need replacement. Property owners sometimes replace historic window sashes when only a small amount of work is needed to repair them. Scraping, painting, glazing, planeing, and weather stripping can make a historic window look better, operate easier, and conserve energy. Deterioration that requires major repair or partial replacement is usually confined to the bottom rail of the sash or to corner joints and the intersection of muntins, where rain condensation is likely to occur. If excessive rot exists, new pieces can be made to replace the rotten ones. Repairing is less expensive than replacing the window and will maintain the historic character and value of the building. Also, modern sash units may not easily fit into existing window openings especially if the original opening is not the same size as modern replacements or the building has undergone uneven settlement.
WINDOWS, DOORS, SHUTTERS, AWNINGS AND CANOPIES
After evaluating window significance, owners and builders can plan appropriate treatments based on an investigation of the physical condition of the window.
78 RAYMOND DESIGN GUIDELINES
deterioration begins. The operation of the window (opening and closing over the years and seasonal temperature changes) weakens the joints and can cause slight separation. This slight separation makes the joints more vulnerable to water, which is readily absorbed into the end grain of the wood. If severe deterioration exists in these areas, it will usually be apparent on visual inspection. Before undertaking any repairs, identify and eliminate all sources of moisture penetration. REPLACEMENT When a historic window sash is beyond repair, a replacement sash is necessary. Before deciding on a new window sash and/or window frame to replace a deteriorated or missing historic window, the following characteristics of windows should be considered:
1. the pattern of the openings and their size; 2. proportions of the frame and sash; 3. configurations of window panes; 4. profiles of the window muntins; 5. type of wood; and the 6. characteristics of the glass.
The search for a replacement window can begin after the contribution of the window to the building has been determined, and the replacement should retain, to the degree possible, the character of the historic window. The best replacement is a custom-made sash to duplicate the original. This not only maintains the historic appearance of the building, but it also simplifies and lowers the cost of installation.
The use of recycled historic materials is often discouraged by architectural historians, as it confuses the physical history of a building. However, salvage and wrecking yards are good sources for inexpensive, matching sash. Recycled historic windows are a better choice than replacement windows of incompatible design. Also, relocating a window from an inconspicuous area of the house to a more prominent location is preferable to replacement by a window of incompatible design.
WINDOW REPLACEMENT IN RAYMOND After all attempts have been made to preserve the original window or to find an exact replacement window of the same material have been unsuccessful then it will be acceptable to replace the historic window based on the following criteria:
1. Replacement windows should be made of wood, however they may be clad in vinyl or metal on the outside.
2. Replacement windows should match as closely as possible the size of the existing window and the style or configuration.
3. Metal or vinyl windows shall only be allowed on accessory buildings, and should have a finish to them of an appropriate color for the building.
4. No bare metal windows shall be approved.

RAYMOND DESIGN GUIDELINES 79
ADDITIONAL INFORMATION: Preservation Briefs: 9 – The Repair of Historic Wooden Windows Preservation Briefs: 13 – The Repair and Thermal Upgrading of Historic Steel Windows
This metal window is not appropriate for a historic house. It is an obvious replacement for a much larger window that has been removed. The original window hole has been filled by un-painted boards . Modern metal win-dows with horizontal divisions, like this ones above and below on the left, are not suitable for historic buildings.
The metal window on the left is inappropri-ate for a historic structure and does not convey the same visual appearance as the neighboring original window.
ALTERATION AND INSTALLATION Often new uses for interior spaces of historic buildings trigger alterations to windows. The installation of kitchens, bathrooms, and closets is a major cause of window removal and the inappropriate alteration of windows. Many historic houses feature one or more window openings that were shortened in height and in-filled with inappropriate sash due to the installation of kitchen counters. More creative and appropriate solutions are possible to accommodate kitchen counters. Some
historic houses feature kitchen counters that are designed to create plant wells, or mini green houses, where they extend across a window. Other historic houses feature kitchen counters that drop to window sill level to create a desk area or window seat in the kitchen. Better than altering the window is to run the counter across the window, after painting the inside surface of the window panes black to camouflage the installation from the exterior. If an owner is determined to remove a window to accommodate interior changes, the window frame should be retained on the exterior and in-filled with shutters in a closed position or a panel installed within the existing frame and painted the wall color. The window sash and interior window trim should be labeled and stored on site in attic, basement, and garage. New functions and changing circumstances can also spur the installation of new window openings in historic buildings. Newly exposed party [shared] walls in houses or commercial buildings offer opportunities for increased ventilation and light that were not available to earlier owners. New windows installed in such walls should be compatible with the design of the building but should not exactly duplicate the detailing of the original windows.
WINDOWS, DOORS, SHUTTERS, AWNINGS AND CANOPIES

80 RAYMOND DESIGN GUIDELINES
SECRETARY OF THE INTERIOR’S RECOMMENDATIONS - WINDOWS Identify, retain and preserve Recommended: Identifying, retaining, and preserving windows--and their
functional and decorative features—that are important in defining the overall historic character of the building. Such features can include frames, sash, muntins, glazing, sills, heads, hood molds, paneled or decorated jambs and moldings, and interior and exterior shutters and blinds.
Not Recommended: Removing or radically changing windows which are
important in defining the historic character of a building so that as a result, the character is diminished.
Changing the number, location, size or glazing pattern of
windows through cutting new o pe n in gs , b loc k in g - i n windows, and installing replacement sashes that do not fit the historic window opening.
Changing the historic appearance of windows through the
use of inappropriate designs, materials, finishes, or colors which noticeably change the sash, depth of reveal, and muntin configuration; the reflectivity and color of the glazing; or the appearance of the frame.
Obscuring historic window trim with metal or other
material.
Stripping windows of historic material such as wood, cast-iron, and bronze.
Recommended: Conducting an in-depth survey of the conditions of existing
windows early in rehabilitation planning so that repair and upgrading methods and possible replacement methods and possible replacement options can be fully explored.
Not Recommended: Replacing windows solely because of peeling paint, broken
glass, stuck sash, and high air infiltration. These conditions, in themselves, are no indication that windows are beyond repair.
Protect and Maintain Recommended: Protecting and maintaining the wood and architectural metal
which comprise the window frame, sash, muntins, and surrounds through appropriate surface treatments such as cleaning, rust removal, limited paint removal, and re-application of protective coating systems.
Not Recommended: Failing to provide adequate protection of materials on a
cyclical basis so that deterioration of the windows results. Recommended: Making windows weather tight by re-caulking and replacing
or installing weatherstripping. These actions also improve thermal efficiency.
RAYMOND DESIGN GUIDELINES 81
Not Recommended: Retrofitting or replacing windows rather than maintaining
the sash, frame, and glazing. Recommended: Evaluating the overall condition of materials to determine
whether more than protection and maintenance are required, i.e., if repairs to windows and window features will be required.
Not Recommended: Failing to undertake adequate measures to assure the
protection of historic windows. Repair Recommended: Repairing window frames and sash by patching, splicing,
consolidating or otherwise reinforcing. Such repair may also include replacement in kind of those parts that are either extensively deteriorated or are missing when there are surviving prototypes such as architraves, hoodmolds, sash, sills, and interior or exterior shutters and blinds.
Not Recommended: Replacing an entire window when repair of materials and
limited replacement of deteriorated or missing parts are appropriate.
Failing to reuse serviceable window hardware such as brass
sash lifts and sash locks.
Using substitute material for the replacement part that does not convey the visual appearance of the surviving parts of the window or that is physically or chemically incompatible.
Replace Recommended: Replacing in kind an entire window that is too deteriorated
to repair using the same sash and pane configuration and other design details. If using the same kind of material is not technically or economically feasible when replacing windows deteriorated beyond repair, then a compatible substitute material may be considered.
Not Recommended: Removing a character-defining window that is not repairable
and blocking it in; or replacing it with a new window that does not convey the same visual appearance.
Design for Missing Historic Features Recommended: Designing and installing new windows when the historic
windows (frames, sash, and glazing) are completely missing. The replacement windows may be an accurate restoration using historical, pictorial, and physical documentation; or be a new design that is compatible with the window openings and the historic character of the building.
Not Recommended: Creating a false historical appearance because the replaced
window is based on insufficient historical evidence, or
WINDOWS, DOORS, SHUTTERS, AWNINGS AND CANOPIES

82 RAYMOND DESIGN GUIDELINES
installing windows that are characteristic of another architectural style.
Introducing a new window design that is incompatible with
the historic character of the building. Alterations/Additions for the New Use Recommended: Designing and installing additional windows on rear or other
non-character-defining elevations if required by the new use. New window openings may also be cut into exposed party walls. Such design should be compatible with the overall design of the building, but not duplicate the fenestration pattern and detailing of a character-defining elevation.
Not Recommended: Installing new windows, including frames, sash, and muntin
configuration that are incompatible with the building’s historic appearance or obscure, damage, or destroy character-defining features.
Recommended: Providing a setback in the design of dropped ceilings when
they are required for the new use to allow for the full height of the window openings.
Not Recommended: Inserting new floors or furred-down ceilings which cut
across the glazed areas of windows so that the exterior form and appearance of the windows are changed.
WINDOW SCREENS Screens for windows became popular in the late nineteenth century. Homeowners in earlier periods combatted insects with cloth netting draped at the windows or around beds. Historic window screens are typically of two types - (1) exterior, full-size screens in wooden frames that hang from brackets at the top and latch from the inside at the bottom and (2) interior, half-size screens in wooden frames that slide on interior tracts. Both types of window screens were easy to install and remove seasonally. With the advent of air-conditioning, many owners of older homes have discarded the screens, and new houses often have windows with no provision for window screening. MAINTENANCE, REPAIR, REPLACEMENT, ALTERATION, AND INSTALLATION Repairing existing wood screens is preferable to replacement. Many historic homeowners have maintained the interior sliding screens that were either original features or later additions to their historic homes. The exterior, full-size aluminum screens that are available today detract from the historic appearance of the building and are easy to damage by bending. An inexpensive alternative to installed aluminum screens are the light-weight wood and aluminum screens that are portable and adjustable in width. They are available in a variety of heights and widths and generally cost about ten dollars a window. These screens consist of two sliding frames that adjust to fit inside an open window and are held in place by the window tracks and the weight of the upper sash.

WINDOWS, DOORS, SHUTTERS, AWNINGS AND CANOPIES
RAYMOND DESIGN GUIDELINES 83
STORM WINDOWS Storm windows are a popular way to improve the energy efficiency of existing windows while not having to replace the windows that may be allowing air infiltration. Some historic houses in cold climates featured original, exterior, wood storm windows that exactly matched the wood sash and were interchangeable with window screens. Installing storm windows is preferable to replacing historic windows, and storm windows are an economical way to increase energy conservation. Exterior storm windows are generally more efficient in conserving energy, but they detract from the historic appearance of a structure and are more difficult to remove for cleaning. Magnetic, Velcro, and clip-in storm windows are ideal for people who remove their storm windows frequently or use them only seasonally and who want to preserve the historic appearance of their building.
These poorly sized aluminum window screens a l t e r t h e appearance of these historic windows.
MAINTENANCE, REPAIR, REPLACEMENT, ALTERATION, AND INSTALLATION Installing new storm windows on the interior of the window is preferred to exterior storm windows as they preserve the historic character of the building and provide easier access for both cleaning and seasonal removal. However, interior storm windows have increased potential for condensation and deterioration, so they should be checked periodically for problems. The outer window should be loose enough to allow moisture to leak to the outside to prevent condensation build up. If more than one storm window must be installed on a single window opening due to height, the junction of the storm window sections should line up behind the meeting rail of the original sash. The use of thermo plastic available at hardware stores is not recommended. WARNING: At least one storm window in every room should be easily removable without the use of any equipment (such as a screwdriver) for easy egress out the window in case of fire. Here are the different kinds of storm windows available:
Magnetic storm windows feature a permanent bar magnet attached around the window frame, similar to refrigerator magnets. The magnetic “lock” forms a seal to minimize air infiltration. Velcro attachment storm windows are similar to magnetic storm windows. They feature a Velcro strip

84 RAYMOND DESIGN GUIDELINES
Exterior storm windows alter the exterior ap-pearance of his-toric buildings and are difficult to remove for cleaning.
These photographs of windows in two historic houses illustrate the use of “invisible” interior storm windows. Interior storm windows are easier to remove for cleaning, are not visible on the exterior of the house, and are barely visible on the interior. Manufacturers of “invisible” interior storm windows offer storm windows that are attached either by clip or by magnetic seal, like the examples pictured above.
system around the window frame. The storm window itself has Velcro to adhere to the strip around the window frame. Clip-in storm windows feature a clip system, which requires only a small number of holes in the window frames. Clips hold the storm window in place and form the seal. Screw-in-place storm windows are storm windows which attach to the window frame by a screw system that goes through the storm window frame and into the window frame. These storm windows are a little more difficult to remove than other types of interior storm windows, since they require a screw driver.
Track Storm Windows are typically found on the exterior and consist of another window with its own track installed on the outside of the existing window. These storm windows obscure the historic window trim and frame and jut out beyond the wall surface and window frame.
USE OF STORM WINDOWS IN RAYMOND If it is not feasible to install interior storm windows then exterior storm windows shall be allowed only on the sides and rear of a building if they are not visible from the public right of way. If exterior storm windows are approved they shall match the size of the existing window, be unobtrusive as possible, and be finished to match the existing color of the window trim or have a white finish. No bare metal storm windows shall be allowed.
RAYMOND DESIGN GUIDELINES 85
ADDITIONAL INFORMATION: Preservation Briefs: 3 – Conserving Energy in Historic Buildings
WINDOWS, DOORS, SHUTTERS, AWNINGS AND CANOPIES
SECRETARY OF THE INTERIOR’S RECOMMENDATIONS - ENERGY CONSERVATION Windows Recommended: Utilizing the inherent energy conserving features of a
building by maintaining windows and louvered blinds in good operable condition for natural ventilation.
Not Recommended: Removing historic shading devices rather than keeping them
in an operable condition. Recommended: Improving thermal efficiency with weather stripping, storm
windows, caulking, interior shades, and, if historically appropriate, blinds and awnings.
Not Recommended: Replacing historic multi-paned windows with new thermal
sash utilizing false muntins.
Recommended: Installing interior storm windows with air-tight gaskets,
ventilating holes, and/or removable clips to insure proper maintenance and to avoid condensation damage to historic windows.
Not Recommended: Installing interior storm windows that allow moisture to
accumulate and damage the window. Recommended: Installing exterior storm windows which do not damage or
obscure the windows and frames. Not Recommended: Installing new exterior storm windows which are
inappropriate in size or color. Replacing windows or transoms with fixed thermal glazing
or permitting windows and transoms to remain inoperable rather than utilizing them for their energy conserving potential.
Recommended: Considering the use of lightly tinted glazing on non-
character defining elevations if other energy retrofitting alternatives are not possible.
Not Recommended: Using tinted or reflective glazing on character-defining or
other conspicuous elevations

86 RAYMOND DESIGN GUIDELINES
Security or burglar bars are not appropriate for historic windows, because they change the historic character of the windows.
SECURITY OR BURGLAR BARS Security or burglar bars are not recommended for windows in the Heritage District of Raymond as the installation of security/burglar bars radically alters the exterior appearance of a historic building. Only in major urban districts were security or burglar bars an original feature of some buildings and acceptable. Security or burglar bars give a negative impression to potential residents, businesses, and tourists, because widespread installation implies a high crime rate. Property owners should consider electronic security systems for safety and appearance.
Securi ty or burglar bars m a s k t h e historic details of this Queen Anne cottage, illustrated in detail on the right.
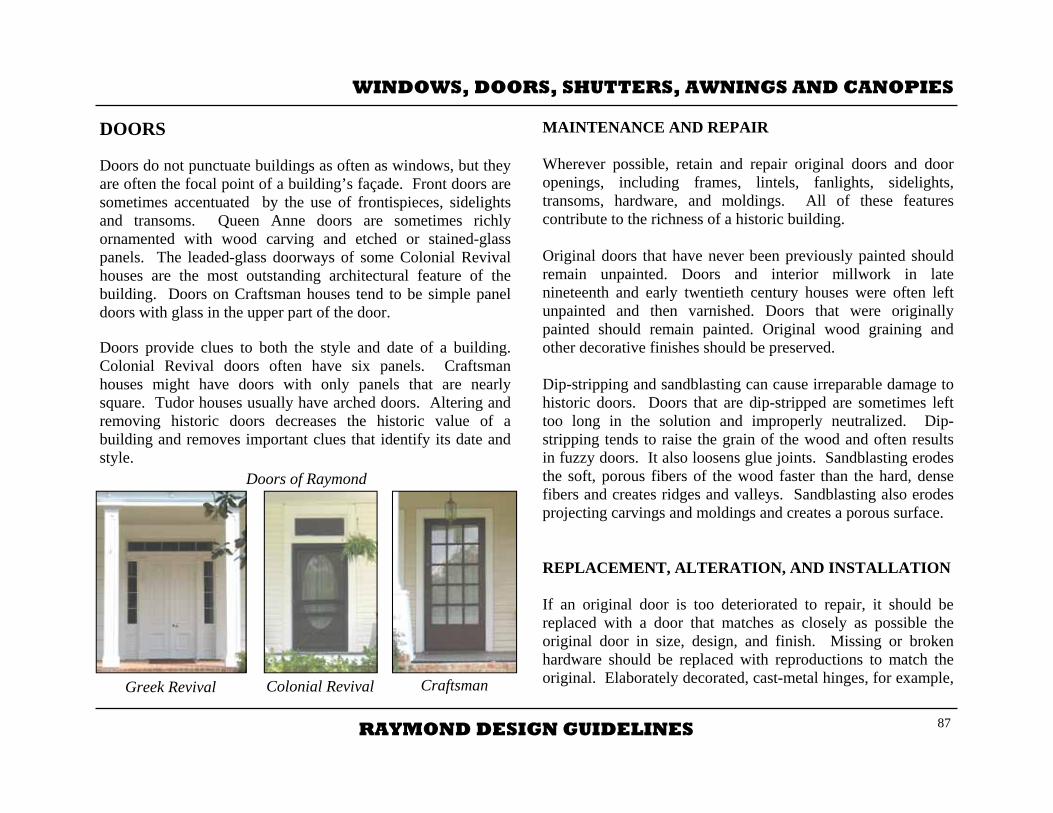
RAYMOND DESIGN GUIDELINES 87
Doors of Raymond
WINDOWS, DOORS, SHUTTERS, AWNINGS AND CANOPIES
DOORS Doors do not punctuate buildings as often as windows, but they are often the focal point of a building’s façade. Front doors are sometimes accentuated by the use of frontispieces, sidelights and transoms. Queen Anne doors are sometimes richly ornamented with wood carving and etched or stained-glass panels. The leaded-glass doorways of some Colonial Revival houses are the most outstanding architectural feature of the building. Doors on Craftsman houses tend to be simple panel doors with glass in the upper part of the door. Doors provide clues to both the style and date of a building. Colonial Revival doors often have six panels. Craftsman houses might have doors with only panels that are nearly square. Tudor houses usually have arched doors. Altering and removing historic doors decreases the historic value of a building and removes important clues that identify its date and style.
MAINTENANCE AND REPAIR Wherever possible, retain and repair original doors and door openings, including frames, lintels, fanlights, sidelights, transoms, hardware, and moldings. All of these features contribute to the richness of a historic building. Original doors that have never been previously painted should remain unpainted. Doors and interior millwork in late nineteenth and early twentieth century houses were often left unpainted and then varnished. Doors that were originally painted should remain painted. Original wood graining and other decorative finishes should be preserved. Dip-stripping and sandblasting can cause irreparable damage to historic doors. Doors that are dip-stripped are sometimes left too long in the solution and improperly neutralized. Dip-stripping tends to raise the grain of the wood and often results in fuzzy doors. It also loosens glue joints. Sandblasting erodes the soft, porous fibers of the wood faster than the hard, dense fibers and creates ridges and valleys. Sandblasting also erodes projecting carvings and moldings and creates a porous surface. REPLACEMENT, ALTERATION, AND INSTALLATION If an original door is too deteriorated to repair, it should be replaced with a door that matches as closely as possible the original door in size, design, and finish. Missing or broken hardware should be replaced with reproductions to match the original. Elaborately decorated, cast-metal hinges, for example, Craftsman Colonial Revival Greek Revival

88 RAYMOND DESIGN GUIDELINES
This mass-produced, leaded-glass door is not appropriate for this mid-twentieth-century Colonial Revival cottage, which would have featured a “colonial” paneled door.
This Queen Anne style house has lost its original corner porch and entrance doorway. The original doorway would have featured a transom and single-leaf door with glazed upper panel. The original porch was enclosed and a new, inappropri-ate 1970s door with raised pan-els was installed. Unfortunately, the house also lost its original porch detailing and entrance steps.
may be suitable for Queen Anne buildings dating to the late nineteenth-century, but they are inappropriate for later houses. Original doors that are too altered to repair should be replaced with a door that matches as closely as possible the original door. The most common examples of door alterations involve (1) splitting a single-leaf door to create a double-leaf door and (2) inserting or removing glass panels. If the existing door is not original and is inappropriate for the style of the building, a replacement door may be installed based both on historical evidence and the architectural style of the building. The new door can be custom-made to match the missing original based on a historic photograph, if one exists. Without a historic photograph, an original door from a building similar in age and style can also serve as a design source for a new custom-made door. Salvage companies may also provide a source for a recycled door appropriate to the style of the building. Avoid replacement doors that are incompatible with the style of the house. Sliding glass doors and French (glazed) doors have replaced many original paneled doors in historic houses. Glazed Queen Anne doors have sometimes been replaced by paneled doors to create an more modern appearance. Today, hundreds of original historic doors are being replaced all across America with mass-produced, leaded-glass doors that are fine for new houses but are not inappropriate for historic buildings.

WINDOWS, DOORS, SHUTTERS, AWNINGS AND CANOPIES
RAYMOND DESIGN GUIDELINES 89
The screen door of this Queen Anne style house at 237 North Oak Street is most likely a later addition, however it is simple in design and properly fits the door opening.
SCREEN DOORS Screen doors were often original features in late nineteenth and early twentieth-century houses and were practical additions to earlier houses. Some Queen Anne, Tudor Revival, Spanish Colonial Revival, and Italian Renaissance houses have elaborate screen doors that echo the detailing of the house. MAINTENANCE AND REPAIR Historic screen doors should be preserved and repaired. REPLACMENT, ALTERATION, AND INSTALLATION New screen doors for historic houses should be made of wood, with rails and styles echoing the design of the entrance door. They should be painted or stained to match the entrance door. Metal screen doors, particularly those with metal panels in the lower section, are inappropriate for historic buildings. Also inappropriate are stock screen doors that are too large or too small and result in the alteration of the size of the door opening. STORM DOORS Storm doors should be restricted to doors on secondary elevations not visible from the right of way. If installed on a primary elevation, the storm door should be made of wood with rails and styles echoing the design of the entrance doorway.
This screen door on this Colonial Revival style house at 212 West Main Street is a simple design that fits the character of the house.

90 RAYMOND DESIGN GUIDELINES
A security or burglar door and sidelight grilles (right) obscure the historic doorway of this Colonial Revival house. Burglar doors and barred windows also increase the risk of death from fire, by making it difficult for rescue personnel to enter the building.
SECURITY OR BURGLAR DOORS Metal security or burglar doors are inappropriate for historic doorways, and their use should be restricted to doorways not visible from the public right-of-way. These metal doors are sometimes elaborately decorated and radically alter the character of a historic building. Metal security or burglar doors also give a negative impression to potential residents, businesses, and tourists, because their existence implies a high crime rate. WARNING: Section 1005.7 of the Standard Building Code states: “Each sleeping room or room with a required exit door in a residential occupancy that has burglar bars installed shall have at least one emergency egress window or door that is operable from the inside without the use of a key, tool, special knowledge, or effort.”
SHUTTERS Architectural historians use the term blind in reference to the hinged louvered panels affixed to the outside of a window or door and the term shutter in reference to hinged panels or boards that have no louvers. Today’s homeowners and builders generally use the term shutter to encompass both shutters and blinds. Blinds and shutters played an important role in the daily life of a historic building. In early houses, paneled and batten shutters provided privacy, security, and protection from storms. Blinds fulfill those same functions, but they also admit light and air. Before air-conditioning, blinds were especially useful in summer, because they allowed air circulation, while providing shade and allowing windows to remain open during rain. The adjustable louvers that became popular in the mid-nineteenth century made it easier for the historic homeowner to operate the blinds with maximum efficiency. Even today, window shutters and blinds can add to the energy efficiency of a house. Closing shutters and blinds during the day reduces sun and heat buildup. Queen Anne style houses typically have operable shutters mounted in shutter hinges attached to the window frame. Some twentieth-century historic houses, like Colonial Revival houses, dating from 1920 onward, and Minimal Traditional style houses feature original shutters or blinds that are purely ornamental and were never intended to be operable. Such shutters and blinds are often nailed to the house on the outside of the window frame. These houses will have no evidence of shutter hardware. Craftsman style houses did not use shutters.

RAYMOND DESIGN GUIDELINES 91
MAINTENANCE AND REPAIR Window and door shutters and blinds should be maintained and repaired rather than replaced. Often the wood used in the historic shutter or blind is far better than wood available today. Blinds too deteriorated to repair can provide spare parts for the repair of other blinds. Avoid dip-stripping historic shutters and blinds, because it loosens joints and hastens deterioration. Scrape and sand shutters and blinds before repainting. Retain original shutter and blind hardware, where possible, and replace with reproduction hardware to match the missing original. REPLACMENT, ALTERATION, AND INSTALLATION
Replace shutters and blinds too deteriorated to repair with replacement shutters and blinds of the same design. If all original shutters or blinds are missing, make new shutters or blinds based on a historic photograph or patterned after original shutters or blinds from a similar historic building. Use original hardware to hang shutters and blinds, where possible, and buy reproduction hardware where needed. When hanging operable shutters or blinds without appropriate hardware, install the shutters to appear to be operable. Do not install shutters or blinds when inappropriate for the architectural style of the building or when no evidence of
WINDOWS, DOORS, SHUTTERS, AWNINGS AND CANOPIES
historic shutters or blinds exists. Twentieth-century bungalow houses, for example, rarely featured shutters or blinds. When installing replacement shutters or blinds, make sure that the replacement shutters or blinds are the same height and width as the window opening. Installing shutters or blinds on picture windows is inappropriate. Vinyl shutters and blinds, as well as many stock replacements in wood, are not appropriate for historic buildings. The proportions and detailing of stock modern blinds are usually incorrect for historic buildings.
Although these applied shutters are not operable they are appropriate for the architectural style of this house at 229 Port Gibson Street as they are characteristic of the Minimal Traditional style used in the 1940s and 1950s.

92 RAYMOND DESIGN GUIDELINES
AWNINGS AND CANOPIES
Awnings on commercial and residential buildings have been popular since the nineteenth-century. Historic photographs of many Mississippi cities illustrate the commercial use of canvas awnings to help control temperature, prevent merchandize from fading in display windows, and protect customers from sun and rain. Some twentieth-century commercial buildings, particularly those dating to 1920 and later, originally featured suspended canopies from the buildings of metal or wood. Historic photographs of buildings on Main Street in Raymond from the 1920s and later show a mix of suspended canopies and awnings. Canvas awnings were not as widely used on residential buildings, but historic photographs document operable awnings on late nineteenth and early twentieth-century houses, particularly in coastal areas.
The window shutters of these two houses are original and properly fit the windows. The house on the left illustrates original shutters that are properly sized and hung for paired windows and a bay window.
Shutters on this arched win-dow are too short, too nar-row, and wrongly hung out-side the window frame. Shutters for this window should also form an arch when closed.
The vinyl shutters flanking this window are too narrow and incorrectly hung outside the window frame. Paneled shut-ters are also inappropriate for Victorian houses.
The window at 45 Copper’s Well Street has properly sized and h i n g e d l o u v e r e d shutters. Underneath the window is Jib door with two panels that open up to allow people to pass through the window to the porch. The shutter properly covers this area as well.

WINDOWS, DOORS, SHUTTERS, AWNINGS AND CANOPIES
RAYMOND DESIGN GUIDELINES 93
porte-cochere. Pole supported awnings should not be used to shade individual windows.
Traditional Canvas Awnings - Residential
Although canvas awnings were not widely used on residential buildings, they are preferable to metal awnings. Install canvas awnings to emphasize rather than obscure the architectural detailing of a building. Install individual awnings over each window rather than spanning two windows with a single awning. Adding a canvas awning to shelter an entrance of a house is preferable to the addition of a structural porch; canopy; or porte cochere.
Choose colors, patterns, and designs that are subdued to avoid disrupting the character of the neighborhood.
Canvas awnings are appropriate for residential buildings. The awning above left is correctly hung. The center one is incorrectly hung with one awning for two windows. The metal awnings above right are not correct for historic buildings.
MAINTENANCE AND REPAIR Original awnings and canopies of wood and/or metal should be preserved and repaired where possible. REPLACEMENT, ALTERATION, AND INSTALLATION Original awnings and canopies of wood or metal that are missing or too deteriorated to repair, should be replaced to match the original as existing or documented in historic photographs. Install new awnings without damaging window trim or other architectural fabric. Take care to insure that the awning does not become a source of water infiltration. Types of Awnings: Metal and Wood Awnings
Metal and wood awnings are not appropriate for historic buildings, unless they were an original design feature of the building.
Vinyl Awnings Vinyl awnings are inappropriate for historic buildings.
Pole-supported Awnings Pole-supported awnings are appropriate for entrances on
certain commercial buildings to provide protection from rain. A pole-supported, canvas awning is preferable to the

94 RAYMOND DESIGN GUIDELINES
Traditional Canvas Awnings - Commercial Install canvas awnings to emphasize rather than obscure the architectural detailing of a historic building. For example, installing individual awnings above window and door openings can expose decorative cast-iron posts and other architectural features. Install canvas awnings to maintain, rather than disrupt, the architectural rhythm of the buildings on a block. On historic buildings with altered storefronts, install the awning to reflect the original first-story height rather than the lowered plate-glass storefront. Select awnings that compliment the style and color of the building, as well as the other buildings in the block.
117 West Main Street uses a suspended metal canopy supported by metal rods which was very common for commercial buildings built in the 1910s to 1940s. Several buildings on East main Street still have visible hooks on the front walls where the canopy supports were attached.
The canvas awnings on these two commercial buildings on Main Street show two appropriate ways to install awnings using a single awning over all of the doors and windows or the alternative of using single awnings over each opening. Originally these buildings had suspended metal canopies.
Suspended Canopies - Commercial Canopies should be constructed of wood or metal and have a slight slop away from the building to drain water to the sidewalk and away form the building. Canopies should be at least eight above the sidewalk and connect to the building above storefront windows. Metal rods or chains should be used to suspend the canopy and securely anchored to the building wall. Look for original anchors before installing new ones.

RAYMOND DESIGN GUIDELINES 95
PORCHES, ENTRANCES, ENTRY STEPS, AND ACCESSIBILITY ♦ Porches
◊ Maintenance and Repair ◊ Replacement, Alteration, and Installation
♦ Entrances ◊ Maintenance and Repair ◊ Replacement, Alteration, and Installation
♦ Entry Steps ◊ Maintenance and Repair ◊ Replacement, Alteration, and Installation
♦ Accessibility ♦ Health and Safety PORCHES Porch is a broad term that encompasses porticoes, galleries, piazzas, and verandas—terms that are both regionally and architecturally inspired. For example in Natchez, gallery is the common term for the porches that are such an integral part of the city’s architecture. However, in Charleston, South Carolina, the popular term is piazza. Houses built in the South, where the climate is warm, are more likely to have porches than their Northern counterparts.
PORCHES, ENTRANCES, ENTRY STEPS, AND ACCESSIBILITY
Porches are often the dominant architectural feature of a historic house or commercial building, and they are both functional and decorative. Porches conserve energy by providing shade and outdoor living space in the summer, and they protect sheltered portions of a building from deterioration. A historic porch with its columns, posts, balustrades, brackets, or other decorative details is also an important determiner of a building’s style and period of construction. Porch components include columns or posts which are the vertical members that support the roof structure. They can either be full height columns that go from the porch floor to the porch ceiling or can be shorter height and sit on masonry piers that extend up from the porch floor. Columns can be round and turned with different shapes or can be one of the classical order of columns including Tuscan, Doric, Ionic, Corinthian, and Composite. Within the classical order of columns there are smooth columns or fluted columns that have shallow concave groves that run vertically up the column. In between the columns usually there will be a set of balusters (short vertical pieces) that support a horizontal rail that goes between columns. The baluster together with the rail is termed a balustrade. Balusters can be of different designs corresponding with the architectural style of the building. Versions of wood balusters include: turned (of various shapes and design), square, or flat sawn cut. Balusters can also be made of iron, or other metal. In some cases historic houses were built with out the use of a balustrade in between columns and if that is the case no balustrade should be installed unless required for safety reasons. If that is the case the balustrade so be appropriate for the style of the building.

96 RAYMOND DESIGN GUIDELINES
The house at 45 Cooper’s Well Street features an integral porch with a bold square columns typical of the Greek Revival style.
In Raymond porches are found on several different architectural styles. Porches can be integral to the building, where the porch is actually inset beneath the front slope of the roof, or can be attached, where a separate roof structure covers the porch visually separating it from the main roof. The Greek Revival style of architecture uses both inset porches and attached porches with some the full width of the facade. Greek Revival style porches typically use bold massive columns that are round, fluted, or boxed. The columns usually support either a frieze with cornice or full entablature. Handrails are often built of component parts and shaped to shed water; balusters may be elaborately turned or rectangular in section.
Column Capital
Top Rail
Baluster
Balustrade
Column Base
Column
Bottom Rail
PORCH COMPONENTS
Porches of late nineteenth-century buildings in the Queen Anne style are usually generous in size and may wrap around two or more elevations of the house. Typically the Queen Anne style porch is integral with turned columns and balusters and may even have decorative brackets attached to the columns. Some later Queen Anne houses have the form of the Queen Anne style with the detailing of the Colonial Revival style. Colonial Revival porches dating to the early twentieth century echo the designs of the earlier periods with turned columns or columns of Roman classical orders. Often columns are paired together and sometimes are on bases or pedestals. Balusters of Colonial Revival houses are usually decoratively turned but slender in proportion.

PORCHES, ENTRANCES, ENTRY STEPS, AND ACCESSIBILITY
RAYMOND DESIGN GUIDELINES 97
This Colonial Revival House at 214 West Main Street features a full width and warp around porch with Tuscan style columns on bases typical of that architectural style.
A porch that features tapered box columns resting on brick piers is one of the most identifiable and common characteristics of the Craftsman/Bungalow style. The pedestals are sometimes linked by a brick porch wall that substitutes for a balustrade. In Raymond there are also Craftsman/Bungalow style houses with a more unusual combination of paired or multiple columns on a pedestal or base. There are also several houses in Raymond that are of an earlier style than the Craftsman/Bungalow style but received updated porch components during the period when Craftsman/Bungalow style houses were popular. The concrete
porch decks of the Craftsman/Bungalow style are practical innovations for lower maintenance. Pergolas are frequently incorporated into the design of Craftsman/Bungalows to create additional outside living space.
This Craftsman style house at 217 West Main Street has a projecting porch with tapered columns on brick piers typical of that style.
Porches are not as large and prominent in Tudor Revival houses, where they generally appear as unsheltered concrete entry decks, gabled entrance structures, or as outside living spaces inset beneath the main roof or a projecting gable and enclosed by low brick walls and supporting piers. The Minimal Traditional and Ranch style houses of the mid-twentieth century sometimes have porches, but they are usually only concrete decks beneath roof overhangs. Contemporary or Modern style houses feature variations on the porch with wide overhanging sloped roofs or entry porches tucked under roof lines like Ranch house.

98 RAYMOND DESIGN GUIDELINES
MAINTENANCE AND REPAIR Porches provide much enjoyment and are the most decorative architectural feature of many houses and commercial buildings. Porches also protect entrances and portions of the elevations that they shelter. However, porches that are framed and/or decked of wood require regular maintenance, and deferring maintenance can have serious and expensive consequences. Simple failure to clean and maintain gutters can cause deterioration of porch posts or columns, which are often difficult to repair and particularly expensive to replace. Retain and repair, if possible, original porch materials and detailing. The materials used to build a historic porch are probably far superior to what is available today. Modern-day epoxies can be used successfully to repair deteriorated sections of original turned posts, columns, and balusters. Repairs to box columns or square or rectangular-sectioned posts should be made with lap joints, when possible, to shed water. Butt joints are more subject to rot from water infiltration. Failure to paint and maintain porch decking accelerates deterioration of perimeter beams and joists. Bases of posts and columns should be periodically checked for signs of settlement that indicate deterioration and compression of supporting perimeter beams. Porches should be routinely painted. Joints, cracks in posts, columns, and balustrades should be carefully caulked to prevent water infiltration before painting. Improper repair of deteriorated tongue-and-groove flooring can hasten deterioration. Carpenters making repairs to porch
This Minimal Traditional style house at 240 North Oak Street has a small projecting porch supported by simple Tuscan style columns.
This Ranch style house at 113 Elm Street has an integral porch that extends to the carport supported by Tuscan style columns.

RAYMOND DESIGN GUIDELINES 99
Failure to clean and maintain gutters is the primary cause of porch deterioration such as the damage caused to the column capital.
PORCHES, ENTRANCES, ENTRY STEPS, AND ACCESSIBILITY
decking sometimes saw the rotten ends of tongue-and-groove flooring back to the first supporting joist and create a junction that is particularly vulnerable to water damage. Differences in thickness between old and new flooring can also create depressions that hold water. In making repairs, use wood that has been pressure treated to increase its resistance to rot and infestation and prime all sides before installation. Avoid planting trees that grow so large that their root systems damage nearby concrete porch decks or patios that are original features of twentieth-century historic houses. Protect and maintain historic ceramic tile that is sometimes a feature of a porch deck.

100 RAYMOND DESIGN GUIDELINES
These two Natchez shotgun houses illustrate how changing the porch components alters the historic appearance and integrity of the house. The original columns on the house on the left were replaced with metal trellis columns while the house on the right has wood columns, which are also replacements but are more in keeping with original style of the building.
REPLACEMENT, ALTERATION, AND INSTALLATION If historic porch materials are too deteriorated to repair, replacements should duplicate, as closely as possible, the deteriorated original. Inappropriate replacements alter the historic appearance of a historic building and greatly devalue its architectural significance. Among the most common inappropriate replacements include the (1) replacement of a wood porch with poured concrete, often at a lower level, (2) the replacement of posts or columns wood posts with metal trellis panels, and (3) the replacement of original wood balusters with metal or inappropriate wood substitutes. Use treated wood when replacing original porch framing, including joists as well as perimeter beams. Today, most builders laminate treated boards to replace or scab onto original perimeter beams. When reconstructing a wood-frame porch, remember that porch floors are pitched to drain water with the usual pitch being about 1:10 (fall of one inch for every 10 feet). When replacing, repairing, or installing wood porch flooring, use new, treated, tongue-and-groove flooring in a width that matches the original porch flooring or is suitable for the period in which the house was built. If in doubt, match the width of the porch flooring boards to the width of the interior flooring of the house. Prime all sides of the tongue-and-groove flooring before installation. Be sure that the flooring boards extend sufficiently beyond the fascia board (1 ½ to 2 inches) to allow water to run off without damaging the fascia board and any cover molding.
Reproduction columns and posts are readily available from column companies, which feature both stock reproductions and custom-made columns. Many stock, reproduction columns are often near replicas of the columns used in twentieth-century classical buildings. However, some nineteenth-century houses will require custom-made columns to properly fit the proportions of the building. Sometimes the best and least expensive method for obtaining a reproduction column is to ship an original column to the company making the reproduction. Shipping costs are often less than the expense of an architectural drawing.

RAYMOND DESIGN GUIDELINES 101
ENTRANCES Entrances are often the focal point of the façade of a historic building. Architectural features of entrances include frontispieces, doors, sidelights, transoms, fanlights, brackets, hoods, stoops, loggias, and other elements. Entrances, like porches, interpret the style and period of buildings. Greek Revival entrances normally use rectilinear shapes in frontispieces, transoms, and sidelights, and doors usually have two or four panels. Queen Anne style houses tend to have transomed and elaborately decorated doors, some with etched or stained-glass panels. Colonial Revival and Neo-Classical Revival entrances are often particularly grand with elaborate leaded-glass fanlights, transoms, and glazed doors. Tudor Revival entrance doorways are often arched and defined by gabled projections, which shelter arched doors with small glazed openings. Doors of Craftsman/Bungalows are generally full or partially glazed and are usually sheltered beneath the deep porches so typical of the style.
PORCHES, ENTRANCES, ENTRY STEPS, AND ACCESSIBILITY
Greek Revival Colonial Revival
MAINTENANCE AND REPAIR Original entrances with their associated components and detailing should be maintained and repaired. Replacing original doors or other features lessens the historic value of the building. Entrances with elaborate fanlights, sidelights, and/or leaded glass need to be periodically checked to make sure that glazing and metal components are in good condition. REPLACEMENT, ALTERATION, AND INSTALLATION If original entrance features are too deteriorated to repair, they should be replaced to match the original as closely as possible. If the existing entrance has been altered and the owner desires to restore it, the missing features should be based both on historical evidence and the architectural style of the building. If no historical documentation exists of the original entrance then a new entrance may be installed based on historical precedents of entrances on other historic buildings in Raymond of the same architectural style.
Queen Anne Craftsman Bungalow

102 RAYMOND DESIGN GUIDELINES
ENTRY STEPS Entry steps, like entrances themselves, can be character-defining features of a historic building. Nineteenth-century houses generally featured wood or stuccoed-brick entry steps. Because entry steps are exposed to the weather, unless sheltered within a loggia or porch, few historic houses retain original wood entry steps. Most wood entry steps built for today’s historic houses are crude imitations of the original entry steps. Old pattern books and historic photographs provide design resources for building appropriate entry steps. The main components of entry steps are treads, risers (upright board beneath tread), and stringers (diagonal board along the side). Well-detailed, wood steps for a nineteenth-century house would feature bull-nosed treads, a beaded stringer, and a bed mould beneath the tread. The overhang of the tread above both the riser and stringer should be about equal. MAINTENANCE AND REPAIR Original entry steps with their associated components and detailing should be maintained and repaired if possible. REPLACEMENT, ALTERATION, AND INSTALLATION If original entry steps are too deteriorated to repair, replacement should match the original as closely as possible. If no evidence exists to document the original entry steps, new steps should be based on the architectural style of the building.
Avoid installing entry steps that are incompatible with the age and style of the building. Simple entry steps without risers are appropriate for historic dependency buildings, country stores, or other vernacular buildings. Crude entry steps without risers are not appropriate for more sophisticated historic buildings. Avoid brick entry steps that overpower the façade of a historic building. Concerns about maintenance have caused many historic home owners to replace wood steps with brick steps. In the nineteenth and early twentieth century, bricks steps on historic buildings were traditionally stuccoed. The color, texture, and pattern of exposed brick can be very visually disruptive and overwhelm the historic character of a building.
The steps of this Greek Revival style house at 104 Dupree Street are appropriately con-structed of wood painted the same color as the porch floor.

PORCHES, ENTRANCES, ENTRY STEPS, AND ACCESSIBILITY
RAYMOND DESIGN GUIDELINES 103
This Crafts-man style house at 140 West Main Street uses c o n c r e t e steps which are appro-priate for the style of house.
The brick steps overpower this house and draw attention from the historic character of the building.
ADDITIONAL INFORMATION: Preservation Briefs: 15 – Preservation of Historic Concrete Preservation Briefs: 17 –Architectural Character Preservation Briefs: 35 –Understanding Old Buildings: The Process of Architectural Investigation Preservation Briefs: 40 –Preserving Historic Ceramic Tile Floors
The steps of this Queen Anne style house at 237 North Oak Street are appro-p r i a t e l y constructed of wood.

104 RAYMOND DESIGN GUIDELINES
SECRETARY OF THE INTERIOR’S RECCOMENDATIONS - ENTRANCES AND PORCHES Identify, retain and preserve Recommended: Identifying, retaining, and preserving entrances—and their
functional and decorative features—that are important in defining the overall historic character of the building such as doors, fanlights, sidelights, pilasters, entablatures, columns, balustrades, and stairs.
Not Recommended: Removing or radically changing entrances and porches
which are important in defining the overall historic character of the building so that, as a result, the character is diminished.
Stripping entrances and porches of historic material such as
wood, cast iron, terra cotta tile, and brick. Removing an entrance or porch because the building has
been reoriented to accommodate a new use. Cutting new entrances on the primary elevation. Altering utilitarian or service entrances so they appear to be
formal entrances by adding paneled doors, fanlights, and sidelights.
Protect and Maintain Recommended: Protecting and maintaining the masonry, wood, and
architectural metal that comprise entrances and porches through appropriate surface treatments such as cleaning, rust removal, limited paint removal, and re-application of protective coating systems.
Not Recommended: Failing to provide adequate protection to materials on a
cyclical basis so that deterioration of entrances and porches results.
Recommended: Evaluating the overall condition of materials to determine
whether more than protection and maintenance are required, that is, if repairs to entrance and porch features will be necessary.
Not Recommended: Failing to undertake adequate measures to assure the
protection of historic entrances and porches. Repair Recommended: Repairing entrances and porches by reinforcing the historic
materials. Repair will also generally include the limited replacement in kind—or with compatible substitute material—of those extensively deteriorated or missing parts of repeated features where there are surviving prototypes such as balustrades, cornices, entablatures, columns,

RAYMOND DESIGN GUIDELINES 105
sidelights, and stairs. Not Recommended: Replacing an entire entrance or porch when the repair of
materials and limited replacement of parts are appropriate. Using a substitute material for the replacement parts that
does not convey the visual appearance of the surviving parts of the entrance and porch or that is physically or chemically incompatible.
Replace Recommended: Replacing in kind an entire entrance or porch that is too
deteriorated to repair—if the form and detailing are still evident—using the physical evidence as a model to reproduce the feature. If using the same kind of material is not technically or economically feasible, then a compatible substitute material may be considered.
Not Recommended: Removing an entrance or porch that is not repairable and not
replacing it; or replacing it with a new entrance or porch that does not convey the same visual appearance.
ACCESSIBILITY The enactment of the Americans with Disabilities Act in 1990 (also the Architectural Barriers Act of 1968 and Section 504 of the Rehabilitation Act of 1973) has presented new challenges to
PORCHES, ENTRANCES, ENTRY STEPS, AND ACCESSIBILITY
owners of historic properties open to the public. According to the Secretary of the Interior’s Standards for Rehabilitation, “The goal is to provide the highest level of access with the lowest level of impact.” Successful projects are usually the result of carefully balancing historic preservation concerns with accessibility needs. Most historic buildings open to the public are not exempt from providing accessibility. In many cases, historic buildings can be made accessible with few physical alterations. Modification may be as simple and inexpensive as a ramp and the creation of a designated parking space. Some buildings, particularly those with first stories raised high above ground level, present a formidable challenge that can only be overcome by installation of an elevator and associated exterior and interior remodeling. Programmatic access, which can be achieved through an exhibit or audio-visual program, may be the only solution to providing access to areas of some historic buildings or to natural attractions. Too often, property owners construct insensitive, overpowering ramps that would be more at home on modern beachfront properties. Careful planning, utilizing design and historic preservation professionals, can insure that the historic character is preserved and that the building is accessible to disabled visitors.
This former house in Amory, now a dentist office, uses an incon-spicuous ramp to the side of the stairs to provide accessibility to the building.

106 RAYMOND DESIGN GUIDELINES
ADDITIONAL INFORMATION: Preservation Briefs: 32 –Making Historic Properties Accessible
SECRETARY OF THE INTERIOR’S RECOMMENDATIONS - ACCESSIBILITY Recommended: Identifying the historic building’s character-defining spaces,
features, and finishes so that accessibility code-required work will not result in their damage or loss.
Not Recommended: Undertaking code-required alterations before identifying
those spaces, features or finishes which are character-defining and must therefore be preserved.
Recommended: Complying with barrier-free access requirements, in such a
manner that character-defining spaces, features, and finishes are preserved.
Not Recommended: Altering, damaging, or destroying character-defining
features in attempting to comply with accessibility requirements.
Recommended: Working with local disability groups, access specialists, and
historic preservation specialists to determine the most appropriate solution to access problems.
Not Recommended: Making changes to buildings without first seeking expert
advice from access specialists and historic preservationists, to determine solutions.
Recommended: Providing barrier-free access that promotes independence
for the disabled person to the highest degree practicable, while preserving significant historic features.
Not Recommended: Providing access modifications that do not provide a
reasonable balance between independent, safe access and
The example of the ramp on a commercial building in Port Gibson p r o v i d e s accessibility to the building in a sensitive manner.

RAYMOND DESIGN GUIDELINES 107
HEALTH AND SAFETY Evolving local, state, and federal regulations regarding health and safety codes can impact the exterior appearance of historic buildings. Fire codes for residential use of commercial buildings may require additional fire-rated staircases or fire escapes. Apartment conversions of second-story spaces in historic commercial buildings may require street entrances and/or exits, which necessitate alterations to facades or interiors of commercial spaces. Fire codes also often require alterations to entrance doors of buildings that are open to the public. Historically, entrance doors opened inward, but fire codes require that doors open outward. Original balustrades on historic porches and balconies may need to be retrofitted to meet height codes, and buildings that historically had no balustrades may need to add them to insure that the buildings comply with safety codes.
Too often, property owners make insensitive or radical alterations to the historic character of buildings to make them conform to code. Often a simple addition will solve the problem. For example, installing a plain horizontal rod or bar above a historic balustrade is often all that is needed to meet the height code. Careful planning that utilizes design and historic preservation professionals can insure that the historic character is preserved and that the building meets health and safety codes. Many historic buildings commonly contain materials that have been determined to be toxic or potentially hazardous to occupants and/or workers. Materials like roofing, siding, insulation, and floor coverings sometimes contain asbestos. Historic buildings also contain lead-based paint, which was banned about 1978. Historic building owners need to insure that all workers involved in the encapsulation, repair, or removal of toxic materials are properly trained and that disposal of toxic materials conforms to health and safety codes.
SECRETARY OF THE INTERIOR’S RECOMMENDATIONS - HEALTH AND SAFETY Recommended: Identifying the historic building’s character-defining spaces,
features, and finishes so that code-required work will not result in their damage or loss.
Not Recommended: Undertaking code-required alterations to a building or site
before identifying those spaces, features, or finishes which are character-defining and most therefore be preserved.
PORCHES, ENTRANCES, ENTRY STEPS, AND ACCESSIBILITY
preservation of historic features. Recommended: Designing new or additional means of access that are
compatible with the historic property and its setting. Not Recommended: Designing new or additional means of access without
considering the impact on the historic property and its setting.

108 RAYMOND DESIGN GUIDELINES
Recommended: Complying with health and safety codes, including seismic
code requirements, in such a manner that character-defining spaces, features, and finishes are preserved.
Not Recommended: Altering, damaging, or destroying character-defining spaces,
features, and finishes while making modifications to a building or site to comply with safety codes.
Recommended: Removing toxic building materials only after thorough
testing has been conducted and only after less invasive abatement methods have been shown to be inadequate.
Not Recommended: Destroying historic interior features and finishes without
careful testing and without considering less invasive abatement methods.
Recommended: Providing workers with appropriate personal protective
equipment for hazards found in the worksite. Not Recommended: Removing unhealthful building materials without regard to
personal and environmental safety. Recommended: Working with local code officials to investigate systems,
methods, or devices of equivalent or superior effectiveness
and safety to those prescribed by code so that unnecessary alterations can be avoided.
Not Recommended: Making changes to historic buildings without first exploring
equivalent health and safety systems, methods, or devices that may be less damaging to historic spaces, features, and
finishes. Recommended: Upgrading historic stairways and elevators to meet health
and safety codes in a manner that assures their preservation, i.e., so that they are not damaged or obscured.
Not Recommended: Damaging or obscuring historic stairways and elevators or
altering adjacent spaces in the process of doing work to meet code requirements.
Recommended: Installing sensitively designed fire suppression systems,
such as sprinkler systems that result in retention of historic features and finishes.
Not Recommended: Covering character-defining wood features with fire-
resistant sheathing which results in altering their visual appearance.
Recommended: Applying fire-retardant coating, such as intumescent paints,

RAYMOND DESIGN GUIDELINES 109
which expand during fire to add thermal protection to steel.
Not Recommended: Using fire-retardant coatings if they damage or obscure
character-defining features.
Recommended: Adding a new stairway or elevator to meet health and safety
codes in a manner that preserves adjacent character-defining features and spaces.
Not Recommended: Radically changing, damaging, or destroying character-
defining spaces, features, or finishes when adding a new code-required stairway or elevator.
Recommended: Placing a code-required stairway or elevator that cannot be
accommodated within the historic building in a new exterior addition. Such an addition should be on an inconspicuous elevation.
Not Recommended: Constructing a new addition to accommodate code-required
stairs and elevators on character-defining elevations highly visible from the street, or where it obscures, damages, or destroys character-defining features.
STOREFRONTS
♦ Storefront Architecture ♦ Raymond Historic District Commercial Architecture ♦ Maintenance and Repair ♦ Replacement and Alteration ♦ Roofs ♦ Exterior Materials ♦ Storefronts
◊ Doors ◊ Windows
♦ Awnings ♦ New Construction ♦ New Additions ♦ Selecting an Effective Storefront Sign in Raymond
◊ Types of Signs ◊ Materials, Lettering, Colors, and Styles ◊ Guidelines for Signs and Recommendations
STOREFRONT ARCHITECTURE The term storefront architecture is often used to describe the architectural form of downtown commercial buildings. Since many historic commercial buildings share party walls and their rear elevations face onto service alleys, the storefront is the architectural identity of the building. Like churches, schools, fire stations, and courthouses, storefront architecture is an identifiable building form that can be expressed in different architectural styles.
STOREFRONTS

110 RAYMOND DESIGN GUIDELINES
Today’s “modern” storefronts date principally from innovations in the 1920s and 30s, which witnessed the widespread use of plate glass and the introduction of aluminum, stainless steel, pigmented structural glass, tinted and mirrored glass, glass block, and neon to storefront architecture. Also, during this period, fixed metal canopies began to replace operable canvas awnings. A storefront is more than the architectural identity of a commercial building; it is also the commercial identity of the business behind the storefront. When businesses change, storefronts are often remodeled. Business owners also remodel storefronts to give their businesses a new look in the hope of creating new interest in their services or goods. Businesses are also competitive, and construction of new commercial buildings often spawns copy-cat remodelings of older buildings. Frequently, business owners remodel only the street level or lower floors of multi-story buildings and create buildings with split architectural personalities. Owners of historic commercial buildings confront several issues in maintaining and rehabilitating storefronts. They need to determine the original appearance of the building and to evaluate both the condition of the building and the significance of later changes. They also need to consider the commercial use of the building. For example, historic buildings remodeled for use as jewelry stores in the mid-twentieth century are not generally functional for other retail uses, since the amount of display glass was greatly reduced.
Early storefront architecture mimicked that of residential styles with similar sized window openings and wood doors. However in the late nineteenth-century glass manufacturing began to allow for larger sheets of glass than previously possible. This allowed commercial storefronts to become more transparent so people could see the wares inside and allow more light into the commercial spaces. Paralleling the evolution of glass size was the nineteenth-century development of architectural cast iron, which allowed structural members to reduce in size and accommodate larger pieces of glass. The parapet façade also became a character-defining feature for storefront architecture during that time. By the late nineteenth century, ornamental parapets in stamped or pressed metal adorned commercial buildings all across America. A typical, late nineteenth-century storefront might feature a transomed entrance of double-leaf glazed doors flanked by display windows with transoms above and molded panels beneath. If the building was two stories to one side of the storefront was sometimes a transomed opening with single-leaf door that provided access to the upper story of the building. Cast-iron posts, both structural and ornamental, flanked the storefront sections and supported the upper wall, which typically rested on an iron beam. Recessed entrances also became popular in the late nineteenth and early twentieth centuries to provide shelter for sidewalk shoppers and to increase display space. Also popular were cloth awnings, which provided shelter for shoppers and protected merchandise from the sun.
STOREFRONTS
RAYMOND DESIGN GUIDELINES 111
RAYMOND HISTORIC DISTRICT COMMERCIAL ARCHITECTURE The Raymond Historic District has a unique and distinctive appearance because of the manner in which it developed and because of the pattern formed by its construction. As typical with many other communities in Mississippi the commercial portion of the town of Raymond sprung up around the original county courthouse which was located in the middle of Town Square where the water tank is currently located. When the courthouse moved to the current location the commercial area remained and formed the commercial core of the town. In Raymond the commercial buildings located along the streets that surround the Town Square and later expanded towards the relocated courthouse. In general most of the current buildings are turn-of-the-century, one-story, attached in a row, and line the sidewalk. There are a couple of two-story buildings, the Merchants and Planters Bank constructed in 1923 and the Keith Press building constructed circa 1830, which is the oldest commercial building in Raymond. Brick construction, awnings, and signs are characteristic of the historic commercial area of Raymond. Historically there were more commercial buildings in Raymond; however, over the years buildings were removed for new commercial buildings and modern service stations. Buildings were removed at two major corners along Main Street for the construction of service stations. The new commercial buildings that have been constructed are mostly freestanding. It is easy to distinguish them because of the use of materials, openings, roof shape, and ornamentation that are not always compatible with
the historic commercial architecture of Raymond. The use of buildings in the historic district vary with three common types: commercial or retail establishments; industrial enterprises; and public or civic institutions. The majority of the buildings are commercial in character. As buildings are reused, new uses which may not be the same as the original use are often introduced into an existing building. For example, commercial storefronts have been converted to restaurants, professional offices, or other uses. This “recycling” of buildings is called adaptive reuse and is encouraged to save historic buildings and keep them in use. Changes in use do not have to negatively impact the historic character of a building. There are different types of storefront architecture with three common building types in the Raymond Historic District. A building type can indicate how unique the building is, and in some cases, identify the historic period in which the structure was most likely constructed. The three most common commercial building types in the historic district are: the store-front, double-front, and business block. The Store-front type is the simplest type of commercial architecture named for the traditional use of the its first floor as a store. Typically store-fronts are made up of a large opening in the façade supported by cast iron columns or other vertical divisions separating a central entrance flanked by display windows on either side. Most store-fronts have symmetrical divisions. In earlier store-front buildings transoms were located over doors and display windows to allow additional light into

112 RAYMOND DESIGN GUIDELINES
The top photo (courtesy of Pattie Adams Snowball) shows 104 East Main Street in the 1940s and the bottom photo is the same building today. The building is a store-front type with a central entrance flanked by display glass and separated by cast iron columns. Note the original transoms in the top photo which are now covered by the awning. Originally the building had a suspended metal canopy rather than the awnings it has today.
the building. Awnings have also been used historically on buildings to help direct sun-light to the interiors of buildings or latter when electricity was available to shield the building from the heat of the sun. In Raymond one-story storefronts are common and grouped together to form a commercial block.
The Double-front commercial building was built for two enterprises with a common façade and detailing. Buildings may be one or two stories high. The double-front differs from the business block, which also may have two storefronts, in that it does not have an emphasized central entrance or a high degree of ornamentation. The store-fronts for each portion of the building may be symmetrical or asymmetrical with the division of the opening between the entry door or doors and the display glass.
The building at 126-128 West Main Street is a good example of a double-front commercial building with its clearly divided store-front areas, yet they have similar detailing to the doors and display windows.
The Business Block refers to a commercial building which usually covers a large or entire city lot. The building can be multiple stories and sometimes has a high degree of architectural detailing. A prominent central entrance may be emphasized further by a roof pediment. If the ground level is divided into a series of storefronts, such buildings may be referred to as continuous business blocks. Secondary entrances to upper levels are common. There were several of these types

RAYMOND DESIGN GUIDELINES 113
of buildings in Raymond; however, there is only one remaining with the Merchants and Planters bank constructed in 1923. With the recent renovation of the bank the wrap-around gallery was added which was not original to the building.
The top photo (courtesy of Pattie Adams Snowball) shows the Merchants and Planters Bank in 1929 and the bottom photo is the same building today after its recent renovation which added the wrap-around gallery. The building is a good example of the business block with a prominent entrance, in this case a corner entrance instead of a central entrance.
MAINTENANCE AND REPAIR Maintain and repair original features of storefronts, if possible. Evaluate the condition and significance of later changes to determine whether the remodeling itself is significant. Historic preservation specialists recommend maintaining and repairing a later storefront remodeling of an older building if it has achieved significance in its own right and in repairable condition. If the later remodeling and its architectural features are not individually significant and/or deteriorated, the property owner may decide to restore the original appearance of the commercial building based on the surviving physical evidence and/or historic photographs. REPLACEMENT AND ALTERATION With a growing appreciation of historic architecture and increased interest in heritage tourism, many business owners are now restoring historic storefronts, and these restored storefronts are proving beneficial to business. The restoration of historic storefronts is a major component of many downtown revitalization programs. Many communities have discovered that the restored storefront is actually the most versatile storefront treatment, because it allows buildings to function as retail, office, or even residential, if that is the only market for the building. In addition to historic photographs, consult Sanborn Insurance Maps, business letterheads, newspaper advertisements, and city directories for architectural footprints and drawings to document

114 RAYMOND DESIGN GUIDELINES
the original appearance of the building. Check sidewalks for evidence of supporting posts for porches, and examine the base of buildings for surviving original thresholds. Historic photographs of similar buildings in the same community can also serve as good references for restoring a historic storefront. With alterations to commercial storefront buildings avoid creating a historic appearance that never existed. Many business owners created “colonial” storefronts during the mid-twentieth century in a misguided attempt to create a historic appearance. Common elements of the typical “colonial” storefront were multi-paned windows, doorway pediments, poorly fitting shutters, and lap siding. The installation of an entire aluminum storefront and an aluminum canopy became a popular treatment for commercial buildings in the 1950s and 1960s. By the 1970s, almost every city in American featured one or more commercial buildings whose facades were totally obscured by windowless aluminum. In the 1960s and 1970s, the addition of shingled mansard roofs became popular as quick storefront fix-ups. Also popular were the fake New Orleans storefronts, which featured “old brick,” modern French doors, shutters, and iron balconies. If the storefront has been altered over time and it is desired to go back with a more appropriate storefront, it is acceptable to install a contemporary treatment that respects the character of the historic building and is compatible with the streetscape. For example, the new storefront openings might echo the conjectural size and placement of original openings but feature simple glass infill.
Avoid creating a false historic appearance like this one-story building in Natchez where a faux New Orleans style balcony and doors were added to make it look like a two-story building.

STOREFRONTS
RAYMOND DESIGN GUIDELINES 115
No photographs existed to guide the restoration of the first-story of the Natchez commercial buildings above and below. Following National Park Service guidelines, the owner installed a contemporary first-story storefront that is compatible with the building and the streetscape in the top photo. Below original storefront doors found in the building and historical precedents and patterning found on other Natchez buildings were used for the new storefront design.
ROOFS Roofs are an important character-defining feature of commercial buildings. Rooflines of commercial buildings are primarily distinguished by the use of parapets or false front walls which extend above the storefront to create a distinctive profile and provide and area for signage. The parapet also hides the low-pitched or flat roof behind the parapet. Civic or institutional buildings generally do not follow this rule and have more traditional style hip and gable roofs like the Hinds County Courthouse and City Hall. The roof design of historic commercial buildings should be maintained and preserved. Aspects of roof design such as shape, symmetry, and complexity should be preserved. Most of the commercial roofs in Raymond are very simple with a parapet wall hiding a flat or low slopped roof. Changes which alter, or cover the original roof are allowable as long as they do not rise above the parapet line and are visible from the front façade. It is also important to maintain the parapet design and to not embellish it with additional architectural detailing. Any roof repair or replacement materials for an existing roof that is visible should match the original materials as closely as possible. Architecturally distinctive roofing materials should be carefully handled during repairs and reused when possible. Since parapets are designed to hide roofs any changes or replacement of a roof behind a parapet are acceptable. It is not as important to match the original roof materials when they are hidden by the parapet. Roof pitch may be also altered for improved drainage, provided that the new roof does not rise above the parapet or lap over onto building elevations.

116 RAYMOND DESIGN GUIDELINES
EXTERIOR MATERIALS The exterior materials and ornament of a historic commercial contribute to its historic integrity and have a significant impact upon its visual character. Typically the primary building material in historic commercial buildings is brick which was used to provide better resistance against fire, and add to a perception of stability and quality for business establishments. Other items that contribute to the character of a historic commercial building are cornices, trim, brackets, braces, moldings, shingles and other such decorative features. Those features are typically wood or metal and contribute ornamentation to commercial buildings. Exterior materials should be preserved and maintained where possible. Since brick is normally the most common exterior material, it is tremendously significant to the character of the historic district. The use of modern replacement materials, such as vinyl or aluminum siding, stucco or synthetic stucco (E.I.F.S.), metal slip covers, western-motif plank siding, etc. should be avoided and not cover a historic façade. The use of those materials diminishes the historic integrity of the building the ability of the building to be a contributing structure in the historic district. When repairing the façade of a historic commercial building care should be taken so that repairs are only done where necessary and in limited areas. Repairs should be sensitive to historic materials and use matching or like materials. Only the damaged material should be removed and the repair should be a an in kind replacement. If brick repointing is necessary the
Parapets are distinguishing features of historic commercial buildings and mask the visibility of the roof which is usually flat or low slopping behind the parapet. Often the parapet has decorative brick work and a sign board.
The addition of a gable roof behind a parapet is not consistent with the traditional use of parapets to hide the roof of a commercial building and should be avoided.

RAYMOND DESIGN GUIDELINES 117
replacement mortar should be carefully selected because modern portland cement is too rigid when it hardens and will cause damage to historic bricks as they expand and contract with changes in the weather. When cleaning of exterior surfaces is necessary the gentlest means possible should be used. Never sandblast exterior surfaces to clean or remove paint. Buildings that never have been painted should remain that way unless previous repair or damage has caused significant contrast between original brick and mortar. Non-historic buildings may be painted which can camouflage over-sized or variegated brick and help to increase compatibility with neighboring buildings. Whenever paint is applied to brick it will become a maintenance issue and need repainting when the paint fails and starts to flake off the building. If painting a brick surface special paint should be used to bond to the masonry to increase the life of the paint job. Bright, iridescent, or florescent paint colors are not appropriate for historic buildings. Neutral colors are preferred, and historic paint palettes are available at most paint stores. If the building has architectural elements, such as cornices they should be retained and never removed or covered up. The alignment of decorative features along a block of buildings is a distinguishing feature of many historic commercial buildings. Those elements visually connect the buildings. Brick storefronts also commonly use decorative brickwork, such as brick corbelling at the roofline, along the cornice, and on the parapet wall. Most historic industrial buildings are usually devoid of ornament. Classical ornamentation, such as pediments, large scale freestanding columns, entablatures, and quoins are most often used on non-commercial buildings such as institutional, civic and religious buildings.
STOREFRONT The storefront to a historic commercial building is a very important defining feature made up of the building’s entrance and display windows. Most historic storefronts use extensive glass surfaces for display windows, and often transom windows above the doors and display glass which allowed additional light to enter into the building before electricity was used to light interior spaces. The design of historic storefronts are very important to the character of the historic district. The division between door openings and display window openings are often
In an attempt to modernize the Merchants and Planters Bank in the 1970s the building was covered by metal panels which hid the brick work and original windows of the façade. The storefront level also had extensive renovations with the removal of original windows and the addition of a modern brick veneer and new canopy covering the sidewalk.
STOREFRONTS

118 RAYMOND DESIGN GUIDELINES
separated by cast iron columns, brick columns, or sometimes the only separation between doors and windows is wood casings around the doors and windows. Often found on later commercial buildings are recessed entrances with larger glassed areas for the display of goods. On two-story commercial buildings there is normally a separate entrance for the upper floor. The original storefront configuration and materials should be preserved and maintained and should not be removed, covered or enclosed. Storefront entrances should not be relocated or infilled. The display windows and transoms should not be enclosed, replaced with a different window type, or covered with a false front.
If the original storefront is too deteriorated to save and repair, the replacement should accurately replicate the original in design and material. Where the original storefront no longer exists, the replacement should be based on historical research and physical evidence. When there is no documentation available, a new storefront should be designed which is compatible with the original storefronts of adjacent and nearby historic buildings.
This historic commercial building in Como, Mississippi has been drastically altered with the removal of the original display glass and doors and replacement with inappropriate wood siding and a modern residential style door and windows. The original cast iron columns are still visible showing the original divisions of the storefront.
Doors The original doors of a historic commercial building are an important feature and when still existing should be preserved and maintained. The original doors, their surrounds, and hardware should be retained where possible. The entrance elements such as the location, configuration (recessed or canted), number and type of doors, should not be altered. The primary entrance should never be enclosed. The secondary entrances for upper floor access and service/delivery area should also be preserved and left in place even if they are no longer being used. If historic doors need to be repaired or replaced care should be taken to match original materials and design as closely as possible. Instead of replacing an entire door the deteriorated sections should be repaired or replaced. If replacement of a door becomes necessary, the replacement should match the historic door in size, shape, materials, and panel patterns. Residential type doors or unfinished aluminum doors should not be installed. The use of decorative doors or additions of surrounds to simple front entrances or utilitarian entrances should be avoided as it decreases the historic integrity of a

STOREFRONTS
RAYMOND DESIGN GUIDELINES 119
building. Warehouse entrances are particularly simple and should not be embellished to create more formal entrances, such as those more characteristic of institutional and civic buildings or residential architecture. Windows Storefront windows that make up a display area and on earlier commercial buildings transom windows are both essential to the commercial character of the storefront and differentiate it from residential buildings. Typically display windows used on commercial storefronts are single pane and fixed. They are often trimmed in wood or metal with later storefronts. Original window configuration should be maintained and preserved. The display windows and transoms should not be removed or covered up. If windows are damaged they should be repaired by only replacing the deteriorated sections with the same material with the same dimensions as the original. If replacement glass is necessary it should be clear and not tinted. Multi-divided pane windows should not be used as replacements if there is no historic evidence for such a window. Additional windows should not be added as well. Below the display window are panels, usually of wood that extend to the ground below the window frame. The panels sometimes have detailing such as decorative recessed panels, or masonry ledges. On later commercial storefronts brick was used below display windows. It is important to maintain the historic panels below windows and during repairs it is important
to replace damaged sections with matching materials. Original wood panels should not be replaced with brick or other siding. On industrial buildings windows are normally smaller, sometimes have sash, and some may even have historic metal frame windows. Those are characteristic of industrial properties and should remain. On the other hand, civic or institutional buildings have more prominent and regularly-spaced windows often more residential in style and type.
AWNINGS AND CANOPIES Awnings historically were used on commercial buildings to help shade sidewalks and provide an outdoor covered area for the display of goods. Later flat canopies were used to help shade storefront windows while bouncing light off of the canopy into the building through the transom windows. If historic awnings or canopies are still existing they should be preserved. Historic examples should be repaired using durable materials similar to the original. When designing new awnings or canopies they should be appropriate to the architectural character of the building and based on historic documentation. It is inappropriate to add awnings based on residential styles of architecture such as mansard or hipped roofs. New awnings should reinforce the scale and design of the building. The design should be evaluated in terms of placement, shape, size, and material. New awnings and canopies should compliment the building without obscuring storefront details and exterior ornament. Attachments

120 RAYMOND DESIGN GUIDELINES
ADDITIONAL INFORMATION: Preservation Briefs: 11 – Rehabilitating Historic Storefronts
SECRETARY OF INTERIOR’S RECOMMENDATIONS - STOREFRONTS Identify, Retain, and Preserve Recommended: Identifying, retaining, and preserving storefronts—and their
functional and decorative features—that are important in defining the overall historic character of the building such as display windows, signs, doors, transoms, kick plates, corner posts, and entablatures. The removal of inappropriate, non-historic cladding, false mansard roofs, and other later alterations can help reveal the historic character of a storefront.
Not recommended: Removing or radically changing storefronts—and their
features—which are important in defining the overall historic character of the building so that, as a result, the character is diminished.
Changing the storefront so that it appears residential rather
than commercial in character. Removing historic material from the storefront to create a
recessed arcade.
should reflect the shape of and fit neatly within the frame of existing openings. Generally convex and concave awnings are not appropriate for historic buildings. Awnings and canopies should also not span several buildings and be individual to each building. Materials and illumination for awnings or canopies should respect the historic character of the district. Fabric is the most appropriate choice for awnings and metal is the most appropriate choice for canopies. Fabric colors for awnings should compliment the existing colors on the building or a new color scheme if changing the color of a building. Awnings should not be internally lit.
This historic commercial building in Newton, Mississippi had an inappropriate shingled awning added to the building and the original storefront was removed and inappropriately replaced with board-and-batten siding with a residential door and windows.

RAYMOND DESIGN GUIDELINES 121
Stripping storefronts of historic material such as wood, cast-iron, terra cotta, carrara glass, and brick.
Recommended: Evaluating the overall condition of storefront materials to
determine whether more than protection and maintenance are required, that is, if repairs to features will be necessary.
Not Recommended: Failing to undertake adequate measures to assure the
preservation of the historic storefront. Recommended: Repairing storefronts by reinforcing the historic materials. Repairs will also generally include the limited replacement
in kind—or with compatible substitute materials—of those extensively deteriorated or missing parts of storefronts where there are surviving prototypes such as transoms, kick plates, pilasters, or signs.
Not Recommended: Replacing an entire storefront when repair of materials and
limited replacement of its parts are appropriate. Using substitute material for the replacement parts that does
not convey the same visual appearance as the surviving parts of the storefront or that is physically or chemically incompatible.
Introducing coach lanterns, mansard designs, wood shakes, non-operable shutters, and small-paned windows if they cannot be documented historically.
Changing the location of a storefront’s main entrance. Protect Recommended: Protecting and maintaining masonry, wood, and
architectural metals which comprise storefronts through appropriate treatments such as cleaning, rust removal, limited paint removal, and reapplication of protective coating systems.
Not Recommended: Failing to provide adequate protection of materials on a
cyclical basis so that deterioration of storefront features results.
Recommended: Protecting storefronts against arson and vandalism before
work begins by boarding up windows and installing alarm systems that are keyed into local protection agencies.
Not Recommended: Permitting entry into the building through unsecured or
broken windows and doors so that interior features and finishes are damaged through exposure to weather or through vandalism.

122 RAYMOND DESIGN GUIDELINES
Replace Recommended: Replacing in kind an entire storefront that is too deteriorated
to repair—if the overall form and detailing are still evident—using the physical evidence as a model. If using the same material is not technically or economically feasible, then compatible substitute materials may be considered.
Not Recommended: Removing a storefront that is not repairable and not
replacing it; or replacing it with a new storefront that does not convey the same visual appearance.
Design for Missing Historic Features Recommended: Designing and constructing a new storefront when the
historic storefront is completely missing. It may be an accurate restoration during historical, pictorial, and physical documentation; or be a new design that is compatible with the size, scale, material, and color of the historic building.
Not Recommended: Creating a false historical appearance because the replaced
storefront is based on insufficient historical, pictorial, and physical documentation.
Introducing a new design that is incompatible in size, scale,
material, and color.
The photos above show Main Street in 1929 and today. Notice the changes that have taken place on the northeast side of the street where the historic two-story commercial buildings where removed for the construction of the service station. The bank has also been altered from the original design. Historic photo courtesy of Pattie Adams Snowball.

STOREFRONTS
RAYMOND DESIGN GUIDELINES 123
NEW CONSTRUCTION Raymond is unique in that the downtown commercial area has available space for new development and has some modern development inconsistent with the historic character of Raymond that could be replaced with more appropriate structures. New construction in the commercial area of downtown Raymond does not have to mimic or copy architectural styles of the past. However, new buildings should harmonize with the existing commercial buildings and their design should be complementary rather than intrusive. The commercial area of Raymond has varying styles and sizes of buildings built at different times and it should not be difficult to design new a new commercial building to fit in with the existing buildings. Raymond benefits economically from their historic character, and intrusive new construction could undermine the economic value of the community’s architectural heritage. An ultra modern, multi-story building in downtown would devalue Raymond’s historic character. Historic photos of commercial buildings and the existing historic commercial buildings in Raymond can serve as a guide for new construction. The following should be taken in to account when designing a new building for the downtown commercial area in Raymond: Style Building style shall be appropriate to the site. While no particular style shall be specified, building style shall be complementary to its surroundings. The selected style shall not unduly detract from, or disturb the overall pattern of historic
development of the town of Raymond. Style shall generally be determined by the subject structure's area of influence. Look at other buildings in the historic district for design ideas. Historic photographs showing commercial buildings in Raymond can also serve as a guide, although replicas of previous buildings should be avoided to prevent a false sense of history.
The photo above shows two historic commercial buildings in Raymond which are no longer surviving. The design and style of the buildings could serve as a design influence for new commercial buildings in Raymond. Historic photo courtesy of Pattie Adams Snowball.

124 RAYMOND DESIGN GUIDELINES
Orientation and Setback Placement of a new commercial building on a lot is an important characteristic of site planning. That includes how far the building is from the front of the lot, or the setback, and the distance between buildings on adjoining lots, or spacing. In the Raymond Heritage District, most commercial buildings share a similar setback and spacing. Orientation is another important characteristic of the placement of a new building. It simply refers to the direction that the primary façade of the building faces. Most commercial buildings in Raymond face the street.
The construction of new buildings in the historic district should follow the traditional placement of historic commercial buildings on a lot. Historically commercial buildings were constructed right to the edge of the property to abut the sidewalk with a zero setback. This pattern of development should continue. New buildings should line up with the facades of other existing buildings. Under no circumstances should a new
The new building in the center above follows the traditional setback of its historic neighbors while the new building in the center below disrupts the pattern with the front wall setback further from neighboring buildings leaving a space between the sidewalk and the new building. Images from the City of Cleveland’s Crosstie Historic District Design Guidelines.
Inappropriate placement and orientation detract from the visual character of the historic district as illustrated above. New buildings should not be oriented differently from their neighbors. Image from the City of Cleveland’s Crosstie Historic District Design Guidelines.
building be setback farther from the other neighboring buildings. Buildings should also not be setback to provide parking in front of the building. If off-street parking is required then it should be to the rear of the new building. Infill constriction, or construction between two existing buildings should go from wall to wall without any spacing in between to maintain the characteristic of historic commercial buildings built wall to wall. Civic or institutional buildings are exceptions to the rule; as they are generally freestanding and located centrally upon the property.

RAYMOND DESIGN GUIDELINES 125
Size and Scale New buildings in the commercial area shall be appropriately related to its site with regard to its size. This means that in the commercial areas, a building may cover the entire site, provided that pattern exists in the building’s area of influence. Section 1301 of the adopted Historic Preservation Plan for Raymond states that no new building may exceed 4,000 square feet of gross area with the Historic District. New buildings should also be of an appropriate scale in relation to its neighbors. This means that the new building should not be excessively larger or smaller that those buildings on either side. New buildings should be compatible to their neighbors to not over power them or look out of scale.
Though this new building has the same rectilinear form and number of stories as its historic neighbors, it fails to match their height due to a lower roofline and the lack of a parapet. Image from the City of Cleveland’s Crosstie Historic District Design Guidelines.
The new building in the center above is out of scale compared to the neighboring buildings and should be avoided. Image from the City of Cleveland’s Crosstie Historic District Design Guidelines.
Height The height of new buildings should be compatible with the existing buildings in downtown Raymond and should not be taller than two stories. The height of each story should also be compatible with neighboring buildings. Typically on a two-story building the first story is usually taller than the second story.
STOREFRONTS
Mass New buildings should exhibit appropriate massing. This means that a building shall be professionally designed so that its component parts are proportionally related to each other based on historic examples.

126 RAYMOND DESIGN GUIDELINES
The fenestration pattern of the new building in the center is inappropriate as it does not follow the same solid-to-void (wall-to-window) ratio as its neighbors. Image from the City of Cleveland’s Crosstie Historic District Design Guidelines.
The fenestration pattern of the new building in the center above is more appropriate as it more closely follows the same solid-to-void (wall-to-window) ratio as its neighbors. Image from the City of Cleveland’s Crosstie Historic District Design Guide-lines.
Fenestration Pattern The fenestration pattern of a building refers to the relationship of the door and window openings to the façade. Typically historic buildings had very symmetrical fenestration patterns with even spacing of doors and window openings. In early buildings before the use of large storefront glass pairs of wood doors with glass were used. If it was a two-story building the windows on the second floor would be placed over the door openings. With the advent of improved glass technology the availability of large glass sheets made commercial storefronts more transparent and the ratio of wall surface to glass was greatly reduced. In the case of a two-story building the windows on the second floor would still be placed evenly although the ratio of window openings to wall surface would be much greater. Storefront windows can be framed in metal however storefront doors should be wood and have a large glass panel. If a two-story building the windows on the second story should be wood double hung units.
Materials and Textures Materials used in the construction of new buildings in downtown Raymond should be similar to those existing on other buildings. Brick is most common building material and is very appropriate for new commercial buildings. Traditional stucco would also be appropriate. Materials that are not appropriate for new commercial buildings include: concrete block, vinyl siding, Dryvit or similar product, corrugated tin, commercial metal panels, and fake brick. Wood lap siding or cement fiber board siding shall only be allowed on a case by case basis and only for one-story buildings. Roofs Roofs of new commercial buildings should be flat or sloped to the rear. Roofs can be hidden behind front and side parapets. Hipped or gable roofs will only be allowed on a case by case basis.

RAYMOND DESIGN GUIDELINES 127
The circa 1965 building in Natchez on the right stands on the same block as the ca. 1870 historic building on the left. This is an example of incompatible new commercial construction with inappropriate height, scale, proportion, massing, and roof design for the streetscape.
NEW ADDITIONS Additions to existing commercial buildings should be placed to the rear of the existing building. Additions should never be added to the front of a building as it can have a negative impact on the facade line. The most appropriate place for a new addition is on the rear of the existing structure. New additions should not alter the orientation of historic commercial building. If the primary entrance is shifted by a new addition it will disturb the historic integrity of the building. New entrances should be carefully evaluated to determine their impact upon orientation.
New additions should not overwhelm the historic building it is attached to and should be proportional to and discernible from the existing historic structure. Additions should not alter or obscure the original scale of the historic building and should remain secondary to the principal building. There should also be a clear visible juncture where the addition adjoins the original building. This can be achieved by using a slightly lower roofline, recessing the wall back from (rather than flush with) the original wall, or the use of a separating element. The form of the new addition should repeat the proportions of the existing form of the building and should not destroy or obscure the original form. The roof form and foundation height of an addition should closely match the original portion of the building. Additions, which are secondary and discernible, should not alter the footprint of a building so drastically as to completely obscure the original form. New additions should use the same or less ornamentation as found on the original structure. Less ornamentation for additions is encouraged. For additions to high style buildings, ornamentation which references the original structure's detailing may be considered; abstracted details are preferred. This change in ornamentation clearly denotes the addition as later construction. New additions should follow the established pattern of elements found on the original building. As additions should be located on the rear of existing buildings, only corner properties will have exposed side elevations. For such properties, it is important to respect the pattern established by similar corner properties.
STOREFRONTS

128 RAYMOND DESIGN GUIDELINES
SELECTING AN EFFECTIVE STOREFRONT SIGN IN RAYMOND Effective presentation of a business establishment's name is an extremely important part of storefront. Signs were often an integral part of the facades of the 19th and early 20th century buildings. It is important to remember that unlike the modern highway strip development the buildings and downtown streets was geared primarily to pedestrians. Consequently, there is no need for overly large signs that not only obscure important architectural features of the building but also contribute to the visual pollution of the street. Appropriately sized signs are one of the easiest and most dramatic type of signs and the expense is minimal.
There is an infinite variety of styles available for signs. There is no need for a stock solution or stamped out plastic box because it appears more readily available. Custom made signs often cost less and they project concern for the quality of the business. When planning a new sign, seek the help of a professional who has had experience in sign design and look at examples of their work. Other merchants who have invested in custom-made signs will probably be pleased to share names of artisans they have used. Look carefully at the entire facade of the building, the upper stories as well as the storefront. The position of the sign and how it relates to the rest of the building is the most important
This old photograph of 244 Town Square illustrates the his-toric use of signage with the sign placed above the storefront and in the specially designed sign board area delineated by the decorative brick pattern. Photo courtesy of Pattie Adams Snowball.
Additions to a historic commercial building should be easily discernable and the example above shows a small recessed “juncture” and the use of openings which differ in shape while respecting placement and size of the original openings. Image from the City of Cleveland’s Crosstie Historic District Design Guidelines.

STOREFRONTS
RAYMOND DESIGN GUIDELINES 129
The signage on this downtown Raymond building is in an appropriate area for this building. The lettering is of an appropriate size and fits neatly in the sign board.
consideration in designing the sign. A sign should never cover or overlap any of the architectural details like posts, columns, cornices, brackets, transoms, moldings, etc. Make sure the sign, particularly if it is a flat signboard, fits comfortably above the storefront windows and transoms and below the second floor window sills if a two-story building. TYPES OF SIGNS Flat or Wall Signs In the past, signboards were used on most commercial buildings. They were usually placed in a specifically designed spot above the transoms for a one-story building and between the storefront and the windows on the second floor if a two-story building. As a general rule 60% of the signboard should be devoted to lettering. Eight to ten inch letters are sufficiently large and are the most appropriate. One line of letters is appropriate. The sign itself should not exceed 2 feet in height in the absence of a limiting surround. It can be fabricated from marine plywood to last longer. A molding around the edge will enhance the appearance and protect the edge from weather.
This professionally designed wall sign from Philadelphia is an example of an appropri-ately designed sign for a his-toric commercial building without an original sign board location that uses an interesting design shape.
Window signs Another type of sign that is appropriate and one that was common at the turn of the century was one that was painted directly on the window. Typically, these signs were metallic gold, however the use of regular paint may work well. Positioned at eye level, this type of sign can be particularly effective and one that can be easily updated or changed as necessary. Signage on window areas should not cover more than 25% of the total glass area.

130 RAYMOND DESIGN GUIDELINES
Hanging signs Signs that were hung perpendicular to the facade were common on older buildings. They are especially suitable for displaying symbols and logos, can be designed in many shapes and hung with attractive hardware. Perpendicular signs are designed primarily to be viewed by pedestrians. The size and position of perpendicular signs should be managed so as to not interfere with pedestrian traffic and have a clearance of at least 8 feet from the bottom of the sign to the sidewalk.
MATERIALS, LETTERING, COLORS, AND STYLES As in all aspects of creating a sign materials and graphics should be chosen with care. Hundreds of styles of letters are available which can be executed in wood, metal, paint and plastic. It is more sensitive to a building to mount a sign board rather than mounting individual sign letters to a building creating numerous holes that could cause problems in the future. For painted signs, white or gilt lettering on a dark background is the most effective. It also ages well and does not show dirt. The style and spacing of lettering used is critically important. Simple, straight forward lettering is best. Two factors to consider are that the lettering should reflect the business image and should relate to the overall design and historic period of the storefront. Avoid choosing flamboyant, overly fancy lettering or garish colors. Muted colors in keeping with softened tones of historical structures are most effective. Lettering or other information on storefront windows, glass doors or other surfaces must be of high quality, professionally executed following accepted standards and cover no more than 25% of the total surface area of the glass. Vinyl lettering is acceptable for window glass. Spacing of the letters is extremely important and should only be attempted by a professional sign maker. Lighting Although most small businesses function without a lighted sign (window display lights are usually sufficient) some depend on evening traffic. Signs should only be lighted by an external source such as a small spot or floodlight. "Gooseneck" lights are also acceptable. Internally lighted plastic box signs should be avoided.
The window sign on this building in Raymond is very effective displaying the name of the business and hours. The signage can easily be altered with the change of business or in the case of a retail store for the addition of new items or removal of existing items.

STOREFRONTS
RAYMOND DESIGN GUIDELINES 131
GUIDELINES FOR SIGNS IN RAYMOND Signs are used to identify places and businesses, but they also convey images as well as direct messages. Restrained and tasteful signs suggest a high-quality business. A jumble of oversized and competing signs on a single façade can confuse customers. All signage in the Heritage District must follow the regulations set forth in Chapter XXI of the Zoning Ordain acne of Raymond pertaining to signage in the City. There are Guidelines for signs in the historic district that will help make them more appropriate for buildings located in the Heritage District of Raymond. Those Guidelines for sign installation in the Historic District are as follows:
1. Retain and preserve signage that is important in defining the overall historic character of a building, site, or streetscape.
2. Maintain and protect the materials, features, and details of historic signage through appropriate traditional methods.
3. Repair historic signage, when deteriorated or damaged, through accepted preservation methods.
4. Replace deteriorated, damaged, or missing signage with new signage that is either similar to the original in material, appearance, and scale or compatible with the building, site, or streetscape in its shape, material, design, scale, and color.
5. Introduce new signage, if needed, that is compatible with the human scale and the historic character of the building, site or streetscape. In considering the compatibility of proposed signage, review its location,
material, design, scale, size, color, and finish. Construct new signs out of traditional materials such as wood and metal. It is not appropriate to fabricate new signs out of materials, such as plastics, that are not compatible with the character of the building or district.
6. Limit the amount of signage added to historic buildings and locate it so that it does not compromise the building’s architectural character. Mount flush signboards on commercial facades in appropriate locations. It is not appropriate to attach new signage on a historic building if it will obscure or damage important architectural features or details.
Recommendations for signs in Raymond
1. Use wall signs that are flush-mounted or painted directly upon the flat surface of the building.
2. All signs placed in traditional locations to fit within architectural features, such as a signboard area outlined with brick, above transoms, on cornice fascia boards, or below cornices.
3. Locate brackets for projecting signs under the second floor window sills on a two-story building or a maximum of 15 feet from the street level. Projecting or hanging signs shall be no larger than 12 square feet and the bottom of the sign shall be at least 8 feet from the ground. .
4. Using symbols, logos and cut-outs, particularly in projecting signs.
5. Signs painted on glass should be less than 25 percent of the total glass area.

132 RAYMOND DESIGN GUIDELINES
ADDITIONS TO HISTORIC BUILDINGS, CONNECTIONS BETWEEN HISTORIC BUILDINGS, AND NEW CONSTRUCTION
♦ Additions to Historic Buildings ♦ New Construction
◊ Height ◊ Proportion and Scale ◊ Massing ◊ Rhythm of Spacing and Setback ◊ Roof Shape ◊ Orientation ◊ Materials and Texture
ADDITIONS TO HISTORIC BUILDINGS Additions have the potential to make substantial changes to the architectural character of historical buildings. Additions should be considered only after determination that a new use cannot be met without altering significant interior spaces. New additions should be added in a manner that preserves the character and detailing of the historic building. The new addition should not be visually disruptive, but neither does it need to mimic exactly the appearance of the historic building. The design of a new addition should be clearly differentiated, so the addition reads as an addition and not as part of the historic building. The genuine
6. Grouping signs where two or more businesses occupy the same building or use a business directory sign.
7. Using painted wood and metal signs. 8. If necessary illuminate signs directly or indirectly with
appropriate exterior lighting. 9. Place signage on awing valances. 10. Signage on a buildings shall not exceed 1 square foot for
each lineal foot of building frontage length, with “building frontage” including each side of a building which fronts on a public street. In no case shall the total aggregate square footage for all signs exceed sixty-four square feet.
Not Recommended for signs in Raymond
1. Wall signs that exceed the height of the building cornice or parapet.
2. Sign materials that are not compatible with the building materials such as plastic or individual plastic letters affixed directly to a sign frieze.
3. Sign designs that suggest an era earlier that the date of the building.
4. Internally lit signs. 5. Flashing signs. 6. Neon signs. 7. Pedestal signs and pole-mounted signs in front of
buildings with no setback. 8. Mass-produced molded plastic signs. 9. Portable trailer signs.

ADDITIONS, CONNECTIONS, AND NEW CONSTRUCTION
RAYMOND DESIGN GUIDELINES 133
historic building should stand out from any new additions. A new addition to a historic building is considered to be successful if it (1) preserves significant historic materials and features; (2) preserves the historic character, and (3) protects the historic significance by making a visual distinction between what is old and what is new. Significant existing additions should be preserved especially if they are over fifty years old or were done well without sacrificing the architectural integrity of the main house. However, not all additions are significant and worthy of preservation. Many later additions were poorly designed and constructed, and they sacrificed the original form, materials, or craftsmanship of the historic building to which they were added. Many new additions respond to the need for modern bathrooms, kitchens, and additional living space. Some historic houses simply cannot accommodate the necessities of modern living within the existing exterior walls. Before building an addition, however, investigate the possibility of enclosing all or a portion of a rear porch without altering the character-defining features of the porch. Design new additions to be secondary to the original building. The new addition should be smaller than the original building and sited in a secondary position. Choose materials that are similar to the materials used on the historic building. Adding a brick addition to a historic frame building is inappropriate, because the texture and color of the brick will draw attention to the addition. Likewise, roof material should be similar. If
siding materials on the addition match the original structure, use vertical trim to visually differentiate the junction between old and new. Maintain existing corner boards and trim elements to delineate the original structure and separate it from the new addition.
Design new additions to replicate the scale and rhythm of features of the historic building. Use similar height lines and make window and door openings retain the general size and rhythm of the openings on the historic building. Architectural detailing should complement rather than exactly duplicate the detailing of the historic resource. If the historic building has an elaborate Federal or Greek Revival style doorway, the entrance to a new addition should be compatible but plain, to keep the focus on the genuine historic doorway.
This rear ad-dition is sec-ondary to the o r i g i n a l house and reads as an addition yet uses materi-als similar to the original house.

134 RAYMOND DESIGN GUIDELINES
This National Park Service pho-tograph illus-trates an appro-priate design for a modern addition and a proper method of con-necting it to the historic building.
This side additon is inappropriate in proportion and scale, height, materials, massing, and roof shape. The upper and lower porches, the entrance door, and the second-story windows of this historic house have also been remodeled.
Design all new additions to be reversible without significant damage to the historic building or loss of its architectural detailing. If an addition or porch enclosure obscures an original window, retain the window in place and close the shutter blinds. If built-ins in a new addition or enclosure of a porch renders an original doorway inoperable, retain the doorway and convert it into a shallow closet with shelving. Generally, the most successful way to add an addition to a historic building is to build a small hyphen or connector. This results in minimal damage to the historic building and clearly differentiates the new from the old. In making an addition to a historic house, the hyphen sometimes takes the form of a covered walk, whose outer walls are faced with lattice or jalousies. Connectors between historic commercial buildings and additions are also sometimes glass, which leaves the exterior wall of the historic resource exposed. Architectural hyphens or connectors should be recessed from the streetscape.
This example of a carport addition is very successful as it does not compete with the historic house and uses similar materials and roof pitch to maximize the compatibility.

RAYMOND DESIGN GUIDELINES 135
inconspicuous side of a historic building; and limiting its size and scale in relationship to the historic building.
Not Recommended: Designing a new addition so that its size and scale in relation
to the historic building are out of proportion, thus diminishing the historic character.
Recommended: Designing new additions in a manner that makes clear what
is historic and what is new. Not Recommended: Duplicating the exact form, material, style, and detailing of
the historic building in the new addition so that the new work appears to be part of the historic building.
Imitating a historic style or period of architecture in new
additions, especially for contemporary uses such as drive-in banks or garages.
Recommended: Considering the attached exterior addition both in terms of
the new use and the appearance of other buildings in the historic district or neighborhood. Design for the new work may be contemporary or may reference design motifs from the historic building. In either case, it should always be clearly differentiated from the historic building and be compatible in terms of mass, materials, relationship of solids to voids, and color.
ADDITIONAL INFORMATION: Preservation Briefs: 14 – New Exterior Additions to Historic Buildings: Preservation Concerns
SECRETARY OF THE INTERIOR’S RECOMMENDATIONS - NEW ADDITIONS TO HISTORIC BUILDINGS Recommended: Placing functions and services required for the new use in
non-character-defining interior spaces rather than constructing a new addition.
Not Recommended: Expanding the size of the historic building by constructing a
new addition when the new use could be met by altering non-character defining interior spaces.
Recommended: Constructing a new addition so that there is the least
possible loss of historic materials and so that character-defining features are not obscured, damaged, or destroyed.
Not Recommended: Attaching a new addition so that the character-defining
features of the historic building are obscured, damaged, or destroyed.
Recommended: Locating the attached exterior addition at the rear or on an
ADDITIONS, CONNECTIONS, AND NEW CONSTRUCTION

136 RAYMOND DESIGN GUIDELINES
NEW CONSTRUCTION New construction does not have to mimic or copy architectural styles of the past. Historic districts typically have buildings that were built at different times and in varying architectural styles. However, new buildings should harmonize with existing buildings in historic neighborhoods, and their design should be complementary rather than intrusive. Many communities benefit economically from their historic character, and intrusive new construction should not undermine the economic value of the community’s architectural heritage. An ultra modern, multi-story building would devalue Raymond’s historic character. Design new buildings to conform to neighborhood height, proportion, scale, massing, spacing, setbacks, roof shape, orientation, and materials and textures. Height Similarity in building height contributes to the visual continuity of a historic neighborhood. The height of new construction should be compatible with existing historic buildings and vary no more than 10% from the height of adjacent buildings. Existing historic residential and commercial buildings in Raymond are no more than two stories in height.
Not Recommended: Designing and constructing new additions that result in the
diminution or loss of the historic character of the resource, including its design, materials, workmanship, location, or setting.
Using the same wall plane, roof line, cornice height,
materials, siding lap or window type to make additions appear to be a part of the historic building.
Recommended: Placing new additions such as balconies and greenhouses on
non-character-defining elevations and limiting the size and scale in relationship to the historic building.
Not Recommended: Designing new additions such as multi-story greenhouse
additions that obscure, damage, or destroy character-defining features of the historic building.
Recommended: Designing additional stories, when required for the new use,
that are set back from the wall plane and are as inconspicuous as possible when viewed from the street.
Not Recommended: Construction of additional stories so that the historic
appearance of the building is radically changed.

RAYMOND DESIGN GUIDELINES 137
with adjacent historic buildings. Window openings should measure 1:2 or 1:3 in width to height proportions and should contain double-hung sash.
Proportion and Scale New construction should echo the proportion and scale of the historic neighborhood. Scale refers to the relationship between the size of buildings and humans. Buildings are said to have a human scale when the building and its details are discernible from the sidewalk. When the scale of a building overwhelms a pedestrian, the scale becomes monumental. Particularly important in integrating new construction into historic neighborhoods is maintaining the traditional relationships of width to height. A one-story Ranch style house with eight-foot ceilings would be intrusive in a neighborhood of vertical Queen Anne houses with steeply pitched gables. New buildings should also echo historic buildings in the ratio of window and door openings to wall surface, also known as solid to void ratio. Windowless walls are particularly intrusive, since historic buildings are characteristically and frequently punctuated by window and door openings. The proportion and scale of window and door openings should also be compatible
Appropriate
Not Appropriate
The height of new construction should be compatible with adjacent structures and within 10 percent of their height.
The proportions of new construction should be compatible with adjacent structures and maintain similar height to width ratios.
Not Appropriate
Appropriate
ADDITIONS, CONNECTIONS, AND NEW CONSTRUCTION
The relationship between the doors and windows of new construction and neighboring historic buildings should be compatible.
Appropriate
Not Appropriate

138 RAYMOND DESIGN GUIDELINES
Massing Design new construction to reflect the massing pattern of historic neighborhoods. The term massing refers to how the basic parts of buildings fit together. Massing can be as simple as a square or rectangular block or as complicated as a Victorian Queen Anne with multiple gables, bays, towers, turrets, porches, and wings. Rhythm of Spacing and Setback New construction should conform to the rhythm of the historic neighborhood. The new building should follow the spacing and setback patterns established by its historic neighbors.
Roof Shape The shape and pitch of roofs for new construction should echo the shape and pitch of existing roofs in the historic neighborhood. New construction should also follow the general established pattern of roof orientation in terms of being front gabled or side gabled or a combination of both.
Setbacks which are inconsistent with the setback pattern of the existing structures in the neighborhood are inappropriate.
Setback Line
Too far from setback line
Too much space
Street
Not Appropriate
Roof shapes and pitch of new construction should be com-patible with the historic buildings in the neighborhood.
Appropriate

RAYMOND DESIGN GUIDELINES 139
Orientation Orient the front of new buildings to the street. The building should be oriented parallel to the lot lines, maintaining the traditional pattern of the block.
Materials and Texture Use materials in new construction that are similar to those commonly found in the heritage district area. Raymond’s residential neighborhoods feature brick, stucco, and wood siding. Roofing material for new buildings should also be compatible with the existing roofing material in the neighborhood.
New construction should be oriented to face the street, in keeping with historic neighbors.
Appropriate
Not Appropriate
ADDITIONS, CONNECTIONS, AND NEW CONSTRUCTION
Roof shapes and orientation should be compatible with the historic buildings in the neighborhood.

140 RAYMOND DESIGN GUIDELINES
BUILDING SITE, BUILDING SETTING, AND LANDSCAPE FEATURES ♦ Outbuildings
◊ Maintenance and Repair ◊ Replacement, Alteration, and Installation
♦ Fences and Walls ◊ Maintenance and Repair ◊ Replacement, Alteration, and Installation
♦ Sidewalks, Walkways, Driveways, Courtyards, and Patios ◊ Maintenance and Repair ◊ Replacement, Alteration, and Installation
♦ Landscape Objects and Lighting ◊ Maintenance, Repair, Replacement, Alteration, and
Installation ♦ Trees, Hedges, Bushes, Flower Beds, etc.
◊ Maintenance, Replacement, and Installation ♦ Building Site, Setting, and Relocation of Historic Buildings
OUTBUILDINGS Many historic houses originally featured associated outbuildings or structures, which are also known as dependency buildings and support buildings. Originally kitchens were not a part of residential buildings and were located behind the main house to minimize the chance of the house catching on fire. Other types
of early outbuildings included privies, barns, and carriage houses. The number of outbuildings decreased throughout the nineteenth century and, by World War II, most of America’s houses featured only a detached garage. By the end of the twentieth century, even the garage had become an integral part of the residence itself. Historic outbuildings represent a particularly endangered historic resource, since most have become functionally obsolete. Many historic homeowners, who juggle time and resources, often have to choose between preservation of the main house and its historic outbuildings. Preservation of historic outbuildings increases the historic value of a property. MAINTENANCE AND REPAIR Maintain and repair historic outbuildings, if possible. Guidelines for maintaining and repairing outbuildings are the same as those for other buildings. Consult the appropriate sections of the design guidelines handbook for recommendations. REPLACEMENT, ALTERATION, AND INSTALLATION Build an additional outbuilding rather than replace a historic building that no longer fulfills its original function. Investigate new uses for the obsolete outbuilding. A historic garage may be inadequate for today’s multi-car, modern family, but it can be sensitively and adaptively rehabilitated as an office, storage

RAYMOND DESIGN GUIDELINES 141
house, or guesthouse. Design new outbuildings to complement rather than detract from historic buildings by following the guidelines for new additions and new construction. The construction of new outbuildings should not destroy significant landscape features. Neither should the construction of new outbuildings disrupt the historic setting of the property. Make sure that new outbuildings reflect the character of the historic property. Victorian gazebos, for instance, are out of character in the front yards of Ranch style houses.
FENCES AND WALLS Most historic houses built before 1900 featured fences. Today, we erect fences for privacy, for decoration, and for protection of children and family pets. In the nineteenth century fences were erected primarily to keep animals out of the yard. Pigs routinely performed the functions of today’s garbage trucks and roamed freely in the streets. Rural homeowners needed fencing to protect the house yard from farm animals. Early fencing was typically wood and picket fences were a popular choice to enclose house yards, and rail fences were used along roadsides. In the late nineteenth century, wire fencing came into common use. Picket fencing typically extended along sidewalks, and only in front of houses, unless the house had a corner location. Picket fencing in the nineteenth century often featured a skirt or base board, which could be easily replaced, when deteriorated, without disturbing the pickets. Iron was another choice for fencing when it became popular in the late nineteenth century. Iron fencing can be either wrought or cast, depending on the manufacturing process, with more ornate fencing cast in moulds. Urban areas also featured vertical board fences to enclose rear yards, to screen side yards, and to provide privacy between buildings. Structural members of board fences traditionally face inward with the smooth face of the fence facing outward. In the late nineteenth and twentieth centuries, many vernacular
BUILDING SITE, BUILDING SETTING, AND LANDSCAPE FEATURES
The house at 140 West Main Street has both an early example of a detached garage before it became popular to attach the garage to the main house. This type of garage should be preserved as an example of early garage construction and is especially important since few survive today.

142 RAYMOND DESIGN GUIDELINES
houses featured chicken wire and hog wire fencing. In the mid-twentieth century, chain-link fencing became the most popular fencing material in America. Generally, in Mississippi, masonry walls were not original features of historic landscapes, unless they functioned as retaining walls.
MAINTAIN AND REPAIR Original fences and walls should be retained and repaired, if possible. Repair individual pickets rather than replacing an entire section of fence. Wood used in repair should be chosen for its resistance to rot and infestation. Guidelines for maintaining and repairing historic fences and walls are generally the same as those for buildings. Consult the appropriate sections of the design guidelines handbook for recommendations. REPLACEMENT, ALTERATION, AND INSTALLATION Replace deteriorated or missing historic fencing and walls with new fencing or walls to match the original as documented by surviving physical evidence or in historic photographs or drawings. Choose new treated wood for its resistance to rot and infestation. Painted aluminum may be substituted for iron, because it conveys the same visual appearance. Picket and rail fencing are today available in vinyl, but the vinyl products do not convey the same visual appearance. If no documentation exists for the design of original fencing or walls, base new designs on surviving or documented original fencing or walls at a similar house of the same style in the same neighborhood. Installing fences and walls that are inappropriate in design and materials detract from the historic character of the property. Vertical board fences and masonry walls taller than three feet are not appropriate in front of historic buildings. Be wary of
The houses at 140 and 214 West Main Street, along with the Courthouse, all use traditional iron fencing to enclose the front yards.

RAYMOND DESIGN GUIDELINES 143
fence designs that mix construction materials, unless documented by physical evidence or historic photographs and drawings. Inappropriate, but popular, are fences constructed of vertical brick piers that are spanned by vertical boards, pickets, or panels of wrought iron. These materials were not historically combined for fencing, and fences with this design are more appropriate for modern subdivisions. In general, metal fences should have metal posts and wood fences should have wood posts. Chain-link fencing is not appropriate for historic properties and should be used only where it is not visible from the street. Install new fences to screen parking areas, mechanical equipment, garbage cans, or other unsightly areas. Such fences may be composed of pickets, vertical board, lattice, or jalousies. New fences should harmonize with the architectural style of the house. Install new board fences with framing members facing inward and the smooth surface facing outward.
SIDEWALKS, WALKWAYS, DRIVEWAYS, COURTYARDS, AND PATIOS Paved sidewalks, walkways, driveways, courtyards, and patios are all landscape features that are associated with urban buildings. Rural communities generally featured graveled drives and graveled walks, with brick used sparingly as an exterior paving material. Brick was the most common paving material in the nineteenth century, and it was typically laid without mortar on a bed of sand.
Cement was first used as a paving material in the mid-nineteenth century, when it was used for flooring in brick dependency buildings and basement rooms. The use of cement and/or concrete as a paving material for sidewalks, walkways, and driveways dates to the early twentieth century. MAINTAINANCE AND REPAIR Maintain and repair historic paving, when possible. Nineteenth-century brick paving which was historically laid without mortar, can often be leveled and repaired by reworking the sand bed and replacing damaged brick or slate. Do not repair historic brick paving by filling cracks with mortar. Maintain and repair historic graveled drives and walks. REPLACEMENT, ALTERATION, AND INSTALLATION If repairing historic paving is not possible, new paving should be installed to match the deteriorated original. Driveways and parking areas paved with concrete are usually additions to historic buildings built before 1920. Except for patios and courtyards, the installation of new paving is generally a response to the growing number of cars. In accommodating new driveways, parking areas, and walkways, property owners should consider the historic character of the site and the setting, as well as the materials used for paving. New paved driveways and parking areas need to be as unobtrusive as possible.
BUILDING SITE, BUILDING SETTING, AND LANDSCAPE FEATURES

144 RAYMOND DESIGN GUIDELINES
Install new paved driveways or parking areas in the least conspicuous part of the historic property. Do not install circular driveways or create parking areas in front of historic buildings, unless documented historically. The paving of long graveled driveways is also inappropriate, because it gives historic properties a modern subdivision appearance. Asphalt is not an appropriate paving material for driveways and parking areas on historic properties. Also inappropriate is stamped concrete to resemble brick or cobblestone paving. Acceptable paving materials are red brick, concrete, and exposed aggregate. For new brick sidewalks, walkways, and driveways for historic properties, bricks should be butt-jointed, or laid without mortar joints. Using mortar introduces too much pattern and texture to the landscape. Brick paving is easier to maintain and repair without mortar joints, and the bricks can be laid in sand atop a concrete base. Herringbone was historically the most popular paving pattern for brick paving, and the herringbone patterned brick were held in place by a borders of bricks laid on end along the borders. Only red brick should be used for paving.
LANDSCAPE OBJECTS AND LIGHTING Many historic properties feature original landscape objects like fountains, urns, benches, bird baths, and other ornaments. MAINTENANCE, REPAIR, REPLACEMENT, ALTERATION, AND INSTALLATION Maintain and repair historic fountains, urns, benches, sundials, trellises, bird baths, and other landscape ornaments that are original to historic properties. Replace missing or badly deteriorated landscape ornaments based on physical evidence or historic photographs and drawings.
Concrete strips are appropriate for driveways in historic districts. They minimize the impact of driveways on the character of the historic property and its neighborhood.
The front yard of this historic house has been inappropri-ately paved for parking. Parked cars and the lack of land-scaping disrupt the character of the historic neighborhood.

RAYMOND DESIGN GUIDELINES 145
Install exterior lighting fixtures that compliment the architectural style of the house. Avoid the introduction of new landscape ornaments, whose scale and design are inappropriate for historic properties. Large-scale lamp posts are meant for street lighting and should not be used in the yards of historic houses, and few historic houses in Mississippi had cast-iron fountains. Refrain from over-decorating front yards with too many landscape ornaments. Permanent yard art, like wood cutouts, plastic animals, and sculptures, is also not appropriate for the front yards of historic neighborhoods. TREES, HEDGES, BUSHES, FLOWER BEDS, ETC. MAINTENANCE, REPLACEMENT, AND INSTALLATION Every effort should be made to retain historic plant material, unless it is causing damage to historic buildings or is jeopardizing the safety of building occupants. Generally, preservation ordinances pay little attention to plant material with the exception of providing some legal protection for large trees and historic formal gardens. Replace historic plant material with new plants of the same or similar species. Use quick-growth dense shrubbery to hide parking areas, mechanical systems, and neighboring intrusions. Do not plant trees with damaging root systems near building foundations, walkways, sidewalks, driveways, patios, or
BUILDING SITE, BUILDING SETTING, AND LANDSCAPE FEATURES
courtyards. Avoid introducing new plant material that is incompatible with the historic site and/or setting. Tall hedges should not be planted in front of historic properties or in front of new construction in a historic neighborhood. When installing plants around a historic house they should be planted a minimum distance of 3 feet from the foundation walls. This will help to minimize the amount of moisture getting into the foundation and will allow any moisture to escape from the walls when it is heated by sunlight. BUILDING SITE, SETTING, AND RELOCATON OF HISTORIC BUILDINGS The landscape associated by ownership with a historic building is its building site, which contributes to the overall character of a particular historic property. The sites of some historic properties are significant in their own right. The setting is the general area or neighborhood in which a historic property is located. Maintaining the integrity of the site and setting are important in protecting the value of a historic building. Relocating or removing historic structures or buildings on a site diminishes the historic character and historic significance of a property. Moving historic buildings onto the site creates a false historic appearance and devalues the relocated building itself. Generally, historic buildings should be preserved on their original sites unless their very survival requires that they be relocated. The new site of a relocated historic building should convey the same sense of place as the original site.

146 RAYMOND DESIGN GUIDELINES
SECRETARY OF INTERIOR’S RECOMMENDATIONS - BUILDING SITE Identify, retain, and preserve Recommended: Identifying, retaining, and preserving buildings and their
features as well as features of the site that are important in defining its overall historic character. Site features may include circulation systems such as walks, paths, roads, or parking; vegetation such as trees, shrubs, fields, or herbaceous plant material; landforms such as terracing, berms or grading; furnishings such as lights, fences, or benches; decorative elements such as sculpture, statuary or monuments; water features including fountains, streams, pools, or lakes; and subsurface archaeological features which are important in defining the history of the site.
Not Recommended: Removing or radically changing buildings and their features
or site features which are important in defining the overall historic character of the property so that, as a result, the character is diminished.
Recommended: Retaining the historic relationship between buildings and
landscape. Not Recommended: Removing or relocating buildings or landscape features thus
destroying the historic relationship between buildings and the landscape.
The house at 233 North Oak Street was moved to Raymond from outside the city as the owner wanted it demolished. In order to save the house the only option was to move it. The house was relocated to a vacant lot on North Oak Street where it was restored for use as a Bed & Breakfast.

RAYMOND DESIGN GUIDELINES 147
Removing or relocating historic buildings on a site or in a complex of related historic structures—such as a mill complex or farm—thus diminishing its historic character.
Moving buildings onto the site, thus creating a false
historical appearance. Radically changing the grade level of the site. For example,
changing the grade adjacent to a building to permit development of a formerly below-grade area that would drastically change the historic relationship of the building to its site.
Recommended: Providing proper drainage to assure that water does not
erode foundation walls; drain toward the building; or damage or erode the landscape.
Not Recommended: Failing to maintain adequate site drainage so that buildings
and site features are damaged or destroyed; or alternatively, changing the site grading so that water no longer drains properly.
Recommended: Minimizing disturbance of terrain around buildings or
elsewhere on the site, thus reducing the possibility of destroying or damaging important landscape features or archeological resources.
Not Recommended: Introducing heavy machinery into areas where it may
disturb or damage important landscape features or archeological resources.
Recommended: Surveying and documenting areas where the terrain will be
altered to determine the potential impact to important landscape features or archeological resources.
Not Recommended: Failing to survey the building site prior to the beginning of
rehabilitation work which results in damage to, or destruction of, important landscape features or archeological resources.
Protect and maintain Recommended: Protecting, e.g., preserving in place important archeological
resources. Not Recommended: Leaving known archeological material unprotected so that it
is damaged during rehabilitation work. Recommended: Planning and carrying out any necessary investigation using
professional archeologists and modern archeological methods when preservation in place is not feasible.
Not Recommended: Permitting unqualified personnel to perform data recovery
on archeological resources to that improper methodology
BUILDING SITE, BUILDING SETTING, AND LANDSCAPE FEATURES

148 RAYMOND DESIGN GUIDELINES
results in the loss of important archeological material. Recommended: Preserving important landscape features, including ongoing
maintenance of historic plant material. Not Recommended: Allowing important landscape features to be lost or
damaged due to a lack of maintenance. Recommended: Protecting building and landscape features against arson and
vandalism before rehabilitation work begins, i.e., erecting protective fencing and installing alarm systems that are keyed into local protection agencies.
Not Recommended: Permitting the property to remain unprotected so that the
building and landscape features or archeological resources are damaged or destroyed.
Removing or destroying features from the building or site
such as wood siding, iron fencing, masonry balustrades, or plant material.
Recommended: Providing continued protection of masonry, wood, and
architectural metals which comprise the building and site features through appropriate cleaning, rust removal, limited paint removal, and re-application of protecting coating systems.
Not Recommended: Failing to provide adequate protection of materials on a
cyclical basis so that deterioration of building and site features results.
Recommended: Evaluating the overall condition of materials and features to
determine whether more than protection and maintenance are required, that is, if repairs to building and site features will be necessary.
Not Recommended: Failing to undertake adequate measures to assure the
protection of building and site features. Recommended: Repairing features of the building and site by reinforcing
historic materials. Not Recommended: Replacing an entire feature of the building or site such as a
fence, walkway, or driveway when repair of materials and limited compatible replacement of deteriorated or missing parts are appropriate.
Using a substitute material for the replacement part that does
not convey the visual appearance of the surviving parts of the building or site feature that is physically or chemically incompatible.

RAYMOND DESIGN GUIDELINES 149
Replace Recommended: Replacing in kind an entire feature of the building or site
that is too deteriorated to repair if the overall form and detailing are still evident. Physical evidence from the deteriorated feature should be used as a model to guide the new work. This could include an entrance or porch, walkway, or fountain. If using the same kind of material is not technically or economically feasible, then a compatible substitute material may be considered.
Not Recommended: Removing a feature of the building or site that is
unrepairable and not replacing it; or replacing it with a new feature that does not convey the same visual appearance.
Recommended: Replacing deteriorated or damaged landscape features in
kind. Not Recommended: Adding conjectural landscape features to the site such as
period reproduction lamps, fences, fountains, or vegetation that is historically inappropriate, thus creating a false sense of historic development.
Design for Missing Historic Features Recommended: Designing and constructing a new feature of a building or
site when the historic feature is completely missing, such as an outbuilding, terrace, or driveway. It may be based on
historical, pictorial, and physical documentation; or be a new design that is compatible with the historic character of the building and site.
Not Recommended: Creating a false historical appearance because the replaced
feature is based on insufficient historical, pictorial, and physical documentation.
Introducing a new building or site feature that is out of scale
or of an otherwise inappropriate design. Introducing a new landscape feature, including plant
material, that is visually incompatible with the site, of that alters or destroys the historic site patterns or vistas.
Alterations/Additions for the New Use Recommended: Designing new onsite parking, loading docks, or ramps
when required by the new use so that they are as unobtrusive as possible and assure the preservation of the historic relationship between the building or buildings and the landscape.
Not Recommended: Locating any new construction on the building where
important landscape features will be damaged or destroyed, for example removing a lawn and walkway and installing a parking lot.
BUILDING SITE, BUILDING SETTING, AND LANDSCAPE FEATURES

150 RAYMOND DESIGN GUIDELINES
Placing parking facilities directly adjacent to historic buildings where automobiles may cause damage to the buildings or to important landscape features.
Introducing new construction onto the building site which is
visually incompatible in terms of size, scale, design, materials, color, and texture; which destroys important landscape features.
Recommended: Removing insignificant buildings, additions, or site features
which detract from the historic character of the site. Not Recommended: Removing a historic building in a complex of buildings; or
removing a building feature, or a landscape feature which is important in defining the historic character of the site.
SECRETARY OF INTERIOR’S RECOMMENDATIONS - SETTING Identify, Retain, and Preserve Recommended: Identifying, retaining, and preserving building and
landscape features which are important in defining the historic character of the setting. Such features can include roads and streets, furnishings such as lights or benches, vegetation, gardens and yards, adjacent open space such as fields, parks, commons, or woodlands, and important views or visual relationships.
Not Recommended: Removing or radically changing those features of the setting
which are important in defining the historic character. Recommended: Retaining the historic relationship between buildings and
landscape features of the setting. For example, preserving the relationship between a city common and its adjacent historic houses, municipal buildings, historic roads, and landscape features.
Not Recommended: Destroying the relationship between the buildings and
landscape features within the setting by widening existing streets, changing landscape materials or constructing inappropriately located new streets or parking.
Removing or relocating historic buildings or landscape
features, thus destroying the historic relationship within the setting.
Protect and Maintain Recommended: Protecting and maintaining historic building materials and
plant features through appropriate treatments such as cleaning, rust removal, limited paint removal, and reapplication of protective coating systems; and pruning and vegetation management.

RAYMOND DESIGN GUIDELINES 151
Not Recommended: Failing to provide adequate protection of materials on a
cyclical basis which results in the deterioration of building and landscape features.
Recommended: Protecting buildings and landscape features against arson
and vandalism before rehabilitation work begins by erecting protective fencing and installing alarm systems that are keyed into local protection agencies.
Not Recommended: Permitting the building and setting to remain unprotected so
that interior or exterior features are damaged. Not Recommended: Stripping or removing features from buildings or the setting
such as wood siding, iron fencing, terra cotta balusters, or plant material.
Recommended: Evaluating the overall condition of the building and
landscape features to determine whether more than protection and maintenance are required, that is, if repairs to features will be necessary.
Not Recommended: Failing to undertake adequate measures to assure the
protection of building and landscape features.
Repair Recommended: Repairing features of the building and landscape by
reinforcing the historic materials. Repair will also generally include the replacement in kind—or with a compatible substitute material—of those extensively deteriorated or missing parts of features which there are surviving prototypes such as porch balustrades or paving materials.
Not Recommended: Replacing an entire feature of the building or landscape
when repair of materials and limited replacement of deteriorated or missing parts are appropriate.
Using a substitute material for the replacement part that does
not convey the visual appearance of the surviving parts of the building or landscape, or that is physically, chemically, or ecologically incompatible.
Replace Recommended: Replacing in kind an entire feature of the building or
landscape that is too deteriorated to repair—when the overall form and detailing are still evident—using the physical evidence as a model to guide the new work. If using the same
kind of material is not technically or economically feasible, then a compatible substitute material may be considered.
BUILDING SITE, BUILDING SETTING, AND LANDSCAPE FEATURES

152 RAYMOND DESIGN GUIDELINES
Not Recommended: Removing a feature of the building or landscape that is
unrepairable and not replacing it; or replacing it with a new feature that does not convey the same visual appearance.
Design for Missing Historic Features Recommended: Designing and constructing a new feature of the building or
landscape when the historic feature is completely missing, such as row house steps, a porch, a streetlight, or terrace. It may be a restoration based on documentary or physical evidence; or be a new design that is compatible with the historic character of the setting.
Not Recommended: Creating a false historical appearance because the replaced
feature is based on insufficient documentary or physical evidence.
Introducing a new building or landscape feature that is out
of scale or otherwise inappropriate to the setting’s historic character, e.g., replacing picket fencing with chain link fencing.
Alterations/Additions for the New Use Recommended: Designing required new parking so that it is as unobtrusive
as possible, thus minimizing the effect on the historic character of the setting. “Shared” parking should also be planned so that several businesses can utilize one parking area as opposed to introducing random, multiple lots.
Not Recommended: Placing parking facilities directly adjacent to historic
buildings which cause damage to historic landscape features, including removal of plant material, relocation of paths and walkways, or blocking of alleys.
Recommended: Designing and construction new additions to historic
buildings when required by the new use. New work should be compatible with the historic character of the setting in terms of size, scale, design, material, color, and texture.
Not Recommended: Introducing new construction into historic districts that is
visually incompatible or that destroys historic relationships within the setting.
Recommended: Removing insignificant buildings, additions, or landscape
features which detract from the historic character of the setting.
Not Recommended: Removing a historic building, building feature, or landscape
feature that is important in defining the historic character of the setting.

RAYMOND DESIGN GUIDELINES 153
GLOSSARY ANITQUITIES ACT OF MISSISSIPPI - The Antiquities Act of 1972 was enacted to locate, protect, and preserve sites, objects, buildings, shipwrecks, and locations of historical, archeological, or architectural interest in the state. The approval of the Mississippi Department of Archives and History is required for the transfer of, or construction activities on, state, county, or municipal lands or water which may affect objects, buildings, shipwrecks, and locations of historical, archaeological, or architectural interest. ARCH - A means of spanning an opening by use of small units of masonry. Typically, a curved structural element which spans an opening and supports weight above. ARCHITRAVE - The molding around a door or window opening; also in classic architecture, the lowest member of the entablature resting on the capital of the column. BALUSTER - A short post or pillar in a series with a top and bottom rail. BALUSTRADE - A series of balusters, or posts, with a top and bottom rail, as along a staircase. BAY - The regular division of the facade of a building, usually defined by windows or other vertical elements. BEADED BOARD - A siding of narrow boards with beads run between boards, usually used on exterior ceilings.
BELT COURSE - A horizontal band around a building, often of a contrasting material. BOARD AND BATTEN - Vertical siding consisting of flat members with narrow projecting strips to cover the joints. BOND - The pattern in which bricks are laid to increase the strength or enhance the design. BRACKET - A small carved or sawn wooden projecting element which supports a horizontal member such as a cornice. CAPITAL - The top member of a column or pilaster. CASEMENT WINDOW - A window hinged on the side that opens outward. CERTIFICATE OF APPROPRIATENESS - A document evidencing the approval of the preservation commission for work in the historic district proposed by an applicant. CERTIFIED LOCAL GOVERNMENT - A federal program authorized by the National Historic Preservation Amendments Act of 1980 that provides for the participation of local governments in a federal/state/local government preservation partnership. The federal law directs the State Historic Preservation Officer (SHPO) (in Mississippi, the director of the Department of Archives and History) and the Department of Interior to certify local governments to participate in this partnership.
GLOSSARY

154 RAYMOND DESIGN GUIDELINES
CLAPBOARD - Siding consisting of overlapping horizontal boards, usually thicker at one edge than the other. COLUMN - A vertical support, usually supporting a horizontal member or roof above. CORNERBOARD - A vertical strip of wood placed at the corners of a frame building to terminate the wood siding and give the corner a finished appearance. CORNICE - A projecting ornamental molding along the top of a wall, window, or door. DORMER - A window that projects through the slope of the roof that is sheltered by its own small roof. DOUBLE-HUNG WINDOW - A window with two sashes, one sliding vertically over the other. EAVE - The overhang at the bottom edge of a roof surface that projects beyond the wall surface. ENTABLATURE - In classic architecture, the horizontal group of elements immediately above the columns or pilasters and consisting of an architrave, frieze, and cornice. ELEVATION - A drawing of a building facade or object, without an allowance for perspective. An elevation drawing will be in a fixed proportion to the measurement on the actual building.
FACADE - An exterior wall of a building; an elevation; commonly referred to as the front wall. FANLIGHT - A semi-circular window over a door with radial bars in the form of a open fan. FASCIA - A horizontal board that covers the ends of rafters. FENESTRATION - The pattern of windows and doors on an elevation. FLASHING - A sheet, usually of metal, used to make an intersection of materials weather tight. FRIEZE - A horizontal band located beneath the cornice at the junction of the exterior wall and roof eaves. GABLE - The triangular section of a wall that carries a pitched roof. GABLE ROOF - A roof with a central ridgepole and one slope at each side. GINGERBREAD TRIM - Pierced curvilinear ornament made with a jig or scroll saw; such as a bargeboard or vergeboard. HIPPED ROOF - A roof with uniform slopes on all four sides. HISTORICAL EVIDENCE - Any documented evidence such as newspaper articles, historic photographs or other historic descriptions describing or illustrating how a structure looked during some specified point in its history.

RAYMOND DESIGN GUIDELINES 155
HISTORIC REHABILITATION TAX CREDITS - The Tax Reform Act of 1976 established the first tax credits to encourage rehabilitation of older historic buildings. Currently, a 20% tax credit is available. To qualify to receive tax credits, the building must be income producing, such as commercial space or residential rental. If only a certain portion of a structure is income producing, the tax credit may be received, but only for the percentage of the building that is income producing. To qualify for Historic Tax Credits:
1. A building must be listed in the National Register of Historic Places, either individually or as a contributing building or structure in a National Register district
2. The rehabilitated building must be income producing, either for commercial or residential rental purposes.
3. The rehabilitation work must be done in accordance with the Secretary of Interior’s Standards for Rehabilitation.
4. An application must first be processed and reviewed by the Mississippi Department of Archives and History before submittal to the National Park Service, Department of the Interior.
JAMB - The side of a doorway or window opening. LATTICE - An openwork grill of interlacing wood strips, usually in a diagonal pattern, used as screening. LIGHTS - A section of window, the pane or glass.
LINTEL - A beam that spans an opening and is supported on vertical posts at each end. A horizontal element over a window or door opening that supports the wall above. MISSISSIPPI LANDMARK - A public site, object, building, ship-wreck, or location of historical, archeological, or architectural interest officially designated a landmark by the Mississippi Department of Archives and History as empowered under the provisions of the Antiquities Act. An easement in perpetuity is filed with the deed in the chancery clerk’s office in the county where the landmark is located. Approval of the Mississippi Department of Archives and History is required for any construction activities or transfer of property ownership. MULLION - The strip of wood separating the lights of a window. MUNTIN - The strip of wood separating the lights of a window. NATIONAL HISTORIC LANDMARK - A district, site, building, structure, and/or object that has been formally designated as a National Historic Landmark by the Secretary of the Interior and possesses exceptional value or quality in illustrating or interpreting the heritage of the United States in history, architecture, archaeology, engineering, and culture and that possesses a high degree of integrity of location, design, setting, materials, workmanship, feeling, and association. Designation of a National Historic Landmark status automatically lists a property in the National Register of Historic Places.
GLOSSARY

156 RAYMOND DESIGN GUIDELINES
NATIONAL REGISTER OF HISTORIC PLACES - The official list of the nation’s cultural resources worthy of preservation. Authorized under the National Historic Preservation Act of 1966, the National Register is part of a national program to coordinate and support public and private efforts to identify, evaluate, and protect our historic and archaeological resources. The National Register is administered on the federal level by the National Park Service, Department of the Interior, and on the state level by the Mississippi Department of Archives and History. Certified Local Governments now also have to approve National Register nominations. NATIONAL TRUST FOR HISTORIC PRESERVATION - The only national, private, nonprofit organization chartered by Congress with the responsibility for encouraging public participation in the preservation of sites, buildings, and objects significant in American history and culture. The National Trust no longer receives federal financial assistance. Its income derives from membership dues, endowment funds, contributions, grants, and proceeds from program services. PALLADIAN WINDOW - An arched window flanked by two smaller square-headed windows. PARAPET - The uppermost portion of the exterior wall which extends above the roof line. It forms the top line of the building silhouette. PEDIMENT - A low pitched gable above a portico, doors, windows, usually with decorative elements or carvings inside the gable portion.
PIER - An upright structure, usually of masonry, which serves as support for the floor joists and walls. PILASTER - A shallow rectangular pier projecting only slightly beyond a the wall surface and normally treated as a column with a capital and a base. PITCH - The degree of the slope of a roof. PORTICO - A roofed space, open or partially enclosed, forming the entrance and center piece of the facade, often with detached or attached columns and a pediment. QUOIN - Units of stone, brick, or other material used to accentuate the corners of a building. RAFTERS - Structural supports placed at an angle to carry a pitched roof. RIDGE - The line at the top of a sloped roof. RISER - The vertical face of a stair step. SASH - The movable framework holding the glass in a window or door. SCROLLWORK - Open woodwork produced by a jigsaw.

RAYMOND DESIGN GUIDELINES 157
SECRETARY OF THE INTERIOR’S STANDARDS FOR R E H A B I L T A T I O N A N D G U I D E L I N E S F O R REHABILITATING HISTORIC STRUCTURES - A federal document delineating ten standards and numerous guidelines for the sensitive rehabilitation and preservation of historic buildings. These ten standards are the ten commandments of preservation theology and are integrated into most of America’s preservation ordinances. SIDELIGHT - A narrow vertical window usually found on both sides of a door. SIDING - The material used to cover the exterior of a building to weatherproof it. SILL - The horizontal water-shedding member at the bottom of a door or window frame. SOFFIT - The underside of a cornice. STATE HISTORIC PRESERVATION OFFICER; OFFICE - The official within each state who has been designated and appointed by the governor to administer the federal and state historic preservation program in a state (in Mississippi, the director of the Mississippi Department of Archives and History ); that agency of the state which provides administrative and technical support to the state historic preservation officer in carrying out federal and state historic programs. In Mississippi, the state historic preservation office is the Historic Preservation Division of the Mississippi Department of Archives and History.
STUCCO - A type of exterior plaster applied as a two or three part coating directly onto masonry, or applied over wood or metal lath to a wood frame structure. Stucco is sometimes scored and colored to represent large stone blocks. TERRA COTTA - Cast and fired clay units, used as decorative ornamentation. TRANSOM - A small operable or fixed window located above a door or window. TREAD - Horizontal part of a stair step. TURNED COLUMN - A column that has been turned on a lathe to form rounded bands and shapes. TRELLIS - Lattice work as an outdoor screen, often a support for vines and other plantings. TURRET - A small slender tower with a conical roof. VERGEBOARD - The vertical face board following and set under the roof edge of a gable, sometimes decorated by carving. VERNACULAR - Architecture that is not high style and academic but indigenous and characteristic of a locality. Shotgun and dog-troll houses are examples of vernacular architecture.
GLOSSARY

158 RAYMOND DESIGN GUIDELINES
ADDITIONAL RESOURCES PROFESSIONAL Mississippi Department of Archives and History Historic Preservation Division P.O. Box 571 Jackson, MS 39205 601-576-6940 www.mdah.state.ms.us/hpres Mississippi Heritage Trust P.O. Box 577 Jackson, MS 39205 601-354-0200 www.mississippiheritage.com National Trust for Historic Preservation 1785 Massachusetts Ave., NW Washington D.C. 20036 202-673-4141 www.preservationnation.org The National Trust for Historic Preservation also has an extensive collection of preservation related books for sale which can be viewed at: www.preservationbooks.org
TECHNICAL PUBLICATIONS: Illustrated Guidelines for Rehabilitating Historic Buildings -U.S. Department of the Interior, National Park Service www.nps.gov/history/hps/TPS/tax/rhb/ Preservation Briefs Series - U.S. Department of the Interior, National Park Service The following are short pamphlets published by the National Park Service to aid in the preservation of historic structures. Each pamphlet focuses on a certain aspect of preservation work or by building component. Below are the titles of the each brief that are available on the National Park Service web site: www.nps.gov/history/hps/tps/briefs/presbhom.htm 01: Assessing Cleaning and Water-Repellent Treatments for Historic Masonry Buildings 02: Repointing Mortar Joints in Historic Masonry Buildings 03: Conserving Energy in Historic Buildings 04: Roofing for Historic Buildings 05: The Preservation of Historic Adobe Buildings 06: Dangers of Abrasive Cleaning to Historic Buildings 07: The Preservation of Historic Glazed Architectural Terra-Cotta 08: Aluminum and Vinyl Siding on Historic Buildings: The Appropriateness of Substitute Materials for Resurfacing Historic Wood Frame Buildings 09: The Repair of Historic Wooden Windows 10: Exterior Paint Problems on Historic Woodwork

RAYMOND DESIGN GUIDELINES 159
11: Rehabilitating Historic Storefronts 12: The Preservation of Historic Pigmented Structural Glass (Vitrolite and Carrara Glass) 13: The Repair and Thermal Upgrading of Historic Steel Windows 14: New Exterior Additions to Historic Buildings: Preservation Concerns 15: Preservation of Historic Concrete: Problems and General Approaches 16: The Use of Substitute Materials on Historic Building Exteriors 17: Architectural Character - Identifying the Visual Aspects of Historic Buildings as an Aid to Preserving Their Character 18: Rehabilitating Interiors in Historic Buildings - Identifying Character-Defining Elements 19: The Repair and Replacement of Historic Wooden Shingle Roofs 20: The Preservation of Historic Barns 21: Repairing Historic Flat Plaster - Walls and Ceilings 22: The Preservation and Repair of Historic Stucco 23: Preserving Historic Ornamental Plaster 24: Heating, Ventilating, and Cooling Historic Buildings: Problems and Recommended Approaches 25: The Preservation of Historic Signs 26: The Preservation and Repair of Historic Log Buildings 27: The Maintenance and Repair of Architectural Cast Iron 28: Painting Historic Interiors 29: The Repair, Replacement, and Maintenance of Historic Slate Roofs 30: The Preservation and Repair of Historic Clay Tile Roofs 31: Mothballing Historic Buildings
32: Making Historic Properties Accessible 33: The Preservation and Repair of Historic Stained and Leaded Glass 34: Applied Decoration for Historic Interiors: Preserving Historic Composition Ornament 35: Understanding Old Buildings: The Process of Architectural Investigation 36: Protecting Cultural Landscapes: Planning, Treatment and Management of Historic Landscapes 37: Appropriate Methods of Reducing Lead-Paint Hazards in Historic Housing 38: Removing Graffiti from Historic Masonry 39: Holding the Line: Controlling Unwanted Moisture in Historic Buildings 40: Preserving Historic Ceramic Tile Floors 41: The Seismic Retrofit of Historic Buildings: Keeping Preservation in the Forefront 42: The Maintenance, Repair and Replacement of Historic Cast Stone 43: The Preparation and Use of Historic Structure Reports 44: The Use of Awnings on Historic Buildings: Repair, Replacement and New Design

160 RAYMOND DESIGN GUIDELINES