Raspberry Pi Projects for Kids - Packt Publishing Pi Projects for Kids . Daniel Bates . Chapter No....
21
Raspberry Pi Projects for Kids Daniel Bates Chapter No. 2 "Making Your Own Angry Birds Game"
Transcript of Raspberry Pi Projects for Kids - Packt Publishing Pi Projects for Kids . Daniel Bates . Chapter No....

Raspberry Pi Projects for Kids
Daniel Bates
Chapter No. 2
"Making Your Own Angry Birds Game"

In this package, you will find: A Biography of the author of the book
A preview chapter from the book, Chapter NO.2 "Making Your Own Angry Birds Game"
A synopsis of the book’s content
Information on where to buy this book
About the Author Daniel Bates is a Computer Science researcher at the University of Cambridge. His day
job involves inventing designs for future mobile phone processors, and when he goes
home, he likes playing games or working on one of his coding projects (or both!). Daniel
has been a volunteer for the Raspberry Pi Foundation since 2011, and is enthusiastic
about introducing new people to computing. He has previously written Instant Minecraft:
Pi Edition Coding How-to, Packt Publishing.
For More Information: www.packtpub.com/raspberry-pi-projects-for-kids/book

Raspberry Pi Projects for Kids After introducing the Raspberry Pi computer and showing you how to set it up, this book
guides you and your kids through three separate mini projects. Each project is fun, visual,
and has plenty of scope for personalization. By the end of this book, you will understand
and be able to use two different programming languages, and will be able to use them to
build creative programs of your own.
What This Book Covers Chapter 1, Getting Started with the Rasberry Pi, will show you what a Raspberry Pi is,
and how you can get one set up and ready to use.
Chapter 2, Making Your Own Angry Birds Game, will teach you how to make your very
own computer game using the Scratch programming language.
Chapter 3, Testing Your Speed, will guide you on how to connect lights and switches to
your Raspberry Pi to create a physical game, controlled by your computer code. This
chapter introduces the Python programming language.
Chapter 4, Making an Interactive Map of Your City, will teach you more about Python,
and will show you how to access Google Maps to create a personal map of your area.
For More Information: www.packtpub.com/raspberry-pi-projects-for-kids/book

Making Your Own Angry Birds Game
In this chapter, we are going to make our own version of the popular Angry Birds game. What's more, when we're fi nished, we will be able to add all sorts of new rules and enemies to keep the game fresh. The following screenshot shows a completed version of our game:
If you haven't played Angry Birds before, here's a quick description of how the game works. The player launches a bird through the air using a slingshot and attempts to hit all of the pigs at the other end of the level. In order to make things more challenging, the pigs are often hidden behind hills or inside fl imsy buildings that the player must knock down.
For More Information: www.packtpub.com/raspberry-pi-projects-for-kids/book
Making Your Own Angry Birds Game
[ 20 ]
By creating our own version of the game, we have the freedom to change whatever we like. We can change the level design, decrease gravity, fi re the bird faster (or bee, in our case), change all of the characters, and add new power-ups and prizes. The sky is the limit!
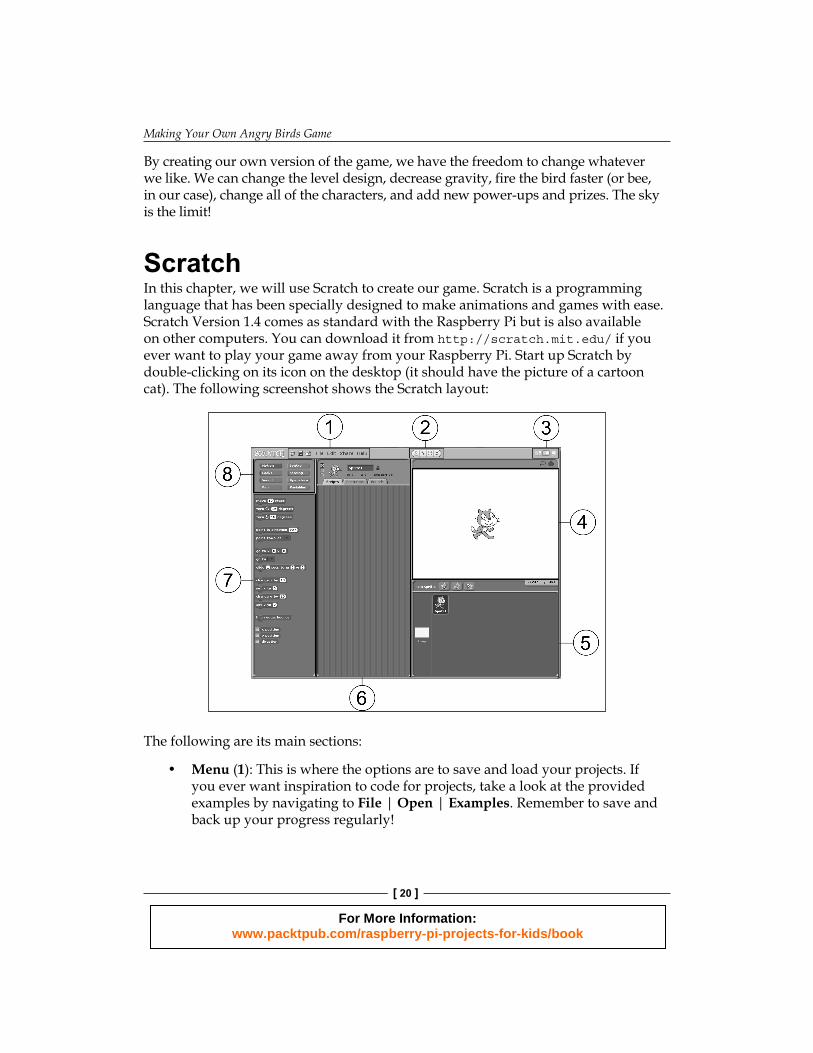
ScratchIn this chapter, we will use Scratch to create our game. Scratch is a programming language that has been specially designed to make animations and games with ease. Scratch Version 1.4 comes as standard with the Raspberry Pi but is also available on other computers. You can download it from http://scratch.mit.edu/ if you ever want to play your game away from your Raspberry Pi. Start up Scratch by double-clicking on its icon on the desktop (it should have the picture of a cartoon cat). The following screenshot shows the Scratch layout:
The following are its main sections:
• Menu (1): This is where the options are to save and load your projects. If you ever want inspiration to code for projects, take a look at the provided examples by navigating to File | Open | Examples. Remember to save and back up your progress regularly!
For More Information: www.packtpub.com/raspberry-pi-projects-for-kids/book

Chapter 2
[ 21 ]
• Sprite controls (2): Every picture in the game is called a sprite. These buttons allow you to copy, remove, grow, and shrink sprites. To use them, click on the button you want, and then click on the sprite you want to affect.
• Screen layout (3): Choose between a small Stage, a large Stage, and a fullscreen game. The small Stage is better for smaller screens as it allows more space for code.
• Stage (4): This is where you will see the effects of all your programming.• Sprite list (5): All of the sprites in your project are shown here, and you can
easily add new pictures or change existing ones.• Script area (6): Each sprite has a number of scripts attached to it, and they
are shown in this area. Each script is a short piece of code that controls how the sprite behaves.
• Blocks (7): Each block is a programming command that can be connected to other blocks (like a jigsaw) to create scripts. Drag a block into the script area to use it, and then drop it next to another block in the script area to join the two.
• Block types (8): The blocks are separated into eight different categories, each having different roles in your programs.
Hello world!Let's create a very simple program to show how easy it is to produce a visible result. From the Motion block type, drag a turn 15 degrees block into the script area (this example uses the clockwise turn block), and do the same for the "when the green fl ag clicked" and "forever" steps from the Control section. Connect them together by dragging one block close to the other. You should see a white highlight where the block needs to be placed. Release the mouse button and the block will snap into place. Click on the green fl ag present at the top-right corner of the screen to run the program.
For More Information: www.packtpub.com/raspberry-pi-projects-for-kids/book

Making Your Own Angry Birds Game
[ 22 ]
You should see the cat rotating. Your script should also be highlighted to show that it is active. You can change the rotation amount to any number you like to see the cat spin faster or slower—click on 15, seen in the preceding code block, and type in a new number. You can even choose a negative number, and the cat will spin in the opposite direction. You could also try adding other types of motion blocks within the forever block. Click on the red stop sign in the top-right corner to stop your program.
This is how the Raspberry Pi understands your program and knows what to do. It understands that the script should start when the green fl ag is clicked. As soon as this has happened, it moves on to the next block, forever. Everything inside the forever block will execute repeatedly until you tell it to stop. In this case, we have told the Raspberry Pi that we want to continuously rotate the cat, and this is what we see. You can see that no blocks can be attached at the bottom of the forever block. If something keeps going forever, no later commands will ever run.
Code tourThere are several types of code blocks available if you want to continue experimenting before we start on the game. A full description can be found online at http://info.scratch.mit.edu/Support/Reference_Guide_1.4. A quick tour of the code blocks is as follows:
• Motion: This allows us to control where a sprite is on the screen and in which direction it is facing. Its options include rotating, moving to any position, and moving in the direction that the sprite is facing.
• Control: This allows us to choose when other blocks of code should run. In the preceding example, we saw how to decide when a script should start and how to repeat a block; however, it is also possible to execute a block only if some condition is true.
• Looks: These enable us to decide what a sprite will look like. Each sprite can have multiple images or costumes associated with it, and these blocks can be used to switch between them. It is also possible for the sprites to talk or change in size or color.
• Sensing: This enables us to allow a sprite to detect its surroundings. We will use it later to work out when a bird in the game hits something.
• Sound: This enables us to play sound. You can add new sounds from the Sounds tab in the script area.
For More Information: www.packtpub.com/raspberry-pi-projects-for-kids/book

Chapter 2
[ 23 ]
• Operators: These are simple mathematical functions, such as add and subtract. Note that some of the blocks are of different shapes; they show which blocks fi t together and will be important later.
• Pen: This enables us to allow a sprite to draw a line to show where it has been.• Variables: These allow us to give names to pieces of information so they can
be accessed from multiple places. As an example, we will create a variable to hold the game score.
Creating a characterTo start our game, we will need a character to fl ing through the air. Angry Birds, of course, used birds as its main characters, but we can use whatever we like.
At the top of the sprite list, you should see the three buttons shown in the previous screenshot. The fi rst lets you draw your own character, the second lets you use an existing image (including a wide range of images included with Scratch), and the third gives you a random image from Scratch's selection.
If you click on the fi rst button, you will be shown the following window; it has plenty of easy-to-use options for creating your own drawings. Hover your mouse cursor over any of the buttons to see what they do.
For More Information: www.packtpub.com/raspberry-pi-projects-for-kids/book

Making Your Own Angry Birds Game
[ 24 ]
The second button brings up a fairly standard fi le explorer with lots of neatly categorized images. This is the option I will use, but feel free to do something different.
Once you have drawn or selected a sprite, click on OK to add it to the game. If you choose not to use the default cat character, right-click on it in the sprite list and click on Delete (this will also delete any code you have created for the cat). You can navigate to Edit | Undelete to bring the cat and its code back.
Now that you have a main character, drag it within the Stage to roughly where you think will be a good starting position, and resize it by clicking on the shrink button in the sprite controls and then repeatedly clicking on the sprite. I suggest making the sprite quite small so there is plenty of room around it to fl y. Now would also be a good time to give your character a name—there is a textbox at the top of the script area that should say something similar to Sprite 2, which you can change to whatever you like.
Your screen should now look something like the following image but with your own character instead of the bee that I have used:
For More Information: www.packtpub.com/raspberry-pi-projects-for-kids/book

Chapter 2
[ 25 ]
Creating a levelNow, let's make the game look a little more interesting by adding some scenery with the following steps:
1. At the left of the sprite list, you'll see a white rectangle called Stage. Click on it and then select the Backgrounds tab in the script area. Again, you have the option of drawing your own background or using a pre-existing image, but this time, I recommend creating your own so that you can make the level fun to play.
2. Click on the Edit button. Try to keep your background as simple as possible; it will be easier to add extra objects (for example, the ground, trees, and clouds) as additional sprites later because then you will be able to move them around more easily. It is perhaps easiest to simply fi ll the background with a solid sky blue color (and maybe some distant mountains).
3. Now back in the Sprite list, create sprites for all of the scenery you want in your game. At minimum, this will be the ground, but you can add all sorts of little details. With each sprite you create, remember to position it on the Stage, make sure it is the size you want, and give it a descriptive name. Remember that you can duplicate sprites using the left button in the Sprite Control area. When you have fi nished, you might be left with something like the following screenshot:
For More Information: www.packtpub.com/raspberry-pi-projects-for-kids/book

Making Your Own Angry Birds Game
[ 26 ]
I have put a hill in the middle of the level to make it more challenging to hit the enemies on the right-hand side of the screen.
When you are happy with your level design, draw a picture of a slingshot and add it to the left-hand side of the Stage. Give it the name Slingshot so we are able to fi nd it easily later on. Your Scratch window should now look as follows:
Moving the characterNow, let's start adding some code and making the game interactive! In this section, we'll do everything necessary to launch our main character using the slingshot.
InitializationThe fi rst thing we want to do is make sure the position of our main character resets every time we start the game. Click on the main character and create the following script in the script area:
For More Information: www.packtpub.com/raspberry-pi-projects-for-kids/book
Chapter 2
[ 27 ]
The code snippet states that when the green fl ag is clicked, the current sprite (the main character) will move to the same position as the slingshot.
Test that your code works by clicking on the green fl ag. You should see your character jumping to the same position as the slingshot. You may fi nd that the character is behind the slingshot; if you would prefer for it to be in front, simply click on it on the Stage and drag it a short distance. Interacting with any sprite in this way will put it on top of all other sprites.
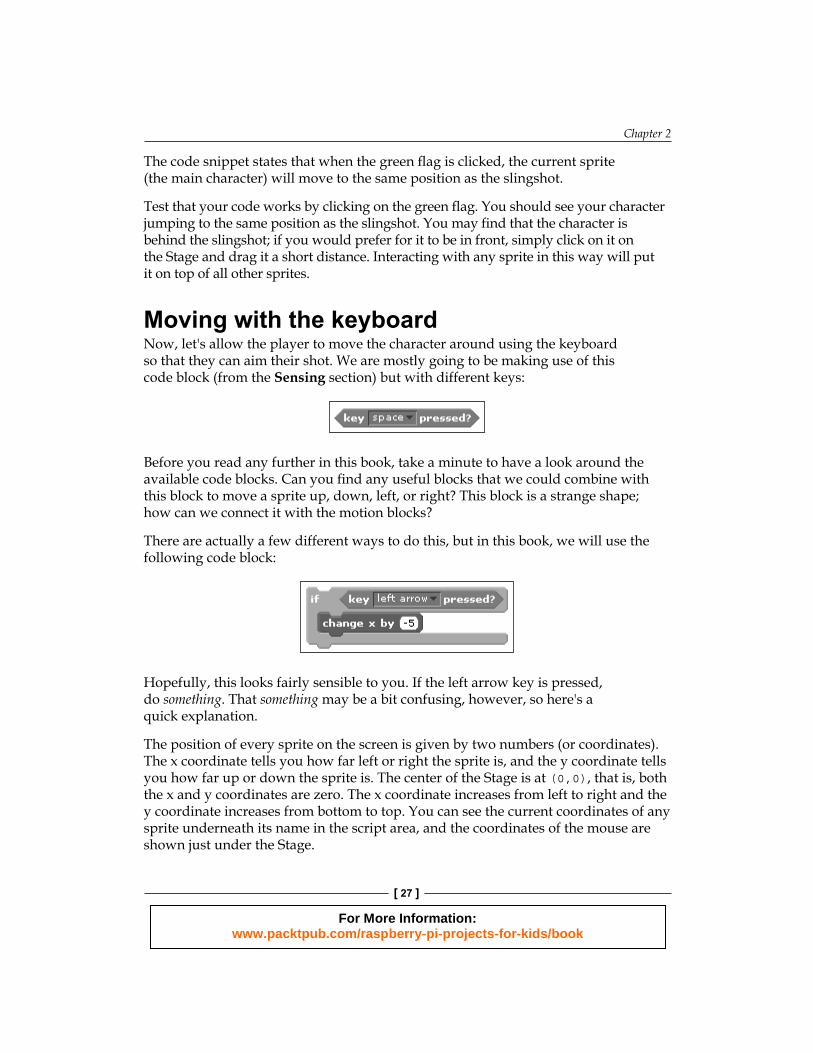
Moving with the keyboardNow, let's allow the player to move the character around using the keyboard so that they can aim their shot. We are mostly going to be making use of this code block (from the Sensing section) but with different keys:
Before you read any further in this book, take a minute to have a look around the available code blocks. Can you fi nd any useful blocks that we could combine with this block to move a sprite up, down, left, or right? This block is a strange shape; how can we connect it with the motion blocks?
There are actually a few different ways to do this, but in this book, we will use the following code block:
Hopefully, this looks fairly sensible to you. If the left arrow key is pressed, do something. That something may be a bit confusing, however, so here's a quick explanation.
The position of every sprite on the screen is given by two numbers (or coordinates). The x coordinate tells you how far left or right the sprite is, and the y coordinate tells you how far up or down the sprite is. The center of the Stage is at (0,0), that is, both the x and y coordinates are zero. The x coordinate increases from left to right and the y coordinate increases from bottom to top. You can see the current coordinates of any sprite underneath its name in the script area, and the coordinates of the mouse are shown just under the Stage.
For More Information: www.packtpub.com/raspberry-pi-projects-for-kids/book

Making Your Own Angry Birds Game
[ 28 ]
Since we want to move left when the left arrow key is pressed, we have to change x by a negative amount. In this case, it has the same effect as subtracting 5.
We will need one of these code blocks for each arrow key:
• The left arrow key should change x by -5• The right arrow key should change x by 5• The up arrow key should change y by 5• The down arrow key should change y by -5
Finally, since we want the player to be able to press each button multiple times to continue adjusting their position, we need to put all of these blocks inside one big forever block. The forever block should be connected at the bottom of the existing script so the player can adjust the character's position after the position has been reset. Your code should now look as follows:
Once again, test your code out by clicking on the green fl ag. You should be able to move your character around by pressing the various arrow keys.
Launch!Now that we've got the character in the right position, let's launch it! First, let's think about what we want to happen when the launch happens. We want to stop the player moving the character (so they can't cheat), and instead, we want to start moving it with a speed and direction dependent on how far from the slingshot the player is.
For More Information: www.packtpub.com/raspberry-pi-projects-for-kids/book
Chapter 2
[ 29 ]
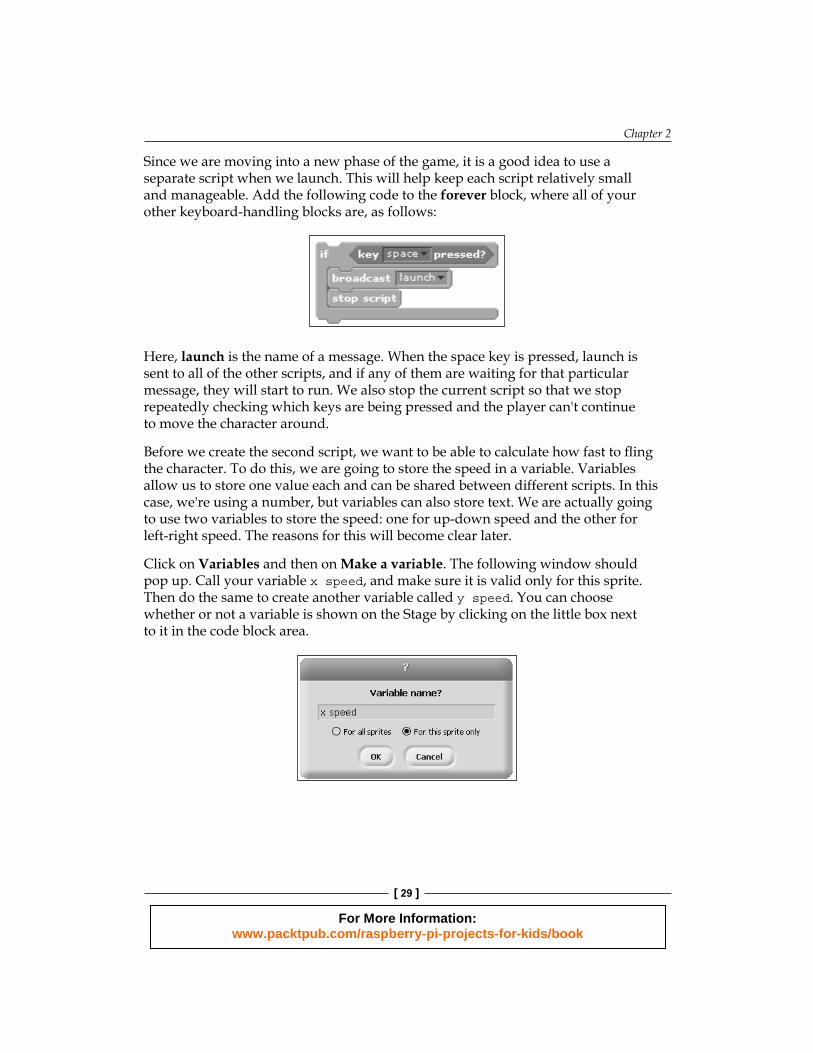
Since we are moving into a new phase of the game, it is a good idea to use a separate script when we launch. This will help keep each script relatively small and manageable. Add the following code to the forever block, where all of your other keyboard-handling blocks are, as follows:
Here, launch is the name of a message. When the space key is pressed, launch is sent to all of the other scripts, and if any of them are waiting for that particular message, they will start to run. We also stop the current script so that we stop repeatedly checking which keys are being pressed and the player can't continue to move the character around.
Before we create the second script, we want to be able to calculate how fast to fl ing the character. To do this, we are going to store the speed in a variable. Variables allow us to store one value each and can be shared between different scripts. In this case, we're using a number, but variables can also store text. We are actually going to use two variables to store the speed: one for up-down speed and the other for left-right speed. The reasons for this will become clear later.
Click on Variables and then on Make a variable. The following window should pop up. Call your variable x speed, and make sure it is valid only for this sprite. Then do the same to create another variable called y speed. You can choose whether or not a variable is shown on the Stage by clicking on the little box next to it in the code bl ock area.
For More Information: www.packtpub.com/raspberry-pi-projects-for-kids/book

Making Your Own Angry Birds Game
[ 30 ]
FlightNow that we have these variables, we can create the second script, which will control our fl ight through the air. The code for this is shown in the following screenshot. It's a little complicated, but try to work out what it does as you build the script up in the script area. I'll explain how it works shortly. (For the two long blocks that are almost identical, it is possible to create one, then right-click on it and duplicate it to save effort in creating the second one.)
The preceding script waits until it receives the launch message from the fi rst script. Only then does it start. We set the x speed variable to a value that is relative to the distance between the character and the slingshot. I divide the value by 20 to make sure that the fl ight isn't too fast, but you may prefer a different value here. We then do exactly the same to compute the y speed value. Once the speed has been computed, we repeatedly move the object according to our speed.
We're now in a good place to test if everything is working. Click on the green fl ag, move around, and then launch using the Space bar. You should see your character fl y in a straight line across the screen. You may want to try launching from different positions to see how this affects your speed and direction.
One thing that you may have noticed is that your character fl ies directly through the middle of the slingshot, not the part that it should actually be fi red from. This is easy to fi x. Click on Slingshot in the sprite list, choose the Costumes tab in the script area, click on Edit, and click on Set costume center. You can now drag the crosshairs around to choose a more sensible launch position. Once you have fi nished, click on OK. The slingshot will probably need repositioning on the Stage, but your character's fl ight should now follow a better path.
Adding physicsThe next thing for us to do is to give our character a more interesting fl ight path. The game would be too easy (and no fun) if we just fl ew in a straight line through all the obstacles.
For More Information: www.packtpub.com/raspberry-pi-projects-for-kids/book

Chapter 2
[ 31 ]
GravityFirst, let's add some gravity. Gravity has the effect of pulling objects down towards the ground. How can we model gravity in our game? The answer lies in the way we split our speed into both x speed and y speed. Gravity will only affect y speed, our speed in the up-down direction, so we can leave x speed as it is. Since the y coordinate increases as we move up but gravity pulls us down, we want gravity to keep subtracting a small amount from the y speed. Add the following code block inside the forever block of your second script:
Try out the game now. You should arc through the air until you hit one of the edges of the screen. You may tweak the number in this code block if you wish; a more negative number will give stronger gravity. What happens if the number is positive?
BouncingNext, we'll make something more interesting happen if we hit the edge of the screen. As always, there are several options available, but I am going to suggest bouncing off the edges. When we bounce, we want to have the same speed but travel in the opposite direction. When we hit either of the side edges, we want our left-right direction to change, and when we hit the top or bottom edges, we want our up-down direction to change. If there is an if on edge, bounce block in the Motion section, but it can have some unexpected effects in the game. Add it inside the forever block to see the effects, if you like, but remember to remove it again before continuing.
Instead, we'll write our own code to handle bouncing. Add the following code inside the forever block:
All we're doing here is checking the current position to see if it is at an edge and then reversing the direction. The numbers 240 and 180 come from the width and height of the Stage, respectively, and multiplying by -1 is a good way to keep the speed the same but reverse the direction.
For More Information: www.packtpub.com/raspberry-pi-projects-for-kids/book

Making Your Own Angry Birds Game
[ 32 ]
Have another test of the game. Your character should bounce around the screen in smooth, curved paths.
Ending the gameThe problem is that you bounce around forever. We want the bouncing to stop at some point, and a good time to do this is when the character hits the ground. This is easy to do in Scratch with the following code:
Add this inside the forever block, and the script will end when the character sprite hits the ground sprite (you will need to choose the name of the sprite that you used for the ground). Since this script is in control of the character's movement, ending the script ends the movement, which is what we wanted.
Give your physics a fi nal test by playing the game. Your character should fl y through the air while being pulled downwards by gravity, bounce off the edges of the screen, and stop when it hits the ground. Your second script should now look as follows:
For More Information: www.packtpub.com/raspberry-pi-projects-for-kids/book

Chapter 2
[ 33 ]
ScoringNow that our main character can be launched properly, it's time to give the player something to aim at. In Angry Birds, there are pigs, but we can have anything we like. Draw a new sprite or use an existing one in the same way we created the main character earlier. I am going to use a pre-made shark in this example. Resize the sprite and put it in a good position.
Do you remember how we checked to see when the main character hit the ground? We're going to need to do something very similar here to detect when an enemy is hit by the main character. The following is the main piece of code to detect collisions, and inside it, we're going to put all of the effects we want to happen when the enemy is hit. Make sure the enemy sprite is selected when you create this script—it controls the enemy's behavior and not the main character's. Note that we're using forever if rather than just if as we want to keep checking for collisions. Buzzy is the name of the sprite for my main bee character.
If everything has been done right, when an enemy is hit, the following events occur:
• The enemy disappears• The score is updated• The script for this enemy stops—we don't care about any future collisions
We can make the enemy disappear using the hide code block, and we've already seen how the script can be ended using stop script. The only thing left, then, is the score.
Create a new variable called score, and this time make sure that For all sprites is selected. This ensures that all sprites have access to the score, so if there are multiple enemies, they can all update the same variable. Once the variable has been created, make sure the box next to it is marked so the score appears on the Stage.
Now we need to add some code so the score increases when the enemy is hit. Add change score by 10 inside the forever if block.
For More Information: www.packtpub.com/raspberry-pi-projects-for-kids/book

Making Your Own Angry Birds Game
[ 34 ]
Your script should now look similar to the following screenshot:
Test your game by playing it and trying to hit this enemy. Remember that you can adjust the sizes of the sprites, their launch speed, and the gravity, if the game is too hard or too easy. You will notice that once you hit the enemy, it disappears and you get points, but the score and enemies don't reset when you play again. Let's fi x this. Add the code shown in the following screenshot to the enemy sprite as a second script:
Now the enemy should come back, and the score should reset to 0 every time you click on the green fl ag.
Only when you've fi nished all the code should you create multiple enemies. Right-click on the enemy sprite in the Sprite list and click on Duplicate to create a copy. This copy will have all the necessary code with it to update the score and disappear after it has been hit. Create as many copies as you like, place them wherever you like, and then sit back and enjoy your game! It should look like the following screenshot:
For More Information: www.packtpub.com/raspberry-pi-projects-for-kids/book

Chapter 2
[ 35 ]
ExtensionsSo far we have created the bare minimum for a game. There are all sorts of extra features we could add, such as the following:
• Animation when two sprites collide• A special enemy that gives bonus points• Barriers that slow the player down• Power-ups that increase the player's speed or fl ip gravity, for example• Extra controls so the player can continue to affect the character after it has
been launched
I will leave the rest of your game up to you, but here are some example scripts to give you some ideas. Try to work out what they do and where they might go, or just try them out! Some scripts may require minor modifi cations elsewhere to fi t in properly.
SummaryIn this chapter, we got to grips with the Scratch programming language. We learned that it can be easy to create animations, and we went as far as creating an entire game.
In the next chapter, we'll take our knowledge of Scratch and see how we can apply it to a different programming language called Python. There, we'll make another game and our own game controller to go with it.
For More Information: www.packtpub.com/raspberry-pi-projects-for-kids/book
Where to buy this book You can buy Raspberry Pi Projects for Kids from the Packt Publishing website:
.
Free shipping to the US, UK, Europe and selected Asian countries. For more information, please
read our shipping policy.
Alternatively, you can buy the book from Amazon, BN.com, Computer Manuals and
most internet book retailers.
www.PacktPub.com
For More Information: www.packtpub.com/raspberry-pi-projects-for-kids/book