Temperature Alert LAN-based Temperature and Humidity Monitor

Radio GuardianMonitor HandbookGuardian Solution S1020B With Plesio Pager

V14.7 UH1448AB Guardian Handbook for Plesio Pages 2 of 36
The Alert-iT Guardian is a highly versatile monitor unit that employs a range ofsensors to detect various presentations of seizure activity, before passing analarm signal to a portable Alert-iT Pager. Your Guardian is preset to detect thekey symptoms most commonly associated with tonic/clonic seizures, and hasbeen supplied with sensors appropriate to your needs.
Before installing the Guardian, you will need to have sufficient knowledge ofthe client to make the necessary risk assessment as to the suitability of theequipment and sensors required to provide a safe environment withcomprehensive support.
This handbook will help you install, test and adjust the settings of your Guardianand its sensors.
Once you have installed your Guardian, we will be pleased to offer you anyassistance you require via our telephone help-line on 01530 239 900. Ourworking hours are 9am-5pm Monday to Friday.
Please test the operation of your Guardian and sensors at least once perweek. We have included a simple form on page 30 which will help you keeptrack of this process.
Should you wish to change any of the operating parameters or modify yoursystem, detailed handbooks are available on request (for hard copies), oron-line at: www.alert-it.co.uk/support
Please call 01530 239 900 or go online to www.alert-it.co.uk/registration andregister your new equipment with our Service Team. You will be assigned anSRN (Support Registration Number) which will link your details and equipmentto our database, ensuring that you always receive fast and efficient service andsupport. An additional benefit is that this will extend your warranty to threeyears at no extra charge.
Introduction

V14.7 UH1448AB Guardian Handbook for Plesio Pages 3 of 36
Cont'd Overleaf
Contents

V14.7 UH1448AB Guardian Handbook for Plesio Pages 4 of 36

V14.7 UH1448AB Guardian Handbook for Plesio Pages 5 of 36
Product Information
Client Assessment
ShallowMovement
(Associatedwith breathing)
BedVacation
P143C BedOccupancy
Mat
XP140 BedMovement
SensorBed
Movement
Enuresis(moisture, vomit
or salivation)
X
X
Symptoms
P142A/FMoistureSensorsInternal
GuardianMicrophone
or P158B
The Alert-iT Guardian is without doubt the most versatile and sensitive epilepsysupport monitoring system ever developed for home use.To get the most from your monitor, we recommend that on first installing it, youuse only the tonic/clonic seizure functions for the first night. Setting the monitor upfor this key role is an ideal introduction to using the controls and understanding theinformation on the display screen. You will then be able to progress quickly to usingthe other functions as described later in this handbook. In addition, our telephoneCustomer Support Team are here to assist you and can be contacted on 01530239900.The Guardian’s wide range of settings, adjustments and nightly movement readingssupport the following symptoms:
- Tonic/clonic seizures from tremors to large movement - SUDEP through failure of shallow movements associated with breathing - Breathing problems though changes in shallow movement activity - Enuresis, vomiting and salivation via the moisture sensor sheets- -Immediate or prolonged bed vacation - Sharp vocal sounds associated with seizures
The appropriate sensors for these symptoms can be verified on the table featured below.
Sound

V14.7 UH1448AB Guardian Handbook for Plesio Pages 6 of 36
The Guardian and its Optional Sensors
A
B
D
J
C
Guardian Solution Contents:
A Guardian Bedside Monitor P139*B Bed Movement Sensor (Included) P140AC Bracket for wall or bed mounting (Included) P159AD Power Supply for Guardian (Included) P171*E Plesio Pager P168F Power Supply for Pager P153BAdditional Items:G Bed Occupancy Mat (optional purchase) P143*H Moisture Sheet(s) (optional purchase) P142A/FI Connecting Lead for H (optional purchase) P141E(S1016)J External microphone (optional purchase) P158B
F
E
G
H
I

V14.7 UH1448AB Guardian Handbook for Plesio Pages 7 of 36
Using The GuardianPart 1 - Quick-Start Guide
Switching The Unit OnInsert the power supply into the socket on the Guardian marked ‘POWER 12V DC’.(Fig.1). Press the arrow button marked ‘menu’ to switch the Guardian on.The Guardian incorporates an internal battery, ensuring that the monitor has a constantpower source in case of power cuts. This battery will charge whenever the powersupply is plugged in. If the battery indicator rectangles appear as solid shapes, theunit is charging; if they appear as outlines only, the unit is operating on its batterypower alone.If the battery becomes discharged then the monitor will emit an alarm noise (whichsounds like a croaking frog) and a fault indication will be transmitted to the pager.
Power Supply Socket Figure 1
SnoozeSee page 25
Shallow MovementInformation - See Page 19

V14.7 UH1448AB Guardian Handbook for Plesio Pages 8 of 36
Sensor Installation and Basic OperationThe following sequence of first use of the sensors is highly recommended.This methodical approach gives you time to familiarise yourself with theway each sensor operates, and ensures that you will go on to use yourGuardian confidently, safely and to its full potential.
Positioning sensors on the bed
MicrophoneSensorP158B
Bed Movement Sensor - P140
Bed Occupancy Sensor - P143
Mattress Moisture Sensor - P142 Pillow Moisture Sensor - P142F.
Pager LEDMonitor LED
Please see Appendix Afor pager charging and
pairing information
Figure 2
Alarm LED
On/Off Button
Pair / Mute
While the pager is shipped with some charge in the batteries, we recommendthat you charge the unit for six hours before use. To turn the pager on, pressand hold the ON/OFF button for 3 seconds. The pager will beep and all threeLEDs will flash. The red Monitor LED will blip every 8 seconds to indicate thatthe pager is linked to the monitor, while the green Pager LED will blip every4 seconds to show that the pager is active and listening for an alarm.
Turning on the Plesio Pager

V14.7 UH1448AB Guardian Handbook for Plesio Pages 9 of 36
Spasm Movement
Install the SensorPlace the Bed Movement Sensor (P140A) underneath the mattress on afirm bed base (as per fig. 2), in a position below the torso. Connect thesensor into the Guardian monitor making sure that the sensor’s yellowplug connects to the movement sensor plug (also marked with yellow asper figure 3).
Activate the FunctionThe Guardian is factory-set with this feature activated. It is pre-set forsending an alarm after detecting tonic/clonic movements lasting longerthen 15 seconds at a rate of at least one movement every two seconds. Todeactivate or alter these settings, please see page 17.
Test the sensorTap the mattress and note that the # symbol appears and remains visiblefor the duration of the delay time (this is 15 seconds at the factory setting).
Normal OperationAn alarm will activate if movements exceed the rate and time settings.The pager will display an alarm light, emit an audible alarm and vibrate (itcan be silenced for 5 minutes while you attend to the client by pressingMute on the pager). The alarm is cleared at the monitor by pressing thebutton marked Alarm Reset on the Guardian’s front panel followed bypressing the Mute button on the pager. It is important to ensure that theGuardian resumes its ACTIVE mode once the occupant has returned tothe bed.
Figure 3
Designed to detect tonic/clonic seizures
V14.7 UH1448AB Guardian Handbook for Plesio Pages 10 of 36
Shallow MovementDesigned to support breathing-related seizures and SUDEP
Install the SensorShallow movement is detected using the P140 Bed Movement sensor,which will have already been installed (see page 9).
Activate the FunctionBy default this is OFF on delivery. Use the MENU key to scroll to“Shallow”and select ‘On’ by pressing the Zz arrow. There are then fourparameters to set:
● Shallow Magnify (Sensitivity): The higher the number the smaller themovements detected, which reduces false alarms. However, thesensor MUST be tested for immunity to ambient vibrations (see pages19-21)
● Shallow Delay (Identified as d on the display): How long the clientstops moving totally to generate an alarm. At the start this is set to 60seconds and refined later with observation of the clients generalbreathing pattern (see pages 19-21)
● Shallow Minimum (Identified as m on the display): The trigger levelfor slow breathing. At the start this should be set to 0 and refined laterwith observation of the clients general breathing pattern (see pages19-21)
● Shallow Maximum (Identified as M on the display): The trigger levelfor fast breathing. At the start this should be set to off and refinedlater with observation of the clients general breathing pattern (seepages 19-21)
When setting these parameters to give fast reliable detection withminimum false alarms, the client’s mattress type, physique and nighttimebreathing patterns all need to be taken into account and adjusted for. Tohelp you achieve this, we strongly recommend using the procedure onpage 19 which uses the built-in movement recorder overnight to helpestablish the monitor’s optimum settings.
V14.7 UH1448AB Guardian Handbook for Plesio Pages 11 of 36
Test the SensorA useful test facility is the “Tick Volume”. This is the second option fromthe home screen as you scroll through the main menu. It is set to OFF bydefault, but after changing to 8 (full volume) a tick will be heard at everydetected breath or shallow movement. To test the sensor; lie on the bedand note that a tick is heard or the breathing symbol (*) appears on thedisplay at every breath.
Normal OperationIf any of the selected alarm conditions are exceeded, an alarm will beraised. Press RESET on the Guardian and ‘Mute’ on the Plesio Pager toclear the alarm. This will also suspend further alarms until a client is onceagain detected in bed (see explanation page 16). This prevents false alarmswhile the bed is unoccupied.
In-bed (active) detection occurs if:
● The sensor detects 10 shallow movements within one minute● A Bed Occupancy mat is activated (see page 13)
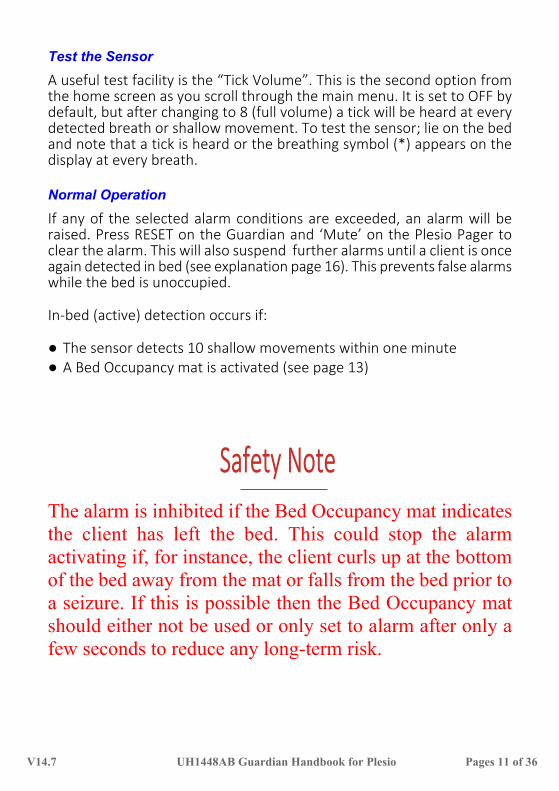
The alarm is inhibited if the Bed Occupancy mat indicatesthe client has left the bed. This could stop the alarmactivating if, for instance, the client curls up at the bottomof the bed away from the mat or falls from the bed prior toa seizure. If this is possible then the Bed Occupancy matshould either not be used or only set to alarm after only afew seconds to reduce any long-term risk.

V14.7 UH1448AB Guardian Handbook for Plesio Pages 12 of 36
SoundDesigned to detect seizures associated with vocal sounds
Install the SensorThe Guardian features an internalmicrophone. However, an externalmicrophone is also available and may berequired to focus sound detection if themonitor is being used in a noisyenvironment (part number P158B - soldseparately).
Activate the FunctionThis is turned off at factory settings. To activate the sound detectionfunction, use the MENU key to scroll to “SOUND”. There are then threeparameters to set:
● Sound Delay: How long the sound sequence must go on forto trigger an alarm.
● Sound Magnify: This ranges from 1-8. The higher thenumber selected, the quieter the sound detected.
● Sound Rate: How frequent the shouting or clicking has to beper minute.
Test the SensorMake a sharp click near the sensor and note that a ) symbol appears onthe display. The sensitivity (Sounds Magnify 1-8) can be adjusted.
Normal OperationIf the sound pattern matches the rate and carries on longer than the setdelay, an alarm is generated. Press RESET on the Guardian and ‘Mute’on the Plesio pager to silence and reset this alarm (Please ‘Suspend ModeExplained‘ on page 16 for further details).*If the client is detected out of bed (with either the Bed Occupancy Mat- see page 13, or the Shallow Movement detector enabled - see page10), then the microphone will be inhibited to prevent false alarms.
External Microphone Input

V14.7 UH1448AB Guardian Handbook for Plesio Pages 13 of 36
Bed Occupancy (if applicable)
Install the Sensor
Insert the sensor cable into the Guardian’s Occupancy Monitor socket asshown in figure 4. Place the Bed Occupancy Sensor (P143*) on top of themattress under a suitable cover sheet, in a position that ensures themaximum body weight is lying on the sensor. Typically this is the areabeneath the upper torso. Positioning the sensor underneath the shoulderarea is advised if an alarm is required before the user’s feet touch the floor.
Activate the FunctionThe Guardian has this function turned off as its factory setting. To turnthe function on, use the MENU key to scroll to “Bed Occupancy” anduse the right-hand arrow (Zz) to select the time required for the occupantto be missing before the alarm is raised. A typical setting* would be6-10 minutes to allow for a toilet visit, yet avoiding the danger of leavingthe client unattended should a seizure occur in the bathroom (however,please see the safety comment regarding SUDEP on page 11). Pleasebe aware - this sensor has safety implications when used in conjunctionwith the Shallow Movement or Sound functions (see pages 10 & 12)*
Test the SensorWith the mat plugged in and the bed unoccupied, the word “vacant”shouldappear on the display. Lie on the bed and ‘in-bed’ should replace the‘vacant’ message.
Normal OperationWhen the occupant leaves the bed, this sensor will automatically inhibitthe shallow movement and sound alarms. If the occupant fails to returnwithin the prescribed time the alarm is raised. The alarm resetsautomatically if the client returns. Press ‘Reset’ on the Guardian and‘Mute’ on the Plesio pager to silence and suspend the alarm once theoccupant is being attended to. (Please refer to ‘Normal Operation’ on page9 and ‘Suspend Mode Explained‘ on page 16 for further details.)*Please note. Any settings must be supported by the risk assessment carried out for the individual.
Figure 4

V14.7 UH1448AB Guardian Handbook for Plesio Pages 14 of 36
Moisture (if applicable)
Install the SensorConnect the Moisture Sensor (P142) to itsconnecting lead using the press-studs (you mustconnect the studs to either the right or left- handpair in the case of the mattress sheet). The otherend of the lead plugs into the Guardian’s greenport (as shown in figure 5).
Please note that there are two types of sensor: either fitted over the pillowfor vomit detection (P142F), or on top of the mattress (on top of the BedOccupancy mat if fitted) in the region of the groin for enuresismonitoring (P142A).
Activate the FunctionThe Guardian has moisture detection turned off as a factory setting. Toturn the function on, press the MENU key repeatedly until the “MOISTURE”option appears, and then use the right key (Zz) to adjust the degree ofwetness required before the alarm is raised.
Test the sensorTo test the sensor, join the two spare stud connections (either left orright-hand pair) with a metal object to trigger an alarm.
Normal OperationWhen the sensor sheet becomes wet, the alarm will sound. Press ‘Reset’on the Guardian and ‘Mute’ on the Plesio pager to silence and suspend thealarm until a dry moisture sensing sheet has been connected (seeexplanation page 16).
Figure 4
Press Studs
Figure 5
V14.7 UH1448AB Guardian Handbook for Plesio Pages 15 of 36
Alarm ConditionThe pager will automatically detect any failure in the communicationsystem or catastrophic failure of the monitor.
All alarms can only be cleared at the monitor by pressing the buttonmarked alarm/reset on the Guardian’s control panel.
When the Menu/Reset button is pressed while the sensor is stilldetecting an alarm condition, then many of the alarms will show“SUSPENDED” (see explanation page 16) and will no longer sendalarms to the pager until the safe condition is restored.
It is strongly recommended that you check the Guardian has returnedto “ACTIVE” before leaving the user, as this ensures an alarm conditionwill be detected.
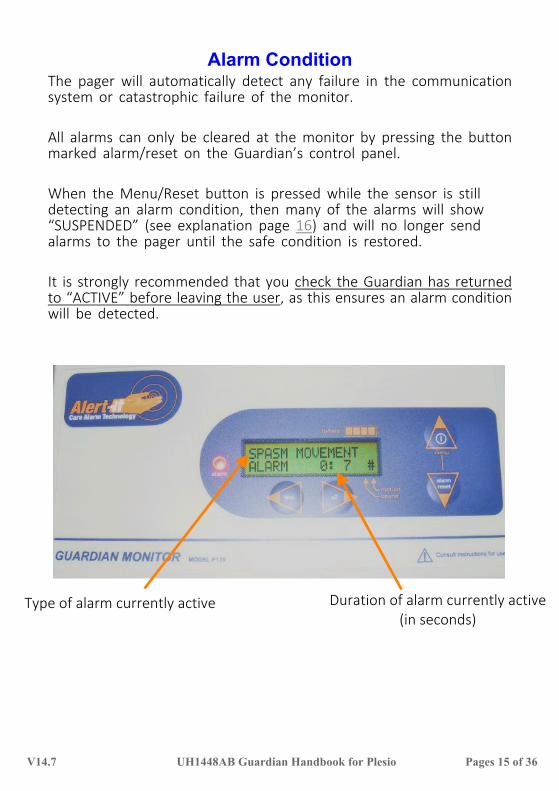
Type of alarm currently active Duration of alarm currently active(in seconds)

V14.7 UH1448AB Guardian Handbook for Plesio Pages 16 of 36
Suspend Mode ExplainedThe word “active” on the main screen confirms that all the sensors areworking and have sensed a safe condition for the bed occupant.When the Alarm Reset Key is pressed following an alarm, or indeed at anytime, sensors that could give false alarms when the occupant is out of thebed are temporarily suspended. They will then remain suspended untilthe occupant is sensed as being in the bed once again whereupon theywill return to active mode automatically. This applies to the ShallowMovement, Sound and Bed Occupancy sensors. In addition the Moisturesensor is suspended until a dry sensor is detected.If any sensor is suspended the the screen shows “Suspended” followedby the corresponding letter(s) indicating which sensors are suspended.All others sensors will still be active.The following table defines the conditions that cause the sensor tobecome active.
Sensor Action to trigger Active mode Effect when Suspended
s Shallow After 10 breaths or if BedOccupied sensor active
Shallow alarms are not
sensed when s is showing
s Sound After 10 breaths or if BedOccupied sensor active (oralways if one of these is notactive)
Sounds are not sensed
while s is showing
m Moisture When sensor dry Moisture is not sensedwhile m is showing
b Occupancy When “in bed” sensed The Bed Vacation alarmtimer is stopped while b isshowing.

V14.7 UH1448AB Guardian Handbook for Plesio Pages 17 of 36
Part II - User Settings & Adjustments
Shallow Maximum (default is Off)Starts at 20 MPM(movement/breaths per minute)maximum is 30. This is to detectrapid movements/breaths whichmay indicate panic attack orhyperventilation.
Press the menu to scroll to the relevant spasm setting. Using the Mm (left)and zZ (right) arrow to alter settings sensitivity.
Spasm Magnify is the sensitivityadjustment for intensity ofmovement. 8 is most sensitive.Slight tremors will be setting 8. Theunit is supplied with a defaultsetting of 4.
Spasm Rate is set at a default of 2,meaning that the unit will alarm ifthere is 1 movement every 2 seconds(i.e. within the setting). Loweringspasm rate to 4 detects slower regularmovements. E.g. Setting 4 couldsupport, myclonic detection (1movement every 4 seconds or faster,which triggers an alarm).
Spasm
Spasm Delay is the amount of timethe person is moving constantly be-fore the alarm is triggered. The unitis supplied with a default setting of15 seconds.
V14.7 UH1448AB Guardian Handbook for Plesio Pages 18 of 36
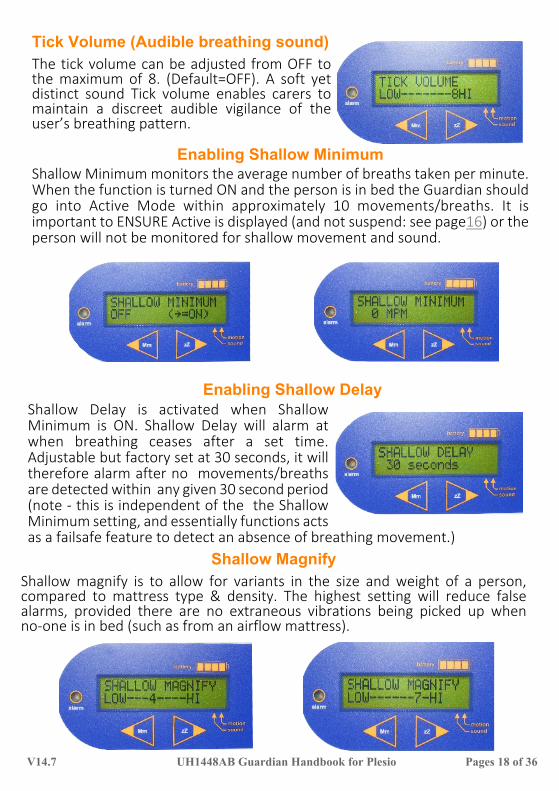
Enabling Shallow MinimumShallow Minimum monitors the average number of breaths taken per minute.When the function is turned ON and the person is in bed the Guardian shouldgo into Active Mode within approximately 10 movements/breaths. It isimportant to ENSURE Active is displayed (and not suspend: see page16) or theperson will not be monitored for shallow movement and sound.
Enabling Shallow DelayShallow Delay is activated when ShallowMinimum is ON. Shallow Delay will alarm atwhen breathing ceases after a set time.Adjustable but factory set at 30 seconds, it willtherefore alarm after no movements/breathsare detected within any given 30 second period(note - this is independent of the the ShallowMinimum setting, and essentially functions actsas a failsafe feature to detect an absence of breathing movement.)
Shallow MagnifyShallow magnify is to allow for variants in the size and weight of a person,compared to mattress type & density. The highest setting will reduce falsealarms, provided there are no extraneous vibrations being picked up whenno-one is in bed (such as from an airflow mattress).
Tick Volume (Audible breathing sound)The tick volume can be adjusted from OFF tothe maximum of 8. (Default=OFF). A soft yetdistinct sound Tick volume enables carers tomaintain a discreet audible vigilance of theuser’s breathing pattern.

V14.7 UH1448AB Guardian Handbook for Plesio Pages 19 of 36
1. Using the TICK function is a good way to audibly check that the movement sensor is working.Turn the function on and select setting 8.
2. Set the Shallow Min to 0, Shallow Magnification at 8, Shallow Delay=15 and with no user in thebed and no one touching the bed, check that neither the * or # symbol do NOT appear on thescreen. Then leave the unit in SUSPEND (press RESET key) for an hour with no-one in the roomand check it remains in SUSPEND. Decrease the magnification if necessary to stop any sensoractivity. This will set the optimum highest sensitivity to pick up movement safely. If the settingfalls below 6 then contact the supplier as the installation may be an issue. This would apply ifairflow or oscillating air mattresses are being used, where additional measures may be needed.
3. On the first few nights leave Shallow Max turned off but set Shallow Min to 0, Shallow Delay=60and use the Mmd readings to decide on the most suitable settings.
4. Once the user is settled in bed, or sleeping, press the Mm button to reset and start therecorder. The readings on the Guardian’s screen will show as M15m15d5. (See pic. below)
5. In the morning, and before the user is awake, note the new readings. Repeat for a number ofnights to get a spread of readings and use these to set the alarm values with a margin to preventfalse alarms. It is best to begin with Shallow Min=0 with Delay set by the d value as required andprove reliable operation before increasing the Min towards the m value (which can increase falsealarms).
6. If the Guardian is an older unit unit that does not have the ‘d’ reading feature (v6.3), then areliable value can be found by decreasing the Delay from 60 step by step until an acceptable valueis reached without excessive false alarms. Experience suggests most people experience very lowbreathing levels with gaps in the early morning, which can trigger alarms without any apparentcause.
7. Validate operation during observed seizures and adjust the magnification and detection limitsas required. Please call Alert-iT if you have any questions.
Mm button
Recommended Procedure For Setting ShallowMovement Alarms

V14.7 UH1448AB Guardian Handbook for Plesio Pages 20 of 36
Stage2 Shallow Movement Alarm: Measuring normal levels
Stage1 Shallow Movement Magnify: Find safe maximum setting
In morning RecordmMD readings each morning
NOShallow Enabled
Begin using Guardian WITHOUT shallowto gain operational experience
At night press LEFTkey to reset.
m-15M=15D=5
To test the magnifyis not too high
Press RESET (down) Display shows SUSPEND s
NO-ONE MUST TOUCH THE BEDEnsure no "tick"
Ensure SUSPEND s remainsLeave the room for an hour or more
No-one should enter for this test period
Alarm goes off yes
no
After 1 hour at leastReturn to room
Unit still in Suspend no
yes
Reduce Magnify by 1 count
mM only valid if seizure free night.Reading with seizure are valuable for comparison
Enable ShallowTick Vol=8
Shallow Min = 0Shallow Magnify=8
Shallow Delay=15sec
MinShallowProtectionTick Vol=off
Shallow Min = 0Shallow Magnify= asleft
Shallow Delay=60sec
Repeat measurements for 1 weekto gauge worst case values
If false alarms occur then the installationwill need changing: Contact Alert-it
Shallow Movement Adjustment Procedure
See Next Page

V14.7 UH1448AB Guardian Handbook for Plesio Pages 21 of 36
Stage3: Setting Shallow min/max after delay proved acceptable
Introduce into serviceMonitor False Alarms
Shallow Delay givesacceptable false alarm
rateno
yes
Change Shallow Delay
Set Shallow Delay based on maximum D found
Set Shallow min (if required) based on m foundSet Shallow max (if required) based on M found
Introduce into serviceMonitor False Alarms
At night press LEFTkey to reset.
m-15M=15D=5
RecordmMD readings each morning
No of true alarmsNo False Alarms
mM only valid if seizure free night.Reading with seizure are valuable for comparison
mM can be used later to set values

V14.7 UH1448AB Guardian Handbook for Plesio Pages 22 of 36
Bed Vacation
Off asdefault
Delay timepredetermined
increments
‘Vacnt’displayedwhen bed
unoccupied
‘InBed’displayedwhen bedoccupied
Alarmactivated after
set time
You will require anoptional bed
occupancy sensorto use this
function. Pleaseenquire about our
P143 range.
When Bed Vacation is enabled, theGuardian is able to detect a bed beingvacated for longer than 5 seconds.(This 5 second period is to allow forturning in bed, without causing a falsealarm). Bed vacation delay setting al-lows the monitor to prevent ShallowMovement & Sound alarms while aperson is out of bed for a set period oftime (up to 24 hr).
WarningIt is important to ensure that theuse of this setting is based upon anindividual assessment to ascertainthat the user does not move off thesensing area while in bed, as thiscould prevent the shallowmovement detection fromoperating. For further advice,please contact Alert-iT support.

V14.7 UH1448AB Guardian Handbook for Plesio Pages 23 of 36
Sound SettingsSound DelayWhere seizures can be detected by sound i.e. a clicking of palate, teethchattering, lip smacking or similar, the Guardian has an internalmicrophone which can be enabled. N.B. an external microphone can beadded as an option (P158B). Settings from 5 seconds up to 60 secondscan be selected, indicating the amount of continuous sound needed totrigger an alarm.
Sound MagnifyTo enable this setting Sound Delay must be ON. To pick up lower volumesounds, increase Sound Magnify up to a maximum of 8. The display willshow ) symbol when sound is detected (see figure 6).
Sound Rate
To enable this setting Sound Delay must be ON. Sound rate picks up therhythm of sound. E.g. For default setting 2; one sound in two seconds orfaster which will trigger an alarm within the Sound Delay settingstimeframe. When sounds are made less frequently increase the numberup to 4.
Figure 6

V14.7 UH1448AB Guardian Handbook for Plesio Pages 24 of 36
Moisture
When moisture is enabled, it is used to detect bed wetting, salivation orvomiting. Detection is via optional sensing sheets, which need to orderedseparately to suit your individual’s requirements. Please enquire aboutour P142 range.
Moisture settings from 1 (moist) to 5 (wet) can be set to reflect therequirements of the user.

V14.7 UH1448AB Guardian Handbook for Plesio Pages 25 of 36
Other Settings
Snooze Function ZzWhilst in snooze mode ALL alarms will be deactivated for the set period oftime. This is useful for personal care or if the user is not settled and falsealarms are being activated prior to sleep. To activate the Snooze feature,press the Zz arrow and select the desired time duration. Snooze can becancelled at any time by pressing the Mm arrow once again - the Guardianmonitor is now actively working. Please be aware that whilst in snoozemode the monitor will not pick up any alarms until the set time has elapsed,therefore we recommend extra vigilance during this time.
Reload Default SettingsSettings can be saved for the individual user. Please refer to SupervisorHandbook for instructions. Available on our website UH1075. Warning: If“Reload Default Settings” is pressed, this will reload the Factory DefaultSettings OR the settings saved as per the Supervisor Handbook. Thereforethe individual settings, if not saved, will be lost.
Auto-test of sensorsIf a sensor shows no sign of having produced a “normal” activity signal for24 hours then a fault alarm is raised to prompt a full test by the carer toensure the sensor has not failed. Please see page 26 for pager fault alarmmessages and codes.

V14.7 UH1448AB Guardian Handbook for Plesio Pages 26 of 36Alar
m S
ettin
g &
Pag
er In
dica
tors
Func
tion/
Men
uLe
ftRa
nge
Your
Sett
ings
ID N
umbe
r/Si
te N
oAp
pear
s on
scr
een
at p
ower
up
with
sof
twar
e ve
rsio
n
On/
men
u ke
ym
enu
Pres
s to
scr
oll m
enu.
Pre
ss a
ny k
ey a
lso re
sets
ala
rms
Activ
e or
Sus
pend
Red
LED/
Urg
ent
Soun
ds/V
ibra
te
POW
ERof
fPr
ess
to tu
rn o
ff (if
ena
bled
)Bl
ank
Tick
Vol
ume
off
18
Volu
me
of c
lick
on e
ach
shal
low
mov
emen
tO
FF
Shal
low
Min
imum
off
010
MPM
(Mov
emen
ts P
er M
inut
e) b
elow
whi
ch a
larm
trig
gers
OFF
SHAL
LOW
MO
VEM
ENT
Red
LED/
Urg
ent
Soun
ds/V
ibra
te
Shal
low
Del
ay1
1060
Min
imum
tim
e fo
r Sha
llow
mov
emen
t ala
rm to
be
dete
cted
30SH
ALLO
W M
OVE
MEN
TRe
d LE
D/U
rgen
tSo
unds
/Vib
rate
Shal
low
Max
imum
off
2030
MPM
abo
ve w
hich
is a
larm
OFF
SHAL
LOW
MO
VEM
ENT
Red
LED/
Urg
ent
Soun
ds/V
ibra
te
Shal
low
Mag
nify
11
8Se
t for
opt
imum
mov
emen
t det
ectio
n us
ing
tick
or *
sym
bol
6
Spas
m D
elay
off
560
Tim
e fo
r spa
sm to
set
ala
rm15
SPAS
M M
OVE
MEN
TRe
d LE
D/U
rgen
tSo
unds
/Vib
rate
Spas
m M
agni
fy1
18
Set f
or o
ptim
um d
etec
tion
of s
pasm
usin
g #
sym
bol
4
Spas
m R
ate1
14
Seco
nds b
etw
een
mov
emen
ts -
a sp
asm
is a
ssum
ed if
fast
er2
Soun
d De
lay
off
560
Tim
e fo
r sou
nd le
vel t
o se
t ala
rmO
FFTR
ANSI
ENT
SOU
ND
Red
LED/
Urg
ent
Soun
ds/V
ibra
te
Soun
d M
agni
fy1
18
Mic
roph
one
sens
itivi
ty4
Soun
ds R
ate1
14
Seco
nds b
etw
een
soun
d bu
rsts
: a sp
asm
is a
ssum
ed if
fast
er2
Moi
stur
eof
f1
5Fa
ult a
larm
if s
enso
r ope
n ci
rcui
t. Co
vers
moi
st to
wet
.O
FFM
OIS
TURE
Red
LED/
Urg
ent
Soun
ds/V
ibra
teBe
d O
ccup
ancy
off
5 s
24h
Tim
e al
low
ed fo
r vac
ancy
bef
ore
alar
m. S
hallo
w a
larm
inhi
bite
d.O
FFBE
D VA
CATI
ON
Red
LED/
Urg
ent
Soun
ds/V
ibra
te
Relo
ad D
efau
ltSn
apsh
ot s
aved
in “
hidd
en m
enu”

V14.7 UH1448AB Guardian Handbook for Plesio Pages 27 of 36
Alarm Settings & Pager Indication
Fault Source Action to clear /confirm fault
Red flash Movement Sensor Tap bed
Red flash Spasm Sensor Tap bed
Red flash Sound Sensor Clap hands
Red flash Occupancy Sensor Sit on bed
Red flash Moisture sensor Fit new dry sensor
All sensors are monitored for signs of correct operation. If no sign ofoperation occurs for 24 hours a fault warning is given to obligate a testof sensors as shown in the following table:
Unless otherwise agreed, the Guardian will be shipped only to create alarms in response to spasm movement,to prevent the confusion of many alarms activating as soon as the unit is turned on. The other alarm functionscan then be enabled one at a time as confidence is gained at each level. The table on page 15 shows therecommended default start setting for alarms and the pager indication that will occur. It can be used torecord the actual settings used.
Other alarms without set-up parametersFunction Pager Comment
Monitor off Red Flash and regular‘du-de-du’ alarm tone
Unit has been turned off (warning)
Battery Low Red Flash and regular‘du-de-du’ alarm tone
Connect charger
Radio Fail Steady Red and regular‘du-de-du’ alarm tone
Must be corrected urgently
Alarm Indication is Flashing Red Alarm Light,Vibrate and Tune

V14.7 UH1448AB Guardian Handbook for Plesio Pages 28 of 36
Maintenance
CleaningIt is recommended to regularly clean both units by wiping with cotton wool pads moistened(compressed until dripping stops) with a mild detergent (0.5% washing-up liquid) solution or byusing an alcohol or baby wipe. Avoid getting any liquid into containers.
Pager Pairing Instructions - see appendix A
Compliance● The system complies with 93/42/EEC as a Class 1 Medical Device for use
in a Home Heathcare environment● The system complies with EN60601 for Class 2 Electrical Safety and does
not need a protective earth and Group 1 Class B for EMC in a HomeHealthcare environment
On radio versions only:· The system has a radio transmitter compliant to EN300-220 operating at
434.075MHz wideband 10mW power (class 8) less than 1% duty cycle(class 2)
BibliographyFull handbook: www.alert-it.co.uk/support

V14.7 UH1448AB Guardian Handbook for Plesio Pages 29 of 36
1. Ensure that the sensor cable is routed and secured to avoid the risk ofentanglement or strangulation.
2. Ensure the power cable is routed and secured to avoid the risk ofentanglement or strangulation.
3. Regularly check the power supplies for damage and potential shock risks4. Ensure, by testing, that the alarm is annunciated at the carer's location(s)5. Regularly test sensors as defined herein6. Use only the power supply and batteries recommended7. Operate power supply and charge pager away from direct heat and uncovered.8. As with all medical electronic equipment there is potential for the equipment to
interfere with or be effected by interference from other electrical or electronicdevices. For this reason avoid placing the monitor, sensor or connecting cable inclose proximity to sensitive electronic devices or devices which produce strongelectromagnetic fields such as radio transmitters, mobile phones or power cables.
9. Only use the monitor with accessories approved for use with this product and onlyin accordance with instructions.
10. If the equipment is modified in any way, appropriate inspection and testing mustbe conducted to ensure continued safe use of the equipment.
11. The carer must conduct a risk assessment to determine if the level of reliabilityoffered by the monitor is sufficient or if additional monitoring is needed. Contactthe manufacturer for assistance with Risk Evaluation Tools.
12. Additional levels of mechanical protection may be needed for some patientdisorders. Contact the manufacturers for advice
13. The advanced pagers “Extended User” option should be disabled if there areconcerns that the carer may turn-off the pager inappropriately and ignore alarms
14. Some accessories are fitted with small screws and have plastic bags. Ensure thesedo not come into the possession of vulnerable patients who might choke on them
15. Any sensor over the mattress (Bed Vacation or Incontinence) has the potential tocause pressure sores . The carer must assess this risk and monitor the use of theseproducts if used
16. Any sensor over the mattress could pose a fire hazard if in contact with an ignition
Important Safety Information

V14.7 UH1448AB Guardian Handbook for Plesio Pages 30 of 36
Test Signature Date1234567891011121314151617181920
Routine Testing Sheet
Serial Number: ……………………………………………………………………………………….

V14.7 UH1448AB Guardian Handbook for Plesio Pages 31 of 36
The Alert-it system has been designed with due regard to reliability and integrity.While it offers a highly vigilant monitoring method,it is always possible that adistress condition can go undetected for a variety of reasons (includingmalfunction) and in life threatening situations it is advisable to use the Alert-itsystem in conjunction with additional monitoring techniques (e.g. video). Neitherthe manufacturer nor its agent can accept legal responsibility to provide asystem that is infallible. The carer is responsible for assessing the risks of usingthis equipment and any settings pertaining to it.

V14.7 UH1448AB Guardian Handbook for Plesio Pages 32 of 36
Appendix A
Ensure the monitor is turned on. Pairing is only possible within 30seconds of powering up the pager. To pair the Monitor to the Pagerplace the monitor close to the pager and press and hold the Pair buttonon the pager. Stimulate any radio transmission from the monitor (to dothis press the reset button, trigger an alarm or just wait for the 8 secondSafelink® signal).
If successful you will hear a beep and see the red Monitor LED blipwhen pairing is successful, you can then release the pair button. A lowerburp with no red light indicates the monitor is too far away to pair. Thisprotects against falsely pairing with another, distant, monitor.
To clear all paired monitors from the pager memory, press and holdboth the ON/OFF button and the Mute/ Pair button together within thefirst 30 seconds after power-up, until the ensuing tone sequence hasfinished sounding and the green Pager LED illuminates, then releaseboth buttons.
Plesio Pager

V14.7 UH1448AB Guardian Handbook for Plesio Pages 33 of 36
Notes

V14.7 UH1448AB Guardian Handbook for Plesio Pages 34 of 36
Notes

V14.7 UH1448AB Guardian Handbook for Plesio Pages 35 of 36
Notes

V14.7 UH1448AB Guardian Handbook for Plesio Pages 36 of 36
Atherstone HouseDesfordLeicesterLE9 9FE
01530 239 900
www.alert-it.co.uk
www.facebook.com/AlertitCareAlarms/or join our supportive
Epilepsy Forum