QUICK START GUIDE › files › staticfiles › theater › plus › ... · 2012-01-16 · The...
3
Now that you have the best HD Media Player available, let’s get you set up quickly so you can start enjoying all your most precious memories! Plug it in, turn it on and go! Optimized for use with a FreeAgent Go™ portable drive, the FreeAgent Theater+ media player will also work with any USB attached external storage device, including hard drives, flash drives, and even many digital still cameras and digital video cameras. Look at the back of your television and decide which interface you would like to use to connect your media player to your television. These descriptions are in order from highest quality picture to lowest. What’s in the Box 1 FreeAgent Theater+™ media player 2 FreeAgent Go™ Portable drive with USB cable (in media player and drive bundle only) 3 Remote control with 2 AAA batteries 4 Composite audio/video cable 5 Component video cable 2 3 4 5 1 7 8 9 10 6 Easy Installation Steps HDMI – If your television has an open HDMI port, this is the best way to connect your media player. You will need to purchase a separate HDMI cable for this connection method. Connect the HDMI cable from the media player to the open HDMI port on the back of your television. This will carry both HD video as well as audio. 1 Choose a connection 2 Connect to the Ethernet Component – If your television has an open Component video connection, use the included Component cables to connect the media player to your television. You will also need to connect the audio using the included composite AV cable (connect only the red and white plugs to your television) or connect an optical SPDIF cable (not included). Connect one end of the Ethernet cable into the LAN outlet on the rear of the media player and the other into your computer network switch or router. At this point, your new FreeAgent Theater+ media player is installed and ready to be enjoyed! Simply slide your FreeAgent Go drive into the built-in dock on the Theater+ media player, or plug any other USB storage device or camera into one of the available USB ports. Then use the included remote control to enjoy your favorite movies, photos and music! Once you have connected your media player to your television, plug in the AC power connector. The power LED on the front of the unit flashes amber while the media player starts up. When the LED shines a steady amber, the unit is in standby/off mode. When the unit is on, the LED is white. Composite – If your television does not have either HDMI or Component video connections available, you can still connect your media player using the included Composite AV cable. Plug the single connector into the back of the media player, and the associated yellow, red and white cables into your Video In, Audio Right and Audio Left inputs on your television. 6 Ethernet cable 7 AC power adapter 8 Quick Start Guide 9 Media Sync installation CD (for Windows and Mac) 10 Warranty i COMPONENT RESET Y Pb Pr 12V DC USB LAN HDMI OPTICAL AV OUT COMPONENT RESET Y Pb Pr 12V DC USB LAN HDMI OPTICAL AV OUT COMPONENT Y Pb Pr COMPONENT RESET Y Pb Pr 12V DC USB LAN HDMI OPTICAL AV OUT COMPOSITE AUDIO R L QUICK START GUIDE COMPONENT Y Pb Pr PN: 100579895 07/09 If you have no sound, click Menu on the remote, go to Settings > Audio, and select the correct Audio Output setting for your TV. COMPONENT RESET Y Pb Pr 12V DC USB LAN HDMI OPTICAL AV OUT LAN LAN LAN LAN AV OUT 3 Plug in power RESET 12V DC USB LAN DMI Flashing amber light: Starting Up Solid amber light: Standby Solid white light: On FRONT 100579895_FA_Theater+_QSG_US_R1.indd 1 7/11/09 11:30:45 AM Print Date:2009-Sep-2 20:22:08 CDT Released; Prod Rel; A; 100579895 Seagate Confidential
Transcript of QUICK START GUIDE › files › staticfiles › theater › plus › ... · 2012-01-16 · The...

Now that you have the best HD Media Player available, let’s get you set up quickly so you can start enjoying all your most precious memories!
Plug it in, turn it on and go!
Optimized for use with a FreeAgent Go™ portable drive, the FreeAgent Theater+ media player will also work with any USB attached external storage device, including hard drives, flash drives, and even many digital still cameras and digital video cameras.
Look at the back of your television and decide which interface you would like to use to connect your media player to your television. These descriptions are in order from highest quality picture to lowest.
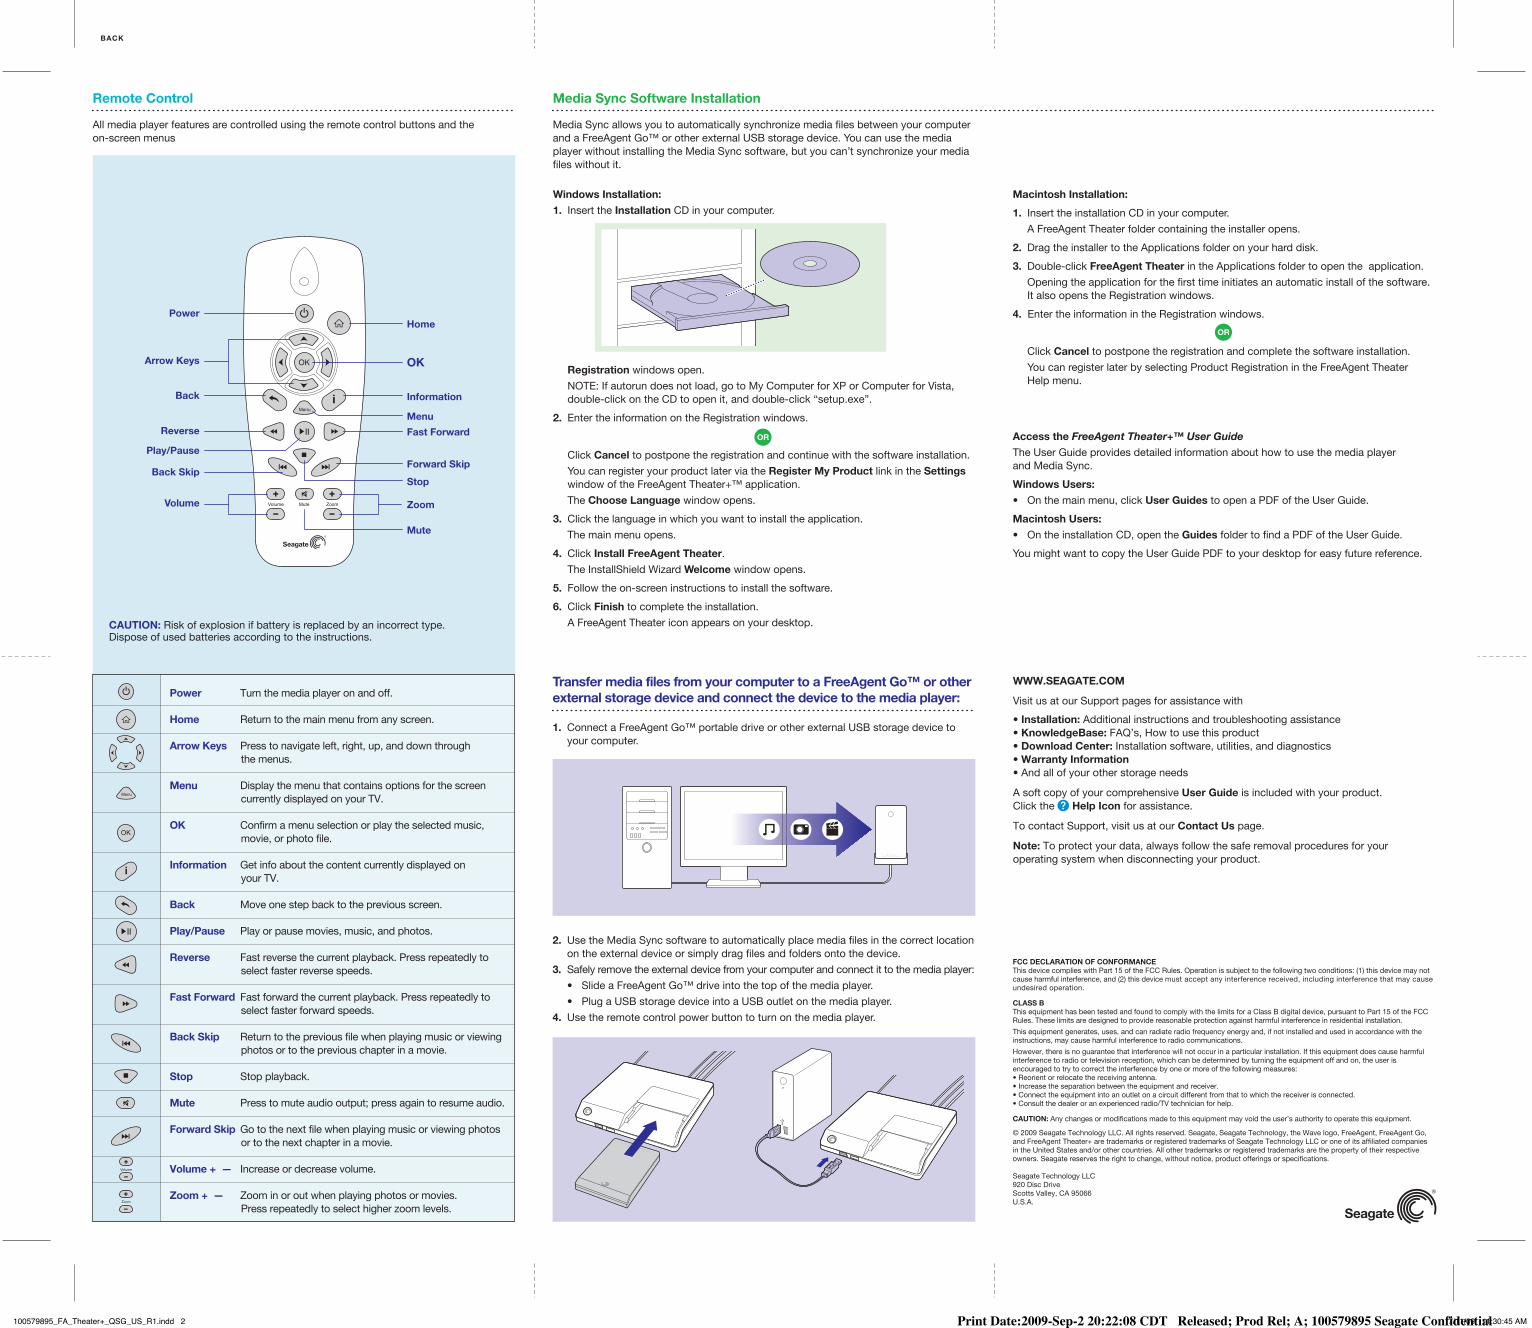
Power Turn the media player on and off.
Home Return to the main menu from any screen.
Arrow Keys Press to navigate left, right, up, and down through the menus.
Menu Display the menu that contains options for the screen currently displayed on your TV.
OK Confirm a menu selection or play the selected music, movie, or photo file.
Information Get info about the content currently displayed on your TV.
Back Move one step back to the previous screen.
Play/Pause Play or pause movies, music, and photos.
Reverse Fast reverse the current playback. Press repeatedly to select faster reverse speeds.
Fast Forward Fast forward the current playback. Press repeatedly to select faster forward speeds.
Back Skip Return to the previous file when playing music or viewing photos or to the previous chapter in a movie.
Stop Stop playback.
Mute Press to mute audio output; press again to resume audio.
Forward Skip Go to the next file when playing music or viewing photos or to the next chapter in a movie.
Volume + — Increase or decrease volume.
Zoom + — Zoom in or out when playing photos or movies. Press repeatedly to select higher zoom levels.
What’s in the Box1 FreeAgent Theater+™ media player
2 FreeAgent Go™ Portable drive with USB cable (in media player and drive bundle only)
3 Remote control with 2 AAA batteries
4 Composite audio/video cable
5 Component video cable
23
4 5
1
7 8
9
10
6
Power
OK
1. Connect a FreeAgent Go™ portable drive or other external USB storage device to your computer.
2. Use the Media Sync software to automatically place media files in the correct location on the external device or simply drag files and folders onto the device.
3. Safely remove the external device from your computer and connect it to the media player:
• Slide a FreeAgent Go™ drive into the top of the media player.
• Plug a USB storage device into a USB outlet on the media player.
4. Use the remote control power button to turn on the media player.
Macintosh Installation:
1. Insert the installation CD in your computer.
A FreeAgent Theater folder containing the installer opens.
2. Drag the installer to the Applications folder on your hard disk.
3. Double-click FreeAgent Theater in the Applications folder to open the application.
Opening the application for the first time initiates an automatic install of the software. It also opens the Registration windows.
4. Enter the information in the Registration windows.
Click Cancel to postpone the registration and complete the software installation.
You can register later by selecting Product Registration in the FreeAgent Theater Help menu.
Access the FreeAgent Theater+™ User Guide
The User Guide provides detailed information about how to use the media player and Media Sync.
Windows Users:
• On the main menu, click User Guides to open a PDF of the User Guide.
Macintosh Users:
• On the installation CD, open the Guides folder to find a PDF of the User Guide.
You might want to copy the User Guide PDF to your desktop for easy future reference.
Transfer media files from your computer to a FreeAgent Go™ or other external storage device and connect the device to the media player:
Easy Installation Steps
HDMI – If your television has an open HDMI port, this is the best way to connect your media player. You will need to purchase a separate HDMI cable for this connection method. Connect the HDMI cable from the media player to the open HDMI port on the back of your television. This will carry both HD video as well as audio.
1 Choose a connection
2 Connect to the Ethernet
Component – If your television has an open Component video connection, use the included Component cables to connect the media player to your television. You will also need to connect the audio using the included composite AV cable (connect only the red and white plugs to your television) or connect an optical SPDIF cable (not included).
Connect one end of the Ethernet cable into the LAN outlet on the rear of the media player and the other into your computer network switch or router.
At this point, your new FreeAgent Theater+ media player is installed and ready to be enjoyed! Simply slide your FreeAgent Go drive into the built-in dock on the Theater+ media player, or plug any other USB storage device or camera into one of the available USB ports. Then use the included remote control to enjoy your favorite movies, photos and music!
Once you have connected your media player to your television, plug in the AC power connector. The power LED on the front of the unit flashes amber while the media player starts up. When the LED shines a steady amber, the unit is in standby/off mode. When the unit is on, the LED is white.
All media player features are controlled using the remote control buttons and the on-screen menus
Media Sync allows you to automatically synchronize media files between your computer and a FreeAgent Go™ or other external USB storage device. You can use the media player without installing the Media Sync software, but you can’t synchronize your media files without it.
Composite – If your television does not have either HDMI or Component video connections available, you can still connect your media player using the included Composite AV cable. Plug the single connector into the back of the media player, and the associated yellow, red and white cables into your Video In, Audio Right and Audio Left inputs on your television.
FCC DECLARATION OF CONFORMANCEThis device complies with Part 15 of the FCC Rules. Operation is subject to the following two conditions: (1) this device may not cause harmful interference, and (2) this device must accept any interference received, including interference that may cause undesired operation.
CLASS BThis equipment has been tested and found to comply with the limits for a Class B digital device, pursuant to Part 15 of the FCC Rules. These limits are designed to provide reasonable protection against harmful interference in residential installation.
This equipment generates, uses, and can radiate radio frequency energy and, if not installed and used in accordance with the instructions, may cause harmful interference to radio communications.
However, there is no guarantee that interference will not occur in a particular installation. If this equipment does cause harmful interference to radio or television reception, which can be determined by turning the equipment off and on, the user is encouraged to try to correct the interference by one or more of the following measures:• Reorient or relocate the receiving antenna.• Increase the separation between the equipment and receiver.• Connect the equipment into an outlet on a circuit different from that to which the receiver is connected.• Consult the dealer or an experienced radio/TV technician for help.
CAUTION: Any changes or modifications made to this equipment may void the user’s authority to operate this equipment.
© 2009 Seagate Technology LLC. All rights reserved. Seagate, Seagate Technology, the Wave logo, FreeAgent, FreeAgent Go, and FreeAgent Theater+ are trademarks or registered trademarks of Seagate Technology LLC or one of its affiliated companies in the United States and/or other countries. All other trademarks or registered trademarks are the property of their respective owners. Seagate reserves the right to change, without notice, product offerings or specifications.
Seagate Technology LLC920 Disc DriveScotts Valley, CA 95066U.S.A.
Media Sync Software InstallationRemote Control
OR
OR
6 Ethernet cable
7 AC power adapter
8 Quick Start Guide
9 Media Sync installation CD (for Windows and Mac)
10 Warranty
i
COMPONENT
RESETYPbPr 12V DCUSBLANHDMIOPTICALAV OUT
COMPONENT
RESETYPbPr 12V DCUSBLANHDMIOPTICALAV OUT
COMPONENT
YPbPr
COMPONENT
RESETYPbPr 12V DCUSBLANHDMIOPTICALAV OUT
COMPOSITE AUDIOR L
Menu
Zoom
i
Zoom
Volume Mute
Volume
Back
Reverse
Play/Pause
Volume
Back Skip
Information
Fast Forward
Zoom
Forward Skip
Mute
Stop
Menu
Home
Arrow Keys
Menu
i
QUICK START GUIDE
CAUTION: Risk of explosion if battery is replaced by an incorrect type. Dispose of used batteries according to the instructions.
Seagate FreeAgent Theater+™ HD Media Player Quick Start Guide-USPart Number: 100579895Folded Size: 122mm W x 155mm HTrim Size: 366mm W x 310mm HColors: CMYK
Y KMC
COMPONENT
YPbPr
WWW.SEAGATE.COM
Visit us at our Support pages for assistance with
• Installation: Additional instructions and troubleshooting assistance• KnowledgeBase: FAQ’s, How to use this product• Download Center: Installation software, utilities, and diagnostics• Warranty Information• And all of your other storage needs
A soft copy of your comprehensive User Guide is included with your product. Click the Help Icon for assistance.
To contact Support, visit us at our Contact Us page.
Note: To protect your data, always follow the safe removal procedures for your operating system when disconnecting your product.
PN: 100579895 07/09
COVER COVER
If you have no sound, click Menu on the remote, go to Settings > Audio, and select the correct Audio Output setting for your TV.
COMPONENT
RESETYPbPr 12V DCUSBLANHDMIOPTICALAV OUTLANLANLANLAN
AV OUT
3 Plug in power
RESET
12V DC
USB
LAN
HDMI
Flashing amber light:Starting Up
Solid amber light:Standby
Solid white light:On
Windows Installation:
1. Insert the Installation CD in your computer.
Registration windows open.
NOTE: If autorun does not load, go to My Computer for XP or Computer for Vista, double-click on the CD to open it, and double-click “setup.exe”.
2. Enter the information on the Registration windows.
Click Cancel to postpone the registration and continue with the software installation.
You can register your product later via the Register My Product link in the Settings window of the FreeAgent Theater+™ application.
The Choose Language window opens.
3. Click the language in which you want to install the application.
The main menu opens.
4. Click Install FreeAgent Theater.
The InstallShield Wizard Welcome window opens.
5. Follow the on-screen instructions to install the software.
6. Click Finish to complete the installation.
A FreeAgent Theater icon appears on your desktop.
FRONT
BACK
100579895_FA_Theater+_QSG_US_R1.indd 1 7/11/09 11:30:45 AMPrint Date:2009-Sep-2 20:22:08 CDT Released; Prod Rel; A; 100579895 Seagate Confidential
Now that you have the best HD Media Player available, let’s get you set up quickly so you can start enjoying all your most precious memories!
Plug it in, turn it on and go!
Optimized for use with a FreeAgent Go™ portable drive, the FreeAgent Theater+ media player will also work with any USB attached external storage device, including hard drives, flash drives, and even many digital still cameras and digital video cameras.
Look at the back of your television and decide which interface you would like to use to connect your media player to your television. These descriptions are in order from highest quality picture to lowest.
Power Turn the media player on and off.
Home Return to the main menu from any screen.
Arrow Keys Press to navigate left, right, up, and down through the menus.
Menu Display the menu that contains options for the screen currently displayed on your TV.
OK Confirm a menu selection or play the selected music, movie, or photo file.
Information Get info about the content currently displayed on your TV.
Back Move one step back to the previous screen.
Play/Pause Play or pause movies, music, and photos.
Reverse Fast reverse the current playback. Press repeatedly to select faster reverse speeds.
Fast Forward Fast forward the current playback. Press repeatedly to select faster forward speeds.
Back Skip Return to the previous file when playing music or viewing photos or to the previous chapter in a movie.
Stop Stop playback.
Mute Press to mute audio output; press again to resume audio.
Forward Skip Go to the next file when playing music or viewing photos or to the next chapter in a movie.
Volume + — Increase or decrease volume.
Zoom + — Zoom in or out when playing photos or movies. Press repeatedly to select higher zoom levels.
What’s in the Box1 FreeAgent Theater+™ media player
2 FreeAgent Go™ Portable drive with USB cable (in media player and drive bundle only)
3 Remote control with 2 AAA batteries
4 Composite audio/video cable
5 Component video cable
23
4 5
1
7 8
9
10
6
Power
OK
1. Connect a FreeAgent Go™ portable drive or other external USB storage device to your computer.
2. Use the Media Sync software to automatically place media files in the correct location on the external device or simply drag files and folders onto the device.
3. Safely remove the external device from your computer and connect it to the media player:
• Slide a FreeAgent Go™ drive into the top of the media player.
• Plug a USB storage device into a USB outlet on the media player.
4. Use the remote control power button to turn on the media player.
Macintosh Installation:
1. Insert the installation CD in your computer.
A FreeAgent Theater folder containing the installer opens.
2. Drag the installer to the Applications folder on your hard disk.
3. Double-click FreeAgent Theater in the Applications folder to open the application.
Opening the application for the first time initiates an automatic install of the software. It also opens the Registration windows.
4. Enter the information in the Registration windows.
Click Cancel to postpone the registration and complete the software installation.
You can register later by selecting Product Registration in the FreeAgent Theater Help menu.
Access the FreeAgent Theater+™ User Guide
The User Guide provides detailed information about how to use the media player and Media Sync.
Windows Users:
• On the main menu, click User Guides to open a PDF of the User Guide.
Macintosh Users:
• On the installation CD, open the Guides folder to find a PDF of the User Guide.
You might want to copy the User Guide PDF to your desktop for easy future reference.
Transfer media files from your computer to a FreeAgent Go™ or other external storage device and connect the device to the media player:
Easy Installation Steps
HDMI – If your television has an open HDMI port, this is the best way to connect your media player. You will need to purchase a separate HDMI cable for this connection method. Connect the HDMI cable from the media player to the open HDMI port on the back of your television. This will carry both HD video as well as audio.
1 Choose a connection
2 Connect to the Ethernet
Component – If your television has an open Component video connection, use the included Component cables to connect the media player to your television. You will also need to connect the audio using the included composite AV cable (connect only the red and white plugs to your television) or connect an optical SPDIF cable (not included).
Connect one end of the Ethernet cable into the LAN outlet on the rear of the media player and the other into your computer network switch or router.
At this point, your new FreeAgent Theater+ media player is installed and ready to be enjoyed! Simply slide your FreeAgent Go drive into the built-in dock on the Theater+ media player, or plug any other USB storage device or camera into one of the available USB ports. Then use the included remote control to enjoy your favorite movies, photos and music!
Once you have connected your media player to your television, plug in the AC power connector. The power LED on the front of the unit flashes amber while the media player starts up. When the LED shines a steady amber, the unit is in standby/off mode. When the unit is on, the LED is white.
All media player features are controlled using the remote control buttons and the on-screen menus
Media Sync allows you to automatically synchronize media files between your computer and a FreeAgent Go™ or other external USB storage device. You can use the media player without installing the Media Sync software, but you can’t synchronize your media files without it.
Composite – If your television does not have either HDMI or Component video connections available, you can still connect your media player using the included Composite AV cable. Plug the single connector into the back of the media player, and the associated yellow, red and white cables into your Video In, Audio Right and Audio Left inputs on your television.
FCC DECLARATION OF CONFORMANCEThis device complies with Part 15 of the FCC Rules. Operation is subject to the following two conditions: (1) this device may not cause harmful interference, and (2) this device must accept any interference received, including interference that may cause undesired operation.
CLASS BThis equipment has been tested and found to comply with the limits for a Class B digital device, pursuant to Part 15 of the FCC Rules. These limits are designed to provide reasonable protection against harmful interference in residential installation.
This equipment generates, uses, and can radiate radio frequency energy and, if not installed and used in accordance with the instructions, may cause harmful interference to radio communications.
However, there is no guarantee that interference will not occur in a particular installation. If this equipment does cause harmful interference to radio or television reception, which can be determined by turning the equipment off and on, the user is encouraged to try to correct the interference by one or more of the following measures:• Reorient or relocate the receiving antenna.• Increase the separation between the equipment and receiver.• Connect the equipment into an outlet on a circuit different from that to which the receiver is connected.• Consult the dealer or an experienced radio/TV technician for help.
CAUTION: Any changes or modifications made to this equipment may void the user’s authority to operate this equipment.
© 2009 Seagate Technology LLC. All rights reserved. Seagate, Seagate Technology, the Wave logo, FreeAgent, FreeAgent Go, and FreeAgent Theater+ are trademarks or registered trademarks of Seagate Technology LLC or one of its affiliated companies in the United States and/or other countries. All other trademarks or registered trademarks are the property of their respective owners. Seagate reserves the right to change, without notice, product offerings or specifications.
Seagate Technology LLC920 Disc DriveScotts Valley, CA 95066U.S.A.
Media Sync Software InstallationRemote Control
OR
OR
6 Ethernet cable
7 AC power adapter
8 Quick Start Guide
9 Media Sync installation CD (for Windows and Mac)
10 Warranty
i
COMPONENT
RESETYPbPr 12V DCUSBLANHDMIOPTICALAV OUT
COMPONENT
RESETYPbPr 12V DCUSBLANHDMIOPTICALAV OUT
COMPONENT
YPbPr
COMPONENT
RESETYPbPr 12V DCUSBLANHDMIOPTICALAV OUT
COMPOSITE AUDIOR L
Menu
Zoom
i
Zoom
Volume Mute
Volume
Back
Reverse
Play/Pause
Volume
Back Skip
Information
Fast Forward
Zoom
Forward Skip
Mute
Stop
Menu
Home
Arrow Keys
Menu
i
QUICK START GUIDE
CAUTION: Risk of explosion if battery is replaced by an incorrect type. Dispose of used batteries according to the instructions.
Seagate FreeAgent Theater+™ HD Media Player Quick Start Guide-USPart Number: 100579895Folded Size: 122mm W x 155mm HTrim Size: 366mm W x 310mm HColors: CMYK
Y KMC
COMPONENT
YPbPr
WWW.SEAGATE.COM
Visit us at our Support pages for assistance with
• Installation: Additional instructions and troubleshooting assistance• KnowledgeBase: FAQ’s, How to use this product• Download Center: Installation software, utilities, and diagnostics• Warranty Information• And all of your other storage needs
A soft copy of your comprehensive User Guide is included with your product. Click the Help Icon for assistance.
To contact Support, visit us at our Contact Us page.
Note: To protect your data, always follow the safe removal procedures for your operating system when disconnecting your product.
PN: 100579895 07/09
COVER COVER
If you have no sound, click Menu on the remote, go to Settings > Audio, and select the correct Audio Output setting for your TV.
COMPONENT
RESETYPbPr 12V DCUSBLANHDMIOPTICALAV OUTLANLANLANLAN
AV OUT
3 Plug in power
RESET
12V DC
USB
LAN
HDMI
Flashing amber light:Starting Up
Solid amber light:Standby
Solid white light:On
Windows Installation:
1. Insert the Installation CD in your computer.
Registration windows open.
NOTE: If autorun does not load, go to My Computer for XP or Computer for Vista, double-click on the CD to open it, and double-click “setup.exe”.
2. Enter the information on the Registration windows.
Click Cancel to postpone the registration and continue with the software installation.
You can register your product later via the Register My Product link in the Settings window of the FreeAgent Theater+™ application.
The Choose Language window opens.
3. Click the language in which you want to install the application.
The main menu opens.
4. Click Install FreeAgent Theater.
The InstallShield Wizard Welcome window opens.
5. Follow the on-screen instructions to install the software.
6. Click Finish to complete the installation.
A FreeAgent Theater icon appears on your desktop.
FRONT
BACK
100579895_FA_Theater+_QSG_US_R1.indd 2 7/11/09 11:30:45 AMPrint Date:2009-Sep-2 20:22:08 CDT Released; Prod Rel; A; 100579895 Seagate Confidential

GLOSS
MATTE
601407
Seagate
FA Theater Plus HD Media Player QSG US
100579895_FA_Theater+_QSG_US_R1.indd
07-11-2009
122mm x 155mm
366mm x 310mm
.125”
100579895_FA_Theater+_QSG_US_R1.indd 3 7/11/09 11:30:46 AMPrint Date:2009-Sep-2 20:22:08 CDT Released; Prod Rel; A; 100579895 Seagate Confidential