Quick Setup Guide
120
Quick Setup Guide Sanctuary 4.4
-
Upload
esther-gonzalez -
Category
Documents
-
view
590 -
download
2
Transcript of Quick Setup Guide
Quick Setup GuideSanctuary 4.4
Document: 02_101_4.4_15
Lumension15880 North Greenway Hayden Loop, Suite 100Scottsdale, AZ 85260United States of AmericaPhone: +1 480.970.1025Fax: +1 480.970.6323E-mail: [email protected]
Copyright© 1997-2009 Lumension Security® ALL RIGHTS RESERVED. Protected by U.S. Patent nos. 7,278,158, 6,990,660, and 7,487,495 and European Patent nos. EP1745343 and EP1743230; other patents pending. This manual, as well as the software described in it, is furnished under license. No part of this manual may be reproduced, stored in a retrieval system, or transmitted in any form - electronic, mechanical, recording, or otherwise - except as permitted by such license.l
TrademarksLumension®, Lumension Security®, PatchLink™, PatchLink Update™, Sanctuary®, SecureWave®, PatchLink Scan, Enterprise Reporting Services™, Patch Developers Kit™, Endpoint Security Suite™, Lumension Device Control™, Lumension Application Control™, their associated logos, and all other trademarks and trade names used here are the property of Lumension Security, Inc.
RSA Secured® is a registered trademark of RSA Security Inc.
Apache is a trademark of the Apache Software Foundation. In addition, any other companies’ names and products mentioned in this document may be either registered trademarks or trademarks of their respective owners.
FeedbackYour feedback lets us know if we are meeting your documentation needs. E-mail the Lumension Technical Publications department at [email protected] to tell us what you like best, what you like least,
LIMIT OF LIABILITY/DISCLAIMER OF WARRANTY: LUMENSION SECURITY® MAKES NO REPRESENTATIONS OR WARRANTIES IN REGARDS TO THE ACCURACY OR COMPLETENESS OF THE INFORMATION PROVIDED IN THIS MANUAL. LUMENSION SECURITY® RESERVES THE RIGHT TO MAKE CHANGES TO THE INFORMATION DESCRIBED IN THIS MANUAL AT ANY TIME WITHOUT NOTICE AND WITHOUT OBLIGATION TO NOTIFY ANY PERSON OF SUCH CHANGES. THE INFORMATION PROVIDED IN THE MANUAL IS NOT GUARANTEED OR WARRANTED TO PRODUCE ANY PARTICULAR RESULT, AND THE ADVICE AND STRATEGIES CONTAINED MAY NOT BE SUITABLE FOR EVERY ORGANIZATION. NO WARRANTY MAY BE CREATED OR EXTENDED WITH RESPECT TO THIS MANUAL BY SALES REPRESENTATIVES OR WRITTEN SALES MATERIALS. LUMENSION SECURITY® SHALL NOT BE LIABLE FOR ANY LOSS OF PROFIT OR ANY OTHER DAMAGES ARISING FROM THE USE OF THIS MANUAL, INCLUDING BUT NOT LIMITED TO SPECIAL, INCIDENTAL, CONSEQUENTIAL, OR OTHER DAMAGES.
- II -
TABLE OF CONTENTS
- III -
Table of Contents
Preface viiAbout This Guide ................................................................................................. viiTypographical Conventions ................................................................................... viiContacting Lumension ......................................................................................... viii
System Requirements 1Minimum Hardware Requirements........................................................................... 1Supported Operating Systems ................................................................................ 2Supported Databases ............................................................................................ 4Other Software Requirements ................................................................................ 4Recommended Configuration.................................................................................. 5Client Supported Languages................................................................................... 5
Installing Sanctuary Components 7Installation Overview ............................................................................................ 7Installation Checklist ............................................................................................. 8Installing the Sanctuary Database........................................................................... 9Generating a Key Pair ..........................................................................................12Installing the Sanctuary Application Server .............................................................14Installing the Sanctuary Management Console .........................................................23Installing the Sanctuary Client...............................................................................28
Using Sanctuary Device Control 39Product Overview ................................................................................................39Sanctuary Server, Database and Client Process .......................................................41Using the Sanctuary Management Console ..............................................................41Accessing the Sanctuary Management Console ........................................................43
Logging In to the Sanctuary Management Console ...............................................43Logging Out of the Sanctuary Management Console .............................................44Sanctuary Device Control Modules .....................................................................44Getting Started ...............................................................................................44
Managing Devices................................................................................................45Device Default Settings ....................................................................................45Device Types Supported by Sanctuary ................................................................46Device Explorer Window ...................................................................................48
Permissions Dialog.......................................................................................49Manage Devices ..............................................................................................53Add Computers ...............................................................................................55
TABLE OF CONTENTS
- IV -
Assign Permissions by Devices...........................................................................55Assign Temporary Permissions to Users ..............................................................58Assign Scheduled Permissions to Users ...............................................................59Add Shadowing ...............................................................................................60
View Shadow Files .......................................................................................62Filtering Templates ......................................................................................64
Sending Updates to All Computers .....................................................................65Authorizing CD/DVDs ...........................................................................................66
Add CD/DVD Media ..........................................................................................67Log Explorer Templates ........................................................................................67
View Administrator Activity ...............................................................................68Upload Latest Log Files.....................................................................................68
Reporting ...........................................................................................................69Opening a Report ............................................................................................69Printing a Report .............................................................................................69Saving a Report...............................................................................................69
User Permissions Report .......................................................................................70Computer Permissions Report................................................................................71Using the Sanctuary Client....................................................................................72
Using Sanctuary Application Control 75Product Overview ................................................................................................75Sanctuary Server, Database and Client Process .......................................................77Using the Sanctuary Management Console ..............................................................77Accessing the Sanctuary Management Console ........................................................79
Logging In to the Sanctuary Management Console ...............................................79Logging Out of the Sanctuary Management Console .............................................80Sanctuary Application Control Modules ...............................................................81Getting Started ...............................................................................................81
Building a Central File Authorization List .................................................................81Importing Standard File Definitions ....................................................................83
Authorizing File Execution .....................................................................................85Creating a File Scanning Template .....................................................................85Scanning Files on a Client Computer...................................................................87Creating a File Group .......................................................................................88Assigning Files to File Groups ............................................................................89Creating Parent-Child Relationships....................................................................91Assigning File Groups to Users...........................................................................94Sending Updates to All Computers .....................................................................95Viewing Database Records ................................................................................97
Local Authorization ..............................................................................................98Log Explorer Templates ......................................................................................100
View Administrator Activity .............................................................................101
TABLE OF CONTENTS
- V -
Upload Latest Log Files...................................................................................101Reporting .........................................................................................................102
Opening a Report ..........................................................................................102Printing a Report ...........................................................................................102Saving a Report.............................................................................................102File Groups by User........................................................................................103User by File Group .........................................................................................104User Options .................................................................................................105

TABLE OF CONTENTS
- VI -
PREFACE
- VII -
PrefaceThis Quick Setup Guide is a resource written for all users of Sanctuary 4.4. This document defines the concepts and procedures for installing, configuring, implementing, and using Sanctuary 4.4.
About This Guide
This guide contains the following chapters and appendices:
• Chapter 1: System Requirements
• Chapter 2: Installing Sanctuary Components
• Chapter 3: Using Sanctuary Device Control
• Chapter 4: Using Sanctuary Application Control
TIP: Lumension documentation is updated on a regular basis. To acquire the latest version of this or any other published document, please refer to the Lumension Customer Portal (http://portal.lumension.com/).
Typographical Conventions
The following conventions are used throughout this documentation to help you identify various information types.
Convention Usage
bold Buttons, menu items, window and screen objects.
bold italics Wizard names, window names, and page names.
italics New terms, options, and variables.
UPPERCASE SQL Commands and keyboard keys.
monospace File names, path names, programs, executables, command syntax, and property names.
PREFACE
- VIII -
Contacting Lumension
NOTE: To receive pricing and licensing information, please visit the Lumension How Do I Purchase? Web page or contact the Lumension Sales Department.
Global Headquarters15880 North Greenway Hayden LoopSuite 100Scottsdale, AZ 85260United States of AmericaPhone: +1 888 725 7828Fax: +1 480 970 6323
European HeadquartersAtrium Business ParkZ.A. Bourmicht23, rue du Puits RomainL-8070 Bertrange, LuxembourgPhone: +352-265 364 11Fax: +352-265 364 12
United Kingdom OfficeUnit C1 Windsor PlaceFaraday Road, CrawleyWest Sussex, London RH10 9TFUnited KingdomPhone: +44 (0) 1908 357 897Fax: +44 (0) 1908 357 600E-mail: [email protected]
Australia OfficeLevel 20, Tower II, Darling Park201 Sussex StreetSydney, NSWAustralia 2000Phone: +61 2 9006 1654Fax: +61 2 9006 1010E-mail: [email protected]
US Federal Solutions GroupVirginia Office - Federal Solutions Group13755 Sunrise Valley Drive, Suite 203Herndon, VA 20171United States of AmericaPhone: +1 888 725 7828 (option 1)Fax: +1 703 793 7007E-mail: [email protected]
Singapore OfficeLevel 27, Prudential Tower30 Cecil StreetSingapore 049712Phone: +65 6725 6415Fax: +65 6725 6363E-mail: [email protected]
North America SalesPhone: +1 480 970 1025 (option 1)E-mail: [email protected]
International SalesUS Phone: +1 480 970 1025 (option 1)UK Phone: + 44 (0) 1908 357 897Luxembourg Phone: + 352 265 364 11Singapore Phone: + 65 6725 6415E-mail: [email protected] or [email protected] (APAC) or [email protected] (EMEA)
PREFACE
- IX -
Lumension Vulnerability Management Technical SupportPhone: +352 265 364 300+1 888 725 7828 (Option 2)+44 800 012 1869 (UK Toll Free)+61 (02) 8223 9810 (Australia)+852 3071 4690 (Hong Kong)+65 6622 1078 (Singapore)E-mail: [email protected]@lumension.com (APAC)[email protected] (EMEA)
Lumension Endpoint Security Technical SupportPhone: +352 265 364 300+1 877 713 8600 (US Toll Free)+44 800 012 1869 (UK Toll Free)E-mail: [email protected]
NOTE: For additional contact information, please visit the Contact Lumension page at http://www.lumension.com/contactUs.jsp.

PREFACE
- X -
SANCTUARY QUICK SETUP GUIDE
- 1 -
1 System RequirementsThe following section describes the minimum system requirements necessary for successful installation of the Sanctuary 4.4 suite.
IMPORTANT: For installation or upgrade to Sanctuary version 4.4:
• You must have a new license file that is valid specifically for version 4.4.
• Existing license files issued before Sanctuary version 4.4 will not work with the Sanctuary Application Server and may cause your Application Servers to stop working.The Sanctuary 4.4 license must be installed before you install or upgrade the Sanctuary database, and then the Application Server.
• Request a new license file using the Lumension Customer Portal.
Minimum Hardware Requirements
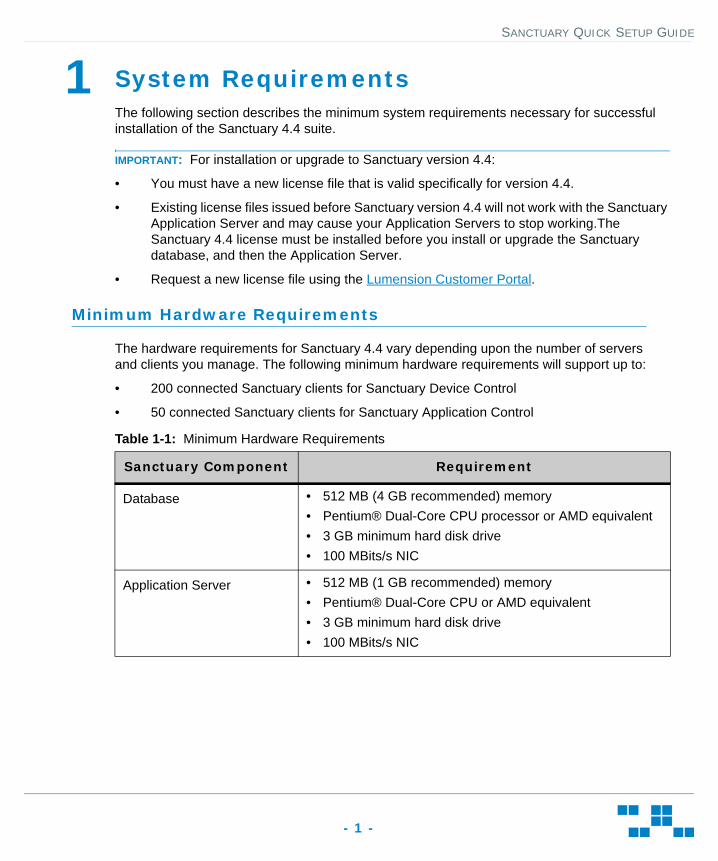
The hardware requirements for Sanctuary 4.4 vary depending upon the number of servers and clients you manage. The following minimum hardware requirements will support up to:
• 200 connected Sanctuary clients for Sanctuary Device Control
• 50 connected Sanctuary clients for Sanctuary Application Control
Table 1-1: Minimum Hardware Requirements
Sanctuary Component Requirement
Database • 512 MB (4 GB recommended) memory• Pentium® Dual-Core CPU processor or AMD equivalent• 3 GB minimum hard disk drive• 100 MBits/s NIC
Application Server • 512 MB (1 GB recommended) memory• Pentium® Dual-Core CPU or AMD equivalent• 3 GB minimum hard disk drive• 100 MBits/s NIC
SYSTEM REQUIREMENTS
- 2 -
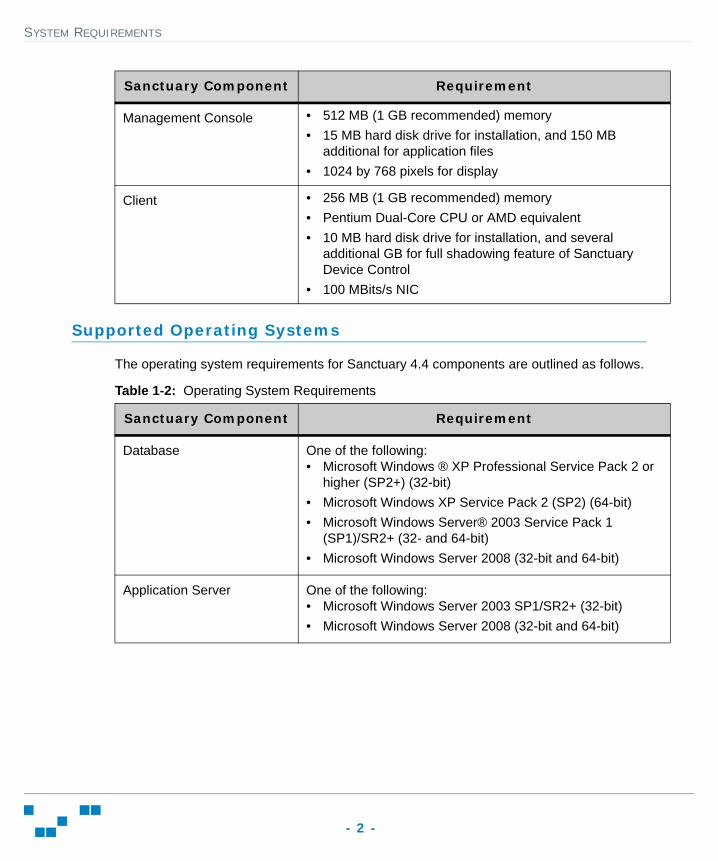
Supported Operating Systems
The operating system requirements for Sanctuary 4.4 components are outlined as follows.
Table 1-2: Operating System Requirements
Management Console • 512 MB (1 GB recommended) memory• 15 MB hard disk drive for installation, and 150 MB
additional for application files • 1024 by 768 pixels for display
Client • 256 MB (1 GB recommended) memory• Pentium Dual-Core CPU or AMD equivalent• 10 MB hard disk drive for installation, and several
additional GB for full shadowing feature of Sanctuary Device Control
• 100 MBits/s NIC
Sanctuary Component Requirement
Sanctuary Component Requirement
Database One of the following:• Microsoft Windows ® XP Professional Service Pack 2 or
higher (SP2+) (32-bit)• Microsoft Windows XP Service Pack 2 (SP2) (64-bit)• Microsoft Windows Server® 2003 Service Pack 1
(SP1)/SR2+ (32- and 64-bit)• Microsoft Windows Server 2008 (32-bit and 64-bit)
Application Server One of the following:• Microsoft Windows Server 2003 SP1/SR2+ (32-bit)• Microsoft Windows Server 2008 (32-bit and 64-bit)
SYSTEM REQUIREMENTS
- 3 -
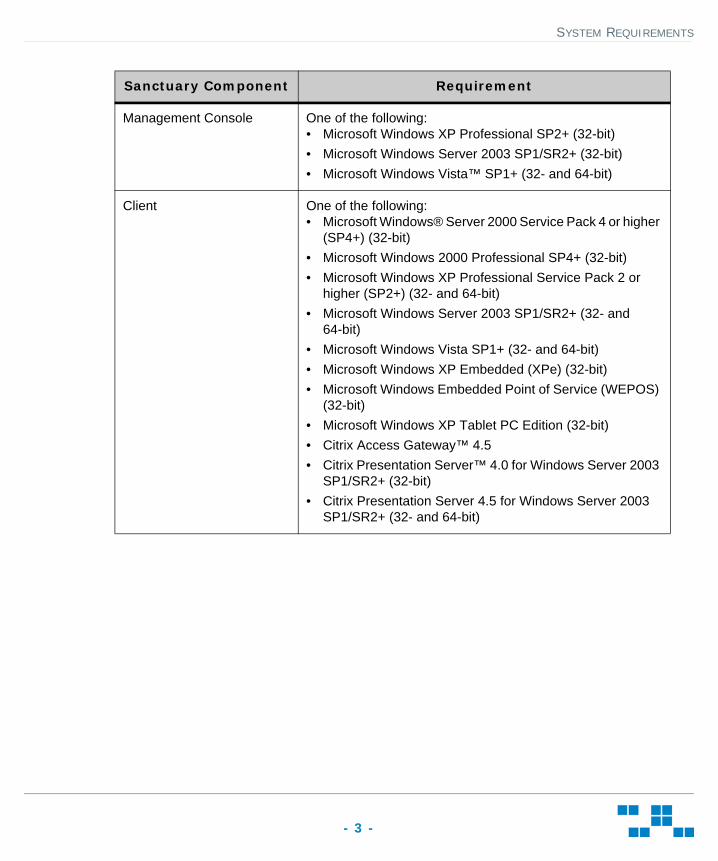
Management Console One of the following:• Microsoft Windows XP Professional SP2+ (32-bit)• Microsoft Windows Server 2003 SP1/SR2+ (32-bit)• Microsoft Windows Vista™ SP1+ (32- and 64-bit)
Client One of the following:• Microsoft Windows® Server 2000 Service Pack 4 or higher
(SP4+) (32-bit)• Microsoft Windows 2000 Professional SP4+ (32-bit)• Microsoft Windows XP Professional Service Pack 2 or
higher (SP2+) (32- and 64-bit)• Microsoft Windows Server 2003 SP1/SR2+ (32- and
64-bit)• Microsoft Windows Vista SP1+ (32- and 64-bit)• Microsoft Windows XP Embedded (XPe) (32-bit)• Microsoft Windows Embedded Point of Service (WEPOS)
(32-bit)• Microsoft Windows XP Tablet PC Edition (32-bit)• Citrix Access Gateway™ 4.5• Citrix Presentation Server™ 4.0 for Windows Server 2003
SP1/SR2+ (32-bit)• Citrix Presentation Server 4.5 for Windows Server 2003
SP1/SR2+ (32- and 64-bit)
Sanctuary Component Requirement
SYSTEM REQUIREMENTS
- 4 -
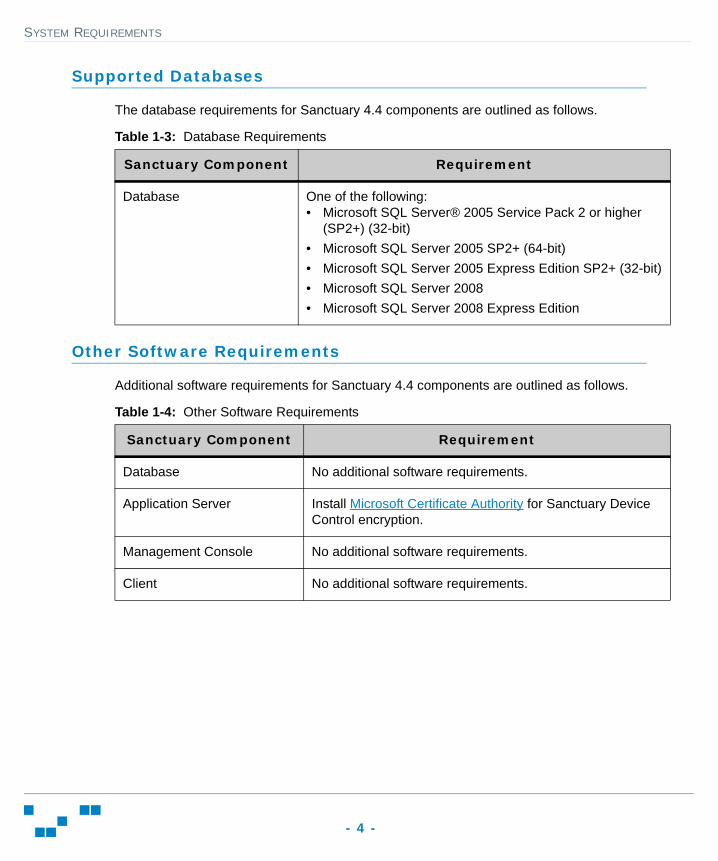
Supported Databases
The database requirements for Sanctuary 4.4 components are outlined as follows.
Table 1-3: Database Requirements
Other Software Requirements
Additional software requirements for Sanctuary 4.4 components are outlined as follows.
Table 1-4: Other Software Requirements
Sanctuary Component Requirement
Database One of the following:• Microsoft SQL Server® 2005 Service Pack 2 or higher
(SP2+) (32-bit)• Microsoft SQL Server 2005 SP2+ (64-bit)• Microsoft SQL Server 2005 Express Edition SP2+ (32-bit)• Microsoft SQL Server 2008• Microsoft SQL Server 2008 Express Edition
Sanctuary Component Requirement
Database No additional software requirements.
Application Server Install Microsoft Certificate Authority for Sanctuary Device Control encryption.
Management Console No additional software requirements.
Client No additional software requirements.
SYSTEM REQUIREMENTS
- 5 -
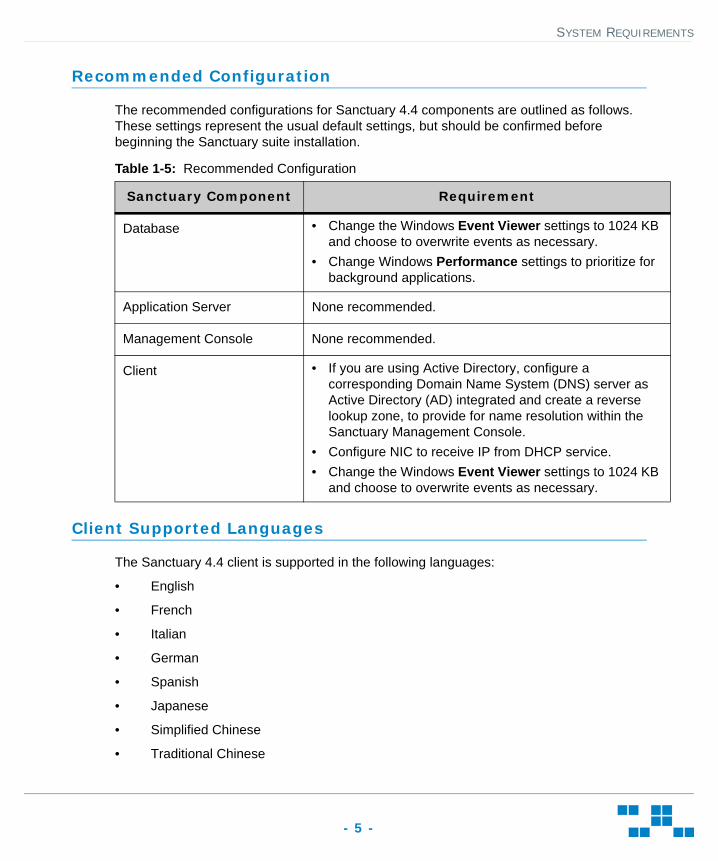
Recommended Configuration
The recommended configurations for Sanctuary 4.4 components are outlined as follows. These settings represent the usual default settings, but should be confirmed before beginning the Sanctuary suite installation.
Table 1-5: Recommended Configuration
Client Supported Languages
The Sanctuary 4.4 client is supported in the following languages:
• English
• French
• Italian
• German
• Spanish
• Japanese
• Simplified Chinese
• Traditional Chinese
Sanctuary Component Requirement
Database • Change the Windows Event Viewer settings to 1024 KB and choose to overwrite events as necessary.
• Change Windows Performance settings to prioritize for background applications.
Application Server None recommended.
Management Console None recommended.
Client • If you are using Active Directory, configure a corresponding Domain Name System (DNS) server as Active Directory (AD) integrated and create a reverse lookup zone, to provide for name resolution within the Sanctuary Management Console.
• Configure NIC to receive IP from DHCP service.• Change the Windows Event Viewer settings to 1024 KB
and choose to overwrite events as necessary.
SYSTEM REQUIREMENTS
- 6 -
• Russian
• Dutch
• Portuguese
• Swedish
SANCTUARY QUICK SETUP GUIDE
- 7 -
2 Installing Sanctuary Components
Installation Overview
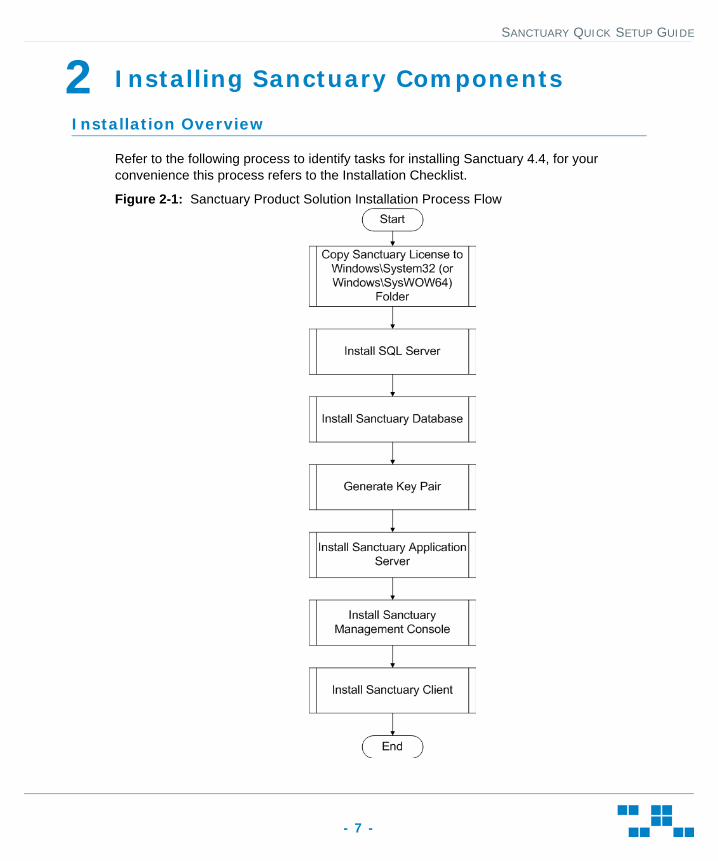
Refer to the following process to identify tasks for installing Sanctuary 4.4, for your convenience this process refers to the Installation Checklist.
Figure 2-1: Sanctuary Product Solution Installation Process Flow
INSTALLING SANCTUARY COMPONENTS
- 8 -
Installation Checklist
The following checklist will guide you through the steps necessary to install your Sanctuary product solution.
IMPORTANT: For installation or upgrade to Sanctuary version 4.4:
• You must have a new license file that is valid specifically for version 4.4.
• Existing license files issued before Sanctuary version 4.4 will not work with the Sanctuary Application Server and may cause your Application Servers to stop working.The Sanctuary 4.4 license must be installed before you install or upgrade the Sanctuary database, and then the Application Server.
• Request a new license file using the Lumension Customer Portal.
To begin your installation:
1) Copy the Sanctuary license file to the \\Windows\System32 or \\Windows\SysWOW64 folder, and rename the file to Sanctuary.lic.
2) Download the Sanctuary suite application software from the Lumension Customer Portal and extract the archive file.
3) Create a device, media, or software application inventory which lists the items that you want Sanctuary 4.4 to control.
4) Document company policy that defines:
• Device permissions.
• Shadowing requirements.
• Device encryption requirements.
• Sanctuary administrators and their roles.
• Global domain groups for Sanctuary administrators.
5) Plan your Sanctuary network architecture, based on capacity requirements, that list the Sanctuary Application Server host names and IP addresses.
6) Create a dedicated Sanctuary Application Server domain user rights service account and set the following:
• User cannot change password.
• Password never expires.
This account must have local administration rights when you plan to use the TLS communication protocol for client-Sanctuary Application Server and inter-Sanctuary Application Server data transfers.

INSTALLING SANCTUARY COMPONENTS
- 9 -
7) Create a security policy for the Sanctuary Application Server to Impersonate a Client After Authentication.
8) Verify that the Sanctuary Application Server has Log in as a service user rights.
9) Install Microsoft® Internet Information Services (IIS) on the same computer as the certification authority, or the enterprise root certificate cannot be generated.
10) Install a Microsoft enterprise root certification authority to enable removable device encryption for Sanctuary Device Control.
11) Install a Microsoft SQL Server® according the procedure defined for Getting Started with SQL Server.
12) Complete Installing the Sanctuary Database.
13) For installation of multiple Sanctuary Application Servers, create a shared file directory on a file server, to share the Datafile directory component.
14) Complete Generating a Key Pair.
15) Complete Installing the Sanctuary Application Server.
IMPORTANT: The Sanctuary Application Server service account must have database owner (DBO) rights to the Sanctuary database.
16) Complete Installing the Sanctuary Management Console.
17) Complete Installing the Sanctuary Client.
18) Test your Sanctuary product solution installation for functionality.
Installing the Sanctuary Database
The Installation Wizard installs the Sanctuary database, the first Sanctuary component that you install. The Sanctuary database serves as the central repository for device permissions rules and executable file authorizations.
PREREQUISITE
IMPORTANT: For installation or upgrade to Sanctuary version 4.4:
• You must have a new license file that is valid specifically for version 4.4.
• Existing license files issued before Sanctuary version 4.4 will not work with the Sanctuary Application Server and may cause your Application Servers to stop working.The Sanctuary 4.4 license must be installed before you install or upgrade the Sanctuary database, and then the Application Server.
INSTALLING SANCTUARY COMPONENTS
- 10 -
• Request a new license file using the Lumension Customer Portal.
Before you can successfully install the Sanctuary database, you must:
• Verify that you satisfy the minimum hardware and software system requirements.
• If you will be using a database cluster, you must specify an alternate TDS port during SQL server setup by Creating a Server Alias for Use by a Client (SQL Server Configuration Manager). You can install the Sanctuary database on a server cluster, where there are at least two servers in the cluster running SQL Server. For additional information regarding database clustering, see Microsoft Cluster Service (MSCS) Installation Resources.
1. Log in to a computer as an administrative user with access to a Microsoft® SQL Server®.
2. Close all programs running on the computer.
3. From the location where you saved the Sanctuary application software, run the \SERVER\DB\SETUP.EXE file.STEP RESULT: The Installation Wizard Welcome page opens.
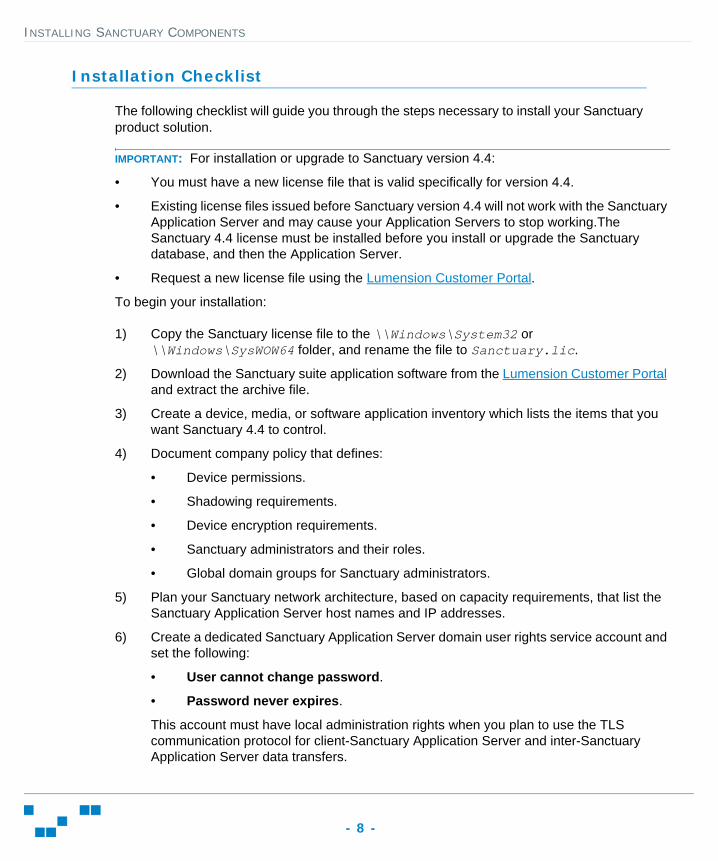
4. Click Next.STEP RESULT: The Installation Wizard License Agreement page opens.
Figure 2-2: License Agreement Page
5. Review the license agreement, and select I accept the terms in the license agreement.
INSTALLING SANCTUARY COMPONENTS
- 11 -
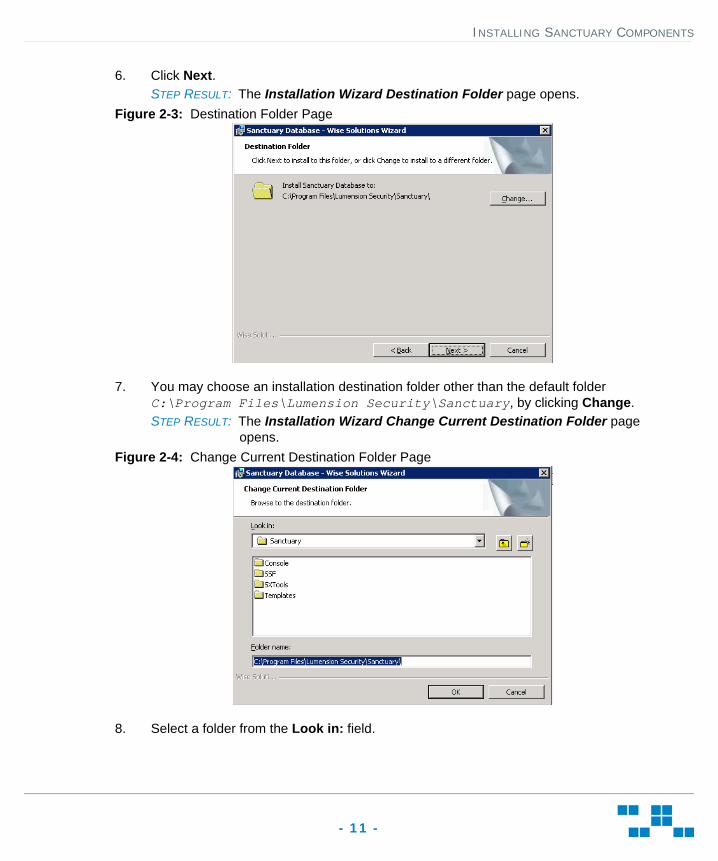
6. Click Next.STEP RESULT: The Installation Wizard Destination Folder page opens.
Figure 2-3: Destination Folder Page
7. You may choose an installation destination folder other than the default folder C:\Program Files\Lumension Security\Sanctuary, by clicking Change.STEP RESULT: The Installation Wizard Change Current Destination Folder page
opens.Figure 2-4: Change Current Destination Folder Page
8. Select a folder from the Look in: field.
INSTALLING SANCTUARY COMPONENTS
- 12 -
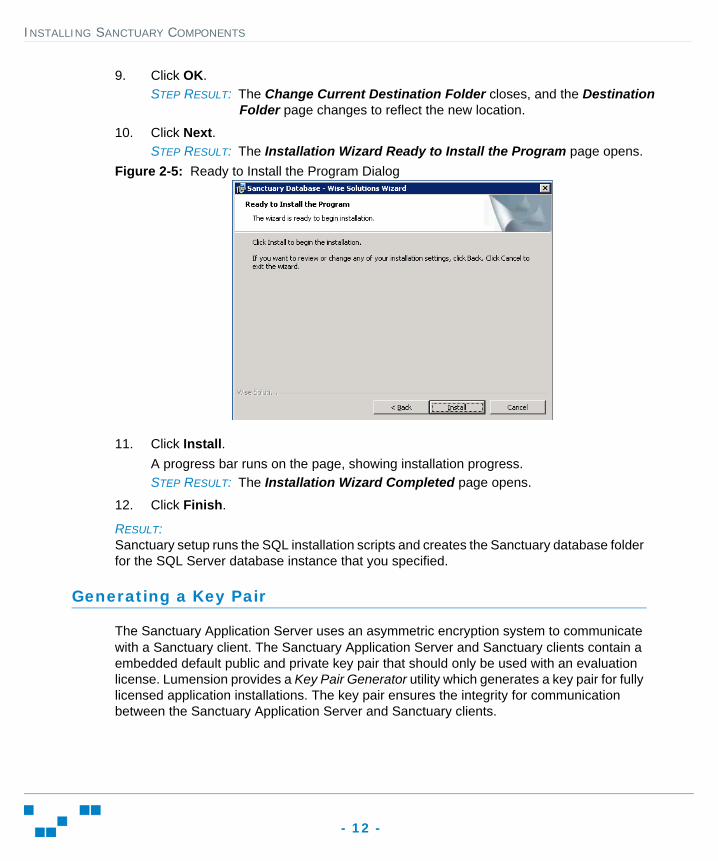
9. Click OK.STEP RESULT: The Change Current Destination Folder closes, and the Destination
Folder page changes to reflect the new location.
10. Click Next.STEP RESULT: The Installation Wizard Ready to Install the Program page opens.
Figure 2-5: Ready to Install the Program Dialog
11. Click Install.A progress bar runs on the page, showing installation progress.STEP RESULT: The Installation Wizard Completed page opens.
12. Click Finish.
RESULT:Sanctuary setup runs the SQL installation scripts and creates the Sanctuary database folder for the SQL Server database instance that you specified.
Generating a Key Pair
The Sanctuary Application Server uses an asymmetric encryption system to communicate with a Sanctuary client. The Sanctuary Application Server and Sanctuary clients contain a embedded default public and private key pair that should only be used with an evaluation license. Lumension provides a Key Pair Generator utility which generates a key pair for fully licensed application installations. The key pair ensures the integrity for communication between the Sanctuary Application Server and Sanctuary clients.
INSTALLING SANCTUARY COMPONENTS
- 13 -
When a Sanctuary Application Server cannot find a valid key pair at startup, the event is logged and Sanctuary uses the default key pair.
CAUTION: When you are using Sanctuary Device Control, do not change the key pair:
• For media encrypted before exchanging a key pair, which will result in disabling password recovery for the previously encrypted media.
• During a Sanctuary upgrade installation which will result in the loss of access to media previously encrypted centrally and subsequent loss of data.
• During a Sanctuary upgrade installation when client hardening is enabled, which will cause the installation to fail.
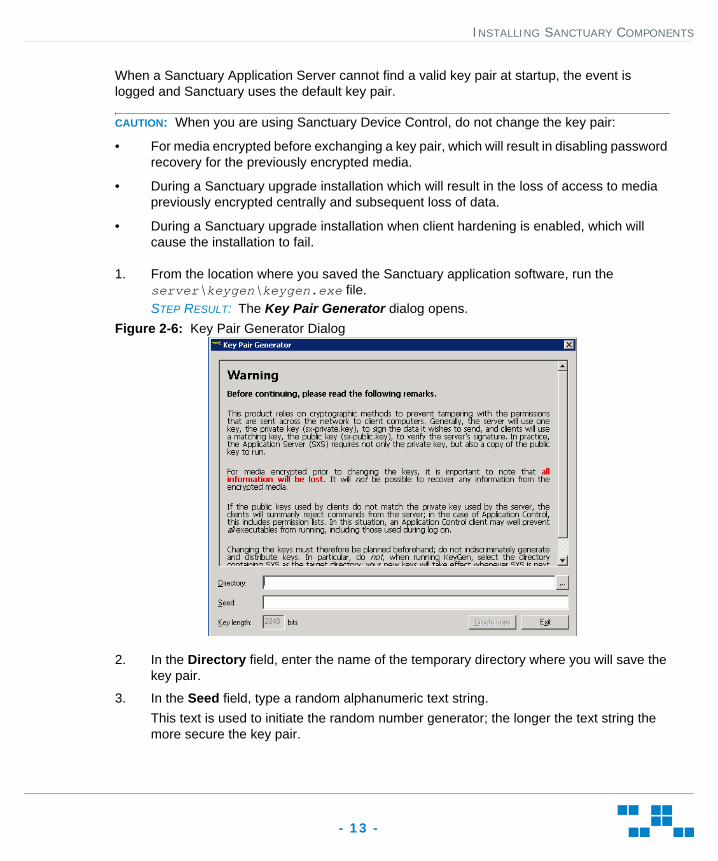
1. From the location where you saved the Sanctuary application software, run the server\keygen\keygen.exe file.STEP RESULT: The Key Pair Generator dialog opens.
Figure 2-6: Key Pair Generator Dialog
2. In the Directory field, enter the name of the temporary directory where you will save the key pair.
3. In the Seed field, type a random alphanumeric text string.This text is used to initiate the random number generator; the longer the text string the more secure the key pair.
INSTALLING SANCTUARY COMPONENTS
- 14 -
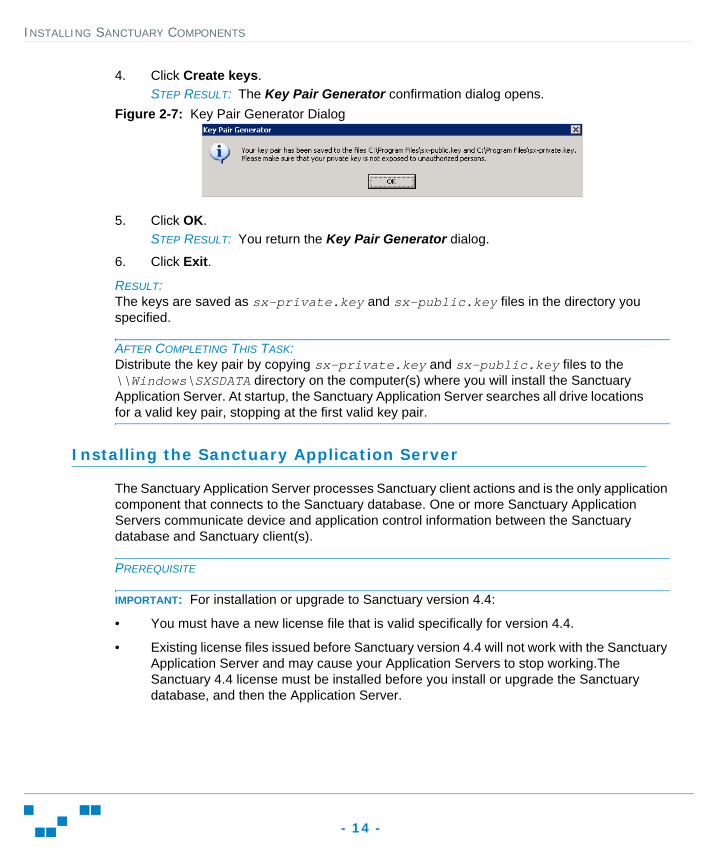
4. Click Create keys.STEP RESULT: The Key Pair Generator confirmation dialog opens.
Figure 2-7: Key Pair Generator Dialog
5. Click OK.STEP RESULT: You return the Key Pair Generator dialog.
6. Click Exit.
RESULT:The keys are saved as sx-private.key and sx-public.key files in the directory you specified.
AFTER COMPLETING THIS TASK:Distribute the key pair by copying sx-private.key and sx-public.key files to the \\Windows\SXSDATA directory on the computer(s) where you will install the Sanctuary Application Server. At startup, the Sanctuary Application Server searches all drive locations for a valid key pair, stopping at the first valid key pair.
Installing the Sanctuary Application Server
The Sanctuary Application Server processes Sanctuary client actions and is the only application component that connects to the Sanctuary database. One or more Sanctuary Application Servers communicate device and application control information between the Sanctuary database and Sanctuary client(s).
PREREQUISITE
IMPORTANT: For installation or upgrade to Sanctuary version 4.4:
• You must have a new license file that is valid specifically for version 4.4.
• Existing license files issued before Sanctuary version 4.4 will not work with the Sanctuary Application Server and may cause your Application Servers to stop working.The Sanctuary 4.4 license must be installed before you install or upgrade the Sanctuary database, and then the Application Server.
INSTALLING SANCTUARY COMPONENTS
- 15 -
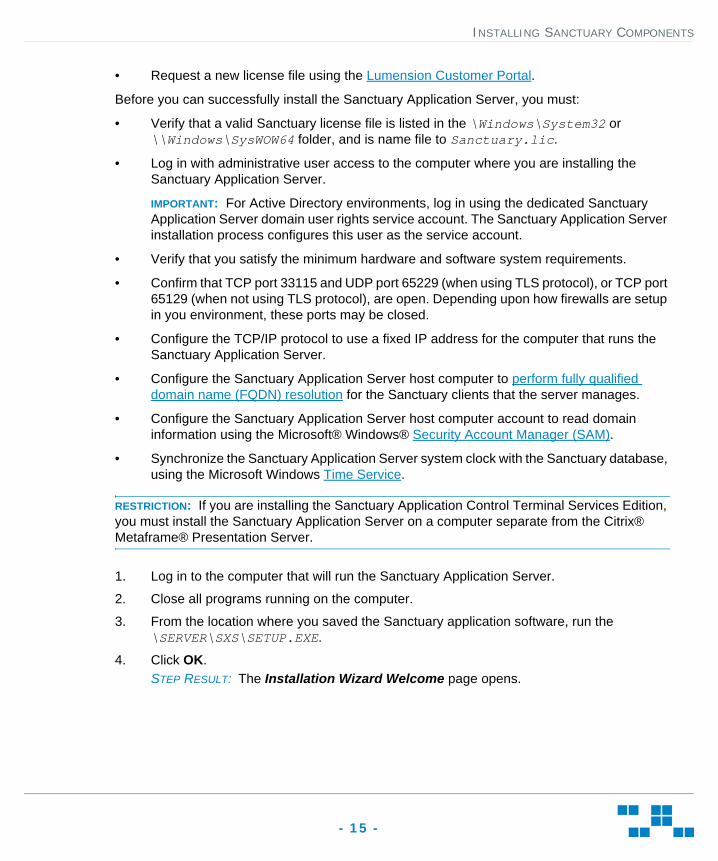
• Request a new license file using the Lumension Customer Portal.
Before you can successfully install the Sanctuary Application Server, you must:
• Verify that a valid Sanctuary license file is listed in the \Windows\System32 or \\Windows\SysWOW64 folder, and is name file to Sanctuary.lic.
• Log in with administrative user access to the computer where you are installing the Sanctuary Application Server.
IMPORTANT: For Active Directory environments, log in using the dedicated Sanctuary Application Server domain user rights service account. The Sanctuary Application Server installation process configures this user as the service account.
• Verify that you satisfy the minimum hardware and software system requirements.
• Confirm that TCP port 33115 and UDP port 65229 (when using TLS protocol), or TCP port 65129 (when not using TLS protocol), are open. Depending upon how firewalls are setup in you environment, these ports may be closed.
• Configure the TCP/IP protocol to use a fixed IP address for the computer that runs the Sanctuary Application Server.
• Configure the Sanctuary Application Server host computer to perform fully qualified domain name (FQDN) resolution for the Sanctuary clients that the server manages.
• Configure the Sanctuary Application Server host computer account to read domain information using the Microsoft® Windows® Security Account Manager (SAM).
• Synchronize the Sanctuary Application Server system clock with the Sanctuary database, using the Microsoft Windows Time Service.
RESTRICTION: If you are installing the Sanctuary Application Control Terminal Services Edition, you must install the Sanctuary Application Server on a computer separate from the Citrix® Metaframe® Presentation Server.
1. Log in to the computer that will run the Sanctuary Application Server.
2. Close all programs running on the computer.
3. From the location where you saved the Sanctuary application software, run the \SERVER\SXS\SETUP.EXE.
4. Click OK.STEP RESULT: The Installation Wizard Welcome page opens.
INSTALLING SANCTUARY COMPONENTS
- 16 -
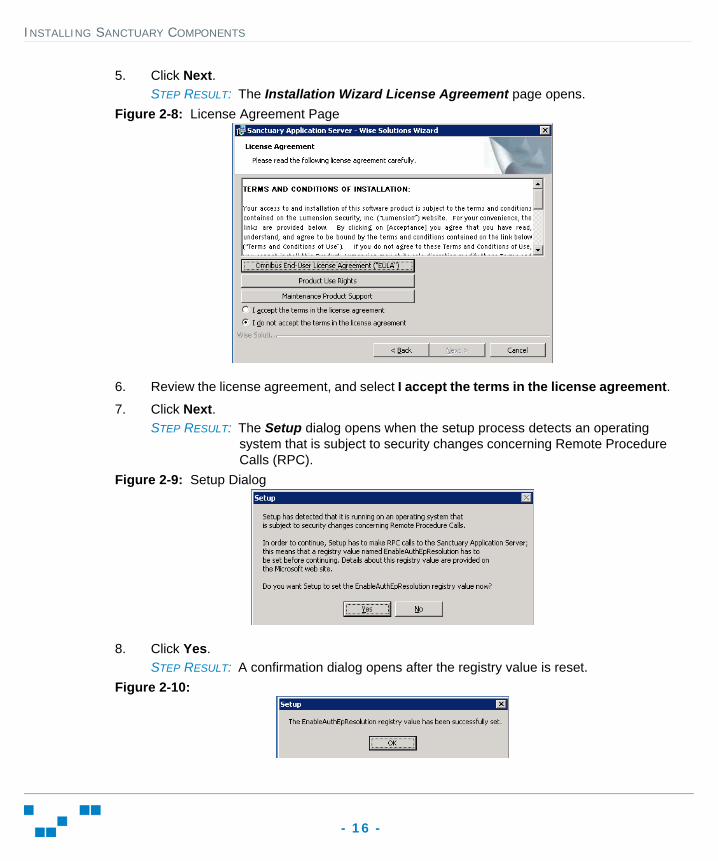
5. Click Next.STEP RESULT: The Installation Wizard License Agreement page opens.
Figure 2-8: License Agreement Page
6. Review the license agreement, and select I accept the terms in the license agreement.7. Click Next.
STEP RESULT: The Setup dialog opens when the setup process detects an operating system that is subject to security changes concerning Remote Procedure Calls (RPC).
Figure 2-9: Setup Dialog
8. Click Yes.STEP RESULT: A confirmation dialog opens after the registry value is reset.
Figure 2-10:
INSTALLING SANCTUARY COMPONENTS
- 17 -
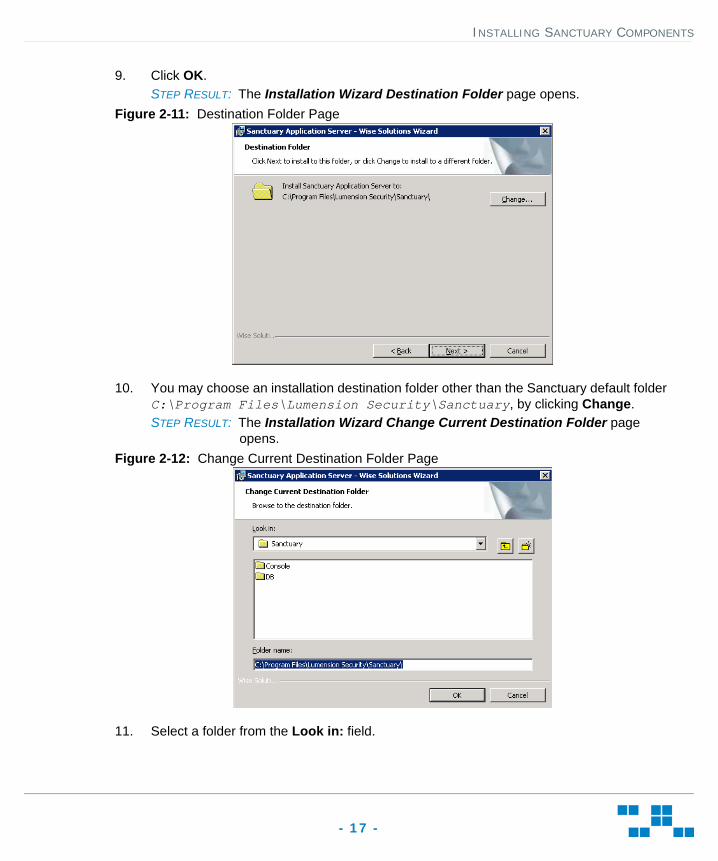
9. Click OK.STEP RESULT: The Installation Wizard Destination Folder page opens.
Figure 2-11: Destination Folder Page
10. You may choose an installation destination folder other than the Sanctuary default folder C:\Program Files\Lumension Security\Sanctuary, by clicking Change.STEP RESULT: The Installation Wizard Change Current Destination Folder page
opens.Figure 2-12: Change Current Destination Folder Page
11. Select a folder from the Look in: field.
INSTALLING SANCTUARY COMPONENTS
- 18 -
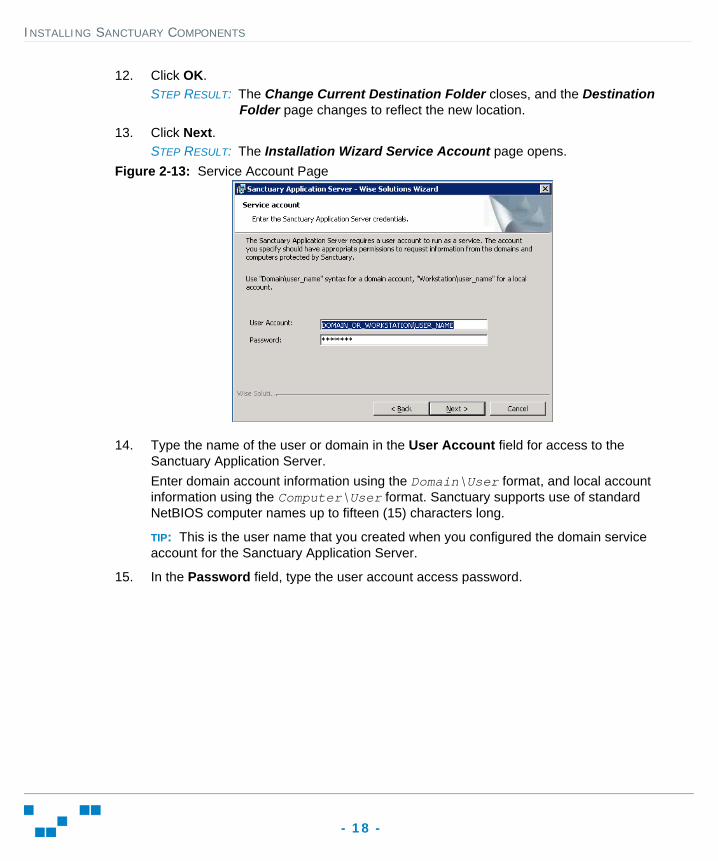
12. Click OK.STEP RESULT: The Change Current Destination Folder closes, and the Destination
Folder page changes to reflect the new location.
13. Click Next.STEP RESULT: The Installation Wizard Service Account page opens.
Figure 2-13: Service Account Page
14. Type the name of the user or domain in the User Account field for access to the Sanctuary Application Server.Enter domain account information using the Domain\User format, and local account information using the Computer\User format. Sanctuary supports use of standard NetBIOS computer names up to fifteen (15) characters long.
TIP: This is the user name that you created when you configured the domain service account for the Sanctuary Application Server.
15. In the Password field, type the user account access password.
INSTALLING SANCTUARY COMPONENTS
- 19 -
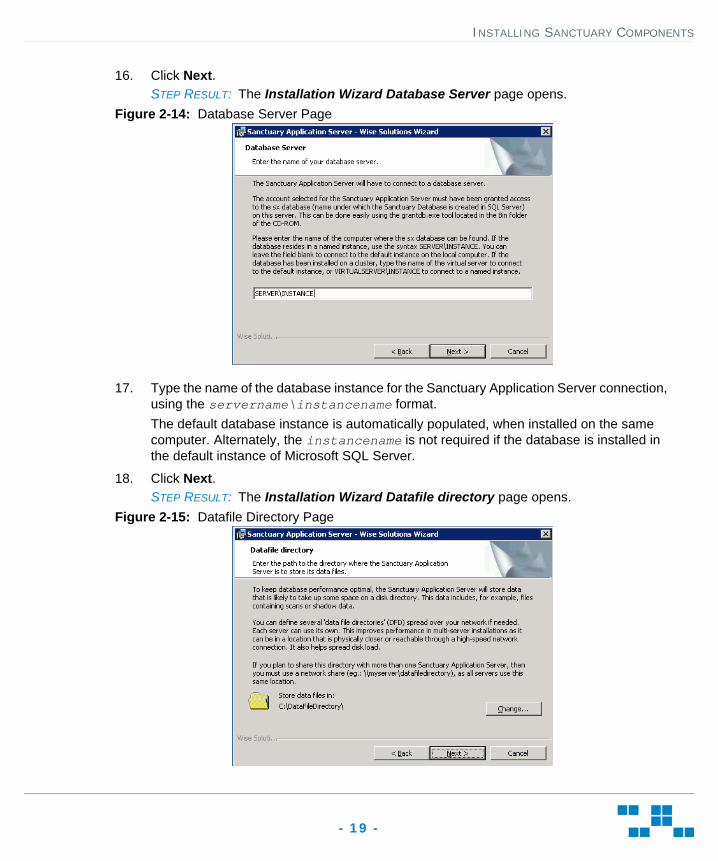
16. Click Next.STEP RESULT: The Installation Wizard Database Server page opens.
Figure 2-14: Database Server Page
17. Type the name of the database instance for the Sanctuary Application Server connection, using the servername\instancename format.The default database instance is automatically populated, when installed on the same computer. Alternately, the instancename is not required if the database is installed in the default instance of Microsoft SQL Server.
18. Click Next.STEP RESULT: The Installation Wizard Datafile directory page opens.
Figure 2-15: Datafile Directory Page
INSTALLING SANCTUARY COMPONENTS
- 20 -
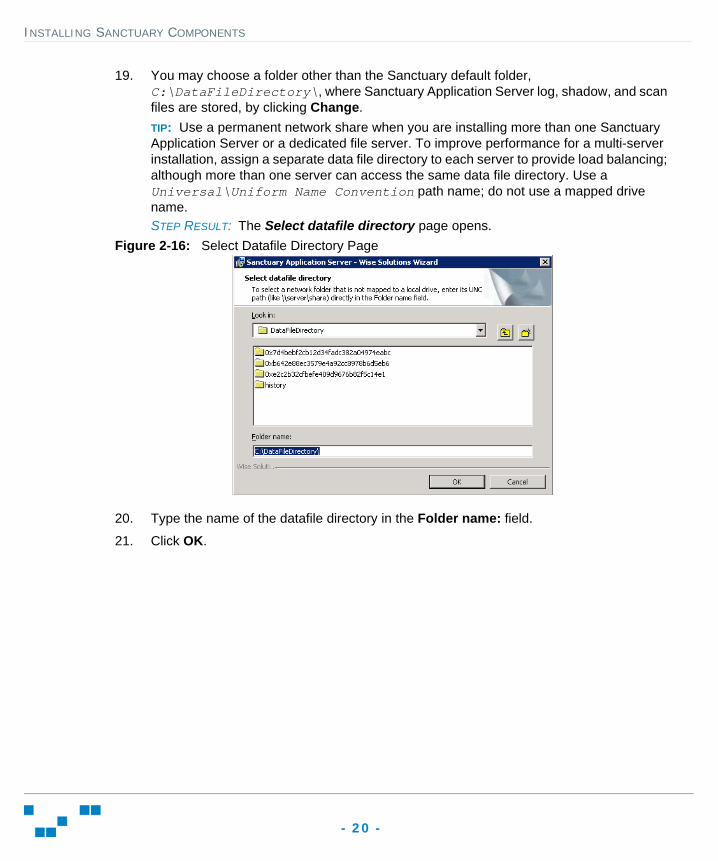
19. You may choose a folder other than the Sanctuary default folder, C:\DataFileDirectory\, where Sanctuary Application Server log, shadow, and scan files are stored, by clicking Change.TIP: Use a permanent network share when you are installing more than one Sanctuary Application Server or a dedicated file server. To improve performance for a multi-server installation, assign a separate data file directory to each server to provide load balancing; although more than one server can access the same data file directory. Use a Universal\Uniform Name Convention path name; do not use a mapped drive name.STEP RESULT: The Select datafile directory page opens.
Figure 2-16: Select Datafile Directory Page
20. Type the name of the datafile directory in the Folder name: field.
21. Click OK.
INSTALLING SANCTUARY COMPONENTS
- 21 -
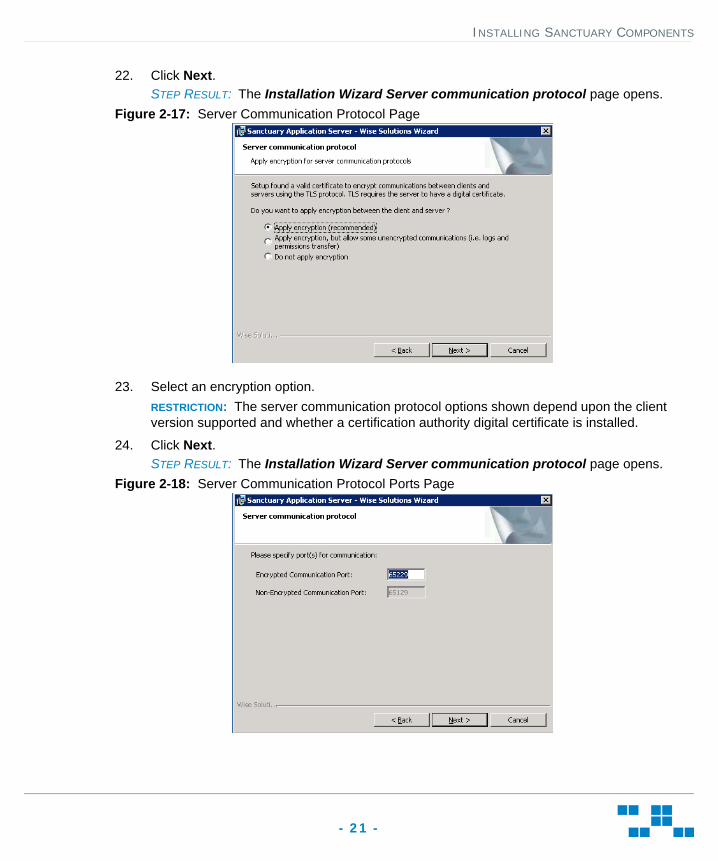
22. Click Next.STEP RESULT: The Installation Wizard Server communication protocol page opens.
Figure 2-17: Server Communication Protocol Page
23. Select an encryption option.RESTRICTION: The server communication protocol options shown depend upon the client version supported and whether a certification authority digital certificate is installed.
24. Click Next.STEP RESULT: The Installation Wizard Server communication protocol page opens.
Figure 2-18: Server Communication Protocol Ports Page
INSTALLING SANCTUARY COMPONENTS
- 22 -
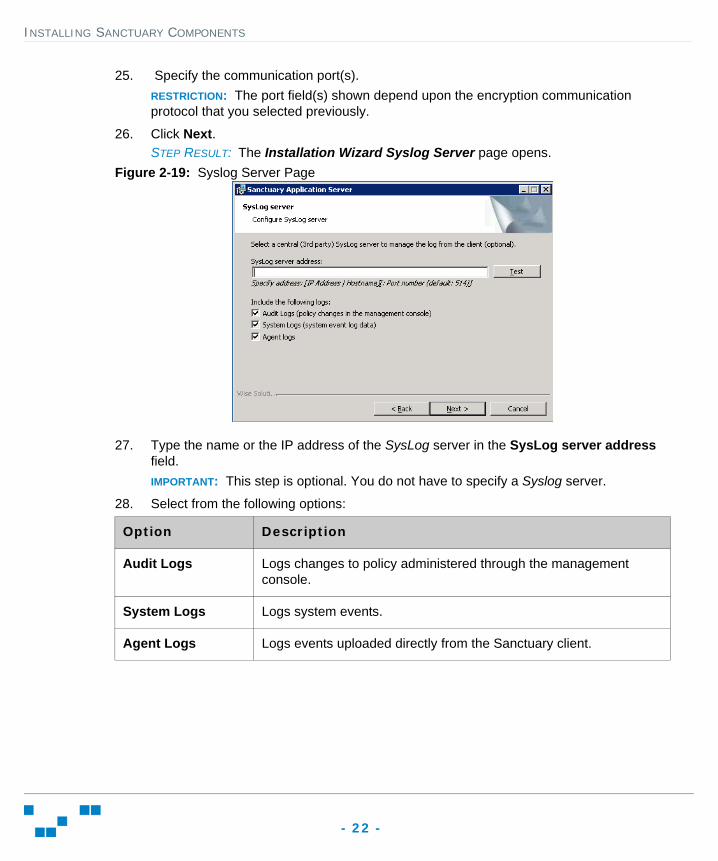
25. Specify the communication port(s).RESTRICTION: The port field(s) shown depend upon the encryption communication protocol that you selected previously.
26. Click Next.STEP RESULT: The Installation Wizard Syslog Server page opens.
Figure 2-19: Syslog Server Page
27. Type the name or the IP address of the SysLog server in the SysLog server address field.IMPORTANT: This step is optional. You do not have to specify a Syslog server.
28. Select from the following options:
Option Description
Audit Logs Logs changes to policy administered through the management console.
System Logs Logs system events.
Agent Logs Logs events uploaded directly from the Sanctuary client.
INSTALLING SANCTUARY COMPONENTS
- 23 -
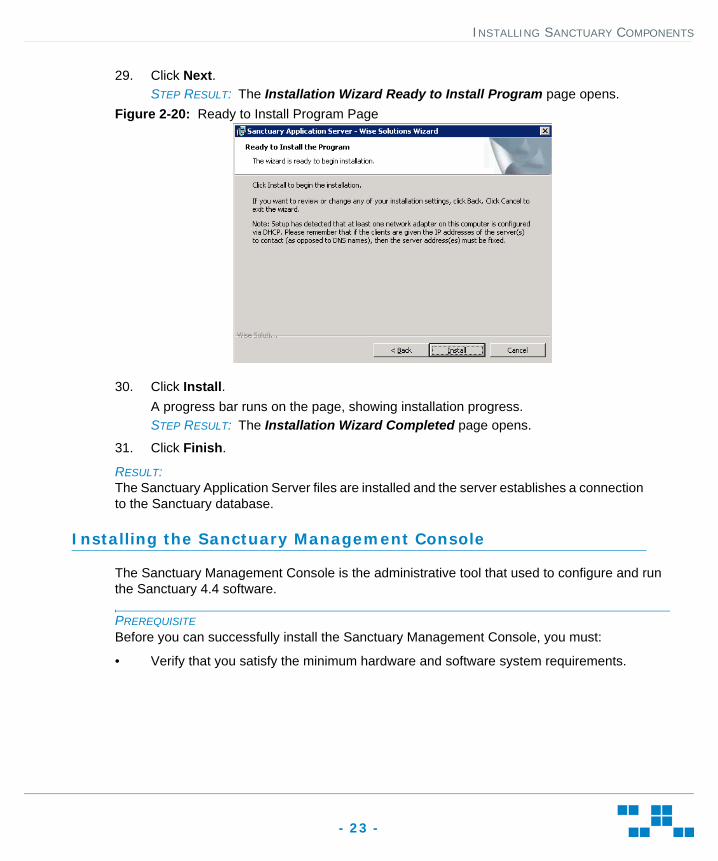
29. Click Next.STEP RESULT: The Installation Wizard Ready to Install Program page opens.
Figure 2-20: Ready to Install Program Page
30. Click Install.A progress bar runs on the page, showing installation progress.STEP RESULT: The Installation Wizard Completed page opens.
31. Click Finish.
RESULT:The Sanctuary Application Server files are installed and the server establishes a connection to the Sanctuary database.
Installing the Sanctuary Management Console
The Sanctuary Management Console is the administrative tool that used to configure and run the Sanctuary 4.4 software.
PREREQUISITEBefore you can successfully install the Sanctuary Management Console, you must:
• Verify that you satisfy the minimum hardware and software system requirements.
INSTALLING SANCTUARY COMPONENTS
- 24 -
• Install the Sanctuary Application Server.
RESTRICTION: If you are installing the Sanctuary Application Control Terminal Services Edition, you must install the Sanctuary Management Console on a computer separate from the Citrix® Metaframe® Presentation Server.
1. Log in as an administrative user to the computer where you are installing the Sanctuary Management Console.
2. Close all programs running on the computer.
3. From the location where you saved the Sanctuary application software, run the \SERVER\SMC\SETUP.EXE.
4. Click OK.STEP RESULT: The Installation Wizard Welcome page opens.
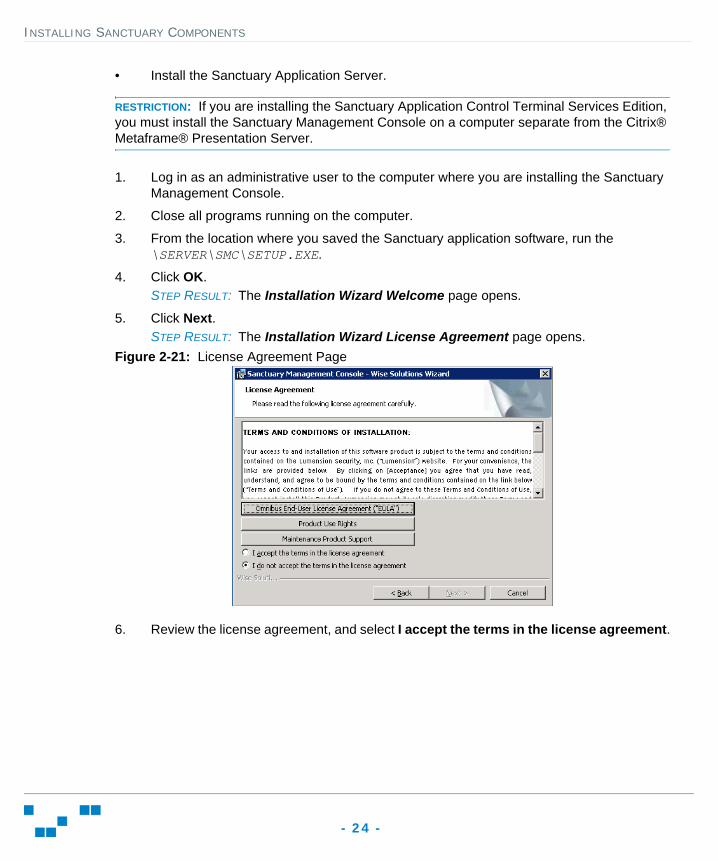
5. Click Next.STEP RESULT: The Installation Wizard License Agreement page opens.
Figure 2-21: License Agreement Page
6. Review the license agreement, and select I accept the terms in the license agreement.
INSTALLING SANCTUARY COMPONENTS
- 25 -
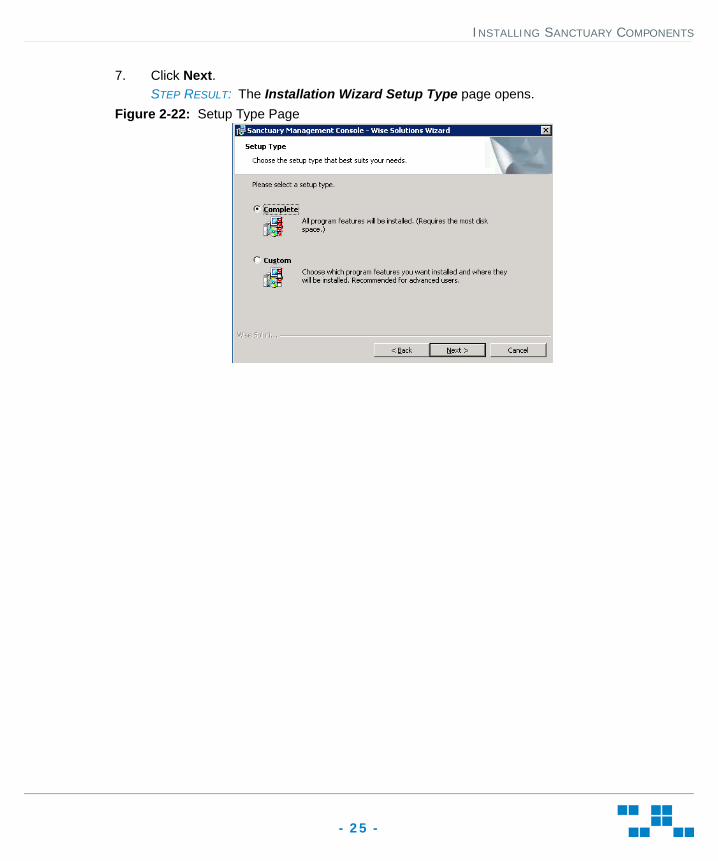
7. Click Next.STEP RESULT: The Installation Wizard Setup Type page opens.
Figure 2-22: Setup Type Page
INSTALLING SANCTUARY COMPONENTS
- 26 -
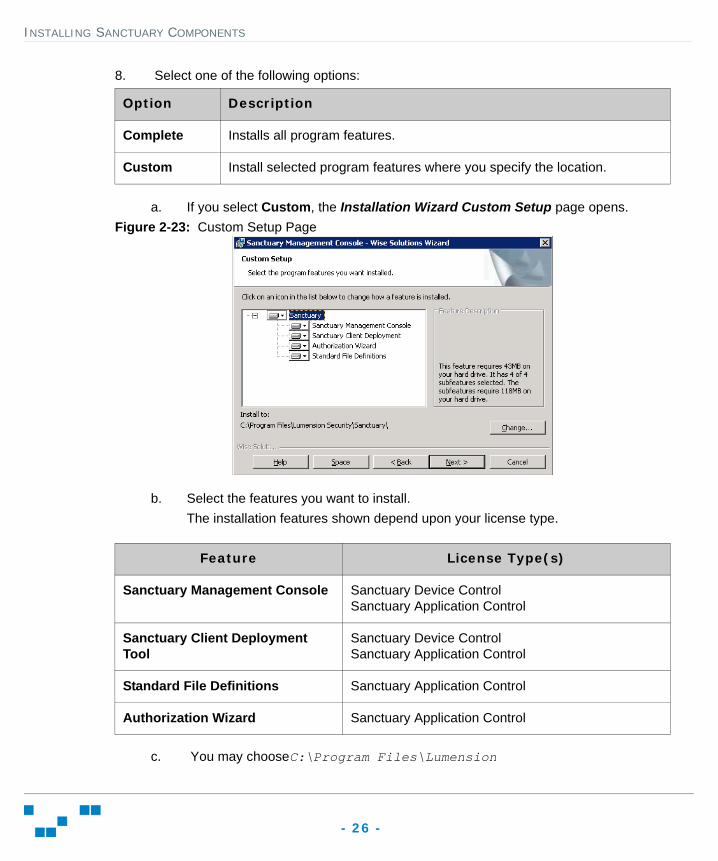
8. Select one of the following options:
a. If you select Custom, the Installation Wizard Custom Setup page opens.Figure 2-23: Custom Setup Page
b. Select the features you want to install.The installation features shown depend upon your license type.
c. You may chooseC:\Program Files\Lumension
Option Description
Complete Installs all program features.
Custom Install selected program features where you specify the location.
Feature License Type(s)
Sanctuary Management Console Sanctuary Device ControlSanctuary Application Control
Sanctuary Client Deployment Tool
Sanctuary Device ControlSanctuary Application Control
Standard File Definitions Sanctuary Application Control
Authorization Wizard Sanctuary Application Control
INSTALLING SANCTUARY COMPONENTS
- 27 -
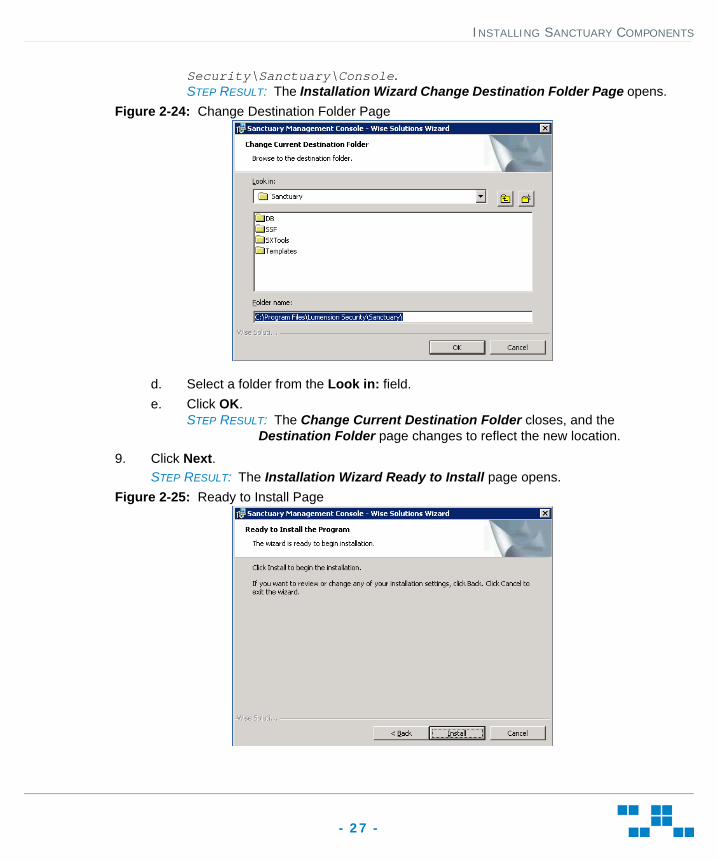
Security\Sanctuary\Console.STEP RESULT: The Installation Wizard Change Destination Folder Page opens.
Figure 2-24: Change Destination Folder Page
d. Select a folder from the Look in: field.e. Click OK.
STEP RESULT: The Change Current Destination Folder closes, and the Destination Folder page changes to reflect the new location.
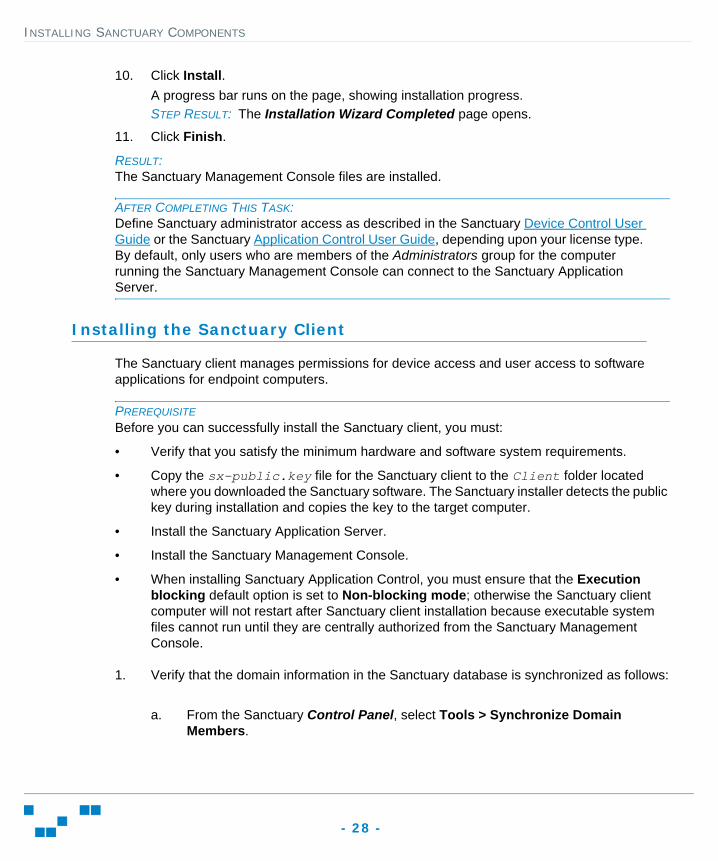
9. Click Next.STEP RESULT: The Installation Wizard Ready to Install page opens.
Figure 2-25: Ready to Install Page
INSTALLING SANCTUARY COMPONENTS
- 28 -
10. Click Install.A progress bar runs on the page, showing installation progress.STEP RESULT: The Installation Wizard Completed page opens.
11. Click Finish.
RESULT:The Sanctuary Management Console files are installed.
AFTER COMPLETING THIS TASK:Define Sanctuary administrator access as described in the Sanctuary Device Control User Guide or the Sanctuary Application Control User Guide, depending upon your license type. By default, only users who are members of the Administrators group for the computer running the Sanctuary Management Console can connect to the Sanctuary Application Server.
Installing the Sanctuary Client
The Sanctuary client manages permissions for device access and user access to software applications for endpoint computers.
PREREQUISITEBefore you can successfully install the Sanctuary client, you must:
• Verify that you satisfy the minimum hardware and software system requirements.
• Copy the sx-public.key file for the Sanctuary client to the Client folder located where you downloaded the Sanctuary software. The Sanctuary installer detects the public key during installation and copies the key to the target computer.
• Install the Sanctuary Application Server.
• Install the Sanctuary Management Console.
• When installing Sanctuary Application Control, you must ensure that the Execution blocking default option is set to Non-blocking mode; otherwise the Sanctuary client computer will not restart after Sanctuary client installation because executable system files cannot run until they are centrally authorized from the Sanctuary Management Console.
1. Verify that the domain information in the Sanctuary database is synchronized as follows:
a. From the Sanctuary Control Panel, select Tools > Synchronize Domain Members.
INSTALLING SANCTUARY COMPONENTS
- 29 -
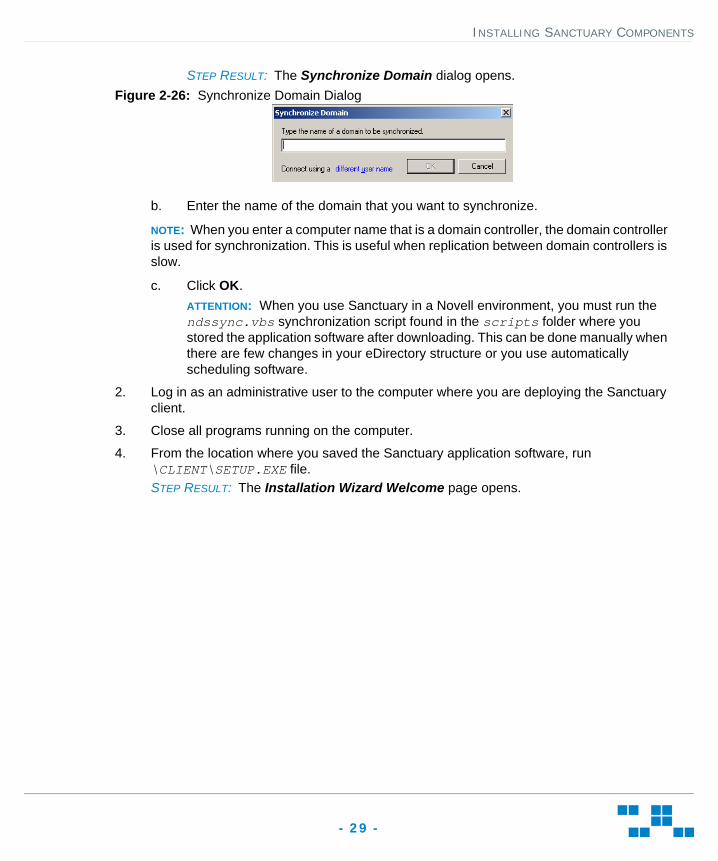
STEP RESULT: The Synchronize Domain dialog opens.Figure 2-26: Synchronize Domain Dialog
b. Enter the name of the domain that you want to synchronize.
NOTE: When you enter a computer name that is a domain controller, the domain controller is used for synchronization. This is useful when replication between domain controllers is slow.
c. Click OK.ATTENTION: When you use Sanctuary in a Novell environment, you must run the ndssync.vbs synchronization script found in the scripts folder where you stored the application software after downloading. This can be done manually when there are few changes in your eDirectory structure or you use automatically scheduling software.
2. Log in as an administrative user to the computer where you are deploying the Sanctuary client.
3. Close all programs running on the computer.
4. From the location where you saved the Sanctuary application software, run \CLIENT\SETUP.EXE file.STEP RESULT: The Installation Wizard Welcome page opens.
INSTALLING SANCTUARY COMPONENTS
- 30 -
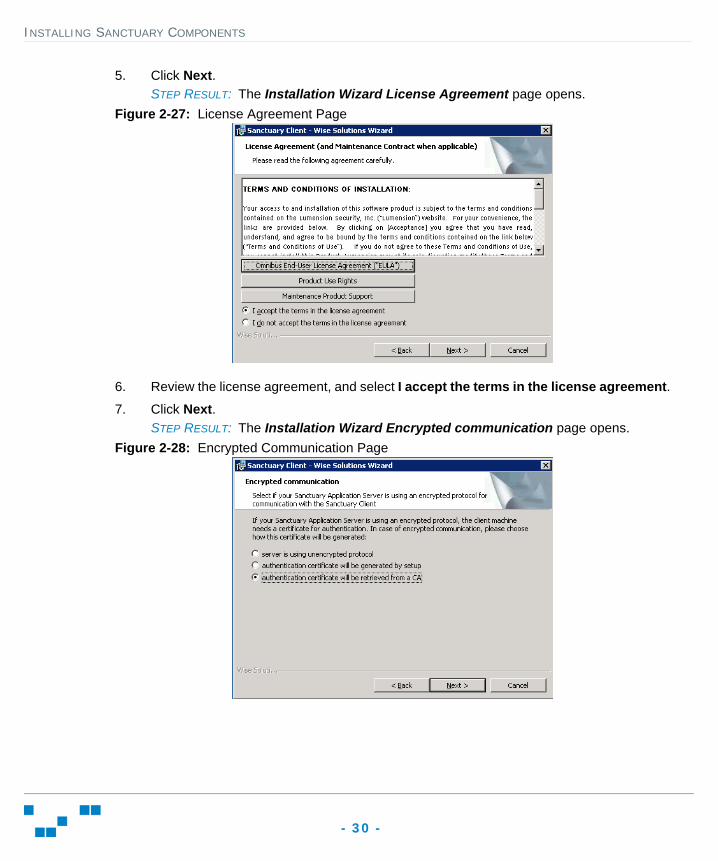
5. Click Next.STEP RESULT: The Installation Wizard License Agreement page opens.
Figure 2-27: License Agreement Page
6. Review the license agreement, and select I accept the terms in the license agreement.7. Click Next.
STEP RESULT: The Installation Wizard Encrypted communication page opens.Figure 2-28: Encrypted Communication Page
INSTALLING SANCTUARY COMPONENTS
- 31 -
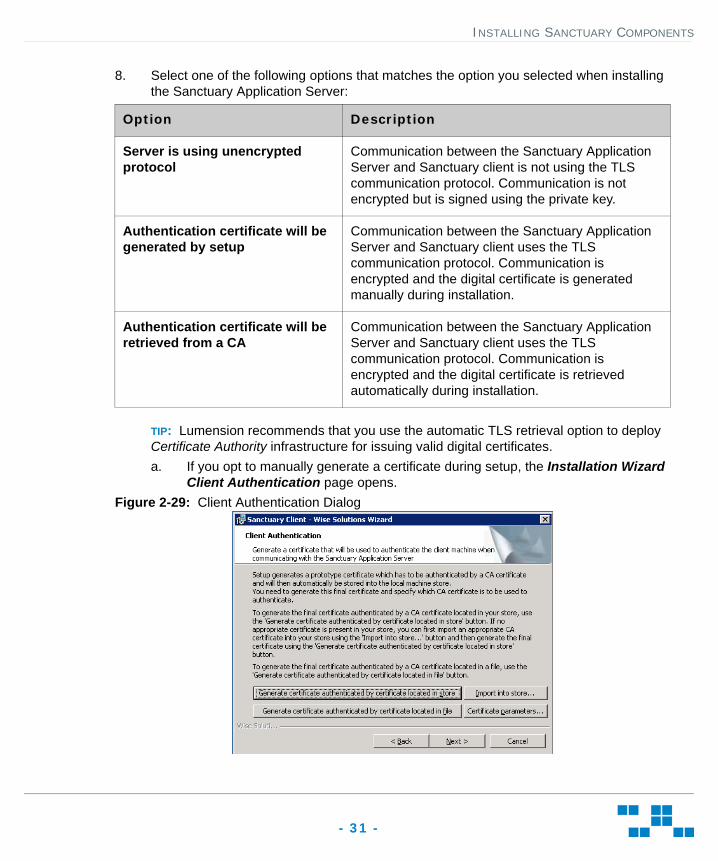
8. Select one of the following options that matches the option you selected when installing the Sanctuary Application Server:
TIP: Lumension recommends that you use the automatic TLS retrieval option to deploy Certificate Authority infrastructure for issuing valid digital certificates.a. If you opt to manually generate a certificate during setup, the Installation Wizard
Client Authentication page opens.Figure 2-29: Client Authentication Dialog
Option Description
Server is using unencrypted protocol
Communication between the Sanctuary Application Server and Sanctuary client is not using the TLS communication protocol. Communication is not encrypted but is signed using the private key.
Authentication certificate will be generated by setup
Communication between the Sanctuary Application Server and Sanctuary client uses the TLS communication protocol. Communication is encrypted and the digital certificate is generated manually during installation.
Authentication certificate will be retrieved from a CA
Communication between the Sanctuary Application Server and Sanctuary client uses the TLS communication protocol. Communication is encrypted and the digital certificate is retrieved automatically during installation.

INSTALLING SANCTUARY COMPONENTS
- 32 -
b. Specify the computer certificate location and parameters from the following options.
9. Click Next.STEP RESULT: The Installation Wizard Sanctuary Application Server page opens.
Figure 2-30: Sanctuary Application Servers Page
10. Specify up to three server names using fully qualified domain names (FQDN) or IP addresses that are managed from the Sanctuary Management Console.CAUTION: Do not use IP address(es) when using the TLS communication protocol for encryption. You can only use FQDNs for when using the TLS communication protocol.
Option Description
Generate certificate signed by certificate located in store
Generates a digital certificate during installation by using a signature certificate located in the local user store.
Generate certificate signed by certificate located in file
Generates a digital certificate during installation by using a signature certificate located in a specified file.
Import into store Imports a signature certificate into the local user store.
Certificate parameters Specifies the certificate parameters for the Cryptographic service provider, Key length, Validity, and Signature.
INSTALLING SANCTUARY COMPONENTS
- 33 -
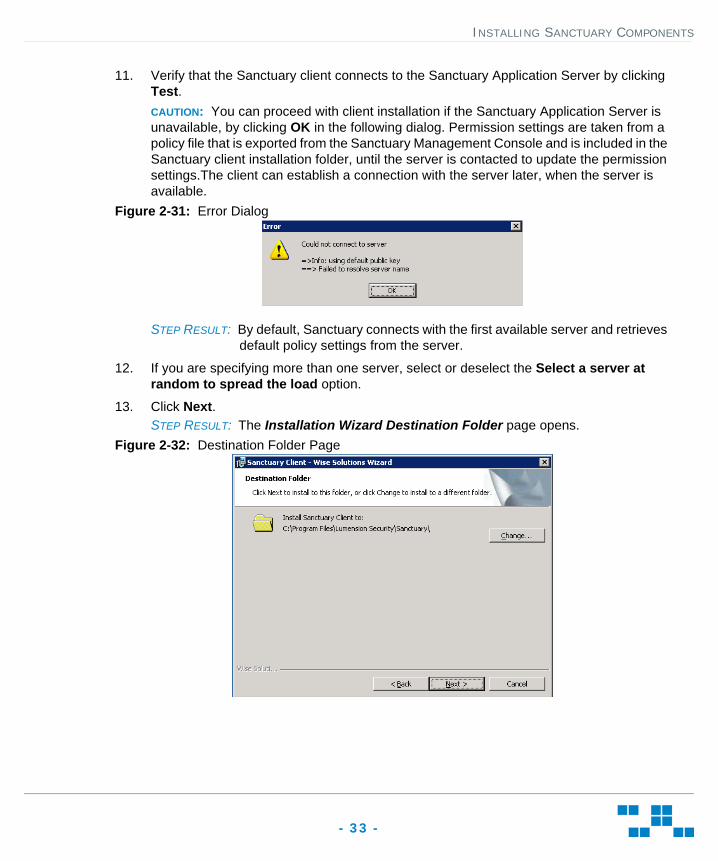
11. Verify that the Sanctuary client connects to the Sanctuary Application Server by clicking Test.CAUTION: You can proceed with client installation if the Sanctuary Application Server is unavailable, by clicking OK in the following dialog. Permission settings are taken from a policy file that is exported from the Sanctuary Management Console and is included in the Sanctuary client installation folder, until the server is contacted to update the permission settings.The client can establish a connection with the server later, when the server is available.
Figure 2-31: Error Dialog
STEP RESULT: By default, Sanctuary connects with the first available server and retrieves default policy settings from the server.
12. If you are specifying more than one server, select or deselect the Select a server at random to spread the load option.
13. Click Next.STEP RESULT: The Installation Wizard Destination Folder page opens.
Figure 2-32: Destination Folder Page
INSTALLING SANCTUARY COMPONENTS
- 34 -
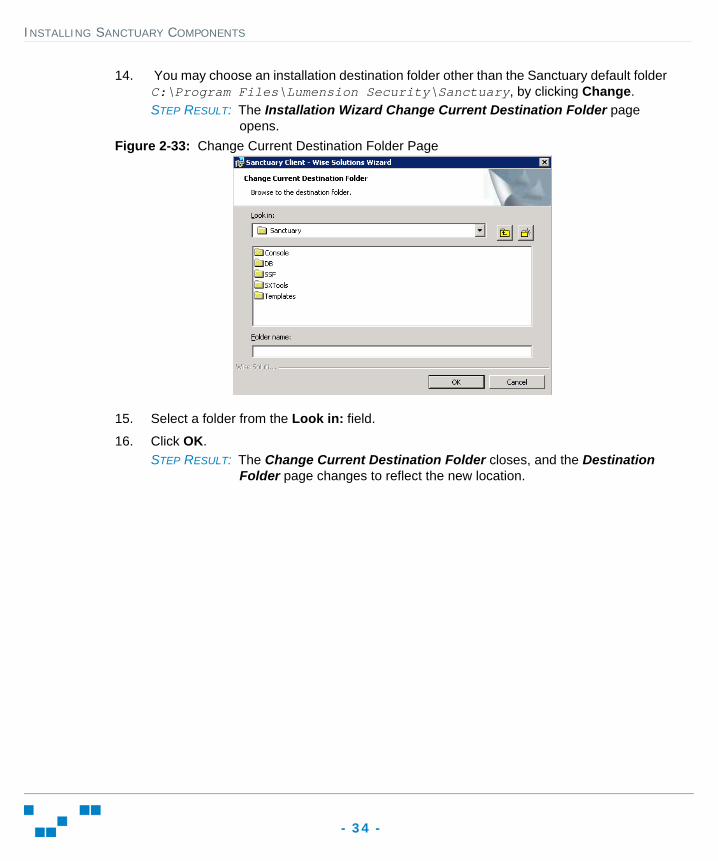
14. You may choose an installation destination folder other than the Sanctuary default folder C:\Program Files\Lumension Security\Sanctuary, by clicking Change.STEP RESULT: The Installation Wizard Change Current Destination Folder page
opens.Figure 2-33: Change Current Destination Folder Page
15. Select a folder from the Look in: field.
16. Click OK.STEP RESULT: The Change Current Destination Folder closes, and the Destination
Folder page changes to reflect the new location.
INSTALLING SANCTUARY COMPONENTS
- 35 -
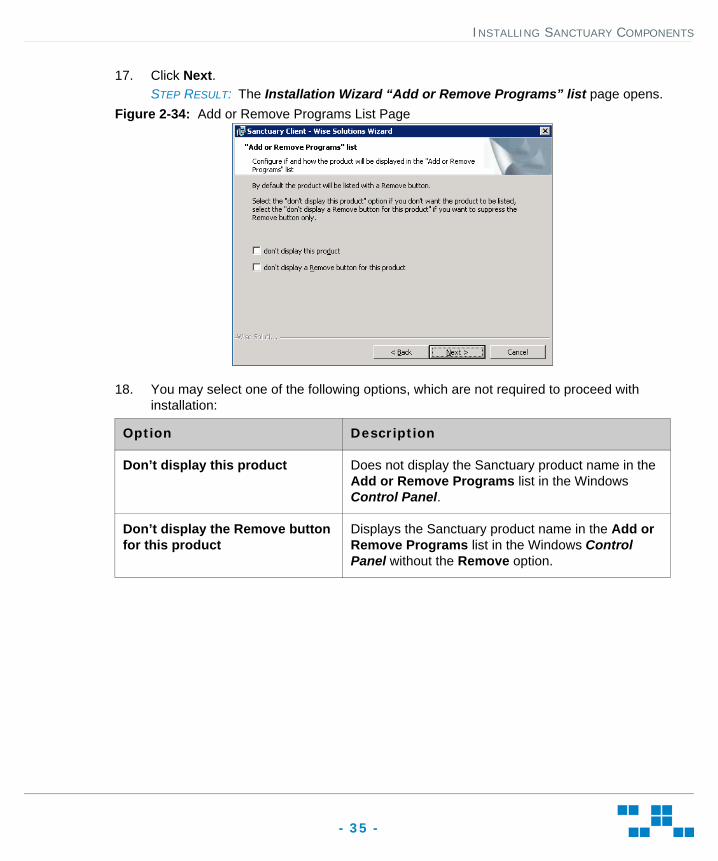
17. Click Next.STEP RESULT: The Installation Wizard “Add or Remove Programs” list page opens.
Figure 2-34: Add or Remove Programs List Page
18. You may select one of the following options, which are not required to proceed with installation:
Option Description
Don’t display this product Does not display the Sanctuary product name in the Add or Remove Programs list in the Windows Control Panel.
Don’t display the Remove button for this product
Displays the Sanctuary product name in the Add or Remove Programs list in the Windows Control Panel without the Remove option.
INSTALLING SANCTUARY COMPONENTS
- 36 -
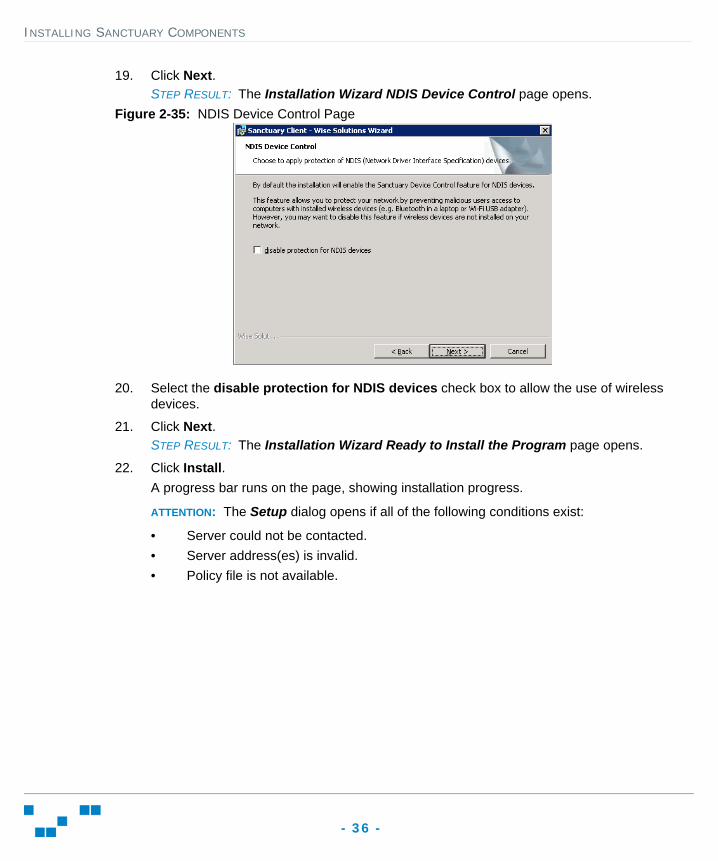
19. Click Next.STEP RESULT: The Installation Wizard NDIS Device Control page opens.
Figure 2-35: NDIS Device Control Page
20. Select the disable protection for NDIS devices check box to allow the use of wireless devices.
21. Click Next.STEP RESULT: The Installation Wizard Ready to Install the Program page opens.
22. Click Install.A progress bar runs on the page, showing installation progress.
ATTENTION: The Setup dialog opens if all of the following conditions exist:
• Server could not be contacted.• Server address(es) is invalid.• Policy file is not available.
INSTALLING SANCTUARY COMPONENTS
- 37 -
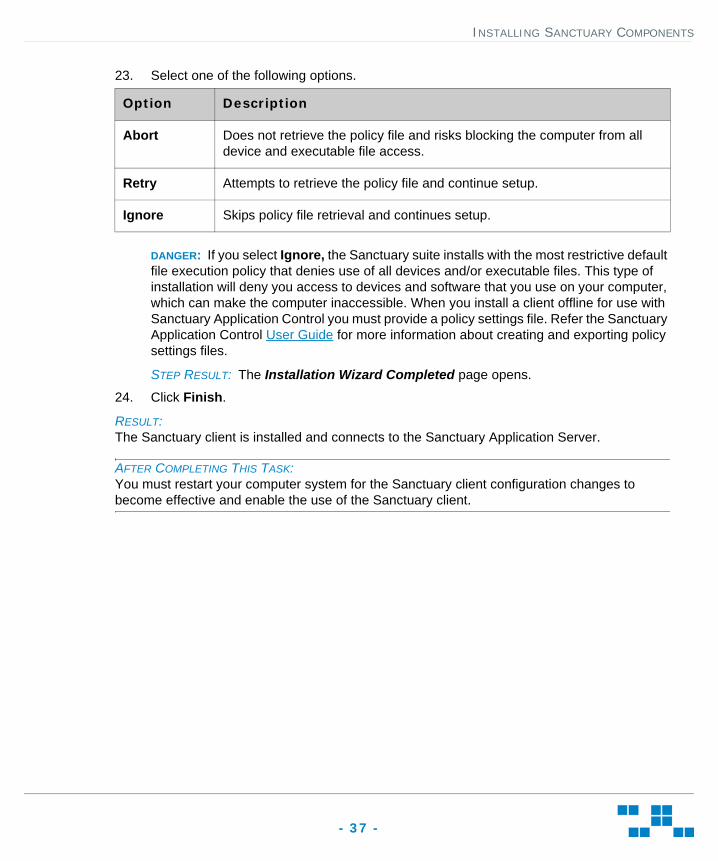
23. Select one of the following options.
DANGER: If you select Ignore, the Sanctuary suite installs with the most restrictive default file execution policy that denies use of all devices and/or executable files. This type of installation will deny you access to devices and software that you use on your computer, which can make the computer inaccessible. When you install a client offline for use with Sanctuary Application Control you must provide a policy settings file. Refer the Sanctuary Application Control User Guide for more information about creating and exporting policy settings files.
STEP RESULT: The Installation Wizard Completed page opens.
24. Click Finish.
RESULT:The Sanctuary client is installed and connects to the Sanctuary Application Server.
AFTER COMPLETING THIS TASK:You must restart your computer system for the Sanctuary client configuration changes to become effective and enable the use of the Sanctuary client.
Option Description
Abort Does not retrieve the policy file and risks blocking the computer from all device and executable file access.
Retry Attempts to retrieve the policy file and continue setup.
Ignore Skips policy file retrieval and continues setup.

INSTALLING SANCTUARY COMPONENTS
- 38 -
SANCTUARY QUICK SETUP GUIDE
- 39 -
3 Using Sanctuary Device ControlThis chapter explains how Sanctuary Device Control works and describes how to define and manage device permissions.
Product Overview
The primary components of the Sanctuary Device Control solution are:
• The Sanctuary database which serves as the central repository of authorization information for devices and applications.
• One or more Sanctuary Application Server that communicate between the Sanctuary database, the protected clients, and the Sanctuary Management Console.
• The Sanctuary client, which is installed on each computer, either end-point or server, that you want to protect.
• The Sanctuary Management Console, which provides the administrative user interface for the Sanctuary Application Server.
USING SANCTUARY DEVICE CONTROL
- 40 -
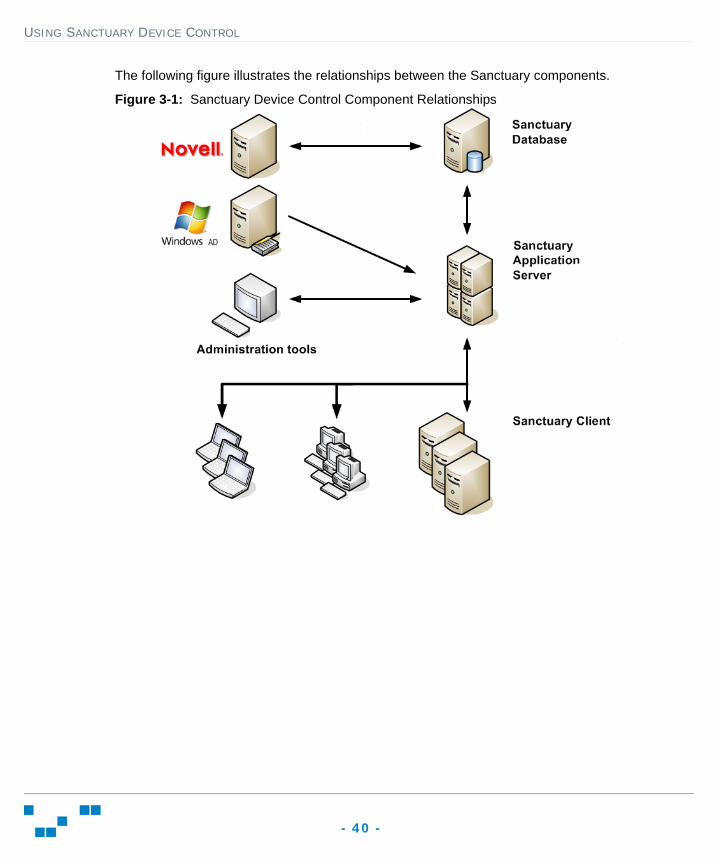
The following figure illustrates the relationships between the Sanctuary components.
Figure 3-1: Sanctuary Device Control Component Relationships
USING SANCTUARY DEVICE CONTROL
- 41 -
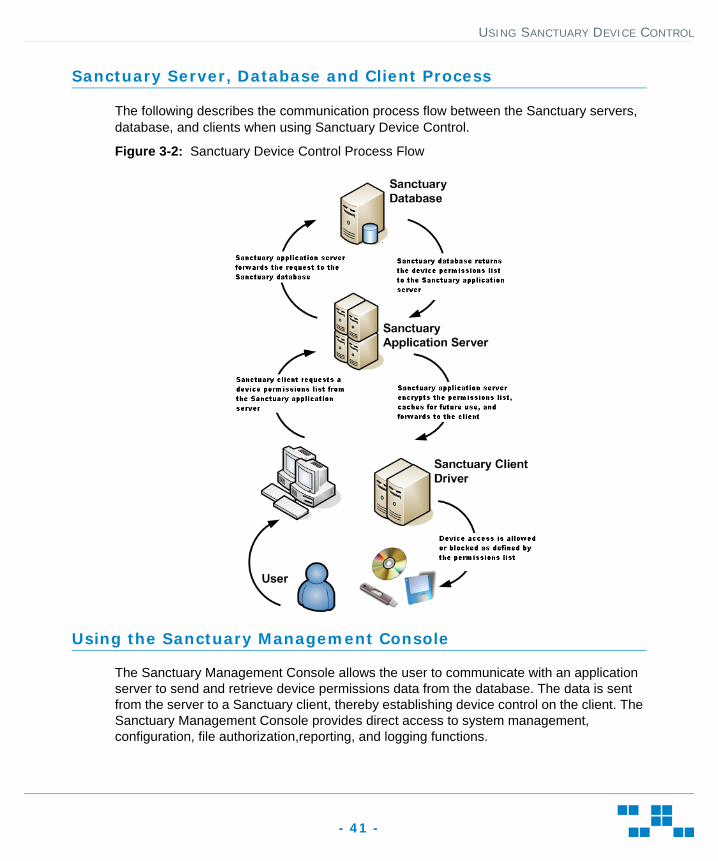
Sanctuary Server, Database and Client Process
The following describes the communication process flow between the Sanctuary servers, database, and clients when using Sanctuary Device Control.
Figure 3-2: Sanctuary Device Control Process Flow
Using the Sanctuary Management Console
The Sanctuary Management Console allows the user to communicate with an application server to send and retrieve device permissions data from the database. The data is sent from the server to a Sanctuary client, thereby establishing device control on the client. The Sanctuary Management Console provides direct access to system management, configuration, file authorization,reporting, and logging functions.
USING SANCTUARY DEVICE CONTROL
- 42 -
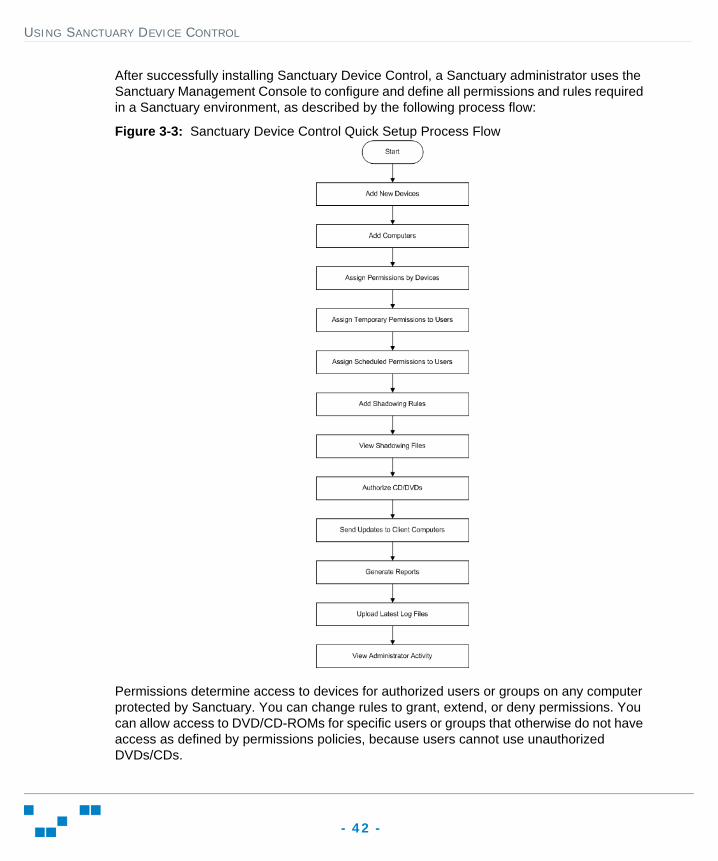
After successfully installing Sanctuary Device Control, a Sanctuary administrator uses the Sanctuary Management Console to configure and define all permissions and rules required in a Sanctuary environment, as described by the following process flow:
Figure 3-3: Sanctuary Device Control Quick Setup Process Flow
Permissions determine access to devices for authorized users or groups on any computer protected by Sanctuary. You can change rules to grant, extend, or deny permissions. You can allow access to DVD/CD-ROMs for specific users or groups that otherwise do not have access as defined by permissions policies, because users cannot use unauthorized DVDs/CDs.

USING SANCTUARY DEVICE CONTROL
- 43 -
Accessing the Sanctuary Management Console
The Sanctuary Management Console is a Windows application that conforms to standard conventions. From the Sanctuary Management Console, you navigate through the system with menu bars, scroll bars, icons, lists, and checkboxes.
Logging In to the Sanctuary Management Console
1. Click Windows Start.2. Select Programs > Start > Sanctuary Management Console.
STEP RESULT: Each time you access the Sanctuary Management Console, the Connect to Sanctuary Management Console dialog appears.
3. From the Application Server drop-down list, select theSanctuary Application Server you want to connect to.You can type the server name as an IP address with port if required in square brackets, NetBios name, or fully qualified domain name in the Application Server field.
4. Select one of the following options:
5. Click OK.STEP RESULT: The Connect to Sanctuary Management Console dialog closes.
RESULT:The Sanctuary Management Console window opens.
Option Description
Use current user By default the system connects to the Sanctuary application server using your credentials
Log in as Type the user name in the Username field and type the password in the Password field.
TIP: Prefix the user name by a computer workstation name and backslash for a local user, and by a domain name and backslash for domain users.
USING SANCTUARY DEVICE CONTROL
- 44 -
Logging Out of the Sanctuary Management Console
1. To disconnect from the Sanctuary Application Server, select File from the navigation bar.
2. Select one of the following options:
RESULT:This action terminates your current administrative session.
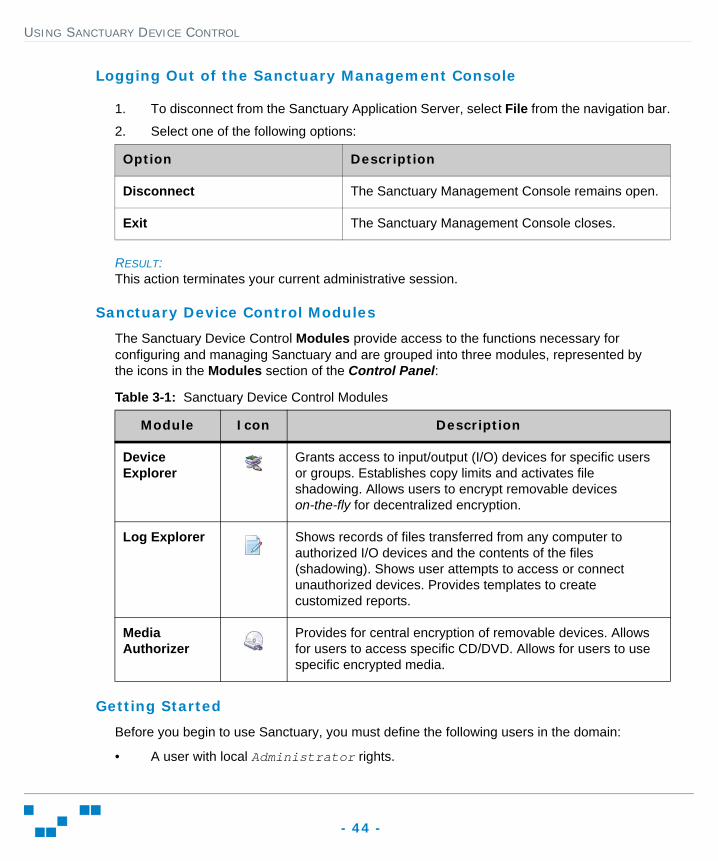
Sanctuary Device Control Modules
The Sanctuary Device Control Modules provide access to the functions necessary for configuring and managing Sanctuary and are grouped into three modules, represented by the icons in the Modules section of the Control Panel:
Table 3-1: Sanctuary Device Control Modules
Getting Started
Before you begin to use Sanctuary, you must define the following users in the domain:
• A user with local Administrator rights.
Option Description
Disconnect The Sanctuary Management Console remains open.
Exit The Sanctuary Management Console closes.
Module Icon Description
Device Explorer
Grants access to input/output (I/O) devices for specific users or groups. Establishes copy limits and activates file shadowing. Allows users to encrypt removable devices on-the-fly for decentralized encryption.
Log Explorer Shows records of files transferred from any computer to authorized I/O devices and the contents of the files (shadowing). Shows user attempts to access or connect unauthorized devices. Provides templates to create customized reports.
Media Authorizer
Provides for central encryption of removable devices. Allows for users to access specific CD/DVD. Allows for users to use specific encrypted media.
USING SANCTUARY DEVICE CONTROL
- 45 -
• A Sanctuary client user with domain user rights.
Managing Devices
When Sanctuary Device Control is initially installed, all removable storage devices that belong to standard Microsoft Windows® device classes are identified and added to the Sanctuary database. You can define general user access permission policies based on the predefined device classes.
Using the Sanctuary Device Explorer you can add devices and device types for computers and add computers that are not included in the Active Directory structure. You can set up and manage user access permission rules for the different models and specific device types using the Device Explorer.
RESTRICTION: You can add specific device models to all base device classes, except the PS/2 ports classes.
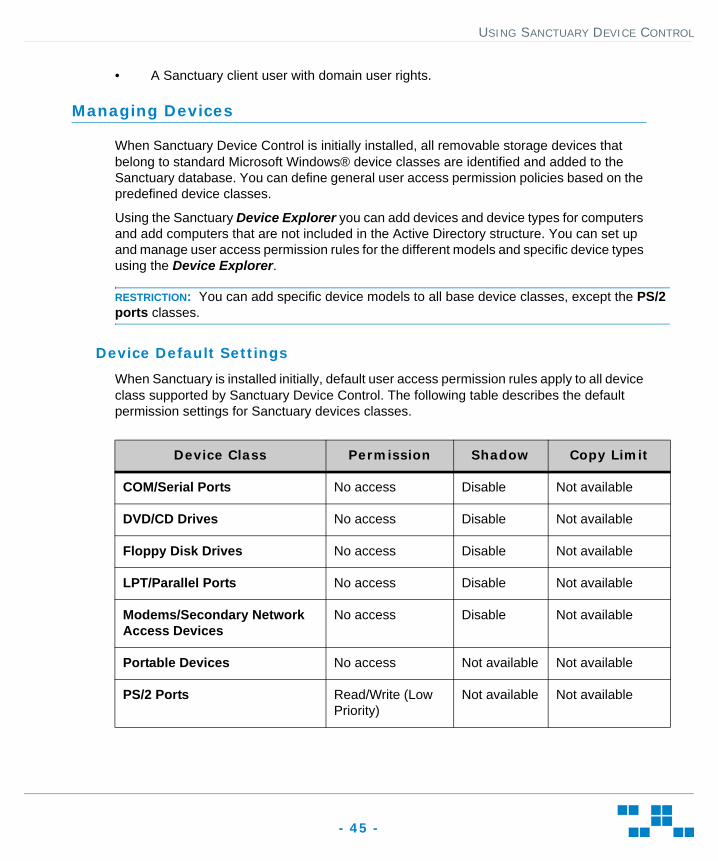
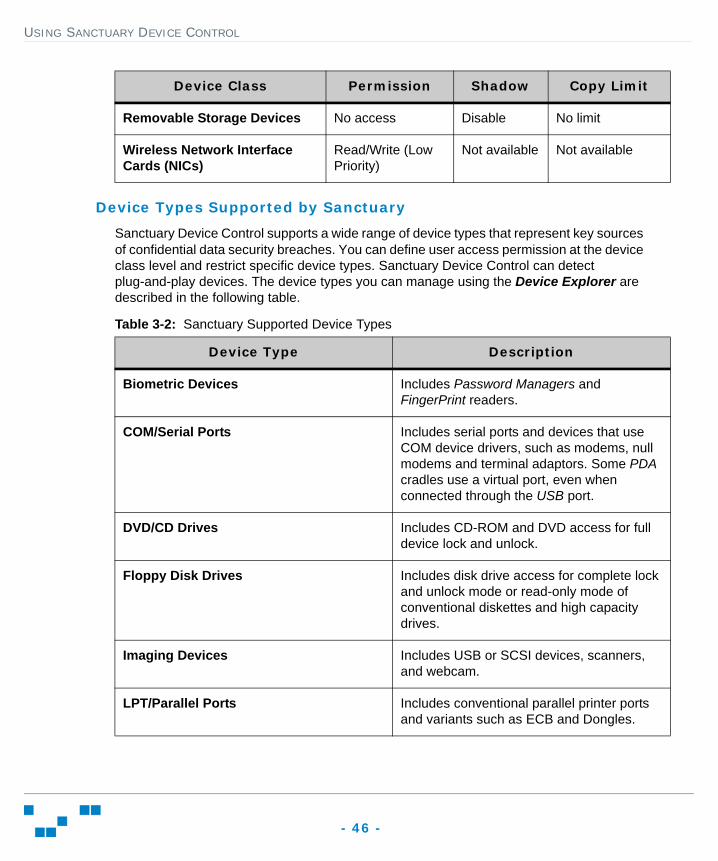
Device Default Settings
When Sanctuary is installed initially, default user access permission rules apply to all device class supported by Sanctuary Device Control. The following table describes the default permission settings for Sanctuary devices classes.
Device Class Permission Shadow Copy Limit
COM/Serial Ports No access Disable Not available
DVD/CD Drives No access Disable Not available
Floppy Disk Drives No access Disable Not available
LPT/Parallel Ports No access Disable Not available
Modems/Secondary Network Access Devices
No access Disable Not available
Portable Devices No access Not available Not available
PS/2 Ports Read/Write (Low Priority)
Not available Not available
USING SANCTUARY DEVICE CONTROL
- 46 -
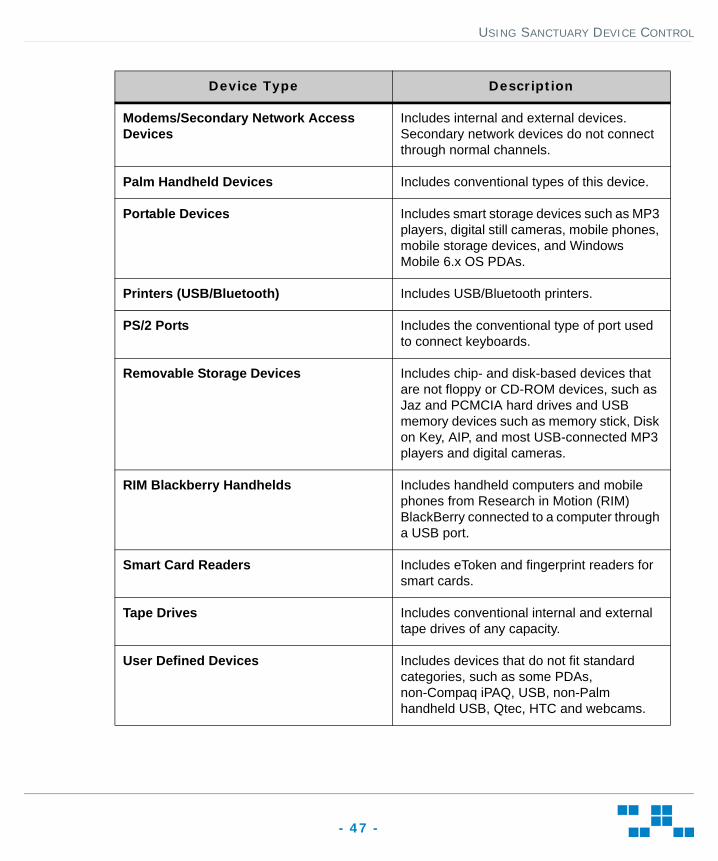
Device Types Supported by Sanctuary
Sanctuary Device Control supports a wide range of device types that represent key sources of confidential data security breaches. You can define user access permission at the device class level and restrict specific device types. Sanctuary Device Control can detect plug-and-play devices. The device types you can manage using the Device Explorer are described in the following table.
Table 3-2: Sanctuary Supported Device Types
Removable Storage Devices No access Disable No limit
Wireless Network Interface Cards (NICs)
Read/Write (Low Priority)
Not available Not available
Device Class Permission Shadow Copy Limit
Device Type Description
Biometric Devices Includes Password Managers and FingerPrint readers.
COM/Serial Ports Includes serial ports and devices that use COM device drivers, such as modems, null modems and terminal adaptors. Some PDA cradles use a virtual port, even when connected through the USB port.
DVD/CD Drives Includes CD-ROM and DVD access for full device lock and unlock.
Floppy Disk Drives Includes disk drive access for complete lock and unlock mode or read-only mode of conventional diskettes and high capacity drives.
Imaging Devices Includes USB or SCSI devices, scanners, and webcam.
LPT/Parallel Ports Includes conventional parallel printer ports and variants such as ECB and Dongles.
USING SANCTUARY DEVICE CONTROL
- 47 -
Modems/Secondary Network Access Devices
Includes internal and external devices. Secondary network devices do not connect through normal channels.
Palm Handheld Devices Includes conventional types of this device.
Portable Devices Includes smart storage devices such as MP3 players, digital still cameras, mobile phones, mobile storage devices, and Windows Mobile 6.x OS PDAs.
Printers (USB/Bluetooth) Includes USB/Bluetooth printers.
PS/2 Ports Includes the conventional type of port used to connect keyboards.
Removable Storage Devices Includes chip- and disk-based devices that are not floppy or CD-ROM devices, such as Jaz and PCMCIA hard drives and USB memory devices such as memory stick, Disk on Key, AIP, and most USB-connected MP3 players and digital cameras.
RIM Blackberry Handhelds Includes handheld computers and mobile phones from Research in Motion (RIM) BlackBerry connected to a computer through a USB port.
Smart Card Readers Includes eToken and fingerprint readers for smart cards.
Tape Drives Includes conventional internal and external tape drives of any capacity.
User Defined Devices Includes devices that do not fit standard categories, such as some PDAs, non-Compaq iPAQ, USB, non-Palm handheld USB, Qtec, HTC and webcams.
Device Type Description
USING SANCTUARY DEVICE CONTROL
- 48 -
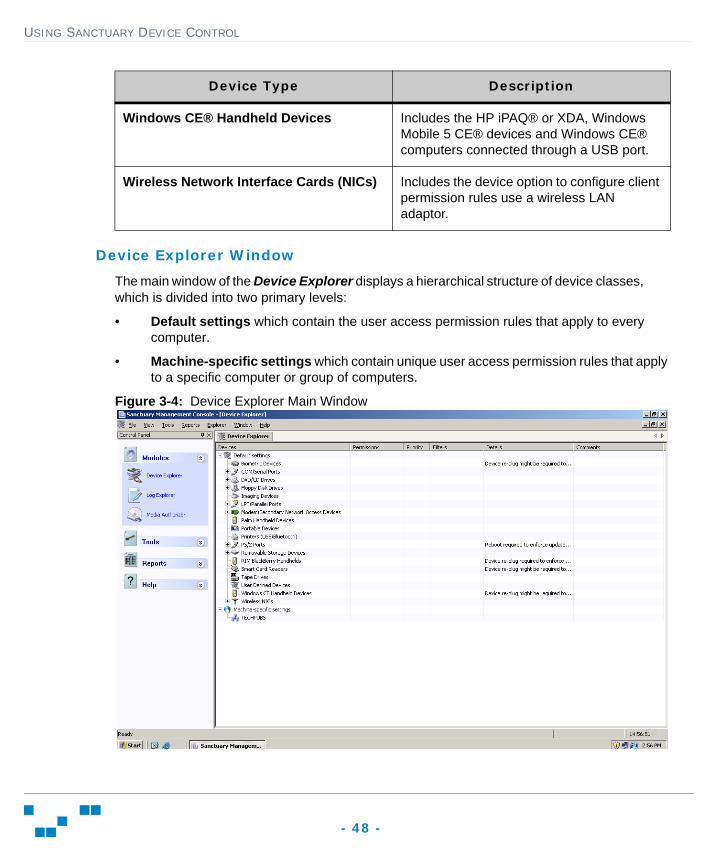
Device Explorer Window
The main window of the Device Explorer displays a hierarchical structure of device classes, which is divided into two primary levels:
• Default settings which contain the user access permission rules that apply to every computer.
• Machine-specific settings which contain unique user access permission rules that apply to a specific computer or group of computers.
Figure 3-4: Device Explorer Main Window
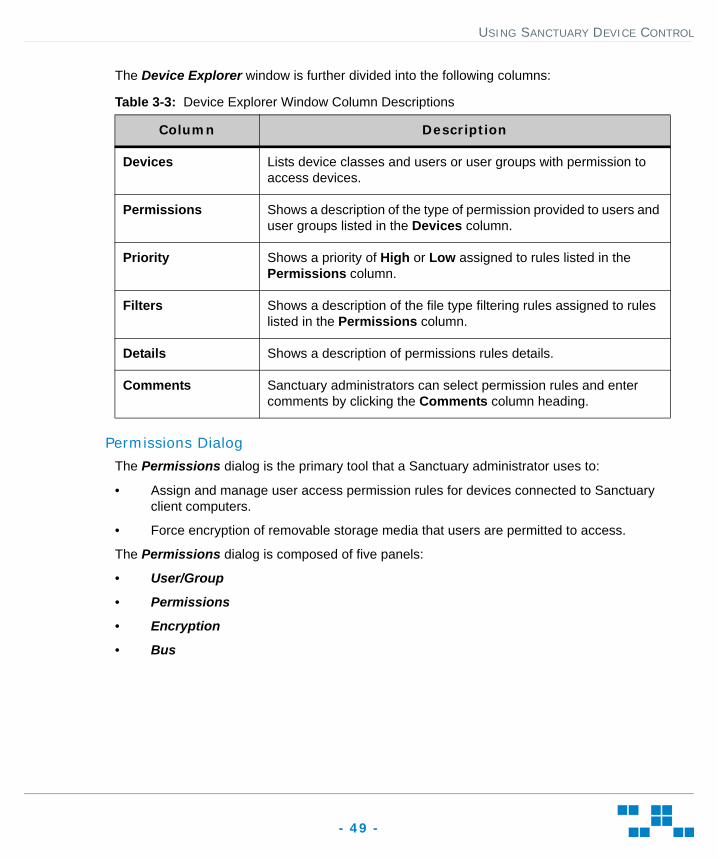
Windows CE® Handheld Devices Includes the HP iPAQ® or XDA, Windows Mobile 5 CE® devices and Windows CE® computers connected through a USB port.
Wireless Network Interface Cards (NICs) Includes the device option to configure client permission rules use a wireless LAN adaptor.
Device Type Description
USING SANCTUARY DEVICE CONTROL
- 49 -
The Device Explorer window is further divided into the following columns:
Table 3-3: Device Explorer Window Column Descriptions
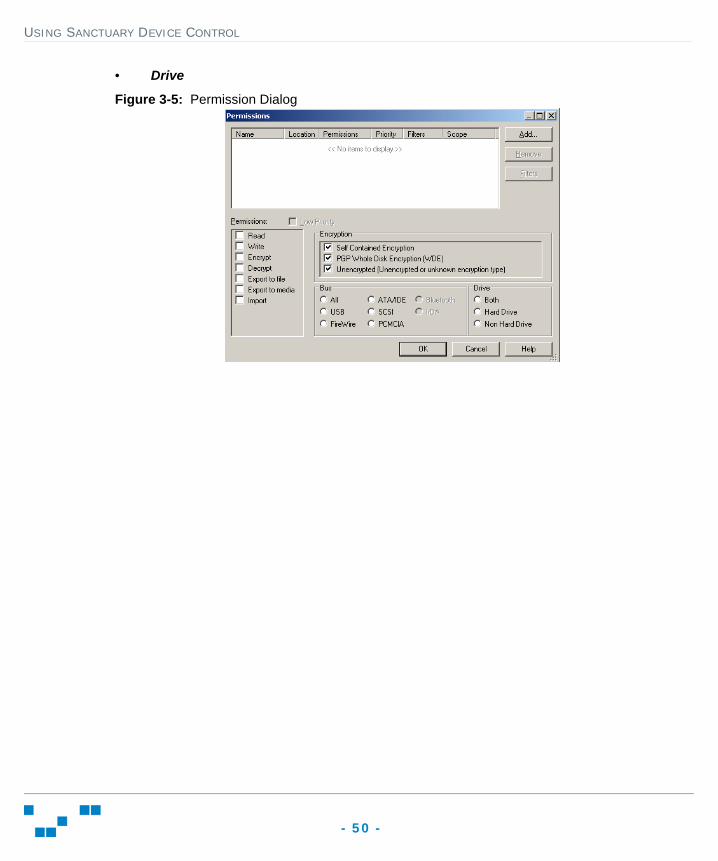
Permissions Dialog
The Permissions dialog is the primary tool that a Sanctuary administrator uses to:
• Assign and manage user access permission rules for devices connected to Sanctuary client computers.
• Force encryption of removable storage media that users are permitted to access.
The Permissions dialog is composed of five panels:
• User/Group
• Permissions
• Encryption
• Bus
Column Description
Devices Lists device classes and users or user groups with permission to access devices.
Permissions Shows a description of the type of permission provided to users and user groups listed in the Devices column.
Priority Shows a priority of High or Low assigned to rules listed in the Permissions column.
Filters Shows a description of the file type filtering rules assigned to rules listed in the Permissions column.
Details Shows a description of permissions rules details.
Comments Sanctuary administrators can select permission rules and enter comments by clicking the Comments column heading.
USING SANCTUARY DEVICE CONTROL
- 50 -
• Drive
Figure 3-5: Permission Dialog
USING SANCTUARY DEVICE CONTROL
- 51 -
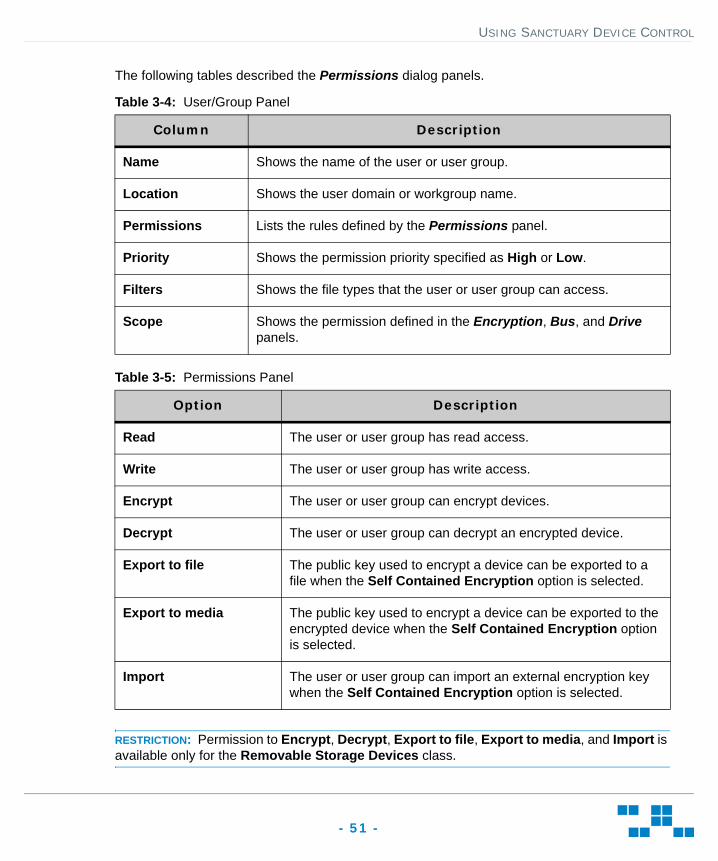
The following tables described the Permissions dialog panels.
Table 3-4: User/Group Panel
Table 3-5: Permissions Panel
RESTRICTION: Permission to Encrypt, Decrypt, Export to file, Export to media, and Import is available only for the Removable Storage Devices class.
Column Description
Name Shows the name of the user or user group.
Location Shows the user domain or workgroup name.
Permissions Lists the rules defined by the Permissions panel.
Priority Shows the permission priority specified as High or Low.
Filters Shows the file types that the user or user group can access.
Scope Shows the permission defined in the Encryption, Bus, and Drive panels.
Option Description
Read The user or user group has read access.
Write The user or user group has write access.
Encrypt The user or user group can encrypt devices.
Decrypt The user or user group can decrypt an encrypted device.
Export to file The public key used to encrypt a device can be exported to a file when the Self Contained Encryption option is selected.
Export to media The public key used to encrypt a device can be exported to the encrypted device when the Self Contained Encryption option is selected.
Import The user or user group can import an external encryption key when the Self Contained Encryption option is selected.
USING SANCTUARY DEVICE CONTROL
- 52 -
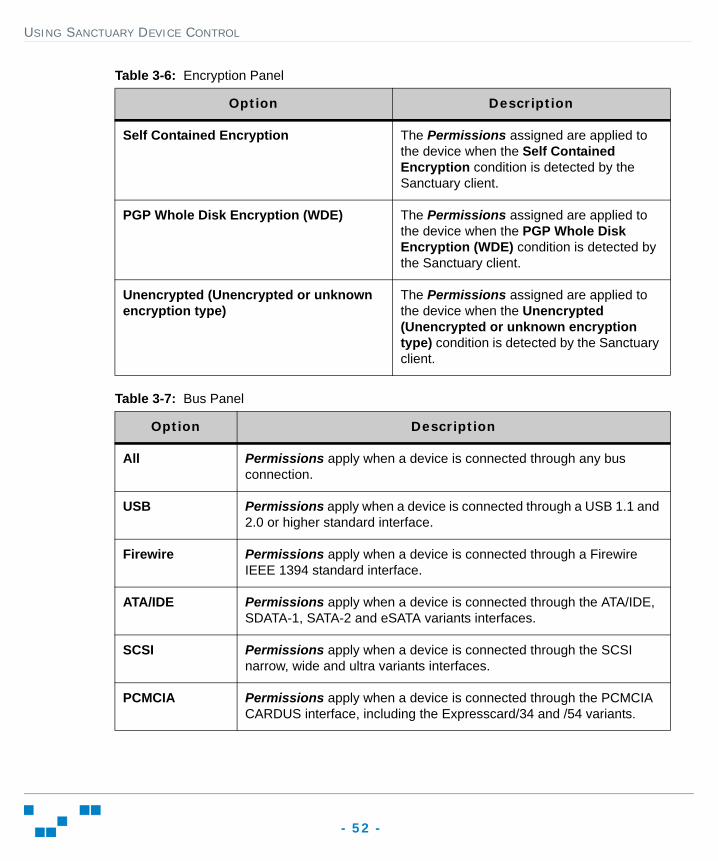
Table 3-6: Encryption Panel
Table 3-7: Bus Panel
Option Description
Self Contained Encryption The Permissions assigned are applied to the device when the Self Contained Encryption condition is detected by the Sanctuary client.
PGP Whole Disk Encryption (WDE) The Permissions assigned are applied to the device when the PGP Whole Disk Encryption (WDE) condition is detected by the Sanctuary client.
Unencrypted (Unencrypted or unknown encryption type)
The Permissions assigned are applied to the device when the Unencrypted (Unencrypted or unknown encryption type) condition is detected by the Sanctuary client.
Option Description
All Permissions apply when a device is connected through any bus connection.
USB Permissions apply when a device is connected through a USB 1.1 and 2.0 or higher standard interface.
Firewire Permissions apply when a device is connected through a Firewire IEEE 1394 standard interface.
ATA/IDE Permissions apply when a device is connected through the ATA/IDE, SDATA-1, SATA-2 and eSATA variants interfaces.
SCSI Permissions apply when a device is connected through the SCSI narrow, wide and ultra variants interfaces.
PCMCIA Permissions apply when a device is connected through the PCMCIA CARDUS interface, including the Expresscard/34 and /54 variants.
USING SANCTUARY DEVICE CONTROL
- 53 -
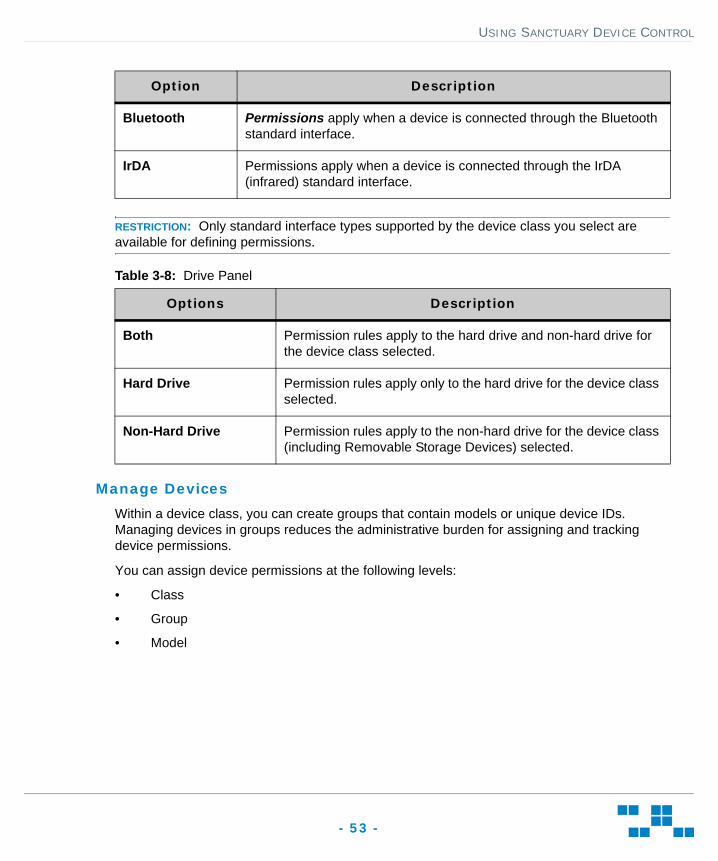
RESTRICTION: Only standard interface types supported by the device class you select are available for defining permissions.
Table 3-8: Drive Panel
Manage Devices
Within a device class, you can create groups that contain models or unique device IDs. Managing devices in groups reduces the administrative burden for assigning and tracking device permissions.
You can assign device permissions at the following levels:
• Class
• Group
• Model
Bluetooth Permissions apply when a device is connected through the Bluetooth standard interface.
IrDA Permissions apply when a device is connected through the IrDA (infrared) standard interface.
Options Description
Both Permission rules apply to the hard drive and non-hard drive for the device class selected.
Hard Drive Permission rules apply only to the hard drive for the device class selected.
Non-Hard Drive Permission rules apply to the non-hard drive for the device class (including Removable Storage Devices) selected.
Option Description
USING SANCTUARY DEVICE CONTROL
- 54 -
• Unique Device ID
RESTRICTION: You can not add specific device model types to the PS/2 Ports class.
1. In the Sanctuary Control Panel, select Modules > Device Explorer.2. In the hierarchical device structure shown in the Device Explorer window, right-click
Default settings.
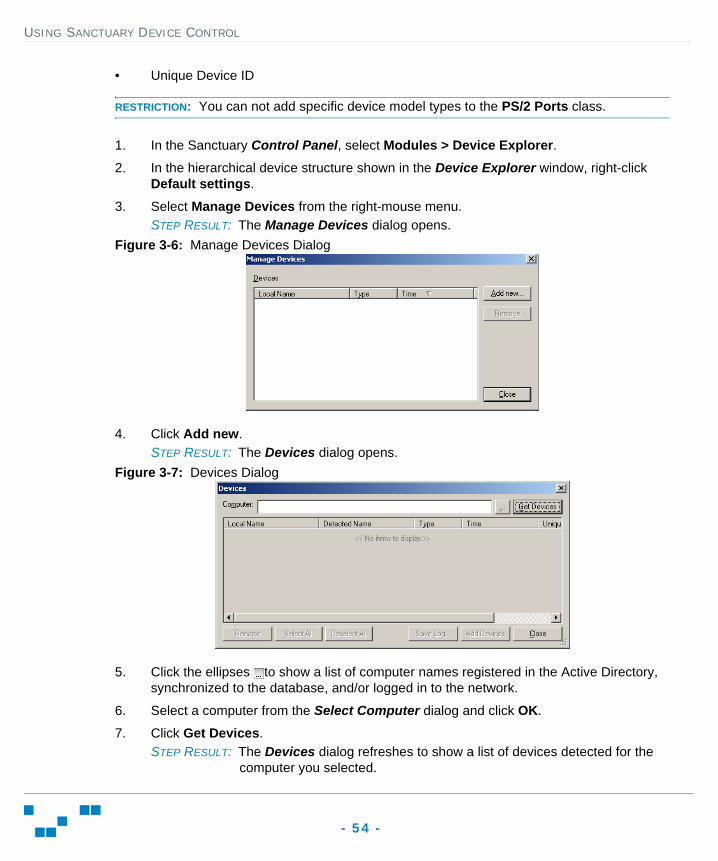
3. Select Manage Devices from the right-mouse menu.STEP RESULT: The Manage Devices dialog opens.
Figure 3-6: Manage Devices Dialog
4. Click Add new.STEP RESULT: The Devices dialog opens.
Figure 3-7: Devices Dialog
5. Click the ellipses to show a list of computer names registered in the Active Directory, synchronized to the database, and/or logged in to the network.
6. Select a computer from the Select Computer dialog and click OK.
7. Click Get Devices.STEP RESULT: The Devices dialog refreshes to show a list of devices detected for the
computer you selected.
USING SANCTUARY DEVICE CONTROL
- 55 -
8. Select device(s) using the check box adjacent to the device name.
9. Click Add Devices.STEP RESULT: The Devices dialog refreshes showing the devices you added as greyed
selections.
TIP: You can save a log entry for all the devices connected to the selected computer by clicking Save Log.
10. Click Close.
RESULT:The new device(s) are shown in the Device Explorer window.
Add Computers
You can add computers to the domain group and/or computer workgroup in the Machine-specific settings structure of the Device Explorer.
1. In the Sanctuary Control Panel, select Modules > Device Explorer.2. Right-click the Machine-specific settings level in the hierarchical device structure.
3. From the right-mouse menu, select Insert Computer 4. From the Select Computer dialog, click Search.
5. Select one or more computers from the list shown.a. To add a computer that is not listed, click Add.b. Type the name of the computer to be added in the corresponding field.
6. Click OK.
RESULT:The computers you selected are added to the domain group.
TIP: You can drag-and-drop computers from one group to another, or you can right-click a computer and use Cut and Paste from the right-mouse menu.
Assign Permissions by Devices
You can assign permission rules for users to access devices and device classes with any computer the user selects. Permission rules can be assigned in the Device Explorer to the:
• Root node of the Default settings hierarchy.
• Device class node of the Default settings hierarchy.
• Device group within a device class node shown in the Default settings hierarchy.
• Device by make and/or model.
USING SANCTUARY DEVICE CONTROL
- 56 -
• Device by unique serial number.
NOTE: Root node permissions are assigned to the root of the Device Explorer hierarchy and apply to all devices for specific users or user groups.
1. In the Sanctuary Control Panel, select Modules > Device Explorer.2. Right-click a node from the Default settings division of the Device Explorer hierarchical
structure.
3. Select Add/Modify Permissions from the right-mouse menu.STEP RESULT: The Permissions dialog opens.
4. Click Add.STEP RESULT: The Select Group, User, Local Group, Local User dialog opens.
5. Click Search or Browse.
6. Select a user or user group.
7. Click OK.
8. In the Permissions dialog, select the user or user group to assign user access permission rules.
9. Select the permission options.IMPORTANT: Only the permissions options available for the device or device class selected are shown.
USING SANCTUARY DEVICE CONTROL
- 57 -
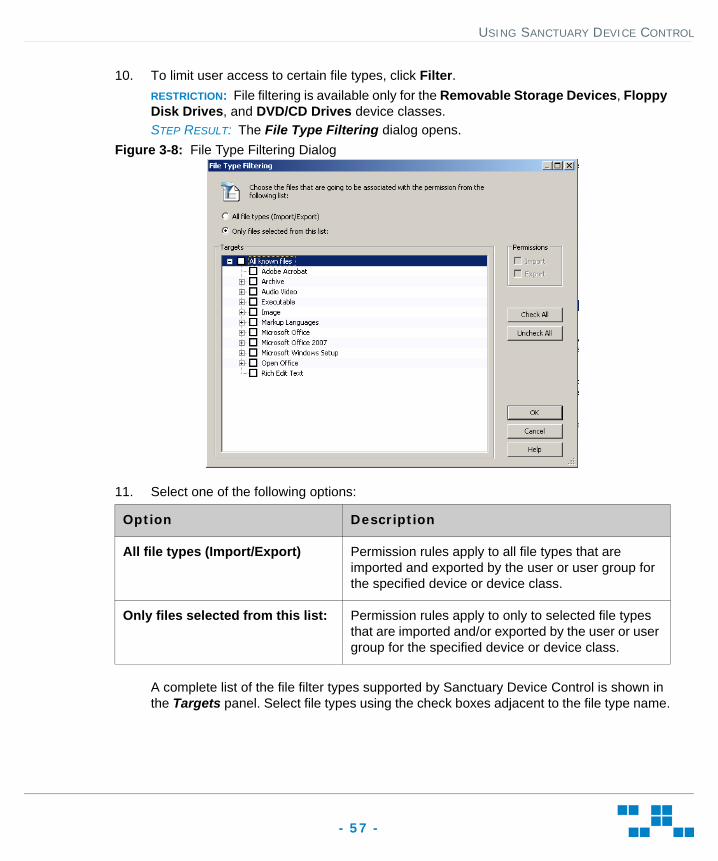
10. To limit user access to certain file types, click Filter.RESTRICTION: File filtering is available only for the Removable Storage Devices, Floppy Disk Drives, and DVD/CD Drives device classes.STEP RESULT: The File Type Filtering dialog opens.
Figure 3-8: File Type Filtering Dialog
11. Select one of the following options:
A complete list of the file filter types supported by Sanctuary Device Control is shown in the Targets panel. Select file types using the check boxes adjacent to the file type name.
Option Description
All file types (Import/Export) Permission rules apply to all file types that are imported and exported by the user or user group for the specified device or device class.
Only files selected from this list: Permission rules apply to only to selected file types that are imported and/or exported by the user or user group for the specified device or device class.
USING SANCTUARY DEVICE CONTROL
- 58 -
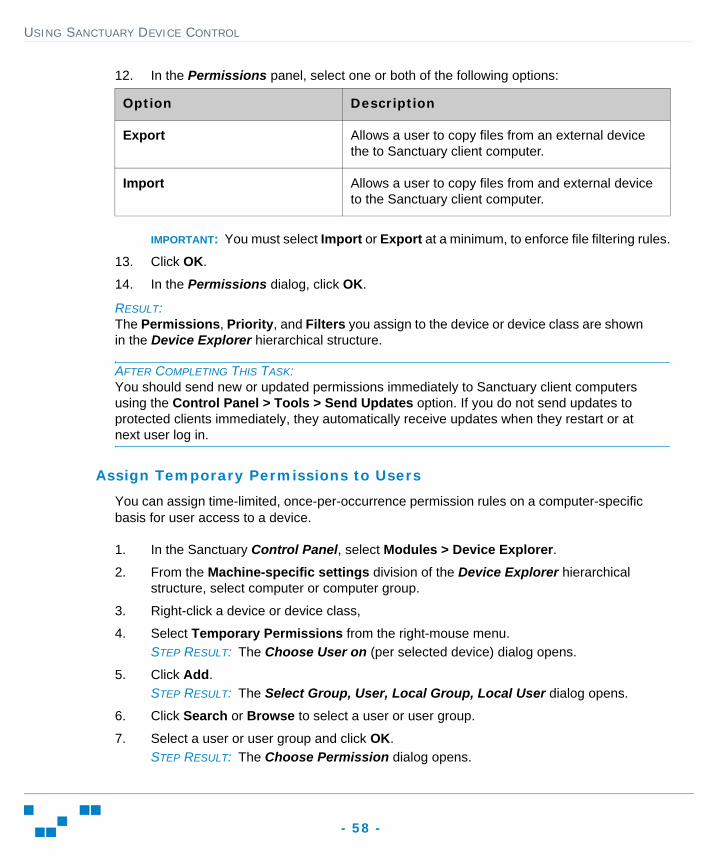
12. In the Permissions panel, select one or both of the following options:
IMPORTANT: You must select Import or Export at a minimum, to enforce file filtering rules.
13. Click OK.
14. In the Permissions dialog, click OK.
RESULT:The Permissions, Priority, and Filters you assign to the device or device class are shown in the Device Explorer hierarchical structure.
AFTER COMPLETING THIS TASK:You should send new or updated permissions immediately to Sanctuary client computers using the Control Panel > Tools > Send Updates option. If you do not send updates to protected clients immediately, they automatically receive updates when they restart or at next user log in.
Assign Temporary Permissions to Users
You can assign time-limited, once-per-occurrence permission rules on a computer-specific basis for user access to a device.
1. In the Sanctuary Control Panel, select Modules > Device Explorer.2. From the Machine-specific settings division of the Device Explorer hierarchical
structure, select computer or computer group.
3. Right-click a device or device class,
4. Select Temporary Permissions from the right-mouse menu.STEP RESULT: The Choose User on (per selected device) dialog opens.
5. Click Add.STEP RESULT: The Select Group, User, Local Group, Local User dialog opens.
6. Click Search or Browse to select a user or user group.
7. Select a user or user group and click OK.STEP RESULT: The Choose Permission dialog opens.
Option Description
Export Allows a user to copy files from an external device the to Sanctuary client computer.
Import Allows a user to copy files from and external device to the Sanctuary client computer.
USING SANCTUARY DEVICE CONTROL
- 59 -
8. Click Next.9. Select the Read and/or Write permissions that you want to apply.
10. Click Next.STEP RESULT: The Choose Period dialog opens.
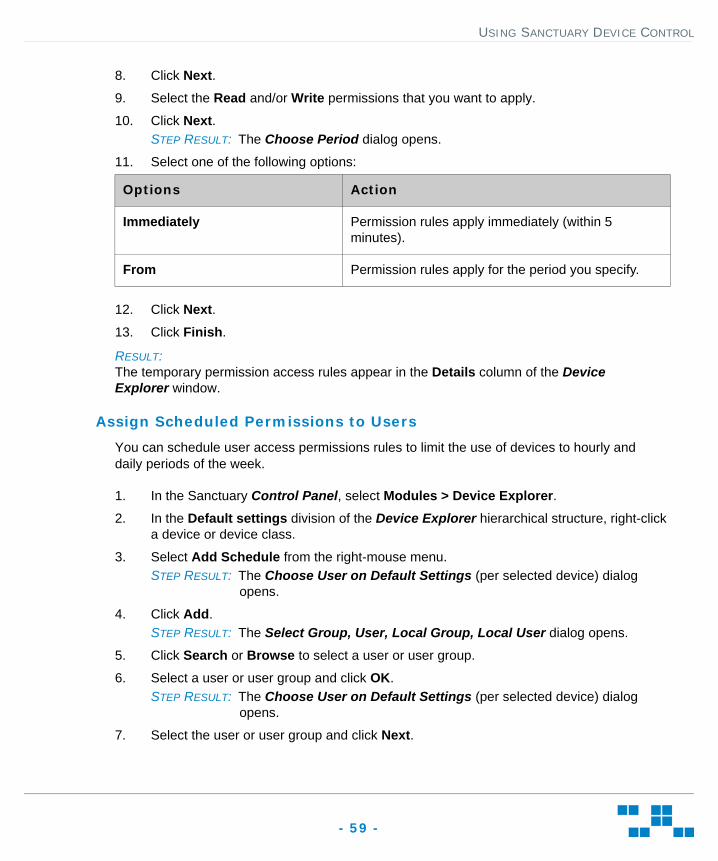
11. Select one of the following options:
12. Click Next.13. Click Finish.
RESULT:The temporary permission access rules appear in the Details column of the Device Explorer window.
Assign Scheduled Permissions to Users
You can schedule user access permissions rules to limit the use of devices to hourly and daily periods of the week.
1. In the Sanctuary Control Panel, select Modules > Device Explorer.2. In the Default settings division of the Device Explorer hierarchical structure, right-click
a device or device class.
3. Select Add Schedule from the right-mouse menu.STEP RESULT: The Choose User on Default Settings (per selected device) dialog
opens.
4. Click Add.STEP RESULT: The Select Group, User, Local Group, Local User dialog opens.
5. Click Search or Browse to select a user or user group.
6. Select a user or user group and click OK.STEP RESULT: The Choose User on Default Settings (per selected device) dialog
opens.
7. Select the user or user group and click Next.
Options Action
Immediately Permission rules apply immediately (within 5 minutes).
From Permission rules apply for the period you specify.
USING SANCTUARY DEVICE CONTROL
- 60 -
8. Select from the listed user access options.RESTRICTION: Only user access options for the device class selected are shown.
9. Click Next.STEP RESULT: The Choose Timeframe dialog opens.
10. Specify hourly time ranges using the To and From field dropdown lists.
11. Select one or more weekdays from the Weekdays panel.
12. Click Next.13. Click Finish.
RESULT:The scheduled permission access rule appears in the Details column of the Device Explorer window.
Add Shadowing
A Sanctuary administrator can establish visibility for the file content read from and written to devices connected to Sanctuary clients. This type of visibility is referred to as file shadowing, which can be applied to the following device classes:
• COM/Serial Ports
• LPT/Parallel Ports
• DVD/CD Drives
• Modem/Secondary Network Access Devices
• Removable Storage Devices
• Floppy Disk Drives
You can also apply file shadowing to:
• Device groups
• Computer-specific devices or device model types
1. In the Sanctuary Control Panel, select Modules > Device Explorer.2. From the Default settings division of the Device Explorer hierarchy, right-click a device,
device class, or device type.
3. Select Add Shadow from the right-mouse menu.
4. Click Add.STEP RESULT: The Select Group, User, Local Group, Local User dialog opens.
USING SANCTUARY DEVICE CONTROL
- 61 -
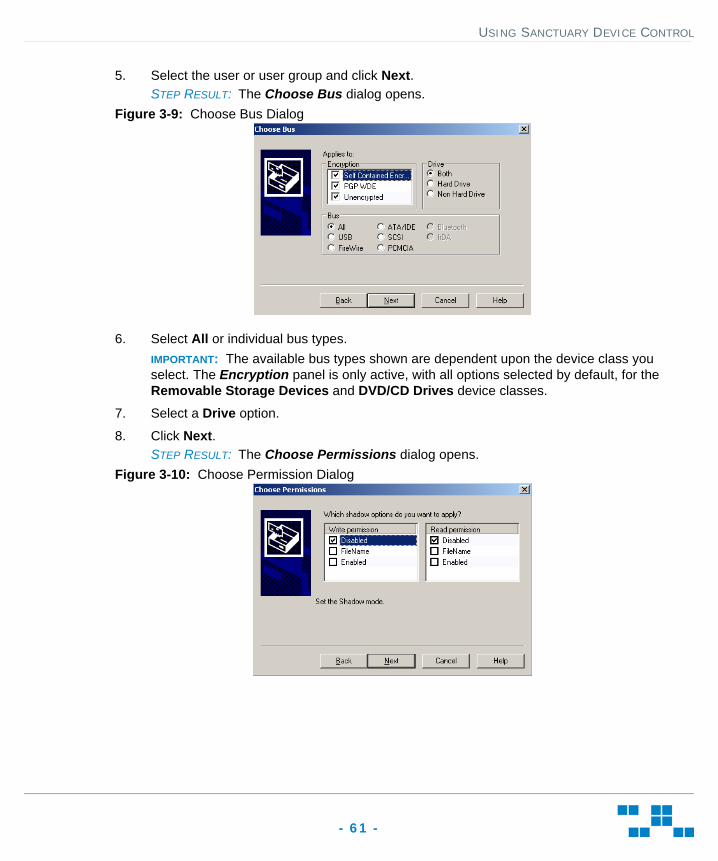
5. Select the user or user group and click Next.STEP RESULT: The Choose Bus dialog opens.
Figure 3-9: Choose Bus Dialog
6. Select All or individual bus types.IMPORTANT: The available bus types shown are dependent upon the device class you select. The Encryption panel is only active, with all options selected by default, for the Removable Storage Devices and DVD/CD Drives device classes.
7. Select a Drive option.
8. Click Next.STEP RESULT: The Choose Permissions dialog opens.
Figure 3-10: Choose Permission Dialog
USING SANCTUARY DEVICE CONTROL
- 62 -
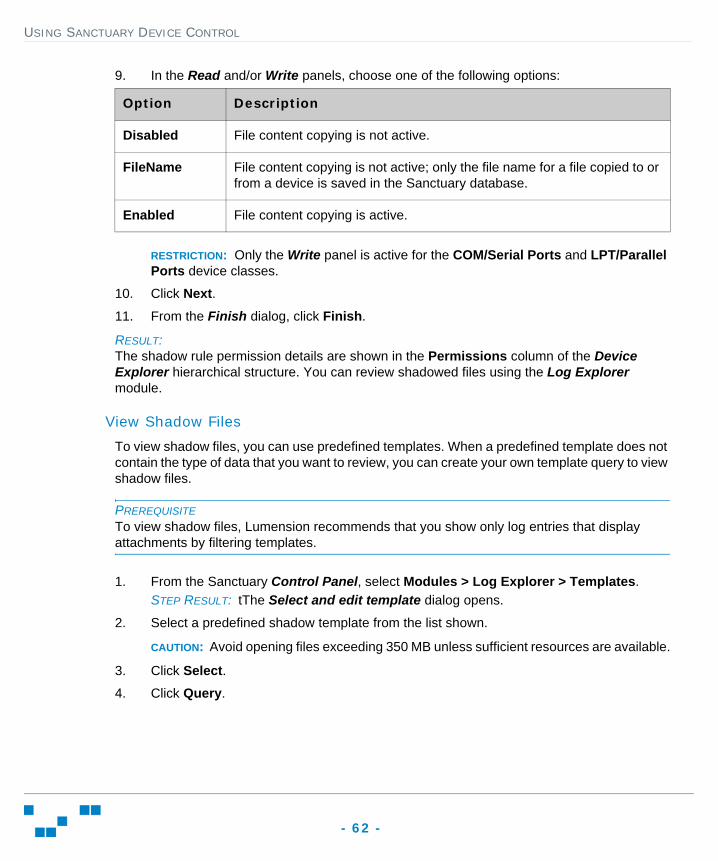
9. In the Read and/or Write panels, choose one of the following options:
RESTRICTION: Only the Write panel is active for the COM/Serial Ports and LPT/Parallel Ports device classes.
10. Click Next.11. From the Finish dialog, click Finish.
RESULT:The shadow rule permission details are shown in the Permissions column of the Device Explorer hierarchical structure. You can review shadowed files using the Log Explorer module.
View Shadow Files
To view shadow files, you can use predefined templates. When a predefined template does not contain the type of data that you want to review, you can create your own template query to view shadow files.
PREREQUISITETo view shadow files, Lumension recommends that you show only log entries that display attachments by filtering templates.
1. From the Sanctuary Control Panel, select Modules > Log Explorer > Templates.STEP RESULT: tThe Select and edit template dialog opens.
2. Select a predefined shadow template from the list shown.
CAUTION: Avoid opening files exceeding 350 MB unless sufficient resources are available.
3. Click Select.4. Click Query.
Option Description
Disabled File content copying is not active.
FileName File content copying is not active; only the file name for a file copied to or from a device is saved in the Sanctuary database.
Enabled File content copying is active.
USING SANCTUARY DEVICE CONTROL
- 63 -
5. To view shadow files using a custom query:a. Click Settings.b. Select Attachment.c. Click Criteria.d. Select With.e. Click OK.f. Click Execute Query.
STEP RESULT: The Select and edit template dialog closes and the query runs.
RESULT:When the Shadow rule is enforced, the entries listed show attachment files that are exact copies of the files:
• Copied to or from authorized devices
• Read by users
Sanctuary logs the file and administrator name for every instance a shadowed file is accessed. Depending on the selected fields, the date shown for the files are:
• Traced On - when files were copied or read, to or from, the device
• Transferred On - when a file was uploaded to the Sanctuary database
TIP: Sanctuary Device Control tracks the:
• User name for the copied file
• Computer name used for the copy action
• Filename
• Content
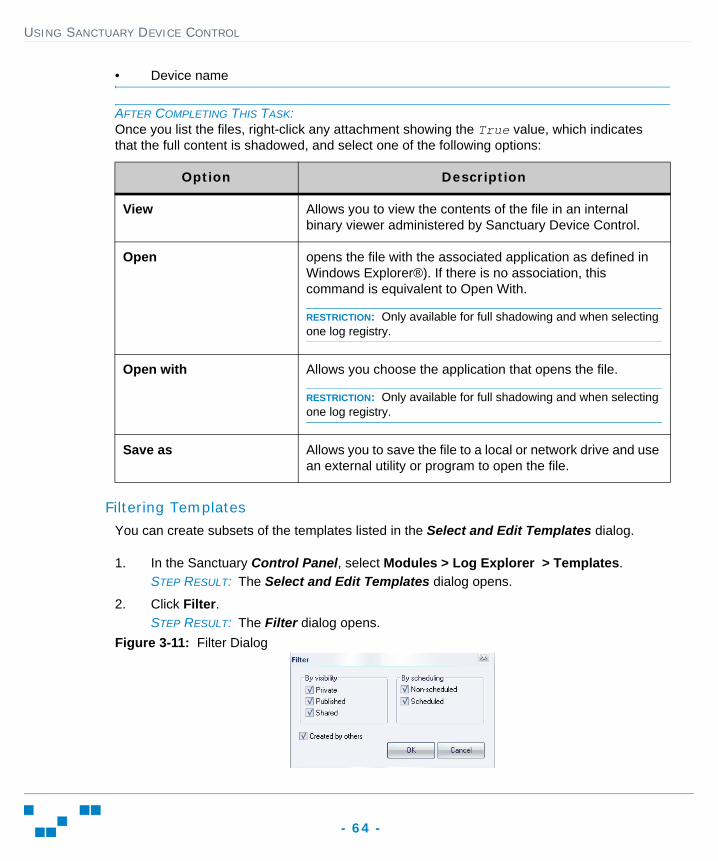
USING SANCTUARY DEVICE CONTROL
- 64 -
• Device name
AFTER COMPLETING THIS TASK:Once you list the files, right-click any attachment showing the True value, which indicates that the full content is shadowed, and select one of the following options:
Filtering Templates
You can create subsets of the templates listed in the Select and Edit Templates dialog.
1. In the Sanctuary Control Panel, select Modules > Log Explorer > Templates.STEP RESULT: The Select and Edit Templates dialog opens.
2. Click Filter.STEP RESULT: The Filter dialog opens.
Figure 3-11: Filter Dialog
Option Description
View Allows you to view the contents of the file in an internal binary viewer administered by Sanctuary Device Control.
Open opens the file with the associated application as defined in Windows Explorer®). If there is no association, this command is equivalent to Open With.
RESTRICTION: Only available for full shadowing and when selecting one log registry.
Open with Allows you choose the application that opens the file.
RESTRICTION: Only available for full shadowing and when selecting one log registry.
Save as Allows you to save the file to a local or network drive and use an external utility or program to open the file.
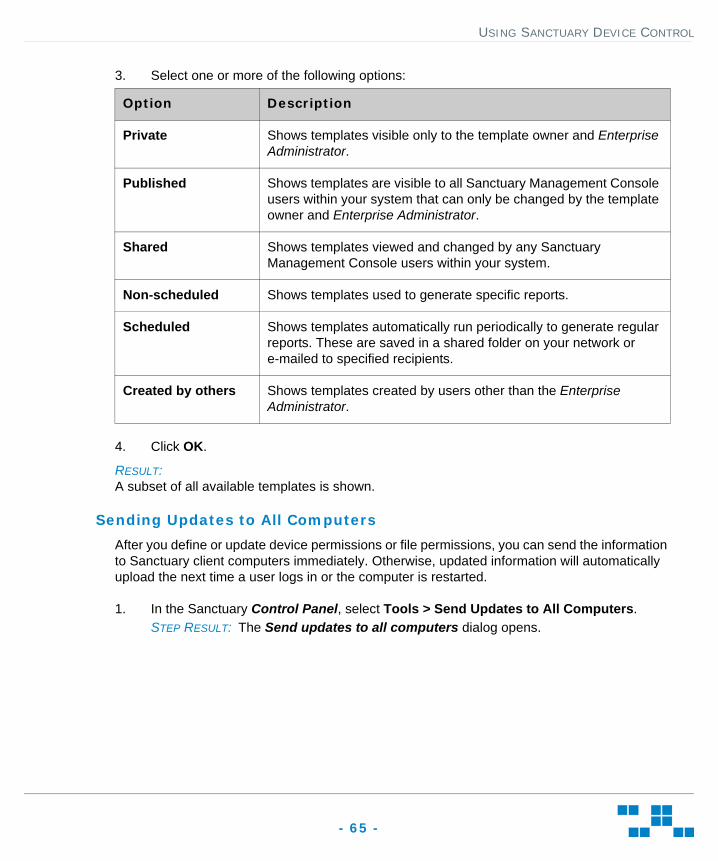
USING SANCTUARY DEVICE CONTROL
- 65 -
3. Select one or more of the following options:
4. Click OK.
RESULT:A subset of all available templates is shown.
Sending Updates to All Computers
After you define or update device permissions or file permissions, you can send the information to Sanctuary client computers immediately. Otherwise, updated information will automatically upload the next time a user logs in or the computer is restarted.
1. In the Sanctuary Control Panel, select Tools > Send Updates to All Computers.STEP RESULT: The Send updates to all computers dialog opens.
Option Description
Private Shows templates visible only to the template owner and Enterprise Administrator.
Published Shows templates are visible to all Sanctuary Management Console users within your system that can only be changed by the template owner and Enterprise Administrator.
Shared Shows templates viewed and changed by any Sanctuary Management Console users within your system.
Non-scheduled Shows templates used to generate specific reports.
Scheduled Shows templates automatically run periodically to generate regular reports. These are saved in a shared folder on your network or e-mailed to specified recipients.
Created by others Shows templates created by users other than the Enterprise Administrator.

USING SANCTUARY DEVICE CONTROL
- 66 -
2. Select one of the following options from the Send updates to all computers dialog.
RESULT:Updates are distributed to all computers running the Sanctuary clients that are registered in the Sanctuary Application Server(s) online table(s). A message appears in the Output window when the updates are complete.
REMEMBER: Any computer that is switched off, locked, or disconnected from the network receives the updates at the next network connection.
Authorizing CD/DVDs
The Sanctuary Device Control Media Authorizer module provides Sanctuary administrators the ability to encrypt non-bootable hard disk or flash removable storage media, and authorize user access to the encrypted media. Removable storage media are defined for Sanctuary Device Control as any device recognized by the Windows removable storage devices class through the plug-and-play feature.
With the Media Authorizer you can:
• Add CD/DVD media to the Sanctuary database.
• Authorize user access to individually specified CD/DVD media in the network environment.
• Perform centralized data encryption for removable storage media.
• Perform centralized data encryption for removable storage media used when computers and user are connected to your network environment.
• Rename CD/DVD disk media that have been added to the Sanctuary database.
Option Description
Yes Immediately updates connected computers. Sanctuary can take a long time to send updates depending on the number of computer connections. The Sanctuary Management Console dialog remains open until the Sanctuary Application Server finishes sending the updates.
No Asynchronously updates connected computers. The Sanctuary Management Console dialog closes while the Sanctuary Application Server finishes sending the updates. You can continue working with the console while the update is done in the background.
Cancel Closes the Send updates to all computers dialog and halts the update process.
USING SANCTUARY DEVICE CONTROL
- 67 -
• Authorize user access to encrypted removable storage media in the network environment.
• Export encryption keys to provide access to encrypted media used outside your network environment.
Add CD/DVD Media
A Sanctuary administrator can add CD/DVD media to the Sanctuary database.
PREREQUISITETo successfully add CD/DVD media to the Sanctuary database, the following conditions must be met:
• The Sanctuary administrator have Read or Read/Write permission assigned as using the Device Explorer module.
• A Sanctuary client is installed on the same computer as the Sanctuary Management Console where encryption takes place.
1. In the Sanctuary Control Panel, select Modules > Media Authorizer.2. Click Add CD/DVD.
STEP RESULT: You are prompted to insert a CD/DVD.
3. Insert the CD/DVD.STEP RESULT: The Sanctuary Media Authorizer calculates a unique cryptographic
signature and displays the Media Name dialog.
4. Click OK.
RESULT:The Media Name label is used to register the CD/DVD in the Sanctuary database.
Log Explorer Templates
The operation of the Log Explorer module is based on templates. These templates let you generate custom reports containing results that match particular criteria.
You use the Log Explorer to change criteria options, column size and order, columns are displayed in the Results panel and custom reports, and the whole sets of configurable options to create templates. A template is, basically, a set of rules to use when displaying audit and activity log data in the Log Explorer. You can save templates for future use.
You can create your own templates or use predefined templates created by Lumension.
NOTE: The list of predefined templates depends upon your license type.
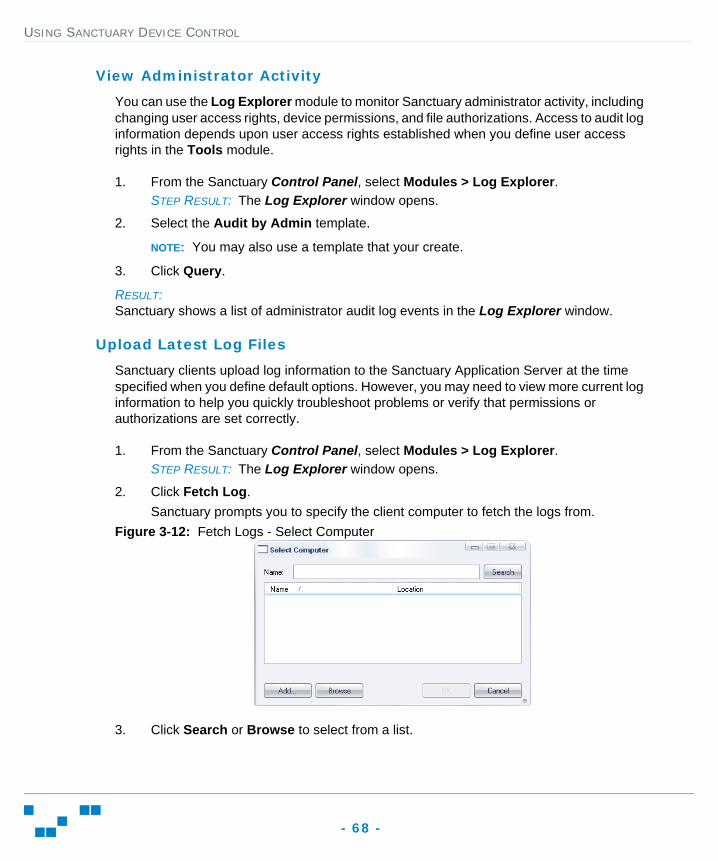
USING SANCTUARY DEVICE CONTROL
- 68 -
View Administrator Activity
You can use the Log Explorer module to monitor Sanctuary administrator activity, including changing user access rights, device permissions, and file authorizations. Access to audit log information depends upon user access rights established when you define user access rights in the Tools module.
1. From the Sanctuary Control Panel, select Modules > Log Explorer.STEP RESULT: The Log Explorer window opens.
2. Select the Audit by Admin template.
NOTE: You may also use a template that your create.
3. Click Query.
RESULT:Sanctuary shows a list of administrator audit log events in the Log Explorer window.
Upload Latest Log Files
Sanctuary clients upload log information to the Sanctuary Application Server at the time specified when you define default options. However, you may need to view more current log information to help you quickly troubleshoot problems or verify that permissions or authorizations are set correctly.
1. From the Sanctuary Control Panel, select Modules > Log Explorer.STEP RESULT: The Log Explorer window opens.
2. Click Fetch Log.Sanctuary prompts you to specify the client computer to fetch the logs from.
Figure 3-12: Fetch Logs - Select Computer
3. Click Search or Browse to select from a list.

USING SANCTUARY DEVICE CONTROL
- 69 -
4. Click OK.
RESULT:The computer logs are uploaded to the Sanctuary Application Server and stored in the database. Updated log files are shown in the Log Explorer window.
RESTRICTION: The time delay between retrieving the log entries from the client and the availability of the latest logs depends on the queue size and the database availability at the time of upload.
Reporting
Sanctuary provides pre-defined reports designed to provide a comprehensive view of your computing environment for application control activities.
In addition to the standard reports, you can customize and generate your own reports by using the Log Explorer module.
You can change the date format for a Sanctuary report by selecting Windows Control Panel > Regional and Language Options. The regional options or settings vary according to the Windows operating system you are using.
Opening a Report
1. In the Sanctuary Control Panel, select Reports.
2. Select a report type from the list.STEP RESULT: The report you select is displayed as an HTML file in the Sanctuary
Management Console main window.
Printing a Report
1. From the navigation menu select File > Print.STEP RESULT: The standard Windows Print dialog opens.
2. Select a printer.
3. Click Print.STEP RESULT: The Windows Print dialog closes.
Saving a Report
1. From the navigation menu select File > Save as.STEP RESULT: The Windows dialog for saving a web page opens.
2. Select the file path.
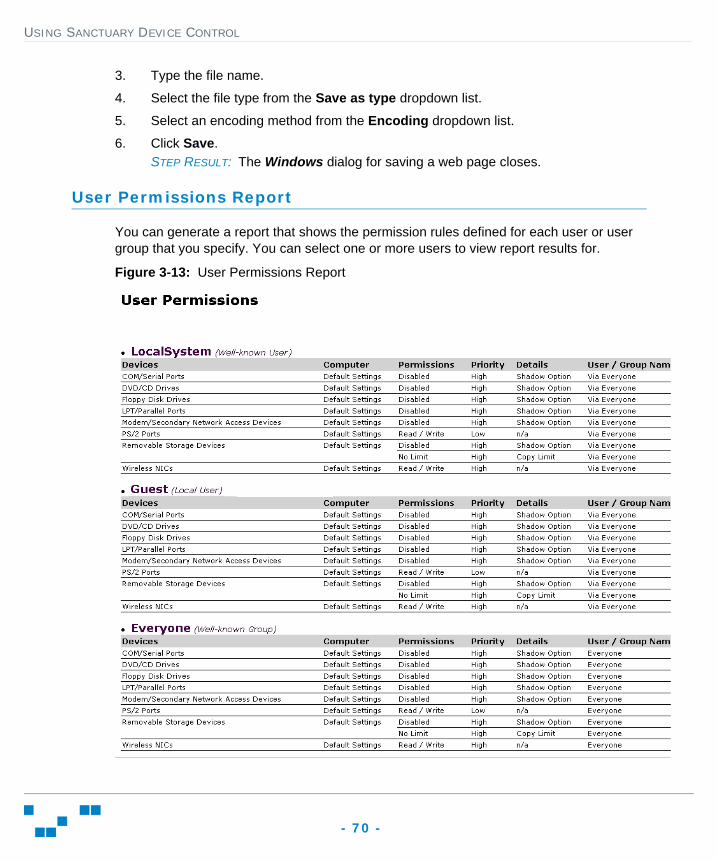
USING SANCTUARY DEVICE CONTROL
- 70 -
3. Type the file name.
4. Select the file type from the Save as type dropdown list.
5. Select an encoding method from the Encoding dropdown list.
6. Click Save.STEP RESULT: The Windows dialog for saving a web page closes.
User Permissions Report
You can generate a report that shows the permission rules defined for each user or user group that you specify. You can select one or more users to view report results for.
Figure 3-13: User Permissions Report
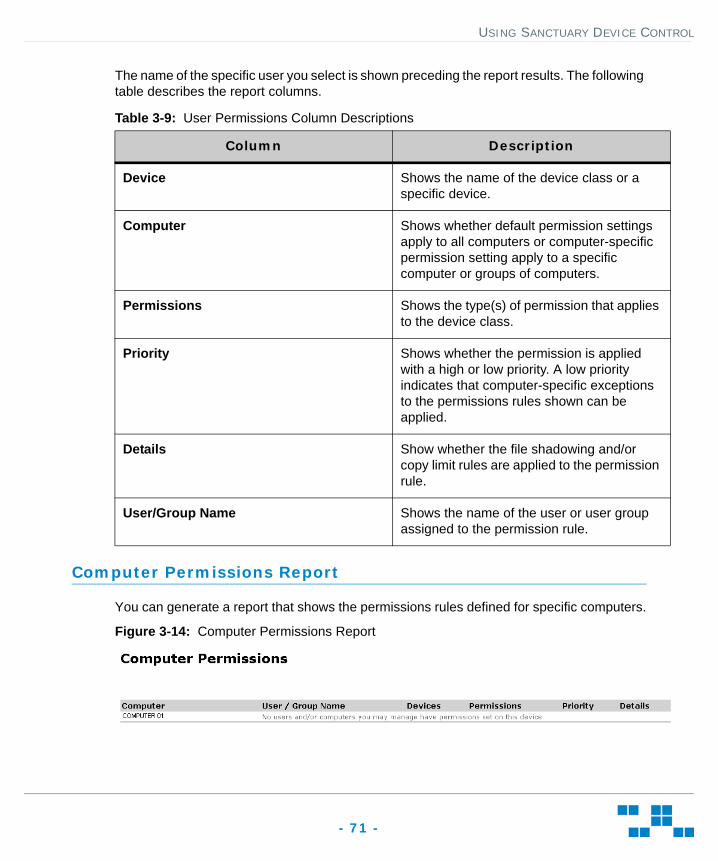
USING SANCTUARY DEVICE CONTROL
- 71 -
The name of the specific user you select is shown preceding the report results. The following table describes the report columns.
Table 3-9: User Permissions Column Descriptions
Computer Permissions Report
You can generate a report that shows the permissions rules defined for specific computers.
Figure 3-14: Computer Permissions Report
Column Description
Device Shows the name of the device class or a specific device.
Computer Shows whether default permission settings apply to all computers or computer-specific permission setting apply to a specific computer or groups of computers.
Permissions Shows the type(s) of permission that applies to the device class.
Priority Shows whether the permission is applied with a high or low priority. A low priority indicates that computer-specific exceptions to the permissions rules shown can be applied.
Details Show whether the file shadowing and/or copy limit rules are applied to the permission rule.
User/Group Name Shows the name of the user or user group assigned to the permission rule.
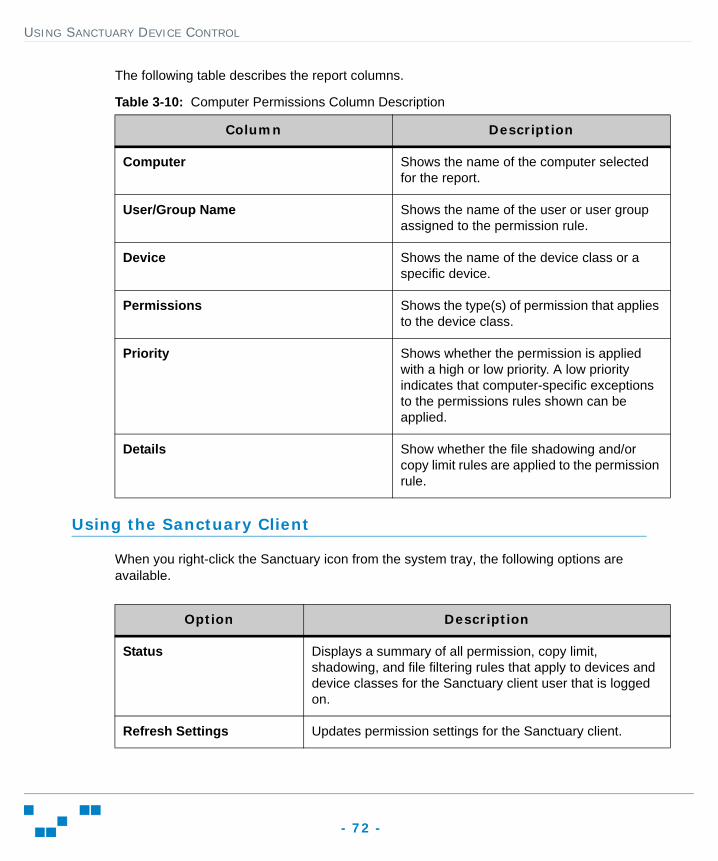
USING SANCTUARY DEVICE CONTROL
- 72 -
The following table describes the report columns.
Table 3-10: Computer Permissions Column Description
Using the Sanctuary Client
When you right-click the Sanctuary icon from the system tray, the following options are available.
Column Description
Computer Shows the name of the computer selected for the report.
User/Group Name Shows the name of the user or user group assigned to the permission rule.
Device Shows the name of the device class or a specific device.
Permissions Shows the type(s) of permission that applies to the device class.
Priority Shows whether the permission is applied with a high or low priority. A low priority indicates that computer-specific exceptions to the permissions rules shown can be applied.
Details Show whether the file shadowing and/or copy limit rules are applied to the permission rule.
Option Description
Status Displays a summary of all permission, copy limit, shadowing, and file filtering rules that apply to devices and device classes for the Sanctuary client user that is logged on.
Refresh Settings Updates permission settings for the Sanctuary client.
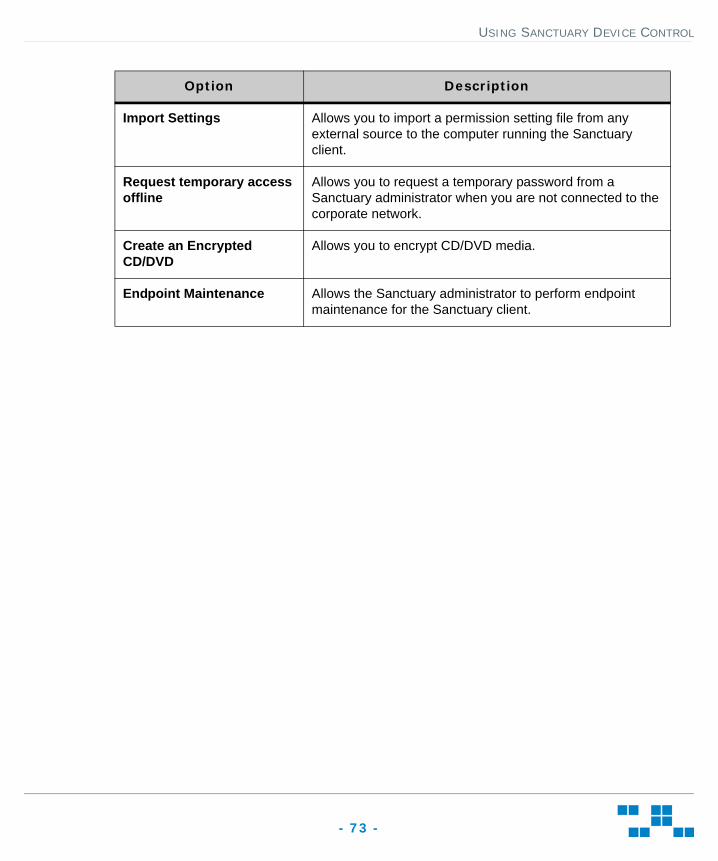
USING SANCTUARY DEVICE CONTROL
- 73 -
Import Settings Allows you to import a permission setting file from any external source to the computer running the Sanctuary client.
Request temporary access offline
Allows you to request a temporary password from a Sanctuary administrator when you are not connected to the corporate network.
Create an Encrypted CD/DVD
Allows you to encrypt CD/DVD media.
Endpoint Maintenance Allows the Sanctuary administrator to perform endpoint maintenance for the Sanctuary client.
Option Description
USING SANCTUARY DEVICE CONTROL
- 74 -

SANCTUARY QUICK SETUP GUIDE
- 75 -
4 Using Sanctuary Application ControlThis chapter explains how Sanctuary Application Control works and describes how to scan, import, and manage software file authorizations.
Product Overview
The primary components of the Sanctuary Application Control solution are:
• The Sanctuary database which serves as the central repository of authorization information for devices and applications.
• One or more Sanctuary application servers that communicate between the Sanctuary database, the protected clients, and the Sanctuary Management Console.
• The Sanctuary client, which isnstalled on each computer, either endpoint or server, that you want to protect.
• The Sanctuary Management Console, which provides the administrative user interface for the Sanctuary Application Server.

USING SANCTUARY APPLICATION CONTROL
- 76 -
The following figure illustrates the relationships between the Sanctuary components.
Figure 4-1: Sanctuary Application Control Component Relationships
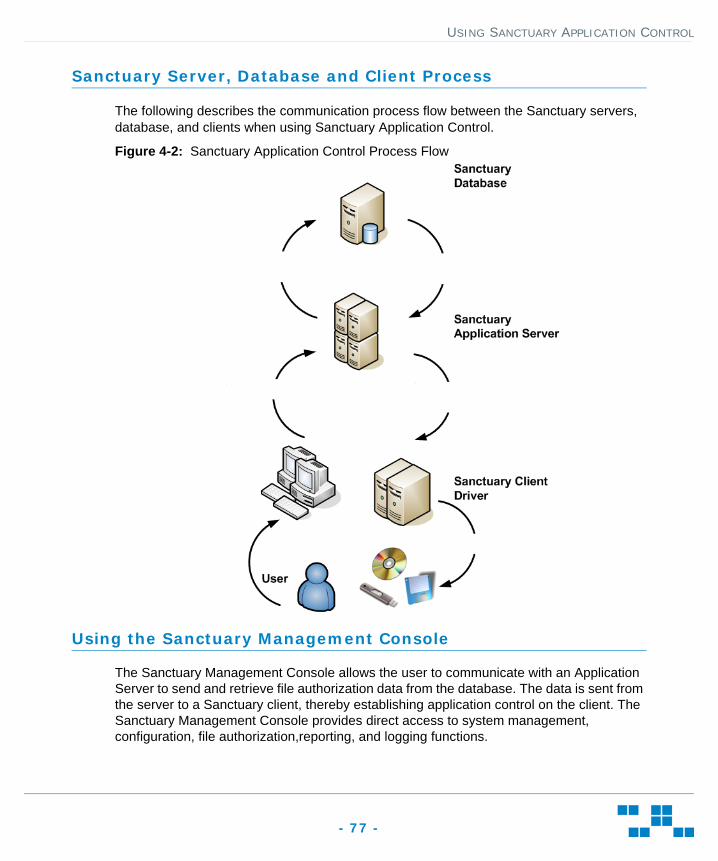
USING SANCTUARY APPLICATION CONTROL
- 77 -
Sanctuary Server, Database and Client Process
The following describes the communication process flow between the Sanctuary servers, database, and clients when using Sanctuary Application Control.
Figure 4-2: Sanctuary Application Control Process Flow
Using the Sanctuary Management Console
The Sanctuary Management Console allows the user to communicate with an Application Server to send and retrieve file authorization data from the database. The data is sent from the server to a Sanctuary client, thereby establishing application control on the client. The Sanctuary Management Console provides direct access to system management, configuration, file authorization,reporting, and logging functions.
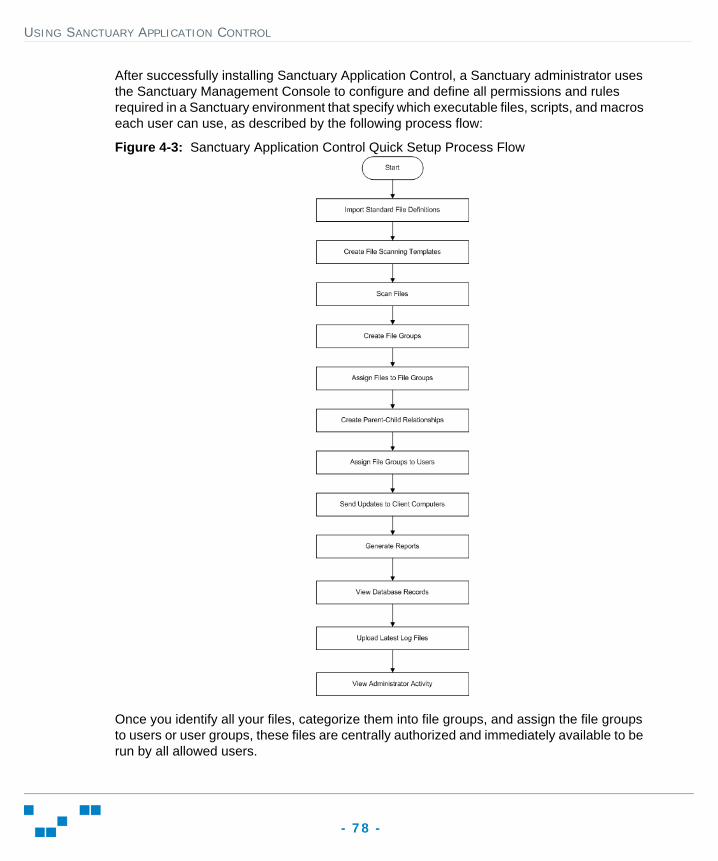
USING SANCTUARY APPLICATION CONTROL
- 78 -
After successfully installing Sanctuary Application Control, a Sanctuary administrator uses the Sanctuary Management Console to configure and define all permissions and rules required in a Sanctuary environment that specify which executable files, scripts, and macros each user can use, as described by the following process flow:
Figure 4-3: Sanctuary Application Control Quick Setup Process Flow
Once you identify all your files, categorize them into file groups, and assign the file groups to users or user groups, these files are centrally authorized and immediately available to be run by all allowed users.
USING SANCTUARY APPLICATION CONTROL
- 79 -
When a user wants to run an executable, script, or macro, the following actions take place automatically:
• A file that is identified as an executable, script, or macro, by the operating system is stored in the Sanctuary database ready for execution (but not actually executed).
• A file is identified by Sanctuary as an executable, script, or macro, has the entire file content checked to determine its digital signature (hash) before being allowed to execute by the operating system.
• The digital signature is compared to those of the authorized files that can be run (stored in a central file authorization list).
• If and only if, the file corresponds exactly to a file in the central file authorization list, that is, the digital signatures are identical, and the file is authorized for execution for the user or machine that requested it, the file is executed.
Accessing the Sanctuary Management Console
The Sanctuary Management Console is a Windows application that conforms to standard conventions. From the Sanctuary Management Console, you navigate through the system with menu bars, scroll bars, icons, lists, and checkboxes.
Logging In to the Sanctuary Management Console
1. Click Windows Start.2. Select Programs > Start > Sanctuary Management Console.
STEP RESULT: Each time you access the Sanctuary Management Console, the Connect to Sanctuary Management Console dialog appears.
3. From the Application Server drop-down list, select theSanctuary Application Server you want to connect to.You can type the server name as an IP address with port if required in square brackets, NetBios name, or fully qualified domain name in the Application Server field.
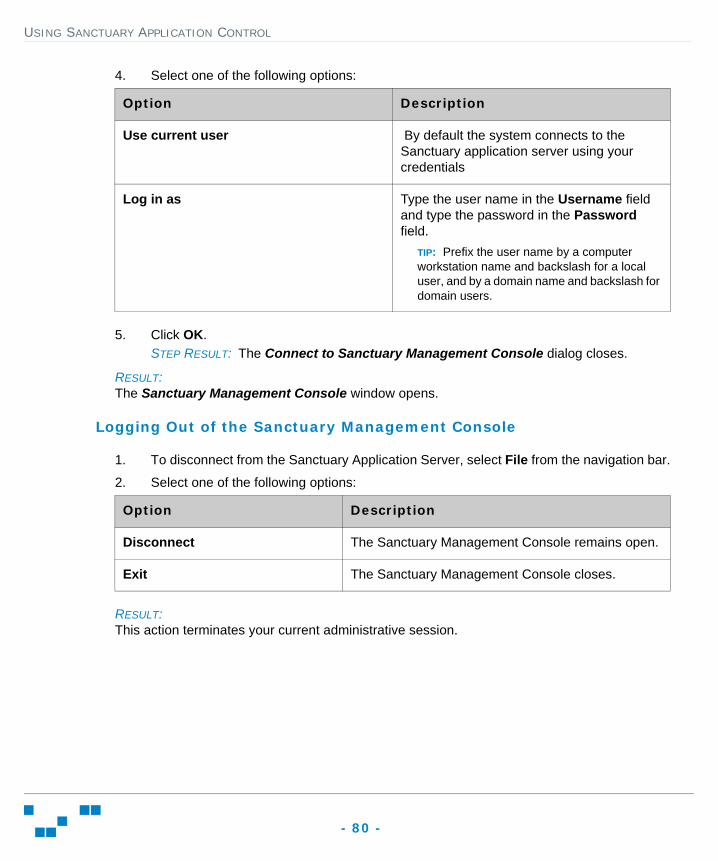
USING SANCTUARY APPLICATION CONTROL
- 80 -
4. Select one of the following options:
5. Click OK.STEP RESULT: The Connect to Sanctuary Management Console dialog closes.
RESULT:The Sanctuary Management Console window opens.
Logging Out of the Sanctuary Management Console
1. To disconnect from the Sanctuary Application Server, select File from the navigation bar.
2. Select one of the following options:
RESULT:This action terminates your current administrative session.
Option Description
Use current user By default the system connects to the Sanctuary application server using your credentials
Log in as Type the user name in the Username field and type the password in the Password field.
TIP: Prefix the user name by a computer workstation name and backslash for a local user, and by a domain name and backslash for domain users.
Option Description
Disconnect The Sanctuary Management Console remains open.
Exit The Sanctuary Management Console closes.
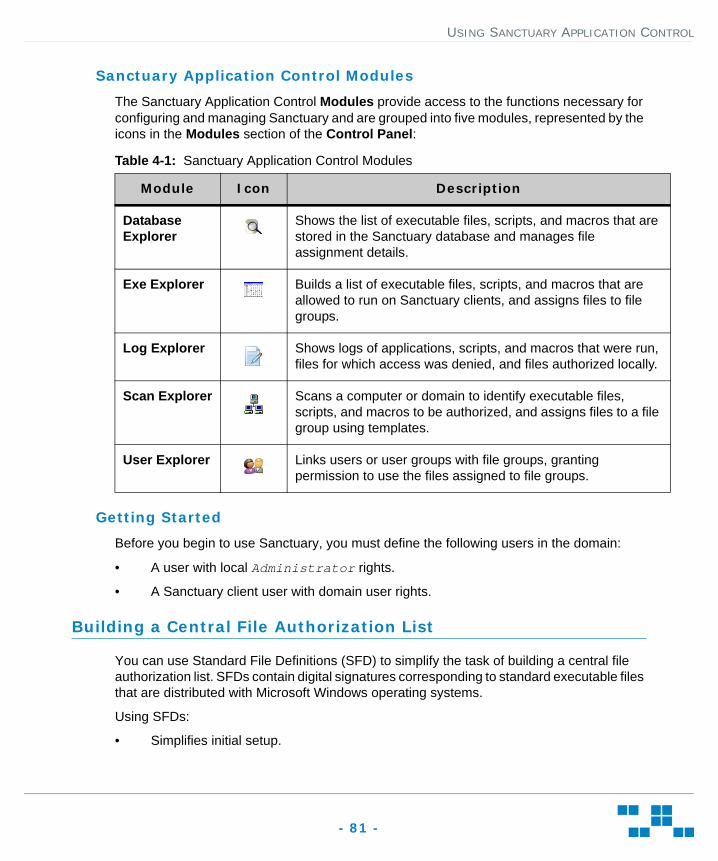
USING SANCTUARY APPLICATION CONTROL
- 81 -
Sanctuary Application Control Modules
The Sanctuary Application Control Modules provide access to the functions necessary for configuring and managing Sanctuary and are grouped into five modules, represented by the icons in the Modules section of the Control Panel:
Table 4-1: Sanctuary Application Control Modules
Getting Started
Before you begin to use Sanctuary, you must define the following users in the domain:
• A user with local Administrator rights.
• A Sanctuary client user with domain user rights.
Building a Central File Authorization List
You can use Standard File Definitions (SFD) to simplify the task of building a central file authorization list. SFDs contain digital signatures corresponding to standard executable files that are distributed with Microsoft Windows operating systems.
Using SFDs:
• Simplifies initial setup.
Module Icon Description
Database Explorer
Shows the list of executable files, scripts, and macros that are stored in the Sanctuary database and manages file assignment details.
Exe Explorer Builds a list of executable files, scripts, and macros that are allowed to run on Sanctuary clients, and assigns files to file groups.
Log Explorer Shows logs of applications, scripts, and macros that were run, files for which access was denied, and files authorized locally.
Scan Explorer Scans a computer or domain to identify executable files, scripts, and macros to be authorized, and assigns files to a file group using templates.
User Explorer Links users or user groups with file groups, granting permission to use the files assigned to file groups.
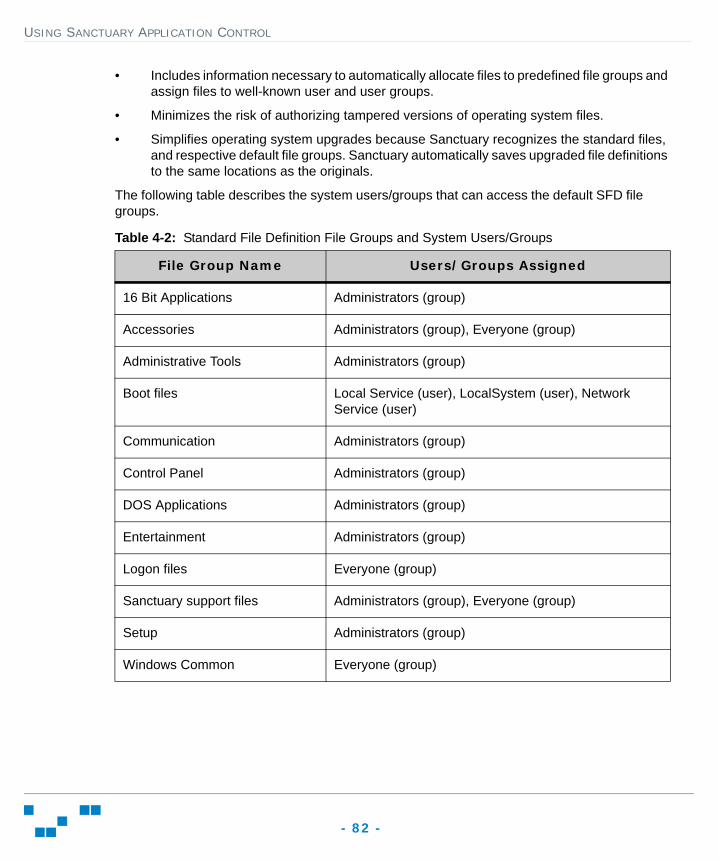
USING SANCTUARY APPLICATION CONTROL
- 82 -
• Includes information necessary to automatically allocate files to predefined file groups and assign files to well-known user and user groups.
• Minimizes the risk of authorizing tampered versions of operating system files.
• Simplifies operating system upgrades because Sanctuary recognizes the standard files, and respective default file groups. Sanctuary automatically saves upgraded file definitions to the same locations as the originals.
The following table describes the system users/groups that can access the default SFD file groups.
Table 4-2: Standard File Definition File Groups and System Users/Groups
File Group Name Users/Groups Assigned
16 Bit Applications Administrators (group)
Accessories Administrators (group), Everyone (group)
Administrative Tools Administrators (group)
Boot files Local Service (user), LocalSystem (user), Network Service (user)
Communication Administrators (group)
Control Panel Administrators (group)
DOS Applications Administrators (group)
Entertainment Administrators (group)
Logon files Everyone (group)
Sanctuary support files Administrators (group), Everyone (group)
Setup Administrators (group)
Windows Common Everyone (group)

USING SANCTUARY APPLICATION CONTROL
- 83 -
Importing Standard File Definitions
1. From the Sanctuary Control Panel, select Tools > Standard File Definitions.STEP RESULT: The Import Standard File Definitions dialog opens.
Figure 4-4: Import Standard File Definitions Dialog
2. Click Add.STEP RESULT: The Open dialog opens and displays files with an .sfd extension.
TIP: You can import standard file definitions from the Lumension web site by downloading to a local computer and unzipping the archived files.
3. Select the standard definition file(s) to import.
4. Click Open.STEP RESULT: The file(s) are shown in the Add window.
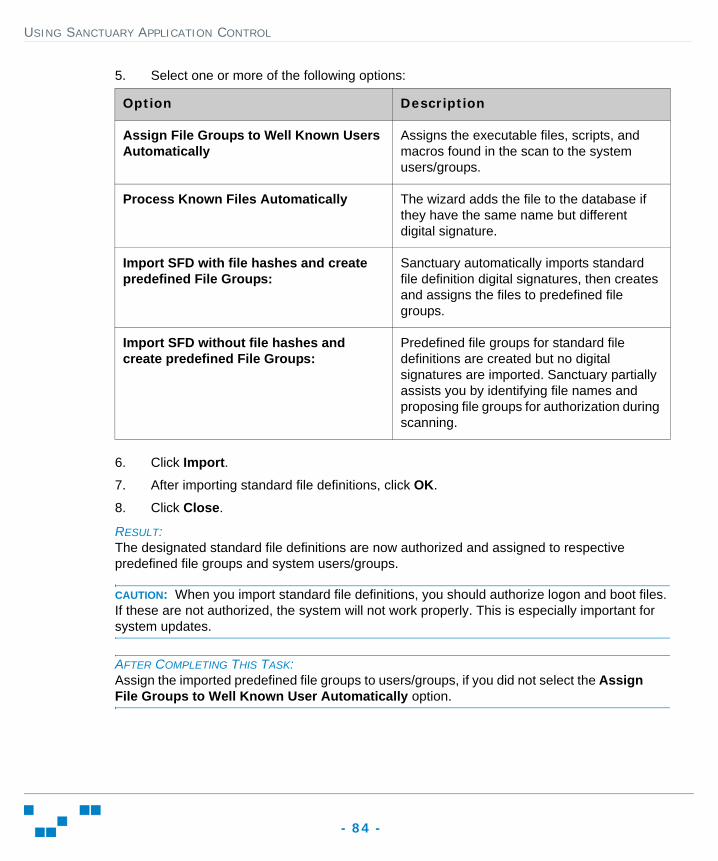
USING SANCTUARY APPLICATION CONTROL
- 84 -
5. Select one or more of the following options:
6. Click Import.7. After importing standard file definitions, click OK.
8. Click Close.
RESULT:The designated standard file definitions are now authorized and assigned to respective predefined file groups and system users/groups.
CAUTION: When you import standard file definitions, you should authorize logon and boot files. If these are not authorized, the system will not work properly. This is especially important for system updates.
AFTER COMPLETING THIS TASK:Assign the imported predefined file groups to users/groups, if you did not select the Assign File Groups to Well Known User Automatically option.
Option Description
Assign File Groups to Well Known Users Automatically
Assigns the executable files, scripts, and macros found in the scan to the system users/groups.
Process Known Files Automatically The wizard adds the file to the database if they have the same name but different digital signature.
Import SFD with file hashes and create predefined File Groups:
Sanctuary automatically imports standard file definition digital signatures, then creates and assigns the files to predefined file groups.
Import SFD without file hashes and create predefined File Groups:
Predefined file groups for standard file definitions are created but no digital signatures are imported. Sanctuary partially assists you by identifying file names and proposing file groups for authorization during scanning.

USING SANCTUARY APPLICATION CONTROL
- 85 -
Authorizing File Execution
An initial scan using the Scan Explorer module allows you to quickly add executable files, scripts, and macros to the Sanctuary database. Once your initial scan is complete, you create files groups and assign the authorized files to file groups. You manage the files added to the database with the User Explorer and Datbase Explorer modules by linking file groups to users or user groups. Files not added to the database are designated as unauthorized and are denied execution.
Creating a File Scanning Template
When you want to create a template to identify new file authorization changes to make when a new application is installed, you can scan for files by creating a template with the following rules:
• Scan all executables matching the pattern *.exe or *.dll in the %SYSTEMROOT% directory and subdirectories
• Scan all files matching the pattern *.exe or *.dll in the %PROGRAMFILES% directory and subdirectories.
1. From the Sanctuary Control Panel, select Modules > Scan Explorer > Perform New Scan > Create New Template.STEP RESULT: The Create New Template dialog opens
Figure 4-5: Create New Template Dialog
2. In the New Template name: field, enter the name for the new template.

USING SANCTUARY APPLICATION CONTROL
- 86 -
3. Click Add.STEP RESULT: The New Rule dialog opens.
Figure 4-6: New Rule Dialog
4. In the Scan files matching the pattern (use * for all files) field, enter the name patterns to use for scanning.
CAUTION: When you specify wildcard masks, for example: *.com, you can miss scanning for files that do not use standard file extensions such as: *.exe, or *.dll, and so forth. The result is that these types of files will not be authorized, which means that these applications will not work or work properly.
5. In the In directory field, enter the path name for the directory you want to scan.
6. Select one or more of the following options:
7. Click OK.STEP RESULT: The New rule dialog closes and the rules you define appear on the Rules
box.
8. Click Save.
RESULT:The Perform New Scan dialog lists the new template in the From Template drop-down list.
Option Description
Include subdirectories
Scan subdirectories of the root directory.
Scan executables
Scan for executable files and ignore all other file types. The scan also searches for 16-bit executables.
ATTENTION: If you do not select the Scan Executables option, you must specify the *.exe and *.sys for the matching pattern to scan for these types of files.

USING SANCTUARY APPLICATION CONTROL
- 87 -
Scanning Files on a Client Computer
You can scan all files on a computer, or you can create a template to scan selected directories or specific file types for example, *.exe, *.com, *.dll, *.ocx, *.sys, *.drv, *.cpl, *.vbs, *.js) to reduce the scan time required.
PREREQUISITEBefore you scan a computer, create a file scanning template.
1. From the Sanctuary Control Panel, select Modules > Scan Explorer.STEP RESULT: The Scan Explorer window opens.
2. Click Perform New Scan.STEP RESULT: The Perform New Scan dialog opens.
Figure 4-7: Perform New Scan Dialog
3. In the From Template field, select a template from the drop-down list.
4. Click on the ellipsis button adjacent to the On Computer field.a. Type the computer name.b. Click Search or Browse.c. Select the computer from the list.d. Click OK.You can type the computer name directly or use wildcard, such as * and ?.STEP RESULT: The Select Computer dialog opens.
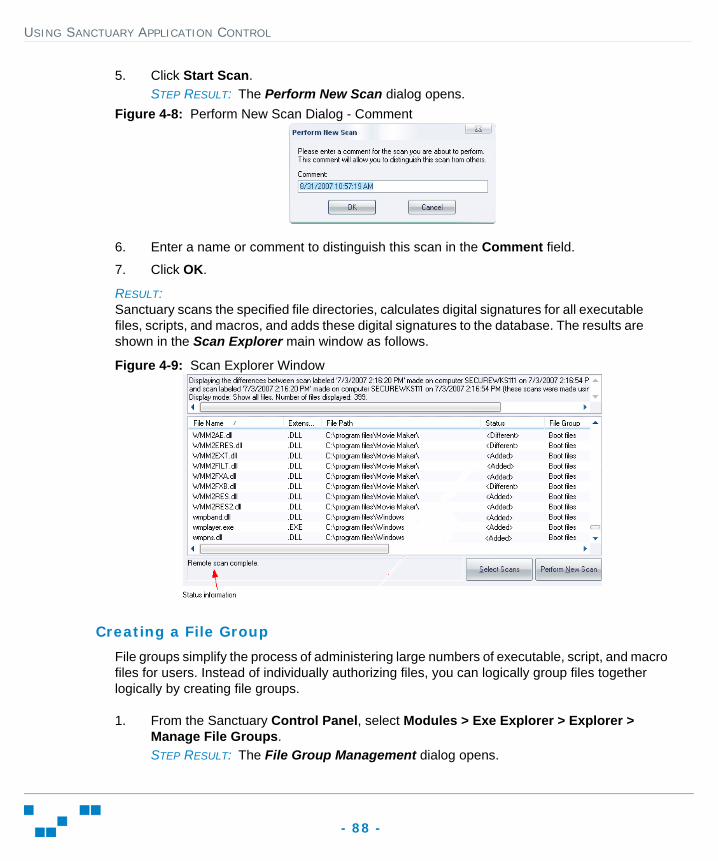
USING SANCTUARY APPLICATION CONTROL
- 88 -
5. Click Start Scan.STEP RESULT: The Perform New Scan dialog opens.
Figure 4-8: Perform New Scan Dialog - Comment
6. Enter a name or comment to distinguish this scan in the Comment field.
7. Click OK.
RESULT:Sanctuary scans the specified file directories, calculates digital signatures for all executable files, scripts, and macros, and adds these digital signatures to the database. The results are shown in the Scan Explorer main window as follows.
Figure 4-9: Scan Explorer Window
Creating a File Group
File groups simplify the process of administering large numbers of executable, script, and macro files for users. Instead of individually authorizing files, you can logically group files together logically by creating file groups.
1. From the Sanctuary Control Panel, select Modules > Exe Explorer > Explorer > Manage File Groups.STEP RESULT: The File Group Management dialog opens.

USING SANCTUARY APPLICATION CONTROL
- 89 -
2. Click Add File Group.Figure 4-10: File Group Management Dialog
3. Enter the name of the file group in the File Group field.
4. Click OK.STEP RESULT: The file group is added to the File Groups list.
5. Click Close.
RESULT:The file group is added to the list. You can now assign files to the new file group.
NOTE: You must grant dedicated accounts such as LocalSystem the right to use the appropriate file groups containing services. For example, if you create a Windows File Group where you place all operating system executable files (including Windows services that run with the LocalSystem account), you should grant LocalSystem the right to use this Windows file group.
Assigning Files to File Groups
Once you create the necessary file groups and any required parent-child relationships, you can assign executable files, scripts, and macros to file groups.
1. In the Sanctuary Control Panel, select Modules > Database Explorer.2. Select the file(s) to assign to a file group.
3. Right-click the file selection.
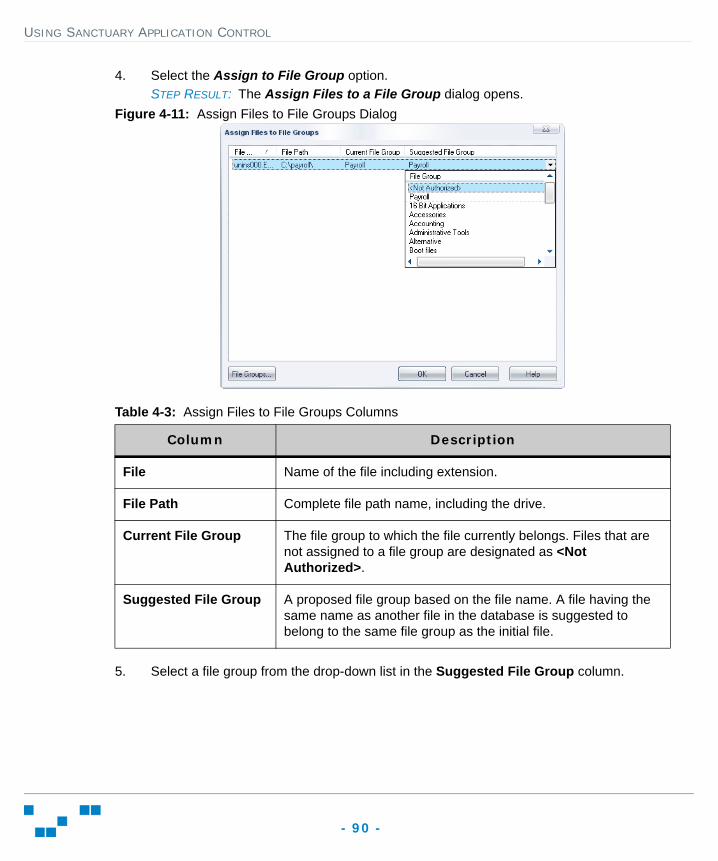
USING SANCTUARY APPLICATION CONTROL
- 90 -
4. Select the Assign to File Group option.STEP RESULT: The Assign Files to a File Group dialog opens.
Figure 4-11: Assign Files to File Groups Dialog
Table 4-3: Assign Files to File Groups Columns
5. Select a file group from the drop-down list in the Suggested File Group column.
Column Description
File Name of the file including extension.
File Path Complete file path name, including the drive.
Current File Group The file group to which the file currently belongs. Files that are not assigned to a file group are designated as <Not Authorized>.
Suggested File Group A proposed file group based on the file name. A file having the same name as another file in the database is suggested to belong to the same file group as the initial file.
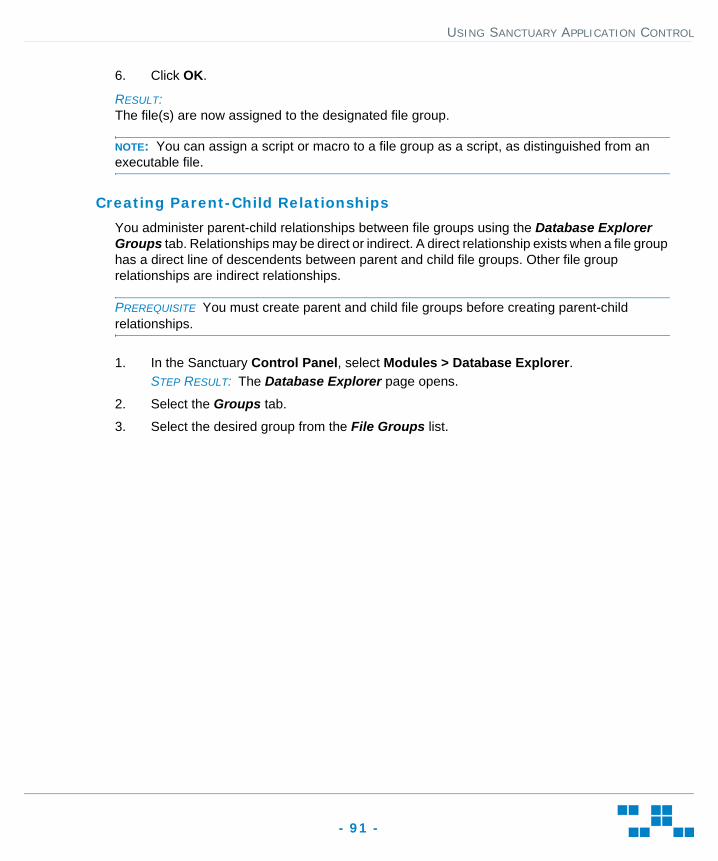
USING SANCTUARY APPLICATION CONTROL
- 91 -
6. Click OK.
RESULT:The file(s) are now assigned to the designated file group.
NOTE: You can assign a script or macro to a file group as a script, as distinguished from an executable file.
Creating Parent-Child Relationships
You administer parent-child relationships between file groups using the Database Explorer Groups tab. Relationships may be direct or indirect. A direct relationship exists when a file group has a direct line of descendents between parent and child file groups. Other file group relationships are indirect relationships.
PREREQUISITE You must create parent and child file groups before creating parent-child relationships.
1. In the Sanctuary Control Panel, select Modules > Database Explorer.STEP RESULT: The Database Explorer page opens.
2. Select the Groups tab.
3. Select the desired group from the File Groups list.
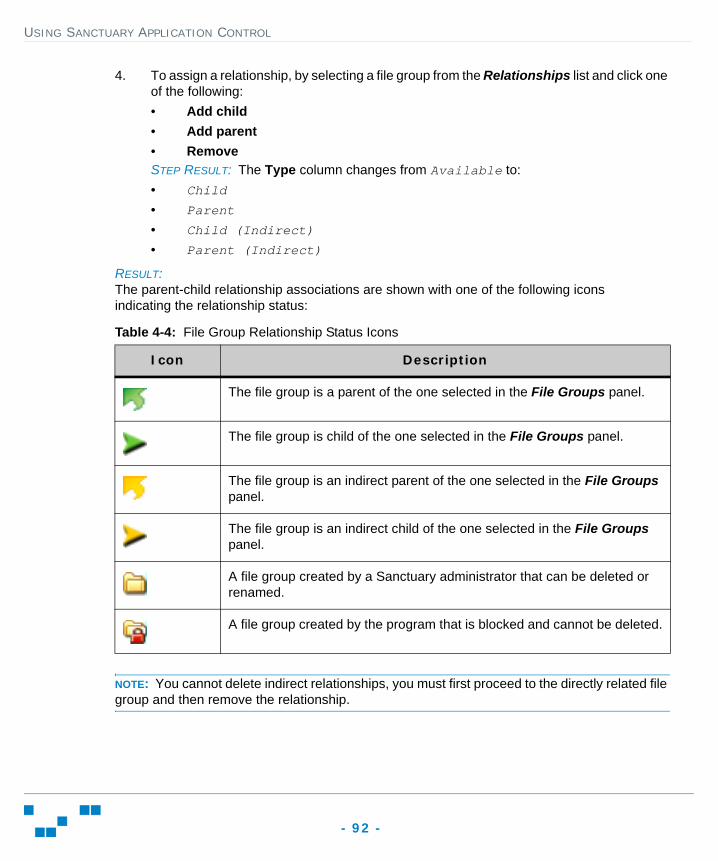
USING SANCTUARY APPLICATION CONTROL
- 92 -
4. To assign a relationship, by selecting a file group from the Relationships list and click one of the following:• Add child• Add parent• RemoveSTEP RESULT: The Type column changes from Available to:• Child
• Parent
• Child (Indirect)
• Parent (Indirect)
RESULT:The parent-child relationship associations are shown with one of the following icons indicating the relationship status:
Table 4-4: File Group Relationship Status Icons
NOTE: You cannot delete indirect relationships, you must first proceed to the directly related file group and then remove the relationship.
Icon Description
The file group is a parent of the one selected in the File Groups panel.
The file group is child of the one selected in the File Groups panel.
The file group is an indirect parent of the one selected in the File Groups panel.
The file group is an indirect child of the one selected in the File Groups panel.
A file group created by a Sanctuary administrator that can be deleted or renamed.
A file group created by the program that is blocked and cannot be deleted.
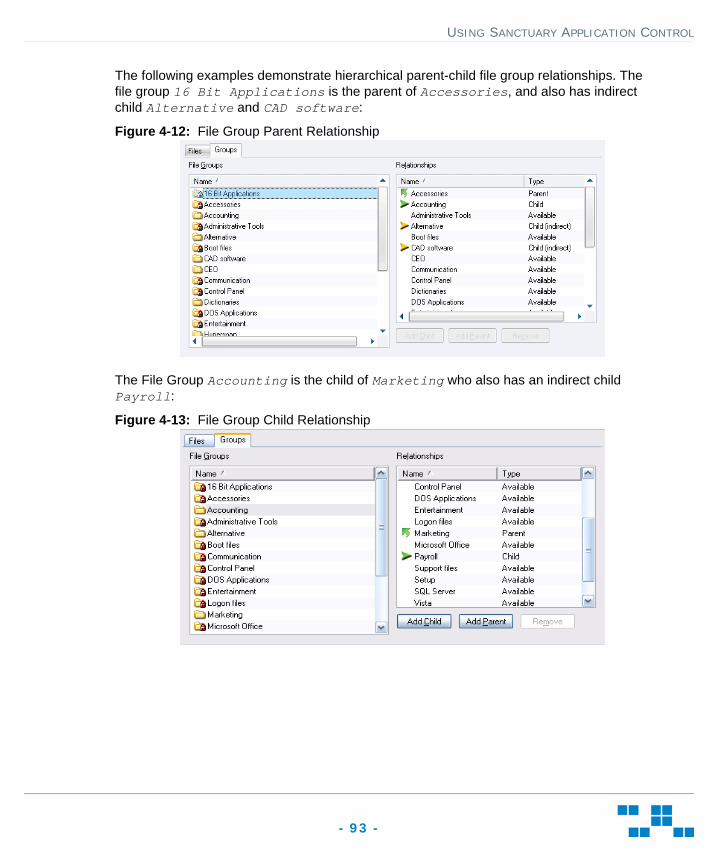
USING SANCTUARY APPLICATION CONTROL
- 93 -
The following examples demonstrate hierarchical parent-child file group relationships. The file group 16 Bit Applications is the parent of Accessories, and also has indirect child Alternative and CAD software:
Figure 4-12: File Group Parent Relationship
The File Group Accounting is the child of Marketing who also has an indirect child Payroll:
Figure 4-13: File Group Child Relationship

USING SANCTUARY APPLICATION CONTROL
- 94 -
This is the consequence of the following parent-child assignments:
Figure 4-14: File Group Parent-Child Relationship
When assigning the file group Payroll to a user or user group; there is also an indirect assignment because of this relationship:
Figure 4-15: File Group Indirect Assignment
You can view indirect parent-child relationship assignments by using the File Groups by User tab of the User Explorer module..
Assigning File Groups to Users
After creating file groups and parent-child relationships you want to use, you can assign file groups to users or user groups.
1. In the Sanctuary Control Panel, select Modules > User Explorer.STEP RESULT: The User Explorer window opens.
2. Select the File Groups by User tab.
3. In the Users, Groups, Computers and Domains panel, select a user or user group.
4. Select one or more file groups from the Not Authorized list.
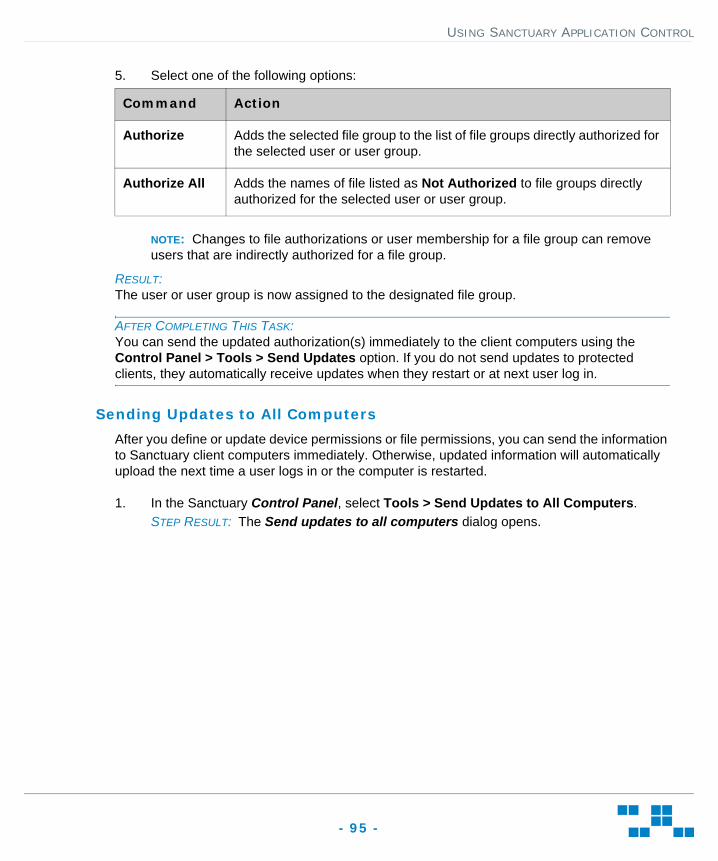
USING SANCTUARY APPLICATION CONTROL
- 95 -
5. Select one of the following options:
NOTE: Changes to file authorizations or user membership for a file group can remove users that are indirectly authorized for a file group.
RESULT:The user or user group is now assigned to the designated file group.
AFTER COMPLETING THIS TASK:You can send the updated authorization(s) immediately to the client computers using the Control Panel > Tools > Send Updates option. If you do not send updates to protected clients, they automatically receive updates when they restart or at next user log in.
Sending Updates to All Computers
After you define or update device permissions or file permissions, you can send the information to Sanctuary client computers immediately. Otherwise, updated information will automatically upload the next time a user logs in or the computer is restarted.
1. In the Sanctuary Control Panel, select Tools > Send Updates to All Computers.STEP RESULT: The Send updates to all computers dialog opens.
Command Action
Authorize Adds the selected file group to the list of file groups directly authorized for the selected user or user group.
Authorize All Adds the names of file listed as Not Authorized to file groups directly authorized for the selected user or user group.
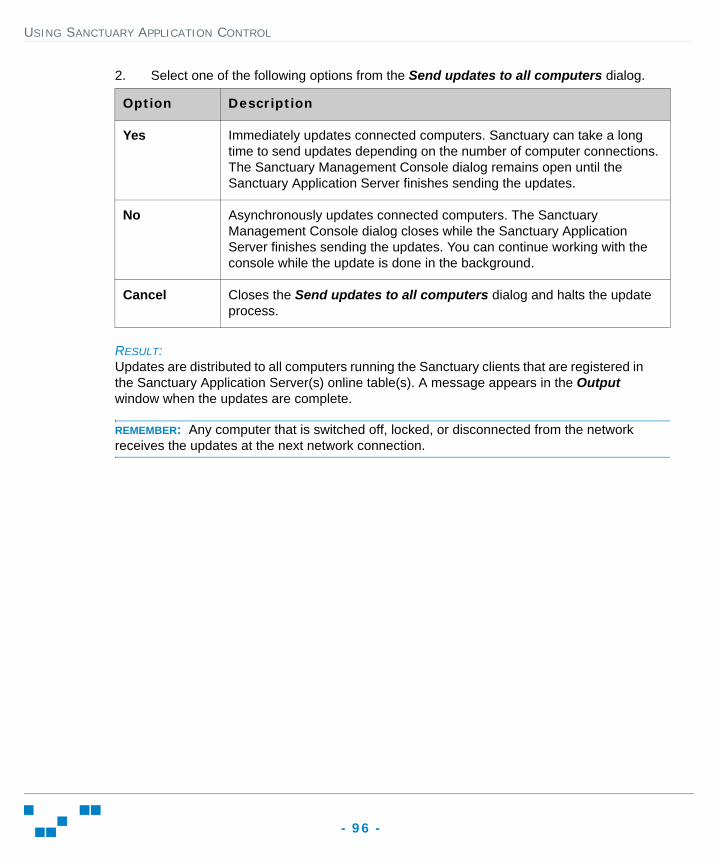
USING SANCTUARY APPLICATION CONTROL
- 96 -
2. Select one of the following options from the Send updates to all computers dialog.
RESULT:Updates are distributed to all computers running the Sanctuary clients that are registered in the Sanctuary Application Server(s) online table(s). A message appears in the Output window when the updates are complete.
REMEMBER: Any computer that is switched off, locked, or disconnected from the network receives the updates at the next network connection.
Option Description
Yes Immediately updates connected computers. Sanctuary can take a long time to send updates depending on the number of computer connections. The Sanctuary Management Console dialog remains open until the Sanctuary Application Server finishes sending the updates.
No Asynchronously updates connected computers. The Sanctuary Management Console dialog closes while the Sanctuary Application Server finishes sending the updates. You can continue working with the console while the update is done in the background.
Cancel Closes the Send updates to all computers dialog and halts the update process.

USING SANCTUARY APPLICATION CONTROL
- 97 -
Viewing Database Records
The Database Explorer module displays a list of the executable, script, and macro files, digital signatures, and assigned file groups stored in the Sanctuary database.
1. In the Sanctuary Control Panel, select Modules > Database Explorer.STEP RESULT: The Database Explorer page opens.
Figure 4-16: Database Explorer Module
2. Select the Files tab.
3. Type a file name in the File name field. You can use wild cards (* and ?).
4. Select a file group from the File Group list.
5. Click Search.
RESULT:You can view the files stored in the database including the digital signature and file group assignment.
CAUTION: Your request may process slowly when you have a large Sanctuary database.
USING SANCTUARY APPLICATION CONTROL
- 98 -
Local Authorization
Local authorization allows users to locally authorize executable file, scripts, and macros that are not in the central authorization list. Then, the user can then use the software locally, providing users with the flexibility to run specific software applications without first requesting central authorization. You should limit use of this feature to avoid compromising the central network protection policy provided by Sanctuary Application Control.
PREREQUISITE
• Using Tools > Default Options, verify that:
• The Computer tab Local Authorization default option is Enabled.
TIP: You can also use this option to disable local authorization on all computers.
• The User/User Group tab Execution Blocking default option is set to: Ask user for *.exe only, for the Blocking mode.
TIP: You may type a customized user notification message in the Notification Text field, such as Do you want to authorize this file locally?
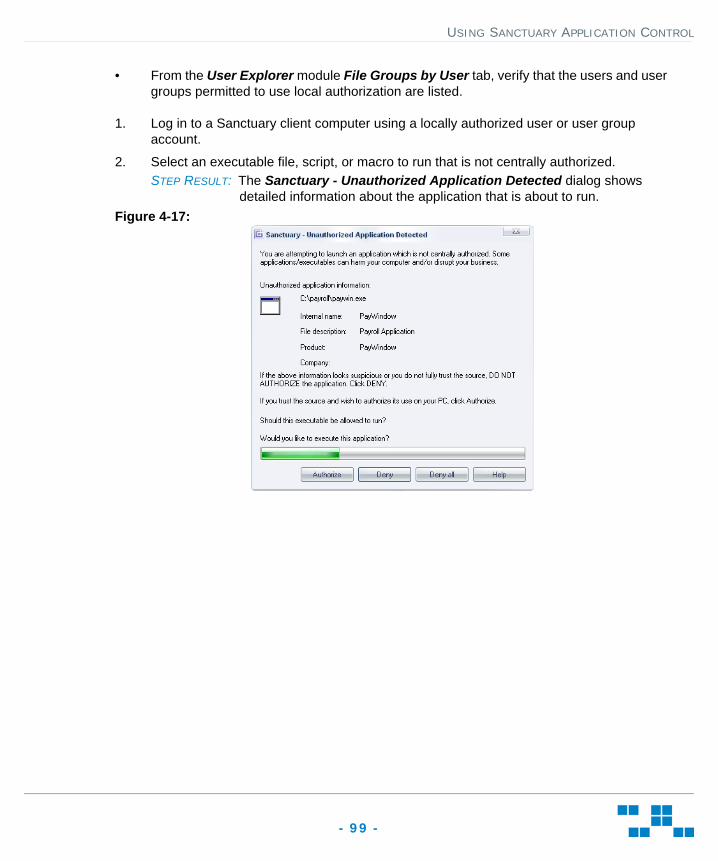
USING SANCTUARY APPLICATION CONTROL
- 99 -
• From the User Explorer module File Groups by User tab, verify that the users and user groups permitted to use local authorization are listed.
1. Log in to a Sanctuary client computer using a locally authorized user or user group account.
2. Select an executable file, script, or macro to run that is not centrally authorized.STEP RESULT: The Sanctuary - Unauthorized Application Detected dialog shows
detailed information about the application that is about to run.Figure 4-17:
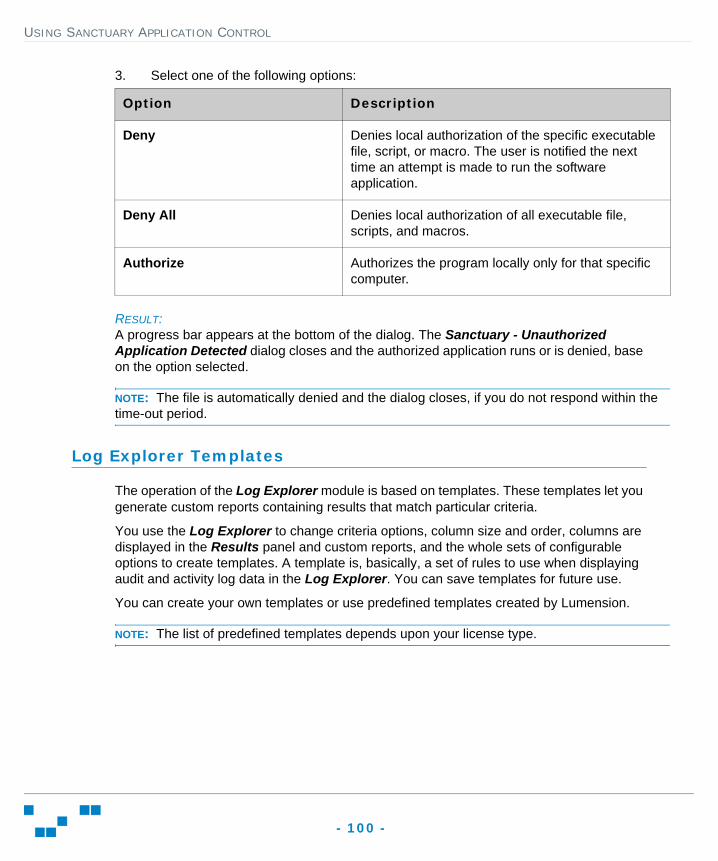
USING SANCTUARY APPLICATION CONTROL
- 100 -
3. Select one of the following options:
RESULT:A progress bar appears at the bottom of the dialog. The Sanctuary - Unauthorized Application Detected dialog closes and the authorized application runs or is denied, base on the option selected.
NOTE: The file is automatically denied and the dialog closes, if you do not respond within the time-out period.
Log Explorer Templates
The operation of the Log Explorer module is based on templates. These templates let you generate custom reports containing results that match particular criteria.
You use the Log Explorer to change criteria options, column size and order, columns are displayed in the Results panel and custom reports, and the whole sets of configurable options to create templates. A template is, basically, a set of rules to use when displaying audit and activity log data in the Log Explorer. You can save templates for future use.
You can create your own templates or use predefined templates created by Lumension.
NOTE: The list of predefined templates depends upon your license type.
Option Description
Deny Denies local authorization of the specific executable file, script, or macro. The user is notified the next time an attempt is made to run the software application.
Deny All Denies local authorization of all executable file, scripts, and macros.
Authorize Authorizes the program locally only for that specific computer.
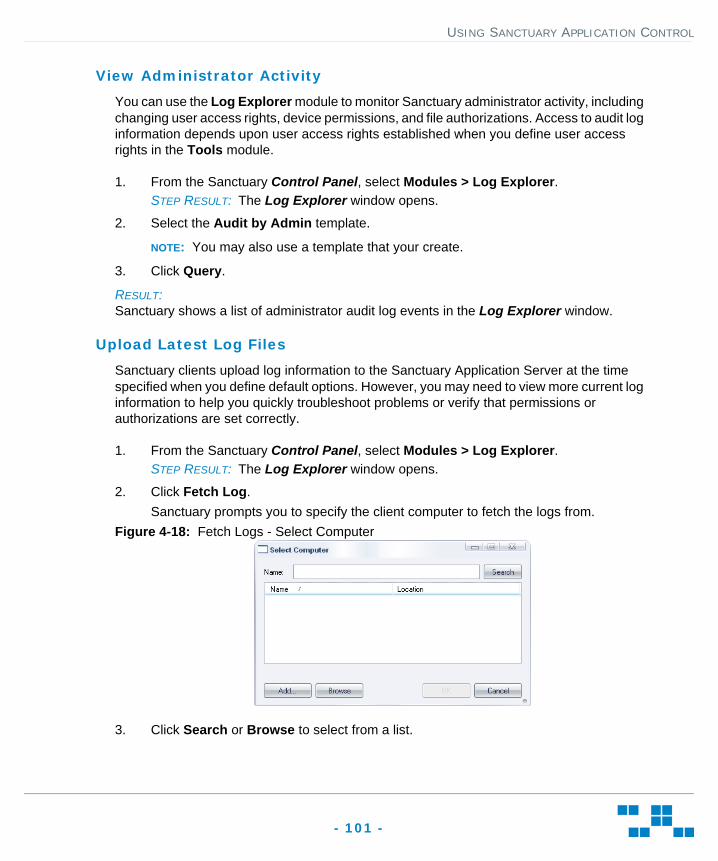
USING SANCTUARY APPLICATION CONTROL
- 101 -
View Administrator Activity
You can use the Log Explorer module to monitor Sanctuary administrator activity, including changing user access rights, device permissions, and file authorizations. Access to audit log information depends upon user access rights established when you define user access rights in the Tools module.
1. From the Sanctuary Control Panel, select Modules > Log Explorer.STEP RESULT: The Log Explorer window opens.
2. Select the Audit by Admin template.
NOTE: You may also use a template that your create.
3. Click Query.
RESULT:Sanctuary shows a list of administrator audit log events in the Log Explorer window.
Upload Latest Log Files
Sanctuary clients upload log information to the Sanctuary Application Server at the time specified when you define default options. However, you may need to view more current log information to help you quickly troubleshoot problems or verify that permissions or authorizations are set correctly.
1. From the Sanctuary Control Panel, select Modules > Log Explorer.STEP RESULT: The Log Explorer window opens.
2. Click Fetch Log.Sanctuary prompts you to specify the client computer to fetch the logs from.
Figure 4-18: Fetch Logs - Select Computer
3. Click Search or Browse to select from a list.
USING SANCTUARY APPLICATION CONTROL
- 102 -
4. Click OK.
RESULT:The computer logs are uploaded to the Sanctuary Application Server and stored in the database. Updated log files are shown in the Log Explorer window.
RESTRICTION: The time delay between retrieving the log entries from the client and the availability of the latest logs depends on the queue size and the database availability at the time of upload.
Reporting
Sanctuary provides pre-defined reports designed to provide a comprehensive view of your computing environment for application control activities.
In addition to the standard reports, you can customize and generate your own reports by using the Log Explorer module.
You can change the date format for a Sanctuary report by selecting Windows Control Panel > Regional and Language Options. The regional options or settings vary according to the Windows operating system you are using.
Opening a Report
1. In the Sanctuary Control Panel, select Reports.
2. Select a report type from the list.STEP RESULT: The report you select is displayed as an HTML file in the Sanctuary
Management Console main window.
Printing a Report
1. From the navigation menu select File > Print.STEP RESULT: The standard Windows Print dialog opens.
2. Select a printer.
3. Click Print.STEP RESULT: The Windows Print dialog closes.
Saving a Report
1. From the navigation menu select File > Save as.STEP RESULT: The Windows dialog for saving a web page opens.
2. Select the file path.
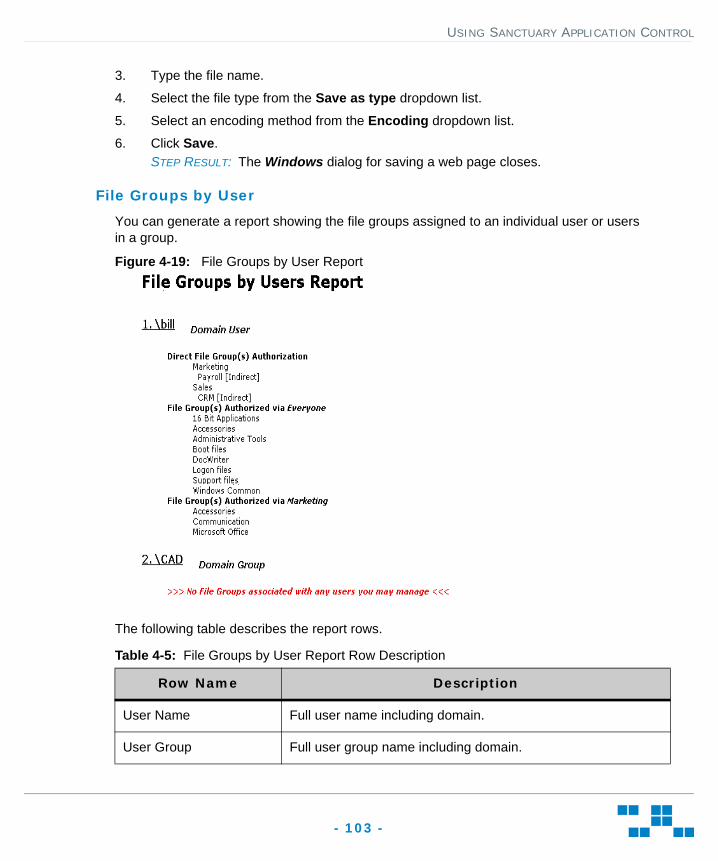
USING SANCTUARY APPLICATION CONTROL
- 103 -
3. Type the file name.
4. Select the file type from the Save as type dropdown list.
5. Select an encoding method from the Encoding dropdown list.
6. Click Save.STEP RESULT: The Windows dialog for saving a web page closes.
File Groups by User
You can generate a report showing the file groups assigned to an individual user or users in a group.
Figure 4-19: File Groups by User Report
The following table describes the report rows.
Table 4-5: File Groups by User Report Row Description
Row Name Description
User Name Full user name including domain.
User Group Full user group name including domain.
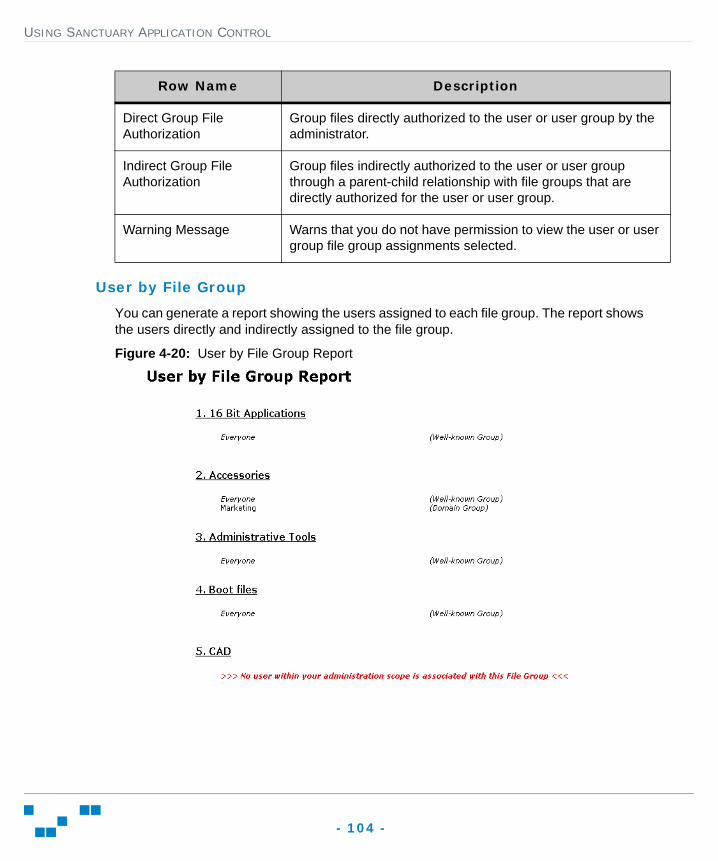
USING SANCTUARY APPLICATION CONTROL
- 104 -
User by File Group
You can generate a report showing the users assigned to each file group. The report shows the users directly and indirectly assigned to the file group.
Figure 4-20: User by File Group Report
Direct Group File Authorization
Group files directly authorized to the user or user group by the administrator.
Indirect Group File Authorization
Group files indirectly authorized to the user or user group through a parent-child relationship with file groups that are directly authorized for the user or user group.
Warning Message Warns that you do not have permission to view the user or user group file group assignments selected.
Row Name Description
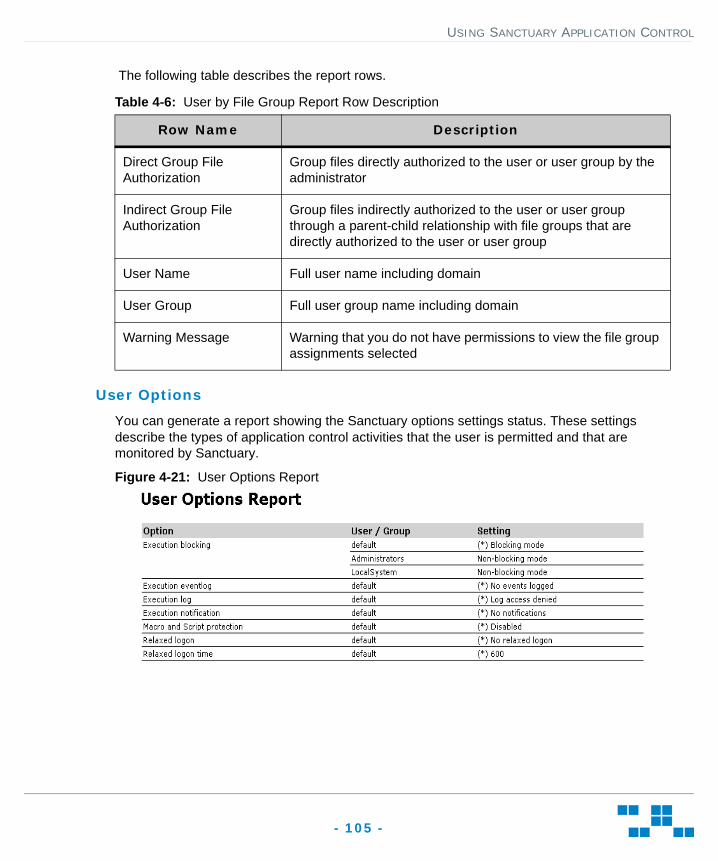
USING SANCTUARY APPLICATION CONTROL
- 105 -
The following table describes the report rows.
Table 4-6: User by File Group Report Row Description
User Options
You can generate a report showing the Sanctuary options settings status. These settings describe the types of application control activities that the user is permitted and that are monitored by Sanctuary.
Figure 4-21: User Options Report
Row Name Description
Direct Group File Authorization
Group files directly authorized to the user or user group by the administrator
Indirect Group File Authorization
Group files indirectly authorized to the user or user group through a parent-child relationship with file groups that are directly authorized to the user or user group
User Name Full user name including domain
User Group Full user group name including domain
Warning Message Warning that you do not have permissions to view the file group assignments selected
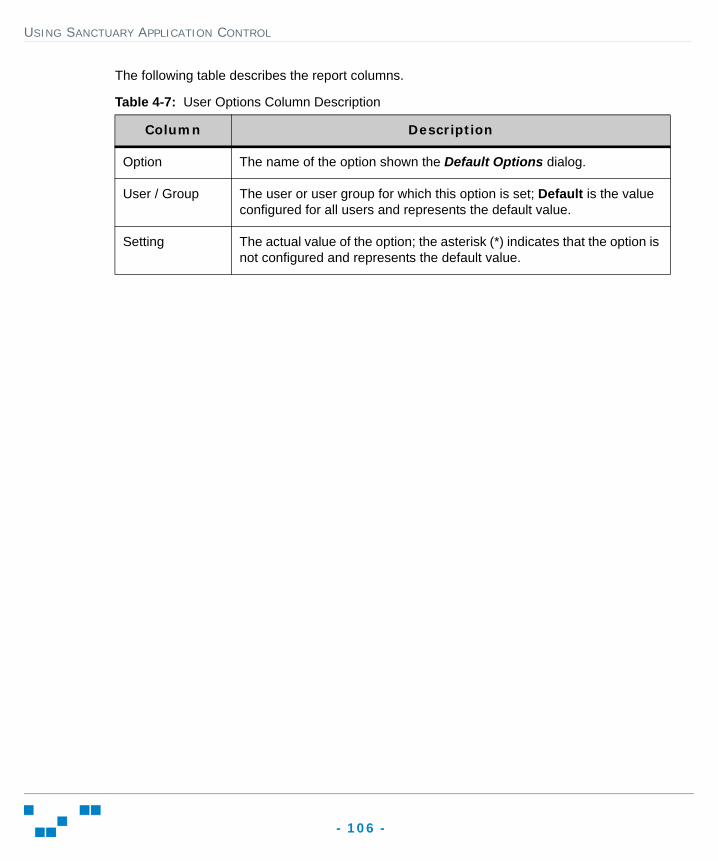
USING SANCTUARY APPLICATION CONTROL
- 106 -
The following table describes the report columns.
Table 4-7: User Options Column Description
Column Description
Option The name of the option shown the Default Options dialog.
User / Group The user or user group for which this option is set; Default is the value configured for all users and represents the default value.
Setting The actual value of the option; the asterisk (*) indicates that the option is not configured and represents the default value.
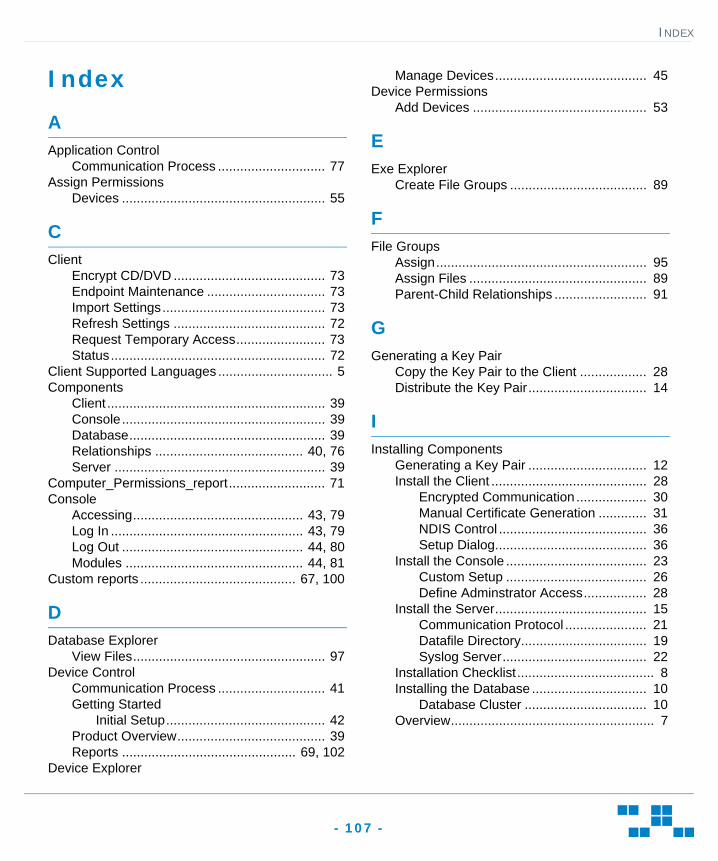
INDEX
- 107 -
Index
AApplication Control
Communication Process ............................. 77Assign Permissions
Devices ....................................................... 55
CClient
Encrypt CD/DVD ......................................... 73Endpoint Maintenance ................................ 73Import Settings............................................ 73Refresh Settings ......................................... 72Request Temporary Access........................ 73Status.......................................................... 72
Client Supported Languages ............................... 5Components
Client ........................................................... 39Console....................................................... 39Database..................................................... 39Relationships ........................................ 40, 76Server ......................................................... 39
Computer_Permissions_report.......................... 71Console
Accessing.............................................. 43, 79Log In .................................................... 43, 79Log Out ................................................. 44, 80Modules ................................................ 44, 81
Custom reports .......................................... 67, 100
DDatabase Explorer
View Files.................................................... 97Device Control
Communication Process ............................. 41Getting Started
Initial Setup........................................... 42Product Overview........................................ 39Reports ............................................... 69, 102
Device Explorer
Manage Devices......................................... 45Device Permissions
Add Devices ............................................... 53
EExe Explorer
Create File Groups ..................................... 89
FFile Groups
Assign......................................................... 95Assign Files ................................................ 89Parent-Child Relationships ......................... 91
GGenerating a Key Pair
Copy the Key Pair to the Client .................. 28Distribute the Key Pair................................ 14
IInstalling Components
Generating a Key Pair ................................ 12Install the Client .......................................... 28
Encrypted Communication ................... 30Manual Certificate Generation ............. 31NDIS Control ........................................ 36Setup Dialog......................................... 36
Install the Console ...................................... 23Custom Setup ...................................... 26Define Adminstrator Access................. 28
Install the Server......................................... 15Communication Protocol ...................... 21Datafile Directory.................................. 19Syslog Server....................................... 22
Installation Checklist..................................... 8Installing the Database ............................... 10
Database Cluster ................................. 10Overview....................................................... 7
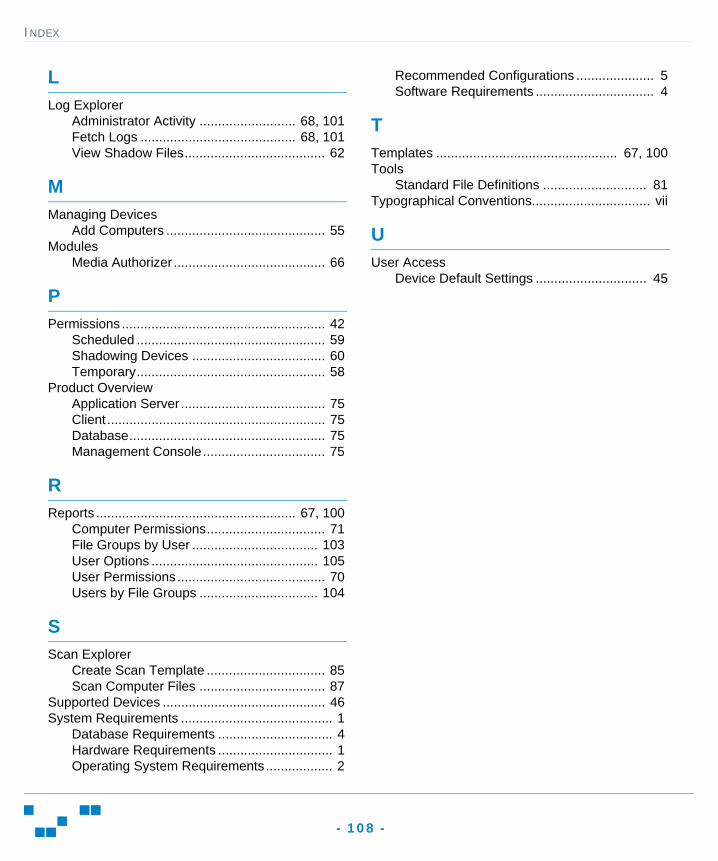
INDEX
- 108 -
LLog Explorer
Administrator Activity .......................... 68, 101Fetch Logs .......................................... 68, 101View Shadow Files...................................... 62
MManaging Devices
Add Computers ........................................... 55Modules
Media Authorizer ......................................... 66
PPermissions ....................................................... 42
Scheduled ................................................... 59Shadowing Devices .................................... 60Temporary................................................... 58
Product OverviewApplication Server ....................................... 75Client ........................................................... 75Database..................................................... 75Management Console................................. 75
RReports ...................................................... 67, 100
Computer Permissions................................ 71File Groups by User .................................. 103User Options ............................................. 105User Permissions........................................ 70Users by File Groups ................................ 104
SScan Explorer
Create Scan Template ................................ 85Scan Computer Files .................................. 87
Supported Devices ............................................ 46System Requirements ......................................... 1
Database Requirements ............................... 4Hardware Requirements ............................... 1Operating System Requirements.................. 2
Recommended Configurations ..................... 5Software Requirements ................................ 4
TTemplates ................................................. 67, 100Tools
Standard File Definitions ............................ 81Typographical Conventions................................ vii
UUser Access
Device Default Settings .............................. 45

- 109 -
02_101 SANCTUARY QUICK SETUP GUIDE
LUMENSION15880 NORTH GREENWAY HAYDEN LOOP, SUITE 100SCOTTSDALE, AZ 85260UNITED STATES OF AMERICAPHONE: +1 480.970.1025FAX: +1 480.970.6323E-MAIL: [email protected]