Quick Reference Guide - Setup Remote Access Mac OSX · Quick Reference Guide - Setup Remote Access...
17
Quick Reference Guide - Setup Remote Access Mac OSX Overview This Quick Reference Guide provides the steps for the initial setup of Mac OSX devices for remote access to the HealthIT network. Prior to remotely accessing the HealthIT network, each computer must first have three applications/clients installed: 1. BIG-IP Edge Client 2. VMware Horizon Client 3. Microsoft Remote Desktop Client Support For assistance, contact the IT Service Desk on (02) 6289 8444 (Central Office) or 1800 500 380 (all other locations). Procedures This Quick Reference Guide is split into five parts: • Part 1 - Remove existing remote access software (if applicable) • Part 2 - Download Software • Part 3 – Installing the Microsoft Remote Desktop Client • Part 4 - Installing the BIG-IP Edge Client • Part 5 - Installing the VMware Horizon Client Quick Reference Guide – Setup Remote Access Mac OSX 1 of 17
Transcript of Quick Reference Guide - Setup Remote Access Mac OSX · Quick Reference Guide - Setup Remote Access...
Quick Reference Guide - Setup Remote Access Mac OSX Overview This Quick Reference Guide provides the steps for the initial setup of Mac OSX devices for remote access to the HealthIT network.
Prior to remotely accessing the HealthIT network, each computer must first have three applications/clients installed:
1. BIG-IP Edge Client 2. VMware Horizon Client 3. Microsoft Remote Desktop Client
Support For assistance, contact the IT Service Desk on (02) 6289 8444 (Central Office) or 1800 500 380 (all other locations).
Procedures This Quick Reference Guide is split into five parts:
• Part 1 - Remove existing remote access software (if applicable) • Part 2 - Download Software • Part 3 – Installing the Microsoft Remote Desktop Client • Part 4 - Installing the BIG-IP Edge Client • Part 5 - Installing the VMware Horizon Client
Quick Reference Guide – Setup Remote Access Mac OSX 1 of 17
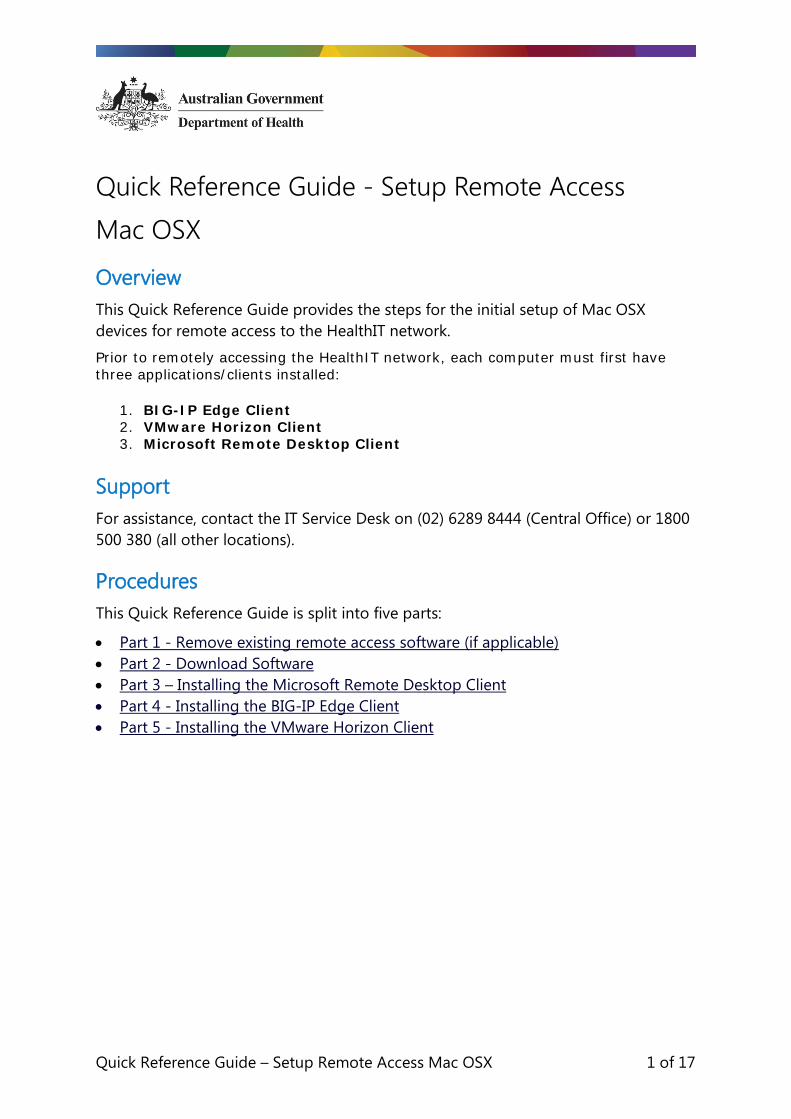
Part 1 – Remove existing remote access software (if applicable) Part 1 only needs to be completed if you have previous versions of Health Remote access software installed.
Step 1 Open the Mac OSX Finder window and click on the Applications favourite.
Step 2 In the finder window, right click on the Health Remote Access application and select Move to Trash from the context menu.
Quick Reference Guide – Setup Remote Access Mac OSX 2 of 17
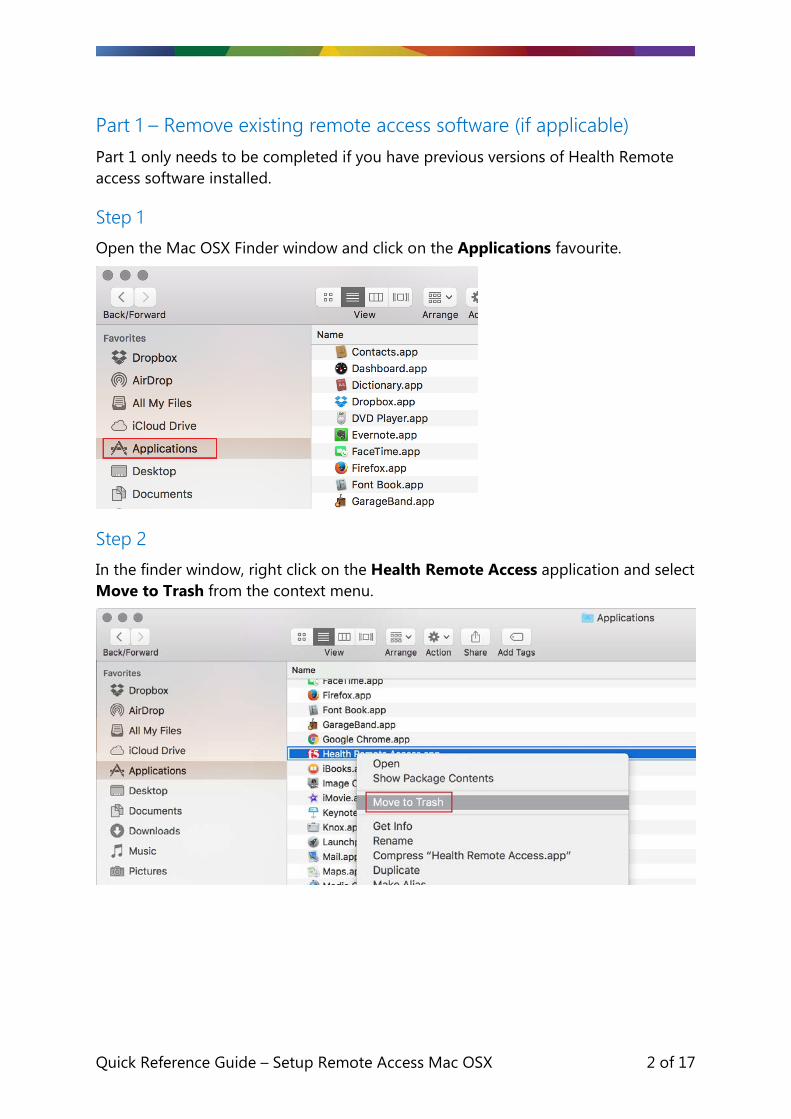
Step 3 Enter your Mac administrator username and password in the dialog box that is presented, and then click OK to provide permission to remove the application.
Step 4 Repeat steps 1- 3 for the Remote Desktop Connection and the VMware Horizon Client.
Quick Reference Guide – Setup Remote Access Mac OSX 3 of 17
Part 2 – Download Software
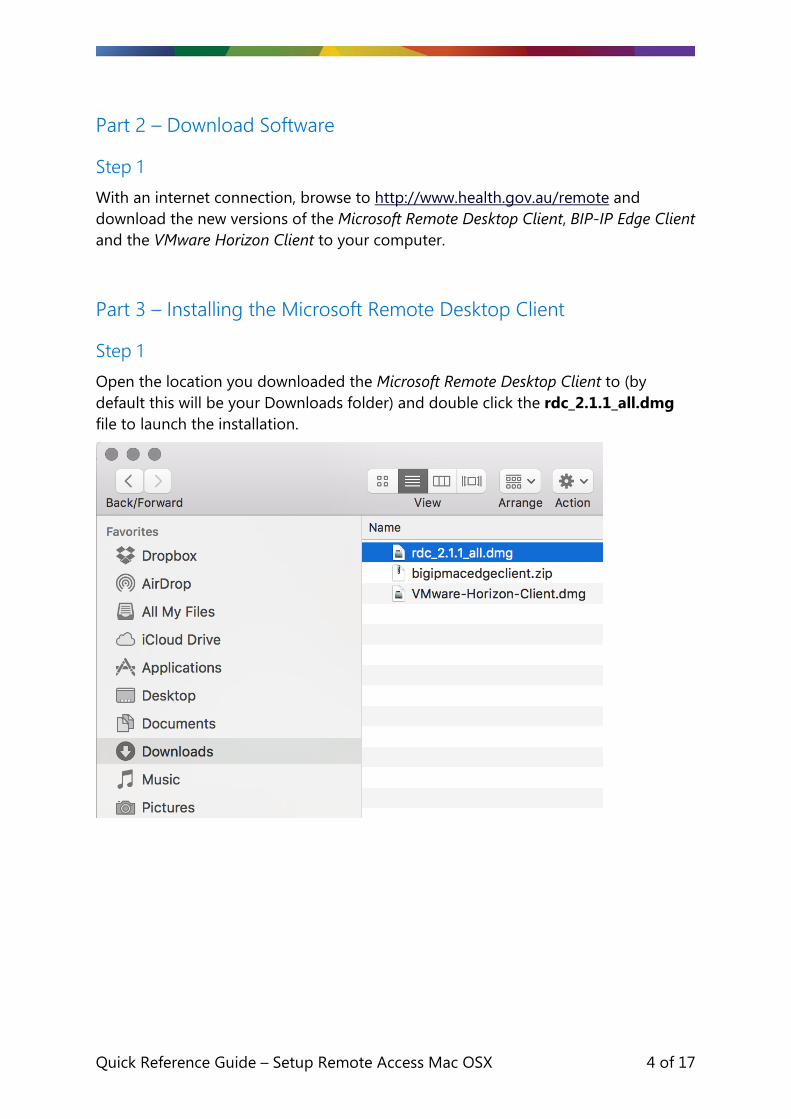
Step 1 With an internet connection, browse to http://www.health.gov.au/remote and download the new versions of the Microsoft Remote Desktop Client, BIP-IP Edge Client and the VMware Horizon Client to your computer.
Part 3 – Installing the Microsoft Remote Desktop Client
Step 1 Open the location you downloaded the Microsoft Remote Desktop Client to (by default this will be your Downloads folder) and double click the rdc_2.1.1_all.dmg file to launch the installation.
Quick Reference Guide – Setup Remote Access Mac OSX 4 of 17
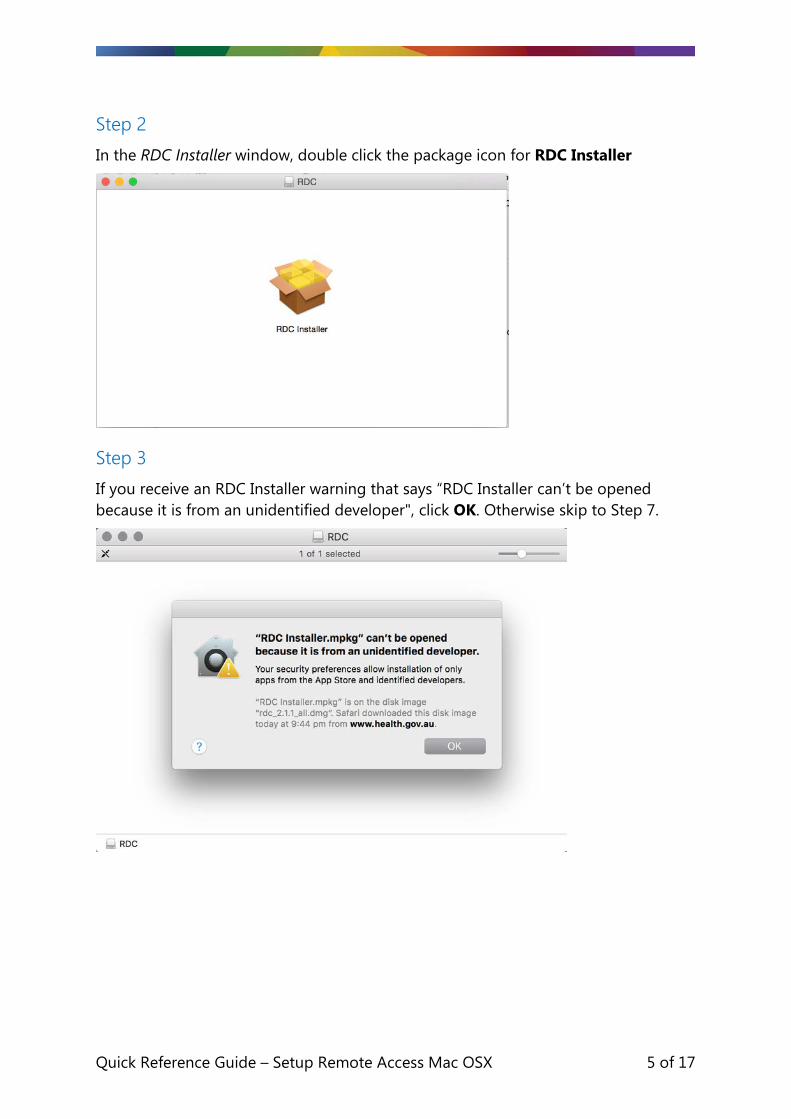
Step 2 In the RDC Installer window, double click the package icon for RDC Installer
Step 3 If you receive an RDC Installer warning that says “RDC Installer can’t be opened because it is from an unidentified developer", click OK. Otherwise skip to Step 7.
Quick Reference Guide – Setup Remote Access Mac OSX 5 of 17
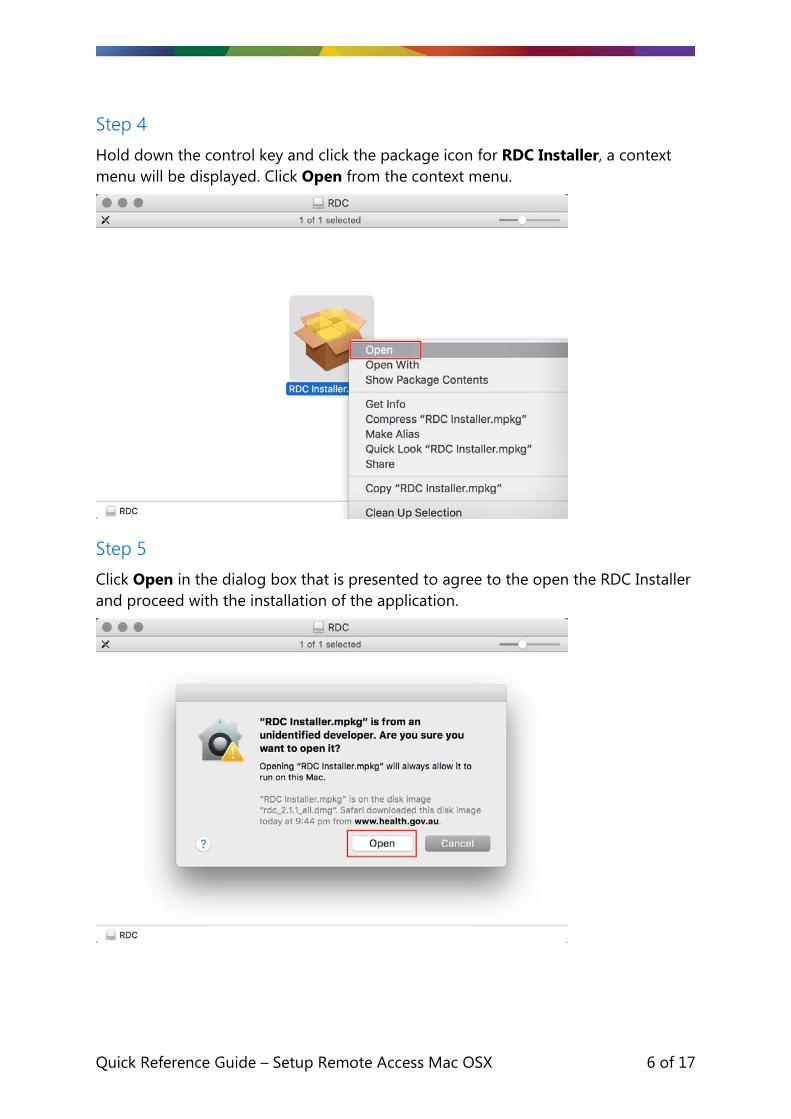
Step 4 Hold down the control key and click the package icon for RDC Installer, a context menu will be displayed. Click Open from the context menu.
Step 5 Click Open in the dialog box that is presented to agree to the open the RDC Installer and proceed with the installation of the application.
Quick Reference Guide – Setup Remote Access Mac OSX 6 of 17
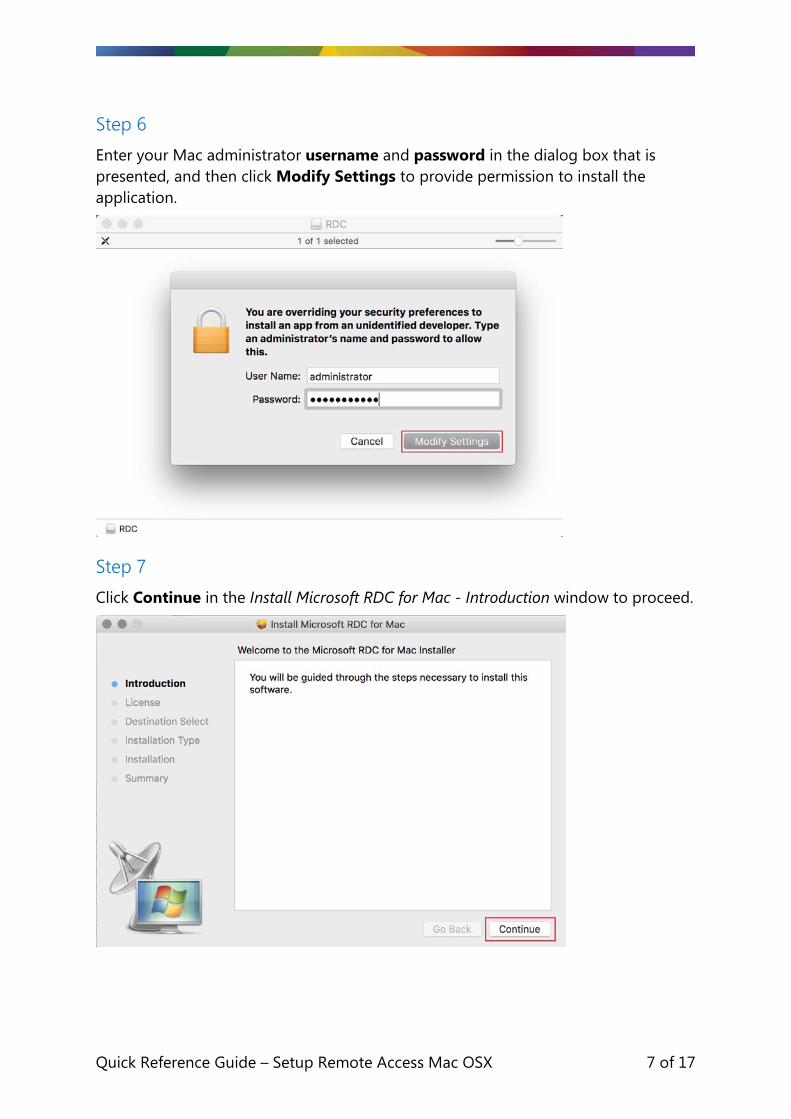
Step 6 Enter your Mac administrator username and password in the dialog box that is presented, and then click Modify Settings to provide permission to install the application.
Step 7 Click Continue in the Install Microsoft RDC for Mac - Introduction window to proceed.
Quick Reference Guide – Setup Remote Access Mac OSX 7 of 17
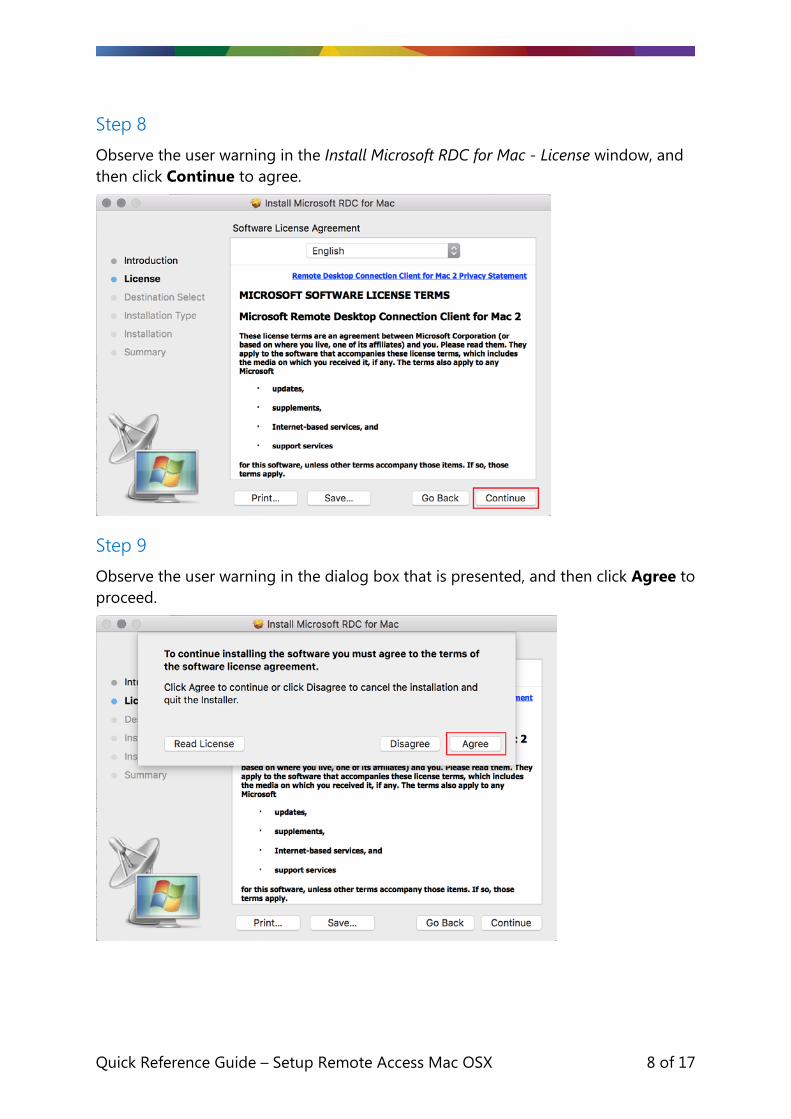
Step 8 Observe the user warning in the Install Microsoft RDC for Mac - License window, and then click Continue to agree.
Step 9 Observe the user warning in the dialog box that is presented, and then click Agree to proceed.
Quick Reference Guide – Setup Remote Access Mac OSX 8 of 17
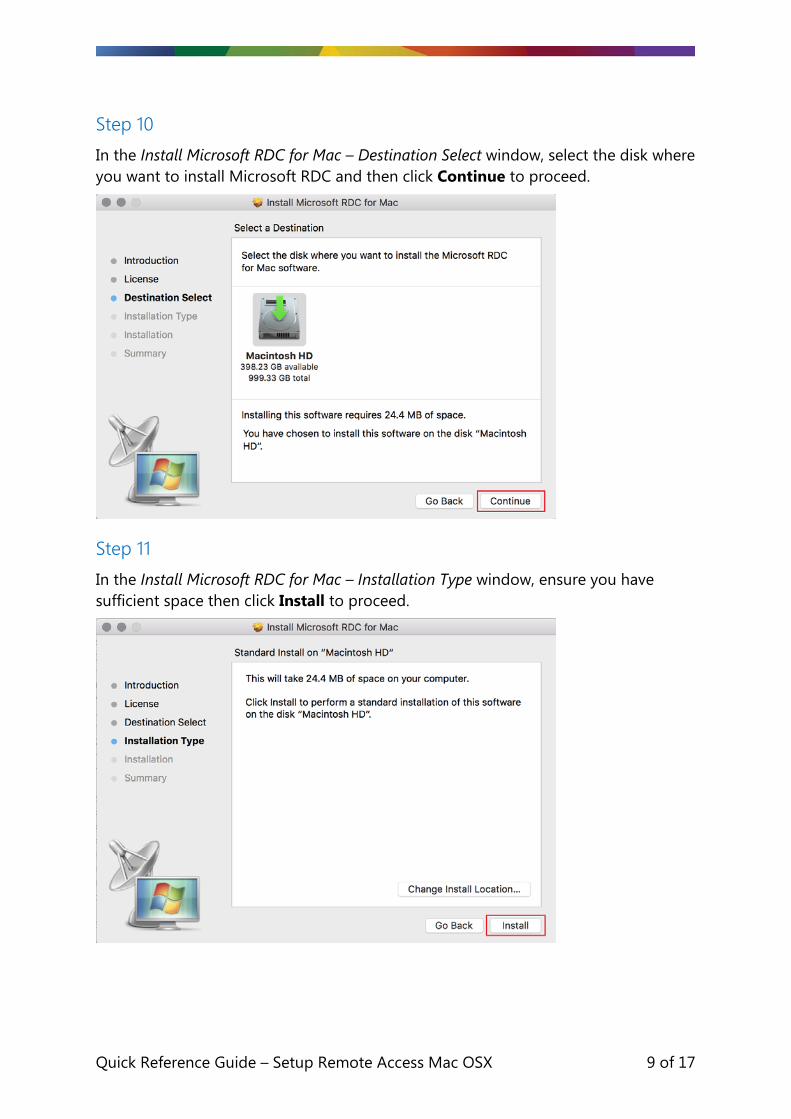
Step 10 In the Install Microsoft RDC for Mac – Destination Select window, select the disk where you want to install Microsoft RDC and then click Continue to proceed.
Step 11 In the Install Microsoft RDC for Mac – Installation Type window, ensure you have sufficient space then click Install to proceed.
Quick Reference Guide – Setup Remote Access Mac OSX 9 of 17

Step 12 Enter your Mac administrator username and password in the dialog box that is presented, and click Install Software to provide permission to install the application.
Step 13 In the Install Microsoft RDC for Mac – Summary window, click close to complete the installation.
Quick Reference Guide – Setup Remote Access Mac OSX 10 of 17
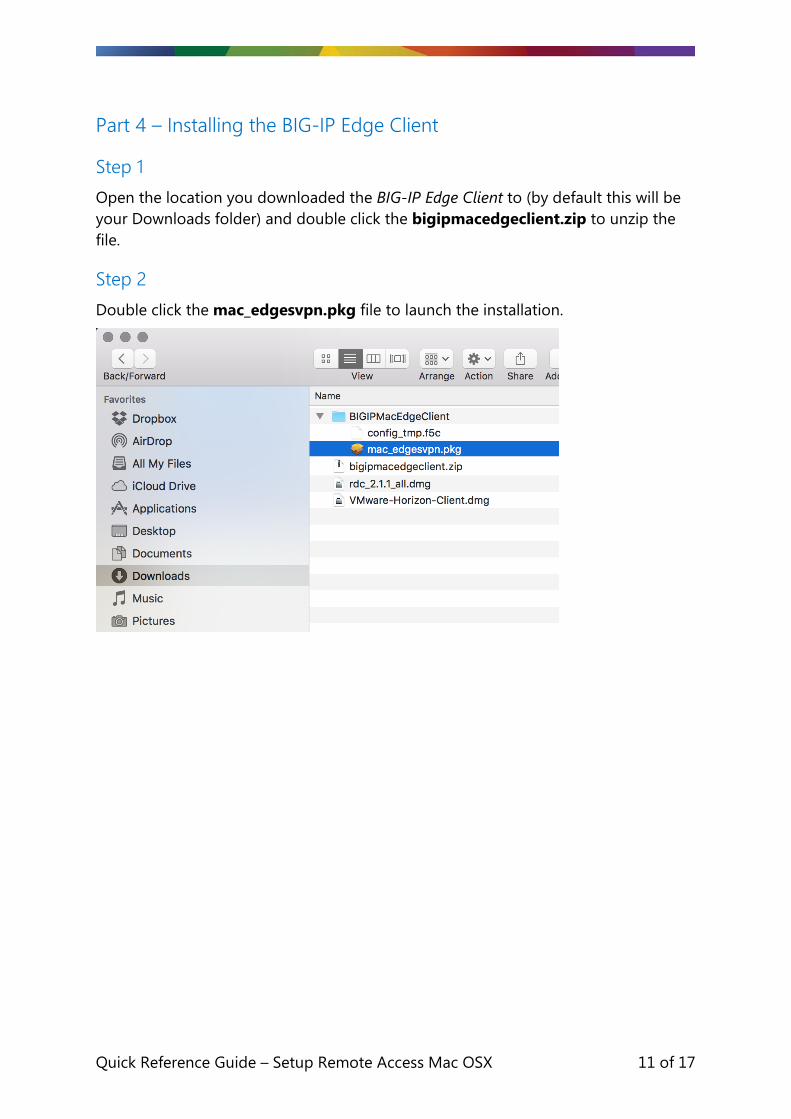
Part 4 – Installing the BIG-IP Edge Client
Step 1 Open the location you downloaded the BIG-IP Edge Client to (by default this will be your Downloads folder) and double click the bigipmacedgeclient.zip to unzip the file.
Step 2 Double click the mac_edgesvpn.pkg file to launch the installation.
Quick Reference Guide – Setup Remote Access Mac OSX 11 of 17
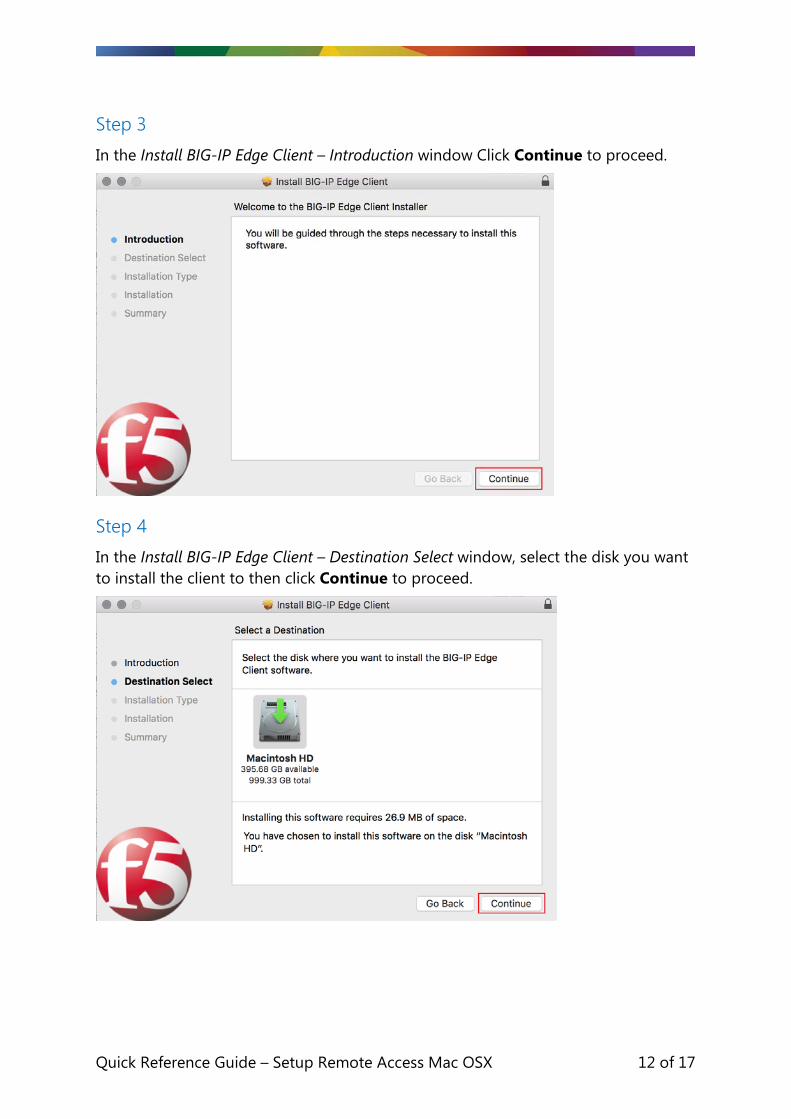
Step 3 In the Install BIG-IP Edge Client – Introduction window Click Continue to proceed.
Step 4 In the Install BIG-IP Edge Client – Destination Select window, select the disk you want to install the client to then click Continue to proceed.
Quick Reference Guide – Setup Remote Access Mac OSX 12 of 17
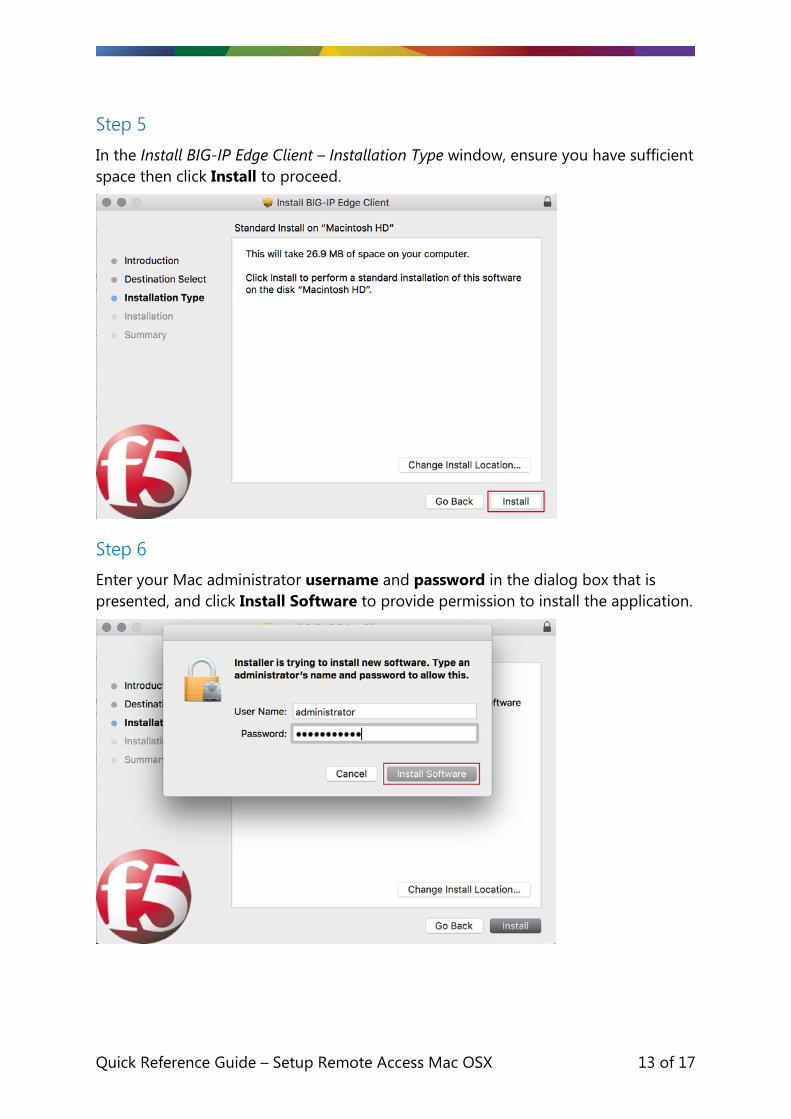
Step 5 In the Install BIG-IP Edge Client – Installation Type window, ensure you have sufficient space then click Install to proceed.
Step 6 Enter your Mac administrator username and password in the dialog box that is presented, and click Install Software to provide permission to install the application.
Quick Reference Guide – Setup Remote Access Mac OSX 13 of 17

Step 7 In the Install BIG-IP Edge Client – Summary window, click close to complete the installation.
Part 5 – Installing the VMware Horizon Client
Step 1 Open the location you downloaded the VMware Horizon Client to (by default this will be your Downloads folder) and double click the VMware-Horizon-Client.dmg file to launch the installation.
Quick Reference Guide – Setup Remote Access Mac OSX 14 of 17

Step 2 Observe the user warning in the VMware-Horizon-Client installer window, and then click Agree to proceed.
Step 3 In the VMware Horizon Client window, click and drag the VMware Horizon Client.app icon onto the Applications icon to install the application.
Quick Reference Guide – Setup Remote Access Mac OSX 15 of 17
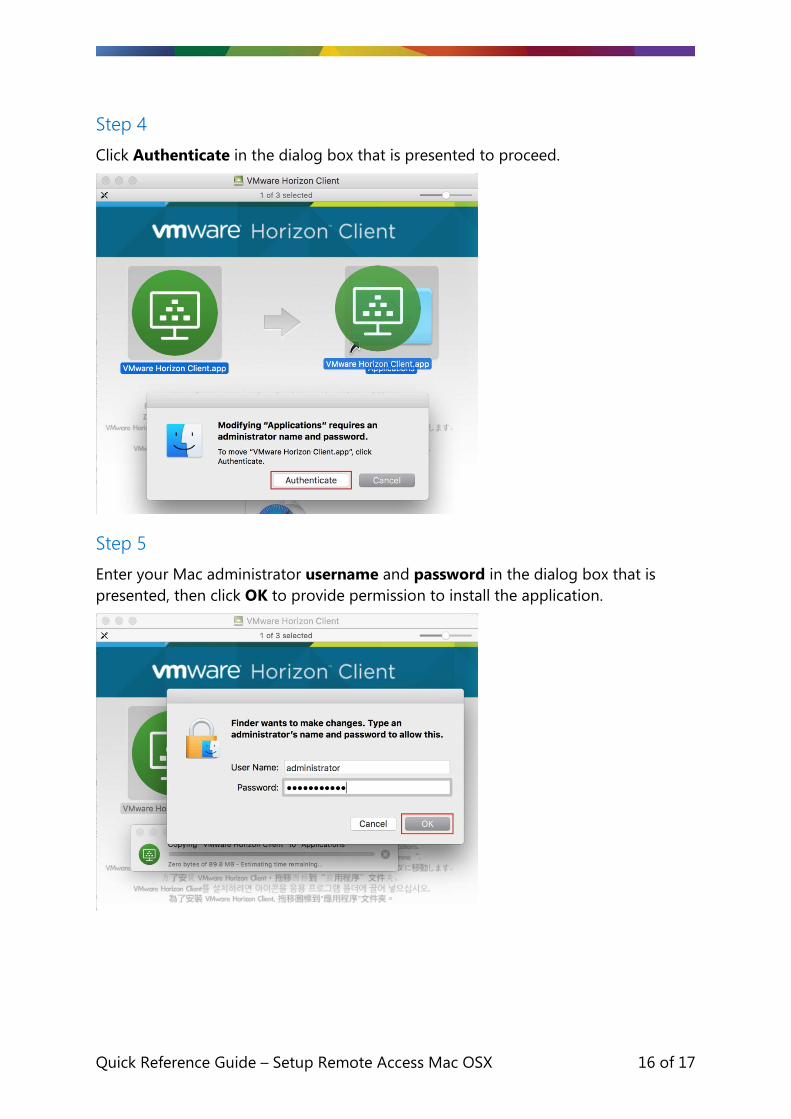
Step 4 Click Authenticate in the dialog box that is presented to proceed.
Step 5 Enter your Mac administrator username and password in the dialog box that is presented, then click OK to provide permission to install the application.
Quick Reference Guide – Setup Remote Access Mac OSX 16 of 17
Step 6 Close the VMware Horizon Client window.
You can now logon to the Health IT Network using remote access.
Quick Reference Guide – Setup Remote Access Mac OSX 17 of 17