Quick Guide for Zeiss 710 Laser Scanning Confocal MGH Cancer Center · PDF file ·...
10
Last update: 3/29/2017 CL 1 Quick Guide for Zeiss 710 Laser Scanning Confocal MGH Cancer Center For any questions or concerns, please contact: Linda Nieman [email protected] Office: (617) 643-9684 Cell: (512) 565-8076 Chenyue Lu [email protected] Cell: (413) 561-3316 Power Up Turn on equipment in the following order: 1. Main System Power • Make sure Key on right hand side in in the horizontal position. • 1A. Flip MAIN SWTICH to ON position • 1B. Flip SYSTEM/PC switch to ON position i. Wait for the Definite Focus module to display OFF • 1C. Flip COMPONENTS switch to ON position i. Wait for components to initialize 2. Argon Laser Black Box Power Supply • Turn the key to the right (clockwise) 3. Argon Laser Remote Controller • Flip switch to RUN position 4. X-Cite widefield fluorescence light source • Flip switch to ON position • Write down the bulb hours on the sign in sheet 5. Turn on PC • Login as LSM USER • Wait for ~3 min for RTC to establish connection with computer 6. Zen software • Double click ZEN black icon in center of desktop (Not Zen blue) • When startup screen appears, click on the BOOT STATUS drop down menu • Click START SYSTEM i. If the screen stalls at 2% or an error about the Real Time Controllers pops up. Press the RTC reset button on the box under the confocal for 5 seconds. Wait 30 seconds. If it fails to continue, close the software, press the button again, and then restart the ZEN software. If that fails, close Zen software, then power off the RTC. Wait 30 seconds. Power the RTC back on. Wait 1-2 minutes. Re-launch Zen. When startup screen appears, click on BOOT STATUS then START SYSTEM
Transcript of Quick Guide for Zeiss 710 Laser Scanning Confocal MGH Cancer Center · PDF file ·...

Last update: 3/29/2017 CL
1
Quick Guide for Zeiss 710 Laser Scanning Confocal MGH Cancer Center
For any questions or concerns, please contact:
Linda Nieman [email protected] Office: (617) 643-9684 Cell: (512) 565-8076 Chenyue Lu [email protected] Cell: (413) 561-3316 Power Up Turn on equipment in the following order:
1. Main System Power • Make sure Key on right hand side in in the horizontal position. • 1A. Flip MAIN SWTICH to ON position • 1B. Flip SYSTEM/PC switch to ON position
i. Wait for the Definite Focus module to display OFF • 1C. Flip COMPONENTS switch to ON position
i. Wait for components to initialize 2. Argon Laser Black Box Power Supply
• Turn the key to the right (clockwise) 3. Argon Laser Remote Controller
• Flip switch to RUN position 4. X-Cite widefield fluorescence light source
• Flip switch to ON position • Write down the bulb hours on the sign in sheet
5. Turn on PC • Login as LSM USER • Wait for ~3 min for RTC to establish connection with computer
6. Zen software • Double click ZEN black icon in center of desktop (Not Zen blue) • When startup screen appears, click on the BOOT STATUS drop down menu • Click START SYSTEM
i. If the screen stalls at 2% or an error about the Real Time Controllers pops up. Press the RTC reset button on the box under the confocal for 5 seconds. Wait 30 seconds. If it fails to continue, close the software, press the button again, and then restart the ZEN software. If that fails, close Zen software, then power off the RTC. Wait 30 seconds. Power the RTC back on. Wait 1-2 minutes. Re-launch Zen.
When startup screen appears, click on BOOT STATUS then START SYSTEM

Last update: 3/29/2017 CL
2
Loading your sample 1. Push microscope head back. Do NOT push on gray HAL100 light box. 2. On Touchpad, choose objective. View using 10X first, then progress to higher magnification 3. Tap LOAD POSITION. (Drops down stage) 4. Load slide onto stage coverslip down (inverted microscope) 5. Bring microscope head back into position 6. On Touchpad, tap SET WORK POSITION
Finding your sample
1. In Zen, go to the LOCATE tab
2. Click Transmitted Light ON if using BF, Reflected Light ON if using fluorescence
3. Choose configuration:
a. BRIGHTFIELD
b. DIC II – For use with dry objectives i. 10x, 20x, 63x dry ii. Requires polarizers
c. DIC III – for use with wet objectives
i. 40x oil, 40x water, 63x oil ii. Requires polarizers
d. DAPI – blue filter
e. GFP – green filter
f. DsRED – red filter
4. Focus on sample Too bright? Lower bright field transmission in ocular tab or using large black dial on XCite light box.
5. Adjust Kohler illumination, if needed:
a. Close top aperture b. Focus with condenser head until a clear
hexagon is formed c. Re-open top aperture

Last update: 3/29/2017 CL
3
Setting confocal configuration 1. Click ACQUISITION tab to enter confocal mode NOTE: There are three different ways to setup a scan:
a. Load saved configuration
(These can be changed, so check before use.)
b. Load template image (File / Open), then click REUSE
c. Smart Setup (see instructions below)
Smart setup
1. In the EXPERIMENT MANGER panel, choose SMART SETUP a. Configure your experiment. Choose dye / fluorophore and image display color b. Add additional dyes / fluorophores using + button. You can also delete dyes using the – buttons
2. Choose imaging option
a. FASTEST: i. Advantage: faster image acquisition ii. Disadvantage: potential cross-talk (spectral overlap) between channels.
b. BEST SIGNAL: i. Advantage: Only one detector and one laser are switched on at any one time. This
reduces crosstalk ii. Disadvantage: slower image acquisition (each color track imaged separately)
c. BEST COMPROMISE - between both speed and best signal
3. Click APPLY
c. Smart Setup a. Load Configuration b. Re-use template image settings

Last update: 3/29/2017 CL
4
Image capture settings 1. In the ACQUISITION MODE panel, set the following parameters:
a. SCAN MODE = FRAME b. FRAME SIZE (i.e. pixel density) = 1024x1024 c. SCAN SPEED should be set between 7-9
i. NOTE: faster scanning gives smaller time interval between images, but lower signal-to-noise ratio. Slower scanning gives longer time intervals, but higher signal-to-noise ratio
d. AVERAGING = 1 i. NOTE: if you have a dim sample with white
noise, you may want to consider averaging at least 4 frames. Note that adding frames adds to the total scan time.
e. BIT DEPTH = 12 for publication images (or 16 bit for high dynamic range images)
i. NOTE: increasing bit depth increases number of gray scale levels (2n)
2. Set PINHOLE to desired spatial resolution NOTE: For best resolution, click 1 AU NOTE: There is an inherent tradeoff between spatial resolution and image brightness. If your sample is dim and high resolution is not critical, you may want to set pinhole larger

Last update: 3/29/2017 CL
5
Setting the detector gain 1. Click SET EXPOSURE
a. (System will find optimal gain setting for each color channel)
2. Click LIVE
a. (next to SET EXPOSURE) b. NOTE: live continuously scans sample at
low resolution to allow quick adjustments. The SNAP image will be captured with Image capture settings above
3. Adjust focus, if needed
4. Click STOP a. (next to SET EXPOSURE)
5. Click TRACK1
a. Desired track will be highlighted in light gray. Other color channels can be unchecked
6. Click LIVE
a. (next to SET EXPOSURE)
7. Enable SINGLE CHANNEL a. (Active channel will be highlighted blue)
8. Enable RANGE INDICATOR a. Red shows pixels that are saturated b. Black are pixels that are underexposed c. Blue are pixels that have optimal exposure d. Aim for an image that is has few red pixels
Last update: 3/29/2017 CL
6
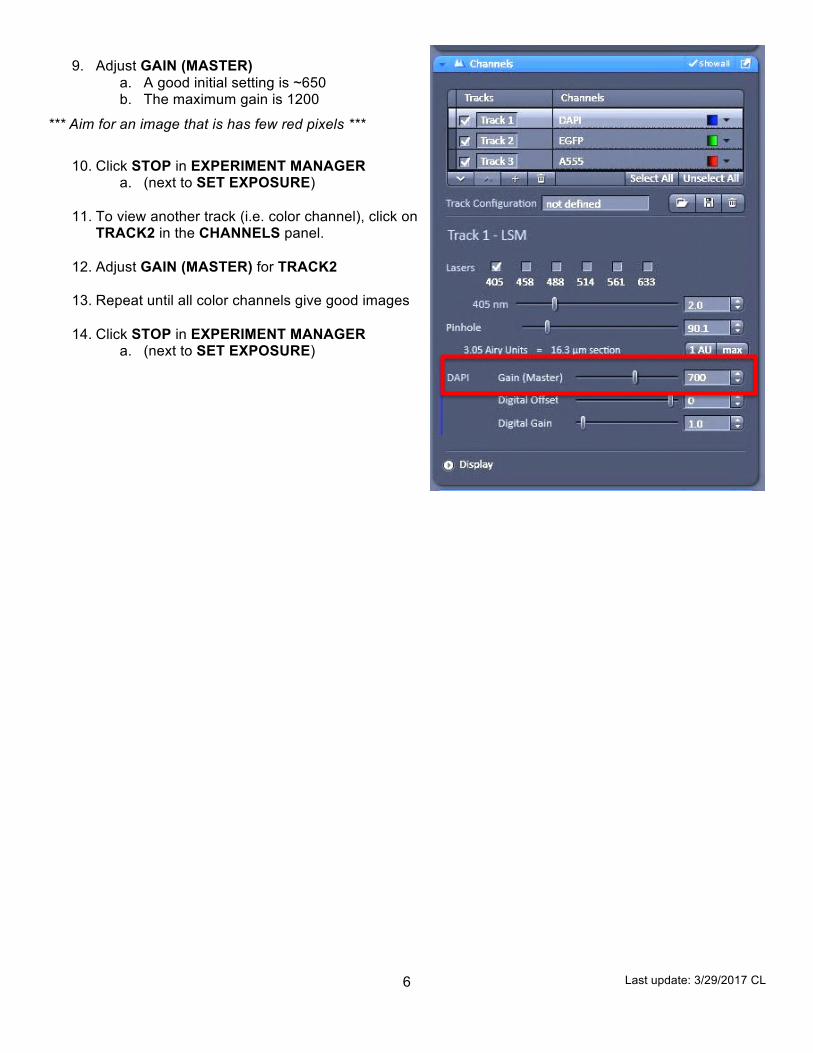
9. Adjust GAIN (MASTER) a. A good initial setting is ~650 b. The maximum gain is 1200
*** Aim for an image that is has few red pixels ***
10. Click STOP in EXPERIMENT MANAGER
a. (next to SET EXPOSURE)
11. To view another track (i.e. color channel), click on TRACK2 in the CHANNELS panel.
12. Adjust GAIN (MASTER) for TRACK2
13. Repeat until all color channels give good images
14. Click STOP in EXPERIMENT MANAGER a. (next to SET EXPOSURE)
Last update: 3/29/2017 CL
7
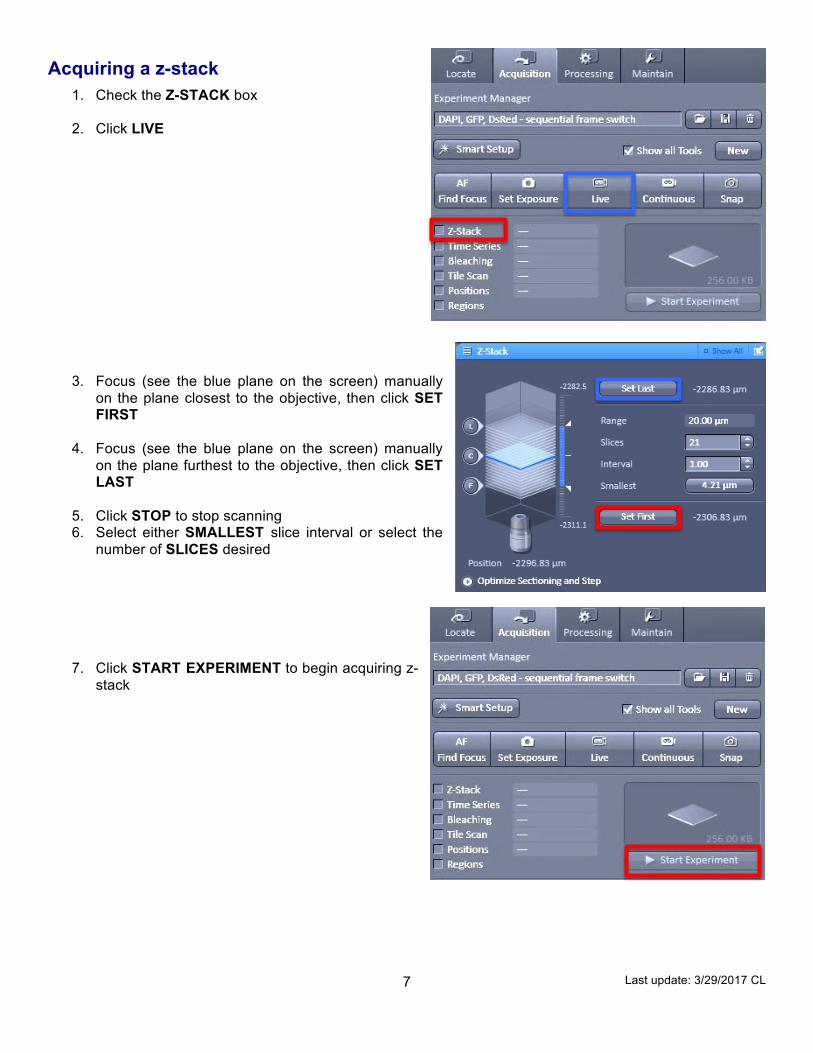
Acquiring a z-stack
1. Check the Z-STACK box
2. Click LIVE
3. Focus (see the blue plane on the screen) manually on the plane closest to the objective, then click SET FIRST
4. Focus (see the blue plane on the screen) manually
on the plane furthest to the objective, then click SET LAST
5. Click STOP to stop scanning 6. Select either SMALLEST slice interval or select the
number of SLICES desired
7. Click START EXPERIMENT to begin acquiring z-stack

Last update: 3/29/2017 CL
8
Tile scan 1. Check the TILE SCAN box
2. Find the TILE SCAN panel
3. Modify number of tiles
4. Choose overlap percentage (10%)
5. Enable ONLINE STITCHING
Crop 1. Click on CROP 2. Adjust the zoom area on your image
3. Go LIVE and then STOP 4. In ACQUISITION MODE, and click on OPTIMAL Frame size to get best resolution

Last update: 3/29/2017 CL
9
Graphics / Overlays 1. Add in:
a. Text b. Scale bar c. Lines d. Arrows e. Boxes f. Circles g. Free draw
Saving your images
1. Click disk icon to save 2. Save to Data / LAB PI NAME / YOUR NAME if saving
locally 3. Please do not store data permanently on computer. It is
not backed up and data folders are periodically deleted 4. Images can be opened using FIJI (ImageJ) 5. Images can be exported as TIFF from the FILE / EXPORT
menu Finishing up Turn off equipment in following order:
6. Close ZEN software 5. Shut down PC 4. Turn off X-Cite light source 3. Argon Laser Remote controller: Flip switch to OFF Position 2. Argon Laser Black Box Power Supply: Turn key to left (counter-clockwise) 1. Main system power:
1C. Flip COMPONENTS switch to OFF position 1B. Flip SYSTEM / PC switch to OFF position
*** WAIT 5 MINUTES TO LET LASER COOL *** (you will hear fan shut off when laser is cool enough)
1A. Flip MAIN SWITCH to OFF position
1. Clean work area 2. Clean any immersion objectives that you used with lens paper
DO NOT USE KIMWIPES! 3. Sign out 4. Put dust cover over microscope

Last update: 3/29/2017 CL
10
ZEN lite for Windows Download ZEN lite, your free copy of the powerful ZEN imaging software. Use this free microscope software to try out key features of the ZEN core package or simply install it as a viewer for your CZI files. Use ZEN lite to: • Control Axiocam microscope cameras • Create microscope images and simple video sequences • Measure distances interactively • Manage images/videos and export them into various formats • View meta information relating to CZI image files • Use simple report functions Expand ZEN lite with selected modules: create impressive multichannel and time lapse images of your specimens or use extended measurement functions.
FIJI (is just imageJ) ImageJ is an open source Java image processing program inspired by NIH Image. It runs on any computer with a Java 1.8 or later virtual machine. Downloadable distributions are available for Windows, Mac OS X and Linux. ImageJ has a strong, established user base, with thousands of plugins and macros for performing a wide variety of tasks.
To download go to:
http://www.zeiss.com/microscopy/en_us/products/microscope-software/zen-lite.html
To download go to:
https://imagej.net/Fiji/Downloads