Query Manager Use V6R1M0 - IBM - United States€¦ · · 2016-03-17Query Manager Use book.. vii...
292
System i Query Manager Use Version 6 Release 1 SC41-5212-07
Transcript of Query Manager Use V6R1M0 - IBM - United States€¦ · · 2016-03-17Query Manager Use book.. vii...

System i
Query Manager Use
Version 6 Release 1
SC41-5212-07
���


System i
Query Manager Use
Version 6 Release 1
SC41-5212-07
���

Note
Before using this information and the product it supports, be sure to read the information in
Appendix E, “Notices,” on page 267.
This edition applies to version 6, release 1, modification 0 of IBM i5/OS (product number 5761-SS1) and to all
subsequent releases and modifications until otherwise indicated in new editions. This version does not run on all
reduced instruction set computer (RISC) models nor does it run on CISC models.
© Copyright International Business Machines Corporation 1998, 2008. All rights reserved.
US Government Users Restricted Rights – Use, duplication or disclosure restricted by GSA ADP Schedule Contract
with IBM Corp.

Contents
About Query Manager Use (SC41–5212) vii
Who should use the Query Manager Use book . . vii
Conventions used in the Query Manager Use book vii
How to use the Query Manager Use book . . . . vii
Prerequisite and related information . . . . . . viii
How to send your comments . . . . . . . . ix
Chapter 1. Introducing Query Manager . 1
What is Query Manager? . . . . . . . . . . 1
General concepts in Query Manager . . . . . . 2
Databases, tables, columns, and rows in Query
Manager . . . . . . . . . . . . . . . 2
Libraries and collections in Query Manager . . . 3
Double-byte character set (DBCS) values in Query
Manager . . . . . . . . . . . . . . . 4
Sort sequence capabilities in Query Manager . . 4
Queries and the SQL language in Query Manager 4
Prompted queries in Query Manager . . . . . 5
Report forms in Query Manager . . . . . . . 5
Active query in Query Manager . . . . . . . 7
Active form in Query Manager . . . . . . . 8
Active data in Query Manager . . . . . . . 8
Sample queries and sample reports in Query
Manager . . . . . . . . . . . . . . . 9
Procedures in Query Manager . . . . . . . 10
Query Manager and relationships to other System i
products . . . . . . . . . . . . . . . 10
Chapter 2. Getting Started with Query
Manager . . . . . . . . . . . . . . 13
Starting DB2 Query Manager . . . . . . . . 13
Exiting from Query Manager . . . . . . . 14
Using the main menu in Query Manager . . . . 14
The work with Query Manager queries display 14
The work with Query Manager report forms
display . . . . . . . . . . . . . . . 15
The work with Query Manager tables display . . 16
The work with Query Manager profiles display 17
Using Query Manager displays . . . . . . . . 17
Entering information through a display in Query
Manager . . . . . . . . . . . . . . 18
Using “Work with” display lists in Query
Manager . . . . . . . . . . . . . . 18
Rules for system name generation in Query
Manager . . . . . . . . . . . . . . 19
Specifying multiple options in Query Manager 20
Using F4 (Prompt) lists in Query Manager . . . 21
Using help and online information in Query
Manager . . . . . . . . . . . . . . . 22
Help for displays in Query Manager . . . . . 22
Help for messages in Query Manager . . . . 22
Using Query Manager function keys . . . . . . 23
Commonly used function keys in Query Manager 23
Messages and errors in Query Manager . . . . . 26
Using the command window in Query Manager . . 28
Naming conventions in Query Manager . . . . . 29
Form and query name conventions in Query
Manager . . . . . . . . . . . . . . 29
Table and file name conventions in Query
Manager . . . . . . . . . . . . . . 29
Column name, field name, and expression name
conventions in Query Manager . . . . . . . 30
Understanding the overflow character (>) in
Query Manager . . . . . . . . . . . . 30
Chapter 3. Working with Query
Manager profiles . . . . . . . . . . 31
What is a Query Manager profile? . . . . . . . 31
Security administrator user access level in Query
Manager . . . . . . . . . . . . . . 31
ALL user access level in Query Manager . . . 32
BASIC user access level in Query Manager . . . 33
The default query manager profile in Query
Manager . . . . . . . . . . . . . . 33
Viewing the additional details display in Query
Manager . . . . . . . . . . . . . . . 42
Changing your Query Manager Profile . . . . . 43
Changing a BASIC access profile in Query
Manager . . . . . . . . . . . . . . 43
Changing an ALL access profile in Query
Manager . . . . . . . . . . . . . . 44
Security administrator tasks in Query Manager . . 45
Using the work with Query Manager profiles
display . . . . . . . . . . . . . . . 45
Creating a Query Manager profile . . . . . . 46
Displaying a Query Manager profile . . . . . 47
Changing a Query Manager profile . . . . . 47
Copying a Query Manager profile . . . . . . 50
Chapter 4. Working with Query
Manager queries . . . . . . . . . . 51
What is a query in Query Manager? . . . . . . 51
Creating a Query Manager query . . . . . . 51
Committing and rolling back changes to the
database . . . . . . . . . . . . . . 51
Using the work with Query Manager queries
display . . . . . . . . . . . . . . . . 52
Copying a query in Query Manager . . . . . . 53
Deleting a query in Query Manager . . . . . . 54
Displaying a query in Query Manager . . . . . 55
Printing a query in Query Manager . . . . . . 58
Renaming a query in Query Manager . . . . . 59
Running a query in Query Manager . . . . . . 60
Chapter 5. Creating and changing
queries in Query Manager . . . . . . 63
Creating and changing a query in Query Manager 63
The difference between prompted and SQL
queries in Query Manager . . . . . . . . 63
© Copyright IBM Corp. 1998, 2008 iii

Changing the query creation mode in Query
Manager . . . . . . . . . . . . . . 64
Testing a query in Query Manager . . . . . . . 64
Running an alternative query in Query Manager 65
Including constants in queries in Query Manager . . 65
Including variables in SQL queries in Query
Manager . . . . . . . . . . . . . . . 66
Creating customized runtime prompts for
variables in Query Manager . . . . . . . . 66
Creating an SQL query through the edit query
display in Query Manager . . . . . . . . . 68
Using the edit query display in Query Manager 71
Prompting for SQL statements in Query Manager 74
Using the edit form function key in Query
Manager . . . . . . . . . . . . . . 77
Using statements in Query Manager . . . . . 77
Creating a prompted query through the define
prompted query display in Query Manager . . . 78
Choosing the tables to include in the query in
Query Manager . . . . . . . . . . . . 80
Defining expressions in Query Manager . . . . 85
Selecting and sequencing columns from the
tables in Query Manager . . . . . . . . . 87
Specifying row selection tests in Query Manager 89
Specifying sort conditions for columns in Query
Manager . . . . . . . . . . . . . . 94
Defining summary functions in Query Manager 95
Choosing to include duplicate rows in Query
Manager . . . . . . . . . . . . . . 97
Specifying a sort sequence in Query Manager . . 98
Defining a report form in Query Manager . . . 99
Saving a query: Using the exit display in Query
Manager . . . . . . . . . . . . . . . 100
Date and time format considerations while
saving a query in Query Manager . . . . . 102
Changing a query in Query Manager . . . . . 102
Converting a prompted query to SQL in Query
Manager . . . . . . . . . . . . . . . 103
Chapter 6. Working with Query
Manager report forms . . . . . . . . 105
What is a Query Manager report form? . . . . . 105
Using the work with Query Manager report forms
display . . . . . . . . . . . . . . . 106
Creating or changing a Query Manager report
form . . . . . . . . . . . . . . . . 107
Testing a report form . . . . . . . . . . 109
Editing or displaying the active query . . . . 110
Loading default values from the active query in
Query Manager . . . . . . . . . . . . 110
Formatting the columns in the report form in
Query Manager . . . . . . . . . . . . 111
Specifying page headings and footings in Query
Manager . . . . . . . . . . . . . . 117
Specifying text for the end of the report in
Query Manager . . . . . . . . . . . 120
Specifying text for each report break in Query
Manager . . . . . . . . . . . . . . 122
Specifying formatting options for the report in
Query Manager . . . . . . . . . . . 126
Copying a report form in Query Manager . . . . 127
Deleting a report form in Query Manager . . . . 128
Displaying a report form in Query Manager . . . 129
Printing a report form in Query Manager . . . . 131
Renaming a report form in Query Manager . . . 132
Running a report in Query Manager . . . . . . 133
Chapter 7. Running queries and
reports in Query Manager . . . . . . 135
Running a query or report in Query Manager . . 135
Running a query in batch mode in Query
Manager . . . . . . . . . . . . . . 135
Specifying run options in Query Manager . . . . 136
Using the run query display in Query Manager 136
Displaying query output in Query Manager . . . 140
Leaving the display report display in Query
Manager . . . . . . . . . . . . . . 141
Date and time format considerations in Query
Manager . . . . . . . . . . . . . . . 141
Running a query against databases from non-i5/OS
databases in Query Manager . . . . . . . . 142
Chapter 8. Working with Query
Manager tables . . . . . . . . . . 145
What are Query Manager tables? . . . . . . . 145
Using the work with Query Manager tables display 146
Specifying a collection for Query Manager
tables . . . . . . . . . . . . . . . 148
Creating a table in Query Manager . . . . . . 149
Defining table columns in Query Manager . . 151
Supported data types in Query Manager . . . 152
The difference between DECIMAL and
NUMERIC in Query Manager . . . . . . . 154
The difference between CHARACTER and
VARCHAR in Query Manager . . . . . . . 154
Default values for data types in Query Manager 154
NULL values in Query Manager . . . . . . 154
Adding data to a table in Query Manager . . . . 155
Adding DBCS data to a table in Query Manager 156
Viewing display type/length information in
Query Manager . . . . . . . . . . . 157
Changing data in a table in Query Manager . . . 157
Searching for rows in Query Manager . . . . 158
Changing the data in Query Manager . . . . 160
Displaying data in a table in Query Manager . . . 162
Copying a table in Query Manager . . . . . . 163
Deleting a table in Query Manager . . . . . . 166
Displaying a table in Query Manager . . . . . 167
Printing a table in Query Manager . . . . . . 168
Renaming a table in Query Manager . . . . . 169
Displaying a table definition in Query Manager 170
Chapter 9. Distributed Relational
Database Architecture in Query
Manager . . . . . . . . . . . . . 173
Remote unit of work (RUW) in Query Manager
DRDA . . . . . . . . . . . . . . . . 173
Distributed unit of work (DUW) in Query Manager
DRDA . . . . . . . . . . . . . . . . 173
iv Query Manager Use V6R1M0
Connection management statements in Query
Manager DRDA . . . . . . . . . . . . 173
Connection management in Query Manager DRDA 173
Default activation group and Query Manager
DRDA . . . . . . . . . . . . . . . . 174
Connecting to a relational database in Query
Manager DRDA . . . . . . . . . . . . 174
Displaying a connection list and connection status
in Query Manager DRDA . . . . . . . . . 174
Understanding conversation type, read-only, and
status fields in Query Manager DRDA . . . . . 177
Conversation type in Query Manager DRDA 177
Read-only in Query Manager DRDA . . . . 178
Status in Query Manager DRDA . . . . . . 178
Connection management considerations in Query
Manager DRDA . . . . . . . . . . . . 178
Profile in Query Manager DRDA . . . . . . . 178
Work with tables connections in Query Manager
DRDA . . . . . . . . . . . . . . . . 179
Prompted query in Query Manager DRDA . . . 179
Outfile processing in Query Manager DRDA . . . 179
SET transaction considerations in Query Manager
DRDA . . . . . . . . . . . . . . . . 179
Appendix A. Practice exercises for
Query Manager . . . . . . . . . . 181
Exercise: Working with tables in Query Manager 181
Exercise: Before you begin tables in Query
Manager . . . . . . . . . . . . . . 181
Exercise: Creating a table named with 18
characters or less in Query Manager . . . . . 182
Exercise: Creating a table named with 19
characters or more in Query Manager . . . . 186
Exercise: Adding data to a table in Query
Manager . . . . . . . . . . . . . . 188
Exercise: Displaying a table in Query Manager 190
Exercise: Creating a new table from a copy in
Query Manager . . . . . . . . . . . 192
Exercise: Changing the definition of a copied
table in Query Manager . . . . . . . . . 194
Exercise: Changing data in a table . . . . . 196
Exercise: Viewing table definitions in Query
Manager . . . . . . . . . . . . . . 202
Exercise: Deleting a table in Query Manager . . 203
Exercise: Working with queries and report forms in
Query Manager . . . . . . . . . . . . 203
Exercise: Before you begin queries and reports
in Query Manager . . . . . . . . . . . 204
Exercise: Creating a prompted query in Query
Manager . . . . . . . . . . . . . . 204
Exercise: Creating an SQL query in Query
Manager . . . . . . . . . . . . . . 210
Exercise: Using the exit display to save a query
in Query Manager . . . . . . . . . . . 213
Exercise: Running a query to creating active
data in Query Manager . . . . . . . . . 214
Exercise: Creating a report form in Query
Manager . . . . . . . . . . . . . . 216
Exercise: Displaying a report in Query Manager 225
Exercise: Changing a prompted query in Query
Manager . . . . . . . . . . . . . . 226
Exercise: Changing an SQL query in Query
Manager . . . . . . . . . . . . . . 229
Exercise: Running the changed query in Query
Manager . . . . . . . . . . . . . . 230
Exercise: Exiting without saving the query or
report form in Query Manager . . . . . . 231
Exercise: Deleting a query in Query Manager 232
Appendix B. Query Manager
statements . . . . . . . . . . . . 235
COMMIT in Query Manager . . . . . . . . 235
Authorization . . . . . . . . . . . . 236
Syntax of COMMIT in Query Manager . . . . 236
Examples of COMMIT statement in Query
Manager . . . . . . . . . . . . . . 236
CONNECT in Query Manager . . . . . . . . 236
Authorization . . . . . . . . . . . . 237
Syntax of CONNECT in Query Manager . . . 237
Examples of the CONNECT Statement under
RUW connection management in Query
Manager . . . . . . . . . . . . . . 237
Examples of the CONNECT statement under
DUW connection management in Query
Manager . . . . . . . . . . . . . . 238
DISCONNECT in Query Manager . . . . . . 238
Authorization . . . . . . . . . . . . 238
Syntax of DISCONNECT in Query Manager . . 238
Examples of the DISCONNECT statement in
Query Manager . . . . . . . . . . . 239
DISPLAY in Query Manager . . . . . . . . 239
Authorization . . . . . . . . . . . . 239
Syntax of DISPLAY in Query Manager . . . . 239
Examples of DISPLAY statement in Query
Manager . . . . . . . . . . . . . . 240
DRAW in Query Manager . . . . . . . . . 240
Authorization . . . . . . . . . . . . 240
Syntax of DRAW in Query Manager . . . . . 241
Examples of DRAW Statement in Query
Manager . . . . . . . . . . . . . . 241
ERASE in Query Manager . . . . . . . . . 241
Authorization . . . . . . . . . . . . 241
Syntax of ERASE in Query Manager . . . . . 242
Examples of ERASE statement in Query
Manager . . . . . . . . . . . . . . 242
EXPORT in Query Manager . . . . . . . . 242
Authorization . . . . . . . . . . . . 242
Syntax of EXPORT in Query Manager . . . . 243
Examples of EXPORT statement in Query
Manager . . . . . . . . . . . . . . 244
IMPORT in Query Manager . . . . . . . . 244
Authorization . . . . . . . . . . . . 244
Syntax of IMPORT in Query Manager . . . . 246
Examples of IMPORT statement in Query
Manager . . . . . . . . . . . . . . 248
PRINT in Query Manager . . . . . . . . . 248
Authorization . . . . . . . . . . . . 248
Syntax of PRINT in Query Manager . . . . . 249
Examples of PRINT statement in Query
Manager . . . . . . . . . . . . . . 250
RELEASE in Query Manager . . . . . . . . 250
Authorization . . . . . . . . . . . . 250
Contents v

Syntax of RELEASE in Query Manager . . . . 251
Examples of the RELEASE statement in Query
Manager . . . . . . . . . . . . . . 251
RUN in Query Manager . . . . . . . . . . 251
Authorization . . . . . . . . . . . . 251
Syntax of RUN in Query Manager . . . . . 252
Examples of RUN statement in Query Manager 253
SAVE DATA AS in Query Manager . . . . . . 253
Authorization . . . . . . . . . . . . 253
Syntax of SAVE DATA AS in Query Manager 254
Examples of SAVE DATA AS statement in
Query Manager . . . . . . . . . . . 254
SAVE FORM AS in Query Manager . . . . . . 254
Authorization . . . . . . . . . . . . 255
Syntax of SAVE FORM AS in Query Manager 255
Examples of SAVE FORM statement in Query
Manager . . . . . . . . . . . . . . 256
SAVE QUERY AS in Query Manager . . . . . 256
Authorization . . . . . . . . . . . . 256
Syntax of SAVE QUERY AS in Query Manager 256
Examples of SAVE QUERY AS statement in
Query Manager . . . . . . . . . . . 257
SET CONNECTION in Query Manager . . . . 257
Authorization . . . . . . . . . . . . 257
Syntax of SET CONNECTION in Query
Manager . . . . . . . . . . . . . . 257
Examples of the SET CONNECTION statement
in Query Manager . . . . . . . . . . . 258
Appendix C. Implications of allowed
SQL statements in Query Manager . . 259
Appendix D. Example: Sort sequence
in Query Manager . . . . . . . . . 261
Example: Sort sequence usages in Query Manager 261
Example: Sorting in Query Manager . . . . . 261
Example: Record selection in Query Manager 262
Example: Report breaks in Query Manager . . 263
Example: Grouping in Query Manager . . . . 265
Appendix E. Notices . . . . . . . . 267
Programming interface information . . . . . . 268
Trademarks . . . . . . . . . . . . . . 269
Index . . . . . . . . . . . . . . . 271
vi Query Manager Use V6R1M0
About Query Manager Use (SC41–5212)
DB2® Query Manager is a database access and manipulation system suitable for use with all IBM®
System i™ models. This guide tells you how to use Query Manager to:
v Create, maintain, and run queries
v Create, maintain, and use report forms that format query output
v Create, maintain, and use database tables
To make full use of the tools that Query Manager provides, use this guide together with the online help
that is available through all Query Manager displays.
Who should use the Query Manager Use book
This book is written for any i5/OS® user who wants to create and run queries, produce reports, or
manipulate data in a database.
To use this guide effectively, you should be familiar with the features of your display station and with the
basic tasks of entering information and making selections from lists. It is also helpful (but not essential)
to be familiar with the DB2 for i5/OS SQL language, and to have an understanding of the basic concepts
behind databases and report formatting.
Conventions used in the Query Manager Use book
This guide presents examples of Query Manager displays as they appear to users who have an ALL user
access level and are using SQL naming conventions.
For many of the Query Manager displays, the options and function keys that are shown differ depending
on the user access level. For example, users with an ALL access can create, change, display, print, and run
queries, while users with BASIC access can only display, print, and run queries. (The create and change
options are not shown on the query displays for BASIC access users.) The default user access level is
ALL. Displays included in this guide show the options and function keys that an ALL user sees.
Through your Query Manager profile, you can specify whether you want to use SQL or SYS (system)
naming conventions. This guide uses SQL conventions in both the displays and the text, so that collection,
table, column, and row are used rather than library, file, field, and record.
How to use the Query Manager Use book
The following table should help you to quickly find the information you need to perform a specific task.
If you want to perform a task that is not listed in this table, turn to the Contents (at the beginning of this
guide) or the Index (at the end of this guide) for a more complete listing of topics.
Table 1. Using This Book
When you want to: Turn to:
Read about Query Manager Page 1
Start using Query Manager Page 13
Perform practice exercises Page 181
Create SQL queries Page 68
Create prompted queries Page 78
Convert a prompted query to SQL Page 103
© Copyright IBM Corp. 1998, 2008 vii

Table 1. Using This Book (continued)
When you want to: Turn to:
Run queries Page 135
Maintain queries Page 52
Specify a sort sequence Page 98
Format query results (using report forms) Page 107
Maintain report forms Page 106
Run procedures Page 251
View a list of allowed SQL statements Page 48
Read about the implications of allowed statements Page 259
Create Query Manager tables Page 149
Add data to tables Page 155
Print or view table data Page 167, 168
Maintain tables Page 146
Read about your Query Manager profile Page 33
Adjust the settings in your profile Page 43
View profile settings you cannot change Page 42
Read about Query Manager (QM) statements Page 235
Enter QM statements or system commands Page 28
Connect to remote databases Page 174
Find other specific information in this guide Contents, Index
Prerequisite and related information
Use the IBM i5/OS Information Center as your starting point for IBM System i technical information.
You can access the information center two ways:
v From the following Web site:
http://www.ibm.com/systems/i/infocenter/
v From the i5/OS Information Center CD, SK3T-4091. This CD-ROM is included with your new System i
hardware or i5/OS software upgrade order. You can also order the CD-ROM from the IBM
Publications Center:
http://www.ibm.com/shop/publications/order
The i5/OS Information Center contains new and updated system information, such as software and
hardware installation, Linux®, WebSphere®, Java™, high availability, database, logical partitions, CL
commands, and system application programming interfaces (APIs). In addition, it provides advisors and
finders to assist in planning, troubleshooting, and configuring your system hardware and software.
With every new hardware order, you receive the System i Access for Windows DVD, SK3T-4098. This DVD
provides for the installation of the IBM System i Access for Windows® licensed program. System i Access
Family offers client and server capabilities for connecting PCs to System i models.
viii Query Manager Use V6R1M0
How to send your comments
Your feedback is important in helping to provide the most accurate and high-quality information. If you
have any comments about this book or any other System i documentation, fill out the readers’ comment
form at the back of this book.
v If you prefer to send comments by mail, use the readers’ comment form with the address that is
printed on the back. If you are mailing a readers’ comment form from a country or region other than
the United States, you can give the form to the local IBM branch office or IBM representative for
postage-paid mailing.
v If you prefer to send comments by FAX, use either of the following numbers:
– United States, Canada, and Puerto Rico: 1-800-937-3430
– Other countries or regions: 1-507-253-5192v If you prefer to send comments electronically, use one of these e-mail addresses:
– Comments on books:
[email protected]– Comments on the i5/OS Information Center:
Be sure to include the following:
v The name of the book or i5/OS Information Center topic.
v The publication number of a book.
v The page number or topic of a book to which your comment applies.
About Query Manager Use (SC41–5212) ix

x Query Manager Use V6R1M0
Chapter 1. Introducing Query Manager
This chapter begins with a description of Query Manager, explaining what it is, and how to use it to
perform different tasks and functions. Following the description are definitions of some of the terms and
concepts used with Query Manager that you might not be familiar with. The chapter ends with an
explanation of how Query Manager relates to other System i products.
What is Query Manager?
DB2 Query Manager, part of the IBM DB2 Query Manager and SQL Development Kit for i5/OS licensed
program, is a collection of tools you can use to obtain information from DB2 for i5/OS databases.
You use Query Manager to select, arrange, and analyze information stored in one or more database
tables, to produce reports or new tables. You can create and run your own query definitions, or you can
run existing queries that you did not create. You can format the way that retrieved query information is
presented by creating a report form, and applying it when you run a query, or you can let Query
Manager format the query information for you, using a simple default report form.
Query Manager queries are created using the DB2 for i5/OS SQL language. If you have little or no
experience using the DB2 for i5/OS SQL language, you can still create and change queries using Query
Manager’s prompted query creation mode. A series of displays prompt you to enter all of the information
that DB2 for i5/OS needs to create a query.
Query Manager queries can obtain information from a single table or from as many as 32 tables. You can
select all the table columns, or only a few of the columns, and organize them for the type of output
chosen. You can have all table rows in the output, or you can select only a few to be included, using row
selection tests. You can also use report breaks and arithmetic summary functions to include additional
information in your report, and make it easier to read.
You determine what data the query is to retrieve, the format of the report, and whether the output
should be displayed, printed, or sent to another database table.
When you send query output to a database table, you can create a new table. You can also create and
maintain database tables using Query Manager’s prompt-guided tables option.
Another way of creating tables is through Query Manager’s command window. Using the command
window, you can enter Query Manager statements and system commands to perform tasks such as:
v Creating and saving queries
v Running queries
v Connecting to other databases
v Importing and exporting objects
v Running procedures that were created outside Query Manager
All of these features are described in detail in this book.
DB2 Query Manager can gather information from any database table in the network if the database is
known to the system. Database tables must be defined on the system using i5/OS data description
specifications (DDS), the i5/OS interactive data definition utility (IDDU), or DB2 for i5/OS. Query
Manager uses DB2 for i5/OS query management to manage query objects (*QMQRY) and report form
objects (*QMFORM).
© Copyright IBM Corp. 1998, 2008 1

General concepts in Query Manager
The following concepts and terms are used throughout Query Manager, and are referred to in this guide.
Read through these definitions to gain a better understanding of the way Query Manager works.
“Databases, tables, columns, and rows in Query Manager”
“Libraries and collections in Query Manager” on page 3
“Double-byte character set (DBCS) values in Query Manager” on page 4
“Sort sequence capabilities in Query Manager” on page 4
“Queries and the SQL language in Query Manager” on page 4
“Prompted queries in Query Manager” on page 5
“Report forms in Query Manager” on page 5
“Active query in Query Manager” on page 7
“Active form in Query Manager” on page 8
“Active data in Query Manager” on page 8
“Sample queries and sample reports in Query Manager” on page 9
“Procedures in Query Manager” on page 10
Databases, tables, columns, and rows in Query Manager
The DB2 for i5/OS database is a relational database that stores information at the most basic level in the
table format. A database can be compared to a filing cabinet:
v The cabinet can have any number of drawers (libraries or collections).
v Each drawer contains folders (tables).
v Each folder contains pieces of paper (rows).
v All pieces of paper in a given folder are identical “fill-in-the-blanks” forms.
When you start Query Manager, you are connected to the database specified in your Query Manager
profile (see “Relational database connection in Query Manager” on page 37). You might also be able to
connect to other databases using the Query Manager CONNECT statement (see page 236) or SET
CONNECTION statement (see page 257). For DRDA® considerations, see Figure 101 on page 175.
The data in a table is arranged in columns and rows:
v Columns of a table identify particular types of information. Each column of a row is related in some
way to all the other columns for that row. A column must be of a particular data type, such as
CHARACTER, DECIMAL, DATE, or TIME. For example, the values in a column of employee salaries
would all be DECIMAL. Each column is identified by a column name.
v Rows contain the actual data of a table. Each row is a sequence of values, one for each column of the
table; it is a group of related data treated as a unit. The data in a row must conform to the column
data types defined for the table. There is no inherent order of the rows within a table.
2 Query Manager Use V6R1M0
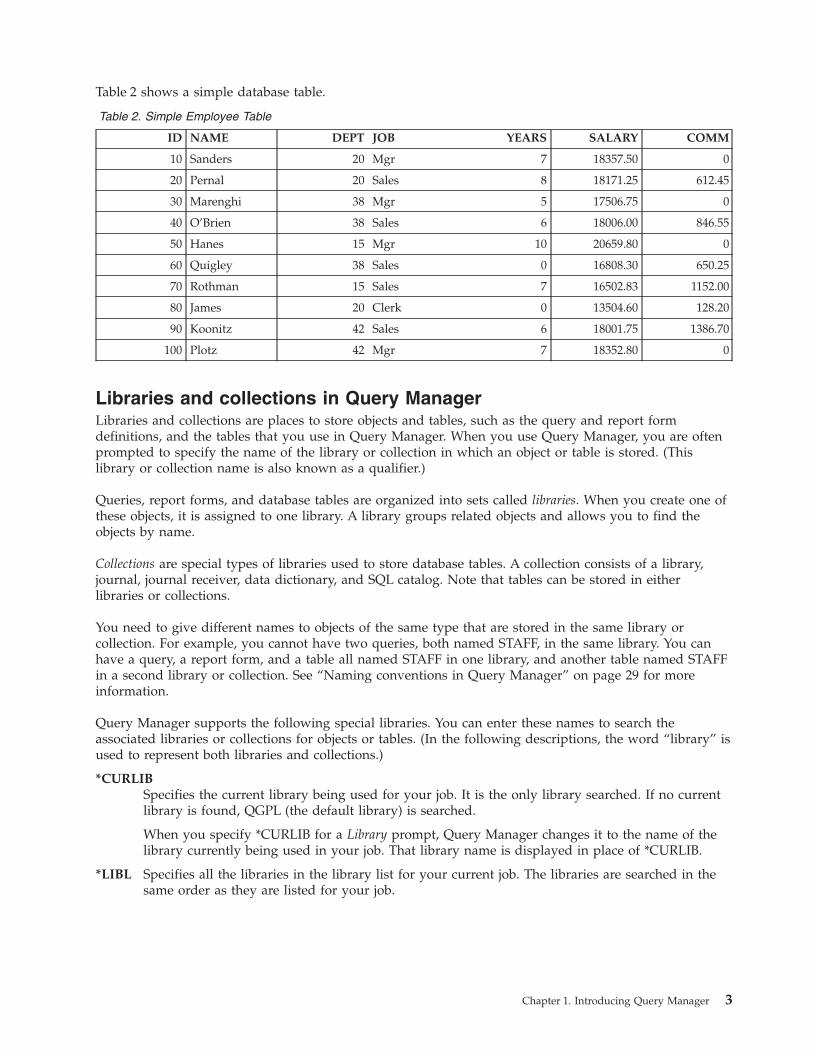
Table 2 shows a simple database table.
Table 2. Simple Employee Table
ID NAME DEPT JOB YEARS SALARY COMM
10 Sanders 20 Mgr 7 18357.50 0
20 Pernal 20 Sales 8 18171.25 612.45
30 Marenghi 38 Mgr 5 17506.75 0
40 O’Brien 38 Sales 6 18006.00 846.55
50 Hanes 15 Mgr 10 20659.80 0
60 Quigley 38 Sales 0 16808.30 650.25
70 Rothman 15 Sales 7 16502.83 1152.00
80 James 20 Clerk 0 13504.60 128.20
90 Koonitz 42 Sales 6 18001.75 1386.70
100 Plotz 42 Mgr 7 18352.80 0
Libraries and collections in Query Manager
Libraries and collections are places to store objects and tables, such as the query and report form
definitions, and the tables that you use in Query Manager. When you use Query Manager, you are often
prompted to specify the name of the library or collection in which an object or table is stored. (This
library or collection name is also known as a qualifier.)
Queries, report forms, and database tables are organized into sets called libraries. When you create one of
these objects, it is assigned to one library. A library groups related objects and allows you to find the
objects by name.
Collections are special types of libraries used to store database tables. A collection consists of a library,
journal, journal receiver, data dictionary, and SQL catalog. Note that tables can be stored in either
libraries or collections.
You need to give different names to objects of the same type that are stored in the same library or
collection. For example, you cannot have two queries, both named STAFF, in the same library. You can
have a query, a report form, and a table all named STAFF in one library, and another table named STAFF
in a second library or collection. See “Naming conventions in Query Manager” on page 29 for more
information.
Query Manager supports the following special libraries. You can enter these names to search the
associated libraries or collections for objects or tables. (In the following descriptions, the word “library” is
used to represent both libraries and collections.)
*CURLIB
Specifies the current library being used for your job. It is the only library searched. If no current
library is found, QGPL (the default library) is searched.
When you specify *CURLIB for a Library prompt, Query Manager changes it to the name of the
library currently being used in your job. That library name is displayed in place of *CURLIB.
*LIBL Specifies all the libraries in the library list for your current job. The libraries are searched in the
same order as they are listed for your job.
Chapter 1. Introducing Query Manager 3

Double-byte character set (DBCS) values in Query Manager
Some countries use pictograms or symbolic characters in their language. DBCS data types must be used
for these values. Usually, if your national language uses alphabetic letters instead of DBCS characters,
your tables do not contain DBCS data. You can ignore any online help that refers to DBCS data.
You can include DBCS characters in query definitions, and in the headings and footings for report forms.
You can also enter DBCS characters in Query Manager tables for columns that are defined with the
GRAPHIC or VARGRAPHIC data types. If your system is DBCS-capable, you can also enter DBCS
characters for columns that are defined with the CHARACTER and VARCHAR data types. See “Adding
DBCS data to a table in Query Manager” on page 156 for more information.
Note: To properly display DBCS data, you need a DBCS-capable display station.
Sort sequence capabilities in Query Manager
Sorting and comparing character data are complex operations in query and report functions. Query
Manager gives you four sort sequence tables to choose from when you create a query:
v You can choose to use the hexadecimal codes of the characters in the character set you are using. When
you use the hexadecimal codes, all the lowercase characters sort before (have lower values than) the
uppercase characters. For example, the characters AbBa sort as abAB. The code for the hexadecimal sort
sequence is *HEX.
v You can choose a sort sequence table that you previously created. You can create a sort sequence table
with the Create Table (CRTTBL) CL command.
v You can select either of two sort sequences associated with the language that is appropriate for query.
The two system-supplied sort sequences are:
*LANGIDSHR
Certain characters in this sort sequence table have the same collating weight. The uppercase
and lowercase versions of a letter share the same value.
*LANGIDUNQ
All characters in this sort sequence table have unique collating weights. This table differs from
the hexadecimal code in that uppercase and lowercase letters have collating weights adjacent to
each other. When using this table, the lowercase characters precede the comparative uppercase
characters.
Appendix D, “Example: Sort sequence in Query Manager,” on page 261 shows several examples of uses
for the *HEX, *LANGIDSHR, and *LANGIDUNQ sort sequences.
Queries and the SQL language in Query Manager
In general terms, a query is a question asked of the database. For example, you use a query to get
information from database tables to produce a report. All queries created in Query Manager are written
in the DB2 for i5/OS SQL language. Most of the queries you write or run are SQL SELECT statements
that generate reports on existing database information. Query Manager queries can contain all interactive
SQL statements except for the CONNECT, DISCONNECT, RELEASE, and SET CONNECTION
statements.
The following example shows a simple query that extracts information from the sample table shown on
page 3.
SELECT DEPT, NAME, JOB, SALARY, COMM
FROM MYCOLL.STAFF
WHERE DEPT = 20 OR DEPT = 38
ORDER BY DEPT, JOB
This means:
4 Query Manager Use V6R1M0

v SELECT the values from the columns named DEPT, NAME, JOB, SALARY, and COMM
v FROM the table named STAFF in the MYCOLL collection
v For each row WHERE the value in the row’s DEPT column is either 20 OR 38
v Sort the results in ORDER BY the values in the DEPT column, and within each DEPT sort in order by
the values in the JOB column.
The results of running this query are shown in Figure 1.
Prompted queries in Query Manager
Users with little or no experience in using the SQL language can create and change SELECT statement
queries using Query Manager’s prompted query creation mode. See “Queries and the SQL language in
Query Manager” on page 4 for an example of a SELECT statement query.
A series of displays are shown, with prompts that ask you to enter all of the information that Query
Manager needs to create the query. Answer the prompts shown on these displays to create a prompted
query.
The values that you can enter in response to the prompts are shown on the displays. Additional
information about the prompts and values is available by pressing F1 (Help) or F4 (Prompt).
Prompted query is started from the Work with Query Manager Queries display, by selecting one of the
following options:
1=Create
(if your current query creation mode is prompted)
2=Change
(if the query was last saved as a prompted query)
5=Display
(if the query was last saved as a prompted query)
See “Creating a prompted query through the define prompted query display in Query Manager” on page
78 for more information.
Report forms in Query Manager
While a query is a question asked of the database, a report form specifies the format of the answer. The
report itself is the result of applying a report form to the data generated by running a query.
If you run the example query shown on page 4 without specifying a report form, Query Manager
generates a default report form and produces a simple report, as shown in Figure 1. This default report
form is referred to as *SYSDFT, the system default form.
DEPT NAME JOB SALARY COMM
---- ------------ -------- ----------- ----------
20 James Clerk 13504.60 128.20
20 Sanders Mgr 18357.50 0
20 Pernal Sales 18171.25 612.45
38 Abrahams Clerk 12009.75 236.50
38 Naughton Clerk 12954.75 180.00
38 Marenghi Mgr 17506.75 0
38 O’Brien Sales 18006.00 846.55
38 Quigley Sales 16808.30 650.25
Figure 1. Report Using Default Report Form
Chapter 1. Introducing Query Manager 5
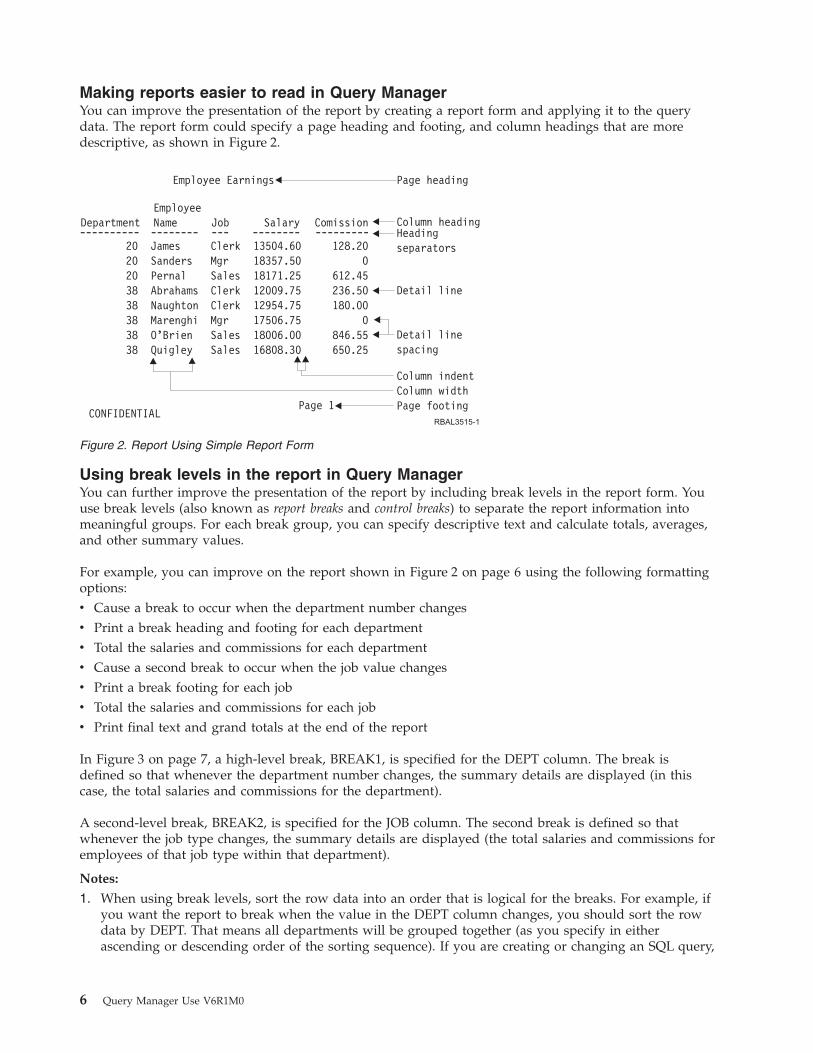
Making reports easier to read in Query Manager
You can improve the presentation of the report by creating a report form and applying it to the query
data. The report form could specify a page heading and footing, and column headings that are more
descriptive, as shown in Figure 2.
Using break levels in the report in Query Manager
You can further improve the presentation of the report by including break levels in the report form. You
use break levels (also known as report breaks and control breaks) to separate the report information into
meaningful groups. For each break group, you can specify descriptive text and calculate totals, averages,
and other summary values.
For example, you can improve on the report shown in Figure 2 on page 6 using the following formatting
options:
v Cause a break to occur when the department number changes
v Print a break heading and footing for each department
v Total the salaries and commissions for each department
v Cause a second break to occur when the job value changes
v Print a break footing for each job
v Total the salaries and commissions for each job
v Print final text and grand totals at the end of the report
In Figure 3 on page 7, a high-level break, BREAK1, is specified for the DEPT column. The break is
defined so that whenever the department number changes, the summary details are displayed (in this
case, the total salaries and commissions for the department).
A second-level break, BREAK2, is specified for the JOB column. The second break is defined so that
whenever the job type changes, the summary details are displayed (the total salaries and commissions for
employees of that job type within that department).
Notes:
1. When using break levels, sort the row data into an order that is logical for the breaks. For example, if
you want the report to break when the value in the DEPT column changes, you should sort the row
data by DEPT. That means all departments will be grouped together (as you specify in either
ascending or descending order of the sorting sequence). If you are creating or changing an SQL query,
Figure 2. Report Using Simple Report Form
6 Query Manager Use V6R1M0

you sort row data using the ORDER BY clause of the SELECT statement. If you are creating or
changing a prompted query, you sort row data using the Select Sort Columns display.
2. Columns for which you specify break levels are not automatically shown on the left of the report, and
the columns for which you specify summaries are not automatically shown on the right. To make
your report more readable, you can specify a column sequence in the report form definition so that
break columns appear on the left of the report, and columns with summary data appear on the right.
Figure 3 shows two break levels, and the features described on page 6.
Report formatting is described in detail in “Creating or changing a Query Manager report form” on page
107.
Active query in Query Manager
The active query is the last query that was created, changed, or run in the current Query Manager
session. Query Manager uses the active query as the default when you choose to run a query or report.
When you create or change a query, you are always prompted to save it before any action is processed
that would otherwise cancel or replace the query. Note that a query run as the result of running a
procedure does not change the active query.
Figure 3. Report Using Report Form with Two Break Levels
Chapter 1. Introducing Query Manager 7
Active form in Query Manager
The active form is the last report form that was created, changed, or used to produce a report in the
current Query Manager session. Query Manager uses the active form as the default when you choose to
run a query or report.
When you create or change a report form, you are always prompted to save it before any action is
processed that would otherwise cancel or replace the report form. Note that a report form used to
produce a report as the result of running a procedure does not change the active form.
Active data in Query Manager
The active data is the data most recently retrieved from a database as the result of interactively running
an SQL SELECT statement query or prompted query. Active data is useful when you create or change a
report form, and when you display or run a report.
When you create or change a report form, active data can provide default values for the column
formatting, such as column headings and widths. You can also use the active data to display the report.
You do not need to run a query each time you want to see how the report formatting values are affecting
the appearance of the report. Run the query once to create active data; then when you display the report,
Query Manager formats the active data using the report form, as long as the active data matches the
report form. For the active data to match the report form, they need to contain the same number of
columns, and the columns need to have compatible data types.
You can also use active data to run a report. When you select option 9 (Run report) from the Work with
Query Manager Report Forms display, a prompt display asks you either to enter the name of the query
you want to run, or to specify that you want to produce the report using the active data. You do not need
to re-run a query if active data already exists.
The active data is not necessarily related to the active query. For example, you might first run query A.
Query A becomes the active query and active data is produced. If you then choose to change query B,
query B becomes the active query, but the active data remains unaffected because no new query has yet
been run.
Active data is not affected when:
v You run an SQL query that does not contain a SELECT statement
v You run an SQL SELECT statement query or prompted query in batch mode
v An SQL SELECT statement query or prompted query is run as the result of running a procedure
Sample active data in Query Manager
Active data is created when an SQL SELECT statement query or prompted query is run interactively.
Some queries take a long time to run: for example, those that are complex or retrieve a large number of
rows from the database. If you do not require full active data, you can save time by running these
queries using the sample restriction, and create sample active data.
When you run an SQL SELECT statement query or prompted query, you can specify that you want it to
retrieve a sample number of rows only. You specify the number of rows to include in the sample
(between 1 and 100) through your Query Manager profile (see “Number of rows to use for sample in
Query Manager” on page 36). Sample queries are always run in interactive mode. The sample active data
that results from a query run in this way is always output to display; it cannot be printed or written to
another table. See “Sample queries and sample reports in Query Manager” on page 9 for more
information.
Note: If “Allow interactive sample run” is set to NO in your Query Manager profile, you cannot run
queries using the sample restriction. See page 36 for more information.
8 Query Manager Use V6R1M0

Incomplete active data in Query Manager
There may be times when you expect to run a full SQL SELECT statement query or prompted query, but
you end up with incomplete data. This is not the same as sample data. When you run queries
interactively, a limit can be placed on the maximum number of rows that can be retrieved from the
database. This limit is determined by your Query Manager profile. See “Maximum number of rows
allowed on interactive run in Query Manager” on page 36.
If Query Manager retrieves the maximum number of rows before it completes the query, a message
appears at the bottom of the display informing you that:
Maximum number of records reached. Data is incomplete.
When this happens, final summary functions such as SUM, AVERAGE, and COUNT are omitted from
your report.
Sample queries and sample reports in Query Manager
When you run an SQL SELECT statement query or prompted query, you can choose to retrieve from the
database either all of the rows specified by the query, or a limited number of rows (a sample). You set the
sample number of rows you want to retrieve (between 1 and 100) through your Query Manager profile.
See “Number of rows to use for sample in Query Manager” on page 36.
When you do not require full active data, you can save time by running queries using the sample
restriction, and creating sample active data. Sample queries are always run in interactive mode. The
output from a sample query or report is always shown on your display; it cannot be printed or written to
another table.
Note: If “Allow interactive sample run” is set to NO in your Query Manager profile, you cannot run
queries or reports using the sample restriction. See page 36 for more information.
Sample reports are produced when you apply a report form to data retrieved by a sample query. Sample
reports are useful when the main purpose for producing the report is one of the following:
v To confirm that the data selected by a particular query is the correct data for your purpose
v To see how a particular report form arranges the report data
Sample queries and reports can be run and displayed in several ways:
v Run a query by choosing option 9 (Run) from either the Work with Query Manager Queries or (Run
report) Work with Query Manager Report Forms display, and set “Run sample only” to YES (see page
138).
v Press F6 (Run sample) from any of the following displays:
– Edit Query or Display Query display
– Any Define Prompted Query or Display Prompted Query display
(See pages 55 and 64.)
v Press F5 from any of the Select Report Format or Display Report Format displays where that key is
labeled (Display sample) rather than (Display report) or (Run report). This happens when the active
data is the result of a sample query (see pages 109 and 129).
v Press F5 from any of the Select Report Format or Display Report Format displays where that key is
labeled (Run report) rather than (Display report) or (Display sample). This happens when there is no
active data. Set “Run sample only” to YES (see pages 109, 129, and 138).
v If “Display run options” is set to YES in your Query Manager profile, press F5 (Run report) from any
of the following displays; then set “Run sample only” to YES:
– Edit Query or Display Query display
– Any Define Prompted Query or Display Prompted Query display
Chapter 1. Introducing Query Manager 9

(See pages 55, 64, and 138.)
v Issue the DISPLAY SAMPLE statement on the Query Manager statement line (see page 239).
Note: When you run a query or report using the sample restriction, final summary functions such as
SUM, AVERAGE, and COUNT are omitted from your report.
Procedures in Query Manager
You use procedures to run a set of Query Manager statements with a single RUN statement. You might
find yourself running queries and producing reports over and over again that use the same Query
Manager statements. If you do, consider running these steps together by creating a procedure.
The following example illustrates a procedure called PAYROLL.
’RUN QUERY PAYROLL’
’PRINT REPORT (FORM=PAYFORM’
’SAVE DATA AS MYCOLL.PAYSUM’
This procedure runs the PAYROLL query, prints a report using the PAYFORM report form, and saves the
data to a table called PAYSUM in the MYCOLL collection.
Procedures are created and changed outside Query Manager, using a Source Edit Utility (SEU) editor.
When you create a procedure to run from Query Manager, the following guidelines apply:
v Each Query Manager statement must be typed in uppercase.
v Procedures can contain only Query Manager statements, blank lines, and comment lines that are
delimited by /* and */. Blank lines and comment lines have no effect on statement processing.
v Procedures can contain a RUN statement that runs another procedure or a query.
v The query statements within a procedure must be delimited by single or double quotation marks.
Use the RUN PROC statement to run the procedures (see page 251). Users with an ALL access level can
enter the RUN PROC statement on any Query Manager statement line. The statement line is available
from most displays by pressing F22 (QM statement).
Notes:
1. Running a procedure does not affect the active query, active form, or active data.
2. When you run a procedure in batch mode, Query Manager uses the default job description specified
in your Query Manager profile to set the environment.
Query Manager and relationships to other System i products
There are several data manipulation tools that have, to some extent, overlapping functions. For querying
data, you can use DB2 for i5/OS SQL, Query Manager, Query for i5/OS, DB2 for i5/OS query
management, and the Open Query File (OPNQRYF) command.
The following information describes the differences between these tools and indicates their likely uses.
DB2 for i5/OS SQL
Programmers use the DB2 for i5/OS SQL language to query and manipulate data in a database.
Most SQL functions can be performed either interactively or in application programs written in a
high-level programming language. The query component can be used in programs to read data
for further processing by other high-level language statements. Interactive SQL can also be used
by programmers to test SQL statements that are to be embedded in a program.
Query Manager
This tool allows easy reporting on database information. It is the interface for using the DB2 for
i5/OS SQL language and i5/OS query management. Query Manager provides three integrated
interfaces for the creation and maintenance of queries, report forms, and database tables.
10 Query Manager Use V6R1M0

Query for i5/OS
This tool allows easy reporting on database information. It is not built on the DB2 for i5/OS SQL
language.
DB2 for i5/OS query management
This is an application programming interface to the query management Common Programming
Interface (CPI). CPI functions are provided by query management. The CPI allows a user to
access information in a relational database and control how this data appears when formatted
into a report. The CPI provides services that fall into two major categories: querying and report
writing.
Open Query File (OPNQRYF) Command
This is a programming command that can be used with a high-level language program. It acts as
a filter between the program and the database, so that the program receives only those records
that meet the criteria specified in the OPNQRYF command. It is not built on the DB2 for i5/OS
SQL language.
Chapter 1. Introducing Query Manager 11

12 Query Manager Use V6R1M0
Chapter 2. Getting Started with Query Manager
This chapter tells you how to get Query Manager up and running. It begins with instructions on how to
start up and exit from Query Manager, and describes the main menu and its options. Following this is a
description of Query Manager displays in general, including instructions on how to select options from
displays and objects from lists, and how to enter information. Next, the online help available is described,
which includes help for messages, and the job log. The commonly used function keys are also described.
You can then read about the prompt and error messages shown on Query Manager displays: when and
why these messages appear, and what you should do when you see them. This is followed by a
description of the Query Manager command window, through which you can enter Query Manager
statements and system commands.
This chapter finishes with a description of the naming conventions to use when saving your Query
Manager queries, report forms, and tables.
Starting DB2 Query Manager
You need to have authority to use the Start Query Manager (STRQM) command before you can use
Query Manager. Start Query Manager by typing STRQM on any command line, or by selecting the Query
Manager option from one of the following menus:
v Query Utilities menu
v SQL Commands menu
v Query Commands menu
v Start Commands menu
If the “Relational database connection” setting in your Query Manager profile is other than *NONE or
*CURRENT, you are connected to the specified database before Query Manager starts. If the specified
database connection is on a remote system, a display prompts you to enter the user ID and password for
the connection. See “CONNECT in Query Manager” on page 236 for a description of the values you can
enter.
Note: If the remote connection fails, you cannot use Query Manager. Ask the security administrator to
change the “Relational database connection” setting in your Query Manager profile. If you have
*SECADM authority and the remote connection fails, you can start Query Manager using your
local database connection, so you are always able to change users’ profile settings.
When you successfully start Query Manager, the main menu is displayed. (An example of the main menu
is shown in Figure 4 on page 14.) This menu and its options are described over the next few pages. From
the main menu, you can select the following:
v Work with Query Manager queries to create, change, copy, delete, display, print, and rename query
definitions, to run queries, and to convert prompted query definitions to SQL query definitions.
v Work with Query Manager report forms to create, change, copy, delete, display, print, and rename
report forms, and run (produce) reports.
v Work with Query Manager tables to create, copy, delete, display, rename, display the definition of,
add data to, change data in, display data in, and print data from tables.
v Work with Query Manager profiles to view, change, and copy your Query Manager profile.
See “Using the main menu in Query Manager” on page 14 for a description of the main menu, and
instructions telling you how to select menu items.
© Copyright IBM Corp. 1998, 2008 13
Exiting from Query Manager
When you finish working with Query Manager, you exit from the main menu by pressing F3 (Exit) or
F12 (Cancel). Either one of these keys takes you out of Query Manager, and returns you to the display
you were using before you started Query Manager.
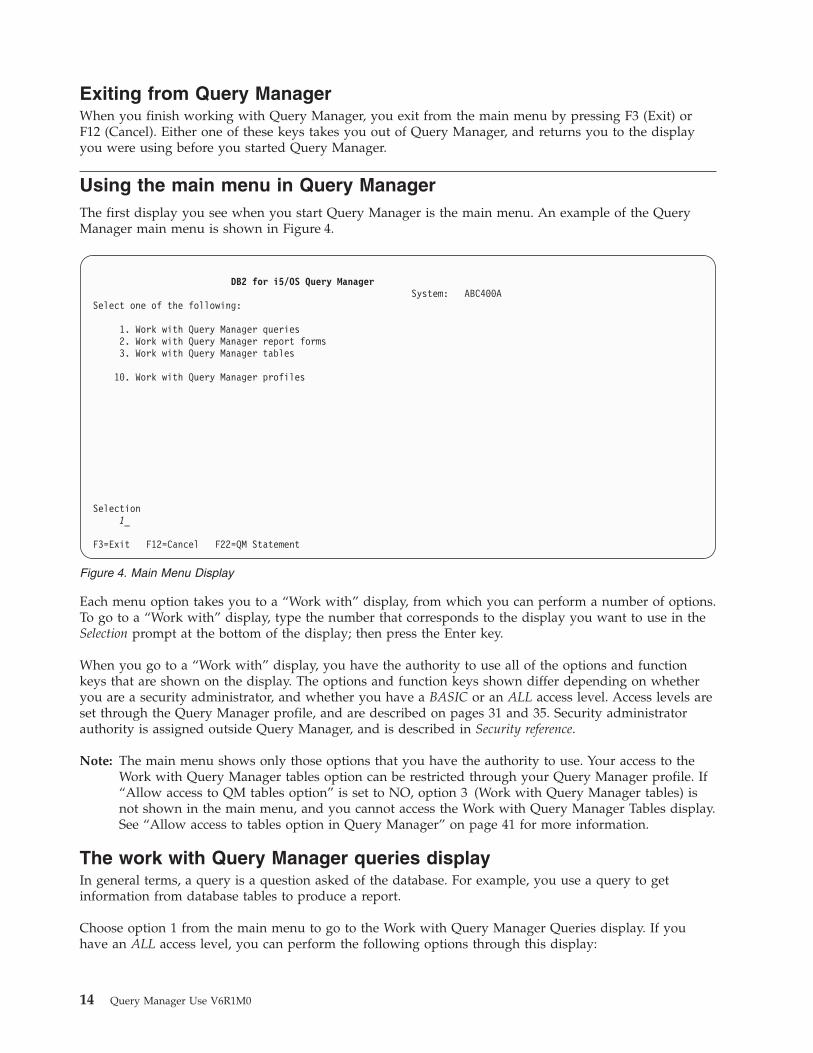
Using the main menu in Query Manager
The first display you see when you start Query Manager is the main menu. An example of the Query
Manager main menu is shown in Figure 4.
Each menu option takes you to a “Work with” display, from which you can perform a number of options.
To go to a “Work with” display, type the number that corresponds to the display you want to use in the
Selection prompt at the bottom of the display; then press the Enter key.
When you go to a “Work with” display, you have the authority to use all of the options and function
keys that are shown on the display. The options and function keys shown differ depending on whether
you are a security administrator, and whether you have a BASIC or an ALL access level. Access levels are
set through the Query Manager profile, and are described on pages 31 and 35. Security administrator
authority is assigned outside Query Manager, and is described in Security reference.
Note: The main menu shows only those options that you have the authority to use. Your access to the
Work with Query Manager tables option can be restricted through your Query Manager profile. If
“Allow access to QM tables option” is set to NO, option 3 (Work with Query Manager tables) is
not shown in the main menu, and you cannot access the Work with Query Manager Tables display.
See “Allow access to tables option in Query Manager” on page 41 for more information.
The work with Query Manager queries display
In general terms, a query is a question asked of the database. For example, you use a query to get
information from database tables to produce a report.
Choose option 1 from the main menu to go to the Work with Query Manager Queries display. If you
have an ALL access level, you can perform the following options through this display:
DB2 for i5/OS Query Manager
System: ABC400A
Select one of the following:
1. Work with Query Manager queries
2. Work with Query Manager report forms
3. Work with Query Manager tables
10. Work with Query Manager profiles
Selection
1_
F3=Exit F12=Cancel F22=QM Statement
Figure 4. Main Menu Display
14 Query Manager Use V6R1M0

v Create a query. Shows the Edit Query display if your current query creation mode is SQL. SQL queries
can contain any SQL statement that you have been granted authority to use through your Query
Manager profile.
Shows the Define Prompted Query display if your current query creation mode is prompted. A series
of displays prompt you to enter all of the information that Query Manager needs to create the query.
v Change a query. Shows the specified query in either the Edit Query display, or the Define Prompted
Query display, depending on the mode in which the query was last saved. You can change the query
definition through this display.
v Copy a query. Copies a query. You can replace an existing query or create a new one.
v Delete a query. Deletes queries you no longer require. You need to respond to a confirm display before
the delete occurs.
v Display a query definition. Shows the definition of the specified query in display-only format. The
query definition is shown in the format in which it was last saved, either SQL or prompted. You
cannot change any values through this option.
v Print a query definition. Sends a copy of the SQL statement that defines the query to the printer
specified in your Query Manager profile.
v Rename a query. Prompts you to specify new names for existing queries.
v Run a query. Runs the selected query. You can run promptedqueries, and any SQL queries that contain
one of the SQL statements that you have been granted authority to use through your Query Manager
profile. If the query is:
– An SQL SELECT statement or prompted query, Query Manager shows a run options display,
prompting you to specify options such as the mode in which you want to run the query (batch or
interactive), and the destination to which you want the query output directed (printer, display, or
table). Run options are described in detail on page 136.
– Not an SQL SELECT statement, Query Manager shows a Run Query display, prompting you for the
mode (batch or interactive) in which you want to run the query.v Convert to SQL. Converts a prompted query to an SQL query. You can replace the existing prompted
query definition with the converted SQL query, or you can create a new SQL query, and leave the
prompted query definition unchanged. You need authority to use the SQL query creation mode and the
SELECT statement.
Users with a BASIC access level can display a query definition, print a query definition, and run a query
through the Work with Query Manager Queries display.
Queries are described in detail in Chapter 4, “Working with Query Manager queries” and Chapter 5,
“Creating and changing queries in Query Manager.”
The work with Query Manager report forms display
While a query is a question asked of the database, a report form specifies the format of the answer. The
report itself is the result of applying a report form to the data generated by running a query.
Choose option 2 from the main menu to go to the Work with Query Manager Report Forms display. If
you have an ALL access level, you can perform the following options through this display:
v Create a report form. Shows the Select Report Format displays, through which you can create a report
form. Specify the headings, footings, formatting, breaks, summary functions, and spacing.
v Change a report form. Shows the specified report form in the Select Report Format displays. You can
change the definition of an existing report form through these displays.
v Copy a report form. Copies a report form. You can replace an existing report form or create a new one.
v Delete a report form. Deletes report forms you no longer require. You need to respond to a confirm
display before the delete occurs.
Chapter 2. Getting Started with Query Manager 15

v Display a report form definition. Shows the definition of a report form in display-only format. You
cannot change any values through this option.
v Print a report form definition. Sends a copy of the report form definition to the printer specified in
your Query Manager profile.
v Rename a report form. Prompts you to specify new names for existing report forms.
v Run a report. Produces a report by applying the selected report form to the active query data. Query
Manager shows a run options display, prompting you to specify options such as the query you want to
run to generate the report data, and the mode in which you want to run the query (batch or
interactive). Run options are described in detail on page 136.
Users with a BASIC access level can display a report form definition, print a report form definition, and
run a report through the Work with Query Manager Report Forms display.
Report forms are described in detail in Chapter 6, “Working with Query Manager report forms.”
The work with Query Manager tables display
You use Query Manager tables to add to and maintain information in the database. Users with BASIC
and ALL access levels can create tables and add information to them. Table information can later be
manipulated, printed, and viewed through the Tables, Queries, and Report Forms options.
Choose option 3 from the main menu to go to the Work with Query Manager Tables display. All Query
Manager users have access to all of the options shown on this display, and can perform the following
options:
v Create a table. Shows the Create Query Manager Table display, through which you can create a table.
Type a description for the table; then specify the name, data type, length, and number of decimal
places for each of the columns you want to include in the table.
v Copy a table. Copies a table. You can replace an existing table or create a new one. You can copy the
table definition only, or copy the definition and the data rows. If required, you can change the
definition of the table during the copy.
v Delete a table. Deletes tables you no longer require. You need to respond to a confirm display before
the delete occurs.
v Display a table. Prompts you to specify search conditions to find the rows you want to display; then
shows the selected rows in a display report. Information is shown in display-only format. You cannot
change any values through this option. This option is not shown if you are running Query Managerin
batch mode (see “Run query mode in Query Manager” on page 35).
v Print a table. Prompts you to specify search conditions to find the rows you want to print; then prints
the selected rows in a report. The table information is printed using the default printer and run query
mode from your Query Manager profile.
v Rename a table. Prompts you to specify new names for existing tables.
v Display table definition. Shows the definition of a table in display-only format. You cannot change
any values through this option.
v Add data to table. Shows a data entry display, through which you can add data rows to a selected
table.
v Change data in table. Prompts you to specify search conditions to find the rows you want to change;
then shows the selected rows one at a time in a data entry display. Using this option you can change
row data, and delete entire rows.
v Display table data. Prompts you to specify search conditions to find the rows you want to display;
then shows the selected rows one at a time in display-only format. You cannot change any values
through this option.
16 Query Manager Use V6R1M0

Note: Not all users can access the Work with Query Manager Tables display. If “Allow access to QM
tables option” is set to NO in your Query Manager profile, the Work with Query Manager tables
option is not shown on the main menu. See page 41 for more information.
Query Manager tables are described in detail in Chapter 8, “Working with Query Manager tables.”
The work with Query Manager profiles display
Your Query Manager profile is the portion of your i5/OS user profile that contains the settings and
default values used when you run Query Manager. Query Manager creates a default Query Manager
profile the first time you use the system. Your security administrator can change the settings contained in
your profile, and as you become familiar with Query Manager, you might also want to change some of
the values.
The values you can change in your Query Manager profile differ depending on whether you have a
BASIC or an ALL access level. Query Manager user access levels are described on page 31.
Choose option 10 from the main menu to go to the Change Query Manager Profile display. You can
change all of the information shown on this display except for your user profile name and description.
Press F10 (Display additional details) to view the rest of the settings and values that make up your Query
Manager profile. This information is shown in display-only format. You cannot change any of the values
shown on the Additional Details display. Only the security administrator has the authority to change
these settings and values.
Security administrator options in Query Manager
If you have security administrator (*SECADM) authority, you can work with the profiles of other Query
Manager users. When you choose option 10, you go to a Work with Query Manager Profiles display,
through which you can perform the following options:
v Change a profile. Shows the Change Query Manager Profile display, through which you can change
the settings and default values in a Query Manager profile for which you have *OBJMGMT rights.
v Copy a profile. Copies a Query Manager profile. You can create a new profile or replace an existing
one with the settings and values from another selected profile. You need to have *OBJMGMT rights for
both the profile you want to copy from and the profile you want to copy to. If you are creating a
profile, the person you are creating the profile for must have a user profile on the system (created
using the CRTUSRPRF CL Command).
v Display a profile. Shows a Query Manager profile in display-only format. You cannot change any
values through these displays. You need to have *READ rights for the profile you want to display, but
you do not need *OBJMGMT rights to display a Query Manager profile.
Query Manager profiles are described in detail in Chapter 3, “Working with Query Manager profiles.”
*SECADM authority, *OBJMGMT rights, and *READ rights are assigned outside Query Manager, and are
described in Security reference.
Using Query Manager displays
All Query Manager displays show instructions telling you how to use them. Simply follow the
instructions shown on the display. For example:
Type choices, press Enter.
Type SQL statement.
To rename table, type New Name, press Enter.
Chapter 2. Getting Started with Query Manager 17
If you are ever unsure how you should use a display, press F1 (Help). Help information is available
throughout Query Manager, and provides you with additional information for an entire display, or for
any value, prompt, or message that you may not understand completely.
Query Manager knows what your profile access level is, and displays only those options and function
keys that you have the authority to use. To choose an option from an Query Manager display, type its
number in the Selection or Opt prompt shown on the display; then press the Enter key.
When you see More... in the bottom right-hand corner of a display, it means that there is more
information to display. Use your display station’s roll keys to view the rest of the display information.
When you reach the end of the information, you see Bottom displayed instead of More...
Many Query Manager displays show lists of items that you can use to complete prompts. These items
might include:
v Queries, report forms, and tables you are authorized to use
v SELECT statement options
v Report formatting options
v Valid data types for tables
v Available printers
These lists eliminate the need to memorize names, and reduce the number of potential typing errors.
Many lists are displayed only when you press F4 (Prompt).
Most lists have Opt prompts that you use to make selections directly from the list. Simply move the
cursor to the Opt prompt next to the item you want to select; then type the number that corresponds to
the option you want to perform. The available options you can perform are shown on the display, usually
at the top of the list.
Making selections from different types of lists is described on pages 18 and 21.
Entering information through a display in Query Manager
Prompts (shown as underlines) are Query Manager’s way of asking you what it needs to know in order
to fulfill your request. You need only “fill in the blank”. Often the prompt even lists the possible correct
choices, so you need only type the choice that fits what you are doing. If you are not sure what
information you are supposed to supply at a prompt, you can move the cursor to the prompt and press
F1 (Help). In some cases you can also press F4 (Prompt) for a list of valid selections.
When some entry displays are shown, some of the prompts are already filled in. These filled-in values are
called default values: they are the values assumed by the system if you do not specify anything yourself.
You can leave a default value the way it is, or if you want, you can change it to another value. Simply
move the cursor to the prompt, and type a new value over the default value.
Prompts are Query Manager’s way of identifying an input field. You can change any values you see that
are underlined.
Using “Work with” display lists in Query Manager
When you choose to work with queries, report forms, or tables from the main menu, Query Manager
shows a “Work with” display. This display lists the options you can perform, followed by a list of the
queries, report forms, or tables you can choose.
18 Query Manager Use V6R1M0

To make a selection from a “Work with” display list, move the cursor to the Opt prompt next to the name
of the query, report form, or table you want to choose; then type the option number that corresponds to
the option you want to perform. You can also type the option number in the Opt prompt at the top of the
list, next to the blank object name; then type the name of the query, report form, or table you want to
choose.
To create a new object, type 1 (Create) in the Opt prompt at the top of the list, next to the blank name;
then type the name of the query, report form, or table you want to create.
Rules for system name generation in Query Manager
There are specific instances when the system generates a system table or column name. These instances
and the name generation rules are described in the following sections.
Rules for column name generation in Query Manager
A system-column-name is generated if the system-column-name is not specified when a table or view is
created and the column-name is not a valid system-column-name.
If the column-name does not contain special characters and is longer than 10 characters, a 10-character
system-column-name will be generated as:
v The first 5 characters of the name
v A 5 digit unique number
For example:
The system-column-name for LONGCOLUMNNAME would be LONGC00001
If the column name is delimited:
v The first 5 characters from within the delimiters will be used as the first 5 characters of the
system-column-name. If there are fewer than 5 characters within the delimiters, the name will be
padded on the right with underscore (_) characters. Lower case characters are folded to upper case
characters. The only valid characters in a system-column-name are: A-Z, 0-9, @, #, $, and _. Any other
characters will be changed to the underscore (_) character. If the first character ends up as an
underscore, it will be changed to the letter Q.
v A 5 digit unique number is appended to the 5 characters.
Work with Query Manager Tables
Library . . . . . . . . . . . MYCOLL____ Name, F4 for list
Type options, press Enter.
1=Create table 3=Copy table 4=Delete table 5=Display table
6=Print table 7=Rename table 8=Display definition 9=Add data
10=Change data 11=Display data
Opt Table Description
1_ STAFF______________
APPLICANT Table of job applicants
CARS Sample CARS Table
EMPLOYEE Personnel in each in each department
ORG Corp.’s organization information
PRODUCT Description of corp. products
SCREENS Output file for STRCPYSCN
VENDINFO Vendor Information
Bottom
F3=Exit F4=Prompt F5=Refresh F11=Display table only F12=Cancel
F16=Repeat position to F17=Position to F24=More keys
Figure 5. A “Work with” Display
Chapter 2. Getting Started with Query Manager 19

For example:
The system-column-name for "abc" would be ABC__00001
The system-column-name for "COL2.NAME" would be COL2_00001
The system-column-name for "C 3" would be C_3__00001
The system-column-name for "??" would be Q____00001
The system-column-name for "*column1" would be QCOLU00001
Rules for table name generation in Query Manager
A system name will be generated if a table, view, or index is created with either:
v A name longer than 10 characters
v A name that contains characters not valid in a system name
Either the SQL name or its corresponding system name can be used in SQL statements to access the file
after it is created. However, the SQL name is only recognized by DB2 for i5/OS and the system name
must be used in other environments.
If the name does not contain special characters and is longer than 10 characters, a 10-character system
name will be generated as:
v The first 5 characters of the name
v A 5 digit unique number
For example:
The system name for LONGTABLENAME would be LONGT00001
If the SQL name contains special characters, the system name is generated as:
v The first 4 characters of the name
v A 4 digit unique number
v All special characters are replaced by the underscore (_)
v Any trailing blanks are removed from the name
v The name is delimited by double quotes (″) if the delimiters are required for the name to be a valid
system name.
For example:
The system name for "??" would be "__0001"
The system name for "longtablename" would be "long0001"
The system name for "LONGTableName" would be LONG0001
The system name for "A b " would be "A_b0001"
SQL ensures the system name is unique by searching the cross reference file. If the name already exists in
the cross reference file, the number is incremented until the name is no longer a duplicate.
Specifying multiple options in Query Manager
You can choose more than one object at a time, by specifying either the same option for multiple objects,
or multiple options for multiple objects. For example, from a single “Work with” display, you can choose
to delete multiple objects, or you can choose to copy three objects, delete one object, and display two
more. The only exception is that you can specify only one option 1 (Create). When you choose to work
with multiple objects, Query Manager deals with them in the following order:
v If you specified a Create, the Create is performed first.
v Following that, the options are performed in the same order as the object names appear in the “Work
with” display list.
20 Query Manager Use V6R1M0

v When Query Manager comes to the first object for which you have chosen Copy, Rename, Delete, or
Convert to SQL, it looks for all other objects for which you have chosen the same option. Confirmation
for all copies, renames, deletes, and conversions is performed at the same time on a single Query
Manager display.
If the object you want to choose is not currently shown in the display list, you can use your display
station’s roll keys, F17 (Position to), F16 (Repeat position to), or F11 (Display name only) to change the
portion of the list shown on the display. F17 prompts you to specify a new object name from which to
begin the list, F16 repeats the most recent “Position to” you performed, and F11 hides the descriptions of
the objects, and shows multiple columns of object names across the display. See “Using Query Manager
function keys” on page 23 for more information.
All of the objects shown in the display list are those stored in the library or collection shown at the top of
the display. If you have an ALL access level, the library or collection name is underlined, indicating that
you can change this value. You can type a new library or collection name over the existing name if you
want to access objects from a different library or collection. Move the cursor to the library or collection
prompt; then press F4 (Prompt) for a list of all of the libraries or collections that you can select.
Using F4 (Prompt) lists in Query Manager
When entering information on a display, you often see messages telling you to press F4 (Prompt) for a
list of the possible values you can enter in response to a specific prompt. An example of an F4 (Prompt)
list that displays the valid data types for Query Manager tables is shown in Figure 6.
You need to position the cursor on the prompt to which the F4 (Prompt) information applies before
pressing F4.
Many of the F4 (Prompt) lists are more than one window in length. When you see More... displayed in
the lower right-hand corner of the window, you can use your display station’s roll keys to display the
rest of the prompt information. When you come to the end of the list, Bottom is displayed instead of
More...
To make a selection from the list, move the cursor to the Opt prompt next to the value you want to
choose, and type 1. Then press the Enter key to exit from the prompt window and return to the display
you were using when you pressed F4. The value you choose through the prompt window is inserted into
the input prompt from which you pressed F4 (Prompt).
Create Query Manager Table
.....................................................................
: Select Data Type :
: :
: Type option, press Enter. : ________
: 1=Select :
: :
: Opt Type Description :
: BIGINT Big integer :
: BLOB Binary large object :
: CHARACTER Any character :
: CLOB Character large object :
: DATALINK Datalink :
: 1 DATE Date :
: More... :
: F12=Cancel :
: :
:...................................................................:
Bottom
F3=Exit F4=Prompt F5=Refresh F6=Insert line F10=Copy line
F12=Cancel F14=Delete line F19=Add data F24=More keys
Figure 6. Example of an F4 (Prompt) List
Chapter 2. Getting Started with Query Manager 21

Using help and online information in Query Manager
The following online information is available on the i5/OS operating system. After pressing F1 (Help) on
any display, you can press F1 a second time to see an explanation of how the online information works.
Read through this online help information using your display station’s roll keys to access the additional
displays of information. To print a copy of the How to Use Help information, press F9 (Print).
Help for displays in Query Manager
You can press F1 (Help) at any time to see information about the current display. There are two types of
help available:
v Context-sensitive
v Extended
Context-sensitive help explains the value on which the cursor is positioned when you press F1 (Help).
For example, it can describe the choices available for a prompt or explain a specific value. If a message
appears at the bottom of the display, you can position the cursor on the message and press F1 (Help) to
display an explanation of the message and the appropriate action to take.
Extended help explains the purpose of the current display. Extended help appears if you press F1 (Help)
when the cursor is outside the areas for which context-sensitive help is available, or if you press
F2 (Extended help) when a context-sensitive help window is shown.
Help for messages in Query Manager
Whenever you see a message at the bottom of the display that you do not fully understand, you can
display help information by positioning the cursor on the message and pressing F1 (Help).
Message help describes the reason the message was displayed, and if applicable, lists the steps you need
to perform to correct any problems. If the message was displayed due to problems of a technical nature, a
technical description is also shown.
Some messages suggest that you check the job log for more information. The job log lists the operations
performed by the i5/OS operating system leading up to the message that is displayed, including all
messages that were displayed by Query Manager. To view job log information, press F10 (Display
messages in job log).
Display Query Manager Table Definition
Table . . . . . . . : STAFF
Description . . . . : The STAFF Table
Decimal
Column Type Length Places
ID INTEGER
NAME CHARACTER 9
DEPT ......................................................
JOB : Type - Help :
YEARS : :
SALARY : The data type used in the specified column. :
COMM : This value is display-only. :
: Bottom :
: F2=Extended help F10=Move to top :
: F11=InfoSeeker F12=Cancel F24=More keys :
:....................................................:
Bottom
Press Enter to continue.
F3=Exit F12=Cancel F22=QM statement
Figure 7. Example of Context-Sensitive Help
22 Query Manager Use V6R1M0
When you finish viewing message help information, press F3 (Exit) to return to the display from which
you started message help.
For more information, see “Messages and errors in Query Manager” on page 26.
Using Query Manager function keys
Function keys such as F1 (Help) can be used at any time from any Query Manager display; however, not
all function keys apply to all displays. At the bottom of each display is a list of the function keys that are
commonly used with that display (all of the available keys might not be shown). If you want to know how
all of the available keys for a particular display work, move the cursor to the function key section of the
display; then press F1 (Help).
Commonly used function keys in Query Manager
The following function keys are used fairly consistently throughout Query Manager. Their use is
described here and not repeated for every display in which they apply. Where one of these keys is used
in a different way, its use is described at the relevant point in this guide.
F1 Help. Displays help information. If the cursor is positioned on a prompt or message, the help
information is context-sensitive. Otherwise, the help describes the current display.
F2 Base keys/Alternate keys. Displays alternate titles for function keys. The F2 key is active when a
function key has more than one definition. For example, on the Edit Query display the F5 key
performs two functions, (Run report) and (Refresh). The function key title that is currently shown
on the display is the function that is active.
F3 Exit. Exits from the current display or option, and returns to the calling display. In most cases,
any information you have added or changed on the current display is discarded. However, if you
were creating or changing a query or report form, F3 takes you to an Exit display.
F4 Prompt. Displays a prompt window containing additional information about the current input
prompt, usually in the form of a list. You can choose any value from this list by typing 1 in the
Opt prompt next to the value you want to use. Prompt is context-sensitive. You need to position
the cursor on the input prompt to which the information applies before you press F4. When you
press F4 from the Edit Query display or the command window, Query Manager shows the syntax
of supported Query Manager statements or system commands.
F5 Refresh. Refreshes the current display, showing all of the values it contained the last time it was
saved. (Information is usually saved by pressing the Enter key.) Use this key to discard the
changes made to the display since the last time you pressed the Enter key.
F5 Run report. Produces a report using the active query and the active form. If there is no active
form, Query Manager applies a default report form to the query data. If “Display run options” is
set to YES in your Query Manager profile, or if the active form does not match the active query, a
run options display is shown. This display prompts you to specify options such as, the report
form you want to use to format the query data, and the mode in which you want to run the
query (batch or interactive). Run query options are described in detail on page 136.
F6 Run sample. Produces a sample report using the active query and active form. The query
retrieves the sample number of rows specified in your Query Manager profile (see page 36). If
“Display run options” is set to YES in your Query Manager profile, or if the active form does not
match the active query, a run options display is shown. This display prompts you to specify the
report form you want to use to format the query data. (See page 136 for a full description of the
available run options.) Sample reports are always run in interactive mode and the output is sent
to display. You cannot use this function key if “Allow interactive sample run” is set to NO in
your Query Manager profile (see page 36).
F6 Insert line. Inserts a line in the current definition or display immediately below the line on which
Chapter 2. Getting Started with Query Manager 23
the cursor is positioned. To insert a line at the beginning of the definition or display, position the
cursor immediately above the first line before you press F6.
F9 Retrieve. Retrieves and displays the last command or statement that was entered in the current
entry mode (either Query Manager statement or system command). Press F9 once to retrieve the
last command entered, press F9 twice to retrieve the second-to-last command entered, and so on.
F10 Copy line. Copies a line in the current definition or display. Place the cursor on the line you
want to copy and press F10. Then, move the cursor to the position after which you want the line
copied and press F10 a second time to perform the copy. As with F6, if you want to copy a line to
the beginning of the definition or display, position the cursor immediately above the first line
before you press F10 the second time.
F11 Display description/Display name only. (where name can be query, form, table, or profile). Press
F11 to hide or display the descriptions of the objects listed on a “Work with” display. When you
choose to display name only, multiple columns of object names are shown across the “Work
with” display. The title for this key changes depending on what information is currently
displayed.
Display connection status Press F11 to obtain the detailed connection status for a DISCONNECT,
SET CONNECTION, or RELEASE statement.
F12 Cancel. Exits from the current display or option, and returns to the previous display. Any
information you have added or changed on the current display is discarded.
F13 Edit query/Edit form. If you are creating or changing an SQL query, F13 (Edit form) takes you to
the Select Report Format display for the active form. If you are creating or changing a report
form, F13 (Edit query) takes you to the query editor display for the active query. If there is no
active form or active query, you are prompted to specify the name of the report form or query
that you want to edit. You can enter the name of an existing report form or query to edit, or you
can enter a new name to create a new report form or query. Queries are edited in the mode in
which they were last saved. Queries are created in your default query creation mode (either
prompted or SQL).
F13 Display query/Display form. If you are displaying an SQL query, F13 (Display form) prompts
you to enter the name of the report form you want to view. If you are displaying a report form,
F13 (Display query) prompts you to enter the name of the query you want to view. Type the
name of an existing report form or query; then press the Enter key to show the report form or
query definition in display-only format.
F14 Delete line. Deletes the line where the cursor is currently positioned from the current definition
or display.
F15 Split line. Breaks a column/file/table name into two lines to allow for insertion of new
characters. The line will be split at the point where the cursor is located. All characters, from the
cursor location through the end of the line, will be moved to the new line.
F16 Repeat position to. Shows the list of object names (on a “Work with” display) beginning at the
name specified the last time you used F17 (Position to). If you have not used F17 yet, you go to
the “Position to” window, and Query Manager prompts you to specify the object name at which
you want the list to begin.
F17 Position to. Shows you a different portion of the list of object names (on a “Work with” display).
For more information, see The “Position to” window in Query Manager.
F18 Display SQL. Displays the SQL statement that you are building in prompted query. For more
information, see step 6 on page 80.
F19 Display column/system column names. Allows you to toggle back and forth between displaying
either the system column names or the column names while working with a prompted query. For
more information, see steps 7 on page 80 through 8 on page 80.
24 Query Manager Use V6R1M0
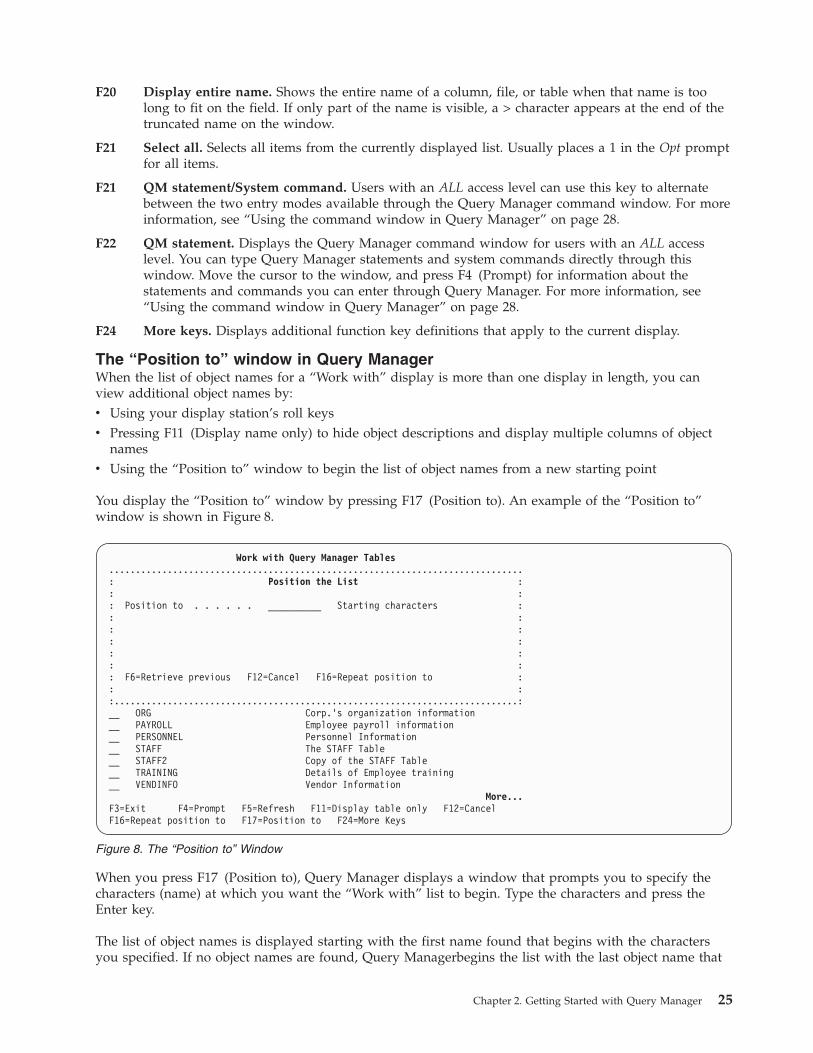
F20 Display entire name. Shows the entire name of a column, file, or table when that name is too
long to fit on the field. If only part of the name is visible, a > character appears at the end of the
truncated name on the window.
F21 Select all. Selects all items from the currently displayed list. Usually places a 1 in the Opt prompt
for all items.
F21 QM statement/System command. Users with an ALL access level can use this key to alternate
between the two entry modes available through the Query Manager command window. For more
information, see “Using the command window in Query Manager” on page 28.
F22 QM statement. Displays the Query Manager command window for users with an ALL access
level. You can type Query Manager statements and system commands directly through this
window. Move the cursor to the window, and press F4 (Prompt) for information about the
statements and commands you can enter through Query Manager. For more information, see
“Using the command window in Query Manager” on page 28.
F24 More keys. Displays additional function key definitions that apply to the current display.
The “Position to” window in Query Manager
When the list of object names for a “Work with” display is more than one display in length, you can
view additional object names by:
v Using your display station’s roll keys
v Pressing F11 (Display name only) to hide object descriptions and display multiple columns of object
names
v Using the “Position to” window to begin the list of object names from a new starting point
You display the “Position to” window by pressing F17 (Position to). An example of the “Position to”
window is shown in Figure 8.
When you press F17 (Position to), Query Manager displays a window that prompts you to specify the
characters (name) at which you want the “Work with” list to begin. Type the characters and press the
Enter key.
The list of object names is displayed starting with the first name found that begins with the characters
you specified. If no object names are found, Query Managerbegins the list with the last object name that
Work with Query Manager Tables
..............................................................................
: Position the List :
: :
: Position to . . . . . . __________ Starting characters :
: :
: :
: :
: :
: :
: F6=Retrieve previous F12=Cancel F16=Repeat position to :
: :
:............................................................................:
__ ORG Corp.’s organization information
__ PAYROLL Employee payroll information
__ PERSONNEL Personnel Information
__ STAFF The STAFF Table
__ STAFF2 Copy of the STAFF Table
__ TRAINING Details of Employee training
__ VENDINFO Vendor Information
More...
F3=Exit F4=Prompt F5=Refresh F11=Display table only F12=Cancel
F16=Repeat position to F17=Position to F24=More Keys
Figure 8. The “Position to” Window
Chapter 2. Getting Started with Query Manager 25

comes before the characters you specified. For example, if you specify “G” and no object names begin
with the letter G, Query Manager begins the list with the last object name that begins with the letter F (so
you can see that no objects begin with G).
Query Manager provides special function keys that help you use the “Position to” window:
F6 Retrieve previous. Displays the last characters that you specified through the “Position to”
window. Use F6 to view or edit your previous “Position to” characters.
F16 Repeat position to. Displays the list of object names using the same “Position to” characters you
specified the last time you used F17 (Position to). If you have not used F17 yet, Query Manager
displays the error message, “No previous position specified.”
The ″Display entire name″ window in Query Manager
When the name of a file, column, or table is longer than space allows on a particular display, you can
view its full name by pressing F20 (Display entire name). (Long names are indicated by a “>” character at
the end of the name.) F20 brings up a window which allows you to view or change the entire
table/file/column name. The name can be up to 128 characters long not including quotes. The maximum
length of the name including quotes is 258.
The name can always be displayed, but can only be changed on some panels. To change a name,
1. Do one of the following.
a. Place the cursor on the name
b. Place the cursor on the line containing the name if there is only one name.2. Press F20.
3. Enter the new name.
F20 will also function in the same way in situations where you are entering a file, column, or table name.
In these situations, Query Managerdisplays the “Display entire name” window with a field large enough
to contain the entire name.
Messages and errors in Query Manager
While using Query Manager, you often see messages at the bottom of the display. Many of these are
information messages, in which Query Manager tells you what it is doing or has just done. For example:
STRQM in progress. Starting DB2 Query Manager...
Report form successfully sent for printing.
Row added.
You do not need to take any action when you see these messages. They are simply letting you know
what the system is doing.
Other messages tell you what you can or should enter on the current display, and how to complete
options you are performing. For example:
You can update only your own profile.
Reposition cursor and press F10 again to complete copy.
Press Enter to save the copied table and copy the data.
These messages tell you how to use the current display. Make sure you read them before using the
display. An example of one of these messages is shown in Figure 9 on page 27.
26 Query Manager Use V6R1M0

Some messages are warning messages. They warn you that what you are about to do might not work, or
might cause damage to programs, devices, systems, or data. For example:
Active query will be lost if you run this new query.
Warning. CCSID conversion resulted in substitutions.
Date/Time formats of job and query are different.
Read these messages, and make sure you understand them before continuing with your option.
The last type of Query Manager messages are error messages. These messages are displayed when you
make an entry error of some kind. Query Manager shows you where the error is whenever possible, by
moving the cursor to the value in error and highlighting it in reverse video. You also see a message at the
bottom of the display telling you what the error is and how to correct it. For example:
Library must be blank if Table for Output is *NONE.
Cannot create a blank table definition.
Active data is sample only. Cannot display a full report.
These are important messages. In most cases, reading the message tells you how to correct the error you
made. You need to make the correction before you can continue with your current option.
If you need additional information about any of the messages you see displayed, move the cursor to the
line that contains the message; then press F1 (Help). The message help display and job log are described
in “Help for messages in Query Manager” on page 22.
Only one message can be shown at the bottom of the display at one time. If Query Manager has issued
more than one message, you see a “+” sign at the end of the displayed message. You can use your
display station’s roll keys to see the additional messages.
Change Query Manager Profile
User profile . . . . . . . . . . . . . : FREDNURK
Description . . . . . . . . . . . . . : User Profile for Fred Nurk.
Type choices, press Enter.
Default library for QM objects . . . . *CURLIB Name, *CURLIB
Default object creation authority . . *LIBCRTAUT *CHANGE, *ALL, *USE
*EXCLUDE, *LIBCRTAUT
Authorization list
Run query mode . . . . . . . . . . . . 1 1=Interactive
2=Batch
Number of rows to use for sample . . . 50 1-100
Display run options . . . . . . . . . Y Y=Yes, N=No
Confirmation messages in QM . . . . . Y Y=Yes, N=No
Naming convention . . . . . . . . . . *SYS *SYS, *SAA
RDB Connection method . . . . . . . . *RUW *RUW, *DUW
Default library for QM tables . . . . *CURLIB___ Name, *NONE, *CURLIB
3=Table
More...
F3=Exit F4=Prompt F5=Refresh F10=Display additional details
F12=Cancel F22=QM statement
You can update only your own profile.
Figure 9. Example of a Message on a Display
Chapter 2. Getting Started with Query Manager 27

Using the command window in Query Manager
Query Manager provides a command window through which users with an ALL access level can enter
Query Manager statements and system commands. The command window is available by pressing
F22 (QM statement) from most displays. Figure 10 shows an example of the command window.
Use this window to enter commands and statements quickly, without leaving the current display. For
example, if you choose to create a report form, but there is no active data (which means that Query
Manager has no default values for report formatting), you can enter a RUN QUERY statement through
the command window to run a query and create active data for the report form.
Query Manager provides special function keys that help you use the command window:
F4 Prompt. Displays a list of all of the Query Manager statements or system commands that you can
enter through the command window. If you are unsure of the syntax of a statement or command,
follow the instructions on these prompt-guided displays, and let Query Manager enter the
statement or command for you.
F9 Retrieve. Retrieves and displays the last command or statement that was entered through the
current mode (either Query Manager statement or system command). Press F9 once to retrieve
the last command entered, press F9 twice to retrieve the second-to-last command entered, and so
on.
F21 System command/QM statement. Alternates between the two entry modes, system command
and Query Manager statement. When you are in Query Manager statement mode, the window
prompts you to enter a Query Manager statement, and the command prompt is shown as QM..
When you are in system command mode, the window prompts you to enter a system command,
and the command prompt is shown as ===>.
Note: The Query Manager statement line is always present at the top of the Edit Query or Display Query
displays, so there is no F22 (QM statement) function key available from these displays. You can
press F21 (System command) to display a command window through which you can enter only
system commands.
When you finish using the command window, press F12 (Cancel) to leave the window and return to the
display you were using when you pressed F22 (QM statement).
DB2 for i5/OS Query Manager
System: ABC400A
Select one of the following:
1. Work with Query Manager queries
2. Work with Query Manager report forms
3. Work with Query Manager tables
10. Work with Query Manager profiles
..............................................................................
: Query Manager Statement :
: :
: QM . . _______________________________________________________________ :
: :
: F4=Prompt F9=Retrieve F12=Cancel F21=System command :
: :
:............................................................................:
F3=Exit F12=Cancel F22=QM statement
Figure 10. The Command Window
28 Query Manager Use V6R1M0

Naming conventions in Query Manager
For any undelimited name, DB2 Query Manager always converts lowercase characters to uppercase
characters. Objects of the same type stored in the same library must have unique names. However,
because report forms and queries are two different object types, you can have a query by the name of
TEST and a report form by the name of TEST in the same library. Because procedures, tables, and views
are all i5/OS files, you cannot have a procedure and a table with the same name. The rest of this section
describes the different naming conventions for tables, columns, queries and report forms.
Note: It is recommended that the name not start with the letter q.
Form and query name conventions in Query Manager
Form and query names can be specified as undelimited names or delimited names.
Undelimited names, names that do not contain quotation marks, are specified as follows:
v Names need to begin with an alphabetic character. Alphabetic characters are A-Z, $, # and @.
v The alphabetic character may be followed by other alphabetic characters, the numbers 0-9, and
underscores.
v No imbedded blanks are allowed in the name.
v Names can be up to 10 characters in length.
Delimited names, names that do contain quotation marks, are specified as follows:
v The name begins and ends with a double quotation mark (″).
v The only characters not allowed inside the beginning and ending quotes are:
– A blank
– An asterisk (*)
– A question mark (?)
– An apostrophe (’)
– Quotation marks (″)
– Numbers with a hexadecimal value less than ’40’X or equal to ’FF’X.v Names can be up to 10 characters in length including the beginning and ending double quotes.
Note: A quoted name can be qualified, but the object name and library name need to be surrounded by
quotation marks separately from each other. For example, “MYLIB” “Name-1”
Table and file name conventions in Query Manager
Table or File names can be specified as undelimited names or delimited names.
Undelimited names, names that do not contain quotation marks, are specified as follows:
v Names need to begin with an alphabetic character. Alphabetic characters are A-Z, $, # and @.
v The alphabetic character may be followed by other alphabetic characters, the numbers 0-9, and
underscores.
v No imbedded blanks are allowed in the name.
v Names can be up to 128 characters in length.
Delimited names, names that do contain quotation marks, are specified as follows:
v The name begins and ends with a double quotation mark (″).
v The only characters not allowed inside the beginning and ending quotes are characters with a
hexadecimal value less than ’40’X or equal to ’FF’X.
Chapter 2. Getting Started with Query Manager 29

v Double quotation marks that are included within the name must be accompanied by a matching
double quotation mark.
v Names can be up to 128 characters in length not including the beginning and ending double quotes
and any matching double quotes within the name.
Column name, field name, and expression name conventions in Query
Manager
Undelimited names, names that do not contain quotation marks, are specified as follows:
v Names need to begin with an alphabetic character. Alphabetic characters are A-Z, $, # and @.
v The alphabetic character may be followed by other alphabetic characters, the numbers 0-9, and
underscores.
v No imbedded blanks are allowed in the name.
v Names can be up to 30 characters in length.
Delimited names, names that do contain quotation marks, are specified as follows:
v The name begins and ends with a double quotation mark (″).
v The only characters not allowed inside the beginning and ending quotes are characters with a
hexadecimal value less than ’40’X or equal to ’FF’X.
v Double quotation marks that are included within the name must be accompanied by a matching
double quotation mark.
v Names can be up to 30 characters in length including the beginning and ending double quotes and any
matching double quotes within the name.
v If column names in existing tables are longer than 30 characters, only the system column name is
shown on most DB2 Query Manager displays.
Understanding the overflow character (>) in Query Manager
When a file, table, column, or field name exceeds the number of characters that can be shown on a
particular display, DB2 Query Manager shows the overflow character (>), following the name. When the
cursor is positioned on a name followed by an overflow character, and F20 (Display entire name) is
pressed, DB2 Query Manager displays a window that shows the name in its entirety.
If you replace the last character of the name with a blank, the remaining unseen characters following that
blank will be replaced with blanks.
Suppose the table name in the Create Query Manager Table display shows the table name as follows:
Table . . . . . . THIS_IS_A_LONG_TAB >
If you pressed F20, the name in the display would look like:
Table . . . . . . THIS_IS_A_LONG_TABLE_NAME______________
If you then blanked out the last 4 characters (’_TAB’) in the shortened name shown in the Create Query
Manager Table display and then pressed F20, the name would display as follows:
Table . . . . . . THIS_IS_A_LONG________________________
30 Query Manager Use V6R1M0
Chapter 3. Working with Query Manager profiles
This chapter tells you about the Query Manager profile. Much of the information you can access and
process within Query Manager is determined by the values of the settings in your profile.
This chapter describes the Query Manager profile in detail, and explains the settings within your profile
that you can change. It also includes instructions for security administrators, describing the different user
access levels available within Query Manager, and explaining how to maintain profiles for different types
of users.
What is a Query Manager profile?
A profile is a description of a user. A Query Manager profile is the section of your i5/OS user profile that
controls the options you can select, and the default values used when you run Query Manager. Your
Query Manager profile is created the first time you start to use Query Manager. Profiles can also be
created by security administrators for users who should run Query Manager using settings other than
those contained in the default profile. You can change and maintain your own Query Manager profile by
selecting option 10 (Work with Query Manager Profiles) from the main menu.
Your Query Manager profile contains information and settings such as:
v The mode in which you want to run queries
v The number of data rows you want sample queries to retrieve
v The output destination to which you want to send reports
v The default library in which you want to store queries and report forms
Security administrator user access level in Query Manager
Query Manager is intended to be used by a wide range of users for a wide range of applications,
therefore there needs to be a way of controlling who has access to which options. Each Query Manager
installation should have at least one user called the security administrator. This administrator is
responsible for maintaining Query Manager profiles by specifying, for each user, the access level and
default settings Query Manager should use when it is running. Many of these settings can later be
changed by users when they are running Query Manager.
Security administrator authority (*SECADM) is assigned outside of, and is not controlled by, Query
Manager. There are two user access levels available within Query Manager: ALL and BASIC.
Security administrators are responsible for maintaining the Query Manager profiles for Query Manager
users. They can display the profiles of users for whom they have *READ rights, and can change the
access levels and default values in the profiles of users for whom they have *OBJMGMT rights. Security
administrators need to have an ALL access level in their own Query Manager profiles. For information on
*SECADM authority and *OBJMGMT rights, see Security reference.
When the security administrator selects option 10 to see the Work with Query Manager Profiles display.
The following screen is displayed:
© Copyright IBM Corp. 1998, 2008 31

ALL user access level in Query Manager
ALL access grants full access to the Queries, Report Forms, and Tables options. Users can change most of
the values in their own Query Manager profiles, but they cannot access any other user’s profile. The ALL
access level is the default, and is suitable for users who want to create, change, and run queries and
report forms. Knowledge of the DB2 for i5/OS SQL language and report generation is beneficial.
When someone with a user access level of ALL selects option 10 to see the Work with Query Manager
Profiles display. The following screen is displayed:
Work with Query Manager Profiles
Type options, press Enter.
2=Change 3=Copy 5=Display
User
Opt Profile Description
__________
FREDNURK User profile for Fred Nurk.
JOESMITH User profile for Joe Smith.
JONESD David Jones - Accounts.
LIZARD Night-shift Operator.
QSECOFR System Administrator.
More...
F3=Exit F5=Refresh F11=Display profile only F12=Cancel
F16=Repeat position to F17=Position to F22=QM Statement
Figure 11. Security Administrator User Access Level
Change Query Manager Profile
User profile . . . . . . . . . . . . . : FREDNURK
Description . . . . . . . . . . . . . : User Profile for Fred Nurk.
Type choices, press Enter.
Default library for QM objects . . . . *CURLIB Name, *CURLIB
Default object creation authority . . *LIBCRTAUT *CHANGE, *ALL, *USE
*EXCLUDE, *LIBCRTAUT
Authorization list
Run query mode . . . . . . . . . . . . 1 1=Interactive
2=Batch
Number of rows to use for sample . . . 50_ 1-100
Display run options . . . . . . . . . Y Y=Yes, N=No
Confirmation messages in QM . . . . . Y Y=Yes, N=No
Naming convention . . . . . . . . . . *SYS *SYS, *SAA
RDB Connection method . . . . . . . . *RUW *RUW, *DUW
Default library for QM tables . . . . *CURLIB___ Name, *NONE, *CURLIB
3=Table
More...
F3=Exit F4=Prompt F5=Refresh F10=Display additional details
F12=Cancel F22=QM statement
You can update only your own profile.
Figure 12. ALL User Access Level
32 Query Manager Use V6R1M0
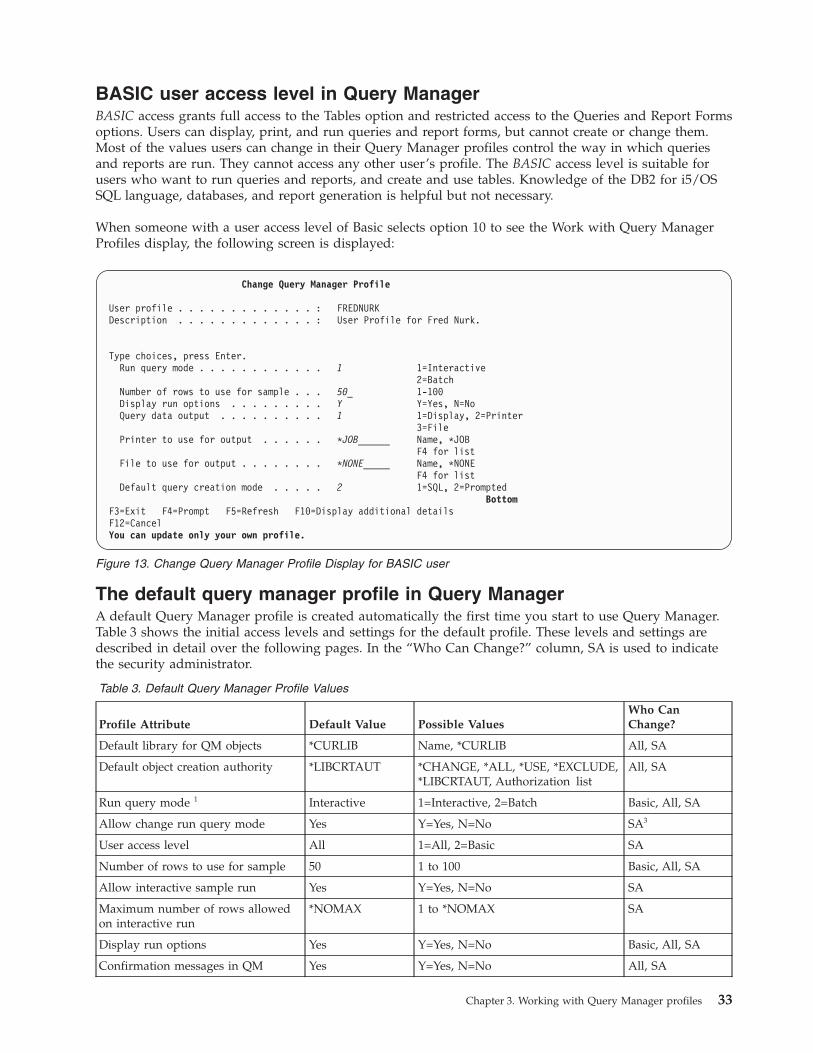
BASIC user access level in Query Manager
BASIC access grants full access to the Tables option and restricted access to the Queries and Report Forms
options. Users can display, print, and run queries and report forms, but cannot create or change them.
Most of the values users can change in their Query Manager profiles control the way in which queries
and reports are run. They cannot access any other user’s profile. The BASIC access level is suitable for
users who want to run queries and reports, and create and use tables. Knowledge of the DB2 for i5/OS
SQL language, databases, and report generation is helpful but not necessary.
When someone with a user access level of Basic selects option 10 to see the Work with Query Manager
Profiles display, the following screen is displayed:
The default query manager profile in Query Manager
A default Query Manager profile is created automatically the first time you start to use Query Manager.
Table 3 shows the initial access levels and settings for the default profile. These levels and settings are
described in detail over the following pages. In the “Who Can Change?” column, SA is used to indicate
the security administrator.
Table 3. Default Query Manager Profile Values
Profile Attribute Default Value Possible Values
Who Can
Change?
Default library for QM objects *CURLIB Name, *CURLIB All, SA
Default object creation authority *LIBCRTAUT *CHANGE, *ALL, *USE, *EXCLUDE,
*LIBCRTAUT, Authorization list
All, SA
Run query mode
1 Interactive 1=Interactive, 2=Batch Basic, All, SA
Allow change run query mode Yes Y=Yes, N=No SA3
User access level All 1=All, 2=Basic SA
Number of rows to use for sample 50 1 to 100 Basic, All, SA
Allow interactive sample run Yes Y=Yes, N=No SA
Maximum number of rows allowed
on interactive run
*NOMAX 1 to *NOMAX SA
Display run options Yes Y=Yes, N=No Basic, All, SA
Confirmation messages in QM Yes Y=Yes, N=No All, SA
Change Query Manager Profile
User profile . . . . . . . . . . . . . : FREDNURK
Description . . . . . . . . . . . . . : User Profile for Fred Nurk.
Type choices, press Enter.
Run query mode . . . . . . . . . . . . 1 1=Interactive
2=Batch
Number of rows to use for sample . . . 50_ 1-100
Display run options . . . . . . . . . Y Y=Yes, N=No
Query data output . . . . . . . . . . 1 1=Display, 2=Printer
3=File
Printer to use for output . . . . . . *JOB______ Name, *JOB
F4 for list
File to use for output . . . . . . . . *NONE_____ Name, *NONE
F4 for list
Default query creation mode . . . . . 2 1=SQL, 2=Prompted
Bottom
F3=Exit F4=Prompt F5=Refresh F10=Display additional details
F12=Cancel
You can update only your own profile.
Figure 13. Change Query Manager Profile Display for BASIC user
Chapter 3. Working with Query Manager profiles 33

Table 3. Default Query Manager Profile Values (continued)
Profile Attribute Default Value Possible Values
Who Can
Change?
Naming convention *SYS *SYS, *SAA All, SA
Relational database connection *NONE Name, *NONE, *CURRENT SA
RDB connection method *RUW *RUW, *DUW All, SA
Default collection for QM tables *NONE Name, *NONE, *CURLIB All, SA
Query data output Display 1=Display, 2=Printer, 3=Table Basic, All, SA
Printer to use for output *JOB Name, *JOB Basic, All, SA
Table to use for output *NONE Name, *NONE Basic, All, SA
Collection (for output table) Name, *LIBL, *CURLIB Basic, All, SA
Job description for batch run *USRPRF Name, *USRPRF All, SA
Library (for job description) Name, *LIBL, *CURLIB All, SA
Commitment control level None 1=None, 2=Change,
3=Cursor stability, 4=All,
5=Repeatable read
All, SA
Default query creation mode1 Prompted2 1=SQL, 2=Prompted BASIC, All, SA
Allow change query creation mode Yes Y=Yes, N=No SA3
Show query sort sequence options No Y=Yes, N=No All, SA
Allow access to QM tables Yes Y=Yes, N=No SA
Default column names displayed Column names 1=Column names, 2=System column
names
All, SA
Select allowed SQL statements N/A Y=Yes, N=No SA3
Notes:
1 You cannot change your “Run query mode” if “Allow change run query mode” is set to NO. You cannot
change your “Default query creation mode” if “Allow change query creation mode” is set to NO.
2 The “Default query creation mode” is prompted for new Query Manager users, and SQL for users who are
upgrading from V2R1.1.
3 These attributes can only be seen by the security administrator. Users with BASIC and ALL do not see
these attributes.
Security administrator tasks are described in detail beginning on page 45.
Default library for Query Manager objects
Allows you to specify the library in which you want Query Manager to store the query and report form
objects you create.
Name Specify a library name to be used as the default whenever Query Manager prompts you
to enter a library name.
If you type the name of a library that does not exist, Query Manager shows a prompt
window asking if you want to create the library in either batch or interactive mode.
*CURLIB Specify the library in your current i5/OS job as the library to be used as the default
whenever Query Manager prompts you to enter a library name.
The default is *CURLIB. This setting can be changed by users with an ALL access level.
Default object creation authority in Query Manager
This value sets the default security level for all query and report form objects you create.
34 Query Manager Use V6R1M0
*CHANGE Allows other users to read and work with your objects, but does not allow other users to
delete, replace, or transfer ownership of your objects. When other users change an object,
they must specify a new name for the object.
*ALL Allows other users to perform all operations on your objects except transferring
ownership.
*USE Allows other users to read, run, export, and print your objects, but does not allow others
to change, replace, or import your objects.
*EXCLUDE Prevents other users from doing anything to your objects unless you specifically grant
them authority (for example, through an authorization list).
*LIBCRTAUT Takes the authority for your objects from the library in which they are created. If the
library authority changes, the new authority does not affect the authority of existing
objects.
Authorization list
This is a list through which you can assign security authorities for your objects to
individual users. Full instructions on how to use an authorization list can be found in
Security reference.
The default is *LIBCRTAUT. This setting can be changed by users with an ALL access level.
Run query mode in Query Manager
This allows you to specify the mode in which you want to run queries and reports: either interactive or
batch.
Interactive This mode causes queries and reports to run as soon as you issue a RUN statement. Use
this mode when you want to create active data, and view the results of RUN statements
on your display screen. Be aware, though, that interactive mode might tie your display
station up for extended periods while you wait for large jobs to finish running.
Batch This mode causes queries and reports to be submitted to a batch queue when you issue a
RUN statement. The order in which the jobs in the batch queue are run depends on what
each job’s priority levels are, and how many other jobs there are in the queue. Your job
might be run immediately, or you might have to wait for jobs with higher priority levels
to finish running before your job begins. This mode frees your display station
immediately after you issue a RUN statement, but it does not create active data, and you
cannot send query output to display.
The default mode is interactive. This setting can be changed by users with BASIC and ALL access levels,
although not all users see this prompt in their profiles. The security administrator can set “Allow change
run query mode” to YES or NO. If you are not able to change your run query mode, this prompt is not
shown in your Change Query Manager Profile display, and you cannot change the mode when you run
queries and reports. Press F10 (Display additional details) to view your run query mode.
Allow change run query mode in Query Manager
This value determines whether you can work in run query mode.
Yes Allows you to change the “Run query mode” setting in your Query Manager profile, and to
change the mode setting when you run queries and reports.
No Forces you to run all jobs in the mode specified in your profile (either batch or interactive) and
removes the “Run query mode” prompt from your Change Query Manager Profile display.
The default authority is Yes. This setting can be changed only by a security administrator.
User access level in Query Manager
This value assigns a user access level of either ALL or BASIC. All security administrators need to have an
ALL access level in their Query Manager profiles.
Chapter 3. Working with Query Manager profiles 35

ALL This level grants full access to the Queries, Report Forms, and Tables options. Users can change
most of the information in their own Query Manager profiles.
BASIC
This level grants full access to the Tables option, and restricted access to the Queries and Report
Forms options. Users can display and print query and report form definitions, and run queries
and reports, but they cannot create or change queries or report forms. Most of the information
users can change in their Query Manager profiles determines the way in which queries and
reports are run.
The default access level is ALL. This setting can be changed only by a security administrator.
Number of rows to use for sample in Query Manager
This allows you to specify the maximum number of rows you want retrieved by a query when it is run
using the sample restriction. (Sample queries are described on page 9.) Type any number from 1 to 100.
The default is 50. This setting can be changed by users with BASIC and ALL access levels.
Allow interactive sample run in Query Manager
This setting is used by the security administrator to specify whether you can run queries and reports
using the sample restriction.
Yes Allows you to run queries and reports using the sample restriction.
No Keeps you from being able to run sample queries and reports.
If your “Run query mode” is batch and you cannot change it, a value of NO stops you from being able to
run queries interactively to create active data. (Sample queries and reports are always run in interactive
mode.)
The default authority is YES. This setting can be changed only by a security administrator.
Maximum number of rows allowed on interactive run in Query Manager
Specifies the maximum number of rows retrieved when you run queries in interactive mode. Type a
value between 1 and *NOMAX, where *NOMAX indicates that there is no limit to the number of rows
retrieved. This value is ignored when you run queries in batch mode.
If Query Manager retrieves the maximum number of rows before it completes a query, you see a message
at the bottom of the display informing you that “Maximum number of records reached. Data is
incomplete.” When this happens, final summary functions such as SUM, AVERAGE, and COUNT are
omitted from reports.
The default maximum is *NOMAX. This setting can be changed only by a security administrator.
Display run options in Query Manager
Specifies whether you want the program to prompt you for run options whenever you press a function
key to run an SQL query, a prompted query, or a report. Run options are always displayed when you run
queries and reports using Work with displays.
Yes Displays the Run Query display, which prompts you to enter the following information:
v The mode in which to run the query: either batch or interactive. (This prompt is not displayed
if your “Allow change run query mode” is set to NO.)
Note: If you are running a non-SELECT SQL query, you are only prompted for the mode.
v Whether to run the query using the sample restriction. (This prompt is not displayed if your
“Allow interactive sample run” is set to NO.)
v The report form to use to format the query data and the library in which it resides (if you are
running a query).
36 Query Manager Use V6R1M0

v The query to run and the library in which it resides (if you are running a report). If active data
exists, you can specify to use the active data instead of running a query.
v The output destination: either display, printer, or table.
v The name of the printer or i5/OS output queue (if output destination is printer).
v The names of the table and collection (if output destination is table).
No Suppresses the Run Options display and uses the default settings from your Query Manager
profile.
The default value is YES. This setting can be changed by users with BASIC and ALL access levels.
Confirmation messages in Query Manager
Allows you to specify whether or not to display confirmation messages. You can override this value by
specifying “CONFIRM=Y” or “CONFIRM=N” when you enter a Query Manager statement.
Yes Display confirmation messages when you delete or replace objects by entering Query Manager
statements through the command window. Confirmation messages are always displayed when
you delete or replace objects through Query Manager displays.
No Suppresses the confirmation messages.
The default value is YES. This setting can be changed by users with an ALL access level.
Naming convention in Query Manager
Allows you to specify whether you want to use *SYS or *SAA naming conventions.
*SYS Causes most displays to prompt for files and libraries rather than tables and collections. Query
Manager expects you to use SYSTEM conventions when you create and name queries and report
forms, and when you enter commands and statements through the command window. For
example:
SELECT FLD1, FLD2 FROM TESTDATA/PHONE
RUN QUERY TESTDATA/QUERY
If no library name is specified in a command or statement, Query Managersearches the library
named as the “Default library for QM objects” in your Query Manager profile to find the object.
If no library name is specified in a query, Query Manager searches the library list (*LIBL) to find
the object named in the SQL statement.
*SAA Causes most displays to prompt for tables and collections rather than files and libraries. Query
Manager expects you to use SQL conventions when you create and name queries and report
forms, and when you enter commands and statements through the command window. For
example:
SELECT FLD1, FLD2 FROM TESTDATA.PHONE
RUN QUERY TESTDATA.QUERY
If no library name is specified in a command or statement, Query Manager searches the library
named as the “Default library for QM objects” in your Query Manager profile to find the object.
If no library name is specified in a query, Query Manager searches the library or collection with
the same name as your user ID to find the object named in the SQL statement.
Note: If you specify *SYS naming conventions, the only relational databases you can connect to are those
on a local machine or those on another i5/OS operating system.
The default naming convention is *SYS. This setting can be changed by users with an ALL access level.
Relational database connection in Query Manager
This allows you to specify the name of the relational database to use when the user starts Query Manager
Chapter 3. Working with Query Manager profiles 37
Name Specify a name for a relational database to connect to each time the user starts Query
Manager
If the user has specified *SYS naming conventions, the only relational databases you can
enter here are those on a local machine, or those on another i5/OS operating system.
*CURRENT Specifies that the database connection which exists when the user starts Query Manager
should continue to be used.
*NONE Specifies that no remote connection is made, and if necessary, you are connected to your
local database when Query Manager is started.
The default database connection is *NONE. This setting can be changed only by a security administrator.
After the setting is changed, the new relational database connection does not come into effect until the
next time the user starts Query Manager. Users who want to connect to the new relational database
immediately should enter the CONNECT statement on the Query Manager statement line (see page 236
for instructions).
RDB connection method in Query Manager
This specifies the connection method to use.
*DUW
Specifies that multiple database connections can be entered.
*RUW Allows you to select a connection to a single database.
For more information on when to use *RUW and *DUW, see Figure 101 on page 175.
The default in Query Manager is *RUW. This setting can be changed by users with an ALL access level.
Default collection for tables in Query Manager
This specifies the name of the collection or library in which to store your Query Manager tables. You
need to have *CHANGE authority for the collection or library if you want to use all options available
through the Work with Query Manager Tables display.
Name Specify the collection or library in which you want to store your Query Manager tables.
If you specify a name, Query Manager selects that collection when you choose to Work with
Query Manager Tables. If the name you enter does not exist, Query Manager shows a prompt
window asking if you want to create a new collection in either batch or interactive mode. If you
choose to create the collection and you answer YES to the prompt asking if you want an “SQL
catalog as part of the library”, Query Manager creates a collection; otherwise it creates a
library.
*NONE
Specify this if you want Query Manager to prompt you to specify a collection name each time
you choose to Work with Query Manager Tables.
*CURLIB
Specify the collection or library in your current i5/OS job as the one in which to store your
Query Manager tables.
The default is *NONE. This setting can be changed by users with an ALL access level, although not all
users see this prompt in their profiles. The security administrator can set “Allow access to QM tables
option” to YES or NO. If you are not able to use the QM tables option, you do not need to specify a
default collection, so the “Default collection for QM tables” prompt is not shown on the Change Query
Manager Profile display.
Note: Security administrators need to specify a collection name for users who have a BASIC access level.
BASIC access users cannot have a default collection of *NONE.
38 Query Manager Use V6R1M0
Query data output in Query Manager
Specifies the default output destination to use when you run queries and reports.
Display Specify to send output data to the display.
Note: You cannot send the output to display if your “Run query mode” is set to batch.
Printer Specify to send output data to the printer.
Printer Specify to write output data to a table.
The default is display. This setting can be changed by users with BASIC and ALL access levels.
Printer to use for output in Query Manager
This specifies the default printer you want to use for query and report output.
Name Specify a printer on which to print queries and reports. You can press F4 (Prompt) for a list of all
available printers from which you can make a selection.
*JOB Specifies to use the printer specified in your current i5/OS job.
The default is *JOB This setting can be changed by users with BASIC and ALL access levels.
Table to use for output in Query Manager
This specifies the default table you want to use for query and report output.
Name Specify a table to use for query and report output. You can press F4 (Prompt) for a list of all
tables in the specified collection from which you can make a selection.
*NONE
Specifies that you want to be prompted for a table name each time you run a query or report.
Notes:
1. You cannot specify a table name of *NONE if “Display run options” is set to NO and “Query data
output” is set to table.
2. If you are connected to a remote database, the table and collection you specify are saved on the local
system.
The default is *NONE. This setting can be changed by users with BASIC and ALL access levels.
Collection (for Output Table)
This is the name of the collection or library in which the default output table resides, or to which you
want the default output table written. Leave the name blank if you specified an output table of *NONE
or you entered a valid object name for your output table. If you specified a name Query Manager inserts
the library you specified as the “Default library for QM objects”.
Name Specify an existing collection or library name in which the table exists.
*LIBL Specify the library list is to be searched for the collection or library in which the table
exists.
*CURLIB Specify that Query Manager is to use the library in your current i5/OS job.
The default is *NONE. This setting can be changed by users with BASIC or ALL access levels.
Job description for batch run in Query Manager
This specifies the job description you want to use when running queries and reports in batch mode. A job
description contains information such as:
v Which batch queue to use
v What your job’s priority levels are
Chapter 3. Working with Query Manager profiles 39
v Which output queue to use
v Which printer to use
Name Specify the name of the job description you want to use when running queries and
reports in batch mode.
Press F4 (Prompt) for a list of all job descriptions in the specified library from which you
can make a selection.
*USRPRF Specify your regular job description.
The default is *USRPRF. This setting can be changed by users with an ALL access level.
Library (for Job Description)
This is the name of the library in which your job description resides. Leave the library name blank if you
specified a job description of *USRPRF or you entered a valid name for your job description. If you
specified a name Query Manager inserts the library you specified as the “Default library for QM objects”.
Name Specify an existing library name.
*LIBL Specify that the library list is to be searched for the library that contains the job
description.
*CURLIB Specify for Query Manager to select the library in your current i5/OS job.
There is no default. This setting can be changed by users with an ALL access level.
Commitment control level in Query Manager
This specifies the commitment control lock level under which you want to run Query Manager.
None No rows are locked.
Change All rows you change are locked until you issue a COMMIT or ROLLBACK statement.
Cursor stability
All rows you change and the row in which the cursor is currently positioned are locked
until you issue a COMMIT or ROLLBACK statement.
All All rows you change or view are locked until you issue a COMMIT or ROLLBACK
statement.
Repeatable read
All rows you change or view are locked until your unit of work (UOW) is completed.
Any row that is read or changed during a unit of work cannot be changed by any process
until the unit of work is completed. During the unit of work, multiple reads always give
the same results.
Note: You must use care when choosing a commitment control level of repeatable read
because it can result in concurrency problems. The table is locked and is not
available for change by another user until the COMMIT or ROLLBACK is done.
The default level is none. This setting can be changed by users with an ALL access level. When you
change this setting, the new commitment control level does not come into effect until the next time you
start Query Manager, or the next time you enter the CONNECT statement on the Query Manager
statement line (see page 236).
Note: You can override the commitment control level by running a SET TRANSACTION statement in a
DB2 for i5/OS query. This will not change the commitment control level you have set. For more
information, see “SET transaction considerations in Query Manager DRDA” on page 179.
40 Query Manager Use V6R1M0
Default query creation mode in Query Manager
This specifies the default mode in which you want to create queries.
SQL This mode shows the Edit Query display when you choose to create a query. You can
create queries containing any one of the SQL statements that you were granted authority
to use (through your profile). If you need help entering an SQL statement, press
F4 (Prompt) for a list of all supported statements and their syntax.
Prompted This mode shows the Define Prompted Query displays when you choose to create a
query. You can create SELECT statement queries through these displays. The displays
prompt you to enter all of the information that Query Manager requires to create the
query.
The default is SQL for users who are upgrading from Query Manager V2R1.1 and prompted for other
Query Manager users.
This setting can be changed by users with an ALL access level, although not all users see this prompt on
their Change Query Manager Profile display. The security administrator can set “Allow change query
creation mode” to YES or NO. If you are not able to change your query creation mode, this prompt is not
shown in your Change Query Manager Profile display, and you cannot change the mode when you create
queries. Press F10 (Display additional details) to view your default query creation mode.
Allow change query creation mode in Query Manager
This specifies whether you can change your default query creation mode and whether you can change
the mode setting when you create queries.
YES Allows you to change the “Default query creation mode” setting in your Query Manager profile,
and to change the mode setting when you create queries.
NO Forces you to create and change all queries in the mode specified in your profile (either SQL or
prompted), and stops you from being able to change the “Default query creation mode” shown at
the top of the Change Query Manager Profile display.
The default is YES. This setting can be changed only by a security administrator.
Show query sort sequence options in Query Manager
This determines whether you can specify the sort sequence and language when you create or change a
query.
YES Allows you to specify the sort sequence and language when creating or changing a query.
When you display a query that was created with a specified sort sequence, the sort sequence
information is shown regardless of the setting of this profile option.
If you choose this option, the Specify sort sequence option is available on the Define Prompted
Query display and F18 (Sort Sequence) is available on the Edit Query display.
NO Keeps you from specifying the sort sequence and language when creating a query. It also keeps
you from changing the sort sequence and language if the query was created with the default
sequence and language.
The default is NO. This setting can be changed by users with an ALL access level,
Allow access to tables option in Query Manager
This specifies whether you can use the Work with Query Manager Tables display and its options.
YES Allows you to use the Work with Query Manager Tables display and its options.
NO Denies access to the Work with Query Manager Tables display, and removes the Work with
Query Manager tables option from the main menu.
Chapter 3. Working with Query Manager profiles 41
You can still run queries and produce reports using the data contained in Query Manager tables,
but you cannot use any of the options listed on the Work with Query Manager Tables display. See
“Using the work with Query Manager tables display” on page 146 for more information.
The security administrator can limit the options that users can choose through the Work with Query
Manager Tables display by changing their authority to use different collections and libraries. See page 148
for more information.
The default authority is YES. This setting can be changed only by a security administrator.
System column names displayed in Query Manager
This specifies whether the column names are shown by default on the Query Manager displays.
1 Causes the column names to be shown on the Query Manager displays.
2 Causes the system column names to be shown on the Query Manager displays.
The default is 1. The value can only be changed by a non-basic user.
Select allowed SQL statements in Query Manager
Note that this is a directional aid, not a profile setting. This specifies whether the Select Allowed SQL
Statements display is shown.
Through the Select Allowed SQL Statements display, the security administrator specifies the SQL
statements that you can and cannot use when you create, change, and run Query Manager SQL queries.
YES Shows the Select Allowed SQL Statements display. Figure 20 on page 49 shows an example of this
display.
NO Does not show the Select Allowed SQL Statements display.
The default is for users who are upgrading from Query Manager V2R1.1 to have authority to use all SQL
statements, and for new users to have authority to use only the SELECT statement. This setting can be
changed only by a security administrator.
Viewing the additional details display in Query Manager
Most users can press F10 (Display additional details) to view a list of the SQL statements they have
authority to use. If the “Allowed SQL statements” setting on the Additional Details display is YES, you
can press the Enter key to view a list of the SQL statements you have authority to use. If the “Allowed
SQL statements” setting is NO, you do not have authority to use any SQL statements, so pressing the
Enter key returns you to the Change Query Manager Profile display.
Granting authority for SQL statements is described in detail in “Selecting allowed SQL statements for
profiles in Query Manager” on page 48.
Notes:
1. These authorities affect only those queries created in the SQL creation mode. You do not need
authority to use the SELECT statement to create, change, or run a prompted query.
2. If authority is restricted for all SQL statements, you cannot create, change, or run SQL queries. Your
“Default query creation mode” needs to be set to prompted, and “Allow change query creation
mode” needs to be set to NO.
3. If authority to use the COMMIT and ROLLBACK statements is not granted, you cannot have a
“Commitment control level” of change, cursor stability, repeatable read, or all.
4. These authorities and restrictions apply only when you create, change, and run SQL queries. You can
still copy, rename, and display SQL queries containing all SQL statements.
42 Query Manager Use V6R1M0

Changing your Query Manager Profile
You view and change the settings and values from your Query Manager profile using the Work with
Query Manager Profiles option.
1. Type 10 in the Selection prompt from the Query Manager main menu.
2. Press the Enter key to show the Change Query Manager Profile display.
Changing a BASIC access profile in Query Manager
If you have a BASIC access level, you have full access to the Tables option (unless it has been restricted
through your Query Manager profile), and limited access to the Queries and Report Forms options. You
can run queries and reports, and display and print their definitions, but you cannot create or change
query or report form definitions. Most of the information you can change in your Query Manager profile
controls the way in which queries and reports are run.
1. Type 10 in the Selection prompt from the Query Manager main menu.
2. Press the Enter key. You see a display similar to the one shown in Figure 14.
3. Move the cursor to the prompts for the values you want to change, and type the new values over the
existing values. Beside each prompt is a list of the supported values that you can enter. Some of these
lists tell you that you can press F4 (Prompt) if you want to view a more complete list of supported
values for the current prompt. All of the values you can change are described in The default query
manager profile in Query Manager, beginning on page 33.
4. Press the Enter key to save your changes and exit from the Change Query Manager Profile display. If
you want to exit without saving your changes, press F3 (Exit) or F12 (Cancel) instead of the Enter
key.
You can change all of the values shown on the display except the profile name and description. These
values are taken from your i5/OS user profile and cannot be changed through Query Manager.
Press F10 (Display additional details) to view the remaining access levels and settings that make up your
Query Manager profile. The additional details are shown in display-only format. You cannot change any
values through the Additional Details display.
Pressing the Enter key takes you to a display that lists all of the SQL statements that you have authority
to use when you run SQL queries.
Change Query Manager Profile
User profile . . . . . . . . . . . . . : FREDNURK
Description . . . . . . . . . . . . . : User Profile for Fred Nurk.
Type choices, press Enter.
Run query mode . . . . . . . . . . . . 1 1=Interactive
2=Batch
Number of rows to use for sample . . . 50_ 1-100
Display run options . . . . . . . . . Y Y=Yes, N=No
Query data output . . . . . . . . . . 1 1=Display, 2=Printer
3=File
Printer to use for output . . . . . . *JOB______ Name, *JOB
F4 for list
File to use for output . . . . . . . . *NONE_____ Name, *NONE
F4 for list
Default query creation mode . . . . . 2 1=SQL, 2=Prompted
Bottom
F3=Exit F4=Prompt F5=Refresh F10=Display additional details
F12=Cancel
You can update only your own profile.
Figure 14. Change Query Manager Profile Display for a BASIC Access User
Chapter 3. Working with Query Manager profiles 43

Changing an ALL access profile in Query Manager
If you have an ALL access level, you have full access to the Queries and Report Forms options, and you
can change most of the values and settings in your Query Manager profile. You also have full access to
the Tables option, unless it has been restricted through your Query Manager profile.
1. Type 10 in the Selection prompt from the Query Manager main menu.
2. Press the Enter key. An example of the Change Query Manager Profile display for an ALL access user
is shown in Figure 15.
3. Move the cursor to the prompts for the values you want to change.
4. Type the new values over the existing values. Beside each prompt is a list of the supported values
that you can enter. Some of these lists tell you that you can press F4 (Prompt) if you want to view a
more complete list of supported values for the current prompt. All of the values you can change are
described in The default query manager profile in Query Manager, beginning on page 33.
The More... in the lower right-hand corner indicates that your profile is more than one display in
length. Use your display station’s roll keys to view and change the remaining settings that make up
your Query Manager profile.
The Bottom in the lower right-hand corner tells you that you have reached the end of the profile
settings.
Change Query Manager Profile
User profile . . . . . . . . . . . . . : FREDNURK
Description . . . . . . . . . . . . . : User Profile for Fred Nurk.
Type choices, press Enter.
Default library for QM objects . . . . *CURLIB___ Name, *CURLIB
Default object creation authority . . *LIBCRTAUT *CHANGE, *ALL, *USE
*EXCLUDE, *LIBCRTAUT
Authorization list
Run query mode . . . . . . . . . . . . 1 1=Interactive
2=Batch
Number of rows to use for sample . . . 50_ 1-100
Display run options . . . . . . . . . Y Y=Yes, N=No
Confirmation messages in QM . . . . . Y Y=Yes, N=No
Naming convention . . . . . . . . . . *SYS *SYS, *SAA
RDB Connection method . . . . . . . . *RUW *RUW, *DUW
Default library for QM tables . . . . *CURLIB___ Name, *NONE, *CURLIB
3=Table
More...
F3=Exit F4=Prompt F5=Refresh F10=Display additional details
F12=Cancel F22=QM statement
You can update only your own profile.
Figure 15. Change Query Manager Profile Display for an ALL Access User
44 Query Manager Use V6R1M0

5. Press the Enter key to save your changes and exit from the Change Query Manager Profile display. If
you want to exit without saving your changes, press F3 (Exit) or F12 (Cancel) instead of the Enter
key.
You can change all of the values shown on the displays except for the profile name and description.
These values are taken from your i5/OS user profile and cannot be changed through Query Manager.
Press F10 (Display additional details) to view the remaining access levels and settings that make up your
Query Manager profile. The Additional Details are shown in display-only format. You cannot change any
values through the Additional Details display.
Pressing the Enter key takes you to a display that lists all of the SQL statements that you have authority
to use when you create, change, or run SQL queries.
Security administrator tasks in Query Manager
Security administrators (users with *SECADM authority) can maintain the Query Manager profiles for
Query Manager users. As a security administrator, you can display the Query Manager profiles of all
users for whom you have *READ rights, and can change or copy the profiles of all users for whom you
have object management (*OBJMGMT) rights. For more information on *SECADM authority, *OBJMGMT
rights, and *READ rights, refer to Security reference.
Note: *SECADM authority is assigned outside Query Manager. All security administrators need to have
ALL access levels in their Query Manager profiles.
Using the work with Query Manager profiles display
If you have security administrator authority, when you select option 10 (Work with Query Manager
profiles) from the Query Manager main menu, you see a display similar to the one shown in Figure 17 on
page 46.
Change Query Manager Profile
User profile . . . . . . . . . . . . . : FREDNURK
Description . . . . . . . . . . . . . : User Profile for Fred Nurk.
Type choices, press Enter.
Query data output . . . . . . . . . . 1 1=Display, 2=Printer
3=File
Printer to use for output . . . . . . *JOB______ Name, *JOB
F4 for list
File to use for output . . . . . . . . *NONE_____ Name, *NONE
F4 for list
Library . . . . . . . . . . . . . . __________ Name, *LIBL, *CURLIB
Job description for batch run . . . . *USRPRF___ Name, *USRPRF
F4 for list
Library . . . . . . . . . . . . . . __________ Name, *LIBL, *CURLIB
Commitment control level . . . . . . . 1 1=None, 2=Change
3=Cursor stability
4=ALL 5=Repeatable read
More...
F3=Exit F4=Prompt F5=Refresh F10=Display additional details
F12=Cancel F22=QM statement
You can update only your own profile.
Figure 16. Change Query Manager Profile Display for an ALL Access User
Chapter 3. Working with Query Manager profiles 45
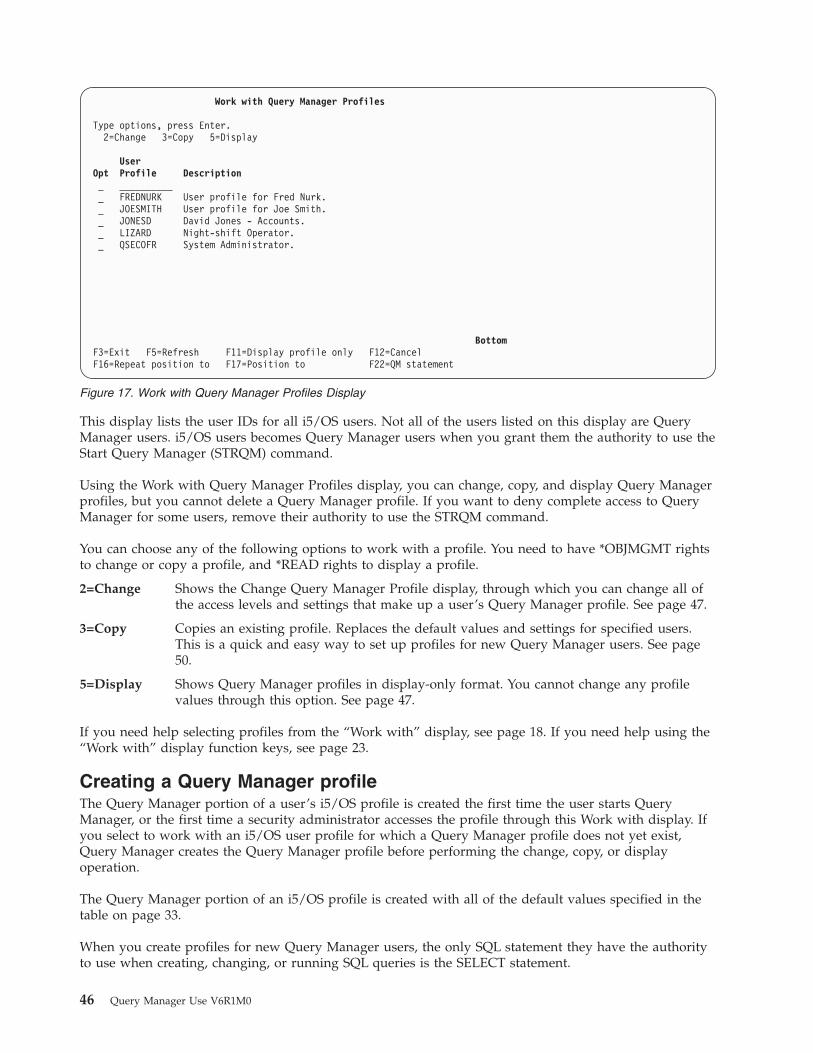
This display lists the user IDs for all i5/OS users. Not all of the users listed on this display are Query
Manager users. i5/OS users becomes Query Manager users when you grant them the authority to use the
Start Query Manager (STRQM) command.
Using the Work with Query Manager Profiles display, you can change, copy, and display Query Manager
profiles, but you cannot delete a Query Manager profile. If you want to deny complete access to Query
Manager for some users, remove their authority to use the STRQM command.
You can choose any of the following options to work with a profile. You need to have *OBJMGMT rights
to change or copy a profile, and *READ rights to display a profile.
2=Change Shows the Change Query Manager Profile display, through which you can change all of
the access levels and settings that make up a user’s Query Manager profile. See page 47.
3=Copy Copies an existing profile. Replaces the default values and settings for specified users.
This is a quick and easy way to set up profiles for new Query Manager users. See page
50.
5=Display Shows Query Manager profiles in display-only format. You cannot change any profile
values through this option. See page 47.
If you need help selecting profiles from the “Work with” display, see page 18. If you need help using the
“Work with” display function keys, see page 23.
Creating a Query Manager profile
The Query Manager portion of a user’s i5/OS profile is created the first time the user starts Query
Manager, or the first time a security administrator accesses the profile through this Work with display. If
you select to work with an i5/OS user profile for which a Query Manager profile does not yet exist,
Query Manager creates the Query Manager profile before performing the change, copy, or display
operation.
The Query Manager portion of an i5/OS profile is created with all of the default values specified in the
table on page 33.
When you create profiles for new Query Manager users, the only SQL statement they have the authority
to use when creating, changing, or running SQL queries is the SELECT statement.
Work with Query Manager Profiles
Type options, press Enter.
2=Change 3=Copy 5=Display
User
Opt Profile Description
_ __________
_ FREDNURK User profile for Fred Nurk.
_ JOESMITH User profile for Joe Smith.
_ JONESD David Jones - Accounts.
_ LIZARD Night-shift Operator.
_ QSECOFR System Administrator.
Bottom
F3=Exit F5=Refresh F11=Display profile only F12=Cancel
F16=Repeat position to F17=Position to F22=QM statement
Figure 17. Work with Query Manager Profiles Display
46 Query Manager Use V6R1M0
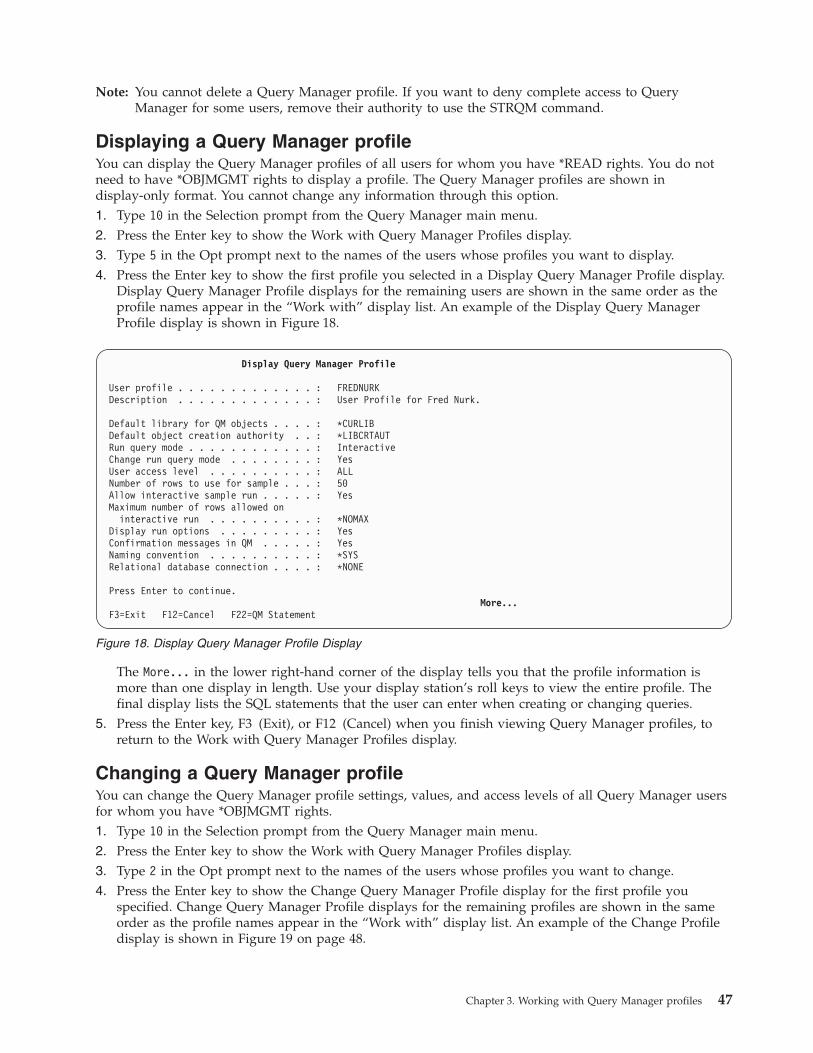
Note: You cannot delete a Query Manager profile. If you want to deny complete access to Query
Manager for some users, remove their authority to use the STRQM command.
Displaying a Query Manager profile
You can display the Query Manager profiles of all users for whom you have *READ rights. You do not
need to have *OBJMGMT rights to display a profile. The Query Manager profiles are shown in
display-only format. You cannot change any information through this option.
1. Type 10 in the Selection prompt from the Query Manager main menu.
2. Press the Enter key to show the Work with Query Manager Profiles display.
3. Type 5 in the Opt prompt next to the names of the users whose profiles you want to display.
4. Press the Enter key to show the first profile you selected in a Display Query Manager Profile display.
Display Query Manager Profile displays for the remaining users are shown in the same order as the
profile names appear in the “Work with” display list. An example of the Display Query Manager
Profile display is shown in Figure 18.
The More... in the lower right-hand corner of the display tells you that the profile information is
more than one display in length. Use your display station’s roll keys to view the entire profile. The
final display lists the SQL statements that the user can enter when creating or changing queries.
5. Press the Enter key, F3 (Exit), or F12 (Cancel) when you finish viewing Query Manager profiles, to
return to the Work with Query Manager Profiles display.
Changing a Query Manager profile
You can change the Query Manager profile settings, values, and access levels of all Query Manager users
for whom you have *OBJMGMT rights.
1. Type 10 in the Selection prompt from the Query Manager main menu.
2. Press the Enter key to show the Work with Query Manager Profiles display.
3. Type 2 in the Opt prompt next to the names of the users whose profiles you want to change.
4. Press the Enter key to show the Change Query Manager Profile display for the first profile you
specified. Change Query Manager Profile displays for the remaining profiles are shown in the same
order as the profile names appear in the “Work with” display list. An example of the Change Profile
display is shown in Figure 19 on page 48.
Display Query Manager Profile
User profile . . . . . . . . . . . . . : FREDNURK
Description . . . . . . . . . . . . . : User Profile for Fred Nurk.
Default library for QM objects . . . . : *CURLIB
Default object creation authority . . : *LIBCRTAUT
Run query mode . . . . . . . . . . . . : Interactive
Change run query mode . . . . . . . . : Yes
User access level . . . . . . . . . . : ALL
Number of rows to use for sample . . . : 50
Allow interactive sample run . . . . . : Yes
Maximum number of rows allowed on
interactive run . . . . . . . . . . : *NOMAX
Display run options . . . . . . . . . : Yes
Confirmation messages in QM . . . . . : Yes
Naming convention . . . . . . . . . . : *SYS
Relational database connection . . . . : *NONE
Press Enter to continue.
More...
F3=Exit F12=Cancel F22=QM Statement
Figure 18. Display Query Manager Profile Display
Chapter 3. Working with Query Manager profiles 47
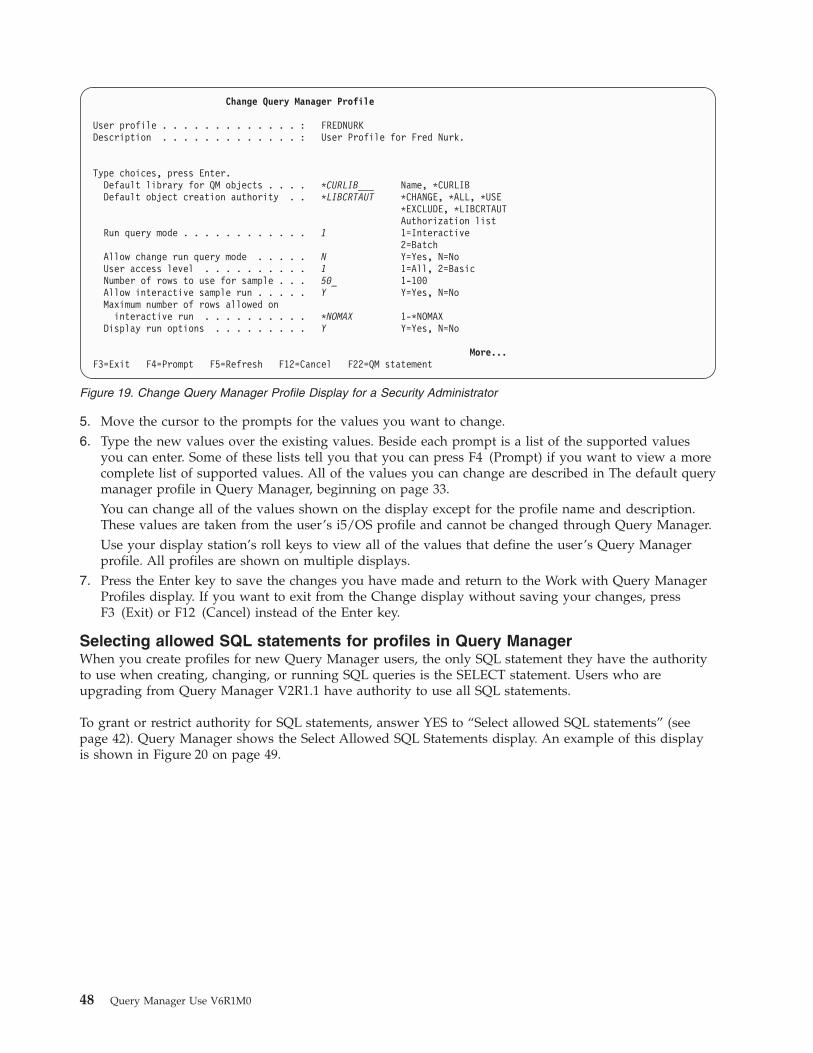
5. Move the cursor to the prompts for the values you want to change.
6. Type the new values over the existing values. Beside each prompt is a list of the supported values
you can enter. Some of these lists tell you that you can press F4 (Prompt) if you want to view a more
complete list of supported values. All of the values you can change are described in The default query
manager profile in Query Manager, beginning on page 33.
You can change all of the values shown on the display except for the profile name and description.
These values are taken from the user’s i5/OS profile and cannot be changed through Query Manager.
Use your display station’s roll keys to view all of the values that define the user’s Query Manager
profile. All profiles are shown on multiple displays.
7. Press the Enter key to save the changes you have made and return to the Work with Query Manager
Profiles display. If you want to exit from the Change display without saving your changes, press
F3 (Exit) or F12 (Cancel) instead of the Enter key.
Selecting allowed SQL statements for profiles in Query Manager
When you create profiles for new Query Manager users, the only SQL statement they have the authority
to use when creating, changing, or running SQL queries is the SELECT statement. Users who are
upgrading from Query Manager V2R1.1 have authority to use all SQL statements.
To grant or restrict authority for SQL statements, answer YES to “Select allowed SQL statements” (see
page 42). Query Manager shows the Select Allowed SQL Statements display. An example of this display
is shown in Figure 20 on page 49.
Change Query Manager Profile
User profile . . . . . . . . . . . . . : FREDNURK
Description . . . . . . . . . . . . . : User Profile for Fred Nurk.
Type choices, press Enter.
Default library for QM objects . . . . *CURLIB___ Name, *CURLIB
Default object creation authority . . *LIBCRTAUT *CHANGE, *ALL, *USE
*EXCLUDE, *LIBCRTAUT
Authorization list
Run query mode . . . . . . . . . . . . 1 1=Interactive
2=Batch
Allow change run query mode . . . . . N Y=Yes, N=No
User access level . . . . . . . . . . 1 1=All, 2=Basic
Number of rows to use for sample . . . 50_ 1-100
Allow interactive sample run . . . . . Y Y=Yes, N=No
Maximum number of rows allowed on
interactive run . . . . . . . . . . *NOMAX 1-*NOMAX
Display run options . . . . . . . . . Y Y=Yes, N=No
More...
F3=Exit F4=Prompt F5=Refresh F12=Cancel F22=QM statement
Figure 19. Change Query Manager Profile Display for a Security Administrator
48 Query Manager Use V6R1M0

Type 1 beside all of the SQL statements that you want the user to be able to use when creating, changing,
or running SQL queries. Press F21 (Select all) if you want to grant authority for all of the SQL statements.
To restrict authority to a statement, blank out the 1 typed beside the statement name. If you restrict
authority to all SQL statements, you stop the user from being able to create, change, or run SQL queries
through Query Manager.
When you finish granting authority for SQL statements, press the Enter key to return to the Change
Query Manager Profile display.
Notes:
1. These authorities and restrictions apply only to SQL queries. Users do not need authority for the
SELECT statement to create, change, or run prompted queries.
2. These authorities and restrictions apply only when the user is creating, changing, or running SQL
queries. The user can still display, print, and copy SQL queries that contain all SQL statements.
3. If you do not grant authority to use the COMMIT and ROLLBACK statements, the user cannot have a
“Commitment control level” of change, cursor stability, repeatable read, or all.
4. For a complete description of all implications when allowing SQL statements, see Appendix C,
“Implications of allowed SQL statements in Query Manager.”
Special considerations for profiles in Query Manager
Keep the following in mind when changing Query Manager profiles:
v When you grant and restrict authority for SQL statements, you limit the user’s access for those
statements when creating, changing, or running SQL queries through Query Manager. This limitation
does not exist outside Query Manager.
v When you name a specific collection or library for “Default collection for QM tables”, you limit the
objects and tables that a user with BASIC access can use through Query Manager. This limitation does
not exist outside Query Manager.
v When you specify a “Relational database connection” of *NONE, users are not automatically connected
to a remote relational database when they start Query Manager. Users with an ALL access level can
enter the CONNECT statement from the Query Manager statement line if they want to connect to a
remote relational database. See page 236. For DRDA considerations, see Chapter 9, “Distributed
Relational Database Architecture in Query Manager,” on page 173.
Select Allowed SQL Statements
User profile . . . . . . . . . . . . . : FREDNURK
Description . . . . . . . . . . . . . : User Profile for Fred Nurk.
Type options to allow use of the statements, press Enter.
Press F21 to select all.
1=Select
SQL SQL
Opt Statement Opt Statement
1 ALTER TABLE _ CREATE PROCEDURE
_ CALL _ CREATE TABLE
_ COMMENT ON _ CREATE TRIGGER
_ COMMIT _ CREATE VIEW
_ CREATE ALIAS _ DECLARE GLOBAL TEMPORARY TABLE
_ CREATE COLLECTION _ DELETE
_ CREATE DISTINCT TYPE _ DROP ALIAS
_ CREATE FUNCTION _ DROP COLLECTION
_ CREATE INDEX _ DROP DISTINCT TYPE
More...
F3=Exit F12=Cancel F21=Select all F22=QM statement
Figure 20. Select Allowed SQL Statements Display
Chapter 3. Working with Query Manager profiles 49
v When users are connected to a remote relational database, their commitment control levels might be
escalated by the connection. To deal with this, Query Manager simulates the commitment control level
specified in each user’s Query Manager profile, and if necessary, issues COMMIT and ROLLBACK
statements for the user during the connection to the remote relational database. For more information
about commitment control, refer to the SQL Programming Concepts.
Copying a Query Manager profile
When you copy a Query Manager profile, you replace the access levels and settings in one profile with
the access levels and settings from another. This is a quick and easy way to prepare default values and
settings for new Query Manager users.
Note: You need to have object management rights (*OBJMGMT) for both the profile you want to copy
from and the profile you want to copy to.
1. Type 10 in the Selection prompt from the Query Manager main menu.
2. Press the Enter key to show the Work with Query Manager Profiles display.
3. Type 3 in the Opt prompt next to the names of the users whose profiles you want to copy values and
settings from.
4. Press the Enter key to show the Copy Query Manager Profile display. An example of this display is
shown in Figure 21.
5. Answer Y or N to specify whether you want the copy to replace a Query Manager profile that already
exists. If you selected to copy more than one profile, all profiles are copied using this setting.
6. Type the names of the profiles you want to copy to.
7. Press the Enter key to perform the copy operation. You need to type existing i5/OS user profile
names.
If you want to exit without performing the copy, press F3 (Exit) or F12 (Cancel) instead of the Enter
key.
Copy Query Manager Profile
Type choices, press Enter:
Replace profile . . . . . N Y=Yes, N=No
Type name of existing user, press Enter.
From Profile To Profile
FREDNURK JOESMITH___
Bottom
F3=Exit F5=Refresh F12=Cancel F22=QM statement
Figure 21. Copy Query Manager Profile Display
50 Query Manager Use V6R1M0

Chapter 4. Working with Query Manager queries
A Query Manager query is an SQL statement that you run to manipulate and view database information.
You can create and maintain queries using Query Manager’s Edit Query display, which provides the
syntax for all of the SQL statements you have been granted authority to use (through your Query
Manager profile). You can also create and maintain SELECT statement queries using the prompted query
option, where a series of displays prompt you to enter all of the information that Query Manager
requires to create the query. You do not need to be a DB2 for i5/OS SQL language expert to work with
Query Manager queries.
This chapter begins with a description of queries, telling you what they are, and where and when you
might find them useful. Following the description are instructions on how to use most of the options that
are available through the Work with Query Manager Queries display. You can learn how to copy, delete,
rename, display, and print query definitions, and how to run Query Manager queries.
Creating and changing query definitions, changing the query creation mode, and converting prompted
query definitions to SQL query definitions are described in Chapter 5, “Creating and changing queries in
Query Manager.”
If you have BASIC access to Query Manager, you can display and print query definitions, and run
queries.
What is a query in Query Manager?
Generally, a query is a question asked of the database. For example, you can use a query to get
information from database tables to produce a report. All queries created in Query Manager are written
in the DB2 for i5/OS SQL language. Most of the queries you write or run will probably be SQL SELECT
statement queries that generate reports on existing database information (for example, to print a monthly
sales report, a client list, or a supply inventory).
Creating a Query Manager query
There are two ways in which you can create Query Manager queries:
v The SQL query editor is suitable for users who have experience using, or who want to learn, the DB2
for i5/OS SQL language. You can create queries containing any of the SQL statements you have been
granted authority to use through your Query Manager profile (see “Selecting allowed SQL statements
for profiles in Query Manager” on page 48 for more information). Press F4 (Prompt) while you are
using this editor when you want to view a list of the SQL statements that you can use, together with
their syntax. Creating queries using the SQL query editor is described in “Creating an SQL query
through the edit query display in Query Manager” on page 68.
v The prompted query editor is suitable for users who have little or no experience using the DB2 for
i5/OS SQL language. A series of displays prompt you to enter all of the information that Query
Manager requires to create a SELECT statement query. Creating queries using the prompted query
displays is described in “Creating a prompted query through the define prompted query display in
Query Manager” on page 78.
Committing and rolling back changes to the database
Using Query Manager, you can run queries that contain all SQL statements you have authority to use
(granted through your Query Manager profile) except for the CONNECT, SET CONNECTION, RELEASE,
and DISCONNECT statements. When you run a query that contains one of the following SQL statements,
you might be responsible for committing or rolling back changes to the database:
© Copyright IBM Corp. 1998, 2008 51

ALTER TABLE
CALL
COMMENT ON
CREATE
DELETE
DROP
GRANT
INSERT
LABEL ON
REVOKE
SELECT
SET TRANSACTION
UPDATE
If your Query Manager profile specifies that your commitment lock level is change, cursor stability, all, or
repeatable read, you are responsible for committing or rolling back any changes to the database. You are
also responsible for committing or rolling back any changes to the database if a SET TRANSACTION is
active. These commitment lock levels are described on page 40.
You might want to create two queries to perform the commit and roll back operations: one containing the
SQL COMMIT statement, and the other containing the SQL ROLLBACK statement. This way you have
the required statements ready to run whenever you want to commit or roll back changes. (Creating
queries is described in Chapter 5, “Creating and changing queries in Query Manager.”)
For more information on writing queries, commitment control, and the SELECT, COMMIT, ROLLBACK,
and other SQL statements, refer to SQL reference .
Using the work with Query Manager queries display
When you want to create, change, run, or use a query in any way, the Work with Query Manager Queries
display is the place to begin.
You select the Work with Query Manager Queries display from the Query Manager main menu. Type 1
in the Selection prompt; then press the Enter key to go to the Work with Query Manager Queries display.
An example of this display for a user with an ALL access level is shown in Figure 22.
If you have a BASIC access level, the only options shown are 5=Display, 6=Print, and 9=Run.
The queries listed on this display are those stored in the library shown at the top of the display.
Work with Query Manager Queries
Library . . . . . . . . . . MYLIB_______ Name, F4 for list
Query creation mode . . . . SQL
Type options, press Enter.
1=Create 2=Change 3=Copy 4=Delete 5=Display 6=Print
7=Rename 9=Run 10=Convert to SQL
Opt Query Type Description
_ __________
_ FINAL PROMPT
_ MYQUERY SQL Example query for DB2 Query Manager
_ TABLE PROMPT
Bottom
F3=Exit F4=Prompt F5=Refresh F11=Display query only F12=Cancel
F16=Repeat position to F17=Position to F24=More keys
F19=Change query creation mode F22=QM statement F24=More keys
Figure 22. Work with Query Manager Queries Display
52 Query Manager Use V6R1M0

If you have an ALL access level, the library name is underlined, indicating that it is a prompt value. You
can type a new library name over the existing name if you want to access queries from a different library.
Position the cursor on the Library prompt, and press F4 (Prompt) to display a list of libraries from which
you can make a selection.
If you have an ALL access level, you also see the “Query creation mode” shown under the library name.
This is the default or current mode that you use to create queries. Most users can change this value by
pressing F19 (Change query creation mode). Creating queries and changing the query creation mode is
described in Chapter 5, “Creating and changing queries in Query Manager.”
You can choose any of the following options to work with a query:
1=Create Shows either the Edit Query display or the Define Prompted Query display, depending
on your current query creation mode. The query you create becomes the active query.
Creating SQL queries is described on page 68. Creating prompted queries is described on
page 78.
2=Change Shows the selected query in either the Edit Query display or the Define Prompted Query
display, depending on the mode in which the query was last saved. The changed query
becomes the active query. See page 102.
3=Copy Copies a query. You can replace an existing query or create a new one. See page 53.
4=Delete Deletes queries you no longer require. You need to respond to a confirm display before
the delete occurs. See page 54.
5=Display Shows the definition of the selected query in display-only format. You cannot change any
values through this option. Note that the query is displayed in the mode in which it was
last saved, either SQL or prompted. See page 55.
6=Print Sends a copy of the SQL statement that defines the selected query to the printer specified
in your Query Manager profile. See page 58.
7=Rename Prompts you to specify new names for existing queries. See page 59.
9=Run Runs the selected query. You can run any prompted query, and only those SQL queries
that contain SQL statements you have been granted authority to use (through your Query
Manager profile). Before an SQL SELECT statement query or prompted query is run, you
can specify run options such as the mode in which you want to run the query (batch or
interactive), and the destination to which you want the query output directed (display,
printer, or table). Before a SQL query runs (except for SELECT queries), you can specify
the mode (batch or interactive) in which you want to run the query. This query becomes
the active query and the data retrieved becomes the active data. If you specify a report
form to format the query data, that report form becomes the active form. See page 60.
10=Convert to SQL
Converts a prompted query to an SQL query. You can replace the existing prompted
query definition with the converted SQL query, or you can create a new SQL query, and
leave the promptedquery definition unchanged. See page 103.
Note: This option is shown only if you have authority to create and change queries using
the SQL query creation mode. You cannot convert a query if you do not have
authority to use the SELECT statement.
If you need help selecting queries from the “Work with” display, see page 18. If you need help using the
“Work with” display function keys, see page 23.
Copying a query in Query Manager
When you copy a query, you can create a new query or replace an existing one.
Chapter 4. Working with Query Manager queries 53

1. Type 1 in the Selection prompt from the Query Manager main menu; then press the Enter key to
show the Work with Query Manager Queries display.
2. Type 3 in the Opt prompt next to the names of the queries you want to copy; then press the Enter key
to go to the Copy Query display. This display lists the names of all of the queries you specified. An
example of this display is shown in Figure 23.
3. Before you can copy a query, you need to specify the following information. If you are copying more
than one query, all queries are copied using the same settings.
v To library. Type the name of the library to which you want the query copied.
v Replace query. Type Y if you want to replace an existing query, or N if you want to create a new
query. The default is N.4. Type the name of the query you want to create or replace in response to the “To Query” prompt. If
you answered N to “Replace query”, the name you type cannot already exist in the specified library.
Query naming conventions are described on page 29.
5. Press the Enter key to perform the copy and return to the Work with Query Manager Queries display.
If you want to leave the Copy Query display without copying any queries, press F3 (Exit) or
F12 (Cancel) instead of the Enter key.
Deleting a query in Query Manager
When you choose to delete a query, Query Manager shows a confirm display. No queries are deleted
until you respond to this display.
1. Type 1 in the Selection prompt from the Query Manager main menu; then press the Enter key to
show the Work with Query Manager Queries display.
2. Type 4 in the Opt prompt next to the names of the queries you want to delete; then press the Enter
key to go to the Confirm Delete of Query display. This display lists the names of all of the queries
you selected to delete. An example of the Confirm Delete of Query display is shown in Figure 24 on
page 55.
Copy Query
From library . . . . . . . . : MYLIB
Type information, press Enter:
To library . . . . . . . . . MYLIB_____ Name
Replace query . . . . . . . N Y=Yes, N=No
To rename copied query, change To Query name.
From Query To Query
VENDINFO VENDINFO___
Bottom
F3=Exit F5=Refresh F12=Cancel F22=QM statement
Figure 23. Copy Query Display
54 Query Manager Use V6R1M0

When you choose to delete more than one query, you may want to press F11 (Display query only) to
hide the query descriptions, and show multiple columns of query names on the display.
3. Press the Enter key to confirm the delete and return to the Work with Query Manager Queries
display. Note that when you press the Enter key, you delete all of the queries shown on the display. If
you want to leave the display without deleting any queries, press F12 (Cancel) instead of the Enter
key.
Displaying a query in Query Manager
You can view the definition of a query in display-only format. The definition is displayed in the mode in
which the query was last saved. SQL queries are shown in a display similar to the Edit Query display,
and prompted queries are shown in displays similar to the Define Prompted Query displays. You cannot
change any values through these displays.
Note: Displaying a query definition does not make the query active.
1. Type 1 in the Selection prompt from the Query Manager main menu; then press the Enter key to
show the Work with Query Manager Queries display.
2. Type 5 in the Opt prompt next to the names of the queries whose definitions you want to display;
then press the Enter key to go to the Display Query option. The definition of the first query you
specified is shown. The definitions of the remaining queries are shown in the same order as the query
names appear in the “Work with” display list.
An example of an SQL query definition is shown in Figure 25 on page 56.
Confirm Delete of Query
Library . . . . . . . . . . : MYLIB
Press Enter to confirm your choices for 4=Delete.
Press F12 to return to change your choices.
Opt Query Description
4 TUTQRY Tutorial Query
Bottom
F11=Display query only F12=Cancel
Figure 24. Confirm Delete of Query Display
Chapter 4. Working with Query Manager queries 55

3. When you are viewing the definition of an SQL query, if the definition is more than one display in
length or width, you can view the entire query in the following ways:
v Use your display station’s roll keys and the F19 (Left) and F20 (Right) function keys (see page 73).
v Type the TOP, BOTTOM, LEFT, RIGHT, and FIND editing commands on the Query Manager
statement line (see page 71).
v Type the nnn go to line command on any line sequence number (see page 72).
An example of a prompted query definition selection list is shown in Figure 26 on page 57.
Display Query
Columns . . . : 1 68 Query . . . . . : MYQUERY
QM . . _____________________________________________________________________
************************ Beginning of data ************************
0001.00 SELECT DEPT, NAME, JOB, SALARY, COMM
0002.00 FROM MYCOLL.STAFF
0003.00 WHERE DEPT = 20 OR DEPT = 38
0004.00 ORDER BY DEPT, JOB
*************************** End of data ***************************
Bottom
F2=Alternate keys F3=Exit F4=Prompt F5=Run report F6=Run sample
F9=Retrieve F24=More keys
F2=Base keys F3=Exit F4=Prompt F5=Refresh F6=Run sample
F9=Retrieve F24=More keys
F10=Cursor F13=Display form F16=Repeat find
F19=Left F20=Right F21=System command F24=More keys
Figure 25. Display SQL Query Display
56 Query Manager Use V6R1M0

4. When you are viewing the definition of a prompted query, type 1 in the Opt prompt next to the parts
of the query definition that you want to display; then press the Enter key. A “>” sign is shown beside
all parts of the query that have been defined. You can choose to display all parts by pressing
F21 (Select all). Displays for the parts you choose are shown in the same order as the part
descriptions appear on the Display Prompted Query display. When you finish viewing one display,
press the Enter key to go to the next display. When you finish viewing all of the parts you selected,
press the Enter key to return to the Display Prompted Query display.
You can find descriptions of the query definition parts on the following pages:
Specify tables 80
Define expressions
Select and sequence columns
Specify row selections 89
Select sort columns 94
Specify summary functions
Specify duplicate rows 97
Specify report formatting 995. You can perform the following tasks through these displays:
v Run a query.
Press F5 (Run report) to run a full query, or F6 (Run sample) to run a sample query. When you run
queries in this way, you are prompted to enter run options if the query meets either of the
following criteria:
a. The query is an SQL SELECT statement or prompted query, and the Display run options prompt
is set to YESin your Query Manager profile (see page 36).
b. The active form does not match the displayed query.
If the query is not a SELECT statement, you are prompted to enter only the mode (batch or
interactive). For the report form and query to match, they need to have the same number of
columns, and the columns need to have compatible data types and lengths. Running queries is
described on page 60.
v View the definition of the report form used to format the query data.
Display Prompted Query
Query . . . . . . . : MYQUERY
Type options, press Enter. Press F21 to select all.
1=Select
Opt Prompted Query Selection
_ > Specify tables
Define expressions
_ > Select and sequence columns
_ > Specify row selections
_ > Select sort columns
Specify summary functions
Specify duplicate rows
_ Specify report formatting
Bottom
F3=Exit F5=Run report F6=Run sample F12=Cancel F18=Display SQL
F21=Select all F22=QM statement
Figure 26. Display Prompted Query Display
Chapter 4. Working with Query Manager queries 57
If you are viewing the definition of a prompted query, type 1 in the Opt prompt beside “Specify
report formatting” and press the Enter key. The Specify Report Formatting display is shown, asking
you to enter the name of the report form you want to display. Type a name, or press F4 (Prompt)
to display a list of the report forms in the current library from which you can make a selection. (See
“Defining a report form in Query Manager” on page 99 for more information.)
If you are viewing the definition of an SQL query, press F13 (Display form) to view the definition
of a report form. A prompt display is shown, asking you to type the name of the report form you
want to display. Type a name, or press F4 (Prompt) to display a list of the report forms in the
current library from which you can make a selection.
The report form you specify is shown in displays similar to the Select Report Format displays. You
cannot change any values through these displays. Press F13 (Display query) when you want to
leave the Display Report Format displays and return to the Display Query or Display Prompted
Query display.
v View the SQL SELECT statement defined by the prompted query.
Press F18 (Display SQL) to show the SELECT statement that results from the information entered
on the Display Prompted Query displays. The SELECT statement is shown with descriptive
comments, in the same format as prompted query definitions are printed. See Figure 27 on page 59
for an example of format in which the SQL statement is presented.6. When you finish viewing the query, press F3 (Exit) to return to the Work with Query Manager
Queries display. If you are viewing the definition of an SQL query, and the Query Manager statement
line is blank, you can also press the Enter key to leave the Display Query display.
Printing a query in Query Manager
You can print the SQL statement that defines a query on the default printer specified in your Query
Manager profile.
1. Type 1 in the Selection prompt from the Query Manager main menu; then press the Enter key to
show the Work with Query Manager Queries display.
2. Type 6 in the Opt prompt next to the names of the queries whose definitions you want to print; then
press the Enter key to send the query definitions to your default printer. If you choose to print more
than one query, the queries are printed in the same order as their names appear in the “Work with”
display list.
A message at the bottom of the display tells you when the query definitions have been successfully
sent to print. Examples of printed SQL and prompted queries are shown in Figure 27 on page 59.
The query definition is sent to the default printer specified in your Query Manager profile. To print the
definition at a different printer, you need to change the default printer setting in your profile before you
choose to print the query (see page 39).
Query definitions are always printed in interactive mode. The “Run query mode” setting in your Query
Manager profile has no effect on the way definitions are printed.
58 Query Manager Use V6R1M0

Renaming a query in Query Manager
You can specify new names for more than one query in a single operation.
1. Type 1 in the Selection prompt from the Query Manager main menu; then press the Enter key to
show the Work with Query Manager Queries display.
2. Type 7 in the Opt prompt next to the names of the queries you want to rename; then press the Enter
key to go to the Rename Query display. This display lists the names of all of the queries you
specified. An example of this display is shown in Figure 28 on page 60.
DB2 for i5/OS Query Management Page 1
57xxST1 VxRxMx yymmdd RCHASLOG
Query . . . . . . . . . . . . . . : SQLQRY
Library . . . . . . . . . . . . : MYLIB
Sort sequence . . . . . . . . . . : *JOBRUN
Language identifier . . . . . . . : *JOBRUN
Text . . . . . . . . . . . . . . : Sample SQL Query for DB2 Query Manager
SEQNBR *...+....1....+....2....+....3....+....4....+....5....+....6....+....7....+....8....+....9
000001 SELECT DEPT, NAME, JOB, SALARY, COMM
000002 FROM MYCOLL.STAFF
000003 WHERE DEPT = 20 OR DEPT = 38
000004 ORDER BY DEPT, NAME
* * * * * END OF SOURCE * * * * *
DB2 for i5/OS Query Management Page 1
57xxST1 VxRxMx yymmdd RCHASL0G
Query . . . . . . . . . . . . . . : PROMPTQRY
Library . . . . . . . . . . . . : MYLIB
Sort sequence . . . . . . . . . . : *JOBRUN
Language identifier . . . . . . . : *JOBRUN
Text . . . . . . . . . . . . . . : Sample Prompted Query for DB2 Query Manager
SEQNBR *...+....1....+....2....+....3....+....4....+....5....+....6....+....7....+....8....+....9
000001 SELECT
000002 -- Columns
000003 A.DEPT, A.NAME, A.JOB, A.SALARY, A.COMM
000004 -- Tables
000005 FROM "MYCOLL"/"STAFF" A
000006 -- Row Selection
000007 WHERE ((DEPT = 20)
000008 OR (DEPT = 38))
000009 -- Sort Columns
000010 ORDER BY A.DEPT, A.NAME
* * * * * END OF SOURCE * * * * *
Figure 27. Examples of Printed SQL and Prompted Queries
Chapter 4. Working with Query Manager queries 59
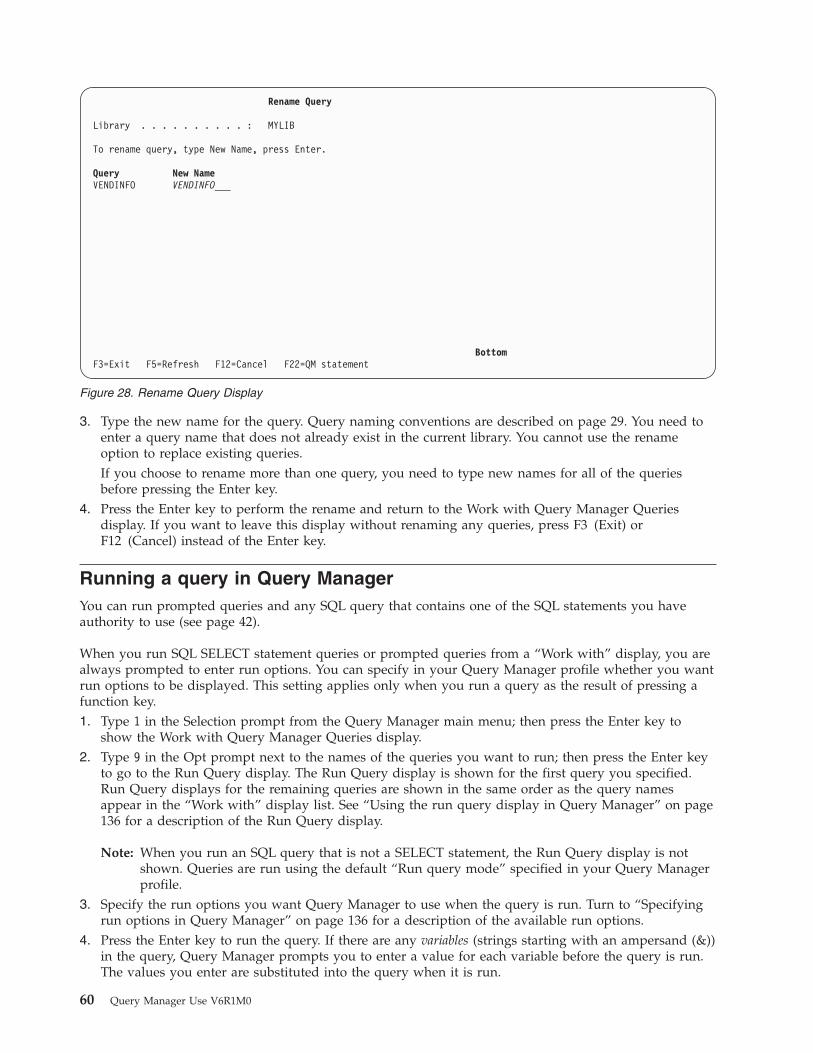
3. Type the new name for the query. Query naming conventions are described on page 29. You need to
enter a query name that does not already exist in the current library. You cannot use the rename
option to replace existing queries.
If you choose to rename more than one query, you need to type new names for all of the queries
before pressing the Enter key.
4. Press the Enter key to perform the rename and return to the Work with Query Manager Queries
display. If you want to leave this display without renaming any queries, press F3 (Exit) or
F12 (Cancel) instead of the Enter key.
Running a query in Query Manager
You can run prompted queries and any SQL query that contains one of the SQL statements you have
authority to use (see page 42).
When you run SQL SELECT statement queries or prompted queries from a “Work with” display, you are
always prompted to enter run options. You can specify in your Query Manager profile whether you want
run options to be displayed. This setting applies only when you run a query as the result of pressing a
function key.
1. Type 1 in the Selection prompt from the Query Manager main menu; then press the Enter key to
show the Work with Query Manager Queries display.
2. Type 9 in the Opt prompt next to the names of the queries you want to run; then press the Enter key
to go to the Run Query display. The Run Query display is shown for the first query you specified.
Run Query displays for the remaining queries are shown in the same order as the query names
appear in the “Work with” display list. See “Using the run query display in Query Manager” on page
136 for a description of the Run Query display.
Note: When you run an SQL query that is not a SELECT statement, the Run Query display is not
shown. Queries are run using the default “Run query mode” specified in your Query Manager
profile.
3. Specify the run options you want Query Manager to use when the query is run. Turn to “Specifying
run options in Query Manager” on page 136 for a description of the available run options.
4. Press the Enter key to run the query. If there are any variables (strings starting with an ampersand (&))
in the query, Query Manager prompts you to enter a value for each variable before the query is run.
The values you enter are substituted into the query when it is run.
Rename Query
Library . . . . . . . . . . : MYLIB
To rename query, type New Name, press Enter.
Query New Name
VENDINFO VENDINFO___
Bottom
F3=Exit F5=Refresh F12=Cancel F22=QM statement
Figure 28. Rename Query Display
60 Query Manager Use V6R1M0
The query is run using the options you specify on the run options display:
v If the query was submitted to batch, the Work with Query Manager Queries display is shown ready
for you to perform the next task.
v If the query was run interactively and the output sent to a printer or table, you need to wait for the
query to complete running before the Work with Query Manager Queries display is shown.
v If the query was run interactively and the output sent to display, you see the results of the query
(and report form) shown on your display. Press F3 (Exit) or F12 (Cancel) when you want to leave
the display and return to the Work with Query Manager Queries display.
Note: When a query is run in interactive mode, the number of rows retrieved might be limited by
your Query Manager profile (see “Maximum number of rows allowed on interactive run in
Query Manager” on page 36). If the maximum number of rows has been reached but there are
more rows to be retrieved, all final summary data is omitted from the report, and a message is
shown telling you that the data is incomplete.
For a more complete description of running queries, see Chapter 7, “Running queries and reports in
Query Manager.”
Chapter 4. Working with Query Manager queries 61

62 Query Manager Use V6R1M0

Chapter 5. Creating and changing queries in Query Manager
This chapter describes the ways in which users with an ALL access level can create and change Query
Manager queries. A Query Manager query is an SQL statement that you run to manipulate and view
database information.
The chapter begins with a general overview of the ways in which you create and change queries, and
describes the two query creation modes available through Query Manager: prompted and SQL. The
overview also includes instructions on how to run queries from the editors, and include constants and
variables in queries. This is followed by instructions for creating and changing queries, saving query
definitions, and converting prompted queries to SQL.
Creating and changing a query in Query Manager
You create and change queries through the Work with Query Manager Queries display. To create a query,
type 1 in the Opt prompt next to the blank query name (at the top of the list). To change a query, type 2
in the Opt prompt next to the name of the query you want to change.
Queries are created in the “Query creation mode” shown at the top of the display, either SQL or
PROMPT. Many users can change this mode by pressing F19 (Change query creation mode). Queries are
changed in the “Query creation mode” in which they were last saved. The change mode for each query is
shown in the “Type” column on the Work with Query Manager Queries display.
The Work with Query Manager Queries display is described in detail in “Using the work with Query
Manager queries display” on page 52.
You can create and change Query Manager queries only if you have an ALL user access level.
The difference between prompted and SQL queries in Query Manager
Using Query Manager, you can create two different kinds of queries: SQL and prompted. These queries
are created, changed, and displayed in different modes, and the query definitions are stored in different
formats.
SQL These queries are created through the Edit Query display. They can contain any SQL
statement that you were granted authority to use through your Query Manager profile
(see “Selecting allowed SQL statements for profiles in Query Manager” on page 48 for
more information). If you need help entering an SQL statement to define a query, press
F4 (Prompt) for a list of the statements you have authority to use, and their syntax.
The SQL query creation mode is suitable for users who have experience using, or want to
learn, the DB2 for i5/OS SQL language. See “Creating an SQL query through the edit
query display in Query Manager” on page 68 for more information.
Note: SQL queries cannot contain the CONNECT, DISCONNECT, SET CONNECTION,
or RELEASE statements.
Prompted These queries are created through the Define Prompted Query displays. A series of
displays prompt you to enter all of the information that Query Manager requires to create
an SQL SELECT statement query. Prompted queries cannot contain subqueries or
variables.
The prompted query creation mode is suitable for users with little or no experience using
the DB2 for i5/OS SQL language. See “Creating a prompted query through the define
prompted query display in Query Manager” on page 78 for more information.
© Copyright IBM Corp. 1998, 2008 63

Note: You need to be connected to a DB2 for i5/OS database before you can use the
prompted query creation mode.
Changing the query creation mode in Query Manager
The default mode in which you create queries is set in your Query Manager profile. Many users can
change this mode, either through their Query Manager profiles, or by pressing F19 (Change query
creation mode) from the Work with Query Manager Queries display.
The query creation mode currently selected is shown at the top of the Work with Query Manager Queries
display. All queries are created using this mode. Changing the query creation mode has no effect on
queries that have already been created and saved. Queries are changed and displayed in the mode in
which they were last saved, which is not necessarily the query creation mode shown on the “Work with”
display. (The creation mode for each query is shown in the “Type” column on the Work with Query
Manager Queries display, see Figure 22 on page 52.)
If “Allow change query creation mode” is set to NO in your Query Manager profile, you cannot change
the mode through your profile, and F19 (Change query creation mode) is not available through the Work
with Query Manager Queries display. All queries you create through Query Manager are created using
the mode specified in your Query Manager profile. Also, you can change only those queries that were
saved using the mode specified in your profile. See “Allow change query creation mode in Query
Manager” on page 41 for more information.
Testing a query in Query Manager
It is often helpful to run a query while you are defining it, to make sure that it is retrieving the correct
data and achieving the results you require.
You can run the query that you are currently creating or changing from the Edit Query display and from
most of the Define Prompted Query displays. Press F5 (Run report) if you want to run a full query, or
F6 (Run sample) to run the query using the sample restriction. Sample queries and reports are described
on page 9.
You cannot run a query in batch mode if it has not yet been named and saved. Query Manager shows
the Exit display, and will not submit the query to batch until it has been named and saved. See “Saving a
query: Using the exit display in Query Manager” on page 100 for instructions.
Any changes made to the query since it was last saved are included if you run the query in interactive
mode, and ignored if you run it in batch. If you run the query in batch, a message tells you that the most
recently saved version of the query is being run. When you return to the query editor, your changes are
still there. Running the previously saved version of the query in batch mode has no effect on the version
of the query you are editing.
Before the query is run, Query Manager checks the syntax. If the query is an SQL query that contains
variables, you are prompted to enter values for the variables before the syntax can be checked. If the
query contains any errors, the run is stopped, the cursor is positioned on the first error (if possible), and
an error message is displayed. If there are no errors, Query Manager runs the query. Running queries is
described in detail in Chapter 7, “Running queries and reports in Query Manager.”
Note that when you run a query by pressing a function key, the program displays options if the query is
an SQL SELECT statement or a prompted query, and if Display run options is set to YES in your Query
Manager profile. If the query is not a SELECT statement, only the mode (batch or interactive) option
appears. See page 36 for more information.
64 Query Manager Use V6R1M0
Running an alternative query in Query Manager
You can also run a query by entering the RUN QUERY statement on the Query Manager statement line.
When you enter the RUN QUERY statement, or when you press F5 (Run report) or F6 (Run sample) and
run options are displayed, you can choose to run a query other than the one you are currently creating or
changing. (See “RUN in Query Manager” on page 251 or “Using the run query display in Query
Manager” on page 136 for instructions.)
The Exit display is shown before the query is run, allowing you to save any changes you have made to
the query that you are currently editing. (See “Saving a query: Using the exit display in Query Manager”
on page 100 for instructions.)
When a query is run interactively, it becomes the active query. If you return to the query editor after
running a query interactively, the new active query is shown in the editor in place of the query you were
previously editing, if possible. The active query is shown in the editor that matches the mode in which it
was last saved, either SQL or prompted.
If you cannot change your query creation mode, you cannot edit a query that was saved in the mode that
you do not have authority to use. For example, if your default query creation mode is prompted and you
cannot change your query creation mode, you cannot edit the active query if it was last saved as an SQL
query.
If you run a query interactively that was last saved in the mode that you do not have authority to use,
and then return to the query editor, the query you were previously creating or changing is shown in the
editor. The query that you run becomes the active query only if you exit from the editor before running
the query.
Including constants in queries in Query Manager
A constant is a value that is unchanging and predefined, and is used in processing. In the example:
SELECT DEPT, NAME, JOB, SALARY, COMM
FROM MYCOLL.STAFF
WHERE DEPT = 28 OR JOB = ’Sales’
28 and ‘Sales’ are constants. You can include constants in SQL queries, and in the expressions and row
selection tests that you define for prompted queries.
When you use a character constant, the following rules apply:
v Enclose the character constant in single quotation marks (for example, ’ABCD’).
v If you want to include a single quotation mark in the character string, you need to type it twice (for
example, ’October’s Profits’).
When you use a graphic constant, the following rule applies:
v The delimited DBCS characters in the constant need to begin with a G or g, be enclosed in single
quotation marks, and be delimited by shift-out and shift-in characters. The following examples use “<”
to indicate the shift-out character, and “>” to indicate the shift-in character: G’<A B C >’ or
g’<D E F >’.
When you use a numeric constant, the following rules apply:
v The maximum length allowed for most numeric values is 31 digits. Single-precision floating-point
values can be a maximum of 9 digits, and double-precision floating-point values can be a maximum of
17 digits.
v Place negative signs directly in front of the left-most digit, with no space between the sign and the
digit. For example, type -5000 instead of - 5000.
v Do not use a currency symbol (for example, $5000) or a thousand separator (for example, 5,000).
Chapter 5. Creating and changing queries in Query Manager 65

Including variables in SQL queries in Query Manager
A variable is a value that can be changed. By including variables in an SQL query, you can run a single
query to generate a number of different results. For example, when you define a query, you can enter the
name of the table being queried as a variable. Then, each time the query is run, users can specify the
name of a different table to be queried.
You identify variables in SQL queries by typing an ampersand (&) before the variable name. For example:
SELECT DEPT, NAME, JOB, SALARY, COMM
FROM &TABLE
WHERE DEPT > &COND1
ORDER BY DEPT, NAME
Query Manager needs you to supply values for all variables before it can check the syntax of the query,
or run the query. You are prompted to enter a value for each variable. The query validation or run will
fail if you do not specify a valid value for each variable.
Note that when you create or change an SQL query, you cannot enter variables through the Specify
“SQL” Statement displays that are shown when you press F4 (Prompt). If the query already contains
variables, F4 (Prompt) is not supported. (See “Prompting for SQL statements in Query Manager” on page
74 for more information.)
Note: Prompted queries cannot contain variables.
Creating customized runtime prompts for variables in Query Manager
If your SQL query contains variables, Query Manager prompts you to enter values for each variable
before the query can be validated or run. Using the method described over the following pages, you can
create a display containing customized prompts that ask users to enter specific values for each variable
when the query is run.
You need to create a control language (CL) program to define the display on which the runtime prompts
are shown, and a command that fills in the appropriate information for the prompts on the display. (You
can also accomplish the same thing by creating a CL program and a DDS source file to define the
display.)
The following examples are based on the STAFF table (shown on page 3) and the SALARYQ2 query and
SALARYR2 report form, shown in Figure 29.
You could create two additional report forms, called BYDEPT and BYDIVISION, with different formatting
and calculations.
SALARYQ2 Query
SELECT DEPT, NAME, ID, JOB, YEARS, SALARY, COMM
FROM MYCOLL.STAFF
WHERE DEPT = &COND1 AND SALARY < &COND2
ORDER BY DEPT, SALARY
SALARYR2 Report Form
Column 1 (DEPT) Usage = BREAK1
Column 5 (YEARS) Usage = AVERAGE
Column 6 (SALARY) Usage = AVERAGE
Break 1 Footing Text: Line Align Text
1 RIGHT Dept Avg:
Figure 29. Example Query and Report Form for Customized Prompts
66 Query Manager Use V6R1M0

The example CL program and command shown in Figure 31 create the display shown in Figure 30. This
display shows customized prompts, asking the user to enter specific values for &COND1, &COND2,
output destination, and report form to use.
Department Report (DEPTREP)
Type choices, press Enter.
Department to report on . . . . 10____ 10, 20, 30, 40, 50
With salary less than . . . . . 100000 Character value
Output location . . . . . . . . *_____ *, *PRINT
Report form name . . . . . . . SALARYR2__ BYDEPT, BYDIVISION,
SALARYR2
Bottom
F3=Exit F4=Prompt F5=Refresh F12=Cancel
F13=How to use this display F24=More keys
Figure 30. Customized Runtime Prompts Display
Example CL Program
SEU Source Listing
SOURCE FILE . . . . . . . . . . EXAMPLE.SOURCE
MEMBER . . . . . . . . . . . . CLPGM
SEQNBR*...+... 1 ...+... 2 ...+... 3 ...+... 4 ...+... 5 ...+...6 ...
100 PGM PARM(&VAR1 &VAR2 &VAR3 &VAR4)
200 DCL &VAR1 *CHAR LEN(6)
300 DCL &VAR2 *CHAR LEN(6)
400 DCL &VAR3 *CHAR LEN(6)
500 DCL &VAR4 *CHAR LEN(10)
600 STRQMQRY QMQRY (EXAMPLE.SALARYQ2) QMFORM(EXAMPLE.&VAR4) +
700 OUTPUT(&VAR3) +
800 SETVAR((COND1 &VAR1) (COND2 &VAR2))
900 ENDPGM
* * * * END OF SOURCE * * * *
______________________________________________________________________________
Example Command
SEU Source Listing
SOURCE FILE . . . . . . . . . . EXAMPLE.SOURCE
MEMBER . . . . . . . . . . . . CLPGM
SEQNBR*...+... 1 ...+... 2 ...+... 3 ...+... 4 ...+... 5 ...+...6 ...
100 CMD PROMPT(’Department Report’)
200 PARM KWD(VAR1) TYPE(*CHAR) LEN(6) RSTD(*YES) +
300 DFT(10) VALUES(10, 20, 30, 40, 50) +
400 PROMPT(’Department to report on’)
500 PARM KWD(VAR2) TYPE(*CHAR) LEN(6) DFT(100000) +
600 PROMPT(’With salary less than’)
700 PARM KWD(VAR3) TYPE(*CHAR) LEN(6) RSTD(*YES) +
800 DFT(*) VALUES(*, *PRINT) +
900 PROMPT(’Output location’)
1000 PARM KWD(VAR4) TYPE(*CHAR) LEN(10) RSTD(*YES) +
1100 DFT(SALARYR2) VALUES(BYDEPT, BYDIVISION, +
1200 SALARYR2) PROMPT(Report form name’)
* * * * END OF SOURCE * * * *
Figure 31. Example CL Program and Command to Create Customized Prompts
Chapter 5. Creating and changing queries in Query Manager 67

When you enter the EXAMPLE.DEPTREP command through the command window and press
F4 (Prompt), you see the display shown in Figure 30 on page 67. This display shows customized
prompts, asking the user to enter specific information before the SALARYQ2 query is run.
You can enter any of the values shown on this display, or press the Enter key to accept the default values.
The following report shows an example of what you might see if you accept the default values from the
customized prompt display:
DEPT NAME ID JOB YEARS SALARY COMM
------- ---------- ------- ----- ------- ----------- ---------
10 Daniels 240 Mgr 5 19,260.25 .00
Lu 210 Mgr 10 20,010.00 .00
Jones 260 Mgr 12 21,234.00 .00
Molinare 160 Mgr 7 22,959.20 .00
------- -----------
Dept Avg: 9 20,865.86
Creating an SQL query through the edit query display in Query
Manager
If your current query creation mode is SQL, Query Manager shows the Edit Query display when you
choose to create a query. Using this display, you can create queries containing any one of the SQL
statements that you have been granted authority to use through your Query Manager profile (see
“Selecting allowed SQL statements for profiles in Query Manager” on page 48). You can view a list of the
allowed statements and their syntax by pressing F4 (Prompt).
1. Type 1 in the Selection prompt from the Query Manager main menu; then press the Enter key to
show the Work with Query Manager Queries display. Make sure that your “Query creation mode”
(shown at the top of the “Work with” display) is SQL. If your creation mode is prompted, press
F19 (Change query creation mode) to change the mode to SQL.
Note: Your Query Manager profile might restrict you from changing the query creation mode. See
page 41 for more information.
2. Type 1 in the Opt prompt next to the blank query name (at the top of the list). You can specify a
name for the query now, or you can leave it unnamed and specify a name when you save the query
through the Exit display. Query naming conventions are described on page 29, and saving queries is
described on page 100.
Press the Enter key to show the Edit Query display. The editing area contains a set of blank lines with
the cursor positioned at the start of the first blank line. An example of this display is shown in
Figure 32 on page 69.
68 Query Manager Use V6R1M0
The following information is provided to help you create a SELECT statement query, but it can be
applied to any interactive SQL statement you choose, such as COMMIT, ROLLBACK, and CREATE
VIEW. Note that you cannot use the Edit Query display to create a query that contains the
CONNECT, DISCONNECT, SET CONNECTION, or RELEASE statements.
3. Type an SQL statement to define the query. (Refer to SQL reference for full details of all SQL
statements.)
There are three functions to help you write the statement:
v Press F4 (Prompt) to display a list of the SQL statements you have authority to use. You can select
a specific statement from this list, and press the Enter key to display its syntax. See page 74 for a
full description of the query prompting feature.
v Use the Query Manager DRAW statement to construct the first two clauses of a SELECT statement.
See “Using statements in Query Manager” on page 77 for further information.
v Press F15 (Check syntax) to check the syntax of the entire SQL statement. If the query contains
variables, Query Manager prompts you to enter values for the variables before it checks the syntax.
If any error is found, the cursor is positioned on the part of the statement that contains the error (if
possible), and an error message is displayed.
Note: F15 (Check syntax) is not supported when you are connected to a relational database that is
not DB2 for i5/OS.The name of the query you are creating is shown in the upper right-hand corner of the display. The
columns of the query you are currently viewing are shown in the upper left-hand corner of the
display. If you are unable to view the entire query on your display at one time, you can use the
F19 (Left) and F20 (Right) function keys to change the portion of the query that you are viewing.
Queries can be a maximum of 79 columns in width.
Edit Query
Columns . . . : 1 68 Query . . . . . : MYQUERY
QM . . _____________________________________________________________________
Type SQL Statement.
************************ Beginning of data ************************
’’’’’’’
’’’’’’’
’’’’’’’
’’’’’’’
’’’’’’’
’’’’’’’
’’’’’’’
’’’’’’’
’’’’’’’
’’’’’’’
’’’’’’’
’’’’’’’
*************************** End of data ***************************
Bottom
F2=Alternate keys F3=Exit F4=Prompt F5=Run report F6=Run sample
F9=Retrieve F15=Check syntax F24=More keys
F2=Base keys F3=Exit F4=Prompt F5=Refresh F6=Run sample
F9=Retrieve F15=Check syntax F18=Sort sequence F24=More keys
F10=Cursor F13=Edit form F16=Repeat find F17=Repeat change
F19=Left F20=Right F21=System command F24=More keys
Figure 32. Edit Query Display
Chapter 5. Creating and changing queries in Query Manager 69

4. You can insert comments to describe your query. Identify comments by beginning them with a double
hyphen (--). Everything from the double hyphen to the end of that line is treated as a comment and is
stripped from the SQL statement during processing. A comment can start at any point in the line, as
shown in Figure 33.
When you use F4 (Prompt) to edit a query, Query Manager removes any formatting (such as extra
spaces and new lines) from the query statement. The edited statement is inserted in the Edit Query
display as one continuous line. Any comments that were on the same line as query text are moved to
the lines following the query statement. Query Manager keeps the comments as close as possible to
the information that they describe.
5. To specify the sort sequence and language for the query, press F18 (Sort sequence). The Query
Manager program shows the Specify Sort Sequence display (see page 98). F19 (Sort sequence) is
available when:
v The Show query sort sequence option in your Query Manager profile is set to YES.
v The Show query sort sequence option is set to NO but you are changing a query with a sort
sequence other than the default.
Edit Query
Columns . . . : 1 70 Query . . . : MYQUERY
QM . . ______________________________________________________________________
Type SQL Statement
************************** Beginning of Data *************************
0001.00 -- query for standard employee report
0002.00 SELECT ID, NAME, DEPT, JOB -- columns to select
0003.00 FROM MYCOLL.STAFF -- table to select from
0004.00 WHERE DEPT > 10 -- select rows only when
0005.00 -- dept number is > 10
0006.00 ORDER BY NAME -- sort by employee name
***************************** End of Data ****************************
F2=Alternate keys F3=Exit F4=Prompt F5=Run report F6=Run sample
F9=Retrieve F15=Check syntax F18=Sort sequence F24=More keys
Exit
Type choices, press Enter.
Option . . . . . 2 1=Save and exit
2=Exit without save
3=Resume without save
4=Save and resume
Query . . . . . MYQUERY___ Name
Library . . . MYCOLL____ Name, *CURLIB
Description . . Select from staff where dept > 10____________________
F5=Refresh F12=Cancel
Figure 33. Example Query Showing Comments
70 Query Manager Use V6R1M0
6. To run the query, press F5 (Run report) or F6 (Run sample). See page 64 for instructions.
7. When you finish creating the query, press F3 (Exit) to leave the Edit Query display and show the Exit
display. Enter a name and description for the query through this display. Query naming conventions
are described on page 29, and the description can be a maximum of 50 characters in length. If the
query is already named, you can change the name if you desire.
Select option 1 to save the query; then press the Enter key to return to the Work with Query Manager
Queries display. The Exit display is described on page 100.
If you have not made any changes to the query definition, you can press F12 (Cancel) to leave the
Edit Query display and return to the Work with Query Manager Queries display. The F12 key is
available only if you have not made any changes to the query definition.
If you want to work through practice exercises in which you create and work with an SQL query, turn to
Appendix A, “Practice exercises for Query Manager.”
Using the edit query display in Query Manager
The Edit Query display provides you with a range of editing features to help you create and change SQL
queries. You can use:
v Edit commands. These commands are entered on the Query Manager statement line (at the top of the
display). Use these commands to search for or replace a string of characters in the statement, and to
move to the top, bottom, right, or left of the editing area. See “Entering edit commands on the
statement line in Query Manager.”
v Line commands. These commands are entered on the line sequence numbers in the edit area. Use these
commands to insert, delete, repeat, and copy lines, and to go to a specified line number. (Line sequence
numbers are shown the first time you press the Enter key while you are creating a query.) See
“Entering line commands in the SQL editor in Query Manager” on page 72.
v Function keys. Use function keys to perform tasks such as repeating find and change commands, and
checking the syntax of your query. See “Using function keys to edit an SQL query in Query Manager”
on page 73.
Entering edit commands on the statement line in Query Manager
When you want to search for or change a string of characters, or view the entire query, type the
following editing commands on the Query Manager statement line, shown at the top of the Edit Query
display. All edit commands can be entered in either uppercase or lowercase letters.
Find FIND string
Searches for a string of characters, starting from the line on which the cursor is positioned. If the
cursor is positioned on the Query Manager statement line, the search starts from the first line
shown in the edit area. The search is in a forward direction only. If the string is found, the search
stops and the cursor is positioned at the beginning of the string. To find the next occurrence of
the same string, press F16 (Repeat find).
You can abbreviate FIND to F. If the search string includes any blanks or lowercase letters, you
need to enclose the string in either single or double quotation marks.
Change
CHANGE findstring replacestring
Searches for a string of characters, starting from the line on which the cursor is positioned. If the
cursor is positioned on the Query Manager statement line, the search starts from the first line
shown in the edit area. The search is in a forward direction only. If the findstring is found, it is
replaced by the replacestring, and the cursor is positioned at the line in which the change was
made. To find the next occurrence of the find string, press F16 (Repeat find). To change the next
occurrence, press F17 (Repeat change).
Chapter 5. Creating and changing queries in Query Manager 71

You can abbreviate CHANGE to C. If the find or replace strings include any blanks or lowercase
letters, you need to enclose the strings in either single or double quotation marks. If the replace
string is longer than the search string, the change is not performed, and an error message tells
you that the text was too long.
Top Positions the first line of the SQL statement at the top of the edit area. You can abbreviate TOP to
T.
Bottom
Positions the last line of the SQL statement at the bottom of the edit area. Shows the final lines of
the query. You can abbreviate BOTTOM to B.
Left Positions column 1 of the query in the leftmost column of the displayed edit area. The range of
columns currently shown is indicated in the Columns field at the top of the display. You can
abbreviate LEFT to L.
Right Positions column 79 of the query in the rightmost column of the displayed edit area. The range of
columns currently shown is indicated in the Columns field at the top of the display. You can
abbreviate RIGHT to R.
Entering line commands in the SQL editor in Query Manager
You can type the following line commands over any line sequence number to insert, delete, repeat, or
copy lines, or to go to a specified line number. When you press the Enter key, the command is performed
and the line numbers are automatically renumbered so that a continuous sequence is kept, beginning
with 0001.00.
Line sequence numbers are shown the first time you press the Enter key while you are creating a query.
The line commands available through the Edit Query display are:
nnn Go to. Repositions the display with the line numbered nnn at the top of the edit area. If you
specify a number that is greater than the number of the last line, the last line is positioned at the
top of the edit area.
I Inserts one blank line following the current line. If you make any changes to the inserted line
(typing a space is regarded as a change), pressing the Enter key causes a second blank line to be
inserted immediately following the first.
Innn Inserts nnn blank lines following the current line. When you press the Enter key, the changed
lines are kept and another blank line is inserted immediately after the inserted lines.
D Deletes the current line.
DD Deletes the block of lines delimited by two DD commands.
RP Repeats the current line, inserting the copy after the current line.
RPnnn Repeats the current line nnn times, inserting the copies after the current line.
C Copies the current line to the position specified by the A (After) or B (Before) command.
CC Copies the block of lines delimited by two CC commands to the position specified by the
A (After) or B (Before) command.
A After. Specifies that one or more lines being copied by the C or CC command are to be inserted
after this line.
B Before. Specifies that one or more lines being copied by the C or CC command are to be inserted
before this line.
When you insert, repeat, and copy lines, keep in mind that the maximum size permitted for a query is
9999 lines or 32K, whichever limit you reach first.
Line commands are subject to the following rules:
72 Query Manager Use V6R1M0
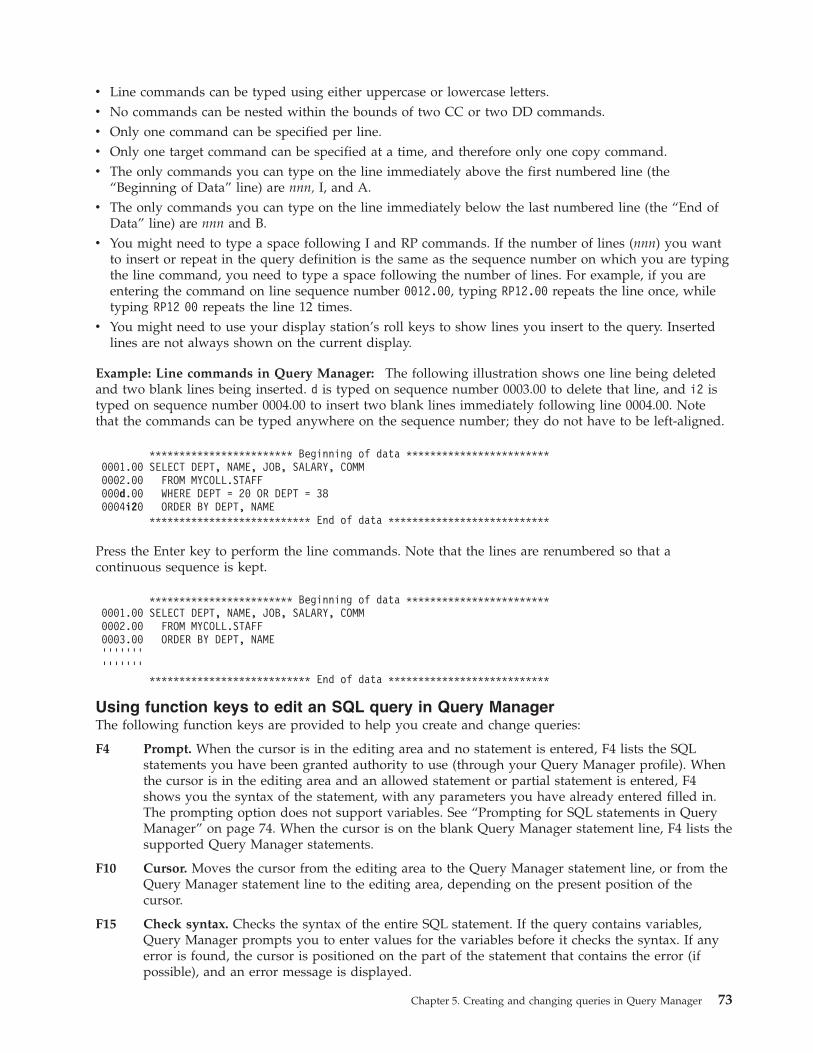
v Line commands can be typed using either uppercase or lowercase letters.
v No commands can be nested within the bounds of two CC or two DD commands.
v Only one command can be specified per line.
v Only one target command can be specified at a time, and therefore only one copy command.
v The only commands you can type on the line immediately above the first numbered line (the
“Beginning of Data” line) are nnn, I, and A.
v The only commands you can type on the line immediately below the last numbered line (the “End of
Data” line) are nnn and B.
v You might need to type a space following I and RP commands. If the number of lines (nnn) you want
to insert or repeat in the query definition is the same as the sequence number on which you are typing
the line command, you need to type a space following the number of lines. For example, if you are
entering the command on line sequence number 0012.00, typing RP12.00 repeats the line once, while
typing RP12 00 repeats the line 12 times.
v You might need to use your display station’s roll keys to show lines you insert to the query. Inserted
lines are not always shown on the current display.
Example: Line commands in Query Manager: The following illustration shows one line being deleted
and two blank lines being inserted. d is typed on sequence number 0003.00 to delete that line, and i2 is
typed on sequence number 0004.00 to insert two blank lines immediately following line 0004.00. Note
that the commands can be typed anywhere on the sequence number; they do not have to be left-aligned.
************************ Beginning of data ************************
0001.00 SELECT DEPT, NAME, JOB, SALARY, COMM
0002.00 FROM MYCOLL.STAFF
000d.00 WHERE DEPT = 20 OR DEPT = 38
0004i20 ORDER BY DEPT, NAME
*************************** End of data ***************************
Press the Enter key to perform the line commands. Note that the lines are renumbered so that a
continuous sequence is kept.
************************ Beginning of data ************************
0001.00 SELECT DEPT, NAME, JOB, SALARY, COMM
0002.00 FROM MYCOLL.STAFF
0003.00 ORDER BY DEPT, NAME
’’’’’’’
’’’’’’’
*************************** End of data ***************************
Using function keys to edit an SQL query in Query Manager
The following function keys are provided to help you create and change queries:
F4 Prompt. When the cursor is in the editing area and no statement is entered, F4 lists the SQL
statements you have been granted authority to use (through your Query Manager profile). When
the cursor is in the editing area and an allowed statement or partial statement is entered, F4
shows you the syntax of the statement, with any parameters you have already entered filled in.
The prompting option does not support variables. See “Prompting for SQL statements in Query
Manager” on page 74. When the cursor is on the blank Query Manager statement line, F4 lists the
supported Query Manager statements.
F10 Cursor. Moves the cursor from the editing area to the Query Manager statement line, or from the
Query Manager statement line to the editing area, depending on the present position of the
cursor.
F15 Check syntax. Checks the syntax of the entire SQL statement. If the query contains variables,
Query Manager prompts you to enter values for the variables before it checks the syntax. If any
error is found, the cursor is positioned on the part of the statement that contains the error (if
possible), and an error message is displayed.
Chapter 5. Creating and changing queries in Query Manager 73

Note: F15 (Check syntax) is not supported when you are connected to a relational database that
is not DB2 for i5/OS.
F16 Repeat find. Looks for the search string you specified in the last FIND or CHANGE command
that you entered on the Query Manager statement line. If the search string is found, the cursor is
positioned on it. A message is displayed indicating the result of the search.
F17 Repeat change. Repeats the last CHANGE command that you entered on the Query Manager
statement line. If the search string is found, the change is performed and the cursor is positioned
on the changed string. A message is displayed indicating the result of the change.
F18 Sort sequence. Shows the Specify Sort Sequence display. This key is not available when the Show
query sort sequence options prompt in the Query Manager profile is set to NO. The only
exception to showing the options is when you change a query that was created with a sort
sequence other than the default.
F19 Left. Shows the query with column 1 of the query beginning in the first column of the display.
The columns of the query that you are currently viewing are shown in the upper left-hand corner
of the display. Use this key, together with F20 (Right) to view the entire query if it is more than
one display in width. (A query can be a maximum of 79 characters wide.)
F20 Right. Shows the query with column 79 of the query ending in the final column of the display.
The columns of the query that you are currently viewing are shown in the upper left-hand corner
of the display. Use this key, together with F19 (Left) to view the entire query if it is more than
one display in width. (A query can be a maximum of 79 characters wide.)
Prompting for SQL statements in Query Manager
Press F4 (Prompt) from the Edit Query display when you want to see a list of the supported SQL
statements and their syntax. Make selections through these prompt displays, and let Query Manager
enter SQL statements for you.
1. Position the cursor in the editing area of the Edit Query display; then press F4 (Prompt) to view SQL
statement prompting.
v If the editing area is blank, you see a list of the SQL statements that you have authority to use. See
Figure 34 on page 75.
v If the editing area contains an authorized SQL statement, you see the syntax of that statement. Any
valid parameters already entered for the statement are shown in the prompt display. (Note that the
statement cannot contain any variables.) See Figure 35 on page 76.
To choose a statement from the Select SQL Statement display, type its option number in the Selection
prompt at the bottom of the display and press the Enter key. Query Manager then shows you the
Specify “SQL” Statement display for the statement you choose.
74 Query Manager Use V6R1M0
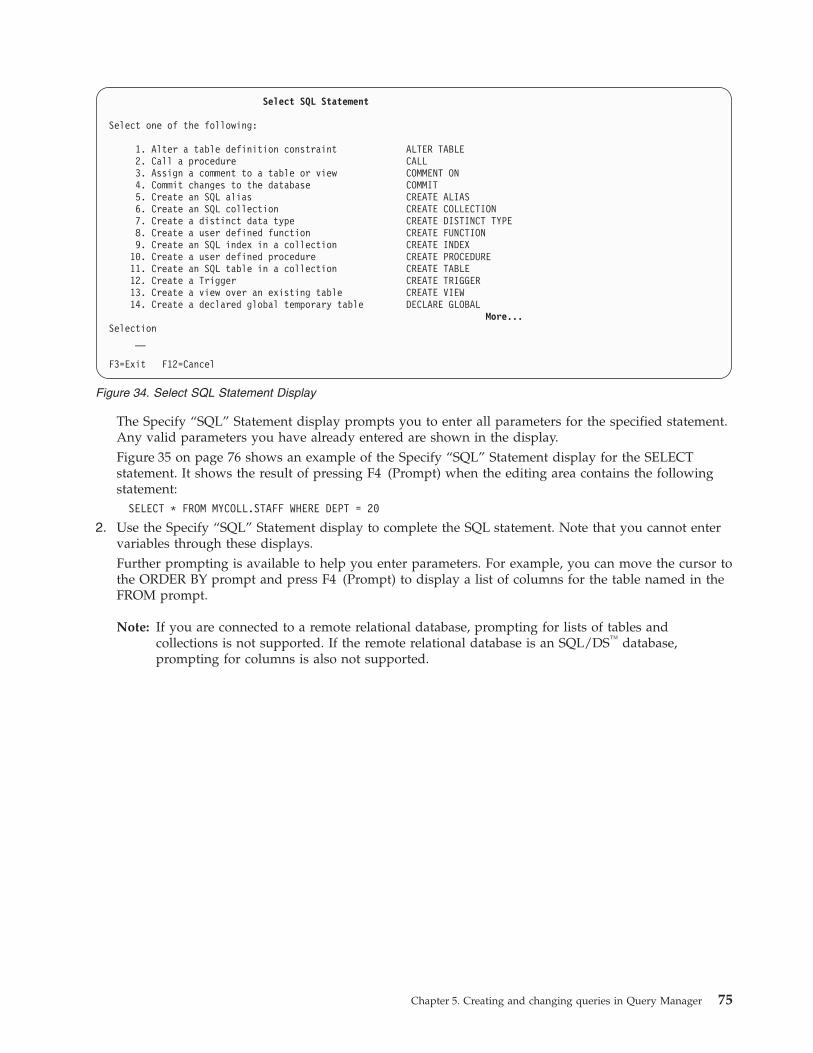
The Specify “SQL” Statement display prompts you to enter all parameters for the specified statement.
Any valid parameters you have already entered are shown in the display.
Figure 35 on page 76 shows an example of the Specify “SQL” Statement display for the SELECT
statement. It shows the result of pressing F4 (Prompt) when the editing area contains the following
statement:
SELECT * FROM MYCOLL.STAFF WHERE DEPT = 20
2. Use the Specify “SQL” Statement display to complete the SQL statement. Note that you cannot enter
variables through these displays.
Further prompting is available to help you enter parameters. For example, you can move the cursor to
the ORDER BY prompt and press F4 (Prompt) to display a list of columns for the table named in the
FROM prompt.
Note: If you are connected to a remote relational database, prompting for lists of tables and
collections is not supported. If the remote relational database is an SQL/DS™ database,
prompting for columns is also not supported.
Select SQL Statement
Select one of the following:
1. Alter a table definition constraint ALTER TABLE
2. Call a procedure CALL
3. Assign a comment to a table or view COMMENT ON
4. Commit changes to the database COMMIT
5. Create an SQL alias CREATE ALIAS
6. Create an SQL collection CREATE COLLECTION
7. Create a distinct data type CREATE DISTINCT TYPE
8. Create a user defined function CREATE FUNCTION
9. Create an SQL index in a collection CREATE INDEX
10. Create a user defined procedure CREATE PROCEDURE
11. Create an SQL table in a collection CREATE TABLE
12. Create a Trigger CREATE TRIGGER
13. Create a view over an existing table CREATE VIEW
14. Create a declared global temporary table DECLARE GLOBAL
More...
Selection
__
F3=Exit F12=Cancel
Figure 34. Select SQL Statement Display
Chapter 5. Creating and changing queries in Query Manager 75

Subqueries are available for any statement that supports a WHERE or HAVING clause. To create a
subquery, position the cursor on the WHERE or HAVING prompt; then press F9 (Specify subquery)
to go to the edit subquery display. When you finish defining the subquery, press the Enter key to
return to the Specify “SQL” Statement display. The subquery is shown as part of the WHERE or
HAVING clause, enclosed in parentheses.
3. Press the Enter key when you complete entering the parameters. The SQL statement that results from
the Specify “SQL” Statement display is inserted in the Edit Query display, provided the syntax of the
statement is correct. If there are any syntax errors, the Specify “SQL” Statement display is again
shown, and the cursor is positioned on the error, if possible.
Note: When you use F4 (Prompt) to edit a query, any formatting you may have entered for the query
(such as extra spaces and new lines) is discarded when you press the Enter key. Query
Manager inserts the edited statement in the Edit Query display as one continuous line. Any
comments you had entered for the query are shown on the lines immediately following the
query statement. The comments are kept as close as possible to the part of the query that they
describe.
For a description of all SQL statements, refer to SQL reference . For information on DBCS considerations
when prompting for SQL statements, refer to SQL programming.
Allowed and restricted SQL statements in Query Manager
The statements that you can enter to define your query may be restricted by the security administrator
through your Query Manager profile. See “Selecting allowed SQL statements for profiles in Query
Manager” on page 48 for more information.
Query Manager knows which SQL statements you can and cannot use, and provides F4 (Prompt)
information for only those statements that you have the authority to use. You cannot save a query that
contains one of the statements you have not been granted authority to use through your Query Manager
profile.
If the security administrator restricts your access to all SQL statements, you cannot create, change, or run
SQL queries through Query Manager.
Specify SELECT Statement
Type information for SELECT statement. Press F4 for a list.
FROM tables . . . . . . . . MYCOLL.STAFF__________________________________
SELECT columns . . . . . . . *_____________________________________________
WHERE conditions . . . . . . DEPT = 20_____________________________________
GROUP BY columns . . . . . . ______________________________________________
HAVING conditions . . . . . ______________________________________________
ORDER BY columns . . . . . . ______________________________________________
FOR UPDATE OF columns . . . ______________________________________________
Bottom
Type choices, press Enter.
DISTINCT rows in result table . . . . . . . . . N Y=Yes, N=No
UNION with another SELECT . . . . . . . . . . . N Y=Yes, N=No
Specify additional options . . . . . . . . . . . N Y=Yes, N=No
F3=Exit F4=Prompt F5=Refresh F6=Insert line F9=Specify subquery
F10=Copy line F12=Cancel F14=Delete line F15=Split line F24=More keys
F21=Display statement F24=More keys
Figure 35. Specify SELECT Statement Display
76 Query Manager Use V6R1M0
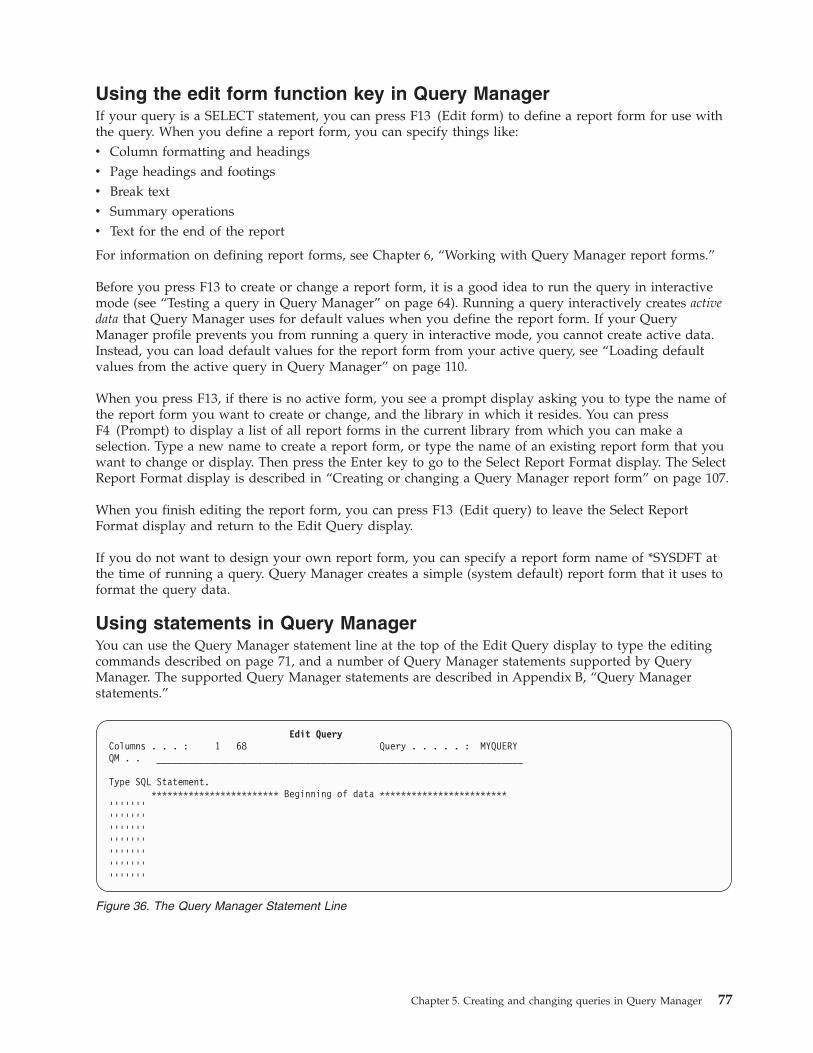
Using the edit form function key in Query Manager
If your query is a SELECT statement, you can press F13 (Edit form) to define a report form for use with
the query. When you define a report form, you can specify things like:
v Column formatting and headings
v Page headings and footings
v Break text
v Summary operations
v Text for the end of the report
For information on defining report forms, see Chapter 6, “Working with Query Manager report forms.”
Before you press F13 to create or change a report form, it is a good idea to run the query in interactive
mode (see “Testing a query in Query Manager” on page 64). Running a query interactively creates active
data that Query Manager uses for default values when you define the report form. If your Query
Manager profile prevents you from running a query in interactive mode, you cannot create active data.
Instead, you can load default values for the report form from your active query, see “Loading default
values from the active query in Query Manager” on page 110.
When you press F13, if there is no active form, you see a prompt display asking you to type the name of
the report form you want to create or change, and the library in which it resides. You can press
F4 (Prompt) to display a list of all report forms in the current library from which you can make a
selection. Type a new name to create a report form, or type the name of an existing report form that you
want to change or display. Then press the Enter key to go to the Select Report Format display. The Select
Report Format display is described in “Creating or changing a Query Manager report form” on page 107.
When you finish editing the report form, you can press F13 (Edit query) to leave the Select Report
Format display and return to the Edit Query display.
If you do not want to design your own report form, you can specify a report form name of *SYSDFT at
the time of running a query. Query Manager creates a simple (system default) report form that it uses to
format the query data.
Using statements in Query Manager
You can use the Query Manager statement line at the top of the Edit Query display to type the editing
commands described on page 71, and a number of Query Manager statements supported by Query
Manager. The supported Query Manager statements are described in Appendix B, “Query Manager
statements.”
Edit Query
Columns . . . : 1 68 Query . . . . . : MYQUERY
QM . . _____________________________________________________________________
Type SQL Statement.
************************ Beginning of data ************************
’’’’’’’
’’’’’’’
’’’’’’’
’’’’’’’
’’’’’’’
’’’’’’’
’’’’’’’
Figure 36. The Query Manager Statement Line
Chapter 5. Creating and changing queries in Query Manager 77
The DRDA commands can be executed from the command line. A list of relational databases and their
connection information can be obtained by prompting on the DRDA statements. For more information on
DRDA considerations, see Chapter 9, “Distributed Relational Database Architecture in Query Manager,”
on page 173.
Use your display station’s arrow keys or press F10 (Cursor) to move the cursor to the Query Manager
statement line. When the cursor is positioned on the Query Manager statement line, you can press
F4 (Prompt) to display a list of the supported statements that you can enter (similar to Figure 34 on page
75).
You will probably enter the DRAW, SAVE QUERY AS, and CONNECT statements most often on this
statement line. These statements are described in detail in Appendix B, “Query Manager statements.”
DRAW table
Adds the SQL statement:
SELECT column1, column2, column3, . . . FROM table
to any text that is currently in the edit area. This statement is particularly helpful when building
SQL statements that contain subselects.
SAVE QUERY AS
Saves the current query using the name you specify.
CONNECT
Makes a connection to a different relational database. For example, to connect to a System i
platform named CHICAGO, you would type:
CONNECT TO CHICAGO
Note that when you create a query in the Edit Query display, the query cannot contain the
CONNECT, DISCONNECT, SET CONNECTION, or RELEASE statements.
Notes:
1. If you connect to a database (other than DB2 for i5/OS) by using the CONNECT statement,
F15 (Check syntax) is not supported.
2. If you specified system naming conventions in your Query Manager profile, the only
relational databases you can connect to are those on a local machine or those on another
i5/OS operating system.
Creating a prompted query through the define prompted query display
in Query Manager
If your current query creation mode is prompted, Query Manager shows the Define Prompted Query
display when you choose to create a query. Using this display, you can create a SELECT statement query.
Choose the parts of the query that you want to define; then press the Enter key.
Query Manager presents a series of “prompted” displays. Answer the prompts on these displays to
provide Query Manager with all of the information it needs to create the SELECT statement query.
Note: You cannot create or change a prompted query while you are connected to a database other than
DB2 for i5/OS. You can change your current database connection using the Query Manager
CONNECT or SET CONNECTION statements. See page 236 for instructions. Refer to Chapter 9,
“Distributed Relational Database Architecture in Query Manager,” on page 173 for DRDA
considerations.
1. Type 1 in the Selection prompt from the Query Manager main menu; then press the Enter key to
show the Work with Query Manager Queries display. Make sure that your “Query creation mode”
78 Query Manager Use V6R1M0
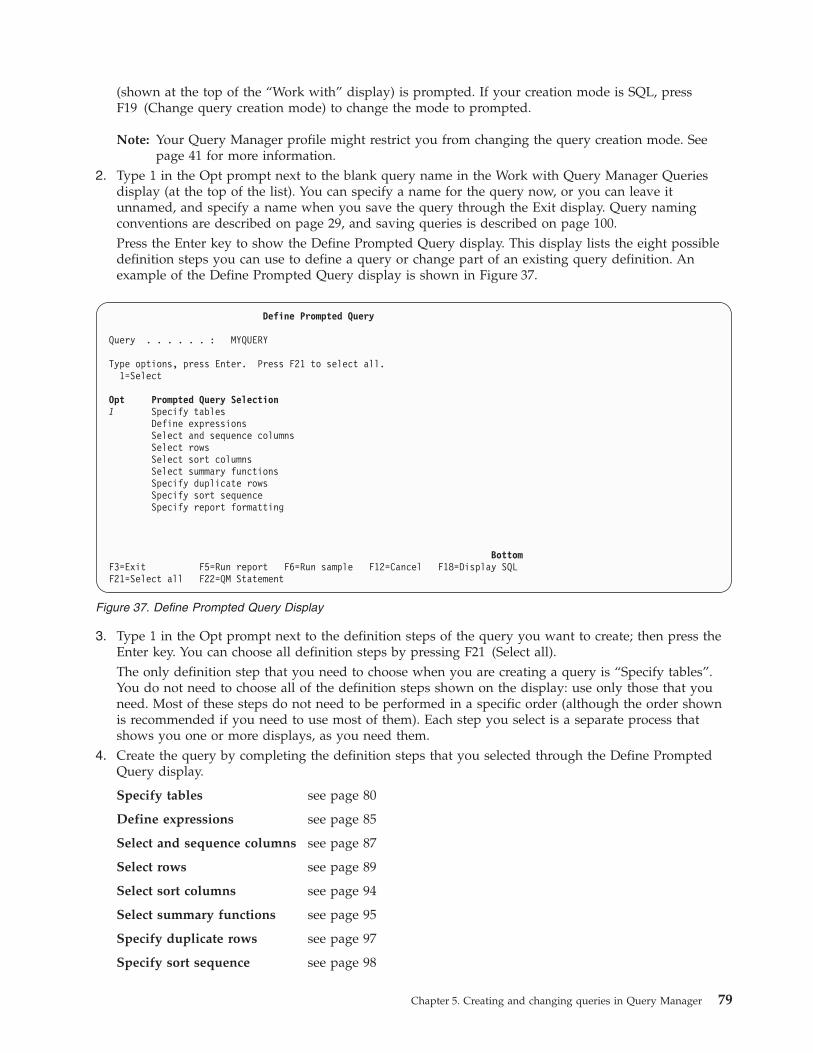
(shown at the top of the “Work with” display) is prompted. If your creation mode is SQL, press
F19 (Change query creation mode) to change the mode to prompted.
Note: Your Query Manager profile might restrict you from changing the query creation mode. See
page 41 for more information.
2. Type 1 in the Opt prompt next to the blank query name in the Work with Query Manager Queries
display (at the top of the list). You can specify a name for the query now, or you can leave it
unnamed, and specify a name when you save the query through the Exit display. Query naming
conventions are described on page 29, and saving queries is described on page 100.
Press the Enter key to show the Define Prompted Query display. This display lists the eight possible
definition steps you can use to define a query or change part of an existing query definition. An
example of the Define Prompted Query display is shown in Figure 37.
3. Type 1 in the Opt prompt next to the definition steps of the query you want to create; then press the
Enter key. You can choose all definition steps by pressing F21 (Select all).
The only definition step that you need to choose when you are creating a query is “Specify tables”.
You do not need to choose all of the definition steps shown on the display: use only those that you
need. Most of these steps do not need to be performed in a specific order (although the order shown
is recommended if you need to use most of them). Each step you select is a separate process that
shows you one or more displays, as you need them.
4. Create the query by completing the definition steps that you selected through the Define Prompted
Query display.
Specify tables see page 80
Define expressions see page 85
Select and sequence columns see page 87
Select rows see page 89
Select sort columns see page 94
Select summary functions see page 95
Specify duplicate rows see page 97
Specify sort sequence see page 98
Define Prompted Query
Query . . . . . . : MYQUERY
Type options, press Enter. Press F21 to select all.
1=Select
Opt Prompted Query Selection
1 Specify tables
Define expressions
Select and sequence columns
Select rows
Select sort columns
Select summary functions
Specify duplicate rows
Specify sort sequence
Specify report formatting
Bottom
F3=Exit F5=Run report F6=Run sample F12=Cancel F18=Display SQL
F21=Select all F22=QM Statement
Figure 37. Define Prompted Query Display
Chapter 5. Creating and changing queries in Query Manager 79
Specify report formatting see page 995. When you finish entering the information for one display, press the Enter key to go to the next
display. All displays are shown in the same order as the definition steps are listed on the Define
Prompted Query display. When you finish entering information for all of the definition steps that you
selected, press the Enter key to return to the Define Prompted Query display. From this display, you
can once again select definition steps of the query to create or change (as described in step 3) if you
require. The parts of the query that you have defined are indicated by a “>” sign, shown to the left of
the definition steps.
If you want to leave one of the displays and return directly to the Define Prompted Query display,
press F12 (Cancel) instead of the Enter key.
6. To display the SQL SELECT statement that you are building through these prompted displays, press
F18 (Display SQL). The SQL statement is shown with descriptive comments that tell you what
function each part of the statement performs. You can find a description of the different parts of the
SQL SELECTstatement on page 4.
7. If you wanted to change the long column names to system names, you would:
a. Press F19 to display the system names.
b. Press Enter to update your query and change the names in the query to the displayed names.8. If you wanted to change the system names to long column names, you would:
a. Press F19 to display the long column names.
b. Press Enter to update your query and change the names in the query to the displayed names.
To run the query, press F5 (Run report) or F6 (Run sample). See page 64 for instructions.
9. When you finish creating the query, press F3 (Exit) from the Define Prompted Query display to go to
the Exit display. Enter a name and description for the query through this display. (Query naming
conventions are described on page 29.) The description can be a maximum of 50 characters in length.
If the query is already named, you can change the name if you desire.
Select option 1 to save the query; then press the Enter key to return to the Work with Query Manager
Queries display. The Exit display is described on page 100.
If you want to work through practice exercises in which you create and work with a prompted query,
turn to Appendix A, “Practice exercises for Query Manager.”
Choosing the tables to include in the query in Query Manager
If you choose to specify tables from the Define Prompted Query display (see page 79), Query Manager
shows the Specify Tables display. An example of this display is shown in Figure 38 on page 81. Use this
display to enter the names of the tables that you want to query.
Note: When you create a prompted query, you need to specify tables before you can define any of the
other parts of the query.
80 Query Manager Use V6R1M0

Enter the following information to specify the tables for the query:
v Table. Type the name of the existing table that you want to query. You can press F4 (Prompt) to
display a list of all tables in the current collection from which you can make a selection. For
information on long table names, see “Exercise: Creating a table named with 19 characters or more in
Query Manager” on page 186.
Query Manager assigns an identifier for each table selected by the query. In Figure 38, the identifier is
“A”. Use the identifiers each time you refer to a table or column within the query definition. You
cannot change this value.
v Collection. Type the name of the collection (or library) in which the table resides. The default library is
*LIBL.
v + for more tables. Type “+” if you want the query to select more than one table. When you type “+”
and press the Enter key, Query Manager displays additional prompts that ask you to enter the name of
the table and the collection in which it resides, as shown in Figure 39.
To remove a table from the query definition, type blank spaces over the table and collection names. You
can also replace a table selection by typing new names over existing table and collection names. When
you remove or replace a specified table, Query Manager automatically removes most references to that
table from the query definition. The only references that you need to remove manually are those that
occur in expressions. See “Defining expressions in Query Manager” on page 85 for more information.
You can select from 1 to 32 tables through the Specify Tables display. “A” and “B” are identifiers that you
use to refer to each table within the query definition. These identifiers also reflect the order in which the
tables are selected by the query. The identifier order goes: A, B, C, ... Z, AA, BB, CC, and so on to FF.
Specify Tables
Type choices, press Enter.
Table . . . . . . . . . : A STAFF________________ Name, F4 for list
Collection . . . . . . : MYCOLL_______________ Name
+ for more tables . . . .
Bottom
F3=Exit F4=Prompt F5=Run report F6=Run sample F12=Cancel
F18=Display SQL F20=Display entire name F22=QM Statement
Figure 38. Specify Tables Display
Specify Tables
Type choices, press Enter.
Table . . . . . . . . . : A STAFF__________________ Name, F4 for list
Collection . . . . . . : MYCOLL_________________ Name
+ for more tables . . . .
Figure 39. Specify Tables Display
Chapter 5. Creating and changing queries in Query Manager 81
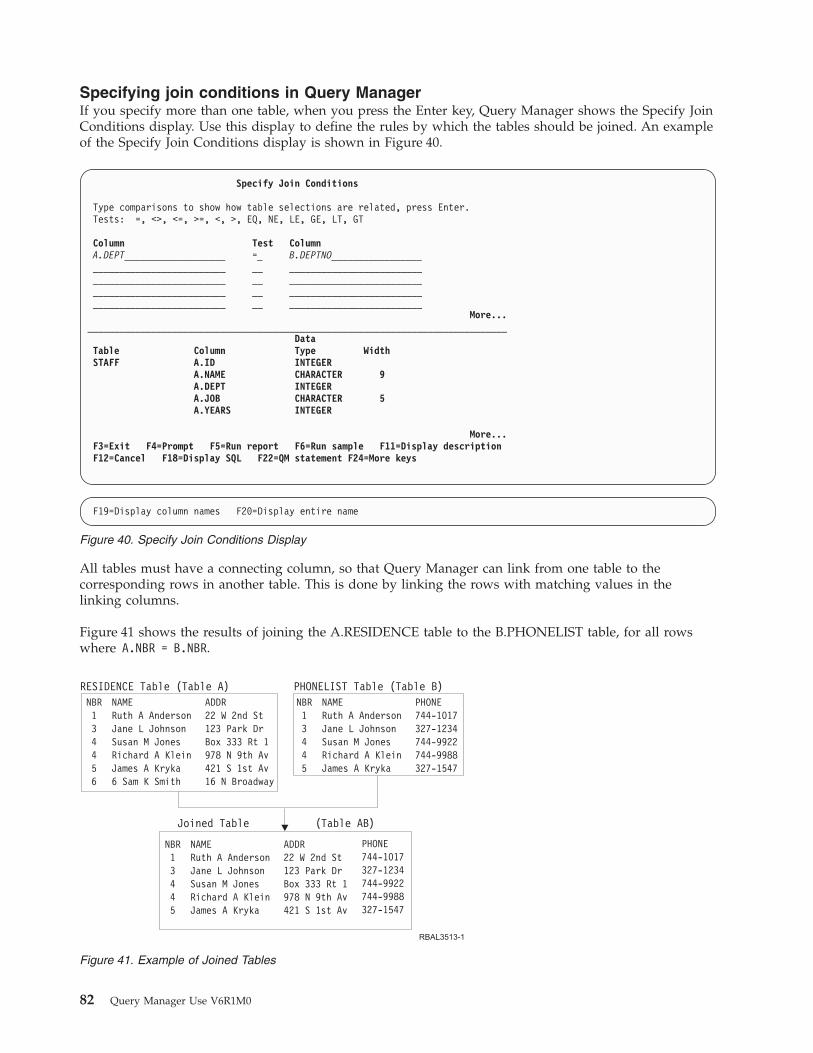
Specifying join conditions in Query Manager
If you specify more than one table, when you press the Enter key, Query Manager shows the Specify Join
Conditions display. Use this display to define the rules by which the tables should be joined. An example
of the Specify Join Conditions display is shown in Figure 40.
All tables must have a connecting column, so that Query Manager can link from one table to the
corresponding rows in another table. This is done by linking the rows with matching values in the
linking columns.
Figure 41 shows the results of joining the A.RESIDENCE table to the B.PHONELIST table, for all rows
where A.NBR = B.NBR.
Specify Join Conditions
Type comparisons to show how table selections are related, press Enter.
Tests: =, <>, <=, >=, <, >, EQ, NE, LE, GE, LT, GT
Column Test Column
A.DEPT___________________ =_ B.DEPTNO_________________
_________________________ __ _________________________
_________________________ __ _________________________
_________________________ __ _________________________
_________________________ __ _________________________
More...
_______________________________________________________________________________
Data
Table Column Type Width
STAFF A.ID INTEGER
A.NAME CHARACTER 9
A.DEPT INTEGER
A.JOB CHARACTER 5
A.YEARS INTEGER
More...
F3=Exit F4=Prompt F5=Run report F6=Run sample F11=Display description
F12=Cancel F18=Display SQL F22=QM statement F24=More keys
F19=Display column names F20=Display entire name
Figure 40. Specify Join Conditions Display
Figure 41. Example of Joined Tables
82 Query Manager Use V6R1M0

Use the top part of the Specify Join Conditions display to specify the conditions that you want Query
Manager to use when it joins the tables. The bottom part of this display lists all of the columns in the
selected tables. Enter the following information to specify join conditions:
v Column. Enter the name of the column (including the table identifier prefix) from the first table for
which you want to specify the condition (for example, A.DEPT in Figure 40 on page 82). The names of
all of the columns you can choose are listed at the bottom of the display.
v Test. Enter the test condition you want to use to compare the two column values. Choose from the
following conditions:
Table 4. Prompted Query Test Conditions for Joining Tables
Test Description
EQ, = Equal to. The columns must match exactly.
NE, <> Not equal to. The columns must not match.
LE, <= Less than or equal to. Column 1 must have a value less
than or equal to Column 2.
GE, >= Greater than or equal to. Column 1 must have a value
greater than or equal to Column 2.
LT, < Less than. Column 1 must have a value less than
Column 2.
GT, < Greater than. Column 1 must have a value greater than
Column 2.
v Column. Enter the name of the column (including the table identifier prefix) from the second table
against which you want to make the comparison (for example, B.DEPTNO in Figure 40 on page 82).
The names of all of the columns you can choose are listed at the bottom of the display.
Query Manager joins the tables after performing column-by-column comparisons. If you specify more
than one condition, the conditions are joined by an AND connector. That means that only those rows
where both conditions are true are selected by the query.
Rules for joining tables in Query Manager
When you specify join conditions, the following rules and guidelines apply:
v All of the tables that you chose through the Specify Table Selections display need to be involved in at
least one join.
v For two tables to be joined, they need to have at least one column in common. (Note that having a
column in common does not mean that the column names are the same.)
v The two columns you specify for the join need to have different table identifier prefixes, and the
columns need to contain similar data, with compatible data types and lengths. The data types and
lengths for all columns are listed at the bottom of the display.
You can use F11 (Display description/Display column only/Display Type) to change the information
shown at the bottom of the display.
v Joins need to be linear rather than circular in nature. The following examples assume that you have
selected four tables: A, B, C, and D. Figure 42 on page 84 shows valid join conditions for these tables.
Chapter 5. Creating and changing queries in Query Manager 83
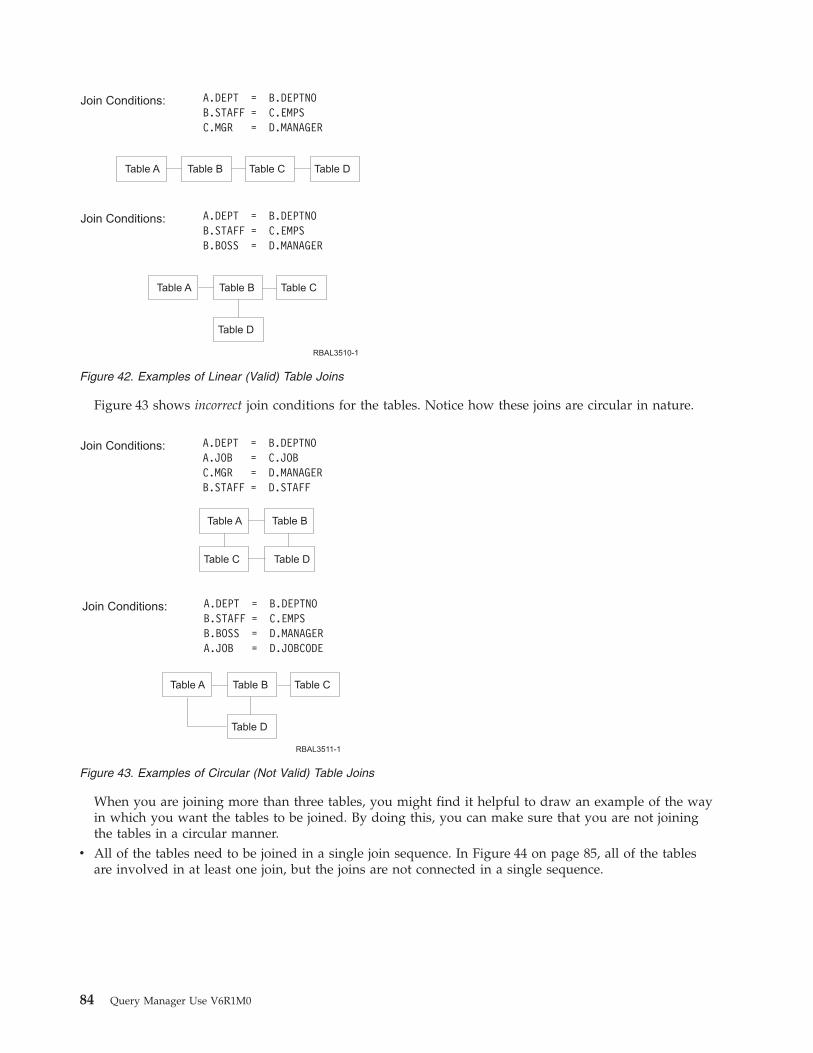
Figure 43 shows incorrect join conditions for the tables. Notice how these joins are circular in nature.
When you are joining more than three tables, you might find it helpful to draw an example of the way
in which you want the tables to be joined. By doing this, you can make sure that you are not joining
the tables in a circular manner.
v All of the tables need to be joined in a single join sequence. In Figure 44 on page 85, all of the tables
are involved in at least one join, but the joins are not connected in a single sequence.
Figure 42. Examples of Linear (Valid) Table Joins
Figure 43. Examples of Circular (Not Valid) Table Joins
84 Query Manager Use V6R1M0
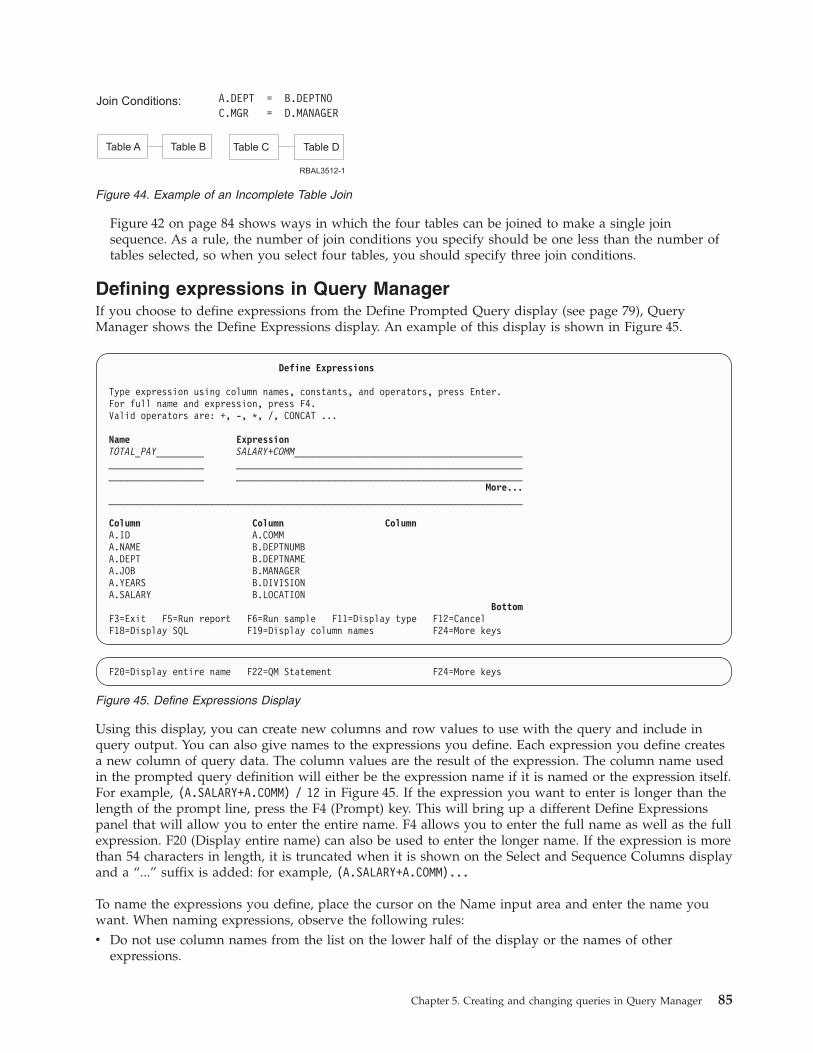
Figure 42 on page 84 shows ways in which the four tables can be joined to make a single join
sequence. As a rule, the number of join conditions you specify should be one less than the number of
tables selected, so when you select four tables, you should specify three join conditions.
Defining expressions in Query Manager
If you choose to define expressions from the Define Prompted Query display (see page 79), Query
Manager shows the Define Expressions display. An example of this display is shown in Figure 45.
Using this display, you can create new columns and row values to use with the query and include in
query output. You can also give names to the expressions you define. Each expression you define creates
a new column of query data. The column values are the result of the expression. The column name used
in the prompted query definition will either be the expression name if it is named or the expression itself.
For example, (A.SALARY+A.COMM) / 12 in Figure 45. If the expression you want to enter is longer than the
length of the prompt line, press the F4 (Prompt) key. This will bring up a different Define Expressions
panel that will allow you to enter the entire name. F4 allows you to enter the full name as well as the full
expression. F20 (Display entire name) can also be used to enter the longer name. If the expression is more
than 54 characters in length, it is truncated when it is shown on the Select and Sequence Columns display
and a “...” suffix is added: for example, (A.SALARY+A.COMM)...
To name the expressions you define, place the cursor on the Name input area and enter the name you
want. When naming expressions, observe the following rules:
v Do not use column names from the list on the lower half of the display or the names of other
expressions.
Figure 44. Example of an Incomplete Table Join
Define Expressions
Type expression using column names, constants, and operators, press Enter.
For full name and expression, press F4.
Valid operators are: +, -, *, /, CONCAT ...
Name Expression
TOTAL_PAY_________ SALARY+COMM___________________________________________
__________________ ______________________________________________________
__________________ ______________________________________________________
More...
______________________________________________________________________________
Column Column Column
A.ID A.COMM
A.NAME B.DEPTNUMB
A.DEPT B.DEPTNAME
A.JOB B.MANAGER
A.YEARS B.DIVISION
A.SALARY B.LOCATION
Bottom
F3=Exit F5=Run report F6=Run sample F11=Display type F12=Cancel
F18=Display SQL F19=Display column names F24=More keys
F20=Display entire name F22=QM Statement F24=More keys
Figure 45. Define Expressions Display
Chapter 5. Creating and changing queries in Query Manager 85

v If you need to enter a name longer than the length of the prompt line, press the F4 (Prompt) key. You
will see another Define Expressions panel that will allow you to enter the full name and the full
expression. F20 (Display entire name) can also be used to enter the long name.
v Start the name with an alphabetic character (A through Z, $, #, or @). Up to 29 alphanumeric characters
(A through Z, 0 through 9, $, #, @ or _) may be used for the remainder of the name. Do not use blanks
within the name, unless the entire name is blank.
The column heading is the expression name if it is named. Expression names can also be quoted, in
which case any character greater than X’3F’ and less than X’FF’ is allowed within the quotes. If the actual
expression is more than 20 characters in length, the phrase describing the expression will be used. If you
would like to define different column headings, you can create a report form from the define Prompted
Query menu and personalize your column headings.
The column heading used for report form definitions and printed reports will either be the expression
itself with blanks added to improve readability or it will be a phrase describing the expression. If the
edited expression is more than 20 characters in length, the phrase describing the expression will be used.
The column name used will be the characters ″SEL″ followed by a unique number, SEL1 for the first
expression, SEL2 for the second expression and so on. The number used depends on how the expression
is sequenced with respect to other expressions, summary functions and duplicate columns on the ’Select
and sequence columns’ display. When you define expressions, it is a good idea to keep a note of which
expression each one of the ″SEL″ column names refers to.
Note that the only way that you can change column headings for printed and displayed reports is by
creating a report form, or by defining a named expression. If you create a report form, the column name
remains unchanged. If you define a named expression, the column name is renamed. See “Defining a
report form in Query Manager” on page 99 for instructions on how to create a report form.
The expressions that you define through this display do not need to appear in your query output. You
can define expressions to use as intermediate steps for obtaining final results. For example, you can
define an expression to use when you select the rows to include in the query output, or to create a value
for which you want to calculate summary data. Expressions are included in query output if you select
them through the Select and Sequence Columns display. See “Selecting and sequencing columns from the
tables in Query Manager” on page 87 for more information.
Enter the expression in free format. The expression can include column names (prefixed by the table
identifier), constants, parentheses (to show operation priority), and any of the following arithmetic
operators:
Table 5. Arithmetic Operators
Op Description
+ Addition
- Subtraction
* Multiplication
/ Division
Use these operators with number values only. If the data types for all columns are not currently shown at
the bottom of the display, press F11 (Display description). The result of any expression containing a null
value is null.
Including functions, durations, and special registers in expressions in Query
Manager
You can include functions, durations, and special registers in the expressions you create through the
Define Expressions display. The supported functions, durations, and special registers include, but are not
limited to, the following:
86 Query Manager Use V6R1M0

v Functions: AVG, CHAR, COALESCE, CONCAT, COUNT, DECIMAL, DIGITS, FLOAT, HEX, INTEGER,
LENGTH, MAX, MIN, STRIP, SUBSTR, SUM, TIME, TIMESTAMP, VALUE, VARCHAR, VARGRAPHIC
v Durations: DATE, DAY, DAYS, HOUR, MICROSECOND, MINUTE, MONTH, SECOND, YEAR
v Special Registers: CURRENT DATE, CURRENT_DATE, CURRENT TIME, CURRENT_TIME,
CURRENT TIMESTAMP, CURRENT_TIMESTAMP, USER, CURRENT PATH, CURRENT SCHEMA
You can find detailed descriptions of all of the functions, durations, and registers in SQL reference.
CONCAT function considerations in Query Manager: Use the CONCAT (concatenation) function to
join two values together. This function can be used only with alphanumeric values, and can join two
columns, or a column and a constant. The result appears as one column in the report.
If you want to include a column with a number data type in a concatenation string, you need to convert
the numbers to alphanumeric values using the DIGITS function. The result of the concatenation is an
alphanumeric string with no decimal place. For example, the expression (’$’ CONCAT DIGITS(A.SALARY))
creates a column containing the SALARY values from table A prefixed with a dollar sign. The
(’$’ CONCAT DIGITS(A.SALARY)) values are alphanumeric values, and cannot be used in arithmetic
operations.
Note that an alphanumeric constant needs to be enclosed in single quotation marks. For more
information, see “Including constants in queries in Query Manager” on page 65.
Each expression you define is limited to the length of one input line shown on the Define Expressions
display. This is due to one of Query Manager’s internal size limitations. You can use the CONCAT
function to join two input lines and create a longer expression.
VARCHAR and VARGRAPHIC functions and UCS2-graphic data in Query Manager: The VARCHAR
function returns a character string in the default or a specified CCSID. You can use VARCHAR to convert
UCS2-graphic data to a form that can be displayed or printed in a report. You can also use it to compare
or concatenate UCS2-graphic data with SBCS or DBCS data. VARCHAR converts UCS2-graphic data to
SBCS, DBCS-open, DBCS-only, or DBCS-either. The function does not convert UCS2-graphic data to bit
data, CCSID 65535.
The VARGRAPHIC function returns a graphic string representation of a string expression. You can use
VARGRAPHIC to convert SBCS, DBCS-open, DBCS-only, or DBCS-either so it can be compared with or
concatenated to UCS2-graphic data. VARGRAPHIC does not convert bit data (CCSID 65535).
For complete details on the VARCHAR and VARGRAPHIC functions, see SQL reference. For more
information, see “Including constants in queries in Query Manager” on page 65.
Selecting and sequencing columns from the tables in Query Manager
If you choose to select and sequence columns from the Define Prompted Query display (see page 79),
Query Manager shows the Select and Sequence Columns display. An example of this display is shown in
Figure 46 on page 88.
Chapter 5. Creating and changing queries in Query Manager 87
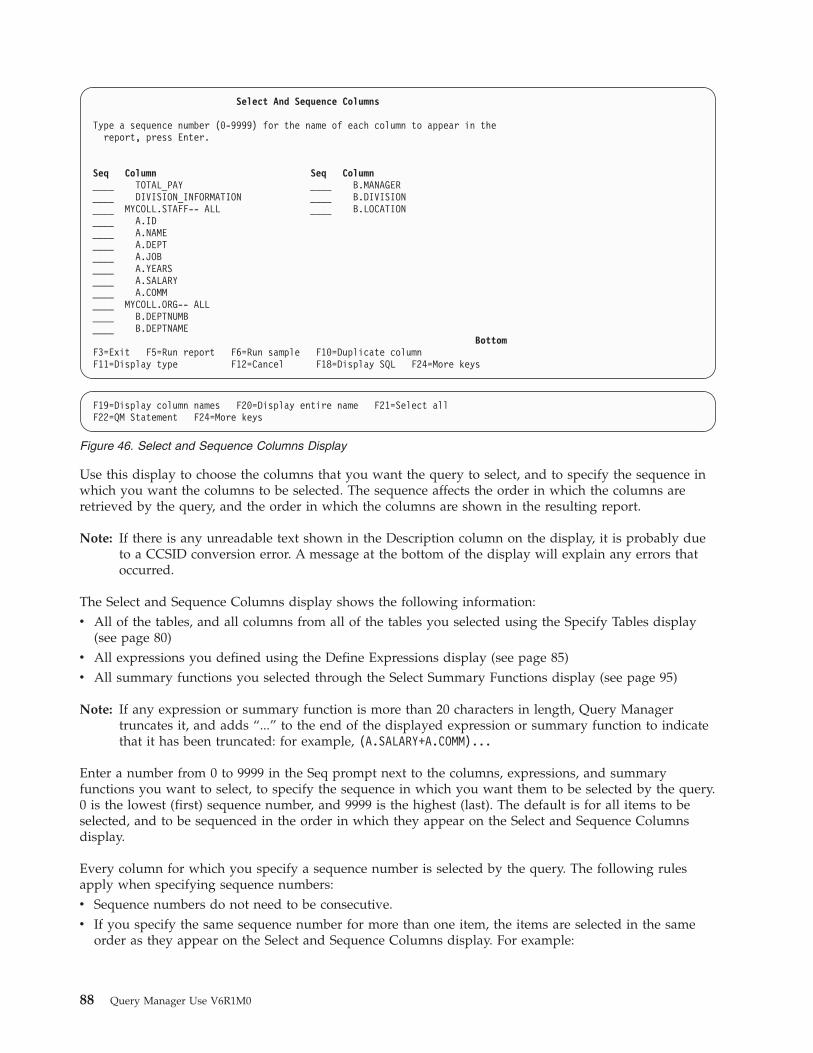
Use this display to choose the columns that you want the query to select, and to specify the sequence in
which you want the columns to be selected. The sequence affects the order in which the columns are
retrieved by the query, and the order in which the columns are shown in the resulting report.
Note: If there is any unreadable text shown in the Description column on the display, it is probably due
to a CCSID conversion error. A message at the bottom of the display will explain any errors that
occurred.
The Select and Sequence Columns display shows the following information:
v All of the tables, and all columns from all of the tables you selected using the Specify Tables display
(see page 80)
v All expressions you defined using the Define Expressions display (see page 85)
v All summary functions you selected through the Select Summary Functions display (see page 95)
Note: If any expression or summary function is more than 20 characters in length, Query Manager
truncates it, and adds “...” to the end of the displayed expression or summary function to indicate
that it has been truncated: for example, (A.SALARY+A.COMM)...
Enter a number from 0 to 9999 in the Seq prompt next to the columns, expressions, and summary
functions you want to select, to specify the sequence in which you want them to be selected by the query.
0 is the lowest (first) sequence number, and 9999 is the highest (last). The default is for all items to be
selected, and to be sequenced in the order in which they appear on the Select and Sequence Columns
display.
Every column for which you specify a sequence number is selected by the query. The following rules
apply when specifying sequence numbers:
v Sequence numbers do not need to be consecutive.
v If you specify the same sequence number for more than one item, the items are selected in the same
order as they appear on the Select and Sequence Columns display. For example:
Select And Sequence Columns
Type a sequence number (0-9999) for the name of each column to appear in the
report, press Enter.
Seq Column Seq Column
____ TOTAL_PAY ____ B.MANAGER
____ DIVISION_INFORMATION ____ B.DIVISION
____ MYCOLL.STAFF-- ALL ____ B.LOCATION
____ A.ID
____ A.NAME
____ A.DEPT
____ A.JOB
____ A.YEARS
____ A.SALARY
____ A.COMM
____ MYCOLL.ORG-- ALL
____ B.DEPTNUMB
____ B.DEPTNAME
Bottom
F3=Exit F5=Run report F6=Run sample F10=Duplicate column
F11=Display type F12=Cancel F18=Display SQL F24=More keys
F19=Display column names F20=Display entire name F21=Select all
F22=QM Statement F24=More keys
Figure 46. Select and Sequence Columns Display
88 Query Manager Use V6R1M0

3 A.ID
1 A.NAME
4 A.DEPT
2 A.JOB
3 A.YEARS
would result in the following SELECT sequence:
SELECT A.NAME, A.JOB, A.ID, A.YEARS, A.DEPT
v Any items for which you do not specify a sequence number are not selected by the query.
If you want to select all columns from a table, and have them sequenced in the same order as they
appear in the table, type a sequence number in the Seq prompt next to the table name (for example,
STAFF and ORG in Figure 46 on page 88). The “-- ALL” that follows the table name tells Query Manager
to select all columns from the table.
When you press the Enter key, the columns are reordered on the display so that they are shown in the
sequence you specified. Unselected columns appear at the end of the list. The columns may also be
renumbered, so that the first selected column has a sequence number of 10, the second of 20, the third of
30, and so on. Continuing the previous example, when you press the Enter key, the columns would be
shown in the following order:
10 A.NAME
20 A.JOB
30 A.ID
40 A.YEARS
50 A.DEPT
Press the Enter key a second time to leave the Select and Sequence Columns display, and go to the next
display you specified through the Define Prompted Query display.
Note: If you do not choose to “Select and Sequence Columns”, the query selects all columns from all of
the tables you specified. The columns are sequenced in the same order as they appear in the
database tables.
Including duplicate columns in Query Manager
You can add a duplicate column, expression, or summary function to the Select and Sequence Columns
display, and get the query to select it (and the report to display it) more than once. Simply position the
cursor on the item that you want to copy; then press F10 (Duplicate column). The duplicate column,
expression, or summary function is inserted immediately below the item the cursor was positioned on
when you pressed F10. If a named expression is duplicated, the duplicated expression will be unnamed.
Specifying row selection tests in Query Manager
If you choose to select rows from the Define Prompted Query display (see page 79), Query Manager
shows the Select Rows display. An example of this display is shown in Figure 47 on page 90.
Chapter 5. Creating and changing queries in Query Manager 89

Use this display to specify the rows that you want to be retrieved by the query. You do this by defining
comparison tests for the column values. Only those rows that match the tests you define are retrieved by
the query. For example, if you want to select only those rows where the salary is greater than $5,000, you
would define the first test condition shown in the bottom half of Figure 47:
If A.SALARY is greater than 5000.00
You define a comparison test by answering all of the prompts shown on the display. Any comparison
tests that you have already defined are shown in the bottom half of the Select Rows display. Each time
you finish defining a new comparison test, it is added to the tests in the bottom half of the display.
You can edit or delete a comparison test that already exists. Simply position the cursor on the test that
you want to change or delete; then press the Enter key. The comparison test is marked by a “>” sign in
the bottom half of the display, and the details of the test are shown as prompt values in the top half of
the display. (Any values that had already been entered for the prompts in the top half of the display are
replaced by the details of the selected comparison test.) Make the changes to the values that define the
comparison test; then press the Enter key to save your changes. To delete the comparison test, blank out
all of the values shown in the prompts before you press the Enter key.
When changing a comparison test, it may be necessary to change the “Values” before you change the
“Test”. The BT (Between) test must have two values specified, the NL (Null) test must have zero values.
If you are changing a comparison test so that it has a “Test” of either BT or NL, you may first need to
erase “Values” by typing blanks over the existing values. Query Manager displays an error message if
you specify BT or NL when an incorrect number of “Values” exist.
Enter the following information to define comparison tests:
v AND/OR. You need to enter either AND or OR when you define more than one comparison test, to
join the tests. Type AND if both the previous test and the current test need to be true for the row to be
selected. Type OR if either the previous test or the current test need to be true for the row to be
selected. The AND/OR connector is described in greater detail in “Choosing columns for row selection
test” on page 91.
v Column/Expression. Type the name of the column or expression on which you want the comparison
test performed. Press F4 (Prompt) if you want Query Manager to display a list of all of the columns
and expressions selected by the query. Choosing a column or expression from the F4 (Prompt) list is
described in “Choosing columns for row selection test” on page 91.
Select Rows
Type new comparison test, press Enter.
Column or expression . . . . . A.SALARY____________________________________
IS/ISNOT . . . . . . . . . . . IS___ IS, ISNOT
Test . . . . . . . . . . . . . >__ EQ, LT, LE, GT, GE...
Value . . . . . . . . . . . . 5000.00_____________________________________
______________________________________________________________________________
To change previous comparison test, position cursor on
test and press Enter.
Previous comparison tests
If A.SALARY is greater than 5000.00
And A.Name is not starting with ’SMIT’
Bottom
F3=Exit F4=Prompt F5=Run report F6=Run sample F12=Cancel
F18=Display SQL F22=QM Statement
Figure 47. Select Rows Display
90 Query Manager Use V6R1M0
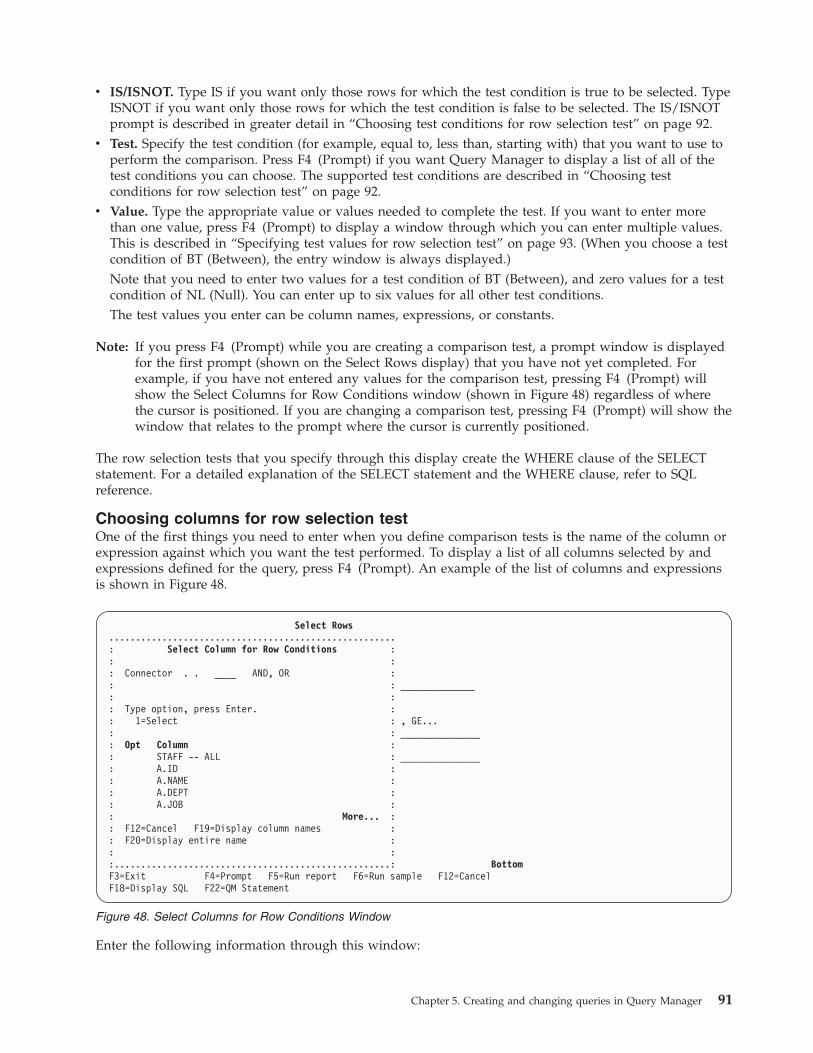
v IS/ISNOT. Type IS if you want only those rows for which the test condition is true to be selected. Type
ISNOT if you want only those rows for which the test condition is false to be selected. The IS/ISNOT
prompt is described in greater detail in “Choosing test conditions for row selection test” on page 92.
v Test. Specify the test condition (for example, equal to, less than, starting with) that you want to use to
perform the comparison. Press F4 (Prompt) if you want Query Manager to display a list of all of the
test conditions you can choose. The supported test conditions are described in “Choosing test
conditions for row selection test” on page 92.
v Value. Type the appropriate value or values needed to complete the test. If you want to enter more
than one value, press F4 (Prompt) to display a window through which you can enter multiple values.
This is described in “Specifying test values for row selection test” on page 93. (When you choose a test
condition of BT (Between), the entry window is always displayed.)
Note that you need to enter two values for a test condition of BT (Between), and zero values for a test
condition of NL (Null). You can enter up to six values for all other test conditions.
The test values you enter can be column names, expressions, or constants.
Note: If you press F4 (Prompt) while you are creating a comparison test, a prompt window is displayed
for the first prompt (shown on the Select Rows display) that you have not yet completed. For
example, if you have not entered any values for the comparison test, pressing F4 (Prompt) will
show the Select Columns for Row Conditions window (shown in Figure 48) regardless of where
the cursor is positioned. If you are changing a comparison test, pressing F4 (Prompt) will show the
window that relates to the prompt where the cursor is currently positioned.
The row selection tests that you specify through this display create the WHERE clause of the SELECT
statement. For a detailed explanation of the SELECT statement and the WHERE clause, refer to SQL
reference.
Choosing columns for row selection test
One of the first things you need to enter when you define comparison tests is the name of the column or
expression against which you want the test performed. To display a list of all columns selected by and
expressions defined for the query, press F4 (Prompt). An example of the list of columns and expressions
is shown in Figure 48.
Enter the following information through this window:
Select Rows
......................................................
: Select Column for Row Conditions :
: :
: Connector . . ____ AND, OR :
: : ______________
: :
: Type option, press Enter. :
: 1=Select : , GE...
: : _______________
: Opt Column :
: STAFF -- ALL : _______________
: A.ID :
: A.NAME :
: A.DEPT :
: A.JOB :
: More... :
: F12=Cancel F19=Display column names :
: F20=Display entire name :
: :
:....................................................: Bottom
F3=Exit F4=Prompt F5=Run report F6=Run sample F12=Cancel
F18=Display SQL F22=QM Statement
Figure 48. Select Columns for Row Conditions Window
Chapter 5. Creating and changing queries in Query Manager 91
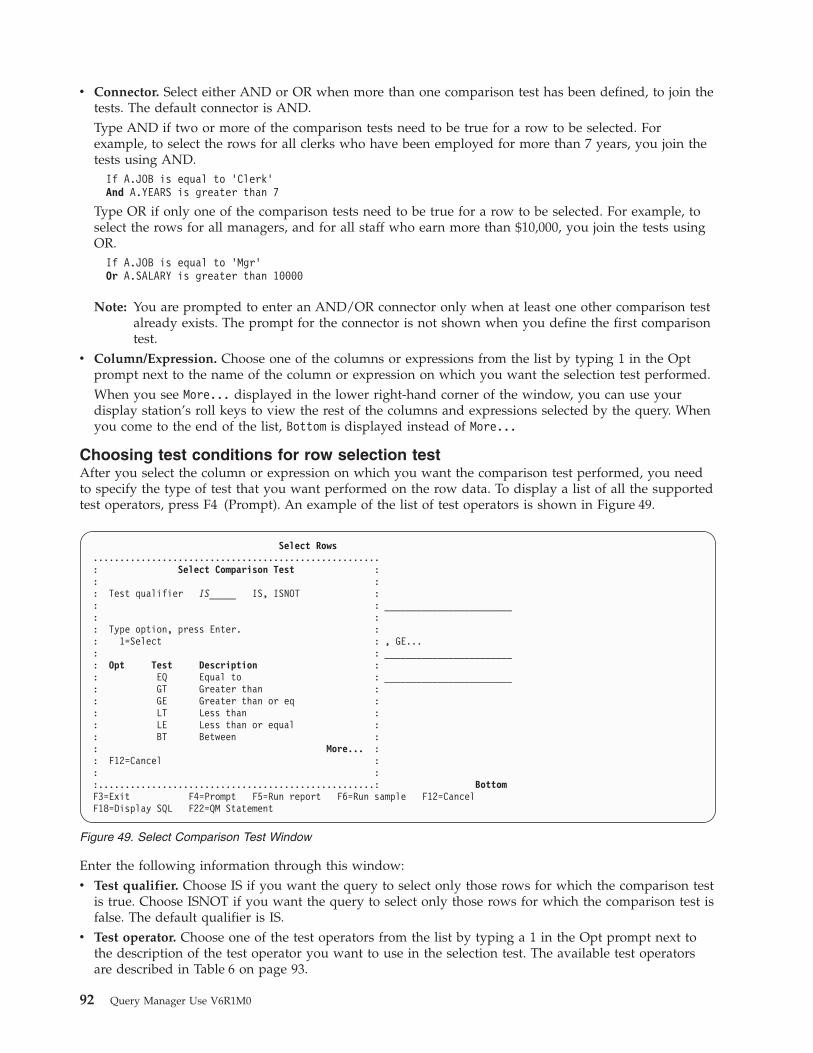
v Connector. Select either AND or OR when more than one comparison test has been defined, to join the
tests. The default connector is AND.
Type AND if two or more of the comparison tests need to be true for a row to be selected. For
example, to select the rows for all clerks who have been employed for more than 7 years, you join the
tests using AND.
If A.JOB is equal to ’Clerk’
And A.YEARS is greater than 7
Type OR if only one of the comparison tests need to be true for a row to be selected. For example, to
select the rows for all managers, and for all staff who earn more than $10,000, you join the tests using
OR.
If A.JOB is equal to ’Mgr’
Or A.SALARY is greater than 10000
Note: You are prompted to enter an AND/OR connector only when at least one other comparison test
already exists. The prompt for the connector is not shown when you define the first comparison
test.
v Column/Expression. Choose one of the columns or expressions from the list by typing 1 in the Opt
prompt next to the name of the column or expression on which you want the selection test performed.
When you see More... displayed in the lower right-hand corner of the window, you can use your
display station’s roll keys to view the rest of the columns and expressions selected by the query. When
you come to the end of the list, Bottom is displayed instead of More...
Choosing test conditions for row selection test
After you select the column or expression on which you want the comparison test performed, you need
to specify the type of test that you want performed on the row data. To display a list of all the supported
test operators, press F4 (Prompt). An example of the list of test operators is shown in Figure 49.
Enter the following information through this window:
v Test qualifier. Choose IS if you want the query to select only those rows for which the comparison test
is true. Choose ISNOT if you want the query to select only those rows for which the comparison test is
false. The default qualifier is IS.
v Test operator. Choose one of the test operators from the list by typing a 1 in the Opt prompt next to
the description of the test operator you want to use in the selection test. The available test operators
are described in Table 6 on page 93.
Select Rows
......................................................
: Select Comparison Test :
: :
: Test qualifier IS_____ IS, ISNOT :
: : ________________________
: :
: Type option, press Enter. :
: 1=Select : , GE...
: : ________________________
: Opt Test Description :
: EQ Equal to : ________________________
: GT Greater than :
: GE Greater than or eq :
: LT Less than :
: LE Less than or equal :
: BT Between :
: More... :
: F12=Cancel :
: :
:....................................................: Bottom
F3=Exit F4=Prompt F5=Run report F6=Run sample F12=Cancel
F18=Display SQL F22=QM Statement
Figure 49. Select Comparison Test Window
92 Query Manager Use V6R1M0
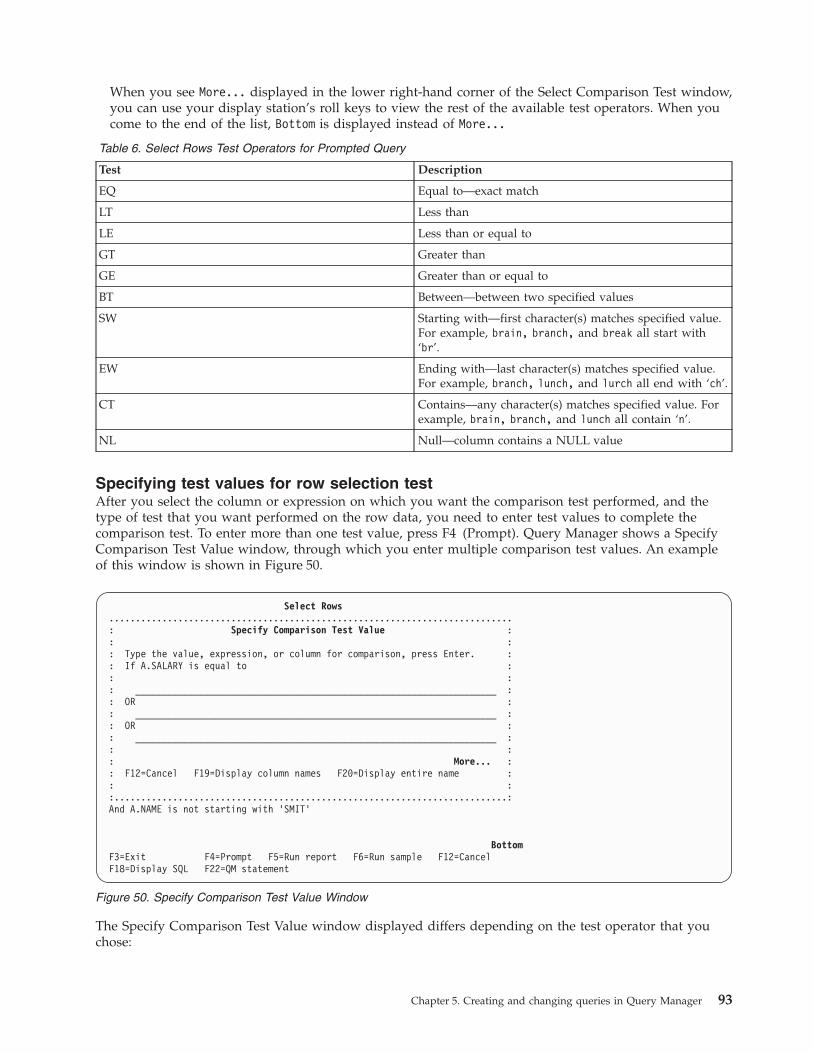
When you see More... displayed in the lower right-hand corner of the Select Comparison Test window,
you can use your display station’s roll keys to view the rest of the available test operators. When you
come to the end of the list, Bottom is displayed instead of More...
Table 6. Select Rows Test Operators for Prompted Query
Test Description
EQ Equal to—exact match
LT Less than
LE Less than or equal to
GT Greater than
GE Greater than or equal to
BT Between—between two specified values
SW Starting with—first character(s) matches specified value.
For example, brain, branch, and break all start with
‘br’.
EW Ending with—last character(s) matches specified value.
For example, branch, lunch, and lurch all end with ‘ch’.
CT Contains—any character(s) matches specified value. For
example, brain, branch, and lunch all contain ‘n’.
NL Null—column contains a NULL value
Specifying test values for row selection test
After you select the column or expression on which you want the comparison test performed, and the
type of test that you want performed on the row data, you need to enter test values to complete the
comparison test. To enter more than one test value, press F4 (Prompt). Query Manager shows a Specify
Comparison Test Value window, through which you enter multiple comparison test values. An example
of this window is shown in Figure 50.
The Specify Comparison Test Value window displayed differs depending on the test operator that you
chose:
Select Rows
............................................................................
: Specify Comparison Test Value :
: :
: Type the value, expression, or column for comparison, press Enter. :
: If A.SALARY is equal to :
: :
: ____________________________________________________________________ :
: OR :
: ____________________________________________________________________ :
: OR :
: ____________________________________________________________________ :
: :
: More... :
: F12=Cancel F19=Display column names F20=Display entire name :
: :
:..........................................................................:
And A.NAME is not starting with ’SMIT’
Bottom
F3=Exit F4=Prompt F5=Run report F6=Run sample F12=Cancel
F18=Display SQL F22=QM statement
Figure 50. Specify Comparison Test Value Window
Chapter 5. Creating and changing queries in Query Manager 93
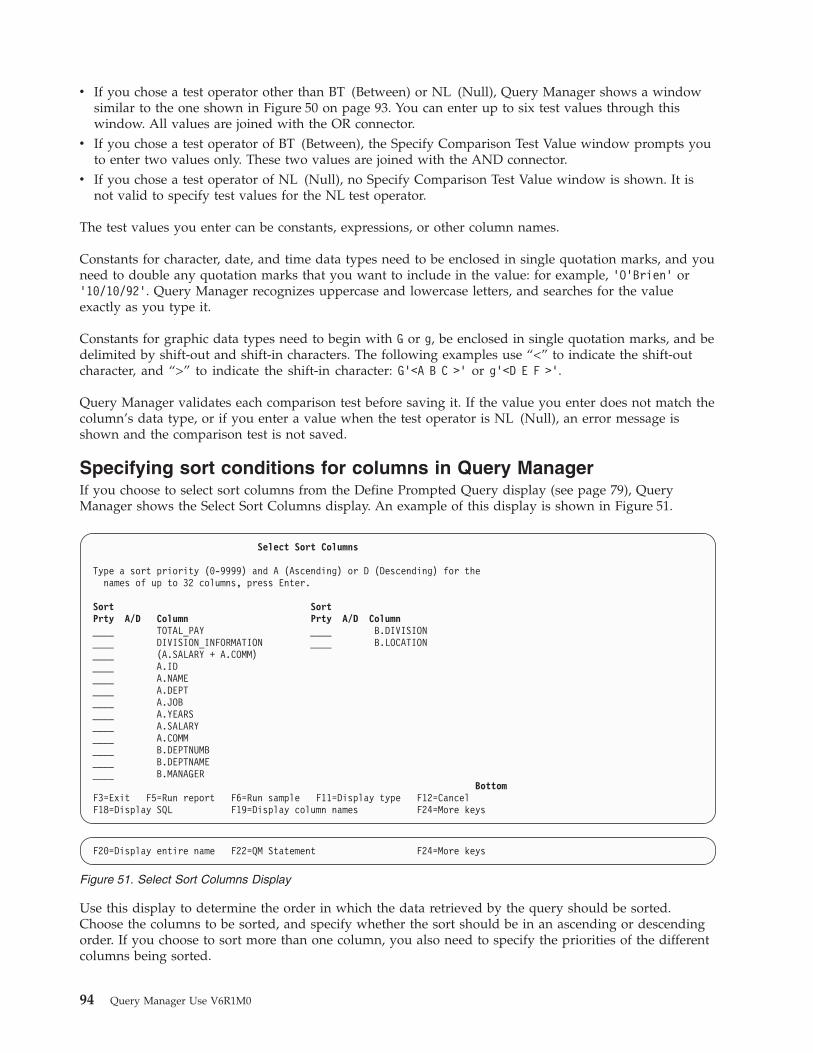
v If you chose a test operator other than BT (Between) or NL (Null), Query Manager shows a window
similar to the one shown in Figure 50 on page 93. You can enter up to six test values through this
window. All values are joined with the OR connector.
v If you chose a test operator of BT (Between), the Specify Comparison Test Value window prompts you
to enter two values only. These two values are joined with the AND connector.
v If you chose a test operator of NL (Null), no Specify Comparison Test Value window is shown. It is
not valid to specify test values for the NL test operator.
The test values you enter can be constants, expressions, or other column names.
Constants for character, date, and time data types need to be enclosed in single quotation marks, and you
need to double any quotation marks that you want to include in the value: for example, ’O’Brien’ or
’10/10/92’. Query Manager recognizes uppercase and lowercase letters, and searches for the value
exactly as you type it.
Constants for graphic data types need to begin with G or g, be enclosed in single quotation marks, and be
delimited by shift-out and shift-in characters. The following examples use “<” to indicate the shift-out
character, and “>” to indicate the shift-in character: G’<A B C >’ or g’<D E F >’.
Query Manager validates each comparison test before saving it. If the value you enter does not match the
column’s data type, or if you enter a value when the test operator is NL (Null), an error message is
shown and the comparison test is not saved.
Specifying sort conditions for columns in Query Manager
If you choose to select sort columns from the Define Prompted Query display (see page 79), Query
Manager shows the Select Sort Columns display. An example of this display is shown in Figure 51.
Use this display to determine the order in which the data retrieved by the query should be sorted.
Choose the columns to be sorted, and specify whether the sort should be in an ascending or descending
order. If you choose to sort more than one column, you also need to specify the priorities of the different
columns being sorted.
Select Sort Columns
Type a sort priority (0-9999) and A (Ascending) or D (Descending) for the
names of up to 32 columns, press Enter.
Sort Sort
Prty A/D Column Prty A/D Column
____ TOTAL_PAY ____ B.DIVISION
____ DIVISION_INFORMATION ____ B.LOCATION
____ (A.SALARY + A.COMM)
____ A.ID
____ A.NAME
____ A.DEPT
____ A.JOB
____ A.YEARS
____ A.SALARY
____ A.COMM
____ B.DEPTNUMB
____ B.DEPTNAME
____ B.MANAGER
Bottom
F3=Exit F5=Run report F6=Run sample F11=Display type F12=Cancel
F18=Display SQL F19=Display column names F24=More keys
F20=Display entire name F22=QM Statement F24=More keys
Figure 51. Select Sort Columns Display
94 Query Manager Use V6R1M0
The Select Sort Columns display shows the following information for you to sort:
v All columns you selected using the Select and Sequence Columns display (see page 87)
v All expressions you defined using the Define Expressions display (see page 85)
v All summary functions you selected through the Select Summary Functions display (see page 95)
Enter the following information to select the sort conditions for the query:
v Sort Prty. Enter a number from 0 to 999 to specify the priority of the columns, expressions, and
summary functions being sorted, where 0 has the highest priority and 999 has the lowest. For example,
in Figure 51 on page 94, A.DEPT has a sort priority of 1, and A.JOB has a sort priority of 2. This means
that the query data is sorted by DEPT number, and within each DEPT, the data is sorted by JOB. If you
specify the same sort priority for more than one item, the items are sorted in the same order as they
appear on the Select Sort Columns display.
Note: The total width of all of the columns that you select to sort cannot exceed 10,000 characters. You
can view the widths of the individual columns by pressing F11 (Display description).
v A/D. Type A if you want the values sorted in ascending order (lowest to highest), or type D if you
want the values sorted in descending order (highest to lowest). When you sort alphanumeric values in
ascending order, Query Manager uses the following sort sequence:
1. Special characters, including blanks, come first
2. Lowercase letters in alphabetic order
3. Uppercase letters in alphabetic order
4. Numbers in ascending order
5. NULL values come last.
Date and time data types are sorted in chronological order.
The sort sequence that you specify through this display determines the ORDER BY clause of the SELECT
statement. For a detailed explanation of the SELECT statement and ORDER BY clause, refer to SQL
reference.
Defining summary functions in Query Manager
If you choose to select summary functions from the Define Prompted Query display (see page 79), the
program shows the Select Summary Functions display. An example of this display is shown in Figure 52
on page 96.
Chapter 5. Creating and changing queries in Query Manager 95

Use this display to specify the summary functions that you want to perform on the query data. Each
summary function you specify creates a new column of query data. The column values are the result of
the summary function. The column name is the summary function itself: for example, SUM(A.SALARY).
All of the columns selected by, and expressions defined for, the query are shown on the Select Summary
Functions display. Type 1 in the prompts beside the column and expression names to specify the
summary functions you want to perform. You can specify more than one summary function to be
performed for a single column or expression.
Table 7 describes the available summary functions. In this table, “A.COLUMN” is used to indicate the
column or expression for which you specify the summary function.
Table 7. Select Summary Functions for Prompted Query
Function Description
SUM The sum (total) of the values in the column.
Generates SELECT SUM(A.COLUMN) ...
AVG (AVERAGE) The average of the values in the column.
Generates SELECT AVG(A.COLUMN) ...
MIN (MINIMUM) The minimum value in the column.
Generates SELECT MIN(A.COLUMN) ...
MAX (MAXIMUM) The maximum value in the column.
Generates SELECT MAX(A.COLUMN) ...
CNT (COUNT) The number of values in the column, including repeated
values and null values. Generates SELECT COUNT(*) ...
Note: The COUNT summary function for prompted queries is not the same as the COUNT column
usage for report formatting. Null values are included in the total when the COUNT summary
function is specified through a prompted query. Null values are not included in the total when the
COUNT column usage is specified through report formatting.
If you want to create a new expression to include in the list of columns retrieved by the query, press
F10 (Define expression) to go to the Define Expressions display (as shown in Figure 45 on page 85). Use
Select Summary Functions
Type options, press Enter.
1=Select
Data
Sum Avg Min Max Cnt Column Type Width
TOTAL_PAY DECIMAL
DIVISION_INFORMATION VARCHAR
TOTAL_PAY/12 DECIMAL
A.DEPT SMALLINT 4
A.JOB OPEN 5
A.ID SMALLINT 4
A.NAME OPEN 9
A.YEARS SMALLINT 4
A.SALARY DECIMAL 8
A.COMM NUMERIC 6
A.DEPTNUMB DECIMAL 2
A.DEPTNAME CHARACTER 15
A.MANAGER DECIMAL 3
More...
F3=Exit F5=Run report F6=Run sample F10=Define expression
F11=Display description F12=Cancel F18=Display SQL F24=More keys
Figure 52. Select Summary Functions Display
96 Query Manager Use V6R1M0

this display to create expressions for which you can select summary functions. When you finish creating
expressions, press the Enter key to return to the Select Summary Functions display. See “Defining
expressions in Query Manager” on page 85 for instructions.
The summary functions that you specify through this display do not necessarily appear in your query
output. To ensure that the summary function does appear in the query output, you should select the
functions through the Select and Sequence Columns display. See “Selecting and sequencing columns from
the tables in Query Manager” on page 87 for more information.
Note that, like expressions, you can define summary functions to use as intermediate steps for obtaining
final results.
Note: When you select summary functions, Query Manager adds a GROUP BY clause to the SELECT
statement. The GROUP BY clause contains all of the column names in the select list, and all of the
column names used in expressions in the select list. The columns are listed in the sequence that
you specify through the Select and Sequence Columns display (see page 87 for more information).
For a detailed explanation of the SELECT statement and the GROUP BY clause, refer to SQL
reference.
Choosing to include duplicate rows in Query Manager
If you choose to specify duplicate rows from the Define Prompted Query display (see page 79), Query
Manager shows the Specify Duplicate Rows display. An example of this display is shown in Figure 53.
Use this display to specify whether you want to include duplicate rows in the data retrieved by the
query. The default is to keep the duplicate rows.
Note: If you press the Enter key after taking the default, the ″>″ will not appear on the Define Prompted
Query display.
If you do not want to include duplicate rows in the data retrieved by the query, select option 2 (Keep
only first copy of each row). Query Manager checks all rows retrieved by the query. When two rows
match exactly (that is, when every value in the first row matches every value in the second row), only
one of the rows is included in the report.
Specify Duplicate Rows
Type option, press Enter.
If duplicate rows exist in the data
Duplicate option . . . 1 1=Keep duplicate rows
2=Keep only first copy of each row
F3=Exit F12=Cancel
Figure 53. Specify Duplicate Rows Display
Chapter 5. Creating and changing queries in Query Manager 97
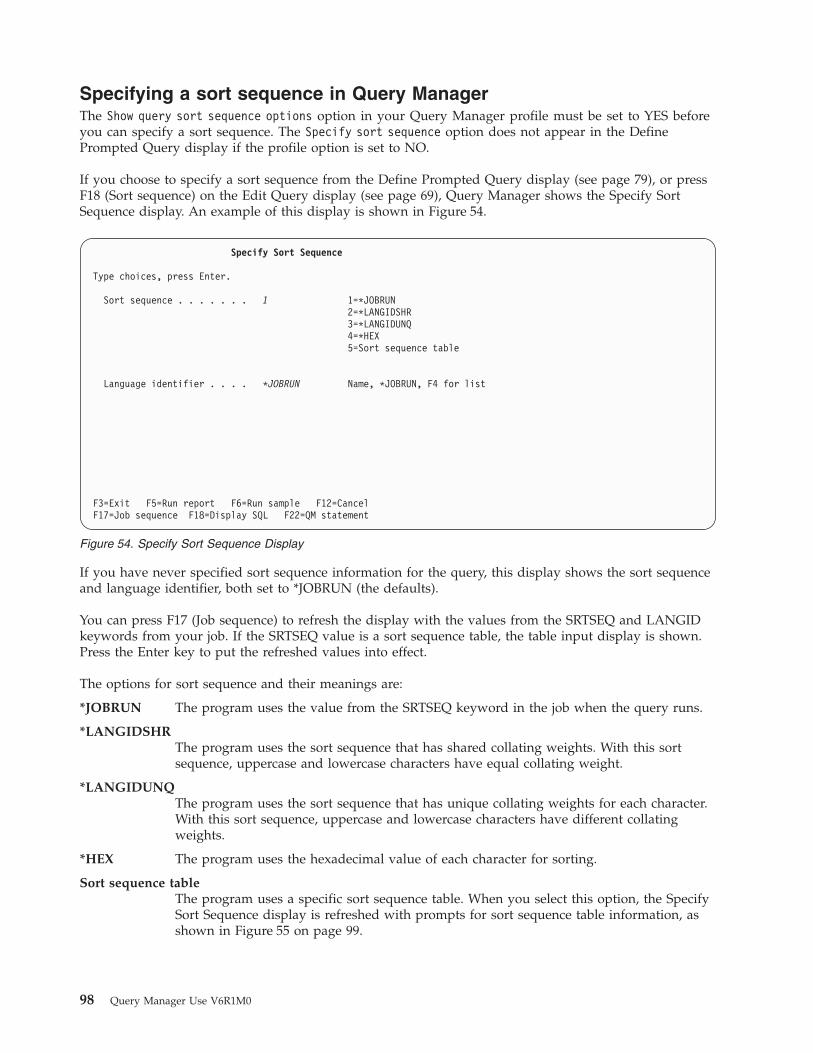
Specifying a sort sequence in Query Manager
The Show query sort sequence options option in your Query Manager profile must be set to YES before
you can specify a sort sequence. The Specify sort sequence option does not appear in the Define
Prompted Query display if the profile option is set to NO.
If you choose to specify a sort sequence from the Define Prompted Query display (see page 79), or press
F18 (Sort sequence) on the Edit Query display (see page 69), Query Manager shows the Specify Sort
Sequence display. An example of this display is shown in Figure 54.
If you have never specified sort sequence information for the query, this display shows the sort sequence
and language identifier, both set to *JOBRUN (the defaults).
You can press F17 (Job sequence) to refresh the display with the values from the SRTSEQ and LANGID
keywords from your job. If the SRTSEQ value is a sort sequence table, the table input display is shown.
Press the Enter key to put the refreshed values into effect.
The options for sort sequence and their meanings are:
*JOBRUN The program uses the value from the SRTSEQ keyword in the job when the query runs.
*LANGIDSHR
The program uses the sort sequence that has shared collating weights. With this sort
sequence, uppercase and lowercase characters have equal collating weight.
*LANGIDUNQ
The program uses the sort sequence that has unique collating weights for each character.
With this sort sequence, uppercase and lowercase characters have different collating
weights.
*HEX The program uses the hexadecimal value of each character for sorting.
Sort sequence table
The program uses a specific sort sequence table. When you select this option, the Specify
Sort Sequence display is refreshed with prompts for sort sequence table information, as
shown in Figure 55 on page 99.
Specify Sort Sequence
Type choices, press Enter.
Sort sequence . . . . . . . 1 1=*JOBRUN
2=*LANGIDSHR
3=*LANGIDUNQ
4=*HEX
5=Sort sequence table
Language identifier . . . . *JOBRUN Name, *JOBRUN, F4 for list
F3=Exit F5=Run report F6=Run sample F12=Cancel
F17=Job sequence F18=Display SQL F22=QM statement
Figure 54. Specify Sort Sequence Display
98 Query Manager Use V6R1M0
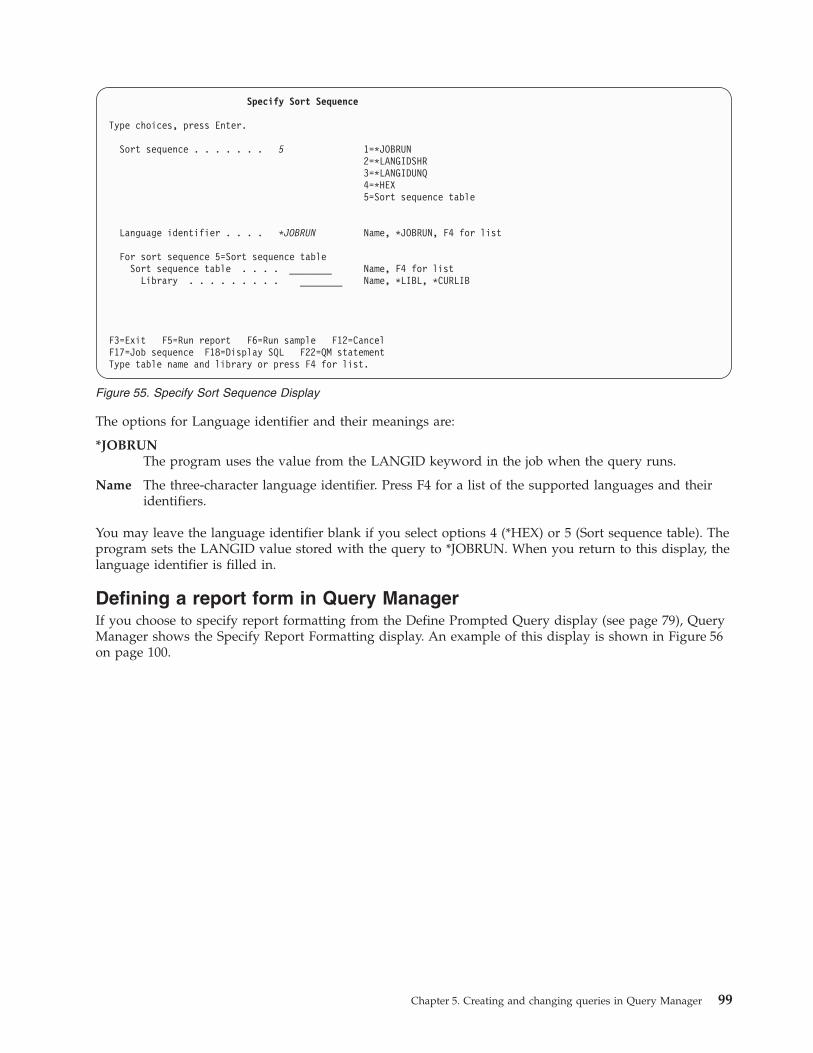
The options for Language identifier and their meanings are:
*JOBRUN
The program uses the value from the LANGID keyword in the job when the query runs.
Name The three-character language identifier. Press F4 for a list of the supported languages and their
identifiers.
You may leave the language identifier blank if you select options 4 (*HEX) or 5 (Sort sequence table). The
program sets the LANGID value stored with the query to *JOBRUN. When you return to this display, the
language identifier is filled in.
Defining a report form in Query Manager
If you choose to specify report formatting from the Define Prompted Query display (see page 79), Query
Manager shows the Specify Report Formatting display. An example of this display is shown in Figure 56
on page 100.
Specify Sort Sequence
Type choices, press Enter.
Sort sequence . . . . . . . 5 1=*JOBRUN
2=*LANGIDSHR
3=*LANGIDUNQ
4=*HEX
5=Sort sequence table
Language identifier . . . . *JOBRUN Name, *JOBRUN, F4 for list
For sort sequence 5=Sort sequence table
Sort sequence table . . . . ________ Name, F4 for list
Library . . . . . . . . . ________ Name, *LIBL, *CURLIB
F3=Exit F5=Run report F6=Run sample F12=Cancel
F17=Job sequence F18=Display SQL F22=QM statement
Type table name and library or press F4 for list.
Figure 55. Specify Sort Sequence Display
Chapter 5. Creating and changing queries in Query Manager 99

Specify the name of the report form that you want to create or change, and the library in which it resides;
then press the Enter key to go to the Select Report Format display. To view a list of all report forms in the
current library, position the cursor on the prompt for “Report form” and press F4 (Prompt).
When you create a report form as part of a prompted query definition, Query Manager extracts
information from the query definition to insert as default values in the Edit Column Formatting display.
These default values make it faster and easier for you to complete the information on this display. The
following default values are loaded from the query definition:
v The columns selected by the query are inserted as default column names and headings.
v Columns are sequenced in the same order as they are selected by the query.
If the report form you choose is not the active form, and if the active form has been edited since it was
last saved, pressing the Enter key takes you to the Exit display. You need to specify whether you want to
save the changes made to the active form before you can go to the Select Report Format display. See
“Saving a query: Using the exit display in Query Manager” for instructions.
For detailed instructions on how to create and change report forms through the Select Report Format
display, turn to “Creating or changing a Query Manager report form” on page 107.
Saving a query: Using the exit display in Query Manager
The Exit display is used to save queries and report forms.
When you finish creating or changing a query through the Edit Query or Define Prompted Query
display, press F3 (Exit) to go to the Exit display. Using the Exit display, you can specify a new name for a
query, enter a description of the query (up to a maximum of 50 characters), and specify the library in
which you want the query saved. Query naming conventions are described on page 29.
The Exit display prompts you with the following options:
1=Save and exit
2=Exit without save
3=Resume without save
4=Save and resume
Specify Report Formatting
Type choices, press Enter.
Report form . . . . . . . . ___________ Name, F4 for list
Library . . . . . . . . . *LIBL__________ Name, *LIBL
F3=Exit F4=Prompt F12=Cancel
Figure 56. Specify Report Formatting Display
100 Query Manager Use V6R1M0
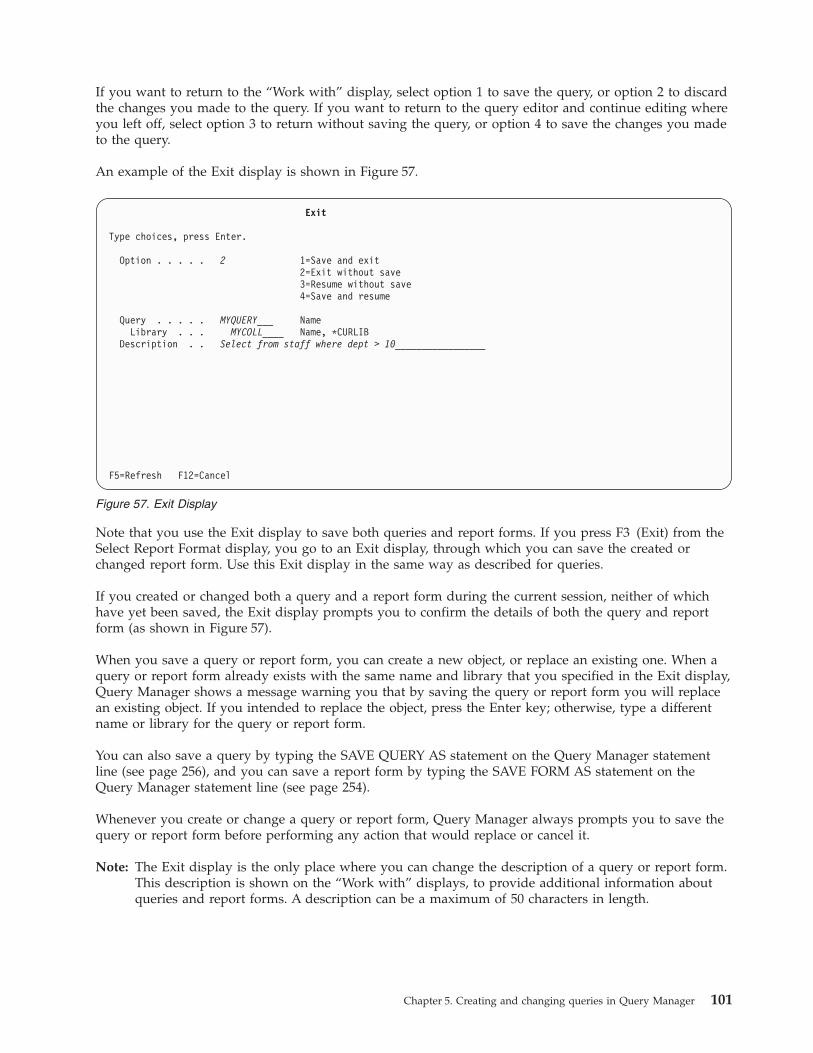
If you want to return to the “Work with” display, select option 1 to save the query, or option 2 to discard
the changes you made to the query. If you want to return to the query editor and continue editing where
you left off, select option 3 to return without saving the query, or option 4 to save the changes you made
to the query.
An example of the Exit display is shown in Figure 57.
Note that you use the Exit display to save both queries and report forms. If you press F3 (Exit) from the
Select Report Format display, you go to an Exit display, through which you can save the created or
changed report form. Use this Exit display in the same way as described for queries.
If you created or changed both a query and a report form during the current session, neither of which
have yet been saved, the Exit display prompts you to confirm the details of both the query and report
form (as shown in Figure 57).
When you save a query or report form, you can create a new object, or replace an existing one. When a
query or report form already exists with the same name and library that you specified in the Exit display,
Query Manager shows a message warning you that by saving the query or report form you will replace
an existing object. If you intended to replace the object, press the Enter key; otherwise, type a different
name or library for the query or report form.
You can also save a query by typing the SAVE QUERY AS statement on the Query Manager statement
line (see page 256), and you can save a report form by typing the SAVE FORM AS statement on the
Query Manager statement line (see page 254).
Whenever you create or change a query or report form, Query Manager always prompts you to save the
query or report form before performing any action that would replace or cancel it.
Note: The Exit display is the only place where you can change the description of a query or report form.
This description is shown on the “Work with” displays, to provide additional information about
queries and report forms. A description can be a maximum of 50 characters in length.
Exit
Type choices, press Enter.
Option . . . . . 2 1=Save and exit
2=Exit without save
3=Resume without save
4=Save and resume
Query . . . . . MYQUERY___ Name
Library . . . MYCOLL____ Name, *CURLIB
Description . . Select from staff where dept > 10_________________
F5=Refresh F12=Cancel
Figure 57. Exit Display
Chapter 5. Creating and changing queries in Query Manager 101

Date and time format considerations while saving a query in Query
Manager
When you save a query, it is saved with the date and time format from your current job. If you change
the date and time format of your job, it has no effect on existing queries. The existing queries still use the
date and time format with which they were saved.
When you select to work with a query, Query Manager checks to see whether the date and time formats
match. You are always warned when the formats are different:
v If you choose to change a query that was saved with a date and time format that is different from the
date and time format of your current job, a message warns you that the formats are different.
v If you choose to run a query that contains global variables and was saved with a date and time format
that is different from the date and time format of your current job, a display warns you that the
formats are different, and asks if you want to continue running the query. See page 141.
Changing a query in Query Manager
You change queries in the mode in which they were last saved: either SQL or prompted. When you save
the changed query, you can replace the original query definition with the edited definition, or you can
save the edited definition as a new query and leave the original query unchanged.
1. Type 1 in the Selection prompt from the Query Manager main menu; then press the Enter key to
show the Work with Query Manager Queries display.
2. Type 2 in the Opt prompt next to the names of the queries you want to change; then press the Enter
key. The query editor display is shown, containing the first query you specified. Query editor displays
for the remaining queries are shown in the same order as the query names appear in the “Work with”
display list.
v If the query you choose to change is an SQL query, the SQL statement that defines the query is
shown in an Edit Query display.
v If the query you choose to change is a prompted query, the definition of the query is shown in the
Define Prompted Query displays.
Note: If “Allow change query creation mode” is set to NO in your Query Manager profile, you can
change only those queries that are the same type (either SQL or prompted) as your “Default
query creation mode”. Your “Query creation mode” and the “Type” for each query are shown
on the Work with Query Manager Queries display.
3. Change the query, using the editor in the same way as when you create a query. Turn to “Creating an
SQL query through the edit query display in Query Manager” on page 68 for instructions on how to
use the SQL query editor. Turn to “Creating a prompted query through the define prompted query
display in Query Manager” on page 78 for instructions on how to use the prompted query editor.
Note that when you change a prompted query, the parts of the query that have already been defined
are indicated by a “>” sign, shown to the left of the definition steps.
4. When you finish changing the query, press F3 (Exit) to leave the query editor and go to the Exit
display. You can save the query under its original name to replace the existing query, or you can enter
a new name for the query, to create a new query and leave the existing one unchanged. Naming
conventions are described on page 29. Using the Exit display and saving the query are described on
page 100.
Note: If the query you change was saved with a date and time format that differs from that of your
current job, Query Manager displays a message warning you that the formats are different. This is
important if a date or time value is used in a conditional test for a WHERE clause. You might need
to change either your query or the date and time format of your job. Position the cursor on the
warning message; then press F1 (Help) for more information.
102 Query Manager Use V6R1M0
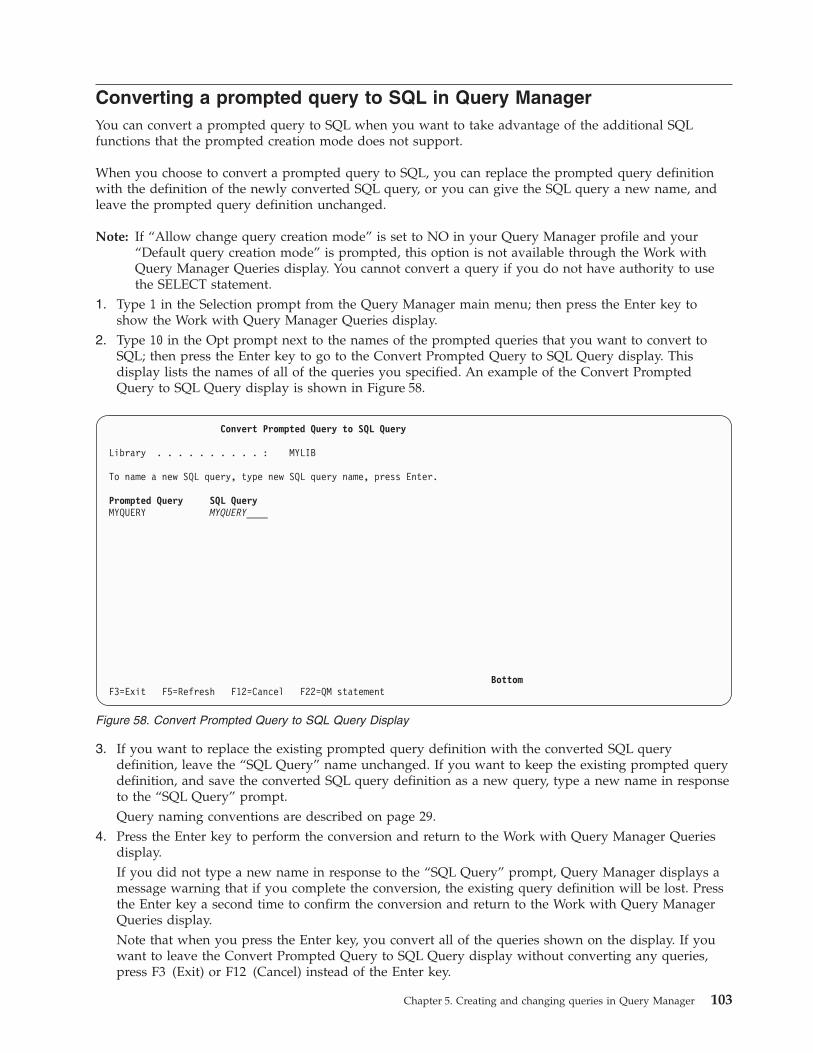
Converting a prompted query to SQL in Query Manager
You can convert a prompted query to SQL when you want to take advantage of the additional SQL
functions that the prompted creation mode does not support.
When you choose to convert a prompted query to SQL, you can replace the prompted query definition
with the definition of the newly converted SQL query, or you can give the SQL query a new name, and
leave the prompted query definition unchanged.
Note: If “Allow change query creation mode” is set to NO in your Query Manager profile and your
“Default query creation mode” is prompted, this option is not available through the Work with
Query Manager Queries display. You cannot convert a query if you do not have authority to use
the SELECT statement.
1. Type 1 in the Selection prompt from the Query Manager main menu; then press the Enter key to
show the Work with Query Manager Queries display.
2. Type 10 in the Opt prompt next to the names of the prompted queries that you want to convert to
SQL; then press the Enter key to go to the Convert Prompted Query to SQL Query display. This
display lists the names of all of the queries you specified. An example of the Convert Prompted
Query to SQL Query display is shown in Figure 58.
3. If you want to replace the existing prompted query definition with the converted SQL query
definition, leave the “SQL Query” name unchanged. If you want to keep the existing prompted query
definition, and save the converted SQL query definition as a new query, type a new name in response
to the “SQL Query” prompt.
Query naming conventions are described on page 29.
4. Press the Enter key to perform the conversion and return to the Work with Query Manager Queries
display.
If you did not type a new name in response to the “SQL Query” prompt, Query Manager displays a
message warning that if you complete the conversion, the existing query definition will be lost. Press
the Enter key a second time to confirm the conversion and return to the Work with Query Manager
Queries display.
Note that when you press the Enter key, you convert all of the queries shown on the display. If you
want to leave the Convert Prompted Query to SQL Query display without converting any queries,
press F3 (Exit) or F12 (Cancel) instead of the Enter key.
Convert Prompted Query to SQL Query
Library . . . . . . . . . . : MYLIB
To name a new SQL query, type new SQL query name, press Enter.
Prompted Query SQL Query
MYQUERY MYQUERY____
Bottom
F3=Exit F5=Refresh F12=Cancel F22=QM statement
Figure 58. Convert Prompted Query to SQL Query Display
Chapter 5. Creating and changing queries in Query Manager 103

You can convert only those query objects that you have the authority to replace. See “Default object
creation authority in Query Manager” on page 34 for more information.
104 Query Manager Use V6R1M0

Chapter 6. Working with Query Manager report forms
This chapter describes Query Manager report forms, telling you what they are, and explaining how to
create, maintain, and use them.
Report forms are used to format query data when you run a query or report. Query Manager provides a
large selection of report formatting options, and its prompt-driven displays make it easy to create both
simple and complex report forms.
This chapter begins with some background information on report forms, followed by instructions on how
to use the options that are available through the Work with Query Manager Report Forms display. You
can learn how to create, change, copy, delete, rename, display, and print report form definitions, and how
to run Query Manager reports.
If you have BASIC access to Query Manager, you can display and print report form definitions, and run
reports.
What is a Query Manager report form?
Report forms are used to format the data that results from running an SQL SELECT statement query or a
prompted query.
If you run a query without specifying the report form you want to use to format the query data, Query
Manager generates a simple default report form. This default report form, called *SYSDFT, arranges the
columns in the order specified by the query, and inserts the column names (from the tables being
queried) at the top of each column.
By creating a report form, you can make the data retrieved by the query easier to read and interpret. You
can also include summary information and perform arithmetic operations to make the query data more
meaningful. Although the data generated is determined by the query, you can use the report form to
specify information and formatting such as:
v The order of the columns
v The horizontal and vertical position of information
v Meaningful column headings, page headings, and page footings
v Report breaks and summary operations
v Separators to highlight headings and summary data
v Text for the end of the report, including final summary data
Examples showing how you can use report forms to improve the way that query data is presented, can
be found in “Report forms in Query Manager” on page 5.
You might decide to create several different report forms to use with the same query, so that you can
alter the appearance of the query data according to your needs. You can also create one report form to
use with several different queries.
All of the formatting options that you can use to create and change your report forms are described in
detail in this chapter.
© Copyright IBM Corp. 1998, 2008 105

Using the work with Query Manager report forms display
When you want to create, change, or use a report form in any way, the Work with Query Manager
Report Forms display is the place to begin.
You select the Work with Query Manager Report Forms display from the Query Manager main menu.
Type 2 in the Selection prompt; then press the Enter key to go to the Work with Query Manager Report
Forms display. An example of this display for a user with an ALL access level is shown in Figure 59.
If you have a BASIC access level, the only options shown are 5=Display, 6=Print, and 9=Run report.
The report forms listed on this display are those stored in the library shown at the top of the display.
If you have an ALL access level, the library name is underlined, indicating that it is a prompt value. You
can type a new library name over the existing name if you want to access report forms from a different
library. Position the cursor on the Library prompt, and press F4 (Prompt) to display a list of libraries from
which you can make a selection. You can choose any of the following options to work with a report form:
1=Create Shows the Select Report Format display, through which you can create a report form
definition. Choose the parts of the report form that you want to define. Prompt-guided
displays for each of the parts you choose are shown in the same order as the parts are
listed on the Select Report Format display. You define the report form through these
displays, specifying column formats, page headings and footings, text for the end of the
report, report breaks, and other formatting options. This report form becomes the active
form. See page 107.
2=Change Shows the Select Report Format display, through which you can change the definition of
the selected report form. Choose the parts of the report form that you want to change;
then make any changes you require. This report form becomes the active form. See page
107.
3=Copy Copies a report form. You can replace an existing report form or create a new one. See
page 127.
4=Delete Deletes report forms you no longer require. You need to respond to a confirm display
before the delete occurs. See page 128.
Work with Query Manager Report Forms
Library . . . . . . . . . . MYLIB________ Name, F4 for list
Type options, press Enter.
1=Create 2=Change 3=Copy 4=Delete 5=Display 6=Print 7=Rename
9=Run report
Opt Form Description
_ __________
_ FINAL
_ MYFORM Example form for DB2 Query Manager
_ STAFF SELECT * FROM TABLE
Bottom
F3=Exit F4=Prompt F5=Refresh F11=Display form only F12=Cancel
F16=Repeat position to F17=Position to F22=QM statement
Figure 59. Work with Query Manager Report Forms Display
106 Query Manager Use V6R1M0

5=Display Shows the definition of the report form in display-only format. You cannot change any
values through this option. The Display Report Format display is shown, prompting you
to choose the parts of the report form that you want to display. Displays for each of the
parts you choose are shown in the same order as the parts are listed on the Display
Report Format display. See page 129.
6=Print Sends a copy of the report form definition to the default printer specified in your Query
Manager profile. See page 131.
7=Rename Prompts you to specify new names for existing report forms. See page 132.
9=Run report Runs a report by applying the specified report form to query data. Before the report is
run, you can specify run options such as, the query you want to run to generate query
data, and the mode in which you want to run the query (batch or interactive). The report
form becomes the active form. If you specify to run a query, that query becomes the
active query, and the data it generates becomes the active data. See page 133.
If you need help selecting report forms from the “Work with” display, see page 18. If you need help
using the “Work with” display function keys, see page 23.
Creating or changing a Query Manager report form
Before you create or change a report form, it is a good idea to run the query that relates to the report
form, and create active data. Query Manager uses the active data to display the report form, so that you
can see how the report form is affecting the layout of the query data. You do not need to run a query
every time you want to display the report form. See “Testing a report form” on page 109 for more
information.
Query Manager also extracts information from the active data to insert as default values in the Edit
Column Formatting display (see Figure 61 on page 111), making it faster for you to complete the
information for that display. Active data is described on page 7, and running queries is described on page
60.
You can also load default values for the Edit Column Formatting display from the active query. See
“Loading default values from the active query in Query Manager” on page 110 for more information.
You can choose to create or change a report form in the following ways:
v Select option 1 (Create) or 2 (Change) from the Work with Query Manager Report Forms display. This
method is described over the next few pages.
v Choose to “Specify report formatting” from the Define Prompted Query display, while you are creating
or changing a prompted query. See “Creating a prompted query through the define prompted query
display in Query Manager” on page 78 and “Defining a report form in Query Manager” on page 99 for
more information.
v Press F13 (Edit form) from the Edit Query display, while you are creating or changing an SQL query.
See “Using the edit form function key in Query Manager” on page 77 for more information.
The following information applies regardless of the method you use to specify that you want to create or
change a report form. All methods show the Select Report Format display, through which you select the
parts of the report form that you want to create or change.
1. Type 2 in the Selection prompt from the Query Manager main menu; then press the Enter key to
show the Work with Query Manager Report Forms display.
2. To create a report form, type 1 in the Opt prompt next to the blank report form name (at the top of the
list). You can specify a name for the report form now, or you can leave it unnamed, and specify a
name when you save the report form through the Exit display. Report form naming conventions are
described on page 29, and saving report forms is described on page 100. Press the Enter key to show
the Select Report Format display.
Chapter 6. Working with Query Manager report forms 107
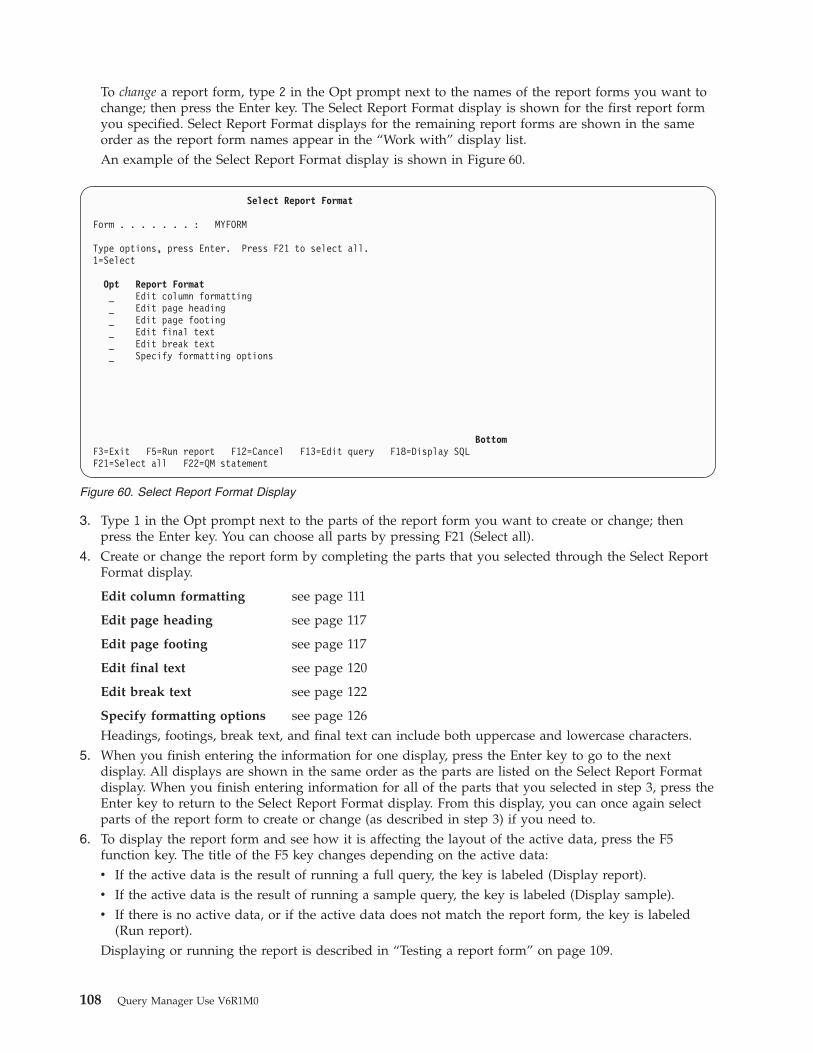
To change a report form, type 2 in the Opt prompt next to the names of the report forms you want to
change; then press the Enter key. The Select Report Format display is shown for the first report form
you specified. Select Report Format displays for the remaining report forms are shown in the same
order as the report form names appear in the “Work with” display list.
An example of the Select Report Format display is shown in Figure 60.
3. Type 1 in the Opt prompt next to the parts of the report form you want to create or change; then
press the Enter key. You can choose all parts by pressing F21 (Select all).
4. Create or change the report form by completing the parts that you selected through the Select Report
Format display.
Edit column formatting see page 111
Edit page heading see page 117
Edit page footing see page 117
Edit final text see page 120
Edit break text see page 122
Specify formatting options see page 126Headings, footings, break text, and final text can include both uppercase and lowercase characters.
5. When you finish entering the information for one display, press the Enter key to go to the next
display. All displays are shown in the same order as the parts are listed on the Select Report Format
display. When you finish entering information for all of the parts that you selected in step 3, press the
Enter key to return to the Select Report Format display. From this display, you can once again select
parts of the report form to create or change (as described in step 3) if you need to.
6. To display the report form and see how it is affecting the layout of the active data, press the F5
function key. The title of the F5 key changes depending on the active data:
v If the active data is the result of running a full query, the key is labeled (Display report).
v If the active data is the result of running a sample query, the key is labeled (Display sample).
v If there is no active data, or if the active data does not match the report form, the key is labeled
(Run report).
Displaying or running the report is described in “Testing a report form” on page 109.
Select Report Format
Form . . . . . . . : MYFORM
Type options, press Enter. Press F21 to select all.
1=Select
Opt Report Format
_ Edit column formatting
_ Edit page heading
_ Edit page footing
_ Edit final text
_ Edit break text
_ Specify formatting options
Bottom
F3=Exit F5=Run report F12=Cancel F13=Edit query F18=Display SQL
F21=Select all F22=QM statement
Figure 60. Select Report Format Display
108 Query Manager Use V6R1M0

7. When you finish working with the report form, press F3 (Exit) to leave the Select Report Format
display and go to the Exit display. Query Manager validates the report form, and makes sure it
contains no errors before the Exit display is shown. Through the Exit display, you specify whether
you want to save the report form, and whether you want to change its name.
If you are creating a report form, enter a name and description for the report form through the Exit
display. If the report form is already named, you can change the name if you desire. Report form
naming conventions are described on page 29, and descriptions can be a maximum of 50 characters in
length.
If you are changing a report form, you can save the changed report form under its existing name and
replace the old report form, or you can save it under a new name and keep both copies of the report
form. You can also change the description of the report form. The Exit display is the only place where
you can change report form descriptions.
Type 1 to save the report form, or 2 to discard it; then press the Enter key to return to the Work with
Query Manager Report Forms display, or the Work with Query Manager Queries display. The Exit
display is described on page 100.
If you have not changed the report form definition, you can press F12 (Cancel) instead of F3 (Exit) to
leave the Select Report Format display. F12 takes you directly to the Work with Query Manager
Report Forms display; the Exit display is not shown.
Note: If you chose to create or change a report form by selecting “Specify report formatting” from the
Define Prompted Query display, or by pressing F13 (Edit form) from the Edit Query display,
you can press F13 (Edit query) when you finish working with the Report Form to return to the
query editor. When you press F3 (Exit) to leave the query editor, the Exit display asks whether
you want to save both the query and the report form.
If you want to work through practice exercises in which you create and work with a Query Manager
report form, turn to Appendix A, “Practice exercises for Query Manager.”
Testing a report form
At any time while you are creating or changing a report form, you can check to see how the current
definition of the report form is affecting the appearance of the report.
To view the layout of the report, press the F5 function key. The title of the F5 key changes depending on
the active data:
v If the active data is the result of running a full query, the key is labeled (Display report).
v If the active data is the result of running a sample query, the key is labeled (Display sample).
v If there is no active data, or if the active data does not match the report form, the key is labeled (Run
report).
Note: For the active data to match the report form, they both need to contain the same number of
columns, and the columns need to have compatible data types. Active data is described on page 7.
When you first press F5, Query Manager validates your report form. If any errors are found in the report
form definition, an error message is shown at the bottom of the display, and the report is not displayed
or run.
If the report form is valid, and F5 is labeled (Display report) or (Display sample), the report form is
applied to the active data, and the resulting report is shown on your display.
If the report form is valid, and F5 is labeled (Run report), the Run Query display is shown, prompting
you to specify run options. Enter information such as the name of the query you want to run, and the
mode in which you want to run the query. The Run Query display options are described in “Using the
run query display in Query Manager” on page 136.
Chapter 6. Working with Query Manager report forms 109

Editing or displaying the active query
While you are creating or changing a report form, you can press F13 (Edit query) to create or change the
query that you want to use with the report form.
When you press F13 (Edit query), Query Manager shows the active query in the query editor display. If
there is no active query, a prompt display asks you to type the name of the query that you want to create
or change, and the library in which it resides. You can press F4 (Prompt) to display a list of all queries in
the current library from which you can make a selection.
Type a new name to create a new query, or type the name of an existing query that you want to change;
then press the Enter key. New queries are created in your default query creation mode: either prompted
or SQL. Existing queries are changed in the mode in which they were last saved. See Chapter 5, “Creating
and changing queries in Query Manager” for instructions.
Note: If “Allow change query creation mode” is set to NO in your Query Manager profile, you can
change only those queries that were last saved in your default query creation mode. The only SQL
queries you can change are those that contain one of the SQL statements you have been granted
authority to use (through your Query Manager profile).
When you finish editing the query, and you want to return to the Select Report Formatting display:
v If you are editing an SQL query, press F13 (Edit form).
v If you are editing a prompted query, choose to “Specify report formatting” from the Define Prompted
Query display.
If you want to view (rather than edit) the SQL SELECT statement that defines the active query, press F18
(Display SQL). If there is no active query, Query Manager displays an error message. When you choose
to display SQL for a prompted query, the SELECT statement is shown with descriptive comments, in the
same format as prompted query definitions are printed. See Figure 27 on page 59 for an example of the
format in which the SQL statement is presented.
The F13 (Edit query) and F18 (Display SQL) keys are available from most of the report formatting
displays.
Loading default values from the active query in Query Manager
When you create or change a report form as part of a prompted query definition, Query Manager takes
values from the query definition and inserts them as default values in the Edit Column Formatting
display.
These default values make it faster and easier for you to complete the information for the display. (Turn
to Figure 61 on page 111 if you want to see an example of the Edit Column Formatting display.)
If the report form you are creating or changing is not part of a promptedquery definition, Query Manager
takes values from the active data, and inserts them as default values in the Edit Column Formatting
display. The default values inserted from the active data are the column names, headings, sequence, and
widths. (Active data is created when you interactively run an SQL SELECT statement query or a
prompted query.)
You can also choose to load default values from the active query, by pressing F19 (Load from query). This
loads the following default values from the query definition:
v The columns selected by the query are inserted as default column names and headings.
v The column usage values are blank.
v The column edit codes are blank.
v Columns are sequenced in the same order as they are selected by the query.
110 Query Manager Use V6R1M0

v The indent defaults to 2 spaces.
v The width values are inserted from the column selected by the query.
Note that if your Query Manager profile is set so that you can run queries only in batch mode and
“Allow interactive sample run” is NO, you cannot create active data. The only way that you can load
default values when you create a report form is by pressing F19 (Load from query).
The F19 function key is available from the Edit Column Formatting display. See “Formatting the columns
in the report form in Query Manager” for more information.
Formatting the columns in the report form in Query Manager
If you choose to edit column formatting from the Select Report Format display (see page 108), Query
Manager shows the Edit Column Formatting display. An example of this display is shown in Figure 61.
You can specify the following information through this display:
v The heading text for each column
v Any special usage to apply to a column: for example, report breaks, and summary operations
v The data type and format of the data in each column
v The order in which the columns are to appear (left to right)
v The spacing between columns
v The width of each column
If you are creating a report form as part of a prompted query definition, Query Manager inserts default
values in the Column and Heading prompts based on the query definition.
If the report form you are creating is not part of a prompted query definition and there is active data,
Query Manager inserts default values in the Column, Heading, and Width prompts based on the active
Edit Column Formatting
Type information, press Enter.
For Usage and Edit, press F4 for list.
For Heading, press F4 for prompt.
Column Heading Usage Edit Seq Indent Width
DEPT DEPT _______ _____ 1 2 14
NAME NAME _______ _____ 2 2 9
JOB JOB _______ _____ 3 2 5
SALARY SALARY _______ _____ 4 2 13
COMM COMM _______ _____ 5 2 10
Bottom
F2=Alternate keys F3=Exit F4=Prompt F5=Run report F6=Insert line
F10=Copy line F11=Edit heading F12=Cancel F24=More keys
F2=Base keys F3=Exit F4=Prompt F5=Refresh F6=Insert line
F10=Copy line F11=Edit heading F12=Cancel F24=More keys
F13=Edit query F14=Delete line F18=Display SQL F19=Load from query
F20=Display entire name F22=QM statement F24=More keys
Figure 61. Edit Column Formatting Display
Chapter 6. Working with Query Manager report forms 111

data, as shown in the Figure 61 on page 111. If there is no active data, the Columns are numbered
sequentially, and the Headings and Widths are blank. You can also load default values from the active
query, by pressing F19 (Load from query). See “Loading default values from the active query in Query
Manager” on page 110 for instructions.
When you create and change the report form, you can insert, copy, and delete lines using the F6 (Insert
line), F10 (Copy line), and F14 (Delete line) function keys. These function keys are described on page 23.
Enter the following information through the Edit Column Formatting displays:
v Column headings
There are two ways in which you can enter and edit column headings. The headings are not entered
through the main Edit Column Formatting display (shown in Figure 61 on page 111). Instead, you need
to use one of two separate displays: one of which prompts you to enter headings for all columns, while
the other prompts you to enter all details (including column heading) for a specific column.
– Press F11 (Edit heading) to show the display through which you can enter headings for all columns.
Figure 62 shows the display you go to when you press F11 (Edit heading).
Type a heading for each of the report columns. When you finish specifying column headings and
want to return to the main Edit Column Formatting display, press F11 (Edit Usage).
– Position the cursor on the Heading, Sequence, Indent, or Width prompt for a particular column;
then press F4 (Prompt) to show the display through which you can enter all values for that column,
including the column heading. Figure 63 on page 113 shows the display you go to when you press
F4 (Prompt).
Edit Column Formatting
Type information, press Enter.
For Usage and Edit, press F4 for list.
For Heading, press F4 for prompt.
Column Heading
DEPT Dept_ID_______________________________________________________
NAME Employee_Name_________________________________________________
JOB Job_Title_____________________________________________________
SALARY Salary_earned_________________________________________________
COMM Commission_paid_against_advance_______________________________
Bottom
F2=Alternate keys F3=Exit F4=Prompt F5=Run report F6=Insert line
F10=Copy line F11=Edit usage F12=Cancel F24=More keys
F13=Edit query F14=Delete line F18=Display SQL F19=Load from query
F20=Display entire name F22=QM Statement F24=More keys
Figure 62. Edit Column Heading Display
112 Query Manager Use V6R1M0

You can enter all of the values for the selected column through the display shown in Figure 63,
including the column heading. When you finish specifying the column information and want to
return to the main Edit Column Formatting display, press the Enter key.
Headings can contain uppercase and lowercase letters, numbers, spaces, and special characters. To
specify a blank heading for a column, type *NONE. If you do not enter heading text or *NONE for a
column, Query Manager uses the column name defined in the database for each column retrieved by
the query.
Headings can also contain double-byte character set (DBCS) characters. Note that when you enter
DBCS strings through any of the Select Report Format displays, you need to enclose the strings in
shift-out and shift-in characters. See “Adding DBCS data to a table in Query Manager” on page 156 for
more information on DBCS values.
If you want the column heading to appear on two or more lines, include an underscore (_) in the
heading at the position at which you want the heading to break to the next line. A column heading can
be a maximum of nine lines. For example, entering a heading of:
Salary_to date
causes the following two line column heading to appear in the report:
Salary
to date
When you return to the main Edit Column Formatting display, any headings you entered are inserted
in the Heading column. If any heading is more than 25 characters in length, Query Manager truncates
it, and adds “...” to the end of the displayed portion of the heading to indicate that it has been
truncated. Press F4 (Prompt) or F11 (Edit Heading) to view the entire heading.
v Column usage
Column usage determines how a column is used in the report form. For example, you can specify that
you want a column to be totalled, averaged, used as a report break, or omitted from the report. Choose
one of the usage codes from Table 8.
Table 8. Options Available for Column Usage
Usage Code Definition
[blank] Include the column in the report.
OMIT Exclude the column from the report.
Edit Column Formatting
Column . . . . . . . . . . . . : DEPT
Type information, press Enter.
Heading . . . . . . . . . . . . Dept_ID___________________________________
____________________
Usage . . . . . . . . . . . . . ______ F4 for list
Editing . . . . . . . . . . . . _____ F4 for list
Sequence in report . . . . . . . 1 1-999
Indent . . . . . . . . . . . . . 2 0-999
Displayed width . . . . . . . . 6 1-32767
Bottom
F2=Alternate keys F3=Exit F4=Prompt F5=Run report F12=Cancel
F13=Edit query F18=Display SQL F22=QM statement
Figure 63. Edit Column Information Display
Chapter 6. Working with Query Manager report forms 113
Table 8. Options Available for Column Usage (continued)
Usage Code Definition
AVERAGE (AVG) Average all values in the column.
COUNT Count the number of non-null values in the column,
including repeated values.
FIRST The first value in the column.
LAST The last value in the column.
MAXIMUM (MAX) The maximum value in the column.
MINIMUM (MIN) The minimum value in the column.
SUM Total all values in the column.
BREAKn Cause a new grouping of details lines to occur in the
report when the value in the column changes. n can be a
value from 1 to 6 to specify up to six levels of report
breaks, where 1 is the highest break level and 6 is the
lowest. See “Using break levels in the report in Query
Manager” on page 6 for further information.
Note that the COUNT column usage for report formatting is not the same as the COUNT summary
function for prompted query. Null values are included in the total when the COUNT summary
function is specified through prompted query. Null values are not included in the total when the
COUNT column usage is specified through report formatting.
The AVERAGE, COUNT, FIRST, LAST, MAXIMUM, MINIMUM, and SUM column usages can insert
summary information at the end of the report. If you specify report breaks, you can also insert
summary information for each break.
When you specify a BREAK column usage, you should make sure that the query sorts the data by the
columns for which you have specified breaks. You sort query data using the ORDER BY clause of the
SELECT statement. Using report breaks is described on page 6.
You might want to specify the OMIT column usage when you are using a query that selects many
columns. Specify OMIT when you want to use a number of different report forms with the same query
data. By omitting columns from reports, you can run the query once; then produce reports using two
(or more) different report forms. You can also specify OMIT when you want to use column data as
substitution values in Break Text or Final Text, but you do not want the column data in the body of the
report.
Position the cursor on the Usage prompt and press F4 (Prompt) to display a full list of the supported
usage values, from which you can make a selection. You can specify only one usage value for each
column.
When you create a report form, the column Usage prompts default to blanks.
v Edit code
Edit codes specify the format in which column values appear in the report. There are a number of
different formats in which character, number, date, and time information can appear, as described in
Table 9 on page 115.
114 Query Manager Use V6R1M0

Table 9. Edit Codes for Column Data
Edit codes for character data:
Code Description
C If the text cannot fit on one line in the column, the text is truncated according to the
width of the column.
CW If the text cannot fit on one line in the column, the text is wrapped according to the
width of the column.
CT If the text cannot fit on one line in the column, the text is wrapped according to spaces
(blanks) or full words, if possible.
Edit codes for graphic data:
Code Description
G If the value cannot fit on one line in the column, the value is truncated according to
the width of the column.
GW If the value cannot fit on one line in the column, the value is wrapped according to
the width of the column.
Edit codes for numeric data: The examples show how the codes might format the number -1234567.89. The
character following the code (n) indicates the number of decimal places and can be any number from 0 through 31.
The examples assume two decimal places.
Code Note Example
E Scientific notation -1.23456789E+06
Dn Currency symbol and
thousands separators
-$1,234,567.89
In Leading zeros -0001234567.89
Jn Leading zeros, no negative
sign
00001234567.89
Kn Thousands separators -1,234,567.89
Ln Decimal notation -1234567.89
Pn Percent sign and thousands
separators
-1,234,567.89%
Edit codes for dates: The date separator (x) can be any special character, including blank, but not a letter or
number. The examples assume the slash (/).
Code Format Example
TDYx YYYYxMMxDD 1992/08/29
TDMx MMxDDxYYYY 08/29/1992
TDDx DDxMMxYYYY 29/08/1992
TDYAx YYxMMxDD 92/08/29
TDMAx MMxDDxYY 08/29/92
TDDAx DDxMMxYY 29/08/92
Edit codes for times: The time separator (x) can be any special character, including blank, but not a letter or
number. The examples assume the colon (:).
Code Format Note Example
TTSx HHxMMxSS Includes seconds 13:42:35
TTCx HHxMMxSS Includes seconds, 12 hour
clock
01:42:35
TTAx HHxMM Abbreviated (no seconds) 13:42
TTAN HHMM Abbreviated, no separator 1342
TTUx HHxMM AM/PM USA style 01:42 PM
Edit code for timestamp:
Code Format Example
TSI YYYY-MM-DD-HH.MM.SS.NNNNNN
1992-01-31-13.42.19.123456
Chapter 6. Working with Query Manager report forms 115

When you create a report form, the Edit code prompts default to blanks. If you leave these values
blank, Query Manager inserts default values when the report is run. The default edit codes are the
data types defined in the database for each column retrieved by the query.
To specify an edit code, type one of the values listed in Table 9 on page 115. For some edit codes, you
also need to specify a qualifier. Enter the qualifier as the final character of the code.
– For numeric codes other than E, you can specify the number of decimal places. Type a number from
0 to 31. If you do not enter a number, zero is assumed. If a column value has more decimal places
than you specify, the value is rounded. If a column value has fewer decimal places than you specify,
the value is padded with zeros.
– For date and time codes other than TTAN, you can specify the character you want to use to separate
the parts of the dates and times. The separator can be any special character, including a blank, but it
cannot be a letter or number.
Position the cursor on the Edit prompt and press F4 (Prompt) to display a list of the supported Edit
codes from which you can make a selection. A prompt window asks you whether the data is Character,
Numeric, Date and Time, or Graphic. Specify the data type and press the Enter key. Query Manager
then shows a Select Column Editing prompt window, listing the available selections for the data type
you specified.
Only those codes that are applicable to the specified data type are shown. An example of the prompt
window for numeric data is shown in Figure 64.
v Seq
Seq (Sequence) specifies the order in which you want columns to appear in the report. The default is
for columns to appear in the same order as they are selected by the query. The following rules apply
when specifying sequence numbers:
– Type any number from 1 through 999.
– Numbers do not need to be consecutive.
– Columns with the same sequence number appear as adjacent columns in the report, in the same
order as they are selected by the query.
Column sequence is particularly important when your report contains breaks and summary data. To
make the report easier to read, we recommend that you specify a column sequence so that break
columns appear on the left of the report (low sequence numbers), and summary data columns appear
on the right (high sequence numbers).
v Indent
Edit Column Formatting
Type information, press Enter.
For ..............................................
: Select Column Editing :
Col : : t Seq Indent Width
DEP : Decimal places . . . . __ 0-31 : __ 1 2 6
NAM : : __ 2 2 9
JOB : Type option, press Enter. : __ 3 2 5
SAL : 1=Select : __ 4 2 10
COM : : __ 5 2 8
: Opt Edit Example :
: _ D -$12,345.67 :
: _ I -0012345.67 :
: _ J 00012345.67 :
: _ K -12,345.67 :
: More... :
: F12=Cancel :
: :
:............................................:
Bottom
F2=Alternate keys F3=Exit F4=Prompt F5=Run report F6=Insert line
F10=Copy line F11=Edit heading F12=Cancel F24=More keys
Figure 64. The Select Edit Code Prompt
116 Query Manager Use V6R1M0

Indent specifies the spacing between columns. For each column, specify the number of blank character
spaces that you want to appear to the left of the column value. For the first column in the report, you
specify the number of spaces you want to indent the column from the edge of the page or display. For
all remaining columns, you specify the number of spaces you want to indent the left edge of each
column from the right edge of the previous column.
You can set the indent to any value from 0 through 999, but a blank value is not permitted. The default
is two spaces.
v Width
Width specifies the maximum number of characters in which to display or print the column values and
heading. A report can be a maximum of 32767 character spaces wide, or 16383 graphic spaces wide.
When you create a report form using active data, Query Manager inserts default widths to the report
form definition. The default widths are the widths of the columns (as defined in the database) or the
widths of the column names, whichever is greater.
Query Manager adjusts the default widths when you change some of the column formatting attributes
such as heading, usage, or edit. If you change a default column width to a specific width, the
automatic adjustment is lost for that column width. For example, a column heading will be truncated if
you specify a column width smaller than the heading text.
If you insert a line (column) the default column widths are lost. The report form no longer matches the
table on which it is based and the default widths no longer have meaning.
The width prompt is blank for all columns when you create a report form without active data, when
you create the report form as part of a prompted query definition, or when you load default values
from the active query using F19 (Load from query). If you leave the width prompt blank, or if you
blank out the value shown in the width prompt, Query Manager inserts runtime defaults when the
report is run. The runtime defaults are the widths of the columns (as defined in the database) or the
widths of the column headings, whichever is greater.
If a column heading is wider than the specified width, the heading is truncated. If a column value is
wider than the specified width, numeric data is replaced by a row of asterisks (*****), and character
and graphic data is truncated at the right. (If character or graphic data has an edit code of CW, CT, or
GW, the column value wraps onto the next line.)
Specifying page headings and footings in Query Manager
When you choose to edit page headings or footings from the Select Report Format display (see page 108),
Query Manager shows the Edit Page Heading and Edit Page Footing displays. An example of the Edit
Page Heading display is shown in Figure 65 on page 118. Through these displays, you specify the text
that you want to appear at the top and bottom of each page of the report, and the position on the page
where you want the heading and footing text to appear.
Chapter 6. Working with Query Manager report forms 117

When you create and change the heading and footing text, you can insert, copy, and delete lines using
the F6 (Insert line), F10 (Copy line), and F14 (Delete line) function keys. These function keys are
described on page 23. Note that when you copy lines, the entire line is copied: text, line number, and
alignment.
Page headings and footings can contain a maximum of 999 lines each. When creating a report form, the
default number of lines is five.
Note: Page headings appear only in printed reports. When you send your report output to display, the
first line shown in the report is the column headings.
The information you can enter when defining page headings and footings is described in the next few
pages.
v Blank lines before and after
For headings: type a number for “Blank lines before” to specify the number of blank lines you want to
appear between the top of the page and the first line of heading text. Then, type a number for “Blank
lines after” to specify the number of blank lines you want to appear between the last line of heading
text and the body of the report.
For footings: type a number for “Blank lines before” to specify the number of blank lines you want to
appear between the report body and the first line of footing text. Then, type a number for “Blank lines
after” to specify the number of blank lines you want to appear between the last line of footing text and
the bottom of the page.
You can type any number in the range 0 to 999. When you create a report form, the default values for
headings is 0 lines before and 2 after, and for footings is 2 lines before and 0 after.
The blank lines before and after apply even when you do not specify any text for the page heading or
footing.
v Line numbers
Edit Page Heading
Type choices, press Enter.
Blank lines before . . . . . . . . . . . . 0__ 0-999
Blank lines after . . . . . . . . . . . . 2__ 0-999
Page text: Use &col, &DATE, &TIME, and &PAGE to cause variable insertion.
Line Align Page Heading Text
1 CENTER___________ _______________________________________________________
2 CENTER___________ _______________________________________________________
3 CENTER___________ _______________________________________________________
4 CENTER___________ _______________________________________________________
5 CENTER___________ _______________________________________________________
Bottom
F2=Alternate keys F3=Exit F4=Prompt F5=Run report F6=Insert line
F10=Copy line F12=Cancel F13=Edit query F14=Delete line F24=More keys
F2=Base keys F3=Exit F4=Prompt F5=Refresh F6=Insert line
F10=Copy line F12=Cancel F13=Edit query F14=Delete line F24=More keys
F18=Display SQL F22=QM statement F24=More keys
Figure 65. Edit Page Heading Display
118 Query Manager Use V6R1M0
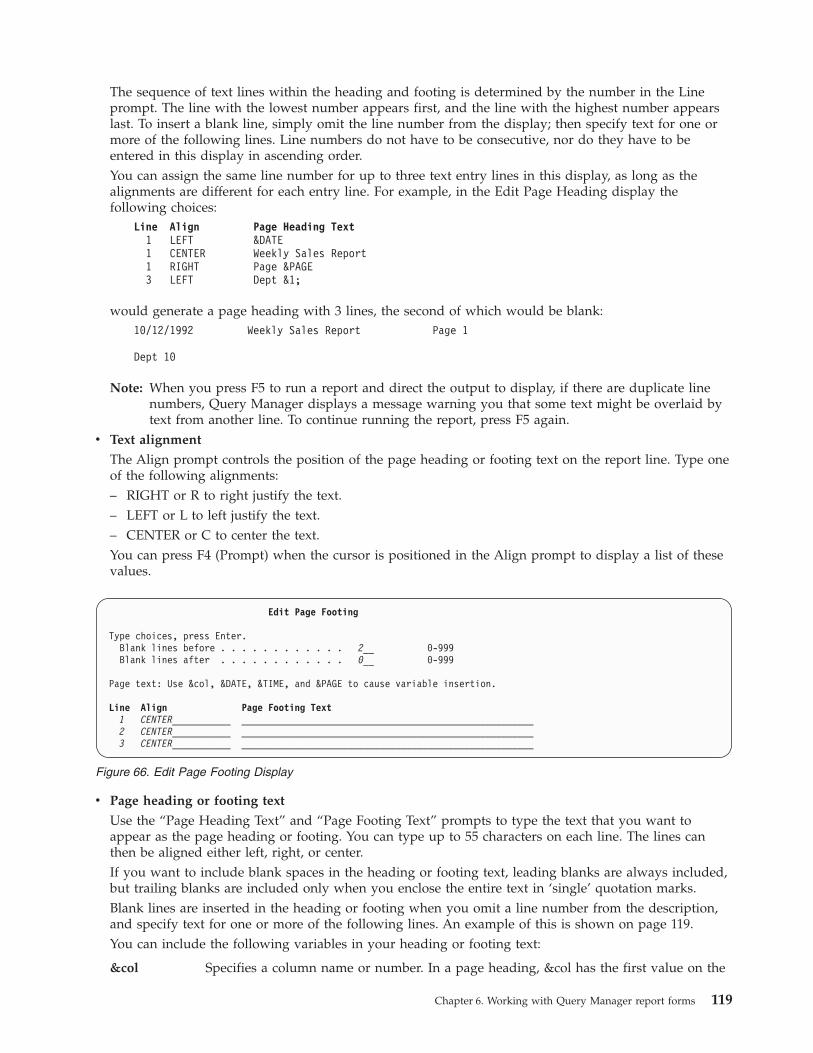
The sequence of text lines within the heading and footing is determined by the number in the Line
prompt. The line with the lowest number appears first, and the line with the highest number appears
last. To insert a blank line, simply omit the line number from the display; then specify text for one or
more of the following lines. Line numbers do not have to be consecutive, nor do they have to be
entered in this display in ascending order.
You can assign the same line number for up to three text entry lines in this display, as long as the
alignments are different for each entry line. For example, in the Edit Page Heading display the
following choices:
Line Align Page Heading Text
1 LEFT &DATE
1 CENTER Weekly Sales Report
1 RIGHT Page &PAGE
3 LEFT Dept &1;
would generate a page heading with 3 lines, the second of which would be blank:
10/12/1992 Weekly Sales Report Page 1
Dept 10
Note: When you press F5 to run a report and direct the output to display, if there are duplicate line
numbers, Query Manager displays a message warning you that some text might be overlaid by
text from another line. To continue running the report, press F5 again.
v Text alignment
The Align prompt controls the position of the page heading or footing text on the report line. Type one
of the following alignments:
– RIGHT or R to right justify the text.
– LEFT or L to left justify the text.
– CENTER or C to center the text.
You can press F4 (Prompt) when the cursor is positioned in the Align prompt to display a list of these
values.
v Page heading or footing text
Use the “Page Heading Text” and “Page Footing Text” prompts to type the text that you want to
appear as the page heading or footing. You can type up to 55 characters on each line. The lines can
then be aligned either left, right, or center.
If you want to include blank spaces in the heading or footing text, leading blanks are always included,
but trailing blanks are included only when you enclose the entire text in ‘single’ quotation marks.
Blank lines are inserted in the heading or footing when you omit a line number from the description,
and specify text for one or more of the following lines. An example of this is shown on page 119.
You can include the following variables in your heading or footing text:
&col Specifies a column name or number. In a page heading, &col has the first value on the
Edit Page Footing
Type choices, press Enter.
Blank lines before . . . . . . . . . . . . 2__ 0-999
Blank lines after . . . . . . . . . . . . 0__ 0-999
Page text: Use &col, &DATE, &TIME, and &PAGE to cause variable insertion.
Line Align Page Footing Text
1 CENTER___________ _______________________________________________________
2 CENTER___________ _______________________________________________________
3 CENTER___________ _______________________________________________________
Figure 66. Edit Page Footing Display
Chapter 6. Working with Query Manager report forms 119

page for the specified column. In a page footing, &col has the last value on the page
for the specified column. The column value is in the format you specified for the Edit
prompt on the Edit Formatting display, unless you specify column wrapping. Column
wrapping is ignored when the column value is formatted into the text.
The column name is the name of the column returned from DB2 for i5/OS SQL. You
must enter the column name in uppercase. You must refer to the column by column
number if the column name is DATE, TIME, or PAGE, or if the column name contains
a $ (dollar sign), # (number sign), @ (at sign), or " (quotation mark). To obtain the
column name of a duplicate column, expression, or summary function, use the Edit
Column Formatting display.
The column number is determined by the sequence in which the columns are retrieved
by the SELECT statement query or the prompted query. The order of the column
numbers are not the same as the order you specify in the Seq column in the Edit
Formatting display.
You might find this variable useful in reports that contain breaks. For example, you can
specify a new page each time the value in the break column changes. By using the
&col variable, you can include the break value in the page heading or footing.
&DATE Inserts the current or report date. You need to type the word DATE in uppercase.
&TIME Inserts the current or report time. You need to type the word TIME in uppercase.
&PAGE Inserts the current page number in the report. You need to type the word PAGE in
uppercase.
Specifying text for the end of the report in Query Manager
If you choose to edit final text from the Select Report Format display (see page 108), Query Manager
shows the Edit Final Text display. An example of this display is shown in Figure 67 on page 121. Use this
display to specify the text that you want to appear at the end of the report, the position in which you
want the final text to appear, and the line within the final text on which you want to include final
summary information.
120 Query Manager Use V6R1M0

When you create and change the final text, you can insert, copy, and delete lines using the F6 (Insert
line), F10 (Copy line), and F14 (Delete line) function keys. These function keys are described on page 23.
Note that when you copy lines, the entire line is copied: text, line number, and alignment.
Final text can contain a maximum of 999 lines. When creating a report form, the default number of lines
is twelve.
Enter the following information to define the final text for the report.
v New page for final text
Type Y if you want the final text to begin on a new page. If you type N and there is not enough space
on the current page for the final text in its entirety, the final text begins on a new page.
v Blank lines before
Specify the number of blank lines you want to appear between the last line of the report body and the
first line of the final text. If you choose to include final summary separators (through the Specify
Report Formatting Options display, see page 127), the separator line is considered the last line of the
report body.
You can type any number between 0 and 999. When you create a report form, the default value is 0
lines. For printed reports, you can also specify BOTTOM, to position the final text immediately before
any page footing text specified for the page. If there is not enough space for the final text on the
current page, it is placed at the bottom of the next page.
v Put final summary at line
Specify whether you want final summary data to appear in the report, and if so, the line on which you
want it to appear within the final text. If the report does not generate summary data, this value is
ignored. An example of final summary data is shown in Figure 3 on page 7.
Specify a line number between 1 and 999, or type NONE to suppress the final summary. The line
number you type here specifies the line within the final text on which you want the summary data to
appear. The summary data is shown beneath the column being summarized. If the number you type is
Edit Final Text
Type choices, press Enter.
New page for final text . . . . . . . . . N Y=Yes, N=No
Blank lines before . . . . . . . . . . . . 0_____ 0-999, BOTTOM
Put final summary at line . . . . . . . . 1___ 0-999, NONE
Final text: Use &col to cause variable insertion.
Line Align Final Text
1 RIGHT__________ _______________________________________________________
2 RIGHT__________ _______________________________________________________
3 RIGHT _ _______________________________________________________
4 RIGHT__________ _______________________________________________________
5 RIGHT__________ _______________________________________________________
6 RIGHT__________ _______________________________________________________
7 RIGHT__________ _______________________________________________________
8 RIGHT__________ _______________________________________________________
9 RIGHT__________ _______________________________________________________
10 RIGHT__________ _______________________________________________________
More...
F2=Alternate keys F3=Exit F4=Prompt F5=Run report F6=Insert line
F10=Copy line F12=Cancel F13=Edit query F14=Delete line F24=More keys
F2=Base keys F3=Exit F4=Prompt F5=Refresh F6=Insert line
F10=Copy line F12=Cancel F13=Edit query F14=Delete line F24=More keys
F18=Display SQL F22=QM statement F24=More keys
Figure 67. Edit Final Text Display
Chapter 6. Working with Query Manager report forms 121
greater than the number of formatted final text lines, blank lines are inserted to make up the required
number. When you create a report form, the default line number is 1.
If you type a line number of NONE, it suppresses final summary information, but has no effect of
break summary information, including any breaks that may occur at the end of the report.
Final summary information is the values that are calculated for the entire report, for example, a grand
total. This differs to break summary information which is calculated from one report break to the next.
You specify summary functions and report breaks through the Usage prompt in the Edit Column
Formatting display. See page 111 for more information.
v Line numbers
Specify line numbers in the same way as you do for page heading and footing text. See page 118.
v Text alignment
Specify text alignment in the same way as you do for page heading and footing text. See page 119.
v Final text
Specify final text in the same way as you do for page heading and footing text. See page 119.
You can only use the &col insert variable. You cannot include &DATE, &TIME, or &PAGE variables in
final text. The value of the &col variable is the last value of the last record in the specified column. The
column value is in the format you specified for the Edit prompt on the Edit Formatting display, unless
you specify column wrapping. Column wrapping is ignored when the column value is formatted into
the text.
The column name is the name of the column returned from DB2 for i5/OS SQL. Specify the name in
uppercase. To obtain the column name of a duplicate column, expression, or summary function, use the
Edit Column Formatting display.
The column number is determined by the sequence in which the columns are retrieved by the SELECT
statement query or the prompted query. The column number is not the same as the order you specify
in the Seq column on the Edit Formatting display.
Specifying text for each report break in Query Manager
If you choose to edit break text from the Select Report Format display (see page 108), Query Manager
shows the Edit Break Text display. An example of this display is shown in Figure 68 on page 123.
122 Query Manager Use V6R1M0
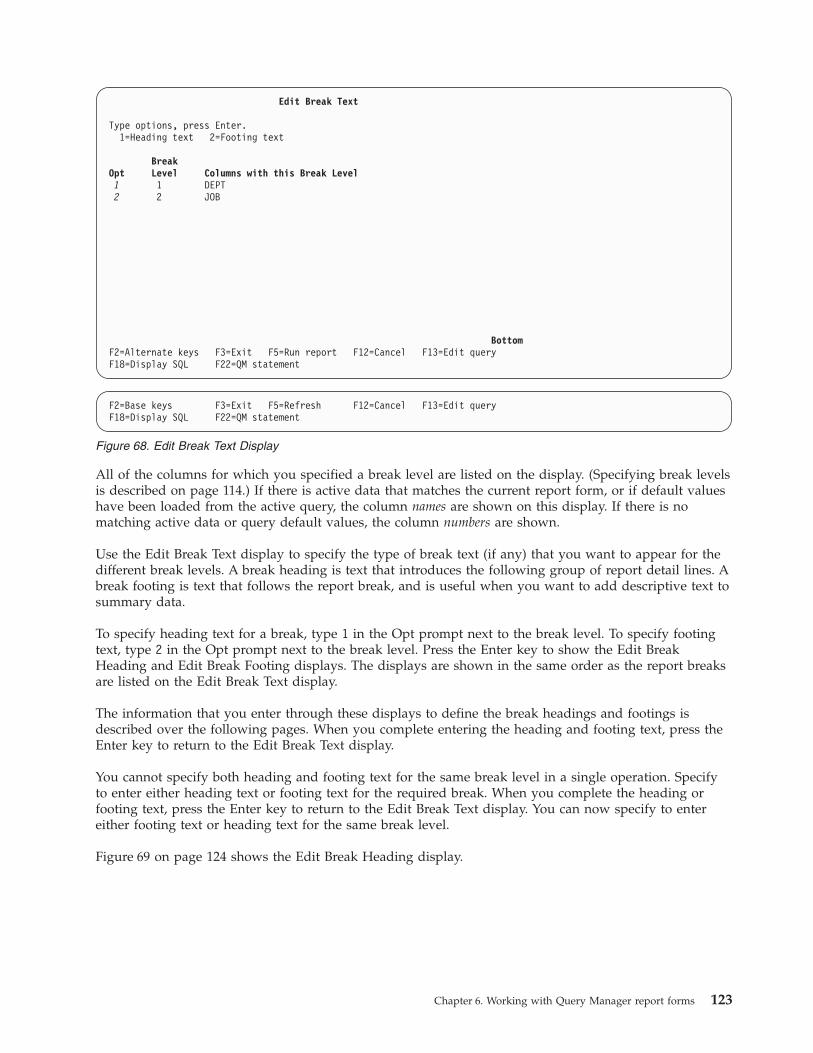
All of the columns for which you specified a break level are listed on the display. (Specifying break levels
is described on page 114.) If there is active data that matches the current report form, or if default values
have been loaded from the active query, the column names are shown on this display. If there is no
matching active data or query default values, the column numbers are shown.
Use the Edit Break Text display to specify the type of break text (if any) that you want to appear for the
different break levels. A break heading is text that introduces the following group of report detail lines. A
break footing is text that follows the report break, and is useful when you want to add descriptive text to
summary data.
To specify heading text for a break, type 1 in the Opt prompt next to the break level. To specify footing
text, type 2 in the Opt prompt next to the break level. Press the Enter key to show the Edit Break
Heading and Edit Break Footing displays. The displays are shown in the same order as the report breaks
are listed on the Edit Break Text display.
The information that you enter through these displays to define the break headings and footings is
described over the following pages. When you complete entering the heading and footing text, press the
Enter key to return to the Edit Break Text display.
You cannot specify both heading and footing text for the same break level in a single operation. Specify
to enter either heading text or footing text for the required break. When you complete the heading or
footing text, press the Enter key to return to the Edit Break Text display. You can now specify to enter
either footing text or heading text for the same break level.
Figure 69 on page 124 shows the Edit Break Heading display.
Edit Break Text
Type options, press Enter.
1=Heading text 2=Footing text
Break
Opt Level Columns with this Break Level
1 1 DEPT
2 2 JOB
Bottom
F2=Alternate keys F3=Exit F5=Run report F12=Cancel F13=Edit query
F18=Display SQL F22=QM statement
F2=Base keys F3=Exit F5=Refresh F12=Cancel F13=Edit query
F18=Display SQL F22=QM statement
Figure 68. Edit Break Text Display
Chapter 6. Working with Query Manager report forms 123

When you create and change the break heading and footing text, you can insert, copy, and delete lines
using the F6 (Insert line), F10 (Copy line), and F14 (Delete line) function keys. These function keys are
described on page 23. Note that when you copy lines, the entire line is copied: text, line number, and
alignment.
Break headings and footings can contain a maximum of 999 lines each. When creating a report form, the
default number of lines is five.
Enter the following information to define your break headings and footings.
v Put on new page
Specified for both break heading and break footing text. Type Y if you want the break text to begin on
a separate page.
v Repeat column heading
For break headings: specify whether you want column headings repeated above the detail lines for the
break group.
Column headings always appear at the top of each page or display. If you type Y for this prompt, the
column headings also appear at the start of each break group. This happens regardless of whether you
specify any break heading text. However, if the break starts at the top of a printed page, only one set
of column headings appears.
v Blank lines before and after
For break headings: type a number for “Blank lines before” to specify the number of blank lines you
want to appear between the previous detail line and the first break heading line. Then, type a number
for “Blank lines after” to specify the number of blank lines you want to appear between the last break
heading line and the next detail line.
Edit Break Heading
Break level . . . . . . . . . : 1
Type choices, press Enter.
Put on new page . . . . . . . . . . . . . N Y=Yes, N=No
Repeat column heading . . . . . . . . . . N Y=Yes, N=No
Blank lines before . . . . . . . . . . . . 0__ 0-999
Blank lines after . . . . . . . . . . . . 0__ 0-999
Break text: Use &col to cause variable insertion.
Line Align Break Heading Text
1 LEFT_____________ _______________________________________________________
2 LEFT_____________ _______________________________________________________
3 LEFT_____________ _______________________________________________________
4 LEFT_____________ _______________________________________________________
5 LEFT_____________ _______________________________________________________
Bottom
F2=Alternate keys F3=Exit F4=Prompt F5=Run report F6=Insert line
F10=Copy line F12=Cancel F13=Edit query F14=Delete line F24=More keys
F2=Base keys F3=Exit F4=Prompt F5=Refresh F6=Insert line
F10=Copy line F12=Cancel F13=Edit query F14=Delete line F24=More keys
F18=Display SQL F22=QM statement F24=More keys
Figure 69. Edit Break Heading Display
124 Query Manager Use V6R1M0

For break footings: type a number for “Blank lines before” to specify the number of blank lines you want
to appear between the last detail line and the first break footing line. Then, type a number for “Blank
lines after” to specify the number of blank lines you want to appear between the last break footing line
and the next detail line.
You can type any number in the range 0 to 999. For printed reports, you can also type BOTTOM to
specify the blank lines before a break footing. This causes the break footing text to appear immediately
before any page footing text specified. It also forces a page break, and all following text appears on the
next page.
When you create a report form, the default values for break headings is 0 lines before and 0 after, and
for break footings is 0 lines before and 1 after.
The blank lines before and after apply even when you do not specify any text for the heading or
footing.
v Put break summary at line
For break footings: specify whether you want break summary data to appear in the report for this break
level, and if so, the line on which you want it to appear within the break footing text. If the report
does not generate summary data, this value is ignored.
You can type any number between 1 and 999, or type NONE to suppress the break summary data. The
line number you type here specifies the line number within the break footing on which you want the
summary data to appear. The summary data is shown beneath the column being summarized. If the
number you type is greater than the number of formatted break footing lines, blank lines are inserted
to make up the required number. When you create a report form, the default line number is 1.
If you type a line number of NONE, it suppresses break summary data, but has no effect on final
summary data. Type NONE when you want final summary data to appear in the report, but you do
not want summary data at each break.
The break summary values are those calculated from one report break to the next. This differs from
final summary values, which are calculated for the entire report: for example, a grand total. You specify
summary functions and report breaks through the Usage prompt in the Edit Column Formatting
display. See page 111 for more information.
v Line numbers
Specify line numbers in the same way as you do for page heading and footing text. See page 118.
v Text alignment
Specify text alignment in the same way as you do for page heading and footing text. See page 119.
v Break heading or footing text
Specify break heading and footing text in the same way as you do for page heading and footing text.
See page 119.
You can only use the &col insert variable. You cannot include &DATE, &TIME, or &PAGE variables in
break heading or footing text. The value of the &col variable is the last value of the last record in the
specified column. The column value is in the format you specified for the Edit prompt on the Edit
Formatting display, unless you specify column wrapping. Column wrapping is ignored when the
column value is formatted into the text.
The column name is the name of the column returned from DB2 for i5/OS SQL. Specify the name in
uppercase. You must refer to the column by column number if the column name is DATE, TIME, or
PAGE, or if the column name contains a $ (dollar sign), # (number sign), @ (at sign), or " (quotation
mark). To obtain the column name of a duplicate column, expression, or summary function, use the
Edit Column Formatting display.
The column number is determined by the sequence in which the columns are retrieved by the SELECT
statement query or the prompted query. The column number is not the order you specify in the Seq
column on the Edit Formatting display.
Chapter 6. Working with Query Manager report forms 125

Specifying formatting options for the report in Query Manager
If you choose to specify formatting options from the Select Report Format display (see page 108), Query
Manager shows the Specify Report Formatting Options display. An example of this display is shown in
Figure 71.
Use this display to enter the following information to specify the formatting for your report.
v Detail line spacing
Specify the spacing between one detail line and the next within the report. Type a value between 1 and
4, where 1 is single spacing, 2 is double spacing, and so on.
v Outlining for break columns
Type N (to suppress outlining) if you want the value in the break column to appear on every detail
line of the report, or Y (to enable outlining) if you want the break value to appear only when it
changes. This affects the report only if you have specified breaks (see page 114).
For example, in Figure 3 on page 7, Department has been used as a break column. When the
department number changes from 20 to 38, a break occurs. Outlining has been used, and the
department number is printed only for the first line in each group of detail lines.
Edit Break Footing
Break level . . . . . . . . . : 2
Type choices, press Enter.
Put on new page . . . . . . . . . . . . . N Y=Yes, N=No
Blank lines before . . . . . . . . . . . . 0_____ 0-999, BOTTOM
Blank lines after . . . . . . . . . . . . 1__ 0-999
Put break summary at line . . . . . . . . 1___ 1-999, NONE
Break text: Use &col to cause variable insertion.
Figure 70. Edit Break Footing Display
Specify Report Formatting Options
Type choices, press Enter.
Detail line spacing . . . . . . . . . 1 1-4
Outlining for break columns . . . . . Y Y=Yes, N=No
Default break text . . . . . . . . . . Y Y=Yes, N=No
Column wrapped lines kept on page . . Y Y=Yes, N=No
Column heading separators . . . . . . Y Y=Yes, N=No
Break summary separators . . . . . . . Y Y=Yes, N=No
Final summary separators . . . . . . . Y Y=Yes, N=No
F2=Alternate keys F3=Exit F5=Run report F12=Cancel F13=Edit query
F18=Display SQL F22=QM statement
F2=Base keys F3=Exit F5=Refresh F12=Cancel F13=Edit query
F18=Display SQL F22=QM statement
Figure 71. Specify Formatting Options Display
126 Query Manager Use V6R1M0
v Default break text
This prompt affects only those break levels where you specify the position within the break footing at
which you want summary data to appear, but you do not enter any break footing text. You position
break summary data and enter break footing text through the Edit Break Footing display, which is
described in “Specifying text for each report break in Query Manager” on page 122.
Default break text is one or more asterisks that indicate the level of the break. The lowest level break
(that is, the break with the highest number) has one asterisk, the next lowest level break has two
asterisks, and so on. Asterisks are right justified so they appear immediately to the left of the first
column that has summary data.
For example, if the report has two breaks, BREAK1 and BREAK3, one asterisk appears beside the
summary data at each level-3 break, and two asterisks appear beside the summary data at each level-1
break.
v Column-wrapped lines kept on page
If you specify line wrapping for any of the columns in the report (by selecting an edit code of CW, CT,
or GW through the Edit Column Formatting display), this prompt determines whether the column data
can be split over more than one page. Type Y if you want to keep the column information on a single
page, or N to split the information over multiple pages if necessary.
v Column heading separators
Type Y if you want separators (dash lines) to appear under each column heading in the report, or type
N if you want to suppress the separators.
v Break summary separators
Type Y if you want separators (dash lines) to appear above any summary data at each report break, or
type N if you want to suppress the separators.
v Final summary separators
Type Y if you want separators (equal signs) to appear above any final summary data at the end of the
report, or type N if you want to suppress the separators.
Copying a report form in Query Manager
When you copy a report form, you can create a new report form or replace an existing one.
1. Type 2 in the Selection prompt from the Query Manager main menu; then press the Enter key to
show the Work with Query Manager Report Forms display.
2. Type 3 in the Opt prompt next to the names of the report forms you want to copy; then press the
Enter key to go to the Copy Report Form display. This display lists the names of all of the report
forms you specified. An example of the Copy Report Form display is shown in Figure 72 on page 128.
Chapter 6. Working with Query Manager report forms 127

3. Before you can copy a report form, you need to specify the following information. If you are copying
more than one report form, all report forms are copied using the same settings.
v To library. Type the name of the library to which you want the report form copied.
v Replace form. Type Y if you want to replace an existing report form, or N if you want to create a
new report form. The default is N.4. Type the name of the report form you want to create or replace in response to the “To Form” prompt.
If you answered N to “Replace form”, the name you type cannot already exist in the specified library.
Report form naming conventions are described on page 29.
5. Press the Enter key to perform the copy and return to the Work with Query Manager Report Forms
display. If you want to leave the Copy Report Form display without copying any report forms, press
F3 (Exit) or F12 (Cancel) instead of the Enter key.
Deleting a report form in Query Manager
When you choose to delete a report form, Query Manager shows a confirm display. No report forms are
deleted until you respond to this display.
1. Type 2 in the Selection prompt from the Query Manager main menu; then press the Enter key to
show the Work with Query Manager Report Forms display.
2. Type 4 in the Opt prompt next to the names of the report forms you want to delete; then press the
Enter key to go to the Confirm Delete of Report Form display. This display lists the names of all of
the report forms you selected to delete. An example of this display is shown in Figure 73 on page 129.
Copy Report Form
From library . . . . . . . . : MYLIB
Type information, press Enter:
To library . . . . . . . . . MYLIB_____ Name
Replace form . . . . . . . . N Y=Yes, N=No
To rename copied form, change To Form name.
From Form To Form
VENDINFO VENDINFO___
Bottom
F3=Exit F5=Refresh F12=Cancel F22=QM statement
Figure 72. Copy Report Form Display
128 Query Manager Use V6R1M0

When you choose to delete more than one report form, you may want to press F11 (Display form
only) to hide the report form descriptions and show multiple columns of report form names on the
display.
3. Press the Enter key to confirm the delete and return to the Work with Query Manager Report Forms
display. Note that when you press the Enter key, you delete all of the report forms shown on the
display. If you want to leave the display without deleting any report forms, press F12 (Cancel) instead
of the Enter key.
Displaying a report form in Query Manager
You can view the definition of a report form in displays that are similar to the Select Report Format
displays through which the report form is defined. This information is shown in display-only format. You
cannot change any values through this option.
1. Type 2 in the Selection prompt from the Query Manager main menu; then press the Enter key to
show the Work with Query Manager Report Forms display.
2. Type 5 in the Opt prompt next to the names of the report forms whose definitions you want to view;
then press the Enter key to go to the Display Report Format display. This display is shown for the
first report form you specified. Display Report Format displays for the remaining report forms are
shown in the same order as the report form names appear in the “Work with” display list. An
example of the Display Report Format display is shown in Figure 74 on page 130.
Confirm Delete of Report Form
Library . . . . . . . . . : MYLIB
Press Enter to confirm your choices for 4=Delete.
Press F12 to return to change your choices.
Opt Form Description
4 MYFORM Example form for DB2 Query Manager
Bottom
F11=Display form only F12=Cancel
Figure 73. Confirm Delete of Report Form Display
Chapter 6. Working with Query Manager report forms 129
3. Type 1 in the Opt prompt next to the parts of the report form that you want to display; then press the
Enter key. You can choose to display all parts by pressing F21 (Select all). Displays for the parts you
choose are shown in the same order as the part names appear on the Display Report Format display.
When you finish viewing one display, press the Enter key to go to the next display. When you finish
viewing all of the parts you selected, press the Enter key to return to the Display Report Format
display.
You can find descriptions of the report form parts on the following pages:
Column formatting page 111
Page heading page 117
Page footing page 117
Final text page 120
Break text page 122
Formatting options page 1264. You can perform the following tasks through this display:
v Press the F5 key to run or display the report. The title of the F5 key changes depending on the
active data:
– If the active data is the result of running a full query, the key is labeled (Display report).
– If the active data is the result of running a sample query, the key is labeled (Display sample).
– If there is no active data, or if the active data does not match the report form, the key is labeled
(Run report).
Note: For the active data to match the active form, they both need to contain the same number of
columns, and the columns need to have compatible data types. Active data is described on
page 7.
If F5 is labeled (Display report) or (Display sample), the report form is applied to the active data,
and the resulting report is shown on your display. If F5 is labeled (Run report), the Run Query
display is shown, prompting you to specify run options such as the name of the query you want to
run, and the mode in which you want to run the query. The Run Query display options are
described on page 136.
Display Report Format
Form . . . . . . . : MYFORM
Type options, press Enter. Press F21 to select all.
1=Select
Opt Report Format
_ Display column formatting
_ Display page heading
_ Display page footing
_ Display final text
_ Display break text
_ Display formatting options
Bottom
F3=Exit F5=Run report F12=Cancel F13=Display query F18=Display SQL
F21=Select all F22=QM statement
Figure 74. Display Report Format Display
130 Query Manager Use V6R1M0

v View the SQL statement that defines the active query. Press F18 (Display SQL) to view the query
statement in display-only format. If there is no active query, an error message is shown.
When you choose to (Display SQL) for a prompted query, the SELECT statement is shown with
descriptive comments, in the same format as prompted query definitions are printed. See Figure 27
on page 59 for an example of the format in which the SQL statement is presented.
When you finish viewing the query definition, press F12 (Cancel) to return to the Display Report
Format display.
v View the definition of any query. Press F13 (Display query) to view the definition of a query. A
prompt display is shown, asking you to type the name of the query you want to display. Type a
name, or press F4 (Prompt) to display a list of the queries in the current library from which you
can make a selection. The query definition is shown in the mode in which the query was last saved:
either prompted or SQL. See “Displaying a query in Query Manager” on page 55 for more
information.
When you finish viewing an SQL query definition, press F13 (Display form) to return to the
Display Report Format display. When you finish viewing a prompted query definition, type 1 in the
Opt prompt beside “Specify report formatting” on the Define Prompted Query display. Then press
the Enter key to return to the Display Report Format display.5. When you finish viewing the report form, press F3 (Exit) or F12 (Cancel) to return to the Work with
Query Manager Report Forms display.
Printing a report form in Query Manager
You can print the formatting information that defines the report form on the default printer specified in
your Query Manager profile.
1. Type 2 in the Selection prompt from the Query Manager main menu; then press the Enter key to
show the Work with Query Manager Report Forms display.
2. Type 6 in the Opt prompt next to the names of the report forms whose definitions you want to print;
then press the Enter key to send the report form definitions to your default printer. To print the
definition at a different printer, you need to change the default printer setting in your Query Manager
profile before you choose to print the report form. See page 39.
If you choose to print more than one report form, the report forms are printed in the same order as
their names appear in the “Work with” display list.
A message at the bottom of the display tells you when the report forms have been successfully sent to
print. (All report form definitions are printed interactively.) The printer file is named QPQXPRTF. An
example of a printed report form is shown in Figure 75 on page 132.
Chapter 6. Working with Query Manager report forms 131

Renaming a report form in Query Manager
You can specify new names for more than one report form in a single operation.
1. Type 2 in the Selection prompt from the Query Manager main menu; then press the Enter key to
show the Work with Query Manager Report Forms display.
2. Type 7 in the Opt prompt next to the names of the report forms you want to rename; then press the
Enter key to go to the Rename Report Form display. This display lists the names of all of the report
forms you specified. An example of this display is shown in Figure 76 on page 133.
DB2 for i5/OS Query Manager Page 1
57xxST1 VxRxMx yymmdd ABC400A 08/02/15 16:38:22
Form . . . . . . . : MYFORM
Library . . . . : MYLIB
Text . . . . . . . : Example Report for DB2 Query Manager
Column Information
Nbr Heading Usage Type Indent Width Edit Seq
1 Department BREAK1 0 1
2 Employee_Name 2 2
3 Job BREAK2 2 3
4 Salary SUM 2 4
5 Commission SUM 2 5
Page Information
Heading text . . . . . . . . . . . . . . . : NO
Blank lines before heading . . . . . . . . : 0
Blank lines after heading . . . . . . . . . : 2
Footing text . . . . . . . . . . . . . . . : NO
Blank lines before footing . . . . . . . . : 2
Blank lines after footing . . . . . . . . . : 0
Final Information
Final text . . . . . . . . . . . . . . . . : YES
New page for final text . . . . . . . . . . : NO
Put final summary at line . . . . . . . . . : 2
Blank lines before text . . . . . . . . . . : 0
Line Align Final Text
1 LEFT Grand total --
2 LEFT Employee Salaries
Break Information
Break number . . . . . . . . . . . . . . . : 1
Columns with this break number . . . . . . : 1
Heading text . . . . . . . . . . . . . . . : NO
New page for heading . . . . . . . . . . . : NO
Blank lines before heading . . . . . . . . : 0
Blank lines after heading . . . . . . . . . : 0
Repeat column headings . . . . . . . . . . : NO
Footing text . . . . . . . . . . . . . . . : YES
New page for footing . . . . . . . . . . . : NO
Blank lines before footing . . . . . . . . : 0
Blank lines after footing . . . . . . . . . : 1
Put break summary at line . . . . . . . . . : 1
Line Align Footing Text
1 RIGHT Total for department &1;
Figure 75. Example of a Printed Report Form
132 Query Manager Use V6R1M0

3. Type the new name for the report form. Report form naming conventions are described on page 29.
You need to enter a report form name that does not already exist in the current library. You cannot
use the rename option to replace existing report forms.
If you choose to rename more than one report form, you need to type new names for all of the report
forms before pressing the Enter key.
4. Press the Enter key to perform the rename and return to the Work with Query Manager Report Forms
display. If you want to leave the Rename Report Forms display without renaming any report forms,
press F3 (Exit) or F12 (Cancel) instead of the Enter key.
Running a report in Query Manager
When you run a report, Query Manager runs an SQL SELECT statement query or prompted query, and
formats the query data using the specified report form. You can run an SQL SELECT statement query
only if you have authority to use the SELECT statement (granted through your Query Manager profile).
1. Type 2 in the Selection prompt from the Query Manager main menu; then press the Enter key to
show the Work with Query Manager Report Forms display.
2. Type 9 in the Opt prompt next to the names of the reports you want to run; then press the Enter key
to go to the Run Query display. The Run Query display is shown for the first report you specified.
Run Query displays for the remaining reports are shown in the same order as the report form names
appear in the “Work with” display list.
Note: You can specify in your Query Manager profile whether you want run options to be displayed.
This setting applies only when you run a report as the result of pressing a function key. Run
options are always displayed when you run a report through a “Work with” display.
3. Specify the run options you want Query Manager to use when the report is run. Run options are
described in detail in “Using the run query display in Query Manager” on page 136.
4. Press the Enter key to run the query and produce the report. If there are any variables (strings starting
with &) in the query, Query Manager prompts you to enter a value for each variable before the query
is run. The values you enter are substituted into the query when it is run.
The report is run using the options you specify on the Run Query display.
v If the report was submitted to batch, the Work with Query Manager Report Forms display is shown
ready for you to perform the next task.
Rename Report Form
Library . . . . . . . . . . : MYLIB
To rename form, type New Name, press Enter.
Form New Name
VENDINFO VENDINFO___
Bottom
F3=Exit F5=Refresh F12=Cancel F22=QM statement
Figure 76. Rename Report Form Display
Chapter 6. Working with Query Manager report forms 133
v If the report was run interactively and the output sent to a printer or table, you need to wait for the
report to complete running before the Work with Query Manager Report Forms display is shown.
v If the report was run interactively and the output sent to display, you see the results of the query
and report form shown on your display when the report completes running. Press F3 (Exit) or F12
(Cancel) when you want to leave the display and return to the Work with Query Manager Report
Forms display.
Note: When a report is run in interactive mode, the number of rows retrieved by the query might be
limited by your Query Manager profile (see “Maximum number of rows allowed on interactive
run in Query Manager” on page 36). If the maximum number of rows has been reached but
there are more rows to be retrieved, all final summary data is omitted from the report, and a
message is shown telling you that the report data is incomplete.
For a more complete description of running reports, see Chapter 7, “Running queries and reports in
Query Manager.”
134 Query Manager Use V6R1M0

Chapter 7. Running queries and reports in Query Manager
This chapter describes the different ways in which you can run queries and reports. You can run any
prompted query, and only those SQL queries that contain one of the SQL statements you have authority
to use (granted through your Query Manager profile). When you run a report, Query Manager runs the
specified SQL SELECT statement query or prompted query, and formats the resulting data using the
specified report form.
You can run queries and reports while you are creating query and report form definitions, to make sure
that the definitions are producing the results you require. Query Manager validates the definitions before
performing the run. You can also run existing queries and reports that you did not create.
This chapter begins with a description of the different ways in which you can run queries and reports. It
then explains how you can specify run options, such as the mode in which you want to run the query or
report and the destination to which you want the output directed. Following that are instructions on how
to use the special function keys that are available when you send your query or report output to display.
Running a query or report in Query Manager
When you run an SQL SELECT statement query, a prompted query, or a report, Query Manager runs the
specified query and formats the resulting data using the specified report form.
To run a query, you need to have access to the library in which the query resides, and access to the
libraries or collections in which the tables being queried reside. If you want to format the query data
using a report form, you need to have access to the library in which the report form resides.
Note: To run an SQL query, you need to have authority to use the SQL statement that defines the query.
(Authority to use SQL statements is granted through your Query Manager profile. See “Selecting
allowed SQL statements for profiles in Query Manager” on page 48 for details.)
Users with a BASIC or ALL access level can run queries and reports in the following ways:
v By choosing option 9 (Run) from the Work with Query Manager Queries display. See page 60.
v By choosing option 9 (Run report) from the Work with Query Manager Report Forms display. See page
133.
v By pressing F5 (Run report) or F6 (Run sample) while they are displaying a query definition. See page
55.
v By pressing F5 (Run report) while they are displaying a report form definition. See page 129.
Users with an ALL access level can run queries and reports in the following additional ways:
v By pressing F5 (Run report) or F6 (Run sample) while they are creating or changing a query
definition. See page 64.
v By pressing F5 (Run report) while they are creating or changing a report form definition. See page 109.
v By entering the RUN QUERY statement on the Query Manager statement line. See page 251.
Running a query in batch mode in Query Manager
You cannot run a query in batch mode if it has not yet been named and saved. Query Manager shows
the Exit display, and will not submit the query to batch until it has been named and saved. See “Saving a
query: Using the exit display in Query Manager” on page 100 for instructions.
© Copyright IBM Corp. 1998, 2008 135

Any changes made to the query since it was last saved are included if you run the query in interactive
mode, and ignored if you run it in batch. If you run the query in batch, a message tells you that the most
recently saved version of the query is being run. When you return to the query editor, your changes are
still there. Running the previously saved version in batch mode has no effect on the version of the query
you are editing.
Specifying run options in Query Manager
The options that you are prompted to specify when you run a query or report differ depending on the
settings in your Query Manager profile, and the way in which you chose to run the query or report:
v When you run a query by choosing option 9 (Run) from the Work with Query Manager Queries
display, the Run Query display is always shown if the query is an SQL SELECT statement or a
prompted query.
v When you run a query by pressing F5 (Run report) or F6 (Run sample) while you are creating,
changing, or displaying a query definition, the Run Query display might be shown if the query is an
SQL SELECT statement or a prompted query:
– If the “Display run options” setting in your Query Manager profile is YES, the Run Query display is
shown.
– If the “Display run options” setting in your Query Manager profile is NO, the Run Query display is
not shown. The query is run using the active form and the default settings from your Query
Manager profile.
Note: A Run Query display is shown if the active query does not match the active form. For the
active query to match the active form, they need to have the same number of columns, and
the columns need to have compatible data types.v When you run a query by entering the RUN QUERY statement on the Query Manager statement line,
no run options display is shown. The query is run using the options you specify as part of the RUN
QUERY statement, and the default settings from your Query Manager profile.
v When you run a report by choosing option 9 (Run report) from the Work with Query Manager Report
Forms display, the Run Query display is always shown.
v When you run a report by pressing F5 (Run report) while you are creating, changing, or displaying a
report form definition, the Run Query display is always shown. If the F5 key is labeled (Display
report) or (Display sample), no run options display is shown. The report is produced using the active
data, and output to display.
Using the Run Query display is described on page 136.
Using the run query display in Query Manager
Use the Run Query display to specify the way in which you want the query or report to be run. You can
change any of the run options shown on this display. The default run options are taken from your Query
Manager profile.
The prompts shown on the Run Query display differ depending on whether you are running a query or
report.
You run a query by choosing option 9 (Run) from the Work with Query Manager Queries display, or by
pressing F5 (Run report) or F6 (Run sample) while you are creating, changing, or displaying a query
definition. Figure 77 on page 137 is an example of the Run Query display shown when you run a
SELECT query. Figure 78 on page 137 is an example of the Run Query display shown when you run a
query other than a SELECT query.
136 Query Manager Use V6R1M0

You run a report by choosing option 9 (Run report) from the Work with Query Manager Report Forms
display, or by pressing F5 (Run report) while you are creating, changing, or displaying a report form
definition. Figure 79 on page 138 is an example of the Run Query display shown when you run a report.
Run Query
Query . . . . . . : MYQUERY
Library . . . . : MYLIB
Type choices, press Enter.
Run query mode . . . 1 1=Interactive
2=Batch
Run sample only . . N Y=Yes, N=No
Form . . . . . . . . *SYSDFT____ Name, *, *SYSDFT, F4 for list
Library . . . . . ___________ Name, *CURLIB, *LIBL
Output . . . . . . . 1 1=Display, 2=Printer
3=Table
F3=Exit F4=Prompt F12=Cancel
Figure 77. Run Query Display for SELECT and Prompted Queries
Run Query
Query . . . . . . : MYQUERY
Library . . . . : MYLIB
Type choices, press Enter.
Run query mode . . . 1 1=Interactive
2=Batch
F3=Exit F4=Prompt F12=Cancel
Figure 78. Run Query Display for Queries Other than SELECT Queries
Chapter 7. Running queries and reports in Query Manager 137
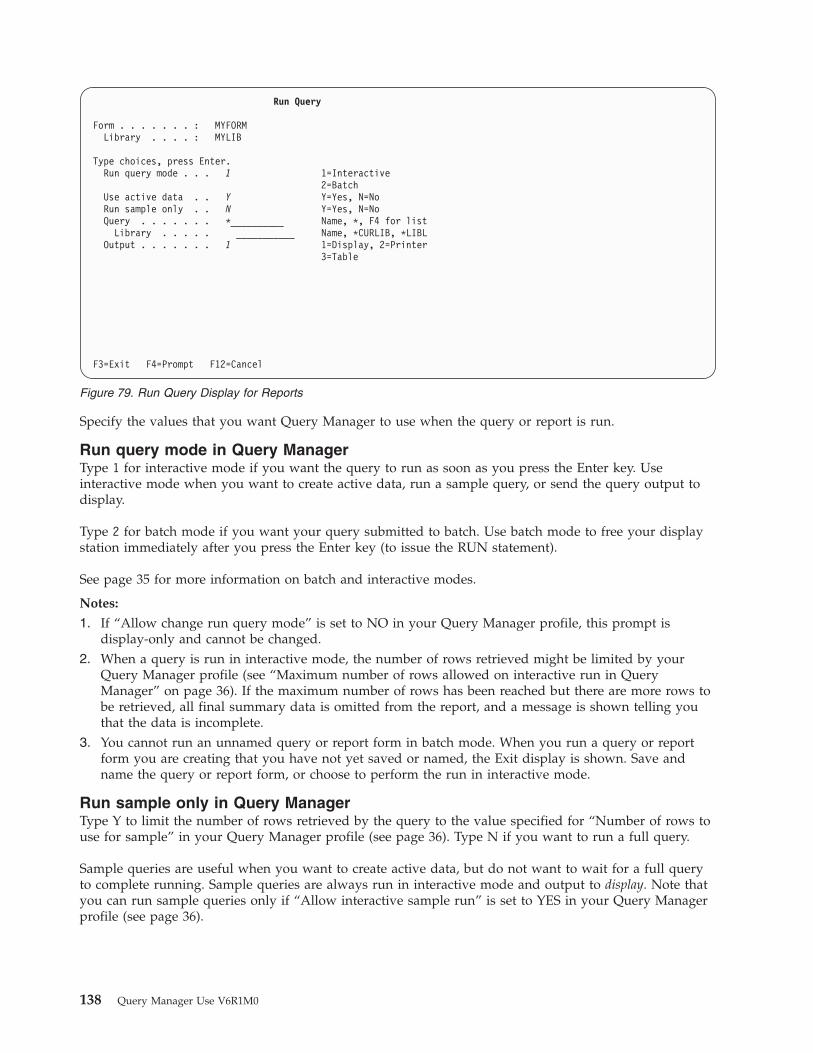
Specify the values that you want Query Manager to use when the query or report is run.
Run query mode in Query Manager
Type 1 for interactive mode if you want the query to run as soon as you press the Enter key. Use
interactive mode when you want to create active data, run a sample query, or send the query output to
display.
Type 2 for batch mode if you want your query submitted to batch. Use batch mode to free your display
station immediately after you press the Enter key (to issue the RUN statement).
See page 35 for more information on batch and interactive modes.
Notes:
1. If “Allow change run query mode” is set to NO in your Query Manager profile, this prompt is
display-only and cannot be changed.
2. When a query is run in interactive mode, the number of rows retrieved might be limited by your
Query Manager profile (see “Maximum number of rows allowed on interactive run in Query
Manager” on page 36). If the maximum number of rows has been reached but there are more rows to
be retrieved, all final summary data is omitted from the report, and a message is shown telling you
that the data is incomplete.
3. You cannot run an unnamed query or report form in batch mode. When you run a query or report
form you are creating that you have not yet saved or named, the Exit display is shown. Save and
name the query or report form, or choose to perform the run in interactive mode.
Run sample only in Query Manager
Type Y to limit the number of rows retrieved by the query to the value specified for “Number of rows to
use for sample” in your Query Manager profile (see page 36). Type N if you want to run a full query.
Sample queries are useful when you want to create active data, but do not want to wait for a full query
to complete running. Sample queries are always run in interactive mode and output to display. Note that
you can run sample queries only if “Allow interactive sample run” is set to YES in your Query Manager
profile (see page 36).
Run Query
Form . . . . . . . : MYFORM
Library . . . . : MYLIB
Type choices, press Enter.
Run query mode . . . 1 1=Interactive
2=Batch
Use active data . . Y Y=Yes, N=No
Run sample only . . N Y=Yes, N=No
Query . . . . . . . *__________ Name, *, F4 for list
Library . . . . . ___________ Name, *CURLIB, *LIBL
Output . . . . . . . 1 1=Display, 2=Printer
3=Table
F3=Exit F4=Prompt F12=Cancel
Figure 79. Run Query Display for Reports
138 Query Manager Use V6R1M0

Report form and library in Query Manager
If you are running an SQL SELECT statement query or a prompted query, you are prompted to specify
the name of the report form you want to use to format the query data, and the name of the library in
which it resides. Choose one of the following:
* Use the active form. This is the default, available only when there is an active form.
Leave the library name blank.
*SYSDFT Use a simple report form, generated by Query Manager when the query is run. This is
the default when there is no active form. Leave the library name blank.
name Use an existing report form. Type the name of a report form and the library in which it
resides, or press F4 (Prompt) to display a list of all report forms in the current library
from which you can make a selection. If you do not enter a library name, Query Manager
uses the “Default library for QM objects” specified in your Query Manager profile.
Query and library in Query Manager
If you are running a report, you are prompted to specify the name of the query you want to run to
generate the query data, and the name of the library in which it resides. Choose one of the following:
* Use the active query. This is the default, available only when there is an active query. Leave the
library name blank.
name Use an existing query. Type the name of a query and the library in which it resides, or press
F4 (Prompt) to display a list of all queries in the current library from which you can make a
selection. If you do not enter a library name, Query Manager uses the “Default library for QM
objects” specified in your Query Manager profile.
blank Leave the query and library names blank, and specify to run the report using the active data.
This option is available only when there is active data.
Use active data in Query Manager
Type Y to produce the report by applying the specified report form to the active data. Leave the prompts
for query name and library name blank when you answer Y to this prompt. This prompt is shown only
when there is active data.
Active data is the data that resulted from the last SQL SELECT statement query or prompted query that
was run interactively during the current Query Manager session.
Output in Query Manager
Type 1 to send the query output to your display station, type 2 to send the output to a printer, or type 3 to
write the output to a table. You can send the output to display only when the query is run interactively.
You need to send the output to display when you run a sample query.
If you specified an output destination of printer or table, press the Enter key to display additional prompts
for the printer name, or the table and collection names.
Printer to use for output in Query Manager
If you specified to send your output to a printer, you are prompted to enter the ID for the i5/OS output
queue or printer that you want to use. Press F4 (Prompt) to view a list of all supported IDs from which
you can make a selection. The default is the output queue or printer ID specified in your Query Manager
profile.
Table to use for output in Query Manager
If you specified to send your output to a table, you are prompted to enter the name of the table, and the
collection in which it resides. Press F4 (Prompt) if you want to view a list of all tables in the current
collection from which you can make a selection.
Chapter 7. Running queries and reports in Query Manager 139
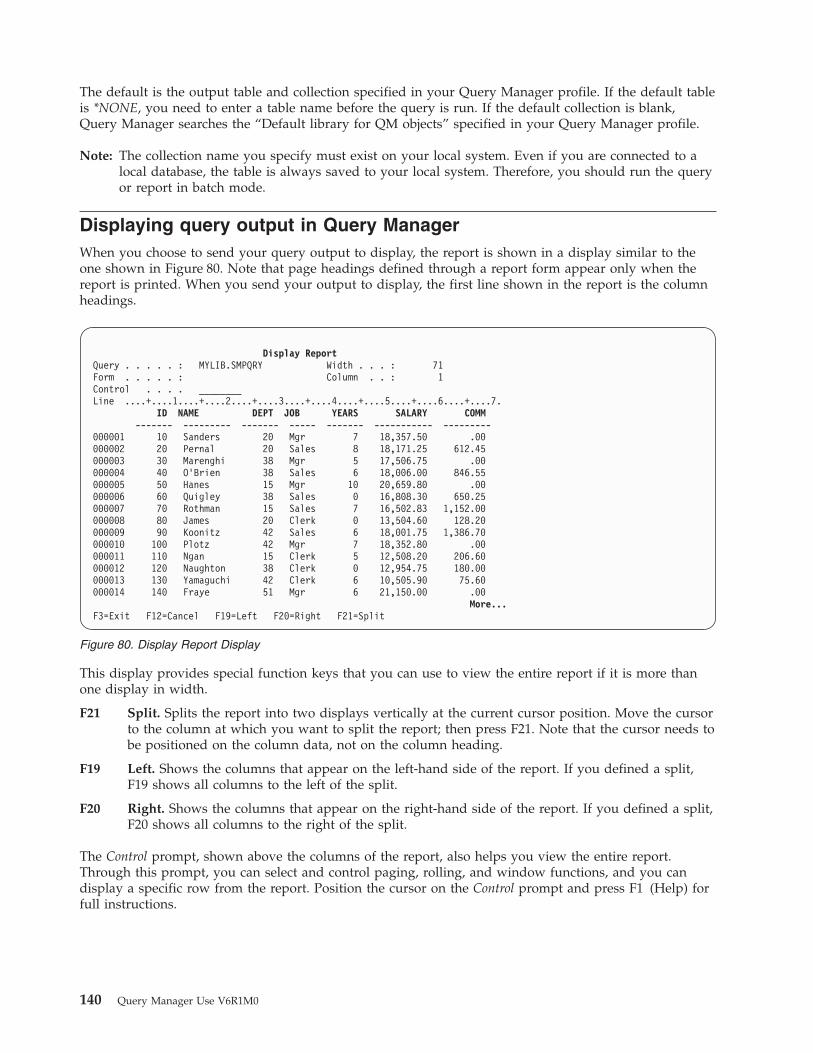
The default is the output table and collection specified in your Query Manager profile. If the default table
is *NONE, you need to enter a table name before the query is run. If the default collection is blank,
Query Manager searches the “Default library for QM objects” specified in your Query Manager profile.
Note: The collection name you specify must exist on your local system. Even if you are connected to a
local database, the table is always saved to your local system. Therefore, you should run the query
or report in batch mode.
Displaying query output in Query Manager
When you choose to send your query output to display, the report is shown in a display similar to the
one shown in Figure 80. Note that page headings defined through a report form appear only when the
report is printed. When you send your output to display, the first line shown in the report is the column
headings.
This display provides special function keys that you can use to view the entire report if it is more than
one display in width.
F21 Split. Splits the report into two displays vertically at the current cursor position. Move the cursor
to the column at which you want to split the report; then press F21. Note that the cursor needs to
be positioned on the column data, not on the column heading.
F19 Left. Shows the columns that appear on the left-hand side of the report. If you defined a split,
F19 shows all columns to the left of the split.
F20 Right. Shows the columns that appear on the right-hand side of the report. If you defined a split,
F20 shows all columns to the right of the split.
The Control prompt, shown above the columns of the report, also helps you view the entire report.
Through this prompt, you can select and control paging, rolling, and window functions, and you can
display a specific row from the report. Position the cursor on the Control prompt and press F1 (Help) for
full instructions.
Display Report
Query . . . . . : MYLIB.SMPQRY Width . . . : 71
Form . . . . . : Column . . : 1
Control . . . . ________
Line ....+....1....+....2....+....3....+....4....+....5....+....6....+....7.
ID NAME DEPT JOB YEARS SALARY COMM
------- --------- ------- ----- ------- ----------- ---------
000001 10 Sanders 20 Mgr 7 18,357.50 .00
000002 20 Pernal 20 Sales 8 18,171.25 612.45
000003 30 Marenghi 38 Mgr 5 17,506.75 .00
000004 40 O’Brien 38 Sales 6 18,006.00 846.55
000005 50 Hanes 15 Mgr 10 20,659.80 .00
000006 60 Quigley 38 Sales 0 16,808.30 650.25
000007 70 Rothman 15 Sales 7 16,502.83 1,152.00
000008 80 James 20 Clerk 0 13,504.60 128.20
000009 90 Koonitz 42 Sales 6 18,001.75 1,386.70
000010 100 Plotz 42 Mgr 7 18,352.80 .00
000011 110 Ngan 15 Clerk 5 12,508.20 206.60
000012 120 Naughton 38 Clerk 0 12,954.75 180.00
000013 130 Yamaguchi 42 Clerk 6 10,505.90 75.60
000014 140 Fraye 51 Mgr 6 21,150.00 .00
More...
F3=Exit F12=Cancel F19=Left F20=Right F21=Split
Figure 80. Display Report Display
140 Query Manager Use V6R1M0

Leaving the display report display in Query Manager
There are two ways in which you can leave the Display Report display:
v Press F12 (Cancel) if you do not want the retrieved query data to become the active data.
v Press F3 (Exit) if you do want the retrieved query data to become the active data.
When you run a query interactively and direct the output to display, Query Manager runs the query one
display at a time, so that the only part of the query that is run is the portion that you view. If you press
F3 (Exit) to leave the display before you finish viewing all of the query data, an Exit display is shown
asking whether you want to complete running the query. An example of this Exit display is shown in
Figure 81.
Choose one of the following options:
1=Exit saving active data
Choose this option when you want to finish running the query and save the retrieved data as
active data. You need to wait for the query to complete running before you return to the display
from which you chose to run the query or report.
2=Exit without saving active data
Choose this option to immediately return to the display from which you chose to run the query
or report. The query does not complete its run and no active data is saved.
3=Resume displayed report
Choose this option to return to the Display Report display, where you can continue to view the
data retrieved by the query.
See page 8 for more information about active data.
Date and time format considerations in Query Manager
If you run a query that was saved with date and time formats that are different from those defined in
your current job, the Confirm Run Query display is shown to warn you that the formats are not
compatible. An example of this display is shown in Figure 82 on page 142.
Exit
Type choice, press Enter.
Option . . . . . . . . . . 1 1=Exit saving active data
2=Exit without saving active data
3=Resume displayed report
F12=Cancel
Figure 81. Exit from Display Report Display
Chapter 7. Running queries and reports in Query Manager 141

Press the Enter key to continue running the query, or F12 (Cancel) to return to the Work with Query
Manager Queries display without running the query.
If you choose to continue running the query, be careful if the query contains global variables. If any of
these variables are dates, you need to enter the dates in a valid SQL format. When Query Manager runs
the query, it translates the SQL date that you entered into the date format used by the query. Select one of
the following formats:
*DMY dd.mm.yyyy 31.10.1992 SQL format: EUR
*MDY mm/dd/yyyy 10/31/1992 SQL format: USA
*YMD yyyy-mm-dd 1992-10-31 SQL format: ISO/JIS
Notice that the characters used to separate the different parts of the dates are different for all three of the
formats.
Note: Typing date variable values in a non-SQL format might cause an SQL failure.
Running a query against databases from non-i5/OS databases in
Query Manager
Some sort sequence capabilities do not function correctly when you run them against remote databases
that do not have the same sort sequence capabilities. These databases reside on systems other than i5/OS.
When the query uses a sort sequence other than *HEX, the Query Manager presents the Confirm Run
Query display (shown in Figure 83).
Confirm Run Query
Query . . . . . . : MYQUERY
Library . . . . : MYLIB
WARNING
The Query Manager query definition you have requested has a date format
that is different from the date format used in your job. Dates
displayed in the report may be in an unexpected format.
If the query contains global variables, you need to enter the variable
values for any dates using a date format of *USA, *ISO, *EUR, or *JIS.
Entering dates in another format may cause an SQL failure.
Job date format . . : *DMY Query date format . : *MDY
Job date separator . : . Query date separator : /
Press Enter to continue.
Press F12 to return without running the query.
F12=Cancel
Figure 82. Confirm Run Query Display
142 Query Manager Use V6R1M0

If the query specifies a particular sort sequence table, the display shows the sort sequence table name and
the library in which it resides.
The warning in Figure 83 appears when the sort sequence is *LANGIDSHR, *LANGIDUNQ, or Sort
sequence table. It also appears when the sort sequence is *JOBRUN and the job default sort sequence is
other than *HEX.
You can avoid this warning by changing the sort sequence to *HEX.
Confirm Run Query
Query . . . . . . : MYQUERY
Library . . . . : MYLIB
WARNING
The Query Manager query definition you have requested uses a sort
sequence table which is not supported on the remote relational database
which you are connected to. The query can be run. No sort sequence
table will be used when running this query or formatting the resulting
report. Record selection, sorting and report processing may not give
expected results.
Sort sequence . . . . . : *LANGIDSHR
Language identifier . . : ENG
Press Enter to continue.
Press F12 to return without running the query.
F12=Cancel
Figure 83. Confirm Run Query Display with Sort Sequence Warning
Chapter 7. Running queries and reports in Query Manager 143

144 Query Manager Use V6R1M0

Chapter 8. Working with Query Manager tables
This chapter describes Query Manager tables, and explains how you can create, maintain, and use them.
You can add and change database information in your Query Manager tables, that can later be printed,
viewed, and manipulated using the Tables, Queries, and Report Forms options. You create and maintain
tables through Query Manager’s prompt-guided displays, which help to make this option simple to use.
The chapter begins with some explanations and descriptions that you might want to read through before
creating a table. It tells you what Query Manager tables are, and suggests where and when you might
find these tables useful.
Following the background information are instructions on how to use the options that are available
through the Work with Query Manager Tables display. You can learn how to create, copy, delete, rename,
and display a table; and how to add, change, search for, display, and print rows of data.
Note: Your access to the Work with Query Manager Tables display might be restricted through your
Query Manager profile. If “Allow access to QM tables option” is set to NO, the (Work with Query
Manager tables) option is not shown in the main menu, and you cannot access the Work with
Query Manager Tables display. See “Allow access to tables option in Query Manager” on page 41
for more information.
What are Query Manager tables?
Query Manager tables contain database information that you can add to, manipulate, format, and view.
All Query Manager users can create tables and add information to them. This information can later be
viewed, printed, and manipulated through the Tables, Queries, and Report Forms options.
Use Query Manager tables to store information such as:
v The results from your latest marketing survey
v The targets and current sales figures for all sales staff in your department
v Your available supplies on hand
If you want to store confidential information in your tables, see your security administrator about setting
up an *EXCLUDE authority for the collection or library in which your tables are stored. The *EXCLUDE
authority stops other users from being able to access the information in your tables unless you
specifically grant them access privileges, so your confidential information is secure.
You can access tables that were created outside Query Manager through the Work with Query Manager
Tables display, as long as the tables are in a collection or library to which you have access, and as long as
they contain only those data types that are supported in Query Manager. A list of supported data types
can be found on page 152.
Each Query Manager table is named by the person who creates it. The following table is named “ORG”.
Table 10. The ORG Table
DEPTNO DEPTNAME MANAGER DIVISION LOCATION
10 Head Office 160 Corporate New York
15 New England 50 Eastern Boston
20 Mid Atlantic 10 Eastern Washington
38 South Atlantic 30 Eastern Atlanta
© Copyright IBM Corp. 1998, 2008 145
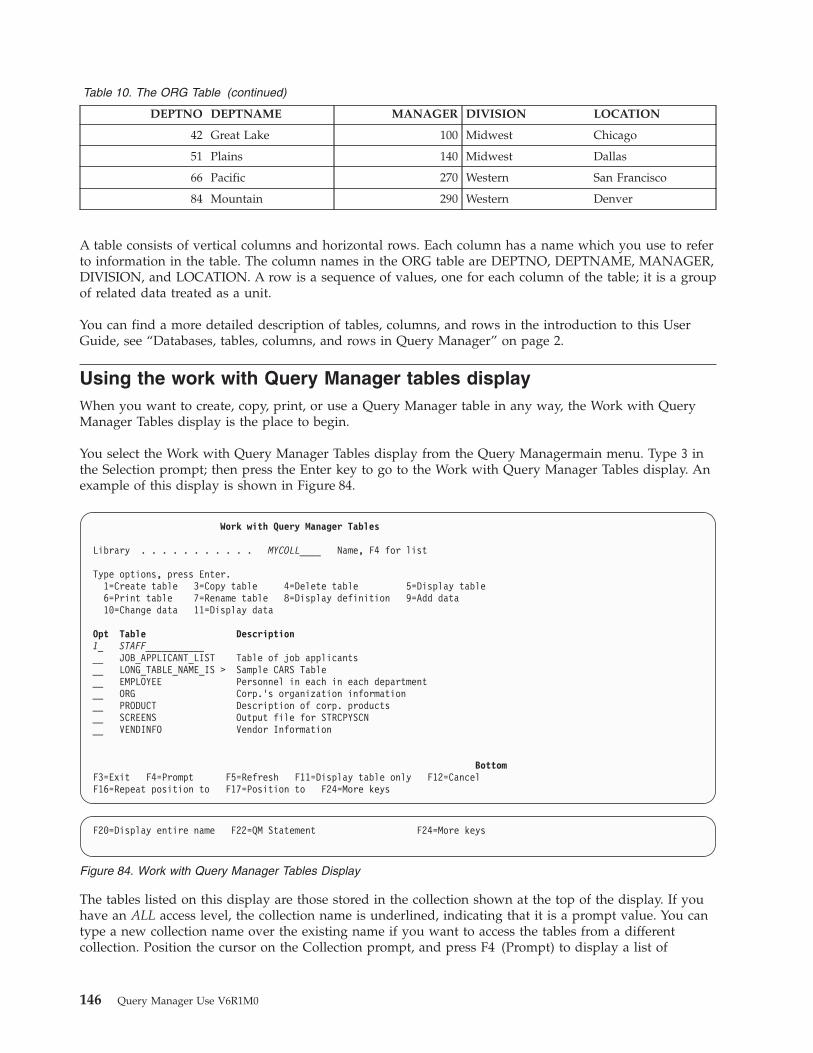
Table 10. The ORG Table (continued)
DEPTNO DEPTNAME MANAGER DIVISION LOCATION
42 Great Lake 100 Midwest Chicago
51 Plains 140 Midwest Dallas
66 Pacific 270 Western San Francisco
84 Mountain 290 Western Denver
A table consists of vertical columns and horizontal rows. Each column has a name which you use to refer
to information in the table. The column names in the ORG table are DEPTNO, DEPTNAME, MANAGER,
DIVISION, and LOCATION. A row is a sequence of values, one for each column of the table; it is a group
of related data treated as a unit.
You can find a more detailed description of tables, columns, and rows in the introduction to this User
Guide, see “Databases, tables, columns, and rows in Query Manager” on page 2.
Using the work with Query Manager tables display
When you want to create, copy, print, or use a Query Manager table in any way, the Work with Query
Manager Tables display is the place to begin.
You select the Work with Query Manager Tables display from the Query Managermain menu. Type 3 in
the Selection prompt; then press the Enter key to go to the Work with Query Manager Tables display. An
example of this display is shown in Figure 84.
The tables listed on this display are those stored in the collection shown at the top of the display. If you
have an ALL access level, the collection name is underlined, indicating that it is a prompt value. You can
type a new collection name over the existing name if you want to access the tables from a different
collection. Position the cursor on the Collection prompt, and press F4 (Prompt) to display a list of
Work with Query Manager Tables
Library . . . . . . . . . . . MYCOLL____ Name, F4 for list
Type options, press Enter.
1=Create table 3=Copy table 4=Delete table 5=Display table
6=Print table 7=Rename table 8=Display definition 9=Add data
10=Change data 11=Display data
Opt Table Description
1_ STAFF___________
__ JOB_APPLICANT_LIST Table of job applicants
__ LONG_TABLE_NAME_IS > Sample CARS Table
__ EMPLOYEE Personnel in each in each department
__ ORG Corp.’s organization information
__ PRODUCT Description of corp. products
__ SCREENS Output file for STRCPYSCN
__ VENDINFO Vendor Information
Bottom
F3=Exit F4=Prompt F5=Refresh F11=Display table only F12=Cancel
F16=Repeat position to F17=Position to F24=More keys
F20=Display entire name F22=QM Statement F24=More keys
Figure 84. Work with Query Manager Tables Display
146 Query Manager Use V6R1M0

collections from which you can make a selection. You need to have *CHANGE authority for the collection
that you specify if you want to use all options available through the Work with Query Manager Tables
display.
Notes:
1. The Query Manager tables option works with local data only. If you are using a remote database
connection when you select to work with tables, Query Manager stores the details; then breaks the
connection. The connection is restored when you exit from the Tables option. For more information on
connection with relational databases, see Chapter 9, “Distributed Relational Database Architecture in
Query Manager,” on page 173.
2. You cannot issue the CONNECT, or SET CONNECTION statements while you are working with
Query Manager tables.
3. It is recommended that you not issue the DISCONNECT or RELEASE statements while you are
working with Query Manager tables.
4. You cannot work with Query Manager tables if you have any COMMIT or ROLLBACK statements
outstanding (see “Commitment control level in Query Manager” on page 40). Once you go to the
Work with Query Manager Tables display, Query Managerignores your commitment control level, and
issues COMMIT statements for all data and updates automatically.
5. When in WORK WITH TABLES, the connection is locked to local and cannot be changed by the
CONNECT or SET CONNECTION statements. The local or previous connection can be destroyed
through the DISCONNECT statement. For more information, see “Work with tables connections in
Query Manager DRDA” on page 179.
You can choose any of the following options to work with a table.
1=Create table
Creates a Query Manager table. Query Manager prompts you to specify the name, data
type, length, and number of decimal places for all of the columns you want to include in
the table. See page 149.
3=Copy table Copies a table. You can replace an existing table or create a new one. You can make an
exact copy of the table definition, or you can make modifications to the definition before
the copy occurs. You can also choose to copy the table definition only, or to copy the
definition and the table data. See page 163.
4=Delete table
Deletes tables you no longer require. You need to respond to a confirm display before the
delete occurs. See page 166.
5=Display table
Displays a report, showing selected rows from a table on your display. You are prompted
to specify search conditions. Only those rows that match the search conditions are
displayed. If you do not specify search conditions, all rows from the table are displayed.
See page 167.
Note: This option is not available if you are running Query Manager in batch mode. See
“Run query mode in Query Manager” on page 35.
6=Print table Prints a report, showing selected rows from a table on your default printer. You are
prompted to specify search conditions. Only those rows that match the search conditions
are printed. If you do not specify search conditions, all rows from the table are printed.
See page 168.
7=Rename table
Prompts you to specify a new name for existing tables. See page 169.
8=Display definition
Shows the definition of a table in display-only format. You cannot change any values
through this option. See page 170.
Chapter 8. Working with Query Manager tables 147
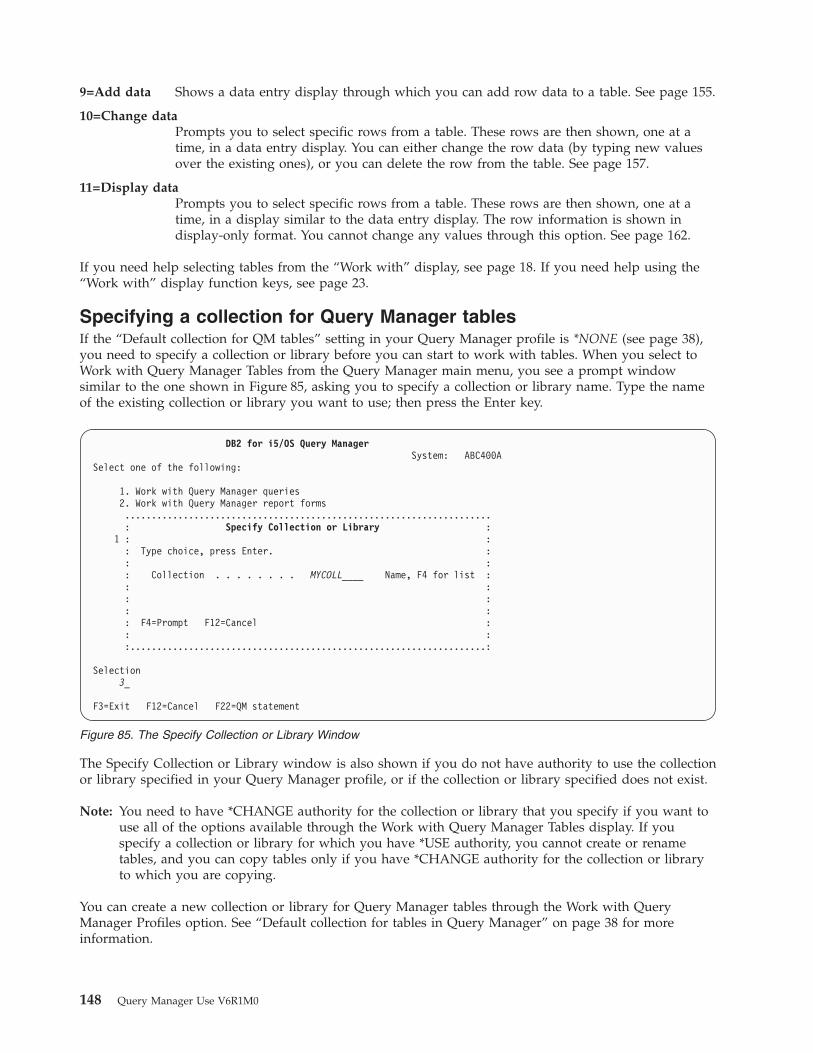
9=Add data Shows a data entry display through which you can add row data to a table. See page 155.
10=Change data
Prompts you to select specific rows from a table. These rows are then shown, one at a
time, in a data entry display. You can either change the row data (by typing new values
over the existing ones), or you can delete the row from the table. See page 157.
11=Display data
Prompts you to select specific rows from a table. These rows are then shown, one at a
time, in a display similar to the data entry display. The row information is shown in
display-only format. You cannot change any values through this option. See page 162.
If you need help selecting tables from the “Work with” display, see page 18. If you need help using the
“Work with” display function keys, see page 23.
Specifying a collection for Query Manager tables
If the “Default collection for QM tables” setting in your Query Manager profile is *NONE (see page 38),
you need to specify a collection or library before you can start to work with tables. When you select to
Work with Query Manager Tables from the Query Manager main menu, you see a prompt window
similar to the one shown in Figure 85, asking you to specify a collection or library name. Type the name
of the existing collection or library you want to use; then press the Enter key.
The Specify Collection or Library window is also shown if you do not have authority to use the collection
or library specified in your Query Manager profile, or if the collection or library specified does not exist.
Note: You need to have *CHANGE authority for the collection or library that you specify if you want to
use all of the options available through the Work with Query Manager Tables display. If you
specify a collection or library for which you have *USE authority, you cannot create or rename
tables, and you can copy tables only if you have *CHANGE authority for the collection or library
to which you are copying.
You can create a new collection or library for Query Manager tables through the Work with Query
Manager Profiles option. See “Default collection for tables in Query Manager” on page 38 for more
information.
DB2 for i5/OS Query Manager
System: ABC400A
Select one of the following:
1. Work with Query Manager queries
2. Work with Query Manager report forms
.....................................................................
: Specify Collection or Library :
1 : :
: Type choice, press Enter. :
: :
: Collection . . . . . . . . MYCOLL____ Name, F4 for list :
: :
: :
: :
: F4=Prompt F12=Cancel :
: :
:...................................................................:
Selection
3_
F3=Exit F12=Cancel F22=QM statement
Figure 85. The Specify Collection or Library Window
148 Query Manager Use V6R1M0
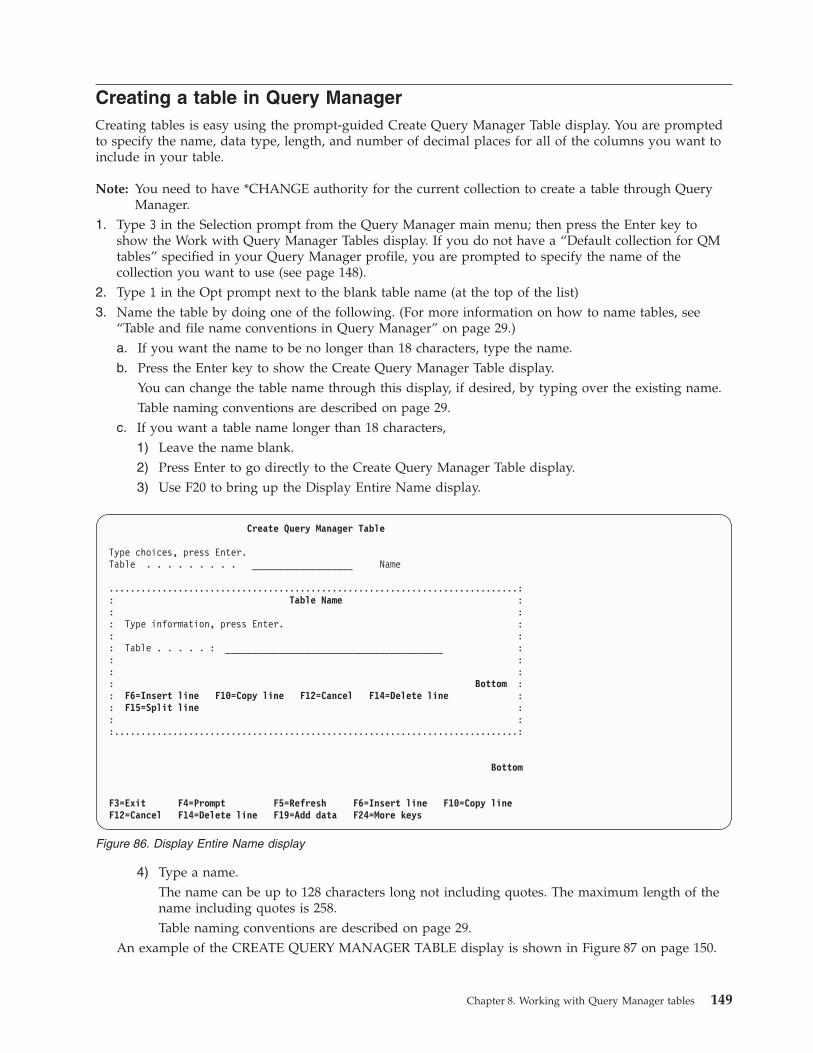
Creating a table in Query Manager
Creating tables is easy using the prompt-guided Create Query Manager Table display. You are prompted
to specify the name, data type, length, and number of decimal places for all of the columns you want to
include in your table.
Note: You need to have *CHANGE authority for the current collection to create a table through Query
Manager.
1. Type 3 in the Selection prompt from the Query Manager main menu; then press the Enter key to
show the Work with Query Manager Tables display. If you do not have a “Default collection for QM
tables” specified in your Query Manager profile, you are prompted to specify the name of the
collection you want to use (see page 148).
2. Type 1 in the Opt prompt next to the blank table name (at the top of the list)
3. Name the table by doing one of the following. (For more information on how to name tables, see
“Table and file name conventions in Query Manager” on page 29.)
a. If you want the name to be no longer than 18 characters, type the name.
b. Press the Enter key to show the Create Query Manager Table display.
You can change the table name through this display, if desired, by typing over the existing name.
Table naming conventions are described on page 29.
c. If you want a table name longer than 18 characters,
1) Leave the name blank.
2) Press Enter to go directly to the Create Query Manager Table display.
3) Use F20 to bring up the Display Entire Name display.
4) Type a name.
The name can be up to 128 characters long not including quotes. The maximum length of the
name including quotes is 258.
Table naming conventions are described on page 29.
An example of the CREATE QUERY MANAGER TABLE display is shown in Figure 87 on page 150.
Create Query Manager Table
Type choices, press Enter.
Table . . . . . . . . . ___________________ Name
.............................................................................:
: Table Name :
: :
: Type information, press Enter. :
: :
: Table . . . . . : _________________________________________ :
: :
: :
: Bottom :
: F6=Insert line F10=Copy line F12=Cancel F14=Delete line :
: F15=Split line :
: :
:............................................................................:
Bottom
F3=Exit F4=Prompt F5=Refresh F6=Insert line F10=Copy line
F12=Cancel F14=Delete line F19=Add data F24=More keys
Figure 86. Display Entire Name display
Chapter 8. Working with Query Manager tables 149

4. Type a description for the table (a maximum of 50 characters); then move the cursor to the first
Column prompt to begin defining the table.
5. Define the columns that you want to include in the table. (See page 151 for general information on
defining table columns.)
Specify the following information for each of the columns you want to define:
v Column. A column name must begin with a letter and can be a maximum of 30 characters in
length. The first 18 characters can be entered directly on the Create Query Manager Table display.
Additional characters can be entered using the Display entire name display. It cannot include any
spaces. The name must be unique within the table being defined; columns in different tables can
have the same name.
For more information on how to name columns, see “Column name, field name, and expression
name conventions in Query Manager” on page 30.
v Type. When the cursor is positioned on the data type prompt, you can press F4 (Prompt) for a list
of all available data types from which you can make a selection. The data types that are supported
for Query Manager tables are described on page 152.
v Length. You need to specify a length for CHARACTER, VARCHAR, GRAPHIC, VARGRAPHIC,
DECIMAL, NUMERIC, and FLOAT data types:
– CHARACTER values can be 1 to 32765 characters in length.
– VARCHAR values can be 1 to 32739 characters.
– GRAPHIC values can be 1 to 16383 characters.
– VARGRAPHIC values can be 1 to 16370 characters.
– DECIMAL and NUMERIC can be a maximum of 31 digits.
– FLOAT can be a maximum of 53 digits.
All other data types have set lengths. If you specify a length for a set length data type, Query
Manager displays an error message.
v Decimal Places. If the data type is NUMERIC or DECIMAL, you need to specify the number of
decimal places. Type a number between 0 and the length you specified for the column,
remembering that the maximum number of digits for both of these data types is 31.
Create Query Manager Table
Type choices, press Enter.
Table . . . . . . . . . STAFF_____________ Name
Description . . . . . . The STAFF Table____________________________________
Decimal
Column Type Length Places
ID___________ CHAR_________ 10____ ___
_____________ _____________ _____ ___
_____________ _____________ _____ ___
_____________ _____________ _____ ___
_____________ _____________ _____ ___
_____________ _____________ _____ ___
_____________ _____________ _____ ___
_____________ _____________ _____ ___
_____________ _____________ _____ ___
Bottom
F3=Exit F4=Prompt F5=Refresh F6=Insert line F10=Copy line
F12=Cancel F14=Delete line F19=Add data F24=More keys
F10=Copy line F14=Delete line F20=Display entire name
F21=Specify CREATE TABLE statement F24=More keys
Figure 87. Create Query Manager Table Display
150 Query Manager Use V6R1M0

When you create a table, you can insert, copy, and delete lines using the F6 (Insert line), F10 (Copy
line), and F14 (Delete line) function keys. These function keys are described on page 23.
6. When you finish defining all of the table columns, press the Enter key to save the table definition. If
you want to exit without saving the definition, press F3 (Exit) or F12 (Cancel) instead of the Enter
key.
Query Manager will not save a table that contains column definitions that are not valid. For example,
you cannot specify a CHARACTER data type with decimal places. If Query Manager finds any errors
when you try to save the table, it highlights the values that are not valid, and shows messages at the
bottom of the display telling you how to correct each entry.
When the table is saved, you see a message at the bottom of the display saying, “Table successfully
created. Press F19 to add rows.” Press F19 (Add data) if you want to begin adding data rows to
the newly created table. This function key works in the same way as if you chose 9 (Add data) from
the Work with Query Manager Tables display. See page 155 for instructions.
7. When you finish creating (and adding data rows to) the table, press F3 (Exit) or F12 (Cancel) to
return to the Work with Query Manager Tables display.
Note: If you create a table with a name that exceeds 10 characters in length or contains special characters,
you will see two table names in the Work With Query Manager Tables display once you return to
that display after leaving it. One name is the name you gave the table. The other name is a name
generated by the system. Both names refer to the same table.
While you are creating a table you can change a column definition or delete an entire column. However,
once the table definition is saved, you cannot add, delete, or copy columns, or change the column
definitions in any way.
The only way to change the definition of an existing table is to copy it. Choose option 3 (Copy table)
from the Work with Query Manager Tables display to create a new table by copying the definition of an
existing one. When you copy the table, you can copy, delete, and add columns, and change column
definitions in the same way as if you were creating a new table. If you need to change a table definition,
see “Copying a table in Query Manager” on page 163 for more information.
The F21=Specify CREATE TABLE statement function key is provided for more sophisticated users who
want to specify more detailed information about each column. When F21 is pressed, the interactive SQL
Create Table display appears. Additional things the user can specify are:
v Whether a column can contain NULL data
v Whether the user can assign a different CCSID to a particular column
All information that was previously entered on the Query Manager Create Table display is carried over to
the Specify Create Table display. Once the user fills in the desired information on the Specify Create Table
display and presses <ENTER> the Display SQL display appears. The user sees the exact CREATE TABLE
SQL statement that was used to create the table.
If you want to work through practice exercises in which you create and work with a Query Manager
table, turn to Appendix A, “Practice exercises for Query Manager.”
Defining table columns in Query Manager
The first step in defining a table is to decide what data the table should contain.
In a table, each column of a row is related in some way to all the other columns for that row. Columns of
a table identify particular types of information. Each column needs to be of a particular data type, such
as CHARACTER, INTEGER, DECIMAL, DATE, or TIME. When you define columns, you are enforcing a
set of entry rules to help maintain data integrity.
Chapter 8. Working with Query Manager tables 151

The rows contain the actual data of the table. The data in a row must conform to the column data types
defined for the table. Each row is a sequence of column values that conform to the column data types
defined for the table.
Before you can define a table, you need to have some idea of the types of data you want in the table. In
the STAFF table, shown below, the NAME column contains CHARACTER data, the ID column contains
INTEGER data, and the SALARY column contains DECIMAL data.
Table 11. The STAFF Table
ID NAME DEPT JOB YEARS SALARY COMM
10 Sanders 20 Mgr 7 18357.50 0
20 Pernal 20 Sales 8 18171.25 612.45
30 Marenghi 38 Mgr 5 17506.75 0
40 O’Brien 38 Sales 6 18006.00 846.55
50 Hanes 15 Mgr 10 20659.80 0
60 Quigley 38 Sales 0 16808.30 650.25
70 Rothman 15 Sales 7 16502.83 1152.00
80 James 20 Clerk 0 13504.60 128.20
90 Koonitz 42 Sales 6 18001.75 1386.70
100 Plotz 42 Mgr 7 18352.80 0
When you define a column’s data type, length, and number of decimal places, you indicate the kind of
data your table can contain for that column, and what operations can be performed using the data. For
example, since DECIMAL data can have arithmetic operations performed on it, you could calculate
SALARY plus COMM in a report form.
You should also determine the order in which the columns should appear. As a rule, you should consider
an order appropriate for the person entering the data. For example, if the information is being entered
from employee time sheets, define the table with the columns in the same order as the information
appears on the time sheet.
After you have determined the particular types of data the columns in your table should contain and the
order in which the columns should appear, you are ready to begin creating the table.
Supported data types in Query Manager
All of the supported data types that you can use when defining Query Manager tables are described in
Table 12. Do not specify a length for set length data types.
Table 12. Query Manager Table Data Types
Data Type Definition
CHARACTER A CHARACTER or CHAR is a fixed length column that can hold any SBCS or DBCS characters.
CHARACTER columns can range from 1 to 32,765 characters in length.
VARCHAR A VARCHAR is a variable length character column that can hold any SBCS or DBCS characters.
VARCHAR columns can range from 1 to 32,739 characters in length.
DECIMAL A DECIMAL or DEC column holds numeric data that contains a decimal point. There can be a
maximum of 31 digits in a DECIMAL column, with 0 to 31 decimal places.
NUMERIC A NUMERIC or NUM column holds zoned decimal numeric data. There can be a maximum of 31
digits in a NUMERIC column, with 0 to 31 decimal places.
INTEGER An INTEGER or INT column holds a large positive or negative whole number: from -2,147,483,648
to 2,147,483,647. (Long binary.) INTEGER columns are set length.
152 Query Manager Use V6R1M0
Table 12. Query Manager Table Data Types (continued)
Data Type Definition
SMALLINT A SMALLINT or SMALL column holds a small positive or negative whole number: from -32,768 to
32,767. (Short binary.) SMALLINT columns are set length.
REAL A REAL column holds single precision short floating-point numeric data (scientific notation). REAL
columns have a set length of 23 digits.
DOUBLE A DOUBLE column holds double precision long floating-point numeric data (scientific notation).
DOUBLE columns have a set length of 53 digits.
FLOAT A FLOAT column holds floating-point numeric data (scientific notation). The length you specify
determines whether the FLOAT column is a REAL or a DOUBLE data type. A length of 1 to 23
digits indicates a REAL data type; a length of 24 to 53 digits indicates a DOUBLE data type.
DATE A DATE column holds a three-part value that denotes year, month, and day in one of the formats
shown below. DATE columns are set length.
ISO yyyy-mm-dd 1992-10-12
USA mm/dd/yyyy 10/12/1992
EUR dd.mm.yyyy 12.10.1992
JIS yyyy-mm-dd 1992-10-12
TIME A TIME column holds a three-part value that denotes hour, minute, and second in one of the
formats shown below. TIME columns are set length.
ISO hh.mm.ss 13.30.05
USA hh:mm AM/PM 5:30 PM
EUR hh.mm.ss 13.30.05
JIS hh:mm:ss 13:30:05
TIMESTAMP A TIMESTAMP column holds the system date and time as a seven-part value that denotes year,
month, day, hour, minute, second, and microsecond entered in the format shown below.
TIMESTAMP columns are set length.
yyyy-mm-dd-hh.mm.ss.nnnnnn 1992-10-12-13.30.05.123456
GRAPHIC A GRAPHIC is a fixed length column that holds double-byte character set (DBCS) data. GRAPHIC
values cannot be operated on arithmetically. GRAPHIC columns can range from 1 to 16,383
characters in length. (Length specifications are given in characters, not bytes.)
VARGRAPHIC A VARGRAPHIC is a variable length graphic column that holds double-byte character set (DBCS)
data. VARGRAPHIC values cannot be operated on arithmetically. VARGRAPHIC columns can
range from 1 to 16,370 characters in length. (Length specifications are given in characters, not
bytes.)
BIGINT A big integer is a binary number composed of 8 bytes (64 bits) with a precision of 19 digits. The
range of big integers is -9223372036854775808 to +9223372036854775807.
BLOB A Binary Large OBject (BLOB) is a varying-length string with a maximum length of 2 147 483 647.
A BLOB is designed to store non-traditional data such as pictures, voice, and mixed media. BLOBs
can also store structured data for use by distinct types and user-defined functions. A BLOB is
considered to be a binary string. Although BLOB strings and FOR BIT DATA character strings
might be used for similar purposes, the two data types are not compatible. The BLOB function can
be used to change a FOR BIT DATA character string into a binary string. The CCSID of a BLOB is
65535.
CLOB A Character Large OBject (CLOB) is a varying-length character string with a maximum length of 2
147 483 647. A CLOB is designed to store large SBCS data or mixed data, such as lengthy
documents. For example, you can store information such as an employee resume, the script of a
play, or the text of novel in a CLOB. The CCSID of a CLOB cannot be 65535.
DATALINK A DATALINK value is an encapsulated value with a set of built-in scalar functions. The maximum
length must be in the range of 1 through 32717.
DBCLOB A Double-Byte Character Large OBject (DBCLOB) is a varying-length graphic string with a
maximum length of 1 073 741 823 double-byte characters. A DBCLOB is designed to store large
DBCS data, such as lengthy documents in UCS-2. The CCSID of a DBCLOB cannot be 65535.
Chapter 8. Working with Query Manager tables 153
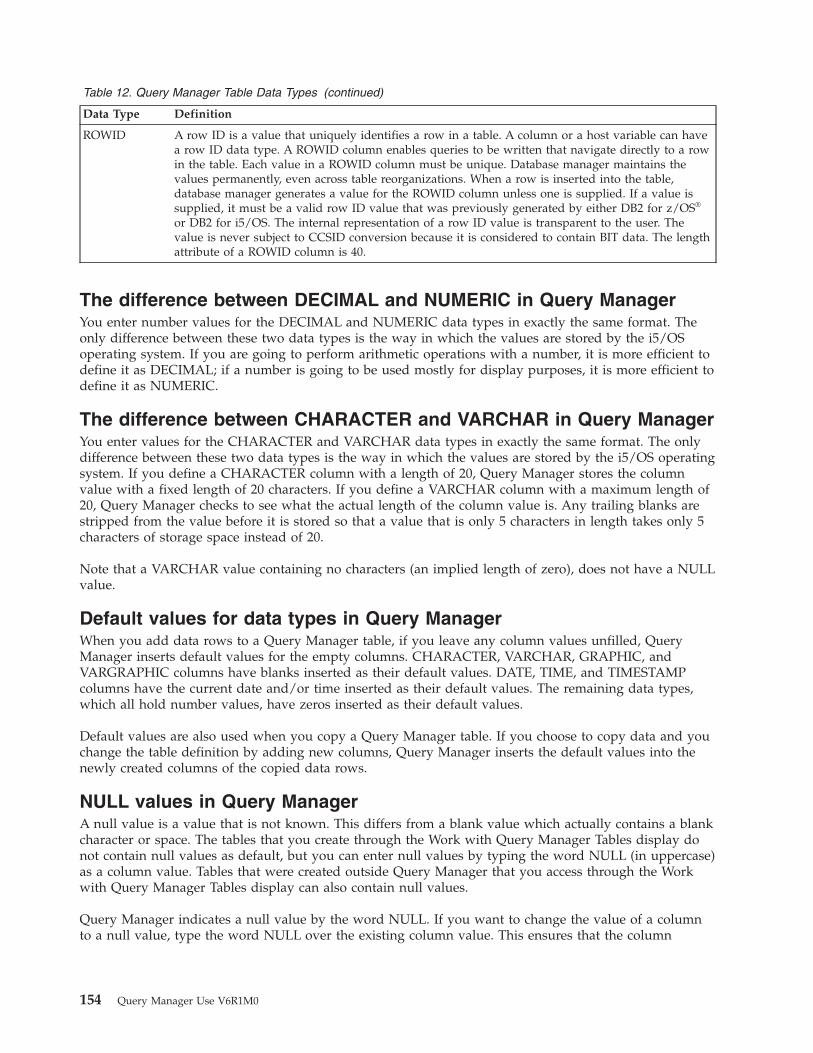
Table 12. Query Manager Table Data Types (continued)
Data Type Definition
ROWID A row ID is a value that uniquely identifies a row in a table. A column or a host variable can have
a row ID data type. A ROWID column enables queries to be written that navigate directly to a row
in the table. Each value in a ROWID column must be unique. Database manager maintains the
values permanently, even across table reorganizations. When a row is inserted into the table,
database manager generates a value for the ROWID column unless one is supplied. If a value is
supplied, it must be a valid row ID value that was previously generated by either DB2 for z/OS®
or DB2 for i5/OS. The internal representation of a row ID value is transparent to the user. The
value is never subject to CCSID conversion because it is considered to contain BIT data. The length
attribute of a ROWID column is 40.
The difference between DECIMAL and NUMERIC in Query Manager
You enter number values for the DECIMAL and NUMERIC data types in exactly the same format. The
only difference between these two data types is the way in which the values are stored by the i5/OS
operating system. If you are going to perform arithmetic operations with a number, it is more efficient to
define it as DECIMAL; if a number is going to be used mostly for display purposes, it is more efficient to
define it as NUMERIC.
The difference between CHARACTER and VARCHAR in Query Manager
You enter values for the CHARACTER and VARCHAR data types in exactly the same format. The only
difference between these two data types is the way in which the values are stored by the i5/OS operating
system. If you define a CHARACTER column with a length of 20, Query Manager stores the column
value with a fixed length of 20 characters. If you define a VARCHAR column with a maximum length of
20, Query Manager checks to see what the actual length of the column value is. Any trailing blanks are
stripped from the value before it is stored so that a value that is only 5 characters in length takes only 5
characters of storage space instead of 20.
Note that a VARCHAR value containing no characters (an implied length of zero), does not have a NULL
value.
Default values for data types in Query Manager
When you add data rows to a Query Manager table, if you leave any column values unfilled, Query
Manager inserts default values for the empty columns. CHARACTER, VARCHAR, GRAPHIC, and
VARGRAPHIC columns have blanks inserted as their default values. DATE, TIME, and TIMESTAMP
columns have the current date and/or time inserted as their default values. The remaining data types,
which all hold number values, have zeros inserted as their default values.
Default values are also used when you copy a Query Manager table. If you choose to copy data and you
change the table definition by adding new columns, Query Manager inserts the default values into the
newly created columns of the copied data rows.
NULL values in Query Manager
A null value is a value that is not known. This differs from a blank value which actually contains a blank
character or space. The tables that you create through the Work with Query Manager Tables display do
not contain null values as default, but you can enter null values by typing the word NULL (in uppercase)
as a column value. Tables that were created outside Query Manager that you access through the Work
with Query Manager Tables display can also contain null values.
Query Manager indicates a null value by the word NULL. If you want to change the value of a column
to a null value, type the word NULL over the existing column value. This ensures that the column
154 Query Manager Use V6R1M0
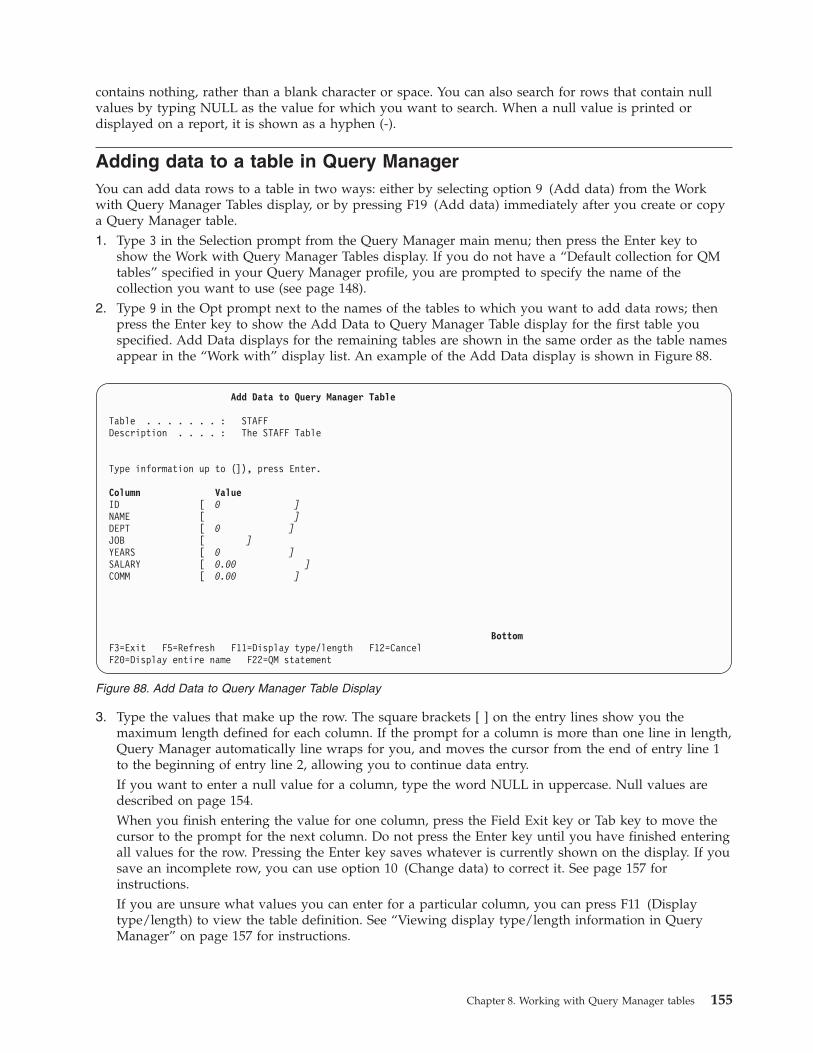
contains nothing, rather than a blank character or space. You can also search for rows that contain null
values by typing NULL as the value for which you want to search. When a null value is printed or
displayed on a report, it is shown as a hyphen (-).
Adding data to a table in Query Manager
You can add data rows to a table in two ways: either by selecting option 9 (Add data) from the Work
with Query Manager Tables display, or by pressing F19 (Add data) immediately after you create or copy
a Query Manager table.
1. Type 3 in the Selection prompt from the Query Manager main menu; then press the Enter key to
show the Work with Query Manager Tables display. If you do not have a “Default collection for QM
tables” specified in your Query Manager profile, you are prompted to specify the name of the
collection you want to use (see page 148).
2. Type 9 in the Opt prompt next to the names of the tables to which you want to add data rows; then
press the Enter key to show the Add Data to Query Manager Table display for the first table you
specified. Add Data displays for the remaining tables are shown in the same order as the table names
appear in the “Work with” display list. An example of the Add Data display is shown in Figure 88.
3. Type the values that make up the row. The square brackets [ ] on the entry lines show you the
maximum length defined for each column. If the prompt for a column is more than one line in length,
Query Manager automatically line wraps for you, and moves the cursor from the end of entry line 1
to the beginning of entry line 2, allowing you to continue data entry.
If you want to enter a null value for a column, type the word NULL in uppercase. Null values are
described on page 154.
When you finish entering the value for one column, press the Field Exit key or Tab key to move the
cursor to the prompt for the next column. Do not press the Enter key until you have finished entering
all values for the row. Pressing the Enter key saves whatever is currently shown on the display. If you
save an incomplete row, you can use option 10 (Change data) to correct it. See page 157 for
instructions.
If you are unsure what values you can enter for a particular column, you can press F11 (Display
type/length) to view the table definition. See “Viewing display type/length information in Query
Manager” on page 157 for instructions.
Add Data to Query Manager Table
Table . . . . . . . : STAFF
Description . . . . : The STAFF Table
Type information up to (]), press Enter.
Column Value
ID [ 0 ]
NAME [ ]
DEPT [ 0 ]
JOB [ ]
YEARS [ 0 ]
SALARY [ 0.00 ]
COMM [ 0.00 ]
Bottom
F3=Exit F5=Refresh F11=Display type/length F12=Cancel
F20=Display entire name F22=QM statement
Figure 88. Add Data to Query Manager Table Display
Chapter 8. Working with Query Manager tables 155

4. Press the Enter key when you finish typing the row data. This saves the row, and shows an empty
data entry display ready for you to enter the next row.
If you made any mistakes typing the row data, (for example, if you enter letters in a number prompt),
Query Manager highlights the errors, and shows messages at the bottom of the display telling you
how to correct each entry. You cannot save a row that contains information that is not valid. Correct
your errors; then press the Enter key again.
5. Press F3 (Exit) or F12 (Cancel) when you want to leave the Add Data to Query Manager Table
display and return to the Work with Query Manager Tables display.
Adding DBCS data to a table in Query Manager
The double-byte character set (DBCS) is a set of characters in which each character is represented by two
bytes. Languages such as Japanese, Chinese, and Korean, which contain more symbols than can be
represented by 256 code points, require double-byte character sets. Because each character requires two
bytes, the typing, displaying, and printing of DBCS characters requires hardware and programs that
support DBCS.
You can enter DBCS characters for Query Manager table values for a column defined with a GRAPHIC,
VARGRAPHIC, CHARACTER, or VARCHAR data type.
Each DBCS value needs to be enclosed between shift-out (SO) and shift-in (SI) characters. When you are
using a DBCS-capable keyboard, Query Manager automatically places the SO/SI characters in GRAPHIC
and VARGRAPHIC input fields, which forces you to enter only DBCS characters. If you accidentally
delete one or both of the SO/SI characters, Query Manager displays an error message telling you that the
value is not a valid DBCS string. Press F5 (Refresh) to restore the previous values for the display; then
re-enter the DBCS value.
If you enter a value that is longer than the maximum length defined for the column, Query Manager
truncates it, and discards the excess characters and blank spaces to the right of the value. If the prompt
for a DBCS value is more than one line in length, Query Manager will concatenate the DBCS strings that
you enter as long as the first character on each line is a shift-out character.
DBCS values need to be entered in insert mode. When you are in insert mode, every time you type a
character, the square bracket that indicates the maximum length for the column moves one character
space to the right. You might need to delete the blank spaces between the shift-in character and the
square bracket before you can enter your column value.
If you are using a keyboard that is not DBCS-capable, you can enter non-DBCS characters for a
GRAPHIC or VARGRAPHIC data type. You must enter an even number of characters between the
shift-out and shift-in characters. The non-DBCS characters are valid on a non-DBCS-capable display, but
they may not be valid DBCS characters.
Note: When you create a table using a display station that is DBCS-capable, all columns defined with
CHARACTER and VARCHAR data types are “DBCS-open”, which means that they accept both
SBCS and DBCS characters.
Query Manager automatically places the SO/SI characters in input fields on the Add Data to Query
Manager Table and Change Data in Query Manager Table displays for GRAPHIC and VARGRAPHIC
data types. If you want to enter a DBCS string on the Find Data in Query Manager Table display, or on
any of the Select Report Format or Define Prompted Query displays, you need to enter the SO/SI
characters yourself.
156 Query Manager Use V6R1M0
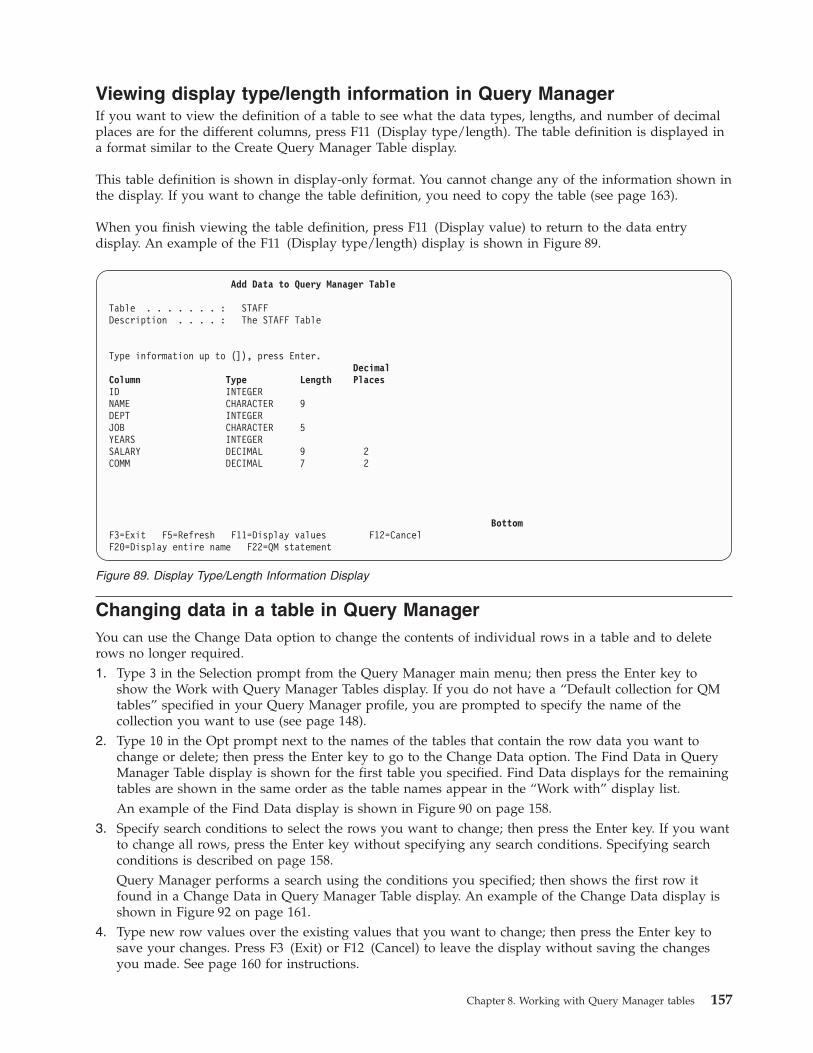
Viewing display type/length information in Query Manager
If you want to view the definition of a table to see what the data types, lengths, and number of decimal
places are for the different columns, press F11 (Display type/length). The table definition is displayed in
a format similar to the Create Query Manager Table display.
This table definition is shown in display-only format. You cannot change any of the information shown in
the display. If you want to change the table definition, you need to copy the table (see page 163).
When you finish viewing the table definition, press F11 (Display value) to return to the data entry
display. An example of the F11 (Display type/length) display is shown in Figure 89.
Changing data in a table in Query Manager
You can use the Change Data option to change the contents of individual rows in a table and to delete
rows no longer required.
1. Type 3 in the Selection prompt from the Query Manager main menu; then press the Enter key to
show the Work with Query Manager Tables display. If you do not have a “Default collection for QM
tables” specified in your Query Manager profile, you are prompted to specify the name of the
collection you want to use (see page 148).
2. Type 10 in the Opt prompt next to the names of the tables that contain the row data you want to
change or delete; then press the Enter key to go to the Change Data option. The Find Data in Query
Manager Table display is shown for the first table you specified. Find Data displays for the remaining
tables are shown in the same order as the table names appear in the “Work with” display list.
An example of the Find Data display is shown in Figure 90 on page 158.
3. Specify search conditions to select the rows you want to change; then press the Enter key. If you want
to change all rows, press the Enter key without specifying any search conditions. Specifying search
conditions is described on page 158.
Query Manager performs a search using the conditions you specified; then shows the first row it
found in a Change Data in Query Manager Table display. An example of the Change Data display is
shown in Figure 92 on page 161.
4. Type new row values over the existing values that you want to change; then press the Enter key to
save your changes. Press F3 (Exit) or F12 (Cancel) to leave the display without saving the changes
you made. See page 160 for instructions.
Add Data to Query Manager Table
Table . . . . . . . : STAFF
Description . . . . : The STAFF Table
Type information up to (]), press Enter.
Decimal
Column Type Length Places
ID INTEGER
NAME CHARACTER 9
DEPT INTEGER
JOB CHARACTER 5
YEARS INTEGER
SALARY DECIMAL 9 2
COMM DECIMAL 7 2
Bottom
F3=Exit F5=Refresh F11=Display values F12=Cancel
F20=Display entire name F22=QM statement
Figure 89. Display Type/Length Information Display
Chapter 8. Working with Query Manager tables 157

5. Press F15 (Next data row) to display the next row in the currently selected set of rows, or
F14 (Previous data row) to display the previous row. Press F16 (Find data) if you want to return to
the Find Data display, and alter the existing search conditions to find a new set of rows. See page 161
for information on the Change Data display function keys.
6. Press F3 (Exit) or F12 (Cancel) when you want to leave the Change Data display and return to the
Work with Query Manager Tables display. When you exit from the Change option, Query Manager
discards all of the search conditions you specified.
Searching for rows in Query Manager
Before you can change data, you need to tell Query Manager which rows you want to change. You do
this by defining search conditions for the different columns. For example:
v If you want to select the manager for department 10, tell Query Manager to search for all rows where
DEPT equals 10 and JOB equals Mgr.
v If you want to select all sales staff who have been with the company for more than 6 years, tell Query
Manager to search for all rows where JOB equals Sales and YEARS is greater than 6.
You use the search option not only to find data rows to change, but also to find data rows to use with the
following Work with Query Manager Tables options:
5=Display table
6=Print table
11=Display data
Specifying search conditions in Query Manager
The first display you see after choosing to Change Data, is the Find Data in Query Manager Table
display. You use this display to define your search conditions. An example of the Find Data display is
shown in Figure 90.
You can specify search conditions for all of the columns in the currently selected table. To create a search
condition, you need to enter the following information:
v AND, OR, (, ). All searches need to start with an opening parenthesis ‘(’ and end with a closing
parenthesis ‘)’. You can also use parentheses to group search conditions. Use AND or OR to join search
conditions and groups of conditions. You can press F4 (Prompt) while the cursor is positioned on the
AND, OR, (, ) prompt, to display a description of these values.
Find Data in Query Manager Table
Table . . . . . . . : STAFF
Description . . . . : The STAFF Table
Type search conditions, press Enter.
No conditions entered will find all data.
AND,OR,
(,) Column Test Value
(__ __________________ ____ ____________________________________
___ __________________ ____ ____________________________________
___ __________________ ____ ____________________________________
___ __________________ ____ ____________________________________
___ __________________ ____ ____________________________________
___ __________________ ____ ____________________________________
___ __________________ ____ ____________________________________
___ __________________ ____ ____________________________________
)__ __________________ ____ ____________________________________
Bottom
F3=Exit F4=Prompt F6=Insert line F10=Copy line F12=Cancel
F14=Delete line F20=Display entire name F22=QM Statement
Figure 90. Find Data in Query Manager Table Display
158 Query Manager Use V6R1M0

Use AND if two or more conditions or groups of conditions need to be true. For example, to select all
employees whose salaries range between $16,000 and $18,000, you would search for SALARY greater
than 16000 “AND” SALARY less than 18000.
Use OR if only one of the conditions needs to be true. For example, to select all clerks and all sales
staff, you would search for JOB equals Sales “OR” JOB equals Clerk.
v Column. Type the name of the column on which you want the search condition performed. If you are
unsure of the column names for this table, press F4 (Prompt) while the cursor is positioned on this
prompt, to display a list. Type 1 in the Opt prompt next to the name of the column you want to
choose; then press the Enter key.
v Test. You can press F4 (Prompt) while the cursor is positioned on this prompt, to display a list of all
available test conditions, from which you can make a selection. The conditions that are supported for
Query Manager tables are shown in Table 13.
Table 13. Search Conditions
Cond Description
EQ Equal to (Exact match)
NE Not Equal to
GT Greater Than
GE Greater Than or Equal to
LT Less Than
LE Less Than or Equal to
v Value. Type the value that you want Query Manager to compare against the row data from the
specified “Column”. Make sure the value you enter is compatible with the column’s data type and
length. If the value you want to enter is longer than the prompt shown on the display, press
F4 (Prompt) while the cursor is positioned on this prompt, to display an extended entry window
through which you can type the value.
If you are performing the search on number data, you can enter a number, an expression, or the name
of another column that contains number data.
If you are performing the search on a character value, you can enter a character string, or the name of
another column that contains character data. Enclose column names in double quotation marks, but do
not enclose character strings in quotation marks. When you enter a character string, Query Manager
searches for the value exactly as you type it, recognizing uppercase and lowercase letters.
If you are performing the search on a graphic value, you can enter a graphic string, a character string,
or the name of another column that contains graphic data. Enclose column names in double quotation
marks, and character strings in shift-out (SO) and shift-in (SI) characters. You can enter either SBCS or
DBCS strings as graphic values. When you enter SBCS strings, the characters should be uppercase
letters only, and remember that each character needs to be two bytes in length. When you enter a
graphic string, it needs to begin with the letter G (to identify the string as graphic) and be enclosed in
single quotation marks and DBCS SO/SI characters. The following example uses < and > to indicate
the SO/SI characters: G’<A B C D E >’. For more information on graphic strings, turn to “Adding
DBCS data to a table in Query Manager” on page 156.
You can search for null values in number, character, and graphic columns. To search for a null value,
type the word NULL (in uppercase) as the search value. Null values are described on page 154.
The Find Data in Query Manager Table display provides nine lines on which you can define your search
conditions. You can use F6 (Insert line), F10 (Copy line), and F14 (Delete line) to increase or decrease the
number of lines, and otherwise edit the search conditions as you create them. These function keys are
described on page 23.
When you finish defining the search conditions, press the Enter key to begin the search.
Chapter 8. Working with Query Manager tables 159

Note: If you press the Enter key without having defined any search conditions, Query Manager selects
all rows in the table.
Figure 91 shows the search conditions you would enter to find all employees who work in either DEPT
20 or DEPT 42.
If you made any errors defining the search conditions, Query Manager highlights the errors, and shows
error messages at the bottom of the display telling you how to correct each entry. Correct any errors; then
press the Enter key again to perform the search.
If no rows are found in Query Manager
If the search is unsuccessful and no data rows are found, Query Manager shows an error message at the
bottom of the Find Data display, and prompts you to enter new search conditions.
Type the new conditions, or press F3 (Exit) or F12 (Cancel) to leave the Find Data display and return to
the Work with Query Manager Tables display.
Note: The error message is displayed only if you are searching for rows through the Change Data,
Display Data, or Print Table options. If a search finds no rows when you are using the Display
Table option, Query Manager shows a blank display report instead of an error message.
Changing the data in Query Manager
When Query Manager completes the search, it shows a Change Data in Query Manager Table display
containing the first data row found that matched the search conditions. The Change Data display is
similar in appearance to the Add Data display, and the same data entry rules apply. See page 155 for data
entry instructions.
An example of the Change Data display is shown in Figure 92 on page 161.
Find Data in Query Manager Table
Table . . . . . . . : STAFF
Description . . . . : The STAFF Table
Type search conditions, press Enter.
No conditions entered will find all data.
AND,OR,
(,) Column Test Value
(__ DEPT______________ EQ 20__________________________________
OR_ DEPT______________ EQ 42__________________________________
___ __________________ ____ ____________________________________
___ __________________ ____ ____________________________________
___ __________________ ____ ____________________________________
___ __________________ ____ ____________________________________
___ __________________ ____ ____________________________________
___ __________________ ____ ____________________________________
)__ __________________ ____ ____________________________________
Bottom
F3=Exit F4=Prompt F6=Insert line F10=Copy line F12=Cancel
F14=Delete line F20=Display entire name F22=QM Statement
Figure 91. Example Search Condition
160 Query Manager Use V6R1M0
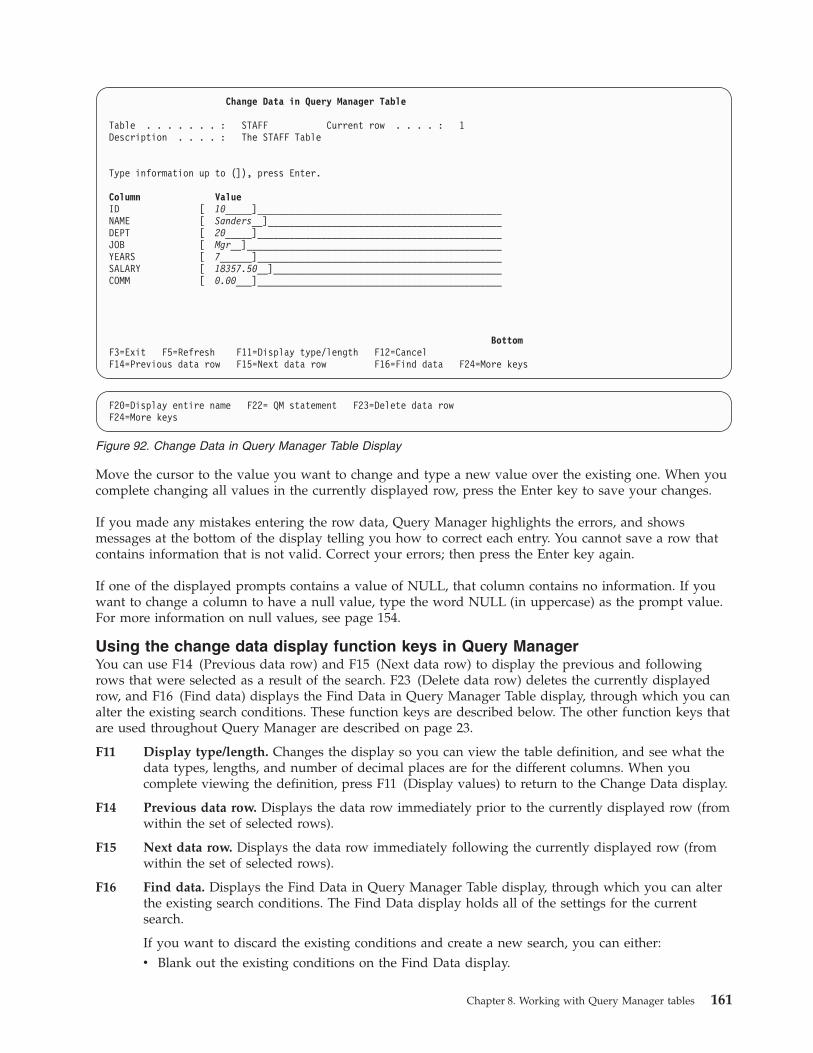
Move the cursor to the value you want to change and type a new value over the existing one. When you
complete changing all values in the currently displayed row, press the Enter key to save your changes.
If you made any mistakes entering the row data, Query Manager highlights the errors, and shows
messages at the bottom of the display telling you how to correct each entry. You cannot save a row that
contains information that is not valid. Correct your errors; then press the Enter key again.
If one of the displayed prompts contains a value of NULL, that column contains no information. If you
want to change a column to have a null value, type the word NULL (in uppercase) as the prompt value.
For more information on null values, see page 154.
Using the change data display function keys in Query Manager
You can use F14 (Previous data row) and F15 (Next data row) to display the previous and following
rows that were selected as a result of the search. F23 (Delete data row) deletes the currently displayed
row, and F16 (Find data) displays the Find Data in Query Manager Table display, through which you can
alter the existing search conditions. These function keys are described below. The other function keys that
are used throughout Query Manager are described on page 23.
F11 Display type/length. Changes the display so you can view the table definition, and see what the
data types, lengths, and number of decimal places are for the different columns. When you
complete viewing the definition, press F11 (Display values) to return to the Change Data display.
F14 Previous data row. Displays the data row immediately prior to the currently displayed row (from
within the set of selected rows).
F15 Next data row. Displays the data row immediately following the currently displayed row (from
within the set of selected rows).
F16 Find data. Displays the Find Data in Query Manager Table display, through which you can alter
the existing search conditions. The Find Data display holds all of the settings for the current
search.
If you want to discard the existing conditions and create a new search, you can either:
v Blank out the existing conditions on the Find Data display.
Change Data in Query Manager Table
Table . . . . . . . : STAFF Current row . . . . : 1
Description . . . . : The STAFF Table
Type information up to (]), press Enter.
Column Value
ID [ 10_____]______________________________________________
NAME [ Sanders__]____________________________________________
DEPT [ 20_____]______________________________________________
JOB [ Mgr__]________________________________________________
YEARS [ 7______]______________________________________________
SALARY [ 18357.50__]___________________________________________
COMM [ 0.00___]______________________________________________
Bottom
F3=Exit F5=Refresh F11=Display type/length F12=Cancel
F14=Previous data row F15=Next data row F16=Find data F24=More keys
F20=Display entire name F22= QM statement F23=Delete data row
F24=More keys
Figure 92. Change Data in Query Manager Table Display
Chapter 8. Working with Query Manager tables 161
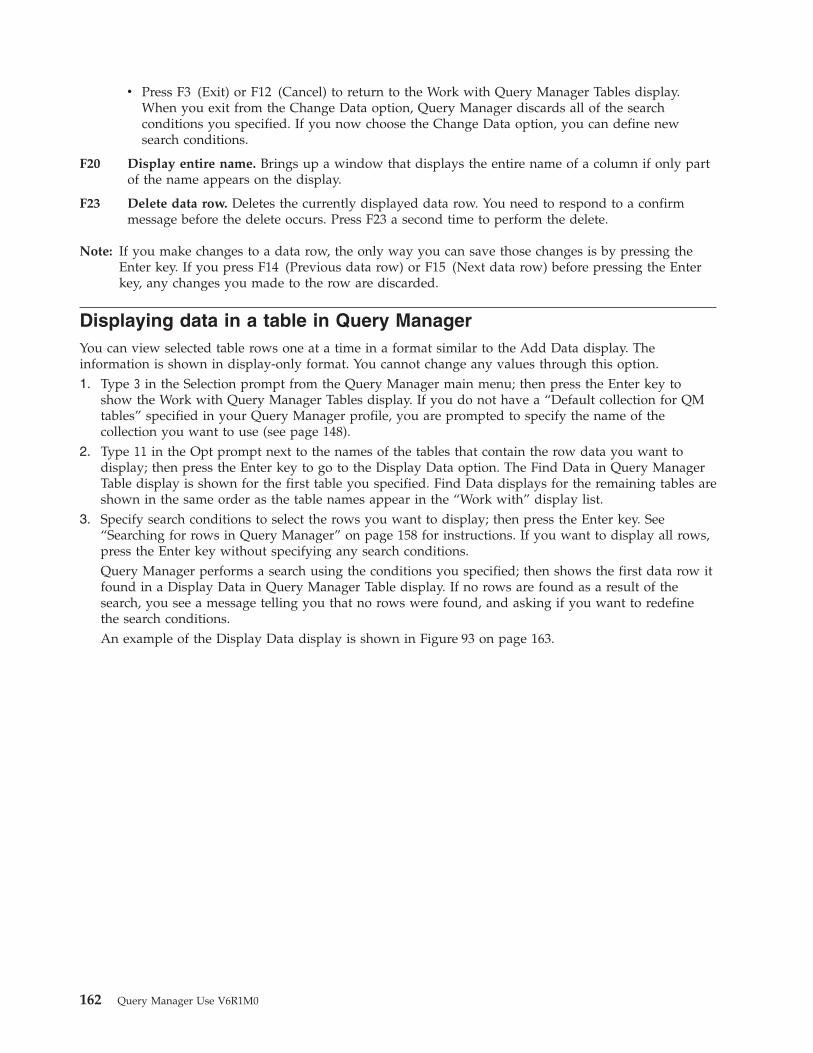
v Press F3 (Exit) or F12 (Cancel) to return to the Work with Query Manager Tables display.
When you exit from the Change Data option, Query Manager discards all of the search
conditions you specified. If you now choose the Change Data option, you can define new
search conditions.
F20 Display entire name. Brings up a window that displays the entire name of a column if only part
of the name appears on the display.
F23 Delete data row. Deletes the currently displayed data row. You need to respond to a confirm
message before the delete occurs. Press F23 a second time to perform the delete.
Note: If you make changes to a data row, the only way you can save those changes is by pressing the
Enter key. If you press F14 (Previous data row) or F15 (Next data row) before pressing the Enter
key, any changes you made to the row are discarded.
Displaying data in a table in Query Manager
You can view selected table rows one at a time in a format similar to the Add Data display. The
information is shown in display-only format. You cannot change any values through this option.
1. Type 3 in the Selection prompt from the Query Manager main menu; then press the Enter key to
show the Work with Query Manager Tables display. If you do not have a “Default collection for QM
tables” specified in your Query Manager profile, you are prompted to specify the name of the
collection you want to use (see page 148).
2. Type 11 in the Opt prompt next to the names of the tables that contain the row data you want to
display; then press the Enter key to go to the Display Data option. The Find Data in Query Manager
Table display is shown for the first table you specified. Find Data displays for the remaining tables are
shown in the same order as the table names appear in the “Work with” display list.
3. Specify search conditions to select the rows you want to display; then press the Enter key. See
“Searching for rows in Query Manager” on page 158 for instructions. If you want to display all rows,
press the Enter key without specifying any search conditions.
Query Manager performs a search using the conditions you specified; then shows the first data row it
found in a Display Data in Query Manager Table display. If no rows are found as a result of the
search, you see a message telling you that no rows were found, and asking if you want to redefine
the search conditions.
An example of the Display Data display is shown in Figure 93 on page 163.
162 Query Manager Use V6R1M0
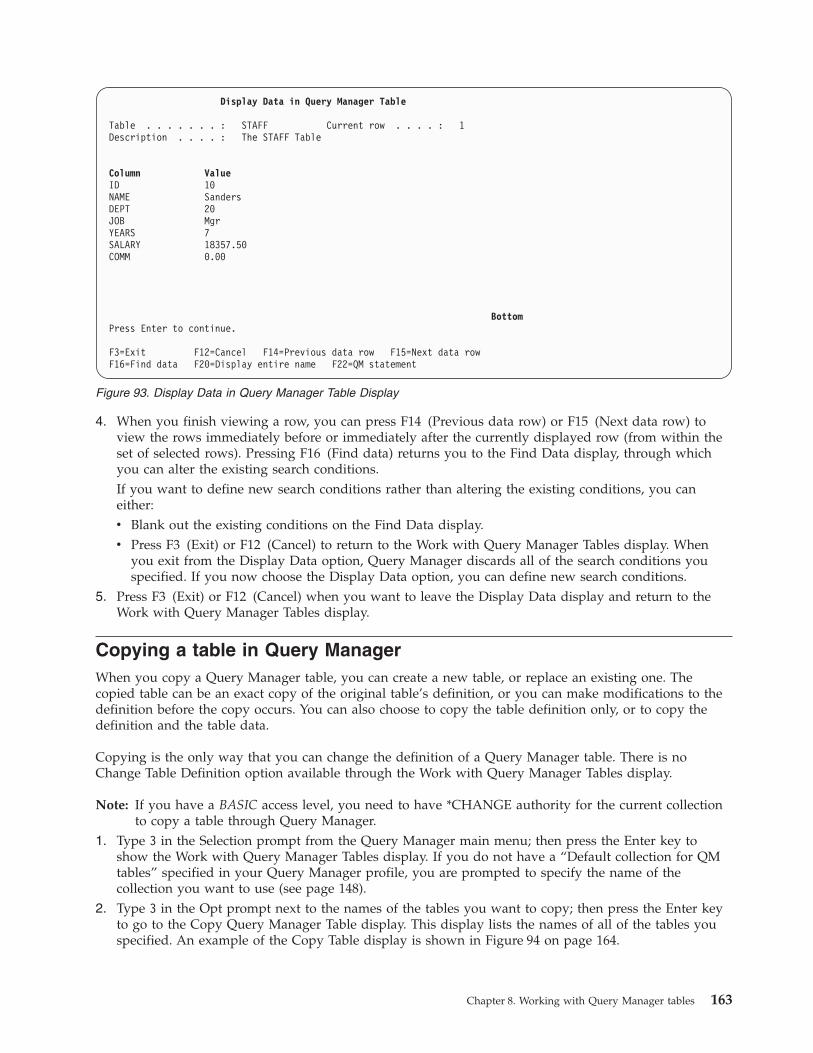
4. When you finish viewing a row, you can press F14 (Previous data row) or F15 (Next data row) to
view the rows immediately before or immediately after the currently displayed row (from within the
set of selected rows). Pressing F16 (Find data) returns you to the Find Data display, through which
you can alter the existing search conditions.
If you want to define new search conditions rather than altering the existing conditions, you can
either:
v Blank out the existing conditions on the Find Data display.
v Press F3 (Exit) or F12 (Cancel) to return to the Work with Query Manager Tables display. When
you exit from the Display Data option, Query Manager discards all of the search conditions you
specified. If you now choose the Display Data option, you can define new search conditions.5. Press F3 (Exit) or F12 (Cancel) when you want to leave the Display Data display and return to the
Work with Query Manager Tables display.
Copying a table in Query Manager
When you copy a Query Manager table, you can create a new table, or replace an existing one. The
copied table can be an exact copy of the original table’s definition, or you can make modifications to the
definition before the copy occurs. You can also choose to copy the table definition only, or to copy the
definition and the table data.
Copying is the only way that you can change the definition of a Query Manager table. There is no
Change Table Definition option available through the Work with Query Manager Tables display.
Note: If you have a BASIC access level, you need to have *CHANGE authority for the current collection
to copy a table through Query Manager.
1. Type 3 in the Selection prompt from the Query Manager main menu; then press the Enter key to
show the Work with Query Manager Tables display. If you do not have a “Default collection for QM
tables” specified in your Query Manager profile, you are prompted to specify the name of the
collection you want to use (see page 148).
2. Type 3 in the Opt prompt next to the names of the tables you want to copy; then press the Enter key
to go to the Copy Query Manager Table display. This display lists the names of all of the tables you
specified. An example of the Copy Table display is shown in Figure 94 on page 164.
Display Data in Query Manager Table
Table . . . . . . . : STAFF Current row . . . . : 1
Description . . . . : The STAFF Table
Column Value
ID 10
NAME Sanders
DEPT 20
JOB Mgr
YEARS 7
SALARY 18357.50
COMM 0.00
Bottom
Press Enter to continue.
F3=Exit F12=Cancel F14=Previous data row F15=Next data row
F16=Find data F20=Display entire name F22=QM statement
Figure 93. Display Data in Query Manager Table Display
Chapter 8. Working with Query Manager tables 163
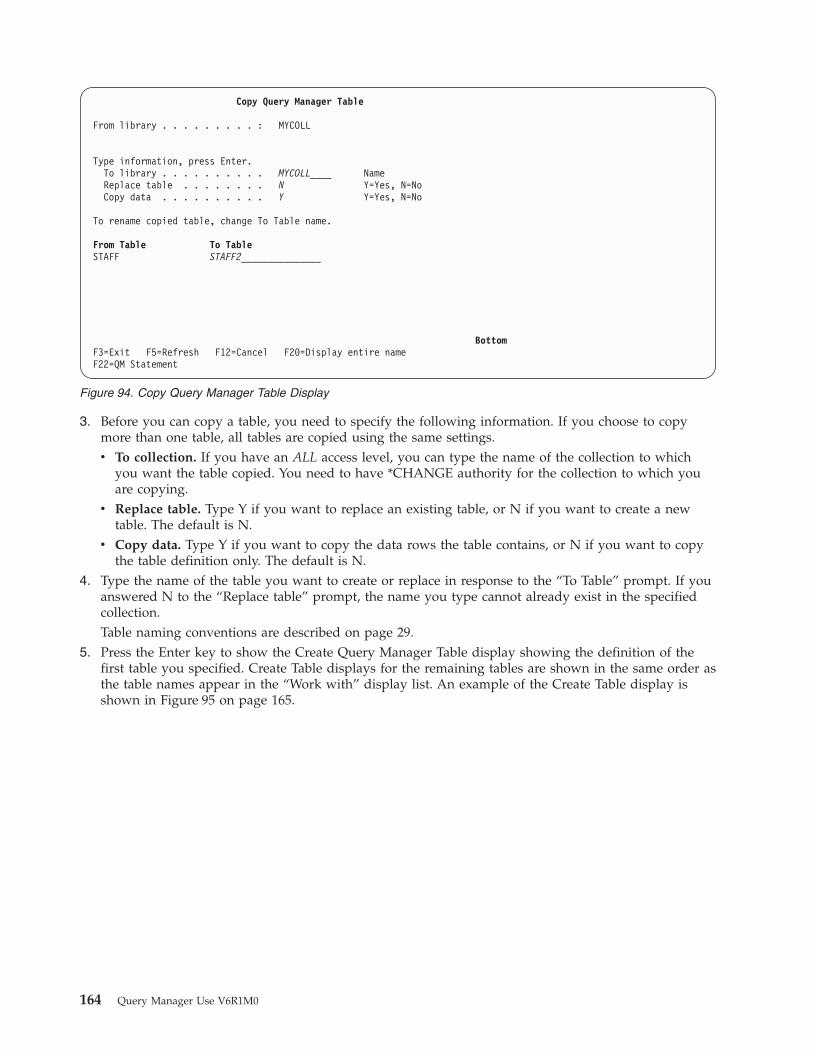
3. Before you can copy a table, you need to specify the following information. If you choose to copy
more than one table, all tables are copied using the same settings.
v To collection. If you have an ALL access level, you can type the name of the collection to which
you want the table copied. You need to have *CHANGE authority for the collection to which you
are copying.
v Replace table. Type Y if you want to replace an existing table, or N if you want to create a new
table. The default is N.
v Copy data. Type Y if you want to copy the data rows the table contains, or N if you want to copy
the table definition only. The default is N.4. Type the name of the table you want to create or replace in response to the “To Table” prompt. If you
answered N to the “Replace table” prompt, the name you type cannot already exist in the specified
collection.
Table naming conventions are described on page 29.
5. Press the Enter key to show the Create Query Manager Table display showing the definition of the
first table you specified. Create Table displays for the remaining tables are shown in the same order as
the table names appear in the “Work with” display list. An example of the Create Table display is
shown in Figure 95 on page 165.
Copy Query Manager Table
From library . . . . . . . . . : MYCOLL
Type information, press Enter.
To library . . . . . . . . . . MYCOLL____ Name
Replace table . . . . . . . . N Y=Yes, N=No
Copy data . . . . . . . . . . Y Y=Yes, N=No
To rename copied table, change To Table name.
From Table To Table
STAFF STAFF2_______________
Bottom
F3=Exit F5=Refresh F12=Cancel F20=Display entire name
F22=QM Statement
Figure 94. Copy Query Manager Table Display
164 Query Manager Use V6R1M0

6. You can change the table definition while the message “Press Enter to create the copied table and
copy the data.” is displayed. When you copy an existing table, you effectively create a new one. You
can now change the definition of the table the same way you would if you were using option
1 (Create table) from the Work with Query Manager Tables display. See page 149 for instructions on
how to use the Create Table display and its function keys.
If you copied table data in addition to copying the definition, you should be careful not to make
major changes to the table definition. Query Manager does its best to fit the data into the newly
defined columns using the following guidelines:
v Data is copied when a column in the new table has the same name as a column in the old table, as
long as the columns have compatible data types. You can change the length of the column and its
position within the definition, but you cannot change its name or give it an incompatible data type.
– CHARACTER and VARCHAR are compatible. If the columns hold only DBCS characters, or an
even number of SBCS characters, they can also be copied to GRAPHIC and VARGRAPHIC
columns.
– GRAPHIC and VARGRAPHIC are compatible. These columns can also be copied to
CHARACTER and VARCHAR columns.
– NUMERIC and DECIMAL are compatible.
– INTEGER and SMALLINT are compatible.
– REAL, DOUBLE, and FLOAT are compatible.v When you decrease the length of a character column, any column values that are longer than the
new length are truncated on the right.
v When you change the length of a number column, if a significant number of digits needs to be
truncated because a shorter length is specified, the column is set to the default value of zero. If the
length or number of decimal places is increased, zeros are added before or after the number.
v The new columns you create are filled with default values depending on their data types (for
example, blanks for characters and zeros for numbers).
v Query Manager discards the data from the columns that existed in the old table but do not exist in
the new one.7. Press the Enter key when you are ready to complete the copy and save the table definition. You
cannot save a table that contains column definitions that are not valid. If Query Manager finds any
errors when you try to save the table, it highlights the values that are not valid one at a time, and
shows messages at the bottom of the display telling you how to correct each entry.
Create Query Manager Table
Type choices, press Enter.
Table . . . . . . . . . STAFF2_______________ Name
Description . . . . . . The STAFF Table____________________________________
Decimal
Column Type Length Places
ID_______________ INTEGER___ ______ ___
NAME_____________ CHARACTER_ 9_____ ___
DEPT_____________ INTEGER___ ______ ___
JOB_____________ CHARACTER_ 5_____ ___
YEARS___________ INTEGER___ ______ ___
SALARY__________ DECIMAL____ 9_____ 2__
COMM____________ DECIMAL____ 7_____ 2__
________________ ___________ ______ ___
________________ ____________ ______ ___
Bottom
F3=Exit F4=Prompt F5=Refresh F6=Insert line F10=Copy line
F12=Cancel F14=Delete line F19=Add data F24=More keys
Figure 95. Create Copied Table Display
Chapter 8. Working with Query Manager tables 165

If you want to leave the Create Table display without saving your newly copied table definition, press
F3 (Exit) or F12 (Cancel) instead of the Enter key.
When the table has been successfully saved, you see a message at the bottom of the display telling
you that the table has been copied. You can now press F19 (Add data) if you want to add row data to
the newly copied table. See “Adding data to a table in Query Manager” on page 155 for data entry
instructions.
8. Press F3 (Exit) of F12 (Cancel) when you want to leave the Create Table display and return to the
Work with Query Manager Tables display.
Deleting a table in Query Manager
When you choose to delete the definition and data of a Query Manager table, Query Manager shows a
confirm display. No tables are deleted until you respond to this display.
1. Type 3 in the Selection prompt from the Query Manager main menu; then press the Enter key to
show the Work with Query Manager Tables display. If you do not have a “Default collection for QM
tables” specified in your Query Manager profile, you are prompted to specify the name of the
collection you want to use (see page 148).
2. Type 4 in the Opt prompt next to the names of the tables that you want to delete; then press the Enter
key to go to the Confirm Delete of Table display. This display lists the names of all of the tables you
selected to delete. When you delete a table that is represented by two names, both table names are
deleted. There are two table names anytime you name a table:
v A name longer than 10 characters
v A name that contains characters not valid in a system name
For more information on how tables are named, see “Rules for table name generation in Query
Manager” on page 20. An example of the Confirm Delete display is shown in Figure 96.
When you choose to delete more than one table, you may want to press F11 (Display table only) to
hide the table descriptions and show multiple columns of table names on the display.
3. Press the Enter key to confirm the delete and return to the Work with Query Manager Tables display.
Note that when you press the Enter key, you delete all of the tables shown on the display. If you want
to leave the Confirm Delete display without deleting any tables, press F12 (Cancel) instead of the
Enter key.
Confirm Delete of Table
Library . . . . . : MYCOLL
Press Enter to confirm your choices for 4=Delete.
Press F12 to return to change your choices.
Opt Table Description
4 APPLICANT Table of job applicants
4 CARS Sample CARS Table
4 STAFF The STAFF Table
F11=Display table only F12=Cancel F20=Display entire name
Figure 96. Confirm Delete of Table Display
166 Query Manager Use V6R1M0

Displaying a table in Query Manager
You can view selected rows of data from a table in a Display Report. Use this option to view table reports
prior to printing.
Note: If the “Run query mode” setting in your Query Manager profile is batch, you cannot use your
display for output, so this option is not available through the Work with Query Manager Tables
display. See “Run query mode in Query Manager” on page 35 for more information.
1. Type 3 in the Selection prompt from the Query Manager main menu; then press the Enter key to
show the Work with Query Manager Tables display. If you do not have a “Default collection for QM
tables” specified in your Query Manager profile, you are prompted to specify the name of the
collection you want to use (see page 148).
2. Type 5 in the Opt prompt next to the names of the tables that contain the rows you want to display;
then press the Enter key to go to the Display Table option. The Find Data in Query Manager Table
display is shown for the first table you specified. Find Data displays for the remaining tables are
shown in the same order as the table names appear in the “Work with” display list.
3. Specify search conditions to select the rows you want to display; then press the Enter key. If you want
to display all rows, press the Enter key without specifying any search conditions. See “Searching for
rows in Query Manager” on page 158 for instructions.
Query Manager performs a search using the conditions you specified; then displays all of the rows it
selected in a Display Report. When you see More... in the lower right-hand corner of the display, it
means that the report is more than one display in length. Use the display station’s roll keys to view
the entire report.
An example of the Display Report display is shown in Figure 97 on page 168.
If no rows are displayed, it means that the search was unsuccessful and found no rows. Press
F3 (Exit) or F12 (Cancel) to leave the Display Report display and return to the Work with Query
Manager Tables display. You can then choose the Display Table option again if you want to define
new search conditions.
4. Press F3 (Exit) or F12 (Cancel) when you want to leave the Display Report display and return to the
Work with Query Manager Tables display. When you exit from the Display Table option, Query
Manager discards all of the search conditions you specified.
Note: If you press F12 (Cancel) to leave the Display Report display, ignore any messages that warn
you that you might lose active data. If you press F3 (Exit) to leave the display, answer NO to
any prompt asking if you want to continue running a query. The Query Manager tables options
have no effect on active data. The only way that you can create active data in Query Manager
is to run an SQL SELECT statement query or prompted query in interactive mode.
Chapter 8. Working with Query Manager tables 167
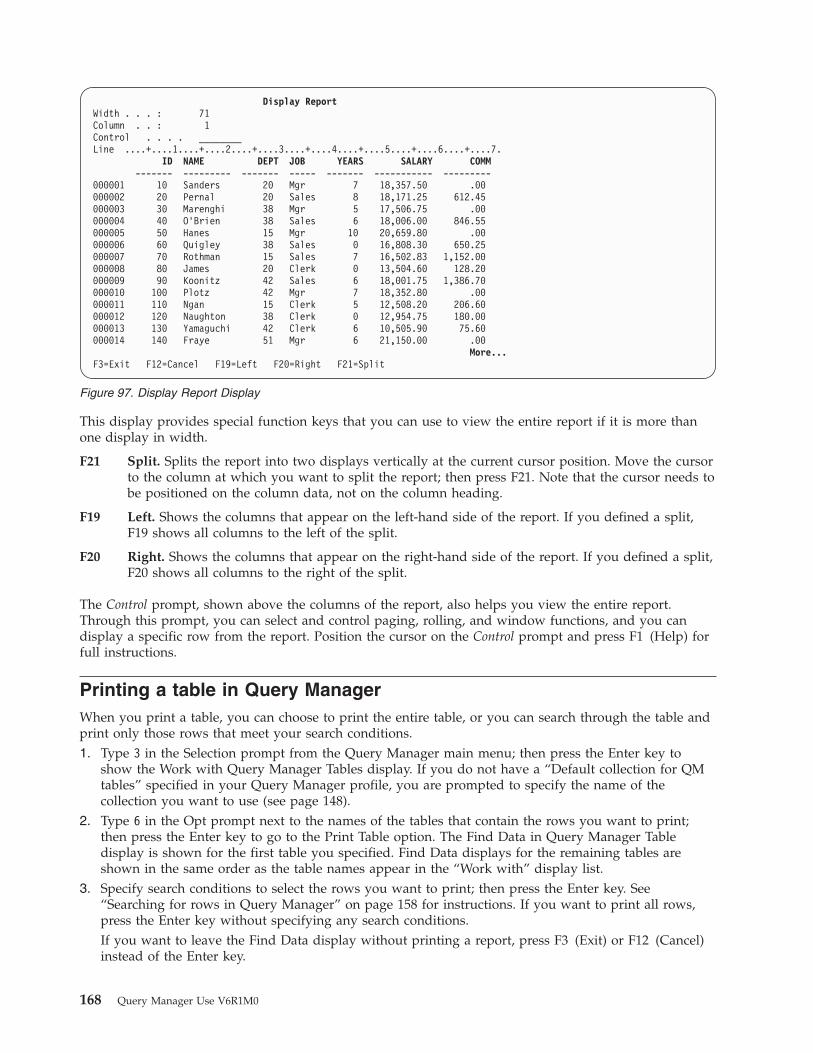
This display provides special function keys that you can use to view the entire report if it is more than
one display in width.
F21 Split. Splits the report into two displays vertically at the current cursor position. Move the cursor
to the column at which you want to split the report; then press F21. Note that the cursor needs to
be positioned on the column data, not on the column heading.
F19 Left. Shows the columns that appear on the left-hand side of the report. If you defined a split,
F19 shows all columns to the left of the split.
F20 Right. Shows the columns that appear on the right-hand side of the report. If you defined a split,
F20 shows all columns to the right of the split.
The Control prompt, shown above the columns of the report, also helps you view the entire report.
Through this prompt, you can select and control paging, rolling, and window functions, and you can
display a specific row from the report. Position the cursor on the Control prompt and press F1 (Help) for
full instructions.
Printing a table in Query Manager
When you print a table, you can choose to print the entire table, or you can search through the table and
print only those rows that meet your search conditions.
1. Type 3 in the Selection prompt from the Query Manager main menu; then press the Enter key to
show the Work with Query Manager Tables display. If you do not have a “Default collection for QM
tables” specified in your Query Manager profile, you are prompted to specify the name of the
collection you want to use (see page 148).
2. Type 6 in the Opt prompt next to the names of the tables that contain the rows you want to print;
then press the Enter key to go to the Print Table option. The Find Data in Query Manager Table
display is shown for the first table you specified. Find Data displays for the remaining tables are
shown in the same order as the table names appear in the “Work with” display list.
3. Specify search conditions to select the rows you want to print; then press the Enter key. See
“Searching for rows in Query Manager” on page 158 for instructions. If you want to print all rows,
press the Enter key without specifying any search conditions.
If you want to leave the Find Data display without printing a report, press F3 (Exit) or F12 (Cancel)
instead of the Enter key.
Display Report
Width . . . : 71
Column . . : 1
Control . . . . ________
Line ....+....1....+....2....+....3....+....4....+....5....+....6....+....7.
ID NAME DEPT JOB YEARS SALARY COMM
------- --------- ------- ----- ------- ----------- ---------
000001 10 Sanders 20 Mgr 7 18,357.50 .00
000002 20 Pernal 20 Sales 8 18,171.25 612.45
000003 30 Marenghi 38 Mgr 5 17,506.75 .00
000004 40 O’Brien 38 Sales 6 18,006.00 846.55
000005 50 Hanes 15 Mgr 10 20,659.80 .00
000006 60 Quigley 38 Sales 0 16,808.30 650.25
000007 70 Rothman 15 Sales 7 16,502.83 1,152.00
000008 80 James 20 Clerk 0 13,504.60 128.20
000009 90 Koonitz 42 Sales 6 18,001.75 1,386.70
000010 100 Plotz 42 Mgr 7 18,352.80 .00
000011 110 Ngan 15 Clerk 5 12,508.20 206.60
000012 120 Naughton 38 Clerk 0 12,954.75 180.00
000013 130 Yamaguchi 42 Clerk 6 10,505.90 75.60
000014 140 Fraye 51 Mgr 6 21,150.00 .00
More...
F3=Exit F12=Cancel F19=Left F20=Right F21=Split
Figure 97. Display Report Display
168 Query Manager Use V6R1M0
Query Manager performs a search using the conditions you specified; then prints all of the rows it
selected in a report. If no rows are found as a result of the search, you see a message telling you that
no rows were found, and asking if you want to redefine the search conditions.
Query Manager displays a message at the bottom of the display telling you when the report has been
successfully sent to print or batch. You then return to the Work with Query Manager Tables display.
When you leave the Print Table option, Query Manager discards all of the search conditions you
specified.
The printed report shows columns in the same order as they appear in the table definition, with the
table’s column names being used for the report headings. Column values are displayed using the width
from the table definitions, and column names that are longer than the specified width are truncated.
The table is printed using the default settings from your Query Manager profile. If you want to change
any of your print settings, you should alter your profile before you choose this print option. See “Run
query mode in Query Manager” on page 35 and “Printer to use for output in Query Manager” on page
39 for more information. If you print the table in interactive mode, you should also see “Maximum
number of rows allowed on interactive run in Query Manager” on page 36.
Renaming a table in Query Manager
You can only change system names. You cannot change a table’s name if the name contains special
characters or is longer than 10 characters.
You can specify new names for more than one Query Manager table in a single operation.
Note: You need to have *CHANGE authority for the current collection to rename a table through Query
Manager. You can copy the table and assign a new name for the copied table.
To rename a table:
1. Type 3 in the Selection prompt from the Query Manager main menu; then press the Enter key to
show the Work with Query Manager Tables display. If you do not have a “Default collection for QM
tables” specified in your Query Manager profile, you are prompted to specify the name of the
collection you want to use (see page 148).
2. Type 7 in the Opt prompt next to the names of the tables that you want to rename; then press the
Enter key. The Rename Query Manager Table display is shown, listing the names of all of the tables
you specified. An example of this display is shown in Figure 98 on page 170.
Chapter 8. Working with Query Manager tables 169

3. Type the new name for the table. Table naming conventions are described on page 29. You need to
enter a table name that does not already exist in the current collection. You cannot use the Rename
Table option to replace existing tables.
If you choose to rename more than one table, you need to type new names for all of the tables before
pressing the Enter key.
4. Press the Enter key to save the renamed tables, and return to the Work with Query Manager Tables
display. If you want to exit from the Rename Table display without specifying new table names, press
F3 (Exit) or F12 (Cancel) instead of the Enter key.
Displaying a table definition in Query Manager
Query Manager displays the definition of a table in a format similar to the Create Table display, showing
the name, data type, length, and number of decimal places for all of the table columns. This information
is shown in display-only format. You cannot change any values through this option.
1. Type 3 in the Selection prompt from the Query Manager main menu; then press the Enter key to
show the Work with Query Manager Tables display. If you do not have a “Default collection for QM
tables” specified in your Query Manager profile, you are prompted to specify the name of the
collection you want to use (see page 148).
2. Type 8 in the Opt prompt next to the names of the tables whose definitions you want to view; then
press the Enter key. The Display Query Manager Table Definition display is shown for the first table
you specified. Display Definition displays for the remaining tables are shown in the same order as the
table names appear in the “Work with” display list. An example of the Display Table Definition
display is shown in Figure 99 on page 171.
Rename Query Manager Table
Collection . . . . . . . . . : MYCOLL
To rename table, type New Name, press Enter.
Table New Name
APPLICANT APPLICANT_
CARS CARS______
STAFF STAFF_____
Bottom
F3=Exit F5=Refresh F12=Cancel F22=QM statement
Figure 98. Rename Query Manager Table Display
170 Query Manager Use V6R1M0

3. Press F3 (Exit) or F12 (Cancel) when you finish viewing the table definition to return to the Work
with Query Manager Tables display.
Display Query Manager Table Definition
Table . . . . . . . : STAFF
Description . . . . : The STAFF Table
Decimal
Column Type Length Places
ID INTEGER
NAME CHARACTER 9
DEPT INTEGER
JOB CHARACTER 5
YEARS INTEGER
SALARY DECIMAL 9 2
COMM DECIMAL 7 2
Bottom
Press Enter to continue.
F3=Exit F12=Cancel F20=Display entire name F22=QM statement
Figure 99. Display Query Manager Table Definition Display
Chapter 8. Working with Query Manager tables 171

172 Query Manager Use V6R1M0
Chapter 9. Distributed Relational Database Architecture in
Query Manager
The Distributed Relational Database Architecture™ (DRDA) function of Query Manager allows the user to
access multiple remote databases and perform commit and rollback operations on the databases in an
organized way. Query Manager supports two types of connection management:
v Remote unit of work (RUW)
v Distributed unit of work (DUW)
The Query Manager profile allows you to select which connection management method to use.
Remote unit of work (RUW) in Query Manager DRDA
Remote Unit of Work (RUW) is the default connection management method for Query Manager. With
RUW, Query Manager continues to connect to its remote databases as it has in the past. Under RUW,
only one connection is allowed to a relational database. Commits and rollbacks apply to the one allowed
connection.
Distributed unit of work (DUW) in Query Manager DRDA
DUW connection management is much more powerful than RUW connection management. Under DUW,
multiple relational database connections are allowed. Commits and rollbacks can be performed to several
systems in an organized way.
Connection management statements in Query Manager DRDA
Query Manager supports the following connection statements:
v CONNECT
v COMMIT
v DISCONNECT
v RELEASE
v SET CONNECTION
These statements can be entered from the Query Manager Command Line. Only the COMMIT command
is allowed in Query Manager Queries. These commands are discussed in detail in Appendix B, “Query
Manager statements,” on page 235.
Connection management in Query Manager DRDA
The CONNECT and RELEASE statements control whether a connection is in a held or released state.
Released state refers to a condition when a disconnect is to occur for the connection at the next successful
commit operation. A released state can be thought of as a pending disconnect. A rollback has no affect on
connections. A held state means that a connection is not to be disconnected at the next commit operation.
A connection is placed in the held state by the CONNECT statement. A connection is moved to the
released state from the held state by the RELEASE statement. A connection in the released state cannot be
returned to or placed in the held state. This means that a connection remains in a released state across
unit-of-work boundaries when a rollback is issued or a commit results in a rollback.
Regardless of whether a connection is in the held or released state, a connection can also be in the current
or in the dormant state. A database in current state is the database where all SQL statements will be run.
© Copyright IBM Corp. 1998, 2008 173

Dormant state refers to a condition when the connection is suspended. While the connection is in the
dormant state, SQL statements use the connection only for commits and rollbacks. The SET
CONNECTION and CONNECT statements change the connection for the named relational database to
the current state while existing connections are placed in or remain in the dormant state. Only one
connection can be in the current state at any given time. When a dormant connection becomes current in
the same unit of work, all locks, cursors, and prepared statements are restored to reflect their last use
when the connection was current.
The DISCONNECT statement destroys specified connections. Once a connection to a relational database
is disconnected, an application must connect to that relational database again if SQL statements need to
be directed to the relational database. For protected conversations, the RELEASE statement must be used.
A protected conversation is a conversation that uses two-phase commit protocols to ensure that, even if a
failure occurs, updates made on all databases that are part of the transaction are all committed or all
rolled back to retain the integrity of the databases.
Default activation group and Query Manager DRDA
Query Manager runs in the Default Activation Group. Consequently, Query Manager allows you to
manage the connections associated with the default activation group.
Connecting to a relational database in Query Manager DRDA
You can connect to a database using the CONNECT or SET CONNECTION statements. To establish a
new connection use the CONNECT statement. To display a list of databases to which you can connect:
1. Prompt from the Query Manager Command Line
2. Select the CONNECT TO statement
3. Prompt again on the ’Relational database’ field.
Use the SET CONNECTION statement to re-establish a dormant connection.
Displaying a connection list and connection status in Query Manager
DRDA
To display your connections and connection states:
1. Prompt from the Query Manager Command Line.
174 Query Manager Use V6R1M0
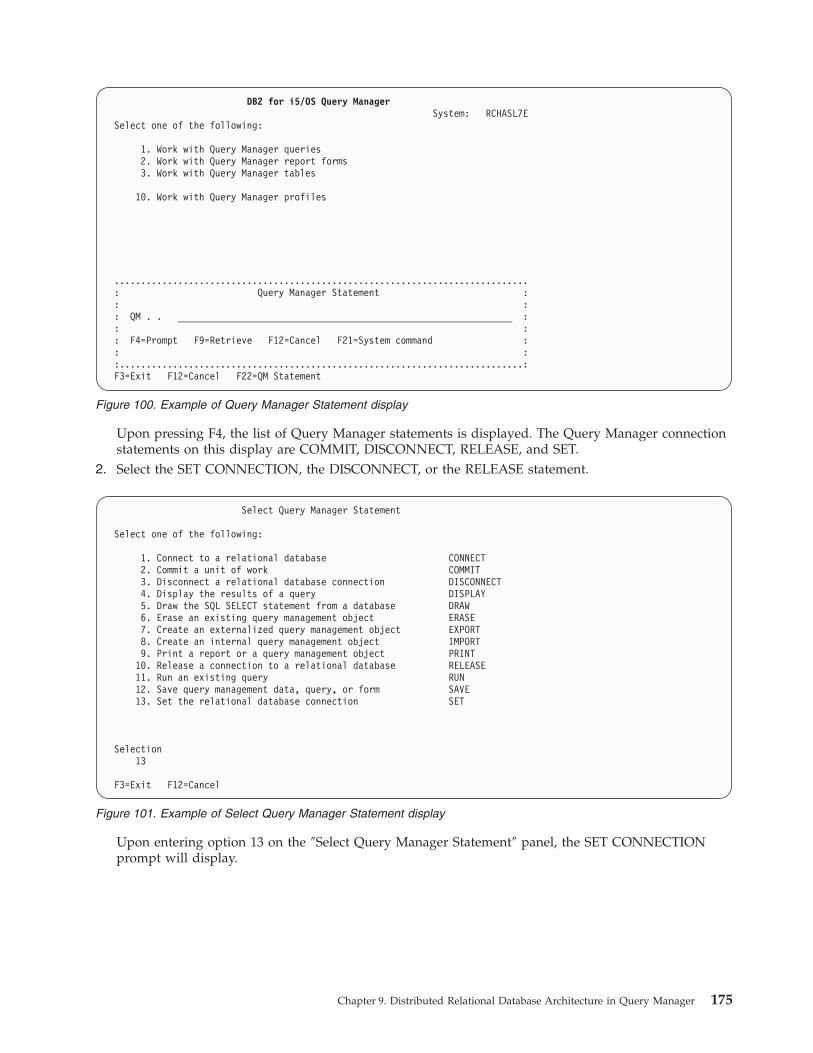
Upon pressing F4, the list of Query Manager statements is displayed. The Query Manager connection
statements on this display are COMMIT, DISCONNECT, RELEASE, and SET.
2. Select the SET CONNECTION, the DISCONNECT, or the RELEASE statement.
Upon entering option 13 on the ″Select Query Manager Statement″ panel, the SET CONNECTION
prompt will display.
DB2 for i5/OS Query Manager
System: RCHASL7E
Select one of the following:
1. Work with Query Manager queries
2. Work with Query Manager report forms
3. Work with Query Manager tables
10. Work with Query Manager profiles
..............................................................................
: Query Manager Statement :
: :
: QM . . _______________________________________________________________ :
: :
: F4=Prompt F9=Retrieve F12=Cancel F21=System command :
: :
:............................................................................:
F3=Exit F12=Cancel F22=QM Statement
Figure 100. Example of Query Manager Statement display
Select Query Manager Statement
Select one of the following:
1. Connect to a relational database CONNECT
2. Commit a unit of work COMMIT
3. Disconnect a relational database connection DISCONNECT
4. Display the results of a query DISPLAY
5. Draw the SQL SELECT statement from a database DRAW
6. Erase an existing query management object ERASE
7. Create an externalized query management object EXPORT
8. Create an internal query management object IMPORT
9. Print a report or a query management object PRINT
10. Release a connection to a relational database RELEASE
11. Run an existing query RUN
12. Save query management data, query, or form SAVE
13. Set the relational database connection SET
Selection
13
F3=Exit F12=Cancel
Figure 101. Example of Select Query Manager Statement display
Chapter 9. Distributed Relational Database Architecture in Query Manager 175
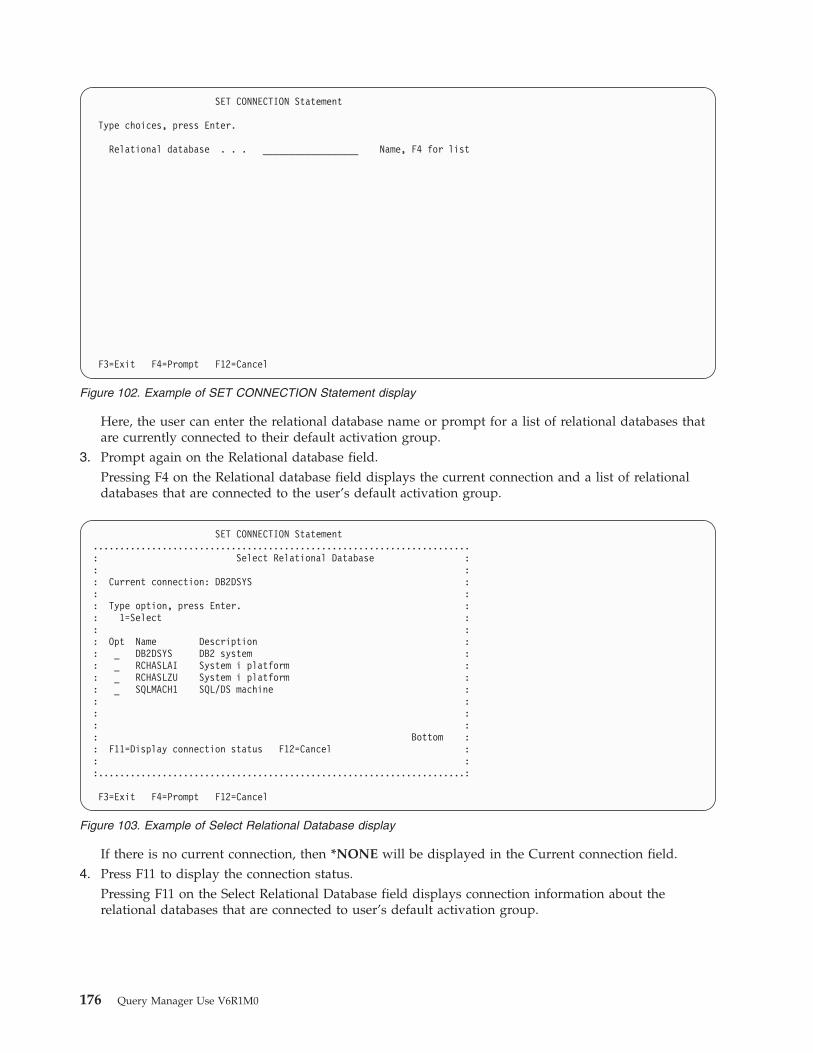
Here, the user can enter the relational database name or prompt for a list of relational databases that
are currently connected to their default activation group.
3. Prompt again on the Relational database field.
Pressing F4 on the Relational database field displays the current connection and a list of relational
databases that are connected to the user’s default activation group.
If there is no current connection, then *NONE will be displayed in the Current connection field.
4. Press F11 to display the connection status.
Pressing F11 on the Select Relational Database field displays connection information about the
relational databases that are connected to user’s default activation group.
SET CONNECTION Statement
Type choices, press Enter.
Relational database . . . __________________ Name, F4 for list
F3=Exit F4=Prompt F12=Cancel
Figure 102. Example of SET CONNECTION Statement display
SET CONNECTION Statement
.......................................................................
: Select Relational Database :
: :
: Current connection: DB2DSYS :
: :
: Type option, press Enter. :
: 1=Select :
: :
: Opt Name Description :
: _ DB2DSYS DB2 system :
: _ RCHASLAI System i platform :
: _ RCHASLZU System i platform :
: _ SQLMACH1 SQL/DS machine :
: :
: :
: :
: Bottom :
: F11=Display connection status F12=Cancel :
: :
:.....................................................................:
F3=Exit F4=Prompt F12=Cancel
Figure 103. Example of Select Relational Database display
176 Query Manager Use V6R1M0

If there is no current connection, then *NONE will be displayed in the Current connection field.
Prompting on the DISCONNECT statement does not show protected conversations.
DB2 Query Manager supports SET CONNECTION, DISCONNECT, and RELEASE statements as Query
Manager statements. The statements can be entered by pressing F22 (QM Statement) on most of the
Query Manager displays.
Understanding conversation type, read-only, and status fields in Query
Manager DRDA
A description of the Conversation Type, Read-only, and Status fields and their possible values are as
follows:
Conversation type in Query Manager DRDA
Protected
A protected conversation is used for the connection to a relational database on a remote system. A
protected conversation is a conversation that uses two-phase commit protocols to ensure that, even if
a failure occurs, updates made on the remote system are synchronized with updates to other remote
or local resources.
Not Protected
The conversation used for the connection to a relational database on a remote system is not protected.
Therefore, if a failure occurs, updates made on the remote system cannot be synchronized with
updates to other remote or local resources.
Local
No conversation is used. The connection is to the local relational database. Two-phase commit
protocols are used to ensure that, even if a failure occurs, updates made to local system are
synchronized with updates to other remote or local resources.
*ARDPGM
The connection is to a relational database accessed by an application requester driver (ARD) program.
SQL requests directed to the relational database are processed by the ARD program specified on the
relational database directory entry.
SET CONNECTION Statement
.......................................................................
: Select Relational Database :
: :
: Current connection: DB2DSYS :
: :
: Type option, press Enter. :
: 1=Select :
: :
: Opt Name Conversation Type Read-only Status :
: _ DB2DSYS Protected NO HLD :
: _ RCHASLAI Local NO HLD :
: _ RCHASLZU Not Protected YES HLD :
: _ SQLMACH1 Protected NO RLS :
: :
: :
: :
: Bottom :
: F11=Display RDB description F12=Cancel :
: :
:.....................................................................:
F3=Exit F4=Prompt F12=Cancel
Figure 104. Example of Select Relational Database display with Selection Status
Chapter 9. Distributed Relational Database Architecture in Query Manager 177

Read-only in Query Manager DRDA
YES
Connection is read-only. If running under commitment control, updates cannot be performed over
this connection.
NO
Connection is not read-only. Updates can be performed over this connection. If an update is
performed over this connection and the connection has a Conversation Type of Local or Protected,
then for this unit-of-work updates are also allowed to all other connections that have a Conversation
Type of Local or Protected and do not have a Read-only value of YES. Otherwise, if an update is
performed over this connection and it has a Conversation Type of Not protected, then updates are
only allowed over this connection for the unit-of-work.
Status in Query Manager DRDA
HLD
A held state means that a connection is not to be disconnected at the next commit operation. A
connection is placed in the held state by the CONNECT statement.
RLS
A released state means that a disconnect is to occur for the connection at the next successful commit
operation (a rollback has no affect on connections). A connection is placed in the released state from
the held state by the RELEASE statement. A connection in the released state cannot be put into the
held state.
Connection management considerations in Query Manager DRDA
The function of the CONNECT depends on the connection management method you are using. The
methods are distributed-unit-of-work (DUW) and remote-unit-of-work (RUW). The default, unless you
change it, is RUW.
Table 14. CONNECT Command Differences Between *DUW and *RUW
DUW RUW
Multiple connections allowed One connection allowed
CONNECT to additional database puts previous
connection in dormant state. The previous connections are
not disconnected.
CONNECT to additional database disconnects previous
connections. The previous connection or connections are
disconnected before performing the connection.
Consecutive CONNECTs to same database fails Consecutive CONNECTs to same database results in no
current connection change
A system running under DUW connecting to a system running under RUW may result in a read-only
connection.
Note: A homogenous connection is read-only as far as commitment control is concerned. A read-only
connection is not allowed to make updates under commitment control. However, an homogenous
read-only connection can still make non-committable updates.
Profile in Query Manager DRDA
The default connection management method is RUW. The Connection Management method can be
changed at anytime, but it only takes effect when you exit Query Manager and sign back on to DB2 for
i5/OS by using the STRQM command. The profile value is not often changed. Keep in mind that the
connection management method specified does affect when connections are disconnected.
178 Query Manager Use V6R1M0

If you specified *SYS naming conventions in your Query Manager profile, the only databases you can
connect to are those on a local machine or those on another i5/OS operating system.
Work with tables connections in Query Manager DRDA
When in Work With Tables, the connection is locked to local and cannot be changed by the CONNECT or
SET CONNECTION statements. This is because the Work With Tables function of Query Manager only
works with local tables. The local or the previous connection can be destroyed by the DISCONNECT or
the RELEASE statements, or a COMMIT statement which destroys a released connection after it is
successful. If the local connection is destroyed, then Query Manager remains in an unconnected state.
Work With Tables uses a commitment control level of None. This does not cause any connections in a
released state to be destroyed because a COMMIT statement is not issued. Although Query Manager
commits all data and updates automatically, the work is not done through commitment control. To
reconnect, you must exit out of Work With Tables. The previous connection is restored when you exit
from Work With Tables.
Prompted query in Query Manager DRDA
If you change the connection from the Query Manager Command Line while creating, changing, or
displaying a prompted query, the new connection lasts only while the command window is shown. The
prompted query connection can be destroyed by the DISCONNECT or the RELEASE statements, or a
COMMIT statement which destroys a released connection after it is successful. If the local connection is
destroyed, then Query Manager remains in an unconnected state. To reconnect, you must issue a
CONNECT statement.
Outfile processing in Query Manager DRDA
RUW connection management does not allow remote outfile processing. Under DUW connection
management, remote data can be used to create an outfile on the local system.
SET transaction considerations in Query Manager DRDA
You can override the commitment control level by running a SET TRANSACTION statement in a DB2 for
i5/OS query. This does not change the commitment control level in your Query Manager profile. It does
set a new commitment control level until you issue a COMMIT or ROLLBACK statement, or until
another SET TRANSACTION is issued. The original commitment control level is restored when a
COMMIT or ROLLBACK operation is performed. For more information about commitment control, refer
to SQL reference.
Notes:
1. If you choose change, cursor stability, all, or repeatable read you are responsible for issuing all
COMMIT and ROLLBACK statements. For more information on the COMMIT and ROLLBACK
statements, see page 51.
2. You cannot choose change, cursor stability, or all, if you have not been granted authority to use the
COMMIT and ROLLBACK statements. For information on granting authority for SQL statements, see
page 48.
3. You need to issue all outstanding COMMIT or ROLLBACK statements before you can start Query
Manager.
4. You need to issue all outstanding COMMIT or ROLLBACK statements before you can go to the Work
with Query Manager Tables display. While you are working with Query Manager tables, you have no
control over when COMMIT and ROLLBACK statements are issued; Query Manager commits all data
and updates automatically.
5. If you choose none, and you are connected to a remote application server other than DB2 for i5/OS,
Query Manager performs all COMMIT and ROLLBACK statements automatically when you run
queries. DB2 and SQL/DS do not support the commitment control level of none.
Chapter 9. Distributed Relational Database Architecture in Query Manager 179

6. A SET TRANSACTION statement will fail if Query Manager is connected to a remote system.
Conversely, a CONNECT to a remote system through Query Manager will fail if a SET
TRANSACTION statement is in effect.
180 Query Manager Use V6R1M0

Appendix A. Practice exercises for Query Manager
This appendix contains exercises that lead you through the basics of Query Manager. If you are a new
user, you can work your way through these exercises to familiarize yourself with the i5/OS operating
system and Query Manager. If you have not used Query Manager for a while, you might also find these
exercises useful to refresh your memory.
The Query Manager tasks you can perform differ depending on whether you have a BASIC or ALL access
level assigned in your Query Manager profile. Therefore, this appendix has been divided into two parts.
v Part 1 includes exercises suitable for users with BASIC or ALL access levels, including creating a table
and adding data to it.
v Part 2 includes exercises suitable for users with an ALL access level, including creating a query and
report form, and running the query.
You need to complete the exercises in Part 1 of this appendix before you can begin the exercises in Part 2.
The query and report form you create in the exercises in Part 2 use data retrieved from the table that you
create in Part 1.
The displays in these exercises use the terms collection, table, column, and row rather than library, file,
field, and record.
Exercise: Working with tables in Query Manager
The exercises in Part 1 lead you through the following tasks:
v Creating a table named with 18 characters or less
v Creating a table named with 19 characters or more
v Adding data to a table
v Displaying individual rows from a table
v Copying a table: creating a new table
v Changing the definition of a copied table
v Changing data in a table
v Viewing table definitions
v Deleting a table
Work your way through these exercises in the order shown above. In most cases, in order to perform one
exercise, you need to have completed all previous exercises.
Exercise: Before you begin tables in Query Manager
The first exercise leads you through the steps required to create the STAFF table shown in Table 15.
Table 15. The STAFF Table
ID NAME DEPT JOB YEARS SALARY COMM
10 Sanders 20 Mgr 7 18357.50 0
20 Pernal 20 Sales 8 18171.25 612.45
30 Marenghi 38 Mgr 5 17506.75 0
40 O’Brien 38 Sales 6 18006.00 846.55
50 Hanes 15 Mgr 10 20659.80 0
© Copyright IBM Corp. 1998, 2008 181
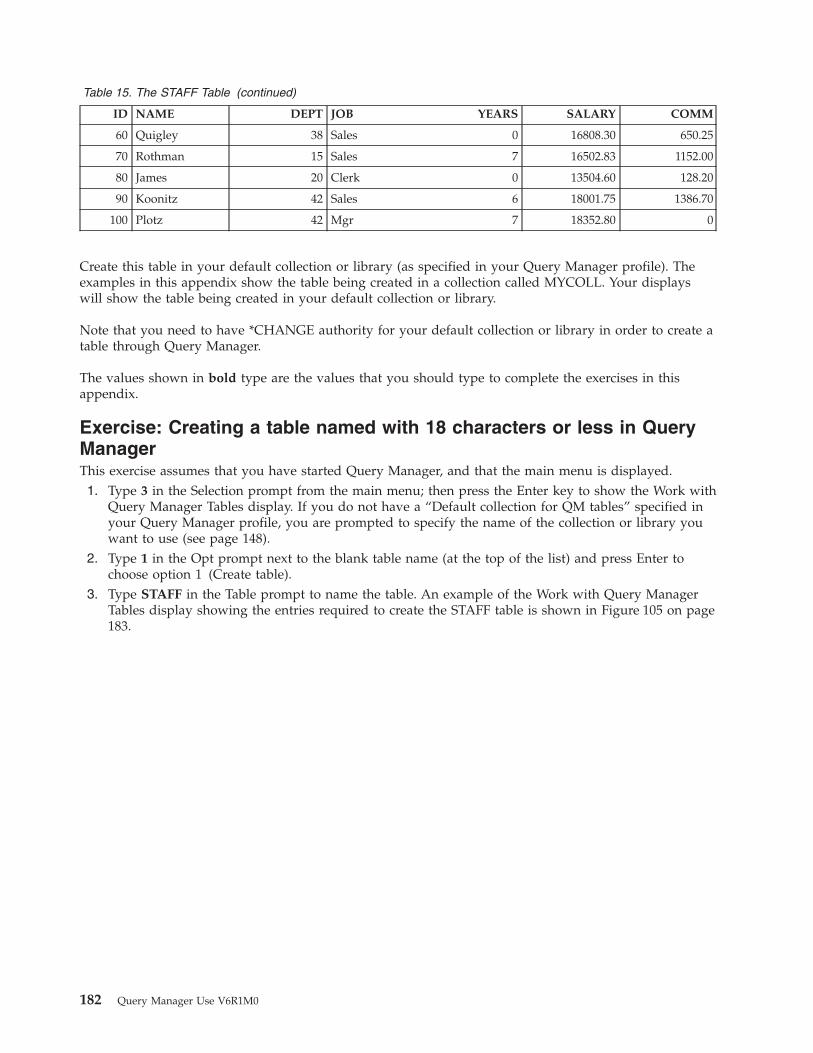
Table 15. The STAFF Table (continued)
ID NAME DEPT JOB YEARS SALARY COMM
60 Quigley 38 Sales 0 16808.30 650.25
70 Rothman 15 Sales 7 16502.83 1152.00
80 James 20 Clerk 0 13504.60 128.20
90 Koonitz 42 Sales 6 18001.75 1386.70
100 Plotz 42 Mgr 7 18352.80 0
Create this table in your default collection or library (as specified in your Query Manager profile). The
examples in this appendix show the table being created in a collection called MYCOLL. Your displays
will show the table being created in your default collection or library.
Note that you need to have *CHANGE authority for your default collection or library in order to create a
table through Query Manager.
The values shown in bold type are the values that you should type to complete the exercises in this
appendix.
Exercise: Creating a table named with 18 characters or less in Query
Manager
This exercise assumes that you have started Query Manager, and that the main menu is displayed.
1. Type 3 in the Selection prompt from the main menu; then press the Enter key to show the Work with
Query Manager Tables display. If you do not have a “Default collection for QM tables” specified in
your Query Manager profile, you are prompted to specify the name of the collection or library you
want to use (see page 148).
2. Type 1 in the Opt prompt next to the blank table name (at the top of the list) and press Enter to
choose option 1 (Create table).
3. Type STAFF in the Table prompt to name the table. An example of the Work with Query Manager
Tables display showing the entries required to create the STAFF table is shown in Figure 105 on page
183.
182 Query Manager Use V6R1M0
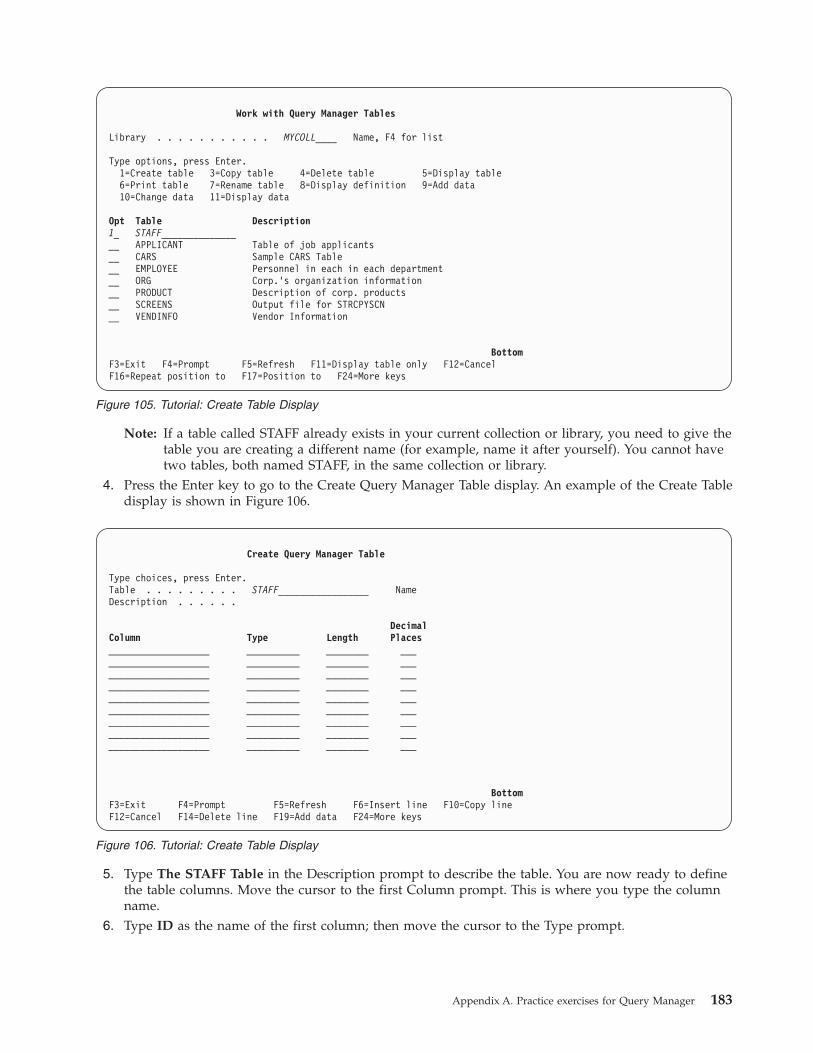
Note: If a table called STAFF already exists in your current collection or library, you need to give the
table you are creating a different name (for example, name it after yourself). You cannot have
two tables, both named STAFF, in the same collection or library.
4. Press the Enter key to go to the Create Query Manager Table display. An example of the Create Table
display is shown in Figure 106.
5. Type The STAFF Table in the Description prompt to describe the table. You are now ready to define
the table columns. Move the cursor to the first Column prompt. This is where you type the column
name.
6. Type ID as the name of the first column; then move the cursor to the Type prompt.
Work with Query Manager Tables
Library . . . . . . . . . . . MYCOLL____ Name, F4 for list
Type options, press Enter.
1=Create table 3=Copy table 4=Delete table 5=Display table
6=Print table 7=Rename table 8=Display definition 9=Add data
10=Change data 11=Display data
Opt Table Description
1_ STAFF______________
__ APPLICANT Table of job applicants
__ CARS Sample CARS Table
__ EMPLOYEE Personnel in each in each department
__ ORG Corp.’s organization information
__ PRODUCT Description of corp. products
__ SCREENS Output file for STRCPYSCN
__ VENDINFO Vendor Information
Bottom
F3=Exit F4=Prompt F5=Refresh F11=Display table only F12=Cancel
F16=Repeat position to F17=Position to F24=More keys
Figure 105. Tutorial: Create Table Display
Create Query Manager Table
Type choices, press Enter.
Table . . . . . . . . . STAFF_________________ Name
Description . . . . . .
Decimal
Column Type Length Places
___________________ __________ ________ ___
___________________ __________ ________ ___
___________________ __________ ________ ___
___________________ __________ ________ ___
___________________ __________ ________ ___
___________________ __________ ________ ___
___________________ __________ ________ ___
___________________ __________ ________ ___
___________________ __________ ________ ___
Bottom
F3=Exit F4=Prompt F5=Refresh F6=Insert line F10=Copy line
F12=Cancel F14=Delete line F19=Add data F24=More keys
Figure 106. Tutorial: Create Table Display
Appendix A. Practice exercises for Query Manager 183

7. Press F4 (Prompt) to display a list of all available data types. A prompt window opens on your
display as shown in Figure 107.
8. Type 1 in the Opt prompt next to “INTEGER” to choose an integer data type; then press the Enter
key. Query Manager inserts INTEGER into the Type prompt for ID. (An integer is a whole number
with no decimal places.)
You have now completed defining the first column of the table. INTEGER is a set length data type,
so you should not specify a length for the column. (See page 152 for information on the valid
lengths for the different data types.)
Move the cursor to the second Column prompt, to begin defining the second column of the table.
The display should appear as shown in Figure 108.
Create Query Manager Table
.....................................................................
: Select Data Type :
: :
: Type option, press Enter. : ________
: 1=Select :
: :
: Opt Type Description :
: BIGINT Big integer :
: BLOB Binary large object :
: CHARACTER Any character :
: CLOB Character large object :
: DATALINK Datalink :
: 1 DATE Date :
: More... :
: F12=Cancel :
: :
:...................................................................:
Bottom
F3=Exit F4=Prompt F5=Refresh F6=Insert line F10=Copy line
F12=Cancel F14=Delete line F19=Add data F24=More keys
Figure 107. Tutorial: Create Table Display
Create Query Manager Table
Type choices, press Enter.
Table . . . . . . . . . STAFF______________ Name
Description . . . . . . The STAFF Table____________________________________
Decimal
Column Type Length Places
ID__________________ INTEGER____ _______ ___
____________________ ___________ _______ ___
____________________ ___________ _______ ___
____________________ ___________ _______ ___
____________________ ___________ _______ ___
____________________ ___________ _______ ___
____________________ ___________ _______ ___
____________________ ___________ _______ ___
____________________ ___________ _______ ___
Bottom
F3=Exit F4=Prompt F5=Refresh F6=Insert line F10=Copy line
F12=Cancel F14=Delete line F19=Add data F24=More keys
Figure 108. Tutorial: Create Table Display
184 Query Manager Use V6R1M0

9. Type NAME as the name of the second column, choose CHARACTER as its data type, and type 9 as
its length.
Move the cursor to the third Column prompt.
10. Type DEPT as the name of the third column, and choose INTEGER as its data type. Do not specify
a length.
Move the cursor to the fourth Column prompt.
11. Type JOB as the name of the fourth column, choose CHARACTER as its data type, and type 5 as its
length.
Move the cursor to the fifth Column prompt.
12. Type YEARS as the name of the fifth column, and choose INTEGER as its data type. Do not specify
a length.
Move the cursor to the sixth Column prompt.
13. Type SALARY as the name of the sixth column, choose DECIMAL as its data type, type 9 as its
length, and 2 as its number of decimal places.
Move the cursor to the seventh Column prompt.
14. Type COMM as the name of the seventh column, choose DECIMAL as its data type, type 7 as its
length, and 2 as its number of decimal places.
You have now finished defining the table. Your display should contain the information shown in
Figure 109.
15. Press the Enter key to save your table definition.
If you made any mistakes typing the definition values (for example, if you defined a CHARACTER
data type with decimal places), Query Manager highlights the errors, and shows messages at the
bottom of the display telling you how to correct each entry. You cannot save a table if it contains any
incorrect column definition values. Correct your errors; then press the Enter key again.
If you do make a mistake, and have trouble understanding the displayed error message, position the
cursor on the message; then press F1 (Help). Help information is available for all Query Manager
messages. When you finish viewing the Help display, press F12 (Cancel) to return to the Create
Query Manager Table display. Displaying help for messages is described in “Help for messages in
Query Manager” on page 22.
Create Query Manager Table
Type choices, press Enter.
Table . . . . . . . . . STAFF______________ Name
Description . . . . . . The STAFF Table_____________________________________
Decimal
Column Type Length Places
ID______________ INTEGER___ ______ __
NAME____________ CHARACTER_ 9_____ __
JOB_____________ CHARACTER_ 5_____ __
DEPT____________ INTEGER___ ______ __
SALARY__________ DECIMAL___ 9_____ 2_
COMM____________ DECIMAL___ 7_____ 2_
________________ __________ ______ __
________________ __________ ______ __
Bottom
F3=Exit F4=Prompt F5=Refresh F6=Insert line F10=Copy line
F12=Cancel F14=Delete line F19=Add data F24=More keys
Figure 109. Tutorial: Create Table Display
Appendix A. Practice exercises for Query Manager 185

When the table is successfully created, you see a message at the bottom of the display telling you the
table has been created, and that you can press F19 (Add data) if you want to begin adding row data
to the table.
Exercise: Creating a table named with 19 characters or more in Query
Manager
To create a table which has a name that is 19 characters or more:
1. Type 3 in the Selection prompt from the main menu; then press the Enter key to show the Work with
Query Manager Tables display. If you do not have a “Default collection for QM tables” specified in
your Query Manager profile, you are prompted to specify the name of the collection or library you
want to use (see page 148).
2. Type 1 in the Opt prompt next to the blank table name (at the top of the list) to choose option
1 (Create table). An example of the Work with Query Manager Tables display showing the 1 in the
Opt prompt shown in Figure 110.
3. Do not type anything in the Table prompt.
4. Press Enter.
The Create Manager Table display appears with the cursor positioned in the blank table field.
5. Press F24 (More keys). The F keys at the bottom of the screen have changed.
6. Press F20 (Display entire name) The Display Entire Name display appears. An example of the
Display Entire Name display is shown in Figure 111 on page 187.
Work with Query Manager Tables
Library . . . . . . . . . . . MYCOLL______ Name, F4 for list
Type options, press Enter.
1=Create table 3=Copy table 4=Delete table 5=Display table
6=Print table 7=Rename table 8=Display definition 9=Add data
10=Change data 11=Display data
Opt Table Description
1_ _______________
__ APPLICANT Table of job applicants
__ CARS Sample CARS Table
__ EMPLOYEE Personnel in each in each department
__ ORG Corp.’s organization information
__ PRODUCT Description of corp. products
__ SCREENS Output file for STRCPYSCN
__ STAFF The STAFF Table
__ VENDINFO Vendor Information
Bottom
F3=Exit F4=Prompt F5=Refresh F11=Display table only F12=Cancel
F16=Repeat position to F17=Position to F24=More keys
Figure 110. Tutorial: Create Table Display
186 Query Manager Use V6R1M0
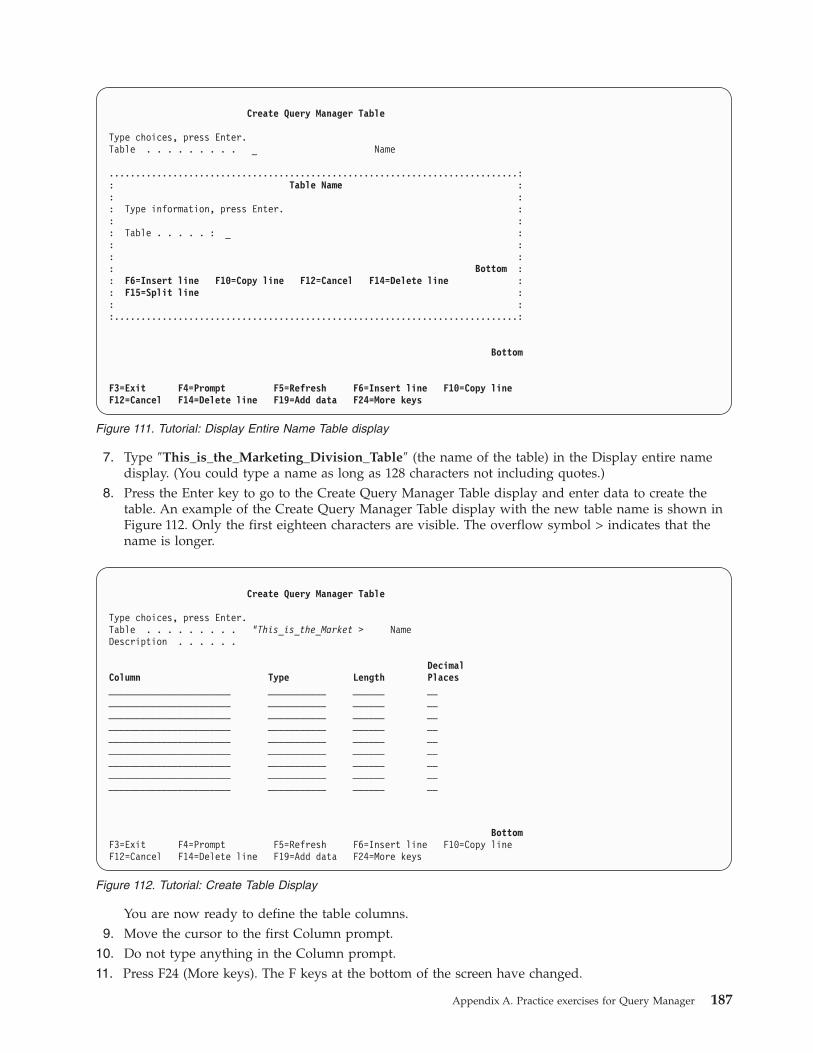
7. Type ″This_is_the_Marketing_Division_Table″ (the name of the table) in the Display entire name
display. (You could type a name as long as 128 characters not including quotes.)
8. Press the Enter key to go to the Create Query Manager Table display and enter data to create the
table. An example of the Create Query Manager Table display with the new table name is shown in
Figure 112. Only the first eighteen characters are visible. The overflow symbol > indicates that the
name is longer.
You are now ready to define the table columns.
9. Move the cursor to the first Column prompt.
10. Do not type anything in the Column prompt.
11. Press F24 (More keys). The F keys at the bottom of the screen have changed.
Create Query Manager Table
Type choices, press Enter.
Table . . . . . . . . . _ Name
.............................................................................:
: Table Name :
: :
: Type information, press Enter. :
: :
: Table . . . . . : _ :
: :
: :
: Bottom :
: F6=Insert line F10=Copy line F12=Cancel F14=Delete line :
: F15=Split line :
: :
:............................................................................:
Bottom
F3=Exit F4=Prompt F5=Refresh F6=Insert line F10=Copy line
F12=Cancel F14=Delete line F19=Add data F24=More keys
Figure 111. Tutorial: Display Entire Name Table display
Create Query Manager Table
Type choices, press Enter.
Table . . . . . . . . . "This_is_the_Market > Name
Description . . . . . .
Decimal
Column Type Length Places
_______________________ ___________ ______ __
_______________________ ___________ ______ __
_______________________ ___________ ______ __
_______________________ ___________ ______ __
_______________________ ___________ ______ __
_______________________ ___________ ______ __
_______________________ ___________ ______ __
_______________________ ___________ ______ __
_______________________ ___________ ______ __
Bottom
F3=Exit F4=Prompt F5=Refresh F6=Insert line F10=Copy line
F12=Cancel F14=Delete line F19=Add data F24=More keys
Figure 112. Tutorial: Create Table Display
Appendix A. Practice exercises for Query Manager 187
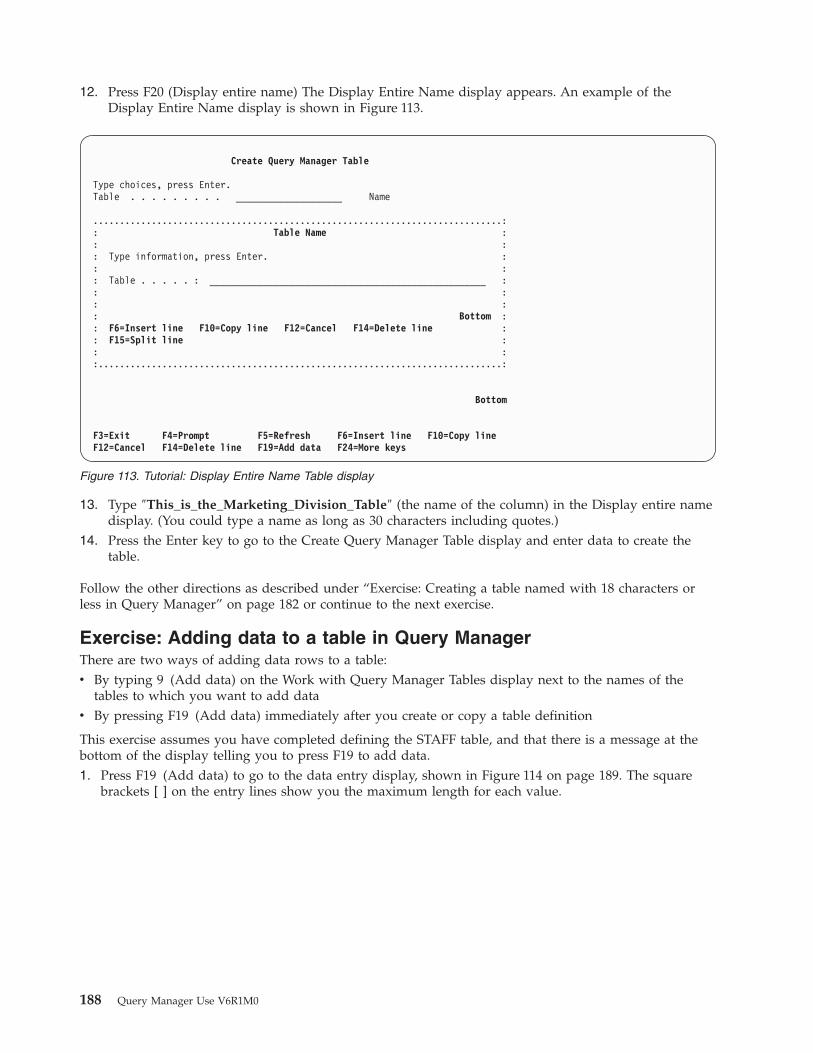
12. Press F20 (Display entire name) The Display Entire Name display appears. An example of the
Display Entire Name display is shown in Figure 113.
13. Type ″This_is_the_Marketing_Division_Table″ (the name of the column) in the Display entire name
display. (You could type a name as long as 30 characters including quotes.)
14. Press the Enter key to go to the Create Query Manager Table display and enter data to create the
table.
Follow the other directions as described under “Exercise: Creating a table named with 18 characters or
less in Query Manager” on page 182 or continue to the next exercise.
Exercise: Adding data to a table in Query Manager
There are two ways of adding data rows to a table:
v By typing 9 (Add data) on the Work with Query Manager Tables display next to the names of the
tables to which you want to add data
v By pressing F19 (Add data) immediately after you create or copy a table definition
This exercise assumes you have completed defining the STAFF table, and that there is a message at the
bottom of the display telling you to press F19 to add data.
1. Press F19 (Add data) to go to the data entry display, shown in Figure 114 on page 189. The square
brackets [ ] on the entry lines show you the maximum length for each value.
Create Query Manager Table
Type choices, press Enter.
Table . . . . . . . . . ____________________ Name
.............................................................................:
: Table Name :
: :
: Type information, press Enter. :
: :
: Table . . . . . : ____________________________________________________ :
: :
: :
: Bottom :
: F6=Insert line F10=Copy line F12=Cancel F14=Delete line :
: F15=Split line :
: :
:............................................................................:
Bottom
F3=Exit F4=Prompt F5=Refresh F6=Insert line F10=Copy line
F12=Cancel F14=Delete line F19=Add data F24=More keys
Figure 113. Tutorial: Display Entire Name Table display
188 Query Manager Use V6R1M0

2. Enter the values from the STAFF table columns (shown on page 181). When you finish entering the
value for one column, press the Field Exit or Tab key to move the cursor to the prompt for the next
column. Query Manager does not automatically advance the cursor for you, you need to move the
cursor manually.
3. When you complete typing all of the values that make up a row, press the Enter key. Pressing the
Enter key saves whatever is currently shown on the display, so be careful not to press the Enter key
before the row data is complete. If you make any errors while adding data, see page 196 for
instructions on how to correct or complete row data.
If Query Manager finds any mistakes in the row data (for example, if you type letters in a number
field), it highlights the errors one at a time and shows messages at the bottom of the display telling
you how to correct each entry. You cannot save a row that contains information that is not valid.
Correct your errors; then press the Enter key again.
If you do make a mistake, and have trouble understanding the displayed error message, position the
cursor on the message; then press F1 (Help). Help information is available for all Query Manager
messages. When you complete viewing the Help display, press F12 (Cancel) to return to the Add Data
display.
4. Press F11 (Display type/length) to view the definition of the STAFF table. This key is useful if you
cannot remember what values you can enter for a particular column.
An example of the definition display you see when you press F11 is shown in Figure 115 on page 190.
Add Data to Query Manager Table
Table . . . . . . . . : STAFF
Description . . . . . : The STAFF Table
Type information up to (]), press Enter.
Column Value
ID [ 0 ]
NAME [ ]
DEPT [ 0 ]
JOB [ ]
YEARS [ 0 ]
SALARY [ 0.00 ]
COMM [ 0.00 ]
Bottom
F3=Exit F5=Refresh F11=Display type/length F12=Cancel
F20=Display entire name F22=QM Statement
Figure 114. Tutorial: Add Data to Table Display
Appendix A. Practice exercises for Query Manager 189

When you finish viewing the definition of the table, press F11 (Display values) to return to the data
entry display.
5. When you complete adding all rows of data, press F3 (Exit) to leave the Add Data display, and return
to the Work with Query Manager Tables display. Notice that the STAFF table has been added to the
list of table names shown on this display.
Exercise: Displaying a table in Query Manager
Now that you have created the STAFF table and added rows to it, you can display your handiwork.
Note: You are not able to perform this exercise if you are running Query Manager in batch mode (see
“Run query mode in Query Manager” on page 35). If you cannot perform this exercise, turn to the
next exercise, “Exercise: Creating a new table from a copy in Query Manager” on page 192.
Add Data to Query Manager Table
Table . . . . . . . . : STAFF
Description . . . . . : The STAFF Table
Type information up to (]), press Enter.
Decimal
Column Type Length Places
ID INTEGER
NAME OPEN 9
DEPT INTEGER
JOB OPEN 5
YEARS INTEGER
SALARY DECIMAL 9 2
COMM DECIMAL 7 2
Bottom
F3=Exit F5=Refresh F11=Display value F12=Cancel
F20=Display entire name F22=QM Statement
Row added.
Figure 115. Tutorial: Add Data to Table Display
Work with Query Manager Tables
Library . . . . . . . . . . . MYCOLL____ Name, F4 for list
Type options, press Enter.
1=Create table 3=Copy table 4=Delete table 5=Display table
6=Print table 7=Rename table 8=Display definition 9=Add data
10=Change data 11=Display data
Opt Table Description
1_ STAFF_____________
__ APPLICANT Table of job applicants
__ CARS Sample CARS Table
__ EMPLOYEE Personnel in each in each department
__ ORG Corp.’s organization information
__ PRODUCT Description of corp. products
__ SCREENS Output file for STRCPYSCN
__ VENDINFO Vendor Information
Bottom
F3=Exit F4=Prompt F5=Refresh F11=Display table only F12=Cancel
F16=Repeat position to F17=Position to F24=More keys
Figure 116. Tutorial: Create Table Display
190 Query Manager Use V6R1M0

1. Make sure the Work with Query Manager Tables display is shown. Type 5 in the Opt prompt next to
the STAFF table; then press the Enter key to go to the Find Data in Query Manager Table display, as
shown in Figure 117.
Note: You may need to use your display station’s roll keys to show the STAFF table in the “Work
with” display list.
Before you can display data rows from a table, you need to tell Query Manager which rows you want
to display. You use the Find Data in Query Manager Table display to enter search conditions to find
the rows that you want to display. Query Manager searches through the STAFF table, and displays
only those rows that match the search conditions that you specify.
If you press the Enter key without having defined any search conditions, Query Manager selects all
rows from the table. For this exercise, you want to display all rows from the table.
2. Press the Enter key to display all rows from the table. (Using the Find Data display to search for
specific rows is described in “Exercise: Searching for table rows in Query Manager” on page 196.)
You see all rows from the STAFF table in a display similar to the Display Report shown in Figure 118
on page 192.
Find Data in Query Manager Table
Table . . . . . . . . : STAFF
Description . . . . . : The STAFF Table
Type search conditions, press Enter.
No conditions entered will find all data.
AND,OR,
(,) Column Test Value
(__ ________________ ____
___ ________________ ____
___ ________________ ____
___ ________________ ____
___ ________________ ____
___ ________________ ____
___ ________________ ____
___ ________________ ____
)__ ________________ ____
Bottom
F3=Exit F4=Prompt F6=Insert line F10=Copy line F12=Cancel
F14=Delete line F20=Display entire name F22=QM Statement
Figure 117. Tutorial: Display Table Data Display
Appendix A. Practice exercises for Query Manager 191
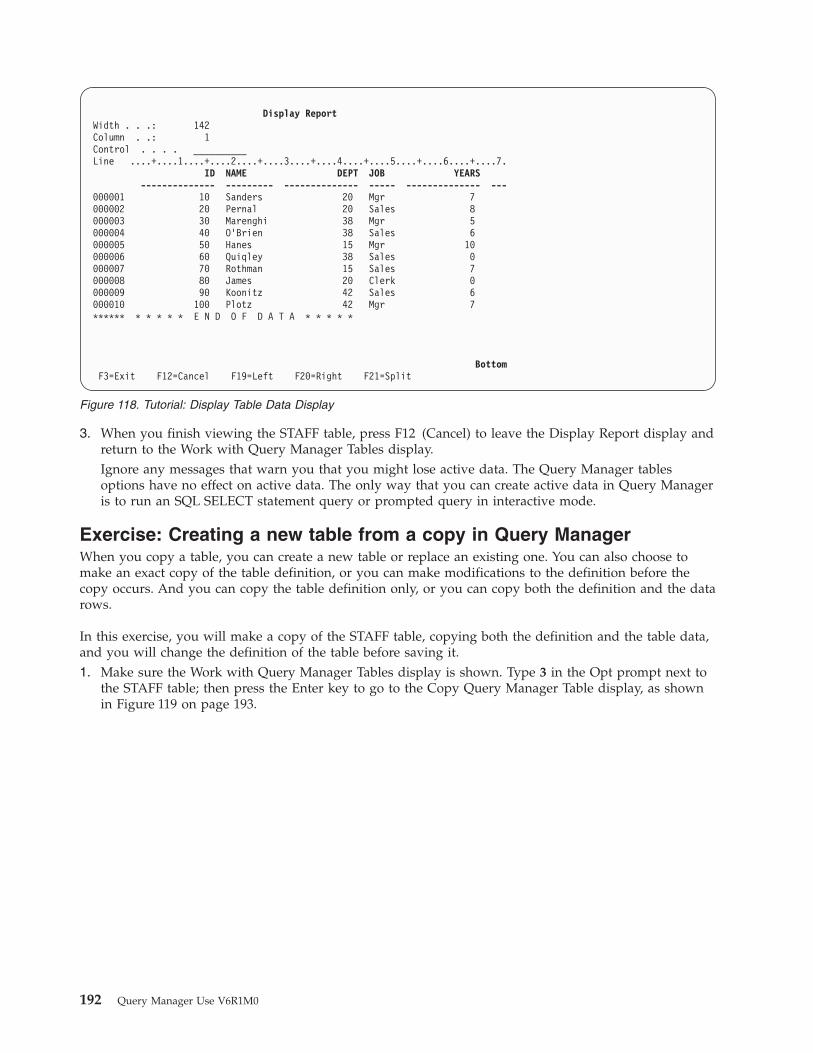
3. When you finish viewing the STAFF table, press F12 (Cancel) to leave the Display Report display and
return to the Work with Query Manager Tables display.
Ignore any messages that warn you that you might lose active data. The Query Manager tables
options have no effect on active data. The only way that you can create active data in Query Manager
is to run an SQL SELECT statement query or prompted query in interactive mode.
Exercise: Creating a new table from a copy in Query Manager
When you copy a table, you can create a new table or replace an existing one. You can also choose to
make an exact copy of the table definition, or you can make modifications to the definition before the
copy occurs. And you can copy the table definition only, or you can copy both the definition and the data
rows.
In this exercise, you will make a copy of the STAFF table, copying both the definition and the table data,
and you will change the definition of the table before saving it.
1. Make sure the Work with Query Manager Tables display is shown. Type 3 in the Opt prompt next to
the STAFF table; then press the Enter key to go to the Copy Query Manager Table display, as shown
in Figure 119 on page 193.
Display Report
Width . . .: 142
Column . .: 1
Control . . . . __________
Line ....+....1....+....2....+....3....+....4....+....5....+....6....+....7.
ID NAME DEPT JOB YEARS
-------------- --------- -------------- ----- -------------- ---
000001 10 Sanders 20 Mgr 7
000002 20 Pernal 20 Sales 8
000003 30 Marenghi 38 Mgr 5
000004 40 O’Brien 38 Sales 6
000005 50 Hanes 15 Mgr 10
000006 60 Quiqley 38 Sales 0
000007 70 Rothman 15 Sales 7
000008 80 James 20 Clerk 0
000009 90 Koonitz 42 Sales 6
000010 100 Plotz 42 Mgr 7
****** * * * * * E N D O F D A T A * * * * *
Bottom
F3=Exit F12=Cancel F19=Left F20=Right F21=Split
Figure 118. Tutorial: Display Table Data Display
192 Query Manager Use V6R1M0
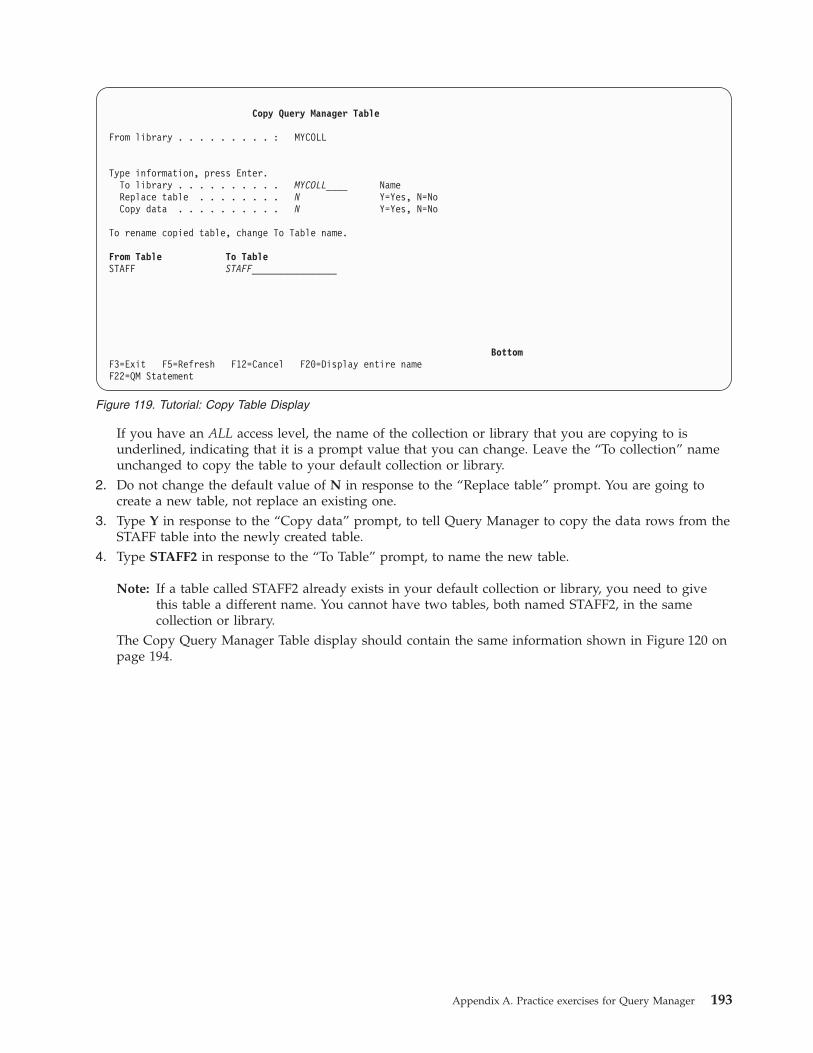
If you have an ALL access level, the name of the collection or library that you are copying to is
underlined, indicating that it is a prompt value that you can change. Leave the “To collection” name
unchanged to copy the table to your default collection or library.
2. Do not change the default value of N in response to the “Replace table” prompt. You are going to
create a new table, not replace an existing one.
3. Type Y in response to the “Copy data” prompt, to tell Query Manager to copy the data rows from the
STAFF table into the newly created table.
4. Type STAFF2 in response to the “To Table” prompt, to name the new table.
Note: If a table called STAFF2 already exists in your default collection or library, you need to give
this table a different name. You cannot have two tables, both named STAFF2, in the same
collection or library.
The Copy Query Manager Table display should contain the same information shown in Figure 120 on
page 194.
Copy Query Manager Table
From library . . . . . . . . . : MYCOLL
Type information, press Enter.
To library . . . . . . . . . . MYCOLL____ Name
Replace table . . . . . . . . N Y=Yes, N=No
Copy data . . . . . . . . . . N Y=Yes, N=No
To rename copied table, change To Table name.
From Table To Table
STAFF STAFF________________
Bottom
F3=Exit F5=Refresh F12=Cancel F20=Display entire name
F22=QM Statement
Figure 119. Tutorial: Copy Table Display
Appendix A. Practice exercises for Query Manager 193
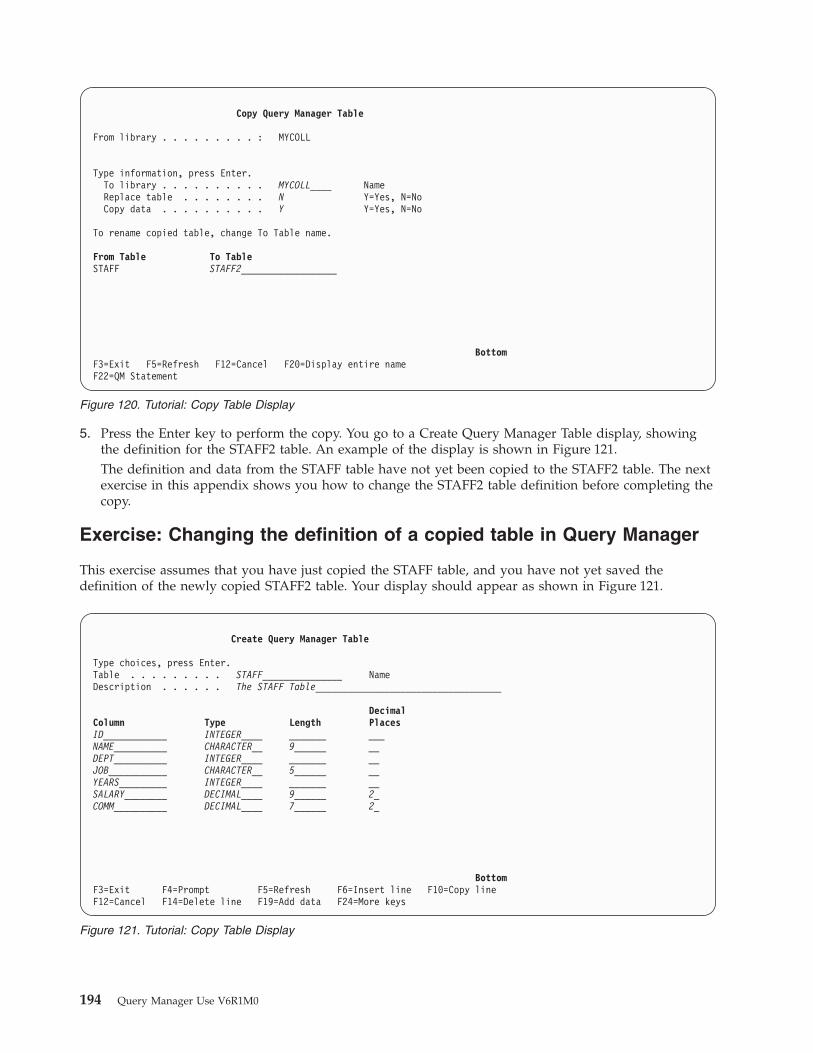
5. Press the Enter key to perform the copy. You go to a Create Query Manager Table display, showing
the definition for the STAFF2 table. An example of the display is shown in Figure 121.
The definition and data from the STAFF table have not yet been copied to the STAFF2 table. The next
exercise in this appendix shows you how to change the STAFF2 table definition before completing the
copy.
Exercise: Changing the definition of a copied table in Query Manager
This exercise assumes that you have just copied the STAFF table, and you have not yet saved the
definition of the newly copied STAFF2 table. Your display should appear as shown in Figure 121.
Copy Query Manager Table
From library . . . . . . . . . : MYCOLL
Type information, press Enter.
To library . . . . . . . . . . MYCOLL____ Name
Replace table . . . . . . . . N Y=Yes, N=No
Copy data . . . . . . . . . . Y Y=Yes, N=No
To rename copied table, change To Table name.
From Table To Table
STAFF STAFF2__________________
Bottom
F3=Exit F5=Refresh F12=Cancel F20=Display entire name
F22=QM Statement
Figure 120. Tutorial: Copy Table Display
Create Query Manager Table
Type choices, press Enter.
Table . . . . . . . . . STAFF_______________ Name
Description . . . . . . The STAFF Table___________________________________
Decimal
Column Type Length Places
ID____________ INTEGER____ _______ ___
NAME__________ CHARACTER__ 9______ __
DEPT__________ INTEGER____ _______ __
JOB___________ CHARACTER__ 5______ __
YEARS_________ INTEGER____ _______ __
SALARY________ DECIMAL____ 9______ 2_
COMM__________ DECIMAL____ 7______ 2_
Bottom
F3=Exit F4=Prompt F5=Refresh F6=Insert line F10=Copy line
F12=Cancel F14=Delete line F19=Add data F24=More keys
Figure 121. Tutorial: Copy Table Display
194 Query Manager Use V6R1M0
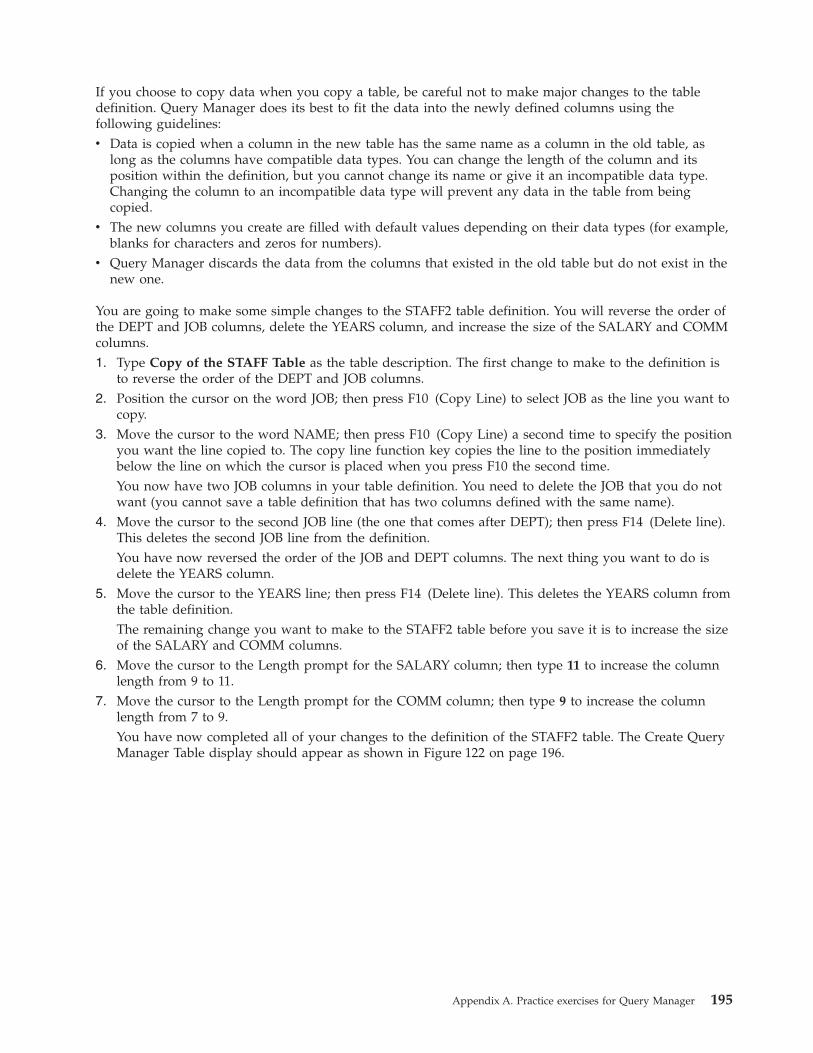
If you choose to copy data when you copy a table, be careful not to make major changes to the table
definition. Query Manager does its best to fit the data into the newly defined columns using the
following guidelines:
v Data is copied when a column in the new table has the same name as a column in the old table, as
long as the columns have compatible data types. You can change the length of the column and its
position within the definition, but you cannot change its name or give it an incompatible data type.
Changing the column to an incompatible data type will prevent any data in the table from being
copied.
v The new columns you create are filled with default values depending on their data types (for example,
blanks for characters and zeros for numbers).
v Query Manager discards the data from the columns that existed in the old table but do not exist in the
new one.
You are going to make some simple changes to the STAFF2 table definition. You will reverse the order of
the DEPT and JOB columns, delete the YEARS column, and increase the size of the SALARY and COMM
columns.
1. Type Copy of the STAFF Table as the table description. The first change to make to the definition is
to reverse the order of the DEPT and JOB columns.
2. Position the cursor on the word JOB; then press F10 (Copy Line) to select JOB as the line you want to
copy.
3. Move the cursor to the word NAME; then press F10 (Copy Line) a second time to specify the position
you want the line copied to. The copy line function key copies the line to the position immediately
below the line on which the cursor is placed when you press F10 the second time.
You now have two JOB columns in your table definition. You need to delete the JOB that you do not
want (you cannot save a table definition that has two columns defined with the same name).
4. Move the cursor to the second JOB line (the one that comes after DEPT); then press F14 (Delete line).
This deletes the second JOB line from the definition.
You have now reversed the order of the JOB and DEPT columns. The next thing you want to do is
delete the YEARS column.
5. Move the cursor to the YEARS line; then press F14 (Delete line). This deletes the YEARS column from
the table definition.
The remaining change you want to make to the STAFF2 table before you save it is to increase the size
of the SALARY and COMM columns.
6. Move the cursor to the Length prompt for the SALARY column; then type 11 to increase the column
length from 9 to 11.
7. Move the cursor to the Length prompt for the COMM column; then type 9 to increase the column
length from 7 to 9.
You have now completed all of your changes to the definition of the STAFF2 table. The Create Query
Manager Table display should appear as shown in Figure 122 on page 196.
Appendix A. Practice exercises for Query Manager 195

8. Press the Enter key to create the STAFF2 table with the definition you have just copied and changed.
You see a message at the bottom of the display telling you that the table has been created, and that
you can press F19 (Add data) if you want to add rows to the table.
9. Press F3 (Exit) to leave the Create Table display, and return to the Work with Query Manager Tables
display. Notice that STAFF2 has been added to the list of tables shown on this display.
Exercise: Changing data in a table
You can use the Change Data option to select, then change, the contents of individual rows in a table,
and to delete the rows you no longer require. In this exercise, you will make changes to rows in the
STAFF2 table, deleting the row for the employee with an ID of 100, and giving pay increases to all Sales
staff and Clerks who earn less than $18,000.
Exercise: Searching for table rows in Query Manager
1. Make sure that the Work with Query Manager Tables display is shown. Type 10 in the Opt prompt
next to the STAFF2 table; then press the Enter key to go to the Find Data in Query Manager Table
display. Before you can change data, you need to tell Query Manager which rows you want to
change. An example of the Find Data in Query Manager Table display is shown in Figure 123 on
page 197.
Create Query Manager Table
Type choices, press Enter.
Table . . . . . . . . . STAFF2________________ Name
Description . . . . . . Copy of the STAFF Table______________________________
Decimal
Column Type Length Places
ID_____________ INTEGER___ _____ __
NAME___________ CHARACTER_ 9____ __
JOB____________ CHARACTER_ 5____ __
DEPT___________ INTEGER___ _____ __
SALARY_________ DECIMAL___ 11___ 2_
COMM___________ DECIMAL___ 9_____ 2_
Bottom
F3=Exit F4=Prompt F5=Refresh F6=Insert line F10=Copy line
F12=Cancel F14=Delete line F19=Add data F24=More keys
Press Enter to create the copied table and copy the data.
Figure 122. Tutorial: Copy Table Display
196 Query Manager Use V6R1M0

Use this display to define search conditions that find the rows you want to change or delete. You
need to find the employee whose ID is 100, and all employees who have a JOB of Sales or Clerk
with a SALARY of less than $18,000.
Notice that the search conditions start with an opening parenthesis ‘(’ and end with a closing
parenthesis ‘)’. All searches need to start and end with parentheses. You also use parentheses to
group search conditions, as demonstrated in this exercise.
The first search condition that you want to define is to find the employee with an ID of 100. Move
the cursor to the Column prompt on the first search line.
2. Press F4 (Prompt) to display a list of all of the columns that make up the STAFF2 table. Your display
should appear as shown in Figure 124.
Find Data in Query Manager Table
Table . . . . . . . . : STAFF2
Description . . . . . : Copy of the STAFF Table
Type search conditions, press Enter.
No conditions entered will find all data.
AND,OR,
(,) Column Test Value
(__ ________________ ____ ______________________________
___ ________________ ____ ______________________________
___ ________________ ____ ______________________________
___ ________________ ____ ______________________________
___ ________________ ____ ______________________________
___ ________________ ____ ______________________________
___ ________________ ____ ______________________________
___ ________________ ____ ______________________________
)__ ________________ ____ ______________________________
Bottom
F3=Exit F4=Prompt F6=Insert line F10=Copy line F12=Cancel
F14=Delete line F20=Display entire name F22=QM Statement
Figure 123. Tutorial: Change Data in a Table Display
Find Data in Query Manager Table
Table . . . . . . . . : STAFF2
Description . . . . . : Copy of the STAFF Table
............................................................
: Select Column :
Type sear : :
No condit : Type option, press Enter. :
: 1=Select :
AND,OR, : :
(,) : opt Column opt Column :
(__ : 1 ID SALARY : ________
___ : NAME COMM : ________
___ : JOB : ________
___ : DEPT : ________
___ : Bottom : ________
___ : F12=Cancel : ________
___ : : ________
___ :..........................................................: ________
)__ _______________ ____ ___________________________
Bottom
F3=Exit F4=Prompt F6=Insert line F10=Copy line F12=Cancel
F14=Delete line F20=Display entire name F22=QM Statement
Figure 124. Tutorial: Change Data in a Table Display
Appendix A. Practice exercises for Query Manager 197

3. Type 1 in the Opt prompt next to ID to choose the ID column; then press the Enter key. Query
Manager inserts ID into the Column prompt.
Move the cursor to the Test prompt.
4. Press F4 (Prompt) to display a list of all of the supported test conditions that you can include in the
search. Your display should appear as shown in Figure 125.
5. You want to find the row where ID is equal to 100, so type 1 in the Opt prompt next to EQ; then
press the Enter key. Query Manager inserts EQ into the Test prompt.
Move the cursor to the Value prompt.
6. Type a value of 100 to complete the search condition. Your display should appear as shown in
Figure 126.
Find Data in Query Manager Table
Table . . . . . . . . : STAFF2
Description . . . . . : Copy of the STAFF Table
................................................
Type search c : Select Test :
No conditions : :
: Type option, press Enter. :
AND,OR, : 1=Select :
(,) C : :
(__ I : Opt Test Description :
___ : 1 EQ Equal to :
___ : NE Not equal to :
___ : GT Greater than :
___ : GE Greater than or equal to :
___ : LT Less than :
__- : LE Less than or equal to :
___ : Bottom :
)__ : F12=Cancel :
: : Bottom
F3=Exit :..............................................: F12=Cancel
F14=Delete line F20=Display entire name F22=QM Statement
Figure 125. Tutorial: Change Data in a Table Display
Find Data in Query Manager Table
Table . . . . . . . . : STAFF2
Description . . . . . : Copy of the STAFF Table
Type search conditions, press Enter.
No conditions entered will find all data.
AND,OR,
(,) Column Test Value
(__ ID______________ EQ__ 100_______________________________
___ ________________ ____ __________________________________
___ ________________ ____ __________________________________
___ ________________ ____ __________________________________
___ ________________ ____ __________________________________
___ ________________ ____ __________________________________
___ ________________ ____ __________________________________
___ ________________ ____ __________________________________
)__ ________________ ____ __________________________________
Bottom
F3=Exit F4=Prompt F6=Insert line F10=Copy line F12=Cancel
F14=Delete line F20=Display entire name F22=QM Statement
Figure 126. Tutorial: Change Data in a Table Display
198 Query Manager Use V6R1M0
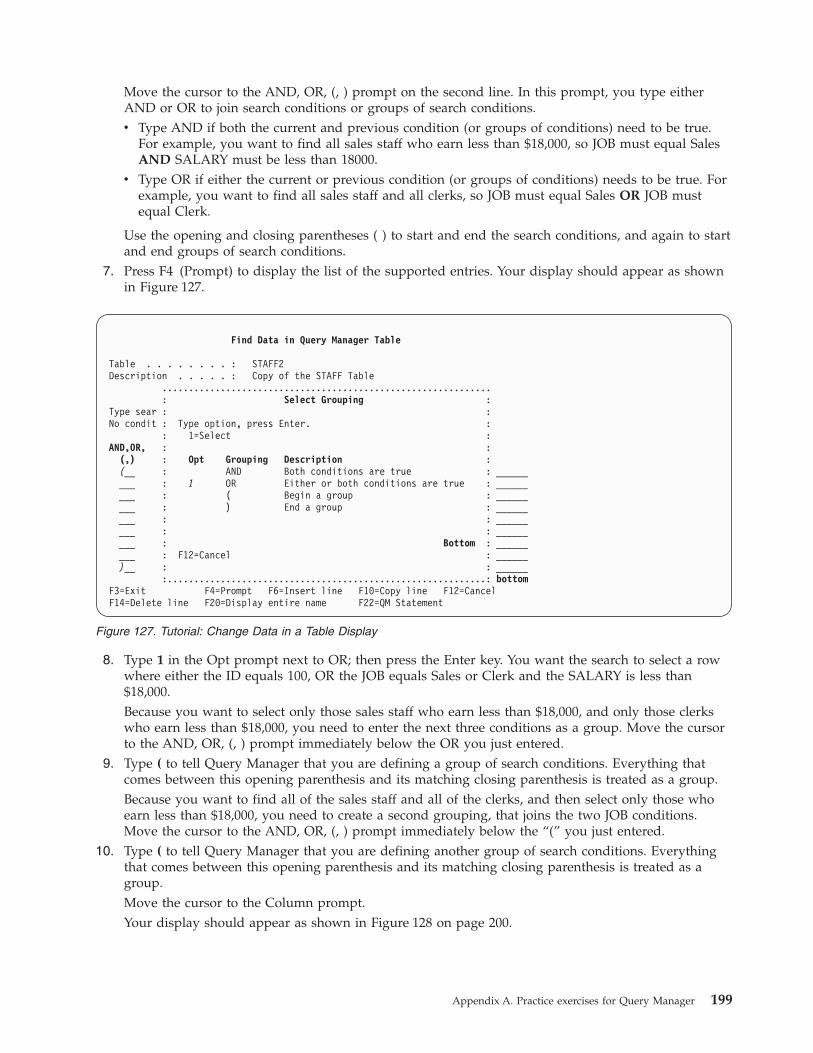
Move the cursor to the AND, OR, (, ) prompt on the second line. In this prompt, you type either
AND or OR to join search conditions or groups of search conditions.
v Type AND if both the current and previous condition (or groups of conditions) need to be true.
For example, you want to find all sales staff who earn less than $18,000, so JOB must equal Sales
AND SALARY must be less than 18000.
v Type OR if either the current or previous condition (or groups of conditions) needs to be true. For
example, you want to find all sales staff and all clerks, so JOB must equal Sales OR JOB must
equal Clerk.
Use the opening and closing parentheses ( ) to start and end the search conditions, and again to start
and end groups of search conditions.
7. Press F4 (Prompt) to display the list of the supported entries. Your display should appear as shown
in Figure 127.
8. Type 1 in the Opt prompt next to OR; then press the Enter key. You want the search to select a row
where either the ID equals 100, OR the JOB equals Sales or Clerk and the SALARY is less than
$18,000.
Because you want to select only those sales staff who earn less than $18,000, and only those clerks
who earn less than $18,000, you need to enter the next three conditions as a group. Move the cursor
to the AND, OR, (, ) prompt immediately below the OR you just entered.
9. Type ( to tell Query Manager that you are defining a group of search conditions. Everything that
comes between this opening parenthesis and its matching closing parenthesis is treated as a group.
Because you want to find all of the sales staff and all of the clerks, and then select only those who
earn less than $18,000, you need to create a second grouping, that joins the two JOB conditions.
Move the cursor to the AND, OR, (, ) prompt immediately below the “(” you just entered.
10. Type ( to tell Query Manager that you are defining another group of search conditions. Everything
that comes between this opening parenthesis and its matching closing parenthesis is treated as a
group.
Move the cursor to the Column prompt.
Your display should appear as shown in Figure 128 on page 200.
Find Data in Query Manager Table
Table . . . . . . . . : STAFF2
Description . . . . . : Copy of the STAFF Table
..............................................................
: Select Grouping :
Type sear : :
No condit : Type option, press Enter. :
: 1=Select :
AND,OR, : :
(,) : Opt Grouping Description :
(__ : AND Both conditions are true : ______
___ : 1 OR Either or both conditions are true : ______
___ : ( Begin a group : ______
___ : ) End a group : ______
___ : : ______
___ : : ______
___ : Bottom : ______
___ : F12=Cancel : ______
)__ : : ______
:............................................................: bottom
F3=Exit F4=Prompt F6=Insert line F10=Copy line F12=Cancel
F14=Delete line F20=Display entire name F22=QM Statement
Figure 127. Tutorial: Change Data in a Table Display
Appendix A. Practice exercises for Query Manager 199

11. Type JOB as the Column name. Move the cursor to the Test prompt.
12. Type EQ as the Test condition. Move the cursor to the Value prompt.
13. Type Sales as the Value, telling Query Manager to search for all staff with a job of sales. When you
search for a character value, you need to type the search value in uppercase and lowercase letters,
exactly as it appears in the table. Move the cursor to the AND, OR, (, ) prompt. The next condition
you define searches for all clerks.
14. Type OR to tell Query Manager that either this condition OR the previous condition needs to be true
for it to select a row. Move the cursor to the Column prompt.
15. Type JOB as the Column name. Move the cursor to the Test prompt.
16. Type EQ as the Test condition. Move the cursor to the Value prompt.
17. Type Clerk as the Value, telling Query Manager to search for all staff with a job of clerk. Move the
cursor to the AND, OR, (, ) prompt.
18. Type ) to tell Query Manager that you have finished defining a group of search conditions. Move the
cursor to the AND, OR, (, ) prompt on the next line. The next condition you define tells Query
Manager to select only those sales staff and clerks who earn less than $18,000.
19. Type AND to tell Query Manager that this condition AND the previous condition(s) need to be true
for it to select a row. Move the cursor to the Column prompt.
20. Type SALARY as the Column name. Move the cursor to the Test prompt.
21. Type LT (less than) as the Test condition. Move the cursor to the Value prompt.
22. Type 18000 as the Value, telling Query Manager to search for sales staff and clerks with a salary less
than $18,000. Move the cursor to the AND, OR, (, ) prompt.
23. Type ) to tell Query Manager that you have finished defining the group of search conditions. Your
display should appear as shown in Figure 129 on page 201.
Find Data in Query Manager Table
Table . . . . . . . . : STAFF2
Description . . . . . : Copy of the STAFF Table
Type search conditions, press Enter.
No conditions entered will find all data.
AND,OR,
(,) Column Test Value
(__ ID_________________ EQ__ 100____________________________
___ ___________________ ____ _______________________________
___ ___________________ ____ _______________________________
___ ___________________ ____ _______________________________
___ ___________________ ____ _______________________________
___ ___________________ ____ _______________________________
___ ___________________ ____ _______________________________
___ ___________________ ____ _______________________________
)__ ___________________ ____ _______________________________
Bottom
F3=Exit F4=Prompt F6=Insert line F10=Copy line F12=Cancel
F14=Delete line F20=Display entire name F22=QM Statement
Figure 128. Tutorial: Change Data in a Table Display
200 Query Manager Use V6R1M0
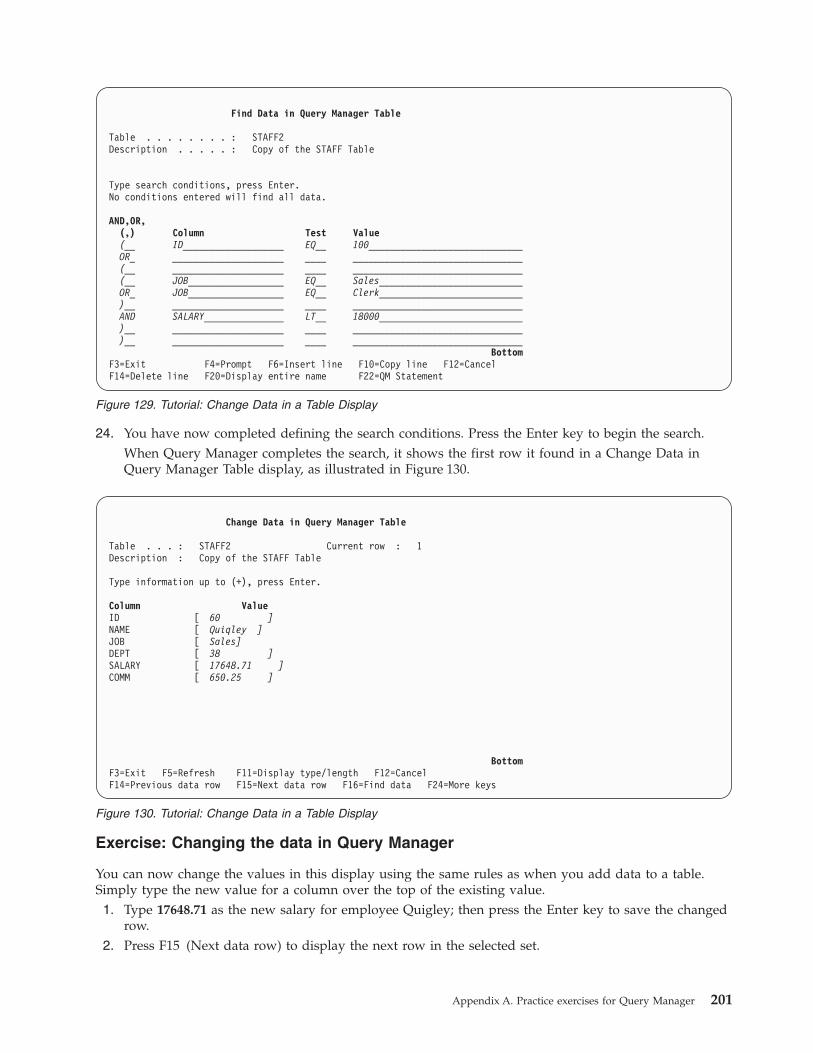
24. You have now completed defining the search conditions. Press the Enter key to begin the search.
When Query Manager completes the search, it shows the first row it found in a Change Data in
Query Manager Table display, as illustrated in Figure 130.
Exercise: Changing the data in Query Manager
You can now change the values in this display using the same rules as when you add data to a table.
Simply type the new value for a column over the top of the existing value.
1. Type 17648.71 as the new salary for employee Quigley; then press the Enter key to save the changed
row.
2. Press F15 (Next data row) to display the next row in the selected set.
Find Data in Query Manager Table
Table . . . . . . . . : STAFF2
Description . . . . . : Copy of the STAFF Table
Type search conditions, press Enter.
No conditions entered will find all data.
AND,OR,
(,) Column Test Value
(__ ID___________________ EQ__ 100_____________________________
OR_ _____________________ ____ ________________________________
(__ _____________________ ____ ________________________________
(__ JOB__________________ EQ__ Sales___________________________
OR_ JOB__________________ EQ__ Clerk___________________________
)__ _____________________ ____ ________________________________
AND SALARY_______________ LT__ 18000___________________________
)__ _____________________ ____ ________________________________
)__ _____________________ ____ ________________________________
Bottom
F3=Exit F4=Prompt F6=Insert line F10=Copy line F12=Cancel
F14=Delete line F20=Display entire name F22=QM Statement
Figure 129. Tutorial: Change Data in a Table Display
Change Data in Query Manager Table
Table . . . : STAFF2 Current row : 1
Description : Copy of the STAFF Table
Type information up to (+), press Enter.
Column Value
ID [ 60 ]
NAME [ Quiqley ]
JOB [ Sales]
DEPT [ 38 ]
SALARY [ 17648.71 ]
COMM [ 650.25 ]
Bottom
F3=Exit F5=Refresh F11=Display type/length F12=Cancel
F14=Previous data row F15=Next data row F16=Find data F24=More keys
Figure 130. Tutorial: Change Data in a Table Display
Appendix A. Practice exercises for Query Manager 201
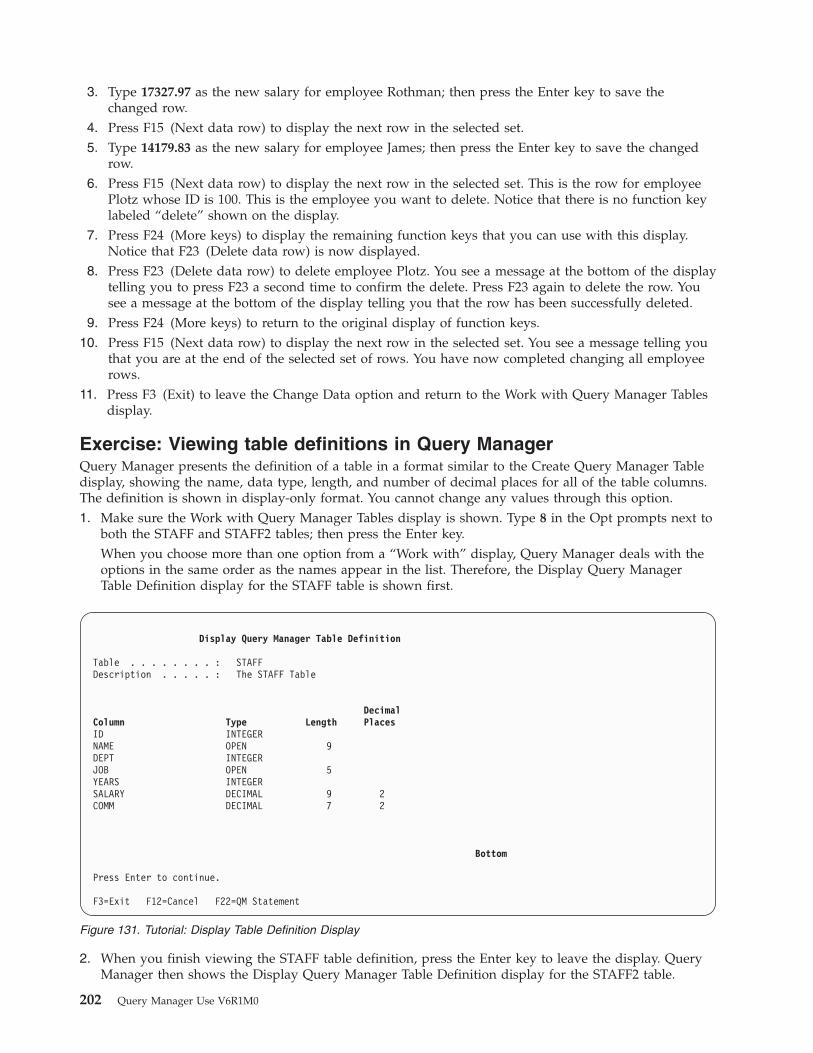
3. Type 17327.97 as the new salary for employee Rothman; then press the Enter key to save the
changed row.
4. Press F15 (Next data row) to display the next row in the selected set.
5. Type 14179.83 as the new salary for employee James; then press the Enter key to save the changed
row.
6. Press F15 (Next data row) to display the next row in the selected set. This is the row for employee
Plotz whose ID is 100. This is the employee you want to delete. Notice that there is no function key
labeled “delete” shown on the display.
7. Press F24 (More keys) to display the remaining function keys that you can use with this display.
Notice that F23 (Delete data row) is now displayed.
8. Press F23 (Delete data row) to delete employee Plotz. You see a message at the bottom of the display
telling you to press F23 a second time to confirm the delete. Press F23 again to delete the row. You
see a message at the bottom of the display telling you that the row has been successfully deleted.
9. Press F24 (More keys) to return to the original display of function keys.
10. Press F15 (Next data row) to display the next row in the selected set. You see a message telling you
that you are at the end of the selected set of rows. You have now completed changing all employee
rows.
11. Press F3 (Exit) to leave the Change Data option and return to the Work with Query Manager Tables
display.
Exercise: Viewing table definitions in Query Manager
Query Manager presents the definition of a table in a format similar to the Create Query Manager Table
display, showing the name, data type, length, and number of decimal places for all of the table columns.
The definition is shown in display-only format. You cannot change any values through this option.
1. Make sure the Work with Query Manager Tables display is shown. Type 8 in the Opt prompts next to
both the STAFF and STAFF2 tables; then press the Enter key.
When you choose more than one option from a “Work with” display, Query Manager deals with the
options in the same order as the names appear in the list. Therefore, the Display Query Manager
Table Definition display for the STAFF table is shown first.
2. When you finish viewing the STAFF table definition, press the Enter key to leave the display. Query
Manager then shows the Display Query Manager Table Definition display for the STAFF2 table.
Display Query Manager Table Definition
Table . . . . . . . . : STAFF
Description . . . . . : The STAFF Table
Decimal
Column Type Length Places
ID INTEGER
NAME OPEN 9
DEPT INTEGER
JOB OPEN 5
YEARS INTEGER
SALARY DECIMAL 9 2
COMM DECIMAL 7 2
Bottom
Press Enter to continue.
F3=Exit F12=Cancel F22=QM Statement
Figure 131. Tutorial: Display Table Definition Display
202 Query Manager Use V6R1M0
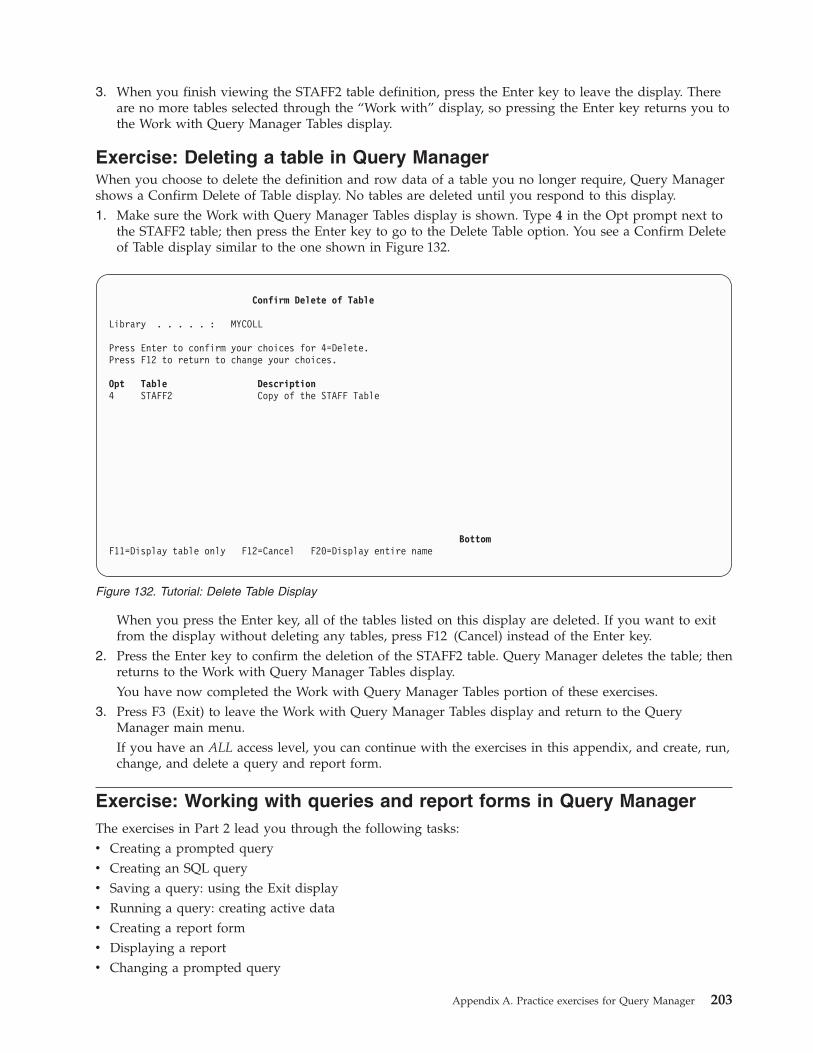
3. When you finish viewing the STAFF2 table definition, press the Enter key to leave the display. There
are no more tables selected through the “Work with” display, so pressing the Enter key returns you to
the Work with Query Manager Tables display.
Exercise: Deleting a table in Query Manager
When you choose to delete the definition and row data of a table you no longer require, Query Manager
shows a Confirm Delete of Table display. No tables are deleted until you respond to this display.
1. Make sure the Work with Query Manager Tables display is shown. Type 4 in the Opt prompt next to
the STAFF2 table; then press the Enter key to go to the Delete Table option. You see a Confirm Delete
of Table display similar to the one shown in Figure 132.
When you press the Enter key, all of the tables listed on this display are deleted. If you want to exit
from the display without deleting any tables, press F12 (Cancel) instead of the Enter key.
2. Press the Enter key to confirm the deletion of the STAFF2 table. Query Manager deletes the table; then
returns to the Work with Query Manager Tables display.
You have now completed the Work with Query Manager Tables portion of these exercises.
3. Press F3 (Exit) to leave the Work with Query Manager Tables display and return to the Query
Manager main menu.
If you have an ALL access level, you can continue with the exercises in this appendix, and create, run,
change, and delete a query and report form.
Exercise: Working with queries and report forms in Query Manager
The exercises in Part 2 lead you through the following tasks:
v Creating a prompted query
v Creating an SQL query
v Saving a query: using the Exit display
v Running a query: creating active data
v Creating a report form
v Displaying a report
v Changing a prompted query
Confirm Delete of Table
Library . . . . . : MYCOLL
Press Enter to confirm your choices for 4=Delete.
Press F12 to return to change your choices.
Opt Table Description
4 STAFF2 Copy of the STAFF Table
Bottom
F11=Display table only F12=Cancel F20=Display entire name
Figure 132. Tutorial: Delete Table Display
Appendix A. Practice exercises for Query Manager 203

v Changing an SQL query
v Running the changed query
v Exiting without saving a query or report form
v Deleting a query
These exercises are intended for users with an ALL access level. You need to have created the STAFF table
from Part 1 of this appendix before you can perform any of these exercises.
Work your way through these exercises in the order shown above. In many cases, in order to perform
one exercise you need to have completed all previous exercises.
Exercise: Before you begin queries and reports in Query Manager
The exercises in this part of the appendix lead you through the steps required to create the TUTQRY
query and the TUTRPT report form. Instructions are provided showing you how to create and change the
TUTQRY query in both the prompted and the SQL query creation modes.
Note: Before you can create the TUTQRY query using the SQL query creation mode, you need to have
authority to use the SELECT statement (granted through your Query Manager profile). See
“Selecting allowed SQL statements for profiles in Query Manager” on page 48 for details.
Create this query and report form in your default library. The example displays in this appendix show
the table being created in a library called MYLIB. Your displays will show the query and report form
being created in your default library (as specified in your Query Manager profile).
Each query and report form within a library must have a unique name. If a query named TUTQRY or a
report form named TUTRPT already exist in your default library, you need to give the query and/or
report form you create through these exercises different names (for example, name them after yourself).
You cannot have two queries or two report forms with the same name in the same library.
The values shown in bold type are the values that you should type to complete the exercises in this
appendix.
Exercise: Creating a prompted query in Query Manager
Perform the following exercise if your current query creation mode is prompted. If your query creation
mode is SQL, turn to “Exercise: Creating an SQL query in Query Manager” on page 210.
This exercise leads you through the steps required to create the tutorial query (TUTQRY) shown below.
SELECT DEPT, NAME, JOB, SALARY, COMM
FROM MYCOLL.STAFF
WHERE DEPT = 20 OR DEPT = 38
ORDER BY DEPT, JOB
The TUTQRY query retrieves data from the STAFF table created through Part 1 of this appendix. Turn to
“Exercise: Creating a table named with 18 characters or less in Query Manager” on page 182 if you have
not yet created the STAFF table.
1. Make sure the Query Manager main menu is displayed. Type 1 in the Selection prompt; then press
the Enter key to go to the Work with Query Manager Queries display.
2. Type 1 in the Opt prompt next to the blank query name (at the top of the list) to choose option 1
(Create).
3. Type TUTQRY in the Query name prompt to name the tutorial query; then press the Enter key to go
to the Create option and show the Define Prompted Query display. An example of the Define
Prompted Query display is shown in Figure 133 on page 205.
204 Query Manager Use V6R1M0

Note: If a query named TUTQRY already exists in your default library, you need to give a different
name to the query you are creating. You cannot have two queries, both named TUTQRY, in
the same library.
Use the Define Prompted Query display to choose the attributes of the query that you want to
define. You can type 1 in the Opt prompt to select individual attributes, or press F21 (Select all) to
select all of the definition attributes.
To create the TUTQRY query, you need to select the following attributes through the Define
Prompted Query display:
v Specify tables. Tell Query Manager that you want to query the MYCOLL.STAFF table.
v Select and sequence columns. Name the columns that you want to select from MYCOLL.STAFF,
and the sequence in which you want the columns selected.
v Select rows. Specify the rows that you want the query to select. (Define the WHERE clause of the
SELECT statement.)
v Select sort columns. Specify the order in which you want the rows to be sorted. (Define the
ORDER BY clause of the SELECT statement.) 4. Type a 1 in the Opt prompt beside all four of these options. The Define Prompted Query display
should appear as shown in Figure 134 on page 206.
Define Prompted Query
Query . . . . . . . : TUTQRY
Type options, press Enter. Press F21 to select all.
1=Select
Opt Prompted Query Selection
1 Specify tables
_ Define expressions
_ Select and sequence columns
_ Select rows
_ Select sort columns
_ Select summary functions
_ Specify duplicate rows
_ Specify report formatting
F3=Exit F5=Run report F6=Run sample F12=Cancel F18=Display SQL
F21=Select all F22=QM statement
Figure 133. Tutorial: Create Prompted Query Display
Appendix A. Practice exercises for Query Manager 205

5. Press the Enter key to begin defining the query.
The first display you go to is the Specify Tables display, through which you choose the tables that
you want to query. Displays for the remaining definition attributes are shown in the same order as
the attribute descriptions appear on the Define Prompted Query display.
An example of the Specify Tables display is shown in Figure 135.
6. Type STAFF as the name of the table you want to query, and MYCOLL as the name of the collection
in which it resides (where MYCOLL is the name of your default collection for Query Manager
tables). Then press the Enter key to go to the display for the next definition attribute that you chose,
the Select and Sequence Columns display.
You use the Select and Sequence Columns display to tell Query Manager which columns you want
to select from the table (or tables) you chose through the Specify Tables display, and to specify the
Define Prompted Query
Query . . . . . . . : TUTQRY
Type options, press Enter. Press F21 to select all.
1=Select
Opt Prompted Query Selection
1 Specify tables
Define expressions
1 Select and sequence columns
1 Select rows
1 Select sort columns
Select summary functions
Specify duplicate rows
Specify report formatting
F3=Exit F5=Run report F6=Run sample F12=Cancel F18=Display SQL
F21=Select all F22=QM statement
Figure 134. Tutorial: Create Prompted Query Display
Specify Tables
Type choices, press Enter.
Table . . . . . . . . . . . A STAFF____________ Name, F4 for list
Collection . . . . . . . MYCOLL_______________ Name
+ for more tables . . . . _
F3=Exit F4=Prompt F5=Run report F6=Run sample F12=Cancel
F18=Display SQL F20=Display entire name F22=QM statement
Figure 135. Tutorial: Create Prompted Query Display
206 Query Manager Use V6R1M0
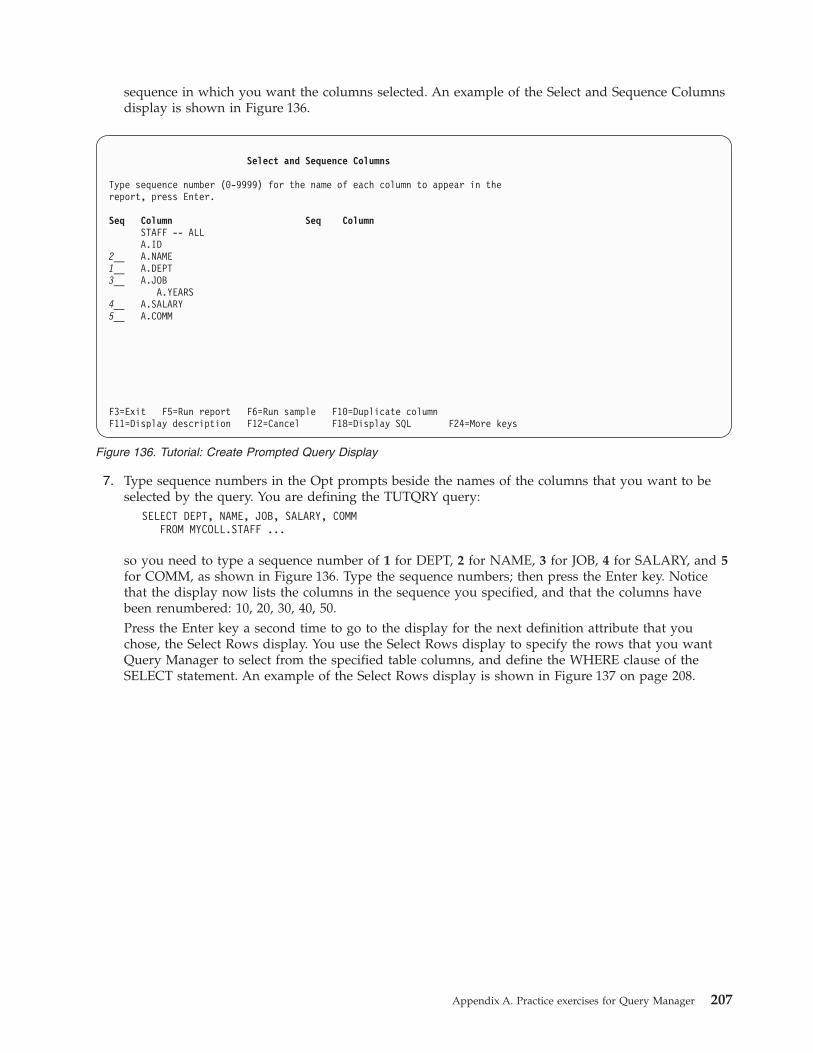
sequence in which you want the columns selected. An example of the Select and Sequence Columns
display is shown in Figure 136.
7. Type sequence numbers in the Opt prompts beside the names of the columns that you want to be
selected by the query. You are defining the TUTQRY query:
SELECT DEPT, NAME, JOB, SALARY, COMM
FROM MYCOLL.STAFF ...
so you need to type a sequence number of 1 for DEPT, 2 for NAME, 3 for JOB, 4 for SALARY, and 5
for COMM, as shown in Figure 136. Type the sequence numbers; then press the Enter key. Notice
that the display now lists the columns in the sequence you specified, and that the columns have
been renumbered: 10, 20, 30, 40, 50.
Press the Enter key a second time to go to the display for the next definition attribute that you
chose, the Select Rows display. You use the Select Rows display to specify the rows that you want
Query Manager to select from the specified table columns, and define the WHERE clause of the
SELECT statement. An example of the Select Rows display is shown in Figure 137 on page 208.
Select and Sequence Columns
Type sequence number (0-9999) for the name of each column to appear in the
report, press Enter.
Seq Column Seq Column
STAFF -- ALL
A.ID
2__ A.NAME
1__ A.DEPT
3__ A.JOB
A.YEARS
4__ A.SALARY
5__ A.COMM
F3=Exit F5=Run report F6=Run sample F10=Duplicate column
F11=Display description F12=Cancel F18=Display SQL F24=More keys
Figure 136. Tutorial: Create Prompted Query Display
Appendix A. Practice exercises for Query Manager 207
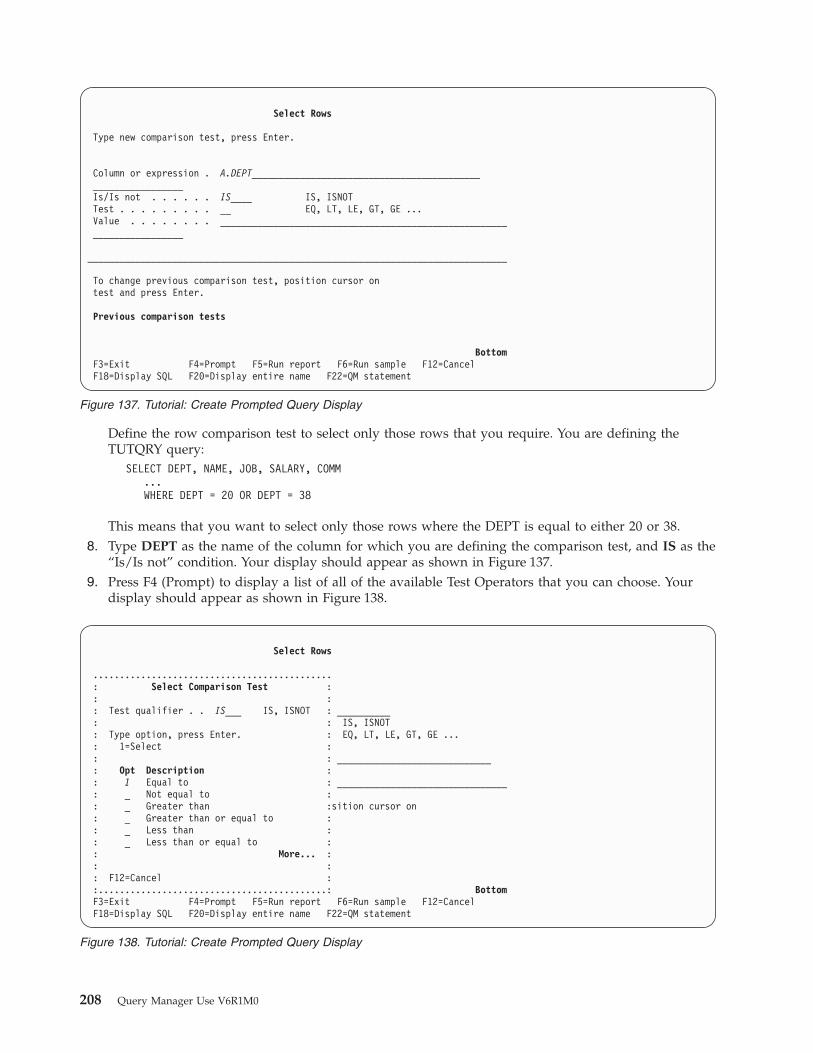
Define the row comparison test to select only those rows that you require. You are defining the
TUTQRY query:
SELECT DEPT, NAME, JOB, SALARY, COMM
...
WHERE DEPT = 20 OR DEPT = 38
This means that you want to select only those rows where the DEPT is equal to either 20 or 38.
8. Type DEPT as the name of the column for which you are defining the comparison test, and IS as the
“Is/Is not” condition. Your display should appear as shown in Figure 137.
9. Press F4 (Prompt) to display a list of all of the available Test Operators that you can choose. Your
display should appear as shown in Figure 138.
Select Rows
Type new comparison test, press Enter.
Column or expression . A.DEPT___________________________________________
_________________
Is/Is not . . . . . . IS____ IS, ISNOT
Test . . . . . . . . . __ EQ, LT, LE, GT, GE ...
Value . . . . . . . . ______________________________________________________
_________________
_______________________________________________________________________________
To change previous comparison test, position cursor on
test and press Enter.
Previous comparison tests
Bottom
F3=Exit F4=Prompt F5=Run report F6=Run sample F12=Cancel
F18=Display SQL F20=Display entire name F22=QM statement
Figure 137. Tutorial: Create Prompted Query Display
Select Rows
.............................................
: Select Comparison Test :
: :
: Test qualifier . . IS___ IS, ISNOT : __________
: : IS, ISNOT
: Type option, press Enter. : EQ, LT, LE, GT, GE ...
: 1=Select :
: : _____________________________
: Opt Description :
: 1 Equal to : ________________________________
: _ Not equal to :
: _ Greater than :sition cursor on
: _ Greater than or equal to :
: _ Less than :
: _ Less than or equal to :
: More... :
: :
: F12=Cancel :
:...........................................: Bottom
F3=Exit F4=Prompt F5=Run report F6=Run sample F12=Cancel
F18=Display SQL F20=Display entire name F22=QM statement
Figure 138. Tutorial: Create Prompted Query Display
208 Query Manager Use V6R1M0

10. Type 1 in the Selection prompt to choose “Equal to” and press the Enter key. Then move the cursor
to the prompt for Value and press F4 (Prompt) to display a window through which you can enter
the values for the comparison test. An example of this window is shown in Figure 139.
11. Type 20 and 38 as the two test values to select all rows with a department number of 20 or 38.
You have now finished defining the comparison test.
12. Press the Enter key to save the test. The display should appear as shown in Figure 140.
The comparison test you have just defined is shown at the bottom of the display, and the prompts at
the top of the display are ready for you to define the next comparison test.
Notice that an “AND/OR” prompt has been added to the top of the display. When you define more
than one comparison test, you need to specify the connector you want to use to join the tests. You
Select Rows
............................................................................
: Specify Comparison Test Value :
: :
: Type the value, expression, or column for comparison, press Enter. :
: If A.DEPT is equal to :
: :
: 20 :
: OR :
: 38 :
: OR :
: ____________________________________________________________________ :
: :
: More... :
: F12=Cancel :
: :
:..........................................................................:
Bottom
F3=Exit F4=Prompt F5=Run report F6=Run sample F12=Cancel
F18=Display SQL F20=Display entire name F22=QM statement
Figure 139. Tutorial: Create Prompted Query Display
Select Rows
Type new comparison test, press Enter.
AND/OR . . . . . . . . ___ AND, OR
Column or expression . ______________________________________________________
_________________
Is/Is not . . . . . . ______ IS, ISNOT
Test . . . . . . . . . __ EQ, LT, LE, GT, GE ...
Value . . . . . . . . ______________________________________________________
_________________
_______________________________________________________________________________
To change previous comparison test, position cursor on
test and press Enter.
Previous comparison tests
If A.DEPT is equal to 20 or 38
Bottom
F3=Exit F4=Prompt F5=Run report F6=Run sample F12=Cancel
F18=Display SQL F20=Display entire name F22=QM statement
Figure 140. Tutorial: Create Prompted Query Display
Appendix A. Practice exercises for Query Manager 209

would choose AND if you wanted both tests to be true for a row to be selected, or OR if you wanted
either of the tests to be true for a row to be selected.
13. You have completed defining the row selection test for the query. Press the Enter key to go to the
next definition attribute that you chose, the Select Sort Columns display.
You use the Select Sort Columns display to specify the sort sequence for the columns being selected,
and define the ORDER BY clause of the SELECT statement. An example of the Select Sort Columns
display is shown in Figure 141.
14. Select each of the columns that you want to sort. Type a number from 0 to 999 to specify the priority
for each sort. Then, type A to specify that you want to sort the column in ascending order, or D to
specify that you want to sort the column in descending order. You are defining the TUTQRY query:
SELECT DEPT, NAME, JOB, SALARY, COMM
...
ORDER BY DEPT, JOB
This means that you want to sort the selected columns in DEPT order, and within each DEPT, sort
by JOB order. Type a sort priority of 1 for DEPT, and 2 for JOB. Both sorts are in ascending order
(which is the default). Your display should appear as shown in Figure 141.
15. Press the Enter key to return to the Define Prompted Query display. You have now completed all of
the Prompted Query displays that you chose through this display, which means that you have now
defined the TUTQRY query. Note that there is a “>” sign beside each part of the query that you have
defined.
16. Press F3 (Exit) to leave the Define Prompted Query display and go to the Exit display. You save and
describe queries using the Exit display. Turn to “Exercise: Using the exit display to save a query in
Query Manager” on page 213 to continue with the exercises in this appendix.
Exercise: Creating an SQL query in Query Manager
Perform the following exercise if your current query creation mode is SQL. If your query creation mode
is prompted, turn to “Exercise: Creating a prompted query in Query Manager” on page 204.
This exercise leads you through the steps required to create the tutorial query (TUTQRY) shown below.
Select Sort Columns
Type sort priority (0-999) and A (Ascending) or D (Descending) for the names
of up to 32 columns, press Enter.
Sort Sort
Prty A/D Column Prty A/D Column
___ _ A.NAME
1__ A A.DEPT
2__ A A.JOB
___ _ A.SALARY
___ _ A.COMM
F3=Exit F5=Run report F6=Run sample F11=Display description
F12=Cancel F18=Display SQL F20=Display entire name F22=QM statement
Figure 141. Tutorial: Create Prompted Query Display
210 Query Manager Use V6R1M0

SELECT DEPT, NAME, JOB, SALARY, COMM
FROM MYCOLL.STAFF
WHERE DEPT = 20 OR DEPT = 38
ORDER BY DEPT, JOB
The TUTQRY query retrieves data from the STAFF table created through Part 1 of this appendix. Turn to
“Exercise: Creating a table named with 18 characters or less in Query Manager” on page 182 if you have
not yet created the STAFF table.
1. Make sure the Query Manager main menu is displayed. Type 1 in the Selection prompt; then press
the Enter key to go to the Work with Query Manager Queries display.
2. Type 1 in the Opt prompt next to the blank query name (at the top of the list) to choose 1 (Create).
3. Type TUTQRY in the Query name prompt to name the tutorial query; then press the Enter key to go
to the Create option and show the Edit Query display. An example of the Edit Query display is
shown in Figure 142.
This is where you type the SQL statement to define your query.
Note: If a query named TUTQRY already exists in your default library, you need to give a different
name to the query you are creating. You cannot have two queries, both named TUTQRY, in
the same library.
Make sure that the cursor is positioned in the SQL editor portion of the display, next to the ’’’’’’’
marks.
4. Type SELECT to begin the query.
If you are unsure which SQL statement you want to enter to create a query, you can press F4
(Prompt) when the editor portion of the display is blank, to show a list of all of the SQL statements
that you can enter through this editor. All of the SQL statements that you have been granted
authority to use through your Query Manager profile are shown in the list (see page 42). You might
need to use your display station’s roll keys to view the entire list.
5. With the cursor on the word SELECT, press F4 (Prompt) to show a list of all the options you can
include as part of the SELECT statement. Your display should appear as shown in Figure 143 on
page 212.
Edit Query
Columns . . . : 1 68 Query . . . . . : TUTQRY
QM . . _____________________________________________________________________
Type SQL Statement.
************************ Beginning of data ************************
’’’’’’’ SELECT
’’’’’’’
’’’’’’’
’’’’’’’
’’’’’’’
’’’’’’’
’’’’’’’
’’’’’’’
’’’’’’’
’’’’’’’
’’’’’’’
’’’’’’’
*************************** End of data ***************************
Bottom
F2=Alternate keys F3=Exit F4=Prompt F5=Run report F6=Run sample
F9=Retrieve F15=Check syntax F24=More keys
Figure 142. Tutorial: Create SQL Query Display
Appendix A. Practice exercises for Query Manager 211

You can now type values in response to the prompts on this display to define the TUTQRY query.
6. Type MYCOLL.STAFF in response to the “FROM tables” prompt, to specify the STAFF table from
your MYCOLL collection (where MYCOLL is the name of your default collection for Query Manager
tables). If you are using *SYS naming conventions, type MYCOLL/STAFF.
7. Type DEPT, NAME, JOB, SALARY, COMM in response to the “SELECT columns” prompt, to
specify the columns you want to select from the table.
8. Type DEPT = 20 OR DEPT = 38 in response to the “WHERE conditions” prompt, to select all rows
with a department number of 20 or 38.
9. Type DEPT, JOB in response to the “ORDER BY columns” prompt, to sort the selected rows by
employee DEPT number, and within each DEPT, sort by JOB order. The display should appear as
shown in Figure 144.
Specify SELECT Statement
Type information for SELECT statement. Press F4 for a list.
FROM tables . . . . . . . . _____________________________________________
SELECT columns . . . . . . . _____________________________________________
WHERE conditions . . . . . . _____________________________________________
GROUP BY columns . . . . . . _____________________________________________
HAVING conditions . . . . . _____________________________________________
ORDER BY columns . . . . . . _____________________________________________
FOR UPDATE OF columns . . . _____________________________________________
Bottom
Type choices, press Enter.
DISTINCT rows in result table . . . . . . . . . N Y=Yes, N=No
UNION with another SELECT . . . . . . . . . . . N Y=Yes, N=No
Specify additional options . . . . . . . . . . . N Y=Yes, N=No
F3=Exit F4=Prompt F5=Refresh F6=Insert line F9=Specify subquery
F10=Copy line F12=Cancel F14=Delete line F15=Split line F24=More keys
Figure 143. Tutorial: Create SQL Query Display
Specify SELECT Statement
Type information for SELECT statement. Press F4 for a list.
FROM tables . . . . . . . . MYCOLL.STAFF
SELECT columns . . . . . . . DEPT, NAME, JOB, SALARY, COMM
WHERE conditions . . . . . . DEPT = 20 OR DEPT = 38
GROUP BY columns . . . . . . ____________________________________________
HAVING conditions . . . . . ____________________________________________
ORDER BY columns . . . . . . DEPT, JOB
FOR UPDATE OF columns . . . ____________________________________________
Bottom
Type choices, press Enter.
DISTINCT rows in result table . . . . . . . . . N Y=Yes, N=No
UNION with another SELECT . . . . . . . . . . . N Y=Yes, N=No
Specify additional options . . . . . . . . . . . N Y=Yes, N=No
F3=Exit F4=Prompt F5=Refresh F6=Insert line F9=Specify subquery
F10=Copy line F12=Cancel F14=Delete line F15=Split line F24=More keys
Figure 144. Tutorial: Create SQL Query Display
212 Query Manager Use V6R1M0
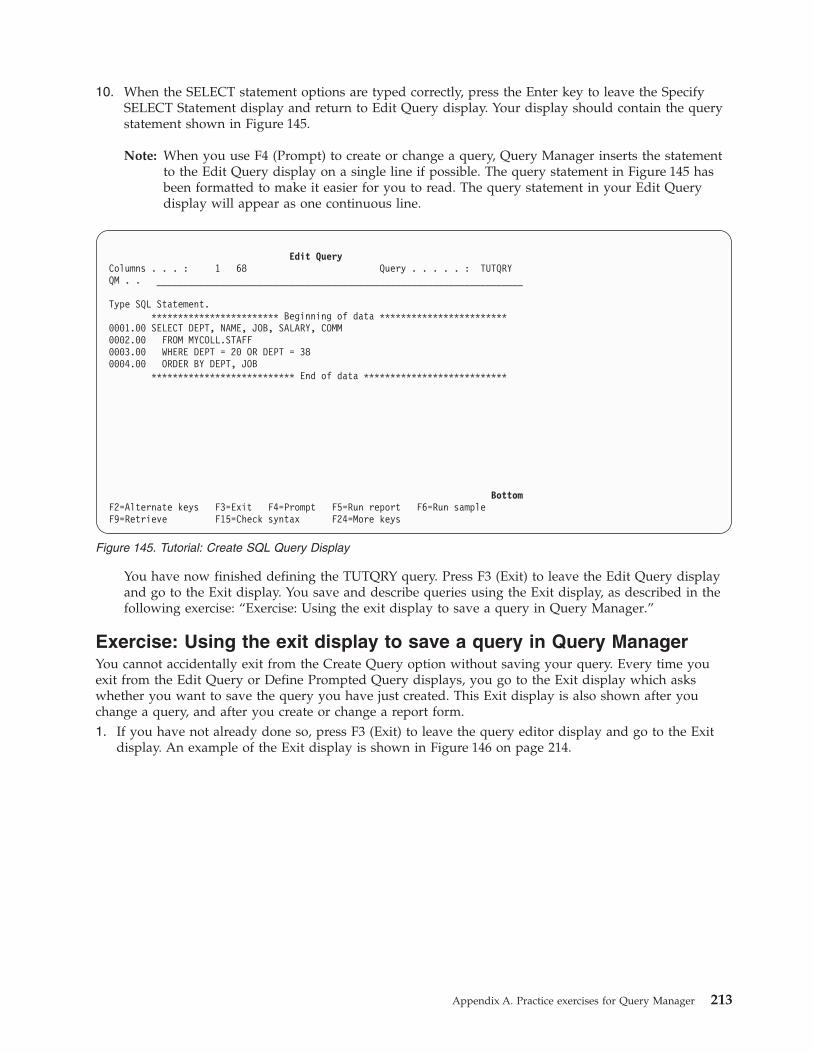
10. When the SELECT statement options are typed correctly, press the Enter key to leave the Specify
SELECT Statement display and return to Edit Query display. Your display should contain the query
statement shown in Figure 145.
Note: When you use F4 (Prompt) to create or change a query, Query Manager inserts the statement
to the Edit Query display on a single line if possible. The query statement in Figure 145 has
been formatted to make it easier for you to read. The query statement in your Edit Query
display will appear as one continuous line.
You have now finished defining the TUTQRY query. Press F3 (Exit) to leave the Edit Query display
and go to the Exit display. You save and describe queries using the Exit display, as described in the
following exercise: “Exercise: Using the exit display to save a query in Query Manager.”
Exercise: Using the exit display to save a query in Query Manager
You cannot accidentally exit from the Create Query option without saving your query. Every time you
exit from the Edit Query or Define Prompted Query displays, you go to the Exit display which asks
whether you want to save the query you have just created. This Exit display is also shown after you
change a query, and after you create or change a report form.
1. If you have not already done so, press F3 (Exit) to leave the query editor display and go to the Exit
display. An example of the Exit display is shown in Figure 146 on page 214.
Edit Query
Columns . . . : 1 68 Query . . . . . : TUTQRY
QM . . _____________________________________________________________________
Type SQL Statement.
************************ Beginning of data ************************
0001.00 SELECT DEPT, NAME, JOB, SALARY, COMM
0002.00 FROM MYCOLL.STAFF
0003.00 WHERE DEPT = 20 OR DEPT = 38
0004.00 ORDER BY DEPT, JOB
*************************** End of data ***************************
Bottom
F2=Alternate keys F3=Exit F4=Prompt F5=Run report F6=Run sample
F9=Retrieve F15=Check syntax F24=More keys
Figure 145. Tutorial: Create SQL Query Display
Appendix A. Practice exercises for Query Manager 213

2. Type Tutorial Query as the description for this query.
3. You want to save the query and exit from the Create Query option, so press the Enter key to accept
the default value of 1 (Save and exit), and return to the Work with Query Manager Queries display.
Notice that the TUTQRY query has been added to the list of queries shown on this display.
When you save a newly created query, it becomes the active query. TUTQRY is now the active query.
Exercise: Running a query to creating active data in Query Manager
Now that you have created the TUTQRY query, you can run it and view the information that the query
retrieves and sorts. Running a query interactively creates active data, which you will use in the next
exercise in this appendix, “Exercise: Creating a report form in Query Manager” on page 216.
Note: If your Query Manager profile is set so that you can run queries only in batch mode and “Allow
interactive sample run” is set to NO, you cannot create active data. Active data is created only
when a query is run interactively.
The way you run a query can differ depending on the settings in your Query Manager profile.
1. Make sure that the Work with Query Manager Queries display is shown. Type 9 in the Opt prompt
next to the TUTQRY query; then press the Enter key to go to the Run Query display, as shown in
Figure 147 on page 215.
Exit
Type choices, press Enter.
Option . . . . . . . . . . 1 1=Save and exit
2=Exit without save
3=Resume without save
4=Save and resume
Query . . . . . . . . TUTQRY____ Name
Library . . . . . . MYLIB_____ Name, *CURLIB
Description . . . . . Tutorial Query
F5=Refresh F12=Cancel
Figure 146. Tutorial: Save Query Display
214 Query Manager Use V6R1M0
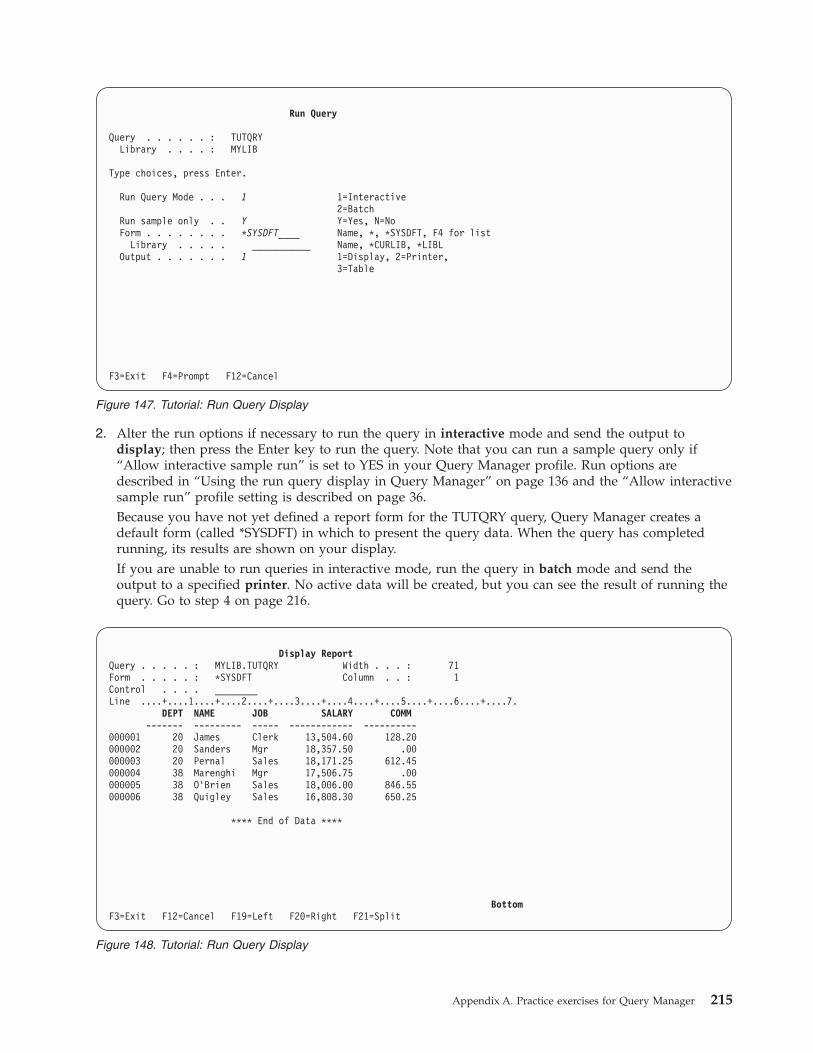
2. Alter the run options if necessary to run the query in interactive mode and send the output to
display; then press the Enter key to run the query. Note that you can run a sample query only if
“Allow interactive sample run” is set to YES in your Query Manager profile. Run options are
described in “Using the run query display in Query Manager” on page 136 and the “Allow interactive
sample run” profile setting is described on page 36.
Because you have not yet defined a report form for the TUTQRY query, Query Manager creates a
default form (called *SYSDFT) in which to present the query data. When the query has completed
running, its results are shown on your display.
If you are unable to run queries in interactive mode, run the query in batch mode and send the
output to a specified printer. No active data will be created, but you can see the result of running the
query. Go to step 4 on page 216.
Run Query
Query . . . . . . : TUTQRY
Library . . . . : MYLIB
Type choices, press Enter.
Run Query Mode . . . 1 1=Interactive
2=Batch
Run sample only . . Y Y=Yes, N=No
Form . . . . . . . . *SYSDFT____ Name, *, *SYSDFT, F4 for list
Library . . . . . ___________ Name, *CURLIB, *LIBL
Output . . . . . . . 1 1=Display, 2=Printer,
3=Table
F3=Exit F4=Prompt F12=Cancel
Figure 147. Tutorial: Run Query Display
Display Report
Query . . . . . : MYLIB.TUTQRY Width . . . : 71
Form . . . . . : *SYSDFT Column . . : 1
Control . . . . ________
Line ....+....1....+....2....+....3....+....4....+....5....+....6....+....7.
DEPT NAME JOB SALARY COMM
------- --------- ----- ------------ ----------
000001 20 James Clerk 13,504.60 128.20
000002 20 Sanders Mgr 18,357.50 .00
000003 20 Pernal Sales 18,171.25 612.45
000004 38 Marenghi Mgr 17,506.75 .00
000005 38 O’Brien Sales 18,006.00 846.55
000006 38 Quigley Sales 16,808.30 650.25
**** End of Data ****
Bottom
F3=Exit F12=Cancel F19=Left F20=Right F21=Split
Figure 148. Tutorial: Run Query Display
Appendix A. Practice exercises for Query Manager 215
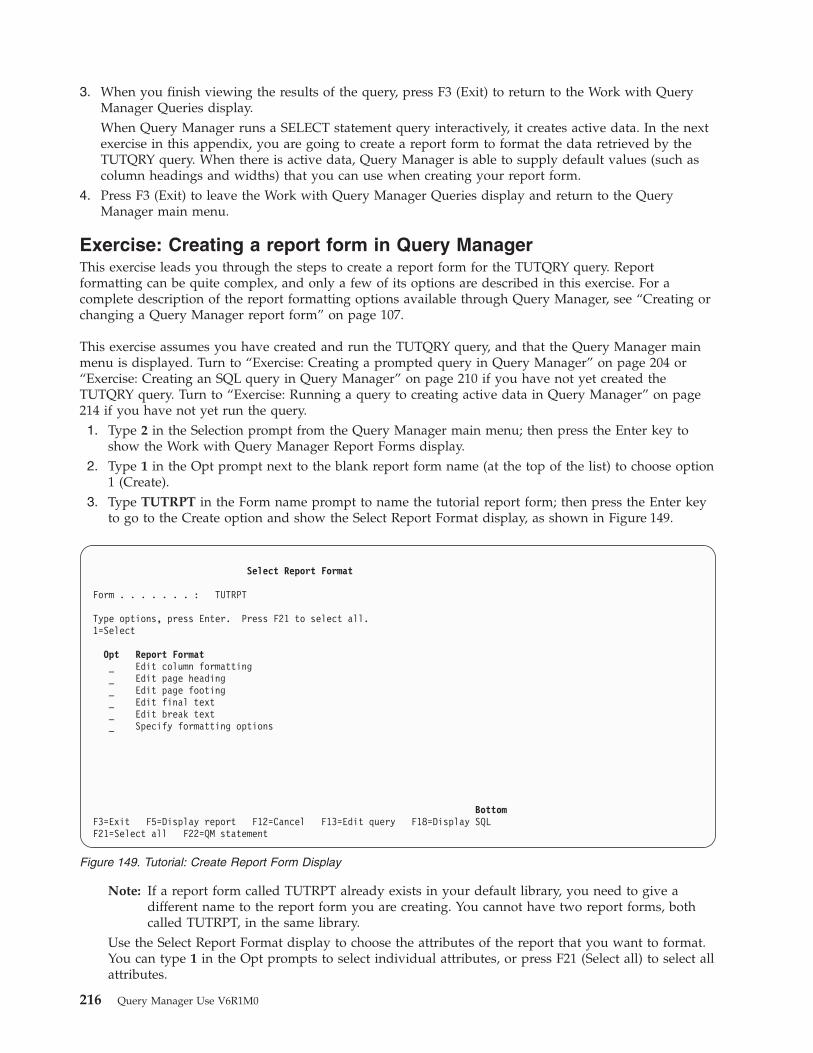
3. When you finish viewing the results of the query, press F3 (Exit) to return to the Work with Query
Manager Queries display.
When Query Manager runs a SELECT statement query interactively, it creates active data. In the next
exercise in this appendix, you are going to create a report form to format the data retrieved by the
TUTQRY query. When there is active data, Query Manager is able to supply default values (such as
column headings and widths) that you can use when creating your report form.
4. Press F3 (Exit) to leave the Work with Query Manager Queries display and return to the Query
Manager main menu.
Exercise: Creating a report form in Query Manager
This exercise leads you through the steps to create a report form for the TUTQRY query. Report
formatting can be quite complex, and only a few of its options are described in this exercise. For a
complete description of the report formatting options available through Query Manager, see “Creating or
changing a Query Manager report form” on page 107.
This exercise assumes you have created and run the TUTQRY query, and that the Query Manager main
menu is displayed. Turn to “Exercise: Creating a prompted query in Query Manager” on page 204 or
“Exercise: Creating an SQL query in Query Manager” on page 210 if you have not yet created the
TUTQRY query. Turn to “Exercise: Running a query to creating active data in Query Manager” on page
214 if you have not yet run the query.
1. Type 2 in the Selection prompt from the Query Manager main menu; then press the Enter key to
show the Work with Query Manager Report Forms display.
2. Type 1 in the Opt prompt next to the blank report form name (at the top of the list) to choose option
1 (Create).
3. Type TUTRPT in the Form name prompt to name the tutorial report form; then press the Enter key
to go to the Create option and show the Select Report Format display, as shown in Figure 149.
Note: If a report form called TUTRPT already exists in your default library, you need to give a
different name to the report form you are creating. You cannot have two report forms, both
called TUTRPT, in the same library.
Use the Select Report Format display to choose the attributes of the report that you want to format.
You can type 1 in the Opt prompts to select individual attributes, or press F21 (Select all) to select all
attributes.
Select Report Format
Form . . . . . . . : TUTRPT
Type options, press Enter. Press F21 to select all.
1=Select
Opt Report Format
_ Edit column formatting
_ Edit page heading
_ Edit page footing
_ Edit final text
_ Edit break text
_ Specify formatting options
Bottom
F3=Exit F5=Display report F12=Cancel F13=Edit query F18=Display SQL
F21=Select all F22=QM statement
Figure 149. Tutorial: Create Report Form Display
216 Query Manager Use V6R1M0

4. Press F21 (Select all) to place a 1 in the Opt prompt for all attributes; then press the Enter key to
show the Edit Column Formatting display. Displays for the attributes you choose are shown in the
same order as they appear on the Select Report Format display. An example of the Edit Column
Formatting display is shown in Figure 150.
Use the Edit Column Formatting display to control the way in which column information is
arranged in the report. You can type headings for all columns, specify the column widths, and
specify break levels and summary functions to include sub-totals and totals in your report.
Note that if you could not run the TUTQRY query interactively to create active data, no default
values are shown on the Edit Column Formatting display. The Columns and Headings are shown as
numbers, and the Width prompts are blank. You can load default values for the Columns, Headings,
and Widths from the active query.
5. If your Edit Column Formatting display contains default values for Column and Heading, go to step
6. If there are no default values, press F24 (More keys). Notice that F19 (Load from query) is now
shown on the display.
Press F19 to load default values for Column and Heading from the active query (TUTQRY). The
prompts for Column and Heading should now contain the information shown in Figure 150.
6. Press F11 (Edit heading) to show a display through which you can enter column headings. Type the
column headings shown in Figure 151 on page 218.
When you complete typing the column headings, press F11 (Edit usage) to return to the main Edit
Column Formatting display.
Edit Column Formatting
Type information, press Enter.
For Usage and Edit, press F4 for list.
For Heading, press F4 for prompt.
Column Heading Usage Edit Seq Indent Width
DEPT DEPT _______ ______ __1 __2 ___14
NAME NAME _______ ______ __2 __2 ____9
JOB JOB _______ ______ __3 __2 ____5
SALARY SALARY _______ ______ __4 __2 ___13
COMM COMM _______ ______ __5 __2 ___10
Bottom
F2=Alternate keys F3=Exit F4=Prompt F5=Display sample F6=Insert line
F10=Copy line F11=Edit heading F12=Cancel F24=More keys
Figure 150. Tutorial: Create Report Form Display
Appendix A. Practice exercises for Query Manager 217

7. Move the cursor to the Usage prompt. You use this prompt to specify break levels, and summary
operations such as Average, Count, Sum, Maximum, and Minimum. You can specify one usage for
each column in the report.
Press F4 (Prompt) to display a list of all of the supported Usage options. The More... at the bottom
of the list indicates that there is more than one window of information. Use your display station’s
roll keys to view the entire list.
8. Specify a BREAK1 Usage for DEPT, a BREAK2 Usage for JOB, and a SUM Usage for SALARY and
COMM. Report breaks are described in detail in “Using break levels in the report in Query
Manager” on page 6.
The next prompt on the display is Edit, through which you specify the format in which you want
column information to appear.
9. Move the cursor to the Edit prompt; then press F4 (Prompt) for a list of all of the formats in which
column information can appear. (For each column, you need to specify whether the column holds
character, numeric, graphic, or date/time data before the list of formats can be displayed.) If there is
a More... at the bottom of a list, it indicates that there is more than one window of information. Use
your display station’s roll keys to view the entire list.
10. Specify an L numeric format for DEPT, an L2 numeric with 2 decimal places format for SALARY and
COMM, and a C character format for the NAME and JOB columns.
11. Move the cursor to the Width prompt. If you have active data, or an active query, default widths are
shown on the display.
Specify a width of 10 for the DEPT column, 13 for NAME, 5 for JOB, 10 for SALARY, and 10 for
COMM.
Leave the remainder of the formatting prompts on this display unchanged, and use the default
values supplied by Query Manager.
v Seq specifies the sequence in which you want the columns to appear. The default is for columns
to appear in the same order as they are retrieved by the query.
v Indent specifies the number of spaces you want to insert before the column to indent the first
column from the edge of the page, and separate all remaining columns from the previous
columns. The default value is two spaces.
Your completed Edit Column Formatting display should contain the information shown in Figure 152
on page 219.
Edit Column Formatting
Type information, press Enter.
For Usage and Edit, press F4 for list.
For Heading, press F4 for prompt.
Column Heading
DEPT Department
NAME Employee Name
JOB Job
SALARY Salary
COMM Commission
Bottom
F2=Alternate keys F3=Exit F4=Prompt F5=Display sample F6=Insert line
F10=Copy line F11=Edit usage F12=Cancel F13=Edit query F24=More keys
Figure 151. Tutorial: Create Report Form Display
218 Query Manager Use V6R1M0

12. Press the Enter key to leave the Edit Column Formatting display, and show the next display in
report formatting sequence: the Edit Page Heading display.
Use the Edit Page Heading display, shown in Figure 153, to specify the text that you want to appear
at the top of each page of the report. Note that the page heading appears only when a report is
printed.
13. The “Blank lines before” and “Blank lines after” prompts specify the vertical position in which you
want the page heading to appear (in relationship to the top of the page and the first detail line).
Specify 0 blank lines before, and 1 blank line after.
14. Move the cursor to the first Line prompt, to enter the heading text for line 1. Leave the line number
of 1 and the alignment of CENTER unchanged, to center the heading on the line. Type Tutorial
Report Form as the page heading.
Edit Column Formatting
Type information, press Enter.
For Usage and Edit, press F4 for list.
For Heading, press F4 for prompt.
Column Heading Usage Edit Seq Indent Width
DEPT Department BREAK1_ _____ __1 __2 ___14
NAME Employee Name _______ _____ __2 __2 ____9
JOB Job break2_ _____ __3 __2 ____5
SALARY Salary sum____ _____ __4 __2 ___13
COMM Commission sum____ _____ __5 __2 ___10
Bottom
F2=Alternate keys F3=Exit F4=Prompt F5=Display sample F6=Insert line
F10=Copy line F11=Edit heading F12=Cancel F24=More keys
Figure 152. Tutorial: Create Report Form Display
Edit Page Heading
Type choices, press Enter.
Blank lines before . . . . . . . . . . . . 0 0-999
Blank lines after . . . . . . . . . . . . 2 0-999
Page text: Use &n, &DATE, &TIME, and &PAGE to cause variable insertion.
Line Align Page Heading Text
1 CENTER _______________________________________________________
2 CENTER _______________________________________________________
3 CENTER _______________________________________________________
4 CENTER _______________________________________________________
5 CENTER _______________________________________________________
Bottom
F2=Alternate keys F3=Exit F4=Prompt F5=Display report F6=Insert line
F10=Copy line F12=Cancel F13=Edit query F14=Delete line F24=More keys
Figure 153. Tutorial: Create Report Form Display
Appendix A. Practice exercises for Query Manager 219

Move the cursor to the second Line prompt. You are going to enter additional heading text for line 1
on this line. You can specify up to three values for one heading line as long as all values have
different alignments: LEFT, CENTER, and RIGHT.
15. Type 1 as the line number, RIGHT as the alignment, and &DATE as the heading text. (You need to
type the word DATE in uppercase.) This causes the current date to appear on the same line as the
report heading. The variable insertion values you can enter are described on page 119. The Edit Page
Heading display should appear as shown in Figure 154.
16. Press the Enter key to save the page heading information, and show the next display in report
formatting sequence: the Edit Page Footing display.
Use the Edit Page Footing display, shown in Figure 155 on page 221, to specify the text that you
want to appear at the bottom of each page of the report. You use this display in the same way as the
Edit Page Heading display.
Edit Page Heading
Type choices, press Enter.
Blank lines before . . . . . . . . . . . . 0 0-999
Blank lines after . . . . . . . . . . . . 1 0-999
Page text: Use &col, &DATE, &TIME, and &PAGE to cause variable insertion.
Line Align Page Heading Text
1 CENTER Tutorial Report Form
1 right &DATE
3 CENTER __________________________________________________________
4 CENTER __________________________________________________________
5 CENTER __________________________________________________________
Bottom
F2=Alternate keys F3=Exit F4=Prompt F5=Display sample F6=Insert line
F10=Copy line F12=Cancel F13=Edit query F14=Delete line F24=More keys
Figure 154. Tutorial: Create Report Form Display
220 Query Manager Use V6R1M0

17. Specify 0 “Blank lines before” and 0 “Blank lines after”.
18. Move the cursor to the first Line prompt, to enter the footing text for line 1. Type an alignment of
RIGHT, and Page &PAGE as the page footing text. (You need to type the second occurrence of the
word PAGE in uppercase.) This causes the word “Page” followed by the page number (&PAGE) to
appear in the bottom right-hand corner of each page.
19. Press the Enter key to save the page footing information, and show the next display in report
formatting sequence: the Edit Final Text display.
Use the Edit Final Text display, shown in Figure 156, to specify the text that you want to appear at
the end of the report.
Edit Page Footing
Type choices, press Enter.
Blank lines before . . . . . . . . . . . . 0 0-999
Blank lines after . . . . . . . . . . . . 0 0-999
Page text: Use &n, &DATE, &TIME, and &PAGE to cause variable insertion.
Line Align Page Footing Text
1 RIGHT Page &PAGE ______________________________________
2 CENTER _______________________________________________________
3 CENTER _______________________________________________________
4 CENTER _______________________________________________________
5 CENTER _______________________________________________________
Bottom
F2=Alternate keys F3=Exit F4=Prompt F5=Display report F6=Insert line
F10=Copy line F12=Cancel F13=Edit query F14=Delete line F24=More keys
Figure 155. Tutorial: Create Report Form Display
Edit Final Text
Type choices, press Enter.
New page for final text . . . . . . . . . N Y=Yes, N=No
Blank lines before . . . . . . . . . . . . 0 0-999, BOTTOM
Put final summary at line . . . . . . . . 2 1-999, NONE
Final text: Use &col to cause variable insertion.
Line Align Final Text
1 LEFT Grand_Total_--
2 LEFT Employee_Salaries
3 RIGHT _______________________________________________________
4 RIGHT _______________________________________________________
5 RIGHT _______________________________________________________
6 RIGHT _______________________________________________________
7 RIGHT _______________________________________________________
8 RIGHT _______________________________________________________
9 RIGHT _______________________________________________________
10 RIGHT _______________________________________________________
More...
F2=Alternate keys F3=Exit F4=Prompt F5=Display report F6=Insert line
F10=Copy line F12=Cancel F13=Edit query F14=Delete line F24=More keys
Figure 156. Tutorial: Create Report Form Display
Appendix A. Practice exercises for Query Manager 221

You use the Edit Final Text display in the same way as the Edit Page Heading and Edit Page Footing
displays. The only differences are that you can specify that the final text is to begin on a new page,
and you can choose the line within the final text on which you want final summary information to
appear.
20. Type N to stop the final text appearing on a new page. Leave “Blank lines before” as 0, and type 2
to specify that you want summary figures (the total SUM for the Salary and Commission columns)
to appear on the second line of the final text.
21. Move the cursor to the first Line prompt. Type an alignment of LEFT, and Grand Total -- as the text
for the first line of final text.
22. Move the cursor to the second Line prompt. Type an alignment of LEFT, and Employee Salaries as
the text for the second line of final text.
This causes the text:
Grand Total --
Employee Salaries 99999.99 9999.99
to appear at the end of the report. You have already specified that you want the summary figures to
appear on the second line of final text, so the totals for the Salary and Commission columns will
appear on the same line as “Employee Salaries”. Summary figures always appear under the column
that they summarize.
The Edit Final Text display should contain the information shown in Figure 156 on page 221.
23. Press the Enter key to save the final text information, and show the next display in report formatting
sequence: the Edit Break Text display.
Use the Edit Break Text display, shown in Figure 157, to specify the information you want to appear
for each break level within your report form.
24. Type 1 beside Break level 1 to specify Heading text, and 2 beside Break level 2 to specify Footing
text; then press the Enter key to show the Edit Break Heading display.
You use the Edit Break Heading and Footing displays in much the same way as the Edit Page
Heading and Footing displays. The only differences are:
v You can force break text to begin on a new page.
v You can repeat column headings above the detail lines for the break group.
v You can specify the line within the break footing on which you want summary data to appear.
Edit Break Text
Type options, press Enter.
1=Heading text 2=Footing text
Break
Opt Level Columns with this Break Level
1 1 DEPT
2 2 JOB
Bottom
F2=Alternate keys F3=Exit F5=Display report F12=Cancel F13=Edit query
F18=Display SQL F22=QM statement
Figure 157. Tutorial: Create Report Form Display
222 Query Manager Use V6R1M0

An example of the Edit Break Heading display is shown in Figure 158.
25. Type N in response to the “Put on new page” prompt, to keep the new break information on the
same page as the previous break. Type N in response to the “Repeat column heading” prompt to
stop the column headings from being repeated under the break heading text.
Specify 0 blank lines before the break heading, and 1 blank line after.
26. Move the cursor to the first Line prompt, to enter the break heading text for line 1. Leave the line
number and alignment unchanged. Type Beginning of department &DEPT as the text. When Query
Manager prints the heading, it replaces the &DEPT variable with the value from the DEPT column
in the current row (where the break occurs), so the current department number is inserted in the
heading line.
27. Press the Enter key to save the break heading information, and show the next display that you
specified through the Edit Break Text display: the Edit Break Footing display for Break level 2.
An example of the Edit Break Footing display is shown in Figure 159 on page 224.
Edit Break Heading
Break level . . . . . . . . . : 1
Type choices, press Enter.
Put on new page . . . . . . . . . . . . . N Y=Yes, N=No
Repeat column heading . . . . . . . . . . N Y=Yes, N=No
Blank lines before . . . . . . . . . . . . 0 0-999
Blank lines after . . . . . . . . . . . . 1 0-999
Break text: Use &col to cause variable insertion.
Line Align Break Heading Text
1 LEFT Beginning_of_department_&DEPT
2 LEFT _______________________________________________________
3 LEFT _______________________________________________________
4 LEFT _______________________________________________________
5 LEFT _______________________________________________________
Bottom
F2=Alternate keys F3=Exit F4=Prompt F5=Display report F6=Insert line
F10=Copy line F12=Cancel F13=Edit query F14=Delete line F24=More keys
Figure 158. Tutorial: Create Report Form Display
Appendix A. Practice exercises for Query Manager 223

28. Type N in response to the “Put on new page” prompt, to keep the footing text on the same page as
the break detail lines. Specify 0 blank lines before the break footing, and 1 blank line after. Type 1 as
the line number (within the break footing) at which you want the break summary information to
appear.
29. Move the cursor to the first Line prompt, to enter the break footing text for line 1. Type an alignment
of LEFT, and Total for job &3 as the text. When Query Manager prints the footing, it replaces the
&3 variable with the value from column 3 in the current row (where the break occurs). Column 3 is
the JOB column, so the current job description is inserted in the footing line.
Because you specified that the summary data was to appear on line 1 of the break footing, the
summary figures follow the heading: Total for job &3.
30. Press the Enter key to save the break footing information, and return to the Edit Break Text display.
You are going to specify both break heading text and break footing text for Break level 1. This is
done in two separate operations.
First, you specified the heading text for break 1. The next thing you are going to do is specify the
footing text for break 1. Type 2 beside Break level 1 to specify Footing text for the DEPT break; then
press the Enter key to show the Edit Break Footing display for Break level 1. Figure 159 shows an
example of the Edit Break Footing display.
31. Type N in response to the “Put on new page” prompt, to keep the footing text on the same page as
the break detail lines. Specify 0 blank lines before the break footing, and 1 blank line after. Type 1 as
the line number (within the break footing) at which you want the break summary information to
appear.
32. Move the cursor to the first Line prompt, to enter the break footing text for line 1. Type an alignment
of LEFT, and Total for department &1 as the text. When Query Manager prints the footing, it
replaces the &DEPT variable with the value from the DEPT column in the current row (where the
break occurs), so the current department number is inserted in the footing line.
Because you specified that the summary data was to appear on line 1 of the break footing, the
summary figures follow the heading, “Total for department &1”.
33. Press the Enter key to save the break footing information, and return to the Edit Break Text display.
You have now finished editing break text information, so press the Enter key to progress to the next
display in report formatting sequence: the Specify Report Formatting Options display.
Edit Break Footing
Break level . . . . . . . . . : 2
Type choices, press Enter.
Put on new page . . . . . . . . . . . . . N Y=Yes, N=No
Blank lines before . . . . . . . . . . . . 0 0-999, BOTTOM
Blank lines after . . . . . . . . . . . . 1 0-999
Put break summary at line . . . . . . . . 1 1-999, NONE
Break text: Use &col to cause variable insertion.
Line Align Break Footing Text
1 LEFT Total_for_job_&3;
2 RIGHT _______________________________________________________
3 RIGHT _______________________________________________________
4 RIGHT _______________________________________________________
5 RIGHT _______________________________________________________
Bottom
F2=Alternate keys F3=Exit F4=Prompt F5=Display report F6=Insert line
F10=Copy line F12=Cancel F13=Edit query F14=Delete line F24=More keys
Figure 159. Tutorial: Create Report Form Display
224 Query Manager Use V6R1M0

Use the Specify Report Formatting Options display, shown in Figure 160, to specify spacing,
separators, and other options to format your report.
34. Accept the default values for all prompts. Leave all of the formatting options on this display
unchanged to produce the report using Query Manager’s default values. (These default values are
described on page 126.)
35. Press the Enter key to save the report formatting options and return to the Select Report Format
display. You have now completed all of the report format displays that you chose through this
display.
In the next exercise, you will run the new report form that you have just defined (but have not yet
saved).
Exercise: Displaying a report in Query Manager
You can now display the report form that you created. Apply the report form to the active data to see the
way that the definition of the report form affects the appearance of the report.
This exercise assumes that you have active data from running the TUTQRY query, and that you have just
completed defining the TUTRPT report form and the Select Report Format display is shown.
Note: If your Query Manager profile is set so you can run queries only in batch mode, you cannot create
active data. You cannot display the report, but you can run it in batch mode, and direct the output
to a specified printer.
1. Press the F5 key, which is labeled (Display report) if your active data is the result of running a full
query, or (Display sample) if your active data is the result of running a sample query. An example of
the displayed report is shown in Figure 161 on page 226.
If there is no active data and the F5 key is labeled (Run report), go to step 4.
Specify Report Formatting Options
Type choices, press Enter.
Detail line spacing . . . . . . . . . 1 1-4
Outlining for break columns . . . . . Y Y=Yes, N=No
Default break text . . . . . . . . . . Y Y=Yes, N=No
Column wrapped lines kept on page . . Y Y=Yes, N=No
Column heading separators . . . . . . Y Y=Yes, N=No
Break summary separators . . . . . . . Y Y=Yes, N=No
Final summary separators . . . . . . . Y Y=Yes, N=No
F2=Alternate keys F3=Exit F5=Display report F12=Cancel F13=Edit query
F18=Display SQL F22=QM statement
Figure 160. Tutorial: Create Report Form Display
Appendix A. Practice exercises for Query Manager 225

2. Use the display station’s roll keys to view the entire report.
3. When you finish viewing the report, press F12 (Cancel) to return to the Select Report Format display.
Go to step 5.
4. If there is no active data, the F5 key is labeled (Run report). Press F5 to go to the Run Query display.
Choose to run the report in batch mode using the active query (*), and direct the output to your
default printer. Run options are described in “Using the run query display in Query Manager” on
page 136.
5. In the next exercise, you will change the TUTQRY query. If you created TUTQRY as a prompted
query, go to page 226. If you created TUTQRY as an SQL query, go to page 229.
Exercise: Changing a prompted query in Query Manager
Perform the following exercise if you created and saved the TUTQRY query using the prompted query
creation mode. If you created and saved the TUTQRY query as an SQL query, turn to “Exercise:
Changing an SQL query in Query Manager” on page 229.
In this exercise, you are going to change the definition of the active query. Instead of selecting all
employees who work in department 20 or 38, you will select all sales staff.
This exercise assumes that TUTQRY is the active query, that you have just displayed the TUTRPT report,
and that the Select Report Format display is shown.
1. Press F13 (Edit query) to leave the Select Report Format display and show the Define Prompted
Query display containing TUTQRY, which is the active query. An example of the Define Prompted
Query display is shown in Figure 162 on page 227.
Display Report
Query . . . . . : * Width . . . : 71
Form . . . . . : MYLIB.TUTRPT Column . . : 1
Control . . . . ________
Line ....+....1....+....2....+....3....+....4....+....5....+....6....+....7.
Department Employee Name Job Salary Commission
---------- ------------- ------ ----------- ------------
000001 Beginning of department 20
000002
000003 20 James Clerk 13504.60 128.20
000004 ----------- ------------
000005 Total for job Clerk 13504.60 128.20
000006
000007 Sanders Mgr 18357.50 .00
000008 ----------- ------------
000009 Total for job Mgr 18357.50 .00
000010
000011 Pernal Sales 18171.25 612.45
000012 ----------- ------------
000013 18171.25 612.45
000014
More...
F3=Exit F12=Cancel F19=Left F20=Right F21=Split
Figure 161. Tutorial: Display Report Display
226 Query Manager Use V6R1M0
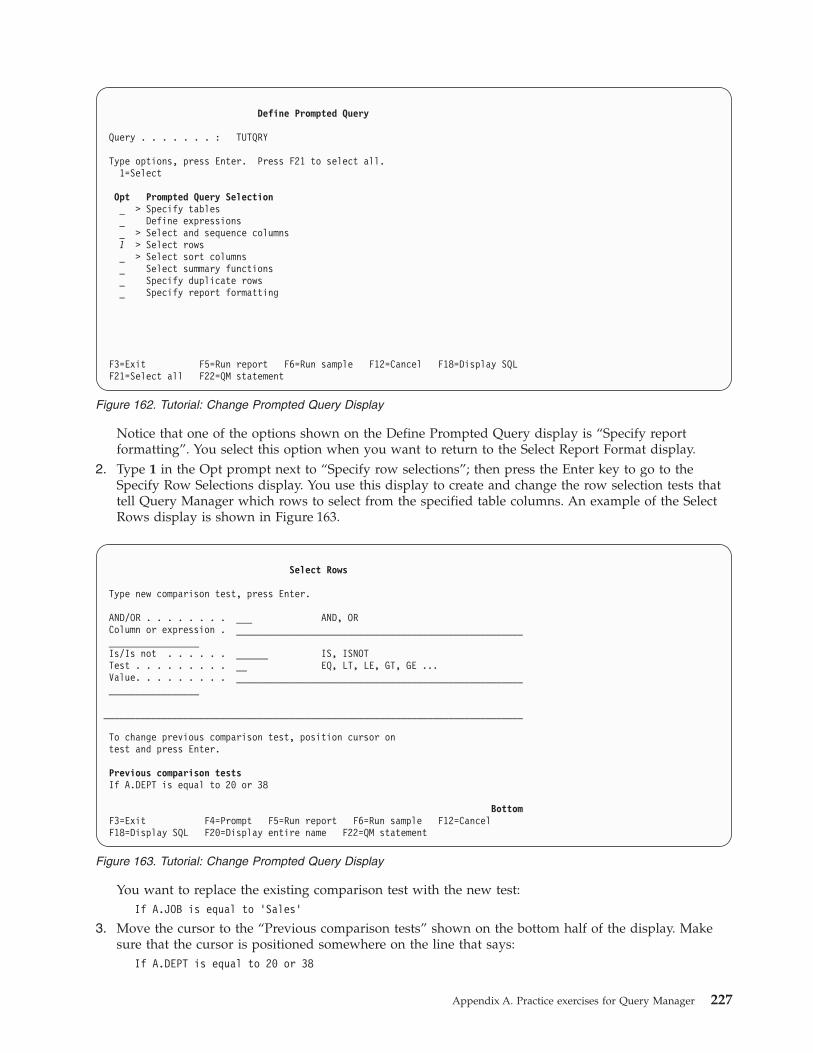
Notice that one of the options shown on the Define Prompted Query display is “Specify report
formatting”. You select this option when you want to return to the Select Report Format display.
2. Type 1 in the Opt prompt next to “Specify row selections”; then press the Enter key to go to the
Specify Row Selections display. You use this display to create and change the row selection tests that
tell Query Manager which rows to select from the specified table columns. An example of the Select
Rows display is shown in Figure 163.
You want to replace the existing comparison test with the new test:
If A.JOB is equal to ’Sales’
3. Move the cursor to the “Previous comparison tests” shown on the bottom half of the display. Make
sure that the cursor is positioned somewhere on the line that says:
If A.DEPT is equal to 20 or 38
Define Prompted Query
Query . . . . . . . : TUTQRY
Type options, press Enter. Press F21 to select all.
1=Select
Opt Prompted Query Selection
_ > Specify tables
_ Define expressions
_ > Select and sequence columns
1 > Select rows
_ > Select sort columns
_ Select summary functions
_ Specify duplicate rows
_ Specify report formatting
F3=Exit F5=Run report F6=Run sample F12=Cancel F18=Display SQL
F21=Select all F22=QM statement
Figure 162. Tutorial: Change Prompted Query Display
Select Rows
Type new comparison test, press Enter.
AND/OR . . . . . . . . ___ AND, OR
Column or expression . ______________________________________________________
_________________
Is/Is not . . . . . . ______ IS, ISNOT
Test . . . . . . . . . __ EQ, LT, LE, GT, GE ...
Value. . . . . . . . . ______________________________________________________
_________________
_______________________________________________________________________________
To change previous comparison test, position cursor on
test and press Enter.
Previous comparison tests
If A.DEPT is equal to 20 or 38
Bottom
F3=Exit F4=Prompt F5=Run report F6=Run sample F12=Cancel
F18=Display SQL F20=Display entire name F22=QM statement
Figure 163. Tutorial: Change Prompted Query Display
Appendix A. Practice exercises for Query Manager 227
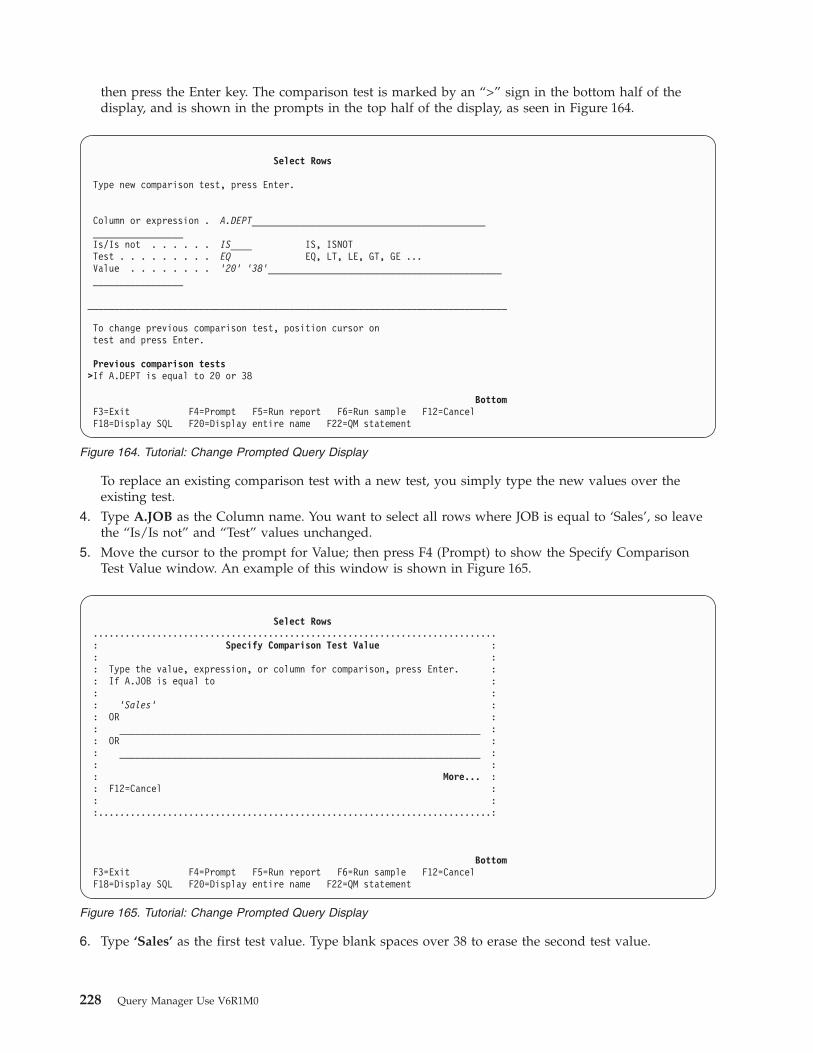
then press the Enter key. The comparison test is marked by an “>” sign in the bottom half of the
display, and is shown in the prompts in the top half of the display, as seen in Figure 164.
To replace an existing comparison test with a new test, you simply type the new values over the
existing test.
4. Type A.JOB as the Column name. You want to select all rows where JOB is equal to ‘Sales’, so leave
the “Is/Is not” and “Test” values unchanged.
5. Move the cursor to the prompt for Value; then press F4 (Prompt) to show the Specify Comparison
Test Value window. An example of this window is shown in Figure 165.
6. Type ‘Sales’ as the first test value. Type blank spaces over 38 to erase the second test value.
Select Rows
Type new comparison test, press Enter.
Column or expression . A.DEPT____________________________________________
_________________
Is/Is not . . . . . . IS____ IS, ISNOT
Test . . . . . . . . . EQ EQ, LT, LE, GT, GE ...
Value . . . . . . . . ’20’ ’38’____________________________________________
_________________
_______________________________________________________________________________
To change previous comparison test, position cursor on
test and press Enter.
Previous comparison tests
>If A.DEPT is equal to 20 or 38
Bottom
F3=Exit F4=Prompt F5=Run report F6=Run sample F12=Cancel
F18=Display SQL F20=Display entire name F22=QM statement
Figure 164. Tutorial: Change Prompted Query Display
Select Rows
............................................................................
: Specify Comparison Test Value :
: :
: Type the value, expression, or column for comparison, press Enter. :
: If A.JOB is equal to :
: :
: ’Sales’ :
: OR :
: ____________________________________________________________________ :
: OR :
: ____________________________________________________________________ :
: :
: More... :
: F12=Cancel :
: :
:..........................................................................:
Bottom
F3=Exit F4=Prompt F5=Run report F6=Run sample F12=Cancel
F18=Display SQL F20=Display entire name F22=QM statement
Figure 165. Tutorial: Change Prompted Query Display
228 Query Manager Use V6R1M0

You need to enclose the word ‘Sales’ in single quotation marks, and type it in uppercase and
lowercase letters, exactly as it appears in the database table.
7. Press the Enter key to accept the changed row selection test. The test is removed from the top half of
the display, and
If A.JOB is equal to ’Sales’
is shown at the bottom of the display, as a “Previous comparison test”.
8. Press the Enter key a second time to return to the Define Prompted Query display.
You are now going to run the changed TUTQRY query. Turn to “Exercise: Running the changed query in
Query Manager” on page 230 to continue with the exercises in this appendix.
Exercise: Changing an SQL query in Query Manager
Perform the following exercise if you created and saved the TUTQRY query using the SQL query creation
mode. If you created and saved the TUTQRY query as a prompted query, turn to “Exercise: Changing a
prompted query in Query Manager” on page 226.
In this exercise, you are going to change the definition of the active query. Instead of selecting all
employees who work in department 20 or 38, you will select all sales staff.
This exercise assumes that TUTQRY is the active query, that you have just displayed the TUTRPT report,
and that the Select Report Format display is shown.
1. Press F13 (Edit query) to leave the Select Report Format display and show the Edit Query display
containing TUTQRY, which is the active query.
2. Press F24 (More keys) to view additional function key definitions for the Edit Query display. Notice
that the description for F13 has changed to (Edit form). You can use F13 to switch back and forth
between the currently active SQL query and report form.
3. Move the cursor to the part of the query that reads:
WHERE DEPT = 20 OR DEPT = 38
and replace it with WHERE JOB = ‘Sales’. You need to enclose the word ‘Sales’ in single quotation
marks, and type it in uppercase and lowercase letters, exactly as it appears in the database table.
Appendix A. Practice exercises for Query Manager 229
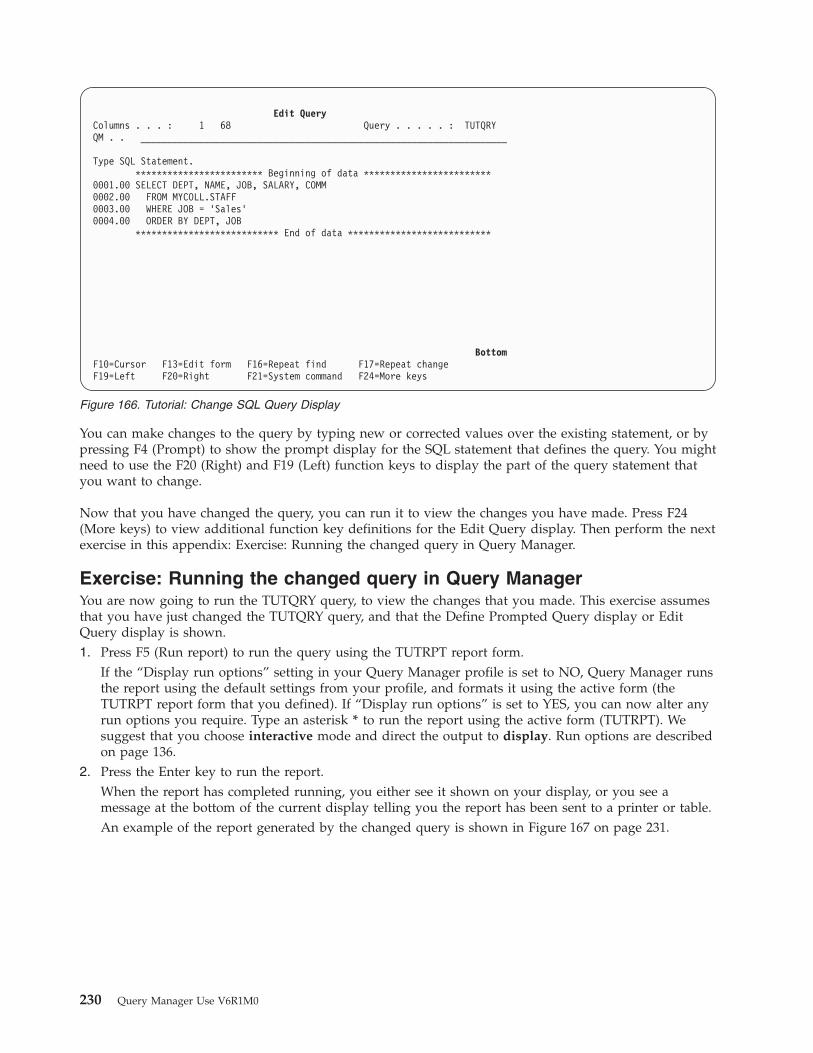
You can make changes to the query by typing new or corrected values over the existing statement, or by
pressing F4 (Prompt) to show the prompt display for the SQL statement that defines the query. You might
need to use the F20 (Right) and F19 (Left) function keys to display the part of the query statement that
you want to change.
Now that you have changed the query, you can run it to view the changes you have made. Press F24
(More keys) to view additional function key definitions for the Edit Query display. Then perform the next
exercise in this appendix: Exercise: Running the changed query in Query Manager.
Exercise: Running the changed query in Query Manager
You are now going to run the TUTQRY query, to view the changes that you made. This exercise assumes
that you have just changed the TUTQRY query, and that the Define Prompted Query display or Edit
Query display is shown.
1. Press F5 (Run report) to run the query using the TUTRPT report form.
If the “Display run options” setting in your Query Manager profile is set to NO, Query Manager runs
the report using the default settings from your profile, and formats it using the active form (the
TUTRPT report form that you defined). If “Display run options” is set to YES, you can now alter any
run options you require. Type an asterisk * to run the report using the active form (TUTRPT). We
suggest that you choose interactive mode and direct the output to display. Run options are described
on page 136.
2. Press the Enter key to run the report.
When the report has completed running, you either see it shown on your display, or you see a
message at the bottom of the current display telling you the report has been sent to a printer or table.
An example of the report generated by the changed query is shown in Figure 167 on page 231.
Edit Query
Columns . . . : 1 68 Query . . . . . : TUTQRY
QM . . _____________________________________________________________________
Type SQL Statement.
************************ Beginning of data ************************
0001.00 SELECT DEPT, NAME, JOB, SALARY, COMM
0002.00 FROM MYCOLL.STAFF
0003.00 WHERE JOB = ’Sales’
0004.00 ORDER BY DEPT, JOB
*************************** End of data ***************************
Bottom
F10=Cursor F13=Edit form F16=Repeat find F17=Repeat change
F19=Left F20=Right F21=System command F24=More keys
Figure 166. Tutorial: Change SQL Query Display
230 Query Manager Use V6R1M0
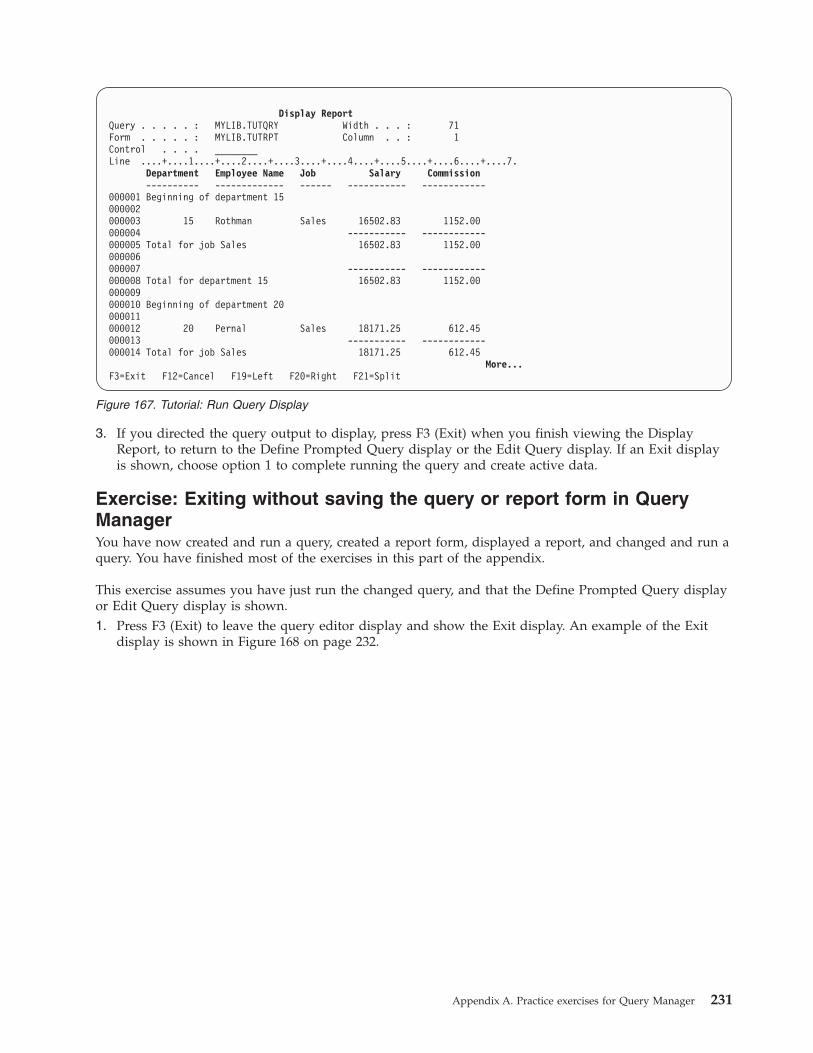
3. If you directed the query output to display, press F3 (Exit) when you finish viewing the Display
Report, to return to the Define Prompted Query display or the Edit Query display. If an Exit display
is shown, choose option 1 to complete running the query and create active data.
Exercise: Exiting without saving the query or report form in Query
Manager
You have now created and run a query, created a report form, displayed a report, and changed and run a
query. You have finished most of the exercises in this part of the appendix.
This exercise assumes you have just run the changed query, and that the Define Prompted Query display
or Edit Query display is shown.
1. Press F3 (Exit) to leave the query editor display and show the Exit display. An example of the Exit
display is shown in Figure 168 on page 232.
Display Report
Query . . . . . : MYLIB.TUTQRY Width . . . : 71
Form . . . . . : MYLIB.TUTRPT Column . . : 1
Control . . . . ________
Line ....+....1....+....2....+....3....+....4....+....5....+....6....+....7.
Department Employee Name Job Salary Commission
---------- ------------- ------ ----------- ------------
000001 Beginning of department 15
000002
000003 15 Rothman Sales 16502.83 1152.00
000004 ----------- ------------
000005 Total for job Sales 16502.83 1152.00
000006
000007 ----------- ------------
000008 Total for department 15 16502.83 1152.00
000009
000010 Beginning of department 20
000011
000012 20 Pernal Sales 18171.25 612.45
000013 ----------- ------------
000014 Total for job Sales 18171.25 612.45
More...
F3=Exit F12=Cancel F19=Left F20=Right F21=Split
Figure 167. Tutorial: Run Query Display
Appendix A. Practice exercises for Query Manager 231
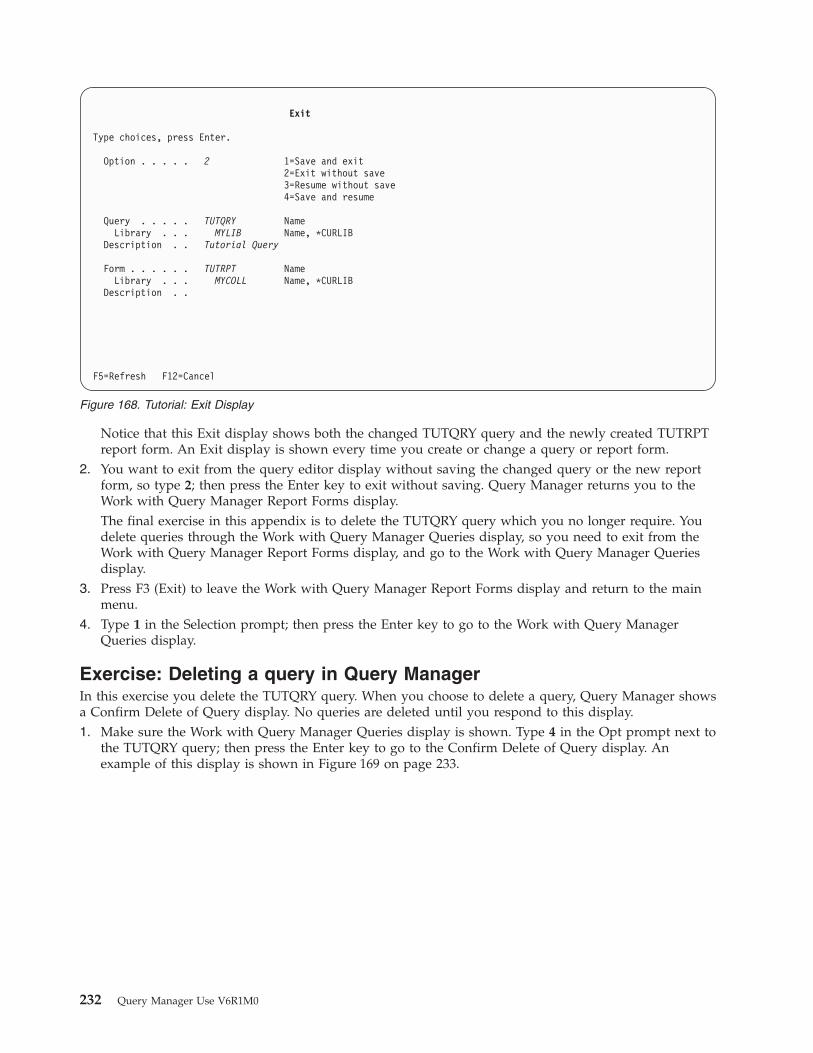
Notice that this Exit display shows both the changed TUTQRY query and the newly created TUTRPT
report form. An Exit display is shown every time you create or change a query or report form.
2. You want to exit from the query editor display without saving the changed query or the new report
form, so type 2; then press the Enter key to exit without saving. Query Manager returns you to the
Work with Query Manager Report Forms display.
The final exercise in this appendix is to delete the TUTQRY query which you no longer require. You
delete queries through the Work with Query Manager Queries display, so you need to exit from the
Work with Query Manager Report Forms display, and go to the Work with Query Manager Queries
display.
3. Press F3 (Exit) to leave the Work with Query Manager Report Forms display and return to the main
menu.
4. Type 1 in the Selection prompt; then press the Enter key to go to the Work with Query Manager
Queries display.
Exercise: Deleting a query in Query Manager
In this exercise you delete the TUTQRY query. When you choose to delete a query, Query Manager shows
a Confirm Delete of Query display. No queries are deleted until you respond to this display.
1. Make sure the Work with Query Manager Queries display is shown. Type 4 in the Opt prompt next to
the TUTQRY query; then press the Enter key to go to the Confirm Delete of Query display. An
example of this display is shown in Figure 169 on page 233.
Exit
Type choices, press Enter.
Option . . . . . 2 1=Save and exit
2=Exit without save
3=Resume without save
4=Save and resume
Query . . . . . TUTQRY Name
Library . . . MYLIB Name, *CURLIB
Description . . Tutorial Query
Form . . . . . . TUTRPT Name
Library . . . MYCOLL Name, *CURLIB
Description . .
F5=Refresh F12=Cancel
Figure 168. Tutorial: Exit Display
232 Query Manager Use V6R1M0
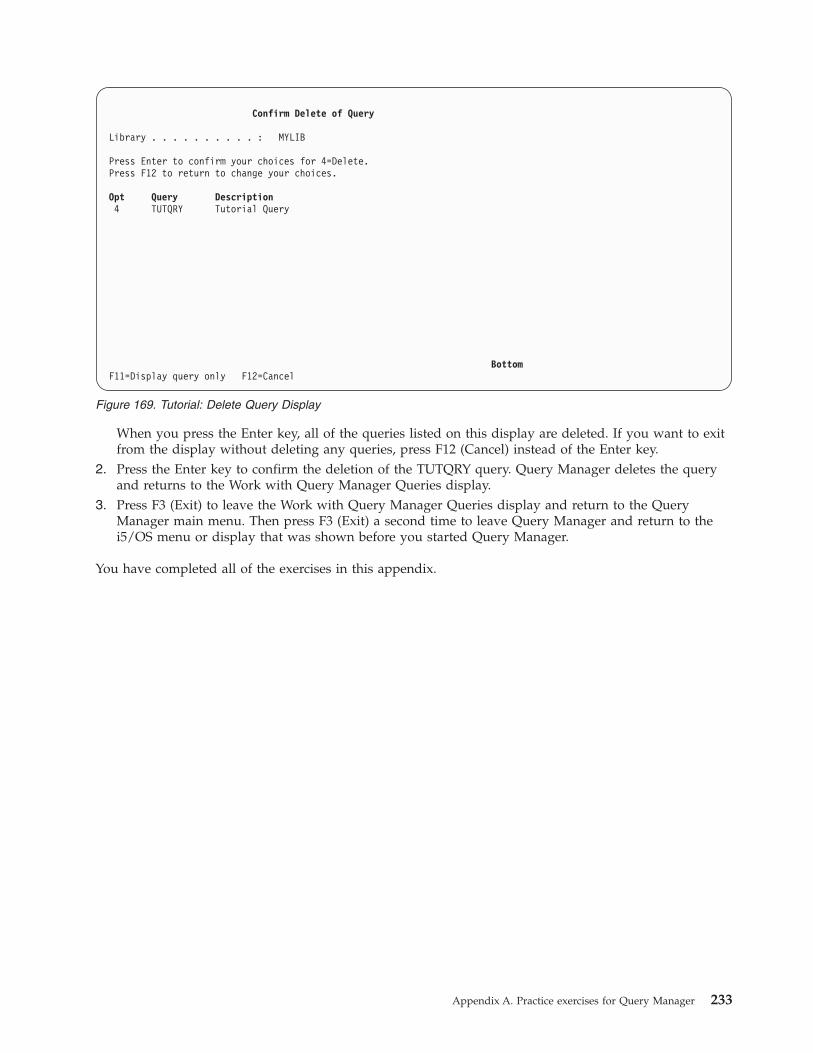
When you press the Enter key, all of the queries listed on this display are deleted. If you want to exit
from the display without deleting any queries, press F12 (Cancel) instead of the Enter key.
2. Press the Enter key to confirm the deletion of the TUTQRY query. Query Manager deletes the query
and returns to the Work with Query Manager Queries display.
3. Press F3 (Exit) to leave the Work with Query Manager Queries display and return to the Query
Manager main menu. Then press F3 (Exit) a second time to leave Query Manager and return to the
i5/OS menu or display that was shown before you started Query Manager.
You have completed all of the exercises in this appendix.
Confirm Delete of Query
Library . . . . . . . . . . : MYLIB
Press Enter to confirm your choices for 4=Delete.
Press F12 to return to change your choices.
Opt Query Description
4 TUTQRY Tutorial Query
Bottom
F11=Display query only F12=Cancel
Figure 169. Tutorial: Delete Query Display
Appendix A. Practice exercises for Query Manager 233

234 Query Manager Use V6R1M0

Appendix B. Query Manager statements
This appendix describes the Query Manager statements that you can enter on the Query Manager
statement line, through either the command window (see page 28) or the Edit Query display (see page
71). The one exception is the DRAW statement, which can be issued only through the Edit Query display.
When typing in any of the following statements, you can press F4 (Prompt) while the cursor is on the
Query Manager statement line, to display a list of the supported statements and their syntax. Depending
on how much of the statement you have already entered, you will be prompted only for the parameters
you have omitted.
COMMIT CONNECT
DISCONNECT DISPLAY
DRAW ERASE
EXPORT IMPORT
PRINT RELEASE
RUN SAVE DATA AS
SAVE FORM AS SAVE QUERY AS
SET CONNECTION
The descriptions of the Query Manager statements include syntax diagrams, which show the structure of
each statement. An example of a syntax diagram is shown below:
�� STATEMENT VALUE1
VALUE2
DEFAULT
(
OPTION1
=
VALUE3
variable
��
v STATEMENT is the name (or keyword) of the Query Manager statement. You need to type the
statement keyword exactly as shown in the diagram.
v VALUE1 is on the same line as the statement keyword, so it is a required part of the statement and
must be entered. When two or more values are joined in the same way as VALUE1 and VALUE2, you
are being offered a choice, and can enter any one of the values shown in the diagram. For example, the
above syntax diagram tells you to enter either STATEMENT VALUE1 or STATEMENT VALUE2.
v OPTION1 is not on the same line as the statement keyword, so it is an optional part of the statement.
Enter optional parts of statements only when required. The opening parenthesis shown in the syntax
diagram needs to be typed before the option keyword.
v DEFAULT, VALUE3, and variable are the choices you can make for OPTION1. VALUE3 is on the same
line as OPTION1, so you need to enter one of these choices when you specify the OPTION1 part of the
statement. When a choice is shown above the line on which a keyword or option appears, that choice
is the DEFAULT value. The default value is used when you do not enter the OPTION1 part of the
statement.
Variable values are shown in italics. Replace the variable shown in the diagram with the actual value
that you want to use as part of the statement. For example, a variable could be the name of a table,
report form, or query.
COMMIT in Query Manager
The COMMIT statement terminates a unit of recovery and commits database changes that were made by
that unit of recovery.
© Copyright IBM Corp. 1998, 2008 235
Authorization
None required.
Syntax of COMMIT in Query Manager
A syntax diagram of the COMMIT statement follows:
�� COMMIT
HOLD ��
HOLD
Indicates a hold on resources. If specified, currently open cursors are not closed, prepared SQL
statements are preserved, and all resources acquired during the unit of work held. Locks on
specific rows and objects implicitly acquired during the transaction, however, are released. If
HOLD is omitted, open cursors (except those declared with WITH HOLD clause) are closed,
prepared SQL statements are discarded, and held resources are released.
If the COMMIT statement is successful, all work will be committed and all connections in a
released state will be disconnected from the default activation group. If the COMMIT statement is
unsuccessful, the connection state of the default activation group and the states of its connections
will be unchanged. The COMMIT statement is still allowed in Query Manager queries.
Examples of COMMIT statement in Query Manager
You do not need the connection to RDB1 in the next unit of work. The following statements remove the
connection, assuming the commit operation is successful.
RELEASE RDB1
COMMIT
You want to commit the changes made to RDB2 but hold the resources acquired during the current unit
of work.
COMMIT HOLD
CONNECT in Query Manager
Use the CONNECT statement to change the database under which you are running Query Manager.
CONNECT allows you to access a database for running queries and procedures.
The function of the CONNECT depends on the connection management method you are using. The
methods are distributed-unit-of-work (DUW) and remote-unit-of-work (RUW). The default, unless you
change it, is RUW. For information on changing the connection management method, see Chapter 9,
“Distributed Relational Database Architecture in Query Manager,” on page 173.
Table 16. CONNECT Command Differences Between *DUW and *RUW
DUW RUW
Multiple connections allowed One connection allowed
CONNECT to additional database puts previous
connection in dormant state. The previous connections are
not disconnected.
CONNECT to additional database disconnects previous
connections. The previous connection or connections are
disconnected before performing the connection.
Consecutive CONNECTs to same database fails Consecutive CONNECTs to same database results in no
current connection change
For more information about Query Manager tables, prompted queries, and connection management, see
Chapter 9, “Distributed Relational Database Architecture in Query Manager,” on page 173.
COMMIT
236 Query Manager Use V6R1M0
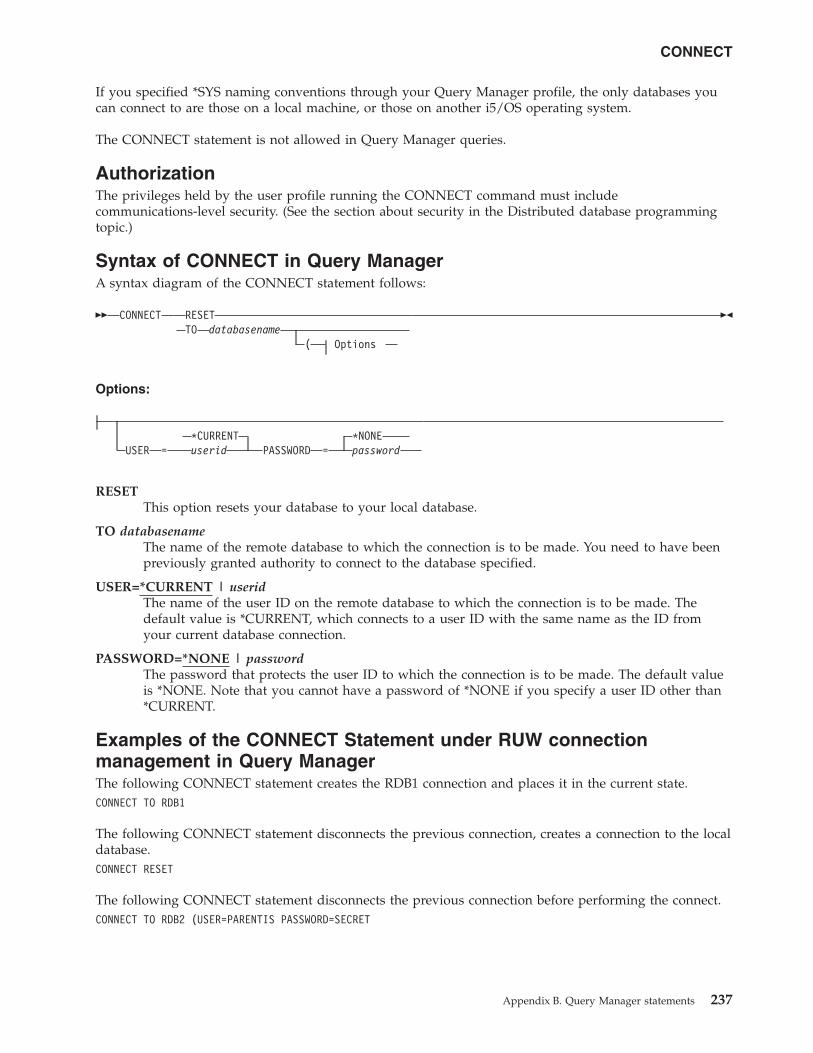
If you specified *SYS naming conventions through your Query Manager profile, the only databases you
can connect to are those on a local machine, or those on another i5/OS operating system.
The CONNECT statement is not allowed in Query Manager queries.
Authorization
The privileges held by the user profile running the CONNECT command must include
communications-level security. (See the section about security in the Distributed database programming
topic.)
Syntax of CONNECT in Query Manager
A syntax diagram of the CONNECT statement follows:
�� CONNECT RESET
TO
databasename
(
Options
��
Options:
*CURRENT
*NONE
USER
=
userid
PASSWORD
=
password
RESET
This option resets your database to your local database.
TO databasename
The name of the remote database to which the connection is to be made. You need to have been
previously granted authority to connect to the database specified.
USER=*CURRENT | userid
The name of the user ID on the remote database to which the connection is to be made. The
default value is *CURRENT, which connects to a user ID with the same name as the ID from
your current database connection.
PASSWORD=*NONE | password
The password that protects the user ID to which the connection is to be made. The default value
is *NONE. Note that you cannot have a password of *NONE if you specify a user ID other than
*CURRENT.
Examples of the CONNECT Statement under RUW connection
management in Query Manager
The following CONNECT statement creates the RDB1 connection and places it in the current state.
CONNECT TO RDB1
The following CONNECT statement disconnects the previous connection, creates a connection to the local
database.
CONNECT RESET
The following CONNECT statement disconnects the previous connection before performing the connect.
CONNECT TO RDB2 (USER=PARENTIS PASSWORD=SECRET
CONNECT
Appendix B. Query Manager statements 237
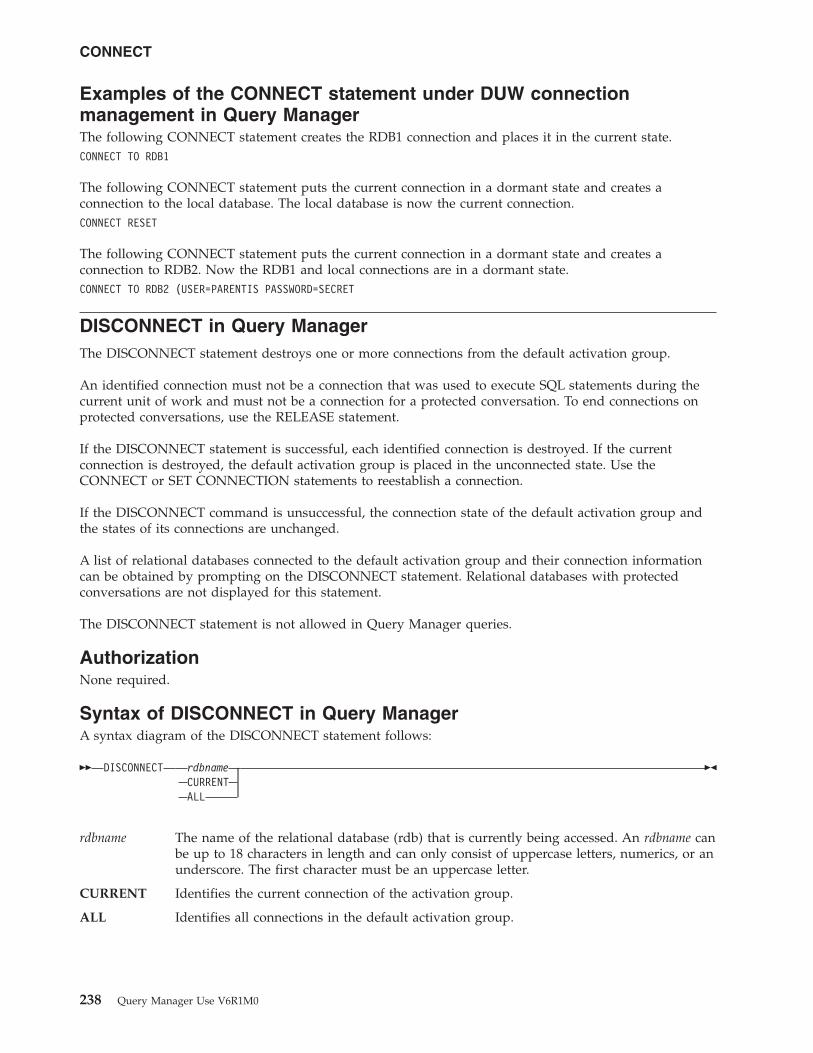
Examples of the CONNECT statement under DUW connection
management in Query Manager
The following CONNECT statement creates the RDB1 connection and places it in the current state.
CONNECT TO RDB1
The following CONNECT statement puts the current connection in a dormant state and creates a
connection to the local database. The local database is now the current connection.
CONNECT RESET
The following CONNECT statement puts the current connection in a dormant state and creates a
connection to RDB2. Now the RDB1 and local connections are in a dormant state.
CONNECT TO RDB2 (USER=PARENTIS PASSWORD=SECRET
DISCONNECT in Query Manager
The DISCONNECT statement destroys one or more connections from the default activation group.
An identified connection must not be a connection that was used to execute SQL statements during the
current unit of work and must not be a connection for a protected conversation. To end connections on
protected conversations, use the RELEASE statement.
If the DISCONNECT statement is successful, each identified connection is destroyed. If the current
connection is destroyed, the default activation group is placed in the unconnected state. Use the
CONNECT or SET CONNECTION statements to reestablish a connection.
If the DISCONNECT command is unsuccessful, the connection state of the default activation group and
the states of its connections are unchanged.
A list of relational databases connected to the default activation group and their connection information
can be obtained by prompting on the DISCONNECT statement. Relational databases with protected
conversations are not displayed for this statement.
The DISCONNECT statement is not allowed in Query Manager queries.
Authorization
None required.
Syntax of DISCONNECT in Query Manager
A syntax diagram of the DISCONNECT statement follows:
�� DISCONNECT rdbname
CURRENT
ALL
��
rdbname The name of the relational database (rdb) that is currently being accessed. An rdbname can
be up to 18 characters in length and can only consist of uppercase letters, numerics, or an
underscore. The first character must be an uppercase letter.
CURRENT Identifies the current connection of the activation group.
ALL Identifies all connections in the default activation group.
CONNECT
238 Query Manager Use V6R1M0

Examples of the DISCONNECT statement in Query Manager
The connection to RDB1 is not needed in the next unit of work. The following statement is run after a
commit operation.
DISCONNECT RDB1
The current connection is not needed in the next unit of work. The following statement is run after a
commit operation.
DISCONNECT CURRENT
None of the existing connections are needed in the next unit of work. The following statement is run
after a commit operation.
DISCONNECT ALL
DISPLAY in Query Manager
Use the DISPLAY statement to apply a report form to the active data that was generated from the most
recent interactively run SQL SELECT statement query or prompted query. If there is no active data, an
error message is displayed. See page 8 for information about active data.
Note: If your Query Manager profile is set so you can run queries only in batch mode and “Allow
interactive sample run” is set to NO, you cannot create active data, so you cannot use the
DISPLAY statement.
To run a sample you can either:
v Select option 9 (Run) from the Work with Query Manager Queries display; then set the Run Sample
prompt to Y on the Run Query display.
v Select option 9 (Run report) from the Work with Query Manager Report Forms display; then set the
Run Sample prompt to Y on the Run Query display.
v Press F6 (Run sample) from the Edit Query or Display Query display.
v Press F6 (Run sample) from any of the Define Prompted Query or Display Prompted Query displays.
v Press F5 (Run report) from any of the Select Report Format or Display Report Format displays; then set
the Run Sample prompt to Y on the Run Query display.
Authorization
The privileges held by the user profile running the DISPLAY REPORT or DISPLAY SAMPLE statement
must have one of the following:
v If a *QMFORM object is specified on the statement:
– *USE system authority on the library that contains the *QMFORM object.
– *USE system authority on the *QMFORM object.v *ALLOBJ special authority.
Syntax of DISPLAY in Query Manager
A syntax diagram of the DISPLAY statement follows:
�� DISPLAY REPORT
SAMPLE
*SYSDFT
(
FORM
=
*
name
��
REPORT This option displays a full report, using the specified report form applied to the active
DISCONNECT
Appendix B. Query Manager statements 239
data. If there is no active data, or if there is sample active data as the result of running an
SQL SELECT statement query or prompted query with the sample restriction, an error
message is displayed.
SAMPLE This option displays a sample report, using the specified report form applied to the active
sample data. If there is no sample data, an error message is displayed.
FORM=*SYSDFT | * | name
The name of the report form to be applied to the active data. If you omit the FORM
option, Query Manager generates a default report form (*SYSDFT). The report form can
be specified as:
*SYSDFT
A simple default report form, generated from the active data. See “Report forms
in Query Manager” on page 5 for a description of the *SYSDFT report form.
* The active form. (The last report form that was created or changed, or used to
format an SQL SELECT statement query or prompted query.)
name The name of the report form to be used, and the name of the library where it
resides. If you do not specify a library name, the default library for query objects
specified in your Query Manager profile is searched for the named report form
when the statement is run. You can specify the name of the report form and
library in one of the following ways:
v library.formname Use this format if your Query Manager profile specifies that
you use the SQL naming convention.
v library/formname Use this format if your Query Manager profile specifies that
you use the system naming convention. Specify *LIBL to search your library
list.
Examples of DISPLAY statement in Query Manager
DISPLAY REPORT (FORM=*
DISPLAY SAMPLE
DISPLAY REPORT (FORM=SMITH.SAL_REPT
DRAW in Query Manager
The DRAW statement is allowed only in the Edit Query display. It builds an SQL SELECT statement for a
named table, and adds this statement to any text that exists in the display. The SELECT statement names
columns explicitly rather than using the asterisk (*). Column names, library names, and table names that
are reserved words will be quoted.
SELECT "YEARS", COL1, COL2 FROM SMITH."TABLE"
Authorization
The privileges held by the user profile running the DRAW statement must have one of the following:
v For the table specified on the statement:
– The system authority of *OBJOPR on the table.
– The system authority of *EXECUTE on the library containing the table.v *ALLOBJ special authority.
DISPLAY
240 Query Manager Use V6R1M0
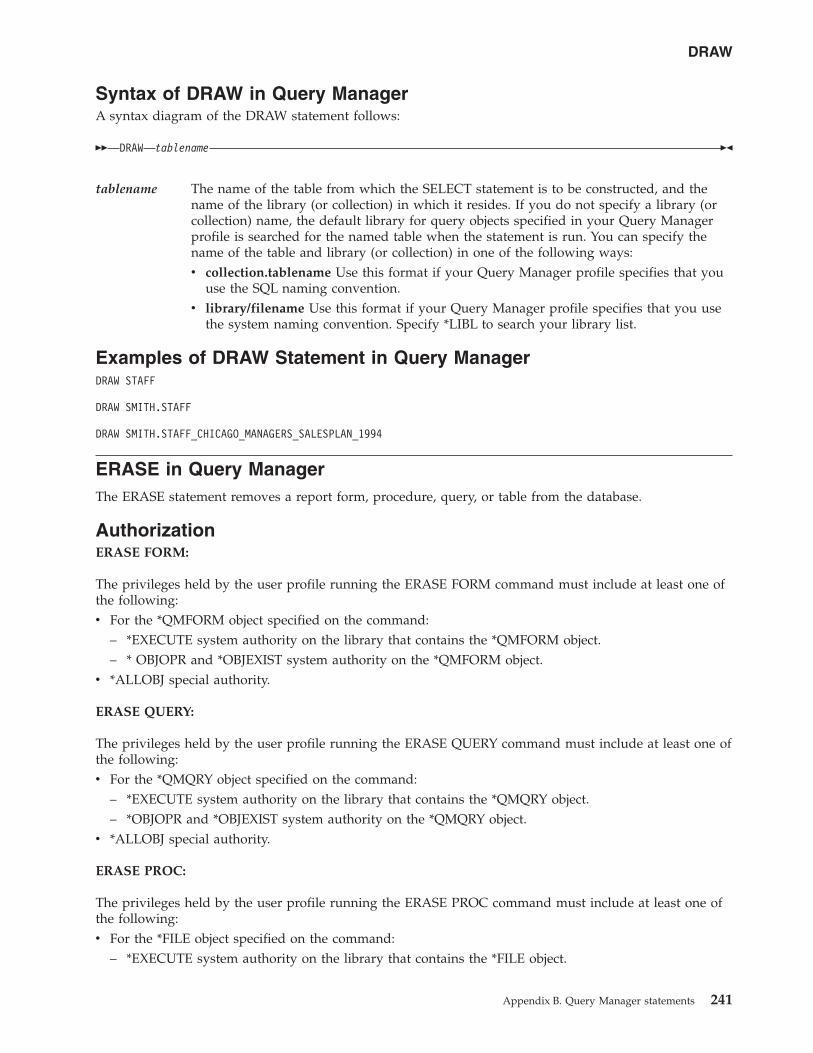
Syntax of DRAW in Query Manager
A syntax diagram of the DRAW statement follows:
�� DRAW tablename ��
tablename The name of the table from which the SELECT statement is to be constructed, and the
name of the library (or collection) in which it resides. If you do not specify a library (or
collection) name, the default library for query objects specified in your Query Manager
profile is searched for the named table when the statement is run. You can specify the
name of the table and library (or collection) in one of the following ways:
v collection.tablename Use this format if your Query Manager profile specifies that you
use the SQL naming convention.
v library/filename Use this format if your Query Manager profile specifies that you use
the system naming convention. Specify *LIBL to search your library list.
Examples of DRAW Statement in Query Manager
DRAW STAFF
DRAW SMITH.STAFF
DRAW SMITH.STAFF_CHICAGO_MANAGERS_SALESPLAN_1994
ERASE in Query Manager
The ERASE statement removes a report form, procedure, query, or table from the database.
Authorization
ERASE FORM:
The privileges held by the user profile running the ERASE FORM command must include at least one of
the following:
v For the *QMFORM object specified on the command:
– *EXECUTE system authority on the library that contains the *QMFORM object.
– * OBJOPR and *OBJEXIST system authority on the *QMFORM object.v *ALLOBJ special authority.
ERASE QUERY:
The privileges held by the user profile running the ERASE QUERY command must include at least one of
the following:
v For the *QMQRY object specified on the command:
– *EXECUTE system authority on the library that contains the *QMQRY object.
– *OBJOPR and *OBJEXIST system authority on the *QMQRY object.v *ALLOBJ special authority.
ERASE PROC:
The privileges held by the user profile running the ERASE PROC command must include at least one of
the following:
v For the *FILE object specified on the command:
– *EXECUTE system authority on the library that contains the *FILE object.
DRAW
Appendix B. Query Manager statements 241

– *OBJOPR, *OBJEXIST and *DLT system authority on the *FILE object.v *ALLOBJ special authority.
ERASE TABLE:
The privileges held by the user profile running the ERASE TABLE command must include at least one of
the following:
v For the *FILE object specified on the command:
– *EXECUTE system authority on the library that contains the *FILE object.
– *OBJOPR, *OBJEXIST and *READ system authority on the *FILE object.v *ALLOBJ special authority.
Syntax of ERASE in Query Manager
A syntax diagram of the ERASE statement follows:
�� ERASE FORM
PROC
QUERY
TABLE
name
(
CONFIRM
=
YES
NO
��
name The name of the report form, procedure, query, or table to be removed, and the name of
the library where it resides. If you do not specify a library name, the default library for
query objects specified in your Query Manager profile is searched for the object when the
statement is run. You need to have the appropriate ownership and database or query
authorization to remove an object. You can specify the name of the object and library in
one of the following ways:
v library.objectname Use this format if your Query Manager profile specifies that you
use the SQL naming convention.
v library/objectname Use this format if your Query Manager profile specifies that you
use the system naming convention. Specify *LIBL to search your library list.
CONFIRM=YES | NO
This option provides for a check before performing your ERASE request. If the option is
set to YES, you are prompted to confirm that the existing object is to be erased. If the
option is set to NO, the erase occurs without confirmation.
The default value is YES. The default can be changed in your Query Manager profile (see
“Confirmation messages in Query Manager” on page 37).
Examples of ERASE statement in Query Manager
ERASE TABLE EMP
ERASE TABLE SMITH.EMP (CONFIRM=YES
EXPORT in Query Manager
The EXPORT statement is used to create a file containing the contents of certain Query objects. The
following objects can be exported: report form, procedure, and query.
Authorization
EXPORT FORM:
The privileges held by the user profile running the EXPORT FORM command must have one of the
following:
ERASE
242 Query Manager Use V6R1M0

v The following system authorities:
– For the *QMFORM object specified on the command:
- *USE system authority on the library that contains the *QMFORM object.
- *USE system authority on the *QMFORM object.– If the *FILE object specified on the command does not exist:
- *ADD and *EXECUTE system authority on the library that will contain the *FILE object.– If the *FILE object specified on the command exists:
- *ADD and *EXECUTE system authority on the library that contains the *FILE object.
- *CHANGE and *OBJMGT system authority on the *FILE object.v *ALLOBJ special authority.
EXPORT PROC:
The privileges held by the user profile running the EXPORT PROC command must have one of the
following:
v The following system authorities:
– For the first *FILE object specified on the command:
- *EXECUTE system authority on the library that contains the *FILE object.
- *USE system authority on the *FILE object.– If the second *FILE object specified on the command does not exist:
- *ADD and *EXECUTE system authority on the library that will contain the *FILE object.– If the second *FILE object specified on the command exists:
- *ADD and *EXECUTE system authority on the library that contains the *FILE object.
- *CHANGE and *OBJMGT system authority on the *FILE object.v *ALLOBJ special authority.
EXPORT QUERY:
The privileges held by the user profile running the EXPORT QUERY command must have one of the
following:
v The following system authorities:
– For the *QMQRY object specified on the command:
- *USE system authority on the library that contains the *QMQRY object.
- *USE system authority on the *QMQRY object.– If the *FILE object specified on the command does not exist:
- *ADD and *EXECUTE system authority on the library that will contain the *FILE object.– If the *FILE object specified on the command exists:
- *ADD and *EXECUTE system authority on the library that contains the *FILE object.
- *CHANGE and *OBJMGT system authority on the *FILE object.v *ALLOBJ special authority.
Syntax of EXPORT in Query Manager
A syntax diagram of the EXPORT statement follows:
�� EXPORT FORM
PROC
QUERY
name TO filename
*FIRST
(
member
)
(
Options ��
EXPORT
Appendix B. Query Manager statements 243

Options:
CONFIRM
=
YES
NO
Comment
=
’text’
name The name of the report form, procedure, or query to be exported, and the name of the
library where it resides. If you do not specify a library name, the default library for query
objects specified in your Query Manager profile is searched for the object when the
statement is run. You can specify the name of the object and library in one of the
following ways:
v library.objectname Use this format if your Query Manager profile specifies that you
use the SQL naming convention.
v library/objectname Use this format if your Query Manager profile specifies that you
use the system naming convention. Specify *LIBL to search your library list.
filename (member)
The name of the system file (and member) that receives the exported object. If you do not
specify a member, *FIRST is used (that is, the first member in the specified file).
To be consistent across systems, you should not specify more than a single file name
without library names or extensions. This allows system defaults to take effect.
Query Manager qualifies the single name to fit the data naming requirements of the
operating environment.
You need to be aware of these naming restrictions when transporting Query Manager
objects between operating environments.
CONFIRM=YES | NO
This option provides for a check before performing your EXPORT request. If the existing
file is about to be replaced and the option is set to YES, you are prompted to confirm the
replacement. If the option is set to NO, the replacement takes place automatically.
The default value is YES, but you can change the default in your Query Manager profile
(see “Confirmation messages in Query Manager” on page 37).
COMMENT=‘text’
Use this option to supply a comment to describe the exported FORM, PROC, or QUERY.
If the comment contains multiple words or imbedded blanks, you need to enclose it in
single quotation marks. Quotation marks within the comment need to be entered as two
adjacent single quotation marks:
COMMENT=’January’s sales figures’
Examples of EXPORT statement in Query Manager
EXPORT QUERY SAMP1 TO SAMP1EX
EXPORT FORM EXLIB/EX1 TO EXLIB/FILE(EX1F) (CONFIRM=YES
IMPORT in Query Manager
You can use the IMPORT statement to copy a file containing an exported object into a report form,
procedure, or query. The IMPORT statement does not affect the external file.
Authorization
IMPORT FORM:
EXPORT
244 Query Manager Use V6R1M0

The privileges held by the user profile running the IMPORT FORM command must have one of the
following:
v The following system authorities:
– If the *QMFORM object specified on the command already exists:
- *CHANGE system authority on the library that contains the *QMFORM object.
- *ALL system authority on the *QMFORM object.– If the *QMFORM object specified on the command does not exist:
- *CHANGE system authority on the library that will contain the *QMFORM object.– For the *FILE object specified on the command:
- *EXECUTE system authority on the library that contains the *FILE object.
- *USE system authority on the *FILE object.v *ALLOBJ special authority.
IMPORT QUERY:
The privileges held by the user profile running the IMPORT QUERY command must have one of the
following:
v The following system authorities:
– If the *QMQRY object specified on the command already exists:
- *CHANGE system authority on the library that contains the *QMQRY object.
- *ALL system authority on the *QMQRY object.– If the *QMQRY object specified on the command does not exist:
- *CHANGE system authority on the library that will contain the *QMQRY object.– For the *FILE object specified on the command:
- *EXECUTE system authority on the library that contains the *FILE object.
- *USE system authority on the *FILE object.– If a *TBL object is specified on the command with the SRTSEQ keyword:
- *EXECUTE system authority on the library that contains the *TBL object.
- *USE system authority on the *TBL object.v *ALLOBJ special authority.
IMPORT PROC:
The privileges held by the user profile running the IMPORT PROC command must have one of the
following:
v The following system authorities:
– If the first *FILE object specified on the command does not exist:
- *ADD and *EXECUTE system authority on the library that will contain the *FILE object.– If the first *FILE object specified on the command exists:
- *ADD and *EXECUTE system authority on the library that contains the *FILE object.
- *CHANGE and *OBJMGT system authority on the *FILE object.– For the second *FILE object specified on the command:
- *EXECUTE system authority on the library that contains the *FILE object.
- *USE system authority on the *FILE object.v *ALLOBJ special authority.
IMPORT
Appendix B. Query Manager statements 245

Syntax of IMPORT in Query Manager
A syntax diagram of the IMPORT statement follows:
�� IMPORT FORM
PROC
QUERY
name FROM filename
*FIRST
(
member
)
( �
� Confirm/Comment
Options
Sort
Options
��
Confirm/Comment Options:
CONFIRM
=
YES
NO
COMMENT
=
’text’
Sort Options:
*SRC
*SRC
SRTSEQ
=
*JOBRUN
LANGID
=
*JOBRUN
*JOB
*JOB
*LANGIDSHR
lang id
*LANGIDUNQ
*HEX
*LIBL/
*CURLIB/
library
table
name The name of the report form, procedure, or query to be imported, and the name of the library in
which it resides. If you do not specify a library name, the default library for query objects
specified in your Query Manager profile is searched for the object when the statement is run. You
can specify the name of the object and library in one of the following ways:
v library.objectname Use this format if your Query Manager profile specifies that you use the
SQL naming convention.
v library/objectname Use this format if your Query Manager profile specifies that you use the
system naming convention. Specify *LIBL to search your library list.
filename (member)
The name of the system file (and member) that Query Manager is to read (that is, the source file
for the imported object). If you do not specify a member, *FIRST (the first member in the specified
file) is used.
In order to be consistent across systems, do not specify more than a single name without library
names or extensions; you need to allow system defaults to be taken.
CONFIRM=YES | NO
This option provides for a check before performing your IMPORT request. If an existing object in
the database is about to be replaced and the option is set to YES, you are prompted to confirm
that the existing object is to be replaced. If the option is set to NO, replacement occurs without
confirmation.
The default value is YES, but you can change the default in your Query Manager profile (see
“Confirmation messages in Query Manager” on page 37).
COMMENT=‘text’
Use this option to supply a comment to describe the imported FORM, PROC, or QUERY. If the
IMPORT
246 Query Manager Use V6R1M0
comment contains multiple words or imbedded blanks, you need to enclose it in single quotation
marks. Quotation marks within the comment need to be entered as two adjacent single quotation
marks:
COMMENT=’Bernie’s greatest work’
SRTSEQ=SRC | *JOBRUN | *JOB | *LANGIDSHR | *LANGIDUNQ | *HEX | table
Use this option to specify the sort sequence to use for this query. The SRTSEQ parameter is
allowed only when importing a QUERY. The possible values are:
*SRC The source file member contains the sort sequence specification. If the source file
member does not contain the sort sequence, *JOBRUN is used. *SRC is the default
if you do not specify SRTSEQ.
*JOBRUN Use the SRTSEQ associated with the job at the time you run the query.
*JOB Use the SRTSEQ associated with the job at the time you import the query.
*LANGIDSHR
Use the sort sequence table that is associated with the language specified by the
LANGID parameter, and that shares collating weights between some characters.
*LANGIDUNQ
Use the sort sequence table that is associated with the language specified by the
LANGID parameter, and that has unique collating weights for all characters.
*HEX Use the binary value of the characters for the sort sequence.
table Use this external sort sequence table object.
LANGID=SRC | *JOBRUN | *JOB | Lang ID
Use this option to specify the language for the query. LANGID specifies what sort sequence table
to use when you specify *LANGIDSHR or *LANGIDUNQ for the SRTSEQ parameter. The
possible values are:
*SRC The source file member contains the language identifier. If the source file member
does not contain the language identifier, *JOBRUN is used. *SRC is the default if
you do not specify LANGID.
*JOBRUN Use the LANGID associated with the job at the time you run the query.
*JOB Use the LANGID associated with the job at the time you import the query.
Lang ID The three-character language identifier.
The IMPORT statement is typically used in the following situations:
v To copy report form, procedure, and query objects from one Query Manager installation to another
(objects are exported by the sending installation and imported by the receiving installation).
v To use a full-function editor outside Query Manager.
v For users who want to migrate SQL queries from program libraries that typically reside outside Query
Manager to libraries inside Query Manager for purposes of modification and interactive processing.
The IMPORT statement copies the contents of the specified file into the database. For SQL queries and
procedures, each record in the file becomes a separate line in the object. All files that were exported using
the Query Manager EXPORT statement can be imported. When importing files containing SQL queries
and procedures, Query Manager accepts records having a logical record length greater than 79 even
though the resulting data may be truncated. If Query Manager finds a logical record length greater than
79, it displays a warning message.
If the imported file has a fixed record format (and a logical record length greater than 79), then Query
Manager accepts only data in positions 1 to 79 and ignores the rest.
IMPORT
Appendix B. Query Manager statements 247

When importing files with a logical record length less than 79, Query Manager does not perform any
validation or semantic checking on the contents of the files. Therefore, it is possible to establish query and
procedure objects containing non-displayable characters. (This could happen if a program’s object file
were imported as a query). Also, it is possible to import SQL statements into the PROC object and vice
verse. It is your responsibility to avoid such mistakes, because Query Manager contains no provision for
“re-categorizing” contents.
Query Manager validates FORM objects. If some part of the file fails a validation test, the object is
brought into the database and a warning messages are issued. It is possible for the file to pass the
validation test, yet supply unpredictable results when used for formatting.
Examples of IMPORT statement in Query Manager
IMPORT FORM REPORT1 FROM REPT1EX
IMPORT QUERY SALARYWK FROM JENSON
PRINT in Query Manager
You can use the PRINT statement to print a hard copy of a report form, procedure, query, or report. The
following objects print as they are written: report forms, procedures, and queries. If you select to print a
report, the report is applied to the active data produced by the last interactively run SQL SELECT
statement query or prompted query. If there is no active data, an error message is returned.
Authorization
PRINT FORM:
The privileges held by the user profile running the PRINT FORM command must have one of the
following:
v For the *QMFORM object specified on the command:
– *USE system authority on the library that contains the *QMFORM object.
– *USE system authority on the *QMFORM object.v *ALLOBJ special authority.
PRINT PROC:
The privileges held by the user profile running the PRINT PROC command must have one of the
following:
v For the *FILE object specified on the command:
– *EXECUTE system authority on the library that contains the *FILE object.
– *USE system authority on the *FILE object.v *ALLOBJ special authority.
PRINT QUERY:
The privileges held by the user profile running the PRINT QUERY command must have one of the
following:
v For the *QMQRY object specified on the command:
– *USE system authority on the library that contains the *QMQRY object.
– *USE system authority on the *QMQRY object.v *ALLOBJ special authority.
PRINT REPORT:
IMPORT
248 Query Manager Use V6R1M0

The privileges held by the user profile running the PRINT REPORT command must have one of the
following:
v If a *QMFORM object is specified on the command:
– *USE system authority on the library that contains the *QMFORM object.
– *USE system authority on the *QMFORM object.v *ALLOBJ special authority.
Syntax of PRINT in Query Manager
A syntax diagram of the PRINT statement follows:
�� PRINT FORM
PROC
QUERY
name
(
PRINTER
=
printername
*JOB
��
A syntax diagram of the PRINT REPORT statement follows:
�� PRINT REPORT
(
Options ��
Options:
FORM
=
formname
*SYSDFT
WIDTH
=
max_char_per_line
*SYSDFT
LENGTH
=
max_number_lines
�
� YES
PAGENO
=
NO
YES
DATETIME
=
NO
PRINTER = printername
*JOB
name The name of the report form, procedure, or query to be printed, and the name of the library
where it resides. If you do not specify a library name, the default library for query objects
specified in your Query Manager profile is searched for the object when the statement is run. You
can specify the name of the object and library in one of the following ways:
v library.objectname Use this format if your Query Manager profile specifies that you use the
SQL naming convention.
v library/objectname Use this format if your Query Manager profile specifies that you use the
system naming convention. Specify *LIBL to search your library list.
PRINTER=*JOB | printername
The printer that produces the printed output. The default is the printer specified in your Query
Manager profile. *JOB uses the printer specified in your current job.
FORM=formname
The name of the report form that you want to print. If no report form is specified, the form used
in the last RUN QUERY that produced the currently active data is used.
WIDTH=*SYSDFT | max characters per print line
An integer between 22 and 378 inclusive to specify the width of the page.
If you do not specify WIDTH, Query Manager uses the corresponding system or user default
(*SYSDFT). If this value is unavailable, the default is set to 80. (See “Report forms in Query
Manager” on page 5 for a description of the *SYSDFT default values.)
Appendix B. Query Manager statements 249
Reports wider than the print width specified are split between pages. Query objects wider than
the print width specified are truncated on the right. Make sure the width you specify is
compatible with the printer you are using.
LENGTH=*SYSDFT | maximum number of lines per page
A number between 1 and 255 inclusive to specify the length of the page.
The default is the corresponding system or user default (*SYSDFT). If this value is not available,
the default is set to 66. (See “Report forms in Query Manager” on page 5 for a description of the
*SYSDFT default values.)
If a report is specified, and the value for LENGTH is less than the total number of lines needed
for column headings, page headings and footings, plus the line needed to print the page number
and date and time, an error message is generated and the report is not printed.
If the LENGTH value is adequate for the report, Query Manager performs a page eject whenever
the number of lines of data printed on a page equals the LENGTH value specified.
PAGENO=YES | NO
This option controls the printing of page numbers on the last line of each page. The default is
YES.
DATETIME=YES | NO
This option controls the generation and display of the system date and time on the bottom of
each page. If YES, the date and time are placed on the last line of each page. If NO, the system
date and time do not print. The default is YES.
Examples of PRINT statement in Query Manager
PRINT QUERY MYLIB.STAFF
PRINT PROC PAYROLL
PRINT REPORT (WIDTH=80 LENGTH=60 DATETIME=YES PAGENO=YES
RELEASE in Query Manager
The RELEASE statement places one or more connections in the released state. A released state can be
thought of as a pending disconnect. When a connection is in the released state, this means that a
disconnect will occur at the next successful commit operation. A disconnect will not occur at the next
rollback because rollbacks have no effect on connections.
If the RELEASE command is successful, each identified connection is placed in the released state and will
be disconnected at the next successful commit operation. If the current connection is in the released state
when a commit operation runs successfully, the connection is destroyed and the default activation group
is left in an unconnected state. Use the CONNECT or the SET CONNECTION statements to reestablish a
connection.
If the RELEASE command is unsuccessful, the connection state of the activation group and the states of
its connections are not changed.
A list of relational databases connected to the default activation group and their connection information
can be obtained by prompting on the RELEASE statement. The RELEASE statement statement can be
used on protected conversations.
The RELEASE statement is not allowed in Query Manager queries.
Authorization
None required.
250 Query Manager Use V6R1M0

Syntax of RELEASE in Query Manager
A syntax diagram of the RELEASE statement follows:
�� RELEASE rdbname
CURRENT
ALL
��
rdbname The name of the relational database (rdb) that is currently being accessed. An rdbname can
be up to 18 characters in length and can only consist of uppercase letters, numerics, or an
underscore. The first character must be an uppercase letter.
CURRENT Identifies the current connection of the activation group.
ALL Identifies all connections in the default activation group.
Examples of the RELEASE statement in Query Manager
The connection to RDB1 is not needed in the next unit of work. The following statement causes it to be
removed at the next successful commit operation.
RELEASE RDB1
The current connection is not needed in the next unit of work. The following statement causes it to be
removed at the next successful commit operation.
RELEASE CURRENT
None of the existing connections are needed in the next unit of work. The following statement causes
them to be removed at the next successful commit operation.
RELEASE ALL
RUN in Query Manager
The Query Manager RUN statement processes a procedure or query. When you enter the RUN statement,
you need to identify the procedure or query, and that query or procedure needs to exist in the database.
If used to process an SQL SELECT statement query or prompted query, the RUN QUERY statement
allows you the option of specifying the active query and the active form. If there is no active query or
active form, you need to provide the query and report form name. When you process the statement, the
query and report form specified become the active query and active form. If you choose to display the
results, you should also select a report form.
Notes:
1. If you run queries in batch mode, the Display parameter cannot be YES. A report is spooled to the
printer specified in your Query Manager profile (see “Printer to use for output in Query Manager” on
page 39).
2. If you run queries interactively and you set the DISPLAY option to NO, the only outcome of
processing the statement is the creation of active data.
3. You can use this statement to run any prompted query, but you can run only those SQL queries that
contain SQL statements that you have been granted authority to use through your Query Manager
profile (see “Select allowed SQL statements in Query Manager” on page 42).
Authorization
RUN PROC:
The privileges held by the user profile running the RUN PROC command must have one of the
following:
v For the *FILE object specified on the command:
RELEASE
Appendix B. Query Manager statements 251

– *EXECUTE system authority on the library that contains the
– *FILE object.*USE system authority on the *FILE object.v *ALLOBJ special authority.
RUN QUERY:
The privileges held by the user profile running the RUN QUERY command must have one of the
following:
v The following system authorities:
– For the *QMQRY object specified on the command:
- *USE system authority on the library that contains the *QMQRY object.
- *USE system authority on the *QMQRY object.– If a *QMFORM object is specified on the command:
- *USE system authority on the library that contains the *QMFORM object.
- *USE system authority on the *QMFORM object.– For the SQL objects referenced in the query:
- The required privileges are documented in SQL reference.v *ALLOBJ special authority.
Syntax of RUN in Query Manager
A syntax diagram of the RUN statement follows:
�� RUN PROC name
QUERY
name
*
(
Options
��
Options:
*SYSDFT
FORM
=
*
name
DISPLAY
=
YES
NO
name The name of the query or procedure to be run, and the name of the library where it resides. If
you do not specify a library name, the default library for query objects specified in your Query
Manager profile is searched for the object when the statement is run. You can specify the name of
the object and library in one of the following ways:
v library.objectname Use this format if your Query Manager profile specifies that you use the
SQL naming convention.
v library/objectname Use this format if your Query Manager profile specifies that you use the
system naming convention. Specify *LIBL to search your library list.
* Uses the active query.
DISPLAY=YES | NO
This option specifies whether the result is to be displayed at your display station. Display cannot
be YES if you run queries in batch mode (see “Run query mode in Query Manager” on page 35).
If you omit the DISPLAY option, it defaults to YES if you run queries interactively, or to NO if
you run queries in batch mode.
RUN
252 Query Manager Use V6R1M0

FORM=*SYSDFT | * | name
This option specifies the report form to be applied. If you omit the FORM option, Query Manager
generates a default report form (*SYSDFT).
The name can be specified as:
*SYSDFT
Uses a system generated default report form. See “Report forms in Query Manager” on
page 5 for a description of the *SYSDFT report form.
* Uses the active form.
name The name of the report form to be used, and the name of the library where it resides. If
you do not specify a library name, the default library for query objects specified in your
Query Manager profile is searched for the named form when the statement is run. You
can specify the name of the report form and library in one of the following ways:
v library.formname Use this format if your Query Manager profile specifies that you use
the SQL naming convention.
v library/formname Use this format if your Query Manager profile specifies that you use
the system naming convention. Specify *LIBL to search your library list.
Examples of RUN statement in Query Manager
RUN PROC WEEKREPT
RUN QUERY * (FORM=*
RUN QUERY SMITH.STAFF (DISPLAY=NO
RUN QUERY SMITH.STAFF (FORM=SMITH.SAL_REPT
SAVE DATA AS in Query Manager
You use the SAVE DATA AS statement to save data in a table in the database. The saved table object is
named according to the name you specify with the statement. If data is saved and a table or view is
being replaced, the data needs to be compatible with the existing definition. Compatible data has
matching data types, lengths, and null attributes. The number of columns in the data needs to match the
target, and the columns need to have compatible data types and null characteristics. If two objects are
incompatible, the statement is rejected.
If the name you are saving data to is a view in the database, the table on which the view is defined is
changed.
Authorization
The privileges held by the user profile running the SAVE DATA AS command must have one of the
following:
v The following system authorities:
– If the *FILE object specified on the command does not exist:
- *ADD and *EXECUTE system authority on the library that will contain the *FILE object.– If the *FILE object specified on the command already exists:
- *EXECUTE system authority on the library that contains the *FILE object.
- *OBJALTER and *CHANGE system authority on the *FILE object.v *ALLOBJ special authority.
RUN
Appendix B. Query Manager statements 253
Syntax of SAVE DATA AS in Query Manager
A syntax diagram of the SAVE DATA AS statement follows:
�� SAVE DATA AS tablename
(
Options ��
Options:
CONFIRM
=
YES
NO
REPLACE
ACTION
=
APPEND
COMMENT
=
’text’
DATA This part of the statement refers to the active data produced by the most recent interactively run
SQL SELECT statement query or prompted query.
tablename
The name of the table or view in which the data is stored in the database, and the name of the
library where it resides. You can specify the name of the table and library (or collection) in one of
the following ways:
v collection.tablename Use this format if your Query Manager profile specifies that you use the
SQL naming convention. If you do not specify a collection name, the default library for query
objects specified in your Query Manager profile is searched for the named table when the
statement is run.
v library/filename Use this format if your Query Manager profile specifies that you use the
system naming convention. If you do not specify a library name, your library list (*LIBL) is
searched for the named file when the statement is run.
CONFIRM=YES | NO
This option provides for a check before performing your SAVE DATA AS request. If a table or
view with the specified name already exists and is about to be replaced, and the option is set to
YES, you are prompted to confirm that the existing table or view is to be replaced. If the option is
set to NO, replacement occurs without confirmation. The default is YES, but you can change the
default value in your Query Manager profile (see “Confirmation messages in Query Manager” on
page 37).
ACTION=REPLACE | APPEND
REPLACE causes an existing table or view to be replaced. APPEND causes the data to be added
to the end of an existing table or view. The default is REPLACE.
COMMENT=‘text’
Use this option to supply a comment when saving data as a table. If the comment contains
multiple words or imbedded blanks, you need to enclose it in single quotation marks. Quotation
marks within the comment need to be entered as two adjacent single quotation marks:
COMMENT=’Don’t ERASE this data without telling Simon!’
Examples of SAVE DATA AS statement in Query Manager
SAVE DATA AS EMP12
SAVE DATA AS EMP12 (COMMENT=’CLASSIC TWO TABLE JOIN’
SAVE FORM AS in Query Manager
Use the SAVE FORM AS statement to save the active form. If there is no active form, an error message is
displayed.
SAVE DATA AS
254 Query Manager Use V6R1M0
Authorization
The privileges held by the user profile running the SAVE FORM AS command must have one of the
following:
v The following system authorities:
– If the *QMFORM object specified on the command already exists:
- *CHANGE system authority on the library that contains the *QMFORM object.
- *ALL system authority on the *QMFORM object.– If the *QMFORM object specified on the command does not exist:
- *CHANGE system authority on the library that will contain the *QMFORM object.v *ALLOBJ special authority.
Syntax of SAVE FORM AS in Query Manager
A syntax diagram of the SAVE FORM AS statement follows:
�� SAVE FORM AS name
(
Options ��
Options.:
CONFIRM
=
YES
NO
COMMENT
=
’text’
name The name of the report form to be saved, and the name of the library where it resides. If you do
not specify a library name, the default library for query objects specified in your Query Manager
profile is searched for the named form when the statement is run. You can specify the name of
the report form and library in one of the following ways.
v library.formname Use this format if your Query Manager profile specifies that you use the
SQL naming convention.
v library/formname Use this format if your Query Manager profile specifies that you use the
system naming convention. Specify *LIBL to search your library list.
CONFIRM=YES | NO
This option provides for a check before performing your SAVE request. If a report form with the
specified name already exists in the library and the option is set to YES, you are prompted to
confirm that the existing report form is to be replaced. If the option is set to NO, replacement
occurs without confirmation.
The default value is YES, but you can change the default in your Query Manager profile (see
“Confirmation messages in Query Manager” on page 37).
COMMENT=‘text’
This option allows you to apply a description to the report form. The description is shown in the
Work with Query Manager Report Forms display.
Because text usually consists of multiple words and blank spaces, you need to enclose it in single
quotation marks. If you want to include a single quotation mark or an apostrophe in the text, you
need to enter it as two adjacent single quotation marks. For example:
COMMENT=’Anne’s monthly sales report form’
The maximum length of text is for the comment is 50 characters, excluding the enclosing
quotation marks.
SAVE FORM AS
Appendix B. Query Manager statements 255
Examples of SAVE FORM statement in Query Manager
SAVE FORM AS SAL_REPT
SAVE FORM AS SAL_REPT (CONFIRM=NO COMMENT=’Monthly sales’
SAVE QUERY AS in Query Manager
Use the SAVE QUERY AS statement to save the active query. If there is no active query, an error message
is displayed.
Authorization
The privileges held by the user profile running the SAVE QUERY AS command must have one of the
following:
v The following system authorities:
– If the *QMQRY object specified on the command already exists:
- *CHANGE system authority on the library that contains the *QMQRY object.
- *ALL system authority on the *QMQRY object.– If the *QMQRY object specified on the command does not exist:
- *CHANGE system authority on the library that will contain the *QMQRY object.v *ALLOBJ special authority.
Syntax of SAVE QUERY AS in Query Manager
A syntax diagram of the SAVE QUERY AS statement follows:
�� SAVE QUERY AS name
(
Options ��
Options:
CONFIRM
=
YES
NO
COMMENT
=
’text’
name The name of the query to be saved, and the name of the library where it resides. If you do not
specify a library name, the default library for query objects specified in your Query Manager
profile is searched for the object when the statement is run. You can specify the name of the
query and library in one of the following ways:
v library.queryname Use this format if your Query Manager profile specifies that you use the
SQL naming convention.
v library/queryname Use this format if your Query Manager profile specifies that you use the
system naming convention. Specify *LIBL to search your library list.
CONFIRM=YES | NO
This option provides for a check before performing your SAVE request. If a query with the
specified name already exists in the library and the option is set to YES, you are prompted to
confirm that the existing query is to be replaced. If the option is set to NO, replacement occurs
without confirmation.
The default value is YES, but you can change the default in your Query Manager profile (see
“Confirmation messages in Query Manager” on page 37).
SAVE FORM AS
256 Query Manager Use V6R1M0

COMMENT=‘text’
This option allows you to apply a description to the query. The description is shown in the Work
with Query Manager Queries display.
Because text usually consists of multiple words and blank spaces, you need to enclose it in single
quotation marks. If you want to include a single quotation mark or an apostrophe in the text, you
need to enter it as two adjacent single quotation marks. For example:
COMMENT=’Mario’s January sales’
The maximum length of text is 50 characters, excluding the enclosing quotation marks.
Examples of SAVE QUERY AS statement in Query Manager
SAVE QUERY AS SMITH.X41
SAVE QUERY AS X41 (CONFIRM=NO COMMENT=’January sales’
SET CONNECTION in Query Manager
Use the SET CONNECTION statement to change the state of a connection from dormant to current. The
SET CONNECTION statement is only useful when running under DUW connection management.
A dormant state means that a connection is temporarily suspended. While a connection is dormant, no
SQL statements may use the connection, except for commits and rollbacks.
While a connection is current, any SQL statement may use the connection. Only one connection may be
in the current state for each activation group.
If a SET CONNECTION command is successful:
v The previous current connection, if any, is placed in the dormant state.
v The identified application server is placed in the current state.
If the SET CONNECTION command is unsuccessful, the connection state of the default activation group
and the states of its connections are unchanged.
A list of relational databases connected to the default activation group and their connection information
can be obtained by prompting on the SET CONNECTION statement.
The SET CONNECTION statement is not allowed in Query Manager queries.
Authorization
None required.
Syntax of SET CONNECTION in Query Manager
A syntax diagram of the SET CONNECTION statement follows:
�� SET CONNECTION rdbname ��
rdbname The name of the relational database (rdb) that is currently being accessed. An rdbname can
be up to 18 characters in length and can only consist of uppercase letters, numerics, or an
underscore. The first character must be an uppercase letter.
SAVE QUERY AS
Appendix B. Query Manager statements 257

Examples of the SET CONNECTION statement in Query Manager
The following statements send SQL statements to RDB1 after the first command, to RDB2 after the
second, and then to RDB1 again after the third command. The first CONNECT command creates the
RDB1 connection and places it in the current state.
...CONNECT TO RDB1 ...SQL statements
The next CONNECT command creates the RDB2 connection, places it in the current state, and places
RDB1 in the dormant state.
...CONNECT TO RDB2 ...SQL statements
The next SET CONNECTION command returns RDB1 to the current state and places RDB2 in the
dormant state.
...SET CONNECTION RDB1 ...SQL statements
SET CONNECTION
258 Query Manager Use V6R1M0

Appendix C. Implications of allowed SQL statements in Query
Manager
When you allow and restrict SQL statements for users through their Query Manager profiles, you
determine which SQL statements they can use when creating, changing, and running SQL queries
through Query Manager (see “Selecting allowed SQL statements for profiles in Query Manager” on page
48). This appendix describes how and when these allowances and restrictions apply, and tells you how to
cause the restrictions to apply outside Query Manager.
Query Manager
When you grant and restrict users’ authorities for SQL statements, you limit the statements they
can use when creating, changing, and running SQL queries through Query Manager. These
limitations do not exist outside Query Manager.
Prompted Queries
Allowed and restricted SQL statements have no effect on prompted queries. Users who have a
“Default query creation mode” of prompted, or who can change their query creation modes, can
create, change, and run prompted queries. They do not need authority to use the SELECT
statement.
Working with SQL Queries
Allowed and restricted SQL statements affect SQL queries only when users create, change, or run
them. Users can still copy, rename, display, and print SQL queries containing all SQL statements.
Running Queries in Batch Mode
The authorities and restrictions apply to all Query Manager options and functions that result in
SQL queries being run in batch mode. This includes issuing the RUN QUERY statement on the
Query Manager statement line, or choosing to use batch mode from the Run Query display.
When the Authorities Apply
The authorities and restrictions apply to all SQL queries created and run interactively in Query
Manager. The authorities apply under the following circumstances:
v When any Query Manager option or function is performed that results in creating or running
an SQL query.
v When the RUN QUERY, IMPORT QUERY, or SAVE QUERY Query Manager statements are
issued on the Query Manager statement line.
v When a Query Management CL command that creates or runs an SQL query is issued: for
example, the STRQMQRY, CRTQMQRY, and STRQMPRC commands. The SQL restrictions
apply if Query Manager is in the program stack when the CL command is issued.
When the Authorities Do Not Apply
The authorities and restrictions do not apply under the following circumstances:
v When users create or run queries using the Query Management Common Programming
Interface (CPI). See Query Management Programming.
v When users run the STRQMQRY, CRTQMQRY, or STRQMPRC CL commands and Query
Manager is not on the program stack.
v When users who are restricted to batch mode issue a RUN PROC Query Manager statement on
the Query Manager statement line.
Restricting Users outside DB2 Query Manager
Security administrators can use the i5/OS object level authority functions to restrict users from
running or creating queries outside Query Manager, although this does not allow the statement
type checking available through Query Manager. For example:
© Copyright IBM Corp. 1998, 2008 259
v Remove authority to the CRTQMQRY CL command, to force users to create all queries through
Query Manager or the Query Management CPI.
v Restrict users from creating programs that use the Query Management CPI. You can do this in
one of two ways:
1. Remove authority to the Query Management CPI include files (see Query Management
Programming). Then, unless users code their own include members, they cannot create
programs that use the Query Management CPI.
2. Remove authority to the C, OPM COBOL, and RPG/400® languages.v Remove authority to the STRQMPRC CL command, to force users to create and run all queries
through Query Manager or the Query Management CPI. Note that users who do not have
authority to the STRQMPRC command cannot run procedures in batch mode using Query
Manager.
v Remove authority to the STRQMQRY CL command, to force users to run all queries through
Query Manager or the Query Management CPI. Note that users who do not have authority to
the STRQMQRY command cannot run queries in batch mode using Query Manager.
260 Query Manager Use V6R1M0

Appendix D. Example: Sort sequence in Query Manager
This appendix shows how to use the support for sort and comparison testing in multiple language
environments.
These example queries and reports are run against the information shown in Table 17. Notice that the
values in the JOB column are in different cases. For example, the job code for manager is entered as Mgr,
MGR, and mgr. A sort sequence table can help you manage this situation.
Table 17. Employee Table
ID NAME DEPT JOB YEARS SALARY COMM
10 Sanders 20 Mgr 7 18357.50 0
20 Pernal 20 Sales 8 18171.25 612.45
30 Marenghi 38 Mgr 5 17506.75 0
40 OBrien 38 Sales 6 18006.00 846.55
50 Hanes 15 Mgr 10 20659.80 0
60 Quigley 38 Sales 00 16808.30 650.25
70 Rothman 15 Sales 7 16502.83 1152.00
80 James 20 Clerk 0 13504.60 128.20
90 Koonitz 42 sales 6 18001.75 1386.70
100 Plotz 42 mgr 6 18352.80 0
Example: Sort sequence usages in Query Manager
The Query Manager uses the sort sequence table for several operations:
v Sorting
v Grouping
v Joining
v Selecting records
v Determining minimum and maximum values
v Determining report breaks that involve SBCS character data
In the following examples, you see the query and resulting report using:
v The binary character code sort sequence (*HEX)
v A shared collating weight sort sequence (*LANGIDSHR)
v A unique collating weight sort sequence (*LANGIDUNQ)
Example: Sorting in Query Manager
The following SQL statement causes the report to be sorted using the values in the JOB column.
SELECT * FROM EMPLOYEE ORDER BY JOB
Figure 170 on page 262 shows how the information in Table 17 sorts using the *HEX sort sequence. The
rows are sorted by the value in the JOB column without recognizing that the values are uppercase and
lowercase variations of the same words. MGR and mgr are treated as different values. Also, with the
*HEX sort sequence, sales sorts before Sales and SALES.
© Copyright IBM Corp. 1998, 2008 261
Figure 171 shows how the information shown in Table 17 on page 261 sorts using a shared sort sequence.
The lowercase letters are treated the same as their uppercase version. Thus, mgr, Mgr,and MGR are
grouped together.
Figure 172 shows how the information in Table 17 on page 261 sorts using a unique sort sequence. The
lowercase and uppercase letters are treated as unique, but they have collating weights that cause them to
sort adjacently. The lowercase letter sorts before the uppercase. This is the sorting that you see in national
language dictionaries.
Example: Record selection in Query Manager
The following SQL statement selects only the records with the value MGR in the JOB column.
SELECT * FROM EMPLOYEE WHERE JOB=’MGR’
Figure 173 on page 263 shows record selection with the *HEX sort sequence. The rows that exactly match
the record selection criteria are selected. Mgr and mgr are not selected because they are not treated the
ID NAME DEPT JOB YEARS SALARY COMM
------- --------- ------- ----- ------- ----------- ---------
000001 100 Plotz 42 mgr 7 18,352.80 .00
000002 90 Koonitz 42 sales 6 18,001.75 1,386.70
000003 80 James 20 Clerk 0 13,504.60 128.20
000004 10 Sanders 20 Mgr 7 18,357.50 .00
000005 50 Hanes 15 Mgr 10 20,659.80 .00
000006 30 Marenghi 38 MGR 5 17,506.75 .00
000007 20 Pernal 20 Sales 8 18,171.25 612.45
000008 40 OBrien 38 Sales 6 18,006.00 846.55
000009 70 Rothman 15 Sales 7 16,502.83 1,152.00
000010 60 Quigley 38 SALES 0 16,808.30 650.25
****** * * * * * E N D O F D A T A * * * * *
Figure 170. SRTSEQ=*HEX. Example report that shows sorting with no sort sequence.
ID NAME DEPT JOB YEARS SALARY COMM
------- --------- ------- ----- ------- ----------- ---------
000001 80 James 20 Clerk 0 13,504.60 128.20
000002 10 Sanders 20 Mgr 7 18,357.50 .00
000003 30 Marenghi 38 MGR 5 17,506.75 .00
000004 50 Hanes 15 Mgr 10 20,659.80 .00
000005 100 Plotz 42 mgr 7 18,352.80 .00
000006 20 Pernal 20 Sales 8 18,171.25 612.45
000007 40 OBrien 38 Sales 6 18,006.00 846.55
000008 60 Quigley 38 SALES 0 16,808.30 650.25
000009 70 Rothman 15 Sales 7 16,502.83 1,152.00
000010 90 Koonitz 42 sales 6 18,001.75 1,386.70
****** * * * * * E N D O F D A T A * * * * *
Figure 171. SRTSEQ=*LANGIDSHR, LANGID=ENU. Example report that shows sorting with a shared sort sequence.
ID NAME DEPT JOB YEARS SALARY COMM
------- --------- ------- ----- ------- ----------- ---------
000001 80 James 20 Clerk 0 13,504.60 128.20
000002 100 Plotz 42 mgr 7 18,352.80 .00
000003 10 Sanders 20 Mgr 7 18,357.50 .00
000004 50 Hanes 15 Mgr 10 20,659.80 .00
000005 30 Marenghi 38 MGR 5 17,506.75 .00
000006 90 Koonitz 42 sales 6 18,001.75 1,386.70
000007 20 Pernal 20 Sales 8 18,171.25 612.45
000008 40 OBrien 38 Sales 6 18,006.00 846.55
000009 70 Rothman 15 Sales 7 16,502.83 1,152.00
000010 60 Quigley 38 SALES 0 16,808.30 650.25
****** * * * * * E N D O F D A T A * * * * *
Figure 172. SRTSEQ=*LANGIDUNQ, LANGID=ENU. Example report that shows sorting with a unique sort sequence.
262 Query Manager Use V6R1M0

same as MGR.
Figure 174 shows record selection with a shared sort sequence. The rows with Mgr, MGR, and mgr are all
selected because the uppercase and lowercase versions of the letters are treated the same way.
Figure 175 shows record selection with a unique sort sequence. The lowercase and uppercase letters are
treated as unique even though they are adjacent in the collating sequence. Mgr and mgr are not selected
because they are not treated the same as MGR.
Example: Report breaks in Query Manager
The following SQL statement sorts the values in the JOB column. The report uses a BREAK1 on the JOB
column and a SUM on the SALARY column.
SELECT * FROM EMPLOYEE ORDER BY JOB
Figure 176 on page 264 shows report breaks with a *HEX sort sequence. The rows are grouped by the
value changes in the JOB column. The uppercase and lowercase versions of the letters are treated
differently. MGR and mgr are not treated the same as the mixed case Mgr and so are not grouped into the
same break level.
ID NAME DEPT JOB YEARS SALARY COMM
------- --------- ------- ----- ------- ----------- ---------
000001 30 Marenghi 38 MGR 5 17,506.75 .00
****** * * * * * E N D O F D A T A * * * * *
Figure 173. SRTSEQ=*HEX. Example report that shows record selection with no sort sequence.
ID NAME DEPT JOB YEARS SALARY COMM
------- --------- ------- ----- ------- ----------- ---------
000001 10 Sanders 20 Mgr 7 18,357.50 .00
000002 30 Marenghi 38 MGR 5 17,506.75 .00
000003 50 Hanes 15 Mgr 10 20,659.80 .00
000004 100 Plotz 42 mgr 7 18,352.80 .00
****** * * * * * E N D O F D A T A * * * * *
Figure 174. SRTSEQ=*LANGIDSHR, LANGID=ENU. Example report that shows record selection with a shared sort
sequence.
ID NAME DEPT JOB YEARS SALARY COMM
------- --------- ------- ----- ------- ----------- ---------
000001 30 Marenghi 38 MGR 5 17,506.75 .00
****** * * * * * E N D O F D A T A * * * * *
Figure 175. SRTSEQ=*LANGIDUNQ, LANGID=ENU. Example report that shows record selection with a unique sort
sequence.
Appendix D. Example: Sort sequence in Query Manager 263

Figure 177 shows report breaks with a unique sort sequence. The rows are grouped by the value in the
JOB column, and lowercase letters are treated the same as uppercase letters. The values mgr, Mgr, and
MGR are grouped together at the same break level.
ID NAME DEPT JOB YEARS SALARY COMM
------- --------- ------- ----- ------- ----------- ---------
000001 100 Plotz 42 mgr 7 18,352.80 .00
000002 -----------
000003 * 18,352.80
000004
000005 90 Koonitz 42 sales 6 18,001.75 1,386.70
000006 -----------
000007 * 18,001.75
000008
000009 80 James 20 Clerk 0 13,504.60 128.20
000010 -----------
000011 * 13,504.60
000012
000013 10 Sanders 20 Mgr 7 18,357.50 .00
000014 50 Hanes 15 10 20,659.80 .00
000015 -----------
000016 * 39,017.30
000017
000018 30 Marenghi 38 MGR 5 17,506.75 .00
000019 -----------
000020 * 17,506.75
000021
000022 20 Pernal 20 Sales 8 18,171.25 612.45
000023 40 OBrien 38 6 18,006.00 846.55
000024 70 Rothman 15 7 16,502.83 1,152.00
000025 -----------
000026 * 52,680.08
000027
000028 60 Quigley 38 SALES 0 16,808.30 650.25
000029 -----------
000030 * 16,808.30
000031
****** * * * * * E N D O F D A T A * * * * *
Figure 176. SRTSEQ=*HEX. Example report that shows report breaks with no sort sequence.
ID NAME DEPT JOB YEARS SALARY COMM
------- --------- ------- ----- ------- ----------- ---------
000001 80 James 20 Clerk 0 13,504.60 128.20
000002 -----------
000003 * 13,504.60
000004
000005 10 Sanders 20 Mgr 7 18,357.50 .00
000006 30 Marenghi 38 5 17,506.75 .00
000007 50 Hanes 15 10 20,659.80 .00
000008 100 Plotz 42 7 18,352.80 .00
000009 -----------
000010 * 74,876.85
000011
000012 20 Pernal 20 Sales 8 18,171.25 612.45
000013 40 OBrien 38 6 18,006.00 846.55
000014 60 Quigley 38 0 16,808.30 650.25
000015 70 Rothman 15 7 16,502.83 1,152.00
000016 90 Koonitz 42 6 18,001.75 1,386.70
000017 -----------
000018 * 87,490.13
000019
****** * * * * * E N D O F D A T A * * * * *
Figure 177. SRTSEQ=*LANGIDSHR, LANGID=ENU. Example report that shows report breaks with a shared sort
sequence.
264 Query Manager Use V6R1M0

Figure 178 shows report breaks with a unique sort sequence. The rows are sorted by the value in the JOB
column. Lowercase and uppercase letters are treated as unique, but they have a weight that causes them
to sort adjacently. The lowercase letter sorts first. When the rows are grouped into break levels, only the
values that are exactly the same are grouped together.
Example: Grouping in Query Manager
The following SQL statement groups the summary data using the values in the JOB column.
SELECT JOB, SUM(SALARY) FROM EMPLOYEE GROUP BY JOB ORDER BY JOB
Figure 179 shows a query grouping with a *HEX sort sequence. For report breaks, the rows are grouped
by the value in the JOB column. The uppercase and lowercase versions of the same letter are treated
differently.
ID NAME DEPT JOB YEARS SALARY COMM
------- --------- ------- ----- ------- ----------- ---------
000001 80 James 20 Clerk 0 13,504.60 128.20
000002 -----------
000003 * 13,504.60
000004
000005 100 Plotz 42 mgr 7 18,352.80 .00
000006 -----------
000007 * 18,352.80
000008
000009 10 Sanders 20 Mgr 7 18,357.50 .00
000010 50 Hanes 15 Mgr 10 20,659.80 .00
000011 -----------
000012 * 39,017.30
000013
000014 30 Marenghi 38 MGR 5 17,506.75 .00
000015 -----------
000016 * 17,506.75
000017
000018 90 Koonitz 42 sales 6 18,001.75 1,386.70
000019 -----------
000020 * 18,001.75
000021
000022 20 Pernal 20 Sales 8 18,171.25 612.45
000023 40 OBrien 38 Sales 6 18,006.00 846.55
000024 70 Rothman 15 Sales 7 16,502.83 1,152.00
000025 -----------
000026 * 52,680.13
000027
000028 60 Quigley 38 SALES 0 16,808.30 650.25
000029 -----------
000030 * 16,808.30
000031
****** * * * * * E N D O F D A T A * * * * *
Figure 178. SRTSEQ=*LANGIDUNQ, LANGID=ENU. Example report that shows report breaks with a unique sort
sequence.
JOB SUM ( SALARY )
----- ------------------------------------------
000001 mgr 18,352.80
000002 sales 18,001.75
000003 Clerk 13,504.60
000004 Mgr 39,017.30
000005 MGR 17,506.75
000006 Sales 52,680.08
000007 SALES 16,808.30
****** * * * * * E N D O F D A T A * * * * *
Figure 179. SRTSEQ=*HEX. Example report that shows grouping with no sort sequence.
Appendix D. Example: Sort sequence in Query Manager 265

Figure 180 shows query grouping with a shared sort sequence. For report breaks, the rows are grouped
by the value in the JOB column, and the lowercase version of a letter is treated the same as the uppercase
version. Notice that mgr, Mgr, and MGR are grouped together.
Figure 181 shows a query grouping with a unique sort sequence. The rows are sorted by the value in the
JOB column. Lowercase and uppercase letters are treated as unique, but they have weights that cause
adjacent sorting. The lowercase letter sorts first. When the rows are grouped into break levels, only the
values that are exactly the same are grouped together.
JOB SUM ( SALARY )
----- ------------------------------------------
000001 Clerk 13,504.60
000002 Mgr 74,876.85
000003 Sales 87,490.13
****** * * * * * E N D O F D A T A * * * * *
Figure 180. SRTSEQ=*LANGIDSHR, LANGID=ENU. Example report that shows grouping with a shared sort
sequence.
JOB SUM ( SALARY )
----- ------------------------------------------
000001 Clerk 13,504.60
000002 mgr 18,352.80
000003 Mgr 39,017.30
000004 MGR 17,506.75
000005 sales 18,001.75
000006 Sales 52,680.13
000006 SALES 16,808.30
****** * * * * * E N D O F D A T A * * * * *
Figure 181. SRTSEQ=*LANGIDUNQ, LANGID=ENU. Example report that shows grouping with a unique sort
sequence.
266 Query Manager Use V6R1M0
Appendix E. Notices
This information was developed for products and services offered in the U.S.A.
IBM may not offer the products, services, or features discussed in this document in other countries.
Consult your local IBM representative for information on the products and services currently available in
your area. Any reference to an IBM product, program, or service is not intended to state or imply that
only that IBM product, program, or service may be used. Any functionally equivalent product, program,
or service that does not infringe any IBM intellectual property right may be used instead. However, it is
the user’s responsibility to evaluate and verify the operation of any non-IBM product, program, or
service.
IBM may have patents or pending patent applications covering subject matter described in this
document. The furnishing of this document does not give you any license to these patents. You can send
license inquiries, in writing, to:
IBM Director of Licensing
IBM Corporation
North Castle Drive
Armonk, NY 10504-1785
U.S.A.
For license inquiries regarding double-byte (DBCS) information, contact the IBM Intellectual Property
Department in your country or send inquiries, in writing, to:
IBM World Trade Asia Corporation
Licensing
2-31 Roppongi 3-chome, Minato-ku
Tokyo 106-0032, Japan
The following paragraph does not apply to the United Kingdom or any other country where such
provisions are inconsistent with local law: INTERNATIONAL BUSINESS MACHINES CORPORATION
PROVIDES THIS PUBLICATION “AS IS” WITHOUT WARRANTY OF ANY KIND, EITHER EXPRESS
OR IMPLIED, INCLUDING, BUT NOT LIMITED TO, THE IMPLIED WARRANTIES OF
NON-INFRINGEMENT, MERCHANTABILITY OR FITNESS FOR A PARTICULAR PURPOSE. Some
states do not allow disclaimer of express or implied warranties in certain transactions, therefore, this
statement may not apply to you.
This information could include technical inaccuracies or typographical errors. Changes are periodically
made to the information herein; these changes will be incorporated in new editions of the publication.
IBM may make improvements and/or changes in the product(s) and/or the program(s) described in this
publication at any time without notice.
Any references in this information to non-IBM Web sites are provided for convenience only and do not in
any manner serve as an endorsement of those Web sites. The materials at those Web sites are not part of
the materials for this IBM product and use of those Web sites is at your own risk.
IBM may use or distribute any of the information you supply in any way it believes appropriate without
incurring any obligation to you.
Licensees of this program who wish to have information about it for the purpose of enabling: (i) the
exchange of information between independently created programs and other programs (including this
one) and (ii) the mutual use of the information which has been exchanged, should contact:
IBM Corporation
© Copyright IBM Corp. 1998, 2008 267

Software Interoperability Coordinator, Department YBWA
3605 Highway 52 N
Rochester, MN 55901
U.S.A.
Such information may be available, subject to appropriate terms and conditions, including in some cases,
payment of a fee.
The licensed program described in this document and all licensed material available for it are provided
by IBM under terms of the IBM Customer Agreement, IBM International Program License Agreement,
IBM License Agreement for Machine Code, or any equivalent agreement between us.
Any performance data contained herein was determined in a controlled environment. Therefore, the
results obtained in other operating environments may vary significantly. Some measurements may have
been made on development-level systems and there is no guarantee that these measurements will be the
same on generally available systems. Furthermore, some measurements may have been estimated through
extrapolation. Actual results may vary. Users of this document should verify the applicable data for their
specific environment.
Information concerning non-IBM products was obtained from the suppliers of those products, their
published announcements or other publicly available sources. IBM has not tested those products and
cannot confirm the accuracy of performance, compatibility or any other claims related to non-IBM
products. Questions on the capabilities of non-IBM products should be addressed to the suppliers of
those products.
All statements regarding IBM’s future direction or intent are subject to change or withdrawal without
notice, and represent goals and objectives only.
This information contains examples of data and reports used in daily business operations. To illustrate
them as completely as possible, the examples include the names of individuals, companies, brands, and
products. All of these names are fictitious and any similarity to the names and addresses used by an
actual business enterprise is entirely coincidental.
COPYRIGHT LICENSE:
This information contains sample application programs in source language, which illustrate programming
techniques on various operating platforms. You may copy, modify, and distribute these sample programs
in any form without payment to IBM, for the purposes of developing, using, marketing or distributing
application programs conforming to the application programming interface for the operating platform for
which the sample programs are written. These examples have not been thoroughly tested under all
conditions. IBM, therefore, cannot guarantee or imply reliability, serviceability, or function of these
programs.
Each copy or any portion of these sample programs or any derivative work, must include a copyright
notice as follows:
© (your company name) (year). Portions of this code are derived from IBM Corp. Sample Programs. ©
Copyright IBM Corp. _enter the year or years_. All rights reserved.
If you are viewing this information softcopy, the photographs and color illustrations may not appear.
Programming interface information
This Query Manager Use publication documents intended Programming Interfaces that allow the
customer to write programs to obtain the services of IBM i5/OS.
268 Query Manager Use V6R1M0

Trademarks
The following terms are trademarks of International Business Machines Corporation in the United States,
other countries, or both:
DB2
Distributed Relational Database Architecture
DRDA
i5/OS
IBM
IBM (logo)
RPG/400
SQL/DS
System i
WebSphere
z/OS
Linux is a registered trademark of Linus Torvalds in the United States, other countries, or both.
Microsoft, Windows, Windows NT, and the Windows logo are trademarks of Microsoft Corporation in the
United States, other countries, or both.
Java and all Java-based trademarks are trademarks of Sun Microsystems, Inc. in the United States, other
countries, or both.
Other company, product, or service names may be trademarks or service marks of others.
Appendix E. Notices 269

270 Query Manager Use V6R1M0
Index
Special characters- (hyphen) to denote null value 154
-- double hyphen in queries 68
(DUW), distributed unit of work 173
* to indicate active form or active
query 139
*ALL object creation authority 34
*CHANGE object creation authority 34
*CURLIB library 3
*EXCLUDE authority for a library or
collection 145
*EXCLUDE object creation authority 34
*JOB printer 39
*LIBCRTAUT object creation
authority 34
*LIBL library 3
*NONE to specify a blank column
heading in a report form 111
*OBJMGMT rights 17, 31, 45
*QMFORM 1
*QMQRY 1
*READ rights 17, 31, 45
*SAA naming convention 37
*SECADM authority 17, 31, 45
*SYS naming convention 37
*SYSDFT report form 5, 77, 105, 139, 215
*USE object creation authority 34
& ampersand to denote variable 66
&col variable 117, 122, 223, 224
&DATE variable 120, 220
&n variable 120
&PAGE variable 120, 221
&TIME variable 120
Aaccess level
See user access level
activation group, default 174
active data 8, 35, 77, 107, 109, 139, 141,
214
active form 8, 99
active query 7, 65, 110
add data (f19) function key 163
add data (F19) function key 149, 155,
188
all access level 32, 35, 44, 63
all commitment control level 40
allow access to QM tables option 41
allow change query creation mode 41,
64
allow change run query mode 35, 138
allow interactive sample run 36
allowed SQL statements 259
alternate keys (F2) function key 23
ampersand (&) to denote variable 66
AND, OR, (, ), for Query Manager
tables 158, 196
AND/OR connector for prompted
query 89, 91
arithmetic operators for prompted
query 85
asterisk (*) to indicate active query or
active form 139
authorization list 34
AVERAGE (AVG) column usage 111
AVG (AVERAGE) summary function 95
Bbase keys (F2) function key 23
basic access level 33, 35, 43, 51, 105
batch mode 35, 138
BOTTOM blank lines before 120, 122
BOTTOM edit command 71
Bottom indicator 17, 21
brackets [ ] 155, 188
BREAK column usage 111
breaksdefinition 6
example 263
headings and footings 122, 222
ORDER BY clause 6, 111
report 263
sequence 111
specifying 111, 218
summary data 111, 122
BT (between) test operator 93
Ccancel (F12) function key 14, 23
change commitment control level 40
CHANGE edit command 71, 73
change query creation mode (F19)
function key 52, 63, 64
CHARACTER data type 111, 152, 154,
156
check syntax (F15) function key 68, 73
CNT (COUNT) summary function 95
collections*CURLIB collection 3
*EXCLUDE authority 145
*LIBL collection 3
changing the collection 20, 146, 148
creating a collection 38
default collection for QM tables 38,
146, 148
definition 3
difference between collection and
library 3
column names displayed, system 42
columns 2, 149, 151
command window 28, 37
comments in queries 68
COMMIT statement 49, 51, 146, 179, 235
commitment control levelall 40
change 40
cursor stability 40
commitment control level (continued)repeatable read 40
CONCAT function 87
confirm run query 141
confirmation messages in QM 37
CONNECT statement 2, 37, 49, 63, 68,
77, 78, 146, 236
examples 237, 238
connectingto a relational database 174
connection management 173
connection method, relational
database 38
considerations, SET
TRANSACTION 179
constants in queries 65
control breakSee breaks
control language (CL) 66
Control prompt 140, 167
converting a prompted query to
SQL 103
copy line (F10) function key 23, 194
COUNT column usage 111
cursor (F10) function key 73
cursor stability commitment control
level 40
customized runtime prompts 66
Ddata entry guidelines 155
data typesCHARACTER 111, 152, 154, 156
DATE 111, 152
DBCS characters 4, 152, 156, 158
DECIMAL 152, 154
decimal places 149
default values 154
difference between CHARACTER and
VARCHAR 154
difference between DECIMAL and
NUMERIC 154
DOUBLE 152
FLOAT 152
for report forms 111
for tables 149, 152
GRAPHIC 111, 152, 156
INTEGER 152
length 149
list 152
null values 85, 154
NUMERIC 152, 154
OPEN 156
REAL 152
set length 149, 152
SMALLINT 152
TIME 111, 152
TIMESTAMP 111, 152
VARCHAR 152, 154, 156
VARGRAPHIC 152, 156
© Copyright IBM Corp. 1998, 2008 271

database*SYS naming considerations 37
commitment control 40, 51
definition 2
remote connection 37, 49, 146, 236
database connection method 38
DATE data type 152
format considerations 102, 141
separator 111
date/time format considerations 102,
141
DB2 for i5/OS 4
DB2 for i5/OS SQL 10, 51
DB2 Query Manager 10
denying access 45
description 1
exiting 14
general concepts 2
starting 13
using displays 17
DBCS characters 4, 152, 156, 158
DECIMAL data type 152, 154
default activation group 174
defaultsdefault collection for QM tables 38,
148
default form 8
default library for QM tables 38, 148
default library for Query Manager
objects 34
default object creation authority 34
default printer 39
default QM profile 17, 33
default query 7
default query creation mode 41
define expression (F10) function key 95
define prompted query display 78
defining expressions in a prompted
query 85
delete data row (F23) function key 161,
201
delete line (F14) function key 23, 194
deleting prompted query comparison
tests 89
denied access to tables 14, 16, 41, 145
DIGITS function 87
DISCONNECT statement 238
DISPLAY 239
report 239
sample report 239
display additional details (F10) function
key 17
display column names (F19) function
key 78
display column/system column names
(F19) function key 23
display connection status 23
display description (F11) function
key 23, 83
display entire name (F20) function
key 23
displaying 161
display entire name window 26
display form (F13) function key 23, 55,
129
display form only (F11) function key 23,
128
display profile only (F11) function
key 23
display query (F13) function key 23, 55,
129
display query only (F11) function
key 23, 54
display report 167
display report (F5) function key 107,
109, 129
display run options 36, 136
display sample (F5) function key 107,
109, 129
display SQL (F18) function key 55, 78,
110, 129
DISPLAY statement 239
display system column names (F19)
function key 78
display table only (F11) function key 23,
166
display type/length (F11) function
key 155, 157, 161, 188
display values (F11) function key 157,
161, 188
displaying query output 140
Distributed Relational Database
Architecture (DRDA) 173
distributed unit of work 173
DOUBLE data type 152
DRAW statement 68, 77, 240
DRDADistributed Relational Database
Architecture 173
duplicate column (F10) function key 89
duplicating columns in a prompted
query 89
DUWdistributed unit of 173
Eedit column formatting 111, 217
edit commandsbottom 71
change 71, 73
find 71, 73
left 71
right 71
top 71
edit form (F13) function key 23, 77, 110,
229
edit heading (F11) function key 111, 217
edit query (F13) function key 23, 77,
110, 229
edit usage (F11) function key 111, 217
editorSee prompted query editor, SQL query
editor
entering information 18
entire name window, display 26
EQ, =, join condition 82
ERASE statement 241
error messages 26
examplesCONNECT statement
DUW connection
management 238
examples (continued)CONNECT statement (continued)
RUW connection
management 237
SET CONNECTION statement 258
sort sequence 261
exit (F3) function key 14, 23
exit display 100, 107, 213, 231
exiting DB2 Query Manager 14
exiting the Display Report display 141
EXPORT statement 242
extended help (F2) function key 22
Ffile to use for output 39, 139
final summary data omitted 9, 36, 138
find data (F16) function key 157, 161,
162
FIND edit command 71, 73
FIRST column usage 111
FLOAT data type 152
formsSee report forms
function keysF01 17, 22, 23
F02 Alt 23
F02 Ext 22
F03 14, 23, 141
F04 17, 21, 23, 28, 68, 73
F05 Dis 107, 109, 129
F05 Display report 225
F05 Ref 23
F05 Run 23, 55, 64, 107, 109, 129, 135
F06 Ins 23
F06 Ret 25
F06 Run 23, 55, 64, 135
F09 23, 28
F10 (Copy line) 23, 194
F10 (Cursor) 73
F10 (Define expression) 95
F10 (Display additional details) 17
F10 (Display messages in job log) 22
F10 (Duplicate column) 89
F11 (Display description/Display
column only) 83
F11 (Display description/Display
name only) 23, 54, 128, 166
F11 (Display type/length / Display
values) 155, 157, 161, 188
F11 (Edit heading/Edit usage) 111,
217
F12 (Cancel) 14, 23, 141
F13 (Display query/Display
form) 23, 55, 129
F13 (Edit query/Edit form) 23, 77,
110, 229
F14 (Delete line) 23, 194
F14 (Previous data row) 157, 161, 162
F15 (Check syntax) 68, 73, 77
F15 (Next data row) 157, 161, 162,
201
F15 (Split line) 23
F16 (Find data) 157, 161, 162
F16 (Repeat find) 71, 73
F16 (Repeat position to) 23, 25
F17 (Position to) 23, 25
272 Query Manager Use V6R1M0

function keys (continued)F17 (Repeat change) 71, 73
F18 (Display SQL) 23, 55, 78, 110,
129
F18 (Sort sequence) 73
F19 (Add data) 149, 155, 163, 188
F19 (Change query creation
mode) 52, 63, 64
F19 (Display column names) 78
F19 (Display column/system column
names) 23
F19 (Display system column
names) 78
F19 (Left) 73, 140, 167
F19 (Load from query) 110, 111, 217
F20 (Display entire name) 23, 161
F20 (Right) 73, 140, 167
F21 (QM statement/System
command) 23, 28
F21 (Select all) 23, 55, 78, 107, 129,
217
F21 (Split) 140, 167
F22 (QM statement) 23, 28
F23 (Delete data row) 161, 201
F24 (More keys) 23, 201
GGE, >=, join condition 82
global variables 66
GRAPHIC data type 111, 152, 156
GROUP BY clause 95
group, default activation 174
grouping 265
GT, >, join condition 82
Hhelp
context-sensitive 17, 22
extended 22
for messages 22
help (F1) function key 17, 22
job log 22
Ii5/OS query management 10
IMPORT statement 244
incomplete active data 9
insert line (F6) function key 23
INTEGER data type 152
interactive mode 35, 138
maximum rows allowed 9, 36
Is/Is not qualifier 92
Jjob description for batch run 39
job log 22
joining tables in a prompted query 82
LLAST column usage 111
LE, <=, join condition 82
left (F19) function key 73, 140, 167
LEFT edit command 71
libraries*CURLIB library 3
*EXCLUDE authority 145
*LIBL library 3
changing the library 20, 52, 106, 146,
148
creating a library 34, 38
default library for QM tables 38, 146,
148
default library for Query Manager
objects 34
definition 3
difference between library and
collection 3
line commandsafter (A) 72
before (B) 72
copy (C) 72
delete (D) 72
go to 72
insert (I) 72
repeat (RP) 72
rules 72
listsfinding objects in a list 20, 25
making selections 17
using F4 (Prompt) 21
load from query (F19) function key 110,
111, 217
LT, <, join condition 82
Mmain menu
selecting options 14
management, connection 173
MAX (MAXIMUM) summary
function 95
MAXIMUM (MAX) column usage 111
maximum number of rows allowed on
interactive run 9, 36, 60, 133
message help 22
messages 26
method, relational database
connection 38
MIN (MINIMUM) summary function 95
MINIMUM (MIN) column usage 111
more keys (F24) function key 23, 201
More... indicator 17, 21
NName of default library 34
names displayed, system column 42
naming conventions 29
CONNECT statement
considerations 37
SAA 37
SYS (system) 37
NE, <>, join condition 82
next data row (F15) function key 157,
161, 162, 201
NL (Null) test operator 93
NONE summary line 120, 122
null value 85, 154, 158, 160
number of rows to use for sample 36
NUMERIC data type 152, 154
Oobject creation authority 34
OMIT column usage 111
online information 22
OPEN character values 156
OPNQRYF command 10
Opt prompt 17
optionsshow sort sequence 41
ORDER BY clause 6, 94, 111, 210
outfileprocessing 179
output 39, 139
Ppage footing 6, 117, 221
page heading 6, 117, 219
position to (F17) function key 23
position to (F18) function key 23
position to window 25
practice exercises 181
previous data row (F14) function
key 157, 161, 162
PRINT statement 248
printer to use for output 39, 139
procedures 10
processingoutfile 179
profileSee Query Manager profile
prompt (F4) function key 17, 21, 23, 28,
68, 74
prompted queries 5, 41, 51, 63, 78
prompted query 179
prompted query editor 78
allowed SQL statements 42, 48
arithmetic operators 85
changing a query 102
checking syntax 64
converting to SQL 103
define expressions 85
duplicating columns 89
joining tables 82
running the query 64
saving the query 100
select columns 87, 207
select rows 89, 208
select sort columns 94, 210
select summary functions 95
sequence columns 87, 207
specify duplicate rows 97
specify report formatting 99
specify tables 80, 206
table identifiers 80
table join conditions 82
test operators for specifying rows 92
Index 273
prompted query editor (continued)testing the query 64
prompts (underlines) 18
default values 18
QQM statement (F21) function key 23, 28
QM statement (F22) function key 23, 28
QM statements 28, 77
QPQXPRTF printer file 131
qualifier 3
queries 51, 63
allow sample run 36
allowed SQL statements 42, 48, 76
changing 63, 102, 110, 226, 229
changing the description 100
comments 68
confirm run 141
constants 65
converting a prompted query to
SQL 103
copying 53
creating 51, 63, 68, 78, 110, 204, 210
default creation mode 41
default output 39
definition 4, 51
deleting 54, 232
differences between prompted and
SQL 63
displaying query output 140
displaying the definition 55, 110
incomplete data 9
interactive mode 8
maximum rows allowed on interactive
run 36
maximum size 72
naming 100
options 52
printing the definition 58
prompted creation mode 5, 41, 51,
63, 78, 204
renaming 59
replacing 100
run options 36, 136
running 55, 60, 64, 135, 214
sample query 9, 36, 64, 138
saving 100, 213
SQL 51
SQL creation mode 4, 41, 63, 68, 210
subqueries 63, 74, 77
syntax checking 64
testing 64
variables 66
work with display 14, 52
query creation modechanging the mode 41, 52, 64
differences between modes 63
prompted creation mode 41, 51, 63,
78
shown on display 52
SQL creation mode 41, 51, 63, 68
query data outputdisplay 39, 140
file 39, 139
i5/OS output queue 139
printer 39, 139
query data output (continued)table 39, 139
query editorSee prompted query editor, SQL query
editor
Query for i5/OS 10
Query Manager profileadditional details display 17
allowed SQL statements 42, 259
changing 17, 43
changing: security administrator 47
copying 50
creating 46
default profile 17, 33
definition 31
deleting 45
displaying 47
restricting SQL statements 42
selecting allowed SQL statements 42
setting up new profiles 50
work with display 17, 45
Query Manager statements 235
COMMIT 235
CONNECT 2, 37, 49, 63, 68, 77, 78,
236
DISPLAY REPORT 239
DISPLAY SAMPLE 239
DRAW 68, 77, 240
ERASE 241
EXPORT 242
IMPORT 244
PRINT 248
RELEASE 250
RUN 10, 35, 65, 135, 251
SAVE DATA AS 253
SAVE FORM AS 100, 254
SAVE QUERY AS 77, 100, 256
SET CONNECTION 257
Query Manager tablesSee tables
query, prompted 179
RREAL data type 152
record selection 262
refresh (F5) function key 23
relational database connection 13, 37, 49
relational database connection
method 38
RELEASE statement 250
remote database connection 236
remote databasesnon-i5/OS 142
running query against 142
sort sequence concerns 142
remote unit of work 173
repeat change (F17) function key 71, 73
repeat find (F16) function key 71, 73
repeat position to (F16) function key 23,
25
repeatable read commitment control
level 40
report 5
report breakSee breaks
report breaks 263
report forms 105
*SYSDFT 5, 77, 105, 139
&variables 117, 120, 122
allow sample run 36
blank column headings 111
break 6, 111, 122, 218, 222
changing 99, 107
changing the description 100
column formatting 111, 217
column headings 6, 111, 217
column indents 111
column usage 111
column width 111
copying 127
creating 99, 107, 216
default output 39
default report form 5, 105, 139
default values 8, 99, 110, 111
definition 5, 105
deleting 128
displaying 109, 140, 225
displaying the definition 55, 129
edit codes 111
final text 120, 222
formatting options 126, 225
line spacing 126, 225
maximum width 111
naming 100
omitting columns 111
options 106
outlining 126
page footing 6, 117, 221
page heading 6, 117, 219
printing the definition 131
producing a report 135, 225
renaming 132
replacing 100
run options 36, 136
running 133, 135
sample report 9, 36, 64, 138
saving 100
separators 126
sequence of columns 6, 111
spacing between columns 111
summary data 6, 120, 122, 222
testing 109, 225
variables 117, 120, 122, 220, 223
work with display 15, 106
restricting SQL statements 42, 48, 49
retrieve (F9) function key 23, 28
retrieve previous (F6) function key 25
right (F20) function key 73, 140, 167
RIGHT edit command 71
ROLLBACK statement 49, 51, 146, 179
rows 2
adding 149, 155, 188
changing 157, 160, 196
copying 163, 192
deleting 157, 161, 201
displaying 162, 190
displaying the definition 157, 188
finding 158, 196
finding all rows 157, 158, 190
printing 168
rulessystem name generation 19
table name generation 20
274 Query Manager Use V6R1M0
run options 36, 136
displaying query output 140
file for output 139
i5/OS output queue 139
output destination 139
printer for output 139
query 139
report form 139
run query mode 138
run sample only 138
table for output 139
use active data 139
run query display 136
run query modebatch 35, 138
changing the mode 35, 138
interactive 35, 138
run report (F5) function key 23, 55, 64,
107, 109, 129, 135
run sample (F6) function key 23, 55, 64,
135
RUN statement 10, 35, 65, 135, 251
running query againstnon-i5/OS 142
remote databases 142
runtime defaults 111
runtime prompts 66
RUWremote unit of work 173
Ssample active data 8
sample queries 64, 138
allow run 36
number of rows 9, 36
sample reports 23, 64, 138
allow run 36
displaying 109
number of rows 9, 36
SAVE DATA AS statement 253
SAVE FORM AS statement 100, 254
SAVE QUERY AS statement 77, 100, 256
saving a query definition 100
saving a report form definition 100
searching for table rows 158
AND, OR, (, ) 158, 196
changing conditions 161, 162
grouping conditions 158, 196
if no rows are found 160
lowercase letters 158
null values 158
selecting all rows 158, 190
specifying conditions 158, 196
test conditions 158, 196
security administrator*OBJMGMT rights 17, 31, 45
*READ rights 17, 31, 45
*SECADM authority 17, 31, 45
tasks 31, 45, 145, 259
select all (F21) function key 23, 55, 78,
107, 129, 217
SELECT statement 4, 8, 63, 74, 78, 105,
111
selecting allowed SQL statements 42, 48,
49, 259
selecting columns in a prompted
query 87, 207
selecting rows for a prompted query 89,
208
selecting summary functions for a
prompted query 95
selectionrecord 262
selection prompt 14
Selection prompt 17
sequencing columns in a prompted
query 87, 207
sequencing columns in a report form 6,
111
SET CONNECTION statement 257
examples 258
SET TRANSACTIONconsiderations 179
shift-out/shift-in characters 156
show query sort sequence options 41
SMALLINT data type 152
sort row data 6
sort sequenceexamples 261
show options 41
usages 261
sort sequence (F18) function key 73
sorting 261
sorting columns in a prompted
query 94, 210
specify sort sequence 98
specifying duplicate rows in a prompted
query 97
specifying join conditions for a prompted
query 82
specifying report formatting for a
prompted query 99
specifying tables for a prompted
query 80, 206
split (F21) function key 140, 167
split line (F15) function key. 23
SQL 10, 51
SQL queries 4, 41, 51, 63, 68
SQL query editorallowed SQL statements 76
changing a query 102
checking syntax 64, 73
columns displayed 71
comments 68
defining a report form 77
edit commands 71
function keys 73
line commands 72
QM statements 77
running the query 64
saving the query 100
SQL prompting 74
testing the query 64
SQL statement 68
square brackets [ ] 155, 188
starting DB2 Query Manager 13
STRQM command 13, 45
subqueries 63, 74, 77
SUM column usage 111
SUM summary function 95
summary functions in a prompted
query 95
syntax checking 64
syntax diagramCONNECT 237
DISCONNECT 238
DISPLAY 239
DRAW 241
ERASE 242
example 235, 236
EXPORT 243
IMPORT 246
PRINT FORM 249
PRINT REPORT 249
RELEASE 251
RUN 252
SAVE DATA AS 254
SAVE FORM AS 255
SAVE QUERY AS 256
SET CONNECTION 257
system column names displayed 42
system command (F21) function key 23,
28
system commands 28
system name generationrules 19
system-column-name 19
Ttable identifiers in a prompted query 80
table name generationrules 20
table to use for output 39, 139
tablesadding data 149, 155, 188
changing data 157, 160, 196, 201
changing the collection 146, 148
changing the definition 163, 194
changing the library 146, 148
column names 149
columns 149, 151
copying 163, 192
created outside Query Manager 145
creating 149, 182, 186
data types 152
definition 2, 145
deleting 166, 203
deleting data 157, 161, 201
denied access 14, 16, 41, 145
displaying a report 167, 190
displaying data 162
displaying table rows 167
displaying the definition 155, 157,
170, 188, 202
finding data 158, 196
options 146
printing rows 168
remote database connection 146
renaming 169
saving 149
saving changes to data 161
saving data 155
security of information 145
work with display 16, 146
test operators for specifying rows in a
prompted query 92
TIME data type 111, 152
format considerations 102, 141
Index 275

TIME data type (continued)separator 111
TIMESTAMP data type 111, 152
TOP edit command 71
UUCS2-graphic data
VARCHAR function 87
VARGRAPHIC function 87
unit of workdistributed 173
remote 173
usagesort sequence 261
user access levelall 32, 35, 44
basic 33, 35, 43
using Query Manager displays 17
VVARCHAR data type 152, 154, 156
VARCHAR function 87
VARGRAPHIC data type 152, 156
VARGRAPHIC functionUCS2-graphic data 87
variable prompting with CL 66
variables in report forms 117, 120, 122
variables in SQL queries 60, 66, 68, 141
WWHERE clause 89, 102, 208
window, display entire name 26
work with displays 18
creating a new object 18
specifying multiple options 20
specifying multiple tasks 202
specifying one option 18
work with QM profiles 17, 45
work with queries 14, 52
work with report forms 15, 106
work with tables 16, 146
276 Query Manager Use V6R1M0

Readers’ Comments — We’d Like to Hear from You
System i
Query Manager Use
Version 6 Release 1
Publication No. SC41-5212-07
We appreciate your comments about this publication. Please comment on specific errors or omissions, accuracy,
organization, subject matter, or completeness of this book. The comments you send should pertain to only the
information in this manual or product and the way in which the information is presented.
For technical questions and information about products and prices, please contact your IBM branch office, your
IBM business partner, or your authorized remarketer.
When you send comments to IBM, you grant IBM a nonexclusive right to use or distribute your comments in any
way it believes appropriate without incurring any obligation to you. IBM or any other organizations will only use
the personal information that you supply to contact you about the issues that you state on this form.
Comments:
Thank you for your support.
Submit your comments using one of these channels:
v Send your comments to the address on the reverse side of this form.
v Send a fax to the following number: United States and Canada: 1-800-937-3430Other countries: 1-507-253-5192
v Send your comments via e-mail to: [email protected]
If you would like a response from IBM, please fill in the following information:
Name
Address
Company or Organization
Phone No. E-mail address

Readers’ Comments — We’d Like to Hear from You SC41-5212-07
SC41-5212-07
����
Cut or FoldAlong Line
Cut or FoldAlong Line
Fold and Tape Please do not staple Fold and Tape
Fold and Tape Please do not staple Fold and Tape
NO POSTAGENECESSARYIF MAILED IN THEUNITED STATES
BUSINESS REPLY MAIL FIRST-CLASS MAIL PERMIT NO. 40 ARMONK, NEW YORK
POSTAGE WILL BE PAID BY ADDRESSEE
IBM CORPORATION
ATTN DEPT 542 IDCLERK
3605 HWY 52 N
ROCHESTER MN 55901-7829
_ _ _ _ _ _ _ _ _ _ _ _ _ _ _ _ _ _ _ _ _ _ _ _ _ _ _ _ _ _ _ _ _ _ _ _ _ _ _ _ _ _ _ _ _ _ _ _ _ _ _ _ _ _ _ _ _ _ _ _ _ _ _ _ _ _ _ _ _ _ _ _ _ _ _ _ _ _ _ _ _ _ _ _ _ _ _ _ _
_ _ _ _ _ _ _ _ _ _ _ _ _ _ _ _ _ _ _ _ _ _ _ _ _ _ _ _ _ _ _ _ _ _ _ _ _ _ _ _ _ _ _ _ _ _ _ _ _ _ _ _ _ _ _ _ _ _ _ _ _ _ _ _ _ _ _ _ _ _ _ _ _ _ _ _ _ _ _ _ _ _ _ _ _ _ _ _ _
__
__
__
__
__
__
__
__
__
__
__
__
__
__
__
__
__
__
__
__
__
__
__
__
__
__
__
__
__
__
__
__
__
__
__
__
__
__
__
__
__
__
__
__
__
__
__
__
__
_


����
Printed in USA
SC41-5212-07


![Resource Management and Query Optimization in the Cloud · Centralized Resource Management [YARN, Mesos, Omega, Borg] Node Manager Node Manager Node Manager • •](https://static.fdocuments.net/doc/165x107/5e9bd5e04173cb1b83218738/resource-management-and-query-optimization-in-the-cloud-centralized-resource-management.jpg)