QTP Basics
907
Transcript of QTP Basics


QuickTest ProfessionalUser’s Guide
Version 6.5

QuickTest Professional User’s Guide, Version 6.5
This manual, and the accompanying software and other documentation, is protected by U.S. and international copyright laws, and may be used only in accordance with the accompanying license agreement. Features of the software, and of other products and services of Mercury Interactive Corporation, may be covered by one or more of the following patents: U.S. Patent Nos. 5,701,139; 5,657,438; 5,511,185; 5,870,559; 5,958,008; 5,974,572; 6,138,157; 6,144,962; 6,205,122; 6,237,006; 6,341,310; 6,360,332, 6,449,739; 6,470,383; 6,477,483; 6,549,944; 6,560,564; and 6,564,342. Other patents pending. All rights reserved.
ActiveTest, ActiveTune, Astra, FastTrack, Global SiteReliance, LoadRunner, Mercury Interactive, the Mercury Interactive logo, Open Test Architecture, Optane, POPs on Demand, ProTune, QuickTest, RapidTest, SiteReliance, SiteRunner, SiteScope, SiteSeer, TestCenter, TestDirector, TestSuite, Topaz, Topaz AIMS, Topaz Business Process Monitor, Topaz Client Monitor, Topaz Console, Topaz Delta, Topaz Diagnostics, Topaz Global Monitor, Topaz Managed Services, Topaz Open DataSource, Topaz Real User Monitor, Topaz WeatherMap, TurboLoad, Twinlook, Visual Testing, Visual Web Display, WebTest, WebTrace, WinRunner and XRunner are trademarks or registered trademarks of Mercury Interactive Corporation or its wholly owned subsidiary Mercury Interactive (Israel) Ltd. in the United States and/or other countries.
All other company, brand and product names are registered trademarks or trademarks of their respective holders. Mercury Interactive Corporation disclaims any responsibility for specifying which marks are owned by which companies or which organizations.
Mercury Interactive Corporation1325 Borregas AvenueSunnyvale, CA 94089 USATel: (408) 822-5200Toll Free: (800) TEST-911, (866) TOPAZ-4UFax: (408) 822-5300
© 2003 Mercury Interactive Corporation, All rights reserved
If you have any comments or suggestions regarding this document, please send them via e-mail to [email protected].
QTPUG6.5/01

iii
Table of Contents
Welcome to QuickTest ...................................................................... xiiiUsing This Guide ............................................................................... xiiiQuickTest Documentation Set ............................................................xvOnline Resources .................................................................................xvTypographical Conventions............................................................ xviii
PART I: STARTING THE TESTING PROCESS
Chapter 1: Introduction ........................................................................3Testing with QuickTest..........................................................................3Understanding the Testing Process .......................................................4Programming in the Expert View..........................................................7Managing the Testing Process ...............................................................7Using the Sample Sites ..........................................................................8Modifying License Information ............................................................8
Chapter 2: QuickTest at a Glance..........................................................9Starting QuickTest ...............................................................................10The QuickTest Window.......................................................................12Test Pane..............................................................................................14Test Details Pane (Active Screen) ........................................................17Data Table............................................................................................17Debug Viewer Pane..............................................................................18Using QuickTest Commands...............................................................18Browsing the QuickTest Professional Program Folder ........................28
PART II : WORKING WITH TEST OBJECTS
Chapter 3: Understanding the Test Object Model .............................33About Understanding the Test Object Model .....................................33Applying the Test Object Model Concept...........................................37Viewing Object Properties Using the Object Spy................................42Viewing Object Methods and Method Syntax Using the
Object Spy........................................................................................45

QuickTest Professional User’s Guide
iv
Chapter 4: Managing Test Objects ....................................................49About Managing Test Objects .............................................................50Understanding the Object Repository Dialog Box..............................51Understanding the Object Properties Dialog Box...............................58Modifying Test Object Properties While Designing Your Test ...........62Working with Test Objects During a Test Run ...................................68Modifying Object Descriptions ...........................................................70Adding Objects to the Object Repository ...........................................76Deleting an Object from the Object Repository .................................82
PART III : CREATING TESTS
Chapter 5: Designing Tests .................................................................87About Creating Tests ...........................................................................87Planning a Test ....................................................................................89Recording a Test ..................................................................................90Understanding Your Test ....................................................................94Choosing Your Recording Mode.........................................................96Changing the Active Screen ..............................................................102Managing a Test ................................................................................103Creating, Opening, and Saving Tests with Locked Resources ..........107
Chapter 6: Enhancing Your Test .......................................................113About Enhancing Your Test ..............................................................113Synchronizing Your Test ...................................................................114Measuring Transactions ....................................................................119
Chapter 7: Understanding Checkpoints ...........................................123About Checkpoints............................................................................123Adding Checkpoints to a Test ...........................................................124Understanding Types of Checkpoints...............................................125
Chapter 8: Checking Object Property Values ...................................131About Checking Object Properties....................................................131Creating Standard Checkpoints .......................................................132Understanding the Checkpoint Properties Dialog Box ....................135Understanding the Image Checkpoint Properties Dialog Box..........141Modifying Checkpoints.....................................................................145

Table of Contents
v
Chapter 9: Checking Tables and Databases .....................................147About Checking Tables and Databases .............................................147Creating a Table Checkpoint.............................................................148Creating a Check on a Database .......................................................149Understanding the Table/Database Checkpoint Properties
Dialog Box ......................................................................................154Modifying a Table Checkpoint .........................................................163Modifying a Database Checkpoint....................................................163
Chapter 10: Checking Text................................................................165About Checking Text.........................................................................165Creating a Text Checkpoint ..............................................................167Creating a Standard Checkpoint for Checking Text.........................169Creating a Text Area Checkpoint......................................................171Understanding the Text/Text Area Checkpoint Properties
Dialog Box ......................................................................................174Modifying a Text or Text Area Checkpoint ......................................187
Chapter 11: Checking Bitmaps..........................................................189About Checking Bitmaps...................................................................189Checking a Bitmap ............................................................................190Modifying a Bitmap Checkpoint.......................................................197
Chapter 12: Checking XML ...............................................................199About Checking XML........................................................................199Creating XML Checkpoints...............................................................201Modifying XML Checkpoints............................................................220Reviewing XML Checkpoint Results .................................................220Using XML Objects and Methods to Enhance Your Test .................220
Chapter 13: Parameterizing Tests ....................................................221About Parameterizing Tests ...............................................................221Parameterizing Your Test Manually ..................................................222Understanding Parameter Types .......................................................226Using the Data Driver to Parameterize Your Test .............................243Example of a Parameterized Test.......................................................249

QuickTest Professional User’s Guide
vi
Chapter 14: Creating Output Values ...............................................255About Creating Output Values..........................................................255Creating Page Output Values ............................................................259Creating Text Output Values ............................................................265Creating Standard Output Values .....................................................276Creating Image Output Values..........................................................282Creating XML Output Values............................................................287Creating Table Output Values...........................................................293Creating Database Output Values .....................................................298
Chapter 15: Using Regular Expressions ............................................299About Regular Expressions ................................................................299Using Regular Expressions for Object Property Values.....................300Using Regular Expressions in Standard Checkpoints .......................305Using Regular Expressions in Text Checkpoints...............................308Understanding and Using Regular Expression Syntax......................310
Chapter 16: Learning Virtual Objects ...............................................319About Learning Virtual Objects ........................................................319Understanding Virtual Objects .........................................................320Defining a Virtual Object ..................................................................321Removing a Virtual Object................................................................326
Chapter 17: Working with Actions ...................................................329About Working with Actions ............................................................330Using Multiple Actions in a Test.......................................................331Using Global and Action Data Sheets ...............................................332Using the Action Toolbar ..................................................................334Creating New Actions........................................................................335Inserting Existing Actions .................................................................337Nesting Actions .................................................................................345Splitting Actions................................................................................346Setting Action Properties...................................................................348Sharing Action Information..............................................................356Exiting an Action ..............................................................................358Removing Actions from a Test ..........................................................359Renaming Actions .............................................................................363Creating an Action Template ............................................................364Guidelines for Working with Actions ..............................................365

Table of Contents
vii
Chapter 18: Working with Data Tables ............................................367About Working with Data Tables......................................................367Working with Global and Action Sheets ..........................................368Editing and Saving the Data Table....................................................370Importing Data from a Database.......................................................379Using Formulas in the Data Table.....................................................383Using Data Table Scripting Methods.................................................387
Chapter 19: Defining and Using Recovery Scenarios .......................389About Defining and Using Recovery Scenarios.................................389Defining Recovery Scenarios .............................................................391Understanding the Recovery Scenario Wizard .................................393Managing Recovery Scenarios ...........................................................415Setting the Recovery Scenarios List for Your Tests............................418Programatically Controlling the Recovery Mechanism....................424
PART IV: WORKING WITH SUPPORTED ENVIRONMENTS
Chapter 20: Working with QuickTest Add-Ins ..................................427About Working with QuickTest Add-ins...........................................427Loading QuickTest Add-ins ...............................................................428Tips for Working with QuickTest Add-ins ........................................430
Chapter 21: Testing Web Objects .....................................................433About Testing Web Objects...............................................................433Working with Web Browsers.............................................................435Checking Web Objects ......................................................................437Checking Web Pages .........................................................................439Setting Alternative Navigation Properties.........................................455Checking Web Content Accessibility................................................457Accessing Password-Protected Resources in the Active Screen .........462Activating Methods Associated with a Web Object..........................467Using Scripting Methods with Web Objects .....................................468
Chapter 22: Testing Visual Basic Applications ..................................469About Testing Visual Basic Applications...........................................469Recording and Running Tests on Visual Basic Applications.............470Checking Visual Basic Objects ..........................................................472Using Visual Basic Objects and Methods to Enhance Your Test ......473
Chapter 23: Testing Multimedia Applications ..................................475About Testing Multimedia Applications ...........................................475Working with Macromedia Flash Controls.......................................476Working with RealPlayer and Windows MediaPlayer
Applications and Controls .............................................................478

QuickTest Professional User’s Guide
viii
Chapter 24: Testing ActiveX Controls ..............................................483About Testing ActiveX Controls .......................................................483Recording and Running Tests on ActiveX Controls .........................485Checking ActiveX Controls...............................................................487Activating an ActiveX Control Method............................................489Using Scripting Methods with ActiveX Controls..............................489
PART V: RUNNING AND DEBUGGING TESTS
Chapter 25: Running Tests ...............................................................493About Running Tests .........................................................................493Running a Test to Check Your Application ......................................494Running a Test or Action from a Selected Step.................................497Updating a Test .................................................................................498Using Optional Steps.........................................................................506Running a Test Batch ........................................................................508
Chapter 26: Debugging Tests ...........................................................511About Debugging Tests .....................................................................511Using the Step Commands................................................................512Pausing Test Runs..............................................................................514Setting Breakpoints............................................................................514Removing Breakpoints ......................................................................515Using the Debug Viewer....................................................................516Handling Run Errors..........................................................................518Practicing Debugging a Test ..............................................................519
Chapter 27: Analyzing Test Results .................................................521About Analyzing Test Results ............................................................521Understanding the Test Results Window..........................................523Viewing the Results of a Test Run.....................................................526Viewing Checkpoint Results .............................................................533Viewing Output Value Results ..........................................................558Analyzing Smart Identification Information in the Test Results......565Deleting Test Results .........................................................................569Submitting Defects Detected During a Test Run ..............................576Viewing WinRunner Test Steps in the Test Results ..........................582

Table of Contents
ix
PART VI: CONFIGURING QUICKTEST
Chapter 28: Setting Global Testing Options ....................................587About Setting Global Testing Options ..............................................587Using the Options Dialog Box ..........................................................588Setting General Testing Options .......................................................589Setting Folder Testing Options..........................................................591Setting Active Screen Options ...........................................................594Setting Run Testing Options .............................................................602Setting Windows Application Testing Options ................................604Setting Web Testing Options ............................................................608
Chapter 29: Setting Testing Options for a Single Test.....................619About Setting Testing Options for a Single Test ...............................619Using the Test Settings Dialog Box ...................................................620Defining Properties for Your Test......................................................621Defining Run Settings for Your Test .................................................624Defining Resource Settings for Your Test..........................................629Defining Environment Settings for Your Test ..................................632Defining Web Settings for Your Test.................................................638Defining Recovery Scenario Settings for Your Test...........................640
Chapter 30: Setting Record and Run Options ..................................643About Setting Record and Run Options............................................643Using the Record and Run Settings Dialog Box................................644Setting Web Record and Run Options ..............................................646Setting Windows Applications Record and Run Options .................648Using Environment Variables to Specify the Application
Details for Your Test .......................................................................651
Chapter 31: Customizing the Expert View .......................................655About Customizing Your Test in the Expert View............................655Setting Display Options.....................................................................656Personalizing Editing Commands.....................................................661
Chapter 32: Setting Testing Options During the Test Run ..............665About Setting Testing Options from a Test Script ............................665Setting Testing Options.....................................................................666Retrieving Testing Options................................................................668Controlling the Test Run...................................................................669Adding and Removing Run-Time Settings........................................670

QuickTest Professional User’s Guide
x
PART VII: ADVANCED FEATURES
Chapter 33: Configuring Object Identification ................................673About Configuring Object Identification .........................................673Understanding the Object Identification Dialog Box.......................675Configuring Smart Identification......................................................683Mapping User-Defined Test Object Classes ......................................692
Chapter 34: Choosing the Object Repository Mode ........................695About Choosing the Object Repository Mode ..................................695Deciding Which Object Repository Mode to Choose.......................697Setting the Object Repository Mode .................................................709
Chapter 35: Configuring Web Event Recording ...............................715About Configuring Web Event Recording ........................................715Selecting a Standard Event Recording Configuration.......................716Customizing the Event Recording Configuration ............................718Saving and Loading Custom Event Configuration Files...................729Resetting Event Recording Configuration Settings...........................730
Chapter 36: Enhancing Your Tests with Programming Statements 731About Enhancing Your Tests with Programming .............................731Inserting Methods Using the Method Wizard ..................................733Using Conditional Statements ..........................................................745Generating ‘With’ Statements for Your Test.....................................749Sending Messages to Your Test Results .............................................754Adding Comments ............................................................................755
Chapter 37: Testing in the Expert View............................................757About Testing in the Expert View .....................................................758Programming in VBScript .................................................................758Understanding the Expert View........................................................759Programming in the Expert View......................................................764Using Programmatic Descriptions.....................................................769Running and Closing Applications Programmatically .....................776Enhancing Tests with Comments, Control-Flow, and Other
VBScript Statements ......................................................................777Retrieving and Setting Test Object Property Values .........................784Accessing Run-Time Object Properties and Methods .......................785Running DOS Commands.................................................................788Choosing Which Steps to Report During the Test Run ....................788

Table of Contents
xi
Chapter 38: Working with User-Defined Functions .........................791About Working with User-Defined Functions ..................................791Working with Associated Library Files..............................................792Executing Externally-Defined Functions from Your Test .................793Using User-Defined Test Object Methods .........................................795
Chapter 39: Automating QuickTest Operations ...............................801About Automating QuickTest Operations ........................................802Deciding When to Use QuickTest Automation Programs ................803Choosing a Language and Development Environment for
Designing and Running Automation Programs.............................804Learning the Basic Elements of a QuickTest Automation Program..806Generating Automation Scripts.........................................................807Using the QuickTest Automation Object Model Reference..............808
PART VIII : WORKING WITH OTHERMERCURY INTERACTIVE PRODUCTS
Chapter 40: Working with WinRunner .............................................811About Working with WinRunner .....................................................811Calling WinRunner Tests ..................................................................812Calling WinRunner Functions ..........................................................816
Chapter 41: Working with TestDirector ...........................................823About Working with TestDirector.....................................................823Connecting to and Disconnecting from TestDirector ......................825Saving Tests to a TestDirector Project ...............................................830Opening Tests from a TestDirector Project .......................................831Running a Test Stored in a TestDirector Project ...............................835Managing Test Versions in QuickTest...............................................837Setting Preferences for TestDirector Test Runs..................................846
Chapter 42: Working with Load Testing and Performance Monitoring Products ......................................................................851
About Working with Load Testing and PerformanceMonitoring Products ......................................................................852
Using QuickTest’s Load/Performance Management Features...........852Designing QuickTest Tests for Use with LoadRunner or the
Topaz Business Process Monitor.....................................................854Inserting and Running Tests in LoadRunner or Topaz.....................855

QuickTest Professional User’s Guide
xii
PART IX: APPENDIX
Appendix A: Working with QuickTest—Frequently Asked Questions ..............................................................................859Recording and Running Tests ...........................................................859Programming in the Expert View......................................................860Working with Dynamic Content ......................................................861Advanced Web Issues ........................................................................862Test Maintenance ..............................................................................863Testing Localized Applications..........................................................865Improving QuickTest Performance ...................................................866
Index ..................................................................................................871

xiii
Welcome to QuickTest
Welcome to QuickTest, Mercury Interactive’s functional enterprise testing tool. QuickTest provides everything you need to quickly create and run tests.
Using This Guide
This guide describes how to use QuickTest to test your applications. It provides step-by-step instructions to help you create, debug, and run tests, and report defects detected during the testing process.
It contains 8 parts:
Part I Starting the Testing Process
Provides an overview of QuickTest and the main stages of the testing process.
Part II Working with Test Objects
Explains how QuickTest identifies objects in your application and how to work with the object repository.
Part III Creating Tests
Describes how to create tests, insert checkpoints, parameters, and output values, use regular expressions, work with actions, and handle unexpected events that occur during a test run.

QuickTest Professional User’s Guide
xiv
Part IV Working with Supported Environments
Explains how to work with QuickTest core add-ins, and includes environment-specific information for testing Web sites, ActiveX controls, Visual Basic applications, and multimedia applications.
Part V Running and Debugging Tests
Describes how to run tests, analyze test results, and control test runs to identify and isolate bugs in test scripts.
Part VI Configuring QuickTest
Describes how to modify QuickTest settings to match your testing needs.
Part VII Advanced Features
Describes how to choose an object repository mode, configure object identification and create Smart Identification definitions, and enhance your test in Expert View mode. It also introduces several programming techniques to create a more powerful test. This section is recommended for advanced QuickTest users.
Part VIII Working with Other Mercury Interactive Products
Describes how you can run tests and call functions in compiled modules from WinRunner, Mercury Interactive’s enterprise functional testing tool for Microsoft Windows applications. This section also describes how QuickTest interacts with TestDirector, Mercury Interactive’s test management tool, and details considerations for designing QuickTest tests for use with Mercury Interactive’s load testing and application performance monitoring products.
Appendix
Provides information on frequently asked questions.

Welcome to QuickTest
xv
QuickTest Documentation Set
In addition to this user’s guide, QuickTest Professional comes with the following printed documentation:
QuickTest Professional Installation Guide explains how to install QuickTest Professional.
QuickTest Professional Tutorial teaches you basic QuickTest skills and shows you how to design tests for your applications.
QuickTest Professional Object Model Reference provides access to the QuickTest Professional VBScript methods, including a description of each object, a list of the methods associated with each object, description, syntax, and an example of usage for each object and method.
QuickTest Professional Shortcut Key Reference Card provides a list of commands that you can execute using shortcut keys.
Online Resources
QuickTest Professional includes the following online resources:
ReadMe (available from the QuickTest Professional Start menu program folder) provides the latest news and information about QuickTest Professional.
What’s New in QuickTest Professional (available from Help > What’s New in QuickTest) describes the newest features, enhancements, and supported environments in this latest version of QuickTest Professional.
QuickTest Professional Tutorial (available from the QuickTest Professional Welcome window, the Help menu, and the QuickTest Professional Start menu program folder) teaches you basic QuickTest skills and shows you how to start designing tests for your applications.

QuickTest Professional User’s Guide
xvi
QuickTest Professional Context-Sensitive Help (available from dialog boxes and windows) describes QuickTest dialog boxes and windows.
QuickTest Professional User’s Guide (available from Help > QuickTest Professional Help) provides step-by-step instructions for using QuickTest Professional to test your applications.
QuickTest Professional Object Model Reference (available from Help > QuickTest Professional Help) describes QuickTest Professional test objects, lists the methods and properties associated with each object, and provides syntax information and examples for the methods.
QuickTest Professional Automation Object Model Reference (available from the QuickTest Professional Start menu program folder and from Help > QuickTest Automation Object Model Reference) provides syntax, descriptive information, and examples for the automation objects, methods, and properties. It also contains a detailed overview to help you get started writing QuickTest automation scripts. The automation object model assists you in automating test management, by providing objects, methods and properties that enable you to control virtually every QuickTest feature and capability.
Microsoft VBScript Reference (available from Help > QuickTest Professional Help) includes Microsoft’s VBScript User's Guide and VBScript Language Reference.
Mercury Tours sample Web site (available from the QuickTest Professional Start menu program folder and also available from the QuickTest Professional Record and Run Settings dialog box) and the Mercury Tours Windows sample flight application (available from the QuickTest Professional Start menu program folder) are the basis for many examples in this book. The URL for the Web site is http://newtours.mercuryinteractive.com.
Technical Support Online (available from Help >Technical Support Online) uses your default Web browser to open Mercury Interactive’s Customer Support Web site. This site enables you to browse the knowledge base and add your own articles, post to and search user discussion forums, submit support requests, download patches and updated documentation, and more. The URL for this Web site is http://support.mercuryinteractive.com.

Welcome to QuickTest
xvii
Support Information (available from Help >Support Information) presents Mercury Interactive’s Web site and Customer Support site, information on user discussion forums, and links to information on Mercury Interactive’s worldwide offices.
Mercury Interactive on the Web (available from Help > Mercury Interactive on the Web) uses your default Web browser to open Mercury Interactive’s home page. This site provides you with the most up-to-date information on Mercury Interactive and its products. This includes new software releases, seminars and trade shows, customer support, educational services, and more. The URL for this Web site is http://www.mercuryinteractive.com.

QuickTest Professional User’s Guide
xviii
Typographical Conventions
This book uses the following typographical conventions:
1, 2, 3 Bold numbers indicate steps in a procedure.
Bullets indicate options and features.
> The greater than sign separates menu levels (for example, File > Open).
Stone Sans The Stone Sans font indicates names of interface elements (for example, the Run button) and other items that require emphasis.
Bold Bold text indicates method or function names.
Italics Italic text indicates method or function arguments, file names in syntax descriptions, and book titles.
<> Angle brackets enclose a part of a file path or URL address that may vary from user to user (for example, <MyProduct installation folder>\bin).
Arial The Arial font is used for examples and text that is to be typed literally.
Arial bold The Arial bold font is used in syntax descriptions for text that should be typed literally.
... In a line of syntax, an ellipsis indicates that more items of the same format may be included. In a programming example, an ellipsis is used to indicate lines of a program that were intentionally omitted.
[ ] Square brackets enclose optional arguments.
| A vertical bar indicates that one of the options separated by the bar should be selected.

Part I
Starting the Testing Process

2

3
1Introduction
Welcome to QuickTestProfessional, Mercury Interactive’s functional enterprise testing tool.
QuickTest Professional enables you to test standard Windows applications, Web objects, ActiveX controls, Visual Basic applications, and multimedia objects on Web pages. You can also acquire additional QuickTest add-ins for a number of special environments (such as Java, Oracle, SAP solutions, .NET Windows and Web Forms, Siebel, PeopleSoft, Web services, and terminal emulator applications).
This introductory section provides you with an overview of the following QuickTest features and testing procedures:
Testing with QuickTest
Understanding the Testing Process
Programming in the Expert View
Managing the Testing Process
Using the Sample Sites
Modifying License Information
Testing with QuickTest
QuickTest facilitates creating tests on your application by recording operations as you perform them. As you navigate through your site or application, QuickTest records each step you perform and generates a test that graphically displays these steps in an icon-based test tree.

QuickTest Professional User’s Guide • Starting the Testing Process
4
For example, clicking a link, selecting a check box, or submitting a form are all recorded in your test.
Once you have recorded a test, you can instruct QuickTest to check the properties of specific objects in your application or site. For example, you can instruct QuickTest to check that a specific text string is displayed in a particular location on a dialog box, or you can check that a hypertext link on your Web page goes to the correct URL address.
You can further enhance your test by adding and modifying steps in the test tree. When you run the test, QuickTest performs each step in your test. After you run your test, you can view a report detailing which steps in your test succeeded or failed.
A test is composed of actions. The steps you add to the test are included within the test’s actions. Note that by default, each test begins with a single action. You can divide your test into multiple actions to organize your test. Most of the chapters in this guide provide information on how to work within a single action. For information on when and how to work with multiple actions in a test, see Chapter 17, “Working with Actions.”
Understanding the Testing Process
Testing with QuickTest involves 3 main stages:

Chapter 1 • Introduction
5
Creating Tests
You create a test by recording a session on your site or application and then modifying your test with special testing options and/or with programming statements.
To create a test:
Record a session on your application or site.
As you navigate through your application or site, QuickTest graphically displays each step you perform in the form of a collapsible, icon-based test tree. A step is something that causes or makes a change in your site or application, such as clicking a link or image, or submitting a data form. For more information, see Chapter 5, “Designing Tests.”
Insert checkpoints into your test.
A checkpoint checks specific values or characteristics of a page, object, or text string and enables you to identify whether or not your Web site or application is functioning correctly. For more information, see Chapter 7, “Understanding Checkpoints.”
Broaden the scope of your test by replacing fixed values with parameters.
When you test your site or application, you can parameterize your test to check how your application performs the same operations with different data. You may supply data in the Data Table, define environment variables and values, or have QuickTest generate random numbers or current user and test data. When you parameterize your test, QuickTest substitutes the fixed values in your test with parameters. When you use Data Table parameters, QuickTest uses the values from a different row in the Data Table for each iteration of the test or action. Each test run or action that uses a different set of parameterized data is called an iteration. For more information, see Chapter 13, “Parameterizing Tests.”
You can also use output values to extract data from your test. An output value is a value retrieved during the test run and entered into your Data Table. You can subsequently use this output value as input data in your test. This enables you to use data retrieved during a test in other parts of the test. For more information, see Chapter 14, “Creating Output Values.”

QuickTest Professional User’s Guide • Starting the Testing Process
6
Use the many functional testing features included in QuickTest to enhance your test and/or add programming statements to achieve more complex testing goals.
Running Tests
After you create your test, you run it.
Run your test to check your site or application.
The test runs from the first line in your test and stops at the end of the test. While running, QuickTest connects to your Web site or application and performs each operation in your test, checking any text strings, objects, or tables you specified. If you parameterized your test with Data Table parameters, QuickTest repeats the test (or specific actions in your test) for each set of data values you defined. For more information, see Chapter 25, “Running Tests.”
Run a test to debug your test.
You can control your test run to help you identify and eliminate defects in your test. You can use the Step Into, Step Over, and Step Out commands to run your test step by step. You can also set breakpoints to pause your test at pre-determined points. You can view the value of variables in your test each time the test stops at a breakpoint in the Debug Viewer. For more information, see Chapter 26, “Debugging Tests.”
Analyzing Test Results
After you run your test, you can view the test results.
View the test results in the Test Results window.
After you run your test, you can view the results of your test in the Test Results window. You can view a summary of your test results as well as a detailed report. For more information, see Chapter 27, “Analyzing Test Results.”

Chapter 1 • Introduction
7
Report defects detected during a test run.
If you have TestDirector installed, you can report the defects you discover to a database. You can instruct QuickTest to automatically report each failed step in your test, or you can report them manually from the Test Results window. TestDirector is Mercury Interactive’s test management tool. For more information, see Chapter 41, “Working with TestDirector.”
Programming in the Expert View
You can use the Expert View tab to view a text-based version of your test. The test script is composed of VBScript statements (Microsoft’s Visual Basic Scripting language) that correspond to the steps and checks displayed in your test tree. For more information, see Chapter 37, “Testing in the Expert View.”
For more information on the test objects and methods available for use in your test and how to program using VBScript, refer to the QuickTest Object Model Reference and the Microsoft VBScript Reference (choose Help > QuickTest Professional Help).
Managing the Testing Process
QuickTest works with TestDirector, Mercury Interactive’s test management tool. You can use TestDirector to create a project (central repository) of manual and automated tests, build test cycles, run tests, and report and track defects. You can also create reports and graphs to help you review the progress of test planning, test runs, and defect tracking before a software release.
When you work in QuickTest, you can create and save tests directly to your TestDirector project. You can also run QuickTest tests from TestDirector and then use TestDirector to review and manage the results. For more information, see Chapter 41, “Working with TestDirector.”

QuickTest Professional User’s Guide • Starting the Testing Process
8
Using the Sample Sites
Many examples in this guide use the Mercury Tours sample Web site. The URL for this Web site is: http://newtours.mercuryinteractive.com.
Note that you must register a user name and password to use this site.
You can also use the Mercury Tours sample Windows application available from the QuickTest Professional Start menu program folder.
Modifying License Information
After you install QuickTest, you are prompted to install your license code. You can modify your license at any time to change your license type. You can request a new license on Mercury Interactive’s Customer Support Web site. The URL for the License Request Web site is http://support.mercuryinteractive.com/license.
If you purchase one or more external add-ins, you need to install an add-in license. For more information, refer to your add-in documentation.
To modify the license information, refer to the QuickTest Professional Installation Guide.

9
2QuickTest at a Glance
This chapter explains how to start QuickTest and introduces the QuickTest window.
This chapter describes:
Starting QuickTest
The QuickTest Window
Test Pane
Test Details Pane (Active Screen)
Data Table
Debug Viewer Pane
Using QuickTest Commands
Browsing the QuickTest Professional Program Folder

QuickTest Professional User’s Guide • Starting the Testing Process
10
Starting QuickTest
To start QuickTest, choose Programs > QuickTest Professional > QuickTest Professional in the Start menu.
The first time you start QuickTest, the Add-in Manager dialog box opens.
If you do not want this dialog box to open the next time you start QuickTest, clear the Show on startup check box.
For more information about loading add-ins, see “Loading QuickTest Add-ins” on page 428.

Chapter 2 • QuickTest at a Glance
11
Click OK. The Welcome to QuickTest window opens. You can choose to open the QuickTest tutorial, start recording a new test, open an existing test, or close the welcome window to begin working in a new test.
Tips: You can press the ESC key to close the window and open a blank test.You can click Tip of the Day to browse through all the available tips.If you do not want this window to be displayed the next time you start QuickTest, clear the Show this screen on startup check box.

QuickTest Professional User’s Guide • Starting the Testing Process
12
The QuickTest Window
The QuickTest window contains the following key elements:
QuickTest title bar—Displays the name of the currently open test.
Menu bar—Displays menus of QuickTest commands.
File toolbar—Contains buttons to assist you in managing your test.
Test toolbar—Contains buttons to assist you in the testing process.
Debug toolbar—Contains buttons to assist you in debugging your test (not displayed by default).
Action toolbar—Contains buttons and a list of actions, enabling you to view the details of an individual action or the entire test flow (available only in the Tree View, not displayed by default).
Test pane—Contains the Tree View and Expert View tabs.
Test Details pane—Contains the Active Screen.
Data Table—Assists you in parameterizing your test. The Data Table contains the Global tab and a tab for each action.
Debug Viewer pane—Assists you in debugging your test. The Debug Viewer pane contains the Watch Expressions, Variables, and Command tabs (not displayed by default).
Status bar—Displays the status of the QuickTest application.

Chapter 2 • QuickTest at a Glance
13
Debug toolbar
Test pane
Data Table
Status bar
Active Screen
File toolbarTest toolbar
Menu barTitle bar
Action toolbar

QuickTest Professional User’s Guide • Starting the Testing Process
14
Test Pane
The Test pane contains two tabs to view your test - the Tree View and the Expert View.
Tree View Tab
In the Tree View tab (default mode), QuickTest displays your test in the form of a collapsible, icon-based test tree. You can view the steps in your test based on each step’s parent object. Steps performed within the same parent object are displayed under that same object. You can collapse or expand a branch in the test tree to change the level of detail that the tree displays.
To collapse a branch, select it and click the collapse (-) sign to the left of the branch icon, or press the minus key (-) on your keyboard number pad. The test tree hides the details for the branch and the collapse sign changes to expand.
To collapse all the branches in the tree, choose View > Collapse All.
To expand a branch one level or to its previously expanded state, select it and click the expand (+) sign to the left of the branch icon, or press the plus key (+) on your keyboard number pad. The tree displays the details for the branch and the expand sign changes to collapse.
To expand a branch and all branches below it, select the branch and click the asterisk (*) key on your keyboard number pad or right-click the branch and choose Expand Current Sub Tree.
To expand all the branches in the report tree, choose View > Expand All.

Chapter 2 • QuickTest at a Glance
15
Each operation performed on your application during a recording session is recorded as an icon in your test tree.
For every icon in the Tree View, QuickTest displays a corresponding line of script in the Expert View. If you focus on a specific node in the Tree View and switch to the Expert View, the cursor is located in that corresponding line of the test.
Expert View Tab
In the Expert View tab, QuickTest displays each operation performed on your application in the form of a script, rather than an icon tree. Your script is composed of VBScript statements and is a script editor with many script editing capabilities. For every object and method in an Expert View statement, a corresponding icon exists in the test tree in the Tree View tab.

QuickTest Professional User’s Guide • Starting the Testing Process
16
For more information on using the Expert View, see Chapter 37, “Testing in the Expert View.”

Chapter 2 • QuickTest at a Glance
17
Test Details Pane (Active Screen)
QuickTest’s Test Details pane contains the Active Screen. To view this pane, click the Active Screen button or choose View > Active Screen.
The Active Screen provides a snapshot of your application as it appeared when you performed a certain step while recording your test. Additionally, depending on the Active Screen capture options that you used when you recorded your test, the page displayed in the Active Screen can contain detailed property information about each object displayed on the page. This enables you to easily parameterize object values and insert checkpoints, methods, and output values for any object in the page, even if your application is not available or you do not have a step in your test corresponding to the selected object.
When QuickTest creates an Active Screen page for a Web-based application, it stores the path to images and other resources on the page, rather than downloading and storing the images with your test. Therefore, you may need to provide login information to view password-protected resources.
Active Screen pages for non-Web-based applications are based on a single bitmap capture of the visible part of the application window (or other top-level object), with context sensitive areas representing each object displayed in the Active Screen.
For information on Active Screen customization options, see “Setting Active Screen Options” on page 594.
For information on accessing password-protected resources in the Active Screen of a Web-based application, see “Accessing Password-Protected Resources in the Active Screen” on page 462.
Data Table
In a new test, the Data Table contains one Global tab plus an additional tab for each action, or test step grouping, in your test. These tabs assist you in parameterizing your test. To view this pane, click the Data Table toolbar button or choose View > Data Table. The Data Table is an Excel-like sheet with columns and rows representing the data applicable to your test. For more information, see Chapter 18, “Working with Data Tables.”

QuickTest Professional User’s Guide • Starting the Testing Process
18
Debug Viewer Pane
The Debug Viewer pane contains three tabs to assist you in debugging your test—Watch Expressions, Variables, and Command. To view the Debug Viewer pane, click the Debug Viewer button or choose View > Debug Viewer.
Watch Expressions Tab
The Watch Expressions tab enables you to view the current value of any variable or other VBScript expression.
Variables Tab
The Variables tab enables you to view the current value of all variables that have been recognized up to the last step performed in the test run.
Command Tab
The Command tab enables you to execute a line of script in order to set or modify the current value of a variable or VBScript object in your test. When you continue running the test, QuickTest uses the new value that was set in the command.
For more information on using the Debug Viewer pane, see Chapter 26, “Debugging Tests.”
Using QuickTest Commands
You can select QuickTest commands from the menu bar or from a toolbar. Certain QuickTest commands can also be executed by pressing shortcut keys, selecting commands from context-sensitive (right-click) menus, or double-clicking icons in your test tree.
Choosing Commands on a Menu
You can choose all QuickTest commands from the menu bar.

Chapter 2 • QuickTest at a Glance
19
Clicking Commands on a Toolbar
You can execute some QuickTest commands by clicking buttons on the toolbars. QuickTest has four built-in toolbars—the File toolbar, the Test toolbar, the Debug toolbar, and the Action toolbar.
File Toolbar
The File toolbar contains buttons for managing a test. For more information on managing your test, see Chapter 5, “Designing Tests.” The following buttons are displayed on the File toolbar:
Test Toolbar
The Test toolbar contains buttons for the commands used when creating and maintaining your test. The following buttons are displayed on the Test toolbar:
Open
SaveNew
ActiveScreen
DataTable
Test Results
Debug Viewer
Test Settings
New Action
Stop
StartRun
RecordSplitAction
InsertCheckpoint
StartTransaction
EndTransaction
Low-LevelRecording
AnalogRecording

QuickTest Professional User’s Guide • Starting the Testing Process
20
Debug Toolbar
The Debug toolbar contains buttons for the commands used when debugging the steps in your test. The following buttons are displayed on the Debug toolbar:
Action Toolbar
The Action toolbar is available in the Tree View and contains options that enable you to view all actions in the test flow or to view the details of a selected action. The following options are displayed on the Action toolbar:
When you have reusable or external actions in your test, the Action toolbar is always visible. If there are no reusable or external actions in your test, you can choose View > Toolbars > Action to show the Action toolbar.
When you have reusable or external actions in your test, only the action icon is visible when viewing the entire Test Flow in the Tree View. You can view the details of the reusable or external actions by double-clicking on the action, selecting the action name from the list in the Action toolbar, or selecting the action in the tree and clicking the Show button. You can return to the Test Flow by clicking the Back button.
For more information about actions, see Chapter 17, “Working with Actions.”
Step Into
Step Over
Pause
Step Out
Insert/Remove Breakpoint
Clear All Breakpoints
Show
Back
Action List

Chapter 2 • QuickTest at a Glance
21
Executing Commands Using Shortcut Keys
You can perform some QuickTest commands by pressing shortcut keys. The shortcut keys listed below are displayed on the corresponding menu commands.
You can perform the following File menu commands by pressing the corresponding shortcut keys:
You can perform the following Edit menu commands by pressing the corresponding shortcut keys:
Command Shortcut Key Function
New CTRL + N Creates a new test.
Open CTRL + O Opens a test.
Save CTRL + S Saves the active test.
Export to Zip File CTRL + ALT + S Creates a zip file of the active test.
Import from Zip File CTRL + ALT + O
Imports a test from a zip file.
Print CTRL + P Prints the active test.
Command Shortcut Key Function
Undo CTRL + Z Reverses the last command or deletes the last entry you typed (Expert View only).
Redo CTRL + Y Reverses the action of the Undo command (Expert View only).
Cut CTRL + X Removes the selection from your test.
Copy CTRL + C Copies the selection from your test.
Paste CTRL + V Pastes the selection to your test.
Delete DEL Deletes the selection from your test.

QuickTest Professional User’s Guide • Starting the Testing Process
22
You can perform the following Insert menu commands by pressing the corresponding shortcut keys:
Rename Action F2 Changes the name of an action.
Find CTRL + F Searches for a specified string (Expert View only).
Replace CTRL + H Searches and replaces a specified string (Expert View only).
Go To CTRL + G Moves the cursor to a particular line in the test (Expert View only).
Complete Word CTRL + SPACE Completes the word when you type the beginning of a VBScript method or object (Expert View only).
Parameter Info CTRL + SHIFT + SPACE
Displays the syntax of a method (Expert View only).
Apply “With” to Script CTRL + W Generates With statements for the action displayed in the Expert View (Expert View only).
Remove “With” from Script
CTRL + SHIFT + W
Converts any With statements in the action displayed in the Expert View to regular (single-line) VBScript statements (Expert View only).
Command Shortcut Key Function
Standard Checkpoint F12 Creates a standard checkpoint for an object or a table.
Standard Output Value CTRL + F12 Creates a standard output value for a text string, an object, or a table.
Command Shortcut Key Function

Chapter 2 • QuickTest at a Glance
23
You can execute the following Test menu commands by pressing the corresponding shortcut keys:
By pressing the ALT + ENTER shortcut keys, you can perform the following Step menu commands, depending on the selected test tree item:
Command Shortcut Key Function
Record F3 Starts recording mode.
Run F5 Runs the test from the beginning or from the line at which the test was paused.
Stop F4 Stops test recording or the test run.
Analog Recording CTRL + SHIFT + F4 Starts/ends analog recording mode.
Low Level Recording CTRL + SHIFT + F3 Starts/ends low level recording mode.
CommandSelected test tree item
Function
Object Properties test object not containing a method
Opens the Object Properties dialog box of a selected object.
Action Properties action Opens the Action Properties dialog box of a selected action.
Method Arguments step containing a method
Opens the Method Arguments dialog box of a selected method.
Checkpoint Properties checkpoint Opens the checkpoint dialog box of a selected checkpoint.

QuickTest Professional User’s Guide • Starting the Testing Process
24
Tip: You can select any test object (including one containing a method) and press CTRL + ENTER to open the Object Properties dialog box of the selected object.
Note: You can use the shortcut keys for the Step menu commands only in the Tree View.
You can perform the following Debug menu commands by pressing the corresponding shortcut keys:
Output Value Properties output value Opens the output value dialog box of a selected output value.
Conditional Statements If or ElseIf statement Opens the Conditional Statement dialog box of a selected If or ElseIf statement.
Command Shortcut Key Function
Pause PAUSE Stops the test run after the statement has been executed. The test run can be resumed from this point.
Step Into F11 Runs only the current line of the test script. If the current line calls a method, the method is displayed in the view but is not performed.
Command Selected test tree item
Function

Chapter 2 • QuickTest at a Glance
25
You can perform the following Data Table menu commands by pressing the corresponding shortcut keys when one or more cells are selected in the Data Table:
Step Over F10 Runs only the current line of the test script. When the current line calls a method, the method is performed in its entirety, but is not displayed in the view.
Step Out SHIFT + F11 Runs to the end of the method then pauses the test run. (Available only after running a method using Step Into.)
Insert/Remove Breakpoint
F9 Sets or clears a breakpoint in the test.
Clear All Breakpoints CTRL + SHIFT + F9
Deletes all breakpoints in the test.
Command Shortcut Key Function
Cut CTRL + X Cuts the table selection and puts it on the Clipboard.
Copy CTRL + C Copies the table selection and puts it on the Clipboard.
Paste CTRL + V Pastes the contents of the Clipboard to the current table selection.
Clear > Contents CTRL + DEL Clears the contents from the current selection.
Insert CTRL + I Inserts empty cells at the location of the current selection. Cells adjacent to the insertion are shifted to make room for the new cells.
Command Shortcut Key Function

QuickTest Professional User’s Guide • Starting the Testing Process
26
Delete CTRL + K Deletes the current selection. Cells adjacent to the deleted cells are shifted to fill the space left by the vacated cells.
Fill Right CTRL + R Copies data in the left-most cell of the selected range to all cells to the right of it, within the selected range.
Fill Down CTRL + D Copies data in the top cell of the selected range to all cells below it within the selected range.
Find CTRL + F Finds a cell containing specified text. You can search the table by row or column and specify to match case or find entire cells only.
Replace CTRL + H Finds a cell containing specified text and replaces it with different text. You can search the table by row or column and specify to match case and/or to find entire cells only. You can also replace all.
Insert Multi-line Values CTRL + F2 Opens the Cell Text dialog box where you can insert multi-line values to a selected cell.
Command Shortcut Key Function

Chapter 2 • QuickTest at a Glance
27
You can perform the following special options using shortcut keys only:
Option Shortcut Key Function
Switch between Tree View and Expert View
CTRL + TAB Toggles between the Tree View and Expert View.
Activate next pane F6 Changes the focus to another displayed pane in the following order—Test pane, Data Table, Debug Viewer pane.
Activate previous pane SHIFT + F6 Changes the focus to another displayed pane in the following order—Debug Viewer pane, Data Table, Test pane.
Open context menu SHIFT + F10, or press the Application Key ( ) [Microsoft Natural Keyboard only]
Opens the context menu for the selected step in the test tree, results tree or Expert View, or for the selected cell in the Data Table.
Activate next/previous data sheet
CTRL + PAGE UP / CTRL + PAGE DOWN
Activates the next or previous sheet (global or action) in the Data Table.
Expand branch * [on the numeric keypad]
Expands the selected tree branch and all branches below it.
Collapse branch - [on the numeric keypad]
Collapses the selected tree branch and all branches below it.

QuickTest Professional User’s Guide • Starting the Testing Process
28
Browsing the QuickTest Professional Program Folder
After the QuickTest Professional setup process is complete, the following items are added to your QuickTest Professional program folder (Start > Programs > QuickTest Professional):
Documentation—Provides the following links to commonly used documentation files:
Books Online—Opens a comprehensive help file containing the QuickTest Professional User’s Guide, the corresponding user’s guide for each installed add-in (if any), the QuickTest Professional Object Model Reference (including the relevant sections for installed add-ins), the Microsoft VBScript User’s Guide, Microsoft VBScript Language Reference.
Tutorial—Opens the QuickTest Professional tutorial, which teaches you basic QuickTest skills and shows you how to start testing your applications.
Automation Object Model Reference—Opens the QuickTest Automation Object Model Reference. The automation object model assists you in automating test management, by providing objects, methods and properties that enable you to control virtually every QuickTest feature and capability. The QuickTest Automation Object Model Reference provides syntax, descriptive information, and examples for the objects, methods, and properties. It also contains a detailed overview to help you get started writing QuickTest automation scripts.
Printer-Friendly Documentation—Opens a page that provides links to printer-friendly versions of all QuickTest documentation, in Adobe Acrobat Reader (PDF) format.
Sample Applications—Contains the following links to sample applications that you can use to practice testing with QuickTest:
Flight—Opens a sample flight reservation Windows application. To access the application, enter any username and the password mercury.
Mercury Tours Web Site—Opens a sample flight reservation Web application. This Web application is used as a basis for the QuickTest tutorial. Refer to the QuickTest Professional Tutorial for more information.

Chapter 2 • QuickTest at a Glance
29
Tools—Contains the following utilities and tools that assist you with the testing process:
Password Encoder—Opens the Password Encoder dialog box, which enables you to encode passwords. You can use the resulting strings as method arguments or Data Table parameter values. For more information, see “Inserting Encoded Passwords into Method Arguments and Data Table Cells” on page 386.
Remote Agent—Activates the QuickTest Remote Agent, which determines how QuickTest behaves when a test is run by a remote application such as TestDirector. For more information, see “Setting QuickTest Remote Agent Preferences” on page 847.
Test Batch Runner—Opens the Test Batch Runner dialog box, which enables you to set up QuickTest to run several tests in succession. For more information, see “Running a Test Batch” on page 508.
Update From The Web—Searches for the Mercury Interactive Web site for updates to your installed version of QuickTest. Ensure that QuickTest is closed and then choose this option to check for QuickTest software updates. If there are components on the Web site that are newer than your installed version, QuickTest downloads and installs them.
Test Results Deletion Tool—Opens the Test Results Deletion Tool dialog box, which enables you to delete unwanted or obsolete test results from your system according to specific criteria that you define. For more information, see “Deleting Results Using the Test Results Deletion Tool” on page 569.
ReadMe—Opens the QuickTest Professional ReadMe, which provides the latest news and information about QuickTest Professional.
Test Results Viewer—Opens the Test Results window, which enables you to select a test and view information about the steps performed during the test run. For more information, see “Understanding the Test Results Window” on page 523.
Uninstall QuickTest Professional—Uninstalls QuickTest Professional and all of its components, including core and external add-ins. Refer to the QuickTest Professional Installation Guide for more information.
QuickTest Professional—Opens the QuickTest Professional application.

QuickTest Professional User’s Guide • Starting the Testing Process
30

Part II
Working with Test Objects

32

33
3Understanding the Test Object Model
This chapter describes how QuickTest learns and identifies objects in your application, explains the concepts of Test Object and Run-Time Object, and explains how to view the available methods for an object and the corresponding syntax, so that you can easily add statements to your script in the Expert View.
This chapter describes:
About Understanding the Test Object Model
Applying the Test Object Model Concept
Viewing Object Properties Using the Object Spy
Viewing Object Methods and Method Syntax Using the Object Spy
About Understanding the Test Object Model
QuickTest tests your dynamically changing application by learning and identifying test objects and their expected properties and values. During recording QuickTest analyzes each object in your application much the same way that a person would look at a photograph and remember its details.
In the following narrative you will be introduced to the concepts related to the test object model and how QuickTest uses the information it gathers to test your application.

QuickTest Professional User’s Guide • Working with Test Objects
34
Understanding How QuickTest Learns Objects While Recording
QuickTest learns objects just as you would.
For example, suppose as part of an experiment, Jonny is told that he will be shown a photograph of a picnic scene for a few seconds during which someone will point out one item in the picture. Jonny is told that he will be expected to identify that item again in identical or similar pictures one week from today.
Before he is shown the photograph, Jonny begins preparing himself for the test by thinking about which characteristics he wants to learn about the item that the tester indicates. Obviously, he will automatically note whether it is a person, inanimate object, animal, or plant. Then, if it is a person, he will try to commit to memory the gender, skin color, and age. If it is an animal, he will try to remember the type of animal, its color, and so forth.
The tester shows the scene to Jonny and points out one of three children sitting on a picnic blanket. Jonny notes that it is a caucasian girl about 8 years old. In looking at the rest of the picture, however, he realizes that one of the other children in the picture could also fit that description. In addition to learning his planned list of characteristics, he also notes that the girl he is supposed to identify has long, brown hair.
Now that only one person in the picture fits the characteristics he learned, he is fairly sure that he will be able to identify the girl again, even if the scene the tester shows him next week is slightly different.
Since he still has a few moments left to look at the picture, he attempts to notice other, more subtle differences between the child he is supposed to remember and the others in the picture—just in case.
If the two similar children in the picture appeared to be identical twins, Jonny might also take note of some less permanent feature of the child, such as the child’s position on the picnic blanket. That would enable him to identify the child if he were shown another picture in which the children were sitting on the blanket in the same order.
QuickTest uses a very similar method when it learns objects during the recording process.

Chapter 3 • Understanding the Test Object Model
35
First, it “looks” at the object on which you are recording and stores it as a test object, determining in which test object class it fits. Just as Jonny immediately checked whether the item was a person, animal, plant, or thing. QuickTest might classify the test object as a standard Windows dialog box (Dialog), a Web button (WebButton), or a Visual Basic scroll bar object (VbScrollBar), for example.
Then, for each test object class, QuickTest has a list of mandatory properties that it always learns; similar to the list of characteristics that Jonny planned to learn before seeing the picture. When you record on an object, QuickTest always learns these default property values, and then “looks” at the rest of the objects on the page, dialog box, or other parent object to check whether this description is enough to uniquely identify the object. If it is not, QuickTest adds assistive properties, one by one, to the description, until it has compiled a unique description; like when Jonny added the hair length and color characteristics to his list. If no assistive properties are available, or if those available are not sufficient to create a unique description, QuickTest adds a special ordinal identifier, such as the object’s location on the page or in the source code, to create a unique description, just as Jonny would have remembered the child’s position on the picnic blanket if two of the children in the picture had been identical twins.
Understanding How QuickTest Identifies Objects During the Test Run
QuickTest also uses a very human-like technique for identifying objects during the test run.
Suppose as a continuation to the experiment, Jonny is now asked to identify the same “item” he initially identified but in a new, yet similar environment.
The first photograph he is shown is the original photograph. He searches for the same caucasian girl, about eight years old, with long, brown hair that he was asked to remember and immediately picks her out. In the second photograph, the children are playing on the playground equipment, but Jonny is still able to easily identify the girl using the same criteria.

QuickTest Professional User’s Guide • Working with Test Objects
36
Similarly, during a test run, QuickTest searches for a run-time object that exactly matches the description of the test object it learned while recording. It expects to find a perfect match for both the mandatory and any assistive properties it used to create a unique description while recording. As long as the object in the application does not change significantly, the description learned during recording is almost always sufficient for QuickTest to uniquely identify the object. This is true for most objects, but your application could include objects that are more difficult to identify during subsequent test runs.
Consider the final phase of Jonny’s experiment. In this phase, the tester shows Jonny another photograph of the same family at the same location, but the children are older and there are also more children playing on the playground. Jonny first searches for a girl with the same characteristics he used to identify the girl in the other pictures (the test object), but none of the caucasian girls in the picture have long, brown hair. Luckily, Jonny was smart enough to remember some additional information about the girl’s appearance when he first saw the picture the previous week. He is able to pick her out (the run-time object), even though her hair is now short and dyed blond.
How is he able to do this? First, he considers which features he knows he must find. Jonny knows that he is still looking for a caucasian female, and if he were not able to find anyone that matched this description, he would assume she is not in the photograph.
Once he has limited the possibilities to the four caucasian females in this new photograph, he thinks about the other characteristics he has been using to identify the girl—her age, hair color, and hair length. He knows that some time has passed and some of the other characteristics he remembers may have changed, even though she is still the same person.
Thus, since none of the caucasian girls have long, dark hair, he ignores these characteristics and searches for someone with the eyes and nose he remembers. He finds two girls with similar eyes, but only one of these has the petite nose he remembers from the original picture. Even though these are less prominent features, he is able to use them to identify the girl.

Chapter 3 • Understanding the Test Object Model
37
QuickTest uses a very similar process of elimination with its Smart Identification mechanism to identify an object, even when the recorded description is no longer accurate. Even if the values of your test object properties change, QuickTest’s TestGuard technology maintains your test’s reusability by identifying the object using Smart Identification. For more information on Smart Identification, see Chapter 33, “Configuring Object Identification.”
The remainder of this guide assumes familiarity with the concepts presented here, including test objects, run-time objects, object properties, mandatory and assistive properties, and Smart Identification. An understanding of these concepts will enable you to create well-designed, functional tests for your application.
Applying the Test Object Model Concept
The Test Object Model is a large set of object types or classes that QuickTest uses to represent the objects in your application. Each test object class has a list of properties that can uniquely identify objects of that class and a set of relevant methods that QuickTest can record for it.
A test object is an object that QuickTest creates in the test to represent the actual object in your application. QuickTest stores information about the object that will help it identify and check the object during the test run.
A run-time object is the actual object in your Web site or application on which methods are performed during the test run.
When you perform an operation on your application while recording a test, QuickTest:
identifies the QuickTest test object class that represents the object on which you performed the operation and creates the appropriate test object
reads the current value of the object’s properties in your application and stores the list of properties and values with the test object

QuickTest Professional User’s Guide • Working with Test Objects
38
chooses a unique logical name for the object, generally using the value of one of its prominent properties
records the operation that you performed on the object using the appropriate QuickTest test object method
For example, suppose you click on a Find button with the following HTML source code:
<INPUT TYPE="submit" NAME="Find" VALUE="Find">
QuickTest identifies the object that you clicked as a WebButton test object. It creates a WebButton object with the logical name Find, and records the following properties and values for the Find WebButton:
It also records that you performed a Click method on the WebButton.
QuickTest displays your step in the Tree View like this:
QuickTest displays your step in the Expert View like this:
Browser("Mercury Interactive").Page("Mercury Interactive").WebButton("Find").Click
When you run a test, QuickTest identifies each object in your application by its test object class and its description—the set of test object properties and values used to uniquely identify the object. The list of test objects and their properties and values are stored in the test’s object repository. In the above example, QuickTest would search in the object repository during the test run for the WebButton object with the logical name “Find” to look up its

Chapter 3 • Understanding the Test Object Model
39
description. Based on the description it finds, QuickTest would then look for a WebButton object in the application with the HTML tag INPUT, of type submit, with the value “Find”. When it finds the object, it performs the Click method on it.
Understanding Test Object Descriptions
For each object class, QuickTest learns a set of properties when it records a test and it uses this description to identify the object when it runs the test.
For example, by default, QuickTest learns the image type (such as plain image or image button), the HTML tag, and the Alt text of each Web image on which you record an operation.
If these three mandatory property values are not sufficient to uniquely identify the object within its parent object, QuickTest adds some assistive properties and/or an ordinal identifier to create a unique description.
When the test runs, QuickTest searches for the object that matches the description it learned. If it cannot find any object that matches the description, or if it finds more than one object that matches, QuickTest may use the Smart Identification mechanism to identify the object.
logical name
test object class
default properties
image icon
logical name

QuickTest Professional User’s Guide • Working with Test Objects
40
You can configure the mandatory, assistive, and ordinal identifier properties that QuickTest uses to record descriptions of the objects in your application, and you can enable and configure the smart identification mechanism. For more information, see Chapter 33, “Configuring Object Identification.”
Understanding Test Object and Run-Time Object Properties and Methods
The test object property set for each test object is created and maintained by QuickTest. The run-time object property set for each run-time object is created and maintained by the object creator. (Microsoft for Internet Explorer objects, Netscape for Netscape objects, the product developer for ActiveX objects, and so forth.)
Similarly, test object methods are methods that QuickTest recognizes and records when they are performed on an object while you are recording a test, and that QuickTest performs when your test runs. Run-time object methods are the methods of the object in your application as defined by the object creator. You can access and perform run-time object methods using the Object property.
For information about activating run-time methods using the Object property, see “Retrieving and Setting Test Object Property Values” on page 784.
Each test object method you perform while recording a test is recorded as a separate step in your test. When you run your test, QuickTest performs the recorded test object method on the run-time object.
Test object properties are the properties whose values are captured from the objects in your Web site or application when you record your test. QuickTest uses the values of these properties to identify run-time objects in your application during a test run.
Property values of objects in your application may change dynamically each time your application opens, or based on certain conditions. To make the test object property values match the property values of the run-time object, you can modify test object properties manually while designing your test or using SetTOProperty statements during a test run. You can also parameterize property values with Data Table parameters so that a different value will be used during each iteration of the test, or you can use regular

Chapter 3 • Understanding the Test Object Model
41
expressions to identify property values based on conditions or patterns you define.
For more information on modifying object properties, see Chapter 4, “Managing Test Objects.” For more information on parameterization, see Chapter 13, “Parameterizing Tests.” For more information on regular expressions, see Chapter 15, “Using Regular Expressions.”
You can view or modify the test object property values that are stored with your test in the Object Properties or Object Repository dialog box. You can view the current test object property values of any object on your desktop using the Properties tab of the Object Spy.
For information about the Object Properties and Object Repository dialog boxes, see “Modifying Test Object Properties While Designing Your Test” on page 62.
For information about viewing test object property values using the Object Spy, see “Viewing Object Properties Using the Object Spy” on page 42.
You can view the syntax of the test object methods as well as the run-time methods of any object on your desktop using the Methods tab of the Object Spy.
For more information, see “Viewing Object Methods and Method Syntax Using the Object Spy” on page 45.
You can retrieve or modify property values of the test object during the test run by adding GetTOProperty and SetTOProperty statements in the Expert View. You can retrieve property values of the run-time object during the test run by adding GetROProperty statements. For more information, see “Retrieving and Setting Test Object Property Values” on page 784.
If the available test object methods or properties for an object do not provide the functionality you need, you can access the internal methods and properties of any run-time object using the Object property. You can also use the attribute object property to identify Web objects in your application according to user-defined properties. For information, see “Accessing Run-Time Object Properties and Methods” on page 785.
For more information about test object methods and properties refer to the QuickTest Object Model Reference.

QuickTest Professional User’s Guide • Working with Test Objects
42
Viewing Object Properties Using the Object Spy
Using the Object Spy, you can view the properties of any object in an open application. You use the Object Spy pointer to point to an object. The Object Spy displays the selected object’s hierarchy tree and its properties and values in the Properties tab of the Object Spy dialog box.
To view object properties:
1 Open your browser or application to the page containing the object on which you want to spy.
2 Choose Tools > Object Spy to open the Object Spy dialog box and display the Properties tab. Alternatively, click the Object Spy button from the Object Repository dialog box. For more information on the Object Repository dialog box, see “Understanding the Object Repository Dialog Box” on page 51.
3 In the Object Spy dialog box, click the pointing hand. Both QuickTest and the Object Spy are minimized so that you can point to and click on any object in the open application.
Note: If the window on which you want to spy is partially hidden by another window, hold the pointing hand over the partially hidden window for a few seconds. The window comes into the foreground. You can now point and click on the object you want. You can configure the length of time required to bring a window into the foreground in the General tab of the Options dialog box. For more information, see Chapter 28, “Setting Global Testing Options.”
4 If the object on which you want to spy can only be displayed by performing an event (such as a right-click or a mouse-over to display a context menu), hold the CTRL key. The pointing hand temporarily turns into a standard arrow and you can perform the event. When the object on which you want to spy is displayed, release the CTRL key. The arrow becomes a pointing hand again.

Chapter 3 • Understanding the Test Object Model
43
5 Click the object for which you want to view properties. The Object Spy returns to focus and displays the object hierarchy tree and the properties of the object that is selected within the tree.
6 To view the properties of the test object, click the Test Object Properties radio button. To view the properties of the run-time object, click the Run-Time Object Properties radio button.
object hierarchy tree
object properties
selected property/value box
object type filter

QuickTest Professional User’s Guide • Working with Test Objects
44
Tip: You can use the Object property to retrieve the values of the run-time properties displayed in the Object Spy. For more information, see “Retrieving Run-Time Object Properties” on page 786.
You can use the GetTOProperty and SetTOProperty methods to retrieve and set the value of test object properties for test objects in your test. You can use the GetROProperty to retrieve the current property value of the objects in your application during the test run. For more information, see “Retrieving and Setting Test Object Property Values” on page 784.
7 If you want to view properties for another object within the displayed tree, click the object in the tree.
8 If you want to copy an object property or value to the clipboard, click the property or value. The value is displayed in the selected property/value box. Highlight the text in the selected property/value box and use CTRL + C to copy the text to the clipboard or right-click the highlighted text and choose Copy from the menu.
Note: If the value of a property contains more than one line, the Values cell of the object properties list indicates multi-line value. To view the value, click the Values cell. The selected property/value box displays the value with delimiters indicating the line breaks.

Chapter 3 • Understanding the Test Object Model
45
Viewing Object Methods and Method Syntax Using the Object Spy
In addition to viewing object properties, the Object Spy also enables you to view both the run-time object methods and the test object methods associated with an object and to view the syntax for a selected method. You use the Object Spy pointer to point to an object. The Object Spy displays the object hierarchy tree and the run-time object methods or test object methods associated with the selected object in the Methods tab of the Object Spy dialog box.
To view object methods:
1 Open your browser or application to the page containing the object on which you want to spy.
2 Choose Tools > Object Spy to open the Object Spy dialog box. Alternatively, click the Object Spy button from the Object Repository dialog box. For more information on the Object Repository dialog box, see “Understanding the Object Repository Dialog Box” on page 51.
3 Click the Methods tab.
4 Click the pointing hand. Both QuickTest and the Object Spy are minimized so that you can point to any object on the open application.
Note: If the object you want is partially hidden by another window, hold the pointing hand over the partially hidden window for a few seconds. The window comes into the foreground. You can now point and click on the object you want. You can configure this option in the Options dialog box. For more information, see Chapter 28, “Setting Global Testing Options.”
5 If the object on which you want to spy can only be displayed by performing an event (such as a right-click or a mouse-over to display a context menu), hold the CTRL key. The pointing hand temporarily turns into a standard arrow and you can perform the event. When the object on which you want to spy is displayed, release the CTRL key. The arrow becomes a pointing hand again.

QuickTest Professional User’s Guide • Working with Test Objects
46
6 Click the object for which you want to view the associated methods. The Object Spy returns to focus and displays the object hierarchy tree and the run-time object or test object methods associated with the object that is selected within the tree.
object hierarchy tree
object methods
selected method syntax box
method description box
object type filter

Chapter 3 • Understanding the Test Object Model
47
7 To view the methods of the test object, click the Test Object Methods radio button. To view the methods of the run-time object, click the Run-Time Object Methods radio button.
Tip: You can use the Object property to activate the run-time object methods displayed in the Object Spy. For more information, see “Activating Run-Time Object Methods” on page 787.
8 If you want to view methods for another object within the displayed tree, click the object on the tree.
9 If you want to copy the syntax of a method to the clipboard, click the method in the list. The syntax is displayed in the selected method syntax box. Highlight the text in the selected method syntax box and use CTRL + C to copy the text to the clipboard, or right-click the highlighted text and choose Copy from the menu.

QuickTest Professional User’s Guide • Working with Test Objects
48

49
4Managing Test Objects
This chapter explains how to manage and maintain the test objects in your test. It describes how to modify test object properties and how to modify the way QuickTest identifies an object, which is useful when working with objects that change dynamically. It also describes how objects can be added to or deleted from your test.
This chapter describes:
About Managing Test Objects
Understanding the Object Repository Dialog Box
Understanding the Object Properties Dialog Box
Modifying Test Object Properties While Designing Your Test
Working with Test Objects During a Test Run
Modifying Object Descriptions
Adding Objects to the Object Repository
Deleting an Object from the Object Repository

QuickTest Professional User’s Guide • Working with Test Objects
50
About Managing Test Objects
QuickTest identifies objects in your application based on a set of test object properties. It stores the object data it learns in the object repository.
If one or more of the property values of an object in your application differ from the property values QuickTest uses to identify the object, your test may fail. Thus, when the property values of objects in your application change, you should modify the corresponding test object property values so that you can continue to use your existing tests.
Note: In some cases, the Smart Identification mechanism may enable QuickTest to identify an object, even when some of its property values change. However, if you know about property value changes for a specific object, you should try to correct the object definition so that QuickTest can identify the object from its basic object description. For more information on the smart identification mechanism, see Chapter 33, “Configuring Object Identification.”
There are several methods for modifying test object properties. Choose the method that best fits your needs:
You can manually change a test object property value to match a new static property of an object in your application.
You can use the SetTOProperty method to modify test object properties during a test run without changing the property values in the object repository.
You can modify the set of properties that QuickTest uses to identify the object, so that it will be able to identify an object even when some of its properties change dynamically.
You can parameterize a test object property with a Data Table parameter if you expect the property value to change in a predictable way with each iteration of the test.
You can use regular expressions to identify an object based on conditions or patterns you define.

Chapter 4 • Managing Test Objects
51
This chapter includes information on the first three options above. You can make the most of these modifications in the Object Properties dialog box or in the Object Repository dialog box. For more information on parameterizing object properties, see Chapter 13, “Parameterizing Tests.” For information on using regular expressions, see Chapter 15, “Using Regular Expressions.”
You can save your objects either in a shared object repository or in action object repository. In shared object repository mode, you can use one object repository file for multiple tests. In object repository per-action mode, QuickTest automatically creates an object repository file for each action in your test. The information in this chapter on modifying test objects is relevant to both the shared object repository and the action object repository. For more information on the shared object repository and the action object repository, see Chapter 34, “Choosing the Object Repository Mode.” For more information on organizing your test using actions, see Chapter 17, “Working with Actions.”
Understanding the Object Repository Dialog Box
The Object Repository dialog box displays a test tree of all objects in the current action or the entire test (depending on the object repository mode you choose when you create your test). You can use the Object Repository dialog box to view or modify the properties of any test object in the repository or to add new objects to your repository.
Note: When working in object repository per-action mode, the object repository stores objects on a per-action basis. Thus, if the same test object is used in several steps within the same action, you need to modify the object’s properties only one time. If the object is used again in another action, however, you need to update the object’s properties in that action as well. For more information about actions, see Chapter 17, “Working with Actions.” For more information on choosing an object repository mode, see Chapter 34, “Choosing the Object Repository Mode.”

QuickTest Professional User’s Guide • Working with Test Objects
52
Even when steps containing a test object are deleted from your test script, the objects remain in the object repository. If you delete all occurrences of an object from your action (in object repository per-action mode) or from all tests using the shared object repository (in shared object repository mode), you can also choose to delete the object from the object repository.

Chapter 4 • Managing Test Objects
53
Identifying the Object
The top part of the dialog box displays information about the object:
Viewing the Object’s Properties
The default properties for the object are listed in the Properties pane of the dialog box. The pane includes the properties, their values, and their types:
Information Description
Logical name The name that QuickTest assigns to the object.
Class The class of the object.
Find Opens the Find dialog box, where you can find a property or value that occurs several times in the same action. For more information, see “Finding Test Object Properties” on page 65.
Replace Opens the Replace dialog box, where you can modify a property or value that occurs several times in the same action. For more information, see “Finding Test Object Properties” on page 65.
Pane Element Description
Type The icon indicates that the value of the property is currently a constant.
The icon indicates that the value of the property is currently a Data Table parameter.
The icon indicates that the value of the property is currently an environment variable parameter.
The icon indicates that the value of the property is currently a random number parameter.
Property The name of the property.
Value The value of the property.

QuickTest Professional User’s Guide • Working with Test Objects
54
Modifying the Expected Value
In the Edit value section, you use the following options to edit the value of the property:
Enable Smart Identification
Indicates whether or not QuickTest uses Smart Identification to identify this object during the test run if it is not able to identify the object using the test object description. Note that this option is available only if Smart Identification properties are defined for the object’s class in the Object Identification dialog box. For more information, see “Configuring Smart Identification” on page 683.
Note: When you select Disable Smart Identification during the test run in the Run tab of the Test Settings dialog box, this option is disabled, although the setting is saved. When you clear the Disable Smart Identification during the test run check box, this option returns to its previous on or off setting after the test run. For more information, see “Defining Run Settings for Your Test” on page 624.
Add/Remove Opens the Add/Remove Properties dialog box which lists the properties that can be used to identify the object. For more information, see “Modifying Object Descriptions” on page 70.
Option Description
Constant (default) Sets the expected value of the property as a constant. The value of the property is constant for each iteration of the test run.
Edit Constant ValueOptions
(enabled only when Constant is selected)
Opens the Constant Value Options dialog box, where you can set the expected value as a text string or a regular expression. For more information on regular expressions, see Chapter 15, “Using Regular Expressions.”
Parameter Sets the expected value of the property as a parameter. For more information, see Chapter 13, “Parameterizing Tests.”
Pane Element Description

Chapter 4 • Managing Test Objects
55
For more information, see “Modifying Test Object Properties While Designing Your Test” on page 62.
Data Table
(enabled only when Parameter is selected)
Specifies the parameter as a Data Table parameter. The value of the property is determined by the data in the Data Table. For more information about creating Data Table parameters, see “Using Data Table Parameters” on page 227.
Parameter name
(enabled only when Data Table is selected)
Specifies the name of the parameter in the Data Table.
Other
(enabled only when Parameter is selected)
Specifies that the parameter is a random number or environment variable parameter. The text box displays the parameter statement.
For more information about creating random number parameters, see “Using Random Number Parameters” on page 241. For more information about creating environment variable parameters, see “Using Environment Variable Parameters” on page 231.
Edit Parameter Options
(enabled only when Parameter is selected)
If you select Data Table, clicking the Edit Parameter Options button opens the Data Table Parameter Options dialog box, where you can set the value as a regular expression. For more information on regular expressions, see Chapter 15, “Using Regular Expressions.” You can also specify the parameter name and set the parameter as global or current action data. For more information, see Chapter 17, “Working with Actions.”
If you select Other, clicking the Edit Parameter Options button opens the Parameter Options dialog box, where you can specify the parameter type and preferences. For more information, see Chapter 13, “Parameterizing Tests.”
Option Description

QuickTest Professional User’s Guide • Working with Test Objects
56
Adding or Viewing New Objects and Saving the Object Repository
From the Object Repository dialog box, you can add a new object to your repository and use the Object Spy. You can also export a per-action repository or save a shared object repository.
Option Description
Add New Object Adds the object selected with the pointing hand to the current object repository. For more information see “Adding Objects to the Object Repository” on page 76.
Object Spy Opens the Object Spy dialog box, enabling you to view the properties of any object in an open application. For more information see “Viewing Object Properties Using the Object Spy” on page 42.
Export Saves all the object properties and values from a per-action object repository to a separate file for use as a shared object repository in another test.
Available only when working in per-action repository mode.

Chapter 4 • Managing Test Objects
57
Note: Clicking Save for a shared object repository cannot be cancelled by clicking Cancel. Clicking Cancel cancels only those changes made after the last save within the same object repository session.
Clicking OK to close the Object Repository dialog box enables the changes you make to the repository to take effect while you are working in your open test. The changes you make are not saved to a per-action repository until you save the test or to a shared object repository until you save the test or click Save.
Save Saves all the object properties and values in a shared object repository file. This option allows you to save the current shared object repository without saving any changes made to the open test.
Available only when working in shared object repository mode.
To save your current shared object repository with a different name, click the arrow next to the Save button and select Save As (see below).
Save As Saves all the object properties and values in the current shared object repository to a different shared object repository file. You can overwrite an existing shared object repository file or you can create a new one.
When you choose to save your shared object repository with the Save As option, QuickTest gives you the option to use the new file as the shared object repository for your open test or to continue working with the old one. For more information and guidelines, see “Choosing a Shared Object Repository File” on page 711.
Available only when working in shared object repository mode.
Option Description

QuickTest Professional User’s Guide • Working with Test Objects
58
Understanding the Object Properties Dialog Box
The Object Properties dialog box accesses test object information from the object repository and displays the properties and values of the test object in the selected step.
Identifying the Object
The top part of the dialog box displays information about the object:
Information Description
Logical name The name that QuickTest assigns to the object.
Class The class of the object.
Repository Opens the Object Repository dialog box and displays a test tree of all objects in the current action. For more information about the Object Repository dialog box, see “Understanding the Object Repository Dialog Box” on page 51.

Chapter 4 • Managing Test Objects
59
Viewing the Object’s Properties
The default properties for the object are listed in the Properties pane of the dialog box. The pane includes the properties, their values, and their types:
Pane Element Description
Type The icon indicates that the value of the property is currently a constant.
The icon indicates that the value of the property is currently a Data Table parameter.
The icon indicates that the value of the property is currently an environment variable parameter.
The icon indicates that the value of the property is currently a random number parameter.
Property The name of the property.
Value The value of the property.
Enable Smart Identification
Indicates whether or not QuickTest uses Smart Identification to identify this object during the test run if it is not able to identify the object using the test object description. Note that this option is available only if Smart Identification properties are defined for the object’s class in the Object Identification dialog box. For more information, see “Configuring Smart Identification” on page 683.
Note: When you select Disable Smart Identification during the test run in the Run tab of the Test Settings dialog box, this option is disabled, although the setting is saved. When you clear the Disable Smart Identification during the test run check box, this option returns to its previous on or off setting after the test run. For more information, see “Defining Run Settings for Your Test” on page 624.
Add/Remove Opens the Add/Remove Properties dialog box which lists the properties that can be used to identify the object. For more information, see “Modifying Object Descriptions” on page 70.

QuickTest Professional User’s Guide • Working with Test Objects
60
Modifying the Expected Value
In the Edit value section, you use the following options to edit the value of the property:
Option Description
Constant (default) Sets the expected value of the property as a constant. The value of the property is constant for each iteration of the test run.
Edit Constant ValueOptions
(enabled only when Constant is selected)
Opens the Constant Value Options dialog box, where you can set the expected value as a text string or a regular expression. For more information on regular expressions, see Chapter 15, “Using Regular Expressions.”
Parameter Sets the expected value of the property as a parameter. For more information, see Chapter 13, “Parameterizing Tests.”
Data Table
(enabled only when Parameter is selected)
Specifies the parameter as a Data Table parameter. The value of the property is determined by the data in the Data Table. For more information about creating Data Table parameters, see “Using Data Table Parameters” on page 227.
Parameter name
(enabled only when Data Table is selected)
Specifies the name of the parameter in the Data Table.

Chapter 4 • Managing Test Objects
61
For more information about modifying property values, see “Modifying Test Object Properties While Designing Your Test,” below.
Viewing Object Properties
You can view the properties and values of an object in any open application using the Object Spy. You can open the Object Spy from the Object Properties dialog box by clicking Object Spy at the bottom of the dialog box. For more information, see “Viewing Object Properties Using the Object Spy” on page 42.
Other
(enabled only when Parameter is selected)
Specifies that the parameter is a random number or environment variable parameter. The text box displays the parameter statement.
For more information about creating random number parameters, see “Using Random Number Parameters” on page 241. For more information about creating environment variable parameters, see “Using Environment Variable Parameters” on page 231.
Edit Parameter Options
(enabled only when Parameter is selected)
If you select Data Table, clicking the Edit Parameter Options button opens the Data Table Parameter Options dialog box, where you can set the value as a regular expression. For more information on regular expressions, see Chapter 15, “Using Regular Expressions.” You can also specify the parameter name and set the parameter as global or current action data. For more information, see Chapter 17, “Working with Actions.”
If you select Other, clicking the Edit Parameter Options button opens the Parameter Options dialog box, where you can specify the parameter type and preferences. For more information, see Chapter 13, “Parameterizing Tests.”
Option Description

QuickTest Professional User’s Guide • Working with Test Objects
62
Modifying Test Object Properties While Designing Your Test
As Web sites and applications change, the property values of the steps in your test may also need to change.
Suppose an object in your application changes. If that object is part of your test, you should modify its values so that QuickTest can continue to identify it. For example, if the MyCompany Web site has a “Contact Us” hypertext link and then the text string in this link is changed to “Contact MyCompany,” you need to update your test so that QuickTest can continue to identify the link properly.
You can modify the object by modifying one or more of the object’s property values in the Object Repository or Object Properties dialog box or by changing the set of objects used to identify that object.
To modify an object property in your test:
1 Right-click the step containing the object that changed, and choose Object Properties or choose Step > Object Properties from the menu bar.
Tip: You can also right-click an object in the Active Screen and choose View/Add Object. If the location you clicked is associated with more than one object, the Object Selection - Object Properties View dialog box opens. Select the object whose properties you want to modify, and click OK.

Chapter 4 • Managing Test Objects
63
The Object Properties dialog box opens and displays the properties QuickTest uses to identify the object.

QuickTest Professional User’s Guide • Working with Test Objects
64
If you want to view all objects in the action, click the Repository button. The Object Repository dialog box opens and displays all objects stored in the repository in a repository tree.
Tip: You can also open the object repository for the selected action by choosing Tools > Object Repository.
2 Highlight the property and value to modify.
3 In the Constant box, enter a new value for the property.
4 If you want to set the property value as a regular expression, click the Edit Constant Value Options button. For information about using regular expressions, see “Using Regular Expressions for Object Property Values” on page 300.

Chapter 4 • Managing Test Objects
65
Note: You can also create a Data Table parameter and set the values in the Data Table as regular expressions. For more information about parameterizing your test, see Chapter 13, “Parameterizing Tests.”
5 Click OK to close the dialog box.
Finding Test Object Properties
You can use the Find and Replace buttons in the Object Repository dialog box to find a property or value that occurs several times in the object repository.
To find a property or value in the object repository:
1 Right-click an object with the property or value you want to find in the test tree or Active Screen and choose Object Properties (or View/Add Object in the Active Screen), and then click the Repository button, or choose Tools > Object Repository.
The Object Repository dialog box opens.
2 Right-click the object in the repository tree and choose Find, or click the Find button. The Find dialog box opens.

QuickTest Professional User’s Guide • Working with Test Objects
66
3 Enter the text for the property or value you want to find. Select Property name, Property value, or both.
If you want the search to find only complete words that exactly match the single word you entered, select Match whole word only.
If you want the search to distinguish between upper and lower case letters, select Match case.
Click Find Next. The first instance of the searched word is displayed.
4 To find the next instance, click Find Next again.
To find and replace a value in the object repository:
1 Right-click an object in the test tree or Active Screen with the property or value you want to find and choose Object Properties (or View/Add Object from the Active Screen) to open the Object Properties dialog box, and then click the Repository button, or choose Tools > Object Repository. The Object Repository dialog box opens.
2 Right-click the object in the repository tree and choose Replace. The Replace dialog box opens.
3 In the Find what box, enter the text for the property value you want to find, and in the Replace with box, enter the modified text for the found property value.
If you want the search to find only complete words that exactly match the single word you entered, select Match whole word only.
If you want the search to distinguish between upper and lower case letters, select Match case.

Chapter 4 • Managing Test Objects
67
4 To individually find and replace each instance of the word(s) you are searching for one at a time, click Find Next. When an instance is found, click Replace. Then click Find Next again to find the next instance.
To replace all instances of the word you are searching for with the new value, click Replace All.
Note: You cannot replace property names. You also cannot replace values in a read-only test or action.
Modifying Logical Names
When an object changes in your application, or for any other reason you are not satisfied with the current logical name of an object, you can change the logical name that QuickTest uses to identify the object. You modify the object’s logical name in the object repository.
When you modify the logical name of an object, the name is automatically updated in both the Tree View and the Expert View throughout the test. If you are working with a shared object repository, your change applies to all occurrences of the object in the test. When you open another test that uses the same shared object repository and has one or more occurrences of the modified object in the test, the logical names within that test are updated as you open the test. This may take a few moments.
If you are working in object repository per-action mode, your change applies to all occurrences of the object in the selected action. If other actions in your test also include operations on the object, you must modify the object’s logical name in each relevant action. When you modify the logical name of an object, the name is automatically updated in both the Tree View and the Expert View throughout the selected action.
For more information on shared and per-action object repository modes, see Chapter 34, “Choosing the Object Repository Mode.”

QuickTest Professional User’s Guide • Working with Test Objects
68
To modify an object’s logical name:
1 Open the object repository. Choose Tools > Object Repository, or click the Repository button in the Object Properties dialog box.
2 Right-click the object in the object repository tree and choose Rename.
3 Modify the logical name and click OK, or select another object in the object repository tree.
The logical name you assign must be unique within the object repository. Logical names are not case-sensitive.
Note: The logical names in QuickTest 6.0 and earlier were case-sensitive. Therefore it is possible that an object repository, created in one of these versions, has two logical names that are identical except for case. If you open a test whose object repository contains such an object, QuickTest informs you that the conflicting logical names will automatically be modified to unique names. The test object’s name will be modified only in the object repository and must be manually modified in the test script.
Working with Test Objects During a Test Run
The first time QuickTest encounters an object during a test run, it creates a temporary version of the test object for that test run. For recorded steps, QuickTest uses the properties in the object repository to create this temporary version of the object. For the remainder of the test, QuickTest refers to the temporary version of the test object rather than to the test object in the object repository.
You can also create temporary versions of test objects to represent objects from your Web site or application using programmatic descriptions and without using the object repository.

Chapter 4 • Managing Test Objects
69
Creating Test Objects During a Test Run
Programmatic descriptions enable you to create temporary versions of test objects to represent objects from your application. You can perform operations on those objects without referring to the object repository. For example, suppose an edit box was added to a form on your Web site. You could use a programmatic description to add a statement in the Expert View that enters a value in the new edit box, so that QuickTest can identify the object even though you never recorded on the object or added it to the object repository.
For more information on programmatic descriptions, see “Using Programmatic Descriptions” on page 769.
Modifying Test Object Properties During a Test Run
You can modify the properties of the temporary version of the object during the test run without affecting the permanent values in the object repository by adding a SetTOProperty statement in the Expert View.
Use the following syntax for the SetTOProperty method:
Object(description).SetTOProperty Property, Value
Note: You can also add a SetTOProperty statement from the Tree View using the Method Wizard. For more information, see “Inserting Methods Using the Method Wizard” on page 733.
For more information, refer to the QuickTest Object Model Reference.

QuickTest Professional User’s Guide • Working with Test Objects
70
Modifying Object Descriptions
You can change the properties that QuickTest uses to identify an object. This is useful when you want to create and run tests on an object that changes dynamically. An object may change dynamically if it is frequently updated or if its property values are set using dynamic content, e.g. from a database.
You can also change the properties that identify an object in order to reference objects using properties that were not automatically learned while recording.
For example, suppose you are testing a Web site that contains an archive of newsletters. The archive page includes a hypertext link to the current newsletter and others to all past newsletters. The text in the first hypertext link on the page changes as the current newsletter changes, but it always links to a page called current.html. Suppose you want to create a step in your test in which you always click the first hypertext link in your archive page. Since the news is always changing, the text in the hypertext link keeps changing. You need to modify how QuickTest identifies this hypertext link so that it can continue to find it.
The default properties for a Link object (hypertext link) are “text” and “HTML tag”. The text property is the text inside the link. The HTML tag property is always, “A”, which indicates a link.
You can modify the default properties for a hypertext link so that you can identify it by its destination page, rather than by the text in the link. You can use the “href” property to check the destination page instead of using the “text” property to check the link by the text in the link.
The Object Properties dialog box contains the set of object properties and values that make up the test object description of a selected object. QuickTest uses this description to identify the object during a test run. For each object class, QuickTest has a default property set that it uses for the object description for a particular object. You can use the Add/Remove Properties dialog box to change the properties that are included in the object description.

Chapter 4 • Managing Test Objects
71
Note: You can also modify the set of properties that QuickTest learns when it records objects from a particular object class using the Object Identification dialog box. Such a change generally affects only objects that you record after you make the change. For more information, see “Configuring Object Identification” on page 673. You can also apply the changes you make in the Object Identification dialog box to the descriptions of all objects in an existing test using the Update Run option. For more information, see “Updating a Test” on page 498.
To modify an object description:
1 Right-click the object in the test tree or Active Screen containing the object that changed, and choose Object Properties (or View/Add Object from the Active Screen) or choose Step > Object Properties.
The Object Properties dialog box opens and displays the properties that are included in the object description.

QuickTest Professional User’s Guide • Working with Test Objects
72
If you want to view all objects in the action or test, click the Repository button. If you are working in object repository per-action mode, the Object Repository dialog box opens and displays the test tree of the action. If you are working in shared object repository mode, the Object Repository dialog box displays the test tree of all objects stored in the object repository file.
Tip: You can also open the object repository by choosing Tools > Object Repository.

Chapter 4 • Managing Test Objects
73
2 Click the Add/Remove button.
The Add/Remove Properties dialog box opens, listing the properties that can be used to identify the object. A selected check box next to a property indicates that the property is part of the object description. The Type column indicates whether the property is a constant or a parameter. The value for each property is displayed in the Value column.
Note: You can click the Add button to add valid test object properties to this properties list. For more information, see “Adding Test Object Properties to the Properties List,” below.
3 Select the properties you want to include in the object description:
To add a property to the object description, select the corresponding check box.
To remove a property from the object description, clear the corresponding check box.
Note: You can click the Default button to instruct QuickTest to highlight the default properties for the object class as defined in the Object Identification dialog box. For more information on the Object Identification dialog box, see Chapter 33, “Configuring Object Identification.”

QuickTest Professional User’s Guide • Working with Test Objects
74
4 Click OK to close the Add/Remove Properties dialog box.
5 Click OK to save your changes and close the Object Repository or Object Properties dialog box.
Tip: After you add a new property to the object description, you can modify its value in the Edit Value area in the Object Repository or Object Properties dialog box. For more information on modifying object properties, see “Modifying Test Object Properties While Designing Your Test” on page 62.
Adding Test Object Properties to the Properties List
You can add a valid test object property to the object properties list in the Add/Remove dialog box. Suppose you want QuickTest to use a specific property to identify your object, but that property is not listed in the properties list. You can open the Add Property dialog box and add that property to the list.
Note: You can use the Properties tab of the Object Spy to view a complete list of valid test object properties for a selected object. For more information on the Object Spy, see “Viewing Object Properties Using the Object Spy” on page 42.
To add test object properties to the properties list:
1 Open the Add/Remove Properties dialog box. For more information, see “Modifying Object Descriptions” on page 70.

Chapter 4 • Managing Test Objects
75
2 Click the Add button. The Add Property dialog box opens.
3 Enter a valid test object property:
Property name—Enter the property name.
Property value—Enter the value for the property.
Note: You must enter a valid test object property. If you enter an invalid property and then select it to be part of the object description, your test run will fail.
4 Click OK to add the property to the list and close the Add Property window.
5 Click OK to include the new property in the object description and close the Add/Remove Properties dialog box.

QuickTest Professional User’s Guide • Working with Test Objects
76
Adding Objects to the Object Repository
When you record a test, QuickTest adds each object on which you perform an operation to the object repository. You can also add objects to the object repository while editing your test.
There are various ways to add an object to the object repository while editing a test:
Use the Add New Object option in the Object Repository dialog box. You can add any object as a single object or a parent object, along with all its children.
Choose the View/Add Object option from the Active Screen.
Insert a step in your test for a selected object from the Active Screen.
Note: To add objects to the object repository using the Active Screen, the Active Screen must contain information for the object you want to add. You can control how much information is captured in the Active Screen in the Active Screen tab of the Options dialog box. For more information, see “Setting Active Screen Options” on page 594.

Chapter 4 • Managing Test Objects
77
To add an object to the object repository using the Add New Object option in the Object Repository dialog box:
1 Choose Tools > Object Repository. The Object Repository dialog box opens.
2 Click Add New Object. QuickTest and the Object Repository dialog box are minimized and the arrow becomes a pointing hand.
Note: If the window containing the object you want to add is partially hidden by another window, hold the pointing hand over the partially hidden window for a few seconds. The window comes into the foreground. You can now point to and click the object you want. You can configure the length of time required to bring a window into the foreground in the General tab of the Options dialog box. For more information, see Chapter 28, “Setting Global Testing Options.”

QuickTest Professional User’s Guide • Working with Test Objects
78
3 If the object you want to add to your repository can be displayed only by performing an event (such as a right-click or a mouse-over to display a context menu), hold the CTRL key. The pointing hand temporarily turns into a standard arrow and you can perform the event. When the object you want to add is displayed, release the CTRL key. The arrow becomes a pointing hand again.
4 Click the object you want to add to your object repository.
5 If the location you click is associated with more than one object, the Object Selection dialog box opens. Select the object you want to add to your repository and click OK to close the Object Selection dialog box.
6 If the object you select in the Object Selection dialog box is typically a parent object, such as a browser or page in a Web environment or a dialog box in a standard Windows application, the Add Object to Object Repository dialog box opens.
You have the following options:
Only the selected object—adds to the object repository the selected object’s properties and values, without its child objects
Selected object and all its direct children—adds to the object repository the properties and values of the selected object, along with those child objects one level below the selected parent object
Selected object and all its descendants—adds to the object repository the properties and values of the selected object, along with all the child objects contained in the selected object, as well as all descendants of the object’s child objects

Chapter 4 • Managing Test Objects
79
Make your selection and click OK to close the Add Object to Object Repository dialog box.
7 The Object Repository dialog box opens, displaying the new object and its properties and values. QuickTest also adds the new object’s parent objects if they do not already exist in the object repository.
You can edit your new object’s settings in the Object Repository dialog box just as you would any other object in your repository.
8 Click OK. The Object Repository dialog box closes and the new object(s) is stored in the object repository.

QuickTest Professional User’s Guide • Working with Test Objects
80
To add an object to the object repository using the View/Add Object option from the Active Screen:
1 If the Active Screen is not displayed, choose View > Active Screen or click the Active Screen toolbar button to display it.
2 Select a step in your test whose Active Screen contains the object that you want to add to the object repository.
3 Right-click the object you want to add and select View/Add Object.
4 If the location you clicked is associated with more than one object, the Object Selection dialog box opens. Select the object for which you want to add a step, and click OK to close the Object Selection dialog box.
5 The Object Properties dialog box opens and displays the default test object properties for the object.

Chapter 4 • Managing Test Objects
81
6 Click Add to repository. The Object Repository dialog box opens and displays the object properties for the selected object.
You can edit your new object’s settings in the Object Repository dialog box just as you would any other object in your test.
7 Click OK. The Object Repository dialog box closes and the object is stored in the object repository.

QuickTest Professional User’s Guide • Working with Test Objects
82
To add an object to the object repository by inserting a step from the Active Screen:
1 If the Active Screen is not displayed, choose View > Active Screen or click the Active Screen toolbar button to display it.
2 Select a step in your test whose Active Screen contains the object for which you want to add a step.
3 Right-click the object for which you want to add a step and select the type of step you want to insert (checkpoint, output value, method, etc.).
4 If the location you clicked is associated with more than one object, the Object Selection dialog box opens. Select the object for which you want to add a step, and click OK.
The appropriate dialog box opens, enabling you to configure your preferences for the step you want to insert.
5 Set your preferences and select whether to insert the step before or after the step currently selected in the test tree or in the Expert View. Click OK to close the dialog box. A new step is inserted in your test, and the object is added to the object repository (if it was not yet included).
Deleting an Object from the Object Repository
When you remove a step from your test, the object remains in the object repository.
If you are working with per-action object repositories and the object in the step you removed does not occur in any other steps within that action, you can delete the object from the object repository.
If you are working with a shared object repository, confirm that the object does not appear in any other test using the same shared object repository file before you choose to delete the object from the object repository.
Note: If your action contains references to an object that you have deleted from the object repository, your test will not run.

Chapter 4 • Managing Test Objects
83
To delete an object from the object repository:
1 Right-click an object you want to delete in the test tree or Active Screen and choose Object Properties (or View/Add Object in the Active Screen), and then click the Repository button, or choose Tools > Object Repository.
The Object Repository dialog box opens.
2 In the repository tree, right-click the step containing the object you want to delete and click Delete. A confirmation message is displayed.
3 Click Yes to confirm that you want to delete the object. The object is deleted from the object repository.
Note: Once you confirm that you want to delete the object, you cannot retrieve the object again. Clicking Cancel after confirming the deletion does not cancel the deletion.

QuickTest Professional User’s Guide • Working with Test Objects
84

Part III
Creating Tests

86

87
5Designing Tests
You can quickly create a test by recording the operations you perform on your Web site or application. Once you have created your test, you can enhance your test using checkpoints and other special testing options.
This chapter describes:
About Creating Tests
Planning a Test
Recording a Test
Understanding Your Test
Choosing Your Recording Mode
Changing the Active Screen
Managing a Test
Creating, Opening, and Saving Tests with Locked Resources
About Creating Tests
QuickTest enables you to generate an automated test by recording the typical processes that you perform on your Web site or application. As you navigate through your application, QuickTest graphically displays each step you perform as an icon in a test tree. A step is anything a user does that changes the content of a page or object in your site or application, for example, clicking a link or typing data into an edit box.

QuickTest Professional User’s Guide • Creating Tests
88
While recording or designing your test, you can insert checkpoints into your test. A checkpoint compares the value of an element captured in your test when you recorded your test, with the value of the same element captured during the test run. This helps you determine whether or not your application or Web site is functioning correctly.
When you test your application or site, you may want to check how it performs the same operations with different data. This is called parameterizing your test. You can supply data in the Data Table by defining environment variables and values, or you can have QuickTest generate random numbers or current user and test data. For more information, see Chapter 13, “Parameterizing Tests.”
After recording, you can further enhance your test by adding and modifying steps in the test tree.
Note: Many QuickTest recording and editing operations are performed using the mouse. In accordance with the Section 508 of the W3C accessibility standards, QuickTest also recognizes operations performed using the MouseKeys option in the Windows Accessibility Options utility. Additionally, you can perform many operations using QuickTest’s shortcut keys. For a list of shortcut keys, see “Executing Commands Using Shortcut Keys” on page 21.

Chapter 5 • Designing Tests
89
Planning a Test
Before you start recording, you should plan your test and consider the following suggestions and options:
Determine the functionality you want to test. Short tests that check specific functions of the application or site or complete a transaction are better than long tests that perform several tasks.
Decide which information you want to check during the test. A checkpoint can check for differences in the text strings, objects, and tables in your application or site. For more information, see Chapter 7, “Understanding Checkpoints.”
Evaluate the types of events you need to record. If you need to record more or fewer events than QuickTest generally records by default, you can configure the events you want to record. For more information, see Chapter 35, “Configuring Web Event Recording.”
Consider increasing the power and flexibility of your test by replacing fixed values with parameters. When you parameterize your test, you can check how it performs the same operations with multiple sets of data, or from data stored or generated by an external source. For more information, see Chapter 13, “Parameterizing Tests.”
Change the way that QuickTest identifies objects. This is particularly helpful when your application contains objects that change frequently or are created using dynamic content, e.g. from a database. For additional information, see Chapter 33, “Configuring Object Identification.”
Decide how you want to organize your object repository files. You can work with the individual action’s object repositories, or you can use a common (shared) object repository file for multiple tests. If you are new to testing, you may want to keep the default object repository per action setting. Once you feel more comfortable with the basics of test design, you may want to take advantage of the shared object repository option. For additional information, see Chapter 34, “Choosing the Object Repository Mode.”

QuickTest Professional User’s Guide • Creating Tests
90
Consider using actions to streamline the testing process. For additional information, see Chapter 17, “Working with Actions.”
Link to WinRunner tests and call WinRunner TSL functions from a QuickTest test. For additional information, see Chapter 40, “Working with WinRunner.”
Recording a Test
You create a test by recording the typical processes that users perform. QuickTest records each step you perform and generates a test tree and test script.
Note that by default, each test includes a single action, but can include multiple actions. This chapter describes how to record a test with a single action. For information on why and how to work with multiple actions, see Chapter 17, “Working with Actions.”
By default, QuickTest records in the normal recording mode. If you are unable to record on an object in a given environment in the standard recording mode, or if you want to record mouse clicks and keyboard input with the exact x- and y-coordinates, you may want to record on those objects using analog or low-level recording. For more information about low-level and analog recording, see “Choosing Your Recording Mode” on page 96.
Tip: If you have objects that behave like standard objects, but are not recognized by QuickTest, you can define your objects as virtual objects. For more information, see Chapter 16, “Learning Virtual Objects.”

Chapter 5 • Designing Tests
91
Consider the following guidelines when recording a test:
Before you start to record, close all applications not required for the test.
If you are recording a test on a Web site, determine the security zone of the site. When you record a test on a Web browser, the browser may prompt you with security alert dialog boxes. You may choose to disable/enable these dialog boxes.
Decide how you want to open the application or Web browser when you record and run your test. You can choose to have QuickTest open one or more specified applications, or record and run on any application or browser that is already open. For more information, see Chapter 30, “Setting Record and Run Options.”
Choose how you want QuickTest to record and run your test by setting global testing options in the Options dialog box and test-specific settings in the Test Settings dialog box. For more information, see Chapter 28, “Setting Global Testing Options” and Chapter 29, “Setting Testing Options for a Single Test.”
Note: If you are creating a test on Web objects, you can record your test on one browser and run it on another browser. QuickTest supports the following browsers—Netscape Navigator, Microsoft Internet Explorer, AOL, and applications with embedded Web browser controls. For additional information, see Chapter 21, “Testing Web Objects.”
To record a test:
1 Open QuickTest. For more information, see “Starting QuickTest” on page 10.
2 Open a test:
To create a new test, click the New button or choose File > New.
To open an existing test, click the Open button or choose File > Open. In the Open QuickTest Test dialog box, select a test and click Open.
For more information, see “Managing a Test” on page 103.

QuickTest Professional User’s Guide • Creating Tests
92
3 Click the Record button or choose Test > Record. If you are recording a new test and have not yet set your record and run settings in the Record and Run Settings dialog box (from Test > Record and Run Settings), the Record and Run Settings dialog box opens.
Note: Once you have set the record and run settings for a test, the Record and Run settings dialog box will not open the next time you start a session in the same test. However, you can choose Test > Record and Run Settings to open the Record and Run Settings dialog box. You can use this option to set or modify your record and run preferences in the following scenarios:
You have already recorded one or more steps in the test and you want to modify the settings before you continue recording.
You want to run the test on a different application or browser than the one you previously used.

Chapter 5 • Designing Tests
93
The Record and Run Settings dialog box contains tabbed pages corresponding to the add-ins loaded. These can include both built-in and separately purchased add-ins, where applicable. The image here includes the environments listed below:
4 To choose a page, click a tab.
5 Set an option, as described in Chapter 30, “Setting Record and Run Options.”
6 To apply your changes and keep the Record and Run Settings dialog box open, click Apply.
For more information about record and run settings, see “Setting Web Record and Run Options” on page 646.
7 Click OK to close the Record and Run Settings dialog box and begin recording your test.
8 Navigate through your application or Web site. QuickTest records each step you perform and displays it in the Tree View or Expert View.
9 To determine whether or not your Web site or application is functioning correctly, you can insert text checkpoints, object checkpoints, and bitmap checkpoints. For more information, see Chapter 7, “Understanding Checkpoints.”
10 You can parameterize your test to check how it performs the same operations with multiple sets of data, or with data from an external source. For more information, see Chapter 13, “Parameterizing Tests.”
Tab Heading Subject
Windows Applications Options for testing standard Windows applications.
Web Options for testing Web sites.
Note: The Web tab is available only when Web support is installed and loaded.

QuickTest Professional User’s Guide • Creating Tests
94
11 When you complete your recording session, click the Stop button or choose Test > Stop.
12 To save your test, click the Save button or choose File > Save. In the Save QuickTest Test dialog box, assign a name to the test. QuickTest suggests a default folder called Tests under your QuickTest Professional installation folder. For more information, see “Managing a Test” on page 103.
Understanding Your Test
While recording, QuickTest creates a test tree—a graphical representation of operations you perform on your application. The test tree is displayed in the Tree View tab.
The following is a sample test of a login procedure to the Mercury Tours site, Mercury Interactive’s sample Web site.
The table below provides an explanation of each step in the tree.
Step Description
Action1 is the action name.
The browser invokes the Welcome: Mercury Web site.
Welcome: Mercury is the name of the Web page.
Welcome: Mercury is the name of the page checkpoint that checks statistical information including the load time, the links, and the source of images in the Welcome: Mercury page.

Chapter 5 • Designing Tests
95
QuickTest also generates a test script—a VBScript program based on the QuickTest object model. The test script is displayed in the Expert View as follows:
Browser("Welcome: Mercury").Page("Welcome: Mercury").Check CheckPoint("Welcome: Mercury")Browser("Welcome: Mercury").Page("Welcome: Mercury").WebEdit("userName").Set "mercury"Browser("Welcome: Mercury").Page("Welcome: Mercury").WebEdit("password").SetSecure "3f13a81da8b683cc009435"Browser("Welcome: Mercury").Page("Welcome: Mercury").Image("Sign-In").Click 32,10
username is the name of the edit box. Set is the method performed on the edit box. mercury is the value of the edit box.
password is the name of the edit box. SetSecure is an encryption method performed on the edit box. 3f13a81da8b683cc009435 is the encrypted value of the password.
Sign-In is the name of the image link. Click is the method performed on the image. 32, 10 are the x- and y-coordinates where the image was clicked.
Step Description

QuickTest Professional User’s Guide • Creating Tests
96
Choosing Your Recording Mode
QuickTest’s normal recording mode records the objects in your application and the operations performed on them. This mode is the default and takes full advantage of QuickTest’s test object model, recognizing the objects in your application regardless of their location on the screen.
When working with specific types of objects or operations, however, you may want to choose from the following, alternative recording modes:
Analog Recording - enables you to record the exact mouse and keyboard operations you perform in relation to either the screen or the application window. In this recording mode, QuickTest records and tracks every movement of the mouse as you drag the mouse around a screen or window. This mode is useful for recording operations that cannot be recorded at the level of an object, for example, recording a signature produced by dragging the mouse.
Low-Level Recording - enables you to record on any object in your application, whether or not QuickTest recognizes the specific object or the specific operation. This mode records at the object level and records all run-time objects as Window or WinObject test objects. Use low-level recording for recording tests in an environment or on an object not recognized by QuickTest. You can also use low-level recording if the exact coordinates of the object are important for your test.
Guidelines for Analog and Low-Level Recording
Consider the following guidelines when choosing Analog Recording or Low-Level Recording:
Use Analog Recording or Low-Level Recording only when QuickTest’s normal recording mode does not accurately record your operation.
Analog Recording and Low-Level Recording require more disk space than normal recording mode.
You can switch to either Analog Recording or Low-Level Recording in the middle of a recording session for specific steps. Once you have recorded the necessary steps in Analog Recording or Low-Level Recording, you can return to normal recording mode for the remainder of your recording session.

Chapter 5 • Designing Tests
97
Analog Recording
Use Analog Recording for applications in which the actual movement of the mouse is what you want to record. These can include drawing a mouse signature or working with drawing applications that create images by dragging the mouse.
You can record in Analog Recording mode relative to the screen or relative to a specific window.
Record relative to a specified window if the operations you perform are on objects located within one window and that window does not move during the analog recording session. This ensures that during the test run, QuickTest will accurately identify the window location on which the analog steps were performed even if the window is in a different location when you run the analog steps. QuickTest does not record any click or mouse movement performed outside the specified window.
Record relative to the screen if the window on which you are recording your analog steps moves during recording or if the operations you perform are on objects located within more than one window. This can include dragging and dropping an object from one window to another.
The steps recorded using Analog Recording are saved in a separate data file. This file is stored with the action in which the analog steps are recorded.
When you record in Analog Recording mode, QuickTest adds to your test a RunAnalog statement that calls the recorded analog file. The corresponding Active Screen displays the results of the last analog step that was performed during the analog recording session.
Low-Level Recording
Use Low-Level Recording for recording on environments or objects not supported by QuickTest.
Use Low-Level Recording for when you need to record the exact location of the operation on your application screen. While recording in normal mode, QuickTest performs the step on an object even if it has moved to a new location on the screen. If the location of the object is important to your test, switch to Low-Level Recording to enable QuickTest to record the object in terms of its x- and y- coordinates on the screen. This way, the step will pass only if the object is in the correct position.

QuickTest Professional User’s Guide • Creating Tests
98
While Low-Level Recording, QuickTest records all parent level objects as Window test objects and all other objects as WinObject test objects. They are displayed in the Active Screen as standard Windows objects.
Low-Level Recording supports the following methods for each test object:
WinObject test object—Click, DblClick, Drag, Drop, Type
Window test object—Click, DblClick, Drag, Drop, Type, Activate, Minimize, Restore, Maximize
Each step recorded in Low-Level Recording mode is shown in the test tree and test script. (Analog Recording records only the one step in the test tree that calls the external analog data file.)
Using Analog Recording
You can switch to Analog Recording mode only while recording a test. The option is not available while editing a test.
To record in Analog Recording mode:
1 If you are not already recording, click the Record button to begin a recording session.
2 Click the Analog Recording button or choose Test > Analog Recording. The Analog Recording Settings dialog box opens.

Chapter 5 • Designing Tests
99
3 Select from the following options:
Record relative to the screen—QuickTest records any mouse movement or keyboard input relative to the coordinates of your screen, regardless of which application(s) are open or which application(s) you specified in the Record and Run Settings dialog box.
Select Record relative to the screen if you perform your analog operations on objects located within more than one window or if the window itself may move while you are recording your analog operations.
Notes:
When you record in analog mode relative to the screen, the test run will fail if your screen resolution or the screen location on which you recorded your analog steps has changed from the time you recorded.
The analog tracking continues to record the movement of the mouse until the mouse reaches the QuickTest screen to turn off analog recording or to stop recording. Clicking on the QuickTest icon in the Windows taskbar is also recorded. This should not affect your test. The mouse movements and clicks on the QuickTest screen itself are not recorded.
Record relative to the following window—QuickTest records any mouse movement or keyboard input relative to the coordinates of the specified window.
Select Record relative to the following window if all your operations are performed on objects within the same window and that window does not move during analog recording. This guarantees that the test will run the analog steps in the correct position within the window even if the window’s screen location changes after recording.
Note: If you have selected to record in analog mode relative to window, any operation performed outside the specified window is not recorded while in analog recording mode.

QuickTest Professional User’s Guide • Creating Tests
100
4 If you choose to Record relative to the following window, click the pointing hand and click anywhere in the window on which you want to record in analog mode. The title of the window you clicked is displayed in the window title box.
5 Click Start Analog Record.
6 Perform the operations you want to record in analog mode.
All of your keyboard input, mouse movements, and clicks are recorded and saved in an external file. When QuickTest runs the test, the external data file is called. It tracks every movement and click of the mouse to replicate exactly the operations you recorded.
7 When you are finished and want to return to normal recording mode, click the Analog Recording button or choose Test > Analog Recording to turn off the option.
If you chose to Record relative to the screen, QuickTest inserts the RunAnalog step under a Desktop parent item. For example:
Desktop.RunAnalog "Track9"
If you chose to Record relative to the following window, QuickTest inserts the RunAnalog step under a Window parent item. For example:
Window("Microsoft Internet").RunAnalog "Track8"
The track file called by the RunAnalog method contains all your analog data and is stored with the action.

Chapter 5 • Designing Tests
101
Note: When entering the RunAnalog method, you must use a valid and existing track file as the method argument.
Tip: To stop an analog step in the middle of a test run, click CTRL + ESC, then click Stop in the test toolbar.
Using Low-Level Recording
You can switch to low-level recording mode only while recording a test. The option is not available while editing a test.
To record in Low-Level Recording mode:
1 If you are not already recording, click the Record button to begin a recording session.
2 Click the Low Level Recording button or choose Test > Low Level Recording.
The record mode changes to low-level recording and all of your keyboard input and mouse clicks are recorded based on mouse coordinates. When QuickTest runs the test, the cursor retraces the recorded clicks.
3 When you are finished and want to return to normal recording mode, click the Low Level Recording button or choose Test > Low Level Recording to turn off the option.

QuickTest Professional User’s Guide • Creating Tests
102
The following examples illustrate the difference between the same operations recorded using normal mode and low-level recording mode.
Suppose you type the word mercury into a user name edit box and then click the TAB key while in normal recording mode. Your test tree and script are displayed as follows:
Browser("Mercury Tours").Page("Mercury Tours").WebEdit("username").Set "mercury"
If you perform the same action while in low-level recording mode, QuickTest records the click in the user name box, followed by the keyboard input, including the TAB key. The test tree and script look like this:
Window("Microsoft Internet").WinObject("Internet Explorer_Se").Click 29,297Window("Microsoft Internet").WinObject("Internet Explorer_Se").Type "mercury"
+ micTab
Changing the Active Screen
As the content of your application or Web site changes, you can continue to use tests you developed previously. You simply update the selected Active Screen display so that you can use the Active Screen to add new steps to your test rather than re-recording steps on new or modified objects.
For example, suppose that one of the pages in the Mercury Tours site now includes a new object and you want to add a checkpoint that checks for this object. You can use the Change Active Screen command to replace the page in your Active Screen tab and then proceed to create a checkpoint for this object.

Chapter 5 • Designing Tests
103
To change the Active Screen:
1 Make sure that your application or Web browser is displaying the window or page that you want to use to replace what is currently displayed in the Active Screen tab.
2 In the test tree, click a step that you want to change and the window or page is displayed in the Active Screen tab.
3 Choose Tools > Change Active Screen. The QuickTest window is minimized and the mouse pointer becomes a pointing hand.
4 Click the window or page displayed in your application or browser. A message prompts you to change your current Active Screen display.
5 Click Yes.
Managing a Test
You can use the File toolbar to create, open, save, zip, and print recorded tests.
Creating a New Test
To create a new test, click the New button or choose File > New. A new test opens. You are ready to start recording your test.
Note: If your default test settings include associating new tests with a locked resource file, a message regarding locked resources opens when you create a new test. For more information, see “Creating, Opening, and Saving Tests with Locked Resources” on page 107.

QuickTest Professional User’s Guide • Creating Tests
104
Opening an Existing Test
You can open an existing test to enhance or run it.
To open an existing test:
1 Click the Open button or choose File > Open. The Open QuickTest Test dialog box opens.
2 Select a test. You can select the Open in read-only mode option at the bottom of the dialog box. Click Open. The test opens and the title bar displays the test name.
You can also open tests that are part of a TestDirector project. For more information, see Chapter 41, “Working with TestDirector.”
Note: If the test you are opening is associated with a locked resource file, a message opens instructing you in how to open the test. For more information, see “Creating, Opening, and Saving Tests with Locked Resources” on page 107.
Saving a Test
You can save a new test or save changes to an existing test. When you save a test, any modified resource files associated with the test are also saved. These associated resources include the Data Table file and the shared object repository file.
To save a new test:
1 Click the Save button or choose File > Save to save the test. The Save QuickTest Test dialog box opens.
2 Choose the folder in which you want to save the test. QuickTest suggests a default folder called Tests under your QuickTest Professional installation folder.

Chapter 5 • Designing Tests
105
3 Type a name for the test in the File name box.
4 Confirm that Save Active Screen files is selected if you want to save the Active Screen files with your test.
Note that if you clear this box, your Active Screen files will not be saved, and you will not be able to edit your test using the options that are normally available from the Active Screen.
Clearing the Save Active Screen files check box can be especially useful for conserving disk space once you have finished designing the test and you are using the test only for test runs.
Tip: If you clear the Save Active Screen files check box and then later want to edit your test using Active Screen options, you can regenerate the Active Screen information by performing an Update Run operation. For more information, see “Updating a Test” on page 498.
Note: You can also instruct QuickTest not to capture Active Screen files while recording or to only capture Active Screen information under certain conditions. You can set these preferences in the Active Screen tab of the Options dialog box. For more information, see Chapter 28, “Setting Global Testing Options.”
5 Click Save. QuickTest displays the test name in the title bar.

QuickTest Professional User’s Guide • Creating Tests
106
To save changes to an existing test:
Click the Save button to save changes to the current test.
Choose File > Save As to save an existing test to a new name or a new location. If you choose File > Save As, the following options are available:
Select or clear the Save Active Screen files check box to indicate whether or not you want to save the Active Screen files with the new test. For more information, see step 4 above.
Select or clear the Save test results check box to indicate whether or not you want to save any existing test results with your test.
Note that if you clear this box, your test result files will not be saved, and you will not be able to view them later. Clearing the Save test results check box can be useful for conserving disk space if you do not require the test results for later analysis, or if you are saving an existing test under a new name and do not need the test results.
You can also save tests to a TestDirector project. For more information, see Chapter 41, “Working with TestDirector.”
Note: If you are saving a test whose locked resources were not opened in read-write mode and modified while editing the test, a warning message opens regarding saving the test. For more information, see “Creating, Opening, and Saving Tests with Locked Resources” on page 107.
Zipping a Test
While you record, QuickTest creates a series of configuration, run-time, setup data, and Active Screen files. QuickTest saves these files together with the test. You can zip these files to conserve space and make the tests easier to transfer.
To zip a test:
1 Choose File > Export to Zip File. The Export to Zip File dialog box opens.
2 Type a zip file name and path, or accept the default name and path, and click OK. QuickTest zips the test and its associated files.

Chapter 5 • Designing Tests
107
Unzipping a Test
To open a zipped test in QuickTest, you must use the Import from Zip File command to unzip it.
To unzip a zipped test:
1 Select File > Import from Zip File. The Import from Zip File dialog box opens.
2 Type or select the zip file that you want to unzip, choose a target folder into which you want to unzip the files, and click OK. QuickTest unzips the test and its associated files.
Printing a Test
You can print your test.
To print a test:
1 Click the Print button or choose File > Print. The Print dialog box opens.
2 Click OK to print.
Creating, Opening, and Saving Tests with Locked Resources
QuickTest resource files can be locked by QuickTest to protect the information in the file from being overwritten. QuickTest resource files are locked if the file:
is being used by another QuickTest user
has been checked into a TestDirector version control database or some other version control software
has been marked as read-only

QuickTest Professional User’s Guide • Creating Tests
108
External Resource Files
QuickTest resource files are external files that are associated with your test and can be edited within QuickTest. These can include:
Shared object repository files. (For more information, see Chapter 34, “Choosing the Object Repository Mode.”)
Data Table files. (For more information, see Chapter 18, “Working with Data Tables.”)
Note: External files that are associated with your test, but cannot be edited within QuickTest (such as library files and environment variable files) are not affected by this locking mechanism.
QuickTest notifies you if a QuickTest resource file that is associated with your test is locked when:
creating a new test whose default settings associate the test with a QuickTest resource that is locked. For more information, see “Creating Tests with Locked Resources” on page 108.
opening a test whose QuickTest resource file is locked. For more information, see “Opening Tests with Locked Resources” on page 110.
saving a test whose external resource files were not opened in read-write mode (because they were locked when you opened the test) and modified while editing the test. For more information, see ‘“Saving Tests with Locked Resources” on page 111.
Creating Tests with Locked Resources
If your QuickTest settings have been configured to use a default, shared object repository file, any test you create is automatically associated with that external file for all test object information. When you create a new test, the shared object repository file may be locked.

Chapter 5 • Designing Tests
109
When you open QuickTest and when you create a new test, the following message opens if the shared object repository file is locked:
Click OK.
It is recommended that you select a different shared object repository or select Per-action as the Object repository type in the Resources tab of the Test Settings dialog box before beginning to record or edit your test. For more information, see “Setting the Object Repository Mode” on page 709. Alternatively, create the test when the associated shared object repository is available.
Note: You are able to change the object repository of the test only before you begin recording or editing the test.
If you choose to create the test with a locked shared object repository, then the shared object repository opens in read-only mode. You can run the test while it is open and you can choose to save the test, but any changes to the shared object repository are not saved. This means that if any of the descriptions or values of any of the objects change as a result of recording or editing your new test, the object repository file will not be saved with the modified data.

QuickTest Professional User’s Guide • Creating Tests
110
Opening Tests with Locked Resources
When you choose to open a test that is associated with a locked, QuickTest resource file, the following message opens:
The resources listed are opened in read-only mode. You have the option to open the test in:
Read-Only Mode
Read-Write Mode
Read-Only Mode
If you open the test in read-only mode, you can run the test but not make any changes to it. All editing options are disabled and you cannot edit the test in the Tree View or the Expert View. While the test itself cannot be saved, if you run the test and choose to save the results, the test results file is saved.
You can choose the Save As option from the File menu, save the test under a new name, and then edit the test. The same is true for a shared object repository file opened in read-only mode.

Chapter 5 • Designing Tests
111
Read-Write Mode
If you open a test in read-write mode, you can run and edit the test and save the changes you make to the test. However, any changes to locked, QuickTest resource files cannot be saved. Locked resource files are opened in read-only mode even if the test has been opened in read-write mode.
For example, suppose you choose to open a test in read-write mode that has a locked Data Table file associated with it. When you edit the test, any changes to the Data Table will not be saved. If any of the Data Table values have changed as a result of editing the test and you save the changes to the test, the test may fail the next time it calls the unmodified Data Table values.
It is therefore recommended to open the test in read-only mode or to close the test without saving.
Saving Tests with Locked Resources
When you choose to save a test with locked resources that you opened in read-write mode, the following message opens if anything in a locked resource file has changed:
It is recommended not to save a test whose locked resource files have been modified. If you do save the test, the next time you run the test, the test may fail because the test may be expecting different values from the resource files.

QuickTest Professional User’s Guide • Creating Tests
112

113
6Enhancing Your Test
Once you record a test, you can use a variety of options to enhance your test. This chapter lists and describes some of the options you may want to use to create comprehensive tests for your Web site or application.
This chapter describes:
About Enhancing Your Test
Synchronizing Your Test
Measuring Transactions
About Enhancing Your Test
You synchronize your test to ensure that your application is ready for QuickTest to perform the next step in your test. For more information, see “Synchronizing Your Test” on page 114.
You can measure the amount of time it takes for your application to perform steps in a test by defining and measuring transactions. For more information, see “Measuring Transactions” on page 119.
You can add checkpoints to your test. A checkpoint is a step in your test that compares the values of the specified property during a test run with the values stored for the same test object property within the test. This enables you to identify whether or not your Web site or application is functioning correctly. For more information about creating checkpoints, see Chapter 7, “Understanding Checkpoints.”

QuickTest Professional User’s Guide • Creating Tests
114
You can parameterize your test to replace fixed values with values from an external source during your test run. The values can come from a Data Table, environment variables you define, or values that QuickTest generates during the test run. For more information, see Chapter 13, “Parameterizing Tests.”
You can retrieve values from your test and store them in the Data Table as output values. You can subsequently use these values as an input parameter in your test. This enables you to use data retrieved during a test in other parts of the test. For more information, see Chapter 14, “Creating Output Values.”
You can divide your test into actions to streamline the testing process of your Web site or application. For more information, see Chapter 17, “Working with Actions.”
You can use special QuickTest options to enhance your test with programming statements. The Method Wizard guides you step-by-step through the process of adding recordable and non-recordable methods to your test. For more information, see Chapter 36, “Enhancing Your Tests with Programming Statements”. You can also manually enter standard VBScript statements, as well as statements using QuickTest test objects and methods, in the Expert View. For more information, see Chapter 37, “Testing in the Expert View.”
Synchronizing Your Test
When you run tests, your application may not always respond with the same speed. For example, it might take a few seconds:
for a progress bar to reach 100%
for a status message to appear
for a button to become enabled
for a window or pop-up message to open
You can handle these anticipated timing problems by synchronizing your test to ensure that QuickTest waits until your application is ready before performing a certain step.

Chapter 6 • Enhancing Your Test
115
There are several options that you can use to synchronize your test:
You can insert a synchronization point, which instructs QuickTest to pause the test until an object property achieves the value you specify. When you insert a synchronization point into your test, QuickTest generates a WaitProperty statement in the Expert View.
You can insert Exist or Wait statements that instruct QuickTest to wait until an object exists or to wait a specified amount of time before continuing the test.
You can also increase the default timeout settings in the Test Settings and Options dialog boxes in order to instruct QuickTest to allow more time for certain events to occur.
Creating Synchronization Points
If you do not want QuickTest to perform a step or checkpoint until an object in your application achieves a certain status, you should insert a synchronization point to instruct QuickTest to pause the test until the object property achieves the value you specify (or until a specified timeout is exceeded).
For example, suppose you record a test on a flight reservation application. You insert an order, and then you want to modify the order. When you click the Insert Order button, a progress bar is displayed and all other buttons are disabled until the progress bar reaches 100%. Once the status bar reaches 100%, you record a click on the Update Order button.
Without a synchronization point, QuickTest may try to click the Update Order button too soon during a test run (if the progress bar takes longer than the test’s object synchronization timeout), and the test will fail.
You can insert a synchronization point that instructs QuickTest to wait until the Update Order button’s enabled property is 1.

QuickTest Professional User’s Guide • Creating Tests
116
Tip: QuickTest must be able to identify the specified object in order to perform a synchronization point. To instruct QuickTest to wait for an object to open or appear, use an Exist or Wait statement. For more information, see “Adding Exist and Wait Statements” on page 118.
To insert a synchronization point:
1 Begin recording your test.
2 Display the screen or page in your application that contains the object for which you want to insert a synchronization point.
3 In QuickTest choose Insert > Step > Synchronization Point. The mouse pointer turns into a pointing hand.
4 Click the object in your application for which you want to insert a synchronization point. Note that it does not matter what property values the object has at the time that you insert the synchronization point.
If the location you click is associated with more than one object in your application, the Object Selection - Synchronization Point dialog box opens.
Select the object for which you want to insert a synchronization point, and click OK.
The Add Synchronization Point dialog box opens.

Chapter 6 • Enhancing Your Test
117
5 The Property name list contains the test object properties associated with the object. Select the Property name you want to use for the synchronization point.
6 Enter the property value for which QuickTest should wait before continuing to the next step in the test.
7 Enter the synchronization point timeout (in milliseconds) after which QuickTest should continue to the next step in the test, even if the specified property value was not achieved.
8 Click OK. A WaitProperty step is added to your test.
Because the WaitProperty step is a method for the selected object, it is displayed in the Tree View with the icon for the selected object. For example, if you insert a synchronization point for the Update Order button, it may look something like this:
In the Expert View, this step appears as:
Window("Flight Reservation").WinButton("Update Order").WaitProperty "enabled", 1, 3000

QuickTest Professional User’s Guide • Creating Tests
118
Tip: To modify the values of your synchronization point, display the WaitProperty step in the Expert View and modify the property name, property value, or timeout. For more information on the WaitProperty method, refer to the QuickTest Object Model Reference.
Adding Exist and Wait Statements
You can enter Exist and/or Wait statements in the Expert View to instruct QuickTest to wait for a window to open or an object to appear.
Exist statements return a boolean value indicating whether or not an object currently exists. Wait statements instruct QuickTest to wait a specified amount of time before proceeding to the next step. You can combine these statements within a loop to instruct QuickTest to wait until the object exists before continuing with the test.
For example, the following statements instruct QuickTest to wait up to 20 seconds for the Flights Table dialog box to open.
y=Window("Flight Reservation").Dialog("Flights Table").Existcounter=1While y=0
Wait (2)y=Window("Flight Reservation").Dialog("Flights Table").Existcounter=counter+1If counter=10 then
y=1End if
Wend
For more information on entering statements in the Expert View, see Chapter 37, “Testing in the Expert View.”
For more information on While, Exist, and Wait statements, refer to the QuickTest Object Model Reference.

Chapter 6 • Enhancing Your Test
119
Modifying Timeout Values
If you find that, in general, the amount of time QuickTest waits for objects to appear or for a browser to navigate to a specified page is insufficient, you can increase the default object synchronization and browser navigation timeout values for your test.
Alternatively, if you insert synchronization points and Exist and/or Wait statements for the specific areas in your test where you want QuickTest to wait a longer time for an event to occur, you may want to decrease the default timeouts for the rest of your test.
To modify the maximum amount of time that QuickTest waits for an object to appear, change the Object Synchronization Timeout (Test > Settings > Run tab). For more information, see “Defining Run Settings for Your Test” on page 624.
To modify the amount of time that QuickTest waits for a Web page to load, change the Browser Navigation Timeout (Test > Settings > Web tab). For more information, see “Defining Web Settings for Your Test” on page 638.
Measuring Transactions
You can measure how long it takes to run a section of your test by defining transactions. A transaction represents the business process that you are interested in measuring. You define transactions within your test by enclosing the appropriate sections of the test with start and end transaction statements. For example, you can define a transaction that measures how long it takes to reserve a seat on a flight and for the confirmation to be displayed on the client’s terminal.
A transaction can be inserted anywhere in your test, but must start and end within the same action. For more information about actions, see Chapter 17, “Working with Actions.”
During the test run, the Start Transaction signals the beginning of the time measurement. The time measurement continues until the End Transaction is encountered. The test report displays the time it took to perform the transaction.

QuickTest Professional User’s Guide • Creating Tests
120
There is no limit to the number of transactions that can be added to a test. You can also insert a transaction within a transaction.
A sample test tree with transactions is shown below:
Inserting Transactions
During the test run, the Start Transaction signals the beginning of the time measurement. You define the beginning of a transaction in the Start Transaction dialog box.
To insert a transaction:
1 In the test tree, click the step where you want the transaction timing to begin. The page is displayed in the Active Screen tab.
2 Click the Start Transaction button or choose Insert > Start Transaction. The Start Transaction dialog box opens.
Start Transaction
End Transaction

Chapter 6 • Enhancing Your Test
121
3 Enter a meaningful name in the Name box.
Note: The following are illegal when specifying a Start Transaction name—spaces # , :
4 Decide where you want the transaction timing to begin:
To insert a transaction before the current step, select Before current step.
To insert a transaction after the current step, select After current step.
5 Click OK. A tree item with the Start Transaction icon is added to the test tree.
Ending Transactions
During the test run, the End Transaction signals the end of the time measurement. You define the end of a transaction in the End Transaction dialog box.
To end a transaction:
1 In the test tree, click the step where you want the transaction timing to end. The page opens in the Active Screen.
2 Click the End Transaction button or choose Insert > End Transaction. The End Transaction dialog box opens.
3 The Name box contains a list of the transaction names you defined in the current test. Select the name of the transaction you want to end.

QuickTest Professional User’s Guide • Creating Tests
122
4 Decide where to insert the end of the transaction:
To insert a transaction before the current step, select Before current step.
To insert a transaction after the current step, select After current step.
5 Click OK. A tree item with the End Transaction icon is added to the test tree.

123
7Understanding Checkpoints
You can check objects in your application or Web site to ensure that they function properly.
This chapter describes:
About Checkpoints
Adding Checkpoints to a Test
Understanding Types of Checkpoints
About Checkpoints
QuickTest enables you to add checks to your test. A checkpoint is a verification point that compares a current value for a specified property with the expected value for that property. This enables you to identify whether your Web site or application is functioning correctly.
When you add a checkpoint, QuickTest adds a checkpoint with an icon in the test tree and adds a Check CheckPoint statement in the Expert View. When you run the test, QuickTest compares the expected results of the checkpoint to the current results. If the results do not match, the checkpoint fails. You can view the results of the checkpoint in the Test Results window.

QuickTest Professional User’s Guide • Creating Tests
124
Note: If you want to retrieve the return value of a checkpoint (a boolean value that indicates whether the checkpoint passed or failed), you must add parentheses around the checkpoint argument in the statement in the Expert View. For example:
a = browser("MyBrowser").page("MyPage").check (checkPoint("MyProperty"))
For more information on Expert View syntax, see “Programming in VBScript” on page 758.
Adding Checkpoints to a Test
You can add checkpoints during a recording session or while editing your test. It is generally more convenient to define checks once the initial test has been recorded.
There are several ways to add checkpoints.
To add checkpoints while recording:
Use the commands on the Insert menu, or click the arrow beside the Insert Checkpoint button on the Test toolbar. This displays a menu of checkpoint options that are relevant to the selected step in the test tree.
To add a checkpoint while editing your test:
Use the commands on the Insert menu, or click the arrow beside the Insert Checkpoint button on the Test toolbar. This displays a menu of checkpoint options that are relevant to the selected step in the test tree.
Right-click the step in the test tree where you want to add the checkpoint and choose Insert Standard Checkpoint.
Right-click any object in the Active Screen and choose Insert Standard Checkpoint. This option can be used to create checkpoints for any object in the Active Screen (even if the object is not part of any step in your test tree).

Chapter 7 • Understanding Checkpoints
125
Notes:
If you use the Active Screen method, ensure that Active Screen contains sufficient data for the object you want to check. For more information, see “Setting Active Screen Options” on page 594.
Throughout this user’s guide, procedures for creating checkpoints while editing your test describe the Active Screen method of creating checkpoints. However, you can choose any of the methods described above.
Understanding Types of Checkpoints
You can insert the following checkpoint types to check various objects in a Web site or application.
Standard Checkpoint checks the property value of an object in your application or Web page. The standard checkpoint checks a variety of objects such as buttons, radio buttons, combo boxes, lists, etc. For example, you can check that a radio button is activated after it is selected or you can check the value of an edit field.
Standard checkpoints are supported for all add-in environments (see “Supported Checkpoints” on page 129).
For more information on standard checkpoints, see Chapter 8, “Checking Object Property Values.”
Image Checkpoint checks the value of an image in your application or Web page. For example, you can check that a selected image’s source file is correct.

QuickTest Professional User’s Guide • Creating Tests
126
Note: You create an image checkpoint by inserting a standard checkpoint on an image object.
Image checkpoints are supported for the Web environment (see “Supported Checkpoints” on page 129).
For more information on image checkpoints, see Chapter 8, “Checking Object Property Values.”
Bitmap Checkpoint checks an area of your Web page or application as a bitmap. For example, suppose you have a Web site that can display a map of a city the user specifies. The map has control keys for zooming. You can record the new map that is displayed after one click on the control key that zooms in the map. Using the bitmap checkpoint, you can check that the map zooms in correctly.
Bitmap checkpoints are supported for all add-in environments (see “Supported Checkpoints” on page 129).
For more information on bitmap checkpoints, see Chapter 11, “Checking Bitmaps.”
Table Checkpoint checks information within a table. For example, suppose your application or Web site contains a table listing all available flights from New York to San Francisco. You can add a table checkpoint to check that the time of the first flight in the table is correct.
Note: You create a table checkpoint by inserting a standard checkpoint on a table object.
Table checkpoints are supported for Web and ActiveX environments (see “Supported Checkpoints” on page 129). Table checkpoints are also supported for many external add-in environments.
For more information on table checkpoints, see Chapter 9, “Checking Tables and Databases.”

Chapter 7 • Understanding Checkpoints
127
Text Checkpoint checks that a text string is displayed in the appropriate place in your application or on a Web page. For example, suppose your application or Web page displays the sentence Flight departing from New York to San Francisco. You can create a text checkpoint that checks that the words “New York” are displayed between “Flight departing from” and “to San Francisco”.
Text checkpoints are supported for all add-in environments (see “Supported Checkpoints,” below).
For more information on text checkpoints, see Chapter 10, “Checking Text.”
Text Area Checkpoint checks that a text string is displayed within a defined area in a Windows application, according to specified criteria. For example, suppose your Visual Basic application has a button that says View Doc <Num>, where <Num> is replaced by the four digit code entered in a form elsewhere in the application. You can create a text area checkpoint to confirm that the number displayed on the button is the same as the number entered in the form.
Text area checkpoints are supported for Standard Windows, Visual Basic, and ActiveX add-in environments (see “Supported Checkpoints” on page 129).
Text area checkpoints are also supported for some external add-in environments.
For more information on text area checkpoints, see Chapter 10, “Checking Text.”
Accessibility Checkpoint identifies areas of your Web site that may not conform to the World Wide Web Consortium (W3C) Web Content Accessibility Guidelines. For example, guideline 1.1 of the W3C Web Content Accessibility Guidelines requires you to provide a text equivalent for every non-text element. You can add an Alt property check to check whether objects that require the Alt property under this guideline, do in fact have this tag.
Accessibility checkpoints are supported for the Web environment (see “Supported Checkpoints” on page 129).
For more information on accessibility checkpoints, see Chapter 21, “Testing Web Objects.”

QuickTest Professional User’s Guide • Creating Tests
128
Page Checkpoint checks the characteristics of a Web page. For example, you can check how long a Web page takes to load or whether a Web page contains broken links.
Note: You create a page checkpoint by inserting a standard checkpoint on a page object.
Page checkpoints are supported for the Web environment (see “Supported Checkpoints” on page 129).
For more information on page checkpoints, see Chapter 21, “Testing Web Objects.”
Database Checkpoint checks the contents of a database accessed by your Web site. For example, you can use a database checkpoint to check the contents of a database containing flight information for your Web site.
Database checkpoints are supported by all environments (see “Supported Checkpoints,” below).
For more information on database checkpoints, see Chapter 9, “Checking Tables and Databases.”
XML Checkpoint checks the data content of XML documents in XML files or XML documents in Web pages and frames. For more information on XML checkpoints, see Chapter 12, “Checking XML.”
XML checkpoints (Web page/frame) are supported for the Web environment; XML checkpoints (file) are supported by all environments (see “Supported Checkpoints,” below).

Chapter 7 • Understanding Checkpoints
129
Supported Checkpoints
The following table shows the types of checkpoints that are supported for each add-in environment supplied with the core installation of QuickTest Professional.
S—SupportedNS—Not SupportedNA—Not Applicable
Note: Checkpoints are also supported for various external add-in environments. Refer to your QuickTest Professional add-in documentation for details.
Web
Std
VB
Act
iveX
Mul
tim
edia
Oth
er O
bje
ct
Standard S S S S S NA
Image S NS NS NS NS NA
Table S NS NS S NS NA
Text S S S S S NA
Text Area NS S S S NS NA
Bitmap S S S S S NA
Accessibility S NS NS NS NS NA
XML S NS NS NS NS S (File)
Page S NA NA NA NA NA
Database NA NA NA NA NA S (DbTable)

QuickTest Professional User’s Guide • Creating Tests
130

131
8Checking Object Property Values
By adding standard checkpoints to your tests, you can compare object property values in different versions of your application or Web site.
This chapter describes:
About Checking Object Properties
Creating Standard Checkpoints
Understanding the Checkpoint Properties Dialog Box
Understanding the Image Checkpoint Properties Dialog Box
Modifying Checkpoints
About Checking Object Properties
You can check the object property values in your Web site or application using standard checkpoints. Standard checkpoints compare the expected values of object properties captured during the recording of the test to the object’s current values during a test run.
You use standard checkpoints to perform checks on images, tables, Web page properties, and other objects within your application or Web site.
Note: You can create standard checkpoints for all supported testing environments (as long as the appropriate add-ins are loaded).

QuickTest Professional User’s Guide • Creating Tests
132
Creating Standard Checkpoints
You can check that a specified object in your application or on your Web page has the property values you expect, by adding a standard checkpoint to your test. To set the options for a standard checkpoint, you use the Checkpoint Properties dialog box.
Creating a Standard Checkpoint
You can add a standard checkpoint while recording or editing your test.
To add a standard checkpoint while recording:
1 Click the Insert Checkpoint toolbar button or choose Insert > Checkpoint > Standard Checkpoint.
The QuickTest window is minimized and the mouse pointer turns into a pointing hand.
Note: If the object you want to check can only be displayed by performing an event (such as a right-click or a mouse over to display a context menu), hold the CTRL key. The pointing hand temporarily turns into a standard arrow and you can perform the event. When the object you want to check is displayed, release the CTRL key. The arrow becomes a pointing hand again.
2 Click the object you want to check. The Select an Object dialog box opens.
3 Select the item you want to check from the displayed object tree. The tree item name corresponds to the object’s class, for example:
Icon Object Class
Windows button WinButton
Windows object WinObject
Windows edit box WinEdit
Windows dialog box Dialog
Web check box WebCheckBox

Chapter 8 • Checking Object Property Values
133
4 Click OK. The Checkpoint Properties dialog box opens.
5 Specify the settings for the checkpoint. For more information, see “Understanding the Checkpoint Properties Dialog Box” on page 135.
6 Click OK to close the dialog box.
A tree item with a checkpoint icon is added to your test tree.
Note: The checkpoint icon varies depending on the environment being tested.
To add a standard checkpoint while editing your test:
1 Make sure the Active Screen button is selected.
Click a step in your test where you want to add a checkpoint.
The Active Screen displays the window or Web page corresponding to the highlighted step.
2 Right-click an object on the Active Screen and choose Insert Standard Checkpoint. The Object Selection - Checkpoint Properties dialog box opens.
Web edit box WebEdit
Web radio button WebRadioGroup
Web list box WebList
Web element WebElement
Visual Basic combo box VbComboBox
Visual Basic radio button VbRadioButton
Visual Basic window VbWindow
Icon Object Class

QuickTest Professional User’s Guide • Creating Tests
134
3 Select the item you want to check from the displayed object tree. The tree item name corresponds to the object’s class, for example:
4 Click OK. The Checkpoint Properties dialog box opens.
5 Specify the settings for the checkpoint. For more information, see “Understanding the Checkpoint Properties Dialog Box,” below.
6 Click OK to close the dialog box.
A tree item with a checkpoint icon is added to your test tree.
Note: The checkpoint icon varies depending on the environment being tested.
Icon Object Class
Windows button WinButton
Windows object WinObject
Windows edit box WinEdit
Windows dialog box Dialog
Web check box WebCheckBox
Web edit box WebEdit
Web radio button WebRadioGroup
Web list box WebList
Web element WebElement
Visual Basic combo box VbComboBox
Visual Basic radio button VbRadioButton
Visual Basic window VbWindow

Chapter 8 • Checking Object Property Values
135
Understanding the Checkpoint Properties Dialog Box
In the Checkpoint Properties dialog box, you can specify which properties of the object to check and edit the values of these properties. While the specific elements vary slightly depending on the type of object you are checking, the Checkpoint Properties dialog box generally includes the following basic elements:
The ABC icon indicates that the value of the property to check is a constant.
The selected check box indicates that this property will be checked.
This icon indicates that the value of the property to check is a Data Table parameter.

QuickTest Professional User’s Guide • Creating Tests
136
The dialog box described above is used to configure most standard checkpoints. Certain standard checkpoint types, however, employ different dialog boxes, as follows:
Identifying the Object
The top part of the dialog box displays information about the object to check:
For Information about the Dialog Box for:
See:
Page checkpoint properties “Understanding the Page Checkpoint Properties Dialog Box” on page 442
Table checkpoint properties “Understanding the Table/Database Checkpoint Properties Dialog Box” on page 154
Image checkpoint properties “Understanding the Image Checkpoint Properties Dialog Box” on page 141
Information Description
Logical name The name that QuickTest assigns to the object.
Class The type of object. In this example, the "WebEdit" class indicates that the object is an edit field.

Chapter 8 • Checking Object Property Values
137
Choosing Which Property to Check
The default properties for the object are listed in the Properties pane of the dialog box. The pane includes the properties, their values, and their types:
Pane Element Description
Check box For each object class, QuickTest recommends default property checks. You can accept the default checks or modify them accordingly.
To check a property, select the corresponding check box.
To exclude a property check, clear the corresponding check box.
Type The icon indicates that the value of the property is currently a constant.
The icon indicates that the value of the property is currently a Data Table parameter.
The icon indicates that the value of the property is currently an environment variable parameter.
The icon indicates that the value of the property is currently a random number parameter.
Property The name of the property to check.
Value The expected value of the property. For information about editing the value of a property, see “Editing the Expected Value of an Object Property,” below.

QuickTest Professional User’s Guide • Creating Tests
138
Editing the Expected Value of an Object Property
In the Edit value section, you use the following options to edit the value of the property to check:
Option Description
Constant (default) Sets the expected value of the property as a constant. The value of the property is constant for each iteration of the test run.
Edit Constant ValueOptions (enabled only when Constant is selected)
Opens the Constant Value Options dialog box, where you can set the expected value as a text string or a regular expression. For more information on regular expressions, see Chapter 15, “Using Regular Expressions.”
Parameter Sets the expected value of the property as a parameter. Accept the default name, enter a different name for a new parameter, or choose an existing parameter from the list. For more information, see Chapter 13, “Parameterizing Tests.”
Data Table(enabled only when Parameter is selected)
Specifies the parameter as a Data Table parameter. The value of the property is determined by the data in the Data Table. For more information about creating Data Table parameters, see “Using Data Table Parameters” on page 227.
Parameter name(enabled only when Data Table is selected)
Specifies the name of the parameter in the Data Table. You can select from the list box of existing Data Table columns or you can enter a new name to create a new column in the Data Table.
Other(enabled only when Parameter is selected)
Specifies that the parameter is a random number or environment variable parameter. The text box displays the parameter statement. For more information about creating random number parameters, see “Using Random Number Parameters” on page 241. For more information about creating environment variable parameters, see “Using Environment Variable Parameters” on page 231.

Chapter 8 • Checking Object Property Values
139
Setting General Checkpoint Options
The bottom part of the Checkpoint Properties dialog box contains the following options:
Checkpoint timeout—Specifies the time interval (in seconds) during which QuickTest attempts to perform the checkpoint successfully. QuickTest continues to perform the checkpoint until it passes or until the timeout occurs. If the checkpoint does not pass before the timeout occurs, the checkpoint fails.
For example, suppose it takes some time for an object to achieve an expected state. Increasing the checkpoint timeout value in this case can make sure that the object has sufficient time to achieve that state and therefore enables the checkpoint to pass before the maximum timeout is reached.
You can see information about the checkpoint timeout, including the time interval used by QuickTest to perform the checkpoint, in the Test Results window.
Edit Parameter Options (enabled only when Parameter is selected)
If you select Data Table, clicking the Edit Parameter Options button opens the Data Table Parameter Options dialog box, where you can set the value as a regular expression, or choose to use a Data Table formula. For more information on regular expressions, see Chapter 15, “Using Regular Expressions.” For more information on Data Table formulas, see Chapter 18, “Working with Data Tables”. You can also specify the parameter name and set the parameter as global or current action data. For more information, see Chapter 17, “Working with Actions.”
If you select Other, clicking the Edit Parameter Options button opens the Parameter Options dialog box, where you can specify the parameter type and preferences. For more information, see Chapter 13, “Parameterizing Tests.”
Option Description

QuickTest Professional User’s Guide • Creating Tests
140
Insert statement—Specifies when to perform the checkpoint in the test. Choose Before current step if you want to check the value of the object property before the highlighted step is performed. Choose After current step if you want to check the value of the object property after the highlighted step is performed.
Note: The Insert statement option is not available when adding a standard checkpoint during recording or when modifying an existing object checkpoint. It is available when adding a new standard checkpoint to an existing test while editing your test.

Chapter 8 • Checking Object Property Values
141
Understanding the Image Checkpoint Properties Dialog Box
Image checkpoints enable you to check the properties of a Web image. In the Image Checkpoint Properties dialog box, you can specify which properties of the image to check and edit the values of those properties. This dialog box is similar to the standard Checkpoint Properties dialog box, except that it contains the Compare image content option. This option enables you to compare the expected image source file with the actual image source file.
The ABC icon indicates that the value of the property to check is a constant.
The selected check box indicates that this property will be checked.
This icon indicates that the value of the property to check is a Data Table parameter.

QuickTest Professional User’s Guide • Creating Tests
142
Identifying the Image
The top part of the dialog box displays information about the image to check:
Choosing Which Property to Check
The default properties for the image are listed in the Properties pane of the dialog box. The pane includes the properties, their values, and their types:
Information Description
Logical name The name that QuickTest assigns to the object.
Class The type of object. This is always image.
Pane Element Description
Check box For each object class, QuickTest recommends default property checks. You can accept the default checks or modify them accordingly.
To check a property, select the corresponding check box.
To exclude a property check, clear the corresponding check box.
Type The icon indicates that the value of the property is currently a constant.
The icon indicates that the value of the property is currently a Data Table parameter.
The icon indicates that the value of the property is currently an environment variable parameter.
The icon indicates that the value of the property is currently a random number parameter.
Property The name of the property.
Value The expected value of the property. For information about editing the value of a property, see “Editing the Expected Value of an Image Property,” below.

Chapter 8 • Checking Object Property Values
143
Editing the Expected Value of an Image Property
In the Edit Value section, you use the following options to edit the value of the property to check:
Option Description
Constant (default) Sets the expected value of the property as a constant. The value of the property is constant for each iteration of the test run.
Parameter Sets the expected value of the property as a parameter. For more information, see Chapter 13, “Parameterizing Tests.”
Data Table(enabled only when Parameter is selected)
Specifies the parameter as a Data Table parameter. The value of the property is determined by the data in the Data Table. For more information about creating Data Table parameters, see “Using Data Table Parameters” on page 227.
Parameter name(enabled only when Data Table is selected)
Specifies the name of the parameter in the Data Table. You can select from the list box of existing Data Table columns or you can enter a new name to create a new column in the Data Table.
Other(enabled only when Parameter is selected)
Specifies that the parameter is a random number or environment variable parameter. The text box displays the parameter statement. For more information about creating random number parameters, see “Using Random Number Parameters” on page 241. For more information about creating environment variable parameters, see “Using Environment Variable Parameters” on page 231.

QuickTest Professional User’s Guide • Creating Tests
144
Setting General Checkpoint Options
The bottom part of the Image Checkpoint Properties dialog box contains the following options:
Checkpoint timeout—Specifies the time interval (in seconds) during which QuickTest attempts to perform the checkpoint successfully. QuickTest continues to perform the checkpoint until it passes or until the timeout occurs. If the checkpoint does not pass before the timeout occurs, the checkpoint fails.
For example, suppose it takes some time for an object to achieve an expected state. Increasing the checkpoint timeout value in this case can ensure that the object has sufficient time to achieve that state and therefore enables the checkpoint to pass before the end of the timeout period is reached.
You can see information about the checkpoint timeout, including the time interval used by QuickTest to perform the checkpoint, in the Test Results window.
Edit Parameter Options (enabled only when Parameter is selected)
If you select Data Table, clicking the Edit Parameter Options button opens the Data Table Parameter Options dialog box where you can choose to use a Data Table formula. You can also specify the parameter name and set the parameter as global or current action data. For more information, see Chapter 17, “Working with Actions.”
If you select Other, clicking the Edit Parameter Options button opens the Parameter Options dialog box where you can specify the parameter type and preferences. For more information, see Chapter 13, “Parameterizing Tests.”
Compare image content
Compares the expected image source file with the graphic of the actual image source file. If the expected and actual images are different, QuickTest displays them both in the Test Results. If the images are identical, only one graphic is displayed.
Option Description

Chapter 8 • Checking Object Property Values
145
Insert statement—Specifies when to perform the checkpoint in the test. Choose Before current step if you want to check the value of the image property before the highlighted step is performed. Choose After current step if you want to check the value of the image property after the highlighted step is performed.
Note: The Insert statement option is not available when adding an image checkpoint during recording or when modifying an existing image checkpoint. It is available when adding a new image checkpoint to an existing test while editing your test.
Modifying Checkpoints
If you already created a checkpoint, or if QuickTest automatically created page checkpoints, you can modify the settings. For example, you can choose to use parameters, or you can use filters to specify which image sources and links to check.
To modify a checkpoint:
1 Right-click an existing checkpoint in the test tree and choose Checkpoint Properties, or select an existing checkpoint in the test tree and choose Step > Checkpoint Properties. A checkpoint dialog box opens.
2 Modify the properties and click OK.

QuickTest Professional User’s Guide • Creating Tests
146

147
9Checking Tables and Databases
By adding table checkpoints, you can check the content of tables displayed in your application. By adding database checkpoints to your test scripts, you can check the contents of databases accessed by your Web site or application. The process for creating and modifying table or database checkpoints is quite similar.
This chapter describes:
About Checking Tables and Databases
Creating a Table Checkpoint
Creating a Check on a Database
Understanding the Table/Database Checkpoint Properties Dialog Box
Modifying a Table Checkpoint
Modifying a Database Checkpoint
About Checking Tables and Databases
You can check that a specified value is displayed in a cell in a table by adding a table checkpoint to your test. To add a table checkpoint to your test, you use the Checkpoint Properties dialog box.
Table checkpoints are supported for Web and ActiveX applications, as well as for a variety of external add-in environments.
You can use database checkpoints in your test to check databases accessed by your Web site or application and to detect defects. You define a query on your database, and then you create a database checkpoint that checks the results of the query.

QuickTest Professional User’s Guide • Creating Tests
148
Database checkpoints are supported for all core environments, as well as for a variety of external add-in environments.
There are two ways to define a database query:
Use Microsoft Query. You can install Microsoft Query from the custom installation of Microsoft Office.
Manually define an SQL statement.
Creating a Table Checkpoint
You can add a table checkpoint while recording or editing your test.
To add a table checkpoint while recording:
1 Choose Insert > Checkpoint > Standard Checkpoint or click the Insert Checkpoint button. The QuickTest window is minimized, and the mouse pointer turns into a pointing hand.
2 Click a table you want to check. The Object Selection - Checkpoint Properties dialog box opens.
3 Select a table item from the displayed object tree.
4 Click OK. The Table Checkpoint Properties dialog box opens.
5 Specify the settings for the checkpoint. For more information, see “Understanding the Table/Database Checkpoint Properties Dialog Box” on page 154.
6 Click OK to close the dialog box.
A tree item with a checkpoint icon is added to your test tree.
To add a table checkpoint while editing your test:
1 Make sure the Active Screen button is selected.
2 Click a step in your test where you want to add a checkpoint. The Active Screen displays the Web page or application screen corresponding to the highlighted step.
3 Right-click the table on the Active Screen and choose Insert Standard Checkpoint. The Object Selection - Checkpoint Properties dialog box opens.

Chapter 9 • Checking Tables and Databases
149
4 Select a table item from the displayed object tree.
5 Click OK. The Table Checkpoint Properties dialog box opens.
6 Specify the settings for the checkpoint. For more information, see “Understanding the Table/Database Checkpoint Properties Dialog Box” on page 154.
7 Click OK to close the dialog box. A tree item with a checkpoint icon is added to your tree.
Creating a Check on a Database
You create a database checkpoint based on the results of the query (result set) you defined on a database. You can create a check on a database in order to check the contents of the entire result set, or a part of it. QuickTest captures the current data from the database and saves this information as expected data. A database checkpoint is inserted into the test script. This checkpoint is displayed in your test script as a DbTable.Check CheckPoint statement and as a step in the Tree View as follows:
When you run the test, the database checkpoint compares the current data in the database to the expected data defined in the Database Checkpoint Properties dialog box. If the expected data and the current results do not match, the database checkpoint fails. The results of the checkpoint can be viewed in the Test Results window. For more information, see Chapter 27, “Analyzing Test Results.”
You can modify the expected data of a database checkpoint before you run your test. You can also make changes to the query in an existing database checkpoint. This can be useful if you move the database to a new location on the network.

QuickTest Professional User’s Guide • Creating Tests
150
Creating a Database Checkpoint
You can define the query for your checkpoint using Microsoft Query or by manually entering a database connection and SQL statement.
To create a database checkpoint:
1 Choose Insert > Checkpoint > Database Checkpoint. The Database Query Wizard opens.
2 Select your database selection preferences and click Next. You can choose from the following options:
Create query using Microsoft Query—Opens Microsoft Query, enabling you to create a new query. Once you finish defining your query, you return to QuickTest. This option is available only if you have Microsoft Query installed on your computer.
Specify SQL statement manually—Opens the Specify SQL statement screen in the wizard, which enables you to specify the connection string and an SQL statement. For additional information, see step 3.

Chapter 9 • Checking Tables and Databases
151
Maximum number of rows—Select this check box if you would like to limit the number of rows and enter the maximum number of database rows to check. You can specify a maximum of 32,000 rows.
Show me how to use Microsoft Query—Displays an instruction screen when you click Next before opening Microsoft Query. (Enabled only when Create query using Microsoft Query is selected).
3 If you chose Create query using Microsoft Query in the previous step, Microsoft Query opens. Choose a data source and define a query. For more information about creating a query, see “Creating a Query in Microsoft Query” on page 153.
If you chose Specify SQL statement in the previous step, the Specify SQL statement screen opens. Specify the connection string and the SQL statement, and click Finish. For more information about specifying SQL statements, see “Specifying SQL Statements” on page 152.
4 The Checkpoint Properties dialog box opens. Select the checks to perform on the result set as described in “Understanding the Table/Database Checkpoint Properties Dialog Box” on page 154. You can also modify the expected data in the result set.
5 Click OK to close the dialog box. A database checkpoint is inserted in the test script.

QuickTest Professional User’s Guide • Creating Tests
152
Specifying SQL Statements
You can manually specify the database connection string and the SQL statement.
To specify SQL statements:
1 Choose Specify SQL statement in the Database Query Wizard screen. The following screen opens:
2 Specify the connection string and the SQL statement, and click Finish.
Connection string—Enter the connection string, or click Create to open the ODBC Select Data Source dialog box. You can select a .dsn file in the ODBC Select Data Source dialog box or create a new .dsn file to have the Database Query Wizard insert the connection string in the box for you.
SQL statement—Enter the SQL statement.
QuickTest takes several seconds to capture the database query and restore the QuickTest window.
3 Return to step 4 in the previous procedure to continue creating your database checkpoint in QuickTest.

Chapter 9 • Checking Tables and Databases
153
Creating a Query in Microsoft Query
You can use Microsoft Query to choose a data source and define a query within the data source. QuickTest supports the following versions of Microsoft Query:
version 2.00 (in Microsoft Office 95)
version 8.00 (in Microsoft Office 97)
version 2000 (in Microsoft Office 2000)
Version 2002 (in Microsoft Office XP)
To choose a data source and define a query in Microsoft Query:
1 When Microsoft Query opens during the insert database checkpoint process, choose a new or an existing data source.
2 Define a query.
3 When you are done:
Version 2.00—Choose File > Exit and return to QuickTest to close Microsoft Query and return to QuickTest.
Version 8.00 and Version 2000—In the Finish screen of the Query Wizard, select Exit and return to QuickTest and click Finish to exit Microsoft Query. Alternatively, click View data or edit query in Microsoft Query and click Finish. After viewing or editing the data, choose File > Exit and return to QuickTest to close Microsoft Query and return to QuickTest.
4 Return to step 4 on page 151 to continue creating your database checkpoint in QuickTest.
For additional information on working with Microsoft Query, refer to your Microsoft Query documentation.

QuickTest Professional User’s Guide • Creating Tests
154
Understanding the Table/Database Checkpoint Properties Dialog Box
The Table/Database Checkpoint Properties dialog box enables you to specify which cells of your table or database to check and which verification method and type to use. You can also edit or parameterize the expected data for the cells included in the check.
The top part of the Table/Database Checkpoint Properties dialog box displays the data that was captured for the checkpoint. You use this section to specify which cells you want to check. For more information, see “Specifying Which Cells to Check,” on page 157.
Click to select an entire row
Click to select the entire table (or result set)
Row and column indicator
Add to CheckRemove from Check
Click to select an entire column

Chapter 9 • Checking Tables and Databases
155
Below the expected data, the Table/Database Checkpoint dialog box contains the following three tabs:
Expected Data—Enables you to set each checked cell as a constant or parameterized value. For example, you can instruct QuickTest to use a value from the Data Table as the expected value for a particular cell. For more information, see “Specifying the Expected Data” on page 158.
Settings—Enables you to set the criteria for a successful match between the expected and actual values. For example, you can instruct QuickTest to treat the value as a number so that 45 or 45.00 are treated as the same value, or you can instruct QuickTest to ignore spaces when comparing the values. For more information, see “Specifying the Value Type Criteria” on page 160.
Cell Identification—Enables you to instruct QuickTest how to locate the cells to be checked. For example, suppose you want to check the data that is displayed in the first row and second column in the Table/Database Checkpoint Properties dialog box. However, you know that each time you run your test, it is possible that the rows may be in a different order, depending on the sorting that was performed in a previous step in your test. Therefore, rather than finding the data based on row and column numbers, you may want QuickTest to identify the cell based on the column name and the row containing a known value in a key column. For more information, see “Specifying the Cell Identification Settings” on page 161.
Tip: The value matching settings and cell identification criteria apply to all selected cells in the checkpoint. If you want to use different value matching or cell identification criteria for different cells in the table or database, create separate checkpoints and specify the relevant cells for each.
The bottom part of the Table/Database Checkpoint Properties dialog box contains the following options:
Checkpoint timeout—Specifies the time interval (in seconds) during which QuickTest attempts to perform the checkpoint successfully. QuickTest continues to perform the checkpoint until it passes or until the timeout occurs. If the checkpoint does not pass before the timeout occurs, the checkpoint fails.

QuickTest Professional User’s Guide • Creating Tests
156
For example, suppose it takes some time for data to load in a table. Increasing the checkpoint timeout value in this case can ensure that the data has sufficient time to load and therefore enables the checkpoint to pass before the end of the timeout period is reached.
You can see information about the checkpoint timeout, including the time interval used by QuickTest to perform the checkpoint, in the Test Results window.
Note: The Checkpoint timeout option is available only when creating a table checkpoint. It is not available when creating a database checkpoint.
Insert statement—Specifies when to perform the checkpoint in the test. Choose Before current step if you want to check the table or database content before the highlighted step is performed. Choose After current step if you want to check the table or database content after the highlighted step is performed.
Note: The Insert statement option is not available when adding a table/database checkpoint during recording or when modifying an existing table/database checkpoint. It is available when adding a new table/database checkpoint to an existing test while editing your test.

Chapter 9 • Checking Tables and Databases
157
Specifying Which Cells to Check
The top part of the Table/Database Checkpoint Properties dialog box displays a grid representing the cells in the table or captured result set.
Tip: You can change the column widths and row heights of the grid by dragging the boundaries of the column and row headers.
When you create a new table/database checkpoint, all cells contain a blue check mark, indicating they are selected for verification. You can select to check the entire table or results set, specific rows, specific columns, or specific cells.
Alternatively, you can select a range of cells and click the Add to Check button to check the selected cells or click the Remove from Check button to remove the selected cells from the check.
QuickTest checks only cells containing a blue check mark.
Notes:
When more than one cell is selected, the options on the Expected Data tab are disabled.
Double-clicking on the grid toggles the settings of each cell in the selection.
To add to check or to remove from check: Double-click:
a single cell the cell
an entire row the row header
an entire column the column header
the entire result set the top-left corner of the grid

QuickTest Professional User’s Guide • Creating Tests
158
Specifying the Expected Data
The Expected Data tab displays options for setting the expected value of the selected cell in the table or result set.
You can modify the value of a cell or you can parameterize it to use a value from an external source, such as the Data Table or an environment variable. During the test run, QuickTest compares the value specified in this tab with the actual value that it finds during the test run. If the expected value and the actual value do not match, the checkpoint fails.
To modify or parameterize several cells in the table, select a cell and then set your preferences for that cell in the Expected Data tab. Repeat the process for each cell you want to modify.
The Expected Data tab includes the following options:
Option Description
Selected cell Indicates the row and column numbers of the selected cell in read-only format.
Constant (default) Sets the expected value of the cell as a constant. You can click the Edit Constant Value Options button to open the Constant Value Options dialog box where you can set the value as a text string or a regular expression. The expected value of the cell is constant for each iteration of the test run.
For more information on regular expressions, see Chapter 15, “Using Regular Expressions.”

Chapter 9 • Checking Tables and Databases
159
Parameter Parameterizes the expected value of a cell. When you parameterize a cell, a symbol is displayed in place of its contents to denote that it is parameterized, for example:
.For more information, see Chapter 13, “Parameterizing Tests.”
Data Table(enabled only when Parameter is selected)
Specifies the parameter as a Data Table parameter. The expected value of the cell is determined by the data in the Data Table. For more information about creating Data Table parameters, see “Using Data Table Parameters” on page 227.
Parameter name(enabled only when Data Table is selected)
Specifies the name of the parameter in the Data Table. You can select from the list box of existing Data Table columns or you can enter a new name to create a new column in the Data Table.
Other(enabled only when Parameter is selected)
Specifies that the parameter is a random number or environment variable parameter. The text box displays the parameter statement that the cell will use.
The expected value of the cell is determined by the current value of the specified parameter when the test runs.
For more information about creating random number parameters, see “Using Random Number Parameters” on page 241. For more information about creating environment variable parameters, see “Using Environment Variable Parameters” on page 231.
Edit Parameter Options (enabled only when Parameter is selected)
If you select Data Table, clicking the Edit Parameter Options button opens the Data Table Parameter Options dialog box where you can instruct QuickTest to treat the values in the Data Table column as regular expressions. For more information on regular expressions, see Chapter 15, “Using Regular Expressions.”
If you select Other, clicking the Edit Parameter Options button opens the Parameter Options dialog box where you can specify the parameter type and preferences.
Option Description

QuickTest Professional User’s Guide • Creating Tests
160
Specifying the Value Type Criteria
The Settings tab includes options that determine how the actual cell values are compared with the expected cell values. The settings in this tab apply to all selected cells.
The default setting is to treat cell values as strings and to check for the exact text, while ignoring spaces.
The Settings tab includes the following options:
Option Description
Verification type Specifies how cell contents are compared:
• String Content— Default. Evaluates the content of the cell as a string. For example, 2 and 2.00 are not recognized as the same string.
• Numeric Content—Evaluates the content of the cell according to numeric values. For example, 2 and 2.00 are recognized as the same number.
• Numeric Range—Compares the content of the cell against a numeric range, where the minimum and maximum values are any real number that you specify. This comparison differs from string and numeric content verification in that the actual result set data is compared against the range that you defined and not against a specific expected value.

Chapter 9 • Checking Tables and Databases
161
Specifying the Cell Identification Settings
The settings in the Cell Identification tab determine how QuickTest locates the cells to be checked. The settings in this tab apply to all selected cells.
The default is to identify cells by column name and row number.
Exact match Default. Checks that the exact text, and no other text, is displayed in the cell. Clear this box if you want to check that a value is displayed in a cell as part of the contents of the cell.Note: QuickTest displays this option only when String
Content is selected as the Verification type.
Ignore space Default. Ignores spaces in the captured content when performing the check. The presence or absence of spaces does not affect the outcome of the check.Note: QuickTest displays this option only when String
Content is selected as the Verification type.
Match case Conducts a case sensitive search.Note: QuickTest displays this option only when String
Content is selected as the Verification type.
Min / Max Specifies the numeric range against which the content of the cell is compared. The range values can be any real number.Note: QuickTest displays this option only when Numeric
Range is selected as the Verification type.
Option Description

QuickTest Professional User’s Guide • Creating Tests
162
The Cell Identification tab includes the following options:
Identify columns Specifies the column location of the cell(s) in your actual database to which you want to compare the expected data.
• By position—Locates cells according to the column position. A shift in the position of the columns within the database results in a mismatch.
• By column name—Default. Locates cells according to the column name. A shift in the position of the columns within the database does not result in a mismatch.
Identify rows Specifies by row the location of the cell(s) in your actual database to which you want to compare the expected data.
• By row number—Default. Locates cells according to the row position. A shift in the position of any of the rows within the database results in a mismatch.
• By selected key column(s)—Locates the row(s) containing the cells to be checked by matching the value of the cell whose column was previously selected as a key column. A shift in the position of the row(s) does not result in a mismatch. If more than one row is identified, QuickTest checks the first matching row. You can use more than one key column to uniquely identify any row.
Note: A key symbol is displayed in the header of selected key columns.
Use value match criteria to identify data in the key column
Instructs QuickTest to use the verification type settings from the Settings tab as the criteria for identifying data in the key column.
Enabled only when you select to identify rows By selected key column(s).

Chapter 9 • Checking Tables and Databases
163
Modifying a Table Checkpoint
You can change the expected data, settings and cell identification options for an existing table checkpoint.
To modify the table checkpoint:
1 In the Tree View or Expert View, right-click the table checkpoint that you want to modify.
2 Select Checkpoint Properties. The Checkpoint Properties dialog box opens.
Modify the settings as described above.
Note: Editing and saving a table checkpoint created in QuickTest 5.02 or earlier converts the checkpoint to an updated format. Converting a checkpoint to the new format may modify some of the settings, so check that the settings are correct in the Checkpoint Properties dialog box before saving the checkpoint. To keep the table checkpoint in its original format, click Cancel in the Checkpoint Properties dialog box.
Modifying a Database Checkpoint
You can make the following changes to an existing database checkpoint:
Modify the SQL query definition.
Modify the expected data, verification type, or method.
To modify the SQL query definition:
1 In the test tree, right-click the database object that you want to modify.
2 Select Object Properties.
3 Modify the SQL and connection string properties as necessary and click OK.

QuickTest Professional User’s Guide • Creating Tests
164
To modify the expected data in a database checkpoint:
1 In the test tree, right-click the database checkpoint that you want to modify.
2 Select Checkpoint Properties. The Checkpoint Properties dialog box opens.
Modify the settings as described “Understanding the Table/Database Checkpoint Properties Dialog Box” on page 154.

165
10Checking Text
QuickTest can check that a text string is displayed in the appropriate place in an application or on a Web page.
This chapter describes:
About Checking Text
Creating a Text Checkpoint
Creating a Standard Checkpoint for Checking Text
Creating a Text Area Checkpoint
Understanding the Text/Text Area Checkpoint Properties Dialog Box
Modifying a Text or Text Area Checkpoint
About Checking Text
You can check that a specified text string is displayed by adding one of the following checkpoints to your test.
Text Checkpoint—Enables you to check that the text is displayed in a screen, window, or Web page, according to specified criteria. It is supported for all environments.
Standard Checkpoint—Enables you to check an object’s text property. This is the preferred way of checking text in many Windows applications.

QuickTest Professional User’s Guide • Creating Tests
166
Text Area Checkpoint—Enables you to check that a text string appears within a defined area in a Windows application, according to specified criteria. It is supported for Standard Windows, Visual Basic, and ActiveX environments.
Note: Text and text area checkpoints are also supported for various external QuickTest Professional add-ins (purchased separately). Refer to your add-in documentation for details.
Considerations for Choosing a Text Checkpoint for Windows Applications
The text-recognition mechanism used when you create a text or text area checkpoint may occasionally retrieve unwanted text information (such as hidden text and shadowed text, which appears as multiple copies of the same string). For this reason, when possible, you should retrieve and check text from your application window by inserting a standard checkpoint for the object containing the desired text, using its text (or text type) property. A text or text area checkpoint must be used when an object does not have a text-type property.
In the Text/Text Area Checkpoint Properties dialog box, you can designate the text to check, as well as the text preceding and following it. This is helpful when the text you want to check appears more than once in the object you want to check. It also allows you to check only a part of the object’s text. These features are not available when checking text with a standard checkpoint.

Chapter 10 • Checking Text
167
Creating a Text Checkpoint
You can add a text checkpoint while recording a test in all environments. You can also add a text checkpoint on a Web page or frame from the Active Screen while editing your test.
Text checkpoints are supported for the Web environment in Windows 98, Me, Windows NT, Windows 2000, and Windows XP. Text checkpoints are supported for Windows-based environments—Standard Windows, Visual Basic, and ActiveX—in Windows NT, Windows 2000, and Windows XP only.
Note: Text checkpoints are also supported for various external QuickTest Professional add-ins (purchased separately). Refer to your add-in documentation for details.
To add a text checkpoint while recording:
1 Display the page, window, or screen containing the text you want to check.
2 Choose Insert > Checkpoint > Text Checkpoint, or click the arrow next to the Insert Checkpoint button and choose Text Checkpoint.
The QuickTest window is minimized and the mouse pointer turns into a pointing hand.
3 Click the text string for which you want to create the checkpoint.

QuickTest Professional User’s Guide • Creating Tests
168
If the area you defined is associated with more than one object, the Object Selection–Text Checkpoint Properties dialog box opens.
Select the object for which you are creating the checkpoint.
4 The Text Checkpoint Properties dialog box opens.
5 Specify the checkpoint settings. For more information, see “Understanding the Text/Text Area Checkpoint Properties Dialog Box” on page 174.
6 Click OK to close the dialog box. A tree item with a checkpoint icon is added to your test tree.
To add a text checkpoint while editing your test:
Note: You can insert text checkpoints using the Active Screen only for Web applications. This option is not supported for other environments.
1 Make sure the Active Screen button is selected.
2 Click a step in your test where you want to add a checkpoint.
The Active Screen displays the page or screen corresponding to the highlighted step.
3 Highlight a text string on the Active Screen.

Chapter 10 • Checking Text
169
4 Right-click the text string and choose Insert Text Checkpoint. The Text Checkpoint Properties dialog box opens.
5 Specify the settings for the checkpoint. For more information, see “Understanding the Text/Text Area Checkpoint Properties Dialog Box” on page 174.
6 Click OK to close the dialog box. A tree item with a checkpoint icon is added to your test tree.
Creating a Standard Checkpoint for Checking Text
You can check the text in Windows-based applications by using a standard checkpoint to check the text property of an object. This is the preferred way of checking text in many Windows applications. Note, however, that the standard checkpoint does not allow you to use the features available in the Text Checkpoint Properties dialog box (see “Considerations for Choosing a Text Checkpoint for Windows Applications” on page 166).
To add a standard checkpoint for checking text, while recording:
1 Click the Insert Checkpoint button or choose Insert > Checkpoint > Standard Checkpoint.
The QuickTest window is minimized, and the mouse pointer turns into a pointing hand.
2 Click the object whose text you want to check. If the area you clicked is associated with more than one object, the Object Selection–Checkpoint Properties dialog box opens.
3 Select the item you want to check from the displayed object tree.
4 Click OK. The Checkpoint Properties dialog box opens.
5 Select the text property.
6 Edit, if necessary, the text value you want QuickTest to check. Note that you can parameterize this value.
7 If you only want to check text, clear the other check boxes in the dialog box.
8 Click OK to close the dialog box. A tree item with a checkpoint icon is added to your test tree.

QuickTest Professional User’s Guide • Creating Tests
170
To add a standard checkpoint for checking text while editing your test:
1 Make sure the Active Screen button is selected.
Click a step in your test where you want to add the checkpoint.
The Active Screen displays the window corresponding to the highlighted step.
2 In the Active Screen, right-click the object whose text you want to check, and choose Insert Standard Checkpoint.
Note: Make sure that the Active Screen contains data for the object you want to check. For more information, see “Setting Active Screen Options” on page 594.
If the area you clicked is associated with more than one object, the Object Selection–Checkpoint Properties dialog box opens.
3 Select the item you want to check from the displayed object tree.
4 Click OK. The Checkpoint Properties dialog box opens.
5 Select the text property.
6 Edit, if necessary, the text value you want QuickTest to check. Note that you can parameterize this value.
7 If you want to check only text, clear the other check boxes in the dialog box.
8 Click OK to close the dialog box. A tree item with a checkpoint icon is added to your test tree.
For more information on creating standard checkpoints, see Chapter 8, “Checking Object Property Values.”

Chapter 10 • Checking Text
171
Creating a Text Area Checkpoint
You can add a text area checkpoint only while recording a test on Windows-based applications—Standard Windows, Visual Basic, and ActiveX. Text area checkpoints are supported in Windows NT, Windows 2000, and Windows XP only.
Note: Text area checkpoints are also supported for various external QuickTest Professional add-ins (purchased separately). Refer to your add-in documentation for details.
To add a text area checkpoint:
1 Choose Insert > Checkpoint > Text Area Checkpoint, or click the arrow next to the Insert Checkpoint button and choose Text Area Checkpoint.
The QuickTest window is minimized, and the mouse pointer turns into a crosshairs pointer.
2 Define the area containing the text you want QuickTest to check by clicking and dragging the crosshairs pointer. (See “Considerations for Defining the Text Area,” below.)
Tip: Hold down the left mouse button and use the arrow keys to make precise adjustments to the defined area.
Release the mouse button after outlining the area required.

QuickTest Professional User’s Guide • Creating Tests
172
If the area you defined is associated with more than one object, the Object Selection–Text Area Checkpoint Properties dialog box opens.
3 Select the object for which you are creating the checkpoint.
The Text Area Checkpoint Properties dialog box opens.
4 Specify the checkpoint settings. For more information, see “Understanding the Text/Text Area Checkpoint Properties Dialog Box” on page 174.
5 Click OK to close the dialog box.
A tree item with a checkpoint icon is added to your test tree.

Chapter 10 • Checking Text
173
Considerations for Defining the Text Area
When checking text displayed in a Windows application, it is often advisable to define a text area larger than the actual text you want QuickTest to check. You then use the Text Area Checkpoint Properties dialog box to configure the relative position of the Checked Text within the captured string. When QuickTest runs tests, it checks for the selected text within the defined area, according to the settings you configured.
Consider the following when defining the area for a text area checkpoint:
If you parameterize a text string, the captured area must be large enough to accommodate any string that might replace the one selected during a test run.
The captured area must be large enough to include all parts of the required text (Checked Text / Text Before / Text After).
Text may change its position during test runs; therefore, make sure that the area you capture is large enough to allow for acceptable position shifts. If the defined area is too small, even a slight shift in the text’s position will cause the test run to fail, although the changed position may be acceptable to you. If, on the other hand, the position of the text on the screen is critical, or if you do not want it to exceed certain boundaries, set the defined area accordingly.

QuickTest Professional User’s Guide • Creating Tests
174
Understanding the Text/Text Area Checkpoint Properties Dialog Box
In the Text/Text Area Checkpoint Properties dialog box, you can specify the text to be checked as well as which text is displayed before and after the checked text. These configuration options are particularly helpful when the text string you want to check appears several times or when it could change in a predictable way during test runs.
For example, suppose you want to check the third occurrence of a particular text string in a page or defined text area. To check for this string, you can specify which text precedes and/or follows it and to which occurrence of the specified text string you are referring.
The Checkpoint Summary pane at the top of the dialog box summarizes the selected text for the checkpoint. For text checkpoints in Web-based environments, it displays the text you selected when creating the checkpoint, plus some text before and after it.

Chapter 10 • Checking Text
175
For text and text area checkpoints in Windows-based environments, it displays the text you selected when creating the checkpoint.
Note: In Windows-based environments, if there is more than one line of text selected, the Checkpoint Summary pane displays [complex value] instead of the selected text string. You can then click Configure to view and manipulate the actual selected text for the checkpoint.
QuickTest automatically displays the Checked Text in red and the text before and after the Checked Text in blue. For text area checkpoints, only the text string captured from the defined area is displayed (Text Before and Text After are not displayed).
To designate parts of the captured string as Checked Text and other parts as Text Before and Text After, click the Configure button. The Configure Test Selection dialog box opens.
For more information about configuring the text selection, see “Configuring the Text Selection,” below.
To set parameterization and other preferences for each of the string elements in your checkpoint, select the string element type (Checked Text / Text Before / Text After) from the list box and select your preferences. For more information, see “Setting Options for the Checked Text” on page 178, “Setting Options for Text Displayed before the Checked Text” on page 180, and “Setting Options for Text Displayed after the Checked Text” on page 183.
The bottom part of the dialog box enables you to specify the time interval during which QuickTest attempts to perform the checkpoint successfully. You can also specify when to perform the checkpoint in the test. For more information, see “Setting General Checkpoint Options” on page 186.

QuickTest Professional User’s Guide • Creating Tests
176
Configuring the Text Selection
You can configure the text selection displayed in the Checkpoint Summary pane using the following options:
The Configure Text Selection dialog box displays the text you captured when creating the text checkpoint. For text checkpoints, it also displays some text before and after the selected text. QuickTest displays the checked text in red and the text before and after it in black (as indicated in the Legend displayed in the dialog box).
For text area checkpoints, you can designate parts of the captured text as checked text, and other parts as text before and text after.
Option Description
Configure Opens the Configure Text Selection dialog box, where you can specify the checked text, the text before (if any), and the text after (if any).
Checkpoint summary
Displays the text configuration you make using the Configure Text Selection dialog box.
Reset Resets the text selection to the previous configuration.

Chapter 10 • Checking Text
177
Note: If you are modifying an existing text checkpoint, the Configure Text Selection dialog box displays the existing text configuration.
Tip: If you want to configure more text than is displayed, cancel the text checkpoint and make a larger text selection in your Web page or application window.
You can specify the parts of the displayed text for the checkpoint by highlighting them and clicking one of the following buttons:
Note: QuickTest displays in gray any text that is not configured as Checked Text, Text Before, or Text After. The gray text is not displayed the next time the Configure Text Selection dialog box is opened.
When you close the Configure Text Selection dialog box, the Checkpoint Summary pane displays the new text selection configuration.
The middle area of the Text/Text Area Checkpoint Properties dialog box enables you to set options for the checked text, text before, and text after as described in the following sections.
Option Description
Checked Text Sets the highlighted text as the checked text. QuickTest displays this text in red and the remainder in black.
Text Before Sets the highlighted text as the text before the checked text.
Text After Sets the highlighted text as the text after the checked text.

QuickTest Professional User’s Guide • Creating Tests
178
Setting Options for the Checked Text
Choose Checked Text from the list box. In the Checked Text section, you can indicate whether you want the checked text to be a constant or a parameter, and you can set the criteria for a successful match. Choose from the following options for the checked text:
Option Description
Constant (default) Sets the expected value of the checked text as a constant. Click the Edit Constant Value Options button to open the Constant Value Options dialog box, where you can specify a text string or a regular expression. For more information on regular expressions, see Chapter 15, “Using Regular Expressions.” The value of the selected text is constant for each iteration of the test run.
Tip: The text box displays the checked text. You can change the checked text by typing in the text box or by using the Configure Text Selection dialog box.
Parameter Sets the expected value of the checked text as a parameter. For more information, see Chapter 13, “Parameterizing Tests.”
Data Table(enabled only when Parameter is selected)
Specifies the parameter as a Data Table parameter. The value of the checked text is determined by the data in the Data Table. For more information about creating Data Table parameters, see “Using Data Table Parameters” on page 227.
Parameter name(enabled only when Data Table is selected)
Specifies the name of the parameter in the Data Table. You can select from the list box of existing Data Table columns or you can enter a new name to create a new column in the Data Table.
Other(enabled only when Parameter is selected)
Specifies that the parameter is a random number or environment variable parameter. The text box displays the parameter statement. For more information about creating random number parameters, see “Using Random Number Parameters” on page 241. For more information about creating environment variable parameters, see “Using Environment Variable Parameters” on page 231.

Chapter 10 • Checking Text
179
Edit Parameter Options (enabled only when Parameter is selected)
If you select Data Table, clicking the Edit Parameter Options button opens the Data Table Parameter Options dialog box, where you can set the value as a regular expression or choose to use a Data Table formula. For more information on regular expressions, see Chapter 15, “Using Regular Expressions.” For more information on Data Table formulas, see Chapter 18, “Working with Data Tables”. You can also specify the parameter name and set the parameter as global or current action data. For more information, see Chapter 17, “Working with Actions.”
If you select Other, clicking the Edit Parameter Options button opens the Parameter Options dialog box, where you can specify the parameter type and preferences. For more information, see Chapter 13, “Parameterizing Tests.”
Match case Conducts a case-sensitive check.
Exact match Checks for the exact expected text. For example, you create a checkpoint with the following description—Check that New York is displayed between Flight departing from and to San Francisco and select Exact match. If the actual text is New York City, the checkpoint fails. If you do not select Exact match, the checkpoint passes because the expected text is contained within the actual text.
Ignore spaces Ignores spaces in the captured text when performing the check. The presence or absence of spaces does not affect the outcome of the check.
Text not displayed Checks that the text string is not displayed. For example, you create a checkpoint with the following description— Check that New York is displayed between Flight departing from and to San Francisco and select Text not displayed. QuickTest checks that the text New York is not displayed.
Option Description

QuickTest Professional User’s Guide • Creating Tests
180
Setting Options for Text Displayed before the Checked Text
Choose Text Before from the list box. In the Text Before section, you can set the text before the checked text as a constant or a parameter.

Chapter 10 • Checking Text
181
QuickTest displays the following options for setting the text displayed before the checked text:
Option Description
Use the text before Checks the text before the checked text. To ignore this text, clear this check box.
Text to check is displayed after occurrence
Checks that the checked text is displayed after the specified text.
If the identical text string you specify is displayed more than once on the page, you can specify to which occurrence of the string you are referring.
If you accept the default text that QuickTest recommends, the number in the dialog box will be correct. If you modify the text, confirm that the occurrence number is also accurate.
If you choose a non-unique text string, change the occurrence number appropriately. For example, if you want to check that the words "Mercury Tours" are displayed after the fourth occurrence of the word "the," enter 4 in the Text to check is displayed after occurrence box.
Constant (default) Sets the expected value of the text before the checked text as a constant. The value is constant for each iteration of the test run. Note that the text box displays the text before the checked text. You can change the text by typing in the text box or by using the Configure Text Selection dialog box.
Tip: If you modify the text, use a unique string whenever possible so that the occurrence number is 1.
Parameter Sets the expected value of the text before the checked text as a parameter. For more information, see Chapter 13, “Parameterizing Tests.”
Data Table(enabled only when Parameter is selected)
Specifies the parameter as a Data Table parameter. The value of the text before the checked text is determined by the data in the Data Table. For more information about creating Data Table parameters, see “Using Data Table Parameters” on page 227.

QuickTest Professional User’s Guide • Creating Tests
182
Parameter name(enabled only when Data Table is selected)
Specifies the name of the parameter in the Data Table. You can select from the list box of existing Data Table columns or you can enter a new name to create a new column in the Data Table.
Other(enabled only when Parameter is selected)
Specifies that the parameter is a random number or environment variable parameter. The text box displays the parameter statement. For more information about creating random number parameters, see “Using Random Number Parameters” on page 241. For more information about creating environment variable parameters, see “Using Environment Variable Parameters” on page 231.
Edit Parameter Options (enabled only when Parameter is selected)
If you select Data Table, clicking the Edit Parameter Options button opens the Data Table Parameter Options dialog box, where you can also specify the parameter name and set the parameter as global or current action data. For more information, see Chapter 17, “Working with Actions.”
If you select Other, clicking the Edit Parameter Options button opens the Parameter Options dialog box, where you can specify the parameter type and preferences. For more information, see Chapter 13, “Parameterizing Tests.”
Option Description

Chapter 10 • Checking Text
183
Setting Options for Text Displayed after the Checked Text
Choose Text After from the list box. In the Text After section, you can set the text after the checked text as a constant or a parameter.

QuickTest Professional User’s Guide • Creating Tests
184
You can choose from the following options for setting which text is displayed after the checked text:
Option Description
Use the text after Checks the text after the checked text. To ignore this text, clear this check box.
Text to check is displayed before occurrence
Checks that the checked text is displayed before the specified text.
QuickTest starts counting occurrences of the is displayed before text you specify, from the end of the is displayed after string. In other words, it starts looking for the specified text from the text you selected to check.
If you accept the default text that QuickTest recommends, the number in the dialog box will be correct. If you modify the recommended text string and the string you specify is displayed in your highlighted text as well as in the is displayed before text, you need to modify the occurrence number accordingly.
For example, if you want to check that the words my hat is the best are displayed before the word hat, enter 2 in the Text to check is displayed before occurrence box, to show that you want your text to be displayed before the second occurrence of the word hat.
Constant (default) Sets the expected value of the text after the checked text as a constant. The value is constant for each iteration of the test run. Note that the text box displays the text after the checked text. You can change the text by typing in the text box or by using the Configure Text Selection dialog box.
Tip: If you modify the text, use a unique string whenever possible so that the occurrence number is always 1.
Parameter Sets the expected value of the text after the checked text as a parameter. For more information, see Chapter 13, “Parameterizing Tests.”

Chapter 10 • Checking Text
185
Data Table(enabled only when Parameter is selected)
Specifies the parameter as a Data Table parameter. The value of the text after the checked text is determined by the data in the Data Table. For more information about creating Data Table parameters, see “Using Data Table Parameters” on page 227.
Parameter name(enabled only when Data Table is selected)
Specifies the name of the parameter in the Data Table. You can select from the list box of existing Data Table columns or you can enter a new name to create a new column in the Data Table.
Other(enabled only when Parameter is selected)
Specifies that the parameter is a random number or environment variable parameter. The text box displays the parameter statement. For more information about creating random number parameters, see “Using Random Number Parameters” on page 241. For more information about creating environment variable parameters, see “Using Environment Variable Parameters” on page 231.
Edit Parameter Options (enabled only when Parameter is selected)
If you select Data Table, clicking the Edit Parameter Options button opens the Data Table Parameter Options dialog box, where you can also specify the parameter name and set the parameter as global or current action data. For more information, see Chapter 17, “Working with Actions.”
If you select Other, clicking the Edit Parameter Options button opens the Parameter Options dialog box, where you can specify the parameter type and preferences. For more information, see Chapter 13, “Parameterizing Tests.”
Option Description

QuickTest Professional User’s Guide • Creating Tests
186
Setting General Checkpoint Options
The bottom part of the Text/Text Area Checkpoint Properties dialog box contains the following options:
Checkpoint timeout—Specifies the time interval (in seconds) during which QuickTest attempts to perform the checkpoint successfully. QuickTest continues to perform the checkpoint until it passes or until the timeout occurs. If the checkpoint does not pass before the timeout occurs, the checkpoint fails.
For example, suppose it takes some time for an object to achieve an expected state. Increasing the checkpoint timeout value in this case can ensure that the object has sufficient time to achieve that state and therefore enables the checkpoint to pass before the end of the timeout period is reached.
You can see information about the checkpoint timeout, including the time interval used by QuickTest to perform the checkpoint, in the Test Results window.
Note: The Checkpoint timeout option is only available when creating a text checkpoint. It is not available when creating a text area checkpoint.
Insert statement—Specifies when to perform the checkpoint in the test. Choose Before current step if you want to check the value of the text before the highlighted step is performed. Choose After current step if you want to check the value of the text after the highlighted step is performed.
Note: The Insert statement option is not available when adding a new text checkpoint or a text area checkpoint during recording, or when modifying an existing checkpoint. It is available only when adding a new text checkpoint to an existing test while editing your test.

Chapter 10 • Checking Text
187
Modifying a Text or Text Area Checkpoint
You can modify an existing text or text area checkpoint.
To modify a text or text area checkpoint:
1 In the Tree View, right-click the checkpoint that you want to modify.
2 Select Checkpoint Properties.
The Text/Text Area Checkpoint Properties dialog box opens.
3 Modify the settings. (See “Understanding the Text/Text Area Checkpoint Properties Dialog Box” on page 174.)

QuickTest Professional User’s Guide • Creating Tests
188

189
11Checking Bitmaps
QuickTest enables you to compare objects in a Web page or application by matching captured bitmaps.
This chapter describes:
About Checking Bitmaps
Checking a Bitmap
Modifying a Bitmap Checkpoint
About Checking Bitmaps
You can check an area of a Web page or application as a bitmap. While creating a test, you specify the area you want to check by selecting an object. You can check an entire object or any area within an object. QuickTest captures the specified object as a bitmap, and inserts a checkpoint in the test. You can also choose to save only the selected area of the object with your test in order to save disk space.
When you run the test, QuickTest compares the object or selected area of the object currently displayed on the Web page or application with the bitmap stored when the test was recorded. If there are differences, QuickTest captures a bitmap of the actual object and displays it with the expected bitmap in the details portion of the Test Results window. By comparing the two bitmaps (expected and actual), you can identify the nature of the discrepancy. For more information on test results of a checkpoint, see “Viewing Checkpoint Results” on page 533.

QuickTest Professional User’s Guide • Creating Tests
190
For example, suppose you have a Web site that can display a map of a city the user specifies. The map has control keys for zooming. You can record the new map that is displayed after one click on the control key that zooms in the map. Using the bitmap checkpoint, you can check that the map zooms in correctly.
You can create bitmap checkpoints for all supported testing environments (as long as the appropriate add-ins are loaded).
Checking a Bitmap
You can add a bitmap checkpoint while recording or editing your test.
To create a bitmap checkpoint while recording:
1 Choose Insert > Checkpoint > Bitmap Checkpoint or click the arrow beside the Insert Checkpoint button and choose Bitmap Checkpoint.
The QuickTest window is minimized and the mouse pointer turns into a pointing hand.
Note: If the object you want to check can only be displayed by performing an event (such as a right-click or a mouse over to display a context menu), hold the CTRL key. The pointing hand temporarily turns into a standard arrow and you can perform the event. When the object you want to check is displayed, release the CTRL key. The arrow becomes a pointing hand again.

Chapter 11 • Checking Bitmaps
191
2 Click an object to check in your Web page or application. If the location you click is associated with more than one object, the Object Selection - Bitmap Checkpoint Properties dialog box opens.
Tip: Select an object from the tree on which to create a bitmap checkpoint. If you want to create a bitmap checkpoint of multiple objects, you should select the highest level object that includes all the objects to include in the bitmap checkpoint.

QuickTest Professional User’s Guide • Creating Tests
192
3 Click OK. The Bitmap Checkpoint Properties dialog box opens.
A bitmap of the object you selected in the previous step is displayed in the dialog box.
4 If you want to check a selected area of the object, click the Select Area button. Use the crosshairs pointer to specify the area you want to select. This instructs QuickTest to check only the selected area and to ignore the remainder of the bitmap. The Test Results window displays the bitmap with this area highlighted.
5 If you want to save only the selected area of the object with your test (to save disk space), select the Save only selected area check box. The Test Results window displays only the selected area of the bitmap.

Chapter 11 • Checking Bitmaps
193
Note: If you select the Save only selected area check box, you can later modify the checkpoint by selecting a smaller area within the selected area, but you cannot return the bitmap to its former size. The Update Run option (Test > Update Run) only updates the saved area of the bitmap, it does not update the original, full size object. To include more of the object in the checkpoint, create a new checkpoint.
6 Specify the Checkpoint Timeout if you want to define the time interval (in seconds) during which QuickTest attempts to perform the checkpoint successfully. QuickTest continues to perform the checkpoint until it passes or until the timeout occurs. If the checkpoint does not pass before the timeout occurs, the checkpoint fails.
For example, suppose it takes some time for an object to achieve an expected state. Increasing the checkpoint timeout value in this case can ensure that the object has sufficient time to achieve that state and therefore enables the checkpoint to pass before the end of the timeout period is reached.
You can see information about the checkpoint timeout, including the time interval used by QuickTest to perform the checkpoint, in the Test Results window.
7 Click OK to add the bitmap checkpoint to your test.
A tree item with a checkpoint icon is added to your test tree.

QuickTest Professional User’s Guide • Creating Tests
194
To create a bitmap checkpoint while editing your test:
1 Make sure the Active Screen button is selected.
2 Click a step in the Tree View to add a checkpoint. The Active Screen displays the Web page or application corresponding to the highlighted step.
3 Right-click an object in the Active Screen and choose Insert Bitmap Checkpoint. If the location you click is associated with more than one object, the Object Selection - Bitmap Checkpoint Properties dialog box opens.
Note: Select an object from the tree on which to create a bitmap checkpoint. Ensure that the object you select is completely visible. Otherwise, if another application is overlapping the object, it will also be captured.
Tip: If you want to create a bitmap checkpoint of multiple objects, you should select a parent object that includes all the objects to include in the bitmap checkpoint.

Chapter 11 • Checking Bitmaps
195
4 Click OK. The Bitmap Checkpoint Properties dialog box opens.
A bitmap of the object you selected in the previous step is displayed in the dialog box.
5 If you want to check a selected area of the object, click the Select Area button. Use the crosshairs pointer to specify the area you want to select. This instructs QuickTest to check only the selected area and to ignore the remainder of the bitmap. The Test Results window displays the bitmap with this area highlighted.
6 If you want to save only the selected area of the object with your test (to save disk space), select the Save only selected area check box. The Test Results window displays only the selected area of the bitmap.

QuickTest Professional User’s Guide • Creating Tests
196
Note: If you select the Save only selected area check box, you can later modify the checkpoint by selecting a smaller area within the selected area, but you cannot return the bitmap to its former size. The Update Run option (Test > Update Run) only updates the saved area of the bitmap, it does not update the original, full size object. To include more of the object in the checkpoint, create a new checkpoint.
7 Specify the Checkpoint Timeout if you want to define the time interval (in seconds) during which QuickTest attempts to perform the checkpoint successfully. QuickTest continues to perform the checkpoint until it passes or until the timeout occurs. If the checkpoint does not pass before the timeout occurs, the checkpoint fails.
For example, suppose it takes some time for an object to achieve an expected state. Increasing the checkpoint timeout value in this case can ensure that the object has sufficient time to achieve that state and therefore enables the checkpoint to pass before the end of the timeout period is reached. You can see information about the checkpoint timeout, including the time interval used by QuickTest to perform the checkpoint, in the Test Results window.
8 Choose to insert the bitmap checkpoint before or after the highlighted step.
Notes:
Choose Before current step if you want to check the bitmap before the highlighted step is performed. Choose After current step if you want to check the bitmap after the highlighted step is performed.
The Insert statement option is not available when adding a new bitmap checkpoint during recording or when modifying an existing bitmap checkpoint. It is available only when adding a new bitmap checkpoint to an existing test while editing your test.
9 Click OK to add the bitmap checkpoint to your test.A tree item with a checkpoint icon is added to your test tree.

Chapter 11 • Checking Bitmaps
197
Modifying a Bitmap Checkpoint
You can modify an existing bitmap checkpoint.
Note: If you selected the Save only selected area check box when you created or previously modified the checkpoint, then you can only modify the checkpoint by selecting a smaller area within the bitmap; you cannot return the bitmap to its former size. The Update Run option (Test > Update Run) only updates the saved area of the bitmap, it does not update the original, full size object. To include more of the object in the checkpoint, create a new checkpoint.
To modify a bitmap checkpoint:
1 In the Test pane, right-click the bitmap checkpoint that you want to modify and select Checkpoint Properties. The Bitmap Checkpoint Properties dialog box opens and displays the object or area you saved with the checkpoint.

QuickTest Professional User’s Guide • Creating Tests
198
2 Click the Select Area button. Use the crosshairs pointer to specify the area you want to select. This instructs QuickTest to check only the selected area and to ignore the remainder of the bitmap. The Test Results window displays the bitmap with this area highlighted.
3 If you want to save only the newly selected area of the object with your test (to save disk space), select the Save only selected area check box. The Test Results window displays only the selected area of the bitmap.
4 Specify the Checkpoint Timeout if you want to define the time interval (in seconds) during which QuickTest attempts to perform the checkpoint successfully. QuickTest continues to perform the checkpoint until it passes or until the timeout occurs. If the checkpoint does not pass before the timeout occurs, the checkpoint fails.
For example, suppose it takes some time for an object to achieve an expected state. Increasing the checkpoint timeout value in this case can ensure that the object has sufficient time to achieve that state and therefore enables the checkpoint to pass before the end of the timeout period is reached.
You can see information about the checkpoint timeout, including the time interval used by QuickTest to perform the checkpoint, in the Test Results window.
5 Click OK to modify the checkpoint.

199
12Checking XML
By adding XML checkpoints to your test scripts, you can check the contents of individual XML data files or documents that are part of your Web application.
This chapter describes:
About Checking XML
Creating XML Checkpoints
Modifying XML Checkpoints
Reviewing XML Checkpoint Results
Using XML Objects and Methods to Enhance Your Test
About Checking XML
XML (Extensible Markup Language) is a meta-markup language for text documents that is endorsed as a standard by the W3C. XML makes the complex data structures portable between different computer environments/operating systems and programming languages, facilitating the sharing of data.
XML files contain text with simple tags that describe the data within an XML document. These tags describe the data content, but not the presentation of the data. Applications that display an XML document or file use either Cascading Style Sheets (CSS) or XSL Formatting Objects (XSL-FO) to present the data.

QuickTest Professional User’s Guide • Creating Tests
200
You can verify the data content of XML files by inserting XML checkpoints. A few common uses of XML checkpoints are described below:
An XML file can be a static data file that is accessed in order to retrieve commonly used data for which a quick response time is needed—for example, country names, zip codes, or area codes. Although this data can change over time, it is normally quite static. You can use an XML file checkpoint to validate that the data has not changed from one application release to another.
An XML file can consist of elements with attributes and values (character data). There is a parent and child relationship between the elements, and elements can have attributes associated with them. If any part of this structure (including data) changes, your application’s ability to process the XML file may be affected. Using an XML checkpoint, you can check the content of an element to make sure that its tags, attributes, and values have not changed.
XML files are often an intermediary that retrieves dynamically changing data from one system. The data is then accessed by another system using Document Type Definitions (DTD), enabling the accessing system to read and display the information in the file. You can use an XML checkpoint and parameterize the captured data values in order to check an XML document or file whose data changes in a predictable way.
XML documents and files often need a well-defined structure in order to be portable across platforms and development systems. One way to accomplish this is by developing an XML schema, which describes the structure of the XML elements and data types. You can use schema validation to check that each item of content in an XML file adheres to the schema description of the element in which the content is to be placed.
Note for users with QuickTest Professional version 6.0 tests: QuickTest version 6.5 saves XML checkpoint information in a new format. If you are using QuickTest 6.0 tests in QuickTest 6.5, you must perform an update run, or manually open each XML Checkpoint Properties dialog box and click the OK button. This converts the XML checkpoint information to the new format and results in a major improvement in performance.

Chapter 12 • Checking XML
201
Creating XML Checkpoints
You can create two types of XML checkpoints:
XML Web Page/Frame Checkpoint—Checks an XML document within a Web page or frame.
File Checkpoint—Checks a specified XML file.
Creating XML Web Page/Frame Checkpoints
You can create an XML Web page/frame checkpoint for any XML document contained in a Web page or frame. Note that you can create an XML Web page/frame checkpoint only while recording a test.
To create an XML Web page/frame checkpoint:
1 Begin recording your test.
2 Choose Insert > Checkpoint > XML Checkpoint (Web Page/Frame), or click the Insert Checkpoint arrow and select XML Checkpoint (Web Page/Frame).
Note: The XML Checkpoint (Web Page/Frame) option is available only when the Web Add-in is installed and loaded. For more information on loading add-ins, see Chapter 20, “Working with QuickTest Add-Ins.”
The QuickTest window is minimized and the mouse pointer becomes a pointing hand.

QuickTest Professional User’s Guide • Creating Tests
202
3 Click a Web page or frame to check the XML documents associated with the page.
If only one XML file is associated with the Web page or frame, the XML Checkpoint Properties dialog box opens. In this case, proceed to step 5.
If more than one XML document is associated with the selected location, the Object Selection - XML Checkpoint Properties dialog box opens.

Chapter 12 • Checking XML
203
4 Select the XML document you want to check, and click OK. The XML Checkpoint Properties dialog box opens.
The XML Checkpoint Properties dialog box displays the element hierarchy and values (character data) of the selected XML document.
Note: QuickTest loads large XML files in the background. While the file is loading, an indication of this is shown in the XML Checkpoint Properties dialog box, and you can only select XML nodes that are already loaded.

QuickTest Professional User’s Guide • Creating Tests
204
5 Select the element(s), attribute(s), and/or value(s) that you want to check. For each element you want to check, select the checks you want to perform. For each attribute or value you want to check, select the checks you want to perform, or the parameterization options you want to set.
For more information on these options, see “Understanding the XML Checkpoint Properties Dialog Box” on page 208.
6 If you want to check that the XML structure adheres to a specific XML schema, click Activate Schema Validation and set the required options. For more information on these options, see “Understanding the Schema Validation Dialog Box” on page 216.
7 Click OK to add the XML checkpoint to your test.
A checkpoint similar to the following is added to your test tree.
QuickTest records this step in the Expert View as:
Browser("Top XML: Chris").Page("Top XML:Chris").WebXML("MyXML1").Check CheckPoint("MyXML1")
Creating XML File Checkpoints
You create XML file checkpoints in order to directly access and verify specified XML files in your system. Note that you can create an XML file checkpoint while you are recording or editing your test.

Chapter 12 • Checking XML
205
To create an XML file checkpoint:
1 Choose Insert > Checkpoint > XML Checkpoint (File), or click the Insert Checkpoint arrow and select XML Checkpoint (File). The XML Checkpoint from File dialog box opens.
2 In the XML file box, enter the file path or Internet address of the XML file. Alternatively, click the browse button to navigate to the XML file for which you want to create a checkpoint. You can specify an XML file either from your file system or from TestDirector.
Note: You can enter a relative path and QuickTest will search for the XML file in the folders listed in the Folders tab of the Options dialog box. Once QuickTest locates the file, it saves it as an absolute path and uses the absolute path during the test run. For more information, see Chapter 28, “Setting Folder Testing Options.”

QuickTest Professional User’s Guide • Creating Tests
206
3 Click OK. The XML Checkpoint Properties dialog box opens.
The XML Checkpoint Properties dialog box displays the element hierarchy and values (character data) of the selected XML file.
Note: QuickTest loads large XML files in the background. While the file is loading, an indication of this is shown in the XML Checkpoint Properties dialog box, and you can only select XML nodes that are already loaded.

Chapter 12 • Checking XML
207
4 Select the element(s), attribute(s), and/or value(s) that you want to check. For each element you want to check, select the checks you want to perform. For each attribute or value you want to check, select the checks you want to perform, or the parameterization options you want to set.
For more information on these options, see “Understanding the XML Checkpoint Properties Dialog Box” on page 208.
5 If you want to check that the XML structure adheres to a specific XML schema, click Activate Schema Validation and set the required options. For more information on these options, see “Understanding the Schema Validation Dialog Box” on page 216.
6 If you are inserting the checkpoint while editing your test, choose whether you want to insert the XML checkpoint before or after the highlighted step. Choose Before current step if you want to check the XML file before the highlighted step is performed. Choose After current step if you want to check the XML file after the highlighted step is performed.
Note: The Insert statement options are not available if you are adding an XML checkpoint while recording, or if you are modifying an existing XML checkpoint. It is available only if you are adding a new XML checkpoint while editing your test.
7 Click OK to add the XML checkpoint to your test.
A checkpoint similar to the following is added to your test tree.
QuickTest inserts this step as follows in the Expert View:
XMLFile("WSXML1.xml").Check CheckPoint("WSXML1.xml")

QuickTest Professional User’s Guide • Creating Tests
208
Understanding the XML Checkpoint Properties Dialog Box
The XML Checkpoint Properties dialog box enables you to choose which elements, attributes, and/or values to check.
Note: QuickTest loads large XML files in the background. While the file is loading, an indication of this is shown in the XML Checkpoint Properties dialog box. You can only select XML nodes that are already fully loaded.

Chapter 12 • Checking XML
209
Identifying the Object
The top part of the dialog box displays test object information about the selected XML document or file:
XML Checkpoint Control Buttons
In the right-hand corner, above the XML Tree, there are four control buttons:
Option Description
Logical Name The name assigned to the checkpoint and step.
Class The test object class. This is either XMLFile (for files) or WebXML (for Web pages or frames).
Option Description
Select All Selects all elements and values in the XML Tree.
Clear All Clears all elements and values in the XML Tree.
Open Value Dialog
Opens the Element Value dialog box, enabling you to view the complete value of each element. This button is enabled only when a value item is selected. Note that you can also open the Element Value dialog box by double-clicking a value tree item.
For more information, see “Understanding the Element Value Dialog Box” on page 215.
Attributes
Expands the window in order to display the attributes of the selected XML element. The attributes are displayed to the right of the XML Tree. Note that you can click this button again to hide the attributes.

QuickTest Professional User’s Guide • Creating Tests
210
XML Tree Pane
The XML Tree pane displays the hierarchy of the XML file, enabling you to select the elements, attributes and/or values you want to check.
Option Description
XML Tree The XML Tree displays the hierarchal relationship between each element and value in the XML document or file. Each element is displayed with a icon. Each value is displayed with a icon.
Attributes Pane
When you click the Attributes >> button, the attributes associated with the selected element are displayed in the Attributes pane to the right of the XML Tree. The attributes pane lists the name and value of each attribute. Note that you can click this button again to hide the Attributes pane.

Chapter 12 • Checking XML
211
Checkpoint Options Pane
The checkpoint options pane enables you to select the types of checks you want to perform on selected elements and/or the parameterization options you want to set for selected values and attributes.
Element Checks
When you select an element in the XML Tree, the checkpoint options pane displays the Element Checks section, which includes the name of the selected element and the available element checks.
The following element checks are available:
Option Description
Attribute values
Checks the values of the attributes that are attached to the element.
(selected by default)
Number of attributes
Checks the number of attributes that are attached to the element.
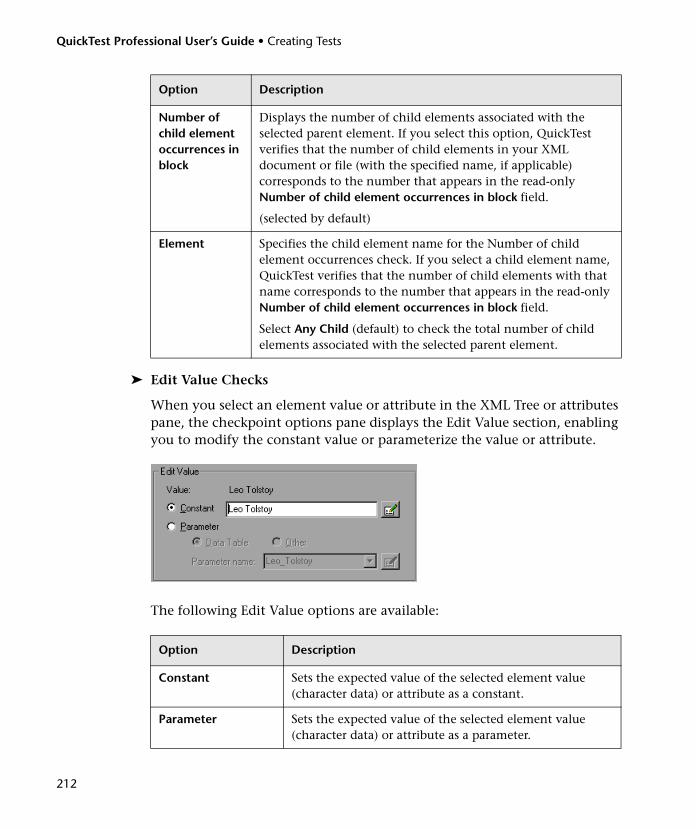
QuickTest Professional User’s Guide • Creating Tests
212
Edit Value Checks
When you select an element value or attribute in the XML Tree or attributes pane, the checkpoint options pane displays the Edit Value section, enabling you to modify the constant value or parameterize the value or attribute.
The following Edit Value options are available:
Number of child element occurrences in block
Displays the number of child elements associated with the selected parent element. If you select this option, QuickTest verifies that the number of child elements in your XML document or file (with the specified name, if applicable) corresponds to the number that appears in the read-only Number of child element occurrences in block field.
(selected by default)
Element Specifies the child element name for the Number of child element occurrences check. If you select a child element name, QuickTest verifies that the number of child elements with that name corresponds to the number that appears in the read-only Number of child element occurrences in block field.
Select Any Child (default) to check the total number of child elements associated with the selected parent element.
Option Description
Constant Sets the expected value of the selected element value (character data) or attribute as a constant.
Parameter Sets the expected value of the selected element value (character data) or attribute as a parameter.
Option Description

Chapter 12 • Checking XML
213
For more information on parameterizing values and attributes, see Chapter 13, “Parameterizing Tests.”
Data Table
(enabled only when Parameter is selected)
Sets the parameter as a Data Table parameter. The expected value of the element value or attribute is determined by the data in the Data Table on each iteration.
Parameter name
(enabled only when Data Table is selected)
Specifies the name of the parameter in the Data Table. You can select from the list box of existing Data Table columns or you can enter a new name to create a new column in the Data Table.
Other Sets the parameter as an environment variable parameter or a random number. Note that the text box displays the default parameter statement. You can modify the default settings by clicking the Edit Parameter Options button. For more information about creating random number parameters, see “Using Random Number Parameters” on page 241. For more information about creating environment variable parameters, see “Using Environment Variable Parameters” on page 231.
Edit Parameter Options button
(enabled only when Parameter is selected)
If you select Data Table, clicking the Edit Parameter Options button opens the Data Table Parameter Options dialog box, in which you can set the value as a regular expression. For more information, see Chapter 15, “Using Regular Expressions.”
You can also specify the parameter name and set the parameter as global or current action data. For more information, see Chapter 17, “Working with Actions.”
If you select Other, clicking the Edit Parameter Options button opens the Parameter Options dialog box, in which you can specify the parameter type and preferences.
For more information on both the above options, see “Parameterizing Individual Steps and Checkpoints” on page 225.
Option Description

QuickTest Professional User’s Guide • Creating Tests
214
Activate Schema Validation
You can use the Activate Schema Validation button to confirm that the XML in your application or file adheres to the XML structure defined in a specific XML schema or schemas. You can validate the XML structure using one or more external schema files or using schema(s) embedded within your XML document. For more information, see “Understanding the Schema Validation Dialog Box” on page 216.
Insert statement options
If you are inserting a checkpoint while editing your test, the bottom part of the XML Checkpoint Properties dialog box displays the Insert statement options, enabling you to choose whether you want to insert the XML checkpoint before or after the step that you highlighted. Choose Before current step if you want to check the value of the text before the highlighted step is performed. Choose After current step if you want to check the value of the text after the highlighted step is performed.
Note: The Insert statement options are not available if you are adding an XML checkpoint while recording or if you are modifying an existing XML checkpoint. They are available only if you are adding a new XML checkpoint while editing your test.

Chapter 12 • Checking XML
215
Understanding the Element Value Dialog Box
The XML Tree in the XML Checkpoint Properties dialog box displays values in a single line. There is limited space for a value to be displayed in both the XML Tree and tooltip (which is displayed when you hold your mouse over the value). The Open Value dialog box enables you to view multi-line values and/or values that are very long.
The following is an example of an Element Value dialog box for a multi-line value with several line breaks.
The Element Value dialog box contains the following options:
Option Description
Enables you to navigate forward through the element values in the XML Tree. Clicking this button displays the next value in the XML Tree.
Enables you to navigate backward through the element values in the XML Tree. Clicking this button displays the previous value in the XML Tree.

QuickTest Professional User’s Guide • Creating Tests
216
Understanding the Schema Validation Dialog Box
The Schema Validation dialog box enables you to specify an XML schema against which you want to validate the structure of the XML in your application or file.
The Schema Validation dialog box contains the following options:
Disable schema validation—Specifies that you do not want to validate the XML in your application or file against an XML schema. This is the default option.
Use the schema defined in the XML document—Instructs QuickTest to use the schema or schemas defined within your XML document to validate the structure of the XML in your Web page/frame or file.

Chapter 12 • Checking XML
217
Use single external schema—Instructs QuickTest to use an external XML schema file to validate the structure of your XML. If you select this option, specify the following:
Schema path or URL—Enter the path or URL of your XML schema file. Alternatively, click the browse button to navigate to the XML schema you want to use to validate the XML in your Web page/frame or file. You can specify a schema file either from your file system or from TestDirector.
Schema namespace (if applicable)—If your schema file has a namespace, specify it. QuickTest checks that the namespace matches the schema file as part of the validation process. If the schema file has a namespace and you do not specify it, or if the namespace you specify is different than the one specified in the schema file, the validation will fail.
Use multiple external schemas—Instructs QuickTest to use multiple external XML schema files to validate the structure of your XML. You can specify a schema file either from your file system or from TestDirector. For each external file you want to use, you must specify its path or URL and namespace.
If you select this option, the following toolbar buttons are enabled:
Button Description
Enables you to add an external schema file to the list. For more information, see “Understanding the Add Schema Dialog Box” on page 219.
Enables you to modify the details of an external schema file in the list. For more information, see “Understanding the Edit Schema Dialog Box” on page 219.
Enables you to remove an external schema file from the list.

QuickTest Professional User’s Guide • Creating Tests
218
Guidelines for Schema Validation
Following are specific guidelines that you should adhere to when specifying a schema file to validate your XML.
If there is more than one schema embedded in the XML, QuickTest recognizes each individual schema and compares the relevant section of the XML document against the schema for the corresponding section.
When specifying multiple external schemas either from your file system or from TestDirector, the paths cannot include spaces. When specifying multiple external schemas from TestDirector, QuickTest ignores the "[TestDirector] " part of the file path, but the remainder of the path must not contain spaces.
If you are validating an XML file using a schema defined in the XML file, the schema can be defined with an absolute or relative path. When you specify a relative path, QuickTest searches for the schema in the folders listed in the Folders tab of the Options dialog box. For more information, see Chapter 28, “Setting Folder Testing Options.”
If you are validating an XML document located on the Web with a schema file located on your file system, you cannot use UNC format (for example, \\ComputerName\Path\To\Schema) to specify the schema file location. Instead, map the schema file location to a network drive.
Using an external XML schema file to validate an XML document may cause an unexpected result if the XML document has an XML schema declaration defined in the document, and the namespace in the external schema file and the schema defined in the document are not identical.
When you perform a schema validation, QuickTest validates all of the elements in the XML document, even if certain XML elements are not associated with a schema file. Any XML elements that are not associated with a schema file will cause the schema validation to fail.

Chapter 12 • Checking XML
219
Understanding the Add Schema Dialog Box
The Add Schema dialog box enables you to specify the path or URL of an external schema file. For each external schema file, you must also specify its namespace.
Understanding the Edit Schema Dialog Box
The Edit Schema dialog box displays the path and namespace of the schema file you selected in the list. You can modify the path or URL of the selected schema file. You can also modify its namespace.

QuickTest Professional User’s Guide • Creating Tests
220
Modifying XML Checkpoints
You can change the expected data and settings of an existing XML checkpoint.
To modify an XML checkpoint:
1 In the Tree View or the Expert View, right-click the XML checkpoint that you want to modify.
2 Select Checkpoint Properties. The XML Checkpoint Properties dialog box opens.
3 Modify the settings as described in the previous sections.
Reviewing XML Checkpoint Results
By adding XML checkpoints to your tests, you can verify that the data and structure in your XML documents or files has not changed unexpectedly. When you run your test, QuickTest compares the expected results of the checkpoint to the actual results of the test run. If the results do not match, the checkpoint fails.
You can view summary results of the XML checkpoint in the Test Results window. You can view detailed results by opening the XML Checkpoint Results window. For more information on XML checkpoint results, see “Analyzing XML Checkpoint Results” on page 542.
Using XML Objects and Methods to Enhance Your Test
QuickTest provides several scripting methods that you can use with XML data. You can use these scripting methods to retrieve data and return new XML objects from existing XML data. You can also use these methods to create and manipulate new XML objects. You do this by entering XML statements in the Expert View. For more information about programming in the Expert View, see Chapter 37, “Testing in the Expert View.”
For additional information on XML objects and methods, refer to the Supplemental section of the QuickTest Object Model Reference.

221
13Parameterizing Tests
QuickTest enables you to expand the scope of a basic test by replacing fixed values with parameters. This process, known as parameterization, greatly increases the power and flexibility of your tests.
This chapter describes:
About Parameterizing Tests
Parameterizing Your Test Manually
Understanding Parameter Types
Using the Data Driver to Parameterize Your Test
Example of a Parameterized Test
About Parameterizing Tests
You can use the parameter feature in QuickTest to enhance your tests by parameterizing values in the test. A parameter is a variable that is assigned a value from various data sources or generators. If you want to parameterize the same value in several steps in your test, you may want to consider using the Data Driver rather than adding parameters manually.

QuickTest Professional User’s Guide • Creating Tests
222
There are two different groups of parameters—Data Table parameters and all other parameters.
Data Table parameters enable you to create a data-driven test (or action) that runs several times using the data you supply. In each repetition, or iteration, QuickTest substitutes the constant value with a different value from the Data Table.
Other parameter types enable you to use variable values from other sources during the test run. These values may be values you supply or values that QuickTest generates for you based on conditions and options you choose.
For example, you can have QuickTest insert a random number in an edit field or you can have QuickTest read all the values for filling in a Web form from an external user-defined file. You can also use one of QuickTest’s built-in environment variables to insert current information about the test or the machine running the test.
Parameterizing Your Test Manually
You can parameterize a step recorded in your test or a checkpoint added to your test.
You parameterize steps and checkpoints manually by opening the appropriate dialog box as described in this section. Once you have opened the appropriate dialog box, follow the instructions in “Parameterizing Individual Steps and Checkpoints” on page 225.
You can parameterize a step in your test tree while recording or editing your test. A step is made up of an object that you navigate in your Web page or application, and/or a method by which you navigate the step. When you parameterize a step, you can parameterize an object property, a method argument, or both.

Chapter 13 • Parameterizing Tests
223
For example, suppose your application or Web site includes an application that enables users to search for contact information from a membership database. The application displays the user’s contact information and a button that says “View <MemName>’s Picture”, where <MemName> is the name of the member that the user entered. You can parameterize the button’s name property so that during each iteration of the test run, QuickTest can identify the different picture buttons.
Your application or Web site may also include a form with an edit field into which the user types a text string. You may want to test how your application or site responds to different data in the form. Rather than record a separate test for each text string typed, you can parameterize the Set method so that during each iteration of the test run, QuickTest sets a different text string into the edit field.
You parameterize object properties in either the Object Properties dialog box or the Object Repository dialog box.
To open the Object Properties dialog box, right-click a step in the test tree and choose Object Properties. The properties are displayed for the object in the step you want to parameterize. For more information about the Object Properties dialog box, see Chapter 5, “Designing Tests.”
To open the Object Repository dialog box, right-click an action containing an object with the property or value you want to parameterize and choose Object Repository. Alternatively, you can select the action, and choose Tools > Object Repository.
Note: When you parameterize an object property, all occurrences of the specified object within the action are parameterized. For more information about actions, see Chapter 17, “Working with Actions.”
You parameterize method arguments using the Method Arguments dialog box.

QuickTest Professional User’s Guide • Creating Tests
224
To open the Method Arguments dialog box, right-click a step in the test tree and choose Method Arguments. The Method Arguments dialog box opens and displays the method arguments in the step. When you parameterize a checkpoint, instead of checking how your Web site or application performs an operation on a single text string or object, you can check how it performs the same operation with multiple sets of data.
For example, if you are testing the Mercury Tours sample Web site, you may create a checkpoint to check that once you book a ticket, it is booked correctly. Suppose that you want to check that flights are booked correctly for a variety of different destinations. Rather than create a separate test with a separate checkpoint for each destination, you can parameterize the destination information. For each iteration of the test, QuickTest checks the flight information for a different destination.
You parameterize checkpoints in the Checkpoint Properties dialog box. To parameterize an existing checkpoint, right-click the checkpoint in the test tree and choose Checkpoint Properties.
For a page checkpoint, the Page Checkpoint Properties dialog box opens.
For a text checkpoint, the Text Checkpoint Properties dialog box opens.
For an object checkpoint, the Checkpoint Properties dialog box opens.
For a table checkpoint, the Table Checkpoint Properties dialog box opens.
For a database checkpoint, the Database Checkpoint Properties dialog box opens.
For more information on checkpoints, and for information on parameterizing checkpoints while creating them, see Chapter 7, “Understanding Checkpoints.”

Chapter 13 • Parameterizing Tests
225
Parameterizing Individual Steps and Checkpoints
You can parameterize individual steps or checkpoints while recording or editing your test.
To parameterize a step or checkpoint:
1 Open the Object Properties, Object Repository, Method Arguments, or Checkpoint Properties dialog box for the step or checkpoint you want to parameterize as described in the previous section.
2 Select the value to parameterize (if applicable).
3 In the Edit value box, click Parameter.
4 Click Data Table or Other to indicate the type of parameter you want to use.
For more information about parameter types, see “Understanding Parameter Types,” below.
5 If you chose Data Table, choose a parameter from the Parameter Name box list or enter a new name.
To use an existing parameter, select it from the list.
To create a new parameter, either use the default parameter name or enter a descriptive name for the parameter.
Note: The parameter name must be unique. It can contain letters, numbers, commas, and underscores. The first character of the parameter name must be a letter or an underscore.
6 If you chose Other or if you want to modify the default Data Table parameter options, click the Edit Parameter Options button to set your desired preferences.

QuickTest Professional User’s Guide • Creating Tests
226
7 Click OK to save your changes and close the Parameter Options dialog box.
For more information on the parameter options for each parameter type, see “Understanding Parameter Types,” below.
8 Click OK to save the parameter and close the dialog box. If you chose Data Table, a new column is highlighted in the Data Table for the new parameter.
In your test tree, the icon next to the step indicates that the step has been parameterized.
Note: You can specify additional data values for Data Table parameters by entering them directly into the Data Table. For more information, see Chapter 18, “Working with Data Tables.”
Understanding Parameter Types
You can parameterize your test using Data Table parameters or by having QuickTest insert values for you based on the parameter type and the parameter-specific preferences you set.
The following parameter types are available:
Using Data Table Parameters
Using Environment Variable Parameters
Using Random Number Parameters
Note: In addition to the procedures described below, you can also define Data Table, environment, and random number variables using parameterization objects and methods in the Expert View. For more information, refer to the QuickTest Object Model Reference.

Chapter 13 • Parameterizing Tests
227
Using Data Table Parameters
You can supply the list of possible values for a parameter by creating a Data Table parameter. Data Table parameters enable you to create a data-driven test (or action) that runs several times using the data you supply. In each repetition, or iteration, QuickTest substitutes the constant value with a different value from the Data Table.
For example, consider the Mercury Tours sample Web site, which enables you to book flight requests. To book a flight, you supply the flight itinerary and click the Continue button. The site returns the available flights for the requested itinerary. You could conduct the test by accessing the Web site and recording the submission of numerous queries. This is a slow, laborious, and inefficient solution. When you parameterize your test, you first record a test that accesses the Web site and checks for the available flights for one requested itinerary. You then substitute the recorded itinerary with a Data Table parameter and add your own multiple sets of data, one for each itinerary, in the Data Table.
Each column in the table represents the list of values for a single parameter. The column header is the parameter name.
Each row in the table represents a set of values that QuickTest submits for all the parameters during a single iteration of the test. When you run your test, QuickTest runs one iteration of the test for each row of data in the table. Thus, a test with ten rows in the Data Table will run ten times.

QuickTest Professional User’s Guide • Creating Tests
228
Tip: You can also create output values, which retrieve values during the test run and insert them into a column in the Data Table. You can then use these columns as Data Table parameters in your test. For more information, see Chapter 14, “Creating Output Values.”
In the previous example, QuickTest submits a separate query for each itinerary when you run the test.
When you create a Data Table parameter, a new column is added in the Data Table and the current value of the property or argument you parameterized is placed in the first row.
By default, the Data Table parameter is placed in the global Data Table and the values are taken as simple text. You can modify these settings in the Parameter Options dialog box.

Chapter 13 • Parameterizing Tests
229
To modify Data Table Parameter options:
1 In the Edit value section of the Object Properties, Object Repository, Method Arguments, or Checkpoint Properties dialog box, click Data Table as the type of parameter you want to use.
2 Click the Edit Parameter Options button next to the Parameter name box. The Data Table Parameter Options dialog box opens.
3 Choose a parameter from the Name box list or enter a new name.
To use an existing parameter, select it from the list.
To create a new parameter, either use the default parameter name or enter a descriptive name for the parameter.
Note: The parameter name must be unique. It can contain letters, numbers, commas, and underscores. The first character of the parameter name must be a letter or an underscore.

QuickTest Professional User’s Guide • Creating Tests
230
4 Click Global sheet or Current action sheet (local).
To add the parameter to the Global tab in the Data Table, click Global sheet.
To add the parameter to the Action tab, click Current action sheet (local).
For more information about the Global vs. Current Action Data Table, see “Setting Data Table Parameters as Global or Action,” below. For more information about actions, see Chapter 17, “Working with Actions.”
5 If you want to set the property value of a checkpoint as a Data Table formula, select the Use Data Table Formula box. Note that this property is available only for checkpoints. For more information, see Chapter 18, “Working with Data Tables.”
6 If you want to set the property value of a checkpoint or object property as a regular expression, select the Regular expression check box (where applicable). Note that this option is available only for checkpoints and object properties. For more information, see Chapter 15, “Using Regular Expressions.”
Setting Data Table Parameters as Global or Action
When you parameterize a step using the Data Table, you must decide whether you want to make it a global parameter or an action parameter.
Global parameters take data from the global sheet in the Data Table. The global sheet contains the data that replaces global parameters in each iteration of the test. By default, the test runs one iteration for each row in the global sheet of the Data Table. You can also set the test to run only one iteration or to run iterations on specified rows within the global sheet of the Data Table. You can use the parameters in the global data sheet in any action. This enables you to pass parameters from one action to another.
For more information about setting global iteration preferences, see “Defining Run Settings for Your Test” on page 624.

Chapter 13 • Parameterizing Tests
231
Action parameters take data from the action’s sheet in the Data Table. The data in the action’s sheet replaces the action’s parameters in each iteration of the action. By default, actions run only one iteration.
You can also set the test to run iterations for all rows in the action’s sheet or to run iterations on specified rows within the action’s sheet. When you set your action properties to run iterations on all rows, QuickTest inserts the next value from the action’s data sheet into the corresponding action parameter during each action iteration, while the values of the global parameters stay constant.
For more information about setting action iteration preferences, see “Setting the Run Properties for an Action” on page 352.
Note: After running a parameterized test, you can view the results of values taken from the Data Table in the Run-Time Data Table. For more information, see “Viewing the Run-Time Data Table” on page 558.
Using Environment Variable Parameters
QuickTest can insert a value from the Environment variable list, which is a list of variables and corresponding values that can be accessed from your test. Throughout the test run, the value of an environment variable remains the same, regardless of the number of iterations, unless you change the value of the variable programmatically in your script.
Tip: The environment parameter is especially useful for localization testing, when you want to test an application where the user interface strings change, depending on the selected language. The environment parameter can be used for testing the same application on different browsers.
You can also vary the input values for each language by selecting a different Data Table file each time you run the test. For more information, see Chapter 18, “Working with Data Tables.”

QuickTest Professional User’s Guide • Creating Tests
232
There are three types of environment variables:
User-Defined Internal—variables that you define within the test. They are saved with the test and accessible only within the test in which they were defined.
User-Defined External—variables that you pre-defined in the active external environment variables file. You can create as many files as you want and select an appropriate file for each test. Note that external environment variable values are designated as read-only within the test.
Built-in—built-in variables, such as Test path and Operating system. They are accessible from all tests, and are designated as read-only.
Note: You can use the pre-defined environment variable names to set the application details to be used for record and run settings. You should not use these names for any other purpose. For more information, see “Using Environment Variables to Specify the Application Details for Your Test” on page 651.
Using Internal User-Defined Environment Variables
You can add or modify internal, user-defined environment variables for your test in the Parameter Options dialog box or in the Environment tab of the Test Settings dialog box.
The section below describes how to add or modify environment variables from the Parameter Options dialog box. For more information on adding or modifying environment variables in the Test Settings dialog box, see “Defining Environment Settings for Your Test” on page 632.

Chapter 13 • Parameterizing Tests
233
To add or modify environment variable parameters:
1 In the Edit value section of the Object Properties, Object Repository, Method Arguments, or Checkpoint Properties dialog box, click Other as the type of parameter you want to use.
2 Click the Edit Parameter Options button next to the parameter type box. The Parameter Options dialog box opens.
3 Select Environment in the Parameter Types box.
4 Accept the default name or enter a new name to add a new user-defined-internal environment parameter, or select an existing environment variable name from the Name box. If you select an existing internal parameter, you can modify the value.
5 If you created a new parameter or selected an existing user-defined-internal parameter, enter the value for the parameter in the Value box.

QuickTest Professional User’s Guide • Creating Tests
234
6 If you want to set the property value of a checkpoint as a regular expression, select the Regular Expression check box. For more information, see Chapter 15, “Using Regular Expressions.”
Note: If you select an external user-defined or a built-in environment variable name, the Value box and the Regular Expression check box are disabled. The variable type of the selected parameter is displayed below the Value box.
7 Click OK to save your changes and close the dialog box.
Using External User-Defined Environment Variable Files
You can create a list of variable-value pairs in an external file written in ini file format and use variables from the file as parameters.
Note that you can also specify TestDirector files as environment variable files. For more information, see “Using Environment Variable Files with TestDirector” on page 240.
Tip: You can create several external variable files with the same variable names and different values, to run the test several times—using a different file each time. This is especially useful for localization testing.
To create an external environment variables file:
1 Open any text editor.
2 Type [Environment] on the first line.
3 Type one variable-value pair on each line in the format—variable=value.

Chapter 13 • Parameterizing Tests
235
4 Save the file in a location that is accessible from the QuickTest machine. The file must be a text file, but you can use any file name extension.
For example:
[Environment]MyParam1=10MyParam2=20MyParam3=Happy Birthday
Note: You can also export all existing user-defined variables (internal and external) to a new external environment-variables file. For more information, see Chapter 29, “Setting Testing Options for a Single Test.”
To select the active external environment-variables file:
1 Choose Test > Settings to open the Test Settings dialog box.
2 Click the Environment tab.
3 Select the Load variables and values from external file (reloaded each test run) check box.
4 Use the browse button or enter the full path of the external environment- variables file you want to use with your test.
For more information about the Test Settings dialog box, see Chapter 29, “Setting Testing Options for a Single Test.”

QuickTest Professional User’s Guide • Creating Tests
236
To insert an external user-defined environment variable:
1 In the Edit value section of the Object Properties, Object Repository, Method Arguments, or Checkpoint Properties dialog box, click Other as the type of parameter you want to use.
2 Click the Edit Parameter Options button next to the parameter type box. The Parameter Options dialog box opens.
3 Select Environment as the Parameter Type.
4 Select the external user-defined parameter you want to use from the Name box. The variable type of the selected parameter is displayed below the Value box. The current value is displayed in the Value box.

Chapter 13 • Parameterizing Tests
237
Note: If you modify the external user-defined parameter name, you create a new internal user-defined parameter. The external parameter still exists and cannot be modified from this dialog box.
5 Click OK to close the dialog box.
Using Built-in Environment Variables
QuickTest provides a set of built-in variables that enable you to use current information about the test and the QuickTest machine running your test. These can include the test name, the test path, the operating system type and version, and the local host name.
For example, you may want to perform different checks in your test based on the operating system being used by the computer that is running the test. To do this, you could include the OSVersion built-in environment variable in an If statement.
The following built-in environment variables are available:
Name Description
ActionIteration The action iteration currently running.
ControllerHostName The name of the controller’s computer. This variable is relevant only when running as a GUI VUser from the LoadRunner controller.
GroupName The name of the group in the running scenario. This variable is relevant only when running as a GUI VUser from the LoadRunner controller.
LocalHostName The local host name.
OS The operating system.
OSVersion The operating system version.
ProductDir The folder path where the product is installed.
ProductName The product name.

QuickTest Professional User’s Guide • Creating Tests
238
ProductVer The product version.
ResultDir The path of the folder in which the current test results are located.
ScenarioId The identification number of the scenario. This variable is relevant only when running as a GUI VUser from the LoadRunner controller.
SystemTempDir The system temporary directory.
TestDir The path of the folder in which the test is located.
TestIteration The test iteration currently running.
TestName The name of the test.
UpdatingActiveScreen Indicates whether the Active Screen images and values are being updated during the update run process. For more information, see “Updating a Test” on page 498.
UpdatingCheckpoints Indicates whether checkpoints are being updated during the update run process. For more information, see “Updating a Test” on page 498.
UpdatingTODescriptions Indicates whether the set of properties used to identify test objects are being updated during the update run process. For more information, see “Updating a Test” on page 498.
UserName The Windows login user name.
VuserId The VUser identification under load. This variable is relevant only when running as a GUI VUser from the LoadRunner controller.
Name Description

Chapter 13 • Parameterizing Tests
239
To insert a built-in environment variable:
1 In the Edit value section of the Object Properties, Object Repository, Method Arguments, or Checkpoint Properties dialog box, click Other as the type of parameter you want to use.
2 Click the Edit Parameter Options button next to the parameter type box. The Parameter Options dialog box opens.
3 Select Environment as the Parameter Type.
4 Select the built-in parameter you want to use from the Name box. The variable type of the selected parameter is displayed below the Value box. The current value is displayed in the Value box.

QuickTest Professional User’s Guide • Creating Tests
240
Note: If you modify the built-in parameter name, you create a new internal parameter. The built-in parameter still exists and cannot be modified.
5 Click OK to close the dialog box.
Using Environment Variable Files with TestDirector
When working with TestDirector and environment variable files, you must save the environment variable file as an attachment in your TestDirector project before you specify the file in the Environment tab of the Test Settings dialog box.
You can add a new or an existing environment variable file to your TestDirector project. Note that if you add an existing file from the file system to a TestDirector project, it will be a copy of the one used by tests not in the TestDirector project. Thus, once you save the file to the project, changes made to the TestDirector repository file will not affect the file system file and vice versa.
To use an environment variable file with TestDirector:
1 If you want to add a new environment variable file, create a new .ini file in your file system.
2 In TestDirector, add the file to the project as an attachment.
3 In the Test Settings dialog box, click the Environment tab.
4 Select User defined from the Variables type list.
5 Select Load variables and values from external file (reload each test run).
6 In the File box, click the browse button to find the user-defined variable file.
7 Create your test. When you save the test, QuickTest saves the Data Table file to the TestDirector project.

Chapter 13 • Parameterizing Tests
241
Using Random Number Parameters
QuickTest can generate random numbers and insert them as the values for a parameter. By default, the random number ranges between 0 and 100. The minimum allowable value for a random number is 0 and the maximum allowable value is 2147483647. A different random number is generated each time the parameter is called. You can modify these settings in the Parameter Options dialog box.
To modify random number parameter options:
1 In the Edit value section of the Object Properties, Object Repository, Method Arguments, or Checkpoint Properties dialog box, click Other as the type of parameter you want to use.
2 Click the Edit Parameter Options button next to the parameter type box. The Parameter Options dialog box opens.

QuickTest Professional User’s Guide • Creating Tests
242
3 Select Random Number as the type of parameter you want to use.
4 Enter the start and end of the range for the random number selection in the From and To boxes, respectively. The start range must be equal to or greater than 0. The end range must be less than 2147483647.
5 If you want to insert the same parameter more than once within your test, select the Name box.
Assigning a name to a random number parameter enables you to use the same parameter several times in your test. If the parameter is used in the test more than once before the Generate new random number event has occurred (as described in step 7), the same number is used. If the parameter is used again after the event has occurred, a new number is generated based on the same numeric range.
6 If you selected the Name box, choose an existing parameter from the Parameter Name list box or enter a new name.
To use an existing parameter, select it from the list.
To create a new parameter, enter a descriptive name for the parameter.
Note: If you select an existing parameter, then changing the settings in the dialog box affects all instances of that parameter in the test.
7 If you selected the Name box, choose the frequency for the generation of a new random number:
For each action iteration—A new number is generated for each action iteration.
For each test iteration—A new number is generated for each global iteration.
Once per entire test run—A new number is generated at the beginning of each test run. The same number is used throughout the test run.

Chapter 13 • Parameterizing Tests
243
Note: The number of action and global iterations performed during the test run is based on the number of rows in the Data Table.
8 Click OK to save your changes and close the dialog box.
Using the Data Driver to Parameterize Your Test
The Data Driver enables you to quickly parameterize several (or all) objects, methods, and/or checkpoints containing the same constant value within a given action. Similar to a ‘Find and Replace All’ operation versus a step-by-step ‘Find and Replace’ process, you can choose to replace all occurrences of a selected constant value with a parameter. QuickTest can also show you each occurrence of the constant so that you can decide whether or not to parameterize the value.
Note: When finding multiple occurrences of a selected value, QuickTest conducts a search that is case sensitive and searches only for exact matches. (It does not find values that include the selected value as part of a longer string.)

QuickTest Professional User’s Guide • Creating Tests
244
To parameterize a value using the Data Driver:
1 Display the action you want to parameterize.
2 Choose Tools > Data Driver. The Data Driver scans the test for constants (this may take a few moments) and then the Data Driver opens.
The Data Driver displays the Constants list for the action. For each constant value, it displays the number of times the constant value appears in the action.
By default, the list displays only the following constants:
The argument value of each Set method
The argument value of each Select method
The value of the second argument (Value) of each SetTOProperty method
For more information on how to work with testing methods, see Chapter 37, “Testing in the Expert View.” For syntax and method information, refer to the QuickTest Object Model Reference.

Chapter 13 • Parameterizing Tests
245
3 If you want to parameterize a value that is not currently displayed in the list (such as an object property value), click Add Value. The Add Value dialog box opens.
Enter a constant value in the dialog box and click OK. The constant is added to the list.
Note: You can only add constant values that currently exist in the test.
4 Select the value you want to parameterize from the Constants list and click Parameterize. The Data Driver Wizard opens.

QuickTest Professional User’s Guide • Creating Tests
246
5 Select the type of parameterization you want to perform:
Step-by-step parameterization—Enables you to view the current values of each step containing the selected value. For each step, you can choose whether or not to parameterize the value and if so, which parameterization options you want to use.
Parameterize all—Enables you to parameterize all occurrences of the selected value throughout the action. You set your parameterization preferences one time and the same options are applied to all occurrences of the value.
6 If you selected Step-by-step parameterization, click Next. The Parameterize the Selected Step screen opens.
If you selected Parameterize all, the Parameter details area is enabled in the Data Driver main screen. Select your parameterization preferences the same way that you would for an individual step. For more information on setting parameterization options, see “Parameterizing Individual Steps and Checkpoints” on page 225.
Proceed to step 9.

Chapter 13 • Parameterizing Tests
247
7 In the Step to parameterize area, the first step with an object property, method argument, or checkpoint value containing the selected value is displayed in the test tree on the left. The parameterization options for the step are displayed on the right.
By default, the value is parameterized as a Data Table variable. Accept the default parameterization settings or set the parameterization options you want to apply to this step.
Click Next to parameterize the selected step and view the next step containing the selected value.
Click Skip if you do not want to parameterize the selected step.
Click Finish to apply the parameterization settings of the current step to all remaining steps containing the selected value.

QuickTest Professional User’s Guide • Creating Tests
248
8 If you clicked Next in the previous step, and steps remain that contain the selected value, the Parameterize the Selected Step screen opens displaying the next relevant step. Repeat step 7 for each relevant step.
If there are no remaining steps containing the selected value, the Finished screen opens.
9 Click Finish. The Data Driver Wizard closes and the Data Driver main screen shows how many occurrences you selected to parameterize and how many remain as constants.
10 If you want to parameterize another constant value, select the value and repeat steps 4 - 9.
11 When you are finished parameterizing constants, click OK. The parameterization options you selected are applied to your action.

Chapter 13 • Parameterizing Tests
249
Example of a Parameterized Test
The following example shows how to parameterize a step object, step method, and checkpoint using Data Table parameters.
When you test your application or Web site, you may want to check how it performs the same operations with multiple sets of data. For example, if you are testing the Mercury Tours sample Web site, you may want to check that the correct departure and the arrival cities are selected before you book a particular flight. Suppose that you want to check that the flights are booked correctly for a variety of different locations. Rather than create a separate test with a separate checkpoint for each location, you can parameterize the location information. For each iteration of the test, QuickTest will then check the flight information for the different locations.
The following is a sample test of a flight booking procedure. The departure city is “Frankfurt” and the arrival city is “Acapulco.”

QuickTest Professional User’s Guide • Creating Tests
250
Parameterize a Step
Parameterize the object and the method of the following step:
In the Object Properties dialog box, select the name property. Select the Parameter radio button. In the Parameter name box, rename depart_name to Activity. Click OK to close the dialog box. The Activity column is added to the Data Table.

Chapter 13 • Parameterizing Tests
251
In the following example, parameterize the method of the above step. In the Method Arguments dialog box, select the item property. Select the Parameter radio button. In the Parameter name box, rename depart_item to Location. Close the dialog box. The Location column is added to the Data Table.
For more information on parameterizing a step, see “Parameterizing Your Test Manually” on page 222.

QuickTest Professional User’s Guide • Creating Tests
252
Parameterize a Checkpoint
In the following example, a parameterized text checkpoint is added to check that the correct locations were selected before you book a flight. A text checkpoint is created for the highlighted text:

Chapter 13 • Parameterizing Tests
253
In the Text Checkpoint Properties dialog box, select Parameter to parameterize the selected text. Click OK. A text checkpoint parameter column is added to the Data Table.
For more information on parameterizing a checkpoint, see “Parameterizing Your Test Manually” on page 222.

QuickTest Professional User’s Guide • Creating Tests
254
Enter Data in the Data Table
Complete the Data Table. The Data Table may be displayed as follows:
For more information on Data Tables, see Chapter 18, “Working with Data Tables.”
Modified Test
The following example shows the test after parameterizing the step and creating a parameterized text checkpoint.
Parameterized step
Parameterized text checkpoint

255
14Creating Output Values
QuickTest enables you to retrieve a value from your test and store it in the Data Table as an output value. You can subsequently use this output value as an input variable in your test. This enables you to use data retrieved during a test in other parts of the test.
This chapter describes:
About Creating Output Values
Creating Page Output Values
Creating Text Output Values
Creating Standard Output Values
Creating Image Output Values
Creating XML Output Values
Creating Table Output Values
Creating Database Output Values
About Creating Output Values
You can add output values to your test. An output value is a value captured during the test run and entered in the run-time Data Table for use at another point in the test run. When you create an output value, the test retrieves a value at a specified point during the test run and stores it in a column in the current row of the run-time Data Table. When the value is needed later in the test run as input, QuickTest retrieves it from the Data Table. You can output the property values of any objects. You can also output text strings and the contents of tables and databases.

QuickTest Professional User’s Guide • Creating Tests
256
For example, consider a flight reservation application. You design a test to create a new reservation and then view the reservation details. Every time you run the test, the application generates a unique order number for the new reservation. To view the reservation, the application requires the user to input the same order number. You cannot know the order number before you run the test.
To solve this problem, you create an output value for the unique order number generated when creating a new reservation. In the View Reservation screen, you insert the output value into the order number input field. You use the Data Table column containing the unique order number as a parameter.
When you run the test, QuickTest retrieves the unique order number generated by the site for the new reservation and enters it in the run-time Data Table as an output value. When the test reaches the order number input field required to view the reservation, QuickTest inserts the unique order number stored in the run-time Data Table into the order number field.
You can insert an output value by using commands on the Insert menu or by clicking the arrow beside the Insert Checkpoint button on the Test toolbar. This displays a menu of options that are relevant to the selected step in the test tree.
Note: After running your test, you can view the output values retrieved during a test run in the Run-Time Data table in your test results. For more information, see “Viewing the Run-Time Data Table” on page 558.

Chapter 14 • Creating Output Values
257
Supported Output Value Types
The following table shows the types of output values that are supported by each environment.
S—SupportedNS—Not SupportedNA—Not Applicable
Understanding the Object Selection – Output Value Properties Dialog Box
When inserting output values, if the location you select is associated with more than one object, the Object Selection – Output Value Properties dialog box opens. It displays, in hierarchical order, the objects associated with the location you clicked in your application, Web page, or in the Active Screen. Selecting the object and clicking OK opens the appropriate Output Value dialog box.
Web
Std
Win
dow
s
VB
Act
iveX
Mul
tim
edia
Oth
er O
bje
ct
Standard S S S S S NA
Table S NS NS S NS NA
Text S NS NS NS NS NA
Text Area NS S S S NS NA
Page S NA NA NA NA NA
Database NS NA NA NA NA S (DbTable)

QuickTest Professional User’s Guide • Creating Tests
258
For example:
Selecting Opens
a Window object
The Output Value Properties dialog box. See “Understanding the Output Value Properties Dialog Box” on page 279.
a Dialog object
a WinObject object
a WinEdit object
a WinButton object
a Page object The Page Output Value Properties dialog box. See “Understanding the Page Output Value Properties Dialog Box” on page 262.
a WebTable object The Output Value Properties dialog box for tables and databases. See “Understanding the Table/Database Output Value Properties Dialog Box” on page 296.
an Image object The Image Output Value Properties dialog box. See “Understanding the Image Output Value Properties Dialog Box” on page 284.
a WebElement object
The Output Value Properties dialog box. See “Understanding the Output Value Properties Dialog Box” on page 279.
a WebRadioGroup object
a WebEdit object
a WebCheckBox object
a WebList object
a VbComboBox objectThe Output Value Properties dialog box. See “Understanding the Output Value Properties Dialog Box” on page 279.
a VbRadioButton object
a VbWindow object
a VbEdit object

Chapter 14 • Creating Output Values
259
Creating Page Output Values
You can create a page output value from a Web page property value. When you run the test, QuickTest retrieves the current value of the property and stores it in the run-time Data Table as an output value.
For example, the number of links on a Web page may vary based on the selections a user makes on a form on the previous page. You could make an output value to store the number of links on the page during each test run or iteration.
Adding a Page Output Value
You can create a page output value for Web pages while recording or editing your test.
To create a page output value while recording:
1 Choose Insert > Output Value > Standard Output Value.
The mouse pointer turns into a pointing hand.
2 Click the Web page.
If the location you clicked is associated with more than one object, the Select an Object dialog box opens.
For more information, see “Understanding the Object Selection – Output Value Properties Dialog Box” on page 257.

QuickTest Professional User’s Guide • Creating Tests
260
3 Select the Page item and click OK.
The Page Output Value Properties dialog box opens.
4 Specify the settings for the output value.
For more information, see “Understanding the Page Output Value Properties Dialog Box,” below.
5 Click OK to close the Page Output Value Properties dialog box.
An output value step is added to your test tree.
To create a page output value while editing your test:
1 Make sure the Active Screen button is selected.
2 Click a page step in your test tree where you want to add an output value.
The Active Screen displays the Web page corresponding to the highlighted step.
3 Right-click the page in your test tree or in the Active Screen and choose Insert Output Value.
If the location you clicked is associated with more than one object, the Object Selection – Output Value Properties dialog box opens.
For more information, see “Understanding the Object Selection – Output Value Properties Dialog Box” on page 257.

Chapter 14 • Creating Output Values
261
4 Select the Page item and click OK.
The Page Output Value Properties dialog box opens.
5 Specify the settings for the output value.
For more information, see “Understanding the Page Output Value Properties Dialog Box,” below.
6 Click OK to close the Page Output Value Properties dialog box.
An output value step is added to your test tree.

QuickTest Professional User’s Guide • Creating Tests
262
Understanding the Page Output Value Properties Dialog Box
In the Page Output Value Properties dialog box, you can choose which property of the page to specify as an output value.
Note: The HTML verification options are only available when creating a page checkpoint while recording. The All objects in page options are only available when creating a page checkpoint. For information on page checkpoints, see “Checking Web Pages” on page 439.
Chapter 14 • Creating Output Values
263
Page Information
The top part of the dialog box displays information about the page:
Choosing Which Property to Specify as an Output Value
The dialog box contains a pane that lists the page properties that you can specify as an output value, with their values and types. This pane contains the following items:
Item Description
Logical name The logical name of the page.
Class The type of object. This is always “Page.”
Pane Element Description
Check box To specify a property as an output value, select the corresponding check box.
Type The icon indicates that the value of the property is currently a constant. The icon indicates that the value of the property is currently an output value.
Property The name of the property.
Value The current value of the property. If you specify the property as an output value, the value column displays the name of a Data Table column.

QuickTest Professional User’s Guide • Creating Tests
264
Specifying the Settings for the Output Value
In the Edit value section, you use the following options to specify the output value settings:
Specifying Where the Output Value Is Inserted
The bottom part of the dialog box displays the Insert statement option. Choose Before current step if you want to output the value of the page property before the highlighted step is performed. Choose After current step if you want to output the value of the page property after the highlighted step is performed.
Note: The Insert statement option is not available when adding a page output value during recording or when modifying an existing page output value. It is only available when adding a new page output value to an existing test while editing your test.
Option Description
Data Table column name Specifies the Data Table column name. Use the default name or type a descriptive name.
Global sheet (default) Adds the Data Table column name to the Global tab in the Data Table. For more information, see Chapter 17, “Working with Actions.”
Current action sheet (local)
Adds the Data Table column name to the current action sheet in the Action tab in the Data Table. For more information, see Chapter 17, “Working with Actions.”

Chapter 14 • Creating Output Values
265
Creating Text Output Values
You can create a text output value from a text string. When you run the test, QuickTest retrieves the current value of the text string and enters it in the run-time Data Table as an output value.
QuickTest allows you to create text output values by adding one of the following to your test:
Text Output Value—enables you to output the text displayed in a screen or Web page, according to specified criteria. It is supported for all environments.
Standard Output Value—enables you to output an object’s text property. This is the preferred way of outputting the text displayed in many Windows applications.
Text Area Output Value—enables you to output the text string displayed within a defined area of a Windows-application screen, according to specified criteria. It is supported for Standard Windows, Visual Basic, and ActiveX environments.
Note: Text Area output values are only supported by the following operating systems: Windows NT, Windows 2000, and Windows XP.
Considerations for Outputting Text in Windows Applications
The text-recognition mechanism used when you create a text area output value may occasionally retrieve unwanted text information (such as hidden text and shadowed text, which appear as multiple copies of the same string). For this reason, when possible, you should retrieve text from your application window by using a standard output value for the object containing the desired text, using its text (or similar) property. A text area output value must be used when an object does not have a text-type property.
When creating a text area output value, you can output a part of the object’s text. You can also tag the text proceeding and following the output text. These features are not available when using a standard output value.

QuickTest Professional User’s Guide • Creating Tests
266
Adding a Text Output Value
You can create a text output value during or after the recording of a test.
To create a text output value while recording:
1 Highlight the text string you want to specify as an output value.
2 Choose Insert > Output Value > Text Output Value.
The mouse pointer turns into a pointing hand.
3 Click the highlighted text string.
The Text Output Value Properties dialog box opens.
4 Specify the settings for the output value.
For more information, see “Understanding the Text/Text Area Output Value Properties Dialog Box” on page 269.
5 Click OK to close the Text Output Value Properties dialog box.
An output value step is added to your test tree.
To create a text output value while editing your test:
1 Make sure the Active Screen button is selected.
2 Click a step in your test where you want to create an output value.
The Active Screen displays the Web page corresponding to the highlighted step.
3 In the Active Screen, highlight and then right-click the text string you want to specify as an output value.
4 Choose Insert Text Output.
The Text Output Value Properties dialog box opens.
5 Specify the settings for the output value.
For more information, see “Understanding the Text/Text Area Output Value Properties Dialog Box” on page 269.
6 Click OK to close the Text Output Value Properties dialog box.
An output value step is added to your test tree.

Chapter 14 • Creating Output Values
267
Adding a Standard Output Value to Check Text
For Windows-based applications, you can use a Standard Output Value to output the text property of an object. This is the preferred way of outputting text in many Windows applications. Note, however, that the Standard Output Value does not allow you to use the features available in the Text Output Value Properties dialog box (see “Considerations for Outputting Text in Windows Applications” on page 265).
For details about using a Standard Output Value, see “Adding a Standard Output Value” on page 276.
Adding a Text Area Output Value
You can create a text area output value only while recording a test on Windows-based applications—Standard Windows, Visual Basic and ActiveX.
To create a text area output value:
1 Choose Insert > Output Value > Text Output Value.
The QuickTest window is minimized and the mouse pointer turns into a crosshairs pointer.
2 Define the area containing the text you want QuickTest to use as an output value by clicking and dragging the crosshairs pointer. (See “Considerations for Defining the Text Area,” below.)
Tip: Hold down the left mouse button and use the arrow keys to make precise adjustments to the defined area.
Release the mouse button after outlining the required area.

QuickTest Professional User’s Guide • Creating Tests
268
If the area you defined is associated with more than one object, the Object Selection – Text Area Output Properties dialog box opens.
For more information, see “Understanding the Object Selection – Output Value Properties Dialog Box” on page 257.
3 Select the object from which you are creating the output value. The Text Area Output Value Properties dialog box opens.
4 Specify the settings for the output value. For more information, see “Understanding the Text/Text Area Output Value Properties Dialog Box,” below.
5 Click OK to close the Text Area Output Value Properties dialog box.
An output value step is added to your test.
Considerations for Defining the Text Area
When capturing text displayed in a Windows application using text-area selection, it is often advisable to define a text area larger than the actual text you want QuickTest to use as an output value. When QuickTest runs your test, it outputs the selected text, within the defined area, according to the settings you configured.
Because text may change its position during test runs, you must make sure that the area defined is large enough so that the output text is always within its boundaries. If the defined area is too small, even a slight shift in the text’s position will cause the test run to fail, even though the position shift may actually be acceptable to you.

Chapter 14 • Creating Output Values
269
If, on the other hand, the position of the text on the screen is critical, or if you do not want it to exceed certain boundaries, you should define the area accordingly.
Understanding the Text/Text Area Output Value Properties Dialog Box
In the Text/Text Area Output Value Properties dialog box, you can specify a text string as an output value, as well as which text is displayed before and after the output value text string. This is helpful when the text string you want to specify as an output value is displayed several times in the defined screen area or when the text could change in a predictable way during test runs.
The top of the dialog box displays a pane that summarizes where the output value text string is located.

QuickTest Professional User’s Guide • Creating Tests
270
Specifying Text as an Output Value
Choose Output Text from the list box. The entire text captured is used as the output value. The following options are displayed for specifying the output value settings:
Specifying Options for Text Displayed before the Text Output Value
Choose Text Before from the list box.
Option Description
Data Table column name
Specifies the Data Table column name. Use the default name or type a descriptive name.
Global sheet (default)
Adds the Data Table column name to the Global tab in the Data Table. For more information, see Chapter 17, “Working with Actions.”
Current action sheet (local)
Adds the Data Table column name to the current action sheet in the Action tab in the Data Table. For more information, see Chapter 17, “Working with Actions.”

Chapter 14 • Creating Output Values
271
The following options are displayed for specifying which text, if any, is displayed before the output value string:
Option Description
Use the text before If selected, enables the options below. If cleared, QuickTest looks for the first occurrence of the output value text string while ignoring any text displayed before it.
Text to capture is displayed after occurrence “X” of...
Outputs the text string displayed after the text specified in the Data Table column name box.
If the identical text you specify is displayed more than once in the Web page or in the defined text area, you can specify to which occurrence of the text you are referring.
If you accept the default text that QuickTest recommends, the number in the dialog box will be correct. If you modify the text, confirm that the occurrence number is also accurate.
If you choose non-unique text, change the occurrence number appropriately. For example, if you want to output the text string displayed after the third occurrence of the words "Mercury Tours", enter 3 in the Text to capture is displayed after occurrence box.
Constant Sets the expected value of the text before the captured text as a constant. The value is constant for each iteration of the test run. Note that when using Text selection, the text box displays the text before the captured text. You can change the text by typing in the text box. When using Text Area selection, you must type or copy the text preceding the output text.
Tip: If you modify the text, use a unique string whenever possible so that the occurrence number is 1.
Parameter Sets the expected value of the text before the captured text as a parameter. For more information, see Chapter 13, “Parameterizing Tests.”

QuickTest Professional User’s Guide • Creating Tests
272
Data Table(enabled only when Parameter is selected)
Specifies the parameter as a Data Table parameter. The value of the text before the captured text is determined by the data in the Data Table. For more information about creating Data Table parameters, see “Using Data Table Parameters” on page 227.
Parameter name(enabled only when Data Table is selected)
Specifies the name of the parameter in the Data Table. You can select from the list box of existing Data Table columns or you can enter a new name to create a new column in the Data Table.
Other(enabled only when Parameter is selected)
Specifies that the parameter is a random number or environment variable parameter. The text box displays the parameter statement. For more information about creating random number parameters, see “Using Random Number Parameters” on page 241. For more information about creating environment variable parameters, see “Using Environment Variable Parameters” on page 231.
Edit Parameter Options (enabled only when Parameter is selected)
If you select Data Table, clicking the Edit Parameter Options button opens the Data Table Parameter Options dialog box, where you can also specify the parameter name and set the parameter as global or current action data.
If you select Other, clicking the Edit Parameter Options button opens the Parameter Options dialog box, where you can specify the parameter type and preferences.
Option Description

Chapter 14 • Creating Output Values
273
Specifying Options for Text Displayed after the Output Value Text
Choose Text After from the list box.

QuickTest Professional User’s Guide • Creating Tests
274
The following options are displayed for specifying which text, if any, is displayed after the output value text string:
Option Description
Use the text after If selected, enables the options below. If cleared, QuickTest looks for the first occurrence of the output value text string while ignoring the text displayed after it.
Text to capture is displayed before occurrence “X” of...
Outputs the text string displayed before the specified text in the Data Table column name box.
QuickTest starts counting occurrences of the is displayed before text you specify, from the end of the is displayed after string. In other words, it starts looking for the specified text from the text string you selected to output.
If you accept the default text that QuickTest recommends, the number in the dialog box will be correct. If you modify the recommended text and the text you specify is displayed in the text string to output as well as in the is displayed before text, you need to modify the occurrence number accordingly.
Constant Sets the expected value of the text after the captured text as a constant. The value is constant for each iteration of the test run. Note that when using “Text” selection, the text box displays the text after the captured text. You can change the text by typing in the text box. When using “Text Area” selection, you must type or copy the text following the output text.
Tip: If you modify the text, use a unique string whenever possible so that the occurrence number is 1.
Parameter Sets the expected value of the text after the captured text as a parameter. For more information, see Chapter 13, “Parameterizing Tests.”

Chapter 14 • Creating Output Values
275
Data Table(enabled only when Parameter is selected)
Specifies the parameter as a Data Table parameter. The value of the text after the captured text is determined by the data in the Data Table. For more information about creating Data Table parameters, see “Using Data Table Parameters” on page 227.
Parameter name(enabled only when Data Table is selected)
Specifies the name of the parameter in the Data Table. You can select from the list box of existing Data Table columns or you can enter a new name to create a new column in the Data Table.
Other(enabled only when Parameter is selected)
Specifies that the parameter is a random number or environment variable parameter. The text box displays the parameter statement. For more information about creating random number parameters, see “Using Random Number Parameters” on page 241. For more information about creating environment variable parameters, see “Using Environment Variable Parameters” on page 231.
Edit Parameter Options (enabled only when Parameter is selected)
If you select Data Table, clicking the Edit Parameter Options button opens the Data Table Parameter Options dialog box, where you can also specify the parameter name and set the parameter as global or current action data.
If you select Other, clicking the Edit Parameter Options button opens the Parameter Options dialog box, where you can specify the parameter type and preferences.
Option Description

QuickTest Professional User’s Guide • Creating Tests
276
Specifying Where the Output Value Is Inserted
The bottom part of the dialog box displays the Insert statement option. Choose Before current step if you want to output the value of the text string before the highlighted step is performed. Choose After current step if you want to output the value of the text string after the highlighted step is performed.
Note: The Insert statement option is not available when adding a Text/Text Area output value during recording or when modifying an existing output value. It is only available when adding a new text output value to an existing test while editing your test.
Creating Standard Output Values
You can create a standard output value from an object property value. When you run the test, QuickTest retrieves the current value of the property and enters it in the run-time Data Table as an output value.
Adding a Standard Output Value
You can create a standard output value while recording or editing your test.
To create a standard output value while recording:
1 Choose Insert > Output Value > Standard Output Value.
The mouse pointer turns into a pointing hand.
2 Click the object in your application.

Chapter 14 • Creating Output Values
277
If the location you clicked is associated with more than one object, the Select an Object dialog box opens.
For more information, see “Understanding the Object Selection – Output Value Properties Dialog Box” on page 257.
3 Select the object for which you want to specify an output value.
4 Click OK.
The Output Value Properties dialog box opens.
5 Specify the settings for the output value.
For more information, see “Understanding the Output Value Properties Dialog Box” on page 279.
6 Click OK to close the Output Value Properties dialog box.
An output value step is added to your test tree.

QuickTest Professional User’s Guide • Creating Tests
278
To create a standard output value while editing your test:
1 Make sure the Active Screen button is selected.
2 Click a step in your test where you want to create an output value.
The Active Screen displays the Web page corresponding to the highlighted step.
Note: For Windows applications, make sure that the Active Screen contains data for the object whose value you want to output. For more information, see “Setting Active Screen Options” on page 594.
3 Right-click the object for which you want to specify an output value in the Active Screen and choose Insert Output Value. Alternatively, you can right-click the step in your test tree and choose Insert Output Value.
If the location you clicked is associated with more than one object, the Object Selection – Output Value Properties dialog box opens.
For more information, see “Understanding the Object Selection – Output Value Properties Dialog Box” on page 257.
4 Select the object for which you want to specify an output value.
5 Click OK.
The Output Value Properties dialog box opens.

Chapter 14 • Creating Output Values
279
6 Specify the settings for the output value.
For more information, see “Understanding the Output Value Properties Dialog Box,” below.
7 Click OK to close the Output Value Properties dialog box.
An output value step is added to your test tree.
Understanding the Output Value Properties Dialog Box
In the Output Value Properties dialog box, you can choose which property of the object to specify as an output value.

QuickTest Professional User’s Guide • Creating Tests
280
Object Information
The top part of the dialog box displays information about the object:
Choosing Which Property to Specify as an Output Value
The dialog box contains a pane that lists the page properties that you can specify as an output value, with their values and types. This pane contains the following items:
Item Description
Logical name The logical name of the object.
Class The type of object. In this example, the WebCheckBox class indicates that the object is a check box.
Pane Element Description
Check box To specify a property as an output value, select the corresponding check box.
Type The icon indicates that the value of the property is currently a constant. The icon indicates that the value of the property is currently an output value.
Property The name of the property.
Value The value of the property. If you specify the property as an output value, the Value box displays the name of a Data Table column.

Chapter 14 • Creating Output Values
281
Specifying the Settings for the Output Value
In the Edit value section, you use the following options to specify the output value settings:
Specifying Where the Output Value Is Inserted
The bottom part of the dialog box displays the Insert statement option. Choose Before current step if you want to output the value of the property before the highlighted step is performed. Choose After current step if you want to output the value of the property after the highlighted step is performed.
Note: The Insert statement option is not available when adding an output value during recording or when modifying an existing output value. It is available only when adding a new output value to an existing test while editing your test.
Option Description
Data Table column name Specifies the Data Table column name. Use the default name or type a descriptive name.
Global sheet (default) Adds the Data Table column name to the Global tab in the Data Table. For more information, see Chapter 17, “Working with Actions.”
Current action sheet (local)
Adds the Data Table column name to the current action sheet in the Action tab in the Data Table. For more information, see Chapter 17, “Working with Actions.”

QuickTest Professional User’s Guide • Creating Tests
282
Creating Image Output Values
You can create an image output value from the property value of a Web image. When you run the test, QuickTest retrieves the current value of the property and enters it in the run-time Data Table as an output value.
Adding an Image Output Value
You can create an image output value while recording or editing your test.
To create an image output value while recording:
1 Choose Insert > Output Value > Standard Output Value.
The mouse pointer turns into a pointing hand.
2 Click the image.
If the location you clicked is associated with more than one object, the Select an Object dialog box opens.
For more information, see “Understanding the Object Selection – Output Value Properties Dialog Box” on page 257.
3 Select the Image item you want to specify for an output value.
4 Click OK.
The Image Output Value Properties dialog box opens.

Chapter 14 • Creating Output Values
283
5 Specify the settings for the output value.
For more information, see “Understanding the Image Output Value Properties Dialog Box,” below.
6 Click OK to close the Image Output Value Properties dialog box.
An output value step is added to your test.
To create an image output value while editing your test:
1 Make sure the Active Screen button is selected.
2 Click a step in your test where you want to create an output value.
The Active Screen displays the Web page corresponding to the highlighted step.
3 Right-click the image for which you want to specify an output value in the Active Screen and choose Insert Output Value.
If the location you clicked is associated with more than one object, the Object Selection – Output Value Properties dialog box opens.
For more information, see “Understanding the Object Selection – Output Value Properties Dialog Box” on page 257.
4 Select the Image item you want to specify for an output value.
5 Click OK.
The Image Output Value Properties dialog box opens.

QuickTest Professional User’s Guide • Creating Tests
284
6 Specify the settings for the output value.
For more information, see “Understanding the Image Output Value Properties Dialog Box,” below.
7 Click OK to close the Image Output Value Properties dialog box.
An output value step is added to your test.
Understanding the Image Output Value Properties Dialog Box
In the Image Output Value Properties dialog box, you can choose which property of the image to specify as an output value.

Chapter 14 • Creating Output Values
285
Image Information
The top part of the dialog box displays information about the image:
Choosing Which Property to Specify as an Output Value
The dialog box contains a pane that lists the image properties that you can specify as an output value, with their values and types. This pane contains the following items:
Item Description
Logical name The logical name of the image as defined in the HTML code of the Web page.
Class The type of object. This is always Image.
Pane Element Description
Check box To specify a property as an output value, select the corresponding check box.
Type The icon indicates that the value of the property is currently a constant. The icon indicates that the value of the property is currently an output value.
Property The name of the property.
Value The value of the property. If you specify the property as an output value, the Value box displays the name of a Data Table column.

QuickTest Professional User’s Guide • Creating Tests
286
Specifying the Settings for the Output Value
In the Edit value section, you use the following options to specify the output value settings:
Specifying Where the Output Value Is Inserted
The bottom part of the dialog box displays the Insert statement option. Choose Before current step if you want to output the value of the image property before the highlighted step is performed. Choose After current step if you want to output the value of the image property after the highlighted step is performed.
Note: The Insert statement option is not available when adding an image output value during recording or when modifying an existing image output value. It is available only when adding a new image output value to an existing test while editing your test.
Option Description
Data Table column name Specifies the Data Table column name. Use the default name or type a descriptive name.
Global sheet (default) Adds the Data Table column name to the Global tab in the Data Table. For more information, see Chapter 17, “Working with Actions.”
Current action sheet (local)
Adds the Data Table column name to the current action sheet in the Action tab in the Data Table. For more information, see Chapter 17, “Working with Actions.”

Chapter 14 • Creating Output Values
287
Creating XML Output Values
You can create an XML output value from an element value or attribute of an XML file or Web page/frame. When you run the test, QuickTest retrieves the current value of the element or attribute and enters it in the run-time Data Table as an output value.
When you run your test, you can view summary results of the XML output value in the Test Results window. You can also view detailed results by opening the XML Output Value Results window. For further information, see Chapter 27, “Analyzing Test Results.”
Note for users with QuickTest Professional version 6.0 tests: QuickTest version 6.5 saves XML output value information in a new format. If you are using QuickTest 6.0 tests in QuickTest 6.5, you must perform an update run, or manually open each XML Output Value Properties dialog box and click the OK button. This converts the XML output value information to the new format and results in a major improvement in performance.
Adding an XML Output Value from an XML Web Page/Frame
You can add an XML output value for any XML document contained in a Web page or frame. You can create an XML output value from an XML Web page or frame only while recording a test.

QuickTest Professional User’s Guide • Creating Tests
288
To create an XML output value from an XML Web page/frame:
1 Choose Insert > Output Value > XML Output Value.
The mouse pointer turns into a pointing hand.
2 Click the XML object.
If the location you clicked is associated with more than one object, the Object Selection - XML Output Value Properties dialog box opens.
For more information, see “Understanding the Object Selection – Output Value Properties Dialog Box” on page 257.
3 Select the XML item you want to specify for an output value.
4 Click OK.
The XML Output Value Properties dialog box opens.
5 Specify the settings for the output value.
For more information, see “Understanding the XML Output Value Properties Dialog Box,” below.
6 Click OK to close the XML Output Value Properties dialog box.
An output value step is added to your test.

Chapter 14 • Creating Output Values
289
Adding an XML Output Value from an XML File
You can add an XML output value directly from an XML file. You can create XML file output values while recording or editing your test.
To create an XML file output value:
1 Choose Insert > Output Value> XML Output Value (File).
The XML Output Value from File dialog box opens.
2 In the XML File box, enter the Internet address or the file path of the XML file. Alternatively, click the browse button to navigate to the XML file for which you want to create output values. You can specify an XML file either from your file system or from TestDirector.
Note: You can enter a relative path and QuickTest will search for the XML file in the folders listed in the Folders tab of the Options dialog box. Once QuickTest locates the file, it saves it as an absolute path and uses the absolute path during the test run. For more information, see Chapter 28, “Setting Folder Testing Options.”
3 Click OK. The XML Output Value Properties dialog box opens.
4 Specify the settings for the output value.
For more information, see “Understanding the XML Output Value Properties Dialog Box” on page 290.
5 Click OK to close the XML Output Value Properties dialog box.
An output value step is added to your test.

QuickTest Professional User’s Guide • Creating Tests
290
Understanding the XML Output Value Properties Dialog Box
In the XML Output Value Properties dialog box, you can choose which element values and attributes to specify as output values.
Note: QuickTest loads large XML files in the background. While the file is loading, an indication of this is shown in the XML Output Value Properties dialog box, and you can only select XML nodes that are already loaded.

Chapter 14 • Creating Output Values
291
XML File Information
The top part of the XML Output Value Properties dialog box displays information about the XML file:
Choosing the Element Values and/or Attributes to Specify as Output Values
The XML Output Value Properties dialog box contains an XML Tree pane that displays the hierarchy of the XML document, enabling you to select the element values and/or attributes for which you want to create output values. This pane contains the following items:
Item Description
Logical name The name assigned to the output value step.
Class The type of object. This is either XMLFile (for files) or WebXML (for Web pages or frames).
Option Description
XML Tree The XML Tree displays the hierarchal relationship between each element and value in the XML document. Each element is displayed with a icon. Each value is displayed with a icon. Select the check box of an element value to create an output value for it.
Attributes Pane
When you click the Attributes>> button, the attributes associated with the selected element are displayed in the Attributes pane to the right of the XML Tree. The attributes pane lists the name and value of each attribute. Select the check box of an attribute to create an output value for it.

QuickTest Professional User’s Guide • Creating Tests
292
Specifying the Settings for the Output Value
When an element value or attribute is selected, the bottom of the XML Output Value Properties dialog box displays the Edit Value section. You use the following options to specify the output value settings:
Specifying Where to Insert the Output Value
The bottom part of the XML Output Value Properties dialog box displays the Insert statement option. Choose Before current step if you want to output the value of the XML element or attribute before the highlighted step is performed. Choose After current step if you want to output the value of the XML element or attribute after the highlighted step is performed.
Note: The Insert statement option is not available when adding an XML output value during recording or when modifying an existing XML output value. It is available only when adding a new XML output value from an XML file while editing an existing test.
Option Description
Value/Attribute name Indicates the element value or attribute name selected in the XML Tree.
Data Table column name Specifies the Data Table column name. Use the default name or type a descriptive name.
Global sheet (default) Adds the Data Table column name to the Global tab in the Data Table. For more information, see Chapter 17, “Working with Actions.”
Current action sheet (local)
Adds the Data Table column name to the current action sheet in the Action tab in the Data Table. For more information, see Chapter 17, “Working with Actions.”

Chapter 14 • Creating Output Values
293
Reviewing XML Output Value Results
When you create an output value for an element value or attribute, the test retrieves its value during the test run and stores it in a column in the current row of the run-time Data Table. When the value is needed later in the test run as input, QuickTest retrieves it from the Data Table.
You can view summary results of the XML output value in the Test Results window. You can view detailed results by opening the XML Output Value Results window.
For more information on XML output value results and the Test Results window in general, see “Analyzing XML Output Value Results” on page 559.
Creating Table Output Values
You can create a table output value from the contents of a table cell. When you run the test, QuickTest retrieves the current value of a table cell and enters it in the run-time Data Table as an output value.
Adding a Table Output Value
You can create a table output value while recording or editing your test.
To create a table output value while recording:
1 Choose Insert > Output Value > Standard Output Value. The mouse pointer turns into a pointing hand.

QuickTest Professional User’s Guide • Creating Tests
294
2 Click the table. If the location you clicked is associated with more than one object, the Select an Object dialog box opens.
For more information, see “Understanding the Object Selection – Output Value Properties Dialog Box” on page 257.
3 Select a Table item and click OK.
The Output Value Properties dialog box opens.
4 Specify the settings for the output value.
For more information, see “Understanding the Table/Database Output Value Properties Dialog Box” on page 296.
5 Click OK to close the Output Value Properties dialog box.
An output value step is added to your test tree.

Chapter 14 • Creating Output Values
295
To create a table output value while editing your test:
1 Make sure the Active Screen button is selected.
2 Click a step in your test where you want to create an output value.
The Active Screen displays the page corresponding to the highlighted step.
3 In the Active Screen, right-click the table you want to specify as an output value and choose Insert Output Value. Alternatively, you can right-click the step in your test tree and choose Insert Output Value.
If the location you clicked is associated with more than one object, the Object Selection – Output Value Properties dialog box opens.
For more information, see “Understanding the Object Selection – Output Value Properties Dialog Box” on page 257.
4 Select a Table item and click OK.
The Table/Database Output Value Properties dialog box opens.
5 Specify the settings for the output value. For more information, see “Understanding the Table/Database Output Value Properties Dialog Box,” below.
6 Click OK to close the Output Value Properties dialog box.
An output value step is added to your test tree.

QuickTest Professional User’s Guide • Creating Tests
296
Understanding the Table/Database Output Value Properties Dialog Box
In the Table/Database Output Value Properties dialog box, you can specify the cells from which to create output values.
Choosing Cells for Output Values
The top part of the dialog box displays a grid representing the cells in the captured table. You can specify one or more cells as output values. QuickTest creates a Data Table column for each cell specified. When the test runs, QuickTest outputs the value of each selected cell to its corresponding column in the Data Table.
Tip: You can change the column widths and row heights of the grid by dragging the boundaries of the column and row headers.

Chapter 14 • Creating Output Values
297
To choose a cell for an output value, double-click it or click the Add Output Value button. An output value icon is added to the cell.
To deselect a cell for an output value, double-click it again or click the Remove Output Value button. The output value icon is removed from the cell.
Note: The Add Output Value and Remove Output Value buttons are located at the upper-right of the Table/Database Output Value Properties dialog box.
Specifying the Settings for the Output Value
Use the following options to specify the table output value settings:
Specifying Where the Output Value Is Inserted
The bottom part of the dialog box displays the Insert statement option. Choose Before current step if you want to output the value of the contents of the table cell before the highlighted step is performed. Choose After current step if you want to output the value of the contents of the table cell after the highlighted step is performed.
Option Description
Selected Cell Indicates the row and column number of the highlighted cell in the grid at the top of the dialog box.
Data Table column name Specifies the Data Table column name. Use the default name or type a descriptive name.
Global sheet (default) Adds the Data Table column name to the Global tab in the Data Table. For more information, see Chapter 17, “Working with Actions.”
Current action sheet (local)
Adds the Data Table column name to the current action sheet in the Action tab in the Data Table. For more information, see Chapter 17, “Working with Actions.”

QuickTest Professional User’s Guide • Creating Tests
298
Note: The Insert statement option is not available when adding a table output value during recording or when modifying an existing table output value. It is available only when adding a new table output value to an existing test while editing your test.
Creating Database Output Values
You can create a database output value from the contents of a database cell. When you run the test, QuickTest retrieves the current value of a database cell and enters it in the run-time Data Table as an output value.
Adding a Database Output Value
You can create a database output value while recording or editing your test.
To create a database output value while recording or editing your test:
1 Choose Insert > Output Value > Database Output Value.
The Database Query Wizard opens.
2 To create the output value using the wizard, follow the instructions for creating a database checkpoint in “Creating a Check on a Database” on page 149.
The Output Value Properties dialog box opens.
3 Specify the settings for the output value.
For more information, see “Understanding the Table/Database Output Value Properties Dialog Box” on page 296.
4 Click OK to close the Output Value Properties dialog box.
A database output value step is added to your test tree.

299
15Using Regular Expressions
You can use regular expressions to increase the flexibility and adaptability of your tests.
This chapter describes:
About Regular Expressions
Using Regular Expressions for Object Property Values
Using Regular Expressions in Standard Checkpoints
Using Regular Expressions in Text Checkpoints
Understanding and Using Regular Expression Syntax
About Regular Expressions
Regular expressions enable QuickTest to identify objects and text strings with varying values. You can use regular expressions when:
defining the property values of an object
parameterizing a step
creating checkpoints with varying values
A regular expression is a string that specifies a complex search phrase. By using special characters such as a period (.), asterisk (*), caret (^), and brackets ([ ]), you can define the conditions of a search. When one of these special characters is preceded by a backslash (\), QuickTest searches for the literal character.

QuickTest Professional User’s Guide • Creating Tests
300
For example, if a window titlebar’s name changes according to a file name, you can use a regular expression to identify a window whose titlebar has the specified product name, followed by a hyphen, and then any other text.
Regular expressions can also be used if you want to create a text checkpoint on a date text string, but the displayed date changes according to the current date. You can define the date as a regular expression so that the checkpoint checks that the captured text string matches the expected format, rather than checking the exact text.
Note that this chapter describes, in detail, the procedure for setting a constant or parameterized object property value, standard checkpoint property or text checkpoint value as a regular expression. You can apply the same principles to any checkpoint types whose dialog box contains the same Edit Value section described in this chapter. For example, you can set cell values of table checkpoints and attribute or element values of XML checkpoints as regular expressions.
Note: You can use regular expressions only for values of type string.
Using Regular Expressions for Object Property Values
You can use regular expressions when defining or parameterizing object property values. If you expect the value of an object property value to change during each test run, you can use regular expressions when defining or parameterizing the object of a step.
For example, your site may include a form in which the user inputs data and clicks the Send button to submit the form. When a required field is not completed, the form is displayed again for the user to complete. When resubmitting the form, the user clicks the Resend button. You can define the value of the button’s name property as a regular expression, so that QuickTest ignores variations in the button name when clicking the button.

Chapter 15 • Using Regular Expressions
301
To define a constant property value as a regular expression:
1 Right-click an object in the test tree and choose Object Properties or right-click an object in the Active Screen and choose View/Add Object to open the Object Properties dialog box for the object.
Note: If you select View/Add Object for an object in the Active Screen that is not yet stored in your Object Repository, you cannot modify the property values until you click the Add to repository button to add it to the object repository. For more information, see “Understanding the Object Properties Dialog Box” on page 58.
Alternatively, choose Tools > Object Repository to open the Object Repository dialog box, and select the object whose property values you want to modify.
2 In the Property column, select the property you want to set as a regular expression. The current property value is displayed in the Constant box.
3 In the Edit value section, click Constant.

QuickTest Professional User’s Guide • Creating Tests
302
4 Click the Edit Constant Value Options button. The Constant Value Options dialog box opens.
5 Select the Regular Expression check box.
6 If the Value text box currently contains a special character, you are prompted to add a backslash (\) before each special character to treat it literally.
By default, QuickTest treats all characters in a regular expression literally, except for the period (.), hyphen (-), asterisk (*), caret (^), brackets ([ ]), parentheses (()), dollar sign ($), vertical line (|), plus sign (+), question mark (?), and backslash (\). When one of these special characters is preceded by a backslash (\), QuickTest treats it as a literal character.
Click Yes to instruct QuickTest to treat a special character literally. The special character is now preceded by a backslash (\).
Click No to instruct QuickTest to treat special characters as regular expression characters.
7 In the Value box, enter the regular expression syntax for the string. For information on regular expression syntax, see “Understanding and Using Regular Expression Syntax” on page 310.
8 Click OK to close the Constant Value Options dialog box.
9 Click OK to save and close the Object Properties or Object Repository dialog box.

Chapter 15 • Using Regular Expressions
303
To parameterize a property value using regular expressions:
1 Right-click an object in the test tree and choose Object Properties or right-click an object in the Active Screen and choose View/Add Object to open the Object Properties dialog box for the object.
Note: If you select View/Add Object for an object in the Active Screen that is not yet stored in your Object Repository, you cannot modify the property values until you click the Add to repository button to add it to the object repository. For more information, see “Adding Objects to the Object Repository” on page 76.
Alternatively, choose Tools > Object Repository to open the Object Repository dialog box, and select the object whose property values you want to modify.
2 In the Property column, select the property you want to set as a regular expression. The current property value is displayed in the Constant box.

QuickTest Professional User’s Guide • Creating Tests
304
3 In the Edit value section, click Parameter. Specify the type of parameter you want to use:
Click Data Table to create a Data Table parameter. Click the Edit Parameter Options button to open the Data Table Parameter Options dialog box.
In the Name box, choose a parameter from the list or enter a new name. To use a parameter that you have already created, select it from the list. To create a new parameter, either use the default parameter name or enter a descriptive name for the parameter. For more information on parameterization, see Chapter 13, “Parameterizing Tests.”
To add the parameter to the Global tab in the Data Table, select Global sheet. To add the parameter to the Action tab, select Current action sheet (local). For more information about Actions, see Chapter 17, “Working with Actions.”
Click Other to create a parameter type other than a Data Table parameter. Click the Edit Parameter Options button to open the Parameter Options dialog box.
Choose Environment. Accept the default name or enter a new name to add a new parameter. Select an existing test environment variable name from the Name box to modify an existing parameter.
Notes:
If you select an external user-defined or built-in environment variable name, the Value box and the Regular Expression check box are disabled. The variable type of the selected environment parameter is displayed below the Value box.
You cannot define a regular expression for a Random Number parameter.
4 Select the Regular Expression check box.
5 If you are setting a regular expression for an Environment variable parameter and the Value text box currently contains a special character, you are prompted to add a backslash (\) before each special character to treat it literally.

Chapter 15 • Using Regular Expressions
305
By default, QuickTest treats all characters in a regular expression literally, except for the period (.), hyphen (-), asterisk (*), caret (^), brackets ([ ]), parentheses (()), dollar sign ($), vertical line (|), plus sign (+), question mark (?), and backslash (\). When one of these special characters is preceded by a backslash (\), QuickTest treats it as a literal character.
Click Yes to instruct QuickTest to treat a special character literally. The special character is now preceded by a backslash (\).
Click No to instruct QuickTest to treat special characters as regular expression characters.
6 If you are setting a regular expression for an Environment variable parameter, enter the value as a regular expression in the Value box.
7 Click OK to close the Parameter Options dialog box.
8 Click OK to save and close the Object Properties dialog box.
In your test tree, the icon next to the step indicates that the step has been parameterized.
9 If you chose Data Table in step 3, enter the necessary regular expressions in the selected Data Table column.
For information on regular expression syntax, see “Understanding and Using Regular Expression Syntax” on page 310. For information on editing Data Tables, see Chapter 18, “Working with Data Tables.”
Using Regular Expressions in Standard Checkpoints
When creating a standard checkpoint to verify the property values of an object, you can set the expected value of an object’s property as a regular expression so that an object with a varying value can be verified.
For example, suppose you want to check that every window and dialog box in your application contains the name of your application followed by a dash and a descriptive title. You can add a checkpoint to each dialog box object in your test to check that the first part of the title contains the name of your application.

QuickTest Professional User’s Guide • Creating Tests
306
To define a regular expression in an object checkpoint:
1 Right-click the an object in your test tree or the Active Screen and choose Insert Standard Checkpoint, or choose Insert > Standard Checkpoint while recording.
Note: If using the Active Screen your checkpoint, make sure that the Active Screen contains data for the object you want to check. For more information, see “Setting Active Screen Options” on page 594.
If the object you select in the Active Screen or in your application is associated with more than one object, the Object Selection - Checkpoint Properties dialog box opens.
2 Select the object you want to check in the Object Selection - Checkpoint Properties dialog box and click OK. The Checkpoint Properties dialog box opens.

Chapter 15 • Using Regular Expressions
307
The Checkpoint Properties dialog box enables you to specify which properties of the object to check, and to edit the expected values of these properties. For more information, see Chapter 7, “Understanding Checkpoints.”
3 In the Property section, select the property you want to set as a regular expression.
4 Follow the instructions for defining a constant or parameterized regular expression as described in “Using Regular Expressions for Object Property Values” on page 300.
5 In the Checkpoint timeout option, specify the time interval (in seconds) during which QuickTest attempts to perform the checkpoint successfully. QuickTest continues to perform the checkpoint until it passes or until the timeout occurs. If the checkpoint does not pass before the timeout occurs, the checkpoint fails.
6 In the Insert statement option, choose Before current step if you want to check the value of the text before the highlighted step is performed. Choose After current step if you want to check the value of the text after the highlighted step is performed.
Note: The Insert statement option is not available when adding a new text checkpoint or a text area checkpoint during recording, or when modifying an existing checkpoint. It is available only when adding a new text checkpoint to an existing test while editing your test.
7 Click OK to save and close the Checkpoint Properties dialog box.

QuickTest Professional User’s Guide • Creating Tests
308
Using Regular Expressions in Text Checkpoints
When creating a text checkpoint to check that a varying text string is displayed on your Web site or application, you can define the text string as a regular expression.
For example, when booking a flight in the Mercury Tours sample Web site, the total cost charged to a credit card number should not be less than $300. You define the amount as a regular expression, so that QuickTest will ignore variations in the text string as long as the value is not less than $300.
To define a regular expression in a text checkpoint:
1 Display the page, window, or screen containing the text you want to check.
2 Choose Insert > Checkpoint > Text Checkpoint, or click the arrow next to the Insert Checkpoint button and choose Text Checkpoint.
The QuickTest window is minimized and the mouse pointer turns into a pointing hand.
3 Click the text string for which you want to create the checkpoint.
If the area you defined is associated with more than one object, the Object Selection–Text Checkpoint Properties dialog box opens.
Select the object for which you are creating the checkpoint.
Alternatively, for Web applications, you can highlight the text you want to check in the Active Screen. Right-click the selected text and choose Insert Text Checkpoint.

Chapter 15 • Using Regular Expressions
309
The Text Checkpoint Properties dialog box opens.
The Text Checkpoint Properties dialog box enables you to specify which text to check as well as which text is displayed before and after the text to check. For more information, see Chapter 7, “Understanding Checkpoints.”
4 Confirm that the Checked Text section is displayed.
Note: You can specify regular expressions for the checked text only. You cannot specify regular expressions for text before or text after.
5 Follow the instructions for defining a constant or parameterized regular expression as described in “Using Regular Expressions for Object Property Values” on page 300.

QuickTest Professional User’s Guide • Creating Tests
310
6 Select to check the text by Match case, Exact match, Ignore spaces, and/or Text not displayed. For more information on these options, see “Setting Options for the Checked Text” on page 178.
7 If you want to check a specific occurrence of the selected text, define the text displayed before and after the checked text. For more information, see “Setting Options for Text Displayed before the Checked Text,” on page 180, and “Setting Options for Text Displayed after the Checked Text,” on page 183.
8 In the Insert statement option, choose Before current step if you want to check the value of the text before the highlighted step is performed. Choose After current step if you want to check the value of the text after the highlighted step is performed.
Note: The Insert statement option is not available when adding a new text checkpoint or a text area checkpoint during recording, or when modifying an existing checkpoint. It is available only when adding a new text checkpoint to an existing test while editing your test.
9 Click OK to save and close the Text Checkpoint Properties dialog box.
Understanding and Using Regular Expression Syntax
This section describes some of the more common options that can be used to create regular expressions. For a complete list and explanation of supported regular expressions characters, refer to Regular Expressions section of the Microsoft Windows Script Technologies Reference (choose Help > QuickTest Professional Help to open the QuickTest Professional Help. Then choose Microsoft Windows Script Technologies > VBScript > User’s Guide > Introduction to Regular Expressions).
Using the Backslash Character ( \ )
Matching Any Single Character ( . )
Matching Any Single Character in a List ( [xy] )

Chapter 15 • Using Regular Expressions
311
Matching Any Single Character Not in a List ( [^xy] )
Matching Any Single Character within a Range ( [x-y] )
Matching Zero or More Specific Characters ( * )
Matching One or More Specific Characters ( + )
Matching Zero or One Specific Character ( ? )
Grouping Regular Expressions ( ( ) )
Matching One of Several Regular Expressions ( | )
Matching the Beginning of a Line ( ^ )
Matching the End of a Line ( $ )
Matching Any AlphaNumeric Character Including the Underscore ( \w )
Matching Any Non-AlphaNumeric Character ( \W )
Combining Regular Expression Operators
Note: QuickTest searches for all characters in a regular expression literally, except for certain special regular expression characters. These include the period (.), brackets ([ ]), list brackets ([:...:]), hyphen (-), caret (^), asterisk (*), plus sign (+), question mark (?), parentheses (()), dollar sign ($), vertical line (|), and backslash (\). When special characters is preceded by a backslash (\), QuickTest searches for the literal character.
Using the Backslash Character
A backslash (\) instructs QuickTest to treat the next character as a literal character, if it is otherwise a special character. The backslash (\) can also instruct QuickTest to recognize certain ordinary characters as special characters. For example, QuickTest recognizes \n as the special newline character.

QuickTest Professional User’s Guide • Creating Tests
312
For example:
w matches the character w
\w is a special character that matches any word character including underscore
\\ matches the literal character \
\( matches the literal character (
For example, if you were looking for a Web site called:
mercurytours.mercuryinteractive.com
the period would be mistaken as an indication of a regular expression. To indicate that the period is not part of a regular expression, you would write it as follows:
mercurytours\.mercuryinteractive\.com
Note: If a backslash character is used before a character that has no special meaning, the backslash is ignored. For example, \z matches z.
Matching Any Single Character
A period (.) instructs QuickTest to search for any single character (except for \n). For example:
welcome.
matches welcomes, welcomed, or welcome followed by a space or any other single character. A series of periods indicates the same number of unspecified characters.
To match any single character including \n, enter:
(.|\n)

Chapter 15 • Using Regular Expressions
313
For more information on the ( ) regular expression characters, see “Grouping Regular Expressions” on page 314. For more information on the | regular expression character, see “Matching One of Several Regular Expressions” on page 315.
Matching Any Single Character in a List
Square brackets instruct QuickTest to search for any single character within a list of characters. For example, to search for the date 1967, 1968, or 1969, write:
196[789]
Matching Any Single Character Not in a List
When a caret (^) is the first character inside square brackets, it instructs QuickTest to match any character in the list except for the ones specified in the string. For example:
[^ab]
matches any character except a or b.
Note: The caret has this special meaning only when it is displayed first within the brackets.
Matching Any Single Character within a Range
In order to match a single character within a range, you can use square brackets ([ ]) with the hyphen (-) character. For instance, to match any year in the 1960s, write:
196[0-9]
A hyphen does not signify a range if it is displayed as the first or last character within brackets, or after a caret (^).
For example, [-a-z] matches a hyphen or any lowercase letter.

QuickTest Professional User’s Guide • Creating Tests
314
Note: Within brackets, the characters “.”, “*”, “[“ and “\” are literal. For example, [.*] matches . or *. If the right bracket is the first character in the range, it is also literal.
Matching Zero or More Specific Characters
An asterisk (*) instructs QuickTest to match zero or more occurrences of the preceding character. For example:
ca*r
matches car, caaaaaar, and cr.
Matching One or More Specific Characters
A plus sign (+) instructs QuickTest to match one or more occurrences of the preceding character. For example:
ca+r
matches car and caaaaaar, but not cr.
Matching Zero or One Specific Character
A question mark (?) instructs QuickTest to match zero or one occurrences of the preceding character. For example:
ca?r
matches car and cr, but nothing else.
Grouping Regular Expressions
Parentheses (()) instruct QuickTest to treat the contained sequence as a unit, just as in mathematics and programming languages.
Using groups is especially useful for delimiting the argument(s) to an alternation operator ( | ) or a repetition operator ( * , + , ? , { } ).
Chapter 15 • Using Regular Expressions
315
Matching One of Several Regular Expressions
A vertical line (|) instructs QuickTest to match one of a choice of expressions. For example:
foo|bar
causes QuickTest to match either foo or bar.
fo(o|b)ar
causes QuickTest to match either fooar or fobar.
Matching the Beginning of a Line
A caret (^) instructs QuickTest to match the expression only at the start of a line, or after a newline character.
For example:
book
matches book within the lines—book, my book, and book list, while
^book
matches book only in the lines—book and book list.
Matching the End of a Line
A dollar sign ($) instructs QuickTest to match the expression only at the end of a line, or before a newline character. For example:
book
matches book within the lines—my book, and book list, while a string that is followed by ($), matches only lines ending in that string. For example:
book$
matches book only in the line—my book.

QuickTest Professional User’s Guide • Creating Tests
316
Matching Any AlphaNumeric Character Including the Underscore
\w instructs QuickTest to match any alphanumeric character and the underscore (A-Z, a-z, 0-9, _).
For example:
\w* causes QuickTest to match zero or more occurrences of the alphanumeric characters—A-Z, a-z, 0-9, and the underscore (_). It matches Ab, r9Cj, or 12_uYLgeu_435.
For example:
\w{3} causes QuickTest to match 3 occurrences of the alphanumeric characters A-Z, a-z, 0-9, and the underscore (_). It matches Ab4, r9_, or z_M.
Matching Any Non-AlphaNumeric Character
\W instructs QuickTest to match any character other than alphanumeric characters and underscores.
For example:
\W matches &, *, ^, %, $, and # .
Combining Regular Expression Operators
You can combine regular expression operators in a single expression to achieve the exact search criteria you need.
For example, you can combine the ‘.’ and ‘*’ characters in order to find zero or more occurrences of any character (except \n).
For example,
start.*
matches start, started, starting, starter, etc.

Chapter 15 • Using Regular Expressions
317
You can use a combination of brackets and an asterisk to limit the search to a combination of non-numeric characters. For example:
[a-zA-Z]*
To match any number between 0 and 1200, you need to match numbers with 1 digit, 2 digits, 3 digits, or 4 digits between 1000-1200.
The regular expression below matches any number between 0 and 1200.
([0-9]?[0-9]?[0-9]|1[01][0-9][0-9]|1200)
Note: The modified registry and the property pattern configuration file must be set up on the computer on which you want to record objects using property patterns. However, once the test is recorded, you can run the test on any QuickTest computer.

QuickTest Professional User’s Guide • Creating Tests
318

319
16Learning Virtual Objects
You can teach QuickTest to recognize any area of your application as an object by defining it as a virtual object. Virtual objects enable you to record and run tests on objects that are not normally recognized by QuickTest.
This chapter describes:
About Learning Virtual Objects
Understanding Virtual Objects
Defining a Virtual Object
Removing a Virtual Object
About Learning Virtual Objects
Your application may contain objects that behave like standard objects but are not recognized by QuickTest. You can define these objects as virtual objects and map them to standard classes, such as a button or a check box. QuickTest emulates the user’s action on the virtual object during the test run. In the test results, the virtual object is displayed as though it is a standard class object.
For example, suppose you want to record a test on a Web page containing a bitmap that the user clicks. The bitmap contains several different hyperlink areas, and each area opens a different destination page. When you record a test, the Web site matches the coordinates of the click on the bitmap and opens the destination page.

QuickTest Professional User’s Guide • Creating Tests
320
To enable QuickTest to click at the required coordinates during a test run, you can define a virtual object for an area of the bitmap, which includes those coordinates, and map it to the button class. When you run a test, QuickTest clicks the bitmap in the area defined as a virtual object so that the Web site opens the correct destination page.
You define a virtual object using the Virtual Object Wizard. The wizard prompts you to select the standard object class to which you want to map the virtual object. You then mark the boundaries of the virtual object using a crosshairs pointer. Next, you select a test object as the parent of the virtual object. Finally, you specify a name and a collection for the virtual object. A virtual object collection is a group of virtual objects that is stored in the Virtual Object Manager under a descriptive name.
Note: QuickTest does not support virtual objects for analog or low-level recording. For additional information about low-level recording, see “Recording and Running Tests” on page 859.
Understanding Virtual Objects
QuickTest identifies a virtual object according to its boundaries. Marking an object’s boundaries specifies its size and position on a Web page or application window. When you assign a test object as the parent of your virtual object, you specify that the coordinates of the virtual object boundaries are relative to that parent object. When you record a test, QuickTest recognizes the virtual object within the parent object and adds it as a test object in the Object Repository so that QuickTest can identify the object during the test run.
Note: The Web page or application window must be the same size and in the same position when recording and running tests as it was when you defined the virtual object.

Chapter 16 • Learning Virtual Objects
321
You can disable recognition of virtual objects without deleting them from the Virtual Object Manager. For additional information, see “Removing a Virtual Object” on page 326.
Notes: You can use virtual objects only when recording and running a test. You cannot insert any type of checkpoint on a virtual object, or use the Object Spy to view its properties.
In order to perform an operation in the Active Screen on a marked virtual object, you must first record it, so that its properties are saved in the test object description in the object repository. If you perform an operation in the Active Screen on a virtual object that has not yet been recorded, QuickTest treats it as a standard object.
Defining a Virtual Object
Using the Virtual Object Wizard, you can map a virtual object to a standard object class, specify the boundaries and the parent of the virtual object, and assign it a logical name. You can also group your virtual objects logically by assigning them to collections.
Note: You can define virtual objects only for objects on which you can click or double-click and which record a Click or DblClick step in the test tree. Otherwise, the virtual object is ignored. For example, if you define a virtual object over the WinList object, the Select operation is recorded, and the virtual object is ignored.

QuickTest Professional User’s Guide • Creating Tests
322
To define a virtual object:
1 With QuickTest open (but not in record mode), open your Web site or application and display the object containing the area you want to define as a virtual object.
2 In QuickTest, choose Tools > Virtual Objects > New Virtual Object. The Virtual Object Wizard opens. Click Next.

Chapter 16 • Learning Virtual Objects
323
3 Select a standard class to which you want to map your virtual object.
If you select the list class, specify the number of rows in the virtual object. For the table class, select the number of rows and columns. Click Next.
4 Click Mark Object.

QuickTest Professional User’s Guide • Creating Tests
324
The QuickTest window and the Virtual Object Wizard are minimized. Use the crosshairs pointer to mark the area of the virtual object. You can use the arrow keys while holding down the left mouse button to make precise adjustments to the area you define with the crosshairs. Click Next.
Note: The virtual object should not overlap other virtual objects in your Web page. If the virtual object overlaps another virtual object, QuickTest may not record or run tests properly on the virtual objects.
5 Click an object in the object tree to assign it as the parent of the virtual object.
The coordinates of the virtual object outline are relative to the parent object you select.

Chapter 16 • Learning Virtual Objects
325
6 In the Identify object using box, select how you want QuickTest to identify and map the virtual object.
If you want QuickTest to identify all occurrences of the virtual object, select parent only. QuickTest identifies the virtual object using its direct parent only, regardless of the entire parent hierarchy. For example, if the virtual object was defined using Browser("A").Page("B").Image("C"), QuickTest will recognize the virtual object even if the hierarchy changes to Browser("X").Page("Y").Image("C").
If you want QuickTest to identify the virtual object in one occurrence only, select entire parent hierarchy. QuickTest identifies the virtual object only if it has the exact parent hierarchy. For example, if the virtual object was defined using Browser("A").Page("B").Image("C"), QuickTest will not recognize it if the hierarchy changes to Browser("X").Page("B").Image("C").
Click Next.
7 Specify a name and a collection for the virtual object. Choose from the list of collections or create a new one by entering a new name in the Collection name box.

QuickTest Professional User’s Guide • Creating Tests
326
8 To add the virtual object to the Virtual Object Manager and close the wizard, select No and then click Finish.
To add the virtual object to the Virtual Object Manager and define another virtual object, select Yes and then click Next. The wizard returns to the Map to a Standard Class screen, where you can define the next virtual object.
Removing a Virtual Object
You can remove virtual objects from your test by deleting them or by disabling recognition of these objects while recording.
To delete a virtual object:
1 Choose Tools > Virtual Objects > Virtual Object Manager. The Virtual Object Manager opens.
2 In the list of available virtual object collections, click the plus sign next to the collection to display the virtual object you want to delete. Select the virtual object, and click Delete.
To delete an entire collection, select it and click Delete.
3 Click Close.

Chapter 16 • Learning Virtual Objects
327
Tip: Click New in the Virtual Object Manager to open the Virtual Object Wizard, where you can define a new virtual object.
To disable recognition of virtual objects while recording:
1 Choose Tools > Options. The Options dialog box opens.
2 In the General tab, select the Disable recognition of virtual objects while recording check box.
3 Click OK.
Note: When you want QuickTest to recognize virtual objects during recording, ensure that the Disable recognition of virtual objects while recording check box in the General tab of the Options dialog box is cleared. For more information, see “Setting General Testing Options” on page 589.

QuickTest Professional User’s Guide • Creating Tests
328

329
17Working with Actions
You can divide your test into actions to streamline the testing process of your Web site or application.
This chapter describes:
About Working with Actions
Using Multiple Actions in a Test
Using Global and Action Data Sheets
Using the Action Toolbar
Creating New Actions
Inserting Existing Actions
Nesting Actions
Splitting Actions
Setting Action Properties
Sharing Action Information
Exiting an Action
Removing Actions from a Test
Creating an Action Template
Guidelines for Working with Actions

QuickTest Professional User’s Guide • Creating Tests
330
About Working with Actions
Actions help divide your test into logical units, like the main sections of a Web site. When you create a new test, it contains one action. By dividing your tests into multiple actions, you can design more modular and efficient tests.
An action consists of its own test tree and test script, including all the steps recorded within that action, and its own object repository if the test is in per-action repository mode. For more information object repositories, see Chapter 34, “Choosing the Object Repository Mode.”
Suppose you want to test several features of a flight reservation system. You plan several tests to test various business processes, but each one requires the same login and logout steps. You can create one action that contains the steps required for the login process, another for the logout steps, and other actions for the main steps in your test. Once you’ve created the login and logout actions, you can insert those actions into other tests.
If you created a test in which you logged into the system, booked one flight, and then logged out of the system, your test might be structured as shown:
Actions enable you to parameterize specific components of a test and to easily re-record one action so that you don’t have to re-record the entire test when part of your application changes.
Two or more tests can call the same action and one action can call another action. Complex tests may have many actions and may share actions with other tests.
If you work with tests that include many steps or lines of script, it is recommended that you use actions to divide your test steps. Actions should ideally contain no more than a few dozen test steps.
Logging in
Logging out
Booking a flight

Chapter 17 • Working with Actions
331
Using Multiple Actions in a Test
When you create a test, it includes one action. All the steps you record and all the modifications you make while editing your test are part of a single action.
You can divide your test into multiple actions by creating new actions or by inserting existing actions. There are three kinds of actions:
non-reusable action—an action that can be used only in the test in which it was created, and only once.
reusable action—an action that can be called multiple times by the test in which it was created (the local test) as well as by other tests.
external action—a reusable action created in another test. External actions are read-only in the calling test. They can be modified only in the test in which they were created.
For more information about creating new actions, see “Creating New Actions” on page 335. For more information about inserting existing actions, see “Inserting Existing Actions” on page 337.
By default, new actions are non-reusable. You can mark each action you create in a test as reusable or non-reusable. Only reusable actions can be called from the current test or from another test.
For every action in your test, QuickTest creates a corresponding action sheet in the Data Table so that you can enter Data Table parameters that are specific to that action only. For more information on global and action data sheets, see “Using Global and Action Data Sheets,” below. For information on parameterizing tests, see Chapter 13, “Parameterizing Tests,” and Chapter 14, “Creating Output Values.”
When you run a test with actions, the test results are divided by actions within each test iteration so that you can see the outcome of each action, and you can view the detailed results for each action individually. For more information on the Test Results window, see Chapter 27, “Analyzing Test Results.”

QuickTest Professional User’s Guide • Creating Tests
332
Note: You can also run a single action, or part of an action, using the Run from Step option. For more information, see Chapter 25, “Running Tests.”
Using Global and Action Data Sheets
When you output a value or add a Data Table parameter to your test, you can specify whether to store the data in the global data sheet or in the action data sheet. You set this option in the Data Table Parameter Options dialog box for Data Table parameters or the Output Value Properties dialog box for output values.
Choosing Global sheet creates columns in the Global sheet in the Data Table. When you run your test, QuickTest inserts or outputs a value from or to the current row of the global data sheet during each global iteration. You can use the columns in the global data sheet for output values or Data Table parameters in any action. This enables you to share information from one action to another.
Each action also has its own sheet in the Data Table so that you can insert data that applies only to that action. Choosing Current action sheet (local) creates a parameter (column) in the corresponding action sheet in the Data Table.
Note: In the Data Table Parameter Options dialog box, you cannot select Current action sheet (local) when parameterizing the value of an object property if you test uses a shared object repository file. For more information, see Chapter 34, “Choosing the Object Repository Mode.”

Chapter 17 • Working with Actions
333
When there are parameters in the current action’s sheet, you can set QuickTest to run one or more iterations on that action before continuing with the current global iteration of the test. When you set your action properties to run iterations on all rows, QuickTest inserts the next value from the action’s data sheet into the corresponding action parameter during each action iteration, while the values of the global parameters stay constant.
Note: If you create Data Table parameters in your action, be sure that the run settings for your action are set correctly in the Run tab of the Action Properties dialog box. You can set your action to run without iterations, to run iterations on all rows in the action’s data sheet, or to run iterations only on the rows you specify. For more information about setting action iteration preferences, see “Setting the Run Properties for an Action” on page 352.
For example, suppose you want to test how a flight reservation system handles multiple bookings. You may want to parameterize the test to check how your site responds to multiple sets of customer flight itineraries. When you plan your test, you plan the following procedures:
1 The travel agent logs into the flight reservation system.
2 The travel agent books five sets of customer flight itineraries.
3 The travel agent logs out of the flight reservation site.
When you consider these procedures, you realize that it is necessary to parameterize only the second step—the travel agent logs into the flight reservation system only once, at the beginning, and logs out of the system only once, at the end. Therefore, it is not necessary to parameterize the login and logout procedures in your test.
By creating three separate actions within your test—one for logging in, another for booking a flight, and a third for logging out—you can parameterize the second action in your test without parameterizing the others.

QuickTest Professional User’s Guide • Creating Tests
334
For more information on the Data Table, see Chapter 18, “Working with Data Tables.” For more information about parameterization, see Chapter 13, “Parameterizing Tests.” For more information about output values, see Chapter 14, “Creating Output Values.”
Using the Action Toolbar
The Action toolbar is available only in the Tree View. By default, the Action toolbar is not displayed when QuickTest opens. To view it, choose View > Toolbars > Action. For more information, see Chapter 2, “QuickTest at a Glance.”
The first time you insert a reusable or external action into a test, the Action toolbar is automatically displayed above the test tree.
The Action List enables you to view either the entire test flow or the action tree for a selected reusable or external action. The test flow displays the overall flow of your test with all the actions in your test. An action tree displays all the details of the selected reusable or external action.
In the test flow, reusable and external actions are not expandable. You can view the expanded tree of reusable and external actions by opening the action tree for that action. For more information about reusable actions, see “Setting General Action Properties” on page 350.
Action List

Chapter 17 • Working with Actions
335
There are three ways to switch to the action tree for a reusable or external action:
Double-click the action you want to view.
Highlight the action you want to view and click the Show button.
Select the name of the action from the Action List.
Note: You can open and expand the tree for an external action, but the action is read-only. The action can only be modified in the original test. For more information about external actions, see “Inserting Calls to Actions” on page 341.
If you are working in a test without reusable or external actions, you can hide the Action toolbar. To hide the Action toolbar, choose View > Toolbars > Action. For more information, see Chapter 2, “QuickTest at a Glance.”
In the Expert view, an Action toolbar is always visible and the Expert view always displays the script for the selected action. For more information on the Expert View, see Chapter 37, “Testing in the Expert View.”
Creating New Actions
You can add new actions to your test during a recording session or while designing your test.
You can add the action as a top-level action, or you can add the action as a sub-action (or nested action) of an existing action in your test. For more information, see “Nesting Actions” on page 345.
You can also split an existing action into two actions. For more information on splitting actions, see “Splitting Actions” on page 346.

QuickTest Professional User’s Guide • Creating Tests
336
To create a new action in your test:
1 If you want to insert the action within an existing action, click the step after which you want to insert the new action.
2 Choose Insert > New Action or click the New Action button. The Insert New Action dialog box opens.
3 Type a new action name or accept the default name.
4 If you wish, add a description of the action. You can also add an action description at a later time in the Action Properties dialog box.
Tip: Descriptions of actions are displayed in the Insert Copy of Action and Insert Call to Action dialog boxes. The description makes it easier for you to select the action you want to insert. For more information, see “Setting General Action Properties” on page 350.
5 Select Reusable Action if you want to make the action reusable. You can also set or modify this setting at a later time in the Action Properties dialog box.
For more information about reusable actions, see page 338.
For more information about the Action Properties dialog box, see page 348.

Chapter 17 • Working with Actions
337
6 Decide where to insert the action and select At the end of the test or After the current step.
For more information about inserting actions within actions, see “Nesting Actions” on page 345.
7 Click OK. A new action is added to your test and is displayed at the bottom of the test tree or after the current step. You can move your action to another location in your test by dragging it to the desired location.
8 Make sure your new action is selected and click Record to continue recording. The steps you record will be added to your new action.
Tip: To insert the action within an existing action, click the step after which you want to insert the new action.
By default, all new actions are inserted as non-reusable actions. If you want to be able to call the action from within your test or from other tests, you can make it a reusable action. For more information about reusable actions, see “Setting General Action Properties” on page 350.
Inserting Existing Actions
When you plan a suite of tests, you may realize that each test requires identical activities, such as logging in. For example, rather than recording the login process three times in three separate tests and enhancing this part of the script (with checkpoints and parameterization) separately for each test, you can create an action that logs into a flight reservation system in one test. Once you are satisfied with the action you recorded and enhanced, you can insert the existing action into other tests.
You can insert an existing action by inserting a copy of the action into your test, or by inserting a call to the original action.
Suppose you wanted to record the following three tests in the Mercury Tours site—booking a flight, modifying a reservation, and deleting a reservation. While planning your test, you realize that for each test, you need to log in and log out of the site.

QuickTest Professional User’s Guide • Creating Tests
338
If you plan to use the insert existing action option for the repeated activities, then you would initially record the three tests as shown:
Once you have set up your tests, you must choose whether you want to insert a copy of the action or insert a call to it.
About Reusable Actions
You can call a reusable action multiple times within a test (from the local test), and you can call it from other tests. You can insert copies of non-reusable actions into your test, but you cannot insert calls to non-reusable actions.
Inserting calls to reusable actions makes it easier to maintain your tests, because when an object or procedure in your application changes, it needs to be updated only one time, in the original action.
Inserting Copies of Actions
When you insert a copy of an action into a test, the action is copied in its entirety, including checkpoints, parameterization, and the corresponding action tab in the Data Table. If the test you are copying into uses per-action repository mode, the copied action’s action object repository will also be copied along with the action.
If the test you are copying into uses a shared object repository, the copied action will use the same shared object repository as the test it is being copied into. Before running the test, confirm that the shared object repository contains all the objects that are in the copied action. Otherwise, the test may fail.

Chapter 17 • Working with Actions
339
Note: If you are working in a test that uses per-action object repository mode, you cannot copy an action from a test using a shared object repository. For more information, see “Splitting and Copying Actions in Object Repository Per-Action Mode” on page 700.
The action is inserted into the test as an independent, non-reusable action (even if the original action was reusable). Once the action is copied into your test, you can add to, delete from, or modify the action just as you would with any other recorded action. Any changes you make to this action after you insert it affect only this action, and changes you make to the original action do not affect the inserted action. You can insert copies of both reusable and non-reusable actions.
To insert a copy of an action:
1 Choose Insert > Copy of Action, right-click the action and select Insert Copy of Action, or right-click any step and select Action > Insert Copy. The Insert Copy of Action dialog box opens.

QuickTest Professional User’s Guide • Creating Tests
340
2 Use the browse button to find the test from which you want to insert the action. The action window displays all local actions (actions that originated) in the test you selected.
Note: You can enter a TestDirector folder or a relative path. If you enter a relative path, QuickTest will search for the test in the folders listed in the Folders tab of the Options dialog box. For more information, see Chapter 28, “Setting Folder Testing Options.”
3 In the Select an action box, select the action you want to insert from the list. When you highlight an action, its description, if one exists, is displayed in the New action description box. This helps you identify the action you want to insert. For more information about action descriptions see “Setting General Action Properties” on page 350.
Note: QuickTest disables the Select an action option if the test you are working in is using per-action repository mode and the test you want to copy from uses a shared object repository. For more information, see “Splitting and Copying Actions in Object Repository Per-Action Mode” on page 700.
4 Type a meaningful name for the action in the New action name box.
5 If you wish, add or modify the action’s description.
6 Decide where to insert the action:
To insert a new action at the end of your test, select At the end of the test.
To insert the new action within the action of the currently selected step, select After the current step.
For more information about inserting actions within actions, see “Nesting Actions” on page 345.

Chapter 17 • Working with Actions
341
7 Click OK. The action is inserted into the test as an independent, non-reusable action. You can move the action to another location in the test by dragging it to the desired location in the test tree.
Inserting Calls to Actions
You can insert a call (link) to a reusable action that resides in your current test (local action), or in any other test (external action).
When you insert a call to an external action, the action is inserted in read-only format. You can view the components of the action in the action tree, but you cannot modify them. You can choose, however, whether you want the data from the action’s data sheet to be imported as a local, editable copy, or whether you want to use the (read-only) data from the original action.
If the test calling an action uses per-action repository mode, the called action’s action object repository will be read-only (as are the steps of the called action) in the test calling the action. If the test you are calling from uses a shared object repository, the called action will use the same shared object repository as the test calling the action. Before running the test, confirm that the shared object repository contains all the objects that are in the called action. Otherwise, the test may fail.
Note: If you are working in a test that uses per-action object repository mode, you cannot call an action from a test using a shared object repository. For more information, see “Inserting Action Calls in Object Repository Per-Action Mode” on page 701.
To modify the action, you must open the test in which the action originated and make your modifications there. In the original action, the modifications apply to all tests that call that action. If you chose to use the original action’s data, then changes to the original action’s data will be applied as well.

QuickTest Professional User’s Guide • Creating Tests
342
Tip: You can view the location of the original action in the General tab of the Action Properties dialog box.
To insert a call to an action:
1 Choose Insert > Call to Action, right-click the action and select Insert Call to Action, or right-click any step and select Action > Insert Call. The Insert Call to Action dialog box opens.
2 Use the browse button to find the test from which you want to insert the action. The action window displays all reusable and external actions in the test you selected.

Chapter 17 • Working with Actions
343
Note: You can enter a TestDirector folder or a relative path. If you enter a relative path, QuickTest will search for the test in the folders listed in the Folders tab of the Options dialog box. For more information, see Chapter 28, “Setting Folder Testing Options.”
3 In the Select an action box, select the action you want to insert from the list. When you highlight an action, its description, if one exists, is displayed in the Action description box. This helps you identify the action you want to insert. For more information about action descriptions, see “Setting General Action Properties” on page 350.
Note: QuickTest disables the Select an action option if the selected test does not contain a reusable or external action. It also disables the option if the test in which you are working is using per-action object repository mode and the test from which you want to call an action is using a shared object repository. For more information, see “Inserting Action Calls in Object Repository Per-Action Mode” on page 701.
4 Choose where to insert the action:
To insert a new action at the end of your test, select At the end of the test.
To insert the new action within the action of the currently selected step, select After the current step.
For more information about nesting actions, see “Nesting Actions” on page 345.

QuickTest Professional User’s Guide • Creating Tests
344
5 Choose where you want to store the parameterization data:
To use the original action’s data, select Use data stored with the original action (read-only). When you select this option, the data is read-only when viewed from the calling test and all changes to the original action’s data sheet apply when the action runs in the calling test.
To store an editable copy of the data in the test’s Data Table, select Use a local, editable copy. When you select this option, the data sheet is stored in the test’s Data Table and is independent of the original action. Changes to the original data sheet do not affect the calling test.
Note: This option is only enabled the first time you insert a call to a given action and the option setting applies to all calls to the same action within the test. You can change the parameterization storage location for the action in the Action Properties dialog box. For more information, see “Setting Action Properties” on page 348.
6 Click OK. The action is inserted into the test as a call to the original action . You can move the action to another location in the test by dragging it to the desired location in the test tree.
Tip: You can create an additional call to any reusable or external action in your test by pressing CTRL while you drag and drop the action to another location in your test.

Chapter 17 • Working with Actions
345
Nesting Actions
Sometimes you may want to run an action within an action. This is called nesting. Nesting actions:
Help you maintain the modularity of your test.
Enable you to run one action or another based on the results of a conditional statement.
For example, suppose you have parameterized a step where a user selects one of three membership types as part of a registration process. When the user clicks Continue on the registration form, the page that opens depends on the membership type selected in the previous page. You can create one action for each type of membership. Then you can use If statements to determine which membership type was selected in a particular iteration of the test and run the appropriate action for that selection.
Your script might look something like this:
For more information about inserting conditional statements, see “Using Conditional Statements” on page 745.
To nest an action within an existing action:
1 Highlight the step after which you would like to insert the action.
2 Follow the instructions for creating a new action as described in “Creating New Actions” on page 335, or follow the instructions for inserting an existing action as described in “Inserting Existing Actions” on page 337.

QuickTest Professional User’s Guide • Creating Tests
346
3 In the Location section of the Insert New Action, Insert Copy of Action, or Insert Call to Action dialog box, select After the current step. The action is inserted after the current step.
Note: In the Expert View, an action called by another action is displayed within the parent action with the following syntax:
Call RunAction (ActionName, Run_Setting, FromRow - ToRow)
For example:
Call RunAction("Select Flight", 0, "1 - 1")
For more information about the Expert View, see Chapter 37, “Testing in the Expert View.” For more information on the RunAction statement, refer to the QuickTest Object Model Reference.
Splitting Actions
You can split an existing action into two sibling actions or into parent-child nested actions.
You cannot split an action and the option is disabled when:
when an external action is selected
when the first line of the action is selected
while recording a test
while running a test
when you are working with a read-only test

Chapter 17 • Working with Actions
347
To split an action:
1 Select the step before which you want the new (second) action to begin.
2 Choose Step > Split Action, click the Split Action button, or right-click the step and select Action > Split. The Split Action dialog box opens.
3 Choose one of the following options:
Independent of each other—Splits the selected action into two sibling actions.
Nested (the second action is called by the first)—Splits the selected action into a parent action whose last step calls the second, child action.
4 If you wish, modify the name and description of the two actions in the Name and Description boxes.

QuickTest Professional User’s Guide • Creating Tests
348
Note: If a reusable action is called more than once in a test and you split the action into two independent actions, each call to the action within the test will be followed by a call to the new (reusable) action. If a reusable action is called from another test, however, splitting it may cause the calling test to fail.
Setting Action Properties
The Action Properties dialog box enables you to modify an action name, add or modify an action description, and set an action as reusable. If you open the Action Properties dialog box in the Tree View with the test flow displayed, you can also set the run properties for an action and set the parameter properties (for external actions only).
Opening the Action Properties Dialog Box
You can open the Action Properties dialog box while recording or editing your test by:
Choosing Step > Action Properties from the Tree View when an action node is highlighted or from the Expert View, displaying the script of the current action.
Right-clicking an action node from the Tree View and selecting Action Properties.

Chapter 17 • Working with Actions
349
When you open the Action Properties dialog box in the Tree View with the test flow displayed (either from a test without reusable or external actions, or with Test Flow selected in the Action List), the Action Properties dialog box contains both the General tab and the Run tab as shown below:
When you open the Action Properties dialog box from an action tree (either from the Tree View or the Expert View with a specific action displayed in the Action List), the Action Properties dialog box does not contain the Run tab.

QuickTest Professional User’s Guide • Creating Tests
350
Note: In addition to the tabs described above, the Action Properties dialog box for an external action also contains an External Actions tab. For more information, see “Setting Properties for an External Action” on page 354.
Setting General Action Properties
You can use the Action Properties General tab to modify the name of an action, add or edit an action’s description, or change the reusability status of the action.
The General tab includes the following options:
Option Description
Name The name of the action.
Location The folder where the action resides.

Chapter 17 • Working with Actions
351
Description You can insert comments about the action. An action description helps you and other testers know what a specific action does without reviewing the entire script or action tree. The description is also displayed in the description section of the Insert Copy of Action and Insert Call to Action dialog boxes. This enables you and other testers to determine which action you want to insert from another test without having to open it. For more information about inserting copies of actions and calls to actions, see “Inserting Existing Actions” on page 337.Note: You can also add a description when inserting a
new action. For more information about adding a new action, see “Creating New Actions” on page 335.
Reusable action Determines whether the action is a reusable action. A reusable action can be called multiple times within a test and can be called from other tests. Non-reusable actions can be copied and inserted as independent actions, but cannot be inserted as calls to the original action.When you change this setting, the action icon changes to a reusable or non-reusable action icon as appropriate. If the action tree was expanded, it collapses after changing a non-reusable action to a reusable action. The first time you convert an action to a reusable action within a test, the Test Flow box is displayed above your test tree. You can view the action tree of the reusable action by selecting the action name in the Test Flow box.
Option Description

QuickTest Professional User’s Guide • Creating Tests
352
Notes:
If the action is called more than once within the test flow or if the action is called by a reusable action, the Reusable action option is read-only. If you want to make the action non-reusable, remove the additional calls to the action.
You cannot expand reusable actions from the test flow view. You can view details of a reusable action in the Tree View by double-clicking the action in the test tree. For more information about the test flow and action trees, see “Using the Action Toolbar” on page 334.
Setting the Run Properties for an Action
You can use the Action Properties Run tab to instruct QuickTest to run only one iteration on the action, to run iterations on all rows in the Data Table, or to run iterations only for certain rows in the Data Table.

Chapter 17 • Working with Actions
353
The Run tab includes the following options:
Option Description
Run one iteration only Runs the action only once, using the row in the action’s data sheet that corresponds to the current global iteration number. If the action’s data sheet contains fewer rows than the global sheet, the last row of the action’s data sheet will be used for each subsequent test iteration.
For example, suppose an action’s data sheet has two rows and the global sheet has four rows. If you choose to run one iteration only for the action and you choose to run iterations on all rows of the global data sheet, then during each iteration of the test, this action will run only one iteration. The data that the action parameters use during each repetition of the test are based on the iteration number for the test. During the first iteration of the test, action parameters in the action will take data from the first row of the action’s data sheet. In the second iteration of the test, action parameters in the action will take data from the second row of the action’s data sheet. In the third and subsequent iterations of the test, the action’s parameters in the action will continue to take data from the second (last) row of the action’s data sheet.
Run on all rows Runs the action with iterations using all rows in the action’s Data Table.
Run from row __ to row __ Runs the action with iterations using the values in the action’s Data Table for the specified row range.

QuickTest Professional User’s Guide • Creating Tests
354
Notes:
If you run multiple iterations on an action, the action must begin and end on the same Web page or frame, so that it is in the proper location to run the next iteration of the action.
The Run tab of the Action Properties dialog box applies to individual actions and refers to the rows in the action’s data sheet. You can set the Run properties for an entire test (setting iterations for rows on the global data sheet) from the Run tab in the Test Settings dialog box. For more information, see Chapter 29, “Setting Testing Options for a Single Test.”
Setting Properties for an External Action
When you insert an external action you can choose where you want QuickTest to store the Data Table data and, if you are using the shared object repository mode, you can choose where to store the action’s object information. You can set these options in the External Action tab of the Action Properties dialog box.

Chapter 17 • Working with Actions
355
Note: When you open the Action Properties dialog box while working in a test in per-action repository mode or for an external action coming from a test that uses the shared object repository mode, the Object repository type options in the External Actions tab are disabled.
The External Action tab includes the following options:
Option Description
Data table parameters Decide where you want to store the action’s Data Table data:• To use the original action’s data, select Use data
stored with the original action (read-only). When you select this option, the data is read-only when viewed from the calling test and all changes to the original action’s data sheet apply when the action runs in the calling test.
• To store an editable copy of the data in the test’s Data Table, select Use a local, editable copy. When you select this option, a copy of the data sheet is stored in the test’s Data Table and is independent of the original action. Changes to the original data sheet do not affect the calling test.
Object repository type Decide which object repository mode you want the action to use:• Choose Per-action to instruct QuickTest to refer to
the external action’s repository.
• Choose Shared to instruct QuickTest to use the test’s shared object repository for this action.
Available only when working with an external action from a test using per-action repository mode.For more information on object repository modes, see Chapter 34, “Choosing the Object Repository Mode.”

QuickTest Professional User’s Guide • Creating Tests
356
Sharing Action Information
There are several ways to share or pass values from one action to other actions:
Store values from one action in the global Data Table and use these values as Data Table parameters in other actions.
Set a value from one action as a user-defined environment variable and then use the environment variable in other actions.
Add values to a Dictionary object in one action and retrieve the values in other actions.
Sharing Values via the Global Data Table
You can share a value that is generated in one action with other actions in your test by storing the value in the global Data Table. Other actions can then use the value in the Data Table as an input parameter. You can store a value in the Data Table by outputting the value to the global Data Table or by using DataTable, Sheet and Parameter objects and methods in the Expert View to add or modify a value.
For example, suppose you are testing a flight reservation application. When a user logs into the application, his or her full name is displayed on the top of the page. Later, when the user chooses to purchase the tickets, the user must enter the name that is listed on his or her credit card. Suppose your test contains three actions—Login, SelectFlight, and PurchaseTickets and the test is set to run multiple iterations with a different login name for each iteration. In the Login action, you can create a text output value to store the displayed name of the user. In the PurchaseTickets action, you can parameterize the value that is set in the Credit Card Owner edit box using the Data Table column containing the user’s full name.
For more information on output values, see Chapter 14, “Creating Output Values.” For more information on parameterization, see Chapter 13, “Parameterizing Tests.” For more information about DataTable objects and methods, see Chapter 18, “Working with Data Tables,” and refer to the QuickTest Object Model Reference.

Chapter 17 • Working with Actions
357
Sharing Values Using Environment Variables
If you don’t need to run multiple iterations of your test or you want the value you are sharing to stay constant for all iterations, you can use an internal, user-defined environment variable that can be accessed by all local actions in your test.
For example, suppose you want to test that your flight reservation application correctly checks the credit card expiration date that the user enters. The application should request a different credit card if the expiration date that was entered is earlier than the scheduled flight departure date. In the SelectFlight action, you can store the value entered in the departure date edit box in an environment variable. In the PurchaseTickets action, you can compare the value of the expiration date edit box with the value stored in your environment variable.
For more information on environment variables, see Chapter 13, “Parameterizing Tests.” For syntax and usage information on the Environment object, refer to the QuickTest Object Model Reference.
Sharing Values Using the Dictionary Object
As an alternative to using environment variables to share values between actions as described above, you can use the Dictionary object. The Dictionary object enables you to assign values to variables that are accessible from all actions (local and external) in the test in which the Dictionary object is created.
To use the Dictionary object, you must first add a reserved object to the registry (in HKEY_CURRENT_USER\Software\Mercury Interactive\QuickTest Professional\MicTest\ReservedObjects\) with ProgID = "Scripting.Dictionary". For example:
HKEY_CURRENT_USER\Software\Mercury Interactive\QuickTest Professional\MicTest\ReservedObjects\GlobalDictionary
Once you have added the reserved Dictionary object to the registry and restarted QuickTest, you can add and remove values to the Dictionary in one action and retrieve the values in another action from the same test.

QuickTest Professional User’s Guide • Creating Tests
358
For example, if you want to access the departure date set in the SelectFlight action from the PurchaseTickets action, you can add the value of the DepartDate WebEdit object to the dictionary in the SelectFlight action as follows:
GlobalDictionary.RemoveAllGlobalDictionary.Add "DateCheck", "DepartDate"
Then you can retrieve the date from the PurchaseTickets action as follows:
Dim CompareDateCompareDate=GlobalDictionary.Item("DateCheck")
For more information about the Dictionary object, refer to the Microsoft VBScript Reference (Help > QuickTest Professional Help > Microsoft Windows Script Technologies).
Exiting an Action
You can add a line in your script in the Expert View to exit an action before it runs in its entirety. You may want to use this option to return the current value of the action to the value at a specific point in the run. There are four types of exit action statements you can use:
ExitAction - Exits the current action, regardless of its iteration attributes.
ExitActionIteration - Exits the current iteration of the action.
ExitRun - Exits the test, regardless of its iteration attributes.
ExitGlobalIteration - Exits the current global iteration.
You can view the exit action node in the Test Results tree. If your exit action statement returns a value, the value is displayed in the action, iteration, or test summary, as applicable.
For more information about these functions, refer to the QuickTest Object Model Reference. For more information about the Test Results, see Chapter 27, “Analyzing Test Results.”

Chapter 17 • Working with Actions
359
Removing Actions from a Test
The procedures and effects of removing non-reusable actions, external actions, reusable actions, or calls to external or reusable actions are different.
When you remove a non-reusable action, you delete the action entirely as well as the action’s data sheet.
When you remove a call to a reusable or external action, you remove the action from your test flow, but the action remains part of the test in which it was created.
When you remove an external action, you remove the action from your test entirely. The original action is not affected.
When you remove a reusable action, you delete the action entirely. This will cause any test calling this action to fail.
Removing a Non-Reusable Action
Removing a non-reusable action from your test deletes the action entirely as well as the action’s data sheet.
To remove a non-reusable action:
1 In the Tree View, select the action you want to remove and press the Delete key on your keyboard or select Edit > Delete. A delete confirmation message box opens.
2 Click Yes to confirm.
Removing a Call to a Reusable or External Action from the Test Flow
You should choose to remove a call to a reusable or external action if you want to remove the action from the test flow, but you still want the action to be available for other calls. When you choose this option, the action still exists even though it is removed from your test flow, and the action’s data sheet remains. You can still view the action (and edit a reusable action) by selecting it from the Action List in the Tree View or in the Expert View.

QuickTest Professional User’s Guide • Creating Tests
360
After you remove a call to an action, you can insert the action back into the test from which it was removed, or into any other test using the Insert Copy of Action or Insert Call to Action options. For more information see “Inserting Existing Actions” on page 337.
To remove a call to a reusable or external action from the test flow:
1 Select the Test Flow view from the Action List in the Tree View.
2 Highlight the action you want to remove.
3 Choose Edit > Delete or press the Delete key on your keyboard. The Delete Action dialog box opens.
4 Choose Delete the selected call to the action and click OK. The action call is deleted. The action remains in the test’s Action List.
Removing an External Action from the Test
When you remove an external action from the test, the action is removed in its entirety, including the corresponding action sheet in the Data Table. Columns related to this action that are located in the global sheet are not removed.
After you remove an external action from your test, you can reinsert it by choosing Insert > Call to Action and locating the test where the original action resides. For more information, see “Inserting Existing Actions” on page 337.

Chapter 17 • Working with Actions
361
To remove an external action from the test:
1 Select the action you want to remove from the Action List.
2 Highlight the action icon in the test tree.
3 Choose Edit > Delete or press the Delete key on your keyboard. The Delete Action dialog box opens.
4 Choose Delete the action and its calls from this test and click OK. The action and all calls to the action are removed from the test. The reusable action in the original test is not affected.
Removing a Reusable Action from the Test
You should choose to remove a reusable action from the test only if you are sure that you no longer need the action and that no other test calls this action. This option deletes the action entirely.
Note: Deleting a reusable action that has been called by other tests will cause those tests to fail.

QuickTest Professional User’s Guide • Creating Tests
362
To remove a reusable action from the test:
1 Select the action you want to remove from the Action List.
2 Highlight the action icon in the test tree.
3 Choose Edit > Delete or press the Delete key on your keyboard. The Delete Action dialog box opens.
4 Choose Delete the action and its calls from this test and click OK. The action is permanently deleted and can no longer be inserted in, or accessed by, any test. Any test calling this action will fail.

Chapter 17 • Working with Actions
363
Renaming Actions
You can rename actions from the Tree View or from the Expert View.
Renaming Actions from the Tree View
You can rename an action from the Tree View in one of four ways:
Right-click the action and choose Action Properties. The Action Properties dialog box opens. Enter a new action name in the Name box of the General tab.
Click the action item in the tree once to select the action. Choose Edit > Rename Action. The selected action name is activated for editing. Modify the name and then click on any other step to save your change.
Click the action item in the tree once to select the action. Click again inside the displayed name to activate the item for editing. Modify the name and then click on any other step to save your change.
Click the action item in the tree once to select the action. Press F2. The selected action name is activated for editing. Modify the name and then click on any other step to save your change.
Renaming Actions from the Expert View
You can rename an action from the Expert View using the Rename Action dialog box.
To rename an action from the Expert View
1 From the Expert View, choose Edit > Rename Action. The Rename Action dialog box opens.
2 Enter a new name for the action in the New name box.

QuickTest Professional User’s Guide • Creating Tests
364
3 Click OK to save the change.
Tip: You can also press F2 to open the Rename Action dialog box.
Creating an Action Template
If you want to include one or more statements in every new action in your test, you can create an action template. For example, if you always enter your name as the author of an action, you can add this comment line to your action template.
To create an action template:
1 Create a text file containing the comments, function calls, and other statements that you want to include in your action template.
2 Save the text file as ActionTemplate.mst in your <QuickTest Installation Folder>\dat folder.
Note: Only the filename ActionTemplate.mst is recognized as an action template.

Chapter 17 • Working with Actions
365
Guidelines for Working with Actions
Consider the following guidelines when working with actions:
If your action runs more than one iteration, the action must ‘clean up after itself.’ In other words, the action must end at the same point in your application as it started, so that it can run another iteration without interruption. For example, suppose you are testing a sample flight reservation site. If the action starts with a blank flight reservation form, it should conclude with a blank flight reservation form.
A single test may include both global Data Table parameters and action parameters. For example, you can create a test in which a travel agent logs into the flight reservation system, books three flights, and logs out; the next travel agent logs into the flight reservation system, books three flights, logs out, and so on. To parameterize the ‘book a flight’ action, you choose Current action sheet (local) in the parameterization dialog box and enter the three flights into the relevant Action tab in the Data Table. To parameterize the entire test, you choose Global in the parameterization dialog box and enter the login names and passwords for the different agents into the Global tab in the Data Table.
Your entire test will run one time for each row in the global data sheet. Within each test, each parameterized action will be repeated according to the number of rows in its data sheet and depending on the run settings selected in the Run tab of the Action Properties dialog box.
You may want to rename the actions in your test with descriptive names to help you identify them. It is also a good idea to add detailed action descriptions. This facilitates inserting actions from one test to another. You can rename an action by choosing Edit > Rename Action.

QuickTest Professional User’s Guide • Creating Tests
366
If you plan to use an identical or virtually identical procedure in more than one test, you should consider inserting an action from another test.
If you want to make slight modifications to the action in only one test, you should use the Insert Copy of Action option to paste a copy of the action.
If you want modifications to affect all tests containing the action, you should use the Insert Call to Action option to insert a link to the action in the original test.
If you want modifications to the action to affect all tests containing the action, but you want to edit data in a specific test’s Data Table, use the Insert Call to Action option and select Use a local, editable copy.
When you insert a call to an external action, the action is inserted in read-only format, so the Record button is disabled. If you want to continue recording, you first need to insert a new action into your test.
Reusable actions help you to maintain your tests, but it is important to consider the effects of making an action reusable. Once you make an action reusable, be sure to consider how changes to your action could potentially affect other tests that call that action.
If you expect other users to open your tests and all actions in your tests are in the same drive, you should use relative paths for your reusable actions so that other users will be able to open your tests even if they have mapped their network drives differently.
If you expect certain elements of your application to change regularly, it is a good idea to divide the steps related to changeable elements into a separate action so that it will be easy to re-record the required steps after the application is modified.

367
18Working with Data Tables
QuickTest enables you to create and run tests that are driven by data stored in the Data Table.
This chapter describes:
About Working with Data Tables
Working with Global and Action Sheets
Editing and Saving the Data Table
Importing Data from a Database
Using Formulas in the Data Table
Using Data Table Scripting Methods
About Working with Data Tables
You can insert Data Table parameters and output values into your test so that it will run several times on different sets of data. Each test run on a different set of data is called an iteration. The data your test uses is stored in the design-time Data Table, which is displayed in the Data Table at the bottom of the screen while you create and edit your test. The Data Table has the characteristics of a Microsoft Excel spreadsheet, meaning that you can also execute mathematical formulas within the cells.
When you run your test, QuickTest creates a run-time Data Table—a live version of the Data Table stored with your test. During the test run, QuickTest displays the run-time data in a table so that you can see any changes to the Data Table as they occur.

QuickTest Professional User’s Guide • Creating Tests
368
After you run a test, the run-time Data Table closes, and the Data Table again displays the design-time Data Table that is stored with your test. The final data from the run-time Data Table is displayed in the Run-Time Data Table in the Test Results window. For more information on the run-time Data Table, see “Viewing the Run-Time Data Table” on page 558.
Tip: If it is important for you to save the resulting data from the run-time Data Table, you can insert a DataTable.Export statement to the end of your test to export the run-time Data Table to a file. You can then import the data to the design-time Data Table using the Data Table File > Import menu. Alternatively you can add a DataTable.Import statement to the beginning of your test to import the run-time Data Table that was exported at the end of the previous test run. For more information on these methods, refer to the QuickTest Object Model Reference.
Working with Global and Action Sheets
There are two types of sheets within the Data Table—Global and Action. You can access the different sheets by clicking the appropriate tabs below the Data Table.
You store data in the Global tab when you want it to be available to all actions in your test, for example, to pass parameters from one action to another.
You store data in the action’s tab when you want it to be available to only one action in your test.
For example, suppose you are creating a test on the sample Mercury Tours Web site. You might create one action for logging in, another for booking flights, and a third for logging out. You may want to create a test in which the user logs onto the site once, and then books flights for five passengers. The data about the passengers is relevant only to the second action, so it should be stored in the action tab corresponding to that action.

Chapter 18 • Working with Data Tables
369
Global Sheet
The Global sheet contains the data that replaces parameters in each iteration of the test. If you create a Global parameter called Arrivals, the Global sheet might look like this:
Action Sheets
Each time you add a new action to the test, a new action sheet is added to the Data Table. Action sheets are automatically labeled with the exact name of the corresponding action. The data contained in an action sheet is relevant for the corresponding action only. For example, if a test had the Data Table below, QuickTest would use the data contained in the Purchase sheet when running iterations on action parameter steps within the Purchase action.
For more information about creating global and action parameters, see Chapter 13, “Parameterizing Tests.”

QuickTest Professional User’s Guide • Creating Tests
370
Editing and Saving the Data Table
The Data Table contains the values that QuickTest substitutes for parameters when you run a test. Whenever you save your test, QuickTest automatically saves the test’s Data Table as an .xls file.
By default, the Data Table is saved in the test folder. You can save the Data Table in another location and instruct the test to use this Data Table when running a test. You specify a name and location for the Data Table in the Resources tab of the Test Settings dialog box.
This can be useful if:
you want to run the same test with different sets of input values
For example, you can test the localization capabilities of your application by running your test with a different Data Table file for each language you want to test.
Tip: You can also vary the user interface strings that you check in each language by using a different environment parameter file each time you run the test. For more information, see Chapter 13, “Parameterizing Tests.”
you need the same input information for different tests
For example, you can test a Web version and a standard Windows version of the same application using different tests, but the same Data Table.

Chapter 18 • Working with Data Tables
371
Note: If you select an external file as your Data Table:
You must make sure that the column names in the external Data Table match the parameter names in the test and that the sheets in the external Data Table match the actions in the test.
The external Data Table file may have been locked by QuickTest. If the file is locked, a message regarding locked resources opens. For more information, see “Creating, Opening, and Saving Tests with Locked Resources” on page 107.
For more information on the Test Settings dialog box, see Chapter 29, “Setting Testing Options for a Single Test.”
You can edit information in the table by typing directly into the table. You can also import data in Microsoft Excel 95, Excel 97, Excel 2000, tabbed text files (.txt), or ASCII format. Note that Microsoft Excel 2002 is not supported. You use the table in the same way as an Microsoft Excel spreadsheet, including inserting formulas into cells.
Note: QuickTest underlines each row to which you add data in the Data Table. When you run your test using the Run on all rows option (Test > Settings > Run tab, or Action Properties, Run tab), it runs one iteration for each underlined row. If you use the Clear option from the table’s Edit menu (or CTRL + X), or select a cell and press Delete on the keypad, the data is deleted from the cells, but the row is not deleted and the underline remains. This means that QuickTest will run an iteration for this row even though there is no data in it. If you want to delete an entire row from the Data Table, you must use the Edit > Delete option (CTRL + K).

QuickTest Professional User’s Guide • Creating Tests
372
To edit the Data Table:
1 Open your test.
2 Make sure the Data Table button is enabled.
Each row in the table represents the set of values that QuickTest submits for the parameterized arguments during a single iteration of the test or action. QuickTest runs the iterations of your action based on the settings selected in the Run tab of the Action Properties dialog box. The number of iterations that a test runs is equal to the number of rows in the Global sheet.
Each column in the table represents the list of values for a single parameterized argument. The column header is the parameter name.
Note: You must enter data in rows from top to bottom and left to right. For example, you cannot enter data in a cell in row 2 until you have entered data in row 1. Additionally, you cannot enter data in column C until you have entered data into column B.
3 To change the name of a column, double-click the column heading cell. The Change Parameter Name dialog box opens. Type a parameter name and click OK.

Chapter 18 • Working with Data Tables
373
Notes:
The parameter name must be unique. It can contain letters, numbers, commas, and underscores. The first character of the parameter name must be a letter or an underscore.
If you change the name in the table, you must also change the corresponding parameter name in the test pane.
4 Use the Data Table menu commands described below to edit the table. To open the Data Table menu, right-click a cell, a row heading or a column heading. The following menus are available—File, Sheet, Edit, Data, and Format.
File Menu
The following commands are available in the File menu:
File Command Description
Import From File Imports an existing Microsoft Excel table file into the Data Table. This command will import all the sheets in the selected Microsoft Excel file. If you want to import only one sheet from an existing Microsoft Excel file, use the Sheet >Import > From File command described below.
Notes: The table file you import replaces all data in all sheets of the table, and the first row in each Microsoft Excel sheet replaces the column headers in the corresponding Data Table sheet. It is therefore essential that the first row of your Microsoft Excel sheet exactly match the parameter names in your test.
If you import a Microsoft Excel table containing combo box or list cells, conditional formatting, or other special cell formats, the formats are not imported and the cell is displayed in the Data Table with a fixed value.

QuickTest Professional User’s Guide • Creating Tests
374
Sheet Menu
The following commands are available in the Sheet menu:
Edit Menu
The following commands are available in the Edit menu:
Export Exports the table to a specified Microsoft Excel file. You can save the table as a text (.txt) or a Microsoft Excel (.xls) file.
Print Prints the entire table or the selected sheet.
Sheet Command Description
Import >From File
Imports a single, existing Microsoft Excel sheet into the table.
Note: The sheet you import replaces all data in the currently selected sheet of the table, and the first row in the Excel sheet replaces the column headers in the corresponding Data Table sheet. It is therefore essential that the first row of your Microsoft Excel sheet exactly match the parameter names in your test.
Import >From Database
Imports data from the specified database to the current sheet.
Export Exports the current sheet of the Data Table to a specified Microsoft Excel file. You can save the table as a text (.txt) or a Microsoft Excel (.xls) file.
Edit Command Description
Cut Cuts the table selection and places it on the Clipboard.
Copy Copies the table selection and places it on the Clipboard.
Paste Pastes the contents of the Clipboard to the current table selection.
File Command Description
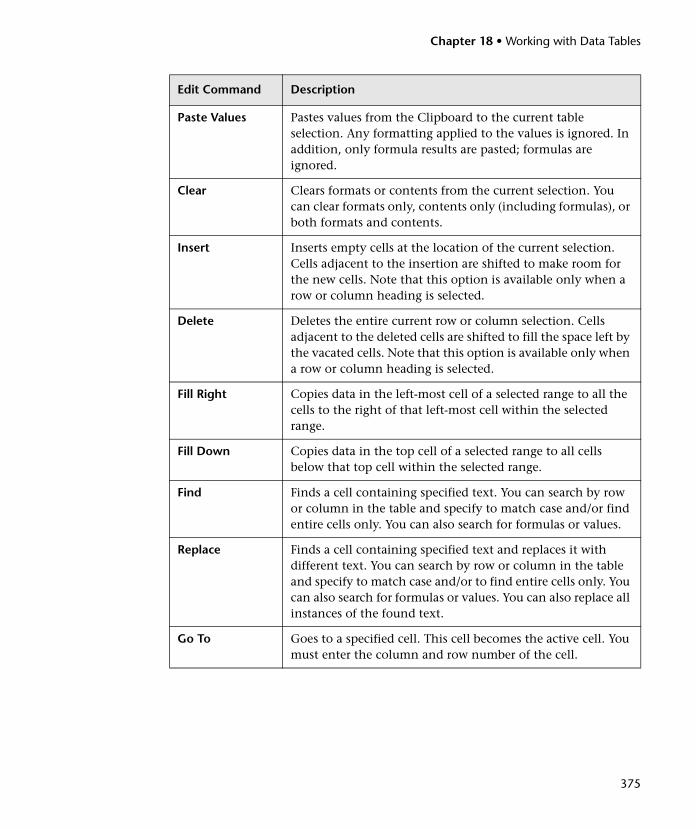
Chapter 18 • Working with Data Tables
375
Paste Values Pastes values from the Clipboard to the current table selection. Any formatting applied to the values is ignored. In addition, only formula results are pasted; formulas are ignored.
Clear Clears formats or contents from the current selection. You can clear formats only, contents only (including formulas), or both formats and contents.
Insert Inserts empty cells at the location of the current selection. Cells adjacent to the insertion are shifted to make room for the new cells. Note that this option is available only when a row or column heading is selected.
Delete Deletes the entire current row or column selection. Cells adjacent to the deleted cells are shifted to fill the space left by the vacated cells. Note that this option is available only when a row or column heading is selected.
Fill Right Copies data in the left-most cell of a selected range to all the cells to the right of that left-most cell within the selected range.
Fill Down Copies data in the top cell of a selected range to all cells below that top cell within the selected range.
Find Finds a cell containing specified text. You can search by row or column in the table and specify to match case and/or find entire cells only. You can also search for formulas or values.
Replace Finds a cell containing specified text and replaces it with different text. You can search by row or column in the table and specify to match case and/or to find entire cells only. You can also search for formulas or values. You can also replace all instances of the found text.
Go To Goes to a specified cell. This cell becomes the active cell. You must enter the column and row number of the cell.
Edit Command Description

QuickTest Professional User’s Guide • Creating Tests
376
Data Menu
The following commands are available in the Data menu:
Data Command Description
Recalc Recalculates any formula cells in the table.
Sort Sorts a selection of cells by row or column and keys in ascending or descending order.
AutoFill List Creates, edits, or deletes an autofill list. An autofill list contains frequently-used series of text such as months and days of the week. To use an autofill list, enter the first item into a cell in the table. Drag the cursor, from the bottom right corner of the cell, and QuickTest automatically fills in the cells in the range according to the autofill list.
• Lists—The lists that are available in your project. Four default lists are included.
• Current List—The selected list. This pane can be used to create a new list. Separate the items in a new list with a semi-colon.
• Add—Adds a new list to the Lists box.
• Delete—Deletes a list from the Lists box.
• Open—Opens the Open dialog box, where you can browse to a previously created list.
• Save—Opens the Save As dialog box, where you can save a new list.
Encrypt Encodes the text in the selected cells. Note that you cannot decrypt data that has been encrypted.
You can also use the Password Encoder to encrypt any text string. This can be useful for entering encrypted strings as method arguments in the Expert View. For more information, see “Inserting Encoded Passwords into Method Arguments and Data Table Cells” on page 386.

Chapter 18 • Working with Data Tables
377
Format Menu
The following commands are available in the Format menu:
Note: Combo box and list cells, conditional formatting, and other special cell formats are not supported in the Data Table.
Format Command
Description
General Sets format to General. General displays numbers with as many decimal places as necessary and no commas.
Currency(0) Sets format to currency with commas and no decimal places. Note that QuickTest uses the currency symbol defined in your Windows Regional Settings dialog box.
Currency(2) Sets format to currency with commas and two decimal places. Note that QuickTest uses the currency symbol defined in your Windows Regional Settings dialog box.
Fixed Sets format to fixed precision with commas and no decimal places.
Percent Sets format to percent with no decimal places. Numbers are displayed as percentages with a trailing percent sign (%).
Fraction Sets format to fraction in numerator denominator form, i.e. 1/2.
Scientific Sets format to scientific notation with two decimal places.
date (dynamic) Sets format to Date with the M/D/YY format.
Time: h:mm AM/PM
Sets format to Time with the h:mm AM/PM format.
Custom Number Sets format to a custom number format that you specify. This option enables you to set special and customized formats for percentages, currencies, dates, times, and so on.

QuickTest Professional User’s Guide • Creating Tests
378
You can also execute Data Table menu commands using shortcut keys. For more information, see “Executing Commands Using Shortcut Keys” on page 21.
Using Data Table Files with TestDirector
When working with TestDirector and Data Tables, you must save the Data Table file as an attachment in your TestDirector project before you specify the Data Table file in the Resources tab of the Test Settings dialog box.
You can add a new or existing Data Table file to your TestDirector project. Note that if you add an existing Data Table from the file system to a TestDirector project, it will be a copy of the one used by tests not in the TestDirector project, and thus once you save the file to the project, changes made to the TestDirector repository file will not affect the Data Table file in the file system and vice versa.
To use a Data Table file with TestDirector:
1 If you want to add a new Data Table file, create a new Microsoft Excel file in your file system with a .xls extension.
2 In TestDirector, add the Data Table file to the project as an attachment.
3 In the Test Settings dialog box, click the Resources tab.
4 Select Other location and click the browse button to locate the Data Table file.
5 Create your test. When you save the test, QuickTest saves the Data Table file to the TestDirector project.

Chapter 18 • Working with Data Tables
379
Importing Data from a Database
You can import data from a database by selecting a query from Microsoft Query or by manually specifying an SQL statement.
You can install Microsoft Query from the custom installation option of Microsoft Office.
Note: Contrary to importing an Excel file (File > Import From File), existing data in the Data Table is not replaced when you import data from a database. If the database you import contains a column with the same name as an existing column, the database column is added as a new column with the column name followed by a sequential number. For example, if your Data Table already contains a column called departures, a database column by the same name would be inserted into the Data Table as departures1.
To import data from a database:
1 Right-click on the Data Table sheet to which you want to import the data and select Sheet > Import > From Database. The Database Query Wizard opens.

QuickTest Professional User’s Guide • Creating Tests
380
2 Select your database selection preferences and click Next. You can choose from the following options:
Create query using Microsoft Query—Opens Microsoft Query, enabling you to create a new query. Once you finish defining your query, you exit back to QuickTest. This option is only available if you have Microsoft Query installed on your computer.
Specify SQL statement manually—Opens the Specify SQL statement screen in the wizard, which enables you to specify the connection string and an SQL statement. For additional information, see step 3.
Maximum number of rows—Select this check box and enter the maximum number of database rows to import. You can specify a maximum of 32,000 rows.
Show me how to use Microsoft Query—Displays an instruction screen before opening Microsoft Query when you click Next. (Enabled only when Create query using Microsoft Query is selected).
3 If you chose Create query using Microsoft Query in the previous step, Microsoft Query opens. Choose a data source and define a query. For more information about creating a query, see “Creating a Query in Microsoft Query,” below.

Chapter 18 • Working with Data Tables
381
If you chose Specify SQL statement manually in the previous step, the following screen opens:
Specify the connection string and the SQL statement and click Finish.
Connection string—Enter the connection string or click Create to open the ODBC Select Data Source dialog box. You can select a .dsn file in the ODBC Select Data Source dialog box or create a new .dsn file to have it insert the connection string in the box for you.
SQL statement—Enter the SQL statement.
4 QuickTest takes several seconds to capture the database query and restore the QuickTest window. The resulting data from the database query is displayed in the Data Table.

QuickTest Professional User’s Guide • Creating Tests
382
Creating a Query in Microsoft Query
You can use Microsoft Query to choose a data source and define a query within the data source. QuickTest supports the following versions of Microsoft Query:
version 2.00 (in Microsoft Office 95)
version 8.00 (in Microsoft Office 97)
version 2000 (in Microsoft Office 2000)
To choose a data source and define a query in Microsoft Query:
1 When Microsoft Query opens during the Import data from database process, choose a new or an existing data source.
2 Define a query.
3 When you are done:
Version 2.00—Choose File > Exit and return to QuickTest to close Microsoft Query and return to QuickTest.
Version 8.00 and Version 2000—In the Finish screen of the Query Wizard, select Exit and return to QuickTest and click Finish to exit Microsoft Query. Alternatively, click View data or edit query in Microsoft Query and click Finish. After viewing or editing the data, choose File > Exit and return to QuickTest to close Microsoft Query and return to QuickTest.
For additional information on working with Microsoft Query, refer to the Microsoft Query documentation.

Chapter 18 • Working with Data Tables
383
Using Formulas in the Data Table
You can use any Microsoft Excel formula in your Data Table. This enables you to create contextually relevant data during the test run. You can also use formulas as part of a checkpoint to check that objects created on-the-fly (dynamically generated) or other variable objects in your Web page or application have the values you expect for a given context.
When you use formulas in a Data Table to compare values (generally in a checkpoint), the values you compare must be of the same type, i.e. integers, strings, etc. When you extract values from different places in your applications using different functions, the values may not be of the same type. Although these values may look identical on the screen, a comparison of them will fail, since, for example, 8.2 is not equal to “8.2”. You can use the TEXT and VALUE functions to convert values from one type to another as follows:
TEXT(value) returns the textual equivalent of a numeric value, so that, for example, TEXT(8.2)="8.2".
VALUE(string) returns the numeric value of a string, so that, for example, VALUE("8.2")=8.2.
For additional information on using worksheet functions, refer to the Microsoft Excel documentation.
Using Formulas to Create Parameterization Data
You can enter formulas rather than fixed values in the cells of a parameter column.
For example, suppose you want to parameterize the value for a WebEdit object that requires a date value no earlier than today’s date. You can set the cells in the Date column to the date format, and enter the =NOW() Excel formula into the first row to set the value to today’s date for the first iteration.

QuickTest Professional User’s Guide • Creating Tests
384
Then you can use another formula in the rest of the rows in order to enter the above date plus one day, as shown below. By using this formula you can run the test on any day and the dates will always be valid.
Using Formulas in Checkpoints
You can use a formula in a checkpoint to confirm that an object created on-the-fly (dynamically generated) or another variable object in your Web page or application contains the value it should for a given context. For example, suppose a shopping cart Web site displays a price total. You can create a text checkpoint on the displayed total value and use a Data Table formula to check whether the site properly computes the total, based on the individual prices of the products selected for purchase in each iteration.
When you use the Data Table formula option with a checkpoint, QuickTest creates two columns in the Data Table. The first column contains a default checkpoint formula. The second column contains the value to be checked in the form of an output parameter. The result of the formula is Boolean—TRUE or FALSE.
A FALSE result in the checkpoint column during a test run causes the test to fail.
Once you finish adding the checkpoint, you can modify the default formula in the first column to perform the check you need.

Chapter 18 • Working with Data Tables
385
To use a formula in a checkpoint:
1 Select the page, text, or object for which you want to create a checkpoint and open the Insert Checkpoint dialog box as described in Chapter 7, “Understanding Checkpoints.”
2 In the Edit value box, click Parameter.
3 Click Data Table and choose a parameter from the Parameter name box list or enter a new name.
To use an existing parameter, select it from the list.
To create a new parameter, either use the default parameter name or enter a descriptive name for the parameter.
4 Click the Edit Parameter Options button. The Data Table Parameter Options dialog box opens.
5 Select the Use Data Table formula check box and click OK to close the Data Table Parameter Options dialog box.

QuickTest Professional User’s Guide • Creating Tests
386
Note: You cannot select Use Data Table formula if Regular expression is selected.
6 Specify your other checkpoint setting preferences as described in Chapter 7, “Understanding Checkpoints.”
7 Click OK. The two columns are added to the table, and a checkpoint icon is added to your test tree.
8 Highlight the value in the first (formula) column to view the formula and modify the formula to fit your needs.
9 If you want to run several iterations, add the appropriate formula in subsequent rows of the formula column for each iteration in the test or action.
Inserting Encoded Passwords into Method Arguments and Data Table Cells
You can encode passwords in order to use the resulting strings as method arguments or Data Table parameter values. For example, your Web site may include a form in which the user must supply a password. You may want to test how your site responds to different passwords, but you also want to ensure the integrity of the passwords. The Password Encoder enables you to encode your passwords and place secure values into the Data Table.
Tip: You can also encrypt strings in Data Table cells using the Encrypt option in the Data Table menu. For more information, see “Data Menu” on page 376.

Chapter 18 • Working with Data Tables
387
To encode a password:
1 From the Windows menu, select Start > Programs > QuickTest Professional > Tools > Password Encoder. The Password Encoder dialog box opens.
2 Enter the password in the Password box.
3 Click Generate. The Password Encoder encrypts the password and displays it in the Encoded String box.
4 Use the Copy button to copy and paste the encoded value into the Data Table.
5 Repeat the process for each password you want to encode.
6 Click Close to close the Password Encoder.
Using Data Table Scripting Methods
QuickTest provides several Data Table methods that enable you to retrieve information about the run-time Data Table and to set the value of cells in the run-time Data Table.
You enter these statements manually in the Expert View. For more information about working in the Expert View, see Chapter 37, “Testing in the Expert View.”
From a programming perspective, the Data Table is made up of three types of objects—DataTable, Sheet (sheet), and Parameter (column). Each object has several methods and properties that you can use to retrieve or set values.

QuickTest Professional User’s Guide • Creating Tests
388
For more details on the Data Table methods, refer to the QuickTest Object Model Reference.

389
19Defining and Using Recovery Scenarios
You can instruct QuickTest to recover from unexpected events and errors that occur in your testing environment during a test run.
This chapter describes:
About Defining and Using Recovery Scenarios
Defining Recovery Scenarios
Managing Recovery Scenarios
Setting the Recovery Scenarios List for Your Tests
Programatically Controlling the Recovery Mechanism
About Defining and Using Recovery Scenarios
Unexpected events, errors, and application crashes during a test run can disrupt your test and distort test results. This is a problem particularly when running tests unattended—the test is suspended until you perform the action needed to recover.
The Recovery Scenario Manager provides a wizard that guides you through the process of defining a recovery scenario—a definition of an unexpected event and the operation(s) necessary to recover the test run. For example, you can instruct QuickTest to detect a Printer out of paper message and recover the test run by clicking the OK button to close the message and continue the test.

QuickTest Professional User’s Guide • Creating Tests
390
Notes for users of earlier versions of QuickTest:
The Recovery Scenario Manager replaces the functionality of the Exception Editor found in QuickTest 6.0 and earlier.
The default Web exceptions included with the Exception Editor are provided as default recovery scenarios in the Recovery Scenario Manager. The scenario file that contains these default recovery scenarios is located in: <QuickTest installation path>\recovery\WebRecovery.qrs.
These default recovery scenarios are automatically associated with tests created in QuickTest 6.0 and earlier. In addition, the recovery scenarios corresponding to Web exceptions that were active in each test are automatically enabled.
If you defined customized Web exceptions in the Exception Editor, you should use the Recovery Scenario Manager to redefine them and then associate them with the relevant tests.
A recovery scenario has three main components:
Trigger Event—The event that interrupts your test run. For example, a window that may pop up on screen, or a QuickTest test run error.
Recovery Operation(s)—The operation(s) that need to be performed in order to continue running the test. For example, clicking an OK button in a pop-up window, or restarting Microsoft Windows.
Post-Recovery Test Run Option—The instructions on how QuickTest should proceed once the recovery operations have been performed, and from which point in the test QuickTest should continue, if at all. For example, you may want to restart a test from the beginning, or skip a problematic test step entirely and continue with the next step in the test.
Recovery scenarios are saved in recovery scenario files. A recovery scenario file is a logical collection of recovery scenarios, grouped according to your own specific requirements.

Chapter 19 • Defining and Using Recovery Scenarios
391
To instruct QuickTest to perform a recovery scenario during a test run, you must first associate it with that test. A test can have any number of recovery scenarios associated with it. You can prioritize the scenarios associated with your test to ensure that trigger events are recognized and handled in the required order. For more information, see “Adding Recovery Scenarios to Your Test” on page 418.
When you run a test for which you have defined recovery scenarios and an error occurs, QuickTest looks for the defined trigger event(s) that caused the error. If a trigger event has occurred, QuickTest performs the corresponding recovery and post-recovery operations.
You can also control and activate your recovery scenarios during the test run by inserting Recovery statements into your test. For more information, see “Programatically Controlling the Recovery Mechanism” on page 424.
Note: If you choose On error in the Activate recovery scenarios box in the Recovery tab of the Test Settings dialog box, the recovery mechanism does not handle triggers that occur in the last step of a test. If you chose this option and need to recover from an unexpected event or error that may occur in the last step of a test, you can do this by adding an extra step to the end of your test.
Defining Recovery Scenarios
The Recovery Scenario Manager dialog box enables you to create recovery scenarios and save them in recovery files. You create recovery scenarios using the Recovery Scenario Wizard, which leads you through the process of defining each of the stages of the recovery scenario. You then save the recovery scenarios in a recovery file, and associate them with a specific test or tests.

QuickTest Professional User’s Guide • Creating Tests
392
Creating a Recovery File
You save your recovery scenarios in a recovery file. A recovery file is a convenient way to organize and store multiple recovery scenarios together. You can create a new recovery file or edit an existing one.
To create a recovery file:
1 Choose Tools > Recovery Scenario Manager. The Recovery Scenario Manager dialog box opens.
2 By default, the Recovery Scenario Manager dialog box opens with a new recovery file. You can either use this new file, or click the Open button to choose an existing recovery file. Alternatively, you can click the arrow next to the Open button to select a recently-used recovery file from the list.
You can now create recovery scenarios using the Recovery Scenario Wizard and save them in your recovery file, as described in the following sections.

Chapter 19 • Defining and Using Recovery Scenarios
393
Understanding the Recovery Scenario Wizard
The Recovery Scenario Wizard leads you, step-by-step, through the process of creating a recovery scenario. The Recovery Scenario Wizard contains five main steps:
defining the trigger event that interrupts the test run
specifying the recovery operation(s) required to continue
choosing a post-recovery test run operation
specifying a name and description for the recovery scenario
specifying whether to associate the recovery scenario to the current test and/or to all new tests
You open the Recovery Scenario Wizard by clicking the New Scenario button in the Recovery Scenario Manager dialog box.

QuickTest Professional User’s Guide • Creating Tests
394
Welcome to the Recovery Scenario Wizard Screen
The Welcome to the Recovery Scenario Wizard screen provides general information about the different options in the Recovery Scenario Wizard, and provides an overview of the stages involved in defining a recovery scenario.
Click Next to continue to the Select Trigger Event screen.

Chapter 19 • Defining and Using Recovery Scenarios
395
Select Trigger Event Screen
The Select Trigger Event screen enables you to define the event type that triggers the recovery scenario, and the way in which QuickTest recognizes the event.
Select a type of trigger and click Next. The next screen displayed in the wizard depends on which of the following trigger types you select:
Pop-up window—QuickTest detects a pop-up window and identifies it according to the window title and textual content. For example, a message box may open during a test run, indicating that the printer is out of paper. QuickTest can detect this window and activate a defined recovery scenario in order to continue the test run.
Select this option and click Next to continue to the Specify Pop-up Window Conditions screen.
Object state—QuickTest detects a specific test object state and identifies it according to its property values and the property values of all its ancestors. Note that an object is identified only by its property values, and not by its class.

QuickTest Professional User’s Guide • Creating Tests
396
For example, a specific button in a dialog box may be disabled when a specific process is open. QuickTest can detect the object property state of the button that occurs when this problematic process is open and activate a defined recovery scenario to close the process and continue the test run.
Select this option and click Next to continue to the Select Object screen.
Test run error—QuickTest detects a test run error and identifies it by a failed return value from a method. For example, QuickTest may not be able to identify a menu item specified in the method argument, due to the fact that the menu item is not available at a specific point during the test run. QuickTest can detect this test run error and activate a defined recovery scenario in order to continue the test run.
Select this option and click Next to continue to the Select Test Run Error screen.
Application crash—QuickTest detects an application crash and identifies it according to a predefined list of applications. For example, a secondary application may crash when a certain step is performed in the test run. You want to be sure that the test run does not fail because of this crash, which may indicate a different problem with your application. QuickTest can detect this application crash and activate a defined recovery scenario to continue the test run.
Select this option and click Next to continue to the Recovery Operations screen.
Notes: The set of recovery operations is performed for each occurrence of the trigger event criteria. For example, suppose you define a specific object state, and two objects match this state, the set of replay operations is performed two times, once for each object that matches the specified state.
The recovery mechanism does not handle triggers that occur in the last step of a test. If you need to recover from an unexpected event or error that may occur in the last step of a test, you can do this by adding an extra step to the end of your test.

Chapter 19 • Defining and Using Recovery Scenarios
397
Specify Pop-up Window Conditions Screen
If you chose a Pop-up window trigger in the Select Trigger Event screen, the Specify Pop-up Window Conditions screen opens.
Click the pointing hand and then click the pop-up window to capture the window title and textual content of the window.
You can choose whether you want to identify the pop-up window according to its Window title and/or Window text. You can also use regular expressions in the window title or textual content by selecting the relevant Regular expression check box and then entering the regular expression in the relevant location. For information on regular expressions, see Chapter 15, “Using Regular Expressions”.
Click Next to continue to the Recovery Operations screen.

QuickTest Professional User’s Guide • Creating Tests
398
Select Object Screen
If you chose an Object state trigger in the Select Trigger Event screen, the Select Object screen opens.
Click the pointing hand and then click the object whose properties you want to specify.
Click Next to continue to the Set Object Properties and Values screen.

Chapter 19 • Defining and Using Recovery Scenarios
399
Set Object Properties and Values Screen
After you select the object whose properties you want to specify in the Select Object screen, the Set Object Properties and Values screen opens.
For each object in the hierarchy, in the Edit property value box, you can modify the property values used to identify the object. You can also click the Add/Remove button to add or remove object properties from the list of property values to check. Note that an object is identified only by its property values, and not by its class.
Select the Regular expression check box if you want to use regular expressions in the property value. For information on regular expressions, see Chapter 15, “Using Regular Expressions”.
Click Next to continue to the Recovery Operations screen.

QuickTest Professional User’s Guide • Creating Tests
400
Select Test Run Error Screen
If you chose a Test run error trigger in the Select Trigger Event screen, the Select Test Run Error screen opens.
In the Error list, choose the test run error that you want to use as the trigger event:
Item in list or menu is not unique—Occurs when more than one item in the list, menu, or tree has the name specified in the method argument.
Item in list or menu not found—Occurs when QuickTest cannot identify the list, menu, or tree item specified in the method argument. This may be due to the fact that the item is not currently available or that its name has changed.
More than one object responds to the physical description—Occurs when more than one object in your application has the same property values as those specified in the test object description for the object specified in the step.
Object is disabled—Occurs when QuickTest cannot perform the step because the object specified in the step is currently disabled.

Chapter 19 • Defining and Using Recovery Scenarios
401
Object not found—Occurs when no object within the specified parent object matches the test object description for the object.
Object not visible—Occurs when QuickTest cannot perform the step because the object specified in the step is not currently visible on the screen.
Click Next to continue to the Recovery Operations screen.
Select Processes Screen
If you chose an Application crash trigger in the Select Trigger Event screen, the Select Processes screen opens.
The Running processes list displays all application processes that are currently running. The Processes list displays the application processes that will trigger the recovery scenario if they crash.

QuickTest Professional User’s Guide • Creating Tests
402
You can add application processes to the Processes list by typing them in the Processes list or by selecting them from the Running processes list.
To add a process from the Running processes list, double-click a process in the Running processes list or select it and click the Add button. You can select multiple processes using standard Windows multiple selection techniques (CTRL and SHIFT keys).
To add a process directly to the Processes list, click the Add New Process button to enter the name of any process you want to add to the list.
To remove a process from the Processes list, select it and click the Remove Process button.
Tip: You can modify the name of a process by selecting it in the Processes list and clicking the process name to edit it.
Click Next to continue to the Recovery Operations screen.

Chapter 19 • Defining and Using Recovery Scenarios
403
Recovery Operations Screen
The Recovery Operations screen enables you to manage the collection of recovery operations in the recovery scenario. Recovery operations are operations that QuickTest performs sequentially when it recognizes the trigger event.
You must define at least one recovery operation. To define a recovery operation and add it to the Recovery operations list, click Next to continue to the Recovery Operation screen.
If you define two or more recovery operations, you can select a recovery operation and use the Move Up or Move Down buttons to change the order in which QuickTest performs the recovery operations. You can also select a recovery operation and click the Remove button to delete a recovery operation from the recovery scenario.

QuickTest Professional User’s Guide • Creating Tests
404
Note: If you define a Restart Microsoft Windows recovery operation, it is always inserted as the last recovery operation, and you cannot change its position in the list.
After you have defined at least one recovery operation, the Add another recovery operation check box is displayed.
Select the check box and click Next to define another recovery operation.
Clear the check box and click Next to continue to the Post-Recovery Test Run Options screen.
Recovery Operation Screen
The Recovery Operation screen enables you to specify the operation(s) QuickTest performs after it detects the trigger event.
Select a type of recovery operation and click Next. The next screen displayed in the wizard depends on which recovery operation type you select.

Chapter 19 • Defining and Using Recovery Scenarios
405
You can define the following types of recovery operations:
Keyboard or mouse operation—QuickTest simulates a click on a button in a window or a press of a keyboard key. Select this option and click Next to continue to the Recovery Operation – Click Button or Press Key screen.
Close application process—QuickTest closes specified processes. Select this option and click Next to continue to the Recovery Operation – Close Processes screen.
Function call—QuickTest calls a VBScript function. Select this option and click Next to continue to the Recovery Operation – Function screen.
Restart Microsoft Windows—QuickTest restarts Microsoft Windows. Select this option and click Next to continue to the Recovery Operations screen.
Note: If you use the Restart Microsoft Windows recovery operation, you must ensure that any test associated with this recovery scenario is saved before you run it. You must also configure the computer on which the test is run to auto login on restart.

QuickTest Professional User’s Guide • Creating Tests
406
Recovery Operation – Click Button or Press Key Screen
If you chose a Keyboard or mouse operation recovery operation in the Recovery Operation screen, the Recovery Operation – Click Button or Press Key screen opens.
Specify the keyboard or mouse operation that you want QuickTest to perform when it detects the trigger event and click Next. The Recovery Operations screen reopens, showing the keyboard or mouse recovery operation that you defined.

Chapter 19 • Defining and Using Recovery Scenarios
407
Recovery Operation – Close Processes Screen
If you chose a Close application process recovery operation in the Recovery Operation screen, the Recovery Operation – Close Processes screen opens.
The Running processes list displays all application processes that are currently running. The Processes to close list displays the application processes that will be closed when the trigger is activated.
You can add application processes to the Processes to close list by typing them in the Processes to close list or by selecting them from the Running processes list.
To add a process from the Running processes list, double-click a process in the Running processes list or select it and click the Add button. You can select multiple processes using standard Windows multiple selection techniques (CTRL and SHIFT keys).

QuickTest Professional User’s Guide • Creating Tests
408
To add a process directly to the Processes to close list, click the Add New Process button to enter the name of any process you want to add to the list.
To remove a process from the Processes to close list, select it and click the Remove Process button.
Tip: You can modify the name of a process by selecting it in the Processes to close list and clicking the process name to edit it.
Click Next. The Recovery Operations screen reopens, showing the close processes recovery operation that you defined.
Recovery Operation – Function Call Screen
If you chose a Function call recovery operation in the Recovery Operation screen, the Recovery Operation – Function Call screen opens.
Select a recently specified library file in the Library file box. Alternatively, click the browse button to navigate to an existing library file.

Chapter 19 • Defining and Using Recovery Scenarios
409
Note: QuickTest automatically associates the library file you select with your test. Therefore, you do not need to associate the library file with your test in the Resources tab of the Test Settings dialog box.
After you select a library file, choose one of the following options:
Select function—Choose an existing function from the library file you selected.
Note: Only functions that match the prototype syntax for the trigger type selected in the Select Trigger Event screen are displayed. Following is the prototype for each trigger type:
Test run error triggerOnRunStep([in] Object as Object: The object of the current test step.[in] Method as String: The method of the current test step.[in] Arguments as Array: The actual method’s arguments.[in] Result as Integer: The actual method’s result.)
Pop-up window and Object state triggersOnObject([in] Object as Object: The detected object.)
Application crash triggerOnProcess([in] ProcessName as String: The detected process’s Name.[in] ProcessId as Integer: The detected process’ ID.)

QuickTest Professional User’s Guide • Creating Tests
410
Define new function—Create a new function by specifying a unique name for it, and defining the function in the Function Name box according to the displayed function prototype. The new function is added to the library file you selected.
Note: If more than one scenario use a function with the same name from different library files, the recovery process may fail. In this case, information regarding the recovery failure is displayed during the test run.
Click Next. The Recovery Operations screen reopens, showing the function operation that you defined.
Post-Recovery Test Run Options Screen
When you clear the Add another recovery operation check box in the Recovery Operations screen and click Next, the Post-Recovery Test Run Options screen opens.

Chapter 19 • Defining and Using Recovery Scenarios
411
Post-recovery test run options specify how to continue the test run after QuickTest has identified the event and performed all of the specified recovery operations.
QuickTest can perform one of the following test run options after it performs the recovery operations you defined:
Repeat current step and continue
Proceed to next step
Proceed to next action iteration
Proceed to next test iteration
Restart current test run
Stop the test run
Note: If you chose Restart Microsoft Windows as a recovery operation, you can choose from only the last two test run options listed above.

QuickTest Professional User’s Guide • Creating Tests
412
Select a test run option and click Next to continue to the Name and Description screen.
Name and Description Screen
After you specify a test run option in the Post-Recovery Test Run Options screen, and click Next, the Name and Description screen opens.
In the Name and Description screen, you specify a name by which to identify your recovery scenario. You can also add descriptive information regarding the scenario.
Enter a name and a textual description for your recovery scenario, and click Next to continue to the Completing the Recovery Scenario Wizard screen.

Chapter 19 • Defining and Using Recovery Scenarios
413
Completing the Recovery Scenario Wizard Screen
After you specify a recovery scenario name and description in the Name and Description screen and click Next, the Completing the Recovery Scenario Wizard screen opens.
In the Completing the Recovery Scenario Wizard screen, you can review a summary of the scenario settings you defined. You can also specify whether to automatically associate the recovery scenario with the current test, and/or to add it to the default settings for all new tests.
Select the Add scenario to current test check box to associate this recovery scenario with the current test. When you click Finish, QuickTest adds the recovery scenario to the Scenarios list in the Recovery tab of the Test Settings dialog box.
Select the Add scenario to default test settings check box to make this recovery scenario a default scenario for all new tests. The next time you create a test, this scenario will be listed in the Scenarios list in the Recovery tab of the Test Settings dialog box.
Click Finish to complete the recovery scenario definition.

QuickTest Professional User’s Guide • Creating Tests
414
Saving the Recovery Scenario in a Recovery File
After you create or modify a recovery scenario in a recovery file using the Recovery Scenario Wizard, you need to save the recovery file.
To save a new or modified recovery file:
1 Click the Save button. If you added or modified scenarios in an existing recovery file, the recovery file and its scenarios are saved. If you are using a new recovery file, the Save Attachment dialog box opens.
Tip: You can also click the arrow to the right of the Save button and select Save As to save the recovery file under a different name.
2 Choose the folder in which you want to save the file.
3 Type a name for the file in the File name box. The recovery file is saved in the specified location with the file extension .qrs.
Tip: If you have not yet saved the recovery file, and you click the Close button in the Recovery Scenario Manager dialog box, QuickTest prompts you to save the recovery file. Click Yes, and proceed with step 2 above. If you added or modified scenarios in an existing recovery file, and you click Yes to the message prompt, the recovery file and its scenarios are saved.

Chapter 19 • Defining and Using Recovery Scenarios
415
Managing Recovery Scenarios
Once you have created recovery scenarios, you can use the Recovery Scenario Manager to manage them.
The Recovery Scenario Manager enables you to manage existing scenarios by:
Viewing Recovery Scenario Properties
Modifying Recovery Scenarios
Deleting Recovery Scenarios
Copying Recovery Scenarios between Recovery Scenario Files

QuickTest Professional User’s Guide • Creating Tests
416
Viewing Recovery Scenario Properties
You can view properties for any defined recovery scenario.
To view recovery scenario properties:
1 In the Scenarios box, select the recovery scenario whose properties you want to view.
2 Click the Properties button. Alternatively, you can double-click a scenario in the Scenarios box. The Recovery Scenario Properties dialog box opens, displaying read-only information about the selected scenario.

Chapter 19 • Defining and Using Recovery Scenarios
417
Modifying Recovery Scenarios
You can modify the settings for an existing recovery scenario.
To modify a recovery scenario:
1 In the Scenarios box, select the scenario that you want to modify.
2 Click the Edit button. The Recovery Scenario Wizard opens, with the settings you defined for the selected recovery scenario.
3 Navigate through the Recovery Scenario Wizard and modify the details as needed. For information on the Recovery Scenario Wizard options, see “Defining Recovery Scenarios” on page 391.
Deleting Recovery Scenarios
You can delete an existing recovery scenario if you no longer need it. When you delete a recovery scenario from the Recovery Scenario Manager, the corresponding information is deleted from the recovery scenario file.
Note: If a deleted recovery scenario is associated with a test, QuickTest ignores it during the test run.
To delete a recovery scenario:
1 In the Scenarios box, select the scenario that you want to delete.
2 Click the Delete button. The recovery scenario is deleted.

QuickTest Professional User’s Guide • Creating Tests
418
Copying Recovery Scenarios between Recovery Scenario Files
You can copy recovery scenarios from one recovery scenario file to another.
To copy a recovery scenario file from one recovery scenario file to another:
1 In the Scenarios box, select the recovery scenario that you want to copy.
2 Click the Copy button. The scenario is copied to the Clipboard.
3 Click the Open button and select the recovery scenario file to which you want to copy the scenario, or click the New button to create a new recovery scenario file in which to copy the scenario.
4 Click the Paste button. The scenario is copied to the new recovery scenario file.
Note: If a scenario with the same name already exists in the recovery scenario file, you can choose whether you want to replace it with the new scenario you have just copied.
Setting the Recovery Scenarios List for Your Tests
After you have created recovery scenarios, you associate them with selected tests so that QuickTest will perform the appropriate scenario(s) during the test runs if a trigger event occurs. You can prioritize the scenarios and set the order in which QuickTest applies the scenarios during the test run. You can also choose to disable specific scenarios, or all scenarios, that are associated with a test. You can also define which recovery scenarios will be used as the default scenarios for all new tests.
Adding Recovery Scenarios to Your Test
After you have created recovery scenarios, you can associate one or more scenarios with a test in order to instruct QuickTest to perform the recovery scenario(s) during the test run if a trigger event occurs. The Recovery tab of the Test Settings dialog box lists all the recovery scenarios associated with the current test.

Chapter 19 • Defining and Using Recovery Scenarios
419
Tip: When a trigger event occurs, QuickTest checks for applicable recovery scenarios in the order in which they are displayed in the Recovery tab. You can change this order as described in “Setting Recovery Scenario Priorities” on page 422.
To add a recovery scenario to a test:
1 Choose Test > Settings. The Test Settings dialog box opens. Select the Recovery tab.

QuickTest Professional User’s Guide • Creating Tests
420
2 Click the Add button. The Add Recovery Scenario dialog box opens.
3 In the Recovery file box, select the recovery file containing the recovery scenario(s) you want to associate with the test. Alternatively, click the browse button to navigate to the recovery file you want to select. The Scenarios box displays the names of the scenarios saved in the selected file.
4 In the Scenarios box, select the scenario(s) that you want to associate with the test and click Add Scenario. The Add Recovery Scenario dialog box closes and the selected scenarios are added to the Scenarios list in the Recovery tab.
Tip: You can edit a recovery scenario file path by clicking the path once to highlight it, and then clicking it again to enter edit mode. For example, you may want to modify an absolute file path to be a relative file path. If you modify a recovery scenario file path, you must ensure that the recovery scenario is defined in the new path location before running your test.

Chapter 19 • Defining and Using Recovery Scenarios
421
Viewing Recovery Scenario Properties
You can view properties for any recovery scenario associated with your test.
Note: You modify recovery scenario settings from the Recovery Scenario Manager dialog box. For more information, see “Modifying Recovery Scenarios” on page 417.
To view recovery scenario properties:
1 In the Scenarios box, select the recovery scenario whose properties you want to view.
2 Click the Properties button. Alternatively, you can double-click a scenario in the Scenarios box. The Recovery Scenario Properties dialog box opens, displaying read-only information regarding the settings for the selected scenario.

QuickTest Professional User’s Guide • Creating Tests
422
Setting Recovery Scenario Priorities
You can specify the order in which QuickTest performs associated scenarios during a test run. When a trigger event occurs, QuickTest checks for applicable recovery scenarios in the order in which they are displayed in the Recovery tab of the Test Settings dialog box.
To set recovery scenario priorities:
1 In the Scenarios box, select the scenario whose priority you want to change.
2 Click the Up or Down button. The selected scenario’s priority changes according to your selection.
3 Repeat steps 1-2 for each scenario whose priority you want to change.
Removing Recovery Scenarios from Your Test
You can remove the association between a specific scenario and a test. After you remove a scenario from a test, the scenario itself still exists, but QuickTest will no longer perform the scenario during a test run.
To remove a recovery scenario from your test:
1 In the Scenarios box, select the scenario you want to remove.
2 Click the Remove button. The selected scenario is no longer associated with the test.
Enabling and Disabling Recovery Scenarios
You can enable or disable specific scenarios and determine when QuickTest activates the recovery scenario mechanism. When you disable a specific scenario, it remains associated with the test, but is not performed by QuickTest during the test run. You can enable the scenario at a later time.
To enable/disable specific recovery scenarios:
Select the check box to the left of one or more individual scenarios to enable them.
Clear the check box to the left of one or more individual scenarios to disable them.

Chapter 19 • Defining and Using Recovery Scenarios
423
To define when the recovery mechanism is activated:
Select one of the following options in the Activate recovery scenarios box:
Always—The recovery mechanism is activated after every step.
On error—The recovery mechanism is activated only after steps that return an error return value.
Never—The recovery mechanism is disabled.
Note: Choosing Always may result in slower performance during the test run.
Tip: You can also enable or disable specific scenarios or all scenarios associated with a test programatically during the test run. For more information, see “Programatically Controlling the Recovery Mechanism” on page 424.
Setting Default Recovery Scenario Settings for All New Tests
You can click the Set as Default button in the Recovery tab of the Test Settings dialog box to set the current list of recovery scenarios to be the default scenarios for all new tests. Any future changes you make to the current recovery scenario list only affect the current test, and do not change the default list that you defined.

QuickTest Professional User’s Guide • Creating Tests
424
Programatically Controlling the Recovery Mechanism
You can use the Recovery object to control the recovery mechanism programatically during the test run. For example, you can enable or disable the entire recovery mechanism or specific recovery scenarios for certain parts of a test run, retrieve status information about specific recovery scenarios, and explicitly activate the recovery mechanism at a certain point in the test run.
By default, QuickTest checks for recovery triggers when an error is returned during the test run. You can use the Recovery object’s Activate method to force QuickTest to check for triggers after a specific step in the test run. For example, suppose you know that an object property checkpoint will fail if certain processes are open when the checkpoint is performed. You want to be sure that the pass or fail of the checkpoint is not affected by these open processes, which may indicate a different problem with your application.
However, a failed checkpoint does not result in a test run error. So by default, the recovery mechanism would not be activated by the object state. You can define a recovery scenario that looks for and closes specified open processes when an object’s properties have a certain state. This state shows the object’s property values as they would be if the problematic processes were open. You can instruct QuickTest to activate the recovery mechanism if the checkpoint fails so that QuickTest will check for and close any problematic open processes and then try to perform the checkpoint again. This ensures that when the checkpoint is performed the second time it is not affected by the open processes.
For more information on the Recovery object and its methods, refer to the QuickTest Professional Object Model Reference.

Part IV
Working with Supported Environments

426

427
20Working with QuickTest Add-Ins
QuickTest Professional is provided with several add-ins, including Web, ActiveX, Multimedia, and Visual Basic. You can also purchase additional add-ins separately.
When you work with these add-ins, you can use special checkpoints, methods, and properties to create the best possible test for your application.
This chapter describes:
About Working with QuickTest Add-ins
Loading QuickTest Add-ins
Tips for Working with QuickTest Add-ins
About Working with QuickTest Add-ins
You can choose to install the core add-ins when you install QuickTest Professional, or you can run the installation again at another time to install the QuickTest add-ins. You can install the QuickTest add-ins you purchase separately at any time after you install QuickTest Professional.
When QuickTest opens, you can choose which of the installed add-ins you want to load using the Add-In Manager dialog box.
If you choose to install and load an add-in, QuickTest recognizes the objects in your application when you record on the corresponding environment and enables you to work with environment-appropriate properties, methods, checkpoints, and other specialized options in order to create the best possible test for your application.

QuickTest Professional User’s Guide • Working with Supported Environments
428
Loading QuickTest Add-ins
If you have installed QuickTest add-ins, you can specify which add-ins to load at the beginning of each QuickTest session.
When you start QuickTest, the Add-in Manager dialog box opens. It displays a list of all installed add-ins for QuickTest. You can select which add-ins to load for the current session of QuickTest.

Chapter 20 • Working with QuickTest Add-Ins
429
The Add-in Manager includes the following options:
Notes:
If you have an old version of a QuickTest add-in installed, the Add-in Manager displays the word outdated next to the add-in name. You cannot load an outdated add-in.
If you install an old version of a QuickTest add-in over your current installation of QuickTest, you must reinstall your current version of QuickTest to ensure that QuickTest functions properly. For more information, refer to the QuickTest Professional Installation Guide.
Option Description
Please select add-ins to load
Lists the installed add-ins that are available to load with QuickTest. The first time QuickTest is started, by default, the ActiveX and Web add-ins are selected. At the beginning of each subsequent QuickTest session, your selection from the previous session is the default setting.
Description Describes the add-in.
Show on startup Hides the Add-in Manager when the check box is cleared. To display it again, choose Tools > Options, click the General tab, and select the Display Add-in Manager on startup check box. For information on working with the Options dialog box, see Chapter 28, “Setting Global Testing Options.”
Add-in License Opens the QuickTest Professional Software License installation program, which enables you to modify your QuickTest Add-in license type. For information about changing your license details in the QuickTest Professional Software License installation program, refer to your add-in documentation.

QuickTest Professional User’s Guide • Working with Supported Environments
430
Tips for Working with QuickTest Add-ins
QuickTest add-ins help you to create and run tests on applications created in a variety of environments. Once you load an add-in, you can record and run tests on applications in that environment similar to the way you do with any other application.
To take full advantage of QuickTest add-in capabilities, keep the following in mind when designing tests for using QuickTest add-ins:
You must install and load an add-in to enable QuickTest to recognize objects from the corresponding environment. To load an add-in, select the add-in from the Add-in Manager dialog box that opens when you start QuickTest.
If the Add-in Manager does not open when you start QuickTest, choose Tools > Options and click the General tab. Select the Display Add-in Manager on startup check box and click OK. Restart QuickTest.
You can view the list of add-ins that are currently installed or loaded by choosing Help > About QuickTest Professional. The dialog box displays a list of all add-ins installed on your computer. A checked box indicates that the add-in is currently loaded.
When you record on objects in your application, QuickTest displays an environment-specific icon in the step in the Tree View and generates a statement with the appropriate test object and method.
QuickTest offers environment-specific checkpoints and output values that you can use to enhance your test. For more information, see Chapter 7, “Understanding Checkpoints.”
You can also add additional steps to your test using the Method Wizard or manually in the Expert View. For more information on the objects, methods, and properties available for your application’s environment, refer to the QuickTest Object Model Reference.
Once you have designed a test using one or more add-ins, you can associate the required add-ins with your test so that QuickTest will check whether the required add-ins are loaded each time you open the test. To view or modify the add-ins associated with a test, choose Test > Settings and click the Properties tab. For more information, see “Specifying Associated Add-Ins” on page 622.

Chapter 20 • Working with QuickTest Add-Ins
431
For detailed information on testing an environment supported by a core QuickTest add-in, select one of the following chapters:
Chapter 21, “Testing Web Objects”
Chapter 22, “Testing Visual Basic Applications”
Chapter 23, “Testing Multimedia Applications”
Chapter 24, “Testing ActiveX Controls”
For information about QuickTest add-ins you purchased separately, refer to the documentation included with the purchased QuickTest add-in.

QuickTest Professional User’s Guide • Working with Supported Environments
432

433
21Testing Web Objects
QuickTest supports testing Web objects. By adding Web object checkpoints to your tests, you can compare Web objects in different versions of your Web site. For information on supported browser versions, refer to the ReadMe file.
This chapter describes:
About Testing Web Objects
Working with Web Browsers
Checking Web Objects
Checking Web Pages
Setting Alternative Navigation Properties
Checking Web Content Accessibility
Accessing Password-Protected Resources in the Active Screen
Activating Methods Associated with a Web Object
Using Scripting Methods with Web Objects
About Testing Web Objects
You can use QuickTest’s Web Add-in to test your Web pages and applications.
You can create Web object checkpoints to compare the expected values of object properties captured during the recording of the test to the object’s current values during a test run. You can perform checks on Web page properties, text, and tables.

QuickTest Professional User’s Guide • Working with Supported Environments
434
You can also perform checks on objects within your application or Web site, such as images or form elements. In addition, you can add accessibility checkpoints to help you quickly identify areas of your Web site that may not conform to the W3C Web Content Accessibility Guidelines. You can also output property or text values from the objects in your Web site.
The following checkpoints and output values are supported when testing Web objects:
Before you begin recording on Web sites and applications, you should ensure that you have installed and loaded the Web add-in. You can check whether the Web add-in is installed by choosing Help > About QuickTest Professional. Loaded add-ins are indicated by a check mark in the add-ins list.
Type Checkpoint Output For more information, see:
Standard Yes Yes “Checking Object Property Values,” on page 131, and“Creating Standard Output Values,” on page 276.
Page Yes Yes “Checking Web Pages,” on page 439, and“Creating Page Output Values,” on page 259
Accessibility Yes No “Checking Web Content Accessibility” on page 457
Text Yes Yes “Creating a Text Checkpoint,” on page 167, and“Creating Text Output Values,” on page 265
Table Yes Yes “Checking Tables and Databases,” on page 147, and“Creating Table Output Values,” on page 293
Bitmap Yes No “Checking Bitmaps” on page 189
XML (Application)
Yes No “Checking XML” on page 199

Chapter 21 • Testing Web Objects
435
You should also set your preferences in the Web tab of the Record and Run dialog box, the Web tab of the Test Settings dialog box, and the Web tab of the Options dialog box. For more information, see Chapter 30, “Setting Record and Run Options,” Chapter 29, “Setting Testing Options for a Single Test,” and Chapter 28, “Setting Global Testing Options” respectively.
If QuickTest does not record Web events in a way that matches your needs, you can also configure the events you want to record for each type of Web object. For example, if you want to record events, such as a mouseover that opens a sub-menu, you may need to modify the your Web event configuration to recognize such events. For more information, see Chapter 35, “Configuring Web Event Recording.”
Working with Web Browsers
You record using a Web browser to create tests that check Web objects. You select your browser in the Web tab of the Record and Run Settings dialog box. For more information, see “Setting Web Record and Run Options” on page 646.
QuickTest supports recording and running tests on the following Web browsers:
Netscape
Microsoft Internet Explorer
AOL (America Online)
Applications with embedded Web browser control
Note: QuickTest tests are generally cross-browser—you can record a test on one browser and run it on any other browser. For information on supported browser versions, refer to the ReadMe file.

QuickTest Professional User’s Guide • Working with Supported Environments
436
Working with Netscape
Keep the following in mind when using Netscape as your Web browser:
Multimedia applications are supported in Internet Explorer only. Do not load the Multimedia add-in if you want to record a test using Netscape.
The Object property accesses DOM objects. These are not supported by Netscape. For more information on the Object property, see “Accessing Run-Time Object Properties and Methods” on page 785.
Dialog boxes which opened while recording in Netscape are not displayed in the Active Screen.
You can record only the following objects on dialog boxes opened while recording in Netscape:
button
check box
edit—You cannot apply a checkpoint to or use the Object Spy on an edit object recorded in a dialog box.
Working with AOL and Applications with Embedded Web Browser Controls
To record and run tests on AOL or an application with embedded Web browser controls:
select Record and run tests on any open Web browser in the Record and Run Settings dialog box
make sure AOL or the application is opened after QuickTest
start recording
For more information on browser settings, see “Recording a Test” on page 90.
For additional information on working with the AOL browser, refer to the ReadMe file. For information on recording and running tests on applications with embedded Web browser controls, refer to QuickTest Plus.

Chapter 21 • Testing Web Objects
437
Checking Web Objects
You create a checkpoint on a Web object as you create a checkpoint on any standard object. When you create a checkpoint on a Web object, QuickTest captures the object’s properties and their values as it does for any standard object. The properties you can check for a Web object depend on the properties of the Web object.
You can create a checkpoint either while recording or editing your test.
For example, you can create a checkpoint on your Web site to check the value of an edit field (No. of Passengers, for example) on a specific Web page (Find Flights page, for example).
To create a checkpoint on a Web object:
1 In the test tree, highlight the page that has the object you want to check. The page is displayed in the Active Screen.
2 In the Active Screen, right-click the object you want to check and choose Insert Standard Checkpoint. The Object Selection - Checkpoint Properties dialog box opens.

QuickTest Professional User’s Guide • Working with Supported Environments
438
3 Confirm that the object you want to check is highlighted.
Click OK. The Checkpoint Properties dialog box opens.
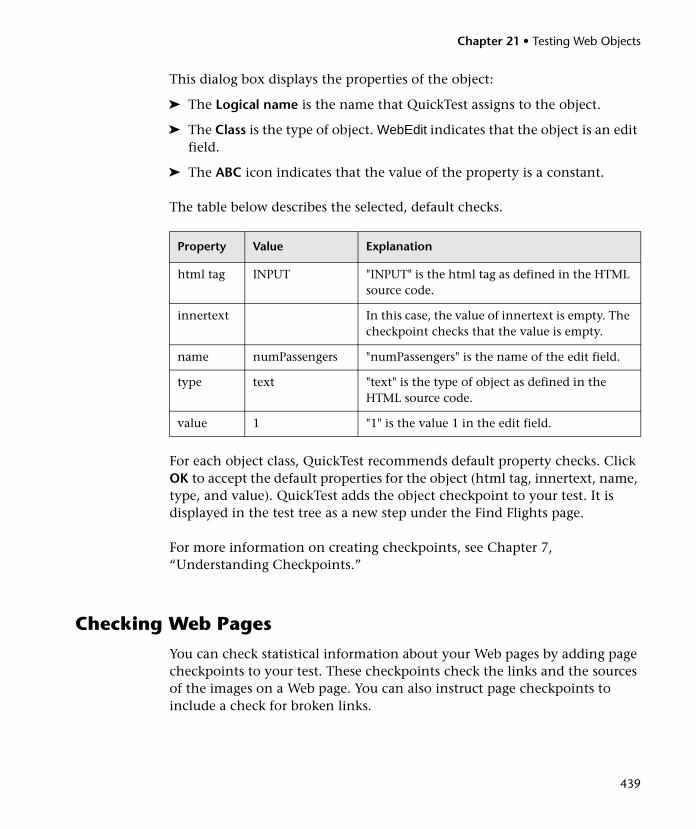
Chapter 21 • Testing Web Objects
439
This dialog box displays the properties of the object:
The Logical name is the name that QuickTest assigns to the object.
The Class is the type of object. WebEdit indicates that the object is an edit field.
The ABC icon indicates that the value of the property is a constant.
The table below describes the selected, default checks.
For each object class, QuickTest recommends default property checks. Click OK to accept the default properties for the object (html tag, innertext, name, type, and value). QuickTest adds the object checkpoint to your test. It is displayed in the test tree as a new step under the Find Flights page.
For more information on creating checkpoints, see Chapter 7, “Understanding Checkpoints.”
Checking Web Pages
You can check statistical information about your Web pages by adding page checkpoints to your test. These checkpoints check the links and the sources of the images on a Web page. You can also instruct page checkpoints to include a check for broken links.
Property Value Explanation
html tag INPUT "INPUT" is the html tag as defined in the HTML source code.
innertext In this case, the value of innertext is empty. The checkpoint checks that the value is empty.
name numPassengers "numPassengers" is the name of the edit field.
type text "text" is the type of object as defined in the HTML source code.
value 1 "1" is the value 1 in the edit field.

QuickTest Professional User’s Guide • Working with Supported Environments
440
Automatic Page Checkpoints
You can instruct QuickTest to create automatic page checkpoints for every page in all tests by selecting the Create a checkpoint for each Web page while recording check box in the Advanced Web Options dialog box (click the Advanced button in the Web tab of the Options dialog box). By default, the automatic page checkpoint includes the checks that you select from among the available options in the Advanced Web Options dialog box.
You can also instruct QuickTest not to perform automatic page checkpoints when you run your test by selecting the Ignore automatic checkpoints while running tests check box in the Advanced Web Options dialog box of the Web tab of the Options dialog box.
For more information, see Chapter 28, “Setting Global Testing Options.”
Creating Individual Page Checkpoints
You can manually add a page checkpoint to your test to check the links and the image sources on a selected Web page either while recording or editing your test.
To add a page checkpoint while recording:
1 Navigate to a page where you want to add a checkpoint.
2 Choose Insert > Checkpoint > Standard Checkpoint or click the Insert Checkpoint button and click in the page. The Object Selection - Checkpoint Properties dialog box opens.
3 Select the Page item and click OK. The Page Checkpoint Properties dialog box opens.
4 Modify the settings for the checkpoint in the Page Checkpoint Properties dialog box, as described in “Understanding the Page Checkpoint Properties Dialog Box” on page 442.
5 Click OK to close the dialog box.
A tree item with a checkpoint icon is added to your test tree.

Chapter 21 • Testing Web Objects
441
To add a page checkpoint while editing your test:
1 Make sure the Active Screen button is selected.
2 Click a step in your test where you want to add a checkpoint.
The Active Screen displays the Web page corresponding to the highlighted step.
3 Right-click anywhere on the Active Screen and choose Insert Standard Checkpoint. The Object Selection - Checkpoint Properties dialog box opens. Select the Page item you want to check from the displayed object tree.
4 Click OK. The Page Checkpoint Properties dialog box opens.
Note: You can also right-click a Page in your test tree and choose Insert Standard Checkpoint to open the Page Checkpoint Properties dialog box.
5 Specify the settings for the checkpoint. For more information, see “Understanding the Page Checkpoint Properties Dialog Box,” below.
6 Click OK to close the dialog box.
A tree item with a checkpoint icon is added to your test tree.
Note: You cannot select the HTML Verification options while creating a page checkpoint from the tree view or Active Screen. You can select these options only when creating a page checkpoint while recording.

QuickTest Professional User’s Guide • Working with Supported Environments
442
Understanding the Page Checkpoint Properties Dialog Box
The Page Checkpoint Properties dialog box enables you to choose which properties to check.
The ABC icon indicates that the value of the property to check is a constant.
The selected check box indicates that this property will be checked.
This icon indicates that the value of the property to check is a Data Table parameter.

Chapter 21 • Testing Web Objects
443
Identifying the Object
The top part of the dialog box displays information about the object to check:
Choosing Which Property to Check
The default properties for the object are listed in the Properties pane of the dialog box. The pane includes the properties, their values, and their types:
Information Description
Logical name The title of the Web page as defined in the HTML code.
Class The type of object. This is always Page.
Pane Element Description
Check box For each object class, QuickTest recommends default property checks. You can accept the default checks or modify them accordingly.
To check a property, select the corresponding check box.
To exclude a property check, clear the corresponding check box.
Type The icon indicates that the value of the property is currently a constant.
The icon indicates that the value of the property is currently a Data Table parameter.
The icon indicates that the value of the property is currently an environment variable parameter.
The icon indicates that the value of the property is currently a random number parameter.
Property The name of the property.
Value The value of the property. Note that the value in the page will be the expected value of the property when you run your test unless you edit this value. For information about editing the value of a property, see “Editing the Value of a Page Property,” below.

QuickTest Professional User’s Guide • Working with Supported Environments
444
Note: By default, page checkpoints include a check on the page load time. The load time displayed in the Page Checkpoint Properties dialog box is the amount of time it took the page to load during recording. To add to the time that QuickTest allows for pages to load without causing page checkpoints to fail, increase the value of the Add seconds to page load time option in the Web tab of the Options dialog. For more information, see “Setting Web Testing Options” on page 608.
Editing the Value of a Page Property
In the Edit value section, you use the following options to edit the value of the property to check:
Option Description
Constant (default) Sets the expected value of the property as a constant.
Parameter Sets the expected value of the property as a parameter. For more information, see Chapter 13, “Parameterizing Tests.”
Data Table(enabled only when Parameter is selected)
Specifies the parameter as a Data Table parameter. The value of the property is determined by the data in the Data Table. For more information about creating Data Table parameters, see “Using Data Table Parameters” on page 227.
Parameter name(enabled only when Data Table is selected)
Specifies the name of the parameter in the Data Table.

Chapter 21 • Testing Web Objects
445
Other(enabled only when Parameter is selected)
Specifies that the parameter is a random number or environment variable parameter. The text box displays the parameter statement. For more information about creating random number parameters, see “Using Random Number Parameters” on page 241. For more information about creating environment variable parameters, see “Using Environment Variable Parameters” on page 231.
Edit Parameter Options (enabled only when Parameter is selected)
If you select Data Table, clicking the Edit Parameter Options button opens the Data Table Parameter Options dialog box, where you can set the value as a regular expression. For more information on regular expressions, see Chapter 15, “Using Regular Expressions.” You can also specify the parameter name and set the parameter as global or current action data. For more information, see Chapter 17, “Working with Actions.”
If you select Other, clicking the Edit Parameter Options button opens the Parameter Options dialog box, where you can specify the parameter type and preferences. For more information, see Chapter 13, “Parameterizing Tests.”
Option Description

QuickTest Professional User’s Guide • Working with Supported Environments
446
Checking the HTML Verification
In the HTML verification section, you can use the following options to check the HTML source and tags of the page:
Note: The HTML verification options are available only when creating a page checkpoint while recording.
Option Description
HTML source Checks that the source in the Web page being tested matches the expected HTML code (the source code of the page at the time that the test is recorded).
Edit HTML Source (enabled only when the HTML Source check box is selected)
Opens the HTML Source dialog box, which displays the expected HTML code. Edit the expected HTML source code and click OK. Note that you can also use regular expressions when editing the expected HTML source code if you click the regular expression check box at the bottom of the page. For more information on regular expressions, see Chapter 15, “Using Regular Expressions.”
HTML tags Checks that the HTML tags in the Web page being tested match the expected HTML tags (the HTML tags on the page at the time that the test is recorded).
Edit HTML Tags (enabled only when the HTML Tags check box is selected)
Opens the dialog box that displays the expected HTML tags. Edit the expected HTML tags and click OK. Note that you can also use regular expressions when editing the HTML tags if you click the regular expression check box at the bottom of the page. For more information on regular expressions, see Chapter 15, “Using Regular Expressions.”

Chapter 21 • Testing Web Objects
447
Checking All the Objects in a Page
In the All objects in page section, you can check all the links, images, and broken links in a page. You can use the following options to check the objects in a page:
Option Description
Links Checks the functionality of the links in the page according to your selections in the Filter Link Check dialog box.
Filter Link Check (enabled only when the Links check box is selected)
Opens the Filter Link Check dialog box, which enables you to specify which hypertext links to check in the page. For additional information, see “Filtering Hypertext Links” on page 449.
Images Checks that the images are displayed on the page according to your selections in the Filter Images Check dialog box.
Filter Image Check (enabled only when the Images check box is selected)
Opens the Filter Image Check dialog box, which enables you to specify which image sources to check in the page. For additional information, see “Filtering Image Sources” on page 452.
Broken links Instructs QuickTest to check for broken links.Note that if you want to check only links that are targeted to your current host, you should select the Broken links - checks only links to current host option in the Web tab of the Options dialog box. For more information, see “Setting Web Testing Options” on page 608.

QuickTest Professional User’s Guide • Working with Supported Environments
448
Setting General Checkpoint Options
The bottom part of the Checkpoint Properties dialog box contains the following options:
Checkpoint timeout—Specifies the time interval (in seconds) during which QuickTest attempts to perform the checkpoint successfully. QuickTest continues to perform the checkpoint until it passes or until the timeout occurs. If the checkpoint does not pass before the timeout occurs, the checkpoint fails.
For example, suppose it takes some time for an object to achieve an expected state. Increasing the checkpoint timeout value in this case can make sure that the object has sufficient time to achieve that state and therefore enables the checkpoint to pass before the maximum timeout is reached.
You can see information about the checkpoint timeout, including the time interval used by QuickTest to perform the checkpoint, in the Test Results window.
Insert statement—Specifies when to perform the checkpoint in the test. Choose Before current step if you want to check the value of the object property before the highlighted step is performed. Choose After current step if you want to check the value of the object property after the highlighted step is performed.
Note: The Insert statement option is not available when adding a page checkpoint during recording or when modifying an existing page checkpoint. It is available only when adding a new page checkpoint to an existing test while editing your test.

Chapter 21 • Testing Web Objects
449
Filtering Hypertext Links
You can filter which hypertext links to check in a page checkpoint using the Filter Link Check dialog box. You open this dialog box by clicking Filter Link Check in the Page Checkpoint Properties dialog box. If you select the Links check box in the Page Checkpoints Properties dialog box, then by default all the links on the page are selected. To instruct QuickTest not to check a particular hypertext link, clear the link’s check box.
For additional information, see “Checking All the Objects in a Page” on page 447.

QuickTest Professional User’s Guide • Working with Supported Environments
450
Choosing Which Hypertext Links to Check
You can use the following options to choose which hypertext links to check in a page checkpoint:
Editing the Value of the Target URL
In the Edit value section, you use the following options to edit the value of the target URL to which the hypertext links:
Pane Element Description
Check box Each link on the page has a corresponding check box.
To check a link, select the corresponding check box (by default all links are selected).
To exclude a link from the page checkpoint, clear the corresponding check box.
Type The icon indicates that the target URL is currently a constant.
The icon indicates that the value of the property is currently a Data Table parameter.
The icon indicates that the value of the property is currently an environment variable parameter.
The icon indicates that the value of the property is currently a random number parameter.
Link name The text in the hypertext link.
Link URL The target URL.
Option Description
Constant (default) Sets the expected value of the target URL as a constant. Click the Edit Constant Value Options button to open the Constant Value Options dialog box, where you can specify the value as a text string or a regular expression. The value of the target URL is constant for each iteration of the test run. For more information on regular expressions, see Chapter 15, “Using Regular Expressions.”

Chapter 21 • Testing Web Objects
451
Parameter Sets the expected value of the target URL as a parameter. For more information, see Chapter 13, “Parameterizing Tests.”
Data Table(enabled only when Parameter is selected)
Specifies the parameter as a Data Table parameter. The value of the target URL is determined by the data in the Data Table. For more information about creating Data Table parameters, see “Using Data Table Parameters” on page 227.
Parameter name(enabled only when Data Table is selected)
Specifies the name of the parameter in the Data Table. You can select from the list box of existing Data Table columns or you can enter a new name to create a new column in the Data Table.
Other(enabled only when Parameter is selected)
Specifies that the parameter is a random number or environment variable parameter. The text box displays the parameter statement. Random number parameters are not logically applicable to setting the expected value of a target URL. For more information about creating environment variable parameters, see “Using Environment Variable Parameters” on page 231.
Edit Parameter Options (enabled only when Parameter is selected)
If you select Data Table, clicking the Edit Parameter Options button opens the Data Table Parameter Options dialog box, where you can set the value as a regular expression. For more information on regular expressions, see Chapter 15, “Using Regular Expressions.” You can also specify the parameter name and set the parameter as global or current action data. For more information, see Chapter 17, “Working with Actions.”
If you select Other, clicking the Edit Parameter Options button opens the Parameter Options dialog box, where you can specify the parameter type and preferences. For more information, see Chapter 13, “Parameterizing Tests.”
Option Description

QuickTest Professional User’s Guide • Working with Supported Environments
452
Filtering Image Sources
You can filter which image sources to check in a page checkpoint using the Filter Images Check dialog box. You open this dialog box by selecting Filter Image Check in the Page Checkpoint Properties dialog box. If you select the Images check box in the Page Checkpoints Properties dialog box, then, by default, all image sources on the page are selected. To instruct QuickTest not to check a particular image source, clear the image’s check box.
For additional information, see “Checking All the Objects in a Page” on page 447.

Chapter 21 • Testing Web Objects
453
Choosing Which Image Sources to Check
You can use the following options to choose which image sources to check in a page checkpoint:
Pane Element Description
Check box Each image source on the page has a corresponding check box.
To check an image source, select the corresponding check box (by default all image sources are selected).
To exclude an image source from the page checkpoint, clear the corresponding check box.
Type The icon indicates that the image source is currently a constant.
The icon indicates that the value of the property is currently a Data Table parameter.
The icon indicates that the value of the property is currently an environment variable parameter.
The icon indicates that the value of the property is currently a random number parameter.
Image name The name of the image.
Image source The image source file and path.

QuickTest Professional User’s Guide • Working with Supported Environments
454
Editing the Value of the Path of the Image Source File
In the Edit value section, you use the following options to edit the path of the image source file:
Option Description
Constant (default) Sets the expected value of the path of the image source file as a constant. Click the Edit Constant Value Options button to open the Constant Value Options dialog box, where you can specify the value as a text string or a regular expression. For more information on regular expressions, see Chapter 15, “Using Regular Expressions.” The value of the path of the image source file is constant for each iteration of the test run.
Parameter Sets the expected value of the path of the image source file as a parameter. For more information, see Chapter 13, “Parameterizing Tests.”
Data Table(enabled only when Parameter is selected)
Specifies the parameter as a Data Table parameter. The value of the path of the image source file is determined by the data in the Data Table. For more information about creating Data Table parameters, see “Using Data Table Parameters” on page 227.
Parameter name(enabled only when Data Table is selected)
Specifies the name of the parameter in the Data Table. You can select from the list box of existing Data Table columns or you can enter a new name to create a new column in the Data Table.
Other(enabled only when Parameter is selected)
Specifies that the parameter is a random number or environment variable parameter. The text box displays the parameter statement. Random number parameters are not logically applicable to setting the expected value of an image source file. For more information about creating environment variable parameters, see “Using Environment Variable Parameters” on page 231.

Chapter 21 • Testing Web Objects
455
Setting Alternative Navigation Properties
You can use the alternative navigation properties as a backup means of navigating to the next Web page during a test run, when both of the following conditions occur:
The navigation step to a page fails.
Continue to the following page if an object is not found during the test run is selected in the Web tab of the Test Settings dialog box.
You can set alternative navigation properties for any Web page or frame object in your test.
To set alternative navigation properties:
1 Right-click a page or step icon in the test’s Tree View, or right-click the corresponding script line in the Expert View.
Edit Parameter Options (enabled only when Parameter is selected)
If you select Data Table, clicking the Edit Parameter Options button opens the Data Table Parameter Options dialog box, where you can set the value as a regular expression. For more information on regular expressions, see Chapter 15, “Using Regular Expressions.” You can also specify the parameter name and set the parameter as global or current action data. For more information, see Chapter 17, “Working with Actions.”
If you select Other, clicking the Edit Parameter Options button opens the Parameter Options dialog box, where you can specify the parameter type and preferences. For more information, see Chapter 13, “Parameterizing Tests.”
Option Description

QuickTest Professional User’s Guide • Working with Supported Environments
456
2 Choose Navigation Fallback Properties. The Alternative Navigation Properties dialog box opens.
3 Enter the following page navigation details and click OK.
URL—the complete URL of the next page in the test.
Target frame name—the name of the frame in which the specified URL should be displayed.

Chapter 21 • Testing Web Objects
457
Posted data—the data to be sent to the server with the HTTP POST transaction. The POST transaction is used to send data gathered by an HTML form to the server. This parameter is ignored if the URL is not an HTTP URL.
Headers—the HTTP header data that is passed to the server upon navigation. For example: Content-Type: application/x-www-form-urlencoded
This parameter is ignored if the URL is not an HTTP URL.
4 Repeat steps 1–3 for each page for which you want to set alternative navigation properties.
Checking Web Content Accessibility
The Section 508 criteria for Web-based technology and information systems are based on access guidelines developed by the Web Accessibility Initiative of the World Wide Web Consortium (W3C). You can add accessibility checkpoints to help you quickly identify areas of your Web site that may not conform to the W3C Web Content Accessibility Guidelines. You can add automatic accessibility checkpoints to each page in your test, or you can add individual accessibility checkpoints to individual pages or frames.
Note: Accessibility Checkpoints are designed to help you easily locate the areas of your Web site that require special attention according to the W3C Web Content Accessibility Guidelines. They do not necessarily indicate whether or not your Web site conforms to the guidelines. For more information, see “Reviewing Accessibility Checkpoint Results” on page 461.

QuickTest Professional User’s Guide • Working with Supported Environments
458
Setting Accessibility Checkpoint Preferences
You can set accessibility checkpoint preferences in the Advanced Web Options dialog box and view them in the Accessibility Checkpoint Properties dialog box. All accessibility checkpoints in your test use the options that are selected in the Advanced Web Options dialog box at the time of the test run. For information about the accessibility checkpoint options, see “Advanced Web Options” on page 609.
Automatic Accessibility Checkpoints
You can instruct QuickTest to create automatic accessibility checkpoints for every page in all tests by selecting the Add Automatic accessibility checkpoint to each Web page while recording check box in the Advanced Web Options dialog box (click the Advanced button in the Web tab of the Options dialog box). If you select this option, an accessibility checkpoint is inserted for each page as you record.
Creating Individual Accessibility Checkpoints
If you did not choose to add accessibility checkpoints automatically while recording, you can add an accessibility checkpoint to help you quickly identify areas of a particular Web page or frame that may not conform to the W3C Web Content Accessibility Guidelines. You can add accessibility checkpoints either while recording or while editing your test.

Chapter 21 • Testing Web Objects
459
To add an accessibility checkpoint while recording:
1 Navigate to a page where you want to add an accessibility checkpoint.
2 Choose Insert > Checkpoint > Accessibility Checkpoint, or click the Insert Checkpoint button and click in the page or frame you want to check.
If the page contains frames, the Object Selection - Accessibility Checkpoint Properties dialog box opens. Select the Page or Frame item you want to check and click OK. The Accessibility Checkpoint Properties dialog box opens.
If the page does not contain frames, the Accessibility Checkpoint Properties dialog box opens. The dialog box displays the object’s logical name, class (this is always Page or Frame), and the options that are currently selected. You can modify the option settings in the Advanced Web Options dialog box. For more information, see page 609.
3 Click OK to close the dialog box.
A tree item with a checkpoint icon is added to your test tree.

QuickTest Professional User’s Guide • Working with Supported Environments
460
To add an accessibility checkpoint while editing your test:
1 Make sure the Active Screen button is selected.
2 Click a step in your test where you want to add a checkpoint.
The Active Screen displays the Web page corresponding to the highlighted step.
3 Right-click anywhere on the Active Screen, and choose Insert Accessibility Checkpoint.
If the page contains frames, the Object Selection - Accessibility Checkpoint Properties dialog box opens. Select the Page or Frame item and click OK. The Accessibility Checkpoint Properties dialog box opens.
If the page does not contain frames, the Accessibility Checkpoint Properties dialog box opens. The dialog box displays the options that are currently selected. You can modify the option settings in the Advanced Web Options dialog box. For more information, see page 609.

Chapter 21 • Testing Web Objects
461
Choose Before current step if you want to check the accessibility elements before the highlighted step is performed. Choose After current step if you want to check the accessibility elements after the highlighted step is performed.
Note: The Insert statement option is not available when adding a page checkpoint during recording or when modifying an existing page checkpoint. It is available only when adding a new page checkpoint to an existing test while editing your test.
4 Click OK to close the dialog box.
A tree item with a checkpoint icon is added to your test tree.
Reviewing Accessibility Checkpoint Results
When you include accessibility checkpoints in your test, the Test Results window displays the results of each accessibility option that you checked.
The Test Results window displays a separate step for each accessibility option that was checked in each checkpoint. The test details provide information that can help you pinpoint parts of your Web site that may not conform to the W3C Web Content Accessibility Guidelines. The information provided for each check is based on the W3C requirements.
For more information on accessibility checkpoint results, see “Analyzing Accessibility Checkpoint Results” on page 553.

QuickTest Professional User’s Guide • Working with Supported Environments
462
Accessing Password-Protected Resources in the Active Screen
When QuickTest creates an Active Screen page for a Web-based application, it stores the path to images and other resources on the page, rather than downloading and storing the images with your test. This ensures that the disk space used by the Active Screen pages captured with your test are not affected by the file size of the resources displayed on the page.
For this reason, a page in the Active Screen (or in your test results) may require a user name and password to access certain images or other resources within the page. If this is the case, a pop-up login window may open when you select a step corresponding to the page, or you may note that images or other resources are missing from the page.
For example, the formatting of your page may look very different than the actual page on your Web site if the cascading style sheet (CSS) referenced in the page is password-protected, and therefore could not be downloaded to the Active Screen.
You may need to use one or both of the following methods to access your password-protected resources, depending on the password-protection mechanism used by your Web server:
Standard Authentication—If your server uses a standard authentication mechanism, you can enter the login information in the Web tab of the Test Settings dialog box. QuickTest saves this information with your test and automatically enters the login information each time you select to display an Active Screen page that requires the information.
Advanced Authentication—If your server uses a more complex authentication mechanism, you may need to log in to the Web site manually using QuickTest’s Advanced Authentication dialog box. This gives the Active Screen access to password-protected resources in your Active Screen pages for the duration of your QuickTest session. When using this method, you must log in to your Web site in the Advanced Authentication dialog box each time you open the test in a new QuickTest session.
In most cases, the automatic login is sufficient. In some cases, you must use the manual login method. In rare cases, you may need to use both login mechanisms to enable access to all resources in your Active Screen pages.

Chapter 21 • Testing Web Objects
463
Note: If your Web site is not password-protected, but you are still unable to view images or other resources on your Active Screen, you may not be connected to the Internet, the Web server may be down, or the source path that was captured with the Active Screen page may no longer be accurate.
Using the Standard Authentication Mechanism
If you select a step in your test or test results, and an Active Screen login window opens over the Active Screen or test results details display, then one or more images or other resources in the Active Screen may be password-protected.
To prevent the pop-up login window from opening and to ensure that all images and resources are displayed in the Active Screen and test results each time you open the test, you can use QuickTest’s automatic Active Screen login mechanism.
To enable the mechanism, you can select Save the User Name and Password in the pop-up login window the first time the it opens. This adds the login information to the Active Screen access section in the Web tab of the Test Settings dialog box. Alternatively, you can add the login information manually in the Web tab of the Test Settings dialog box.

QuickTest Professional User’s Guide • Working with Supported Environments
464
To set Active Screen access information in the Test Settings dialog box:
1 Choose Test > Settings. The Test Settings dialog box opens.
2 Click the Web tab.
3 Enter the User name and Password for the Web site or Web page containing the password-protected resources.
4 Click OK to save your changes and close the dialog box.
5 Refresh the Active Screen by selecting a new step in the test tree or toggle the Active Screen button to redisplay the Active Screen. Confirm that the page is displayed correctly.
If one or more resources are still missing or displayed incorrectly, you may need to use the Advanced Authentication mechanism.

Chapter 21 • Testing Web Objects
465
For more information on the Web tab of the Test Settings dialog box, see “Defining Web Settings for Your Test” on page 638.
For more information on the Advanced Authentication mechanism, see page 465.
Using the Advanced Authentication Mechanism
Depending on the authentication mechanisms used to password-protect resources on a Web site, QuickTest’s automatic Active Screen login mechanism may not be sufficient.
To enable the Active Screen to access the resources on such a site, you must log in to your site using the Advanced Authentication dialog box. When you log in this way, you remain logged in to the site for the duration of the QuickTest session. If you close and reopen QuickTest and then reopen your test, you must log in again.
Note: If the site to which you log in has an inactivity timeout after which you are automatically logged out of the Web site, you may need to log in using the Advanced Authentication dialog box more than once while editing your test to re-enable access to your Active Screen pages.

QuickTest Professional User’s Guide • Working with Supported Environments
466
To log in to your Web site using the advanced authentication mechanism:
1 Choose Test > Settings. The Test Settings dialog box opens.
2 Click the Web tab.
3 Click the Advanced button. The Advanced Authentication dialog box opens.
The browser window in the dialog box displays the default Web page for the test according to the following guidelines:
The first time you open this dialog box for a given test, the browser window displays the URL address set for the test in the Web tab of the Record and Run Settings dialog box.
If no value is set in the Web tab of the Record and Run Settings dialog box, the browser window displays a local QuickTest page.
If you navigate to a new URL address using this dialog box, that address becomes the default Advanced Authentication page for this test.

Chapter 21 • Testing Web Objects
467
4 If the displayed Web page is not the correct page for logging in to your site, enter the correct URL address in the Address box and click Go. Otherwise, proceed to step 5.
5 Enter your login information in the page displayed in the Advanced Authentication browser window.
6 When the login process is complete, click Close. The Advanced Authentication dialog box closes, but the login session remains open for the remainder of your QuickTest session (or until the Web site’s inactivity timeout is exceeded).
7 Refresh the Active Screen by selecting a new step in the test tree or toggle the Active Screen button to redisplay the Active Screen. Confirm that the pages are displayed correctly.
If you still cannot view images or other resources on your Active Screen, you may not be connected to the Internet, the Web server may be down, or the source path that was captured with the Active Screen page may no longer be accurate.
Activating Methods Associated with a Web Object
In the Expert View, you can use the “Object” property to activate the method for a Web object. Activating the method for a Web object has the following syntax:
WebObjectName.Object.Method_to_activate( )
For example, suppose you have a the following statement in your script:
document.MyForm.MyHiddenField.value = My New Text

QuickTest Professional User’s Guide • Working with Supported Environments
468
The following example achieves the same thing by using the Object property, where MyDoc is the DOM’s document:
Dim MyDocSet MyDoc = Browser(browser_name).page(page_name).ObjectMyDoc.MyForm.MyHiddenField.value = My New Text
In this example, LinksCollecton is assigned to the link collection of the page through the Object property. Then, a message box pops for each of the links, with its innerHTML text.
Dim LinksCollection, linkSet LinksCollection = Browser(browser_name).Page(page_name).Object.linksFor Each link in LinksCollection
MsgBox link.innerHTMLNext
For additional information about the Object property (.Object), see “Retrieving and Setting Test Object Property Values” on page 784.
For a list of a Web object's internal properties and methods see:
http://msdn.microsoft.com/library/default.asp?url=/workshop/author/dhtml/reference/objects/obj_document.asp
Using Scripting Methods with Web Objects
QuickTest provides several scripting methods that you can use with Web objects. You can record some of these methods while recording on Web objects. You can enter statements manually with the other methods in the Expert View. For more information about programming in the Expert View, see Chapter 37, “Testing in the Expert View.”
For additional information on these methods, refer to the QuickTest Object Model Reference.

469
22Testing Visual Basic Applications
QuickTest supports the testing of Visual Basic 6.0 applications.
Note: To test Visual Basic applications, you must install and load the Visual Basic Add-in. To test Visual Basic.NET Windows Forms applications, you must install and load the .NET Add-in. Note that the .NET Add-in is not included with your QuickTest installation. To obtain this add-in, contact your QuickTest supplier or Mercury Interactive customer support.
This chapter describes:
About Testing Visual Basic Applications
Recording and Running Tests on Visual Basic Applications
Checking Visual Basic Objects
Using Visual Basic Objects and Methods to Enhance Your Test
About Testing Visual Basic Applications
QuickTest recognizes Visual Basic objects and generates Visual Basic-specific statements when you record tests on a Visual Basic application.
You check the properties of Visual Basic objects the same way you check the properties of any other object. You can also output property or text values from the objects in your Visual Basic application.

QuickTest Professional User’s Guide • Working with Supported Environments
470
The following checkpoints and output values are supported when testing Visual Basic objects:
In the Expert View or using the Insert > Step option, you can activate Visual Basic methods, retrieve and set the values of properties (including run-time properties), and check that objects exist.
Note that this chapter provides examples using both the Tree View and the Expert View. Some of the information provided and procedures described require working in the Expert View. For information on working in the Expert View, see Chapter 37, “Testing in the Expert View.”
Recording and Running Tests on Visual Basic Applications
QuickTest records and runs steps on Visual Basic 6.0 applications as it does on any other object. You can view the details of your test run in the Test Results window.
It is recommended that you begin your recording session before opening the Visual Basic application on which you want to record. You can choose one of the following options:
Type Checkpoint Output For more information, see:
Standard Yes Yes “Checking Object Property Values,” on page 131, and“Creating Standard Output Values,” on page 276
Text Yes Yes “Creating a Text Checkpoint,” on page 167, and “Creating Text Output Values,” on page 265
Text Area Yes Yes “Creating a Text Area Checkpoint,” on page 171, and“Adding a Text Area Output Value,” on page 267
Bitmap Yes No “Checking Bitmaps” on page 189

Chapter 22 • Testing Visual Basic Applications
471
Select Record and run on these applications in the Windows Applications tab of the Record and Run Settings dialog box and specify the name and full path of the executable file of your Visual Basic application. QuickTest automatically opens this application when the recording session begins.
Select Record and run on any application in the Windows Applications tab of the Record and Run Settings dialog box, and click OK to begin recording. When QuickTest begins recording, open your Visual Basic application.
For more information on the Record and Run Settings dialog box, see Chapter 30, “Setting Record and Run Options.”
Note: The Visual Basic application must be executed before setting the Record and Run options.
QuickTest records Visual Basic-specific statements for the operations performed on the Visual Basic objects. When you record on a Visual Basic application, QuickTest displays a Visual Basic icon next to the step in the Tree View. For example, if you record typing a name in a Visual Basic text field, the Tree View may be displayed as follows:
QuickTest records this step in the Expert View as:
VbWindow("Login").VbEdit("txtAgentsName").Set "shawn"
You run tests on Visual Basic objects just as you would with any other QuickTest object. The test results tree displays the same Visual Basic object icon as that used in the test tree.
For more information on running tests, see Chapter 25, “Running Tests.” For information on viewing test results, see Chapter 27, “Analyzing Test Results.”

QuickTest Professional User’s Guide • Working with Supported Environments
472
Checking Visual Basic Objects
You can check Visual Basic objects by inserting a standard checkpoint. For information on standard checkpoints, see Chapter 8, “Checking Object Property Values.” For information on the properties available for a given Visual Basic object, refer to the QuickTest Object Model Reference.
For example, you can create a checkpoint to check the enabled property of a Visual Basic combo box.
A Visual Basic checkpoint is similar in appearance to other checkpoint statements. In the Tree View, the statement may be displayed as follows:

Chapter 22 • Testing Visual Basic Applications
473
In the Expert View, the above checkpoint statement would appear as:
VbWindow("MainForm").VbComboBox("cbxDepartures").Check CheckPoint("cbxDepartures")
Using Visual Basic Objects and Methods to Enhance Your Test
QuickTest provides several methods that you can use with Visual Basic objects. You can record some of these methods while recording on Visual Basic objects. You can add additional functionality to your test by entering statements manually in the Expert View or by using the Method Wizard. For more information about programming in the Expert View, see Chapter 37, “Testing in the Expert View.” For more information about using the Method Wizard, see Chapter 36, “Enhancing Your Tests with Programming Statements.”
In addition to the Visual Basic-specific objects and methods, you can use the .Object property to access the internal properties of any run-time object. The .Object property is available for all Visual Basic objects.
You can also use the .Object property to directly access Visual Basic object properties and activate their methods.
For example, you can set the focus and caption of a button using code similar to the following:
Set theButton = VbWindow("frmMain").VbButton("OK").Object
theButton.SetFocus
theButton.Caption = "Yes"
The .Object property is also useful for checking the value of properties that are not available using a standard Visual Basic checkpoint.
For additional information on Visual Basic objects and methods, refer to the QuickTestObject Model Reference.

QuickTest Professional User’s Guide • Working with Supported Environments
474

475
23Testing Multimedia Applications
You can record and run tests on Macromedia Flash, Windows MediaPlayer, and RealPlayer multimedia objects.
Note: QuickTest Professional supports the testing of multimedia objects with Internet Explorer only.
This chapter describes:
About Testing Multimedia Applications
Working with Macromedia Flash Controls
Working with RealPlayer and Windows MediaPlayer Applications and Controls
About Testing Multimedia Applications
QuickTest Professional records and runs steps on Macromedia Flash controls in Internet Explorer, and on RealPlayer and Windows MediaPlayer applications and controls. QuickTest records special multimedia actions on these objects.
You create checkpoints for multimedia objects, much like for other objects. You can also output property values from the objects in your multimedia application.

QuickTest Professional User’s Guide • Working with Supported Environments
476
The following checkpoints and output values are supported when testing multimedia objects:
You can create or enhance tests on multimedia applications by entering scripting statements in the Expert View. For information on working in the Expert View, see Chapter 37, “Testing in the Expert View.”
Working with Macromedia Flash Controls
QuickTest supports Macromedia Flash 4 or 5 objects that are ActiveX controls in Internet Explorer. You can also test Macromedia Flash 6 clips containing Flash 4 or 5 commands. For additional information, see Chapter 24, “Testing ActiveX Controls.”
Recording and Running Tests on Macromedia Flash Controls
When you record on a Macromedia Flash object, QuickTest displays a Flash object icon next to the name of the object in the Tree View, and adds a corresponding statement in the Expert view.
The following example shows how the Tree View displays an operation on a FlashButton:
Type Checkpoint Output For more information, see:
Standard Yes Yes “Checking Object Property Values,” on page 131, and
“Creating Standard Output Values,” on page 276

Chapter 23 • Testing Multimedia Applications
477
QuickTest records this step in the Expert View as follows:
Browser("FrameAction").Page("FrameAction").FlashControl("ShockwaveFlash.Shock").ButtonClick "/LeftMovieClip/#33",0,0
When recording on a Macromedia Flash object, the following syntax is used in the Expert View:
...FlashControl(ShockwaveFlash.Shock).Method(arguments)
You run tests on Macromedia Flash objects just as you would for other QuickTest objects. For information about running tests, see Chapter 25, “Running Tests.”
The test results tree displays the same icons for Macromedia Flash objects as those used in the test tree. The bottom right pane of the Test Results window displays the Flash object that was captured during the test run. For information about test results, see Chapter 27, “Analyzing Test Results.”
Checking Macromedia Flash Objects
When you create a checkpoint on a Macromedia Flash object, QuickTest captures the object’s properties and values, as with any standard object.
You can create a checkpoint while recording or editing your test.
By creating a checkpoint, you could, for example, make sure that the right Flash movie file opens.
To create a checkpoint on a Macromedia Flash object:
1 In the test tree, highlight the Macromedia Flash object you want to check.
2 In the Active Screen, right-click the highlighted object, and select Insert Standard Checkpoint. The Object Selection - Checkpoint Properties dialog box opens.
3 Select the object for which you want to create a checkpoint and click OK. The Checkpoint Properties dialog box opens.
4 Select the properties you would like to check.
5 For each property, select the checkpoint options to apply.

QuickTest Professional User’s Guide • Working with Supported Environments
478
6 Click OK. A tree item with a multimedia checkpoint icon is added to your test tree.
For more information about creating checkpoints, see Chapter 7, “Understanding Checkpoints.”
Using Scripting Methods in Tests on Macromedia Flash Objects
QuickTest provides several test objects and methods that you can use when recording actions on Macromedia Flash objects. You can record some methods while recording on Macromedia Flash objects. You can also enter methods manually in the Expert View or using the Method Wizard.
For information about programming in the Expert View, see Chapter 37, “Testing in the Expert View.” For more information on using the Method Wizard, see Chapter 36, “Enhancing Your Tests with Programming Statements.”
For more information about Macromedia Flash test objects, methods, and properties, refer to the QuickTest Object Model Reference.
Working with RealPlayer and Windows MediaPlayerApplications and Controls
QuickTest supports RealPlayer and Windows MediaPlayer applications and controls, which are ActiveX controls. It is recommended that you have the ActiveX, Web, and Multimedia add-ins installed and loaded to properly record and run tests on these objects. For more information on ActiveX controls, see Chapter 24, “Testing ActiveX Controls.” For more information on Web objects, see Chapter 21, “Testing Web Objects.”
Recording and Running Tests on RealPlayer and MediaPlayer Applications and Controls
When you record on a RealPlayer or MediaPlayer application or control, QuickTest displays an icon for the respective object next to its name in the Tree View, and adds a corresponding statement in the Expert View.

Chapter 23 • Testing Multimedia Applications
479
Note: When recording on RealPlayer/MediaPlayer applications, you must open QuickTest before activating the application, including the RealPlayer StartCenter. Therefore, before opening QuickTest to record on a RealPlayer application, make sure that the RealPlayer StartCenter icon is not displayed in the status area of the Windows task bar.
The following example shows how the Tree View displays the opening of a RealPlayer:
QuickTest records this step in the Expert View as follows:
RealPlayer("RealPlayer").OpenURL "file://C:\RealPlayer\videotest.rm"
The following example shows how the Tree View displays a click operation on the play button in a RealPlayer control, within a Web browser.
QuickTest records this step in the Expert View as:
Browser("RealMedia Player").Page("RealMedia Player").RealControl("video1").Play
When recording on a RealPlayer or MediaPlayer application, the following syntax is used in the Expert View:
...RealPlayer(RealPlayerApplicationName).Method(Parameters)
...WMPlayer(RealPlayerApplicationName).Method(Parameters)

QuickTest Professional User’s Guide • Working with Supported Environments
480
When recording on a RealPlayer or MediaPlayer control within a Web browser, the following syntax is used in the Expert View:
...RealControl(ControlName).Method(Parameters)
...WMControl(ControlName).Method(Parameters)
You run tests on RealPlayer and MediaPlayer applications and controls just as you would for other QuickTest objects. For information about running tests, see Chapter 25, “Running Tests.”
The test results tree displays the same icons for RealPlayer and MediaPlayer applications and controls as those used in the test tree. The bottom-right pane of the Test Results window displays a snapshot of the RealPlayer/ MediaPlayer control panel or application, captured during the test run.
For more information about test results, see Chapter 27, “Analyzing Test Results.”
Checking RealPlayer/MediaPlayer Applications and Controls
When you create a checkpoint for a RealPlayer or MediaPlayer application or control, QuickTest captures the object’s properties and its values, just as it does for any standard object.
You can create a checkpoint while recording or editing your test.
Note: When a clip is stopped (not paused), or when it has finished playing, it is unloaded from the application/control; the properties checked at that point reflect this status. For this reason, a checkpoint inserted after a step that stops the clip will show the URL property empty, the current position 0, etc.—the same as for a clip before it starts.

Chapter 23 • Testing Multimedia Applications
481
In addition to several general object properties, QuickTest captures the following three properties:
Using these properties, you can create a checkpoint on your RealPlayer or MediaPlayer application or control to check that your clip stops and returns to the beginning when you click the Stop button.
To create a checkpoint on a RealPlayer/MediaPlayer application or control:
1 In the test tree, highlight the RealPlayer or MediaPlayer application or control you want to check.
2 Right-click the highlighted object in the Active Screen and select Insert Standard Checkpoint. The Object Selection - Checkpoint Properties dialog box opens.
3 Select the object for which you want to create a checkpoint and click OK. The Checkpoint Properties dialog box opens.
4 Select the properties you would like to check.
Property Description
State The current running state of the RealPlayer or MediaPlayer. Possible values are:
–1 initial state (no action performed on the clip)
0 stopped
1 connecting
2 buffering
3 playing
4 paused
5 seeking
URL The URL of the open clip
Current Position The time-position of the clip (in seconds).

QuickTest Professional User’s Guide • Working with Supported Environments
482
5 For each property, select the checkpoint options to apply.
6 Click OK. A tree item with a checkpoint icon is added to your test tree.
For more information about creating checkpoints, see Chapter 7, “Understanding Checkpoints.”
Using Scripting Methods in Tests on RealPlayer/MediaPlayer Applications and Controls
QuickTest provides several test objects and methods that you can use when recording actions on RealPlayer and MediaPlayer applications and controls. You can record some methods while recording your test. You can also enter methods manually in the Expert View or using the Method Wizard.
For information about programming in the Expert View, see Chapter 37, “Testing in the Expert View.” For more information on using the Method Wizard, see Chapter 36, “Enhancing Your Tests with Programming Statements.”
For more information about RealPlayer and MediaPlayer test objects, methods, and properties, refer to the QuickTest Object Model Reference.

483
24Testing ActiveX Controls
QuickTest supports testing on ActiveX controls in any application.
This chapter describes:
About Testing ActiveX Controls
Recording and Running Tests on ActiveX Controls
Checking ActiveX Controls
Activating an ActiveX Control Method
Using Scripting Methods with ActiveX Controls
About Testing ActiveX Controls
Many applications include ActiveX controls developed with third-party vendors. QuickTest can record and run tests on these controls as well as check their properties.
You can check the properties of an ActiveX control as you check the properties of any other object. You can also output property or text values from the objects in your ActiveX application.

QuickTest Professional User’s Guide • Working with Supported Environments
484
The following checkpoints and output values are supported when testing ActiveX objects:
In the Expert View, or using the Insert > Step option, you can activate ActiveX control methods, retrieve and set the values of properties (including run-time properties), and check that objects exist.
Note that this chapter provides examples using both the Tree View and the Expert View. Some of the information provided and procedures described require working in the Expert View. For information on working in the Expert View, see Chapter 37, “Testing in the Expert View.”
For information on supported controls and versions, refer to the QuickTest Professional ReadMe.
Type Checkpoint Output For more information, see:
Standard Yes Yes “Checking Object Property Values,” on page 131, and“Creating Standard Output Values,” on page 276
Text Yes Yes “Creating a Text Checkpoint,” on page 167, and“Adding a Text Output Value,” on page 266
Note: Text checkpoints and output values are not supported for windowless ActiveX controls.
Text Area Yes Yes “Creating a Text Area Checkpoint,” on page 171, and“Adding a Text Area Output Value,” on page 267
Table Yes Yes “Checking Tables and Databases,” on page 147, and“Creating Table Output Values,” on page 293
Bitmap Yes No “Checking Bitmaps” on page 189

Chapter 24 • Testing ActiveX Controls
485
Recording and Running Tests on ActiveX Controls
QuickTest records and runs steps on ActiveX controls as it does on any other object. You can view the details of your test run in the Test Results window. For more information on running tests, see Chapter 25, “Running Tests.” For more information on viewing test results, see Chapter 27, “Analyzing Test Results.”
QuickTest records clicks inside the ActiveX control. When you record on an ActiveX control, QuickTest displays an ActiveX icon next to the step in the Tree View. For example, if you record clicking on a calendar that is an ActiveX control, the Tree View may be displayed as follows:
QuickTest records this step in the Expert View as:
Browser("Untitled").Page("Untitled").ActiveX("Calendar").Click 65,107
Recording on an ActiveX control has the following syntax in the Expert View:
...ActiveX (ActiveX_control).Method (arguments)

QuickTest Professional User’s Guide • Working with Supported Environments
486
QuickTest can record on standard controls within an ActiveX control. For example, suppose your ActiveX control is a calendar that contains a drop-down list from which you can choose the month. If you click in the list to select the month of May, QuickTest records this in the Tree View as follows:
QuickTest records this step in the Expert View as:
Browser("Untitled").Page("Untitled").ActiveX("Calendar").WinComboBox("ComboBox").Select "May"
Note: If an ActiveX control contains another ActiveX control, then QuickTest can record and run tests on this internal control as well.
You run tests on ActiveX controls just as you would with any other QuickTest objects. The test results tree displays the same ActiveX control icon as that used in the test tree. The bottom right pane of the Test Results window displays the ActiveX control that was captured during the test run and highlights the ActiveX control for each step in the test results tree.
For more information about running tests, see Chapter 25, “Running Tests.”
For more information about test results, see Chapter 27, “Analyzing Test Results.”

Chapter 24 • Testing ActiveX Controls
487
Checking ActiveX Controls
You create a checkpoint on an ActiveX control as you create a checkpoint on any standard object. When you create a checkpoint on an ActiveX control, QuickTest captures the ActiveX control properties and their values as it does for any standard object. The properties you can check for an ActiveX control depend on the properties of the ActiveX control. By default, when you create a checkpoint on an ActiveX control, QuickTest captures all the properties for an ActiveX control, but it does not select any properties to check.
For example, you can create a checkpoint on an ActiveX control that is a calendar to check the current date in the calendar.
To create a checkpoint on an ActiveX control:
1 Right-click the ActiveX control you want to check in the Active Screen and select Insert Standard Checkpoint. The Object Selection - Checkpoint Properties dialog box opens.

QuickTest Professional User’s Guide • Working with Supported Environments
488
2 Select the ActiveX control for which you want to create a checkpoint and click OK. The Checkpoint Properties dialog box opens and displays all the properties for the ActiveX control.
3 Select the properties you want to check in the check box column.
4 For each property, select the checkpoint options you want to apply.
Click OK. A tree item with an ActiveX checkpoint icon is added to your test tree.
For more information on creating checkpoints, see Chapter 7, “Understanding Checkpoints.”

Chapter 24 • Testing ActiveX Controls
489
Activating an ActiveX Control Method
In the Expert View, you can use the Object property to activate the method for an ActiveX control. The list of available methods depends on the ActiveX control. Activating the method for an ActiveX control has the following syntax:
...ActiveX (ActiveX_control).Object.Method_to_activate( )
For example, suppose the MakeObjVisible method is supported for your ActiveX control. To activate the MakeObjVisible method, you insert the following statement into your test script:
Browser("Home").Page("HomePage").ActiveX("Calendar").Object.MakeObjVisible()
For additional information about the Object property (.Object), see “Retrieving and Setting Test Object Property Values” on page 784.
Using Scripting Methods with ActiveX Controls
QuickTest provides several scripting methods that you can use with ActiveX controls. You can record some of these methods while recording on ActiveX controls. You can enter statements manually with the other methods in the Expert View or using the Method Wizard. For more information about programming in the Expert View, see Chapter 37, “Testing in the Expert View.” For more information on the Method Wizard, see Chapter 36, “Enhancing Your Tests with Programming Statements.”
For additional information on these methods, refer to the QuickTest Object Model Reference.

QuickTest Professional User’s Guide • Working with Supported Environments
490

Part V
Running and Debugging Tests

492

493
25Running Tests
Once you have created a test, you can run it to check the behavior of your Web site or application.
This chapter describes:
About Running Tests
Running a Test to Check Your Application
Running a Test or Action from a Selected Step
Updating a Test
Using Optional Steps
Running a Test Batch
About Running Tests
When you run a test, QuickTest opens the Web site or application and performs the steps you recorded. When the test run is complete, QuickTest displays a report detailing the test results.
If your test contains a global Data Table parameter, QuickTest runs the test once for each row in the Data Table. If your test contains a Data Table parameter for the current action data sheet, QuickTest runs the action once for each row of data in that action data sheet. You can also specify whether to run the first iteration or all iterations, for the entire test or for a specific action in the test; or to run the iterations for a specified range of data sets. For additional information, see Chapter 29, “Setting Testing Options for a Single Test,” and Chapter 17, “Working with Actions.”

QuickTest Professional User’s Guide • Running and Debugging Tests
494
You can set up a battery of tests and run them sequentially, using the QuickTest Test Batch Runner. For information, see “Running a Test Batch” on page 508.
You can also run tests on objects with dynamic descriptions. For information, see Chapter 4, “Managing Test Objects.”
Note for WinRunner users: You can run WinRunner tests and call functions from WinRunner-compiled modules while running a QuickTest test. For information, see Chapter 40, “Working with WinRunner.”
Running a Test to Check Your Application
When you run a test, QuickTest performs the steps you recorded in your application or Web site and displays each screen or Web page. QuickTest always runs a test from the first step, unless you specify otherwise.
Note: You can use the Run from Step option to run a test from a selected action or step. This feature is useful if you want to check a specific section of the test, without running it from the beginning. For more information, see “Running a Test or Action from a Selected Step” on page 497.
If your test does not contain Data Table parameters, QuickTest runs the test once. If the test does contain Data Table parameters, QuickTest runs the test for each row in the Data table, using the parameters you specified. If an action within your test is parameterized, you can choose to run only certain data sets. For more information, see Chapter 17, “Working with Actions.”

Chapter 25 • Running Tests
495
To run a test to check your application:
1 If your test is not already open, choose File > Open or click the Open button to open the test.
2 Click the Run button on the toolbar, or choose Test > Run. The Run dialog box opens, with New run results folder selected by default. This option displays the default path and a folder name in which the test run results are saved.
3 To save the test run results in a different folder, type the path in the text box or click the browse button to locate the folder.
If you are running a test from a TestDirector project, the Run name, Test set, and Instance options are displayed instead of the New run results folder box. For more information, see “Running a Test Stored in a TestDirector Project” on page 835.
4 To save the test run results in a temporary folder, click Temporary run results folder. This overwrites any results previously saved in this folder.

QuickTest Professional User’s Guide • Running and Debugging Tests
496
Notes:
QuickTest stores temporary test run results for all tests in <System Drive>\Documents and Settings\<user name>\Local Settings\Temp. The path in the text box of the Temporary run results folder option cannot be changed.
If you save test results to an existing test results folder, the contents of the folder are deleted before the test run.
5 Click OK. The Run dialog box closes and QuickTest begins running the test.
As QuickTest runs the test, it highlights each step in the test tree. When the test stops running, the Test Results window opens, unless you cleared the View results when test run ends check box, in the Run tab of the Options dialog box. For more information about the Options dialog box, see Chapter 28, “Setting Global Testing Options.”
Note: If you want to interrupt a test while it is running, do either of the following:
Click the Pause button or choose Debug > Pause. The test run pauses. To resume running a paused test run, click the Run button or choose Test > Run.
Click the Stop button or choose Test > Stop. The test run stops running and the Test Results window opens.

Chapter 25 • Running Tests
497
Running a Test or Action from a Selected Step
You can use the Run from Step option to run your test from a selected step to the end of the current action, if running from the Expert View, or to the end of the test, if running from the Tree View. This enables you to check a specific part of your application or to confirm that a certain part of your test runs smoothly.
Use the Run from Step option from the action tree in the Expert View to run your test from the selected step until the end of the action. Using Run from Step in this mode ignores any iterations. However, if the action contains nested actions, QuickTest runs the nested actions for the defined number of iterations.
Use the Run from Step option from the test flow in the Tree View to run your test from the selected step until the end of the test. Using Run from Step in this mode includes all iterations. The first iteration will run from the step you selected until the end of the test; all other iterations will run from the beginning of the test.
Tips:
If you only want to run one iteration of your test, choose Run one iteration only from the Run tab in the Test Settings dialog box.
If you want to run your test until a specific point within the test (and not to the end of the action or test), you can insert a breakpoint. The test will then run from the selected step or action until the breakpoint. For more information on breakpoints, see “Setting Breakpoints” on page 514.
For more information on actions, see Chapter 17, “Working with Actions.”
At the end of the test run, the standard report is displayed if View results when test run ends is selected in the Run tab of the Options dialog box. The test results summary displays a note indicating that the test was run using the Run from Step option.

QuickTest Professional User’s Guide • Running and Debugging Tests
498
To run a test or action from a selected step:
1 Open your browser to the location matching the action or step you want to test.
2 Select the action or step where you want to start running the test:
In the Tree View, highlight a step.
In the Expert View, place your cursor in a line of VBScript.
Make sure that the step you choose is not dependent on previous steps.
3 Choose Test > Run from Step or right-click and choose Run from Step.
4 In the Run dialog box, choose where to save the test results, as described in “Running a Test to Check Your Application” on page 494. Click OK.
Updating a Test
When you update a test, QuickTest runs through the test to update the test object descriptions, the expected checkpoint values, and/or the Active Screen images and values. After you save the test, the updated data is used for subsequent test runs.
When QuickTest updates tests, it runs through only one iteration of the test and one iteration of each action in the test. For information on actions, see Chapter 17, “Working with Actions.”
Note: When QuickTest updates tests, it does not update parameterized values, such as Data Table data and environment variables. For information on parameterized tests and environment variables, see Chapter 13, “Parameterizing Tests.”

Chapter 25 • Running Tests
499
To run a test to update the expected results:
1 If your test is not already open, choose File > Open or click the Open button to open the test.
2 Choose Test > Update Run. The Update Run dialog box opens.
3 Specify the settings for the update run process. For more information, see “Understanding the Update Run Dialog Box” on page 501.
4 Click OK. The Update Run dialog box closes and QuickTest begins running the test update.
QuickTest runs the test and updates the test object descriptions, the Active Screen information, and/or the expected checkpoint values, depending on your selections.
As QuickTest runs the test, it highlights each step in the test tree. When the test stops running, the Test Results window opens (unless you cleared the View results when test run ends check box in the Run tab of the Options dialog box). For more information about the Options dialog box, see Chapter 28, “Setting Global Testing Options.”

QuickTest Professional User’s Guide • Running and Debugging Tests
500
When the update run ends, the Test Results window can show:
updated values for checkpoints.
updated test object descriptions. For example:

Chapter 25 • Running Tests
501
Understanding the Update Run Dialog Box
The Update Run dialog box enables you to run through your test to update the test object descriptions, the expected checkpoint values, and/or the Active Screen images and values. After you save the test, the results of the updated test are used for subsequent test runs.
Specifying the Results Folder Location
You can specify the location to which you want to save the results of the update run process:
New run results folder—This option displays the default path and folder name in which the test run results are saved. Accept the default settings, or enter a new path by typing it in the text box or clicking the browse button to locate a different folder.

QuickTest Professional User’s Guide • Running and Debugging Tests
502
Note: If you are updating a test from a TestDirector project, the Run name, Test set and Instance options are displayed instead of the New run results folder option. To save the test run results in the project, accept the default run name, or type a different one in the box. Accept the default test set, or browse to select another one. If there is more than one instance of the test in the test set, specify the test set for which you want to save the update run results.
Temporary run results folder—Saves the test run results in a temporary folder. This option overwrites any results previously saved in this folder.
Note: QuickTest stores temporary test run results for all tests in <System Drive>\Documents and Settings\<user name>\Local Settings\Temp. The path in the text box of the Temporary run results folder option cannot be changed.
Specifying Update Options
You can specify one or more of the following information types to update when you update your test:
Update test object descriptions—QuickTest updates the test object description according to the properties currently defined in the Object Identification dialog box for each object class. You can use this option to modify the set of properties used to identify an object.
Note: If the property set you select in the Object Identification dialog box for an object class is not ideal for a particular object, the new object description may cause future test runs to fail. Therefore, it is recommended that you save a copy of your test (or check it into a TestDirector project with version control support, if applicable) before updating the test, so that you can return to the previously saved version if necessary.

Chapter 25 • Running Tests
503
This option can be especially useful when you want to record and debug your test using property values that are easy to recognize in your application (such as object labels), but may be language or operating system-dependent. Once you have debugged your test, you can use the Update Run option to change the object descriptions to use more universal property values.
For example, suppose you designed a test for the English version of your application. The test objects are recognized according to the test object property values in the English version, some of which may be language dependent. You now want to use the same test for the French version of your application.
To do this, you define non-language dependent properties to be used for the object identification (for example, you can identify a link object by its target property value instead of its text property value). You can then perform an update run on the English version of your application using these new properties to modify the test object descriptions so that you can later run the test successfully on the French version of your application.
Tip: If you have a test that runs successfully, but in which certain objects are identified using Smart Identification, you can also use the Update test object descriptions option to update the test object description property values.
When you run the test with Update test object descriptions selected, QuickTest finds the test object specified in each test step based on its current test object description. If QuickTest cannot find the test object based on its description, it uses the Smart Identification properties to identify the test object (if Smart Identification is enabled). After QuickTest finds the test object, it then updates its description based on the mandatory and assistive properties that you define in the Object Identification dialog box.
Note: Test objects that cannot be identified during the update process are not updated. As in any test run, if an object cannot be found during the update run, the test run fails, and information about the failure is included in the test results.

QuickTest Professional User’s Guide • Running and Debugging Tests
504
Any properties that were used in the previous test object description and are no longer part of the description for that test object class, as defined in the Object Identification dialog box, are removed from the new description, even if the values were parameterized or defined as regular expressions.
If the same property appears both in the test object’s new and previous descriptions, one of the following occurs:
If the property value in the previous description is parameterized or specified as a regular expression and matches the new property value, QuickTest keeps the property’s previous parameterized or regular expression value. For example, if the previous property value was defined as the regular expression button.*, and the new value is button1, the property value remains button.*.
If the property value in the previous description does not match the new property value, but the object is found using Smart Identification, QuickTest updates the property value to the new, constant property value. For example, if the previous property value was button.*, and the new value is My button, then if a Smart Identification definition enabled QuickTest to find the object, then My button becomes the new property value. In this case, any parameterization or use of regular expressions is removed from the test object description.
Update checkpoint properties—QuickTest updates the expected checkpoint values to reflect any changes that may have occurred in your application since you recorded the test. For example, suppose you had defined a text checkpoint as part of your test, and the text in your application has changed since you recorded your test. You can update a test to update the checkpoint properties to reflect the new text.

Chapter 25 • Running Tests
505
Notes:
If you selected the Save only selected area check box when creating a bitmap checkpoint, the Update Run option only updates the saved area of the bitmap; it does not update the original, full size object. To include more of the object in the checkpoint, create a new checkpoint. For more information, see “Checking Bitmaps” on page 189.
If your test includes calls to a WinRunner test and you have write permissions for both the test and the expected results folder, then selecting Update checkpoint properties also updates the expected values of the checkpoints in your WinRunner test. If you do not want to update the WinRunner test, you may want to comment out the line that calls the WinRunner test. For more information on calling WinRunner tests, see “Calling WinRunner Tests” on page 812. For more information on comment lines, see “Adding Comments” on page 755.
Update Active Screen images and values—QuickTest updates images and property values in the Active Screen to reflect any changes that may have occurred in your application since you recorded the test or if the Active Screen does not appear as it should. For example, suppose a dialog box in your application has changed since you recorded your test. You can update the test to update the dialog box appearance and its properties in the Active Screen.

QuickTest Professional User’s Guide • Running and Debugging Tests
506
Using Optional Steps
When running a test, if a step does not succeed in opening a dialog box, QuickTest does not necessarily abort the test run. It bypasses any step designated “optional” and continues running the test. By default, QuickTest automatically marks as optional steps that open certain dialog boxes. You can manually designate additional steps as optional.
Note: An alternative method to bypassing dialog boxes is the use of recovery scenarios to click a button, press Enter, or enter login information in a step. For information, see Chapter 19, “Defining and Using Recovery Scenarios”.
Setting Optional Steps
When recording a test, the site you are testing may prompt you to enter a user name and password in a login window. When you run the test, however, the site does not prompt you to enter your user name and password, because it has retained the information that was previously entered. In this case, the steps that were recorded for entering the login information are not required and should, therefore, be marked optional.
When running a test, if a step in an optional dialog box does not open, QuickTest bypasses this step and continues to run the test. When the test run is completed, a message is displayed for the step that failed to open the dialog box, but the step does not cause the test to fail.

Chapter 25 • Running Tests
507
To set an optional step:
Right-click a step in the test tree and choose Optional Step. The Optional Step icon is added next to the selected step.
Note: You can also add an optional step from the Expert View by adding OptionalStep to the beginning of the VBScript statement. For example:
OptionalStep.Browser("browser_name").Page("page_name").Link("link_name")
For information on working in Expert View, see Chapter 37, “Testing in the Expert View.” For information on the OptionalStep object, refer to the QuickTest Object Model Reference.
Default Optional Steps
By default, QuickTest considers steps that open the following dialog boxes optional:
Dialog Box Titlebar
Auto Complete
File Download
Internet Explorer
Netscape
Enter Network Password
Error
Security Alert
Security Information
Security Warning
Username and Password Required

QuickTest Professional User’s Guide • Running and Debugging Tests
508
Running a Test Batch
You can use Test Batch Runner to run several tests in succession. The results for each test are stored in their default location. Using Test Batch Runner, you can set up a list of tests and save the list as an .mtb file, so that you can easily run the same batch of tests again, at another time. You can also choose to include or exclude a test in your batch list from running during a batch run.
Note: To enable Test Batch Runner to run tests, you must select Allow other Mercury Interactive tools to run tests in the Run tab of the Options dialog box. For more information, see Chapter 28, “Setting Global Testing Options.”
To set up and run a test batch:
1 Choose Programs > QuickTest Professional > Tools > Test Batch Runner from the Start menu. The Test Batch Runner dialog box opens.
2 Click the Add button or choose Batch > Add. The Open Test dialog box opens.

Chapter 25 • Running Tests
509
3 Select a test you want to include in the test batch list and click Open. The test is added to the list.
4 Repeat step 3 for each test you want to include in the list. By default, each test selected is added to the bottom of the list.
To insert a test at another point in the list, select the test that is to precede the test you would like to add. When you add the test, it is added above the selected test.
To remove a test from the list, select it and click the Remove button, or choose Batch > Remove.
If you want to include a test in the list, but you do not want the test to be run during the next batch run, clear the check box next to the test name.
5 If you want to save the batch list, click the Save button, or choose File > Save, and enter a name for the list. The file extension is .mtb.

QuickTest Professional User’s Guide • Running and Debugging Tests
510
6 When you are ready to run your test batch, click the Run button or choose Batch > Run. If QuickTest is not already open, it opens and the tests run sequence begins. Once the batch run is complete, you can view the results for each test in its default test results folder (<test folder>\res#\report).
Note: You can click the Stop button to end the batch run.
For more information about Test Results, see Chapter 27, “Analyzing Test Results.”

511
26Debugging Tests
Controlling test runs can help you identify and eliminate defects in your tests.
This chapter describes:
About Debugging Tests
Using the Step Commands
Pausing Test Runs
Setting Breakpoints
Removing Breakpoints
Using the Debug Viewer
Handling Run Errors
Practicing Debugging a Test
About Debugging Tests
After you create a test, you should check that it runs smoothly, without errors in syntax or logic. In order to detect and isolate defects in a test, you can use step commands and the Pause command to control the test run.
You can also do this by setting breakpoints. When the test stops at a breakpoint, you can use the Debug Viewer to check and modify the values of VBScript objects and variables. Also, if QuickTest displays a run-error message during a test run, you can click the Debug button on the error message to suspend the test and debug it.

QuickTest Professional User’s Guide • Running and Debugging Tests
512
Note: You can also use the Run from Step feature to debug your test. This runs your test from a selected step to the end of the test. For additional information, see “Running a Test or Action from a Selected Step” on page 497.
Using the Step Commands
You can run a single step of a test using the Step Into, Step Out, and Step Over commands.
Step Into
Choose Debug > Step Into, click the Step Into button, or press F11 to run only the current line of the active test. If the current line of the active test calls another action or a function, the called action/function is displayed in the QuickTest window, and the test pauses at the first line of the called action/function.
Step Out
Choose Debug > Step Out or click the Step Out button, or press SHIFT+F11 only after using Step Into to enter a action or a user-defined function. Step Out runs to the end of the called action or user-defined function, then returns to the calling action and pauses the test run.
Step Over
Choose Debug > Step Over or click the Step Over button, or press F10 to run only the current step in the active test. When the current step calls another action or a user-defined function, the called action or function is executed in its entirety, but the called action script is not displayed in the QuickTest window.

Chapter 26 • Debugging Tests
513
Using the Step Commands - An Example
Follow the instructions below to create a simple test and run it using the Step Into, Step Out, and Step Over commands.
To create the sample test:
1 Choose File > New to open a new test.
2 Click the Expert View tab to display the Expert View.
3 Enter the following lines exactly:
public Function myfunc()msgbox "one"msgbox "two"msgbox "three"End Function
myfuncmyfuncmyfunc
To run the test using the Step Into, Step Out, and Step Over commands:
1 Press F9 (Insert/Remove Breakpoint) to add a breakpoint on the seventh line of the test (the first call to the myfunc function). The breakpoint symbol is displayed in the left margin. For more information, see See “Setting Breakpoints” on page 514.
2 Run the test. The test pauses at the breakpoint.
3 Press F11 (Step Into). The execution arrow points to the first line within the function (msgbox "one").
4 Press F11 (Step Into) again. A message box displays the text one.
5 Click OK to close the message box. The execution arrow moves to the next line in the function.
6 Continue pressing F11 (Step Into) until the execution arrow leaves the function and is points to the eighth line in the script (the second call to the myfunc function).
7 Press F11 (Step Into) to enter the function again. The execution arrow points to the first msgbox line within the function.

QuickTest Professional User’s Guide • Running and Debugging Tests
514
8 Press SHIFT+F11 (Step Out). Three message boxes open. The execution arrow continues to point to the first line in the function until you close the last of the three message boxes. After you close the third message box, the execution arrow points to the last line in the test.
9 Press F10 (Step Over.) The three message boxes open again. The execution arrow remains on the last line in the test.
Pausing Test Runs
You can temporarily suspend test runs by choosing Debug > Pause or clicking the Pause button. A paused test stops running when all previously interpreted steps have been run.
To resume running a paused test, click the Run button or choose Test > Run. The test run continues from the point it was suspended.
Setting Breakpoints
By setting a breakpoint, you can stop a test run at a pre-determined place in a test. A breakpoint is indicated by a red-colored hand in the left margin of the test window. QuickTest pauses the test run when it reaches the breakpoint, before executing the step. You can examine the effects of the test run up to the breakpoint, make any necessary changes, and then continue running the test from the breakpoint.
You can use breakpoints to:
suspend a test run and inspect the state of your site or application
mark a point from which to begin stepping through a test using the step commands

Chapter 26 • Debugging Tests
515
To set a breakpoint:
1 Click a step or a line in the test where you want the test run to stop.
2 Choose Debug > Insert/Remove Breakpoint or click the Insert/Remove Breakpoint button. The breakpoint symbol is displayed in the left margin of the QuickTest window.
Note: The breakpoints inserted are active only during the current QuickTest session. If you terminate your QuickTest session, you must insert new breakpoints to continue debugging the test in another session.
Removing Breakpoints
From the Debug menu you can remove a single breakpoint or all breakpoints defined for the current test.
To remove a single breakpoint, click a line in your test with the breakpoint symbol and choose Debug > Insert/Remove Breakpoint, or click the Insert/Remove Breakpoint button.
The breakpoint symbol is removed from the left margin of the QuickTest window.
To remove all breakpoints, choose Debug > Clear All Breakpoints, or click the Clear All Breakpoints button.
All breakpoint symbols are removed from the left margin of the QuickTest window.

QuickTest Professional User’s Guide • Running and Debugging Tests
516
Using the Debug Viewer
When a test stops at a breakpoint, you use the Debug Viewer pane to view, set, or modify the current value of objects or variables in your test.
To open the Debug Viewer pane:
1 Run a test with one or more breakpoints.
2 When the test pauses at a breakpoint, choose View > Debug Viewer or click the Debug Viewer button.
The Debug Viewer pane opens along the bottom of the QuickTest screen.
If the Data Table is also displayed, the Debug Viewer pane occupies the bottom-right part of the screen.
The Debug Viewer tabs are used to display the values of variables and objects in the main script of the current action, or in a selected subroutine. Choose between the main script of the action (VBScript: global code) and subroutines and functions of the action, from the Context box.
Debug Viewer tabs
Context box

Chapter 26 • Debugging Tests
517
Watch Expressions Tab
Use the Watch Expressions tab to view the current value of any variable or VBScript object that you enter in the Watch Expressions table. Paste or type the name of the object or variable into the Name column and press ENTER to view the current value in the Value column. If the value of the object or variable changes when you continue to run the test, the value in the Watch Expressions tab is updated. You can also change the value of the variable manually when the test pauses at a breakpoint.
Note: QuickTest updates the value of the object or variable in the Watch Expressions tab when running a test step-by-step.
Variables Tab
Use the Variables tab to view the current value of all variables, in the current action or selected subroutine, identified up to the point where the test stopped. If the value of a variable changes when the test run continues, the value in the Variables tab is updated. (You can also change the value of the variable manually, during the breakpoint pause.)
Note: QuickTest updates the value of the variable in the Variables tab when running a test step by step.
Command Tab
Use the Command tab to execute a line of script in order to set or modify the current value of a variable or VBScript object in your test. When the test run continues, QuickTest uses the value that you set.

QuickTest Professional User’s Guide • Running and Debugging Tests
518
Handling Run Errors
The Run Error message box displayed during a test run offers a number of option buttons for dealing with errors encountered:
Stop—Stops the test run. The test results are displayed if QuickTest is configured to show test results after the test run.
Retry—QuickTest attempts to perform the step again. If the step succeeds, the test run continues.
Skip—QuickTest skips the step that caused the error, and continues the test run from the next step.
Debug—QuickTest suspends the test run, enabling you to debug the test.You can edit the step or perform any of the debugging operations described in this chapter. After debugging, you can continue the test run from the step where the test stopped, or you can use the step commands to control the remainder of the test run.
Help—Opens QuickTest troubleshooting Help for the displayed error message. After you review the Help topic, you can select another button in the error message box.
Details—Expands the message box to display additional information about the error.

Chapter 26 • Debugging Tests
519
Practicing Debugging a Test
Suppose you create an action in your test that defines variables that will be used in other parts of your test. You can add breakpoints to the action to see how the value of the variables change as you run the test. To see how the test handles the new value, you can also change the value of one of the variables during a breakpoint.
Step 1: Create the New Action
Open a test and insert a new action called “SetVariables.” For more information about inserting actions, see Chapter 17, “Working with Actions.”
Enter the VBScript code for the action in the Expert View, as follows:
Dim aa="hello"b="me"MsgBox a
For more information about the Expert View, see Chapter 37, “Testing in the Expert View.”
Step 2: Add Breakpoints
Add breakpoints at line 3 and line 4. For more information about adding breakpoints, see “Setting Breakpoints” on page 514.
Step 3: Begin Running the Test
Run the test. The test stops at the first breakpoint, before executing that step (line of script).

QuickTest Professional User’s Guide • Running and Debugging Tests
520
Step 4: Check the Value of the Variables in the Debug Viewer Pane
Choose View > Debug Viewer to open the Debug Viewer pane.
Select the Watch Expressions tab on the Debug Viewer pane. In the first cell of the Name column, type ”a” (without quotes) and press Enter on the keypad. The Value column indicates that the a variable value is currently hello, because the breakpoint stopped after the value of variable a was initiated. In the next cell of the Name column, type ”b” (without quotes) and press Enter on the keypad. The Value column indicates that Variable b is undefined, because the test stopped before variable b was declared.
Select the Variables tab in the Debug Viewer pane. Note that the variable a is displayed with the value hello, because a is the only variable initiated, at this point in the test.
Step 5: Check the Value of the Variables at the Next Breakpoint
Click the Run button to continue running the test. The test stops at the next breakpoint. Note that the values of variables a and b have both been updated in the Watch Expressions and Variables tabs.
Step 6: Modify the Value of a Variable Using the Command Tab
Select the Command tab in the Debug Viewer pane. Type: a="This is the new value of a" at the command prompt, and press Enter on the keypad. Click the Run button to continue running the test. The message box that appears displays the new value of a.

521
27Analyzing Test Results
After running a test, you can view a report of major events that occurred during the test run.
This chapter describes:
About Analyzing Test Results
Understanding the Test Results Window
Viewing the Results of a Test Run
Viewing Checkpoint Results
Viewing Output Value Results
Analyzing Smart Identification Information in the Test Results
Deleting Test Results
Submitting Defects Detected During a Test Run
Viewing WinRunner Test Steps in the Test Results
About Analyzing Test Results
When a test run ends, you can view the test results in the Test Results window. By default, the Test Results window opens automatically at the end of a test run. If you want to change this behavior, select or clear the View results when test run ends check box in the Run tab of the Options dialog box.
The Test Results window contains a description of the steps performed during the test run. If the test does not contain Data Table parameters, the Test Results window shows a single test iteration.

QuickTest Professional User’s Guide • Running and Debugging Tests
522
If the test contains Data Table parameters, and the test settings are configured to run multiple iterations, the Test Results window displays details for each iteration of the test run. The results are grouped by the actions in the test.
Note: You set the test to run for one or all iterations in the Run tab of the Test Settings dialog box. For more information, see “Defining Run Settings for Your Test” on page 624.
After you run a test, the Test Results window displays all aspects of the test run, including:
a high-level results overview report (pass/fail status)
the data used in all test runs
an expandable Tree View of the test script, specifying exactly where application failures occurred
the exact locations in the script where failures occurred
application screen shots that highlight any discrepancies, for each stage of the test script
detailed explanations of each step and checkpoint pass or failure, at each stage of the test script

Chapter 27 • Analyzing Test Results
523
Understanding the Test Results Window
After a test run, you view the results in the Test Results window. By default, the Test Results window opens when a test run is completed. For information on changing the default setting, see “Viewing the Results of a Test Run” on page 526.
Note: You can open the Test Results window as a standalone application from the Start menu. To open the Test Results window, choose Start > Programs > QuickTest Professional > Test Results Viewer.
The Test Results window contains the following key elements:
Test results title bar—Displays the name of the test.
Menu bar—Displays menus of available commands.
Test results toolbar—Contains buttons for viewing test results (choose View > Test Results Toolbar to display the toolbar).
Test results tree—Contains a graphic representation of the test results in the test results tree.
Test results details—Contains details of the selected step.
Status bar—Displays the status of the currently selected command (choose View > Status Bar to view the status bar).

QuickTest Professional User’s Guide • Running and Debugging Tests
524
Test results tree
Test results details
Test results toolbar
Menu bar
Status bar
Test results title bar

Chapter 27 • Analyzing Test Results
525
Test Results Tree
The left pane in the Test Results window displays the test results tree—a graphical representation of the test results:
indicates a step that succeeded.
indicates a step that failed. Note that this causes all parent steps (up to the root action or test) to fail as well.
indicates a warning, meaning that the step did not succeed, but it did not cause the action or test to fail.
indicates a step that failed unexpectedly, such as when an object is not found for a checkpoint.
indicates an optional step that failed and therefore was ignored. Note that this does not cause the test to fail.
indicates that the Smart Identification mechanism successfully found the object.
indicates that a recovery scenario was activated.
indicates that the test run was stopped before it ended.
In the Test Results window displayed above, the tree includes three iterations. The test results tree also includes the icon that displays the Run-Time Data—a table that shows the values used to run a parameterized test or the output values retrieved from a test while it runs. Note that your test results are organized by action.
You can collapse or expand a branch in the test results tree in order to change the level of detail that the tree displays.

QuickTest Professional User’s Guide • Running and Debugging Tests
526
Test Results Details
By default, when the Test Results window opens, a test summary is displayed in the right portion of the window. Indicated are the test name, results name, the date and time of the test run, the number of iterations, and whether a test iteration passed or failed.
When you select a branch or step in the tree, the right pane displays detailed information for the selected item.
Test Results Toolbar
The Test Results toolbar contains buttons for viewing test results.
Viewing the Results of a Test Run
After a test run, the results are displayed, by default, in the Test Results window. (You can change the default setting in the Options dialog box. For more information, see “Setting General Testing Options” on page 589.)
In addition, you can view the results of previous runs of the current test, and results of other tests. You can also print test results to your default Windows printer.
FiltersOpen
TestDirector Connection
Add Defect
Help Topics
Find
Find Previous
FindNext
Go to Previous Page
Go to Next Page

Chapter 27 • Analyzing Test Results
527
To view the results of a test run:
1 If the Test Results window is not already open, click the Test Results button or choose Test > Results.
If there are test results for the current test, they are displayed in the Test Results window.
If there are several test results for the current test, or if there are no test results for the current test, the Open Test Results dialog box opens. You can select the test results for any test, or you can search for the test results (.qtp) file anywhere in the file system. Click Open to display the selected results in the Test Results window. For additional information on viewing test results, see “Opening Test Results to View a Selected Test Run” on page 531.
Test results tree
Test results details

QuickTest Professional User’s Guide • Running and Debugging Tests
528
2 You can collapse or expand a branch in the test results tree to select the level of detail that the tree displays.
To collapse a branch, select it and click the collapse (–) sign to the left of the branch icon, or press the minus key (–) on your keyboard number pad. The details for the branch disappear in the results tree, and the collapse sign changes to expand (+).
To collapse all of the branches in the test results tree, choose View > Collapse All or right click a branch and select Collapse All.
To expand a branch, select it and click the expand (+) sign to the left of the branch icon, or press the plus key (+) on your keyboard number pad. The tree displays the details for the branch and the expand sign changes to collapse.
If you just opened the test results, the tree expands one level at-a-time. If the tree was previously expanded, it reverts to its former state.
To expand a branch and all branches below it, select the branch and press the asterisk (*) key on your keyboard number pad.
To expand all of the branches in the test results tree, choose View > Expand All; right click a branch and select Expand All; or select the top level of the tree and press the asterisk (*) key on your keyboard number pad.
3 You can view the results of an individual iteration, action, or step. The results can be one of three types:
Iterations, Actions, and Steps that contain checkpoints are marked Passed or Failed in the bottom right part of the Test Results window and are identified by the icon or in the tree pane.
Iterations, Actions, and Steps that ran successfully, but do not contain checkpoints, are marked Done in the bottom right part of the Test Results window.
Steps that were not successful, but did not cause the test to stop running, are marked Warning in the bottom right part of the Test Results window and are identified by the icon or .

Chapter 27 • Analyzing Test Results
529
Note: A test, iteration, or action containing a step marked Warning may still be labeled Passed or Done.
4 To filter the information displayed in the test results window, click the Filters button or choose View > Filters. The Filters dialog box opens.
The default filter options are displayed in the image above. The Filters dialog box contains the following options:
Iterations area:
All—Displays test results from all iterations.
From iteration X to X—Displays the test results from a specified range of test iterations.
Status area:
Fail—Displays the test results for the steps that failed.
Warning—Displays the test results for the steps with a Warning status (steps that did not pass, but did not cause the test to fail).

QuickTest Professional User’s Guide • Running and Debugging Tests
530
Pass—Displays the test results for the steps that passed.
Done—Displays the test results for the steps with a Done status (steps that were performed successfully but did not receive a pass, fail, or warning status).
Content area:
All—Displays all steps from all nodes in the test.
Show only actions—Displays the action nodes in the test (not the specific steps in the action nodes).
5 To find specific steps within the test results, click the Find button or choose Tools > Find.
6 To move between previously selected nodes within the test results tree, click the Move to previous page or Move to next page buttons.
7 To view the results of other test runs, click the Open button or choose File > Open. For additional information, see “Opening Test Results to View a Selected Test Run” on page 531.
8 To print test results, click the Print button or choose File > Print. For additional information, see “Printing Test Results” on page 533.
Note: If you have TestDirector installed, you can add a defect to a TestDirector project. For additional information, see “Submitting Defects Detected During a Test Run” on page 576.
9 Choose File > Exit to close the Test Results window.

Chapter 27 • Analyzing Test Results
531
Note: You can use Report.Filter statements in the Expert View to disable or enable the saving of selected steps, or to save only “failed” and “warning” steps. For more information about saving test run information, see “Choosing Which Steps to Report During the Test Run” on page 788 or refer to the QuickTest Object Model Reference.
The Report.Filter statement differs from the Filters dialog box described above. The Report.Filter statement determines which steps are saved in the test results, while the Filter dialog box determines which steps are displayed at any time.
Opening Test Results to View a Selected Test Run
You can view the saved results for the current test, or you can view the saved results for other tests.
You select the test results to open for viewing from the Open Test Results dialog box, available if:
you choose File > Open from within the Test Results window.
you click the Test Results button or choose Test > Results, when there are several results, or no results, for the current test.

QuickTest Professional User’s Guide • Running and Debugging Tests
532
The results of test runs for the current test are listed. To view one of the results sets, select it and click Open.
Tip: To update the results list after you change the specified test path, click Refresh.
To view results of test runs for other tests, you can search by test, within QuickTest, or by result (.qtp) files, in your file system.
To search for results by test:
1 In the Open Test Results dialog box, enter the path of the test folder, or click Browse to open the Open Test dialog box.
2 Find and highlight the test whose results you want to view, and click Open.
3 In the Open Test Results dialog box, highlight the test result set you want to view, and click Open.
To search for results by test result files:
1 From the Open Test Results dialog box, click the Open from File button to open the Select Results File dialog box.
2 Browse to the folder where the test results are stored.
3 Highlight the test results (.qtp) file you want to view, and click Open.
Note: By default, test result files are stored in <Test>\<ResultsName>\Report.

Chapter 27 • Analyzing Test Results
533
Printing Test Results
You can print test results from the Test Results window.
To print the test results:
1 Click the Print button or choose File > Print. The Print dialog box opens.
2 Select a Print Range option:
Select All to print a summary of the entire test.
Select Selection to print the action summary for the selected branch in the test results tree.
3 Click OK to print.
Viewing Checkpoint Results
By adding checkpoints to your tests, you can compare expected values in Web pages, text strings, objects, and tables to the values of these elements in your Web site or application. This enables you to ensure that your application functions as desired.
When you run the test, QuickTest compares the expected results of the checkpoint to the current results. If the results do not match, the checkpoint fails, which causes the test to fail. You can view the results of the checkpoint in the Test Results window.

QuickTest Professional User’s Guide • Running and Debugging Tests
534
The following sections provide information about viewing results for most checkpoint types.
For more information on checkpoints, see Chapter 7, “Understanding Checkpoints.”
Analyzing Standard Checkpoint Results
By adding standard checkpoints to your tests, you can compare the expected values of object properties to the object’s current values during a test run. If the results do not match, the checkpoint fails.
For more information on standard checkpoints, see “Checking Object Property Values” on page 131.
You can view detailed results of the standard checkpoint in the Test Results window.
To view the results of a standard checkpoint:
1 If the Test Results window is not already open, click the Test Results button or choose Test > Results.
If you have only one set of results for your test and you created the test in the current session, the Test Results window opens and displays the test results. Otherwise, the Open Test Results dialog box opens. Select a results (.qtp) file, and click Open. The Test Results window opens and displays the test results.
2 In the left pane of the Test Results window, expand the branches of a test iteration.
3 Click a checkpoint branch. The top right pane displays detailed results of the selected checkpoint, including its status (passed or failed), the date and time the checkpoint was run, and the portion of the checkpoint timeout interval that was used (if any).

Chapter 27 • Analyzing Test Results
535
It also displays the values of the object properties that are checked, and any differences between the expected and actual property values. The bottom right pane displays the image capture for the checkpoint step (if available).
In the above example, the details of the failed checkpoint indicate that the expected results and the current results do not match. The expected value of the flight departure is “Seattle,” but the actual value is “Acapulco.”

QuickTest Professional User’s Guide • Running and Debugging Tests
536
Note: By default, the bottom right part of the Test Results window displays a snapshot of the checkpoint step only if it has failed status. You can change the conditions for when an image is saved, in the Run tab of the Options dialog box. For more information, see “Setting Run Testing Options” on page 602.
4 Choose File > Exit to close the Test Results window.
Analyzing Table and Database Checkpoint Results
By adding table checkpoints to your tests, you can check that a specified value is displayed in a cell in a table on your Web page or in your application. By adding database checkpoints to your tests, you can check the contents of databases accessed by your Web page or application. The results displayed for table and database checkpoints are similar. When you run your test, QuickTest compares the expected results of the checkpoint to the actual results of the test run. If the results do not match, the checkpoint fails.
For more information on table and database checkpoints, see Chapter 9, “Checking Tables and Databases”.
You can view detailed results of the table or database checkpoint in the Test Results window.
To view the results of a table or database checkpoint:
1 If the Test Results window is not already open, choose Test > Results or click the Test Results button.
If you have only one set of results for your test and you created the test in the current session, the Test Results window opens and displays the test results. Otherwise, the Open Test Results dialog box opens. Select a results (.qtp) file, and click Open. The Test Results window opens and displays the test results.
2 In the left pane of the Test Results window, expand the test iteration tree.

Chapter 27 • Analyzing Test Results
537
3 Locate the table or database checkpoint branch and click the checkpoint item. The top right pane displays the checkpoint step results, including its status (passed or failed), the date and time the checkpoint was run, the verification settings you specified for the checkpoint, and the number of individual table cells or database records that passed and failed the checkpoint.
The bottom right pane shows the table cells or database records that were checked by the checkpoint. Cell values or records that were checked are displayed in black; cell values or records that were not checked are displayed in gray. Cells or records that failed the checkpoint are marked with a failed icon.
Note: By default, the bottom right part of the Test Results window displays information about the selected checkpoint only if it has failed status. You can change the conditions for when a step’s image is saved, in the Run tab of the Options dialog box. For more information, see “Setting Run Testing Options” on page 602.

QuickTest Professional User’s Guide • Running and Debugging Tests
538
4 You can click the Next Mismatch button in the bottom right pane to highlight the next table cell or database record that failed the checkpoint.
5 You can click the Compare Values button in the bottom right pane to display the expected and actual values of the selected table cell or database record.
6 Choose File > Exit to close the Test Results window.
Analyzing Bitmap Checkpoint Results
By adding bitmap checkpoints to your tests, you can check the appearance of elements in your Web page or application by matching captured bitmaps. When you run your test, QuickTest compares the expected results of the checkpoint to the actual results of the test run. If the results do not match, the checkpoint fails.
For more information on bitmap checkpoints, see Chapter 11, “Checking Bitmaps”.
You can view detailed results of the bitmap checkpoint in the Test Results window.
To view the results of a bitmap checkpoint:
1 If the Test Results window is not already open, choose Test > Results or click the Test Results button.
If you have only one set of results for your test and you created the test in the current session, the Test Results window opens and displays the test results. Otherwise, the Open Test Results dialog box opens. Select a results (.qtp) file, and click Open. The Test Results window opens and displays the test results.
2 In the left pane of the Test Results window, expand the test iteration tree.
3 Locate the bitmap checkpoint branch and click the checkpoint item. The top right pane displays the checkpoint step results, including its status (passed or failed), the date and time the checkpoint was run and the portion of the checkpoint timeout interval that was used (if any).

Chapter 27 • Analyzing Test Results
539
The bottom right pane shows the expected and actual bitmaps that were compared during the test run.
Note: By default, the bottom right part of the Test Results window displays information about the selected checkpoint only if it has failed status. You can change the conditions for when a step’s image is saved, in the Run tab of the Options dialog box. For more information, see “Setting Run Testing Options” on page 602.
4 Choose File > Exit to close the Test Results window.

QuickTest Professional User’s Guide • Running and Debugging Tests
540
Analyzing Text or Text Area Checkpoint Results
By adding text or text area checkpoints to your tests, you can check that a text string is displayed in the appropriate place in your application or on your Web page. When you run your test, QuickTest compares the expected results of the checkpoint to the actual results of the test run. If the results do not match, the checkpoint fails.
For more information on text and text area checkpoints, see Chapter 10, “Checking Text”.
You can view detailed results of the text or text area checkpoint in the Test Results window.
To view the results of a text or text area checkpoint:
1 If the Test Results window is not already open, choose Test > Results or click the Test Results button.
If you have only one set of results for your test and you created the test in the current session, the Test Results window opens and displays the test results. Otherwise, the Open Test Results dialog box opens. Select a results (.qtp) file, and click Open. The Test Results window opens and displays the test results.
2 In the left pane of the Test Results window, expand the test iteration tree.
3 Locate the text or text area checkpoint branch and click the checkpoint item. The top right pane displays the checkpoint step results, including its status (passed or failed), the date and time the checkpoint was run and the portion of the checkpoint timeout interval that was used (if any). It also shows the expected text and actual text that was checked, and the verification settings you specified for the checkpoint.

Chapter 27 • Analyzing Test Results
541
The bottom right pane displays the image capture for the checkpoint step.
Note: By default, the bottom right part of the Test Results window displays information about the selected checkpoint only if it has failed status. You can change the conditions for when a step’s image is saved, in the Run tab of the Options dialog box. For more information, see “Setting Run Testing Options” on page 602.
4 Choose File > Exit to close the Test Results window.

QuickTest Professional User’s Guide • Running and Debugging Tests
542
Analyzing XML Checkpoint Results
By adding XML checkpoints to your tests, you can verify that the data and structure in your XML documents or files has not changed unexpectedly. When you run your test, QuickTest compares the expected results of the checkpoint to the actual results of the test run. If the results do not match, the checkpoint fails.
For more information on XML checkpoints, see Chapter 12, “Checking XML”.
You can view summary results of the XML checkpoint in the Test Results window. You can view detailed results by opening the XML Checkpoint Results window.
To view the results of an XML checkpoint:
1 If the Test Results window is not already open, choose Test > Results or click the Test Results button.
If you have only one set of results for your test and you created the test in the current session, the Test Results window opens and displays the test results. Otherwise, the Open Test Results dialog box opens. Select a results (.qtp) file, and click Open. The Test Results window opens and displays the test results.
2 In the left pane of the Test Results window, expand the test iteration tree.
3 Locate the XML checkpoint branch and click the checkpoint item. The top right pane displays the checkpoint step results.

Chapter 27 • Analyzing Test Results
543
The bottom right pane shows the details of the schema validation (if applicable) and a summary of the checkpoint results. If the schema validation failed, the reason(s) for the failure is also shown.

QuickTest Professional User’s Guide • Running and Debugging Tests
544
4 If the checkpoint failed, you can view details of each check performed in the checkpoint. In the bottom right pane, click View XML Checkpoint Results. The XML Checkpoint Results window opens, displaying details of the checkpoint’s failure.
Note: By default, if the checkpoint passes, the View XML Checkpoint Results button is not available. If you want to view the detailed results of the checkpoint even when the checkpoint passes, choose Tools > Options and select the Run tab. In the Save step screen capture to test results option, select always.
5 Choose File > Exit to close the XML Checkpoint Results window.
6 Choose File > Exit to close the Test Results window.
Understanding the XML Checkpoint Results Window
When you click the View XML Checkpoint Results button from the Test Results window, the XML Checkpoint Results window displays the XML file hierarchy.
The Expected XML Tree pane displays the expected results—the elements, attributes, and values, as stored in your XML checkpoint.
The Actual XML Tree pane displays the actual results—what the XML document actually looked like during the test run.

Chapter 27 • Analyzing Test Results
545
The Checkpoint Summary pane displays results information for the check performed on the selected item in the expected results pane. When you open the XML Checkpoint Results window, the Checkpoint Summary pane displays the summary results for the first checked item in the expected results pane.

QuickTest Professional User’s Guide • Running and Debugging Tests
546
Navigating the XML Checkpoint Results Window
The XML Checkpoint Results window provides a menu and toolbar that enables you to navigate the various components of your XML checkpoint results.
You can use the following commands or toolbar buttons to navigate your XML checkpoint results:
View Checkpoint Summary—Select an element in the XML Tree and click the View Checkpoint Summary button or choose View > Checkpoint Summary. The Checkpoint Summary pane, which provides a detailed description of what parts of an element passed or failed, is displayed at the bottom of the XML Checkpoint Results window.

Chapter 27 • Analyzing Test Results
547
The following example displays the Checkpoint Summary for the <book> element in a particular XML file.
View Attribute Details—In the XML Tree, select an element whose attributes were checked. Click the View Attribute Details button or choose View > Attribute Details. Both the Expected Attributes and Actual Attributes panes at the bottom of the XML Checkpoint Results window display the details of the attributes check.
The following example shows the attribute details of the second <Customers> element in an XML Web page or frame. The Expected Attributes pane displays each attribute name, its expected value, and the result status of the attribute check.

QuickTest Professional User’s Guide • Running and Debugging Tests
548
The Actual Attributes pane displays the attribute name and its actual value during the execution run.
Find Next Check—Choose View > Find Next Check or click the Find Next Check button to jump directly to the next checked item in the XML Tree.
Find Previous Check—Choose View > Find Previous Check or click the Find Previous Check button to jump directly to the previous checked item in the XML Tree.
Scroll Trees Simultaneously—Choose View > Scroll Trees Simultaneously, or click the Scroll Trees Simultaneously button to synchronize the scrolling of the Expected and Actual XML Trees. If this option is selected, the Expected and Actual XML Trees scroll simultaneously as you navigate through either of the tree structures. If this option is not selected, you can scroll only one tree at a time.
Help Topics—Choose Help > Help Topics or click the Help Topics button to view help on the XML Checkpoint Results window.

Chapter 27 • Analyzing Test Results
549
Examining Sample XML Checkpoint Results
Below are four sample XML checkpoint scenarios. Each example describes the changes that occurred in the actual XML document, explains how you locate the cause of the problem in the XML checkpoint results, and displays the corresponding XML Checkpoint Results window.
Scenario 1
In the following example, the <airline> element tag was changed to <airlines> and the XML checkpoint identified the change in the tag structure. The <airline> element’s child element check also failed because of the mismatch at the parent element level.
To view details of the failed element, select the <airline> tag from the Expected XML Tree and choose View > Checkpoint Summary to view the Checkpoint Summary in the bottom pane of the XML Checkpoint Results window. The text: This element is missing indicates that the <airline> element tag changed in your XML document.

QuickTest Professional User’s Guide • Running and Debugging Tests
550
Scenario 2
In the following example, an attribute that is associated with the <orders> element tag was changed from the original, expected value of orders1, to a new value of orders2.
To view details of the failed attribute, select the failed element from the Expected XML Tree and choose View > Attribute Details. The Expected Attributes and Actual Attributes panes are displayed at the bottom of the XML Checkpoint Results window.
Using the Expected Attributes and Actual Attributes panes, you can identify which attribute caused the error and which values were mismatched.

Chapter 27 • Analyzing Test Results
551
Scenario 3
In the following example, the actual value of the <total> element was changed between execution runs, causing the checkpoint to fail.
To view details of the failed value, select the failed element from the Expected XML Tree and choose View > Checkpoint Summary to view the Checkpoint Summary in the bottom pane of the XML Checkpoint Results window.
Using the Checkpoint Summary pane, you can compare the expected and actual values of the <total> element.

QuickTest Professional User’s Guide • Running and Debugging Tests
552
Scenario 4
In the following example, the value of the <total> element was parameterized and the value’s content caused the checkpoint to fail in this iteration.
Note that the value icon is displayed with a pound symbol to indicate that the value was parameterized.
To view details of the failed value, select the failed element from the Expected XML Tree and choose View > Checkpoint Summary to view the Checkpoint Summary in the bottom pane of the XML Checkpoint Results window. Note that the procedure for analyzing the checkpoint results does not change even though the value was parameterized.
Using the Checkpoint Summary pane, you can compare the expected and actual values of the <total> element.

Chapter 27 • Analyzing Test Results
553
Analyzing Accessibility Checkpoint Results
When you include accessibility checkpoints in your test, the Test Results window displays the results of each accessibility option that you checked.
The test results tree displays a separate step for each accessibility option that was checked in each checkpoint. For example, if you selected all accessibility options, the test results tree for an accessibility checkpoint may look something like this:
The test results details provide information that can help you pinpoint parts of your Web site that may not conform to the W3C Web Content Accessibility Guidelines. The information provided for each check is based on the W3C requirements.
Note: Some of the W3C Web Content Accessibility Guidelines that are relevant to accessibility checkpoints are cited or summarized in the following sections. This information is not comprehensive. When checking whether your Web site satisfies the W3C Web Content Accessibility Guidelines, you should refer to the complete document at: http://www.w3.org/TR/WAI-WEBCONTENT/.
For more information on accessibility checkpoints, see Chapter 21, “Testing Web Objects”.

QuickTest Professional User’s Guide • Running and Debugging Tests
554
ActiveX Check
Guideline 6 of the W3C Web Content Accessibility Guidelines requires you to ensure that pages are accessible even when newer technologies are not supported or are turned off. When you select the ActiveX check, QuickTest checks whether the selected page or frame contains any ActiveX objects (including multimedia). If it does not contain any ActiveX objects, the checkpoint passes. If the page or frame does contain ActiveX objects then the results display a warning and a list of the ActiveX objects so that you can check the accessibility of these pages on browsers without ActiveX support. For example:
Alt Property Check
Guideline 1.1 of the W3C Web Content Accessibility Guidelines requires you to provide a text equivalent for every non-text element. The Alt property check checks whether objects that require the Alt property under this guideline, do in fact have this attribute. If the selected frame or page does not contain any such objects, or if all such objects have the required attribute, the checkpoint passes. If one or more objects that require the property do not have it, the test fails and the test results details display a list that shows which objects are lacking the attribute. For example:
The bottom right pane of the Test Results window displays the captured page or frame, so that you can see the objects listed in the Alt property check list.

Chapter 27 • Analyzing Test Results
555
Applet Check
The Applet Check also helps you ensure that pages are accessible, even when newer technologies are not supported or are turned off (Guideline 6), by finding any Java applets or applications in the checked page or frame. The checkpoint passes if the page or frame does not contain any Java applets or applications. Otherwise, the results display a warning and a list of the Java applets and applications. For example:
Frame Titles Check
Guideline 12.1 requires you to title each frame to facilitate frame identification and navigation. When you select the Frame Titles check, QuickTest checks whether Frame and Page objects have the TITLE tag. If the selected page or frame and all frames within it have titles, the checkpoint passes. If the page, or one or more frames, do not have the tag, the test fails and the test results details display a list that shows which objects are lacking the tag. For example:
The bottom right part of the Test Results window displays the captured page or frame, so that you can see the frames listed in the Frame Titles check list.

QuickTest Professional User’s Guide • Running and Debugging Tests
556
Multimedia Links Check
Guidelines 1.3 and 1.4 require you to provide an auditory, synchronized description of the visual track of a multimedia presentation. Guideline 6 requires you to ensure that pages are accessible, even when newer technologies are not supported or are turned off. The Multimedia Links Check identifies links to multimedia objects so that you can confirm that alternate links are available where necessary. The checkpoint passes if the page or frame does not contain any multimedia links. Otherwise, the results display a warning and a list of the multimedia links.
Server-Side Image Check
Guideline 1.2 requires you to provide redundant text links for each active region of a server-side image map. Guideline 9.1 recommends that you provide client-side image maps instead of server-side image maps except where the regions cannot be defined with an available geometric shape. When you select the Server-side Image check, QuickTest checks whether the selected page or frame contains any server-side images. If it does not, the checkpoint passes. If the page or frame does contain server-side images, then the results display a warning and a list of the server-side images so that you can confirm that each one answers the guideline requirements. For example:
Tables Check
Guideline 5 requires you to ensure that tables have the necessary markup to be transformed by accessible browsers and other user agents. It emphasizes that you should use tables primarily to display truly tabular data and to avoid using tables for layout purposes unless the table still makes sense when linearized. The TH, TD, THEAD, TFOOT, TBODY, COL, and COLGROUP tags are recommended so that user agents can help users to navigate among table cells and access header and other table cell information through auditory means, speech output, or a braille display.

Chapter 27 • Analyzing Test Results
557
The Tables Check checks whether the selected page or frame contains any tables. If it does not, the checkpoint passes. If the page or frame does contain tables, the results display a warning and a visual representation of the tag structure of the table.
For example:

QuickTest Professional User’s Guide • Running and Debugging Tests
558
Viewing Output Value Results
You can add output values to your test. An output value is a value captured during the test run and entered in the run-time Data Table for use at another point in the test run. When the value is needed later in the test run as input, QuickTest retrieves it from the Data Table.
The following section provides general information about viewing output values in the Data Table. In addition, you can view more detailed information about XML output values. For more information, see “Analyzing XML Output Value Results” on page 559.
For more information on output values, see Chapter 14, “Creating Output Values”.
Viewing the Run-Time Data Table
After running a parameterized test, the Run-Time Data Table displays the parameterized values used and any output values retrieved during the test run. For more information on parameterization, see Chapter 13, “Parameterizing Tests.” For more information on output values, see Chapter 14, “Creating Output Values.” For more information on the test Data Table, see Chapter 18, “Working with Data Tables.”
To view the Run-Time Data Table:
1 If the Test Results window is not already open, then click the Test Results button or choose Test > Results. If you have more than one set of results, or no results, the Open Test Results dialog box opens. Select a results (.qtp) file. Click Open. The Test Results window opens. If you have only one set of results for your test, the Test Results window opens directly.

Chapter 27 • Analyzing Test Results
559
2 In the left pane of the Test Results window, highlight Run-Time Data. The right pane displays the Run-Time Data Table.
In the above example, the Run-Time Data Table contains the parameterized flight departure values.
3 Choose File > Exit to close the Test Results window.
Analyzing XML Output Value Results
You can add output values from XML in your Web page/frame or XML files to your test. An output value is a value captured during the test run and entered in the run-time Data Table for use at another point in the test run. When you create an output value for an element value or attribute, the test retrieves its value during the test run and stores it in a column in the current row of the run-time Data Table. When the value is needed later in the test run as input, QuickTest retrieves it from the Data Table.
For more information on XML output values, see Chapter 14, “Creating Output Values”.

QuickTest Professional User’s Guide • Running and Debugging Tests
560
You can view summary results of the XML output value in the Test Results window. You can view detailed results by opening the XML Output Value Results window.
To view the results of an XML output value:
1 If the Test Results window is not already open, choose Test > Results or click the Test Results button.
If you have more than one set of results, the Open Test Results dialog box opens. Select a results .qtp file, and click Open. The Test Results window opens and displays the test results. If you have only one set of results for your test, the Test Results window opens and displays the test results.
2 In the left pane of the Test Results window, expand the test results tree.
3 Locate the XML output value branch and click the output value item. The right pane displays a summary of the output value results.

Chapter 27 • Analyzing Test Results
561
4 If the output value failed, you can view details. In the bottom right pane, click View XML Output Value Results. The XML Output Value Results window opens, displaying details of the output value.
Note: By default, if the output value passes, the View XML Output Value Results button is not available. If you want to view the detailed results of the output value even when the output value passes, choose Tools > Options and select the Run tab. In the Save step screen capture to test results option, select always.
5 Choose File > Exit to close the XML Output Value Results window.
6 Choose File > Exit to close the Test Results window.
For more information on XML output value results, see “Understanding the XML Output Value Results Window” below.
Understanding the XML Output Value Results Window
When you click the View XML Output Value Results button from the Test Results window, the XML Output Value Results window displays the XML file hierarchy.
The Data Table Names pane displays the XML output value settings—the structure of the XML and the Data Table column names you selected to output.
The Output Values pane displays the actual XML tree—what the XML document or file actually looked like and the actual values that were output during the test run.

QuickTest Professional User’s Guide • Running and Debugging Tests
562
The Additional Details pane displays results information for the selected item in the Data Table Names pane.
Navigating the XML Output Value Results Window
The XML Output Value Results window provides a menu and toolbar that enables you to navigate the various components of your XML output value results.

Chapter 27 • Analyzing Test Results
563
You can use the following commands or toolbar buttons to navigate your XML output value results:
View Output Value Summary—Select an element in the XML Tree and click the View Output Value Summary button or choose View > Output Value Summary. The Additional Details pane, which provides information regarding the output value for the selected element, attribute, or value, is displayed at the bottom of the XML Output Value Results window.
The following example displays the Additional Details pane for the <name> element in a particular XML file.

QuickTest Professional User’s Guide • Running and Debugging Tests
564
View Attribute Details—In the XML Tree, select an element whose attributes were output as values. Click the Attribute Details button or choose View > Attribute Details. Both the Expected Attributes and Actual Attributes panes at the bottom of the XML Output Value Results window display the details of the attributes output value.
The following example shows the attribute details of the <shiporder> element in an XML file.
The Expected Attributes pane displays each attribute name and its expected value or output value Data Table column name. The Actual Attributes pane displays the attribute name and the actual value of each attribute during the test run.
Find Next Output Value—Choose View > Find Next Output Value or click the Find Next Output Value button to jump directly to the next output value in the XML Tree.

Chapter 27 • Analyzing Test Results
565
Find Previous Output Value—Choose View > Find Previous Output Value or click the Find Previous Output Value button to jump directly to the previous output value in the XML Tree.
Scroll Trees Simultaneously—Choose View > Scroll Trees Simultaneously, or click the Scroll Trees Simultaneously button to synchronize the scrolling of the Data Table Names and Output Values trees. If this option is selected, the Data Table Names and Output Values trees scroll simultaneously as you navigate through either of the tree structures. If this option is not selected, you can scroll only one tree at a time.
Help Topics—Choose Help > Help Topics or click the Help Topics button to view help on the XML Output Value Results window.
Analyzing Smart Identification Information in the Test Results
If the recorded description does not enable QuickTest to identify the specified object in a step, and a Smart Identification definition is defined (and enabled) for the object, then QuickTest tries to identify the object using the Smart Identification mechanism.

QuickTest Professional User’s Guide • Running and Debugging Tests
566
If QuickTest successfully uses Smart Identification to find an object after no object matches the recorded description, the test results receive a warning status and include the following information:
For more information on the Smart Identification mechanism, see Chapter 33, “Configuring Object Identification”.
In the results tree: In the results details:
A description mismatch icon for the missing object. For example:
An indication that the object was not found.
A Smart Identification icon for the missing object. For example:
An indication that the Smart Identification mechanism successfully found the object, and information about the properties used to find the object. You can use this information to modify the recorded test object description, so that QuickTest can find the object using the description in future test runs.
The actual step performed. For example:
Normal result details for the performed step.

Chapter 27 • Analyzing Test Results
567
The image below shows the results for a test in which Smart Identification was used to identify the userName object after one of the recorded description property values changed.
If QuickTest successfully uses Smart Identification to find an object after multiple objects are found that match the recorded description, QuickTest shows the Smart Identification information in the test results. The step still receives a passed status, because in most cases, if Smart Identification was not used, the test object description plus the ordinal identifier could have potentially identified the object.

QuickTest Professional User’s Guide • Running and Debugging Tests
568
In such a situation, the test results show the following information:
The image below shows the results for a test in which Smart Identification was used to uniquely identify the Home object after the recorded description resulted in multiple matches.
If the Smart Identification mechanism cannot successfully identify the object, the test fails and a normal failed step is displayed in the test results.
In the results tree: In the results details:
A Smart Identification icon for the missing object. For example:
An indication that the Smart Identification mechanism successfully found the object, and information about the properties used to find the object. You can use this information to create a unique object description for the object, so that QuickTest can find the object using the description in future test runs.
The actual step performed. For example:
Normal result details for the performed step.

Chapter 27 • Analyzing Test Results
569
Deleting Test Results
You can use the Test Results Deletion Tool to remove unwanted or obsolete test results from your system, according to specific criteria that you define. This enables you to free up valuable disk space.
You can use this tool with a Windows-style user interface, or you can use the Windows command line to run the tool in the background (silently) in order to directly delete results that meet criteria that you specify.
Deleting Results Using the Test Results Deletion Tool
You can use the Test Results Deletion Tool to view a list of all the test results in a specific location in your file system or in a TestDirector project. You can then delete any test results that you no longer require.
The Test Results Deletion Tool enables you to sort the test results by name, date, size, and so forth, so that you can easily identify the results you want to delete.
To delete test results using the Test Results Deletion Tool:
1 Choose Programs > QuickTest Professional > Tools > Test Results Deletion Tool from the Start menu. The Tests Results Deletion Tool window opens.

QuickTest Professional User’s Guide • Running and Debugging Tests
570
2 In the Test or folder box, specify the folder or specific test from which you want to delete test results. You can specify a full file system path or a full TestDirector path.
You can also browse to a test or folder as follows:
To navigate to a specific test, click the Browse button or click the arrow to the right of the Browse button and select Tests.
To navigate to a specific folder, click the arrow to the right of the Browse button and select Folders.
Note: To delete test results from a TestDirector database, click Connect to connect to TestDirector before browsing or entering the test path. Specify the TestDirector test path in the format [TestDirector] Subject\<folder name>\<test name>. For more information, see “Connecting QuickTest to TestDirector” on page 825.
3 Select Include test results found in subfolders if you want to view all tests results contained in subfolders of the specified folder.
Note: The Include test results found in subfolders check box is available only for folders in the file system. It is not supported when working with tests in TestDirector.
The test results in the specified test or folder are displayed in the Test Results box, together with descriptive information for each one. You can click a column's title in the Test Results box to sort test results based on the entries in that column. To reverse the order, click the column title again.
The Delete Test Results window status bar shows information regarding the displayed test results, including the number of results selected, the total number of results in the specified location and the size of the files.
4 Select the test results you want to delete. You can select multiple test results for deletion using standard Windows selection techniques.

Chapter 27 • Analyzing Test Results
571
5 Click Delete. The selected test results are deleted from the system and the TestDirector database.
Tip: You can click Refresh at any time to update the list of test results displayed in the Test Results box.
Deleting Results Using the Windows Command Line
You can use the Windows command line to instruct the Test Results Deletion Tool to delete test results according to criteria you specify. For example, you may want to always delete test results older than a certain date or over a minimum file size.
To run the Test Results Deletion Tool from the command line:
1 Open a Windows command prompt and type <QuickTest installation path>\bin\TestResultsDeletionTool.exe, then type a space and type the command line options you want to use. For more information, see “Command Line Options” below.
Note: If you use the -Silent command line option to run the Test Results Deletion Tool, all test results that meet the specified criteria are deleted. Otherwise, the Delete Test Results window opens.
Command Line Options
You can use command line options to specify the criteria for the test results that you want to delete. Following is a description of each command line option.

QuickTest Professional User’s Guide • Running and Debugging Tests
572
Note: If you add command line options that contain spaces, you must specify the option within quotes, for example:
TestResultsDeletionTool.exe -Test "F:\Tests\Keep\web objects"
-Domain TestDirector_domain_name
Specifies the name of the TestDirector domain to which you want to connect. This option should be used in conjunction with the -Server, -Project, -User, and -Password options.
-FromDate results_creation_date
Deletes test results created after the specified date. Results created on or before this date are not deleted. The format of the date is MM/DD/YYYY.
The following example deletes all results created after November 1, 2002.
TestResultsDeletionTool.exe -Silent -Test "C:\tests\test1" -FromDate "11/1/2002"
-Log log_file_path
Creates a log file containing an entry for each test results file in the folder or test you specified. The log file indicates which results were deleted and the reasons why other results were not. For example, results may not be deleted if they are smaller than the minimum file size you specified.
You can specify a file path and name or use the default path and name. If you do not specify a file name, the default log file name is TestResultsDeletionTool.log in the folder where the Test Results Deletion Tool is located.
The following example creates a log file in C:\temp\Log.txt.
TestResultsDeletionTool.exe -Silent -Log "C:\temp\Log.txt" -Test "C:\tests\test1"
The following example creates a log file named TestResultsDeletionTool.log in the folder where the Test Results Deletion Tool is located.
TestResultsDeletionTool.exe -Silent -Log -Test "C:\tests\test1"

Chapter 27 • Analyzing Test Results
573
-MinSize minimum_file_size
Deletes test results larger than or equal to the specified minimum file size. Specify the size in bytes.
Note: The -MinSize option is available only for test results in the file system. It is not supported when working with tests in TestDirector.
The following example deletes all results larger than or equal to 10000 bytes. Results that are smaller than 10000 bytes are not deleted.
TestResultsDeletionTool.exe -Silent -Test "C:\tests\test1" -MinSize "10000"
-Name result_file_name
Specifies the name(s) of the result file(s) to be deleted. Only results with the specified name(s) are deleted.
You can use regular expressions to specify criteria for the result file(s) you want to delete. For more information about regular expressions and regular expression syntax, see Chapter 15, “Using Regular Expressions”.
The following example deletes results with the name Res1.
TestResultsDeletionTool.exe -Silent -Test "C:\tests\test1" -Name "Res1"
The following example deletes all results whose name starts with Res plus one additional character. (For example, Res1 and ResD would be deleted. ResDD would not be deleted.)
TestResultsDeletionTool.exe -Silent -Test "C:\tests\test1" -Name "Res."
-Password TestDirector_password
Specifies the password for the TestDirector user name. This option should be used in conjunction with the -Domain, -Server, -Project, and -User options.

QuickTest Professional User’s Guide • Running and Debugging Tests
574
The following example connects to the Default TestDirector domain, using the server located at http://TDServer/Tdbin, with the project named TestDirector_Demo, using the user name Admin and the password PassAdmin.
TestResultsDeletionTool.exe -Domain "Default" -Server "http://TDServer/Tdbin" -Project "TestDirector_Demo" -User "Admin" -Password "PassAdmin"
-Project TestDirector_project_name
Specifies the name of the TestDirector project to which you want to connect. This option should be used in conjunction with the -Domain, -Server, -User, and -Password options.
-Recursive
Deletes test results from all tests in a specified folder and its subfolders. When using the -Recursive option, the -Test option should contain the path of the folder that contains the tests results you want to delete (and not the path of a specific test).
The following example deletes all results in the F:\Tests folder and all of its subfolders.
TestResultsDeletionTool.exe -Test "F:\Tests" -Recursive
Note: The -Recursive option is available only for folders in the file system. It is not supported when working with tests in TestDirector.
-Server TestDirector_server_path
Specifies the full path of the TestDirector server to which you want to connect. This option should be used in conjunction with the -Domain, -Project, -User, and -Password options.

Chapter 27 • Analyzing Test Results
575
-Silent
Instructs the Test Results Deletion Tool to run in the background (silently), without the user interface.
The following example instructs the Test Results Deletion Tool to run silently and delete all results located in C:\tests\test1.
TestResultsDeletionTool.exe -Silent -Test "C:\tests\test1"
Note: The following options are available only when used in conjunction with the -Silent option.
-Test test_or_folder_path
Sets the test or test path from which the Test Results Deletion Tool deletes test results. You can specify a test name and path, file system path, or full TestDirector path.
Note: The -Domain, -Server, -Project, -User, and -Password options must be used to connect to TestDirector.
The following example deletes all results in the F:\Tests\Keep\webobjects test.
TestResultsDeletionTool.exe -Test "F:\Tests\Keep\webobjects"
The following example deletes all results in the TestDirector Tests\webobjects test, if you are connected to TestDirector.
TestResultsDeletionTool.exe -Test "[TestDirector] Subject\Tests\webobjects"
Note: The -Test option can be combined with the -Recursive option to delete all test results in the specified folder and all its subfolders.

QuickTest Professional User’s Guide • Running and Debugging Tests
576
-UntilDate results_creation_date
Deletes test results created before the specified date. Results created on or after this date are not deleted. The format of the date is MM/DD/YYYY.
The following example deletes all results created before November 1, 2002.
TestResultsDeletionTool.exe -Silent -Test "C:\tests\test1" -UntilDate "11/1/2002"
-User TestDirector_user_name
Specifies the user name for the TestDirector project to which you want to connect. This option should be used in conjunction with the -Domain, -Server, -Project, and -Password options.
Submitting Defects Detected During a Test Run
You can instruct QuickTest to automatically submit a defect to a TestDirector project for each failed step in your test. You can also manually submit a defect for a specific test step to TestDirector directly from within your QuickTest Test Results window. These options are only available when you are connected to a TestDirector project.
For more information about working with TestDirector and QuickTest, see Chapter 41, “Working with TestDirector”. For additional information about TestDirector, refer to the TestDirector User’s Guide.
Manually Submitting Defects to a TestDirector Project
When viewing the results of a test run, you can submit any defects detected to a TestDirector project directly from the Test Results window.
To manually submit a defect to TestDirector:
1 Choose Tools > TestDirector Connection or click the TestDirector Connection button to connect to a TestDirector project. For additional information, see “Connecting to TestDirector from the Test Results Window” below.

Chapter 27 • Analyzing Test Results
577
Note: If you do not connect to a TestDirector project before proceeding to the next step, QuickTest prompts you to connect before continuing.
2 Choose Tools > Add Defect or click the Add Defect button to open the Add Defect dialog box in the specified TestDirector project. The Add Defect dialog box opens.
3 You can modify the Defect Information if required. Basic information about the test and any checkpoints (if applicable) is included in the description:
4 Click Submit to add the defect information to the TestDirector project.
5 Click Close to close the Add Defect dialog box.
Connecting to TestDirector from the Test Results Window
To manually submit bugs to TestDirector from the Test Results window, you must be connected to TestDirector.
The connection process has two stages. First, you connect QuickTest to a local or remote TestDirector Web server. This server handles the connections between QuickTest and the TestDirector project.
Next, you choose the project in which you want to report the defects.
Note that TestDirector projects are password protected, so you must provide a user name and a password.

QuickTest Professional User’s Guide • Running and Debugging Tests
578
To connect QuickTest to TestDirector:
1 Choose Tools > TestDirector Connection. The TestDirector Connection dialog box opens.
2 In the Server box, type the URL address of the Web server where TestDirector is installed.
Note: You can choose a Web server accessible via a Local Area Network (LAN) or a Wide Area Network (WAN).
3 Click Connect.
Once the connection to the server is established, the server’s name is displayed in read-only format in the Server box.
4 If you are connecting to a project in TestDirector 7.5 or later, in the Domain box, select the domain which contains the TestDirector project.
If you are connecting to a project in TestDirector 7.2, skip this step.

Chapter 27 • Analyzing Test Results
579
5 In the Project box, select the desired project with which you want to work.
6 In the User name box, type a user name for opening the selected project.
7 In the Password box, type the password.
8 Click Connect to connect QuickTest to the selected project.
Once the connection to the selected project is established, the project’s name is displayed in read-only format in the Project box.
9 To automatically reconnect to the TestDirector server and the selected project the next time you open QuickTest or the Test Results viewer, select the Reconnect on startup check box.
10 If the Reconnect on startup check box is selected, then the Save password for reconnection on startup check box is enabled. To save your password for reconnection on startup, select the Save password for reconnection on startup check box.
If you do not save your password, you will be prompted to enter it when QuickTest connects to TestDirector on startup.
11 Click Close to close the TestDirector Connection dialog box. The TestDirector icon and the address of the TestDirector server is displayed on the status bar to indicate that QuickTest is currently connected to a TestDirector project.
Tip: You can open the TestDirector Connection dialog box by double-clicking the TestDirector icon in the status bar.
You can disconnect from a TestDirector project and/or server. Note that if you disconnect QuickTest from a TestDirector server without first disconnecting from a project, QuickTest’s connection to that project database is automatically disconnected.

QuickTest Professional User’s Guide • Running and Debugging Tests
580
To disconnect QuickTest from TestDirector:
1 Choose Tools > TestDirector Connection. The TestDirector Connection dialog box opens.
2 To disconnect QuickTest from the selected project, in the Project connection section, click Disconnect.
3 To disconnect QuickTest from the selected Web server, in the Server connection section, click Disconnect.
4 Click Close to close the TestDirector Connection dialog box.

Chapter 27 • Analyzing Test Results
581
Automatically Submitting Defects to a TestDirector Project
You can instruct QuickTest to automatically submit a defect to the TestDirector project specified in the TestDirector Connection dialog box (Tools > TestDirector Connection) for each failed step in your test.
To automatically submit defects to TestDirector:
1 Choose Tools > Options. The Options dialog box opens.
2 Click the Run tab.
3 Select the Submit a defect to TestDirector for each failed step check box.
4 Click OK to close the Options dialog box.

QuickTest Professional User’s Guide • Running and Debugging Tests
582
A sample of the information that is submitted to TestDirector for each defect is shown below:
Viewing WinRunner Test Steps in the Test Results
If your QuickTest test includes a call to a WinRunner test and WinRunner 7.6 or later is installed on your computer, you can view detailed results of the WinRunner steps within your QuickTest Test Results window.
Note: If you have WinRunner version 7.5 installed on your computer, you can view basic information about the WinRunner test run in the QuickTest Test Results window. You can also open the WinRunner Test Results window for additional details.

Chapter 27 • Analyzing Test Results
583
The left pane of the QuickTest test results include a node for each WinRunner event that would normally be included in the WinRunner results. When you select a node corresponding to a WinRunner test event or function call, the right pane displays a summary of the called WinRunner test or function and details about the selected event.
The start and end of the WinRunner test are indicated in the results tree by test run icons. WinRunner events are indicated by WinRunner icons. Calls to WinRunner functions are indicated by icons.
When you select a step in a WinRunner test, the top right pane displays the results summary for the WinRunner test. The summary includes the start and end time of the test, total run time, operator name, and summary results of the checkpoints performed during the test.

QuickTest Professional User’s Guide • Running and Debugging Tests
584
The bottom right pane displays the following information:
For more information on running WinRunner tests and functions from QuickTest, see “Working with WinRunner” on page 811.
Option Description
Event name The name of the selected step.
Result The status (pass or fail) of the step.
Line number The line number of the step within the WinRunner test.
Event time The time when the event was performed.
Description Displays additional information about the selected step followed by a link to the WinRunner details for the step.
For example, clicking the link for a GUI checkpoint that checks the enabled property of a push button displays a WinRunner dialog box similar to the following:
Note: You must have WinRunner 7.6 or later installed on your computer to view WinRunner details for a selected step.

Part VI
Configuring QuickTest

586

587
28Setting Global Testing Options
You can control how QuickTest records and runs tests by setting global testing options.
This chapter describes:
About Setting Global Testing Options
Using the Options Dialog Box
Setting General Testing Options
Setting Folder Testing Options
Setting Active Screen Options
Setting Run Testing Options
Setting Windows Application Testing Options
Setting Web Testing Options
About Setting Global Testing Options
Global testing options affect how you record and run tests, as well as the general appearance of QuickTest. For example, you can choose not to display the Welcome screen when QuickTest starts, or set timing-related settings used by QuickTest when running a test. The values you set remain in effect for all tests and for subsequent testing sessions.
You can also set testing options that affect only the test currently open in QuickTest. For more information, see Chapter 29, “Setting Testing Options for a Single Test.”

QuickTest Professional User’s Guide • Configuring QuickTest
588
Using the Options Dialog Box
You can use the Options dialog box to modify your testing options. The values you set remain in effect for all subsequent record and run sessions.
The Options dialog box can contain the following tabbed pages:
Tab Heading Contains:
General Options for general test settings.
Folders Options for entering the folders in which QuickTest searches for tests, actions, or files that are specified as relative paths.
Active Screen Options for configuring which information QuickTest saves and displays in the Active Screen while recording.
Run Options for running tests.
Windows Applications Options for configuring how QuickTest records and runs tests for the following Windows applications:
• Standard Windows applications
• .NET Windows Forms
• Visual Basic
• ActiveX
• Multimedia (Flash/RealPlayer/Windows MediaPlayer)
Web Options for configuring recording and test run behavior in the Web environment.
Note: The Web tab is displayed only if the Web Add-in is installed and loaded.

Chapter 28 • Setting Global Testing Options
589
To set global testing options:
1 Choose Tools > Options.
The Options dialog box opens. It is divided by subject into several tabbed pages.
2 To choose a page, click a tab.
3 Set options as necessary. See the sections below for information on the available options.
4 To apply your changes and keep the Options dialog box open, click Apply.
5 When you are finished, click OK to save your changes and close the dialog box.
Setting General Testing Options
The General tab options affect the general appearance of QuickTest and other general testing options.

QuickTest Professional User’s Guide • Configuring QuickTest
590
The General tab includes the following options:
Option Description
Display Add-in Manager on startup
Determines whether the Add-in Manager is displayed when starting QuickTest. For information on working with the Add-in Manager, see “Loading QuickTest Add-ins” on page 428.
Display Welcome screen on startup
Determines whether the Welcome screen is displayed when starting QuickTest.
Disable recognition of virtual objects while recording
Determines whether the defined virtual objects stored in the Virtual Object Manager are recognized while recording. For more information, see Chapter 16, “Learning Virtual Objects.”
Automatically generate “With” statements after recording
Instructs QuickTest to automatically generate With statements when you record. For more information, see “Generating ‘With’ Statements for Your Test” on page 749.
Generate “With” statements for __ or more objects
Indicates the minimum number of identical, consecutive objects for which you want to apply the With statement. This setting is used when QuickTest automatically generates With statements after recording and when you select to generate With statements for an existing action. Default = 2.For more information, see “Generating ‘With’ Statements for Your Test” on page 749.
When pointing at a window, activate it after __ tenths of a second
Specifies the time (in tenths of a second) that QuickTest waits before it sets the focus on an application window when using the pointing hand to point to an object in the application (for Object Spy, checkpoints, Method Wizard, Recovery Scenario Wizard, and so on). Default = 5.
Save integration data with tests
Saves QuickTest data that enables integration with other Mercury Interactive load testing and monitoring products.

Chapter 28 • Setting Global Testing Options
591
Setting Folder Testing Options
The Folders tab enables you to enter the folders in which QuickTest searches for actions or files that are specified as relative paths. For example, suppose you add the folder in which all of your tests are stored to the folders list. If you later insert a copy of an action to a test, you only have to enter the name of the test containing the action you want to insert in the Insert Copy of Action dialog box. QuickTest searches for the test’s path in the folders you specified in the Folders tab.
Note: The current test is listed in the Search list by default. It cannot be deleted.
Restore Layout Restores the layout of the QuickTest window so that it displays the panes in their default sizes and positions.
Generate Script Generates an automation script containing the current global testing options. For more information, see “Automating QuickTest Operations” on page 801, or refer to the QuickTest Automation Object Model Reference (Help > QuickTest Automation Object Model Reference).
Option Description

QuickTest Professional User’s Guide • Configuring QuickTest
592
The order in which the folders are displayed in the search list determines the order in which QuickTest searches for the specified test, action, or file.

Chapter 28 • Setting Global Testing Options
593
The Folders tab includes the following options:
Tip: You can use a PathFinder.Locate statement in your test to retrieve the complete path that QuickTest will use for a specified relative path based on the folders specified in the Folders tab. For more information, refer to the QuickTest Object Model Reference.
Option Description
Search list Indicates the folders in which QuickTest searches for tests, actions, or files. If you define folders here, you do not need to designate the full path of a test, action, or file in other dialog boxes or call statements. The order of the search paths in the list determines the order in which QuickTest searches for a specified action or file.
Adds a new folder to the search list.
Tip: To add a TestDirector path when connected to TestDirector, click this button. QuickTest adds [TestDirector], and displays a browse button so that you can locate the TestDirector path.
When not connected to TestDirector, hold the SHIFT key and click this button. QuickTest adds [TestDirector], and you enter the path. You can also type the entire TestDirector path manually. If you do, you must add a space after [TestDirector]. For example: [TestDirector] Subject\Tests.
Note that QuickTest searches TestDirector project folders only when you are connected to the corresponding TestDirector project.
Deletes the selected folder from the search list.
Moves the selected folder up in the list.
Moves the selected folder down in the list.

QuickTest Professional User’s Guide • Configuring QuickTest
594
Setting Active Screen Options
The Active Screen tab enables you to specify which information QuickTest saves and displays in the Active Screen while recording and running tests.
Tip: The more information saved in the Active Screen, the easier it is to edit the test after it is recorded. However, more information saved in the Active Screen adds to the recording time and disk space required. This is especially critical in Visual Basic, ActiveX, and .NET Windows Forms environments.
You can increase or decrease the amount of information saved in your test after you record the test. For more information, see “Can I increase or decrease Active Screen information after I finish recording a test?” on page 864.
Note: When you are recording on an MDI (Multiple Document Interface) application, the Active Screen does not capture information for non-active child frames.

Chapter 28 • Setting Global Testing Options
595
The Active Screen tab includes the following options:

QuickTest Professional User’s Guide • Configuring QuickTest
596
Option Description
Capture level Specifies the objects for which QuickTest stores data in the Active Screen.
Use the slider to select one of the following options:
• Complete—Captures all properties of all objects in the application’s active window/dialog box/Web page in the Active Screen of each step. This level saves Web pages after any dynamic changes and saves Active Screen files in a compressed format.
• Partial—(Default). Captures all properties of all objects in the application’s active window/dialog box/Web page in the Active Screen of the first step performed in an application’s window, plus all properties of the recorded object in subsequent steps in the same window. This level saves Web pages after any dynamic changes and saves Active Screen files in a compressed format.
• Minimum—Captures properties only for the recorded object and its parent in the Active Screen of each step. This level saves the original source HTML of all Web pages (prior to dynamic changes) and saves Active Screen files in a compressed format.
• None—Disables capturing of Active Screen files for all applications and Web pages.
Custom Level Enables you to specify custom Active Screen options. For more information, see “Custom Active Screen Capture Settings” on page 597.
Default Level Returns the capture level settings to the predefined default level (Partial).
Advanced Enables you to define the appearance of Web pages in the Active Screen, see “Web Page Appearance” on page 600.

Chapter 28 • Setting Global Testing Options
597
Custom Active Screen Capture Settings
The Custom Active Screen Capture Settings dialog box enables you to customize how QuickTest captures and saves Active Screen information.
Note: The Custom Active Screen Capture Settings dialog box may also contain options applicable to any QuickTest external add-ins installed on your computer. For information regarding these options, refer to your add-in documentation.

QuickTest Professional User’s Guide • Configuring QuickTest
598
General Options
You can specify the type of compression QuickTest uses for storing captured Active Screen information.
Simple—Instructs QuickTest to save Active Screen captures in standard uncompressed file formats (for example, .html and .png).
Compressed—Instructs QuickTest to save Active Screen captures in a compressed (zipped) file format. Using this option saves disk space, but it may affect the time it takes to load images in the Active Screen. This is the default option.
Standard Windows Options
You can specify which properties are captured for each object in a Windows application when it is captured for the Active Screen.
Complete—Instructs QuickTest to save all properties of all objects in the application’s open window/dialog box in the Active Screen of each step.
This option makes it possible for you to insert checkpoints and perform other operations on any object in the window/dialog box, from the Active Screen for any step.
Partial—(Default). Instructs QuickTest to save all properties of all objects in the application’s open window/dialog box in the Active Screen of the first step performed in an application’s window, plus all properties of the recorded object in subsequent steps in the same window.
This option makes it possible for you to insert checkpoints and perform other operations on any object displayed in the Active Screen, while conserving recording time and disk space. Note that with this option the Active Screen information may not be fully updated for subsequent steps.
Minimum—Instructs QuickTest to save properties only for the recorded object and its parent in the Active Screen of each step.
This option enables speedy recording and requires relatively little disk space. However, you can insert checkpoints and perform other operations only on the recorded object and on the window/dialog box itself. You cannot perform operations on the other objects displayed in the Active Screen.

Chapter 28 • Setting Global Testing Options
599
None—Disables capture of Active Screen files for Windows applications.
This option allows extremely fast recording and requires only a minimum of disk space. However, you cannot perform post-recording test editing from the Active Screen.
Web Options
You can specify whether QuickTest captures Web pages for the Active Screen.
Disable Active Screen capture—Disables the screen capture of all steps in the Active Screen.
If you do not select this option, you can also delete Active Screen information after you have finished editing your test by selecting Save As, and clearing the Save Active Screen files check box. For more information, see “Saving a Test” on page 104.
Capture original HTML source—Captures the HTML source of Web pages as they appear originally, before any scripts are run. Deselecting this option instructs QuickTest to capture the HTML source of Web pages after any dynamic changes have been made to the HTML source (for example, by scripts running automatically when the page is loaded).
Reset Custom Settings
You can reset the custom settings to one of the predefined levels provided with QuickTest (Complete, Partial, Minimum, or None) by choosing a level from the Reset to list and clicking Reset. For more information on the available capture levels, see “Standard Windows Options” on page 598.

QuickTest Professional User’s Guide • Configuring QuickTest
600
Web Page Appearance
The Web Page Appearance dialog box enables you to modify how QuickTest displays captures Web pages in the Active Screen.
The Web Page Appearance dialog box contains the following options:
Run scripts—Specifies whether QuickTest runs scripts when a page is loaded in the Active Screen, according to one of the following options:
Enabled—Runs scripts whenever loading a page in the Active Screen.
Automatic—Runs scripts as needed, according to the page that is displayed.
Disabled—Prevents scripts from running when loading a page in the Active Screen.
Note: This option refers only to scripts that run automatically when the page loaded. It does not enable you to activate scripts in the Active Screen by performing an operation on the screen.

Chapter 28 • Setting Global Testing Options
601
Load ActiveX controls—Instructs QuickTest to load ActiveX controls from your browser page to the Active Screen pane. If this option is cleared, a default ActiveX image is displayed in the Active Screen for all ActiveX control objects.
Load images—Instructs QuickTest to load images from your browser page to the Active Screen pane.
Load Java applets—Instructs QuickTest to load Java applets from your browser page to the Active Screen pane. If this option is cleared, a default Java image is displayed in the Active Screen for all Java applet objects.
Note: To perform operations on these items from the Active Screen, you must load the relevant add-in and then record directly on the Java or ActiveX object.

QuickTest Professional User’s Guide • Configuring QuickTest
602
Setting Run Testing Options
The Run tab options affect how QuickTest runs tests and displays test results.

Chapter 28 • Setting Global Testing Options
603
The Run tab includes the following options:
Option Description
Run mode Instructs QuickTest how to run your test:
Normal (displays execution marker)—Runs your test with the execution arrow to the left of the test tree, marking each step or statement as it is performed. If the test contains multiple actions, the Tree View expands to display the steps, and the Expert View displays the script, of the currently running action. This option requires more system resources.
Note: You must have Microsoft Script Debugger installed to enable this mode. For more information, refer to the QuickTest Installation Guide.
Fast—Runs your test without the execution arrow to the left of the test tree and does not show the Tree View or Expert View of each action as it runs. This option requires fewer system resources.
Submit a defect to TestDirector for each failed step
Instructs QuickTest to automatically submit a defect to TestDirector for each failed step in your test. This option is only available when you are connected to a TestDirector project. For more information, see “Automatically Submitting Defects to a TestDirector Project” on page 581.
View results when test run ends
Instructs QuickTest to display the test results automatically following the test run.
Allow other Mercury Interactive tools to run tests
Enables other Mercury Interactive products such as TestDirector, WinRunner, and Test Batch Runner to run QuickTest tests.

QuickTest Professional User’s Guide • Configuring QuickTest
604
Setting Windows Application Testing Options
The Windows Applications tab options allow you to configure how QuickTest records and runs tests for the following Windows applications:
Standard Windows applications
.NET Windows Forms
Visual Basic
ActiveX
Multimedia (Flash/RealPlayer/Windows MediaPlayer)
Save step screen capture to test results
Instructs QuickTest when to capture and save images of the application during the test run to display them in the test results.
Choose an option from the list:
• Always—Captures images of each step, whether the step fails or passes.
• On errors—Captures images only if the step fails.
• On errors and warnings—Captures images only if the step returns a failed or warning status.
• Never—Never captures images.
Option Description

Chapter 28 • Setting Global Testing Options
605
The Windows Applications tab includes the following options:
Attached Text
Enables you to specify the search criteria that QuickTest uses to retrieve an object’s attached text. An object’s attached text is the closest static text within a specified radius from a specified point. The retrieved attached text is saved in the object’s corresponding text or attached text test object property.
Note: Sometimes the static text that you believe to be closest to an object is not actually the closest static text. You may need to use trial and error to make sure that the attached text is the static text object of your choice.
Search radius indicates the maximum distance, in pixels, that QuickTest searches for attached text.

QuickTest Professional User’s Guide • Configuring QuickTest
606
Search area indicates the point on an object from which QuickTest searches for the object’s attached text.
Choose an option from the list:
Top-Left—top-left corner
Top—midpoint of the two top corners
Top-Right—top-right corner
Right—midpoint of the two right corners
Bottom-Right—bottom-right corner
Bottom—midpoint of the two bottom corners
Bottom-Left—bottom-left corner
Left—midpoint of the two left corners
Additional Windows Applications Options
At the bottom of the Windows Applications page of the Options dialog box, you can specify your preferences for working with special objects:
Open menu to retrieve item properties—Instructs QuickTest to open menu objects before retrieving menu item properties during a test run.
Notes:
Selecting this option may slow the test run, but it can be useful if menu item properties change upon opening the menu.
This option, selected by default, sets the default behavior for all menu objects. You can use the ExpandMenu method to set this behavior for a specified menu object. For more information, refer to the QuickTest Object Model Reference.

Chapter 28 • Setting Global Testing Options
607
Record non-unique list items—Determines what QuickTest records when more than one item (in a list or tree) has an identical name.
Choose an option from the list:
by name—Records the item’s name.
When the test runs, QuickTest finds and selects the first instance of the name, no matter which item was chosen during recording. Select this option if the all items with the same name have identical properties.
by index—Records the item’s index number.
Select this option if items with the same name do not necessarily have identical properties.
Record owner-drawn buttons as—Instructs QuickTest how to identify and record custom-made buttons in the application.
Choose an option from the list:
push buttons
check boxes
radio buttons
objects
Note: Choosing objects records each owner-drawn button either as a WinObject or as a virtual object. For the latter, you must also define the virtual object—see “Defining a Virtual Object” on page 321.

QuickTest Professional User’s Guide • Configuring QuickTest
608
Setting Web Testing Options
The Web tab options determine QuickTest’s behavior when recording and running tests on Web sites.
The Web tab includes the following options:
Option Description
Add seconds to page load time
Instructs QuickTest to add a specified number of seconds to the page load time specified in each page checkpoint.
Note: This option is a safeguard that prevents page checkpoints from failing in the event that the amount of time it takes for a page to load during the test run is longer than the amount of time it took during the record session.

Chapter 28 • Setting Global Testing Options
609
Advanced Web Options
The Advanced Web Options dialog box enables you to modify how QuickTest records and runs tests on Web sites.
Broken links - check only links to current host
Instructs QuickTest to check only for broken links that are targeted to your current host.
Advanced Opens the Advanced Web Options dialog box, where you can customize record and run options for your Web sites.
Option Description

QuickTest Professional User’s Guide • Configuring QuickTest
610
Accessibility Checkpoint Options
You can add accessibility checkpoints to check that Web pages and frames conform to the W3C Web Content Accessibility Guidelines.
Note: All accessibility checkpoints in a test use the options that are selected in this dialog box during the test run.
The Advanced Web Options dialog box includes the following Accessibility checkpoint options:
Option Description
Include the following checks in the checkpoint
Instructs QuickTest to check the selected accessibility elements for all accessibility checkpoints. Choose from the following:
• ActiveX Check—Checks whether the page or frame contains ActiveX/multimedia objects. If it does, QuickTest sends a warning and displays a list of the objects in the Test Results.
• Alt Property Check—Checks that the <alt> attribute exists for all relevant objects (such as images). If one or more objects lack the required attribute, the test fails and QuickTest displays a list of the objects with the missing attribute in the Test Results. This option is selected by default.
• Applet Check—Checks whether the page or frame contains Java objects. If it does, QuickTest sends a warning and displays a list of the objects in the Test Results.
• Frame Titles Check—Checks that the page and all frames in the page have titles. If one or more frames (or the page) lack the required title, the test fails and QuickTest displays a list of the frames that lack titles in the Test Results.
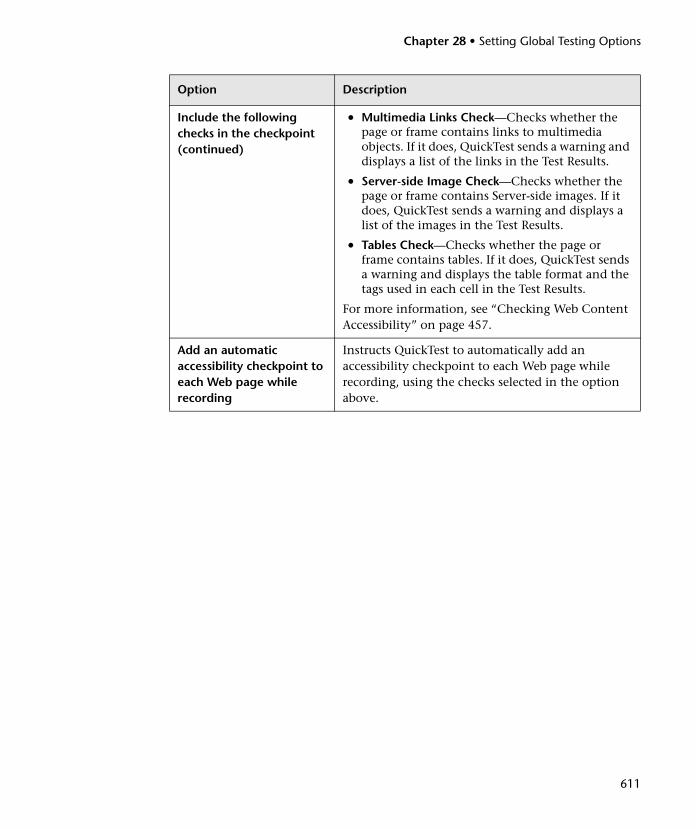
Chapter 28 • Setting Global Testing Options
611
Include the following checks in the checkpoint (continued)
• Multimedia Links Check—Checks whether the page or frame contains links to multimedia objects. If it does, QuickTest sends a warning and displays a list of the links in the Test Results.
• Server-side Image Check—Checks whether the page or frame contains Server-side images. If it does, QuickTest sends a warning and displays a list of the images in the Test Results.
• Tables Check—Checks whether the page or frame contains tables. If it does, QuickTest sends a warning and displays the table format and the tags used in each cell in the Test Results.
For more information, see “Checking Web Content Accessibility” on page 457.
Add an automatic accessibility checkpoint to each Web page while recording
Instructs QuickTest to automatically add an accessibility checkpoint to each Web page while recording, using the checks selected in the option above.
Option Description

QuickTest Professional User’s Guide • Configuring QuickTest
612
Automatic Web Page Checkpoint Options
You can check that expected and actual page properties are identical. The Advanced Web Options dialog box includes the following automatic Web page checkpoint options:
Option Description
Create a checkpoint for each Web page while recording
Instructs QuickTest to automatically add a page checkpoint for each Web page navigated during the recording process.
Note: If you are testing a Web page with dynamic content, using automatic page checkpoints may cause the test to fail as these checkpoints assume that the page content is static between record and run sessions.
The automatic page checkpoint includes the checks that you select from among the following options:
• Broken links—Displays the number of broken links contained in the page during the test run.
• HTML source—Checks that the expected source code is identical to the source code during the test run.
• HTML tags—Checks that the expected HTML tags in the source code are identical to those in the test run.
• Image source—Checks that the expected source paths of the images are identical to the sources in the test run.

Chapter 28 • Setting Global Testing Options
613
Create a checkpoint for each Web page while recording (continued)
• Links URL—Checks that the expected URL addresses for the links are identical to the URL addresses in the source code during the test run.
• Load time—Checks that the expected time it takes for the page to load during the test run is less than or equal to the amount of time it took during the record session PLUS the amount of time specified in the Add seconds to page load time option (see “Setting Web Testing Options” on page 608).
• Number of images—Checks that the expected number of images is identical to the number displayed in the test run.
• Number of links—Checks that the expected number of links is identical to the number displayed in the test run.
Ignore automatic checkpoints while running tests
Instructs QuickTest to ignore the automatically added page checkpoints while running your test.
Option Description

QuickTest Professional User’s Guide • Configuring QuickTest
614
Record Settings
You can set the preferences for recording Web objects. The Advanced Web Options dialog box includes the following Record options:
Option Description
Create a new Page object for
Instructs QuickTest when to create a new Page object in the object repository while recording.
Note: This option only affects how Page objects are created; Frame objects are created according to the Optimize Page/Frame test object creation settings you select.
• Every navigation—Creates a new Page object every time you click a hyperlink on a Web page.
• Pages with different URLs (according to Optimize options)—(Default). Creates a new Page object for pages that have different URLs, according to the Optimize Page/Frame test object creation settings you select.
• Pages with different test object descriptions—Creates a new Page object for pages with different test object descriptions, according to the properties defined for the Page test object.
Note: The default test object description for Page objects includes only the test object class. If you select this option, it is highly recommended that you define object identification properties that uniquely identify different Page objects. You should also ensure that the properties you define remain constant over time, otherwise future test runs may fail.

Chapter 28 • Setting Global Testing Options
615
Optimize Page/Frame test object creation
Instructs QuickTest to create a new Page/Frame test object only when the URL changes, or if the URL stays the same and data that is transferred to the server changes. The following elements are taken into consideration when considering the data: the type of data (user input or non-user input) and the method used to transfer the data to the server (Post or Get).
Notes: Clear this option to instruct QuickTest to create a new Page/Frame test object for every navigation. (QuickTest version 5.6 and earlier worked this way.)
For any test or step recorded with this option selected, QuickTest will not apply the Continue to the following page if the object is not found during the test run option in the Web tab of the Test Settings dialog box. For more information, see “Defining Web Settings for Your Test” on page 638.
• Ignore non user-input data - Get—Instructs QuickTest to ignore non user input data if the Get method is used to transfer data to the server.
For example, suppose a user enters data on a Web page, and the data is then inserted as a hidden field using the Get method. The user clicks Submit (to send the data to the server). The new Web page is different, according to the hidden field data. However, QuickTest does not create a new Page test object.
Option Description

QuickTest Professional User’s Guide • Configuring QuickTest
616
Optimize Page/Frame test object creation (continued)
• Ignore non user-input data - Post—Instructs QuickTest to ignore non user input data if the Post method is used to transfer data to the server.
For example, suppose a user enters data on a Web page, and the data is then inserted as a hidden field using the Post method. The user clicks Submit (to send the data to the server). The new Web page is different, according to the hidden field data. However, QuickTest does not create a new Page test object.
• Ignore user-input data - Get—Instructs QuickTest to ignore user-input data if the Get method is used to transfer data to the server.
For example, suppose a user enters data in a form on a Web page and clicks Submit (to send the data to the server) using the Get method. The new Web page is different according to the data filled in by the user. However, QuickTest does not create a new Page test object.
• Ignore user-input data - Post—Instructs QuickTest to ignore user-input data if the Post method is used to transfer data to the server.
For example, suppose a user enters data in a form on a Web page and clicks Submit (to send the data to the server) using the Post method. The new Web page is different according to the data filled in by the user. However, QuickTest does not create a new Page test object.
• Use additional information of Page/Frame instructs QuickTest to use additional properties of the test object to identify an existing Page/Frame test object.
Tip: Select this option to instruct QuickTest to recognize existing pages when the Back and Forward navigation buttons are used.
Option Description

Chapter 28 • Setting Global Testing Options
617
If QuickTest does not record Web events in a way that matches your needs, you can also configure the events you want to record for each type of Web object. For example, if you want to record events, such as a mouseover that opens a sub-menu, you may need to modify the your Web event configuration to recognize such events. For more information, see Chapter 35, “Configuring Web Event Recording.”
Record coordinates Records the actual coordinates relative to the object for each operation.
Record MouseDown and MouseUp as Click
Records a Click method for MouseUp and MouseDown events.
Record Navigate for all navigation operations
Records a Navigate statement each time a Frame URL changes.
Use standard Windows mouse events
Instructs QuickTest to use standard Windows mouse events instead of browser events for the following events:
• OnClick
• OnMouseDown
• OnMouseUp
Note: Use this option only if the events are not properly recorded using browser events.
ViewLink support Enables you to record and run tests on objects created using ViewLink technology.
Notes: Some ViewLink objects may appear differently in the Active Screen than they did in the application, and some ViewLink objects may not appear at all in the Active Screen.
This option may not fully support record and run operations for all ViewLink objects.
Option Description

QuickTest Professional User’s Guide • Configuring QuickTest
618
Run Settings
You can set the preferences for working with Web objects during a test run. The Advanced Web Options dialog box includes the following Run options:
Option Description
Browser cleanup Closes all open browsers when the test or iteration is finished.
Run only click Runs Click events using the MouseDown event, the MouseUp event, and the Click event, or using only the Click event.
Replay Type Configures how to run mouse operations according to the selected option:
• Event—Runs mouse operations using browser events.
• Mouse—Runs mouse operations using the mouse.
Run using source index Uses the source index property for better performance.
Enable browser resize on record/run
When selected, instructs QuickTest to resize the browser when a record or run session begins so that you can view both the browser and the QuickTest windows. When cleared, the browser opens to its default size.

619
29 Setting Testing Options for a Single Test
You can control how QuickTest records and runs individual tests by setting different testing options for each test.
This chapter describes:
About Setting Testing Options for a Single Test
Using the Test Settings Dialog Box
Defining Properties for Your Test
Defining Run Settings for Your Test
Defining Resource Settings for Your Test
Defining Environment Settings for Your Test
Defining Web Settings for Your Test
Defining Recovery Scenario Settings for Your Test
About Setting Testing Options for a Single Test
You can set testing options that affect how you record and run a specific test. For example, you can instruct QuickTest to run a parameterized action for only certain lines in the Data Table. These testing options are saved when you save the test.
You can also set testing options for part of the test from within a test. For more information, see Chapter 32, “Setting Testing Options During the Test Run.”
You can also set testing options that affect all tests. For more information, see Chapter 28, “Setting Global Testing Options.”

QuickTest Professional User’s Guide • Configuring QuickTest
620
Using the Test Settings Dialog Box
Before you record or run a test, you can use the Test Settings dialog box to modify your testing options.
The Test Settings dialog box can contain the following tabbed pages:
To set testing options for a single test:
1 Choose Test > Settings or click the Test Settings toolbar button.
The Test Settings dialog box opens. It is divided by subject into tabbed pages.
2 To choose a page, click a tab.
3 Set the options as necessary. See the sections below for more information on the available options.
4 To apply your changes and keep the Test Settings dialog box open, click Apply.
5 When you are done, click OK to save your changes and close the dialog box.
Tab Heading Subject
Properties Options for setting the properties of the test.
Run Options for setting test run preferences.
Resources Options for specifying resources you want to associate with your test.
Environment Options for viewing and modifying environment variables, and selecting the active External environment variables file.
Web Options for setting how the test records and runs on a Web browser.
Note: The Web tab is displayed only if the Web Add-in is installed and loaded.
Recovery Options for setting how QuickTest recovers from unexpected events and errors that occur in your testing environment during a test run.

Chapter 29 • Setting Testing Options for a Single Test
621
Defining Properties for Your Test
The Properties tab settings define general test information.
The Properties tab includes the following items:
Option Description
Name Indicates the name of the test.
Author Indicates the user name of the test author.
Last modified using Indicates the version of QuickTest last used to modify the test.
Location Indicates the path of the test.
Description Enables you to specify a description for your test.
Associated add-ins Displays the add-ins associated with the test.

QuickTest Professional User’s Guide • Configuring QuickTest
622
Specifying Associated Add-Ins
You can associate or disassociate add-ins with your test in the Modify Associated Add-ins dialog box.
When you open QuickTest, you select the add-ins to load from the Add-in Manager dialog box. You can record on any environment for which the necessary add-in is loaded.
When you create a new test, the add-ins that are currently loaded are automatically associated with your test.
Choosing to associate an add-in with your test instructs QuickTest to check that the associated add-in is loaded each time you open that test. When you open a test, QuickTest notifies you if an associated add-in is not currently loaded, or if you have loaded add-ins that are not currently associated with your test. This process ensures that your test will not fail due to unloaded add-ins and reminds you to add required add-ins to the associated add-ins list if you plan to use them with the currently open test.
TestDirector uses the associated add-ins list to determine which add-ins to load when it opens QuickTest. For more information on working with TestDirector, see Chapter 41, “Working with TestDirector.”
You can also retrieve this list and load add-ins accordingly using an automation script. For more information on working with automation scripts, refer to the QuickTest Automation Object Model Reference.
Modify Opens the Modify Associated Add-ins dialog box, allowing you to modify which add-ins are associated with your test.
Generate Script Generates an automation script containing the current test settings. For more information, see “Automating QuickTest Operations” on page 801, or refer to the QuickTest Automation Object Model Reference (Help > QuickTest Automation Object Model Reference).
Option Description

Chapter 29 • Setting Testing Options for a Single Test
623
To modify the associated add-ins list:
1 In the Properties tab of the Test Settings dialog box, click Modify. The Modify Associated Add-ins dialog box opens.
This dialog box lists all of the add-ins currently associated with your test, as well as any other add-ins that are currently loaded in QuickTest. Add-ins that are associated with your test but are not currently loaded, are dimmed.
In the above example:
ActiveX and Web are loaded and associated with the test.
Multimedia is loaded, but not associated with the test.
Visual Basic is associated with the test, but is not loaded.

QuickTest Professional User’s Guide • Configuring QuickTest
624
Note: If a specific add-in is not currently loaded, but you want to associate it with your test, reopen QuickTest and load the add-in from the Add-in Manager. If the Add-in Manager dialog box is not displayed when you open QuickTest, you can choose to display it the next time you open QuickTest. To do so, select Display Add-in Manager on startup from the General tab of the Options dialog box. See Chapter 28, “Setting Global Testing Options” for more information on the Options dialog box. For more information on the Add-in Manager, see Chapter 20, “Working with QuickTest Add-Ins.”
2 Select the check boxes for add-ins that you want to associate with your test. Clear the check boxes for add-ins that you do not want to associate with your test.
3 Click OK to save your changes and close the Modify Associated Add-ins dialog box.
Defining Run Settings for Your Test
When you run a test, QuickTest performs the steps you recorded on your application or Web site. By default, when you run a test with global parameters, QuickTest runs the test for each row in the Data Table, using the parameters you specified. For more information, see “Setting Data Table Parameters as Global or Action” on page 230. You can use the Run tab to instruct QuickTest to run iterations on a test only for certain lines in the Global tab in the Data Table.
You can also use the Run tab to choose what to do when an error occurs during the test run, set your object synchronization timeout and choose whether or not to disable the Smart Identification mechanism for the test.

Chapter 29 • Setting Testing Options for a Single Test
625
Note: The Run tab of the Test Settings dialog box applies to the entire test. You can set the run properties for an individual action from the Run tab in the Action Properties dialog box of a selected action. For more information about action run properties, see “Setting the Run Properties for an Action” on page 352.

QuickTest Professional User’s Guide • Configuring QuickTest
626
The Run tab includes the following options:
Option Description
Run one iteration only Runs the test only once, using only the first row in the global Data Table.
Run on all rows Runs the test with iterations using all rows in the global Data Table.
Run from row __ to row __
Runs the test with iterations using the values in the global Data Table for the specified row range.

Chapter 29 • Setting Testing Options for a Single Test
627
When error occurs during test run
Specifies how QuickTest responds to an error during the test run. Choose an option from the list:
• pop up message box—QuickTest displays an error message dialog box when an error occurs. You must click a button on the message box to continue or end the test run. This is the default option.
• proceed to next iteration—QuickTest proceeds to the next action iteration when an error occurs.
• stop run—QuickTest stops the test run when an error occurs.
• proceed to next step—QuickTest proceeds to the next step in the test when an error occurs.
QuickTest first performs any recovery scenarios associated with the test, and only performs the option selected above if the associated recovery scenarios do not resolve the error. For more information, see “Defining Recovery Scenario Settings for Your Test” on page 640.
Note: This test-specific option replaces the global option found in QuickTest versions 6.0 and earlier. When you open a test created in QuickTest 6.0 and earlier, the pop up message box option is automatically selected by default.
To use a different setting for a large number of tests, use a QuickTest automation script to set this value. For more information, refer to the QuickTest Automation Object Model Reference. To easily access the automation script line that controls this option, use the Create Script button in the General tab of the Test Settings dialog box. For more information, see “Defining Properties for Your Test” on page 621.
Option Description

QuickTest Professional User’s Guide • Configuring QuickTest
628
Object synchronization timeout
Sets the maximum time (in milliseconds) that QuickTest waits for an object to load before running a test step.
Note: When working with Web objects, QuickTest waits up to the amount of time set in the Browser navigation timeout plus the Object Synchronization Timeout.
Disable Smart Identification during the test run
Instructs QuickTest not to use the Smart Identification mechanism during the test run.
Note: When you select this option, the Enable Smart Identification check boxes in the Object Properties and Object Repository dialog boxes are disabled, although the settings are saved. When you clear this option, the Enable Smart Identification check boxes return to their previous on or off setting.
Option Description

Chapter 29 • Setting Testing Options for a Single Test
629
Defining Resource Settings for Your Test
You use the Resources tab to define files and storage resources that you want to associate with your test. You can use the Resources tab to associate VBScript library files with your test, define the default Data Table location, and specify the object repository mode and file to use for your test. You can also set the current associated library files and object repository type settings to be the default settings for all new tests.
Note: In earlier versions of QuickTest, resources were associated globally with all tests, using the Options dialog box.

QuickTest Professional User’s Guide • Configuring QuickTest
630
The Resources tab includes the following options:
Option Description
Associated library files
Indicates the list of library files associated with your test. QuickTest searches these files for the VBScript functions, subroutines, etc. specified in the test. The order of the library files in the list determines the order in which QuickTest searches for a specified function, subroutine, etc. If there are two functions, subroutines, etc. with the same name, the first one overrides the second. For more information, see “Working with Associated Library Files” on page 792.
Notes: You can specify TestDirector files as associated library files. For more information, see “Using Associated Library Files with TestDirector” on page 793.
You can enter an associated library file as a relative path. During the test run, QuickTest searches for the file in the current test’s directory, and then in the folders listed in the Folders tab of the Options dialog box. For more information, see Chapter 28, “Setting Folder Testing Options.”

Chapter 29 • Setting Testing Options for a Single Test
631
Library files control buttons
The library file controls include the following buttons:
• The button enables you to add a new library file to the list.
Tip: To add a TestDirector path when connected to TestDirector, click this button. QuickTest adds [TestDirector], and displays a browse button so that you can locate the TestDirector path.
When not connected to TestDirector, hold the SHIFT key and click this button. QuickTest adds [TestDirector], and you enter the path. You can also type the entire TestDirector path manually. If you do, you must add a space after [TestDirector]. For example: [TestDirector] Subject\Tests.
Note that QuickTest uses library files in TestDirector project folders only when you are connected to the corresponding TestDirector project.
• The button enables you to delete a selected file from the list.
• The button enables you to move the selected file up in the list.
• The button enables you to move the selected file down in the list.
• Set as Default—Sets the current list of library files to be associated with all new tests by default.
Data Table • Default location (under test directory)—Instructs QuickTest to use data stored in the default Data Table location under the test folder.
• Other location—Instructs QuickTest to use data stored in the specified Data Table location. The Data Table can be any Microsoft Excel (.xls) file.
For more information on choosing a Data Table location, see “Editing and Saving the Data Table” on page 370.
Note: You can specify Microsoft Excel files stored in TestDirector as Data Tables. For more information, “Using Data Table Files with TestDirector” on page 378.
Option Description

QuickTest Professional User’s Guide • Configuring QuickTest
632
Defining Environment Settings for Your Test
The Environment tab displays existing built-in and user-defined environment variables. It also enables you to add, modify or delete internal, user-defined environment variables.
For more information about environment variables and environment parameters, see Chapter 13, “Parameterizing Tests.”
Object repository type
Indicates the object repository mode and file to use for your test:
• Per-action—Instructs QuickTest to use the object repository per-action mode. The repository is stored in each action.
• Shared—Instructs QuickTest to use the shared object repository mode and the specified object repository file.
Notes: You can enter an existing shared object repository file as a relative path.When creating or running tests, QuickTest searches for the file in the current test’s directory, and then in the folders listed in the Folders tab of the Options dialog box. For more information, see “Setting Folder Testing Options” on page 591. To create a new object repository file, enter the complete path of the new file.
If you have already saved a shared object repository file as an attachment in your TestDirector project, you can enter a TestDirector path. For more information, see “Using Shared Object Repository Files with TestDirector” on page 708.
• Set as Default—Sets the currently specified object repository mode and/or file to be the default for all new tests.
For more information about object repository modes, see Chapter 34, “Choosing the Object Repository Mode.”
Option Description

Chapter 29 • Setting Testing Options for a Single Test
633
The Environment tab includes the following settings for the Variable type:
Built-in—Displays the built-in environment variables defined by QuickTest Professional.
User-defined—Displays both internal and external user-defined environment variables.
When Built-in is selected, the Environment tab displays the following information for the built-in variable:
Name—The name of each built-in environment variable.
Description—A short description of each built-in environment variable.
Current value—The current value of the selected environment variable.

QuickTest Professional User’s Guide • Configuring QuickTest
634
When User-defined is selected, the Environment tab displays the following information for user-defined variables:
Name—The name of each user-defined variable.
Value—The value assigned to each user-defined variable.
Type—The type of each user-defined variable: Internal or External.
Note: Variables from the external environment variables file are displayed in blue. Internal environment variables are displayed in black.

Chapter 29 • Setting Testing Options for a Single Test
635
Working with User-Defined Environment Variables
You can add, edit, and delete internal, user-defined environment variables. Internal environment variables are available only to the test in which they are defined. You can also view the properties of external, user-defined variables. In addition, you can export your user-defined variables to an external text file for use with other tests. You can then load the exported environment variable file into any test.
To add internal, user-defined environment variables:
1 In the Environment tab of the Test Settings dialog box, click the New button. The Add New Environment Parameter dialog box opens.
2 In the Arguments box, enter a definition for the variable:
Name—Enter the name of the internal variable.
Value—Enter the value of the internal variable.
3 Click OK to save your changes and close the Add New Environment Parameter dialog box.
To view or modify user-defined environment variables:
1 In the Environment tab of the Test Settings dialog box, double-click the variable you want to view or modify, or select it and click the View/Edit button. The View Environment Parameter dialog box or Edit Environment Parameter dialog box opens.
2 To modify an internal environment variable, modify the value in the Value box.

QuickTest Professional User’s Guide • Configuring QuickTest
636
3 To copy the value of the external or internal environment variable to the Windows Clipboard, select the value text, right-click and choose Copy.
4 Click OK to save your changes and close the Edit Environment Parameter dialog box, or click Close to close the View Environment Parameter dialog box.
To delete internal, user-defined environment variables:
1 In the Environment tab of the Test Settings dialog box, select the variable you want to delete and click the Delete button. A confirmation message is displayed.
2 Click Yes to confirm that you want to delete the environment variable. The environment variable is deleted.
Note: After confirming the deletion of the environment variable, you cannot retrieve it, even if you then click Cancel on the Test Settings dialog box.
To export user-defined environment variables:
1 In the Environment tab of the Test Settings dialog box, click the Export button. The Save User-Defined Variables dialog box opens, enabling you to export the current list of user-defined variables and values to a text file.
2 Choose the folder in which you want to save the file.
3 Type a name for the text file in the File name box.
Note: By default, QuickTest creates the file with an .ini extension. You can save it with another extension by typing the file name and extension in the File name box.
4 Click Save to save your file.

Chapter 29 • Setting Testing Options for a Single Test
637
To load an external, user-defined environment variable file:
1 In the Environment tab of the Test Settings dialog box, select Load variables and values from external file (reloaded each test run).
2 In the File box, enter the file name or click the browse button to find the external, user-defined variable file.
The environment variables from the file are displayed in the Environment tab.
Note: You can enter a relative path for the environment variable file. QuickTest searches for the file in the folders listed in the Folders tab of the Options dialog box. For more information, see Chapter 28, “Setting Folder Testing Options.”
For more information on built-in and user-defined variables, and for information on how to create an external, user-defined environment variable file, see “Using Environment Variable Parameters” on page 231.

QuickTest Professional User’s Guide • Configuring QuickTest
638
Defining Web Settings for Your Test
The Web tab provides options for recording and running tests on Web sites. You can set how long to wait for browser navigations, how to continue the test run when an object is not found on a particular Web page, and the Active Screen access information to use for password-protected resources in the captured Active Screen page.
The Web tab includes the following options:
Option Description
Browser navigation timeout
Sets the maximum time (in milliseconds) that QuickTest waits for a Web page to load before running a test step.

Chapter 29 • Setting Testing Options for a Single Test
639
Continue to the following page if an object is not found during the test run
When this option is selected, it instructs QuickTest not to perform further operations on the current Web page when an object is not found, and to navigate to the next page in the test. This enables the test to continue running. The step is marked with a warning, but the test can still be designated as “passed.”
Note: When this option is cleared (default), the test stops running and an error message is displayed. You must select whether to stop, retry, skip or debug the test. If this option is selected, it instructs QuickTest to ignore any recovery scenarios associated with this test, and also to ignore the option selected in the When error occurs during test run option of the Run tab in the Test Settings dialog box. If the following Web page cannot be located, QuickTest activates any associated recovery scenarios that apply, and then performs the defined When error occurs during test run option if the associated recovery scenarios do not resolve the error.
QuickTest will not apply this option for any test or step recorded with the Optimize Page/Frame test object creation option selected in the Advanced Web Options dialog box (Tools > Options > Web tab > Advanced). For more information, see “Advanced Web Options” on page 609.
User name The user name for password-protected resources that use a standard authentication mechanism.
For more information, see “Using the Standard Authentication Mechanism” on page 463.
Password The password for password-protected resources that use a standard authentication mechanism.
For more information, see “Using the Standard Authentication Mechanism” on page 463.
Option Description

QuickTest Professional User’s Guide • Configuring QuickTest
640
If QuickTest does not record Web events in a way that matches your needs, you can also configure the events you want to record for each type of Web object. For example, if you want to record events, such as a mouseover that opens a sub-menu, you may need to modify the your Web event configuration to recognize such events. For more information, see Chapter 35, “Configuring Web Event Recording.”
Defining Recovery Scenario Settings for Your Test
The Recovery tab displays a list of all recovery scenarios associated with the current test. It also enables you to associate additional recovery scenarios with the test, remove scenarios from the test, change the order in which they are applied to the test run, and view a read-only summary of each scenario. You can enable or disable specific scenarios or the entire recovery mechanism for the test. You can also specify that the current list of scenarios be used as the default for all new tests.
Note: If you want other users or Mercury Interactive products to be able to run this test on other computers, you should set the recovery file path as a relative path (click the path once to highlight it, and then click it again to enter edit mode). Any users who want to run this test should then specify the folder in which QuickTest should search for the relative path. For more information, see “Setting Folder Testing Options” on page 591.
Advanced Opens the Advanced Authentication dialog box, which enables you to manually log in to your Web site in order to enable access to password-protected resources that use an advanced authentication mechanism.
For more information, see “Using the Advanced Authentication Mechanism” on page 465.
Option Description

Chapter 29 • Setting Testing Options for a Single Test
641
For more information about recovery scenarios, see Chapter 19, “Defining and Using Recovery Scenarios”.
The Recovery tab includes the following options:
Option Description
Associates a recovery scenario with the test.
Removes an associated recovery scenario from the test.
Assigns a higher priority to the selected scenario.
Assigns a lower priority to the selected scenario.
Displays summary properties for the selected recovery scenario in read-only format.

QuickTest Professional User’s Guide • Configuring QuickTest
642
Scenarios Displays the name and recovery file path for the selected recovery scenario. You can select or clear the check box next to each scenario in order to enable or disable it for the current test.
You can also edit the recovery scenario file path by clicking the path once to highlight it, and then clicking it again to enter edit mode. For example, you may want to modify an absolute file path to be a relative file path. If you modify a recovery scenario file path, you must ensure that the recovery scenario is defined in the new path location before running your test.
Note: The default recovery scenarios provided with QuickTest are installed in your QuickTest installation folder. The paths specifying the default recovery scenarios in the Test Settings tab use an environment variable (%ProductDir%) in the file path. This enables QuickTest to locate these recovery scenarios when tests associated with them are run on different computers or by different Mercury Interactive products. Do not modify the file paths of these default recovery scenarios or attempt to use the environment variable for any other purpose.
Scenario description Displays the textual description of the scenario selected in the Scenarios box.
Activate recovery scenarios
Instructs QuickTest to activate enabled scenarios as follows:
• Always—The recovery mechanism is activated after every step.
• On error—The recovery mechanism is activated only after steps that return an error return value.
• Never—The recovery mechanism is disabled.
Note: Choosing Always may result in slower performance during the test run.
Set as Default Sets the current list of recovery scenarios as the default scenarios for all new tests.
Option Description

643
30Setting Record and Run Options
You can control how QuickTest starts recording and running tests in specific environments by setting the record and run options.
This chapter describes:
About Setting Record and Run Options
Using the Record and Run Settings Dialog Box
Setting Web Record and Run Options
Setting Windows Applications Record and Run Options
Using Environment Variables to Specify the Application Details for Your Test
About Setting Record and Run Options
You can set options that affect how you start recording and running tests for different environments. For example, you can choose to have QuickTest open specific Windows applications when you are recording or running tests in the standard Windows environment, or QuickTest can open a particular Web browser and URL when recording and running tests on a Web site. You can set your record and run options in the Record and Run Settings dialog box, or you can set the options using environment variables.

QuickTest Professional User’s Guide • Configuring QuickTest
644
Using the Record and Run Settings Dialog Box
Before you record or run a test on a Web or Windows application, you can use the Record and Run Settings dialog box to instruct QuickTest which applications to open when you begin to record or run your test, and to indicate whether or not you want to record operations you perform on Windows applications. Note that you can instruct QuickTest to open and record on applications from more than one environment.
Note: You can set the record and run settings for some add-in environments using the corresponding tab (displayed only when the add-in is installed and loaded). For other add-in environments, such as multimedia applications and terminal emulators, you may use the Windows Applications tab. You can choose not to set record and run options at all but, in this case, you may need to open the application after you open QuickTest to ensure support for that application. For more information, refer to the Working with Supported Environments section of this guide, or refer to your add-in documentation.
The Record and Run Settings dialog box opens automatically each time you begin recording a new test (unless you open the dialog box and set your preferences manually before you begin recording). QuickTest uses the same settings for additional record sessions on the same test, and when you run the test, unless you open the Record and Run Settings dialog box manually to modify the settings.
Note: The setting of the Active Screen capture level (Tools > Options > Active Screen tab) can significantly affect the recording time for your test and the functionality of the Active Screen while editing your test. Confirm that the level selected answers your testing needs. For more information, see “Setting Active Screen Options” on page 594.

Chapter 30 • Setting Record and Run Options
645
The Record and Run Settings dialog box can contain the following tabbed pages:
Note: If you define environment variables for the record and run settings, those values override the values in the Record and Run dialog box. For more information, see “Using Environment Variables to Specify the Application Details for Your Test” on page 651.
To set record and run options:
1 Click the Record button or choose Test > Record. If you are recording for the first time in a test and have not yet set your recording preferences (by opening the dialog box manually), the Record and Run Settings dialog box opens. It is divided by environment into several tabbed pages.
2 To choose an environment, click a tab.
3 Set the required options, as described in the following sections.
4 To apply your changes and keep the Record and Run Settings dialog box open, click Apply.
5 When you are finished, click OK to save your changes and start recording.
Tab Heading Subject
Web Options for testing Web sites.
Note: The Web tab is only available when Web support is installed and loaded.
Windows Applications Options for testing standard Windows applications.
Note: This tab is always available and applies to all Standard Windows, Visual Basic, and ActiveX. (Appropriate add-ins must also be loaded.)

QuickTest Professional User’s Guide • Configuring QuickTest
646
Note: Once you have set the record and run settings for a test, the Record and Run settings dialog box will not open the next time you record operations in that test. However, you can choose Test > Record and Run Settings to open the Record and Run Settings dialog box. Use this option to set or modify your record and run preferences in the following scenarios:
You have already recorded one or more steps in the test and you want to modify the settings before you continue recording.
You want to run the test on a different application or browser than the one you previously set in the Record and Run Settings dialog box.
If you change the record and run settings for additional recording sessions, confirm that you return the settings to match the needs of the first step in your test before you run it.
Setting Web Record and Run Options
The Web tab defines your browser preferences for recording and running your test.

Chapter 30 • Setting Record and Run Options
647
Note: The Web tab displayed in the image above is available only when the corresponding Web add-in is installed and loaded.
The Web tab includes the following options:
Option Description
Record and run test on any open Web browser
Instructs QuickTest to use any open Web browser to record and run the test.Note: You must open your Web browser after you open
QuickTest.
Open the following browser when a record or run session begins
Instructs QuickTest to open a new browser session to record and run the test using the specified URL address.
Note: This option can be used with supported versions of Microsoft Internet Explorer and Netscape Navigator. For other browser types, use the Record and run tests on any open Web browser option. For information on supported browser versions, see “Working with Web Browsers” on page 435 and refer to the ReadMe file.
Browser details Instructs QuickTest regarding the use of the browser during test recording and test runs.
• Type—instructs QuickTest to open the specified browser type (i.e. Internet Explorer, Netscape, etc.).
Note that the Type list displays only those browsers that were installed on your computer when you opened QuickTest.
• Address—instructs QuickTest to open the browser to the specified URL.
• Close the browser when the test is closed—instructs QuickTest to close the browser window when you close the test.

QuickTest Professional User’s Guide • Configuring QuickTest
648
Note to AOL users and users of applications with embedded Web browser controls:
To record and run tests on AOL or an application with embedded Web browser controls, select Record and run tests on any open Web browser in the Record and Run Settings dialog box, make sure AOL or the application is opened after QuickTest, and start recording. For more information on browser settings, see “Recording a Test” on page 90. For additional information on working with the AOL browser, refer to the ReadMe file.
Setting Windows Applications Record and Run Options
The Windows Application tab defines your preferences for recording and running tests on Windows applications including Standard Windows, Visual Basic, and ActiveX applications.

Chapter 30 • Setting Record and Run Options
649
Note: The Web tab displayed in the image above is available only when the corresponding add-in is installed and loaded.
The record and run options in this tab have a slightly different significance than the corresponding options in the other tabs.
Selecting Record and Run test on any application records all operations performed on any Windows application while recording your test (including on e-mail applications, file management applications, etc.).
Selecting Record and run on these applications (opened when a session begins) records operations only on the Windows applications specified in the list. Additionally, QuickTest opens these applications for you at the beginning of a record or run session.
Tip: If you do not want to record on any Windows application, select Record and run on these applications (opened when a session begins) and leave the Application details section blank. (This is the default setting.)
You can manually add standard Windows steps to your test and then run them, even if the above option is selected and the Application details section is left blank (or does not list the application for which you want to add a step).
The Windows Applications tab includes the following options:
Option Description
Record and run test on any application
Instructs QuickTest to use any open Windows application to record and run the test.
Record and run on these applications (opened when a session begins)
Instructs QuickTest to restrict its recording on Windows applications to the specified applications and to open these applications when record or run sessions begin.

QuickTest Professional User’s Guide • Configuring QuickTest
650
Applications details Lists the details of the applications on which to record and run the test. If the application path contains spaces, use quotation marks when specifying the path. (If you browse to the application path, the quotation marks are added automatically.)
Add Adds an application to the application list. You can add up to ten applications. Specify the details of the Windows applications in the Application Details dialog box:
• Executable file—Instructs QuickTest to record on and open the specified executable or batch file.
• Working directory—Instructs QuickTest to open the application from the specified directory.
Note: If the executable file path contains spaces, add quotation marks around the path. Note that if you select the application using the browse button, the necessary quotation marks are added automatically.
Edit Edits the selected application details.
Delete Deletes the selected application from the Applications details list.
Option Description

Chapter 30 • Setting Record and Run Options
651
Using Environment Variables to Specify the ApplicationDetails for Your Test
You can use special, predefined environment variables to specify the applications you want to use for your test. This can be useful if you want to test how your application works in different environments. For example, you may want to test that your Web application works properly on identical or similar Web sites with different Web addresses.
When you define an environment variable for one (or more) of the application detail options and you select the option to open an application when record and run sessions begin for a particular environment (the lower radio button in each tab of the Record and Run Settings dialog box), the environment variable value overrides the value specified in the Record and Run Settings dialog box.
Note: If you select the option to Record and Run on any application from a particular environment (the upper radio button in each tab of the Record and Run Settings dialog box), QuickTest ignores the application details environment variables.
You can define the environment variables as internal user-defined variables, or you can add them to an external environment variable file and set your test to load environment variables from that file.
You can set your Record and Run settings manually while recording your test and then define the environment variables or load the environment variable file only when you are ready to run the test (as described in the procedure below).
Alternatively, you can define environment variables before you record your test. In this case, QuickTest uses these values to determines which applications to open when you begin recording—assuming that the option to open an application when starting record and run sessions for the particular environment is selected. (This option is the lower radio button in each tab of the Record and Run Settings dialog box.)

QuickTest Professional User’s Guide • Configuring QuickTest
652
To use application details environment variables for your test:
1 Set your Record and Run Setting preferences normally to record your test.
Note: If you already have environment variables set for one or more application details, and you select the option to open an application when the record session begins, the environment variable values override the record settings you enter in the dialog box.
2 Record and edit your test normally.
3 If you did not define environment variables prior to recording your test, define an environment variable for each application detail you want to set using the appropriate variable name.
For a list of available application details environment variables, see “Defining Application Details Environment Variables” below.
For more information on how to define a user-defined environment variable and how to create environment variable files, see “Using Environment Variable Parameters” on page 231.
4 Before running the test, confirm that the lower radio button is selected in the tab(s) corresponding to the environment(s) for which you want to use environment variables.
5 Run the test. QuickTest uses the environment values to determine which application(s) to open at the beginning of the run session.

Chapter 30 • Setting Record and Run Options
653
Defining Application Details Environment Variables
In order to use environment variables to specify the applications you want to use for your test run, you must use the appropriate variable names as specified below.
Use the variable name listed in the table below to define the Web browser and URL to open:
Use the variable name listed in the table below to define the details for Windows applications on which you want to record and run test:
Option Variable Name Description
Type BROWSER_ENV The browser type to open.
Possible values: IE, NS, NS6
Address URL_ENV The Web address to display in the browser.
OptionVariable Names Description
Application 1_APP_ENV,2_APP_ENV,...10_APP_ENV
The executable or batch files (up to ten application names) on which QuickTest records operations (and opens when record and run sessions begin).
Working Directory 1_DIR_ENV2_DIR_ENV...10_DIR_ENV
The folder to which the corresponding executable or batch file refers (for up to ten corresponding folder paths).

QuickTest Professional User’s Guide • Configuring QuickTest
654

655
31Customizing the Expert View
You can customize the way your test is displayed when you work in the Expert View. QuickTest includes a powerful and customizable test script editor. You can set the size of margins in the Expert View tab, change the way the elements of a test script are displayed, and create a list of typing errors that will be automatically corrected by QuickTest.
This chapter describes:
About Customizing Your Test in the Expert View
Setting Display Options
Personalizing Editing Commands
About Customizing Your Test in the Expert View
QuickTest’s test script editor lets you set display options, and personalize test script editing commands for working in the Expert View.
Setting Display Options
Display options let you configure the Expert View in QuickTest and customize how your test scripts will be displayed or printed. For example, you can set the size of Expert View tab margins, and activate or deactivate line wrapping.
Display options also let you change the color and appearance of different test script elements. These include comments, strings, QuickTest reserved words, operators and numbers. For each test script element, you can assign colors, text attributes (bold, italic, underline), font, and font size. For example, you could display all text strings in red.

QuickTest Professional User’s Guide • Configuring QuickTest
656
Finally, there are display options that let you control how your test scripts are displayed when printed.
Personalizing Test Script Editing Commands
QuickTest includes a list of default keyboard shortcuts that let you move the cursor, delete characters, cut, copy, and paste information to and from the Clipboard. You can replace these shortcuts with shortcuts you prefer. For example, you could change the Set Bookmark [#] command from the default CTRL + K + [#] to CTRL + B + [#].
Setting Display Options
QuickTest’s display options let you control how test scripts are displayed in the Expert View tab, how different elements of test scripts are displayed, and how test scripts are displayed when they are printed. You set these options from the Editor Options dialog box. This dialog box consists of three tabs:
Options—Customizes the appearance of your script and customizes your print settings.
Highlighting—Edits script elements.
Key assignments—Personalizes edit commands.
Customizing Print Options and Test Scripts
You can set how the hard copy of your script is displayed when it is sent to the printer. For example, your printed script can include line numbers, the name of the file, and the current date.
You can also customize how QuickTest’s test scripts are displayed on the screen. For example, you can highlight test script elements and show or hide text symbols.

Chapter 31 • Customizing the Expert View
657
To customize the print options and the appearance of your script:
1 Choose Tools > Editor Options. The Editor Options dialog box opens.
2 Click the Options tab.
3 Choose from the following print options:
Option Description
Wrap long lines Automatically wraps a line of text to the next line if it is wider than the current printer page settings.
Line numbers Prints a line number next to each line in the script.
Title in header Inserts the test title into the header of the printed script.
Date in header Inserts today’s date into the header of the printed script.
Page numbers Numbers each page of the script.

QuickTest Professional User’s Guide • Configuring QuickTest
658
4 Choose from the following general options:
Options Description
Auto indent Causes lines following an indented line to automatically begin at the same point as the previous line. You can click the HOME key on your keyboard to move the cursor back to the left margin.
Smart tab Causes a single press of the tab key to insert the appropriate number of tabs and spaces to align the cursor with the text in the line above.
Smart fill Inserts the appropriate number of tabs and spaces when applying the Auto indent option. When this option is not selected, only spaces are used to apply the Auto indent.
(Both Auto indent and Use tab character must be selected to apply this option).
Use tab character Inserts a tab character when the tab key on the keyboard is used. When this option is not enabled, the appropriate number of space characters is inserted.
Line numbers in gutter Displays a line number next to each line in the script. The line number is displayed in the test script window’s gutter.
Statement completion Opens a list box displaying all available matches to the method prefix whenever you press the CTRL + SPACE keys, the period (.) key, or choose Edit > Complete Word. Selecting an item from the displayed list replaces the typed string. To close the list box, press the ESC key.
Displays a tooltip with the method arguments once the complete method name is entered in the Expert View editor. The method arguments are also displayed whenever you press the CTRL + SHIFT + SPACE keys simultaneously, or choose Edit > Parameter Info.

Chapter 31 • Customizing the Expert View
659
5 Click OK to save the changes and close the dialog box.
Show all chars Displays all text symbols, such as tabs and paragraph symbols.
Block cursor for Overwrite Displays a block cursor instead of the standard cursor when you select overwrite mode.
Word select Selects the nearest word when you double-click in the Expert View tab.
Syntax highlight Highlights test script elements such as comments, strings, or reserved words in special colors, fonts, etc. as set in the Highlighting tab. For more information, see “Highlighting Script Elements,” below.
Visible right margin Displays a line that indicates the Expert View tab’s right margin.
Right margin Sets the position, in characters, of the Expert View tab’s right margin (0=left tab edge).
Visible gutter Displays a blank area (gutter) in the Expert View tab’s left margin.
Gutter width Sets the width, in pixels, of the gutter.
Block indent step size Sets the number of characters that the selected block of VBScript statements will be moved (indented) when the INDENT SELECTED BLOCK softkey is used. For more information on editor softkeys, see “Personalizing Editing Commands” on page 661.
Tab stop Sets the distance, in characters, between each tab stop.
Options Description

QuickTest Professional User’s Guide • Configuring QuickTest
660
Highlighting Script Elements
QuickTest test scripts contain many different elements, such as comments, strings, QuickTest or VBScript reserved words, operators, and numbers. Each element of a QuickTest test script can be displayed in a different color and style. You can create your own personalized color scheme and style for each script element. For example, all comments in your scripts could be displayed as italicized, blue letters on a yellow background.
To set highlighting preferences for script elements:
1 Choose Tools > Editor Options. The Editor Options dialog box opens to the Options tab. Click the Highlighting tab.
2 Select a script element from the Element list.

Chapter 31 • Customizing the Expert View
661
3 For each script element you select, choose from the following options:
An example of each change you apply is displayed in the pane at the bottom of the dialog box.
4 Click OK to apply the changes and close the dialog box.
Personalizing Editing Commands
You can personalize the default keyboard shortcuts you use for editing test scripts. QuickTest includes keyboard shortcuts that let you move the cursor, delete characters, and cut, copy, or paste information to and from the Clipboard. You can replace these shortcuts with your own preferred shortcuts. For example, you could change the Paste shortcut from the default CTRL + V to CTRL + P.
Options Description
Foreground Sets the color applied to the text of the script element.
Background Sets the color that is displayed behind the script element.
Text attributes Sets the text attributes applied to the script element. You can select Bold, Italic, Underline, or a combination of these attributes.
Use defaults for Applies the background and foreground colors of the default style to the selected style.
Font Sets the font of the script element.
Size Set the size, in points, of the script element.
Charset Sets the character subset of the selected font.

QuickTest Professional User’s Guide • Configuring QuickTest
662
To personalize editing commands:
1 Choose Tools > Editor Options. The Editor Options dialog box opens.
2 Click the Key assignments tab.
3 Select a command from the Commands list.
4 Click Add to create an additional key assignment or click Edit to modify the existing assignment. The Add new key pair for <command> or Edit new key pair for <command> dialog box opens. Press the key(s) you want to use for the selected command. For example, CTRL + 4.

Chapter 31 • Customizing the Expert View
663
5 Click Next. To add an additional key sequence, press the key(s) you want to use. For example, if you want the shortcut to be CTRL + 4 and then U, type U in the Step 2 box.
6 Click Finish to add the key sequence(s) to the Use keys list.
If you want to delete a key sequence from the list, highlight the keys in the Uses keys list and click Delete.
7 Click OK to apply the changes and close the dialog box.

QuickTest Professional User’s Guide • Configuring QuickTest
664

665
32Setting Testing Options During the Test Run
You can control how QuickTest records and runs tests by setting and retrieving testing options during a test run.
This chapter describes:
About Setting Testing Options from a Test Script
Setting Testing Options
Retrieving Testing Options
Controlling the Test Run
Adding and Removing Run-Time Settings
About Setting Testing Options from a Test Script
QuickTest testing options affect how you record test scripts and run tests. For example, you can set the maximum time that QuickTest allows for finding an object in a page.
You can set and retrieve the values of testing options during a test run using the Setting object in the Expert View. For more information on working in the Expert View, see Chapter 37, “Testing in the Expert View.”
By retrieving and setting testing options in using the Setting object, you can control how QuickTest runs a test.

QuickTest Professional User’s Guide • Configuring QuickTest
666
You can also set many testing options using the Options dialog box (global testing options) and the Test Settings dialog box (test-specific settings). For more information on setting global testing options using the Options dialog box, see Chapter 28, “Setting Global Testing Options.” For more information on setting test-specific settings, see Chapter 29, “Setting Testing Options for a Single Test.”
Note: You can also control QuickTest options as well as most other QuickTest operations from an external application using automation programs. For more information, see “Automating QuickTest Operations” on page 801, or refer to the QuickTest Automation Object Model Reference (Help > QuickTest Automation Object Model Reference).
Setting Testing Options
You can use the Setting object to set the value of a testing option from within the test script. To set the option, use the following syntax:
Setting (testing_option) = new_value
Some options are global and others are per-test settings.
Using the Setting object with a global testing option changes a testing option globally, and this change is reflected in the Options dialog box.
For example, if you execute the following statement:
Setting("AutomaticLinkRun")=1
QuickTest disables automatically created checkpoints in the test. The setting remains in effect during your current QuickTest session until it is changed again, either with another Setting statement, or by clearing the Ignore automatic checkpoints while running tests check box in the Advanced Web Options dialog box (Choose Tools > Options > Web tab, and click Advanced).

Chapter 32 • Setting Testing Options During the Test Run
667
Using the Setting object to set per-test options is also reflected in the Test Settings dialog box. You can also use the Setting object to change a setting for a specific part of a specific test. For more information see “Controlling the Test Run” on page 669.
For example, if you execute the following statement:
Setting("WebTimeOut")=50000
QuickTest automatically changes the amount of time it waits for a Web page to load before running a test step to 50000 milliseconds. The setting remains in effect during your current QuickTest session until it is changed again, either with another Setting statement, or by setting the Browser Navigation Timeout option in the Web tab of the Test Settings dialog box.
Note: Although the changes you make using the Setting object are reflected in the Options and Test Settings dialog boxes, these changes are not saved when you close QuickTest, unless you make other changes in the same dialog box manually and click Apply or OK (which saves all current settings in that dialog box).
The following section lists some of the QuickTest testing options that can be used with the Setting object from within a test script. The corresponding dialog box option is listed where applicable.
AutomaticLinkRun
Sets or retrieves the setting for the Ignore automatic checkpoints while running tests option.
AutomaticLinkRun is a global testing option.
Note that you can also set this option using the Ignore automatic checkpoints while running tests option in the Advanced Web Options dialog box as described in “Advanced Web Options” on page 609.

QuickTest Professional User’s Guide • Configuring QuickTest
668
DefaultLoadTime
Sets or retrieves the setting for the Add X seconds to page load time option (in seconds).
DefaultLoadTime is a global testing option.
Note that you can also set this option using the Add X seconds to page load time option in the Web tab of the Options dialog box as described in “Setting Web Testing Options” on page 608.
DefaultTimeOut
Sets or retrieves the delay (in milliseconds) for finding objects.
DefaultTimeOut is a per-test setting.
Note that you can also set this option using the Object synchronization timeout option in the Run tab of the Test Settings dialog box as described in “Defining Run Settings for Your Test” on page 624.
WebTimeOut
Sets or retrieves the delay (in milliseconds) for navigating to a URL address.
WebTimeOut is a per-test setting.
Note that you can also set this option using the Browser navigation timeout option in the Web tab of the Test Settings dialog box as described in “Defining Web Settings for Your Test” on page 638.
Retrieving Testing Options
You can also use the Setting object to retrieve the current value of a testing option.
To store the value in a variable, use the syntax:
new_var = Setting ( testing_option )
To display the value in a message box, use the syntax:
MsgBox (Setting (testing_option) )

Chapter 32 • Setting Testing Options During the Test Run
669
For example:
LinkCheckSet = Setting("AutomaticLinkRun")
assigns the current value of the AutomaticLinkRun setting to the user-defined variable LinkCheckSet.
Other examples of testing options that you can use to retrieve a setting are shown in “Setting Testing Options” on page 666.
Controlling the Test Run
You can use the retrieve and set capabilities of the Setting object together to control a test run without changing global settings. For example, if you want to change the DefaultTimeOut testing option to 5 seconds for objects on one Web page only, insert the following statement after the Web page opens in your test script:
‘Keep the original value of the DefaultTimeOut testing optionold_delay = Setting ("DefaultTimeOut")
‘Set temporary value for the DefaultTimeOut testing optionSetting("DefaultTimeOut")= 5000
To return the DefaultTimeOut testing option to its original value at the end of the Web page, insert the following statement immediately before linking to the next page in the script:
‘Change the DefaultTimeOut testing option back to its original value.Setting("DefaultTimeOut")=old_delay

QuickTest Professional User’s Guide • Configuring QuickTest
670
Adding and Removing Run-Time Settings
In addition to the global and test-specific settings, you can also add, modify, and remove custom run-time settings. These settings are applicable during the test run only.
To add a new run-time setting, use the syntax:
Setting.Add "testing_option", "value"
For example, you could create a setting that indicates the name of the current tester and displays the name in a message box.
Setting.Add "Tester Name", "Mark Train"MsgBox Setting(“Tester Name")
Note: When using a Setting.Add statement, an error occurs if you try to add an existing key value. To avoid this error you should use a Setting.Exists statement first. For more details about all the Setting methods, refer to the QuickTest Object Model Reference.
To modify a run-time setting that has already been initialized, use the same syntax you use for setting any standard setting option:
Setting ( testing_option ) = new_value
For example:
Setting("Tester Name")="Alice Wonderlin"
To delete a custom run-time setting, use the following syntax:
Setting.Remove ( testing_option )
For example:
Setting.Remove ("Tester Name")

Part VII
Advanced Features

672

673
33Configuring Object Identification
When you record an operation on an object, QuickTest learns a set of properties and values that uniquely describe the object within its parent object. In most cases, this description is sufficient to enable QuickTest to identify the object during the test run.
If you find that the description QuickTest uses for a certain object class is not the most logical one for the objects in your application, or if you expect that the values of the properties in the object description may change frequently, you can configure the way that QuickTest learns and identifies objects. You can also map user-defined objects to standard test object classes and configure the way QuickTest learns objects from your user-defined object classes.
This chapter describes:
About Configuring Object Identification
Understanding the Object Identification Dialog Box
Configuring Smart Identification
Mapping User-Defined Test Object Classes
About Configuring Object Identification
QuickTest has a predefined set of properties that it learns for each test object. If these mandatory property values are not sufficient to uniquely identify an object you record, QuickTest can add some assistive properties and/or an ordinal identifier in order to create a unique description.
Mandatory properties are properties that QuickTest always learns for a particular test object class.

QuickTest Professional User’s Guide • Advanced Features
674
Assistive properties are properties that QuickTest learns only if the mandatory properties that QuickTest learns for a particular object in your application are not sufficient to create a unique description. If several assistive properties are defined for an object class, then QuickTest learns one assistive property at a time, and stops as soon as it creates a unique description for the object. If QuickTest does learn assistive properties, those properties are added to the test object description.
Note: If the combination of all defined mandatory and assistive properties is not sufficient to create a unique test object description, QuickTest also records the value for the selected ordinal identifier. For more information, see “Selecting an Ordinal Identifier” on page 680.
When you run a test, QuickTest searches for the object that matches the description it learned (without the ordinal identifier). If it cannot find any object that matches the description, or if it finds more than one object that matches, QuickTest uses the Smart Identification mechanism (if enabled) to identify the object. In many cases, a Smart Identification definition can help QuickTest identify an object, if it is present, even when the recorded description fails due to changes in one or more property values. The test object description is used together with the ordinal identifier only in cases where the Smart Identification mechanism does not succeed in narrowing down the object candidates to a single object.
You use the Object Identification dialog box (Tools > Object Identification) to configure the mandatory, assistive, and ordinal identifier properties that QuickTest uses to record descriptions of the objects in your application, and to enable and configure the Smart Identification mechanism.
The Object Identification dialog box also enables you to configure new user-defined classes and map them to an existing test object class so that QuickTest can recognize objects from your user-defined classes when you run your test.

Chapter 33 • Configuring Object Identification
675
Understanding the Object Identification Dialog Box
You use the main screen of the Object Identification dialog box to set mandatory and assistive recording properties, to select the ordinal identifier, and to specify whether you want to enable the Smart Identification mechanism for each test object. From the Object Identification dialog box, you can also define user-defined object classes and map them to Standard Windows object classes, and you can configure the smart identification mechanism for any object.
For more information, see:
“Configuring Mandatory and Assistive Recording Properties,” below
“Selecting an Ordinal Identifier” on page 680
“Enabling and Disabling Smart Identification” on page 682
“Restoring Default Object Identification Settings for all Test Objects” on page 683
“Generating Automation Scripts for Your Object Identification Settings” on page 683
“Mapping User-Defined Test Object Classes” on page 692
“Configuring Smart Identification” on page 683
Configuring Mandatory and Assistive Recording Properties
If you find that the description QuickTest uses for a certain object class is not the most logical one for the objects in your application, or if you expect that the values of the properties currently used in the object description may change, you can modify the mandatory and assistive properties that QuickTest learns when you record on an object of a given class.
During the test run, QuickTest looks for objects that match all properties in the test object description - it does not distinguish between properties that were learned as mandatory properties and those that were learned as assistive properties.

QuickTest Professional User’s Guide • Advanced Features
676
For example, the default mandatory properties for a Web Image object are the alt, html tag, and image type properties. There are no default assistive properties defined. Suppose your Web site contains several space holders for different collections of rotating advertisements. You want to record a test that clicks on the images in each one of these space holders. However, since each advertisement image has a different alt value, one alt value would be recorded when you create the test, and most likely another alt value will be captured when you run the test, causing the test run to fail. In this case, you could remove the alt property from the Web Image mandatory properties list. Instead, since each ad image displayed in a certain space holder in your site has the same value for the image name property, you could add the name property to the mandatory properties to enable QuickTest to uniquely identify the object.
Also, suppose that whenever a Web image is displayed more than once on a page (like a logo displayed on the bottom and top of a page), the Web designer adds a special ID property to the Image tag. Thus, the mandatory properties are sufficient to create a unique description for images that are only displayed once on the page, but you also want QuickTest to learn the ID property for images that are displayed more than once on a page. To do this, you add the ID property as an assistive property, so that QuickTest learns the ID property only when it is necessary for creating a unique test object description.

Chapter 33 • Configuring Object Identification
677
To configure mandatory and assistive properties for a test object class:
1 Choose Tools > Object Identification. The Object Identification dialog box opens.
2 Select the appropriate environment in the Environment list. The test object classes associated with the selected environment are displayed in the Test object classes list.
Note: The environments included in the Environment list correspond to the loaded add-in environments. For more information on loading add-ins, see Chapter 20, “Working with QuickTest Add-Ins.”
3 In the Test Object classes list, select the test object class you want to configure.

QuickTest Professional User’s Guide • Advanced Features
678
4 In the Mandatory Properties list, click Add/Remove. The Add/Remove Properties dialog box for mandatory properties opens.
5 Select the properties you want to include in the Mandatory Properties list and/or clear the properties you want to remove from the list.
Note: You cannot include the same property in both the mandatory and assistive property lists.
You can specify a new property by clicking New and specifying a valid property name in the displayed dialog box.
Tip: You can also add property names to the set of available properties for Web objects using the attribute/<PropertyName> notation. To do this, click New. The New Property dialog box opens. Enter a valid property in the format attribute/<PropertyName> and click OK. The new property is added to the Mandatory Properties list. For example, to add a property called MyColor, enter attribute/MyColor.

Chapter 33 • Configuring Object Identification
679
6 Click OK to close the Add/Remove Properties dialog box. The updated set of mandatory properties is displayed in the Mandatory Properties list.
7 In the Assistive Properties list, click Add/Remove. The Add/Remove Properties dialog box for assistive properties opens.
8 Select the properties you want to include in the assistive properties list and/or clear the properties you want to remove from the list.
Note: You cannot include the same property in both the mandatory and assistive property lists.
You can specify a new property by clicking New and specifying a valid property name in the displayed dialog box.

QuickTest Professional User’s Guide • Advanced Features
680
Tip: You can also add property names to the set of available properties for Web objects using the attribute/<PropertyName> notation. To do this, click New. The New Property dialog box opens. Enter a valid property in the format attribute/<PropertyName> and click OK. The new property is added to the Mandatory Properties list. For example, to add a property called MyColor, enter attribute/MyColor.
9 Click OK to close the Add/Remove Properties dialog box. The properties are displayed in the Assistive Properties list.
10 Use the up and down arrows to set your preferred order for the assistive properties. When you record a test and assistive properties are necessary to create a unique object description, QuickTest adds the assistive properties to the description one at a time until it has enough information to create a unique description, according to the order you set in the Assistive Properties list.
Selecting an Ordinal Identifier
In addition to recording the mandatory and assistive properties specified in the Object Identification dialog box, QuickTest can also record a backup ordinal identifier for each test object. The ordinal identifier assigns the object a numerical value that indicates its order relative to other objects with an otherwise identical description (objects that have the same values for all properties specified in the mandatory and assistive property lists). This ordered value enables QuickTest to create a unique description when the mandatory and assistive properties are not sufficient to do so.

Chapter 33 • Configuring Object Identification
681
Because the assigned ordinal property value is only accurate relative to the other objects displayed when you record, changes in the layout or composition of your application page or screen could cause this value to change, even though the object itself has not changed in any way. Thus, only when QuickTest cannot create a unique description using all available mandatory and assistive properties, does it record a value for this backup ordinal identifier.
Further, even if QuickTest records an ordinal identifier, it does not use it to identify the object during the test run, unless neither the recorded description, nor the Smart Identification mechanism are able to single out the object in your application.
In general, there are two types of ordinal identifiers:
Index—Indicates the order in which the object appears in the application code relative to other objects with an otherwise identical description.
Location—Indicates the order in which the object appears within the parent window, frame, or dialog box relative to other objects with an otherwise identical description. Values are assigned from top to bottom, and then left to right.
The Web Browser object has a third ordinal identifier type:
CreationTime—Indicates the order in which the browser was opened relative to other open browsers with an otherwise identical description.
Each test object class has a default ordinal identifier selected.
To modify the selected ordinal identifier, select the desired type from the Ordinal identifier box.

QuickTest Professional User’s Guide • Advanced Features
682
Tip: If QuickTest successfully creates a unique test object description while recording using the mandatory and assistive properties, it does not record an ordinal identifier value. You can add an ordinal identifier to an object’s test object properties at a later time using the Add/Remove option from the Object Properties or Object Repository dialog box. For more information, see Chapter 4, “Managing Test Objects.”
Enabling and Disabling Smart Identification
Selecting the Enable Smart Identification check box for a particular test object class instructs QuickTest to record the property values of all properties specified as the object’s base filter or optional filter properties in the Smart Identification Properties dialog box.
By default, some test objects already have Smart Identification configurations and others do not. Those with default configurations also have the Enable Smart Identification check box selected by default.
You should enable the Smart Identification mechanism only for test object classes with Smart Identification configuration defined. However, even if you define a Smart Identification configuration for a test object class, you may not always want to record the Smart Identification property values. If you do not want to record the Smart Identification properties, clear the Enable Smart Identification check box.
Note: Even if you choose to record Smart Identification properties for an object, you can disable use of the Smart Identification mechanism for a specific object in the Object Properties or Object Repository dialog box, or you can disable use of the mechanism for an entire test in the Run tab of the Test Settings dialog box. For more information, see Chapter 4, “Managing Test Objects” and Chapter 29, “Defining Run Settings for Your Test.”
However, if you do not record Smart Identification properties, you cannot enable the Smart Identification mechanism for an object later.

Chapter 33 • Configuring Object Identification
683
For more information on the Smart Identification mechanism, see “Configuring Smart Identification” on page 683.
Restoring Default Object Identification Settings for all Test Objects
You can click the Reset to Default button to restore the default settings for all elements of the Object Identification dialog box for all environments listed in the Environment box (corresponding to the add-ins that are currently loaded).
Note that the Reset to Default button applies to the main object identification properties and the smart identification properties for all QuickTest test object classes and currently available in the Object Identification dialog box and to the user-defined test object classes that are mapped in the Object Mapping dialog box.
Generating Automation Scripts for Your Object Identification Settings
You can click the Generate Script button to generates an automation script containing the current object identification settings. For more information, see “Automating QuickTest Operations” on page 801, or refer to the QuickTest Automation Object Model Reference (Help > QuickTest Automation Object Model Reference).
Configuring Smart Identification
Configuring Smart Identification properties enables you to help QuickTest identify objects in your application even if some of the properties in the object’s recorded description have changed.
When QuickTest uses the recorded description to identify an object, it searches for an object that matches every one of the property values in the description. In most cases, this description is the simplest way to identify the object and unless the main properties of the object change, this method will work.

QuickTest Professional User’s Guide • Advanced Features
684
If QuickTest is unable to find any object that matches the recorded object description, or if it finds more than one object that fits the description, then QuickTest ignores the recorded description, and uses the Smart Identification mechanism to try to identify the object.
While the Smart Identification mechanism is more complex, it is more flexible, and thus, if configured logically, a Smart Identification definition can probably help QuickTest identify an object, if it is present, even when the recorded description fails.
The Smart Identification mechanism uses two types of properties:
Base filter properties—The most fundamental properties of a particular test object class; those whose values cannot be changed without changing the essence of the original object. For example, if a Web link’s tag was changed from <A to any other value, you could no longer call it the same object.
Optional filter properties—Other properties that can help identify objects of a particular class as they are unlikely to change on a regular basis, but which can be ignored if they are no longer applicable.
Understanding the Smart Identification Process
If QuickTest activates the Smart Identification mechanism during a test run (because it was unable to identify an object based on its recorded description), it follows the following process to identify the object:
1 QuickTest “forgets” the recorded test object description and creates a new object candidate list containing the objects (within the object’s parent object) that match all of the properties defined in the base filter property list.
2 From that list of objects, QuickTest filters out any object that does not match the first property listed in the Optional Filter Properties list. The remaining objects become the new object candidate list.
3 QuickTest evaluates the new object candidate list:
If the new object candidate list still has more than one object, QuickTest uses the new (smaller) object candidate list to repeat step 2 for the next optional filter property in the list.
If the new object candidate list is empty, QuickTest ignores this optional filter property, returns to the previous object candidate list, and repeats step 2 for the next optional filter property in the list.

Chapter 33 • Configuring Object Identification
685
If the object candidate list contains exactly one object, then QuickTest concludes that it has identified the object and performs the statement containing the object.
4 QuickTest continues the process described in steps 2 and 3 until it either identifies one object, or runs out of optional filter properties to use.
If, after completing the Smart Identification elimination process, QuickTest still cannot identify the object, then QuickTest uses the recorded description plus the ordinal identifier to identify the object.
If the combined recorded description and ordinal identifier are not sufficient to identify the object, then QuickTest stops the test run and displays a Run Error message.
Reviewing Smart Identification Information in the Test Results
If the recorded test does not enable QuickTest to identify a specified object in a step, and a Smart Identification definition is defined (and enabled) for the object, then QuickTest tries to identify the object using the Smart Identification mechanism.
If QuickTest successfully uses Smart Identification to find an object after no object matches the recorded description, the test results receive a warning status and indicate that the Smart Identification mechanism was used.
If the Smart Identification mechanism cannot successfully identify the object, QuickTest uses the recorded description plus the ordinal identifier to identify the object. If the object is still not identified, the test fails and a normal failed step is displayed in the test results.
For more information, see “Analyzing Smart Identification Information in the Test Results” on page 565.
Walking Through a Smart Identification Example
The following example walks you through the object identification process for an object.
Suppose you have the following statement in your test:
Browser("Mercury Tours").Page("Mercury Tours").Image("Login").Click 22,17

QuickTest Professional User’s Guide • Advanced Features
686
When you recorded your test, QuickTest recorded the following object description for the Login image:
At some point after you recorded your test, however, a second login button (for logging into a VIP section of the Web site) was added to the page, so the Web designer changed the original Login button’s alt tag to: basic login.
The default description for Web Image objects (alt, html tag, image type) works for most images in your site, but it no longer works for the Login image, because that image’s alt property no longer matches the recorded description. Thus, when you run your test, QuickTest is unable to identify the Login button based on the recorded description. However, QuickTest succeeds in identifying the Login button using its Smart Identification definition.
The explanation below describes the process that QuickTest uses to find the Login object using Smart Identification:
1 According to the Smart Identification definition for Web image objects, QuickTest recorded the values of the following properties when you recorded the click on the Login image:

Chapter 33 • Configuring Object Identification
687
The recorded values are as follows:
Base Filter Properties:
Optional Filter Properties:
2 QuickTest begins the Smart Identification process by identifying the five objects on the Mercury Tours page that match the base filter properties definition (html tag = INPUT and image type = Image Button). QuickTest considers these to be the object candidates and begins checking the object candidates against the Optional Filter Properties list.
3 QuickTest checks the alt property of each of the object candidates, but none have the alt value: Login, so QuickTest ignores this property and moves on to the next one.
4 QuickTest checks the name property of each of the object candidates, and finds that two of the objects (both the basic and VIP Login buttons) have the name: login. QuickTest filters out the other three objects from the list, and these two login buttons become the new object candidates.
5 QuickTest checks the file name property of the two remaining object candidates. Only one of them has the file name login.gif, so QuickTest correctly concludes that it has found the Login button and clicks it.
Step-by-step Instructions for Configuring a Smart Identification Definition
You use the Smart Identification Properties dialog box, accessible from the Object Identification dialog box, to configure the Smart Identification definition for a test object class.
html tag: INPUT
image type: Image Button
alt: Login
name: login
file name: login.gif
class: <null>
visible: 1

QuickTest Professional User’s Guide • Advanced Features
688
To configure Smart Identification properties:
1 Choose Tools > Object Identification. The Object Identification dialog box opens.
2 Select the appropriate environment in the Environment list. The test object classes associated with the selected environment are displayed in the Test object classes list.
Note: The environments included in the Environment list are those that correspond to the loaded add-in environments. For more information on loading add-ins, see Chapter 20, “Working with QuickTest Add-Ins.”
3 Select the test object class you want to configure.

Chapter 33 • Configuring Object Identification
689
4 Click the Configure button next to the Enable Smart Identification check box. The Configure button is enabled only when the Enable Smart Identification option is selected. The Smart Identification Properties dialog box opens:
5 In the Base Filter Properties list, click Add/Remove. The Add/Remove Properties dialog box for base filter properties opens.
6 Select the properties you want to include in the Base Filter Properties list and/or clear the properties you want to remove from the list.
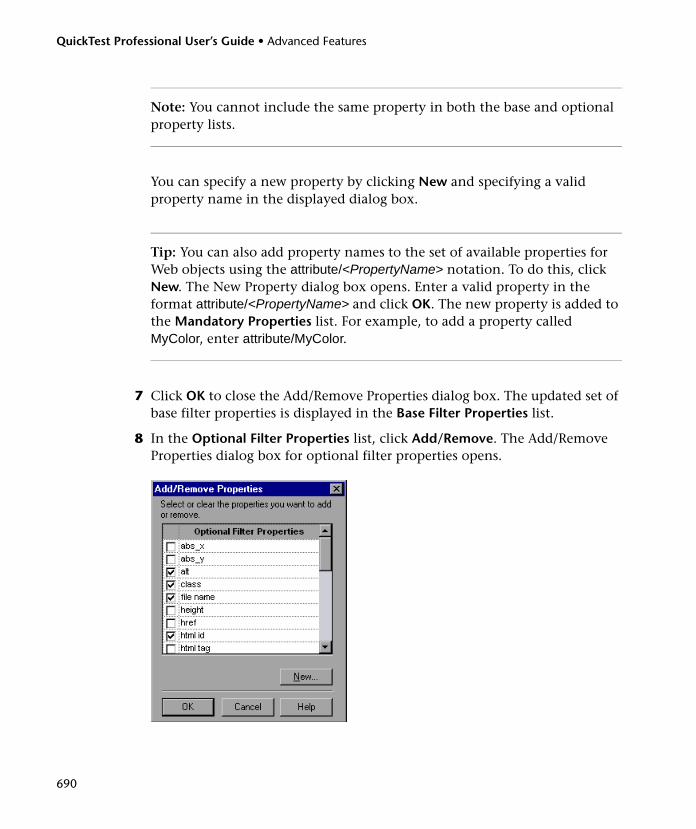
QuickTest Professional User’s Guide • Advanced Features
690
Note: You cannot include the same property in both the base and optional property lists.
You can specify a new property by clicking New and specifying a valid property name in the displayed dialog box.
Tip: You can also add property names to the set of available properties for Web objects using the attribute/<PropertyName> notation. To do this, click New. The New Property dialog box opens. Enter a valid property in the format attribute/<PropertyName> and click OK. The new property is added to the Mandatory Properties list. For example, to add a property called MyColor, enter attribute/MyColor.
7 Click OK to close the Add/Remove Properties dialog box. The updated set of base filter properties is displayed in the Base Filter Properties list.
8 In the Optional Filter Properties list, click Add/Remove. The Add/Remove Properties dialog box for optional filter properties opens.

Chapter 33 • Configuring Object Identification
691
9 Select the properties you want to include in the Optional Filter Properties list and/or clear the properties you want to remove from the list.
Note: You cannot include the same property in both the base and optional property lists.
You can specify a new property by clicking New and specifying a valid property name in the displayed dialog box.
Tip: You can also add property names to the set of available properties for Web objects using the attribute/<PropertyName> notation. To do this, click New. The New Property dialog box opens. Enter a valid property in the format attribute/<PropertyName> and click OK. The new property is added to the Mandatory Properties list. For example, to add a property called MyColor, enter attribute/MyColor.
10 Click OK to close the Add/Remove Properties dialog box. The properties are displayed in the Optional Filter Properties list.
11 Use the up and down arrows to set your preferred order for the optional filter properties. When QuickTest uses the Smart Identification mechanism, it checks the remaining object candidates against the optional properties one-by-one according to the order you set in the Optional Properties list until it filters the object candidates down to one object.

QuickTest Professional User’s Guide • Advanced Features
692
Mapping User-Defined Test Object Classes
The Object Mapping dialog box enables you to map an object of an unidentified or custom class to a Standard Windows class. For example, if your application has a button that cannot be identified, this button is recorded as a generic WinObject. You can teach QuickTest to identify your object as if it belonged to a standard Windows button class. Then, when you click the button while recording a test, QuickTest records the operation in the same way as a click on a standard Windows button. When you map an unidentified or custom object to a standard object, your object is added to the list of Standard Windows test object classes as a user-defined test object. You can configure the object identification settings for a user defined object class just as you would any other object class.
Note that an object that cannot be identified should be mapped only to a standard Windows class with comparable behavior. For example, do not map an object that behaves like a button to the edit class.
Note: You can define user-defined classes only when Standard Windows is selected in the Environment box.
To map an unidentified or custom class to a standard Windows class:
1 Choose Tools > Object Identification. The Object Identification dialog box opens.
2 Select Standard Windows in the Environment box. The User-Defined button becomes enabled.

Chapter 33 • Configuring Object Identification
693
3 Click User-Defined. The Object Mapping dialog box opens.
4 Click the pointing hand and then click the object whose class you want to add as a user-defined class. The name of the user-defined object is displayed in the Class Name box.
5 In the Map to box, select the standard object class to which you want to map your user-defined object class and click Add. The class name and mapping is added to the object mapping list.
6 If you want to map additional objects to standard classes, repeat steps 4-5 for each object.
7 Click OK. The Object Mapping dialog box closes and your object is added to the list of Standard Windows test object classes as a user-defined test object. Note that your object has an icon with a red U in the corner, identifying it as a user-defined class.
8 Configure the object identification settings for your user defined object class just as you would any other object class. For more information, see “Configuring Mandatory and Assistive Recording Properties,” on page 675, and “Configuring Smart Identification,” on page 683.

QuickTest Professional User’s Guide • Advanced Features
694
To modify an existing mapping:
1 In the Object Mapping dialog box, select the class you want to modify from the object mapping list. The class name and current mapping are displayed in the Class name and Map to boxes.
2 Select the standard object class to which you want to map the selected user-defined class and click Update. The class name and mapping is updated in the object mapping list.
3 Click OK to close the Object Mapping dialog box.
To delete an existing mapping:
1 In the Object Mapping dialog box, select the class you want to delete from the object mapping list.
2 Click Delete. The class name and mapping is deleted from the object mapping list in the Object Mapping dialog box.
3 Click OK. The Object Mapping dialog box closes and the class name is deleted from the Standard Windows test object classes list in the Object Identification dialog box.

695
34Choosing the Object Repository Mode
When you create a test, all the information about the objects in your test is stored in an object repository. You can view and modify this information in the Object Repository dialog box.
There are two types of object repositories—shared object repository and action object repository. You can choose which type of object repository you want to use as the default type for all new tests, and you can change the object repository type as necessary for each new test.
This chapter describes:
About Choosing the Object Repository Mode
Deciding Which Object Repository Mode to Choose
Setting the Object Repository Mode
Choosing a Shared Object Repository File
About Choosing the Object Repository Mode
When QuickTest runs tests, it simulates a human user by moving the mouse cursor over the application, clicking objects, and entering keyboard input. Like a human user, QuickTest must learn the interface of an application to be able to work with it. QuickTest does this by learning the application’s objects and their corresponding property values and storing these object descriptions in an object repository file.

QuickTest Professional User’s Guide • Advanced Features
696
When you plan and create tests, you must consider how you want to store the objects in your test. You can have a separate action repository for each action and store the objects for each action in its corresponding action repository, or you can store all the objects in your test in a common (shared) object repository file that can be used among multiple tests.
QuickTest’s TestGuard technology enables you to maintain the reusability of your tests by storing all the information regarding your test objects in the shared object repository. When objects in your application change, test object information can be updated in one central location for multiple tests.
If you are new to using QuickTest, you may want to use the object repository per-action mode. This is the default setting, and all tests created in QuickTest 5.6 or earlier use this mode. In this mode, QuickTest automatically creates an object repository file for each action in your test so that you can record and run tests without creating, choosing, or modifying object repository files. If you do make changes to an action object repository, your changes do not have any effect on other actions or other tests (except tests that call the action; for more information, see “Inserting Calls to Actions” on page 341).
If you are familiar with testing, it is probably most efficient to work in the shared object repository mode. In this mode, you can use one object repository file for multiple tests if the tests include the same objects. Object information that applies to many tests is kept in one central location. When the objects in your application change, you can update them in one location for multiple tests.
You do not have to use the same object repository mode for all tests. You can select the per-action repository mode or a specific shared object repository file as the default for new tests in the Resources tab of the Test Settings dialog box. When you open a new test, the test is set to use the default repository. If you want to use a different shared object repository or set per-action mode for your new test, you can change the selection for that test in the Resources tab of the Test Settings dialog box before you begin adding objects to the test.
For example, suppose you set a shared object repository file as the default for all tests. If you open a new test and want to use the per-action repository mode for that particular test, select Per-action in the Test Settings dialog box before you begin adding objects to the new test.

Chapter 34 • Choosing the Object Repository Mode
697
When you open and work with an existing test, the test always uses the mode (and file) that is specified in the Resources tab of the Test Settings dialog box.
Notes:
You can change the object repository type for the test only if the test does not include any steps or any objects and the test does not call any external actions. However, if you are using a shared object repository, you can modify the path of the shared object repository file and change the file the test is using. For more information, see “Choosing a Shared Object Repository File” on page 711.
There is no need to load object repository files from within your test script.
If you want to use a shared object repository from TestDirector, you must save the shared object repository as an attachment in your TestDirector project before you specify the object repository file in the Resources tab of the Test Settings dialog box. For more information, see “Using Shared Object Repository Files with TestDirector” on page 708.
Deciding Which Object Repository Mode to Choose
To choose the default object repository mode and the appropriate object repository mode for each test, you need to understand the differences between the two modes.
In general, the object repository per action mode is easiest to use when you are creating simple record and run tests, especially under the following conditions:
You have only one, or very few, tests that correspond to a given application, interface, or set of objects.
You do not expect to frequently modify test object properties.
You generally create single-action tests.

QuickTest Professional User’s Guide • Advanced Features
698
Conversely, the shared object repository mode is generally the preferred mode when:
You have several tests that test elements of the same application, interface, or set of objects.
You expect the object properties in your application to change from time to time and/or you regularly need to update or modify test object properties.
You often work with multi-action tests and regularly use the Insert Copy of Action and Insert Call to Action options.
The sections below describe the effects and implications of using each mode in conjunction with various QuickTest features.
Understanding the Object Repository Per Action Mode
When working in object repository per action mode:
QuickTest creates a new (blank) object repository for each action.
As you record operations on objects in your application, QuickTest automatically stores the information about those objects in the appropriate action object repository.
When you create a new action, QuickTest creates another new object repository and again begins adding test objects to the repository as you record.
When you record on the same object in your application in two different actions, the object is stored as a separate test object in each action repository.
When you save your test, all of the action object repositories are automatically saved with the test as part of each action within the test. The action object repository is not accessible as a separate file (as is the shared object repository).

Chapter 34 • Choosing the Object Repository Mode
699
Updating Test Objects in Object Repository Per-Action Mode
Modifying the test object properties, values, or logical names in one action repository does not affect the information stored for the same test object in another action repository or in other tests.
If you parameterize objects in one action, the parameterization applies only to the objects in that current action. For more information about parameterizing tests, see Chapter 13, “Parameterizing Tests.”
If you want to update object properties, values, or logical names for the same object in several actions, open the object repository for each action containing the object (by selecting a step in the action you want to modify and choosing Tools > Object Repository) and make the required change in each action repository.
Using the Object Repository Dialog Box in Object Repository Per-Action Mode
You can view and modify the information about the objects in an action in the Object Repository dialog box. You also can use the Export option to save your action repository as a shared object repository file to use with other tests.

QuickTest Professional User’s Guide • Advanced Features
700
When working in the object repository per-action mode, the Object Repository dialog box displays a hierarchy of all objects in the current action, grouped at each level by test object class.
There are a variety of options for managing the objects in your action using the Object Repository dialog box. For more information, see Chapter 4, “Managing Test Objects.”
Splitting and Copying Actions in Object Repository Per-Action Mode
When you split an action in your test while using the object repository per action mode:
QuickTest makes a copy of the action object repository.
The two actions have identical object repositories containing all of the objects that were in the original object repository.
If you add objects to one of the split actions, the new objects are added only to the corresponding action object repository.

Chapter 34 • Choosing the Object Repository Mode
701
For more information, see “Splitting Actions” on page 346.
When you insert a copy of an action into your test:
The copied action’s action object repository is copied along with the action steps.
You can edit the object repository of the copied action as you would any other action repository in the test.
Note: You cannot insert a copy of an action that uses a shared object repository file into a test that is using action object repositories. This is because a test using action object repositories has a separate action repository for each action. A copied action must use its own action object repository and not one that is shared throughout a test or several tests.
For more information about copying actions, see “Inserting Existing Actions” on page 337.
Inserting Action Calls in Object Repository Per-Action Mode
When you insert a call to an action into a test using the object repository per-action mode:
QuickTest refers to the called action’s action repository when running the test.
The called action’s action repository is read-only, as are all the steps in the called action.

QuickTest Professional User’s Guide • Advanced Features
702
Note: You cannot insert a call to an action that uses a shared object repository file into a test using action object repositories. This is because a test using action object repositories has a separate action repository for each action and an action in a test using shared object repositories uses a repository that is shared throughout a test or several tests. You also cannot change a called action’s repository type within a test that uses action repositories.
For more information about calling actions, see “Inserting Calls to Actions,” on page 341, and “Setting Action Properties,” on page 348.
Understanding the Shared Object Repository Mode
When you use the shared object repository mode, QuickTest uses the object repository file you specify for all the actions in your test. When you create a new test, you can specify an existing object repository file, or you can create a new one, by specifying a new file name.
Once you have begun creating your test, you can specify a different object repository file or create a new one. Before running the test, you must ensure that the object repository file being used by the test contains all the objects in your test. Otherwise, the test may fail. For more information, see “Adding Objects to the Object Repository” on page 76.
Tip: If you do not specify a file extension when creating a new object repository file, then QuickTest automatically appends the default extension name for shared object repositories: .tsr

Chapter 34 • Choosing the Object Repository Mode
703
When working in shared object repository mode:
QuickTest adds new objects to the object repository as you record steps on the object.
QuickTest uses the existing information and does not add the object to the object repository if you record operations on an object that already exists in the shared object repository (i.e. the object has the same test object description).
QuickTest uses the same test object from the shared object repository file when you record on the same object in two different actions or in different tests.
QuickTest saves changes to the shared object repository file when you save your open test or when you click Save in the Object Repository dialog box if the shared object repository is not locked and/or opened in read-only mode.
Note: A shared object repository file may have been locked by QuickTest. If the file is locked, a message regarding locked resources opens. For more information, see “Creating, Opening, and Saving Tests with Locked Resources” on page 107.
Updating Test Objects in Shared Object Repository Mode
Shared object repository mode enables you to:
easily maintain your tests when an object in your application changes
manage all the objects for a suite of tests in one central location
When you modify the test object properties, logical names, parameterization settings, etc., in your shared object repository for an open test, QuickTest applies the change to all the tests that use the same shared object repository file.

QuickTest Professional User’s Guide • Advanced Features
704
Note: You save the changes you make to the shared object repository by saving the open test or by clicking Save in the Object Repository dialog box. You cannot save changes to the shared object repository if it has been locked and/or opened in read-only mode.
Parameterizing Test Objects in Shared Object Repository Mode
When you parameterize an object property in a shared object repository, you must use the global Data Table.
When you parameterize an object property in a shared object repository with a global Data Table parameter, keep the following in mind:
The Current action sheet (local) option in the Data Table Parameter Options dialog box is disabled.
Your change to the object is saved in the shared object repository, but the corresponding Data Table is saved only with the test in which you are currently working.
You must ensure that every other test containing the parameterized object and using the same shared object repository also has a corresponding column in the global Data Table. Otherwise the test may fail.
The column name in the global Data Table related to the parameterized object must be the same for every test using the same shared object repository.
The data within the global Data Table column can be different for each test.
When you parameterize an object property (with any type of parameter), the change applies to all tests that already contain that object.

Chapter 34 • Choosing the Object Repository Mode
705
When you parameterize an object property that is part of an object’s description, and then record on the object in your application again, QuickTest creates a new test object in the shared object repository. This is because the description of the object in the object repository is not identical to the one in the application (one or more of the properties in the test object description has a parameterized value rather than the constant value of the corresponding object property in the application).
Using the Object Repository Dialog Box in Shared Object Repository Mode
You can view and modify the information about the objects in your test in the Object Repository dialog box.
When working in the shared object repository mode, the Object Repository dialog box displays a hierarchy of all objects in the object repository file. Objects in the Object Repository dialog box are grouped at each level by test object class.

QuickTest Professional User’s Guide • Advanced Features
706
There are a variety of options for managing the objects in your test using the Object Repository dialog box. For more information, see Chapter 4, “Managing Test Objects.”
Renaming Objects in a Shared Object Repository
If you rename objects in a shared object repository in one test and save the changes, when you open another test using the same shared object repository, that test updates the object name in all steps of the test. This process may take a few moments. If you save the changes to the second test, the renamed steps are saved. However, if you close the second test without saving, then the next time you open the same test, it will again take a few moments to update the object names in the test steps.
Splitting and Copying Actions in Shared Object Repository Mode
When using the shared object repository mode, splitting an action has no effect on the object repository file. For more information, see “Splitting Actions” on page 346.
When you insert a copy of an action into a test that uses a shared object repository, keep in mind:
Only the action itself is copied and not its corresponding object repository.
The copied action will use the same shared object repository as the test into which it is being copied.
When you insert copies of actions from tests using a different shared object repository or per-action repository mode, you must ensure that all the objects contained in the action are in the test’s shared object repository. If the action uses objects that are not in the shared object repository, the test may fail. For more information, see “Adding Objects to the Object Repository” on page 76.

Chapter 34 • Choosing the Object Repository Mode
707
Inserting Action Calls in Shared Object Repository Mode
When you insert a call to an external action while working in the shared object repository mode, you can call actions from tests that use:
the same shared object repository as the calling test
the object repository per action mode
a different shared object repository than the one used by the calling test
When you insert a call to an action whose test uses the object repository per action mode, you can instruct the external action to refer to its own action repository or to use the same shared object repository as the rest of the current test. You do this in the External Action tab of the Action Properties dialog box. For more information, see “Setting Action Properties” on page 348.
Note: If the called action continues to use its own per-action repository, that action repository is read-only in the test calling the action, as are all the called action’s steps.
When you insert a call to an external action using a different shared object repository, the called action uses the current test’s shared object repository. Before running the test, ensure that all the objects in the called action are in the current test’s shared object repository file. If the called action contains objects that are not in the current test’s shared object repository file, the test may fail. For information on adding objects to the object repository, see “Adding Objects to the Object Repository” on page 76.

QuickTest Professional User’s Guide • Advanced Features
708
Using Shared Object Repository Files with TestDirector
When working with shared object repositories from TestDirector, you must save the shared object repository as an attachment in your TestDirector project before you specify the object repository file in the Resources tab of the Test Settings dialog box. Keep in mind:
You can add a new or existing shared object repository to your TestDirector project.
If you add an existing shared object repository file from the file system to a TestDirector project, it will be a copy of the one used by tests not in the TestDirector project.
You must be connected to TestDirector to work with a shared object repository from the file system.
Once you save the file to the project, changes made to the TestDirector repository file will not affect the file in the file system and vice versa.
You can use the Save as option in the Object Repository dialog box to save your shared object repository to TestDirector.
To use a shared object repository file from TestDirector:
1 If you want to add a new object repository file, create a new, empty file in your file system with a .tsr extension.
2 In TestDirector, add the shared object repository file to the project as an attachment.
3 In the Test Settings dialog box, click the Resources tab.
4 Select Shared and type the path of the default or test object repository file in the format: [TestDirector] Subject\<Rest_of_path>\<SORfile>.tsr. You can also use a relative path. For more information on working with relative paths, see “Setting Folder Testing Options” on page 591.
5 Create your test. When you save the test, QuickTest saves the object repository file to the TestDirector project.

Chapter 34 • Choosing the Object Repository Mode
709
Setting the Object Repository Mode
You set the object repository mode for your tests in the Resources tab of the Test Settings dialog box. You can change the object repository mode for a test if the test does not call any external actions and if the test does not contain any steps or any objects. If you do not change your object repository, QuickTest will use the object repository mode and/or file that was set as the default for new tests.
To set the object repository mode:
1 Choose Test > Settings > Resources tab.
2 In the Object repository type area, select Per-action or Shared.

QuickTest Professional User’s Guide • Advanced Features
710
3 If you selected Shared in step 2, specify the shared object repository file you want to use as the object repository file. To specify a file, enter the object repository file name or click the browse button and select a resource file from the Open dialog box. To create a new shared object repository file, enter a new file name in the Shared box.
Tip: The default file extension for object repository files is .tsr, but the file may have any extension. When browsing for an existing object repository file in the Open dialog box, select All Files in the Files of type box.
Notes:
You can enter an existing object repository file as a relative path. QuickTest will search for the file in the current test’s directory, and then in the folders listed in the Folders tab of the Options dialog box. For more information, see “Setting Folder Testing Options” on page 591. When creating a new shared object repository file, you must enter the full path.
Make sure that you have write permissions for the object repository file you select. Otherwise, you will be able to save changes to your test, but new test objects or any changes you make to object properties or parameterization settings will not be saved in the object repository.
When working with TestDirector and shared object repositories, you can set a shared object repository file from TestDirector as the default repository file. For more information, see “Using Shared Object Repository Files with TestDirector” on page 708.

Chapter 34 • Choosing the Object Repository Mode
711
4 If you want to make your selection the default setting for new tests, click Set as Default.
If Per-action is the default setting, all new tests will be created with a per-action repository.
If you set Shared as the default setting for new tests, the shared object repository file listed will be the default shared object repository for all new tests.
For guidelines and more information, see “Choosing a Shared Object Repository File,” below.
5 Click OK to save and close the Test Settings dialog box.
Note: Changes you make to the default object repository type apply only to tests opened after you click OK to close the Test Settings dialog box. If a new test is already open when you make changes to the default object repository type, the changes are not applied to that test. To use the new settings, create a new test by choosing File > New.
Choosing a Shared Object Repository File
When working with an existing test, the object repository mode and/or file that is associated with the test is displayed in the Resources tab of the Test Settings dialog box. When you create a test, the default mode is displayed.
If the test does not call any external actions and the test does not contain any steps or any objects, you can change the repository mode or the shared object repository file being used for that test.
Once any objects or steps have been added to a test, the object repository mode cannot be changed from per-action to shared or vice versa. If your existing test uses a shared object repository file, you can change the shared object repository file that the test uses.

QuickTest Professional User’s Guide • Advanced Features
712
Guidelines for Choosing a Shared Object Repository File
You can create a new shared object repository file or associate an existing shared object repository file with your test:
when creating a new test
when working with an existing test that is in shared object repository mode
if your test does not call any external actions and if the test does not contain any steps or any objects
When creating a new shared object repository file or selecting an existing shared object repository file for your test, consider the following:
You create a new shared object repository file by typing a new name in the Resources tab of the Test Settings dialog box or in the Object Repository dialog box of an existing test after selecting the Save As option.
You can select an existing shared object repository file by browsing to it and selecting it in the Resources tab of the Test Settings dialog box.
You cannot create a new shared object repository file with a relative path. You must designate an absolute path for a new shared object repository file.
When changing the shared object repository file your test uses, changes to the current shared object repository are not automatically saved. If you do not want to lose your changes to the current shared object repository, click Save in the Object Repository dialog box before designating a different shared object repository file.
If you select a file that has a relative path, QuickTest will search for the file in the current test’s directory and then in the folders listed in the Folders tab of the Options dialog box. For more information, see Chapter 28, “Setting Folder Testing Options.”
When associating your existing test with a new or existing shared object repository file, you must ensure that all the objects contained in the test and all its actions are in the test’s shared object repository before running the test. Otherwise, your test may fail. For more information, see “Adding Objects to the Object Repository” on page 76.

Chapter 34 • Choosing the Object Repository Mode
713
An existing shared object repository file you associate with your test may be locked by QuickTest. When opening a test with a locked shared object repository, QuickTest enables you to open the test in read-only or read-write mode. However, the object repository is opened in read-only mode. For more information, see “Creating, Opening, and Saving Tests with Locked Resources” on page 107.
Setting a Default Shared Object Repository File
You set a default shared object repository file by clicking Set as Default in the Resources tab of the Test Settings dialog box with the Shared option selected. The file listed will be the default shared object repository file for all new tests.
Consider the following when setting a default shared object repository file:
Any existing or open tests will not be affected by setting a different, default shared object repository file.
All new tests will attempt to access your default shared object repository.
If the shared object repository file’s path is relative, QuickTest searches for the shared object repository file in the current test’s directory and then in the Folders tab of the Options dialog box.
It is recommended that you ensure that the path for the shared object repository is absolute or listed in the Folders tab of the Options dialog box.
If you choose to set a file with a relative path or one that is in the current test’s directory as the default shared object repository, QuickTest may not be able to locate the file when creating a new test.

QuickTest Professional User’s Guide • Advanced Features
714

715
35Configuring Web Event Recording
If QuickTest does not record Web events in a way that matches your needs, you can configure the events you want to record for each type of Web object.
This chapter describes:
About Configuring Web Event Recording
Selecting a Standard Event Recording Configuration
Customizing the Event Recording Configuration
Saving and Loading Custom Event Configuration Files
Resetting Event Recording Configuration Settings
About Configuring Web Event Recording
QuickTest creates your test by recording the events you perform on your Web-based application. An event is a notification that occurs in response to an operation, such as a change in state, or as a result of the user clicking the mouse or pressing a key while viewing the document. You may find that you need to record more or fewer events than QuickTest automatically records by default. You can modify the default event recording settings by using the Web Event Recording Configuration dialog box to select one of three standard configurations, or you can customize the individual event recording configuration settings to meet your specific needs.

QuickTest Professional User’s Guide • Advanced Features
716
For example, QuickTest does not generally record mouseover events on link objects. If, however, you have a mouseover behavior connected to a link, it may be important for you to record the mouseover event. In this case, you could customize the configuration to record mouseover events on link objects whenever they are connected to a behavior.
Note: Event configuration is a global setting and therefore affects all tests that are recorded after you change the settings.
Changing the event configuration settings does not affect tests that have already been recorded. If you find that QuickTest recorded more or less than you need, change the event recording configuration and then re-record the part of your test that is affected by the change.
Selecting a Standard Event Recording Configuration
The Web Event Recording Configuration dialog box offers three standard event-configuration levels. By default, QuickTest uses the Basic recording-configuration level. If QuickTest does not record all the events you need, you may require a higher event-configuration level.
Level Description
Basic Default • Always records click events on standard Web
objects such as images, buttons, and radio buttons.
• Always records the submit event within forms.
• Records click events on other objects with a handler or behavior connected.For more information on handlers and behaviors, see “Listening Criteria” on page 725.
• Records the mouseover event on images and image maps only if the event following the mouseover is performed on the same object and is dependent on the mouseover event.

Chapter 35 • Configuring Web Event Recording
717
To set a standard event-recording configuration:
1 Choose Tools > Web Event Recording Configuration. The Web Event Recording Configuration dialog box opens.
2 Use the slider to select your preferred standard event recording configuration.
Medium Records click events on the <DIV>, <SPAN>, and <TD> HTML tag objects, in addition to the objects recorded in the basic level.
High Records mouseover, mousedown, and double-click events on objects with handlers or behaviors attached, in addition to the objects recorded in the basic level.For more information on handlers and behaviors, see “Listening Criteria” on page 725.
Level Description

QuickTest Professional User’s Guide • Advanced Features
718
Tip: You can click the Custom Settings button to open the Custom Web Event Recording dialog box where you can customize the event recording configuration. For more information, see “Customizing the Event Recording Configuration,” below.
You can click the Default Settings button to return the scale to the Basic level.
3 Click OK.
Customizing the Event Recording Configuration
If the standard event configuration levels do not exactly match your recording needs, you can customize the event recording configuration using the Custom Web Event Recording Configuration dialog box.
The Custom Web Event Recording Configuration dialog box enables you to customize event recording in several ways. You can:
add or delete objects to which QuickTest should apply special listening or recording settings
add or delete events for which QuickTest should listen
modify the listening or recording settings for an event
To customize the event recording configuration:
1 Choose Tools > Web Event Recording Configuration. The Web Event Recording Configuration dialog box opens.

Chapter 35 • Configuring Web Event Recording
719
2 Click the Custom Settings button. The Custom Web Event Recording Configuration dialog box opens.
3 Customize the event recording configuration using the following options:
Option Description
Objects pane Displays a list of standard Web test object classes and HTML tag objects.• To add an object, choose Object > Add.
• Only HTML Tag objects can be deleted. To delete an HTML object from the list, choose Object > Delete.
For more information, see “Adding and Deleting Objects in the Custom Configuration Object List” on page 721.
Events pane Displays a list of events associated with the object.• To add an event to the Events pane, choose
Event > Add.
• To delete an event, choose Event > Delete.
For more information, see “Adding and Deleting Listening Events for an Object” on page 723.
Event Name The name of the event.

QuickTest Professional User’s Guide • Advanced Features
720
Listen The criteria for when QuickTest listens to the event.• Always—Always listens to the event.
• If Handler—Listens to the event if a handler is attached to it. A handler is code in a Web page, typically a function or routine written in a scripting language, that receives control when the corresponding event occurs.
• If Behavior—Listens to the event if a DHTML behavior is attached to it. A DHTML behavior is a simple, lightweight component that encapsulates specific functionality or behavior on a page. When applied to a standard HTML element on a page, a behavior enhances that element’s default behavior.
• If Handler or Behavior—Listens to the event if a handler or behavior are attached to it.
• Never—Never listens to the event.
For more information, see “Modifying the Listening and Recording Settings for an Event” on page 725.
Record Enables or disables recording of the event for the selected object.
Reset Enables you to reset your settings to a preconfigured level.
Option Description

Chapter 35 • Configuring Web Event Recording
721
4 Click OK. The Custom Web Event Recording Configuration dialog box closes. The slider scale on the Web Event Recording Configuration dialog box is hidden and the configuration description displays Custom.
Note: Changes to the custom Web event recording configuration settings do not take effect on open browsers. To apply your changes for an existing test, make the changes you need in the Web Event Recording Configuration dialog box, refresh any open browsers, and then start a new recording session.
Adding and Deleting Objects in the Custom Configuration Object List
The Custom Web Event Recording Configuration dialog box lists objects in an object hierarchy. The top of the hierarchy is Any Web Object. The settings for Any Web Object apply to any object on the Web page being tested, for which there is no specific event recording configuration set. Below this are the Standard Web Objects and HTML Tag Objects categories, each of which contains a list of objects.

QuickTest Professional User’s Guide • Advanced Features
722
When working with the objects in the Custom Web Event Recording Configuration dialog box, keep the following principles in mind:
If an object is listed in the Custom Web Event Recording Configuration dialog box, then the settings for that object override the settings for Any Web Object.
You cannot delete or add to the list of objects in the Standard Web Objects category, but you can modify the settings for any of these objects.
You can add any HTML Tag object in your Web page to the HTML Tag Objects category.
To add objects to the event configuration object list:
1 In the Custom Web Event Recording Configuration dialog box, choose Object > Add. A New Object object is displayed in the HTML Tag Objects list.
2 Click New Object to rename it. Enter the exact HTML Tag name.
By default the new object is set to listen and record onclick events with handlers attached.

Chapter 35 • Configuring Web Event Recording
723
For more information on adding or deleting events, see “Adding and Deleting Listening Events for an Object,” below. For more information on listening and recording settings, see “Modifying the Listening and Recording Settings for an Event” on page 725.
To delete objects from the HTML Tag Objects list:
1 From the Custom Web Event Recording Configuration dialog box, select the object in the HTML Tag Objects category that you want to delete.
2 Choose Object > Delete. The object is deleted from the list.
Note: You cannot delete objects from the Standard Web Objects category.
Adding and Deleting Listening Events for an Object
You can modify the list of events that trigger QuickTest to listen to an object.
To add listening events for an object:
1 In the Custom Web Event Recording Configuration dialog box, select the object to which you want to add an event, or select Any Web Object.

QuickTest Professional User’s Guide • Advanced Features
724
2 Choose Event > Add. A list of available events opens.
3 Select the event you want to add. The event is displayed in the Event Name column in alphabetical order. By default, QuickTest listens to the event when a handler is attached and always records the event (as long as it is listened to at some level).
For more information on listening and recording settings, see “Modifying the Listening and Recording Settings for an Event,” below.
To delete listening events for an object:
1 In the Custom Web Event Recording Configuration dialog box, select the object from which you want delete an event, or select Any Web Object.
2 Select the event you want to delete from the Event Name column.
3 Choose Event > Delete. The event is deleted from the Event Name column.

Chapter 35 • Configuring Web Event Recording
725
Modifying the Listening and Recording Settings for an Event
You can select the listening criteria and set the recording status for each event listed for each object.
Note: The listen and record settings are mutually independent. This means that you can choose to listen to an event for particular object, but not record it, or you can choose not to listen to an event for an object, but still record the event. For more information, see “Tips for Working with Event Listening and Recording” on page 727.
Listening Criteria
For each event, you can instruct QuickTest to listen every time the event occurs on the object if an event handler is attached to the event, if a DHTML behavior is attached to the event, if an event handler or DHTML behavior are attached to the event, or to never listen to the event.
An event handler is code in a Web page, typically a function or routine written in a scripting language, that receives control when the corresponding event occurs.
A DHTML behavior is a simple, lightweight component that encapsulates specific functionality or behavior on a page. When applied to a standard HTML element on a page, a behavior enhances that element's default behavior.
To specify the listening criterion for an event:
1 From the Custom Web Event Recording Configuration dialog box, select the object for which you want to modify the listening criterion or select Any Web Object.

QuickTest Professional User’s Guide • Advanced Features
726
2 In the row of the event you want to modify, select the listening criterion you want from the Listen column.
You can select Always, If Handler, If Behavior, If Handler or Behavior, or Never.
Recording Status
For each event, you can enable recording, disable recording, or enable recording only if the next event is dependent on the selected event.
Enabled - records the event each time it occurs on the object as long as QuickTest listens to the event on the selected object, or on another object to which the event bubbles.
Bubbling is the process whereby, when an event occurs on a child object, the event can travel up the chain of hierarchy within the HTML code until it encounters an event handler to process the event.
Disabled - does not record the specified event and ignores event bubbling where applicable.
Enabled on next event - same as Enabled, except that it records the event only if the subsequent event occurs on the same object and is dependent on this event. For example, suppose a mouseover behavior modifies an image link. You may not want to record the mouseover event each time you happen to move the mouse over this image. Because only the image that is displayed after the mouseover event enables the link event, however, it is essential that the mouseover event is recorded before a click event on the same object. This option applies only to the Image and WebArea objects.

Chapter 35 • Configuring Web Event Recording
727
To set the recording status for an event:
1 From the Custom Web Event Recording Configuration dialog box, select the object for which you want to modify the recording status or select Any Web Object.
2 In the row of the event you want to modify, select a recording status from the Record column.
Tips for Working with Event Listening and Recording
It can sometimes be difficult to find the ideal listen and recording settings. When defining these settings, keep in mind the following guidelines:
If settings for different objects in the Objects Pane conflict, QuickTest gives first priority to settings for specific HTML Tag Objects and second priority to Standard Web Objects settings. QuickTest only applies the settings for Any Web Object to Web objects that were not defined in the HTML Tag Object or Standard Web Objects sections.
To record an event on an object, you must instruct QuickTest to listen for the event, and to record the event when it occurs. You can listen for an event on a child object, even if a parent object contains the handler or behavior, or you can listen for an event on a parent object, even if the child object contains the handler or behavior. However, you must enable recording for the event on the source object (the one on which the event actually occurs, regardless of which parent object contains the handler or behavior).

QuickTest Professional User’s Guide • Advanced Features
728
For example, suppose a table cell with an onmouseover event handler contains two images. When a user touches either of the images with the mouse pointer, the event also bubbles up to the cell, and the bubbling includes information on which image was actually touched. You can record this mouseover event by:
Setting Listen on the <TD> tag mouseover event to If Handler (so that QuickTest “hears” the event when it occurs), while disabling recording on it, and then setting Listen on the <IMG> tag mouseover event to Never, while setting Record on the <IMG> tag to Enable (to record the mouseover event on the image after it is listened to at the <TD> level).
Setting Listen on the <IMG> tag mouseover event to Always (to listen for the mouseover event even though the image tag does not contain a behavior or handler), and setting Record on the <IMG> tag to Enabled (to record the mouseover event on the image).
Instructing QuickTest to listen for many events on many objects may lower performance, so try to limit listening settings to the required objects.
In rare situations, listening to the object on which the event occurs (the source object) can interfere with the event.
If you find that your application works properly until you begin recording on the application using QuickTest, your listen settings may be interfering.
If this problem occurs with a mouse event, try selecting the appropriate Use standard Windows mouse events option(s) in the Advanced Web Options dialog box. For more information, see “Advanced Web Options” on page 609.
If this problem occurs with a keyboard or internal event, or the Use standard Windows mouse events option does not solve your problem, set the listen settings for the event to Never on the source object (but keep the record setting enabled on the source object), and set the listen settings to Always for a parent object.

Chapter 35 • Configuring Web Event Recording
729
Saving and Loading Custom Event Configuration Files
You can save the changes you make in the Custom Web Event Recording Configuration dialog box, and load them at any time.
To save a custom configuration:
1 Customize the event recording configuration as desired. For more information on how to customize the configuration, see “Customizing the Event Recording Configuration” on page 718.
2 In the Custom Web Event Recording Configuration dialog box, Choose File > Save Configuration As. The Save As dialog box opens.
3 Navigate to the folder in which you want to save your event configuration file and enter a configuration file name. The extension for configuration files is .xml.
4 Click Save to save the file and close the dialog box.
To load a custom configuration:
1 Choose Tools > Web Event Recording Configuration and then click Custom Settings to open the Custom Web Event Recording Configuration dialog box.
2 Choose File > Load Configuration. The Open dialog box opens.
3 Locate the event configuration file (.xml) that you want to load and click Open. The dialog box closes and the selected configuration is loaded.

QuickTest Professional User’s Guide • Advanced Features
730
Resetting Event Recording Configuration Settings
You can restore standard settings after you set Custom settings by resetting the event recording configuration settings to the basic level from the Web Event Recording Configuration dialog box.
Note: When you choose to reset standard settings, your custom settings are cleared completely. If you do not want to lose your changes, be sure to save your settings in an event configuration file. For more information, see “Saving and Loading Custom Event Configuration Files” on page 729.
To reset basic level configuration settings from the Web Event Recording Configuration dialog box:
1 Choose Tools > Web Event Recording Configuration. The Web Event Recording Configuration dialog box opens.
2 Click Default. The standard configuration slider is displayed again and all event settings are restored to the Basic event recording configuration level.
3 If you want to select a different standard configuration level, see “Selecting a Standard Event Recording Configuration” on page 716.
You can also restore the settings to a specific (base) custom configuration from within the Custom Web Event Recording Configuration dialog box so that you can begin customizing from that point.
To reset the settings to a custom level from the Custom Web Event Recording Configuration dialog box:
1 Choose Tools > Web Event Recording Configuration. The Web Event Recording Configuration dialog box opens.
2 Click the Custom Settings button. The Custom Web Event Recording Configuration dialog box opens.
3 In the Reset to box, select the standard event recording level you want.
4 Click Reset. All event settings are restored to the defaults for the level you selected.

731
36Enhancing Your Tests with Programming Statements
After recording a test, you can use special QuickTest tools to enhance your test with programming statements, even if you choose not to program manually in the Expert View.
This chapter describes:
About Enhancing Your Tests with Programming
Inserting Methods Using the Method Wizard
Using Conditional Statements
Generating ‘With’ Statements for Your Test
Sending Messages to Your Test Results
Adding Comments
About Enhancing Your Tests with Programming
The easiest way to create a test is to begin by recording typical business processes that you perform on your application or Web site. Then, to increase your test’s power and flexibility, you can add programming statements to the recorded framework. Programming statements can contain:
• recordable test object methods: operations that a user can perform on an application or Web site.

QuickTest Professional User’s Guide • Advanced Features
732
• non-recordable test object methods: operations that users cannot perform on an application or Web site. You use these methods to retrieve or set information, or to perform operations triggered by an event.
• run-time methods of the object being tested.
• various VBScript programming commands that affect the way the test runs, such as conditions and loops. These are often used to control the logical flow of a test.
• supplemental statements, such as comments, to make your test easier to read, and messages that appear in the test results, to alert you to a specified condition
Note: Test object methods are defined in QuickTest; run-time methods are defined within the object you are testing, and therefore are retrieved from them.
This chapter shows you how to insert different types of statements, mostly from the Tree View, aided by the QuickTest Method Wizard and other dialog boxes. The Method Wizard is a step-by-step wizard that helps you quickly and easily add methods to your test. For information on how to insert statements in the Expert View, see Chapter 37, “Testing in the Expert View.”
You can incorporate decision-making into your test and define messages for the test results by using the appropriate dialog boxes.
In addition, you can improve the readability of your test using With statements. You can instruct QuickTest to automatically generate With statements as you record. But even after your basic test is recorded, you can convert its statements, in the Expert View, to With statements—by selecting a menu command.

Chapter 36 • Enhancing Your Tests with Programming Statements
733
Inserting Methods Using the Method Wizard
The Method Wizard is a programming tool that helps you to quickly and easily add recordable and non-recordable methods to your test. For example, you can add a step that checks that an object exists, or that retrieves the return value of a method. You can use the returned value as an output value or as part of a conditional statement.
When you use the Method Wizard to insert a method for a test object in your application or Web site, you first select the object and then create a statement containing an appropriate method, with arguments and return values that you define. The resulting statement can be parameterized. The Method Wizard guides you through this process, and then inserts a statement, with proper syntax, into your test.
You can insert statements using the Method Wizard while recording or editing your test.
To activate the Method Wizard while recording:
1 During a recording session, choose Insert > Step > Method. QuickTest is minimized.
2 Click on the object in your application for which you want to enter a statement.
Tip: If the window containing the object you want to click is partially hidden by another window, hold the pointing hand over the partially hidden window for a few seconds. The window comes into the foreground. You can now point and click on the object you want. You can configure the length of time required to bring a window into the foreground in the General tab of the Options dialog box. For more information, see Chapter 28, “Setting Global Testing Options.”

QuickTest Professional User’s Guide • Advanced Features
734
QuickTest returns to focus. If the location you clicked is associated with more than one object, the Object Selection - Method Wizard dialog box opens.
3 Select the object for which you want to insert a statement. Click OK.
The Method Wizard opens. For detailed information, see “Method Wizard Screens” on page 735.
To activate the Method Wizard from the test tree while editing your test:
1 In the Tree View, select a step containing the object for which you want to add a statement.
2 Choose Insert > Step > Method or right-click the step and choose Insert Step > Method.
The Method Wizard opens. For information about using it, see “Method Wizard Screens” on page 735.
To activate the Method Wizard from the Active Screen while editing your test:
1 Confirm that the Active Screen is displayed. If it is not, choose View > Active Screen or toggle the Active Screen toolbar button.
2 In the Tree View or Expert View, click a step or statement. The Active Screen displays the screen corresponding to the step you selected.

Chapter 36 • Enhancing Your Tests with Programming Statements
735
Right-click the object in the Active Screen for which you want to add a statement, and choose Insert Method. If the location you clicked is associated with more than one object, the Object Selection - Method Wizard opens.
3 Select an object and click OK.
The Method Wizard opens. For detailed information, see “Method Wizard Screens,” below.
Method Wizard Screens
The Method Wizard guides you through the process of creating a statement containing the object and method you select. Follow the instructions on each screen and click Next to continue. When you click Finish, at the end of the procedure, the statement is inserted into your test.
Tip: You can click the Object Help or Method Help button on any screen of the Method Wizard to display information about the currently selected object or method, depending on the stage you are at in the wizard process. Conversely, you can click the Help button on any screen of the Method Wizard to display information regarding the options in that screen.

QuickTest Professional User’s Guide • Advanced Features
736
Welcome Screen
The Welcome screen is the first screen displayed when you open the Method Wizard. Read the information on the screen and click Next.

Chapter 36 • Enhancing Your Tests with Programming Statements
737
Select Method Screen
The Select Method screen displays the test object class and logical name of the object you selected and enables you to select the method for your statement.
If QuickTest can retrieve run-time methods for the selected object, select the method type—Test object method or Run-time object method. (If QuickTest cannot retrieve run-time methods for the selected object, the method-type options are not displayed.)
The relevant methods are displayed in the list. For test object methods, the selected method is described in the box under the list. For information about run-time methods, refer to the documentation for the environment or application you are testing.

QuickTest Professional User’s Guide • Advanced Features
738
Note: If you select a run-time method, the Method Wizard inserts a statement using .Object syntax. For information on using the .Object property, see “Accessing Run-Time Object Properties and Methods” on page 785.
Configure Arguments Screen
If the method you chose has arguments, the Configure Arguments screen opens, displaying the arguments, values, and their types. You can modify or parameterize the method arguments in this screen.

Chapter 36 • Enhancing Your Tests with Programming Statements
739
The top part of the dialog box displays information about the method and its arguments:
In the Edit value section, you use the following options to edit the argument value:
Option Description
Method The name of the method.
Type The icon indicates that the value of the property is currently a constant.
The icon indicates that the value of the property is currently a Data Table parameter.
The icon indicates that the value of the property is currently an environment variable parameter.
The icon indicates that the value of the property is currently a random number parameter.
Argument The name of the argument.
Value The current value of the argument. Arguments whose value you must enter are indicated by <mandatory>. For other arguments, you can either accept the default value or enter a new value.
Option Description
Constant (default) Sets the expected value of the argument as a constant.Tip: Arguments entered as strings must be surrounded by quotation marks. For information on the appropriate data types for each argument, refer to the QuickTest Object Model Reference.
Parameter Sets the expected value of the argument as a parameter. For more information, see Chapter 13, “Parameterizing Tests.”
Data Table(enabled only when Parameter is selected)
Specifies the parameter as a Data Table parameter. The value of the argument is determined by the data in the Data Table for each iteration of the action or test run. For more information about creating Data Table parameters, see “Using Data Table Parameters” on page 227.

QuickTest Professional User’s Guide • Advanced Features
740
Parameter name(enabled only when Data Table is selected)
Specifies the name of the parameter in the Data Table. You can select from the list box of existing Data Table columns or you can enter a new name to create a new column in the Data Table.
Other(enabled only when Parameter is selected)
Specifies that the parameter is a random number or environment variable parameter. The text box displays the parameter statement. For more information about creating random number parameters, see “Using Random Number Parameters” on page 241. For more information about creating environment variable parameters, see “Using Environment Variable Parameters” on page 231.
Edit parameter options (enabled only when Parameter is selected)
If you select Data Table, clicking the Edit parameter options button opens the Data Table Parameter Options dialog box, where you can also specify the parameter name and set the parameter as global or current action data. For more information, see “Using Data Table Parameters” on page 227. For more information, see Chapter 17, “Working with Actions.”
If you select Other, the Edit parameter options button opens the Parameter Options dialog box, where you can specify your parameter as a random number type or an environment variable type. For more information, see Chapter 13, “Parameterizing Tests.”
Option Description

Chapter 36 • Enhancing Your Tests with Programming Statements
741
Configure Return Value Screen
If the method that you chose in the Select Method screen returns a value, the Configure Return Value screen enables you to specify where to store the value.

QuickTest Professional User’s Guide • Advanced Features
742
This screen contains a combination of the following options, according to the method’s return value type:
Option Description
Do not store the value
When selected, the return value is not stored.
Store the value in a variable named:
Assigns the return value to a new variable of the specified name.
Save the value in the Data Table
Inserts the return value of the method as an output value in your Data Table. For more information, see Chapter 14, “Creating Output Values.”
Data Table column name
Sets the name for the output value column. You can accept the default name, select from the list, or enter a new name. This option is only relevant if you select the Save the value in the Data Table option. For more information, see Chapter 14, “Creating Output Values.”
Location in Data Table
Specifies whether to store the data in the global or current action sheet in the Data Table. This option is only relevant if you select the Save the value in the Data Table option.
Insert the value in a new conditional statement
Inserts the return value of the method into a conditional (If...Then) statement. This option is only displayed for methods that return boolean values. For more information, see “Using Conditional Statements” on page 745.

Chapter 36 • Enhancing Your Tests with Programming Statements
743
Insert Statement Screen
The Insert Statement screen enables you to specify whether to insert the statement before or after the selected step in the test.

QuickTest Professional User’s Guide • Advanced Features
744
Congratulations Screen
The Congratulations screen confirms that you are ready to generate the statement and insert it into your test.
To continue using the Method Wizard to insert another statement for the same object, select Insert another method and then click Finish. The Welcome screen opens for you to insert an additional method (see page 736).
To close the Method Wizard and insert the statement into your test, click Finish.
A tree item with the appropriate icon is added to your test tree.

Chapter 36 • Enhancing Your Tests with Programming Statements
745
Using Conditional Statements
You can control the flow of your test with conditional statements. Using conditional If...Then...Else statements, you can incorporate decision-making into your tests.
The If...Then...Else statement is used to evaluate whether a condition is true or false and, depending on the result, to specify one or more statements to run. Usually the condition is an expression that uses a comparison operator to compare one value or variable with another. The following comparison operators are available: less than <, less than or equal to <=, greater than >, greater than or equal to >=, not equal <>, and equal =.
Your If...Then...Else statement can be nested to as many levels as you need. It has the following syntax:
If condition Then statements [Else elsestatements] End If
Or, you can use the block form syntax:
If condition Then[statements]
[ElseIf condition-n Then[elseifstatements] . . .
[Else[elsestatements]
End If
Note: For additional information, refer to the Microsoft VBScript Reference (choose Help > QuickTest Professional Help > Microsoft Windows Script Technologies).

QuickTest Professional User’s Guide • Advanced Features
746
To add a conditional statement:
1 In the Tree View, click a step in the test tree.
2 Choose Insert > Step > Conditional Statement > If...Then or right-click a step in the Test Tree and choose Insert Step > Conditional Statement > If...Then. The Conditional Statement dialog box opens.
3 Set the expression as a constant or a parameter. Note that the expression must be a Boolean expression.
To set the expression as a constant, select Constant and type the expression in the box. For example, type i>5.
To set the expression as a parameter, select Parameter and choose one of the options below. For more information, see Chapter 13, “Parameterizing Tests.”
• To set the expression as a Data Table parameter, select Data Table and choose a parameter from the Parameter name list or enter a new parameter. The value of the expression is determined by the data in the Data Table for each iteration of the action or test run. For more information about creating Data Table parameters, see “Using Data Table Parameters” on page 227.
Click the Edit parameter options button to open the Data Table Parameter Options dialog box, where you can also specify the parameter name and set the parameter as global or current action data. For more information, see Chapter 17, “Working with Actions.”

Chapter 36 • Enhancing Your Tests with Programming Statements
747
• To set the expression as a random number or environment variable parameter, select Other.
Click the Edit parameter options button to open the Parameter Options dialog box, where you can specify your parameter as a random number type or an environment variable type.
For more information about creating environment variable parameters, see “Using Environment Variable Parameters” on page 231. For more information about creating random number parameters, see “Using Random Number Parameters” on page 241.
4 Click OK to close the dialog box.
5 To complete the Then statement you can:
Record a new step, and then use the Cut/Paste commands to add it to your Then statement.
Copy an existing step and paste it in your Then statement.
Click and drag a step to move it to your Then statement.
Enter the statement manually.
6 To nest an additional level to your statement, click the Then statement in the Tree View and choose one of the following options:
To complete the new statement you can:
Record a new step, and then use the Cut/Paste commands to add it to your statement.
Copy an existing step and paste it in your statement.
Click and drag a step to move it to your statement.
Enter the statement manually.
To add: Choose:
an If statement Insert > Step > Conditional Statement > If...Then
an Elseif statement Insert > Step > Conditional Statement > Elseif...Then
an Else statement Insert > Step > Conditional Statement > Else

QuickTest Professional User’s Guide • Advanced Features
748
For example, the test segment below (as it is displayed in the Tree View) checks that the User Name edit box exists in the Mercury Tours site. If the edit box exists, then a user name is entered; else a message is sent to the test results.
The same example is displayed in the Expert View as follows:
If Browser("Mercury Tours").Page("Mercury Tours").WebEdit("username").Exist Then Browser("Mercury Tours").Page("Mercury Tours").WebEdit("username").Set "mercury"ElseReporter.ReportEvent 1, "UserName Check", "The User Name field does not exist."End If
In the test tree, the following icons are used to indicate the different elements of If...Then...Else statements:
Icon Description
Starts an If statement.
Starts a Then statement.
Starts an Elseif statement.
Starts an Else statement.

Chapter 36 • Enhancing Your Tests with Programming Statements
749
Generating ‘With’ Statements for Your Test
You can instruct QuickTest to automatically generate With statements when you record a test or to generate With statements for any existing action. You can also remove With statements from an action.
Note that generating With statements for your test does not affect the Tree View in any way.
Understanding ‘With’ Statements
With statements make your script (in the Expert View) more concise and easier to read by grouping consecutive statements with the same parent hierarchy.
The With statement has the following syntax.
With objectstatementstatementstatement
End With
For example, you could replace this script:
Window("Flight Reservation").WinComboBox("Fly From:").Select "London"Window("Flight Reservation").WinComboBox("Fly To:").Select "Los Angeles"Window("Flight Reservation").WinButton("FLIGHT").ClickWindow("Flight Reservation").Dialog("Flights Table").WinList("From").Select "19097 LON "Window("Flight Reservation").Dialog("Flights Table").WinButton("OK").Click
with the following:
With Window("Flight Reservation") .WinComboBox("Fly From:").Select "London" .WinComboBox("Fly To:").Select "Los Angeles" .WinButton("FLIGHT").Click With .Dialog("Flights Table")
.WinList("From").Select "19097 LON "
.WinButton("OK").Click

QuickTest Professional User’s Guide • Advanced Features
750
End With ’Dialog("Flights Table") End With ’Window("Flight Reservation")
Automatically Generating ‘With’ Statements
You can instruct QuickTest to automatically generate With statements for the steps you record. When you select this option, statements are displayed in their normal format while recording. When you stop recording, the statements in all actions recorded during the current recording session are automatically converted to the With format.
To automatically generate With statements when you record:
1 Choose Tools > Options. The Options dialog box opens.
2 In the General tab, select Automatically generate “With” statements after recording.
3 Enter the minimum number of consecutive, identical objects for which you want to apply the With statement in the Generate “With” statements for __ or more objects box. The default is 2.

Chapter 36 • Enhancing Your Tests with Programming Statements
751
Note: This setting is used when you use the Apply “With” to Script option (see “Generating ‘With’ Statements for Existing Actions,” below) as well as for the Automatically generate “With” statements after recording option.
For example, if you only want to generate a With statement when you have three or more consecutive statements based on the same object, enter 3.
4 Begin recording your test. While recording, statements are recorded normally. When you stop recording, the statements in all actions recorded during the current recording session are automatically converted to the With format.
Generating ‘With’ Statements for Existing Actions
You can instruct QuickTest to generate With statements for any action displayed in the Expert View.
To generate With statements for existing actions:
1 Confirm that the proper number is set for the Generate “With” statements for __ or more objects in the General tab of the Options dialog box. (The default is 2.)
2 Display the action for which you want to generate With statements.

QuickTest Professional User’s Guide • Advanced Features
752
3 From the Expert View, choose Edit > Apply “With” to Script. The “With” Generation Results window opens.
Note that each With statement contains only one object.
4 To confirm the generated results, click OK. The With statements are applied to the action.

Chapter 36 • Enhancing Your Tests with Programming Statements
753
Removing ‘With’ Statements from an Action
You can remove all the With statements in an action displayed in the Expert View.
To remove With statements from an action:
1 Display the action for which you want to remove With statements.
2 From the Expert View, choose Edit > Remove “With” From Script. The Remove “With” Results window opens.
3 To confirm the results, click OK. The With statements are replaced with the standard statement format.

QuickTest Professional User’s Guide • Advanced Features
754
Sending Messages to Your Test Results
You can define a message in your test that QuickTest sends to your test results. For example, suppose you want to check that a password edit box exists in the Mercury Tours site. If the edit box exists, then a password is entered. Otherwise, QuickTest sends a message to the test results indicating that the object is absent.
To send a message to your test results:
1 In the test tree, select a step and choose Insert > Step > Report or right-click a step and choose Insert Step > Report. The Insert Report dialog box opens.
2 Select the status that will result from this step from the Status list.
3 In the Name box, type a name for the test step. For example, “Password edit box”.
Status Description
Passed Causes this step to pass. Sends the specified message to the report.
Failed Causes this step (and therefore the test itself) to fail. Sends the specified message to the report.
Done Sends a message to the report without affecting the pass/fail status of the step.
Warning Sends a warning status for the step, but does not cause the test to stop running, and does not affect the pass/fail status of the test.

Chapter 36 • Enhancing Your Tests with Programming Statements
755
4 In the Details box, type a detailed description of this step to send to your test results. For example, “Password edit box does not exist.”
5 Click OK. A report step is inserted into the test tree and a ReportEvent statement is inserted into your script in the Expert View. For example:
Reporter.ReportEvent micFail, "Password edit box", "Password edit box does not exist"
Where micFail indicates the status of the report (failed), “Password edit box” is the report name, and “Password edit box does not exist” is the report message.
For more information on test results, see Chapter 27, “Analyzing Test Results”
Adding Comments
While programming, you can add comments to your tests. A comment is an explanatory remark in a program. When you run a test, QuickTest does not process comments. Use comments to explain sections of a test to improve readability and to make tests easier to update.
To add a comment:
1 In the test tree, select a step and choose Insert > Step > Comment, or right-click a step and choose Insert Step > Comment. The Insert Comment dialog box opens.
2 Type a comment and click OK.
A comment statement is added to your test. If you are working in the Tree View, the icon indicates a comment. In the Expert View, a comment is specified with an apostrophe (‘).

QuickTest Professional User’s Guide • Advanced Features
756
Tip: If you want to add the same comment to every action that you create, you can add the comment to an action template. For more information, see “Creating an Action Template” on page 364.

757
37Testing in the Expert View
In QuickTest, test scripts are composed of statements coded in Microsoft’s VBScript programming language. This chapter provides a brief introduction to VBScript and shows you how to enhance your test scripts using a few simple programming techniques.
This chapter describes:
About Testing in the Expert View
Programming in VBScript
Understanding the Expert View
Programming in the Expert View
Using Programmatic Descriptions
Running and Closing Applications Programmatically
Enhancing Tests with Comments, Control-Flow, and Other VBScript Statements
Retrieving and Setting Test Object Property Values
Accessing Run-Time Object Properties and Methods
Running DOS Commands
Choosing Which Steps to Report During the Test Run

QuickTest Professional User’s Guide • Advanced Features
758
About Testing in the Expert View
The Expert View provides an alternative to the Tree View for testers who are familiar with VBScript. In the Expert View, you can view the recorded test in VBScript and enhance it with programming.
In the Expert View you can also add methods manually instead of from the Method Wizard. For information on using the Method Wizard, see Chapter 36, “Enhancing Your Tests with Programming Statements.”
Programming in VBScript
When programming in VBScript, you must use parentheses around method arguments if you are calling a method that returns a value and you are using the return value. For example, use parentheses around method arguments if you are declaring a variable, if you are using the method in an If statement, or if you are using the Call keyword to call an action. You also need to add parentheses around the name of the checkpoint if you want to retrieve its return value.
Tip: If you receive an Expected end of statement error message when running a step in your test, it may indicate that you need to add parentheses around the arguments of the step's method.
Following are several examples showing when to use or not use parentheses.
The following example requires parentheses around method arguments, since it declares a variable.
Set WebEditObj = Browser("Mercury Tours").Page("Method of Payment").WebTable("FirstName").ChildItem (8, 2, "WebEdit", 0)WebEditObj.Set "Example"
The following example requires parentheses around method arguments, since Call is being used.
Call RunAction("BookFlight", oneIteration)

Chapter 37 • Testing in the Expert View
759
The following example requires parentheses around method arguments, since the method is used in an If statement.
if Browser("index").Page("index").Link("All kind of").WaitProperty("attribute/readyState", "complete", 4) then Browser("index").Page("index").Link("All kind of").Click
The following example requires parentheses around method arguments, since it returns the value of the checkpoint.
a = browser("MyBrowser").page("MyPage").check (checkPoint("MyProperty"))
The following example does not require parentheses around method arguments, since there is no return value being used.
Browser("Mercury Tours").Page("Method of Payment").WebTable("FirstName").Click
Note: Arguments entered as strings must be surrounded by quotation marks.
You can edit and view your test in VBScript using the Expert View. To learn about working with VBScript, you can open Microsoft’s Language Reference from the QuickTest Help menu (Help > QuickTest Professional Help > Microsoft Windows Script Technologies).
Understanding the Expert View
QuickTest can display tests you record in two formats:
the Tree View, where QuickTest displays the object hierarchy in an icon-based tree

QuickTest Professional User’s Guide • Advanced Features
760
the Expert View, where QuickTest displays the object hierarchy in VBScript
Note that in the diagram above, the object hierarchy is identical in both views.
Each line of VBScript in the Expert View represents a step in the test. The example above represents a step in the test in which the user inserts the name “mercury” into an edit box. The hierarchy of the step enables you to see the name of the site, the name of the page, the name of the object in the page, and the name of the method performed on the object. When you record your test, QuickTest records the operations you perform on your application in terms of the objects in it.
To further understand how a step in the Expert View corresponds with a step in the Tree View, examine the table below.
Tree View Expert View Description
Browser ("Mercury Tours")
The name of the Web site is “Mercury Tours.”
Page ("Mercury Tours") The name of the current page in the Web site is “Mercury Tours.”

Chapter 37 • Testing in the Expert View
761
An object’s description is displayed in parentheses following the object type. For all objects stored in the object repository, the object’s logical name is a sufficient object description. In the following example, the object type is Browser, and the logical name of the Browser is “Mercury Tours”:
Browser ("Mercury Tours")
Note: Logical names are not case-sensitive.
The objects in the object hierarchy are separated by a dot. In the following example, Browser and Page are two separate objects:
Browser("Mercury Tours").Page("Mercury Tours")
The method performed on the object is always displayed at the end of the line of script. In the following example, the word “mercury” is inserted in the “username” edit box using the Set method:
Browser("Mercury Tours").Page("Mercury Tours").WebEdit("username").Set"mercury"
For a complete list of objects and their associated methods and properties, choose Help > QuickTest Professional Help, and open the QuickTest Object Model Reference from the Contents tab.
WebEdit ("username") The name of the edit field upon which the action is performed is “username.”
Set "mercury" The name of the method performed on the edit box is “Set.” The name inserted into the edit box is “mercury.”
Tree View Expert View Description

QuickTest Professional User’s Guide • Advanced Features
762
Understanding Checkpoint Statements
In QuickTest, you can create checkpoints on pages, text strings, tables, and other objects. When you create a checkpoint in the Tree View, QuickTest creates a corresponding line in VBScript in the Expert View. It uses the Check method to perform the checkpoint.
For example, in the following statement QuickTest performs a check on the word “confirmed”:
Browser("Mercury Tours").Page("Flight Confirmation").Check Checkpoint("confirmed")
The corresponding step in the Tree View is displayed as follows:
Notes:
You can only insert checkpoints into your test in the Expert View while you are recording. Use the Tree View to insert and modify checkpoints while editing your test.
The details about a checkpoint are stored with the object it checks and are not contained in the statement displayed in the Expert View. Therefore, you cannot copy a checkpoint statement from the Expert View to another to another test.
For more information on inserting and modifying checkpoints, see Chapter 7, “Understanding Checkpoints.”

Chapter 37 • Testing in the Expert View
763
Understanding Parameter Indications
You can use QuickTest to enhance your tests by parameterizing values in the test. A parameter is a variable that is assigned a value from outside the test in which it is defined. When you create a parameter in the Tree View, QuickTest creates a corresponding line in VBScript in the Expert View.
QuickTest calls the values of a parameterized object from the Data Table using the following syntax:
Object_Hierarchy.Method DataTable (parameterID, sheetID)
For example, suppose you are creating a test on the Mercury Tours site, and you select “Paris” as your destination. The following statement is inserted into your test in the Expert View:
Browser("Mercury Tours").Page("Find Flights").WebList("depart").Select "Paris"
Now suppose you want to parameterize the destination, and you create a “Departure” column in the Data Table. The previous statement is modified to the following:
Browser("Mercury Tours").Page("Find Flights").WebList("depart").SelectDataTable("Departure",dtGlobalSheet)
where Select is the method name, DataTable is the object, Departure is the name of the column in the Data Table, and dtGlobalSheet indicates name of the sheet in the Data Table.
For more information on parameterization, see Chapter 13, “Parameterizing Tests.”
Object_Hierarchy The object-oriented definition of the test object.
Method The name of the method that QuickTest executes on the parameterized object.
DataTable The Data Table object.
parameterID The name of the column in the Data Table.
sheetID The name of the sheet. If the parameter is a global parameter, “dtGlobalSheet” is displayed.

QuickTest Professional User’s Guide • Advanced Features
764
Programming in the Expert View
The Expert View displays the steps you executed while recording your test in VBScript. After you record your test, you can increase its power and flexibility by adding recordable and non-recordable VBScript statements. You can add statements that perform operations on objects or retrieve information from your site. For example, you can add a step that checks that an object exists, or you can retrieve the return value of a method.
The objects in QuickTest are divided by environment. QuickTest environments include standard Windows objects, Visual Basic objects, ActiveX objects, Web objects, Multimedia objects, as well as objects from other environments available as external add-ins.
Most objects have corresponding methods. For example, the Back method is associated with the Browser object.
In the following example, the user enters mercury in the User Name edit box while recording. The following line is recorded in the Expert View:
Browser ("Mercury_Tours"). Page ("Mercury_Tours"). WebEdit ("username").Set "mercury"
When running the test, the Set method inserts the mercury text into the WebEdit object.
In the following example, the user selects Paris from the Departure City list box while recording. The following line is recorded in the Expert View:
Browser("Mercury Tours").Page("Find Flights").WebList("depart").Select "Paris"
When the test runs, the Select method selects Paris in the WebList object.
Note: For more information on QuickTest objects, methods, and properties, refer to the QuickTest Object Model Reference. To open the reference, choose Help > QuickTest Professional Help and then select QuickTest Object Model Reference from the Contents tab.

Chapter 37 • Testing in the Expert View
765
Generating a Method for an Object
In the Expert View you can generate methods. You can also generate methods in the Tree View using the Method Wizard. For additional information, see Chapter 36, “Enhancing Your Tests with Programming Statements.”
By default, QuickTest displays the syntax for methods as you type in the Expert View. QuickTest also displays native methods and properties of any run-time object in your application, when using the Object property in your statement. You can disable or enable this Statement Completion option in the Editor Options dialog box. For additional information, see Chapter 31, “Customizing the Expert View.”
To generate a method in the Expert View:
1 In the Expert View, type a period (.) after the object upon which you want to perform the method.
Alternatively, you can press CTRL + SPACE or choose Edit > Complete Word before or after a period, or after you have begun to type a method name.
2 A list of the available methods for the object is displayed.
3 Double-click a method in the list or use the arrow keys to choose a method and press ENTER. QuickTest inserts the method into the line of script.

QuickTest Professional User’s Guide • Advanced Features
766
If you began typing a method name before selecting the statement completion option and only one method matches the text you typed, the word is completed automatically. If more than one word matches the text you typed, the list of available methods is displayed, and the first method (alphabetically) that matches the text you typed is highlighted.
4 If the method contains arguments, and the Statement Completion option is enabled, QuickTest displays the syntax of the method in a ToolTip.
In the above example, the Set method has one argument, called Text. The argument name represents the text to enter in the edit box.
You can also place the cursor on any object or method and press CTRL + SHIFT + SPACE or choose Edit > Parameter Info to display the statement completion tooltip for that item.
5 Enter the method arguments after the method as per the displayed syntax.
For more details and examples for any QuickTest method, refer to the QuickTest Object Model Reference.
Statement Completion tooltip

Chapter 37 • Testing in the Expert View
767
Navigating to a Line in the Expert View
You can use bookmarks or the Go To dialog box to jump to a specific line in the Expert View. These options make it easier to navigate through sections of a long action or test.
Using the Go To Dialog Box
You can use the Go To dialog box to navigate to a specified line in the Expert View.
To navigate to a line in the Expert View using the Go To dialog box:
1 Click the Expert View tab.
2 Choose Edit > Go To. The Go To dialog box opens.
3 Enter the line of script to which you want to navigate in the Line Number box. The cursor moves to the script line you indicate.
Working with Bookmarks
You can use bookmarks to mark important sections in your test or action so that you can easily navigate between various parts of your test.
You can assign up to ten bookmarks (numbered 0 through 9) to specific lines in your test or action using the “Set bookmark” shortcuts keys defined in the Editor Options dialog box (Tools > Editor Options > Key assignments tab). When you assign a bookmark, an icon is added to the left of the selected line in the Expert View. You can then use the “Goto bookmark” shortcut keys to jump to the bookmarked rows.

QuickTest Professional User’s Guide • Advanced Features
768
In the following example, bookmarks 2 and 3 have been added to the test.
To set and navigate to bookmarks:
1 Click the Expert View tab.
2 Select the line in your test or action where you want to assign a bookmark.
3 Press the shortcut keys for one of the Set bookmark commands defined in the Editor Options dialog box. A bookmark icon is added to the left of the selected line in the Expert View.
The default shortcut keys for setting bookmarks are: [CTRL+K] [0] for Set bookmark 0, [CTRL+K] [1] for Set bookmark 1, etc.
4 To navigate to a bookmarked line, press the shortcut keys for the appropriate Goto bookmark command. QuickTest jumps to the appropriate line in your test or action.
The default shortcut keys for setting bookmarks are: [CTRL+Q] [0] for Goto bookmark 0, [CTRL+Q] [1] for Goto bookmark 1, etc.
Note: You can customize Set bookmark, Go to bookmark, and other shortcut keys. For information, see “Personalizing Editing Commands” on page 661.

Chapter 37 • Testing in the Expert View
769
Using Programmatic Descriptions
When you record an operation on an object, QuickTest adds the appropriate test object to the Object Repository. Once the object exists in the Object Repository, you can add statements in the Expert View to perform additional methods on that object. To add these statements, you usually enter the logical name (not case-sensitive) of each of the objects in the object’s hierarchy as the object description, and then add the appropriate method.
For example, in the statement below, “username” is the logical name of an edit field. The edit field is located on a page with the logical name “Mercury Tours” and the page was recorded in a browser with the logical name “Mercury Tours.”
Browser("Mercury Tours").Page("Mercury Tours").WebEdit("username")
Because each object in the Object Repository has a unique logical name, the logical name is all you need to specify. During the test run, QuickTest finds the object in the Object Repository based on its logical name and parent objects, and uses the stored test object description for that test object to identify the object in your Web site or application.
You can also instruct QuickTest to perform methods on objects without referring to the Object Repository, without referring to the object’s logical name. To do this, you provide QuickTest with a list of properties and values that QuickTest can use to identify the object or objects on which you want to perform a method.
Such a programmatic description can be very useful if you want to perform an operation on an object that is not stored in the object repository. You can also use programmatic descriptions in order to perform the same operation on several objects with certain identical properties, or in order to perform an operation on an object whose properties match a description that you determine dynamically during the test run.
For example, suppose you are testing a Web site that generates a list of potential employers based on biographical information you provide, and offers to send your resume to the employer names you select from the list. You want your test to select all the employers displayed in the list, but when you design your test, you do not know how many check boxes will be

QuickTest Professional User’s Guide • Advanced Features
770
displayed on the page, and you cannot, of course, know the exact object description of each check box. In this situation, you can use a programmatic description to instruct QuickTest to perform a Set "ON" method for all objects that fit the description: HTML TAG = input, TYPE = check box.
There are two types of programmatic descriptions. You can either list the set of properties and values that describe the object directly in a test statement, or you can add a collection of properties and values to a description object, and then enter the description object name in the statement.
Entering programmatic descriptions directly into your statements may be the easier method for basic object-description needs. However, in most cases, the description object method is more powerful and more efficient.
Entering Programmatic Description Directly into Test Statements
You can describe an object directly in a test statement by specifying property:=value pairs describing the object instead of specifying an object’s logical name.
The general syntax is:
TestObject("PropertyName1:=ProperyValue1", "..." , "PropertyNameX:=ProperyValueX")
TestObject—the test object class.
PropertyName:=PropertyValue—the test object property and its value. Each property:=value pair should be separated by commas and quotation marks.
Note that you can enter a variable name as the property value if you want to find an object based on property values you retrieve during a test run.

Chapter 37 • Testing in the Expert View
771
Note: QuickTest evaluates all property values in programmatic descriptions as regular expressions. Therefore, if you want to enter a value that contains a special regular expression character (such as *, ?, + ), use the \ escape character to instruct QuickTest to treat the special characters as literal characters. For more information, see Chapter 15, “Using Regular Expressions.”
The statement below specifies a WebEdit test object in the Mercury Tours page with the Name author and an index of 3. When the test runs, QuickTest finds the WebEdit object with matching property values and enters the text “Mark Twain.”
Browser("Mercury Tours").Page("Mercury Tours").WebEdit("Name:=Author”, "Index:=3").Set "Mark Twain"
For more information about working with test objects, see Chapter 4, “Managing Test Objects.”
If you want to use the same programmatic description several times in one test, you may want to assign the object you create to a variable.
For example, instead of entering:
Window("Text:=Myfile.txt - Notepad").Move 50, 50Window("Text:=Myfile.txt - Notepad").WinEdit("AttachedText:=Find what:").Set "hello"Window("Text:=Myfile.txt - Notepad").WinButton("Caption:=Find next").Click
You can enter:
Set MyWin = Window("Text:=Myfile.txt - Notepad")MyWin.Move 50, 50MyWin.WinEdit("AttachedText:=Find what:").Set "hello"MyWin.WinButton("Caption:=Find next").Click

QuickTest Professional User’s Guide • Advanced Features
772
Alternatively, you can use a With statement:
With Window("Text:=Myfile.txt - Notepad") .Move 50, 50 .WinEdit("AttachedText:=Find what:").Set "hello" .WinButton("Caption:=Find next").Click
End With
For more information about the With statement, see “‘With’ Statement” on page 783.
Using Description Objects for Programmatic Descriptions
You can use the Description object to return a Properties collection object containing a set of Property objects. A Property object consists of a property name and value. You can then specify the returned Properties object in place of a logical name in a test statement. (Each property object contains a property name and value pair.)
To create the Properties collection, you enter a Description.Create statement using the following syntax:
Set MyDescription = Description.Create()
Once you have created a Properties object (such as MyDescription in the example above), you can enter statements to add, edit, remove, and retrieve properties and values to or from the Properties object during the test run. This enables you to determine which, and how many properties to include in the object description in a dynamic way during the test run.
Once you have filled the Properties collection with a set of Property objects (properties and values), you can specify the Properties object in place of a logical name in a test statement.
For example, instead of entering:
Window("Error"). WinButton("text:=OK", "width:=50").Click

Chapter 37 • Testing in the Expert View
773
You can enter:
Set MyDescription = Description.Create()MyDescription("text").Value = "OK"MyDescription("width").Value = 50Window("Error").WinButton(MyDescription).Click
When working with Properties objects, you can use variable names for the properties or values in order to generate the object description based on properties and values you retrieve during a test run.
You can create several Properties objects in your test if you want to use programmatic descriptions for several objects.
For more information on the Description and Properties objects and their associated methods, refer to the QuickTest Object Model Reference.
Retrieving ChildObjects
You can use the ChildObjects method to retrieve all objects located inside a specified parent object, or only those child objects that fit a certain programmatic description. In order to retrieve this subset of child objects, you first create a description object and add the set of properties and values that you want your child object collection to match using the Description object.
Note: You must use the Description object to create the programmatic description for the ChildObjects description argument. You cannot enter the programmatic description directly into the argument using the property:=value syntax.
Once you have “built” a description in your description object, use the following syntax to retrieve child objects that match the description:
Set MySubSet=TestObject.ChildObjects(MyDescription)

QuickTest Professional User’s Guide • Advanced Features
774
For example, the statements below instruct QuickTest to select all of the check boxes on the Itinerary Web page:
Set MyDescription = Description.Create()MyDescription("html tag").Value = "INPUT" MyDescription("type").Value = "checkbox"
Set Checkboxes = Browser("Itinerary").Page("Itinerary").ChildObjects(MyDescription)NoOfChildObjs = Checkboxes.CountFor Counter=0 to NoOfChildObjs-1
Checkboxes(Counter).Set "ON" Next
For more information about the ChildObjects method, refer to the QuickTest Object Model Reference.
Using Programmatic Descriptions for the WebElement Object
The WebElement object enables you to perform methods on Web objects that may not fit into any other Mercury test object class. The WebElement test object is never recorded, but you can use a programmatic description with the WebElement object to perform methods on any Web object in your Web site.
For example, when you run the statement below:
Browser("Mercury Tours").Page("Mercury Tours").WebElement("Name:=UserName", "Index:=0").Click
or
set WebObjDesc = Description.Create() WebObjDesc("Name").Value = "UserName" WebObjDesc("Index").Value = "0" Browser("Mercury Tours").Page("Mercury Tours").WebElement(WebObjDesc).Click
QuickTest clicks on the first Web object in the Mercury Tours page with the name UserName.

Chapter 37 • Testing in the Expert View
775
For more information about the WebElement object, refer to the QuickTest Object Model Reference.
Using the Index Property in Programmatic Descriptions
The index property can sometimes be a useful test object property for uniquely identifying an object. The index test object property identifies an object based on the order in which it appears within the source code, where the first occurrence is 0.
Note that index property values are object-specific. Thus, if you use an index value of 3 to describe a WebEdit test object, QuickTest searches for the fourth WebEdit object in the page.
If you use an index value of 3 to describe a WebElement object, however, QuickTest searches for the fourth Web object on the page regardless of the type, because the WebElement object applies to all Web objects.
For example, suppose you have a page with the following objects:
an image with the name “Apple”
an image with the name “UserName”
a WebEdit object with the name “UserName”
an image with the name “Password”
a WebEdit object with the name “Password”
The description below refers to the third item in the list above, as it is the first WebEdit object on the page with the name UserName.
WebEdit("Name:=UserName", "Index:=0")
The following description, however, refers to the second item in the list above, as that is the first object of any type (WebElement) with the name UserName.
WebElement("Name:=UserName", "Index:=0")

QuickTest Professional User’s Guide • Advanced Features
776
Running and Closing Applications Programmatically
In addition to using the Record and Run dialog box to instruct QuickTest to open a new browser or application when a test run begins, and/or opening the application you want to test manually, you can also insert statements into your test that open and close the applications you want to test.
You can run any application from a specified location using a SystemUtil.Run statement. It is most useful when your test includes more than one application and you have selected Record and run test on any application in the Record and Run Settings dialog box. You can specify an application and pass any supported parameters, or you can specify a file name and the associated application starts with the specified file open.
You can close most applications using the Close method.
For example, you could use the following statements to open a file named type.txt in the default text application (Notepad), type happy days, save the file using shortcut keys, and then close the application:
SystemUtil.Run "C:\type.txt", ""","",""Window("Text:=type.txt - Notepad").Type "happy days" Window("Text:=type.txt - Notepad").Type micAltDwn & "F" & micAltUpWindow("Text:=type.txt - Notepad").Type micLShiftDwn & "S" & micLShiftUpWindow("Text:=type.txt - Notepad").Close
Notes:
When you specify an application to open using the Record and Run Settings dialog box, QuickTest does not add a SystemUtil.Run statement to your test.
The InvokeApplication method can open only executable files and is used primarily for backward compatibility.
For more information, refer to the QuickTest Object Model Reference.

Chapter 37 • Testing in the Expert View
777
Enhancing Tests with Comments, Control-Flow, and OtherVBScript Statements
QuickTest enables you to incorporate decision-making into your test by adding conditional statements that control the logical flow of your test. In addition, you can define messages in your test that QuickTest sends to your test results. To improve the readability of your tests, you can also add comments to your test.
For information on how to use these programming concepts in the Tree View, see Chapter 36, “Enhancing Your Tests with Programming Statements.”
Note: QuickTest includes Microsoft’s VBScript Language Reference. The VBScript Language reference describes VBScript in detail. To open this reference, choose Help > QuickTest Professional Help > Microsoft Windows Script Technologies.
Inserting Comments
A comment is a line or part of a line in a test script that is preceded by an apostrophe ('). When you run a test, QuickTest does not process comments. Use comments to explain sections of a test script in order to improve readability and to make tests easier to update.
The following example shows how a comment describes the purpose of the statement below it:
‘Sets the word "mercury" into the "password" edit field.Browser("Mercury Tours").Page("Mercury Tours").WebEdit("username").
Set "mercury"
By default, comments are displayed in green in the Expert View. You can customize the appearance of comments in the Editor Options dialog box. For more information, see “Highlighting Script Elements” on page 660.

QuickTest Professional User’s Guide • Advanced Features
778
Note: You can also add a comment line using VBScript’s Rem statement. For additional information, refer to the VBScript Reference (choose Help > QuickTest Professional Help > Microsoft Windows Script Technologies).
Performing Calculations
You can write statements that perform simple calculations using mathematical operators. For example, you can use a multiplication operator to multiply the values displayed in two text boxes in your site. VBScript supports the following mathematical operators:
In the following example, the multiplication operator is used to calculate the total luggage weight of the passengers at 100 pounds each.
‘Retrieves the number of passengers from the edit box using the GetROPropertymethod
passenger = Browser ("Mercury_Tours"). Page ("Find_Flights").WebEdit("numPassengers"). GetROProperty("value")
‘Multiplies the number of passengers by 100
weight = passenger * 100
‘Inserts the maximum weight into a message box.
msgbox("The maximum weight for the party is "& weight &"pounds.")
+ addition
– subtraction
– negation (a negative number—unary operator)
* multiplication
/ division
^ exponent

Chapter 37 • Testing in the Expert View
779
“For...Next” Statement
A For...Next loop instructs QuickTest to execute one or more statements a specified number of times. It has the following syntax:
for counter = start to end [Step step]statement
Next
In the following example, QuickTest calculates the factorial value of the number of passengers using the For statement.
number = Browser("Mercury Tours").Page("Find Flights").WebEdit("numPassengers").GetROProperty("value")total = 1For i=1 to number
total = total * inextMsgBox "!" & number & "=" & total
“For...Each” Statement
A For...Each loop instructs QuickTest to execute one or more statements for each element in an array or an object collection. It has the following syntax:
For Each item In arraystatement
Next
counter The variable used as a counter.
start The start number of the counter.
end The last number of the counter.
step The number to increment at the end of each loop. Default = 1.Optional.
statement The statement to be executed during the loop.

QuickTest Professional User’s Guide • Advanced Features
780
The following example uses a For...Each loop to display each of the values in an array.
MyArray = Array("one","two","three","four","five")For Each element In MyArray
msgbox elementNext
“Do...Loop” Statement
The Do...Loop statement instructs QuickTest to execute a statement or series of statements while a condition is true or until a condition becomes true. It has the following syntax:
Do [{while}{until}condition]statement
Loop
In the following example, QuickTest calculates the factorial value of the number of passengers using the Do...Loop.
number = Browser("Mercury Tours").Page("Find Flights").WebEdit("numPassengers").GetROProperty("value")total = 1i = 1Do while i <= number
total = total * i i = i + 1
item A variable representing the element in the array.
array The name of the array.
statement A statement, or series of statements, to be executed during the loop.
condition A condition to be fulfilled.
statement A statement or series of statements to be executed during the loop.

Chapter 37 • Testing in the Expert View
781
LoopMsgBox "!" & number & "=" & total
“While” Statement
A While statement instructs QuickTest to execute a statement or series of statements while a condition is true. It has the following syntax:
While conditionstatement
Wend
In the following example, QuickTest performs a loop using the While statement while the number of passengers is fewer than four. Within each loop, QuickTest increments the number of passengers by one.
passengers = Browser("Mercury Tours").Page("Find Flights").WebEdit("numpassengers").GetROProperty("value")
while passengers < 4passengers = passengers + 1
wend
“If...Then...Else” Statement
The If...Then...Else statement instructs QuickTest to execute a statement or a series of statements based on specified conditions. If a condition is not fulfilled, the next elseif condition or else statement is examined. It has the following syntax:
If condition Thenstatement
ElseIf condition2 Thenstatement
Elsestatement
EndIf
condition Condition to be fulfilled.
statement Statement to be executed.

QuickTest Professional User’s Guide • Advanced Features
782
In the following example, if the number of passengers is fewer than four, QuickTest closes the browser.
passengers = Browser("Mercury Tours").Page("Find Flights").WebEdit("numpassengers").GetROProperty("value")
If (passengers < 4) ThenBrowser("Mercury Tours").close
ElseBrowser("Mercury Tours").Page("Find Flights").Image("continue").Click 69,5
End If
The following example, uses If, ElseIf, and Else statements to check whether a value is equal to 1, 2, or 3.
value = 2If value = 1 Then msgbox "one"Elseif value = 2 Then msgbox "two"Else msgbox "three"End If
“Dim” Statement
The Dim statement is used to declare variables of all types, including strings, integers, and arrays. Use the Dim statement at the beginning of a procedure. It has the following syntax:
Dim variable [(subscript)]
In the following example, the Dim statement is used to declare the “passengers” variable.
Dim passengerspassengers = Browser("Mercury Tours").Page("Find Flights").
WebEdit("numpassengers").GetROProperty("value")
variable The name of the variable.
subscript The dimensions of the array.

Chapter 37 • Testing in the Expert View
783
‘With’ Statement
With statements make your script more concise and easier to read by grouping consecutive statements with the same parent hierarchy.
The With statement has the following syntax.
With objectstatements
End With
For example, you could replace this script:
Window("Flight Reservation").WinComboBox("Fly From:").Select "London"Window("Flight Reservation").WinComboBox("Fly To:").Select "Los Angeles"Window("Flight Reservation").WinButton("FLIGHT").ClickWindow("Flight Reservation").Dialog("Flights Table").WinList("From").Select "19097 LON "Window("Flight Reservation").Dialog("Flights Table").WinButton("OK").Click
with the following:
With Window("Flight Reservation") .WinComboBox("Fly From:").Select "London" .WinComboBox("Fly To:").Select "Los Angeles" .WinButton("FLIGHT").Click With .Dialog("Flights Table")
.WinList("From").Select "19097 LON "
.WinButton("OK").Click End With ’Dialog("Flights Table")
End With ’Window("Flight Reservation")
Note that entering With statements in the Expert View does not affect the Tree View in any way.
object An object or a function that returns an object.
statements One or more statements to be executed on an object.

QuickTest Professional User’s Guide • Advanced Features
784
Note: In addition to entering With statements manually, you can also instruct QuickTest to automatically generate With statements as you record or to generate With statements for an existing test. For more information, see “Generating ‘With’ Statements for Your Test” on page 749
Retrieving and Setting Test Object Property Values
Test object properties are the set of properties defined by QuickTest for each object. You can set and retrieve a test object’s property values, and you can retrieve the values of test object properties from a run-time object.
When you run your test, QuickTest creates a temporary version of the test object that is stored in the test object repository. You use the GetTOProperty, GetTOProperties, and SetTOProperty methods to set and retrieve the test object property values of the test object.
The GetTOProperty and GetTOProperties methods enable you to retrieve a specific property value or all the properties and values that QuickTest uses to identify an object.
The SetTOProperty method enables you to modify a property value that QuickTest uses to identify an object.
Note: Because QuickTest refers to the temporary version of the test object during the test run, any changes you make using the SetTOProperty method apply only during the course of the test run, and do not affect the values stored in the test object repository.

Chapter 37 • Testing in the Expert View
785
For example, the following statements would set the Submit button’s name value to my button, and then retrieve the value my button to the ButtonName variable:
Browser("QA Home Page").Page("QA Home Page").WebButton("Submit").SetTOProperty "Name", "my button"
ButtonName=Browser("QA Home Page").Page("QA Home Page").WebButton("Submit").GetTOProperty("Name")
You use the GetROProperty method to retrieve the current value of a test object property from a run-time object in your application.
For example, you can retrieve the target value of a link during the test run as follows:
Browser("Mercury Technologies").Page("Mercury Technologies").Link("Jobs").GetROProperty("href")
Tip: If you do not know the test object properties of objects in your Web site or application, you can view them using the Object Spy. For information on the Object Spy, see Chapter 3, “Understanding the Test Object Model.”
For a list and description of test object properties supported by each object, and for additional information about the GetROProperty, GetTOProperty, GetTOProperties, and SetTOProperty methods, refer to the QuickTest Object Model Reference.
Accessing Run-Time Object Properties and Methods
If the test object methods and properties do not provide the functionality you need, you can access the native methods and properties of any run-time object in your application using the Object property. If the object is a Web object, you can also access the attribute Web object property.

QuickTest Professional User’s Guide • Advanced Features
786
Tips: When entering a .Object statement in the Expert View, you can also view a list of the available native methods and properties of the object in the statement. In addition, you can view the syntax for any selected method or property in a statement completion tooltip.
This statement completion feature is useful if you do not know the native properties and methods of objects in your Web site or application. You can disable or enable this Statement Completion option in the Editor Options dialog box (Tools > Editor Options > Statement Completion). For additional information, see “Generating a Method for an Object” on page 765.
In addition, if you do not know the native properties and methods of objects in your Web site or application, you can also view them using the Object Spy. For information on the Object Spy, see Chapter 3, “Understanding the Test Object Model.”
Retrieving Run-Time Object Properties
You can use the Object property to access the native properties of any run-time object. For example, you can retrieve the current value of the ActiveX calendar’s internal Day property as follows:
Dim MyDaySet MyDay= Browser("index").Page("Untitled").ActiveX("MSCAL.Calendar.7").Object.Day
For additional information about the Object property, refer to the QuickTest Object Model Reference.

Chapter 37 • Testing in the Expert View
787
Activating Run-Time Object Methods
You can use the Object property to activate the internal methods of any run-time object. For example, you can activate the edit box’s native focus method as follows:
Dim MyWebEdit Set MyWebEdit=Browser("Mercury Tours").Page("Mercury Tours").WebEdit("username").Object MyWebEdit.focus
For additional information about the Object property, refer to the QuickTest Object Model Reference.
Accessing User-Defined Properties
You can use the attribute/<property name> notation to access native properties of Web objects and use these properties to identify such objects with programmatic descriptions.
For example, suppose a Web page has the same company logo image in two places on the page:
<IMG src="logo.gif" LogoID="122"><IMG src="logo.gif" LogoID="123">
You could identify the image that you want to click using a programmatic description by including the user-defined property LogoID in the description as follows:
Browser("Mercury Tours").Page("Find Flights").Image("src:=logo.gif", "attribute/LogoID:=123").Click 68, 12
Note: The attribute/<property name> notation is not supported in Netscape 4.x.
For more information about programmatic descriptions, see “Using Programmatic Descriptions” on page 769.

QuickTest Professional User’s Guide • Advanced Features
788
Running DOS Commands
You can run standard DOS commands in your QuickTest test using the VBScript Windows Scripting Host Shell object (WSCript.shell). For example, you can open a DOS command window, change the path to C:\, and execute the DIR command using the following statements:
Dim oShellSet oShell = CreateObject ("WSCript.shell")oShell.run "cmd /K CD C:\ & Dir"Set oShell = Nothing
For more information, refer to the Microsoft VBScript Reference.
Choosing Which Steps to Report During the Test Run
You can use the Report.Filter method to determine which steps or types of steps are included in the Test Results. You can completely disable or enable reporting of steps following the statement, or you can indicate that you only want subsequent failed or failed and warning steps to be included in the report. You can also use the Report.Filter method to retrieve the current report mode.
The following report modes are available:
Mode Description
0 or rfEnableAll All events are displayed in the Test Results.Default.
1 or rfEnableErrorsAndWarnings
Only events with a warning or fail status are displayed in the Test Results.
2 or rfEnableErrorsOnly Only events with a fail status are displayed in the Test Results.
3 or rfDisableAll No events are displayed in the Test Results.

Chapter 37 • Testing in the Expert View
789
To disable reporting of subsequent steps, enter the following statement:
Reporter.Filter = rfDisableAll
To re-enable reporting of subsequent steps, enter:
Reporter.Filter = rfEnableAll
To instruct QuickTest to include only subsequent failed steps in the Test Results, enter:
Reporter.Filter = rfEnableErrorsOnly
To instruct QuickTest to include only subsequent failed or warning steps in the Test Results, enter:
Reporter.Filter = rfEnableErrorsAndWarnings
To retrieve the current report mode, enter:
MyVar=Report.Filter
For more information, refer to the QuickTest Object Model Reference.

QuickTest Professional User’s Guide • Advanced Features
790

791
38Working with User-Defined Functions
In addition to the test objects, methods, and functions supported by the QuickTest Test Object Model, you can define your own VBScript functions subroutines, classes, modules, etc., and then call them from your test.
This chapter describes:
About Working with User-Defined Functions
Working with Associated Library Files
Executing Externally-Defined Functions from Your Test
Using User-Defined Test Object Methods
About Working with User-Defined Functions
If you have large segments of code that you need to use several times in one test or in several different tests, you may want to create a user-defined function in order to make your tests easier to design and to read. You can define these functions within an individual test, or you can create one or more external VBScript library files containing your functions, so that you can access them from any test.
You can also register your functions as methods for QuickTest test objects. Your registered methods can override the functionality of an existing test object method for the duration of a test run, or you can register a new method for a test object class.

QuickTest Professional User’s Guide • Advanced Features
792
Working with Associated Library Files
You can create VBScript library files containing VBScript functions, subroutines, classes, modules, etc., and then associate the files with your test. You can call any VBScript function, subroutine, etc., contained within any library file that is associated with your test.
Any text file written in standard VBScript syntax can act as a library file. Note that the functions within library files can call QuickTest reserved objects, the objects that QuickTest supplies for test enhancement purposes, such as utility objects.
You can specify the default library files for all new tests in the Test Settings dialog box (Test > Settings > Resources tab). You can also edit the list of associated library files for an existing test in the Test Settings dialog box. Note that once a test is created, the list of files specified in the Test Settings dialog box is independent of the files set as default in the Test Settings dialog box. Changes to the default library files list in the Test Settings dialog box do not affect existing tests.
For more information, see “Defining Resource Settings for Your Test” on page 629.
Note: In addition to the functions available in the associated library files, you can also call a function contained in a VBScript file directly from any action using the ExecuteFile function. You can also insert ExecuteFile statements within an associated library file. For more information, see “Executing Externally-Defined Functions from Your Test” below.

Chapter 38 • Working with User-Defined Functions
793
Using Associated Library Files with TestDirector
When working with TestDirector and associated library files, you must save the associated library file as an attachment in your TestDirector project before you specify the associated file in the Resources tab of the Test Settings dialog box.
You can add a new or existing library file to your TestDirector project. Note that if you add an existing library file from the file system to a TestDirector project, it will be a copy of the one used by tests not in the TestDirector project, and thus once you save the file to the project, changes made to the TestDirector file does not affect the file in the file system and vice versa.
To use an associated library file with TestDirector:
1 If you want to add a new library file, create a new file in your file system with a .vbs extension.
2 In TestDirector, add the library file to the project as an attachment.
3 In the Test Settings dialog box, click the Resources tab.
4 To add a new file to the associated library files list, when connected to TestDirector, click the Add button. QuickTest adds [TestDirector], and displays a browse button so that you can locate the TestDirector path.
If you are not connected to TestDirector, hold the SHIFT key and click the Add button. QuickTest adds [TestDirector], and you enter the path. You can also type the entire TestDirector path manually. If you do, you must add a space after [TestDirector]. For example: [TestDirector] Subject\Tests.
Note that QuickTest searches TestDirector project folders only when you are connected to the corresponding TestDirector project.
Executing Externally-Defined Functions from Your Test
You can create a VBScript file and call its functions, subroutines, classes, etc., from an action in your test or from an associated library file by inserting an ExecuteFile statement in your action or library file.
When you run your test, the ExecuteFile statement executes all global code in the specified file in order to make all definitions in the file available from the global scope of the action’s (or library file’s) script.

QuickTest Professional User’s Guide • Advanced Features
794
Tip: If you want to include a certain ExecuteFile statement in every action you create, you can add the statement to an action template. For more information, see “Creating an Action Template” on page 364.
To execute an externally-defined function:
1 Create a VBScript file using standard VBScript syntax. For more information, refer to the Microsoft VBScript Reference (Help > QuickTest Professional Help > Microsoft Windows Script Technologies).
2 Store the file in any folder that you can access from the machine running your test.
3 Add an ExecuteFile statement to an action in your test or in an associated library file using the following syntax:
ExecuteFile FileName
where FileName is the absolute or relative path of your VBScript file.
4 Use the functions, subroutines, classes, etc., from the specified VBScript file as necessary in your action or within other functions in an associated library file.
Notes:
The ExecuteFile statement utilizes the VBScript ExecuteGlobal statement. For more information, see: http://msdn.microsoft.com/library/default.asp?url=/library/en-us/script56/html/vsstmExecuteGlobal.asp.
When you run an ExecuteFile statement within an action, you can call the functions in the file only from the current action. To make the functions in a VBScript file available to your entire test, add the file name to the associated library files list in the Resources tab of the Test Settings dialog box. For more information, see “Working with Associated Library Files” on page 792.

Chapter 38 • Working with User-Defined Functions
795
Using User-Defined Test Object Methods
You can use RegisterUserFunc and UnregisterUserFunc statements to instruct QuickTest to use or not use your user-defined function as a method of a specified test object class during the test run.
To register a method, you first define a function in your test or in an associated library file. You then enter a RegisterUserFunc statement in your test that specifies the test object class, the function to use, and the method name that calls your function. You can register a new method for a test object class, or you can use an existing method name in order to (temporarily) override the existing functionality of the specified method.
Note that your registered method applies only to the test in which you register it and that QuickTest clears all function registrations at the beginning of each test run.
Preparing the User-Defined Function
You can write your user-defined function directly into your test if you want to limit its use only to the local action, or you can store the function in an associated library file in order to make it available to many actions and tests (recommended). Note that if the same function name exists within your action and within an associated library file, QuickTest uses the function defined in the action.
When you run a statement containing a registered method, it sends the test object as the first argument. Thus, your user-defined function must have at least one argument. Your user-defined function can have any number of arguments, or it can have only the test object argument. Note that if the function overrides an existing method, it should have the exact syntax of the method it is replacing. This means that its first argument is the test object and the rest of the arguments match all the original method arguments.
Tip: You can use the parent test object property to retrieve the parent of the object represented by the first argument in your function. For example:ParentObj = obj.GetROProperty("parent")

QuickTest Professional User’s Guide • Advanced Features
796
When writing your function, you can use standard VBScript statements as well as any QuickTest reserved objects, methods, or functions, and any method associated with the test object specified in the first argument of the function.
For example, suppose you want to report the current value of an edit box to the Test Results before you set a new value for it. You can override the standard QuickTest Set method with a function that retrieves the current value of an edit box, reports that value to the Test Results, and then sets the new value of the edit box. The function would look something like this:
Function MyFuncWithParam (obj, x)dim yy = obj.GetROProperty("value")Reporter.ReportEvent EVENTSTATUS_GENERAL, "previous value", yMyFuncWithParam=obj.Set (x)
End Function
Note: The function defines a return value, so that each time it is called from a test, the function returns the Set method argument value.
You can also use RegisterUserFunc statements within your user-defined function in order to call additional registered methods. See “Registering User-Defined Test Object Methods” below, for information on how to write a RegisterUserFunc statement.
Registering User-Defined Test Object Methods
You can use the RegisterUserFunc statement to instruct QuickTest to use your user-defined function as a method of a specified test object class for the duration of a test, or until you unregister the method. Note that if you call an external action that registers a method (and does not unregister it at the end of the action), the method registration also takes effect for the remainder of the test that called the action.

Chapter 38 • Working with User-Defined Functions
797
Note: You cannot register a method for a QuickTest reserved object (such as DataTable, Environment, Reporter, etc.).
To register a user-defined function as a test object method, use the following syntax:
RegisterUserFunc TOClass, MethodName, FunctionName
For example, suppose that the Find Flights Web page contains a Country edit box, and by default, the box contains the value USA. The following example registers the Set method to use the MySet function in order to retrieve the default value of the edit box before the new value is entered.
Function MySet (obj, x) dim yy = obj.GetROProperty("value") Reporter.ReportEvent EVENTSTATUS_GENERAL, "previous value", y MySet=obj.Set(x) End Function
RegisterUserFunc "WebEdit", "Set", "MySet" Browser("MercuryTours").Page("FindFlights").WebEdit("Country").Set "Canada"
For more information and examples, refer to the QuickTest Object Model Reference.
TOClass Any test object class.
MethodName The method you want to register. If you enter the name of a method already associated with the specified test object class, your user-defined function overrides the existing method. If you enter a new name, it is added to the list of methods that the object supports.
FunctionName The name of your user-defined function. The function can be located in your test, or in any library file associated with your test.

QuickTest Professional User’s Guide • Advanced Features
798
Unregistering User-Defined Test Object Methods
When you register a method using a RegisterUserFunc statement, your method becomes a recognized method of the specified test object for the remainder of the test, or until you unregister the method. If your method overrides a QuickTest method, unregistering the method resets the method to its normal behavior. Unregistering other methods removes them from the list of methods supported by the test object.
Unregistering methods is especially important when a reusable action contains registered methods that override QuickTest methods. For example, if you do not unregister a method that uses a function defined directly within a called action, then the calling test will fail if the registered method is called again in a later action, because it will not be able to find the function definition.
If the registered function was defined in a library file, then the calling test may succeed (assuming the library file is associated with the calling test). However, unexpected results may be produced as the author of the calling test may not realize that the called action contained a registered function, and therefore, may use the registered method in later actions, expecting normal QuickTest behavior.
To unregister a user-defined method, use the following syntax:
UnRegisterUserFunc TOClass, MethodName
TOClass The test object class for which your method is registered.
MethodName The method you want to unregister.

Chapter 38 • Working with User-Defined Functions
799
For example, suppose that the Find Flights Web page contains a Country edit box, and by default, the box contains the value USA. The following example registers the Set method to use the MySet function in order to retrieve the default value of the edit box before the new value is entered. After using the registered method in a WebEdit.Set statement for the Country edit box, the UnRegisterUserFunc statement is used to return the Set method to its standard functionality.
Function MySet (obj, x) dim yy = obj.GetROProperty("value") Reporter.ReportEvent EVENTSTATUS_GENERAL, "previous value", y MySet=obj.Set(x) End Function
RegisterUserFunc "WebEdit", "Set", "MySet" Browser("MercuryTours").Page("FindFlights").WebEdit("Country").Set "Canada" UnRegisterUserFunc "WebEdit", "Set"
Guidelines for Registering User-Defined Test Object Methods
When registering user-defined methods, consider the following tips and guidelines:
You can re-register the same method to use different user-defined functions without first unregistering the method. However, note that when you do unregister the method, it resets to its original QuickTest functionality (or is cleared completely if it was a new method), and not to the previous registration. For example, suppose you enter the following statements:
RegisterUserFunc "Link”, "Click”, "MyClick”RegisterUserFunc "Link”, "Click”, "MyClick2”UnRegisterUserFunc "Link”, "Click”
After running the UnRegisterUserFunc statement, the Click method stops using the functionality defined in the MyClick2 function, and returns to the original QuickTest Click functionality, and not to the functionality defined in the MyClick function.

QuickTest Professional User’s Guide • Advanced Features
800
QuickTest clears all method registrations at the beginning of each test run. Thus, if you use the begin running the test from a point after a method registration (using the Run from step option), QuickTest does not recognize the registration.
You cannot register a method for a specific test object or test object instance. Method registrations apply to an entire test object class.
If you register a method in a reusable action, it is strongly recommended to unregister the method at the end of the action (and then re-register it at the beginning of the next action if necessary), so that tests calling your action will not be affected by the method registration.

801
39Automating QuickTest Operations
Just as you use QuickTest to automate the testing of your applications, you can use the QuickTest Professional automation object model to automate your QuickTest operations. Using the objects, methods, and properties exposed by QuickTest’s automation object model, you can write programs that configure QuickTest options and run tests instead of performing these operations manually using the QuickTest interface.
Automation programs are especially useful for performing the same tasks multiple times or on multiple tests, or quickly configuring QuickTest according to your needs for a particular environment or application.
This chapter describes:
About Automating QuickTest Operations
Deciding When to Use QuickTest Automation Programs
Choosing a Language and Development Environment for Designing and Running Automation Programs
Learning the Basic Elements of a QuickTest Automation Program
Generating Automation Scripts
Using the QuickTest Automation Object Model Reference

QuickTest Professional User’s Guide • Advanced Features
802
About Automating QuickTest Operations
You can use the QuickTest Professional automation object model to write programs that automate your QuickTest operations. The QuickTest automation object model provides objects, methods, and properties that enable you to control QuickTest from another application.
What is Automation?
Automation is a Microsoft technology that makes it possible to access software objects inside one application from other applications. These objects can be easily created and manipulated using a scripting or programming language such as VBScript or VC++. Automation enables you to control the functionality of an application programmatically.
An object model is a structural representation of software objects (classes) that comprise the implementation of a system or application. An object model defines a set of classes and interfaces, together with their properties, methods and events, and their relationships.
What is the QuickTest Automation Object Model?
Essentially all configuration and test run functionality provided via the QuickTest interface is in some way represented in the QuickTest automation object model via objects, methods, and properties. Although a one-on-one comparison cannot always be made, most dialog boxes in QuickTest have a corresponding automation object, most options in dialog boxes can be set and/or retrieved using the corresponding object property, and most menu commands and other operations have corresponding automation methods.
You can use the objects, methods, and properties exposed by the QuickTest automation object model, along with standard programming elements such as loops and conditional statements to design your program.
Automation programs are especially useful for performing the same tasks multiple times or on multiple tests, or quickly configuring QuickTest according to your needs for a particular environment or application.

Chapter 39 • Automating QuickTest Operations
803
For example, you can create and run an automation program from Microsoft Visual Basic that loads the required add-ins for a test, starts QuickTest in visible or minimized mode, opens the test, configures settings that correspond to those in the Options, Test Settings, and Record and Run Settings dialog boxes, runs the test, and saves the test.
You can then add a simple loop to your program so that your single program can perform the operations described above for a number of tests.
You can also create an initialization program that opens QuickTest with specific configuration settings. You can then instruct all of your testers to open QuickTest using this automation program to ensure that all of your testers are always working with the same configuration.
Deciding When to Use QuickTest Automation Programs
Like the tests you design using QuickTest, creating a useful QuickTest automation program requires planning, design time, and testing. You must always weigh the initial investment with the time and human-resource savings you gain from automating potentially long or tedious tasks.
Any QuickTest operation that you must perform many times in a row or must perform on a regular basis is a good candidate for a QuickTest automation program.
The following are just a few examples of useful QuickTest automation programs:
Initialization programs—You can write a program that automatically starts QuickTest and configures the options and the test settings required for recording on a specific environment.
Maintaining your test database—You can write a program that iterates over your entire test database to accomplish a certain goal. For example:
Updating values—opening each test with the proper add-ins, running it in update run mode against an updated application, and saving it in order to update the values in all of your tests to match the updated values in your application.

QuickTest Professional User’s Guide • Advanced Features
804
Applying new options to existing tests—When you upgrade to a new version of QuickTest, you may find that the new version offers certain options that you want to apply to your existing tests. You can write a program that opens each existing test, sets values for the new options, then saves and closes the test.
Calling QuickTest from other applications—You can design your own applications with options or controls that run QuickTest automation programs. For example, you could create a Web form or simple Windows interface from which a product manager could schedule QuickTest test runs, even if the manager is not familiar with QuickTest.
Choosing a Language and Development Environment forDesigning and Running Automation Programs
You can choose from a number of object-oriented programming languages for your automation programs. For each language, there are a number of development environments available for designing and running your automation programs.
Writing Your Automation Program
You can write your QuickTest automation programs in any language and development environment that supports automation. For example, you can use: VBScript, JavaScript, Visual Basic, Visual C++, or Visual Studio.NET.
Some development environments support referencing a type library. A type library is a binary file containing the description of the objects, interfaces, and other definitions of an object model.
If you choose a development environment that supports referencing a type library, you can take advantage of features like Microsoft IntelliSense, automatic statement completion, and status bar help tips while writing your program. The QuickTest automation object model supplies a type library file named QTObjectModel.dll. This file is stored in <QuickTest installation folder>\bin.

Chapter 39 • Automating QuickTest Operations
805
If you choose an environment that supports it, be sure to reference the QuickTest type library before you begin writing or running your automation program. For example, if you are working in Microsoft Visual Basic, choose Project > References to open the References dialog box for your project. Then select QuickTest Professional <Version> Object Library (where <Version> is the current installed version of the QuickTest automation type library).
Running Your Automation Program
There are several applications available for running automation programs. You can also run automation programs from command line using Microsoft’s Windows Script Host.
For example, you could use the following command line to run your automation program:
WScript.exe /E:VBSCRIPT myScript.vbs

QuickTest Professional User’s Guide • Advanced Features
806
Learning the Basic Elements of a QuickTest Automation Program
Like most automation object models, the root object of the QuickTest automation object model is the Application object. The Application object represents the application level of QuickTest. You can use this object to return other elements of QuickTest such as the Test object, Options object, and Addins collection, and to perform operations like loading add-ins, starting QuickTest, opening and saving tests, and closing QuickTest.
Each object returned by the Application object can return other objects, perform operations related to the object and retrieve and/or set properties associated with that object.
Every automation program begins with the creation of the QuickTest Application object. Creating this object does not start QuickTest. It simply provides an object from which you can access all other objects, methods and properties of the QuickTest automation object model.
The structure for the rest of your program depends on the goals of the program.You may perform a few operations before you start QuickTest such as retrieving the associated add-ins for a test, loading add-ins, and instructing QuickTest to open in visible mode.After you perform these preparatory steps, if QuickTest is not already open on the computer, you can open QuickTest using the Application.Launch method. Most operations in your automation program are performed after the Launch method.
When you finish performing the necessary operations, or you want to perform operations that require closing and restarting QuickTest, such as changing the set of loaded add-ins, use the Application.Quit method.

Chapter 39 • Automating QuickTest Operations
807
Generating Automation Scripts
The Properties tab of the Test Settings dialog box, the General tab of the Options dialog box, and the Object Identification dialog box each contain a Generate Script button. Clicking this button generates a automation script file (.vbs) containing the current settings from the corresponding dialog box.
You can run the generated script as is to open QuickTest with the exact configuration of the QuickTest application that generated the script, or you can copy and paste selected lines from the generated files into your own automation script.
For example, the generated script for the Options dialog box may look something like this:
Dim App ’As ApplicationSet App = CreateObject("QuickTest.Application")App.LaunchApp.Visible = TrueApp.Options.DisableVORecognition = FalseApp.Options.AutoGenerateWith = FalseApp.Options.WithGenerationLevel = 2App.Options.TimeToActivateWinAfterPoint = 500....App.Options.WindowsApps.NonUniqueListItemRecordMode = "ByName"App.Options.WindowsApps.RecordOwnerDrawnButtonAs = "PushButtons"App.Folders.RemoveAll
For more information on the Generate Script button and for information on the options available in the Options, Object Identification and Test Settings dialog box, see Chapter 28, “Setting Global Testing Options,” Chapter 33, “Configuring Object Identification,”, and Chapter 29, “Setting Testing Options for a Single Test” respectively.

QuickTest Professional User’s Guide • Advanced Features
808
Using the QuickTest Automation Object Model Reference
The QuickTest Automation Object Model Reference is a help file that provides detailed descriptions, syntax information, and examples for the objects, methods, and properties in the QuickTest automation object model.
You can open the QuickTest Automation Object Model Reference from the:
QuickTest program folder (Start > Programs > QuickTest Professional > Documentation > Automation Object Model Reference)
QuickTest Help menu (Help > QuickTest Automation Object Model Reference)

Part VIII
Working with OtherMercury Interactive Products

810

811
40Working with WinRunner
When you work with QuickTest, you can also run WinRunner tests and call TSL or user-defined functions in compiled modules.
This chapter describes:
About Working with WinRunner
Calling WinRunner Tests
Calling WinRunner Functions
About Working with WinRunner
If you have WinRunner 7.5 or later installed on your computer, you can include calls to WinRunner tests and functions in your QuickTest test.
Once you create a call to a WinRunner test or function, you can modify parameter values in existing call statements by editing them in the Expert View. For information on working in the Expert View, see Chapter 37, “Testing in the Expert View.”
When QuickTest is connected to a TestDirector project that contains WinRunner tests or compiled modules, you can call a WinRunner test or function that is stored in that TestDirector project.
Note: You cannot run WinRunner tests on Web pages (using WinRunner’s WebTest Add-in) from QuickTest if the QuickTest Web Add-in is loaded.

QuickTest Professional User’s Guide • Working with Other Mercury Interactive Products
812
Enabling WinRunner to Run Tests on a QuickTest Computer
For security reasons, remote access to your QuickTest application is not enabled. If you want to allow WinRunner (or other remote access clients) to open and run QuickTest tests, you must select the Allow other Mercury Interactive tools to run tests option.
To enable remote WinRunner applications to run tests on your QuickTest computer:
1 Open QuickTest.
2 Choose Tools > Options. The Options dialog box opens.
3 Click the Run tab.
4 Select the Allow other Mercury Interactive tools to run tests check box.
For more information on this option, see “Setting Run Testing Options” on page 602.
Calling WinRunner Tests
When QuickTest links to WinRunner to run a test, it starts WinRunner, opens the test, and runs it. Information about the WinRunner test run is displayed in the QuickTest Test Results window.
You can insert a call to a WinRunner test using the Call to WinRunner Test dialog box or by entering a TSLTest.RunTestEx statement in the Expert View.
Note: You cannot call a WinRunner test that includes calls to QuickTest tests.

Chapter 40 • Working with WinRunner
813
To insert a call to a WinRunner test using the Call to WinRunner Test dialog box:
1 Choose Insert > Call to WinRunner Test.
The Call to WinRunner Test dialog box opens.
2 In the Test path box, enter the path of the WinRunner test or browse to it.
If you are connected to TestDirector when you click the browse button, the Open WinRunner Test from TestDirector project dialog box opens so that you can select the module from the TestDirector project. For more information on this dialog box, see Chapter 41, “Opening Tests from a TestDirector Project.”
3 The Parameters box lists any test parameters required for the WinRunner test. To enter values for the parameters:
Highlight the parameter in the Test Parameters list. The selected parameter is displayed in the Name box below the list
Enter the new value in the Value box.

QuickTest Professional User’s Guide • Working with Other Mercury Interactive Products
814
Note: You can also use the parameter values from a QuickTest random environment parameter or from the QuickTest Data Table as the parameters for your WinRunner test. You do this by entering the parameter information manually in the TSLTest.RunTestEx statement. For more information, see “Passing QuickTest Parameterized Values to a WinRunner Test” below.
4 Select Run WinRunner minimized if you do not want to view the WinRunner window while the test runs. (This option is supported only for WinRunner 7.6.)
5 Select Close WinRunner after running the test if you want the WinRunner application to close when the step calling the WinRunner test is complete. (This option is supported only for WinRunner 7.6.)
6 Click OK to close the dialog box.
For information on WinRunner test parameters, refer to the WinRunner User’s Guide.
In QuickTest, the call to the WinRunner test is displayed as:
a WinRunner RunTestEx item in the Tree View. For example:
a TSLTest.RunTestEx statement in VBScript in the Expert View. For example:
TSLTest.RunTestEx "C:\WinRunner\Tests\basic_flight",TRUE,FALSE, "MyValue"
The RunTestEx method has the following syntax:
TSLTest.RunTestEx TestPath , RunMinimized, CloseApp [ , Parameters ]

Chapter 40 • Working with WinRunner
815
Note: Tests created in QuickTest 6.0 may contain calls to WinRunner tests using the RunTest method, which has slightly different syntax. Your tests will continue to run successfully with this method. However, if you are working with WinRunner 7.6, it is recommended to update your tests to the RunTestEx method (and corresponding argument syntax). For more information on these methods, refer to the QuickTest Object Model Reference.
For additional information on the RunTestEx method and an example of usage, refer to the QuickTest Object Model Reference.
Passing QuickTest Parameterized Values to a WinRunner Test
Rather than setting fixed values for the parameters required for a WinRunner test, you can pass WinRunner parameter values defined in a QuickTest Data Table, random or environment parameter. You specify these parameterized values by entering the appropriate statement as the Parameters argument in the TSLTest.RunTestEx statement.
For example, suppose you want to run a WinRunner test on a Windows-based Flight Reservation application, and that the test includes parameterized statements for the number of passengers on the flight and the seat class. You can pass the WinRunner test the value for its first parameter from a QuickTest random parameter (that generates a random number between 1 and 100), and pass it the value for the seat class from a QuickTest Data Table column labeled Class. Your TSLTest.RunTestEx statement in QuickTest might look something like this:
TSLTest.RunTestEx "D:\test1", TRUE, FALSE, RandomNumber(1, 100) , DataTable("Class", dtGlobalSheet)
For more information on the syntax and usage of the RandomNumber, Environment, and DataTable methods, refer to the Utility section of the QuickTest Object Model Reference.

QuickTest Professional User’s Guide • Working with Other Mercury Interactive Products
816
Viewing the Results
When you run a call to a WinRunner test, and WinRunner 7.6 is installed on your computer, your QuickTest test results include a node for each event that would normally be included in the WinRunner results. When you select a node corresponding to a WinRunner step, the right pane displays a summary of the WinRunner test and details about the selected step.
Note: You can also view the results of the called WinRunner test from the results folder of the WinRunner test. For WinRunner tests stored in TestDirector, you can also view the WinRunner test results from TestDirector.
For more information, see “Viewing WinRunner Test Steps in the Test Results” on page 582.
For more information on designing and running WinRunner tests, refer to your WinRunner documentation.
Calling WinRunner Functions
When QuickTest links to WinRunner to call a function, it starts WinRunner, loads the compiled module, and calls the function. This is useful when you want to use a user-defined function from WinRunner in QuickTest.
You call a WinRunner function from QuickTest by specifying the function and the compiled module containing the function.
Note: You cannot retrieve the values returned by the WinRunner function in your QuickTest test. However, you can view the returned value in the test results.

Chapter 40 • Working with WinRunner
817
To call a user-defined function from a WinRunner compiled module:
1 Choose Insert > Call to WinRunner Function.
The Call to WinRunner Function dialog box opens.
2 In the Module box, enter the path of the compiled module containing the function or browse to it.
If you are connected to TestDirector when you click the browse button, the Open WinRunner Test from TestDirector project dialog box opens so that you can select the compiled module from the TestDirector project.
To call a WinRunner TSL function, enter the path of any compiled module.
3 In the Function name box, enter the name of a function defined in the specified compiled module, or enter any WinRunner TSL function.
4 Click inside the Arguments box. If WinRunner is currently open on your computer, the Arguments box displays the argument names as defined for the selected function. If WinRunner is not open, the Arguments box lists p1-p15, representing a maximum of fifteen (15) possible arguments for the function.

QuickTest Professional User’s Guide • Working with Other Mercury Interactive Products
818
5 Enter values for in or inout arguments as follows:
Highlight the argument in the Arguments box. The argument name is displayed in the Name box.
In the Type box, select the correct argument type (in/out/inout).
If the argument type is “in” or “inout,” enter the value in the Value box.
Note: You can also use the parameter values from a QuickTest random or environment parameter or from the QuickTest Data Table as the in or inout arguments for your function. You do this by entering the argument information manually in the TSLTest.CallFuncEx statement. For more information, see “Passing QuickTest Parameters to a WinRunner Function” below.
For more information on function parameters, refer to the WinRunner User’s Guide.
6 Select Run WinRunner minimized if you do not want to view the WinRunner window while the function runs. (This option is supported only for WinRunner 7.6.)
7 Select Close WinRunner after running the test if you want the WinRunner application to close when the step calling the WinRunner function is complete. (This option is supported only for WinRunner 7.6.)
8 Click OK to close the dialog box.
In QuickTest, the call to the TSL function is displayed as:
a WinRunner CallFuncEx item in the Tree View. For example:
a TSLTest.CallFuncEx statement in VBScript in the Expert View. For example:
CallFuncEx "C:\WinRunner\Tests\TlStep","TlStep1",TRUE,FALSE, "MyArg1"

Chapter 40 • Working with WinRunner
819
The CallFuncEx function has the following syntax:
TSLTest.CallFuncEx ModulePath, Function, RunMinimized, CloseApp [ , Arguments ]
Note: Tests created in QuickTest 6.0 may contain calls to WinRunner tests using the CallFunc method, which has slightly different syntax. Your tests will continue to run successfully with this method. However, if you are working with WinRunner 7.6, it is recommended to update your tests to the CallFuncEx method (and corresponding argument syntax). For more information on these methods, refer to the QuickTest Object Model Reference.
For additional information on the CallFuncEx method and an example of usage, refer to the QuickTest Object Model Reference.
For information on WinRunner functions, function arguments, and WinRunner compiled modules, refer to the WinRunner User’s Guide and the WinRunner TSL Reference Guide.
Passing QuickTest Parameters to a WinRunner Function
Rather than setting fixed values for the in and inout arguments in a WinRunner function, you can instruct QuickTest to have WinRunner use the parameter values defined in a QuickTest random or environment parameter, or in a QuickTest Data Table. You specify these parameters by entering the appropriate statement as the Parameters argument in the TSLTest.CallFuncEx statement.
For example, suppose you created a user-defined function in WinRunner that runs an application and enters the user name and password for the application.

QuickTest Professional User’s Guide • Working with Other Mercury Interactive Products
820
You can instruct QuickTest to have WinRunner take the value for the user name and password from QuickTest Data Table columns labeled FlightUserName and FlightPwd. Your TSLTest.CallFuncEx statement in QuickTest might look something like this:
TSLTest.CallFuncEx "D:\flightfuncs", "run_flight", TRUE, FALSE, DataTable("FlightUserName", dtGlobalSheet), DataTable("FlightPwd", dtGlobalSheet)
For more information on the syntax and usage of the RandomNumber, Environment and DataTable methods, refer to the Utility section of the QuickTest Object Model Reference.
Viewing the Results
After you run a WinRunner function in WinRunner 7.6 from QuickTest, you can view the results of your function call. The Test Results show the start of the WinRunner function and the WinRunner function results. If the called function included events such as report_msg or tl_step, information about the results of these events are also included.
Note: If you have WinRunner version 7.5 installed on your computer, you can view basic information about the WinRunner function run in the QuickTest Test Results window.

Chapter 40 • Working with WinRunner
821
Highlight the WinRunner Function Results item in the test results tree to display the function return value and additional information about the call to the function.
For more information on working with WinRunner functions and compiled modules, refer to your WinRunner documentation.

QuickTest Professional User’s Guide • Working with Other Mercury Interactive Products
822

823
41Working with TestDirector
Web site testing typically involves creating and running many tests. TestDirector, Mercury Interactive’s test management tool, can help you organize and control the testing process.
This chapter describes:
About Working with TestDirector
Connecting to and Disconnecting from TestDirector
Saving Tests to a TestDirector Project
Opening Tests from a TestDirector Project
Running a Test Stored in a TestDirector Project
Managing Test Versions in QuickTest
Setting Preferences for TestDirector Test Runs
About Working with TestDirector
QuickTest integrates with TestDirector, Mercury Interactive’s Web-based test management tool. TestDirector helps you maintain a project of tests that covers all aspects of your application’s functionality. Each test in your project is designed to fulfill a specified testing requirement of your application. To meet the goals of a project, you organize the tests in your project into unique groups.
TestDirector provides an intuitive and efficient method for scheduling and running tests, collecting test results, analyzing the results, and managing test versions. It also features a system for tracking defects, enabling you to monitor defects closely from initial detection until resolution.

QuickTest Professional User’s Guide • Working with Other Mercury Interactive Products
824
A TestDirector project is a database for collecting and storing data relevant to a testing process. For QuickTest to access a TestDirector project, you must connect to the local or remote Web server where TestDirector is installed. When QuickTest is connected to TestDirector, you can create tests and save them in your TestDirector project. After you run your tests, you can view the results in TestDirector.
Note that when working with TestDirector, you can associate tests with external files attached to a TestDirector project. You can associate external files for all tests or for a single test. For example, suppose you set the shared object repository mode as the default mode for new tests. You can instruct QuickTest to use a specific object repository file stored in TestDirector. For more information on specifying external files for all tests, see Chapter 28, “Setting Global Testing Options.” For more information on specifying external files for a single test, see Chapter 29, “Setting Testing Options for a Single Test.”
You can report defects to a TestDirector project either automatically as they occur, or manually directly from QuickTest’s Test Results window. For information on manually or automatically reporting defects to a TestDirector project, see “Submitting Defects Detected During a Test Run” on page 576.
For more information on working with TestDirector, refer to the TestDirector User’s Guide. For the latest information and tips regarding QuickTest and TestDirector integration, refer to the QuickTest Read Me (available from Start > Programs > QuickTest Professional > ReadMe).

Chapter 41 • Working with TestDirector
825
Connecting to and Disconnecting from TestDirector
If you are working with both QuickTest and TestDirector, QuickTest can communicate with your TestDirector project. You can connect or disconnect QuickTest to or from a TestDirector project at any time during the testing process. However, do not disconnect QuickTest from TestDirector while a QuickTest test is opened from TestDirector or while QuickTest is using a shared resource from TestDirector (such as a shared object repository or Data Table file).
Note: To work with TestDirector 7.6 or earlier, you must install the TestDirector Connectivity Add-in on your QuickTest computer. For more information, see “Working with the TestDirector Connectivity Add-in” on page 829.
Connecting QuickTest to TestDirector
The connection process has two stages. First, you connect QuickTest to a local or remote TestDirector Web server. This server handles the connections between QuickTest and the TestDirector project.
Next, you choose the project you want QuickTest to access. The project stores tests and test run information for the Web site or application you are testing. Note that TestDirector projects are password protected, so you must provide a user name and a password.

QuickTest Professional User’s Guide • Working with Other Mercury Interactive Products
826
To connect QuickTest to TestDirector:
1 Choose Tools > TestDirector Connection. The TestDirector Connection dialog box opens.
2 In the Server box, type the URL address of the Web server where TestDirector is installed.
Note: You can choose a Web server accessible via a Local Area Network (LAN) or a Wide Area Network (WAN).
3 In the Server connection area, click Connect.
Once the connection to the server is established, the server’s name is displayed in read-only format in the Server box.
4 If you are connecting to a project in TestDirector 7.5 or later, in the Domain box, select the domain that contains the TestDirector project.
5 In the Project box, select the project with which you want to work.

Chapter 41 • Working with TestDirector
827
6 In the User name box, type a user name for opening the selected project.
7 In the Password box, type the password for the selected project.
8 In the Project connection area, click Connect to connect QuickTest to the selected project.
Once the connection to the selected project is established, the fields in the Project connection area are displayed in read-only format.
9 To automatically reconnect to the TestDirector server and the selected project the next time you open QuickTest, select the Reconnect on startup check box.
10 If the Reconnect on startup check box is selected, then the Save password for reconnection on startup check box is enabled. To save your password for reconnection on startup, select the Save password for reconnection on startup check box.
If you do not save your password, you will be prompted to enter it when QuickTest connects to TestDirector on startup.
11 Click Close to close the TestDirector Connection dialog box. The TestDirector icon is displayed on the status bar to indicate that QuickTest is currently connected to a TestDirector project.
Tip: To view the current TestDirector connection, point to the TestDirector icon. To open the TestDirector Connection dialog box, double-click the TestDirector icon.
Disconnecting QuickTest from TestDirector
You can disconnect from a TestDirector project or a Web server. Note that if you disconnect QuickTest from a Web server without first disconnecting from a project, QuickTest’s connection to that project database is automatically disconnected.

QuickTest Professional User’s Guide • Working with Other Mercury Interactive Products
828
Note: If a TestDirector test or shared file (such as a shared object repository or Data Table file) is open when you disconnect from TestDirector, then QuickTest closes it.
To disconnect QuickTest from TestDirector:
1 Choose Tools > TestDirector Connection. The TestDirector Connection dialog box opens.
2 To disconnect QuickTest from the selected project, in the Project connection area, click Disconnect.
3 To disconnect QuickTest from the selected Web server, in the Server connection area, click Disconnect.
4 Click Close to close the TestDirector Connection dialog box.

Chapter 41 • Working with TestDirector
829
Working with the TestDirector Connectivity Add-in
Connecting to TestDirector requires the TestDirector Connectivity Add-in.
If you are working with TestDirector 8.0, this add-in is installed automatically when you connect to TestDirector in the TestDirector Connection dialog box.
To work with TestDirector 7.6 or earlier, you must manually install the TestDirector Connectivity Add-in that corresponds to your TestDirector version on your QuickTest computer.
To view the version of the TestDirector Connectivity Add-in that is currently installed on your computer, go to <QuickTest Professional installation folder>\TDAPIClient. Right-click the tdclient.dll file and click Properties.
To install the TestDirector Connectivity Add-in, choose TestDirector Connectivity from the TestDirector Add-ins page (available from the TestDirector main screen).
Note: The TestDirector Connectivity Add-in also enables access to TDOTA functionality (i.e. via an automation program), even if TestDirector is not installed on your computer. For more information on accessing TDOTA using automation programs, refer to the QuickTest Automation Object Model Reference.

QuickTest Professional User’s Guide • Working with Other Mercury Interactive Products
830
Saving Tests to a TestDirector Project
When QuickTest is connected to a TestDirector project, you can create new tests in QuickTest and save them directly to your project. To save a test, you give it a descriptive name and associate it with the relevant subject in the test plan tree. This helps you to keep track of the tests created for each subject and to quickly view the progress of test planning and creation.
To save a test to a TestDirector project:
1 Connect to a TestDirector server and project. For more information, see “Connecting QuickTest to TestDirector” on page 825.
2 In QuickTest, click Save or choose File > Save to save the test.
The Save QuickTest Test to TestDirector project dialog box opens and displays the test plan tree.
Note that the Save QuickTest Test to TestDirector project dialog box opens only when QuickTest is connected to a TestDirector project.
To save a test directly in the file system, click the File System button to open the Save QuickTest Test dialog box. (From the Save QuickTest Test dialog box, you can return to the Save QuickTest Test to TestDirector project dialog box by clicking the TestDirector button.)

Chapter 41 • Working with TestDirector
831
3 Select the relevant subject in the test plan tree. To expand the tree and view a sublevel, double-click a closed folder. To collapse a sublevel, double-click an open folder.
4 In the Test Name box, enter a name for the test. Use a descriptive name that will help you easily identify the test.
5 Confirm that the Save Active Screen files is selected if you want to save the Active Screen files with your test. Note that if you clear this box, your Active Screen files will be deleted, and you will not be able to edit your test using Active Screen options. For more information, see “Saving a Test” on page 104.
6 Click OK to save the test and close the dialog box. Note that the word Uploading is displayed in the status bar. This word disappears when QuickTest completes the save test process.
The next time you start TestDirector, the new test will be included in TestDirector’s test plan tree. For more information, refer to the TestDirector User’s Guide.
Opening Tests from a TestDirector Project
When QuickTest is connected to a TestDirector project, you can open QuickTest tests that are a part of your TestDirector project. You locate tests according to their position in the test plan tree, rather than by their actual location in the file system. When you open a test in a TestDirector project with version control support, icons indicate the test’s version control status. You can also open tests from the recent tests list in the File menu.
To open a test from a TestDirector project:
1 Connect to a TestDirector server and project. For more information, see “Connecting QuickTest to TestDirector” on page 825.

QuickTest Professional User’s Guide • Working with Other Mercury Interactive Products
832
2 In QuickTest, click Open or choose File > Open to open the test. The Open Test from TestDirector Project dialog box opens and displays the test plan tree.
Note that the Open Test from TestDirector Project dialog box opens only when QuickTest is connected to a TestDirector project.
Note: To open a test directly from the file system while you are connected to TestDirector, click the File System button to open the Open Test dialog box. (From the Open Test dialog box, you can click the TestDirector button to return to the Open Test from TestDirector Project dialog box.)
3 Click the relevant subject in the test plan tree. To expand the tree and view sublevels, double-click closed folders. To collapse the tree, double-click open folders.
Note that when you select a subject, the tests that belong to the subject are displayed in the right pane of the Open Test from TestDirector Project dialog box.

Chapter 41 • Working with TestDirector
833
If the test is stored in a TestDirector project with version control support, icons next to the Test Name indicate the test’s version control status. For more information, see “Opening Tests from a TestDirector Project with Version Control Support” on page 834.
The Test Name column lists the names of the tests that belong to the selected subject.
The Status column indicates whether each test is in Design stage or is Ready for test runs. Note that by default, tests saved to a TestDirector project from QuickTest are labeled as Design. The status can be changed only from the TestDirector client.
The Created column indicates the date on which each test was created.
4 Select a test in the Test Name list. The test is displayed in the read-only Test Name box.
5 If you want to open the test in read-only mode, select the Open in read-only mode check box.
6 Click OK to open the test.
As QuickTest downloads and opens the test, the operations it performs are displayed in the status bar.
When the test opens, the QuickTest title bar displays “[TestDirector]”, the full subject path and the test name. For example:
[TestDirector] Subject\System\qa_test1
The test opens in read-only mode if:
You selected Open in read-only mode
You opened a test that is locked by another user, or whose attachments are currently locked by another user
You opened a test that is currently checked in to the TestDirector version control database (for projects that support version control)
You opened a test that is currently checked out to another user (for projects that support version control)
For more information, see “Opening Tests from a TestDirector Project with Version Control Support” on page 834 and “Creating, Opening, and Saving Tests with Locked Resources” on page 107.

QuickTest Professional User’s Guide • Working with Other Mercury Interactive Products
834
Opening Tests from the Recent Tests List
You can open TestDirector tests from the recent tests list in the File menu. If you select a test located in a TestDirector project, but QuickTest is currently not connected to TestDirector or to the correct project for the test, the Connect to TestDirector Project dialog box opens and displays the correct Server, project, and the name of the user who most recently opened the test on this computer.
Log in to the project, and click OK. Note that if you log in to a new project using this dialog, it also changes your current connection in the TestDirector Connection dialog box.
The Connect to TestDirector Project dialog box also opens if you choose to open a test that was last edited on your computer using a different TestDirector user name. You can either log in using the displayed name or you can click Cancel to stay logged in with your current user name.
Opening Tests from a TestDirector Project with Version Control Support
When you click the Open toolbar button or choose File > Open to open a test from a TestDirector project with version control support, the Open QuickTest Test from TestDirector Project dialog box displays icons that indicate the version control status of each test in the selected subject.
When you open a test from a TestDirector project with version control support, the test opens in read-write or read-only mode depending on the current version control status of the test.

Chapter 41 • Working with TestDirector
835
The table below summarizes the version control status icons and the open mode for each status:
For more information about working with tests stored in a TestDirector project with version control, see “Managing Test Versions in QuickTest” on page 837.
Running a Test Stored in a TestDirector Project
QuickTest can run a test from a TestDirector project and save the test run results in the project. To save the test run results, you specify a name for the test run and a test set in which to store the results.
Icon Description Open Mode
<None> The test is currently checked in to the version control database.
Read-only
The test is currently checked out to you. Read-write
The test is currently checked out to another user.
Read-only
An old version of the test is currently open on your computer.
As is

QuickTest Professional User’s Guide • Working with Other Mercury Interactive Products
836
To save test run results to a TestDirector project:
1 In QuickTest, click the Run button or choose Test > Run. The Run dialog box opens.
2 The Project name box displays the TestDirector project to which you are currently connected.
To save the test run results in the TestDirector project, accept the default Run name, or type a different one in the box.
3 Accept the default Test set, or browse to select another one.
4 If there is more than one instance of the test in the test set, specify the instance of the test for which you want to save the results in the Instance box.
Note: A test set is a group of tests selected to achieve specific testing goals. For example, you can create a test set that tests the user interface of the application or the application’s performance under stress. You define test sets when working in TestDirector’s test run mode. For more information, refer to your TestDirector documentation.
To run the test and overwrite the previous test run results, select the Temporary run results folder (not saved in the project) option.

Chapter 41 • Working with TestDirector
837
Note: QuickTest stores temporary test run results for all tests in <System Drive:\Temp\TempResults>. The path in the text box of the Temporary run results folder (not saved in the project) option is read-only and cannot be changed.
5 Click OK. The Run dialog box closes and QuickTest begins running the test. As QuickTest runs the test, it highlights each step in the test tree.
When the test stops running, the Test Results window opens unless you have cleared the View results when test run ends check box in the Run tab of the Options dialog box. For more information about the Options dialog box, see Chapter 28, “Setting Global Testing Options.”
When the test stops running, Uploading is displayed in the status bar. The Test Results window opens when the uploading process is completed.
Note: You can report defects to a TestDirector project either automatically as they occur, or manually directly from QuickTest’s Test Results window. For more information, see “Submitting Defects Detected During a Test Run” on page 576.
Managing Test Versions in QuickTest
When QuickTest is connected to a TestDirector project with version control support, you can update and revise your automated test scripts while maintaining old versions of each test. This helps you keep track of the changes made to each test script, see what was modified from one version of a script to another, or return to a previous version of the test script.
You add a test to the version control data base by saving it in a project with version control support. You manage test versions by checking tests in and out of the version control database.

QuickTest Professional User’s Guide • Working with Other Mercury Interactive Products
838
The test with the latest version is the test that is located in the TestDirector test repository and is used by TestDirector for all test runs.
Notes:
A TestDirector project with version control support requires the installation of version control software as well as TestDirector’s Version Control Add-in. For more information, refer to your TestDirector documentation.
The TestDirector Version Control options in the File menu are available only when you are connected to a TestDirector project database with version control support and you have a TestDirector test open.
Adding Tests to the Version Control Database
When you use Save As to save a new test in a TestDirector project with version control support, QuickTest automatically saves the test in the project, checks the test into the version control database with version number 1.1.1 and then checks it out so that you can continue working. The QuickTest status bar indicates each of these operations as they occur. Note, however, that saving your changes to an existing test does not check them in. Even if you save and close the test, the test remains checked out until you choose to check it in. For more information, see “Checking Tests into the Version Control Database” on page 840.
Checking Tests Out of the Version Control Database
When you choose File > Open to open a test that is currently checked in to the version control database, it is opened in read-only mode.
Note: The Open Test from TestDirector Project dialog box displays icons that indicate the version control status of each test in your project. For more information, see “Opening Tests from a TestDirector Project” on page 831.

Chapter 41 • Working with TestDirector
839
You can review the checked-in test. You can also run the test and view the results.
To modify the test, you must check it out. When you check out a test, TestDirector copies the test to your unique check-out directory (automatically created the first time you check out a test), and locks the test in the project database. This prevents other users of the TestDirector project from overwriting any changes you make to the test. However, other users can still run the version that was last checked in to the database.
You can save and close the test, but it remains locked until you return the test to the TestDirector database. You can release the test either check the test in, or undo the check out operation. For more information on checking tests in, see “Checking Tests into the Version Control Database” on page 840. For more information on undoing the check-out, see “Cancelling a Check-Out Operation” on page 846.
By default, the check out option accesses the latest version of the test. You can also check out older versions of the test. For more information, see “Using the Version History Dialog Box” on page 842.
To check out the latest version of a test:
1 Open the test you want to check out. For more information, see “Opening Tests from a TestDirector Project” on page 831.
Note: Make sure the test you open is currently checked in. If you open a test that is checked out to you, the Check Out option is disabled. If you open a test that is checked out to another user, all TestDirector Version Control options, except the Version History option, are disabled.

QuickTest Professional User’s Guide • Working with Other Mercury Interactive Products
840
2 Choose File > TestDirector Version Control > Check Out. The Check Out dialog box opens and displays the test version to be checked out.
3 You can enter a description of the changes you plan to make in the Comments box.
4 Click OK. The read-only test closes and automatically reopens as a writable test.
5 View or edit your test as necessary.
Note: You can save changes and close the test without checking the test in, but your changes will not be available to other TestDirector users until you check it in. If you do not want to check your changes in, you can undo the check-out. For more information on checking tests in, see “Checking Tests into the Version Control Database” on page 840. For more information on undoing the check-out, see “Cancelling a Check-Out Operation” on page 846.
Checking Tests into the Version Control Database
While a test is checked out, TestDirector users can run the previously checked-in version of your test. For example, suppose you check out version 1.2.3 of a test and make a number of changes to it and save the test. Until you check the test back in to the version control database as version 1.2.4 (or another number that you assign), TestDirector users can continue to run version 1.2.3.

Chapter 41 • Working with TestDirector
841
When you have finished making changes to a test and you are ready for TestDirector users to use your new version, you check it in to the version control database.
Note: If you do not want to check your changes into the TestDirector database, you can undo the check-out operation. For more information, see “Cancelling a Check-Out Operation” on page 846.
When you check a test back into the version control database, TestDirector deletes the test copy from your checkout directory and unlocks the test in the database so that the test version will be available to other users of the TestDirector project.
To check in the currently open test:
1 Confirm that the currently open test is checked out to you. For more information, see “Viewing Version Information For a Test” on page 842.
Note: If the open test is currently checked in, the Check In option is disabled. If you open a test that is checked out to another user, all TestDirector Version Control options, except the Version History option, are disabled.
2 Choose File > TestDirector Version Control > Check In. The Check In dialog box opens.

QuickTest Professional User’s Guide • Working with Other Mercury Interactive Products
842
3 Accept the default new version number and proceed to step 7, or click the browse button to specify a custom version number. If you click the browse button, The Edit Check In Version Number dialog box opens.
4 Modify the version number manually or using the up and down arrows next to each element of the version number. You can enter numbers 1-900 in the first element. You can enter numbers 1-999 in the second and third elements. You cannot enter a version number lower than the most recent version of this test in the version control database.
5 Click OK to save the version number and close the Edit Check In Version Number dialog box.
6 If you entered a description of your change when you checked out the test, the description is displayed in the Comments box. You can enter or modify the comments in the box.
7 Click OK to check in the test. The test closes and automatically reopens as a read-only test.
Using the Version History Dialog Box
You can use the Version History dialog box to view version information about the currently open test and to view or retrieve an older version of the test.
Viewing Version Information For a Test
You can view version information for any open test that has been stored in the TestDirector version control database, regardless of its current status.

Chapter 41 • Working with TestDirector
843
To open the Version History dialog box for a test, open the test and choose File > TestDirector Version Control > Version History.
The Version History dialog box provides the following information:
Test name—The name of the currently open test.
Test status—The status of the test. The test can be:
Checked-in—The test is currently checked in to the version control database. It is currently open in read-only format. You can check out the test to edit it.
Checked-out—The test is checked out by you. It is currently open in read-write format.
Checked-out by <another user>—The test is currently checked out by another user. It is currently open in read-only format. You cannot check out or edit the test until the specified user checks in the test.
My open version—The test version that is currently open on your QuickTest computer.

QuickTest Professional User’s Guide • Working with Other Mercury Interactive Products
844
Version details
Version—A list of all versions of the test.
User—The user who checked in each listed version.
Date and Time—The date and time that each version was checked in.
Version comments—The comments that were entered when the selected test version was checked in.
Working with Previous Test Versions
You can view an old version of a test in read-only mode or you can check out an old version and then check it in as the latest version of the test.
To view an old version of a test:
1 Open the TestDirector test. The latest version of the test opens. For more information, see “Opening Tests from a TestDirector Project” on page 831.
2 Choose File > TestDirector Version Control > Version History. The Version History dialog box opens.
3 Select the test version you want to view in the Version details list.
4 Click the Get Version button. QuickTest reminds you that the test will open in read-only mode because it is not checked out.
5 Click OK to close the QuickTest message. The selected version opens in read-only mode.
Tips: To confirm the version number that you now have open in QuickTest, look at the My open version value in the Version History dialog box.
After using the Get Version option to open an old version in read-only mode, you can check-out the open test by choosing File > TestDirector Version Control > Check Out. This is equivalent to using the Check Out button in the Version History dialog box.

Chapter 41 • Working with TestDirector
845
To check out an old version of a test:
1 Open the TestDirector test. The latest version of the test opens. For more information, see “Opening Tests from a TestDirector Project” on page 831.
2 Choose File > TestDirector Version Control > Version History. The Version History dialog box opens.
3 Select the test version you want to view in the Version details list.
4 Click the Check Out button. A confirmation message opens.
5 Confirm that you want to check out an older version of the test. The Check Out dialog box opens and displays the test version to be checked out.
6 You can enter a description of the changes you plan to make in the Comments box.
7 Click OK. The open test closes and the selected version opens as a writable test.
8 View or edit the test as necessary.
9 If you want to check in your test as the new, latest version in the TestDirector database, choose File > TestDirector Version Control > Check In. If you do not want to upload the modified test to TestDirector, choose File > TestDirector Version Control > Undo Check out.
For more information on checking tests in, see “Checking Tests into the Version Control Database” on page 840. For more information on undoing the check-out, see “Cancelling a Check-Out Operation” on page 846.

QuickTest Professional User’s Guide • Working with Other Mercury Interactive Products
846
Cancelling a Check-Out Operation
If you check out a test and then decide that you do not want to upload the modified test to TestDirector you should Cancel the check-out operation so that the test will be available for check out by other TestDirector users.
To cancel a check-out operation:
1 If it is not already open, open the checked-out test.
2 Choose File > TestDirector Version Control > Undo Check out.
3 Click Yes to confirm the cancellation of your check-out operation. The check-out operation is cancelled. The checked-out test closes and the previously checked-in version reopens in read-only mode.
Setting Preferences for TestDirector Test Runs
You can run QuickTest tests that are stored in a TestDirector database via QuickTest, via a TestDirector client that is installed on your computer, or via a remote TestDirector client. Note that when a TestDirector client runs your QuickTest test, it uses the associated add-ins list to load the proper add-ins for your test. For more information, see “Specifying Associated Add-Ins” on page 622.
You can instruct QuickTest to report a defect for each failed step when TestDirector test runs on your QuickTest computer. You can also submit defects to TestDirector manually from the QuickTest Test Results window. For more information, see “Submitting Defects Detected During a Test Run” on page 576.
Before you instruct a remote TestDirector client to run QuickTest tests on your computer, you must give TestDirector permission to use your QuickTest application. You can also view or modify the QuickTest Remote Agent Settings.

Chapter 41 • Working with TestDirector
847
Enabling TestDirector to Run Tests on a QuickTest Computer
For security reasons, remote access to your QuickTest application is not enabled. If you want to allow TestDirector (or other remote access clients) to open and run QuickTest tests, you must select the Allow other Mercury Interactive tools to run tests option.
To enable remote TestDirector clients to run tests on your QuickTest computer:
1 Open QuickTest.
2 Choose Tools > Options. The Options dialog box opens.
3 Click the Run tab.
4 Select the Allow other Mercury Interactive tools to run tests check box.
For more information on this option, see “Setting Run Testing Options” on page 602.
Tip: To access QuickTest tests from TestDirector, you must also have the QuickTest Add-in for TestDirector installed on the TestDirector computer. For additional information on this add-in, refer to the QuickTest Professional Add-in screen (accessible from the main TestDirector screen).
Setting QuickTest Remote Agent Preferences
When you run a QuickTest test from TestDirector, the QuickTest Remote Agent opens on the QuickTest computer. The QuickTest Remote Agent determines how QuickTest behaves when a test is run by a remote application such as TestDirector.
You can open the Remote Agent Settings dialog box at any time to view or modify the settings that your QuickTest application uses when TestDirector runs a QuickTest test on your computer.

QuickTest Professional User’s Guide • Working with Other Mercury Interactive Products
848
To open the Remote Agent Settings dialog box:
1 Choose Start > Programs > QuickTest Professional > Tools > Remote Agent. The Remote Agent opens and the Remote Agent icon is displayed in the task bar tray.
2 Right-click the Remote Agent icon and choose Settings. The Remote Agent Settings dialog box opens.
3 View or modify the settings in the dialog box. For more information, see “Understanding the Remote Agent Settings Dialog Box” below.
4 Click OK to save your settings and close the dialog box.
5 Right-click the Remote Agent icon and choose Exit to end the Remote Agent session.

Chapter 41 • Working with TestDirector
849
Understanding the Remote Agent Settings Dialog Box
The Remote Agent Settings dialog box enables you to view or modify the settings that your QuickTest application uses when TestDirector runs a QuickTest test on your computer.
The Remote Agent Settings dialog box contains the following options:
Option Description
Level The level of detail to include in the log that is created when TestDirector runs a QuickTest test.
None (default)—No log is created.
Low—The log lists any TestDirector-QuickTest communication errors.
Medium—The log includes TestDirector-QuickTest communication errors and information on other major operations that result in TestDirector-QuickTest communication.
High—The log includes all available information related to TestDirector-QuickTest communications.
Log folder The folder path for storing the log file. Required if a log type is specified in the Level option.
Restart testing tool after __ runs
Restarts the QuickTest application after the TestDirector completes the specified number of test runs. When QuickTest restarts, it continues with the next test in the test set.
You may want to use this option to maximize available memory.
If you do not want QuickTest to restart during a test set, enter 0 (default).
Save the open, modified test before the test run
If an existing (named) test is open in QuickTest when the Remote Agent begins running a test, this option ensures that any modifications to the test are saved.

QuickTest Professional User’s Guide • Working with Other Mercury Interactive Products
850
Save the open, new test before the test run
If a new (untitled) test is open in QuickTest when the Remote Agent begins running a test, this option saves the test in:<QuickTest installation folder>\Tests\TestDirector with a sequential test name.
Open a new test after the test run
By default, the last test run by the remote agent stays open in QuickTest when it finishes running all tests. However, if any shared resources (such as a shared object repository or Data Table file) are associated with the open test, those resources are locked to other users until the test is closed. You can select this option to ensure that the last test that TestDirector runs is closed, and a blank test is open instead.
Restart testing tool after Restarts QuickTest if there is no response after the specified number of seconds for:
Operations—QuickTest operations such as Open or Run.
Queries—Standard status queries that remote applications perform to confirm that the application is responding (such as TestDirector’s get_status query).
The default value for both options is 2700 seconds (45 minutes). However, while QuickTest operations may take a long time between responses, queries usually take only several seconds. Therefore, you may want to set different values for each of these options.
Option Description

851
42Working with Load Testing and Performance Monitoring Products
Once you have used QuickTest to create and run a suite of tests that test the functional capabilities of your application, you may want to test how much load your application can handle or to monitor your application as it runs.
LoadRunner is Mercury Interactive’s tool for testing the performance of applications under controlled and peak load conditions. To generate load, LoadRunner runs hundreds of virtual users. These virtual users provide consistent, repeatable, and measurable load to exercise your application just as real users would.
Topaz is Mercury Interactive’s Application Performance Management (APM) solution for real-time monitoring of the end-user experience. The Topaz Business Process Monitor (formerly known as Topaz ActiveAgent) runs virtual users to perform typical activities on the monitored application.
If you have already created and perfected a test in QuickTest that is a good representation of your users’ actions, you may be able to use your QuickTest test as the basis for load testing and monitoring activities.
This chapter describes:
About Working with Load Testing and Performance Monitoring Products
Using QuickTest’s Load/Performance Management Features
Designing QuickTest Tests for Use with LoadRunner or the Topaz Business Process Monitor
Inserting and Running Tests in LoadRunner or Topaz

QuickTest Professional User’s Guide • Working with Other Mercury Interactive Products
852
About Working with Load Testing and PerformanceMonitoring Products
QuickTest enables you to create complex tests that examine the full spectrum of your application’s functionality to confirm that every element of your application works as expected in all situations.
The recording mechanisms used in all Mercury Interactive Load Testing and Performance Management products are the same. This means that you can create tests that are compatible with LoadRunner and Topaz, enabling you to take advantage of tests or test segments that have already been designed and debugged in QuickTest, and use them as the basis for your work in other Mercury Interactive Load Testing and Performance Management products.
For example, you can add QuickTest tests to specific points in a LoadRunner scenario to confirm that the application’s functionality is not affected by the extra load at those sensitive points.
QuickTest also offers several features that are designed specifically for integration with LoadRunner and Topaz. However, since LoadRunner and the Topaz Business Process Monitor are designed to run tests using virtual users representing many users simultaneously performing standard user operations, some QuickTest features may not be available when integrating these products with QuickTest.
If you do plan to use a single test in both QuickTest and LoadRunner and/or Topaz, you should take into account the different options supported in each product as you design your test.
Using QuickTest’s Load/Performance Management Features
QuickTest includes an option for saving integration data with your test. This data makes it possible to run tests designed in QuickTest using Topaz or LoadRunner. You can also take advantage of other QuickTest features that were designed primarily for LoadRunner and Topaz users.

Chapter 42 • Working with Load Testing and Performance Monitoring Products
853
Saving Integration Data with Your Tests
To enable integration with LoadRunner’s and Topaz’s Virtual User technology, QuickTest must generate special integration files. By default, the option to generate this data is enabled. However, you, or someone else working on your QuickTest tests may have disabled the option in order to preserve disk space. Before you begin creating tests for use with LoadRunner or Topaz, enable this option as follows:
1 In QuickTest, choose Tools > Options. The Options dialog box opens and displays the General tab.
2 In the General tab, confirm that Save integration data with tests is selected.
3 If you want to integrate a test with LoadRunner or Topaz that was saved without this option, open and save the test again after selecting this option.
For more information on the Options dialog box, see Chapter 28, “Setting Global Testing Options.”
Tip: To check whether a test was saved with integration data, look for a <testname>.usr file in your test folder with the same modified date as the test.
Adding Statements for Checking Load and Performance
You can use the Services object and its associated methods to insert statements that are specifically relevant to load testing and performance monitoring. These include Abort, GetEnvironmentAttribute, LogMessage, Rendezvous, SetTransactionStatus, ThinkTime, UserDataPoint, StartTransaction and EndTransaction. For more information on these methods, refer to your LoadRunner or Topaz documentation.
You can also insert StartTransaction and EndTransaction statements using the Insert > Start Transaction and Insert > End Transaction menu options or toolbar buttons to insert the statement. For more information on these options, see “Measuring Transactions” on page 119.

QuickTest Professional User’s Guide • Working with Other Mercury Interactive Products
854
Designing QuickTest Tests for Use with LoadRunner or theTopaz Business Process Monitor
The QuickTest tests you use with LoadRunner or Topaz should be simple, designed to pinpoint specific operations, and should avoid using external actions and references to other external files.
Designing Tests for LoadRunner
Consider the following guidelines when designing tests for use with LoadRunner:
When LoadRunner starts QuickTest, it loads all installed add-ins. Ensure that the QuickTest computer on which you are running the test does not have any conflicting add-ins installed.
LoadRunner cannot run multiple action iterations.
Do not include references to external actions or other external resources, such as an external Data Table file, environment variable file, shared object repositories, and so on.
Designing Tests for Topaz Business Process Monitor
Consider the following guidelines when designing tests for use with Topaz Business Process Monitor:
Corresponding StartTransaction and EndTransaction statements must be contained within the same action.
The Topaz Business Process Monitor does not use the iteration settings from the Run tab of the QuickTest Options dialog box. Instead, it uses the number of lines in the Data Table file.

Chapter 42 • Working with Load Testing and Performance Monitoring Products
855
Inserting and Running Tests in LoadRunner or Topaz
In addition to designing your test appropriately for use with LoadRunner or Topaz, there are a few issues you should be aware of when using your QuickTest test in LoadRunner or Topaz.
Inserting and Running Tests in a LoadRunner Scenario
When inserting and running tests in a LoadRunner scenario, consider the following guidelines:
You can run only one GUI VUser concurrently per machine.
To insert a QuickTest test in a LoadRunner scenario schedule, browse to the test folder in the Open Test dialog box and select Astra Tests in the Files of type box in order to view QuickTest tests in the folder.
Ensure that QuickTest is closed on the QuickTest computer before running a QuickTest test from LoadRunner.
In the Run-time Settings for script dialog box, only the General categories and sub-categories (General, Iterations, Miscellaneous, Think Time) are relevant for QuickTest tests. The Replay options are not relevant.
For more information on working with LoadRunner, refer to your LoadRunner documentation.
Inserting and Running Tests in the Topaz Business Process Monitor
When inserting and running tests in the Topaz Business Process Monitor, consider the following guidelines:
The Topaz Business Process Monitor can run only one QuickTest test (transaction file) at a time.
Transaction Breakdown is not supported for tests (transaction files) recorded with QuickTest.
For more information on working with Topaz, refer to your Topaz documentation.

QuickTest Professional User’s Guide • Working with Other Mercury Interactive Products
856

Part IX
Appendix

858

859
AWorking with QuickTest—Frequently Asked Questions
This chapter answers some of the questions that are asked most frequently by advanced users of QuickTest. The questions and answers are divided into the following sections:
Recording and Running Tests
Programming in the Expert View
Working with Dynamic Content
Advanced Web Issues
Test Maintenance
Testing Localized Applications
Improving QuickTest Performance
Recording and Running Tests
How does QuickTest capture user processes in Web pages?
QuickTest hooks the browser (Netscape, Microsoft Internet Explorer, or AOL). As the user navigates the Web-based application, QuickTest records the user actions. (For information about modifying which user actions are recorded, see Chapter 35, “Configuring Web Event Recording.”) QuickTest can then run the test by running the steps as they originally occurred.

QuickTest Professional User’s Guide • Appendix
860
How can I record on objects or environments not supported by QuickTest?
In addition to the environments supported by QuickTest itself, many external add-ins are available for QuickTest Professional to support the environments you use in your application, such as Java, Oracle, .NET, SAP solutions, Siebel, PeopleSoft, terminal emulators, and Web services.
If the add-in you need is not available, there are two ways to record on such objects. You can either define virtual objects for objects that behave like test objects and then record in the normal recording mode, or you can record your clicks and keyboard input based on coordinates in the low-level recording mode.
For more information on defining virtual objects, see Chapter 16, “Learning Virtual Objects.” For more information on low-level recording, see “Choosing Your Recording Mode” on page 96.
Programming in the Expert View
Can I store functions and subroutines in a function library?
You can define functions within an individual test, or you can create one or more external VBScript library files containing your functions, and then call them from any test.
You can also register your functions as methods for QuickTest test objects. Your registered methods can override the functionality of an existing test object method for the duration of a test run, or you can register a new method for a test object class.
For more information, see Chapter 38, “Working with User-Defined Functions.”

Appendix A • Working with QuickTest—Frequently Asked Questions
861
Working with Dynamic Content
How can I record and run tests on objects that change dynamically from viewing to viewing?
Sometimes the content of objects in a Web page or application changes due to dynamic content. You can create dynamic descriptions of these objects so that QuickTest will recognize them when it runs the test. For more information, see Chapter 4, “Managing Test Objects.”
How can I check that a child window exists (or does not exist)?
Sometimes a link in one window creates another window.
You can use the Exist method to check whether or not a window exists. For example:
Browser("Window_logical_name").Exist
You can also use the ChildObjects method to retrieve all child objects (or the subset of child objects that match a certain description) on the Desktop or within any other parent object.
For additional information about the Exist and ChildObjects methods, refer to the QuickTest Object Model Reference.
How does QuickTest record on dynamically generated URLs and Web pages?
QuickTest actually clicks on links as they are displayed on the page. Therefore, QuickTest records how to find a particular object, such as a link on the page, rather than the object itself. For example, if the link to a dynamically generated URL is an image, then QuickTest records the “IMG” HTML tag, and the name of the image. This enables QuickTest to find this image in the future and click on it.

QuickTest Professional User’s Guide • Appendix
862
Advanced Web Issues
How does QuickTest handle cookies?
Server side connections, such as CGI scripts, can use cookies both to store and retrieve information on the client side of the connection.
QuickTest stores cookies in the memory for each user, and the browser handles them as it normally would.
How does QuickTest handle session IDs?
The server, not the browser, handles session IDs, usually by a cookie or by embedding the session ID in all links. This does not affect QuickTest.
How does QuickTest handle server redirections?
When the server redirects the client, the client generally does not notice the redirection, and misdirections generally do not occur. In most cases, the client is redirected to another script on the server. This additional script produces the HTML code for the subsequent page to be viewed. This has no effect on QuickTest or the browser.
How does QuickTest handle meta tags?
Meta tags do not affect how the page is displayed. Generally, they contain information only about who created the page, how often it is updated, what the page is about, and which keywords represent the page’s content. Therefore, QuickTest has no problem handling meta tags.
Does QuickTest work with .asp?
Dynamically created Web pages utilizing Active Server Page technology have an .asp extension. This technology is completely server-side and has no bearing on QuickTest.
Does QuickTest work with COM?
QuickTest complies with the COM standard.
QuickTest supports COM objects embedded in Web pages (which are currently accessible only using Microsoft Internet Explorer) and you can drive COM objects in VBScript.

Appendix A • Working with QuickTest—Frequently Asked Questions
863
Does QuickTest work with XML?
XML is eXtensible Markup Language, a pared-down version of SGML for Web documents, that enables Web designers to create their own customized tags. QuickTest supports XML and recognizes XML tags as objects.
You can also create XML checkpoints to check the content of XML documents in Web pages, frames or files. QuickTest also supports XML output and schema validation.
For more information, see Chapter 12, “Checking XML.”
Test Maintenance
How do I maintain my test when my application changes?
The way to maintain a test when your application changes depends on how much your application changes. This is one of the main reasons you should create a small group of tests rather than one large test for your entire application. When your application changes, you can rerecord part of a test. If the change is not significant, you can manually edit a test to update it.
You can also use QuickTest’s action feature to design more modular and efficient tests. While recording, you divide your test into several actions, based on functionality. When your application changes, you can rerecord a specific action, without changing the rest of the test. Whenever possible, insert calls to reusable actions rather than creating identical pieces of script in several tests. This way, changes to your original reusable action are automatically applied to all tests calling that action. For additional information, see Chapter 17, “Working with Actions.”
If you have many tests and actions that contain the same test objects, it is recommended to work with shared object repositories so that you can update object information in a centralized location. For more information, see Chapter 34, “Choosing the Object Repository Mode.”

QuickTest Professional User’s Guide • Appendix
864
To update the information in your checkpoints, the Active Screen, or about your test object properties when object properties change, or to add new objects or steps on an Active Screen image without rerecording steps, use the Update Run option. For more information, see “Updating a Test” on page 498.
Can I increase or decrease Active Screen information after I finish recording a test?
If you find that the information saved in the Active Screen after recording is not sufficient for your test editing needs, or if you no longer need Active Screen information, and you want to decrease the size of your test, there are several methods of changing the amount of Active Screen information saved with your test.
To decrease the disk space used by your test, you can delete Active Screen information by selecting Save As, and clearing the Save Active Screen files check box. For more information, see “Saving a Test” on page 104.
If you chose not to save all information in the Active Screen when testing a Windows application, you can use one of several methods to increase the information stored in the Active Screen.
Confirm that the Active Screen capture preference in the Active Screen tab of the Options dialog box is set to capture the amount of information you need and then:
Perform an Update Run operation to save the required amount of information in the Active Screen for all existing steps.
Re-record the step(s) containing the object(s) you want to add to the Active Screen.
To re-record the step, select the step after which you want to record your step, position your application to match the selected location in your test, and then begin recording. Alternatively, place a breakpoint in your test at the step before which you want to add a step and run your test to the breakpoint. This will bring your application to the correct place in order to record the step.

Appendix A • Working with QuickTest—Frequently Asked Questions
865
For more information on changing the amount of information saved in the Active Screen for Windows applications, see “Setting Active Screen Options,” on page 594. For more information on the Update Run options, see “Updating a Test” on page 498. For more information on setting breakpoints, see “Setting Breakpoints” on page 514.
Testing Localized Applications
I am testing localized versions of a single application, each with localized user interface strings. How do I create efficient tests in QuickTest?
You can parameterize these user interface strings using parameters from the global Environment variable list. This is a list of variables and corresponding values that can be accessed from any test. For additional information, see Chapter 13, “Parameterizing Tests.”
I am testing localized versions of a single application. How can I efficiently input different data in my tests, depending on the language of the application?
If you are running a single iteration of your test, or if you want values to remain constant for all iterations of an action or test, use environment variables, and then change the active environment variable file for each test run.
If you are running multiple iterations of your test or action, and you want the input data to change in each iteration, you can create an external Data Table for each localized version of your application. When you change the localized version of the application you are testing, you simply switch the Data Table file for your test in the Resources tab of the Test Settings dialog box. For more information on working with Data Tables, see Chapter 18, “Working with Data Tables.” For more information on selecting the Data Table file for your test, see “Defining Resource Settings for Your Test” on page 629.

QuickTest Professional User’s Guide • Appendix
866
Improving QuickTest Performance
How can I improve the working speed of QuickTest?
You can improve the working speed of QuickTest by doing any of the following:
Do not load unnecessary add-ins in the Add-in Manager when QuickTest starts. This will improve both recording time and test run performance. For more information about loading add-ins, see “Loading QuickTest Add-ins” on page 428.
Run your tests in “Fast mode.” From the Run tab in the Options dialog box, select the Fast option. This instructs QuickTest to run your test without displaying the execution arrow for each step, enabling the test to run faster. For more information on the Run tab of the Options dialog box, see “Setting Run Testing Options” on page 602.
If you are not using the Active Screen while editing your test, hide the Active Screen while editing your test to improve editing response time. Choose View > Active Screen, or toggle the Active Screen toolbar button to hide the Active Screen. For more information, see Chapter 2, “QuickTest at a Glance.”
Decide if and how much information you want to capture and save in the Active Screen. The more information you capture, the easier it is to add steps to your test using the many Active Screen options, but more captured information also leads to slower recording and editing times. You can choose from the following Active Screen options to improve performance:
If you are testing Windows applications, you can choose to save all Active Screen information in every step, save information only in certain steps, or to disable Active Screen captures entirely. You set this preference in the Active Screen tab of the Options dialog box. For more information, see “Setting Active Screen Options” on page 594.

Appendix A • Working with QuickTest—Frequently Asked Questions
867
If you are testing Web applications, you can disable screen capture of all steps in the Active Screen. From the Active Screen tab of the Options dialog box, click Custom Level to open the Custom Active Screen Capture Settings dialog box. Select the Disable Active Screen Capture option. This will improve recording time. For more information on the Active Screen tab of the Options dialog box, see “Setting Active Screen Options” on page 594.
When you save a new test, or when you save a test with a new name using Save As, you can choose not to save the captured Active Screen files with the test by clearing the Save Active Screen files option in the Save or Save As dialog box. This is especially useful when you have finished designing your test and you plan to use your test only for test runs. Tests without Active Screen files open more quickly and use significantly less disk space.
Decide when you want to capture and save images of the application for the test results. From the Run tab in the Options dialog box, select an option from the Save step screen capture to test results box. You can improve test run time and reduce disk space by saving screen captures only in certain situations or by not saving the images at all. For more information on the Active Screen tab of the Options dialog box, see “Setting Active Screen Options” on page 594.
Tip: If you need to recover Active Screen files after you save a test without Active Screen files, re-record the necessary steps or use the Update Run option to recapture screens for all steps in your test. For more information, see “Updating a Test” on page 498.

QuickTest Professional User’s Guide • Appendix
868
How can I decrease the disk space used by QuickTest?
You can decrease the disk space used by QuickTest by doing any of the following:
Decide when you want to capture and save images of the application for the test results. From the Run tab in the Options dialog box, select an option from the Save step screen capture to test results box. You can reduce disk space and improve test run time by saving screen captures only in certain situations or not saving images at all. For more information on the Active Screen tab of the Options dialog box, see “Setting Active Screen Options” on page 594.
Decide if and how much information you want to capture and save in the Active Screen. The more information you capture, the easier it is to add steps to your test using the many Active Screen options, but more captured information also leads to slower recording and editing times. You can choose from the following Active Screen options to improve performance:
If you are testing Windows applications, you can choose to Save all Active Screen information in every step, save information only in certain steps, or to disable Active Screen captures entirely. You set this preference in the Active Screen tab of the Options dialog box. For more information, see “Setting Active Screen Options” on page 594.
If you are testing Web applications, you can disable screen capture of all steps in the Active Screen. From the Active Screen tab, click Custom Level to open the Custom Active Screen Capture Settings dialog box. Select the Disable Active Screen Capture option. This will improve recording time. For more information on the Active Screen tab of the Options dialog box, see “Setting Active Screen Options” on page 594.
When you save a new test, or when you save a test with a new name using Save As, you can choose not to save the captured Active Screen files with the test by clearing the Save Active Screen files option in the Save or Save As dialog box. This is especially useful when you have finished designing your test and you plan to use your test only for test runs. Tests without Active Screen files use significantly less disk space.

Appendix A • Working with QuickTest—Frequently Asked Questions
869
Tip: If you need to recover Active Screen files after you save a test without Active Screen files, re-record the necessary steps or use the Update Run option to recapture screens for all steps in your test. For more information, see “Updating a Test” on page 498.
Is there a recommended length for tests?
Although there is no formal limit regarding test length, it is recommended that you divide your tests into actions and that you use reusable actions in tests, whenever possible. An action should contain no more than a few hundreds steps and, ideally, no more than a few dozen.
For more information, see Chapter 17, “Working with Actions.”

QuickTest Professional User’s Guide • Appendix
870

871
Numerics
1_APP_ENV variable 6531_DIR_ENV variable 653
A
accessibility. See Web content accessibilityaction data sheets 332, 369action iterations 352Action List 334action parameters 231Action tab, Data Table 332Action toolbar 20, 334action tree 334ActionIteration, environment variable 237actions 329–366
creating 336diagram 330, 338external 331guidelines for working with 365inserting
call to 341copy of 338existing 337
multiple, in tests 331nesting 345non-reusable 331overview 330parameterization data, location 344parameterization data, storage
location 355removing 359renaming 363–364reusable 331run properties 352
actions (cont’d)running from a step 497–498sharing values 356
using Dictionary objects 357splitting 346template 364
Active Screen 17access, Test Settings dialog box
Web tab 464advanced authentication 465changing 102defining capture settings 597defining Web settings 600increasing/decreasing saved
information 864saving and deleting files 104
Active Screen dialog box 463, 465Active Server Page technology 862ActiveX controls
activating, syntax 489checking 487–488checkpoints and output values
supported 484recording and running tests on
485–486scripting methods 489testing 483–489
Add Schema dialog box, XML checkpoint 219
Add Synchronization Point dialog box 116Add/Remove dialog box, object
identification 677, 688Add/Remove Properties dialog box 73Add-in Manager dialog box 428adding tests to version control 838
Index

QuickTest Professional User’s Guide
872
add-insassociating with a test 622–624loading 428modifying 623tips 430using 427–431
advanced authenticationActive Screen 465
Advanced Web Options dialog box 609Agent, Remote 847Allow other Mercury Interactive tools to run
tests 812, 847America Online (AOL) browser 436analog recording 96, 98analyzing test results 521–533
checkpoints 533filtering results 529printing results 533Run-Time Data Table 558Test Results window 523
Application crash trigger 395application, sample xvi, 8applications
closing 776running 776testing localized versions 865
ASCII 371asp files 862assistive properties, configuring 675associated library files 792
with TestDirector 793associating add-ins with a test 622–624attribute property 787automation
Application object 806definition 802development environment 804language 804object model 801type library 804
B
Basic event recording configuration level 716behavior, DHTML 725
Bitmap Checkpoint Properties dialog box 190
bitmap checkpointsanalyzing results 538creating 190–196modifying 197–198
bitmaps, checking 189–198bookmarks, in the Expert View 767breakpoints 511–520
deleting 515overview 511setting 514
BROWSER_ENV variable 653browsers, supported 435bubbling 726built-in environment variables 237–240
C
calculations, in the Expert View 778Call to WinRunner Function dialog box 817Call to WinRunner Test dialog box 813calling TSL functions
from QuickTest 816–821CGI scripts 862Check In command 838, 840Check Out command 838checking tests
out of version control 838checkpoint
parameterizing 252Checkpoint Properties dialog box
Expected Data tab 158for checking databases 154–164for checking objects 135for checking tables 154–164
checkpointsaccessibility options 597, 610definition 113, 123for ActiveX controls 484for bitmaps 189–198for databases 147–164for images 141–145for objects 132–140for pages 439–451

Index
873
checkpoints (cont’d)for tables 147–149, 154–163for text 165–187in Expert View 762Macromedia Flash objects 477modifying 141standard, for checking text 169supported for Web objects 434text area 171types 125understanding 123–129using formulas 384Web content accessibility 457–461XML 199–220
Close application process operation 404Close method 776CMDLINE_ENV variable 653collapsing a tree branch, shortcut key 27collection, properties. See programmatic
descriptionscollections, of virtual objects 319COM 862command line options, deleting test results
using 571comments
in the Expert View 777in the Tree View 755
Completing the Recovery Scenario Wizard screen 413
conditional statements 745configuration levels
customizing 718–727standard 716–718
Configure Text Selection dialog box 176connecting QuickTest to TestDirector 577,
825–828connection string, specifying for database
checkpoints 152Constant Value Options dialog box 158content property check, on databases
149–153context menu, shortcut key 27ControllerHostName, environment variable
237conventions. See typographical conventionscookies 862
creatinga new test 103test objects during a test run 69tests 87–112tests with locked resources 108
currenciessetting custom format 377
Custom Active Screen Capture Settings dialog box 597
custom event-recording configuration 718–727
adding listening events 723adding objects to the list 722deleting objects from the list 723procedure 718specifying listening criteria 725
custom number formatsetting 377
custom objects, mapping 692custom web event configuration files
loading 729saving 729
Custom Web Event Recording Configuration dialog box 719
customer support, online xvicustomizing test scripts 655–663
highlighting script elements 660overview 655print options 656script window customization 657
D
Data Driver 243Data menu commands, Data Table 376data sheets
action 369activating next/previous, shortcut key
27global 369global/action, choosing 332
Data Table 12, 17, 367–388action data sheets 369Action tab 332changing focus, shortcut key 26Data menu commands 376

QuickTest Professional User’s Guide
874
Data Table (cont’d)data sheets 369design-time 367Edit menu commands 374editing tables 370–377File menu commands 373Format menu commands 377Global tab 332importing data, in various formats
371location 370menu commands, for editing tables
373parameter 227–231run-time 367scripting functions, using 387–388Sheet menu commands 374table columns 227table rows 227test results 525using formulas 383–386with TestDirector 378worksheet functions 383
Data Table Parameter Options dialog box 159, 229
database checkpointsanalyzing results 536expected data 147modifying 163specifying cell identification settings
161–162specifying cells 157specifying expected data 158–160specifying value type 160–161
Database Query wizard 150databases
checking 147–164connection string 152creating a query in ODBC / Microsoft
Query 382creating a query with Microsoft Query
/ SQL statement 153creating checkpoints for 149–153manually defining an SQL statement
150–153
databases (cont’d)result set 149Specify SQL statement screen 152
data-driven test 222dates
setting custom format 377Debug toolbar, QuickTest window 12, 20Debug Viewer 516–517
changing focus, shortcut key 26pane 18
debugging tests 511–520, 521–533deleting breakpoints 515example 519overview 511pausing runs 514setting breakpoints 514
decreasing Active Screen information 864default
object identification settings 683default optional steps 507default properties, modifying 33–47, 49–83DefaultLoadTime, testing option 668DefaultTimeOut, testing option 668defects
reporting 576reporting automatically during test
581reporting from Test Results 576
deletingactions 359breakpoints 515objects from list 723objects from the Object Repository 82test results 569user-defined environment variables
636description, test objects 38
modifying 70–74See also objects
descriptive programming. See programmatic descriptions
design-time Data Table 367Dictionary object 357Dim statement, in the Expert View 782disconnecting from TestDirector 827disk space, saving 866

Index
875
Do...Loop statement, in the Expert View 780documentation
online xviprinted xv
Domain command line option 572DOS commands, run within tests 788dynamic Web content 861dynamically generated URLs and Web pages
861
E
Edit menu commands, Data Table 374Edit Schema dialog box, XML checkpoint
219Element Value dialog box, XML checkpoint
215embedded Web browser controls 436encoding passwords 386End Transaction button 19End Transaction dialog box 121environment variables 231–240, 632–637
application detailspredefined variable names 653understanding 651
built-in 237–240files, with TestDirector 240types 232user-defined
deleting 636exporting 636external 234internal 232modifying 635viewing 635
environment variables, user-defined 637event-recording configuration 715–730
customizing levels 718resetting 730standard levels 716
Excel formulasfor creating input parameters 383in checkpoints 384in the Data Table 383–386
Excel. See Microsoft ExcelExecuteFile function 793
EXEPATH_ENV variable 653Exist function 861Exist statement 118existing actions, inserting 337expanding a tree branch, shortcut key 27expected data, for database checkpoints 147Expert View 15, 757–789, 860
checkpoints 762closing applications 776parameters 763running applications 776toggling with Tree View 26viewing steps 759
eXtensible Markup Language 863external action
data location 344, 355definition 331
external functions, executing from script 793external user-defined environment variables
234
F
fallback properties, navigation 455FAQs 859–869File menu commands, Data Table 373File toolbar, QuickTest window 12, 19Filter Images Check dialog box 447, 452Filter Links Check dialog box 447, 449filter properties 684filtering
hypertext links 449image sources 452
Flash objects. See Macromedia Flash objectsFor...Each statement, in the Expert View 779For...Next statement, in the Expert View 779Format menu commands, Data Table 377formulas
for creating input parameters 383in checkpoints 384in the Data Table 383–386
frequently asked questions 859–869FromDate command line option 572function arguments, passing parameters
from QuickTest to WinRunner 819Function call operation 404

QuickTest Professional User’s Guide
876
function libraries. See associated library filesfunctions, user-defined 791–800
G
Generate Script option 807GetROProperty method 785global data sheet 332, 369global parameter 230global/action data sheets, choosing 332Go To dialog box 767GroupName, environment variable 237
H
handler 725Help, online, from within QuickTest
Professional xviHigh event recording configuration level 717HTML Source dialog box 446HTML Tags dialog box 446HTML verification 446hypertext links, filtering 449
I
identifying test objects 33–47If Statement dialog box 746If...Then...Else statement, in the Expert View
781Image Checkpoint Properties dialog box 141image checkpoints
comparing image contents 143editing the property value 143–144
Image Output Value Properties dialog box 284
image sources, filtering, for page checkpoints 452
images, checking 141–145increasing Active Screen information 864index identifier. See ordinal identifierIndex property, programmatic descriptions
775initialization scripts 803Insert Action dialog box 342Insert Checkpoint button 19Insert Copy of Action dialog box 339
Insert New Action dialog box 336Insert Report dialog boxInstallation Guide, QuickTest Professional xvIntelliSense 765internal user-defined environment variables
232Internet Explorer. See Microsoft Internet
Exploreriterations 227, 352, 367
K
key assignments, in Expert View 661key column 162Keyboard or mouse operation 404keyboard shortcuts
in Expert View 661
L
library filesassociated 792specifying for tests 629
license information 8loading QuickTest add-ins 428local data sheet. See action data sheetslocal test 331LocalHostName, environment variable 237localization 231, 370localized applications, testing 865location identifier. See ordinal identifierlocked resources 107
creating tests 108opening tests 110saving tests 111
Log command line option 572logical names, modifying 67low-level recording 96, 101, 860Low-Level Recording button 19
M
Macromedia Flash objects 476–478checking 477recording and running tests on 476using scripting functions 478
managing test objects 49–83

Index
877
managing tests 103–107creating new 103opening 104printing 107saving 104testing process 7, 823unzipping 107zipping 106
mandatory properties, configuring 675mapping custom objects 692mathematical formulas, in the Data Table
383–386measuring transactions 119Medium event recording configuration level
717menu bar, QuickTest window 12Mercury Interactive, information xviiMercury Tours, sample application xvi, 8meta tags 862Method Arguments dialog box 224Method Wizard 732, 733–744
Configure Arguments screen 738Configure Return Value screen 741Congratulations screen 744Insert Statement screen 743Select Method screen 737Welcome screen 736
methodsinserting from the Tree View 733–744run-time objects 785user-defined 795viewing test objects 33–47
Microsoft Excel 371, 383Microsoft Internet Explorer 435Microsoft Query
choosing a database for a database checkpoint 153, 382
database check 150–153supported versions 153
Microsoft VBScript Reference xviMicrosoft Visual Basic scripting language 7MinSize command line option 573Modify Associated Add-ins dialog box 623modifying
default properties 33–47, 49–83test object descriptions 70–74
modifying (cont’d)test object properties during a test run
69your license 8
multimedia applications, testing 475–482multiple actions in tests 331
N
Name and Description screen 412Name command line option 573Navigation Fallback Properties dialog box
455nesting actions 345Netscape 436New Action button 19non-reusable action 331
O
object identificationgenerating automation scripts 683restoring defaults 683
Object Identification dialog box 675Object Mapping dialog box 692object model
automation 801definition 802
Object Model Reference, QuickTest Professional xv
Object Properties dialog box 58, 63, 71Object property, run-time methods 787Object Repository
adding an object 76deleting an object 82finding an object property or value 65replacing an object property value 66
Object Repository dialog box 51, 72Object Repository Mode
choosing 695–713per action 698setting for tests 629, 709setting the default 709shared 702with TestDirector 708

QuickTest Professional User’s Guide
878
Object Selection - Output Value Properties dialog box 257
Object Spy 45Object state trigger 395objects
checking 132–140checking, editing an object-property
value 138–139descriptions, modifying 70–74identification 673–694identifying 33–47methods
run-time 785names, modifying 67properties
adding 74run-time 785
viewing methods 33–47ODBC
choosing a database for a database checkpoint 382
Open dialog box 104Open QuickTest Test dialog box 91, 104Open Test from TestDirector Project dialog
box 832, 834opening tests 104
in a TestDirector project 831opening tests with locked resources 110optional steps 506–507
default 507setting 506
Options dialog box 588Active Screen tab 594Folders tab 591General tab 589Generate Script option 807generating automation scripts 589Run tab 602Web tab 608Windows Applications tab 604
ordinal identifier 680OS, environment variable 237OSVersion, environment variable 237Output Value Properties dialog box
for objects 279for tables and databases 296
output valuesActiveX controls 484databases 298definition 255Image Output Value Properties dialog
box 284images 282–286objects 276–281Output Value Properties dialog box
for objects 279for tables and databases 296
Page Output Value Properties dialog box 262
pages 259–264tables 293–298text 265–276
types 265Text/Text Area Output Value
Properties dialog box 269viewing results 558XML 287–292XML Output Value Properties dialog
box 290
P
Page Checkpoint Properties dialog box 440, 442
page checkpointsediting page property values 444–445filtering hypertext links 449–451filtering image sources 452–455HTML verification 446
Page Output Value Properties dialog box 262page properties, navigation fallback
properties 455pages, checking 439–451panes
changing focus, shortcut key 26Debug Viewer 18Test 14
Parameter Options dialog box 159for environment variables 233for random number variables 241
parameter types 226–243Data Table 227–231

Index
879
parameter types (cont’d)environment variable 231–240random number 241–243
parameterizingcheckpoints 222methods 223tests 221–254
example 249–254using the Data Driver 243
parametersenvironment variables, user-defined
635–637Expert View 763
passing data between actions 332passing parameters
to a WinRunner function 819to a WinRunner test 815
passwordencoding 386
Password command line option 573Password Encoder dialog box 387PathFinder.Locate, statement 593pausing test runs 514percentages
setting custom format 377performance, improving 866planning tests 89–90Pop-up window trigger 395post-recovery test run options 389Post-Recovery Test Run Options screen 410power users, advanced features 859–869print options 656, 657printing test results 533printing tests 107priority
setting for recovery scenarios 422ProductDir, environment variable 237ProductName, environment variable 237ProductVer, environment variable 238programmatic descriptions 69, 769–775
for description objects 772for WebElement objects 774in statement 770
using the With statement 772using the Index property 775using variables 771
programming 860comments 755conditional statements 745in Expert View 757–789in Tree View 731–755in VBScript 758Method Wizard 732, 733–744sending messages to test results 754
project (TestDirector)connecting to 825–828disconnecting from 827opening tests in 831saving tests to 830–831
Project command line option 574properties
adding test object properties 74default 33–47, 49–83run-time objects 785viewing for recovery scenarios 416,
421property collection. See programmatic
descriptionsproperty values, waiting for 115
Q
query file, for a database checkpointcreating 153, 382working with ODBC / Microsoft
Query 382Query. See Microsoft QueryQuickTest
automation object model 801introduction 3–7overview 9–29window 12
Action toolbar 12, 20Data Table 12Debug toolbar 12, 20File toolbar 12, 19menu bar 12status bar 12Test Details pane 12Test pane 12Test toolbar 12, 19title bar 12

QuickTest Professional User’s Guide
880
QuickTest Automation Object Model Reference 808
R
random number parameters 241–243ReadMe xvReadMe, QuickTest Professional xvReal Player objects
checking 480recording and running tests on 478testing 478–482using scripting functions on 482
Record and Run Settings dialog box 644environment variables 651Web tab 646Windows Applications tab 648
Record button 19recording
analog 96low-level 96, 860on Web sites 433status, options 726tests 90–94, 643–653time, improving 866
recoveryassociating scenarios with tests 418copying scenarios 418deleting scenarios 417disabling scenarios 422files 392modifying scenarios 417operations 389removing scenarios from tests 422saving scenario 414scenarios 389setting default scenarios 423setting scenario priority 422viewing scenario properties 416, 421
recovery operationClose application process 404Function call 404Keyboard or mouse operation 404Restart Microsoft Windows 404
Recovery Operation - Click Button or Press Key screen 406
Recovery Operation - Close Processes screen 407
Recovery Operation - Function screen 408Recovery Operation screen 404Recovery Operations screen 403Recovery Scenario Manager Dialog Box 392Recovery Scenario Wizard 393
Click Button or Press Key screen 406Close Processes screen 407Completing the Recovery Scenario
Wizard screen 413Function screen 408Name and Description screen 412Post-Recovery Test Run Options
screen 410Recovery Operation screen 404Recovery Operations screen 403Select Object screen 398Select Processes screen 401Select Test Run Error screen 400Select Trigger Event screen 395Set Object Properties and Values
screen 399Specify Pop-up Window Conditions
screen 397Recursive command line option 574redirection of server 862registering methods 795
guidelines for 799using the RegisterUserFunc statement
796RegisterUserFunc statement 795regular expressions 299–317
defining in object checkpoints 305defining in text checkpoints 308for object property values 300syntax 310treating special characters literally
302, 304remote access to QuickTest 812, 847Remote Agent 847removing actions 359renaming actions 363–364report. See Test Results window

Index
881
reportingdefects automatically 576defects manually 576
reports, filter 788reserved objects 792Restart Microsoft Windows operation 404result set 149ResultDir, environment variable 238Results Remover Utility
running from the command line 571reusable actions 331Run button 19Run dialog box 495run options, in the Options dialog box 602run properties for actions 352running single actions 332running tests 493–510, 643–653
from a step 497–498from a TestDirector project 835on Web sites 433on Web-based applications 494–496Run dialog box 495to update expected results 498–500Update Run dialog box 498using optional steps 506–507viewing results 526WinRunner tests 812–816
run-timeData Table 367
Test Results window 525objects 785settings, adding and removing 670
S
sample application, Mercury Tours xvi, 8Save dialog box 104Save QuickTest Test dialog box 94, 104Save Test to TestDirector Project dialog box
830saving
recovery scenarios 414saving tests 104
to a TestDirector project 830–831saving tests with locked resources 111ScenarioId, environment variable 238
scenariosassociating with tests 418copying recovery 418deleting recovery 417disabling recovery 422modifying recovery 417recovery 389removing recovery from tests 422saving recovery 414setting default recovery 423setting recovery priority 422viewing recovery properties 416, 421
Schema Validation dialog box, XML checkpoint 216
scripts, test. See test scriptsSection 508, Web Content Accessibility
Guidelines 88, 457Select Object screen 398Select Processes screen 401Select Test Run Error screen 400Select Trigger Event screen 395server
redirections 862server-side connections 862TestDirector, disconnecting from 827
Server command line option 574session IDs 862Set Object Properties and Values screen 399Setting 847Setting object 666SetTOProperty method 69SGML 863shared object repository 695, 702
choosing a file 711shared object repository mode
with TestDirector 708sharing action values
using Dictionary objects 357using environment variables 357via the global Data Table 356
Sheet menu commands, Data Table 374Shortcut Key Reference Card, QuickTest
Professional xvshortcuts
for menu items 21–27in Expert View 661

QuickTest Professional User’s Guide
882
Silent command line option 575Smart Identification
analyzing information 565configuring 683disabling during test runs 628enabling from the Object
Identification dialog box 682, 683Smart Identification Properties dialog box
688Specify Pop-up Window Conditions screen
397Specify SQL statement screen, for creating
database checkpoints 152Split Action button 19Split Action dialog box 347splitting actions 346Spy. See Object Spystandard checkpoints
analyzing results 534specifying timeout 139, 448
standard event-recording configuration 716–718
Start Transaction button 19Start Transaction dialog box 120starting QuickTest 10Statement Completion 765status bar, QuickTest window 12Step commands 512steps, optional 506–507Stop button 19support information xviisynchronizing tests 114–119
modifying timeout values 119synchronization point 115waiting for objects to appear 118waiting for specified property values
115SystemTempDir, environment variable 238SystemUtil.Run method 776
T
table checkpointsanalyzing results 536modifying 163
table checkpoints (cont’d)specifying cell identification settings
161–162specifying cells 157specifying expected data 158–160specifying value type 160–161
tables, checking 147–149, 154–163technical support, online xvitemplate, for actions 364test batches, running 508–510Test command line option 575test database
maintaining 803Test Details pane 12
Active Screen 17test flow 334test objects
identifying 33–47managing 49–83modifying logical names of 67property values, retrieving and setting
784Test pane 12, 14
changing focus, shortcut key 26Expert View tab 15Tree View tab 14
test resultsdeleting 569
with command line options 571with Test Results Deletion Tool 569
enabling and filtering 788output values 558reporting defects 576reporting defects automatically 581reporting defects manually 576sending messages to 754viewing for any test 531–532viewing WinRunner steps 582
Test Results Deletion Tool 569Test Results toolbar, Test Results window 526Test Results window 523
Run-Time Data Table 525Test results toolbar 526test results tree 525
Test run error trigger 395

Index
883
test run time, improving 866test scripts
customizing 655–663highlighting script elements 660print options 656script window customization 657
test set 836Test Settings dialog box 620
Environment tab 632–637Generate Script option 807Properties tab 621Recovery tab 640Resources tab 629Run tab 624Web tab 638
Test toolbar, QuickTest window 12, 19test tree
creating 93definition 94
test versions in QuickTest 837test window
customizing appearance of 656highlighting script elements 660
TestDir, environment variable 238TestDirector 823–850
associated library files 793Connectivity Add-in 829Data Table 378disconnecting 827environment variable files 240managing the testing process 7project
connecting QuickTest to 577, 825–828reporting defaults 576reporting defaults automatically 581reporting defaults manually 576running QuickTest tests remotely 847shared object repository 708using QuickTest with 7version control 837
TestDirector Connection dialog box 578, 826
TestDirector projectopening tests in 831saving tests to 830–831
testing in Expert View 757–789
testing optionsDefaultLoadTime 668DefaultTimeOut 668restoring 669retrieving 668run-time 670setting 666setting for a single test 619setting for all tests 587–618WebTimeout 668within a test script 665–670
testing process 4analyzing test results 6creating tests 5running tests 6
TestIteration, environment variable 238TestName, environment variable 238tests
associating recovery scenarios with 418
checking databases 147–153debugging 511–520deleting results 569diagram 330, 338disabling recovery scenarios 422local 331managing 103–107opening 104output values 255–298parameterizing 221–254
example 249–254pausing runs 514planning 89–90printing 107printing results 533programming 731–755recording 90–94, 643–653removing recovery scenarios from 422running 493–510, 643–653running from a step 497–498running, using optional steps
506–507saving 104saving to a TestDirector project
830–831setting default recovery scenarios 423

QuickTest Professional User’s Guide
884
tests (cont’d)test results 521–533unzipping 107updating 498–500zipping 106
Text Area Checkpoint Properties dialog box 174
text area checkpointsanalyzing results 540
Text Area output valuesdefining the area 268
text area output valuesconsiderations for using 265
Text Checkpoint Properties dialog box 174text checkpoints
analyzing results 540configuring the text selection 176modifying 187specifying the checked text 178–179specifying the text after 183–185specifying the text before 180–182specifying timeout 186types 165
TEXT function in Data Table worksheet 383text output values, types 265text, checking 165–187
using standard checkpoints 169using text area checkpoints 171using text checkpoints 167See also text checkpoints
Text/Text Area Output Value Properties dialog box 269
timeoutspecifying for standard checkpoint
139, 448specifying for text checkpoints 186
timessetting custom format 377
timing transactions 119title bar, QuickTest window 12toolbars, QuickTest window
Action 20Debug 12, 20File 12, 19Test 12, 19
transactions 119defining 119inserting 120measuring 119
Tree View 14toggling with Expert View 26
triggerApplication crash 395events 389Object state 395Pop-up window 395Test run error 395
TSL functionscalling from QuickTest 816–821
Tutorial, QuickTest Professional xvtypographical conventions xviii
U
unregistering methods, using the UnregisterUserFunc statement 798
UnregisterUserFunc statement 795UntilDate command line option 576unzipping tests 107Update Run dialog box 498updating tests 498–500UpdatingActiveScreen, environment
variable 238UpdatingCheckpoints, environment variable
238UpdatingTODescriptions, environment
variable 238URL_ENV variable 653User command line option 576User’s Guide xviuser-defined
functions 791–800methods 795properties, accessing 787test objects, mapping 692
UserName, environment variable 238
V
VALUE function in Data Table worksheet 383

Index
885
variablesenvironment 632–637See also environment variables, user-
definedVBScript
Language Reference xvilibrary files 792syntax 758User’s Guide xvi
version control 837adding tests to 838checking tests in to 838, 840checking tests out of 838
version manager 837viewing test results 521–533
checkpoints 533filtering results 529for any test 531–532printing test results 533Run-Time Data Table 558Test Results window 523
Virtual Object Manager 326Virtual Object wizard 322–326virtual objects 319–327
defining 321–326removing 326–327
Visual Basic objects 469–473checking 472recording and running tests on 470using objects and methods 473
VuserId, environment variable 238
W
W3C Web Content Accessibility Guidelines 88, 457
Wait statement 118waiting for objects 114–119WaitProperty statement 115Web browsers, supported 433Web content accessibility 88, 457–557
checkpointsautomatically adding 458in test results 461, 553manually adding 458–461setting preferences 458
Web content, dynamic 861Web Event Recording Configuration dialog
box 717Web information, Mercury Interactive xviiWeb Page Appearance dialog box 600web page/frame XML checkpoint 201Web settings
Advanced Web Options dialog box 609
Options dialog box 608Web sites, recording and running tests 433Web tab, Record and Run Settings dialog box
646Web-based applications, checking 494–496WebElement objects, programmatic
descriptions 774Web-event-recording configuration
715–730customizing 718–727standard 716–718
WebTimeout testing option 668What’s New in QuickTest Professional xvWhile statement, in the Expert View 781wildcard characters. See regular expressionsWindows applications
settings 604Windows Applications tab, Record and Run
Settings dialog box 648Windows command line options 571WinRunner
calling tests from QuickTest 812–816calling TSL functions
from QuickTest 816–821function arguments, passing
parameters from QuickTest 819running QuickTest tests remotely 812tests, passing parameters from
QuickTest 815WinRunner
viewing WinRunner steps in test results 582
working with 811–821With Generation Results window 752

QuickTest Professional User’s Guide
886
With statements 749–753"With" Generation Results window
752entering manually 783generating automatically, while
recording 750generating for existing actions 751in the Expert View 749removing 753
WORKDIR_ENV variable 653working test 838worksheet functions in the Data Table 383
X
XMLchecking 199–220checkpoints
Add Schema dialog box 219analyzing results 220, 542Edit Schema dialog box 219Element Value dialog box 215elements 211for files 204for web page/frame 201modifying 220
attribute details 547checkpoint summary 546
objects and methods 220output value results
analyzing 293, 559attribute details 564checkpoint summary 563
XML Checkpoint from File dialog box 204XML Checkpoint Properties dialog box 208XML Checkpoint Results window 544XML Output Value Properties dialog box 290XML Output Value Results window 561
Z
zipping tests 106


Mercury Interactive Corporation1325 Borregas Avenue Sunnyvale, CA 94089 USA
Main Telephone: (408) 822-5200Sales & Information: (800) TEST-911, (866) TOPAZ-4UCustomer Support: (877) TEST-HLPFax: (408) 822-5300
Home Page: www.mercuryinteractive.comCustomer Support: support.mercuryinteractive.com � ������� � ��