QMS Materials System USER GUIDE - QA Software · QMS Materials System USER GUIDE. ... 3.5 Working...
164
UGD-MM-002 5P 2 nd January 2014 Document: Revision: Last Updated: QMS Materials System USER GUIDE
Transcript of QMS Materials System USER GUIDE - QA Software · QMS Materials System USER GUIDE. ... 3.5 Working...

UGD-MM-002 5P 2
nd January 2014
Document: Revision:
Last Updated:
QMS Materials System USER GUIDE

Document No: UGD-MM-002 Rev: 5P QMS User Guide Page 2 of 164
Information in this document is subject to change without notice. Companies, names and data used in examples are fictitious.
1996 - 2014 by QA Software. All rights reserved. No part of this document may be reproduced or
transmitted in any form or by any means, electronic or mechanical, for any purpose, without the express permission of QA Software. Microsoft Windows, Microsoft Excel and Microsoft FoxPro are registered trademarks of Microsoft Corporation. Although QMS has undergone extensive testing, QA Software makes no warranty or representation, either express or implied, with respect to this software or documentation, its quality, performance, merchantability, or fitness for purpose. As a result this software and documentation are licensed “as is”, and you, the licensee are assuming the entire risk as to its quality and performance. In no event will QA Software be liable for direct, indirect, special, incidental or consequential damages arising out of the use or inability to use the software or documentation. Please send your comments to:
QA Software L3, 332
St Kilda Road Melbourne 3006 Australia
For technical support: Australia Phone: 03 9291 0800 Fax: 03 9699 6293 International Phone: +61 3 9291 0800 Fax: +61 3 9699 6293 Email: [email protected] Internet: http://www.qa-software.com

Table of contents
Document No: UGD-MM-002 Rev: 5P QMS User Guide Page 3 of 164
Chapter 1 - Introduction ......................................................................... 9 1.1 Introduction ........................................................................................................................................ 10 1.2 The Main Elements of QMS .............................................................................................................. 10 1.3 Stockcode Library .............................................................................................................................. 12 1.4 Bill of Materials .................................................................................................................................. 12 1.5 Requisitions ....................................................................................................................................... 13 1.6 Bid Documents .................................................................................................................................. 13 1.7 Purchase Orders ............................................................................................................................... 13 1.8 Expediting and Shipping .................................................................................................................... 14 1.9 Material Deliveries ............................................................................................................................. 14 1.10 Material Movements ........................................................................................................................ 15 1.11 Material Issues ................................................................................................................................ 15 1.12 Materials Availability Analysis ......................................................................................................... 16 1.13 Stock Control ................................................................................................................................... 16 1.14 Procurement Status Report ............................................................................................................. 17
Chapter 2 - Installing and running QMS ............................................. 19 2.1 Overview ............................................................................................................................................ 20
2.1.01 How to get started with QMS ................................................................................................................ 20 2.2 Installing QMS ................................................................................................................................... 20
2.2.01 System Requirements ........................................................................................................................... 20 2.2.02 Installing the QMS application .............................................................................................................. 20
2.3 Running QMS .................................................................................................................................... 21
2.3.01 Launching QMS .................................................................................................................................... 21 2.3.02 Registering the Program ....................................................................................................................... 21
2.4 Configuring QMS ............................................................................................................................... 23
2.4.01 Moving QMS to the Server .................................................................................................................... 23 2.4.02 Installing the QASYS Files .................................................................................................................... 23 2.4.03 Creating a short cut icon on your desktop ............................................................................................. 23 2.4.04 QMS Directory Structure ....................................................................................................................... 24 2.4.05 QMS Standard Tool bar buttons ........................................................................................................... 25
Chapter 3 - Working with Projects ...................................................... 27 3.1 Creating Projects ............................................................................................................................... 28
3.1.01 Overview ............................................................................................................................................... 28 3.1.02 Creating a Project ................................................................................................................................. 28
3.2 Working with Projects ........................................................................................................................ 29
3.2.01 Project Details ....................................................................................................................................... 29 3.2.02 Project Settings ..................................................................................................................................... 30 3.2.03 Project List ............................................................................................................................................ 31 3.2.04 Project Calendar ................................................................................................................................... 31
3.3 Transfer Project Data ........................................................................................................................ 32 3.4 Working with the Address Book ........................................................................................................ 32
3.4.01 Overview ............................................................................................................................................... 32 3.4.02 Company Types .................................................................................................................................... 32 3.4.03 Companies ............................................................................................................................................ 33 3.4.04 Contacts ................................................................................................................................................ 33 3.4.05 Rename a Contact or Company ........................................................................................................... 34
3.5 Working with the Configuration Tables .............................................................................................. 35 3.6 Project Summary View ...................................................................................................................... 36 3.7 Project Statistics ................................................................................................................................ 37
Table of contents
Document No: UGD-MM-002 Rev: 5P QMS User Guide Page 4 of 164
3.8 Project Housekeeping ....................................................................................................................... 37 3.8.01 Backup and Restoring Projects ............................................................................................................. 37 3.8.02 Deleting Projects ................................................................................................................................... 38
Chapter 4 – The Bill of Materials ......................................................... 39 4.1 Overview ............................................................................................................................................ 40 4.2 Using the Stockcode Library ............................................................................................................. 40
4.2.01 Creating New Stockcodes ..................................................................................................................... 40 4.2.02 Defining Substitute Materials ................................................................................................................ 42
4.3 BOM List Maintenance ...................................................................................................................... 42
4.3.01 Creating a BOM Container .................................................................................................................... 42 4.4 Working with the BOM ....................................................................................................................... 43
4.4.01 Selecting the current BOM .................................................................................................................... 43 4.4.02 Entering the Document Details ............................................................................................................. 43 4.4.03 Entering the materials for a document .................................................................................................. 44 4.4.04 Customising the BOM Grid Layout ....................................................................................................... 46
4.5 BOM Maintenance ............................................................................................................................. 47
4.5.01 Revising a BOM .................................................................................................................................... 47 4.5.02 Archiving a BOM ................................................................................................................................... 48 4.5.03 Restoring a BOM .................................................................................................................................. 48 4.5.04 Deleting a BOM .................................................................................................................................... 48 4.5.05 Re-Assign BOM Required At values ..................................................................................................... 49
4.6 Document Register ............................................................................................................................ 50
4.6.01 Using the Document Register ............................................................................................................... 50 4.6.02 Re-numbering Documents .................................................................................................................... 50 4.6.03 Revising Documents ............................................................................................................................. 50 4.6.04 Document Priority Allocation wizard...................................................................................................... 51 4.6.05 Progress Monitoring .............................................................................................................................. 51
4.7 Reporting ........................................................................................................................................... 52
4.7.01 BOM Reports ........................................................................................................................................ 52
Chapter 5 - Generating Requisitions .................................................. 55 5.1 Overview ............................................................................................................................................ 56 5.2 Manual generation of Requisitions .................................................................................................... 56
5.2.01 Creating a Requisition manually ........................................................................................................... 56 5.2.02 Editing the Requisition Details .............................................................................................................. 57
5.3 Automatically generating a requisition ............................................................................................... 58
5.3.01 Overview ............................................................................................................................................... 58 5.3.02 Generating a Requisition from the BOM ............................................................................................... 59 5.3.03 Generating a Requisition using Re-Order Levels .................................................................................. 62
5.4 Requisition Reports ........................................................................................................................... 62
Chapter 6 – Bid Documents ................................................................ 63 6.1 Overview ............................................................................................................................................ 64 6.2 Creating a Bid Document .................................................................................................................. 64 6.3 Maintaining Bid Documents ............................................................................................................... 66 6.4 Receiving/Importing Bids ................................................................................................................... 67 6.5 Bid Analysis ....................................................................................................................................... 67 6.6 Bid Document Reports ...................................................................................................................... 68

Table of contents
Document No: UGD-MM-002 Rev: 5P QMS User Guide Page 5 of 164
Chapter 7 – Generating Purchase Orders .......................................... 69 7.1 Overview ............................................................................................................................................ 70 7.2 Creating a Purchase Order Manually ................................................................................................ 70 7.3 Editing a Draft Purchase Order ......................................................................................................... 72 7.4 Automatically creating a Draft Purchase Order from a Requisition ................................................... 73 7.5 Automatically creating a Draft Purchase Order from a Bid Document .............................................. 74 7.6 Creating a Draft Purchase Order from the BOM ............................................................................... 75 7.7 Finalizing a Draft Purchase Order ..................................................................................................... 76 7.8 Viewing a Finalized Purchase Order ................................................................................................. 76 7.9 Revising a Purchase Order ............................................................................................................... 77 7.10 Splitting a Finalized Purchase Order ............................................................................................... 77 7.11 Deleting a Finalized Order ............................................................................................................... 78 7.12 Closing a Finalized Order ................................................................................................................ 78 7.13 Currencies ....................................................................................................................................... 78 7.14 Using Substitutes ............................................................................................................................. 79
7.14.01 Purchasing Substitute Materials ......................................................................................................... 79 7.14.02 Importing Substitute Materials from a Bid Document .......................................................................... 79
7.15 Purchase Order Reports ................................................................................................................. 80
Chapter 8 – Expediting and Shipping ................................................. 83 8.1 Overview ............................................................................................................................................ 84 8.2 Expediting Schedule .......................................................................................................................... 84
8.2.01 Expediting Activity Library ..................................................................................................................... 84 8.2.02 Expediting Schedule ............................................................................................................................. 84 8.2.03 Using Auto Alerts .................................................................................................................................. 85
8.3 Updating Forecast Deliveries ............................................................................................................ 85 8.4 Using Expediting Groups ................................................................................................................... 88 8.5 Tracking Shipments ........................................................................................................................... 88
8.5.01 Shipping Details .................................................................................................................................... 88 8.5.02 Shipping Transactions .......................................................................................................................... 89
8.6 Expediting and Shipping Reports ...................................................................................................... 90
Chapter 9 - Material Receipts .............................................................. 91 9.1 Overview ............................................................................................................................................ 92 9.2 Using Locations ................................................................................................................................. 92 9.3 Generating a Delivery Docket from a Purchase Order ...................................................................... 93 9.4 Manual entry of Delivery Dockets ...................................................................................................... 95 9.5 Generating a Delivery Docket for an Unknown Purchase Order ...................................................... 96 9.6 Assigning a Purchase order to a Delivery Docket ............................................................................. 96 9.7 Delivery Docket Maintenance ............................................................................................................ 97 9.8 Returns of Delivered Material ............................................................................................................ 97 9.9 Delivery Approvals ............................................................................................................................. 98 9.10 Overages, Shortages and Damages (OS&D) ................................................................................. 98 9.11 Delivery Reports ............................................................................................................................ 100
Chapter 10 - Movement Dockets ....................................................... 101 10.1 Using Movement Dockets ............................................................................................................. 102 10.2 Creating a Movement Docket ........................................................................................................ 102 10.3 Viewing/Editing a Movement Docket ............................................................................................. 103 10.4 Accepting a Movement Docket ...................................................................................................... 104 10.5 Movement Reports ........................................................................................................................ 105

Table of contents
Document No: UGD-MM-002 Rev: 5P QMS User Guide Page 6 of 164
Chapter 11 - Material Availability Analysis ....................................... 107 11.1 Overview ........................................................................................................................................ 108 11.2 Running the Analysis Wizard (Analysis only) ................................................................................ 108 11.3 Running the Analysis Wizard (Analysis + Issue) ........................................................................... 110
Chapter 12 - Material Issues .............................................................. 113 12.1 Overview ........................................................................................................................................ 114 12.2 Issuing Material from Standard Locations ..................................................................................... 114
12.2.01 Generating Issues automatically ....................................................................................................... 114 12.2.02 Generating Issues manually ............................................................................................................. 115 12.2.03 Return of Issued Material .................................................................................................................. 116
12.3 Issuing Material from Temporary Locations .................................................................................. 117
12.3.01 Overview ........................................................................................................................................... 117 12.3.02 Enabling the Issue of Material from a Temporary Location ............................................................... 117 12.3.03 Issuing Material from Temporary Locations using the Issue Wizard ................................................. 117 12.3.04 Maintenance of the Issue of material from Temporary Locations ..................................................... 118
12.4 Issue Docket Reports .................................................................................................................... 118
Chapter 13 – Stock Control ............................................................... 121 13.1 Overview ........................................................................................................................................ 122 13.2 Preparing for a Stock Take ............................................................................................................ 122 13.3 Reconciling Stock .......................................................................................................................... 122 13.4 Stock at Location ........................................................................................................................... 123 13.5 Stock Transfers ............................................................................................................................. 123 13.6 Stock Search ................................................................................................................................. 124 13.7 Using Bin Numbers ........................................................................................................................ 124 13.8 Stock Reports ................................................................................................................................ 124
Chapter 14 - Generating Reports ...................................................... 127 14.1 Standard Reports .......................................................................................................................... 128
14.1.01 Overview ........................................................................................................................................... 128 14.1.02 Creating a standard report ................................................................................................................ 128 14.1.03 Areas of the System to Report from .................................................................................................. 129 14.1.04 Sorting Data ...................................................................................................................................... 129 14.1.05 Using Filters ...................................................................................................................................... 130 14.1.06 Advanced Filters ............................................................................................................................... 130 14.1.07 Printing to Excel ................................................................................................................................ 131 14.1.08 Printing to PDF .................................................................................................................................. 131
14.2 Cross Tabulated Reports .............................................................................................................. 131
Chapter 15 – Procurement Status Report ........................................ 133 15.1 Overview ........................................................................................................................................ 134 15.2 Standard Library of Milestones ...................................................................................................... 134 15.3 The Procurement Schedule ........................................................................................................... 135 15.4 The Procurement Status Report .................................................................................................... 136 15.5 Updating the Procurement Schedule ............................................................................................ 137
15.5.01 How to update Actual Dates using Link Transactions ....................................................................... 137 15.5.02 How to update Actual Dates for user Defined Milestones ................................................................. 137 15.503 How to update Forecast Dates .......................................................................................................... 138

Table of contents
Document No: UGD-MM-002 Rev: 5P QMS User Guide Page 7 of 164
Chapter 16 - Customising QMS ......................................................... 139 16.1 Dashboard ..................................................................................................................................... 140
16.1.01 Customising the Favorites ................................................................................................................ 140 16.1.02 Dashboard Logo and Project Summary Details ................................................................................ 140
16.2 Customising Standard Reports ..................................................................................................... 140
16.2.01 Overview ........................................................................................................................................... 140 16.2.02 Using a Custom Title ......................................................................................................................... 141 16.2.03 Customising the Report Layout ......................................................................................................... 141
16.3 Customising Standard Templates ................................................................................................ 141
16.2.01 Overview ........................................................................................................................................... 141 16.2.02 The MS Office Templates ................................................................................................................ 141 16.2.03 Customising the MS Office Templates .............................................................................................. 142
Chapter 17 – Administration ............................................................. 143 17.1 Program Defaults ........................................................................................................................... 144 17.2 Security .......................................................................................................................................... 144
17.2.01 Overview ........................................................................................................................................... 144 17.2.02 Levels and Features ......................................................................................................................... 144 17.2.03 Users and Projects............................................................................................................................ 145 17.2.04 Change Password............................................................................................................................. 146 17.2.05 View User Login Details .................................................................................................................... 146 17.2.06 Duplicate User Settings .................................................................................................................... 146
17.3 Utilities ........................................................................................................................................... 147
17.3.01 Compact Files ................................................................................................................................... 147 17.3.02 Rebuild Summary Files ..................................................................................................................... 148 17.3.03 Cascade Deletion.............................................................................................................................. 148 17.3.04 Download Global Libraries ................................................................................................................ 149
17.4 Upgrading QMS ............................................................................................................................. 149
17.4.01 Overview ........................................................................................................................................... 149 17.4.02 Install Upgrade .................................................................................................................................. 149
Chapter 18 - Import / Export .............................................................. 151 18.1 Importing data ................................................................................................................................ 152
18.1.01 Importing the BOM - Overview .......................................................................................................... 152 18.1.02 Importing the BOM - Process ............................................................................................................ 153 18.1.03 Importing Requisitions ...................................................................................................................... 155 18.1.04 Importing Draft and Finalised Purchase Orders ................................................................................ 156 18.1.05 Importing Expediting Data ................................................................................................................. 158 18.1.06 Importing Delivery Dockets ............................................................................................................... 156 18.1.07 Importing the Address Book .............................................................................................................. 157
18.2 Exporting data ............................................................................................................................... 158
Chapter 19 - Reference Section ........................................................ 159 19.1 File menu ....................................................................................................................................... 160 19.2 Edit menu ...................................................................................................................................... 160 19.3 BOM menu .................................................................................................................................... 161 19.4 Purchasing menu ........................................................................................................................... 161 19.5 Deliveries menu ............................................................................................................................. 162 19.6 Stock menu .................................................................................................................................... 163 19.7 Tools menu .................................................................................................................................... 163


Document No: UGD-MM-002 Rev: 5P QMS User Guide Page 9 of 164
Chapter 1 - Introduction
1.1 Introduction
1.2 QMS Main Elements
1.3 Stock Library
1.4 Bill of Materials
1.5 Requisitions
1.6 Bid Documents
1.7 Purchase Orders
1.8 Expediting
1.9 Deliveries
1.10 Movements
1.11 Issues
1.12 Material availability analysis
1.13 Stock Control
1.14 Procurement Status Report

Chapter 1 - Introduction to QMS
Document No: UGD-MM-002 Rev: 5P QMS User Guide Page 10 of 164
1.1 Introduction In an ideal world, materials control should be easy! Once the design is completed, a bill of materials (BOM) or material take-off (MTO) is generated and issued as a requisition for purchase. Fabrication or installation begins only after all materials have been delivered to site. Reality is often very different. The above phases overlap and it is common to be installing the first materials before even the design is complete. Managing the intermediate phases of purchasing material progressively while the design is in progress, and controlling sub-contractors when there are material shortages can be complex, time consuming, and off-course be very expensive. QA Software’s Materials Management System QMS is a fully integrated system for managing all phases of the material management process, from Bills of Material through to receipt in store and issues to the field. It is designed to handle large volumes of data and enable the management of change to be carried out quickly and effectively.
1.2 The Main Elements of QMS The QMS System is made up of a number of elements, each of which addresses a particular area of the materials control process. These are: Stockcode Library. Bill of Materials. Requisitions Bid Documents Purchase Orders. Shipping Expediting. Material Deliveries. Material Movements. Material Issues. Materials Availability Analysis. Stock Control. A Procurement Status Register can be used to tracking the Procurement Process through its lifecycle based on procurement packages. These main elements of QMS are related as described by the business process diagram on the next page.

Chapter 1 - Introduction to QMS
Document No: UGD-MM-002 Rev: 5P QMS User Guide Page 11 of 164
ENGINEERING PROCUREMENT CONSTRUCTION
Initial Bill of Materials (BOM)
Revise BOM
BOM History
Raise Requisition
Create and Send Bid
Documents to Vendors
Receive Bids
Bid Analysis
Raise Draft Order
Finalise Draft Order
Revise Order
Define Expediting Schedule
Expedite Deliveries
Receive Materials
(Deliveries)
Analyze Materials Received
Issue Materials
against the BOM
Stock Reconciliation
Stockcode Library
DESIGN
Raise Requisitions for material Not Ordered
PO History
Technical and Commercial
Approval
Identify Shortages
TOTAL QUANTITIES BY MODULE AND PROCUREMENT STATUS REPORT
Compare Required Qty (BOM) against Purchased Qty to ensure sufficient material is ordered
Compare Ordered Qty (PO) against Delivered Qty to ensure all material ordered is received.
Track Quantity Issued against the Requirement (BOM) to capture utilization
Bill of Materials List
BOM including Issued Material
BOM Comparisons
BOM Revision Changes
REPORT ON: Bid and PO Registers
Material not Ordered
Ordered but Delivery overdue
Expediting activity history
Material Delivery History
Material Returns to Suppliers
Materials Transfers/Movements
Material Issued History

Chapter 1 - Introduction to QMS
Document No: UGD-MM-002 Rev: 5P QMS User Guide Page 12 of 164
Estimate
Piping BOM Revision 1
Piping BOM Revision 2
Piping BOM Revision 3
Structural BOM Revision 1
Structural BOM Revision 2
Structural BOM Revision 3
Electrical BOM Revision 1
Electrical BOM Revision 2
Electrical BOM Revision 3
1.3 Stockcode Library QMS uses a Stockcode library to define a catalogue of Stockcodes for use on a project. This library is used throughout QMS for validating Stockcode data entry in the various QMS elements, and for the allocation of Stockcode descriptions. Use of a Stockcode library minimises one of the main sources of errors in the materials control process, the mis-typing of Stockcodes. The Stockcode library can be created manually, sourced from another project, or imported electronically from an external application.
1.4 Bill of Materials A Bill of materials (BOM) defines the material requirement for a project, specified in terms of drawings, stock or component codes, and the quantities of each item required. A Bill of materials may be generated in total as a single BOM for the complete project, or as a number of smaller BOMs, perhaps on a discipline by discipline basis or on a per area basis. A BOM can be entered into QMS manually or, on larger projects, imported electronically. A combination of these two methods may also be used. As the project design and hence the BOM changes, the revised quantities can be recorded in QMS while maintaining a complete audit trail. Hence QMS facilities the management of change to the BOM throughout the project life cycle. A single BOM typically moves through the following phases:
QMS maintains all Bills of Materials, at all revisions, enabling historical analysis of how the BOM changes during the project.
Requisitions and Purchase Orders can be generated at any stage from a single BOM or combination of BOMs.
Bulk BOM
Intermediate BOM Final
BOM Revised
Final BOM

Chapter 1 - Introduction to QMS
Document No: UGD-MM-002 Rev: 5P QMS User Guide Page 13 of 164
1.5 Requisitions A Requisition in QMS is list of material with required quantities and is prepared for the purpose of obtaining prices and delivery dates from one or more suppliers via Bid Documents. Purchase orders are normally then placed with the supplier offering the best price/delivery combination although, in QMS purchase orders can be created without the need to generate a Bid Document or a Requisition if required. Requisitions can be generated by manually entering the material required or, automatically from the Bill of Materials. The facility to automatically generate requisitions is one of the major benefits of using QMS. When automatically generating requisitions, the following options are available: Select from one or more Bills of Material for calculation of the quantities required. Filter on specific material types, stock type, or even on a phrase in the Stockcode description to
generate requisitions for a particular range of materials. Deduct quantities already out on requisition or already purchased when calculating outstanding
quantities required. Add a percentage mark-up during the calculation process. Use rounding for material supplied in fixed quantities. The facility to automatically generate requisitions saves time and reduces errors, and a complete audit trail on all requisitions generated is maintained by the system.
1.6 Bid Documents Bid Documents are used to obtain prices from one or more vendors for the material on a Requisition. Bid Documents are created using a Requisition as the basis and vendors are allocated via the Address Book. A Vendor Pricing Schedule in MS Excel and a Bid Document (RFQ) cover sheet in MS Word format both auto generated by the system are sent via QMS to the vendors. Vendors update the Pricing Schedule with their pricing and lead times and once returned this data is imported into QMS to enable an auto generated Bid Tabulation to be created.
1.7 Purchase Orders A Purchase Order in QMS is a list of material requirements sourced from a vendor and defines the quantities required, unit rates, delivery dates, and order value. Once an order is placed, QMS facilitates the expediting of material on order via an expediting module. As material on a purchase order is delivered, the details are recorded, enabling analysis of outstanding and over supplied material as well as reconciliation for accounting purposes. Purchase orders in QMS can be generated in four different ways:
They can be generated manually in the Purchase order module.
They can be generated automatically from a Bid Document.
They can be generated automatically from a Requisition.
The can be generated automatically direct from the Bills of Materials.

Chapter 1 - Introduction to QMS
Document No: UGD-MM-002 Rev: 5P QMS User Guide Page 14 of 164
All purchase orders in QMS, regardless of how they were generated, must first be prepared as a “draft”. While an order remains in draft mode it can be edited and modified as required. Once the order is as ready for issue, it is “finalised”, at which point it can no longer be edited. Further changes are then made by formally revising the order. A full audit trail is provided to enable historical analysis of changes to orders. When generating an order automatically from a bid document or a requisition, QMS provides the facility to split Stockcodes across a number of orders. Rates and final quantities can be adjusted and additional line items added which may not have been included in the bid document or requisition. When generating an order automatically, direct from the Bills of Materials, the same options are provided as with the automatic generation of requisitions.
1.8 Expediting and Shipping Expediting is the important function of monitoring the status of manufacture in relation to purchase orders, to ensure materials are supplied in accordance with the delivery dates specified. QMS includes a powerful expediting module to maintain a complete history of expediting activity. Reporting by exception means that high priority or potential problem areas get the greatest attention, and that expediting becomes a routine process. Expediting information can be recorded at both a summary level, in relation to a Purchase Order in general, or at a line item level of detail. The history of previous contacts is maintained at both levels. Typical information that can be recorded includes:
Date of contact.
Vendor Comments.
Promised Delivery Date and ETA Site Date.
Expeditor’s comments.
Next Contact date.
Shipping details. An Expediting Activity Schedule can be defined per Order to organise the expediting process and to send alerts to expeditors in regard to upcoming activities planned. The Shipping Module enables close monitoring of shipping movements from the time of ex works of the supplier to arrival at the final destination.
1.9 Material Deliveries Recording the delivery of material from suppliers is a crucial function of the QMS system. This process allocates the received material into stock at the location receiving the material. There are a number of other areas of the QMS system that also rely on the recording of material deliveries:
Comparison of purchased versus delivered quantities.
Calculation of outstanding quantities for expediting.
Warning of over supplied items and generation of OS&D Reports.
Accounts reconciliation by generation of priced delivery dockets.
QMS provides two options for the rapid and accurate recording of material deliveries: Direct entry of partial or completed deliveries against purchase order line items; or, entry against an "unknown" order with the facility to later assign an order to the delivery when this information becomes known.
Chapter 1 - Introduction to QMS
Document No: UGD-MM-002 Rev: 5P QMS User Guide Page 15 of 164
QMS also features additional functionality in the area of material deliveries by recording heat numbers on delivered material if required for traceability purposes.
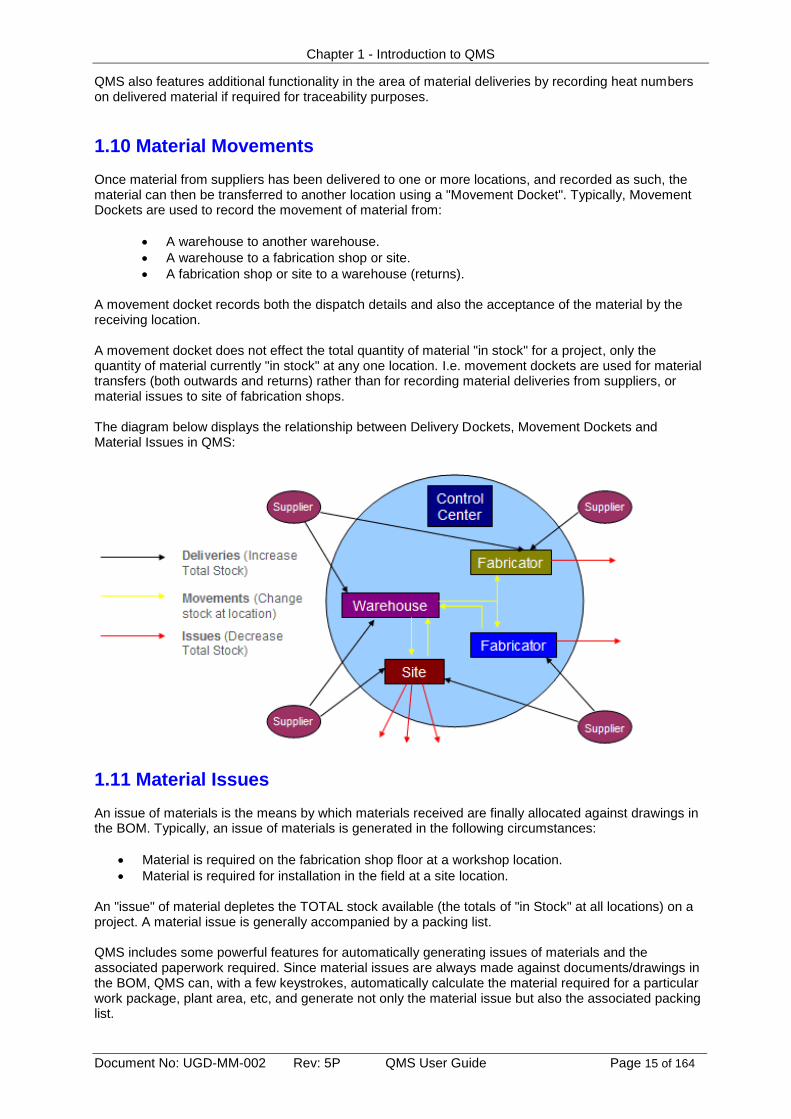
1.10 Material Movements Once material from suppliers has been delivered to one or more locations, and recorded as such, the material can then be transferred to another location using a "Movement Docket". Typically, Movement Dockets are used to record the movement of material from:
A warehouse to another warehouse.
A warehouse to a fabrication shop or site.
A fabrication shop or site to a warehouse (returns). A movement docket records both the dispatch details and also the acceptance of the material by the receiving location. A movement docket does not effect the total quantity of material "in stock" for a project, only the quantity of material currently "in stock" at any one location. I.e. movement dockets are used for material transfers (both outwards and returns) rather than for recording material deliveries from suppliers, or material issues to site of fabrication shops. The diagram below displays the relationship between Delivery Dockets, Movement Dockets and Material Issues in QMS:
1.11 Material Issues An issue of materials is the means by which materials received are finally allocated against drawings in the BOM. Typically, an issue of materials is generated in the following circumstances:
Material is required on the fabrication shop floor at a workshop location.
Material is required for installation in the field at a site location. An "issue" of material depletes the TOTAL stock available (the totals of "in Stock" at all locations) on a project. A material issue is generally accompanied by a packing list. QMS includes some powerful features for automatically generating issues of materials and the associated paperwork required. Since material issues are always made against documents/drawings in the BOM, QMS can, with a few keystrokes, automatically calculate the material required for a particular work package, plant area, etc, and generate not only the material issue but also the associated packing list.

Chapter 1 - Introduction to QMS
Document No: UGD-MM-002 Rev: 5P QMS User Guide Page 16 of 164
1.12 Materials Availability Analysis The QMS Material Availability Analysis module is a powerful tool, for not only analysing what work can take place with the material currently in stock, but for generating the necessary paperwork for the issue of material. The Analysis can be carried out for:
The work required at a particular location . . .
for one of more areas/packages of work . . .
taking into account material in stock at one or more locations. .
and the priority of the work to be completed. Once the analysis has been performed, QMS can automatically "issue" the correct material or create a movement docket to move the material to the issuing location ready for issue. QMS can also analyse material availability based on forecast (promised delivery) dates and/or ETA Site Dates. This is ideal for planning ahead.
1.13 Stock Control QMS provides the tools necessary for stock taking, reconciling the calculated "stock on hand" against physical stock, and tracking down stock discrepancies. QMS calculates the stock at any location as follows: Quantity of material delivered Less Quantity of material sent out on movement dockets.
Plus Quantity of material accepted on movement dockets. Less Quantity of material issued. Plus Quantity of material returned from issue. Less Stock adjustments Equals Stock on hand at location. The total quantity of stock on hand for the project is summated from the “stock on hand" quantities at each location.

Chapter 1 - Introduction to QMS
Document No: UGD-MM-002 Rev: 5P QMS User Guide Page 17 of 164
1.14 Procurement Status Report QMS provides a procurement tracking status report to monitor procurement packages through the various milestones that commence with raising a requisition and end with delivery to site. Ten System milestones that are linked to QMS Transactions such as raising purchase orders are built in (and hence auto updated as they occur) and users can define their own milestones in addition to this (and opt not to use one or more of the system milestones).
.


Document No: UGD-MM-002 Rev: 5P QMS User Guide Page 19 of 164
Chapter 2 - Installing and running QMS
2.1 Overview 2.1.01 How to get Started with QMS
2.2 Installing QMS 2.2.01 System Requirements 2.2.02 Installing the QMS Application
2.3 Running QMS 2.3.01 Launching QMS 2.3.02 Registering the Program
2.4 Configuring QMS 2.4.01 Moving QMS to the Server 2.4.02 Installing the QASYS Files 2.4.03 Creating a Shortcut 2.4.04 The QMS Directory Structure 2.4.05 QMS Standard Toolbar buttons

Chapter 2 – Installing and Running QMS
Document No: UGD-MM-002 Rev: 5P QMS User Guide Page 20 of 164
2.1 Overview
2.1.01 How to get started with QMS QMS requires installation of some software. This can be obtained from www.qa-software.com or by contacting QA Software on: Phone: +61 (3) 9291 0800
Fax: +61 (3) 9699 6293 Email: [email protected]
2.2 Installing QMS
2.2.01 System Requirements The system requirements for running QMS are:
Hardware/Software Minimum Requirements
Recommended Requirements
Computer/Processor Pentium 250
Pentium 800
Memory (RAM) 512 MB
1 GB
Available Hard Disk Space 30 MB 80 MB
Display 800 x 600 16 Bit
1024 x 768 16 Bit
Operating System Windows 98, Windows Me, Windows 2000, Windows NT, Windows XP, Windows VISTA, Windows 7
Windows XP, Windows 7
2.2.02 Installing the QMS application To install the QMS application files: 1. Close all open applications. 2. Click on the Start button and select Run. 3. Insert the QA Software CD in your CD drive. 4. Click on the Browse button and locate the D:\QMS\Setup folder on the CD. 5. Select the QMS.msi file in this folder and click OK. 6. Back at the Run window, click the OK button to start the setup process. Follow the instructions without changing the default settings in the setup process. Notes: a) QMS can also be installed using the Menu that appears when you load the QAS CD ROM. Simply
click the QMS Option. b) After Installation and prior to running QMS, ensure you screen is set to a resolution of 800 x 600
pixels or greater.

Chapter 2 – Installing and Running QMS
Document No: UGD-MM-002 Rev: 5P QMS User Guide Page 21 of 164
2.3 Running QMS
2.3.01 Launching QMS With the QMS installed you can now log into the system for the first time. By default, QMS will be installed in the QA Software program group. To start QMS: 1. Click on the Start button. 2. Select Programs. 3. Select the QA Software Work group. 4. Select QMS. 5. At the login screen, enter the User ID as QA and type the Password as QA. 6. Click OK. Note that the User Id and Password values are populated automatically when you first
run QMS from version 4 onwards.
You are now at the QMS Dashboard, which confirms that the installation has been successful. Press F1 for context sensitive help at any time.
7. Click on the File menu and choose Exit to close the program. At this point it is highly recommended that staff new to QMS work through the QMS Guided Tour. If you do not already have a hardcopy of the Guided Tour, a copy can be found on the QAS CD ROM in the \Valupack\Documentation\Guided Tours folder or can be downloaded from the QA Software website www.qa-software.com by following the links from Downloads \ Materials Control.
2.3.02 Registering the Program QA Software products are normally licensed:
Either to specific PCs that will be able to access the software OR
On a Concurrent User basis
(a) Registering QMS for Per Seat Licensing With Per Seat Licensing, each PC accessing QMS must be registered. For this reason it is essential for you to go around to every PC that you are purchasing a license for and choose either the Register button from the Register Reminder window, or select Register Program from the Help Menu.
Obtaining a Registration key: 1. From the Help menu, select Register Program. 2. Complete the Name and Organisation fields.
Note that for first time registrations, you will need to add your organisation (company) to the QMS Address book to be able to select it at the Registration screen. See Companies [Section 3.4.03] for more on how to do this.
3. Select the Contact Information Tab and complete the contact information that QA Software will use to communicate with you.
Note the License number will have been provided to you with your QA Software CD Rom. This License number should be quoted on all correspondence with QA Software.
4. Click the Add to Log button. If you have been to each PC you are registering, go to 6. 5. Go to the next computer and return to step 1. 6. Click either Print Log and attach it to your purchase order; or click Email Log to electronically mail
the log to QA Software.

Chapter 2 – Installing and Running QMS
Document No: UGD-MM-002 Rev: 5P QMS User Guide Page 22 of 164
Note: If you only have a couple of computers to register, you may want to call QA Software and register each PC over the phone.
Entry of Registration Key: Once QA Software have received your purchase order and your registration log, they will either send you a printed Registration Details sheet via mail/fax or send you an updated registration log via email. If you have received such a print registration details sheet:
Go around to each PC you placed an order for, enter the registration screen and manually enter the appropriate Registration Key for each machine and click Register.
If you have received a registration log by email:
1. Copy the attached file to your CONFIG Directory (usually C:\Qasoft\Qms\Config\). 2. Go around to each PC you placed an order for and enter the registration screen. 3. Click Register.
(b) Registering QMS for Concurrent User Licensing With Concurrent User Licensing, the system can be registered from any PC setup to access the system. Hence the following steps can be performed from any PC and need only be done once.
Obtaining a Registration key: 1. Follow Steps 1 – 3 in Section (a) above for per seat licensing. 2. Copy and paste the User Reg No. into an email and send the email to [email protected]. Note: You can also call QA Software and register over the phone.
Entry of Registration Key Once QA Software have received your purchase order and your User Reg No., they will either send you the registration key required encrypted for the number of concurrent users.. 3. Repeat step 1 above and enter the Registration key provided, and click Register.

Chapter 2 – Installing and Running QMS
Document No: UGD-MM-002 Rev: 5P QMS User Guide Page 23 of 164
2.4 Configuring QMS
2.4.01 Moving QMS to the Server With the QMS installed on your local drive, it is now time to move the program to the server, which is necessary if you are going to have more than one user of the system. Instructions for moving the QMS to the Server: 1. Start Windows Explorer. 2. Move the complete QASOFT folder and all subfolders to the server drive (e.g. K). 3. Install the QASYS files (QA Software System Files) on all work stations requiring access to QMS. 4. Finally, create icons pointing to QMS.EXE on all workstations requiring access to the QMS System.
2.4.02 Installing the QASYS Files The QA Software System Files (QASYS Files) contain a number of Dlls that are used by QA Software Applications. It is necessary to install the QASYS files on all workstations that are going to run QA Software applications. The QASYS files are not the application itself. I.e. they are not QMS. However they are required to enable you to run QMS. Note that the QASYS files are installed automatically when you install QMS. Hence if you have a network license, you normally move the QMS Application from the PC that it was first installed on to the server. On this PC it is not necessary to also install the QASYS files. You must use the QA Software Setup program to install the QA Software System files. The files on the program CD are compressed; you can’t just copy them to your hard drive. Follow the steps below: 1. Close any open applications. 2. Click on the Start button. 3. Select Run. 4. Insert the QA Software CD in your CD drive. 5. Click on the Browse button and locate the QASYS folder on the CD. 6. Select the Setup.exe file in this folder and click OK. 7. At the Run window, click the OK button to start the setup process. Follow the instructions on the screen. Note at this stage it is advisable to accept the default settings in the setup process. At the end of the setup process you will normally be requested to restart your computer.
2.4.03 Creating a short cut icon on your desktop If a short cut icon was not created automatically on your desktop when installing the system you can manually create such a short cut icon as follows:
1. Run Windows Explorer. 2. Locate the Desktop Folder (often right at the top). 3. Select the Desktop folder and click on the File menu and sub-menu New. 4. Select Shortcut. 5. At the “Create shortcut” screen, click on Browse and locate the \QASOFT\QMS folder on the
server drive. 6. Click on the QMS.EXE file and click Open. 7. Follow the remaining instructions and a QMS icon will be created on the desktop.

Chapter 2 – Installing and Running QMS
Document No: UGD-MM-002 Rev: 5P QMS User Guide Page 24 of 164
2.4.04 QMS Directory Structure During installation of QMS, a number of directories are created. These are:
\QASOFT\QMS Stores read only Program files.
\QASOFT\QMS\CONFIG
Contains all Configuration files.
\QASOFT\QMS\HELP
Contains the QMS Help File.
\QASOFT\QMS\Import
Contains a series of example and standard excel based import templates for use with QMS.
\QASOFT\QMS\Templates
Contains the excel and word templates used to generate Requisitions, Purchase Orders, Delivery Dockets etc.
\QASOFT\QMS\PDFFiles
Default folder for storage of all Reports generated to PDF Format.
\QASOFT\QMS\PROJECTS All Project Data files are stored in folders underneath the Projects folder.
\QASOFT\QMS\PROJECTS\DEMO Data files for the Demonstration Project.
\QASOFT\QMS\PROJECTS\DEMO\ ATTACHMENTS
Default folder for storage of file attachments to QMS Project Transactions.
\QASOFT\QMS\PROJECTS\DEMO\ ARCHIVES
Default folder for storage of Project Archives.
\QASOFT\QMS\REPORTS Contains all QMS Standard Reports files.
\QASOFT\QMS\TMPFILES Used for the storage of temporary tables. When QMS is closed and no users are logged in, this folder should be empty.
\QASOFT\QMS\TRANSIT Default folder for the storage of import/export files.
\QASOFT\QMS\TRASH Used for the storage of deleted data.
\QASOFT\GLOBAL
The global folder is created after first login and stores user profiles, and the global address book.
The \QMS directory can be made “Read Only” if required on network installations. Note however that ALL users on a network installation require write access to all folders other than the QMS folder.

Chapter 2 – Installing and Running QMS
Document No: UGD-MM-002 Rev: 5P QMS User Guide Page 25 of 164
2.4.05 QMS Standard Tool bar buttons With the QMS system installed you are now ready to start using the system. Until you become familiar with the system it maybe worthwhile making a copy of this page which explains the meaning of the most commonly used buttons on the QMS Toolbars.
New Row Used to add a new row to the main table.
New Duplicate Used to add a new row to the table, duplicating the current row.
Add Item The New Row button is used to add a new line in the Child file. For example this might be a new line item on a Purchase Order.
Edit Used to edit a record or details on a screen.
Undo Used to undo changes.
Delete Used to delete the current row.
Renumber The renumber button is used to re-number a key reference value. Examples of key reference values are: the "Document Number" in the Bill of Materials File; and the Purchase Order Number in the Purchase Order File.
Find A simple search based on the key field in the table.
Filter A structure search on any field in the table.
First This is a navigation button which will take you to the first entry in the table.
Previous This is a navigation button which will take you to the previous entry.
Next This is a navigation button which will take you to the next entry.
Last This is a navigation button which will take you to the last entry in the table.
Preview Preview a report.
Print Print a report.
Save
Close This button is used to close the current form.


Document No: UGD-MM-002 Rev: 5P QMS User Guide Page 27 of 164
Chapter 3 - Working with Projects
3.1 Create Projects 3.1.01 Overview 3.1.02 Creating a Project
3.2 Working with Projects 3.2.01 Project Details 3.2.02 Project Settings 3.2.03 Project List 3.2.04 Project Calendar
3.3 Transfer Project Data
3.4 Working with the Address Book 3.4.01 Overview 3.4.02 Company Types 3.4.03 Companies 3.4.04 Contacts 3.4.05 Renaming a Contact or Company
3.5 Working with the Configuration Tables
3.6 Project Summary View
3.7 Project Statistics and Dashboard
3.8 Project Housekeeping 3.8.01 Backup and Restoring 3.8.02 Deleting Projects

Chapter 3 – Working with Projects
Document No: UGD-MM-002 Rev: 5P QMS User Guide Page 28 of 164
3.1 Creating Projects
3.1.01 Overview QMS is a multi-project system. There is no limit to how many projects you may create within QMS (unless restricted to a single project via the terms of your license). Each Project is maintained in a separate database which facilitates archiving at project completion if required. While each project is a separate database, meaning material transactions for a project are stored within a project database container, the address book and Stockcode Libraries in QMS can be either Project specific or Global, servicing multiple projects for your company. The first step to manage a project via QMS is to create the project.
3.1.02 Creating a Project 1. From the File menu, select Project – Create New. 2. Click Next at the Welcome screen of the wizard. 3. Enter your Project Number and press Tab. 4. Enter the Project Name.
Do not change the Database Suffix or Data Directory settings unless you are an advanced QMS user.
5. Click Next. 6. At the Transfer Existing Data screen of the Project Wizard, select the Data Transfer
methodology. See Transfer project data [3.3] for more on this.
TIP: Choose Do not populate if this is your first QMS Project. Choose Current project (All) if this is not your first QMS project, or you are evaluating the system only.
7. Tick Use Global address book for this project if required. See Working with the Address book
[3.4] for more on this. 8. Tick Use Global Stockcode library for this project if required. This will mean the project uses a
global library of Stockcodes rather than a project specific one. 9. Click Next. 10. If at step 6. you choose any option other than Do not populate, the next screen will prompt you to
select the tables that you want to have populated from the current project. Select or un-select the tables as required.
11. Click Next. 12. At the Enter Project Details screen, enter/edit the project details as required.
Note that the Company value is the Registered Company name. It must be identical to the Organization name that you entered when registering QMS. If you are unsure what this is, go to the Help menu and then select the Register program option.
13. Click Next. 14. At the Input Formats screen click Next.

Chapter 3 – Working with Projects
Document No: UGD-MM-002 Rev: 5P QMS User Guide Page 29 of 164
Note that Input Formats are templates for the structure of certain key fields such as the Stockcode used throughout QMS and are discussed in detail in the next section and at this stage there is no need to enter any data in these fields.
15. At the Project Settings screen, enter/edit details as required (see Project Settings [3.2.02] for
more on these fields). 16. Click Next. 17. At the Finish screen, click Finish to create the new project. After your project has been created, the details in regard to the project can be adjusted as discussed in the next section. Notes: (a) If at step 6 you choose Do Not Populate, you can transfer data selectively from another project at
any time using Transfer project data [3.3]. (b) You can switch between using a Project or Global Address book and Stockcode Library for your
project at any time. See Project Details [3.2.01]. (c) Users can be assigned access to your new project See Assigning users to projects [17.2.03].
3.2 Working with Projects
3.2.01 Project Details Once a project has been created, the general details about the project can be edited at any time (security permitting). 1. From the Tools menu, select Options. 2. Click on the Project Details tab and click the Edit button on the toolbar. 3. Adjust values as required. 4. Click the Save button on the toolbar. Notes: (a) The Database Suffix is an internal 4 to 6 character identifier of the project. It defaults to the Project
Number (up to a maximum of the first 6 characters) and should not be changed unless you are an expert user of QMS and have contacted QA Software in advance.
(b) The Directory is the location of the new set of database tables that you are about to create. QMS
will allocate a default data directory automatically. This should only be changed if you have a good understanding of IT or have a procedure in place for where projects are to be created to suit an overall project filing system. If you are unsure, do not change this value.
(c) To switch between a project specific or global Address book and/or Stockcode library, use the tick
boxes at this screen. (d) Use the Inactive tick box to make the project Inactive (not accessible at login to any user). (e) Input formats can be applied to a number of key fields to ensure that data entry is consistent.
Careful consideration should be given to the user of Input formats prior to commencing work on a project.
The fields to which input formats can be applied are:
Stockcode Primary component code in Stock Library.
Bin Number Storage Bin Number in Stock Library.
Drawing Number Document # in BOM.
Revision Number Revision Number in BOM.

Chapter 3 – Working with Projects
Document No: UGD-MM-002 Rev: 5P QMS User Guide Page 30 of 164
An input format is created by entering a string of characters in one of the fields at the above screen. The following characters have a fixed meaning:
§ = Any character @ = Any alphabetic character # = Any numeric character © = Any alpha numeric character
Any other character will take it’s specific value.
3.2.02 Project Settings The Project Settings page of the Options screen in QMS is a project specific page of default settings for use on a project. 1. From the Tools menu, select Options 2. Click on the Project Settings Tab.
Dashboard Logo: This can be used to select a project related image to appear on the Dashboard. Report Logo: This can be used to select a project related logo to appear on reports generated from the current project. Data Export Files: Select a default folder for all files exported out of QMS to be stored. Custom Class: This field is for use by QA Software and stores custom configuration values for a customer when these are in use. Project Summary: This field can be used to store some summary text about the project that appears on the Dashboard. Auto Alerts CC to: Used to define a person to copy all auto alert emails to (normally a procurement or project manager). Revision Sequence Required: Used to define that the Bill of Materials, Requisitions, and Purchase Orders must be revised using Revision values in sequence (as defined in the Configuration table for Revisions). Show Procurement Status shortcuts on Dashboard: If ticked the Dashboard will show links to the Procurement Status Report with a number of pre-defined filters. If un-ticked, the Dashboard will display a number of Project Statistics in terms of quantities of items in each QMS Module. Issue Materials from Temporary Locations: Typically in QMS materials are issued only from Standard Locations. However, customers needing to directly link material received to material issued can do so by enabling the issue of material from Temporary Locations using this box. See Section 9.2 for more on using Locations. Add Expediting Comments as activities to the Expediting Schedule: If ticked, then a new expediting activity is automatically added to the expediting schedule for a Purchase Order if the next contact date field is updated while updating forecast delivery dates. Enable editing of item numbers in wizards: If ticked this option enables items numbers on Requisitions, Purchase Orders, Deliveries, Movements and Issue Dockets to be edited if required, for example if they are no longer in a continuous sequence which occurs as only selected items are carried forward from module to module. By default this option is not ticked as most users prefer to ensure that item numbers from one module carry forward to the next. AutoFit Column width: If ticked, all columns in all grids in all screens will automatically resize to display the full content of the largest value in each column.

Chapter 3 – Working with Projects
Document No: UGD-MM-002 Rev: 5P QMS User Guide Page 31 of 164
3.2.03 Project List The Project List page of the Options screen in QMS is a list of all projects within QMS and includes their status as to whether Active or In-Active.
3.2.04 Project Calendar QMS has its own project specific calendar. This is used in the process of automatic calculation of Order Delivery Dates based on Lead times and with auto calculated Schedule/Forecast dates within the Procurement Schedule. To define the project calendar: 1. From the File menu, select Calendar. 2. Use the arrow buttons on the toolbar to navigate from month to month and year to year. 3. Non Working days are defined simply by clicking on the appropriate squares in the calendar
display.
Tip: Click on a column heading to change the day to non-working throughout the current month and right click on a column heading to change the day throughout the complete calendar.
4. Note that Saturdays and Sundays default as non-working. Non working days can be reverted to
working days by clicking on them. Extending the Calendar Range: The Calendar range is normally extended automatically by QDMS as required but, to extend it manually click the edit date range button on the toolbar: 5. Enter a new From date and To date and click OK. To add notations on the calendar: Messages can be displayed against required dates for reference purposes. 6. Tick the Edit Descriptions check box. 7. Click the day for the annotation. 8. Enter a summary annotation in the field for Short Description that appears. 9. Enter a detailed annotation in the large field for Long Description that appears. Printing the project calendar: The calendar can be printed as a project calendar if required. Note that each working day will be numbered on the printed copy. Notes: a) To make a non-working day as working, simply click on the grey square and it will change to white. b) To change an annotation, click on the square, and click on Edit Descriptions.

Chapter 3 – Working with Projects
Document No: UGD-MM-002 Rev: 5P QMS User Guide Page 32 of 164
3.3 Transfer Project Data If you are using QMS in a multi project environment it is often useful to transfer information between projects. From the Tools menu, select Transfer project data: 1. First select a project to transfer from (you should be located in the project where you want the data
transferred to).
2. Tick the tables in the left hand list that you want to transfer. 3. The transfer information can be previewed on the Preview Target Page. 4. Click the Transfer button on the tool bar to perform the transfer. Notes: (a) If there is existing data in the tables being transferred, there are three options at the bottom of the
above screen to control how to handle duplicates. Overwrite all means empty the existing table first and transfer the new data. Replace existing records means that if there is the same record in both projects, the new record will be used. Only New means that existing data will not be overwritten.
3.4 Working with the Address Book
3.4.01 Overview The address book in QMS is used to store the names and addresses of suppliers and other contact details as required. The address book is primarily used when creating Bid Documents and Purchase Orders to identify supplier details. However, it can also be used when generating movement dockets to print a delivery address. The Address book in QMS is structured in three levels:
Company Types: These are the types of companies involved in projects you perform. Companies: These are the companies you do business with on projects. They are categorised by Company Types. Contacts: These are the contacts (names and addresses) of the people within each company.
It is important that the Address book is one of the first areas set up after installation of QMS. Notes: a) The Address book in use for any project can either be a project specific address book or a Global
Address book that services multiple projects. b) To use a Global Address book, [see Section 3.2.01]. c) There is a selection of Address Book reports available via Print \ Standard Reports.
3.4.02 Company Types 1. From the Purchasing menu, select Address Book. 2. At the top centre of the screen, click the Edit Company Details select button above the Company
ID drop down list. 3. At the top right corner of the Company Details screen, click the Edit Company Types select
button.

Chapter 3 – Working with Projects
Document No: UGD-MM-002 Rev: 5P QMS User Guide Page 33 of 164
4. At the Company Types screen, click the New Company Type button to add a new Company Type. 5. Enter a company Type and Title and click OK. 6. Add / Edit further company types as required. 7. Close the Company Types screen via the toolbar when done. Notes: a) You can print a list of company types using the print or preview buttons on the toolbar. b) You can delete company types using the delete button on the toolbar.
3.4.03 Companies 1. From the Purchasing menu, select Address Book. 2. At the top centre of the screen, click the Edit Company Details select button above the Company
ID drop down list. 3. At the Company Details screen, click the New Company button. 4. At the Add new company window, enter the Company ID, the Company Title, select the Company
Type, and click OK.
Note that the Company ID you assign will be used throughout the QMS system and it is worthwhile preparing a procedure on how you will assign Company Ids before creating too many companies. A meaningful abbreviation for Company Ids is suggested. Eg QASOFT for QA Software.
5. Repeat steps 3 to 4 for other companies.
Notes: a) You can print a list of companies using the print or preview buttons on the toolbar. b) You can delete companies using the delete button on the toolbar as long as there are no contacts
set up for the company. c) Use the Filter button to display selected companies only in this screen.
3.4.04 Contacts To create new contacts you must first have created the company they belong to. Once the company has been created, contacts are created as follows: 1. From the Purchasing menu, select Address Book. 2. At the Contact details screen, select the company that the contact relates to from the Company ID
drop down list in the top centre of the screen. 3. Once the company is selected, click the New Contact button on the toolbar. 4. At the new window, enter a Contact ID, Title, First Name, and Last Name for the contact, and
click OK.
Note that Contact Ids must be unique within each company. This means it is possible to have JB as a contact id in many companies but this Id can only be used once within a single company. Generally it is suggested to use Initials for Contact Ids.
5. Once the new Contact has been added to the contact details screen you can enter the remaining details for the contact on the form on the right hand side of the screen.

Chapter 3 – Working with Projects
Document No: UGD-MM-002 Rev: 5P QMS User Guide Page 34 of 164
Tip: When creating the first contact within a company, ensure you complete the address details as fully as possible as you can then use the New Duplicate option to create further contacts and save the retyping of the same or similar address details.
6. Click on the Close button when done to return to the main menu. Notes: a) Use the Full Name Button on the right hand side of the screen to edit the First or Last Name. b) It is possible to store both a Business and Other Address for each contact. Choose the require
address using the radio buttons and then click the Addresses button to access the Address Details.
c) Click the Details tab on the right hand side of the screen with a contact selected to capture
additional information such as the Department the contact belongs to. d) You can print a contact register using the Print or Preview buttons. e) Use the filter button to print a selected list of contacts only. f) Un-Tick the Active tick box to make a contact Inactive within a project. Contacts made Inactive
will not be displayed in drop down lists using the Address Book throughout the project. g) Un-tick the Hide Inactive contacts box to display both Active and Inactive contacts in the Address
Book. This is required if an Inactive contact needs to be changed back to Active. h) The Title band of the Address book indicates whether you are using a Global or Local (project
based) address book.
3.4.05 Rename a Contact or Company Contact and Company ID’s may need to be changed from time to time, especially in the setup period of the project. These ID’s cannot simply be edited in the Address Book as they may already have been used when creating bid documents or purchase orders. Hence there is a special utility provided to perform this renumbering process. 1. From the Tools menu, select Rename Contact ID/ Company ID.
2. Click Next at the welcome screen of the wizard that launches. 3. Choose from the four available renaming options and click Next.
Merge Duplicate Contact ID
Only the Company ID
Only the Contact ID
Both Company ID and Contact ID 4. Select the Current Values to be changed. 5. Enter the New Values to change the current values to.
6. Click the Next button and then click the Finish button.
7. Click Yes at the warning about the process requiring Exclusive access to the system (if you are the
only user logged in).
8. Click OK when the process is completed.

Chapter 3 – Working with Projects
Document No: UGD-MM-002 Rev: 5P QMS User Guide Page 35 of 164
Notes: (a) If the Company ID or Contact ID is not displayed in the list of old Company and/or Contact Ids, tick
the I want to rename an ID that is not listed option and manually type the existing Company and/or Contact ID to be changed.
(b) Changes to Company and Contact Ids are reflected throughout the QMS System.
3.5 Working with the Configuration Tables There are a number of configuration tables in QMS that relate to fields in the major QMS files. The majority of the configuration tables are utilised in the Document Register, Stockcode Library, and Bill of Materials files. Others are used in the Procurement Module. The configuration tables are used both to populate drop down lists and as group headings on reports. A List of the available tables is:
Table Description
BOM → Configuration Tables
Areas Geographical Areas: Used as an attribute against documents in the Bill of Materials and Document Register.
BOM Revisions BOM Revisions: Used to control which BOM Revisions are included on Total Quantities Report T09.
Categories Material categories: Used as an attribute in the Stockcode Library.
Cost Codes Project Costs Codes: Used in the Requisition and Purchase order modules to apply cost codes to Requisition and Purchase Order line items.
Disciplines Engineering disciplines: Eg Structural, mechanical, piping. Used as an attribute against documents in the Document Register. Also used in the Stockcode Library.
Insulation Insulation types: Used as an attribute in the Document Register.
Line Numbers For piping these are process line numbers. For other disciplines they can be used as required to group related documents. Used as an attribute in the Document Register.
Locations Physical locations for the receipt and storage of materials.
Materials Typically material types: Used as an attribute in the Stockcode Library.
Packages Typically work packages: Used as an attribute in the Document Register.
Positions Typically physical positions: Used as an attribute in the Document Register (eg a location within a Pipe-rack).
Required At Places where materials are to be utilised (Fabrication workshop, Site etc.)
Revisions Revisions: This is a library of revision values for use when revising the Bill of Materials and Purchase Orders. A Sequence can be used to control the order that the revisions are used. [See Project Settings Section 3.2.02].
Test Packages Pre-commissioning test packages. Groups of documents related for testing purposes. Used as an attribute in the Document Register.
Types Fitting Types: Used as an attribute in the Stockcode Library.

Chapter 3 – Working with Projects
Document No: UGD-MM-002 Rev: 5P QMS User Guide Page 36 of 164
Table Description
BOM → Configuration Tables
Specifications Material Specification: Used as an attribute in the Stockcode Library and Document Register.
Surface Treatment Surface Treatment type: Used as an attribute in the Document Register.
Units Units of Measure: Used as an attribute in the Stockcode Library.
Purchasing → Configuration Tables
Bid Attachments Used to define a list of standard Attachments for use when generating Bid Documents.
Bid Evaluation Status
Used in the Bid Documents Module to assign Commercial and Technical Bid Evaluation Status.
Bid Status Used in the Bid Documents Module to assign acknowledgement status from bidders.
Contact Titles Used in the Address Book (Mr, Ms etc)
Countries Used in the Address Book
Procurements Centres
Used throughout the Procurement Modules to identify a Procurement centre responsible for a transaction.
Shipment Methods Used in the Shipping Module.
The configuration tables above are accessed and maintain in the same way. The Discipline table can be used by way of example. To access the Discipline table: 1. From the BOM menu, select Configuration Tables and then from the drop down listing, select
Disciplines. 2. Use the New Row button to create a new Discipline. Notes: (a) A Purchasing related configuration table is accessed via the Purchasing menu rather than the BOM
menu. (b) Reports on the contents of each Configuration table can be generated using the Print Standard
Reports option on the File menu and selecting the Report on Group as M for Miscellaneous. (c) If Configuration table values are changed after already being utilized in the various QMS Modules,
the values assigned in the modules will be updated automatically. (d) Values in Configuration tables cannot be deleted if they are in use with one or more of the QMS
Modules.
3.6 Project Summary View The project summary view in QMS is a view of the all unique Stockcodes in the system with totals displayed from all elements of QMS. To access the Project Summary: 1. From the File menu, select Project Summary. 2. You will be prompted to rebuild your summary files first. It is a good idea to click Yes at this
question to ensure the Project Summary takes into consideration the latest data.

Chapter 3 – Working with Projects
Document No: UGD-MM-002 Rev: 5P QMS User Guide Page 37 of 164
This Project Summary is very useful for quickly checking the status of a particular Stockcode. It shows the status of each Stockcode with total quantities for:
Bill of Materials (current and previous)
Requisitioned
Bid Documents
Ordered
Received
Issued
In Stock Use the drop down lists at the top of the screen for a fast search and the filter buttons above the drop downs, to see only Stockcodes with the selected values. From within the Project Summary it is possible to drill down to the underlying details of all values by double clicking on any of the Qty values. For example, double clicking in the Demonstration project on the BOM value against Stockcode 001C250.20 will shows that the total value is made up of quantities from three documents.
3. Click on the Close button to return to the Dashboard. Notes: (a) Use the XL button to export the current view of the Project Summary to an MS Excel spread sheet.
3.7 Project Statistics and Dashboard The Dashboard in QMS has two alternative views: Project Statistics (Default): This view show both Stockcode and Expediting Statistics at the Dashboard. The various Expediting Statistics are each hyperlinked to relevant activities in the Expediting Schedule. Refer Section 8.2 for more on the expediting schedule. Procurement Status: Useful if the Procurement Status report facility is being used with QMS. Refer to Chapter 15 for more on the Procurement Status report. To activate the Procurement Status view, go to Tools → Options → Project Settings and tick the Show the Procurement Status shortcuts on Dashboard box. In addition to the statistics at the Dashboard there is also a standard report in relation to Project Statistics: From the File menu, select Project Statistics. A report will be generated displaying the number of entries in each data file, a list of all the Bills of Materials, and other general information about the Project.
3.8 Project Housekeeping 3.8.01 Backup and Restoring Projects It is important that your QMS data is backed up regularly. This is normally handled automatically if your system is installed on a Server and this server gets backed up by your IT Department. If you have QMS Installed on a PC, you should backup the data daily using the Backup utility available from within QMS for this purpose. To make a backup: 1. From the File menu, select Backup and Restore.

Chapter 3 – Working with Projects
Document No: UGD-MM-002 Rev: 5P QMS User Guide Page 38 of 164
2. Tick All Projects. 3. Click the Backup button. On completion of the backup process, locate the \Qasoft\Qms\Backup folder and copy the zip file created to a CD or another hard drive. To restore from backup: 4. From the File menu, select Backup and Restore. 5. Click the Restore button. 6. Use the select button to locate the backup zip file (normal location is \Qasoft\Qms\Backup) 7. Tick the Overwrite files tick box if restoring over the top of an existing project. 8. Click the Restore button.
3.8.02 Deleting Projects Once a Project has been completed it can be deleted from QMS. Note that only the listing of the Project at the login screen is deleted. The data files cannot be deleted from within QMS. To delete a project: 1. Run QMS and select a project other than the one to be deleted. 2. Click on the Tools menu. 3. Select Options. 4. Click on the Project Settings Page. 5. Navigate to the project to be deleted. 6. Click the Edit button. 7. Click the Delete button. Note that the data files should be deleted by locating the project folder via Windows Explorer and deleting this folder (after first copying it to CD or diskette).

Document No: UGD-MM-002 Rev: 5P QMS User Guide Page 39 of 164
Chapter 4 – The Bill of Materials
4.1 Overview
4.2 The Stockcode Library 4.2.01 Creating new Stockcodes 4.2.02 Defining Substitute Materials
4.3 BOM List Maintenance 4.3.01 Creating a BOM Container
4.4 Working with the BOM 4.4.01 Specifying the current BOM 4.4.02 Entering the Document Details 4.4.03 Entering the Materials against a Document 4.4.04 Customising the Grid Layout
4.5 BOM Maintenance 4.5.01 Revising a BOM 4.5.02 Archiving a BOM 4.5.03 Restoring a BOM from Archive 4.5.04 Deleting a BOM 4.5.05 Re-Assign BOM Required At values
4.6 Document Register 4.6.01 Using the Document Register 4.6.02 Renumbering a Document 4.6.03 Revising Documents 4.6.04 Document Priority Allocation Wizard 4.6.05 Progress Monitoring
4.7 Reporting

Chapter 4 - Bill of Materials
Document No: UGD-MM-002 Rev: 5P QMS User Guide Page 40 of 164
4.1 Overview The Bill of Materials (BOM) is the cornerstone of the QMS system. The BOM defines the materials required for the project in terms of drawings, Stockcodes and quantities. The BOM is defined by documents or drawings to enable control of the remaining materials control functions such as purchasing, and issue of materials in terms of work packages, geographic areas, plant items, fabricators, or any other grouping that may be of benefit. The concepts behind the BOM, and QMS in general are best understood by working through the Guided Tour. Contact QA Software if you do not have a copy of this. QMS supports multiple Bills of Materials and also utilises revision control on Bills of Material at both the BOM Container and Document level to enable maintenance of a complete history of changes.
4.2 Using the Stockcode Library
4.2.01 Creating New Stockcodes QMS utilise a Stockcode file to store for every Stockcode on the project, a series of attributes. Throughout QMS, the stock library is used to generate items such as Stockcode descriptions on BOM’s, Requisitions and Purchase orders, Delivery dockets and Movement dockets etc. To create a new Stockcode: 1. From the BOM menu, select Stockcodes. 2. Click the New Row button to enter a new Stockcode. 3. Enter the Stockcode and TitleA (Description of the Stockcode) and click OK. 4. Complete the remaining fields as required. These are:
Field Description
Size This is the size of the component. It can be entered here directly but will also default from the values in the Size1 + Size2 + Size3 fields below when importing from MS Excel.
Unit* Unit of measurement.
Title B A Secondary description for the item.
Required At* The default Required At value for this item.
Discipline* Discipline Code (eg Mechanical, Piping, Insulation)
Type* Type of component (eg Elbow, Pump)
Category* Component Category.
Spec* Specification for component.
Material* Material type for component.
Schedule1 Schedule1 (wall thickness).
Size1 First size field.

Chapter 4 - Bill of Materials
Document No: UGD-MM-002 Rev: 5P QMS User Guide Page 41 of 164
Field Description
Size2 Second size field.
Size3 Third size field.
Schedule2 Second schedule.
Rating Pressure rating.
Inspection Free form field to store an Inspection Requirement.
Weight Unit Weight per Unit of Measure
Alt Stockcode Alternative Stockcode. This is often used to store a client Stockcode when different from the project Stockcodes.
Alternate Size Alternative representation of the size.
Remarks Optional remarks.
Bin No Default storage bin number.
Line Class Line Class.
PartNo Part Number (used with the optional estimating module)
Equivalent Qty This field is used to enable comparison of material issued (in say M3) against material received (in Linear Meters). For example say you want to analyse wastage on PIR. PIR Block has a unit of measure of m3. It is received from the vendor and issued to the workshop in m3. However the fabricated sections are delivered into the workshop in LM. Hence in the Stockcode Library, for each fabricated PIR Section (for which the UOM is LM), the Equivalent Qty field you need to store the value of the PIR Section in m3/m. This enables the system to compare the issued Qty in m3 against the fabricated Qty in LM as the LM Qty can be converted to m3 using the Equivalent Qty.
Wastage Group The Wastage Grouping code is used simply to group Stockcodes for the purpose of Wastage Reporting. For example PIR Block and all Fabricated PIR Sections should be allocated the same Wastage Grouping Code. A different code should be used to group Cellular Glass block and fabricated Sections. A different code again to group Stainless Steel Sheet and fabricated SS cladding.
Rate Used to store a cost rate for the Stockcode.
Equivalent UOM This field can be used to store an alternative Unit of measure. For example Screws may have a Unit of measure of Pieces but are issued in KG.
Re-Order Level This is the Quantity of the Stockcode to be maintained as a minimum in stock and below which the Stockcode should be re-ordered.
Qty to Re-Order This is the Quantity of the Stockcode to re-order if the quantity in stock falls below the Re-Order Level.
Ave Rate This is the Average Rate material is purchased at and is calculated automatically from the Purchase Order Module when Rebuild Summary files is run. Note the Ave Rate is a weighted average taking into consideration the quantity purchased at each rate.
Prev.Ave.Rate This is the Previous value of the Average Rate.
WBS A Work Breakdown Structure code
Facing The Facing type for Flanges and Valves

Chapter 4 - Bill of Materials
Document No: UGD-MM-002 Rev: 5P QMS User Guide Page 42 of 164
5. Click Close when finished to return to the Dashboard. Notes: (a) Fields identified with an * above are populated via selection from drop down lists that use the values
maintained under BOM\Configuration tables. (b) Stockcodes can be deleted in bulk using the Delete Multiple button and then selecting multiple
Stockcodes for deletion. (c) Stockcodes cannot be deleted once they have been used in a Bill of Materials or in any of the other
transactional modules of QMS. (d) Stockcodes can be made In-Active using the Active tick box. In-Active Stockcodes are not available
for selection throughout the various QMS Modules and are not displayed by default in the Stockcode Library.
4.2.02 Defining Substitute Materials For each Stockcode defined in the library it is possible to define one or more substitute Stockcodes that can be used as alternatives to the primary code when purchasing and/or issuing material. 1. From within the Stockcode library click on the Display Substitutes button. 2. Locate the primary Stockcode to define substitute codes for.
Note that the substitute Stockcodes must exist in their own right as Stockcodes before they can be defined as substitutes for other Stockcodes.
3. In the lower grid, click the Add Substitutes button and after locating the substitute code by
scrolling, or using the find or the filter buttons, select it by clicking the right arrow button.
Multiple Substitute codes can be selected. 4. Click OK. Notes: (a) To remove a substitute Stockcode, follow steps 1 and 2 above and then in the lower grid, select the
code to remove and click the Delete button. (b) To Hide the Substitutes grid, click the Hide Substitutes button. (c) See also Sections 7.14 and 12.2.01 Note (i) on how to use substitute Stockcodes in the Purchasing
and Issue modules respectively.
4.3 BOM List Maintenance
4.3.01 Creating a BOM Container Prior to entering data into a Bill of Materials, a BOM Container must first be created. This can be considered as container into which the Bill of Materials for a set of documents will be entered. Some projects separate Bills of Materials into different containers by Discipline or Module. Other projects use only a single BOM container. The recommended option is to use a Single BOM Container per project phase as the structure of the material take-off changes from phase to phase. Initially the BOM made be based on an estimate only in which case the “Documents” in the BOM could be Project Areas or Modules. As the design progresses the piping BOM will be made by Line Number (typically from a Cad model) in which case a new BOM Container is used in QMS where the Document number in the BOM is the Line Number. Once detailed workshop drawings are produced the structure of the BOM changes again, this time with the Document Number being a Spool number perhaps. This again requires a new BOM Container. Hence as a rule of thumb, if the meaning of the Document Number (which is a fundamental building block of the BOM in QMS) changes for the same type of material (from Line number to Spool number in the above example) a separate BOM Container is required.
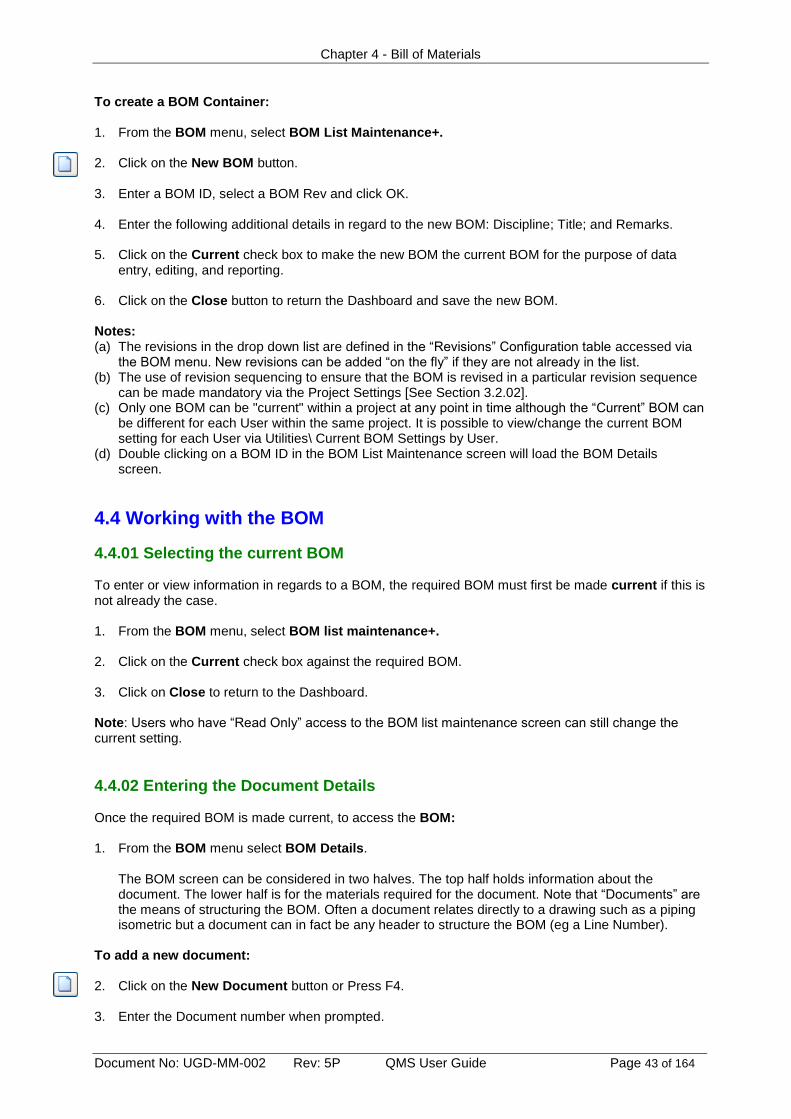
Chapter 4 - Bill of Materials
Document No: UGD-MM-002 Rev: 5P QMS User Guide Page 43 of 164
To create a BOM Container: 1. From the BOM menu, select BOM List Maintenance+. 2. Click on the New BOM button. 3. Enter a BOM ID, select a BOM Rev and click OK. 4. Enter the following additional details in regard to the new BOM: Discipline; Title; and Remarks.
5. Click on the Current check box to make the new BOM the current BOM for the purpose of data
entry, editing, and reporting. 6. Click on the Close button to return the Dashboard and save the new BOM. Notes: (a) The revisions in the drop down list are defined in the “Revisions” Configuration table accessed via
the BOM menu. New revisions can be added “on the fly” if they are not already in the list. (b) The use of revision sequencing to ensure that the BOM is revised in a particular revision sequence
can be made mandatory via the Project Settings [See Section 3.2.02]. (c) Only one BOM can be "current" within a project at any point in time although the “Current” BOM can
be different for each User within the same project. It is possible to view/change the current BOM setting for each User via Utilities\ Current BOM Settings by User.
(d) Double clicking on a BOM ID in the BOM List Maintenance screen will load the BOM Details screen.
4.4 Working with the BOM
4.4.01 Selecting the current BOM To enter or view information in regards to a BOM, the required BOM must first be made current if this is not already the case. 1. From the BOM menu, select BOM list maintenance+. 2. Click on the Current check box against the required BOM. 3. Click on Close to return to the Dashboard. Note: Users who have “Read Only” access to the BOM list maintenance screen can still change the current setting.
4.4.02 Entering the Document Details Once the required BOM is made current, to access the BOM: 1. From the BOM menu select BOM Details.
The BOM screen can be considered in two halves. The top half holds information about the document. The lower half is for the materials required for the document. Note that “Documents” are the means of structuring the BOM. Often a document relates directly to a drawing such as a piping isometric but a document can in fact be any header to structure the BOM (eg a Line Number).
To add a new document: 2. Click on the New Document button or Press F4. 3. Enter the Document number when prompted.

Chapter 4 - Bill of Materials
Document No: UGD-MM-002 Rev: 5P QMS User Guide Page 44 of 164
4. Enter/Select the Document Revision and click OK.
The list of revisions is populated from the configuration table for Revisions found under the BOM Menu).
5. Back at the BOM Details screen enter the Document Title.
6. The following information can also be entered in relation to the document.
Field Description
Size This is a general size for materials on the document.
Priority A priority for the document. This is generally a fabrication and/or installation priority and can be used by the Material Availability Analysis.
Position This is the physical location of the Drawing within the project.
Fab Start A scheduled fabrication start date.
Site Start A scheduled Installation start date.
Location The physical Location of the Document in relation to the Project.
Discipline The Discipline the Document relates to.
Spec The Specification the Document relates to.
Fabricator The name of the fabricator. This is drawn from the Address Book.
Area The Area the Document relates to.
Line Number The Line Number the Document relates to. For piping this is the process line. For other disciplines, other uses can be made of this field.
Surf Treatment Surface treatment type for the material defined by this document.
Package The Work Package the document relates to.
Test Package The Test Package the document relates to.
Insulation The Insulation type for the material defined by this document.
PCT A physical percentage complete generally used to record Installation progress.
The above Attribute field values are maintained in their respective configuration tables. Notes: (a) The BOM Rev which is displayed for information only is the Revision number of the complete Bill of
Materials (i.e. the revision of the BOM Container itself). (b) The Issue Status (eg PART, FULL) is maintained automatically by the system).
4.4.03 Entering the materials for a document 1. Click the Add Item button or press F5. 2. Enter the following details in regards to the line item:
Item Number The Item Number (defaults to 0001) Stockcode The Stockcode (Press F3 to select) Quantity Quantity Required. Required At This is the place where the material item is required to be utilised.
In the initial stages of a project it can be used to distinguish between fabricated material and field installed material. Later, as contracts are awarded, the Required At value can be re-assigned to perhaps specific fabrication shops, or sites using the utility to re-assign Required At values (see Section 4.5.05).
The use of the Required At value in the BOM is discussed in further detail under Material Availability Analysis.
Inspection Optional field to indicate an Inspection requirement for the item. Remarks Optional remark relating to the item. Hold Used to identify an item on hold (which is then excluded from the BOM total in
the Project Summary) Bid Price Optional field to capture a Bid Price.

Chapter 4 - Bill of Materials
Document No: UGD-MM-002 Rev: 5P QMS User Guide Page 45 of 164
Fab Start An item level scheduled fabrication start date. Site Start An item level scheduled Installation start date. The following information is captured automatically: Title A Defaults from the Stockcode Library. Size Defaults from the Stockcode Library. Unit Defaults from the Stockcode Library. Prev BOM Qty This is the Previous BOM quantity and is 0.00 for a new entry. It is updated by
the process of Revising the BOM. See Section 4.5.01 Prev Doc Qty This is the Previous Document BOM quantity and is 0.00 for a new entry. It is
updated by the process of Revising the Document (as opposed to revising the complete BOM Container). See Section 4.6.03
Bom Rev This defaults based on the current BOM Revision. Doc Rev This defaults based on the current Document Revision. Substituted System field used to indicate that when issued the item was substituted with
another material. 3. Repeat steps 1 and 2 for additional line items. 4. Click on the Save button to save the BOM for the new document and click Yes to save the changes
when prompted (or No to discard the changes). 5. Enter new documents with their BOM details as required. Notes: (a) Selecting Stockcodes
On all screens in QMS where the Stockcode field is displayed, pressing F3 when your cursor is positioned in the Stockcode field will bring up a search window. The default sorting for the search is by Stockcode. Typing the first few characters of a Stockcode will display a list of matching records. Click on an item to select it and then click the OK button. You can also search for Stockcodes via any of the attributes fields relating to Stockcodes in the Stockcode library. Simply click on the relevant column header in the F3 window. You can also change from Containing text to Beginning with text.
(b) Alternative view of the BOM
At the top centre of the BOM Details screen are two radio buttons for Stockcode and Document Number. The default display on the BOM Details screen is by Document Number. With this display you see the details of a document in the top half of the screen and in the bottom, the materials required for that document. If the display is changed to by Stockcode, the top half of the screen will display a Stockcode and the bottom half of the screen will display a list of documents that have this Stockcode on them.
(c) To revise a document and keep a history of changes to the BOM details of the previous revision of
the document without updating the revision of the BOM container, see Section 4.6.03
(d) To delete a complete document with all associated line items, use Tools\Cascade Deletion [see Section 17.3.03]. To delete a line item use the Delete button.
Note that documents and line items cannot be deleted if material has been issued against them.
(e) Importing a BOM: It is possible to import the BOM from an Excel file [see Section 18.1.02]. (f) Attachments: It is possible to attach (link) one or more external files to any document in the BOM
using the Attachments button. (g) The Issue Qty and Short Qty are updated by the system from the Issues Module.

Chapter 4 - Bill of Materials
Document No: UGD-MM-002 Rev: 5P QMS User Guide Page 46 of 164
(h) It is possible to double click on the Issued Qty to drill down to the underlying Issue Dockets.
(i) The BOM for single document can be printed either as a standard hardcopy report or MS Excel in WSYWIG format using the Print button. It is also possible to email a copy of the BOM for a single document using the Print button and email option.
4.4.04 Customising the BOM Grid Layout Users can have up to three customised views of lower grid in the BOM Details screen. To customize the layout of the BOM Details: 1. From the BOM menu, select BOM Details. 2. At the BOM Details screen, right click anywhere in the grid and select the view to customise from
Default, Custom View 1, and Custom View 2. 3. Right click again and select Customize. 4. Change the values as required of the following settings:
Setting
Description
Visible This logical flag indicates whether the field is visible in the Register.
Column Number The column number controls the order in which the columns are displayed on the grid.
Column Width The column width (in pixels) controls how wide a column appears on the grid.
Font Name Controls the font with which the values in the column are displayed.
Font Size Controls the size at which the values in the column are displayed.
Fore Colour Controls the colour of the text in a column.
Back Colour Controls the background colour of a column.
5. Select the default sort order for the documents in the grid by clicking the Sort Order button and
using the drop down lists. 6. When you have modified the settings as required, click the Save button to save your changes and
then close to return to the BOM Details. Notes: (a) The Partition value in the bottom left of the screen controls whether the BOM Details will be
displayed as split screen. Set the Partition to 180 to use a split screen with a non scrolling Stockcode.
(b) The Row Height controls the height of each row in the grid. 18 is recommended. (c) To reset a custom view back to the factory settings, click on the Clear Custom Settings button and
then click Yes when prompted. (d) It is possible to add additional Stockcode attributes from the Stockcode library to be displayed in the
lower grid of the BOM Details screen (and other main module screens) by right clicking anywhere in the lower grid and selecting Modify Display of Stockcode attributes. Tick the required attribute fields to be displayed but note that the changes made are applied for all users on the project
(e) With the BOM Details displayed, data in columns can be re-sorted simply by clicking on the column
heading. (f) With the BOM Details displayed, columns can be re-sized by clicking on the vertical line between
columns in the column header and dragging left or right.

Chapter 4 - Bill of Materials
Document No: UGD-MM-002 Rev: 5P QMS User Guide Page 47 of 164
(g) The upper half of the BOM Details screen can only be customised by QA Software.
(h) Columns in the grid can be made to auto re-size to fit the largest value in each column if this option
is enabled via Tools → Options → Project Settings and ticking the AutoFit Column Width box.
4.5 BOM Maintenance
4.5.01 Revising a BOM Generally in QMS the concept of “Revising the BOM” refers to effectively taking a snap shot of a BOM Container and its contents at a moment in time. Taking regular snap shots of Revisions of the complete BOM (which posts a copy of the BOM to a BOM History) at key moments throughout the project enables comparisons of the quantities of each material item required at each BOM Revision. Once a BOM has been fully entered it can still be adjusted, edited as often as required and until it is formally “Revised” the changes are simply overwriting the previous data. It is important therefore that once the BOM has been got up to date, it is formally revised before making the next series of changes In addition to the above general concept of BOM Revisions, it is also possible in QMS if required to maintain a complete history of changes to the materials for each document revision within the same BOM Revision. For example it maybe that you decide to take a snap shot of the BOM Container once a month. If a Document is revised more than once within that period, only the details of the latest revision prior to the end of the month would be captured in the history. For most customers using QMS this is not an issue. However for some customers, they prefer that every change to every document is captured in a history within QMS in addition to the general concept of Revising the BOM. In this case see section 4.6.03 for more details on how to revise a Document (as opposed to how to revise the complete BOM). To Revise a BOM: 1. From the BOM menu, select BOM List Maintenance+. 2. Highlight the required BOM. 3. Click on the Revise BOM button and select the new revision number.
Wait while the BOM History is updated. 4. Click on Close to return to the Dashboard. Notes: (a) The revisions in the drop down list are defined in the “Revisions” Configuration table accessed via
the BOM menu. New revisions can be added “on the fly” if they are not already in the list. (b) The use of revision sequencing to ensure that the BOM is revised in a particular revision sequence
can be made mandatory via the Project Settings [See Section 3.2.02]. (c) The BOM History can be viewed via the History menu option under the BOM menu and then sub-
menu By BOM Container – BOM Details. Note also that the BOM History does NOT include the current BOM revision details.
(d) BOM Revisions can be compared using the X-Tab Reports under the File menu [See Section 14.2].

Chapter 4 - Bill of Materials
Document No: UGD-MM-002 Rev: 5P QMS User Guide Page 48 of 164
4.5.02 Archiving a BOM The Archive feature for BOM’s in QMS provides the ability to effectively take a backup of the BOM. A BOM can be archived only if no material has been issued against documents contained in the BOM. BOM archives are stored in a folder called Archives found under the relevant project data folder. An Archived BOM remains in the list of BOM’s in the BOM List Maintenance screen unless it is also deleted. An Archived BOM can only be restored to the project from which it was archived and only if the current version of the same BOM is first deleted. To Archive a BOM: 1. From the BOM menu, select BOM List Maintenance +. 2. Highlight the required BOM to Archive 3. Click on the Archive/Restore a BOM button and select Archive BOM. 4. Choose between the following two options:
Save data to file
Save data to file and then delete BOM 5. Click the Archive button. Notes: (a) A BOM cannot be archived if there is material issued against it.
4.5.03 Restoring a BOM To restore an archived BOM: 1. First make sure that the current version of the same BOM has been deleted. 2. From the BOM menu, select BOM List Maintenance +. 3. Click the Archive/Restore a BOM button and select Restore BOM. 4. Select from the available BOM’s to Restore. 5. Click the Restore button.
4.5.04 Deleting a BOM A BOM can be deleted only if no material has been issued against documents contained in the BOM To delete a BOM: 1. From the BOM menu, select BOM List Maintenance +. 2. Highlight the required BOM to Delete. 3. Click the Delete button. Notes: (a) A deleted BOM cannot be restored (unless it was first archived).

Chapter 4 - Bill of Materials
Document No: UGD-MM-002 Rev: 5P QMS User Guide Page 49 of 164
4.5.05 Re-Assign BOM Required At values The use of Required At values within the BOM can play an important part of the operation of QMS for advanced users. Required At values are used to define where material is required to be utilised and are used when performing a material availability analysis and to simplify the process of issuing materials (to separate field and fabricated materials for example). When initially setting up a Stockcode Library and the Bill of Materials it is common that "pseudo" Required At values are specified against each item to distinguish between say fabricated material and field installed material. As fabrication and installation sub-contracts are awarded, it becomes necessary to re-assign the Required At values in the BOM to the actual sub-contracts prior to performing a material availability analysis. This is most simply done using the utility to Re-assign BOM Required At values. 1. From the BOM menu, select Utilities and then Re-Assign BOM Required At values. 2. Select the Bill of Materials for the Re-Assign to take place on. 3. Select the Current Required At location. i.e. the Required At value in the BOM to be re-assigned.
This can be blank if Required At values have not been assigned if required. 4. Select the New Required At location required from the drop down list.
Note: If the Required At value required is not found in the drop down list it must first be added via the BOM menu, sub-menu Configuration Tables, then File Required At.
5. The re-assign process can be further controlled using a filter. The filter can be applied to either or
both the Bill of Materials or Document Register.
Some example filters:
(a) To re-assign the materials for a fabrication work package WPKG002, a filter on the document register of PACKAGE equal to WPKG002 would be applicable.
(b) To re-assign all carbon steel piping to a paint shop prior to fabrication, a filter on the Bill of
materials of STOCKCODE begins with 001CS might be applicable where the 001 signifies pipe and the CS indicates Carbon Steel. This example is based on the identification of the type and material of the fitting being able to be determined from the Stockcode.
6. Clicking on the View button prior to clicking on Re-Assign is recommended. This gives a preview of
the re-assignments that will take place before they actually occur.
The values in the Old Required At and New Required At columns are shown side by side. The new Required At values will replace the old Required At values when the re-assign is performed.
If the values shown are not as expected, the filter used may need adjusting.
7. Click OK to return to the Re-assign screen and then click Re-Assign.
In left hand window are all the documents selected for which the re-assign will take place.
This screen gives the user a further option to fine tune the documents being selected that contain materials that will be re-assigned.
Note that not all the materials for these documents may necessarily be re-assigned as documents can contain materials with varying Required At values (eg fabricated and field installed fittings).
8 9

Chapter 4 - Bill of Materials
Document No: UGD-MM-002 Rev: 5P QMS User Guide Page 50 of 164
8. To select all the documents, click on the Move all button. This moves all documents from the left hand window to the right hand window. Specific documents only may be selected and moved (Move selected) or removed (Remove selected) from the left hand and right hand windows respectively.
9. Click on the OK button to complete the re-assign process.
4.6 Document Register
4.6.01 Using the Document Register The document register in QMS is the "Parent" file to the Bill of Materials. While new documents can be created, edited, and revised via the Bill of Materials above, it is often easy to perform maintenance functions in relation to documents via the Document Register directly. To access the Document register: 1. From the BOM menu, select Document Register. 2. From here new documents can be entered, duplicated, the details edited, or the document revised. The fields in the Document Register are discussed in detail earlier [see Section 4.4.02]. Notes: (a) It is possible to double click on a Document Number in the Document register to drill down into the
BOM Details. (b) When using the New Duplicate button in the Document Register to add new documents, you are
prompted whether you want to duplicate the Document only or the Document with BOM Details. (c) It is possible to Revise a Document (updating a History file at the same time) using the Revise
Document button. [Refer Section 4.6.03]. (d) It possible to customise the layout of the Document Register (in a similar way to the way the BOM
Details screen can be customised). [Refer Section 4.4.04]. (e) Documents in the register that have attachments associated with them are indicated with a paper
clip icon.
4.6.02 Re-numbering Documents Document Numbers are stored both in the BOM and Issue Docket tables in QMS and cannot simply be edited. If a Document number needs to be changed it must be formally renumbered. 1. From the BOM menu, select Utilities and then Renumber Document.
2. At the Renumber Document Screen, enter the Old Document number and then the New Document
Number.
3. Click the Renumber button. Notes: (a) The Document number will be changed both in the BOM and in the Issue Dockets tables.
4.6.03 Revising Documents The concept of revising a Document in QMS refers to maintaining a history of all changes to the materials required for a Document at each revision independent of the more general concept in QMS of Revising the BOM. [Refer Section 4.5.01 for more details on Revising the BOM].

Chapter 4 - Bill of Materials
Document No: UGD-MM-002 Rev: 5P QMS User Guide Page 51 of 164
To revise a Document: 1. From the BOM menu, select Document Register. 2. Locate the Document to be revised using the Find button and once located click on the Revise
Document button.
3. Enter the new Revision and click OK.
4. Now double click on the document to update the BOM Details for the new revision. Notes: (a) On clicking the Revise Document button the BOM Quantities for the previous revision of the
document are copied to the Prev Doc Qty column.
(b) It is also possible to revise a document from within the BOM Details screen directly.
(c) To view the history of changes to the BOM Quantities for a Document at each revision use the History menu option under the BOM menu and then sub-menus By Document – BOM Detail (shows the BOM for each Document at each revision) or By Document – Summary (which shows only a register of document revisions). Note that the History does NOT include the current revision of each document.
4.6.04 Document Priority Allocation wizard The Document Priority Allocation wizard can be used to simplify the process of allocating or re-allocating priorities to documents in the document register. 1. From the BOM menu, select Utilities and then Document Priority Allocation wizard. 2. Click Next at the welcome screen of the wizard. 3. Choose from the various options to base the priority allocation on (eg Area, Fabricator etc) and click
Next. 4. Assign the priority to each of the Areas, Fabricators, etc (depends on your choice at step 3). 5. Click Next 6. The next screen shows in red the records that will be updated in the Document Register. If this
looks OK click Next. 7. Click Finish and then OK when prompted.
4.6.05 Progress Monitoring There are a number of generic fields provided with the Document Register for the purpose of enabling some basic progress monitoring of each document through up to six activities (eg Design, Procurement, Delivery, Fabrication, Installation, Testing). These fields are:
PCT1 through to PCT6 which can be used to capture up to 5 different progress percentages complete.
Weight: Used to assign a “weighting” to each document of between 0 and 100. While the above fields are maintained manually, there are a number of standard Summary and Detailed reports available to report on progress using these fields by Area, Package, Fabricator, Discipline, and Test Package. See Section 4.7.01 – Report Group S for more on these reports.

Chapter 4 - Bill of Materials
Document No: UGD-MM-002 Rev: 5P QMS User Guide Page 52 of 164
4.7 Reporting
4.7.01 BOM Reports There are a large number of BOM related reports in QMS. These are located within the Standard Reports listing [see Section 14.1.01].
Report No.
Title
Description
Report Group: 01 – Bill of Materials
11A by Drawing No Prints the Bill of Materials by Document Number with the details of the Stockcodes and Quantities required for each Document.
11B by Drawing No - Incl. long descriptions
As per Report 11A but includes Title B details in additional to Title A for each Stockcode.
12A by Stockcode As per Report 11A but sorted by Stockcode.
12B by Stockcode - Summary Prints a summary of the BOM Quantities by Stockcode.
13
Weight - by Area & Stockcode - Detailed
Prints the weight of Stockcodes in the BOM by Area and Stockcode using the unit Weight in the Stockcode Library multiplied by the BOM Qty. Includes the Detail of each occurrence of each Stockcode by Document.
13S Weight - by Area & Stockcode - Summary
As per Report 13 but summarised at Stockcode Level.
16 by Stockcode - Invalid Stockcodes Prints details of any Stockcodes in the BOM that do not exist in the Stockcode Library.
Note that reports 11C0 through 11C5 plus 12C, 12DA and 12DS all relate to Issues of materials against the BOM and are covered in Section 12.4.
Report Group: D – Document Register
D1 by Document Number Prints a simple Document Register (current Revisions only)
DA by Area and Document Number As per Report D1 but sorted by Area
DH By Document Number – History Prints a simple Document Register but includes all Revisions
DP by Package As per Report D1 but sorted by Package
DR by Reference Number As per Report D1 but sorted by Reference
DRA by Area and Reference Number As per Report D1 but sorted by Area and Reference
DRAT by Area, Test Package, and Document No
As per Report D1 but sorted by Area and Test Package.
DRTA by Test Package, Area, and Document No
As per Report D1 but sorted by Test Package and Area.
DS by Service and Document Number As per Report d1 but sorted by Service.
Report Group: S – Progress Reports
S01 by Package Prints PCT1 to PCT6 plus calculated Weighted Percentages Complete with Sub Totals based on values in the Document Register.
S02 by Package - Summary As per S01 but Summarised by Package Level
S03 by Fabricator As per S01 but sorted by Fabricator
S04 by Fabricator - Summary As per S02 but by Fabricator
S05 by Area As per S01 but sorted by Area
S06 By Area - Summary As per S02 but by Area
S07 by Test Package As per S01 but sorted by Test Package
S08 by Test Package - Summary As per S02 but by Test Package
S09 by Discipline As per S01 but sorted by Discipline
S10 by Discipline - Summary As per S02 but by Discipline

Chapter 4 - Bill of Materials
Document No: UGD-MM-002 Rev: 5P QMS User Guide Page 53 of 164
Report No.
Title
Description
Report Group: 09 – Stockcodes
91 by Stockcode Prints a list of all Stockcodes in the Stockcode Library.
92 by Stockcode - Incl. long descriptions
As per Report 91 but includes Title B details in additional to Title A for each Stockcode.
93 With Substitutes Prints a list of Stockcodes from the Stockcode library and includes details of any Substitute codes defined.
94 Stockcodes by Type
Prints a list of Stockcodes from the Stockcode library sorted by Type.
95 Stockcodes by Discipline
Prints a list of Stockcodes from the Stockcode library sorted by Discipline and Type.
96 Stockcodes by Category:
Prints a list of Stockcodes from the Stockcode library sorted by Category.
Report Group: T – Total Quantities
T06 Wastage Detail Report Prints per Wastage group the Qty Issued against the Equivalent Qty Delivered by Stockcode. For more information on managing wastage factors (eg when fabricating insulation), contact QA Software.
T07 Wastage Summary Report A summarised version of Report T6 above printing one row per Wastage Group.
T09 BOM Quantity with Revisions Prints the Total Quantities summarised across all Bills of Materials (that are in use) for each BOM revision selected via BOM\Configuration tables\BOM Revisions and compares these to the Quantities in the other modules of QMS. Requires A3 printer.
T11 BOM Quantity – Multiple BOM Comparison
Prints the BOM and Issue Qty side by side for each BOM selected by Stockcode.
There are also a series of X-Tab Reports related to the Bill of Materials. These are located within the X-Tab reports listing [see Section 14.2]
Report No.
Title
Description
X06 BOM Revision Changes – Detailed by Document
This report prints for the selected BOM a list of Documents down the left of the page including for each document a list of the Stockcodes, and then the details for each Document + Stockcode the Quantities at each Revision of the BOM across the page. The “Diff” column prints the difference between the Qty in the last column and the second from last column.
X07 BOM Revision Changes – Detailed by Stockcode
This report is similar to Report X06 but is sorted first by Stockcode and then by Document.
X08 BOM Revision Changes – Summary by Stockcode
This report is as per X07 but summarised by Stockcode.
X09 BOM Qty – Summary by Stockcode
This report enables the user to select multiple BOMs and for each Stockcode the report will print the Qty in each of the selected BOMs in a cross tabulated format. Useful for seeing how quantities have changed between preliminary, intermediate and final BOMs. The “Diff” column prints the difference between the Qty in the last column and the second from last column.

Chapter 4 - Bill of Materials
Document No: UGD-MM-002 Rev: 5P QMS User Guide Page 54 of 164
Report No.
Title
Description
X10 BOM Qty – Detailed by Stockcode This report is used to compare 2 BOM’s side by side. Filtering is possible via any fields in either the Stockcode library and/or the Document Register. For example the report can be used to compare the BOM for an Area say at estimate stage against the final isometric BOM for the same Area.
X11 Document Revision Changes – Details by Document
This report compares changes in the BOM Qty between Document Revisions. However it can only be run for a single document at a time.

Document No: UGD-MM-002 Rev: 5P QMS User Guide Page 55 of 164
Chapter 5 - Generating Requisitions
5.1 Overview
5.2 Manual Generation of Requisitions 5.2.01 Creating a Requisition manually 5.2.02 Editing the Requisition Details
5.3 Automatically Generating a Requisition 5.3.01 Overview 5.3.02 Generating a Requisition from the BOM 5.3.03 Generating a Requisition using Re-Order Levels
5.4 Requisition Reports

Chapter 5 - Requisitions
Document No: UGD-MM-002 Rev: 5P QMS User Guide Page 56 of 164
5.1 Overview Requisitions or requisitions for material can be created in a number of ways using QMS. For small requisitions, the requisition can be created by simple manual entry in the Requisition register. For larger requisitions, typically for bulk materials, requisitions are better generated automatically from the Bills of Materials. The basics of the automatic requisition generation process is the summation of one or more Bills of Materials for the project to determine the total quantities of material required. From these quantities, QMS deducts either the previous quantities put out on requisition or, the previous amounts ordered, and hence determines the shortfall quantities to be added to the current requisition. QMS provides a great deal of flexibility and functionality for the automated generation of requisitions. For example:
Separate bills of materials can be combined and/or filtered which enables requisitions to be quickly generated for specific material types.
Mark up factors can be applied on requisition quantities for bulk materials to allow for wastage.
Standard units of measure can be allocated for material that is supplied in standard quantities. For example, pipe is typically supplied in 6 or 12 m lengths.
5.2 Manual generation of Requisitions
5.2.01 Creating a Requisition manually 1. From the Purchasing menu, select Requisitions. 2. Click on the New Requisition button or press F4. 3. Enter the Requisition number when prompted and click OK and a new requisition will be created. 4. Enter the Dated value and the Title for the Requisition. 5. To add line items for the Requisition, press Ctrl+E or click on the Add Item button. 6. Enter the Item number, Stockcode, Purch Quantity and any Remarks as required. Use F3 to locate
Stockcodes. 7. Press Ctrl+E or click or the Add Item button to enter another item. 8. After all items have been entered, click on the Save button and click Yes to save the changes. 9. The Requisition can be printed to a standard report format directly using the Print button.
10. The Requisition can also be generated into an MS Excel file using the XL button. The template
being used (mmpr,xls) can be modified if required. See Section 16.3.
11. Use the Close button to return to the main menu. Notes: (a) The Stockcode is validated during entry. If the Stockcode entered, exists in the Stockcode Library,
the Title, Size and Unit will be brought into the Requisition line item entry automatically. These cannot be changed.
(b) If the Stockcode entered does not exist, the user is prompted to add it to the Stockcode Library.

Chapter 5 - Requisitions
Document No: UGD-MM-002 Rev: 5P QMS User Guide Page 57 of 164
(c) The Rate field for requisition line items and Requisition Value total are generally used only if the Bid Documents module of QMS is not being used [see Chapter 6]. In this case the rates entered after the receipt of priced copies of the requisition are returned from potential suppliers. The rate can then be entered prior to converting the requisition into a Purchase Order. The Rate field is only enabled however for Users belonging to a Security group with “Enable Rates” ticked. [See Section 17.2.02].
(d) The Currency field is only enabled for Users belonging to a Security group with “Enable Rates”
ticked. [See Section 17.2.02].
(e) Approvals: The Approved tick box, Approved By (person) and Approved Date can be used for the management of Requisition approvals if required. These three fields are accessible only to users belonging to a Security group with “Enable Approvals” ticked. [See Section 17.2.02].
(f) Attachments: It is possible to attach (link) one or more external files to a Requisition (g) To exclude a Requisition from the Project Summary, tick the Superseded box. Note that
Superseded Requisitions are not displayed by default throughout the other procurement modules (eg when creating a Purchase order from a Requisition).
(h) Use the Additional Information tab to select a Procurement Officer who will be responsible for
the purchase of the material on the Requisition and use the Notify button to notify them by email that the Requisition has been created (the sent date is captured by the system). Once the Procurement Officer has acknowledged the notification, this date can be recorded in the Acknowledgement date field.
(i) Additional fields (customer specific) can be added to the Additional Information tab by QA Software
if required.
(i) It is possible to add additional Stockcode attributes from the Stockcode library to be displayed in the lower grid of the Requisitions screen by right clicking anywhere in the lower grid and selecting Modify Display of Stockcode attributes.
5.2.02 Editing the Requisition Details The information in a requisition can be edited or updated at any time. 1. From the Purchasing menu, select Requisitions. 2. At the requisitions screen, find the required requisition using the navigation buttons, the Find button
or the Filter button, which ever method the user prefers. 3. Once the requisition details are displayed, press F2 or click on the Edit button. 4. Make any changes required. 5. Click on the save button to save the changes. Note that changes can be reversed by using the
Undo button prior to clicking the save button. This reverts the last record changed. Notes: (a) An email notification can be resent to the responsible Procurement Officer if required using the
Notify button on the Additional Information tab. (b) Use the Reset button against the fields Required by and Currency in the upper part of the screen to
reset the values in the lower grid. (c) The Requisition can be generated into an MS Excel file using the XL button. The template being
used (mmpr,xls) can be modified if required. See Section 16.3.

Chapter 5 - Requisitions
Document No: UGD-MM-002 Rev: 5P QMS User Guide Page 58 of 164
5.3 Automatically generating a requisition
5.3.01 Overview Requisitions can be automatically generated in QMS using the Bill of Materials. This can be particularly useful for bulk materials where the number of different components is large. QMS summarizes the quantities for each unique Stockcode in the BOM and imports these values into the requisition database, while at the same time, allocating the correct descriptions and attributes from the Stockcode library for each Stockcode. In overview the automatic generation of a requisition process is as follows: (a) Select one or more Bills of Materials. For example, if the requisition is for bulk pipe and fittings, the
BOM selected would be Piping. However, if the BOM for piping has been created as a number of individual BOM’s, perhaps split by geographical area then these BOM’s can be combined for the purpose of generating a material requisition.
(b) After selecting one or more BOM’s, a Filter can be applied to consider only selected materials.
Again for Piping, the BOM might contain all bulk pipe and fittings but the requisition being generated is for bolts and gaskets only. In this case, a filter can be applied so that the requisition generation process only considers bolts and gaskets.
Alternatively, it may be that while the BOM for piping contains all pipe and fittings for the project, in respect of this requisition, only materials for a certain plant area are being sought. A filter can be applied based on the drawing register to restrict the requisition to only material relating to drawings in this area.
(c) A general factor can be applied to mark up the quantities calculated during the requisition generation process to allow say for wastage. This factor can be later fine-tuned on a line by line basis before the final requisition is generated.
(d) During the requisition generation process, QMS summates the BOM based on the variables defined
and then calculates the requisition quantities only after deducting any material already on order, or out on requisition. The user decides whether the system should deduct the quantities already out on requisition or the quantities out on Order.
(e) After the summation process has been completed, the requisition is viewed prior to saving and the
final quantities can be adjusted, rounded, and additional line items included if required. Use the Select All, Unselect All and Select tick boxes to select which items to include on the requisition.
(f) Finally the requisition is saved and printed, generally to then be passed to the Procurement team as
the basis for generation of Bid Documents [see Chapter 6]. Note that the responsible procurement officer can be notified by email automatically by the system if this option is chosen at the final screen of the wizard.
(g) If the requisition is to be generated into a MS Excel file, this can only be done from within the
Requisitions screen after the generation wizard process has been completed. The above process can be repeated at any time. Adjustments to the quantities of material on order or material out on requisition can be made with confidence, accurately, and extremely fast, should the BOM be revised. It is also possible to auto generate requisitions based on stock re-order levels [see Section 5.3.03].

Chapter 5 - Requisitions
Document No: UGD-MM-002 Rev: 5P QMS User Guide Page 59 of 164
5.3.02 Generating a Requisition from the BOM 1. From the Purchasing menu, select Requisition Wizard. 2. Click Next at the Welcome screen. 3. Choose Bill of Materials at the Select Requisition Generation option screen and click Next. 4. Select one or more Bills of Materials using the Select boxes and click Next. At the Select Requisition Options screen: 5. Enter a value for “Markup quantities by” (Optional)
A percentage markup can be applied to the total requisition quantities. This percentage is applied to the total BOM requisition quantity required. I.e. before the cumulative value of previous orders or requisitions has been deducted. A negative percentage can also be applied. This maybe appropriate when creating requisitions from preliminary Bills of Materials.
6. Select either Requisitions, Purchase orders, or None as the basis for the deduction of
cumulative previous quantities.
The automatic calculation of requisition quantities is generally based on the total quantities in the Bill of Materials less the cumulative quantity of all previous requisitions or finalized purchase orders placed. It is also possible to deduct neither the previous requisition or finalized purchase quantities by selecting the None option. Choose the appropriate option for this requisition. Once finalized purchase orders have been placed it is generally preferable to deduct the cumulative value of all previous finalized purchase orders.
7. Show negative values for previously over ordered items (Optional)
This option is activated using the check box provided. Say the total BOM quantity for an item is 100 and previously 110 have been placed on order. With this option activated, the requisition value will be calculated as –10. With this option de-activated (the default), the requisition value will be 0.
8. Show previously fully and over-ordered items only (Optional)
With this option activated, only items that are either fully or over-ordered will be displayed.
9. Consider Substitutes This option is active only if Purchase Orders is selected at step 6, and is relevant only if “Substitutes” have been purchased via the Purchasing module [See Section 7.14]. For example if Stockcode B has been purchased as a substitute for Stockcode A (as required in the BOM) then this option should be ticked to avoid the system calculating that Stockcode A still needs to be requisitioned.
10. Apply a Filter (Optional)
If a filter is not used, the calculation of the required requisition quantities will be based on the total of the Bills of materials selected, less the cumulative value of all previous orders or requisitions. Generally, requisitions are specific for a particular type of material. For example, mechanical valves, or Carbon Steel pipe and fittings. In this case a filter should be activated to restrict the items considered for the requisition to only those required. There are three different files that the filter can be used on and within each of those files, the filter can be constructed using any of the fields in the file.

Chapter 5 - Requisitions
Document No: UGD-MM-002 Rev: 5P QMS User Guide Page 60 of 164
The three files are:
Bill of Materials.
Related Drawing Register.
Related Stockcodes. The use of filters is best explained by example. Example A – Generating a requisition for supply of holding down bolts. Since holding down bolts have a specific Stockcode beginning say HD, the best filter to apply would be via the Related Stockcode file: STOCKCODE begins with HD
Note the same effect would be achieved by using the same filter in the BOM file. Example B – Generate a requisition for Carbon Steel Pipe and fittings for a Piperack P1 In this case, assume the Carbon Steel Pipe and fittings are all defined as Specification “AAZ” in the Stockcode Library. Additionally, drawings in the Drawing register that relate to the Piperack P1 have been allocated a Package Number “P1”. Then, the filters that should be applied are: In the Related Drawing Register, use PACKAGE equal to P1 In the Related Stockcodes, use SPEC equal to AAZ
11. Click Next to go to generate the quantities for the requisition
Enter the general details and fine tune the requisition quantities as discussed below before printing and saving.
12. Fine tuning the requisition
In the Upper half of the screen: (a) Edit the Requisition Number if required. (b) Enter the Date of the Requisition (defaults to the system date). (c) Enter the Required by date for the material on the Requisition. (d) Enter the Raised by value (defaults to the User Logged in) (e) Use the Round up this requisition to the nearest multiple of feature (optional). This
feature can be used when material on the requisition is normally supplied in standard sizes. For example, pipe is normally supplied in standard lengths of 12 meters. By setting the round up value to 12 and pressing tab, the “This requisition” values will round up to the nearest multiple of 12 (or use 12,000 if the Piping UOM in the BOM is in MM). Alternatively this function can be used to remove unwanted decimals. Just set the round up value to 1.
(f) Enter a Title for the Requisition. (g) Select the Currency for the Requisition (optional).
(h) Select the default Cost Code for the Requisition (optional).
(i) Enter any Notes about the Requisition.

Chapter 5 - Requisitions
Document No: UGD-MM-002 Rev: 5P QMS User Guide Page 61 of 164
(j) The earliest fab start date and earliest site start dates are for information only and are drawn from the Document Register for the Documents considered in the requisition. They can be edited if required.
In the lower grid:
(k) BOM Qty: This is the total quantity of each item required based on the Bill of Materials selected for this requisition. It cannot be edited here.
(l) Markup %: This is the percentage value established for this requisition. It can be adjusted
on a line by line basis at this screen. The Adjusted quantity will be re-calculated automatically.
(m) Markup Qty: this is the Markup Qty value for this requisition and is auto-calculated based
on the Markup %. It can be adjusted if required. (n) Adjusted Quantity: The Adjusted Quantity is equal to the BOM Qty + the Markup
percentage. It can be manually adjusted on a line by line basis if required just by typing over the calculated value. Note that the Markup percentage re-calculates automatically if the adjusted quantity is modified.
(o) Prev Ordered/All Prev Req: This value is calculated based on the value of the cumulative
totals previously ordered or put out on requisition. This value cannot be edited. (p) Purch Qty: The “Purchase Qty” is the Qty of material to be purchased on this requisition
and the value equals the Adjusted Quantity less the Previously Ordered Amount. This value can be manually adjusted just by typing over the calculated value. Note that the Adjusted Quantity and Markup percentage re-calculate automatically if this value is modified.
Other columns in the In the lower grid include: Required By: Used if different line items are required on different dates.
Currency: Used to change the currency on a per line item basis. Current Rate: Used to edit the default currency rate. Cost Code: Used to change the Cost Code on a per line item basis. New: System field used to identify records added manually in the requisition wizard. TitleC: Field for user to enter a free form comment against each line item. 13. Use the Select All button or the Select tick boxes to select which items listed to include on the
Requisition and use the Show Selected tick box to display only selected items 14. Click Next. 15. Use the Print button on the Finish page of the wizard to print a hard copy of the Requisition
document. 16. Tick the Send Notification box and select the responsible Procurement Officer if you want to send
an auto generated email to the officer that the Requisition has been created. Note that the Procurement Officer should be a user of the system and have an entry in the Address book with an email address. Use the Edit Address book button to add in a new Procurement Office on the fly.
17. Click the Finish button to save the Requisition. Notes: (a) After a requisition has been generated and saved, it can be further modified if required. Refer
Editing a requisition for more details. (b) In addition to making adjustments for items selected for the Requisition, it is possible to add
additional items to this Requisition using the New Row button. (c) It is possible to edit the Item numbers in the lower grid, or renumber them automatically if required
using the renumber button at the top left corner of the screen. Note that this option must however be first enabled via Tools → Options → Project Settings and ticking the box Enable editing of item numbers in wizards.

Chapter 5 - Requisitions
Document No: UGD-MM-002 Rev: 5P QMS User Guide Page 62 of 164
(d) Items can be removed from the Requisition at steps 11 and 12 using the Delete button as an alternative to simply unselecting them.
5.3.03 Generating a Requisition using Re-Order Levels In the Stockcode library it is possible to define for one or more Stockcodes:
Re-Order Level: This is a minim stock level below which the item should be re-ordered.
Qty to Re-Order: This is the Qty to re-order should a stock fall below the Re-Order Level. The Requisition Wizard provides an option to auto generate a Requisition for materials in stock that have fallen below the Re-Order Level. The Requisition Quantities are based on the Qty to Re-order. 1. From the Purchasing menu, select Requisition Wizard. 2. Click Next at the Welcome screen. 3. Choose Material Re-Order Level at the Select Requisition option screen and click Next. 4. Now you can proceed as from Step 10 in Section 5.3.02 to finalize the Requisition details. Notes: (a) The option to Deduct cumulative total for Ordered by not delivered quantity defaults to selected.
This option controls whether to deduct from the Qty to Re-Order any quantities that are already on order but have not yet been delivered.
5.4 Requisition Reports Requisition related reports are located within the Standard Reports listing [see Section 14.1.01].
Report No.
Title
Description
Report Group: 02 - Requisitions
21 by Requisition No
Prints Requisitions with the details of the material on each Requisition Document.
21S Requisition Register
Prints a summary register of Requisitions.
22 by Stockcode As per Report 21 but sorted by Stockcode.

Document No: UGD-MM-002 Rev: 5P QMS User Guide Page 63 of 164
Chapter 6 – Bid Documents
6.1 Overview
6.2 Creating Bid Documents
6.3 Maintaining Bid Documents
6.4 Receiving/Importing Bids
6.5 Bid Analysis
6.6 Bid Document Reports
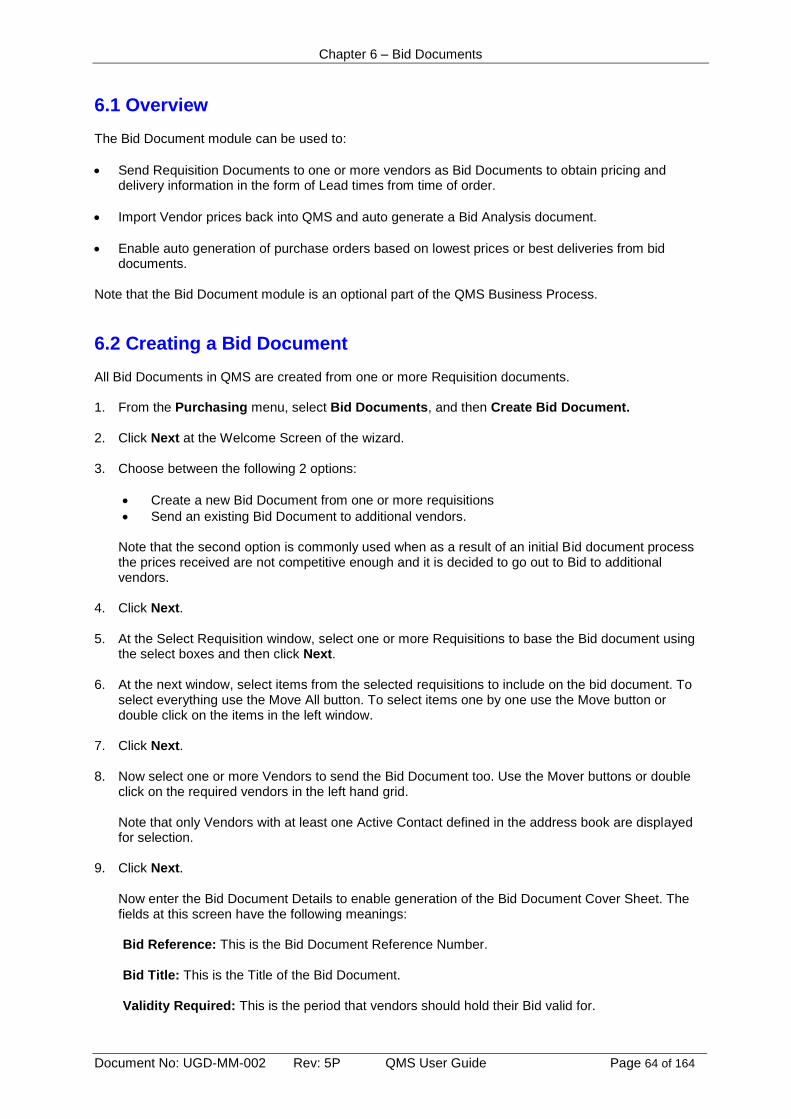
Chapter 6 – Bid Documents
Document No: UGD-MM-002 Rev: 5P QMS User Guide Page 64 of 164
6.1 Overview The Bid Document module can be used to:
Send Requisition Documents to one or more vendors as Bid Documents to obtain pricing and delivery information in the form of Lead times from time of order.
Import Vendor prices back into QMS and auto generate a Bid Analysis document.
Enable auto generation of purchase orders based on lowest prices or best deliveries from bid documents.
Note that the Bid Document module is an optional part of the QMS Business Process.
6.2 Creating a Bid Document All Bid Documents in QMS are created from one or more Requisition documents. 1. From the Purchasing menu, select Bid Documents, and then Create Bid Document. 2. Click Next at the Welcome Screen of the wizard. 3. Choose between the following 2 options:
Create a new Bid Document from one or more requisitions
Send an existing Bid Document to additional vendors. Note that the second option is commonly used when as a result of an initial Bid document process the prices received are not competitive enough and it is decided to go out to Bid to additional vendors.
4. Click Next. 5. At the Select Requisition window, select one or more Requisitions to base the Bid document using
the select boxes and then click Next. 6. At the next window, select items from the selected requisitions to include on the bid document. To
select everything use the Move All button. To select items one by one use the Move button or double click on the items in the left window.
7. Click Next. 8. Now select one or more Vendors to send the Bid Document too. Use the Mover buttons or double
click on the required vendors in the left hand grid.
Note that only Vendors with at least one Active Contact defined in the address book are displayed for selection.
9. Click Next.
Now enter the Bid Document Details to enable generation of the Bid Document Cover Sheet. The fields at this screen have the following meanings:
Bid Reference: This is the Bid Document Reference Number. Bid Title: This is the Title of the Bid Document. Validity Required: This is the period that vendors should hold their Bid valid for.

Chapter 6 – Bid Documents
Document No: UGD-MM-002 Rev: 5P QMS User Guide Page 65 of 164
Delivery: Details of where Delivery is required. Quotation Currency: The Currency the vendors are to quote in. Message to Bidders: Free form message field. Specifications: List of relevant Specifications. Datasheets: List of relevant Datasheets. Supporting Data Required: Date for submission of Supporting Data. Bid Date: Date of the Bid Document Respond By Date: Date the Bid Document submissions are required. From1: Used to populate the TO field on the Bid Document. From2: Used to populate a CC field on the Bid Document. Requisition No: Relevant Engineering Requisition Number. Scope of Supply/Work: Text field. Drawings: List of relevant Drawings for the Bid. Estimated Contract Award Date: Date expected for award of the contract. Procurement Centre: Responsible Procurement Centre for the Bid.
10. Click Next. 11. Select the required Bid Attachment details using the mover buttons. Note that the list of Bid
Attachments that can be selected is defined via the Configuration Table Bid Attachments under the Purchasing menu.
12. Click Next.
13. Click the Finish button to save the bid document and click OK when prompted.
Next the system will auto generate the following:
A Bid Document cover sheet for each Vendor in MS Word format.
A MS Excel Vendor pricing schedule for each vendor. This process can take a few minutes. The external files created are saved by default into the \Qms\Projects\<Project No>\Attachments\ Bid Documents folder.
14. Once the files have been created you will be prompted and can click OK.
Now the Bid Document email wizard loads to auto email the Bid Documents to each vendor. 15. The email Subject defaults to the Bid Document Title. Edit it if required. 16. Enter a Message if required to appear in the body text of the sending email. 17. Attach any additional external files if required.
Note that you can view the Bid Document MS Word file and/or the MS Excel vendor pricing schedule (VPS) using the View RFQ and View Bid buttons in the grid.

Chapter 6 – Bid Documents
Document No: UGD-MM-002 Rev: 5P QMS User Guide Page 66 of 164
18. Click Email when ready and the Bid Documents will be sent to the vendors by email using your standard email system.
Notes: (a) At Step 5, tick the “Include Superseded Requisitions” box to select a superseded requisition as the
basis for the Bid Document. (b) At Step 13 it is possible to print a Bid Document report (hardcopy) if required. (c) Also at Step 13, it is possible to save the bid document without creating the Vendor Pricing
Schedule and RFQ documents using tick box provided for this option. The Vendor Pricing Schedule and RFQ sheet can be created later via View Bid Documents.
(d) For Bid Documents to be auto emailed to vendors, the vendor must have an email address defined in the address book.
(e) The MS Excel Vendor pricing schedule is fully protected so that vendors can only input rate information, lead times, and country of origin for each material item.
(f) The Vendor Pricing Schedule can also include columns for the vendor to make an alternative offer for any item by an alternative Description and Quantity.
(g) To define the use of an email system other than MS Outlook (for example Lotus Notes), go to Tools\Options\Program Defaults.
(h) The Bid Document Cover sheet and Excel based Vendor Pricing schedule can be customized to suit individual customer requirements. The Bid Document Cover sheet (RFQ) uses the template mmrfq.dot and the Vendor Pricing Schedule uses the template mmvps.xls. See also Section 16.3
6.3 Maintaining Bid Documents To view the details of existing Bid documents: 1. From the Purchasing menu, select Bid Documents and then the sub menu View Bid
Documents. 2. Use the Navigation or Find buttons to locate the required bid Document. 3. Use the four tabs to display either:
Bid Document Details
Vendor Items and Item prices
Bid Document options.
Status Information Notes: (a) Use the XL button to generate a Bid Analysis Excel file for the currently selected Bid Document.
The Bid Analysis template is called mmcbe.xls and can be customized to suit individual customer requirements. See Section 16.3.
(b) The Bid Sent date can be updated manually. (c) Bid Documents not yet sent (indicated by an empty Bid Sent Date) can be fully edited. (d) At the Vendor Items and prices tab it is possible to change the Contact for the Bid Document
relating to the currently selected Vendor using the Change Contact button. (e) Use the Status Information tab to manually maintain the following information in regard to each
Vendors Bid Document:
Acknowledgement Date
Acknowledgement Status*
Date Tender submitted
Confirmation of Commercial Acceptability*
Confirmation of Technical Acceptability*
Notes
Extended Closing Date
Delivery EXW * Drop down list values maintained via Purchasing \ Configuration Tables.

Chapter 6 – Bid Documents
Document No: UGD-MM-002 Rev: 5P QMS User Guide Page 67 of 164
(f) Use the Resend Bid Documents button to resend a bid document by email to one or more of the
vendors. (g) The Bid Document MS Word file and the MS Excel vendor pricing schedule (VPS) can be viewed
using the View Pricing Schedule and View Bid Document Cover Sheet links. (h) Use the Create DOC and Excel for RFQ and Vendor Pricing Schedule button to create new
copies of these documents. (i) Use the Attachments button to attach one or more external files to the bid document.
6.4 Receiving/Importing Bids Once bids are received from vendors (in the form of completed and returned MS Excel Vendor Pricing schedules), the next phase in the bid document process is to import the pricing and delivery information for each vendor. 1. From the Purchasing menu, select Bid Documents and then Receive Bids. 2. Select the correct Bid Reference Number from the drop down list. 3. Select the first bidder from the Vendor Id Drop down list. 4. Click the Import bid data from Excel button and locate the vendors Excel pricing schedule which
you should have saved to your PC on receipt from the vendor. The Vendors Rates, Lead times and Country of Origin for each Stockcode will now be imported into the grid.
5. Click the Save button. 6. Repeat steps 3 to 5 for additional Vendors and click the Close button when done. Notes: (a) Use the XL Button to generate the bid analysis spread sheet from this screen once you have
imported all vendors prices.
6.5 Bid Analysis To generate a Bid Analysis spread sheet: 1. From the Purchasing menu, select Bid Documents and then Bid Analysis. 2. Select the Bid Reference Number. 3. Click the Bid Evaluation button. Notes: (a) Note that the Bid Analysis spread sheet is not saved by the system (due to the commercially
sensitive information it contains). (b) The Bid Analysis template is called mmcbe.xls and can be customized to suit individual customer
requirements. See Section 16.3. (c) The Bid Analysis can also be generated via the View Bid Documents or Receive Bids screens. (d) Purchase orders can also be created from Bid Documents using the Purchase Order Wizard [see
Section 7.5].
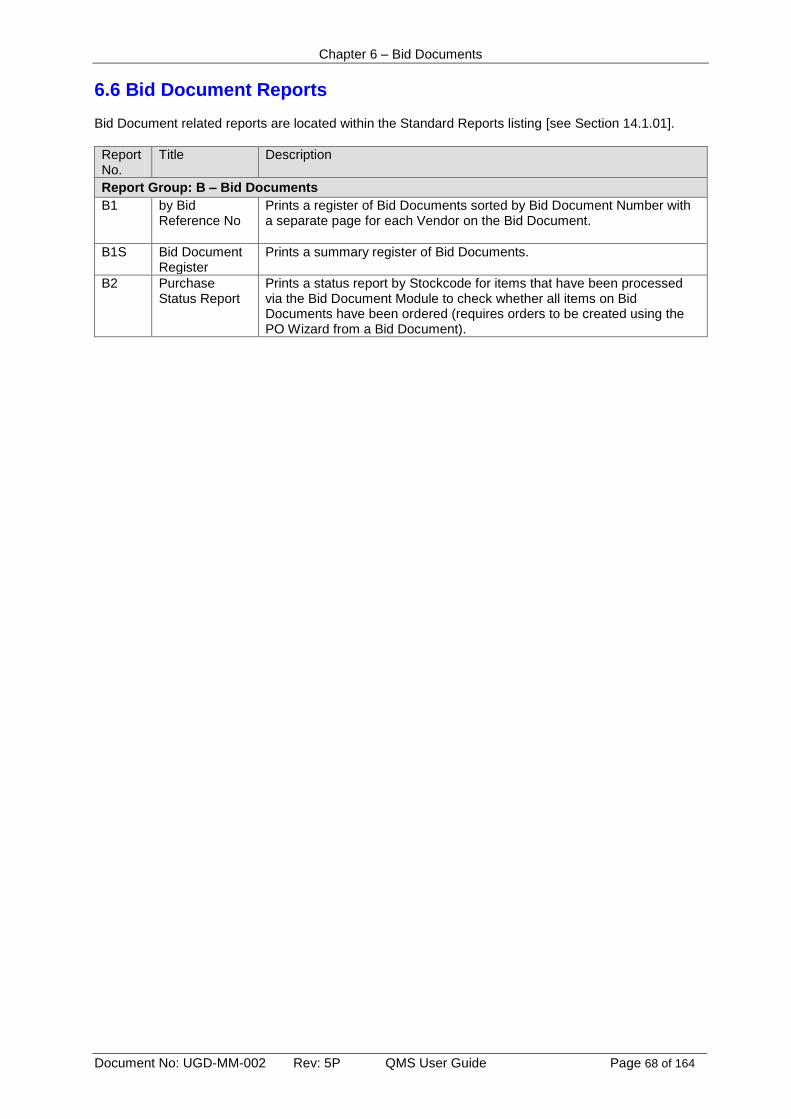
Chapter 6 – Bid Documents
Document No: UGD-MM-002 Rev: 5P QMS User Guide Page 68 of 164
6.6 Bid Document Reports Bid Document related reports are located within the Standard Reports listing [see Section 14.1.01].
Report No.
Title
Description
Report Group: B – Bid Documents
B1 by Bid Reference No
Prints a register of Bid Documents sorted by Bid Document Number with a separate page for each Vendor on the Bid Document.
B1S Bid Document Register
Prints a summary register of Bid Documents.
B2 Purchase Status Report
Prints a status report by Stockcode for items that have been processed via the Bid Document Module to check whether all items on Bid Documents have been ordered (requires orders to be created using the PO Wizard from a Bid Document).
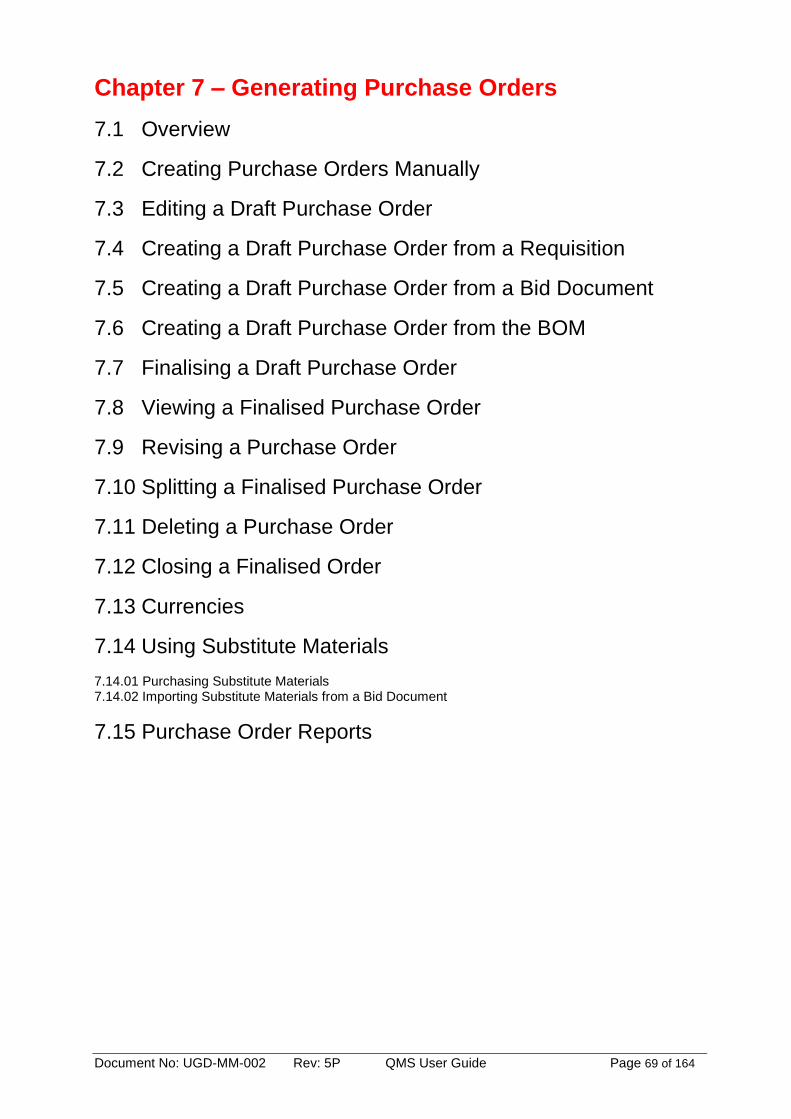
Document No: UGD-MM-002 Rev: 5P QMS User Guide Page 69 of 164
Chapter 7 – Generating Purchase Orders
7.1 Overview
7.2 Creating Purchase Orders Manually
7.3 Editing a Draft Purchase Order
7.4 Creating a Draft Purchase Order from a Requisition
7.5 Creating a Draft Purchase Order from a Bid Document
7.6 Creating a Draft Purchase Order from the BOM
7.7 Finalising a Draft Purchase Order
7.8 Viewing a Finalised Purchase Order
7.9 Revising a Purchase Order
7.10 Splitting a Finalised Purchase Order
7.11 Deleting a Purchase Order
7.12 Closing a Finalised Order
7.13 Currencies
7.14 Using Substitute Materials 7.14.01 Purchasing Substitute Materials 7.14.02 Importing Substitute Materials from a Bid Document
7.15 Purchase Order Reports
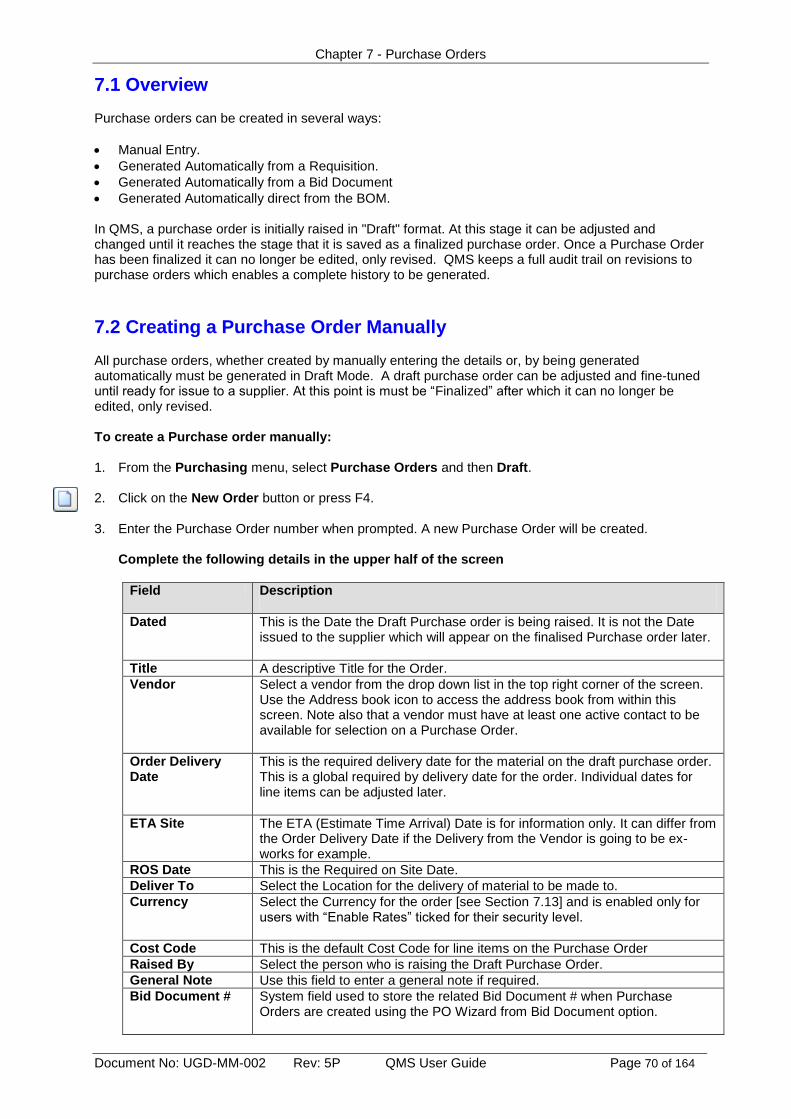
Chapter 7 - Purchase Orders
Document No: UGD-MM-002 Rev: 5P QMS User Guide Page 70 of 164
7.1 Overview Purchase orders can be created in several ways:
Manual Entry.
Generated Automatically from a Requisition.
Generated Automatically from a Bid Document
Generated Automatically direct from the BOM. In QMS, a purchase order is initially raised in "Draft" format. At this stage it can be adjusted and changed until it reaches the stage that it is saved as a finalized purchase order. Once a Purchase Order has been finalized it can no longer be edited, only revised. QMS keeps a full audit trail on revisions to purchase orders which enables a complete history to be generated.
7.2 Creating a Purchase Order Manually All purchase orders, whether created by manually entering the details or, by being generated automatically must be generated in Draft Mode. A draft purchase order can be adjusted and fine-tuned until ready for issue to a supplier. At this point is must be “Finalized” after which it can no longer be edited, only revised. To create a Purchase order manually: 1. From the Purchasing menu, select Purchase Orders and then Draft. 2. Click on the New Order button or press F4. 3. Enter the Purchase Order number when prompted. A new Purchase Order will be created.
Complete the following details in the upper half of the screen
Field Description
Dated This is the Date the Draft Purchase order is being raised. It is not the Date issued to the supplier which will appear on the finalised Purchase order later.
Title A descriptive Title for the Order.
Vendor Select a vendor from the drop down list in the top right corner of the screen. Use the Address book icon to access the address book from within this screen. Note also that a vendor must have at least one active contact to be available for selection on a Purchase Order.
Order Delivery Date
This is the required delivery date for the material on the draft purchase order. This is a global required by delivery date for the order. Individual dates for line items can be adjusted later.
ETA Site The ETA (Estimate Time Arrival) Date is for information only. It can differ from the Order Delivery Date if the Delivery from the Vendor is going to be ex-works for example.
ROS Date This is the Required on Site Date.
Deliver To Select the Location for the delivery of material to be made to.
Currency Select the Currency for the order [see Section 7.13] and is enabled only for users with “Enable Rates” ticked for their security level.
Cost Code This is the default Cost Code for line items on the Purchase Order
Raised By Select the person who is raising the Draft Purchase Order.
General Note Use this field to enter a general note if required.
Bid Document # System field used to store the related Bid Document # when Purchase Orders are created using the PO Wizard from Bid Document option.

Chapter 7 - Purchase Orders
Document No: UGD-MM-002 Rev: 5P QMS User Guide Page 71 of 164
Adding the Line Item Details for the Order 4. Press Ctrl+E or the Add Item button to add the first line item entry for the order. Enter the line item
details in the fields described below in the lower half of the screen:
Field Description
Item The Item number.
Stockcode The Stockcode (use F3 to select).
Title If an existing Stockcode has been entered, the Title defaults from the Title field in the Stockcode Library. This title cannot be edited here.
Titles The Titles field is used to define which of the two possible title fields for any line item are to be used on the purchase order. Enter either A, B or AB as required (default is A). Values of C, AC, BC and ABC are also possible if TitleC is not empty
Size The Size is entered automatically from the Stockcode Library after the Stockcode has been entered. This field cannot be edited.
Quantity Enter the Quantity required.
Unit The unit of measure defaults from the Stockcode library. It cannot be edited.
Rate Enter the $ Rate for this item. The field is enabled only for users with “Enable Rates” ticked for their security level. [ See Section 17.2.02]
Value The Value is calculated as the Quantity multiplied by the Rate.
Lead Time This is the lead time for the supply of the item in days (optional). Note that Days are working days as defined via the Project Calendar.
Order Delivery Date
This Date defaults from the Order Delivery Date in the upper half of the screen but can be edited if required. Use the Reset button in the upper part of the screen to reset the line item dates to the Order Delivery date for the Purchase Order in general. Use the ∑ button in the upper part of the screen to reset the Order Delivery dates based on the general Order date + lead times.
ETA Site This Date defaults from the ETA Site Date in the upper half of the screen but can be edited if required.
ROS Date This Date defaults from the ROS Date in the upper half of the screen but can be edited if required.
Deliver to The Delivery Location defaults from the upper grid but can be edited here on a per line item basis if required.
Title C Title C is field that can be populated to capture a remark about the line item on the order. This value prints in the Remarks column on the printed order report.
Currency The Currency defaults from the upper grid but can be edited here if required and If “Enable Rates” is ticked for the security level the user belongs to.
Currency Rate This is the current rate against your local currency for the selected currency. It can be edited here if required.
Discount % This is a Discount % for the line item.
Tax % This is a Tax % for the line item.
Cost Code This is the cost code for the line item (optional) and defaults from the value in the upper part of the screen.
Country of Origin This is the Country the item is being sourced from (optional).

Chapter 7 - Purchase Orders
Document No: UGD-MM-002 Rev: 5P QMS User Guide Page 72 of 164
5. Repeat step 4 for additional lines items. 6. On completion of entry of items for the purchase order, click on the save button to save the draft
purchase order. The order can now be printed out for checking.
7. It is also possible to generate the draft Purchase order into a MS Word file using the word button on the toolbar. The template used for this is mmpo.dot (See also Section 16.3). Note that the generated word file is stamped as DRAFT and not saved by QMS.
Notes: (a) The Stockcode is validated against the Stockcode Library. If the Stockcode entered exists in the
Stockcode library, a number of the remaining line item fields are populated automatically. They cannot be edited. Entries such as the title of a Stockcode can only be modified via the Stockcode library.
(b) New Stockcodes can be added if required by entering them and then adding them to the Stockcode
library when prompted. (c) A purchase order line item can have one or both of the available title fields :
Title A This is the primary title for a Stockcode derived from the Stockcode library. Title B This is a secondary title for a Stockcode derived from the Stockcode library. Title C A free form comment field.
(d) At any point during the draft order creation process you can click on the button for a Total Value of the Purchase Order.
(e) The Additional Information tab can customized to capture any additional information about the
purchase order which is required if a formal Purchase Order is to be printed from the system. Contact QA Software for details.
(f) Use the Attachments button to attach (link) one or more external files to the purchase order.
(g) Use the Modify Display of Stockcode attributes option displayed when right clicking anywhere in
the lower grid to add additional Stockcode attributes from the Stockcode library to be displayed in the grid.
(h) If the required Stockcode (say A) is not available for purchase it is possible to purchase a substitute
Stockcode (say B) and identify that B has been purchased as a substitute for A (assuming it is really technically equivalent of course). See Section 7.14.01 for more details.
7.3 Editing a Draft Purchase Order The information on a Draft Purchase order can be edited or updated at any time. 1. From the BOM menu, select Purchase Orders and then Draft. 2. At the Draft Purchase Order screen, find the required Purchase order using the navigation buttons,
the Find button or the Filter button, which ever method the user prefers. 3. Once the Draft Purchase Order details are displayed, press F2 or click on the Edit button. 4. Make any changes required. 5. Click on the Save button and click Yes when prompted to save the changes. Notes: (a) A Draft PO can be re-numbered if required using the Renumber button. (b) Use the Reset button against the ETA Site, ROS Site, and/or Order Delivery date fields in the upper
part of the screen to rest the values against the line items in the lower grid.

Chapter 7 - Purchase Orders
Document No: UGD-MM-002 Rev: 5P QMS User Guide Page 73 of 164
7.4 Automatically creating a Draft Purchase Order from a Requisition If the Purchase order to be created is based on all, or part of a requisition that was generated by QMS, it is preferable to create the Draft Purchase Order automatically, thus reducing the potential for error and saving on data entry time. The Purchase order can be for a part, or all of the items created on a single requisition. Additional items that were not on the requisition can also be added to the Purchase Order. To use the Purchase Order Wizard: 1. From the Purchasing menu, select Purchase Order Wizard and then From a Requisition. 2. Click Next at the welcome screen. 3. Select the Requisition to use as the basis for the Draft Purchase Order using the Select tick boxes
and click Next. Note that the Find and Filter buttons can be used if there are large numbers of requisitions to select from.
4. Items from the requisition can be Included or excluded from being transferred to the Draft Purchase
order by using the Select box against each item.
Tip: Use the Select All button to select all items and use the Show Selected button to show only items selected.
5. Click on the Next button after selecting the required items. 6. Enter the Order Number, and Order Date. 7. Select a Vendor for the purchase order from the drop down list. 8. Enter an Order Delivery date. This sets the line item Order Delivery dates automatically. 9. Enter the ETA Site and ROS Dates as required. 10. If the Order Delivery, ETA Site and/or ROS dates vary for different line items then edit/enter the
dates at a line item level. Use the Reset and/or ∑ button to reset the Order Delivery dates if required [See Section 7.2].
11. If required, the Quantity can be modified here to reflect the actual quantity to be purchased. (This
can also be adjusted again later after the draft order has been saved so this step is optional at this stage.)
Setting the Qty to 0 has the same effect as un-selecting the item.
12. In the Rate column, the unit rate for each item can be entered.
The line item value is calculated as the quantity multiplied by the Rate. The Total Value for the
order can be calculated at any time using the button. 13. Click Next when done and at the Final screen of the wizard click the Print button and OK when
prompted to preview a hardcopy report of the Draft Purchase Order. 14. Close the report preview and click the Finish button to save the Draft Order and click OK when
prompted. The Draft Purchase Order can now be accessed in the normal way via the Purchasing menu and adjusted as required. Refer earlier in this section for details on Editing a Draft order.

Chapter 7 - Purchase Orders
Document No: UGD-MM-002 Rev: 5P QMS User Guide Page 74 of 164
Notes: (a) The Item numbers on the Draft Order are carried forward from the Requisition by default. (b) It is possible to edit the Item numbers in the lower grid, or renumber them automatically if required
using the renumber button above the grid at the right side.. Note that this option must however be first enabled via Tools → Options → Project Settings and ticking the box Enable editing of item numbers in wizards.
(c) To select a superseded Requisition as the basis for the Purchase Order at step 3, tick the “Include Superseded Requisitions” box.
7.5 Automatically creating a Draft Purchase Order from a Bid Document If the Purchase order to be created is based on all, or part of a bid document that was generated by QMS, it is preferable to create the Draft Purchase Order automatically, thus reducing the potential for error and saving on data entry time. The Purchase order can be for a part, or all of the items created on a single bid. Additional items that were not on the requisition can also be added to the Purchase Order. To use the Purchase Order from a Bid Document Wizard: 1. From the Purchasing menu, select Purchase Order Wizard and then From a Bid Document. 2. Click Next at the welcome screen. 3. Select a Bid Document from the list using the select box and click Next. Note that the Find and
Filter buttons can be used if there are large numbers of bid documents to select from. 4. Choose between the following two options and click Next.
Allocate one or more items to a single vendor to create a Single PO
With this option you will manually select items on the bid document and allocate them to a single vendor to create a single purchase order.
Auto allocate items to each vendor based on the lowest price to create one or more POs
With this option you will allow QMS to automatically allocate items on the bid document to the vendor with the lowest price. This may result in one or more purchase orders being created.
If you choose Allocate one or more items to a single vendor to create a Single PO 5. Select a Vendor from the drop down list and the items on the bid document with the selected
vendors prices and details will be displayed. 6. Select one or more items to put onto the Purchase order and click Next. 7. Enter the details for the Purchase order as per Section 7.2 above and click Next when done. 8. At the final screen of the wizard the Finish button and click OK when prompted that your order has
been saved. If you choose Auto allocate items to each vendor based on the lowest price to create one or more POs 9. The next screen displays the auto selection that the system will make.
The View by Item tab shows the items on the bid document in the upper grid and as you click on each item in the upper grid the lower grid shows which of the vendors have been selected. You change the automatic selection if required.

Chapter 7 - Purchase Orders
Document No: UGD-MM-002 Rev: 5P QMS User Guide Page 75 of 164
The View by Vendor tab shows Vendors in the top grid and as you click on each vendor the items that the system has selected for that vendor are shown in the lower grid. Note that only vendors who have the lowest price for at least one item on the bid document are displayed.
10. Click Next when ready. 11. Enter the details for the first Purchase order the system will create as per Section 7.2 above. 12. Use the arrow navigation buttons at the top of the screen to move to the next purchase order the
system will create (assuming multiple orders are going to be created) and complete the details for that order too. Repeat this step if there are further orders being created.
13. Click Next when you have populated the details of all orders being created. 14. At the final screen of the wizard the Finish button and click OK when prompted that your order has
been saved. Notes: (a) Use the Import button at Step 5 above to import the PO Line items from the MS Excel version of a
Vendor Pricing Schedule (VPS) rather than transfer the lines items from the Bid Document module. This option is useful in the case where you have hundreds of items in the VPS and only selected items are required for the Purchase Order as you can edit the VPS to remove unwanted line items prior to importing.
(b) The Import option described in Note (a) above can also be used as a means of importing alternative material offerings into the Purchase Order (relevant when the vendor cannot provide the requisitioned Stockcode but can provide an approved alternative (substitute)). See Section 7.14.02 for more details on this.
7.6 Creating a Draft Purchase Order from the BOM It is common, (especially after a number of purchase orders have already been placed with suppliers) to create new orders on existing suppliers without going through the requisition process in the circumstance where unit rates have been agreed with the supplier. For example, say all orders for bulk materials have been placed based on the Bill of Materials Revision 1. Work is well under way and a design change causes changes to the Bill of Materials. A quick order is required for additional material on an existing supplier. This is a perfect example for using the wizard explained below. 1. From the Purchasing menu, select Purchase Order Wizard and then From Bill of Materials. 2. Click Next at the Welcome screen. 3. Select one or more BOMs to consider using the Select boxes and click Next. 4. The next screen of the wizard is identical to the Requisition Wizard described in the previous
chapter. Adjust the settings as required and click Next. 5. Enter the Order Number, Order Date, and Order Title. 6. Select the Vendor from the drop down list.
The remaining information is the same as for the automatic generation of a requisition except that in this wizard it is important to enter the Rates, Deliver to Location, Order Delivery Dates, ETA Site and ROS Dates.
7. Click Next. 8. Click Finish at the final screen of the wizard to save the Draft Order.

Chapter 7 - Purchase Orders
Document No: UGD-MM-002 Rev: 5P QMS User Guide Page 76 of 164
7.7 Finalizing a Draft Purchase Order When a Draft Order has been approved by the relevant personnel it is ready to be converted into a Finalised Purchase Order. Note that when a purchase order has been finalised it can no longer be edited, only revised. To Finalise a Draft Purchase Order: 1. From the Purchasing menu, select Utilities, and then select Finalise a Draft Purchase order. 2. Select the Order Number to be finalised from the drop down list. 3. Edit the Dated and Revision number fields as required. A revision number is mandatory. 4. Edit any of the remaining information in regard to the purchase order if required [see Section 7.2]. 5. When finished, click on Save. Print if required when prompted. Note that you should check the
printed copy prior to saving. Once saved the finalised purchase order can no longer be edited. Notes: (a) Order Delivery dates are auto calculated from lead times if not already populated. (b) The Order Placement Date is set equal to the Dated date. (c) A formal copy of the Purchase Order can be generated into a MS Word document if required from
within the Final Purchase Orders screen. (d) Purchase Orders can also be finalised using the Finalise PO button from within the Draft Purchase
Orders screen. Use of this option requires Read/Write access to the Utility to Finalise a PO.
7.8 Viewing a Finalized Purchase Order A finalised purchase order can be viewed at any time but editing is limited to the following fields:
Dated (Effective date of the Purchase order)
ETA Site date
Order Delivery date
Lead times
Order Placement Date (Additional Information tab)
Plus all other fields on the Additional Information tab 1. From the Purchasing menu, select Purchase Orders and then Final. 2. At the Purchase Orders - Final screen, find the required Purchase order using the navigation
buttons, the Find button or the Filter button, which ever method the user prefers. 3. Once the Purchase Order details are displayed, they can be printed using the Print button.
4. It is also possible to generate the Finalized Purchase order into a MS Word file using the word
button on the toolbar. The template used for this is mmpo.dot which can be customized by the customer if required (See also Section 16.3).
5. Click on the Close button to return to the Dashboard. Notes: (a) Use the Modify Display of Stockcode attributes option displayed when right clicking anywhere in
the lower grid to add additional Stockcode attributes from the Stockcode library to be displayed in the grid.
(b) Use the Display Substitutes button (if highlighted in red) to display information about any line items where the Stockcode purchased was purchased as a substitute for the material actually specified in the Bill of Materials. [See also Section 7.14.01].

Chapter 7 - Purchase Orders
Document No: UGD-MM-002 Rev: 5P QMS User Guide Page 77 of 164
7.9 Revising a Purchase Order Once a Purchase order has been finalised rates and quantities cannot be edited. However it can be revised. This enables QMS to maintain a complete Audit trail on changes to Purchase Orders including how they changed and who changed them. To Revise a Purchase Order: 1. From the Purchasing menu, select Utilities and then select Revise a Finalised Purchase Order. 2. Select the Purchase Order Number to be revised using the drop down list. 3. Enter a new revision number and Revision Date. 4. Select the Revised by person from the address book. 5. By changing any of the values the lower grid for any line item, the Revision number for that line item
will change to the new revision entered at step 3. Unchanged line items will remain at the previous revision.
Notes: (a) If the changes are reversed, the line item revision reverts to the original revision number.
(b) By positioning the mouse in the first column on the space between the first line item and the
second line item (adjacent to box b. above), the horizontal grid height can be increased and a scroll bar used in the Title field if required.
6. New rows can be added when revising Purchase Orders by using the Add Item button. 7. Items can be deleted using the delete button but only if there have been no deliveries made against
the item. 8. After modifications to the Purchase Order are complete, click Save and Print or Cancel. Notes: (a) Make sure the revised order is checked before it is saved as the revised order cannot be edited
after saving, just further revised. (b) It is possible to split a line item on the Purchase order without having to revise the Purchase Order.
[See Section 7.10]. (c) It is possible to view all revisions of a purchase order using the Purchasing menu, Purchase
Orders, History option. (d) Purchase Orders can also be Revised from within the Final Purchase Orders screen using the
Revise PO button. Use of this option requires Read/Write access to the Utility to Revise a PO.
7.10 Splitting a Finalized Purchase Order Since a single line item on a Purchase Order can only have a single Order Delivery, ETA Site and ROS Date, it is sometimes necessary to have the same Stockcode appear twice on the same purchase order. For example if 10 Valves of the same type are purchased with 5 to be delivered on one date and a further 5 a week later, this will require two line items on the Purchase Order. The option to Split a Finalized Purchase Order is used when the need to have two line items for the same Stockcode becomes necessary only after the order has already been finalized. For example an order for 10 valves was only partially delivered and you want to split the line item for them to set a new set of dates for the balance.

Chapter 7 - Purchase Orders
Document No: UGD-MM-002 Rev: 5P QMS User Guide Page 78 of 164
To split a line item on a Finalized Purchase Order: 1. From the Purchasing menu, select Purchase Orders and then Final. 2. At the Purchase Orders - Final screen, find the required Purchase order using the navigation
buttons, the Find button or the Filter button, which ever method the user prefers. 3. Once the Purchase Order details are displayed, click on the Line item to be split and click the Split
PO button. 4. Enter the Qty for the additional line item to be added (the original line item will have it’s quantity
reduced automatically to suit) and click OK.
5. Click the Save button and Yes when prompted to save the changes. 6. Click on the Close button to return to the Dashboard. Notes: (a) It is not possible to increase or decrease quantities using Split PO. In this case the Order must be
Revised.
7.11 Deleting a Finalized Order A Finalized Purchase Order can be deleted only if no material has been received (delivered) against it. To Delete a Finalised Purchase Order: 1. From the Tools menu, select Cascade Deletion. 2. Select Purchase Orders Final from the Category drop down list. 3. Select the Purchase Order Number(s) to be deleted using the mover arrows. 4. Click the Delete button.
7.12 Closing a Finalized Order There comes a point with a Purchase order that it needs to be closed completely. A closed Purchase order cannot be revised. 1. From the Purchasing menu, select Utilities and then select Close a Finalised Purchase Order.
2. Select the Finalized Order to be closed. 3. Select the required Do not Allow options. You can prevent further revision of the order while still
allowing materials to be delivered if required. 4. Click the Save button and then click the Close button to return to the Dashboard.
7.13 Currencies QMS supports the use of multiple currencies. All currencies are converted back to a single currency which will normally be the currency of the country in which QMS is being used. To set up the currencies and their conversion rates: 1. From the Purchasing menu, select Currencies.

Chapter 7 - Purchase Orders
Document No: UGD-MM-002 Rev: 5P QMS User Guide Page 79 of 164
2. Click the New Currency button to add a new row to the above table.
The Conversion rate (Contract) is used to define a contractual conversion rate between yourself and your client if required. The Conversion rate (current) is used to define the current rate. Note that the Effective date field enables the current rate to be changed as often as required without losing the information on previous rates.
7.14 Using Substitutes
7.14.01 Purchasing Substitute Materials If the required material for purchase (as defined in the Bill of Materials) is not available for purchase but an approved alternative (a substitute) is the options are: Revise the BOM: The preferred option is to revise the BOM so that BOM reflects the item that is actually purchase. Use Substitutes: With this option you indicate that the purchased item is a substitute for the BOM Item. To define that a purchase item is a substitute for an item in the BOM: 1. Access the Purchase Order from within the Draft Purchase Order screen. 2. Click the Display Substitutes button (a column headed Substitute will then be displayed in the
grid) 3. For a line item, select the required Substitute Stockcode from the drop down list of acceptable
Substitute Stockcodes. 4. The selected substitute Stockcode becomes the “Stockcode” on the Purchase Order and the
original Stockcode (the required Stockcode as defined in the BOM) is move to the Substituted For column.
Notes: (a) See also Section 4.2.02 on Defining Substitute Materials for how to define the list of acceptable
substitutes for a Stockcode. (b) It is possible to use the +Add option the drop down list of Substitutes to define a new acceptable
substitute Stockcode on the fly within the Draft PO screen. (c) Use Standard Reports 49D and 49E to compare BOM quantities with purchased quantities taking
into consideration the purchase of substitutes. (d) Substitute definitions can be included when importing Purchase Orders using the provided Import
Templates [see Section 18.1.04].
7.14.02 Importing Substitute Materials from a Bid Document If the Bid Document module has been used to obtain vendor prices and the submitted Vendor Pricing Schedule (VPS) includes information on alternative offers (substitutes), this can be used as a way of importing the substitute information into the Purchase Order via the Purchase Order Wizard – from a Bid Document [see Section 7.5 – Note (a)]. In this case the following fields (columns) must be in the MS Excel Vendor Pricing Schedule: Substitute: This value is imported as the Stockcode for the Purchase Order line item Stockcode: This value is imported into the SUBSTFOR value for the PO Line item (i.e. it is the
Stockcode being substituted). Vendor Offer: This value is imported as the description for the PO Line item. Offer Qty: This value is imported as the Quantity for the PO Line Item.

Chapter 7 - Purchase Orders
Document No: UGD-MM-002 Rev: 5P QMS User Guide Page 80 of 164
Notes: (a) The value of the Substitute will also be imported into the Stockcode library if not already present
there with the TITLEA (description) value equal to the contents of the Vendor Offer column. (b) The Stockcode library will also be updated with the fact that the Substitute value in the VPS is a
valid substitute for the Stockcode in the VPS.
7.15 Purchase Order Reports Purchase Order related reports are located within the Standard Reports listing [see Section 14.1.01].
Report No.
Title
Description
Report Group: 04 – Purchase Orders - Draft
31 by Order No Prints details of each draft purchase order in a formal format for inclusion in the documentation provided to the supplier.
31S Draft PO Register Prints a summary register of Draft Purchase Orders.
Report Group: 04 – Purchase Orders - Draft
32 by Order No - Detailed As per Report 31 but without the formal format.
33 by Stockcode Prints the details sort by Stockcode of the draft purchase orders placed that include the Stockcode.
Report Group: 04 – Purchase Orders - Final
41 by Order No As per Report 31 but for Finalised Purchase Orders
41S Finalised PO Register As per Report 31S but for Finalised Purchase Orders.
42 by Stockcode As per Report 33 but for Finalised Purchase Orders
43 by Order No - Incl. Received details
As per Report 41 but includes details of the materials received against each purchase order.
44A By Cost Code – Summary
Summary report showing total ordered value (spent amount) per cost code.
44B By Cost Code – Detailed
As per report 44A but listing the relevant values per order per cost code.
45 Shipment Details Prints a report of the Shipping Details for each Purchase Order.
46 by Stockcode - Summary
This is a useful Expediting Report that prints by Stockcode the details of purchase order quantities that are outstanding to be delivered, overdue or due within the next X days. It can also show only over delivered items and can exclude Closed Purchase Orders if required.
47 by Order No - Summary As per Report 46 but sorted by Purchase Order Number
47A By Order No – Summary with Weights
This report details a register of Purchase Orders showing the Weight of material both ordered and delivered. The Weight is calculated using the Weight value defined in the Stockcode library for each of the purchased Stockcodes.
47B By Order No – Summary – Ordered <> Received
This report details all Purchase Order line items where the Ordered Quantity is not equal to the Received Quantity. Hence it shows material not fully delivered and/or material over delivered.
47C By Order No – Including Shipment Details
This report details all Purchase Order line items and includes for each line item details of all shipments made (via the Shipping module) with Shipment and Not Shipped quantities.
48 Order Revisions This is a formal report for a select Purchase order and Revision to provide to the supplier when placing revisions to purchase orders. It shows only the changes required.
49A Material Not Ordered – By Stockcode
A report comparing the Total BOM Qty against the Total Ordered Qty and identifying material that is Not ordered. Options when running the report include: All Materials; Shortages Only; Over Ordered Only.
49B Material Not Ordered – By Title
As per Report 49A but sorted by Stockcode Title.
49C Material Not Ordered – By BOM and Stockcode
This report is as per report 49A but the user can select to run it for only one, or selected Bills of Materials rather than All Used Bills of material which is the case on report 49A.

Chapter 7 - Purchase Orders
Document No: UGD-MM-002 Rev: 5P QMS User Guide Page 81 of 164
Report No.
Title
Description
49D Material Not Ordered – Including Substitutes – Detailed
This report is as per report 49C but takes into consideration when calculating material not order the case where a substitute material has been purchased in lieu of the required material. The report prints down BOM Document and line item level detail.
49E Material Not Ordered – Including Substitutes – Summary
This report is as per report 49D but is summarised by Stockcode.
Report Group: 05 – Purchase Orders - History
51 by Order No As per Report 41 but for all revisions of the Finalised Purchase Order.
51S Finalised PO History Register
As per Report 41S but for all revisions of the Finalised Purchase Order.
52 by Stockcode As per Report 42 but sorted by Stockcode.
There are also a series of X-Tab Reports related to Purchase Orders. These are located within the X-Tab reports listing [see Section 14.2]
Report No.
Title
Description
X01 Purchase Order Revision History – By Stockcode
This prints a report with Stockcodes listed down the left of the page and in the columns across the page are shown the Order Numbers placed. Under each order number and against each Stockcode is the Quantity ordered where applicable.
X02 Purchase Order Revision History – By Stockcode
This report prints for a selected Order Number the Stockcode details down the left with the Quantities at each Revision to the Order listed across the page.


Document No: UGD-MM-002 Rev: 5P QMS User Guide Page 83 of 164
Chapter 8 – Expediting and Shipping
8.1 Overview
8.2 Expediting Schedule 8.2.01 Expediting Activity Library 8.2.02 Expediting Schedule 8.2.03 Auto Alerts
8.3 Updating Forecast Delivery Dates
8.4 Using Expediting Groups
8.5 Tracking Shipments 8.5.01 Shipping Details 8.5.02 Shipping Transactions
8.6 Expediting and Shipping Reports

Chapter 8 – Expediting and Shipping
Document No: UGD-MM-002 Rev: 5P QMS User Guide Page 84 of 164
8.1 Overview Expediting is the process of monitoring the status of purchase orders and contracts with suppliers to ensure that materials will be delivered as per the required delivery dates. Expediting should be done on a routine basis and QMS assists by maintaining a history of expediting actions, plus provides a range of expediting reports to ensure expediting is focused on high priority materials.
8.2 Expediting Schedule
8.2.01 Expediting Activity Library The Expediting Schedule in QMS is a facility to manage a schedule of Expediting and/or Inspection activities in relation to a Purchase Order. The Expediting Activity Library is used to define a standard list of Expediting and Inspection activities that can then be imported on a per purchase order basis as required. 1. From the Purchasing menu, select Expediting and then Expediting Activity Library. 2. Click the New button on the toolbar to define the first activity. 3. Enter a Description against the Activity ID that defaults. 4. Allocate a Type to the Activity (choose between Expediting and Inspection) 5. Select the responsible person for the activity 6. If the Activity can be considered as a Hold Point then select Y in this column. 7. Enter a default Percentage complete to be earned when this activity is completed. 8. Repeat Steps 2 to 7 for additional activities. 9. Click the Close button when done.
8.2.02 Expediting Schedule The Expediting Schedule is where the Expediting and/or Inspection activities in relation to a Purchase Order are defined.
1. From the Purchasing menu, select Expediting and then Expediting Schedule. 2. Select the required Purchase Order. 3. Click the Edit button. 4. Use the Import Activities button and at the mover window that appears, click on one or more
activities listed from the Standard Library to import against the purchase order and click OK. 5. Use the Add Item button to add any Purchase Order specific Expediting/Inspection activities. 6. For each activity you can define:
The type of activity (choose either Expediting or Inspection).
The Responsible Person (Who By).
The Scheduled, Forecast and Actual Dates for the activity.
Whether or not the activity is a Hold Point.
The Percentage Complete.

Chapter 8 – Expediting and Shipping
Document No: UGD-MM-002 Rev: 5P QMS User Guide Page 85 of 164
Notes: (a) It is also possible for each Activity to attach one or more external files (eg an Inspection Report)
using the Edit/View link. (b) Using the Auto Alerts function (see next Section) the system will send out auto reminders of both
upcoming and overdue expediting activities by email to the responsible persons (and a nominated CC person if required).
(c) On completing an Expediting activity the responsible person should update the Actual date and Percentage complete which is a manual process or following Steps 1 to 3 above and then updating the Actual date against the relevant activity.
(d) Expediting activities can be created automatically by the system based on the Next Action date when updating Forecast Delivery dates – See Section 8.3.
(e) There are links to outstanding and overdue expediting activities based on both Schedule and Forecast dates, plus a link to upcoming activities at the Dashboard based on the Project Statistics Dashboard view. [Refer Section 3.7].
8.2.03 Using Auto Alerts The Auto Alerts function is a utility to auto generate reminder emails based on the Expediting schedule (see Section above). 1. From the Tools menu, select Send Auto Alerts. 2. Choose to send the Alert emails based on either Scheduled or Forecast Dates in the Expediting
Schedule. 3. Select the Alert types to send:
Reminders for Actions due in the next X days
Overdue Alerts 4. Click the Send button. Notes: (a) Ensure you have defined the email client you are using (eg Lotus Notes) via Tools\Options\Program
Defaults. (b) If it is required to CC all Alerts to say the Procurement Manager, Expediting Manager or Project
Manager, this can be defined via the Project Settings [See Section 3.2.02]. (c) It is possible to view the email alerts that the system generates prior to them being sent. (d) Alerts are automatically batched so that users receive one email only rather than one email per
action.
8.3 Updating Forecast Deliveries
Updating at a Summary Level Expediting is generally performed by an expeditor calling a supplier by telephone. Ideally the Expeditor has the QMS expediting screen open during the conversation with the supplier to enable the most accurate recording of expediting information. The following steps are for recording the latest information in regard to the status of a purchase order at a summary level. i.e. all comments and dates recorded are in relation to the total order rather than individual line items. 1. From the Purchasing menu, select Expediting and then Update Forecast Deliveries. 2. Select the required Purchase order from the drop down list. The screen then displays the line item
details for the selected purchase order. The individual fields are:

Chapter 8 – Expediting and Shipping
Document No: UGD-MM-002 Rev: 5P QMS User Guide Page 86 of 164
Field Description
Item # Line Item Number.
Stockcode Item Stockcode.
Title Stockcode Description
Quantity Current quantity of item on order.
Received Quantity received to date (this value is generated from the delivery dockets and cannot be adjusted here).
Last Received Date last delivery received (this value is generated from the delivery dockets and cannot be adjusted here).
Order Delivery Contractual Delivery date as per the Purchase Order.
Promised Delivery
Promised (Forecast) Delivery Date. This value is generated using the expediting recording window in the lower half of the screen. It cannot be entered directly against a line Item.
Diff The difference in days between the Order Delivery and Promised Delivery Date.
ETA Site The Expected Arrival on Site date. This value is generated using the expediting recording window in the lower half of the screen. It cannot be entered directly against a line Item. Note that it may differ from the Promised Deliver date if for example the delivery from the Vendor is Ex-Works.
ROS Date The Required on Site Date (for information only).
Diff The difference in days between the ETA Site Date and ROS Date.
Group ID The ID of the Expediting Group the Line item belongs to (if Expediting Groups are being used [See Section 8.4]).
3. Now click the Edit button to get into Edit mode.
4. Enter the Date. This is date that the expediting data is obtained. 5. Check the option to View General Only is ticked. This is the default setting. 6. Click on the Add new Item button to record the expediting information obtained on this date in
relation to the total order. 7. The following fields are available for use by the expeditor:
Field Description
Dated This defaults automatically.
Item This defaults to NONE because this is a global expediting update relating to the purchase order in general.
Vendors Comments
This is a field to record comments from the Vendor. To enter information in this field, click on the Details button in the adjacent column.
Promised Delivery
This is the promised (forecast) delivery date agreed between the vendor and the Expeditor.
ETA Site The Expected Arrival on Site date.
Expeditors Comments
This field is for use by the Expeditor to make any other notes. To enter information in this field, click on the Details button in the adjacent column.
Next Contact This field is used to schedule the Next Contact date with this vendor.
Edit Use the Edit button at the right of each row in the lower grid to update the Promised Delivery and ETA Site Dates and also to control the following options:
Apply changes to all line items (default) – Updates the Promised Delivery and ETA Site dates against all line items on the PO.
Overwrite existing values (default)
8. Click on the Save button to save the entries made.

Chapter 8 – Expediting and Shipping
Document No: UGD-MM-002 Rev: 5P QMS User Guide Page 87 of 164
Updating Forecast Dates at a Detail Level Expediting at line item level against a purchase order can be done in addition to, or instead of, expediting at a summary level. 1. Un-check the option to View General Only by clicking on the check box. 2. In the upper half of the screen, select the line item to record expediting information against. The
navigation buttons can be used to easily locate the required Item on larger orders.
Alternatively see using the Bulk Update Dates button in Note (d) below. 3. Click on the Add new Item button to record the expediting information obtained on this date in
relation to the selected item. 4. The expediting data is recorded in exactly the same way as described above on summary level
expediting with the following exceptions:
The Item number is now recorded as the selected item number. All expediting information entered relates to this item only.
5. Repeat steps 2 to 4 for other line items as required. Notice that expediting information relating to a
line item is only displayed when that line item has been selected. 6. Click on the Save button to save the entries made. Notes: (a) Use the tick box filter options at the top of the screen to control the display of line items for
purchase orders with very large numbers of line items. The options are to display only items that are not delivered, items that are partly delivered or all items.
(b) To view a history of expediting entries made, check the box adjacent to View History by clicking on it. This displays all entries that have been made, including the current, against this line item.
(c) If the View General only box is activated, the history displayed is in relation to summary level
expediting. (d) Use the Find button to the right of the Order No. drop down list to select an order to expedite when
managing a large number of purchase orders.
(e) Use the Bulk Update Dates button at the top of the screen in the case where there are large numbers of line items on the Purchase Order to be updated with a selection of Promised Delivery dates. For example there may be 100 line items on the Purchase Order, 50 of which are Promised on one date and 50 on another date. In this case, after clicking the Bulk Update Dates button enter the Promised Delivery and ETA Site dates at the window that appears, and then select the PO line items that these dates apply to using the Mover buttons (to move the selected line items from the left to the right window). Then click OK .
(f) A new expediting activity can be created automatically by the system based on the Next Action date
if this option is enabled via Tools → Options → Project Settings and ticking the box Add expediting comments as activities to the Expediting Schedule.
(g) Use the print button to print an Expediting Detail report. (h) An expediting entry can be deleted using the Delete Item button at the bottom of the screen.

Chapter 8 – Expediting and Shipping
Document No: UGD-MM-002 Rev: 5P QMS User Guide Page 88 of 164
8.4 Using Expediting Groups Expediting Groups can be used to enable grouping together one or more items across one or more purchase orders for the purpose of expediting. To create a new Expediting Group: 1. From the Purchasing menu select Expediting and then Update Forecast Deliveries. 2. Click on the Exp.Groups button.
3. Use the New Group button to create a new Group. 4. Enter a Title for the new Group. 5. Use the Add PO Items to group to select the Items from the first purchase order to include in the
Group. 6. Select the Purchase Order at the Select Expediting Group Items window and use the mover arrows
to select one or more items from the Purchase Order to include in the Group. 7. Click OK to return to the Expediting Groups screen. 8. Repeat steps 5 to 7 for additional Purchase Orders. 9. Click the Save icon when done to return to the Update Forecast Deliveries screen. To update Forecast Deliveries using Expediting Groups: 10. From within the Update Forecast deliveries screen, select the By Expediting Group option at the
top of the screen and then select the required Group from the drop down list.
The updating of Promised Delivery and ETA Site dates is then performed as normal. Notes: (a) A Purchase Order Line Item can only exist in one group. If it is necessary to split quantities from a
single purchase order line item across multiple groups this can be achieved by Splitting the Purchase Order line item [See Section 7.10].
(b) It is possible to edit a group and add/remove items at any time. (c) Expediting Groups can be deleted via Tools\Cascade Deletion [See Section 17.3.03].
8.5 Tracking Shipments
8.5.01 Shipping Details Shipping details are used in QMS to closely monitor the shipment of materials from the Vendor to the final destination where they are received by the Project via the QMS Deliveries module. Use of the Shipping module is optional and is based on manual update of information. To create Shipping Details: 1. From the Purchasing menu, select Shipping. 2. Click on the New Shipment button and enter a Shipment number when prompted and click OK. 3. Fill in the remaining details in the upper part of the screen. These include Scheduled, Forecast and
Actual ETD (Estimated Time Departure) Dates relating to the Origin and ETA (Estimated Time Arrival) Dates relating to the Final Destination.
4. Click the Add Item button

Chapter 8 – Expediting and Shipping
Document No: UGD-MM-002 Rev: 5P QMS User Guide Page 89 of 164
5. Select a Purchase Order number from the drop down list (or use the Find button). 6. Select from the listed Stockcodes using the mover buttons which items are included on this
shipment and click OK when done. Items from multiple purchase orders can be included on the same shipment.
7. Adjust the Shipment Quantities if they differ from the Purchase Order Quantities. 8. Click the Save button on the toolbar and click Yes when prompted to save the shipment details. Notes: (a) Shipment methods are maintained via the Purchasing menu, select Configuration Tables and then
Shipment Methods. (b) It is also possible to record for each item on the shipment:
Inspection Release Certificate Number; Inspected Qty; Test Required; Final Inspection Qty
(c) To monitor Shipments between intermediate destinations between the Origin and Final Destination,
use the Shipping Transactions tab (see next Section).
(d) Use the Additional Information tab to capture additional information about the shipment. Contact QA Software for details on how to add additional fields to this screen.
8.5.02 Shipping Transactions If tracking of Shipments is required in more detail than simply monitoring the departure from the Point of Origin and Arrival at the Final Destination then the Shipping Transactions tab at the Shipment Details can be used to allow tracking of a shipment from/to up to 8 intermediate destinations in addition to the Original and Final Destinations. 1. From the Purchasing menu select Shipping. 2. Locate the Shipment Number and click on the Shipping Transactions tab. 3. Click the Edit button and enter the Intermediate Destination Locations for each destination to be
tracked. 4. For each Intermediate Destination enter Scheduled and Forecast Dates for the Arrival and
Departure. 5. Use the Attachments button to attach one or more external files (such as a packing list) to the
Shipment details. Notes: (a) The Actual dates for each arrival and departure must be updated manually.
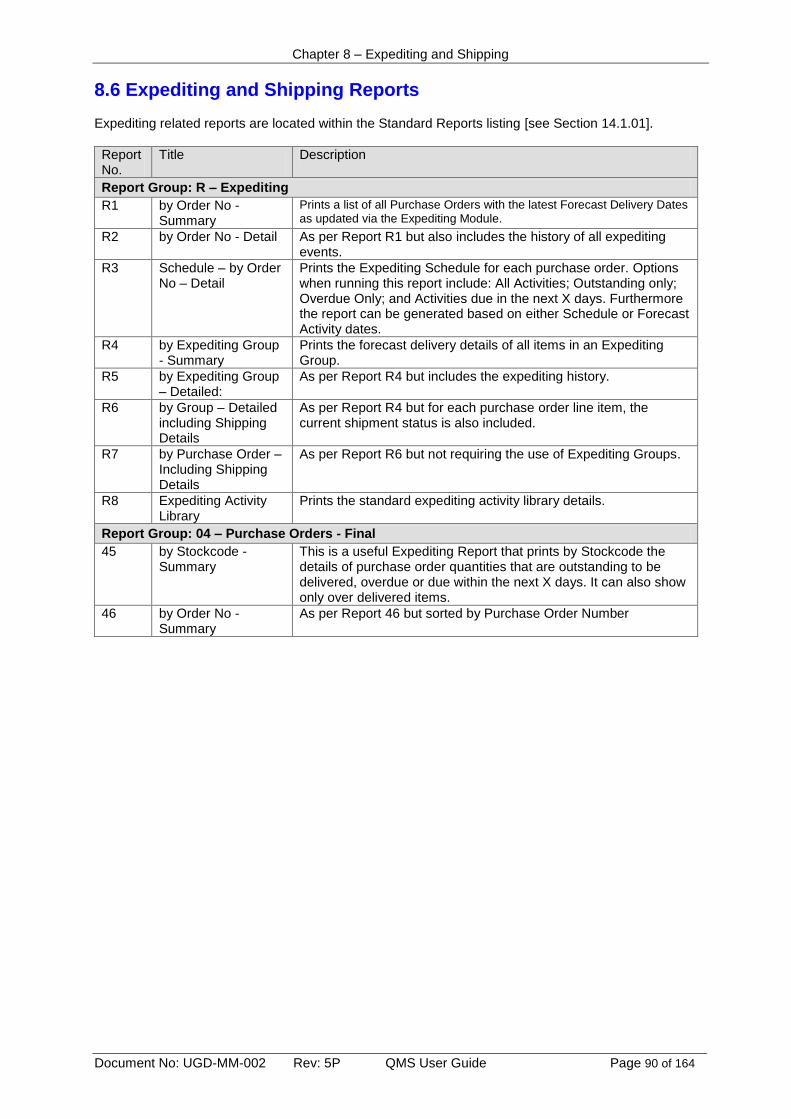
Chapter 8 – Expediting and Shipping
Document No: UGD-MM-002 Rev: 5P QMS User Guide Page 90 of 164
8.6 Expediting and Shipping Reports Expediting related reports are located within the Standard Reports listing [see Section 14.1.01].
Report No.
Title
Description
Report Group: R – Expediting
R1 by Order No - Summary
Prints a list of all Purchase Orders with the latest Forecast Delivery Dates as updated via the Expediting Module.
R2 by Order No - Detail As per Report R1 but also includes the history of all expediting events.
R3 Schedule – by Order No – Detail
Prints the Expediting Schedule for each purchase order. Options when running this report include: All Activities; Outstanding only; Overdue Only; and Activities due in the next X days. Furthermore the report can be generated based on either Schedule or Forecast Activity dates.
R4 by Expediting Group - Summary
Prints the forecast delivery details of all items in an Expediting Group.
R5 by Expediting Group – Detailed:
As per Report R4 but includes the expediting history.
R6 by Group – Detailed including Shipping Details
As per Report R4 but for each purchase order line item, the current shipment status is also included.
R7 by Purchase Order – Including Shipping Details
As per Report R6 but not requiring the use of Expediting Groups.
R8 Expediting Activity Library
Prints the standard expediting activity library details.
Report Group: 04 – Purchase Orders - Final
45 by Stockcode - Summary
This is a useful Expediting Report that prints by Stockcode the details of purchase order quantities that are outstanding to be delivered, overdue or due within the next X days. It can also show only over delivered items.
46 by Order No - Summary
As per Report 46 but sorted by Purchase Order Number
Document No: UGD-MM-002 Rev: 5P QMS User Guide Page 91 of 164
Chapter 9 - Material Receipts
9.1 Overview
9.2 Using Locations
9.3 Generating a Delivery Docket from a Purchase Order
9.4 Manual entry of Delivery Dockets
9.5 Generating a Delivery Docket for an Unknown Order
9.6 Assigning a Purchase order to a Delivery Docket
9.7 Delivery Docket Maintenance
9.8 Returns of Delivered Materials
9.9 Delivery Approvals
9.10 Overages, Shortages, and Damages (OS&D)
9.11 Delivery Reports

Chapter 9 - Material Receipts
Document No: UGD-MM-002 Rev: 5P QMS User Guide Page 92 of 164
9.1 Overview A record of materials received can quickly be created in QMS in one of three ways:
Generated automatically from a purchase order using a wizard.
Manual direct entry
Generated without reference to a purchase order In normal circumstances, the purchase order details for a delivery of material will be recorded in QMS prior to delivery of the material itself. In this case the delivery record is processed using a wizard against the purchase order details which minimizes potential errors and saves time. Alternatively for small deliveries against large purchase orders, direct entry of the delivery docket can be used (and may be faster). If the shipping module is being used, deliveries can even be imported direct from Shipment details. In some cases, materials may be received prior to the purchase order details being processed in QMS. In this latter case, the delivery docket is first created against an Unknown order and later assigned to the correct order when this information becomes available. Returns of delivered material back to the Vendor are handled when required via a Wizard for this purpose.
9.2 Using Locations Locations in QMS are used to identify:
Where material is received (delivered) to.
Where it is moved from and moved to.
Where it is issued from. Locations are defined as one of two types:
Standard Locations: Material can be Delivered to, Moved from/to, and Issued from such locations.
Temporary Locations: Material can be Delivered to, and Moved from/to such locations but not generally Issued from temporary locations unless Issuing from Temporary Locations is enabled via the Project Settings. [See Section 3.2.02].
With Standard Locations, when material is delivered into such a location the relationship back to the delivery docket and purchase order is not maintained. I.e. the material becomes part of a general pool of material at the location that can be moved and issued as needed to meet the requirements of the BOM. In QMS materials are not purchased for a specific document but rather to meet the requirements of the BOM and materials in stock are available for use for any part of the project that requires them. With Temporary Locations, the traceability back to the purchase order and delivery docket is maintained once the material is delivered. If the material is moved or Issued (if enabled) from a temporary location it carries with it this relationship to the PO and Delivery Docket until it is moved to a Standard Location at which point the relationship is broken. The primary purpose of temporary locations (the use of which is optional) is to enable for example the setting up of locations for a Receiving Area, a Quarantine Area, and an Inspected Area. The Receiving and Quarantine Areas would be Temporary Locations and hence maintain the link back to the PO and Delivery. However material cannot generally be issued from these locations. The Inspected Area would normally be a Standard Location to which material is moved after inspection from the Receiving area and from which it is then available for Issue.

Chapter 9 - Material Receipts
Document No: UGD-MM-002 Rev: 5P QMS User Guide Page 93 of 164
If Issuing Material from Temporary Locations is enabled (not the default setting in QMS) then when issuing material from Temporary locations the user must select from the available list at the location the required Purchase Order + Delivery docket combination to deduct the Issue Qty from which enables the Issued Qty to be linked back to Delivery Docket (and the associated traceability information captured at the time of receipt). This is as opposed to the system simply auto-deducting the Issued Qty from the available In-Stock Qty when issuing from Standard Locations. [ See Section 12.2 for more on Issuing material from Temporary Locations]. Notes: (a) Locations are maintained via the Configuration Tables under the BOM Menu. (b) Material cannot generally be issued from a Temporary Location unless this option is activated via
the Project Settings. (c) It is possible to control the Movement of material from Temporary locations via the Approval tick box
on the deliveries screens (see Section 9.9) (d) Stock takes cannot be performed at Temporary Locations. (e) Material cannot be moved from a Standard Location to a Temporary Location. (f) The table below details how the Location types affects QMS Transactions:
Transaction Type
FROM Location Type
TO Location Type
Transaction Possible (Y/N)
Selection via PO# Possible (Y/N)
Delivery Standard Y N/A
Delivery Temp Y N/A
Movement Temp Temp Y Y
Movement Temp Standard Y Y
Movement Standard Temp N N/A
Movement Standard Standard Y N
Issue Temp Y* Y
Issue Standard Y N
*Only if Enabled via Project Settings.
9.3 Generating a Delivery Docket from a Purchase Order On receipt of material from a supplier, a delivery docket must be generated in QMS to record the receipt of the material in the system. Without this information, the remaining downstream modules of QMS cannot operate. Additionally the upstream modules, purchase orders and expediting, also required the Delivery Docket data. Processing of delivery dockets should be done daily and discrepancies sorted out promptly. To create a delivery docket using the Delivery Wizard: 1. From the Deliveries menu, select Delivery Wizard, and then From an Order. 2. Click Next at the welcome screen of the wizard. 3. Locate the purchase order number for the delivery and select it using the select tick box.
Tip: Click on the column headings to sort the purchase order information as required or use the Find or Filter buttons to locate an order from a long list.
4. Click the Next button and enter the Delivery Docket number.
The delivery docket number is generally an internal Material Receiving Report (MRR) Number. 5. Select the Received at location and enter the Received Date for the material (both mandatory).

Chapter 9 - Material Receipts
Document No: UGD-MM-002 Rev: 5P QMS User Guide Page 94 of 164
6. Enter a Supplier Reference, generally the supplier’s quoted dispatch or packing list number. 7. Enter the Accepted Quantity received against each line item on the purchase order. This is the
quantity that will go into stock at the receiving location,
Additional columns relating to managing Overages, Shortages and Damaged Materials can be populated if required. These are explained in Section 9.10 below. The status against each line item on the purchase order will adjust automatically based on the quantity received.
Part If the quantity received entered is less than the purchase order amount.
All If the quantity received entered is equal to the purchase order amount.
Over If the quantity received entered is greater than the purchase order amount.
None If the quantity received is zero.
To quickly receive the total quantity ordered for any line item, double click in the Accepted Qty field.
Tip: You can resort the order in which the items are displayed on the screen by clicking on the column headers.
8. Click the Next button and you will be shown only items on the Purchase Order that have been
received with this delivery. 9. Click the Next button and at the final screen of the wizard, click on the Print icon to generate a hard
copy of the docket. 10. Click Finish when done. Notes: (a) Partial deliveries are supported by QMS. An unlimited number of delivery dockets can be created
for the same purchase order. (b) Use the Filter button at Step 7 to filter for specific Stockcodes on a large purchase order. (c) Select Deliveries via Shipments: This option can be used at Step 4 above to import the delivered
quantities based on one or more Shipments (requires use of the Shipping module). Any item on the shipments selected will be listed on the screen and the Packing list quantities will be set to the Sent quantities on the shipments. The user must still enter the Accepted quantities as normal.
(d) Accepted = Order Qty: This option at the bottom of the screen can be used to set the Accepted Qty equal to the Ordered Qty for all currently selected line items.
(e) After processing the delivery the material will appear In-Stock at the Received at Location. (f) It is possible to restrict the movement of material being received at a temporary location by un-
ticking the Approved tick box – See Section 9.9 for more on this. (g) Use the tick box on the final screen of the wizard labelled I have more deliveries to create to
return to the first screen of the wizard. (h) At Step 7 above it is possible to enter a number of attributes against each line item being delivered
for information only. These include:
Field Description
Approved Used to restrict the movement of material been received until ticked. (Applicable only for Temporary Locations).
Approved for Payment
A flag to indicate whether or not the delivered Qty for the line item is Approved for Payment. This field is linked to the Approved for Payment tick box in the upper part of the grid also so that all rows can be ticked (if currently all un-ticked) or un-ticked (if currently all ticked) with a single click.
Batch # A Batch Number (for traceability)
Heat Number A Heat Number (for traceability)
OSD Number Overage/Shortage/Damaged (OSD) Reference Number if applicable.

Chapter 9 - Material Receipts
Document No: UGD-MM-002 Rev: 5P QMS User Guide Page 95 of 164
Field Description
OSD Date OSD Date
General Note Descriptive field – can be used on OSD Report.
RFI# An RFI #
MRIR# A Materials Received Incoming Report Number
Cert Number A Certificate Number
Plate A Plate Number
Tag # A Tag Number
Bin # Area within the Location where the material is being stored.
Deviation Tick the box if the material deviates from the specification
Deviation Description
A Description of the Deviation
NCR # An NCR #
Trace Number A Trace Number (for traceability)
Rejected Qty Used to indicate the Qty received that has been rejected.
(i) If the material delivery contains the same item with different heat numbers, the line item can be split
into multiple line items using the Split Line Item button to enable the different heat numbers as required.
(j) If a Stockcode being delivered is not contained on the Purchase Order, the Purchase Order must be revised to include this item before the delivery can be processed.
(k) The Delivery Docket can be generated into an MS Excel file if required. See Section 9.7 for more on this.
9.4 Manual entry of Delivery Dockets To enter a Delivery Docket directly into the system without using the Delivery Wizard: 1. From the Deliveries menu, select Deliveries. 2. Click the New Delivery button. 3. Enter the Delivery Docket when prompted and click OK. 4. Enter the Date Received and the Received at Location. 5. Enter the Supplier Reference. 6. Select the Purchase Order Number. 7. Click the Add Item button. 8. Select the Stockcodes from the Purchase Order that are on the delivery using the mover window so
that these are added to the grid 9. Enter the Quantity received in the Accepted Quantity column.
See also Section 9.10 below for details on using the Packing List, Overage, Shortage, Damage and OS&D report columns.
10. Click the Save button when done and Yes when prompted to save the changes. Notes: (a) After processing the delivery the material will appear In-Stock at the Received at Location. (b) Additional information such as heat numbers can be captured if required. See Note (g) in Section 9.3
above. (c) Use the Attachments button to attach (link) one or more external files to the Delivery Docket.

Chapter 9 - Material Receipts
Document No: UGD-MM-002 Rev: 5P QMS User Guide Page 96 of 164
(d) It is possible to add additional Stockcode attributes from the Stockcode library to be displayed in the lower grid of the Deliveries screen by right clicking anywhere in the lower grid and selecting Modify Display of Stockcode attributes.
(e) The Delivery Docket can be generated into an MS Excel file if required. See Section 9.7 for more on this.
9.5 Generating a Delivery Docket for an Unknown Purchase Order In certain circumstances, deliveries may be received and for one reason or another, there is no entry in the purchase order file. In this case it is not possible to generate the delivery docket by simply entering quantities received against order lines items as described above. Instead the delivery is first recorded by creating a delivery docket against an “UNKNOWN” purchase order and later, when the relevant purchase order details have been processed, the purchase order is assigned to this delivery docket. To create a delivery docket against an Unknown Order: 1. From the Deliveries menu, select the sub-menu Delivery Wizard, and then select From an
Unknown Order. 2. Enter the Delivery Docket number. 3. Enter the Date Received and the Received at Location. 4. Enter the Supplier Reference. 5. Select the name of the supplier of the materials from the Vendor drop down list.
6. Click on the Add Item button to enter the first item received. 7. Enter the Stockcode for the first item received. If a valid Stockcode is entered (validated against the
Stockcode library), the Title, Size and Unit will default. 8. Enter the quantity received in the Accepted Quantity column. 9. Repeat steps 6 to 8 for remaining items to be recorded. 10. When all items have been recorded, click on Print to generate a hard copy of the docket and/or
click on the Save button to save your data. A printed copy of the docket should be filed separately for processing when the purchase order details become available.
9.6 Assigning a Purchase order to a Delivery Docket This utility is used to assign a purchase order number to a delivery docket that has previously been generated against an Unknown Purchase Order. The purchase order must first have been added to QMS. To assign a purchase order to a delivery docket: 1. From the Deliveries menu, select Utilities and then select Delivery Docket - Assign Order No. 2. Click Next at the Welcome screen of the wizard. 3. Select the Delivery Docket number from the drop down list. 4. Select the Purchase Order number from the drop down list.

Chapter 9 - Material Receipts
Document No: UGD-MM-002 Rev: 5P QMS User Guide Page 97 of 164
5. Click Next and at the next screen, un-check the check boxes for selected line items in the Assign field if required.
6. Click Next and at the final screen, click the Finish button for the Assign process to take place. Note, if the Stockcodes on the delivery docket do not all match the Stockcodes on the order that the delivery is being assigned to, the user is given an option to transfer the items that cannot be assigned from the current delivery docket to a new delivery docket if required.
9.7 Delivery Docket Maintenance To view or edit an existing delivery docket: From the Deliveries menu, select Deliveries and use the navigation buttons to locate the required Delivery Docket. The Delivery Docket can be generated into an MS Excel file if required using the XL button on the toolbar. The template being used for this (mmmdd,xls) can be modified if required. See Section 16.3. To delete a delivery Docket: 1. From the Tools menu, select Cascade Deletion. 2. At the Cascade Deletion screen, select the category as Delivery Dockets. 3. Select the Delivery Docket to delete using the mover button and click the Delete button. Notes: (a) Deliveries received at Standard Locations (see Section 9.2) can be deleted at any time.
(b) Deliveries received at Temporary Locations (see Section 9.2) are subject to the following rules:
The Deliver To Location cannot be changed if any of the material delivered has subsequently been moved to another Location.
The Received Qty can be increased.
The Received Qty can be reduced down to the Qty that is currently at the Location (related to the Delivery Docket)
Additional Stockcodes can be added to the Delivery.
The material cannot be moved to another location unless the Approved tick box is ticked. See Section 9.9.
When using Cascade Deletion to delete delivery dockets, if any amount of any item on the delivery docket has been moved to another location, the docket cannot be deleted.
(c) Use the Filter Delivery Details button at the top right of the screen to filter the materials listed in the
lower grid via any of the attributes displayed such as Heat Number or Tag Number.
9.8 Returns of Delivered Material Excess, Incorrect Supply or Damaged material that needs to be returned to the Vendor should (after already having been processed into QMS as an incoming delivery) be returned using a deliver docket generated by the Returns of Delivered Material Wizard. 1. From the Deliveries menu, select Returns of Delivered Material Wizard. 2. Click Next at the Welcome screen and at the next screen, select the relevant Purchase Order. 3. Select the Delivery Docket that the material was received against in QMS (multiple Dockets can be
selected using the Selected button if the material being return was received against multiple deliveries).
4. Click Next and enter a Return Docket # and the Date the material is being returned.

Chapter 9 - Material Receipts
Document No: UGD-MM-002 Rev: 5P QMS User Guide Page 98 of 164
5. Enter a Supplier Reference (optional) and any comments. 6. Now populate the Return Qty column for the items being returned. 7. Click Next and then at the last screen of the wizard, click the Print button to print a Return Delivery
Docket if required. 8. Click the Finish button when done. Notes: (a) Comments can be entered at a line item level for items being returned if required.
(b) The Damaged Qty is populated by default based on the Damaged Qty entered when processing
the original incoming delivery docket (see Section 9.10) and is for information only.
(c) Material can only be returned if it is still in stock at the location it was delivered to in QMS.
(d) To View a list of Dockets that relate only to the Return of Delivered Material, use the Returns of Delivered Material menu option under the Deliveries menu.
9.9 Delivery Approvals An approval tick box is provided on the delivery docket screens at both a summary and line item level to provide an additional and optional level of control for managing the use of materials received until they have been inspected and accepted (Approved). The approval tick box is only active when material is received into a Temporary location. By un-ticking the Approval box, the material stored at a temporary location is prevented from being moved (it is of course already being prevented from being issued by the nature of it being a temporary location). Once the material has been inspected the Approval tick box can be ticked and movement is then enabled. The business rules for the use of the Approval tick box are:
If the Location the material is received at is a Standard Location, Approved = Ticked and cannot be changed.
If the receiving Location for all material on a single delivery docket is a Temporary Location, the Approved value defaults to Ticked but can be Un-ticked at either a summary or per item level.
If Approved = Un-ticked, the material related to the delivery docket cannot be moved (and of course cannot be issued since material cannot be issued from a Temporary location).
9.10 Overages, Shortages and Damages (OS&D) Overages, Shortages and Damages (OS&D) reporting can be performed at a delivery docket line item level within QMS. OS&D reporting relates to Overages and/or Shortages on a specific delivery docket as opposed to over or under supply against the total order quantities. Capturing OS&D data in QMS is optional. When processing the receipt of material only the Accepted Quantity is mandatory and this is the quantity that goes into Stock. To capture OS&D information in addition to the Accepted Qty, then within either the Delivery Wizard or deliveries screen, enter quantities into the following fields as required:
Packing List This is the Quantity that the supplier has indicated they have supplied on their packing list. It defaults to the Accepted Qty but can be manually changed.
Damaged This is any quantity that is Damaged and is manually entered. It is not considered
by the system as received.

Chapter 9 - Material Receipts
Document No: UGD-MM-002 Rev: 5P QMS User Guide Page 99 of 164
Shortages and Overages are then calculated automatically as follows: Shortage This quantity is auto calculated as Packing List Qty less Accepted Qty less
Damaged Qty. Overage This quantity is auto calculated as Accepted Qty less Packing List Qty plus
Damaged Qty. Where there are Shortages, Overages and or Damaged Qty, users can also populate the following columns:
OSD Number: An OS&D Form reference number OSD Date: An OS&D Report Date Generate Note: An OS&D General Comment
Notes: (a) A separate OS&D report Number should be used for each line item on the delivery docket with an
OS&D issue. (b) An OS&D Report can be generated in MS Word by right clicking on the OS&D number against a
line item on a delivery docket from within the delivery dockets screen. (c) The OS&D Report template mmosd.dot can be modified if required to suit a company specific
format (see Section 16.3) (d) There are two reports available for OS&D Reporting under the Delivery Docket Group of Reports
within Standard Reports. These are reports 65 and 66

Chapter 9 - Material Receipts
Document No: UGD-MM-002 Rev: 5P QMS User Guide Page 100 of 164
9.11 Delivery Reports Delivery related reports are located within the Standard Reports listing [see Section 14.1.01].
Report No.
Title
Description
Report Group: 06 – Delivery Dockets
61 by Docket No - Summary Prints a register of Delivery Dockets include the details of the material received, sorted by Delivery Docket Number.
61D by Docket No - Detailed As per Report 61 but also includes all the information captured in regard to heat numbers, MRIR numbers etc.
61OD by Order No & Docket No. This report prints a register of Delivery Dockets sorted by Purchase Order first and then Delivery Dockets related to the Purchase order second.
61OS by Order No & Stockcode This report prints a register of Delivery Dockets sorted by Purchase Order first and then for each Stockcode on the Purchase Order, the related Delivery Docket information.
61S Delivery Docket Register Prints a summary register of Delivery Dockets.
62 by Stockcode - Detailed As per Report 61D but sorted by Stockcode.
62S by Stockcode - Summary As per report 61 but sorted by Stockcode.
63 by Docket No - With Prices As per Report 61 but includes prices from the Finalised Purchase Orders each delivery relates to.
64 Return of Delivered Material Docket - Summary
Prints a register of Return of Delivered Material Dockets.
64D Return of Delivered Material Docket - Detailed
As per Report 64 but including information in regard to heat numbers etc.
65
OS&D Report – By OS&D Reference:
Prints a simple register of OS&D Report information sorted by OS&D Reference numbers.
66 OS&D Report – By Stockcode + PO + Delivery
Prints a register of OS&D information sorted by Stockcode.
There are also a series of X-Tab Reports related to Deliveries. These are located within the X-Tab reports listing [see Section 14.2]
Report No.
Title
Description
X03 Deliveries History – By Purchase Order
This report prints for a selected Order Number the Stockcode details down the left with the Quantities at on each Delivery Docket listed across the page.
X04 Deliveries History – By Stockcode This report prints a list of Stockcodes down the left of each page and across the page has the Quantities on each Delivery Docket regardless of Order Number.

Document No: UGD-MM-002 Rev: 5P QMS User Guide Page 101 of 164
Chapter 10 - Movement Dockets
10.1 Overview
10.2 Creating a Movement Docket
10.3 Viewing/Editing a Movement Docket
10.4 Accepting a Movement Docket
10.5 Movement Reports

Chapter 10 - Movement Dockets
Document No: UGD-MM-002 Rev: 5P QMS User Guide Page 102 of 164
10.1 Using Movement Dockets When QMS is used in all project locations for materials control, Movement Dockets provide a simple and efficient means of recording the transfer of materials between locations. Generally, the same movement docket is used by both the sending and receiving party to record the dispatch from the first location, and the receipt at the second location. Movement Dockets are NOT used for taking acceptance of materials from a vendor. Materials received from a vendor must be recorded via a Delivery Docket. This is to ensure that the materials ordered via purchase order can be compared with materials received on delivery dockets. Movement Dockets affect the material in stock at any location and are used to record both dispatches and returns. For quick reference, the following table defines the docket type to use for a range of events: Action Use Receipt of material into a warehouse supplied from a vendor Delivery Docket Receipt of material at a fabrication shop supplied direct from a vendor Delivery Docket Receipt of material at site supplied direct from a vendor Delivery Docket Dispatch of material from a warehouse to a fabrication shop Movement Docket Dispatch of material from a warehouse to a site Movement Docket Dispatch of material from a warehouse to another warehouse Movement Docket Dispatch of material from a fabricator to another fabricator Movement Docket Dispatch of material from a fabricator to a site Movement Docket Return of material to a warehouse from a site Movement Docket Return of material to a warehouse from another warehouse Movement Docket Return of material to a warehouse from a fabrication shop Movement Docket
10.2 Creating a Movement Docket To create a new movement docket: 1. From the Deliveries menu select Movements Wizard. 2. Click Next at the welcome screen. 3. Choose the From Location type. The options are:
Standard Location (default)
Temporary Location [See Section 9.2 for more on Location Types]
4. For the location type chosen, select the Location to move the material FROM. 5. Select the Location to move the materials TO and click Next.
Note that the type of Location you are moving To is highlighted in red.
If you are moving from a Standard Location: 6. Select the Stockcodes to move using the arrow buttons in the mover window or by double clicking
on the required Stockcodes and click Next when done.

Chapter 10 - Movement Dockets
Document No: UGD-MM-002 Rev: 5P QMS User Guide Page 103 of 164
7. Enter the Quantities being moved in the Sent column for each Stockcode. Note that this value defaults to the available Stock.
Note that the Movement Docket # defaults to the next available reference number and the date of the movement defaults to the system date.
8. Select the Sent By and Sent To values relating to who is sending the material and who will be
receiving the material at the other end. Use the All Contacts tick box to select a name if the person does not belong to your company.
9. Enter the Approved by date and Approved by person if required.
10. Click the Next button and at that the final screen of the wizard, click the Print button to print a copy
of the Movement Docket. 11. Click the Finish button when done. If you are moving from a Temporary Location: 12. Select the Purchase Order number and Delivery Docket # for the material being moved. 13. Proceed as per steps 6 to 9 above. Notes: (a) All movement quantities are validated against the stock at location. (b) Use the Filter button at step 6 to assist with selecting the material to be moved. (c) When a movement is created the material being sent is deducted as Sent from the Location it is
being moved FROM. It is not however added to the material in stock at the TO Location until it is accepted by the TO location.
(d) If the movement of the material is being carried out to transfer materials from one location to another at the same physical site (eg from a Temporary Location such as Quarantine to a Standard Location for issue) at the last screen of the Movement Wizard it is possible to tick the box Set Accepted Qty to Sent Qty in which case it is not then necessary to have to accept (receive) the moved quantities via a separate process as in Section 10.4 below.
(e) Movement Dockets cannot be deleted unless the status of the Movement Docket is that it has been sent but not yet Accepted. If this is the case the Movement can be deleted via Cascade Deletion.
(f) For Movement dockets that cannot be deleted, they should be reversed if required by generating new movement docket in the reverse direction.
(g) The Movement Wizard can also be launched by clicking New in the View Movements screen. (h) Use the Attachments button to attach one or more external files to the Movement Docket. (i) A Movement Docket can be generated into an Excel template if required (see Section 10.3).
10.3 Viewing/Editing a Movement Docket Movement Dockets can be viewed and edited via the Movements screen. Viewing of dockets can be either by Docket Number or by Stockcode. 1. From the Deliveries menu, select Movements. 2. At the movement dockets screen, select the required docket using either, the navigation buttons,
the find, or the filter buttons. 3. Click on the Edit button to edit the movement docket details. 4. Click on the Save button and Yes when prompted to save the changes made and click Close to
return to the Dashboard.
Chapter 10 - Movement Dockets
Document No: UGD-MM-002 Rev: 5P QMS User Guide Page 104 of 164
Notes: (a) Movement Dockets cannot be deleted once created unless none of the material on the movement
has yet been Accepted. Editing is severely limited to only the Sent Qty and Senders Comments. If there is a mistake on a Movement docket (for example the wrong From or To Location) then a new movement docket must be created to correct it.
(b) Once the Movement Docket has been accepted the Sent Qty cannot be reduced to below the Accepted Qty.
(c) The Movement Docket can be generated into an MS Excel file if required using the XL button on the toolbar. The template being used for this (mmmmd,xls) can be modified if required. See Section 16.3.
(d) It is possible to add additional Stockcode attributes from the Stockcode library to be displayed in the lower grid of the Movements screen by right clicking anywhere in the lower grid and selecting Modify Display of Stockcode attributes.
10.4 Accepting a Movement Docket On receipt of material accompanied by a movement docket, the receiving party must enter the accepted quantities, thus confirming receipt of the materials. To do this the QMS System at the receiving store must be up to date with latest movement dockets. To accept a Movement Docket: 1. From the Deliveries menu, select Movements. 2. At the movement dockets screen, select the required docket using either, the navigation buttons,
the find, or the look for buttons. 3. Click the Accept Materials button. 4. Enter the Date Received in the Received box. 5. Enter the quantity received against each line item in the Received column or double click in the
Received field to set it equal to Sent Qty. 6. If there are any Damaged materials, the damaged quantity should be input in the Damaged column.
This is not considered as accepted.
Note that Shortages and Overages are then calculated automatically as follows: Shortage: This quantity is auto calculated as Sent Qty less Received Qty less Damaged Qty. Overage: This quantity is auto calculated as Received Qty plus Damaged Qty less Sent Qty.
7. Changed the Received by person (if required). 8. Enter any comments in the Receivers comments field. 9. Click on the Save button and Yes when prompted to save the changes made and click on the
Close button to return to the Dashboard. Notes: (a) The Quantity of material accepted can be equal to, less than, but not greater than the Quantity
Sent. (b) Material accepted from a Movement will appear In Stock at the receiving location. (c) If the person recording the acceptance of material on a Movement Docket makes a mistake with the
quantity of material accepted and saves the Movement Docket, the only way to overcome this error is to:
1. Amend the Sent Quantity to equate to the Accepted Quantity
Chapter 10 - Movement Dockets
Document No: UGD-MM-002 Rev: 5P QMS User Guide Page 105 of 164
2. Generate and accept another movement docket to correct the difference.
The exception to this is if the receiver accepted too little a Qty and wants to increase it. In this case the Accepted Qty can be edited but only up to value of the Sent Qty.
10.5 Movement Reports Movement related reports are located within the Standard Reports listing [see Section 14.1.01].
Report No.
Title
Description
Report Group: 07 – Movement Dockets
71 by Docket No Prints a register of Movement Dockets including the detail of the material moved, sorted by Docket Number.
71S Movement Docket Register Prints a summary register of all Movement Dockets.
74 by Stockcode As per Report 71 but sorted by Stockcode.
75 by Docket No - Accepted less than Sent
Prints only Movement Dockets where the Quantity of material accepted is less than the Sent Quantity.


Document No: UGD-MM-002 Rev: 5P QMS User Guide Page 107 of 164
Chapter 11 - Material Availability Analysis
11.1 Overview
11.2 Running the Analysis Wizard (Analysis only)
11.3 Running the Analysis Wizard (Analysis + Issue)

Chapter 11 - Material Availability Analysis
Document No: UGD-MM-002 Rev: 5P QMS User Guide Page 108 of 164
11.1 Overview The ability to analyse the materials available for use at one or more locations is one of the most powerful features of QMS when materials are being delivered progressively and manufacture must commence. Obviously, in the situation where all materials have been delivered into a store prior to the commencement of manufacture, fabrication or installation, the materials analysis feature is of slightly less importance but is still significant for the automatic generation of movement and issue docket paperwork and record keeping. The Materials availability analysis in QMS performs the following functions:
Calculation of the total work that can be commenced with the materials available at one or more locations
Calculation of the total work that could be commenced based on the materials expected to be received in the next X days based on Promised Delivery or ETA Site dates.
Calculation of the material availability status for a particular work area, work package, or any other breakdown of the scope.
Automatic generation of Issue dockets.
11.2 Running the Analysis Wizard (Analysis only) 1. From the Stock menu, select Material Availability Wizard 2. Click Next at the Welcome screen of the Wizard. 3. Choose Material Availability Analysis only and click Next.
Note that the ability to run an analysis and then do an issue of material as part of one continuous process is covered in the next section.
4. At the Select Material Availability Options screen:
Select either a single location using the drop down list OR select multiple locations using the Select button and the mover window that appears. Note that the Location(s) being selected are the location(s) where the material either already exists (has been delivered to) or are the location(s) where material will be delivered to in the next X days.
5. Now choose between the following three options:
Consider only material already in Stock
Consider only material to be delivered in the next X days
Consider both The first option means the analysis will be based on material that is already received and in stock. The second and third options are for planning purposes and means the analysis will be based the assumption that either:
All material that is promised to be delivered in the next x days (but has not already been received) will in fact be delivered as forecast, or All material expected in the next X days will be received as per the ETA Site dates.
If either the second or third options are chosen, you then need to select one of the further options in regard to whether to base the analysis on Promised Delivery dates or ETA Site dates.

Chapter 11 - Material Availability Analysis
Document No: UGD-MM-002 Rev: 5P QMS User Guide Page 109 of 164
ETA Site
Promised Delivery
ETA Site or Promised Delivery
Promised Delivery or ETA Site These last two options are provided in case one of the two date fields is empty.
6. Click Next. 7. At the Select Documents to be Analysed screen:
Select which Bill of Materials the analysis is to be performed against. This is the requirement for materials. The options are:
Single - select via a drop down list
Selected – click the Select button and use the mover buttons to make your selection.
All 8. Now select which Documents within the selected BOMs are to be analysed. This enables the
analysis to be performed for a particular work package for example rather than for the complete BOM. The options are:
All
Selected – click the Select button and use the mover buttons to make your selection.
9. Now fine tune the selection even further if required by choosing between:
Consider all required materials
Filter on BOM Details For most users the default option of Consider all Materials will be the relevant choice. However for those users who have separated out say fabricated and field install materials in the BOM Details, the filter option enables the analysis to be performed for only say fabricated materials required for each document by filtering on the Required At value. See also the Utility Re-Assign BOM delivery Required At values [4.5.05].
10. Use the Exclude Material Types button (optional) to exclude certain types of Stockcodes from the analysis. For example, Weldolets, Sockolets and the like. Tick the check box and then using the window that appears, select from the material types in the left pane to add them to the types of material to be excluded.
11. Further options at this screen include:
Documents cannot be short of more than X Items: Use this option to prevent partial allocations if a Document is missing more than X items.
Force Allocation for Documents with Priority X: Use this option for partial allocations where necessary for Documents with Priority X (as defined in the Document Register). Note that if un-ticked (the default) the analysis on the first pass allocates only documents that can be fully allocated before taking a second pass for partial allocations.
Include Un-Approved Deliveries: Use option to include as available any material that has been delivered but is not yet approved. This option is only enabled if the From Location being considered is a Temporary location and issuing material from temporary locations is enabled.
12. Click Next. 13. Click Yes when prompted to proceed with the Analysis.
The results of the Analysis are displayed in two page frames (tabs). One for documents which have been Fully Allocated with material and the other for those documents that have been Partially Allocated (i.e. for which there is insufficient material to fully allocate all items for the document(s)).

Chapter 11 - Material Availability Analysis
Document No: UGD-MM-002 Rev: 5P QMS User Guide Page 110 of 164
14. Use the Print button at the bottom of the screen to print either a Detailed or Summary report of the
results. 15. Click Next and then Finish when done.
Notes: (a) The Material Analysis process has two passes through the BOM (subject to settings selected). On
the first pass the process only allocates material if a document can be fully allocated. On the second pass partial allocations take place. Both passes consider documents in order of Priority (as defined in the Document Register) and then Document Number.
(b) Use the Show Alt Stockcodes tick box to display the Alternative Stockcode numbers adjacent to the primary Stockcodes (relevant only if Alternative Stockcodes are being used).
(c) Use the XL button to export the results of the analysis at either a summary or detailed level to a MS Excel spread sheet.
11.3 Running the Analysis Wizard (Analysis + Issue) If when running the Material Availability Analysis wizard you wish to create an Issue of Material as part of the process, then at Step 3 in the section above, choose the option Material Availability Analysis plus Material Issue. By choosing this option, additional restrictions are applied to the analysis process. These are: (a) Only a single FROM Location can be selected at Step 4 above (as material can only be issued from
a single location on a single issue docket). (b) The analysis can only be run based on Material In-Stock at Step 5 above. (c) Only a single BOM can be selected at Step 7 above (as material can only be issued against a
Single BOM on a single issue docket). Other than the above restrictions, the analysis part of the process is as described in section 11.2 above. However at the end of the analysis (Step 14): 1. When you click Next, rather than going to the Finish screen of the wizard, you are taken to a screen
where documents that have material allocated as part of the analysis process (either Fully or Partially) are displayed for possible Material Issue.
Notes:
The lower half of the screen shows the BOM relating each selected document with the Qty required, the Qty already issued (Prev Issued) and the Qty available in stock at the selected location.
Where there is insufficient material available in stock the Stockcodes are highlighted in red.
2. Select documents to be issued and adjust the This Issue Qty if required. Tip: Use the Select Fully Allocated button to automatically select for issue only documents that can be fully allocated.
3. Click Next. 4. Enter the Issued By and Issued To names and the Date Issued. The Issue Docket number
defaults to the next available number. 5. Click Next and at the final screen of the wizard, use the Print button to print first an Issue Docket
by Document (which details the materials being issued for each document) and then a Packing List (which is used by the store for collecting the materials required together).
6. Click the Finish button when done.

Chapter 11 - Material Availability Analysis
Document No: UGD-MM-002 Rev: 5P QMS User Guide Page 111 of 164
Notes: (a) The Use Substitutions button can be used to display a Substitute Stockcode column in the lower
grid from which you can select any material substitutions defined for Stockcodes in the Library [see Section 4.2.02]. See also Section 12.2.01 Note (i).
(b) Use the Show Alt Stockcodes tick box to display any Alternative Stockcodes to the right of the standard Stockcodes.
(c) The Reset Issue Qty button is used to reset the Issued Qty for all items for the document. (d) The Enable all Cost Codes button is for use only when material being issued is being issued
against a cost code. By default only cost codes against which the Stockcode has been purchased are available for selection. The Enable all Cost codes button allows any cost code to be selected.
(e) If you are Issuing material from a Temporary location, then at Step 2 above you will notice that the system auto selects the first listed Purchase Order + Delivery Docket combination available as the one from which the material will be issued. The selection can be changed if required on a Per Document per Stockcode being issued basis. [See Section 12.3 for more information on Issuing materials from Temporary Locations].
(f) To delete a complete Issue Docket use Cascade Deletion from the Tools menu. (g) To edit the details on a saved Issue Docket [see Section 12.2.02]


Document No: UGD-MM-002 Rev: 5P QMS User Guide Page 113 of 164
Chapter 12 - Material Issues
12.1 Overview
12.2 Issuing Material from Standard Locations 12.2.01 Generating Issues automatically 12.2.02 Generating Issues manually 12.2.03 Return of Issued Material
12.3 Issuing Material from Temporary Locations 12.3.01 Overview 12.3.02 Enabling the Issue of Material from a Temporary Location 12.3.03 Issuing Material from Temporary Locations using the Issue Wizard 12.3.04 Maintenance of the Issue of material from Temporary Locations
12.4 Issue Docket Reports

Chapter 12 - Material Issues
Document No: UGD-MM-002 Rev: 5P QMS User Guide Page 114 of 164
12.1 Overview An issue of materials is the means by which materials that have been received at a location are recorded as having been used (allocated) against drawings in the BOM. Typically, an issue of materials is generated in the following circumstances:
Material is required on the fabrication shop floor at a workshop location
Material is required for installation in the field at a site location An issue of material depletes the TOTAL stock available (the totals of "in Stock" at all locations) on a project, as well as depleting the stock available at the Location the material is being issued from. Material issues can be generated in a number of ways:
Material Issues Wizard
Direct data entry
Material Availability Wizard. Materials can generally only be issued from Standard Locations. However where it is required to directly link an item being issued material with the supplier it was received from, it is possible to enable the Issue of material from Temporary Locations. [See Section 12.03 for more on this].
12.2 Issuing Material from Standard Locations
12.2.01 Generating Issues automatically Issues are generally created using the Issue Wizard. 1. From the Stock menu, select Issues Wizard. 2. Click Next at the welcome screen of the wizard. 3. Select the Location that the materials are being issued FROM and click Next. 4. Select one or more documents to issue materials for using the select tick boxes against them.
The lower half of the screen shows the BOM relating each selected document with the Qty required, the Qty already issued (Prev Issued) and the Qty available in stock at the selected location. The This Issue Qty is allocated as each document is selected. Where there is insufficient material available in stock the Stockcodes are highlighted in red. Tip: Use the Print icon on the toolbar to run an Insufficient Stock Report. There are two options: Detailed and Summary. The Detailed report will show you for each Stockcode the quantities required for each document and the details in relation to purchase orders of when the balance of the material to be delivered can be expected. The Summary Report shows only the total values required for each Stockcode and again, the relevant purchase orders for these materials with forecast deliveries. This is a useful report to pass back to expediting to chase the deliveries.
5. Click Next. 6. Enter the Issued By person name and the Date Issued. The Issue Docket number defaults to the
next available number. 7. Select the Issued To person name (use the All Contacts tick box to select a person outside of the
users own company).
8. Enter a Reqn Ref. if relevant. This could be a material request voucher reference number for example.

Chapter 12 - Material Issues
Document No: UGD-MM-002 Rev: 5P QMS User Guide Page 115 of 164
9. Click Next and at the final screen of the wizard, use the Print button to print first an Issue Docket by Document (which details the materials being issued for each document) and then a Packing List (which is used by the store for collecting the materials required together).
10. Click the Finish button when done. Notes: (a) Use the Filter button on the toolbar at Step 4 to select all the documents for a Package, Line No,
Area etc. (b) Use the Find button to quickly locate a specific document to issue. (c) Use the Filter button in the lower grid at Step 4 to filter the Stockcodes listed (eg for a BOM
Required At value). (d) The This Issue Qty can be edited if required at Step 4 if for any reason it is required to issue less
or more than the requirement (subject to the material being in stock). (e) The Select Fully Allocated button can be used to display only selected documents that can be
fully allocated but is only enabled if the Issued Wizard is being activated as part of the Material Availability Analysis wizard process. [See Section 11.3].
(f) Use the Show Alt Stockcodes tick box to display any Alternative Stockcodes to the right of the standard Stockcodes.
(g) The Reset Issue Qty button is used to reset the Issued Qty for all items for the document. (h) The Enable all Cost Codes button is for use only when material being issued is being issued
against a cost code. By default only cost codes against which the Stockcode has been purchased are available for selection. The Enable all Cost codes button allows any cost code to be selected.
(i) Use the Use Substitutions button at Step 4 to display a Substitute Stockcode column in the lower grid from which you can select any material substitutions defined for Stockcodes in the Library [see Section 4.2.02]. This is useful if the required material is not available but there is stock available of a substitution. Note that if a substitute Stockcode is issued:
The Packing List report will display the details of the substitute Stockcode being used.
The Issue Docket Report will detail that the original Stockcode required has been substituted.
The In-Stock value at the location being issued from will be reduced by the quantity of the substitute Stockcode being issued.
The BOM will be updated that the required Stockcode has been issued but flagged that a substitute was used.
(j) Use the Reference field at Step 6 to enter a reference # if required against each line item being
issued. (k) To delete a complete Issue Docket use Cascade Deletion from the Tools menu. (l) To edit the details on a saved Issue Docket [see Section 12.3] (m) Use the Auto generate requisition for items to be re-ordered option at Step 9 above to auto
generate a requisition for items to be re-ordered based on minimum stock levels after the issue is processed.
(n) The Issue Docket can be generated into an MS Excel file if required. See Section 12.2.02 for more on this.
12.2.02 Generating Issues manually To manually generate an issue docket: 1. From the Stock menu, select Issues. 2. Click on the New Docket button. 3. Enter the Issue Docket No when prompted and click on OK. 4. Select the Document Number for which materials are being issued.
The BOM for the selected document will be displayed in the Grid. 5. Enter the date that the materials are being issued in the Dated field and the initials of the person
making the issue docket in the Issued By field.

Chapter 12 - Material Issues
Document No: UGD-MM-002 Rev: 5P QMS User Guide Page 116 of 164
6. Select the Location which the material is being issued FROM. 7. Enter/Select the Issued To value. 8. Now in the Qty column, enter the Quantities of each Stockcode being issued. These are validated
against the Stock Available at the Location. 9. Click the Save button when done and Yes when prompted to save the changes and click Close to
return to the Dashboard.
Notes: (a) Enter a Batch # or Heat Certificate reference if required against each item being issued. (b) To issue materials for the document that are not in the BOM, use the Add Item button and enter the
required Stockcode and Qty issued. (c) Use the General Note field to capture a general note about the issue docket. (d) The Issued Docket that is saved by the system will only contain records where the Qty Issued is >
0. (e) It is possible to include material from more than one document on the issue docket using the
manual method but QA Software recommends the use of the Issue wizard to create the issue docket when this is the case.
(f) To clear all items in the grid after selecting a document to issue, use the Clear Issues button. (g) Line items on issue dockets can be edited or deleted using the above screen. (h) Use the Show Alt Stockcodes tick box to display any Alternative Stockcodes to the right of the
standard Stockcodes. (i) Use the Display Substitutes button to display Stockcodes that have been issued as Substitutes. (j) Use the Attachments button to attach (link) one or more external files to the Issue Docket. (k) The Issue Docket can be generated into an MS Excel file if required using the XL button on the
toolbar. The template being used for this (mmmid,xls) can be modified if required. See Section 16.3. (l) It is possible to add additional Stockcode attributes from the Stockcode library to be displayed in the
lower grid of the Issues screen by right clicking anywhere in the lower grid and selecting Modify Display of Stockcode attributes.
(m) The Approved tick box, Approved By person and Approve Date fields can be utilised to manage approvals if required but are enabled only for users with “Enable Approvals” ticked for their user level.
12.2.03 Return of Issued Material While QMS facilitates issuing the correct material quantities as defined in the BOM, for one or more reasons it is common that either additional material needs to be issued for a document (in excess of the requirements of the BOM), or material issued but not used needs to be recorded as being returned into the store. In this latter case, the material return must be captured in QMS as follows: 1. From the Stock menu, select Return of Issued material. 2. Select the Original Issue Docket that the material being returned was issued under. 3. Enter a new Docket Number to record the return of issued material. 4. Enter the Return Date and the Initials of the person returning the material. 5. Select the Location to return the material into. 6. Now select the Stockcodes being returned which must be selected on a by document basis. Use
the arrow button to move the document + Stockcode combinations to the right hand grid.
Tip: Click the column headings in the grid to resort the data by Stockcode or use the filter to locate the document + Stockcode combinations being returned.
7. Once selected in the right hand grid, enter the Qty being returned for each Stockcode in the column
provided.

Chapter 12 - Material Issues
Document No: UGD-MM-002 Rev: 5P QMS User Guide Page 117 of 164
8. Click OK when done. Notes (a) The stock will be returned to the In-Stock Qty at the location selected. (b) The returned Qty will be deducted from the Qty Issued against the document. (c) Use the Find button at Step 2 to quickly locate a Docket Number. (d) To view Return of Issued material dockets use the View Return Issues screen accessed via the
menu.
12.3 Issuing Material from Temporary Locations
12.3.01 Overview Typically with QMS, material is only ever issued from Standard Locations. Material in a Standard location has no link back to the delivery docket it was received on. A link is typically not required as a Stockcode received on one delivery docket from a supplier is by definition identical to the all other Stockcodes of the same value from all other suppliers – other than the traceability information such as heat numbers. Since there is no way of knowing where any specific elbow, flange etc will be used within the fabrication shop it is considered of little worth to capture the heat numbers of materials being issued as they are normally marked up on the As-Built drawings by the workshop QA Staff after fabrication. However for customers using QMS who do require to track material being issued by Heat number, rather than just manually entering heat numbers when generating issue dockets (which would have a very high risk of mistake (mis-typing) and would require manual maintenance of how much of heat number for an item is in stock, it is possible in QMS to enable the issue of material from Temporary locations. Since at a Temporary location materials retain a link back to the Delivery Docket (and hence Purchase Order) they were received on, and hence to the traceability information such as Heat numbers captured at the time of delivery, being able to issuing material from a temporary location enables the select of the material to be issued by Delivery Docket and Heat number.
12.3.02 Enabling the Issue of Material from a Temporary Location
The ability to issue materials from temporary locations is enabled as follows 1. From the Tools menu select Options. 2. Click on the Project Settings tab and click the Edit button on the toolbar. 3. Tick the box against “Issue materials from Temporary Locations” Notes: (a) Unless this is actually required it is best to leave this box un-ticked as not being able to issue
materials from temporary locations is a significant protection for most users of QMS who use temporary locations to store damaged or otherwise quarantined materials which must not be issued.
12.3.03 Issuing Material from Temporary Locations using the Issue Wizard If a temporary location is selected as the From Location when using the Issue wizard (the location where the materials are in stock), then the Issue wizard displays a third grid for the selection of the Purchase Order + Delivery Docket + Heat Number combination from which each Stockcode for each document should be issued.

Chapter 12 - Material Issues
Document No: UGD-MM-002 Rev: 5P QMS User Guide Page 118 of 164
This selection if done manually is a time consuming task as for each Spool for example being issued, each Stockcode on the spool has to be selected in turn and then the required item from the list of available materials (listed by PO + Delivery + Heat number) selected. Note that only “Approved” material [see Section 9.9] with an In-Stock value > 0 is available for selection. Material in stock but not approved is displayed in a grey colour. Furthermore it means that when the packing list is passed to the store, the materials in the store need to be searched for an packed by PO + Delivery Docket + Heat Number. Note however that if the Issue Wizard is run as part of the Material availability Analysis wizard + Issues process then the system auto allocates the first available PO + Delivery Docket + Heat number combination for all items being issued. Saving the material controllers time in the above process but not the store mans!
12.3.04 Maintenance of the Issue of material from Temporary Locations Other areas of the Issues module that change when the Issue of materials from Temporary locations is enabled include: Issues Screen: If the issue docket relates to an issue of material from a temporary location a third grid is displayed on the issues screen detailing the information about the Purchase Order + Delivery Docket + Heat Number that was used on the issue for each Stockcode. Use the tick box “Show all delivery items” if it is required to edit the Issue docket and modify any of the information about what heat number etc was issued. This will display all available materials in stock in the lowest grid by PO + Delivery Docket etc. Return of Issued Material: If the location that the material being return was issued from a temporary location then the Return of Issued Material screen changes to enable the material being returned to be selected via Delivery Docket and Heat number.
12.4 Issue Docket Reports Issue Docket related reports are located within the Standard Reports listing [see Section 14.1.01].
Report No.
Title
Description
Report Group: 08 – Issue Dockets
81 by Docket No - Detailed Prints a list of Issue Dockets with full detail of the material issued sorted by Issue Docket Number.
81S Issue Docket Register Prints a summary register of Issue Docket Numbers.
82 by Stockcode As per Report 81 but sorted by Stockcode.
82A by Alt Stockcode As per Report 81 but sorted by Alt Stockcode
82W by Stockcode with Weights This report prints the weight of issued material by Stockcode using the weight defined per Stockcode in the Stockcode library.
83 by Packing List Prints a packing list (summary of quantities for each Stockcode) for each Issue Docket.
84 Return of Issued Material – by Docket
Prints a register on Issue Dockets related to return of issued materials.
84A Return of Issued Material – by Stockcode
As per report 84 but by Stockcode.

Chapter 12 - Material Issues
Document No: UGD-MM-002 Rev: 5P QMS User Guide Page 119 of 164
Report No.
Title
Description
85 Substitute Materials Prints a list of Issue Dockets where substitute materials have been used.
Report Group: 01 – Bill of Materials
11C0 by Drawing No - Incl. Issues Prints the Bill of Materials by Document Number and includes the quantity of material issued for each Stockcode plus details on shortages and stock available.
11C01 by Drawing No - Incl. Issues With Substitutes
As per Report 11CO but includes details of substitute Stockcodes where there have been issued.
11C1 by Drawing No - Fully Issued only
As per Report 11CO but includes only documents that have been fully issued.
11C2 by Drawing No - Partly Issued only
As per Report 11CO but includes only documents that have been partly issued.
11C3 by Drawing No - Not Issued only As per Report 11CO but includes only documents that have had no material issued against them.
11C4 by Drawing No - Short Items only
As per Report 11CO but includes only documents where there are material shortages preventing issue.
11C5 By Drawing No – Over Issued Only
As per Report 11CO but includes only documents where there are materials over issued as compared to the BOM Qty.
12C by Stockcode - Incl. Issue status As per Report 11CO but sorted by Stockcode rather than by Document Number.
12DA by Stockcode & Area - Incl. Issue status
As per Report 12C but sorted by Area + Stockcode with sub totals for each Area.
12DS by Stockcode - Summary - Incl. Issue status
As per Report 12C but summarised at Stockcode level – one row printed per Stockcode.


Document No: UGD-MM-002 Rev: 5P QMS User Guide Page 121 of 164
Chapter 13 – Stock Control
13.1 Overview
13.2 Preparing for a Stock take
13.3 Reconciling Stock
13.4 Stock at Locations
13.5 Stock Transfers
13.6 Stock Searches
13.7 Bin Numbers
13.8 Stock Reports

Chapter 13 - Stock Control
Document No: UGD-MM-002 Rev: 5P QMS User Guide Page 122 of 164
13.1 Overview Stock in QMS is fundamentally Stockcodes with quantities at a location. Stock is determined to be at a location when it is either received at (delivered to) or moved to (and accepted at) the location. Stock is removed from a location when it is either issued or moved from (Sent from) that location to another location. This chapter covers stock control functions in QMS such as performing stock takes and doing stock reconciliations. Also covered are various Stock utilities such as searching and stock transfers.
13.2 Preparing for a Stock Take Performing regular stock takes is an essential part of the stock control process. The first step in this process is to generate a stock report to be used for the stock take. 1. From the Stock menu, select Reconcile Stock. 2. Click Next at the Welcome screen of the wizard. 3. Select Print Stock Take Report and click Next. 4. Select the Location(s) that the Stock take is to be performed at. 5. Click the Print button to print the report. 6. Once the report has printed you can cancel from the wizard. Notes: (a) You can filter the material listed on the stock take report using the filter button at step 4. (b) You can print a Stock Take Report for multiple locations using the Selected button at Step 4 and
selecting the required locations using the mover arrows. (c) The printed report is then during the stock take marked up with actual quantities in stock. (d) You can print a Stock Take report for a previous Stock Take by clicking this option after Step 4 and
selecting the previous Stock Take date. (e) Note that it is not currently possible to Reconcile Stock at Temporary Locations.
13.3 Reconciling Stock Once the stock take has been performed, you will have a marked up copy of the stock report which you will use as the basis for the stock reconciliation. The reconciliation is done as follows: 1. From the Stock menu, select Reconcile Stock. 2. Click Next at the Welcome screen of the wizard. 3. Select Enter New Stock Reconciliation and click Next. 4. Select the Location(s) that the Stock take was performed at. 5. Enter the Stock Take Date and click Next. 6. Enter the Stock Take by person (defaults to the user logged in). 7. Now in the In-Stock Actual column, adjust the calculated values to the physical values in stock
using the marked up copy of the stock take report. Note that you only need to adjust the values where the physical in stock amount differs from the calculated value. Note also that you can make a comment against each adjusted record if required.

Chapter 13 - Stock Control
Document No: UGD-MM-002 Rev: 5P QMS User Guide Page 123 of 164
8. Click Next and at the Final screen of the wizard click the Finish button to save the Stock Take
Records. Notes: (a) At step 8 it is also possible to print an audit trail report that lists only Stockcodes that have been
adjusted during the reconciliation. (b) The stock take information relating to the Stock Take date entered at step 5 can be updated further
at any time using the Edit Last Stock Reconciliation option at Step 3 as long as it remains the most recent stock take for the location(s).
(c) A complete history of all stock adjustments made via the reconciliation wizard is maintained by the system.
13.4 Stock at Location It is often required to do a quick check of what stock is in place at a location. 1. From the Stock menu, select Stock at Location. 2. Click Yes at the Stock at Locations options screen. 3. Select the Location that you are interested in and the grid will display the following values
Required As defined in the BOM via the Required At field Incoming Delivered From Delivery Dockets Incoming Moved (Accepted) From Movement Dockets that have been Accepted Outgoing Moved (Sent) From Movement Dockets that have been Sent Outgoing Issued From Issue Dockets Outgoing Lost From Stock Reconciliations In Stock Calculated as Incoming less Outgoing values.
Notes: (a) Use the Selected button to select Multiple Locations for display.
13.5 Stock Transfers This utility is used to transfer stock between projects. 1. From the Stock menu, select Stock Transfer. 2. Click Next at the Welcome screen of the wizard. 3. Select the From Location (within the current project) and click Next. 4. Select the Stockcodes to transfer and for each Stockcode enter the Transfer Qty. 5. Click Next. 6. Select Project to transfer the material to. 7. Select the To Location (within the target project). 8. Enter the Movement Docket # and enter the Date for the Transfer. 9. Click Next and at the final screen of the wizard click the Finish button. Notes: (a) This process creates a Movement Docket in both the project the material is being transferred from
and the project the material is being transferred to.

Chapter 13 - Stock Control
Document No: UGD-MM-002 Rev: 5P QMS User Guide Page 124 of 164
13.6 Stock Search A stock search is a means by which you can find out all locations where one or more Stockcodes are required. The search can even be made across projects. 1. From the Stock menu, select Stock Search. 2. First enter or select the search criteria based on any of:
Stockcode contains text
Stockcode begins with text
Selected Stockcodes (use a mover window to select one or more codes to search for)
3. Select the Location(s) for the search. Note that All, Selected or a Single Location can be selected if required.
4. Select the Project for which you want to perform the search. Note that All, Selected or a Single Project can be selected if required.
5. Click on the Start Search button. The results are displayed in the grid and can be printed if required.
13.7 Using Bin Numbers Bin numbers can be defined under the Stock Menu, Configuration Tables, and Bin Areas. Define your bin numbers in this table. Then when entering delivery dockets you can record which bins the various items are stored in. Bin numbers can also be used when generating both movement and issue dockets but note that the system does not maintain an In-Stock value for Bin Numbers. Bin Numbers are used as a labelling system only.
13.8 Stock Reports Stock related reports are located within the Standard Reports listing [see Section 14.1.01].
Report No.
Title
Description
Report Group: T – Total Quantities
T01 Location Totals - by Stockcode
Prints by Stockcode the following quantities, totalled from each QMS Module for All, or Selected Locations: BOM; Requisitioned; Ordered; To Order; Received (Delivered); Awaited (Ordered by not delivered); Sent (on Movements); Accepted (from Movements); Issued; Lost In Stock (Calculated). Note that the report prints only once the first delivery has been made (or BOM Required At values are being used).
T02 Location Totals - by Stock Type
As per Report T01 but sorted by Stock Type
T04 Stock Reconciliation Audit Report
Prints an audit trail of material reported as lost or gained during a stock take.
T05 Project Summary Prints the summarised totals per Stockcode from each QMS Module. This report differs from report T01 in that it is not related to Locations.
T05A Project Totals by Stockcode
Similar to Report T05 but also displays a number of calculated values such as “To Order vs. BOM” and “To Order vs. Requisition”.

Chapter 13 - Stock Control
Document No: UGD-MM-002 Rev: 5P QMS User Guide Page 125 of 164
Report No.
Title
Description
T06 Wastage Detail Report
Prints a Detailed report on material wastage – Contact QA Software for details on how this works.
T07 Wastage Summary Report
Prints a Detailed report on material wastage – Contact QA Software for details on how this works.
T08 Stock Recon. Report
This is a Stock take Report – used for performing stock takes.
T10 Minimum Stock Level Report
Prints the Re-Order Levels for Material In-Stock at one or more locations.
T10A Material Requiring Re-Order
Prints a list of Stockcodes requiring re-order based on the Re-Order Level defined in the Stockcode Library and the current In-Stock values.
T12 Value of Material In-Stock
Prints the value of Material in Stock at a Location using the Average Rate calculated from the Purchase Order module and stored in the Stockcode Library. Note that if the Average Rate is empty the Rate value in the Stockcode library is used instead.
T13 By Stockcode – Usage Report
A simple summary report showing the percentage usage based on Issue Qty against the BOM Qty.
T14 Project Summary Weight Report
This report is similar to report T05A but includes the total Weight of each Stockcode Qty in each QMS Module (based on the Weight value defined in the Stockcode library).
T15 Stockcode Reconciliation History
A simple history report displaying a history of all Stock Reconciliation Adjustments.
T16 Stockcode – Stores History
A transactional report for use in the Stores that displays for each Stockcode at a Location a history of transactions from the Deliveries. Movements and Issues Modules including the running balance of material in-stock.


Document No: UGD-MM-002 Rev: 5P QMS User Guide Page 127 of 164
Chapter 14 - Generating Reports
14.1 Standard Reports 14.1.01 Overview 14.1.02 Creating a Standard Report 14.1.03 Areas of the System to Report on 14.1.04 Sorting Data 14.1.05 Using Filters 14.1.06 Advanced Filters 14.1.07 Printing to Excel 14.1.08 Printing to PDF
14.2 Cross Tabulated Reports

Chapter 14 – Generating Reports
Document No: UGD-MM-002 Rev: 5P QMS User Guide Page 128
of 164
14.1 Standard Reports
14.1.01 Overview Standard reports are a predefined series of numbered reports available with QMS. All standard reports are generated in a similar way and from a single screen. The sorting of the data on the report is predefined and the user controls the filter settings and the destination of the report. A number of standard reports contain either calculations or print data from a number of related tables which makes them different from Grid reports which generally print the data from a single table while viewing it on the screen. The standard reports relevant to each QMS Module are listed at the end of the relevant chapters within this User Guide.
14.1.02 Creating a standard report To run a standard report: 1. From the File menu, select Print Standard Reports.
2. Select from the various options at the report generation screen.
3. Click OK to generate the report. The standard reports generation screen has the following sections:
Select the area of the System to generate a Report from: This window lists the various tables or areas of QMS from which reports can be generated. Selecting the Area to report on value is the first step in generating a standard report. Report No.: For each report on option there are a predefined list of reports. After selecting a report on option the reports available are listed in this section.
Print Range: The print range area controls:
The Page range to print.
The number of copies of the report to print.
Access to the windows page setup dialog box. Destination: The destination controls how the report is generated. The options are:
Preview: To generate the report to the screen.
Printer: To send the report to a printer.
File: To send the report to a file such as Microsoft Excel.
PDF File: To generate the report in PDF format.
Email: To email a copy of the PDF format of the report to selected recipients selected from within the Address book. Custom Title: This is a facility to define a custom title for the report. Custom Report: This is a facility to create a customised version of the standard report. Report Type: This is a facility to control the fields that appear on the standard report (available for selected reports only). Filter: The filter is a means of controlling the data that is selected for the report.
Chapter 14 – Generating Reports
Document No: UGD-MM-002 Rev: 5P QMS User Guide Page 129
of 164
14.1.03 Areas of the System to Report from The Select the area of the System to generate a Report from window contains a list of all areas of the QMS system from which reports can be generated. These include:
Report on Description
1. Bill of Materials.
Used to generate a large range of Bill of Material related reports.
2. Requisitions.
Used to generate a register of Requisitions sorted either by Requisition number or Stockcode.
3. Purchase Orders – Draft.
Used to generate a register of Draft purchase orders sorted either by PO number or Stockcode.
4. Purchase Orders – Final.
Used to generate a register of Final purchase orders sorted either by PO number or Stockcode.
5. Purchase Orders – History.
Used to generate a Purchase Order History register sorted either by PO number or Stockcode.
6. Delivery Dockets Used to generate a register of Material Deliveries sorted either by Delivery Docket number or Stockcode.
7. Movement Dockets Used to generate a register of Material Movements sorted either by Movement Docket number or Stockcode.
8. Issue Dockets Used to generate a register of Material Issues sorted either by Issue Docket number or Stockcode.
9. Stockcodes Used to generate a list of Stockcodes.
A. Address Book Used to generate various Address Book reports.
B. Bid Documents Used to generate a register of Bid Documents.
D. Document Register Used to print a Document Register.
M. Miscellaneous Used to print the values contained in Configuration tables.
P. Packages Use to print the Procurement Status Report.
R. Expediting
Used to print Expediting Reports
S. Progress Reports Used to generate progress reports based on the various PCT values in the Document Register.
T. Total Quantities
Used to print a summary of Quantities in each QMS Module by Stockcode.
14.1.04 Sorting Data The way the information on your report is sorted can make an important contribution to the usefulness of the report. For example, if you printed the contents of the Bill of Materials sorted by Document, this would be very useful to see the BOM for a particular document. However the same report would not be very useful to see all the documents that require a particular Stockcode as you would have to search every document on the report. Sorting the same report by Stockcode would solve this. Sort orders for Standard Reports in QMS are predefined. Each Sort order for a QMS file has a unique report number.
Chapter 14 – Generating Reports
Document No: UGD-MM-002 Rev: 5P QMS User Guide Page 130
of 164
14.1.05 Using Filters A Filter is a means of selecting the data to be displayed either on the screen or in a report. A filter button is present on most toolbars throughout QMS and is also available when generating standard reports. To use the filter, click on the Filter. The Build filter expression window will open and it is now that you set up your selection criteria. The structure of the filter is always FIELD + COMPARISON + VALUE, where FIELD is a field name or column heading and COMPARISON is how the field is to be compared to the VALUE (e.g. begins with, equal to, greater than, contains etc.). Some examples are given below. In the Bill of Materials: BOM for drawings in package "WP1" Filter: PACKAGE equal to WP1 The BOM for "pipe" only in Filter: AREA equal to 3 or Areas "3, 4 and 5" AREA equal to 4 or AREA equal to 5 All Drawings on which valve Filter: STOCKCODE equal to VLV-1200 "VLV-1200" is listed All drawings that have a BOM with Filter: TYPE equal to FLANGE and Duplex Stainless Steel Flanges MATERIAL equal to DSS In the Purchase order file Purchase order number "PO-345" Filter: ORDERNO equal to PO-345 Purchase orders containing Duplex Filter: STOCKCODE contains DSS Stainless Steel All orders raised on Houston Filter: VENDORID contains HOUSTON Contracting All Orders issued in March 1997 Filter: DATED less than 01/04/97 and DATED greater than 28/02/97 It is also possible to save filters for re-use later. To save a filter, first setup the required filter and then click the Save button at the filter screen. Enter a title for the saved filter and any comments when prompted. Note that saved filters are User specific. To load the filter at any time, activate the filter screen and then click the Load button. Select the required filter from the list. Saved filters from any user can be deleted by users with Supervisory access. Other users can delete only their own saved filters.
14.1.06 Advanced Filters Advanced Filters are a means by which more complex filter criteria can be applied to a screen view or report than those options available with a simple filter. A simple filter operates only on the current or primary table being viewed or reported on. An Advanced filter enables filtering information contained in tables that are linked to the primary table. Contact QA Software for more information on the syntax to use when the need to use an Advanced filter arises.

Chapter 14 – Generating Reports
Document No: UGD-MM-002 Rev: 5P QMS User Guide Page 131
of 164
14.1.07 Printing to Excel The destination of a report when generating standard reports can be selected from any of Preview, Print, File, or PDF. To print a report to Excel requires the selection of the destination as File. The report file name defaults but can be changed as can the location the Excel file will be saved. Note that it is also possible to print single transactions (eg a Bill of Materials for a single document or a Requisition etc.) to MS Excel in WYSWIG format from within each main module screen using the Print button.
14.1.08 Printing to PDF The destination of a report when generating standard reports can be selected from any of Preview, Print, File, or PDF. To print a report to PDF requires the selection of the destination as PDF File. After selecting PDF a default file name will be allocated automatically. The user can change this if required. The resulting report will be stored in the \QMS\PDF Files folder or the user can select an alternative folder if required.
14.2 Cross Tabulated Reports The cross tabulation report generation screen is accessed under the File menu, and sub-menu Print X Tab Reports. The report alternatives are listed below and described in more detail in the relevant reporting sections of the User Guide: X01 Purchase Order History – By Stockcode X02 Purchase Order Revision History – by PO X03 Deliveries History – By PO X04 Deliveries History – By Stockcode X06 BOM Revision Changes – Detailed by Document X07 BOM Revision Changes – Detailed by Stockcode X08 BOM Revision Changes – Summary by Stockcode X09 BOM Qty – Summary by Stockcode X10 BOM Qty – Detailed by Stockcode. X11 Document Revision Changes – Detailed by Document


Document No: UGD-MM-002 Rev: 5P QMS User Guide Page 133
of 164
Chapter 15 – Procurement Status Report
15.1 Overview
15.2 Standard Library of Milestones
15.3 Procurement Schedule
15.4 Procurement Status Report
15.5 Updating the Procurement Schedule 15.5.01 How to update Actual Dates using Link Transactions 15.5.02 How to update Actual Dates for user Defined Milestones 15.5.03 How to update Forecast Dates
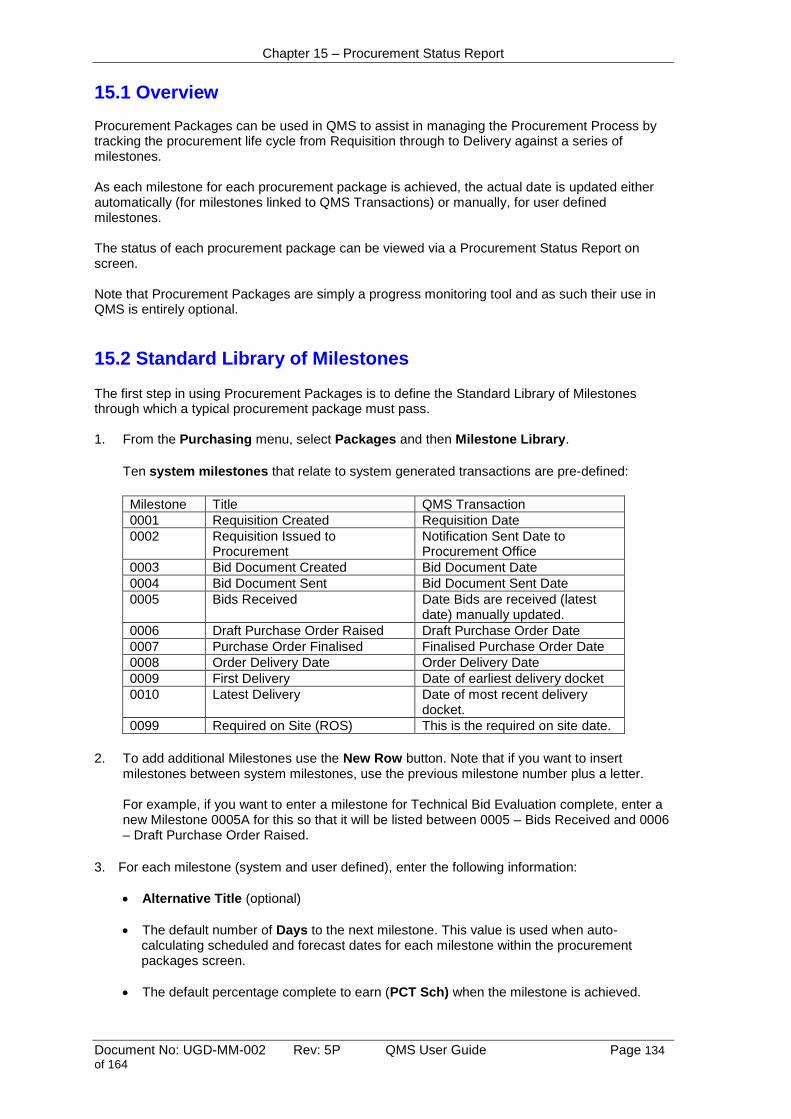
Chapter 15 – Procurement Status Report
Document No: UGD-MM-002 Rev: 5P QMS User Guide Page 134
of 164
15.1 Overview Procurement Packages can be used in QMS to assist in managing the Procurement Process by tracking the procurement life cycle from Requisition through to Delivery against a series of milestones. As each milestone for each procurement package is achieved, the actual date is updated either automatically (for milestones linked to QMS Transactions) or manually, for user defined milestones. The status of each procurement package can be viewed via a Procurement Status Report on screen. Note that Procurement Packages are simply a progress monitoring tool and as such their use in QMS is entirely optional.
15.2 Standard Library of Milestones The first step in using Procurement Packages is to define the Standard Library of Milestones through which a typical procurement package must pass. 1. From the Purchasing menu, select Packages and then Milestone Library.
Ten system milestones that relate to system generated transactions are pre-defined:
Milestone Title QMS Transaction
0001 Requisition Created Requisition Date
0002 Requisition Issued to Procurement
Notification Sent Date to Procurement Office
0003 Bid Document Created Bid Document Date
0004 Bid Document Sent Bid Document Sent Date
0005 Bids Received Date Bids are received (latest date) manually updated.
0006 Draft Purchase Order Raised Draft Purchase Order Date
0007 Purchase Order Finalised Finalised Purchase Order Date
0008 Order Delivery Date Order Delivery Date
0009 First Delivery Date of earliest delivery docket
0010 Latest Delivery Date of most recent delivery docket.
0099 Required on Site (ROS) This is the required on site date.
2. To add additional Milestones use the New Row button. Note that if you want to insert
milestones between system milestones, use the previous milestone number plus a letter.
For example, if you want to enter a milestone for Technical Bid Evaluation complete, enter a new Milestone 0005A for this so that it will be listed between 0005 – Bids Received and 0006 – Draft Purchase Order Raised.
3. For each milestone (system and user defined), enter the following information:
Alternative Title (optional)
The default number of Days to the next milestone. This value is used when auto-calculating scheduled and forecast dates for each milestone within the procurement packages screen.
The default percentage complete to earn (PCT Sch) when the milestone is achieved.

Chapter 15 – Procurement Status Report
Document No: UGD-MM-002 Rev: 5P QMS User Guide Page 135
of 164
The role Responsible for achieving the milestone. The options are simply B for Buyer and E for Engineering.
Tick View 1 and/or View 2 which controls whether the milestone will appear on each of these Procurement Status Report views.
4. Click the Close button when done. Notes: (a) If one or more system milestones are not required, tick the Not Used tick box against them. (b) The Required on Site milestone cannot be made Not Used and is always included as a milestone
within each Procurement Package regardless of whether manually selected or not. (c) To generate a report of the Milestone Library, use Report P8 found under Print Standard Reports
in the Package Group of Reports.
15.3 The Procurement Schedule The Procurement Schedule is used to define a register of all procurement packages that will be required for the project. This will include tagged equipment, packaged equipment and bulk materials etc. 1. From the Purchasing menu, select Packages and then Procurement Schedule. To create a new Procurement Package (Schedule ID): 2. Click the New Procurement Schedule button on the toolbar. 3. Enter a Schedule ID in the window that appears and click OK. 4. Enter a Title for the Procurement Package. Note: Do not select an Order at this stage unless the order for the package has already been created. 5. Click the Import Milestones button and at the window that appears, use the Move All button
to select the standard milestones for the Schedule Item (or select specific milestones if required by double clicking on them one by one) and click OK.
6. Adjust the Days to the next milestone for each milestone as required. Note that these are
working days as defined via the Project Calendar. 7. Adjust the PctSch (Percentage Complete) to be earned as each milestone is achieved if
required. 8. Enter the Scheduled date for either the first or last milestone. 9. Un-tick the Manual Dates box and click on the Schedule Dates button to the right of Auto
Calculate and select Auto Calculate Forwards (or Auto Calculate Backwards if you have entered the scheduled date for the last milestone). The scheduled and forecast dates for all remaining milestones will be auto calculated based on the Days value.
10. Click on the General tab and populate the general details about the package as follows:
Responsible Engineer (Mandatory)
Responsible Buyer (Mandatory)
Budgeted Value
Delivery Lead Time (Weeks)
Priority

Chapter 15 – Procurement Status Report
Document No: UGD-MM-002 Rev: 5P QMS User Guide Page 136
of 164
Note that the Percentage complete and Float will be calculated automatically. There are also a number of other fields on the General tab that can be used if required.
11. Click on the Save button when done and the Close button to close the screen.
Notes: (a) User defined milestones must be defined via the Milestone Library and then imported into the
Procurement Schedule. (b) System Milestones are displayed in red while User Defined Milestones are displayed in black. (c) The Forecast Dates button to the right of Auto calculate is used to re-calculate the forecast
dates only. (d) The Reset Schedule button is used to clear all schedule and forecast dates. (e) Use the Change Sequence Option to re-order the sequence of milestones for this package. (f) Use the Attachments button to link any external files to the Package. (g) If the responsible Engineer/Buyers are not already defined as users of QMS it is possible to
add them on the fly. (h) The Order number drop down is used to link the Procurement Package to a Purchase Order
once one has been raised. (i) The Activity ID, Actual Start and PctComplt fields can be used to enable the Procurement
Schedule to be integrated with a Project Schedule. Contact QA Software for more on this. (j) The Link Transactions button is used later to link each milestone to the relevant system
transaction once they have occurred [See Section 15.5.01].
15.4 The Procurement Status Report The Procurement Status Report is a register display of the status of procurement packages. 1. From the Purchasing menu, select Packages and then Procurement Status Report.
It is possible to have direct access to the Procurement Status report via the QMS Dashboard. To activate this go to Tools\Options\Project Settings and tick the box “Show Procurement Status shortcuts on Dashboard”
From within the Procurement Status Report it is possible to:
Manage two separate views via the View 1 and View 2 drop down options. This is useful when a large number of milestone columns are being used.
Link package milestones to the related QMS System transaction by simply right clicking on the relevant milestone date and selecting Link Transactions. Then select the relevant transaction to link to.
Double click on the Title of a Package to view the Procurement Schedule for this package in detail.
Double click on an Actual Date for a milestone to view the underlying Transaction.
View the status of Milestones via either Forecast Dates or Schedule Dates.
Use the drop down list of filters to display for example only “Planned Orders with Requisition but not yet out for Tender”.
Create new system transactions such as Bid Documents, Draft PO’s by using the buttons provided under the Toolbar.

Chapter 15 – Procurement Status Report
Document No: UGD-MM-002 Rev: 5P QMS User Guide Page 137
of 164
Notes: (a) The Required on Site Milestone always appears to the far right of the Procurement Status
Report. (b) The Float is calculated as the Required on Site Date less the Scheduled or Forecast Date for
System Milestone 008 – Order Delivery Date. (c) Milestones that have been completed are shaded to give a visual impression of progress. (d) System milestones can be identified via the column heading being in red text.
15.5 Updating the Procurement Schedule
15.5.01 How to update Actual Dates using Link Transactions For System Milestones that have been achieved, it is necessary to link the Milestone to the system transaction so that the Actual Date for the milestone can be updated automatically. The linking of milestones to system transactions can be done in either of two ways: Option 1 is to use the Procurement Status Register 1. Right click on the Milestone Date and select Link Transactions. You will be prompted to
select the related QMS Transaction using find window for the relevant module. 2. Select the transaction (eg Purchase Order) and click OK. The Actual Date will now be shown on the Procurement Register report and the cell coloured accordingly. Option 2 is to use the Procurement Schedule 1. From within the Procurement Schedule, locate the Procurement Package Schedule ID 2. Click the Edit button. 3. Click on the Milestone in the lower grid to select it 4. Click on the Link Transactions button. You will be prompted to select the related QMS
Transaction using find window for the relevant module. 5. Select the transaction (eg Purchase Order) and click OK. The Actual Date will now be populated. Notes: (a) Once a Purchase Order has been raised in relation to a Procurement page, the PO Number
should be allocated via the Procurement Schedule using the Purchase Order drop down list while in Edit mode.
15.5.02 How to update Actual Dates for user Defined Milestones For user defined milestones, the Actual dates must be updated manually. 1. From the Purchasing menu, select Packages and then Procurement Schedule. 2. Locate the Procurement Package Schedule ID 3. Click the Edit button. 4. Enter the Actual Date for the User Defined milestone in the field provided. 5. Click the Save button.

Chapter 15 – Procurement Status Report
Document No: UGD-MM-002 Rev: 5P QMS User Guide Page 138
of 164
15.503 How to update Forecast Dates From time to time it is important to update the Forecast Dates against each milestone that is incomplete for each Purchase Order. This is done from within the Procurement Schedule. 1. From the Purchasing menu, select Packages and then Procurement Schedule. 2. Locate the Procurement Package Schedule ID 3. Click the Edit button. 4. Tick the Manual Dates box and update the Forecast Dates as required. 5. Alternatively, with the Manual Dates box un-ticked, use the Forecast Dates button to re-
forecast for the remaining milestones either forwards or backwards. 6. Click the Save button.

Document No: UGD-MM-002 Rev: 5P QMS User Guide Page 139 of 164
Chapter 16 - Customising QMS
16.1 Dashboard 16.1.01 Customising the Favorites 16.1.02 Dashboard Logo and Project Summary Details
16.2 Customising Standard Reports 16.2.01 Overview 16.2.02 Using a Custom Title 16.2.03 Customising the Report Layout
16.3 Customising Standard Templates 16.3.01 Overview 16.3.02 The MS Office Templates 16.3.03 Customising the MS Office Templates
Chapter 16 – Customising QMS
Document No: UGD-MM-002 Rev: 5P QMS User Guide Page 140 of 164
16.1 Dashboard
16.1.01 Customising the Favorites The list of Favorites (shortcut to menu or report options) that appears on the dashboard when you run QMS can be customised per user if required. The steps to follow are: 1. Click on the Tools menu and select Customise Favorites
You can have up to ten menu or report items on the list of Favorites. If there are 10 items already on the list you will have to remove one or more first before new items can be added. Items are moved from right to left or left to right using the Arrow buttons at the top of the screen.
2. Click Save to save the settings and Close to exit. Notes: a) Items in blue cannot be selected. b) Click the Standard Reports option to select reports to include on the list of Favorites. c) Enter a Custom Title to include for each Favorites menu option if required.
16.1.02 Dashboard Logo and Project Summary Details The Image and Text that appear on the right hand side of the dashboard when you run QMS can be customised per Project if required. The steps to follow are: 1. Click on the Tools menu and select Options 2. Click on the Project Settings Tab of the Options screen. 3. Click the Edit button. 4. Use the select button against the field for Dashboard Logo to select the required image. 5. Enter the Project Summary details. 6. Click the Save button to save your changes. Notes: (a) The image will be automatically resized to fit the space available on the dashboard.
16.2 Customising Standard Reports
16.2.01 Overview Limited customisation for QMS Standard reports is available. From the File menu, select Print - Standard Reports. There are now two types of customisation to consider:
Using a Custom Title
Customising the Report Layout

Chapter 16 – Customising QMS
Document No: UGD-MM-002 Rev: 5P QMS User Guide Page 141 of 164
16.2.02 Using a Custom Title To use a custom title on the report, first select the report to be run and then click the Custom Title tick box at the bottom left of the screen. Enter the custom title in the field provided and click OK to run the report. Note the custom title will be saved for future use on the same report.
16.2.03 Customising the Report Layout The most advance customisation of reports available from within QMS is achieved by using the Modify button at the bottom left of the screen. 1. First select the report to modify. 2. If the report can be modified, when you click the Modify button a Report Design Window will open.
Note that you are not about to modify the standard version of the report. Rather a copy of the report is made automatically and it is the copy you are about to modify.
3. The report designer window is based on the Microsoft Visual FoxPro Report designer. If you are
unfamiliar with customising database reports, go no further without advice. 4. To save the changes you make to the report, press Ctrl+W. To exit the report designer without
saving, press Esc. 5. Finally to run the Customised version of the report, click the Run button rather than the OK button. Notes: a) Additional customisation of reports can be performed by the QA Software technical support team.
Contact [email protected] for details.
16.3 Customising Standard Templates
16.2.01 Overview Most of the modules in QMS produce an output in the form of a document. For example a Purchase Order, or Material Delivery Docket. Each of these documents has a standard report format in QMS that can be customised to meet specific customer formatting requirements but this customisation must be done by QA Software. In addition to a standard report, each of these documents has a MS Office template that can be used to generate the document. These templates can be modified by the customer themselves.
16.2.02 The MS Office Templates The MS Office templates are located in the \Qasoft\Qms\Templates folder: Document Name Template Type Template Name Purchase Requisition MS Excel mmpr.xls Bid Document (RFQ) MS Word mmrfq.dot Vendor Pricing Schedule MS Excel mmvps.xls Commercial Bid Evaluation MS Excel mmcbe.xls Purchase Order MS Word mmpo.dot Material Delivery Docket MS Excel mmmdd.xls OS&D Report MS Word mmosd.dot Material Movement Docket MS Excel mmmmd.xls Material Issue Docket MS Excel mmmid.xls

Chapter 16 – Customising QMS
Document No: UGD-MM-002 Rev: 5P QMS User Guide Page 142 of 164
16.2.03 Customising the MS Office Templates To customise any of the MS Office Templates provided with QMS: 1. Locate the required template in the\Qasoft\Qms\Templates folder.
2. Make a copy of the template and rename as “Z<Template Name>”. For example if you are
customising the Purchase Requisition template you would make a copy of the file mmpr.xls as zmmpr.xls.
3. Modify the format as required. Great care should be taken with all fields that have a comment
attached as these fields are dynamically populated by QMS when the document is generated.

Document No: UGD-MM-002 Rev: 5P QMS User Guide Page 143 of 164
Chapter 17 – Administration
17.1 Program Defaults
17.2 Security 17.2.01 Overview 17.2.02 Levels and Features 17.2.03 Users and Projects 17.2.04 Change Password 17.2.05 View User Login Details 17.2.06 Duplicate User Settings
17.3 Utilities 17.3.01 Compact Files 17.3.02 Rebuild Summary Files 17.3.03 Cascade Deletion 17.3.04 Download Global Libraries
17.4 Upgrading 17.4.01 Overview 17.4.02 Install Upgrade

Chapter 17 – Administration
Document No: UGD-MM-002 Rev: 5P QMS User Guide Page 144 of 164
17.1 Program Defaults Program Defaults are a series of settings that affect the complete QMS System. To access the Program Defaults: 1. From the Tools menu, select Options. 2. Click on the Program Defaults page frame or Tab.
The key fields in this screen are explained below: Century Roll over Year: With the default setting of 30, QMS interprets a year entered as 60 as 1960 because 60 is greater than 30. For a year entered as 20, QMS interprets the year, as 2020 since 20 is less than 30. This default setting of 30 could be changed. Show Century: To display all date fields with the year in four digits. Forms – Zoom to Fill Screen: This will maximise the various window sizes. Show menu at Startup: With this box ticked the Dashboard will load when QMS is started. Email Client: Choose between Other (for MS Outlook, Outlook Express etc), Lotus Notes, and Novell Groupwise. Custom menu: Used when necessary to specify a customised menu for a client.
17.2 Security
17.2.01 Overview QMS has a robust and easy to define internal security system. Security settings are defined in terms of User levels. A user level controls:
The functionality of QMS available to a user who is assigned that level of access by controlling menu access.
For modules of QMS users are given access to, whether they can Read, Write, or View only.
For modules of QMS users are given Read/Write access to, which records they can edit.
17.2.02 Levels and Features 1. From the Tools menu, select Security – Levels and Features. User Levels The top section of the grid displays the User Levels that have been defined. New user levels can be defined using the New User Level button or the New Duplicate User Level button. There is no limit to the number of user levels that can be defined. Assign the default level of Record Level Access (RLA). This affects only users who are given Read/Write access to an area of QMS and controls their ability to edit records within each module they are given Read/Write Access to. The choices are:
ALL – means the user can edit any record within a table to which they have Read/Write access.
SLA – means the user can edit only records within a table to which they have Read/Write access if the records were created by other users assigned the same security level.
PA – means the user can edit only records within a table to which they have Read/Write access if they created the record.

Chapter 17 – Administration
Document No: UGD-MM-002 Rev: 5P QMS User Guide Page 145 of 164
Note that for tables to which a user has Read only or No access, RLA has no impact. Use the Hide Rate/Values box to hide rates and values in the purchasing module from users with the select level of access. Use the Enable Rates box to give the users with the current level of access the ability to enter/edit rates and currencies in the Requisition and Purchase Order modules. Use the Enable Approvals box to give the users with the current level of access the ability to use the Approval tick boxes and other Approval fields in the Requisition, Deliveries and Issues modules. Access Rights The Lower grid displays all the menu options in QMS with the access rights for the User Level in the upper grid. Select between:
Read/Write: This option gives users full access to this menu option.
Read only: This option restricts the user level to Read Only access which means new information cannot be added or existing information edited.
No Access: This option denies access to this item for this user level.
Note that it is possible to set all menu options to any of the above options in one go using the radio buttons at the bottom of the screen. Restricted Reports For each user level, not only can you define the menu access but you can also restrict access to specific reports. To do this, at the above screen click on the Restricted reports button on the toolbar: 1. Select Report type from the drop down listing. 2. Select Report title to restrict access of selected User Level. 3. Tick No Print to prevent the selected user level from printing this report. 4. Tick No Edit to prevent the selected user level from editing this report. 5. Click OK when done.
17.2.03 Users and Projects All staff requiring access to QMS must be set up as users before they can access the system. All users are allocated a Security level from the levels defined in the previous section. Users can also be assigned to one or more projects. To add a new User 1. From the Tools menu, select Security – Users and Projects. 2. Click on the New User button and the Add User window will appear. 3. Select a User ID (Users are selected from the Address Book). 4. Enter the password and reconfirm your entry. 5. Select a User Level for the user and select a default Location (Optional).

Chapter 17 – Administration
Document No: UGD-MM-002 Rev: 5P QMS User Guide Page 146 of 164
6. Adjust/select the Record Level Access (RLA) setting as required. Choices are ALL, SLA or PA and their meanings are discussed in detail in the previous section.
7. Click OK to return to the previous screen. Notes: (a) The check box for Supervisory Access at the top of the users screen controls access to the
Security screens. Note that users with Supervisory Access allocated should belong to a User Level that has access to all menu options.
To Assign Projects to Users You can restrict the access of users to complete projects in QMS using the Assign Users to Projects button on the Security – Users and Projects screen. 1. Click on the Assign Users to Projects Button. 2. Use the arrow buttons to add or remove projects assigned to the selected user. If a large number of
projects are listed, use the Find and Filter button to select required projects (located in the bottom left corner of the screen).
3. Click OK when done.
17.2.04 Change Password Users can change their passwords using the Change Password option under the File menu.
17.2.05 View User Login Details The View User Login Details screen allows an administrator to see which other users are currently logged into QMS and also to see a history for a selected user on past access to the system. The ability to see who is currently logged into QMS is especially useful if you are about to perform a system upgrade and need to ensure all users are logged out. 1. From the Tools menu, select View User Login Details. 2. Choose between Current User Access Details (the default), User Access History and Deleted
User Access Details. 3. If Current User Access Details is selected, the grid displays the session details of users currently
logged into QMS. 4. If User Access History is selected, the grid displays a list for all users of each access they have
made to QMS. Use the drop down list to restrict the display to a specific user.
17.2.06 Duplicate User Settings This wizard enables the security and other settings for one user to be copied to other users. 1. From the Tools menu, select Duplicate User Settings. 2. Click Next at the Welcome screen of the Wizard. 3. Select the User ID to copy from. 4. Click Next and select the Settings to copy and click Next. 5. Select the Users to copy the settings To and click Next. 6. Click Finish to complete the process.

Chapter 17 – Administration
Document No: UGD-MM-002 Rev: 5P QMS User Guide Page 147 of 164
17.3 Utilities
17.3.01 Compact Files QMS is a database system that stores data in tables. It is possible during operation of QMS that one or more tables become corrupted if for example you just switch of your computer while running a materials availability analysis. While this may seem unlikely, this is effectively what happens if you lose power while using QMS or the network crashes. After any un-expected exit from the QMS program such as described above, it is highly recommended that you run the Compact Files utility provided which will compact and re-index all the QMS tables. To Compact Files: 1. First ensure all users are logged out of QMS other than yourself. Check this via View User Login
Details [see Section 17.2.05]. 2. From the File menu, select Compact Files. 3. Choose between the following options:
Current Project (default)
All Projects
Selected Projects 4. Click OK to start the process. Notes: (a) IT IS HIGHLY RECOMMENDED THAT YOUR QMS INSTALLATION IS BACKED UP DAILY. (b) If you choose Selected projects you will be prompted to select the required projects using a mover
window. (c) If while running compact files, errors are reported, this means that one or more of your tables have
become corrupted. In this case you will need to restore you latest backup of your installation and re-enter any data processed since this backup. If for any reason you do not have a recent backup:
Using Windows explorer, locate the \QMS\Projects\1234 folder where 1234 is the project
number of the project that has corrupt data files.
Zip up the \QMS\Projects\1234 folder and email the zip file to [email protected]
QA Software is often able to repair corrupted data. Charges apply.

Chapter 17 – Administration
Document No: UGD-MM-002 Rev: 5P QMS User Guide Page 148 of 164
17.3.02 Rebuild Summary Files This option is found under the File menu and is used to force a re-calculation of the total quantities in each element of QMS for posting to the Project Summary file. It is also used to rebuild the values of the Stock at each location based on totals received, sent, accepted, issued, and lost. This option should be run prior to viewing the Project Summary if the most up to date details on quantities are to be seen after changes have been made. When running this option the user is prompted whether to rebuild the stock at location values. Generally click Yes to this prompt. Note also that this window there is an option to Exclude BOM Qty for Stock at Location which is ticked by default. The reason for this option is that the Stock at Location screen includes the concept of a BOM Qty at each location (the material required at the location as defined in the Bill of Materials). Most users of QMS do not use the BOM “Required at location” concept in QMS and hence get confused seeing this value in the Stock at Location screens. By default the system does not calculate a Required at Qty (BOM Qty) on a per location basis. If you require this calculation simply un-tick the “Exclude” option when running Rebuild Summary files.
17.3.03 Cascade Deletion Data stored in the Parent file of “Parent/Child” file types, cannot be deleted using the Delete button when viewing the data file. Instead they must be deleted using Cascade deletion. The file types that fall into this category are:
Document Register (Bill of Materials)
Requisitions
Bid Documents
Purchase Orders – Draft
Purchase Orders - Finalised
Shipping Details
Deliveries
Movements
Issue Dockets
Expediting Groups
Procurement Packages 1. From the Tools menu, select Cascade deletion. 2. Select the Category. 3. Select one or more documents/dockets/parent records etc to delete using the mover buttons. 4. Click on the Delete button to delete the selected information and click Yes when prompted. Notes: (a) Viewing the Parent and or Child file using the Browse buttons is only for the purpose of verifying
that you have selected the correct item to delete. (b) The purchase order - History File stores the complete history of purchase orders and cannot be
deleted (although Finalised Purchase Orders that are deleted are also removed from the history). (c) Movement Dockets cannot be deleted unless the material on them has been sent but not accepted. (d) The ability to delete using Cascade Deletion is linked to the User Level allocated to the User. Eg if a
user does not have Full Access to Requisitions they will not be able to delete Requisitions.
Chapter 17 – Administration
Document No: UGD-MM-002 Rev: 5P QMS User Guide Page 149 of 164
17.3.04 Download Global Libraries QMS support the use of either project specific Stockcodes and Address Books or global files for this information, on a project by project basis. Information can be copied from global to project or vice versa as required. 1. From the Tools menu, select Download Global Libraries. 2. Click Next at the Welcome screen of the wizard. 3. Select either the Address Book or the Stockcode Library. 4. Choose the transfer mode. The options are:
Local (Project) to Global
Global to Local (Project) 5. Click the Next button.
The next window displays the contents of the FROM table on the left side and the TO table on the right hand side.
6. Use the Mover buttons to select the records to be transferred. 7. Choose between the update options:
Only New (Default option)
Add New and Update Existing 8. Click Next and click Finish to perform the transfer.
17.4 Upgrading QMS
17.4.01 Overview Further development of the QMS system is a continuous process. From time to time a new release of the system is made available to customers. Information on new releases is available from www.qa-software.com and is normally announced via Newsletters. Contact QA Software if you have not received an upgrade in the last 12 months or use the option Check for Upgrades under the Help menu to see if an upgrade is available.
17.4.02 Install Upgrade QMS Upgrades are normally provided by email in the form of a zip file. The process of upgrading is simple and seamless and the steps required to install the upgrade are:
Determine where QMS is Installed
Backup your existing installation
Install the upgrade file
Run the upgrade wizard
Cleanup Determine where QMS is Installed To find out where you existing QMS System is installed: 1. Run QMS and login to your project as normal.

Chapter 17 – Administration
Document No: UGD-MM-002 Rev: 5P QMS User Guide Page 150 of 164
2. On the bottom of the screen under the Copyright message, the QMS Program folder is listed.
3. Make a note of this program folder. Backup your existing installation The following backup procedure is recommended: 1. Quit all QA Software Products (QMS, QDMS, QTRAK, etc) on all machines. 2. Run Windows Explorer. 3. Create a folder called ZQABACKUP on your c: drive. 4. Copy the QMS Program Folder to C:\ZQABACKUP (Typically this is simply done by copying the
QASOFT folder with all sub directories. Alternatively if you have other QA Software products installed, copy the Qasoft\Qms folder with all sub directories plus the Qasoft\Global folder.)
Install the Upgrade file The QMS Upgrade can be provided in a number of formats: Zip file: Simply extract the zip file provided to the C:\ directory on your PC. Note that it is essential that the User folder names option in Winzip is ticked when extracting the zip file so that the correct folder structure is created. This will normally be c:\UpgradeQMS plus sub folders. Self Extracting EXE: Simply double click on the file and click Unzip. By CD ROM: Install the CD ROM. Run the Upgrade Wizard 1. Check that no one else is using QMS (the upgrade will not work if someone else is in the system).
See also View User Login Details [see Section 17.2.05]. 2. Run QMS and login to your project. 3. From the Tools Menu choose Upgrade QMS. 4. You will be presented with an Upgrade Window. 5. Type D:\UpgradeQMS\ in the field Upgrade From Drive and Directory
Note if the upgrade was supplied by zip file or select extracting EXE, type C:\UpgradeQMS at this screen or use the select button to locate this folder.
6. Make sure Upgrade all Projects is selected and click OK. The Upgrade will begin and a status window will flash in the top right corner of your screen. When the upgrade is complete, QMS will shut down and restart automatically. This may take several minutes. The next thing that will happen is that the QMS login screen will reappear and you can log in and start work with the new version. Notes: a) The Upgrade Process may consume a lot of network resources. It may be advisable to either run
the upgrade from your server machine, or temporarily copy the application to a local drive and run the upgrade.
b) It is possible to upgrade only the current or selected projects but this is only recommended in exceptional circumstances.

Document No: UGD-MM-002 Rev: 5P QMS User Guide Page 151 of 164
Chapter 18 - Import / Export
18.1 Importing 18.1.01 Importing the BOM - Overview 18.1.02 Importing the BOM – Process 18.1.03 Importing Requisitions 18.1.04 Importing Draft and Final Purchase Orders 18.1.05 Importing Expediting Data 18.1.06 Import Delivery Dockets 18.1.07 Import the Address Book
18.2 Exporting

Chapter 18 – Import / Export
Document No: UGD-MM-002 Rev: 5P QMS User Guide Page 152 of 164
18.1 Importing data
18.1.01 Importing the BOM - Overview Importing of Bill of Materials (BOM) data is restricted to the Bill of Materials, Stockcode Library, Document Register and Configuration Tables. These tables can be updated/populated from a single Import file or from separate import files if required. The most common type of import file is an excel spread sheet. This should contain the BOM data in rows in the following format:
DocumentNo Stockcode Qty Additional Columns to populate the Document Register or Stockcode Library
A-0001 STC-001 2.00 Eg Discipline, Document Rev, Document Title, Insulation, Position, Area, Type, Material etc.
A-0001 STC-002 12.00
A-0001 STC-003 2.50
A-0002 STC-001 4.00
A-0002 STC-002 6.00
A-0002 STC-003 2.00
Note the following rules; (a) The column headings in the excel file must not include spaces and should be no longer than 10
characters. (b) Every row must include a Document Number, Stockcode and Qty>0 (c) There should be no empty column headings in the excel file (to the left of the last populated column
heading). (d) The Quantity field should be formatted in Excel as a Decimal to three decimal places. (e) Typically a Document contains multiple Stockcodes. However the Document information must be
repeated on every row regardless of this. The following are the minimum recommended columns to include in a BOM Import file: Document Number* DocumentNo Document Revision* DocRev Document Title DocTitle BOM Revision BOMRev [see Section 4.5.01] Stockcode* StCode Stockcode Description StDesc BOM Qty* BOMQty Discipline Disc Required At BOM_Locn [see Section 4.4.03] Type Fitting Type Material Material Type Size1 Size 1 (for single size fittings) Size2 Size 2 (for fittings with 2 sizes) * = Mandatory field
For a Stockcode only import file the minimum columns are simply Stockcode and Title. For a Document Register only import the column headings should relate to the attribute fields in the Document Register but need only include the Document Number, Rev and Title as a minimum. An Excel template called “TEMPLATE_BOM_IMPORT’.xls” is found in the \Qasoft\Qms folder and can contains useful notes on what can be imported. A simple sample template “BOM Import - Simple Sample File.xls” is located in the QMS\Import\ folder and shows the minimum information required for import.

Chapter 18 – Import / Export
Document No: UGD-MM-002 Rev: 5P QMS User Guide Page 153 of 164
18.1.02 Importing the BOM - Process 1. First ensure the correct BOM to be imported into is selected as the Current BOM [see Section 4.4.01]. 2. Then from the File menu, select Import. 3. Click Next at the Welcome screen of the wizard. 4. Bill of Materials is selected by default. Choose from the following import options:
BOM and Stockcode Library data (default)
Stockcode Library data only
Document Register data only
BOM data only
Substitute Stockcode Library data only 5. Click Next. 6. Use the Select button to locate and select the excel import file. (Importing from a Database (DBF)
file is also supported). 7. Click the Next button.
The system now reads to the excel file and displays two grids in a mover window. The left hand grid displays the column headings of the Import file. The right hand grid displays the fields in relevant QMS Tables (this depends on which of the import options were selected at step 4).
Field Mapping
The next step is to map each field in the import file to the related field in the QMS System. Once the mapping is done it can be saved and re-used for updated imports later. Note that the minimum fields that must be mapped (for a BOM import) are the Document Number, Document Revision, the Stockcode and the Quantity.
8. To map the first field, select the field in the left grid by clicking on it (eg Document Number) and then locate the field in the right grid which stores the Document Number and double click on it (or click the Map button). The name of this field will then appear to the right of the Document Number field in the right grid.
9. Repeat step 8 for the each of the fields to be mapped.
Note that for a full BOM and Stockcode Library import the fields in the right grid are listed in the following order: Bill of Materials Fields Document Register Fields Stockcode Library Fields
10. Click the Save Mapping button and enter a title and description for the saved map when prompted
and click OK.
Notes: (a) The mapping can be saved to All projects if required. Tick the All Projects option before
clicking OK if this is required. (b) To use a saved mapping arrangement, click the Load Mapping button after Step 7 above and
select the required map. The mapping details will then be populated in the lower grid. (c) If you select the wrong mapping by mistake, the mapped fields can be cleared from the lower
grid using the Clear Mapping button.

Chapter 18 – Import / Export
Document No: UGD-MM-002 Rev: 5P QMS User Guide Page 154 of 164
(d) The Auto Mapping button will map fields in the import file to the QMS Database if they have the QMS System field names (these names can be found using the file TEMPLATE_BOM_IMPORT.xls located in the \qasoft\qms folder.).
(e) Saved maps can be maintained/deleted via BOM \ Utilities \ Edit Import mapping and the
details of an Import map can be exported to MS Excel using the Export button. (f) Use the Show Data button to view the contents of the Import file.
(g) Tick the Display mapped fields only box to see only mapped fields.
11. Click Next when the mapping is complete. 12. A screen listing the records for import will now be displayed. Any invalid records are displayed in
red and a reason is given as to why the record will not be imported (eg the Qty = 0). It is also possible at this screen to unselect any valid record to prevent it being imported if required.
Note that the BOM Container ID that the data will be imported into (the current BOM) is displayed clearly in the screen header and should be checked as data once imported cannot be un-imported.
13. Click Next and at the next screen of the Import process, choose from the following Import options:
Add New Documents and Overwrite Existing Documents Add New Documents Only
Replace Complete Bill of Materials
Add New and Update Existing
When importing a BOM, the first option Add New Documents and Overwrite Existing Documents is the recommended option as long as the import file contains the complete BOM for each document rather than just changes. Note however that Documents that exist in the BOM but are not in the import file will be left unchanged. If they are no longer required they should be deleted manually using Cascade Deletion after the import is completed. When importing the Stockcode library, Document Register etc only the last option Add New and Update Existing option is available. This will add any new records found in the import file to the QMS System and update existing records. However existing records that are not in the import file will not be changed. The Replace Complete Bill of Materials option should be used with EXTREME CARE only as this will overwrite the complete BOM in QMS with the information in the import file.
14. Click Next click Finish to proceed with the Import. Notes: (a) If either the Add New Documents and Overwrite Existing Documents or Replace Complete Bill of
Materials options are chosen in regard to importing in to the BOM and if the documents being imported have already had material issued against them, then system will rebuild this issued information using the same Item numbers (regardless of the Item numbers in the Import file). If an existing Stockcode with Issued Qty > 0 was not in the import file it will remain in the BOM but the BOM Qty will be set to zero. If there are multiple entries for the same Stockcode within the same document that have all been issued, only the first entry will be updated.
(b) If the Document Revision of a Document being imported differs from the existing revision of the document in the BOM, the BOM History – By Document will be updated (see Revising Documents in section 4.6.03]
(c) The Size field in the Stockcode library for each Stockcode normally stores the combination of the Size1 x Size2 x Size3 values. The Size field will be populated automatically in this way via the Import process if it is left empty in the Import file.
(d) The Required At value for each Stockcode for each document in the BOM will be populated via the value assigned to the Stockcode in the Stockcode library if it is left empty in the Import file.
(e) The import process supports the import of duplicate Stockcodes for the same Document Number.

Chapter 18 – Import / Export
Document No: UGD-MM-002 Rev: 5P QMS User Guide Page 155 of 164
However there are three possible scenarios for how duplicate Stockcodes within the same document number are handled:
If the Item number against each Document + Stockcode is mapped in the import process then duplicate Stockcodes within the same document will be imported.
If the Item number is not mapped but the Required at value is mapped then the duplicate Stockcodes within a document will be imported but summarised by Required at for each document.
If neither the Item number or Required at values are mapped for the import process, then duplicate Stockcodes within a document will be summarised during the import process to a single entry.
(f) For existing documents that get updated via the import process, the Previous Qty will be rebuilt after the import process from the BOM History.
18.1.03 Importing Requisitions Requisition Information can be imported into QMS via Ms Excel using the template “Template_Requisition_Import.xls” which can be found in the \Qasoft\Qms folder. The Import process will add new Requisitions and update existing Requisitions. The columns in the Import Template are structured in three groups:
Parent Table Information (eg Requisition Number, Requisition Date, Requisition Title etc)
Child Table Information (Stockcodes and Quantities)
Stockcode Library Information (Stockcode Description and other Stockcode attributes) The mandatory fields to enable import are:
Requisition Number
Requisition Title
Requisition Date
Stockcode During the import process, the Stockcode Library and Configuration tables will also be updated if the import file contains Stockcodes and configuration table values that do not already exist in the QMS Project. Notes: (a) If it is the case the Stockcodes being imported as part of the Import process already exist in the
QMS Stockcode library, then it is strongly recommended that the STOCK_TITL column in the import file be left empty so that the Stockcode Descriptions are allocated from the Stockcode library during the import process.
(b) If the STOCK_TITL column contains values for Stockcode Titles and these Stockcodes already exist in the Stockcode library, then the title in the Stockcode library will be updated from the Import file.
(c) As a general rule, if the import file contains empty cells for a row, and the Requisition already exists in QMS, then the existing value in QMS is not overwritten. Otherwise the data in QMS is updated from the import file.
(d) Since the Parent Table information in the import file is repeated for each row in the Child table (ie the Requisition Number, Date etc are repeated for every row on the Requisition), the last row for the requisition is the row used to update the Parent Table.
(e) Stockcode values and other key field values will be auto converted to uppercase during the import process.
Chapter 18 – Import / Export
Document No: UGD-MM-002 Rev: 5P QMS User Guide Page 156 of 164
18.1.04 Importing Draft and Finalised Purchase Orders Draft and/or Finalised Purchase Order Information can be imported into QMS via Ms Excel using the templates “Template_PO_Draft_Import.xls” and “Template_PO_Final_Import.xls” which can be found in the \Qasoft\Qms folder. . The Import process will add new Purchase Orders and update existing Purchase Orders. The columns in the Import Templates are structured in three groups:
Parent Table Information (eg Purchase Order Number, PO Date, PO Title etc)
Child Table Information (Stockcodes and Quantities, Order Delivery Dates etc)
Stockcode Library Information (Stockcode Description and other Stockcode attributes) The mandatory fields to enable import are:
Order Number
Order Title
Order Revision (Finalised Orders only)
Order Date
Vendor ID
Contact ID During the import process, the Address Book, Stockcode Library and Configuration tables will also be updated if the import file contains values that do not already exist in the QMS Project. Notes: (a) IMPORTANT - Notes (a) and (b) from section 18.1.03 apply to the PO Import process. (b) The Order Qty for each line item must be greater than 0. (c) If importing Finalised Purchase Orders, the Order number must not already exist in Draft Purchase
Orders. If importing Draft Orders, the Order number must not already exist in Finalised Purchase Orders.
(d) When importing Finalised Purchase Orders, if the PO # already exists in Finalised Orders, then the revision of the Purchase Order being imported is taken from the last row for that Purchase order in the MS Excel import file (and all other rows for the same purchase order will be considered as having this revision regardless of what revision they have assigned).
(e) The SUBSTFOR column in the import file can be used to indicate the Stockcode for which the primary Stockcode being purchased is a substitute for (as defined in the BOM). During the import process the Stockcode library substitutes definition table will also be updated automatically if the relationship between the Stockcode and the substitute is not already defined therein.
18.1.05 Importing Expediting Data Expediting data (ETA Site, Promised Delivery dates etc) for a Purchase order can be imported into QMS via Ms Excel using the template “Template_Expediting_Import.xls” which can be found in the \Qasoft\Qms folder. The Import process will update the expending data module for Purchase orders. The fields in the import file are self-explanatory the import procedure is as per the other import options. Notes: (a) The Purchase Order number must already exist in the QMS system. (b) If the expediting data is General rather than line item level expediting data, simply leave the Item
No column blank in the import file or enter NONE.
18.1.06 Importing Delivery Dockets Delivery Docket Information can be imported into QMS via Ms Excel using the template “Template_Delivery_Import.xls” which can be found in the \Qasoft\Qms folder. The Import process will add new Delivery Dockets and update existing Delivery Dockets.

Chapter 18 – Import / Export
Document No: UGD-MM-002 Rev: 5P QMS User Guide Page 157 of 164
The columns in the Import Template are structured in three groups:
Parent Table Information (eg Docket Number, PO Number, Received Date, Received at Location etc)
Child Table Information (Stockcodes and Quantities Received)
Stockcode Library Information (Stockcode Description and other Stockcode attributes) The mandatory fields to enable import are:
Docket Number
Order Number
Received Date
Received At Location
Stockcode
Received Qty Notes: (c) The Stockcode must exist against the Purchase Order the Delivery Docket relates to.
18.1.07 Importing the Address Book The Import Address Book feature is provided to enable the list of Vendors for QMS to be imported via an Excel file, Database file, or from MS Outlook. To import data to the Address Book: 1. From the Tools menu, select Import Address Book Wizard and click Next at the Welcome
screen. 2. Choose the required import option from the following:
Import from Excel
Import from Outlook
Import from DBF If Importing from Excel or DBF: 3. Click the Select File button to locate the file to be imported. Select the file and click Next. 4. If there are any entries in the Import file which are invalid (for example a company with no contact
or a contact with no company), these will be displayed first. These entries will not be imported. 5. Click Next and if there are any entries in the import file that already exist in the QMS Address
book, these will be displayed next. The details about these recipients will be updated from the import file. All entries are selected for import by default. Specific entries can be un-selected if required.
6. Click Next and then click the Finish button to perform the import. If Importing from Outlook: 7. At step 3 above, simply click Next. 8. The Contacts from your Outlook address book will be displayed and it is necessary to enter a
Company ID and Contact ID against each Contact. 9. Use the Suggest button to auto allocate these values. The Company ID’s will be allocated based
on the first 4 characters of the company name and the Contact ID’s will be allocated based on the Initials of the Contact.
10. Click Next and any invalid entries will be displayed.
Chapter 18 – Import / Export
Document No: UGD-MM-002 Rev: 5P QMS User Guide Page 158 of 164
11. Click Next and a list of valid contacts that will be imported is displayed. Note also that any contacts
in the list that already existing in the QMS Address book will be highlighted in brown and if selected will be updated with non-blank data only from Outlook. Note that all entries are selected for import by default.
12. Click Next and then click Finish. Notes: (a) If importing from Excel or DBF, the import file must have field or column headings that relate to the
field names used in QMS. (b) A default template called “Address Book.xls” is located in the QMS folder and has the correct
column headings already in place. (c) It is possible to fine tune which contacts will be imported using the Import tick box against each
contact.
18.2 Exporting data All data files in QMS can be exported into standard file formats such as spread sheet, text and database. 1. From the File menu, select Export. 2. Select the File to Export. 3. Select the Export File Type. 4. Enter an Export File Name. 5. Click OK to do the export. Notes: (a) A filter can be applied to export selected records only. (b) Use the Advanced Export option to include Stockcode titles and other Parent table information
where relevant with the exported data. For example if Finalised Purchase Orders are exported without using the Advanced option, only the PO Line Item Details are exported. With the Advanced option the general information about each Purchase Order is also exported.
(c) Use the Summarise BOM button to export a summarised list of BOM Quantities per Stockcode for
selected documents. (d) To define a default folder for the Export files to be saved into, go to the Tools menu, select Options
and on the Project Settings tab, select the required folder. (e) The User Level applied to a user affects the Export options available. For example if a user has no
access to Purchase Orders – Final within their user level, they will not be able to export this table. A minimum of Read Access is required.
(f) To copy a Bill of Materials or Stockcode Library one from project to another, simply Export it from
the first project to Excel or DBF and the then use File\Import to import it to the second Project (using Auto Mapping to map the fields).

Document No: UGD-MM-002 Rev: 5P QMS User Guide Page 159 of 164
Chapter 19 - Reference Section
19.1 File menu
19.2 Edit menu
19.3 BOM menu
19.4 Purchasing menu
19.5 Deliveries menu
19.6 Stock menu
19.7 Tools menu

Chapter 19 - Reference Section
Document No: UGD-MM-002 Rev: 5P QMS User Guide Page 160 of 164
19.1 File menu
Menu Item Description
Project - Select Used to switch between projects.
Project – Open Used to change projects (via the log-in screen list)
Project – Create New Used to create a new project.
Project Statistics Generates a project statistics report detailing the status of each file.
Backup & Restore Used to backup and restore project data.
Print Standard Reports Used to generate standard QMS reports.
Print X tab Reports Used to generate standard QMS Cross Tabulated reports.
Page Setup Used to control the Page Setup.
Rebuild Summary Files Used to rebuild the Project Totals file.
Project Summary Used to view only the project summary quantities.
Compact Files Used to rebuild file indexes.
Export Used to export data files.
Import Used to import data files.
Calendar Used to define a Project Calendar of working/non-working days.
Hide Dashboard Used to hide the dashboard.
Re-enter password Used to re-enter your password without exiting the system.
Change Password User to change your password.
Exit Used to Exit from QMS.
19.2 Edit menu The Edit menu is a standard windows menu for normal edit actions such as cut, copy, and paste. The Edit menu only becomes active when data is being viewed and / or selected.

Chapter 19 - Reference Section
Document No: UGD-MM-002 Rev: 5P QMS User Guide Page 161 of 164
19.3 BOM menu
Menu Item Description
BOM Details Used for data entry / edit in the Bill of Materials database.
Document Register Used to view / edit the document register.
Stockcodes Used for data entry /edit in the Stockcode Library.
Utilities: Document Priority Allocation Wizard
Used to allocate/re-allocate priorities to documents in the document register.
Utilities: Re-assign BOM Required At values
Used to re-assign Required At values in the Bill of Materials.
Utilities: Re-number Document
Used to renumber a Document throughout the system.
Utilities: Current BOM Settings by User
Used to view/change which BOM is current for each User.
Utilities: Edit Import Mapping Used to edit/delete saved Import Maps.
Configuration Tables Access to: Areas, BOM Revisions, Categories, Cost Codes, Disciplines, Insulation, Line Numbers, Locations, Materials, Packages, Positions, Required At, Revisions, Test Packages, Types, Specs, Surf Treatment, Units.
BOM list maintenance+ Used to create and revise Bills of materials.
BOM History Used to access a complete history of the Bill of Materials at each BOM Revision (excluding the current revision).
19.4 Purchasing menu
Menu Item Description
Requisitions Used to view / edit the Requisitions database
Requisition Wizard Used to generate a requisition automatically from the Bill of Materials
Packages – Milestone Library Used to define a default set of Milestones for use with the Procurement Schedule.
Packages – Procurement Schedule
Used to define the list of Procurement Packages for the Project and for each package, the schedule of milestones.
Packages – Procurement Status Report
A register of Procurement Packages for progress management and reporting.
Bid Documents – Create Bid Document.
Used to create bid documents from an existing requisition.
Bid Documents – View Bid Documents.
Used to View Bid Document information.
Bid Documents – Receive Bids.
Used to record rates and delivery dates against bid documents.
Bid Documents – Bid Analysis.
Used to perform the bid analysis and select items for order.
Purchase Orders – Draft/Final/History
Used to view / edit the Purchase Orders – Draft, Final and History tables.
Purchase order Wizard – From a Requisition
Used to generate a Draft Purchase Order automatically from a Requisition.

Chapter 19 - Reference Section
Document No: UGD-MM-002 Rev: 5P QMS User Guide Page 162 of 164
Menu Item Description
Purchase order Wizard – From a Bid Document
Used to generate a Draft Purchase Order automatically from a Bid Document.
Purchase order Wizard – From Bill of Materials
Used to generate a Draft Purchase Order automatically from the Bill of Materials.
Expediting - Update Forecast Deliveries
Used to update the Promised Delivery and ETA Site dates against Purchase Order Details.
Expediting - Expediting Schedule
Used to create and maintain and expediting and inspection schedule per Purchase Order.
Expediting - Expediting Activity Library
Used to create a library of Standard expediting and inspection activities for use with the Expediting Schedule.
Shipping Used to record Shipment Details.
Utilities – Finalise a Draft PO Used to turn a Draft PO into a Finalised PO.
Utilities – Revise a Finalised PO
Used to Revise a Finalised PO.
Utilities – Close a Finalised Purchase Order
Use to stop further revisions and or deliveries against a Finalised PO.
Address Book The QMS Address Book.
Configuration Tables Access to: Bid Attachments, Bid Evaluation Status, Contact Titles, Country codes, Procurement Centres, Shipment Methods.
Currencies Used to setup currency values.
19.5 Deliveries menu
Menu Item Description
Deliveries Used to Edit/Add Delivery Dockets.
Delivery Wizard - From an Order
Used to generate a delivery docket against a purchase order.
Delivery Wizard - From an Unknown Order
Used to generate a delivery docket where the purchase order is not known.
Returns of Delivered Material Used to view return of delivered material dockets.
Returns of Delivered Material Wizard
Used to generate a return of delivered material delivery docket when materials are returned to suppliers.
Movements Used to Create, View, Edit and Accept Movements.
Movement Wizard Used to create Movements automatically.
Utilities - Delivery docket - Assign Order No
Used to assign a purchase order to a delivery docket that was entered against an unknown order.

Chapter 19 - Reference Section
Document No: UGD-MM-002 Rev: 5P QMS User Guide Page 163 of 164
19.6 Stock menu
Menu Item Description
Issues Used to manually create an Issue or edit an existing Issue Docket.
Issues Wizard Used to generate Issue dockets automatically by Document.
Material Availability Wizard Used to analyse the material availability
Returns of Issued Material Used to return issued material to stock.
View Return Issues Used to view material returned from Issue.
Stock at Location Used to view the stock at a location.
Stock Transfer Used to transfer stock between projects.
Stock Search Used to search for Stock across projects and locations.
Reconcile Stock Used to reconcile stock at locations.
Configuration Tables Used to set up Bin Areas.
19.7 Tools menu
Menu Item Description
Security – Users and Projects
Used to create users and assign user levels and project access.
Security – Levels and Features
Used to define access rights per User Level.
View User Login Details Used to see who is logged into QMS.
Options
Project Details Used to view / edit the project details.
Project Settings Used to configure the Dashboard Image and Project Summary text.
Program Defaults Used to view / edit the program defaults (applicable to all projects)
Transfer Project Data Used to transfer data between projects.
Download Global Libraries Used to transfer Stockcodes or the address book from the project to Global files.
Send Auto Alerts Used to send auto reminders by email in regard to the Expediting Schedule.
Rename Contact ID/Company ID
Use to rename the ID of a contact or company.
Duplicate User Settings Used to duplicate security settings from one user to another.
Import Address Book Wizard Used to import an Address Book into a project.
Cascade deletion Used to delete entries in "Parent / Child" file types
Execute a program command Used to execute a program command. Used only by QA Software technical support.

Chapter 19 - Reference Section
Document No: UGD-MM-002 Rev: 5P QMS User Guide Page 164 of 164
Menu Item Description
Execute a Script File
Used to execute a program script file. Used only by QA Software technical support.
Reset System Reset System.
Upgrade QMS Used to install QMS Upgrades.
Customise Favorites Used to set up custom Favorites menu options on the dashboard.