QCG Entry CE Client & Watchguard Firebox X Edge series · PDF fileSecure Entry (CE) Client &...
15
Secure Entry (CE) Client & Watchguard Firebox ® X Edge series A quick configuration guide to setting up the NCP Secure Entry (CE) Client in a simple VPN scenario Client-to-Gateway using pre-shared secrets Typical client-to-gateway VPN using a pre-shared secret for authentication. Document version 2.03 Using NCP Secure Entry CE Client v2.26 (build 7) & the NCP Secure Entry Client v9.00 (build 24) Prepared by: NCP Engineering GmbH Dombuehler Strasse 2, 90449 Nürnberg, Germany Phone: +49-911-99.68.0 Fax: +49-911-99.68.299
Transcript of QCG Entry CE Client & Watchguard Firebox X Edge series · PDF fileSecure Entry (CE) Client &...

Secure Entry (CE) Client &
Watchguard Firebox® X Edge series A quick configuration guide to setting up the NCP Secure Entry (CE) Client in a simple VPN scenario
Client-to-Gateway using pre-shared secrets Typical client-to-gateway VPN using a pre-shared secret for authentication.
Document version 2.03
Using NCP Secure Entry CE Client v2.26 (build 7) & the NCP Secure Entry Client v9.00 (build 24)
Prepared by: NCP Engineering GmbH
Dombuehler Strasse 2, 90449 Nürnberg, Germany
Phone: +49-911-99.68.0
Fax: +49-911-99.68.299

Network Communications Products engineering GmbH
Version 2.03 Page 2 of 15 14.Mar.07
Disclaimer
Considerable care has been taken in the preparation of this quick guide, errors in content, typographical
or otherwise may occur. If you have any comments or recommendations concerning the accuracy, then please contact NCP as desired.
NCP makes no representations or warranties with respect to the contents or use of this quick guide, and explicitly disclaims all expressed or implied warranties of merchantability or use for any particular
purpose. Furthermore, NCP reserves the right to revise this publication and to make amendments to the content, at any time, without obligation to notify any person or entity of such revisions and changes.
Copyright
This quick guide is the sole property of NCP and may not be copied for resale, commercial distribution or translated to another language without the express written permission of NCP engineering GmbH,
Dombühler Str.2, D-90449 Nürnberg, Germany.
Trademarks
All trademarks or registered trademarks appearing in this manual belong to their respective owners.
© 2007 NCP Engineering GmbH. All rights reserved.
Network Communications Products engineering GmbH
Version 2.03 Page 3 of 15 14.Mar.07
1. Configuring the Watchguard Firebox X Edge series device Please refer to the manual/documentation for a comprehensive explanation and procedures to follow
when configuring the Firebox security appliance for remote user access. This document serves merely as a simple guide to assist in the configuration. It is by no means complete; and therefore highly
recommended to consult the respective product's manuals.
1.0 Configuring a Remote User
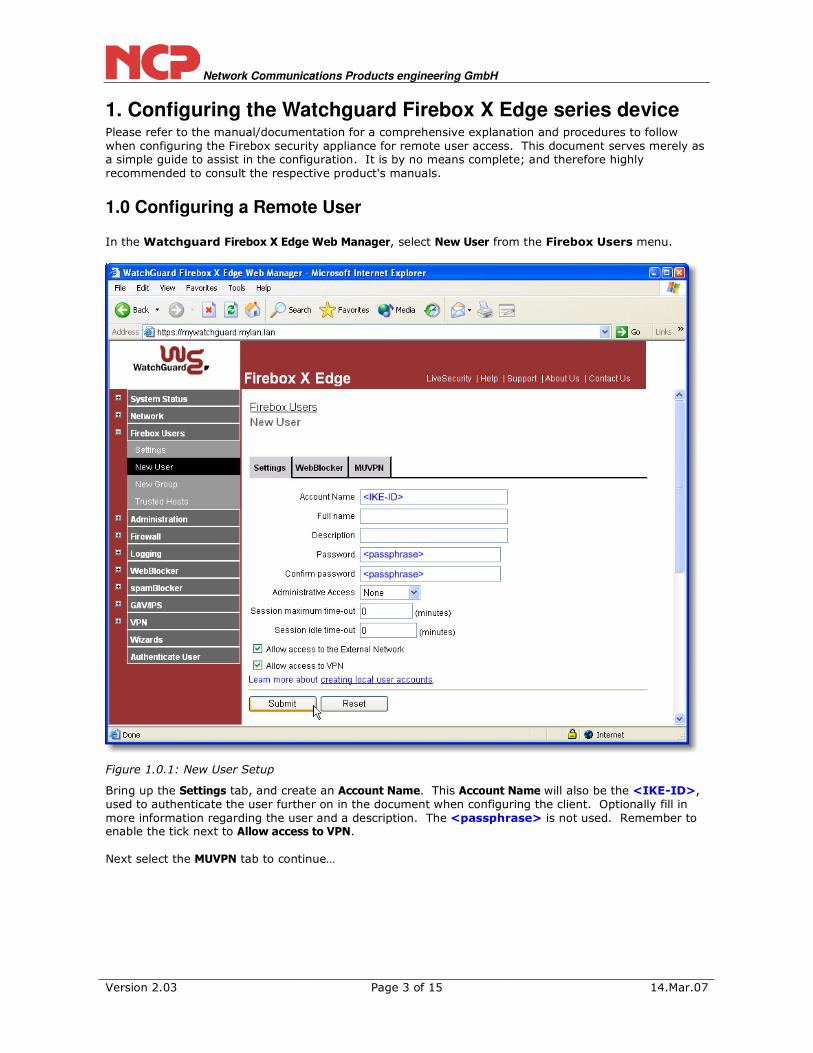
In the Watchguard Firebox X Edge Web Manager, select New User from the Firebox Users menu.
Figure 1.0.1: New User Setup
Bring up the Settings tab, and create an Account Name. This Account Name will also be the <IKE-ID>,
used to authenticate the user further on in the document when configuring the client. Optionally fill in
more information regarding the user and a description. The <passphrase> is not used. Remember to enable the tick next to Allow access to VPN.
Next select the MUVPN tab to continue…

Network Communications Products engineering GmbH
Version 2.03 Page 4 of 15 14.Mar.07
Figure 1.0.2: Defining the MUVPN user
Ensure the tick is placed, enabling this user to make use of the VPN functionalities. Select a Pre-Shared
Key or secret that will be referred to as <PSK> further on in this document. Also designate a free IP address in the same network segment to the remote user. This will be referred to as the <Virtual IP> further on in this document. You may wish to change the Security Association (Key expiration) lifetimes
if required.
NOTE: Regardless of whether the NCP Secure Client is running on Windows or on an Pocket PC
(WinCE/Windows Mobile), do NOT select Pocket PC as VPN Client Type! This should always be left on Mobile User as shown in the screenshot above.
NOTE: If you wish to have all the traffic originating from the client's machine to pass through the Firebox, which includes web requests and such, then you can tick the All traffic uses tunnel (0.0.0.0/0 IP
Subnet) options. Alternatively, you can define only the subnet the device is connected to, to be
accessible via the tunnel. This will require the network to be defined later in the client under Remote
Networks section (see figure 2.1.9). Click Submit to complete the addition of a new (VPN) user…
Network Communications Products engineering GmbH
Version 2.03 Page 5 of 15 14.Mar.07
2. Setting up the Client This section will outline the configuration of the NCP Secure Entry (CE) Client for Windows, Linux or PocketPCs or Smart Phones running Windows CE/Windows Mobile. The configuration screenshots may
differ slightly depending on which platform is being used. The first section 2.0 shows screenshots of the configuration being made with the help of the Configuration Assistant. Section 2.1 outlines how to
modify and existing profile.
2.0 Using the Configuration Assistant
The first time you start up the NCP Entry Client or (for CE Clients) the Configurator, you will be prompted
to create a profile if none are preconfigured or exist. You can either use the assistant or modify an existing profile as shown in section 2.1.
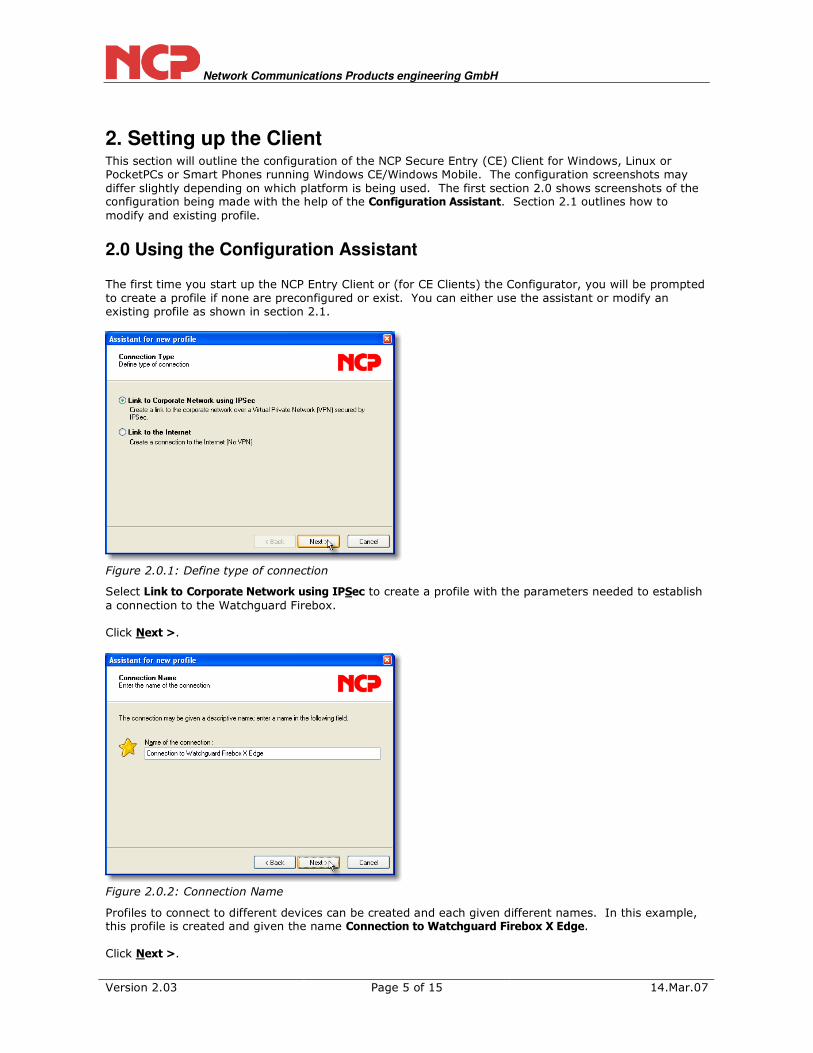
Figure 2.0.1: Define type of connection
Select Link to Corporate Network using IPSec to create a profile with the parameters needed to establish
a connection to the Watchguard Firebox. Click Next >.
Figure 2.0.2: Connection Name
Profiles to connect to different devices can be created and each given different names. In this example, this profile is created and given the name Connection to Watchguard Firebox X Edge.
Click Next >.

Network Communications Products engineering GmbH
Version 2.03 Page 6 of 15 14.Mar.07
NOTE: Communication Media selection options will differ depending on which platform is used and which media type is being used. For the PocketPCs, select PocketPC Connection Manager as shown in fig.
2.0.3b.
figure 2.0.3a: Secure Entry Client: Link type
In this example, select LAN (over IP) and then click Next >.
figure 2.0.3b: Secure Entry CE Client: Link type
The NCP Secure Entry CE Client supports different media types; if however you've already configured the
device to have Internet connectivity, it's easiest to select PocketPC Connection Manager as the link type. In this example, select PocketPC Connection Manager and then click Next >.
Click Next > to continue…

Network Communications Products engineering GmbH
Version 2.03 Page 7 of 15 14.Mar.07
figure 2.0.4: VPN gateway parameters
Enter in the Firebox's IP address or resolvable DNS name. (If the VPN Gateway supports extended
authentication (XAUTH) as defined in draft-beaulieu-ike-xauth-02 then enter in the appropriate
Username and Password).
Click Next >.
figure 2.0.5: Basic IPSec Configuration
This example will use Aggressive Mode and Perfect Forward Secrecy seamless re-keying, employing DH-
Group 2 (1024 Bit). (If the VPN Gateway supports compression, then this can be enabled here).
Click Next >.

Network Communications Products engineering GmbH
Version 2.03 Page 8 of 15 14.Mar.07
figure 2.0.6: Pre-shared keys
In this example, a pre-shared key or a shared secret is used, identical passwords on the IPSec communicating peers. The Firebox expects ID_USER_FQDN as Local Identity so therefore select Fully
Qualified Username as IKE-type (as shown above) and enter in the values <IKE-ID> (see figure 1.0.1),
and pre-shared key <PSK> (see figure 1.0.2) used and confirm this to ensure that it is correctly entered
in. The Next > button will not be available until the Shared Secrets have been entered in, confirmed and
match.
figure 2.0.7: IPSec Configuration – IP addresses
The Firebox is configured to assign a Virtual IP Address, <Virtual IP> (see figure 1.0.2) to the incoming
connection request using IKE-ConfigMode. (The NCP Secure Entry client supports three options, manual
IP address assignment, IKE-Config Mode, or using the IP address assigned to the physical network
interface). You do not need to enter in a DNS or WINS addresses here, as the Firebox when using IKE-ConfigMode also will assign them.
Click Next > to continue.
Network Communications Products engineering GmbH
Version 2.03 Page 9 of 15 14.Mar.07
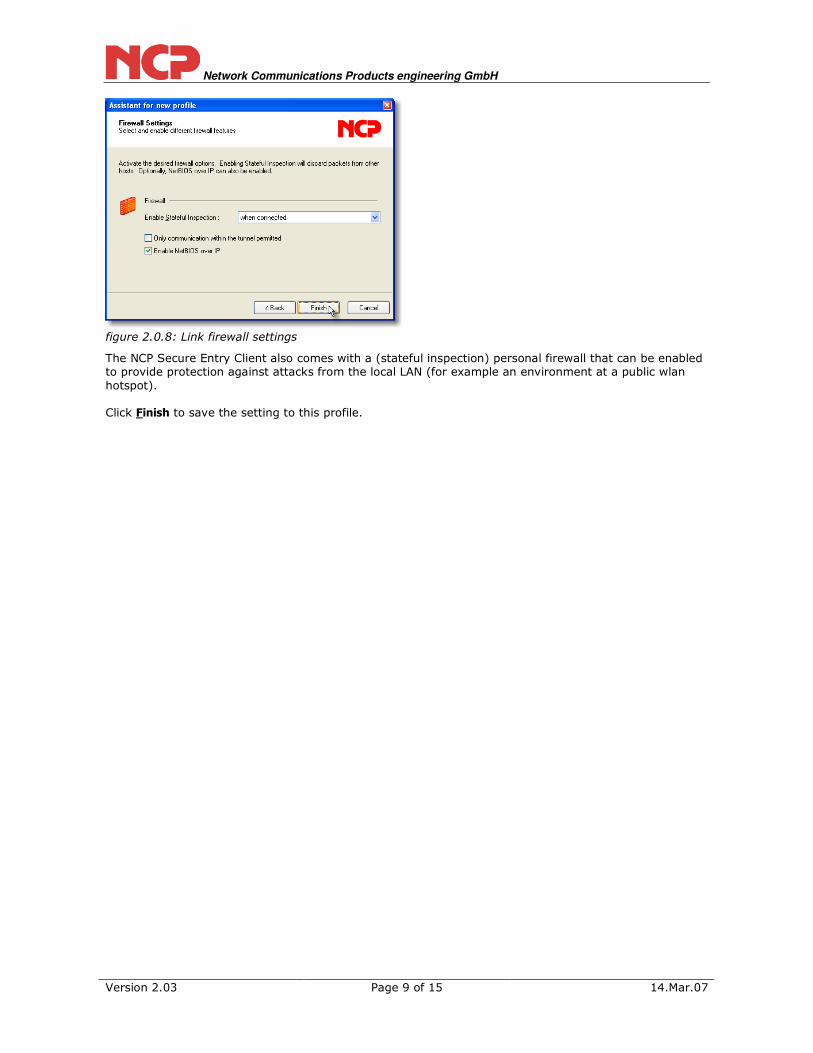
figure 2.0.8: Link firewall settings
The NCP Secure Entry Client also comes with a (stateful inspection) personal firewall that can be enabled to provide protection against attacks from the local LAN (for example an environment at a public wlan
hotspot). Click Finish to save the setting to this profile.
Network Communications Products engineering GmbH
Version 2.03 Page 10 of 15 14.Mar.07
2.1 Checking/Modifying the Configuration
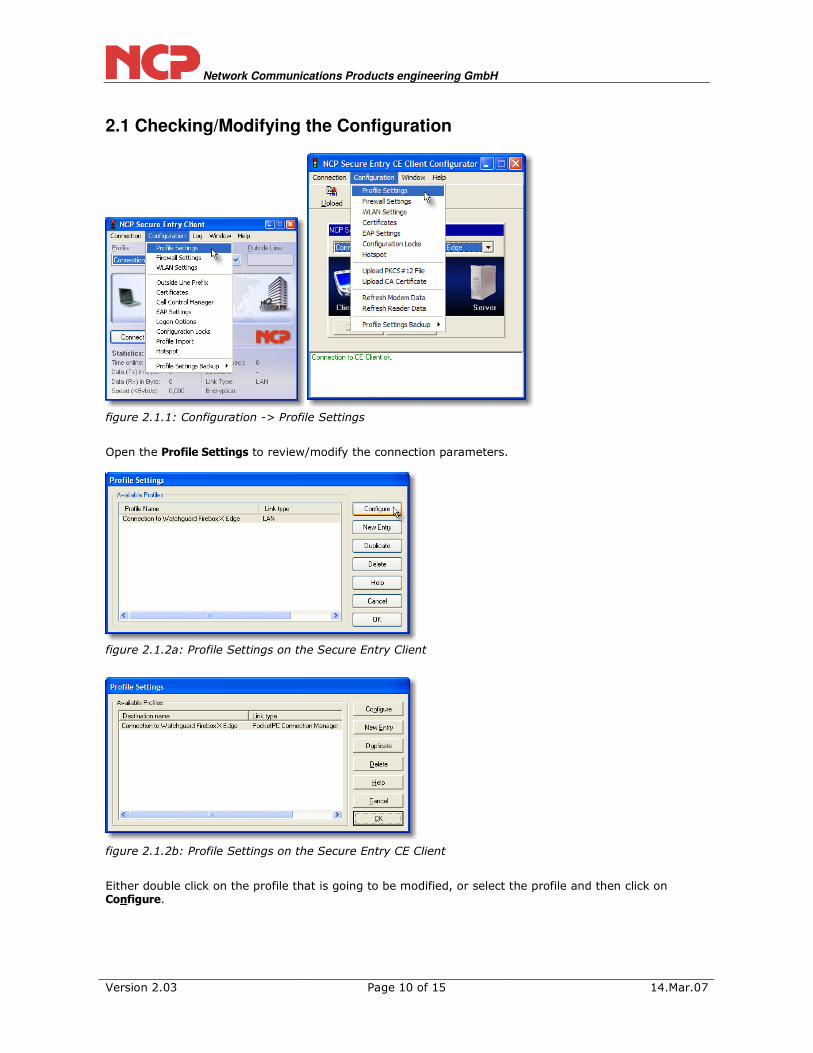
figure 2.1.1: Configuration -> Profile Settings
Open the Profile Settings to review/modify the connection parameters.
figure 2.1.2a: Profile Settings on the Secure Entry Client
figure 2.1.2b: Profile Settings on the Secure Entry CE Client
Either double click on the profile that is going to be modified, or select the profile and then click on Configure.

Network Communications Products engineering GmbH
Version 2.03 Page 11 of 15 14.Mar.07
figure 2.1.3a: Profile Settings: Basic Settings on Secure Entry Client
For the Client users; select LAN (over IP) has been selected. Please refer to the manual if you wish to
use the other link types/internal dialer or configuring the use of automatic media detection.
figure 2.1.3b: Profile Settings: Basic Settings on Secure Entry CE Client
For the CE Client users; verify that PocketPC Connection Manager has been selected. Ensure also that the Destination Network is set to Internet. Please refer to the manual if you wish to use the other link
types/internal dialer or configuring the use of automatic media detection Select Line Management to continue…
figure 2.1.4a: Profile Settings: Line Management on Secure Entry Client

Network Communications Products engineering GmbH
Version 2.03 Page 12 of 15 14.Mar.07
figure 2.1.4b: Profile Settings: Line Management on Secure Entry CE Client
The Connection Mode can be set to connect automatically, meaning that any time a packet is destined for
Firebox's Internal LAN, the VPN Tunnel can automatically be established. In this example however, one manually establishes the connection. The Inactivity Timeout is set to 100 seconds. Select IPSec General Settings to continue…
figure 2.1.5: Profile Settings: IPSec General Settings
Verify the IP address or resolvable DNS name of the Watchguard Firebox is correctly configured.
When automatic mode is selected for both the IKE (Phase 1) and IPSec (Phase 2) Policies, the client will
submit a range of different commonly used proposals and the Firebox can then select one to use for the
connection. The select settings as shown in figure 1.0.2 will work automatically, thereby not necessitating the definition of custom proposals. Ensure you've configured the correct Diffie-Hellmann group for PFS: DH-Group 2 (1024 Bit).
figure 2.1.6: Profile Settings: Advanced IPSec options
These options are either not supported or required and therefore should be left off.
Click on Identities to move to the next dialog box.

Network Communications Products engineering GmbH
Version 2.03 Page 13 of 15 14.Mar.07
figure 2.1.7: Profile Settings: Identities
The Firebox is expecting a Fully Qualified Username; enter in the same values as in figure 1.0.1. Other
IKE-ID types can be used, but are beyond the scope of this quick guide; please refer to the manual for more details.
The pre-shared key is the value entered in as <PSK> in figure 1.0.2 as shared key. Click on IP Address Assignment to continue…
figure 2.1.8: Profile Settings: IP Address Assignment
The Watchguard Firebox X Edge supports the use of IKE-ConfigMode to assign the virtual IP address, as well as DNS and WINS servers to the client when connecting. Therefore it's enough to simply enable Use IKE Config Mode.
Then click on Remote Networks to move to the next dialog box.
figure 2.1.9: Profile Settings: Remote Networks
Enter in the Network address(es) (depending on the subnet masks defined, these can be individual hosts
or network segments) that are to be reached. This is used in the Phase 2 negotiation and often the
cause for configuration mistakes.

Network Communications Products engineering GmbH
Version 2.03 Page 14 of 15 14.Mar.07
Defining remote networks is not required if you have enabled the tick next to the All traffic uses tunnel (0.0.0.0/0 IP Subnet) option as shown in figure 1.0.2.
NOTE: If you do not wish to have all the traffic to pass through the tunnel, but only that of the subnet on
the secure side of the Watchguard device, then you must define the subnet here, and remove the tick next to the option All traffic uses tunnel (0.0.0.0/0 IP Subnet) as shown in figure 1.0.2.
Skip Certificate Check, because this example does not call for the use of certificates, refer to the manual if you do wish to use certificates, select the Firewall Settings instead…
figure 2.1.10: Profile Settings: Firewall Settings
Confirm the settings here as entered in figure 2.0.8.
Click on OK to return to the main Profile Settings dialog box.
figure 2.1.11: Profile Settings
Select OK to return to the Configurator (the graphical user interface to configure the VPN CE Client)
The client should now be able to connect to the Firebox. For PocketPC users, please remember to upload
the configuration to the PDA or Smart Phone first!

Network Communications Products engineering GmbH
Version 2.03 Page 15 of 15 14.Mar.07
figure 2.1.12: Upload Profile Settings to PDA
Copy the profile to the connected PDA. Please make sure that the PDA is connected with Active Sync when doing so.