Pure Warranty Statement for Australia - Amazon Web … · Pure Warranty Statement for Australia...
20
Transcript of Pure Warranty Statement for Australia - Amazon Web … · Pure Warranty Statement for Australia...


Pure Warranty Statement for AustraliaThis statement replaces any reference to warranty which may be contained elsewhere within this manual.What do you need to do now?Option 1: You can register your purchase on-line at: https://www.pure.com/au/register/register.aspOption 2: Or you can do nothing other than keep your proof of purchase as evidence of your purchase date. This proof of purchase would need to be presented if warranty service was ever required. If you have any questions about your warranty you can call us toll free: 1800 988 268What’s covered by this warranty?• Pure agrees to refund, repair or replace, at your election, without charge to you, any part found to be defective during the warranty period.• If equipment has been used according to its accompanying instruction manual and is used in a domestic situation, a two year warranty period applies (excludes rechargeable ChargePAK where fitted. A one year warranty period applies to all ChargePAKs).
How do you make your claim?Call 1800 988 268 for instructions on how to return your Pure product for warranty service or go to: http://support.pure.com/au/ and complete the contact us form.
What’s NOT covered by this warranty?Under this express warranty Pure will not be liable for loss or damage of any kind whatsoever, whether direct, indirect, incidental, consequential or otherwise.• Replacement of parts due to normal wear and tear.• Products with serial number defacement, modification or removal.• Water damage or corrosion caused by dampness.• Any damage or deterioration due to shipments.• Any damage or deterioration due to shipment.• Any product which has been subjected to misuse, abuse or accident.
Australian consumers — The benefits to the consumer given by this express warranty are in addition to other rights and remedies of the consumer under a law in relation to the goods or services to which this warranty relates. Our goods come with guarantees that cannot be excluded under the Australian Consumer Law, You are entitled to a replacement or refund for a major failure and for compensation for any other reasonably foreseeable loss or damage. You are also entitled to have the goods repaired or replaced if the goods fail to be of acceptable quality and the failure does not amount to a major failure.
Pure is distributed and supported in Australia by PIONEER ELECTRONICS AUSTRALIA PTY LTD, 5 ARCO LANE, HEATHERTON, VICTORIA, 3202.

Thank you for choosing One Elite Series 2. This manual will get you up and running in no time and explains how to make the most of One Elite Series 2’s great features. If you need additional help with topics not covered in this manual, please visit the Pure support pages at www.pure.com.

Safety instructions1. Keep the radio away from heat sources such as radiators, heaters or other appliances that
produce heat.2. Do not expose the unit to direct sunlight.3. Do not use the radio near water.4. Avoid objects or liquids getting into the radio.5. Do not remove screws from or open the radio casing.6. Fit the mains adapter to an easily accessible socket, located near the radio and ONLY use the mains
power adapter supplied.7. Always switch the radio off and disconnect it from mains power before inserting or removing a
ChargePAK.8. Should not be immersed in water, used in shower or bathroom if plugged into the mains.9. WARNING: To reduce the risk of fire or electric shock, do not expose this apparatus to rain or moisture.
The apparatus shall not be exposed to dripping or splashing and objects filled with liquids, such as vases, shall not be placed on apparatus.
CopyrightCopyright 2013 by Imagination Technologies Limited. All rights reserved. No part of this publication may be copied or distributed, transmitted, transcribed, stored in a retrieval system, or translated into any human or computer language, in any form or by any means, electronic, mechanical, magnetic, manual or otherwise, or disclosed to third parties without the express written permission of Imagination Technologies Limited.
TrademarksOne Elite, the One Elite logo, Intellitext, Listen Later, textSCAN, ChargePAK, Pure, the Pure logo, EcoPlus, the EcoPlus logo, Imagination Technologies, and the Imagination Technologies logo are trademarks or registered trademarks of Imagination Technologies Limited. All other product names are trademarks of their respective companies. Version 2 October 2013.
Warranty informationImagination Technologies Limited warrants to the end user that this product will be free from defects in materials and workmanship in the course of normal use for a period of two years from the date of purchase. This guarantee covers breakdowns due to manufacturing or design faults; it does not apply in cases such as accidental damage, however caused, wear and tear, negligence, adjustment, modification or repair not authorised by us. Please visit www.pure.com/register to register your product with us. Should you have a problem with your unit please contact your supplier or contact Pure Support at the address shown at the rear of this manual. If you need to return your product please use the original packaging and include all parts and accessories. We reserve the right to refuse incomplete or badly packaged returns.
DisclaimerImagination Technologies Limited makes no representation or warranties with respect to the content of this document and specifically disclaims any implied warranties of merchantability or fitness for any particular purpose. Further, Imagination Technologies Limited reserves the right to revise this publication and to make changes in it from time to time without obligation of Imagination Technologies Limited to notify any person or organization of such revisions or changes.
Disposal of Waste Electrical & Electronic EquipmentThis symbol on the product or on its packaging indicates that this product should not be treated as household waste. Instead it should be handed over to a suitable collection point for the recycling of electrical and electronic equipment. By ensuring this product is disposed of correctly, you will help prevent potential negative consequences for the environment and human health, which could otherwise be caused by inappropriate waste handling of this product. The recycling of materials will help to conserve natural resources. For more detailed information about recycling of this product, please contact your local council office, your household waste disposal service or the shop where you purchased the product.

1
Contents2 Getting started
2 Setting up 3 Controls at a glance 3 Connectors
4 Listening to radio 4 Adjusting the volume 4 Changing stations 5 Using presets 5 Changing the information displayed on screen 5 Control scrolling text 5 Intellitext - view stored text information 6 Pausing and rewinding live digital radio
7 Using Listen Later 7 Setting up Listen Later 8 Listening to a saved programme 8 Stopping Listen Later
9 Setting the alarm & timers 9 Setting the alarm 10 Setting the kitchen timer 10 Setting the sleep timer
11 Options and settings 11 Digital radio options 11 FM options 11 General options
13 Using a ChargePAK 13 Installing ChargePAK13 Removing ChargePAK
14 Help and specifications 14 Secondary and inactive stations 14 Hints and tips 14 Technical specifications

2
Lift the aerial from the clip on the top of the radio and fully extend it.
Insert the connector of the mains power adapter into the socket on the rear of the radio.
Plug the mains power adapter into the mains supply and wait for the radio to switch on.
Select your language when prompted. Turn the dial to select (English/French/German/Italian) and push to confirm.
Getting started
Wait for One Elite to complete an Autotune, which finds all available digital stations (this takes about a minute). When the Autotune is complete, a station will be selected.
Setting upNote: If you have a ChargePAK C6L rechargeable battery (sold separately) fit it now before
plugging the radio in. See page 13.
PRESS
C
B
A
Choose language English
Energysaving enabled
(See page 12)
1
2
3
One Elite 011
C B A
C B A
C B A

3
Controls at a glance
1:1
13A68 ONE Elite Front Silkscreen (17/03/08)
Standby
Stations
Menu
Source
Info
Volume
ListenLater
Presets
StationsDigital: Press to display station list. Turn dial to browse stations; press dial to change station.FM: Press to display the current frequency. Turn the dial to scan to the next station.
VolumePress to display volume level then turn dial to adjust.
PresetsStore up to 25 digital and 25 FM preset stations.
SourcePress and repeat to switch between digital radio/FM/auxiliary input.
Listen LaterPress to play a saved digital radio programme. Press again to exit.
Press to pause and play live digital radio then turn dial to fast-forward/rewind. Press and hold to return to live radio.Listen Later: Press to pause/play a saved digital radio programme.
MenuDisplay setup options.Set up Listen Later. Access Intellitext.
Centre dialUsed for changing the station and adjusting the volume, as well as other functions explained later in this manual.
StandbySwitch on and into standby or off if powered by ChargePAK or batteries.
InfoPress to change the on-screen information.
Connectors
USB connector for software upgrades (mini-B type)
Analogue stereo input for iPod/MP3 player
3.5mm stereo headphone socket
Alarm/Timer Set the alarm, kitchen timer or sleep timer.

4
Listening to radioAdjusting the volumeAdjust the volume by turning the dial. If in a menu, press the volume button first then turn the dial.
StationsMenu InfoVolumeAlarm Presets SourceListenLater
Volume
(From menus)
Changing stations
When listening to digital radio1. Press the Stations button to display the station list on the bottom line of the display.2. Turn the dial right or left to scroll through the list. The name of the current station remains at
the top of the screen.3. Push the dial to change the station.
StationsMenu InfoVolumeAlarm Presets SourceListenLater
Absolute RadioBBC Radio 2
When listening to FM
Seek TuningPress the Stations button and turn the dial right or left to seek to the next or previous FM station with a strong signal.
StationsMenu InfoVolumeAlarm Presets SourceListenLater
87.60MHz
Searching... >Turn to tune87.50MHz
Manual Tuning1. Change the FM tuning mode to Manual (see page 11). 2. Press the Stations button then turn the dial right or left to step up or down 0.05 MHz.

5
Using presetsYou can store up to 25 digital and 25 FM presets.
Storing a preset1. Tune to the digital or FM station you want to store.2. Press the Presets button.3. Turn the dial to scroll to a preset between 1 and 25.4. Push and hold the dial or the Presets button until Preset saved appears on screen.
Selecting a preset1. Press the Presets button to show the presets list.2. Turn the dial to browse the list of preset stations.3. Push the dial to tune to a preset station.
Changing the information displayed on screenPress the Info button to switch between the following information:
Scrolling text: Information broadcast by most digital and some FM (RDS) stations.Date: Today’s date automatically updated by the digital radio signal.LL Duration: The maximum Listen Later time available based on the bit rate of the current digital station.
Control scrolling text1. Press the dial to pause the scrolling text.2. Turn the dial left or right to scroll through the text. To exit press the dial again.
Intellitext – view stored text informationIntellitext provides on-demand text information such as sports headlines, weather forecasts and news from digital stations that support the service including BBC Radio 5 live in the UK. The text is updated by the broadcasters and stored in your radio while you listen. Intellitext is listed by station and split into categories, e.g., Football, Cricket, Headlines, etc.
Planet Rock

6
To view Intellitext messages1. Press the Menu button, turn the dial until you see Intellitext and push the dial to select.
Push the dial to select View and access a list of stations for which you have Intellitext information (if you see No data you need to tune to a station broadcasting Intellitext for a few minutes before information is received).
2. Push the dial to select a station and turn and push the dial to browse Intellitext categories for that station, e.g., BBC Radio 5Live > SPORT > FOOTBALL. The selected information will scroll across the screen. Press Menu to go back up to the previous category.
Note: You can use textSCAN (page 5) to pause and control Intellitext messages.
Pausing and rewinding live digital radioOne Elite enables you to pause and rewind digital radio by saving an audio 'buffer' of the current station. You can rewind for approximately 5–15 minutes depending on the bitrate of the current station and/or how long you’ve been tuned to the current station.
To pause and rewind live radio1. Press to pause the current station.
2. When the audio is paused you can do the following:
FOOTBALLSPORT
Man City completFOOTBALL
and the team briBBC R2 [00:02] Time from live
StationsMenu InfoVolumeAlarm Presets SourceListenLater
StationsMenu InfoVolumeAlarm Presets SourceListenLater
Tune Tune
Rewind up to the start of the audio buffer.Press to stop rewinding or turn the dial one click in the opposite direction.
Press to play and pause. Press and hold to Return to live radio.
Fast-forward through the audio buffer.Press to stop fast-forwarding or turn the dial one click in the opposite direction.
and the team briBBC R2 [00:02]

7
Using Listen LaterListen Later enables you to save your favourite digital radio programme and play it back later. The programme is stored in memory while your radio is switched on, or in standby, until it is overwritten by another. The memory will hold up to about 45 minutes* worth of a typical broadcast and will stop once the memory is full.
Setting up Listen Later1. Press the Menu button, turn the dial and push to select Listen Later.2. Turn the dial to scroll through the five options on the bottom line of the display, while the
top line displays their current setting. To change a setting, push the dial, turn it to make your selection and then push it to confirm the change.
Set
Push the dial to choose between On (programme will be saved) or Off (programme will not be saved).
Set time
Push the dial to set the programme start time. Turn the dial to set the hour then push to confirm. Repeat to set the minutes.
Set duration
Push the dial and turn to increase the duration of the programme (minimum 15 minutes) and push to confirm.
Set days
Push the dial to set which day(s) programme you want to save. Choose between: Daily (every day), Weekday (every day Monday to Friday), Weekend (Saturday and Sunday), Weekly (One day every week) or Once only (no repeat).
Select station
Push the dial, choose a digital station and push to confirm.
At the time set, the programme will be saved if the radio is in standby or switched on and the display will show LL. If your radio is switched on it will switch to the chosen digital radio station.
Note: If the time you set clashes with a set alarm you will be warned so you can change it.
Note: Listen Later only works if your radio is switched on or in standby, if you switch off your radio (remove mains power or switch off when using battery/ChargePAK power) any Listen Later setting will be ignored and any previously saved programme will be lost.
*(Limited temporary storage on the radio for a typical maximum programme length of between 45 minutes to 3 hours depending on the station bit rate.)

8
Listening to a saved programmeWhile listening to digital radio, press the Listen Later button to start playing a saved programme. Press to pause/play. Turn the dial left or right, one, two or three clicks (1 click = 2x, 2 clicks = 8x and 3 clicks = 32x normal speed) to rewind or fast forward and turn the dial back to the centre to play.To stop playing a programme, press the Listen Later button, tune to a different station or change the source.
Note: If you exit Listen Later before the end of the programme, next time you press Listen Later you will be given the option to continue listening from where you left off (resume) or to start from the beginning.
Stopping Listen LaterTo stop Listen Later while a programme save is in progress you can press the Listen Later button, tune to a different station or change the source. In each case you will be asked to confirm that you want to stop Listen Later. Anything saved up to that point will be stored.
YesStop LL?
Note: Listen Later will stop automatically if a kitchen timer goes off or the duration set has been reached.
PlayingLL [00:01]

9
Setting the alarm & timersSetting the alarm1. Press the (Alarm/Timer) button and select Alarm to display the alarm status screen.2. Push the dial to enter the alarm menu. You can scroll through six alarm options on the
bottom line of the display, while the top line displays their current setting. To change a setting, push the dial, turn it to make your selection and then push it to confirm the change.
Set alarm
Push dial to choose between On (alarm sounds) or Off (alarm does not sound). The symbol on the screen indicates that the alarm is on.
Set time
Push dial to set the alarm time. Turn the dial to set the hour then push to confirm. Repeat to set the minutes.
Set days
Push dial to set the days that the alarm sounds. Choose between: Daily (every day), Weekday (Monday to Friday), Weekend, Saturday or Sunday or Once only (no repeat).
Set alarm mode
Push dial to choose between: Digital radio, FM or Tone (buzzer).
Select station
If you’ve set alarm mode as Digital radio or FM, choose a digital station or an FM preset and push to confirm. Last tuned tunes to the most recent station.
Alarm volume
If the alarm mode is set to Digital radio or FM, push the dial to change the alarm volume. Turn the dial left to decrease the alarm volume or right to increase it then push to confirm.
Cancelling a sounding alarmTo cancel a tone alarm push the dial or press the Standby button. To cancel a radio alarm press any button.
Note: A sounding radio alarm will switch off after one hour unless you cancel it.
Using alarms with ChargePAK C6L or batteries fittedWhen a ChargePAK rechargeable battery or 'C' cell batteries are fitted and the unit is not connected to mains power the radio switches off completely when the Standby button is pressed. In this case, the message Disabling alarm will be briefly displayed after the Standby button is pressed and the alarm will not sound.
10
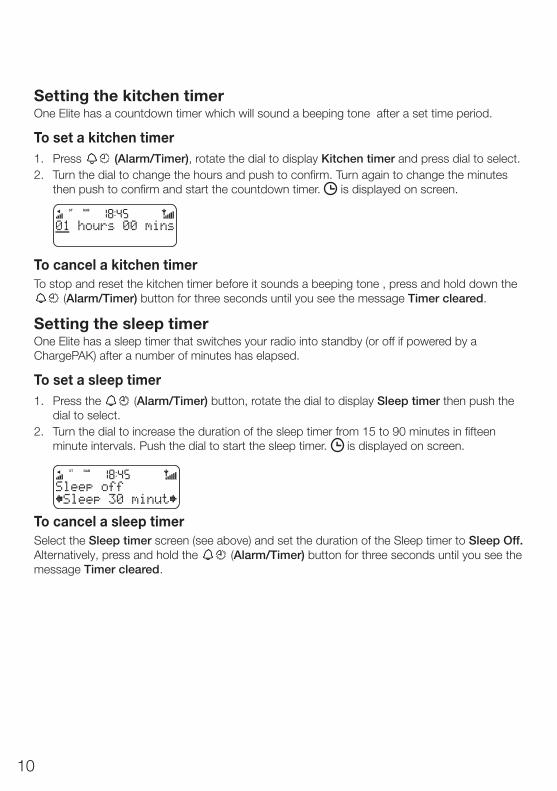
Setting the kitchen timerOne Elite has a countdown timer which will sound a beeping tone after a set time period.
To set a kitchen timer1. Press (Alarm/Timer), rotate the dial to display Kitchen timer and press dial to select.2. Turn the dial to change the hours and push to confirm. Turn again to change the minutes
then push to confirm and start the countdown timer. is displayed on screen.
01 hours 00 mins
To cancel a kitchen timerTo stop and reset the kitchen timer before it sounds a beeping tone , press and hold down the
(Alarm/Timer) button for three seconds until you see the message Timer cleared.
Setting the sleep timerOne Elite has a sleep timer that switches your radio into standby (or off if powered by a ChargePAK) after a number of minutes has elapsed.
To set a sleep timer1. Press the (Alarm/Timer) button, rotate the dial to display Sleep timer then push the
dial to select.2. Turn the dial to increase the duration of the sleep timer from 15 to 90 minutes in fifteen
minute intervals. Push the dial to start the sleep timer. is displayed on screen.
Sleep 30 minutSleep off
To cancel a sleep timerSelect the Sleep timer screen (see above) and set the duration of the Sleep timer to Sleep Off.Alternatively, press and hold the (Alarm/Timer) button for three seconds until you see the message Timer cleared.

11
Options and settingsPress the Menu button to access the options menu, turn the dial to scroll through and change the options and push the dial to select.
Digital radio options
AutotuneScans all digital frequencies for stations, automatically adds any new stations found to the station list and removes inactive stations. To stop an Autotune press Menu.
Intellitext optionsPress Menu, select Intellitext and turn the dial to access the following options for managing Intellitext messages.
Set timeout: Choose to delete old Intellitext messages after 1 week (default) or 1 day.Clear all: Delete all stored Intellitext messages immediately.
FM options
FM tuning modeSeek: When you turn the dial, the radio tunes to the next station with a good signal.Manual: When you turn the dial, the radio tunes up or down in steps of 0.05 MHz.
FM stereoChoose from Stereo (default) or Mono. Mono may improve clarity where stereo signals are weak.
General options
BacklightTimed off: The backlight turns on for 7 seconds when any button is pressed (default).Off: The backlight does not switch on.On: The backlight is always on when the radio is on.
AudioTurn the dial to adjust the treble or bass and push to confirm.
Bass: Adjust the bass between -5 (minimal bass), 0 (neutral) and 5 (maximum bass).Treble: Adjust the treble between -5 (minimal treble), 0 (neutral) and 5 (high treble).
Set clockThe clock will automatically set itself and also update for GMT/BST clock changes in the UK. However, if you cannot receive a digital signal, the time and date can be manually set by selecting Set clock from the options menu.

12
LanguageTurn the dial to select a language (English/French/German/Italian) and push to confirm.
Energy savingOne Elite is part of the Pure EcoPlus product family, designed and manufactured to minimise power consumption when the unit is switched on and in standby. One way this low power consumption is enabled is by not collecting and storing Intellitext messages when the unit is in standby. Two options are available:
On (default): One Elite updates the Intellitext data when you tune to a station that broadcasts Intellitext. Intellitext data is not collected in standby.
Off: One Elite collects Intellitext data in standby from the last station viewed Intellitext, which increases standby power consumption.
Note: If you fit the optional ChargePAK C6L or 6 x 'C' batteries (see below) the unit will switch off when you press the Standby button and not enter standby, as long as the unit is not connected to mains power.
Factory resetResetting your radio removes all presets, clears the station list, any Listen Later programmes and resets all options to their defaults.To reset your radio select Factory reset and push the dial to confirm the reset.
Software upgradeSoftware updates for your One Elite may be made available in the future. If you register your product and include a valid e-mail address you will receive notification of software updates (register at www.pure.com/register). Available software updates are also listed at http://support.pure.com.*
To upgrade your radio1. Press and hold the Info button for four seconds to access the maintenance menu.2. Select Upgrade and follow the instructions provided with the upgrade software*.
*Requires a PC (not Mac) with internet access running Windows XP/Vista/7 and a suitable USB cable (not included).

13
Using a ChargePAKChargePAK C6L is a high powered rechargeable battery pack. ChargePAK provides the benefits of rechargeable batteries without the inconvenience of removing and recharging separate batteries. ChargePAK is designed to be left in your unit, so if usually connected to the mains, your product will always be charged up, ready to go.
Installing ChargePAK1. Switch your radio off and disconnect from
the mains power supply.2. Open the battery compartment and push
the ChargePAK connector plug into the socket in the compartment. Line up the ridges on the plug with the slots in the socket to ensure correct orientation. Do not force the plug.
3. Insert ChargePAK into the battery compartment, logo side out.
4. Replace the battery cover and connect your product to a power supply.
5. The battery charging indicator on your unit appears and ChargePAK will begin charging.
Note: When charging your ChargePAK for the first time or after an extended period of inactivity it is recommended that it is charged for around 24 hours to ensure full battery power. If ChargePAK is in a highly discharged state there may be a slight delay before the battery charging indicator is displayed.
Removing ChargePAKTo remove your ChargePAK either to replace with normal batteries or install a new ChargePAK,switch your product off, lift the ChargePAK out and pull gently on the connector plug to remove it.
Note: Damage may occur if you attempt to remove the plug by pulling on the connecting wires or ChargePAK itself.
Note: It is perfectly normal for your ChargePAK to get warm to the touch in use, especially during charging. Your ChargePAK should give years of trouble-free use under normal circumstances, however, as for all rechargeable batteries the operating life will gradually reduce with age.

14
Help and specificationsSecondary and inactive stations
(<</>>) Secondary digital servicesSecondary services accompany some stations, providing extra information or alternative content and may only be broadcast at certain times. If a station has secondary services available, the station shows >> next to its name in the station list and the secondary service appears next to the station in the list. A secondary service has a << before its name in the station list.
(?) Inactive or unavailable digital stationsInactive or unavailable stations appear on the station list preceded by ? and cannot be tuned to. A station may be inactive or unavailable because the station is not broadcasting at the current time (check with the station) or has stopped broadcasting altogether. Alternatively, you may not have a strong enough signal to receive the Multiplex on which the station is broadcast.
Hints and tips
Display says ‘No stations available’Use Autotune (page 11) to search for stations. Try adjusting your aerial or radio position.
Receiving new digital stations that have started broadcasting Use Autotune (page 11) to scan for new stations and add any new stations to the station list.
Technical specificationsRadio Digital and FM radio.
Frequencies UK products receive DAB/FM; non-UK products receive DAB/DAB+/DMB-Radio. Parametric stereo decode up to 256 kbps. FM radio 87.5-108 MHz.
Speakers 2 x Full-range 3" drive unit.
Input connectors 12V DC power adapter socket (230V adapter supplied), Mini USB connector for software upgrades, 3.5mm Line in for auxiliary devices.
Output connectors 3.5mm headphone socket.
Mains power supply 230V AC to 12V (0.8A) DC external power adapter.
Battery power Six C (R14) batteries or ChargePAK C6L (not supplied).
Approvals CE marked. Compliant with the EMC and Low Voltage Directives (2004/108/EC an 2006/95/EC). ETSI EN 300 401 compliant. Australian C-Tick N1600 & Electrical Safety.
Dimensions (mm) 256 wide x 155 high x 88 deep (excluding controls).
Aerial Integral telescopic aerial.

PureImagination Technologies LimitedHome Park EstateKings LangleyHerts, WD4 8LZUnited Kingdomhttp://support.pure.com
Pure Australasia Pty LtdPO Box 5049Wonga Park Victoria [email protected]://support.pure.com/au

105EB
www.pure.comconnect.pure.com
www.facebook.com/pure