Published by Golden Artist Colors, Inc. / Issue 28 by Golden Artist Colors, Inc. / Issue 28 Issue 28...
16
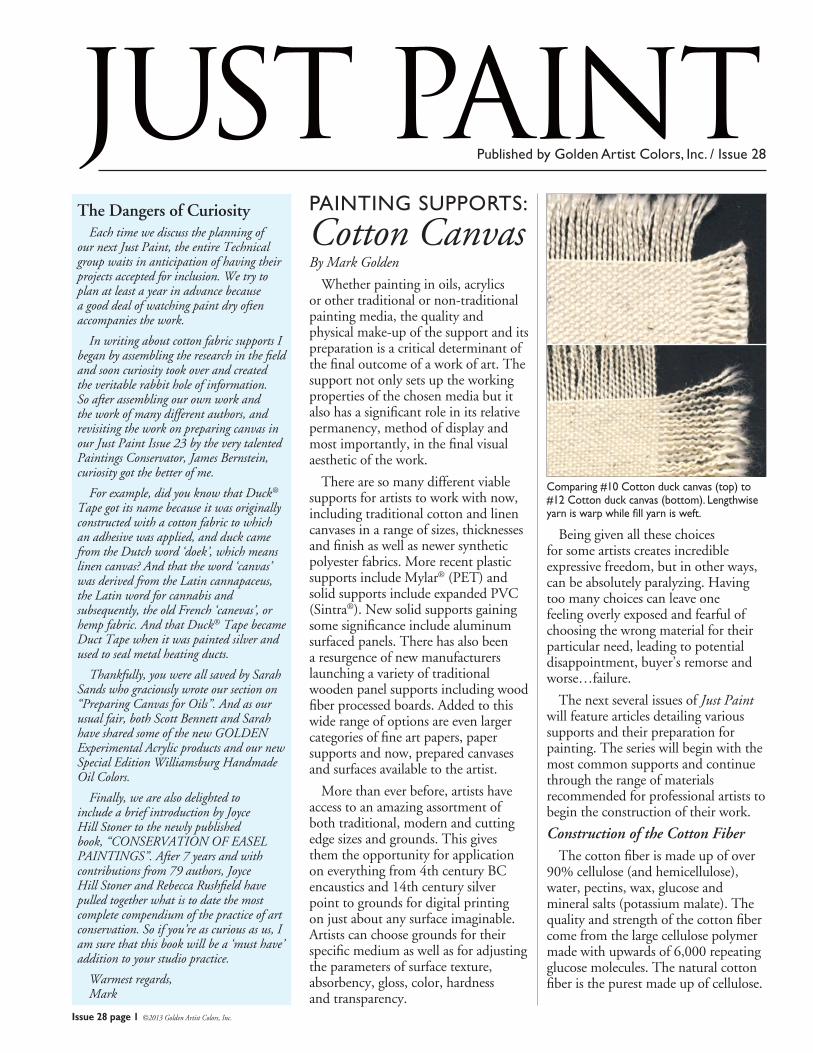
JUST PAINT Published by Golden Artist Colors, Inc. / Issue 28 Issue 28 page 1 ©2013 Golden Artist Colors, Inc. Comparing #10 Cotton duck canvas (top) to #12 Cotton duck canvas (bottom). Lengthwise yarn is warp while fill yarn is weft. PAINTING SUPPORTS: Cotton Canvas By Mark Golden Whether painting in oils, acrylics or other traditional or non-traditional painting media, the quality and physical make-up of the support and its preparation is a critical determinant of the final outcome of a work of art. The support not only sets up the working properties of the chosen media but it also has a significant role in its relative permanency, method of display and most importantly, in the final visual aesthetic of the work. There are so many different viable supports for artists to work with now, including traditional cotton and linen canvases in a range of sizes, thicknesses and finish as well as newer synthetic polyester fabrics. More recent plastic supports include Mylar ® (PET) and solid supports include expanded PVC (Sintra ® ). New solid supports gaining some significance include aluminum surfaced panels. There has also been a resurgence of new manufacturers launching a variety of traditional wooden panel supports including wood fiber processed boards. Added to this wide range of options are even larger categories of fine art papers, paper supports and now, prepared canvases and surfaces available to the artist. More than ever before, artists have access to an amazing assortment of both traditional, modern and cutting edge sizes and grounds. This gives them the opportunity for application on everything from 4th century BC encaustics and 14th century silver point to grounds for digital printing on just about any surface imaginable. Artists can choose grounds for their specific medium as well as for adjusting the parameters of surface texture, absorbency, gloss, color, hardness and transparency. Being given all these choices for some artists creates incredible expressive freedom, but in other ways, can be absolutely paralyzing. Having too many choices can leave one feeling overly exposed and fearful of choosing the wrong material for their particular need, leading to potential disappointment, buyer’s remorse and worse…failure. The next several issues of Just Paint will feature articles detailing various supports and their preparation for painting. The series will begin with the most common supports and continue through the range of materials recommended for professional artists to begin the construction of their work. Construction of the Cotton Fiber The cotton fiber is made up of over 90% cellulose (and hemicellulose), water, pectins, wax, glucose and mineral salts (potassium malate). The quality and strength of the cotton fiber come from the large cellulose polymer made with upwards of 6,000 repeating glucose molecules. The natural cotton fiber is the purest made up of cellulose. The Dangers of Curiosity Each time we discuss the planning of our next Just Paint, the entire Technical group waits in anticipation of having their projects accepted for inclusion. We try to plan at least a year in advance because a good deal of watching paint dry often accompanies the work. In writing about cotton fabric supports I began by assembling the research in the field and soon curiosity took over and created the veritable rabbit hole of information. So after assembling our own work and the work of many different authors, and revisiting the work on preparing canvas in our Just Paint Issue 23 by the very talented Paintings Conservator, James Bernstein, curiosity got the better of me. For example, did you know that Duck ® Tape got its name because it was originally constructed with a cotton fabric to which an adhesive was applied, and duck came from the Dutch word ‘doek’, which means linen canvas? And that the word ‘canvas’ was derived from the Latin cannapaceus, the Latin word for cannabis and subsequently, the old French ‘canevas’, or hemp fabric. And that Duck ® Tape became Duct Tape when it was painted silver and used to seal metal heating ducts. Thankfully, you were all saved by Sarah Sands who graciously wrote our section on “Preparing Canvas for Oils”. And as our usual fair, both Scott Bennett and Sarah have shared some of the new GOLDEN Experimental Acrylic products and our new Special Edition Williamsburg Handmade Oil Colors. Finally, we are also delighted to include a brief introduction by Joyce Hill Stoner to the newly published book, “CONSERVATION OF EASEL PAINTINGS”. After 7 years and with contributions from 79 authors, Joyce Hill Stoner and Rebecca Rushfield have pulled together what is to date the most complete compendium of the practice of art conservation. So if you’re as curious as us, I am sure that this book will be a ‘must have’ addition to your studio practice. Warmest regards, Mark
-
Upload
hoangxuyen -
Category
Documents
-
view
228 -
download
3
Transcript of Published by Golden Artist Colors, Inc. / Issue 28 by Golden Artist Colors, Inc. / Issue 28 Issue 28...
JUST PAINTPublished by Golden Artist Colors, Inc. / Issue 28
Issue 28 page 1 ©2013 Golden Artist Colors, Inc.
Comparing #10 Cotton duck canvas (top) to #12 Cotton duck canvas (bottom). Lengthwise yarn is warp while fill yarn is weft.
PAINTING SUPPORTS:
Cotton CanvasBy Mark Golden
Whether painting in oils, acrylics or other traditional or non-traditional painting media, the quality and physical make-up of the support and its preparation is a critical determinant of the final outcome of a work of art. The support not only sets up the working properties of the chosen media but it also has a significant role in its relative permanency, method of display and most importantly, in the final visual aesthetic of the work.
There are so many different viable supports for artists to work with now, including traditional cotton and linen canvases in a range of sizes, thicknesses and finish as well as newer synthetic polyester fabrics. More recent plastic supports include Mylar® (PET) and solid supports include expanded PVC (Sintra®). New solid supports gaining some significance include aluminum surfaced panels. There has also been a resurgence of new manufacturers launching a variety of traditional wooden panel supports including wood fiber processed boards. Added to this wide range of options are even larger categories of fine art papers, paper supports and now, prepared canvases and surfaces available to the artist.
More than ever before, artists have access to an amazing assortment of both traditional, modern and cutting edge sizes and grounds. This gives them the opportunity for application on everything from 4th century BC encaustics and 14th century silver point to grounds for digital printing on just about any surface imaginable. Artists can choose grounds for their specific medium as well as for adjusting the parameters of surface texture, absorbency, gloss, color, hardness and transparency.
Being given all these choices for some artists creates incredible expressive freedom, but in other ways, can be absolutely paralyzing. Having too many choices can leave one feeling overly exposed and fearful of choosing the wrong material for their particular need, leading to potential disappointment, buyer’s remorse and worse…failure.
The next several issues of Just Paint will feature articles detailing various supports and their preparation for painting. The series will begin with the most common supports and continue through the range of materials recommended for professional artists to begin the construction of their work.
Construction of the Cotton FiberThe cotton fiber is made up of over
90% cellulose (and hemicellulose), water, pectins, wax, glucose and mineral salts (potassium malate). The quality and strength of the cotton fiber come from the large cellulose polymer made with upwards of 6,000 repeating glucose molecules. The natural cotton fiber is the purest made up of cellulose.
The Dangers of CuriosityEach time we discuss the planning of
our next Just Paint, the entire Technical group waits in anticipation of having their projects accepted for inclusion. We try to plan at least a year in advance because a good deal of watching paint dry often accompanies the work.
In writing about cotton fabric supports I began by assembling the research in the field and soon curiosity took over and created the veritable rabbit hole of information. So after assembling our own work and the work of many different authors, and revisiting the work on preparing canvas in our Just Paint Issue 23 by the very talented Paintings Conservator, James Bernstein, curiosity got the better of me.
For example, did you know that Duck® Tape got its name because it was originally constructed with a cotton fabric to which an adhesive was applied, and duck came from the Dutch word ‘doek’, which means linen canvas? And that the word ‘canvas’ was derived from the Latin cannapaceus, the Latin word for cannabis and subsequently, the old French ‘canevas’, or hemp fabric. And that Duck® Tape became Duct Tape when it was painted silver and used to seal metal heating ducts.
Thankfully, you were all saved by Sarah Sands who graciously wrote our section on “Preparing Canvas for Oils”. And as our usual fair, both Scott Bennett and Sarah have shared some of the new GOLDEN Experimental Acrylic products and our new Special Edition Williamsburg Handmade Oil Colors.
Finally, we are also delighted to include a brief introduction by Joyce Hill Stoner to the newly published book, “CONSERVATION OF EASEL PAINTINGS”. After 7 years and with contributions from 79 authors, Joyce Hill Stoner and Rebecca Rushfield have pulled together what is to date the most complete compendium of the practice of art conservation. So if you’re as curious as us, I am sure that this book will be a ‘must have’ addition to your studio practice.
Warmest regards, Mark
Issue 28 page 2 ©2013 Golden Artist Colors, Inc.
Cotton fibers are made up of areas constructed of well-ordered crystalline segments and less ordered segments or amorphous areas. The crystalline regions are tightly packed, reducing the penetration of water and other chemicals making the fibers stronger and more resistant to chemical and biological attack. The amorphous areas allow for flexibility of the fiber, but are more prone to chemical and biological degradation as well as greater absorption of water. The greater the ratio of amorphous regions of a fiber compared to its crystalline regions, the more easily the fiber is degraded. Cotton fibers contain approximately 70% crystalline regions versus linen which has up to 90% crystalline makeup of its fiber.
Cotton can be degraded by several forces including photochemical (UV and visible light), chemical attack, mechanical stress and biological attack. Effects of light will increase with increasing moisture and other photo-reactive materials in the cotton. The degradation caused by light in combination with other environmental factors produces a loss of tensile strength, increased yellowing and loss of elongation percentage, creating a more brittle textile. For artists, most canvas is protected from significant UV damage by the filtering of window glass. Damage to cotton canvas is more often the result of chemical attack from acids, enzymes from mold and mildew and most importantly, the effects of mechanical stress. Weakened canvas is more easily degraded as the damaged sites create greater permeability and are more easily degraded by these enzymes.
Cotton is highly degraded by acids or acid salts. The large cellulose polymer is broken apart and is oxidized to oxycellulose. It has long been a practice for artists to protect the cotton fabric before painting with oils with a sizing to prevent the acids in the oil and the drying catalysts from reaching the fiber surfaces. The alkaline chemistry is much less destructive to the cellulose molecule and requires much higher concentration than that found in the acrylic medium.
One of the most common destructive processes affecting cotton comes from mold and mildew growing on fabric
exposed to high levels of moisture or humidity or from paintings exposed to flooding. The enzymes produced by these organisms break down the cellulose and more easily reproduce in highly moist conditions. They preferentially attack starches, potentially added to fibers either in the weaving or finishing processes. All of these conditions affecting the cotton fiber are exacerbated when the fibers are under the stresses of the woven and stretched cloth. We’ll cover the effects of mechanical stress later in this paper.
Cotton is capable of absorbing up to 25 times its weight in water. This water-loving (hydrophilic) nature is based on the strong attraction of the OH portion of the cellulose and especially the hemicellulose polymer to the water molecule. This is also the reason that unrestrained cotton fabric, when wet, will shrink dramatically as the fibers swell. Cotton canvas which is under strain, stretched, reacts slightly different. In this case the fibers also swell, but water also lubricates the fibers (in the amorphous region) allowing them to slip past one another thereby reducing some of the stress and first loosening the fabric, before dramatically retightening.
Weaving the Cotton CanvasThe weaving process for textiles
requires first, a setting of lengthwise yarns that are held in tension by a loom. The word for these fibers, warp, is derived from the old English word weorpan (or Dutch werpen), meaning ‘that which is thrown across like a net’. The fill yarn that is actually woven in and out of the warp fibers is called the weave or weft (old English ‘wefen’ meaning to weave). To achieve the speed necessary in the weaving process, the use of a size, specifically in single plied yarn, is required. The size is simply a coating of material that when dry, increases the fibers’ strength and binds the surface of the fiber to reduce fraying and friction during weaving. The process of applying size to the surface of the cotton fibers is called ‘cotton slashing’. It was typical of traditional weaving processes to apply a starch to the warp fibers, which stiffens the fiber, making it less flexible. The weft fiber is not sized as it had the potential of making the fiber
too brittle. The size composition for cotton typically contains corn starch, but may also be blended with other starches, including potato, wheat, rice, sago (from a variety of palm tree) or tapioca. The starches are heated with water to reduce their viscosity and make them more active. Additionally, softeners need to be added to this size to increase the pliability of the yarn and allow it a bit more lubricity for the weaving. Normal sizing is done to improve the properties of the weave. At the end of the slashing process, the fibers are dried. After the weaving, the size is typically removed. Raw cotton canvas contains significant quantities of impurities, many of which have been shown to be responsible for Support Induced Discoloration (SID) which causes significant yellowing of waterborne polymers when applied in thick layers to these fabrics. (See Just Paint Issue 17 http://www.goldenpaints.com/justpaint/jp17article2.php and Issue 23 http://www.goldenpaints.com/justpaint/jp23article2.php)
It is becoming more common for artists to use single filled (single ply) cotton for their work. The heavier single filled canvases weighing over 10 oz. will often contain a double plied yarn in the warp with a single ply weft or fill yarn. Canvas 7 oz. or less will most often be single ply for both warp and weft. Cotton numbered duck for artists contains plied fibers in both the warp and weave, meaning two or more yarns twisted together to form a stronger, thicker plied yarn.
Cotton canvas or numbered duck is usually woven in a plain weave; one yarn under and over each yarn of the warp and weft. There are examples of artists’ canvas being woven in drill or twill pattern, meaning two or three fibers in the warp over two or three fibers in the weft. The warp threads are held at tension yet the fill or weaving threads run much straighter, making the warp yarns much more crimped than the weft yarns.
Multiple ply cotton duck is measured by weight per square yard of material. These weights are commonly referred to as number ducks to differentiate them from other cotton canvas or single filled canvas.

Issue 28 page 3 ©2013 Golden Artist Colors, Inc.
time especially when tightened over a stretcher, given the stresses on the material to keep it taut and in-plane. The lighter canvas does have a less pronounced weave, which may be attractive to some artists. It is often sold as ‘portrait canvas’.
The tear strength and tensile strength of the numbered cotton duck is typically stronger than a similar weight single filled duck of the same quality fibers. It is possible to gain significantly greater strength of the fabric by using better quality cotton fibers and a thicker yarn in both the single and double filled canvas. In single filled cotton duck, the weight gets lighter as the yarn width gets thinner, yet it is also typical that the yarn count will increase slightly to maintain the structure. Both the tensile strength and the tear strength are greater in the warp yarns than the fill yarns. Not only are the warp and weft fibers potentially different in their width and number of plied yarns, but they will also differ in the number of twists of the yarn, with the warp usually having more twists, reducing the number of hairs protruding from the threads. It is therefore easy to understand that the fabric will have different properties of stretch and strain in the warp and weft.
The final cotton fabric is graded according to several factors; its lightness of color, the amount of trash (plant material not cleaned in the ginning or spinning process), the number of broken yarns, misweaves, oil staining, other colored yarns, slubs or neps (bumps in the canvas often caused by immature fibers, or smaller fibers getting through the yarn making process) or broken yarns. The grades of woven cotton fabrics range from AB for the poorest goods with the most amount of defects and the weakest
strength to A++ grades with the fewest amount of defects and strongest goods. Cotton canvas for artists is typically A grade goods with some at the lowest AB grades. It is therefore important for artists using unprimed cotton duck to check the fabric, especially if a very smooth, continuous surface is desired. If the canvas is pre-primed it’s more difficult to recognize flaws, but most quality manufacturers of pre-primed canvas have inspected their goods for missing weave and slubs, which will show up on visual inspection of the canvas even with pre-priming.
Stretching Cotton CanvasMost artists using unprimed cotton
canvas will do their priming after the canvas is stretched. Whether sizing with acrylic primers, rabbit skin glues or PVA size or going directly to acrylic gesso (acrylic dispersion grounds), these materials all contain water. Water will dramatically swell the cotton threads, causing the total length of the fibers to shorten, and therefore increase the tension of the stretched fabric. In some cases, the tension created can splinter or warp the wood stretchers. Even if the stretchers are able to withstand the forces created, the differential in stretching will show itself in the variability of the tension next to the staples in a scalloped patterning. In James Bernstein’s technical paper in Just Paint 17, http://www.goldenpaints.com/justpaint/JamesBernstein/NumberThree.pdf, he shares the benefits of pre-stretching your canvas before final attachment to your support. By sizing (pre-wetting) and pre-stretching, the cotton is both allowed to come to a greater equilibrium as well as cementing or locking the fibers into a more protected composite material. Also demonstrated in the Just Paint 17 article “A Remarkable Way to Stretch Canvases” at http://www.goldenpaints.com/justpaint/jp17article1.php is Bernstein’s technique for stretching the perfect canvas, creating an even tension across the entire surface of a canvas.
For a description of the differences between stretchers and strainers, see the Just Paint article, “Stretchers and Cont. on page 14
CANVAS TYPES
#8 Duck: ...............18.00 oz./sq. yd.#10 Duck: .............14.73 oz./sq. yd.#12 Duck: .............11.73 oz./sq. yd.Single Fill Duck: .....14.9 oz./sq. yd.Single Fill Duck: ........12 oz./sq. yd.Single Fill Duck: ........10 oz./sq. yd.Single Fill Duck: ..........7 oz./sq. yd.Single Fill Duck: ..........5 oz./sq. yd.
The lower number ducks increase in weight by increasing the number of plied fibers, as well as increasing the weight (or thickness) of the yarn, therefore containing more cotton per yard. A #8 duck contains 3 ply warp and 3 ply weft fibers. It is the thickest of typical artists’ canvases, making it a bit more difficult to stretch. It is commonly used for floor cloths and has a very pronounced texture. The #12 cotton duck is the most common numbered duck for artists’ use and consists of two ply yarns in both directions. A #10 cotton duck, a coarser canvas using thicker plied yarns is also a common artist canvas and is often used for larger canvases above 4 feet. It is simply a much sturdier fabric. The yarns in number duck run between 7 count (coarse) to 11 count1. It is very common that some inexpensive canvases use fabric that is as light as 5 oz. per square yd. using a 16 count yarn and thinner. When the prepared canvas is already filled with a priming coat of a synthetic gesso it feels much more substantial. Some manufacturers of prepared canvas provide the weight of the canvas including the size and/or ground, making it difficult to know the actual weight of the raw cotton fabric. As the cotton canvas gets lighter, it tends to be a more open weave and is usually made with single filled (or non-plied yarns called single ply). Thinner fabrics may be less stable over
Cotton warp fibers Cotton weft fibers
1 Yarn thickness is measured by a long standing tradition determined by the yield length of one pound of cotton. A 1 count or size 1 yarn is one pound of cotton, creating 840 yards of thread. A size 100 yarn would yield 84,000 (extremely thin) yards of fibers. In the decimal system the constant is the gram weight of 1000 meters of cotton. Called the Tex system a 1000 meter thread tex 10 would weigh 10 grams and be very fine. A tex 100 would be a coarse fiber.
Issue 28 page 4 ©2013 Golden Artist Colors, Inc.
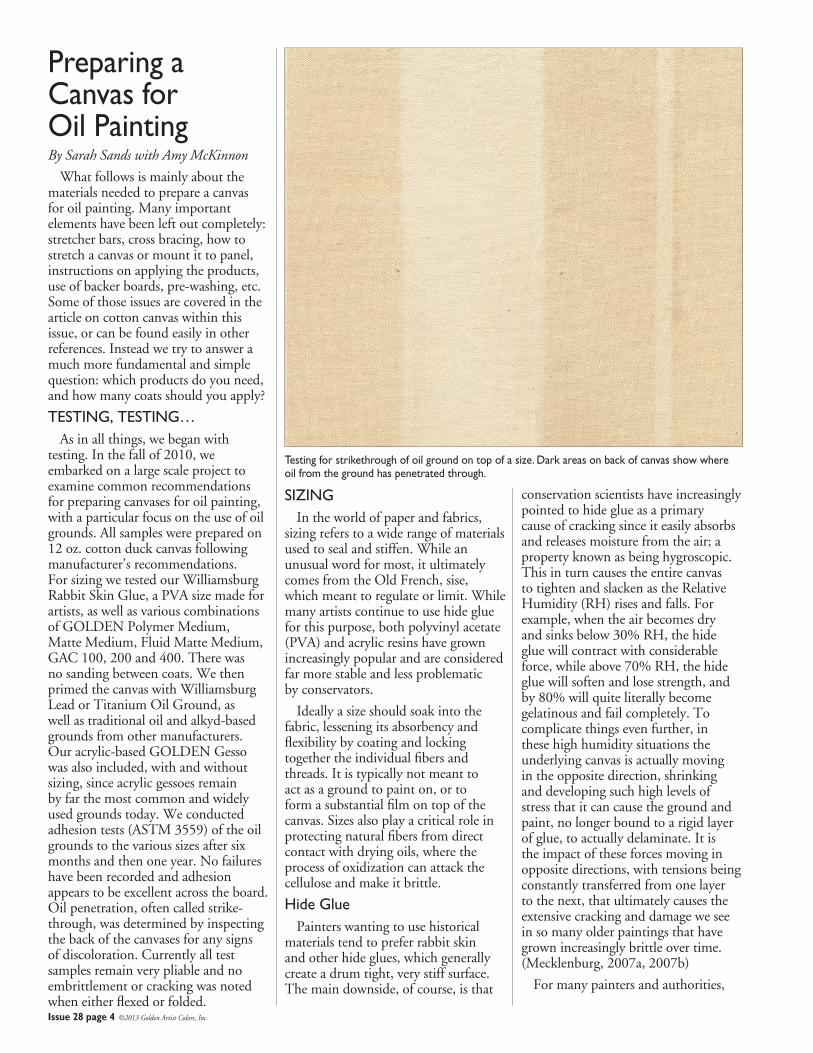
Testing for strikethrough of oil ground on top of a size. Dark areas on back of canvas show where oil from the ground has penetrated through.
Preparing a Canvas for Oil Painting By Sarah Sands with Amy McKinnon
What follows is mainly about the materials needed to prepare a canvas for oil painting. Many important elements have been left out completely: stretcher bars, cross bracing, how to stretch a canvas or mount it to panel, instructions on applying the products, use of backer boards, pre-washing, etc. Some of those issues are covered in the article on cotton canvas within this issue, or can be found easily in other references. Instead we try to answer a much more fundamental and simple question: which products do you need, and how many coats should you apply?
TESTING, TESTING…As in all things, we began with
testing. In the fall of 2010, we embarked on a large scale project to examine common recommendations for preparing canvases for oil painting, with a particular focus on the use of oil grounds. All samples were prepared on 12 oz. cotton duck canvas following manufacturer’s recommendations. For sizing we tested our Williamsburg Rabbit Skin Glue, a PVA size made for artists, as well as various combinations of GOLDEN Polymer Medium, Matte Medium, Fluid Matte Medium, GAC 100, 200 and 400. There was no sanding between coats. We then primed the canvas with Williamsburg Lead or Titanium Oil Ground, as well as traditional oil and alkyd-based grounds from other manufacturers. Our acrylic-based GOLDEN Gesso was also included, with and without sizing, since acrylic gessoes remain by far the most common and widely used grounds today. We conducted adhesion tests (ASTM 3559) of the oil grounds to the various sizes after six months and then one year. No failures have been recorded and adhesion appears to be excellent across the board. Oil penetration, often called strike-through, was determined by inspecting the back of the canvases for any signs of discoloration. Currently all test samples remain very pliable and no embrittlement or cracking was noted when either flexed or folded.
SIZINGIn the world of paper and fabrics,
sizing refers to a wide range of materials used to seal and stiffen. While an unusual word for most, it ultimately comes from the Old French, sise, which meant to regulate or limit. While many artists continue to use hide glue for this purpose, both polyvinyl acetate (PVA) and acrylic resins have grown increasingly popular and are considered far more stable and less problematic by conservators.
Ideally a size should soak into the fabric, lessening its absorbency and flexibility by coating and locking together the individual fibers and threads. It is typically not meant to act as a ground to paint on, or to form a substantial film on top of the canvas. Sizes also play a critical role in protecting natural fibers from direct contact with drying oils, where the process of oxidization can attack the cellulose and make it brittle.
Hide GluePainters wanting to use historical
materials tend to prefer rabbit skin and other hide glues, which generally create a drum tight, very stiff surface. The main downside, of course, is that
conservation scientists have increasingly pointed to hide glue as a primary cause of cracking since it easily absorbs and releases moisture from the air; a property known as being hygroscopic. This in turn causes the entire canvas to tighten and slacken as the Relative Humidity (RH) rises and falls. For example, when the air becomes dry and sinks below 30% RH, the hide glue will contract with considerable force, while above 70% RH, the hide glue will soften and lose strength, and by 80% will quite literally become gelatinous and fail completely. To complicate things even further, in these high humidity situations the underlying canvas is actually moving in the opposite direction, shrinking and developing such high levels of stress that it can cause the ground and paint, no longer bound to a rigid layer of glue, to actually delaminate. It is the impact of these forces moving in opposite directions, with tensions being constantly transferred from one layer to the next, that ultimately causes the extensive cracking and damage we see in so many older paintings that have grown increasingly brittle over time. (Mecklenburg, 2007a, 2007b)
For many painters and authorities,

Issue 28 page 5 ©2013 Golden Artist Colors, Inc.
these issues spell out a death sentence for ever using this material. Yet, truth be told, as long as the relative humidity can be kept between 30-60%, rabbit skin glue continues to represent the gold standard for stiffness and strength that other sizes are compared against.
PolyVinyl Acetate (PVA)While pH-neutral PVA adhesives
have long been used in conservation and the book arts, some manufacturers now provide PVA-based sizes for use in preparing canvases. These should adequately protect fibers from the oxidizing effect of drying oils and prevent strikethrough. In our own testing, the number of required coats to achieve this was varied, with one coat clearly sufficient for a faster drying, alkyd-based ground we tested, while a minimum of two coats were required for all the slower drying, oil-based products. Always consult with the manufacturer and check for your own application to see what is optimal.
Acrylic SizeAcrylic dispersion mediums have
provided some of the most durable options when it comes to sizing a canvas, and for a very long time our recommendations have remained fairly stable: apply a coat of GAC 400 to the front in order to stiffen the fabric, followed by an additional 2 coats of GAC 100 to act as an oil blocker. Many artists saw this two-step process as cumbersome, especially since GAC 400 should ideally be heat set to lessen its water sensitivity; a step most would find impractical on any larger scale. Luckily the testing we did allowed us to reexamine this issue and ultimately modify our advice.
In terms of oil blocking, two coats of GAC 100, GAC 200 and Polymer Medium can be equally effective, as well as one coat followed by a second of either Matte Medium or Fluid Matte Medium. Adhesion of different oil grounds to a wide assortment of these
combinations also did quite well. That said, everything we know from research in this area, tells us that the stiffer we can make the canvas, the more stable and secure the oil painting will be in the long run. And in that regard, GAC 200 was clearly the best choice. The one caution is that is has a higher minimum film forming temperature than our other mediums and must be applied when the temperature is at least 70ºF / 21ºC.
GROUNDSFor stretched canvas the three most
common options artists will encounter are traditional oil grounds, faster drying alkyd ones, and of course, acrylic gessoes. Each will have its advocates and devotees, and all represent viable options.
Traditional Oil GroundsThese are usually a simple blend of
white pigment with marble dust and/or barium sulfate ground in linseed oil.
Table 1 – Various sizes for protecting and stiffening canvas.
COATING #1 COATING #2 COATING #3 GROUND STRIKETHROUGH STIFFNESS
GAC 200 GAC 200 Linseed Oil Grounds None Stiff GAC 400 GAC 100 GAC 100 Linseed Oil Grounds None Moderate Acrylic Gesso Acrylic Gesso Acrylic Gesso Linseed Oil Grounds None Moderate GAC 100 Fluid Matte Medium Linseed Oil Grounds None Flexible GAC 100 Matte Medium Linseed Oil Grounds None Flexible Polymer Medium Polymer Medium Linseed Oil Grounds None Flexible GAC 100 GAC 100 Linseed Oil Grounds None Flexible Rabbit Skin Glue Rabbit Skin Glue Linseed Oil Grounds None/Very Slight Stiff GAC 400 GAC 100 Linseed Oil Grounds Very Slight Moderate GAC 200 Linseed Oil Grounds Very Slight Moderate GAC 100 Acrylic Gesso Linseed Oil Grounds Very Slight Flexible PVA Size PVA Size Linseed Oil Grounds Very Slight Flexible Polymer Medium Linseed Oil Grounds Very Slight Flexible GAC 100 Linseed Oil Grounds Very Slight Flexible Rabbit Skin Glue Linseed Oil Grounds Slight/Moderate Moderate Acrylic Gesso Acrylic Gesso Linseed Oil Grounds Slight/Moderate Flexible GAC 400 Linseed Oil Grounds Moderate/Severe Moderate Acrylic Gesso Linseed Oil Grounds Severe Flexible PVA Size Linseed Oil Grounds Severe Flexible

Issue 28 page 6 ©2013 Golden Artist Colors, Inc.
Table 2 – Recommendations on preparing a canvas for oil painting.
SIZE GROUND NOTES
Basic
Standard AcrylicGround
Standard Oil Ground
Traditional
Clear
---
x2 GAC 200Minimum applicationtemp. 70º F/ 21º C
x2 GAC 200Minimum applicationtemp. 70º F/ 21º C
x2 Rabbit Skin Glue
x2 GAC 200Minimum applicationtemp. 70º F/ 21º C
x3-5 GOLDEN Gesso
x2 GOLDEN Gesso
x2 Williamsburg Leador Titanium Oil Ground
x2 Williamsburg Leador Titanium Oil Ground
x2 GOLDEN Fluid Matte Medium
3 coats will block oil, while additional layers increase stiffness. Wait minimum of 3 days after last layer is dry before using.
Excellent oil blocking and good stiffness. Wait minimum of 3 days after last layer is dry before using.
Excellent oil blocking and good stiffness. Wait minimum of 2 weeks after last layer is touch dry before using.
Excellent oil blocking and good stiffness, but unstable in very dry or humid environments. Keep relative humidity between 30-60% to lessen risk. Wait a minimum of 2 weeks after last layer is touch dry before using.
Excellent oil blocking and good stiffness. Wait minimum of 3 days after last layer is dry before using.
The marble dust and barium sulfate serve to provide tooth and modify the absorbency and sheen of the surface. In terms of pigments, Titanium White has become the most common; its opacity and high tint strength helping to mask the natural tendency of linseed oil to yellow with age. Lead White, however, is by far the most flexible and durable option, and there is reason to believe it has beneficial effects on the painting as a whole. Lead does come with significant health warnings, however, and should be handled with great care. One should never sand a lead ground as the resulting dust and airborne particles present a significant health hazard. Zinc oxide is not frequently found in oil grounds since it will form a particularly brittle film and current research shows a strong correlation between its use and increased risk of cracking and delamination later on. Because of this, we believe one should err on the side of caution and avoid its use in grounds altogether.
For Williamsburg Oil Grounds one should wait a minimum of two weeks after the last layer is fully touch dry before using. This will give time for the ground to pass through the most active period of the drying process, when the oil is still absorbing oxygen and gaining in mass. For a fuller explanation, please see our article in Just Paint Issue 25, “Weighing in on the Drying of Oils”.
Dark yellowing is a well-known phenomenon but can be very disconcerting if you are not familiar with it. It occurs when a canvas is stored in the dark or turned against the wall for a prolonged period. During this time there is a build up of unstable chromophores that create a yellow caste but are easily bleached by light. If this happens, allow the primed canvas to be exposed to sunlight or other light source and the yellowing should lessen considerably or disappear altogether.
Alkyd-based Oil GroundsGenerally thought of and marketed
as a type of oil ground, these are actually oil-modified alkyd resins that dry quickly and can often be painted on in a matter of days. Like all oil grounds, there are concerns about long-term flexibility and brittleness, especially in colder temperatures. (Young, Hagen 2008)
Acrylic GessoBy far the most common product
currently used, acrylic gesso provides an alternative to the oil-based products reviewed above. Fast drying, permanently flexible, and with an optimal level of tooth and absorbency. Not to be confused with traditional hide glue gessoes that can only be applied to rigid supports. A minimum of three layers should be applied to prevent oil from striking through to
the back of the canvas. Increasing the number of layers acts to stiffen the surface even further, and it is not uncommon to apply 4-5 layers to create a fairly stiff surface. For a fuller explanation of this, as well as an extensive look at the research showing acrylic grounds can be safely used under oils, see our article in Just Paint Issue 24, “Using Oils with Acrylics”.
Clear GroundsNever truly transparent, a so called
‘clear gesso’ allows for the natural color of the substrate to show through. While some products are marketed specifically for this purpose, artists can actually use any number of matte mediums to achieve the same aim. In fact, our Molding Paste will be quite translucent if applied in thinner layers, and our Acrylic Ground for Pastels, while having a more pronounced tooth, can also be adapted to these needs. For general needs, we recommend using Fluid Matte Medium since it is easily applied and more resistant to long term color shifts. If you plan to leave areas of the substrate and ground exposed, we highly recommend adding a UV protective varnish at the end to limit the risk of yellowing even further.
PUTTING IT ALL TOGETHERThe above grid summarizes our
best recommendations when priming canvas for oil painting based on
Issue 28 page 7 ©2013 Golden Artist Colors, Inc.
Conservation of Easel Paintings Edited by Joyce Hill Stoner and Rebecca Rushfield
After seven years of work and including essays by seventy-nine international author-experts, Conservation of Easel Paintings is now available from Taylor and Francis, amazon.com and barnesandnoble.com, etc. David Bomford, formerly Acting Director at the Getty Museum and currently Director of Conservation at the Museum of Fine Arts, Houston, writes in the foreword, “For the first time, we are looking at a coherent account of the entire history, philosophy, theory, and practice of the discipline [of painting conservation].” Bomford himself wrote the key chapter about history and philosophy of the cleaning of paintings, the most
challenging procedure carried out by a conservator.
The book, almost 900 pages long, provides a thorough history of Western easel painting materials, from wooden or canvas supports to varnishes; techniques used to examine paintings (including x-radiography, infra-red reflectography, optical microscopy, and cross-section analysis); methods and approaches for treatment, including consolidation, tear mending, lining, cleaning, retouching, and varnishing; and improved methods for transporting, storing, lighting, and framing paintings. Special sections address sustainable conservation management of exhibitions, emergency preparedness and recovery, attack by insect pests, and health and safety concerns in the studio.
Practicing artists may enjoy reading “Recommending Materials to Artists,” by Mark Gottsegen, author of the excellent up-to-date “bible” on artists’ materials: The Painter’s Handbook. Conservators have been working internationally to establish dialogues with living artists so that both the materials and the spiritual values of their works can be more sensitively preserved in the future. The International Network for the Conservation of Contemporary Art (INCCA or http://www.incca.org/ ) is described in a section on “Collecting and Archiving Information from Living Artists.” Respected expert on the composition and longevity of modern paints, Dr. Tom Learner
of the Getty Conservation Institute, discusses the new paints that have appeared since 1940 and cleaning concerns for acrylic emulsion paints. He describes how the binding media of new paints helped to make possible the results achieved by Jackson Pollock, Morris Louis, Mark Rothko, Bridget Riley, and many others. Mark Golden has provided an essay on varnishing of acrylic paintings by artists.
Dr. Joyce Hill Stoner credits her co-editor, Rebecca Rushfield, with the extraordinary work compiling a comprehensive 100-page bibliography. Dr. Stoner herself has been teaching paintings conservation and collaborating with living artists for over thirty-five years. She identified and recruited key experts who have carried out significant research in artists’ interviews; historical gesso, grounds, and pigments; causes of deterioration of Old Master paint media; current sophisticated methods of examination and instrumental analysis; and new approaches and materials for the cleaning and retouching of paintings, etc.
This is a truly comprehensive book that presents a range of up-to-date information and can now form the basis for further development and discussion. It is now a crucial resource for training conservation students and will provide generations of interested artists, dealers, students of art and art history, curators, directors, collectors, and practicing paintings conservators with valuable information and guidance.
current testing. However, it is absolutely critical that GAC 200 be applied and allowed to dry in temperatures at or above 70ºF / 21ºC. If you cannot maintain this temperature during that time, replace GAC 200 with the standard one coat of GAC 400 followed by two coats of GAC 100, which will provide good oil blocking and still moderate stiffness. We have also included a way to create clear grounds, as these have become increasingly popular, as well as acknowledge the continuing importance of historical materials like rabbit skin glue. Finally, we want to acknowledge that the search for a truly
ideal system will continue far into the foreseeable future, and that for now, at least, painting on an inflexible support still trumps all of these in terms of stability.
Bibliography
Mecklenburg, Marion F., 2007a, Determining the Acceptable Ranges of Relative Humidity and Temperature in Museums and Galleries, Part 1, Structural Response to Relative Humidity, http://eprints.sparaochbevara.se/165/., 1-57. (http://si=pddr.si.edu/dspace/handle/10088/7056)
Mecklenburg, Marion F., 2007b Determining the Acceptable Ranges of Relative Humidity and Temperature in Museums and Galleries, Part 2, Structural Response to Temperature, http://eprints.sparaochbevara.se/165/., 1-29. (http://si-pddr.si.edu/dspace/handle/10088/7055)
Young, Christina, and Eric Hagan. 2008. Cold Temperatures Effects on Modern Paints used for Priming Flexible Supports. In Preparation for Painting: The Artist’s Choice and Its Consequences, ed. Joyce H. Townsend, Tiarna Doherty, Gunnar Heydenreich, and Jacqueline Ridge, 172-179. London: Archetype
Issue 28 page 8 ©2013 Golden Artist Colors, Inc.
The BarnBy Emma Golden
Ring Ring. “Golden Foundation, this is Emma, may I help you?”“Yeah, I’m calling about the barn...”“Do you mean the Golden Residency?”“That’s right, the barn..., and where are you again?”
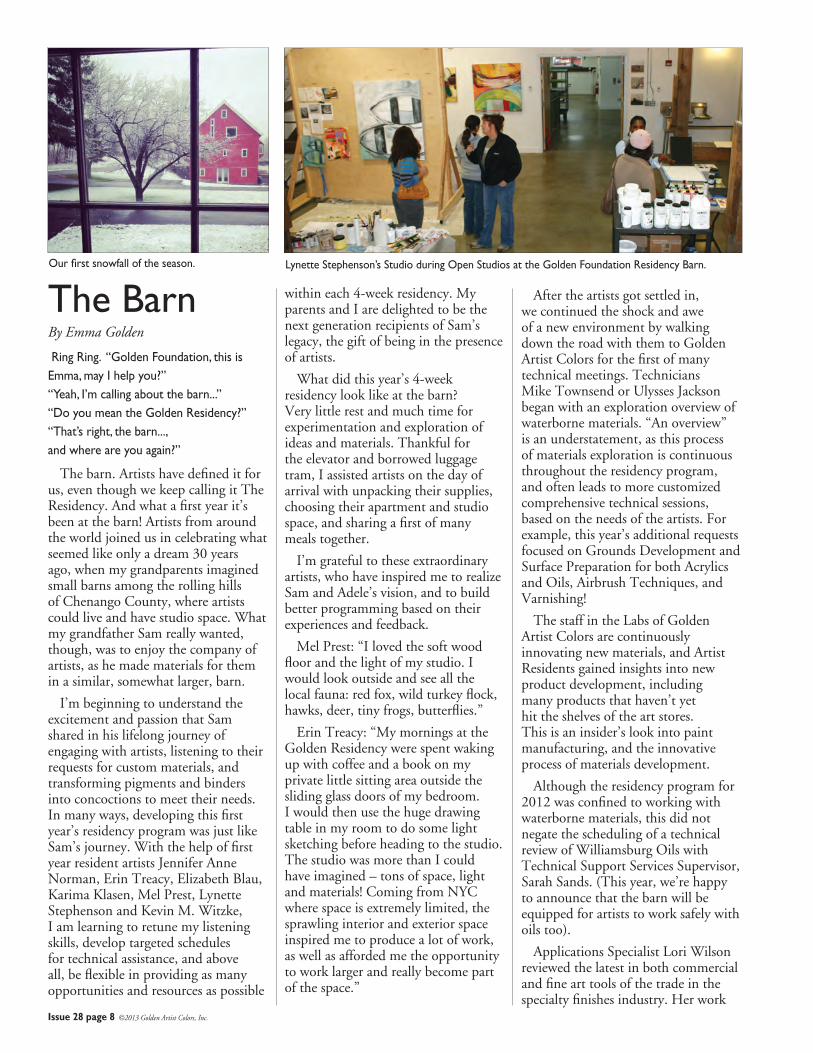
The barn. Artists have defined it for us, even though we keep calling it The Residency. And what a first year it’s been at the barn! Artists from around the world joined us in celebrating what seemed like only a dream 30 years ago, when my grandparents imagined small barns among the rolling hills of Chenango County, where artists could live and have studio space. What my grandfather Sam really wanted, though, was to enjoy the company of artists, as he made materials for them in a similar, somewhat larger, barn.
I’m beginning to understand the excitement and passion that Sam shared in his lifelong journey of engaging with artists, listening to their requests for custom materials, and transforming pigments and binders into concoctions to meet their needs. In many ways, developing this first year’s residency program was just like Sam’s journey. With the help of first year resident artists Jennifer Anne Norman, Erin Treacy, Elizabeth Blau, Karima Klasen, Mel Prest, Lynette Stephenson and Kevin M. Witzke, I am learning to retune my listening skills, develop targeted schedules for technical assistance, and above all, be flexible in providing as many opportunities and resources as possible
within each 4-week residency. My parents and I are delighted to be the next generation recipients of Sam’s legacy, the gift of being in the presence of artists.
What did this year’s 4-week residency look like at the barn? Very little rest and much time for experimentation and exploration of ideas and materials. Thankful for the elevator and borrowed luggage tram, I assisted artists on the day of arrival with unpacking their supplies, choosing their apartment and studio space, and sharing a first of many meals together.
I’m grateful to these extraordinary artists, who have inspired me to realize Sam and Adele’s vision, and to build better programming based on their experiences and feedback.
Mel Prest: “I loved the soft wood floor and the light of my studio. I would look outside and see all the local fauna: red fox, wild turkey flock, hawks, deer, tiny frogs, butterflies.”
Erin Treacy: “My mornings at the Golden Residency were spent waking up with coffee and a book on my private little sitting area outside the sliding glass doors of my bedroom. I would then use the huge drawing table in my room to do some light sketching before heading to the studio. The studio was more than I could have imagined – tons of space, light and materials! Coming from NYC where space is extremely limited, the sprawling interior and exterior space inspired me to produce a lot of work, as well as afforded me the opportunity to work larger and really become part of the space.”
After the artists got settled in, we continued the shock and awe of a new environment by walking down the road with them to Golden Artist Colors for the first of many technical meetings. Technicians Mike Townsend or Ulysses Jackson began with an exploration overview of waterborne materials. “An overview” is an understatement, as this process of materials exploration is continuous throughout the residency program, and often leads to more customized comprehensive technical sessions, based on the needs of the artists. For example, this year’s additional requests focused on Grounds Development and Surface Preparation for both Acrylics and Oils, Airbrush Techniques, and Varnishing!
The staff in the Labs of Golden Artist Colors are continuously innovating new materials, and Artist Residents gained insights into new product development, including many products that haven’t yet hit the shelves of the art stores. This is an insider’s look into paint manufacturing, and the innovative process of materials development.
Although the residency program for 2012 was confined to working with waterborne materials, this did not negate the scheduling of a technical review of Williamsburg Oils with Technical Support Services Supervisor, Sarah Sands. (This year, we’re happy to announce that the barn will be equipped for artists to work safely with oils too).
Applications Specialist Lori Wilson reviewed the latest in both commercial and fine art tools of the trade in the specialty finishes industry. Her work
Our first snowfall of the season. Lynette Stephenson’s Studio during Open Studios at the Golden Foundation Residency Barn.
Issue 28 page 9 ©2013 Golden Artist Colors, Inc.
with world renowned decorative painters lends itself to insights in generating surfaces and layers that can be chiseled, carved, knocked down, built up, removed and revealed.
Technician Amy McKinnon shared the latest techniques in Digital Grounds development on surfaces ranging from aluminum foil to plastics to fabric and acrylic skins. Amy also shared further information in the process of Acrylic Transfers, continuing the research to improve and expedite the process.
And for those resident artists who were really interested in understanding the chemistry side of materials, Ulysses Jackson offered an intense technical session in the inherent properties of acrylics and oils, where they succeed, and where they fail.
Mel Prest: “Meeting the technicians was especially exciting because they are paint geeks as I’d like to be. Their knowledge and experience were super important to my residency experience.” “It was really amazing to have such knowledgeable people to work with….” I feel I learned EIGHT YEARS worth of information; like I just gained eight more years of my painting life. I can’t think of anything that allowed me to grow in the painting realm more than the time at the Golden Foundation…even including graduate school.”
Elizabeth Blau: “I really liked the structure of the tutorials, yet the flexibility of the programming. There was this low-pressure mentality, which lent itself to liberating studio production….”
Jennifer Anne Norman: “It was
enlightening to visit the factory and meet the people who work so hard to make the paints and then go back to the studio to work them in a different way….”
Have I mentioned that artists receive all the paint materials they need during their residency? Since the technical meetings included hands-on materials experimentation and exploration of dried films and surfaces, the artists were then asked to check off product on their wish list and those materials were delivered to their studios within 24 hours. I loved delivering the boxes to them, seeing their delight!
Karima Klasen: “The Golden Foundation gave me all the support I could have hoped for. It was really about the work and to create a place where the artist can just work. I never had to worry about things because I knew there are many helping hands and brains around. I never felt like my questions and concerns weren’t important. There was always an open ear…”
Elizabeth Blau: “Working with the materials was a gift beyond measure. My work was able to come to life without the worry of paint consumption.”
Since the residency is about the exploration of materials and the ability to play with the products with no limits, artists are not required to have finished work by the end of their residency. Each group of artists offered Open Studios night at the end of their residency, and our upstate arts community of local individuals, businesses, galleries and nearby residencies, has been incredibly supportive.
The Golden Foundation’s application process consists of an online application to be submitted by the announced deadlines. The deadline for applications for the 2013 Residency was extended one more week, due to Hurricane Sandy. We’re thrilled to announce that the program has doubled for this year, enabling up to 18 artists to attend. Artists from around the world have applied, and were chosen by an independent selection committee based on the quality of their work. The selection committee members, as well as the 2013 artists in residence, can be viewed soon at www.goldenfoundation.org.
As we grow the program and the Golden Foundation endowment, our goal is to be even more generous in our services to resident artists. This includes financial support toward the cost of a residency.
As I reflect back on last year’s journey, I’m thinking we too, will be calling it “the barn”.
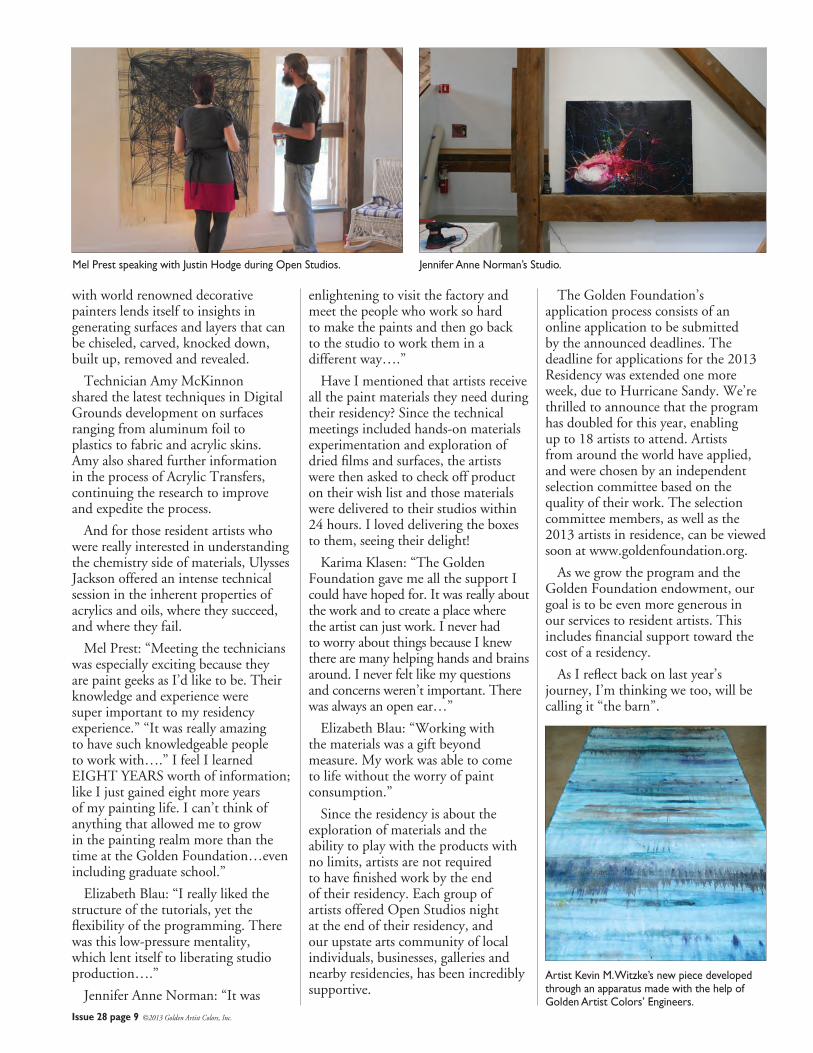
Mel Prest speaking with Justin Hodge during Open Studios. Jennifer Anne Norman’s Studio.
Artist Kevin M. Witzke’s new piece developed through an apparatus made with the help of Golden Artist Colors’ Engineers.
Issue 28 page 10 ©2013 Golden Artist Colors, Inc.
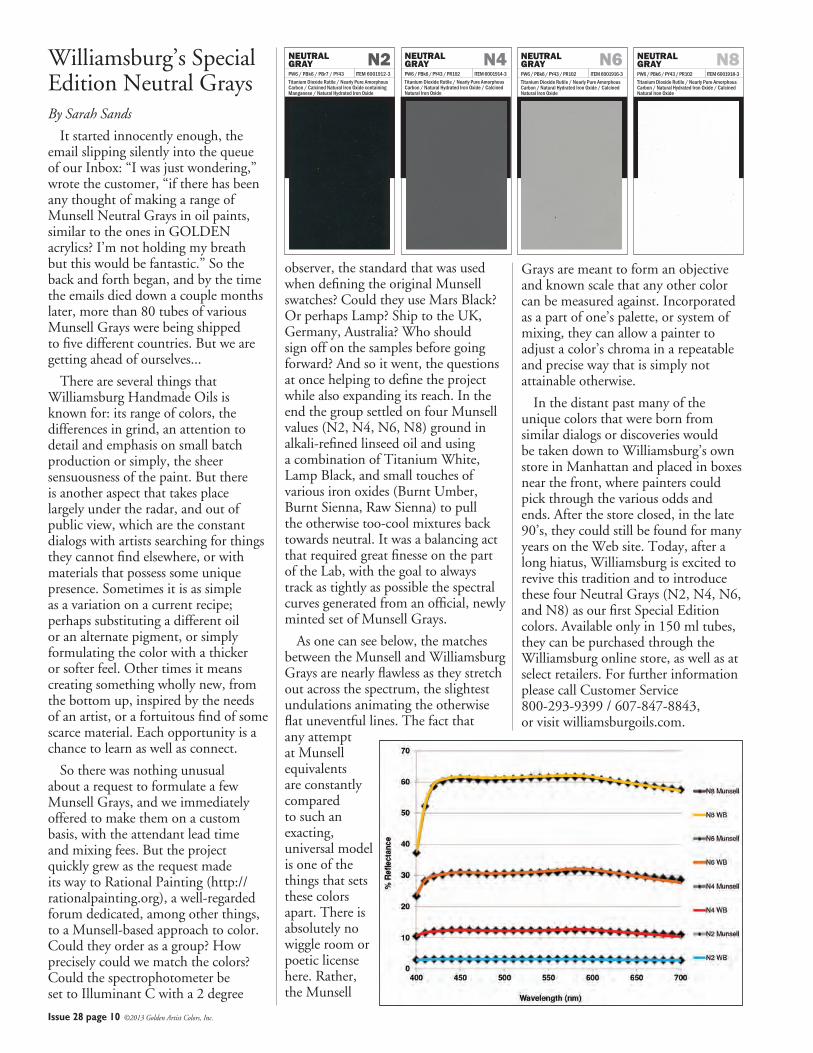
Williamsburg’s Special Edition Neutral GraysBy Sarah Sands
It started innocently enough, the email slipping silently into the queue of our Inbox: “I was just wondering,” wrote the customer, “if there has been any thought of making a range of Munsell Neutral Grays in oil paints, similar to the ones in GOLDEN acrylics? I’m not holding my breath but this would be fantastic.” So the back and forth began, and by the time the emails died down a couple months later, more than 80 tubes of various Munsell Grays were being shipped to five different countries. But we are getting ahead of ourselves...
There are several things that Williamsburg Handmade Oils is known for: its range of colors, the differences in grind, an attention to detail and emphasis on small batch production or simply, the sheer sensuousness of the paint. But there is another aspect that takes place largely under the radar, and out of public view, which are the constant dialogs with artists searching for things they cannot find elsewhere, or with materials that possess some unique presence. Sometimes it is as simple as a variation on a current recipe; perhaps substituting a different oil or an alternate pigment, or simply formulating the color with a thicker or softer feel. Other times it means creating something wholly new, from the bottom up, inspired by the needs of an artist, or a fortuitous find of some scarce material. Each opportunity is a chance to learn as well as connect.
So there was nothing unusual about a request to formulate a few Munsell Grays, and we immediately offered to make them on a custom basis, with the attendant lead time and mixing fees. But the project quickly grew as the request made its way to Rational Painting (http://rationalpainting.org), a well-regarded forum dedicated, among other things, to a Munsell-based approach to color. Could they order as a group? How precisely could we match the colors? Could the spectrophotometer be set to Illuminant C with a 2 degree
observer, the standard that was used when defining the original Munsell swatches? Could they use Mars Black? Or perhaps Lamp? Ship to the UK, Germany, Australia? Who should sign off on the samples before going forward? And so it went, the questions at once helping to define the project while also expanding its reach. In the end the group settled on four Munsell values (N2, N4, N6, N8) ground in alkali-refined linseed oil and using a combination of Titanium White, Lamp Black, and small touches of various iron oxides (Burnt Umber, Burnt Sienna, Raw Sienna) to pull the otherwise too-cool mixtures back towards neutral. It was a balancing act that required great finesse on the part of the Lab, with the goal to always track as tightly as possible the spectral curves generated from an official, newly minted set of Munsell Grays.
As one can see below, the matches between the Munsell and Williamsburg Grays are nearly flawless as they stretch out across the spectrum, the slightest undulations animating the otherwise flat uneventful lines. The fact that any attempt at Munsell equivalents are constantly compared to such an exacting, universal model is one of the things that sets these colors apart. There is absolutely no wiggle room or poetic license here. Rather, the Munsell
Grays are meant to form an objective and known scale that any other color can be measured against. Incorporated as a part of one’s palette, or system of mixing, they can allow a painter to adjust a color’s chroma in a repeatable and precise way that is simply not attainable otherwise.
In the distant past many of the unique colors that were born from similar dialogs or discoveries would be taken down to Williamsburg’s own store in Manhattan and placed in boxes near the front, where painters could pick through the various odds and ends. After the store closed, in the late 90’s, they could still be found for many years on the Web site. Today, after a long hiatus, Williamsburg is excited to revive this tradition and to introduce these four Neutral Grays (N2, N4, N6, and N8) as our first Special Edition colors. Available only in 150 ml tubes, they can be purchased through the Williamsburg online store, as well as at select retailers. For further information please call Customer Service 800-293-9399 / 607-847-8843, or visit williamsburgoils.com.
NEUTRAL GRAYPW6 / PBk6 / PBr7 / PY43 ITEM 6001912-3Titanium Dioxide Rutile / Nearly Pure Amorphous Carbon / Calcined Natural Iron Oxide containing Manganese / Natural Hydrated Iron Oxide
NEUTRAL GRAYPW6 / PBk6 / PY43 / PR102 ITEM 6001914-3Titanium Dioxide Rutile / Nearly Pure Amorphous Carbon / Natural Hydrated Iron Oxide / Calcined Natural Iron Oxide
NEUTRAL GRAYPW6 / PBk6 / PY43 / PR102 ITEM 6001916-3Titanium Dioxide Rutile / Nearly Pure Amorphous Carbon / Natural Hydrated Iron Oxide / Calcined Natural Iron Oxide
NEUTRAL GRAYPW6 / PBk6 / PY43 / PR102 ITEM 6001918-3Titanium Dioxide Rutile / Nearly Pure Amorphous Carbon / Natural Hydrated Iron Oxide / Calcined Natural Iron Oxide
N2 N4 N6 N8
Issue 28 page 11 ©2013 Golden Artist Colors, Inc.
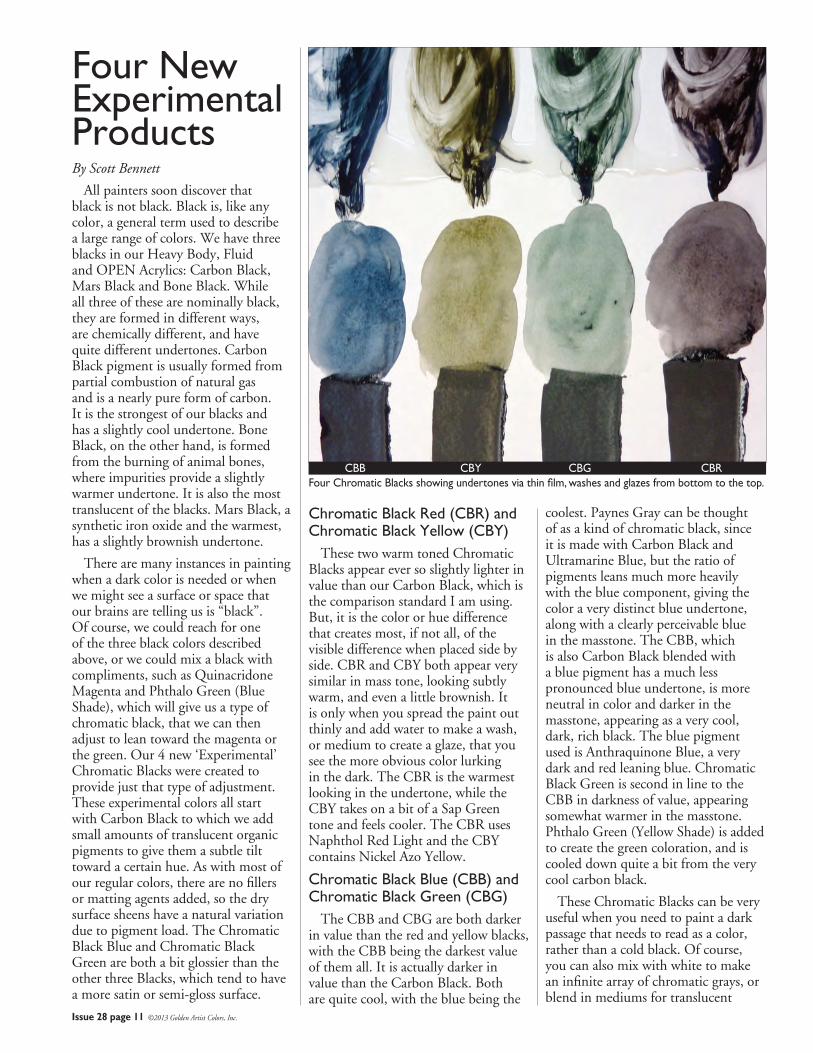
Four New Experimental ProductsBy Scott Bennett
All painters soon discover that black is not black. Black is, like any color, a general term used to describe a large range of colors. We have three blacks in our Heavy Body, Fluid and OPEN Acrylics: Carbon Black, Mars Black and Bone Black. While all three of these are nominally black, they are formed in different ways, are chemically different, and have quite different undertones. Carbon Black pigment is usually formed from partial combustion of natural gas and is a nearly pure form of carbon. It is the strongest of our blacks and has a slightly cool undertone. Bone Black, on the other hand, is formed from the burning of animal bones, where impurities provide a slightly warmer undertone. It is also the most translucent of the blacks. Mars Black, a synthetic iron oxide and the warmest, has a slightly brownish undertone.
There are many instances in painting when a dark color is needed or when we might see a surface or space that our brains are telling us is “black”. Of course, we could reach for one of the three black colors described above, or we could mix a black with compliments, such as Quinacridone Magenta and Phthalo Green (Blue Shade), which will give us a type of chromatic black, that we can then adjust to lean toward the magenta or the green. Our 4 new ‘Experimental’ Chromatic Blacks were created to provide just that type of adjustment. These experimental colors all start with Carbon Black to which we add small amounts of translucent organic pigments to give them a subtle tilt toward a certain hue. As with most of our regular colors, there are no fillers or matting agents added, so the dry surface sheens have a natural variation due to pigment load. The Chromatic Black Blue and Chromatic Black Green are both a bit glossier than the other three Blacks, which tend to have a more satin or semi-gloss surface.
Chromatic Black Red (CBR) and Chromatic Black Yellow (CBY)
These two warm toned Chromatic Blacks appear ever so slightly lighter in value than our Carbon Black, which is the comparison standard I am using. But, it is the color or hue difference that creates most, if not all, of the visible difference when placed side by side. CBR and CBY both appear very similar in mass tone, looking subtly warm, and even a little brownish. It is only when you spread the paint out thinly and add water to make a wash, or medium to create a glaze, that you see the more obvious color lurking in the dark. The CBR is the warmest looking in the undertone, while the CBY takes on a bit of a Sap Green tone and feels cooler. The CBR uses Naphthol Red Light and the CBY contains Nickel Azo Yellow.
Chromatic Black Blue (CBB) and Chromatic Black Green (CBG)
The CBB and CBG are both darker in value than the red and yellow blacks, with the CBB being the darkest value of them all. It is actually darker in value than the Carbon Black. Both are quite cool, with the blue being the
coolest. Paynes Gray can be thought of as a kind of chromatic black, since it is made with Carbon Black and Ultramarine Blue, but the ratio of pigments leans much more heavily with the blue component, giving the color a very distinct blue undertone, along with a clearly perceivable blue in the masstone. The CBB, which is also Carbon Black blended with a blue pigment has a much less pronounced blue undertone, is more neutral in color and darker in the masstone, appearing as a very cool, dark, rich black. The blue pigment used is Anthraquinone Blue, a very dark and red leaning blue. Chromatic Black Green is second in line to the CBB in darkness of value, appearing somewhat warmer in the masstone. Phthalo Green (Yellow Shade) is added to create the green coloration, and is cooled down quite a bit from the very cool carbon black.
These Chromatic Blacks can be very useful when you need to paint a dark passage that needs to read as a color, rather than a cold black. Of course, you can also mix with white to make an infinite array of chromatic grays, or blend in mediums for translucent
CBB CBY CBG CBRFour Chromatic Blacks showing undertones via thin film, washes and glazes from bottom to the top.

Issue 28 page 12 ©2013 Golden Artist Colors, Inc.
chromatic gray glazes. Try adding just a touch of any Iridescent color to that glaze and watch to see what happens. Sure, Manet could make dense Bone Black work as a color, but in most cases a specific chromatic black is needed. Here they are, waiting for you. Don’t be afraid of the dark.
Clear Pouring Medium (Thin)Clear Pouring Medium (Thick)
Over the last decade or so we have been fielding regular questions in Technical Support Services about how to achieve what has very loosely been described as the “resin look” on the surface of acrylic paintings. It started with artists using industrial grade two part epoxy resins on their paintings, which were typically on rigid panels, since this type of epoxy resin is usually pretty hard and inflexible. In tests we have seen them yellow from exposure to UV light, and the compounds are known to be fairly toxic. Our new Clear Pouring Mediums have broken tradition with the inflexibility and toxicity of epoxy resin and with all pouring mediums made with acrylic that have come before them. They are truly clear in the wet state.
At present we offer two types: Thin and Thick. Both are long rheology in consistency, and level out very nicely. What this means is that they have a very syrupy consistency like molasses or honey, so tool marks will tend to melt away as the product settles out. At first look, they might seem very close to the same consistency, but if you poured out a puddle of each and then tilted the panel, the Thin one would run down the panel twice as fast as the Thick version. The Thick one can be used to create what we often call “pancake” pours, while the Thin type will tend to flow out and create a thinner film that would probably be better for applications where a relatively thin, clear, smooth and glossy coating is required over the entire surface of the work. Both are good at releasing air bubbles, and the Thin type is virtually bubble free when poured directly from the container with minimal manipulation. At this time, these mediums come in gloss sheen.
These Clear Pouring Mediums are waterborne acrylic urethanes, very
translucent in the wet state and dry to very clear, flexible films. This is very different from the catalytic curing process of two part epoxies, which harden and cure due to chemical interactions, rather than evaporation of water, so they are compatible with our whole range of waterborne acrylic paints and mediums.
We conducted the same level of UV light testing that we put all of our products through, and these Mediums came through with flying colors. They had fewer changes as compared to most of our Mediums and Gel Mediums,
and retained much of their clarity. The dry films have about the same level of flexibility as our standard paints and mediums, but in testing they were more block resistant. They will still imprint and ferrotype if left pressed against another surface, but less so than our standard acrylics. These attributes make them better as a topcoat for fine art. One possible use that we are excited about is for floor cloths, where the combination of physical durability and flexibility is important. It is important to note that they will not have the physical hardness of
Left to right: Clear Pouring Medium (Thick) and Clear Pouring Medium (Thin).
Puddles of pouring medium run down panel when tilted, showing viscosity differences.
Fluid Acrylics dripped onto Clear Pouring Mediums, demonstrating clarity of material.

Issue 28 page 13 ©2013 Golden Artist Colors, Inc.
polyurethane and should not be used for a topcoat on functional objects.
Any instance where a fine art grade, clear, glossy, less tacky and very smooth coating is desired on an acrylic painting, these Clear Pouring Mediums can work well. They can also be used as painting mediums, blended with our Fluid or Heavy Body colors, and their high translucency in the wet state enables techniques not possible with a standard acrylic medium, since you can see the different layers of color moving inside the liquid medium as you work with it. For many artists this may be the most exciting attribute. Be on the lookout for these products at select retail locations beginning in June.
We would still advocate packing, storing and shipping any acrylic painting with nothing touching the surface. For more information about proper handling of acrylic paintings, here are previous articles from our Just Paint Newsletters and the Canadian Conservation Institute:
n Safe Handling and Transportation of Acrylic Paintingshttp://goldenpaints.com/justpaint/jp11article1.phpn The Canadian Conservation Institute - How to Wrap a Painting for Shippinghttp://www.cci-icc.gc.ca/crc/notes/html/10-16-eng.aspx
For more information about changes that typical acrylic mediums can incur over time, refer to these Just Paint articles:n The Acrylic Patinahttp://www.goldenpaints.com/justpaint/jp23article2.phpn Guidelines for Clear or Lightly Tinted Textures, Layers, and Glazeshttp://goldenpaints.com/technicaldata/clear_layers.php
Thick Self Leveling Gel (TSLG)Another name for this Gel Medium
could have been “the incredible melting gel”. The easiest way to describe its consistency and working properties is to compare it to how corn starch and water react as a mixture, or to the way Silly Putty® can flow when at rest, but will break when suddenly shocked or pulled apart. Materials that behave like this are called shear thickening fluids. When at rest, it looks
like it could be a very liquid material, as the surface is very smooth, but you can completely invert the container and the Gel will barely move. With some movement of the container, the Gel can be poured very slowly, but it will do so in a thick and very long, stringy mass. These characteristics can make it a little challenging to use initially, but they also open up a world of possibilities.
When you dip a palette knife or other tool into the smooth surface and move it around, it stiffens up immediately and takes on a rougher, “cottage cheese” like texture due to the sudden viscosity change. It will hold tool marks initially for a very short period, but just as quickly, those tool marks begin to melt away as the Gel begins to level out. After several minutes, most texture or tool marks will have completely disappeared.
One interesting technique involves brushing out a blend of TSLG and a little Fluid Acrylic or Heavy Body Acrylic. As you move the mixture on a surface, it thickens and you can easily create grainy looking, dry brush effects and sgraffito marks. When you stop and allow the mixture to relax, the thicker areas will settle out, adopting a very smooth and rounded texture, but the dry brushy and sgraffito marks will remain. It’s an effect that would
be very hard to get with any other medium or paint.
Unlike our Clear Pouring Mediums, this Gel is quite white and opaque when wet, similar to most other waterborne acrylic mediums, but will dry glossy and translucent. It will have the same potential for changes in color over time that all standard Gels and Mediums have, as outlined in the ‘Acrylic Patina’ article listed above.
As with all Experimental Products we develop, we welcome your feedback. Just call Technical Support Services at 607-847-6154.
Thick Self Leveling Gel agitated with a palette knife, relaxes after several minutes, losing all tool marks.
Both dry brush and sgraffito techniques are possible to achieve with Thick Self Leveling Gel.

Issue 28 page 14 ©2013 Golden Artist Colors, Inc.
Cont. from page 3 Strainers: Secrets of the Trade” by David Headley at http://www.goldenpaints.com/justpaint/jp17article3.php, and by James Bernstein at http://www.goldenpaints.com/justpaint/JamesBernstein/NumberFour.pdf.
Sizing Canvas for Acrylic PaintingApplying a very fluid acrylic polymer
to the cotton canvas either in the process of pre-stretching the duck or applying over an already stretched unprimed canvas will both lock the fibers in place, reducing the movement and vibration of the canvas. Not all acrylic sizes are equivalent in their ability to reduce the dirt, trash and water soluble components of the cotton fabric from penetrating back into the painting and potentially discoloring acrylic films. Other than washing your canvas, which is in many cases impractical, using an appropriate size will reduce the potential for SID.
We have recommended using a specialty acrylic polymer, GAC 100, to block the bleed through from the canvas additives. Additionally, our Polymer Medium (Gloss) is also a very effective size capable of reducing the effects of SID in your acrylic painting. Both GAC 100 and Polymer Medium (Gloss) are very flexible under normal indoor temperatures above 50° F.
Sizing the cotton canvas with an acrylic polymer or medium that is allowed to soak through or is forced into the canvas fibers creates a composite of cotton threads and acrylic binder that dramatically reduces the overall stretch of the support, making it much more rugged, stiff and capable of reducing a great deal of the floppiness of the stretched canvas.
Most artists will go directly to applying an acrylic gesso on the
unprimed canvas without a size coat. This can also effectively lock in the fibers of the cotton, reducing the elongation of the fabric. It creates a relatively hard, absorbent and toothy surface for subsequent adhesion of the acrylic paints. Multiple coats of the acrylic gesso will increase the hardness and increase the tensile strength of the composite fabric and acrylic ground. The whiteness of the gesso also gives a beautiful reflective surface that will increase the luminosity of colors above. Acrylic gesso is typically produced with titanium dioxide to improve the overall whiteness of the surface. Titanium dioxide pigment is well known as a UV blocker, reducing the damage caused from this spectrum of radiation from bombarding the cellulose structure of the cotton fibers.
Whether using first, a size, or directly applying the acrylic gesso to the canvas, the canvas can still be stretched with significantly less concern over cracking the priming layers. Acrylic gessoes do vary significantly in a number of ways, including their flexibility, but a new standard (ASTM D-7733) has been developed that requires manufacturers conforming to the standard, to produce a relatively flexible film allowing the cotton canvas to at least fold over a 90° angle without cracking. It is hoped that this new standard will be adapted by the many manufacturers of artists’ acrylic gesso.
All acrylic artist paints become less flexible in lower temperatures and quite stiff in freezing temperatures. These films are prone to cracking if hit or stretched, rolled or unrolled while frozen. Stretching or re-stretching already acrylic primed canvases should be done above 65° F.
We have found that the acrylic gessoes by themselves do not reduce
the effects of SID from cotton canvas, even when multiple coats are applied. Acrylic gesso is typically filled with pigment and functional solids (calcium carbonate, silica) as well as other additives. These coatings are quite porous and allow those impurities in the cotton duck to migrate through the gesso and into the acrylic paints on the surface. The high solids of an acrylic gesso create an even more porous film allowing for significant infiltration of moisture to the cotton fibers.
Applying Size and GroundsWith the advent of acrylic, artists
have been freed from so many of the restrictions required to create a stable and relatively permanent painting using other traditional painting media. But there is still an opportunity to share best practice as we currently understand it for artists working with acrylic on cotton duck.
When applying a size to cotton duck we have recommended an application of a thin medium. Our Polymer Medium thinned with up to 20% water will easily soak into the cotton fibers and lock them in place. Brushing the size layer on with a stiff brush will tend to force the acrylic binder into the fabric. Some artists will use a broad painter’s blade to both size as well as apply the gesso ground. This allows for an even application, further forcing the medium into the canvas. We have recommended two coats of our Polymer Medium or GAC 100 to act as a sealer for the canvas. On top of this size coat, there are a wide range of grounds that can then be applied. The grid to the right shares the types of applications and grounds that can be possible within the acrylic medium.
Cotton Canvas Without Size or Ground
This process dates back to the early stain painting of Morris Louis, Ken Noland and Helen Frankenthaler. There is currently no coating or size that will completely mimic the way paint lays down on raw cotton duck, yet to achieve this aesthetic, the artist is sacrificing the benefits that a substantial size and ground will provide. Most artists have learned not to work with oil directly on raw cotton duck, yet even for artists working with acrylic, there Regular Gel (Gloss) on unwashed #10 Cotton
Canvas with 2 coats of GessoRegular Gel (Gloss) on washed #10 Cotton Canvas with 2 coats of Gesso
Issue 28 page 15 ©2013 Golden Artist Colors, Inc.
is still concern that the unprotected cotton fibers lacking the restraint of a binder will be more easily abraded, degraded, collect dirt, and move.
Retaining the Look or Feel of Raw Duck
Although it is possible to achieve a very similar likeness of raw cotton duck, it is difficult to achieve both the look of the cotton fabric and its level of absorbency with the same approach.
It is possible to retain the look of the cotton by applying the two coats of Polymer Medium and then finishing with a coat of Fluid Matte Medium which will provide some of the matte quality of the fabric surface while also protecting the fibers. This will not dramatically cover the creamy color or fill in the texture of the canvas cloth.
If you wish to have some of the same absorbency as the raw cotton fibers, again it is necessary to first size with two layers of Polymer Medium or GAC 100 and then multiple coats
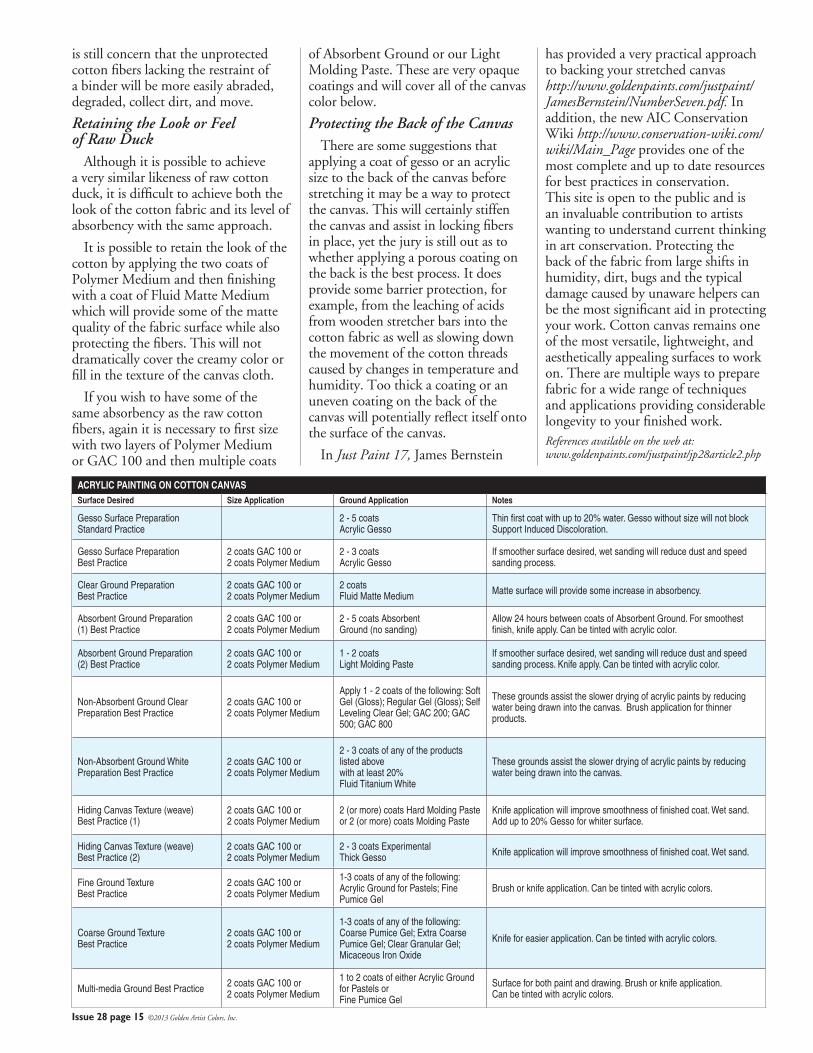
ACRYLIC PAINTING ON COTTON CANVAS
Surface Desired Size Application Ground Application Notes
Gesso Surface Preparation Standard Practice 2 - 5 coats
Acrylic GessoThin first coat with up to 20% water. Gesso without size will not block Support Induced Discoloration.
Gesso Surface Preparation Best Practice
2 coats GAC 100 or 2 coats Polymer Medium
2 - 3 coats Acrylic Gesso
If smoother surface desired, wet sanding will reduce dust and speed sanding process.
Clear Ground Preparation Best Practice
2 coats GAC 100 or 2 coats Polymer Medium
2 coats Fluid Matte Medium Matte surface will provide some increase in absorbency.
Absorbent Ground Preparation (1) Best Practice
2 coats GAC 100 or 2 coats Polymer Medium
2 - 5 coats Absorbent Ground (no sanding)
Allow 24 hours between coats of Absorbent Ground. For smoothest finish, knife apply. Can be tinted with acrylic color.
Absorbent Ground Preparation (2) Best Practice
2 coats GAC 100 or 2 coats Polymer Medium
1 - 2 coats Light Molding Paste
If smoother surface desired, wet sanding will reduce dust and speed sanding process. Knife apply. Can be tinted with acrylic color.
Non-Absorbent Ground Clear Preparation Best Practice
2 coats GAC 100 or 2 coats Polymer Medium
Apply 1 - 2 coats of the following: Soft Gel (Gloss); Regular Gel (Gloss); Self Leveling Clear Gel; GAC 200; GAC 500; GAC 800
These grounds assist the slower drying of acrylic paints by reducing water being drawn into the canvas. Brush application for thinner products.
Non-Absorbent Ground White Preparation Best Practice
2 coats GAC 100 or 2 coats Polymer Medium
2 - 3 coats of any of the products listed above with at least 20% Fluid Titanium White
These grounds assist the slower drying of acrylic paints by reducing water being drawn into the canvas.
Hiding Canvas Texture (weave) Best Practice (1)
2 coats GAC 100 or 2 coats Polymer Medium
2 (or more) coats Hard Molding Paste or 2 (or more) coats Molding Paste
Knife application will improve smoothness of finished coat. Wet sand. Add up to 20% Gesso for whiter surface.
Hiding Canvas Texture (weave) Best Practice (2)
2 coats GAC 100 or 2 coats Polymer Medium
2 - 3 coats Experimental Thick Gesso Knife application will improve smoothness of finished coat. Wet sand.
Fine Ground Texture Best Practice
2 coats GAC 100 or 2 coats Polymer Medium
1-3 coats of any of the following: Acrylic Ground for Pastels; Fine Pumice Gel
Brush or knife application. Can be tinted with acrylic colors.
Coarse Ground Texture Best Practice
2 coats GAC 100 or 2 coats Polymer Medium
1-3 coats of any of the following: Coarse Pumice Gel; Extra Coarse Pumice Gel; Clear Granular Gel; Micaceous Iron Oxide
Knife for easier application. Can be tinted with acrylic colors.
Multi-media Ground Best Practice 2 coats GAC 100 or 2 coats Polymer Medium
1 to 2 coats of either Acrylic Ground for Pastels or Fine Pumice Gel
Surface for both paint and drawing. Brush or knife application. Can be tinted with acrylic colors.
of Absorbent Ground or our Light Molding Paste. These are very opaque coatings and will cover all of the canvas color below.
Protecting the Back of the CanvasThere are some suggestions that
applying a coat of gesso or an acrylic size to the back of the canvas before stretching it may be a way to protect the canvas. This will certainly stiffen the canvas and assist in locking fibers in place, yet the jury is still out as to whether applying a porous coating on the back is the best process. It does provide some barrier protection, for example, from the leaching of acids from wooden stretcher bars into the cotton fabric as well as slowing down the movement of the cotton threads caused by changes in temperature and humidity. Too thick a coating or an uneven coating on the back of the canvas will potentially reflect itself onto the surface of the canvas.
In Just Paint 17, James Bernstein
has provided a very practical approach to backing your stretched canvas http://www.goldenpaints.com/justpaint/JamesBernstein/NumberSeven.pdf. In addition, the new AIC Conservation Wiki http://www.conservation-wiki.com/wiki/Main_Page provides one of the most complete and up to date resources for best practices in conservation. This site is open to the public and is an invaluable contribution to artists wanting to understand current thinking in art conservation. Protecting the back of the fabric from large shifts in humidity, dirt, bugs and the typical damage caused by unaware helpers can be the most significant aid in protecting your work. Cotton canvas remains one of the most versatile, lightweight, and aesthetically appealing surfaces to work on. There are multiple ways to prepare fabric for a wide range of techniques and applications providing considerable longevity to your finished work. References available on the web at: www.goldenpaints.com/justpaint/jp28article2.php

JUST PAINTGolden Artist Colors, Inc.188 Bell RoadNew Berlin, NY 13411-3616 USA
PRSRT STDU.S. Postage
PAIDIthaca, NY
Permit #780
Return service requested
Issue 28 February 2013
Articles: Mark Golden, Sarah Sands, Amy McKinnon, Emma Golden,
Scott Bennett, Jodi O’Dell
Editor: Jodi O’Dell
Publisher: Golden Artist Colors, Inc.
188 Bell Road, New Berlin, NY 13411-3616
607-847-6154 800-959-6543
Fax: 607-847-6767
Email: [email protected]
www.goldenpaints.com
www.WilliamsburgOils.com
www.thesagg.org
© 2013 Golden Artist Colors, Inc. All rights reserved. The contents of this publication may not be reproduced either in whole, or in part, without the consent of Golden Artist Colors, Inc. Golden Artist Colors is an Employee Owned Company.13628
By Jodi O’Dell Last August we celebrated the
opening of an exhibition of works by Knox Martin, entitled “SHE” at the Sam & Adele Golden Gallery (The SAGG) in our facility.
“SHE” presents over a dozen recent large scale works by Knox Martin. Knox continues his powerful use of metaphor applied to these paintings of Woman. Knox Martin’s work is in the permanent collections of major museums around the world, including the Whitney, MOMA, Albright-Knox, Hirshhorn and the Corcoran.
Knox Martin has taught at Yale University, New York University, University of Minnesota, and The International School of Art in Italy. Knox continues to teach Master classes at the Art Students League of New York.
This past October Knox Martin was recognized by the Artists’ Fellowship, Inc. with the Benjamin West Clinedinst Memorial Medal. This award is given for the
achievement of exceptional artistic merit. The medal was established in 1947 to commemorate Benjamin West Clinedinst’s dedication to the fundamental and traditional principles of art, his interest in his fellow artists and his devotion to the Fellowship.
It’s been incredibly rewarding to share the artwork with visitors coming to the shop, with some spending several hours viewing the show. Whether it’s been an artist, a student of Knox’s or a college art class seeing the show for the first time, the reaction has been universal, “what an incredibly breathtaking show!”
“SHE” will be displayed in our Gallery until April 6, 2013, so if you have the opportunity to take a trip to Upstate New York, we’d love to have you! The SAGG is open Monday - Friday from 8:30 am to 5:00 pm.
Please contact Jodi O’Dell by phone at 607-847-6154 or email [email protected] for further details. For more information about Knox Martin and “SHE,” go to www.thesagg.org.
Knox Martin at The SAGG
Eesha, 2012, Acrylic on Linen, 80” x 65”