
PSoC’s in the Advanced Laboratory - ... · Web viewFigure 1 shows a diagram of the PSoC...
18
PSoC’s in the Advanced Laboratory We use the the Cypress PSoC quite extensively in our instrumentation, advanced laboratory and research. In fact, it is generally the only microcontroller we use. There are many aspects of the PSoC that make it an ideal device for a physics laboratory such as the integration of analog and digital components on the I.C. We are going to be using the new PSoC 5 prototyping kit for its low cost and ease of use to produce successful experimental devices. PSoC 5 PSoC stands for Programmable System on a Chip. The PSoC 5 is a mixed signal microcontroller system. Key features are: A 32 bit ARM Cortex M3 processor, A variety of analog components such as programmable gain amplifiers, operational amplifiers, comparators, and programmable analog components A 700 Sample per second 20 bit analog to digital converter, two 1 MSample/second 12 bit analog to digital converters Four 8-bit digital to analog converters A 24 bit digital filter system CapSense – using capacitive buttons and sliders – these are very convenient to use rather than mechanical buttons. 24 universal digital blocks (UDB). The UDB’s consist of a matrix of uncommitted Programmable Logic Devices (PLD’s) and a digital interconnect. The PLD may be configured to be any number of digital devices from simple logic elements to more complex digital devices such as counters, pulse width modulators and communication. Almost every pin is reconfigurable for analog or digital, input or output. Furthermore, Individual ports (a group of 8 pins) can be assigned to different input/output voltages such as 1.2 V allowing convenient level shifting.
Transcript of PSoC’s in the Advanced Laboratory - ... · Web viewFigure 1 shows a diagram of the PSoC...

PSoC’s in the Advanced LaboratoryWe use the the Cypress PSoC quite extensively in our instrumentation, advanced laboratory and research. In fact, it is generally the only microcontroller we use. There are many aspects of the PSoC that make it an ideal device for a physics laboratory such as the integration of analog and digital components on the I.C. We are going to be using the new PSoC 5 prototyping kit for its low cost and ease of use to produce successful experimental devices.
PSoC 5 PSoC stands for Programmable System on a Chip. The PSoC 5 is a mixed signal microcontroller system. Key features are:
A 32 bit ARM Cortex M3 processor, A variety of analog components such as programmable gain amplifiers, operational
amplifiers, comparators, and programmable analog components A 700 Sample per second 20 bit analog to digital converter, two 1 MSample/second 12 bit
analog to digital converters Four 8-bit digital to analog converters A 24 bit digital filter system CapSense – using capacitive buttons and sliders – these are very convenient to use rather
than mechanical buttons. 24 universal digital blocks (UDB).
The UDB’s consist of a matrix of uncommitted Programmable Logic Devices (PLD’s) and a digital interconnect. The PLD may be configured to be any number of digital devices from simple logic elements to more complex digital devices such as counters, pulse width modulators and communication.
Almost every pin is reconfigurable for analog or digital, input or output. Furthermore, Individual ports (a group of 8 pins) can be assigned to different input/output voltages such as 1.2 V allowing convenient level shifting.
Components are wired and routed on the IC. There is no external routing (unless using the op-amps and you are programming the gain).
You can create your own components (I have never done this).
One of the great advantages of the PSoC is that you can combine analog and digital circuitry on a single chip combined with a relatively powerful processor which allows you to collect data and then do some processing on the data. Figure 1 shows a diagram of the PSoC 5.

Figure 1
The CY8CKIT-059 prototyping kit has simplified the process of using the PSoC 5. It consists of a small circuit board with breakout pins to allow you to access most of the GPIO ports of the PSoC5 and its capabilities. It also comes with an integrated USB programmer which makes it very convenient to use. The programmer can also be used to communicate serially with the computer through a virtual serial port. The board also has a micro USB port that can be used for communication. Figure 2 shows an image of the CY8CKIT-059 prototyping kit. On the left side is the programmer which plugs directly into a USB port (or preferably a USB extension cable). This is also used for serial communications. Once your device is completely programmed, the programmer may be removed.
Figure 2
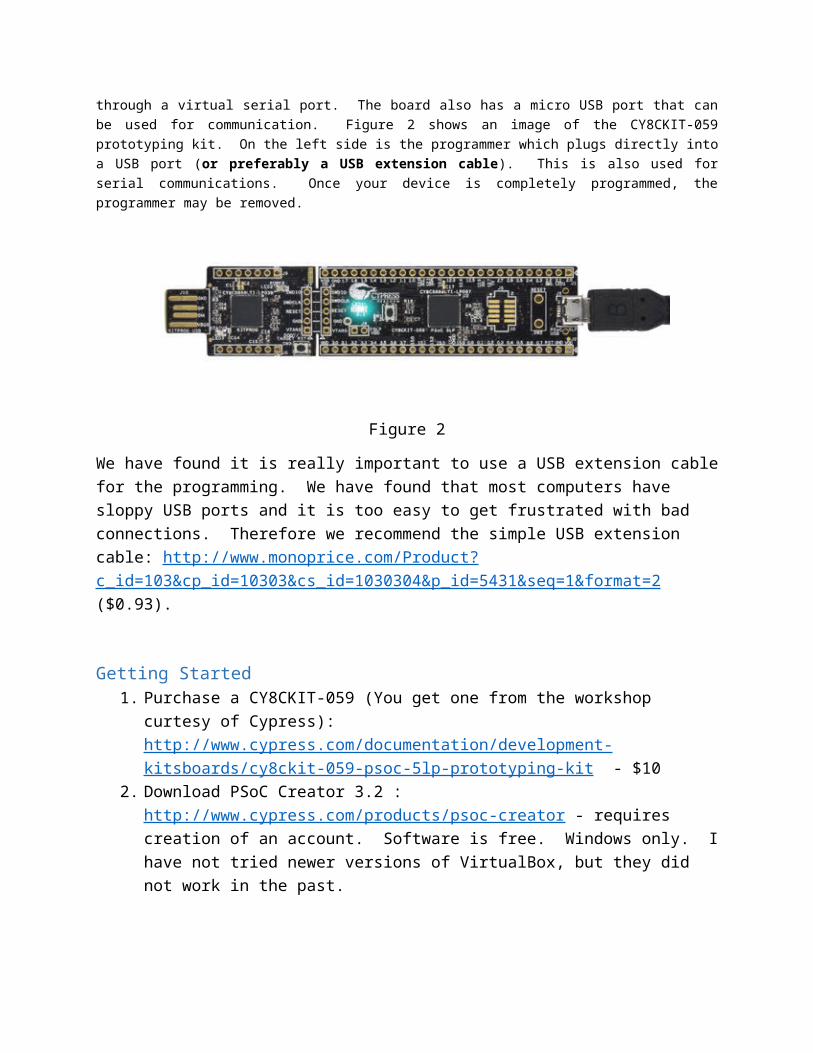
We have found it is really important to use a USB extension cable for the programming. We have found that most computers have sloppy USB ports and it is too easy to get frustrated with bad connections. Therefore we recommend the simple USB extension cable: http://www.monoprice.com/Product?c_id=103&cp_id=10303&cs_id=1030304&p_id=5431&seq=1&format=2 ($0.93).
Getting Started1. Purchase a CY8CKIT-059 (You get one from the workshop curtesy of Cypress):
http://www.cypress.com/documentation/development-kitsboards/cy8ckit-059-psoc-5lp-prototyping-kit - $10
2. Download PSoC Creator 3.2 : http://www.cypress.com/products/psoc-creator - requires creation of an account. Software is free. Windows only. I have not tried newer versions of VirtualBox, but they did not work in the past.
3. Download the kit software: http://www.cypress.com/documentation/development-kitsboards/cy8ckit-059-psoc-5lp-prototyping-kit
4. Download the kit guide and work through some of the examples.
Counter1. Start PSoC Creator. Open a new PSoC5LP project. Choose a name and set the device to
CY8C5888LTI-LP097.
2. We will start out by setting up the window for counting. This is done using a pulse width modulator. On the schematic page, drag in a PWM from the Digital->Functions component in the library on the right. Drag in a clock from the System folder. Then also drag in a Digital Output Pin from the Ports and Pins folder. You can wire the clock to the clock input of the PWM. You can wire the pin to the pwm port of the PWM component.
Double click on the clock and set it to 1 kHz.
Double click on the PWM, set it to one output and set the period to 999 and the compare value (CMP) to 500. This will create a 50% duty cycle 1 Hz pulse.
From the menu at the top, choose Build->Project (whatever you named your project). This serves the purpose of loading all the libraries and headers necessary.
Double click on the main.c file in the left panel. Type in PWM_1_Start(); before the for loop start. This turns on the PWM.
Double click on the .cydwr file which will open a diagram of the IC. This will show to which port Pin_1 was assigned. It can be reassigned on this page.

Now you can build and program a device. Attach an LED to the pin if you like so you can see the window pulse.
3. Setup interrupt (this is the hardest part). We need to read the counters when the window completes a cycle. This will require creating an interrupt.
Drag an interrupt from the system component and attach it to the interrupt output of the PWM.
Double click on isr_1 and set the interrupt to rising edge. Choose advanced and set the interrupt to be on compare.
Rebuild the project to generate the libraries, and then select the isr c file (isr_1.c).
Right at the top you see:
#if !defined(isr_1__REMOVED) /* Check for removal by optimization */
/******************************************************************************** Place your includes, defines and code here ********************************************************************************//* `#START isr_1_intc` */#include PWM_1.h uint8 flag=0; /* `#END` */
We need to access some information in the PWM header. So we will add PWM_1.h as an include file. We also need a flag to communicate with the main program.
Scrolling down, we find the location for our interrupt code: CY_ISR(ISR_Compare_Interrupt)
CY_ISR(isr_1_Interrupt){ /* Place your Interrupt code here. */ /* `#START isr_1_Interrupt` */
flag = 1; /* this sets the flag for to say that the interrupt had * occurred */

PWM_1_ReadStatusRegister(); /*this clears the interrupt so that the * next one can occur */ /* `#END` */}
You will need to put in the interrupt setting the flag (flag = 1) and a second line to clear the interrupt PWM_1_ReadStatusRegister()
In the main program, you need to add a line above the main declaration: extern uint8 flag; This simply declares a variable which is declared in another file.
Finally, in the main() routine, turn on the isr with isr_1_Start(); and in the for loop add the lines:
if (flag ==1){
flag = 0;}
This simply checks to see if the flag is set, then it resets the flag to zero. Within this if clause, we will read the counter values.
4. Input. Drag two analog pins onto the schematic (we are going to be using low voltages. If we were using a detector that put out digital pulses we would use a digital input).
Drag a comparator on the schematic (in the analog components folder). Double click on the comparator and set it to fast and bypass sync. Attach the pins to the two inputs.
Click and drag a rectangle around the pins and comparator, copy (ctrl-c) and paste to duplicate the pins and comparator.
We now have the input configured for two channels. If we do nothing to the output of the comparators, then the output width will be determined by the input signal. This will be several microseconds. If we want shorter, we will have to do something to this signal. We can, for instance add a pulse converter or edge detector – both of which will limit the output to the duration of about 1 clock cycle.
Because we only have two inputs, we only need to have coincidence detection between the two channels. This is performed by an “and” gate. Drag an AND gate from the digital logic components.

In the main() program, we need to turn on the comparators (this is critical!). The AND gate does not need to be started.
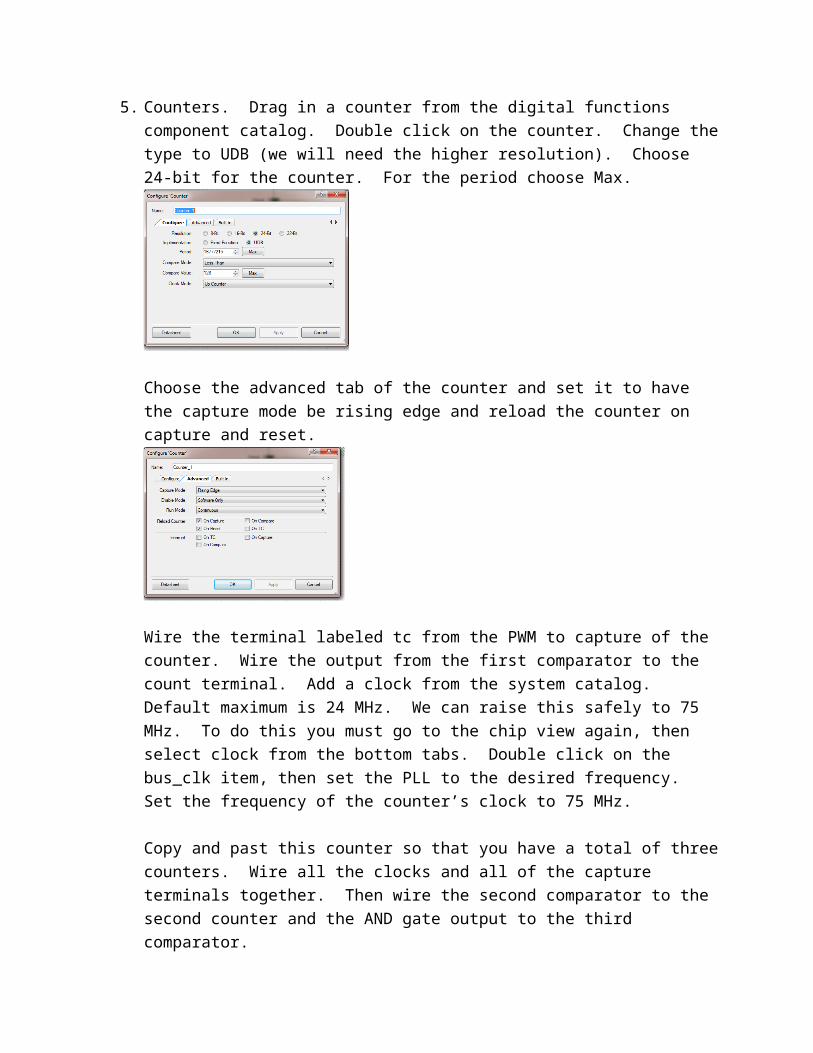
5. Counters. Drag in a counter from the digital functions component catalog. Double click on the counter. Change the type to UDB (we will need the higher resolution). Choose 24-bit for the counter. For the period choose Max.
Choose the advanced tab of the counter and set it to have the capture mode be rising edge and reload the counter on capture and reset.
Wire the terminal labeled tc from the PWM to capture of the counter. Wire the output from the first comparator to the count terminal. Add a clock from the system catalog. Default maximum is 24 MHz. We can raise this safely to 75 MHz. To do this you must go to the chip view again, then select clock from the bottom tabs. Double click on the bus_clk item, then set the PLL to the desired frequency. Set the frequency of the counter’s clock to 75 MHz.

Copy and past this counter so that you have a total of three counters. Wire all the clocks and all of the capture terminals together. Then wire the second comparator to the second counter and the AND gate output to the third comparator.
Finally, we have to turn on the counters with software, and then read them during an interrupt. To read the value of the counter we use the command Counter_ReadCapture()
At this point we have a working counter without a readout.
6. Readout. To readout we could use any number of LCD’s. I like the low cost I2C, 4 line LCD screens available on ebay. http://www.ebay.com/itm/Blue-Serial-IIC-I2C-TWI-2004-204-20X4-Character-LCD-Module-Display-For-Arduino-/181299099752?pt=LH_DefaultDomain_0&hash=item2a3644b868
The physical wiring is easier, but you have to use a special library not available in the package. In particular, I modified a Cypress library to work with these LCD’s. It is called MFM_LIB and is available from my web page at present at http://users.ipfw.edu/masters. To include this library you must go to the Project menu at the top of the screen. Select dependencies. In User dependencies, choose the folder and find the MFM_LIB. Then click ok. You will see a new tab appear in the component catalog called “Frustrated”. If you go to this tab you can drag on the IIC 4bit character LCD device.
You also need to drag on the I2C_master communication package.
In main() you need to start both the LCD device and the I2C master control
#include <project.h>extern uint8 flag;int main(){ uint32 Count1=0, Count2=0, Count3=0; CyGlobalIntEnable; /* Enable global interrupts. */
/* Place your initialization/startup code here (e.g. MyInst_Start()) */ PWM_1_WritePeriod(1); PWM_1_Start(); isr_1_Start(); Comp_1_Start(); Comp_2_Start(); Counter_1_Start(); Counter_2_Start(); Counter_3_Start(); IIC_4LCD_Char_1_Start(); I2C_1_Start(); IIC_4LCD_Char_1_Position(0,0); IIC_4LCD_Char_1_PrintString("counting"); for(;;)

{ if (flag == 1) { flag = 0; Count1=Counter_1_ReadCapture(); Count2=Counter_2_ReadCapture(); Count3=Counter_3_ReadCapture(); IIC_4LCD_Char_1_Position(1,0); IIC_4LCD_Char_1_PrintU32Number(Count1); IIC_4LCD_Char_1_Position(2,0); IIC_4LCD_Char_1_PrintU32Number(Count2); IIC_4LCD_Char_1_Position(3,0); IIC_4LCD_Char_1_PrintU32Number(Count3); } }}
ExperimentThe experiment we are going to use the counter for is a simple one in which we use reverse bias LED’s as single photon detectors. We can do a simple random source (another LED) and look at the coincidences as a function of intensity. The LED we use is an 870 nm fast LED from Liteon. This LED is part number 859-HSDL-4250 from Mouser. It costs about $0.30 per LED.
The LED is wired as follows:
As you slowly turn up the voltage on across the diode, eventually you start to see “spikes” as the LED starts to break down. The counter can then be used to count individual counts. If you set up two LED’s you can look for coincidences.
Performing an experiment in which you slowly increase the light from an incandescent source (or another LED) both of which behave as “random” sources, you can determine the coincidence
To Scope and counter
5k
~20V

window. The rate number of coincidence counts per second (Rc ¿ from a random source is proportional to the product of the count rates of the two individual counters (R1 ,R2):
Rc=α R1R2
The constant of proportionality is the coincidence window (α ). By plotting Rc as a function of
(R1 R2 )12, you get a nice parabola which can be used to determine α . The window is determined
by the width of the “spikes” that you are observing which in this case is several microseconds and can be compared with that from the fits.
Programming the PSoC.
Attach the kit to a USB port (I recommend using a USB extension cable). Then choose the program icon from the top of the screen. This will program your device. Your device can also be powered from the USB port.

Project 2 – Analog to Digital ConversionThe analog to digital conversion is quite straight forward. You start in the same way as before, creating a blank project. Moving to the right you can open the analog folder and drag in a Delta Sigma ADC – which is up to 20bits.
The ADC is by default differential. To change the resolution and make the ADC single ended, double click on the ADC.

On the “config” tabs you can set the resolution, conversion rate and conversion mode. Rate depends the resolution you choose. There is also a buffer which has an up to 8x gain. If you wanted more gain, you could add an amplifier (on the chip).
In the common tab, you can set the input mode to single ended (amongst other features).

Drag an analog pin and attach it to the ADC input. Finally, you need some type of output, we will use the same I2C LCD screen for a readout.
To develop the firmware it is useful to build the project first to load the necessary libraries. Then open main.c and add the following code:
int main(){ CyGlobalIntEnable; /* Enable global interrupts. */ int Result; /* Place your initialization/startup code here (e.g. MyInst_Start()) */
I2C_1_Start(); LCD_Start(); ADC_DelSig_1_Start(); ADC_DelSig_1_StartConvert(); //start conversions for(;;) { ADC_DelSig_1_IsEndConversion(ADC_DelSig_1_WAIT_FOR_RESULT);//wait until there is a conversion Result=ADC_DelSig_1_GetResult16(); LCD_Position(1,0); LCD_PrintString(" "); //Clear a line LCD_Position(1,0); LCD_PrintNumber(Result); CyDelay(500);// wait 500ms }}
Changing pin assignments:
If you open the file which is named <your project name>.cydwr in the workspace explorer, you can see where the software assigned different pins.

You see a image of the IC with the pin assignments. On the right, there are your specific pin assignments. These may be reassigned to other physical pins for your convenience. If you reassign pins you do need to rebuild.

There are many examples on-line. PSoC creator gives a list of example projects which will work with little modification. There is also extensive support from forums and also very helpful tech support from cypress itself.


